25
CMS Client software Instruction V1.0 CMS Client Software Instruction Version:1.0

CMS Client software Instruction V1.0
CMS Client Software
Instruction
Version:1.0

CMS Client software Instruction V1.0
CONTENTS
1 Introduction & operation of CMS Client software..................................................................................... 3 1.1 DVR Network Remote Client ......................................................................................................... 3
1.1.1 Login ......................................................................................................................................... 3 1.1.2 Introduction of main interface................................................................................................ 3 1.1.3 Specific operation..................................................................................................................... 8
1.1.3.1 Password management ..................................................................................................... 8 1.1.3.2 Add, delete, disconnect the DVR IP ................................................................................ 9 1.1.3.3 Connect or disconnect many DVR IP at the same time ............................................... 12 1.1.3.4 Move the IP ..................................................................................................................... 12 1.1.3.5 Remote View.................................................................................................................... 13 1.1.3.6 View many DVR images at the same time. ................................................................... 13 1.1.3.7 Remote set DVR parameters.......................................................................................... 14 1.1.3.8 Set net parameter............................................................................................................ 15 1.1.3.9 Record .............................................................................................................................. 15 1.1.3.10 Set PTZ .......................................................................................................................... 16
1.2 AVH Files Player............................................................................................................................ 17 1.2.1 Introduction of the interface ................................................................................................. 17 1.2.2 Specific operation................................................................................................................... 18
1.2.2.1 Select the file and play .................................................................................................... 18 1.2.2.2 Four channels play at the same time ............................................................................. 19 1.2.2.3 Switch the file format from .AVH to .AVI..................................................................... 19 1.2.2.4 Capture and save ............................................................................................................ 19
1.3 DVR Network Files Player............................................................................................................ 20 1.3.1 Introduction of the interface ................................................................................................. 20 1.3.2 Specific Operation.................................................................................................................. 21
1.3.2.1 Login ................................................................................................................................ 21 1.3.2.2 Remote Play DVR HDD file. .......................................................................................... 22 1.3.2.3 Remote backup................................................................................................................ 24
1.4 Network Tools................................................................................................................................. 25

CMS Client software Instruction V1.0
3
1 Introduction & operation of CMS Client software
1.1 DVR Network Remote Client
1.1.1 Login
Put the accessories CD of the DVR into the CD driver of the computer and open
it, you could see the folder “client” . Please copy it onto the computer, then double-click it,
you could see , please double-click the software to login the Client software.
1.1.2 Introduction of main interface
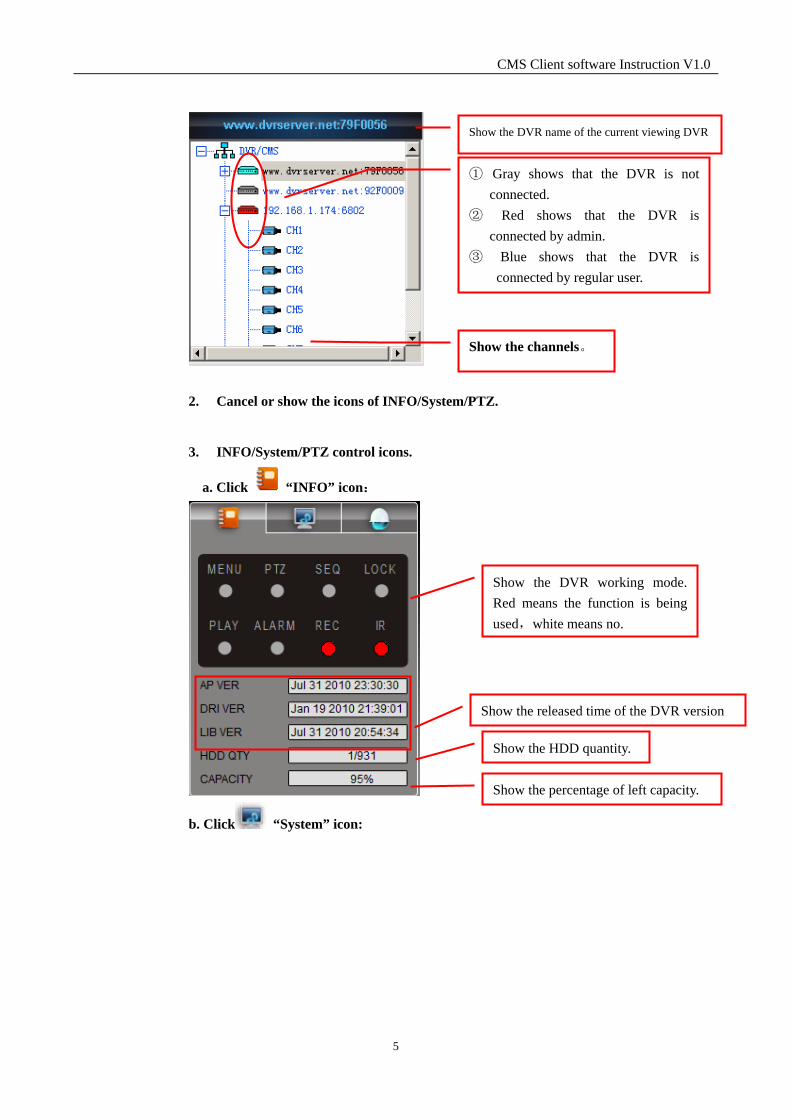
DVR Network Remote Client is used to view the live image, remote operate DVR and control PTZ and network video recording. After login, you could see the following screen:

CMS Client software Instruction V1.0
4
NO. Description � DVR list. � Cancel or show the icons of INFO/System/PTZ. � INFO/System/PTZ control icons. � Alarm information list. � Channels display and capture icons. � Video images display channels. � Interface control icons.
1. DVR list: Show the IP/domain name and channels of the added DVR. E.g.
③ ④
⑤
①
⑥
②
⑦
CMS Client software Instruction V1.0
5
2. Cancel or show the icons of INFO/System/PTZ.
3. INFO/System/PTZ control icons.
a. Click “INFO” icon:
b. Click “System” icon:
Show the released time of the DVR version
Show the HDD quantity.
Show the percentage of left capacity.
Show the DVR working mode. Red means the function is being used,white means no.
① Gray shows that the DVR is not connected.
② Red shows that the DVR is connected by admin.
③ Blue shows that the DVR is connected by regular user.
Show the channels。
Show the DVR name of the current viewing DVR
CMS Client software Instruction V1.0
6
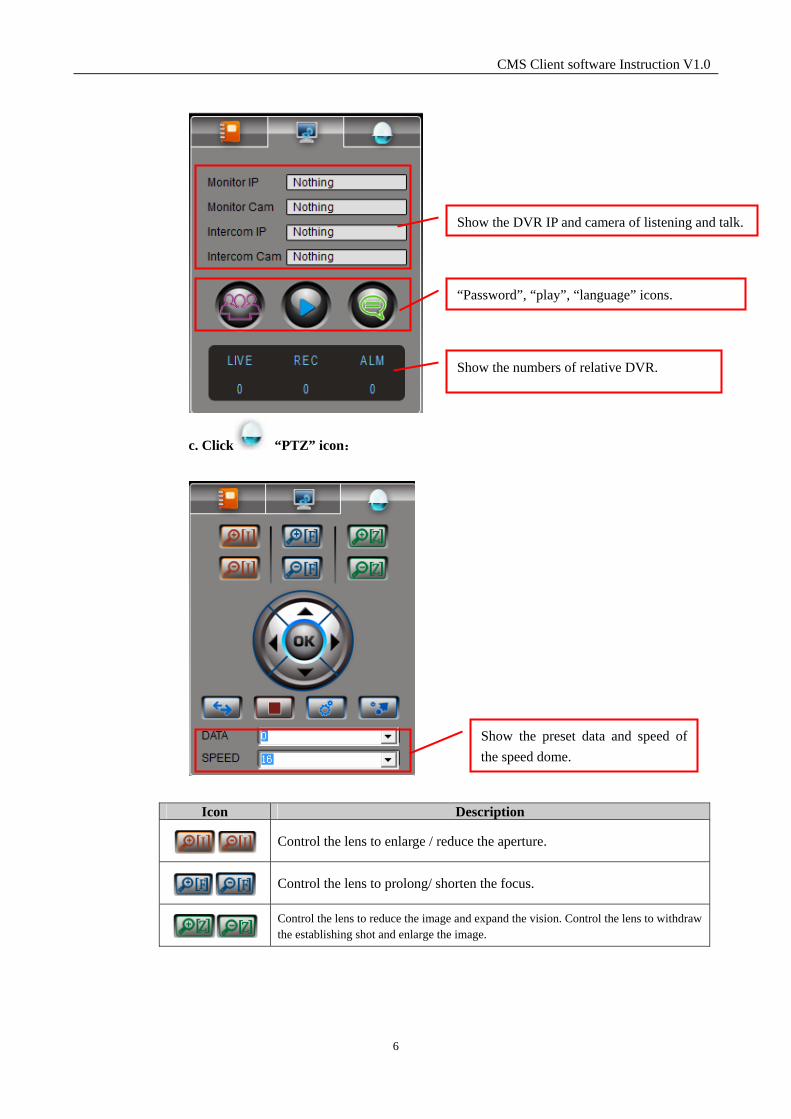
c. Click “PTZ” icon:
Icon Description
Control the lens to enlarge / reduce the aperture.
Control the lens to prolong/ shorten the focus.
Control the lens to reduce the image and expand the vision. Control the lens to withdraw the establishing shot and enlarge the image.
Show the DVR IP and camera of listening and talk.
Show the numbers of relative DVR.
“Password”, “play”, “language” icons.
Show the preset data and speed of the speed dome.

CMS Client software Instruction V1.0
7
Control speed dome to rotate upward/ downward/ leftward/ rightward and click OK to stop auto rotation.
Control the speed dome to auto rotation.
STOP
Preset setting. Set a number for the image. Select the image,then set a number for it in “DATA” box。Press the icon to finish setting.
Select preset point。Select data number,then click this icon to show the relative image.
4. Alarm information list:
When alarm happened,it will show the alarm server name, channel, type, information and
time etc.
Setting steps for alarm:� Set motion alarm or sensor alarm in DVR and record. � Select alarm output in Client properties-network parameters.
5. Channels display and capture icons.
icon description
Capture and save the image.
Full screen.
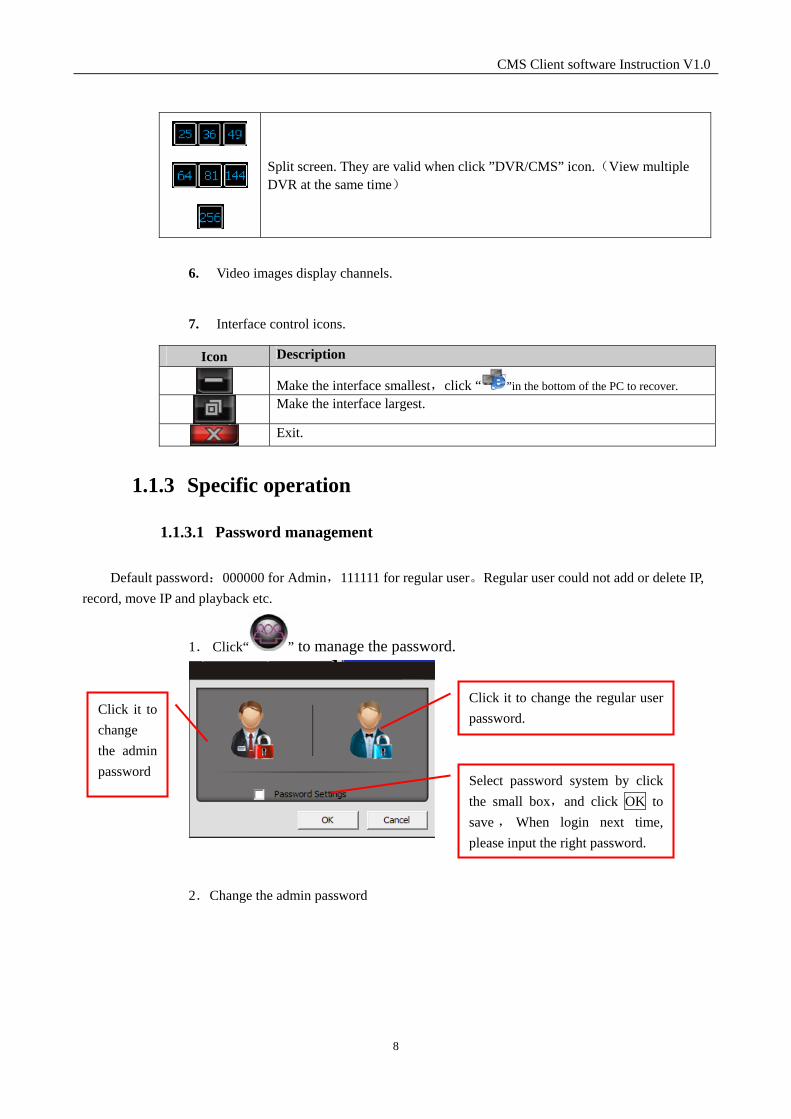
Split screen.
CMS Client software Instruction V1.0
8
Split screen. They are valid when click ”DVR/CMS” icon.(View multiple DVR at the same time)
6. Video images display channels.
7. Interface control icons.
Icon Description
Make the interface smallest,click “ ”in the bottom of the PC to recover.
Make the interface largest.
Exit.
1.1.3 Specific operation
1.1.3.1 Password management Default password:000000 for Admin,111111 for regular user。Regular user could not add or delete IP,
record, move IP and playback etc.
1. Click“ ” to manage the password.
2.Change the admin password
Click it to change the regular user password. Click it to
change the admin password
Select password system by click the small box,and click OK to save , When login next time, please input the right password.

CMS Client software Instruction V1.0
9
3.Change regular password.
1.1.3.2 Add, delete, disconnect the DVR IP
ADD IP 1. Right-click DVR/CMS in DVR list to pop up the following picture:
Then you could see:
Input the former admin password.
Input new admin password
Confirm the new password.
Input new regular password
Input the admin password.
Confirm the new password.
Click new IP
Input DVR IP /domain name and port
Input user name
Input password

CMS Client software Instruction V1.0
10
The above information should be the same as the DVR machine.
Then click OK to save IP and return to the main interface. The IP/domain name will show in the DVR list. If the DVR IP is not connected, it shows gray, e.g.
Click “connect”
Change IP, port,user name, password and display name.
Click OK to save
Right-click the IP to pop up the following picture:
Click “property” to pop up the following picture:
Red means login by admin

CMS Client software Instruction V1.0
11
If connect failed, please check the IP, PORT, user name and password is right or not. It should be the same settings in the DVR menu. And please check the network cable is connected well or not.
Delete or disconnect the DVR IP
Right-click the IP,select “delete” or “disconnect”.
Blue means login by regular user
Gray means the DVR is not connected.

CMS Client software Instruction V1.0
12
Delete any one of the DVR IP,other IP will be disconnected,please connect them again。One DVR could be used by 16 regular users at the same time, but one admin user. When admin login, regular user will be log out and could not login.
Rename the DVR IP
The default name is the DVR IP and port. There way to rename. 1. Right-click and select “rename”. 2. Double click the IP and input new name. Right-click or press “ENTER” key to save.
3. Right-click and rename in ”user info”—“property”.
1.1.3.3 Connect or disconnect many DVR IP at the same time Click “DVR/CMS”, and then right click it. Then click “Connect All”.
1.1.3.4 Move the IP
Right click the IP, and then select “up/down” It will disconnect all IP. It needs to connect again.

CMS Client software Instruction V1.0
13
1.1.3.5 Remote View
When the DVR IP is connected, it will display the images:
1.1.3.6 View many DVR images at the same time. Click “DVR/CMS” in the DVR list to connect all DVR.。It could view 256 cameras at
most at the same time. Set the cameras display place automatically:
Move the mouse cursor on the screen, right-click, and then select “AUTO”.
Click the single channel to switch between single channel and multiple channels
Click the channel to view that channel

CMS Client software Instruction V1.0
14
Set the cameras display place according to the DVR IP.
Set the cameras display place according to the channels of each DVR IP.
1.1.3.7 Remote set DVR parameters
It will enter into the remote setting menu.
Move the mouse cursor to any camera, right-click the mouse to pop up all DVR IP or name. Then select channels.
Select the DVR IP and then right-click. Select “remote settings”

CMS Client software Instruction V1.0
15
Click could show more items. You could change the settings here for the DVR.
The DVR will restart automatically after the settings are changed.
1.1.3.8 Set net parameter
Select the DVR IP and right-click, select “property”----click “Net parameter”:
Save path of the files: Click “Browse” and then select the save path of network video file. Click “Save Audio”, “Auto Connect” and “Alarm Output” to save audio and connect the network automatically and alarm output. After setting, click “Enter” to save and exit.
1.1.3.9 Record
Open/close a certain channel of live network video recording.
Set the frame rate/ image quality of live view.

CMS Client software Instruction V1.0
16
Firstly please confirm the save path of the recording file,default is Disk C. In DVR connecting mode, right-click the DVR name, and then click “Record” to start
recording. Click “Stop” to stop recording. If the DVR machine is not in record mode, you could start DVR record by Client software. E.g.
1.1.3.10 Set PTZ Set PTZ in live view mode. Click the speed dome channels and make it full screen, and then click PTZ icon to see
the PTZ control icons.
e.g. It is the speed dome channel, click it to be full screen, then you could do relative PTZ operation.
Click it to start record of the DVR machine.

CMS Client software Instruction V1.0
17
1.2 AVH Files Player
1.2.1 Introduction of the interface
1. Click“ ” to open the Player. E.g.
2. .AVH Files Player could play back-up files. Client’s local video recording
files, USB backup files and DVD files could be played by this player. It could be changed into AVI file and then play by normal PC player.
� � � � �
⑩
⑧
⑨
②
①

CMS Client software Instruction V1.0
18
3. Introduction. NO. Name Description
� Video image screen View the playback video.
� Play schedule tool Show the play schedule. Left-click the mouse to drag the schedule.
� Open the file Click it to open the folder and select the file.
Play
Pause
Stop
Backward. When pause, click it backward one frame.
Play control icons
Forward. When pause, click it forward one frame.
�
Capture Screen capture. The picture will be saved at Disk C.
� Play speed control 1/2X:1/2 play slow, 1X:Normal play, 2X:Twice forward. 4X:Four times forward.
� Audio Open or close the audio.
� Exit Exit the AVH Play file.
� .AVI Switch the file format from .AVH to .AVI.
� Four-split screen Playback four channels at the same time.
� Change channels Select video playing channels.
1.2.2 Specific operation
1.2.2.1 Select the file and play
Click“ ”, you can see the path of opening files:
Click it to select the .avh file
Click “Open”to play.

CMS Client software Instruction V1.0
19
If record resolution is CIF,the default screen of play file is single and small. If record resolution is D1,the default screen of play file is single and big. E.g.
1.2.2.2 Four channels play at the same time
Click“ ”to play four channels at the same time. If more than four channels have record files,click this icon to switch to another four channels. If some channel no record file, it will display“NO DATA”. If the speed of switching channels is slow, it will display “WAITING…”. If the record file less than four channels, click this icon is useless. You could click the single channel number to switch.
1.2.2.3 Switch the file format from .AVH to .AVI.
Click“ ”to switch the file from .avh to .avi. The .AVI file could be play by Real Media Player and other player in the PC. It is single channel play.
1.2.2.4 Capture and save
Click it to switch the screen small or big.
The bright channels could play files. Gray ones mean no record files and could not play.
①Click it to select.avh file.
② Click it to select save path.
③Click it, the .avh file will be changed into the .avi file.
Click the box as to save the audio.

CMS Client software Instruction V1.0
20
Click “ ” to capture screen and then save the screen image in another files.
Click this icon to capture the image, at the same time, the following dialog box pop up.
1.3 DVR Network Files Player
1.3.1 Introduction of the interface
Select one DVR IP in the DVR list of the CMS interface. Right-click, and then select “Net playback”.
The net files player will pop up:
Then click “Save” to save the captured screen as .bmp file.
Select one folder from the save path.

CMS Client software Instruction V1.0
21
序号 说明
� Video file play screen View the record files.
� Time tool Drag the cursor in the time tool, the record information of each channel will display.
� Play icons :Play/ stop
:Normal play and forward play. � Exit Exit.
� Time Show the playing time.
Audio / Open/ close the audio. Capture :Capture screen pictures. �
Backup :Backup the record files. � Calendar Date selecting. � Channels Select playback channels. “NONE” means no channels.
IP/domain name Show the IP/ domain name of the connected DVR. � Valid time Show the start and end time of the record file.
1.3.2 Specific Operation
1.3.2.1 Login It should be admin user. When login this network files player, the CMS main
interface will be closed.
①
② ③
④
⑤
⑦
⑧
⑨
⑥

CMS Client software Instruction V1.0
22
1.3.2.2 Remote Play DVR HDD files.
a) Select play time, date according to the valid time.
Click / in the calendar, it could change year and month too. Click the data number to select day.
Show the playing channels
Show the current date.
Click the year “2010”, you could
see , select
year here.
Click the month (e.g.May=5) to select month.

CMS Client software Instruction V1.0
23
Then the record information will show here:
b) Click “ ” to play. Drag the cursor“ ”in the time tool or
click“ ”to select the begin time.
c) Click “ ”to play fast forward. d) Before playing, you could select any four channels to play. E.g.
After selection, you could see record information here:
e) Click to play with four channels at the same time. e.g.
The number with red circle is the present day.
It shows there are record files from 9 to 15
The number with blue is the selected day.。

CMS Client software Instruction V1.0
24
1.3.2.3 Remote backup
1. Click “ ”to backup:
Click it to switch between single channel and multiple screens.
Set the start time.
Set the end time Click it to select the save path for backup of live network video.
Show the backup schedule.
Click OK to exit.

CMS Client software Instruction V1.0
25
1.4 Network Tools Select one DVR IP in the DVR list of the CMS interface. Right-click, and then select “Net tool”.
Change the channel title of DVR through network:
After changed here,please enter into the camera setting menu in the DVR, and
then change the camera name as bitmap, you could see the new channel name on the live screen of the DVR.
That’s it.
Select font here.
Preview screen.
Click it to preview the new name.
Input new channel name
Click it to change the channel name.


