243
PC Passport Word Processing Student Workbook

PC PassportWord ProcessingStudent Workbook

Published date: August 2008
Publication code: CB4119
Published by the Scottish Qualifications Authority
The Optima Building, 58 Robertson Street, Glasgow G2 8DQ
Ironmills Road, Dalkeith, Midlothian EH22 1LE
www.sqa.org.uk
The information in this publication may be reproduced to support the delivery of PC Passport
or its component Units. If it is to be used for any other purpose, then written permission must
be obtained from the Assessment Materials and Publishing Team at SQA. It must not be
reproduced for trade or commercial purposes.
© Scottish Qualifications Authority 2008
ii

PC Passport Support Materials
IntroductionThis student workbook is one of a range of eight titles designed to cover
topics for the refreshed PC Passport. Each title in the range covers the
required subject material and exercises for candidates studying PC Passport.
This workbook covers all three levels of PC Passport — Beginner,
Intermediate and Advanced. Advanced topics are clearly marked in the
workbook.
There are a number of exercises associated with each subject and it is
recommended that centres download and use the sample exercise files
provided.
Each workbook will help prepare candidates for the assessments for the
refreshed PC Passport. It is recommended that centres use the most up-to-
date Assessment Support Packs appropriate for their type of centre, eg either
school, FE or work-based.
Word Processing Student Workbook — Beginner/Intermediate/Advanced iii

PC Passport Support Materials
Word Processing Student Workbook — Beginner/Intermediate/Advanced iv
PC Passport Support Materials
Contents
Beginner/Intermediate 1Opening and Closing Your Word Processor 1Common Text Formats 4Using and Creating Documents 6
Exercise 1: Search for a Document 8Document Types 9Customising and Creating Document Templates 12
Exercise 2: Creating a Document Using a Template 13Exercise 3: Creating a Memo Template 13Exercise 4: Creating New Templates 15
Entering and Editing Text 17Exercise 5: Selecting Text Using the Mouse 22Exercise 6: Copying and Moving Text in a Document 23Exercise 7: Creating a Document 25
Formatting 29Exercise 8: Creating a New Style 37Exercise 9: Using AutoFormat Options 38
Inserting Graphics 38Exercise 10: Using Other Formatting Options 43
Inserting Page Breaks 43Using Headers and Footers 44
Exercise 11: Creating Headers and Footers 44Inserting the Date and Time 45Working with Columns 45
Exercise 12a: Creating Columns 46Exercise 12b: Using Columns 46Exercise 12c: Creating More Than Two Columns 48
Working with Standard Paragraphs 49Using Tabs 51
Exercise 13: Using Tabs 52Adding Special Characters and Symbols 52
Exercise 14: Inserting a Symbol and Using a Watermark 54Changing the Page Setup 55Previewing and Printing Documents 56Working with Tables 60
Exercise 15a: Creating a Table 63Exercise 15b: Manipulating a Table 65Exercise 15c: Using Table Features 65
Security 67Exercise 16: Adding Password Protection 70
Advanced 71Creating a Web Page 72Hyperlinks 74
Exercise 17a: Creating a Web Page 78Exercise 17b: Adding Hyperlinks 79
Using Sections in a Document 80Exercise 18a: Inserting a Section Break 81Exercise 18b: Applying Different Formatting within a Section 82
Word Processing Student Workbook — Beginner/Intermediate/Advanced v

PC Passport Support Materials
Using Mail Merge 83Exercise 19a: Creating the Mail Merge Letter 89Exercise 19b: Creating the Data Source 90Exercise 19c: Adding Mail Merge Records 91Exercise 19d: Editing Mail Merge Records 93Exercise 19e: Inserting Placeholders 93Exercise 19f: Inserting Merge Fields 95Exercise 19g: Completing the Mail Merge 96Exercise 19h: Printing the Merged Letter 97
Envelopes and Labels 98Importing Other File Types into Documents 102
Exercise 20a: Importing a Chart 107Exercise 20b: Edit the Chart Data 108Exercise 20c: Chart Elements 110
Creating Forms 110Table of Contents 114
Exercise 21a: Creating a Table of Contents 118Indexes 119
Exercise 21b: Creating Manual Index Entries 121Exercise 21c: Creating Automatic Index Entries 121
Footnotes and Bookmarks 122Exercise 22: Creating Footnotes 124
Tracking Changes and Version Control 125Exercise 23a: Tracking Changes in a Document 127Exercise 23b: Print a Document with Tracked Changes and Comments Showing 127
Working with Master and Subdocuments 128Customising Menus and Toolbars 133Making Changes to the Menu 139Macros 143
Exercise 24: Macros, Toolbars and Menus 145Recovering Documents 146Finally 151
Word Processing Student Workbook — Beginner/Intermediate/Advanced vi

PC Passport Support Materials
Opening and Closing Your Word Processor
Opening a Word ProcessorYou can load word processing software in a number of ways. The most
popular method is using the Start menu, which is shown at the bottom left of
the Windows screen on the taskbar:
Log on to your computer (it may require a user logon and password).
Click the Start button, choose All Programs (or Programs if you don’t use
Windows XP) and then Microsoft Word (this is one of the most popular
word processing programs). This would apply to any word processing
package and could include simple ones like Notepad and WordPad, which
can be found in the Accessories menu.
On a Macintosh computer you will probably need to double-click an icon on
the desktop.
Note: If you use Windows XP, and you use Word frequently, you may also
find it on the menu shown when you first click the Start button. This is to
make it quicker for you to launch the program.
When your word processor is open you can use the File menu to open an
existing document file or to start a new document.
Word Processor Screen ElementsWhen your word processor software is loaded, the application window will be
displayed. Some of the screen elements in this window can be switched on
and off, so the screen may look slightly different from machine to machine.
Some of the more important screen elements are now described.
Title Bar
The title bar displays the document name, usually Document 1 which will
change to the name you give the document when you save it.
Word Processing Student Workbook — Beginner/Intermediate 1

PC Passport Support Materials
Most word processors have a standard window which has window elements
such as the Minimise and Maximise buttons so you can resize and position
the window anywhere on the screen.
Menu Bar
Below the title bar, you will often find the menu bar. By clicking a menu name
or by pressing [Alt] then the underlined letter, you can display the menu
options. For example, [Alt] F will access the File menu. Once the menu is
open, to choose an option simply click it or press its underlined letter. Some
commands can be accessed using keyboard shortcuts. When a keyboard
shortcut is available, you will see it described to the right of the command
name.
For example, if you click the Edit menu, you will see the Copy command can
also be actioned by pressing [Ctrl] C. This means pressing C while you hold
down one of the [Ctrl] keys. Options that appear dimmed are not available for
selection at this time. If the command can also be accessed through a toolbar
button, eg Cut, the picture that appears on the button is shown to the left of
the menu option.
Initially, only some of the options will be shown on each menu, however, you
can extend the menu to show all the available options if necessary.
Toolbars
To begin with, most word processors display the Standard and Formatting
toolbars. You can choose to display or hide toolbars using the View, Toolbars command. Alternatively, right-click any toolbar currently displayed
to see the shortcut menu and then select a toolbar name to display or hide it.
Ruler
The ruler can be used to set margins, tabs and paragraph indents using the
mouse. It will also display the paragraph settings in effect at the insertion
point.
Word Processing Student Workbook — Beginner/Intermediate 2

PC Passport Support Materials
You can choose to display or hide the ruler using the View, Ruler command.
This is a toggle option, meaning selecting it once will display the ruler and
selecting it again will hide it.
Text Area
Below the ruler is the text area representing the page. The flashing mark is
called the insertion point and indicates where text will appear when you start
to type.
Scroll Bars
The scroll bars along the bottom and right edges of the document window can
be used to view different parts of your document if it is too large to be seen all
at once on the screen. When you click the arrow buttons at the end of a scroll
bar, the text on-screen will scroll in the direction shown on the arrow. If you
want to scroll further, you can click and drag the scroll box along the scroll bar
to the required position.
Status Bar
At the left side of the status bar you will see the current page number, section
number and number of pages in the current document. The next section
shows where the insertion point is positioned on the page and to the right are
various indicators which light up when certain modes are active. For example,
OVR will illuminate when overtype mode is switched on. When overtype mode
is on, characters are replaced as you edit instead of being inserted.
The section of the status bar in the shape of a book is the spell check
indicator. If switched on, it will constantly check your spelling as you type. The
spelling mistake will be displayed with a red cross when detected. You can
run the spell check by double-clicking this indicator.
The last section is the background save indicator. When this option is
switched on, it’s possible to keep working while you save a document. This
option uses additional system memory and may not be advisable if you have
limited memory resources.
Word Processing Student Workbook — Beginner/Intermediate 3

PC Passport Support Materials
Using Word Processor Help
Like all applications, your word processor provides an online facility for getting
help when you need it. Most have a comprehensive online help system that
you can use when you want to know more about a particular option or how to
complete a task. Described below are some of the ways you can get help.
There may be several different ways to access parts of the word processor
help system, but the most common is to use the [F1] function key whilst your
word processor is open. It defaults to word processor help because that is the
screen you are in.
Closing Your Word ProcessorWhen you have finished using your word processor, you should close it. You
do this by clicking File on the menu bar and then choosing Exit from the
menu of options.
Common Text FormatsWhen you save any document it is stored in a particular format, complete with
the formatting that has been applied, the graphics that have been included
and so on. The file name you supply is given a .doc extension (an
abbreviation added to the end of the file name to identify the file type) which
tells Word that it’s a Word document.
Word processors can both read and save your documents in other formats.
This is so that you can exchange data with other programs. So if, for example,
another user has a different word processing program that can’t read your
files, you could save the document in one of these other formats for them. The
two most common are plain text and rich text format.
Word Processing Student Workbook — Beginner/Intermediate 4

PC Passport Support Materials
Format Description File Extension
Plain text This is text that does not contain any special
formatting or special fonts.
.txt
Rich text format Rich text format is a format which can hold
information about the formatting and layout of
the document. This can include which fonts are
used for text, the size of margins, how
paragraphs are formatted and much more.
.rtf
ASCII Stands for the American Standard Code for
Information Interchange. This is another format
that does not contain any formatting, just plain
text so that it can be read by any computer.
Appears on list as MS-DOS Text with Layout.
Graphics cannot be displayed in this format. It
can be read by most word processing software.
.asc
HTML This is the language used on the Internet.
When you save a file with this format, not all
original formatting is saved with the document.
For example: animated text will be converted to
italicised text
any non-standard underline style will be
converted to the standard solid underline style
decorative paragraph borders will be converted
to plain box borders
graphics that have been formatted with text
wrapping will become left or right aligned but
will be displayed.
.htm or .html
PDF A Portable Document Format used for
compressing a large document into a read only
file. Text and some graphics can be converted,
and displayed.
Word Processing Student Workbook — Beginner/Intermediate 5
PC Passport Support Materials
To open or save a document in a format other than the standard document
format, use the Files of type drop-down list to choose the particular format
you want to work with.
Using and Creating Documents
Opening a DocumentIf the document you want to work with has already been typed and saved, you
will have to open it first.
1 Open the file using one of these methods:
Select the File, Open menu option, ie click the File menu and
then the Open option.
Hold down [Ctrl] and press O.
Click the Open button on the toolbar when the Open dialogue
box will be displayed.
2 Choose where the document is located, eg on the desktop or somewhere
on My Computer, by selecting an option from the Look in drop-down list.
You can display this list by clicking anywhere on the box or the small arrow
at the end of it. This is known as a drop-down arrow as clicking it displays
a drop-down list.
Note: The Places bar at the left of the dialogue box can be used to quickly
display the contents of the listed folders. Simply click the appropriate
button.
3 If necessary, choose the disk where the document has been saved by
clicking it. The contents of that disk, including any files not stored inside a
folder, will be displayed in the main window in the dialogue box.
4 Open the folder where the file has been saved by double-clicking its name.
For example, if the document is in the Projects folder, double-click the
Projects folder. The folder name will then appear in the Look in box and
its contents displayed in the main window.
5 Once the folder you want is open and its name is shown in the Look in
drop-down list box, click the document name and then the Open button.
Word Processing Student Workbook — Beginner/Intermediate 6

PC Passport Support Materials
Saving a DocumentWhen saving files to your computer, you can choose to save them in a folder
on your computer's local hard disk, floppy disk or memory stick. If you are
attached to a network, you can also choose to save them in a folder on the
network. You can also choose to store them in a folder that already exists, or
choose to create a new folder for them.
1 Choose to save the file using one of these methods:
Select the File, Save menu option, ie click the File menu and
then the Save option.
Hold down [Ctrl] and press S.
Click the Save button on the toolbar and the Save As dialogue
box will be displayed.
2 In the File name text box enter a suitable file name. The following rules
apply when naming document files.
File names can be a maximum of 255 characters.
Some characters cannot be used in file names. These include:
\ / * ? : ; " | < >
Within a single folder each file name must be unique.
3 If necessary, choose the file format from the Save as type drop-down list.
In most cases the file will be saved in the .doc format.
4 Specify where the file is to be saved, eg on the desktop or somewhere on
My Computer, by selecting an option from the Save in drop-down list.
You can display this list by clicking anywhere in the box or on the small
arrow at the end of it.
5 Once the folder you want is open and displayed in the Save in drop-down
list box, click the Save button.
Note: When you save a file that has been saved before, your word processor
assumes that you want to save it on top of the previous version and so does
not ask you for a file name or a location. If you want to save another copy of
the file, use the File, Save As menu option, which will always ask you for a
file name and a location.
Word Processing Student Workbook — Beginner/Intermediate 7

PC Passport Support Materials
Backing up Documents It is important that if you wish to create a back-up copy of your file, you would
go through the same Save process as above, but call your file a different
name and store it in a different location, eg a USB pen drive or flash memory
stick, CD-ROM or DVD drive. A backup is a copy of any data taken for
security purposes, in case of corruption or accidental deletion/editing of the
original data.
Finding DocumentsIn addition to the search facilities that Windows Explorer offers, there is a
search facility that you can use when opening documents in a word
processor.
In the Open dialogue box, click the Tools button to see a list of options.
Click the Find option and specify your search conditions (also known as
criteria). Once you’ve set all your conditions and chosen where you want to
look, click Find Now to start the search. Word will return a list showing the
documents that match your conditions. To open any one of them, select it
then click Open.
Exercise 1: Search for a Document1 Make sure that your word processor is open. These instructions are for
Microsoft Word.
2 Follow the instructions below to use the Open dialogue box to find a
specified document.
Click the Open button on the Standard toolbar.
Click Tools and then Find in the dialogue box.
Make sure the Property box is set to File name and the
Condition is included.
In the Value box type Chinese then click the Add to List button.
Word Processing Student Workbook — Beginner/Intermediate 8

PC Passport Support Materials
Make sure your PC Passport Student folder is shown in the
Look in box at the bottom of the dialogue box.
Click Find Now to search for documents in the documents
folder with the specified value in their names.
One or more document may be listed.
Double-click a document to open it.
3 Close the document you have found.
4 Close your word processor.
Printing a DocumentTo print a copy of your document to the default printer, you simply click the
Print button on the toolbar.
Closing a DocumentWhen you have finished working with a document, you can close it by
selecting Close from the File menu.
Document TypesEach document created in a word processor is based on a template that
defines its initial appearance and layout. This means that the fonts, sizes and
so on give the document a consistent look and feel. There are a number of
templates for different document types including letters, faxes, memos and
reports, and you can create your own if necessary.
If you choose to create a new document using the New Blank Document button on the toolbar, the document will be based on the default Normal template.
If you want to create a document based on one of the other templates, you
have to use the File, New menu option as this will give you a choice of
templates to choose from.
Word Processing Student Workbook — Beginner/Intermediate 9
PC Passport Support Materials
Your word processor can be used to create any type of document you need.
For example, you can create letters, faxes, menus, newsletters and reports.
Some of these documents have standard layouts that you should stick to as
much as possible. Letters are an example of documents that you will be
expected to lay out in a particular way.
LettersThe standards you use when writing a letter depend on how formal you need
it to be. An example of this would be the reference added to many business
letters so that the letter can be easily identified by the sender and the recipient
in the event of any follow-up communications. In an informal letter to a friend
or member of your family, you would not include a reference. Below is an
illustration of a formal letter.
Blackwell Veterinary Surgery1 Priory LaneBLACKWELLBL8 9TRweb: www.blackwell_vets.co.uktel: 01523 854411
JM/04/012W
9 April 2004
Mrs J Black14 Franklin SquareHogie VillageBLACKWELLBL9 1EE
Dear Mrs Black
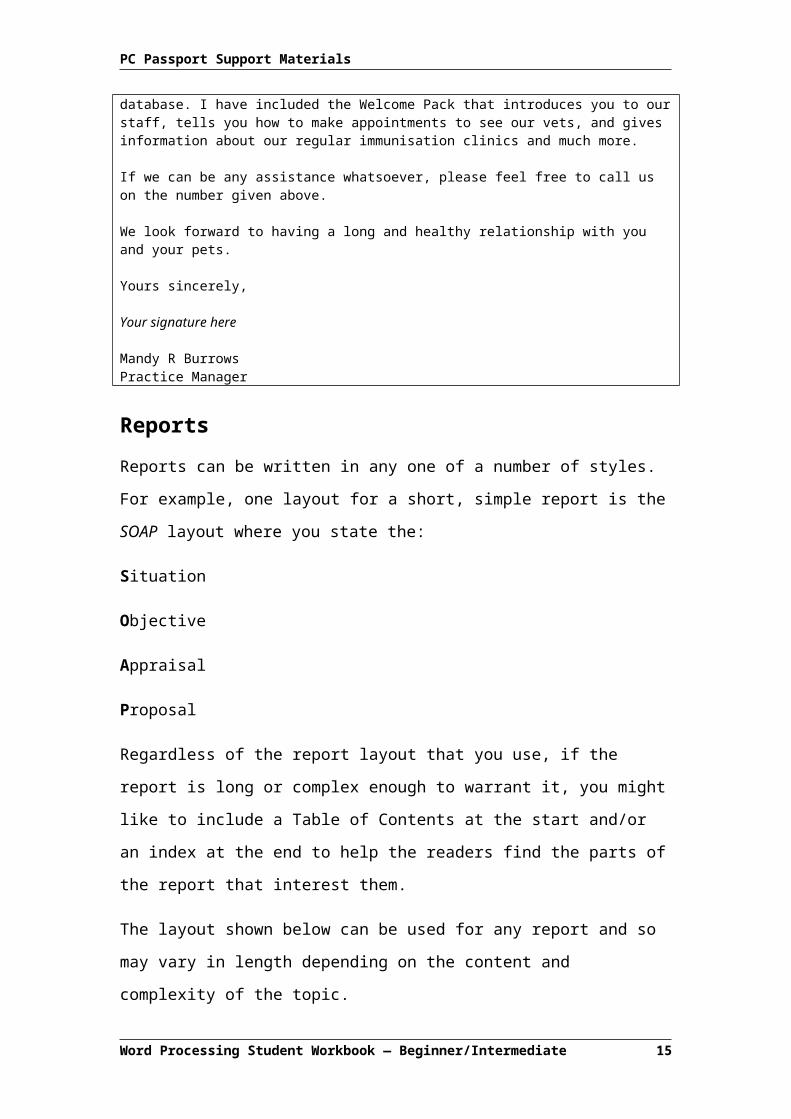
Welcome to the Blackwell Veterinary Surgery. We have now added Seagull your budgerigar and Toodles the Persian cat to our client database. I have included the Welcome Pack that introduces you to our staff, tells you how to make appointments to see our vets, and gives information about our regular immunisation clinics and much more.
If we can be any assistance whatsoever, please feel free to call us on the number given above.
We look forward to having a long and healthy relationship with you and your pets.
Yours sincerely,
Your signature here
Mandy R BurrowsPractice Manager
Word Processing Student Workbook — Beginner/Intermediate 10
PC Passport Support Materials
ReportsReports can be written in any one of a number of styles. For example, one
layout for a short, simple report is the SOAP layout where you state the:
Situation
Objective
Appraisal
Proposal
Regardless of the report layout that you use, if the report is long or complex
enough to warrant it, you might like to include a Table of Contents at the start
and/or an index at the end to help the readers find the parts of the report that
interest them.
The layout shown below can be used for any report and so may vary in length
depending on the content and complexity of the topic.
IntroductionThis explains the purpose and background to the report. It may also include brief acknowledgements to anyone, for example, who helped you gather the information for the report or who helped compile it.
Discussion (Main Body)This is likely to be the longest section as it sets out your main results, findings, arguments, options and ideas. Make a point of using headings and sub-headings so readers can easily find their way around and read quickly from point to point.
ConclusionsThese are inferences you draw from the Discussion, not concluding remarks. You could include these within the Discussion; however, having them in a separate section may help the reader, particularly in a longer report.
RecommendationsRecommendations are actions that you think should be taken based on the conclusions reached. Like conclusions, recommendations could be included with the main Discussion.Recommendations should normally be written in the ‘should’ or ‘should be’ style.
AppendicesAppendices may be useful where additional detail would be beneficial to the reader so they can follow the Discussion. An example might be to include a reference to a study or other report where you found some of the information you included in the report.
Distributing a SummaryIf you think that some readers are unlikely to want the full report, consider circulating only a summary of the main points to them. They then have the option of requesting the full
Word Processing Student Workbook — Beginner/Intermediate 11
PC Passport Support Materials
report if they need more detail.
Customising and Creating Document Templates A template stores a variety of items that form the basis of a document. When
you create a new document, some of the items, such as text and styles, are
copied into the document from the template that you select.
Template Items that are Copied to a New Document
Template Item Comments
Text and graphics, together with the
formatting assigned to them
Includes headers, footers, footnotes and
comments.
Page setup Includes the margins, paper size and
source, page layout, and other features.
Also includes the default tab stop setting
(which you define by choosing Format, Tabs and entering a value into the
Default Tab Stops text box).
Styles All the styles stored in the template are
copied to the document.
A document can access any item stored in the document template. It can also
access any item stored in the Normal template.
Template Items Kept within the Document Template
Template Item Comments
AutoText entries An AutoText entry is a stored block of
text or graphics that you can insert
anywhere into a document.
Macros A macro is a script for automating a task.
Custom toolbars, as well as modifications
to toolbars, menus, or shortcut keys
Creating custom toolbars and modifying
toolbars and menus.
Shortcut key definitions Defining shortcut keys to run commands,
Word Processing Student Workbook — Beginner/Intermediate 12
PC Passport Support Materials
apply styles, or perform other tasks.
Using TemplatesMany of a word processor’s templates contain text placeholders. These make
it quick and easy for you to enter the document text at the correct position and
in a format in keeping with the overall style of the document. All you need to
do is click a placeholder and then type the required text.
Exercise 2: Creating a Document Using a TemplateThis exercise uses Microsoft Word as the word processor, but you can use
any other word processor that has fax and memo templates.
1 Open your word processor software. Click File, New, find a template to
send a fax.
2 Edit the Fax template with a company name, who it is going to and who is
sending it, then save it with the name Edited Professional Fax in your PC Passport Student folder. Make sure you include your name and the date
at the bottom of the file. Be sure to show the file to your tutor, or print a
copy to keep in your portfolio of work.
Exercise 3: Creating a Memo TemplateMake sure that your word processor is open. Click File, New and find a
Memo template.
1 Give it a title Student Memo.
2 Fill the date Current Date, put Your Name for who it is from and give it a
subject of Activities.
3 Leave Priority blank.
4 Leave Recipient blank.
5 Under closing fields put your initials under Writer’s Initials.
6 Leave the defaults under Headers/Footers.
Word Processing Student Workbook — Beginner/Intermediate 13

PC Passport Support Materials
7 Click Finish and save the file in your PC Passport Student folder. Make
sure you include your name and the date at the bottom of the file. Be sure
to show the file to your tutor, or print a copy to keep in your portfolio of
work.
Types of Styles Stored in a Document TemplateThe following types of styles can be stored directly within a document or
template file.
All documents and templates store four basic ‘default’ built-in styles
(whether or not these styles have been used in the document or have
been modified): Normal, Default Paragraph Font, No List and Table Normal. Default Paragraph Font, No List and Table Normal are styles that
are applied to text to remove characters, lists, or table styles or other
formatting. They can’t be modified.
Any built-in style that was used in the document, even if it is no longer
applied to document text and even if it hasn’t been modified.
Modified versions of built-in styles.
User-defined styles.
You can view a complete list of the styles currently stored in a document or
template by using the Styles tab of the Organiser. When you apply styles to
text in a document or template, you can use any of the styles that are actually
stored in the document or template, plus any of the built-in styles stored in
Word.
Customising TemplatesYou can modify templates in a variety of ways. Performing any of the following
common actions can automatically modify a template. When you create any of
the items (listed in the previous tables), you can save it in the Normal
template or in the document template if it is other than Normal.
Word Processing Student Workbook — Beginner/Intermediate 14

PC Passport Support Materials
Clicking the Default button in the Font, Language, or Page Setup
dialogue box and responding Yes when prompted. Clicking Default saves
the character formatting, language, or page setup in the document
template. The character formatting and language are stored within the
Normal style of the document template.
Selecting the Add To Template option when modifying or creating a style
(in the Modify Style or New Style dialogue box) will copy the modified or
new style to the document template.
Exercise 4: Creating New TemplatesThe procedure for creating a new template is similar to that for creating a new
document.
Perform the following basic steps.
1 Choose File, New in the New Document task pane, click the General Templates command in the New From Template area.
2 In the Templates dialogue box, select the Template option in the Create New area in the lower right corner.
3 In the Templates dialogue box, select an existing template to use as the
starting point for your new template, and click OK. Your new template will
be opened and will acquire the contents of the template you chose.
Notice in this memo template how it prompts you for the things you can
change, and how to use the memo template.
4 Enter text and graphics, edit, and format the new template using the same
techniques used for documents.
5 Choose File, Save, or click the Save button to save the new template in
your PC Passport Student folder. This is not the normal location for
saving templates. Make sure you include your name and the date at the
bottom of the file. Be sure to show the file to your tutor, or print a copy to
keep in your portfolio of work.
Word Processing Student Workbook — Beginner/Intermediate 15

PC Passport Support Materials
Choose Locations for Your Templates Templates are stored in specific folders, separate from where you store your
documents, for example the templates supplied with Microsoft Word (except
Normal) are stored in subfolders of:
C:\Program Files\Microsoft Office\Templates.
The Normal template, plus any templates you create, are usually stored in
one of the following folders, or subfolders of these folders:
C:\Documents And Settings\User Name\Application Data\Microsoft\
Templates (in Windows 2000)
C:\Windows\Application Data\Microsoft\Templates (in Windows 95 and
Windows 98 without users defined)
C:\Windows\Profiles\UserName \Application Data\Microsoft\Templates (in
Windows 95 and Windows 98 with users defined).
You can change the locations where Normal and user-created templates are
stored. Edit and format the template using the same techniques used for
documents. Choose File, Save, or click the Save button to save your
changes.
If you save the template directly in your User Templates folder, in this case
the template will be displayed in the General tab of the Templates (or New Office Document) dialogue box. Alternatively, you can place it in a subfolder
of your User Templates folder (an existing subfolder or a new one that you
create); in this case, the template will be displayed in the Templates (or New Office Document) dialogue box in a tab that’s labelled with the name of the
subfolder. Also, you must name the template file with the .dot extension or
omit the extension.
Note: File extensions might not be displayed when you list files, depending on
the options you have chosen in Windows.
Word Processing Student Workbook — Beginner/Intermediate 16
PC Passport Support Materials
Troubleshooting TemplatesYou moved or copied a document to a different computer or network location
(perhaps you sent the file to a co-worker), and now you or your co-worker can
no longer access the AutoText entries, the macros, or the menu, toolbar and
keyboard customisations that you previously used with that document.
The most likely reason that the items are missing is that they are stored in the
document’s template (or in the Normal template) and your word processor
can’t access that template from the document’s new location. Here are two
possible solutions to this problem:
Before you move or copy the document, copy all macros and custom
toolbars from the document template directly into the document. This
method won’t work, however, for AutoText entries (which can be stored
only in a template) or for other customisations.
Create a new template located in the same folder as the document on your
computer, attach the template to your document, and copy all needed
items into the new template. (Be sure not to name the new template
Normal.dot.) Then, copy or move both the document and its new template
to the new location.
Entering and Editing TextWhen you’re typing text you don’t have to press [Enter] at the end of each
line. Word uses a feature called word wrap, which ensures the text ‘wraps’
down to the next line when it reaches the right margin of the document. You
need only press [Enter] when you want to start a new paragraph or insert
space between paragraphs. You would also press [Enter] at the end of a
short line, such as a heading or a line of an address.
Word has a feature called AutoCorrect that will correct common typing
mistakes, for example if you type teh AutoCorrect will change it to the and if
you start to type with the [Caps Lock] key switched on accidentally, Word will
switch it off and correct the text you typed.
Word Processing Student Workbook — Beginner/Intermediate 17

PC Passport Support Materials
Correcting Mistakes as You TypeIf you make a mistake that AutoCorrect does not correct, press the
[Backspace] key to delete characters to the left of the cursor (in Word, the
position of the cursor is known as the insertion point). This will move the
insertion point back through what you’ve typed, deleting as it moves.
Note: The appearance of the [Backspace] key can vary from keyboard to
keyboard, but it will always be above the [Enter] key on the main keyboard.
The key might have the word ‘Backspace’ on it along with an arrow pointing
left, or just the arrow. Be careful not to mix it up with the left arrow cursor key.
Example
OVERVIEW
The Centre intends to develop applications to be used for teatching
The word ‘teaching’ has been spelled incorrectly in this example (the red wavy
underline shows the incorrect word). To correct it, you could either press the
[Backspace] key until you remove the t that shouldn’t be there and then re-
type the rest of the word, or you could use the cursor keys to move the cursor
back until it’s between the t and the c and then press [Backspace] once to
remove the t (you would then have to use the cursor keys to move the cursor
back to the end of the word before you continue typing).
Note: The [Delete] key can also be used to remove text from your document.
It works in a different way from the [Backspace] key as it will remove
characters to the right of the insertion point.
Checking Your SpellingSometimes even the best typist makes a typing mistake. Therefore, your word
processor’s Spell and Grammar utility can be useful for checking your
document for spelling mistakes and grammatical errors.
Word Processing Student Workbook — Beginner/Intermediate 18

PC Passport Support Materials
Most word processors have a built-in dictionary against which each word in
your document is checked, and a ‘custom’ dictionary to which you can add
words that are valid in your documents, but not usually found in an ordinary
dictionary. For example, you will probably add your surname to documents. If
your surname isn’t one of those recognised by your word processor, it’ll be
marked as a spelling mistake each time you type it unless you add it to the
custom dictionary.
Microsoft Word alerts you through a red or green wavy underline in your
document when it finds what it considers to be an error. You can correct these
quickly by right-clicking the underlined word or phrase and choosing one of
the options that appear on the shortcut menu.
Alternatively, you can create your document and then check it in one sweep
using the Tools, Spelling and Grammar menu option. This menu option will
display the Spelling and Grammar dialogue box, with the first mistake
highlighted in the box.
You will be prompted to make your changes in the Spelling and Grammar dialogue box by either ignoring the suggestion or accepting it. If neither of
these options will deal with the issue, you can edit the document without
closing the Spelling and Grammar box and then resume the check.
Once one mistake is dealt with, it moves on to the next and the next until
there are no further mistakes.
As an alternative to selecting the Tools, Spelling and Grammar menu
option, you can press [F7] or click the Spelling and Grammar button on the
toolbar. As you type, you will notice that spelling mistakes are underlined in
red and grammatical errors in green. These wavy lines only appear on the
screen — they would not be printed along with the document. To correct a
spelling/grammar error, right-click the word(s) and Word will suggest how to
fix the problem.
Word Processing Student Workbook — Beginner/Intermediate 19

PC Passport Support Materials
Sometimes your word processor does not have any alternatives to suggest. If
this is the case, you will have to either edit the word yourself after checking its
spelling with another source or choose to ignore the error. You might choose
to do this if you know the spelling is correct but Word doesn’t recognise it, for
example it may be a surname that Word doesn’t recognise.
Using Undo and RedoIf you need to, you can undo up to your last 255 actions in your document.
This means that if you make a mistake, you can undo it. However, you must
remember that every action that you’ve performed in between will also be
undone.
Clicking the Undo button on the Standard toolbar will undo your most recent
action, but you can click the drop-down arrow next to it to show the Undo list
so that you can undo more than one action at a time. The Edit, Undo menu
option can also be used for undoing just your last action or you could press
[Ctrl] Z if you prefer.
If you undo actions that you shouldn’t have, you can redo them using the Edit, Redo option or Redo button that appears on the Standard toolbar. The Redo
option will be available only when you have used Undo, and it also has a
drop-down arrow that can be used to select more than one action at a time.
Using Find and ReplaceThe Find and Replace facility allows you to find a particular set of characters
and replace them with something else. For example, if you’ve written a report
referring to revenues but want to change it to sales, then you can use Find
and Replace to do this for you. To use this feature, select the Edit, Replace
menu option.
Note: You should take care using the Replace All button as you will not see
each occurrence as it is changed. For example, say you want to change the
word he to she throughout a document. If you click Replace All, you won’t
Word Processing Student Workbook — Beginner/Intermediate 20
PC Passport Support Materials
see that Word changes these two letters every time it finds them, eg if the
word the is in the document, it will become tshe.
To help you make sure that only the occurrences you want are changed, you
can use the Find Next button. This will take you to each occurrence so that
you can check it is one you want to change. You can then click Replace to
change just that one and find the next.
More Options
The More button in the Find and Replace box gives you options to help
narrow the search. In the he/she example given before, ticking Find whole words only would solve the problem since this would mean the letters he
would only be found it they were the whole word he and not just part of
another word.
Moving the Insertion PointAny text that you enter is placed at the insertion point within the document, so
before you type text you have to make sure the insertion point is at the correct
position. You can do this using either the keyboard or the mouse.
To Move the Insertion Point Using the Keyboard
[↑] Up one line [Ctrl] [←] Left one word
[↓] Down one line [Home] Beginning of the line
[←] Left one character [End] End of the line
[→] Right one character [Ctrl] [Home] Beginning of document
[Ctrl] [↑] Up one paragraph [Ctrl] [End] End of document
[Ctrl] [↓] Down one paragraph [Page Up] Up one screen
[Ctrl] [→] Right one word [Page Down] Down one screen
To Move the Insertion Point Using the Mouse
1 If necessary, use the scroll bars to locate the text you want to edit.
Word Processing Student Workbook — Beginner/Intermediate 21

PC Passport Support Materials
2 Once the text is visible, move the mouse to where you would like the
insertion point positioned and click the left mouse button.
Word Processing Student Workbook — Beginner/Intermediate 22

PC Passport Support Materials
Selecting TextAlthough you can use the [Backspace] key to remove text as you type,
sometimes you’ll want to delete more than a few characters at a time. You
can do this by selecting the text before pressing [Backspace]. There are a
number of different ways of selecting text, using either the keyboard or the
mouse, and many of Word’s operations need you to select the text first.
Exercise 5: Selecting Text Using the Mouse 1 Open the document Advantages of Word Processing in your PC
Passport Student folder. Using the mouse, point to a word, sentence or
paragraph.
2 Double-click the word to select the word. Hold down [Ctrl] and click any
part of the sentence to select the sentence. Triple-click any part of the
paragraph to select the paragraph.
Selecting Text Using the Mouse — A Block of Text1 Click at the start of the text you wish to select.
2 Click and hold down the left mouse button then drag over the text, then
release the mouse button.
Alternatively, click to the left of the first character to be included in the
selection, hold down the [Shift] key and click at the end of the required block.
3 Close the document without saving any changes.
Selecting Text Using the Keyboard
If you prefer to use the keyboard to select text, you can use the arrow keys
that you learned earlier for moving the cursor, but by holding down [Shift] as
you move the cursor, the text it moves over will be selected.
Word Processing Student Workbook — Beginner/Intermediate 23

PC Passport Support Materials
Deselecting Highlighted Text
To deselect highlighted text, click anywhere within the document text or press
any one of the arrow keys.
Copying and Moving TextYou can copy or move text in a document or between documents using the
same Edit menu options you used to copy and move files in Windows
Explorer. First select the text to be copied or moved as described above, then
select Edit, Copy or Edit, Cut (Copy to make another copy of the text, Cut to
remove it in preparation for placing it somewhere else).
Anything you copy is added to the copy clipboard. Move the insertion point to
the location where the text is to be placed then select the Edit, Paste menu
option to select the clipboard icon.
Note: You can use the same shortcut keys as mentioned before. [Ctrl] C will
copy the selected text; [Ctrl] X will cut it, and [Ctrl] V will paste text at the
insertion point.
Exercise 6: Copying and Moving Text in a Document1 Make sure that your word processor is open.
2 Open the Advantages of Word Processing document stored in the PC Passport Student folder.
3 Follow the instructions below to use cut, copy and paste in this document.
Select the text advantages of using a word processor in the
first paragraph of the document.
Click the Copy button on the Standard toolbar.
Word Processing Student Workbook — Beginner/Intermediate 24

PC Passport Support Materials
Move the cursor to the start of the document by holding down
[Ctrl] and pressing [Home]. Click the Paste button on the Standard
toolbar.
A copy of this text is placed at the insertion point.
Press [Enter] twice to insert a blank line then edit the new
heading so it has initial capital letters as shown here:
The list that makes up the main part of the document is shown in the wrong
order.
Select item 1, including the blank line after it.
Click the Cut button to remove this text from the document.
Place the cursor on the same line as point 2, immediately before
this number.
Click the Paste button to place the cut text here.
Use the same techniques to place the rest of the list in the
correct order.
4 Save the changes you’ve made to the document and then close it. Make
sure you include your name and the date at the bottom of the file. Be sure
to show the file to your tutor, or print a copy to keep in your portfolio of
work.
Word Processing Student Workbook — Beginner/Intermediate 25

PC Passport Support Materials
Exercise 7: Creating a Document1 Create a new document by clicking the New Blank Document button on
the toolbar. Notice that the cursor (or insertion point) is flashing in the
document. Anything you type will appear at this position, and as you type
the insertion point moves along.
2 Type the following text. Do not press [Enter] at the end of each line; notice
that Word’s word wrap feature moves the text to the next line when it
reaches the right margin. Only press [Enter] at the end of headings and
paragraphs or when you want to leave a blank line. Remember that you
can press [Backspace] to correct mistakes as you type and press the
[Spacebar] once after punctuation marks.
Great Bumblebee
Identification
A characteristic feature of the bumblebee is its long, furry coat formed by the body
hairs. The great yellow bumblebee is a large sized bee with a yellow or brownish
body with a black interalar band (between the wings).
Adults are found between April and September. Working bees are quite fast and
therefore may be difficult to approach while feeding. The great yellow bumblebee’s
scientific name, Bombus distinguendus, comes from the fact that when protecting
their nest the bees omit a strong aromatic odour to warn off predators.
3 Follow the instructions below to save the document in the PC Passport Student folder.
Click the Save button on the toolbar.
Word has taken the main heading of the document as the
default file name so you don’t have to type anything here.
Display the PC Passport Student folder in the Look in box.
Click Save.
Word Processing Student Workbook — Beginner/Intermediate 26

PC Passport Support Materials
4 Now you’ll add more text to the document. Click after predators at the end
of the second paragraph and press [Enter] twice to leave a line between
this paragraph and the new text.
5 Type the following text.
The great yellow bumblebee is widespread in northern and central Europe, and Asia,
but is thought to be declining throughout this range. In the UK, during the 1960s, it
was recorded in scattered localities, mainly associated with areas of flower-rich
meadows. Since then it has undergone drastic reductions in range and abundance
and is now classified as Nationally Scarce. Today it is confined to a few areas
practising traditional agriculture, such as the Hebridean machair system or crofting
areas of Orkney, Coll and Tiree.
6 Follow these instructions to make some changes to the document.
In the document’s main heading, insert the word Yellow
between Great and Bumblebee.
Great Yellow Bumblebee
Identification
Place the insertion point at the start of the third paragraph and
type Range and numbers.
Press [Enter]. The text you’ve just typed becomes a heading for
the third paragraph.
Range and numbers
The great yellow bumblebee is widespread in northern and central Europe, and Asia,
but is thought to be declining throughout this range. In the UK, during the 1960s, it
was recorded in scattered localities, mainly associated with areas of flower-rich
meadows. Since then it has undergone drastic reductions in range and abundance
and is now classified as Nationally Scarce. Today it is confined to a few areas
practising traditional agriculture, such as the Hebridean machair system or crofting
areas of Orkney, Coll and Tiree.
Click before the word body in the second sentence of the first
paragraph and type yellow.
Word Processing Student Workbook — Beginner/Intermediate 27

PC Passport Support Materials
A characteristic feature of the bumblebee is its long, furry coat formed by the body
hairs. The great yellow bumblebee is a large sized bee with a yellow or brownish
yellow body with a black interalar band (between the wings).
Position the insertion point at the end of the word interalar near
the end of the first paragraph.
Use the [Backspace] key to remove this word and the space
before it.
Remove the brackets from the text between the wings.
A characteristic feature of the bumblebee is its long, furry coat formed by the body
hairs. The great yellow bumblebee is a large sized bee with a yellow or brownish
yellow body with a black band between the wings.
Double-click the heading Identification to select it.
Press the [Delete] key to delete this heading.
Great Yellow Bumblebee
A characteristic feature of the bumblebee is its long, furry coat formed by the body
hairs. The great yellow bumblebee is a large sized bee with a yellow or brownish
yellow body with a black band between the wings.
Now click the Undo button on the toolbar to reverse your last
action. The Identification heading is ‘undeleted’.
In the second paragraph, remove the sentence that starts:
Working bees are quite fast…
Adults are found between April and September. The great yellow bumblebee's
scientific name, Bombus distinguendus, comes from the fact that when protecting
their nest the bees omit a strong aromatic odour to warn off predators.
Word Processing Student Workbook — Beginner/Intermediate 28
PC Passport Support Materials
The document should now look like this:
Great Yellow Bumblebee
Identification
A characteristic feature of the bumblebee is its long, furry coat formed by the body
hairs. The great yellow bumblebee is a large sized bee with a yellow or brownish
yellow body with a black band between the wings.
Adults are found between April and September. The great yellow bumblebee's
scientific name, Bombus distinguendus, comes from the fact that when protecting
their nest the bees omit a strong aromatic odour to warn off predators.
Range and numbers
The great yellow bumblebee is widespread in northern and central Europe, and Asia,
but is thought to be declining throughout this range. In the UK, during the 1960s, it
was recorded in scattered localities, mainly associated with areas of flower-rich
meadows. Since then it has undergone drastic reductions in range and abundance
and is now classified as Nationally Scarce. Today it is confined to a few areas
practising traditional agriculture, such as the Hebridean machair system or crofting
areas of Orkney, Coll and Tiree.
7 Follow the instructions below to copy some text.
Select the text great yellow at the start of the Range and numbers paragraph.
Select the Edit, Copy menu option to copy this text.
Click before the word bumblebee in the first paragraph.
Select Edit, Paste to put a copy of the words you copied here.
Identification
A characteristic feature of the great yellow bumblebee is its long, furry coat formed by
the body hairs. The great yellow bumblebee is a large sized bee with a yellow or
brownish yellow body with a black band between the wings.
Word Processing Student Workbook — Beginner/Intermediate 29

PC Passport Support Materials
8 Save the changes you’ve made by clicking the Save button on the toolbar.
Make sure you include your name and the date at the bottom of the file. Be
sure to show the file to your tutor, or print a copy to keep in your portfolio
of work.
9 Close the document using the File, Close menu option.
Formatting Formatting allows you to change the appearance of your documents, perhaps
to emphasise particular parts of it, or perhaps to make it look better. There are
two types of formatting you can apply to your document: text formatting and
paragraph formatting.
Text FormattingText formatting is formatting that affects the text itself, eg bold text, italic text,
font, font size (also known as point size) or font colour.
Some of these effects can be added using the toolbars, while all of them can
be added using the Format, Font menu option.
Formatting Toolbar
To apply formatting effects using the toolbar, first select the text you want to
apply the effect to and then choose the effect. For bold, italic and underline,
simply click the appropriate button to switch it on or off. For the other effects,
choose the option you want from the drop-down lists.
Applying Text and Heading Styles
A variety of text styles can be applied to your document. Notice the default
one is Normal, but you can make use of a number of built-in text styles to
enhance your document. Heading styles come in four main styles:
Heading 1 is a large bold font (size 24 point)
Heading 2 is a large bold and italicised font (size 18 point)
Heading 3 is a smaller bold font (size 14 point)
Word Processing Student Workbook — Beginner/Intermediate 30

PC Passport Support Materials
Heading 4 is a smaller bold font (size 12 point)
You can adjust these standard headings to any type of font, have them bold,
italicised or underlined, but it is important that you try not to use headings
more than four levels deep, so if you create a Table of Contents it is able to
cope with the different heading styles correctly. You can of course create your
own styles but there are many standard ones included with your word
processing application.
Superscript and Subscript
If you want to display text or numbers in smaller than normal text and slightly
above or below it (eg in a mathematical expression) you can make use of
superscript or subscript. You can turn this off or on from within the Format Font menu option. Notice that it’s a check box under font effects and you will
see a preview of what the text would look like applying an effect in the preview
pane.
To display a smaller raised number after a letter you would use superscript,
eg P3.
Subscript — the opposite of superscript — allows you to place the number
lower than normal text, eg P3.
Remember whenever you turn on a font effect it will remain until you turn it off
again. There are other types available like Shadow, Emboss etc.
Alignment, Bullets and Numbering
There are four alignment options: left aligns text to the left margin; centre
alignment aligns text to both left and right margins, but does not justify the
text, so text can be uneven; right alignment justifies text to the right margin;
and fully aligned justifies the text so it is even on both sides.
Bullets and Numbering are good ways to emphasise certain key points in your
document. You can choose which style of bullet or number points you want to
use from the Bullets and Numbering option in the Format menu.
Word Processing Student Workbook — Beginner/Intermediate 31

PC Passport Support Materials
Format, Font Menu Option
To apply formatting effects using the Format, Font menu option, first select
the text you want to apply the effect to. Next select the menu option and
choose the effects you want to apply. Once you’ve chosen all the effects you
want, click OK to apply them to the selected text.
Paragraph FormattingParagraph formatting is formatting that affects whole paragraphs rather than
individual characters within them, eg the spacing between one paragraph and
the next, the space between the lines of a paragraph, bullets or numbers on
lists, paragraph indents (extra space between the margins and the paragraph
text).
Some of the paragraph formatting effects that can be added using the
Format, Paragraph menu option can also be applied using the Formatting
toolbar.
Formatting Paragraphs Using the Formatting Toolbar
To apply paragraph formatting effects using the toolbar, first select the
paragraph or paragraphs you want to apply the effect to and then choose the
effect from the toolbar.
You can also use the alignment options to align your paragraphs either left,
right, centred or fully justified.
Format, Paragraph Menu Option
To apply formatting effects using the Format, Paragraph menu option, first
select the paragraph or paragraphs you want to apply the effects to. Next
select the Format, Paragraph menu option and choose the effects you want
to apply. Once you’ve chosen all the effects you want, click OK to apply them
to the selected paragraphs.
Word Processing Student Workbook — Beginner/Intermediate 32

PC Passport Support Materials
Here are some more examples of paragraph formatting effects.
Paragraph A:
This paragraph uses a hanging indent that leaves the first line at the left
of the page while all the other lines in the paragraph are indented further
as you can see. This type of indent is usually used for numbered or
bulleted paragraphs as you saw in the earlier examples.
Paragraph B:
While still using the hanging indent from the previous paragraph, this
paragraph also uses justified alignment. That means that the left and
right edges of the paragraph are even. If you look at the previous
paragraph, you’ll see that the text on each line at the left of the indent is
lined up, while at the right side of the paragraph it isn’t. In this paragraph,
the text on each line is lined up at both the left and the right sides. This
type of alignment is sometimes called block format.
This paragraph uses another type of special indentation called a first line
indent. This formatting means that the first line of the paragraph is indented further
than the other lines in the paragraph — as you can see, all lines except the first begin
at the left margin of the document. In addition to the special indent, 12 pt of space
has been applied above the paragraph to separate it from the paragraph before, and
justified alignment and 1.5 lines of line spacing have been specified.
Note: When you format a paragraph with any of these attributes and then
continue typing, the same attributes will be applied until you change them.
Format, Borders and Shading Menu OptionTo further enhance the appearance of your document, you can add borders
and shading to parts of it. As you’ve seen, the Formatting toolbar has a drop-
down list that will let you choose the borders you want to apply. However, you
can also choose different border styles, colours and widths if you use the
Format, Borders and Shading menu option. This dialogue box also lets you
choose the shading you require.
Word Processing Student Workbook — Beginner/Intermediate 33

PC Passport Support Materials
How to Use the Format, Border and Shading Option
1 First of all, select the paragraph or paragraph that you want to add the
border or shading to, and then choose the Format, Borders and Shading menu option.
2 To add borders to your selection, make sure the Borders settings are
displayed and then choose the Style, Colour and Width of the border you
want to apply, either:
choose one of the preset borders from the Setting list at the left
of the dialogue box
use the buttons surrounding the preview at the right of the
window to add the borders you want for the selected paragraph(s).
(You could also click the borders on the diagram itself instead of the
buttons if you prefer.)
3 To add shading to the selected paragraph(s), make sure the Shading
settings are displayed and then choose the colour and/or pattern you want
to apply.
4 Click OK to apply your selections.
Format PainterThe Format Painter feature can be used to copy text or paragraph formatting
attributes that you’ve already applied using the techniques you’ve just learned
and apply it to other parts of your document.
How to Use the Format Painter
1 Select the text or paragraph that has already been formatted with the
attributes you want to apply elsewhere.
2 Click the Format Painter button on the Standard toolbar to copy the
formatting.
3 If you copied formatting from text, click and drag over the text that’s to be
formatted with the copied formatting. In this case, only the text formatting
will be copied, not the paragraph formatting
Word Processing Student Workbook — Beginner/Intermediate 34

PC Passport Support Materials
If you copied formatting from a paragraph, click anywhere in the paragraph
that’s to be formatted in the same way. In this case, the paragraph
formatting attributes as well as the text formatting attributes will be applied.
Note: If you double-click the Format Painter button at step 2, you can repeat
step 3 as many times as you need to. Once you’ve finished, you click the
button again to switch it off.
Automatic FormattingBy using AutoFormat, you can quickly apply formatting such as headings,
bulleted and numbered lists, borders, numbers, symbols, and fractions to your
text. Microsoft Word can also:
automatically format internet, network, and e-mail addresses as hyperlinks
apply bold or italic character formatting to text surrounded by asterisks (*)
or underscores (_)
replace two hyphens (--) with an em dash (—).
You can automatically format a document either as you type or after you’ve
written it. In both cases, you can control which automatic changes Word
makes. You can also turn off automatic formatting.
Formatting As You Type
When you set options on the AutoFormat As You Type tab (Tools menu,
AutoCorrect Options command), your word processor can automatically
format text as you’re typing your document. For example, if you type a
number followed by a period or hyphen, followed by a space or tab, followed
by text, Word makes the text a numbered list.
When your word processor applies automatic formatting, you can use the
AutoCorrect Options button to undo the action or change AutoFormat
settings. Depending on the situation, the entire button may appear or the
button may first appear as a small blue box that changes to a button icon
when you point to it.
Word Processing Student Workbook — Beginner/Intermediate 35
PC Passport Support Materials
Formatting After You Type
When you use the AutoFormat dialogue box (Format menu, AutoFormat command), your word processor can format text in one pass, enabling you to
review all the changes made and accept or reject each one.
In addition to using AutoFormat, you can use the Styles and Formatting
task pane (or toolbar if using an older version of Microsoft Word) to help
format your document quickly.
The AutoCorrect Options button is not available when you run
AutoFormat after you type. You can, however, review AutoFormat results
and determine whether or not to accept a change.
How to Review AutoFormat Changes
Use this procedure to review suggested formatting changes after you run
AutoFormat.
1 In the AutoFormat dialogue box, click Review Changes.
2 In the Review AutoFormat Changes dialogue box, click the Find button
to review changes one by one.
3 When you have finished reviewing changes, click Cancel to return to the
AutoFormat dialogue box (Format menu, AutoFormat command), where
you can accept or reject all changes.
Using StylesA style is a set of formatting characteristics that you can apply to text, tables
and lists in your document to quickly change their appearance. When you
apply a style, you apply a whole group of formats in one simple task. Your
word processor may have options in the View menu, or a specific style gallery
to access different styles.
For example, instead of taking three separate steps to format your title as
16 pt, Arial and centre-aligned, you can achieve the same result in one step
by applying the Title style.
Word Processing Student Workbook — Beginner/Intermediate 36

PC Passport Support Materials
The following are the types of styles you can create and apply:
A paragraph style controls all aspects of a paragraph’s appearance, such
as text alignment, tab stops, line spacing and borders, and can include
character formatting.
A character style affects selected text within a paragraph, such as the font
and size of text, and bold and italic formats.
A table style provides a consistent look to borders, shading, alignment and
fonts in tables.
A list style applies similar alignment, numbering or bullet characters, and
fonts to lists.
You can create, view, and reapply styles as often as you like.
How to Use Styles
1 If the Styles and Formatting task pane is not open (or you have an earlier
version of Microsoft Word), click Styles and Formatting on the
Formatting toolbar (or find it under the View menu, Toolbars option).
2 In your document, click on a word that’s formatted like the text you want to
select. The formatting description will appear under Formatting of selected text in the Styles and Formatting task pane.
3 In the Styles and Formatting task pane, click Select All.
How to Create a New Style
1 If the Styles and Formatting task is not open (or you have an earlier
version of Microsoft Word), click Styles and Formatting on the
Formatting toolbar (or find it under the View menu, Toolbars option).
2 In the Styles and Formatting task pane, click New Style.
3 In the Name box, type a name for the style.
4 Do one of the following:
Paragraph — In the Style type box, click Paragraph.
Character — In the Style type box, click Character. Table — In the Style type box, click Table.
List — In the Style type box, click List.5 Select the options that you want, or click Format to see more options.
Word Processing Student Workbook — Beginner/Intermediate 37

PC Passport Support Materials
How to Apply a Different Style
1 Click the words, paragraph, list or table you want to change.
2 If the Styles and Formatting task pane is not open, click Styles and Formatting on the Formatting toolbar.
3 Click the style you want in the Styles and Formatting task pane. If the
style you want is not listed, click All Styles in the Show box.
You can also apply a style by clicking or typing a style name in
the Style box on the Formatting toolbar.
How to Copy Styles to Another Document or Template
1 On the Tools menu, click Templates and Add-Ins.
2 Click Organiser, and then click the Styles tab.
3 To copy items to or from a different template or file, click Close File to
close the active document and its attached template or to close the Normal
template. Then click Open File, and open the template or file you want.
Click the items you want to copy in either list, and then click Copy.
Exercise 8: Creating a New Style1 Open your word processor (if it is not already open). You are going to
create a new style and apply it to a document. We are using Microsoft
Word in these instructions.
2 Open up the World Calendar file in your PC Passport Student folder.3 Go to Styles and Formatting under the Format menu, and try applying
different heading styles to all the headings in the document. See the
differences.
4 Now go to the New Style menu and create a style with your name, eg
Moira.
5 The Style type is going to be paragraph, and the style is going to be
Normal (web).6 Go to the format button and change:
the font type to Arial black, in bold, size 16.
the font colour to red with an embossed finish.
Word Processing Student Workbook — Beginner/Intermediate 38

PC Passport Support Materials
7 Save your new style and apply it to all the headings in the calendar
document.
8 Save the file with a different name (Your calendar) in your PC Passport Student folder. Make sure you include your name and the date at the
bottom of the file. Be sure to show the file to your tutor, or print a copy to
keep in your portfolio of work.
Exercise 9: Using AutoFormat Options1 If your word processor is not already open, do so now. We are using
Microsoft Word. You are going to set some auto formatting options.
2 Open up the World Calendar document you did in the last exercise on
styles.
3 Go to the Format menu and click AutoFormat.4 In the AutoFormat menu click the AutoFormat and review each change
radio button then click the Options button.
5 In the Options button click the AutoCorrect tab, and type in words you
commonly misspell, so that they can be auto corrected as you type.
6 Add a paragraph at the bottom of the calendar document using some of
those common words you misspell and watch if AutoFormat corrects them
for you as you type.
7 Do not save your changes to the document. Close and exit your word
processor.
Inserting GraphicsDepending on the style and tone of your documents, you might want to add
one or more graphics to add visual interest to the document or to illustrate a
point. There are a number of ways to add a graphic element — these are
explained below.
Word Processing Student Workbook — Beginner/Intermediate 39

PC Passport Support Materials
Adding an Existing Picture to a DocumentIf you have graphics on your computer, maybe a company logo or a picture
downloaded from a digital camera or a scanner, you can add it to your
document using the Insert, Picture, From File menu option.
From here, you can locate the graphics file using the methods you used
earlier to locate files, then click Insert to add it to the page.
Adding an Image or Graphics File to a DocumentA collection of pictures, sounds and motion clips, known as Clip Art, is
available as part of the Microsoft Office suite of programs. When any of the
programs is installed on your computer, a small selection of these is copied to
your computer while the remainder are stored on the program CD-ROM.
How to Insert Clip Art
If you want to use the extended set of Clip Art, ensure the program CD-ROM
is in your computer’s CD drive.
1 Select the Insert, Picture, Clip Art menu option.
2 Click the Clip Art button shown on the Drawing toolbar.
3 The Insert Clip Art dialogue box will be displayed.
You choose the type of Clip Art you want by clicking the Pictures, the
Sounds or the Motion Clips tab. Then choose a category by clicking its icon.
The available clips will be displayed.
To insert a clip, click it to display the shortcut menu then select Insert Clip.
Close the Insert Clip Art dialogue box. The selected clip is added to your
document.
Note: The other options on this menu allow you to preview the clip, add it to a
list of your favourites, and find similar clips.
Word Processing Student Workbook — Beginner/Intermediate 40

PC Passport Support Materials
Wrapping OptionsWhen you add a graphic to a document, it is treated as part of the text, which
means that it will move as if it were text when you edit the document. This is
due to the graphics wrapping style being set to In line with text. Most of the
graphics used in this manual use this wrapping style so that when the manual
is edited, the graphics move along with the text they support.
Note: When an inline graphic is selected, its selection handles are black.
Other Wrapping Options
If you prefer, you can change the wrapping style using the Picture toolbar
that’s displayed when a graphic is selected (if it is not, you can display it using
the View, Toolbars menu option).
Each of the other options on the menu has a small illustration showing the
effect it will have. The examples below show some of the different effects you
can create by changing the wrapping options.
When you choose the Square wrapping style, the text wraps around the
square bounding box. When a graphic that doesn’t use the In line with text style is selected, the selection handles are white instead of black and
the graphic can be moved by clicking and dragging it to where you want it.
When you use the Tight wrapping style, the text surrounding the graphic
wraps around the graphic’s actual shape rather than its bounding box as
the Square option does. You can move any of the graphics by clicking and
dragging, and the text surrounding it will adjust itself to match the wrapping
option applied to the graphic.
Graphics formatted with Behind text wrapping sit behind the text on their
own ‘layer’. This means that only some graphics will suit this style since
any text shown in front of the graphic still has to be readable. There is no
text wrapping with this format.
The In front of text wrapping style obscures the text sitting behind it.
There is no text wrapping with this format either.
Word Processing Student Workbook — Beginner/Intermediate 41

PC Passport Support Materials
Adding AutoShapes to a DocumentYour word processor probably has a variety of tools you can use to draw
shapes that you need in a document, and these may be available from a
Drawing toolbar. This toolbar contains some simple shapes as well as the
AutoShapes menu which contains some commonly used, ready-made
shapes such as stars, crosses, boxes and arrows. To use any of these tools,
click the one you want to draw then click and drag the shape within the
document.
Note: To keep the height of the object in proportion to its width, hold down
[Shift] as you drag.
Adding Text to DrawingsYou can add text to most objects, formatting it however you want in the same
way as you would format any other text, and the text will become part of the
shape. To add text, right-click the shape and choose Add Text from the
shortcut menu. Note: There are some shapes that you cannot add text to —
these include lines and freeform shapes.
Moving Images or Drawn Objects in a DocumentWhen you add a drawing to a document, it’s formatted with the In front of text wrapping style, so to move a drawn object, click and drag it to its required
location. If you want to move more than one object at a time, you must first
select all the objects as described below.
Selecting Objects
Select a single object by clicking it. Select a number of objects by clicking the
first then holding down [Shift] as you click the others.
Selected objects are shown with sizing handles around them.
Once you have selected your object/image, hold down the mouse button and
drag the object to the new location and then release the mouse button.
Word Processing Student Workbook — Beginner/Intermediate 42

PC Passport Support Materials
Aligning Objects
The Draw, Align or Distribute menu on the Drawing toolbar contains
options that allow you to place selected objects in relation to one another. You
can line up the edges or centres of the objects as well as distribute them
either horizontally or vertically between the first and the last.
First select the objects to be aligned or distributed, then select the required
option from the Draw, Align or Distribute menu on the Drawing toolbar.
Note: If you tick the Draw, Align or Distribute, Relative to Page option
before choosing an alignment, the option will be aligned in relation to the page
instead of in relation to another object.
Formatting Objects
The fill colour, line colour and style, and text format of drawn objects can be
formatted using the palettes on the Drawing and Standard toolbars. To format
drawn objects, first select them then choose the required options.
Resizing a Graphic
To resize a graphic or an object, select the graphic or object by clicking it
once. Move the mouse pointer to one of the corner selection handles until the
pointer changes to a diagonal arrow shape, then press the mouse button and
drag to resize the image. Release the mouse button when the object is the
required size.
Grouping Objects
Sometimes when you’re working with graphics it can be useful to group
together several shapes. This makes it easier as the objects are all treated as
one, so when you move one, all the objects in the group move. To group
together objects, first select them all as described above, then click the Draw
menu and choose Group.
Word Processing Student Workbook — Beginner/Intermediate 43
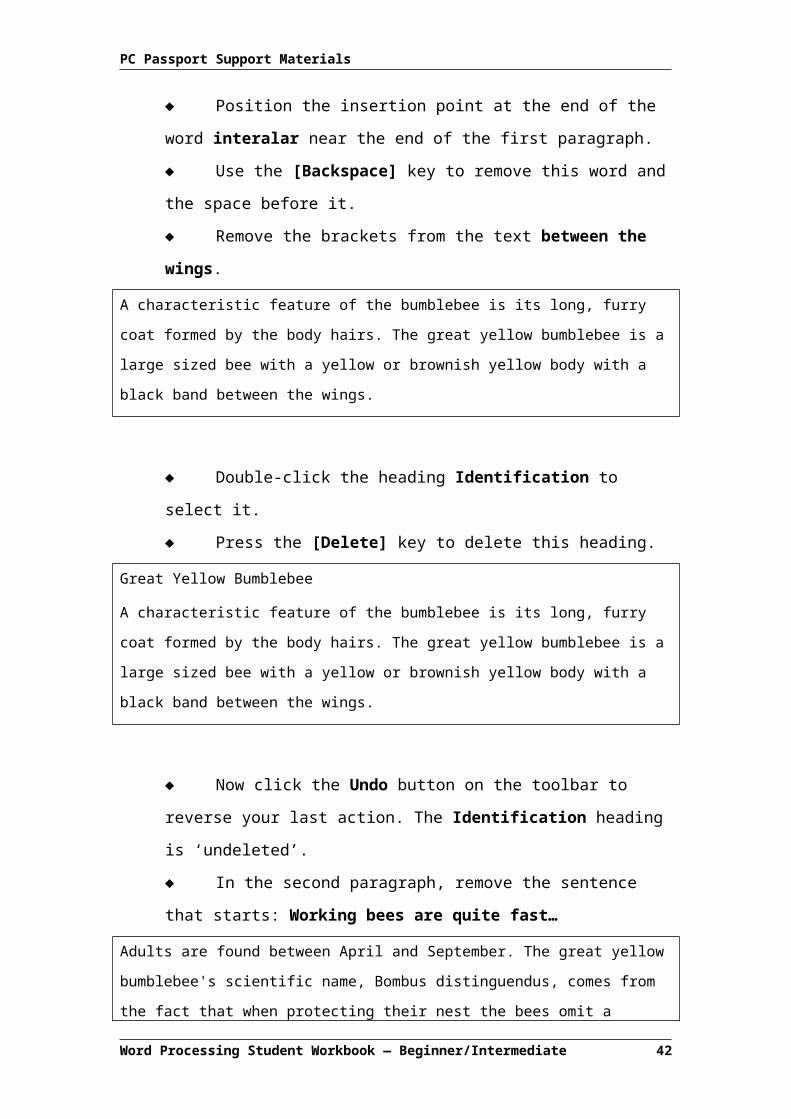
PC Passport Support Materials
Exercise 10: Using Other Formatting Options1 Open the file called Activities in your PC Passport Student folder. Use
your word processor to change the first list to diamond-shaped bullet
points.
2 The second list under Other Activities should be numbered starting at 1.
3 Try to find suitable graphics (artwork or clip art) that you could add before
each activity heading. You must add at least three.
4 Use your word processor text effects to change all the activity headings.
You might use WordArt to change the shape or colour, or use some of the
Formatting Font effects like embossed, shadow or outline.
5 Save your file with your name followed by activities (eg John Smith
activities) in your PC Passport Student folder. Make sure you include
your name and the date at the bottom of the file. Be sure to show the file to
your tutor, or print a copy to keep in your portfolio of work.
Inserting Page BreaksWhen you reach the end of a page a new one is started. Where the end of the
page is depends on the size of paper you’ve told your word processor you’re
using and the margins that you’ve set (you’ll learn about these settings later).
This won’t always suit what you want, eg a paragraph may be split over two
pages if it doesn’t all fit on one, but you might want it all to be on one page. In
a case like this you can insert a page break so that the text splits where you
want it to.
To insert a page break, move the insertion point to just before the text that is
to appear on the new page and select the Insert, Page Break menu option.
Click OK to move the text after the cursor onto a new page. If you prefer, you
can press [Ctrl][Enter] instead of using the Insert, Page Break menu option.
Word Processing Student Workbook — Beginner/Intermediate 44

PC Passport Support Materials
Using Headers and FootersWhen you want to place standard text such as the date or page numbers on
every printed sheet of your document, you add a header and/or footer. A
header will appear at the top of every page of your document and a footer at
the bottom. To create a header and/or footer, select the View, Header and Footer menu option. The header and footer areas are opened and the
Header and Footer toolbar is displayed.
Click in the header area and insert the text and any graphics you want
repeated on every page. If necessary, use the Switch Between Header and Footer button to display the footer, then enter the footer information. You can
quickly access an existing header or footer by double-clicking it in your
document.
The buttons on the Header and Footer toolbar can be used to add items such
as AutoText entries, the current date and time, the file name and page
numbers. Once you’ve added the text and/or graphics you want in your
header and footer, click the Close button on the Header and Footer toolbar or
double-click in the document text.
Exercise 11: Creating Headers and Footers1 If your word processor is not already open, do so now. We are using
Microsoft Word. You are going to set some auto formatting options.
2 Open up the World Calendar document you did in the last exercise on
styles.
3 Open up the toolbar for Headers and Footers (you may find it in under the
View menu).
4 Create a Header which contains the title World Calendar, centred in bold.
5 Switch to the footer and add your name in the bottom left corner and the
page number in the bottom right corner.
6 Format the page number as lowercase a, b, c instead of numbers.
7 Make sure your headers and footers are applied to the whole document.
Word Processing Student Workbook — Beginner/Intermediate 45

PC Passport Support Materials
8 Save the document as World Calendar with headers and footers in your
PC Passport Student folder. Make sure you include your name and the
date at the bottom of the file. Be sure to show the file to your tutor, or print
a copy to keep in your portfolio of work.
Inserting the Date and Time To insert the current date, the current time, or both into your document,
perform the following steps:
1 Choose Insert, Date and Time to open the Date and Time dialogue box.
2 Select the desired date or time format in the Available formats list.
3 To have the date or time automatically updated whenever you print the
document, check Update automatically. If this option isn’t checked, the
date or time remains the same as it was when you inserted it.
4 To have your current settings in the Date and Time dialogue box
displayed by default the next time you open the dialogue box, click the
Default button. Click the OK button.
Working with ColumnsWhen you create a document such as a newsletter or a brochure, you may
want to lay it out in columns. Microsoft Word calls these types of columns
newspaper columns, with the text flowing from the bottom of one column to
the top of the next.
Creating ColumnsFirst type the text that’s to be arranged in columns. Next, click the Columns
button on the Standard toolbar and highlight the number of columns you want.
The text will be organised into these columns and will also be balanced, which
means the text in the columns will be roughly the same length. When you add
or remove any text from columns, they will re-balance themselves.
Word Processing Student Workbook — Beginner/Intermediate 46

PC Passport Support Materials
Note: If you set the number of columns in a new document or section before
typing the text, when you type the text it will be displayed in the first column
only. To distribute the text between the columns you must insert a continuous
section break at the end of the text to be balanced. Use the Insert, Break
command to do this.
Exercise 12a: Creating Columns 1 In your word processor, open the file December Calendar in your PC
Passport Student folder.2 Make the main heading DECEMBER, Heading style 2.
3 Make the other headings Hanukkah, Christmas and Kwanzaa, Heading
style 3.
4 Make the paragraphs fully justified (aligned justified).
5 Change the whole document, except for the main heading into two
columns. Click the Columns button on the Standard toolbar and highlight
the number of columns you want.
6 Save the document as Your Name (eg John Smith), December Calendar in your PC Passport Student folder. Make sure you include your name
and the date at the bottom of the file. Be sure to show the file to your tutor,
or print a copy to keep in your portfolio of work.
Exercise 12b: Using Columns 1 Open the Successful Writing document in your PC Passport Student
folder.2 Follow the instructions below to format the document to include columns.
Select the text from Rule 1 to ‘Readers will indulge in reading
between the lines’.
Word Processing Student Workbook — Beginner/Intermediate 47

PC Passport Support Materials
Format this text into four columns by clicking the Columns
button on the Standard toolbar and dragging four columns.
The text is rearranged into balanced columns.
Word Processing Student Workbook — Beginner/Intermediate 48
Select all the rules.
Click and drag four columns.
The text that you selected is arranged into four columns.

PC Passport Support Materials
Exercise 12c: Creating More Than Two Columns1 Follow the instructions below to ensure that each rule starts at the top of a
column.
Position the insertion point before the heading Rule 2.
Select the Insert, Break menu option.
Choose the Column break option button.
Click OK.
Repeat this process to insert column breaks before the Rule 3
and Rule 4 headings.
Word Processing Student Workbook — Beginner/Intermediate 49
Adding a column break will ensure that the text at the cursor moves to the top of the next column.
Each rule now starts at the top of its own column.

PC Passport Support Materials
2 Save the document as Successful Column Writing in your PC Passport Student folder. Make sure you include your name and the date at the
bottom of the file. Be sure to show the file to your tutor, or print a copy to
keep in your portfolio of work.
Working with Standard ParagraphsIn business letters, it’s often the case that you use the same paragraphs of
text in different documents. For example, an organisation may have standard
paragraphs they add to letters welcoming new customers to their business, or
it may be that they create employee contracts from a variety of standard
paragraphs, depending on the job role and terms of employment.
10 April 2007
Mrs J Black14 Franklin SquareHogie VillageBLACKWELLBL9 1EE
Dear Mrs Black
Welcome to the Blackwell Veterinary Surgery. We have now added your pets to our client database. I have included the Welcome Pack that introduces you to our staff, tells you how to make appointments to see our vets, and gives information about our regular immunisation clinics and much more.
If we can be any assistance whatsoever, please feel free to call us on the number given above.
We look forward to having a long and healthy relationship with you and your pets.
Yours sincerely,
Mandy R BurrowsPractice Manager
Rather than type these paragraphs each time they are required, the user can
create and save them in a series of documents that can be brought together
in the arrangement that’s needed for any particular document.
Word Processing Student Workbook — Beginner/Intermediate 50

PC Passport Support Materials
Creating Standard ParagraphsCreating these standard paragraphs is the same as creating any other
document. You enter any text and graphics needed and format it if that’s
appropriate. The document is then saved in the same way as any other.
Inserting Standard ParagraphsWhen you want to insert one of these standard paragraphs in a document
you’re working on, place the cursor at the point where the paragraph is to be
inserted then select the Insert, File menu option.
Locate the folder where the standard paragraph has been stored, then select
it and click Insert.
The contents of the selected document will be placed at the cursor position
and becomes part of the document. There is no link between the original
document (which remains unchanged) and this one. Any changes that you
make to the inserted text will not be reflected in the standard paragraph
document.
Using AutoTextAutoText is a feature that carries out a similar task, ie you can use it to store
standard text, then insert it into the same or different documents. However,
using AutoText, the standard text is stored as part of the Word program on the
computer where it was created, which means that you can access it only from
that computer. When you save standard paragraphs as separate documents,
you can use them on any computer that has access to the drive where you
saved them.
To create an AutoText entry, type the text and then select it. Next, select the
Insert, AutoText, New menu option and type a memorable name for this
entry. Click OK.
To insert an AutoText entry into a document, position the cursor at the correct
position, then start typing the name you gave the entry when you saved it.
Word Processing Student Workbook — Beginner/Intermediate 51

PC Passport Support Materials
When Word recognises what you’re typing, it will suggest the rest of the
name. Press [Enter] to insert the AutoText.
Note: You can also insert AutoText using the Insert, AutoText, AutoText menu option. This displays a dialogue box where you can select the entry you
need.
Using TabsThe tab stop is the location on the horizontal ruler that indicates how far to
indent text or where to begin a column of text. The horizontal ruler is a bar
displayed along the top of your document window, marked off in units of
measure (such as centimetres or inches).
A tab stop will enable you to line up text to the left, right, centre, or to specific
characters like decimal or bar characters. You can also insert other characters
like periods or dashes before each tab.
To clear tab stops, you should drag the tab marker down from the horizontal
ruler. To move a tab stop, drag the tab marker to the right or left on the
horizontal ruler.
How to Set Tabs
Left Tab Right Tab Centre Tab Decimal Tab Bar Tab
1 Click Left Tab at the far left of the horizontal ruler until it changes to the
type of tab you want: Left Tab, Right Tab, Centre Tab, Decimal Tab or
Bar Tab.
2 Click the horizontal ruler where you want to set a tab stop.
3 To set precise measurements, click Tabs on the Format menu, enter the
measurements you want under Tab stop position, and then click Set.
Word Processing Student Workbook — Beginner/Intermediate 52

PC Passport Support Materials
How to Change the Spacing between Default Tab Stops
1 On the Format menu, click Tabs.
2 In the Default tab stops box, enter the amount of spacing you want
between tab stops.
Exercise 13: Using Tabs1 Open the January Calendar document in your PC Passport Student
folder. Use your word processor to set the following tabs in the document.
2 Highlight the text in paragraphs 1, 3, 5 and 7 under the heading New
Year’s Day.
3 Set the left hand tab marker to 4 on the horizontal ruler.
4 Under the heading Australia Day, highlight the whole paragraph and set
the right-hand tab marker to 10.
5 Add your name and today’s date to the bottom of the document. Save the
document as Your Name, January Calendar in your PC Passport Student folder. Make sure you include your name and the date at the
bottom of the file. Be sure to show the file to your tutor, or print a copy to
keep in your portfolio of work.
Adding Special Characters and SymbolsSymbols and special characters that don't appear on your keyboard can be
displayed on your screen and printed. For example, you can insert symbols
such as ¼ and ©, special characters such as an em dash (—), ellipsis (…), as
well as many international characters such as Ç and ë.
You can insert symbols and characters by using the Symbol dialogue box or
shortcut keys. You can also use AutoCorrect to automatically replace text you
type as symbols.
Word Processing Student Workbook — Beginner/Intermediate 53

PC Passport Support Materials
The types of symbols and characters you can insert depend on the available
fonts. For example, some fonts may include fractions (¼), international
characters (Ç, ë), and international monetary symbols (£, ¥). The built-in
Symbol font includes arrows, bullets and scientific symbols. You might also
have additional symbol fonts, such as Wingdings, which include decorative
symbols.
You can quickly insert a recently used symbol by clicking a symbol in the
Recently used symbols list in the Symbol dialogue box, and you can resize
the Symbol dialogue box so that you can view more symbols.
How to Insert a Symbol
1 Click where you want to insert the symbol.
2 On the Insert menu, click Symbol, and then click the Symbols tab.
3 In the Font box, click the font that you want.
4 Double-click the symbol that you want to insert.
5 Click Close.
How to Insert a Special Character
1 Click where you want to insert the character which could be a letter,
number, punctuation mark or symbol.
2 On the Insert menu, click Symbol, and then click the Special Characters
tab.
3 Double-click the character you want to insert.
4 Click Close.
About Backgrounds and WatermarksBackgrounds are primarily used in a web browser to create a more interesting
background for online viewing. However, you can display backgrounds in Web
layout and most other views, except Normal view and Outline view.
Watermarks are text or pictures that appear behind document text. They often
add interest or identify the document status, such as marking a document as
a ‘Draft’. Watermarks are intended for printed documents.
Word Processing Student Workbook — Beginner/Intermediate 54
PC Passport Support Materials
You can use gradients, patterns, pictures, solid colours or textures for
backgrounds. Gradients, patterns, pictures and textures are tiled, or repeated,
to fill the page. When you save a document as a web page, the textures and
gradients are saved as JPEG files and the patterns are saved as GIF files.
You can see watermarks in Print Layout view or on a printed document. If you
use a picture, you can lighten it, or wash it out, so that it doesn't interfere with
document text. If you use text, you can select from built-in phrases, or enter
your own.
How to Add a Watermark to a Printed Document
1 On the Format menu, point to Background, and then click Printed Watermark.
2 Do one of the following:
To insert a picture as a watermark, click Picture Watermark,
and then click Select Picture. Select the picture you want, and then
click Insert. To insert a text watermark, click Text Watermark, and then
select or enter the text that you want.
3 Select any additional options that you want, and then click Apply.
4 To view a watermark as it will appear on the printed page, use Print Layout
view.
Exercise 14: Inserting a Symbol and Using a Watermark1 Open the document Chart albums in your PC Passport Student folder.
Use your word processor to set the following tabs in the document.
2 For each paragraph about an artist, add the pound (£) symbol before each
of the prices.
3 For each paragraph, add the special copyright character (©) before the
artist’s name.
4 For the whole document, add a text watermark of your choice.
Word Processing Student Workbook — Beginner/Intermediate 55
PC Passport Support Materials
5 Add your name and today’s date to the bottom of the document. Save the
document as Your Name, Chart Albums in your PC Passport Student folder. Make sure you include your name and the date at the bottom of the
file. Be sure to show the file to your tutor, or print a copy to keep in your
portfolio of work.
Changing the Page SetupYou can change the layout of your document using the File, Page Setup
menu option. The Page Setup dialogue box allows you to change page
attributes such as the size of paper you're using and the margins you want to
apply, and consists of four parts: Margins, Paper Size, Paper Source and
Layout.
Changing the Page LayoutSelect the File, Page Setup menu option. The Page Setup dialogue box will
be displayed. To change the paper settings, click the Page Size tab and make
the required selections.
Some printers, especially large ones, have more than one paper tray so that
users can print onto a number of different types of paper without having to
change the supply. For example, perhaps one tray would contain company
headed paper, another plain paper, and another card. To specify which printer
tray holds the paper to be used, click the Paper Source tab and make the
required selections.
To change the layout options, click the Layout tab.
Vertical Alignment: By default, text on a page will line up with the top
margin of the document. If you want the contents of the page to be centred
between the top and bottom margins, select the Centre option from the
Vertical Alignment drop-down list.
Word Processing Student Workbook — Beginner/Intermediate 56

PC Passport Support Materials
Alternatively, if you would like the contents of the page to be spaced out so
that the first line on each page lines up with the top margin and the last line
of each page lines up with the bottom margin, select the Justified option
from the Vertical Alignment drop-down list.
Line Numbers: If you would like each line of text numbered, click the Line Numbering button and activate the Add Line Numbering check box.
Specify the number that's to be assigned to the first line and by how much
the count should be increased for each subsequent line.
Within the Margins tab you can adjust the margins to ensure text typed into a
document is either left justified (aligned) to the left margin by decreasing the
left margin size or right justified (aligned) to the right margin by increasing the
left margin and decreasing the right margin sizes.
You can also fully justify text (aligned to both left and right margins) by making
both the left and right margins exactly the same size. You can also do this
with the vertical alignment by adjusting the top and bottom margins. This is
different to adjusting paragraph alignment. To adjust the margins, click the
Margins tab and make the required selections.
If you want the options you have chosen for the page layout to be the default
for all new documents based on the same template, click the Default button.
The Office Assistant will prompt you that these changes will affect all
documents based on the same template as the current document.
Once you have made the necessary selections, click OK.
Previewing and Printing DocumentsBefore printing a document, you can use Print Preview to check how it’s going
to look. When you choose the File, Print Preview command you will see the
document on the screen exactly as it will appear on paper. If you need to
make any last minute changes, you can do so within Print Preview.
To begin, select the File, Print Preview menu option or click the Print Preview button on the toolbar.
Word Processing Student Workbook — Beginner/Intermediate 57

PC Passport Support Materials
Print Preview ToolbarWhen working in Print Preview, the toolbar has the following options available.
Click this button to print one copy of the document.
Magnifier
When this button appears depressed, magnifier mode is switched on. The
mouse pointer will appear as a magnifying glass, and you can click the
page to zoom in and out to see either the detail on the page or the overall
layout of the page.
If you click the Magnifier button again, Word will switch back to editing
mode. While in editing mode you can click the page then edit your
document text as required. Once you have finished editing, clicking the
Magnifier button will disable editing mode, so you can zoom in and out
again.
One Page
Click this button to display one full page on-screen.
Multiple Page
Using this button you can display up to 24 pages on-screen at the same
time. To display multiple pages, click the button, and then drag over the
number of pages you want to display on the drop-down grid.
Zoom Control
To view the current page at a specific size, enter or select the required
percentage using the Zoom Control box.
View Ruler
Click this button to display or hide the rulers. Using the rulers you can
resize document margins, set tabs and adjust paragraph indentation.
Word Processing Student Workbook — Beginner/Intermediate 58

PC Passport Support Materials
Shrink to Fit
When you click this button, Word will attempt to fit your document text onto
one less page than it currently takes up.
Full Screen
Click this button to remove screen elements including the scroll bars and
status bar, so the document fills the screen. This lets you see more of the
document. To return to Print Preview, press [Esc] or click the Full Screen
button once more.
Close
Click this button to exit Print Preview.
Help
When you click this button, the mouse pointer will change to a large
question mark. Clicking a menu option or a button will give help text
relating to the option you clicked.
Types of PrinterThe printer you use will usually depend on the number of documents you print
and the quality you need. Here is a short summary of the most common types
in use today:
Black and white laser printer — crisp, high quality black and white
output. Laser printers also have the fastest output rate, so if you know
you’ll print a large number of documents, you should consider a laser
printer. A laser printer uses a replaceable toner cartridge to produce its
output.
Colour laser printer — good for documents that contain high quality
graphics such as photos or charts. These are quite expensive to buy and
to run, and a good quality, less expensive, inkjet printer may print your
documents with a similar quality.
Word Processing Student Workbook — Beginner/Intermediate 59

PC Passport Support Materials
Inkjet printer — if you need good quality text, colour charts and graphs, or
photos. With inkjet printers, the paper you use can make a big difference to
the print quality, so you should use paper that is suited to the document
you are printing.
All-in-one printer — combines printer, scanner and photocopier in one
unit. This type of peripheral is relatively new to the market and is capable
of good quality printed output as well as its scanning and copying
capabilities.
If you’re buying a printer, you should try to get a test print from different
models so you can compare the quality. Inkjets can provide very good quality
but don’t print as fast as laser printers. Inkjet printers use ink cartridges
(usually separate black and colour) to produce their output. Cartridges for
laser printers can often be expensive, especially for colour printers where
more than one cartridge is needed to mix the range of colours the printer can
reproduce.
Making Sure the Printer is ReadyBefore you print a document, you must make sure that the printer is ready to
print, ie that it is online, there’s no paper jam, and it has enough paper and
toner or ink.
Checking the Printer is Online
How you do this varies from printer to printer, but all printers have a light that
tells you when they’re online. Usually this light is green or yellow and, if the
printer is not ready, the light will flash to alert you that there is something
wrong.
Checking for Printer Problems
If there is a problem with your printer, you will get a message alerting you to it
or, depending on the printer, the error might be displayed on a panel on the
printer. For example, if the printer runs out of paper, you may get a message
telling you so, or if your laser printer needs more toner, a message to this
effect will be displayed on its message panel.
Word Processing Student Workbook — Beginner/Intermediate 60

PC Passport Support Materials
If your printer has a paper jam (a sheet or sheets of paper stuck in the printer
mechanism), you should clear it according to the manufacturer’s instructions.
This may be as simple as gently pulling a sheet of paper out of the printer, or
it might involve opening doors on the printer to find all the jammed sheets.
How to Print a Document1 Choose the printer you want to use from the Name drop-down list at the
top of the dialogue box.
2 Type the number of copies you want to print or use the buttons to enter
this number in the Number of copies box.
3 Choose which pages you want to print:
All — Select this option button to print every page in the
document.
Current — Choose this option to print the page of the document
the insertion point is currently in.
Pages — To print specific pages, type the page numbers and/or
page ranges into this text box. The entries should be separated by
commas. For example, if you want to print pages 1, 3, 20 to 25 and 30,
you would type 1,3,20-25,30 into the text box.
4 Click OK to print your selections.
Working with TablesUsing tables in your documents makes it simple for you to lay out information
in a neat, easy-to-read format. You can then change the appearance of the
table to give the look you want by applying any of the formatting effects you’ve
learned about so far as well as effects specifically for tables.
A table is made up of rows and columns and the point at which a row and a
column meet is called a cell.
Creating Tables
Word Processing Student Workbook — Beginner/Intermediate 61

PC Passport Support Materials
There are a number of different ways to create a table. Two of the easiest
ways are using the Insert Table button on the Standard toolbar and using the
Table, Insert, Table menu option.
Using the Insert Table Button
To insert a table using this button, you click it then drag over the grid it
displays until you have highlighted the number of rows and columns you want.
Using the Table, Insert, Table Menu Option
When you select this menu option, the Insert Table dialogue box is displayed
so that you can set up your table.
Enter the number of columns and rows you want in your table then click OK to
create it.
Note: Depending on how your system has been set up, your new table may or
may not have borders already applied. If it has no borders, you’ll still be able
to see grey borders called gridlines. These gridlines won’t be printed along
with your table. If you want to outline the table or its cells, you must apply
borders to it. You’ll learn about applying borders to tables later in this section
of the workbook.
Entering and Editing Text in a TableTo enter text into any of the cells in a table, position the cursor there and type
the required text. Editing table text is done in the same way as editing any
other text.
You can move from cell to cell in the table using either the arrow keys or the
[Tab] key. When you press the [Tab] key, the cursor moves to the cell to the
right. When you reach the last cell on any row, the cursor will move to the first
cell on the next row. If there is no next row, a new row will be created.
Note: If you hold down [Shift] while you press [Tab], the cursor will move to
the cell to the left.
Adjusting the Column Width
Word Processing Student Workbook — Beginner/Intermediate 62

PC Passport Support Materials
If you need to you can change the width of a column. Move the mouse pointer
onto the right border of any cell in the column and then click and drag to the
right to make it wider, or to the left to make it narrower.
If there’s a column to the right of the one whose width you’re adjusting, it will
compensate for the change you’re making. That is, if you make the column
wider, the column to its right will become narrower; if you make the column
narrower, the column to the right will become wider.
If you hold down the [Ctrl] key while you change a column’s width, all
columns to its right also change width without affecting the overall width of the
table. So, if you make the first of four columns wider, the other three columns
will become narrower so that they still fit in the original width of the table.
If you hold down the [Shift] key as you drag, only that column is resized, but
the overall width of the table will reflect the change, whether it’s wider or
narrower.
Adjusting the Row HeightFactors that affect the row height are the amount of text in the cell given the
column width, and the size of the text, with Word adjusting the row height if
necessary. There may be times, though, when you want to change the height
of the row for another reason, eg to achieve a particular effect.
To adjust the row height, you click and drag the bottom edge of any cell in that
row.
Selecting CellsOnce you’ve created a table you can format it by applying borders, shading
and other formatting options. As always, you must first select the part to be
formatted.
To select the entire table, click in any cell then choose the Table, Select, Table menu option or hold down the [Shift] and [Alt] keys and press 5 on the
numeric keypad.
Word Processing Student Workbook — Beginner/Intermediate 63

PC Passport Support Materials
To select a row, move the mouse pointer to the left side of the table then click
and, if necessary, drag to highlight the required row(s).
Note: Another way to select the entire table would be to use this method to
select every row in the table.
To select a column, move the mouse pointer to the top of the table so that it
becomes a black arrow then click to select. If you want to select more than
one column, click at the top of the first and drag to highlight the others.
To select a single cell, move the mouse pointer to just inside the left edge of
the cell, then click the left mouse button.
Formatting TablesWhen you have selected the part of the table that you want to format, you
would use the same menu options and toolbar buttons to apply the formatting
as you learned earlier for document text.
Table AutoFormat
The Table, Table AutoFormat menu option in Word lets you apply a mixture
of formatting attributes in one step. There are a number of different
AutoFormats to choose from and, although the overall effect may not be
exactly what you want, you can use this is as a shortcut to apply a number of
attributes and then adapt it to suit yourself.
To apply an AutoFormat to a table, make sure the table is selected and then
choose the Table, Table AutoFormat menu option.
When you’ve chosen the effects you want, click OK to apply them to the table.
Exercise 15a: Creating a Table1 Create a new blank document.
2 Following the instructions below, create and complete a table of 5 rows
and 3 columns.
Click the Insert Table button on the Standard toolbar.
Word Processing Student Workbook — Beginner/Intermediate 64

PC Passport Support Materials
Click and drag down 5 rows and across 3 columns. Although
only four rows are shown, if you drag the mouse down, another row will
appear.
Release the mouse button to create the table.
Click in the first cell in the table and type Cat No.
Press the [Tab] key to move to the cell to the right then type
Description.
Press the [Tab] key to move to the last cell on the first row then
type Price.
Complete the table as shown below:
3 The first column can be narrowed to allow more space for the descriptions
in the second column, so move the mouse pointer onto the right edge of
the first column then click and drag to the left. Release the mouse button
when the column is just wide enough for the cell contents:
Word Processing Student Workbook — Beginner/Intermediate 65
PC Passport Support Materials
Exercise 15b: Manipulating a Table1 Select the headings in the first row of the table and format them with the
Arial font and make them bold.
2 Add your name and today’s date to the footer then print one copy of this
document. Save the document with the name Furniture Catalogue in
your PC Passport Student folder. Make sure you have included your
name and the date at the bottom of the file. Be sure to show the file to your
tutor, or print a copy to keep in your portfolio of work.
3 Close the document.
Exercise 15c: Using Table Features1 Create a new document.
2 Type the heading Stationery Books Price List then press [Enter] twice.
3 Following the instructions below, use the Table, Insert, Table command to
create a table of 4 columns and 10 rows.
Select the Table, Insert, Table menu option.
Enter 4 into the Number of Columns text box.
Enter 10 into the Number of Rows text box.
Click OK to create the table.
4 Enter the table information shown below.
Word Processing Student Workbook — Beginner/Intermediate 66
PC Passport Support Materials
5 Format the table as shown below:
6 Name the document Price List and save it in your PC Passport Student folder.
7 Click in the cell containing the price of the Quick Memo Book then edit
the price so that it reads 4.49.
8 Follow these steps to apply one of the AutoFormats to the table.
Make sure the cursor is in the table.
Select the Table, Table AutoFormat menu option.
Using the page set-up options print your document in landscape.
Include a box page border around your document. Remember to
include your name and today’s date on the bottom of the document
before you print.
9 Re-save your file in your PC Passport Student folder. Make sure you
include your name and the date at the bottom of the file. Be sure to show
the file to your tutor, or print a copy to keep in your portfolio of work.
Word Processing Student Workbook — Beginner/Intermediate 67

PC Passport Support Materials
SecurityYou can use the security options in your word processor to protect the
integrity of your document as others review it. At times you will want the
information in a document to be used, but not changed; at other times you
might want only specific people in your office to be able to view the document.
To protect a document, you use the options on the Security tab in the
Options dialogue box. You can find this dialogue box by clicking on the Tools menu, click Options, and then click Security. We have Microsoft Word as an
example; your word processor may have different options.
In this dialogue box, you can set a password that must be entered before
someone can open or modify your document. Selecting the Read-only recommended check box allows you to display a message that suggests that
the user open the document as read-only, a setting that lets someone read or
copy the file, but not change or save it.
Word Processing Student Workbook — Beginner/Intermediate 68

PC Passport Support Materials
Setting a document as read-only is useful when you want a document to be
distributed and read but not changed. You can also use the Protect Document button on the Security tab to set passwords so that you can
restrict who can track changes or enter comments.
When you set a password, take a moment to write it down. Word doesn't keep
a list of passwords. If you lose or forget the password for a protected
document, you will not be able to open it.
To open a protected document, you need to enter the password in the exact
same way that it was set, including spaces, symbols, and uppercase and
lowercase characters. In this procedure, you set a password for a document.
You save and close the document, and then you test the security of the
document by entering an incorrect password.
You open the document as read-only and then re-open it with the correct
password. Finally, you remove the protection from the document.
How to Set a Password on a Document1 On the Tools menu, click Options. The Options dialogue box appears.
2 Click the Security tab to display security options.
3 In the Password to modify box, type tgc3.
4 As you type the password, asterisks appear instead of the characters you
type to keep your password confidential. Tip: Passwords should never be
common words or phrases, and the same password should never be used
for multiple documents.
5 Click OK to close the Options dialogue box. The Confirm Password
dialogue box appears.
6 In the Re-enter password to modify box, type tgc3.
7 Click OK to set the password.
8 On the Standard toolbar, click the Save button to save the document.
9 Click the Close Window button in the document window.
Word Processing Student Workbook — Beginner/Intermediate 69

PC Passport Support Materials
Protecting a Document
You can suggest, but not require, that users open a document as read-only. If
a user opens the document as read-only and changes it, that person can save
the document only by giving it a different file name.
How to Set a Document to Read-only
1 On the Tools menu, click Options.
2 Click Security.
3 Select the Read-only recommended check box, and then click OK.
4 Click Save on the Standard toolbar.
How to Protect Formatting
1 On the Tools menu, click Protect Document. 2 In the Protect Document task pane, type a password in the Password
(optional) box, and then confirm the password.
Word Processing Student Workbook — Beginner/Intermediate 70

PC Passport Support Materials
Exercise 16: Adding Password ProtectionNote the instructions are for Microsoft Word.
1 Open the Chart Albums document you used earlier. On the Tools menu,
in your word processor, click Options.2 The Options dialogue box appears. Click the Security tab to display
security options.
3 In the Password to modify box, type Passport. 4 Click OK to close the Options dialogue box.
5 The Confirm Password dialogue box appears. In the Re-enter password to modify box, type Passport.
6 Click OK to set the password.
7 Re-save your file in your PC Passport Student folder. Make sure you
include your name and the date at the bottom of the file. Be sure to show
the file to your tutor, or print a copy to keep in your portfolio of work.
Word Processing Student Workbook — Beginner/Intermediate 71

PC Passport Support Materials
Word Processing Student Workbook — Advanced
Word Processing Student Workbook — Advanced 72

PC Passport Support Materials
Creating a Web PageYou can use Microsoft Word to create web pages in the same way you create
regular Word documents. You can use the Web Page Wizard, or save a Word
document as a web page.
Using the Web Page WizardBy using the Web Page Wizard, you can create a single web page or an
entire website. You can add existing web pages and Word documents to your
website. Accessed via the web page tab under File, New or via the New document task pane in Microsoft Word 2000 or later.
Using a Web Page TemplateWhen you use a web page template, Word will make features that are not
supported by your target browser unavailable so that you don’t have to worry
about how your formatting will look in a web browser.
There are a range of web tools you can use to help with your web page
design. They can be found in the View menu, under Toolbars, in most
versions of Microsoft Word.
From an Existing Word DocumentSave an existing document as a web page to quickly get your Word
documents ready for copying to the web or an intranet. By using hyperlinks,
you can explore objects, documents, pages, and other destinations on the
intranet.
Preview a Document as a Web PageUse this procedure to preview your document or web page in your default web
browser. On the File menu, click Web Page Preview.
If you click on the Web Page Preview button, Word will open using Internet
Explorer to show how your document would look displayed in a browser.
Word Processing Student Workbook — Advanced 73

PC Passport Support Materials
Using Backgrounds and Watermarks in Web PagesBackgrounds are used in Web Layout view or in a web browser to create a
more interesting background for online viewing. Backgrounds are displayed in
web layout view only and aren’t designed for printing. Watermarks are text or
pictures that appear behind document text. They often add interest or identify
the document status, such as marking a document as a ‘Draft’. Watermarks
are intended for printed documents.
You can see watermarks in Print Layout view or on a printed document. If you
use a picture, you can lighten, or wash it out, so that it doesn’t interfere with
document text. If you use text, you can select from built-in phrases, or enter
your own.
How to Add a Background
Backgrounds are displayed in Web Layout view only and aren’t designed for
printing.
To add a background colour or texture to a web page, online document or e-
mail message:
1 On the Format menu, point to Background.
2 Do one of the following:
Click the colour you want.
Click More Colours to see additional colour choices.
Click Fill Effects to change or add special effects, such as
gradients, textures or patterns.
3 Select any additional options that you want. For help on an option, click
the question mark, then click the option.
How to Add a Watermark
Watermarks are intended for printed documents.
1 On the Format menu, point to Background, and then click Printed Watermark.
Word Processing Student Workbook — Advanced 74

PC Passport Support Materials
2 Do one of the following:
To insert a picture as a watermark, click Picture Watermark,
and then click Select Picture. Select the picture you want, and then
click Insert. To insert a text watermark, click Text Watermark, and then
select or enter the text that you want.
3 Select any additional options that you want, and then click Apply. For help
on an option, click the question mark, then click the option.
4 To view a watermark as it will appear on the printed page, use Print Layout
view.
View the HTML Source of a Web PageHTML markup codes determine how text and graphics are displayed on a web
page and enable a user to go through the pages ‘in any order’. You can view
the HTML source markup codes at any time. You must be viewing a web
page for this option to be available.
On the View menu, click HTML Source.
1 Make your changes to the HTML.
2 On the File menu, click Exit.
Hyperlinks
Creating a HyperlinkYour word processor will often create a hyperlink for you when you type the
address of an existing web page, such as www.microsoft.com, if the
automatic formatting of hyperlinks has not been turned off.
How to Create an Existing Document or Web Page Hyperlink
1 Select the text or picture you want to display as the hyperlink, and then
click Insert Hyperlink on the Standard toolbar.
2 Under Link to, click Existing File or Web Page.
Word Processing Student Workbook — Advanced 75

PC Passport Support Materials
Do one of the following:
If you know the address you want to link to, type it into the
Address box.
Click one of the locations under Look in, and then locate and
select the link you want.
If you don’t know the address of a web page, click Browse the Web to switch to your web browser, open the web page you want, and
then switch back to Word.
How to Create a Hyperlink Using an E-mail Address
1 Select the text or picture you want to display as the hyperlink, and then
click Insert Hyperlink on the Standard toolbar.
2 Under Link to, click E-mail Address.
3 Either type the e-mail address you want in the E-mail address box, or
select an e-mail address in the Recently used e-mail addresses box.
4 In the Subject box, type the subject of the e-mail message.
Note: Some web browsers and e-mail programs might not recognise the
subject line.
5 To assign a ScreenTip to display when you rest the mouse over the
hyperlink, click ScreenTip and then type the text you want.
Word uses ‘mailto’ followed by the e-mail address and the subject line as
the tip if you do not specify one.
You can also create a hyperlink to an e-mail address by typing the address in
the document. For example, type [email protected], and Word
creates the hyperlink for you.
How to Create a Hyperlink to a Specific Location in Another Document or Web Page
1 Open the file you want to go to and insert a bookmark.
2 Open the file you want to link from, and select the text or object you want
to make a hyperlink.
3 On the Standard toolbar, click Insert Hyperlink.
Word Processing Student Workbook — Advanced 76

PC Passport Support Materials
4 Under Link to, click Existing File or Web Page.
5 Locate and select the document that you want to link to.
6 Click Bookmark, and then select the bookmark you want.
7 To assign a ScreenTip to be displayed when you rest the mouse over the
hyperlink, click ScreenTip and then type the text you want.
8 Word uses the path to the file including the bookmark name as the tip if
you do not specify one.
From Word documents, you can create links to specific locations in files that
are saved in Microsoft Excel (.xls) or PowerPoint (.ppt) format. To link to a
specific location in an Excel workbook, create a defined name in the
workbook, and then at the end of the file name in the hyperlink, type #
(number sign) followed by the defined name. To link to a specific slide in a
PowerPoint presentation, type # followed by the slide number after the file
name.
How to Create a Hyperlink to a Location in the Current Document or Web Page
1 To link to a place in the current document, you can use either heading
styles or bookmarks in Word.
2 In the current document, do one of the following:
Insert a bookmark at the location you want to go to.
Apply one of Word’s built-in heading styles to the text at the
location you want to go to.
3 Select the text or object you want to represent the hyperlink.
4 On the Standard toolbar, click Insert Hyperlink.
5 Under Link to, click Place in This Document.6 In the list, select the heading or bookmark you want to link to.
7 To assign a ScreenTip to be displayed when you rest the mouse over the
hyperlink, click ScreenTip, and then type the text you want.
For links to headings, Word uses ‘Current document’ as the tip if you do not
specify one; for links to bookmarks, Word uses the bookmark name.
Word Processing Student Workbook — Advanced 77

PC Passport Support Materials
Hyperlinks to Another File or Program that You Drag from
You can create a hyperlink quickly by dragging selected text or pictures from
a Word document or Microsoft PowerPoint slide, a selected range in Microsoft
Excel, a selected database object in Microsoft Access, or a web address or
hyperlink from some web browsers. The text you copy must come from a file
that has already been saved.
1 Display both files on the screen.
If you are dragging text between two Word files, open both files, and then
click Arrange All on the Window menu. If you are dragging text between
two programs, resize the windows of both programs so you can see them
at the same time.
2 In the destination document or worksheet, select the text, graphic or other
item you want to jump to.
3 Use the right mouse button to drag the selection to your publication.
4 Click Create Hyperlink Here.
Notes: You can also copy and paste text as a hyperlink to achieve the same
effect. Copy the text you want to the Clipboard, click where you want to
insert the text, and then click Paste as Hyperlink on the Edit menu.
You cannot drag and drop drawing objects, such as AutoShapes, to create
hyperlinks. Use the standard hyperlink procedure to create hyperlinks for
drawing objects.
Format a HyperlinkYou can format text or a graphic that’s displayed for a single hyperlink by
selecting the text or graphic and applying new formatting.
How to Format a Hyperlink
1 Open the document that contains the hyperlinks you want to change.
2 On the Formatting, click Styles and Formatting.
Word Processing Student Workbook — Advanced 78

PC Passport Support Materials
3 Do one of the following:
To change the appearance of hyperlinks, right-click the
Hyperlink style, and then click Modify.
To change the appearance of followed hyperlinks, right-click
FollowedHyperlink in the Styles box, and then click Modify.
If the Hyperlink or FollowedHyperlink styles do not appear in Styles
and Formatting, in the Show box, click All Styles.
4 Select the formatting options that you want, or click Format, and then click
Font to see more options.
For Help on an option, click the question mark, and then click the option.
Change the Way Hyperlinks are FollowedBy default, users follow a hyperlink or open a hyperlink by pressing [Ctrl] while clicking the hyperlink. If you prefer, you can have hyperlinks open by
just clicking them.
1 On the Tools menu, click Options, and then click the Edit tab.
2 Clear the Use CTRL+Click to follow hyperlink check box.
Remove a HyperlinkDo one of the following.
To remove a hyperlink completely
Select the hyperlink, and then press [Delete].
To remove a hyperlink but keep the text
Right-click the hyperlink you want to remove, and then click Remove Hyperlink.
Exercise 17a: Creating a Web Page1 Open your word processor with a new document. You are going to use the
web page template to help you create a simple web page document.
2 Add the following title: My Student Web Page.
Word Processing Student Workbook — Advanced 79

PC Passport Support Materials
3 Now start to add in your details.
4 Put in some personal facts about yourself like Name, Date of Birth, Address and Hobbies (you will use this section to create a hyperlink to
text about your hobbies later in the exercise).
5 Create two paragraphs about your hobbies further down the document
starting with My hobbies include.
Now you are going to experiment with backgrounds.
6 Go to the Format menu and pick Backgrounds from the drop-down
menu.
7 Try changing the colour of the background and using some of the fill
effects on the background of your web page.
8 Save your work, calling it My Student Web Page.
Exercise 17b: Adding Hyperlinks1 You are going to open up the My Student Web Page you created in
Exercise 17a. You will first insert some bookmarks to identify the two
paragraphs you created in the previous exercise about hobbies.
2 Go to the first paragraph and place the cursor at the start of My Hobbies include.
3 In the Insert menu, click Bookmark and in the bookmark screen create a
bookmark called Hobbies (no spaces in any of the bookmarks), click Add
and then Close.
4 In the main web page document, either use the Insert menu or the Insert hyperlink icon and insert a hyperlink at the word Hobbies at the top of
your document.
5 You are going to create this hyperlink in this document and make
reference to the bookmark you created above called Hobbies.
6 Notice the hyperlink has become underlined and is in blue. Check it works
by pressing [Ctrl] and click to make sure it takes you to the first paragraph
entitled My hobbies.
7 Add in suitable headings about the World Wildlife Fund.
8 Create a hyperlink to the www.wwf.org.uk web page.
9 Add some text about one of the animals featured on the website.
Word Processing Student Workbook — Advanced 80

PC Passport Support Materials
10 Insert a picture, sound or video clip about the animals.
11 Change the background and back colour of the web page you create.
12 Save the web pages as World Wildlife Student Page.13 Use the browse button in the hyperlink screen to browse to your hobby
website.
14 Test that your hyperlink to your hobby website works.
15 Save your web page in your PC Passport Student folder. Make sure you
include your name and the date at the bottom of the file. Be sure to show
the file to your tutor, or print a copy to keep in your portfolio of work.
Using Sections in a DocumentSection breaks specify parts of a document that have different page
orientation, columns, or headers and footers. Section breaks allow the user to
specify where the different formatting will begin and end. You might use
section breaks in the following circumstances:
Different margins. If the first page of a letter needs a 5 cm margin, and
the following pages need a different margin, you will need a section break
in the document.
Columns. You can use Word's newspaper column feature in the middle of
a page, and place section breaks before and after the multiple columns. If
you have text prepared and put it into a column format, Word will
automatically put in the section breaks.
Different paper sizes. If you want a document to contain one portrait page
and one landscape page, you will need a section break between the
pages.
Different headers and footers. If the document you are working on needs
to have different headers and footers on various pages, you would need to
use section breaks to achieve this.
Word Processing Student Workbook — Advanced 81

PC Passport Support Materials
Different numbering schemes. If you are working in a document where
the Table of Contents needs lower case Roman numerals, the contract
needs Arabic numerals, and the Appendices need alphabetic numerals,
you can achieve all of these with section breaks.
How to View a Section Break
You can see the section breaks in your document in many views, but Normal
view is the easiest to recognise. Once you insert the section break a double
dotted line appears from one side of your document to the other.
Exercise 18a: Inserting a Section Break1 Open a blank document.
2 Change your document view to Normal.
3 Type the following: Title Page.
4 Now choose Insert > Break.
5 Choose Next Page section break.
6 Type Table of Contents.
7 Choose Insert > Break.
8 Choose Next Page section break.
9 Type Main Document.
You should end up with a document like this:
Word Processing Student Workbook — Advanced 82

PC Passport Support Materials
View your document in Print Preview. You now have three sections. Switch
between Normal View and Print Layout views in this document to see how the
section break appearance differs.
Section breaks store the following information:
The header and footer information for the section
The page setup for the section
The column settings for the section
When you delete a section break, or move an entire section to another part of
the document, you get what seem to be very strange results. For instance,
deleting a Continuous section break causes the preceding Next Page section
break to convert to a Continuous one, or deleting a section break causes an
important header to disappear from the document, or causes the entire
document to become landscape.
Changing Page Formatting in a Specific SectionTo better understand how sections work, think of your document as a book
with different chapters, and each chapter starts with page number 1. In the
previous exercise you created a document with three separate sections. You
are now going to apply unique formatting to each section of the document.
The exercise that follows will help you change the margins and the page
layout in the document using section breaks.
Exercise 18b: Applying Different Formatting within a Section1 Use the document you created in Exercise 18a.
2 Press [Ctrl] [End] to move to the end of your document. You should be in
Section 3.
3 Choose File | Page Setup | click Paper Size: A4.
4 In the Orientation area, select Landscape.
Word Processing Student Workbook — Advanced 83

PC Passport Support Materials
5 Be sure that Apply to: says This section.
6 Warning: If you do not apply the section break to ‘this section only’ the
whole document will be formatted in landscape!
7 Click OK. The last page should now be landscape and the rest of the
document should still be portrait. You will have to switch into Print Layout
view to see this.
8 Press [Ctrl] [Home] to go to the top of the document.
9 Choose File | Page Setup | click Layout.10 In the Vertical alignment: section, select Centre from the drop-down list.
11 Be sure that Apply to: says This section.
12 Click OK. Your ‘Title Page’ text should now be centred vertically.
13 Try changing margins in a specific section. Make sure you include your
name and the date at the bottom of the file. Be sure to show the file to your
tutor, or print a copy to keep in your portfolio of work.
Using Mail MergeThe mail merge feature is a quick and efficient method of producing many
versions of the same standard document. Mail merge works by combining
information that is unique for each version (names and addresses, for
example) with the information that will appear in every copy of the document.
The unique information is called the data source; the common information is
in the main document.
Word Processing Student Workbook — Advanced 84

PC Passport Support Materials
The Main Document
This could be, for example, an interview letter or an invitation to an event and
will contain placeholders called merge field codes that will be replaced with
the unique information in each copy of the document.
The Data Source
The data source will contain a number of merge fields that will replace the
merge field codes in the main document. The data source can be created
using Word or may have been produced by another application such as a
database or spreadsheet.
Preparing the Main DocumentThe first step in the mail merge process is to identify the main document. The
Mail Merge Helper can be used to guide you through doing this, whether you
want to type a new document or use an existing one.
Note: The Mail Merge Helper can also be used both to help create the data
source and merge the data.
How to Prepare the Main Document in Microsoft Word 2000
(Your word processor mail merge options may be different.)
1 If an existing document is to be used as the main document, open it.
2 Select the Tools, Mail Merge menu option.
3 Click the Create button under the Main Document option.
4 Select the type of document you want to create.
A prompt will be displayed, asking you if you have an existing document
that’s open in Word, or if you want to create a new document to be your
main document.
5 To use the document that’s currently on screen, click the Active Window
button.
The current document's name will be displayed under the Main Document option in the Mail Merge Helper and the Edit button will become available
in case you want to make some changes to it.
Word Processing Student Workbook — Advanced 85

PC Passport Support Materials
Depending on how your main document was created, you may want to edit
this document to remove any of the information that will be provided by the
data source during the merge (for example, if this is a letter that was
created and sent to an individual and now you want to use it for a mail
merge, you’ll want to remove the name and address information from the
letter at this point).
or
To create a new document:
a) Click the New Main Document button.
The name of the blank document, eg Document1 or Document 2, will be
displayed under the Main Document option and the Edit button will light up
so you can edit this document.
b) Click the Edit button then choose the document name from the list.
c) Close the dialogue box then type the standard text to be included.
d) Save the document.
Note: Next time you display the Mail Merge Helper dialogue box you will
see that the name you gave the saved document is displayed under the
Main Document option.
Note: The merge field codes can be added only once the data source has
been created. This process is explained later in this section.
Preparing the Data SourceThe data source may be a Word file or it may have been created in another
program such as a database or spreadsheet. The Mail Merge Helper is used
to identify the file that is to be used as the data source or, if necessary, to help
you create it.
A data source contains rows of data. The first of these rows is called the
header row and contains the names of the fields in each row so that Word
knows which field is which. These names are also used within the main
document to identify where the data source data is to go. Common fields are
title, first name, last name, and address lines. Each row in the data source is
called a record and contains all the fields for one copy of the letter or other
document, although there may not be data in all the fields for every record.
Word Processing Student Workbook — Advanced 86

PC Passport Support Materials
How to Prepare the Data Source
1 Ensure the main document is on screen.
2 Select the Tools, Mail Merge menu option.
The Mail Merge Helper dialogue box will be displayed.
3 Click the Get Data button below the Data Source option.
4 Choose the required option from this list:
Create Data Source: If you choose to create a new data
source, the Create Data Source dialogue box will be displayed.
a) Edit the list of names in the Field names in header row list box:
— To remove a field name, click the field name and then the Remove Field Name button.
— To add a field name, type the field name into the Field Name text
box then click the Add Field Name button.
— To change the order the fields appear in, click a field name and use
the appropriate Move arrow button to change its position in the
order.
b) When you’ve specified all the field names, click OK.
c) Display the folder where the data source is to be saved then type a
name for the new data source file into the File Name text box.
d) Click Save.
A prompt will be displayed, giving you the choice of adding data to your
data source or adding merge fields to the main document.
e) To add data, click the Edit Data Source button then follow the
instructions given in the next section Adding and Editing Data Records.
Open Data Source: Locate and open an existing data source
file.
If no merge fields have been inserted in the main document, you'll be
prompted about this when the data source is opened. Click Edit Main
Document to display the main document. If the main document does
already contain merge fields, click Close to close the Mail Merge Helper dialogue box.
Word Processing Student Workbook — Advanced 87

PC Passport Support Materials
Use Address Book: This option will let you use your mail
system address book as the data source. Select the book to use then
click OK. The defining process will now be complete and you won’t
have to do anything else for the data source. Click Close to close the
Mail Merge Helper dialogue box.
Adding and Editing Data RecordsOnce you’ve created a data source file, you must then add the fields for each
record. The Mail Merge Helper can guide you through this step too.
Select the Tools, Mail Merge menu option and at step 2 Data Source, click
the Edit button and choose the file name from the list. A form will be displayed
listing the fields that you added to your data source.
Fill in the individual information for each copy of the document you’re creating,
clicking Add New once you’ve filled each one in. When you’ve finished adding
records, click OK.
Note: You can use this method any time you want to add more records or
make changes to the information you’ve entered.
Adding Merge Codes to the Main DocumentBefore you can merge the main document with the data source, you have to
tell Word which field goes where in the main document by inserting merge
field codes at the appropriate places.
How to Add Merge Codes to the Main Document
1 Ensure the main document is displayed on screen.
As this document has been identified as a main document, the Mail Merge toolbar is displayed at the top of the main document window.
2 Move the insertion point to where you want to insert a merge field then
click the Insert Merge Field button on the Mail Merge toolbar.
3 Select the required merge field from the list.
4 Repeat the last two steps for each merge field you want to insert in the
document.
Word Processing Student Workbook — Advanced 88
PC Passport Support Materials
Make sure that you include any spaces or punctuation required before,
between and after the merge fields.
Merging the Main Document and the Data Source
Once you’ve prepared the main document and the data source, you have to
run the merge to combine them, replacing the merge field codes with the
actual data from the data source in the process.
How to Merge the Main Document and the Data Source
1 Open the main document.
2 Select the Tools, Mail Merge menu option to display the Mail Merge
Helper box.
3 Click the Merge button at step 3.
4 Choose where the documents produced by the merge are to go from the
Merge to drop-down list:
New Document: The documents will be created in a single new
document.
Printer: The documents will be printed.
Electronic Mail: Select this option if you want to send the
documents by e-mail or fax.
5 If you want to use all the records from the data source, make sure that the
All option is selected under the Records to be merged heading.
Otherwise enter the first and last records in the range in the From and To
text boxes.
6 Where data fields are empty in the data source (for example, if you’ve
allowed for four address lines but only used three in some records) you
can choose whether a blank line appears in place of the missing field.
Click the appropriate option under the When merging records heading.
7 Click Merge to run the merge.
Note: The first time you run a merge on any main document, it can be a good
idea to merge to a new document rather than to the printer straight away, as
this will allow you to check that you used the correct fields in the correct
positions and so on. You can then print the document when you’re sure it’s
the way you want it.
Word Processing Student Workbook — Advanced 89

PC Passport Support Materials
Exercise 19a: Creating the Mail Merge LetterIn this exercise, you will create a group of form letters using an existing
document as the main document, and create a data source. Here you’ll open
the main document and specify it as the main document. Subsequent
exercises will continue with this merge and so these exercises should be
carried out one after the other in the same session.
1 Open the document Interview Letter in the PC Passport Student folder.
2 Follow the instructions below to specify that this is the main document for
the mail merge.
Select the Tools, Mail Merge menu option to display the Mail Merge Helper. Click the Create button then choose the Form Letters option.
Click the Active Window button to specify that the current
document is to be used as the main document. The name of this
document is displayed in the box.
Word Processing Student Workbook — Advanced 90

PC Passport Support Materials
3 Save the changes you’ve made to the Interview Letter, but don’t close it.
Exercise 19b: Creating the Data SourceIn this exercise, you will create the data source for the form letters, specifying
which fields are to be included in each record.
1 With the Interview Letter still open and on the screen, select the Tools, Mail Merge option to display the box again.
2 Click the Get Data button below step 2, then select the Create Data Source option.
3 Follow the instructions below to create the fields that are to be included in
each data source record.
When the Create Data Source box is displayed, it already
contains a list of standard fields that are commonly used in mail
merges. You won’t use all of the fields, so remove the following fields
by clicking them and then clicking the Remove Field Name button:
JobTitle; Company; State; Country; HomePhone and WorkPhone.
An additional field, InterviewDate, is required to give the date
and time of the interview. Specify this field by typing its name into the
Field name text box then clicking the Add Field Name button.
Click OK.
4 Save the data source in the PC Passport Student folder, naming it
Interview Candidates.
You’ll be prompted to edit either the data source or the main document,
but don’t do anything yet.
Word Processing Student Workbook — Advanced 91

PC Passport Support Materials
Exercise 19c: Adding Mail Merge RecordsNow to add records to the data source you created earlier.
1 Click the Edit Data Source button to display a form showing all the fields
in the data source. (If you have returned to this exercise after a break, you
can edit the data source by selecting the Tools, Mail Merge menu option
and then choosing the name of the data source from the list displayed
when you click the Edit button.)
2 Use [Enter] to move from one field to another. Press [Enter] to move to
another blank record then add the following people to the data source:
Title Miss
FirstName Jane
LastName Long
Address1 39 Rowantree Way
Address2
City CARRSBRIDGE
PostalCode BL2 5TT
InterviewDate 5 May at 10 am
Title Mr
FirstName Jack
LastName Innes
Address1 4 Risk Street
Address2 Boxhill
City CARRSBRIDGE
PostalCode BL2 1MM
InterviewDate 5 May at 10:45 am
Title Miss
Word Processing Student Workbook — Advanced 92
PC Passport Support Materials
FirstName Fiona
LastName Drysden
Address1 1 Highwayman Lane
Address2
City BLACKWELL
PostalCode BL1 0RT
InterviewDate 5 May at 11:30 am
Title Mr
FirstName Rory
LastName Barnes
Address1 102 Knowles Park
Address2
City TUPPLEY
PostalCode BL7 2PT
InterviewDate 6 May at 2:30 pm
Title Ms
FirstName Ros
LastName Stockwell
Address1 8 Park Avenue
Address2
City HOCKWELL
PostalCode BL6 3EB
InterviewDate 6 May at 4 pm
Title Mrs
FirstName Karen
LastName Francis
Address1 65 Jones Terrace
Address2
City CARRSBRIDGE
Word Processing Student Workbook — Advanced 93

PC Passport Support Materials
PostalCode BL2 4TQ
InterviewDate 6 May at 4:45pm
Exercise 19d: Editing Mail Merge Records1 Click the button shown at the bottom of the form until Ros
Stockwell’s record is displayed.
2 Edit the record as shown in the illustration below.
3 Click OK to close the data form and return to your main document.
Exercise 19e: Inserting PlaceholdersThe next step is to insert placeholders, or merge field codes, into the main
document. When you run the mail merge, these merge field codes will be
replaced with the data you added to your data source.
1 Following the instructions below, insert merge fields into the main
document.
Click at the end of the date then press the [Enter] key twice.
Word Processing Student Workbook — Advanced 94

PC Passport Support Materials
Click the Insert Merge Field button on the Mail Merge toolbar,
choose Title from the list.
The Title merge code is inserted at the insertion point.
Press the [Spacebar] to type a space then use the Insert Merge Field button to insert FirstName.
Insert another space followed by the LastName merge code.
Press [Enter] to move to the next line.
Insert the Address1 merge field.
On the following line insert the Address2 merge field.
Under this, insert the City merge field.
Under this, insert the PostalCode merge field.
Word Processing Student Workbook — Advanced 95

PC Passport Support Materials
Exercise 19f: Inserting Merge FieldsThe placeholders should look like this:
1 After Dear insert a space followed by the Title and LastName merge
fields, remembering to put a space between them.
2 At the end of the first paragraph insert the InterviewDate merge field
followed by a full stop.
3 Save the changes to the Interview Letter.
Word Processing Student Workbook — Advanced 96

PC Passport Support Materials
Exercise 19g: Completing the Mail MergeNow you’ll run the merge to combine the main document with the data source,
creating one letter for each person in your data source. The data you entered
in the fields will replace the placeholders in each copy of the letter.
1 Follow the instructions below to run the merge.
Ensure the Interview Letter document is displayed on screen
and select the Tools, Mail Merge menu option.
Click the Merge button.
Ensure the options in the Merge box are set as shown here:
Click the Merge button in this box to combine the main
document Interview Letter with the data source Interview Candidates and create a new document containing one copy of the letter for every
record in the data source.
The first of these merged documents is shown on the next page.
Word Processing Student Workbook — Advanced 97

PC Passport Support Materials
Exercise 19h: Printing the Merged Letter
Ref: AM/IN/09
10 February, 2004
Miss Jane Long
39 Rowntree Way
CARRSBRIDGE
BL2 5TT
Dear Miss Long
Position of Administrative Assistant
Thank you for your application for the post of Administrative Assistant within this company.
Having studied your very interesting application, I would like to take things a stage further
and, to this end, would ask that you kindly attend for an interview at this office on 5 May at 10
am.
Perhaps you would be good enough to confirm with Miss Jones, my secretary (Ext 454) that
you will be able to attend as proposed.
I look forward to meeting you in person.
Yours sincerely
Alan RamseyManaging Director
1 Look through this new document to see that each interview letter is
addressed to a different person from the data source and that each letter
begins on a new page.
2 Save the document in the PC Passport Student folder with the name
Interview Letters.
3 Run the merge again, this time including records 2 to 5 only.
Word Processing Student Workbook — Advanced 98

PC Passport Support Materials
4 Add your name to the footer then print the merged documents.
5 Close the merged document, saving it with the name Interview Letters 2 to 5. Make sure you include your name and the date at the bottom of the
file. Be sure to show the file to your tutor, or print a copy to keep in your
portfolio of work.
Envelopes and Labels
Printing EnvelopesWord provides a simple and suitable way to print envelopes and labels. You
can print mailing and return addresses on an envelope, or addresses on a
mailing label.
To create and print an envelope, follow these steps.
1 Choose Envelopes and Labels from the Tools menu. The Envelopes and Labels dialogue box will appear.
Word Processing Student Workbook — Advanced 99

PC Passport Support Materials
2 Click the Envelopes tab to display envelope options.
3 Enter (or Edit) the mailing address in the Delivery address box.
4 Enter (or Edit) the return address in the Return address box. You can
select the Omit check box to omit a return address.
5 Click the Options button to specify the envelope size, the type of paper
and other options.
6 Click the Add to Document button to add or attach the envelope to the
current document for printing later or editing.
7 Click the Print button to print the envelope.
You can also add graphics to the return address of your envelope. To add a
graphic, follow these steps.
1 Select mailing address in the document.
2 Open the Envelopes and Labels dialogue box.
3 Click the Add to Document (or Change Document) button.
4 Click the Page Layout View icon in the Status bar.
5 Insert or create the graphic in the document.
6 Position the item on the envelope.
Word Processing Student Workbook — Advanced 100

PC Passport Support Materials
Printing LabelsSometimes you might only need to print labels with addresses for mailing out
a standard generic letter. Your word processor should have a label printing
facility. Labels come in many different types and sizes, so it is important to
pick the correct label and size before attempting to print text onto the labels. It
is also important to check how many labels will be printed on each sheet of
label paper. This is how you would print labels using Microsoft Word.
How to Select the Correct Label Type
1 Start or open your word processor. We are using Microsoft Word in this
example.
2 Open an existing document.
3 Click on the Envelopes and Labels shortcut key in the toolbar (it is an
icon of a small envelope) or look under Tools, Letters and Mailings and
select Envelopes and Labels.
4 The Envelopes and Labels window will appear.
5 Click on the Labels tab.
Word Processing Student Workbook — Advanced 101

PC Passport Support Materials
To select the correct label type:
1 Check in the Label box to see if it is the correct label type you are using.
2 If it is not, click on the Options button.
3 When the Labels options window appears, select the brand name of the
label in the Label Products box (for example, Avery standard).
4 In the Product Number box, select the number that corresponds with your
label.
How to Create a Full Page of the Same Label
1 Click on the Envelopes and Labels shortcut key in the toolbar (it is an
icon of a small envelope) or look under Tools, Letters and Mail and
select Envelopes and Labels.
2 The Envelopes and Labels window will appear. Be sure to select the
correct Label Product and Product Number that you are using.
3 Click on the Labels tab if it is not already on top.
4 Make sure there is nothing in the Address box (if there is, highlight it and
click Delete).
5 Click the New Document button.
6 A new document will appear. This will have lines representing the borders
of the labels. (If it does not show the borders, go to Edit and choose
Select All. Then under Format, select Borders and Shading. When the
Borders and Shading window appears, click on the All button on the left-
hand side. Click OK).
7 You cursor should be in the first label. (If it is not, click once in the first
box.)
8 You can type whatever text you desire. Use your word processing skills to
change the look of the font and to insert clip art, if desired.
Word Processing Student Workbook — Advanced 102

PC Passport Support Materials
9 To move from one label to the next, click the [Tab] key twice. Note: The
Tab key will take you inside the margins (or the space between the labels).
Be sure not to type text in these spaces.
To print your labels, click on the Print shortcut button in the toolbar or under
File select Print.
Importing Other File Types into Documents
Importing from Microsoft Excel If you want, you can simply copy and paste your data into your word
processor. When you do this, all the Microsoft Excel data is converted into a
table. So the Microsoft Excel data does not retain any of its functionality once
it is pasted into Word.
How to Import a Microsoft Excel Spreadsheet into Microsoft Word
1 Open your Word document.
2 Open your Excel spreadsheet.
3 Within Excel, select the cells you want to copy into Word.
4 From the Edit menu, click Copy.
5 Switch to your Word document.
6 Place the insertion point where you want the data.
7 From the Edit menu, click Paste.
You can then modify the data in this table as you would any other Word table.
If you want to be able to use Excel tools to make changes to the Excel data in
Word, you use the Paste Special command. When you use this command, the
Excel data is embedded as a Worksheet object.
How to Use the Paste Special Command
1 Open your Word document.
2 Open your Excel spreadsheet.
3 Within Excel, select the cells you want to copy into Word.
4 From the Edit menu, click Copy.
Word Processing Student Workbook — Advanced 103

PC Passport Support Materials
5 Switch back to your Word document.
6 Place the insertion point where you want the data placed.
7 From the Edit menu, click Paste Special. 8 Select Microsoft Excel Worksheet Object.
9 Click OK.
When you double-click the table that you inserted in your Word document,
you will notice that it now retains its Excel functionality.
Finally, there is a third method you can use. If you want to be able to edit that
data within Excel and have those changes updated automatically in Word, you
can do so by creating a dynamic link.
How to Create a Dynamic Link
1 Open your Word document.
2 Open your Excel spreadsheet.
3 Within Excel, select the cells you want to copy into Word.
4 From the Edit menu, click Copy.
5 Switch back to your Word document.
6 Place the insertion point where you want the data placed.
7 From the Edit menu, click Paste Special.8 Select Microsoft Excel Worksheet Object.
9 Select the Paste Link radio button.
10 Click OK.
Now when you double-click the table in Word, the worksheet will open in
Excel and allow you to use Excel to manipulate the data.
Importing from Other ApplicationsYou can import information from other applications that reside on your
computer by following the steps below.
1 Open the appropriate Word document.
2 From the Insert menu, select Object.3 The following dialogue box will appear.
Word Processing Student Workbook — Advanced 104

PC Passport Support Materials
4 The object types that are listed are dependent upon the application
software you have on your machine so they may be different.
5 Scroll down and select the appropriate application, for example Adobe
Acrobat Document.
6 The file dialogue box appears, to allow you to select the file you wish to
insert.
7 Click on OK.
The file will then be inserted into your document. If this is a PDF file, for
example, the first page of the document is displayed. If you double-click this
document the original document is opened using Acrobat Reader.
Working with ChartsThere may be times when you want to illustrate some figures in a graphical
format in your documents. Using the Insert, Object menu option to add a
Microsoft Graph Chart to your document will let you do that.
When you first select to add a chart, the Datasheet window will have sample
values filled in. You should replace these values with your own, deleting any
extra columns or rows. As you do, you’ll see the data being added to the
chart. Initially the chart selected is called a 3-D column chart. However, you
can change the chart type if it doesn’t suit what you need and you can format
the individual parts of the chart, adding titles if you want them.
Word Processing Student Workbook — Advanced 105
PC Passport Support Materials
It’s important that you know the terminology that’s used with charts, so here is
an explanation of the various terms you will encounter.
Chart Title — A title can be shown at any position on the chart. You can
increase or decrease the size of the font, and add lines and shading to the
title if required.
Plot Area — The plot area is the area of the chart on which the data series
(column/bars etc) are displayed. You can add lines, referred to as gridlines, to
the plot area to help the reader relate the data series to values shown on the
value axes. A colour and/or a pattern can be added to the plot area.
X-axis — The x-axis displays the names of the categories being shown on the
chart. When creating a chart, Word will determine the category names from
the data selected. It is always assumed that there are more categories than
data series, therefore if the selected range has more columns than rows, the
column headings will be used as the x-axis category labels and the row
headings will appear in the legend (see below for a description of legend).
A title can be added to the x-axis to give more information about the category
names.
Both the axis title and the category labels can be customised by changing the
font size and style used.
Y-axis — The y-axis assumes a different position on the chart depending on
whether the chart uses a 2-D or a 3-D style. On a 2-D chart, the y-axis is the
vertical value axis, the scale of which will be determined by the values to be
plotted and the physical size of the chart. A title can be added to the y-axis on
a 2-D chart to describe what the values represent.
A 3-D chart, however, shows the y-axis marking the floor of the chart.
Z-axis — Z-axes are found only on 3-D charts where they represent the
vertical value axis. The scale of this axis is determined by the values to be
plotted on the chart and the physical size of the chart.
Like the other axes, you can add a title and customise it by changing the font
size and style.
Word Processing Student Workbook — Advanced 106

PC Passport Support Materials
Data Series — The appearance of the data series on any chart will depend
on the type of chart chosen. For example, on a column chart, the data series
are shown as columns; on a line chart, the data series are shown as points
joined by lines; and on a pie chart, the data series are shown as segments.
You can change the colour applied to each of the data series and apply labels
such as percentages on a pie chart or values on a column chart.
Legend — The legend is the key to the chart, identifying the data series
shown on it. You can choose to display or hide the legend, move it to another
position on the chart and customise its appearance by changing the font size
and style that it uses.
Chart Area — You can apply a colour and/or pattern to the chart area. You
can also choose the style of border to be used, for example a simple or a
shadowed box.
Customising the Chart
Once you’ve created the chart you can change it to look the way you want by
adding titles, changing the colours and patterns used on the chart, and so on.
First you must make the chart active by double-clicking it. When the chart is
active, the Chart menu is added to the menu bar and extra options for
working with the chart are added to the Standard toolbar.
You can access the customising options either through the Chart menu, the
Standard toolbar, the shortcut menu or by double-clicking the element to be
modified.
Double-clicking the element is the most direct way to display the formatting
options available to customise it. If, however, you want to add an element that
is not currently shown on the chart, you have to use the menu options.
Help Tip: When the pointer rests on any part of the chart, a ScreenTip will be
displayed telling you its name and in some instances giving you other
information. For example, when the pointer rests on a data series, the name
of the series and the actual value of the data point (for instance, one bar
within a data series) that you’re pointing to are shown.
Word Processing Student Workbook — Advanced 107

PC Passport Support Materials
To edit text labels such as the chart title or data labels, select the element by
clicking on it, then click on it again to edit the text. This should not be a
double-click, which would display the formatting options for the text element.
Changing the Chart Type
There are many different types of chart you can create, each with two or more
sub-types. For example, you can create a line chart that represents each data
series with a line. Using the sub-types for this chart, you can make the lines
either 2-D or 3-D and add markers at each data point on the line if you want.
When creating a chart, you should choose the chart type that best illustrates
the values you are presenting. For example, pie charts are useful when
showing percentages, whereas line and area charts are useful when
illustrating values that change over time.
To change the type of chart, select the Chart, Chart Type menu option. If you
prefer, you can click on a blank part of the chart’s background and right-click
to show the shortcut menu then choose the Chart Type.
Exercise 20a: Importing a Chart1 Open the Sales document stored in the PC Passport Student folder.2 Click at the end of the first paragraph after … not much better. Then
press [Enter] twice.
3 Select the Insert, Object menu option.
Word Processing Student Workbook — Advanced 108

PC Passport Support Materials
4 Choose Microsoft Graph 2000 Chart from the Object type list:
5 Click OK.
The chart object and a datasheet containing sample data are displayed.
Exercise 20b: Edit the Chart Data1 Click and drag over the sample data in the datasheet and then press
[Delete] on the keyboard to remove the sample data.
2 Type the following data into the datasheet:
As you do this, the chart is updated.
Word Processing Student Workbook — Advanced 109

PC Passport Support Materials
3 Click away from the chart. This deactivates the chart and closes the
Datasheet window.
The chart is now included in the memo at the point where you placed the
insertion point earlier.
Word Processing Student Workbook — Advanced 110
This border around the chart shows that the chart is active. When the chart is active, you can make changes to it.
To make a chart active, you double-click it.

PC Passport Support Materials
Exercise 20c: Chart Elements1 Match the labelled area on the chart to its name in the table below.
Name Letter
Chart Area _______
Legend _______
X-axis _______
Data Series _______
Plot Area _______
2 Save and close the document. Make sure you include your name and the
date at the bottom of the file. Be sure to show the file to your tutor, or print
a copy to keep in your portfolio of work.
Creating Forms With forms, you can ask specific questions and get responses in the format
that you want. Forms can be either printed or online documents with
instructions, questions and fields (blanks) where users can enter their
responses.
Word Processing Student Workbook — Advanced 111
B
D
A
C
E

PC Passport Support Materials
You can transform any document into a form by inserting form fields next to
questions in the document. Word includes many different types of form fields:
text boxes for typed entries, date fields, time fields, fields that perform
calculations, and check boxes where users can click the box that represents
their answer.
If you want to distribute a form electronically and let users complete it online,
you will need to protect the form document and then save it as a template.
This allows users to complete the form without changing the layout of the form
or the original question text.
To create a form, you insert form fields into a document. In Word, you can
insert several types of form fields: a text box for typed text, a check box for
yes or no responses, or a drop-down list for predefined choices.
There are six types of Text form fields, listed and defined in the table below.
Text form field type Characteristics
Regular text Accepts any combination of keyboard characters, including
letters, numbers, or symbols. This text field is useful for
comments and short text answers.
Number Accepts only numeric values, making them appropriate for a
quantity or price field on an order form.
Date Lets you type a date in any standard date format that you
specify when you create the date field, such as 21/12/2007.
Current date Allows you to use Word to complete the field by entering the
current date set in your computer.
Current time Allows you to use Word to complete the field by entering the
current system time.
Calculation Allows you to perform a calculation based on the formula and
values that you supply, such as when you want to display a
total order amount.
Word Processing Student Workbook — Advanced 112

PC Passport Support Materials
Check box form fields let you provide several options so that users can click
one or more to indicate their choices. For example, suppose you wanted to
know which brands of seeds were most favoured by customers. One solution
would be to poll customers in the store with a brief survey card listing all of the
major seed manufacturers with check boxes next to each one and instructions
to ‘choose your favourite’. Check boxes are also good for true/false and
yes/no responses.
Use a Drop-down form field when you want to limit users to several possible
pre-defined answers. You specify all the possible options, and users choose
one. In this way, drop-down form fields ensure that users will enter consistent
and accurate information. For example, if you use a text box for users to
respond to a question such as ‘How was our service?’, you would have to
read and tally the responses by hand.
However, if you use a drop-down list and limit the user’s responses to
excellent, very good, good, fair and poor, the responses are easier to gather
and interpret. The Forms toolbar provides buttons for adding and modifying
form fields and other elements used in forms.
After you insert a form field into a document, you can click the Form Field Options button on the Forms toolbar to specify form field properties, such as
field type and length, in the Form Field Options dialogue box. The choices in
the Form Field Options dialogue box change based on the selected form field
type.
Adding Help Text to Form FieldsYou can add help text to form fields to provide instructions for filling out the
field. In any Form Field Options dialogue box, click the Add Help Text button. Then, in the Form Field Help Text dialogue box, click Type your own, type your help text in the box, and then click OK.
You can customise your form by changing some of the form field attributes,
such as text field length or the check box default setting. You can format fields
in a form in the same way that you format other text in Word.
Word Processing Student Workbook — Advanced 113
PC Passport Support Materials
Before you distribute the form to users, you need to protect it so that users
can interact only with the fields, not change the form itself. In fact, you cannot
use a form to gather responses until you protect it. If you need to change the
layout or content, you must unprotect the form again.
You can add further protection to a form by adding password protection,
which ensures that only password holders can unlock, unprotect and edit the
form.
When you are finished working with a form, you can print it or distribute it
electronically and let users complete it online. If you distribute the form
electronically, you need to save it as a template so that each user creates a
separate document with his or her responses. You can then send the form in
an e-mail message or store it in a central location where others can access
the file. If you have a network, you can make electronic forms available for
others to fill out online. If you have a website, you can save the form as a web
page and publish it to the internet.
Templates and styles are two features that help you to apply and maintain a
consistent look within one or more documents. A style is a collection of text
and paragraph formatting that you can apply to text throughout your
document. A template is a special document that stores text, styles,
formatting, macros and page information, so that you can use these settings
in other documents.
You can enhance the look of any document by applying one of the following
types of styles:
Character styles format selected words and lines of text within a
paragraph. For example, a character style might be 18-point, bold,
underlined and centred text.
Paragraph styles format entire paragraphs, including their indents,
alignment and tabs. For example, a paragraph style might include a border
and hanging indent.
Word Processing Student Workbook — Advanced 114
PC Passport Support Materials
Instead of applying each of these formatting effects or attributes individually,
you can apply all of these attributes using a style. As you change the
appearance of the text in your documents, you might find that you have
created a look of your own, which you can save as a style for future use. You
can also take advantage of the many pre-defined styles that Word provides.
To create a new template, you can start with a pre-defined Word template or
save one of your own documents as a template. Word comes with templates
for all types of documents, including publications, reports, letters, faxes,
memos and web pages.
If you want to distribute a form electronically, you need to save it as a
template so that each user creates a separate document with his or her
responses. You can then send the form in an e-mail message, or post it on a
network or a website for users to fill out.
Table of Contents You can use your word processor to compile and insert a table of contents
which lists the document headings in your document. When you view a table
of contents in any Word view except Web Layout, each entry typically
includes the page number of the heading and functions as a hyperlink that
you can click to navigate to that heading.
When you view a table of contents in Web Layout view or when you view a
web page document in a browser, each entry usually consists of only a
hyperlink without a page number. (Page numbers would be meaningless in a
browser, which doesn’t divide a document into separate pages.) When you
generate the table of contents, however, you can choose whether or not to
include page numbers or hyperlinks.
The following is the fastest way to create a table of contents:
1 Make sure that every heading you want to include in the table of contents
has been assigned one of the built-in heading styles, Heading 1 through
Heading 9.
Word Processing Student Workbook — Advanced 115
PC Passport Support Materials
2 Place the insertion point at the position in your document where you want
to display the table of contents.
3 Choose Insert, Reference, Index and Tables, then click the Table of Contents tab.
4 If you want to modify the appearance of the table of contents, choose
options in the Table of Contents tab until the model table of contents in the
Print Preview or Web Preview area has the look you want.
5 The Print Preview area shows how the table of contents will appear in any
Word view except Web Layout, and the Web Preview area shows how it
will look in Web Layout view or when a web page document is viewed in a
browser. You can specify the alignment of page numbers, the tab leader
character, the overall format of the table of contents, and the number of
heading levels that should be included in the table of contents.
6 Clearing the Use Hyperlinks Instead Of Page Numbers option has two
results:
Hyperlinks won’t be included in the table of contents, whether
the document is viewed in Normal, Print Layout, or Outline view in
Word, or if it’s viewed in Web Layout view or in a browser.
When the document is viewed in Web Layout view or in a
browser, page numbers are displayed unless you've cleared the Show Page Numbers option, which eliminates the display of page numbers
from all views.
7 Click the OK button.
Word creates a table of contents by inserting a TOC field. Under certain
circumstances, rather than seeing the table of contents itself, you might see
the field code for the table of contents, which would look something like this:
The switches following the field name, TOC, indicate the options you selected
in the Index and Tables dialogue box. The switches in this example have the
meanings shown in the following table.
Word Processing Student Workbook — Advanced 116

PC Passport Support Materials
TOC Field Code Switches
TOC Field Code Switch
Meaning
\o "1-3" Build the table of contents from document paragraphs that are
assigned the built-in Heading styles Heading 1 through Heading 3.
\h Assign a hyperlink to each table of contents entry.
\z In Web Layout view, hide the page numbers, as well as the tab
leader (the dots, dashes, or underlining between the end of the entry
text and the page number).
\u In addition to using the headings with the built-in heading styles to
build the table of contents, use paragraphs that have been assigned
outline-level formatting. (Outline-level formatting is assigned to a
paragraph by choosing Format, Paragraph, clicking the Indents and
Spacing tab, and selecting a level in the Outline Level drop-down
list.)
If you see the field code for the table of contents rather than the table of
contents itself, you can make the table of contents appear by selecting the
entire field code and pressing [Shift] [F9]. Note that a table of contents
usually includes nested HYPERLINK and PAGEREF fields; if you see any of
these field codes rather than the field contents, you can likewise select the
entire field code and press [Shift] [F9] to show the contents.
If the content or page locations of your outline headings change — or if you
added or removed headings — after you insert a table of contents, you can
update the table of contents by clicking the Update TOC button on the
Outlining toolbar (available in Microsoft Word for 2000, XP and 2003).
You can also select or place the insertion point within the table of contents
and press [F9] (method available in all versions of Microsoft Word). Word will
ask whether you want to update the page numbers only or update the entire
table of contents.
Word Processing Student Workbook — Advanced 117

PC Passport Support Materials
To have Word automatically update the table of contents when you print the
document, choose Tools, Options, click the Print tab, and make sure that
the Update Fields option is checked.
About FieldsFields are used as placeholders for data that might change in a document,
and for creating form letters and labels in mail merge documents. Microsoft
Word inserts fields when you use particular commands, such as the Date and Time command on the Insert menu. You can also manually insert your own
fields by using the Field command on the Insert menu.
You might insert a field if you want to:
display information about a document such as the author’s name, the file
size or the number of pages — to do so, use the Author, FileSize,
NumPages or DocProperty field
add, subtract or perform other calculations — to do so, use the
= (Formula) field
work with documents in a mail merge, for example insert Ask and Fill-in
fields to display a prompt as Word merges each data record with the main
document.
In other cases, it’s simpler to use the commands and options provided in
Word to add the information you want.
Field Codes
Field codes appear between curly brackets, or braces ( { } ). Fields are like
formulas in Microsoft Excel — the field code is like the formula and the field
result.
When you print the document or hide field codes, the field results replace the
field codes. This is like the value that the formula produces. You can switch
between displaying field codes and results in your document.
You cannot insert field braces by typing the characters on the keyboard.
However, you can insert them by using the keyboard shortcut [Ctrl] [F9].
Word Processing Student Workbook — Advanced 118

PC Passport Support Materials
About Field SwitchesA switch is a special instruction that when placed in a field causes a specific
action to occur. For example, inserting the \* Caps switch into a field specifies
that the first letter of each word in the field result is capitalised.
Example
Contact: {DOCPROPERTY "Manager" \* Upper}
In this example:
Contact is the text that will precede the field result.
DOCPROPERTY is the field name.
“Manager” is the text for the required instruction (“Name”).
\* Upper is an optional switch to specify that the name is displayed in all
capitals.
If the name of the Manager specified on the Summary field of the Document Properties dialogue box is Anna Gerrard, inserting this field in your document
results in the following:
Contact: ANNA GERRARD
Exercise 21a: Creating a Table of Contents1 Open up the document called Final Video Report in the PC Passport
Student folder.2 Create a page break between the heading of the report and the
introduction page (to create a blank page).
3 Move through the document changing all of the Headings to Heading 2.
4 Move the cursor to the top of the new blank page and from the Insert menu select Reference.
5 Under Reference choose to insert Index and Tables.
6 Select the Table of Contents tab in the Index and Tables screen.
Word Processing Student Workbook — Advanced 119

PC Passport Support Materials
7 See the table of contents appear. Now add in an extra paragraph at the
bottom in Heading 2 entitled Adding a Table of Contents. Write some
text about the table of contents.
8 Move back up to the table of contents you created earlier, and right-click
within the shaded area to update the field. When asked if you want to
update the entire table, click the radio button. Your table of contents will
now show the heading you just added to its list.
9 Save the document as Your Name, Final Video Report in your PC Passport student folder. Make sure you include your name and the date
at the bottom of the file. Be sure to show the file to your tutor, or print a
copy to keep in your portfolio of work.
IndexesAn index lists the terms and topics discussed in a document, along with the
pages they appear on. To create an index, you mark the index entries in your
document. Once you mark an index entry, Microsoft Word adds a special XE
(Index Entry) field (for example, the Date field inserts the current date) to your
document:
You can create an index entry:
for an individual word, phrase or symbol
for a topic that spans a range of pages
that refers to another entry, such as ‘Transportation. See Bicycles’.
After you’ve marked all the index entries, you choose an index design and
build the finished index. Word then collects the index entries, sorts them
alphabetically, references their page numbers, finds and removes duplicate
entries from the same page, and displays the index in the document.
Word places symbols, such as @, at the beginning of the index. If you
selected an index format that includes headings for alphabetic groups, the
symbols are grouped under the # (number sign) heading.
Word Processing Student Workbook — Advanced 120

PC Passport Support Materials
How to Mark Words or Phrases1 To use existing text as an index entry, select the text. To enter your own
text as an index entry, click where you want to insert the index entry.
2 Press [Alt] [Shift] [X]. 3 To create the main index entry, type or edit the text in the Main entry box.
You can customise the entry by creating a subentry or by creating a cross-
reference to another entry.
To include a third-level entry, type the subentry text followed by
a colon (:) and then type the text of the third-level entry.
If you want to use a symbol, such as @, in the entry, type ;#
(semicolon followed by the number sign) immediately following the
symbol.
4 To select a format for the page numbers that will appear in the index, click
to select the Bold or Italic check box below Page number format. If you
want to format the text for the index, right-click it in the Main entry or
Subentry box, and click Font. Select the formatting options that you want
to use.
5 To mark the index entry, click Mark. To mark all occurrences of this text in
the document, click Mark All. 6 To mark additional index entries, select the text, click in the Mark Index
Entry dialogue box, and then repeat steps 3 through 5.
How to Mark Entries for Text that Spans a Range of Pages1 Select the range of text you want the index entry to refer to.
2 On the Insert menu, click Bookmark.
3 In the Bookmark name box, type a name, and then click Add.
4 In the document, click at the end of the text you marked with a bookmark.
5 Press [Alt] [Shift] [X]. 6 In the Main entry box, type the index entry for the marked text.
7 To select a format for the page numbers that will appear in the index, click
to select the Bold or Italic check box below Page number format.
Word Processing Student Workbook — Advanced 121

PC Passport Support Materials
If you want to format the text for the index, right-click it in the Main entry
or Subentry box, and click Font. Select the formatting options that you
want to use.
8 Under Options, click Page range.
9 In the Bookmark box, type or select the bookmark name you typed in step
3.
10 Click Mark.
Microsoft Word inserts each marked index entry as an XE (Index Entry) field
in hidden text format. If you don’t see the XE fields, click Show/Hide on the
Standard toolbar. Use the Formats box for Indexes to pick the style you want.
Exercise 21b: Creating Manual Index Entries1 Open up the document Chinese Calendar in your PC Passport Student
folder. You are going to create manual index entries to include in a table
of contents.
2 Create a blank section at the end of the document so you can place your
index there.
3 For each heading, manually add an index entry using [Alt] [Shift] [X], moving through the document until you have the entire index entries
marked.
4 Remember to use the Show/hide icon to display all of your index entries.
Make sure you save the file as Indexed Chinese Calendar in your PC
Passport Student folder. Make sure you include your name and the date
at the bottom of the file. Be sure to show the file to your tutor, or print a
copy to keep in your portfolio of work.
Exercise 21c: Creating Automatic Index Entries1 Create a concordance file (a list of words to include in an index). Use a
concordance file to quickly mark index entries.
2 Click Insert Table on the Standard toolbar.
Drag to select two columns.
Word Processing Student Workbook — Advanced 122

PC Passport Support Materials
In the first column, enter the text you want Microsoft Word to
search for and mark as an index entry. Make sure to enter the text
exactly as it appears in the document. Then press [Tab]. In the second column, type the index entry for the text in the first
column. Then press [Tab]. Repeat steps 3 and 4 for each index reference and entry.
Save the concordance file in your PC Passport Student folder. 3 Open the Chinese Calendar document in your PC Passport Student
folder. 4 On the Insert menu, point to Reference, click Index and Tables, and then
click the Index tab.
5 Click AutoMark.
6 In the File name box, enter the name of the concordance file you want to
use.
7 Click Open.
8 Click where you want to insert the finished index.
Remember to use the Show/hide icon to display all of your index entries.
Make sure you save the file as Auto Chinese Calendar in your PC Passport Student folder. Make sure you include your name and the date at the bottom
of the file. Be sure to show the file to your tutor, or print a copy to keep in your
portfolio of work.
Footnotes and BookmarksFootnotes and endnotes are used in printed documents to explain, comment
on, or provide references for text in a document. You might use footnotes for
detailed comments and endnotes for citation of sources.
A footnote is typically put at the end of each page or below text to mark a
reference to a subject or source of information like an author of a book.
An endnote is typically put at the end of a document, or section, and refers
to extra text or reading that the person might do.
A footnote or an endnote consists of two linked parts — the note reference
mark and the corresponding note text.
Word Processing Student Workbook — Advanced 123

PC Passport Support Materials
You can add note text of any length and format note text just as you would
any other text. You can customise note separators — the lines that separate
the document text from the note text.
Automatic NumberingMicrosoft Word automatically numbers footnotes and endnotes for you,
whether you use a single numbering scheme throughout a document or
different numbering schemes in each section in a document. After you insert
the first footnote or endnote in a document or in a section, subsequent
footnotes and endnotes are automatically numbered with the correct format.
Viewing and Printing Footnotes and EndnotesIf you’re viewing the printed document on-screen, you can view notes by
resting the pointer on the note reference mark in the document. The note text
appears above the mark. When you print the document, footnotes appear
where you specified — either at the end of each page or directly below the
text. In the printed document, endnotes also appear where you specified —
either at the end of the document or at the end of each section.
Footnotes and Endnotes on a Web PageMicrosoft Word automatically changes the footnotes and endnotes to
hyperlinks and moves the footnotes to the end of the web page. If the
document also contains endnotes, Word places them directly after the
footnotes. Word inserts short horizontal lines called note separators to
separate the main text from the footnotes, and the footnotes from the
endnotes. In the browser, custom note separators appear as short horizontal
lines.
You can also use shortcut keys to insert footnotes and endnotes without using
the Footnote command. Select the number format and other options by
following the steps above, and then use the shortcut keys to insert
subsequent footnotes and endnotes. To change the number format, use the
Footnote command again.
Word Processing Student Workbook — Advanced 124

PC Passport Support Materials
You cannot use shortcut keys to insert custom footnotes or endnotes.
Press [Ctrl] [Alt] [F] to insert a footnote.
Press [Ctrl] [Alt] [D] to insert an endnote.
Viewing Footnotes and Endnotes on a Web Page In the document, rest the pointer on the note reference mark.
The note text appears above the mark in a ScreenTip.
Converting Footnotes to Endnotes and Vice Versa In the document, select the note reference mark of the note you want to
delete, and then press [Delete]. On the View menu, click Footnotes. If your document contains both
footnotes and endnotes, a message appears. Click View footnote area or
View endnote area, and then click OK.
In the note pane, click All Footnotes or All Endnotes.
Select the notes you want to convert, and then right-click.
Click Convert to Footnote or Convert to Endnote.
Deleting Footnotes and EndnotesWhen you want to delete a note, you work with the note reference mark in the
document window, not the text in the note pane. If you delete an automatically
numbered note reference mark, Microsoft Word renumbers the notes in the
new order.
Exercise 22: Creating Footnotes1 Open up the document Monthly Movies in your PC Passport Student
folder. You are going to add two footnotes to this document.
2 Highlight the actor Brendan Fraser in the document. Go to the Insert menu and click Footnote.
3 In the Footnote screen accept all the default settings and click OK.
Word Processing Student Workbook — Advanced 125

PC Passport Support Materials
4 You will notice a small 1 has appeared and the cursor is sitting at the
bottom of the page. Type the following:
Brendan Fraser is well known for his role in The Mummy and George of the Jungle
5 Now repeat the process for Steve Martin. Notice a 2 has appeared next to
his name. This time type the following text:
Steve Martin is a well known comedy actor, in films like Roxanne, The Man with Two Brains and many others
6 Use the Save As command to save the document as Footnotes exercise in your PC Passport Student folder. Make sure you include your name
and the date at the bottom of the file. Be sure to show the file to your tutor,
or print a copy to keep in your portfolio of work.
Tracking Changes and Version Control When you share your documents with others, you can track changes to see
exactly what additions and deletions they make. You can then review the
changes and decide whether to accept or reject each revision. If you want a
record of changes made to a document, you can save different versions of it
within the same document.
Tracking changes allows you to make revisions without losing the original text.
Word shows changed text in a different colour from the original text and uses
revision marks, such as underlines, to distinguish the revised text from the
original text. To preserve the layout of your document, Word also identifies the
change and its type, such as a deletion, in a balloon that appears in the
margin of the document.
By default, Word underlines and changes the colour of inserted text. It also
includes a vertical line in the margin to the left of any changed text to help you
locate changes in the document.
Word Processing Student Workbook — Advanced 126

PC Passport Support Materials
If reviewers return their changes in separate documents, you can merge all
their revisions into a single document and then review them. As you review
the tracked changes, you can accept or reject them one at a time, or you can
accept or reject all the changes at once. To review changes and comments in
a document, you use the Reviewing toolbar.
To reject all changes at once, you can click the Reject Change arrow and
then in the menu that appears, click Reject All Changes in Document. Likewise, the Accept Change arrow displays a menu that allows you to
accept a single change or accept all changes at once.
To accept a change, you can also right-click the change and then click
Accept Insertion or Accept Deletion on the shortcut menu that appears.
When you save a version of a document, you also conserve disk space
because Word saves only the differences between versions, not an entire
copy of each document. After you’ve saved several versions of the document,
you can go back and review, open, print and delete earlier versions. You can
also have Word save a version of your document each time the document is
closed, which is useful when you need a record of who made changes and
when, as in the case of a legal document.
To save a version every time you close a document, use the Versions
command on the File menu to open the Versions in the TrackChange
dialogue box, and then click to insert a check mark in the Automatically save a version on close check box.
You can also double-click the Versions icon on the status bar to open the
Versions in the TrackChange dialogue box.
When you point to a change on the screen, a ScreenTip appears, with the
name of the person who made the change, along with the date and type of
change. The name that appears here is the user name that was entered when
the operating system was installed. If no name was entered, the ScreenTip
shows User as the name.
Word Processing Student Workbook — Advanced 127

PC Passport Support Materials
You can change the user name as follows:
Click the Tools menu, and click Options.
In the Options dialogue box, click the User Information tab.
In the Name box, type your name and then click OK.
To compare an earlier version of a document with the current one, you can
merge them. When you compare and merge versions of a document, changes
are shown as tracked changes, even if you didn’t track your changes as you
edited.
Exercise 23a: Tracking Changes in a Document1 Open the document you want to revise.
2 On the Tools menu, click Track Changes.
3 When the Track Changes feature is enabled, TRK appears on the status
bar at the bottom of your document. When you turn off change tracking,
TRK is dimmed.
4 Make the changes you want by inserting, deleting or moving text or
graphics. You can also change formatting.
5 On the Tools menu, click Options, and then click the Track Changes tab.
6 Do the following:
Change the colour used for tracked changes.
Under Markup, next to Colour, click a colour.
Exercise 23b: Print a Document with Tracked Changes and Comments Showing1 Switch to Print Layout view.
2 Display the tracked changes and comments as you want them to appear in
the printed document. To quickly display tracked changes or comments,
click Markup on the View menu.
Word Processing Student Workbook — Advanced 128

PC Passport Support Materials
Note: Clicking Markup on the View menu will display or hide all markup in
the document for selected reviewers. When you display all markup, all
types of markup will be selected on the Show menu.
3 If the Reviewing toolbar is hidden, go to the View menu | Toolbars to
display it.
4 On the Reviewing toolbar, click Show.
5 On the Reviewing toolbar, in the Display for Review box, click Final Showing Markup.
6 On the File menu, click Print. 7 In the Print what list, click Document showing markup, and then click
OK.
8 Save your file in the PC Passport Student folder. Make sure you include
your name and the date at the bottom of the file. Be sure to show the file to
your tutor, or print a copy to keep in your portfolio of work.
Working with Master and SubdocumentsA master document is like a container for a set of separate files (or
subdocuments). You can use a master document to set up and manage a
multipart document, such as a book with several chapters. The master
document contains links to a set of related subdocuments. The links are used
to insert a copy of information created in one program into a Microsoft Word
document while maintaining a connection between the two files. When the
information changes in the source file, the changes are reflected in the
destination document.
You can use a master document to organise and maintain a long document
by dividing it into smaller, more manageable subdocuments. In a workgroup,
you can store a master document on a network to share ownership of a
document by dividing it into individual subdocuments.
Word Processing Student Workbook — Advanced 129

PC Passport Support Materials
Understanding Master Document and Subdocument CreationTo create a master document, you start with an outline and then designate
headings in the outline as subdocuments. You can also add an existing
document to a master document to make it a subdocument.
A master document allows you to create a table of contents, index, cross-
references, and headers and footers for all of the subdocuments.
You can use Outline view to work in a master document. For example, you
can:
expand or collapse a master document (collapse a master document in
Outline view to hide the contents of subdocuments and display them as
hyperlinks), subdocuments or change views to show or hide detail
quickly change the structure of the document by adding, removing,
combining, splitting, renaming and rearranging subdocuments.
Working with Subdocuments
To work with the contents of a subdocument, open it from the master
document. When subdocuments are collapsed in the master document, each
subdocument appears as a hyperlink. When you click the hyperlink, Microsoft
Word displays the subdocument in a separate document window.
Using Templates and Formatting in a Master Document
The template you use for a master document controls the styles used when
you view and print the entire document. You can also use different templates
or use different settings within the templates for the master document and for
individual subdocuments.
Protecting Shared Master Documents from Unauthorised Access
Word Processing Student Workbook — Advanced 130
PC Passport Support Materials
If someone is currently working on a subdocument, the document is ‘locked’
to you and others. This means that you can view the subdocument, but you
can’t modify it until the other person closes the subdocument.
If you want to prevent unauthorised users from viewing or changing a master
document or subdocument, you can open the document and assign a
password to limit access to the document. You can also set an option to open
the file as read-only. (Note that if you set file sharing to the read-only option,
the subdocument is ‘locked’ to other users.)
Creating a Master Document and SubdocumentsYou can use a master document to set up and manage a multipart document,
such as a book with several chapters. You start with an outline and then you
create new subdocuments or add existing documents to it.
Decide on a Location for Your Documents
1 In Microsoft Windows Explorer, designate a folder that you can use to
store your master document and subdocuments.
2 If you want to use existing Microsoft Word documents as subdocuments,
move these existing documents into the folder.
Create the Master Document
Do one of the following.
Outline a New Master Document
1 Click on the new document icon on the Standard toolbar.
2 On the View menu, click Outline.
3 Type headings for the document title and each subdocument. Make sure
to press [Enter] after typing each heading.
Word formats the headings with the built-in heading.
Assign a heading style to each heading (for example, use Heading 1 for the
title and Heading 2 for each subdocument).
To do this, use the buttons on the Outlining toolbar.
Word Processing Student Workbook — Advanced 131

PC Passport Support Materials
Click the Promote icon to increase the heading level.
Click the Demote icon to decrease the heading level.
Word Processing Student Workbook — Advanced 132

PC Passport Support Materials
Convert an Existing Document to a Master Document
1 Open the document that you want to use as your master document.
2 On the View menu, click Outline.
3 Assign a heading to each heading (for example, use Heading 1 for the title
and Heading 2 for each subdocument). To do this, use the buttons on the
Outlining toolbar:
Click the Promote icon to increase the heading level.
Click the Demote icon to decrease the heading level.
Add Subdocuments to the Master DocumentDo one or both of the following.
Create a Subdocument from an Outline Heading
You must have a master document outline to create a subdocument from an
outline heading.
1 On the View menu, click Outline.
2 In the master document, select the headings and text you want to separate
into subdocuments.
Make sure that the first heading in the selection is formatted with the
heading style or outline level you want to use for the beginning of each
subdocument. For example, if the selection begins with Heading 2, Word
creates a new subdocument at each Heading 2 in the selected text.
3 On the Outlining toolbar, click Create Subdocument.Word inserts a continuous section break before and after each
subdocument.
If the Create Subdocument button isn’t available, you need to first click
Expand Subdocuments.
After you add a subdocument to a master document, do not move or
delete it unless you first remove it from the master document.
Rename a subdocument only from within the master document.
Insert an Existing Word Document into a Master Document
1 Open the master document and click Outline on the View menu.
Word Processing Student Workbook — Advanced 133

PC Passport Support Materials
2 If the subdocuments are collapsed, click the Expand Subdocuments icon
on the Outlining toolbar.
3 Click where you want to add the existing document.
4 Make sure to click a blank line between existing subdocuments.
5 On the Outlining toolbar, click the Insert Subdocument icon.
6 In the File name box, enter the name of the document you want to add,
and then click Open.
Microsoft Word inserts a next page section break before the subdocument
and a continuous section break after it.
Save the Master Document
1 On the File menu, click Save As.
2 Select the location you designated at the beginning of this procedure, type
a file name for the master document, and then click Save.
Word automatically assigns a file name to each new subdocument based on
the first characters in the subdocument’s heading in the master document
outline. For example, a subdocument that begins with the outline heading
‘Chapter 1’ might be named ‘Chapter 1.doc’.
Lock or Unlock a Subdocument1 On the View menu, click Outline.
2 On the Outlining toolbar, click the Expand Subdocuments icon.
3 Click anywhere in the subdocument you want to lock or unlock.
4 On the Outlining toolbar, click the Lock Document icon.
Microsoft Word also locks subdocuments in the following cases:
The subdocuments are collapsed.
The master document is shared by a workgroup, and someone else is
currently working on the subdocument.
Someone who previously worked on the subdocument set file sharing to
the read-only option.
The subdocument is stored on a read-only file share.
Word Processing Student Workbook — Advanced 134
PC Passport Support Materials
Open a Subdocument from Within a Master DocumentIf a subdocument is locked (a lock icon appears next to it), you must unlock
the subdocument before you can open it and make changes.
How to unlock a subdocument:
1 On the View menu, click Outline.
2 On the Outlining toolbar, click the Expand Subdocuments icon.
3 Click anywhere in the subdocument you want to lock or unlock.
4 On the Outlining toolbar, click the Lock Document icon.
Print a Master DocumentPrinting a master document is a fast way to print all the subdocuments without
opening them individually.
1 If the subdocuments are collapsed, click the Expand Subdocuments icon
on the Outlining toolbar.
2 On the View menu, click Print Layout. 3 Click the Print icon on the Standard toolbar. You can specify how much
you want to print
Customising Menus and ToolbarsWith a single click of a toolbar icon you can accomplish a task that might take
you two, three or four clicks via the menus. Three clicks here or there may
sound like a small thing, but over time those clicks add up into extra effort.
As handy as they are, there’s no toolbar that could not do with some
improvement, and that's certainly the case with the toolbars in Word. The
important thing is that you don't have to put up with the default toolbars and
these can be customised to your heart's content. No two people use Word in
quite the same way, so a one-size-fits-all toolbar is going to please very few
people.
Word Processing Student Workbook — Advanced 135

PC Passport Support Materials
Word has two default toolbars — the Standard toolbar and the Formatting
toolbar — which display when you first install the program. You can customise
how toolbars appear.
1 From the Tools menu, select Customise.
2 Click the Options tab.
3 Click to remove the checkmark beside the Standard and Formatting Toolbars Share One Row option, and click Close.
Display the two default toolbars in their entirety by adjusting this Customise
setting. Now you'll see the two toolbars one above the other.
If you do not like having the toolbars at the top of the screen, you can move
them elsewhere. Notice how each toolbar has a little handle at its left end. To
move a toolbar, grab its handle and drag it to a new position. You can make it
'float' over the document window, or you can drag it to any edge of the Word
window to make it 'dock' there. When you make a toolbar float, it loses its
handle and gains its own title bar instead — drag it by that title bar to move it
into a new position.
You can also use the handle to resize a toolbar. That's handy when you want
to place a couple of toolbars side-by-side on the same row (or one above the
other).
Word Processing Student Workbook — Advanced 136

PC Passport Support Materials
Hint: Try to avoid placing toolbars that include drop-down lists (such as the
font-picker on the Formatting toolbar) to the sides of the screen. The drop-
down lists do not function well when the toolbar is docked vertically and, in
fact, you lose some toolbar buttons when you do this.
A Collection of ToolbarsThe Standard and Formatting toolbars are the tip of the iceberg. Right-click
anywhere on one of these toolbars and you will be presented with a long list
of toolbars that usually remain hidden. Select a toolbar that is not checked to
display it; select a checked toolbar to hide it.
If you right-click a toolbar and choose Customise from the pop-up menu, then
click the Toolbars tab, you will see there are even more toolbars tucked
away. There is also a New button in the Customise dialogue box. Click it, and
in the New Toolbar dialogue box give your new toolbar a name, make your
toolbar available within all your documents by choosing Normal.dot in the
Make Toolbar Available To box, and click OK.
You will see a new blank toolbar appear. Drag it to a convenient location
(perhaps underneath your Formatting toolbar).
Populating a New ToolbarIn its created state, your new toolbar is not worth anything. It will be empty!
What you need to do is stock it with the commands you use most which are
not included in the other toolbars. So, for example, why not stick a Close
option on this toolbar. Here is how you can do this:
1 Right-click the toolbar and choose Customise from the pop-up menu.
2 Click the Commands tab.
3 In the Categories list on the left, choose File. The Commands list on the
right now shows all the File menu commands. In fact, it contains a whole
lot more commands than you'll find if you open the File menu. That is
because your screen is not long enough to accommodate a fully stocked
File menu.
Word Processing Student Workbook — Advanced 137
PC Passport Support Materials
This list of File menu commands is not exhaustive either. If you want to
see the full list, scroll down the Categories list and select All Commands,
then scroll through the Commands list to find all commands beginning with
File. This is the full list.
4 Now, reselect the File menu from the Categories list before you continue.
5 Locate the Close command and drag-and-drop it onto your newly created
toolbar.
6 From the Customise dialogue box, drag the desired toolbar command
onto your newly created toolbar. Your toolbar is now functional.
You could click the Close button now, and start to make use of it. But before
you do that, why not add some more buttons to make it really useful? Here
are some you find useful:
Edit | Select All
Edit | Find
Edit | Replace
Tools | Word Count
Tools | Tools Calculate
If you add all these command you should have a toolbar that resembles this:
That last command is great for turning Word into a quick calculator. Just type
an equation — such as (26.23*12)*17.5% — then select it and click your
Calculate button to display the answer in the status bar at the bottom of the
window and copy it to the clipboard. It is also very handy for performing
column total calculations in tables, too.
Altering Existing Toolbar ButtonsJust as you can create your own toolbar full of icons, you can also create,
move and delete icons on any of the existing toolbars. When you have the
Customise box displayed, all the toolbars become morphable.
Word Processing Student Workbook — Advanced 138

PC Passport Support Materials
In this state, you can:
click-and-drag an icon to move it from one toolbar to another
click-and-drag an icon into the document window to delete it from a toolbar
click-and-drag an icon slightly to the right to create a divider between it and
the icon to its left
right-click an icon to change its looks and name or to attach a hyperlink to
it.
If you don't like the way the icons are grouped, you can rearrange them. For
instance, that Close button that you put on your newly created toolbar might
go better next to the Open and Save buttons on the Standard toolbar. Drag it
up there and drop it beside the Save button, if you like.
Similarly, you may never use some of the options that make it onto the
Standard and Formatting toolbars. Why not delete them, or create a new
‘Infrequently used’ toolbar, drag-and-drop them there, then hide that toolbar
away until you need it.
Tidying up Your ToolbarYou'll find that not all commands have their own icon. When you add such a
command to a toolbar, the command name is displayed instead of an icon.
For instance, if you add the Select All command to a toolbar, you will see the
words Select All displayed instead of an icon. If you prefer icons to command
labels (after all they take up much less space) you can edit the toolbar button
to give it a new icon. (Of course, you can also do the reverse if you find labels
more useful than indecipherable icons.)
To edit a toolbar button to display an icon instead of a label:
1 Display the Customise dialogue box by right-clicking a toolbar and
choosing Customise from the pop-up menu.
2 Right-click the button you wish to change and choose Default Style. The
label will disappear and in its place will be a blank button.
3 Right-click the button once more, choose Change Button Image and
select one of the supplied button images.
Word Processing Student Workbook — Advanced 139

PC Passport Support Materials
If you don't like any of the choices, click the Edit Button Image option
instead to load the button editor. You can then design your own button
from scratch. If you have little artistic inclination, you can always select
one of the default images and then use the Edit Button Image option to
tailor it to your liking.
4 Click Close when you're done.
Word's Button Editor in action and, below, the results.
Restoring the DefaultsWhat happens if you get it wrong? Well you can reset individual buttons to
their original state and you can also reset entire toolbars to the default
settings.
How to Reset a Button
1 Display the Customise dialogue box by right-clicking a toolbar and
choosing Customise from the pop-up menu.
Word Processing Student Workbook — Advanced 140

PC Passport Support Materials
2 Right-click the button in question and choose Reset from the pop-up
menu.
How to Reset an Entire Toolbar
1 Display the Customise dialogue box by right-clicking a toolbar and
choosing Customise from the pop-up menu.
2 Select the toolbar in the list then click the Reset button.
3 In the Reset Toolbar dialogue box, select Normal.dot and click OK.
If you make lots of changes to your own toolbars, consider making a copy of
Normal.dot and storing it somewhere safe. That way, if you have to format
and reinstall, you can recover your new settings by copying Normal.dot back
into the Templates folder.
Making Changes to the MenuTo make any changes to the menu system you have to use Customise. This
command is available from Toolbars in the View menu, or via a shortcut
menu.
How to Add a Command to a Menu1 Load up the application as usual.
2 Right-click on the menu bar or any toolbar.
3 Select Customise... from the bottom of the shortcut menu.
4 The Customise window appears. Click on the Commands tab.
Word Processing Student Workbook — Advanced 141

PC Passport Support Materials
5 Under Categories: choose the menu where the command you require is
usually found. Note that Word has an entry for All Commands.
6 Under Commands: scroll down to find the particular command you want.
If you are just practising, choose any command in any category.
7 Drag the command from the Customise window into the most appropriate
menu, and release the mouse when the command is positioned where you
would like it.
8 Repeat steps 5 to 7 for any other commands you would find useful. The
Description button tells you what a selected command does.
9 Click on the menu heading to close it.
10 Choose whether to save in Normal.dot or the Current Document.
11 Confirm the changes by pressing [Return] or clicking on the Close button.
Note: You can assign your own macros to a menu in the same way. Near the
bottom of the list of Categories in the Customise window is an entry for
Macros. In Word you can also add fonts, styles and autotext to a menu.
How to Remove a Command from a Menu1 Right-click on the menu bar or any toolbar and select Customise....2 Open the menu containing the command to be removed.
Word Processing Student Workbook — Advanced 142

PC Passport Support Materials
3 Right-click on the command and choose Delete from the shortcut menu.
4 Confirm the changes by pressing [Return] or clicking on the Close button.
Restoring a Menu to its Default SettingsWhenever the Customise window is open, you can reset a menu to its original
setting:
1 Right-click on the menu to be restored and choose Reset.2 Repeat step 1 for any further menus to be restored to normal.
3 Close the Customise window when all your menus are restored.
Repositioning the Menu BarConventionally, the menu bar is displayed at the top of the screen, but it can
be placed anywhere you like.
How to Reposition a Menu Bar
1 Place the mouse cursor at the far left of the bar — the cursor appears as a
4-direction arrow.
2 Hold down the mouse button and drag the bar to the required position
(either floating or at the left/right or bottom of the screen).
3 Release the mouse button to fix the position.
4 If the menu bar is floating, it can be moved (like any other window) by
placing the mouse cursor in the blue window title bar. It can also be
resized (again, like any other window) by using the mouse to drag in/out
one of the edges.
5 End by returning the bar to its original position.
How to Create Your Own Menu1 Right-click on the menu bar or any toolbar and choose Customise....2 In Word only, decide whether you want to save in Normal.dot or the
Current_Document.
3 Scroll to the bottom of the Categories list and choose New Menu.
Word Processing Student Workbook — Advanced 143

PC Passport Support Materials
4 A New Menu item will appear under Commands. Drag this up onto the
menu bar.
5 Right-click on the New Menu and change the name to whatever you like
(eg &Personal) and press [Return].6 The new menu will be added to the menu bar, ready for you to add
commands to it. The ampersand you typed into Name creates a key
combination you can use to open the menu from the keyboard. You can
similarly add an ampersand to the Name of a command in your new menu
to run it from the keyboard.
7 Move commands into your new menu, as dealt with earlier. The first
command must be placed carefully in the empty box beneath the menu
heading (if you drag it onto the heading it will become an icon on the menu
bar).
8 Close the Customise window — press [Return] or click on the Close
button.
Finally test out the key combination — press [Alt] [P] and your new menu
should open.
Deleting a MenuIn order to delete your own (or a built-in) menu, the Customise window must
be open.
1 Right-click on the menu bar or any toolbar and choose Customise....2 Right-click on the menu you no longer require and choose Delete.
3 Close the Customise window — press [Return] or click on the Close
button.
Note: If you delete a built-in menu then you can restore it by opening the
Customise window and selecting Built-in Menus under Categories: on the
Commands tab. Select the menu from the list under the Commands: heading
and drag it up to the menu bar.
Word Processing Student Workbook — Advanced 144

PC Passport Support Materials
Saving Your New MenusWith Word, you are asked whether or not you want to save the changes to
Normal.dot (if you have chosen this option rather than restricting the changes
to a particular document). When asked, reply Yes to save the changes or No
to return to the standard menus. To save the menu changes as a new
template, choose Save As... from the File menu and Save as type: Document
Template (*.dot). You can, of course, make further changes to your menus
whenever you choose, adding new commands or deleting ones no longer
required.
MacrosInstead of using a long set of Word commands to perform a task, you can
automate and simplify the process by creating a macro, which is a recorded
series of Word commands (keystrokes and instructions) that are treated as a
single command. For example, suppose your company uses a special format
and design for any tables that you insert in your documents. Instead of
inserting a table, adding shading and borders, applying different fonts to
column and row headings, and then adjusting the line spacing, you can create
a macro to perform all these steps and save yourself a great deal of time and
effort.
You can use macros to automate many tasks in Word, such as creating form
letters, inserting AutoText, formatting text, creating tables, or turning
command options on and off.
You can run a macro from the list of macros in the Macros dialogue box, or
you can assign the macro to a toolbar, menu item or shortcut key to make it
more readily available. If you aren’t sure where you want to assign your
macro, you can create it first and then assign it later. To run a macro from the
list of macros:
1 On the Tools menu, point to Macro, and then click Macros.
Word Processing Student Workbook — Advanced 145

PC Passport Support Materials
2 In the Macros dialogue box, in the Macro name box, click the appropriate
macro and then click Run (or double-click the macro name).
3 To assign a macro to a shortcut key, in the Record Macro dialogue box,
click the Keyboard button.
4 Then, in the Customise Keyboard dialogue box, click in the Press new
shortcut key box, press the desired shortcut key, and click Close.
Macros are not separate files, and they work only in conjunction with the
document or template for which they were created. Only the template or
document that is currently active will be modified by any macros that you
create. When you create a new document, Word uses the Normal template by
default. Because you will use the Normal template most frequently, record
your macros so that the Normal.dot template file is updated accordingly.
When you store macros in the Normal template, the macros will always be
available when you use the template.
Before you run a macro, position the insertion point where you want the result
of the macro to be displayed. For example, if you are creating a macro to
insert a table, click where you want the table to appear.
Sometimes a macro does not work as you expect, so you need to modify it.
You can re-record the macro to correct the problem or you can directly edit
and change the macro in the Visual Basic Editor program using Microsoft
Visual Basic, a programming language contained in Word in an abbreviated
form. Your macro is stored as a module within a Visual Basic project. Projects
are executable programs that can be stored in a Word document or template.
A macro virus is a type of computer virus that is stored in a macro within a file,
template or add-in. For the best protection against macro viruses, you should
purchase and install specialised antivirus software. To further reduce the risk
of macro infection in Word files, set the macro security level to High or
Medium, and use digital signatures. To set the macro security level, click the
Tools menu, click Options, click the Security tab, click Macro Security, click
the Security Level tab, and then select the security level that you want to
use.
Word Processing Student Workbook — Advanced 146

PC Passport Support Materials
When you no longer need a macro, or if you want to remove a poorly
functioning macro to re-record it with the same name, you can delete it.
Deleting a macro from a template or document is straightforward, but after
you delete a macro from the list of available macros in a document or
template, you also need to delete its associated toolbar button or menu
command (if you created one).
Exercise 24: Macros, Toolbars and MenusPractise your macro skills — remember to stop recording once you have
completed your macro, then test it to make sure that it works.
Create a New Document
1 Create a macro that will create a new document using either a template
that you have created, or one of the Word templates.
2 Make your macro run from either a menu entry, or an icon on your toolbar.
3 Print your macro code. Make sure you include your name and the date at
the bottom of the file. Be sure to show the file to your tutor, or print a copy
to keep in your portfolio of work.
Format a Row in a Table
1 Create a macro that will format a row in your table to have 15% shading,
blue font, font size 14 and a 3 pt border.
2 Make your macro run from either a menu entry, or an icon on your toolbar.
3 Create a table and format the first row in it to test your macro.
4 Print your macro code. Make sure you include your name and the date at
the bottom of the file. Be sure to show the file to your tutor, or print a copy
to keep in your portfolio of work.
Word Processing Student Workbook — Advanced 147

PC Passport Support Materials
Recovering Documents
Document Recovery and AutoRecoverIf a Microsoft Office program encounters a problem and stops responding, you
can close the program in a controlled manner. The files you were working on
are analysed for errors, and information in them is recovered if possible. In
some cases, however, no information can be recovered.
The Document Recovery task pane lists all the files that were recovered
when the program stopped responding. This applies in later versions of Office
like 2000/XP and 2003. In earlier versions some of these routines did not
exist.
Following the name of the file will be a status indicator, which shows what was
done to the file during recovery.
[Original] — This is the original file based on the last manual save.
[Recovered] — File recovered during recovery process or file saved during
AutoRecover save process.
The Document Recovery task pane allows you to open the files, view what
repairs were made, and compare the recovered versions. You can then save
the best version and delete the other versions, or save all of the open files to
review later.
Additional File ProtectionYou can protect your work by using the AutoRecover feature to periodically
save a temporary copy of the file you’re working on. To recover work after a
power failure or similar problem, you must have turned on the AutoRecover
feature before the problem occurred. You can set the AutoRecover save
interval to occur more frequently than every ten minutes (its default setting).
For example, if you set it to save every five minutes, you’ll recover more
information than if you set it to save every ten minutes.
Word Processing Student Workbook — Advanced 148
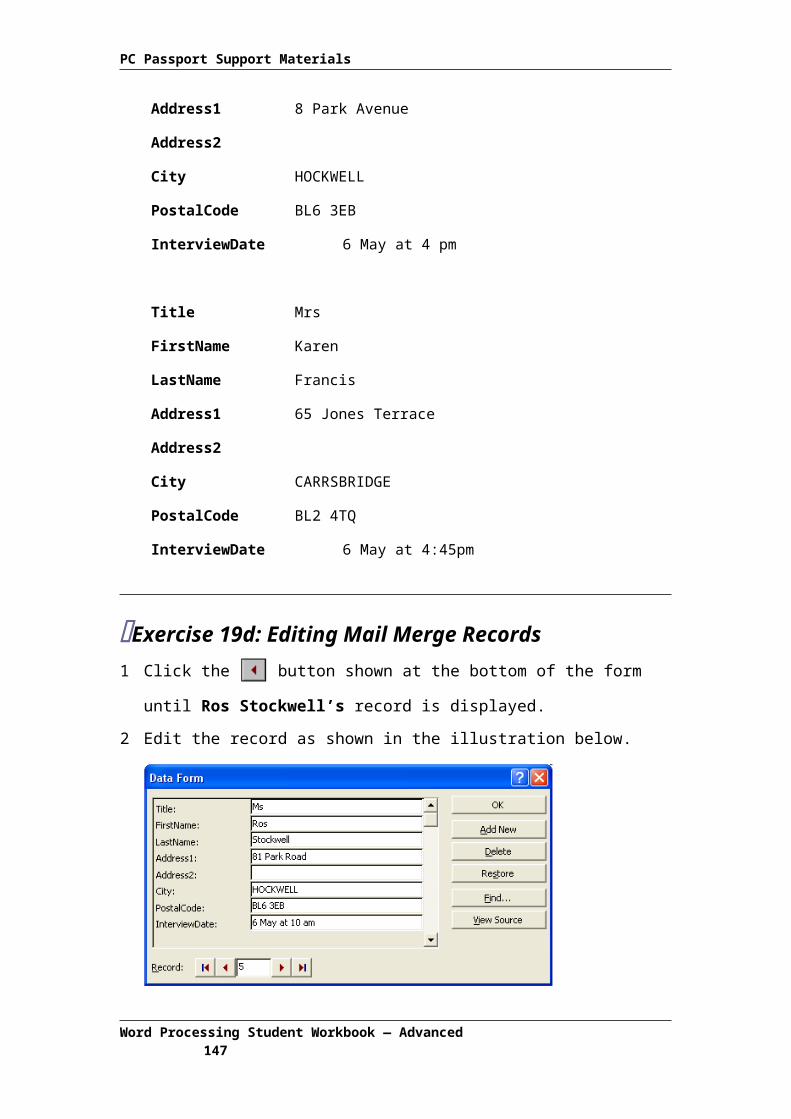
PC Passport Support Materials
With AutoRecover on, if an Office program stops responding while you have
files open, you can use the Microsoft Office Application Recovery dialogue
box and recovered files will be displayed in the Document Recovery task
pane. The data in the files reflects the last time AutoRecover saved the files.
AutoRecover should not be used as a substitute for manually saving or
backing up your files.
Change the Save Interval for Automatic File Recovery1 On the Tools menu, click Options, and then click the Save tab.
2 Select the Save AutoRecover info every check box.
3 In the Minutes box, specify how often you want your Microsoft Office
program to save files.
Automatic Backup CopiesYou can set Word to automatically save a backup copy each time you save a
document. The backup copy provides you with a previously saved copy, so
you have the current saved information in the original document and the
information saved prior to that in the backup copy. Each time you save the
document, a new backup copy replaces the existing backup copy. Saving a
backup copy can protect your work if you accidentally save changes you don’t
want to keep or you delete the original file.
How to Save a Backup Copy of a Document
1 On the File menu, click Save As.
2 Click Tools, and then click Save Options.
3 Select the Always create backup copy check box.
4 Click OK.
5 Click Save.
File Recovery ConverterYou can use the Recover Text Converter at any time to open a document that
has been damaged and recover the text.
Word Processing Student Workbook — Advanced 149

PC Passport Support Materials
After you successfully open the damaged document, you can then save it in
Word format or in another format (for example, text or HTML format). Text in
paragraphs, headers, footers, footnotes, endnotes, and fields is recovered as
plain text. Document formats, graphics, fields, drawing, and any other
information that is not text are not recovered.
How to Recover the Text from a Damaged Document
1 On the File menu, click Open.
2 In the Look in list, click the drive, folder or internet location that contains
the file that you want to open.
3 In the folder list, locate and open the folder that contains the file.
4 Select the file that you want to recover.
5 Click the arrow next to the Open button, and then click Open and Repair.
VersioningIf you want a record of changes made to a document, you can save multiple
versions of a document within the same document. You also save disk space
because Microsoft Word saves only the differences between versions, not an
entire copy of each version. After you've saved several versions of the
document, you can go back and review, open, print and delete earlier
versions.
You can save versions:
Manually — Any time you want to save a ‘snapshot’ of a document in its
current state, you can save a version of the document. For example, you
might save the version you’ve sent to review, and after you’ve incorporated
review changes save another version.
Automatically — You can have Word automatically save a version of your
document each time the document is closed. This is useful when you need
a record of who made changes and when, for example in the case of a
legal document.
Word Processing Student Workbook — Advanced 150

PC Passport Support Materials
After you’ve saved multiple versions of a document in one file, there are two
instances in which you will want to save a specific version as a separate file:
If the document you’re sending to review contains several versions and
you want to make sure that you’re sending only the most recent version or
the specific version you want. This will prevent viewers from opening
earlier versions of the document.
If you want to compare an earlier version of the document with the current
version of the document. You can use the Compare and Merge Documents command on the Tools menu to compare separate files.
How to Save a Version of a Document as a Separate File
1 On the File menu, click Versions.
2 Click the version of the document you want to save as a separate file.
3 Click Open.
4 On the File menu, click Save As.
5 In the File name box, enter a name, and then click Save.
Note: Saving multiple versions is different from saving a backup copy of a
document, which is designed to ensure against data loss or against
unintended changes. When backup saving is turned on, a new backup
replaces the existing backup each time you save the document.
If a Microsoft Office program encounters a problem and stops responding, you
can close the program in a controlled manner. The files you were working on
are analysed for errors, and information in them is recovered if possible. In
some cases, however, no information can be recovered.
How to Recover Files1 If the Microsoft Office program you are using is not responding, recover
the program.
On the Microsoft Windows Start menu, point to Programs, point
to Microsoft Office Tools, and then click Microsoft Office
Application Recovery. This may not be available in older versions of
Microsoft Office.
Word Processing Student Workbook — Advanced 151
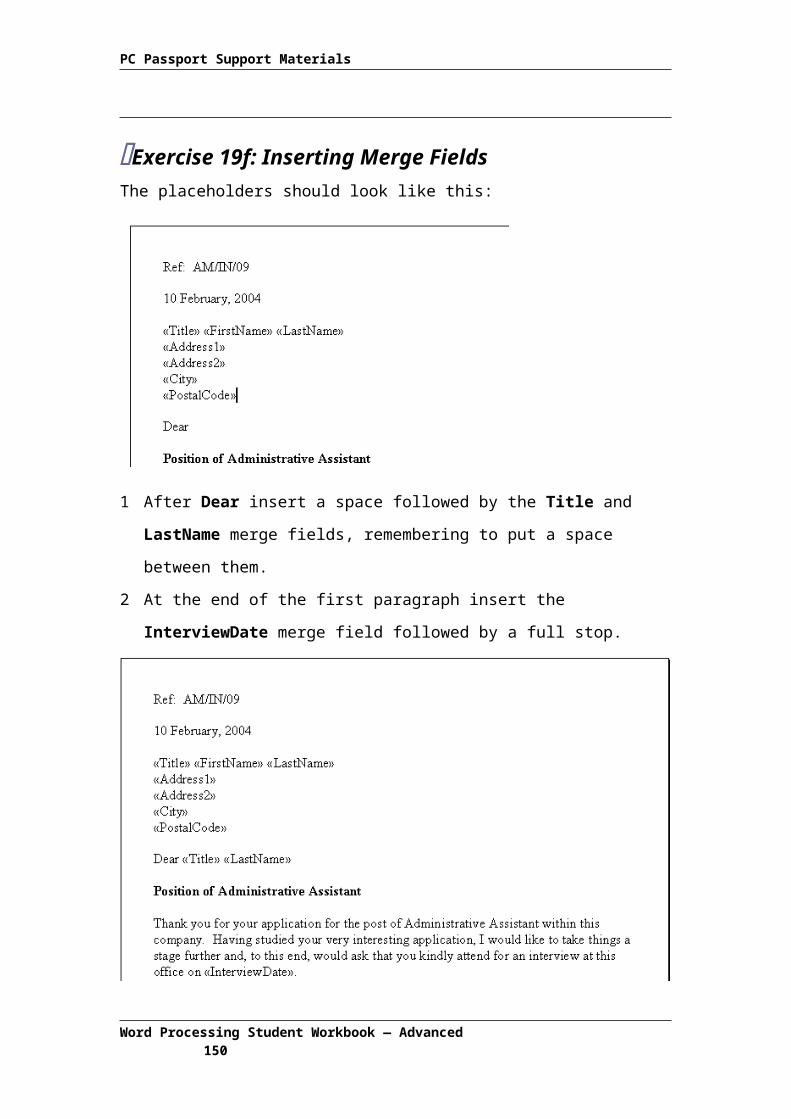
PC Passport Support Materials
In the Application list, click the program or document that is not
responding.
Do one of the following:
a) To attempt to recover the files you were working on, click Recover Application or Restart Application.
b) If you just want to close the program, and lose recent changes to the
files, click End Application.
The error that caused the problem can be reported to Microsoft
for use in improving future versions of the program. Click Report problem or Don’t report problem.
2 Open the Office program.
3 Review the files listed in the Document Recovery task pane, and decide
which to keep.
If a file has [Recovered] in the title it is usually a file that contains more
recent changes than a file with [Original] in the title.
If you want to view what repairs were made to a file, point to the
file in the Document Recovery task pane, click the arrow next to the
file’s name, and then click Show Repairs.
If you want to review the versions that were recovered, open all
of the versions and save the best one.
4 For each file you want to keep, point to the file in the Document Recovery task pane, click the arrow next to the file’s name, and then do one of the
following:
To work with the file, click Open.
To save the file, click Save As, and then enter a name for the
file. By default, the file is saved in the same folder as the original file. If
you use the same name as the original file, the original is overwritten.
When you see a message asking whether you want to replace the
existing file (with the changes you made up to the last time you saved
the file), click Yes.
5 When you have opened or saved all of the files you want to keep, click
Close in the Document Recovery task pane.
Word Processing Student Workbook — Advanced 152

PC Passport Support Materials
FinallyThe candidate should (after consultation with their tutor) be able to do the
assessment for this Unit.
This completes all the learning Outcomes for the PC Passport Word
Processing subject. Microsoft Word is one of a range of word processing
packages that could be used to achieve the same results.
Word Processing Student Workbook — Advanced 153


![Module 3 - Word Processing [ Word ]](https://static.documents.pub/doc/80x56/577daecc1a28ab223f915bf5/module-3-word-processing-word-.jpg)


