17
GEN.0000000005113 Rev B © 2017 SRAM, LLC Basic Troubleshooting Power Meter

GEN.0000000005113 Rev B© 2017 SRAM, LLC
Basic Troubleshooting
Power Meter

SRAM® LLC WARRANTY
EXTENT OF LIMITED WARRANTYExcept as otherwise set forth herein, SRAM warrants its products to be free from defects in materials or workmanship for a period of two years after original purchase. This warranty only applies to the original owner and is not transferable. Claims under this warranty must be made through the retailer where the bicycle or the SRAM component was purchased. Original proof of purchase is required. Except as described herein, SRAM makes no other warranties, guaranties, or representations of any type (express or implied), and all warranties (including any implied warranties of reasonable care, merchantability, or fitness for a particular purpose) are hereby disclaimed.
LOCAL LAWThis warranty statement gives the customer specific legal rights. The customer may also have other rights which vary from state to state (USA), from province to province (Canada), and from country to country elsewhere in the world.
To the extent that this warranty statement is inconsistent with the local law, this warranty shall be deemed modified to be consistent with such law, under such local law, certain disclaimers and limitations of this warranty statement may apply to the customer. For example, some states in the United States of America, as well as some governments outside of the United States (including provinces in Canada) may:
a. Preclude the disclaimers and limitations of this warranty statement from limiting the statutory rights of the consumer (e.g. United Kingdom).
b. Otherwise restrict the ability of a manufacturer to enforce such disclaimers or limitations.
For Australian customers:This SRAM limited warranty is provided in Australia by SRAM LLC, 1000 W. Fulton Market, 4th Floor, Chicago, IL, 60607, USA. To make a warranty claim please contact the retailer from whom you purchased this SRAM product. Alternatively, you may make a claim by contacting SRAM Australia, 6 Marco Court, Rowville 3178, Australia. For valid claims SRAM will, at its option, either repair or replace your SRAM product. Any expenses incurred in making the warranty claim are your responsibility. The benefits given by this warranty are additional to other rights and remedies that you may have under laws relating to our products. Our goods come with guarantees that cannot be excluded under the Australian Consumer Law. You are entitled to a replacement or refund for a major failure and for compensation for any other reasonably foreseeable loss or damage. You are also entitled to have the goods repaired or replaced if the goods fail to be of acceptable quality and the failure does not amount to a major failure.
LIMITATIONS OF LIABILITYTo the extent allowed by local law, except for the obligations specifically set forth in this warranty statement, in no event shall SRAM or its third party suppliers be liable for direct, indirect, special, incidental, or consequential damages.
LIMITATIONS OF WARRANTYThis warranty does not apply to products that have been incorrectly installed and/or adjusted according to the respective SRAM user manual. The SRAM user manuals can be found online at sram.com, rockshox.com, avidbike.com, truvativ.com, or zipp.com.
This warranty does not apply to damage to the product caused by a crash, impact, abuse of the product, non-compliance with manufacturers specifications of usage or any other circumstances in which the product has been subjected to forces or loads beyond its design.
This warranty does not apply when the product has been modified, including, but not limited to any attempt to open or repair any electronic and electronic related components, including the motor, controller, battery packs, wiring harnesses, switches, and chargers.
This warranty does not apply when the serial number or production code has been deliberately altered, defaced or removed.
This warranty does not apply to normal wear and tear. Wear and tear parts are subject to damage as a result of normal use, failure to service according to SRAM recommendations and/or riding or installation in conditions or applications other than recommended.
Wear and tear parts are identified as:
• Dust seals• Bushings• Air sealing o-rings• Glide rings• Rubber moving parts• Foam rings• Rear shock mounting hardware
and main seals• Upper tubes (stanchions)
• Stripped threads/bolts (aluminium, titanium, magnesium or steel)
• Brake sleeves• Brake pads• Chains• Sprockets• Cassettes• Shifter and brake cables (inner
and outer)
• Handlebar grips• Shifter grips• Jockey wheels• Disc brake rotors• Wheel braking surfaces• Bottomout pads• Bearings• Bearing races• Pawls
• Transmission gears• Spokes• Free hubs• Aero bar pads• Corrosion• Tools• Motors• Batteries
Notwithstanding anything else set forth herein, the battery pack and charger warranty does not include damage from power surges, use of improper charger, improper maintenance, or such other misuse.
This warranty shall not cover damages caused by the use of parts of different manufacturers.
This warranty shall not cover damages caused by the use of parts that are not compatible, suitable and/or authorised by SRAM for use with SRAM components.
This warranty shall not cover damages resulting from commercial (rental) use.

SAFETY FIRST!We care about YOU. Please, always wear your safety glasses and
protective gloves when servicing Quarq® products. Protect yourself! Wear your safety gear!

TABLE OF CONTENTS
POWER METER IDENTIFICATION .....................................................................................................................................................................5
QUARQ® POWER METER TROUBLESHOOTING ............................................................................................................................................6
DZERO™ AND LEGACY POWER METER BATTERY COMPARTMENT SERVICE .........................................................................................7PARTS, TOOLS, AND SUPPLIES ..................................................................................................................................................................................................................7BATTERY COMPARTMENT SERVICE .........................................................................................................................................................................................................7POWER METER REBOOT ...............................................................................................................................................................................................................................9
LEGACY POWER METER SPIDER INSPECTION SERVICE............................................................................................................................11LEGACY BATTERY COMPARTMENT EXPLODED VIEW ...................................................................................................................................................................... 11PARTS, TOOLS, AND SUPPLIES ................................................................................................................................................................................................................. 11BATTERY COMPARTMENT REMOVAL (LEGACY POWER METERS ONLY) .................................................................................................................................. 12BATTERY COMPARTMENT INSTALLATION (LEGACY POWER METERS ONLY) ......................................................................................................................... 14

5Power Meter Identification
P o w e r M e t e r I d e n t i f i c a t i o n
NOTICEIdentify the power meter platform before proceeding with any troubleshooting.
Road DZero™ Power Meter : Model name printed on power meter as either DZero or DFour.
MTB DZero Power Meter : Lacks an XX1™ graphic on the spider.
DZero platform power meters include:
• DZero Carbon and Aluminum• SRAM RED® DZero• SRAM® XX1™ Eagle®
All DZero platform power meters feature a green LED that blinks on: when the power meter turns on, and when a zero offset is performed (calibration).
Legacy Power Meter: All Legacy Platform power meters are found in the Quarq product archive.
Legacy platform power meters include:
• Riken™ AL, Riken R, Elsa™ R and Elsa RS• SRAM RED® and SRAM XX1™• Specialized® and Cannondale® power meter spiders.
All Legacy platform power meters feature a red LED that blinks on: when the power meter turns on, and when a zero offset is performed (calibration).
Identification DZero
Identification DZero
Identification MTB DZero
Green LED DZero
Red LED Legacy Power Meter
6Quarq® Power Meter Troubleshooting
Q u a r q ® P o w e r M e t e r T r o u b l e s h o o t i n g
Information contained in this publication is subject to change at any time without prior notice. For the latest technical information, please visit our website at www.quarq.com.
Your product‘s appearance may differ from the pictures/diagrams contained in this publication.
If your power meter is exhibiting any of the symptoms below, then perform the steps in this troubleshooting guide.
Battery & Battery Compartment Issues
• The power meter battery drains quicker than it should.
• LED light is on continuously. Power meter will not pair.
Firmware Related Issues
• LED light is continually flashing. Power meter will not pair to head unit.
Data Reporting & Pairing Issues
• My power meter will not calibrate (zero offset).
• I am experiencing gaps in my cadence and power data.
• My power meter will not pair to my head unit.
• My power meter will pair to my head unit, but I am getting no cadence or power data.
• My power meter is reporting cadence but not power.
Power Measurement & Zero Offset Issues
• My power meter is giving very high or low power readings.
• My zero offset value is greater than +/-1500.
• My zero offset value is frequently changing by more than +/-50 points.

7DZero™ and Legacy Power Meter Battery Compartment Service
D Z e r o ™ a n d L e g a c y P o w e r M e t e r B a t t e r y C o m p a r t m e n t S e r v i c e
P a r t s , T o o l s , a n d S u p p l i e s
Parts• CR2032 coin cell battery
Safety and Protection Supplies• Apron• Clean, lint-free rags• Isopropyl alcohol• Nitrile gloves• Safety glasses
Lubricants and Fluids• SRAM® Butter grease
Common Tools• 2 mm hex wrench• 2 mm hex bit socket• Flat blade screwdriver• Needle-nose pliers or 2 coins• T10 TORX® wrench • T10 TORX bit socket• Torque wrench
B a t t e r y C o m p a r t m e n t S e r v i c e
Use your fingers to rotate the battery compartment lid counter-clockwise and remove the lid. Remove the battery and set it aside.
NOTICEDo not use any tools to remove the battery lid. Tools can permanently damage the power meter making it inoperable.
⚠WARNINGConsult the battery manufacturer for safe handling instructions. Keep the battery out of reach of children. Do not put the battery in your mouth. If ingested, seek medical attention immediately. Do not use sharp objects to remove batteries.
Loosen the battery compartment screw a 1/4 turn, then tighten the battery compartment screw.
Apply gentle pressure to the battery compartment as you tighten it.
NOTICEIf the battery compartment screw is not tight, the base of the battery compartment may not make a good connection with the spider, and cause an intermittent signal.
1
2
2 mm or T10
2 mm or T10 1.0 N·m (9 in-lb)
8Battery Compartment Service
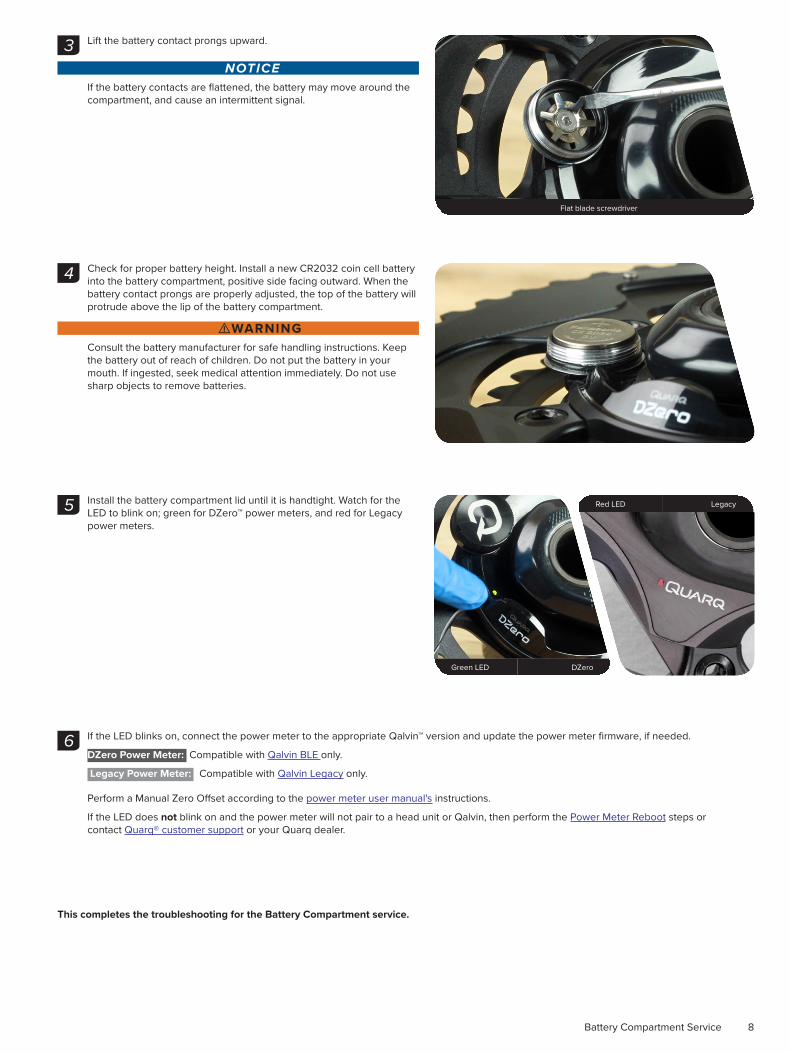
Lift the battery contact prongs upward.
NOTICEIf the battery contacts are flattened, the battery may move around the compartment, and cause an intermittent signal.
Check for proper battery height. Install a new CR2032 coin cell battery into the battery compartment, positive side facing outward. When the battery contact prongs are properly adjusted, the top of the battery will protrude above the lip of the battery compartment.
⚠WARNINGConsult the battery manufacturer for safe handling instructions. Keep the battery out of reach of children. Do not put the battery in your mouth. If ingested, seek medical attention immediately. Do not use sharp objects to remove batteries.
Install the battery compartment lid until it is handtight. Watch for the LED to blink on; green for DZero™ power meters, and red for Legacy power meters.
If the LED blinks on, connect the power meter to the appropriate Qalvin™ version and update the power meter firmware, if needed.
DZero Power Meter: Compatible with Qalvin BLE only.
Legacy Power Meter: Compatible with Qalvin Legacy only.
Perform a Manual Zero Offset according to the power meter user manual's instructions.
If the LED does not blink on and the power meter will not pair to a head unit or Qalvin, then perform the Power Meter Reboot steps or contact Quarq® customer support or your Quarq dealer.
This completes the troubleshooting for the Battery Compartment service.
3
Flat blade screwdriver
4
Green LED DZero
Red LED Legacy5
6

9Power Meter Reboot
P o w e r M e t e r R e b o o t
A power meter reboot drains voltage stored in the electronics, and resets the power meter operation.
Use your fingers to rotate the battery compartment lid counter-clockwise and remove the lid. Remove the battery and set it aside.
NOTICEDo not use any tools to remove the battery lid. Tools can permanently damage the power meter making it inoperable.
⚠WARNINGConsult the battery manufacturer for safe handling instructions. Keep the battery out of reach of children. Do not put the battery in your mouth. If ingested, seek medical attention immediately. Do not use sharp objects to remove batteries.
Use pliers to make contact on the battery compartment screw and the threads on the battery compartment at the same time. Hold the pliers in place 3-5 seconds, then remove.
Alternative method: Install two coins into the battery compartment. Install the battery compartment lid. Wait 3-5 seconds, then remove the battery compartment lid and coins.
NOTICEThe height of the coins must equal the height of the CR2032 battery. The reboot will not be successful if the coins used are not the same height as the battery.
1
2
Needle-nose pliers

10Power Meter Reboot
Install a new CR2032 coin cell battery into the battery compartment, positive side facing outward.
⚠WARNINGKeep the battery out of reach of children. Do not put the battery in your mouth. If ingested, seek medical attention immediately. Do not disassemble, damage, or puncture the battery. Consult the battery manufacturer for safe handling instructions.
Install the battery compartment lid until it is handtight. Watch for the LED to blink on; green for DZero™ power meters, and red for Legacy power meters.
If the LED blinks on, connect the power meter to the appropriate Qalvin™ version and update the power meter firmware, if needed.
DZero™ Power Meter: Compatible with Qalvin BLE only.
Legacy Power Meter: Compatible with Qalvin Legacy only.
If the LED does not blink on and the power meter will not pair to a head unit or Qalvin:
DZero™ Power Meter: Contact Quarq® customer support or your Quarq® dealer.
Legacy Power Meter: Perform the Spider Inspection steps in the following section.
This completes the troubleshooting for the Power Meter Reboot service.
3
CR2032
Green LED DZero
Red LED Legacy4
5

11Legacy Power Meter Spider Inspection Service
L e g a c y P o w e r M e t e r S p i d e r I n s p e c t i o n S e r v i c e
L e g a c y B a t t e r y C o m p a r t m e n t E x p l o d e d V i e w
Clocking pin
O-ringClocking pin hole
Battery compartment hole
Spider
Battery compartment
Battery compartment screw assembly
Battery compartment lid
CR2032 coin cell battery
P a r t s , T o o l s , a n d S u p p l i e s
Parts• CR2032 coin cell battery
Safety and Protection Supplies• Apron• Clean, lint-free rags• Isopropyl alcohol• Nitrile gloves• Safety glasses
Lubricants and Fluids• SRAM® Butter grease
Common Tools• 2 mm hex wrench• 2 mm hex bit socket• Flat blade screwdriver• T10 TORX® wrench• T10 TORX bit socket• Torque wrench

12Battery Compartment Removal (Legacy Power Meters Only)
B a t t e r y C o m p a r t m e n t R e m o v a l ( L e g a c y P o w e r M e t e r s O n l y )
NOTICEThe following section, Spider Inspection, should only be performed on a Legacy power meter. Do NOT perform the spider inspection service on a DZero™ platform power meter. DZero platform power meters include, but are not limited to DZero, DFour™, and XX1™ Eagle® power meters.
If you remove the battery compartment on a DZero platform power meter, you will damage the unit and void the warranty.
Use your fingers to rotate the battery lid counter-clockwise and remove the lid. Remove the battery and set aside.
⚠WARNINGConsult the battery manufacturer for safe handling instructions. Keep the battery out of reach of children. Do not put the battery in your mouth. If ingested, seek medical attention immediately. Do not use sharp objects to remove batteries.
NOTICEDo not use any tool to remove the battery lid. Tools can permanently damage the power meter making it inoperable. The lid should be loosened by hand.
Remove the battery compartment screw. Remove the battery compartment screw assembly and battery compartment, and set them aside.
NOTICEDo NOT remove the battery compartment on a DZero platform power meter, you will damage the unit and void the warranty. The DZero platform power meter has a green LED blink on when awake. Do not proceed if a green LED blinks on.
A Legacy power meter has a red LED blink on when the power meter is awake.
Red LED Legacy Power Meter
1
2
T10

13Battery Compartment Removal (Legacy Power Meters Only)
Remove the o-ring between the battery compartment and the spider.
Inspect the clocking pin hole under the battery compartment location for damage, such as gouging or scarring.
If damage to the clocking pin hole is present, the power meter will require inspection by Quarq®. Contact Quarq customer support or your Quarq dealer.
Inspect the battery compartment clocking pin for damage. If the clocking pin is worn down or broken, contact Quarq customer support or your Quarq dealer.
3
Good condition space between frames
space between steps
4
Damaged
Damaged
space between frames
space between steps
Good condition
5

14Battery Compartment Installation (Legacy Power Meters Only)
B a t t e r y C o m p a r t m e n t I n s t a l l a t i o n ( L e g a c y P o w e r M e t e r s O n l y )
Spray isopropyl alcohol on the battery compartment and spider and clean them with a rag.
Apply SRAM® Butter grease to the o-ring and install it onto the base of the battery compartment.
Install the battery compartment onto the spider lens. Slowly rotate the battery compartment until you feel the clocking pin enter the hole on the spider. Rotate the compartment back and forth to verify it is fully seated.
NOTICEFailure to seat the clocking pin into the hole will prevent the power meter from working properly and/or cause damage to the spider.
Use your fingers to install the battery compartment screw assembly. Tighten the battery compartment screw.
Apply gentle pressure to the battery compartment as you tighten it to prevent the clocking pin from becoming unseated.
1
2
space between frames
space between steps
3
2 mm or T10 1.0 N·m (9 in-lb)4

15Battery Compartment Installation (Legacy Power Meters Only)
Lift the battery contact prongs upward.
⚠WARNINGKeep the battery out of reach of children. Do not put the battery in your mouth. If ingested, seek medical attention immediately. Do not disassemble, damage, or puncture the battery. Consult the battery manufacturer for safe handling instructions.
NOTICEIf the battery contacts are flattened, the battery may move around the compartment and cause an intermittent signal.
Check for proper battery height. Install a new CR2032 coin cell battery into the battery compartment, positive side facing outward. When the battery contact prongs are properly adjusted, the top of the battery will protrude above the lip of the battery compartment.
Install the battery compartment lid until it is handtight. Watch for the red LED to blink on.
If the LED blinks on, connect the power meter to Qalvin™ Legacy and update the power meter firmware, if needed.
If the LED does not blink on and the power meter will not pair to a head unit or Qalvin, then perform the Power Meter Reboot steps or contact Quarq® customer support or your Quarq dealer.
Perform a Manual Zero Offset according to the power meter user manual's instructions.
This completes the troubleshooting for the Legacy Power Meter Spider Inspection service.
5
Flat blade screwdriver
6
7
8
9

This publication includes trademarks and registered trademarks of the following companies:
Cannondale® is a registered trademark of Cannodale Bicycle Corporation.
Specialized® is a registered trademark of Specialized Bicycle Componetns, Inc.
TORX® is a registered trademark of Acument Intellectual Properties, LLC

17
ASIAN HEADQUARTERS SRAM Taiwan No. 1598-8 Chung Shan Road Shen Kang Hsiang, Taichung City Taiwan R.O.C.
WORLD HEADQUARTERS SRAM LLC
1000 W. Fulton Market, 4th Floor Chicago, Illinois 60607
USA
EUROPEAN HEADQUARTERS SRAM Europe
Paasbosweg 14-16 3862ZS Nijkerk
The Netherlands
www.sram.com


