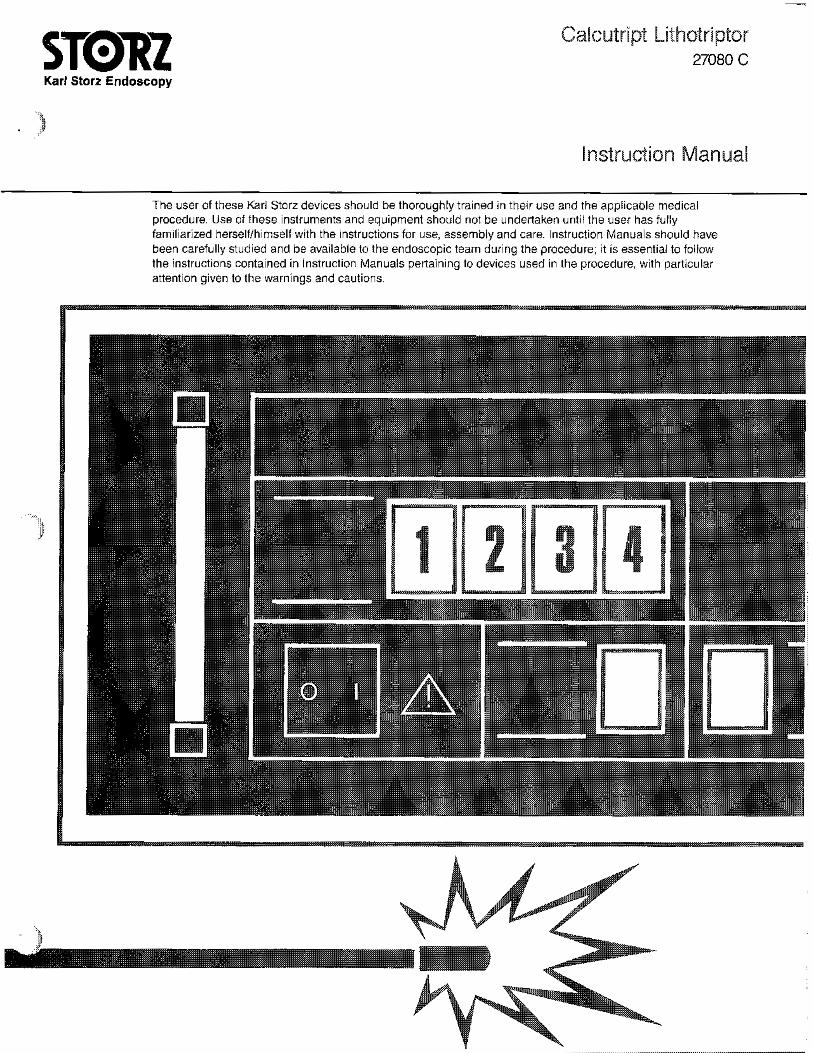
Karl Storz Endoscopy Instruction Manual The user of these Karl Storz devices should be thoroughly trained in their use and the applicable medical procedure. Use of these instruments and equipment should not be undertaken until the user has fully familiarized herselWhimselfwith the instructions for use, assembly and care. Instruction Manuals should have been carefully studied and be available to the endoscopic team during the procedure; it is essential to follow the instructions contained in instruction Manuals pertaining to devices used in the procedure, with particular attention given to the warnings and cautions.
Transcript
Karl Storz Endoscopy
Instruction Manual
The user of these Karl Storz devices should be thoroughly trained in their use and the applicable medical procedure. Use of these instruments and equipment should not be undertaken until the user has fully familiarized herselWhimself with the instructions for use, assembly and care. Instruction Manuals should have been carefully studied and be available to the endoscopic team during the procedure; it is essential to follow the instructions contained in instruction Manuals pertaining to devices used in the procedure, with particular attention given to the warnings and cautions.
Karl Storz Endoscopy
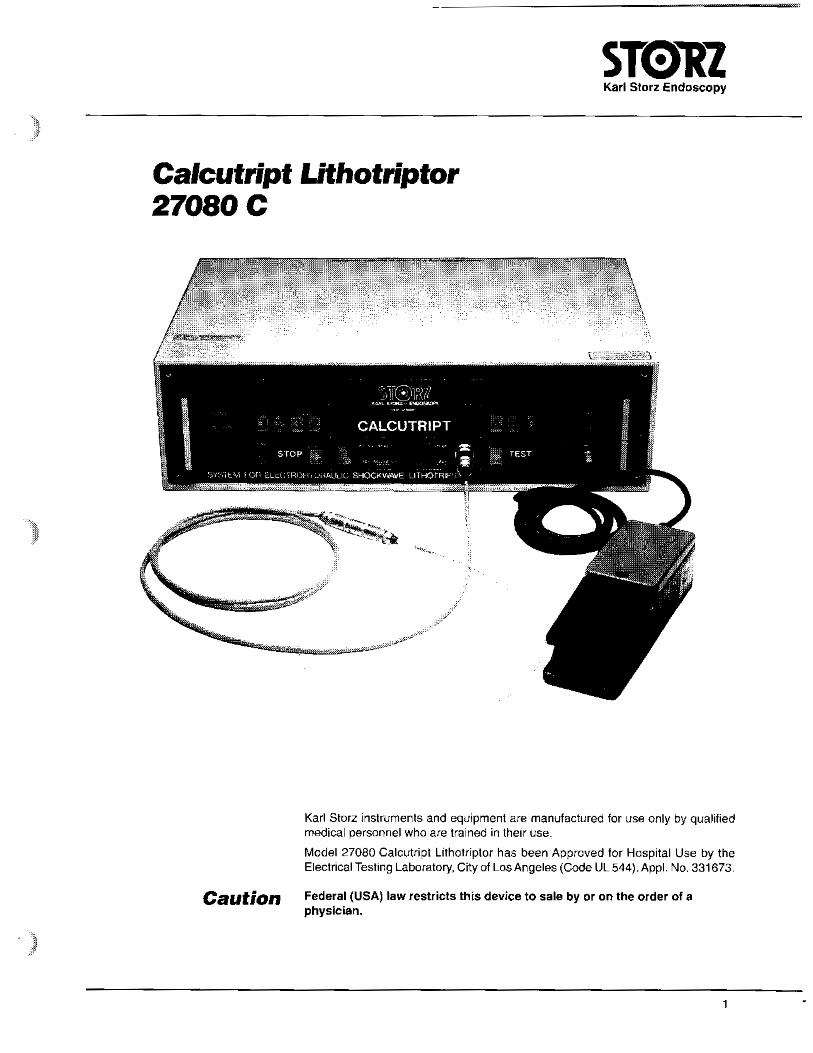
Calcutript Lithotriptor 27080 C
Karl Storz instruments and equipment are manufactured for use only by qualified medical personnel who are trained in their use.
Model 27080 Calcutript Lithotriptor has been Approved for Hospital Use by the Electrical Testing Laboratory, City of Los Angeles (Code UL 544). Appl. No. 331 673.
Caution Federal (USA) law restricts this device to sale by or on the order of a physician.
Karl Storz Endoscopy
General Warning
The user of these Karl Storz devices should be thoroughly trained in their use and the applicable medical procedure. Use of these instruments and equipment should not be undertaken until the user has fully familiarized herselflhimself with the instructions for use, assembly and care. lnstruction Manuals should have been carefully studied and be available to the endoscopic team during the procedure; it is essential to follow the instructions contained in Instruction Manuals pertaining to devices used in the procedure, with particular attention given to the warnings and cautions. If more lnstruction Manuals or other Care and Maintenance literature are needed, Karl Storz should be contacted and they will be sent at no charge.
Care must be exercised during endoscopic procedures, or the instruments may be broken and surrounding tissue injured. Possible injuries may include perforation, electrical or thermal burns, infection and breakage of the instruments which may produce foreign bodies.
Karl Storz endoscopes and endoscopic instruments are made as small and atraumatic as possible. They are therefore delicate and should not be subjected to excess force or pressure. Never force a sheath, telescope or instrument; they should enter smoothly and easily. When viewing through a telescope, be aware that a change in the normal view to a reduced non-round image is a warning that the telescope is being bent and may be broken. Before every procedure, carefully inspect the instruments and equipment to be certain that they were cleaned and maintained properly between procedures, and are fully functional.
Light sources use high intensity lamps which produce heat as well as light. Thermal burns can be caused by the light source, and the light output of the fiber cable or endoscope. All electrical equipment must be used with grounded hospital grade receptacles, and properly maintained, to protect against electrical shock.
Summary THOROUGHLY STUDY INSTRUCTION MANUALS AND ALL CARE AND MAINTENANCE LITERATURE BEFORE USE OF THE INSTRUMENTS AND EQUIPMENT.
USE ENDOSCOPES WITH THE CARE NECESSARY FOR ALL DELICATE INSTRUMENTS.
TRAINED PERSONNEL SHOULD HANDLE ENDOSCOPES BETWEEN CASES WHILE THEY ARE CLEANED, DISINFECTED AND/OR STERILIZED.
CAREFULLY INSPECT THE ENDOSCOPE SETS BEFORE EACH PROCEDURE.
. . ContentS General Descrlpt~on .................................................................................................. 6 Contraindications for Electrohydraulic Lithotripsy ...................... .. ........... 6
Inspection Before a Procedure ..................... .. ............................................ 6 ........................................................................................................... Generator 6 ....................................................................................................... Power Cord 6
Operation ................................................................................................................... 10 After Testing Has Been Completed ........................................................ 10
......................................................................... Repair Program ........................... .. 17
........................................................................... Related Parts and Accessories 19
Karl Storz Endoscopy
General Descrintion
The Calcutript Lithotriptor (#27080C) is specifically designed for the electrohydraulic fragmentation of urinary or biliary calculi into pieces which can then be mechanically extracted from the urinary or biliary tract by flushing with
I fluid or with a stone basket or forceps.
The generator produces an energy force which is carried through the connection cable @! to the probe @. The probe tip @, placed in situ in a fluid medium directly in front of the calculus, discharges the energy as a spark, causing a shock wave which fragments the stone. Clinical testing and use have shown this method to be very effective for the fragmentation of urinary or biliary calculi of all sizes and composition.
The generator features four different intensity settings @ - @ for calculi of varying compositions, and four frequency settings @ - @ for duration of pulses.
A choice of 1.6 Fr., 3.0 Fr., 4.5 Fr., and 7.0 Fr. probes are offered for compatibility with different styles of endoscopes and for use on calculi throughout the urinary or biliary systems. Probes are intended for one-time use only and, except for test purposes, are never to be operated other than in situ.
The generator is activated by a footswitch @.
Confrajndjcafjons 1. EHL is contraindicated in high-risk patients, urinary and biliary tract infections,
for ~ l ~ ~ t ~ ~ h ~ d ~ ~ ~ l j ~ stones of low radiodensity and poor visibility.
2. The possibility of perforation is inherent to any endoscopic procedure. It is Lithotripsy remote during EHL, however, because it is a continuously visual procedure.
3. In cases requir~ng extended operation because of multiple stones, an additional procedure may be required for residual stones. (Contra~ndication based on slze and site of stones is impossible since it is difficult to determine stone accessibility before endoscopic inspection.)
4. Consult a cardiologist before using this device on a patient who has an externally connected intracardiac catheter or pacemaker.
Inspection Inspect equipment upon receipt and prior to each procedure. Damaaed - - eaui~ment should be removed from service and returned . . Before a
Pmcedure Before a procedure, the Calcutript Lithotriptor should be inspected for integrity and completeness of parts.
Generator Press all intensity pushbuttons @ - @ and frequency pushbuttons @ - @ to make sure they click in and out properly.
Power Cord Routinely inspect electrical plug and cord a. Do not use if inspection reveals any damage.
Footswitch Inspect footswitch cable @ to make sure there are no tears
Check that footswitch @ moves up and down freely.
Connection Cable Inspect connection cable @ to make sure it is free of tears.
and Probe The probe @ should be free of kinks.
Se+Up and (Numbers in this section refer to main illustrative description.)
The generator, footswitch, cables, and probe should be completely assembled Assembly prior to any procedure.
Warnings Keep equipment out of reach of patient.
Remove any electrosurgical unit dispersive electrode prior to use (i.e. grounding pad or patient plate.)
Do not use or store liquids on or above generator @. Electrical Shock Hazard. Do not remove outside case. Refer servicing to Karl Storz service personnel.
Explosion Hazard. Do not use in presence of flammable anesthetics.
Do not operate probes in air or inside endoscope. Operate probes in sterile saline only.
Do not use probes for more than one procedure. Discard probes after use.
Never bring probe tips into direct contact with tissue. Discharge while in contact with tissue can cause tissue damage.
No member of the O.R. staff should touch the patient or any electrically conductive object in contact with the patient during shockwave delivery without wearing surgical gloves.
Set-Up 1. Connect power cord @ to power connection @ on back of generator and to a wall socket. Grounding reliability is guaranteed only when connected to "Hospital Use" or "Hospital Grade" receptacle.
2. Attach plug @ of footswitch @ to footswitch socket @ on generator. Tighten the outer securing collar @ on footswitch plug when connecting footswitch to socket.
Karl ~ t o r ~ ~ n d o s c o ~ ~
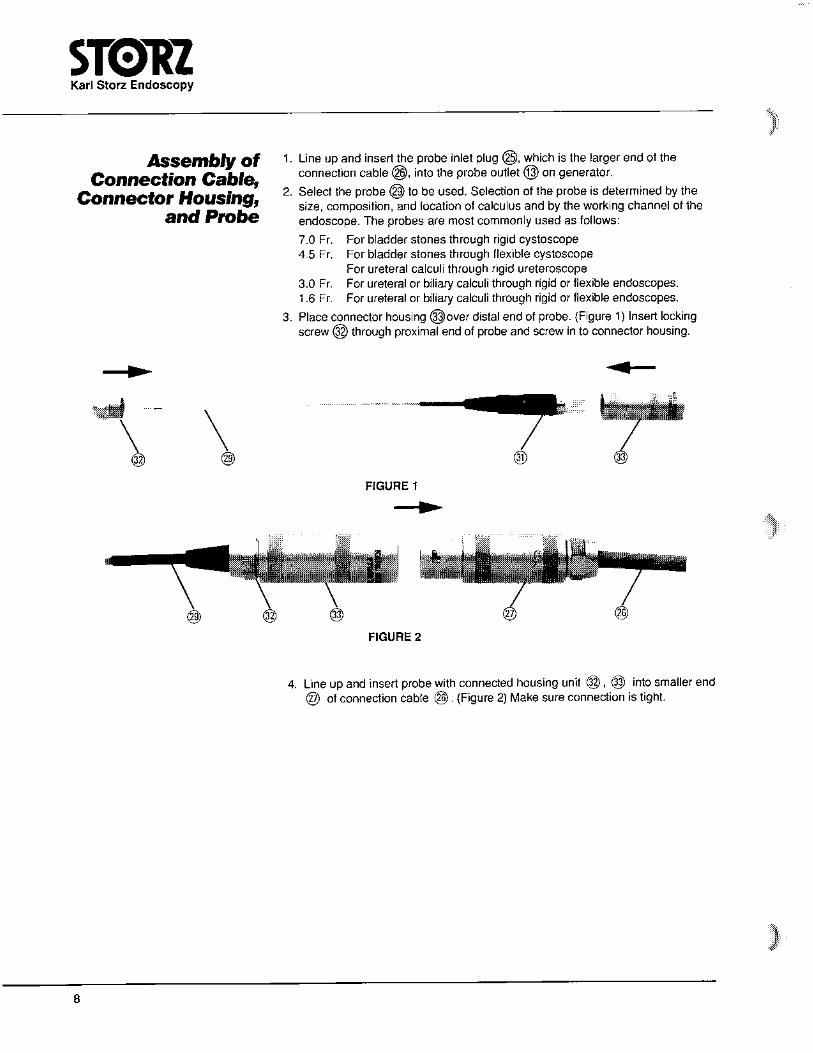
Assembly of 1. Line up and insert the probe inlet plug @, which is the larger end of the
Connection Cable, connection cable @, into the probe outlet @ on generator.
2. Select the probe @to be used. Selection of the probe is determined by the Connector size, composition, and location of calculus and by the working channe of the and Probe endoscope. The probes are most commonly used as follows:
7.0 Fr. For bladder stones through rigid cystoscope 4.5 Fr. For bladder stones through flexible cystoscope
For ureteral calculi through rigid ureteroscope 3.0 Fr. For ureteral or biliary calculi through rigid or flexible endoscopes. 1.6 Fr. For ureteral or biliary calculi through rigid or flexible endoscopes.
3. Place connector housing @over distal end of probe. (Figure 1) Insert locking screw @? through proximal end of probe and screw in to connector housing.
FIGURE 1
+
FIGURE 2
4. Line up and insert probe with connected housing unit @ , 8 into smaller end @ of connection cable a. (Figure 2) Make sure connection is tight.
Warnings Do not operate probe @ in air, even briefly.
Do not try to use probes for more than one procedure. Discard used probes.
Testing Immediately prior to any procedure, the probe should be tested in a sterile field.
1. Press the intensity button 1 @ and frequency button A @. These are the only positions for testing. Use of other buttons will destroy the probe.
2. Turn main power switch @ "ON!' Intensity button 1 and frequency button A should light up yellow. If lights do not come on:
A. Check power cord connection @ to generator and to wall socket.
B. Turn lithotriptor off and check the circuit breaker by unscrewing the fuse box @ in the back with a coin. If a new fuse is necessary, disconnect unit from wall outlet and insert fuse (T4A250V).
C. Check for presence of proper voltage at wall socket.
3. If the "Replace Probe" light @ lights up, it means a used probe has been attached. Remove and discard. Replace with a new probe.
4. If the probe is acceptable, and the intensity and frequency lights are on, press the test pushbutton @ . The electronic circuitry is in proper working order if the pushbutton lights up green.
5. Test the probe further by inserting the probe tip @ in normal saline solution inside a foam or paper cup. If using a glass or metal container, take extra care not to touch the sides of such containers when firing the probe.
6. Press footswitch @I. The probe tip @ should cause a "popping" sound and a flash of bright light in the solution. If there is no flash and popping sounds, replace probe and test again.
NOTE: When testing, do not touch the bare wire @ or probe tip @ . Handle by connection cable @$ or connector housing @ only.
Karl ~ t o r z - ~ n d o s c o p ~
Operation To maintain satisfactory performance of the Calcutript Lithotriptor, periodic operational check should be made.
The Calcutript Lithotriptor employs the principle of a capacitor discharge to establish electrohydraulic waves in a fluid medium. The generator features four different intensity settings @ - @ for calculi of varying compositions, and four frequency settings @ - @ for duration of pulses. Always begin lithotripsy at the lowest possible settings and, if desired results are not achieved, increase the settings. Remember, the purpose of electrohydraulic lithotripsy is only to fragment stones into pieces manageable for mechanical extraction, not to cause total pulverization.
After testing has 1. Insert probe @ through working channel of endoscope. To avoid damage to the endoscope, the probe tip @ should be a minimum of 5mm from the
been com~l@ted: endoscope tip.
2. Select and press the desired intensity level, 1 through 4.
3. Select and press the appropriate frequency level:
Level A: Single pulse Level B: Continuous pulse frequency (2.0 Hz) Level C: Rising pulse frequency (2.5 - 6 Hz) Level D: 3 groups of 15 pulses each
4. Turn the power switch @ "ON." Selected intensity button and frequency button should light up yellow. "Replace Probe" light @should be off.
5. Insert endoscope with probe into patient.
6. The procedure must be done with direct endoscopic visualization of the probe tip @. Prior to electrode discharge, make sure:
A. Probe tip is at least 5mm from the tip of the endoscope.
B. Probe tip is in fluid medium of normal saline solution.
- - - Karl Storz Endoscopy
C. Probe tip is approximately 1 millimeter from the calculus. Note: For biliary calculi, the probe tip should be placed approximately I mm from the stone for optimal results (stone fragmentation). The user may place the probe tip less than I mm from the stone, or actually touch the stone, but fragmentation will take longer.
D. Probe tip is not in contact with tissue or common bile duct wall. Warning: Discharge in contact with tissue or common bile duct wall can cause damage.
7. When all above conditions are met, the electrode can be discharged by depressing the footswitch @. Expect to see a flash of bright light. If desired results are not achieved, gradually increase settings.
8. If there is a problem, the unit can immediately be put out of operation by pressing the "stop" button a. The stop function can only be reset by turning the unit off and by switching it on again.
Pmcedure Settings For Bladder Stones: we suggest a beginning intensity setting of 2 and a frequency of B. After beginning at this minimal setting the stone density and content may require higher settings. These may proceed up to the maximum settings of both intensity and frequency.
For Ureteral Stones: we suggest a beginning setting of 1 A progressing next to 2 A and then to 2 B. 2 B is suggested as a maximum for this anatomical area.
For Kidney Stones: we suggest a beginning setting of 1 A progressing to 1 8. If the stone does not respond by breaking up, move to 2 A, then 2 B.
For Biliary Stones: we suggest a beginning setting of 1 A progressing to 1 B. If no response then go to 2 A, then 2 B.
warnings Sterile saline is the recommended irrigant. Do not use sterile water. Salinity is necessary to ensure that probes will fire.
Use D mode ONLY with 7 Fr. probes.
Never use levels 3 and 4 with 1.6 Fr. and 3 Fr. probes.
Never exceed a setting of 2 B when using flexible scopes.
Never exceed a setting of 2 B in the ureter.
Never exceed a setting of 2 8 in the biliary tree.
Karl Storz Endoscopy
~ou&leshooting If there is no output, proceed as follows:
1. Check power cord connection @ to generator and to wall socket.
2. Turn power @ to lithotriptor off and check the circuit breaker by unscrewing the fuse box @ in the back with a coin. If a new fuse is necessary, disconnect unit from wall outlet and insert fuse (T4A250V).
3. Check for presence of proper voltage at wall socket.
If there is no spark, proceed as follows:
1. Make sure "Replace Probe" @ light is not lit. If it is, turn unit off and replace probe. Turn unit on.
2. If "Replace Probe" light is not lit, turn unit off and check the probe outlet connection @ and footswitch connection @ .
3. Turn unit on. Make sure intensity button 1 @ and frequency button A @ are on. Press the test pushbutton @ . The electronic circuitry is in proper working order if the test pushbutton lights up green.
4. Test the probe by inserting the probe tip @ in normal saline solution and pressing footswitch @.
Karl Storz Endoscopy
NOTE: When testing, do not touch the bare wire @ or probe tip @? Handle by connection cable @ or connector housing @ only.
Cleaning To maintain maximum performance and long service life for the Calcutript Lithotriptor, cleaning is essential.
1. Remove the connection cable @ and footswitch @ from generator a. To remove footswitch, loosen outer securing collar @ on footswitch plug @I.
2. The generator and footswitch can be cleaned with any cleaner safe for painted surfaces.
3. Remove the probe distal plug @ from the connector housing @ by unscrewing the locking screw @. DISCARD THE PROBE @ . It is intended for one-time use only.
4. Prepare a basin with a solution of warm water and a mild detergent. Clean the connector housing @ and locking screw @ with the solution and an instrument channel brush.
5. Clean outside of connection cable @ with the solution and a soft cloth. Clean cable plugs @ , @ with cleaning solution and a brush or water pistol. Use
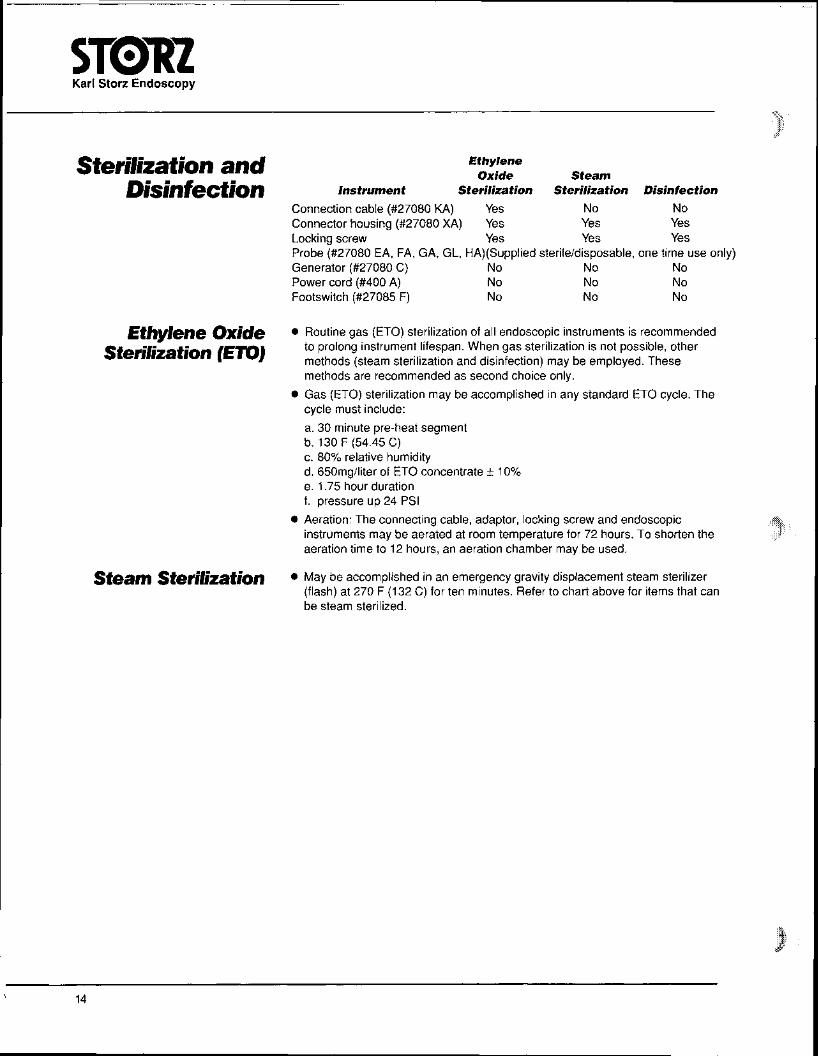
Connection cable (#27080 KA) Yes No No Connector housing (#27080 XA) Yes Yes Yes Locking screw Yes Yes Yes Probe (#27080 EA, FA, GA, GL, HA)(Supplied sterile/disposable, one time use only) Generator (#27080 C) No No No Power cord (#400 A) No No No Footswitch (#27085 F) N o No No
Routine gas (ETO) sterilization of all endoscopic instruments is recommended to prolong instrument lifespan. When gas sterilization is not possible, other methods (steam sterilization and disinfection) may be employed. These methods are recommended as second choice only.
Gas (ETO) sterilization may be accomplished in any standard ETO cycle. The cycle must include:
a. 30 minute pre-heat segment b. 130 F (54.45 C) c. 80% relative humidity d. 650mg/liter of ETO concentrate k 10% e. 1.75 hour duration f. pressure up 24 PSI
Aeration: The connecting cable, adaptor, locking screw and endoscopic instruments may be aerated at room temperature for 72 hours. To shorten the aeration time to 12 hours, an aeration chamber may be used
7
Steam Steri/ization May be accomplished in an emergency gravity displacement steam sterilizer (flash) at 270 F (132 C) for ten minutes. Refer to chart above for items that can
Karl Storz Endoscopy
Disinfection 1. Meticulous cleaning prior to disinfection is essential.
2. Only EPA registered hard surface disinfection solutions capable of high level disinfection should be used. Solutions with an acidic pH or which contain a high percentage of surfactants are not recommended.
3. Disinfect connection cable @ , connector housing @ and locking screw @ according to solution manufacturer's instructions.
4. Make sure to completely remove all disinfection solution with sterile water. inadequate rinsing of disinfection solution may lead to electrical malfunction. Gentle agitation helps remove disinfection solution. Two separate and very thorough rinses with agitation are recommended.
5. Do not allow instruments to remain in any solution, including sterile water, for more than thirty (30) minutes.
6. Thorough drying is essential. Electrical contacts must be given particular attention and be completely dry before use. For best results, use an air pistol.
Sf orage The CaCutript Lithotriptor should be covered and stored off the floor in a dry location. The lithotriptor is a rugged instrument; however, care should be taken
Handling not to drop or unduly jar the unit.
Karl ~ t o r ~ ~ n d o s c o ~ ~
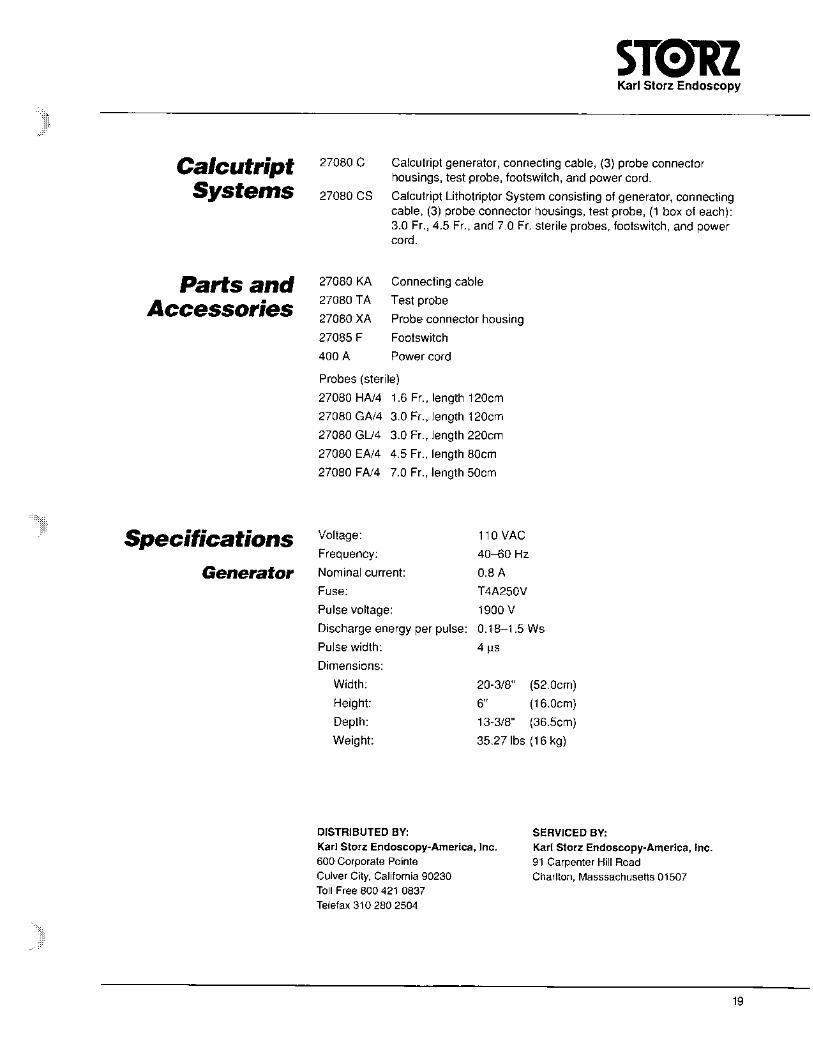
Calcutript 27080 C Calcutript generator, connecting cable, (3) probe connector housings, test probe, footswitch, and power cord.
Systems 27080 CS Calcutript Lithotriptor System consisting of generator, connecting cable, (3) probe connector housings, test probe, (1 box of each): 3.0 Fr., 4.5 Fr., and 7.0 Fr. sterile probes, footswitch, and power cord.
PartS and 27080 KA Connecting cable
27080 TA Test probe
Accessories 27080 XA Probe connector housing
27085 F Footswitch
400 A Power cord
Probes (sterile)
27080 HA14 1.6 Fr., length 120cm
27080 GAl4 3.0 Fr., length 120cm
27080 GLl4 3.0 Fr., length 220cm
27080 EAl4 4.5 Fr., length 80cm
27080 FA14 7.0 Fr., length 50cm
Specifications Frequency:
Generafor Nominal current:
Fuse:
Pulse voltage:
Discharge energy per pulse:
Pulse width:
Dimensions:
Width:
Height:
Depth:
Weight:
110 VAC
40-60 HZ
0.8 A
T4A250V
1900 V
0.18-1.5 WS
4 I.ls
20-318" (52.0cm)
6" (1 6.0cm)
13-318" (36.5cm)
35.27 Ibs (1 6 kg)
DISTRIBUTED BY: SERVICED BY: Karl Storz Endoscopy-America, Inc. Karl Storz Endoscopy-America, Inc. 600 Corporate Pointe 91 Carpenter Hill Road Culver City, California 90230 Charlton, Masssachusetts 01507 Toll Free 800 421 0837