Quick Guide TL-QG-001 TopconLink Data Transfer with TopconLink (version 5.04) Introduction The latest version of TopconLink introduces increased functionality for use with the GPT7000i range of Imaging Total Stations. It also introduces new ways of downloading from Topcon’s diverse range of data collecting devices and rationalizes the number of options available when downloading from Windows CE based devices. Once installation has been completed, the program can be run from the Topcon program group located on the Start menu. Downloading from within the program From the File menu, select Import from Device or press Shift-F3. The following dialog box shows the various options that are available to use for downloading. Double click on the device you wish to download from in the left hand pane. N.B. If these options aren’t available to you, use the Look in: drop down to navigate through to My Computer. If the options aren’t there, then it may be that the installation hasn’t completed and may need to be repeated. Downloading from GTS-600, 700, 800 (and derivatives) Total Stations Select the Topcon Total Station icon in the above dialog and the following option will be displayed (N.B. if you have already created connections, they will be listed here). Double click on this Add New Station icon… And from the following dialog choose the appropriate settings for you instrument (here the connection is shown as being GTS-700) using COM Port 4 and type GTS-700 / 710. On the advanced tab, the correct communications parameters are set. Page 1 of 10
Transcript
Quick Guide TL-QG-001 TopconLink
Data Transfer with TopconLink (version 5.04) Introduction The latest version of TopconLink introduces increased functionality for use with the GPT7000i range of Imaging Total Stations. It also introduces new ways of downloading from Topcon’s diverse range of data collecting devices and rationalizes the number of options available when downloading from Windows CE based devices.
Once installation has been completed, the program can be run from the Topcon program group located on the Start menu.
Downloading from within the program From the File menu, select Import from Device or press Shift-F3. The following dialog box shows the various options that are available to use for downloading.
Double click on the device you wish to download from in the left hand pane. N.B. If these options aren’t available to you, use the Look in: drop down to navigate through to My Computer. If the options aren’t there, then it may be that the installation hasn’t completed and may need to be repeated.
Downloading from GTS-600, 700, 800 (and derivatives) Total Stations Select the Topcon Total Station icon in the above dialog and the following option will be displayed (N.B. if you have already created connections, they will be listed here). Double click on this Add New Station icon…
And from the following dialog choose the appropriate settings for you instrument (here the connection is shown as being GTS-700) using COM Port 4 and type GTS-700 / 710. On the advanced tab, the correct communications parameters are set.
Page 1 of 10
Quick Guide TL-QG-001 TopconLink
Page 2 of 10
Once the connection has been created, it can be started by double clicking on the appropriate icon in the list (GTS-700 below)…
The connection name will be shown in the Look in: field at the top of the dialog, and a file called file1.txt will be nominally selected which will contain the required download data (N.B. This file can not be renamed at this stage… if you wish to give the file a different name; you will need to rename it once it has been transferred). On the right hand side of the dialog, select the folder on your computer where you wish the downloaded data to be saved to.
Select file1.txt and click once on the button in the middle of the dialog marked >>. Note if the file already exists on your computer, you will receive the following warning…
If this is okay, press Yes to continue and the following dialog will appear with instructions as to what to do next. Basically, at this stage you have opened a communication port on the PC and you will now need to send the data down from the instrument.
Quick Guide TL-QG-001 TopconLink
Page 3 of 10
Once you have started to send the data from the total station, the status will change from ‘Waiting for start…’ to ‘Downloading…’. After the download has completed, the above dialog will automatically disappear and you will be left back at the Import from Device screen where you will now see the file1.txt file on the right hand side. This file can now be renamed in any of the standard ways, including right clicking on the file name and select Rename from the context menu.
Note: the type of data exported is controlled entirely from the instrument, TopconLink will accept whatever is sent, whether that is raw data, points or (for SSS based instruments) DXF data. For this reason, it is essential to give appropriate file name and extensions to all files that have been downloaded; i.e. GT7 for raw data (see below), XYZ for coordinated points, DXF for AutoCAD files.
Viewing the data Once the file has been downloaded, it can be opened and viewed in TopconLink. Having pressed close on the above dialog, from the File menu, select Open and from the following dialog choose the appropriate format type for the file you wish to open. This step is important to help TopconLink accurately identify the file type you are working with…
Quick Guide TL-QG-001 TopconLink Press Open once you have carried this out and the file will be loaded into the program. The following was a downloaded raw data file. As can be seen from the right hand view, if it has sufficient control and orientation, then point coordinates will be computed for the data. If not, this information can be added and produced by selecting Compute Coordinates from the Process menu (see below for further details).
Downloading from GTS-220, 300, GPT-3000 (and derivatives) Total Stations Select the Topcon Total Station icon in the above dialog and the following option will be displayed (N.B. if you have already created connections, they will be listed here). Double click on this Add New Station icon…
And from the following dialog choose the appropriate settings for you instrument (here shown as GTS-220) using COM Port 4 and type GTS-220. On the advanced tab, the correct communications parameters are set.
In the same way as shown above, open a new connection and move the file1.txt file across to the download folder…
The following dialogs will appear to inform you of what needs to be done next…
Page 4 of 10
Quick Guide TL-QG-001 TopconLink
Page 5 of 10
Once the download has been completed, rename the file to something more appropriate, bearing in mind the need to identify a file correctly by its file extension. (N.B. when downloading a GPT-3000, ensure that GTS not SSS is selected)
To open and view the file repeat the above procedure, selecting the correct file format name (click on the Advanced options tab to ensure that all the correct settings have been used as shown below… )
To save the downloaded coordinate data as a DXF, select File / Save As and then choose GIS Files / DXF Files.
Computing Coordinates from Raw Data As discussed previously, it is possible within TopconLink to compute the coordinates of raw data by adding the required data. Once the coordinates of the occupied point have been entered or checked, from the Process menu, select Compute Coordinates…
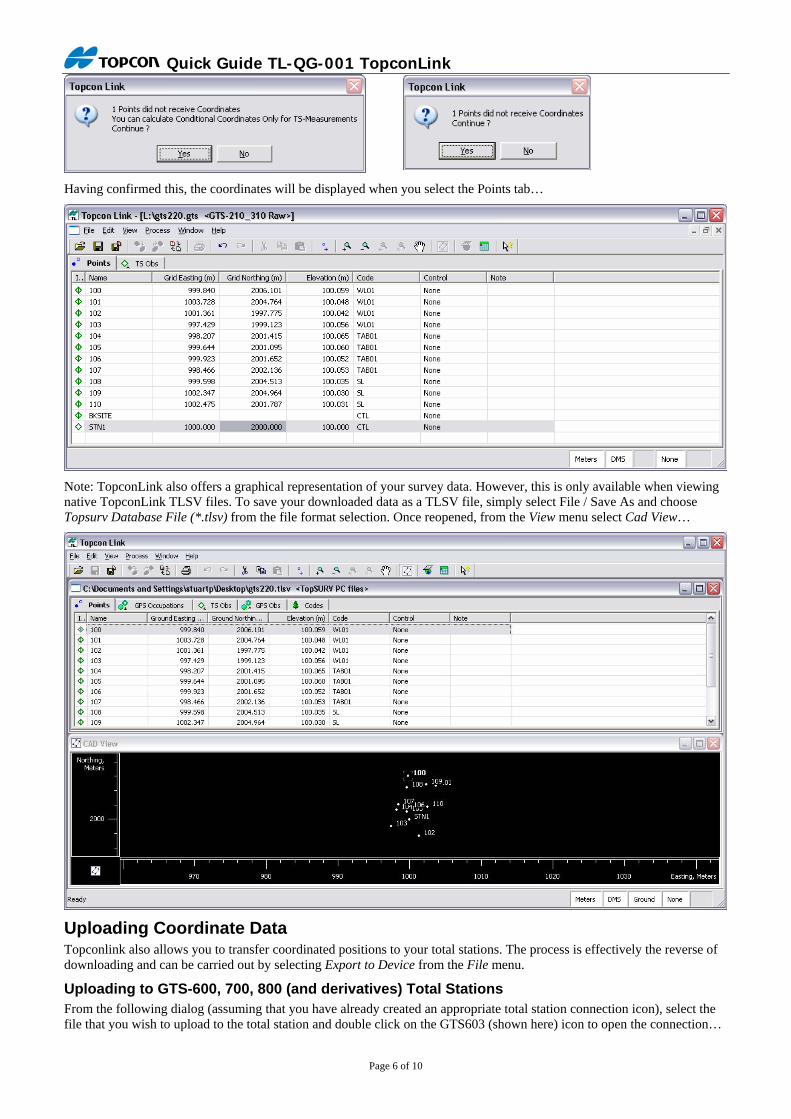
If your backsight point isn’t coordinated (i.e. you have only referenced it by horizontal and vertical angles), then you will receive the following warning dialogs:
Quick Guide TL-QG-001 TopconLink
Page 6 of 10
Having confirmed this, the coordinates will be displayed when you select the Points tab…
Note: TopconLink also offers a graphical representation of your survey data. However, this is only available when viewing native TopconLink TLSV files. To save your downloaded data as a TLSV file, simply select File / Save As and choose Topsurv Database File (*.tlsv) from the file format selection. Once reopened, from the View menu select Cad View…
Uploading Coordinate Data Topconlink also allows you to transfer coordinated positions to your total stations. The process is effectively the reverse of downloading and can be carried out by selecting Export to Device from the File menu.
Uploading to GTS-600, 700, 800 (and derivatives) Total Stations From the following dialog (assuming that you have already created an appropriate total station connection icon), select the file that you wish to upload to the total station and double click on the GTS603 (shown here) icon to open the connection…
Quick Guide TL-QG-001 TopconLink
Page 7 of 10
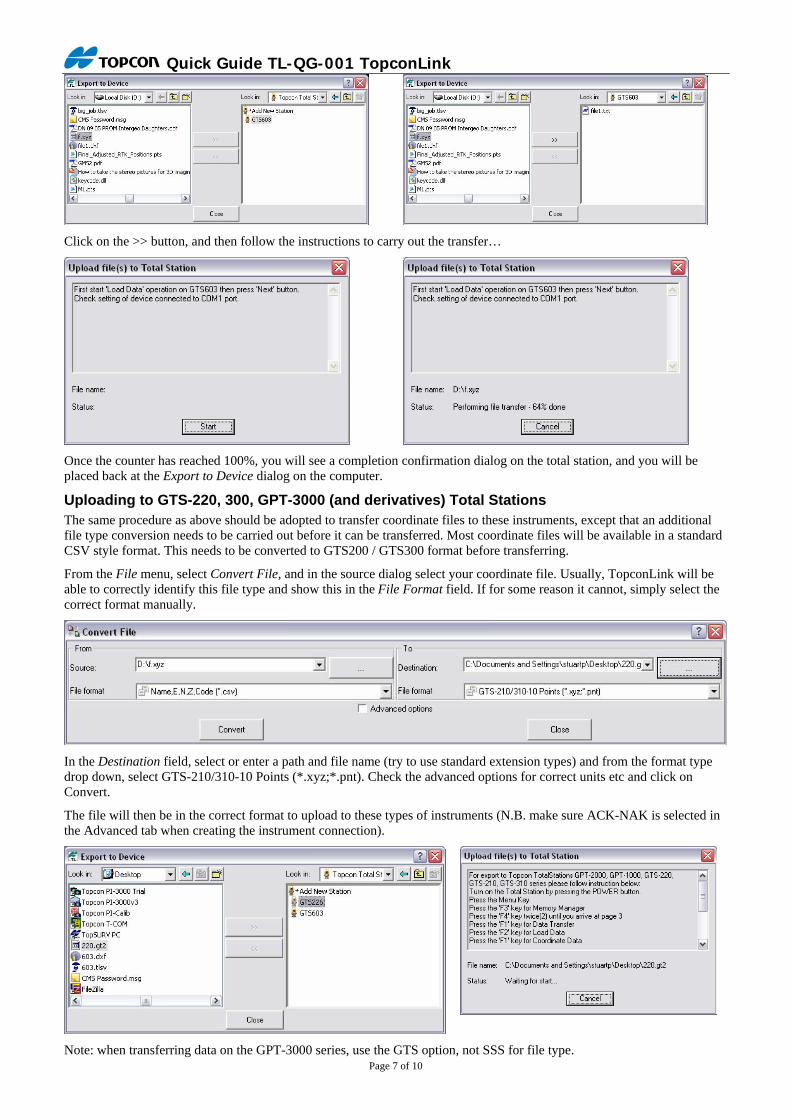
Click on the >> button, and then follow the instructions to carry out the transfer…
Once the counter has reached 100%, you will see a completion confirmation dialog on the total station, and you will be placed back at the Export to Device dialog on the computer.
Uploading to GTS-220, 300, GPT-3000 (and derivatives) Total Stations The same procedure as above should be adopted to transfer coordinate files to these instruments, except that an additional file type conversion needs to be carried out before it can be transferred. Most coordinate files will be available in a standard CSV style format. This needs to be converted to GTS200 / GTS300 format before transferring.
From the File menu, select Convert File, and in the source dialog select your coordinate file. Usually, TopconLink will be able to correctly identify this file type and show this in the File Format field. If for some reason it cannot, simply select the correct format manually.
In the Destination field, select or enter a path and file name (try to use standard extension types) and from the format type drop down, select GTS-210/310-10 Points (*.xyz;*.pnt). Check the advanced options for correct units etc and click on Convert.
The file will then be in the correct format to upload to these types of instruments (N.B. make sure ACK-NAK is selected in the Advanced tab when creating the instrument connection).
Note: when transferring data on the GPT-3000 series, use the GTS option, not SSS for file type.
Quick Guide TL-QG-001 TopconLink
Windows CE based devices (Total Station or Data Collector) TopconLink also allows for data transfer to and from Windows CE devices. The major difference to the way that the non-Windows CE devices transfer is that a program called Microsoft ActiveSync needs to be loaded and running on the computer to enable a connection.
Downloading Files Once ActiveSync is loaded on your computyer, connect the device to the PC either via the supplied serial or USB cable and check for an active connection by looking for the green ActiveSync icon in the Windows Taskbar…
From the File menu, select Import from Device and select the Mobile Device option in the left hand side of the dialog…
This will open the Windows CE device at its root directory; you will need to navigate through to the internal memory storage area where Topsurv stores its jobs. This location is dependent upon which device you are downloading from; on the FC1000 its the Storage Card, on the FC100 its CF Card and on the Windows CE total stations, its Internal Memory…
From here, double click on the Topsurv installation folder which will be either Topsurv or TPS Topsurv…
Finally making your way to the Jobs sub-folder…
On the left hand side, all of the available Topsurv job databases will be displayed. Simply select the file that you are interested in and click on the >> button…
Page 8 of 10
Quick Guide TL-QG-001 TopconLink
Page 9 of 10
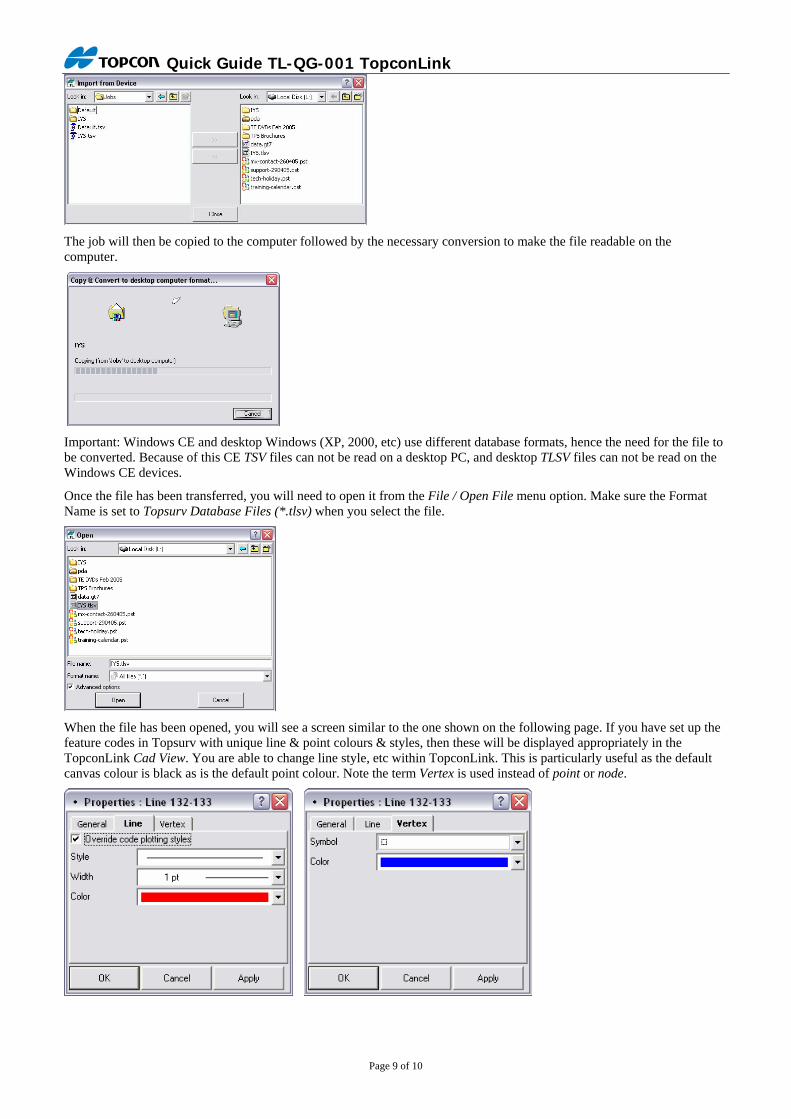
The job will then be copied to the computer followed by the necessary conversion to make the file readable on the computer.
Important: Windows CE and desktop Windows (XP, 2000, etc) use different database formats, hence the need for the file to be converted. Because of this CE TSV files can not be read on a desktop PC, and desktop TLSV files can not be read on the Windows CE devices.
Once the file has been transferred, you will need to open it from the File / Open File menu option. Make sure the Format Name is set to Topsurv Database Files (*.tlsv) when you select the file.
When the file has been opened, you will see a screen similar to the one shown on the following page. If you have set up the feature codes in Topsurv with unique line & point colours & styles, then these will be displayed appropriately in the TopconLink Cad View. You are able to change line style, etc within TopconLink. This is particularly useful as the default canvas colour is black as is the default point colour. Note the term Vertex is used instead of point or node.
Quick Guide TL-QG-001 TopconLink
The TLSV database shown above is one that has been downloaded from the imaging total station GPT-7000i. In such cases, you will notice an extra tab along with the observations called Images.
If you click on this tab, you will be able to see all of the images that were taken with the instrument, both the wide angle shots and the telescopic images. Clicking on a point in the cad view should automatically select the appropriate telescopic image and vice versa.
Data can then be exported in a variety of formats to be used in your mapping and modelling software.