107
PDM Guide PDM Core User Guide Authored by: Adenium Systems Training Department
PDM Guide PDM Core User Guide
Authored by:
Adenium Systems Training Department

Document History
Initial Release: Wednesday, July 25, 2007
Latest Release: Wednesday, September 19, 2007
Release Number: 18
Printed: Wednesday, September 19, 2007 © 2007 Adenium Systems Inc. All rights reserved. The information contained in this document represents the current view of Adenium Systems on the issues discussed as of the date of publication. Because Adenium Systems must respond to changing market conditions, it should not be interpreted to be a commitment on the part of Adenium Systems, and Adenium Systems cannot guarantee the accuracy of any information presented after the date of publication. This document is for informational purposes only. Adenium Systems MAKES NO WARRANTIES, EXPRESS OR IMPLIED, IN THIS DOCUMENT. Adenium Systems is the registered trademarks or trademarks of Adenium Systems in the United States and/or other countries. Other product and company names mentioned herein may be the trademarks of their respective owners. Adenium Systems • 34103 Lakeshore Blvd • Cleveland, OH 44095• USA
CCOONNTTEENNTTSS PDM OVERVIEW........................................................................................................... 6 Logging into PDM Pro 6 Projects Tab Overview 7 Contacts Tab Overview 8 Documents Tab Overview 9 Notifications Tab Overview 10 Bid Packages Tab Overview 11 My Account Tab Overview 12
PROJECT MANAGEMENT .......................................................................................... 13 Creating a New Project 13
CONTACT MANAGEMENT ......................................................................................... 18 Organizing Contacts 18 Searching for Contacts 20 Creating Contact Lists 21 Creating New Contacts 23 Importing Contacting Lists 30 Sharing Contacts 34 Emailing Contacts 35
DOCUMENT MANAGEMENT ...................................................................................... 37 Documents Tab Operations 37 Document Manager Operations 39
Adding Files to a Documents Folder 40 Copying Documents Between Folders 44 Opening a Document 45 Creating a Subfolder 46 Adding Documents to Folders by Browsing 47 Adding Documents to Folders by Drag and Drop 49 Editing a Document 51 Undoing a Checkout 54 Extracting Documents 56 Re-sequencing Documents 59 Modifying Document Statuses 61 Removing Documents From a Folder 63
MANAGING THE BIDDING PROCESS ........................................................................ 65 Prequalifying Bidders 66
Inviting Potential Bidders to Prequalify 66 Collecting Potential Bidder Prequalification Information 70 Viewing Detailed Prequalification Information for Each Bidder 73 Selecting Prospective Bidders for the Project 75

Defining Bid Packages 76 Creating Bid Packages 76 Organizing Bid Documents 80 Adding Bidders to Bid Packages 82 Adding Bidders to Bid Packages 83 Sending Invitations to Bid for a Bid Package 84 Sending Invitations to Bid for a Bid Package 85
Inviting Subcontractors to Bid 90 Subcontractor Receives Email Invitation to Bid 90 Sub Reviews Bid Package in Online Plan Room 91 Subcontractor Replies with bidding intentions 94
Managing Subcontractor Bid Responses 95 Reviewing the Bidder Coverage 97 Bid Package Report 98
Processing an Addenda 99 Awarding the Bid Package 104
MANAGING USER SETTINGS .................................................................................. 106 Managing My Account 106

PDM User Guide 5
PDM User Guide 6
PPDDMM OOVVEERRVVIIEEWW PDM Pro is a Windows Remote Application developed with the latest Internet Technology. It runs on the local computer as a native windows application, but connects to a remote web server for services and data. This provides the rich user interface of a windows application with the easy deployment and maintenance of a web application.
A user can access this application from any PC in the world. They simply have to connect to a special page or link we set up on their web site and click on the PDM button. PDM will then install the appropriate software on the PC each time it is executed.
PDM is an application that allows you to manage the way you communicate with other people on the project and also how you store, access, and distribute documents. PDM is a sophisticated tool that allows you to manage your documents, bid packages, contacts, notifications, reports and many other things related to your project.
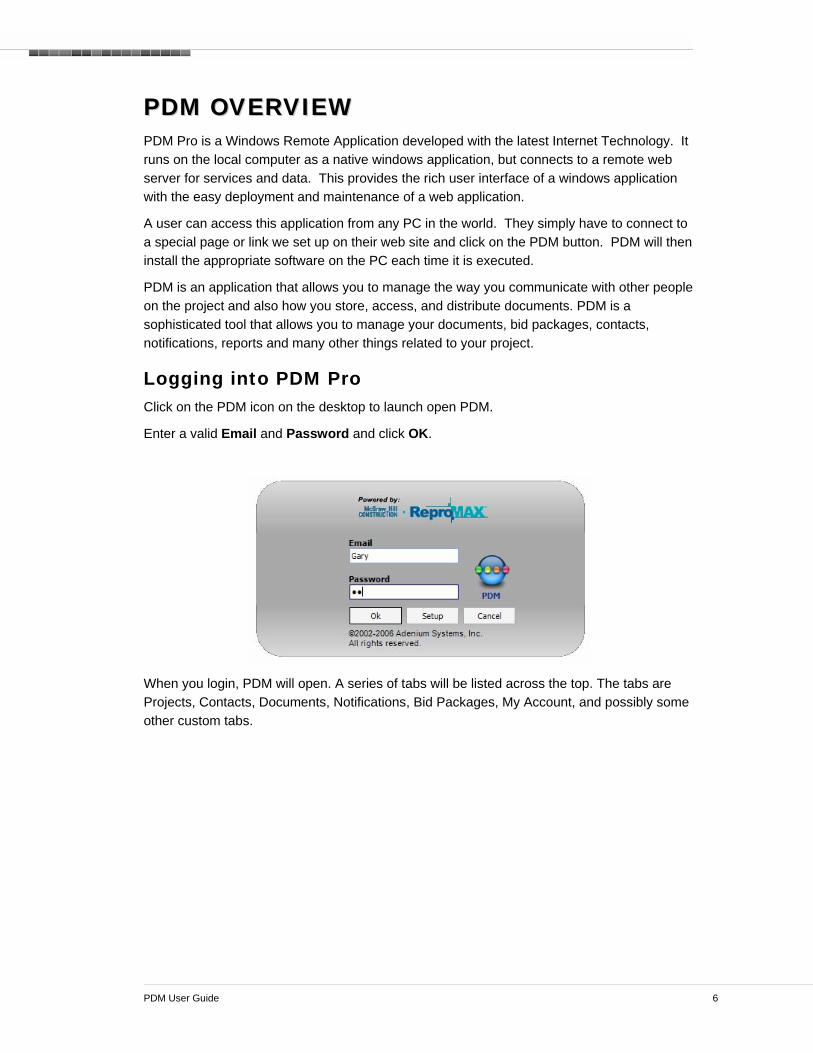
Logging into PDM Pro Click on the PDM icon on the desktop to launch open PDM.
Enter a valid Email and Password and click OK.
When you login, PDM will open. A series of tabs will be listed across the top. The tabs are Projects, Contacts, Documents, Notifications, Bid Packages, My Account, and possibly some other custom tabs.
PDM User Guide 7
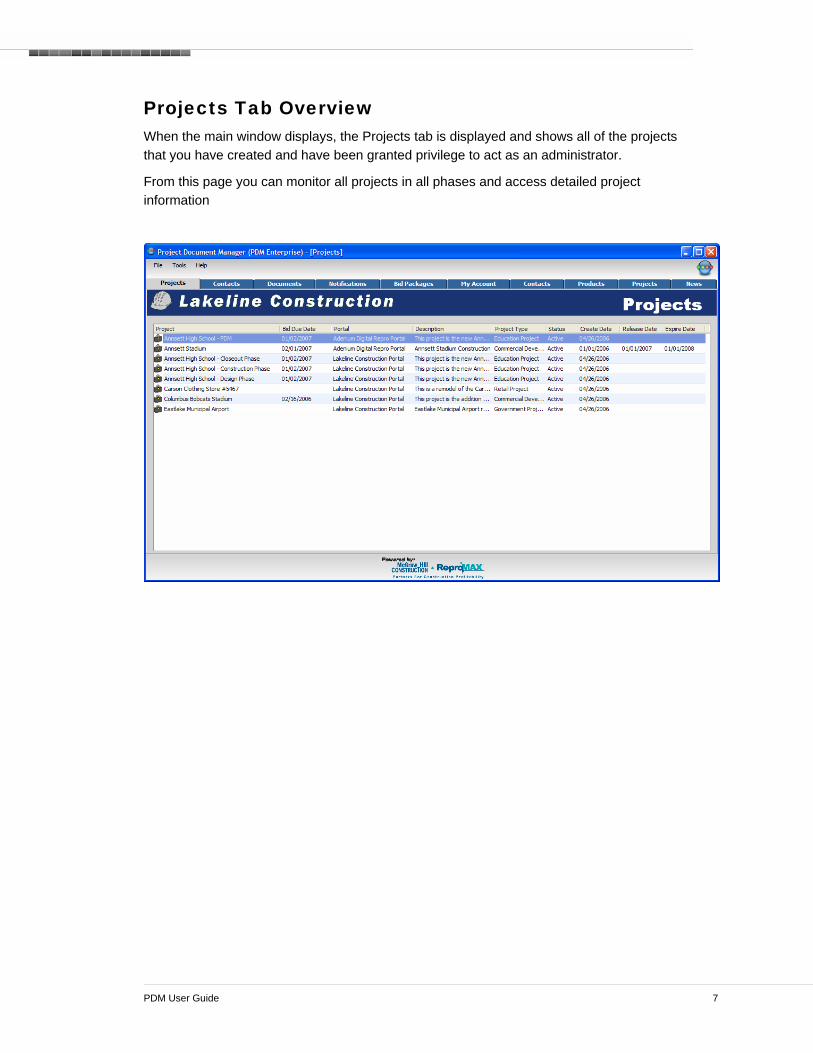
Projects Tab Overview When the main window displays, the Projects tab is displayed and shows all of the projects that you have created and have been granted privilege to act as an administrator.
From this page you can monitor all projects in all phases and access detailed project information
PDM User Guide 8
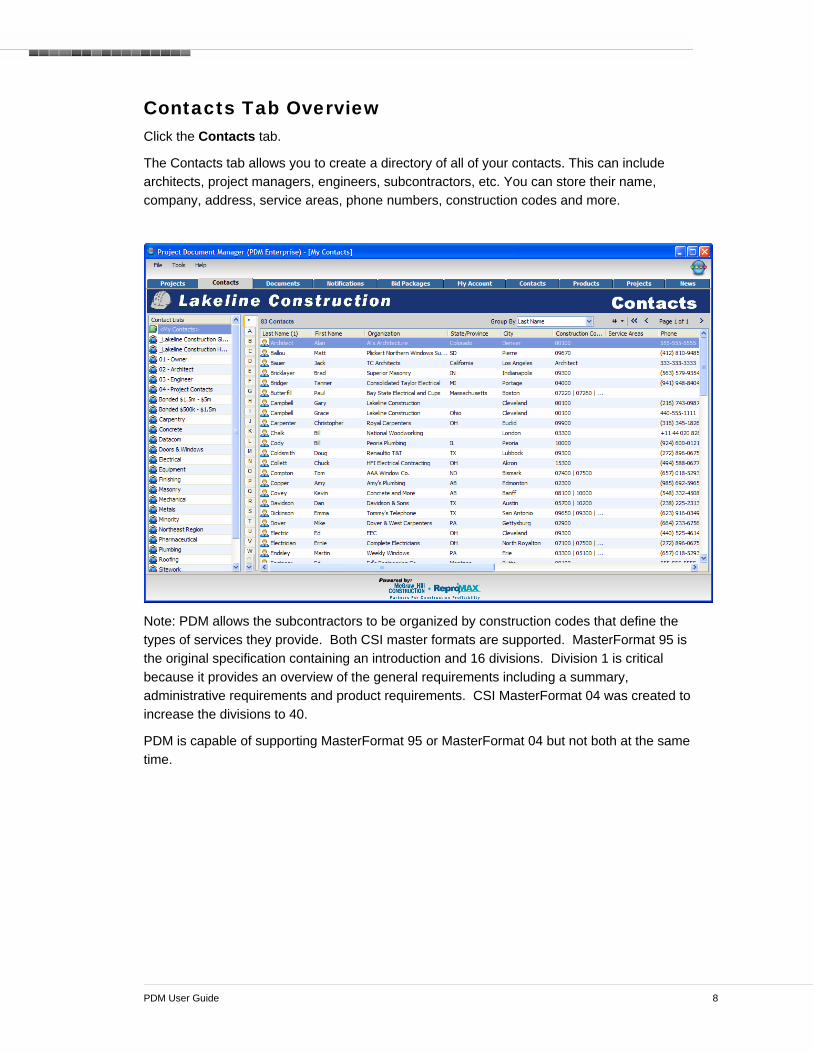
Contacts Tab Overview Click the Contacts tab.
The Contacts tab allows you to create a directory of all of your contacts. This can include architects, project managers, engineers, subcontractors, etc. You can store their name, company, address, service areas, phone numbers, construction codes and more.
Note: PDM allows the subcontractors to be organized by construction codes that define the types of services they provide. Both CSI master formats are supported. MasterFormat 95 is the original specification containing an introduction and 16 divisions. Division 1 is critical because it provides an overview of the general requirements including a summary, administrative requirements and product requirements. CSI MasterFormat 04 was created to increase the divisions to 40.
PDM is capable of supporting MasterFormat 95 or MasterFormat 04 but not both at the same time.
PDM User Guide 9
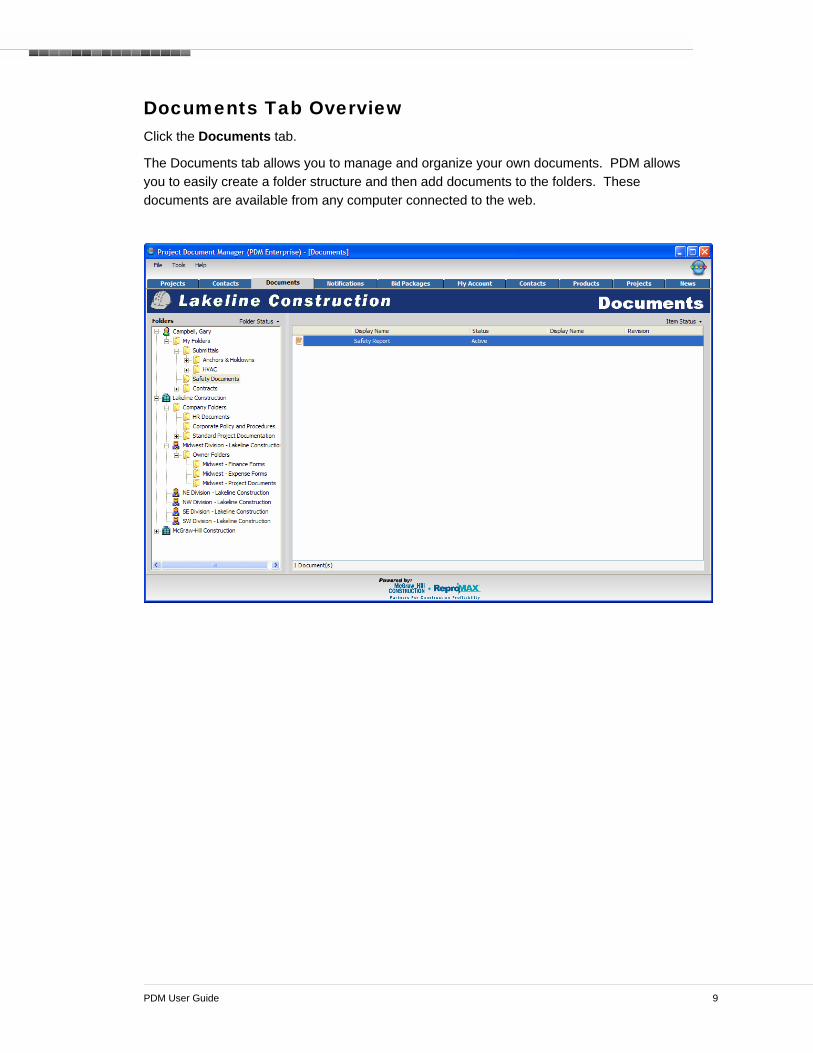
Documents Tab Overview Click the Documents tab.
The Documents tab allows you to manage and organize your own documents. PDM allows you to easily create a folder structure and then add documents to the folders. These documents are available from any computer connected to the web.
PDM User Guide 10
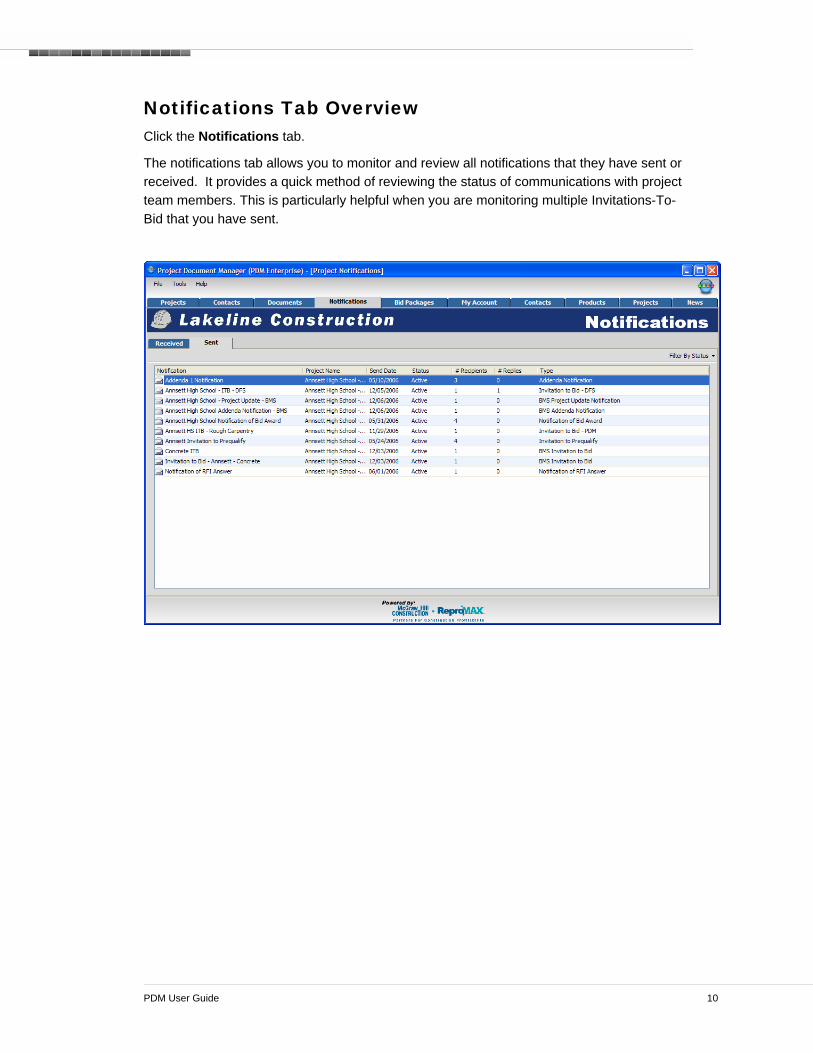
Notifications Tab Overview Click the Notifications tab.
The notifications tab allows you to monitor and review all notifications that they have sent or received. It provides a quick method of reviewing the status of communications with project team members. This is particularly helpful when you are monitoring multiple Invitations-To-Bid that you have sent.
PDM User Guide 11
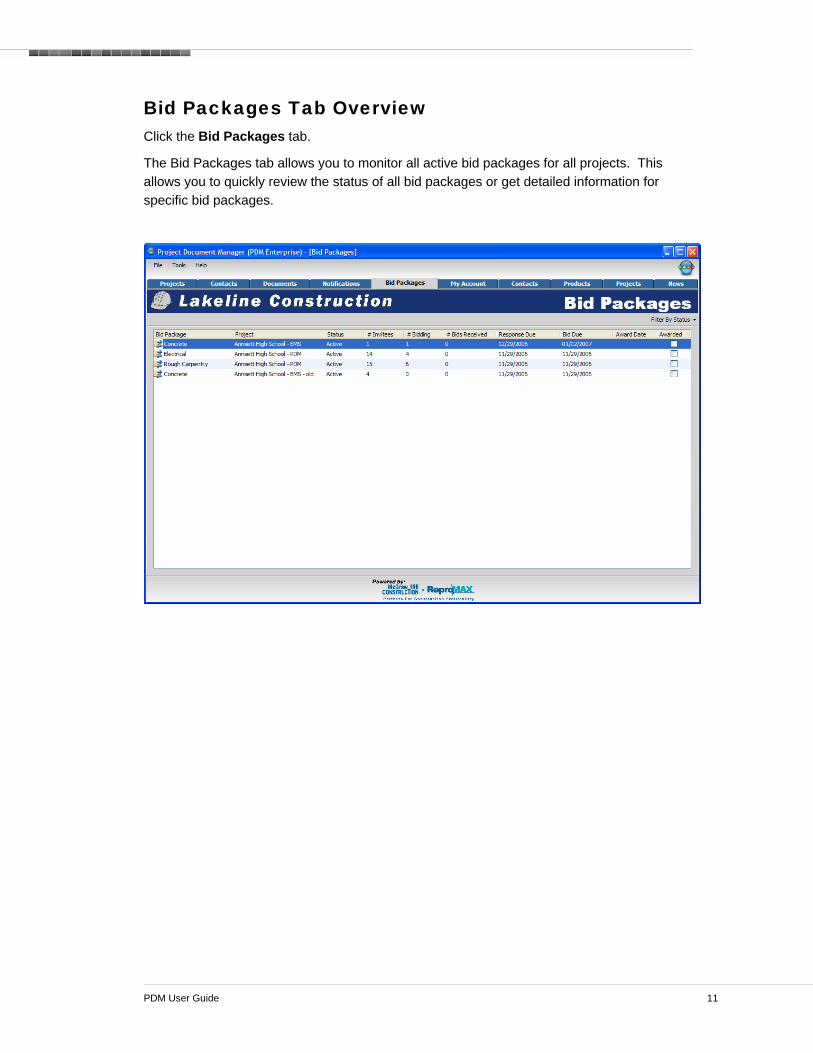
Bid Packages Tab Overview Click the Bid Packages tab.
The Bid Packages tab allows you to monitor all active bid packages for all projects. This allows you to quickly review the status of all bid packages or get detailed information for specific bid packages.

PDM User Guide 12
My Account Tab Overview Click the My Account tab.
The My Account tab allows you to enter your public and private contact information and notes.

PDM User Guide 13
PPRROOJJEECCTT MMAANNAAGGEEMMEENNTT Creating a New Project PDM allows you to manage your projects. You select the projects that you want to manage and display in your “Projects” tab. Each project contains a name, description, thumbnail, and attributes.
To create a new project, click the Projects tab.
Right click and select Manage My Projects.
PDM User Guide 14
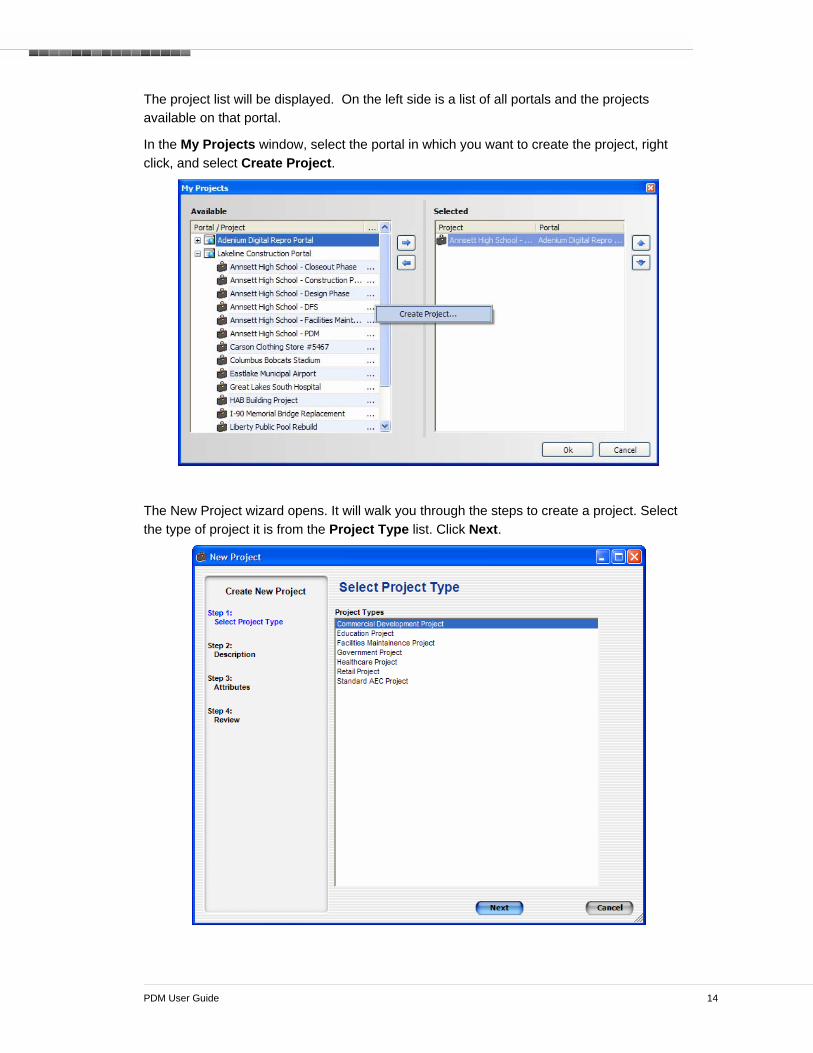
The project list will be displayed. On the left side is a list of all portals and the projects available on that portal.
In the My Projects window, select the portal in which you want to create the project, right click, and select Create Project.
The New Project wizard opens. It will walk you through the steps to create a project. Select the type of project it is from the Project Type list. Click Next.

PDM User Guide 15
Enter the Project information like Display Name, Description, Status, and Default Print Location. Click Next.
Enter the Attribute information. Click Next.
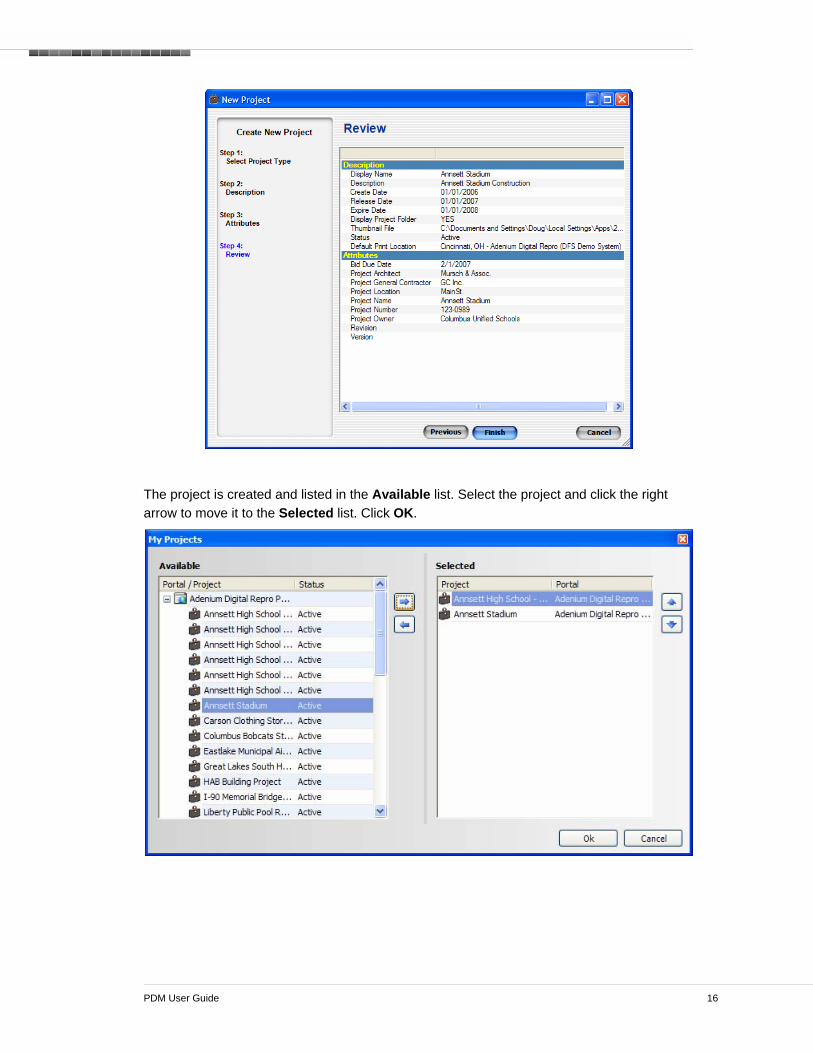
Review the project and click Finish.
PDM User Guide 16
The project is created and listed in the Available list. Select the project and click the right arrow to move it to the Selected list. Click OK.

PDM User Guide 17
The project is listed on the Projects tab.
PDM User Guide 18
CCOONNTTAACCTT MMAANNAAGGEEMMEENNTT PDM contains a very robust contact management system that is easy to use. Contacts can easily be created, imported, organized, and searched for. Contacts can be managed at two levels, at the global level and the project level.
Organizing Contacts There are many ways that you can organize and search for contacts in PDM. With large numbers of contacts, you can find them by browsing through contact lists, by sorting by fields, by sorting by groups, or by running a search based on criteria.
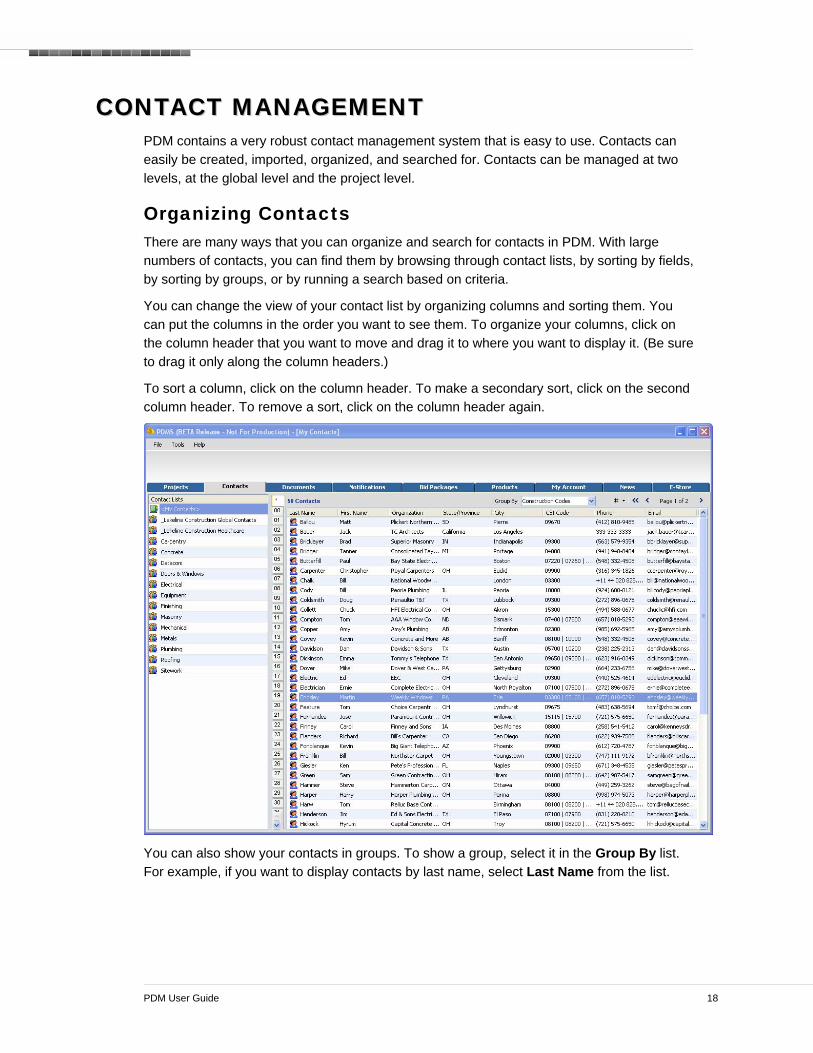
You can change the view of your contact list by organizing columns and sorting them. You can put the columns in the order you want to see them. To organize your columns, click on the column header that you want to move and drag it to where you want to display it. (Be sure to drag it only along the column headers.)
To sort a column, click on the column header. To make a secondary sort, click on the second column header. To remove a sort, click on the column header again.
You can also show your contacts in groups. To show a group, select it in the Group By list. For example, if you want to display contacts by last name, select Last Name from the list.

PDM User Guide 19
When you do this, the tabs down the side will allow you to easily see contacts that start with that letter or number. Click on the tab that contains the information you want to display.
For example, if you want to show all of the contacts with the last name that begins with “S”, click on the “S” tab.
The list will display all of the contacts with the last name beginning with “S”.
Click the star (*) to display all.
You can also group contacts by First Name, Organization, and Construction Codes.
PDM User Guide 20
Searching for Contacts When you have very large contact lists, or when you are having trouble locating a contact, you can search for contacts by any attribute.
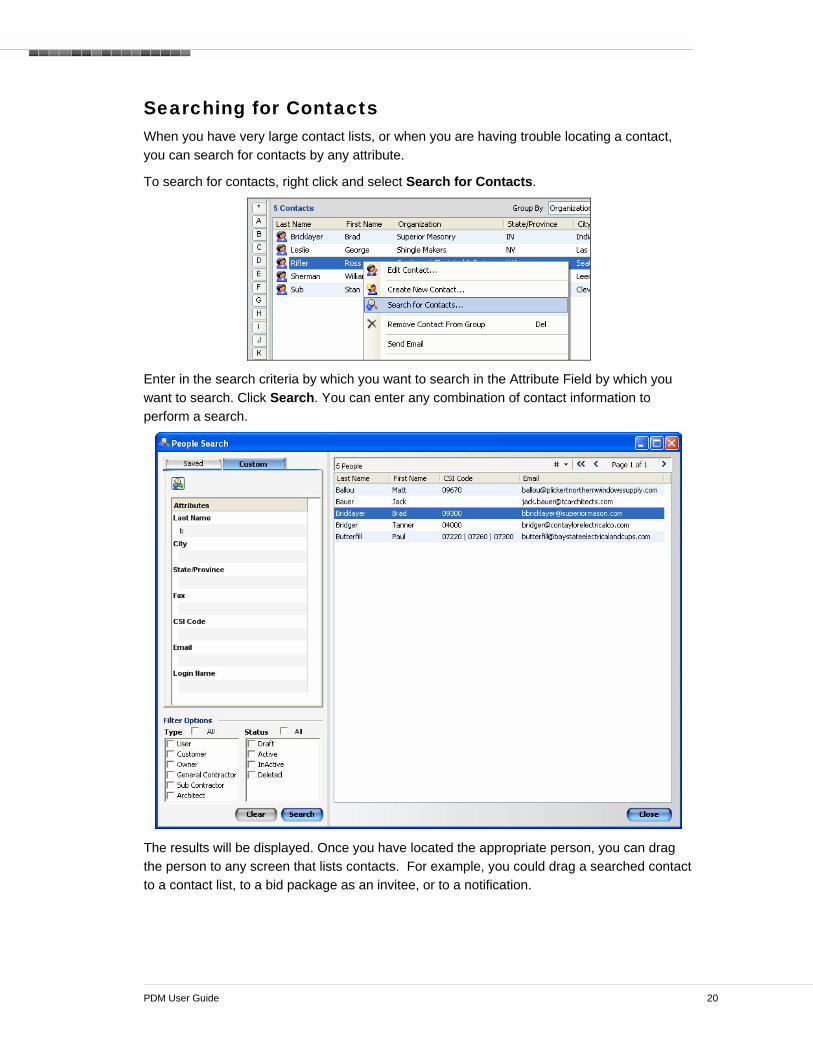
To search for contacts, right click and select Search for Contacts.
Enter in the search criteria by which you want to search in the Attribute Field by which you want to search. Click Search. You can enter any combination of contact information to perform a search.
The results will be displayed. Once you have located the appropriate person, you can drag the person to any screen that lists contacts. For example, you could drag a searched contact to a contact list, to a bid package as an invitee, or to a notification.
PDM User Guide 21
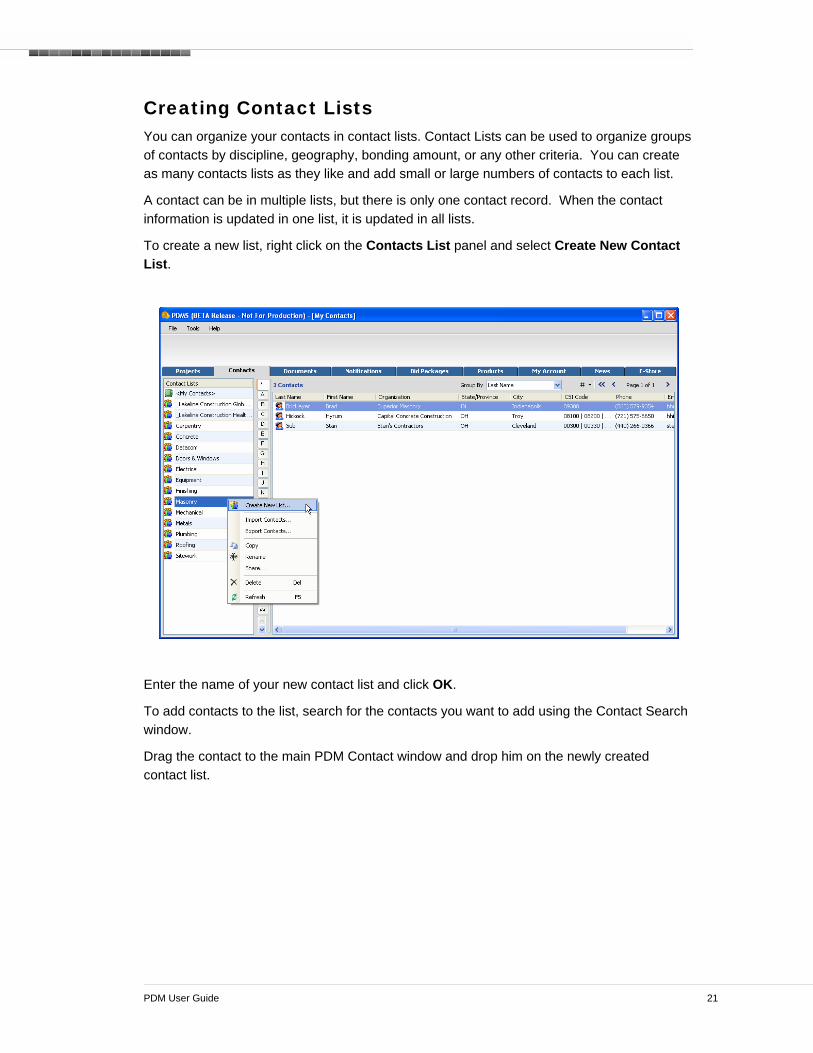
Creating Contact Lists You can organize your contacts in contact lists. Contact Lists can be used to organize groups of contacts by discipline, geography, bonding amount, or any other criteria. You can create as many contacts lists as they like and add small or large numbers of contacts to each list.
A contact can be in multiple lists, but there is only one contact record. When the contact information is updated in one list, it is updated in all lists.
To create a new list, right click on the Contacts List panel and select Create New Contact List.
Enter the name of your new contact list and click OK.
To add contacts to the list, search for the contacts you want to add using the Contact Search window.
Drag the contact to the main PDM Contact window and drop him on the newly created contact list.
PDM User Guide 22
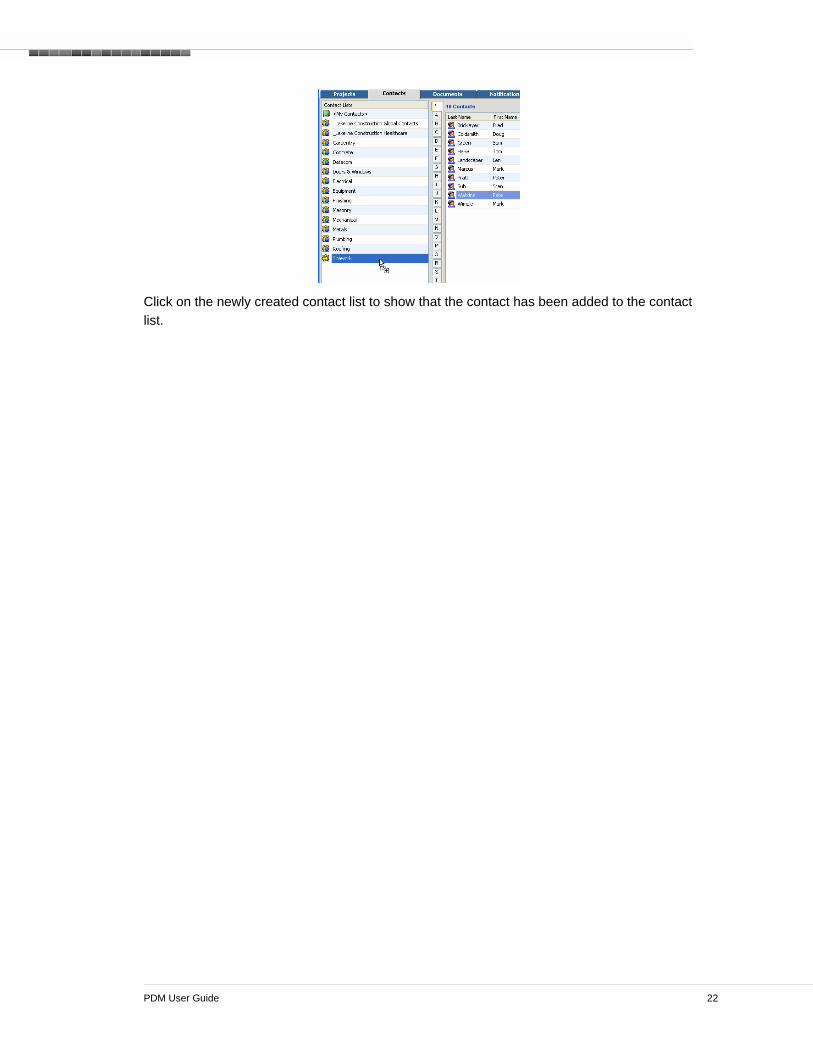
Click on the newly created contact list to show that the contact has been added to the contact list.

PDM User Guide 23
Creating New Contacts You can create a new contacts. All contacts have a unique identifier (their email address) and belong to an organization and location.
To create a new contact, right click on the contact list, and select Create New Contact.
Enter an Email Address and click Verify to see if it is unique. PDM uses the email address as a unique duplicate key. This assures that duplicate contacts aren't entered into PDM. Click Next.

PDM User Guide 24
Contacts are organized based on the organization and location where they are based. This makes it easy to locate information on multiple people within the same company.
To create a new organization, click New to the right of the Organization text box.
Enter the organization information. You can enter standard organization information, as well as basic prequalification information.

PDM User Guide 25
Frequently users who are searching for subcontractors to be used on a project will need to assure that they have a certain percentage of subcontractors who are “Disadvantaged” bidding on the project. The basic system allows the user to search for subcontractors by the three most common disadvantage types: Minority Business Enterprise (MBE), Woman owned Business Enterprise (WBE), and Disadvantaged Business Enterprise (DBE).
Each organization may have one or more locations where they conduct business. PDM allows each of these locations to be separately identified. This allows a user to locate the appropriate location for performing work on a remote project. To create a new location, click Add.
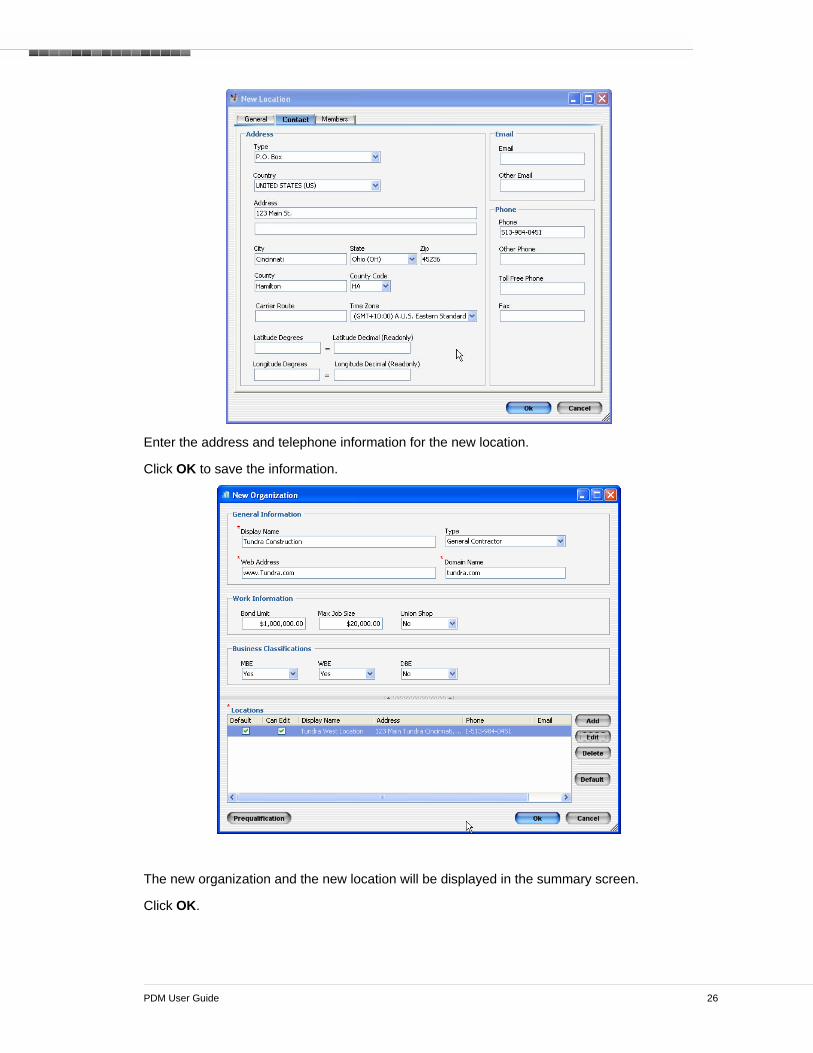
Fill out the appropriate information for the location of the new contact, and then click the Contact Tab.
PDM User Guide 26
Enter the address and telephone information for the new location.
Click OK to save the information.
The new organization and the new location will be displayed in the summary screen.
Click OK.
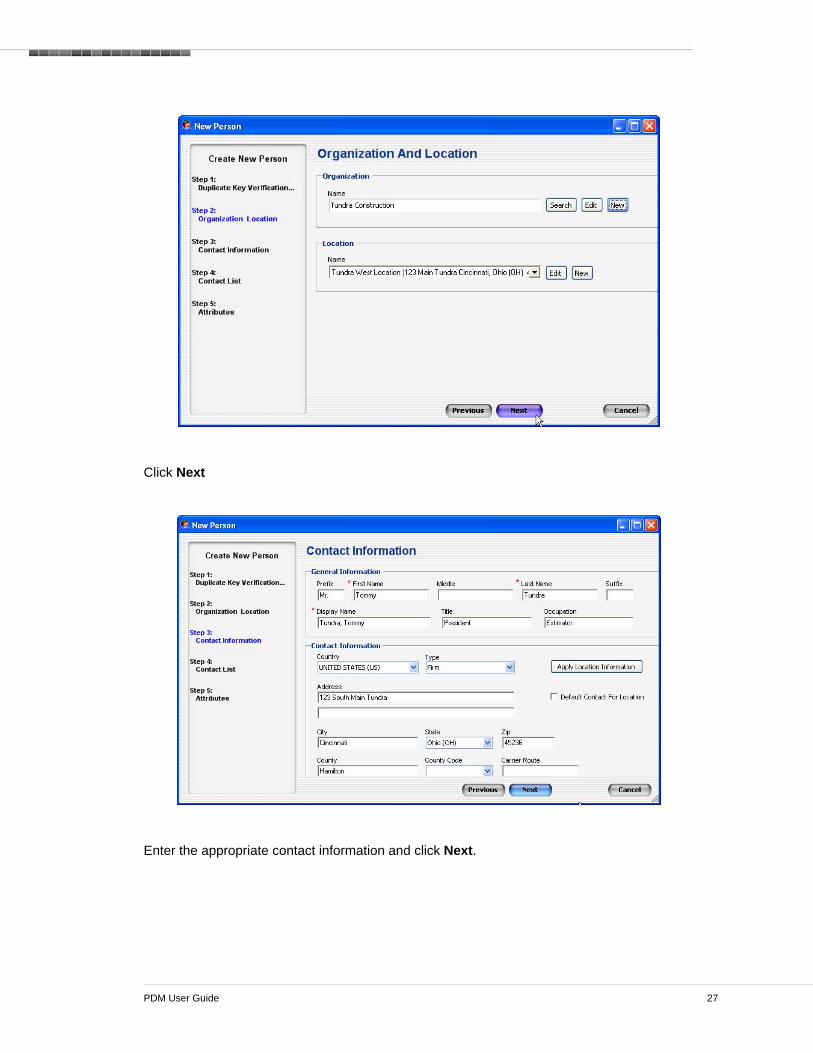
PDM User Guide 27
Click Next
Enter the appropriate contact information and click Next.

PDM User Guide 28
You can enter the construction codes for which this contact provide services. You can also enter a service area which identifies what geographic locations this contact should be used to service.
Select the Construction Codes and then click Next.
The Service Areas allows a user to search and locate contacts based on geographies services instead of office addresses. For example, a subcontractor may provide services in Dayton, Ohio even though their office is located 50 miles away in Cincinnati, Ohio. The user would specify two Service Areas: Greater Dayton Ohio, and Greater Cincinnati Ohio. Users searching either city would find this contact.
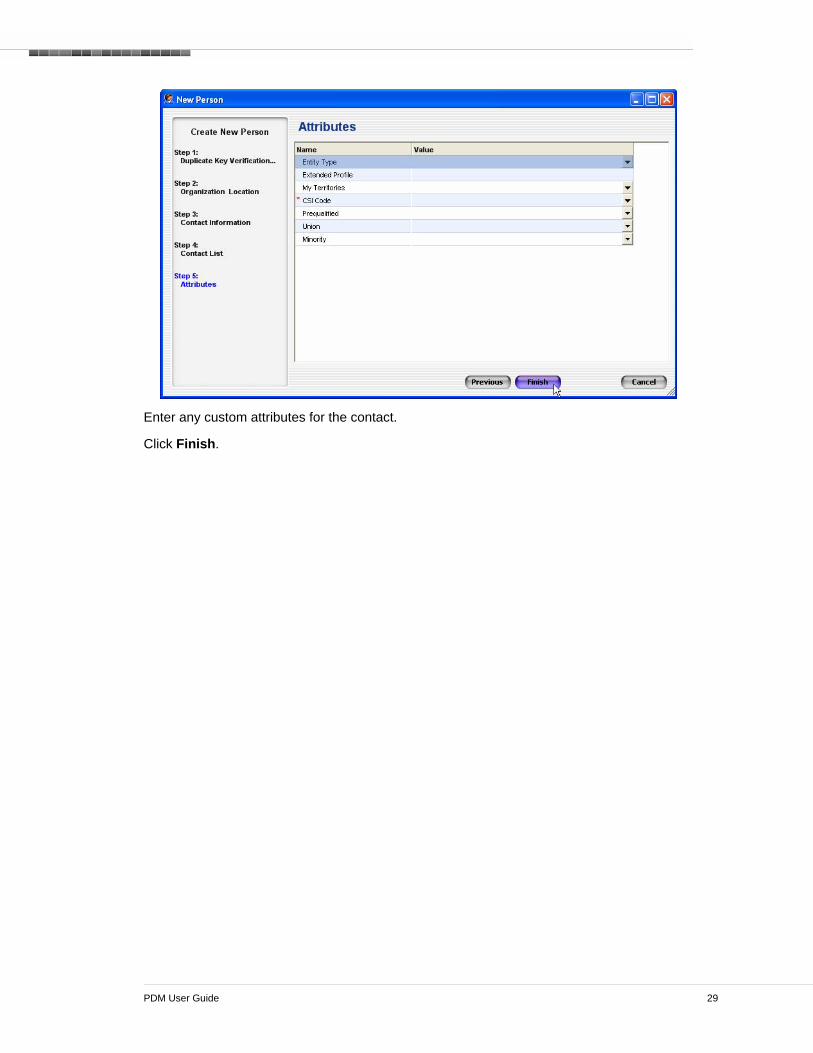
PDM User Guide 29
Enter any custom attributes for the contact.
Click Finish.
PDM User Guide 30
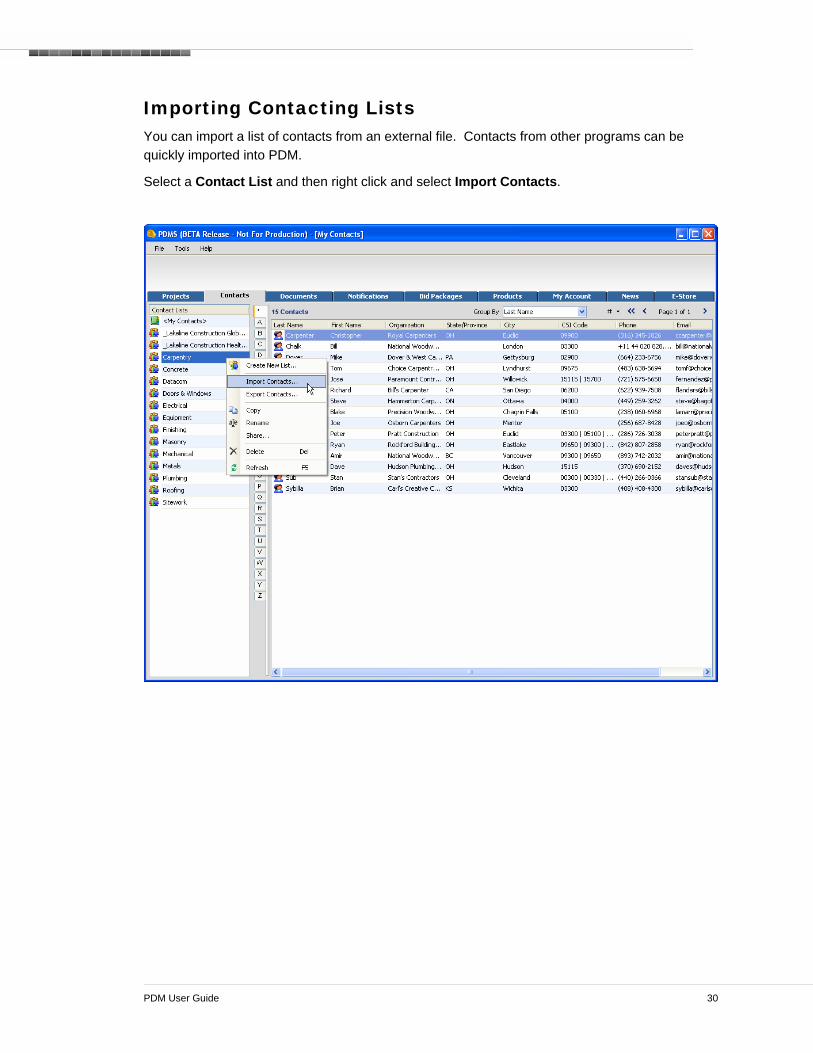
Importing Contacting Lists You can import a list of contacts from an external file. Contacts from other programs can be quickly imported into PDM.
Select a Contact List and then right click and select Import Contacts.

PDM User Guide 31
Click Browse and browse to the .xls or .csv file that contains the contacts you want to import and click Next.
Verify that the fields contained in the contact import file match the properties of the PDM contact record then click Next.
PDM User Guide 32
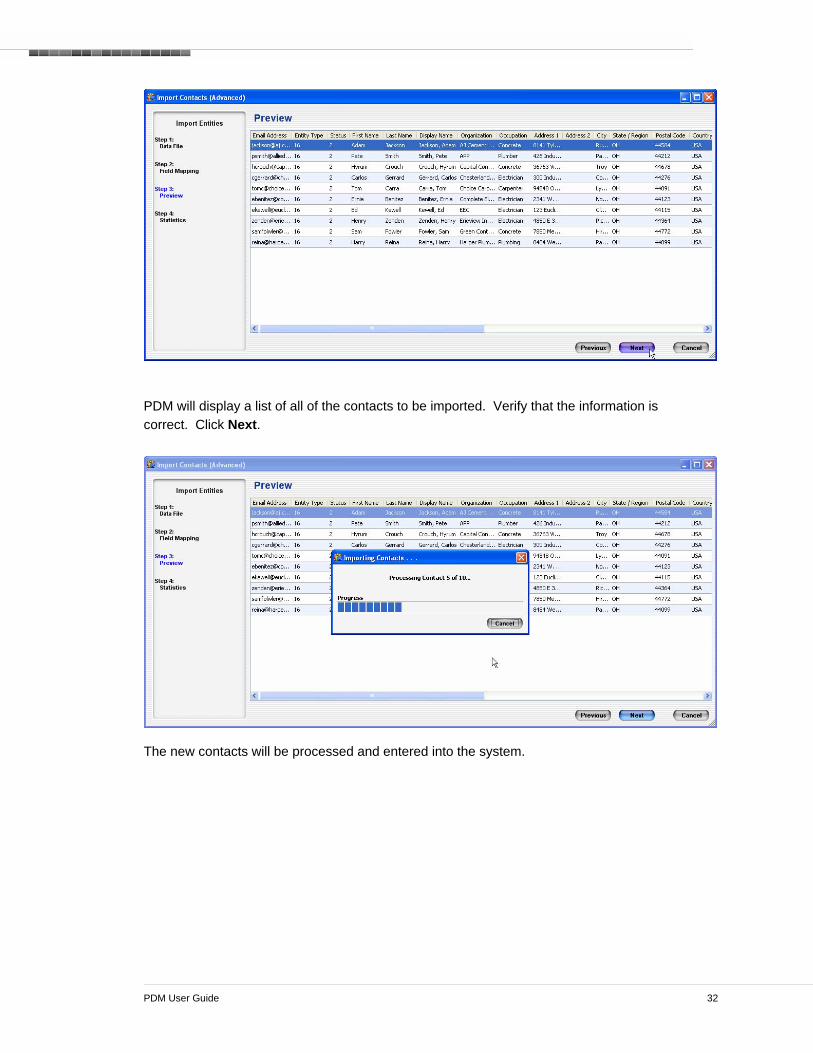
PDM will display a list of all of the contacts to be imported. Verify that the information is correct. Click Next.
The new contacts will be processed and entered into the system.

PDM User Guide 33
When PDM is finished importing, a summary of the records imported will be displayed. If any errors occur, it will allow you to view the information about each contact that caused an error so you can correct it and re-import it.
Click Finish.
PDM User Guide 34
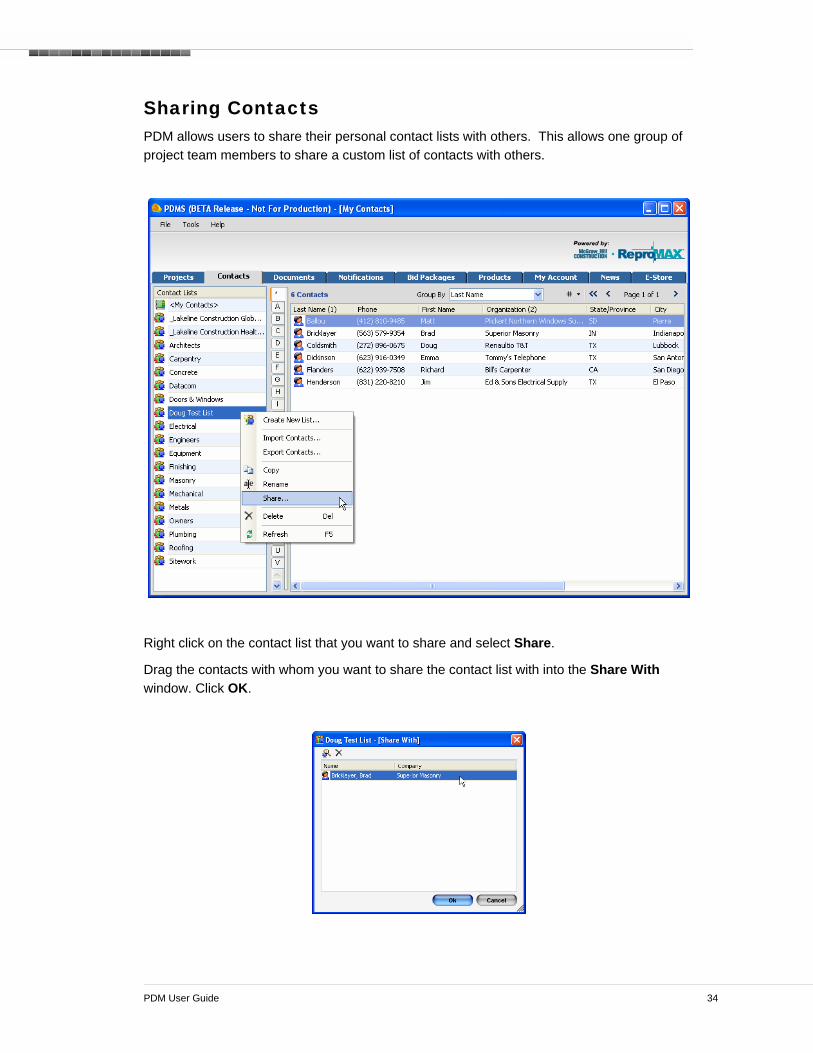
Sharing Contacts PDM allows users to share their personal contact lists with others. This allows one group of project team members to share a custom list of contacts with others.
Right click on the contact list that you want to share and select Share.
Drag the contacts with whom you want to share the contact list with into the Share With window. Click OK.
PDM User Guide 35
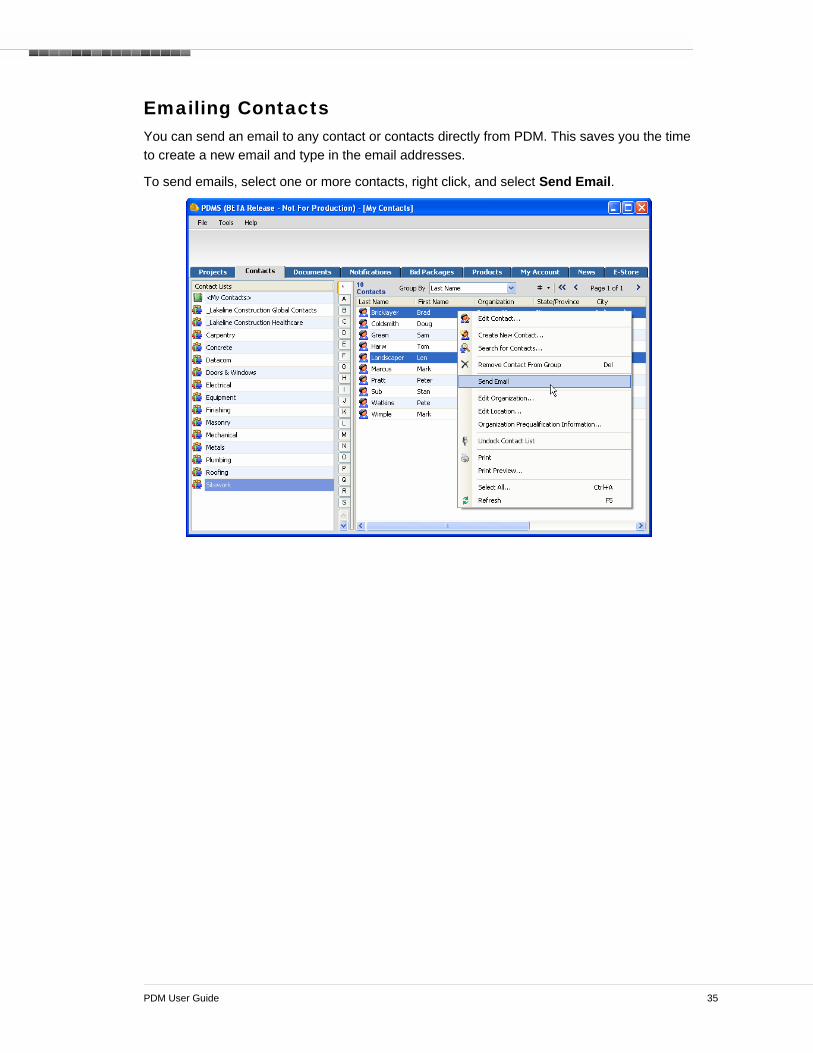
Emailing Contacts You can send an email to any contact or contacts directly from PDM. This saves you the time to create a new email and type in the email addresses.
To send emails, select one or more contacts, right click, and select Send Email.

PDM User Guide 36
A new message will open with the To field already populated with their email addresses.
Type your message and click Send.
Note: Emails sent this way are NOT tracked in PDM.

PDM User Guide 37
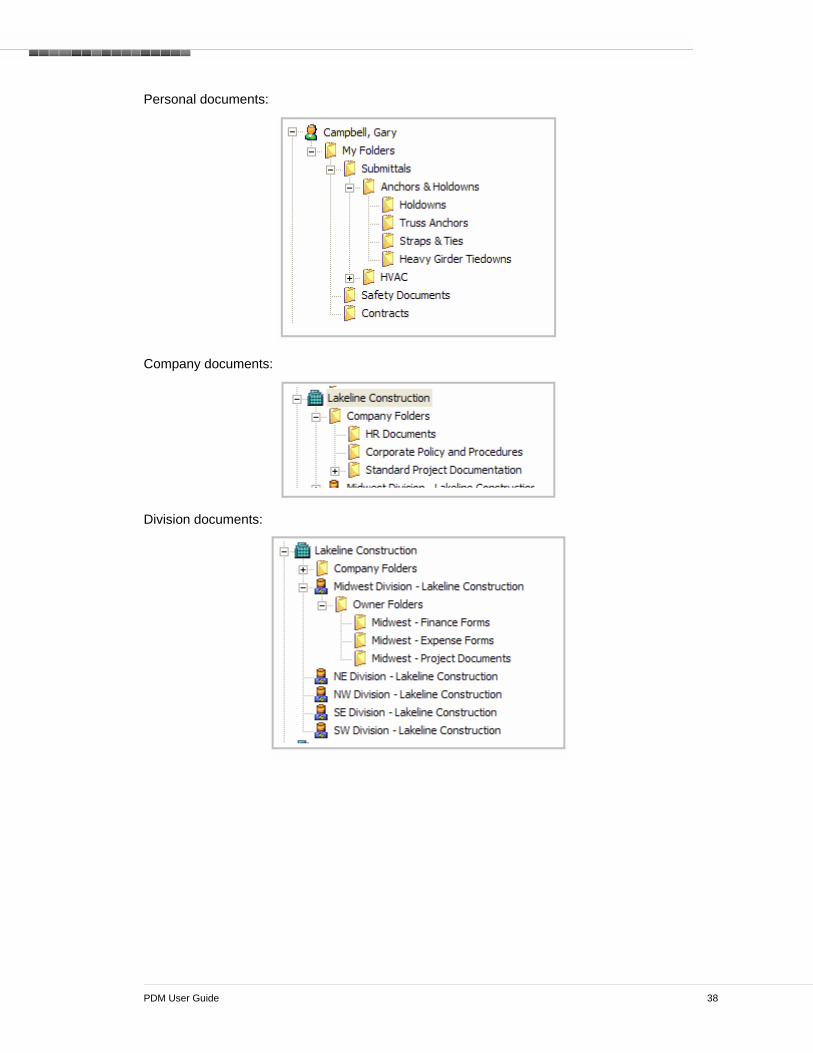
DDOOCCUUMMEENNTT MMAANNAAGGEEMMEENNTT Documents Tab Operations PDM provides two types of document storage and organization. Non-Project Documents and Project Documents. The Non-Project documents are documents are documents organized in the base PDM application in three distinct groups: Personal Documents called “My Documents”, Company Documents called “My Company’s Documents” and Divisional documents called “My Division” Documents.
On the Documents tab, you can modify your “My Documents” folder structure and access the Company and Division documents in the tree structure if they have been given permission to access those folders.
PDM User Guide 38
Personal documents:
Company documents:
Division documents:
PDM User Guide 39
Document Manager Operations There are many advantages of working with PDM Document Manager. PDM Enterprise tracks all document activity. With PDM’s version control system, every document that comes into PDM is versioned. If a duplicate document is added to DFS, it gets a new revision number and becomes the current version and previous versions are marked with a red dot to indicate that it is an older version. No documents are deleted or over-written.
There are three ways to access a document that is already in PDM. You can open, edit, or view the document.
Opening a Document: When you open a document, you are opening the native “Design” format of the document in Read-Only mode.
When you edit a document, you are checking out the “Design” format of the document. The document is marked as “Under Change” and no one else can make changes. You can then make changes and then check the document back in as a new version.
Viewing a document: When you view a document, you are opening the “Viewable” format of the document. This might be the same as the design format or it might be a in a different format. For example, if you view project plans, the original may be a TIF file but the viewable format could be a low-resolution PDF file.
You can always access documents from the Manage Documents window. Every time you view, open, or edit a document, it is downloaded to your local machine. PDM Enterprise will select the download location. As a consequence, you do not need select, remember, or search for a document download location. All you have to do is access it right out of the Manage Documents window. If you already have the current version downloaded to your local machine, PDM will access the local copy. If it is not the current version, PDM Enterprise will download the current version for you. PDM Enterprise manages all of your downloads for you.
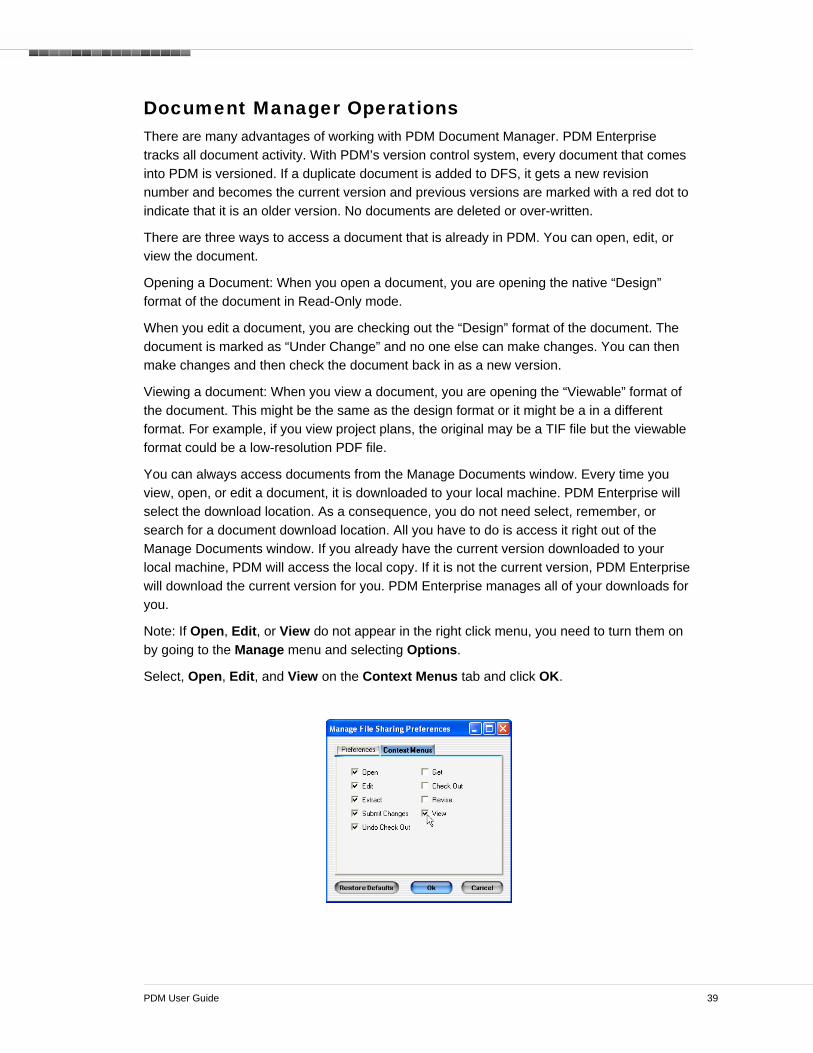
Note: If Open, Edit, or View do not appear in the right click menu, you need to turn them on by going to the Manage menu and selecting Options.
Select, Open, Edit, and View on the Context Menus tab and click OK.
PDM User Guide 40
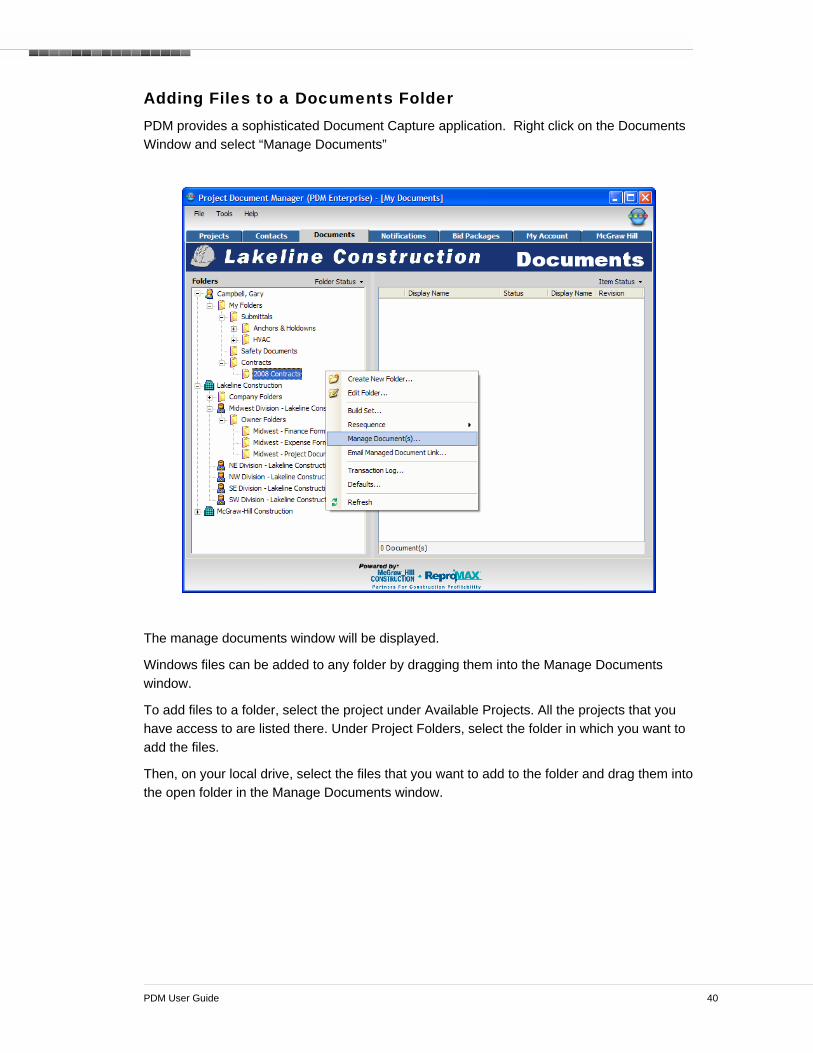
Adding Files to a Documents Folder PDM provides a sophisticated Document Capture application. Right click on the Documents Window and select “Manage Documents”
The manage documents window will be displayed.
Windows files can be added to any folder by dragging them into the Manage Documents window.
To add files to a folder, select the project under Available Projects. All the projects that you have access to are listed there. Under Project Folders, select the folder in which you want to add the files.
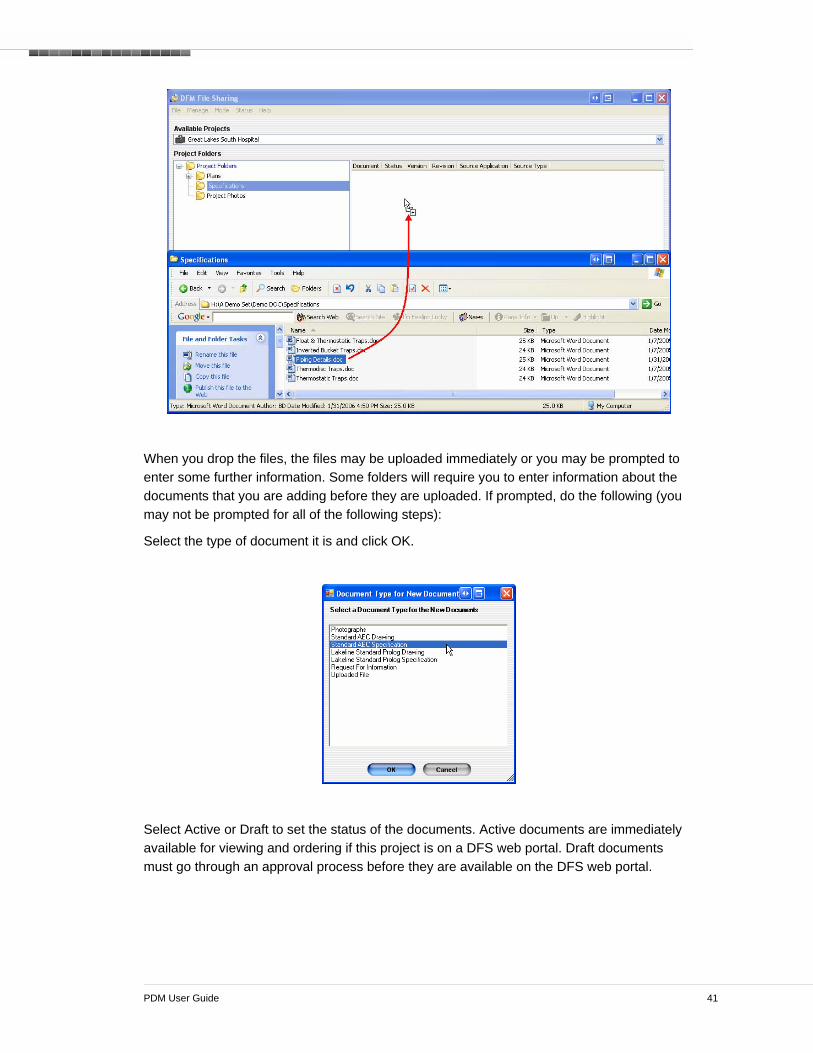
Then, on your local drive, select the files that you want to add to the folder and drag them into the open folder in the Manage Documents window.
PDM User Guide 41
When you drop the files, the files may be uploaded immediately or you may be prompted to enter some further information. Some folders will require you to enter information about the documents that you are adding before they are uploaded. If prompted, do the following (you may not be prompted for all of the following steps):
Select the type of document it is and click OK.
Select Active or Draft to set the status of the documents. Active documents are immediately available for viewing and ordering if this project is on a DFS web portal. Draft documents must go through an approval process before they are available on the DFS web portal.

PDM User Guide 42
Enter the attributes for the documents and click OK. A red star next to a field indicates that the attribute is required.
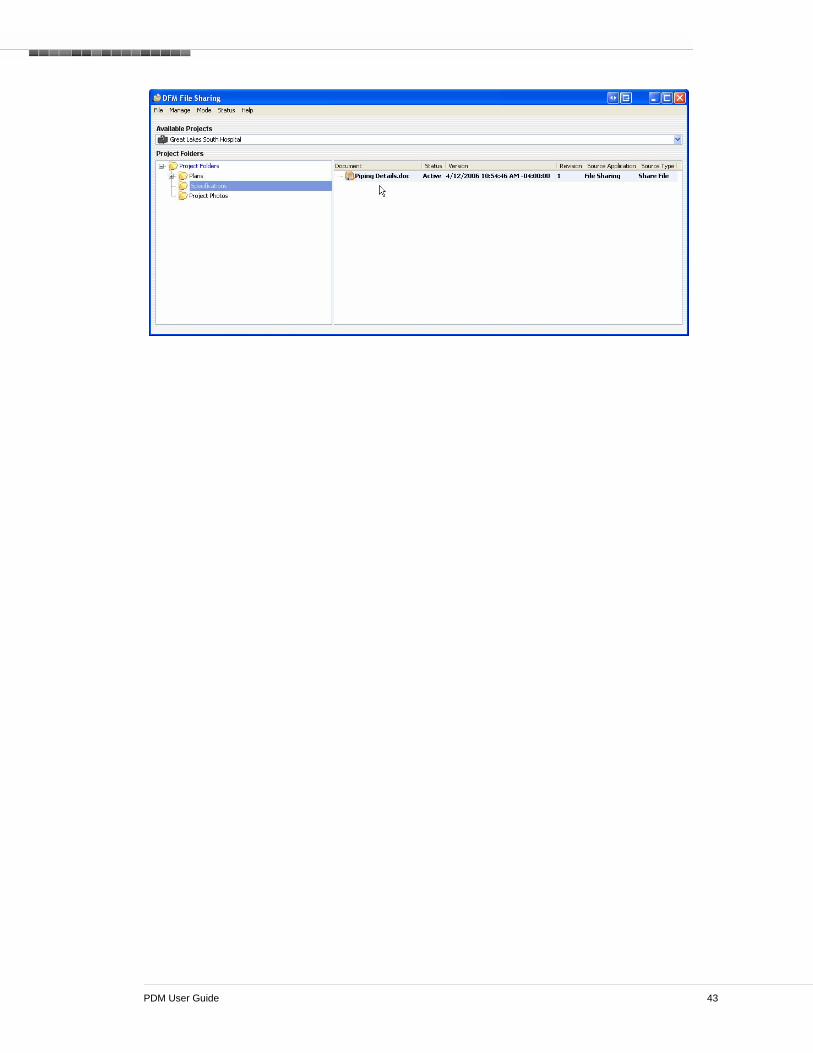
The document will be uploaded into PDM and will appear in the folder.
If you added a file into a folder that already contains a file with the exact same name, then a new version of the existing document will be created. If the file name is unique, then the document will go in as the first revision.
After taking the time to enter 3 or 4 documents, let the customer know ReproMAX members can provide you with production importing and indexing services drastically reducing the time it takes to import documents into the customers archive.
Don’t forget, before the documents can be fully processed you must start your Gateway Processor.
PDM User Guide 43

PDM User Guide 44
Copying Documents Between Folders PDM allows documents to be dragged between any two folders. PDM will add the document to the second folder.
If you wanted to drag a document from your “My Document” folder to a project, you could simply open both windows and drag the appropriate files between the two windows.

PDM User Guide 45
Opening a Document Opening a document will open the native design format in Read-Only mode.
To open a document, right click on the document and select Open.
The document is downloaded to your machine and is opened in Read-Only mode.
Close the document when you are finished. If you need to re-open it, repeat the steps to open the file in Manage Documents. PDM Enterprise will not need to download the document again unless it has been updated. In which case, it will download and open the current version.

PDM User Guide 46
Creating a Subfolder You can add subfolders to any folder in the folder tree.
To add a subfolder, right click on the folder in which you want to add the new folder and click Add Subfolder To <Folder Name>.
Enter the name of the folder in the Folder Name field and click OK.
Note: You cannot have multiple folders with the same name. This includes inactive and deleted folders that may not be displayed.
The folder is added.

PDM User Guide 47
Adding Documents to Folders by Browsing You can upload a batch of documents into Manage Documents. There are two ways to do so, you can use the Upload Files menu option or drag a folder or documents into the Manage Documents window. If you drag a folder or documents, you get the additional option of compressing the files into one ZIP file.
To upload a folder and all of its documents and subfolders, right click in Manage Documents on the folder to which you want to upload the files and select Upload Files To.
Select the folder that you want to upload and click OK.

PDM User Guide 48
A message displays to verify what you are about to upload. Click Continue.
The folder is uploaded with all of its documents and subfolders. The Manage Documents folder name is the original path of the folder. You can rename the folder if needed.

PDM User Guide 49
Adding Documents to Folders by Drag and Drop You can drag and drop a folder or a group of documents into a Manage Documents folder. When you drag a folder into Manage Documents, you can upload it as a single ZIP file or as individual files and folders.
To upload folders or documents, select the folder in Manage Documents in which you want to upload the files. Drag the folder or group of documents into the Manage Documents window.
If you are uploading a folder, you are asked if you want to upload it as individual files and folders or if you want to compress them into a single ZIP file. Do one of the following:
• Click Upload to upload the folder and all subfolders and documents as individual files.
• Click Single to compress all of the files into a single ZIP file.

PDM User Guide 50
If you selected Upload, the folder is uploaded with all of its documents and subfolders. The Manage Documents folder name is the original path of the folder. You can rename the folder if needed.
If you selected Single, a single ZIP file is uploaded into the folder you selected.
PDM User Guide 51
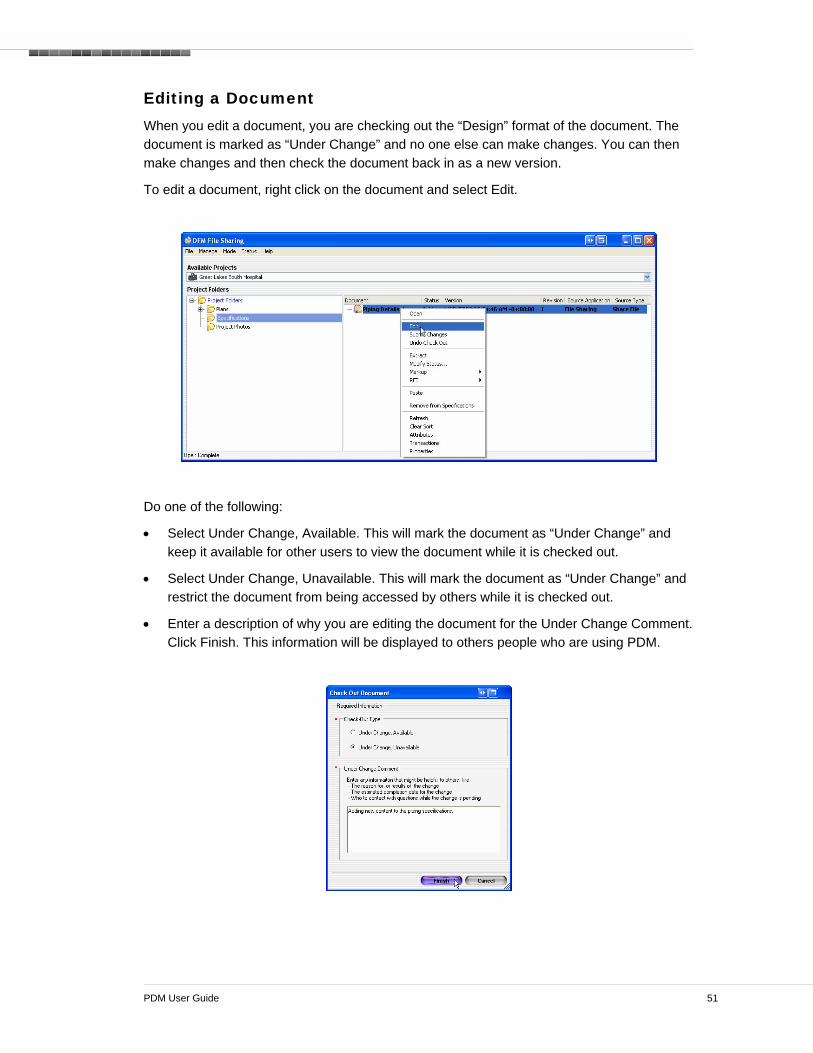
Editing a Document When you edit a document, you are checking out the “Design” format of the document. The document is marked as “Under Change” and no one else can make changes. You can then make changes and then check the document back in as a new version.
To edit a document, right click on the document and select Edit.
Do one of the following:
• Select Under Change, Available. This will mark the document as “Under Change” and keep it available for other users to view the document while it is checked out.
• Select Under Change, Unavailable. This will mark the document as “Under Change” and restrict the document from being accessed by others while it is checked out.
• Enter a description of why you are editing the document for the Under Change Comment. Click Finish. This information will be displayed to others people who are using PDM.

PDM User Guide 52
The document will be downloaded to your machine. In Manage Documents, the document will be displayed in red, indicating that it is under change. It also displays the edited version of the document under the original.
The document is open and available for editing. The title of the document begins with “Edit of…” indicating that this document is under change and editable. Make the necessary edits.
When complete, you can close the document and application. When you close the application used to edit the document, PDM Enterprise will prompt you if you want to submit the changes now. Click Yes or No. If you click Yes, the document will be uploaded as a new version. If you click No, the document will remain checked out. (In order for this message to display, the application must have been opened by PDM Enterprise and then completely closed. If the application was previously open or if you close the document only and leave the application open, this message will not display.)

PDM User Guide 53
If you do not submit the changes now, you can reopen the “Edit of” document from Manage Documents to make further edits. PDM Enterprise will automatically access the checked out document that you have on your machine.
You can submit the changes at any time. To submit the changes and check the document back in as a new version, right click on the document in Manage Documents and select Submit Changes.
The document is checked in as a new version and is available for others to edit or access. Previous versions are still in PDM and marked with a red dot, indicating that they are not current. (Depending on the folder properties, old versions of a document may not be displayed.)
PDM User Guide 54
Undoing a Checkout You can undo a checkout if you decide that the checkout was not necessary.
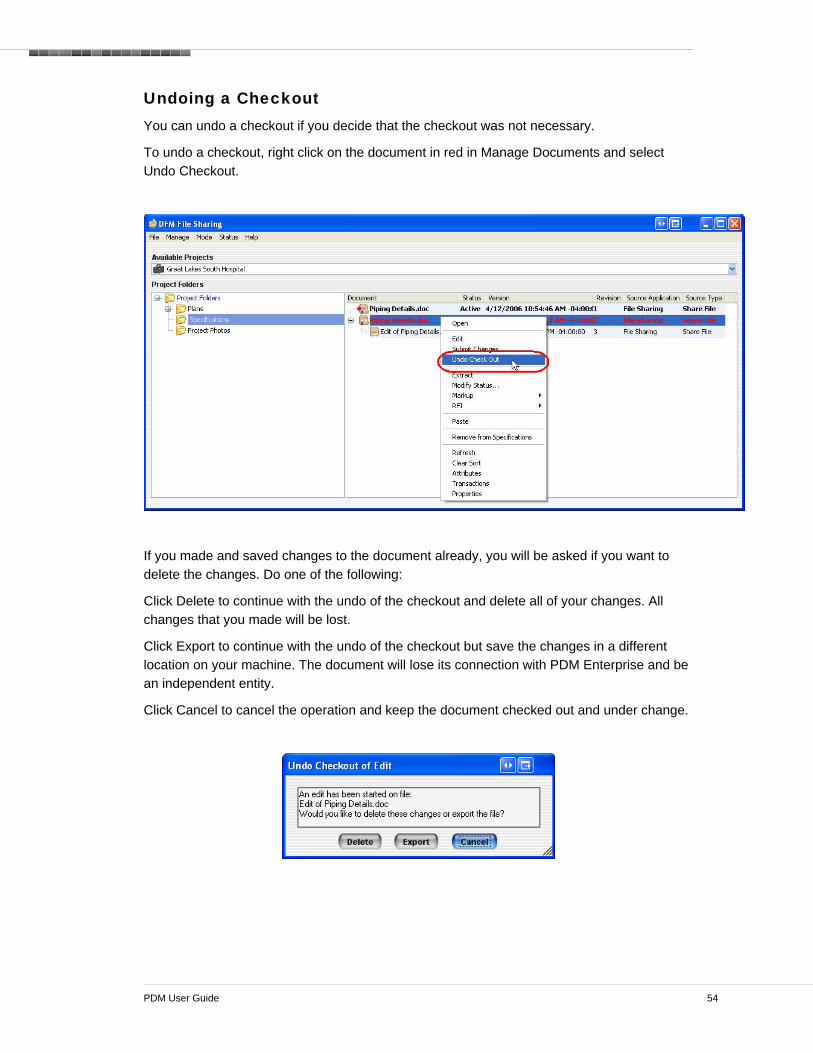
To undo a checkout, right click on the document in red in Manage Documents and select Undo Checkout.
If you made and saved changes to the document already, you will be asked if you want to delete the changes. Do one of the following:
Click Delete to continue with the undo of the checkout and delete all of your changes. All changes that you made will be lost.
Click Export to continue with the undo of the checkout but save the changes in a different location on your machine. The document will lose its connection with PDM Enterprise and be an independent entity.
Click Cancel to cancel the operation and keep the document checked out and under change.

PDM User Guide 55
If you clicked Delete or Export, the checkout is undone. The action will still be recorded in the transaction log. (For more information on the transaction log, see the “Viewing Document Transactions” section of this guide.)

PDM User Guide 56
Extracting Documents You can extract documents out of the PDM Vault and put in on a drive of your choice. In doing so, the document will lose its connection with PDM Enterprise and be an independent entity. Consequently, it will lose all version control.
To extract a document, go to the main documents tab, or the project Documents tab. Select the folder that contains the documents to be exported. Right click on the document and select Extract.

PDM User Guide 57
Select the folder in which you want to place the extracted documents and click OK.
You will be asked which document type to extract and how the files should be named. Click on the appropriate format and the name fields and click Extract.

PDM User Guide 58

PDM User Guide 59
Re-sequencing Documents You can set the sequence of documents if they need to be in a different order. Sequencing is different than sorting. Sorting is a temporary order for viewing and is done by clicking on the column header. Sequencing is actually changing the order of the documents in the database and will affect how they are displayed on the web portal and in Manage Documents for all users. It will also set the print order.
To sequence documents, right click on the folder that contains the documents you want to sequence and click Resequence Documents.

PDM User Guide 60
Drag the documents to the order in which you want them. You can also use the up and down arrow keys. To use a sort, click on a column header. Multiple documents can be selected at once by using the Ctrl and Shift keys while clicking.
Click Apply to save the changes.
The documents will be displayed in the new sequence.
Notice the document with the highest value is first in the list!
PDM User Guide 61
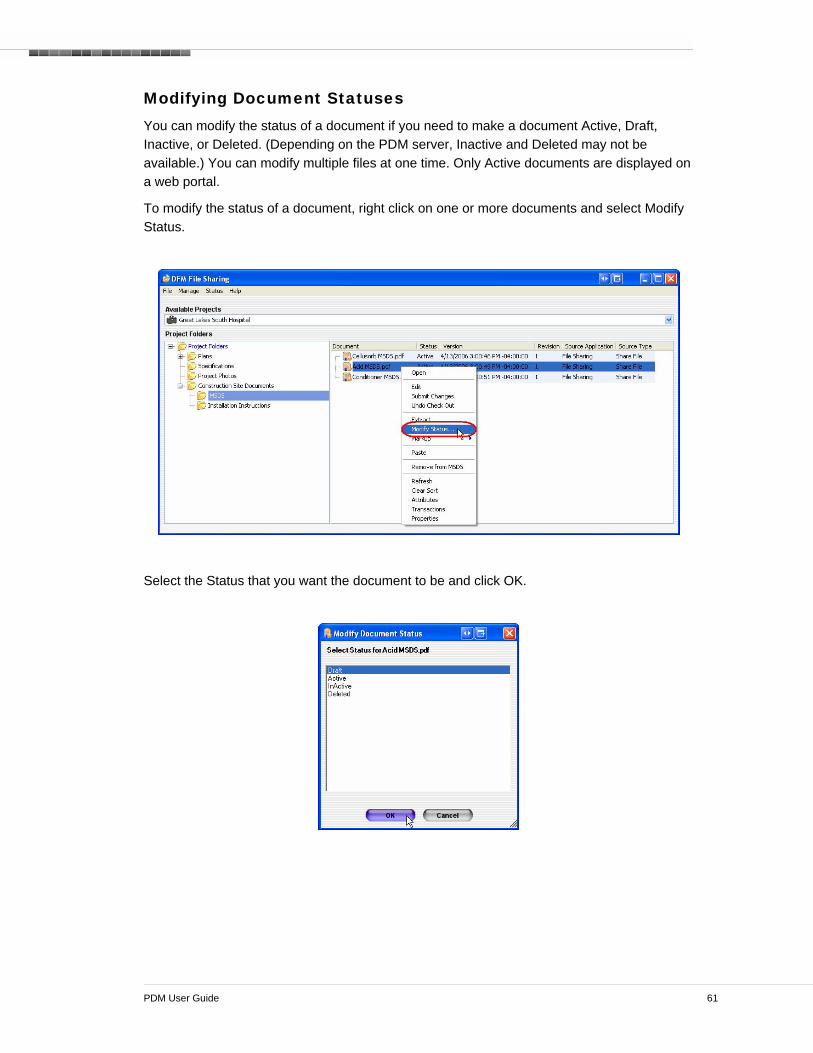
Modifying Document Statuses You can modify the status of a document if you need to make a document Active, Draft, Inactive, or Deleted. (Depending on the PDM server, Inactive and Deleted may not be available.) You can modify multiple files at one time. Only Active documents are displayed on a web portal.
To modify the status of a document, right click on one or more documents and select Modify Status.
Select the Status that you want the document to be and click OK.

PDM User Guide 62
The document status is changed. Draft documents display in blue. Inactive and Deleted documents display in gray (or they may not display at all).

PDM User Guide 63
Removing Documents From a Folder If you no longer need a file in a folder, you can remove it. Removing a document from a folder does not delete the document out of the PDM Vault; it simply removes it from the folder. If you remove a document that is only contained in one folder, you will not be able to access it with PDM Enterprise Manage Documents. PDM administrator can restore the document using the administrator tools.
To remove a file or multiple files from a folder, right click on the file(s) and select Remove From.
The document is removed from the folder.

PDM User Guide 64

PDM User Guide 65
MMAANNAAGGIINNGG TTHHEE BBIIDDDDIINNGG PPRROOCCEESSSS Using PDM, you can efficiently manage the bidding process. You can easily invite potential bidders to prequalify by sending them an invitation. They can enter all of their prequalification information online using a PDM web form. The information is stored in PDM and you can view the prequalification information that they submitted and signify if they are prequalified or not.
Once prequalified, you can create a bid package with the plans and specs that you want to send out to bid. You can create as many bid packages as needed for the various disciplines. You can send out an email or fax invitation to bid on a project to any contact that you have in the system.
When the invitee receives the email or fax, they can view the bid documents online, order prints, create electronic takeoffs, or instant print the documents. They then respond to the invitation where their responses are automatically stored in PDM for you to review.
You can run bid package reports and award the bids. All of this information is fully tracked and managed with PDM.

PDM User Guide 66
Prequalifying Bidders The first step in the bid process is to prequalify your bidders.
Inviting Potential Bidders to Prequalify To prequalify your potential bidders, you can use PDM to send them an email notification asking them to log onto a website and fill out the prequalification form. PDM notifications allow members of the preconstruction team to communicate information back and forth with potential bidders.
PDM allows you to define a pre-design “prequalification” notification with the appropriate graphics and text messages for requesting subcontractors to pre-qualify.
To send a prequalification notification, on the Contacts tab, select the contacts to whom you want to send the invitation. Right click and select the Send Notification to Contacts option.

PDM User Guide 67
The next window displays the predefined notification types. PDM allows you to define an unlimited number of notification types. Each notification type can have its own set of attributes, email, fax, and a Web text and graphics. Normally you will have one or more notification types were prequalification.
When the Select Notification Type window is displayed, click on the Invitation to Prequalify notification type. Click Next.
PDM User Guide 68
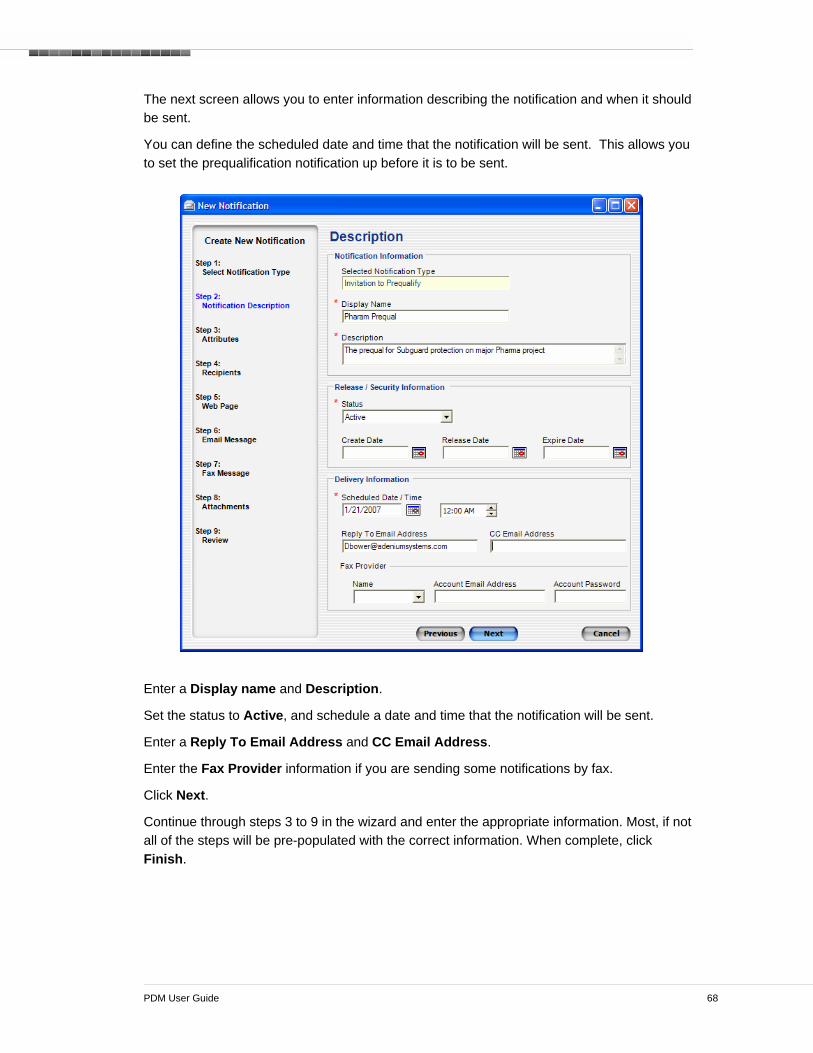
The next screen allows you to enter information describing the notification and when it should be sent.
You can define the scheduled date and time that the notification will be sent. This allows you to set the prequalification notification up before it is to be sent.
Enter a Display name and Description.
Set the status to Active, and schedule a date and time that the notification will be sent.
Enter a Reply To Email Address and CC Email Address.
Enter the Fax Provider information if you are sending some notifications by fax.
Click Next.
Continue through steps 3 to 9 in the wizard and enter the appropriate information. Most, if not all of the steps will be pre-populated with the correct information. When complete, click Finish.
PDM User Guide 69
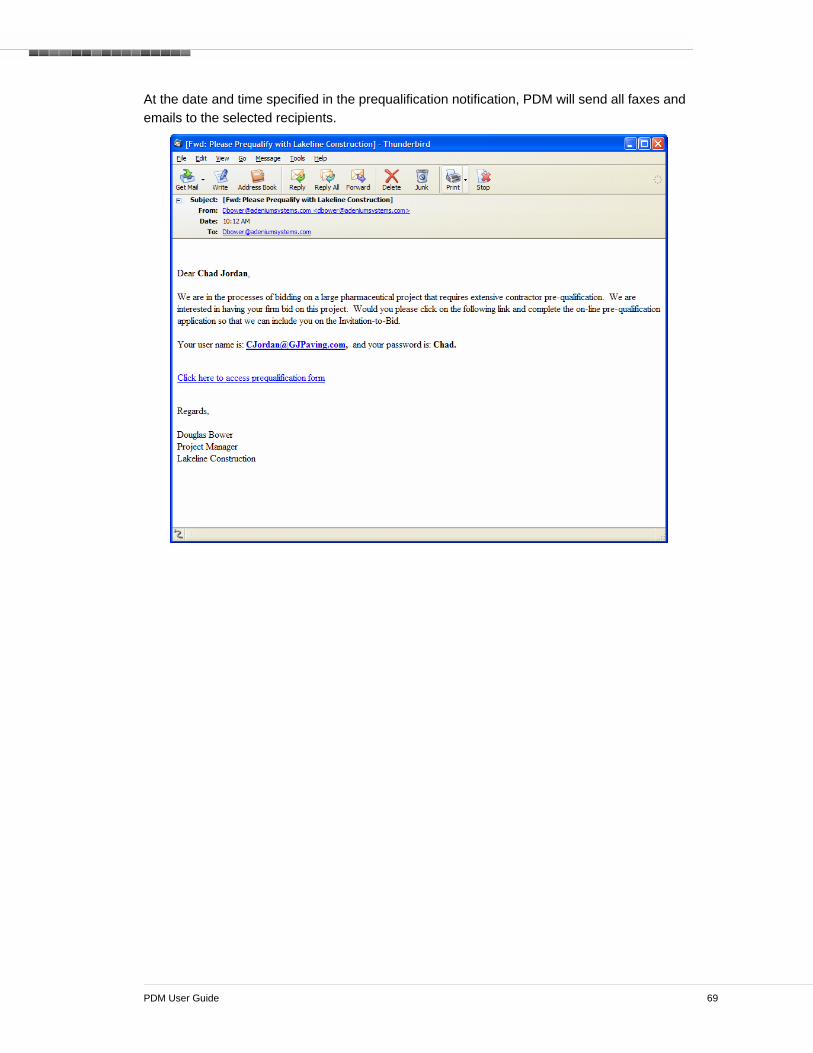
At the date and time specified in the prequalification notification, PDM will send all faxes and emails to the selected recipients.
PDM User Guide 70
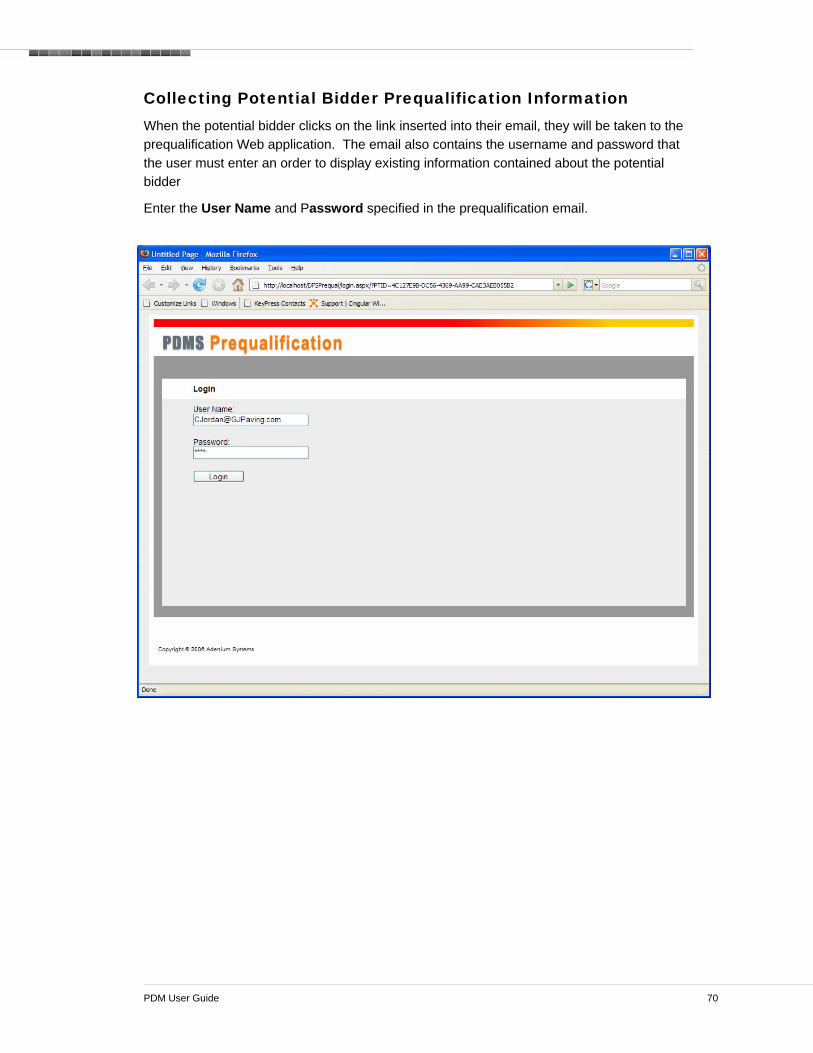
Collecting Potential Bidder Prequalification Information When the potential bidder clicks on the link inserted into their email, they will be taken to the prequalification Web application. The email also contains the username and password that the user must enter an order to display existing information contained about the potential bidder
Enter the User Name and Password specified in the prequalification email.

PDM User Guide 71
The first page displays the contact information for the user who has been invited to prequalify. The user can quickly enter any information that is incorrect, out-of-date or missing.
Enter any information that needs to be added or updated.
Click on the Extended Profile tab to continue entering prequalification information.

PDM User Guide 72
The remainder of the prequalification information can be entered in various section of the web application. By default PDM allows the potential bidder to enter Company information, Financial information, References, Resource information, Safety and Risk analysis data, and then Review and Submit the application.
Because it may take a significant amount of time for the user to locate and enter the information, they can click Save and Continue at any time and close the web application. Once they have the information necessary, they can restart the entire process by clicking on the email link.
PDM User Guide 73
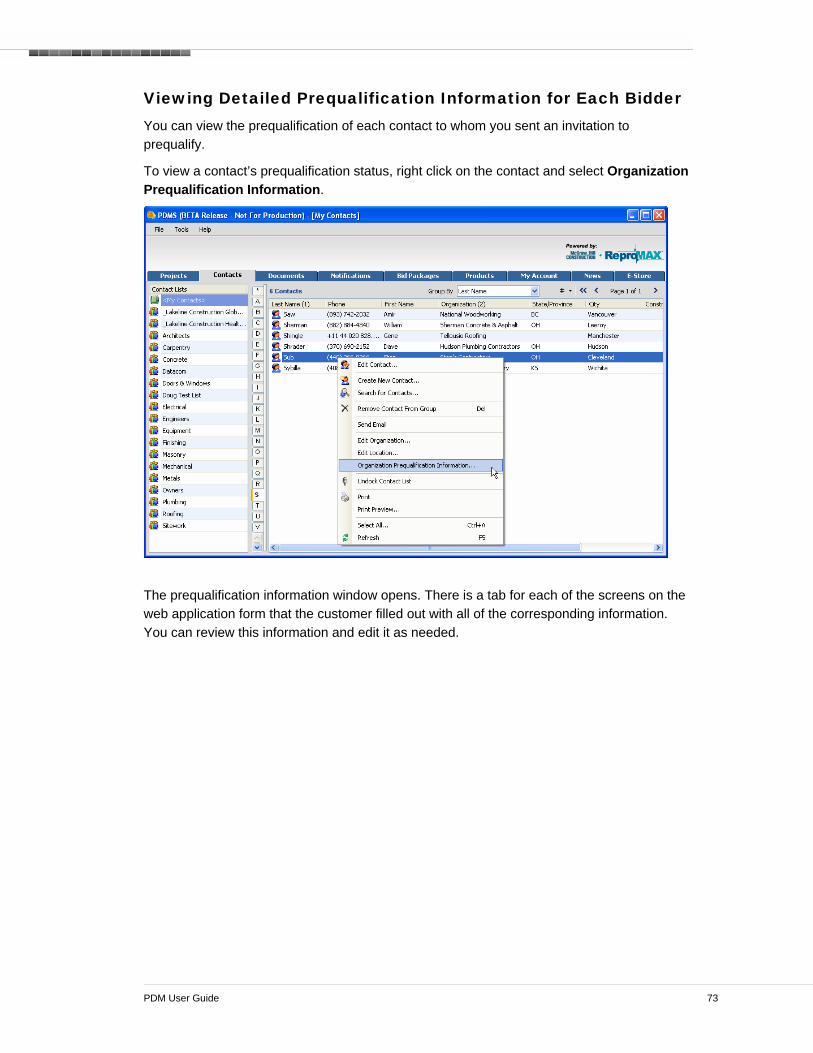
Viewing Detailed Prequalification Information for Each Bidder You can view the prequalification of each contact to whom you sent an invitation to prequalify.
To view a contact’s prequalification status, right click on the contact and select Organization Prequalification Information.
The prequalification information window opens. There is a tab for each of the screens on the web application form that the customer filled out with all of the corresponding information. You can review this information and edit it as needed.

PDM User Guide 74
Click the Review tab to set whether the person is prequalified or not.
Click Print to print the information.
Click OK to save and close the information.

PDM User Guide 75
Selecting Prospective Bidders for the Project You can select the qualified bidders and add them to the project.
Open the My Contacts Window in PDM and the project Contacts window.
Select the appropriate Subcontractor Contact List on project Contacts tab.
Select and Drag the subcontractor Contacts from the My Contacts window to the appropriate project subcontractor contact list.
PDM User Guide 76
Defining Bid Packages In many projects the bidding phase is divided into bidding on multiple bid packages. This allows you to break the work required for the projects into smaller, more manageable bids. Each bid package is usually for a type of work, or a phase of the project. The type of subcontractors that would bid on a bid package is usually specialized for the scope of work covered by the Bid package. For example, there is no reason for Painters to bid on a bid package that covers demolition.
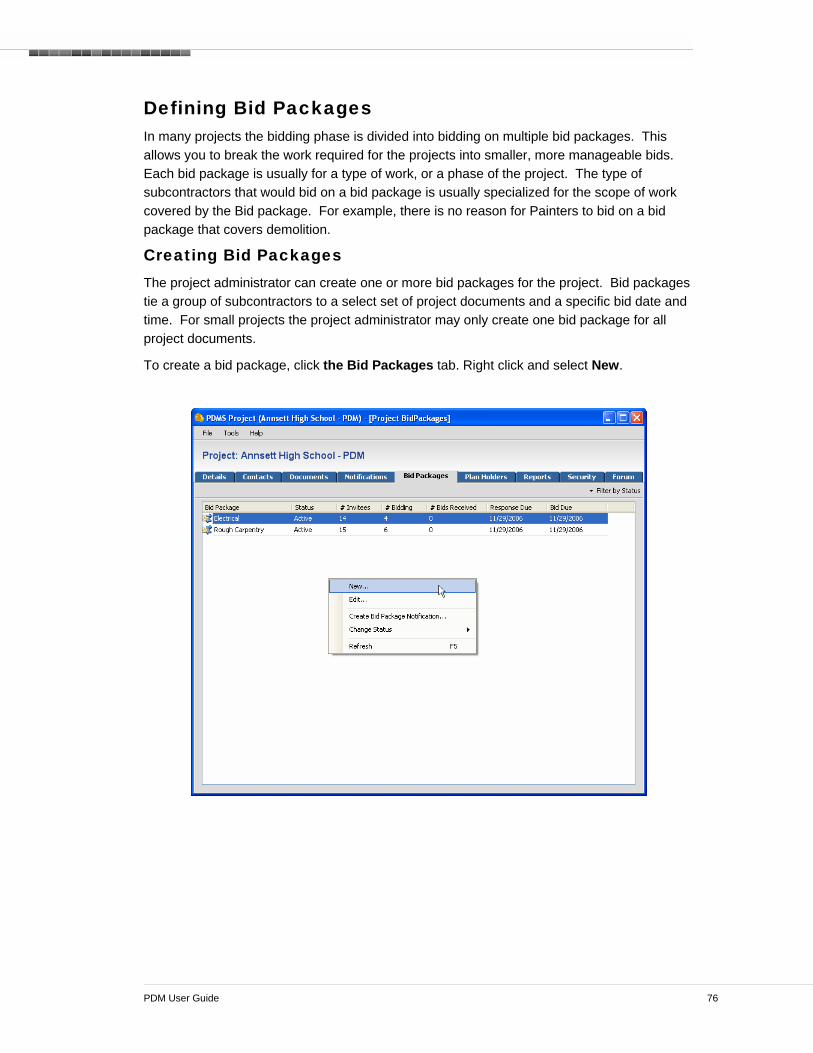
Creating Bid Packages The project administrator can create one or more bid packages for the project. Bid packages tie a group of subcontractors to a select set of project documents and a specific bid date and time. For small projects the project administrator may only create one bid package for all project documents.
To create a bid package, click the Bid Packages tab. Right click and select New.
PDM User Guide 77
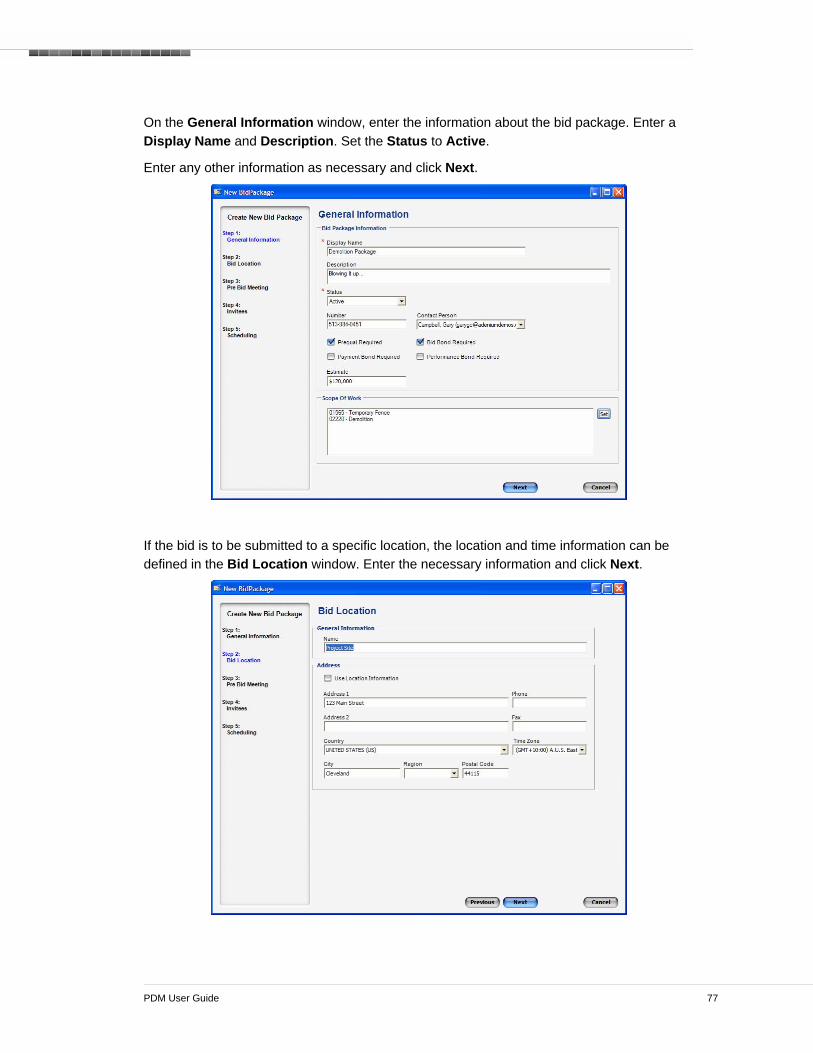
On the General Information window, enter the information about the bid package. Enter a Display Name and Description. Set the Status to Active.
Enter any other information as necessary and click Next.
If the bid is to be submitted to a specific location, the location and time information can be defined in the Bid Location window. Enter the necessary information and click Next.

PDM User Guide 78
Many times there will be a pre-bid meeting to make sure all bidders start out with a good understanding of the project. Enter the bid submission location information on the Pre Bid Meeting window. If there will not be a pre-bid meeting, do not enter any information.
Click Next.
In the Invitees window, drag the people to whom you want to send the bid package. Drag the contacts from the My Contacts tab main PDM window (or any other contact window).
Enter any goals you have for the bid. This information is for reference only. Click Next.

PDM User Guide 79
In the Scheduling window, enter the critical dates and times for the bid package.
When complete, click Finish.
PDM User Guide 80
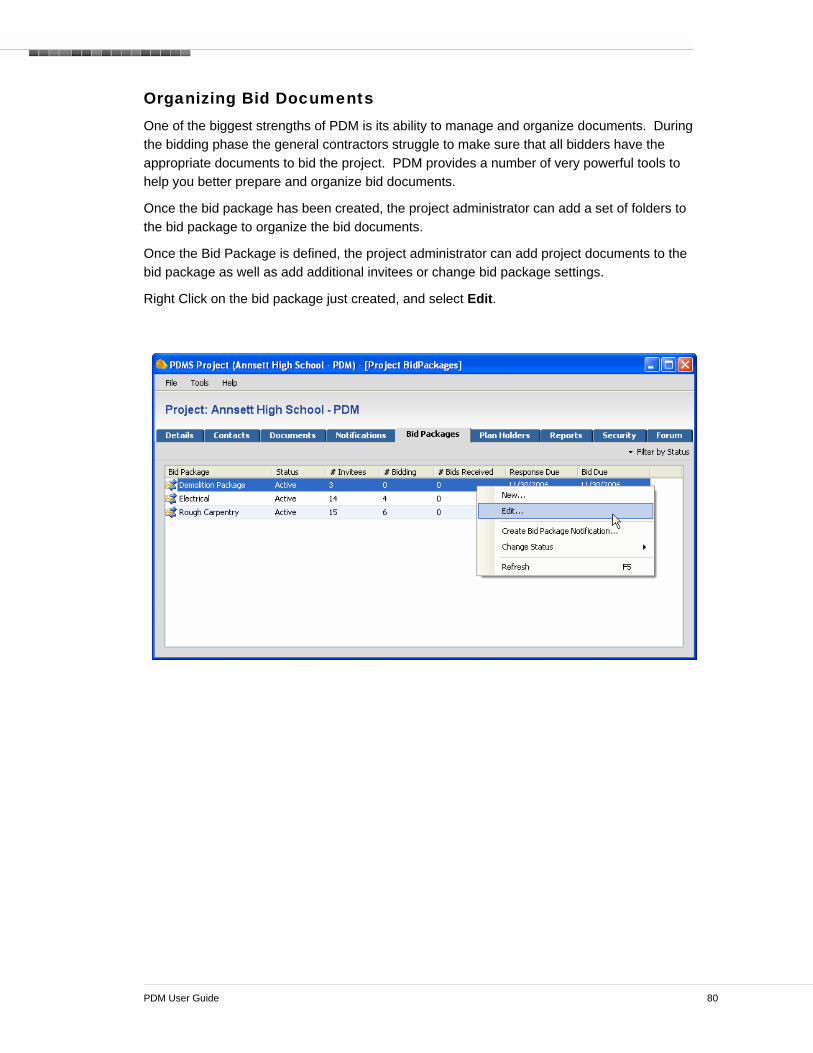
Organizing Bid Documents One of the biggest strengths of PDM is its ability to manage and organize documents. During the bidding phase the general contractors struggle to make sure that all bidders have the appropriate documents to bid the project. PDM provides a number of very powerful tools to help you better prepare and organize bid documents.
Once the bid package has been created, the project administrator can add a set of folders to the bid package to organize the bid documents.
Once the Bid Package is defined, the project administrator can add project documents to the bid package as well as add additional invitees or change bid package settings.
Right Click on the bid package just created, and select Edit.

PDM User Guide 81
The document tab allows the project administrator to define a folder structure for the bid package documents and add project documents to a bid package.
Right Click on the bid package name and select Create New Folder.
Create the folder by entering a Display Name and Description. Set the Status to Active. Complete the wizard and click Finish.
PDM User Guide 82
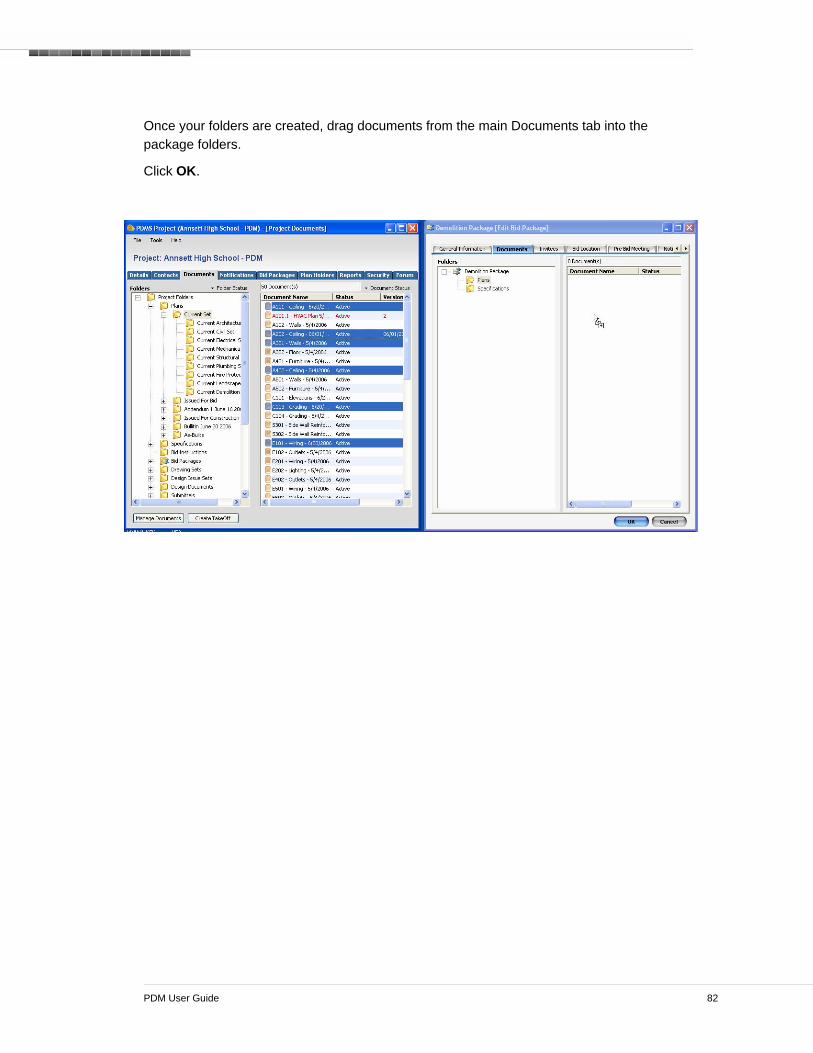
Once your folders are created, drag documents from the main Documents tab into the package folders.
Click OK.

PDM User Guide 83
Adding Bidders to Bid Packages Once the bid package has been defined, the project manager needs to begin selecting the potential bidders that they want to invite to bid. This process is critical to assuring that an adequate number of bids are received to assure a competitive bid amount.
PDM makes it extremely easy for Project Administrators to select potential bidders for each bid package. PDM allows the project administrator to drag and drop contacts from the main contact directory, from the project contacts, or other bid packages.
Open the Contact tab in the project window.
Undock the contact list

PDM User Guide 84
Drag the contacts that you want to send the bid package to from the undocked contact list to the bid package Invitees tab.
The contacts are added to the bid package.

PDM User Guide 85
Sending Invitations to Bid for a Bid Package Once the bid package is created with the folders, documents, and contacts added, you can then send create and send the bid package notification.
To do so, right click in the Bid Packages tab and select Create Bid Package Notification.
Select Invitation to Bid as the Notification Type. Click Next.

PDM User Guide 86
Enter the Display Name and Description. Set the Status to Active.
Enter the Delivery Information for when you want to send the invitation and the Reply To email address. Click Next.
Many of the Attributes will be pre-populated. Enter any additional information for the attributes as needed. Click Next.

PDM User Guide 87
If you need to add or remove recipients, drag them from the main PDM window as needed. The contacts you previously added are already displayed. Click Next.
The HTML for the Web Content is for the notification. You can edit it as needed. Usually you will not have to edit anything. Click Next.

PDM User Guide 88
The HTML for the Email Message Content can be edited. Click Preview Email to see what it will look like. Usually you will not have to edit anything. Click Next.
The HTML for the Fax Message Content can be edited. Click Preview Fax to see what it will look like. Usually you will not have to edit anything. Click Next.
PDM User Guide 89
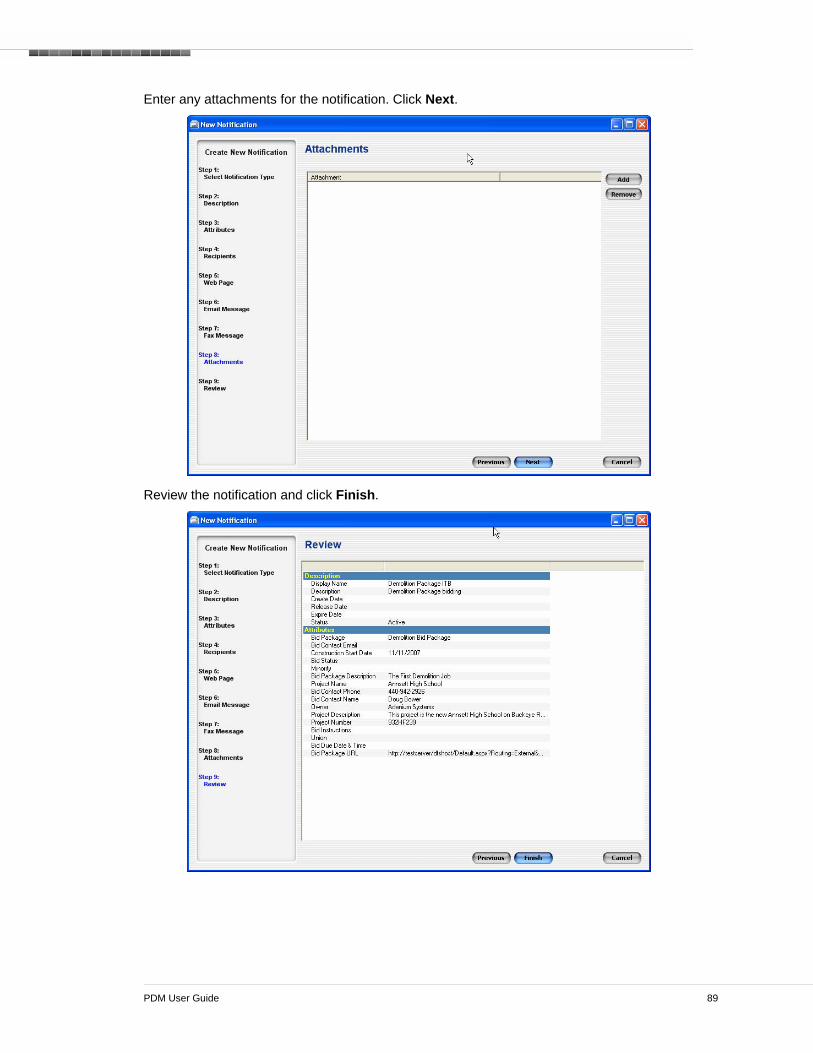
Enter any attachments for the notification. Click Next.
Review the notification and click Finish.

PDM User Guide 90
Inviting Subcontractors to Bid When the bid package has been created, the recipients of the invitation to bid will receive an email or fax invitation. They can then go online to view and print the documents and then respond to your invitation.
Subcontractor Receives Email Invitation to Bid The subcontractor will receive the email with the Invitation To Bid information. A link in the email will take him to the web page.

PDM User Guide 91
Sub Reviews Bid Package in Online Plan Room The sub is directed to the web portal that contains the bid packages and documents. When they click on the “Bid Packages” folder, a list of all bid packages that the user has been invited to bid will be displayed in the window on the right, as well as in the tree on the left.
Note: If the Bid Packages folder does not exist, then the user does not have access to any bid packages.
Click the Bid Packages folder.

PDM User Guide 92
Select one of the bid packages displayed under the “Bid Packages” Folder
When a user clicks on one of the bid package folders, the information about the bid package will be displayed in the window on the right. Folders that contain bid package documents will be displayed in the tree below the bid package folder selected.
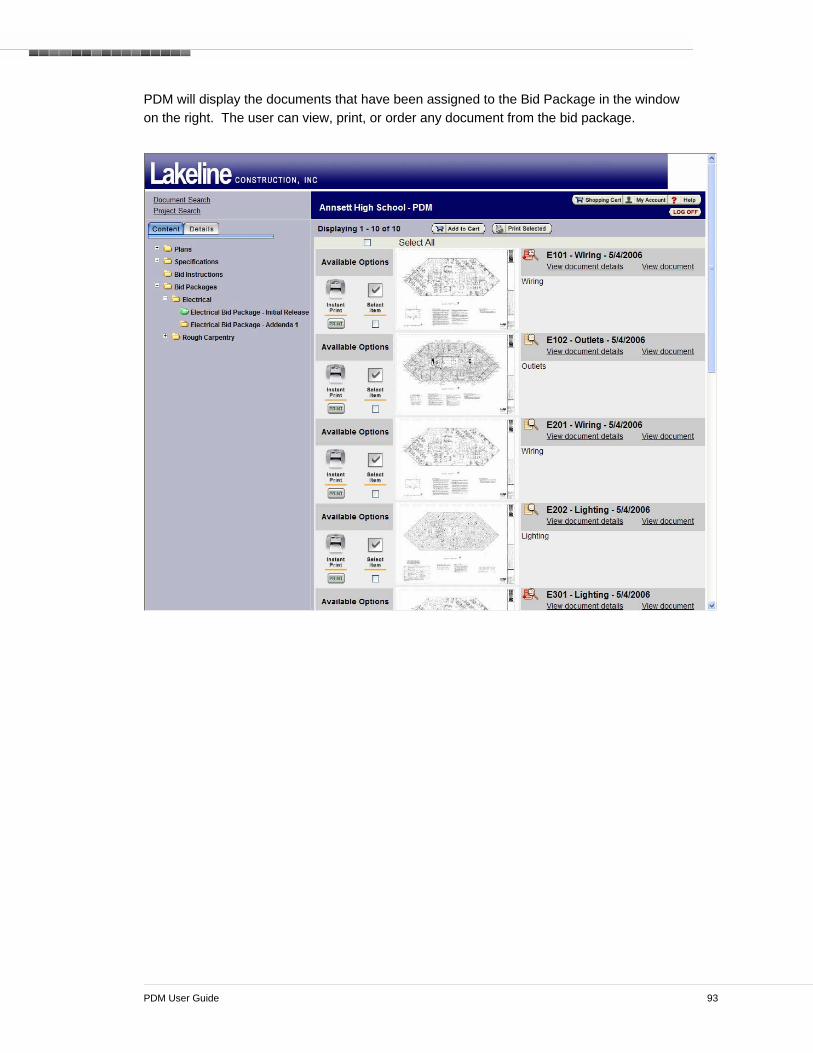
In the example below, the Electrical bid package information is displayed. There has been two sets of documents issued: Initial Release and Addenda 1.
PDM User Guide 93
PDM will display the documents that have been assigned to the Bid Package in the window on the right. The user can view, print, or order any document from the bid package.
PDM User Guide 94
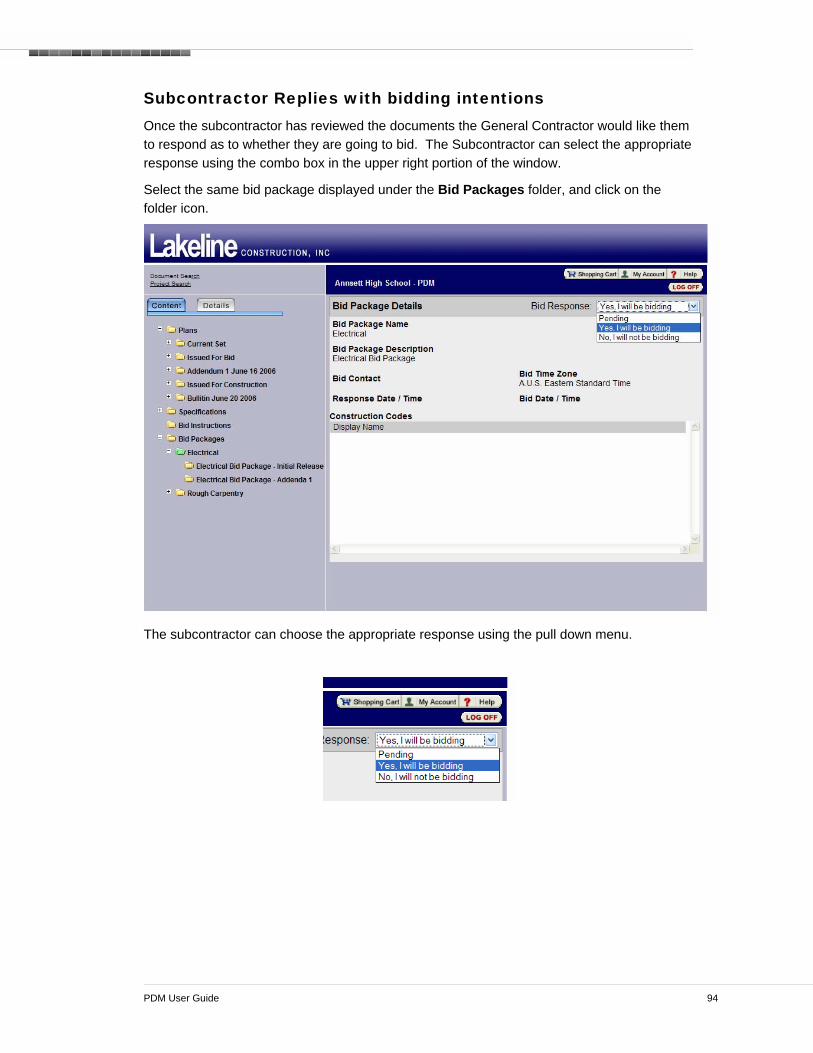
Subcontractor Replies with bidding intentions Once the subcontractor has reviewed the documents the General Contractor would like them to respond as to whether they are going to bid. The Subcontractor can select the appropriate response using the combo box in the upper right portion of the window.
Select the same bid package displayed under the Bid Packages folder, and click on the folder icon.
The subcontractor can choose the appropriate response using the pull down menu.
PDM User Guide 95
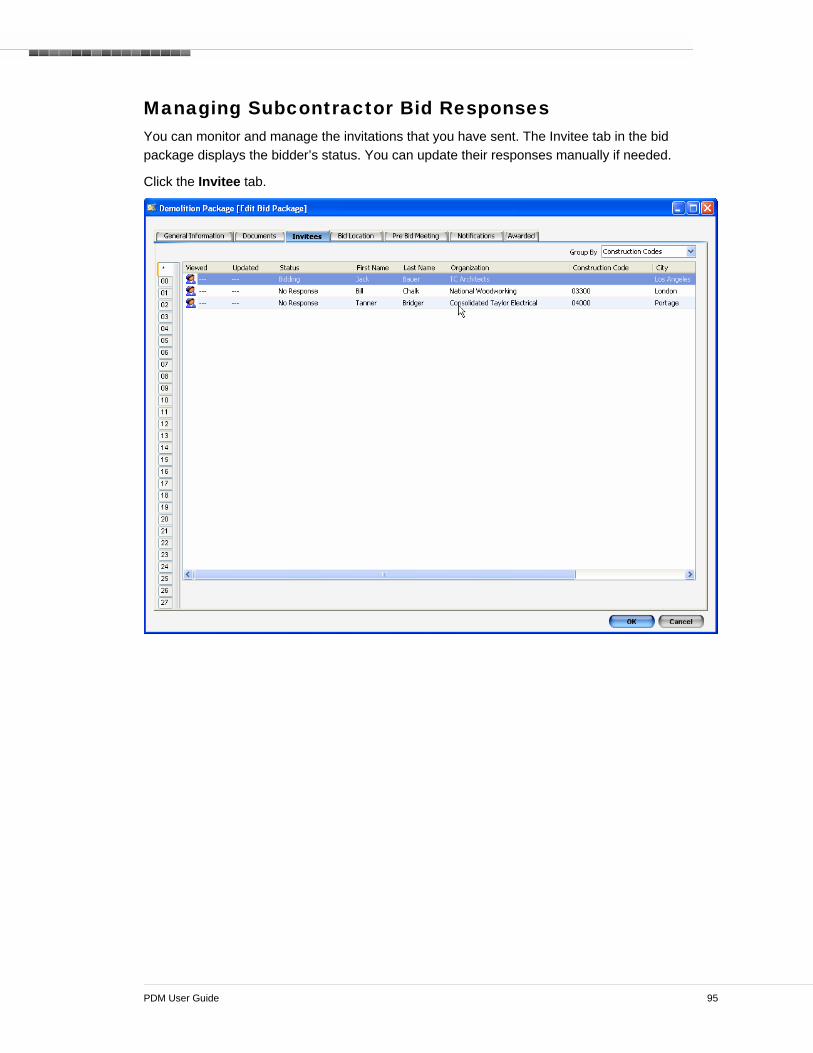
Managing Subcontractor Bid Responses You can monitor and manage the invitations that you have sent. The Invitee tab in the bid package displays the bidder’s status. You can update their responses manually if needed.
Click the Invitee tab.
PDM User Guide 96
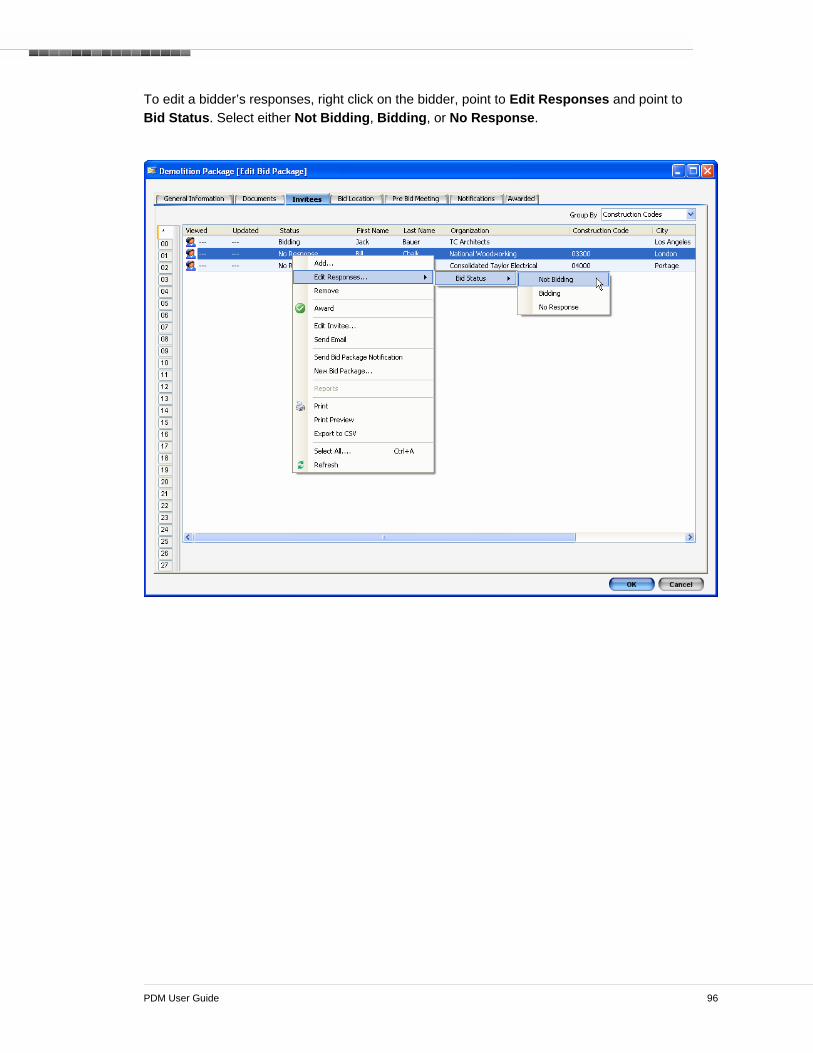
To edit a bidder’s responses, right click on the bidder, point to Edit Responses and point to Bid Status. Select either Not Bidding, Bidding, or No Response.
PDM User Guide 97
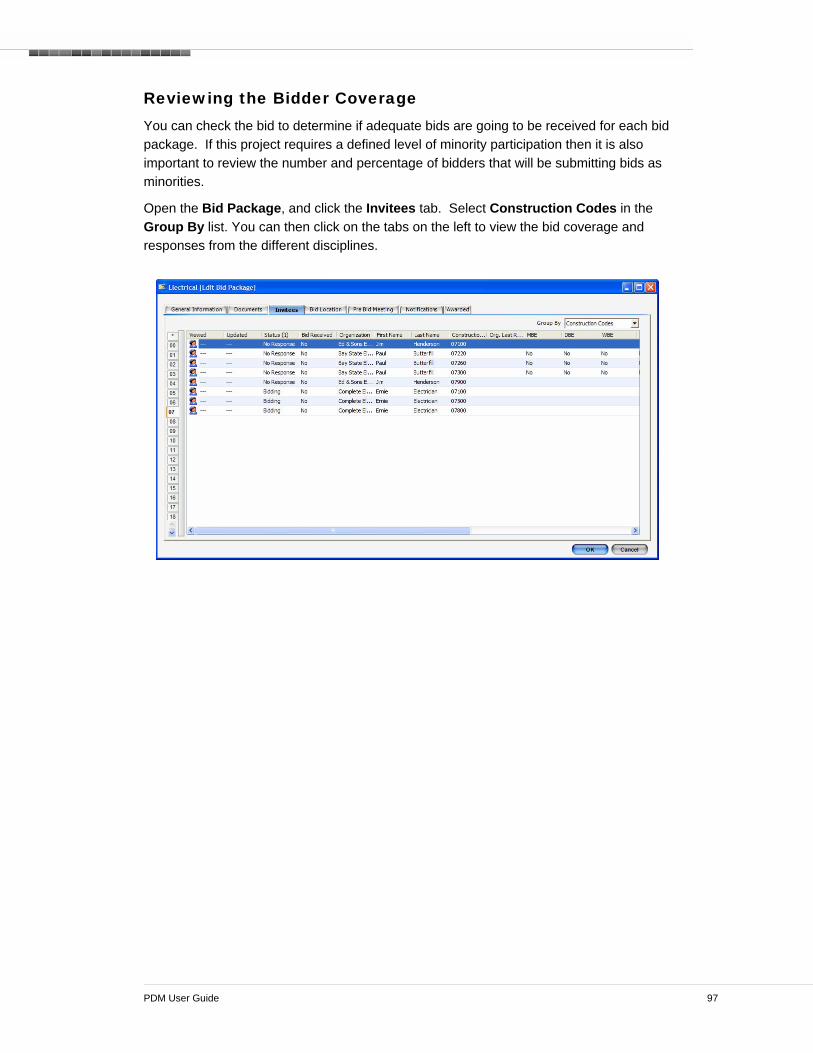
Reviewing the Bidder Coverage You can check the bid to determine if adequate bids are going to be received for each bid package. If this project requires a defined level of minority participation then it is also important to review the number and percentage of bidders that will be submitting bids as minorities.
Open the Bid Package, and click the Invitees tab. Select Construction Codes in the Group By list. You can then click on the tabs on the left to view the bid coverage and responses from the different disciplines.

PDM User Guide 98
Bid Package Report You can run a bid package report to monitor responses and bid information.
To do so, click the Reports tab. Right click on the Bid Package Status Report and click Generate.
This report provides an easy to read listing of every bid for this project. It provides a summary of the entire bid including package name, key dates and summary of current status of the invitees. It provides a detailed list of all the invitees, with their key contact information
PDM User Guide 99
and their current bid status.
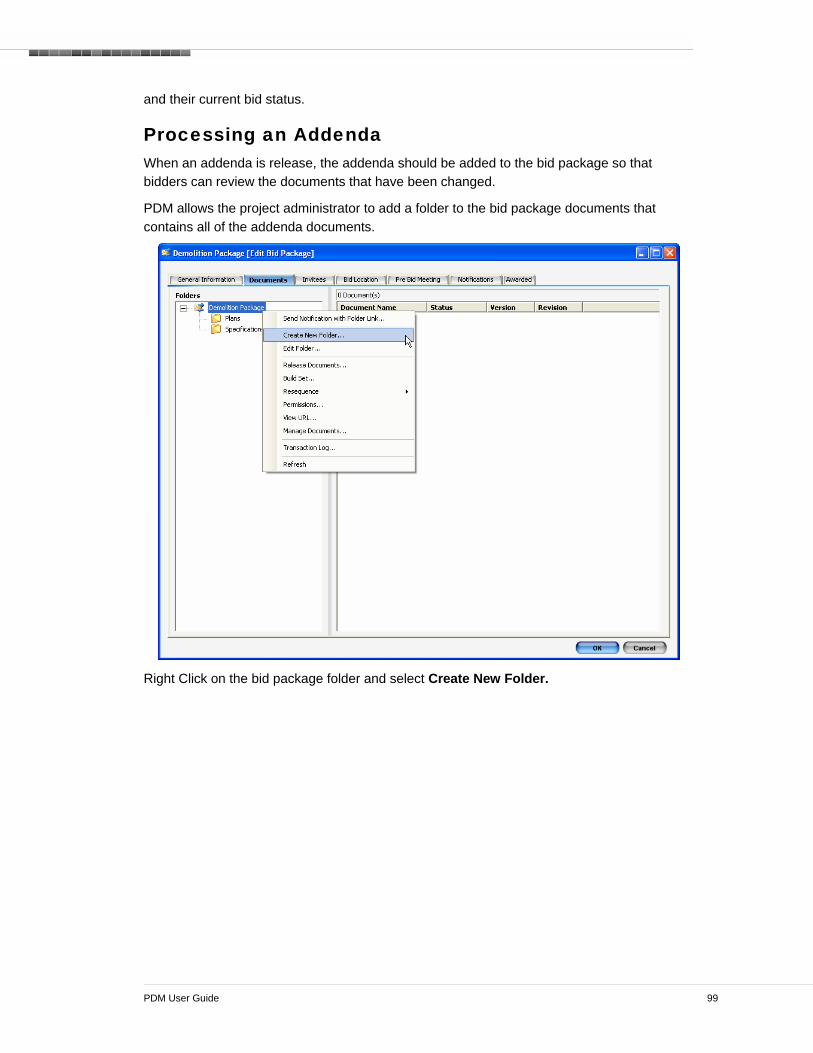
Processing an Addenda When an addenda is release, the addenda should be added to the bid package so that bidders can review the documents that have been changed.
PDM allows the project administrator to add a folder to the bid package documents that contains all of the addenda documents.
Right Click on the bid package folder and select Create New Folder.

PDM User Guide 100
Enter the display name and the rest of the appropriate information.
PDM User Guide 101
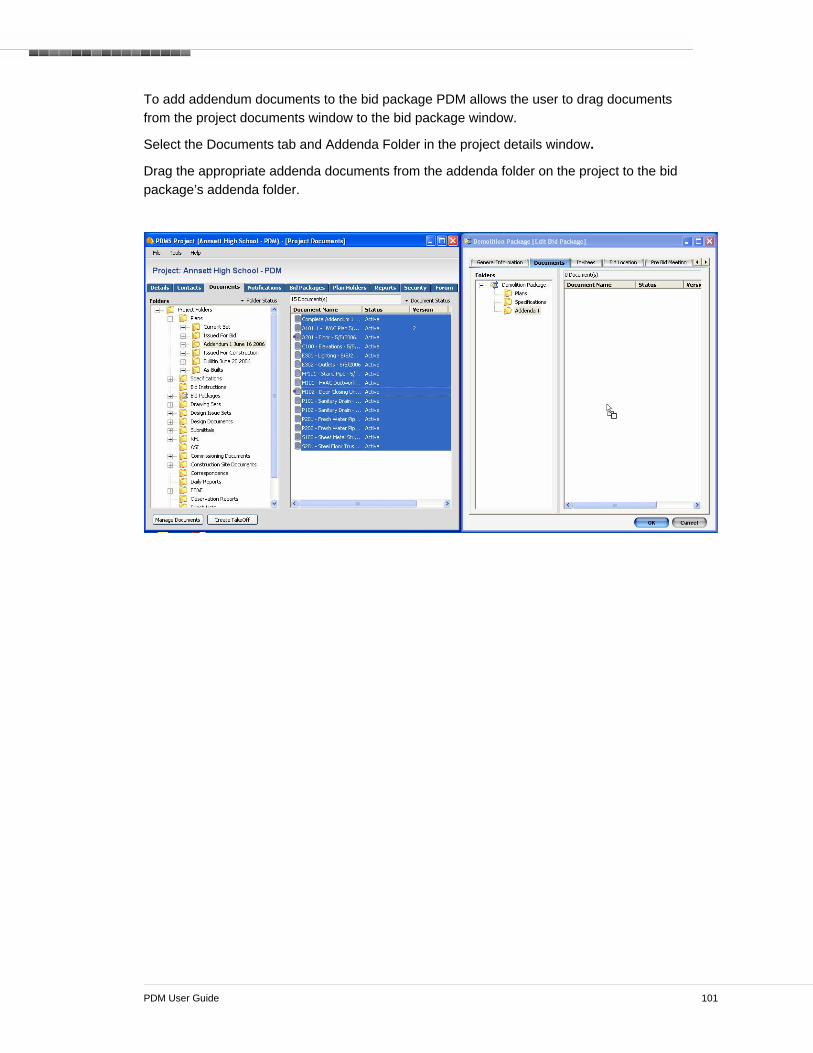
To add addendum documents to the bid package PDM allows the user to drag documents from the project documents window to the bid package window.
Select the Documents tab and Addenda Folder in the project details window.
Drag the appropriate addenda documents from the addenda folder on the project to the bid package’s addenda folder.
PDM User Guide 102
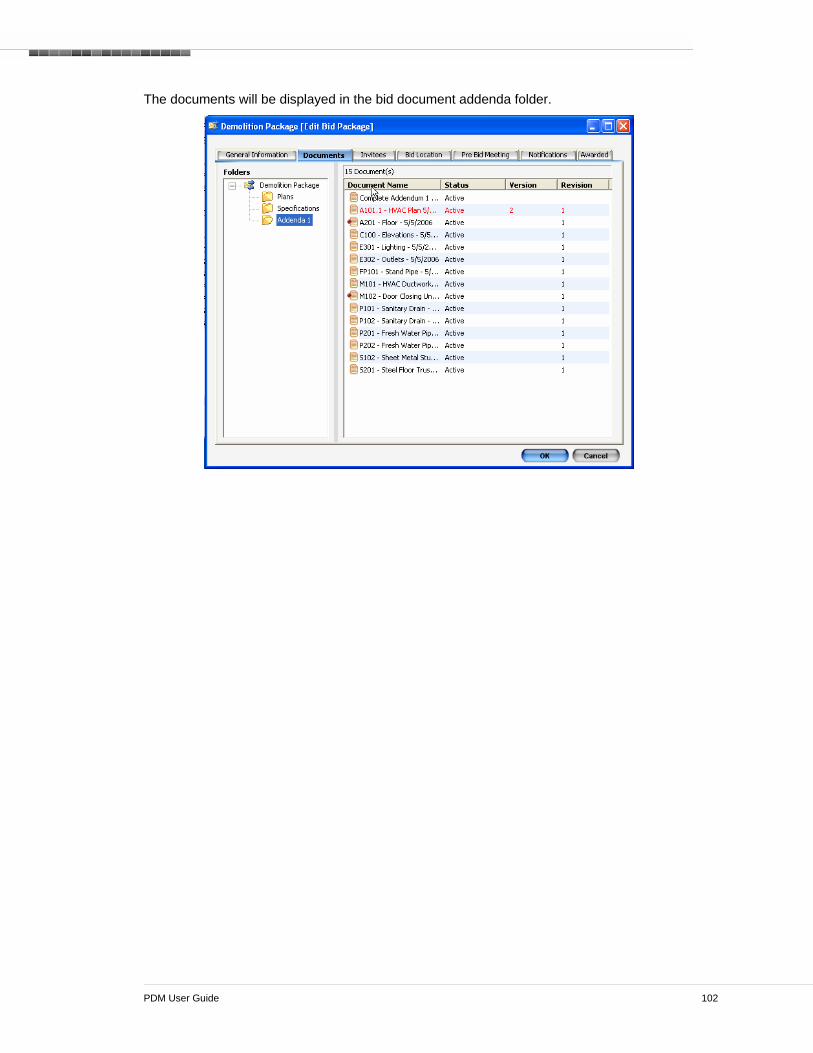
The documents will be displayed in the bid document addenda folder.

PDM User Guide 103
Once the addenda folder has been created and populated, a notification of addenda should be sent to the bidders.
Right click on the Addend folder and select Send Notification with Folder Link.

PDM User Guide 104
Awarding the Bid Package Once all of the subcontractor’s bids have been received and a decision made, the bid package can be closed and awarded.
To award the bid package, go to the Invitees tab for the bid package. Right click on the contact to whom you want to award the bid and select Award. The bid is awarded to the contact.

PDM User Guide 105
To view the awarded bid, click the Awarded tab.

PDM User Guide 106
MMAANNAAGGIINNGG UUSSEERR SSEETTTTIINNGGSS Managing My Account You can update your contact and administrative information on the My Account tab. This allows you to maintain your own information without the involvement of a system administrator.
To manage your account, click the My Account tab.
Enter or change any information on the Duplicate Key, Organization and Location, Contact Information, Contact List, Attributes, or Private tabs.
PDM User Guide 107
Adenium Systems
34103 Lakeshore Boulevard
Cleveland, OH 44095
www.adeniumsystems.com


