1) Creating the templateRight, this isn't the most enjoyable part but it is required, get your calculator out we're going to do some maths!
Decide what you'd like the height, bottom diameter and top diameter of your crown to be. For Daisy and Peach I use 3.5 inches, 4 inches and 5 inches. For Rosalina I use 4 inches, 4 inches and 6 inches.
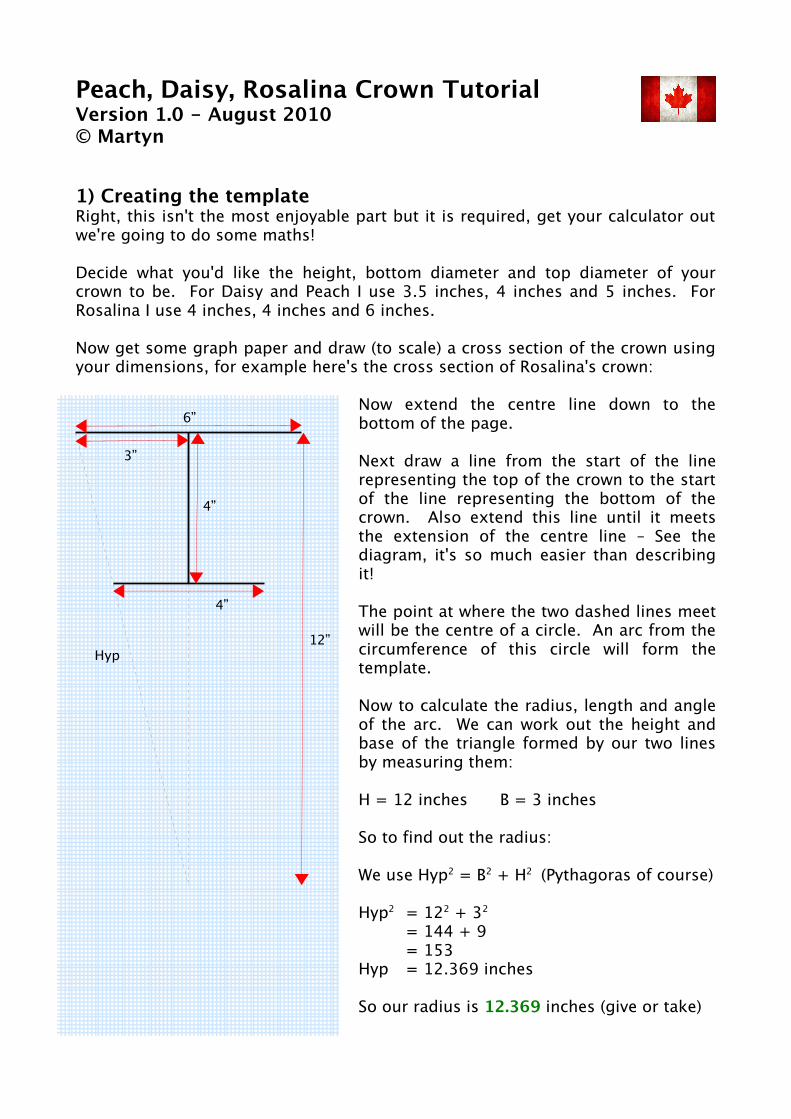
Now get some graph paper and draw (to scale) a cross section of the crown using your dimensions, for example here's the cross section of Rosalina's crown:
Now extend the centre line down to the bottom of the page.
Next draw a line from the start of the line representing the top of the crown to the start of the line representing the bottom of the crown. Also extend this line until it meets the extension of the centre line – See the diagram, it's so much easier than describing it!
The point at where the two dashed lines meet will be the centre of a circle. An arc from the circumference of this circle will form the template.
Now to calculate the radius, length and angle of the arc. We can work out the height and base of the triangle formed by our two lines by measuring them:
H = 12 inches B = 3 inches
So to find out the radius:
We use Hyp2 = B2 + H2 (Pythagoras of course)
Hyp2 = 122 + 32
= 144 + 9 = 153
Hyp = 12.369 inches
So our radius is 12.369 inches (give or take)
6”
4”
4”
Hyp
3”
12”
To find the arc length we simply need to work out the circumference of the top of the crown, which is a circle with a 6 inch diameter:
Circumference = π x D = 3.142 x 6 Arc length = 18.852 inches
Finally find the angle of the arc. So find the circumference of the complete circle of which the arc is part:
Circumference = 3.142 x (12.369 x 2) (since 12.369 is the radius)= 77.727 inches
Now divide the arc length by this circumference and multiply by 360 to get the angle:
Arc angle = (18.852/77.727) x 360Arc angle = 87.315º
Great! We're done. You can put the calculator away now (you used one right?)
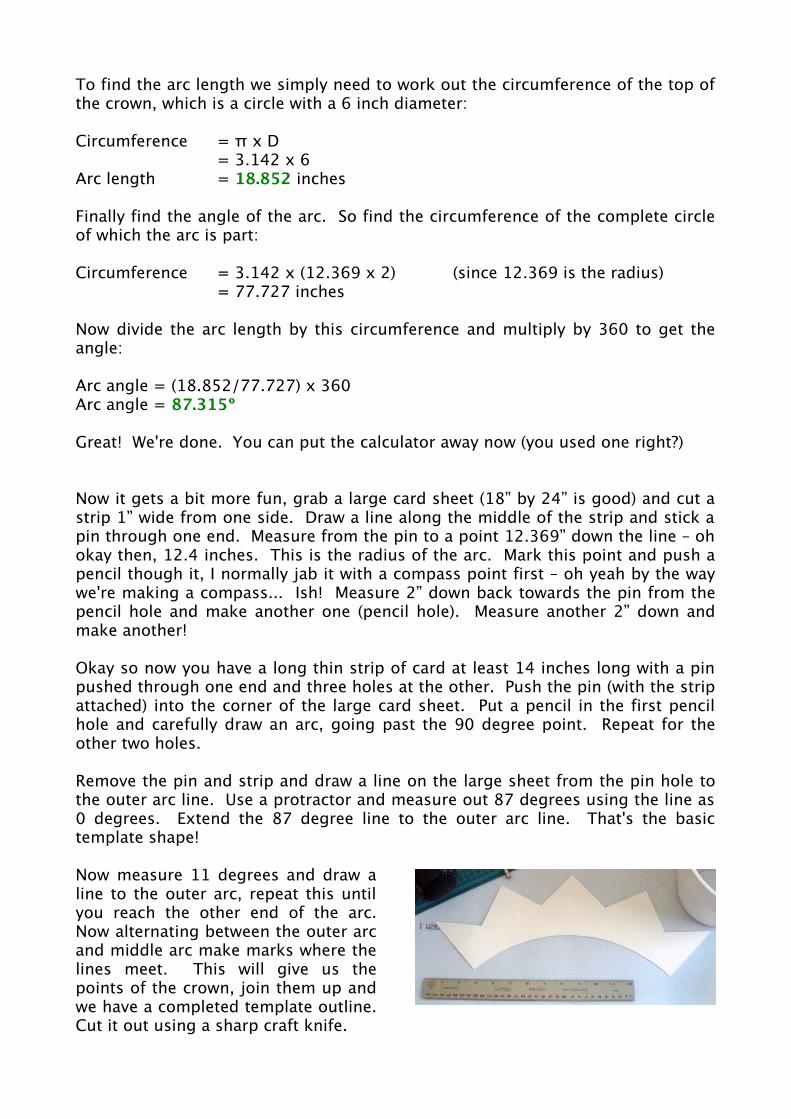
Now it gets a bit more fun, grab a large card sheet (18” by 24” is good) and cut a strip 1” wide from one side. Draw a line along the middle of the strip and stick a pin through one end. Measure from the pin to a point 12.369” down the line – oh okay then, 12.4 inches. This is the radius of the arc. Mark this point and push a pencil though it, I normally jab it with a compass point first – oh yeah by the way we're making a compass... Ish! Measure 2” down back towards the pin from the pencil hole and make another one (pencil hole). Measure another 2” down and make another!
Okay so now you have a long thin strip of card at least 14 inches long with a pin pushed through one end and three holes at the other. Push the pin (with the strip attached) into the corner of the large card sheet. Put a pencil in the first pencil hole and carefully draw an arc, going past the 90 degree point. Repeat for the other two holes.
Remove the pin and strip and draw a line on the large sheet from the pin hole to the outer arc line. Use a protractor and measure out 87 degrees using the line as 0 degrees. Extend the 87 degree line to the outer arc line. That's the basic template shape!
Now measure 11 degrees and draw a line to the outer arc, repeat this until you reach the other end of the arc. Now alternating between the outer arc and middle arc make marks where the lines meet. This will give us the points of the crown, join them up and we have a completed template outline. Cut it out using a sharp craft knife.
2) Making the basic structureYou can use plastic or card for this, I'd go with plastic if you want your crown to be reasonably rugged. At the time of writing I was using Wonderflex which works quite well but is a bit expensive and can be unpredictable if you're not careful with the hair dryer or heat gun.
Place your template on your card/plastic sheet and mark around it. Now cut along the outline, again with a sharp craft knife.
Here's the tricky part... You need to be as accurate as you can with joining the two ends of the shape together. Perhaps it goes without saying but it will impact the “trueness” of the whole crown.
With card you can just use craft glue and weights to hold it in place. With plastic you'd need some styrene cement or even super-glue. With Wonderflex you just need heat, aren't thermoplastics great? Well yes and no, too much heat and your crown will droop!
Make sure you have a suitable curved surface to form the join over. I made a form out of card. Regardless of the material you choose to use, you want to avoid altering the natural curve it adopts as you join the ends.
Don't worry about the join line, it will be hidden by the time we're finished.
Before and after comparison... Or rather after and before!
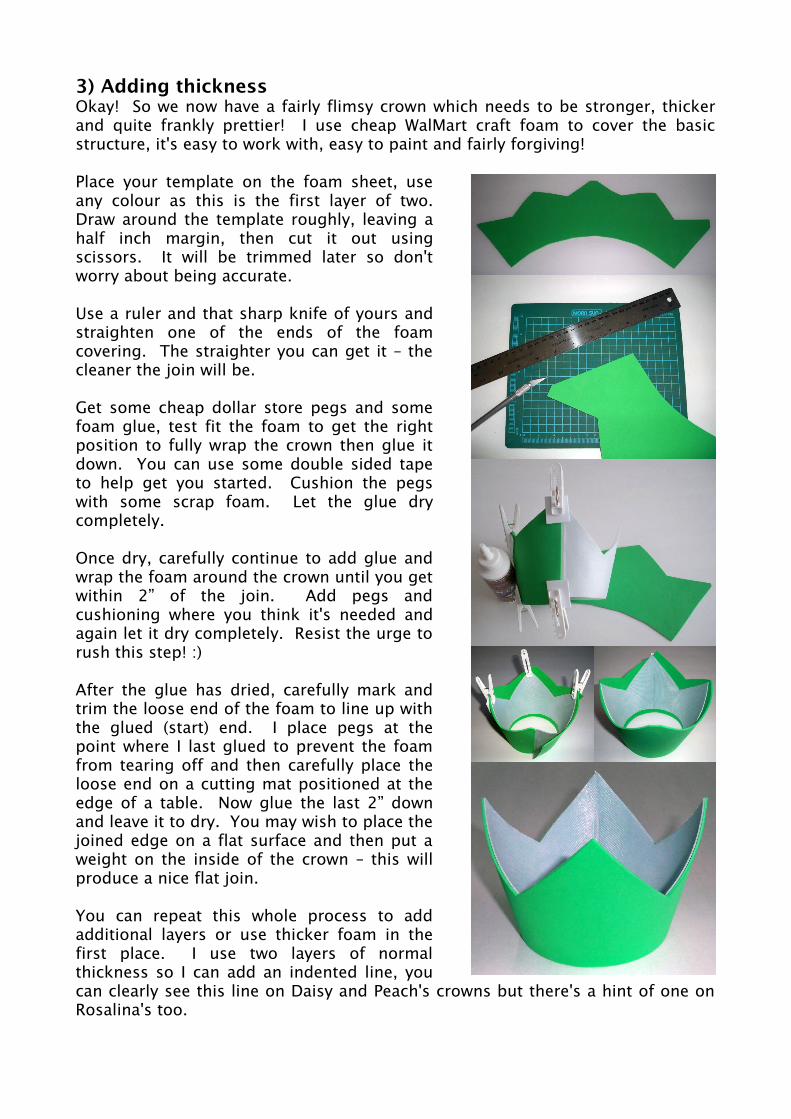
3) Adding thicknessOkay! So we now have a fairly flimsy crown which needs to be stronger, thicker and quite frankly prettier! I use cheap WalMart craft foam to cover the basic structure, it's easy to work with, easy to paint and fairly forgiving!
Place your template on the foam sheet, use any colour as this is the first layer of two. Draw around the template roughly, leaving a half inch margin, then cut it out using scissors. It will be trimmed later so don't worry about being accurate.
Use a ruler and that sharp knife of yours and straighten one of the ends of the foam covering. The straighter you can get it – the cleaner the join will be.
Get some cheap dollar store pegs and some foam glue, test fit the foam to get the right position to fully wrap the crown then glue it down. You can use some double sided tape to help get you started. Cushion the pegs with some scrap foam. Let the glue dry completely.
Once dry, carefully continue to add glue and wrap the foam around the crown until you get within 2” of the join. Add pegs and cushioning where you think it's needed and again let it dry completely. Resist the urge to rush this step! :)
After the glue has dried, carefully mark and trim the loose end of the foam to line up with the glued (start) end. I place pegs at the point where I last glued to prevent the foam from tearing off and then carefully place the loose end on a cutting mat positioned at the edge of a table. Now glue the last 2” down and leave it to dry. You may wish to place the joined edge on a flat surface and then put a weight on the inside of the crown – this will produce a nice flat join.
You can repeat this whole process to add additional layers or use thicker foam in the first place. I use two layers of normal thickness so I can add an indented line, you can clearly see this line on Daisy and Peach's crowns but there's a hint of one on Rosalina's too.
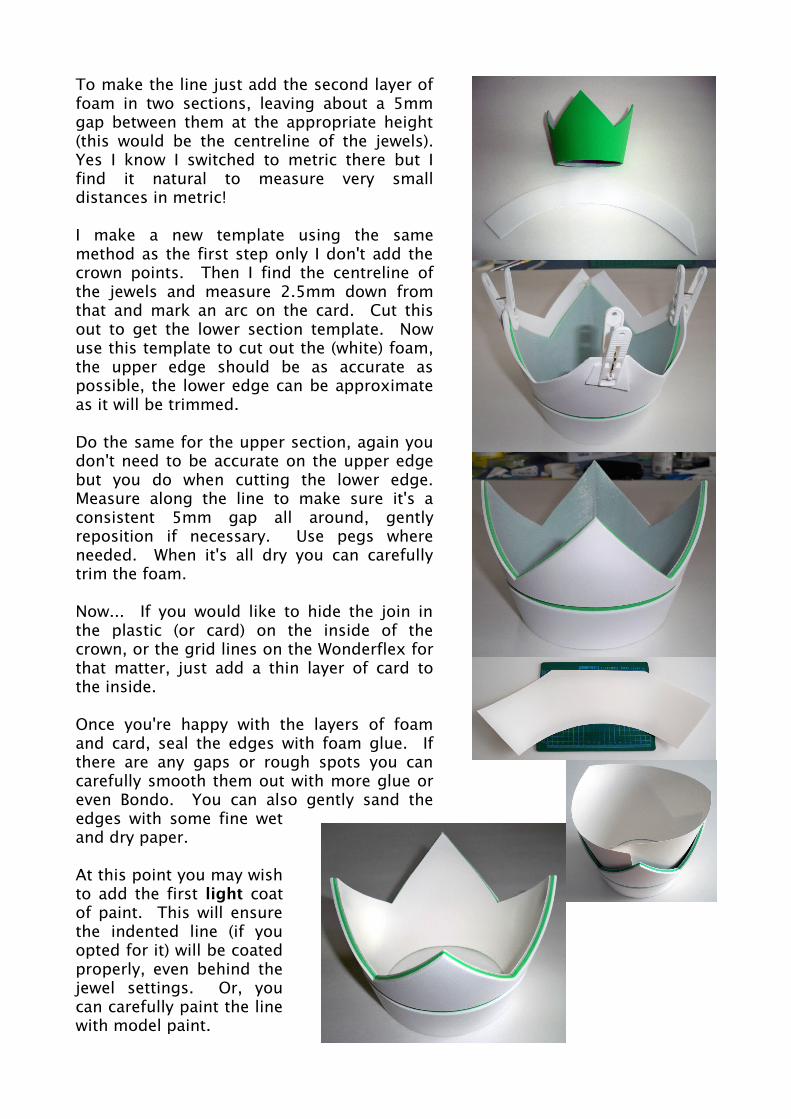
To make the line just add the second layer of foam in two sections, leaving about a 5mm gap between them at the appropriate height (this would be the centreline of the jewels). Yes I know I switched to metric there but I find it natural to measure very small distances in metric!
I make a new template using the same method as the first step only I don't add the crown points. Then I find the centreline of the jewels and measure 2.5mm down from that and mark an arc on the card. Cut this out to get the lower section template. Now use this template to cut out the (white) foam, the upper edge should be as accurate as possible, the lower edge can be approximate as it will be trimmed.
Do the same for the upper section, again you don't need to be accurate on the upper edge but you do when cutting the lower edge. Measure along the line to make sure it's a consistent 5mm gap all around, gently reposition if necessary. Use pegs where needed. When it's all dry you can carefully trim the foam.
Now... If you would like to hide the join in the plastic (or card) on the inside of the crown, or the grid lines on the Wonderflex for that matter, just add a thin layer of card to the inside.
Once you're happy with the layers of foam and card, seal the edges with foam glue. If there are any gaps or rough spots you can carefully smooth them out with more glue or even Bondo. You can also gently sand the edges with some fine wet and dry paper.
At this point you may wish to add the first light coat of paint. This will ensure the indented line (if you opted for it) will be coated properly, even behind the jewel settings. Or, you can carefully paint the line with model paint.
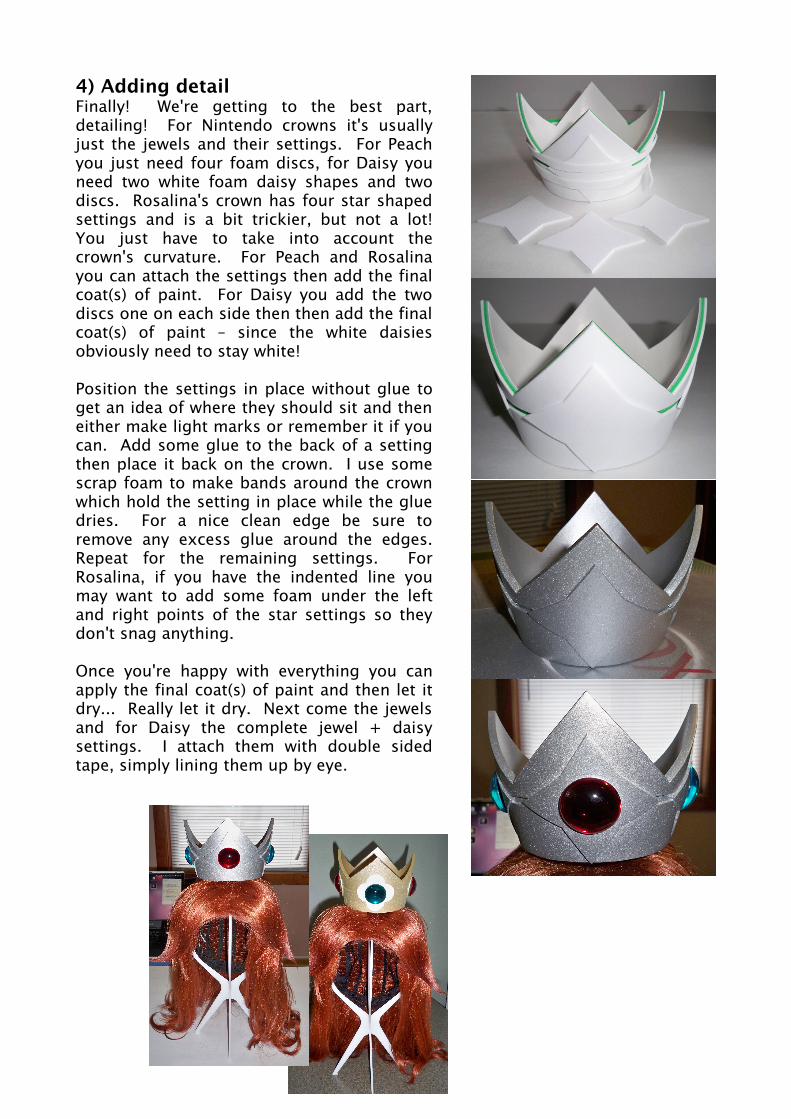
4) Adding detailFinally! We're getting to the best part, detailing! For Nintendo crowns it's usually just the jewels and their settings. For Peach you just need four foam discs, for Daisy you need two white foam daisy shapes and two discs. Rosalina's crown has four star shaped settings and is a bit trickier, but not a lot! You just have to take into account the crown's curvature. For Peach and Rosalina you can attach the settings then add the final coat(s) of paint. For Daisy you add the two discs one on each side then then add the final coat(s) of paint – since the white daisies obviously need to stay white!
Position the settings in place without glue to get an idea of where they should sit and then either make light marks or remember it if you can. Add some glue to the back of a setting then place it back on the crown. I use some scrap foam to make bands around the crown which hold the setting in place while the glue dries. For a nice clean edge be sure to remove any excess glue around the edges. Repeat for the remaining settings. For Rosalina, if you have the indented line you may want to add some foam under the left and right points of the star settings so they don't snag anything.
Once you're happy with everything you can apply the final coat(s) of paint and then let it dry... Really let it dry. Next come the jewels and for Daisy the complete jewel + daisy settings. I attach them with double sided tape, simply lining them up by eye.
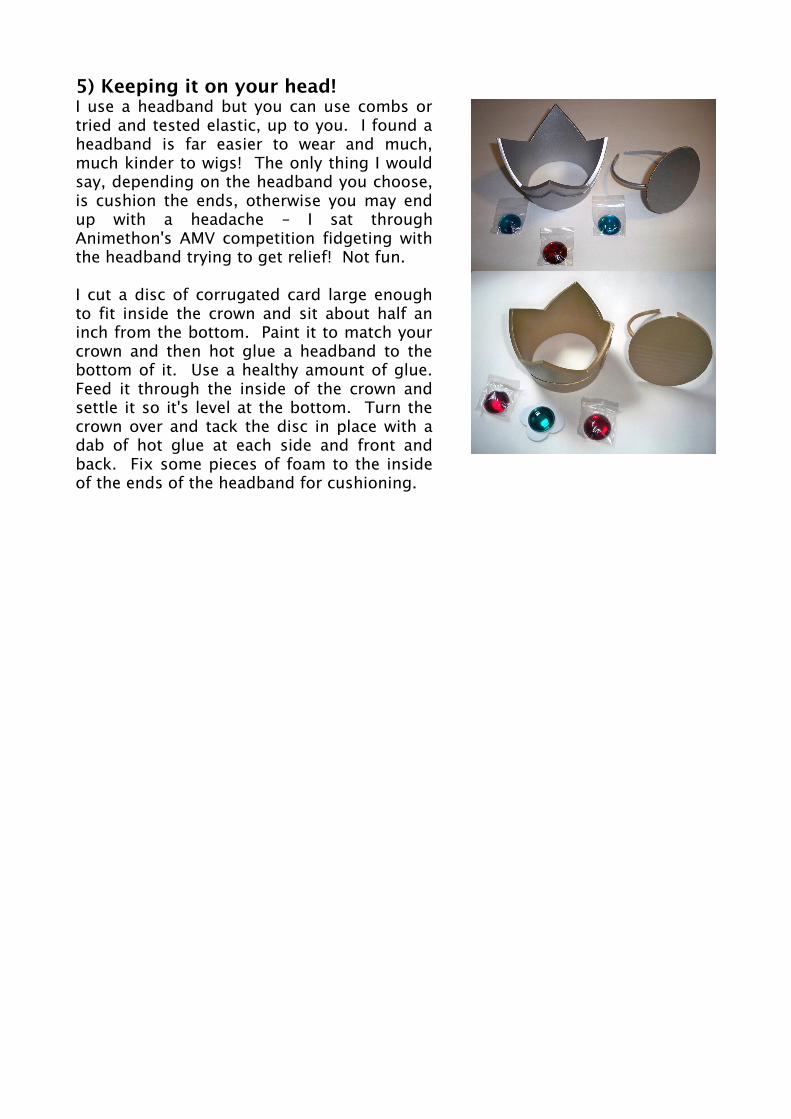
5) Keeping it on your head!I use a headband but you can use combs or tried and tested elastic, up to you. I found a headband is far easier to wear and much, much kinder to wigs! The only thing I would say, depending on the headband you choose, is cushion the ends, otherwise you may end up with a headache – I sat through Animethon's AMV competition fidgeting with the headband trying to get relief! Not fun.
I cut a disc of corrugated card large enough to fit inside the crown and sit about half an inch from the bottom. Paint it to match your crown and then hot glue a headband to the bottom of it. Use a healthy amount of glue. Feed it through the inside of the crown and settle it so it's level at the bottom. Turn the crown over and tack the disc in place with a dab of hot glue at each side and front and back. Fix some pieces of foam to the inside of the ends of the headband for cushioning.