32
Pegasus Software User Manual v1.0 © 2011 GsmServer Team

Pegasus Software
User Manual
v1.0
© 2011 GsmServer Team
[2]
Table of Contents
Pegasus Software Overview ................................................................................................ 3
Service Mode Explanation ................................................................................................... 5
Pegasus Unlock Procedure Tutorial ..................................................................................... 9
Creating a Backup Copy ..................................................................................................... 15
Flash Procedure ................................................................................................................ 20
Rebuild IMEI ...................................................................................................................... 27
[3]
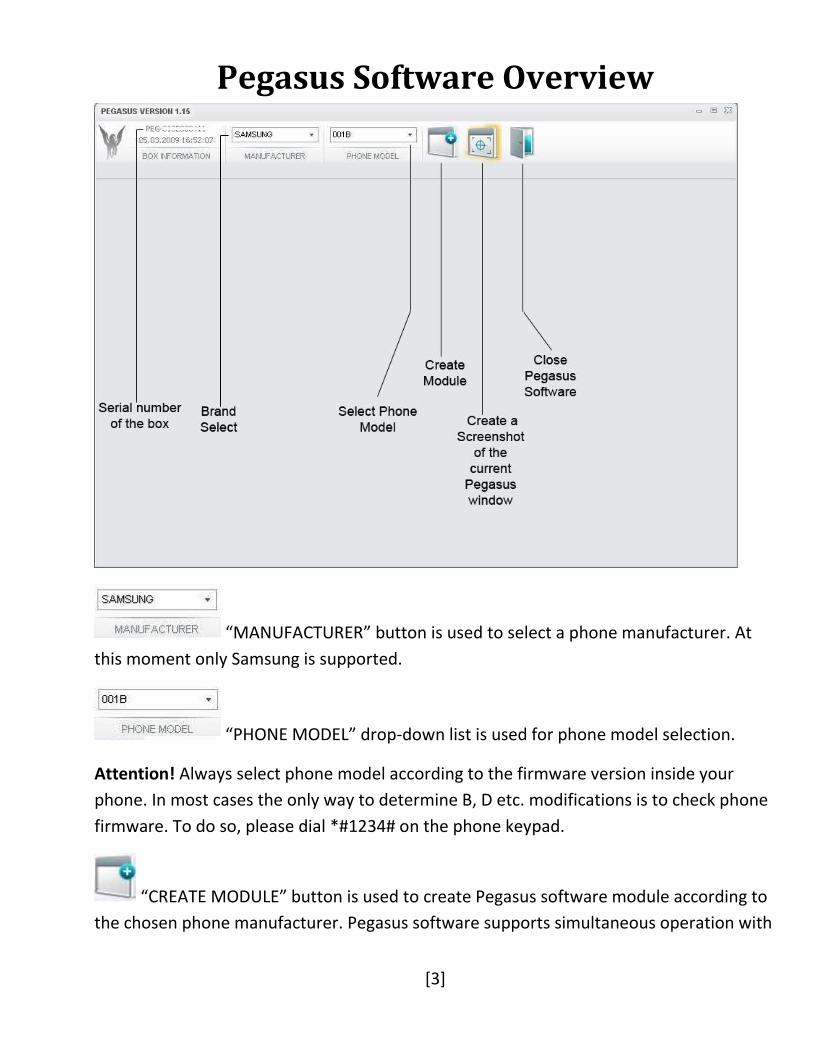
Pegasus Software Overview
“MANUFACTURER” button is used to select a phone manufacturer. At
this moment only Samsung is supported.
“PHONE MODEL” drop-down list is used for phone model selection.
Attention! Always select phone model according to the firmware version inside your
phone. In most cases the only way to determine B, D etc. modifications is to check phone
firmware. To do so, please dial *#1234# on the phone keypad.
“CREATE MODULE” button is used to create Pegasus software module according to
the chosen phone manufacturer. Pegasus software supports simultaneous operation with
[4]
as many COM ports as you have boxes or phones in USB mode connected to your PC.
Each module allows to service one phone at a time.
“TAKE SCREENSHOT” button is used to make screenshots of Pegasus software
current status. Screenshots are saved in “Screenshots” folder, in the Pegasus installation
folder. Files are automatically named “Screenshot dd.mm.yyyy. hh-mm-ss.jpg”. You may
use this button to save log information and send it to Support Team if you encounter
some technical problems.
“Exit” button closes all opened modules and Pegasus software.
Warning! All operations will be cancelled immediately! Make sure that no phone is being
flashed at this moment!
[5]
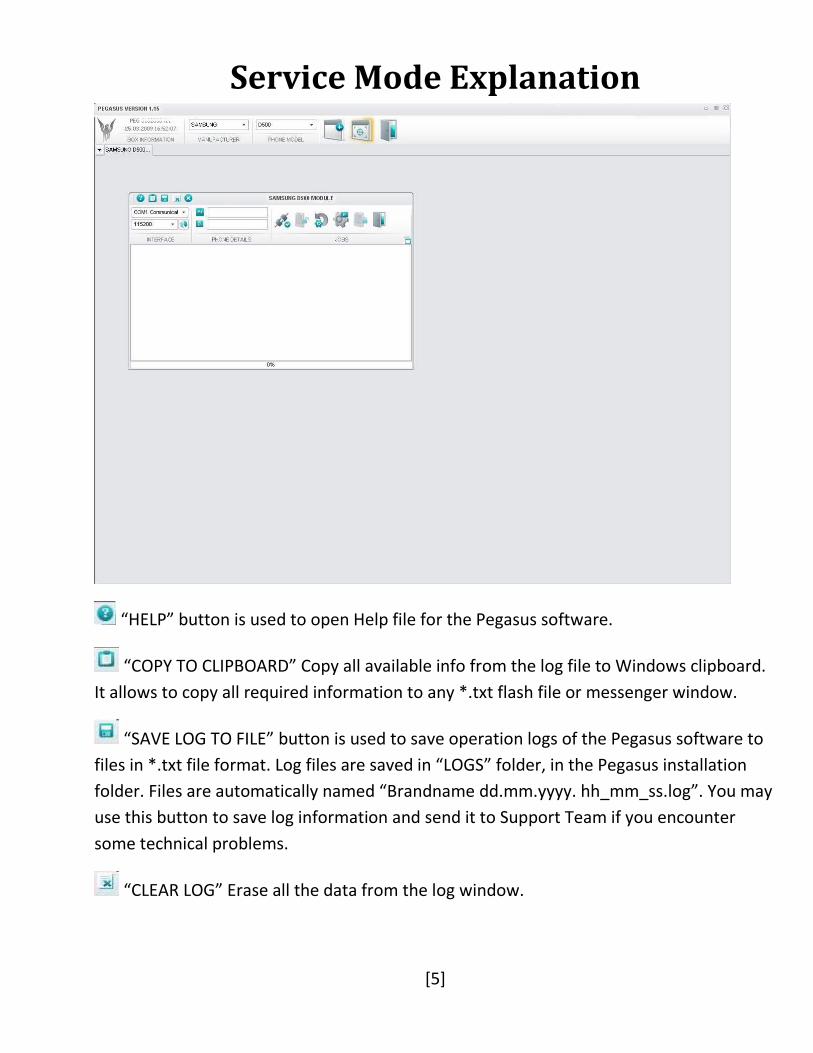
Service Mode Explanation
“HELP” button is used to open Help file for the Pegasus software.
“COPY TO CLIPBOARD” Copy all available info from the log file to Windows clipboard.
It allows to copy all required information to any *.txt flash file or messenger window.
“SAVE LOG TO FILE” button is used to save operation logs of the Pegasus software to
files in *.txt file format. Log files are saved in “LOGS” folder, in the Pegasus installation
folder. Files are automatically named “Brandname dd.mm.yyyy. hh_mm_ss.log”. You may
use this button to save log information and send it to Support Team if you encounter
some technical problems.
“CLEAR LOG” Erase all the data from the log window.
[6]
“CLOSE MODULE WINDOW” Closes active module window. Please notice, all active
procedures will be terminated if the module get closed.
“COM PORT” drop-down list is used to select operation port. Pegasus
software communicates through any interface able to create virtual COM port on your PC.
Native COM1 and USB operation is supported as well.
“BAUDRATE” drop-down menu is used to select operation speed. The higher
speed is selected – the faster will the flashing procedure be.
“IMEI” Reads IMEI number of the phone.
“SN” Reads serial number of the handset
“CONNECT TO PHONE” button is used to start boot sequence and put your phone
into appropriate mode for servicing operations.
“UNOCK PHONE” button used to perform unlock procedure of the connected
phone. Please notice that COM port and phone model suppose to match connected
handset.
“FACTORY RESET” Resets phone settings to the default one, settings that get set to
the phone at the factory.
“REPAIR EMPTY BOARD” button is used to repair “illegal trial” error, IMEI
00000000000000 that can’t be repaired in usual way etc. You should type handset serial
number to input field.
You can get serial number from factory sticker. Example on image below:
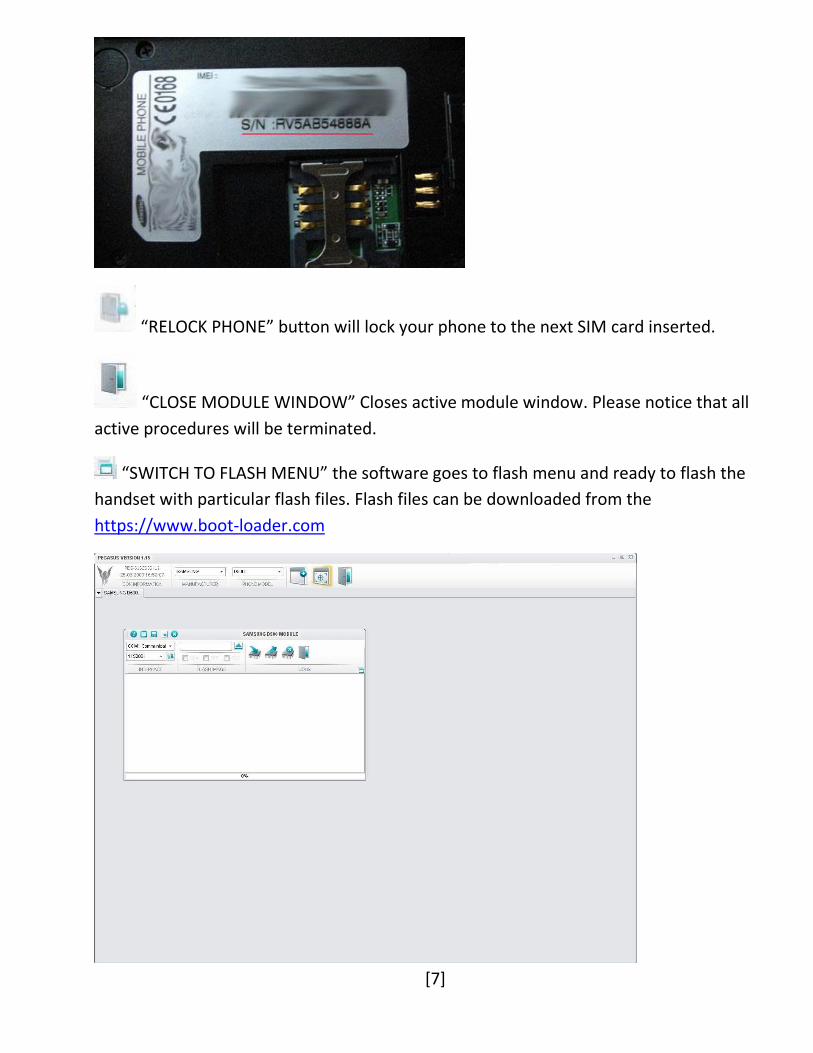
[7]
“RELOCK PHONE” button will lock your phone to the next SIM card inserted.
“CLOSE MODULE WINDOW” Closes active module window. Please notice that all
active procedures will be terminated.
“SWITCH TO FLASH MENU” the software goes to flash menu and ready to flash the
handset with particular flash files. Flash files can be downloaded from the
https://www.boot-loader.com
[8]
“OPEN FLASH IMAGE” Allow selecting proper flash file that meant to be used for the
flashing purposes.
“CLA” main firmware version of the handset.
“TFS“ contains all multimedia content of the handset. Such as mp3, pictures, videos etc.
“CSC” customization file. Contains languages, phone’s menu language and keyboard input
language.
“WRITE FLASH” button begins flashing procedure. Before flashing you should
checkmark which file parts should be written. If some checkboxes are grayed-out and not
operational this means that flash image does not contain corresponding flash parts. It is
recommended to flash all flash parts to avoid handset software malfunction.
“READ FLASH” button is used to dump handset flash memory into .FLB file. This file
format is used by our team for debugging procedure. Don’t send us backup files each time
you have a problem. Please use this function upon our request only.
“ERASE FLASH” Erase firmware version of the phone, including user data.
“CLOSE MODULE WINDOW”

[9]
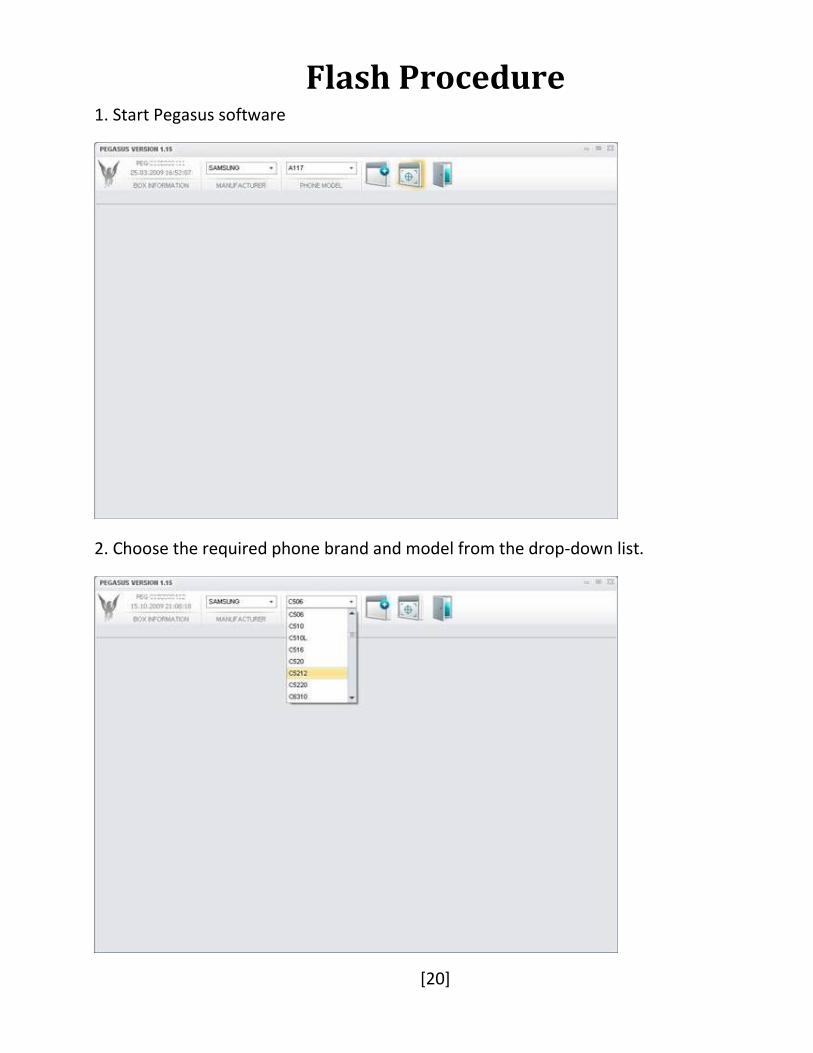
Pegasus Unlock Procedure Tutorial 1. Start the Pegasus software
2. Choose an appropriate phone brand and a model from the drop-down list.

[10]
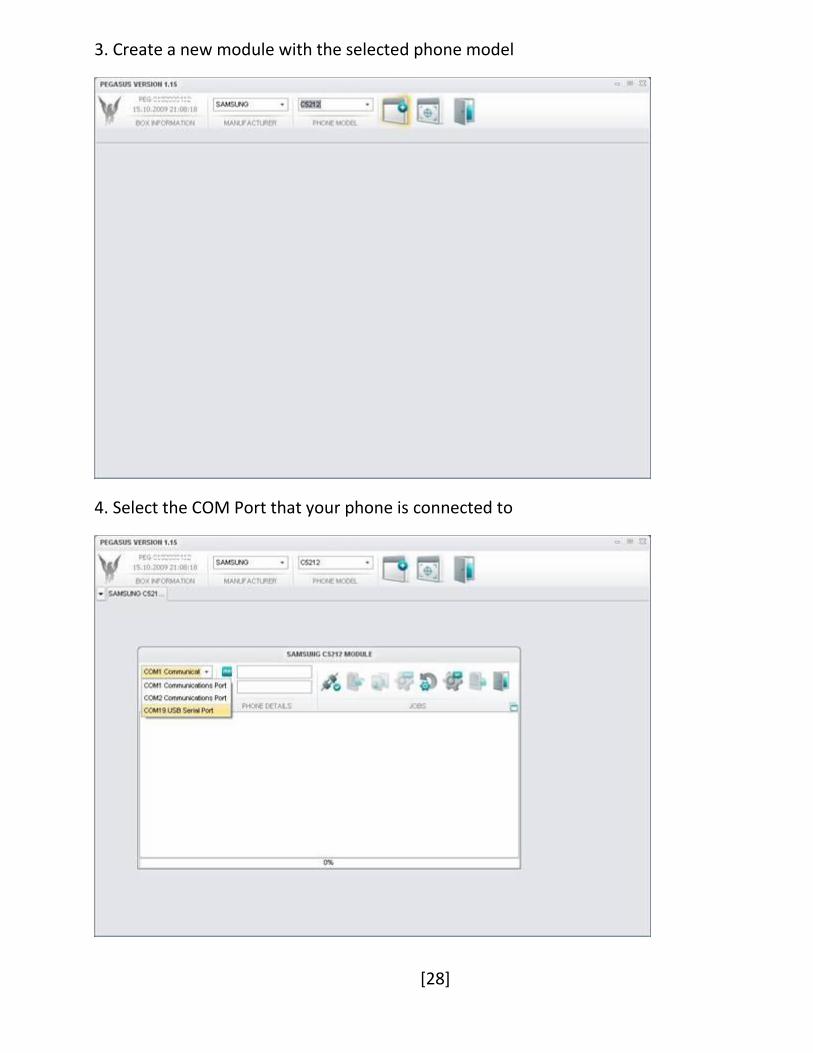
3. Create a new module with a selected phone model.
4. Select the COM Port that your phone is connected to.
[11]
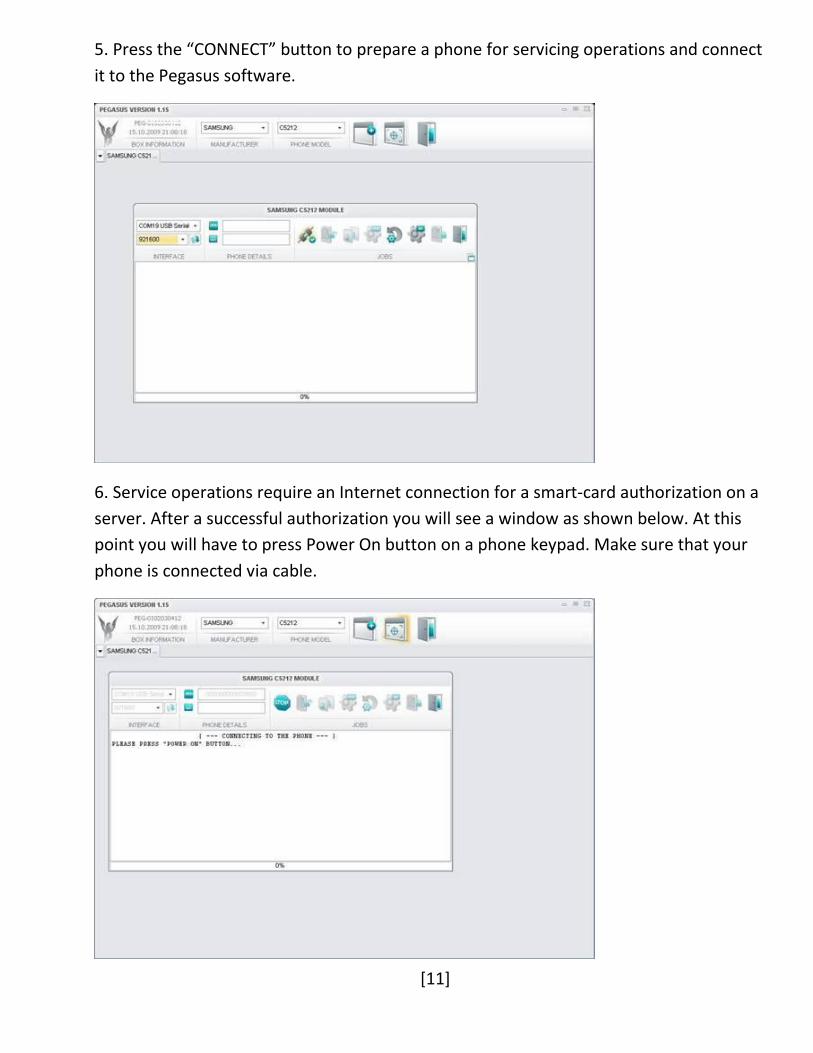
5. Press the “CONNECT” button to prepare a phone for servicing operations and connect
it to the Pegasus software.
6. Service operations require an Internet connection for a smart-card authorization on a
server. After a successful authorization you will see a window as shown below. At this
point you will have to press Power On button on a phone keypad. Make sure that your
phone is connected via cable.
[12]
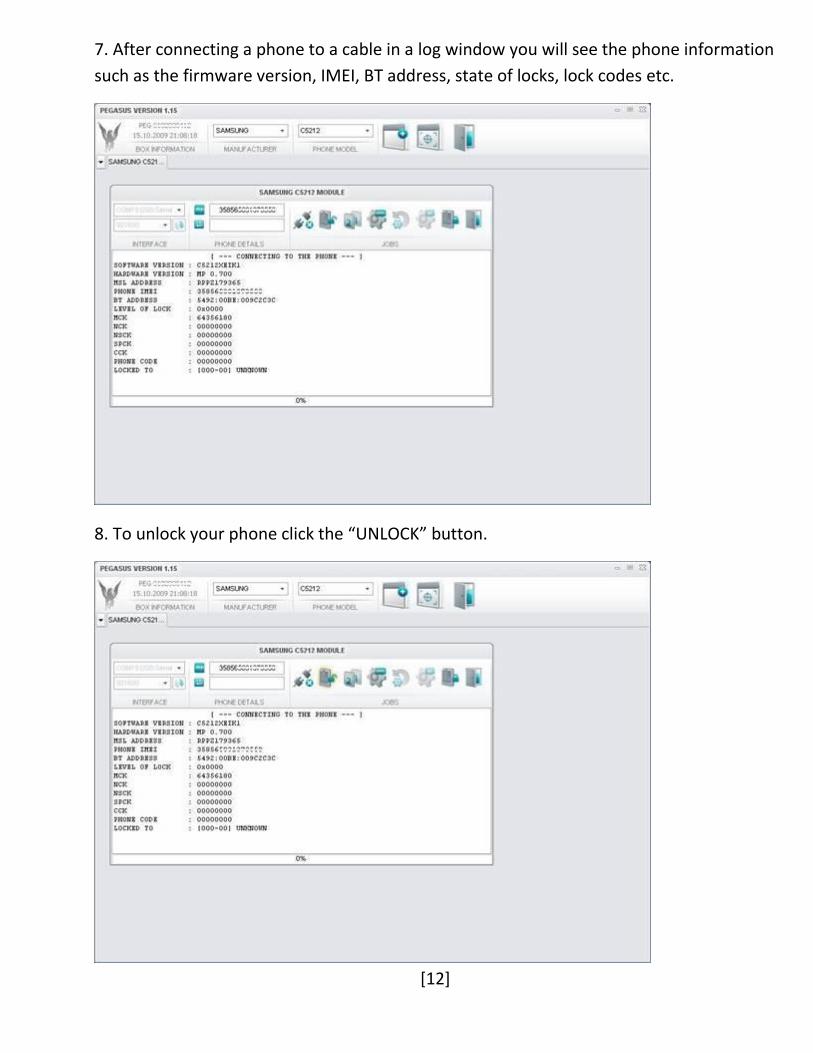
7. After connecting a phone to a cable in a log window you will see the phone information
such as the firmware version, IMEI, BT address, state of locks, lock codes etc.
8. To unlock your phone click the “UNLOCK” button.
[13]
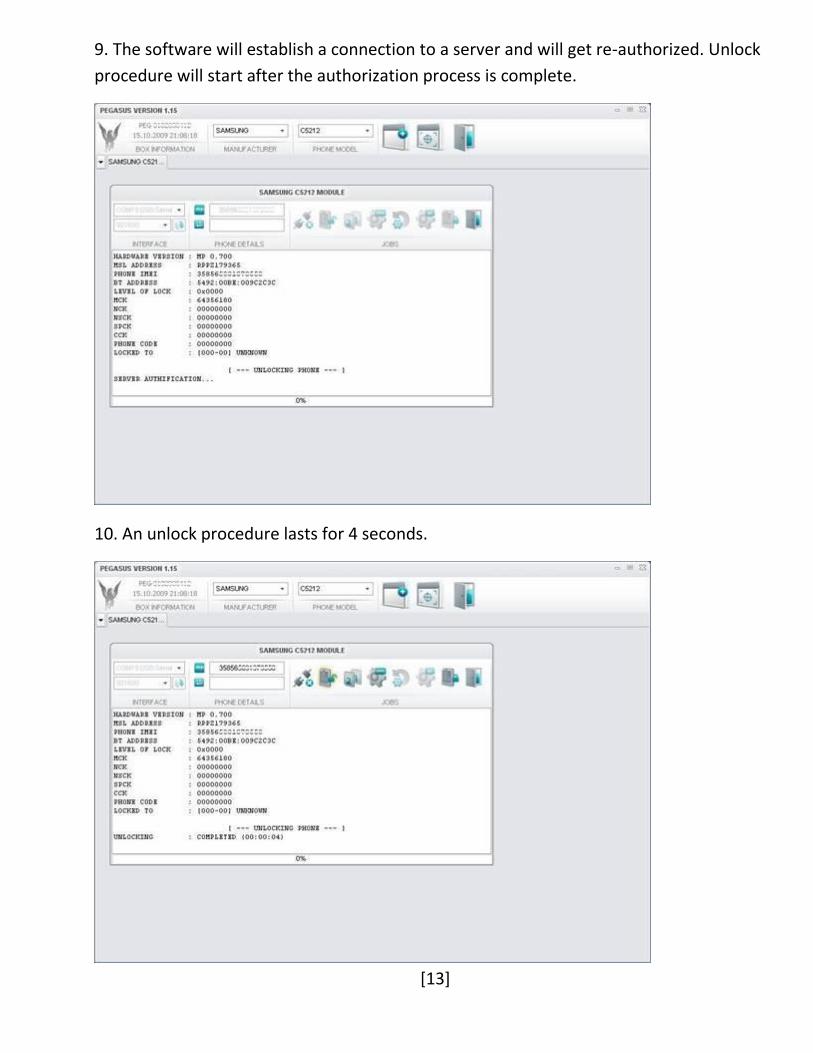
9. The software will establish a connection to a server and will get re-authorized. Unlock
procedure will start after the authorization process is complete.
10. An unlock procedure lasts for 4 seconds.
[14]
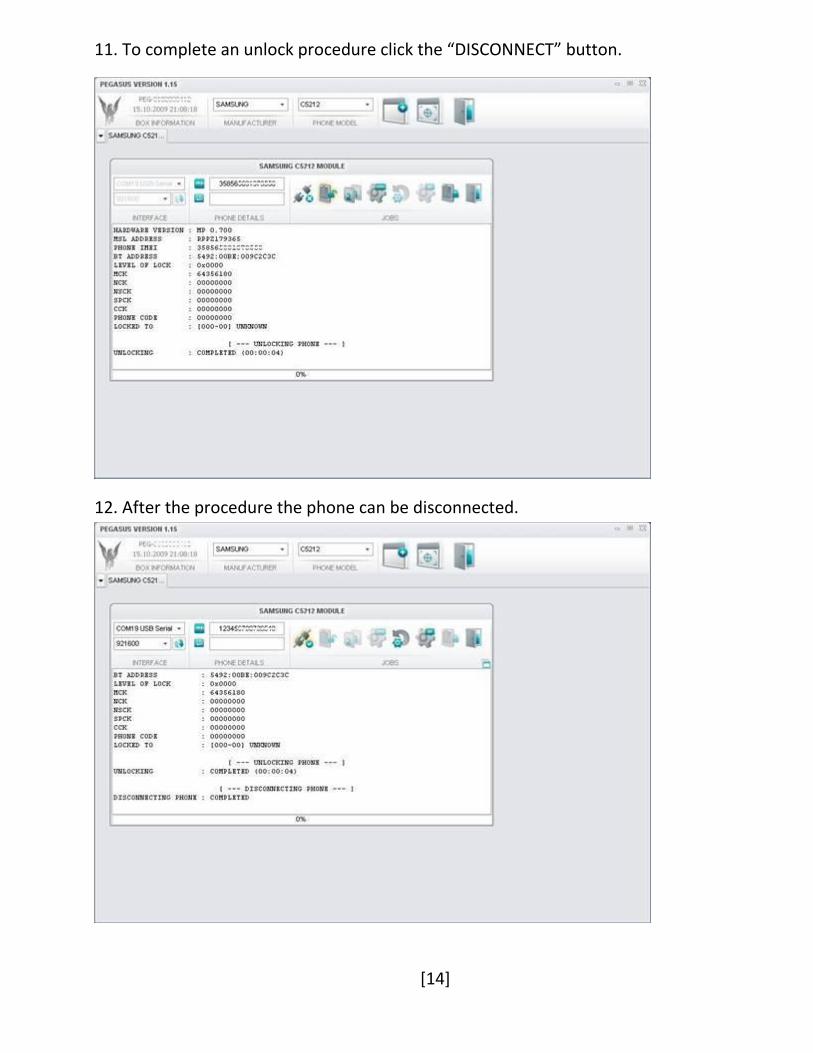
11. To complete an unlock procedure click the “DISCONNECT” button.
12. After the procedure the phone can be disconnected.

[15]
Creating a Backup Copy 1. Start the Pegasus software
2. Choose the required phone brand and model from the drop-down list.
[16]
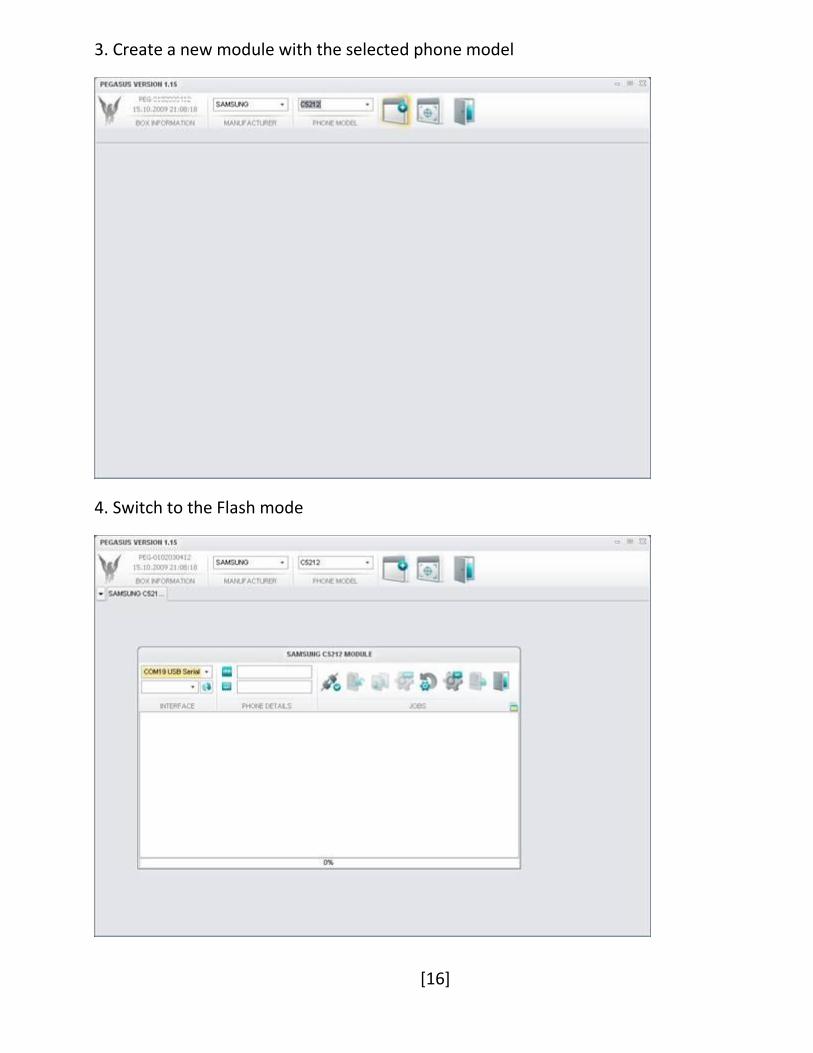
3. Create a new module with the selected phone model
4. Switch to the Flash mode

[17]
5. Select a COM Port that your phone is connected to.
6. Click the “READ FLASH” button

[18]
7. Pegasus software will read phone information
8. Backup save procedure will start.

[19]
9. After the procedure phone can be disconnected.
[20]
Flash Procedure 1. Start Pegasus software
2. Choose the required phone brand and model from the drop-down list.

[21]
3. Create a new module with the required phone model selected
4. Switch to a flash mode

[22]
5. Select COM port the handset is connected to
6. Click the “Open Flash Image” button

[23]
7. Select the required firmware version/versions and click the “Open” button or just
double-click the required file.
8. Pegasus uses its own flash files format named the .PGS, which is the special file that
contains all flash file parts. To select required flash parts you just have to tick checkboxes
on the right side of the “Flash Image” button. To begin the flash procedure, click the
“Flash Image” button.

[24]
9. Press and hold the “Power On” button as soon as the software instructs you to do so.
10. This will start the Flash procedure
[25]
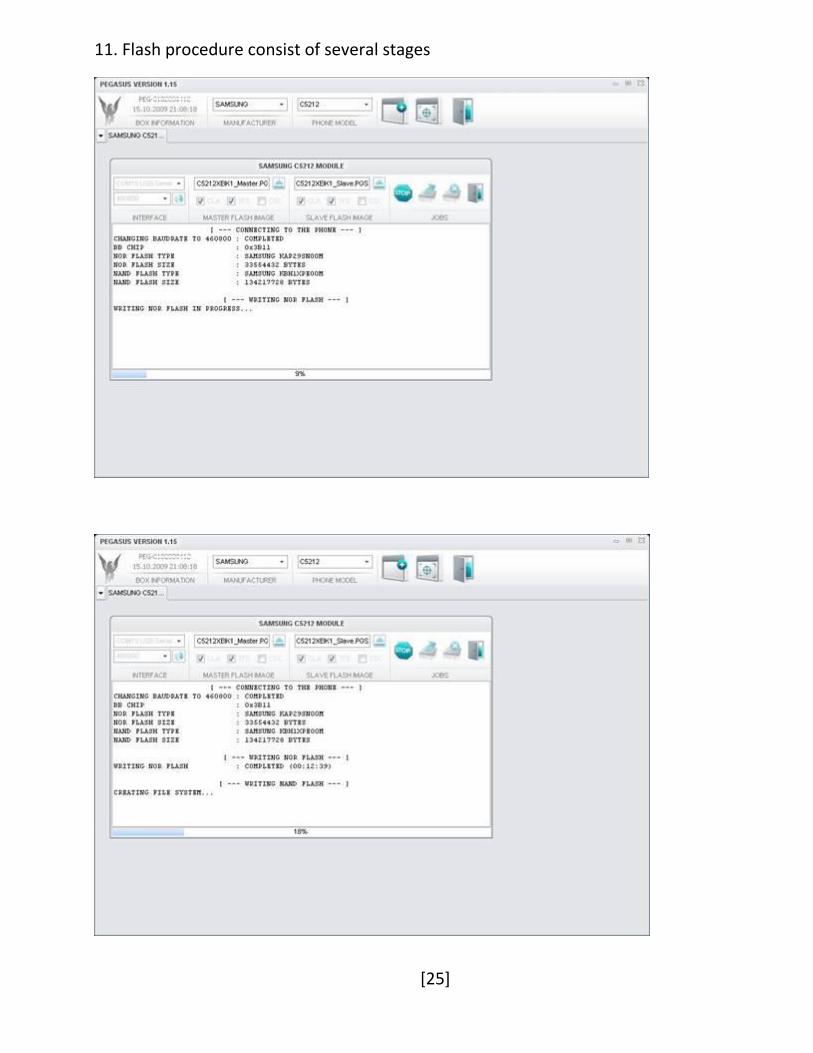
11. Flash procedure consist of several stages

[26]
12. After all stages completion the Flash procedure will finish.

[27]
Rebuild IMEI 1. Start Pegasus software.
2. Choose the required phone brand and model from a drop-down list.
[28]
3. Create a new module with the selected phone model
4. Select the COM Port that your phone is connected to

[29]
5. Click the “CONNECT” button to prepare phone for servicing operations and connect it
to the Pegasus software.
6. Service operations require Internet connection for the smart-card authorization on
server. After a successful authorization you will see a window. At this point you have to
press the “Power On” button on a phone keypad. Make sure that your phone is
connected via cable.
[30]
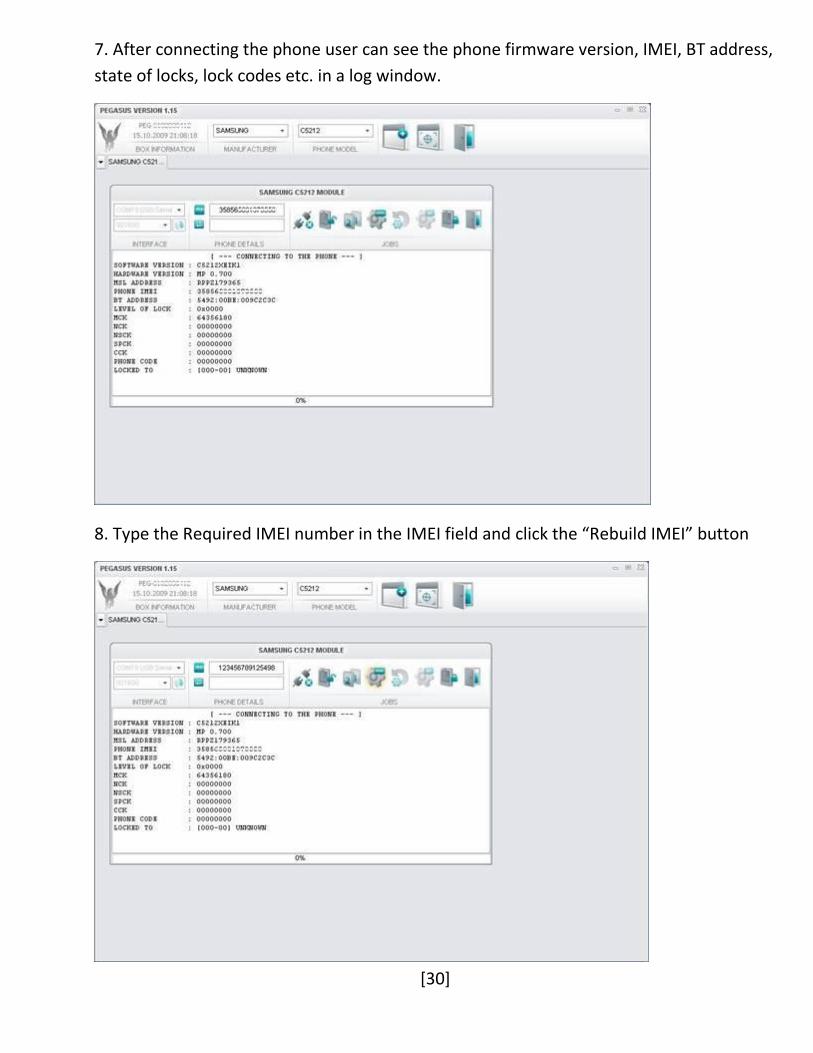
7. After connecting the phone user can see the phone firmware version, IMEI, BT address,
state of locks, lock codes etc. in a log window.
8. Type the Required IMEI number in the IMEI field and click the “Rebuild IMEI” button
[31]
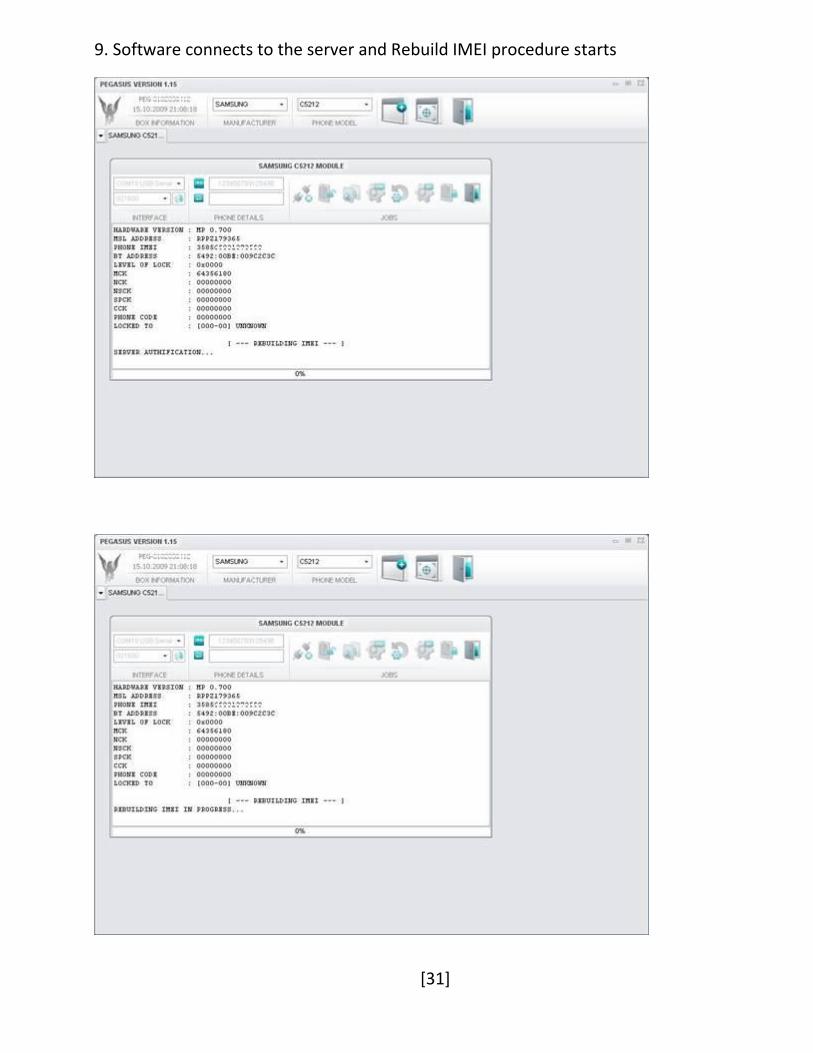
9. Software connects to the server and Rebuild IMEI procedure starts
[32]
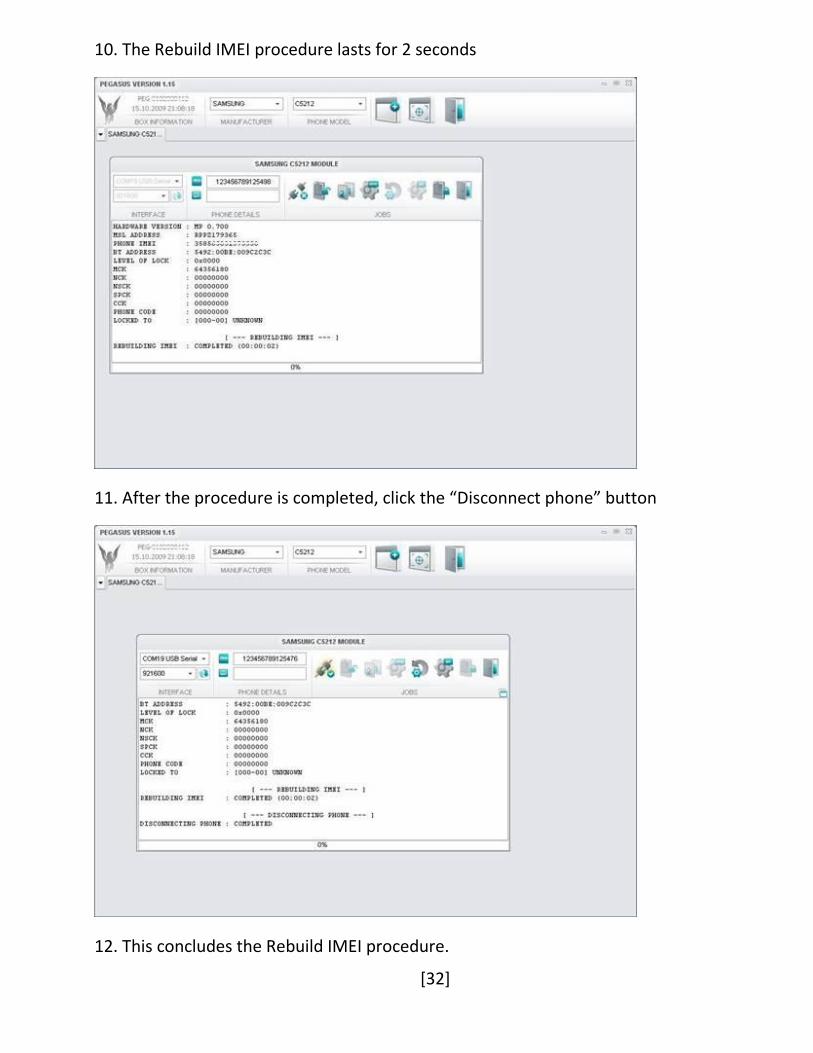
10. The Rebuild IMEI procedure lasts for 2 seconds
11. After the procedure is completed, click the “Disconnect phone” button
12. This concludes the Rebuild IMEI procedure.


