78
Penpower Junior User Manual Version: 8.5 Release: May, 2014 Edition: 1

Penpower Junior User Manual
Version: 8.5
Release: May, 2014
Edition: 1

Penpower Technology Ltd.,Software User License Agreement
You are licensed to legally use this software program (“the Software”) by Pen-power Technology Ltd (“Penpower”) under this license agreement (“The Agree-ment”). If you do not agree with any of the provisions in this Agreement, please do not install, copy or use the Software. By using the Software, you are deemed to fully understand and accept the provisions of this Agreement.
1. Intellectual PropertyAll intellectual property rights in the Software, together with all information and documents included in the packaging for the Software (including but not limited to copyrights), are property of Penpower or have been licensed to Penpower, and are protected by relevant laws and regulations.
2. License to UseYou are authorized to use the Software on one (1) single computer only. You may not use the Software on any other machines other than the said single computer.
3. Authority to CopyThe Software and all documents included with the Software, and copyright thereof, are property of Penpower. You are licensed to make one (1) copy of the Software for your personal backup purposes. All other acts of copying are strictly prohibited. The backup copy shall not be installed nor used while the Software is being used.You may not sell, lease, dissemble, reverse engineer, copy, translate, adapt or de-rive the Software, or obtain the source code of the Software by any other means. You may not use the Software for any purposes other than those permitted under this Agreement.
4. Business UsersIf you need to install or use the Software on more than one (1) computer, please contact Penpower or our local distributor to purchase a license for the additional use.
5. LiabilityYou agree to indemnify Penpower against all losses, costs, debts, settlement pay-ments or other expenses (including but not limited to attorneys fees) arising from
your breach of this Agreement, and you agree to compensate Penpower for all of the abovementioned damages.
6. No WarrantyEffectiveness of a packaged software in handling information is closely related to its software and hardware environment. The Software is published following careful development and product testing by Penpower, but Penpower is not able to conduct tests based on all possible combinations of software and hardware en-vironment. Therefore, Penpower is unable to promise nor warrant that there will be absolutely no risk of loss or damage of information, or any other kind of loss, during installation and/or execution of the Software. You must be fully aware of your risks in using the Software.Penpower will provide you with the Software and support services in respect of the Software to the maximum extent permitted by law. However, Penpower does not warrant that the Software and information included in the package of the Soft-ware contain no defects or errors. Penpower is not liable for any indirect, special or incidental loss arising from the Software, including but not limited to loss of profits, damage to business reputation, cessation of work, hardware malfunction or damage, or any other commercial damage or loss arising from commercial use of the Software.
7. Limitation of Liability and DamagesExcept as expressly specified and expressly agreed to in writing by Penpower, Penpower shall not be responsible for any damage incurred by you for any reason under this Agreement, The maximum amount of compensation payable by Pen-power, in respect of any damage incurred by you for any reason under this Agree-ment, is limited to the amount you have already paid to Penpower in respect of the Software.Under no circumstances will Penpower be held liable for the possibility of loss, notwithstanding Penpower may be aware of the possibility of such loss.
8. Prohibition Against SublicenseYou are prohibited to assign the license in respect of the Software granted to you under this Agreement, or to grant a sublicense to another person.

9. JurisdictionWith regards to any disputes arising from this Agreement, Penpower and you agree that the court having jurisdiction over the business location of Penpower will be the court in the first instance.
10. MiscellaneousIn the event that any provision of this Agreement is found to be invalid at law, such invalidity will not affect the validity of any other provisions, or the legal en-forceability of such other provisions.In the event that the Software cannot be executed under conditions of normal use, due to any damage to the original disk/s, Penpower will replace the disk/s free of charge.Automatic updates are set by default within this software. If new updates are available, the automatic updates will download them and our server will record your computer’s IP and MAC address along with the automatic updates.Any information collected by us from your computer will be used exclusively for the stated purpose, and will not be used for any other purpose.This function of automatic updates can be disabled by clicking on the Settings button and in the options panel ticking the box “Cancel Automatic update”.

ContentsChapter 1 Product Feature ................................................................... 1 -1
Chapter 2 Installation ............................................................................ 2 -12.1 System Requirement ................................................................... 2 -12.2 Software Installation ................................................................... 2 -1
Chapter 3 Getting Started ..................................................................... 3 -13.1 USB Human Interface Device Installation ................................. 3 -13.2 Launch Penpower Jr. .................................................................. 3 -13.3 Calibration .................................................................................. 3 -23.4 Registration ................................................................................ 3 -33.5 Start on System Startup .............................................................. 3 -3
Chapter 4 Penpower Jr. ......................................................................... 4 -14.1 Interface Introduction ................................................................. 4 -14.2 Handwriting Modes .................................................................... 4 -2
4.2.1 Full Screen handwriting Mode ........................................ 4 -24.2.2 Writing Pad Mode ............................................................ 4 -3
4.3 Input Tool ................................................................................... 4 -44.4 Settings ....................................................................................... 4 -54.5 Learning String ........................................................................... 4 -54.6 Custom Phrase ............................................................................ 4 -54.7 AI ................................................................................................ 4 -54.8 On-Line Translator ..................................................................... 4 -64.9 Recitation .................................................................................... 4 -64.10 Signature ................................................................................... 4 -6

4.11 Data Management ..................................................................... 4 -64.12 Gesture ...................................................................................... 4 -7
Chapter 5 Full Screen Handwriting Mode .......................................... 5 -15.1 Getting Started to Write .............................................................. 5 -15.2 Candidate Words ........................................................................ 5 -35.3 Related Phrase ............................................................................ 5 -45.4 Symbols ...................................................................................... 5 -55.5 How to Write in Free Writing Mode .......................................... 5 -65.6 Bubble Interface ......................................................................... 5 -7
5.6.1 Open and Close Bubble Interface .................................. 5 -85.6.2 Candidate Words ............................................................ 5 -95.6.3 Phrase Correction .......................................................... 5-105.6.4 Artificial Intelligence ..................................................... 5-115.6.5 Original Script................................................................ 5-125.6.6 Symbols ......................................................................... 5-125.6.7 Homophone .................................................................... 5-135.6.8 Related word .................................................................. 5-145.6.9 Translation ..................................................................... 5-15
Chapter 6 Writing Pad .......................................................................... 6 -1
Chapter 7 Input Tool ............................................................................ 7 -17.1 Zhu yin Keyboard ....................................................................... 7 -17.2 English Keyboard ....................................................................... 7 -37.3 Hanyu Pinyin Keyboard ............................................................. 7 -47.4 Symbol Keyboard ....................................................................... 7 -5

Chapter 8 Settings ................................................................................. 8 -18.1 General Setting ........................................................................... 8 -28.2 Chinese Output Setting ............................................................... 8 -58.3 Recognition ................................................................................ 8 -78.4 Writing Setting ........................................................................... 8 -98.5 Tablet Setting ............................................................................ 8-138.6 Update Setting .......................................................................... 8-15
Chapter 9 Learning String ................................................................... 9 -1
Chapter 10 Custom Phrase ................................................................ 10-110.1 Add Phrase .............................................................................. 10-110.2 Delete Phrase .......................................................................... 10-3
Chapter 11 Artificial Intelligence....................................................... 11-1
Chapter 12 On-Line Translator ......................................................... 12-1
Chapter 13 Recitation ......................................................................... 13-113.1 Penpower Voice Reader .......................................................... 13-113.1 Reading Setting ...................................................................... 13-2
Chapter 14 Signature .......................................................................... 14-1
Chapter 15 Data Management ........................................................... 15-1
There may be newer versions of the software that was released during or after this product’s manufacturing date. If the content in the User Manual differs from the on-screen interface, please follow the instructions on the on-screen interface instead of the User Manual.
Chapter 1 Product Feature
1-1
Chapter 1 Product Feature
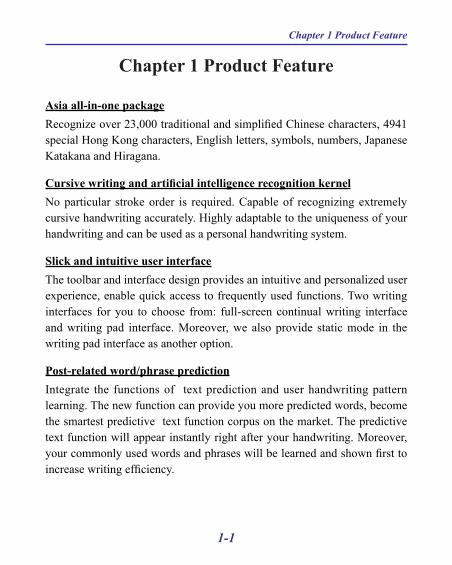
Asia all-in-one packageRecognize over 23,000 traditional and simplified Chinese characters, 4941 special Hong Kong characters, English letters, symbols, numbers, Japanese Katakana and Hiragana.
Cursive writing and artificial intelligence recognition kernelNo particular stroke order is required. Capable of recognizing extremely cursive handwriting accurately. Highly adaptable to the uniqueness of your handwriting and can be used as a personal handwriting system.
Slick and intuitive user interfaceThe toolbar and interface design provides an intuitive and personalized user experience, enable quick access to frequently used functions. Two writing interfaces for you to choose from: full-screen continual writing interface and writing pad interface. Moreover, we also provide static mode in the writing pad interface as another option.
Post-related word/phrase predictionIntegrate the functions of text prediction and user handwriting pattern learning. The new function can provide you more predicted words, become the smartest predictive text function corpus on the market. The predictive text function will appear instantly right after your handwriting. Moreover, your commonly used words and phrases will be learned and shown first to increase writing efficiency.

1-2
Penpower Junior
Character conversion toolQuickly switch between Simplified Chinese and Traditional Chinese with one key.
Personal signature applicationYour signature can be inserted into the Microsoft Word and Excel docu-ments or Emails to send to others.
Work smart and play smart via handwritingYou can hand write text in Microsoft Office, email, MSN, Skype, QQ, Facebook, Twitter and others.

Chapter 2 Installation
2-1
Chapter 2 Installation
2.1 System Requirement
1. Windows 7 / Vista / XP2. 32 bit OS : At least 1GB of available hard disk space 64 bit OS : At least 2GB of available hard disk space3. USB Port
Note: The products of Penpower Junior serial provide handwriting func-tion used in Chinese operating system. Otherwise, some of the products can be used in English operating system. Please refer to the introductions of related product types on the official website.
2.2 Software Installation
1. Please insert CD-ROM disc into the CD-ROM drive and the system will automatically launch setup.exe. Select [Penpower Jr.] option.

2-2
Penpower Junior
2. The welcome window of the installation process appears. Click [Next] to continue.
3. Please read the license agreement, select [I accept the terms of the li-cense agreement], and click [Next].
Note: If you don’t have CD-ROM drive, or you lost your CD-ROM disc, please go to PenPower’s website (http://www.penpower.net) and choose your country/ region site to download the software.

Chapter 2 Installation
2-3
4. Select the destination location. Click [Next].
5. Select the program folder. Click [Next].

2-4
Penpower Junior
6. Click [Install] to begin the installation.
7. When the installation is completed, click [Finish] to exit.
Note: If the “Microsoft .NET Framework 4" was not installed in your com-puter. The Penpower Jr. installing program will install “Microsoft .NET Framework 4" automatically. To avoid happening errors, please make sure the disk space in your computer is enough.

Chapter 3 Getting Started
3-1
3.2 Launch Penpower Jr.
Run [Start]/ [All Programs]/ [Penpower Jr.]/ [Penpower Jr.] or dou-ble click the Penpower Jr. shortcut to launch Penpower Jr.
Help : Connect to user manual. Chinese Convert Tool : Convert to Traditional or Simplified Chinese. Error reporting : Email problems to Penpower Technology. Penpower Jr. : Start to use Penpower Jr. Penpower Technology official Website: Connect to Penpower official
website.
Remote support : Used for technology support from Penpower. Uninstall Penpower Jr. : Uninstall Penpower Jr. software.
Chapter 3 Getting Started
3.1 USB Human Interface Device Installation
Connect the touch-tablet with USB port on computer.

3-2
Penpower Junior
3.3 Calibration
Before getting started to use Penpower Jr., please tap on the upper-left corner and the lower-right corner of the touch tablet with your pen to cali-brate the tablet.
Note: When calibrating the Penpower Jr. touch tablet, please orient the touch pad in landscape mode.
Tip 1 : You can select [Reset] to start the calibration again.
Tip 2 : After calibration, the new configuration would take effect imme-diately. You do not need reboot or reload Penpower Jr. handwrit-ing system.
Chapter 3 Getting Started
3-3
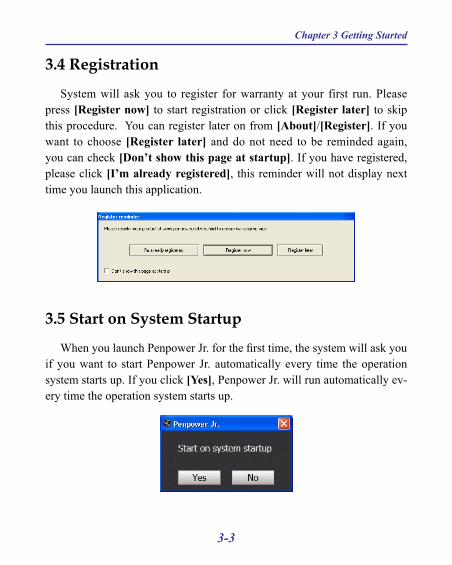
3.4 Registration
System will ask you to register for warranty at your first run. Please press [Register now] to start registration or click [Register later] to skip this procedure. You can register later on from [About]/[Register]. If you want to choose [Register later] and do not need to be reminded again, you can check [Don’t show this page at startup]. If you have registered, please click [I’m already registered], this reminder will not display next time you launch this application.
3.5 Start on System Startup
When you launch Penpower Jr. for the first time, the system will ask you if you want to start Penpower Jr. automatically every time the operation system starts up. If you click [Yes], Penpower Jr. will run automatically ev-ery time the operation system starts up.
Chapter 4 Penpower Jr.
4-1
Chapter 4 Penpower Jr.
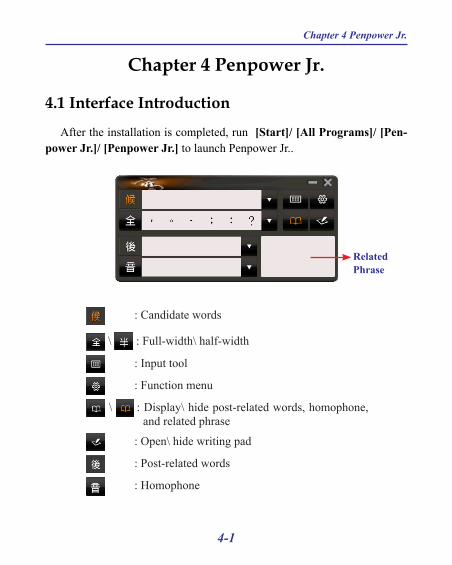
4.1 Interface Introduction
After the installation is completed, run [Start]/ [All Programs]/ [Pen-power Jr.]/ [Penpower Jr.] to launch Penpower Jr..
Related Phrase
: Candidate words
\ : Full-width\ half-width
: Input tool
: Function menu
\ : Display\ hide post-related words, homophone, and related phrase
: Open\ hide writing pad
: Post-related words
: Homophone

4-2
Penpower Junior
4.2 Handwriting Modes
Penpower Jr. provides two handwriting modes: full screen handwriting mode and writing pad handwriting mode.
Tip: For more information, please refer to Chapter 5.
4.2.1 Full Screen handwriting ModeThe full screen handwriting mode is the default writing mode in Pen-
power Jr. software. Open any word processor, for example Microsoft Word or WordPad, and write a word on the writing tablet. You can see the stroke shown on the screen. Select the word you want in the candidate words area with your mouse and the word will display on the word processor immedi-ately.
(1) While writing on the tablet, the stroke will show on the screen.
(2) The recognized words will be listed in the candidate words area. Select the word you want.

Chapter 4 Penpower Jr.
4-3
4.2.2 Writing Pad ModeBesides the full screen writing mode, you can also select writing pad
mode. Click the writing pad button and the writing pad will appear. Open any word processor, for example Microsoft Word or WordPad, and write a word on the writing tablet. You can see the stroke shown on the writing pad. Select the word you want in the candidate words area with your mouse and the word will display on the word processor immediately.
(1) Click button to open the writing pad.
(2) While writing on the tablet, the stroke will show on the writing pad.
(3) The recognized words will be listed in the candidate words area. Select the word you want.
Tip: For more information, please refer to Chapter 6.
4-4
Penpower Junior
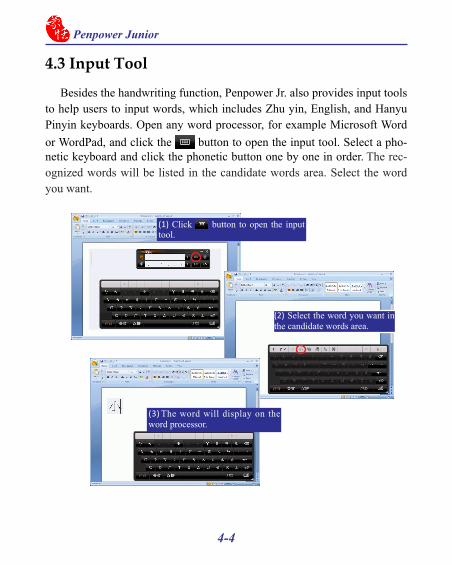
4.3 Input Tool
Besides the handwriting function, Penpower Jr. also provides input tools to help users to input words, which includes Zhu yin, English, and Hanyu Pinyin keyboards. Open any word processor, for example Microsoft Word or WordPad, and click the button to open the input tool. Select a pho-netic keyboard and click the phonetic button one by one in order. The rec-ognized words will be listed in the candidate words area. Select the word you want.
(1) Click button to open the input tool.
(2) Select the word you want in the candidate words area.
(3) The word will display on the word processor.

Chapter 4 Penpower Jr.
4-5
4.4 SettingsClick the function menu button and select [Settings] which
includes [General setting], [Chinese output setting], [Recognition setting], [Writing setting], [Tablet setting], and [Update setting].
Tip: For more information, please refer to Chapter 8.4.5 Learning String
Click the function menu button and select [Learning String]. Penpower Jr. provides the function of using a simple symbol to represent a string of characters to speed up inputting speed.Tip: For more information, please refer to Chapter 9
4.6 Custom PhraseClick the function menu button and select [Custom Phrase].
There are thousands upon thousands default phrases that you can use in the Penpower handwriting recognition. It also allows you to customize the phrase database to meet your needs.
Tip: For more information, please refer to Chapter 10.
4.7 AIClick the function menu button and select [AI]. Artificial Intel-
ligence helps you to correct incorrect recognition character. It also learns your handwriting style to improve the recognition rate.
Tip: For more information, please refer to Chapter 11.

4-6
Penpower Junior
4.8 On-Line TranslatorClick the function menu button and select [Open On-Line
Translator]. When reading English or Chinese articles, if you encounter unknown characters or phrases, move the cursor over the characters, and a translation window pops up to explain them for you.
Tip: For more information, please refer to Chapter 12.
4.9 RecitationClick the function menu button and select [Recitation]. Penpower
Jr. utilizes a state of the art text-to-speech technology, it reads influent Mandarin or Cantonese of any articles. You can use it as a tool for fast proofreading or in teaching the correct Mandarin/Cantonese pronunciation.
Tip: For more information, please refer to Chapter 13.
4.10 SignatureClick the function menu button and select [Signature]. Penpower
Jr. provides Signature function for you to sign on the MS Word, Outlook, Outlook Express, and other applications which can contain picture and text.
Tip: For more information, please refer to Chapter 14.
4.11 Data ManagementClick the function menu button and select [Data Management]
to import or export data.
Tip: For more information, please refer to Chapter 15.

Chapter 4 Penpower Jr.
4-7
4.12 Gesture
Penpower Jr. handwriting system support four standard inking gesture. You can handwriting these gestures to simulate keyboard input.
1. Delete : simulate DELETE key.
2. Backspace : simulate BACKSPACE key.
3. Enter : simulate ENTER key. or
4. Space : simulate SPACE key.

Chapter 5 Full Screen Handwriting Mode
5-1
Chapter 5 Full Screen Handwriting Mode
5.1 Getting Started to Write
The full screen handwriting mode is the default writing mode in Pen-power Jr. software. Open any word processor, for example Microsoft Word or WordPad, and write a word on the writing tablet. You can see the stroke shown on the screen.

5-2
Penpower Junior
The recognized words will be listed in the candidate words area. Select the word you want with your mouse and the word will display in the word processor immediately. Penpower Jr. can recognize various characters including Traditional Chinese, Simplified Chinese, English, Japanese(Hiragana/ Katakana), numbers, and symbols.
Chapter 5 Full Screen Handwriting Mode
5-3
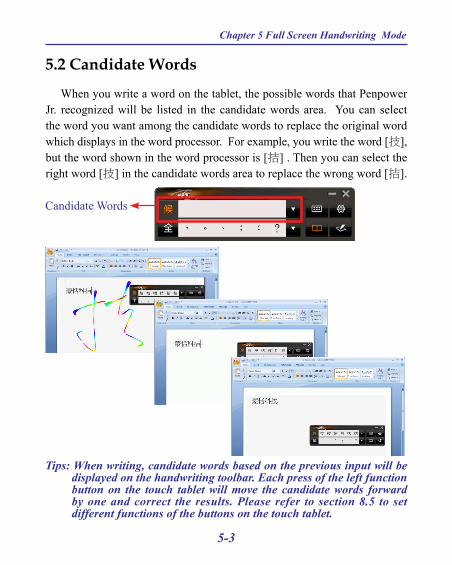
5.2 Candidate Words
When you write a word on the tablet, the possible words that Penpower Jr. recognized will be listed in the candidate words area. You can select the word you want among the candidate words to replace the original word which displays in the word processor. For example, you write the word [技], but the word shown in the word processor is [拮] . Then you can select the right word [技] in the candidate words area to replace the wrong word [拮].
Candidate Words
Tips: When writing, candidate words based on the previous input will be displayed on the handwriting toolbar. Each press of the left function button on the touch tablet will move the candidate words forward by one and correct the results. Please refer to section 8.5 to set different functions of the buttons on the touch tablet.

5-4
Penpower Junior
5.3 Related Phrase
After writing a character, the related phrases will appear in [Related Phrase] window. Select the phrase you want to input. It can short your time to input words. For example, you want to input [置之不理]. You only need to write the first word [置], and you will find [置之不理] in the related phrase window. Then you can select it to input.

Chapter 5 Full Screen Handwriting Mode
5-5
5.4 Symbols
While you are writing, you can input symbols quickly by select the symbols in the [Symbols] area.
Symbols
Tips: You can click for more symbols to select. The default function of the right button on the tablet allows to input six habitual symbols. Please refer to section 8.5 to set different functions of the buttons on the touch tablet.

5-6
Penpower Junior
5.5 How to Write in Free Writing Mode
In Free writing mode, it’s better to keep strokes of the same word closed, and keep not to overlap between words when you write. You need to finish writing every strokes of one word.Right example
Write three words of 『明日
月』.
Wrong example 1
Overlap between two words. All the strokes may be recognized as one word.
Wrong example 2
The two parts of one word are written far away from each other. All the strokes may be segmented into two words.Auto Phrase Correction
The system automatically proofreads on your writing content to im-prove the recognition rate. For example, when you continuously write『天
下太平』 (peace on the earth) four characters, but the character『天』
is incorrectly written as『夫』, so they become『夫下太平』. Penpower uses its internal phrase dictionary to correctly recognize your intended re-sult『天下太平』.
Chapter 5 Full Screen Handwriting Mode
5-7
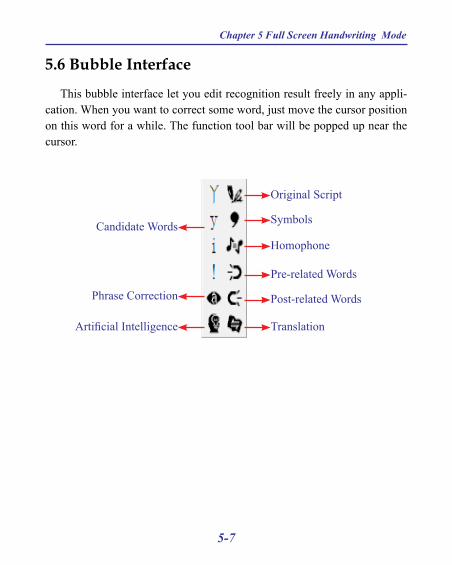
5.6 Bubble Interface
This bubble interface let you edit recognition result freely in any appli-cation. When you want to correct some word, just move the cursor position on this word for a while. The function tool bar will be popped up near the cursor.
Candidate Words
Artificial Intelligence
Phrase Correction
Original Script
Symbols
Homophone
Pre-related Words
Post-related Words
Translation

5-8
Penpower Junior
5.6.1 Open and Close Bubble Interface
1. Click the function button and select [Settings].
2. Select the [General] tag.
3. You can see [Open] and [Close] options under Bubble Interface in [General] tag. Check the [Open] or [Close] option to open or close the bubble interface.
Note: When Bubble Interface is in 64-bit Operating System, it won’t sup-port certain applications(e.g., Notepad). Moreover, Bubble Interface can’t be used in Windows 8.

Chapter 5 Full Screen Handwriting Mode
5-9
5.6.2 Candidate Words Penpower Je. provides 4 candidate words in bubble interface. Move the
cursor position on a word for a while. The function tool bar will be popped up near the cursor. You can select a candidate word to correct the incorrect recognition.

5-10
Penpower Junior
5.6.3 Phrase Correction
1. When entering an idiom in Full Screen mode such as『揠苗助長』, and you are not sure of how to write the character『揠』, you can enter the character『一』instead to input『一苗助長』.
2. Move the mouse over the character『一』and pause for a moment to bring up the “Candidate Characters Window”. Click the phrase correc-tion button and the『一』char-acter will be changed to『揠』.
3. If the phrase correction function came up with multiple candidate words, these will be shown in the candidate words window for you to choose from. For example, if the input was『股份一限公司』when you pause the mouse cursor over the『一』character, this will bring up the “Candidate Characters Window”. Pressing the phrase correction button
will bring up a list of all phrase correction candidate words for you to choose and make the correction with.

Chapter 5 Full Screen Handwriting Mode
5-11
5.6.4 Artificial IntelligenceWhen you use candidate word or AI button to correct result, the system
will modify its recognition database to adapt your personal writing style. The may improve the recognition rate.
1. Handwrite some words. The result would be sent in the caret.
2. e.g.『恬』is wrongly recognized as『恰』.
3. Move the cursor on the word『恰』
for a while to pop up the function tool bar.
4. Click the candidate word if the cor-rect word is there.
5. Otherwise click the AI button to open the AI correction dialog.
6. Input the correct word『恬』, and then click [Input Complete].
7. You will see the wrong result『恰』 is already updated as『恬』. Your personal writing style of inking has also been learned.
5-12
Penpower Junior
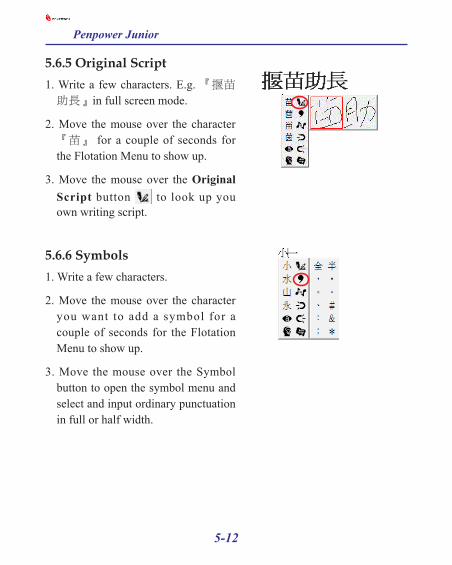
5.6.5 Original Script1. Write a few characters. E.g. 『揠苗助長』in full screen mode.
2. Move the mouse over the character 『苗』 for a couple of seconds for the Flotation Menu to show up.
3. Move the mouse over the Original Script button to look up you own writing script.
5.6.6 Symbols1. Write a few characters.
2. Move the mouse over the character you want to add a symbol for a couple of seconds for the Flotation Menu to show up.
3. Move the mouse over the Symbol button to open the symbol menu and select and input ordinary punctuation in full or half width.

Chapter 5 Full Screen Handwriting Mode
5-13
5.6.7 HomophoneIf you forget how to write some words, or they are too complicated to
write, you can write down some other easy homophone to get the word that you would like to input. e.g. If you want to input the word『豫』:
1. Write any one homophone of『豫』, e.g.『玉』. The result would be sent in the caret.
2. Move the cursor on the first word『玉』for a while to pop up the function tool bar.
3. Click button to open the window of homophone words.
4. You can Click / / button to toggle other Zhu yin homophone/Cantonese homophone/Hanyu homophone.
5. Click『豫』to replace『玉』.

5-14
Penpower Junior
2. Move the cursor on the word『恰』
for a while to pop up the function tool bar.
3. Click button to open the window of pre-related phrases. If the correct phrase 『蒙恬』is in the list, click it to update the result.
4. Move the cursor on the word『料』
for a while to pop up the function tool bar.
5. Click button to open the window of post-related phrases. If the correct phrase『科技』is in the list, click it to update the result.
6. You will see the wrong result『蒙恰
料技』is already updated as 『蒙恬
科技』at last.
5.6.8 Related wordFor any two contiguous words, the first one is the pre-related word of
the second one. The second one is the post-related word of the first one.
e.g.『科技』, 『科』is the pre-related word of『技』, and『技』is the post-related word of『科』.
1. Handwrite some words. The result would be sent in the caret e.g.『恬』 is wrongly recognized as『恰』, and『科』is wrongly recognized as 『料』.

Chapter 5 Full Screen Handwriting Mode
5-15
5.6.9 TranslationTranslate the words or phrases. E.g. write a word『小』, and want to
know the translation of『小』.
1. Write 『小』.
2. Move the mouse over the character『小』, and wait for the Flotation Menu to pop up.
3. Move the mouse over the Translation button, the translation will show up.

Chapter 6 Writing Pad
6-1
Chapter 6 Writing Pad
Besides the full screen writing mode, you can also select writing pad mode. Click the writing pad button and the writing pad will appear. Open any word processor, for example Microsoft Word or WordPad, and write a word on the writing tablet. You can see the stroke shown on the writing pad. Select the word you want in the candidate words area with your mouse and the word will display on the word processor immediately.
Penpower Jr. can recognize various characters including Traditional Chinese, Simplified Chinese, English, Japanese(Hiragana/ Katakana), num-bers, and symbols.
Related Phrase
Writing Pad
Virtual Button:Clear
Virtual Button:Finish
Tip: Click to switch to full screen handwriting mode or writing pad mode.

6-2
Penpower Junior
: Candidate words
\ : Full-width\ half-width
: Input tool
: Function menu
\ : Display\ hide post-related words, homophone, and related phrase
: Open\ hide writing pad
: Post-related words
: Homophone
: Virtual button. Clear the handwriting on the writing pad.
: Virtual button. Send the handwriting to the word processor.
Tips: You can tap the left/ right top corner of the writing pad with the pan to use Clear and Finish functions.
Other functions in the writing pad mode are the same with the functions in the full screen mode, such as candidate words, related phrase, and etc.. Please refer to the Chapter 5 for more information.

Chapter 7 Input Tool
7-1
Chapter 7 Input Tool
Besides handwriting function, Penpower Jr. provides other input tools, including Zhu yin, English, Hanyu Pinyin, and Symbol keyboards.
7.1 Zhu yin Keyboard
1. Click Input tool button to open input tool. 2. Select Zhu yin "注音" on the keyboard.
Candidate words
Backspace
Move to nextlineClear
Close

7-2
Penpower Junior
3. When you begin to spell a word in Zhu yin, the keyboard will ignore the alphabet you don’t need automatically and help you to write the word quickly.
4. The candidate words will show up in the top of the keyboard. Select the word you need and the word will display at the cursor location. If the word you want did not show up among the candidates, you can click
to see more candidates.

Chapter 7 Input Tool
7-3
7.2 English Keyboard
1. Click Input tool button to open input tool. 2. Select English "英文" on the keyboard.
3. Input words.
Backspace
Close
Tips: Click to change to capital letter and click again to return to small letter.
Move to nextline

7-4
Penpower Junior
7.3 Hanyu Pinyin Keyboard
1. Click Input tool button to open input tool. 2. Select Hanyu Pinyin "漢拼" on the keyboard.
3. Input words.
Candidate words
Backspace
Move to nextlineClear
Close

Chapter 7 Input Tool
7-5
7.4 Symbol Keyboard
1. Click Input tool button to open input tool. 2. Select Symbol on the keyboard.
3. You can select various types of symbols from the top of the keyboard which includes Graph, Table, Math., Alphabet, Hiragana, Katakana, Bracket, and Misc..
Symbol Options
Close

Chapter 8 Settings
8-1
Chapter 8 Settings
Click the function menu button to select [Settings].

8-2
Penpower Junior
8.1 General Setting
Tips: Click [Tips] at the left-bottom corner, and you can see the discriptions of the function when you move the cursor on it.
Bubble Interface
This unique user interface let you edit recognition result freely in any application. Check [Open] to turn on this function. The visual user interface is hidden transparent-ly. When you want to correct some word, just move the cursor position on this word for a while. The func-tion tool bar will be popped up near the cursor.

Chapter 8 Settings
8-3
In the function tool bar of Bubble Interface, you can click candidate words, AI button , homophone , pre-related word , post-related word or phrase correction to correct the result. Click button to see the original script. Click button to input punctuation symbol, and the button is for the Chinese-English translation function. Details are described in section 5.6.
Tip : You do not need to press any button after the cursor is moved on the word.

8-4
Penpower Junior
Version
You can select the display language in the user interface, including Tra-ditional Chinese, Simplified Chinese, and English.
UI Size
You can select [Small] or [Big] to change the UI size according to your preference.
Start on system startup
If you check the [Start on system startup] option, Penpower Jr. will run automatically every time the operation system starts up.
Chapter 8 Settings
8-5
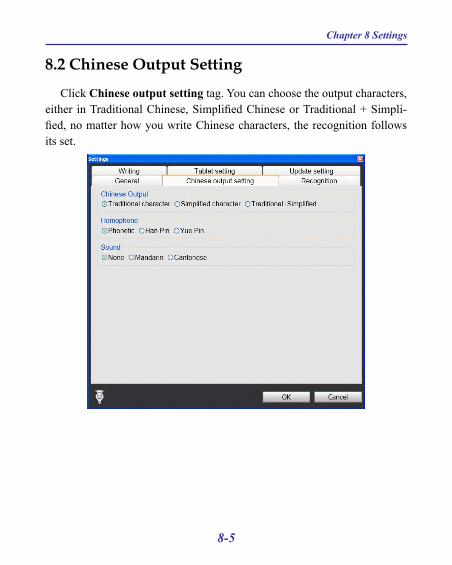
8.2 Chinese Output Setting
Click Chinese output setting tag. You can choose the output characters, either in Traditional Chinese, Simplified Chinese or Traditional + Simpli-fied, no matter how you write Chinese characters, the recognition follows its set.

8-6
Penpower Junior
Homophone
Window Interface provides Homophone candidates, you can choose a pinyin method such as Phonetic, Han Pin or Yue Pin.
Sound
Pronounce the character in Mandarin or Cantonese immediately after recognition in Mandarin or Cantonese.
Traditional + Simplified
When you write traditional char-acters, they show up as traditional characters. When you write simpli-fied characters, they show up as simplified characters. Penpower al-lows you to use traditional or sim-plified writing method to input any Chinese character, or mixed them. For example, input 『書寫』.
Traditional Character
No matter whether you write traditional or simplified characters, the recognition result is displayed as traditional characters.
Simplified Character
No matter whether you write traditional or simplified characters, the recognition result is displayed as simplified characters.

Chapter 8 Settings
8-7
8.3 Recognition
Recognition Mode
Penpower Jr. provides Chinese, English, Numeral, Symbol, and Hira-gana/ Katakana Japanese recognition modes. Only select the recognition modes you want to improve the recognition rate.

8-8
Penpower Junior
Recognition Kernel
Select [Traditional Chinese] if you write in Traditional Chinese; select [Simplified Chinese] if you wite in Simplified Chinese. It can help you to have higher recognition rate.
Running Hand
Check this option to recognize run-on cursive. When you do not need to recognize running hand characters, uncheck this function to have higher recognition rate.
Hongkong Character
This recognition mode is only available when the Penpower Jr. is set to the Traditional Chinese or Traditional Chinese (Hongkong) version. You can connect to http://www.microsoft.com/hk/hkscs/default.aspx to check the Hongkong characters list.
Note: This recognition mode is only available when the Penpower is set to the Traditional Chinese or Traditional Chinese (Hong Kong) version.

Chapter 8 Settings
8-9
8.4 Writing Setting

8-10
Penpower Junior
There are three different options of full screen mode in the main menu.
Single-word writing
It is allowed to handwrite one word only at one time.You can not hand-write the next word until the recognition result of current word has been finished.
Two-sides writing
After the first stroke is written, one vertical line would be displayed on the center of screen. All the strokes written on the same side would be con-sidered as part of one word. When a new stroke is crossed to the other side, it means that the last word is finished and the next word start to write.
Free writing
You can handwrite multiple characters before recognition at one time. Forty one characters at most is allowed. It permits left-to-right,or top-to-bottom free writing order. Remember to keep adequate distance between two contiguous words when you write. It affects the result of character seg-mentation.

Chapter 8 Settings
8-11
Right example
Write three words of 『明日
月』.
Wrong example 1
Overlap between two words. All the strokes may be recognized as one word.
Wrong example 2
The two parts of one word are written far away from each other. All the strokes may be segmented into two words.
Auto Phrase Correction
The system automatically proofreads on your writing content to im-prove the recognition rate. For example, when you continuously write『天
下太平』 (peace on the earth) four characters, but the character『天』
is incorrectly written as『夫』, so they become『夫下太平』. Penpower uses its internal phrase dictionary to correctly recognize your intended re-sult『天下太平』.

8-12
Penpower Junior
Speed
There are several levels of writing speed you can set. After you stop writing, the less the relative value is, the shorter the timeout waiting for recognition is.
Ink Color
Change the color of inking. You can select [Single] or [Multi-color].
Ink Change
Adjust the smoothness of color degree for the [Multi-color] option.
Ink Width
Change the thickness of inking.
Ink Sound
Change the sound effect while writing.
Pen Style
There three kind of pen style to choose, including Felt-tip pen, Mark pen, and Writing brush.
Chapter 8 Settings
8-13
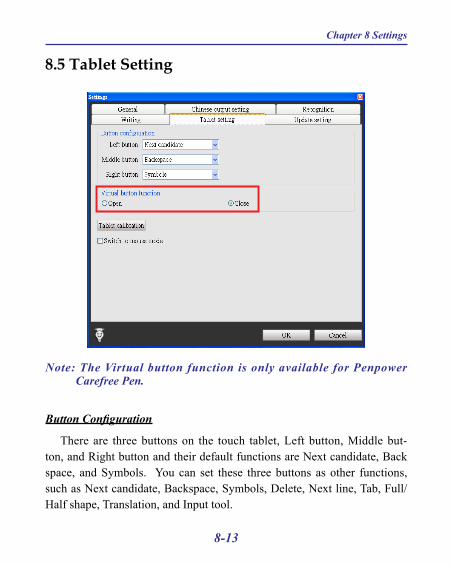
8.5 Tablet Setting
Button Configuration
There are three buttons on the touch tablet, Left button, Middle but-ton, and Right button and their default functions are Next candidate, Back space, and Symbols. You can set these three buttons as other functions, such as Next candidate, Backspace, Symbols, Delete, Next line, Tab, Full/Half shape, Translation, and Input tool.
Note: The Virtual button function is only available for Penpower Carefree Pen.

8-14
Penpower Junior
Virtual Button Function
Penpower Carefree Pen provides virtual button functions to use, including Mode Switching Button, Shortcut Buttons, and Frequently Used Symbols. Check [Open] or [Close] to turn on or turn off these functions.
Tablet Calibration
Click [Tablet calibration] to open the calibration window to calibrate the tablet.
Switch to Mouse Mode
If you check [Switch to Mouse Mode], you can use your handwriter on the tablet as mouse on the computer’s full screen.
Note: If you checked this option, you can’t use the function of handwriting recognition and Button Confi guration.
Chapter 8 Settings
8-15
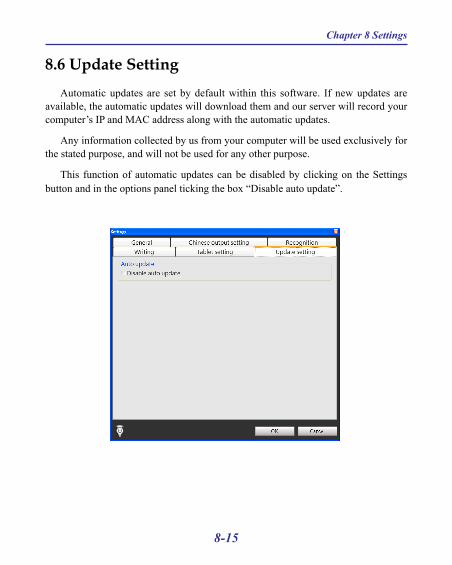
8.6 Update SettingAutomatic updates are set by default within this software. If new updates are
available, the automatic updates will download them and our server will record your computer’s IP and MAC address along with the automatic updates.
Any information collected by us from your computer will be used exclusively for the stated purpose, and will not be used for any other purpose.
This function of automatic updates can be disabled by clicking on the Settings button and in the options panel ticking the box “Disable auto update”.

Chapter 9 Learing String
9-1
Chapter 9 Learning String
Penpower Jr. provides the function of using a simple symbol to repre-sent a string of characters to speed up inputting speed.
1. Click the function menu button and select [Learning String].2. Click [Add].

9-2
Penpower Junior
3. Input a string of characters. Then click Start button.
4. Draw a symbol and click OK. Then the system will ask you to draw it again. Click OK again to finish learning.
Tip: Click to open the input tool.
Note: If the symbols you draw have too big differences, the learning will be failed. Please redraw the symbol.

Chapter 9 Learing String
9-3
5. You can see the learned results as below.

Chapter 10 Custom Phrase
10-1
2. Click [Add Pheases] to input a new phrase.
3. Input a new phrase. E.g.『蒙恬文件王商務版』.
Note: The maximum length of one phrase is 200 words. Tip: Click to open the input tool.
Chapter 10 Custom Phrase
There are thousands upon thousands default phrases that you can use in the Penpower Jr.. It also allows you to customize the phrase database to meet your needs.
10.1 Add Phrase
1. Click the function menu button and select [Custom Phrase] to open the phrase dialogue.

10-2
Penpower Junior
5. When you want to input『蒙恬文件王商務版』next time, you can write『蒙』, and 『蒙恬文件王商務版』phrase will be displayed in related phrase area. You may select it to input directly.
4. Click Ok button to add the new phrase and click to exit.

Chapter 10 Custom Phrase
10-3
10.2 Delete Phrase
If you want to delete a phrase in the phrase database, you can select the phrase and click [Delete].

Chapter 11 Artificial Intelligence
11-1
Chapter 11 Artificial Intelligence
Artificial Intelligence helps you to correct incorrect recognition character. It also learns your handwriting style to improve the recognition rate.
1. If Penpower Jr. recognize the wrong word, and the correct word did not show in the candidates, you can lick the function menu button and select [AI] to open artificial intelligence dialogue. For example, you want to input the word 『畫』, but you did not find 『畫』in the candidate words.

11-2
Penpower Junior
2. Turn on AI function and input 『畫』.
3. You will see the wrong result is already updated as『畫』. Your personal writing style of inking has also been learned.
Chapter 12 On-Line Translator
12-1
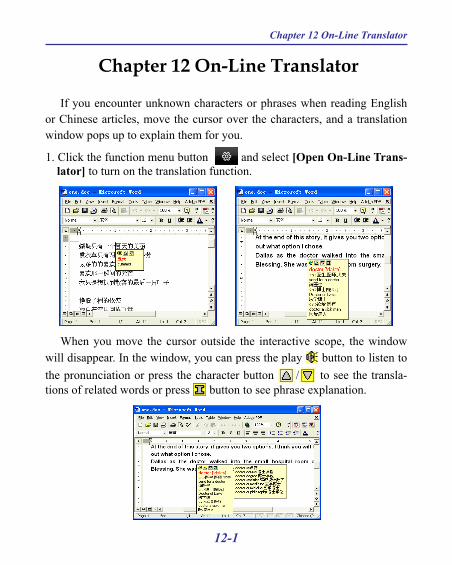
Chapter 12 On-Line Translator
If you encounter unknown characters or phrases when reading English or Chinese articles, move the cursor over the characters, and a translation window pops up to explain them for you.
When you move the cursor outside the interactive scope, the window will disappear. In the window, you can press the play button to listen to the pronunciation or press the character button / to see the transla-tions of related words or press button to see phrase explanation.
1. Click the function menu button and select [Open On-Line Trans-lator] to turn on the translation function.

12-2
Penpower Junior
The online translation is also used in the balloon interface as the can-didate window. The online translation window and the candidate window will not pop up at the same time. If only candidate window pops up, you can also select button from the candidate window to see the translation results.

Chapter 13 Recitation
13-1
Chapter 13 Recitation
Integrate the Text to Speech (TTS) technology to read aloud the Chinese article content within any window.
4. If you click without selection, then select “Start/Stop Text To Speech”. The text would be read aloud from caret location.
Note: The Windows Vista 64bit edition does not support the direct text-to-speech function. You must select a section of text before you can use the text-to-speech function.
5.You can click , and select “Start/Stop Text To Speech” again to stop reading.
2. After voice reader is executed, the small icon would be dis-played on the right top corner of any application.
3. If you select one paragraph of text first, then click , and se-lect “Start/Stop Text To Speech”. The selected text will be read aloud. You can choose Mandarin or Cantonese tone pronunciation from the menu.
13.1 Penpower Voice Reader
1. Click the function menu button and select [Recitation] to open voice reader.

13-2
Penpower Junior
13.1 Reading Setting
1. Click , select “Setting” to open the setting dialog.Speech Speed : Adjust the speed of reading.
Speech Pitch : Adjust the tone of reading.
Speech Volume : Adjust the volume of reading.
6.Click , select “Exit” to exit the Penpower Voice Reader.

Chapter 14 Signature
14-1
Chapter 14 Signature
Penpower Jr. provides Signature function for you to sign on the MS Word, MS Excel and other applications which can contain picture and text.
1. Move the cursor to the place you want to sign in your document and click the function menu button to select [Signature].

14-2
Penpower Junior
: Select the color of inking
: Select the thickness of inking.
: Select pen style.
: Clear the script and sign again.
: Send the signature out.
: Preview the signature.
2. Sign your signature.

Chapter 14 Signature
14-3
3. Click the Preview button can view the signature in a preview window.
4. Click the Send button to insert the signature next to the cursor.
Chapter 15 Data Management
15-1
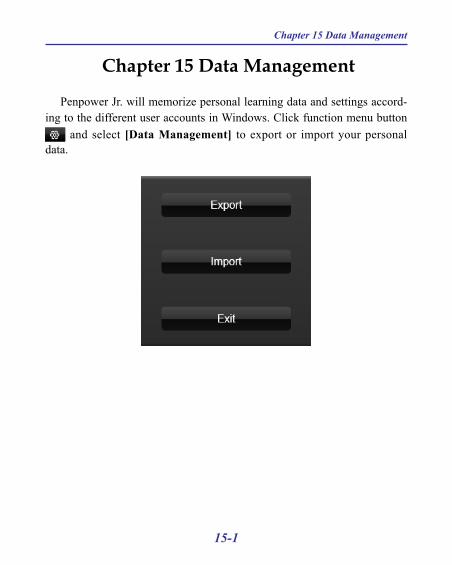
Chapter 15 Data Management
Penpower Jr. will memorize personal learning data and settings accord-ing to the different user accounts in Windows. Click function menu button
and select [Data Management] to export or import your personal data.
15-2
Penpower Junior
Penpower Jr. V8.0.2 User Manual
Penpower Technology LTD.,
Release: October, 2012
Edition: 1

Penpower Jr. V8.5 User Manual
Penpower Technology LTD.,
Release: May, 2014
Edition: 1


