Page 1 of 39 Version 1.1 PeopleSoft CRM 8.9 Table of Contents ADDING A CRM CASE ......................................................................................................................................... 4 ACCESSING PEOPLESOFT ................................................................................................................................ 4 CORE HOME PAGE ................................................................................................................................................. 4 ADDING A CASE ................................................................................................................................................... 5 NAVIGATOR BAR................................................................................................................................................... 5 LOCATING AN EMPLOYEE ...................................................................................................................................... 6 THE EMPLOYEE INFORMATION SECTION ............................................................................................................... 8 THE PROBLEM SECTION......................................................................................................................................... 8 Summary and Description : ............................................................................................................................. 8 Summary ....................................................................................................................................................................... 8 Description .................................................................................................................................................................... 8 CASE INFORMATION SECTION ............................................................................................................................... 9 On the Main Tab ............................................................................................................................................ 10 Business Unit.................................................................................................................................................... 10 Quick Code:...................................................................................................................................................... 10 Case Type: ........................................................................................................................................................ 10 Case Subtype .................................................................................................................................................... 10 Visibility ........................................................................................................................................................... 10 Status ................................................................................................................................................................ 10 New ............................................................................................................................................................. 10 Reopened..................................................................................................................................................... 10 Researching ................................................................................................................................................. 10 Resolved ...................................................................................................................................................... 10 Working ...................................................................................................................................................... 10 Resolved by First Contact................................................................................................................................. 10 Provider Group ................................................................................................................................................. 11 Assigned To...................................................................................................................................................... 11 Error Code ........................................................................................................................................................ 11 Error Message................................................................................................................................................... 11 Target Close Date ............................................................................................................................................. 11 Category, .......................................................................................................................................................... 11 Specialty Type, ................................................................................................................................................. 11 Detail: ............................................................................................................................................................... 11 Priority.............................................................................................................................................................. 11 1. Three Minutes ......................................................................................................................................... 11 2. One Hour ................................................................................................................................................. 11 3. Same Business Days................................................................................................................................ 11 4. Five Business Days ................................................................................................................................. 11 5. Thirty Calendar Days .............................................................................................................................. 11 Impact ............................................................................................................................................................... 12 1. One User Affected ................................................................................................................................... 12 2. Multiple Users Affected .......................................................................................................................... 12 3. One Location Affected ............................................................................................................................ 12 4. Single Agency Affected .......................................................................................................................... 12 5. Multiple Agencies Affected .................................................................................................................... 12 Severity............................................................................................................................................................. 12 1. Prod - Affected ........................................................................................................................................ 12
Transcript
Page 1 of 39 Version 1.1
PeopleSoft CRM 8.9 Table of Contents
ADDING A CRM CASE......................................................................................................................................... 4 ACCESSING PEOPLESOFT ................................................................................................................................ 4
CORE HOME PAGE................................................................................................................................................. 4 ADDING A CASE ................................................................................................................................................... 5
NAVIGATOR BAR................................................................................................................................................... 5 LOCATING AN EMPLOYEE...................................................................................................................................... 6 THE EMPLOYEE INFORMATION SECTION ............................................................................................................... 8 THE PROBLEM SECTION......................................................................................................................................... 8
Summary and Description : ............................................................................................................................. 8 Summary....................................................................................................................................................................... 8 Description.................................................................................................................................................................... 8
CASE INFORMATION SECTION ............................................................................................................................... 9 On the Main Tab ............................................................................................................................................ 10
Business Unit.................................................................................................................................................... 10 Quick Code:...................................................................................................................................................... 10 Case Type: ........................................................................................................................................................ 10 Case Subtype .................................................................................................................................................... 10 Visibility........................................................................................................................................................... 10 Status ................................................................................................................................................................ 10
Resolved by First Contact................................................................................................................................. 10 Provider Group ................................................................................................................................................. 11 Assigned To...................................................................................................................................................... 11 Error Code ........................................................................................................................................................ 11 Error Message................................................................................................................................................... 11 Target Close Date ............................................................................................................................................. 11 Category, .......................................................................................................................................................... 11 Specialty Type, ................................................................................................................................................. 11 Detail: ............................................................................................................................................................... 11 Priority.............................................................................................................................................................. 11
1. Three Minutes ......................................................................................................................................... 11 2. One Hour................................................................................................................................................. 11 3. Same Business Days................................................................................................................................ 11 4. Five Business Days ................................................................................................................................. 11 5. Thirty Calendar Days .............................................................................................................................. 11
Impact............................................................................................................................................................... 12 1. One User Affected................................................................................................................................... 12 2. Multiple Users Affected .......................................................................................................................... 12 3. One Location Affected ............................................................................................................................ 12 4. Single Agency Affected .......................................................................................................................... 12 5. Multiple Agencies Affected .................................................................................................................... 12
2. Prod - Down ............................................................................................................................................ 12 3. Stage........................................................................................................................................................ 12 4. Quality Assurance ................................................................................................................................... 12 5. Test System ............................................................................................................................................. 12 6. Development ........................................................................................................................................... 12 7. Demonstration ......................................................................................................................................... 12 CSR............................................................................................................................................................. 12 Course of Business ...................................................................................................................................... 12 Direct Call ................................................................................................................................................... 12 Email ........................................................................................................................................................... 12 FAX............................................................................................................................................................. 12 Form Submissions ....................................................................................................................................... 12 Self-Service ................................................................................................................................................. 13 Voice Mail................................................................................................................................................... 13 Walk-Up...................................................................................................................................................... 13
On the More Tab............................................................................................................................................ 13 Status ................................................................................................................................................................ 13
Provider Group ................................................................................................................................................. 13 Problem Type ................................................................................................................................................... 13 Serial Number................................................................................................................................................... 13 Asset Tag.......................................................................................................................................................... 13 Installed ............................................................................................................................................................ 13 Select Agreement.............................................................................................................................................. 13 Response Met ................................................................................................................................................... 13 Restore Met ...................................................................................................................................................... 13 Actual Response ............................................................................................................................................... 13 Actual Restore .................................................................................................................................................. 14
THE ACTION SECTION ......................................................................................................................................... 14 CASE CREATION STEP BY STEP.................................................................................................................... 15
Create New Case............................................................................................................................................ 15 Add to Favorites............................................................................................................................................. 15 Problem Description...................................................................................................................................... 16 Case Information ........................................................................................................................................... 16 Spell Check .................................................................................................................................................... 17 Saving the Record .......................................................................................................................................... 18
UPDATING A CASE ............................................................................................................................................ 18 LOCATING A CASE ............................................................................................................................................... 18
Tip............................................................................................................................................................................... 20 SEARCH RESULTS SCREEN................................................................................................................................... 21 THE SUMMARY SCREEN. ..................................................................................................................................... 22 NOTES, RESOLUTIONS, AND “STEPS TO ACCOMPLISH”........................................................................................ 23 THE NOTES TAB .................................................................................................................................................. 23 THE RELATED CASES TAB ................................................................................................................................... 24
THE SOLUTION TAB............................................................................................................................................. 29 In Consideration.......................................................................................................................................................... 29 Waiting on Customer .................................................................................................................................................. 29 Withdrawn................................................................................................................................................................... 29 Failed Resolution ........................................................................................................................................................ 29
THE SOLUTIONS LIBRARY ................................................................................................................................... 29 The Search Tab .............................................................................................................................................. 30 The FAQ Tab ................................................................................................................................................. 30 The Frequently Used Solutions Tab............................................................................................................... 31
Page 3 of 39 Version 1.1
New Solution Tab........................................................................................................................................... 31 USING SOLUTION NOTES ..................................................................................................................................... 32 SOLUTION STATUS............................................................................................................................................... 34
Failed Resolution........................................................................................................................................... 34 In Consideration ............................................................................................................................................ 34 Successful Resolution..................................................................................................................................... 34 Waiting on Customer ..................................................................................................................................... 34 Withdrawn...................................................................................................................................................... 34
ASSIGNING A CASE .............................................................................................................................................. 35 NOTIFICATIONS................................................................................................................................................. 36
EMAILING FROM WITHIN A CASE ........................................................................................................................ 36 EMAILING A RESOLUTION.................................................................................................................................... 37
ADDING TIME MEASUREMENTS .................................................................................................................. 38
Page 4 of 39 Version 1.1
Adding A CRM Case The Office of State Finance uses PeopleSoft CRM as its repository for all technical problems. Over time, many applications have been used - spread sheets, Access databases, Lotus Notes databases, etc. Many of these have already been integrated into PeopleSoft CRM and others are soon to follow. With its flexibility, CRM allows staff and managers alike to gather information about - and report on- a variety of issues from PMP updates to customer case volume. As a rule of thumb, if an issue requires assistance from an OSF employee, it should be logged in CRM for tracking and reporting purposes. A case contains all the vital information needed to communicate the nature and scope of the problem to all other readers in a succinct manner. It also provides future readers the ability to fully understand all attempts to resolve it. Below we will explore the methods for opening a new case.
Accessing PeopleSoft Core Home Page
Open PeopleSoft CRM through the Core webpage : [http://www.ok.gov/coreoklahoma/login.html] . Under the CRM banner, select Customer Relationship Management Production.
Page 5 of 39 Version 1.1
When the sign in screen appears, enter your PeopleSoft User ID and User Password and left-click the “Sign In” button.
|NOTE: the User ID and Password are case sensitive. The User ID is all capital letters, but the password may not be. The password is at least eight characters long, should include at least one capital letter, and at least one number.|
Adding a Case Navigator Bar
To open a case in CRM, we’ll navigate through the “Menu Pane" on the left side of your screen. In the menu pane, left-click HelpDesk, Create Case
Page 6 of 39 Version 1.1
A new case screen appears. CRM 8.9 allows the user to begin wherever it makes the most sense. Generally we begin by locating the employee, but often it makes more sense to begin capturing the customer's problem description. Either way, 8.9 allows you the flexibility to gather data in the order that makes sense for a particular situation. Later, we'll step through the process in screen order - but feel free to begin anywhere on the screen.
Locating an Employee There are several methods of locating an employee in the system. The simplest method is to ask the customer for his Employee ID. Enter the Employee ID and left-click search.
Page 7 of 39 Version 1.1
Alternately, you may search by first or last name. The screen may return one name or several names. Should two employees share the same name it is important to verify the employee by EmplID.
|Note: While it is possible to enter the entire name, it is a safer approach to allow the system to return all matching names in the system. Typically, with three letters of the last name, only a hand full of names will be returned. Entering the entire name may produce unexpected results|
|Note: The ampersand (%) may be used as a wild card. It can be used before and/or after any text.|
After selecting the correct customer, left-click the drop downs for the Phone and Email fields. There may be multiple telephone numbers and email accounts for this user, if so verify which telephone and email the customer wants to use on this case.
Page 8 of 39 Version 1.1
The Employee Information Section Now that we've located an employee, let's define what the various fields and links do on the case screen. Once we've defined the fields, we'll step through creating a case from start to finish. The Employee Information section displays the name, agency, location, telephone and email address(es) of the person with a problem.
The Problem Section Summary and Description :
Summary The summary field is designed to be a concise one-line synopsis of the problem. Select key words for the summary so that in a list of summaries you’ll know the general issues contained in the case. If left blank, the summary will be automatically populated with the first 32 characters of the problem description.
Description The description field is a free-form text field allowing you to describe the problem encountered. The description should be as complete as practically possible, including all pertinent data such as PO numbers, voucher numbers, specific questions the employee has, specific concerns expressed etc. Spell check is available for both the summary and the description fields by selecting the icon immediately to the right of either field.
| Note: The Description field should not include any information other than a description of the problem – i.e. Updates should not be in the description field, but rather in the Notes Section.| |Note: Each problem receives its own case number. If the customer emails the Help Desk with ten problems, create and appropriately relate ten separate cases. There are some exceptions to this generalization, however. Please contact a member of the Help Desk if there is any question||
Page 9 of 39 Version 1.1
Case Information Section The case information section contains vital case information regarding the type of case, the number of people affected, and to whom the case is assigned. There are two tabs, the Main tab and the More tab. Below we'll discuss each field and how it is used in OSF.
Page 10 of 39 Version 1.1
On the Main Tab
Business Unit: Your agency. This is not the customer’s agency, but rather your employer. This will govern which case types, categories, and resolutions you are able to see Quick Code: A series of pre-written descriptions and summaries designed to speed up data entry. Using a quick code pre-fills most data in the Case Information areas.
Case Type: Case type provides a drop-down selection list for defining the ‘type’ of case being entered. If the problem is a request for documentation about a product, one might select “Documentation." Case Subtype: Based on the case type selected, a separate set of optional descriptions appears. Using a subtype allows the system to use the information to assist in problem analysis. Visibility: Default value is External. External would allow self-service to view the case, however, at this point OSF is not implementing Self-Service. Status: the case may be defined as:
New A case newly created by the Help Desk, but not yet worked by support staff.
Reopened A case in which the customer reports the resolution given did not resolve the initial problem.
Researching A case that requires a detailed analysis, generally taking 30 days or longer. This is generally used by the Technical team.
Resolved An answer has been provided to the customer.
Working A case support staff have received and performed some tasks, but one which the resolution has not been provided. These cases should always include notes detailing what work has been performed.
Resolved by First Contact: This check box is generally used only by the Help Desk and only applies to those cases where the customer's issue was resolved during the initial conversation.
Page 11 of 39 Version 1.1
Provider Group: The group to whom the case is assigned. Assigned To: Support staff responsible for the next step in the process.
Error Code: Any alpha numeric value reported by the customer regarding an error. ( i.e. V200) Error Message: A full text description of any error message. (i.e. Page can not be displayed.)
Target Close Date: This date is blank by default, but will be used if the customer provides a date required to have the issue resolved. If left blank, the assignee may choose to note when they expect to have the problem resolved. Category, Specialty Type, Detail: These three fields
allow you to group the case into predefined categories. This simplifies the reporting process and may expedite training material updates. It allows you to see at a glance the distribution of cases based on a category. Priority: Priority provides a drop down list to determine the urgency with which this case should be addressed. Each priority's description details the resolution SLA associated with it. For instance, a priority of "4. Five Business Days" is an agreement with the customer the issue will be resolved within five business days. The priorities are:
1. Three Minutes 2. One Hour 3. Same Business Days 4. Five Business Days 5. Thirty Calendar Days
6. Target Date (Default: “4. Five Business Days”)
|Note: Target date supersedes all other priorities.|
Page 12 of 39 Version 1.1
Impact: Impact provides an indication of the scope of the problem. The impact choices are:
1. One User Affected 2. Multiple Users Affected 3. One Location Affected 4. Single Agency Affected 5. Multiple Agencies Affected
(Default: "1. One User Affected") Severity: Severity details which server environment is affected. Generally calls deal with the production environment. Production Affected indicates one or more users are experiencing difficulty with their normal access, but the system is up. Production Down indicates the production server(s) is offline and the software is not functional. All cases marked with Production Down must also be marked with a priority of "5. Multiple Agencies Affected." The severity choices are:
1. Prod - Affected 2. Prod - Down 3. Stage 4. Quality Assurance 5. Test System 6. Development 7. Demonstration
(Default: "1. Production Affected") Source: Source describes the method the case was reported. The source choices are:
CSR Course of Business Direct Call Email FAX Form Submissions
Page 13 of 39 Version 1.1
Self-Service Voice Mail Walk-Up
(Default: Direct Call)
On the More Tab Visibility: Default value is External. External would allow self-service to view the case, however, at this point OSF is not implementing Self-Service. Status: the case may be defined as:
New Reopened Researching Resolved Working
Provider Group: The group to whom the case is assigned. Assigned To: Support staff responsible for the next step in the process. Problem Type: Not currently used. Serial Number: Not currently used. Asset Tag: Not currently used. Installed: Not currently used. Select Agreement: Not currently used. Target Close Date: This date is blank by default, but may be used by the assignee to note when they expect to have the problem resolved. Response Met: Not currently used. Restore Met: Not currently used. Actual Response: Not currently used.
Page 14 of 39 Version 1.1
Actual Restore: Not currently used. Interested Parties: Adding interested parties to a case allows for individuals other than the customer and the assignee to receive copies of emails automatically sent by the system.
The Action Section The action section allows provider groups to offer predetermined actions, scripts, or resolutions one can take to resolve the caller's issue. These are generally set up to work directly with quick codes. In the example shown here, a quick code was selected for unlocking a CRM account. Notice the appearance of "Unlock PS Account". Selecting this action then provides a solution detail the Help Desk can use to resolve the problem.
Page 15 of 39 Version 1.1
Case Creation Step by Step Create New Case
Now that we've defined each field on the case screen, let's step through an actual case creation from start to finish.
From the menu system, select: Help Desk Create Case
Add to Favorites
|Note: You can save this link to your favorites, making it easier to navigate directly to this link. To add to your favorites, left-click Add to Favorites and provide a description of your new favorite.|
When the new case screen appears, enter the Employee ID, the first three letters of the first name, or the first three letters of the last name and left-click Search.
Page 16 of 39 Version 1.1
Problem Description Enter a full description of the problem. Left-click the spell check icon. Add a summary description. The summary line is used in a number of lists providing you an ability to distinguish this case in a list of cases. | Note: If you utilize the quick code to create a case, the description and summary are automatically populated |
Case Information The Case Information section is filled in this order:
1. Select your own business unit (if not defaulted).
2. Select a quick code from the drop down menu (if desired.)
3. Select the case type. 4. Select the case subtype. 5. Verify visibility defaulted to
External. 6. Select "Resolved by first contact if
the Help Desk resolved the issue with the customer immediately.
7. Enter any error message 8. Enter any error description 9. Select the Category. 10. Select the Specialty Type. 11. Select the Detail 12. Select the Priority 13. Select the Impact. 14. Select the Severity 15. Select the Source 16. Select the Provider group (and
assignee if appropriate.) Left-click the magnifying glass to locate the provider group.
| Note: Assignments of cases by the Help Desk is done to a group account. Each provider group has a generic "Pending" user. It is the responsibility of each group to monitor each inbound group case and assign them to an individual within their own group immediately up on receipt. |
Page 17 of 39 Version 1.1
|Note: If you utilize the quick code to create a case, all of these will be automatically filled in except the Resolved by First Contact.|
Spell Check After entering the case information, left-click Spell Check to verify all text fields in the case are correct.
The resulting Spell Check screen will check the entire case for spelling concerns. As with
many other applications, CRM will provide you a list of suggestions as well as the ability to enter free form text. You may also opt to ignore the word in this case or to add the word to your dictionary.
Once the fields have been checked the system will return a message the spelling check is complete.
Page 18 of 39 Version 1.1
Saving the Record Once you have entered the all the pertinent data, save the record. To save the record, select one of the three save options. At the top left of the screen is the first save button, ... in the bottom left of the screen are the second and third save buttons. Left-click one of the three.
Saving the record causes a series of events to happen behind the scenes – including emails sent to the assignee and to the employee reporting the case.
Updating a Case Locating a Case
When a case is assigned, the assignee receives an email detailing the vital statistics of the case including: Case description, priority, and the number of users affected. This email also contains a link to the actual case. Once the assignee signs in, PeopleSoft CRM will take the assignee directly to the case. Often though, a support person must locate a case without the convenience of the link provided in the initial email.
To locate a case, select HD Search Case.
Page 19 of 39 Version 1.1
When the search criteria screen appears, select the business unit as Office of State Finance. Select other criteria as desired. If the criteria is not shown on the initial screen, right-click Advanced Search The advanced search screen provides additional searchable fields. Complete the criteria you wish to search for and left-click Search.
Page 20 of 39 Version 1.1
Tip
If you perform a search with the same criteria often (such as looking for your new open cases) you can save the criteria and repeat the search later without having to fill in the same fields. To do this, fill in the search criteria normally. Left-click Save Search Criteria Enter a name for this saved search and left-click Save.
Page 21 of 39 Version 1.1
To repeat the search in the future, simply select the desired search from the Use Saved Search drop-down menu. Left-click Search.
Search Results Screen Executing a search will automatically bring any matching cases to the screen. To select a case from the list, simply left-click the case number link from the summary list.
Page 22 of 39 Version 1.1
The Summary Screen. Once selected, a case opens to the summary screen by default. Virtually all the necessary information is displayed on this screen .
On the summary tab, you will have access to:
1. The description. 2. The status
(open/closed) 3. The SLA governing
the case. 4. The number of users
affected. 5. The environment
affected (production, test, etc.)
6. Notes written regarding the case.
7. Any step-by-steps added about a specific note.
8. Any attempted solutions.
9. All step-by-step added about a specific solution.
10. Any related actions taken (tasks, etc.)
11. All related cases and how they are related.
From this screen, you can also elect to email notes and/or solutions to any individual desired.
Page 23 of 39 Version 1.1
Notes, Resolutions, and “Steps to Accomplish” Often a specific set of tasks must be performed to resolve the customer’s problem. Quite often the most appropriate notification to the customer is simply “we have completed your request” - the detail of the technical aspects of the resolution would only serve to confuse them Recording the steps is, however, critically important for knowledge retention. CRM 8.9 provides an ability to add a solution of “we completed your request” and a note about the resolution providing the steps taken to accomplish the task.
The Notes Tab All communications between the customer and any support staff or between support staff regarding a case must be added to the notes section. This provides an accurate up-to-date view of the case progress and provides the Help Desk the ability to answer customer inquiries related to the case progress.
|Note: Each unsuccessful attempt to contact the customer will also be entered as a note. The note may be as simple as “Called user, line busy.” This allows the Help Desk to provide confirmation of work progress and contact attempts made. It is especially helpful when a customer complains no one has contacted them regarding a case.|
One can add a note from the summary screen by simply left-clicking “Add a Note.”
Alternately, one can add a note from the Notes Tab.
1. When adding a note, enter the note in the detail section. You may elect to add a Subject if desired, if not, the system will automatically populate the first sentence from the detail line.
2. Select the visibility. "Internal" is the
default visibility selected – meaning it is not visible from Self Service. If "All" is selected, this particular note will be visible through Self-Service as well as automatically notify the customer.
3. The note type stipulates the style of contact - is this a note from the customer, a
communication to the customer, or simply additional information added to the case.
Page 24 of 39 Version 1.1
4. If desired, you may specify specific employee contact information for this single note.
If the case is about John Doe, but Jane Smith calls in with an update, populate Jane Smith's name.
5. If desired, you may add an attachment (screen shot, file, etc) by left-clicking Add an
Attachment
6. Once the information is entered, left-click Apply Note.
7. Left-click Save Case
The Related Cases Tab Cases often associated with a larger problem will have related cases. The Summary tab provides a list of related cases and defines how they’re related. The Related Cases displays this information as well. The Relationship, highlighted here, indicates what type of case is related. In the example below, the related case is listed as an “Auto Parent.” This means the related case is the parent case for the case currently displayed. Auto Parent relationships ensure that when the parent case is closed, the children cases will close with the same resolution provided
Page 25 of 39 Version 1.1
Occasionally, you may receive a case that should be related to an existing case you’re already working. This may happen when you discover two symptoms relate to the same underlying cause or when two cases arrive simultaneously from two Help Desk staff. Should you need to relate two cases, left-click Relate an Existing Case.
Page 26 of 39 Version 1.1
Locate the case you desire to link by filling in the appropriate criteria on the search page and left-click Search. Select the relationship type from the *Relationship Type drop down.
Automated: All automated children cases will automatically be updated and closed when the parent closes.
Manual: All manual children cases will receive the solution, but the case will remain open until the Help Desk manually contacts the customer.
Similar: There is no parent/child relationship. These cases share similarity with other existing cases, but no solution will be passed down and the case will not automatically close based on what the other related cases do. This is often used to report a similar problem (such as password
Page 27 of 39 Version 1.1
resets) where the user ID changes but the case is fundamentally the same. Resolving one password reset will not necessarily resolve another password reset.. Select how each case is to be linked. Parent, child, or equal.
|Note: For automated or manual, one must select one case as the parent, and the other case as the child.|
Below is a graphical description of the general case relationship types. In the example, three separate issues happened simultaneously, affecting numerous customers. The initial case was assigned to the appropriate support group, and the subsequent cases were assigned to the Help Desk for customer follow up. Cases colored yellow will automatically close when the Parent case is close. Cases colored green will receive the solution, but not automatically close. The Help Desk will manually contact each of these customers when the parent case is closed.
Page 28 of 39 Version 1.1
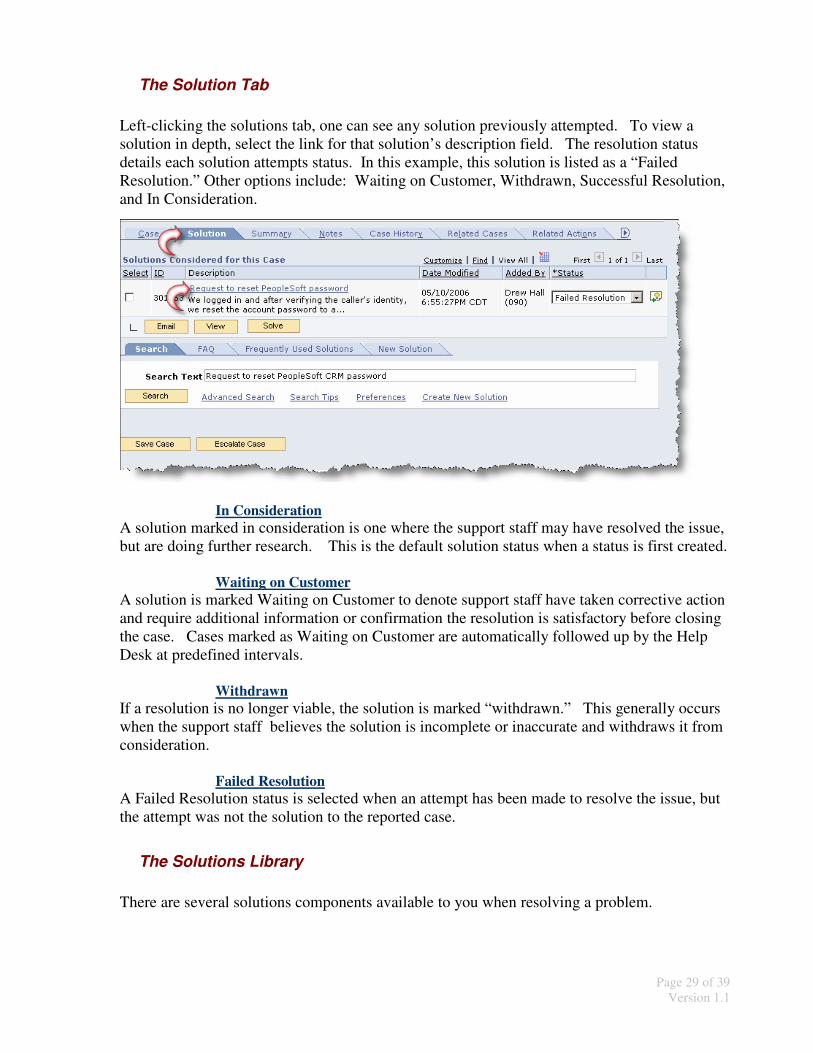
Page 29 of 39 Version 1.1
The Solution Tab Left-clicking the solutions tab, one can see any solution previously attempted. To view a solution in depth, select the link for that solution’s description field. The resolution status details each solution attempts status. In this example, this solution is listed as a “Failed Resolution.” Other options include: Waiting on Customer, Withdrawn, Successful Resolution, and In Consideration.
In Consideration
A solution marked in consideration is one where the support staff may have resolved the issue, but are doing further research. This is the default solution status when a status is first created.
Waiting on Customer A solution is marked Waiting on Customer to denote support staff have taken corrective action and require additional information or confirmation the resolution is satisfactory before closing the case. Cases marked as Waiting on Customer are automatically followed up by the Help Desk at predefined intervals.
Withdrawn If a resolution is no longer viable, the solution is marked “withdrawn.” This generally occurs when the support staff believes the solution is incomplete or inaccurate and withdraws it from consideration.
Failed Resolution A Failed Resolution status is selected when an attempt has been made to resolve the issue, but the attempt was not the solution to the reported case.
The Solutions Library There are several solutions components available to you when resolving a problem.
Page 30 of 39 Version 1.1
The Search Tab The search tab allows one to key in words and phrases used in the case description or case resolutions previously entered in other cases. Selecting the Advance Search allows one to specify exact phrases to include, exclude, or if word variations should be considered.
The FAQ Tab The FAQ tab allows experts in specific areas to enter detailed resolution data and troubleshooting guidelines. The FAQ section is separated by “libraries” – solutions grouped by a similar application or hardware configuration. From the FAQ tab, select the appropriate library. Select from the returned searches. Left-click Attempt and have the user confirm the steps provided resolved the issue. If you are certain the returned ID is the solution, select Solve – by passing the customer’s confirmation. Left-click Save.
Page 31 of 39 Version 1.1
The Frequently Used Solutions Tab The Frequently Used solutions allows the system to select case resolutions that have been marked ‘effective’ and used repeatedly. Each time a solution ID is used, a usage count is incremented. The higher the increments, the more likely that solution will provide relief to the problem listed in the case – so the system brings the resolution to the top of the list. From the Frequently Used Solutions Tab, Select the Type. Locate the solutions available. Save the case.
New Solution Tab In the event there are no existing solutions available to resolve the problem, the new solution tab gives you an opportunity to create a new solution for evaluation. If the solution meets OSF guidelines, it will be added to the solutions database for future reference on future cases. To enter a new solution, select the New Solution tab. Enter the step-by-step process taken to resolve the problem. Left-click the spell check icon. Left-click Attempt and have the user confirm the steps provided resolved the issue. If you are certain the returned ID is the solution, select Solve – by passing the customer’s confirmation. Left-click Save. Each new solution must follow precise standards to maintain quality. Each solution: Must Contain
• Step by step description of the events used to resolve the problem. This should not include descriptions of any failed attempts.
|Note: This step by step may either be located in the Solution description or in the Solution Notes. See below|
Page 32 of 39 Version 1.1
Must Not Contain • Gender specific personal pronouns (he, she, his, hers, etc.) • Proper names of customers or staff – (unless the proper name is the object being
corrected. i.e. “I adjusted the first name for EMPLID 123456 to John Doe by the following steps…..1. Open HRMS…”)
Using Solution Notes Solutions are generally classified in one of two manners. The first is a solution the customer could have enacted with the proper training and experience. In this case, you must write each step-by-step process in the Solution Details. The solution should be written at an eight grade reading level and should include all the necessary instructions for the customer to repeat the process without contacting OSF for additional information. These types of solutions require no solution notes.
|Note: If you write this type of solution, notify the Help Desk and, if you desire, we will gladly assist you in authoring formal documentation presentable to the general public.|
The second type of solution involves steps only a technical support person could perform. With these solutions, Solution Details can be a rather broad description of the actions taken, but without the step-by-step process. The step by step process must then be written in the Solution Notes section. In the example below, a New Solution was attempted. Since the issue dealt with a security process, the customer does not need to know the links and steps involved in actually correcting the problem. The description simply notes the overall actions taken to resolve the problem. Since the actual step-by-steps are required, we left-clicked Add Resolution Note or Attachment.
Page 33 of 39 Version 1.1
Enter “Steps to Accomplish” as the subject line. Add the full step-by-step description of the actions taken in the details section. This includes all paths and variables. Left-click the spell check Icon for the summary line. Left-click the spell check Icon for the detail section. Select a visibility of “Internal” Select a note type of “4. Step By Step” If desired, left-click Attach a File. This may be helpful if a file was required to resolve the issue, but is not generally available to the customer (i.e. site certificates.) Left-click Save Resolution Note.
Once saved the Resolution note provides any future user access to your problem resolving without revealing secure information to the customer.
Page 34 of 39 Version 1.1
Solution Status Once a solution is entered, you have several options for the Solution Status. They are:
Failed Resolution Any resolution attempted but unsuccessful in correcting the customer’s issue is set to Failed Resolution. If a case is reopened by the Help Desk, a successful resolution will be marked Failed Resolution.
In Consideration This is the default status. This status indicates the support staff continue to work on the issue and are not certain this is the final resolution.
Successful Resolution When a solution resolves the customer’s problem it is marked as a Successful Resolution. Several automated processes will execute once a case is saved with a Successful Resolution, including: changing the case status to Closed and automatically emailing the customer notifying them the issue is resolved.
Waiting on Customer Waiting on Customer is most often used when a support staff needs the customer to validate the solution proposed does indeed correct the issue reported. It is also used when the customer needs to provide additional information in order for the support staff to continue a support process. Automated processes will send the user an email asking for additional information if this case type is selected and the case is saved.
|Note: Help Desk procedures will assist in following up on cases marked Waiting on Customer. It is not uncommon for the customer to forget to reply and let OSF know the issue they reported is corrected. On days three and seven after a case is marked Waiting on Customer, the Help Desk will follow up with an email. On day ten, the Help Desk will automatically close the case with an additional note to the customer that if they need, we’ll reopen the case at their request.|
Withdrawn If a customer replies to a case and states a provided solution did not resolve their issue, the Help Desk will mark the solution as “withdrawn” and notify the assignee.
Once a resolution status is selected, left-click Save.
Page 35 of 39 Version 1.1
Assigning a Case The Help Desk will assign all cases to the provider group's generic ID. That ID automatically sends a group email to the individuals comprising that group. Once received, the individual(s) responsible for monitoring the group's cases should immediately assign the case to the appropriate member of the team. The case should always be assigned to the support staff performing the next action. In this regard, cases may be assigned and reassigned often depending on which staff and which teams are involved in solving the problem. To reassign a case to another support staff, select the look up glass for provider group from the Case tab.
Select the desired provider group from the resulting list.
|Note: If you know the name of the provider group, you may simply type the name in and skip the look-up class.|
Page 36 of 39 Version 1.1
To locate an available staff member within the group you selected, left-click the look up glass to the right of “Assigned To.”
Select the desired staff from the resulting list of support staff. Save the case. An automated email will be sent to the new assignee informing them of their new case assignment.
Notifications Emailing from Within a Case
Left-click the notification icon.
Select the recipients or manually add an email address. If the recipient has access to CRM (unlikely) check the “Attach URL to Email Recipients” and a link to the case will be added to the email. Left-click send.
Page 37 of 39 Version 1.1
Emailing a Resolution You might desire to manually email the entire resolution to the customer, fellow department members, and/or other interested parties. To alleviate the “cut & paste” routine, PeopleSoft affords you the ability to email directly from the case. Once the case is resolved, check the resolution(s) you wish to email to the customer, and then left-click the Email button.
Select the recipients or manually add an email address. If the recipient has access to CRM (unlikely) check the “Attach URL to Email Recipients” and a link to the case will be added to the email. Left-click send.
Page 38 of 39 Version 1.1
Adding Time Measurements It is possible to track specific time measurements for purposes such as billing or determining how much time each individual invested in a case. To add a time to a case, left-click Time Entry.
Left-click Add Time.
A new entry appears, defaulting in the Name, Current Date, and Current time. To close this time record fill in the End Date and End time.
Page 39 of 39 Version 1.1
Left-click the Comments tab. Add brief description of what actions were taken during this time entry.
The time entry used in conjunction with the Category, Specialty Type, and Detail can easily be used for billing purposes. If you have a billing need and would like specific Category/Specialty Type/Details added, contact the Help Desk.