38
Perforce 2010.1 JavaScript API for Visual Tools September 2010
Perforce 2010.1JavaScript API for Visual Tools
September 2010

This manual copyright 2010 Perforce Software.
All rights reserved.
Perforce software and documentation is available from http://www.perforce.com. You may download and use Perforce programs, but you may not sell or redistribute them. You may download, print, copy, edit, and redistribute the documentation, but you may not sell it, or sell any documentation derived from it. You may not modify or attempt to reverse engineer the programs.
Perforce programs and documents are available from our Web site as is. No warranty or support is provided. Warranties and support, along with higher capacity servers, are sold by Perforce Software.
Perforce Software assumes no responsibility or liability for any errors or inaccuracies that may appear in this book.
By downloading and using our programs and documents you agree to these terms.
Perforce and Inter-File Branching are trademarks of Perforce Software. Perforce software includes software developed by the University of California, Berkeley and its contributors.
"JavaScript" is a trademark of Sun Microsystems.
Qt, and the Qt logo are trademarks of Nokia Corporation and/or its subsidiaries in Finland and other countries.
All other brands or product names are trademarks or registered trademarks of their respective companies or organizations.
Table of Contents
Chapter 1 Perforce JavaScript API for Visual Tools.................... 5Overview .............................................................................................................5Architecture .........................................................................................................6Enabling Applets ................................................................................................7The Permissions Table Entry.............................................................................8The Central Settings File....................................................................................9
Coding the Central Settings File ..................................................................9Configuring Applets for Specific Users and Groups ..............................10Central Settings Keys...................................................................................11
Programming Applets .....................................................................................12Issuing Perforce Commands.......................................................................12Processing Command Results ....................................................................12Using P4Web URLs ......................................................................................13
Extending P4Admin and P4V.........................................................................14Raising Alerts in P4Admin .........................................................................14
Example: A Basic Alert............................................................................14Example: Check the Security Level .......................................................15
Adding Main Tabs to P4Admin and P4V .................................................15Display Connection Settings ..................................................................16Display the Five Most Recent Submitted Changelists........................17
Implementing a Custom Submit Dialog in P4V ......................................19Administering P4V Settings Centrally ..........................................................20Security...............................................................................................................22
Secure Your Applet Source Code ...............................................................23Restrict Access to the Central Settings File...............................................24Use Only Trusted Perforce Servers ............................................................24Monitor Your Perforce Server Activity .....................................................24Configure Only Trusted Web Servers........................................................24Preventing Cross-Site Scripting (XSS) Attacks.........................................24
Types of XSS Issues ..................................................................................25Escaping Dynamic Data..........................................................................25
Troubleshooting ................................................................................................27
Perforce 2010.1 JavaScript API for Visual Tools 3
Table of Contents
Appendix A Method and Command Reference............................ 29JavaScript API Methods.................................................................................. 29
Central Settings Logic Methods ................................................................ 29Alert Methods .............................................................................................. 29Server Data Methods................................................................................... 30
Supported p4 Commands............................................................................... 32
Index.............................................................................. 37
4 Perforce 2010.1 JavaScript API for Visual Tools
Chapter 1 Perforce JavaScript API for Visual Tools
Overview
The Perforce JavaScript API for Visual Tools enables you to extend the P4V, Perforce’s Visual Client, and P4Admin, Perforce’s Administration Tool, using applets written in JavaScript and HTML. Your applets can take full advantage of the capabilities offered by JavaScript and the World Wide Web. For example, you can incorporate Google charting widgets into a tab to graph data. Specifically, you can:
• Add alerts: By default, the Administration Tool displays three standard alerts, which are displayed on the P4Admin Home Page. You can define your own alerts (for example, to notify the Perforce administrator that a new superuser has been created).
• Add tabs to P4V and P4Admin: In these tabs you can display any content that can be rendered by a Web browser.
• Override P4V performance settings: to reduce the server load imposed by a large number of P4V users connected to the same Perforce server, you can use a centrally-administered settings file to override performance-related defaults.
• Create a custom Submit dialog: you can replace the P4V Submit dialog with one of your own design.
If you have multiple Perforce servers, you can use one of them to serve applets and configure the other servers to refer to the central server. You can tailor applets for specific Perforce users and groups. The following sections describe the Perforce JavaScript API for Visual Tools in detail.
Perforce 2010.1 JavaScript API for Visual Tools 5
Architecture
Architecture
P4V and P4Admin use the Qt toolkit as the basis of their cross-platform user interface. Qt-based applications incorporate the open source WebKit HTML rendering engine. The Perforce JavaScript API for Visual Tools uses WebKit to enable you to create applets that extend P4V and P4Admin. Applets are implemented using the following components:
• Central settings file: a JavaScript file that specifies how requests are dispatched.
• Application files: HTML and JavaScript files that contain the logic for your applets. These files can reside in a Perforce server, on local machines, or in any location that is Web-accessible.
P4V and P4Admin call the central settings file according to internal application logic, providing a key to be processed. In the central settings file, you configure extensions by detecting the keys of interest and specifying the JavaScript or HTML files to be executed or rendered.
Here is how P4Admin and P4V execute applets:
1. Look up and load the central settings file.
When P4V or P4Admin first connects to a Perforce server, it scans the permissions table for a centralsettings entry that is configured for the current user, according to the standard logic Perforce uses to parse the protections table.
2. Execute the central settings file.
At startup, P4V and P4Admin execute the JavaScript in the central settings file with various keys, according to proprietary application logic.
3. Execute the applets.
If the central settings file contains logic for a key, that logic is executed. Typically, for alerts, JavaScript files are executed; for tabs, HTML files are rendered.
6 Perforce 2010.1 JavaScript API for Visual Tools
Enabling Applets
Enabling Applets
By default, applet support is disabled in P4Admin and P4V, and unconfigured in the Perforce Server. To implement applets, you perform the following steps:
1. Perforce administrators: Create a central settings file, which dispatches alerts and tabs. For details, see “The Central Settings File” on page 9.
2. Perforce administrators: In your Perforce server, create an entry for the central settings file in the permissions table (using the p4 protect command or the Administration Tool).
3. Perforce administrators: Create the HTML and JavaScript files containing the logic for your applets.
4. All users: In P4V or P4Admin Preferences, enable the Accept applets... preference on the Applets tab, add the Perforce server to the list of allowed servers, then exit and relaunch the application.
The following sections describe applet development and administration in detail.
Perforce 2010.1 JavaScript API for Visual Tools 7
The Permissions Table Entry
The Permissions Table Entry
To add the required centralsettings entry to the permissions table:
1. Launch the Perforce Administration Tool and connect to the desired server as a Perforce superuser.
1. Click the Permissions tab. The permissions table is displayed in a grid at the bottom of the pane.
2. Click to add a line to the permissions table.
3. In the resulting empty line, specify the location of the central settings file. In the host column, specify the keyword centralsettings. For example, the following entry specifies a single central settings file to be used for all users.list user * centralsettings //depot/jsapi/centralsettings.js
4. Click Save Edits to save your entry.
You can configure different central settings files for specific users or groups. For example, the following entry configures a central settings file solely for the user named Jon.list user jon centralsettings //depot/dev/jon/jonsettings.js
The central settings file can reside in the local filesystem or a Perforce server. The following example configures a local central settings file:list user tex centralsettings C:/Documents and Settings/cs/test.js
If you are modifying the central settings file and want to isolate users from your modifications until they are complete and tested, create a separate entry for yourself, specifying your user name and a local file. Note that, as with all Perforce permissions, the entries are read from the bottom of the permissions table to the top, using the first applicable entry found, so be sure that your entry is below any other entry that might include you.
8 Perforce 2010.1 JavaScript API for Visual Tools

The Central Settings File
The Central Settings File
The central settings file is a JavaScript file that processes keys and returns the location of the HTML or JavaScript files to be executed for tabs and alerts. It can contain per-group and per-user logic and can point to files in other Perforce servers. To configure the central settings files for a Perforce server, you make one or more entries in the Perforce permissions table. To receive applets, users must have list access to the central settings file.
The following sections provide details about configuring, coding, and administering the central settings file. For details about administering permissions, refer to the Perforce System Administrator’s Guide.
To configure the central settings file, you must, at a minimum:
• Create a centralsettings entry in the permissions table. This entry specifies the location of the central settings file (in the local filesystem or a Perforce server).
• Create the central settings file and any HTML or JavaScript files that it calls.
Coding the Central Settings File
To add applets, you create a function that returns the applet that is to be executed, branching according to the key that P4V or P4Admin passed to the central settings file. For alerts, return JavaScript files. For tabs, return HTML files. The files can reside on the local filesystem, in a Perforce server, or on the Web, as follows:
Finally, you include a line of code that executes the function to process the key passed by the Administration Tool. Important: This function call must be the last line of the central settings file.
The JavaScript API includes a set of methods for coding the logic in the central settings file. For details, see “Method and Command Reference” on page 29.
File resides in Specify the file and path using...
The local filesystem Operating system syntax
A Perforce server Perforce URI syntax:
p4:// [user@][server[:port]]/files/depot-file-path
(or, for files in the currently-connected server, the depot path.)
If you omit connection settings, the current connection settings are used.
The Web The URL of the file (can be http or https)
Perforce 2010.1 JavaScript API for Visual Tools 9
The Central Settings File
Following is an extremely basic central settings file that adds a tab to the Perforce Administration tool. The contents of the tab are determined by the specified HTML file.
Configuring Applets for Specific Users and Groups
You can configure different central settings files on a per-user or per-group basis, for example, to provide different tabs for different users. One approach is to make separate entries in the permissions table for each group or user. For example, the following entries configure different tabs for developers and for artists.
Another approach is to specify the per-user or per-group logic in the central settings file itself. For example, the following logic ensures that users Tony and Herman each see their own tab, while other users see the default tab:.
function settings(key){if (key == "p4admin_mainTabs")
return ["p4://admin@perforce:1667/files/depot/jsapi/mytab.html"];
}
settings(P4JsApi.centralSettingsKey());
list group dev centralsettings //depot/jsapi/centralsettings-dev.jslist group art centralsettings //depot/jsapi/centralsettings-art.js
function settings(key, user)
{if (key == 'p4admin_mainTabs'){
if (user == "tonyz")return ["p4:///files/depot/jsapi/tony.html"];
else if (user == "herman")return ["p4:///files/depot/jsapi/herm.html"];
elsereturn ["p4:///files/depot/jsapi/default-tab.html"];
}}
settings(P4JsApi.centralSettingsKey(), P4JsApi.getUser());
10 Perforce 2010.1 JavaScript API for Visual Tools
The Central Settings File
Central Settings Keys
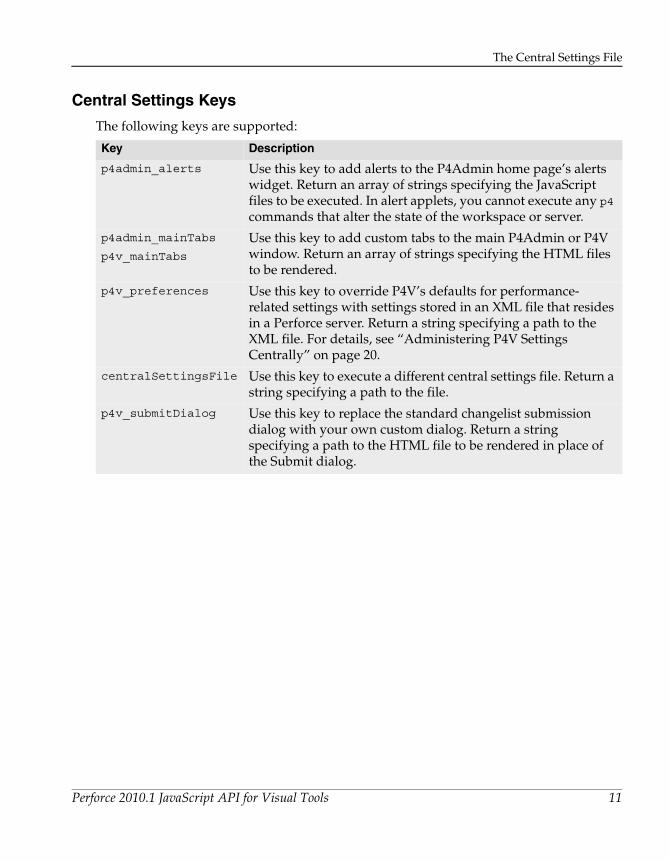
The following keys are supported:
Key Description
p4admin_alerts Use this key to add alerts to the P4Admin home page’s alerts widget. Return an array of strings specifying the JavaScript files to be executed. In alert applets, you cannot execute any p4 commands that alter the state of the workspace or server.
p4admin_mainTabs
p4v_mainTabs
Use this key to add custom tabs to the main P4Admin or P4V window. Return an array of strings specifying the HTML files to be rendered.
p4v_preferences Use this key to override P4V’s defaults for performance-related settings with settings stored in an XML file that resides in a Perforce server. Return a string specifying a path to the XML file. For details, see “Administering P4V Settings Centrally” on page 20.
centralSettingsFile Use this key to execute a different central settings file. Return a string specifying a path to the file.
p4v_submitDialog Use this key to replace the standard changelist submission dialog with your own custom dialog. Return a string specifying a path to the HTML file to be rendered in place of the Submit dialog.
Perforce 2010.1 JavaScript API for Visual Tools 11
Programming Applets
Programming Applets
Issuing Perforce Commands
To issue Perforce commands, use the p4() method. For example, to obtain a list of open jobs:
var cmdOutput = P4JsApi.p4("jobs -e status=open");
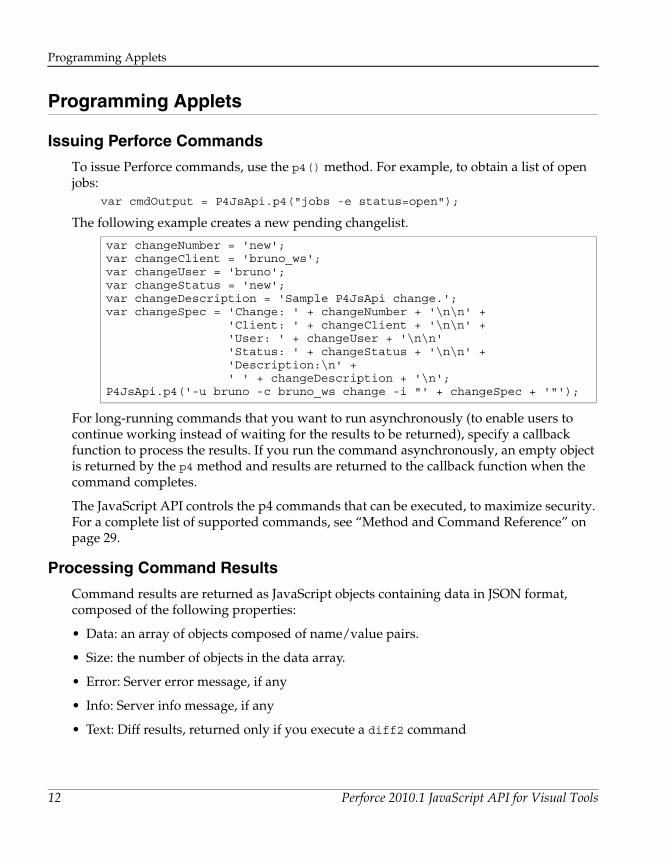
The following example creates a new pending changelist.
For long-running commands that you want to run asynchronously (to enable users to continue working instead of waiting for the results to be returned), specify a callback function to process the results. If you run the command asynchronously, an empty object is returned by the p4 method and results are returned to the callback function when the command completes.
The JavaScript API controls the p4 commands that can be executed, to maximize security. For a complete list of supported commands, see “Method and Command Reference” on page 29.
Processing Command Results
Command results are returned as JavaScript objects containing data in JSON format, composed of the following properties:
• Data: an array of objects composed of name/value pairs.
• Size: the number of objects in the data array.
• Error: Server error message, if any
• Info: Server info message, if any
• Text: Diff results, returned only if you execute a diff2 command
var changeNumber = 'new';var changeClient = 'bruno_ws';var changeUser = 'bruno';var changeStatus = 'new';var changeDescription = 'Sample P4JsApi change.';var changeSpec = 'Change: ' + changeNumber + '\n\n' +
'Client: ' + changeClient + '\n\n' +'User: ' + changeUser + '\n\n' 'Status: ' + changeStatus + '\n\n' +'Description:\n' +' ' + changeDescription + '\n';
P4JsApi.p4('-u bruno -c bruno_ws change -i "' + changeSpec + '"');
12 Perforce 2010.1 JavaScript API for Visual Tools
Programming Applets
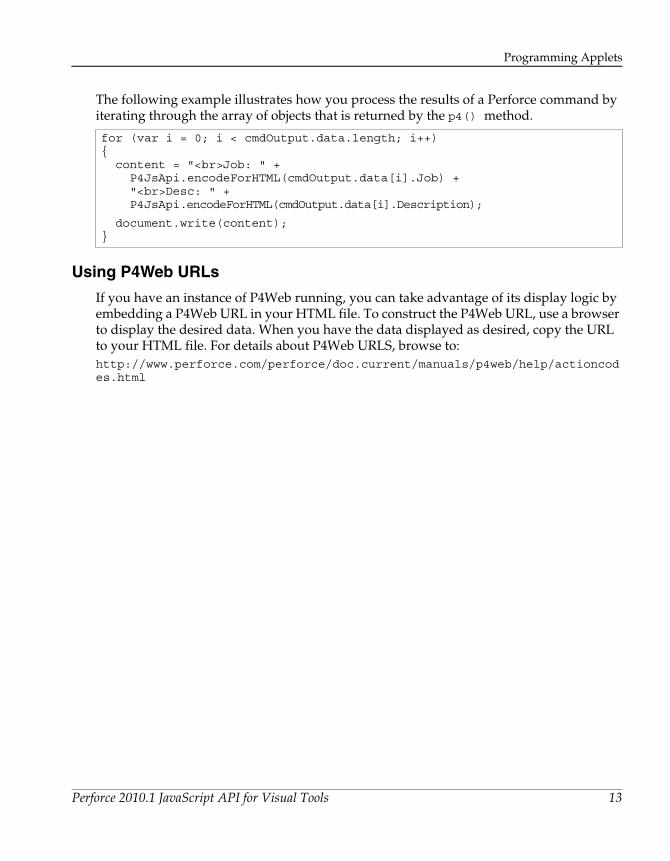
The following example illustrates how you process the results of a Perforce command by iterating through the array of objects that is returned by the p4() method.
Using P4Web URLs
If you have an instance of P4Web running, you can take advantage of its display logic by embedding a P4Web URL in your HTML file. To construct the P4Web URL, use a browser to display the desired data. When you have the data displayed as desired, copy the URL to your HTML file. For details about P4Web URLS, browse to:http://www.perforce.com/perforce/doc.current/manuals/p4web/help/actioncodes.html
for (var i = 0; i < cmdOutput.data.length; i++){content = "<br>Job: " +
P4JsApi.encodeForHTML(cmdOutput.data[i].Job) +"<br>Desc: " + P4JsApi.encodeForHTML(cmdOutput.data[i].Description);
document.write(content);}
Perforce 2010.1 JavaScript API for Visual Tools 13
Extending P4Admin and P4V
Extending P4Admin and P4V
Raising Alerts in P4Admin
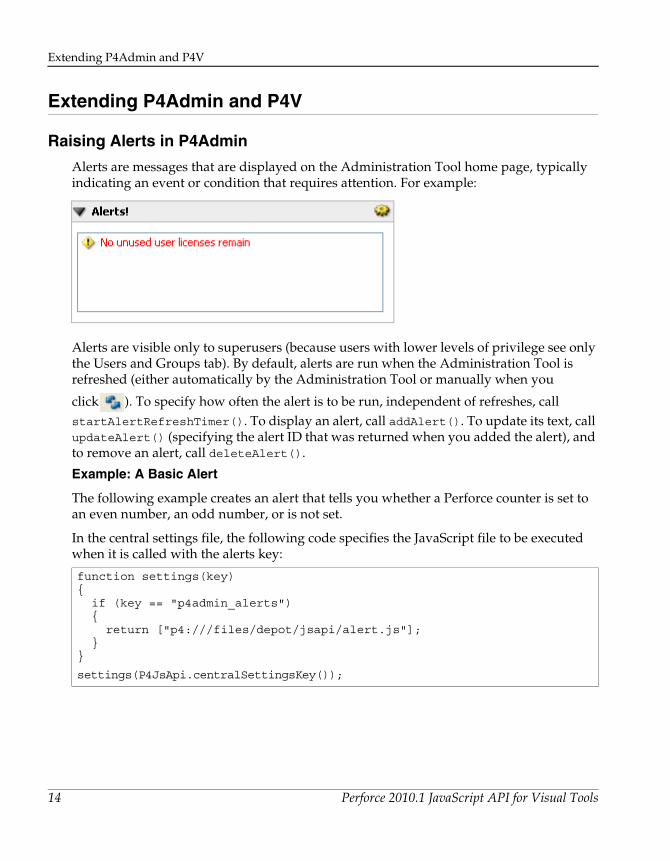
Alerts are messages that are displayed on the Administration Tool home page, typically indicating an event or condition that requires attention. For example:
Alerts are visible only to superusers (because users with lower levels of privilege see only the Users and Groups tab). By default, alerts are run when the Administration Tool is refreshed (either automatically by the Administration Tool or manually when you
click ). To specify how often the alert is to be run, independent of refreshes, call startAlertRefreshTimer(). To display an alert, call addAlert(). To update its text, call updateAlert() (specifying the alert ID that was returned when you added the alert), and to remove an alert, call deleteAlert().
Example: A Basic Alert
The following example creates an alert that tells you whether a Perforce counter is set to an even number, an odd number, or is not set.
In the central settings file, the following code specifies the JavaScript file to be executed when it is called with the alerts key:
function settings(key){if (key == "p4admin_alerts"){
return ["p4:///files/depot/jsapi/alert.js"];}
}
settings(P4JsApi.centralSettingsKey());
14 Perforce 2010.1 JavaScript API for Visual Tools
Extending P4Admin and P4V
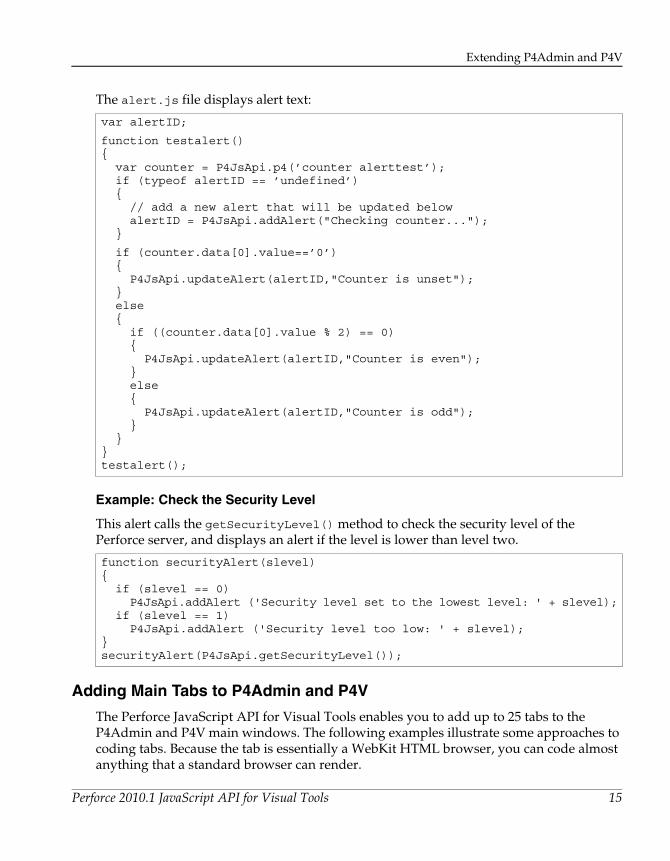
The alert.js file displays alert text:
Example: Check the Security Level
This alert calls the getSecurityLevel() method to check the security level of the Perforce server, and displays an alert if the level is lower than level two.
Adding Main Tabs to P4Admin and P4V
The Perforce JavaScript API for Visual Tools enables you to add up to 25 tabs to the P4Admin and P4V main windows. The following examples illustrate some approaches to coding tabs. Because the tab is essentially a WebKit HTML browser, you can code almost anything that a standard browser can render.
var alertID;
function testalert(){var counter = P4JsApi.p4(’counter alerttest’);if (typeof alertID == ’undefined’){
// add a new alert that will be updated belowalertID = P4JsApi.addAlert("Checking counter...");
}
if (counter.data[0].value==’0’){
P4JsApi.updateAlert(alertID,"Counter is unset");}else{
if ((counter.data[0].value % 2) == 0){
P4JsApi.updateAlert(alertID,"Counter is even");}else{
P4JsApi.updateAlert(alertID,"Counter is odd");}
}}testalert();
function securityAlert(slevel){if (slevel == 0)
P4JsApi.addAlert ('Security level set to the lowest level: ' + slevel);if (slevel == 1)
P4JsApi.addAlert ('Security level too low: ' + slevel);}securityAlert(P4JsApi.getSecurityLevel());
Perforce 2010.1 JavaScript API for Visual Tools 15
Extending P4Admin and P4V
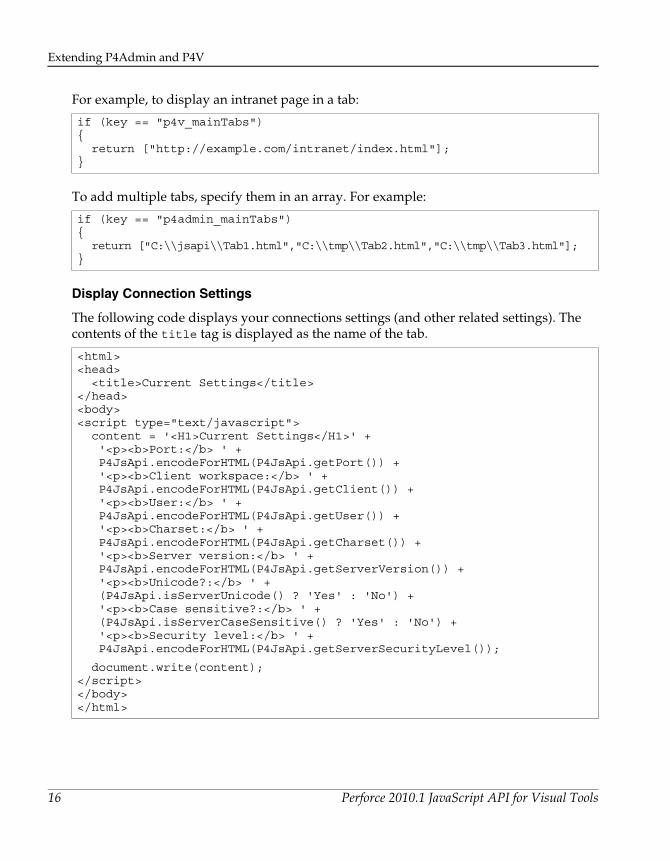
For example, to display an intranet page in a tab:
To add multiple tabs, specify them in an array. For example:
Display Connection Settings
The following code displays your connections settings (and other related settings). The contents of the title tag is displayed as the name of the tab.
if (key == "p4v_mainTabs"){return ["http://example.com/intranet/index.html"];
}
if (key == "p4admin_mainTabs"){return ["C:\\jsapi\\Tab1.html","C:\\tmp\\Tab2.html","C:\\tmp\\Tab3.html"];
}
<html><head><title>Current Settings</title>
</head><body><script type="text/javascript">content = '<H1>Current Settings</H1>' +'<p><b>Port:</b> ' +P4JsApi.encodeForHTML(P4JsApi.getPort()) +'<p><b>Client workspace:</b> ' +P4JsApi.encodeForHTML(P4JsApi.getClient()) +'<p><b>User:</b> ' +P4JsApi.encodeForHTML(P4JsApi.getUser()) +'<p><b>Charset:</b> ' +P4JsApi.encodeForHTML(P4JsApi.getCharset()) +'<p><b>Server version:</b> ' +P4JsApi.encodeForHTML(P4JsApi.getServerVersion()) +'<p><b>Unicode?:</b> ' +(P4JsApi.isServerUnicode() ? 'Yes' : 'No') +'<p><b>Case sensitive?:</b> ' +(P4JsApi.isServerCaseSensitive() ? 'Yes' : 'No') +'<p><b>Security level:</b> ' +P4JsApi.encodeForHTML(P4JsApi.getServerSecurityLevel());
document.write(content);</script></body></html>
16 Perforce 2010.1 JavaScript API for Visual Tools
Extending P4Admin and P4V
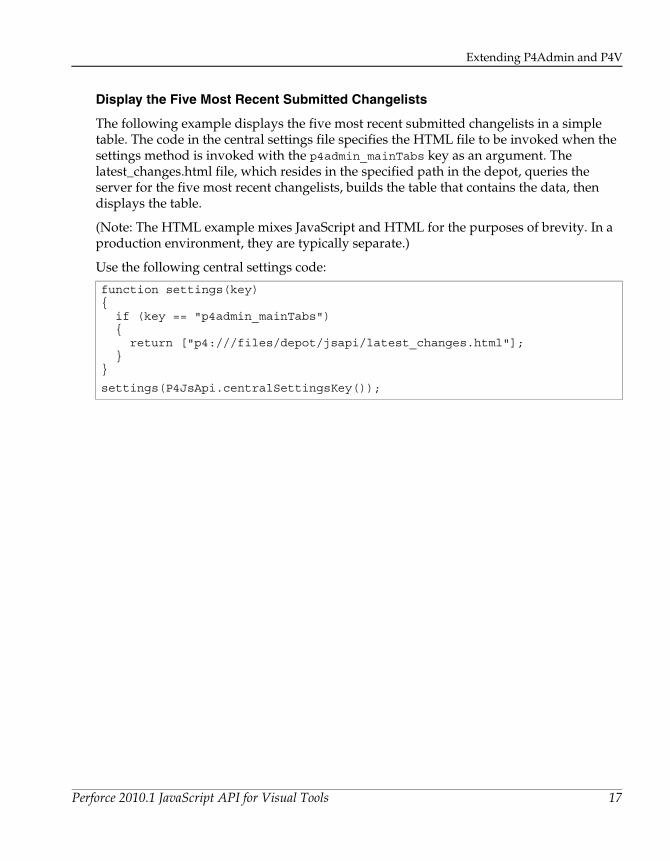
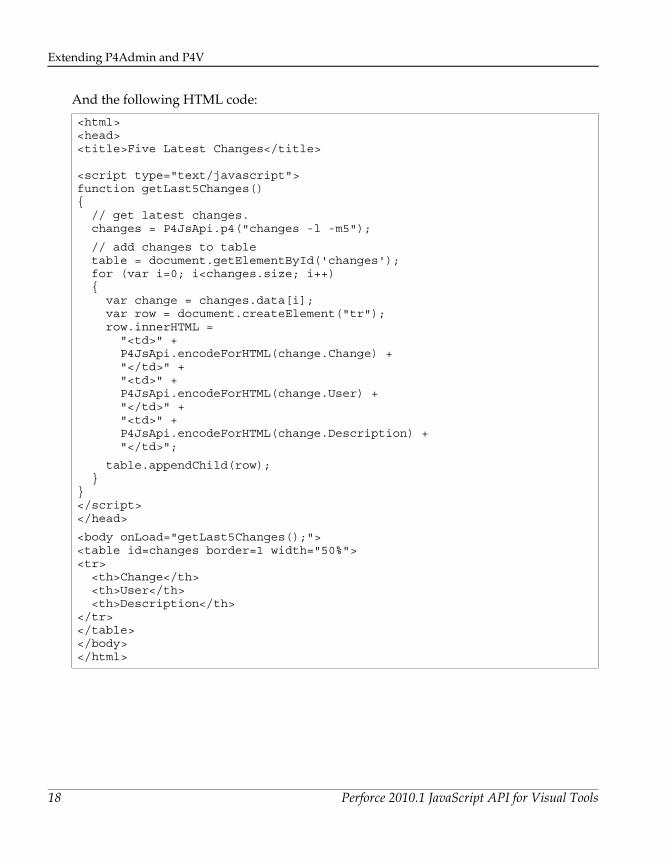
Display the Five Most Recent Submitted Changelists
The following example displays the five most recent submitted changelists in a simple table. The code in the central settings file specifies the HTML file to be invoked when the settings method is invoked with the p4admin_mainTabs key as an argument. The latest_changes.html file, which resides in the specified path in the depot, queries the server for the five most recent changelists, builds the table that contains the data, then displays the table.
(Note: The HTML example mixes JavaScript and HTML for the purposes of brevity. In a production environment, they are typically separate.)
Use the following central settings code:
function settings(key){if (key == "p4admin_mainTabs"){
return ["p4:///files/depot/jsapi/latest_changes.html"];}
}
settings(P4JsApi.centralSettingsKey());
Perforce 2010.1 JavaScript API for Visual Tools 17
Extending P4Admin and P4V
And the following HTML code:
<html><head><title>Five Latest Changes</title>
<script type="text/javascript">function getLast5Changes(){// get latest changes.changes = P4JsApi.p4("changes -l -m5");
// add changes to table table = document.getElementById('changes');for (var i=0; i<changes.size; i++){
var change = changes.data[i];var row = document.createElement("tr");row.innerHTML =
"<td>" + P4JsApi.encodeForHTML(change.Change) + "</td>" + "<td>" + P4JsApi.encodeForHTML(change.User) + "</td>" + "<td>" + P4JsApi.encodeForHTML(change.Description) + "</td>";
table.appendChild(row);}
}</script></head>
<body onLoad="getLast5Changes();"><table id=changes border=1 width="50%"><tr><th>Change</th><th>User</th><th>Description</th>
</tr></table></body></html>
18 Perforce 2010.1 JavaScript API for Visual Tools
Extending P4Admin and P4V
Implementing a Custom Submit Dialog in P4V
To replace the standard P4V Submit dialog with your own customized version, add logic to the central settings file specifying the HTML file that defines the custom dialog. Your custom Submit dialog can include logic, for example, to include information from a defect tracker. To submit the changelist, use the P4JsApi.p4 method to issue the submit command. For examples of custom Submit dialogs, see the Perforce Public depot.
Perforce 2010.1 JavaScript API for Visual Tools 19
Administering P4V Settings Centrally
Administering P4V Settings Centrally
By default, P4V users configure performance-related settings (such as the number of minutes between refresh requests) individually. You can use the JavaScript API to override individual settings, which is useful if you have a large number of P4V users connected to the same server and server performance is being affected by the volume of requests.
To override P4V’s defaults, you create an XML file that contains the desired settings, check it into Perforce, and add logic to the central settings file to perform the override. You can override the following settings:
• ServerRefresh: How frequently P4V or P4Admin polls the Perforce server for changes to displayed information.
• MaxFiles: Maximum number of files displayed in changelists and the Resolve dialog.
• MaxFilePreviewSize: Maximum size of file preview in kilobytes
• FetchCount: For changelist, branch mappings, jobs and labels, number of entries to fetch, specified as a multiple of 100.
Note the following:
• Perforce installs an example XML settings file in the following location:
• Windows (default location): C:\Program Files\Perforce\P4VResources\examples\p4vdefaults.xml
• Macintosh: in Applications, right-click P4.app, choose Show Package Contents, and browse to /Contents/Resources/examples/p4vdefaults.xml
• P4V reads the settings when it is launched, but users can override the settings for the session through the Preferences dialog.
• If you change the settings in the XML file or change the central settings file so that it returns a different XML file, users must exit and relaunch P4V to obtain the new settings.
• To verify that the settings specified in the XML file have overridden the defaults or previously-configured settings, display the Preferences dialog Connections tab and examine the Data retrieval section.
• Unlike tabs and alerts, you cannot configure a local file for this feature: the XML file must reside in the server you want to administer.
20 Perforce 2010.1 JavaScript API for Visual Tools
Administering P4V Settings Centrally
To configure P4V to read settings from a centrally-administered source, perform the following steps:
1. Edit the example XML settings file installed by Perforce so that it contains the desired settings.
For example, to poll the server every half hour, set the <ServerRefresh> value to 30.
2. Check the XML settings file into the server that you want to administer.
3. In the central settings file, create logic the detects the p4v_preferences key and returns the depot path to the XML settings file. For example:
if (key == "p4v_preferences")
return "//depot/settings/p4vsettings.xml";
Perforce 2010.1 JavaScript API for Visual Tools 21
Security
Security
Creating Perforce applets using the Perforce JavaScript API for the Visual Tools is programming using Web technologies. The Perforce JavaScript API offers a variety of features for running applets securely:
• Per-user and group administration: Using the Perforce protections table, you have complete control of who can run applets and which applets can be run from a particular server
• Safe subset of Perforce commands: The API controls the subset of commands that applets are permitted to run. No destructive commands can be issued.
• Dynamic data safety: Encoding commands prevent malicious HTML or JavaScript from being executed.
The JavaScript API disables the following WebKit features:
• Java
• Private browsing
• JavaScript ability to open windows
• JavaScript clipboard access
• Developer extras (to enable use P4JsApi.setWebKitDeveloperExtrasEnabled method)
• Zoom text only
• Offline storage database
• Offline web application cache
• Local storage
• Local content access to remote URLs
• DNS prefetch
22 Perforce 2010.1 JavaScript API for Visual Tools
Security
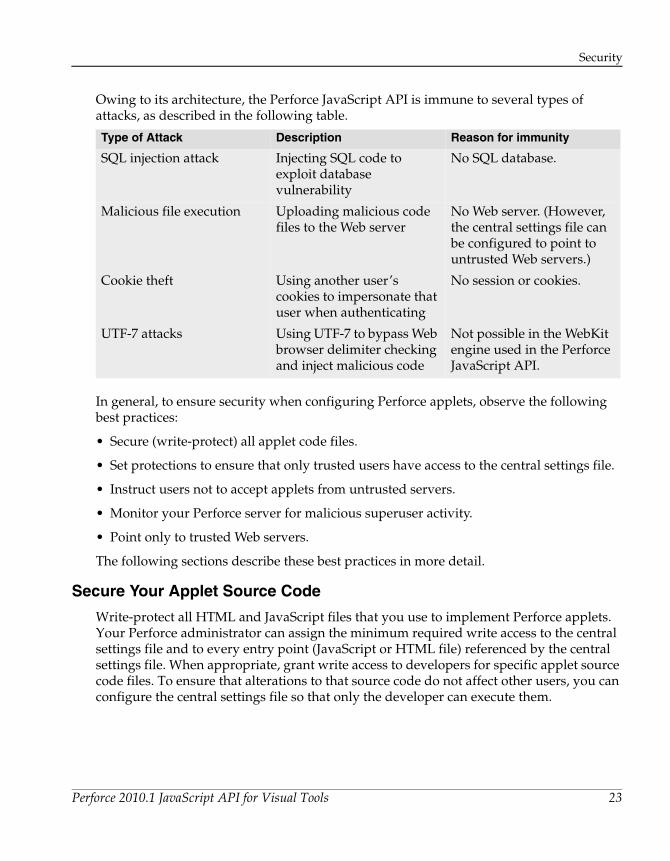
Owing to its architecture, the Perforce JavaScript API is immune to several types of attacks, as described in the following table.
In general, to ensure security when configuring Perforce applets, observe the following best practices:
• Secure (write-protect) all applet code files.
• Set protections to ensure that only trusted users have access to the central settings file.
• Instruct users not to accept applets from untrusted servers.
• Monitor your Perforce server for malicious superuser activity.
• Point only to trusted Web servers.
The following sections describe these best practices in more detail.
Secure Your Applet Source Code
Write-protect all HTML and JavaScript files that you use to implement Perforce applets. Your Perforce administrator can assign the minimum required write access to the central settings file and to every entry point (JavaScript or HTML file) referenced by the central settings file. When appropriate, grant write access to developers for specific applet source code files. To ensure that alterations to that source code do not affect other users, you can configure the central settings file so that only the developer can execute them.
Type of Attack Description Reason for immunity
SQL injection attack Injecting SQL code to exploit database vulnerability
No SQL database.
Malicious file execution Uploading malicious code files to the Web server
No Web server. (However, the central settings file can be configured to point to untrusted Web servers.)
Cookie theft Using another user’s cookies to impersonate that user when authenticating
No session or cookies.
UTF-7 attacks Using UTF-7 to bypass Web browser delimiter checking and inject malicious code
Not possible in the WebKit engine used in the Perforce JavaScript API.
Perforce 2010.1 JavaScript API for Visual Tools 23
Security
Restrict Access to the Central Settings File
Ensure that only superusers (and a minimum number of them) have write access to the central settings file. The central settings file can reside in a Perforce server, in which case access to it is governed by the same permissions as all other depot files.
Use Only Trusted Perforce Servers
One possible means of attack is a “hostile” Perforce server: a server that has a central settings file designed to deliver applets that attack the local computer or connected computers. Applets can perform write operations (using the p4() method) only on primary connections (servers to which P4Admin or P4V is currently connected), so trusted servers are safe. However, an applet might be able to run a long- running read-only command on another server or otherwise disrupt the session.
To prevent this, your users can specify the settings for trusted servers and refuse applets from any other server. To configure trusted server settings, use the Applets preferences tab, or connect to the trusted server and, when prompted, choose Always accept applets. Never connect to an untrusted server with the applet feature turned on, and never accept applets from an untrusted server if prompted to do so.
Monitor Your Perforce Server Activity
Monitor your Perforce server to detect unauthorized access. (For details, refer to the discussion of the audit log in the Perforce System Administrators Guide.) If a malicious user gains superuser access to your server, they can modify the central settings file and protections table, and can install applets. (A malicious superuser can cause harm in many other ways, such as obliterating, replaying a journal, creating new superusers, or manipulating protections to exclude current superusers.)
Configure Only Trusted Web Servers
When configuring an entry in the central settings file that points to a Web server (http: protocol), ensure that the Web server is a secure one. If the Web server is not secure, the risk is that a malicious user can change the content on the server to compromise your installation.
Preventing Cross-Site Scripting (XSS) Attacks
Such attacks (also referred to as injection attacks) occur when malicious data or code is embedded in a seemingly safe Web page. To defend your installation against XSS attacks, never put dynamic data (that is, data returned by a Perforce Server command, entered by users, or originating from any uncontrolled source) in a context where it can be executed. Because the Perforce superuser controls access to the applets that are configured and how those applets transmit data, XSS vulnerabilities can be effectively minimized.
24 Perforce 2010.1 JavaScript API for Visual Tools
Security
Some JavaScript frameworks provide utility methods for escaping dynamic data. However, do not assume that a framework automatically handles XSS issues. Applet developers might need to implement the logic required to prevent XSS attacks manually.
Types of XSS Issues
There are two main forms of this security issue:
• Unintentional injection: innocent user accidently causes a script to run.
Example: a user pastes some code into a changelist description, submits the changelist, then creates an applet that displays changelists. If the dynamic data is not escaped effectively, the code might execute and cause unintended results. This eventuality is unlikely, because data returned from the Perforce Server to the applet is encoded into a JavaScript object and the contents can be handled as data.
• Malicious injection: malicious user attempts to attack system
To prevent malicious injection, escape dynamic data (as described in the following sections). Likewise, escape the HTML and attribute header data according to established Web security practices.
Escaping Dynamic Data
The Perforce JavaScript API provides three methods for escaping dynamic data:
• encodeForHTML(): Use for general HTML, for example, the JavaScript innerHTML method (which sets or retrieves the HTML between the start and end tags of an element).
• encodeForHTMLAttribute(): Use in HTML attribute tag, for example setAttribute()
• encodeForJavaScript(): Use for JavaScript, for example onLoadAttr.setAttribute()
Properties such as innerHTML are not safe, because the text being added is executed. Best practice is to add the HTML as an object. For example:
If you must use innerHTML, escape the data that you are adding. For example:
var textNode = document.createTextNode(text_to_be_displayed);document.getElementById("htmlElement").appendChild(textNode);
function escapeHTML(html) {var div = document.createElement('div');var text = document.createTextNode(html);div.appendChild(text);return div.innerHTML;
}
Perforce 2010.1 JavaScript API for Visual Tools 25

Security
The following example illustrates how you escape methods.
<div id="displayText"></div>
<input type="text" id="textBox" value="my text"/>
<img id="errorImg" src="" style="display: none;"onError="alert('no image found');"/>
<script type="text/javascript">var result = P4JsApi.p4("some_p4_command");var data = result.data[0]; // data is a string
// Example data that can cause attacksvar data1 = '<img src="" style="display: none;"
onError="alert(\'victim file obliterated\');"/>';var data2 = "test data here" ;
var data3 = "alert('victim file obliterated')";
// Rule: 1
var displayTextDiv=document.getElementById("display text");displayTextDiv.innerHTML = data1; // insecuredisplayTextDiv.innerHTML = P4JsApi.encodeForHtml(data1); // secure
// Rule: 2var inputTag = document.getElementById("textBox");inputTag.setAttribute("value", data2); // insecureinputTag.setAttribute("value",
P4JsApi.encodeForHTMLAttribute(data2)); // secure
// Rule: 3var errorImgTag = document.getElementById("errorImg");errorImgTag.setAttribute("onError", data3); // insecureerrorImgTag.setAttribute("onError",
P4JsApi.encodeForJavaScript(data3)); // secure
</script>
26 Perforce 2010.1 JavaScript API for Visual Tools
Troubleshooting
Troubleshooting
The following pointers can help you solve applet-related problems.
• If you or your users cannot see a new customization and you are sure that the customization is correctly coded and configured, exit and relaunch P4V or P4Admin. Some settings are read only once, when the application is launched.
• To view a list of applets and any errors that occur when the central settings file is loaded and executed, display the System Info dialog from the Help menu.
• To debug JavaScript applets, you can use Firebug. Add this line of code to your applet:
<script type='text/javascript' src='http://getfirebug.com/releases/lite/1.2/firebug-lite-compressed.js'></script>
• If your P4V users say that they cannot view custom tabs, make sure the tabs are listed in their View menu.
• p4 commands issued by applets are indicated in the server log (flagged as “jsapi” commands).
Perforce 2010.1 JavaScript API for Visual Tools 27

Troubleshooting
28 Perforce 2010.1 JavaScript API for Visual Tools

Appendix A Method and Command Reference
JavaScript API Methods
You can use the following methods to code the logic in your central settings files. These methods are contained by the P4JsApi object (so be sure to prefix all method calls with "P4JsApi.").
Central Settings Logic Methods
Alert Methods
Method Description
centralSettingsKey() Returns a string containing the key that was specified when the central settings file was executed.
encodeForHTML(str)
encodeForHTMLAttribute(str)
encodeForJavaScript(str)
Encodes characters to prevent XSS attacks injected into dynamic data. For details, see “Preventing Cross-Site Scripting (XSS) Attacks” on page 24.
refreshAll() Forces a refresh of P4V or P4Admin.
setWebKitDeveloperExtrasEnabled(bool) Enables or disables the Inspect item in the context menu, which displays the WebKit WebInspector for debugging.
Method Description
addAlert(msg) Adds an alert to the P4Admin Alerts widget. Returns an int identifier that can be passed to updateAlert() or deleteAlert().
deleteAlert(ID) Deletes the specified alert from the Alerts widget on the P4Admin Home tab. Returns false if the specified alert is not found.
startAlertRefreshTimer(int) Directs P4Admin or P4V to issue a refresh request to the server after the specified number of seconds (one or more) has elapsed instead of refreshing automatically.
updateAlert(int, str) For the specified alert ID, replaces the currently-displayed text with the specified message.
Perforce 2010.1 JavaScript API for Visual Tools 29
JavaScript API Methods
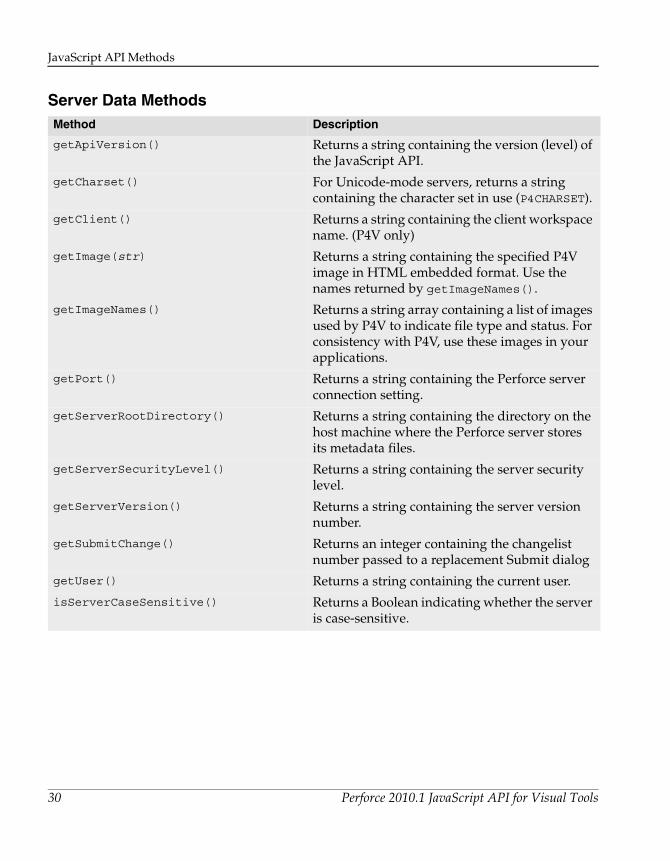
Server Data MethodsMethod Description
getApiVersion() Returns a string containing the version (level) of the JavaScript API.
getCharset() For Unicode-mode servers, returns a string containing the character set in use (P4CHARSET).
getClient() Returns a string containing the client workspace name. (P4V only)
getImage(str) Returns a string containing the specified P4V image in HTML embedded format. Use the names returned by getImageNames().
getImageNames() Returns a string array containing a list of images used by P4V to indicate file type and status. For consistency with P4V, use these images in your applications.
getPort() Returns a string containing the Perforce server connection setting.
getServerRootDirectory() Returns a string containing the directory on the host machine where the Perforce server stores its metadata files.
getServerSecurityLevel() Returns a string containing the server security level.
getServerVersion() Returns a string containing the server version number.
getSubmitChange() Returns an integer containing the changelist number passed to a replacement Submit dialog
getUser() Returns a string containing the current user.
isServerCaseSensitive() Returns a Boolean indicating whether the server is case-sensitive.
30 Perforce 2010.1 JavaScript API for Visual Tools
JavaScript API Methods
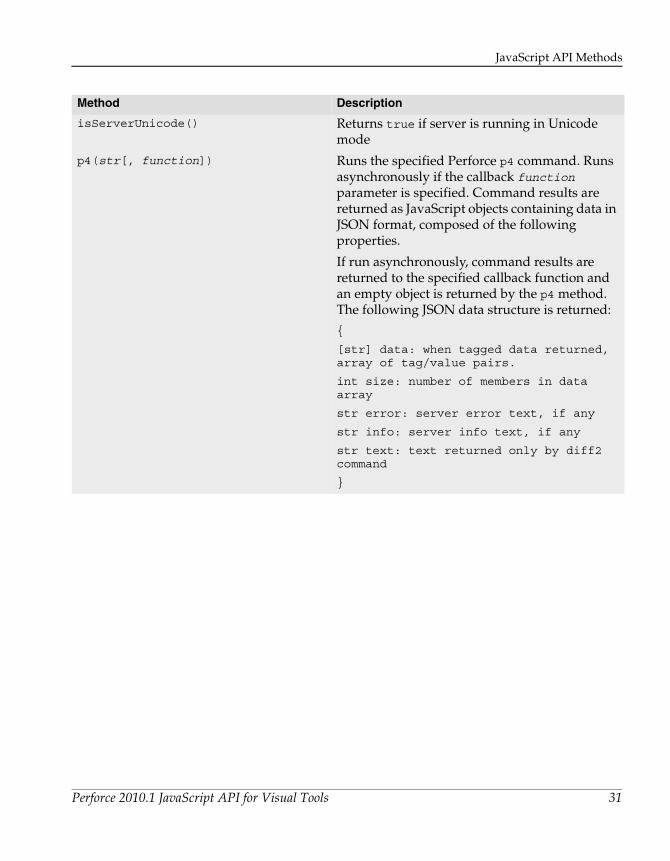
isServerUnicode() Returns true if server is running in Unicode mode
p4(str[, function]) Runs the specified Perforce p4 command. Runs asynchronously if the callback function parameter is specified. Command results are returned as JavaScript objects containing data in JSON format, composed of the following properties.
If run asynchronously, command results are returned to the specified callback function and an empty object is returned by the p4 method. The following JSON data structure is returned:
{
[str] data: when tagged data returned, array of tag/value pairs.
int size: number of members in data array
str error: server error text, if any
str info: server info text, if any
str text: text returned only by diff2 command
}
Method Description
Perforce 2010.1 JavaScript API for Visual Tools 31
Supported p4 Commands
Supported p4 Commands
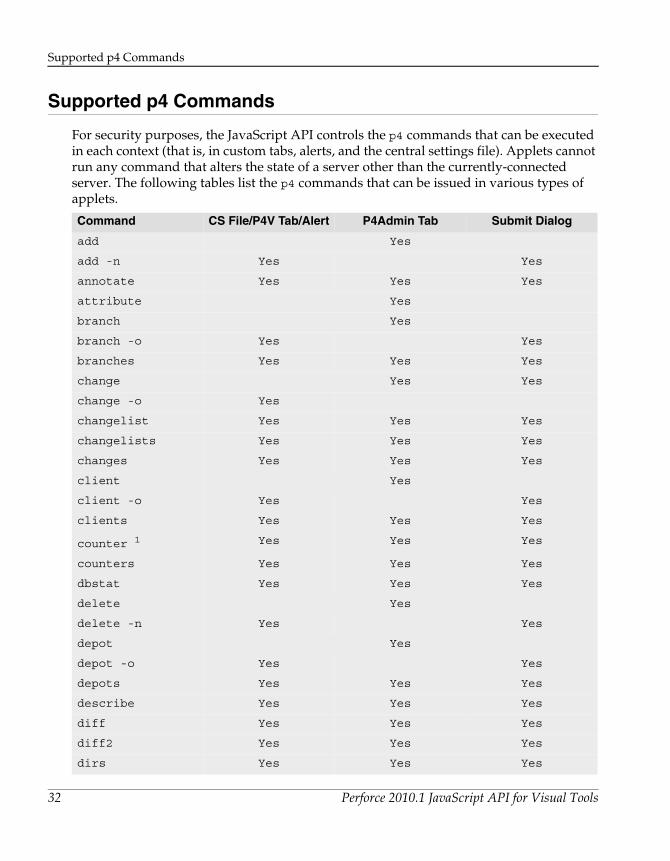
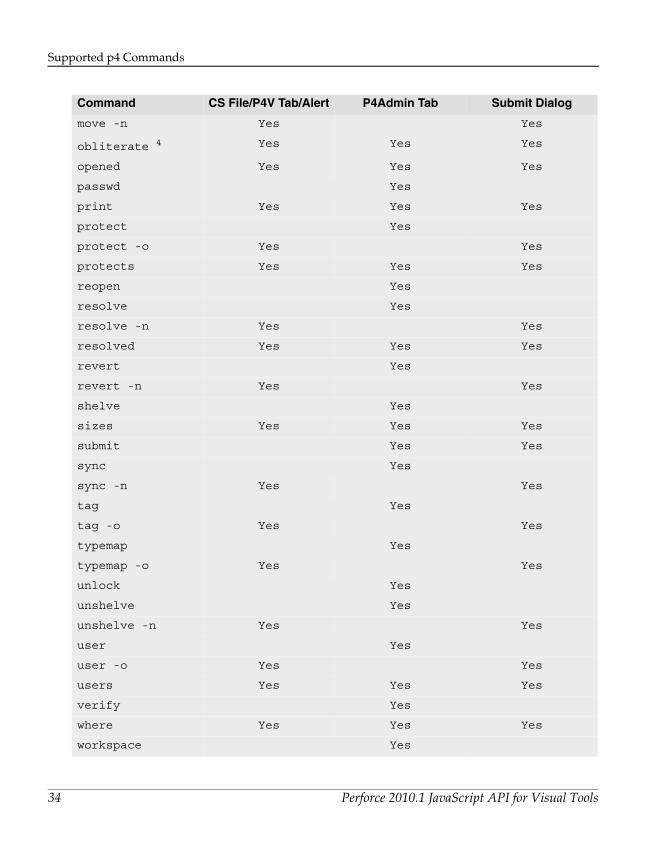
For security purposes, the JavaScript API controls the p4 commands that can be executed in each context (that is, in custom tabs, alerts, and the central settings file). Applets cannot run any command that alters the state of a server other than the currently-connected server. The following tables list the p4 commands that can be issued in various types of applets.
Command CS File/P4V Tab/Alert P4Admin Tab Submit Dialog
add Yes
add -n Yes Yes
annotate Yes Yes Yes
attribute Yes
branch Yes
branch -o Yes Yes
branches Yes Yes Yes
change Yes Yes
change -o Yes
changelist Yes Yes Yes
changelists Yes Yes Yes
changes Yes Yes Yes
client Yes
client -o Yes Yes
clients Yes Yes Yes
counter 1 Yes Yes Yes
counters Yes Yes Yes
dbstat Yes Yes Yes
delete Yes
delete -n Yes Yes
depot Yes
depot -o Yes Yes
depots Yes Yes Yes
describe Yes Yes Yes
diff Yes Yes Yes
diff2 Yes Yes Yes
dirs Yes Yes Yes
32 Perforce 2010.1 JavaScript API for Visual Tools
Supported p4 Commands
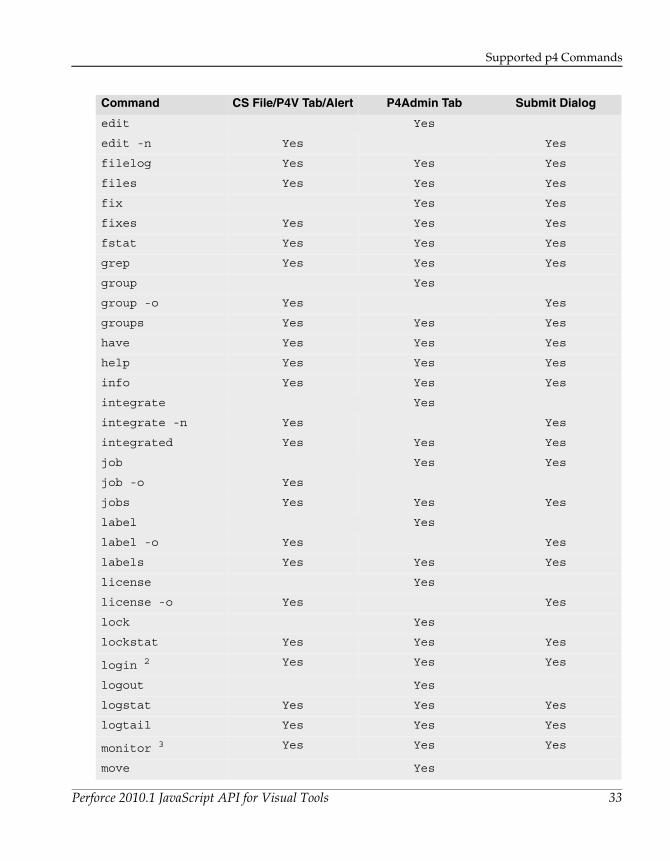
edit Yes
edit -n Yes Yes
filelog Yes Yes Yes
files Yes Yes Yes
fix Yes Yes
fixes Yes Yes Yes
fstat Yes Yes Yes
grep Yes Yes Yes
group Yes
group -o Yes Yes
groups Yes Yes Yes
have Yes Yes Yes
help Yes Yes Yes
info Yes Yes Yes
integrate Yes
integrate -n Yes Yes
integrated Yes Yes Yes
job Yes Yes
job -o Yes
jobs Yes Yes Yes
label Yes
label -o Yes Yes
labels Yes Yes Yes
license Yes
license -o Yes Yes
lock Yes
lockstat Yes Yes Yes
login 2 Yes Yes Yes
logout Yes
logstat Yes Yes Yes
logtail Yes Yes Yes
monitor 3 Yes Yes Yes
move Yes
Command CS File/P4V Tab/Alert P4Admin Tab Submit Dialog
Perforce 2010.1 JavaScript API for Visual Tools 33
Supported p4 Commands
move -n Yes Yes
obliterate 4 Yes Yes Yes
opened Yes Yes Yes
passwd Yes
print Yes Yes Yes
protect Yes
protect -o Yes Yes
protects Yes Yes Yes
reopen Yes
resolve Yes
resolve -n Yes Yes
resolved Yes Yes Yes
revert Yes
revert -n Yes Yes
shelve Yes
sizes Yes Yes Yes
submit Yes Yes
sync Yes
sync -n Yes Yes
tag Yes
tag -o Yes Yes
typemap Yes
typemap -o Yes Yes
unlock Yes
unshelve Yes
unshelve -n Yes Yes
user Yes
user -o Yes Yes
users Yes Yes Yes
verify Yes
where Yes Yes Yes
workspace Yes
Command CS File/P4V Tab/Alert P4Admin Tab Submit Dialog
34 Perforce 2010.1 JavaScript API for Visual Tools
Supported p4 Commands
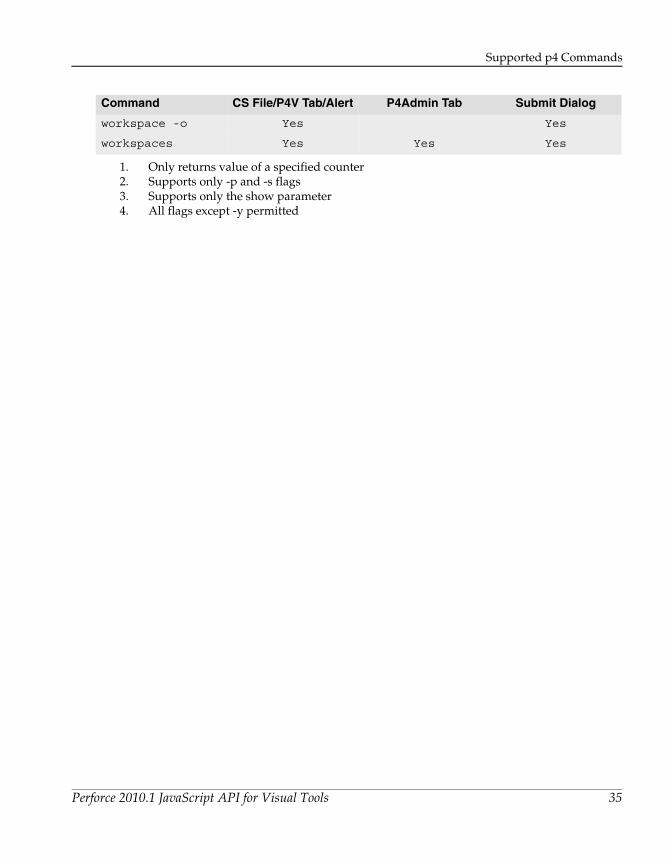
workspace -o Yes Yes
workspaces Yes Yes Yes
1. Only returns value of a specified counter2. Supports only -p and -s flags3. Supports only the show parameter4. All flags except -y permitted
Command CS File/P4V Tab/Alert P4Admin Tab Submit Dialog
Perforce 2010.1 JavaScript API for Visual Tools 35

Supported p4 Commands
36 Perforce 2010.1 JavaScript API for Visual Tools
Index
AAdding tabs 15Alerts 14, 29Applets
paths in central settings file 9CCentral settings file 9Central settings keys 11Cross-site scripting (XSS) attacks 24Custom Submit Dialog 19EEscaping dynamic data 25JJSON format 12PP4JsApi object 29P4V Settings 20P4Web 13Permissions table 8RRole-based configuration 8, 10, 22Running p4 commands 12SSecurity 14Server log 27WWebKit features disabled 22
Perforce 2010.1 JavaScript API for Visual Tools 37

Index
38 Perforce 2010.1 JavaScript API for Visual Tools


![[Paris merge world tour] Perforce Introducing Perforce Insights](https://static.documents.pub/doc/80x56/54843e1fb47959f10c8b4b7b/paris-merge-world-tour-perforce-introducing-perforce-insights.jpg)


