166
Perforce 2003.2 User’s Guide December 2003
| Date post: | 18-Sep-2014 |
| Category: |
Documents |
| Upload: | vijaya-lakshmi-bhupathi-raju |
| View: | 701 times |
| Download: | 2 times |

Perforce 2003.2User’s Guide
December 2003
This manual copyright 1997-2003 Perforce Software.
All rights reserved.
Perforce software and documentation is available from http://www.perforce.com. You may download and usePerforce programs, but you may not sell or redistribute them. You may download, print, copy, edit, and redistributethe documentation, but you may not sell it, or sell any documentation derived from it. You may not modify orattempt to reverse engineer the programs.
Perforce programs and documents are available from our Web site as is. No warranty or support is provided.Warranties and support, along with higher capacity servers, are sold by Perforce Software.
Perforce Software assumes no responsibility or liability for any errors or inaccuracies that may appear in this book.
By downloading and using our programs and documents you agree to these terms.
Perforce and Inter-File Branching are trademarks of Perforce Software. Perforce software includes softwaredeveloped by the University of California, Berkeley and its contributors.
All other brands or product names are trademarks or registered trademarks of their respective companies ororganizations.

Table of Contents
Preface About This Manual ..................................................... 11Administering Perforce?..................................................................................11Please Give Us Feedback .................................................................................11
Chapter 1 Product Overview....................................................... 13Perforce Server and Perforce Client Programs.............................................14
Moving files between the clients and the server......................................14File conflicts...................................................................................................15Labeling groups of files ...............................................................................15Branching files ..............................................................................................15Job tracking ...................................................................................................16Change notification ......................................................................................16Protections .....................................................................................................17
Other Perforce Clients......................................................................................17P4Win .............................................................................................................17P4Web.............................................................................................................17
Merge Tools .......................................................................................................17P4 resolve.......................................................................................................18P4WinMerge..................................................................................................18Other merge utilities ....................................................................................18
Defect Tracking Systems..................................................................................18Perforce jobs ..................................................................................................18P4DTI integrations with third-party defect trackers...............................19
Plug-Ins, reporting and tool integrations......................................................19IDE Plug-ins ..................................................................................................19P4Report and P4SQL ...................................................................................20P4OFC ............................................................................................................20
Chapter 2 Connecting to thePerforce Server............................................................. 21Before you begin ...............................................................................................21Setting up your environment to use Perforce...............................................21
Perforce 2003.2 User’s Guide 3
Table of Contents
Telling Perforce clients where the server is.............................................. 22Verifying the connection to the Perforce server ...................................... 23
Chapter 3 Perforce Basics:Quick Start....................................................................25Underlying concepts ....................................................................................... 25
File configurations used in the examples................................................. 25Setting up a client workspace ........................................................................ 26
Naming the client workspace .................................................................... 26Describing the client workspace to the Perforce server......................... 26
Copying depot files into your workspace .................................................... 28Updating the depot with files from your workspace ................................. 29
Adding files to the depot............................................................................ 30Editing files in the depot ............................................................................ 31Deleting files from the depot ..................................................................... 32Submitting with multiple operations ....................................................... 33
Backing out: reverting files to their unopened states ................................. 34Basic reporting commands ............................................................................. 34
Chapter 4 Perforce Basics:The Details....................................................................37Description of the Client Workspace............................................................. 37Wildcards .......................................................................................................... 38
Wildcards and “p4 add”............................................................................. 38Mapping the Depot to the Client Workspace .............................................. 38
Multiple depots............................................................................................ 39Using views .................................................................................................. 39Wildcards in views ...................................................................................... 41Types of mappings ...................................................................................... 41
Editing Existing Client Specifications........................................................... 44Deleting an existing client specification................................................... 45Client specification options........................................................................ 45Multiple workspace roots for cross-platform work................................ 47Line-ending conventions (CR/LF translation)........................................ 47
Referring to Files on the Command Line ..................................................... 48Local syntax.................................................................................................. 48
4 Perforce 2003.2 User’s Guide
Table of Contents
Perforce syntax..............................................................................................48Providing files as arguments to commands .............................................49Wildcards and Perforce syntax...................................................................50
Name and String Limitations..........................................................................50Illegal characters in filenames and Perforce objects ................................50Name and description lengths ...................................................................51
Specifying Older File Revisions......................................................................51Using revision specifications without filenames .....................................54
Revision Ranges................................................................................................54File Types ...........................................................................................................55
Base file types................................................................................................56Forms and Perforce Commands.....................................................................60
Reading forms from standard input;Writing forms to standard output..............................................................61
General Reporting Commands.......................................................................61
Chapter 5 Perforce Basics:Resolving File Conflicts.............................................. 63RCS Format: How Perforce Stores File Revisions ........................................63
Only the differences between revisions are stored..................................63Use of “diff” to determine file revision differences.................................65
Scheduling Resolves of Conflicting Files ......................................................65Why “p4 sync” to Schedule a Resolve? .........................................................65How Do I Know When a Resolve is Needed?..............................................66Performing Resolves of Conflicting Files ......................................................66
File revisions used and generated by “p4 resolve” .................................67Types of conflicts between file revisions...................................................67How the merge file is generated ................................................................68The “p4 resolve” options.............................................................................68
Using Flags with Resolveto Automatically Accept Particular Revisions..........................................71Binary files and “p4 resolve” ......................................................................72
Locking Files to Minimize File Conflicts.......................................................72Preventing multiple resolves with p4 lock ...............................................73Preventing multiple checkouts with +l files.............................................73
Resolves and Branching...................................................................................74Resolve Reporting.............................................................................................74
Perforce 2003.2 User’s Guide 5
Table of Contents
Chapter 6 Perforce Basics:Miscellaneous Topics ..................................................77Reconfiguring the Perforce Environment with $P4CONFIG .................... 77Perforce Passwords.......................................................................................... 78Command-Line Flags Common to All Perforce Commands .................... 79Working Detached ........................................................................................... 81
Finding changed files with “p4 diff” ........................................................ 81Using “p4 diff” to update the depot ......................................................... 81
Refreshing files ................................................................................................. 82Recommendations for Organizing the Depot.............................................. 82Renaming Files ................................................................................................. 83
Revision histories and renamed files ........................................................ 83
Chapter 7 Changelists ...................................................................85Working with the Default Changelist ........................................................... 86Creating Numbered Changelists Manually ................................................. 87Working With Numbered Changelists ......................................................... 87Automatic Creation and Renumbering of Changelists .............................. 88
When submit of the default changelist fails,the changelist is assigned a number ......................................................... 88
Perforce May Renumber a Changelist upon Submission .......................... 89Deleting Changelists........................................................................................ 89Changelist Reporting....................................................................................... 90
Chapter 8 Labels ............................................................................91Why not just use changelist numbers? ......................................................... 91Using labels....................................................................................................... 91
Creating a new label.................................................................................... 92Labeling all revisions in your workspace ................................................ 92Tagging specific files and revisions with p4 labelsync........................... 93Untagging files with p4 labelsync............................................................. 93Previewing labelsync’s results................................................................... 93Preventing inadvertent tagging and untagging of files ......................... 93Listing files tagged by a label .................................................................... 94Using label views......................................................................................... 94Referring to files using a label ................................................................... 95
6 Perforce 2003.2 User’s Guide
Table of Contents
Deleting labels...............................................................................................95Details: How p4 labelsync works ...................................................................96Label Reporting.................................................................................................97
Chapter 9 Branching ..................................................................... 99What is Branching?...........................................................................................99When to Create a Branch .................................................................................99Perforce’s Branching Mechanisms: Introduction .......................................100Branching and Merging, Method 1:
Branching with File Specifications ...........................................................101Creating branched files..............................................................................101Propagating changes between branched files ........................................102Propagating changes from branched files to the original files ............103
Branching and Merging, Method 2:Branching with Branch Specifications......................................................103
Branch Specification Usage Notes................................................................105Integration Usage Notes ................................................................................106Deleting Branches...........................................................................................107Advanced Integration Functions..................................................................107
Integrating specific file revisions .............................................................107Re-integrating and re-resolving files .......................................................108
How Integrate Works .....................................................................................108The yours, theirs, and base files ...............................................................108The integration algorithm .........................................................................108Integrate’s actions.......................................................................................109
Integration Reporting.....................................................................................110For More Information ....................................................................................110
Chapter 10 Job Tracking ................................................................111Job Usage Overview.......................................................................................111
Creating and editing jobs using the default job specification..............112Creating and editing jobs with custom job specifications ....................113
Viewing jobs by content with jobviews.......................................................114Finding jobs containing particular words...............................................114Finding jobs by field values ......................................................................115Using and escaping wildcards in jobviews ............................................115Negating the sense of a query ..................................................................115
Perforce 2003.2 User’s Guide 7

Table of Contents
Using dates in jobviews.............................................................................116Comparison operators and field types ....................................................116
Linking Jobs to Changelists...........................................................................117Linking jobs to changelists with the JobView: field...............................117Linking jobs to changelists with p4 fix ....................................................118Linking jobs to changelists from within the submit form ....................118Automatic update of job status ................................................................119What if there’s no status field? ................................................................ 120
Deleting Jobs................................................................................................... 120Integrating with External Defect Tracking Systems ................................. 120Job Reporting Commands ............................................................................ 120
Chapter 11 Reporting and Data Mining.....................................123Files .................................................................................................................. 123
File metadata .............................................................................................. 123Relationships between client and depot files ........................................ 125File contents................................................................................................ 126
Changelists...................................................................................................... 130Viewing changelists that meet particular criteria ................................. 130Files and jobs affected by changelists ..................................................... 131
Labels............................................................................................................... 132Branch and Integration Reporting............................................................... 133Job Reporting.................................................................................................. 133
Basic job information ................................................................................ 133Jobs, fixes, and changelists ....................................................................... 134
Reporting for Daemons................................................................................. 135System Configuration.................................................................................... 135Special Reporting Flags................................................................................. 136Reporting with Scripting .............................................................................. 136
Comparing the change content of two file sets ..................................... 137
Appendix A Installing Perforce .....................................................139Getting Perforce ............................................................................................. 139Installing Perforce on UNIX......................................................................... 139
Download the files and make them executable .................................... 140Creating a Perforce server root directory............................................... 140Telling the Perforce server which port to listen to................................ 140
8 Perforce 2003.2 User’s Guide
Table of Contents
Starting the Perforce server.......................................................................140Stopping the Perforce server.....................................................................141Telling Perforce clients which port to talk to..........................................141
Installing Perforce on Windows ...................................................................141Terminology note: Windows services and servers ................................142Starting and stopping Perforce on Windows .........................................142
Appendix B Environment Variables ............................................. 143Setting and viewing environment variables...............................................144
Appendix C Glossary...................................................................... 145
Index ........................................................................... 155
Perforce 2003.2 User’s Guide 9

Table of Contents
10 Perforce 2003.2 User’s Guide

Preface About This Manual
This is the Perforce 2003.2 User’s Guide. It teaches the use of Perforce’s Command-LineClient. Other Perforce clients such as P4Win (the Perforce Windows Client) are notdiscussed here. If you’d like documentation on other Perforce client programs, please seeour documentation pages, available from our web site at http://www.perforce.com.
Although you can use this guide as a reference manual, we intend it primarily as aguide/tutorial on using Perforce. The full syntax of most of the Perforce commands isexplicitly not provided here; in particular, only a subset of the available flags arementioned. For a complete guide to Perforce, please see the Perforce Command Reference, orthe on-line help system. If you will be using Perforce on any operating system other thanUNIX, please consult the Perforce platform notes for that OS.
Chapters 2 through 4 of this manual comprise our Getting Started guide. Newcomers toPerforce should start there, and move to subsequent chapters as needed.
Administering Perforce?
If you’re administering a Perforce server, you’ll need the Perforce System Administrator’sGuide, which contains all the system administration material formerly found in thismanual. If you’re installing Perforce, the Perforce System Administrator’s Guide is also theplace to start.
Please Give Us Feedback
We are interested in receiving opinions on it from our users. In particular, we’d like tohear from users who have never used Perforce before. Does this guide teach the topicwell? Please let us know what you think; we can be reached at [email protected].
Perforce 2003.2 User’s Guide 11

Preface: About This Manual
12 Perforce 2003.2 User’s Guide
Chapter 1 Product Overview
Perforce facilitates the sharing of files among multiple users. It is a software configurationmanagement tool, but software configuration management (SCM) has been defined inmany different ways, depending on who’s giving the definition. SCM has been describedas providing version control, file sharing, release management, defect tracking, buildmanagement, and a few other things. It’s worth looking at exactly what Perforce does anddoesn’t do:
• Perforce offers version control: multiple revisions of the same file are stored and olderrevisions are always accessible.
• Perforce provides facilities for concurrent development; multiple users can edit their owncopies of the same file.
• Perforce supports distributed development; users can work with files stored on a centralserver or with files replicated on a proxy server.
• Some release management facilities are offered; Perforce can track the file revisions thatare part of a particular release.
• Bugs and system improvement requests can be tracked from entry to fix; this capabilityis known as defect tracking or change management.
• Perforce supplies some lifecycle management functionality; files can be kept in releasebranches, development branches, or in any sort of needed file set.
• Change review functionality is provided by Perforce; this functionality allows users to benotified by email when particular files are changed.
• Although a build management tool is not built into Perforce, we do offer a companionopen source product called Jam. The Jam tool and Perforce meet at the file system;source files managed by Perforce are easily built by Jam.
Although Perforce was built to manage source files, it can manage any sort of on-linedocuments. Perforce can be used to store revisions of a manual, to manage Web pages, orto store old versions of operating system administration files.
Perforce 2003.2 User’s Guide 13

Chapter 1: Product Overview
Perforce Server and Perforce Client Programs
Perforce has a client/server architecture, in which users at other computers are connectedto one central machine, the server. Each user works on a client machine; at their command,a Perforce client program transfers files to and from the Perforce server. The clientprograms communicate with the server using TCP/IP.
The Perforce clients can be distributed around a local area network, wide area network,dialup network, or any combination of these topologies. Perforce clients can also reside onthe same host as the server.
The following programs do the bulk of Perforce’s work:
• The Perforce Server (p4d) runs on the Perforce server machine. It manages the sharedfile repository, and keeps track of users, workspaces, and other Perforce metadata.
The p4d program must be run on a UNIX or Windows machine.
• Perforce client programs (for instance, p4) run on Perforce client machines. Clientprograms send users’ requests to the Perforce Server (p4d) for processing, andcommunicate with p4d using TCP/IP.
Perforce client programs can be run on many platforms, including UNIX, Linux,Windows, VMS, Macintosh, BeOS, and NeXT hosts.
This manual assumes that you or your system administrator have already installed bothp4 and p4d. You’ll find installation instructions in the Perforce System Administrator’sGuide, also available at our Web site.
Moving files between the clients and the server
Users create, edit, and delete files in their own directories on client machines; thesedirectories are called client workspaces. Perforce commands are used to move files to andfrom a shared file repository on the server known as the depot. Perforce users can retrievefiles from the depot into their own client workspaces, where they can be read, edited, andresubmitted to the depot for other users to access. When a new revision of a file is stored inthe depot, the old revisions are kept and are still accessible.
Files that have been edited within a client workspace are sent to the depot using achangelist, which is a list of files and instructions that tell the depot what to do with thosefiles. For example, one file might have been changed in the client workspace, anotheradded, and another deleted. These file changes can be sent to the depot in a singlechangelist, which is processed atomically: either all the changes are made to the depot atonce, or none of them are. This approach allows users to simultaneously update all filesrelated to a bug fix or a new feature.
14 Perforce 2003.2 User’s Guide

Chapter 1: Product Overview
Each client workspace has its own client view, which determines which files in the depotcan be accessed by that client workspace. One client workspace might be able to access allthe files in the depot, while another client workspace might access only a single file. ThePerforce Server is responsible for tracking the state of the client workspace; Perforceknows which files a client workspace has, where they are, and which files have writepermission turned on.
For basic information about using Perforce, see Chapter 3, Perforce Basics: Quick Startand Chapter 4, Perforce Basics: The Details.
File conflicts
When two users edit the same file, their changes can conflict. For example, suppose twousers copy the same file from the depot into their workspaces, and each edits his copy ofthe file in different ways. The first user sends his version of the file back to the depot, andthen the second user tries to do the same thing. If Perforce were to unquestioningly acceptthe second user’s file into the depot, the first user’s changes would not be included in thelatest revision of the file (known as the head revision).
When a file conflict is detected, Perforce allows the user experiencing the conflict toperform a resolve of the conflicting files. The resolve process allows the user to decidewhat needs to be done: should his file overwrite the other user’s? Should his own file bethrown away? Or should the two conflicting files be merged into one? At the user’srequest, Perforce will perform a three-way merge between the two conflicting files and thesingle file that both were based on. This process generates a merge file from the conflictingfiles, which contains all the changes from both conflicting versions. This file can be editedand then submitted to the depot.
To learn how to resolve file conflicts, see Chapter 5, Perforce Basics: Resolving FileConflicts.
Labeling groups of files
It is often useful to mark a particular set of file revisions for later access. For example, therelease engineers might want to keep a list of all the file revisions that comprise aparticular release of their program. This list of files can be assigned a name, such asrelease2.0.1; this name is a label for the user-determined list of files. At any subsequenttime, the label can be used to copy its revisions into a client workspace.
For details about labels, see Chapter 8, Labels.
Branching files
Thus far, it has been assumed that all changes to files happen linearly, but this is notalways the case. Suppose that one source file needs to evolve in two separate directions;perhaps one set of upcoming changes will allow the program to run under VMS, and
Perforce 2003.2 User’s Guide 15
Chapter 1: Product Overview
another set will make it a Mac program. Clearly, two separately-evolving copies of thesame files are necessary.
Perforce’s Inter-File Branching™ mechanism allows any set of files to be copied within thedepot. By default, the new file set, or codeline, evolves separately from the original files,but changes in either codeline can be propagated to the other.
For details about branching, see Chapter 9, Branching.
Job tracking
A Job is a generic term for a plain-text description of some change that needs to be made tothe source code. A job might be a bug description, like “the system crashes when I pressreturn”, or it might be a system improvement request, like “please make the program runfaster.”
Whereas a job represents work that is intended to be performed, a changelist representswork actually done. Perforce’s job tracking mechanism allows jobs to be linked to thechangelists that implement the work requested by the job. A job can later be looked up todetermine if and when it was fixed, what files were modified to implement the fix, whofixed it, and whether the fix has been propagated to other codelines. The fields containedin your system’s jobs can be defined by the Perforce system administrator.
Perforce’s job tracking mechanism does not implement all the functionality that isnormally supplied by full-scale defect tracking systems. Its simple functionality can beused as is, or it can be integrated with third-party job tracking systems through P4DTI -Perforce Defect Tracking and Integration.
To read more about jobs, please see Chapter 10, Job Tracking.
Change notification
Perforce’s change review mechanism allows users to receive email notifying them whenparticular files have been updated in the depot. The files for which a particular userreceives notification are determined by that user. Change review is implemented by anexternal program, or daemon, which can be customized.
Perforce can be made to run external scripts whenever changelists are submitted. Thesescripts, called triggers, allow changelists to be validated before they’re submitted to thedepot.
To learn how to set up the change review daemon, integrate Perforce with third-partydefect tracking systems, or write your own daemons, consult the Perforce SystemAdministrator’s Guide.
16 Perforce 2003.2 User’s Guide
Chapter 1: Product Overview
Protections
Perforce provides a protection scheme to prevent unauthorized or inadvertent access tothe depot. The protection mechanism determines exactly which Perforce commands areallowed to be run by any particular client.
Permissions can be granted or denied based on users’ usernames and IP addresses, or canbe granted or denied to entire groups of users. Because Perforce usernames are easilychanged, protections at the user level provide safety, not security. Protections at the IPaddress level are as secure as the host itself.
We discuss protections in the Perforce System Administrator’s Guide.
Other Perforce Clients
The Perforce Command-Line Client (p4) is not the only Perforce client program. OtherPerforce client programs, including P4Win, the Perforce Windows Client, may bedownloaded from the Perforce web site.
P4Win
The Perforce Windows Client provides a native Microsoft Windows user interface for allSCM tasks. Using the familiar Windows® Explorer look and feel, it shows you your workin progress at a glance and lets you point, click, drag, and drop your way throughPerforce tasks.
For more about P4Win, see the product page at:http://www.perforce.com/perforce/products/p4win.html
P4Web
The Perforce web client turns most any Web browser into a complete SCM tool. P4Webwill work with a Perforce Server at Release 99.2 or newer, and runs on Unix, Macintosh,and Windows.
For more about P4Web, see the product page at:http://www.perforce.com/perforce/products/p4web.html
Merge Tools
Interactive merge tools allow you to display the differences between file versions,simplifying the process of resolving conflicts that result from parallel or concurrentdevelopment efforts. Merge tools often use color-coding to highlight differences and someeven include the option to automatically merge non-conflicting changes.
Perforce 2003.2 User’s Guide 17

Chapter 1: Product Overview
Perforce offers full support for both parallel and concurrent development environments.In situations where concurrent file check-out is not desirable, Perforce can be configuredto restrict this capability to specific file types or file locations (for instance, management ofdigital assets in environments where concurrent development is not encouraged).
P4 resolve
Perforce’s “p4 resolve” command includes built-in merge capability for the consoleenvironment.
P4WinMerge
P4WinMerge is Perforce’s graphical three-way merge and conflict resolution tool forWindows. P4WinMerge uses the “3-pane” approach to display and edit files during themerge process.
P4WinMerge is a stand-alone Windows application; it does not require a Perforce Serverwhen used by itself. However, when invoked from within a Perforce client program likethe Perforce Command-Line Client, P4Win, or P4Web, a Perforce Server is necessary.
For more about P4WinMerge, see:http://www.perforce.com/perforce/products/p4winmerge.html
Other merge utilities
Perforce is easily integrated with third-party merge tools and diff utilities. Users needonly change an environment variable (such as P4MERGE or P4DIFF) to point to their mergetool of choice.
For more about using third-party merge tools with Perforce, see:http://www.perforce.com/perforce/products/merge.html
Defect Tracking Systems
Perforce provides a number of options for defect tracking. In addition to providing basicbuilt-in defect tracking, Perforce is integrated with several leading defect trackingsystems. Activity performed by Perforce users can be automatically sent to your defecttracking system. Conversely, issues and status entered into your defect tracking systemcan be accessed by Perforce users.
Perforce jobs
Perforce’s built-in defect tracking and reporting features are available to all Perforceusers.
18 Perforce 2003.2 User’s Guide

Chapter 1: Product Overview
P4DTI integrations with third-party defect trackers
Although Perforce provides built-in defect tracking, some companies prefer to use thedefect tracking system they’ve already got in place, or want to install a different defecttracker for use with Perforce.
Perforce Defect Tracking Integration (P4DTI) is an open source project specificallydesigned to integrate Perforce with other defect tracking systems by replicating Perforcejobs and changelist numbers to their equivalents in the other system.
P4DTI connects your defect tracking system to Perforce, so that you don’t have to switchbetween your defect tracker and SCM tool and enter duplicate information about yourwork. P4DTI also links changes made in Perforce with defect tracker issues, making it easyto find out why a change was made, find the work that was done to resolve an issue, orgenerate reports relating issues to files or codelines.
Activity in your Perforce depot - enhancements, bug fixes, propagation of changes intorelease branches, and so forth - can be automatically entered into your defect trackingsystem by P4DTI. Conversely, issues and status entered into your defect tracking system -bug reports, change orders, work assignments, and so on, can be converted automaticallyto Perforce metadata for access by Perforce users. With P4DTI, you can integrate Perforcewith any third-party defect tracking or process management software.
P4DTI uses Perforce’s built-in “jobs” feature to mirror data in defect tracking systems.While Perforce jobs can be used without additional software for straightforward issuetracking, P4DTI lets you take advantage of third-party user interfaces, reporting tools,databases, and workflow rules to manage complex processes.
P4DTI runs on Unix and Windows. It can be used with a Perforce Server on any platformat Release 2000.2 or newer.
For more about using third-party defect tracking systems with Perforce, including a list ofdefect tracking systems for which P4DTI integrations have already been built, see:
http://www.perforce.com/perforce/products/defecttracking.html
Plug-Ins, reporting and tool integrations
IDE Plug-ins
Perforce IDE Plug-ins allow developers to work with Perforce from within integrateddevelopment environments (IDEs) such as Microsoft Developer Studio, Borland JBuilder,and Metrowerks CodeWarrior.
For more about Perforce IDE Plug-ins, see:http://www.perforce.com/perforce/products/plugins-ide.html
Perforce 2003.2 User’s Guide 19
Chapter 1: Product Overview
P4Report and P4SQL
The Perforce Reporting System (P4Report) offers query and reporting capability forPerforce depots. P4Report also includes the Perforce SQL Command-Line Client (P4SQL).P4SQL can be used to execute SQL statements either interactively or using scripts.
Based on P4ODBC, the Perforce ODBC Data Source, P4Report can be used by ODBC-compliant reporting tools including Crystal Reports®, Microsoft® Access® and Excel®.P4Report can also be integrated with some defect tracking systems.
For more about P4Report and P4SQL, see:http://www.perforce.com/perforce/products/p4report.html
P4OFC
The Perforce Plug-in for Microsoft Office (P4OFC) adds a “Perforce” menu to MicrosoftWord, Microsoft Excel, and Microsoft Powerpoint. This menu provide easy access tocommon Perforce SCM commands, so that users never have to leave familiar officeapplications to work with documents under Perforce control.
For more about P4OFC, see:http://www.perforce.com/perforce/products/plugins-ofc.html
20 Perforce 2003.2 User’s Guide
Chapter 2 Connecting to thePerforce Server
Perforce uses a client/server architecture. Files are created and edited by users on theirown client hosts; these files are transferred to and from a shared file repository located ona Perforce server. Every running Perforce system uses a single server and can have manyclients.
As mentioned earlier, two programs do the bulk of Perforce’s work:
• The p4d program runs on the Perforce server. It manages the shared file repository, andkeeps track of users, clients, protections, and other Perforce metadata.
• The p4 program runs on each Perforce client. It sends the users’ requests to the p4dserver program for processing, and communicates with p4d via TCP/IP.
Each Perforce client program needs to know the address and port of the Perforce serverwith which it communicates. This address is stored in the P4PORT environment variable.
Before you begin
This chapter assumes that your system administrator has already set up a Perforce server(p4d) for you, and that it is already up and running.
If this is not the case (for instance, if you’re installing Perforce from scratch), you’ll alsohave to install the Perforce server before continuing. See the appendix, “InstallingPerforce” on page 139, for information on how to install the server.
The information in the appendix is intended to help you install a server for evaluationpurposes. If you’re installing a production server, or are planning on extensive testing ofyour evaluation server, we strongly encourage you to read the full installationinstructions in the Perforce System Administrator’s Guide.
Setting up your environment to use Perforce
A Perforce client program needs to know two things in order to talk to a Perforce server:
• the name of the host on which p4d is running, and
• the port on which p4d is listening
Perforce 2003.2 User’s Guide 21

Chapter 2: Connecting to the Perforce Server
These are set via a single environment variable, P4PORT.
If your site is already using Perforce, it’s possible that your system administrator hasalready set P4PORT for you; if not, you’ll need to set it yourself.
Either way, after setting P4PORT to point to your server, you should verify your client’sconnection to the Perforce server with the p4 info command.
Telling Perforce clients where the server is
To use Perforce, you’ll need to know the name of the host where p4d is located, and thenumber of the TCP/IP port on which it’s listening.
• If you’ve just installed the Perforce server yourself, you already know this, havingconfigured the server on a specific host to listen to a specific port.
• If you’re connecting to an existing Perforce installation, you’ll have to ask your systemadministrator for the host and port of the Perforce server.
Once you’ve obtained the host and port information, set your P4PORT environmentvariable to host:portNum, where host is the name of the host on which p4d is running,and portNum is the port to which it is listening. For example:
The definition of P4PORT can be shortened if the Perforce client is running on the samehost as the server. In this case, only the port number need be provided to p4. If p4d isrunning on a host named or aliased perforce, listening on port 1666, the definition ofP4PORT for the p4 client can be dispensed with altogether. For example:
When P4PORT has been set, you should re-verify the connection with p4 info, asdescribed below. Once this has been done, Perforce is ready to use.
Note See “Setting and viewing environment variables” on page 144 forinformation about how to set environment variables for most operatingsystems and shells.
If the server is running on... and is listening to port... set P4PORT to:
dogs 3435 dogs:3435
x.com 1818 x.com:1818
If the server is running on... and is listening to port... set P4PORT to:
<same host as the p4 client> 1543 1543
perforce 1666 <no value needed>
22 Perforce 2003.2 User’s Guide
Chapter 2: Connecting to the Perforce Server
Verifying the connection to the Perforce server
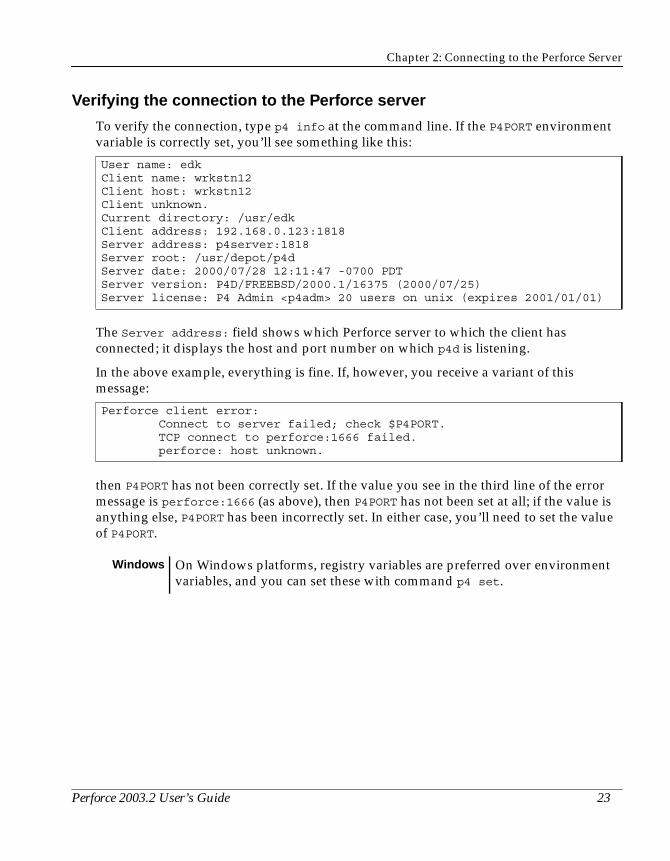
To verify the connection, type p4 info at the command line. If the P4PORT environmentvariable is correctly set, you’ll see something like this:
The Server address: field shows which Perforce server to which the client hasconnected; it displays the host and port number on which p4d is listening.
In the above example, everything is fine. If, however, you receive a variant of thismessage:
then P4PORT has not been correctly set. If the value you see in the third line of the errormessage is perforce:1666 (as above), then P4PORT has not been set at all; if the value isanything else, P4PORT has been incorrectly set. In either case, you’ll need to set the valueof P4PORT.
User name: edkClient name: wrkstn12Client host: wrkstn12Client unknown.Current directory: /usr/edkClient address: 192.168.0.123:1818Server address: p4server:1818Server root: /usr/depot/p4dServer date: 2000/07/28 12:11:47 -0700 PDTServer version: P4D/FREEBSD/2000.1/16375 (2000/07/25)Server license: P4 Admin <p4adm> 20 users on unix (expires 2001/01/01)
Perforce client error: Connect to server failed; check $P4PORT. TCP connect to perforce:1666 failed. perforce: host unknown.
Windows On Windows platforms, registry variables are preferred over environmentvariables, and you can set these with command p4 set.
Perforce 2003.2 User’s Guide 23

Chapter 2: Connecting to the Perforce Server
24 Perforce 2003.2 User’s Guide

Chapter 3 Perforce Basics:Quick Start
This chapter teaches basic Perforce usage. You’ll learn how to set up a workspace,populate it with files from the common file repository (the depot), edit these files andsubmit the changes back to the repository, back out of any unwanted changes, and thebasic Perforce reporting commands.
This chapter gives a broad overview of these concepts and commands; for details, seeChapter 4, Perforce Basics: The Details.
Underlying concepts
The basic ideas behind Perforce are quite simple: files are created, edited, and deleted inthe user’s own directories, which are called client workspaces. Perforce commands are usedto move files to and from a shared file repository known as the depot. Perforce users canretrieve files from the depot into their own client workspaces, where they can be read,edited, and resubmitted to the depot for other users to access. When a new revision of afile is stored in the depot, the old revisions are kept and remain accessible.
Perforce was written to be as unobtrusive as possible, so that very few changes to yournormal work habits are required. Files are still created in your own directories with yourtool of choice; Perforce commands supplement your normal work actions instead ofreplacing them.
Perforce commands are always entered in the form p4 command [arguments].
File configurations used in the examples
This manual makes extensive use of examples based on the source code set for a programcalled Elm. The Elm examples used in this manual are set up as follows:
• A single depot is used to store the Elm files, and perhaps other projects as well. The elmfiles will be shared by storing them under an elm subdirectory within the depot.
• Each user will store his or her client workspace Elm files in a different subdirectory. Thetwo users we’ll be following most closely, Ed and Lisa, will work with their Elm files inthe following locations:
User Username Client Workspace Name Top of own Elm File Tree
Ed edk eds_elm /usr/edk/elm
Lisa lisag lisas_ws /usr/lisag/docs
Perforce 2003.2 User’s Guide 25
Chapter 3: Perforce Basics: Quick Start
Setting up a client workspace
To move files between a client workspace and the depot, the Perforce server requires twopieces of information:
• A name that uniquely identifies the client workspace, and
• The top-level directory of this workspace.
Naming the client workspace
To name your client workspace, or to use a different workspace, set the environmentvariable P4CLIENT to the name of the client workspace
Example: Naming the client workspace
Ed is working on the code for Elm. He wants to refer to the collection of files he’s working onby the name eds_elm. In the Korn or Bourne shells, he’d type:
Each operating system or shell has its own method of defining environment variables. Seethe “Environment Variables” section of the Perforce Command Reference for details.
Describing the client workspace to the Perforce server
Once the client workspace has been named, it must be identified and described to thePerforce server with the p4 client command. Typing p4 client brings up the clientdefinition form in a standard text editor; once the form is filled in and the editor exited,the Perforce server is able to move files between the depot and the client workspace.
$ P4CLIENT=eds_elm ; export P4CLIENT
Note Many p4 commands, including p4 client, display a form for editing in astandard text editor. You can define the editor your client uses through theP4EDITOR environment variable.
In the text forms used by Perforce, field names always start in the leftmostcolumn of text, and field values are indented with tabs or spaces. Perforcerequires that there be at least one space or a tab prior to the contents of aform field.
26 Perforce 2003.2 User’s Guide
Chapter 3: Perforce Basics: Quick Start
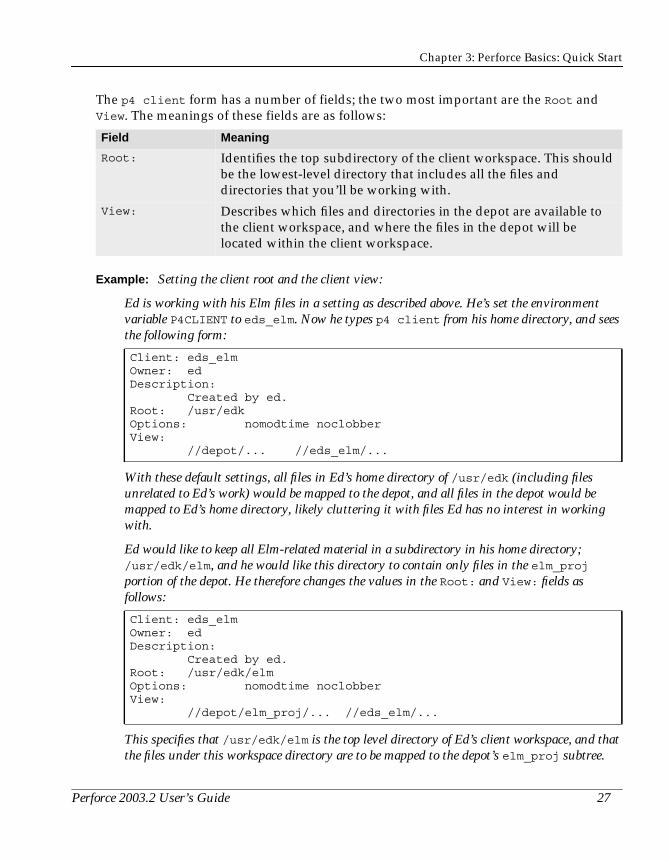
The p4 client form has a number of fields; the two most important are the Root andView. The meanings of these fields are as follows:
Example: Setting the client root and the client view:
Ed is working with his Elm files in a setting as described above. He’s set the environmentvariable P4CLIENT to eds_elm. Now he types p4 client from his home directory, and seesthe following form:
With these default settings, all files in Ed’s home directory of /usr/edk (including filesunrelated to Ed’s work) would be mapped to the depot, and all files in the depot would bemapped to Ed’s home directory, likely cluttering it with files Ed has no interest in workingwith.
Ed would like to keep all Elm-related material in a subdirectory in his home directory;/usr/edk/elm, and he would like this directory to contain only files in the elm_projportion of the depot. He therefore changes the values in the Root: and View: fields asfollows:
This specifies that /usr/edk/elm is the top level directory of Ed’s client workspace, and thatthe files under this workspace directory are to be mapped to the depot’s elm_proj subtree.
Field Meaning
Root: Identifies the top subdirectory of the client workspace. This shouldbe the lowest-level directory that includes all the files anddirectories that you’ll be working with.
View: Describes which files and directories in the depot are available tothe client workspace, and where the files in the depot will belocated within the client workspace.
Client: eds_elmOwner: edDescription: Created by ed.Root: /usr/edkOptions: nomodtime noclobberView: //depot/... //eds_elm/...
Client: eds_elmOwner: edDescription: Created by ed.Root: /usr/edk/elmOptions: nomodtime noclobberView: //depot/elm_proj/... //eds_elm/...
Perforce 2003.2 User’s Guide 27
Chapter 3: Perforce Basics: Quick Start
When Ed is done, he exits from the editor, and the p4 client command saves his changes.
The read-only Client: field contains the string stored in the P4CLIENT environmentvariable. The Description: can be filled with anything at all; it’s a place where you canenter text that describes the contents of this client workspace. The View: describes therelationship between files in the depot and files in the client workspace.
Creating a client specification has no immediate visible effect; no files are created when aclient specification is created or edited. The client specification simply indicates wherefiles will be located when subsequent Perforce commands are used.
You’ll also use p4 client to change existing client specifications. This is described in“Perforce Basics: The Details” on page 37.
Copying depot files into your workspace
Use p4 sync to retrieve files from the depot into a client workspace.
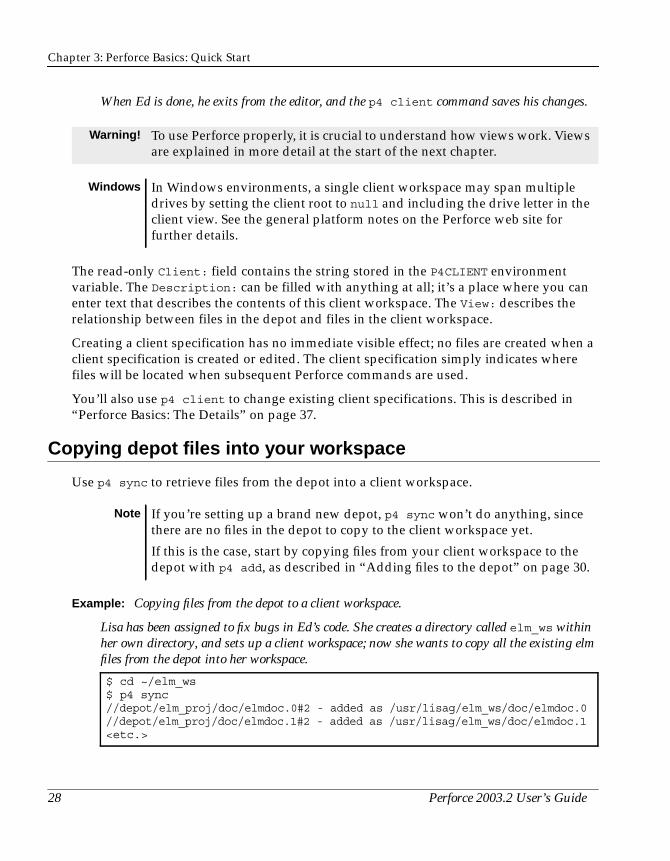
Example: Copying files from the depot to a client workspace.
Lisa has been assigned to fix bugs in Ed’s code. She creates a directory called elm_ws withinher own directory, and sets up a client workspace; now she wants to copy all the existing elmfiles from the depot into her workspace.
Warning! To use Perforce properly, it is crucial to understand how views work. Viewsare explained in more detail at the start of the next chapter.
Windows In Windows environments, a single client workspace may span multipledrives by setting the client root to null and including the drive letter in theclient view. See the general platform notes on the Perforce web site forfurther details.
Note If you’re setting up a brand new depot, p4 sync won’t do anything, sincethere are no files in the depot to copy to the client workspace yet.
If this is the case, start by copying files from your client workspace to thedepot with p4 add, as described in “Adding files to the depot” on page 30.
$ cd ~/elm_ws$ p4 sync//depot/elm_proj/doc/elmdoc.0#2 - added as /usr/lisag/elm_ws/doc/elmdoc.0//depot/elm_proj/doc/elmdoc.1#2 - added as /usr/lisag/elm_ws/doc/elmdoc.1<etc.>
28 Perforce 2003.2 User’s Guide
Chapter 3: Perforce Basics: Quick Start
Once the command completes, the most recent revisions of all the files in the depot that aremapped through her client workspace view will be available in her workspace.
The p4 sync command maps depot files through the client view, compares the resultagainst the current client contents, and then adds, updates, or deletes files in the clientworkspace as needed to bring the client contents in sync with the depot. p4 sync can takefilenames as parameters, with or without wildcards, to limit the files it retrieves.
If a file exists within a particular subdirectory in the depot, but that directory does not yetexist in the client workspace, the directory is created within the client workspace at synctime.
The job of p4 sync is to match the state of the client workspace to that of the depot; thus,if a file has been deleted from the depot, p4 sync deletes it from the client workspace.
Updating the depot with files from your workspace
Any file in a client workspace can be added to, updated in, or deleted from the depot. Thisis accomplished in two steps:
1. Perforce is told the new state of client workspace files with the commands p4 addfilenames, p4 edit filenames, or p4 delete filenames. When these commandsare given, the corresponding files are listed in a Perforce changelist, which is a list offiles and operations on those files to be performed in the depot.
2. The operations are performed on the files in the changelist when the p4 submitcommand is given.
The commands p4 add, p4 edit, and p4 delete do not immediately add, edit, or deletefiles in the depot. Instead, the affected file and the corresponding operation are listed inthe default changelist, and the files in the depot are affected only when this changelist issubmitted to the depot with p4 submit. This allows a set of files to be updated in thedepot all at once: when the changelist is submitted, either all of the files in the changelistare affected, or none of them are.
When a file has been opened with p4 add, p4 edit, or p4 delete, but the correspondingchangelist has not yet been submitted in the depot, the file is said to be open in the clientworkspace.
Note This chapter discusses only the default changelist, which is automaticallymaintained by Perforce. Changelists can also be created by the user; for afull discussion, see Chapter 7, Changelists.
Perforce 2003.2 User’s Guide 29

Chapter 3: Perforce Basics: Quick Start
Adding files to the depot
To add a file or files to the depot, type p4 add filename(s). The p4 add command opensthe file(s) for add and lists them in the default changelist, but they won’t be added to thedepot until the p4 submit command is given.
Example: Adding files to a changelist.
Ed is writing a help manual for Elm. The files are named elmdoc.0 through elmdoc.3, andthey’re sitting in the doc subdirectory of his client workspace root. He wants to add these filesto the depot.
At this point, the files he wants to add to the depot have been added to his defaultchangelist. However, the files are not actually stored in the depot until the p4 submitcommand is given.
Example: Submitting a changelist to the depot.
Ed is ready to submit his added files to the depot. He types p4 submit and sees the followingform in a standard text editor:
Ed changes the contents of the Description: field to describe what these file updates do.When he’s done, he quits from the editor, and the new files are added to the depot.
The Description: field contents must be changed, or the depot update won’t beaccepted. Lines can be deleted from the Files: field; any files deleted from this list willcarry over to the next default changelist, and will appear again the next time p4 submit isperformed.
$ cd ~/elm/doc$ p4 add elmdoc.*//depot/elm_proj/doc/elmdoc.0#1 - opened for add//depot/elm_proj/doc/elmdoc.1#1 - opened for add//depot/elm_proj/doc/elmdoc.2#1 - opened for add//depot/elm_proj/doc/elmdoc.3#1 - opened for add
Change: newClient: edkUser: edkStatus: newDescription: <enter description here>Files: //depot/elm_proj/doc/elmdoc.0 # add //depot/elm_proj/doc/elmdoc.1 # add //depot/elm_proj/doc/elmdoc.2 # add //depot/elm_proj/doc/elmdoc.3 # add
30 Perforce 2003.2 User’s Guide

Chapter 3: Perforce Basics: Quick Start
Adding more than one file at once
Multiple file arguments can be provided on the command line.
Example: Using multiple file arguments on a single command line.
Ed wants to add all of his Elm library, documentation, and header files to the depot.
After p4 add is finished, Ed then does a p4 submit.
If the directory containing a new file does not exist in the depot, it is automatically createdwithin the depot at submit time.
The operating system’s write permission on submitted files is turned off in the clientworkspace when p4 submit is performed. This helps ensure that file editing is done withPerforce’s knowledge. The write permissions are turned back on by p4 edit, which isdescribed below.
You might have noticed in the example above that the filenames are displayed asfilename#1. Perforce always displays filenames with a #N suffix; the #N indicates that thisis the Nth revision of this file. Revision numbers are always assigned sequentially.
Populating empty depots
In Perforce, there’s no difference between adding files to an empty depot and adding filesto a depot that already contains other files. For this reason, populate new, empty depotsby adding files from a client workspace with p4 add, as described above.
Editing files in the depot
To open a file for edit, use p4 edit. This has two effects:
• The file(s) write permissions are turned on in the client workspace, and
• The file(s) to be edited are added to the default changelist.
$ cd ~$ p4 add elm/lib/* elm/hdrs/* elm/doc/*//depot/elm_proj/lib/Makefile.SH#1 - opened for add//depot/elm_proj/lib/add_site.c#1 - opened for add//depot/elm_proj/lib/addrmchusr.c#1 - opened for add<etc.>
Warning! If a submit fails, the default changelist will be assigned a number, andyou’ll need to submit that changelist in a slightly different way.
Please see Chapter 5, Perforce Basics: Resolving File Conflicts forinstructions on resolving file conflicts.
Perforce 2003.2 User’s Guide 31

Chapter 3: Perforce Basics: Quick Start
Since the files must have their write permission turned back on before they can be edited,you must give the p4 edit command before attempting to edit the file.
To save the new file revision in the depot, use p4 submit, as described above.
Example: Opening a file for edit:
Ed wants to make changes to his elmdoc.3 file. He opens the file for edit.
He then edits the file with any text editor. When he’s finished, he submits the file to the depotwith p4 submit, as described above.
Deleting files from the depot
Files are deleted from the depot in a way similar to the way in which they are added andedited.
The p4 delete command opens the file for delete in the default changelist, and then p4
submit is used to delete the file from the depot. The p4 delete command also deletes thefile from the client workspace; this occurs when the p4 delete command is given. Thedeletion of the file in the depot occurs only after the changelist with the delete operation issubmitted.
Example: Deleting a file from the depot.
Ed’s file doc/elmdoc.3 is no longer needed. He deletes it from both his client workspace andfrom the depot as follows:
The file is deleted from the client workspace immediately, but it is not deleted from the depotuntil he gives the p4 submit command.
Once the changelist is submitted, it appears as if the file has been deleted from the depot;however, old file revisions are never actually removed. This makes it possible to readolder revisions of “deleted” files back into the client workspace.
Note Before a file can be opened for edit, it must already have been added to thedepot with p4 add, or copied into the client workspace from the depot withp4 sync.
$ cd ~/elm$ p4 edit doc/elmdoc.3//depot/elm_proj/doc/elmdoc.3#1 - opened for edit
$ cd ~/elm/doc$ p4 delete elmdoc.3//depot/elm_proj/doc/elmdoc.3#1 - opened for delete
32 Perforce 2003.2 User’s Guide
Chapter 3: Perforce Basics: Quick Start
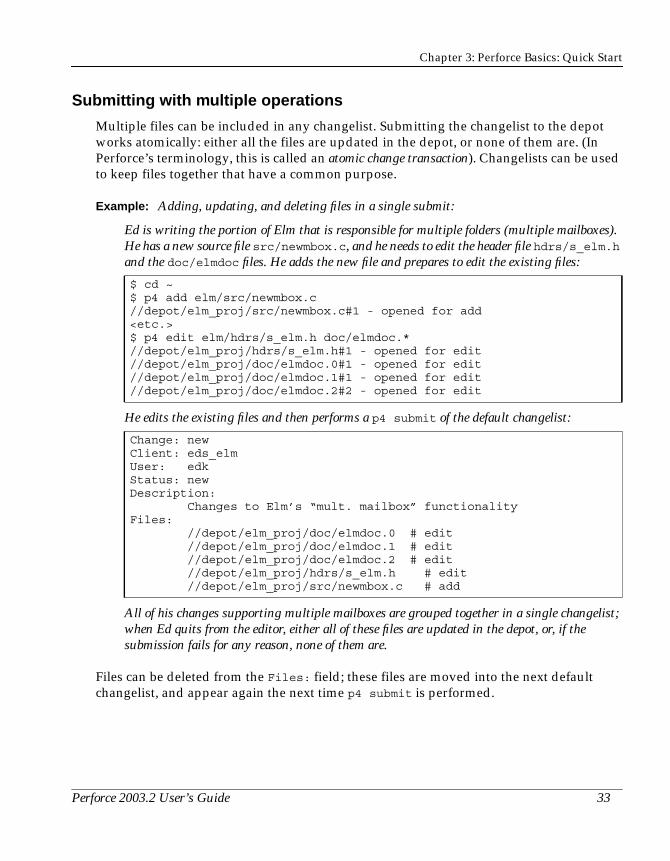
Submitting with multiple operations
Multiple files can be included in any changelist. Submitting the changelist to the depotworks atomically: either all the files are updated in the depot, or none of them are. (InPerforce’s terminology, this is called an atomic change transaction). Changelists can be usedto keep files together that have a common purpose.
Example: Adding, updating, and deleting files in a single submit:
Ed is writing the portion of Elm that is responsible for multiple folders (multiple mailboxes).He has a new source file src/newmbox.c, and he needs to edit the header file hdrs/s_elm.hand the doc/elmdoc files. He adds the new file and prepares to edit the existing files:
He edits the existing files and then performs a p4 submit of the default changelist:
All of his changes supporting multiple mailboxes are grouped together in a single changelist;when Ed quits from the editor, either all of these files are updated in the depot, or, if thesubmission fails for any reason, none of them are.
Files can be deleted from the Files: field; these files are moved into the next defaultchangelist, and appear again the next time p4 submit is performed.
$ cd ~$ p4 add elm/src/newmbox.c//depot/elm_proj/src/newmbox.c#1 - opened for add<etc.>$ p4 edit elm/hdrs/s_elm.h doc/elmdoc.*//depot/elm_proj/hdrs/s_elm.h#1 - opened for edit//depot/elm_proj/doc/elmdoc.0#1 - opened for edit//depot/elm_proj/doc/elmdoc.1#1 - opened for edit//depot/elm_proj/doc/elmdoc.2#2 - opened for edit
Change: newClient: eds_elmUser: edkStatus: newDescription: Changes to Elm’s “mult. mailbox” functionalityFiles: //depot/elm_proj/doc/elmdoc.0 # edit //depot/elm_proj/doc/elmdoc.1 # edit //depot/elm_proj/doc/elmdoc.2 # edit //depot/elm_proj/hdrs/s_elm.h # edit //depot/elm_proj/src/newmbox.c # add
Perforce 2003.2 User’s Guide 33

Chapter 3: Perforce Basics: Quick Start
Backing out: reverting files to their unopened states
Any file opened for add, edit, or delete can be removed from its changelist with p4
revert. This command reverts the file in the client workspace back to its unopened state,and any local modifications to the file are lost.
Example: Reverting a file back to the last synced version.
Ed wants to edit a set of files in his src directory: leavembox.c, limit.c, and signals.c.He opens the files for edit:
and then realizes that signals.c is not one of the files he will be working on, and that hedidn’t mean to open it. He can revert signals.c to its unopened state with p4 revert:
If p4 revert is used on a file that had been opened with p4 delete, it will appear back inthe client workspace immediately. If p4 add was used to open the file, p4 revertremoves it from the changelist, but leaves the client workspace file intact.
If the reverted file was originally opened with p4 edit, the last synced version will bewritten back to the client workspace, overwriting the newly-edited version of the file. Toreduce the risk of overwriting changes by accident, you may want to preview a revert byusing p4 revert -n before running p4 revert. The -n option reports what files wouldbe reverted by p4 revert without actually reverting the files.
Basic reporting commands
Perforce provides some 20+ reporting commands. Each chapter in this manual ends witha description of the reporting commands relevant to the chapter topic. All the reportingcommands are discussed in greater detail in Chapter 11, Reporting and Data Mining.
The most basic reporting commands are p4 help and p4 info.
$ cd ~elm/src$ p4 edit leavembox.c limit.c signals.c//depot/elm_proj/src/leavembox.c#2 - opened for edit//depot/elm_proj/src/limit.c#2 - opened for edit//depot/elm_proj/src/signals.c#1 - opened for edit
$ p4 revert signals.c//depot/elm_proj/src/signals.c#1 - was edit, reverted
Command Meaning
p4 help commands Lists all Perforce commands with a brief description of each.
p4 help command For any command provided, gives detailed help about thatcommand. For example, p4 help sync provides detailedinformation about the p4 sync command.
34 Perforce 2003.2 User’s Guide
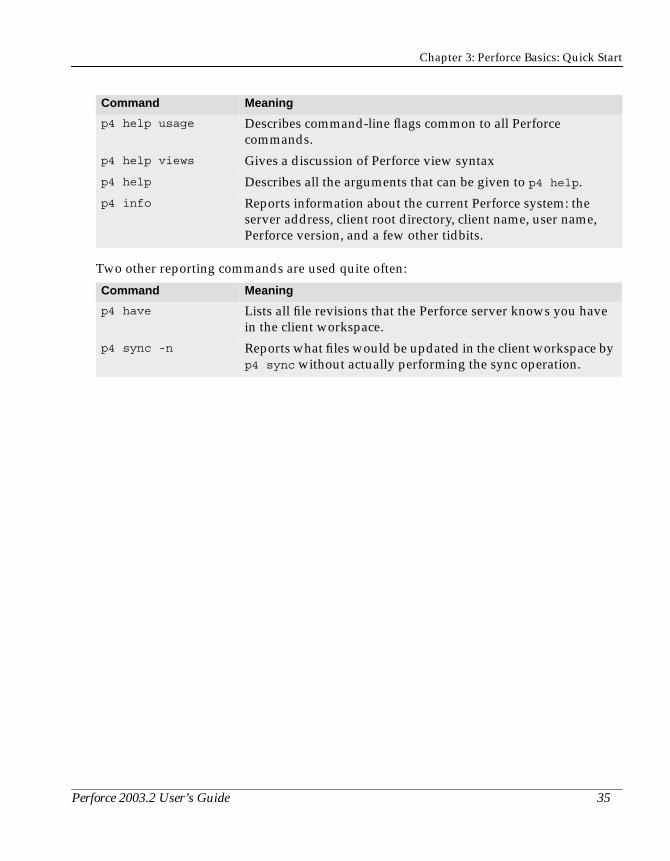
Chapter 3: Perforce Basics: Quick Start
Two other reporting commands are used quite often:
p4 help usage Describes command-line flags common to all Perforcecommands.
p4 help views Gives a discussion of Perforce view syntax
p4 help Describes all the arguments that can be given to p4 help.
p4 info Reports information about the current Perforce system: theserver address, client root directory, client name, user name,Perforce version, and a few other tidbits.
Command Meaning
p4 have Lists all file revisions that the Perforce server knows you havein the client workspace.
p4 sync -n Reports what files would be updated in the client workspace byp4 sync without actually performing the sync operation.
Command Meaning
Perforce 2003.2 User’s Guide 35

Chapter 3: Perforce Basics: Quick Start
36 Perforce 2003.2 User’s Guide

Chapter 4 Perforce Basics:The Details
This chapter covers the Perforce rules in detail. The topics discussed include views,mapping depots to client workspaces, Perforce wildcards, rules for referring to older filerevisions, file types, and form syntax. For a brief overview of Perforce, refer to Chapter 3,Perforce Basics: Quick Start.
Description of the Client Workspace
A Perforce client workspace is a collection of source files managed by Perforce on a host.Each collection is given a name which identifies the client workspace to the Perforceserver. By default, the name is simply the host’s name, but this can be overridden by theenvironment variable P4CLIENT. There can be more than one Perforce client workspace ona client host.
All files within a Perforce client workspace share a common root directory, called theclient root. In the degenerate case, the client root can be the host’s root, but in practice theclient root is the lowest level directory under which the managed source files reside.
Perforce manages the files in a client workspace in three direct ways:
• It creates, updates, or deletes files as required in the workspace when the user requestsPerforce to synchronize the client workspace with the depot,
• It turns on write permission when the user requests to edit a file, and
• It turns off write permission and submits updated versions back to the depot when theuser has finished editing the file and submits his or her changes.
The entire Perforce client workspace state is tracked by the Perforce server. The serverknows what files a client workspace has, where they are, and which files have writepermission turned on.
Perforce’s management of a client workspace requires a certain amount of cooperationfrom the user. Because client files are ordinary files with write permission turned off,willful users can circumvent the system by turning on write permission, directly deletingor renaming files, or otherwise modifying the file tree supposedly under Perforce’scontrol.
Perforce counters this with two measures: first, Perforce has explicit commands to verifythat the client workspace state is in accord with the server’s recording of that state;second, Perforce tries to make using Perforce at least as easy as circumventing it. Forexample: to make a temporary modification to a file, it is easier to use Perforce than it is tocopy and restore the file manually.
Perforce 2003.2 User’s Guide 37

Chapter 4: Perforce Basics: The Details
Files not managed by Perforce may also be under a client’s root, but are ignored byPerforce. For example, Perforce may manage the source files in a client workspace, whilethe workspace also holds compiled objects, libraries, and executables, as well as adeveloper’s temporary files.
In addition to accessing the client files, the p4 client program sometimes createstemporary files on the client host. Otherwise, Perforce neither creates nor uses any files onthe client host.
Wildcards
Perforce uses three wildcards for pattern matching. Any number and combination ofthese can be used in a single string:
The “...” wildcard is passed by the p4 client program to the Perforce server, where it isexpanded to match the corresponding files known to p4d. The * wildcard is expandedlocally by the OS shell before the p4 command is sent to the server, and the files that matchthe wildcard are passed as multiple arguments to the p4 command. To have Perforcematch the * wildcard against the contents of the depot, it must be escaped, usually withquotes or a backslash. Most command shells don’t interfere with the other two wildcards.
Wildcards and “p4 add”
The “...” wildcard can’t be used with the p4 add command. The “...” wildcard isexpanded by the Perforce server, and since the server doesn’t know what files are beingadded (after all, they’re not in the depot yet), it can’t expand that wildcard. The *wildcard may be used with p4 add, as it is expanded by the local OS shell, not by the p4dserver.
Mapping the Depot to the Client Workspace
Just as a client name is simply an alias for a particular directory on the client machine, adepot name is an alias for a directory on the Perforce server. The relationship betweenfiles in the depot and files in the client workspace is described in the client view, and it isset with the p4 client command.
Wildcard Meaning
* Matches anything except slashes; matches only within a single directory.
... Matches anything including slashes; matches across multiple directories.
%d Used for parametric substitution in views. See “Changing the order offilename substrings” on page 43 for a full explanation.
38 Perforce 2003.2 User’s Guide
Chapter 4: Perforce Basics: The Details
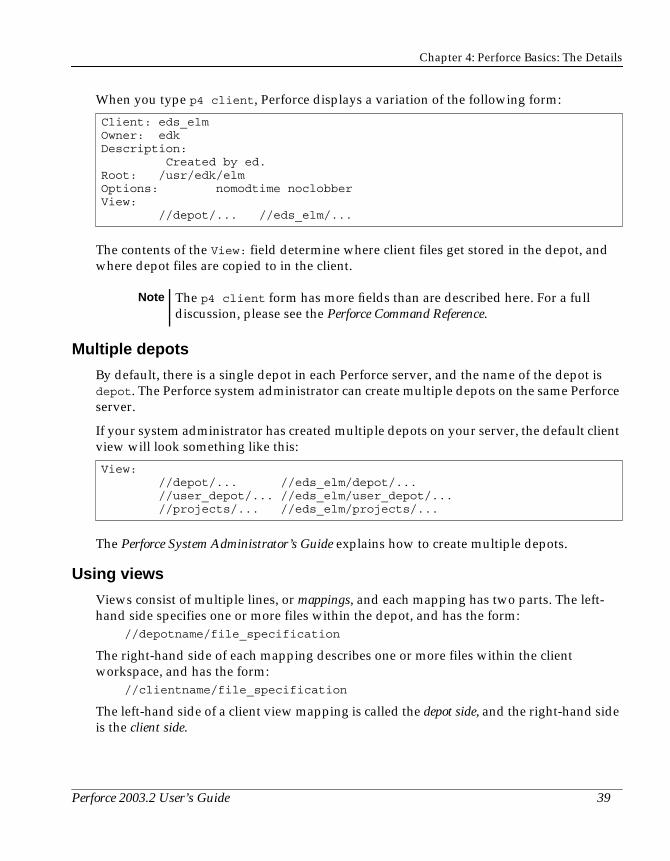
When you type p4 client, Perforce displays a variation of the following form:
The contents of the View: field determine where client files get stored in the depot, andwhere depot files are copied to in the client.
Multiple depots
By default, there is a single depot in each Perforce server, and the name of the depot isdepot. The Perforce system administrator can create multiple depots on the same Perforceserver.
If your system administrator has created multiple depots on your server, the default clientview will look something like this:
The Perforce System Administrator’s Guide explains how to create multiple depots.
Using views
Views consist of multiple lines, or mappings, and each mapping has two parts. The left-hand side specifies one or more files within the depot, and has the form:
//depotname/file_specification
The right-hand side of each mapping describes one or more files within the clientworkspace, and has the form:
//clientname/file_specification
The left-hand side of a client view mapping is called the depot side, and the right-hand sideis the client side.
Client: eds_elmOwner: edkDescription: Created by ed.Root: /usr/edk/elmOptions: nomodtime noclobberView: //depot/... //eds_elm/...
Note The p4 client form has more fields than are described here. For a fulldiscussion, please see the Perforce Command Reference.
View: //depot/... //eds_elm/depot/... //user_depot/... //eds_elm/user_depot/... //projects/... //eds_elm/projects/...
Perforce 2003.2 User’s Guide 39
Chapter 4: Perforce Basics: The Details
The default view in the example above is quite simple: it maps the entire depot to theentire client workspace. Views can contain multiple mappings, and can be much morecomplex, but all client views, no matter how elaborate, perform the same two functions:
• Determine which files in the depot can be seen by a client workspace.
This is determined by the sum of the depot sides of the mappings within a view. A viewmight allow the client workspace to retrieve every file in the depot, or only those fileswithin two directories, or only a single file.
• Construct a one-to-one mapping between files in the depot and files in the client workspace.
Each mapping within a view describes a subset of the complete mapping. The one-to-one mapping might be straightforward; for example, the client workspace file treemight be identical to a portion of the depot’s file tree. Or it can be oblique; for example,a file might have one name in the depot and another in the client workspace, or bemoved to an entirely different directory in the client workspace. No matter how thefiles are named, there is always a one-to-one mapping.
To determine the exact location of any client file on the host machine, substitute the valueof the p4 client form’s Root: field for the client name on the client side of the mapping.For example, if the p4 client form’s Root: field for the client eds_elm is set to/usr/edk/elm, then the file //eds_elm/doc/elmdoc.1 will be found on the client host in/usr/edk/elm/doc/elmdoc.1.
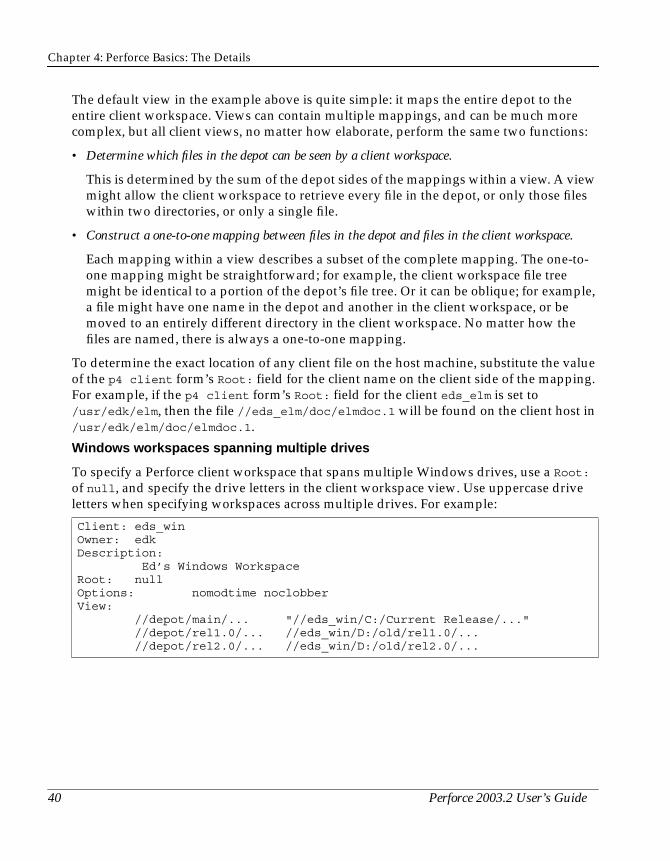
Windows workspaces spanning multiple drives
To specify a Perforce client workspace that spans multiple Windows drives, use a Root:
of null, and specify the drive letters in the client workspace view. Use uppercase driveletters when specifying workspaces across multiple drives. For example:
Client: eds_winOwner: edkDescription: Ed’s Windows WorkspaceRoot: nullOptions: nomodtime noclobberView: //depot/main/... "//eds_win/C:/Current Release/..." //depot/rel1.0/... //eds_win/D:/old/rel1.0/... //depot/rel2.0/... //eds_win/D:/old/rel2.0/...
40 Perforce 2003.2 User’s Guide
Chapter 4: Perforce Basics: The Details
Wildcards in views
Any wildcard used on the depot side of a mapping must be matched with an identicalwildcard in the mapping’s client side. Any string matched by the wildcard is identical onboth sides.
In the client view//depot/elm_proj/... //eds_elm/...
the single mapping contains Perforce’s “...” wildcard, which matches everythingincluding slashes. The result is that any file in the eds_elm client workspace will bemapped to the same location within the depot’s elm_proj file tree. For example, the file//depot/elm_proj/nls/gencat/README is mapped to the client workspace file//eds_elm/nls/gencat/README.
To properly specify file trees, use the “...” wildcard after a trailing slash. (If you specifyonly //depot/elm_proj..., then the resulting view also includes files and directoriessuch as //depot/elm_project_coredumps, which is probably not what you intended.)
Types of mappings
By changing the View: field, it is possible to map only part of a depot to a clientworkspace. It is even possible to map files within the same depot directory to differentclient workspace directories, or to have files named differently in the depot and the clientworkspace. This section discusses Perforce’s mapping methods.
Direct client-to-depot views
The default view in the form presented by p4 client maps the entire client workspacetree into an identical directory tree in the depot. For example, the default view
//depot/... //eds_elm/...
indicates that any file in the directory tree under the client eds_elm will be stored in theidentical subdirectory in the depot. This view is usually considered to be overkill, as mostusers only need to see a subset of the files in the depot.
Mapping the full client to only part of the depot
Usually, you’ll only want to see part of the depot. Change the left-hand side of the View:field to point to only the relevant portion of the depot.
Example: Mapping part of the depot to the client workspace.
Bettie is rewriting the documentation for Elm, which is found in the depot within its docsubdirectory. Her client is named elm_docs, and her client root is /usr/bes/docs; shetypes p4 client and sets the View: field as follows:
//depot/elm_proj/doc/... //elm_docs/...
Perforce 2003.2 User’s Guide 41
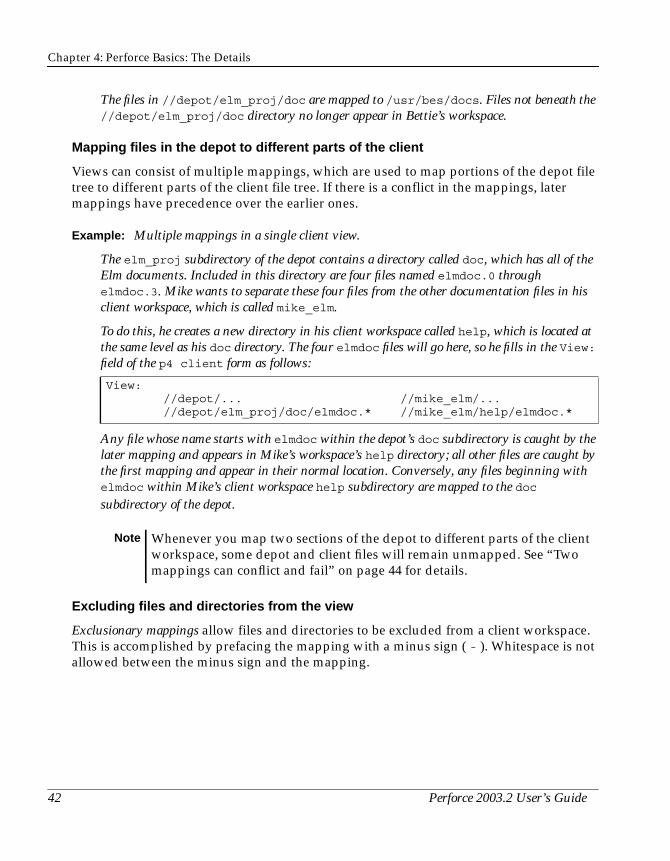
Chapter 4: Perforce Basics: The Details
The files in //depot/elm_proj/doc are mapped to /usr/bes/docs. Files not beneath the//depot/elm_proj/doc directory no longer appear in Bettie’s workspace.
Mapping files in the depot to different parts of the client
Views can consist of multiple mappings, which are used to map portions of the depot filetree to different parts of the client file tree. If there is a conflict in the mappings, latermappings have precedence over the earlier ones.
Example: Multiple mappings in a single client view.
The elm_proj subdirectory of the depot contains a directory called doc, which has all of theElm documents. Included in this directory are four files named elmdoc.0 throughelmdoc.3. Mike wants to separate these four files from the other documentation files in hisclient workspace, which is called mike_elm.
To do this, he creates a new directory in his client workspace called help, which is located atthe same level as his doc directory. The four elmdoc files will go here, so he fills in the View:field of the p4 client form as follows:
Any file whose name starts with elmdoc within the depot’s doc subdirectory is caught by thelater mapping and appears in Mike’s workspace’s help directory; all other files are caught bythe first mapping and appear in their normal location. Conversely, any files beginning withelmdoc within Mike’s client workspace help subdirectory are mapped to the docsubdirectory of the depot.
Excluding files and directories from the view
Exclusionary mappings allow files and directories to be excluded from a client workspace.This is accomplished by prefacing the mapping with a minus sign ( - ). Whitespace is notallowed between the minus sign and the mapping.
View: //depot/... //mike_elm/... //depot/elm_proj/doc/elmdoc.* //mike_elm/help/elmdoc.*
Note Whenever you map two sections of the depot to different parts of the clientworkspace, some depot and client files will remain unmapped. See “Twomappings can conflict and fail” on page 44 for details.
42 Perforce 2003.2 User’s Guide

Chapter 4: Perforce Basics: The Details
Example: Using views to exclude files from a client workspace.
Bill, whose client is named billm, wants to view only source code; he’s not interested in thedocumentation files. His client view would look like this:
Since later mappings have precedence over earlier ones, no files from the depot’s docsubdirectory will ever be copied to Bill’s client. Conversely, if Bill does have a docsubdirectory in his client, no files from that subdirectory will ever be copied to the depot.
Allowing filenames in the client to differ from depot filenames
Mappings can be used to make the filenames in the client workspace differ from those inthe depot.
Example: Files with different names in the depot and client workspace.
Mike wants to store the files as above, but he wants to take the elmdoc.X files in the depotand call them helpfile.X in his client workspace. He uses the following mappings:
Each wildcard on the depot side of a mapping must have a corresponding wildcard on theclient side of the same mapping. The wildcards are replaced in the copied-to direction bythe substring that the wildcard represents in the copied-from direction.
There can be multiple wildcards; the nth wildcard in the depot specification correspondsto the nth wildcard in the client description.
Changing the order of filename substrings
The %d wildcard matches strings similarly to the * wildcard, but %d can be used torearrange the order of the matched substrings.
Example: Changing string order in client workspace names.
Mike wants to change the names of any files with a dot in them within his doc subdirectory insuch a way that the file’s suffixes and prefixes are reversed in his client workspace. Forexample, he’d like to rename the Elm.cover file in the depot cover.Elm in his clientworkspace. (Mike can be a bit difficult to work with). He uses the following mappings:
View: //depot/elm_proj/... //billm/... -//depot/elm_proj/doc/... //billm/doc/...
View: //depot/elm_proj... //mike_elm/... //depot/elm_proj/doc/elmdoc.* //mike_elm/help/helpfile.*
View: //depot/elm_proj/... //mike_elm/... //depot/elm_proj/doc/%1.%2 //mike_elm/doc/%2.%1
Perforce 2003.2 User’s Guide 43

Chapter 4: Perforce Basics: The Details
Two mappings can conflict and fail
When you use multiple mappings in a single view, some files may map to two separateplaces in the depot or on the client. When a file doesn’t map to the same place in bothdirections, Perforce ignores that file.
Example: Mappings that conflict and fail.
Joe has constructed a view as follows:
The file //depot/proj1/file.c maps to //joe/proj1/newfile.c, but that same clientfile //joe/proj1/newfile.c maps back to the depot via the higher-precedence second lineto //depot/proj1/file.c. Because the file would be written back to a different location inthe depot than where it was read from, Perforce doesn’t map this name at all, and the file isignored.
In older versions of Perforce, this was often used as a trick to exclude particular files fromthe client workspace. Because Perforce now has exclusionary mappings, this type ofmapping is no longer useful, and should be avoided.
Editing Existing Client Specifications
You can use p4 client at any time to change the client workspace specification.
Note that changing a client specification has no immediate effect on the locations of anyfiles; the locations of files in your workspace are affected only when the clientspecification is used in subsequent commands.
This is particularly important for two types of client spec changes, specifically changes tothe client view and changes to the client root:
• If you change only the value of the client workspace View: field with p4 client,perform a p4 sync immediately afterward. The files in the client workspace will bedeleted from their old locations and written to their new locations.
• If you use p4 client to change the client workspace Root:, use p4 sync #none toremove the files from their old location in the workspace before using p4 client tochange the client root. After using p4 client to change the root directory, perform a p4sync to copy the files to their new locations within the client view. (If you forget to
View: //depot/proj1/... //joe/proj1/... //depot/proj1/file.c //joe/proj1/newfile.c
44 Perforce 2003.2 User’s Guide
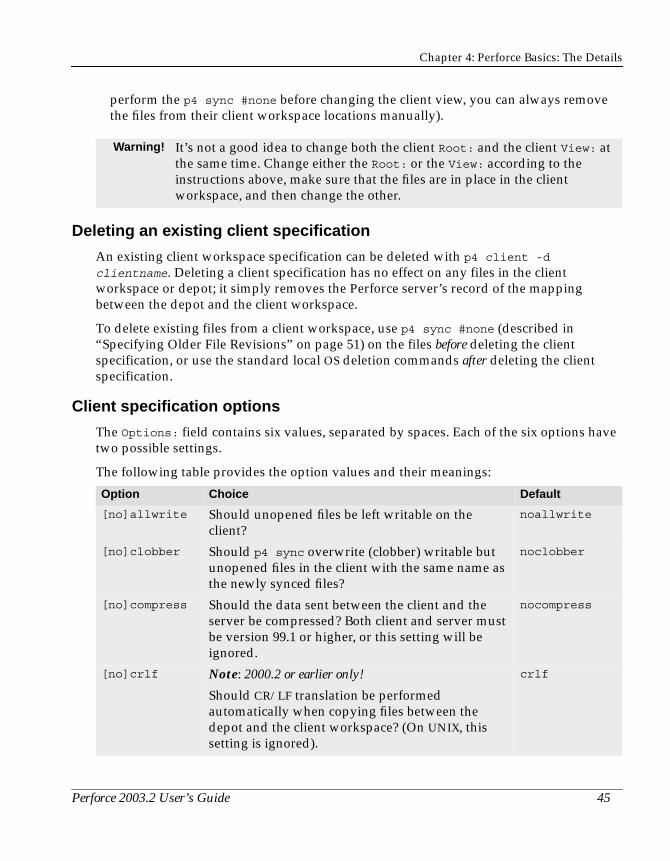
Chapter 4: Perforce Basics: The Details
perform the p4 sync #none before changing the client view, you can always removethe files from their client workspace locations manually).
Deleting an existing client specification
An existing client workspace specification can be deleted with p4 client -d
clientname. Deleting a client specification has no effect on any files in the clientworkspace or depot; it simply removes the Perforce server’s record of the mappingbetween the depot and the client workspace.
To delete existing files from a client workspace, use p4 sync #none (described in“Specifying Older File Revisions” on page 51) on the files before deleting the clientspecification, or use the standard local OS deletion commands after deleting the clientspecification.
Client specification options
The Options: field contains six values, separated by spaces. Each of the six options havetwo possible settings.
The following table provides the option values and their meanings:
Warning! It’s not a good idea to change both the client Root: and the client View: atthe same time. Change either the Root: or the View: according to theinstructions above, make sure that the files are in place in the clientworkspace, and then change the other.
Option Choice Default
[no]allwrite Should unopened files be left writable on theclient?
noallwrite
[no]clobber Should p4 sync overwrite (clobber) writable butunopened files in the client with the same name asthe newly synced files?
noclobber
[no]compress Should the data sent between the client and theserver be compressed? Both client and server mustbe version 99.1 or higher, or this setting will beignored.
nocompress
[no]crlf Note: 2000.2 or earlier only!
Should CR/LF translation be performedautomatically when copying files between thedepot and the client workspace? (On UNIX, thissetting is ignored).
crlf
Perforce 2003.2 User’s Guide 45

Chapter 4: Perforce Basics: The Details
[un]locked Do other users have permission to edit the clientspecification? (To make a locked client specificationtruly effective, be sure to set a password for theclient’s owner with p4 passwd.)
If locked, only the owner is able to use, edit, ordelete the client spec. Note that a Perforceadministrator is still able to override the lock withthe -f (force) flag.
unlocked
[no]modtime For files without the +m (modtime) file typemodifier:
• For Perforce clients at the 99.2 level or earlier, ifmodtime is set, the modification date (on thelocal filesystem) of a newly synced file is the dateand time at the server when the file was submit-ted to the depot.
• For Perforce clients at the 2000.1 level or higher,if modtime is set, the modification date (on thelocal filesystem) of a newly synced file is the dat-estamp on the file when the file was submitted tothe depot.
• If nomodtime is set, the modification date is thedate and time of sync, regardless of Perforce cli-ent version.
For files with the +m (modtime) file type modifier:
• For Perforce clients at the 99.2 level or earlier, the+m modifier is ignored, and the behavior of mod-time and nomodtime is as documented above.
• For Perforce clients at the 2000.1 level or higher,the modification date (on the local filesystem) ofa newly synced file is the datestamp on the filewhen the file was submitted to the depot, regard-less of the setting of modtime or nomodtime onthe client.
nomodtime(i.e. date andtime of sync) formost files.
Ignored for fileswith the +m filetype modifier.
[no]rmdir Should p4 sync delete empty directories in a clientif all files in the directory have been removed?
normdir
Option Choice Default
46 Perforce 2003.2 User’s Guide
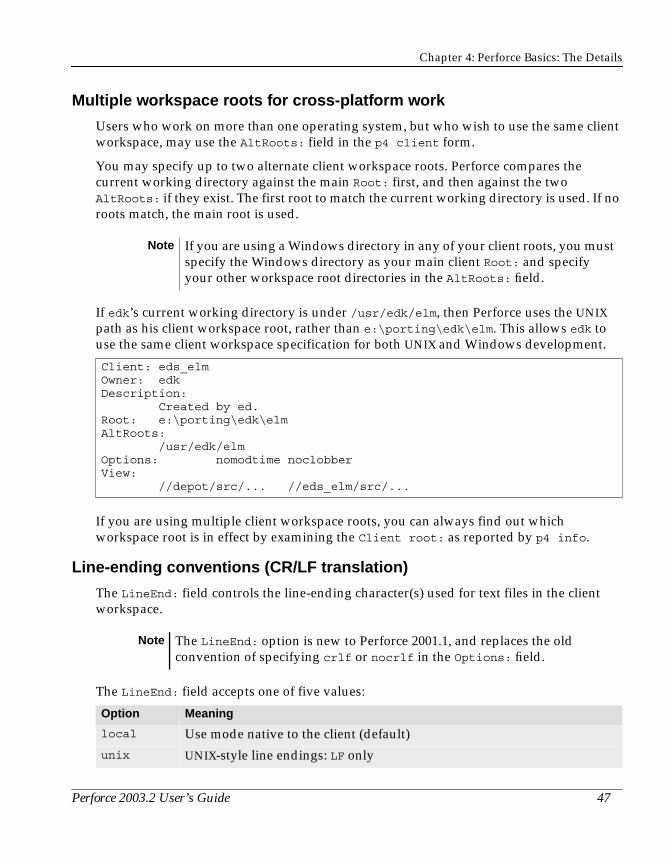
Chapter 4: Perforce Basics: The Details
Multiple workspace roots for cross-platform work
Users who work on more than one operating system, but who wish to use the same clientworkspace, may use the AltRoots: field in the p4 client form.
You may specify up to two alternate client workspace roots. Perforce compares thecurrent working directory against the main Root: first, and then against the twoAltRoots: if they exist. The first root to match the current working directory is used. If noroots match, the main root is used.
If edk’s current working directory is under /usr/edk/elm, then Perforce uses the UNIXpath as his client workspace root, rather than e:\porting\edk\elm. This allows edk touse the same client workspace specification for both UNIX and Windows development.
If you are using multiple client workspace roots, you can always find out whichworkspace root is in effect by examining the Client root: as reported by p4 info.
Line-ending conventions (CR/LF translation)
The LineEnd: field controls the line-ending character(s) used for text files in the clientworkspace.
The LineEnd: field accepts one of five values:
Note If you are using a Windows directory in any of your client roots, you mustspecify the Windows directory as your main client Root: and specifyyour other workspace root directories in the AltRoots: field.
Client: eds_elmOwner: edkDescription: Created by ed.Root: e:\porting\edk\elmAltRoots: /usr/edk/elmOptions: nomodtime noclobberView: //depot/src/... //eds_elm/src/...
Note The LineEnd: option is new to Perforce 2001.1, and replaces the oldconvention of specifying crlf or nocrlf in the Options: field.
Option Meaning
local Use mode native to the client (default)
unix UNIX-style line endings: LF only
Perforce 2003.2 User’s Guide 47

Chapter 4: Perforce Basics: The Details
Referring to Files on the Command Line
File names provided as arguments to Perforce commands can be referred to in one of twoways: by using the names of the files in the client workspace, or by providing the namesof the files in the depot. When providing client workspace file names, you may give thename in either local syntax or Perforce syntax.
Local syntax
Local syntax is simply a file’s name as specified by the local shell or OS. This name may bean absolute path, or may be specified relative to the current directory, although it can onlycontain relative components at the beginning of the file name (that is, it doesn’t allowsub/dir/./here/file.c). On UNIX, Ed could refer to the README file at Elm’s top level as/usr/edk/elm/README, or in a number of other ways.
Perforce syntax
Perforce provides its own filename syntax which remains the same across operatingsystems. Filenames specified in this way begin with two slashes and the client or depotname, followed by the path name of the file relative to the client or depot root directory.
The components of the path are separated by slashes.
mac Macintosh-style: CR only
win Windows-style: CR, LF
share Shared mode: Line endings are LF with any CR/LF pairs translated to LF-only style before storage or syncing with the depot.
When you sync your client workspace, line endings will be LF. If you editthe file on a Windows machine, and your editor inserts CRs before each LF,the extra CRs will not appear in the archive file.
The most common use of the share option is for users of Windowsworkstations who mount their UNIX home directories mounted asnetwork drives; if you sync files from UNIX, but edit the files on aWindows machine, the share option eliminates problems caused byWindows-based editors’ insertion of carriage returns in text files.
Examples of Perforce syntax
//depot/...
//elm_client/docs/help.1
Option Meaning
48 Perforce 2003.2 User’s Guide

Chapter 4: Perforce Basics: The Details
Perforce syntax is sometimes called depot syntax or client syntax, depending on whether thefile specifier refers to a file in the depot or on the client, but both forms of file specificationwork the same way.
Providing files as arguments to commands
Because the client view provides a one-to-one mapping between any file in the clientworkspace and any file in the depot, any file can be specified within any PERFORCE commandin client syntax, depot syntax, or local syntax. A depot’s file specifier can be used to refer to afile in the client, and vice versa. Perforce will do the necessary mapping to determinewhich file is actually used.
Any filenames provided to Perforce commands can be specified in any valid local syntax,or in Perforce syntax by depot or client. If a client filename is provided, Perforce uses theclient view to locate the corresponding file in the depot. If a depot filename is given, theclient view is used to locate the corresponding file in the client workspace.
Example: Uses of different syntaxes to refer to a file.
Ed wants to delete the src/lock.c file. He can give the p4 delete command in a numberof ways:
While in his client root directory, he could typep4 delete src/lock.c
or, while in the src subdirectory, he could typep4 delete lock.c
or, while in any directory on the client host, he could type any of the following commands:p4 delete //eds_elm/src/lock.cp4 delete //depot/elm_proj/src/lock.cp4 delete /usr/edk/elm/src/lock.c
Client names and depot names in a single Perforce server share the same namespace, soPerforce will never confuse a client name with a depot name. Client workspace namesand depot names can never be the same.
Note The point of this section is worth repeating: any file can be specified withinany Perforce command in client syntax, depot syntax, or local syntax. Theexamples in this manual will use these syntaxes interchangeably.
Perforce 2003.2 User’s Guide 49

Chapter 4: Perforce Basics: The Details
Wildcards and Perforce syntax
Perforce wildcards may be mixed with both local or Perforce syntax. For example:
Name and String Limitations
Illegal characters in filenames and Perforce objects
In order to support internationalization, Perforce allows the use of “unprintable” (i.e. non-ASCII) characters in filenames, label names, client workspace names, and other identifiers.
Perforce wildcards, the pathname component separator (/), and the revision-specifyingcharacters @ and #, are not allowed in file names, label names, or other identifiers:
Observe that most of these characters tend to be difficult to use in filenames in cross-platform environments: UNIX separates path components with /, while many DOScommands interpret / as a command line switch. Most UNIX shells interpret # as thebeginning of a comment. Both DOS and UNIX shells automatically expand * to matchmultiple files, and the DOS command line uses % to refer to variables.
Wildcard Meaning
J* Files in the current directory starting with J
*/help All files called help in current subdirectories
... All files under the current directory and its subdirectories
.../*.c All such files ending in .c
/usr/edk/... All files under /usr/edk
//weasel/... All files on client (or depot) weasel
//depot/... All files in the depot named depot
//... All files in all depots (when used to specify files on the command line)
Character Reason
@ Perforce revision specifier for date, label name, or changelist number.
# Perforce revision specifier for revision numbers.
* Perforce wildcard: matches anything, works within a single directory
... Perforce wildcard: matches anything, works at the current directory leveland includes files in all directory levels below the current level.
% Perforce wildcard: %0 through %9 are used for positional substitutions.
/ Perforce separator for pathname components.
50 Perforce 2003.2 User’s Guide
Chapter 4: Perforce Basics: The Details
Caveats on non-ASCII filenames
Although non-ASCII characters are allowed in filenames and Perforce identifiers, enteringthem from the command line may require platform-specific solutions. Users of GUI-basedfile managers can manipulate such files with drag-and-drop operations.
For internationalization purposes, there are some limitations on how filenames with non-ASCII character sets are displayed. For Release 2001.1, all users should use a common codepage setting (under Windows, use the Regional Settings applet in the Control Panel;under UNIX, set the LOCALE environment variable) in order to ensure that all filenames aredisplayed consistently across all machines in your organization.
If you are using Perforce in internationalized mode, all users must have P4CHARSET setproperly. For details, see the Command Reference.
Using spaces in file and path names
Use quotation marks to enclose depot-side or client side mappings of files or directoriesthat contain spaces. For instance, the mapping:
"//depot/release 1.2/doc/..." "//eds_ws/1.2 documentation/..."
maps all files in //depot/main/release 1.2/doc into the 1.2 documentationsubdirectory of client workspace eds_ws.
Other Perforce objects, such as branch names, client names, label names, and so on, maybe specified with spaces, but these spaces are automatically converted to underscores bythe Perforce server.
Name and description lengths
Descriptions in the forms used by p4 client, p4 branch, and so on, may be of anylength. All names given to Perforce objects such as branches, clients, and so on, are limitedto 1024 characters.
Specifying Older File Revisions
All of the commands and examples we’ve seen thus far have been used to operate only onthe most recent revisions of particular files, but many Perforce commands can act on olderfile versions. For example, if Ed types p4 sync //eds_elm/src/lock.c, the latestrevision, or head revision, of lock.c is retrieved, but older revisions can be retrieved bytacking a revision specification onto the end of the file name.
Warning! Some OS shells treat the revision character # as a comment character if itstarts a new word. If your shell is one of these, escape the # before use.
Perforce 2003.2 User’s Guide 51

Chapter 4: Perforce Basics: The Details
RevisionSpecifier
Meaning Examples
file#n Revision number p4 sync lock.c#3
Refers to revision 3 of file lock.c
file@n A change number p4 sync lock.c@126
Refers to the version of lock.c whenchangelist 126 was submitted, even if it wasnot part of the change.
p4 sync //depot/...@126
Refers to the state of the entire depot atchangelist 126 (numbered changelists areexplained in Chapter 7, Changelists).
file@labelname A label name p4 sync lock.c@beta
The revision of lock.c in the label calledbeta (labels are explained in Chapter 8,Labels).
file@clientname A client name.
The revision of filelast taken intoclient workspaceclientname.
p4 sync lock.c@lisag_ws
The revision of lock.c last taken into clientworkspace lisag_ws
file#none The nonexistentrevision.
p4 sync lock.c#none
Says that there should be no version oflock.c in the client workspace, even if oneexists in the depot.
file#head The head revision,or latest version,of the file.
p4 sync lock.c#head
Except for explicitly noted exceptions, this isidentical to referring to the file with norevision specifier.
file#have The revision onthe current client.
This issynonymous to@client whereclient is thecurrent clientname.
p4 sync lock.c#have
The revision of lock.c found in the currentclient.
52 Perforce 2003.2 User’s Guide
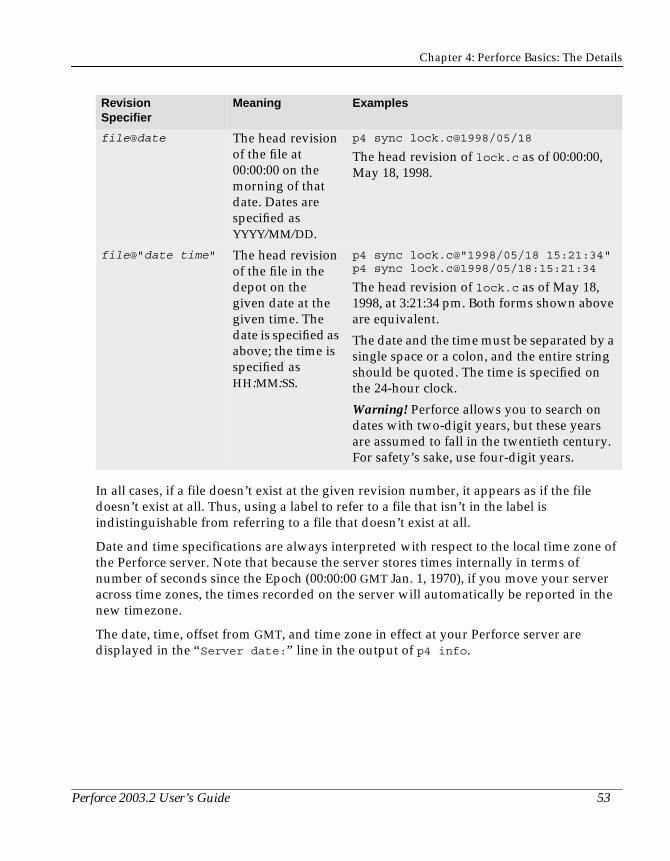
Chapter 4: Perforce Basics: The Details
In all cases, if a file doesn’t exist at the given revision number, it appears as if the filedoesn’t exist at all. Thus, using a label to refer to a file that isn’t in the label isindistinguishable from referring to a file that doesn’t exist at all.
Date and time specifications are always interpreted with respect to the local time zone ofthe Perforce server. Note that because the server stores times internally in terms ofnumber of seconds since the Epoch (00:00:00 GMT Jan. 1, 1970), if you move your serveracross time zones, the times recorded on the server will automatically be reported in thenew timezone.
The date, time, offset from GMT, and time zone in effect at your Perforce server aredisplayed in the “Server date:” line in the output of p4 info.
file@date The head revisionof the file at00:00:00 on themorning of thatdate. Dates arespecified asYYYY/MM/DD.
p4 sync lock.c@1998/05/18
The head revision of lock.c as of 00:00:00,May 18, 1998.
file@"date time" The head revisionof the file in thedepot on thegiven date at thegiven time. Thedate is specified asabove; the time isspecified asHH:MM:SS.
p4 sync lock.c@"1998/05/18 15:21:34"p4 sync lock.c@1998/05/18:15:21:34
The head revision of lock.c as of May 18,1998, at 3:21:34 pm. Both forms shown aboveare equivalent.
The date and the time must be separated by asingle space or a colon, and the entire stringshould be quoted. The time is specified onthe 24-hour clock.
Warning! Perforce allows you to search ondates with two-digit years, but these yearsare assumed to fall in the twentieth century.For safety’s sake, use four-digit years.
RevisionSpecifier
Meaning Examples
Perforce 2003.2 User’s Guide 53

Chapter 4: Perforce Basics: The Details
Using revision specifications without filenames
Revision specifications can be provided without file names. This limits the command’saction to the specified revision of all files in the depot or in the client’s workspace. Thus,#head refers to the head revisions of all files in the depot, and @labelname refers to therevisions of all files in the named label.
Example: Retrieving files using revision specifiers.
Ed wants to retrieve all the doc files into his Elm doc subdirectory, but he wants to see onlythose revisions that existed at change number 30. He types
p4 sync //eds_elm/doc/*@30
Later, he creates another client for a different user. The new client should have all of the filerevisions that Ed last synced. Ed sets up the new client specification and types
p4 sync //depot/elm_proj/...@eds_elm
He could have typedp4 sync @eds_elm
and the effect would have been the same.
Example: Removing files from the client workspace.
Another client needs all its files removed, but these files shouldn’t be deleted from the depot.Ed sets P4CLIENT to the correct clientname, and types
p4 sync #none
The files are removed from his workspace (“synced to the nonexistent revision”), but not fromthe depot.
Revision Ranges
A few Perforce client commands can limit their actions to a range of revision numbers,rather than just a single revision. A revision range is two revision specifications, separatedby a comma.
If only a single revision is given where a revision range is expected, the named revisionspecifies the end of the range, and the start of the range is assumed to be 1. If no revisionnumber or range is given where a revision range is expected, the default is all revisions.
The commands that accept revision range specifications are:
p4 changes p4 file p4 integrate p4 jobs
p4 print p4 sync p4 verify
54 Perforce 2003.2 User’s Guide
Chapter 4: Perforce Basics: The Details
Example: Listing changes with revision ranges.
A release manager needs to see a list of all changes to the Elm project in July. He types:p4 changes //depot/elm_proj/...@2000/7/1,2000/8/1
The resulting list of changes looks like this:Change 632 on 2000/07/1 by edk@eds_elm ’Started work’Change 633 on 2000/07/1 by edk@eds_elm ’First build w/bug fix’...Change 673 on 2000/07/31 by edk@eds_elm ’Final build for QA’
He can then use p4 describe change# against any desired change for a full description.
File Types
Perforce supports six base file types: text files, binary files, unicode files, native applefiles on the Macintosh, Mac resource forks, and UNIX symlinks. File type modifiers canbe applied to the base types to enable preservation of timestamps, support for RCSkeyword expansion, file compression on the server, and more.
When you add a file, Perforce attempts to determine the type of the file automatically:when a file is opened with p4 add, Perforce first determines if the file is a regular file or asymbolic link, and then examines the first part of the file to determine whether it’s text orbinary. If any non-text characters are found, the file is assumed to be binary; otherwise,the file is assumed to be text. (Files of type unicode are detected only when the server isrunning in unicode mode; for details, see your system administrator.)
Once set, a file’s type is inherited from one revision to the next, but can be overridden orchanged by opening the file with the -t filetype flag:
• p4 add -t filetype filespec adds the files as the type you’ve specified.
• p4 edit -t filetype filespec opens the file for edit; when the files are submitted,their type will be changed.
• p4 reopen -t filetype filespec changes the type of a file that’s already open foradd or edit.
The filetype argument is specified as basetype+modifiers. File type modifiers may becombined; for instance, to change the file type of your Perl script myscript.pl toexecutable text with RCS keyword expansion, use p4 edit -t text+kx myscript.pl.You can determine the type of an existing file by using p4 opened or p4 files.
File revisions of binary files are normally stored in full within the depot, but only changesmade to text files since the previous revision are normally stored. This is called deltastorage, and Perforce uses RCS format to store its deltas. The file’s type determineswhether full file or delta storage is used. When delta storage is used, file merges and file
Perforce 2003.2 User’s Guide 55

Chapter 4: Perforce Basics: The Details
compares can be performed. Files that are stored in their full form cannot be merged orcompared.
Some file types are compressed to gzip format when stored in the depot. Thecompression occurs during the submission process, and decompression happens whilesyncing. The client workspace always contains the file as it was submitted.
Base file types
The base Perforce file types are:
Warning! Do not try to fool Perforce into storing binary files in delta storage bychanging the file type to text! If you add a file that contains a ^Z as textfrom a Windows client, only the part of the file up to the ^Z will be stored inthe depot.
Keyword Description Comments Server StorageType
text Text file Treated as text on the client. Line-endingtranslations are performed automaticallyon Windows and Macintosh clients.
delta
binary Non-text file Accessed as binary files on the client.Stored compressed within the depot.
full file,compressed
symlink Symbolic link UNIX clients (and the BeOS client) accessthese as symbolic links. Non-UNIXclients treat them as (small) text files.
delta
apple Multi-forkedMacintosh file
AppleSingle storage of Mac data fork,resource fork, file type and file creator.New to Perforce 99.2.
For full details, please see the Macplatform notes athttp://www.perforce.com/perforce/technical.html
full file,compressed,AppleSingleformat.
resource Macintoshresource fork
The only file type for Mac resource forksin Perforce 99.1 and before. This is stillsupported, but we recommend using thenew apple file type instead.
For full details, please see the Macplatform notes athttp://www.perforce.com/perforce/technical.html
full file,compressed
56 Perforce 2003.2 User’s Guide

Chapter 4: Perforce Basics: The Details
File type modifiers
The file type modifiers are:
unicode Unicode file Perforce servers operating ininternationalized mode support aUnicode file type. These files aretranslated into the local character set.
For details, see the System Administrator’sGuide.
Stored as UTF-8
Modifier Description Comments
+x Execute bit set on client Used for executable files.
+w File is always writable onclient
+ko Old-style keyword expansion Expands only the $Id$ and $Header$
keywords:
This pair of modifiers exists primarily forbackwards compatibility with versions ofPerforce prior to 2000.1, and correspondsto the +k (ktext) modifier in earlierversions of Perforce.
+k RCS keyword expansion Expands RCS (Revision Control System)keywords. RCS keywords are case-sensitive.
When using keywords in files, a colon afterthe keyword (e.g., $Id:$) is optional.
Supported keywords are:
• $Id$
• $Header$
• $Date$
• $DateTime$
• $Change$
• $File$
• $Revision$
• $Author$
Keyword Description Comments Server StorageType
Perforce 2003.2 User’s Guide 57

Chapter 4: Perforce Basics: The Details
File type keywords
Versions of Perforce prior to 99.1 used a set of keywords to specify file types. Thefollowing table lists the older keywords and their current base file types and modifiers:
+l Exclusive open (locking) If set, only one user at a time will be able toopen a file for editing.
Useful for binary file types (e.g., graphics)where merging of changes from multipleauthors is meaningless.
+C Server stores the fullcompressed version of eachfile revision
Default server storage mechanism forbinary files.
+D Server stores deltas in RCSformat
Default server storage mechanism for textfiles.
+F Server stores full file perrevision
Useful for long ASCII files that aren’t readby users as text, such as PostScript files.
+S Only the head revision isstored on the server
Older revisions are purged from the depotupon submission of new revisions. Usefulfor executable or .obj files.
+m Preserve original modtime The file’s timestamp on the local filesystemis preserved upon submission and restoredupon sync. Useful for third-party DLLs inWindows environments.
Old Keyword Description Base Filetype Modifiers
text Text file text none
xtext Executable text file text +x
ktext Text file with RCS keyword expansion text +k
kxtext Executable text file with RCS keywordexpansion
text +kx
binary Non-text file binary none
xbinary Executable binary file binary +x
ctext Compressed text file text +C
cxtext Compressed executable text file text +Cx
symlink Symbolic link symlink none
resource Macintosh resource fork resource none
Modifier Description Comments
58 Perforce 2003.2 User’s Guide

Chapter 4: Perforce Basics: The Details
Overriding file types with the typemap table
Some file formats (for example, Adobe PDF files, and Rich Text Format files) are actuallybinary files, but can sometimes be mistakenly detected by Perforce as being of type text.Your system administrator can use the p4 typemap command to set up a table matchingPerforce file types to file name specifications.
When you open a new file for add, Perforce checks the typemap table. If the file matchesan entry in the table, Perforce uses the file type specified in the table, rather than the filetype it would have otherwise used. You can override the file type specified in thetypemap table by specifying it on the command line with the -t filetype modifier.
Preserving timestamps with the modtime (+m) modifier
The modtime (+m) modifier is a special case: It is intended for use by developers who needto preserve a file’s original timestamp. (Normally, Perforce updates the timestamp when afile is synced.) It allows a user to ensure that the timestamp of a file in a client workspaceafter a p4 sync will be the original timestamp existing on the file at the time of submission(that is, not the time at the Perforce server at time of submission, and not the time on theclient at the time of sync).
The +m modifier is useful when developing using the third-party DLLs often encounteredin Windows environments. Because the timestamps on such files are often used as proxiesfor versioning information (both within the development environment and also by theoperating system), it is sometimes necessary to preserve the files’ original timestampsregardless of a Perforce user’s client settings. If you use the +m modifier on a file, Perforceignores the modtime (“file’s timestamp at time of submission”) or nomodtime (“date andtime on the client at time of sync”) options on the p4 client form when syncing the file,and always restore the file’s original timestamp at the time of submit.
uresource Uncompressed Macintosh resource fork resource +F
ltext Long text file text +F
xltext Executable long text file text +Fx
ubinary Uncompressed binary file binary +F
uxbinary Uncompressed executable binary file binary +Fx
tempobj Temporary object ubinary +FSw
ctempobj Temporary object (compressed) cbinary +Sw
xtempobj Temporary executable object ubinary +FSwx
xunicode Executable unicode unicode +x
Old Keyword Description Base Filetype Modifiers
Perforce 2003.2 User’s Guide 59

Chapter 4: Perforce Basics: The Details
Expanding RCS keywords with the +k modifier
If you use the +k modifier to activate RCS keyword expansion for a file, RCS keywords areexpanded as follows:
Forms and Perforce Commands
Certain Perforce commands, such as p4 client and p4 submit, present a form to theuser to be filled in with values. This form is displayed in the editor defined in theenvironment variable P4EDITOR. When the user changes the form and exits the editor, theform is parsed by Perforce, checked for errors, and used to complete the commandoperation. If there are errors, Perforce gives an error message and you must try again.
The rules of form syntax are simple: keywords must be against the left margin and endwith a colon, and values must either be on the same line as the keyword or indented onthe lines beneath the keyword. Only the keywords already present on the form arerecognized. Some keywords, such as the Client: field in the p4 client form, take a
Keyword Expands To Example
$Id$ File name and revisionnumber in depot syntax
$Id: //depot/path/file.txt#3 $
$Header$ Synonymous with $Id$ $Header: //depot/path/file.txt#3 $
$Date$ Date of last submission informat YYYY/MM/DD
$Date: 2000/08/18 $
$DateTime$ Date and time of lastsubmission in formatYYYY/MM/DD hh:mm:ss
Date and time are as of thelocal time on the Perforceserver at time ofsubmission.
$DateTime: 2000/08/18 23:17:02 $
$Change$ Perforce changelistnumber under which filewas submitted
$Change: 439 $
$File$ File name only, in depotsyntax (without revisionnumber)
$File: //depot/path/file.txt $
$Revision$ Perforce revision number $Revision: #3 $
$Author$ Perforce user submittingthe file
$Author: edk $
60 Perforce 2003.2 User’s Guide

Chapter 4: Perforce Basics: The Details
single value; other fields, such as Description:, take a block of text; and others, likeView:, take a list of lines.
Certain fields, like Client: in p4 client, can’t have their values changed; others, likeDescription: in p4 submit, must have their values changed. If you don’t change a fieldthat needs to be changed, or vice versa, the worst that will happen is that you’ll get anerror. When in doubt about what fields can be modified, see the Command Reference or usep4 help command.
Reading forms from standard input;Writing forms to standard output
Any commands that require the user to fill in a form, such as p4 client and p4 submit,can read the form from standard input with the -i flag. Similarly, the -o flag can be usedto write a form specification to standard output.
These two flags are primarily used in scripts that access Perforce: use the -o flag to read aform, process the strings representing the form within your script, and then use the -iflag to send the processed form back to Perforce.
For example, to create a new job within a script you could first use p4 job -o >tempfile to read a blank job specification, then add information to the proper lines intempfile, and finally use a command like p4 job -i < tempfile to store the new job inPerforce.
The commands that display forms and can therefore use these flags are:
* p4 submit can take the -i flag, but not the -o flag.
General Reporting Commands
Many reporting commands have specialized functions, and these are discussed in laterchapters. The following reporting commands give the most generally useful information;all of these commands can take file name arguments, with or without wildcards, to limitreporting to specific files. Without the file arguments, the reports are generated for allfiles.
p4 branch p4 change p4 client
p4 job p4 label p4 protect
p4 submit* p4 typemap p4 user
Perforce 2003.2 User’s Guide 61

Chapter 4: Perforce Basics: The Details
The following Perforce reporting commands generate information on depot files, not fileswithin the client workspace. When files are specified in local or client syntax on thecommand line, Perforce uses the client workspace view to map the specified files to theirlocations in the depot.
Revision specifiers can be used with all of these reporting commands, for example p4files @clientname can be used to report on all the files in the depot that are currentlyfound in client workspace clientname. See Chapter 11, Reporting and Data Mining, for amore detailed discussion of each of these commands.
Command Meaning
p4 filelog Generates a report on each revision of the file(s), in reversechronological order.
p4 files Lists file name, latest revision number, file type, and other informationabout the named file(s).
p4 sync -n Tells you what p4 sync would do, without doing it.
p4 have Lists all the revisions of the named files within the client that were lastgotten from the depot. Without any files specifier, it lists all the files inthe depot that the client has.
p4 opened Reports on all files in the depot that are currently open for edit, add,delete, branch, or integrate within the client workspace.
p4 print Lists the contents of the named file(s) to standard output.
p4 where Given a file argument, displays the mapping of that file within thedepot, the client workspace, and the local OS.
62 Perforce 2003.2 User’s Guide

Chapter 5 Perforce Basics:Resolving File Conflicts
File conflicts can occur when two users edit and submit two versions of the same file.Conflicts can occur in a number of ways, but the situation is usually a variant of thefollowing:
1. Ed opens file file.c for edit.
2. Lisa opens the same file in her client for edit.
3. Ed and Lisa both edit their client workspace versions of file.c.
4. Ed submits a changelist containing file.c, and the submit succeeds.
5. Lisa submits a changelist with her version of file.c; and her submit fails.
If Perforce were to accept Lisa’s version into the depot, the head revision would containnone of Ed’s changes. Instead, the changelist is rejected and a resolve must be performed.The resolve process allows a choice to be made: Lisa’s version can be submitted in place ofEd’s, Lisa’s version can be dumped in favor of Ed’s, a Perforce-generated merged versionof both revisions can be submitted, or the Perforce-generated merged file can be editedand then submitted.
Resolving a file conflict is a two-step process: first the resolve is scheduled, then the resolveis performed. A resolve is automatically scheduled when a submit of a changelist failsbecause of a file conflict; the same resolve can be scheduled manually, withoutsubmitting, by syncing the head revision of a file over an opened revision within the clientworkspace. Resolves are always performed with p4 resolve.
Perforce also provides facilities for locking files when they are edited. This can eliminatefile conflicts entirely.
RCS Format: How Perforce Stores File Revisions
Perforce uses RCS format to store its text file revisions; binary file revisions are alwayssaved in full. If you already understand what this means, you can skip to the next sectionof this chapter, as the remainder of this section explains how RCS format works.
Only the differences between revisions are stored
A single file might have hundreds, even thousands, of revisions. Every revision of aparticular file must be retrievable, and if each revision was stored in full, disk spaceproblems could occur: one thousand 10KB files, each with a hundred revisions, would usea gigabyte of disk space. The scheme used by most SCM systems, including Perforce, is to
Perforce 2003.2 User’s Guide 63
Chapter 5: Perforce Basics: Resolving File Conflicts
save only the latest revision of each file, and then store the differences between each filerevision and the one previous.
As an example, suppose that a Perforce depot has three revisions of file file. The headrevision (file#3) looks like this:
Revision two might be stored as a symbolic version of the following:
And revision one might be a representation of this:
From these partial file descriptions, any file revision can be reconstructed. Thereconstructed file#1 would read
The RCS (Revision Control System) algorithm, developed by Walter Tichy, uses a notationfor implementing this system that requires very little storage space and is quite fast. InRCS terminology, it is said that the full text of the head revisions are stored, along with thereverse deltas of each previous revision.
It is interesting to note that the full text of the first revision could be stored, with the deltasleading forward through the revision history of the file, but RCS has chosen the otherpath: the full text of the head revision of each file is stored, with the deltas leadingbackwards to the first revision. This is because the head revision is accessed much morefrequently than previous file revisions; if the head revision of a file had to be calculatedfrom the deltas each time it was accessed, any SCM utilizing RCS format would run muchmore slowly.
file#3:This is a testof theemergencybroadcast system
file#2:line 3 was “urgent”
file#1:line 4 was “system”
Reconstructed file#1:This is a testof theurgentsystem
64 Perforce 2003.2 User’s Guide

Chapter 5: Perforce Basics: Resolving File Conflicts
Use of “diff” to determine file revision differences
RCS uses the “GNU diff” algorithm to determine the differences between two versions ofthe same file; p4d contains its own diff routine which is used by Perforce servers todetermine file differences when storing deltas.
Because Perforce’s diff always determines file deltas by comparing chunks of textbetween newline characters, it is by default only used with text files. If a file is binary,each revision is stored in full.
Scheduling Resolves of Conflicting Files
Whenever a file revision is to be submitted that is not an edit of the file’s current headrevision, there will be a file conflict, and this conflict must be resolved.
In slightly more technical terms, we’ll call the file revision that was read into a clientworkspace the base file revision. If the base file revision for a particular file in a clientworkspace is not the same as the head revision of the same file in the depot, a resolve mustbe performed before the new file revision can be accepted into the depot.
Before resolves can be performed with p4 resolve, they must be scheduled; this can bedone with p4 sync. An alternative is to submit a changelist that contains the newlyconflicting files. If a resolve is necessary, the submit fails, and the resolve is scheduledautomatically.
Why “p4 sync” to Schedule a Resolve?
Remember that the job of p4 sync is to project the state of the depot onto the client. Thus,when p4 sync is performed on a particular file:
• If the file does not exist in the client, or it is found in the client but is unopened, it iscopied from the depot to the client.
• If the file has been deleted from the depot, it is deleted from the client.
• If the file has been opened in the client with p4 edit, the Perforce server can’t simplycopy the file onto the client: any changes that had been made to the current revision ofthe file in the client would be overwritten. Instead, a resolve is scheduled between thefile revision in the depot, the file on the client, and the base file revision (the revisionthat was last read into the client).
Example: Scheduling resolves with p4 sync
Ed is making a series of changes to the *.guide files in the elm doc subdirectory. He hasretrieved the //depot/elm_proj/doc/*.guide files into his client and has opened the fileswith p4 edit. He edits the files, but before he has a chance to submit them, Lisa submits new
Perforce 2003.2 User’s Guide 65

Chapter 5: Perforce Basics: Resolving File Conflicts
versions of some of the same files to the depot. The versions Ed has been editing are no longerthe head revisions, and resolves must be scheduled and performed for each of the conflictingfiles before Ed’s edits can be accepted.
Ed schedules the resolves with p4 sync //edk/doc/*.guide. Since these files are alreadyopen in the client, Perforce doesn’t replace the client files. Instead, Perforce schedules resolvesbetween the client files and the head revisions in the depot.
Alternatively, Ed could have submitted the //depot/elm_proj/doc/*.guide files in achangelist; the file conflicts would cause the p4 submit to fail, and the resolves would bescheduled as part of the submission failure.
How Do I Know When a Resolve is Needed?
p4 submit fails when it determines that any of the files in the submitted changelist needto be resolved, and the error message includes the names of the files that need resolution.If the changelist provided to p4 submit was the default changelist, it is assigned anumber, and this number must be used in all future references to the changelist.(Numbered changelists are discussed in Chapter 7, Changelists)
Another way of determining whether a resolve is needed is to run p4 sync -n filenames
before performing the submit, using the files in the changelist as arguments to thecommand. If file conflict resolutions are necessary, p4 sync -n reports them. Theadvantage of this approach is that the files in the default changelist remain in the defaultchangelist (that is, the default changelist will not be reassigned to a numbered changelist).
Performing Resolves of Conflicting Files
File conflicts are fixed with p4 resolve [filenames]. Each file provided as anargument to p4 resolve is processed separately. p4 resolve starts with three revisionsof the same file and generates a fourth version; the user can accept any of these revisionsin place of the current client file, and can edit the generated version before accepting it.The new revisions must then be submitted with p4 submit.
p4 resolve is interactive; a series of options are displayed for the user to respond to. Thedialog looks something like this:
The remainder of this section explains what this means, and how to use this dialog.
/usr/edk/elm/doc/answer.1 - merging //depot/elm_proj/doc/answer.1#5Diff chunks: 4 yours + 2 theirs + 1 both + 1 conflictingAccept(a) Edit(e) Diff(d) Merge (m) Skip(s) Help(?) [e]:
66 Perforce 2003.2 User’s Guide

Chapter 5: Perforce Basics: Resolving File Conflicts
File revisions used and generated by “p4 resolve”
p4 resolve [filenames] starts with three revisions of the same file, generates a newversion that merges elements of all three revisions, allows the user to edit the new file,and writes the new file (or any of the original three revisions) to the client. The filerevisions used by p4 resolve are these:
The remainder of this chapter will use the terms theirs, yours, base, merge, and result
to refer to the corresponding file revisions. The definitions given above are somewhatdifferent when resolve is used to integrate branched files.
Types of conflicts between file revisions
The diff program that underlies the Perforce resolve mechanism determines differencesbetween file revisions on a line-by-line basis. Once these differences are found, they aregrouped into chunks: for example, three new lines that are adjacent to each other aregrouped into a single chunk. Yours and theirs are both generated by a series of edits tobase; for each set of lines in yours, theirs, and base, p4 resolve asks the followingquestions:
• Is this line set the same in yours, theirs, and base?
• Is this line set the same in theirs and base, but different in yours?
yours The newly-edited revision of the file in the client workspace.This file is overwritten by result once the resolve process iscomplete.
theirs The revision in the depot that the client revision conflicts with.Usually, this is the head revision, but p4 sync can be used toschedule a resolve with any revision between the head revisionand base.
base The file revision in the depot that yours was edited from. Notethat base and theirs are different revisions; if they were thesame, there would be no reason to perform a resolve.
merge File variation generated by Perforce from theirs, yours, andbase.
result The file resulting from the resolve process. result is written tothe client workspace, overwriting yours, and must subsequentlybe submitted by the user. The instructions given by the userduring the resolve process determine exactly what is containedin this file. The user can simply accept theirs, yours, or mergeas the result, or can edit merge to have more control over theresult.
Perforce 2003.2 User’s Guide 67
Chapter 5: Perforce Basics: Resolving File Conflicts
• Is this line set the same in yours and base, but different in theirs?
• Is this line set the same in yours and theirs, but different in base?
• Is this line set different in all three files?
Any line sets that are the same in all three files don’t need to be resolved. The number ofline sets that answer the other four questions are reported by p4 resolve in this form:
2 yours + 3 theirs + 1 both + 5 conflicting
In this case, two line sets are identical in theirs and base but are different in yours; threeline sets are identical in yours and base but are different in theirs; one line set waschanged identically in yours and theirs; and five line sets are different in yours, theirs,and base.
How the merge file is generated
p4 resolve generates a preliminary version of the merge file, which can be accepted as is,edited and then accepted, or rejected. A simple algorithm is followed to generate this file:any changes found in yours, theirs, or both yours and theirs are applied to the basefile and written to the merge file; and any conflicting changes will appear in the merge filein the following format:
Thus, editing the Perforce-generated merge file is often as simple as opening the mergefile, searching for the difference marker “>>>>”, and editing that portion of the text. Thisisn’t always the case, as it is often necessary to examine the changes made to theirs tomake sure they’re compatible with other changes that you made. This can be facilitated bycalling p4 resolve with the -v flag; p4 resolve -v tells Perforce to generate differencemarkers for all changes made in either file being resolved, instead of only for changes thatare in conflict between the yours and theirs files.
The “p4 resolve” options
The p4 resolve command offers the following options:
>>>> ORIGINAL VERSION file#n(text from the original version)==== THEIR VERSION file#m(text from their file)==== YOUR VERSION file(text from your file)<<<<
Option Short Meaning What it Does
e edit merged Edit the preliminary merge file generated by Perforce
ey edit yours Edit the revision of the file currently in the client
68 Perforce 2003.2 User’s Guide
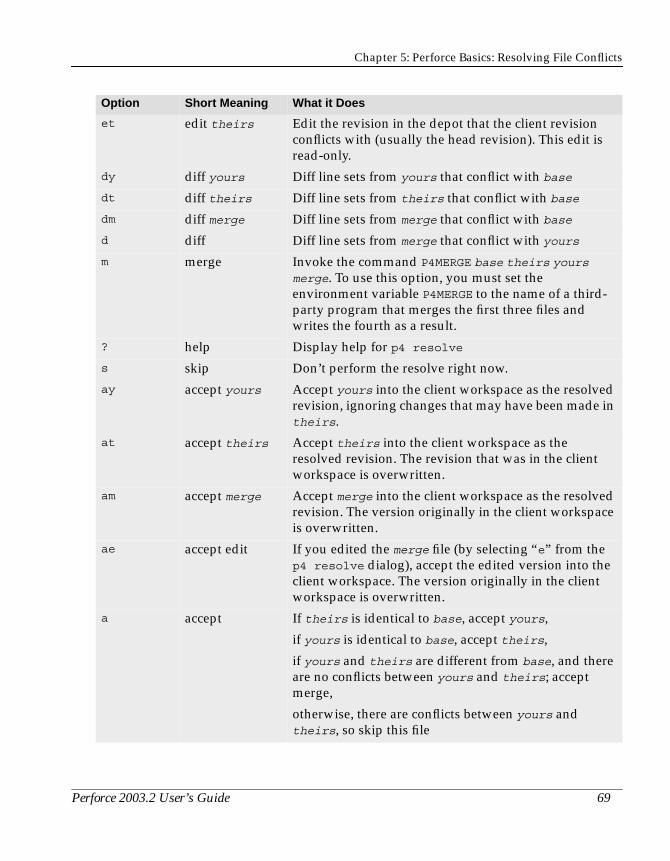
Chapter 5: Perforce Basics: Resolving File Conflicts
et edit theirs Edit the revision in the depot that the client revisionconflicts with (usually the head revision). This edit isread-only.
dy diff yours Diff line sets from yours that conflict with base
dt diff theirs Diff line sets from theirs that conflict with base
dm diff merge Diff line sets from merge that conflict with base
d diff Diff line sets from merge that conflict with yours
m merge Invoke the command P4MERGE base theirs yours
merge. To use this option, you must set theenvironment variable P4MERGE to the name of a third-party program that merges the first three files andwrites the fourth as a result.
? help Display help for p4 resolve
s skip Don’t perform the resolve right now.
ay accept yours Accept yours into the client workspace as the resolvedrevision, ignoring changes that may have been made intheirs.
at accept theirs Accept theirs into the client workspace as theresolved revision. The revision that was in the clientworkspace is overwritten.
am accept merge Accept merge into the client workspace as the resolvedrevision. The version originally in the client workspaceis overwritten.
ae accept edit If you edited the merge file (by selecting “e” from thep4 resolve dialog), accept the edited version into theclient workspace. The version originally in the clientworkspace is overwritten.
a accept If theirs is identical to base, accept yours,
if yours is identical to base, accept theirs,
if yours and theirs are different from base, and thereare no conflicts between yours and theirs; acceptmerge,
otherwise, there are conflicts between yours andtheirs, so skip this file
Option Short Meaning What it Does
Perforce 2003.2 User’s Guide 69
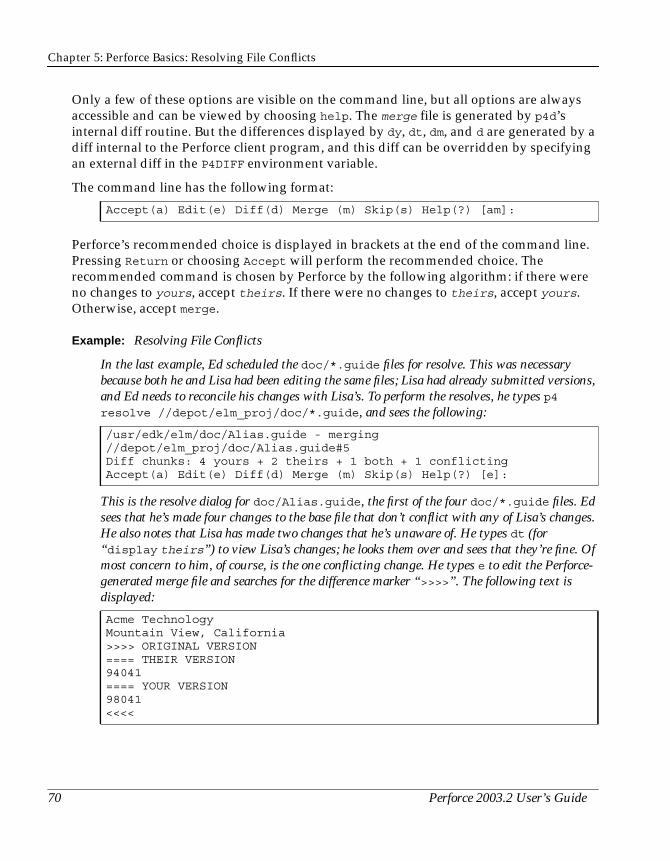
Chapter 5: Perforce Basics: Resolving File Conflicts
Only a few of these options are visible on the command line, but all options are alwaysaccessible and can be viewed by choosing help. The merge file is generated by p4d’sinternal diff routine. But the differences displayed by dy, dt, dm, and d are generated by adiff internal to the Perforce client program, and this diff can be overridden by specifyingan external diff in the P4DIFF environment variable.
The command line has the following format:
Perforce’s recommended choice is displayed in brackets at the end of the command line.Pressing Return or choosing Accept will perform the recommended choice. Therecommended command is chosen by Perforce by the following algorithm: if there wereno changes to yours, accept theirs. If there were no changes to theirs, accept yours.Otherwise, accept merge.
Example: Resolving File Conflicts
In the last example, Ed scheduled the doc/*.guide files for resolve. This was necessarybecause both he and Lisa had been editing the same files; Lisa had already submitted versions,and Ed needs to reconcile his changes with Lisa’s. To perform the resolves, he types p4resolve //depot/elm_proj/doc/*.guide, and sees the following:
This is the resolve dialog for doc/Alias.guide, the first of the four doc/*.guide files. Edsees that he’s made four changes to the base file that don’t conflict with any of Lisa’s changes.He also notes that Lisa has made two changes that he’s unaware of. He types dt (for“display theirs”) to view Lisa’s changes; he looks them over and sees that they’re fine. Ofmost concern to him, of course, is the one conflicting change. He types e to edit the Perforce-generated merge file and searches for the difference marker “>>>>”. The following text isdisplayed:
Accept(a) Edit(e) Diff(d) Merge (m) Skip(s) Help(?) [am]:
/usr/edk/elm/doc/Alias.guide - merging//depot/elm_proj/doc/Alias.guide#5Diff chunks: 4 yours + 2 theirs + 1 both + 1 conflictingAccept(a) Edit(e) Diff(d) Merge (m) Skip(s) Help(?) [e]:
Acme TechnologyMountain View, California>>>> ORIGINAL VERSION==== THEIR VERSION94041==== YOUR VERSION98041<<<<
70 Perforce 2003.2 User’s Guide
Chapter 5: Perforce Basics: Resolving File Conflicts
He and Lisa have both tried to add a zip code to an address in the file, but Ed had typed itwrong. He edits this portion of the merge file so it reads as follows:
The merge file is now acceptable to him: he’s viewed Lisa’s changes, seen that they’recompatible with his own, and the only line conflict has been resolved. He quits from the editorand types am; the edited merge file is written to the client, and the resolve process continues onthe next doc/*.guide file.
When a version of the file is accepted onto the client, the previous client file isoverwritten, and the new client file must still be submitted to the depot. Note that it ispossible for another user to have submitted yet another revision of the same file to thedepot between the time p4 resolve completes and the time p4 submit is performed; inthis case, it would be necessary to perform another resolve. This can be prevented byperforming a p4 lock on the file before performing the resolve.
Using Flags with Resolveto Automatically Accept Particular Revisions
Five optional p4 resolve flags tell the command to work non-interactively. When theseflags are used, particular revisions of the conflicting files are automatically accepted.
Acme TechnologyMountain View, California94041
“p4 resolve” flag Meaning
-ay Automatically accept yours.
-at Automatically accept theirs. Use this option with caution, as the filerevision in the client workspace will be overwritten with no chance ofrecovery.
-am Automatically accept the Perforce-recommended file revision:
If theirs is identical to base, accept yours,
if yours is identical to base, accept theirs,
if yours and theirs are different from base, and there are no conflictsbetween yours and theirs, accept merge,
otherwise, there are conflicts between yours and theirs, so skip thisfile.
Perforce 2003.2 User’s Guide 71

Chapter 5: Perforce Basics: Resolving File Conflicts
Example: Automatically accepting particular revisions of conflicting files
Ed has been editing the files in doc/*.guide, and knows that some of them will requireresolving. He types p4 sync doc/*.guide, and all of these files that conflict with files inthe depot are scheduled for resolve.
He then types p4 resolve -am, and the merge files for all scheduled resolves are generated,and those merge files that contain no line set conflicts are written to his client workspace.
He’ll still need to manually resolve all the other conflicting files, but the amount of work heneeds to do is substantially reduced.
Binary files and “p4 resolve”
If any of the three file revisions participating in the merge are binary instead of text, athree-way merge is not possible. Instead, p4 resolve performs a two-way merge: the twoconflicting file versions are presented, and you can edit and choose between them.
Locking Files to Minimize File Conflicts
Once open, a file can be locked with p4 lock so that only the user who locked the file cansubmit the next revision of that file to the depot. Once the file is submitted, it isautomatically unlocked. Locked files can also be unlocked manually by the locking userwith p4 unlock.
The clear benefit of p4 lock is that once a file is locked, the user who locked it experiencesno further conflicts on that file, and will not need to resolve the file. However, this comesat a price, as other users will not be able to submit the file until the file is unlocked, andwill have to do their own resolves once they submit their revision. Under mostcircumstances, a user who locks a file is essentially saying to other users “I don’t want todeal with any resolves; you do them.”
There is an exception to this rule: Perforce also has a +l file type modifier to supportexclusive-open. If you have a +l file open for edit, other users who attempt to edit the filewill receive an error message.
-af Accept the Perforce-recommended file revision, no matter what. Ifthis option is used, the resulting file in the client should be edited toremove any difference markers.
-as If theirs is identical to base, accept yours;
if yours is identical to base, accept theirs;
otherwise skip this file.
“p4 resolve” flag Meaning
72 Perforce 2003.2 User’s Guide
Chapter 5: Perforce Basics: Resolving File Conflicts
The difference between p4 lock and +l is that p4 lock allows anyone to open a file foredit, but only the person who locked the file may submit it. By contrast, a file of type +lallows only one person to open the file for edit in the first place.
Preventing multiple resolves with p4 lock
Without file locking, there is no guarantee that the resolve process will ever end. Thefollowing scenario demonstrates the problem:
1. Ed opens file file for edit.
2. Lisa opens the same file in her client for edit.
3. Ed and Lisa both edit their client workspace versions of file.
4. Ed submits a changelist containing that file, and his submit succeeds.
5. Lisa submits a changelist with her version of the file; her submit fails because of fileconflicts with the new depot’s file.
6. Lisa starts a resolve.
7. Ed edits and submits a new version of the same file.
8. Lisa finishes the resolve and attempts to submit; the submit fails and must now bemerged with Ed’s latest file.
...and so on
File locking can be used in conjunction with resolves to avoid this sort of headache. Thesequence would be implemented as follows:
1. Before scheduling a resolve, lock the file.
2. Then sync the file, resolve the file, and submit the file.
As long as the locked file is open, new versions can’t be submitted by other users until theresolved file is either submitted or unlocked.
Locked files appear in the output of p4 opened with an indication of *locked*. On UNIX,you can find all locked files you have open with the following command:
p4 opened | grep "*locked*"
This lists all open files you have locked with p4 lock.
Preventing multiple checkouts with +l files
If you know in advance that a certain file is only going to be worked on by a single user,you can use the +l (exclusive-open) filetype modifier to ensure that only one user at atime may work on the file.
Perforce 2003.2 User’s Guide 73

Chapter 5: Perforce Basics: Resolving File Conflicts
You can change a file’s type to exclusive-open by reopening it with the +l modifier. Forinstance:
p4 reopen -t binary+l file.gif
Although this prevents concurrent development, for some file types (usually binary files),merging and resolving may not be meaningful, and you may decide that you prefer toallow only one user to check these files out at a time.
If you find this style of work to be useful, you may want to ask your Perforceadministrator to use the p4 typemap command (documented in the Perforce CommandReference) to ensure that all files matching a file specification (for instance,//depot/.../*.gif for all .gif files) are assigned type +l by default.
Resolves and Branching
Files in separate codelines can be integrated with p4 resolve; for details about resolvingbranched files, see Chapter 9, Branching.
Resolve Reporting
Four reporting commands are related to file conflict resolution: p4 diff, p4 diff2, p4sync -n, and p4 resolved.
Command Meaning
p4 diff [filenames] Runs a diff program between the file revision currently inthe client and the revision that was last gotten from thedepot. If the file is not open for edit in the client, the two filerevisions should be identical, so p4 diff fails. Comparisonof the revisions can be forced with p4 diff -f, even whenthe file in the client is not open for edit
Although p4 diff runs a diff routine internal to Perforce,this routine can be overridden by specifying an externaldiff in the P4DIFF environment variable.
p4 diff2 file1 file2 Runs p4d’s diff subroutine on any two Perforce depot files.The specified files can be any two file revisions, evenrevisions of entirely different files.
The diff routine used by p4d cannot be overridden.
p4 sync -n [filenames] Reports what the result of running p4 sync would be,without actually performing the sync. This is useful to seewhich files have conflicts and need to be resolved.
p4 resolved Reports which files have been resolved but not yetsubmitted.
74 Perforce 2003.2 User’s Guide

Chapter 5: Perforce Basics: Resolving File Conflicts
The reporting chapter (Chapter 11, Reporting and Data Mining) has a longer descriptionof each of these commands. p4 help provides a complete listing of the many flags forthese reporting commands.
Perforce 2003.2 User’s Guide 75

Chapter 5: Perforce Basics: Resolving File Conflicts
76 Perforce 2003.2 User’s Guide
Chapter 6 Perforce Basics:Miscellaneous Topics
The manual thus far has provided an introduction to the basic functionality provided byPerforce, and subsequent chapters cover the more advanced features. In between are ahost of other, smaller facilities; this chapter covers these topics. Included here isinformation on the following:
• Changing your Perforce environment with the P4CONFIG environment variable,
• Using passwords to prevent impersonation by other users,
• Command-line flags common to all Perforce commands,
• How to work on files while not connected to a Perforce server,
• Refreshing the client workspace,
• Renaming files, and
• Recommendations for organization of files within the depot.
Reconfiguring the Perforce Environment with $P4CONFIG
Some Perforce users have multiple client workspaces, each of which may connect to adifferent port. There are three ways of changing your Perforce environment on the fly:
• Reset your environment or registry variables each time you want to move to a newworkspace.
• Use command-line flags (discussed in the next section) to override the value of theenvironment variables P4PORT, P4CLIENT, and P4USER.
• Use the environment variable or registry variable P4CONFIG to point to a file containinga specification for the current Perforce environment.
P4CONFIG names a file (for example, .p4env) that is used to store variable settings.Whenever a Perforce command is executed, the current working directory and its parentdirectories are searched for a file with the name stored in P4CONFIG. If a file with thatname is found, the values of P4PORT, P4CLIENT, and so on, are read from that file. If no fileof the given name is found, the current values of the Perforce environment variables areused.
Each variable setting in the file stands alone on a line and must be in the form:P4VAR=value
Perforce 2003.2 User’s Guide 77
Chapter 6: Perforce Basics: Miscellaneous Topics
Values that can be stored in the P4CONFIG file are:
Example: Using P4CONFIG to automatically reconfigure the Perforce environment
Ed often switches between two workspaces on the same machine. The first workspace iselmproj. It has a client root of /usr/edk/elm, and connects to the Perforce server atida:1818. The second workspace is called graphicwork. Its client root is/usr/edk/other/graphics, and it uses the Perforce server at warhol:1666.
Ed sets the P4CONFIG environment variable to .p4settings. He creates a file called.p4settings in /usr/edk/elm containing the following text:
P4CLIENT=elmprojP4PORT=ida:1818
He creates a second .p4settings file in /usr/edk/other/graphics. It contains:P4PORT=warhol:1666P4CLIENT=graphicwork
He always works within the directories where his files are located. Whenever Ed is anywherebeneath /usr/edk/other/graphics, his Perforce client is graphicwork, and when he’sin /usr/edk/elmproj, his client is elmproj.
The values found in the file specified by P4CONFIG override any environment or registryvariables that have been set. Command-line flags (discussed in the next section) overridethe values found in the P4CONFIG file.
P4CONFIG automates the process of changing the Perforce environment variables, as newsettings take effect whenever you switch your current working directory from one clientworkspace directory to another. If you use multiple client workspaces, this is a very usefulfeature.
Perforce Passwords
By default, any user can assume the identity of any other Perforce user by setting thevalue of P4USER to a different username, by using the -u flag with the p4 command, or bysetting the value of P4USER configuration within the file described by P4CONFIG. Althoughthis makes it easy to perform tasks for other users when necessary, it can also lead tosecurity problems.
To prevent another user from impersonating you within Perforce, use the p4 passwdcommand. No one, including the user who set the password, will be able to use any p4
command without providing the password to Perforce. You can provide this password toPerforce in one of three ways:
P4CLIENT P4DIFF P4EDITOR P4USER P4CHARSET
P4PORT P4MERGE P4PASSWD P4HOST P4LANGUAGE
78 Perforce 2003.2 User’s Guide
Chapter 6: Perforce Basics: Miscellaneous Topics
1. Set the value of the environment or registry variable P4PASSWD to the correctpassword.
2. Use the -P password flag between p4 and the actual command when giving aPerforce command (for instance, p4 -P eds_password submit).
3. Set the value of P4PASSWD within the file described by P4CONFIG.
For security’s sake, the password should always be set while logged onto the server.
Be careful when setting passwords. Once you have set your Perforce password with p4
user, there is no way for you to use Perforce if you forget their password and the value ofP4PASSWD has not been properly set. If this happens, the Perforce superuser will have toreset or remove your password.
If you need to have your password reset, contact your Perforce administrator. If you are aPerforce administrator, consult the Perforce System Administrator’s Guide for informationon resetting passwords and other common user-related tasks.
Command-Line Flags Common to All Perforce Commands
Some flags are available for use with all Perforce commands. These flags are givenbetween the system command p4 and the command argument taken by p4. The flags areas follows:
Note Passwords can also be created, changed, and deleted within the p4 userform.
Flag Meaning Example
-c clientname Runs the command on thespecified client. Overrides theP4CLIENT environmentvariable.
p4 -c joe edit //depot/file.c
Opens file file.c for editing underclient workspace joe.
-C charset For servers in unicode mode,override the P4CHARSETvariable.
p4 -C utf8 print //depot/file
-d directory Specifies the current directory,overriding the environmentvariable PWD.
p4 -d ~elm/src edit one two
Opens files one and two for edit;these files are found relative to~elm/src.
Perforce 2003.2 User’s Guide 79
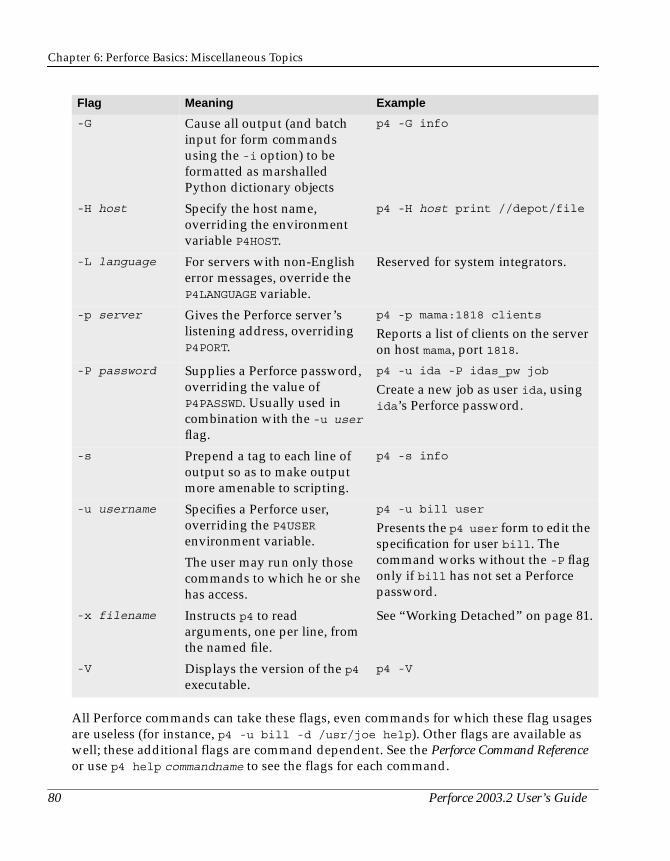
Chapter 6: Perforce Basics: Miscellaneous Topics
All Perforce commands can take these flags, even commands for which these flag usagesare useless (for instance, p4 -u bill -d /usr/joe help). Other flags are available aswell; these additional flags are command dependent. See the Perforce Command Referenceor use p4 help commandname to see the flags for each command.
-G Cause all output (and batchinput for form commandsusing the -i option) to beformatted as marshalledPython dictionary objects
p4 -G info
-H host Specify the host name,overriding the environmentvariable P4HOST.
p4 -H host print //depot/file
-L language For servers with non-Englisherror messages, override theP4LANGUAGE variable.
Reserved for system integrators.
-p server Gives the Perforce server’slistening address, overridingP4PORT.
p4 -p mama:1818 clients
Reports a list of clients on the serveron host mama, port 1818.
-P password Supplies a Perforce password,overriding the value ofP4PASSWD. Usually used incombination with the -u user
flag.
p4 -u ida -P idas_pw job
Create a new job as user ida, usingida’s Perforce password.
-s Prepend a tag to each line ofoutput so as to make outputmore amenable to scripting.
p4 -s info
-u username Specifies a Perforce user,overriding the P4USERenvironment variable.
The user may run only thosecommands to which he or shehas access.
p4 -u bill user
Presents the p4 user form to edit thespecification for user bill. Thecommand works without the -P flagonly if bill has not set a Perforcepassword.
-x filename Instructs p4 to readarguments, one per line, fromthe named file.
See “Working Detached” on page 81.
-V Displays the version of the p4executable.
p4 -V
Flag Meaning Example
80 Perforce 2003.2 User’s Guide

Chapter 6: Perforce Basics: Miscellaneous Topics
Working Detached
Under normal circumstances, you work in your client workspace with a functioningnetwork connection to a Perforce server. As you edit files, you announce your intentionsto the server with p4 edit, and the server responds by noting the edit in the depot’smetadata, and by unlocking the file in your client workspace. However, it is not alwayspossible you to have a network connection to be present, and you may need a method forworking entirely detached from the server.
The scheme is as follows:
• Work on files without giving Perforce commands. Instead, you use native OScommands to manually change the permissions on files, and then edit or delete thefiles.
• If you did not edit the files within the client workspace, copy them to the clientworkspace when the network connection is reestablished.
• Use p4 diff to find all files in your workspace that have changed or been addedwithout Perforce’s knowledge. Use the output from this command to bring the depot insync with the client workspace.
Finding changed files with “p4 diff”
Use the p4 diff reporting command to compare a file in the client workspace with thecorresponding file in the depot. The behavior of p4 diff can be modified with two flags:
Using “p4 diff” to update the depot
The p4 diff variations described above can be used in combination with the -x flag tobring the state of the depot in sync with the changes made to the client workspace.
“p4 diff” Variation Meaning
p4 diff -se Tells the names of unopened files that are present on the client,but whose contents are different than the files last taken by theclient with p4 sync. These files are candidates for p4 edit.
p4 diff -sd Reports the names of unopened files missing from the client.These files are candidates for p4 delete.
Note You can use p4 edit on any file, even files you don’t want to edit; thiscommand gives the local file write permissions, but does not otherwisealter it.
Perforce 2003.2 User’s Guide 81
Chapter 6: Perforce Basics: Miscellaneous Topics
To open changed files for edit after working detached, use:
To delete files from the depot that were removed from the client workspace, use:
As always, your edit and delete requests are stored in changelists, which Perforce doesnot process until you type p4 submit.
Refreshing files
The process of syncing a depot with a formerly detached client workspace has a converse:Perforce can get confused about the contents of a client workspace if you accidentally usethe local OS file deletion command.
For example, suppose that you accidentally delete a client workspace file via the UNIX rm
command, and that the file is one that you wanted to keep. Even after a submit, p4 havewill still list the file as being present in the workspace.
In such a situation, you can use p4 sync -f files to bring the client workspace in syncwith the files the depot thinks you have. This command is mostly a recovery tool forbringing the client workspace back into sync with the depot after accidentally removingor damaging files managed by Perforce.
Recommendations for Organizing the Depot
The default view brought up by p4 client maps the entire depot to the entire clientworkspace. If the client workspace is named eds_elm, the default view looks like this:
//depot/... //eds_elm/...
This is the easiest mapping, and can be used for the most simple Perforce depots, butmapping the entire depot to the workspace can lead to problems later on. Suppose yourserver currently stores files for only one project, but another project is added later:everyone who has a client workspace mapped as above will wind up receiving all the filesfrom both projects into their workspaces. Additionally, the default workspace view doesnot facilitate branch creation.
The safest way to organize the depot, even from the start, is to create one subdirectory perproject within the depot. For example, if your company is working on three projectsnamed zeus, athena, and apollo, three subtrees might be created within the depot:
p4 diff -se > CHANGED_FILESp4 -x CHANGED_FILES edit
p4 diff -sd > DEL_FILESp4 -x DEL_FILES delete
82 Perforce 2003.2 User’s Guide

Chapter 6: Perforce Basics: Miscellaneous Topics
//depot/zeus, //depot/athena, and //depot/apollo. If Joe is working on the zeusproject, his mapping might look like this:
And Sarah, who’s working on the athena and apollo projects, might set up her clientworkspace as:
This sort of organization can be easily extended to as many projects and branches as areneeded.
Another way of solving the same problem is to have the Perforce system administratorcreate one depot for each project or branch. See the Perforce System Administrator’s Guidefor details about setting up multiple depots.
Renaming Files
Although Perforce doesn’t have a rename command, you can rename files by using p4
integrate to copy the file from one location in the depot to another, deleting the file fromthe original location, and then submitting the changelist that includes the integrate andthe delete. The process is as follows:
The from_file is moved to the directory and renamed according to the to_file specifier.For example, if from_file is d1/one and to_file is d2/two, then one is moved to the d2directory, and is renamed two. The from_file and to_file specifiers may includewildcards, as long as they are matched on both sides. Perforce write access (explained inthe Perforce System Administrator’s Guide) is needed on all the specified files.
Revision histories and renamed files
When you rename a file (or move it from one directory to another) with p4 integrate,you create the new file by creating an integration record that links it to its deletedpredecessor.
//depot/zeus/... //joe/...
//depot/athena/... //sarah/athena/...//depot/apollo/... //sarah/apollo/...
p4 integrate from_files to_filesp4 delete from_filesp4 submit
Perforce 2003.2 User’s Guide 83

Chapter 6: Perforce Basics: Miscellaneous Topics
As a result, if you run p4 changes newfile, you’ll see only changes to newfile. Onlychanges that have taken place after the renaming will be listed:
In order to see the full history of changes to the file (including changes made before thefile was renamed or moved), you must specify the -i (include changes from integrations)flag to p4 changes, as follows:
Specifying the -i flag tells p4 changes to trace back through the integration records andretrieve all change information, regardless of how many times the file (or the directory inwhich it lives) has been renamed or moved.
$ p4 changes newfile.cChange 4 on 2000/10/24 by user@client ’Latest bugfix’Change 3 on 2000/10/23 by user@client ’Renamed file’
$ p4 changes -i newfile.cChange 4 on 2000/10/24 by user@client ’Latest bugfix’Change 3 on 2000/10/23 by user@client ’Renamed file’Change 2 on 2000/10/21 by user@client ’second version’change 1 on 2000/10/20 by user@client ’initial check-in’
84 Perforce 2003.2 User’s Guide
Chapter 7 Changelists
A Perforce changelist is a list of files, their revision numbers, and operations to beperformed on these files. Commands such as p4 add filenames and p4 edit filenames
include the affected files in a changelist; the depot is not actually altered until thechangelist is submitted with p4 submit.
When a changelist is submitted to the depot, the depot is updated atomically: either all ofthe files in the changelist are updated in the depot, or none of them are. This grouping offiles as a single unit guarantees that code alterations spanning multiple files are updatedin the depot simultaneously. To reflect the atomic nature of changelist submissions,submission of a changelist is sometimes called an atomic change transaction.
Perforce attempts to make changelist usage as transparent as possible: in the normal case,Perforce commands such as p4 edit add the affected files to the default changelist, and p4
submit sends the default changelist to the server for processing. However, there are twosets of circumstances that would require the user to understand and manipulate non-default changelists:
• Sometimes a user wants to split files into separate groups for submission.
For example, suppose a user is fixing two bugs, each of which spans a separate set offiles. Rather than submit the fixes to both bugs in a single changelist, the user mightelect to create one changelist for the files that fix the first bug, and another changelist forthe files that fix the second bug. Each changelist would be submitted to the depot viaseparate p4 submit operations.
• Under certain circumstances, the p4 submit command can fail.
For example, if one user has a file locked and another user submits a changelist thatcontains that file, the submit fails. When a submit of the default changelist fails, thechangelist is assigned a number, is no longer the default changelist, and must bereferred to by its number.
In the above circumstances, the user must understand how to work with numberedchangelists.
Perforce 2003.2 User’s Guide 85

Chapter 7: Changelists
Working with the Default Changelist
A changelist is a list of files, revision numbers of those files, and operations to beperformed on those files. For example, a single changelist might contain the following:
Each of the files in the changelist is said to be open within the client workspace: the first ofthe files above was opened for edit with p4 edit, and the second was opened for deletionwith p4 delete.
The files in the changelist are updated within the depot with p4 submit, which sends thechangelist to the server; the server processes the files contained in the changelist andalters the depot accordingly.
The commands that add or remove files from changelists are:
By default, these commands, and p4 submit, act on the default changelist. For example, ifyou type p4 add filename, this file is added to the default changelist. When you type p4submit, the default changelist is submitted.
When you type p4 submit, a change form is displayed, containing the files in the defaultchangelist. Any file can be deleted from this list; when a file is deleted, it is moved to thenext default changelist, and will appear again the next time you type p4 submit. Achangelist must contain a user-entered description, which describes the nature of thechanges being made.
p4 submit can take an optional, single file pattern as an argument. In this case, only thosefiles in the default changelist that match the file pattern are included in the submittedchangelist. Since the p4d server program must receive this file pattern as a singleargument, make sure to escape the * wildcard if it is used.
When the user quits from the p4 submit editor, the changelist is submitted to the serverand the server attempts to update the files in the depot. If there are no problems, thechangelist is assigned a sequential number, and its status changes from new or pending tosubmitted. Once a changelist has been submitted, it becomes a permanent part of thedepot’s metadata, and is unchangeable except by Perforce administrators.
Note The material in this subsection has already been presented in a slightlydifferent form in earlier chapters. It is presented again here to provide acomplete discussion of changelists.
/doc/elm-help.1 revision 3 edit/utils/elmalias.c revision 2 delete
p4 add p4 delete p4 edit
p4 integrate p4 reopen p4 revert
86 Perforce 2003.2 User’s Guide
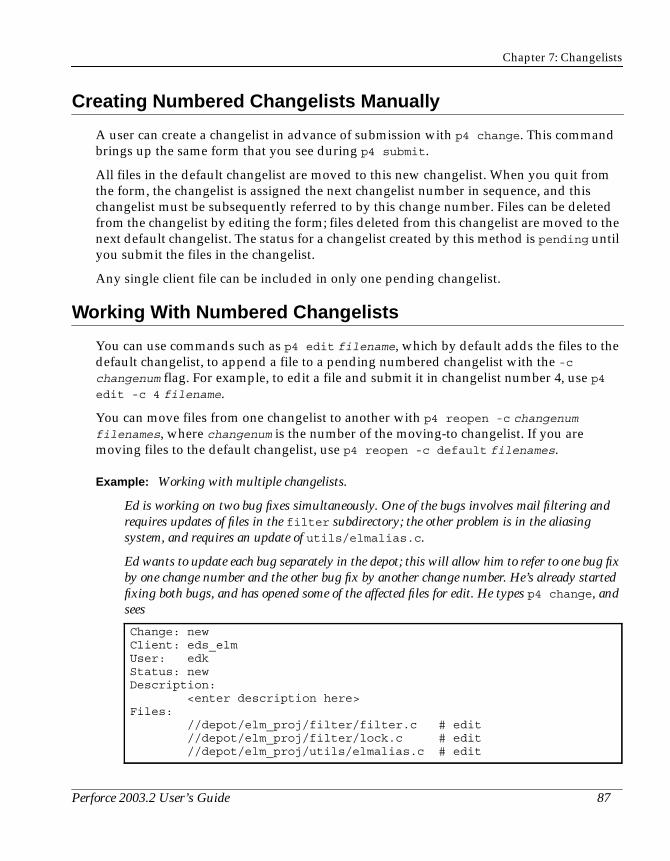
Chapter 7: Changelists
Creating Numbered Changelists Manually
A user can create a changelist in advance of submission with p4 change. This commandbrings up the same form that you see during p4 submit.
All files in the default changelist are moved to this new changelist. When you quit fromthe form, the changelist is assigned the next changelist number in sequence, and thischangelist must be subsequently referred to by this change number. Files can be deletedfrom the changelist by editing the form; files deleted from this changelist are moved to thenext default changelist. The status for a changelist created by this method is pending untilyou submit the files in the changelist.
Any single client file can be included in only one pending changelist.
Working With Numbered Changelists
You can use commands such as p4 edit filename, which by default adds the files to thedefault changelist, to append a file to a pending numbered changelist with the -cchangenum flag. For example, to edit a file and submit it in changelist number 4, use p4edit -c 4 filename.
You can move files from one changelist to another with p4 reopen -c changenum
filenames, where changenum is the number of the moving-to changelist. If you aremoving files to the default changelist, use p4 reopen -c default filenames.
Example: Working with multiple changelists.
Ed is working on two bug fixes simultaneously. One of the bugs involves mail filtering andrequires updates of files in the filter subdirectory; the other problem is in the aliasingsystem, and requires an update of utils/elmalias.c.
Ed wants to update each bug separately in the depot; this will allow him to refer to one bug fixby one change number and the other bug fix by another change number. He’s already startedfixing both bugs, and has opened some of the affected files for edit. He types p4 change, andsees
Change: newClient: eds_elmUser: edkStatus: newDescription: <enter description here>Files: //depot/elm_proj/filter/filter.c # edit //depot/elm_proj/filter/lock.c # edit //depot/elm_proj/utils/elmalias.c # edit
Perforce 2003.2 User’s Guide 87

Chapter 7: Changelists
Ed wants to use this changelist to submit only the fix to the filter problems. He changes theform, deleting the last file revision from the file list. When he’s done, the form looks like this:
When he quits from the editor, he’s told Change 29 created with 2 open file(s).
The file that he removed from the list, utils/elmalias.c, is now found in the defaultchangelist. He could include that file in another numbered changelist, but decides to leave itwhere it is.
He fixes both bugs at his leisure. He realizes that the filter problem requires updates to anotherfile: filter/lock.c. He opens this file for edit with p4 edit -c 29 filter/lock.c;opening the file with the -c 29 flag puts the file in changelist 29, which he created above. (Ifthe file had already been open for edit in the default changelist, he could have moved it tochangelist 29 with p4 reopen -c 29 filter/lock.c).
Ed finishes fixing the aliasing bug, and, since the affected files are in the default changelist, hesubmits the changelist with a straightforward p4 submit. He’ll finish fixing the filteringbug later.
Automatic Creation and Renumbering of Changelists
When submit of the default changelist fails,the changelist is assigned a number
Submits of changelists occasionally fail. This can happen for a number of reasons:
• A file in the changelist has been locked by another user with p4 lock.
• The client workspace no longer contains a file included in the changelist.
• There is a server error, such as not enough disk space.
• The user was not editing the head revision of a particular file. The following sequenceshows an example of how this can occur:
• User A types p4 edit //depot/file1.c,
• User B types p4 edit //depot/file1.c,
Change: newClient: eds_elmUser: edkStatus: newDescription: Fixes filtering problemsFiles: //depot/elm_proj/filter/filter.c # edit //depot/elm_proj/filter/lock.c # edit
88 Perforce 2003.2 User’s Guide

Chapter 7: Changelists
• User B submits her default changelist, and
• User A submits his default changelist.
User A’s submit is rejected, since the file revision of file1.c that he edited is no longerthe head revision of that file.
If any file in a changelist is rejected for any reason, the entire changelist is backed out, andnone of the files in the changelist are updated in the depot. If the submitted changelist wasthe default changelist, Perforce assigns the changelist the next change number insequence, and this change number must be used from this point on to refer to thechangelist. Perforce also locks the files to prevent others from changing them while theuser resolves the reason for the failed submit.
If the submit failed because the client-owned revision of the file is not the head revision, amerge must be performed before the changelist will be accepted. (File merging is describedin Chapter 5, Perforce Basics: Resolving File Conflicts).
Perforce May Renumber a Changelist upon Submission
The change numbers of submitted changelists always reflect the order in which thechangelists were submitted. Thus, when a changelist is submitted, it may be renumbered.
Example: Automatic renumbering of changelists
Ed has finished fixing the filtering bug that he’s been using changelist 29 for. Since he createdthat changelist, he’s submitted another changelist (change 30), and two other users havesubmitted changelists. Ed submits change 29 with p4 submit -c 29, and is told:
Change 29 renamed change 33 and submitted.
Deleting Changelists
To remove a pending changelist that has no files or jobs associated with it, use p4 change
-d changenum. Pending changelists that contain open files or jobs must have the files andjobs removed from them before they can be deleted: use p4 reopen to move files toanother changelist, p4 revert to remove files from the changelist (and revert them backto their old versions), or p4 fix -d to remove jobs from the changelist.
Changelists that have already been submitted can be deleted by a Perforce administratoronly under very specific circumstances. Please see the Perforce System Administrator’sGuide for more information.
Perforce 2003.2 User’s Guide 89

Chapter 7: Changelists
Changelist Reporting
The two reporting commands associated with changelists are p4 changes and p4
describe. The former is used to view lists of changelists with short descriptions, whilethe latter prints verbose information for a single changelist.
Command Meaning
p4 changes Displays a list of all pending and submitted changelists,one line per changelist, and an abbreviated description.
p4 changes -m count Limits the number of changelists reported on to the lastcount changelists.
p4 changes -s status Limits the list to those changelists with a particularstatus; for example, p4 changes -s submitted will listonly already submitted changelists.
p4 changes -u user Limits the list to those changelists submitted by aparticular user.
p4 changes -c workspace Limits the list to those changelists submitted from aparticular client workspace.
p4 describe changenum Displays full information about a single changelist. If thechangelist has already been submitted, the reportincludes a list of affected files and the diffs of these files.(You can use the -s flag to exclude the file diffs.)
90 Perforce 2003.2 User’s Guide
Chapter 8 Labels
A Perforce label is a set of tagged file revisions. You can use labels to reproduce the state ofthese files within a client workspace.
Labels provide a method of naming important sets of file revisions for future reference.For example, you might want to tag the file revisions that compose a particular releasewith the label release2.0.1. At a later time, you can retrieve all the tagged revisions intoa client workspace by syncing the workspace to the label.
Create a label when you want to:
• keep track of all the file revisions contained in a particular release of software,
• distribute a particular set of file revisions to other users, or
• branch from a known set of file revisions.
Why not just use changelist numbers?
Labels share certain important characteristics with changelist numbers, as both refer toparticular sets of file revisions, and both can be used to refer to all the revisions in the set.Labels have some important advantages over change numbers:
• The file revisions tagged by a particular label can come from different changelists.
• A changelist number refers to the contents of all the files in the depot at the time thechangelist was submitted, but a label can refer to any arbitrary set of files and revisions.
• The files and revisions tagged by a label can be changed at any point in the label’sexistence.
• Changelists are always referred to by Perforce-assigned numbers, but labels are namedby the user.
Using labels
Labeling files is a two-step process.
1. Create the label.
2. Tag the file revisions with the label.
Perforce 2003.2 User’s Guide 91

Chapter 8: Labels
Creating a new label
Use p4 label labelname to create a label. This command brings up a form similar to thep4 client form.
Label names share the same namespace as client workspaces, branches, and depots. Thus,a new label name must be distinct from any existing client workspace, branch, or depotname.
After you have created the label, you can use p4 labelsync to tag files.
For instance, you can create a new label my_label by typing:p4 label my_label
The following form is displayed:
(The View: field denotes a label view; this field can be used to limit which files can betagged with the label. You do not normally need to change the View: field; the only thingyou need to do is update the label’s description.)
After you have created the label, you can use it to tag any revision of any file underPerforce control. Only one revision of a given file can be tagged with a given label, but thesame file revision may be tagged with multiple labels. Files are tagged with labels usingthe p4 labelsync command.
Labeling all revisions in your workspace
To tag file revisions in your client workspace with a label, use p4 labelsync as follows:p4 labelsync -l my_label
All revisions in your client workspace are tagged with my_label, and any revisionspreviously tagged by my_label which are not present in your client workspace, areuntagged.
Label: my_labelOwner: edkDescription: Created by edk.Options: unlockedView: //depot/...
Note Anyone can use p4 labelsync with your label to tag or untag files.
To prevent others (or yourself) from inadvertently changing which filesare tagged by a label, lock the label. See “Preventing inadvertent taggingand untagging of files” on page 93 for details.
92 Perforce 2003.2 User’s Guide

Chapter 8: Labels
Tagging specific files and revisions with p4 labelsync
To tag a set of files (in addition to any revisions that may already have been tagged), usep4 labelsync -a, specifying the label and the desired file revisions.
For example, to tag all files in your client workspace that reside under//depot/proj/rel1.0/hdrs with the label my_label, use the following:
p4 labelsync -a -l my_label //depot/proj/rel1.0/hdrs/...
The revisions of files under //depot/proj/rel1.0/hdrs/.. that also reside in yourclient workspace are tagged with the name my_label.
(This operation can also be thought of as “adding” the label to the files; hence the use ofthe -a flag with p4 labelsync.)
Untagging files with p4 labelsync
You can untag revisions with:p4 labelsync -d -l labelname filepattern
If you omit the filepattern, an implicit //... is assumed; all files formerly tagged bythe label are untagged.
To untag a subset of tagged files, supply a file specification. For example, if you havepreviously tagged all revisions under //depot/proj/rel1.0/... with my_label, youcan untag only the header files with:
p4 labelsync -d -l my_label //depot/proj/rel1.0/hdrs/*.h
Revisions of the *.h header files are no longer tagged with my_label.
(Just as you can add a label to files with p4 labelsync -a, you can delete the label fromfiles with p4 labelsync -d.)
Previewing labelsync’s results
You can preview the results of p4 labelsync with p4 labelsync -n. This command liststhe revisions that would be tagged, untagged, or retagged by the labelsync commandwithout actually performing the operation.
Preventing inadvertent tagging and untagging of files
Using p4 labelsync with no file arguments tags the eligible files in your clientworkspace and any applicable label view, and untags all other files. This means that it ispossible to accidentally lose the information that a label is meant to contain.
To prevent this, call p4 label labelname and set the value of the Options: field tolocked. It will be impossible to call p4 labelsync on that label until the label issubsequently unlocked.
Perforce 2003.2 User’s Guide 93
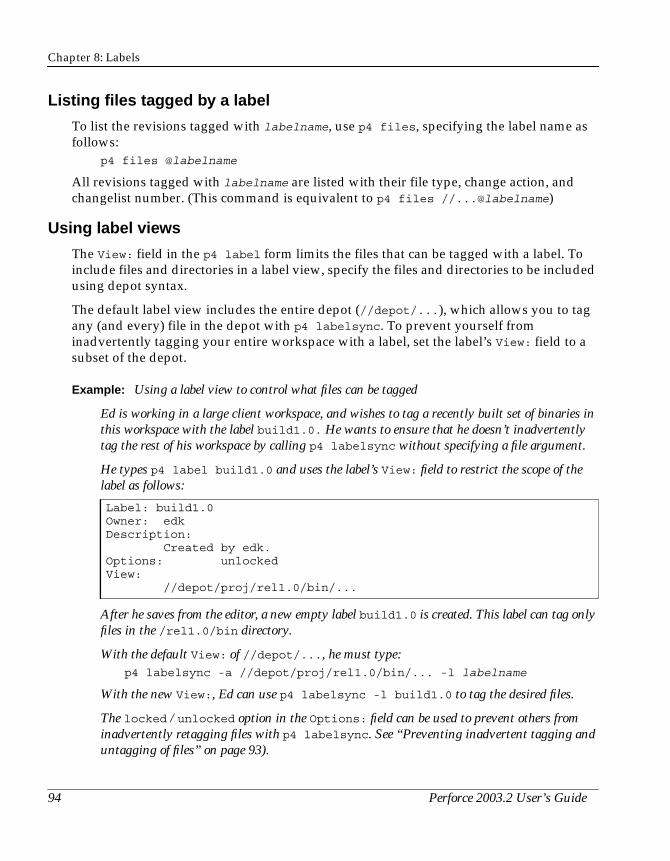
Chapter 8: Labels
Listing files tagged by a label
To list the revisions tagged with labelname, use p4 files, specifying the label name asfollows:
p4 files @labelname
All revisions tagged with labelname are listed with their file type, change action, andchangelist number. (This command is equivalent to p4 files //...@labelname)
Using label views
The View: field in the p4 label form limits the files that can be tagged with a label. Toinclude files and directories in a label view, specify the files and directories to be includedusing depot syntax.
The default label view includes the entire depot (//depot/...), which allows you to tagany (and every) file in the depot with p4 labelsync. To prevent yourself frominadvertently tagging your entire workspace with a label, set the label’s View: field to asubset of the depot.
Example: Using a label view to control what files can be tagged
Ed is working in a large client workspace, and wishes to tag a recently built set of binaries inthis workspace with the label build1.0. He wants to ensure that he doesn’t inadvertentlytag the rest of his workspace by calling p4 labelsync without specifying a file argument.
He types p4 label build1.0 and uses the label’s View: field to restrict the scope of thelabel as follows:
After he saves from the editor, a new empty label build1.0 is created. This label can tag onlyfiles in the /rel1.0/bin directory.
With the default View: of //depot/..., he must type:p4 labelsync -a //depot/proj/rel1.0/bin/... -l labelname
With the new View:, Ed can use p4 labelsync -l build1.0 to tag the desired files.
The locked / unlocked option in the Options: field can be used to prevent others frominadvertently retagging files with p4 labelsync. See “Preventing inadvertent tagging anduntagging of files” on page 93).
Label: build1.0Owner: edkDescription: Created by edk.Options: unlockedView: //depot/proj/rel1.0/bin/...
94 Perforce 2003.2 User’s Guide

Chapter 8: Labels
Referring to files using a label
You can use a label name anywhere you can refer to files by revision (#1, #head),changelist number (@7381), or date (@2003/07/01).
If p4 sync @labelname is called with no file parameters, all files in the workspace that aretagged by the label are synced to the revision specified in the label. All files in theworkspace that do not have revisions tagged by the label are deleted from the workspace.Open files or files not under Perforce control are unaffected. This command is equivalentto p4 sync //...@labelname.
If p4 sync @labelname is called with file arguments, as in p4 sync files@labelname,files in the user’s workspace that are specified on the command line and also tagged bythe label are updated to the tagged revisions.
Example: Retrieving files tagged by a label into a client workspace.
Lisa wants to retrieve some of the binaries tagged by Ed’s build1.0 label into her clientworkspace. To get all files tagged by build1.0, she could type:
p4 sync //depot/[email protected]
or even:p4 sync @build1.0
Instead, she’s interested in seeing only one platform’s build from that label, so she types:p4 sync //depot/proj/rel1.0/bin/osx/*@build1.0
and sees:
All files under //depot/proj/rel1.0/bin/osx that are tagged with Ed’s build1.0 labeland are also in Lisa’s client workspace view are retrieved into her workspace.
Deleting labels
To delete a label, use the following command:p4 label -d labelname
//depot/proj/rel1.0/bin/osx/server#6 - added as /usr/lisa/osx/server#6//depot/proj/rel1.0/bin/osx/logger#12 - added as /usr/lisa/osx/logger#12//depot/proj/rel1.0/bin/osx/install#2 - added as /usr/lisa/osx/install#2<etc>
Perforce 2003.2 User’s Guide 95

Chapter 8: Labels
Details: How p4 labelsync works
The full syntax of the p4 labelsync command is:p4 labelsync [-a -d -n] -l labelname [filename...]
The rules followed by labelsync to tag files with a label are as follows:
1. You must be the owner of the label to use p4 labelsync on it, and the label must beunlocked. If you are not the owner of a label, you may (assuming you have sufficientpermissions) make yourself the owner by running:
p4 label labelname
and changing the Owner: field to your Perforce user name in the p4 label form. Ifyou are the owner of a label, you may unlock the label by setting the Options: field(also in the p4 label form) to unlocked.
2. All files tagged with a label must be in the label view specified in the p4 label form.Any files or directories not included in a label view are ignored by p4 labelsync.
3. When p4 labelsync is used to tag a file revision with a label, the revision is taggedwith the label if it is not already tagged with the label. If a different revision of the fileis already tagged with the label, it is untagged and the newly specified revision istagged. Any given file revision may be tagged by one or more labels, but only onerevision of any file can be tagged with a given label at any one time.
4. If labelsync is called with no filename arguments, as in:p4 labelsync -l labelname
then all the files in both the label view and the client workspace view are tagged withthe label. The revisions tagged by the label are those last synced into the clientworkspace; these revisions (“the #have revisions”) can be seen in the p4 have list.Calling p4 labelsync this way removes the label from revisions it previously taggedunless those revisions are in your workspace.
5. When you call p4 labelsync with file pattern arguments, but the arguments containno revision specifications, the #have revision is tagged with the label.
6. If you call p4 labelsync with file pattern arguments and those arguments containrevision specifications, the specified file revisions are tagged with the label.
Specifying a revision in this manner overrides all other ways of specifying a revisionwith a label; whether the client workspace contains a different revision than the onespecified, (or doesn’t contain the file at all), the revision specified on the commandline is tagged with the label.
96 Perforce 2003.2 User’s Guide
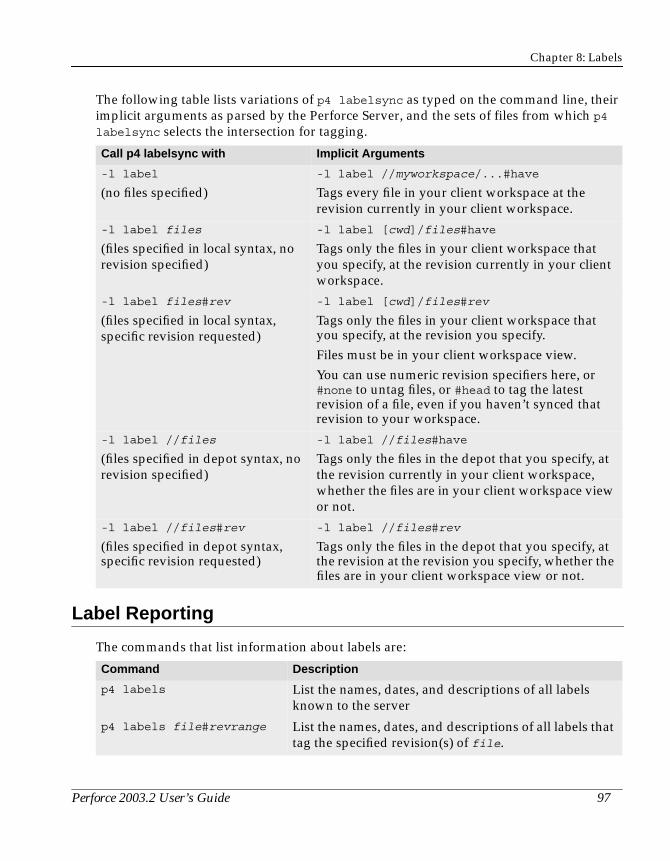
Chapter 8: Labels
The following table lists variations of p4 labelsync as typed on the command line, theirimplicit arguments as parsed by the Perforce Server, and the sets of files from which p4
labelsync selects the intersection for tagging.
Label Reporting
The commands that list information about labels are:
Call p4 labelsync with Implicit Arguments
-l label
(no files specified)-l label //myworkspace/...#have
Tags every file in your client workspace at therevision currently in your client workspace.
-l label files
(files specified in local syntax, norevision specified)
-l label [cwd]/files#have
Tags only the files in your client workspace thatyou specify, at the revision currently in your clientworkspace.
-l label files#rev
(files specified in local syntax,specific revision requested)
-l label [cwd]/files#rev
Tags only the files in your client workspace thatyou specify, at the revision you specify.Files must be in your client workspace view.You can use numeric revision specifiers here, or#none to untag files, or #head to tag the latestrevision of a file, even if you haven’t synced thatrevision to your workspace.
-l label //files
(files specified in depot syntax, norevision specified)
-l label //files#have
Tags only the files in the depot that you specify, atthe revision currently in your client workspace,whether the files are in your client workspace viewor not.
-l label //files#rev
(files specified in depot syntax,specific revision requested)
-l label //files#rev
Tags only the files in the depot that you specify, atthe revision at the revision you specify, whether thefiles are in your client workspace view or not.
Command Description
p4 labels List the names, dates, and descriptions of all labelsknown to the server
p4 labels file#revrange List the names, dates, and descriptions of all labels thattag the specified revision(s) of file.
Perforce 2003.2 User’s Guide 97
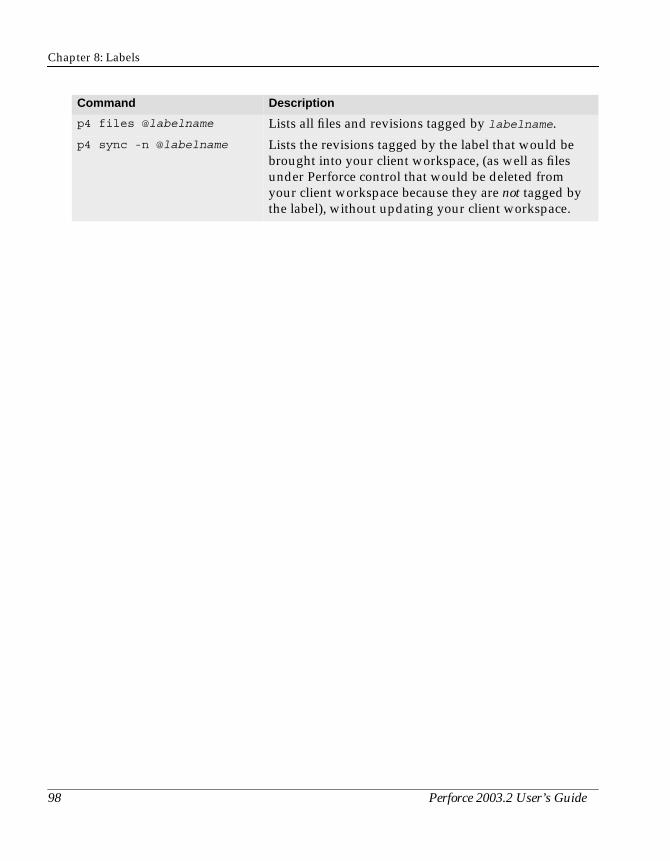
Chapter 8: Labels
p4 files @labelname Lists all files and revisions tagged by labelname.
p4 sync -n @labelname Lists the revisions tagged by the label that would bebrought into your client workspace, (as well as filesunder Perforce control that would be deleted fromyour client workspace because they are not tagged bythe label), without updating your client workspace.
Command Description
98 Perforce 2003.2 User’s Guide
Chapter 9 Branching
Perforce’s Inter-File Branching™ mechanism allows any set of files to be copied within thedepot, and allows changes made to one set of files to be copied, or integrated, into another.By default, the new file set (or codeline) evolves separately from the original files, butchanges in either codeline can be propagated to the other with the p4 integratecommand.
What is Branching?
Branching is a method of keeping two or more sets of similar (but not identical) filessynchronized. Most software configuration management systems have some form ofbranching; we believe that Perforce’s mechanism is unique because it mimics the style inwhich users create their own file copies when no branching mechanism is available.
Suppose for a moment that you’re writing a program and are not using an SCM system.You’re ready to release your program: what would you do with your code? Chances arethat you’d copy all your files to a new location. One of your file sets would become yourrelease codeline, and bug fixes to the release would be made to that file set; your otherfiles would be your development file set, and new functionality to the code would beadded to these files.
What would you do when you find a bug that’s shared by both file sets? You’d fix it inone file set, and then copy the edits that you made into the other file set.
The only difference between this homegrown method of branching and Perforce’sbranching methodology is that Perforce manages the file copying and edit propagation for you.In Perforce’s terminology, copying the files is called making a branch. Each file set is knownas a codeline, and copying an edit from one file set to the other is called integration. Theentire process is called branching.
When to Create a Branch
Create a branch when two sets of code files have different rules governing when code canbe submitted, or whenever a set of code files needs to evolve along different paths. Forexample:
• The members of the development group want to submit code to the depot whenevertheir code changes, whether or not it compiles, but the release engineers don’t wantcode to be submitted until it’s been debugged, verified, and signed off on.
Perforce 2003.2 User’s Guide 99

Chapter 9: Branching
They would branch the release codeline from the development codeline. When thedevelopment codeline is ready, it is integrated into the release codeline. Afterwards,patches and bug fixes are made in the release code, and at some point in the future,integrated back into the development code.
• A company is writing a driver for a new multi-platform printer. It has written a UNIXdevice driver, and is now going to begin work on a Macintosh driver using the UNIXcode as their starting point.
The developers create a branch from the existing UNIX code, and now have two copiesof the same code. These two codelines can then evolve separately. If bugs are found ineither codeline, bug fixes can be propagated from one codeline to the other with thePerforce p4 integrate command.
One basic strategy is to develop code in //depot/main/ and create branches for releases(for example, //depot/rel1.1/). Make bug fixes that affect both codelines in//depot/main/ and integrate them into the release codelines. Make release-specific bugfixes in the release branch and, if required, integrate them back into the //depot/main/codeline.
Perforce’s Branching Mechanisms: Introduction
Perforce provides two mechanisms for branching. One method requires no special setup,but requires the user to manually track the mappings between the two sets of files. Thesecond method remembers the mappings between the two file sets, but requires someadditional work to set up.
In the first method, the user specifies both the files that changes are being copied from andthe files that the changes are being copied into. The command looks like this:
p4 integrate fromfiles tofiles
In the second method, Perforce stores a mapping that describes which set of files getbranched to other files, and this mapping, or branch specification, is given a name. Thecommand the user runs to copy changes from one set of files to the other looks like this:
p4 integrate -b branchname [tofiles]
These methods are described in the following two sections.
100 Perforce 2003.2 User’s Guide

Chapter 9: Branching
Branching and Merging, Method 1:Branching with File Specifications
Use p4 integrate fromfiles tofiles to propagate changes from one set of files (thesource files) to another set of files (the target files). The target files need to be containedwithin the current client workspace view. The source files do not need to be, so long as thesource files are specified in depot syntax. If the target files do not yet exist, the entirecontents of the source files are copied to the target files. If the target files have alreadybeen created, changes can be propagated from one set of files to the other with p4
resolve. In both cases, p4 submit must be used to store the new file changes in thedepot. Examples and further details are provided below.
Creating branched files
To create a copy of a file that will be tracked for branching, use the following procedure:
1. Determine where you want the copied (or branched) file(s) to reside within the depotand within the client workspace. Add the corresponding mapping specification toyour client view.
2. Run p4 integrate fromfiles tofiles. The source files are copied from the serverto target files in the client workspace.
3. Run p4 submit. The new files are created within the depot, and are now available forgeneral use.
Example: Creating a branched file.
Version 2.0 of Elm has just been released, and work on version 3.0 is about to commence.Work on the current development release always proceeds in //depot/elm_proj/..., andit is determined that maintenance of version 2.0 will take place in //depot/elm_r2.0/...
The files in //depot/elm_proj/... need to be branched into //depot/elm_r2.0/...,so Ed does the following:
He decides that he’ll want to work on the new //depot/elm_r2.0/... files within hisclient workspace at /usr/edk/elm_proj/r2.0. He uses p4 client to add the followingmapping to his client view:
//depot/elm_r2.0/... //eds_elm/r2.0/...
He runsp4 integrate //depot/elm_proj/... //depot/elm_r2.0/...
which copies all the files under //depot/elm_proj/... to //eds_elm/v2.0 in his clientworkspace. Finally, he runs p4 submit, which adds the new branched files to the depot.
Perforce 2003.2 User’s Guide 101
Chapter 9: Branching
Why not just copy the files?
Although it is possible to accomplish everything that has been done thus far by copyingthe files within the client workspace and using p4 add to add the files to the depot, whenyou use p4 integrate, Perforce is able to track the connections between related files in anintegration record, allowing easy propagation of changes between one set of files andanother.
Branching not only enables you to more easily track changes, it creates less overhead onthe server. When you copy files with p4 add, you create two copies of the same file on theserver. When you use branching, Perforce performs a “lazy copy” of the file, so that thedepot holds only one copy of the original file and a record that a branch was created.
Propagating changes between branched files
After a file has been branched from another with p4 integrate, Perforce can trackchanges that have been made in either set of files and merge them using p4 resolve intothe corresponding branch files. (You’ll find a general discussion of the resolve process inChapter 5, Perforce Basics: Resolving File Conflicts. File resolution with branching isdiscussed in “How Integrate Works” on page 108).
The procedure is as follows:
1. Run p4 integrate fromfiles tofiles to tell Perforce that changes in the sourcefiles need to be propagated to the target files.
2. Use p4 resolve to copy changes from the source files to the target files. The changesare made to the target files in the client workspace.
3. Run p4 submit to store the changed target files in the depot.
Example: Propagating changes between branched files.
Ed has created a release 2.0 branch of the Elm source files as above, and has fixed a bug in theoriginal codeline’s src/elm.c file. He wants to merge the same bug fix to the release 2.0codeline. From his home directory, Ed types
p4 integrate elm_proj/src/elm.c //depot/elm_r2.0/src/elm.c
and sees//depot/elm_r2.0/src/elm.c#1 - integrate from //depot/elm_proj/src/elm.c#9
The file has been scheduled for resolve. He types p4 resolve, and the standard merge dialogappears on his screen.
/usr/edk/elm_r2.0/src/elm.c - merging //depot/elm_proj/src/elm.c#2Diff chunks: 0 yours + 1 theirs + 0 both + 0 conflictingAccept(a) Edit(e) Diff(d) Merge (m) Skip(s) Help(?) [at]:
102 Perforce 2003.2 User’s Guide

Chapter 9: Branching
He resolves the conflict with the standard use of p4 resolve. When he’s done, the result fileoverwrites the file in his branched client, and it still must be submitted to the depot.
There is one fundamental difference between resolving conflicts in two revisions of thesame file, and resolving conflicts between the same file in two different codelines. Thedifference is that Perforce will detect conflicts between two revisions of the same file andthen schedule a resolve, but there are always differences between two versions of the samefile in two different codelines, and these differences usually don’t need to be resolvedmanually. (In these cases, a p4 resolve -as or p4 resolve -am to accept the Perforce-recommended revision is usually sufficient. See “Using Flags with Resolve toAutomatically Accept Particular Revisions” on page 71 for details.)
In their day-to-day use, there is no difference between branched files and non-branchedfiles. The standard Perforce commands like sync, edit, delete, submit, and so on. areused with all files, and evolution of both codelines proceeds separately. When changes toone codeline need to be propagated to another, you must tell Perforce to do this with p4
integrate, but if the codelines evolve separately, and changes never need to bepropagated, you’ll never need to integrate or resolve the files in the two codelines.
Propagating changes from branched files to the original files
A change can be propagated in the reverse direction, from branched files to the originalfiles, by supplying the branched files as the source files, and the original files as the targetfiles.
Example: Propagating changes from branched files to the original files.
Ed wants to integrate some changes in //depot/elm_r2.0/src/screen.c file to the originalversion of the same file. He types
p4 integrate //depot/elm_r2.0/src/screen.c //depot/elm_proj/src/screen.c
and then runs p4 resolve. The changes in the branched file can now be merged into hissource file.
Branching and Merging, Method 2:Branching with Branch Specifications
To map a set of source files to target files, you can create a branch specification and use it asan argument to p4 integrate. To create and use a branch specification, do the following:
1. Use p4 branch branchname to create a view that indicates which target files map towhich source files.
2. Make sure that the new files and directories are included in the p4 client view ofthe client workspace that will hold the new files.
Perforce 2003.2 User’s Guide 103

Chapter 9: Branching
3. Use p4 integrate -b branchname to create the new files.
4. To propagate changes from source files to target files, use p4 integrate -bbranchname [tofiles]. Perforce uses the branch specification to determine whichfiles the merged changes come from
5. Use p4 submit to submit the changes to the target files to the depot.
The following example demonstrates the same branching that was performed in theexample above, this time using a branch specification.
Example: Creating a branch.
Version 2.0 of Elm has just been released, and work on version 3.0 is about to commence.Work on the current development release always proceeds in //depot/elm_proj/..., andit is determined that maintenance of version 2.0 will take place in //depot/elm_r2.0/...
The files in //depot/elm_proj/... need to be branched into //depot/elm_r2.0/...,so Ed does the following:
Ed creates a branch specification called elm2.0 by typing p4 branch elm2.0. Thefollowing form is displayed:
The view maps the original codeline’s files (on the left) to branched files (on the right). Edchanges the View: and Description: fields as follows:
Ed wants to work on the new //depot/elm_r2.0/... files within his client workspace at/usr/edk/elm_proj/r2.0. He uses p4 client to add the following mapping to his clientview: //depot/elm_r2.0/... //eds_elm/r2.0/...
He runs p4 integrate -b elm2.0, which copies all the files under//depot/elm_proj/... to //eds_elm/r2.0/... in his client workspace; then he runsp4 submit, which adds the newly branched files to the depot.
Branch: elm2.0Date: 1997/05/25 17:43:28Owner: edkDescription: Created by edk.View: //depot/... //depot/...
Branch: elm2.0Date: 1997/05/25 17:43:28Owner: edkDescription: Elm release 2.0 maintenance codelineView: //depot/elm_proj/... //depot/elm_r2.0/...
104 Perforce 2003.2 User’s Guide

Chapter 9: Branching
Once the branch has been created and the files have been copied into the branchedcodeline, changes can be propagated from the source files to the target files with p4
integrate -b branchname.
Example: Propagating changes to files with p4 integrate.
A bug has been fixed in the original codeline’s src/elm.c file. Ed wants to propagate thesame bug fix to the branched codeline he’s been working on. He types
p4 integrate -b elm2.0 ~edk/elm_r2.0/src/elm.c
and sees://depot/elm_r2.0/src/elm.c#1 - integrate from //depot/elm_proj/src/elm.c#9
The file has been scheduled for resolve. He types p4 resolve, and the standard merge dialogappears on his screen.
/usr/edk/elm_r2.0/src/elm.c - merging //depot/elm_proj/src/elm.c#9Diff chunks: 0 yours + 1 theirs + 0 both + 0 conflictingAccept(a) Edit(e) Diff(d) Merge (m) Skip(s) Help(?) [at]:
He resolves the conflict with the standard use of p4 resolve. When he’s done, the result fileoverwrites the file in his branched client, and it still must be submitted to the depot.
Branch Specification Usage Notes
• Creating or altering a branch specification has absolutely no immediate effect on any files withinthe depot or client workspace. The branch specification merely specifies which files areaffected by subsequent p4 integrate commands.
• Branch specifications may contain multiple mappings, just as client views can. Forexample, the following branch specification branches the Elm 2.0 source code anddocuments to two separate locations within the depot:
• Exclusionary mappings can be used within branch specifications.
• To reverse the direction of an integration that uses a branch specification, use the -rflag.
Branch: elm2.0Date: 1997/05/25 17:43:28Owner: edkDescription: Elm release 2.0 maintenance codelineView: //depot/elm_proj/src/... //depot/elm_r2.0/src/... //depot/elm_proj/docs/... //depot/docs/2.0/...
Perforce 2003.2 User’s Guide 105
Chapter 9: Branching
Integration Usage Notes
• p4 integrate only acts on files that are the intersection of target files in the branchview and the client view. If file patterns are given on the command line, integratefurther limits its actions to files matching the patterns. The source files supplied asarguments to integrate need not be in the client view.
• The basic syntax of the integrate command when using a branch specification is:p4 integrate -b branchname [tofiles]
If you omit the tofiles argument, all the files in the branch are affected.
• The direction of integration through a branch specification may be reversed with the -rflag. For example, to integrate changes from a branched file to the original source file,use p4 integrate -b branchname -r [tofiles]
• The p4 integrate command, like p4 add, p4 edit, and p4 delete, does not actuallyaffect the depot immediately; instead, it adds the affected files to a changelist, whichmust be submitted with p4 submit. This keeps the integrate operation atomic: eitherall the named files are affected at once, or none of them are.
• The actual action performed by p4 integrate is determined by particular properties ofthe source files and the target files:
If the target file doesn’t exist, the source file is copied to target, target is opened for branch,and Perforce begins tracking the integration history between the two files. The nextintegration of the two files will treat this revision of source as base.
If the target file exists, and was originally branched from the source file with p4 integrate,then a three-way merge is scheduled between target and source. The base revision is thepreviously integrated revision of source.
If the target file exists, but was not branched from the source, then these two file revisions didnot begin their lives at a common, older file revision, so there can be no base file, and p4
integrate rejects the integration. This is referred to as a baseless merge. To force theintegration, use the -i flag; p4 integrate will use the first revision of source as base.(Actually, p4 integrate uses the most recent revision of source that was added to thedepot as base. Since most files are only opened for add once, this will almost always bethe first revision of source.)
Note In previous versions of Perforce (99.1 and earlier), integration of a targetthat was not originally branched from the source would schedule a two-way merge, in which the only resolve choices were accept yours andaccept theirs. As of Perforce 99.2, it is no longer possible to perform atwo-way merge of a text file (even when possible, it was never desirable).
106 Perforce 2003.2 User’s Guide

Chapter 9: Branching
• By default, a file that has been newly created in a client workspace by p4 integrate
cannot be edited before its first submission. To make a newly-branched file available forediting before submission, perform a p4 edit of the file after the resolve process iscomplete.
• To run the p4 integrate command, you need Perforce write access on the target files,and read access on the source files. (See the Perforce System Administrator’s Guide forinformation on Perforce protections).
Deleting Branches
To delete a branch, usep4 branch -d branchname
Deleting a branch deletes only the branch specification, making the branch specificationinaccessible from any subsequent p4 integrate commands. The files themselves can stillbe integrated with p4 integrate fromfiles tofiles, and the branch specification canalways be redefined. If the files in the branched codeline are to be removed, they must bedeleted with p4 delete.
Advanced Integration Functions
Perforce’s branching mechanism also allows integration of specific file revisions, the re-integration and re-resolving of already integrated code, and merging of two files thatwere previously not related.
Integrating specific file revisions
By default, the integrate command integrates into the target all the revisions of thesource since the last source revision that integrate was performed on. A revision rangecan be specified when integrating; this prevents unwanted revisions from having to bemanually deleted from the merge while editing. In this case, the revision used as base isthe first revision below the specified revision range.
The argument to p4 integrate is the target, the file revision specifier is applied to thesource.
Example: Integrating Specific File Revisions.
Ed has made two bug fixes to his file src/init.c, and Kurt wants to integrate the changeinto his branched version, which is called newinit.c. Unfortunately, init.c has gonethrough 20 revisions, and Kurt doesn’t want to have to delete all the extra code from all 20revisions while resolving.
Perforce 2003.2 User’s Guide 107
Chapter 9: Branching
Kurt knows that the bug fixes he wants were made to file revisions submitted in changelist 30.From the directory containing his newinit.c file in his branched workspace, he types
p4 integrate -b elm_r1 newinit.c@30,@30
The target file is given as an argument, but the file revisions are applied to the source. WhenKurt runs p4 resolve, only the revision of Ed’s file that was submitted in changelist 30 isscheduled for resolve. That is, Kurt only sees the changes that Ed made to init.c inchangelist 30. The file revision that was present in the depot at changelist 29 is used as base.
Re-integrating and re-resolving files
After a revision of a source file has been integrated into a target, that revision is usuallyskipped in subsequent integrations with the same target. If all the revisions of a sourcehave been integrated into a particular target, p4 integrate returns the error message Allrevisions already integrated. To force the integration of already-integrated files,specify the -f flag to p4 integrate.
Similarly, a target that has been resolved but not (yet) submitted can be re-resolved byspecifying the -f flag to p4 resolve, which forces re-resolution of already resolved files.When this flag is used, the original client target file has been replaced with the result fileby the original resolve process; when you re-resolve, yours is the new client file, the resultof the original resolve.
How Integrate Works
The following sections describe the mechanism behind the integration process.
The yours, theirs, and base files
The following table explains the terminology yours, theirs, and base files.
The integration algorithm
Term Meaning
yours The file to which changes are being propagated (also called thetarget file). This file in the client workspace is overwritten by theresult when you resolve.
theirs The file from which changes are read (also known as the sourcefile). This file resides in the depot, and is not changed by theresolve process.
base The last integrated revision of the source file. When you useintegrate to create the branched copy of the file in the depot,the newly-branched copy is base.
108 Perforce 2003.2 User’s Guide
Chapter 9: Branching
p4 integrate performs the following steps:
1. Apply the branch view to any target files provided on the command line to produce alist of source/target file pairs. If no files are provided on the command line, a list ofall source/target file pairs is generated, including each revision of each source filethat is to be integrated.
2. Discard any source/target pairs for which the source file revisions have already beenintegrated. Each revision of each file that has been integrated is recorded, to avoidmaking you merge changes more than once.
3. Discard any source/target pairs whose source file revisions have integrationspending in files that are already opened in the client.
4. Integrate all remaining source/target pairs. The target file is opened on the client forthe appropriate action and merging is scheduled.
Integrate’s actions
The integrate command will take one of three actions, depending on particularcharacteristics of the source and target files:
By default, when you integrate using a branch specification, the original codeline containsthe source files, and the branched codeline is the target. However, if you reverse thedirection of integration by specifying the -r flag, the branched codeline contains thesource, and the original files are the targets.
Action Meaning
branch If the target file does not exist, it is opened for branch. Thebranch action is a variant of add, but Perforce keeps a record ofwhich source file the target file was branched from. This allowsthree-way merges to be performed between subsequent sourceand target revisions with the original source file revision asbase.
integrate If both the source and target files exist, the target is opened forintegration, which is a variant of edit. Before a user can submita file that has been opened for integration, the source and targetmust be merged with p4 resolve.
delete When the target file exists but no corresponding source file ismapped through the branch view, the target is marked fordeletion. This is consistent with integrate’s semantics: itattempts to make the target tree reflect the source tree.
Perforce 2003.2 User’s Guide 109
Chapter 9: Branching
Integration Reporting
The branching-related reporting commands are:
For More Information
Although Perforce’s branching mechanism is relatively simple, the theory of branchingcan be very complex. When should a branch be created? At what point should codechanges be propagated from one codeline to another? Who is responsible for performingmerges? These questions will arise no matter what SCM system you’re using, and theanswers are not simple. Three on-line documents can provide some guidance in thesematters.
A white paper on InterFile Branching, which describes Perforce’s branching mechanism intechnical detail, is available from:
http://www.perforce.com/perforce/branch.html
Christopher Seiwald and Laura Wingerd’s Best SCM Practices paper provides a discussionof many source configuration management issues, including an overview of basicbranching techniques. This paper is available at:
http://www.perforce.com/perforce/bestpractices.html
Streamed Lines: Branching Patterns for Parallel Software Development is an extremely detailedpaper on branching techniques. You’ll find it at:
http://www.enteract.com/~bradapp/acme/plop98/streamed-lines.html
Command Function
p4 integrate -n [filepatterns] Previews the results of the specified integration,but does not perform the integration. (Toperform the integration, omit the -n flag.)
p4 resolve -n [filepatterns] Displays files that are scheduled for resolve by p4integrate, but does not perform the resolve. (Toperform the resolve, omit the -n flag.)
p4 resolved Displays files that have been resolved but not yetsubmitted.
p4 branches Displays all branches.
p4 integrated filepatterns Displays the integration history of the specifiedfiles.
p4 filelog -i [filepatterns] Displays the revision histories of the specifiedfiles, including the integration histories of filesfrom which the specified files were branched.
110 Perforce 2003.2 User’s Guide

Chapter 10 Job Tracking
A job is a written description of some modification to be made to a source code set. A jobmight be a bug description, like “the system crashes when I press return”, or it might bea system improvement request, like “please make the program run faster.”
Whereas a job represents work that is intended, a changelist represents work actuallydone. Perforce’s job tracking mechanism allows jobs to be linked to the changelists thatimplement the work requested by the job. A job can later be looked up to determine if andwhen it was fixed, which file revisions implemented the fix, and who fixed it. A job linkedto a numbered changelist is marked as completed when the changelist is submitted.
Jobs perform no functions internally to Perforce; rather, they are provided as a method ofkeeping track of information such as what changes to the source are needed, which user isresponsible for implementing the job, and which file revisions contain the implementationof the job. The type of information tracked by the jobs system can be customized; fields inthe job form can be added, changed, and deleted by Perforce administrators.
Job Usage Overview
There are five related but distinct aspects of using jobs.
• The Perforce superuser or administrator decides what fields are to be tracked in yoursystem’s jobs, the possible values of a job’s fields, and their default values. This jobtemplate is edited with the p4 jobspec command. (See the Perforce SystemAdministrator’s Guide for details on how to edit the job specification. The jobspecification need not be changed before users can create jobs).
• Jobs can be created and edited by any user with p4 job.
• The p4 jobs command can be used to look up all the jobs that meet specified criteria.
• Jobs can be linked to changelists automatically or manually; when a job is linked to achangelist, the job is marked as closed when the changelist is submitted.
• The jobs that have been fixed can be displayed with Perforce reporting commands.These commands can list all jobs that fixed particular files or file revisions, all the jobsthat were fixed in a particular changelist, or all the changelists that were linked to aparticular job fix.
The remainder of this chapter discusses how these tasks are accomplished.
Perforce 2003.2 User’s Guide 111

Chapter 10: Job Tracking
Creating and editing jobs using the default job specification
Jobs are created with the p4 job command.
Example: Creating a job
Sarah’s Perforce server uses Perforce’s default jobs specification. Sarah knows about a job inElm’s filtering subsystem, and she knows that Ed is responsible for Elm filters. Sarah creates anew job with p4 job and fills in the resulting form as follows:
Sarah has filled in a description and has changed User: to edk.
Since job fields differ from site to site, the fields in jobs at your site may be very differentthan what you see above. The default p4 job form’s fields are:
Job: newStatus: openUser: edkDate: 1998/05/18 17:15:40Description: Filters on the “Reply-To:” field don’t work.
Field Name Description Default
Job The name of the job. Whitespace is not allowed inthe name.
new
Status open, closed, suspended, or new.
An open job is one that has been created but hasnot yet been fixed.
A closed job is one that has been completed.
A suspended job is an open job that is notcurrently being worked on.
Jobs with status new exist only while a new job isbeing created; they change to status open as soonas the form has been completed and the job addedto the database.
new; changes toopen after jobcreation form isclosed.
User The user whom the job is assigned to, usually theusername of the person assigned to fix thisparticular problem.
Perforce usernameof the personcreating the job.
Date The date the job was last modified, displayed asYYYY/MM/DD HH/MM/SS
The date and time atthe moment this jobwas last modified.
112 Perforce 2003.2 User’s Guide
Chapter 10: Job Tracking
If p4 job is called with no parameters, a new job is created. The name that appears on theform is new, but this can be changed by the user to any desired string. If the Job: field isleft as new, Perforce will assign the job the name jobN, where N is a sequentially-assignedsix-digit number.
Existing jobs can be edited with p4 job jobname. The user and description can bechanged arbitrarily; the status can be changed to any of the three valid status values open,closed, or suspended. When you call p4 job jobname with a nonexistent jobname,Perforce creates a new job. (A job, if submitted with a Status: of new, has this statusautomatically changed to open upon completion of the job form.)
Creating and editing jobs with custom job specifications
A Perforce administrator can add and change fields within your server’s jobs templatewith the p4 jobspec command. If this has been done, there may be additional fields inyour p4 jobs form, and the names of the fields described above may have changed.
A sample customized job specification might look like this:
Description Arbitrary text assigned by the user. Usually awritten description of the problem that is meantto be fixed.
Text that must bechanged
# Custom Job fields:# Job: The job name. ’new’ generates a sequenced job number.# Status: Either ’open’, ’closed’, or ’suspended’. Can be changed# User: The user who created the job. Can be changed.# Date: The date this specification was last modified.# Type: The type of the job. Acceptable values are# ’bug’, ’sir’, ’problem’ or ’unknown’# Priority: How soon should this job be fixed?# Values are ’a’, ’b’, ’c’, or ’unknown’# Subsystem: One of server/gui/doc/mac/misc/unknown# Owned_by: Who’s fixing the bug# Description: Comments about the job. Required.
Job: newStatus: openUser: setmeType: setmePriority: unknownSubsystem: setmeOwned_by: edkDescription: <enter description here>
Field Name Description Default
Perforce 2003.2 User’s Guide 113
Chapter 10: Job Tracking
Some of the fields have been set by the administrator to allow one of a set of values; forexample, Priority: must be one of a, b, c, or unknown. The p4 job fields don’t tell youwhat the valid values of the fields are; your Perforce administrator can tell you this incomments at the top of the job form. If you find the information in the comments for yourjobs to be insufficient to enter jobs properly, please tell your Perforce administrator.
Viewing jobs by content with jobviews
Jobs can be reported with p4 jobs. In its simplest form, with no arguments, p4 jobs willlist every job stored in your Perforce server. However, p4 job -e jobview will list alljobs that match the criteria contained in jobview.
Throughout the following discussion, the following rules apply:
• Textual comparisons within jobviews are case-insensitive, as are the field names thatappear in jobviews,
• only alphanumeric text and punctuation can appear in a jobview,
• there is currently no way to search for particular phrases. Jobviews can search jobs onlyby individual words.
Finding jobs containing particular words
The jobview 'word1 word2 ... wordN' can be used to find jobs that contain all of word1through wordN in any field (excluding date fields).
Example: Finding jobs that contain all of a set of words in any field.
Ed wants to find all jobs that contain the words filter, file, and mailbox. He types:p4 jobs -e 'filter file mailbox'
Spaces between search terms in jobviews act as boolean and’s. You can use ampersandsinstead of spaces in jobviews, so the jobviews 'joe sue' and 'joe&sue' are identical.
To find jobs that contain any of the terms, separate the terms with the '|' character.
Example: Finding jobs that contain any of a set of words in any field.
Ed wants to find jobs that contains any of the words filter, file or mailbox. He types:p4 jobs -e 'filter|file|mailbox'
114 Perforce 2003.2 User’s Guide

Chapter 10: Job Tracking
Finding jobs by field values
Search results can be narrowed by matching values within specific fields with the jobviewsyntax 'fieldname=value'. Value must be a single alphanumeric word.
Example: Finding jobs that contain words in specific fields
Ed wants to find all open jobs related to filtering of which he is the owner. He types:p4 jobs -e 'status=open user=edk filter.c'
This will find all jobs with a Status: of open, a User: of edk, and the word filter.c inany non-date field.
Using and escaping wildcards in jobviews
The wildcard “*” allows for partial word matches. The jobview “fieldname=string*”matches “string”, “stringy”, “stringlike”, and so on.
To search for words that happen to contain wildcards, escape them at the command line.For instance, to search for “*string” (perhaps in reference to char *string), you’d usethe following:
p4 jobs -e '\*string'
Negating the sense of a query
The sense of a search term can be reversed by prefacing it with ^, the not operator.
Example: Finding jobs that don’t contain particular words.
Ed wants to find all open jobs related to filtering of which he is not the owner. He types:p4 jobs -e 'status=open ^user=edk filter'
This displays all jobs with a Status: of open, a User: of anyone but edk, and the wordfilter in any non-date field.
The not operator ^ can be used only directly after an and (space or &). Thus, p4 jobs -e'^user=edk' is not allowed.
You can use the * wildcard to get around this: p4 jobs -e 'job=* ^user=edk' returnsall jobs with a user field not matching edk.
Perforce 2003.2 User’s Guide 115

Chapter 10: Job Tracking
Using dates in jobviews
Jobs can be matched by date by expressing the date as yyyy/mm/dd oryyyy/mm/dd:hh:mm:ss. If you don’t provide a specific time, the equality operator =matches the entire day.
Example: Using dates within jobviews.
Ed wants to view all jobs modified on July 13, 1998. He entersp4 jobs -e 'mod_date=1998/07/13'
Comparison operators and field types
The usual comparison operators are available. They are:
The behavior of these operators depends upon the type of the field in the jobview.Thefield types are:
Field types are often obvious from context; a field called mod_date, for example, is mostlikely a date field. If you’re not sure of a field’s type, run p4 jobspec -o, which outputsthe job specification your local jobspec. The field called Fields: lists the job fields’ namesand datatypes.
= > < >= <=
Field Type Explanation Examples
word A single word A user name: edk
text A block of text A job’s description
line A single line of text. Differs from text fieldsonly in that line values are entered on thesame line as the field name, and text valuesare entered on the lines beneath the fieldname.
An email address
A user’s real name, forexample Linda Hopper
select One of a set of values A job’s status:
open/suspended/closed
date A date value The date and time of jobcreation:
1998/07/15:13:21:4
116 Perforce 2003.2 User’s Guide

Chapter 10: Job Tracking
The jobview comparison operators behave differently depending upon the type of fieldthey’re used with. The comparison operators match the different field types as follows:
Linking Jobs to Changelists
Perforce automatically changes the value of a job’s status field to closed when the job islinked to a particular changelist, and the changelist is submitted.
Jobs can be linked to changelists in one of two ways:
• Automatically, by setting the JobView: field in the p4 user form to a jobview thatmatches the job, and
• manually, with the p4 fix command.
• manually, by editing them within the p4 submit form.
Linking jobs to changelists with the JobView: field
The p4 user form can be used to automatically include particular jobs on any newchangelists created by that user. To do this, call p4 user and change the JobView: fieldvalue to any valid jobview.
Field Type Use of Comparison Operators in Jobviews
word The equality operator = must match the value in the word field exactly.
The inequality operators perform comparisons in ASCII order.
text The equality operator = matches the job if the word given as the value isfound anywhere in the specified field.
The inequality operators are of limited use here, since they’ll match thejob if any word in the specified field matches the provided value. Forexample, if a job has a text field ShortDescription: that contains onlythe phrase gui bug, and the jobview is 'ShortDesc<filter', the job willmatch the jobview, because bug<filter.
line See text, above.
select The equality operator = matches a job if the value of the named field is thespecified word. Inequality operators perform comparisons in ASCII order.
date Dates are matched chronologically. If a specific time is not provided, theoperators =, <=, and >= will match the whole day.
Perforce 2003.2 User’s Guide 117
Chapter 10: Job Tracking
Example: Automatically linking jobs to changelists with the p4 user form’s JobView field.
Ed wants to see all open jobs that he owns in all changelists he creates. He types p4 user andadds a JobView: field:
All of Ed’s jobs that meet these JobView: criteria automatically appear on all changelists hecreates. He can, and should, delete jobs that aren’t fixed by the changelist from the changelistform before submission. When a changelist is submitted, the jobs linked to it will have theirstatus: field’s value changed to closed.
Linking jobs to changelists with p4 fix
p4 fix -c changenum jobname can be used to link any job to any changelist. If thechangelist has already been submitted, the value of the job’s Status: field is changed toclosed. Otherwise, the job keeps its current status.
Example: Manually attaching jobs to changelists.
You can use p4 fix to link a changelist to a job owned by another user.
Sarah has submitted a job called options-bug to Ed. Unbeknownst to Sarah, the bugreported by the job was fixed in Ed’s previously submitted changelist 18. Ed links the job tothe previously submitted changelist by typing:
Since changelist 18 has already been submitted, the job’s status is changed to closed.
Linking jobs to changelists from within the submit form
You can also add jobs to changelists by editing the Jobs: field (or creating a Jobs: field ifnone exists) in the p4 submit form.
Any job can be linked to a changelist by adding it to a changelist’s change form, orunlinked from a changelist by deleting the job from the changelist’s change form.
User: edkUpdate: 1998/06/02 13:11:57Access: 1998/06/03 20:11:07JobView: user=edk&status=open
p4 fix -c 18 options-bug
118 Perforce 2003.2 User’s Guide

Chapter 10: Job Tracking
Example: Including and excluding jobs from changelists.
Ed has set his p4 user’s JobView: field as in the example above. He is unaware of a job thatSarah has made Ed the owner of (when she entered the job, she set the User: field to edk). Heis currently working on an unrelated problem; he types p4 submit and sees the following:
Since this job is unrelated to the work he’s been doing, and since it hasn’t been fixed, he deletesjob000125 from the form and then quits from the editor. The changelist is submitted withoutjob000125 being associated with the changelist.
Automatic update of job status
The value of a job’s Status field is automatically changed to closed when one of itsassociated changelists is successfully submitted.
Example: Submitting a changelist with an attached job.
Ed uses the reporting commands to read the details about job job000125. He fixes thisproblem, and a number of other bugs; when he next types p4 submit, he sees:
Since the job is fixed in this changelist, Ed leaves the job on the form. When he quits from theeditor, the job’s status is changed to closed.
Change: newClient: eds_wsUser: edkStatus: newDescription: Updating "File" I/O filesJobs: job000125 # Filters on "Reply-To" field don’t work
Files: //depot/src/file.c # edit //depot/src/file_util.c # edit //depot/src/fileio.c # edit
Change: newClient: eds_wsUser: edkStatus: newDescription: Fixes a number of filter problemsJobs: job000125 # Filters on "Reply-To" field don’t workFiles: //depot/filter/actions.c # edit //depot/filter/audit.c # edit //depot/filter/filter.c # edit
Perforce 2003.2 User’s Guide 119

Chapter 10: Job Tracking
What if there’s no status field?
The discussion in this section has assumed that the server’s job specification still containsthe default Status: field. If the job specification has been altered so that this is no longertrue, jobs can still be linked to changelists, but nothing in the job changes when thechangelist is submitted. (In most cases, this is not a desired form of operation.) Please seethe chapter on editing job specifications in the Perforce System Administrator’s Guide formore details.
Deleting Jobs
A job can be unlinked from any changelist with p4 fix -d -c changenum jobname.
Jobs can be deleted entirely with p4 job -d jobname.
Integrating with External Defect Tracking Systems
If you want to integrate Perforce with your in-house defect tracking system, or develop anintegration with a third-party defect tracking system, P4DTI is probably the best place tostart.
To get started with P4DTI, see the P4DTI product information page at:http://www.perforce.com/perforce/products/p4dti.html
Available from this page are the TeamShare and Bugzilla implementations, an overviewof the P4DTI’s capabilities, and a kit (including source code and developer documentation)for building integrations with other products or in-house systems.
Even if you don’t use the P4DTI kit as a starting point, you can still use Perforce’s jobsystem as the interface between Perforce and your defect tracker. See the Perforce SystemAdministrator’s Guide for more information.
Job Reporting Commands
The job reporting commands can be used to show the correspondence between files andthe jobs they fix.
To See a Listing of... Use This Command:
...all jobs that match particular criteria p4 jobs -e jobview
...all the jobs that were fixed by changelists that affectedparticular file(s)
p4 jobs filespec
...all changelists and file revisions that fixed a particular job p4 fixes -j jobname
120 Perforce 2003.2 User’s Guide
Chapter 10: Job Tracking
Other job reporting variations are available. For more examples, please see “JobReporting” on page 133, or consult the Perforce Command Reference.
...all jobs linked to a particular changelist p4 fixes -c changenum
...all jobs fixed by changelists that contain particular files orfile revisions
p4 fixes filespec
To See a Listing of... Use This Command:
Perforce 2003.2 User’s Guide 121
Chapter 10: Job Tracking
122 Perforce 2003.2 User’s Guide

Chapter 11 Reporting and Data Mining
Perforce’s reporting commands supply information on all data stored within the depot.There are many reporting commands; in fact, there are almost as many reportingcommands as there are action commands. These commands have been discussedthroughout this manual; this chapter presents the same commands and providesadditional information for each command. Tables in each section contain answers toquestions of the form “How do I find information about...?”
Many of the reporting commands have numerous options, but discussion of all optionsfor each command is beyond the scope of this manual. For a full description of anyparticular command, please consult the Perforce Command Reference, or type p4 helpcommand at the command line.
One previously mentioned note on syntax is worth repeating here: any filespec
argument in Perforce commands, as in:p4 files filespec
will match any file pattern that is supplied in local syntax, depot syntax, or client syntax,with any Perforce wildcards. Brackets around [filespec] mean that the file specificationis optional. Additionally, many of the reporting commands can take revision specifiers aspart of the filespec. Revision specifiers are discussed on “Specifying Older File Revisions”on page 51.
Files
The commands that report on files fall into two categories: those that give informationabout file contents, (for instance, p4 print, p4 diff), and those that supply informationon file metadata, the data that describe a file with no reference to content (e.g. p4 files, p4filelog). The first set of reporting commands discussed in this section describe filemetadata, while the second set describe file contents.
File metadataBasic file information
To view information about single revisions of one or more files, use p4 files. Thiscommand provides the locations of the files within the depot, the actions (add, edit,delete, and so on) on those files at the specified revisions, the changelists the specifiedfile revisions were submitted in, and the files’ types. The output has this appearance:
//depot/README#5 - edit change 6 (text)
Perforce 2003.2 User’s Guide 123
Chapter 11: Reporting and Data Mining
The p4 files command requires one or more filespec arguments. Filespec argumentscan, as always, be provided in Perforce or local syntax, but the output always reports onthe corresponding files within the depot. If you don’t provide a revision number, Perforceuses the head revision.
Unlike most other commands, p4 files also describes deleted revisions, rather thansuppressing information about deleted files.
File revision history
The revision history of a file is provided by p4 filelog. One or more file arguments mustbe provided, and since the point of p4 filelog is to list information about each revisionof particular files, file arguments to this command may not contain a revisionspecification.
The output of p4 filelog has this form:
For each file that matches the filespec argument, the complete list of file revisions ispresented, along with the number of the changelist that the revision was submitted in, thedate of submission, the user who submitted the revision, the file’s type at that revision,and the first few characters of the changelist description. With the -l flag, the entiredescription of each changelist is printed:
To View File Metadata for... Use This Command:
...all files in the depot, whether or not visiblethrough your client view
p4 files //depot/...
...all the files currently in any client workspace p4 files @clientname
...all the files in the depot that are mapped throughyour current client workspace view
p4 files //clientname/...
...a particular set of files in the current workingdirectory
p4 files filespec
...a particular file at a particular revision number p4 files filespec#revisonNum
...all files at change n, whether or not the file wasactually included in change n
p4 files @n
...a particular file within a particular label p4 files filespec@labelname
... #3 change 23 edit on 1997/09/26 by edk@doc <ktext> ’Fix help system’
... #2 change 9 edit on 1997/09/24 by lisag@src <text> ’Change file’
... #1 change 3 add on 1997/09/24 by edk@doc <text> ’Added filtering bug’
#3 change 23 edit on 1997/09/26 by edk@docUpdated help files to reflect changesin filtering system & other subsystems...<etc.>
124 Perforce 2003.2 User’s Guide

Chapter 11: Reporting and Data Mining
Opened files
To see which files are currently opened within a client workspace, use p4 opened. Foreach opened file within the client workspace that matches a file pattern argument, p4opened prints a line like the following:
//depot/elm_proj/README - edit default change (text)
Each opened file is described by its depot name and location, the operation that the file isopened for (add, edit, delete, branch, or integrate), which changelist the file isincluded in, and the file’s type.
Relationships between client and depot files
It is often useful to know how the client and depot are related at a particular moment intime. Perhaps you simply want to know where a particular client file is mapped to withinthe depot, or you may want to know whether or not the head revision of a particulardepot file has been copied to the client. The commands that express the relationshipbetween client and depot files are p4 where, p4 have, and p4 sync -n. The first of thesecommands, p4 where, shows the mappings between client workspace files, depot files,and local OS syntax. p4 have tells you which revisions of files you’ve last synced to yourclient workspace, and p4 sync -n describes which files would be read into your clientworkspace the next time you perform a p4 sync.
All these commands can be used with or without filespec arguments. p4 sync -n is theonly command in this set that allows revision specifications on the filespec arguments.
The output of p4 where filename looks like this://depot/elm_proj/doc/Ref.guide //edk/doc/Ref.guide /usr/edk/doc/Ref.guide
The first part of the output is the location of the file in depot syntax; the second part is thelocation of the same file in client syntax, and the third is the location of the file in local OSsyntax.
p4 have’s output has this form://depot/doc/Ref.txt#3 - /usr/edk/elm/doc/Ref.txt
To See... Use This Command:
...a listing of all opened files in the current workspace p4 opened
...a list of all opened files in all client workspaces p4 opened -a
...a list of all files in a numbered pending changelist p4 opened -c changelist#
...a list of all files in the default changelist p4 opened -c default
...whether or not a specific file is opened by you p4 opened filespec
...whether or not a specific file is opened by anyone p4 opened -a filespec
Perforce 2003.2 User’s Guide 125

Chapter 11: Reporting and Data Mining
and p4 sync -n provides output like://depot/doc/Ref.txt#3 - updating /usr/edk/elm/doc/Ref.txt
The following table lists other useful commands:
File contentsContents of a single revision
You can view the contents of any file revision within the depot with p4 print. Thiscommand simply prints the contents of the file to standard output, or to the specifiedoutput file, along with a one-line banner that describes the file. The banner can beremoved by passing the -q flag to p4 print. When printed, the banner has this format:
//depot/elm_proj/README#23 - edit change 50 (text)
p4 print takes a mandatory file argument, which can include a revision specification. If arevision is specified, the file is printed at the specified revision; if no revision is specified,the head revision is printed.
To See... Use This Command:
...which revisions of which files you have in theclient workspace
p4 have
...which revision of a particular file is in your clientworkspace
p4 have filespec
...where a particular file maps to within the depot,the client workspace, and the local OS
p4 where filespec
...where a particular file in the depot maps to in theworkspace
p4 where //depot/.../filespec
...which files would be synced into your clientworkspace from the depot when you do the nextsync
p4 sync -n
To See the Contents of Files... Use This Command:
...at the current head revision p4 print filespec
...without the one-line file header p4 print -q filespec
...at a particular change number p4 print filespec@changenum
126 Perforce 2003.2 User’s Guide
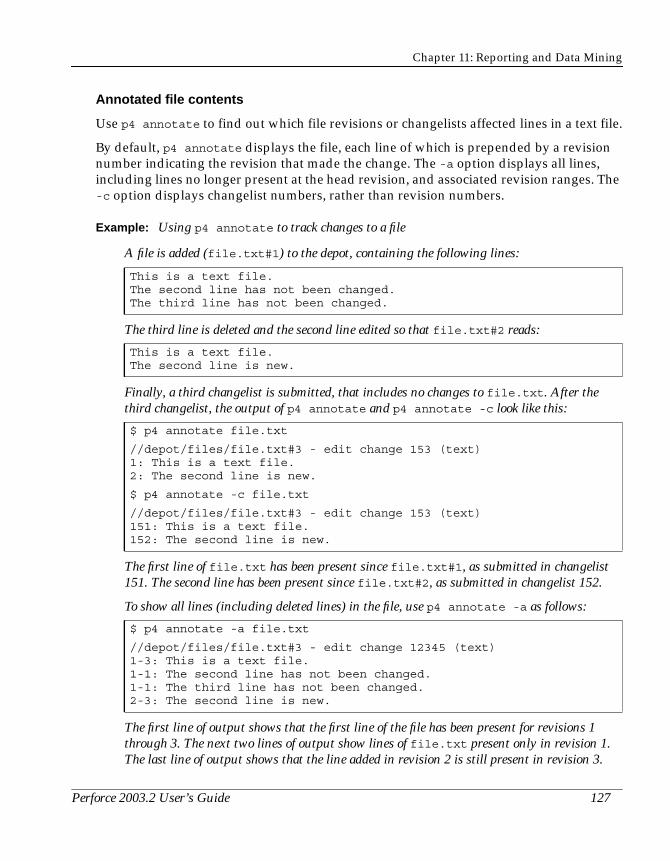
Chapter 11: Reporting and Data Mining
Annotated file contents
Use p4 annotate to find out which file revisions or changelists affected lines in a text file.
By default, p4 annotate displays the file, each line of which is prepended by a revisionnumber indicating the revision that made the change. The -a option displays all lines,including lines no longer present at the head revision, and associated revision ranges. The-c option displays changelist numbers, rather than revision numbers.
Example: Using p4 annotate to track changes to a file
A file is added (file.txt#1) to the depot, containing the following lines:
The third line is deleted and the second line edited so that file.txt#2 reads:
Finally, a third changelist is submitted, that includes no changes to file.txt. After thethird changelist, the output of p4 annotate and p4 annotate -c look like this:
The first line of file.txt has been present since file.txt#1, as submitted in changelist151. The second line has been present since file.txt#2, as submitted in changelist 152.
To show all lines (including deleted lines) in the file, use p4 annotate -a as follows:
The first line of output shows that the first line of the file has been present for revisions 1through 3. The next two lines of output show lines of file.txt present only in revision 1.The last line of output shows that the line added in revision 2 is still present in revision 3.
This is a text file.The second line has not been changed.The third line has not been changed.
This is a text file.The second line is new.
$ p4 annotate file.txt
//depot/files/file.txt#3 - edit change 153 (text)1: This is a text file.2: The second line is new.
$ p4 annotate -c file.txt
//depot/files/file.txt#3 - edit change 153 (text)151: This is a text file.152: The second line is new.
$ p4 annotate -a file.txt
//depot/files/file.txt#3 - edit change 12345 (text)1-3: This is a text file.1-1: The second line has not been changed.1-1: The third line has not been changed.2-3: The second line is new.
Perforce 2003.2 User’s Guide 127

Chapter 11: Reporting and Data Mining
You can combine the -a and -c options to display all lines in the file and the changelistnumbers (rather than the revision numbers) at which the lines existed.
File content comparisons
A client workspace file can be compared to any revision of the same file within in thedepot with p4 diff. This command takes a filespec argument; if no revision specificationis supplied, the workspace file is compared against the revision last read into theworkspace.
The p4 diff command has many options available; only a few are described in the tablebelow. For more details, please consult the Perforce Command Reference.
Whereas p4 diff compares a client workspace file against depot file revisions, p4 diff2
can be used to compare any two revisions of a file. It can even be used to comparerevisions of different files. p4 diff2 takes two file arguments -- wildcards are allowed,but any wildcards in the first file argument must be matched with a correspondingwildcard in the second. This makes it possible to compare entire trees of files.
There are many more flags to p4 diff than described below. For a full listing, please typep4 help diff at the command line, or consult the Perforce Command Reference.
To See the Differencesbetween...
Use This Command:
...an open file within the clientworkspace and the revisionlast taken into the workspace
p4 diff file
...any file within the clientworkspace and the revisionlast taken into the workspace
p4 diff -f file
...a file within the clientworkspace and the same file’scurrent head revision
p4 diff file#head
...a file within the clientworkspace and a specificrevision of the same file withinthe depot
p4 diff file#revnumber
...the n-th and head revisionsof a particular file
p4 diff2 filespec filespec#n
...all files at changelist n andthe same files at changelist m
p4 diff2 filespec@n filespec@m
128 Perforce 2003.2 User’s Guide
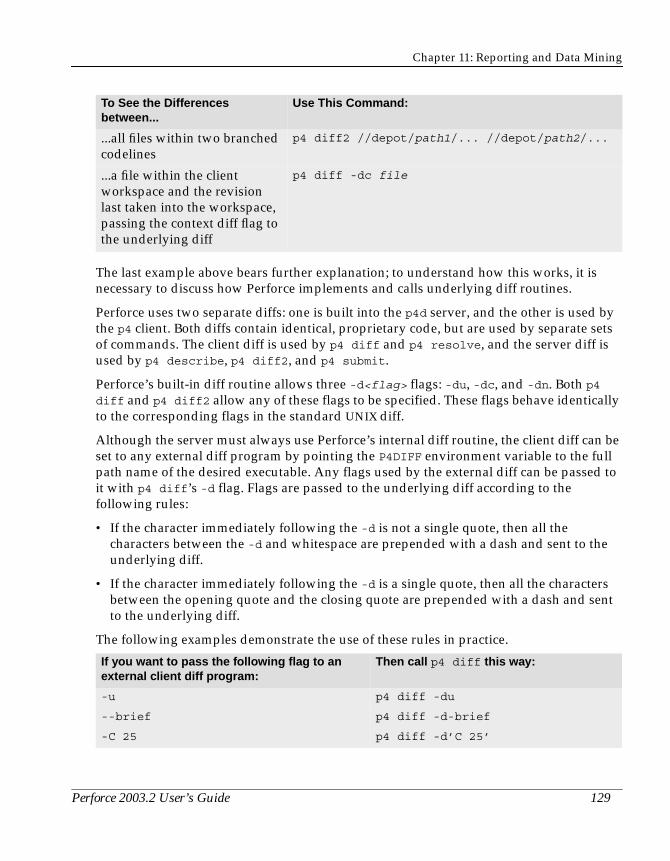
Chapter 11: Reporting and Data Mining
The last example above bears further explanation; to understand how this works, it isnecessary to discuss how Perforce implements and calls underlying diff routines.
Perforce uses two separate diffs: one is built into the p4d server, and the other is used bythe p4 client. Both diffs contain identical, proprietary code, but are used by separate setsof commands. The client diff is used by p4 diff and p4 resolve, and the server diff isused by p4 describe, p4 diff2, and p4 submit.
Perforce’s built-in diff routine allows three -d<flag> flags: -du, -dc, and -dn. Both p4
diff and p4 diff2 allow any of these flags to be specified. These flags behave identicallyto the corresponding flags in the standard UNIX diff.
Although the server must always use Perforce’s internal diff routine, the client diff can beset to any external diff program by pointing the P4DIFF environment variable to the fullpath name of the desired executable. Any flags used by the external diff can be passed toit with p4 diff’s -d flag. Flags are passed to the underlying diff according to thefollowing rules:
• If the character immediately following the -d is not a single quote, then all thecharacters between the -d and whitespace are prepended with a dash and sent to theunderlying diff.
• If the character immediately following the -d is a single quote, then all the charactersbetween the opening quote and the closing quote are prepended with a dash and sentto the underlying diff.
The following examples demonstrate the use of these rules in practice.
...all files within two branchedcodelines
p4 diff2 //depot/path1/... //depot/path2/...
...a file within the clientworkspace and the revisionlast taken into the workspace,passing the context diff flag tothe underlying diff
p4 diff -dc file
If you want to pass the following flag to anexternal client diff program:
Then call p4 diff this way:
-u p4 diff -du
--brief p4 diff -d-brief
-C 25 p4 diff -d’C 25’
To See the Differencesbetween...
Use This Command:
Perforce 2003.2 User’s Guide 129
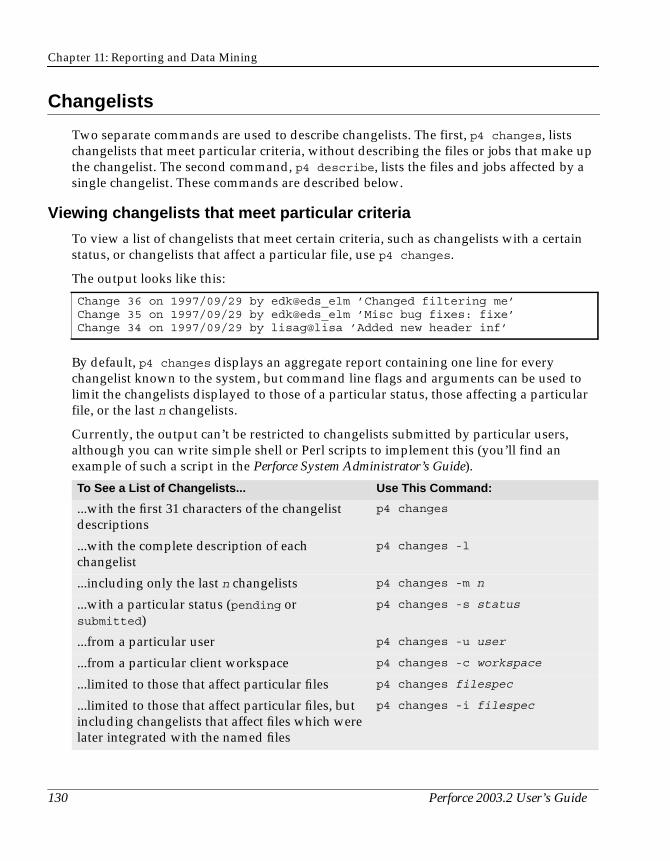
Chapter 11: Reporting and Data Mining
Changelists
Two separate commands are used to describe changelists. The first, p4 changes, listschangelists that meet particular criteria, without describing the files or jobs that make upthe changelist. The second command, p4 describe, lists the files and jobs affected by asingle changelist. These commands are described below.
Viewing changelists that meet particular criteria
To view a list of changelists that meet certain criteria, such as changelists with a certainstatus, or changelists that affect a particular file, use p4 changes.
The output looks like this:
By default, p4 changes displays an aggregate report containing one line for everychangelist known to the system, but command line flags and arguments can be used tolimit the changelists displayed to those of a particular status, those affecting a particularfile, or the last n changelists.
Currently, the output can’t be restricted to changelists submitted by particular users,although you can write simple shell or Perl scripts to implement this (you’ll find anexample of such a script in the Perforce System Administrator’s Guide).
Change 36 on 1997/09/29 by edk@eds_elm ’Changed filtering me’Change 35 on 1997/09/29 by edk@eds_elm ’Misc bug fixes: fixe’Change 34 on 1997/09/29 by lisag@lisa ’Added new header inf’
To See a List of Changelists... Use This Command:
...with the first 31 characters of the changelistdescriptions
p4 changes
...with the complete description of eachchangelist
p4 changes -l
...including only the last n changelists p4 changes -m n
...with a particular status (pending orsubmitted)
p4 changes -s status
...from a particular user p4 changes -u user
...from a particular client workspace p4 changes -c workspace
...limited to those that affect particular files p4 changes filespec
...limited to those that affect particular files, butincluding changelists that affect files which werelater integrated with the named files
p4 changes -i filespec
130 Perforce 2003.2 User’s Guide
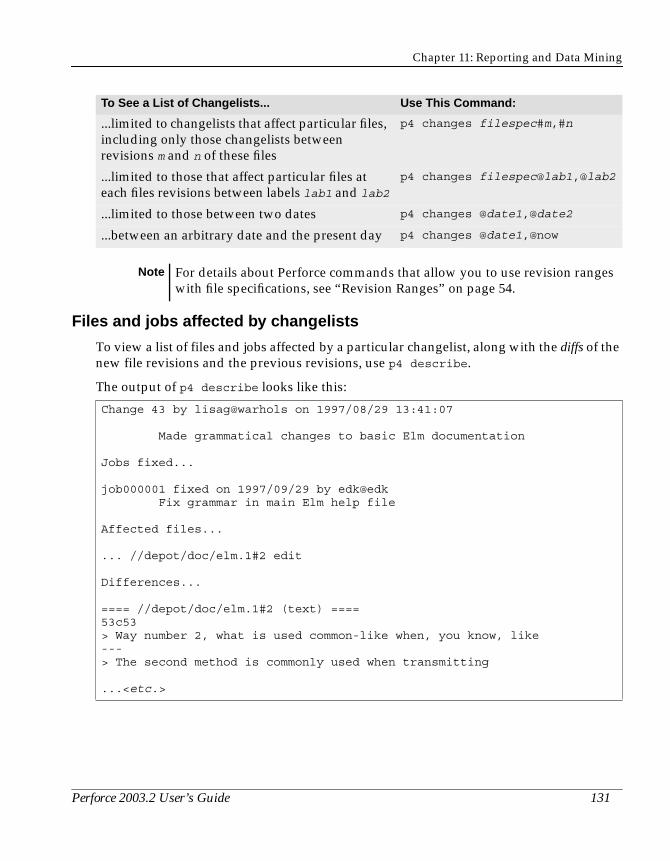
Chapter 11: Reporting and Data Mining
Files and jobs affected by changelists
To view a list of files and jobs affected by a particular changelist, along with the diffs of thenew file revisions and the previous revisions, use p4 describe.
The output of p4 describe looks like this:
...limited to changelists that affect particular files,including only those changelists betweenrevisions m and n of these files
p4 changes filespec#m,#n
...limited to those that affect particular files ateach files revisions between labels lab1 and lab2
p4 changes filespec@lab1,@lab2
...limited to those between two dates p4 changes @date1,@date2
...between an arbitrary date and the present day p4 changes @date1,@now
Note For details about Perforce commands that allow you to use revision rangeswith file specifications, see “Revision Ranges” on page 54.
Change 43 by lisag@warhols on 1997/08/29 13:41:07
Made grammatical changes to basic Elm documentation
Jobs fixed...
job000001 fixed on 1997/09/29 by edk@edk Fix grammar in main Elm help file
Affected files...
... //depot/doc/elm.1#2 edit
Differences...
==== //depot/doc/elm.1#2 (text) ====53c53> Way number 2, what is used common-like when, you know, like---> The second method is commonly used when transmitting
...<etc.>
To See a List of Changelists... Use This Command:
Perforce 2003.2 User’s Guide 131

Chapter 11: Reporting and Data Mining
This output is quite lengthy, but a shortened form that eliminates the diffs can begenerated with p4 describe -s changenum.
For more commands that report on jobs, see “Job Reporting” on page 133.
Labels
Reporting on labels is accomplished with a very small set of commands. The onlycommand that reports only on labels, p4 labels, prints its output in the followingformat:
The other label reporting commands are variations of commands we’ve seen earlier.
To See: Use This Command:
...a list of files contained in a pending changelist p4 opened -c changelist#
...a list of all files submitted and jobs fixed by aparticular changelist, displaying the diffs betweenthe file revisions submitted in that changelist andthe previous revisions
p4 describe changenum
...a list of all files submitted and jobs fixed by aparticular changelist, without the file diffs
p4 describe -s changenum
...a list of all files and jobs affected by a particularchangelist, while passing the context diff flag tothe underlying diff program
p4 describe -dc changenum
...the state of particular files at a particularchangelist, whether or not these files were affectedby the changelist
p4 files filespec@changenum
Label release1.3 1997/5/18 ’Created by edk’Label lisas_temp 1997/10/03 ’Created by lisag’...<etc.>
To See: Use This Command:
...a list of all labels, the dates they were created, and thename of the user who created them
p4 labels
...a list of all labels containing a specific revision (orrange)
p4 labels file#revrange
...a list of files that have been included in a particularlabel with p4 labelsync
p4 files @labelname
...what p4 sync would do when retrieving files from aparticular label into your client workspace
p4 sync -n @labelname
132 Perforce 2003.2 User’s Guide
Chapter 11: Reporting and Data Mining
Branch and Integration Reporting
The plural form command of branch, p4 branches, lists the different branches in thesystem, along with their owners, dates created, and descriptions. Separate commands areused to list files within a branched codeline, to describe which files have been integrated,and to perform other branch-related reporting.
The table below describes the most commonly used commands for branch- andintegration-related reporting.
Job Reporting
Two commands report on jobs. The first, p4 jobs, reports on all jobs known to thesystem, while the second command, p4 fixes, reports only on those jobs that have beenattached to changelists. Both of these commands have numerous options.
Basic job information
To see a list of all jobs known to the system, use p4 jobs. This command produces outputsimilar to the following:
To See: Use This Command:
...a list of all branches known to the system p4 branches
...a list of all files in a particular branchedcodeline
p4 files filespec
...what a particular p4 integrate variationwould do, without actually doing theintegrate
p4 integrate [args] -n [filespec]
...a list of all the revisions of a particular file p4 filelog -i filespec
...what a particular p4 resolve variationwould do, without actually doing the resolve
p4 resolve [args] -n [filespec]
...a list of files that have been resolved buthave not yet been submitted
p4 resolved [filespec]
...a list of integrated, submitted files thatmatch the filespec arguments
p4 integrated filespec
...a list of all the revisions of a particular file,including revision of the file(s) it wasbranched from
p4 filelog -i filespec
job000302 on 1997/08/13 by saram *open* ’FROM: headers no’filter_bug on 1997/08/23 by edk *closed* ’Can’t read filters w’
Perforce 2003.2 User’s Guide 133

Chapter 11: Reporting and Data Mining
Its output includes the job’s name, date entered, job owner, status, and the first 31characters of the job description.
All jobs known to the system are displayed unless command-line options are supplied.These options are described in the table below.
Jobs, fixes, and changelists
Any jobs that have been linked to a changelist with p4 change, p4 submit, or p4 fix issaid to be fixed, and can be reported with p4 fixes.
The output of p4 fixes looks like this:
A number of options allow the reporting of only those changes that fix a particular job,jobs fixed by a particular changelist, or jobs fixed by changelists that are linked toparticular files.
A fixed job will not necessarily have a status of closed job, since open jobs can be linkedto pending changelists, and pending jobs can be reopened even after the associatedchangelist has been submitted. To list jobs with a particular status, use p4 jobs.
To See a List of Jobs: Use This Command:
...including all jobs known to the server p4 jobs
...including the full texts of the job descriptions p4 jobs -l
...for which certain fields contain particular values (For moreabout jobviews, see “Viewing jobs by content with jobviews”on page 114)
p4 jobs -e jobview
...that have been fixed by changelists that contain specific files p4 jobs filespec
...that have been fixed by changelists that contain specificfiles, including changelists that contain files that were laterintegrated into the specified files
p4 jobs -i filespec
job000302 fixed by change 634 on 1997/09/01 by edk@eds_elmfilter_bug fixed by change 540 on 1997/10/22 by edk@eds_elm
To See a Listing of... Use This Command:
...all fixes for all jobs p4 fixes
...all changelists linked to a particular job p4 fixes -j jobname
...all jobs linked to a particular changelist p4 fixes -c changenum
134 Perforce 2003.2 User’s Guide

Chapter 11: Reporting and Data Mining
Reporting for Daemons
The Perforce change review mechanism uses the following reporting commands. Any ofthese commands might also be used with user-created daemons. For further informationon daemons, please see the Perforce System Administrator’s Guide.
System Configuration
Three commands report on the Perforce system configuration. One command reports onall Perforce users, another prints data describing all client workspaces, and a third reportson Perforce depots.
p4 users generates its data as follows:
Each line includes a username, an email address, the user’s “real” name, and the date thatPerforce was last accessed by that user.
To report on client workspaces, use p4 clients:
...all jobs fixed by changelists that contain particular files p4 fixes filespec
...all jobs fixed by changelists that contain particular files,including changelists that contain files that were laterintegrated with the specified files
p4 fixes -i filespec
To list... Use this Command:
...the names of all counter variables currently used byyour Perforce system
p4 counters
...the numbers of all changelists that have not yetbeen reported by a particular counter variable
p4 review -t countername
...all users who have subscribed to review particularfiles
p4 reviews filespec
...all users who have subscribed to read any files in aparticular changelist
p4 reviews -c changenum
...a particular user’s email address p4 users username
edk <edk@eds_ws> (Ed K.) accessed 1997/07/13lisag <lisa@lisas_ws> (Lisa G.) accessed 1997/07/14
Client eds_elm 1997/09/12 root /usr/edk ’Ed’s Elm workspace’Client lisa_doc 1997/09/13 root /usr/lisag ’Created by lisag.’
To See a Listing of... Use This Command:
Perforce 2003.2 User’s Guide 135
Chapter 11: Reporting and Data Mining
Each line includes the client name, the date the client was last updated, the client root, andthe description of the client.
Depots can be reported with p4 depots. All depots known to the system are reported on;the described fields include the depot’s name, its creation date, its type (local or remote),its IP address (if remote), the mapping to the local depot, and the system administrator’sdescription of the depot.
The use of multiple depots on a single Perforce server is discussed in the Perforce SystemAdministrator’s Guide.
Special Reporting Flags
Two special flags, -o and -n, can be used with certain action commands to change theirbehavior from action to reporting.
The -o flag is available with most of the Perforce commands that normally bring up formsfor editing. This flag tells these commands to write the form information to standardoutput, instead of bringing the definition into the user’s editor. This flag is supported bythe following commands:
The -n flag prevents commands from doing their job. Instead, the commands simply tellyou what they would ordinarily do. You can use the -n flag with the following commands
Reporting with Scripting
Although Perforce’s reporting commands are sufficient for most needs, there may betimes when you want to view data in a format that Perforce doesn’t directly support. Inthese situations, the reporting commands can be used in combination with scripts to printonly the data that you want to see.
To view: Use This Command:
...user information for all Perforce users p4 users
...user information for only certain users p4 users username
...brief descriptions of all client workspaces p4 clients
...a list of all defined depots p4 depots
p4 branch p4 client p4 label
p4 change p4 job p4 user
p4 integrate p4 resolve p4 labelsync p4 sync
136 Perforce 2003.2 User’s Guide

Chapter 11: Reporting and Data Mining
Comparing the change content of two file sets
To compare the “change content” of two sets of files, you have to diff them externally. Todo this, run p4 changes twice, once on each set of files, and then use any external diffroutine to compare them.
In the following example, main represents the main codeline, and r98.4 is a codeline thatwas originally branched from main:
You can use this to uncover which changes have been made to r98.4 that haven’t beenintegrated back into main.
p4 changes //depot/main/... > changes-in-mainp4 changes //depot/r98.4/... > changes-in-r98.4
Perforce 2003.2 User’s Guide 137

Chapter 11: Reporting and Data Mining
138 Perforce 2003.2 User’s Guide

Appendix A Installing Perforce
This appendix outlines how to install a Perforce server for the first time.
This appendix is mainly intended for people installing an evaluation copy of Perforce fortrial use; if you’re installing Perforce for production use, or are planning on extensivetesting of your evaluation server, we strongly encourage you to read the detailedinformation in the Perforce System Administrator’s Guide.
Getting Perforce
Perforce requires at least two executables: the server (p4d), and at least one Perforce clientprogram (such as p4 on UNIX, or p4.exe or p4win.exe on Windows).
The server and client executables are available from the Downloads page on the Perforceweb site:
http://www.perforce.com/perforce/loadprog.html
Go to the web page, select the files for your platform, and save the files to disk.
Installing Perforce on UNIX
Although p4 and p4d can be installed in any directory, on UNIX the Perforce clientprograms typically reside in /usr/local/bin, and the Perforce server is usually locatedeither in /usr/local/bin or in its own server root directory. Perforce client programs canbe installed on any machine that has TCP/IP access to the p4d host.
To limit access to the Perforce server files, ensure that the p4d executable is owned andrun by a Perforce user account that has been created for that purpose.
After downloading p4 and p4d, you need to do a few more things before you can startusing Perforce:
1. Make the downloaded p4 and p4d files executable.
2. Create a server root directory to hold the Perforce database and versioned files.
3. Provide a TCP/IP port to p4d to tell the Perforce server what port to listen to.
4. Provide the name of the Perforce server and the p4d port number to the Perforceclient program(s).
5. Start the Perforce server (p4d).
Perforce 2003.2 User’s Guide 139
Appendix A: Installing Perforce
Download the files and make them executable
On UNIX (or MacOS X), you must also make the Perforce executables (p4 and p4d)executable. After downloading the programs, use the chmod command to make themexecutable, as follows:
Creating a Perforce server root directory
Perforce stores all of its data in files and subdirectories of its own root directory, whichcan reside anywhere on the server system. This directory is called the server root.
To specify a server root, set the environment variable P4ROOT to point to the server root, oruse the -r root_dir flag when invoking p4d. Perforce client programs never use theP4ROOT directory or environment variable; the p4d server is the only process that uses theP4ROOT variable.
A Perforce server requires no privileged access; there is no need to run p4d as root or anyother privileged user. See the System Administrator’s Guide for details.
The server root can be located anywhere, but the account that runs p4d must have read,write, and execute permissions on the server root and all directories beneath it. Forsecurity purposes, set the umask(1) file creation-mode mask of the account that runs p4dto a value that denies other users access to the server root directory.
Telling the Perforce server which port to listen to
The p4d server and Perforce client programs communicate with each other using TCP/IP.When p4d starts, it listens (by default) on port 1666. The Perforce client assumes (also bydefault) that its p4d server is located on a host named perforce, listening on port 1666.
If p4d is to listen on a different port, specify that port with the -p port_num flag whenstarting p4d (as in, p4d -p 1818), or set the port with the P4PORT environment or registryvariable.
Unlike P4ROOT, the environment variable P4PORT is used by both the Perforce server andPerforce client programs, and must be set on both Perforce server machines and Perforceclient workstations.
Starting the Perforce server
After setting p4d’s P4PORT and P4ROOT environment variables, start the server by runningp4d in the background with the command:
p4d &
chmod +x p4chmod +x p4d
140 Perforce 2003.2 User’s Guide

Appendix A: Installing Perforce
Although the example shown is sufficient to run p4d, other flags that control such thingsas error logging, checkpointing, and journaling, can be provided. These flags (and others)are discussed in the Perforce System Administrator’s Guide.
Stopping the Perforce server
To shut down a Perforce server, use the command:p4 admin stop
to gracefully shut down the Perforce server. Only a Perforce superuser can use p4 admin
stop.
If you are running a release of Perforce from prior to 99.2, you must find the process ID ofthe p4d server and kill the process manually from the UNIX shell. Use kill -15 (SIGTERM)instead of kill -9 (SIGKILL), as p4d might leave the database in an inconsistent state ifp4d is in the middle of updating a file when a SIGKILL signal is received.
Telling Perforce clients which port to talk to
By this time, your Perforce server should be up and running; see “Connecting to thePerforce Server” on page 21 for information on how to set up your environment to allowPerforce’s client programs to talk to the server.
Installing Perforce on Windows
To install Perforce on Windows, use the Perforce installer (perforce.exe) from theDownloads page of the Perforce web site.
The Perforce installer allows you to:
• Install Perforce client software (“User install”).
This option allows you to install p4.exe (the Perforce Command-Line Client),p4win.exe (P4Win, the Perforce Windows Client), and p4scc.dll (Perforce’simplementation of the Microsoft common SCM interface).
• Install Perforce as either a Windows server or service as appropriate. (“Administratortypical” and “Administrator custom” install).
These options allow you to install Perforce client programs and the Perforce Windowsserver (p4d.exe) and service (p4s.exe) executables, or to automatically upgrade anexisting Perforce server or service running under Windows.
Under Windows 2000 or higher, you must have Administrator privileges to installPerforce as a service, and Power User privileges to install Perforce as a server.
Perforce 2003.2 User’s Guide 141

Appendix A: Installing Perforce
• Uninstall Perforce: remove the Perforce server, service, and client executables, registrykeys, and service entries. The Perforce database and the depot files stored under yourserver root are preserved.
Terminology note: Windows services and servers
The terms “Perforce server” and “p4d” are used interchangeably to refer to “the processwhich handles requests from Perforce client programs”. In cases where the distinctionbetween an NT server and an NT service is important, the distinction is made.
On UNIX systems, there is only one Perforce “server” program (p4d) responsible for thisback-end task. On Windows, however, the back-end program can be started either as aWindows service (p4s.exe) process that runs at boot time, or as a server (p4d.exe)process that must be invoked from a command prompt.
The Perforce service (p4s.exe) and the Perforce server (p4d.exe) executables are copiesof each other; they are identical apart from their filenames. When run, the executables usethe first three characters of the name with which they were invoked (either p4s or p4d) todetermine their behavior. (For example, invoking copies of p4d.exe namedp4smyservice.exe or p4dmyserver.exe invoke a service and a server, respectively.)
In most cases, it is preferable to install Perforce as a service, not a server. For a moredetailed discussion of the distinction between services and servers, see the Perforce SystemAdministrator’s Guide.
Starting and stopping Perforce on Windows
If you install Perforce as a service under Windows, the service starts whenever themachine boots. Use the Services applet in the Control Panel to control the Perforceservice’s behavior.
If you install Perforce as a server under Windows, invoke p4d.exe from a commandprompt. The flags for p4d under Windows are the same as those used under UNIX.
To stop a Perforce service (or server) at Release 99.2 or above, use the command:p4 admin stop
Only a Perforce superuser can use p4 admin stop.
For older revisions of Perforce, shut down services manually by using the Services appletin the Control Panel. Shut down servers running in command prompt windows bytyping CTRL-C in the window or by clicking on the icon to Close the command promptwindow.
Although these manual shutdown options work with Release 99.2 and earlier versions ofPerforce, they are not necessarily “clean”, in the sense that the server or service is shutdown abruptly. With the availability of the p4 admin stop command in 99.2, the manualshutdown options are obsolete.
142 Perforce 2003.2 User’s Guide

Appendix B Environment Variables
This table lists all the Perforce environment variables and their definitions.
You’ll find a full description of each variable in the Perforce Command Reference.
Variable Definition
P4CHARSET For internationalized installations only, the character set to use forUnicode translations
P4CLIENT Name of current client workspace
P4CONFIG File name from which values for current environment variables are tobe read
P4DIFF The name and location of the diff program used by p4 resolve and p4diff
P4EDITOR The editor invoked by those Perforce commands that use forms
P4HOST Name of host computer to impersonate. Only used if the Host: field ofthe current client workspace has been set in the p4 client form.
P4JOURNAL A file that holds the database journal data, or off to disable journaling.
P4LANGUAGE This variable is reserved for system integrators.
P4LOG Name and path of the file to which Perforce server error and diagnosticmessages are to be logged.
P4MERGE A third-party merge program to be used by p4 resolve’s merge option
P4PAGER The program used to page output from p4 resolve’s diff option
P4PASSWD Stores the user’s password as set in the p4 user form
P4PORT For the Perforce server, the port number to listen on; for the p4 client,the name and port number of the Perforce server with which tocommunicate
PWD The directory used to resolve relative filename arguments to p4
commands
P4ROOT Directory in which p4d stores its files and subdirectories
P4USER The user’s Perforce username
TMP The directory to which Perforce writes its temporary files
Perforce 2003.2 User’s Guide 143

Appendix B: Environment Variables
Setting and viewing environment variables
Each operating system and shell has its own syntax for setting environment variables. Thefollowing table shows how to set the P4CLIENT environment variable in each OS and shell:
To view a list of the values of all Perforce variables, use p4 set without any arguments.
On UNIX, this displays the values of the associated environment variables. On NT, thisdisplays either the MS-DOS environment variable (if set), or the value in the registry andwhether it was defined with p4 set (for the current user) or p4 set -s (for the localmachine).
OS or Shell Environment Variable Example
UNIX: ksh, sh, bash P4CLIENT=value ; export P4CLIENT
UNIX: csh setenv P4CLIENT value
VMS def/j P4CLIENT “value”
Mac MPW set -e P4CLIENT value
Windows p4 set P4CLIENT=value
(See the p4 set section of the Perforce Command Reference or runthe command p4 help set to obtain more information aboutsetting Perforce’s registry variables in Windows).
Windows administrators running Perforce as a service can setvariables for use by a specific service with p4 set -S svcname
var=value.
144 Perforce 2003.2 User’s Guide
Appendix C Glossary
Term Definition
access level A permission assigned to a user to control which Perforcecommands the user can execute. See protections.
admin access An access level that gives the user permission to run Perforcecommands that override metadata, but do not affect the state ofthe server.
apple file type Perforce file type assigned to Macintosh files that are storedusing AppleSingle format, permitting the data fork andresource fork to be stored as a single file.
atomic changetransaction
Grouping operations affecting a number of files in a singletransaction. If all operations in the transaction succeed, all thefiles are updated. If any operation in the transaction fails, noneof the files are updated.
base The file revision on which two newer, conflicting file revisionsare based.
binary file type Perforce file type assigned to a non-text file. By default, thecontents of each revision are stored in full and the file is storedin compressed format.
branch (noun) A codeline created by copying another codeline, asopposed to a codeline that was created by adding original files.branch is often used as a synonym for branch view.
(verb) To create a codeline branch with p4 integrate.
branch form The Perforce form you use to modify a branch.
branch specification Specifies how a branch is to be created by defining the locationof the original codeline and the branch. The branchspecification is used by the integration process to create andupdate branches. Client workspaces, labels, and branchspecifications cannot share the same name.
branch view A specification of the branching relationship between twocodelines in the depot. Each branch view has a unique name,and defines how files are mapped from the originating codelineto the target codeline. See branch.
Perforce 2003.2 User’s Guide 145
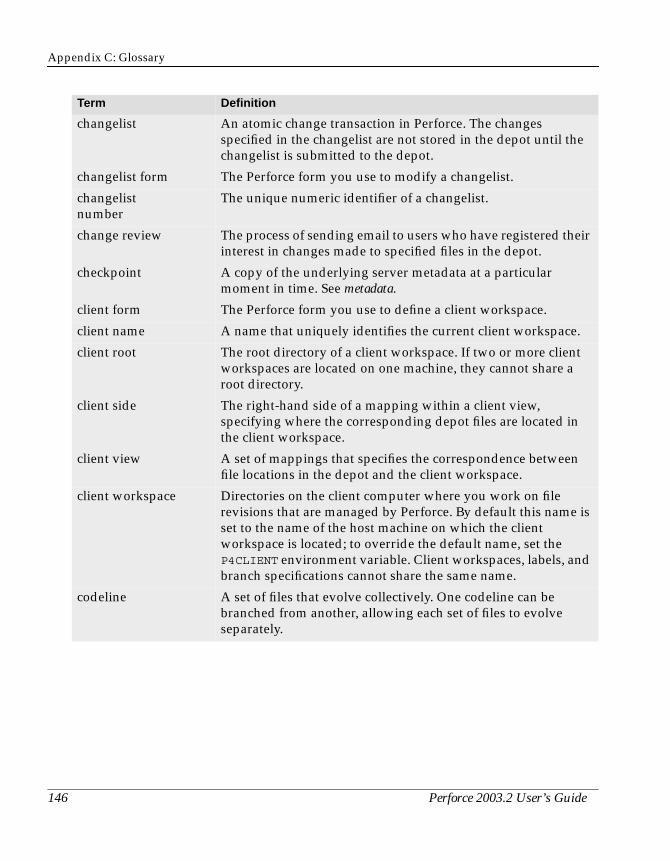
Appendix C: Glossary
changelist An atomic change transaction in Perforce. The changesspecified in the changelist are not stored in the depot until thechangelist is submitted to the depot.
changelist form The Perforce form you use to modify a changelist.
changelistnumber
The unique numeric identifier of a changelist.
change review The process of sending email to users who have registered theirinterest in changes made to specified files in the depot.
checkpoint A copy of the underlying server metadata at a particularmoment in time. See metadata.
client form The Perforce form you use to define a client workspace.
client name A name that uniquely identifies the current client workspace.
client root The root directory of a client workspace. If two or more clientworkspaces are located on one machine, they cannot share aroot directory.
client side The right-hand side of a mapping within a client view,specifying where the corresponding depot files are located inthe client workspace.
client view A set of mappings that specifies the correspondence betweenfile locations in the depot and the client workspace.
client workspace Directories on the client computer where you work on filerevisions that are managed by Perforce. By default this name isset to the name of the host machine on which the clientworkspace is located; to override the default name, set theP4CLIENT environment variable. Client workspaces, labels, andbranch specifications cannot share the same name.
codeline A set of files that evolve collectively. One codeline can bebranched from another, allowing each set of files to evolveseparately.
Term Definition
146 Perforce 2003.2 User’s Guide
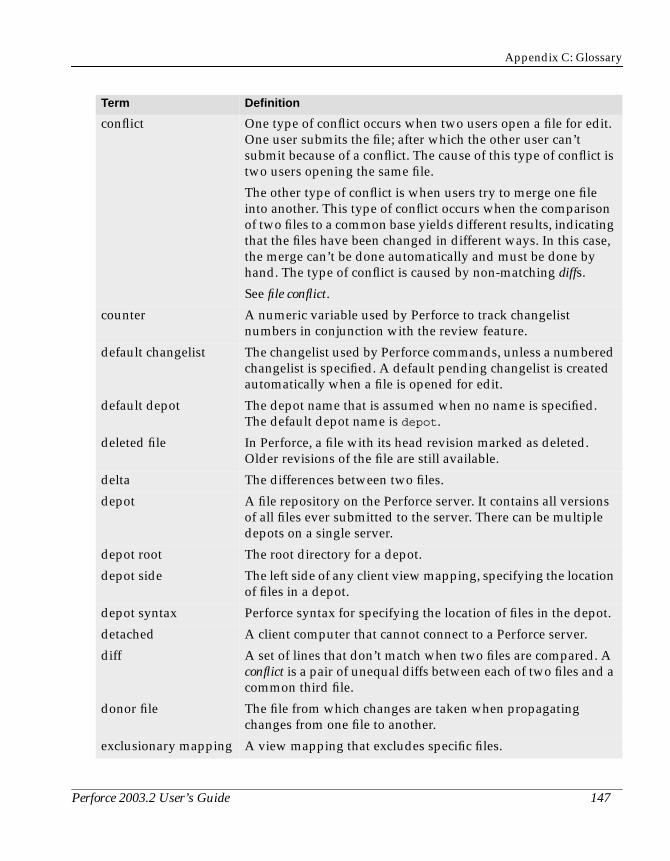
Appendix C: Glossary
conflict One type of conflict occurs when two users open a file for edit.One user submits the file; after which the other user can’tsubmit because of a conflict. The cause of this type of conflict istwo users opening the same file.
The other type of conflict is when users try to merge one fileinto another. This type of conflict occurs when the comparisonof two files to a common base yields different results, indicatingthat the files have been changed in different ways. In this case,the merge can’t be done automatically and must be done byhand. The type of conflict is caused by non-matching diffs.
See file conflict.
counter A numeric variable used by Perforce to track changelistnumbers in conjunction with the review feature.
default changelist The changelist used by Perforce commands, unless a numberedchangelist is specified. A default pending changelist is createdautomatically when a file is opened for edit.
default depot The depot name that is assumed when no name is specified.The default depot name is depot.
deleted file In Perforce, a file with its head revision marked as deleted.Older revisions of the file are still available.
delta The differences between two files.
depot A file repository on the Perforce server. It contains all versionsof all files ever submitted to the server. There can be multipledepots on a single server.
depot root The root directory for a depot.
depot side The left side of any client view mapping, specifying the locationof files in a depot.
depot syntax Perforce syntax for specifying the location of files in the depot.
detached A client computer that cannot connect to a Perforce server.
diff A set of lines that don’t match when two files are compared. Aconflict is a pair of unequal diffs between each of two files and acommon third file.
donor file The file from which changes are taken when propagatingchanges from one file to another.
exclusionary mapping A view mapping that excludes specific files.
Term Definition
Perforce 2003.2 User’s Guide 147

Appendix C: Glossary
exclusionary access A permission that denies access to the specified files.
file conflict In a three-way file merge, a situation in which two revisions ofa file differ from each other and from their base file.
Also: an attempt to submit a file that is not an edit of the headrevision of the file in the depot; typically occurs when anotheruser opens the file for edit after you have opened the file foredit.
file pattern Perforce command line syntax that enables you to specify filesusing wildcards.
file repository The master copy of all files; shared by all users. In Perforce, thisis called the depot.
file revision A specific version of a file within the depot. Each revision isassigned a number, in sequence. Any revision can be accessedin the depot by its revision number, for example: testfile#3.
file tree All the subdirectories and files under a given root directory.
file type An attribute that determines how Perforce stores and diffs aparticular file. Examples of file types are text and binary.
fix A job that has been linked to a changelist.
form Screens displayed by certain Perforce commands. For example,you use the Perforce change form to enter comments about aparticular changelist and to verify the affected files.
full-filestorage
The method by which Perforce stores revisions of binary files inthe depot: every file revision is stored in full. Contrast this withreverse delta storage, which Perforce uses for text files.
get An obsolete Perforce term: replaced by sync.
group A list of Perforce users.
have list The list of file revisions currently in the client workspace.
head revision The most recent revision of a file within the depot. Because filerevisions are numbered sequentially, this revision is thehighest-numbered revision of that file.
integrate To compare two sets of files (for example, two codelinebranches) and
• determine which changes in one set apply to the other,• determine if the changes have already been propagated,• propagate any outstanding changes.
Term Definition
148 Perforce 2003.2 User’s Guide
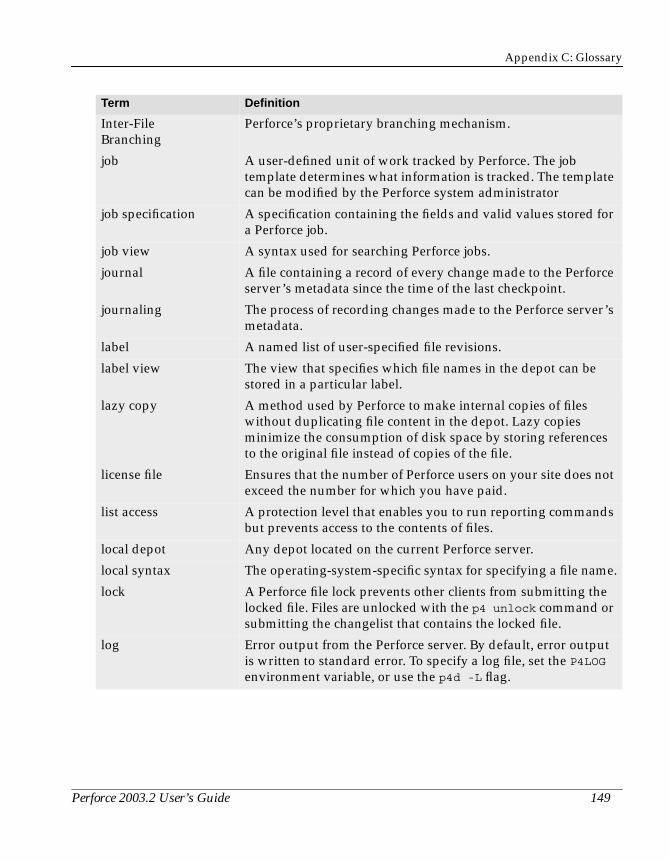
Appendix C: Glossary
Inter-FileBranching
Perforce’s proprietary branching mechanism.
job A user-defined unit of work tracked by Perforce. The jobtemplate determines what information is tracked. The templatecan be modified by the Perforce system administrator
job specification A specification containing the fields and valid values stored fora Perforce job.
job view A syntax used for searching Perforce jobs.
journal A file containing a record of every change made to the Perforceserver’s metadata since the time of the last checkpoint.
journaling The process of recording changes made to the Perforce server’smetadata.
label A named list of user-specified file revisions.
label view The view that specifies which file names in the depot can bestored in a particular label.
lazy copy A method used by Perforce to make internal copies of fileswithout duplicating file content in the depot. Lazy copiesminimize the consumption of disk space by storing referencesto the original file instead of copies of the file.
license file Ensures that the number of Perforce users on your site does notexceed the number for which you have paid.
list access A protection level that enables you to run reporting commandsbut prevents access to the contents of files.
local depot Any depot located on the current Perforce server.
local syntax The operating-system-specific syntax for specifying a file name.
lock A Perforce file lock prevents other clients from submitting thelocked file. Files are unlocked with the p4 unlock command orsubmitting the changelist that contains the locked file.
log Error output from the Perforce server. By default, error outputis written to standard error. To specify a log file, set the P4LOGenvironment variable, or use the p4d -L flag.
Term Definition
Perforce 2003.2 User’s Guide 149

Appendix C: Glossary
mapping A single line in a view, consisting of a left side and a right sidethat specify the correspondences between files in the depot andfiles in a client, label, or branch. The left side specifies the depotfile and the right side specifies the client files.
(See also client view, branch view, label view).
MD5 checksum The method used by Perforce to verify the integrity of archivedfiles.
merge The process of combining the contents of two conflicting filerevisions into a single file.
merge file A file generated by Perforce from two conflicting file revisions.
metadata The data stored by the Perforce server that describes the files inthe depot, the current state of client workspaces, protections,users, clients, labels, and branches. Metadata includes all thedata stored in the server except for the actual contents of thefiles.
modification time The time a file was last changed.
nonexistentrevision
A completely empty revision of any file. Syncing to anonexistent revision of a file removes it from your workspace.An empty file revision created by deleting a file and the #nonerevision specifier are examples of nonexistent file revisions.
numbered changelist A pending changelist to which Perforce has assigned a number.
open file A file that you are changing in your client workspace.
owner The Perforce user who created a particular client, branch, orlabel.
P4 The Perforce Command-Line Client program, and thecommand you issue to execute Perforce commands from theoperating system command line.
P4D The program on the Perforce server that manages the depot andthe metadata.
P4Diff A Perforce application that displays the differences betweentwo files. P4Diff is the default application used to comparefiles during the file resolution process.
P4Win The Perforce Windows Client, a Windows Explorer-styleapplication that enables you to perform Perforce operationsand view results graphically.
pending changelist A changelist that has not been submitted.
Term Definition
150 Perforce 2003.2 User’s Guide
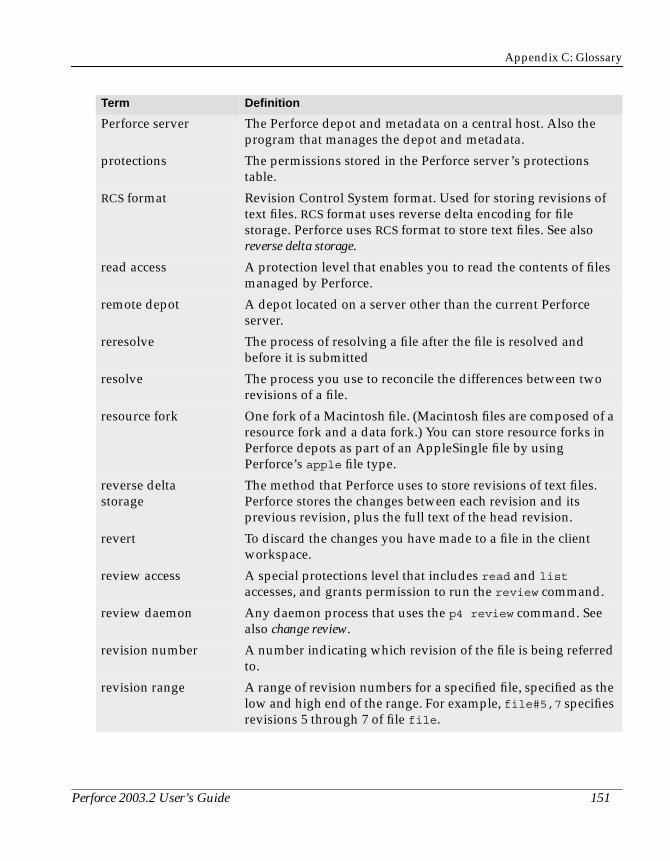
Appendix C: Glossary
Perforce server The Perforce depot and metadata on a central host. Also theprogram that manages the depot and metadata.
protections The permissions stored in the Perforce server’s protectionstable.
RCS format Revision Control System format. Used for storing revisions oftext files. RCS format uses reverse delta encoding for filestorage. Perforce uses RCS format to store text files. See alsoreverse delta storage.
read access A protection level that enables you to read the contents of filesmanaged by Perforce.
remote depot A depot located on a server other than the current Perforceserver.
reresolve The process of resolving a file after the file is resolved andbefore it is submitted
resolve The process you use to reconcile the differences between tworevisions of a file.
resource fork One fork of a Macintosh file. (Macintosh files are composed of aresource fork and a data fork.) You can store resource forks inPerforce depots as part of an AppleSingle file by usingPerforce’s apple file type.
reverse deltastorage
The method that Perforce uses to store revisions of text files.Perforce stores the changes between each revision and itsprevious revision, plus the full text of the head revision.
revert To discard the changes you have made to a file in the clientworkspace.
review access A special protections level that includes read and list
accesses, and grants permission to run the review command.
review daemon Any daemon process that uses the p4 review command. Seealso change review.
revision number A number indicating which revision of the file is being referredto.
revision range A range of revision numbers for a specified file, specified as thelow and high end of the range. For example, file#5,7 specifiesrevisions 5 through 7 of file file.
Term Definition
Perforce 2003.2 User’s Guide 151
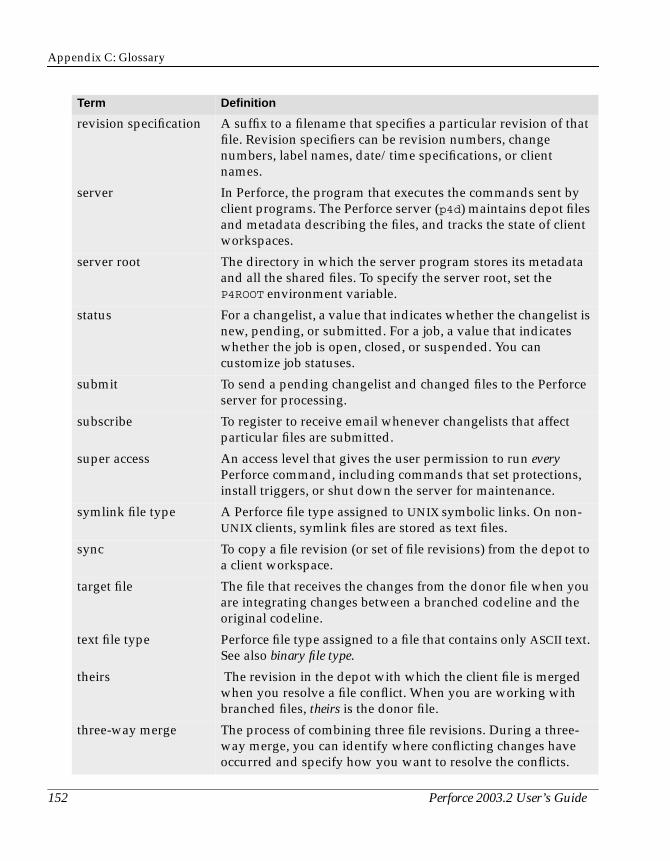
Appendix C: Glossary
revision specification A suffix to a filename that specifies a particular revision of thatfile. Revision specifiers can be revision numbers, changenumbers, label names, date/time specifications, or clientnames.
server In Perforce, the program that executes the commands sent byclient programs. The Perforce server (p4d) maintains depot filesand metadata describing the files, and tracks the state of clientworkspaces.
server root The directory in which the server program stores its metadataand all the shared files. To specify the server root, set theP4ROOT environment variable.
status For a changelist, a value that indicates whether the changelist isnew, pending, or submitted. For a job, a value that indicateswhether the job is open, closed, or suspended. You cancustomize job statuses.
submit To send a pending changelist and changed files to the Perforceserver for processing.
subscribe To register to receive email whenever changelists that affectparticular files are submitted.
super access An access level that gives the user permission to run everyPerforce command, including commands that set protections,install triggers, or shut down the server for maintenance.
symlink file type A Perforce file type assigned to UNIX symbolic links. On non-UNIX clients, symlink files are stored as text files.
sync To copy a file revision (or set of file revisions) from the depot toa client workspace.
target file The file that receives the changes from the donor file when youare integrating changes between a branched codeline and theoriginal codeline.
text file type Perforce file type assigned to a file that contains only ASCII text.See also binary file type.
theirs The revision in the depot with which the client file is mergedwhen you resolve a file conflict. When you are working withbranched files, theirs is the donor file.
three-way merge The process of combining three file revisions. During a three-way merge, you can identify where conflicting changes haveoccurred and specify how you want to resolve the conflicts.
Term Definition
152 Perforce 2003.2 User’s Guide

Appendix C: Glossary
tip revision In Perforce, the head revision. Tip revision is a term used by someother SCM systems.
trigger A script automatically invoked by the Perforce server whenchangelists are submitted.
two-way merge The process of combining two file revisions. In a two-waymerge, you can see differences between the files but cannot seeconflicts.
typemap A Perforce table in which you assign Perforce file types to files.
user The identifier that Perforce uses to determine who isperforming an operation.
view A description of the relationship between two sets of files. Seeclient view, label view, branch view.
wildcard A special character used to match other characters in strings.Perforce wildcards are:
• * matches anything except a slash• ... matches anything including slashes• %d used for parameter substitution in views
write access A protection level that enables you to run commands that alterthe contents of files in the depot. Write access includes readand list accesses.
yours The edited version of a file in the client workspace, when youresolve a file. Also, the target file when you integrate abranched file.
Term Definition
Perforce 2003.2 User’s Guide 153

Appendix C: Glossary
154 Perforce 2003.2 User’s Guide

Index
Symbols#
forbidden in filenames 50#have
specifying the revision synced-to 52#head
specifying the latest revision 52#none 52%
forbidden in filenames 50%0 .. %n 38, 43* (wildcard) 38, 115+k flag
keyword expansion 55... (wildcard) 38=
operator in job queries 116>
operator in job queries 116>>>>
as diff marker 68@
forbidden in filenames 50syncing to a label’s contents 95
^
operator in job queries 115Aaccepting
files when resolving 70access level
defined 145adding files to depot 29administration
depot configuration 82allwrite client option 45annotate 127architecture of Perforce 14atomic change transactions 85
branching and integration 106
defined 14, 145example 33
automating Perforce 61Bbase
defined 145resolving 67
base file types 55baseless merge 106basics of Perforce 25BeOS
symbolic links 56binary files
how files are stored 56how revisions are stored 55resolving 72
branch specsbranching with 103creating 103deleting 107example 104exclusionary mappings allowed 105usage notes 105using with p4 integrate -b 104
branch viewscreating 103defined 145
branchescomparing files between 129defined 145deleting 107listing files in 133propagating changes between files 102,
105when to create 99
branchingautomatic 103best practices 110branch command 103
Perforce 2003.2 User’s Guide 155

Index
branch spec example 104codelines and 99copying files vs. 102defined 99files without common ancestors 106introduced 15manually, with p4 integrate 101reporting 133reverse integration and 106two techniques 100when to branch 99white paper 110
bug tracking 13build management 13Ccarriage return 45change management 13change review 13
defined 146changelist number
defined 146changelists
adding and removing files 86associated jobs 89, 131, 134atomic change transactions and 85automatic renumbering of 88default 30, 85default (defined) 147defined 145deleting 89files open in 86introduced 14jobs 117jobs vs. 16, 111moving files between 87numbered 85, 87, 91p4 reopen command 89pending (defined) 150processed atomically 14reporting 90, 130reporting by user 90scheduling resolves 65status of 86
submitting 29changes
conflicting 63, 68how to propagate between codelines 103propagating between codelines 102, 103undoing with p4 revert 34
chunks, diff 67client files
mapping to depot files 125client programs 14, 21client root
changing 44defined 37, 146null 40specifying 27
client side (of mapping) 39client specification
defining 26deleting 45editing 44
client syntax 49client view
changing 44defined 146exclusionary mappings 42introduced 15specifying 27, 38
client workspacechanging client root 44changing view 44comparing files against depot 74, 129defined 25, 37, 146displaying files 62listing 135moving files between client and server 14options 45p4 have command 35populating 29, 95refreshing 82spanning multiple drives 40specifying 26state of 37switching between 26
156 Perforce 2003.2 User’s Guide
Index
user directories 14client/server architecture 14clobber client option 45codelines
branching and 99comparing files between 129defined 146listing files in 133propagating changes between 103resolving differences between 103when to branch 99
command-linecommon flags and p4 help usage 35flags, common to all commands 79specifying files on 48
commandsapplying to multiple revisions at once 54forms and 60reporting 34, 61, 74, 120, 123
comparingfiles 128
compress client option 45concurrent development 13configuration
changing 77configuration files 77conflicting changes 63conflicts
file 15, 72file (defined) 148
counterdefined 147
CR/LF translation 45, 47creating
jobs 112crlf client option 45cross-platform development
line endings 47customizing
job specification 113Ddaemons
reporting 135
default changelistdefined 147introduced 29using 85
default depotdefined 147
default job specification 112defect tracking
interfacing with third-party products 120jobs and 16using jobs 111
deletingbranch specs 107client specifications 45files 29, 32jobs 120labels 95
deltadefined 147
depotadding files from workspace 29changelists and 14comparing against files in workspace 129compressing files 56copying files to workspace 28default (defined) 147defined 14, 25, 147listing 135local (defined) 149mapping to client files 125multiple 39organizing 82remote (defined) 151side of mapping 39syntax 49syntax (defined) 147updating after working offline 81
detacheddefined 147
developmentconcurrent 13distributed 13
diff
Perforce 2003.2 User’s Guide 157

Index
chunks 67differences between revisions 65excluding 90markers 68suppressing display 132two algorithms used by Perforce 129
diffsannotated 127
directoriesand spaces 51client workspace 14removing empty 46
distributed development 13donor file
defined 147Eediting
client specifications 44files 29, 31
email notification 146environment variables
P4CHARSET 143P4CLIENT 26, 143P4CONFIG 77, 143P4DIFF 143P4EDITOR 26, 143P4HOST 143P4JOURNAL 143P4LOG 143P4MERGE 143P4PAGER 143P4PASSWD 78, 143P4PORT 22, 143P4ROOT 143P4USER 143PWD 143setting 144TMP 143
error messages 23example set
for this manual 25examples
adding files to depot 30
advanced integration 107branch spec 104combining file type modifiers 55creating a label 92filling forms with -i and -o 61linking jobs and changelists 117, 118p4 job 112propagating changes to branches 105RCS keyword expansion 60reporting and scripting 137reporting on jobs 120resolving file conflicts 70use of %0 .. %n wildcard 43
exclusionary mappingsbranch specs and 105client views and 42defined 147
exclusive-openlocking vs. 72
Ffields
jobviews and 116file conflict
defined 148introduced 15resolving 70
file formatRCS (defined) 151
file repositorydefined 148
file revisiondefined 148
file specificationsbranching with 101
file type modifierscombining 55listed 57
file types+l 72apple 56binary 56compressed in depot 56determined by Perforce 55
158 Perforce 2003.2 User’s Guide
Index
determining 55explained 55keywords 58listed 56, 58overview 55resource 56specifying 55, 57symlink 56text 56
filenamesand spaces 51forbidden characters 50spaces in 50
filesadding to depot 29, 30annotated 127binary 55, 72changelist revision specifier 52changelists and 14changing type 55client workspace 38client workspace revision specifier 52command line syntax 48, 49commands for reporting 123comparing 74, 128conflicting 63, 74copying vs. branching 102deleting from depot 29, 32deleting from labels 95displaying branch contents 133displaying contents 126displaying integrated and submitted 133displaying label contents 98, 132displaying mappings 62displaying opened 62, 125displaying resolved but not submitted 74,
133displaying revision history 62displaying workspace contents 62donor (defined) 147editing 29, 31have revision 52head revision 52
integrating 107label revision specifier 52listing with p4 files 62locked 73locking 72managed by Perforce 37merging 67, 68merging (defined) 150modifying a changelist 86moving between changelists 87moving between workspace and server
14, 28multi-forked 56nonexistent revision 52opening 29, 86permissions 45, 57propagating changes between branches
102removing from workspace 52renaming 83reopening in other changelist 89re-resolving 108resolving 66, 70result 67specifying revision 51, 52, 53, 54specifying type 55, 57stored in RCS format 63submitting changes to depot 29target (defined) 152text 55text (defined) 152theirs (defined) 152types of 55undoing changes 34wildcards 38working offline 81yours (defined) 153
fixdefined 148jobs and changelists 134
flagscommon to all commands 35, 79-i flag 61
Perforce 2003.2 User’s Guide 159
Index
-n flag 136-o flag 136
formsautomating processing of 61P4EDITOR 26standard input/output and 61using 60
Ggetting started with Perforce 25group
defined 148Hhave list
defined 148have revision
defined 52head revision
defined 52, 148resolving conflicts 65
helpdisplaying command help 34displaying view syntax 35p4 help command 34
historydisplaying revision history 124
hostPerforce server 21
I-i flag
filling forms with standard input 61installation
UNIX 139Windows 141
installingon Windows 141
integrationadvanced functions 107defined 148displaying integrated files 133displaying submitted integrated files 133files without common ancestors 106forcing 108lazy copy (defined) 149
previewing 133reporting commands 110reverse 106specific file revisions 107specifying direction of 106technical explanation 108
Inter-File Branchingdefined 16, 149use of 99
Jjob specification
customizing 113default 112defined 149
job tracking 13, 16, 111jobs 111
* wildcard 115changelists 117changelists associated 120, 131, 134changelists vs. 16, 111creating 112defined 111deleting 120editing 112jobviews 114, 116, 117reporting 120, 133searching 114, 116third-party defect trackers and 120
Kkeywords
expansion 55, 57RCS examples 60specifying Perforce file types 58
Llabel specifier
without filenames 54label view 94
defined 149labels
changelist numbers vs. 91changing owner of 96client workspaces and 95defined 149
160 Perforce 2003.2 User’s Guide
Index
deleting 95deleting files from 95displaying contents 97, 98, 132introduced 15locking 93reporting 97, 132unlocking 96
labelsyncownership required 96syntax 96
lazy copy 102defined 149
lifecycle management 13limitations
description lengths 50valid filenames 50
line endings 47LineEnd 47linefeed convention 45listing
file contents 126files in a branch 133files in a label 132files resolved but not submitted 133integrated and submitted files 133jobs in system 133opened files 125
local syntaxdefined 48, 149wildcards and 50
locked client option 46locked files
finding 73locking files 72
defined 149p4 lock vs. +l 72
MMacintosh
file types 56line-ending convention 48linefeed convention 45resource fork 56resource fork (defined) 151
mappingsclient-side (defined) 146conflicting 44defined 150depot and client sides 39depot-side (defined) 147directories with spaces 51displaying 62, 125examples 41exclusionary 105exclusionary (defined) 147multiple 105renaming client files 43views and 39
markers, difference 68merge
baseless 106defined 67, 150three-way 15, 68three-way (defined) 152two-way (defined) 153
mergingconflicting changes 68files (defined) 150
metadata 124defined 150
modefiles in workspace 45, 57
modtime client option 46moving files
between changelists 87multi-forked file 56multiple depots 39multiple mappings 105N-n flag
previewing commands 34, 35, 136namespace
shared for labels, clients, branches, anddepots 92
networkdata compression 45
new changelist 86
Perforce 2003.2 User’s Guide 161
Index
noallwrite client option 45noclobber client option 45nocompress client option 45nocrlf client option 45nomodtime client option 46normdir client option 46numbered changelists
creating 87O-o flag
scripting 61, 136offline
working with Perforce 81older revisions 51opened files
listing 62operators
job queries 116options
client workspace 45p4 resolve command 68
overriding 59owner
changing label 96Pp4 admin
and Windows 142stopping server with 141
p4 annotate 127p4 commands
add command 29, 30branch command 103, 107branches command 133change command 89changes command 90, 130client command 26, 38, 44common flags 79counters command 135delete command 29, 32depots command 136describe command 90, 131diff command 74, 81, 128diff2 command 74, 128
edit command 29, 31filelog command 62, 124, 133files command 55, 62, 98, 124fix command 89, 117, 118fixes command 134have command 35, 62, 126help command 34info command 23, 34integrate command 83, 101, 103, 105, 106,
108, 133job command 112jobs command 133label command 95labels command 97, 132labelsync command 95lock command 72opened command 55, 62, 125passwd command 78print command 62, 126rename command 83reopen command 55, 89resolve command 66, 68, 72, 103, 133resolved command 74, 133revert command 34review command 135reviews command 135submit command 29, 66, 85, 86, 88sync command 29, 62, 65, 74, 82, 95, 126typemap command 59user command 79, 117users command 135where command 62, 126
P4CHARSET 143P4CLIENT 26, 143P4CONFIG 77, 143p4d
host 21port 21purpose of 14, 21
p4d.exe 142P4DIFF 143P4DTI 120P4EDITOR 26, 143
162 Perforce 2003.2 User’s Guide

Index
P4HOST 143P4JOURNAL 143P4LOG 143P4MERGE 143P4PAGER 143P4PASSWD 78, 143P4PORT 22, 143
and server 140P4ROOT 140, 143p4s.exe 142P4USER 143parametric substitution 38, 43passwords 78, 79pending changelist
defined 150deleting 89submitting 86
Perforce client programsconnecting to server 21purpose 14, 21
Perforce serverand P4PORT 140connecting to 21defined 151host 21port 21purpose of 14, 21tracks state of client workspace 37vs. service 142working when disconnected from 81
Perforce servicevs. server 142
Perforce syntaxdefined 48wildcards 50
perforce.exe 141permissions
files in workspace 45, 57user (defined) 145
portfor server 140Perforce server 21
pre-submit trigger
defined 153previewing
integration results 133label contents 93-n flag 136resolve results 133revert results 34sync results 35, 62, 74
propagating changesbranches 105
proxy 13PWD 143RRCS format
defined 151files 63
RCS keyword expansion 57+k modifier 55examples 60
recent changelistsp4 changes command 90
release management 13remote depot
defined 151removing files
from depot 32from workspace 52
renaming files 83renumbering
changelists, automatic 88reporting
basic commands 34, 61branches 133changelists 90, 130, 131daemons and 135file metadata 124files 123integration 110, 133jobs 120, 133labels 97, 132overview 123resolves 74scripting 136
Perforce 2003.2 User’s Guide 163
Index
repositoryfile (defined) 148
resolvebetween codelines 103branching and 74conflicting changes 63default 70defined 15, 151detecting 66diff chunks 67displaying files before submission 133multiple 108performing 66preventing multiple 73previewing 133reporting 74scheduling 65
resource fork 56defined 151
resultresolving 67
reverse delta storagedefined 151
reverse integration 106revert
defined 151example 34
revisionbase (defined) 145diffs and 65file (defined) 148have 52head 52head (defined) 148history 62, 124number (defined) 151range 54range (defined) 151specification 51, 54specification (defined) 152tip (defined) 153
rmdir client option 46root
client 37SSCM 13scripting
examples 61-o flag 136reporting 136
searchingjobs 114
serverconnecting to 21Perforce 14, 21Perforce (defined) 151port 140stopping with p4 admin 141verifying connection 23vs. service 142Windows 142
server rootand P4ROOT 140creating 140defined 140
setting environment variables 144setting up
client workspaces 26environment 21p4 info 23
shellparsing wildcards 38
software configuration management 13spaces
filenames 50within filenames 51
special charactersfilenames 50
specificationrevision (defined) 152
standard inputfilling forms with 61
standard outputgenerating forms with 61p4 print command 62
stopping server
164 Perforce 2003.2 User’s Guide
Index
with p4 admin 141storage
full-file vs. delta (defined) 148reverse delta (defined) 151
submitdefined 152
submitted changelist 86submitting
multiple changes at once 33subscribe
defined 152symbolic links 56
file types and 55non-UNIX systems 56
syncforcing 82preview 62, 74
syntaxclient 49depot 49depot (defined) 147local 48local (defined) 149Perforce syntax 48specifying files 49
system administrationcheckpoint (defined) 146groups (defined) 148journal (defined) 149reporting 135
Ttarget files
defined 152TCP/IP 14
and port number 140text files 55, 56
defined 152theirs 67
defined 152three-way merge
binary files and 72defined 152merge file generation 68
when scheduled 106time zones 53timestamps
preserving DLLs 59tip revision
defined 153TMP 143tracking
defects 13jobs 16
translationCR/LF 45
triggerdefined 153
two-way mergedefined 153
typemapfile types 59
Uumask(1) 140unicode 57UNIX
line-ending convention 47linefeed convention 45
unlocked client option 46usage notes
integration 106users
email addresses 135listing submitted changelists 90passwords 78reporting on 135
V-v flag
diff markers 68variables
environment, how to set 144version control 13views
branch (defined) 145branch, creating 103client 15, 27, 38client (defined) 146
Perforce 2003.2 User’s Guide 165

Index
conflicting mappings 44defined 153examples of mappings 41exclusionary mappings 42help on 35jobviews 114label 94label (defined) 149mappings and 39multiple mapping lines 42renaming client files using mappings 43wildcards 41
Wwarnings
# and local shells 51binary files and delta storage 56changing client root 44
white paperbest practices 110branching 110Streamed Lines 110
wildcards%0 .. %n 38, 43* 38... 38defined 38escaping on command line 86jobviews 115local shell considerations 38local syntax 50Perforce syntax 50views 41
Windowsand p4 admin 142installer 141installing on 141line-ending convention 48linefeed convention 45multiple drives 40server 142setting variables on a Windows service
144third-party DLLs 59
working detached 81working detached (defined) 147workspace
client 14, 37, 95client (defined) 146comparing files against depot 129copying files from depot 29displaying files 62refreshing 82spanning multiple drives 40
Yyours 67
defined 153
166 Perforce 2003.2 User’s Guide


![[Paris merge world tour] Perforce Introducing Perforce Insights](https://static.documents.pub/doc/80x56/54843e1fb47959f10c8b4b7b/paris-merge-world-tour-perforce-introducing-perforce-insights.jpg)


