Operating instructions Commercial dishwasher for laboratory glassware and utensils PG 8504 To avoid the risk of accidents or damage to the machine, it is essential to read these instructions before it is installed and used for the first time. en - GB, AE, AU, IE, NZ M.-Nr. 10 089 651
Transcript
Operating instructionsCommercial dishwasher for laboratoryglassware and utensilsPG 8504
To avoid the risk of accidents or damageto the machine, it is essential to readthese instructions before it is installedand used for the first time.
en - GB, AE, AU, IE, NZ
M.-Nr. 10 089 651
Contents
2
Notes about these instructions.......................................................................................... 5
Intended use ........................................................................................................................ 6User profiles .......................................................................................................................... 8
Guide to the machine .......................................................................................................... 9Machine overview.................................................................................................................. 9Control panel ....................................................................................................................... 10LEDs in the buttons............................................................................................................. 11
Warning and Safety instructions ...................................................................................... 12Symbols on the machine..................................................................................................... 17
Using the machine............................................................................................................. 18Display illustrations.............................................................................................................. 18Switching on........................................................................................................................ 19Switching off........................................................................................................................ 19Automatic switch-off (Auto-off function) ............................................................................. 19Display interface.................................................................................................................. 20Menu operation ................................................................................................................... 20Symbols on the display ....................................................................................................... 21Menu operation ................................................................................................................... 22
Commissioning .................................................................................................................. 23Installation and connection ................................................................................................. 23Procedure ............................................................................................................................ 23
Opening and closing the door .......................................................................................... 27Opening the door ................................................................................................................ 27Closing the door.................................................................................................................. 27
Water softener ................................................................................................................... 28Water hardness ................................................................................................................... 28Setting the water hardness level ......................................................................................... 29Filling the salt reservoir........................................................................................................ 31Add salt reminder ................................................................................................................ 33
Areas of application .......................................................................................................... 34Mobile units, baskets, modules and inserts........................................................................ 34Adjusting the upper basket ................................................................................................. 36Preparing the load ............................................................................................................... 38Wash load............................................................................................................................ 41
Chemical processes and technology .............................................................................. 42
Adding and dispensing chemical agents ........................................................................ 46Using chemical agents ........................................................................................................ 46Dispensing systems ............................................................................................................ 46
Labelling the siphons ..................................................................................................... 46DOS modules ...................................................................................................................... 47
Connecting a DOS module ............................................................................................ 47Dispensing liquids .......................................................................................................... 47
Contents
3
Dispensing neutralising agent or rinsing agent ................................................................... 48Neutralising agent .......................................................................................................... 48Rinsing agent.................................................................................................................. 48Filling the reservoir ......................................................................................................... 49
Operation............................................................................................................................ 55Selecting a programme ... ................................................................................................... 55Starting a programme ......................................................................................................... 55
Starting a programme using delay start ......................................................................... 55Programme sequence indicator .......................................................................................... 57At the end of the programme .............................................................................................. 57Interrupting a programme.................................................................................................... 58Cancelling a programme ..................................................................................................... 59
Programme cancelled due to a fault .............................................................................. 59Cancelling a programme manually ................................................................................. 59
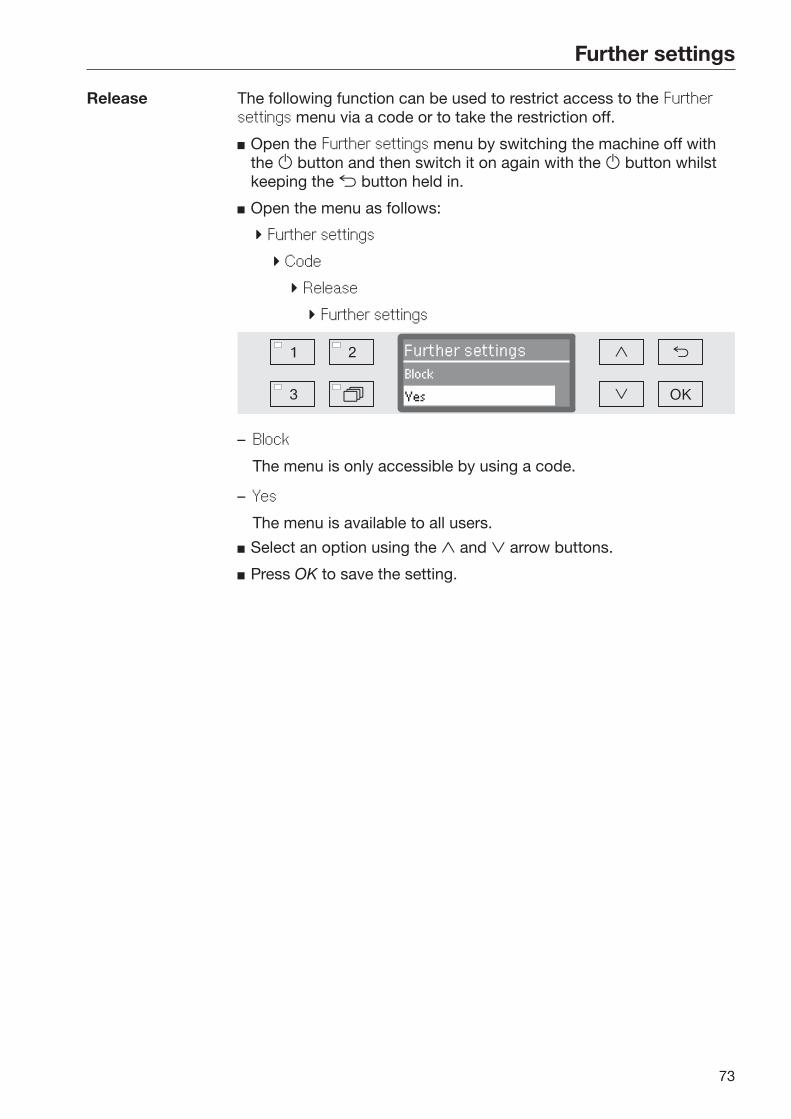
Further settings ................................................................................................................. 70Code.................................................................................................................................... 72
Enter code ...................................................................................................................... 72Release........................................................................................................................... 73
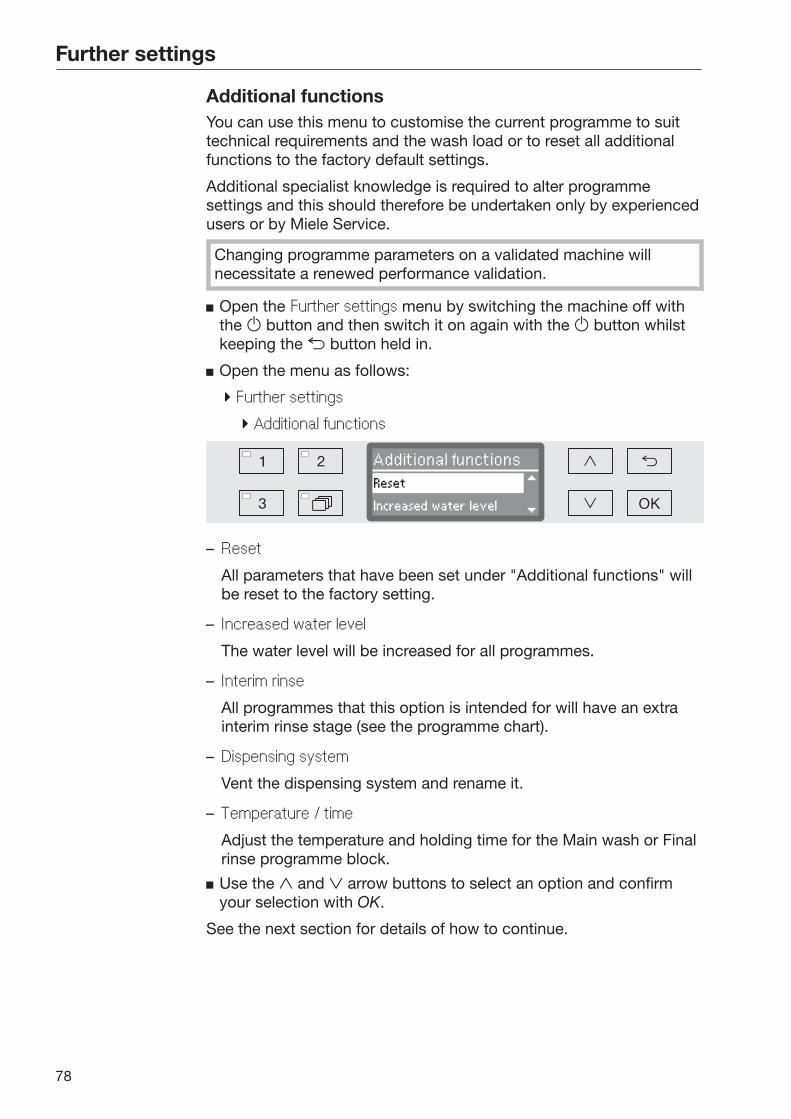
Log book ............................................................................................................................. 75Temperature unit.................................................................................................................. 76Moving a programme: allocating programme selection buttons......................................... 77Additional functions............................................................................................................. 78
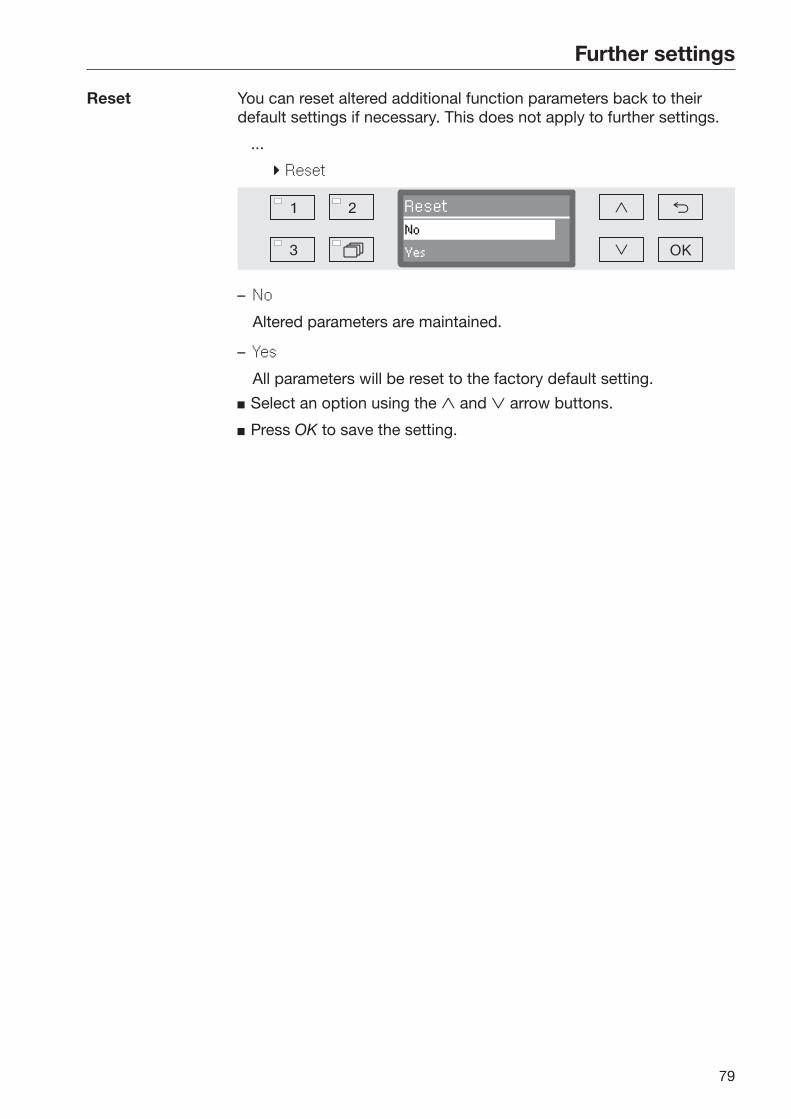
Reset .............................................................................................................................. 79Increased water level...................................................................................................... 80Interim rinse.................................................................................................................... 80Dispensing systems ....................................................................................................... 81Temperature / Time ........................................................................................................ 85
Release programme ............................................................................................................ 87Water hardness ................................................................................................................... 87Display: Temperature........................................................................................................... 88Display brightness and contrast.......................................................................................... 89Switch off after (Auto-Off function)...................................................................................... 90
Activating readiness for use ........................................................................................... 91Factory default..................................................................................................................... 92Software version.................................................................................................................. 93
Routine checks.................................................................................................................... 95Cleaning the filters in the wash cabinet .............................................................................. 95Cleaning the spray arms...................................................................................................... 97Cleaning the machine.......................................................................................................... 99
Cleaning the control panel ............................................................................................. 99Cleaning the door and the door seal.............................................................................. 99Cleaning the wash cabinet ............................................................................................. 99Cleaning the door front .................................................................................................. 99Preventing re-soiling....................................................................................................... 99
Checking mobile units, baskets, modules and inserts...................................................... 100
Problem solving guide .................................................................................................... 101Technical faults and messages ......................................................................................... 101Dispensing/Dispensing systems ....................................................................................... 102Insufficient salt/Water softener.......................................................................................... 104Cancel with fault code....................................................................................................... 105Process-related faults and messages ............................................................................... 107Unsatisfactory cleaning and corrosion.............................................................................. 108Water inlet and drainage ................................................................................................... 111Noises................................................................................................................................ 112
Problem solving guide .................................................................................................... 113Cleaning the drain pump and non-return valve................................................................. 113Clean the water intake filters ............................................................................................. 114
After sales service ........................................................................................................... 115Contacting Miele Service .................................................................................................. 115Software version................................................................................................................ 116
Installation........................................................................................................................ 117Installation and levelling .................................................................................................... 117Building under a continuous worktop ............................................................................... 118
Removing the lid........................................................................................................... 118Electromagnetic compatibility ........................................................................................... 119
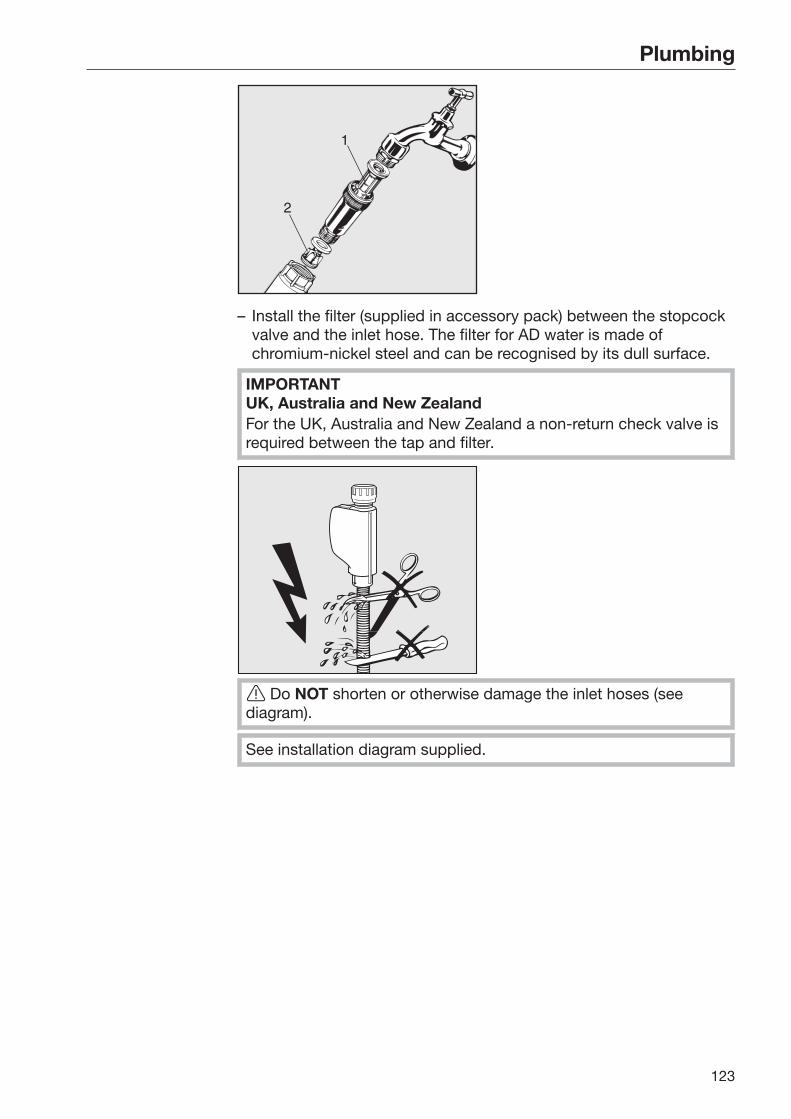
Plumbing .......................................................................................................................... 122Connection to the water supply ........................................................................................ 122Connecting the drain hose ................................................................................................ 125
Programme chart ............................................................................................................ 126Programme selection and suitable accessories................................................................ 128
Caring for the environment ............................................................................................ 130Disposal of the packing material ...................................................................................... 130
Notes about these instructions
5
Important warnings
Information which is important for safety is highlighted in a thickframed box with a warning symbol. This alerts you to the potentialdanger of injury to people or damage to property.Read these warning notes carefully and observe the proceduralinstructions and codes of practice they describe.
Notes
Information of particular importance that must be observed ishighlighted in a thick framed box.
Additional information and comments
Additional information and comments are contained in a simpleframe.
Operating stepsOperating steps are indicated by a black square bullet point.
Example:
Select an option using the arrow buttons and save your choice withOK.
DisplayCertain functions are shown in display messages using the same fontas that used for the function itself in the display.
Example:
Settings menu.
Intended use
6
This Miele commercial dishwasher can be used to reprocesslaboratory glassware and laboratory utensils with water based media.The process includes cleaning and rinsing. Due to the wide variety oflaboratory glassware and laboratory utensils on the market, it may benecessary in some cases to establish whether it is suitable forreprocessing in a dishwasher. This will depend on its use and thetype of soiling present. Please also observe information provided bythe manufacturer of the laboratory glassware and laboratory utensils.
Laboratory glassware and laboratory utensils suitable forreprocessing include a range of items from evaporating dishes tocentrifuge tubes, for example:
– Vessels such as test tubes, beakers, flasks, etc.
– Measuring vessels such as measuring cylinders, volumetric flasksetc.
– Dishes such as petri dishes, watch glasses, etc.
– Plates such as slides, sequencing plates, etc.
– Small items such as lids, spatulas, magnetic stirring rods, stoppers,etc.
– Other items such as funnels, pipe/hose pieces, etc.
Pipettes are not included in this list. They are not suitable forreprocessing in this commercial dishwasher.
Examples of application areas:
– Laboratories in schools, colleges and universities,
– Different areas of inorganic, organic, analytical and physicalchemistry,
– Biology (excluding agriculture soiling).
Laboratory glassware and laboratory utensils for reprocessing arereferred to as the wash load if they are not more closely defined.
Processing conditions must be suitable for the wash load and for thetype of soiling.Chemical agents must be suitable for the type of soiling and formethods of analysis being used.
Intended use
7
The use of a suitable carrier (mobile unit, basket, module, insert, etc.)is important to ensure adequate processing of the load. Examples aregiven in the section "Areas of application".
This machine is programmed to carry out the final rinse with mainswater or with processed water of a quality to suit the application (e.g.purified water, fully demineralised water or demineralised water). It is particularly important to ensure the appropriate water quality forthe rinse and final rinse of items for analytical purposes.
The machine can be qualified for process validation.
The machine fulfills the requirements of Machinery Directive2006/42/EC.
Intended use
8
User profiles
Daily operators Daily operators must be instructed in operating and loading themachine and trained regularly to guarantee safe daily use. Theyrequire knowledge of machine reprocessing of laboratory glasswareand utensils.
Tasks for daily routine operation are located in the Settings menu.This menu is freely accessible to all users.
Administration More advanced tasks, e.g. interrupting or cancelling a programme,require more detailed knowledge about the machine reprocessing oflaboratory glassware and utensils.
Alterations or adaptations of the machine, e.g. accessories used oron-site conditions require additional specific knowledge of themachine.
Validation processes assume specialised knowledge of the machinereprocessing of laboratory glassware and utensils, of the processesinvolved and of applicable standards and legislation.
Administrative processes and settings are allocated to the Furthersettings. This is protected from unauthorised access by a code.
Guide to the machine
9
Machine overview
a Door lockb Test point for performance checks
(Top, front right; only visible with lidremoved)
c Upper machine spray armd Rails for baskets and mobile unitse Lower machine spray armf Data plateg Reservoir for neutralising agent or rinsing
agent
h Salt reservoiri Dispenser for powder cleaning agentj Filter combinationk Plinth facingl On the back:
– Second data plate– Electrical and plumbing connections– Connection for an external dispenser
module (DOS module)m Plumbing connections for mobile units
and baskets
Guide to the machine
10
Control panel
a On/Off buttonFor switching the machine on and off.
b , and buttonsProgramme selection buttons.Can be configured.
c Programme list buttonFor accessing the list of all programmes.
d DisplayUser interface and programme sequence display.
e and arrow buttonsFor navigating within the display.
f Cancel buttonFor cancelling a process (not for cancelling programmes)
g Start/Stop buttonFor starting or cancelling a programme.
h OK buttonFor selecting or confirming entries in the user interface (acknowledge or save).
i PC/Optical interfaceThis is used by Miele Service technicians to run diagnostic checksand can also be used to update programming data in the future.
Guide to the machine
11
LEDs in the buttonsThe buttons on the control panel have LEDs (Light Emitting Diodes)that indicate the status of the machine.
Button LED Status
button ON The machine is switched on.
FLASHES The machine is ready for use.
OFF The machine is switched off.
Programmeselectionbuttons, and
ON The respective programme has beenselected. At the end of the programmethe LED will remain lit until a differentprogramme is selected.
OFF The programme is not selected or theprogramme settings are being selected.
button ON A programme has been selected fromthe programme list with this button. Atthe end of the programme the LED willremain lit until a different programme isselected.
OFF No programme has been selected fromthe list with this button or theprogramme settings are being selected.
Start/Stop button
ON Programme running.
FLASHESGREEN
A programme has been selected but notyet started.
FLASHESRED
A fault has occurred (see "Problemsolving guide").
OFF A programme has finished.
Warning and Safety instructions
12
This machine complies with all statutory safety requirements.Inappropriate use can, however, lead to personal injury andmaterial damage.Read these instructions carefully before using it for the first time toavoid the risk of accidents and damage to the machine.Keep these instructions in a safe place where they are accessibleto users at all times.
Correct application
This machine is designed for use with the applications described inthese operating instructions only. Alterations or conversions to themachine, or using it for purposes other than those for which it wasdesigned, are not permitted and could be dangerous.This machine must only be used for cleaning laboratory glasswareand utensils if the manufacturer has stated that they are suitable formachine reprocessing. Manufacturer's cleaning and maintenanceinstructions must also be observed.Miele cannot be held liable for damage caused by improper orincorrect use or operation of the machine.
This machine is intended for indoor use only.
Risk of injuryPlease pay attention to the following notes to avoid injury
This machine must be commissioned, serviced and repaired by aMiele authorised and trained service technician only. To ensurecompliance with Good Laboratory Practice guidelines, Miele repairand maintenance contracts are recommended. Unauthorised repairscan pose considerable risks to the user.
Do not install the machine in an area where there is any risk ofexplosion or of freezing conditions.
In order to reduce the risk of water damage, the area around themachine should be limited to furniture and fittings that are designedfor use in commercial environments.
If the machine is built under, it must only be installed under acontinuous worktop run which is firmly secured to adjacent units toimprove stability.
The electrical safety of this machine can only be guaranteed whencorrectly earthed. It is essential that this standard safety requirementis met. If in any doubt, please have the on-site wiring system testedby a qualified electrician. Miele cannot be held liable for theconsequences of an inadequate earthing system (e.g. electric shock).
A damaged or leaking machine could be dangerous andcompromise your safety. Disconnect the machine from the mainsimmediately and call the Miele Service Department.
Warning and Safety instructions
13
Personnel operating the machine should be trained regularly.Untrained personnel must not be allowed access to the machine orits controls.
Only use chemical agents which have been approved by theirmanufacturer for use in the application you are using. The chemicalagent manufacturer is responsible for any negative influences on thematerial the load is made from and for any damage they may causeto the machine.
Take care when handling chemical agents. These may containirritant, corrosive or toxic ingredients. Please observe the chemical agent manufacturer's safety instructionsand safety data sheets. Wear protective gloves and goggles.
The machine is designed for operation with water andrecommended additive chemical agents only. Organic solvents andflammable liquid agents must not be used in it.This could cause an explosion, damage rubber or plastic componentsin the machine and cause liquids to leak out of it.
The water in the cabinet must not be used as drinking water.
Take care not to inhale powder agents. Chemical agents can causechemical burns in the mouth and throat or lead to asphyxiation.
Do not lift the machine by protruding parts such as the controlpanel or the opened service flap as these could be damaged or tornoff.
Do not sit or lean on the opened door. This could cause themachine to tip up and be damaged or cause an injury.
Be careful when sorting items with sharp pointed ends andpositioning them in the machine that you do not hurt yourself orcreate a danger for others.
Broken glass can result in serious injury when loading orunloading. Broken glass items must not be processed in the machine.
The machine can get hot when in use. Be careful not to scald orburn yourself or come into contact with irritant substances whenopening the door.
Should personnel accidentally come into contact with toxicvapours or chemical agents, follow the emergency instructions givenin the manufacturer's safety data sheets.
Mobile units, baskets, modules, inserts and the load must beallowed to cool down before they are unloaded. Any water remainingin containers could still be very hot. Empty them into the washcabinet before taking them out.
Never clean the machine or near vicinity with a water hose or apressure washer.
Warning and Safety instructions
14
The machine must be disconnected from the mains electricitysupply before any maintenance or repair work is carried out.
Quality assuranceThe following points should be observed to assist in maintainingquality standards when processing laboratory glassware andutensils to avoid damage to the loads being cleaned.
If it is necessary to interrupt a programme in exceptionalcircumstances, this may only be done by authorised personnel.
The standard of cleaning and disinfection must be routinelyconfirmed by the user. The process should be validated on a regularbasis, and checked against documented control results.
Make sure items being washed are suitable for machinereprocessing and are in good condition. Plastic items must bethermally stable. Nickel plated items and aluminium items can bemachine processed using special procedures only.Items containing iron, and soiling containing residual rust must not beplaced in the cabinet.
Chemical agents can, in certain circumstances, cause damage tothe machine. Always follow the recommendations of the chemicalagent manufacturer. In case of damage or doubt about compatibility, please contactMiele.
Abrasive substances must not be placed in the machine as theycould cause damage to the mechanical components of the watersupply. Any residues of abrasive substances on items to be washedmust be removed without trace before reprocessing in the machine.
Pre-treatments with cleaning or disinfecting agents can createfoam, as can certain types of soiling and chemical agents. Foam canhave an adverse effect on the cleaning result.
Processes must be set up such that foam cannot escape from thewash cabinet. It would hinder the correct functioning of the machine.
The process used must be monitored on a regular basis by thesupervisor to check foaming levels.
To avoid the risk of damage to the machine and any accessoriesused with it caused by chemical agents, soiling and any reactionbetween the two please read the notes in "Chemical Processes andTechnology".
Warning and Safety instructions
15
Where a chemical agent is recommended on technical applicationgrounds (e.g. a cleaning agent), this does not imply that themanufacturer of the machine accepts liability for the effect of thechemical on the items being cleaned. Please be aware that changes in formulation, storage conditions etc.which may not be publicised by the chemical manufacturer, can havea negative effect on the cleaning result.
When using a chemical agent it is essential that the manufacturer'sinstructions are followed. The chemical agent must only be used forthe application it is designed for and in the situation specified, toavoid material damage and such dangers as a severe explosivechemical reaction (e.g. an explosive oxyhydrogen gas reaction).
Always follow the relevant manufacturer's instructions on storageand disposal of chemical agents.
In critical applications where very stringent requirements have tobe met, it is strongly recommended that all the relevant factors for theprocess, such as chemical agents, water quality etc. are discussedwith the Miele Application Technology specialists.
If the cleaning result is subject to particularly stringentrequirements, a regular quality control test should be carried out bythe user to ensure that required standards of cleanliness are beingachieved.
Mobile units, baskets, modules and inserts should only be used forthe purpose they are designed for.Hollow items must be thoroughly cleaned, internally and externally.
Secure small and light items with cover nets or place in a meshtray for small items, so that they do not block the spray arms.
Empty any containers or utensils before loading them.
The amount of residual solvents and acids on items going into thecabinet should be minimal.There should be no more than a trace of any solvents with a flashpoint of below 21 °C.
Chlorous solutions, in particular hydrochloric acid, must not beplaced in the cabinet.
Ensure that solutions or steam containing chlorides or hydrochloricacid do not come into contact with the stainless steel outer casing ofthe machine in order to avoid any damage through corrosion.
After any plumbing work the water pipework to the machine willneed to be vented. If this is not done, components can be damaged.
The gaps between a built-in machine and adjacent cabinetry mustnot be filled e.g. with silicone sealant as this could compromise theventilation to the circulation pump.
Warning and Safety instructions
16
Follow the installation instructions in the operating and installationinstructions.
Safety with children
Children must be supervised in the vicinity of the machine. Do notallow children to play with the machine. They could get locked insideit.
Children must not use the machine.
Keep children away from chemical agents. These can causeburning in the mouth, nose and throat if swallowed, or inhibitbreathing. Keep children away from the machine when the door isopen. There could still be residual chemical agent in the cabinet.Observe the safety data sheets for the chemical agent and seekmedical advice immediately if a child has swallowed chemical agentor got it in the eyes.
Using accessories
Only Miele accessories should be connected to this machine. Theymust be suitable for the application they are required for. ConsultMiele for details on the type of accessories that can be used.
Only use Miele mobile units, baskets, modules and inserts with thismachine. Using mobile units, baskets, modules and inserts made byother manufacturers, or making modifications to Miele accessoriescan cause unsatisfactory cleaning results, for which Miele cannot beheld liable. Any resultant damage would not be covered by theguarantee.
Warning and Safety instructions
17
Symbols on the machine
Warning:Observe the operating instructions
Warning:Danger of electric shock
Disposing of your old machine
Please note that the machine may have contamination from blood,bodily fluids, pathogenic germs, facultative pathogenic germs,genetically modified material, etc. in it and must be decontaminatedbefore disposal. For environmental and safety reasons ensure the machine iscompletely drained of any residual water, chemical residues andcleaning agent. Observe safety regulations and wear safety gogglesand gloves. Make the door lock inoperable, so that children cannot accidentallyshut themselves in. Then make appropriate arrangements for its safedisposal.
Miele cannot be held liable for damage caused by non-compliancewith these Warning and Safety Instructions.
Using the machine
18
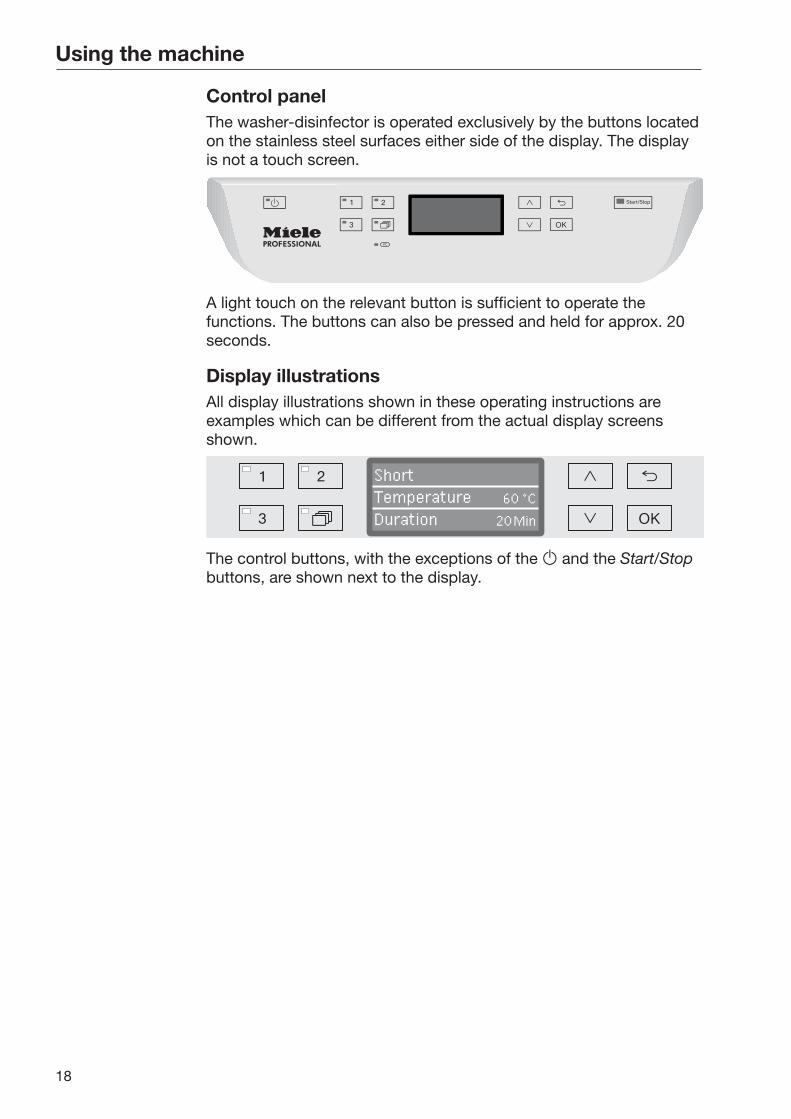
Control panelThe washer-disinfector is operated exclusively by the buttons locatedon the stainless steel surfaces either side of the display. The displayis not a touch screen.
A light touch on the relevant button is sufficient to operate thefunctions. The buttons can also be pressed and held for approx. 20seconds.
Display illustrationsAll display illustrations shown in these operating instructions areexamples which can be different from the actual display screensshown.
ShortTemperatureDuration Min20
60 °C
The control buttons, with the exceptions of the and the Start/Stopbuttons, are shown next to the display.
Using the machine
19
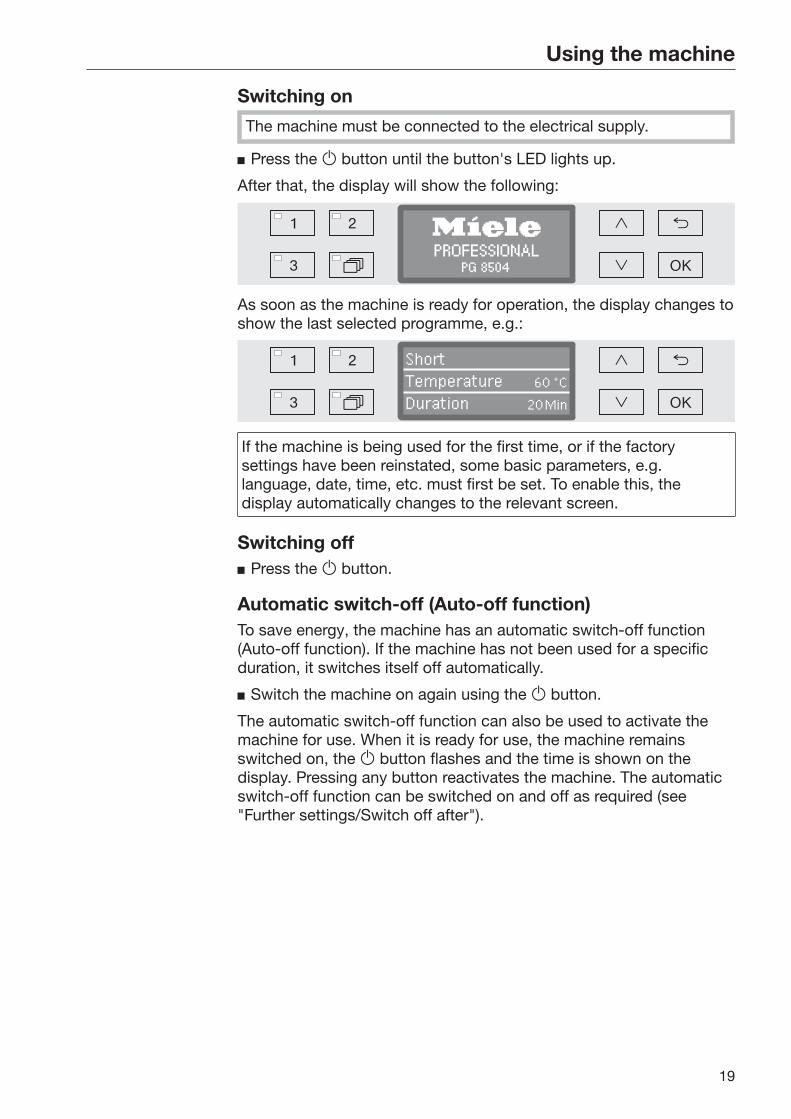
Switching on
The machine must be connected to the electrical supply.
Press the button until the button's LED lights up.
After that, the display will show the following:
PG 8504
As soon as the machine is ready for operation, the display changes toshow the last selected programme, e.g.:
ShortTemperatureDuration Min20
60 °C
If the machine is being used for the first time, or if the factorysettings have been reinstated, some basic parameters, e.g.language, date, time, etc. must first be set. To enable this, thedisplay automatically changes to the relevant screen.
Switching off Press the button.
Automatic switch-off (Auto-off function)To save energy, the machine has an automatic switch-off function(Auto-off function). If the machine has not been used for a specificduration, it switches itself off automatically.
Switch the machine on again using the button.
The automatic switch-off function can also be used to activate themachine for use. When it is ready for use, the machine remainsswitched on, the button flashes and the time is shown on thedisplay. Pressing any button reactivates the machine. The automaticswitch-off function can be switched on and off as required (see"Further settings/Switch off after").
Using the machine
20
Display interfaceThe machine is controlled by menus. The menus are displayed in a 3-line display on the control panel.
The name of the menu (top line) and up to two options are shown.The currently selected option is highlighted, e.g.
Settings Language
Date
Menu operationTo access the system settings menu you must first switch themachine off with the button.Then press and hold the button whilst switching the machine backon with the button. Then release both buttons.
and Arrow buttons
The arrow buttons are used to navigate up and down by row within amenu. Press and hold the button to automatically scroll through thelist to the end of the menu. Press the button again to continuenavigating. Parameter values can also be altered in defined increments using thearrow buttons. Instructions for this can be found in the relevantsections.
OK OK button
The OK button is used for confirming (acknowledging) a selection orfor saving input. The display then moves to the next menu or, whenentering parameter values, to the next input position. Instructions forthis can be found in the relevant sections.
Cancel button
Before the OK button has been pressed, a process can be cancelledat any time by pressing the button. The menu is then ended earlyand the display changes to the next menu level up. Any settingchanges made will not be saved.
Using the machine
21
Symbols on the display
Navigation arrows
If a menu consists of more than two options, two navigation arrowsare shown at the side of the menu options.
Settings Language
Date
Use the and arrow buttons on the control panel to navigatethrough the menu.
- - - - - - Dotted line
If a menu contains more than two options, the end of the option list ismarked by a dotted line. The last entry appears above the line, thefirst entry below it.
Tick
If there are several options available, the current setting is markedwith a tick .
Language deutsch
english (GB)
(
System messages
The symbol denotes system messages. These give information,such as a notification of an excessively low level in the supplycontainers or a reminder for the next service.
Refill salt
System messages are displayed at the start and end of a programmeand have to be confirmed (acknowledged) individually with OK or alltogether at the end of the programme by opening the door. If the symbol is shown on the display, the system messages can beopened by pressing the OK button.
Fault messages
In the event of a fault a warning triangle is shown in place of the symbol. See "Problem solving guide" and "After sales service" formore information.
Using the machine
22
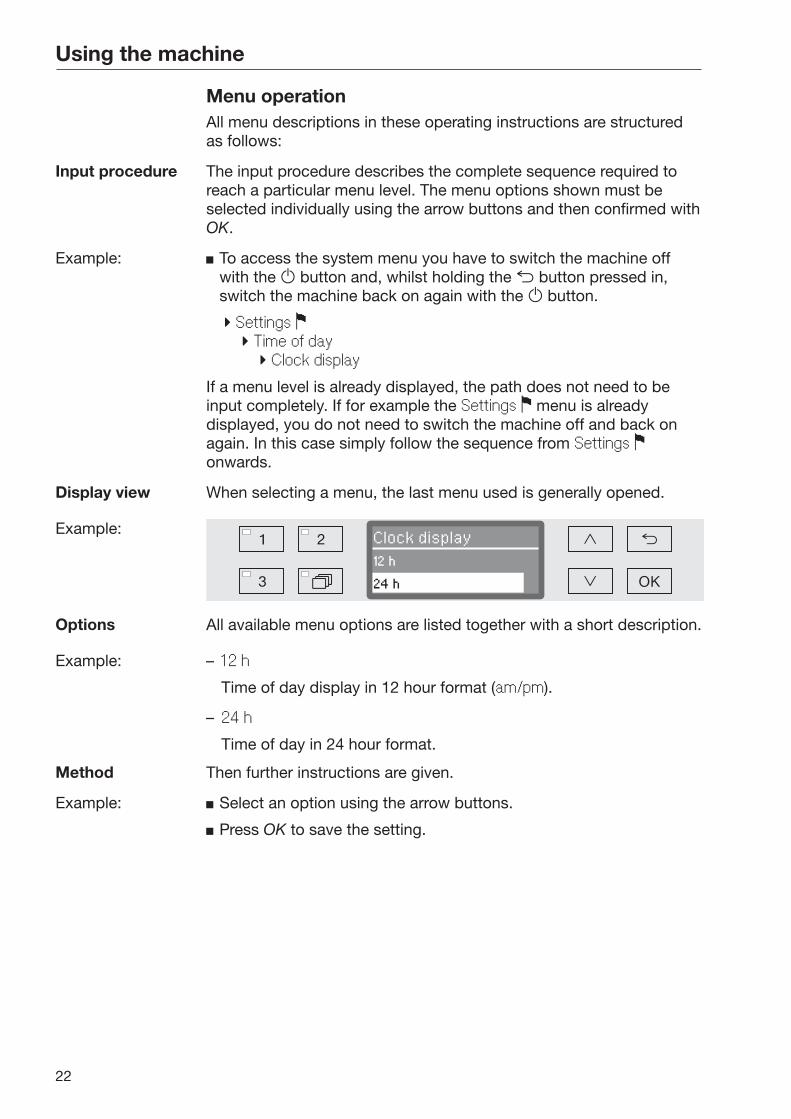
Menu operationAll menu descriptions in these operating instructions are structuredas follows:
Input procedure The input procedure describes the complete sequence required toreach a particular menu level. The menu options shown must beselected individually using the arrow buttons and then confirmed withOK.
Example: To access the system menu you have to switch the machine offwith the button and, whilst holding the button pressed in,switch the machine back on again with the button.
Settings Time of day Clock display
If a menu level is already displayed, the path does not need to beinput completely. If for example the Settings menu is alreadydisplayed, you do not need to switch the machine off and back onagain. In this case simply follow the sequence from Settings onwards.
Display view When selecting a menu, the last menu used is generally opened.
Example:Clock display12 h
24 h
Options All available menu options are listed together with a short description.
Example: – 12 h
Time of day display in 12 hour format (am/pm).
– 24 h
Time of day in 24 hour format.
Method Then further instructions are given.
Example: Select an option using the arrow buttons.
Press OK to save the setting.
Commissioning
23
Installation and connectionBefore commissioning the machine must be securely installed, andthe water inlet and drain hoses and the mains cable correctlyconnected. See "Installation", "Plumbing connections" and "Electricalconnection" and the installation diagram supplied.
ProcedureDuring commissioning a set procedure is followed which must not beinterrupted. The display will automatically guide you through theprocess.
All settings, except for selecting plumbing connections, can beretrospectively altered via the Settings and Further settings menus.
The settings made during the commissioning process are onlyadopted after a complete programme has been run.If the programme is interrupted or if no programme is started andthe machine is switched off, the commissioning process must becarried out again.
Switching on Press the button until the LED lights up.
Select language
The commissioning process starts with selecting the language.
Language deutsch
english (GB)
(
Use the and arrow buttons to select the language you wantand touch OK to save.
Selecttemperature unit
The menu for selecting the temperature unit will then appear.
Temperature unit
°C
°F
Use the and arrow buttons to select the temperature unit youwant and touch OK to save.
Commissioning
24
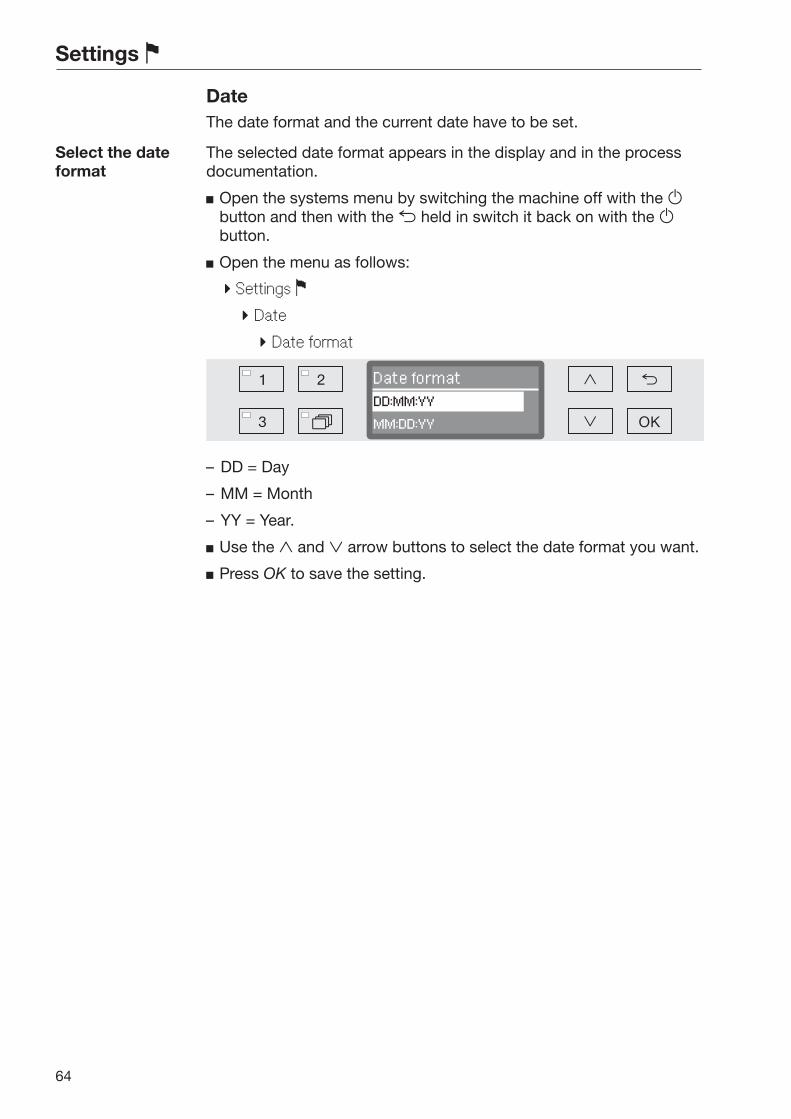
Select the date format
The menu for selecting the date format will then appear.
Date formatDD:MM:YY
MM:DD:YY
– DD = Day
– MM = Month
– YY = Year
Use the and arrow buttons to select the date format you wantand touch OK to save.
Set the date The menu for setting the date will then appear.
Date
Use the and arrow buttons to set the day, month and year andtouch OK to save each one.
Select Clock display
The menu for selecting the clock format will then appear.
Clock display12 h
24 h
Use the and arrow buttons to select the format you want andtouch OK to save.
Set the time ofday
The menu for setting the display for the time of day will then appear.
Time of day
Use the and arrow buttons to select the hours and minutesand touch OK to save each one.
Commissioning
25
Setting the water hardnesslevel
The menu for setting the water hardness will then appear.
Water hardness19
(0 - 70
°dH
°dH)
The possible range is shown in the bottom line of the display. Waterhardness setting values can be found in the "Water softener/Settings"chart.
Your local water authority can give you information about the exactwater hardness in your area.
Where the water hardness fluctuates, e.g. between 1.4 – 3.1 mmol/l(8 – 17 °dH), always programme the machine to the higher value,3.1 mmol/l (17 °dH) in this example.
Set the water hardness using the arrow buttons (higher) and (lower) and touch OK to save.
Write down the water hardness in "Water softener / Waterhardness".
Select plumbingconnections
The menu for setting plumbing connections will then appear.
Unused plumbing connections, e.g. if there is only one connection,can be deactivated here.
Following commissioning the plumbing connections can bereinstated by Miele Service.
Plumbing connections
Cold water
Accept
The plumbing connection is set via multiple choice. A box is shownin the display next to all plumbing connections. If the connection isactivated, a tick can be seen in it. Select to activate or deactivatethe plumbing connections.
Use the and arrow buttons to select the plumbing connectionyou want. Plumbing connections are activated or deactivated bytouching OK.
To save the selection select the Accept option at the end of the listand confirm with OK.
Commissioning
26
Commissioning completed
Commissioning is completed when the following message isdisplayed.
Set up successful
Confirm the message with OK.
The machine is now ready for use.
ShortTemperatureDuration Min20
60 °C
The settings made during the commissioning process are onlyadopted after a complete programme has been run.
Select any programme, e.g.: Drain.
Press the Start/Stop button to start the programme.
After commissioning every programme starts with reactivation ofthe water softener.
Fault 420 If the programme is cancelled using Fault 420, all the plumbingconnections are deactivated.
Confirm the error message with OK.
Switch the machine off using the button.
Wait approximately 10 seconds before switching the machine onagain with the button.
The commissioning procedure starts again.
Perform commissioning and activate at least one plumbingconnection; e.g. for cold water.
Opening and closing the door
27
Opening the door
If the door is opened during a programme cycle, hot water andcleaning agents can escape.Risk of scalding, burning and chemical burns.Do not open the door if a programme is running.
The control panel of the machine is also a door handle.
Grasp the handle underneath the control panel and lower the doorto open it.
Closing the door
Do not put your hand inside the door as it is closing.Danger of injury.
Lift the door until it engages with the door lock.
Water softener
28
Water hardnessIn order to achieve good cleaning results, the machine needs tooperate with soft water. Hard water results in the build-up of calciumdeposits on the load and in the machine.
Mains water with a water hardness of 0.7 mmol/l (4 °dH) must besoftened. This occurs automatically in the built-in water softener. The water softener must be set to the exact hardness of the mainswater (see "Water softener/Setting the water hardness").
Your local water authority will be able to tell you the exact degree ofhardness in the mains water supply.For future servicing it is useful to make a note of your waterhardness level. Enter your water hardness level here:
________________________mmol/l or °dH
The water softener must be reactivated at regular intervals. Thisrequires special reactivation salt (see "Water softener/Filling the saltreservoir"). Reactivation is carried out automatically during aprogramme sequence.
If the hardness level of your water is constantly less than 0.7 mmol/l (= 4 °dH), salt is not required for the water softener. The waterhardness level must, however, still be set.
Water softener
29
Setting the water hardness levelWater hardness can be set between 0 and 12.6 mmol/l (0 - 70 °dH).
Open the Further settings menu by switching the machine off withthe button and then switch it on again with the button whilstkeeping the button held in.
Open the menu as follows:
Further settings
Water hardness
Water hardness19
(0 - 70
°dH
°dH)
The bottom line of the display shows the possible input range. Water hardness input values can be found in the chart on the nextpage.
Where the water hardness fluctuates, e.g. between 1.4 - 3.1 mmol/l (8 - 17 °dH), always programme the machine to the higher value, 3.1 mmol/l (17 °dH) in this example.
Set the water hardness level using the arrow buttons ( = higher and = lower).
Filling the salt reservoirUse only special, coarse-grained reactivation salt with a granule sizeof approx. 1 - 4 mm.Do not under any circumstances use other types of salt such as tablesalt, agricultural or gritting salt. These may contain insoluble additiveswhich can impair the functioning of the water softener.
Inadvertently filling the salt reservoir with cleaning agent willcause serious damage to the water softener.Before filling the salt container make sure that you have picked upthe right packet of reactivation salt.
Open the door to an angle of approx. 45°. This ensures that the saltflows into the reservoir more easily.
Press the yellow button on the salt reservoir with the symbol onit in the direction of the arrow. The flap will spring open.
Lift up the funnel.
The reservoir takes approx. 1.4 - 2 kg of salt, depending on the typeof salt and how much is left in.
Water softener
32
Do not fill the reservoir with water.The reservoir could overflow when filled with salt.
Add salt only until the funnel of the salt reservoir is full, so that itcan close properly. Do not add more than 2 kg of salt.
As the salt reservoir is being filled, displaced water (saline solution)may run out.
Clean any excess salt from the area around the salt reservoir andespecially from the seal. Do not use running water as this cancause the salt reservoir to overflow.
Close the funnel.
Run the Rinsing programme after refilling salt.
This will ensure that any traces of salt and saline solution aredissolved and rinsed away.
Salt and saline solution which has overflowed can cause corrosiondamage if they are not rinsed away.
Water softener
33
Add salt reminderIf the salt level in the reservoir is low, the following reminder willappear:
Refill salt
Confirm the message with the OK button and
fill the reservoir as described.
When the message first appears, there may be sufficient salt for afurther programme, depending on the water hardness level set.
If there is no saline solution left in the water softener, a relevantmessage will appear in the display and the machine will be lockedfor further use.The machine can be used again a few seconds after the salt hasbeen refilled.
Areas of application
34
Mobile units, baskets, modules and insertsThis machine can be equipped with an upper and lower basket or amobile unit which can be fitted with different inserts and modules orexchanged for special accessories depending on the items to bewashed.
Select accessories which are appropriate for the application.
Information on the individual areas of application can be found on thefollowing pages, as well as in the operating instructions for the mobileunits, baskets, modules and inserts (if available).
For all areas of application defined in "Intended use" Miele offerssuitable accessories such as mobile units, baskets, modules andinserts and special fittings. Contact Miele for more information.
When using an upper basket with a spray arm at the same timeas 2 injector modules in the bottom basket, the amount of waterrequired has to be increased by + 1.5 l for the programme (see"Further settings / Additional functions").Using up to 4 injector modules in the upper basket and the lowerbasket at the same time is not permitted.
See "Programme chart" for an overview of which programmes can beused for which accessories.
Areas of application
35
Water supply Mobile units and baskets with spray arms or other rinse fittings areequipped with one or more connection points to the water supply.When loading baskets, mobile units, etc into the machine, connectthese to the water connection points in the back panel of the washcabinet. The mobile units and baskets are held in place by the washcabinet door when closed. Any free connections in the back panel are closed mechanically.
Older models of mobile units andbaskets
Only use older models of mobile units and baskets in this machine inconsultation with Miele. In particular mobile units and baskets withwater supply pipes for spray arms and injector manifolds must beconverted to the new type of water connector. Conversion must be carried out by Miele Service and is only availablefor selected models.
The fitting of connectors for the water supply of mobile unitsand baskets must be carried out by Miele Service.Fitting faults on mobile units and baskets can cause damage to themachine.
Following conversion, mobile units and baskets can no longer beused in older models of the machine.
Areas of application
36
Adjusting the upper basketHeight-adjustable upper baskets can be adjusted between threepositions with 2 cm between each position to accommodate items ofdifferent heights.
To adjust the height, the brackets with rollers on the side of the upperbasket and the water connector at the back of the basket have to bemoved. The roller brackets are each secured to the upper basket bytwo screws. The water connector consists of the followingcomponents:
– A stainless steel plate with 2 apertures,
– a plastic connection piece and
– 6 screws.
Only adjust the upper basket horizontally. The baskets are notdesigned to be positioned on a slant (one side up, one side down).Altering the height will alter loading heights for both the upper andlower baskets.
To adjust theupper basket:
Remove the upper basket by pulling it out until a resistance is feltand lifting it off the runners.
Unscrew the roller brackets and the water connector.
To adjust the upper basket to the ...
... Upper position:
Move the roller brackets on both sides to the lower position andsecure them firmly.
Position the stainless steel plate over the openings in the watersupply pipe so that the upper aperture is covered. Secure thestainless steel plate at the top with 2 screws. Place the waterconnector in the lower aperture of the stainless steel plate so thatthe middle aperture is covered. Secure the water connector with 4screws.
Areas of application
37
... Middle position:
Move the roller brackets on both sides to the middle position andsecure them firmly.
Position the stainless steel plate over the openings in the watersupply pipe so that one of the outer apertures is covered. Securethe stainless steel plate at the top or bottom with 2 screws. Placethe water connector in the middle aperture of the stainless steelplate so that the outer aperture is covered. Secure the waterconnector with 4 screws.
... Lower position:
Move the roller brackets on both sides to the top position andsecure them firmly.
Position the stainless steel plate over the openings in the watersupply pipe so that the lower aperture is covered. Secure thestainless steel plate at the bottom with 2 screws. Place the waterconnector in the upper aperture of the stainless steel plate so thatthe middle aperture is covered. Secure the water connector with 4screws.
Then check: Replace the upper basket on the rails and push it in carefully tocheck that the water connector is positioned correctly.
Areas of application
38
Preparing the load
Only items which have been declared by their manufacturer assuitable for machine processing may be processed. Themanufacturer's specific processing instructions must be observed.
Special injector nozzles, irrigation sleeves or adapters may berequired for appropriate internal cleaning, depending on the load.These, together with other accessories, are available from Miele.
– Arrange the load so that water can access all surfaces. Thisensures that it gets properly cleaned.
– Do not place items to be cleaned inside other pieces where theymay be concealed.
– Hollow items must be thoroughly cleaned, internally and externally.
– Ensure that items with long, narrow, hollow sections can be flushedthrough properly before placing them in a fitting or whenconnecting them to a water connection.
– Hollow vessels should be inverted and placed in the correct mobileunits, baskets, modules, and inserts to ensure that water can flowin and out of them unrestricted.
– Deep-sided items should be placed at an angle to make sure waterruns off them freely.
– Tall, narrow, hollow items should be placed in the centre of thebaskets or units if possible to ensure better water coverage.
– Take apart any items which can be dismantled according to themanufacturer's instructions and process the individual partsseparately from each other.
– Lightweight items should be secured with a cover net (e.g. an A 6)and small items placed in a mesh tray to prevent them blocking thespray arms.
– The spray arms must not be blocked by items which are too tall orwhich hang down in their path.
– Broken glass can result in serious injury when loading or unloading.Broken glass items must not be processed in the machine.
– Nickel and chrome-plated items, as well as items made ofaluminium, require special procedures and are not generallysuitable for machine processing.
– Items containing iron that can rust or corrode must not be added tothe load or to the wash cabinet as contaminated items.
– With items which are made entirely or partly of plastic, observe themaximum thermal stability for the items and select an appropriateprogramme or adjust the temperature of the programme.
Observe the further information given in the following sections asnecessary depending on area of application.
Areas of application
39
Preparing theload
Empty all items before loading into the machine (paying particularattention to relevant regulations).
Remove non-water soluble residues such as paint, adhesives andpolymer compounds using appropriate solvents.
Rinse load items which have been in contact with chloride solutionsor hydrochloric acid thoroughly with water before loading in themachine and drain well.
The amount of residual solvents and acids on items going intothe cabinet should be minimal.There should be no more than a trace of any solvents with a flashpoint of below 21 °C.
Chloride solutions, in particular hydrochloric acid, and itemscontaining iron that can rust or corrode must not be placed in themachine.
Shake out any blood residues and remove any clots.
If necessary, rinse the load briefly with water to prevent coarsesoiling entering the machine.
Remove stoppers, corks, labels, sealing residues, etc.
Secure small items such as stoppers and taps in suitable basketsfor small items.
It may be necessary in individual cases to check whether extremelystubborn contamination – such as vacuum grease and paper labels –which could affect the cleaning result must be removed in advance.
It must be determined whether load items which are contaminatedwith microbiological material, pathogenic germs, facultativepathogenic bacteria, genetically modified material, etc. need to besterilised prior to machine processing.
Areas of application
40
Carry out a visual check before starting every programme:
– Is everything correctly loaded/connected for cleaning?
– Was the recommended loading template followed?
– Can the lumen / narrow sections of hollow items be accessed bythe wash fluid?
– Are the spray arms clean and do they rotate freely?
– Are the filters clean? Remove any coarse soiling and clean them if necessary.
– Are the removable modules, injector nozzles, irrigation sleeves andother rinsing fittings securely connected?
– Are the baskets and modules or mobile units correctly connected tothe water supply and are the water connectors undamaged?
– Are all chemical containers sufficiently filled?
The following must be checked at the end of every programme:
– Carry out a visual check of the load for cleanliness.
– Check that all hollow items are still securely located on their injectornozzles.
Any hollow items that have become disconnected from theirfittings during reprocessing must be reprocessed.
– Check that the lumen of hollow items are free of obstruction.
– Check that injector nozzles and connectors are securely held inposition in the baskets or inserts.
Areas of application
41
Wash load...
...wide necked Wash load items with wide necks, e.g. beakers, wide neckedErlenmeyer flasks and petri dishes, or cylindrical items, e.g. testtubes, can be cleaned inside and out by rotating spray arms.To do this the wash load is positioned in full, half or quarter insertsand placed in an empty lower basket or an upper basket with a sprayarm.
...narrow necked Baskets with special injector modules are available for wash loaditems with narrow necks, e.g. narrow necked Erlenmeyer flasks,round bottomed flasks and measuring flasks.
The injector units and modules come with their own operatinginstructions.
When loading please note:
– Place petri dishes in the appropriate insert with the dirty side facingtowards the middle.
– Quarter segment inserts should be positioned at a minimum 3 cmdistance from the edge of the upper or lower basket.
– Position quarter segment inserts for test tubes around the middle toleave the corners of the upper or lower basket free.
– Use a cover net to avoid breakages if required.
Chemical processes and technology
42
In this section you will find a description of the causes of common chemical reactionswhich can occur between different types of soiling, chemical agents and the componentsof the machine, along with their remedies as necessary.
This section is intended as a guide. If unforeseen interactions occur during reprocessing,or if you have any queries on this subject, please seek advice from Miele.
General notes
Problem How to resolve it
If elastomers (hoses and seals) and plasticsin the machine are damaged, this can leadto, for example, swelling, shrinking,hardening or brittleness of materials leadingto the development of tears and cracks.Components can then not functioncorrectly and this generally leads to leaks.
– Establish the cause of the damage andrectify it.
See information regarding "Chemicalagents", "Soiling" and "Reaction betweenchemical agents and soiling".
Heavy foaming during a programme affectscleaning and rinsing results. Foam escapingfrom the wash cabinet can cause damageto the machine. Cleaning processes cannot be regulatedand validated where there has been a build-up of foam.
– Establish the cause of the foam andrectify it.
– Check the process used regularly tomonitor foaming levels.
See information regarding "Chemicalagents", "Soiling" and "Reaction betweenchemical agents and soiling".
Corrosion to stainless steel in the washcabinet and to accessories can give them adifferent appearance:
– rust (red marks / discolouration),
– black marks / discolouration,
– white marks / discolouration (etchedsurface).
Corrosive pitting can lead to the machinenot being water-tight. Depending onapplication corrosion can influence cleaningand rinsing results (laboratory analysis) orcause corrosion to stainless steel items inthe cabinet.
– Establish the cause of the corrosion andrectify it.
See information regarding "Chemicalagents", "Soiling" and "Reaction betweenchemical agents and soiling".
Chemical processes and technology
43
Chemical agents
Problem How to resolve it
The ingredients in chemical agents have astrong influence on the longevity andfunctionality (throughput) of the dispensingsystem.
– Follow the chemical agent manufacturer'sinstructions and recommendations.
– Carry out a regular visual check of thedispensing system (siphons, hoses,dispensing containers, etc.) for anydamage.
– Regularly check the flow rate of thedispensing system.
– Ensure that the regular cycle ofmaintenance is observed.
– Please contact Miele Service for advice.
Chemical agents can damage elastomersand plastics in the machine andaccessories.
– Follow the chemical agent manufacturer'sinstructions and recommendations.
– Carry out a regular visual check of anyaccessible elastomers and plastics fordamage.
The following chemical agents can causelarge amounts of foam to build up:
– Cleaning agents and rinsing agentscontaining tensides.
Foam can occur:
– in the programme block in which thechemical agent is dispensed,
– in the following programme block if it hasbeen spilt,
– in the following programme with rinsingagent if it has been spilt.
– Process parameters in the washprogramme, such as dispensingtemperature, dosage concentration, etc.must be set to ensure the whole processis foam-free or very low-foaming.
– Please observe the chemical agentmanufacturers' instructions.
De-foaming agents, especially silicone-based ones, can cause the following:
– deposits to build up in the wash cabinet,
– deposits to build up on the load,
– damage to elastomers and plastics in themachine,
– damage to certain plastics (e.g.polycarbonate and plexiglass) in the loadbeing processed.
– De-foaming agents should be used inexceptional cases only; for instance, whenabsolutely essential for the process.
– The wash cabinet and accessories shouldbe periodically cleaned without a load andwithout de-foaming agent using theMedium or Long programme.
– Please contact Miele Service for advice.
Chemical processes and technology
44
Soiling
Problem How to resolve it
The following substances can damageelastomers (hoses and seals) and plastics inthe machine:
– oil, wax, aromatic and unsaturatedhydrocarbons,
– emollients,
– cosmetics, hygiene and care productssuch as creams (analytical applicationsand filling).
– Depending on usage, wipe the lower doorseal on the machine periodically with alint-free cloth or sponge. Clean the washcabinet and accessories without a loadusing the Medium or Long programme.
– Use the Medium or Long programme anddispense powder detergent on the door.
The following substances can lead to aheavy build-up of foam during washing andrinsing:
– some disinfecting agents and cleaningagents, etc.
– reagents for analysis, e.g. for microtiterplates,
– cosmetics, hygiene and care productssuch as shampoos and creams (analyticalapplications, filling),
– active foaming agents such as tensides.
– Thoroughly rinse items in waterbeforehand.
– Select the Long programme (with a cold orhot pre-wash).
– Depending on the application, use de-foaming agents that do not containsilicone oils.
The following substances cause corrosionto stainless steel in the wash cabinet and toaccessories:
– hydrochloric acid,
– other substances containing chloridessuch as sodium chloride, etc.
– concentrated sulphuric acid,
– chromic acid,
– particles of iron and swarf.
– Thoroughly rinse items in waterbeforehand.
– Drip dry items to be processed and thenplace into their mobile units, baskets,modules, and inserts. Start theprogramme as soon as possible afterplacing them in the machine.
Chemical processes and technology
45
Reaction between chemical agents and soiling
Problem How to resolve it
Natural oils and fats can be emulsified withalkaline chemical agents. This can lead to aheavy build-up of foam.
– Select the Medium or Long programme.
– Depending on application use de-foamingagents that do not contain silicone oils.
Soiling containing high protein levels suchas blood can cause a heavy build-up offoam when processed with alkalinechemical agents.
– With a cold water connection use theLong programme (cold water pre-wash).
– With a hot water connection pre-treat theload as necessary.
Non-precious metals such as aluminium,magnesium and zinc can release hydrogenwhen processed with very acidic or alkalinechemical agents (oxyhydrogen reaction).
– Please observe chemical agentmanufacturer's instructions
Adding and dispensing chemical agents
46
Using chemical agents
Only use chemical agents designed specifically for use in themachine and follow the manufacturer's instructions on theirapplication. Please observe carefully any instructions relating to non-toxicresidues.
Caution when using chemical agents. Some agents may becorrosive and irritant.The relevant safety regulations and the chemical agentmanufacturer's safety data sheets must be observed. Wear protective goggles and gloves.
Contact Miele for information about suitable chemical agents.
Highly viscous (thick) chemical agents can affect the dispensermonitoring and lead to inaccurate data. In this instance pleasecontact Miele Service for advice.
Dispensing systemsThe machine is equipped with a number of internal dispensingsystems for chemical agents:
– Neutralishing agent or rinsing agent This is dispensed via a storage reservoir in the door.
– Powder cleaning agent This is dispensed via a detergent dispenser in the door.
Labelling thesiphons
Liquid chemical agents from external containers are dispensed bysiphons. Colour coding the siphons can be helpful for correctdispensing.
Miele use and recommend the following:
– Blue: for cleaning agent
– Red: for neutralising agent
– Green: for chemical disinfection agents oran additional second cleaning agent
– White: for acidic chemical agent
– Yellow: for free choice
Adding and dispensing chemical agents
47
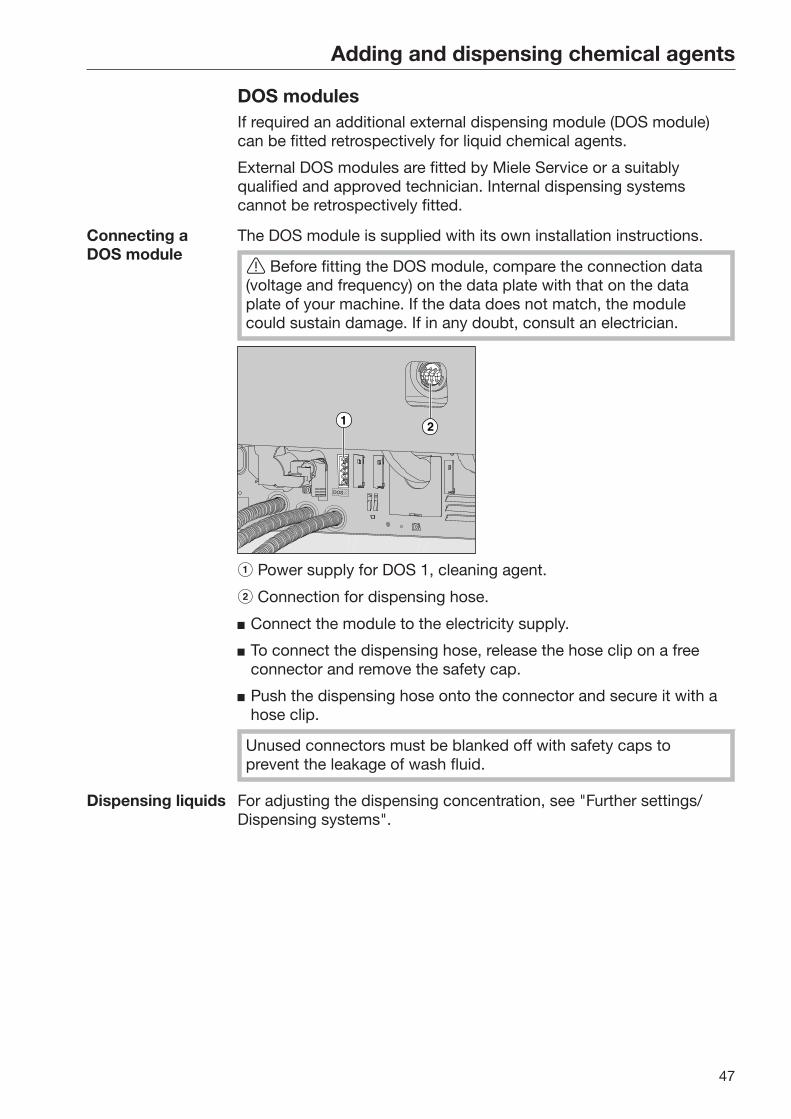
DOS modulesIf required an additional external dispensing module (DOS module)can be fitted retrospectively for liquid chemical agents.
External DOS modules are fitted by Miele Service or a suitablyqualified and approved technician. Internal dispensing systemscannot be retrospectively fitted.
Connecting aDOS module
The DOS module is supplied with its own installation instructions.
Before fitting the DOS module, compare the connection data(voltage and frequency) on the data plate with that on the dataplate of your machine. If the data does not match, the modulecould sustain damage. If in any doubt, consult an electrician.
Power supply for DOS 1, cleaning agent.
Connection for dispensing hose.
Connect the module to the electricity supply.
To connect the dispensing hose, release the hose clip on a freeconnector and remove the safety cap.
Push the dispensing hose onto the connector and secure it with ahose clip.
Unused connectors must be blanked off with safety caps toprevent the leakage of wash fluid.
Dispensing liquids For adjusting the dispensing concentration, see "Further settings/Dispensing systems".
Adding and dispensing chemical agents
48
Dispensing neutralising agent or rinsing agentThe reservoir with the symbol on the lid can either be used fordispensing neutralising agent or for rinsing agent.
It is programmed ex-works for neutralising agent.
The machine's controls have to be reprogrammed by Miele Serviceif you wish to change product, e.g. from neutralising agent torinsing agent.
Neutralising agent Neutralising agent (pH setting: acidic) neutralises any residues ofalkaline cleaning agents on the surface of the load.
Neutralising agent is dispensed automatically in the Interim rinsephase after the main wash (see the "Programme charts"). Thereservoir must be filled for this to occur.
Rinsing agent The dispensing of rinsing agent is deactivated ex-works.Please contact Miele Service if you wish to activate it.If rinsing agent has been activated, neutralising agent will not bedispensed in the Interim rinse phase of the programme.
Rinsing agent is necessary to ensure water does not cling and leavemarks on items, and to help items dry faster after they have beenwashed.
Residues of rinsing agent remain on the surface of items afterthey have dried.It is important to check the suitability of the rinsing agent beingused.
Rinsing agent is automatically dispensed in the Final rinse phase. Thereservoir must be filled for this to occur.
Adding and dispensing chemical agents
49
Filling thereservoir
The reservoir must only be filled with the programmed chemicalagent - neutralising agent or rinsing agent.Do not fill it with cleaning agent. This will damage the reservoir.
Open the door fully.
Unscrew the yellow lid with the symbol in the direction of thearrow.
The reservoir holds approx. 300 ml.
Add the liquid agent only until it is visible at the "max" mark in thefunnel.
Close the reservoir.
Adding and dispensing chemical agents
50
Thoroughly wipe up any spilled chemical agents. Then start theRinsing programme to prevent over-foaming occurring during thenext programme.
Refill indicator When the fill level is low in the (DOS 2) supply container forneutralising or rinsing agent you are reminded to refill it.
Refill surfactant
This message also appears when dispensing neutralising agent.When refilling the reservoir make sure you are using the correctchemical agent.
Confirm the message shown with OK and
refill the chemical agent as described above.
Dispensing For adjusting the dispensing concentration, see "Further settings/Additional functions/Dispensing systems".
If spots appear on items after processing:
reduce the amount if using neutralising agent.
increase the amount if using rinsing agent.
If clouding or smearing appears on items after processing:
increase the amount if using neutralising agent.
reduce the amount if using rinsing agent.
Adding and dispensing chemical agents
51
Cleaning agent
Only use cleaning agent which is suitable for commercialdishwashers. Do not use detergent for domestic dishwashers.
This machine can be used with powder cleaning agent or with liquidcleaning agent via an external DOS module.
DOS modules are fitted by Miele Service and can be retrospectivelyfitted at any time.
Miele recommend the use of liquid cleaning agent.
For environmental reasons it is important to always consider thefollowing factors when selecting a cleaning agent:
– How alkaline does the cleaning agent need to be for the cleaningapplication involved?
– Are protein-removing enzymes required and is the programmesequence suitable for this?
– Are tensides required for proper dispersal and emulsification?
– Is a cleaning agent containing active chlorine required or can acleaning agent without active chlorine be used?
Chlorous cleaning agents can damage plastics and elastomersin the machine.
For cleaning specific types of soiling, and for information on theoptimum cleaning agents and additives to use for liquid dispensing,please contact Miele Service.
Refilling liquidcleaning agent
Liquid cleaning agent is dispensed from an external supply containere.g. a canister.
Place the liquid cleaning agent container (blue marking) on the opencabinet door or on a surface which is robust and easy to clean.
Unscrew and remove the siphon. Place the siphon on the opencabinet door.
Replace the empty container with a full one.
Adding and dispensing chemical agents
52
Push the siphon into the opening of the container and screw it backon tightly. Observe the colour coding.
Wipe up any spilled chemical agent thoroughly.
Place the container on the floor next to the machine or in anadjacent cupboard. The container must not be placed on top of orabove the machine. Make sure that the dispensing hose is notkinked or trapped.
The dispensing system must then be vented (see "Settings /DOSventing").
Checkingconsumption
Check consumption regularly by checking the fill levels in the supplycontainers and replace containers in good time to avoid thedispensing system being sucked completely dry.
Refill indicator When the fill level is low in the DOS 1 supply container for liquidcleaning agent you are reminded to replenish it.
DOS Refill
Confirm the message shown with OK and
replenish the liquid cleaning agent as described.
If the liquid cleaning agent has run out, the machine will be lockedfor further use.It will be ready for use again when the supply container has beenreplaced.
Dispensing liquidcleaning agent
For adjusting the dispensing concentration, see "Further settings/Additional functions/Dispensing systems".
Adding and dispensing chemical agents
53
Dispensingpowder cleaningagent
Avoid inhaling powder cleaning agent.Swallowing chemical agents can cause chemical burns in themouth and throat or lead to asphyxiation.
Add powder cleaning agent to the dispenser in the door with the symbol before starting the programme. Do not dispense powdercleaning agent in the Rinsing and Drain programmes.
Press the yellow button on the dispenser with the symbol.
The flap will spring open. The flap is always open at the end of aprogramme.
The level markers in the powder dispenser with the door in thehorizontal position equate to the amount dispensed in ml. The max.capacity is approx. 60 ml of cleaning agent.The amount in ml equates to approx. the amount normallyrecommended in grams (g) for proprietary powder cleaning agents.Powder density can affect this amount.
Dispensing example:Approx. 10.5 l of water are taken into the machine for the mainwash. With a cleaning agent concentration of approx. 3 g/l you willneed approx. 30 g of cleaning agent. Please observe manufacturer'srecommendations, which may vary!
Adding and dispensing chemical agents
54
Add powder agent to the dispenser.
Close the flap.
Make sure that all of the cleaning agent has dissolved at theend of the programme.Repeat the programme if residual agent is present.Check whether any items of the load have obstructed the flushingout of the dispenser and rearrange the load if necessary.
Nozzle A 802 The nozzle A 802 flushes the powder detergent out of the dispenserduring the programme.
If an upper basket and a lower basket with two modules are beingused, nozzle A 802 for powder detergent must be fitted. Theoperating instructions for the modules describe how to do this.
Operation
55
Selecting a programme ...
... using theshort-cut buttons
Select a programme using short-cut buttons , or .
... from theprogramme list
Press the button and
use the and arrow buttons to highlight a programme andconfirm your selection with OK.
ShortTemperatureDuration Min20
60 °C
The LED in the button selected will light up and the relevantprogramme will appear in the display. The LED in the Start/Stopbutton also starts to flash.
Another programme can be selected at any time before a programmehas started. Once it has started, programme selection is locked.
Always select the programme depending on the type of load anddegree and type of soiling, or on infection prevention issues.The programmes and their areas of application are described in theProgramme chart at the end of these operating instructions.
Starting a programme Close the door.
Press the Start/Stop button. The LED in the button will light up constantly.
Starting aprogramme usingdelay start
The start of a programme can be delayed; for example, to benefitfrom economy rates of electricity or to clean the cabinet before it isused the next day. Starting from the programmed time, a delay starttime between 1 minute and 24 hours can be selected in one minuteincrements (see "Settings/Time of day").
Delay start must be switched on (see "Settings/Delay start").
If soiling is left to dry on the load for too long, the processing resultcan be adversely affected and there is also a risk of corrosion forstainless steel items.
Operation
56
Setting the starttime
Select a programme.
Press the OK button before starting the programme.
Start time
Use the arrow buttons (higher) and (lower) to set the hours andconfirm your selection with the OK button.
When the OK button is pressed, the display jumps automatically tothe next input position. You cannot go back to the previous entry. If amistake is made, the process must be cancelled using the buttonand repeated.
Set the minutes using the arrow buttons (higher) and (lower),and save your entry with OK.
The start time is now saved and can be changed as described at anytime up to activation of delay start.
Activating delaystart
Delay start is activated with the Start/Stop button.
ShortTemperatureSwitch on at 12:30
60 °C
The selected programme with the set start time set is then shown onthe display. If the automatic switch-off after function has beenactivated (see "Further settings/Switch off after"), the machine willswitch itself off after the set time until the programme start time set isreached.
Deactivating delaystart
Press the button or switch the machine off using the button.
Operation
57
Programme sequence indicatorAfter the programme has started, the programme sequence can befollowed on the three-line display.
ShortMain washTime left Min15
Top line – Programme name.
Middle line The following parameters can be checked using the and arrowbuttons:
– Current programme block, e.g. Main wash,
– Actual or required temperature(depending on the display set, see "Further settings/Display:Temperature"),
– Cycle number.
Bottom line – Time left (in hours; under an hour, in minutes).
At the end of the programmeThe following messages and parameters appear at the end of aprogramme:
Top line – Programme name.
Middle line – Temperature (required temperature of the final wash phase)
Bottom line – Programme finished.
The LED in the Start/Stop button goes out as well. In the factorydefault state, an acoustic tone also sounds for approx. 10 seconds(see "Settings/Volume").
Ending theprogramme
Open the door to end the programme. The machine must beswitched on when you do this.
Operation
58
Interrupting a programme
Be careful when opening the door.The load could be hot. Danger of scalding, burning, and chemicalburns.
A programme which is already running should only be interrupted ifstrictly necessary, e.g. if the load is moving about significantly.
Open the door.
The display shows the following message:
Programme interrupted:Door opened
Rearrange the items so that they are stable and close the door.
The programme continues from the point at which the interruptionoccurred.
Operation
59
Cancelling a programme
Be careful when opening the door.The load could be hot. Danger of scalding, burning, and chemicalburns.
Programmecancelled due to afault
The programme stops and an error message appears on the display.
Take appropriate steps to resolve the fault, depending on its cause(see "Problem solving guide").
Cancelling aprogrammemanually
A programme which is already running should only be cancelled ifstrictly necessary, e.g. if the load is moving about significantly.
Press and hold the Start/Stop button until the display changes tothe following view:
Cancel programmeNo
Yes
Use the and arrow buttons to select the Yes option.
Confirm the selection with OK; this will cancel the programme.
Selecting No will cause the programme to continue withoutinterruption. If no button is pressed for several seconds, or if theprocess if cancelled using the button, the display will revert to theprogramme sequence display.
Restarting theprogramme
Before starting the programme, check to see whether any morepowder cleaning agent is required.
Start the programme again or select a new programme.
Settings
60
The structure of the Settings menu is shown below. The menuincorporates all relevant functions to support daily routine tasks.
In the structure overview all options which can be permanentlyselected have boxes beside them. Factory settings are indicatedby a tick . You will find an explanation of how to change settingsafter the overview.
Settings
Delay start No Yes
DOS venting DOS_
Language deutsch english (GB) ...
Date Date format DD:MM:YY MM:DD:YY Set
Time of day Set Display On On for 60 seconds Do not display Clock display 12 h 24 h
Volume Keypad tone Buzzer tones Programme end Warning
Settings
61
Delay startThis setting must be activated for delay start to be available for use.
Open the systems menu by switching the machine off with the button and then with the held in switch it back on with the button.
Open the menu as follows:
Settings
Delay start
Delay start
Yes
No
– No
Delay start is deactivated.
– Yes
Delay start is activated and can be used for all programmes.
Select an option using the and arrow buttons.
Press OK to save the setting.
Settings
62
DOS ventingThe dispensing system for liquid chemical agents can only dispensereliably if the system has been purged of air.
The DOS system must only be vented:
– if the dispensing system is being used for the first time,
– if the liquid cleaning agent container has been replaced,
– if the dispensing system has been sucked completely dry.
Before venting, ensure that the liquid chemical agent container issufficiently full and the siphons are securely screwed to thecontainers. Only one DOS system can be vented at a time.
Open the systems menu by switching the machine off with the button and then with the held in switch it back on with the button.
Open the menu as follows:
Settings
DOS venting
DOS... (name of dispensing system)
DOS ventingDOS
Automatic venting will start when the dispensing system is selected.Once started, the automatic venting process can no longer becancelled.
Select a dispensing system using the and arrow buttons.
Press OK to start the venting process.
Automatic venting is successfully completed when the followingmessage appears in the display:
Dispensing system DOS
successfully vented
Settings
63
Language The language set will be used in the display.
Open the systems menu by switching the machine off with the button and then with the held in switch it back on with the button.
Open the menu as follows:
Settings
Language
The flag symbol after the Settings and Language menuoptions acts as a guide if a language which you do not understandhas already been set.
Language deutsch
english (GB)
(
A list will appear in the display with all the languages available. Thecurrently selected language has a tick beside it.
The factory default language is set as english (GB).
Use the and arrow buttons to select the language you want.
Press OK to save the setting.
The display will change immediately to the language selected.
Settings
64
DateThe date format and the current date have to be set.
Select the dateformat
The selected date format appears in the display and in the processdocumentation.
Open the systems menu by switching the machine off with the button and then with the held in switch it back on with the button.
Open the menu as follows:
Settings
Date
Date format
Date formatDD:MM:YY
MM:DD:YY
– DD = Day
– MM = Month
– YY = Year.
Use the and arrow buttons to select the date format you want.
Press OK to save the setting.
Settings
65
Set the date The current date will be set in the selected date format.
Open the systems menu by switching the machine off with the button and then with the held in switch it back on with the button.
Open the menu as follows:
Settings
Date
Set
Date
Use the arrow buttons (higher) and (lower) and confirm yourentry using the OK button.
When the OK button is pressed, the display jumps automatically tothe next input position. You cannot go back to the previous entry. If amistake is made, the process must be cancelled using the buttonand repeated.
Use the arrow buttons (higher) and (lower) to set the month/day and confirm your entry using the OK button.
Use the arrow buttons (higher) and (lower) to set the year andpress the OK button to save the date.
The date will be saved when the OK button is pressed for the lasttime.
Settings
66
Time of dayThe time of day is required for delay start and the display, forexample. The date format and the current time of day have to be set.
There is no automatic adjustment between summer and winter time(daylight savings).You need to make this adjustment yourself as necessary.
Selecting the timeof day format
To set the format for the time of day in the display:
Open the systems menu by switching the machine off with the button and then with the held in switch it back on with the button.
Open the menu as follows:
Settings
Time of day
Clock display
Clock display12 h
24 h
– 12 h
Time of day in 12 hour format (am/pm).
– 24 h
Time of day in 24 hour format.
Use the and arrow buttons to select the date format you want.
Press OK to save the setting.
Settings
67
Set the time ofday
To set the format for the time of day:
Open the systems menu by switching the machine off with the button and then with the held in switch it back on with the button.
Open the menu as follows:
Settings
Time of day
Set
Time of day
Use the arrow buttons (higher) (lower) to set the hours andconfirm your entry with the OK button.
When the OK button is pressed, the display jumps automatically tothe next input position. You cannot go back to the previous entry. If amistake is made, the process must be cancelled using the buttonand repeated.
Use the arrow buttons (higher) and (lower) to set the minutesand press the OK button to save the time of day.
The time of day will be saved when the OK button is pressed for thelast time.
Settings
68
Display If necessary, the machine may be activated for use during breaks inoperation.
– An option to display the time of day must be selected for thispurpose.
– Additionally, automatic switch-off must be activated and a standbyduration set in Further settings/Switch off after.
Once the set standby time elapses, the machine is activated for use.When it is ready for use, the machine remains switched on and thetime is shown on the display. Pressing any button reactivates themachine.
Open the systems menu by switching the machine off with the button and then with the held in switch it back on with the button.
Open the menu as follows:
Settings
Time of day
Display
DisplayDo not display
On
– On
Once the set standby time elapses, the machine is permanentlyactivated for use and the time appears on the display.
– On for 60 seconds
Once the standby time elapses, the machine is activated for use for60 seconds. After 60 seconds, the machine switches itself off. Thetime appears on the display throughout the time during which themachine is activated for use.
– Do not display
Once the set standby time elapses, the machine switches off. Notime appears on the display.
Select an option using the and arrow buttons.
Press OK to save the setting.
Settings
69
VolumeA buzzer which is integrated into the control panel can give anacoustic signal in the following situations:
– When buttons are pressed (keypad tone)
– At the end of the programme
– System messages (information)
Open the systems menu by switching the machine off with the button and then with the held in switch it back on with the button.
Open the menu as follows:
Settings
Volume
Buzzer tones
Buzzer tones
Keypad tone
– Buzzer tones
Setting the buzzer volume for programme end and systemmessages (information)
– Keypad tone
Setting the buzzer volume for keypad tone.
Select an option using the and arrow buttons.
Confirm your selection with OK.
When Keypad tone has been selected you can adjust the volumeimmediately. When Buzzer tones has been selected you must firstselect which tone, Warning or Programme end, you would like toadjust the volume for.
Programme end
LouderQuieter
Keypad tone
Quieter Louder
The volume level is represented by a bar chart. On the lowest settingthe buzzer tone is switched off.
Use the arrow buttons (Louder) and (Quieter) to set the volume.
Press OK to save the setting.
Further settings
70
The Further settings menu incorporates all administrative processesand settings.
The Further settings menu can only be accessed by using a code.If you do not have the code, contact a user with appropriateaccess rights or cancel the process using the button.
In the structure overview all options which can be permanentlyselected have boxes beside them. Factory settings are indicatedby a tick . You will find an explanation of how to change settingsafter the overview.
Further settings
Code Release Further settings Block Yes Change code
Log book Consumption: Water Consumption: Detergent Consumption: Surfactant Operating hours Wash cycles Service interval
Temperature unit °C °F
Move programme Short Medium Long
Additional functions Reset Increased water level Interim rinse Dispensing system Active Inactive DOS venting Concentration Change name Temperature / time ...
Further settings
71
Release programme All Selection ...
Water hardness 19
Display view Actual temperature Required temperature
Display Contrast Brightness
Switch off after Yes No
Factory default Reset Programme settings only All settings No
Software version EB ID XXXXX EGL ID XXXXX EZL ID XXXXX EFU ID XXXXX LNG ID XXXXX
Further settings
72
CodeThe Further settings menu incorporates relevant functions and systemsettings which require an enhanced knowledge of machinereprocessing. Access to the menu can therefore be protected by afour digit code. It is not possible to block individual options or the inputting ofmultiple codes at the same time.
If a code is lost, a new code must be issued by Miele Service.
Enter code If access to the Further settings menu is blocked, you will beprompted to enter the code when it is selected.
PIN code
If you do not have the code, contact a user with appropriateaccess rights or cancel the process using the button.
Use the arrow buttons (higher) and (lower) to enter the relevantdigits.
Confirm each digit individually with the OK button.
When the OK button is pressed, the display jumps automatically tothe next input position. You cannot go back to the previous entry. If amistake is made, the process must be cancelled using the buttonand repeated. Entered digits are replaced by a * symbol.
If all digits are entered correctly the menu will be released.
If an incorrect entry is made, an error message will appear.
Wrong code entered
Confirm the message with OK.
Access remains blocked and the display reverts to the menuselection.
Further settings
73
Release The following function can be used to restrict access to the Furthersettings menu via a code or to take the restriction off.
Open the Further settings menu by switching the machine off withthe button and then switch it on again with the button whilstkeeping the button held in.
Open the menu as follows:
Further settings
Code
Release
Further settings
Further settings
Yes
Block
– Block
The menu is only accessible by using a code.
– Yes
The menu is available to all users.
Select an option using the and arrow buttons.
Press OK to save the setting.
Further settings
74
Change code The code consists of a four digit number and is set by the user. Eachdigit can be programmed freely between 0 and 9.
When a new code is entered the old code is overwritten and ispermanently deleted. Therefore it cannot be reinstated.If a code is lost, a new code must be issued by Miele Service.
Open the Further settings menu by switching the machine off withthe button and then switch it on again with the button whilstkeeping the button held in.
Open the menu as follows:
Further settings
Code
Change code
PIN code
Use the arrow buttons (higher) and (lower) to enter the relevantdigits.
Confirm each digit individually with the OK button.
When the OK button is pressed, the display jumps automatically tothe next input position. You cannot go back to the previous entry. If amistake is made, the process must be cancelled using the buttonand repeated. Entered digits are replaced by a * symbol.
The code is saved to memory once you have confirmed the last digit.
Further settings
75
Log bookThe entire life cycle of the machine, including consumption data forwater and chemical agents, as well as operating hours andprogramme cycles are recorded in the log book.
Miele Service can also use the log to calculate a recommendation forservice intervals.
Open the Further settings menu by switching the machine off withthe button and then switch it on again with the button whilstkeeping the button held in.
Open the menu as follows:
Further settings
Log book
Log bookConsumption: Water
Consumption: Detergent
– Consumption: Water
Display the total amount of water used in litres (l).
– Consumption: Detergent
Display the total amount of liquid cleaning agent used in litres (l).Powder cleaning agent is not shown.
– Consumption: Surfactant
Display total consumption of neutralising agent or rinsing agent inlitres (l).
– Operating hours
Display the total number of operating hours.
– Programme cycle counter
Total of all completed programmes. There is no breakdown ofindividual programmes. Cancelled programmes are not included.
– Service interval
Date of the next service (entered by Miele Service).
Select an option using the and arrow buttons and save yourchoice with OK.
Values in the machine log cannot be altered.
Press the button to exit the menu.
Further settings
76
Temperature unitDuring a programme the temperature display is refreshed every 2 to 5seconds depending on the programme stage. The temperature canbe displayed in degrees Celsius (°C) or Fahrenheit (°F).
The temperature unit is set at the factory to °C.
When the temperature unit is changed to °F, the temperaturedisplayed is automatically recalculated.
Open the Further settings menu by switching the machine off withthe button and then switch it on again with the button whilstkeeping the button held in.
Open the menu as follows:
Further settings
Temperature unit
Temperature unit
°C
°F
– °C
Display temperature in degrees Celsius.
– °F
Display temperature in degrees Fahrenheit.
Select an option using the and arrow buttons.
Press OK to save the setting.
Further settings
77
Moving a programme: allocating programme selectionbuttonsYou can sort the programme selection list to suit your requirementsand therefore also allocate the programme selection buttons , and .
Open the Further settings menu by switching the machine off withthe button and then switch it on again with the button whilstkeeping the button held in.
Open the menu as follows:
Further settings
Move programme
Move programme
Medium
Short
2.
1.
All released programmes are shown in the programme list (see"Further settings/Programme release"). A programme's position in theprogramme list is decisive for allocating the programme selectionbuttons. Programmes are numbered from 1 - n. The first threeprogrammes in the list are allocated to the programme selectionbuttons; for example:
– 1. Short on programme selection button – 2. Medium on programme selection button – 3. Long on programme selection button – 4. Demineralised rinse
– 5. Rinsing
– etc.
Use the and arrow buttons to select the programme you wouldlike to move.
Confirm your selection with OK.
Now you can move this programme within the list.
Use the and arrow buttons to move the programme to theposition you want.
Press OK to save the programme to the selected position.
The programme which was previously saved to this position and allsubsequent programmes are moved down by one position.
The process can be repeated as often as you wish.
Press the button to exit the menu.
Further settings
78
Additional functionsYou can use this menu to customise the current programme to suittechnical requirements and the wash load or to reset all additionalfunctions to the factory default settings.
Additional specialist knowledge is required to alter programmesettings and this should therefore be undertaken only by experiencedusers or by Miele Service.
Changing programme parameters on a validated machine willnecessitate a renewed performance validation.
Open the Further settings menu by switching the machine off withthe button and then switch it on again with the button whilstkeeping the button held in.
Open the menu as follows:
Further settings
Additional functions
Additional functionsReset
Increased water level
– Reset
All parameters that have been set under "Additional functions" willbe reset to the factory setting.
– Increased water level
The water level will be increased for all programmes.
– Interim rinse
All programmes that this option is intended for will have an extrainterim rinse stage (see the programme chart).
– Dispensing system
Vent the dispensing system and rename it.
– Temperature / time
Adjust the temperature and holding time for the Main wash or Finalrinse programme block.
Use the and arrow buttons to select an option and confirmyour selection with OK.
See the next section for details of how to continue.
Further settings
79
Reset You can reset altered additional function parameters back to theirdefault settings if necessary. This does not apply to further settings.
...
Reset
ResetNo
Yes
– No
Altered parameters are maintained.
– Yes
All parameters will be reset to the factory default setting.
Select an option using the and arrow buttons.
Press OK to save the setting.
Further settings
80
Increased waterlevel
Increasing the water level is advisable if a large amount of waterclings to items due to the structure of the wash load or if a heavybuild-up of foam might occur due to the type of soiling (e.g. blood)and the chemical agents used. The additional amount of waterrequired depends on the type of basket or mobile unit used, the typeof soiling and the load.
... Change volume of water
Increased water level
0,0 l
(0,0 - 1,5 l )
The water quantity can be increased in 0.5 l increments. The possiblerange is shown in the bottom line.
Use the arrow buttons (higher) and (lower) to alter the waterquantity.
Press OK to save the setting.
Interim rinse Some programmes can have the option of adding an extra interimrinse (see "Programme chart").
...
Interim rinse
Interim rinseNo
Yes
– No
The additonal interim rinse block is deactivated.
– Yes
The additional interim rinse block is activated for all applicableprogrammes.
Select an option using the and arrow buttons.
Press OK to save the setting.
Further settings
81
Dispensingsystems
Individual dispensing systems can be activated or deactivated for allprogrammes as follows.
...
Dispensing system
DOS... (name of dispensing system)
DOS
Inactive
Active
– Active
The selected dispensing system is activated. Dispensing will onlyoccur in the appropriate wash blocks (see Programme charts).
– Inactive
The selected dispensing system is deactivated for all programmes.
Select an option using the and arrow buttons.
Press OK to save the setting.
If the dispensing systems have been activated (Active) the followingoptions are also available:
– DOS venting
Vent the dispensing system.
– Concentration
Set the dosage concentration level. The setting applies to allprogrammes.
– Change name
Change the name of the dispensing system.
With DOS 2 Surfactant the only option shown is Concentration.
Further settings
82
DOS venting The dispensing system for liquid chemical agents can only dispensereliably if the system has been purged of air.
The DOS system must only be vented:
– if the dispensing system is being used for the first time,
– if the liquid cleaning agent container has been replaced,
– if the dispensing system has been sucked completely dry.
Before venting, ensure that the liquid chemical agent container issufficiently full and the siphons are securely screwed to thecontainers. Only one DOS system can be vented at a time.
...
Dispensing system
DOS_
DOS venting
DOS ventingDOS
Automatic venting will start when the dispensing system is selected.Once started, the automatic venting process can no longer becancelled.
Select a dispensing system using the and arrow buttons.
Press OK to start the venting process.
Automatic venting is successfully completed when the followingmessage appears in the display:
Dispensing system DOS
successfully vented
Further settings
83
Concentration Dispensing concentration for liquid chemical agents, e.g. in the caseof a change of manufacturer, can be adjusted for all programmes atonce.
Dispensing concentration must be set in accordance with themanufacturer's instructions or with the required processing result.
Consumption of liquid agents is recorded in the log book (see"Further settings/Log book").
...
Dispensing system
DOS_
Concentration
Concentration
(0,05 - 2,00 %)
0,30 %
Dispensing concentration can be adjusted in increments of 0.01. Thepossible range is shown in the bottom line of the display.
Set the concentration using the arrow buttons (higher) and (lower).
Press OK to save the setting.
Further settings
84
Changing thename
If required, the names of the dispensing systems – "DOS1", etc. – canbe extended to include additional information, e.g. "DOS1 cleaningagent". The name "DOS" and the accompanying number cannot bechanged.
Use this option to document all changes to factory settings in caseof a subsequent Service call requirement.
If the option
– Change name
has been selected, the display changes to the following view:
Change name
The current name is shown on the second line of the display. This canbe changed using the options shown in the bottom line. The top lineshows which option has been selected from the bottom line.
Names may consist of up to 15 characters including spaces. Thefollowing options are available:
– Letters from A to Z,each new word will start with a capital letter.
– Numbers from 0 to 9.
– Space .
– Use the symbol to delete the last position.
– The name is saved when the OK symbol in the display is selected.The display will then revert to the initial menu.
– The symbol in the display or the button end the processwithout saving the name change. The display reverts to the initialmenu.
Use the arrow buttons (right) and (left) to move the cursor tothe option you require.
Confirm each entry with OK.
Further settings
85
Temperature /Time
You now have the option of adjusting the temperature and holdingtime in the main wash and final rinse stages of individualprogrammes.
...
Temperature / time
Temperature / time
Main wash
Reset
– Reset
The parameters in all programmes will be reset to their factorysettings.
– Main wash
Temperature and holding time is adjusted for this programme block.
– Final rinse
Temperature and holding time is adjusted for this programme block.
Select an option using the and arrow buttons and confirm yourselection with OK.
Select programme
Medium
Short
Then use the and arrow buttons to select the programme andconfirm your selection with OK.
If you select Reset, the programme selected will be reset to its factorysettings and the menu will be closed.
Further settings
86
If you select Main wash or Final rinse, the following settings can bealtered:
ResetTemperature
Holding time
– Temperature / Final rinse temp.
The temperature of the selected block can be altered.
– Holding time
The holding time of the selected block can be altered.
Select an option using the and arrow buttons and confirm yourselection with OK.
Holding timeTemperature50
(30 - 70
°C
°C) )Min(1 - 10
3 Min
Adjustment is in increments of 1. The possible range is shown in thebottom line.
Dispensing of chemical agents occurs at a default dispensingtemperature set at the factory. If chemical agents are to be dispensedin this wash block, the lowest temperature that can be set will be thedispensing temperature. It is not possible to set a lower value.
Use the arrow buttons (higher) and (lower) to set the value.
Press OK to save the setting.
Further settings
87
Release programmeIt is possible to block access to individual programmes. Blockedprogrammes are not available for selection, so for example it can beensured that only validated programmes are used.
Open the Further settings menu by switching the machine off withthe button and then switch it on again with the button whilstkeeping the button held in.
Open the menu as follows:
Further settings
Release programme
Release programme
Selection
All
– All
All programmes are released for use.
– Selection
A selection of programmes are available for use.
Select an option using the and arrow buttons and confirm yourselection with OK.
The Selection option displays a list of all programmes.
Release programme
Short
Accept
Programmes are selected by multiple choice. A box is shown next toall programmes in the list. If a programme is released, there is a tick in the box. An empty box indicates a blocked programme.
Programmes can be released or blocked using the arrow buttons and and by confirming with OK.
To save the selection select the Accept option at the end of the listand confirm with OK.
Water hardnessYou can use this menu to set the water softener to the waterhardness of the mains supply.
For more information see "Water softener".
Further settings
88
Display: TemperatureThe wash cabinet temperature can be viewed during a programme. Either the current actual temperature or the required temperaturewhich has been preset for the current wash block is displayed.
Open the Further settings menu by switching the machine off withthe button and then switch it on again with the button whilstkeeping the button held in.
Open the menu as follows:
Further settings
Display view
Display viewActual temperature
Required temperature
– Actual temperature
Display the current actual temperature in the wash cabinet.
– Required temperature
Display the required temperature which has been preset for thecurrent wash block. If a temperature has not been set, a dotted line--- is shown.
During a programme both settings are displayed together asTemperature. There is no breakdown of actual and requiredtemperature.
Select an option using the and arrow buttons.
Press OK to save the setting.
Further settings
89
Display brightness and contrastYou can use this menu to adjust the brightness and contrast of thedisplay.
Open the Further settings menu by switching the machine off withthe button and then switch it on again with the button whilstkeeping the button held in.
Open the menu as follows:
Further settings
Display
Display
Brightness
Contrast
– Contrast
Set the contrast.
– Brightness
Set the brightness.
Select an option using the and arrow buttons.
Confirm your selection with OK.
Brightness
BrighterDarker
Contrast
Lower Higher
Contrast and brightness are shown as a bar chart in the display.
Use the arrow buttons (Higher/Brighter) and (Lower/Darker) toset the brightness and contrast you want.
Press OK to save the setting.
Further settings
90
Switch off after (Auto-Off function)If the machine has not been used for a specific duration, it switchesitself off automatically to save energy.
The automatic switch-off function can also be used to activate themachine for use. When it is ready for use, the machine remainsswitched on and the time is shown on the display. Pressing anybutton reactivates the machine.
The automatic switch-off function can be switched on and off asrequired.
Open the Further settings menu by switching the machine off withthe button and then switch it on again with the button whilstkeeping the button held in.
Open the menu as follows:
Further settings
Switch off after
Switch off afterYes
No
– Yes
The Auto-Off function is activated. A duration must be set afterwhich automatic switch-off should occur.
– No
The Auto-Off function is deactivated.
Select an option using the and arrow buttons.
Press OK to save the setting.
Further settings
91
Setting thestandby duration
If the Yes option is displayed, the standby duration after whichautomatic switch-off should occur must be set next.
Switch off after
)Min(5 - 60
60 Min
The standby duration can be adjusted in 5 minute increments. Thepossible range is shown in the bottom line of the display.
Use the (higher) and (lower) arrow buttons to set the standbyduration.
Press OK to save the setting.
Activatingreadiness for use
To activate readiness for use, automatic switch-off must beactivated and a standby duration set in Further settings/Switch offafter.
An option to display the time of day must be selected in Settings /Time of day/Display.
Once the set standby time elapses, the machine is activated for use.When it is ready for use, the machine remains switched on and thetime is shown on the display. Pressing any button reactivates themachine.
Further settings
92
Factory defaultAll parameters which have been altered can be reset to their defaultsettings. Control parameters and programme settings are resetseparately.
Open the Further settings menu by switching the machine off withthe button and then switch it on again with the button whilstkeeping the button held in.
Open the menu as follows:
Further settings
Factory default
Reset
ResetNo
Programme settings only
– No
Altered parameters are maintained.
– Programme settings only
All programme settings are reset.
Programmes saved on free memory locations remain unchanged.
– All settings
All control parameters including dispensing quantities and waterhardness will be reset.
Select an option using the and arrow buttons.
Confirm your selection with OK.
The machine is restarted.
All settings When All settings is selected and the machine is restarted, you will beprompted to re-enter basic parameters such as the language, date,time, water hardness, etc.
Enter the language, date, time etc.
When the last entry is made, all the parameters are saved and thefactory default settings have been reset. The display changes andshows the last selected programme.
Further settings
93
Software versionYou can use this menu to call up the software versions of individualelements, e.g. when contacting Miele Service.
For more information see "Service".
Maintenance
94
Periodic checksThe machine should be serviced every 1000 hours of operation, orat least once a year by Miele Service.
This maintenance will cover the following:
– Electrical safety according to national regulations (VDE 0701/0702in Germany)
– Door mechanism and door seal
– Any screw connections and connectors in the wash cabinet
– Water inlet and drainage
– Internal and external dispensing systems
– Spray arms
– Filter combination
– Sump including drain pump and non-return valve
– All mobile units, baskets, modules and inserts
The following operational tests will be carried out within theframework of the maintenance:
– A programme will be run as a test run
– Thermo electrical measurements will be taken
– Seals will be tested for water tightness
– All relevant measuring systems will be safety tested including errormessage displays
– Safety features
Maintenance
95
Routine checksBefore the start of each working day the user must carry out anumber of routine checks. A check list is supplied with the machinefor this purpose.
The following need to be inspected:
– All filters in the wash cabinet
– The spray arms in the machine and in any mobile units or baskets
– The wash cabinet and the door seal
– The dispensing systems and
– Mobile units, baskets, modules and inserts.
Cleaning the filters in the wash cabinetThe filters in the floor of the wash cabinet prevent coarse soiling fromcoming into contact with the circulation system. Filters can becomeblocked by soiling, so they need to be checked every day andcleaned as necessary.
This machine must not be used without all the filters in place.
Danger of injury from glass shards, needles, etc. retained in thefilters.
Turn the microfine filter in the direction of the arrow and remove ittogether with the coarse filter.
Maintenance
96
Press the catches towards each other and pull the coarse filterupwards to remove it.
Remove the fine filter which sits loosely between between thecoarse filter and the microfine filter.
Remove the flat filter last.
Clean the filters.
Re-insert the filter combination in the reverse order. Ensure ...
– ... that the flat filter sits flat in the base of the wash cabinet.
– ... that the coarse filter has securely clicked into place in themicrofine filter.
– ... that the microfine filter is tightly screwed in as far as it will go.
Maintenance
97
Cleaning the spray armsThe spray arms can become blocked, especially if the filters are notinserted correctly in the wash cabinet. This can cause coarseparticles of soiling to get into the wash fluid circulation.
The spray arms must be visually checked daily for any soiling.
To do this remove the mobile unit and the baskets.
Visually check the spray arms for soiling and blocked jets.
Also check that the spray arms can turn easily.
Immobile or blocked spray arms must not be used again.In this case contact Miele Service.
Cleaning thespray arms
The spray arms in the machine as well as in the mobile units andbaskets must be fully dismantled for cleaning:
Remove the mobile unit or baskets from the machine.
The machine upper spray arm is connected by a push-fit connector.
Pull the machine upper spray arm downwards to remove it.
The machine lower spray arm and the spray arms in the mobile unitsand baskets are secured with bayonet fittings.
To release the knurled bayonet fittings, turn them in the direction ofthe arrow as far as they will go.
Then the spray arms can be removed by pulling them upwards ordownwards.
Mobile unit and basket spray arms with knurled nuts:The spray arms of older types of mobile units and baskets aresecured with knurled nuts. These must be unscrewed and thespray arms pulled downwards to remove them.Metal knurled nuts have a left-hand thread.Ceramic knurled nuts have a right-hand thread.
Maintenance
98
Use a pointed object to push food particles into the spray arm.
Rinse the spray arm thoroughly under running water.
Do not allow any magnetic objects or wash items stick to themagnets on the spray arms.Remove all metallic objects from the magnets.
Check the spray arm bearings for visible signs of wear.
Visible wear on the bearings can adversely affect the long-termfunctioning of the spray arms.In this case, contact Miele Service.
Replace the spray arms after cleaning.
Make sure the spray arms can rotate easily after they have beenfitted.
The spray arms and baskets each have a number e.g. 03, which isalso embossed on the water supply pipes near the bayonet fittings.When refitting, ensure that the numbers on the spray armscorrespond with the numbers on the water supply pipes.
Maintenance
99
Cleaning the machine
Never clean the machine or near vicinity with a water hose or apressure washer.
Do not use cleaning agents containing ammonia or thinners onstainless steel surfaces!These agents can damage the surface material.
Cleaning thecontrol panel
Do not use any abrasive materials or general-purpose cleaners toclean the control panel.These can cause considerable damage to the glass and plasticsurfaces and to the onset control buttons.
Clean the control panel with a damp cloth and a little washing-upliquid or with a non-abrasive stainless steel cleaner.
Proprietary glass or plastic cleaning agents can also be used toclean the display.
For surface disinfection use a listed agent recommended by themanufacturer.
Cleaning the doorand the door seal
Wipe the door seal regularly with a damp cloth to remove soiling.Have damaged or leaking door seals replaced by Miele Service.
Remove any soiling from the door sides and hinges.
Regularly clean the groove in the plinth panel under the door with adamp cloth.
Cleaning thewash cabinet
The wash cabinet is largely self-cleaning, however if deposits shouldstart to build up, contact Miele Service.
Cleaning the doorfront
To clean the stainless steel front, use a damp cloth with a solutionof washing-up liquid and hot water, or with a non-abrasive cleaningagent for use on stainless steel.
Preventingre-soiling
To help prevent re-soiling of stainless steel surfaces (fingerprints,etc.), a suitable stainless steel conditioner can be used aftercleaning.
Maintenance
100
Checking mobile units, baskets, modules and insertsMobile units, baskets, modules and inserts should be checked dailyto make sure they are functioning correctly. The machine is suppliedwith a check list.
Check the following points:
– Are the mobile unit or basket rollers in good condition, and are theysecurely attached to their mobile units or baskets?
– Are the water connectors present and undamaged?
– Are height-adjustable water connectors adjusted to the correctheight and securely fixed?
– Are all injector nozzles, irrigation sleeves and hose adaptorssecurely attached to mobile units, baskets or modules?
– Are all injector nozzles, sleeves, and hose adapters clear so thatwash fluid can flow through unhindered?
– Are all caps and fasteners securely attached to the irrigationsleeves?
– Are end caps present and securely located for all modules andinjector manifolds?
– Are the locking caps in the water connectors of mobile units andbaskets working properly?
and where applicable:
– Make sure that the spray arms rotate freely.
– Make sure the spray arm jets are free of any blockages. See"Cleaning the spray arms".
– Make sure that the magnets integrated into the spray arms have nometallic objects sticking to them.
– Check whether the tubular filters need to be cleaned or filter plates,e.g. in an E 478/1 need to be replaced.
The machine should be serviced every 1000 hours of operation, orat least once a year by Miele Service.
Problem solving guide
101
The following guide may help you to find the reason for a fault, and to correct it. Youshould, however, note the following:
Repairs may only be carried out by Miele Service.Repairs and other work by unqualified persons could be dangerous for the user.
To avoid unnecessary service call-outs, check that the fault has not been caused byincorrect operation when an error message first appears.
Technical faults and messages
Problem Cause and remedy
The display is dark and allLEDs are out.
The machine is not switched on. Switch the machine on using the button.A fuse is defective or has tripped Minimum fuse rating - see data plate. Reset the trip switch. If the mains fuse trips again, call Miele Service.The machine is not plugged in, or connected to the mains. Plug the machine in and connect it to the mains supply.
The machine has switcheditself off.
This is not a fault.The Auto-Off function switches the machine offautomatically after a pre-set duration to save energy. Switch the machine on using the button.
The time appears on thedisplay.
This is not a fault.The machine is ready for use. Press any button to reactivate the machine.
Programme finished hasappeared on the displayand you cannot select orstart a programme.
This is not a fault. Open and close the door.
The machine must be switched on when you do this.
Interruption to the powersupply during operation
If a temporary interruption to the power supply occursduring a programme sequence, no action is required.The programme will continue after the interruption.If the temperature in the wash cabinet drops below theminimum value required for the programme block duringthe interruption to the power supply, the programme blockwill be repeated.If there has been an interruption to the power supply of≥ 20 hours, the entire programme will be repeated.
Next service due on: This is not a fault.Miele Service has recommended a date for the next servicevisit. Please contact the Miele Service Department to arrange
a service visit.
Problem solving guide
102
Dispensing/Dispensing systems
Caution when handling chemical agents.For all chemical agents, the chemical agent manufacturer's safety instructions as givenon their safety data sheets must be observed.
Problem Cause and remedy
The dispenser for powdercleaning agent containsresidual agent at the endof the programme.
The dispenser was still damp when cleaning agent wasadded. Make sure the dispenser is dry before adding powder
cleaning agent.The dispenser flap was blocked by items in the cabinet. Rearrange the load so that the flap can open.
The dispenser flap will notclose.
Residual cleaning agent is blocking the catch. Remove the cleaning agent.
DOS Refill During a programme sequence a low level of liquidchemical agent in a container has been identified. Replace the empty container with a full one.
Programme could not bestarted. Vent DOS
A programme cannot be started because ... ... there is air in the dispensing system. ... the dispensing system has been sucked completely dry. Check the level in the supply container. Replace an
empty container with a full one, if necessary. Vent the dispensing system.
Dispensing system DOSventing
This is not a fault.The dispensing system will now be automatically vented.
Wait until the venting process is finished.
Venting DOS cancelled.Venting must be repeated
Venting of the dispensing system was cancelled becausean insufficient flow rate was identified. A dispensing hosemay be kinked or the siphon blocked. Check the dispensing hose for kinks and leaks. Position
it so that it cannot become kinked. Check the suction aperture of the siphon for blockages
and remove these as necessary. Start the venting process again.
Contact Miele Service if there are leaks in the dispensinghose or a fault with the siphon.
Problem solving guide
103
Problem Cause and remedy
Check container/lance DOS Little or no flow has been identified. Check the level in the supply container. Replace an
empty container with a full one, if necessary. Check the suction aperture of the siphon for deposits. Vent the dispensing system.The dispensing hose is blocked. Remove any kinks from the dispensing hose. Position it
so that it cannot become kinked. Check the dispensing hose for leaks. Vent the dispensing system.
Contact Miele Service if there are leaks in the dispensinghose or a fault with the siphon.
Highly viscous (thick) chemical agents can affect the dispenser monitoring and lead toinaccurate data. In this instance please contact Miele Service for advice.
Problem solving guide
104
Insufficient salt/Water softener
Problem Cause and remedy
Refill salt Salt is running low in the water softener. Refill the reactivation salt before starting the next
programme.
Machine locking outInsufficient salt
Salt in the water softener is completely depleted andreactivation is no longer possible. The machine is locked forfurther use. Refill the reactivation salt.
Salt container empty,Programme locked
The water softener cannot reactivate because there isinsufficient salt. The machine is locked for further use. Refill the reactivation salt.
The lock is lifted a couple of seconds after refilling the saltreservoir. Reactivation will occur automatically during thenext programme sequence.
Salt container lid not properlyclosed
The salt container is not closed properly. Close the container properly.Salt residues are preventing it from closing. Remove all residues from the funnel, the lid, and the
seal. Do not use running water as this can cause the saltcontainer to overflow.
Close the container properly.The salt container flap has sprung open during aprogramme.
When the door is opened, hot steam and chemicalagents can escape!
Open the door and close the container flap.
Problem solving guide
105
Cancel with fault code
If a programme is cancelled and a fault code appears, e.g. Fault XXX (where XXXrepresents a number), there could be a serious technical fault.
In the event of a programme being cancelled and a fault code being shown:
Switch the machine off using the button.
Wait approximately 10 seconds before switching the machine on again with the button.
Start the previously selected programme again.
If the same message appears again:
Make a note of the fault message.
Switch the machine off using the button.
Contact Miele Service.
Please also read the notes regarding the following fault codes.
Problem Cause and remedy
Fault 403-405 A programme has been cancelled because water intake bythe machine was insufficient or severely restricted. Open the stopcocks fully. Follow the additional information given in the Check
water inlet message.
Fault 406-408 A programme was cancelled because the water inletvolume is insufficient. Check whether the stopcocks are fully opened. Refer to the information regarding minimum flow
pressure in "Plumbing" and "Technical data". Check the filter in the water inlet. Contact Miele Service for advice.
Fault 412-414 A programme was cancelled because the water inletvolume is too high. Refer to the information regarding recommended
maximum flow pressure and maximum permissible staticwater pressure in "Plumbing" and "Technical data".
Contact Miele Service for advice.
Fault 440 The float switch in the base of the machine has not beenactivated. The switch might be blocked. Remove the filter combination. Check the float switch to make sure it moves freely. The
float switch is located in the base of the machine behindthe spray arm.
Problem solving guide
106
Problem Cause and remedy
Fault 492, 504 A programme has been cancelled because there is notenough spray pressure. The filters in the wash cabinet maybe blocked.
Danger of injury from glass shards, needles, etc.retained in the filters.
Check and clean the filters in the wash cabinet (see"Maintenance/Cleaning the filters in the wash cabinet").
Fault 550 The waterproof system has been activated. One of thewater intake hoses might have a leak. Close the stopcocks. Contact the Miele Service Department.
Fault 578 The peak-load cut-out has lasted longer than 3 hours. Have your electrical system and your energy
management system tested by a suitably qualifiedperson.
Problem solving guide
107
Process-related faults and messages
Problem Cause and remedy
Wrong code entered The code entered is not the same as the code saved. Enter the code again. Report the loss of the code to Miele Service.
Programme cancelled This is not a fault.A programme which was running was cancelled by theuser.
The wash cabinet interior can be very hot.When the door is opened, hot steam and chemicalagents can escape. Protective measures for personalsafety must be observed.
Programme continued This is not a fault.The process of cancelling a programme was notcompleted.
The programme which was running continued withoutinterruption.
Peak load cut-out This is not a fault. Individual components of the machine are paused whilethere is a peak load signal from your energy managementsystem.
All settings reset This is not a fault.A user has restored factory default settings. Confirm the message with OK.
All programme settings reset This is not a fault.A user has restored the factory setting for the programme. Confirm the message with OK.
Problem solving guide
108
Unsatisfactory cleaning and corrosion
Problem Cause and remedy
There are white depositson the wash load.
The water softener is set too low. Set the water softener to the correct water hardness.There is no salt in the salt reservoir. Refill the reactivation salt.The quality of the water for the final rinse was insufficient. Use water with a low conductance value. If the machine is connected to a water softening
cartridge, check it and replace as necessary.The water from the AD water connection is not sufficientlysoftened. Check the pre-selected water softening units. If
necessary, replace the water softening cartridge with anew one.
Problem solving guide
109
Problem Cause and remedy
The cleaning result isunsatisfactory.
Mobile units, baskets, modules and inserts were notsuitable for the load. Select mobile units, baskets, modules and inserts which
are suitable for the task.Mobile units, baskets, inserts and modules were incorrectlyloaded or overloaded. Arrange the wash load correctly according to the
information in the Operating instructions. Avoid overloading the mobile units, baskets, modules
and inserts.The programme was not suitable for the soiling. Select a suitable programme.
or Adjust the parameters to suit the task.A spray arm is blocked. Ensure the spray arms are not obstructed when
arranging the wash load.Injector nozzles in the mobile units, baskets, modules orspray arms are blocked. Check the nozzles and clean them as necessary.The filters in the wash cabinet are dirty. Check the filters and clean them if necessary.Mobile units, baskets or modules were not correctly fittedto the water connection. Check the adapter.
Items made of glass areshowing signs ofcorrosion.
The items are not suitable for machine processing. Only use items which are declared by their manufacturer
as suitable for machine reprocessing.Neutralisation has not taken place during the programme.- Dispensing using the reservoir in the door (DOS 2): Refill the reservoir with neutralising agent.- Dispensing from an external container: Check the level in the supply container and vent the
dispensing system if necessary.The wash temperature was too high. Select a different programme.
or Reduce the wash temperature.Cleaning agents used were too alkaline. Use a milder cleaning agent.
or Reduce the concentration of the cleaning agent.
The stainless steel is of insufficient quality for machineprocessing. Only use stainless steel items made of high-quality
stainless steel and follow the instructions of themanufacturer regarding machine processing.
The chloride content in the water is too high. Have a water analysis check carried out. Connection to
an external water processing unit and the use ofdemineralised water may be necessary.
Neutralisation has not taken place during the programme.- Dispensing using the reservoir in the door (DOS 2): Refill the reservoir with neutralising agent.- Dispensing from an external container: Check the level in the supply container and vent the
dispensing system if necessary.Rust or superficial rust has built up in the wash cabinet,e.g. due to an excessively high iron content in the water orrust on other load items. Check the installation. Discard any rusty items.
Problem solving guide
111
Water inlet and drainage
Problem Cause and remedy
Check water inlet One or more stopcocks are closed. Open the stopcocks.There was insufficient water in the machine. Clean the water intake filters. Open the stopcocks fully.Flow pressure at the plumbing connection is less than30 kPa (0.3 bar). Contact a suitably qualified plumber.
Check drainage A programme was cancelled because the water in the washcabinet is only being pumped away slowly or not at all.- The drain hose is blocked. Remove any kinks or large loops in the drain hose. Start the programme again.
- The filters in the wash cabinet are blocked. Clean the filters in the wash cabinet.
Danger of injury from glass shards, needles, etc.retained in the filters.
Start the programme again.
- The drain pump or the non-return valve is blocked. Clean the access to the drain pump and the non-return
valve. Start the programme again.
- The drainage system cannot take in enough waterbecause it is blocked. Contact a suitably qualified plumber.
Problem solving guide
112
Noises
Problem Cause and remedy
Knocking noise in thewash cabinet.
One or more spray arms are knocking against the washload. Cancel the programme. To do this follow the instructions
in "Cancelling a programme". Arrange the wash load so it cannot obstruct the spray
arms. Make sure the spray arms can rotate freely. Start the programme again.
Rattling noise in the washcabinet.
Items are insecure in the wash cabinet. Cancel the programme. To do this follow the instructions
in "Cancelling a programme". Rearrange the load so that items are secure. Start the programme again.
Knocking noise in thewater pipes.
This may be caused by the on-site installation or the cross-section of the piping. It has no influence on the function ofthe machine. Contact a suitably qualified plumber.
Problem solving guide
113
Cleaning the drain pump and non-return valveIf water has not pumped away at the end of a programme there maybe a foreign object in the drain pump or blocking the non-returnvalve.
Take the filter combination out of the wash cabinet (see"Maintenance/Cleaning the filters in the wash cabinet").
Lift the locking clamp.
Lift out the non-return valve and rinse well under running water.
Make sure that the vent on the external part of the non-return valveis not blocked. (This vent is only visible when the non-return valvehas been taken out.) If it is blocked, use a pointed object to releasethe blockage.
The drain pump impeller is situated under the non-return valve (seearrow).
Check the impeller for blockages and remove them if necessary.
Carefully replace the non-return valve and secure it with the clamp.
Problem solving guide
114
Clean the water intake filtersFilters are incorporated into the water inlet connection on the hose toprotect the water inlet valve. If these filters get dirty they must becleaned as otherwise too little water will flow into the wash cabinet.
The plastic housing on the water inlet valve contains anelectrical component. It must not be dipped in water.
Cleaning thefilters
Disconnect the machine from the mains (switch the machine off,unplug it or disconnect or disable the fuse).
Close the stopcock.
Unscrew the inlet hose.
Carefully pull the large surface area filter 1 out.
Carefully remove the seal from the threaded union.
Withdraw fine filter 2 using pointed pliers.
Clean the filters or replace them with new ones if necessary.
Replace the filters and seals, making sure they are sitting correctly.
Reconnect the hose to the stopcock, making sure the union goeson straight and not cross-threaded.
Turn on the stopcock gradually to test for leaks. If there is a leak,the inlet hose might not be on securely, or it may have beenscrewed on at an angle. Unscrew and reconnect the water inlethose correctly before tightening it.
IMPORTANTUK, Australia and New ZealandFor the UK, Australia and New Zealand a non-return check valve isrequired between the tap and filter.
After sales service
115
Contacting Miele Service
Repairs should only be carried out by a suitably qualified andtrained Miele technician in accordance with local and nationalsafety regulations. Unauthorised or incorrect repairs could causepersonal injury or damage the machine.
To avoid unnecessary service call-outs, check that the fault has notbeen caused by incorrect operation when an error message firstappears. Please refer to the information in "Problem solving guide".
If, having followed the advice in the operating instructions, you arestill unable to resolve a problem please call the Miele ServiceDepartment.
Contact details can be found at the end of this manual.
When contacting the Service Department, please quote the modeltype and number of your machine. These are shown on the dataplates one on the side of the door and another on the back of theappliance.
Please tell Miele Service the fault message or code shown in thedisplay.
After sales service
116
Software versionWhen contacting the Service department you may need the versionnumber of individual components of control software. These can becalled up as follows:
Open the Further settings menu by switching the machine off withthe button and then switch it on again with the button whilstkeeping the button held in.
Open the menu as follows:
Further settings
Software version
Software versionEB Id: XXXXX
EGL Id: XXXXX
The software units are listed on the display. XXXXX stands for therelevant version number:
– EB Id: XXXXX
Software version of the control and display units in the controlpanel.
– EGL Id: XXXXX
Software version of the control board.
– EZL Id: XXXXX
Software version of the relay board.
– EFU Id: XXXXX
Software version of the frequency converter.
– LNG Id: XXXXX
Language package version.
You cannot change any settings in this menu.
Software updates und -upgrades may only be undertaken by MieleService.
Exit the menu with the OK or buttons.
Installation
117
Installation and levelling
Please refer to the installation diagram provided.
In order to reduce the risk of water damage, the area around themachine should be limited to furniture and fittings that are designedfor use in commercial environments.
The machine must be stable and level.
Any unevenness in the floor level and height of the machine can becompensated for by adjusting the four feet. The feet can be screwedout to a maximum of 60 mm.
Do not lift the machine by protruding parts such as the controlpanel.They could be damaged or torn off.
The washer-disinfector is suitable for the following types ofinstallation:
– Freestanding.
– Slot-in:
The washer-disinfector can be installed beside other appliances orfurniture or in a suitable niche. The niche must be at least 600 mmwide and 600 mm deep.
– Built-under:
The washer-disinfector can be built under a continuous worktop orthe draining board of a sink. The space provided must be at least600 mm wide, 600 mm deep and 820 mm high.
Installation
118
Building under a continuous worktop
Removing thelid
To build the machine under a continuous worktop the lid must beremoved as follows:
Unscrew both securing screws from the lid at the back of themachine.
Open the door.
Unscrew the left and right fixing screws.
Lift the lid off.
Protective foil/Worktopprotector
The protective foil supplied protects the worktop from damagecaused by steam when the door is opened. It should be positionedunderneath the worktop above the machine door.
Securing to theworktop
To improve stability the machine must be secured to the worktopafter it has been aligned.
Open the door.
Screw the machine to the continuous worktop through the holes inthe front trim on the left and right.
Please contact Miele to secure it at the sides to adjacent cabinetry.
Venting thecirculation pump.
The gaps between a built-in machine and adjacent cabinetrymust not be filled with silicone sealant as this could compromisethe ventilation to the circulation pump.
Installation
119
Electromagnetic compatibilityThis machine has been tested for electromagnetic compatibility(EMC) in accordance with EN 61326-1 and is suitable for operation incommercial environments, such as laboratories and other similarenvironments which are connected to the mains power supply.
The machine's HF emissions are very low and are therefore unlikely tointerfere with other electronic appliances in the vicinity.
Flooring in the installation area must be wood, concrete or tiled.Synthetic flooring must be able withstand a relative humidity level of30 % to minimise the risk of electrostatic discharges.
The quality of the power supply should comply with that found in atypical commercial or hospital environment and should deviate fromthe nominal voltage by a maximum of +/- 10 %.
Electrical connection
120
All electrical work must be carried out by a suitably qualifiedand competent person in accordance with local and national safetyregulations.
– In the U.K. it must comply with BS 7671.
– We recommend connecting the machine to the power supply via asuitable IP 44 plug and socket which must be easily accessible forservicing and maintenance work after the machine has beeninstalled. An electrical safety test must be carried out afterinstallation and after any service work.
– For hard-wired machines, connection should be made via a suitablemains switch with all-pole isolation which when in the off positionensures a 3 mm gap between all open contacts.
– Equipotential bonding should be carried out if required.
– For technical data see data plate or wiring diagram supplied.
– For increased safety, it is recommended to protect the machinewith a suitable residual current device (RDC) with a trip current of30 mA.
– If replacing the mains cable, use only original Miele replacementparts or a suitable cable with core cable ends.
Further notes on electrical connection are given on the Installationdiagram supplied with the machine.
The machine must only be operated with the voltage, frequency andfusing shown on the data plate.
Depending on country this machine can be converted to a differenttype of power supply in accordance with the conversion diagramand wiring diagram supplied.
A data plate can be found on the inside of the door and another onthe back of the machine.
The wiring diagram is supplied with the machine.
Equipotential bonding connectionThere is a screw connection point marked at the back of themachine, to which additional equipotential bonding can be connectedif required.
Electrical connection
121
Peak load cut-outThe machine is suitable for use in an energy management system. Forthis purpose, it must be technically adapted and the controls reset byMiele Service.
Please contact Miele Service for further information.
Peak loadmanagement
In the event of a peak load cut-out, some machine components suchas the heater element will be switched off for a while. The machinewill remain on during this period and the current programme will notbe interrupted. If one of the components that is switched off isneeded during the current programme stage, the programme durationwill simply increase for the duration of the load cut-out.
The third line of the display will alert you to the peak load; forexample:
ShortTemperaturePeak load cut-out
70 °C
Plumbing
122
Connection to the water supply
Water from the wash cabinet must not be consumed.
– The machine must be connected to the water supply in strictaccordance with current local and national water authorityregulations.
– The water used must at least comply with European regulations fordrinking water quality. If the water supply has a high iron contentthere is a danger of corrosion occurring on items being cleaned inthe machine, as well as the machine itself. If the chloride content ofthe water exceeds 100 mg/l the risk of corrosion to items beingcleaned in the machine will be further increased.
– UK, Australia and New Zealand only: To comply with waterregulation requirements, this machine must be connected to thepotable water supply via the the non-return check valve suppliedwith the machine.
– This machine is supplied as standard for connection to cold water(blue coded hose) or hot water up to max. 65 °C (red coded hose).Connect the inlet hose to the cold or hot water stopcock asrequired.
– The Minimum flow pressure for a cold or hot water connection is40 kPa pressure, and for AD water connection is 30 kPa pressure.
– Recommended flow pressure for cold and hot water connectionsis ≥ 200 kPa pressure and for AD water connection ≥ 200 kPapressure, to avoid excessively long water intake times.
– The maximum permissible static water pressure is 1,000 kPapressure.
– If the water pressure does not fall into the stated range contactMiele Service for advice.
– More information on AD water connection can be found at the endof this section.
– A stopcock valve with a ¾" threaded union must be provided onsite. It should be easily accessible so that the water supply can beturned off when the machine is not in use.
– The inlet hose is approx. 1.7 m long terminating in a ¾" femalethread. On no account may the inlet filter be removed.
Plumbing
123
– Install the filter (supplied in accessory pack) between the stopcockvalve and the inlet hose. The filter for AD water is made ofchromium-nickel steel and can be recognised by its dull surface.
IMPORTANTUK, Australia and New ZealandFor the UK, Australia and New Zealand a non-return check valve isrequired between the tap and filter.
Do NOT shorten or otherwise damage the inlet hoses (seediagram).
See installation diagram supplied.
Plumbing
124
AD waterconnection for30-1,000 kPapressure -pressure-resistant(optional)
This machine can be optionally supplied for a pressurised systemoperating between 30-1,000 kPa. If the water pressure is below200 kPa the water intake duration will be automatically increased.
The pressure tested hose for AD water, coded green, has a ¾ inchthreaded union for connection to the onsite stopcock for AD water.
If the machine is not going to be connected to AD water, the ADwater connection has to be deactivated by a Miele Servicetechnician. The inlet hose remains in position at the back of themachine.
AD waterconnection for8.5-60 kPa -without pressure(optional)
The machine has to be converted for connection to 8.5-60 kPapressure unless ordered as such ex-works. Installation of the pumpmust only be carried out by Miele Service.
With a pressureless AD water connection, the drainage point mustbe at least as high as the top of the machine. See installationinstructions.
Demineralisedwater ring line
The machine can be connected to a ring line system fordemineralised water. For this purpose, it must be technically adaptedand the controls reset by Miele Service.
Please contact Miele Service for further information.
IMPORTANT UK, Australia and New Zealand.
This appliance must be installed according to AS/NZS 3500.1(Australia and New Zealand) or in accordance with WRASregulations (UK). This appliance has been supplied with a separatebackflow prevention device.
This machine must be connected to the potable water supply via thenon-return valve (check valve) supplied with the machine.
Before making plumbing connections, ensure the appliance isdisconnected from the mains power supply (switch off or unplug fromthe power supply).
Turn off the mains water tap.
Place the seals on both sides of the non-return valve.
Connect the female end of the non-return valve to the mains watertap (3/4" thread).
Connect the filter to the male end of the non-return valve (3/4"thread).
Connect the inlet hose to the filter.
Ensure that all connections are screwed into position correctly. Theconnection point is subject to mains water pressure.
Turn on the tap slowly and check for leaks.
Correct the position of the seal and union if necessary.
Plumbing
125
Connecting the drain hose
– A non-return valve is incorporated into the drain system in themachine to prevent drainage water flowing back into the machinevia the drain hose.
– The machine drainage hose should be connected to a separatedrain for the machine only. If no separate drain is available, werecommend connecting it to a dual-chamber siphon.
– The on-site connection point, measured from the lower edge ofthe machine, should be positioned at a height between 0.3 m and1.0 m. If it is lower than 0.3 m, the drain hose must be laid in a coilat a height of at least 0.3 m.
– The drainage system must be able to accommodate a minimumdrainage flow of 16 l/min.
– The drainage hose is approx. 1.4 m long and flexible with aninternal diameter of 22 mm. Hose clips for the connection aresupplied.
– The drain hose must not be shortened.
– The drain hose can be extended using a connection piece to attacha further length of hose. The drainage length must not be longerthan 4.0 m, and the delivery head must not exceed 4.0 m.
See installation diagram supplied.
Programme chart
126
Programme When to use
(Free memory) Programmable programme for special applications; programmingby arrangement with Miele Service.
(Free memory) Programmable programme for special applications; programmingby arrangement with Miele Service.
Short For removing contamination that is easily soluble in water. Notsuitable for denatured or acid-soluble residues such as proteins,metal salts and amines. For low levels of soiling and wash results.
Medium For removing contamination that is easily soluble in water. Notsuitable for denatured or acid-soluble residues such as proteins,metal salts and amines. For low levels of soiling and for normalwash results.
Long For removing organic residues (e.g. proteins, oils, and fats) andsome inorganic residues. For low to medium levels of soiling andnormal wash results.
Demineralised rinse Rinse with fully demineralised water (DI water).
Rinsing For flushing out saline solution (see "Water softener/Adding salt")and rinsing heavily soiled loads, e.g. for pre-rinsing soiling,residual disinfecting agent, or to prevent items drying out and toprevent incrustation before running a full load.
Drain For draining wash water, e.g. after a programme cancellation (see"Operation/Cancelling a programme").
Programme chart
127
Programme sequence
Pre-wash Main wash Interim rinse Final rinse
1 2 3 1 2 1 2 * 3 4 1 2
CW60°C
DOS 13 Min
CW
DOS 22 Min
AD70 °C
1 Min
CW65°C
DOS 13 Min
CW
DOS 22 Min
CW
1 Min
AD70 °C
1 Min
CW
1 Min
CW70°C
DOS 13 Min
CW
DOS 22 Min
CW
1 Min
AD70 °C
1 Min
AD
CW
CW = cold water AD = aqua destillata, fully demineralised water (DI), demineralised water
Min = Holding time in minutes
* = Optional programme block
DOS 1 = Cleaning agent DOS 2 = Neutralising agent or Rinsing agent agent (door dispenser)
Programme chart
128
Programme selection and suitable accessoriesP
rog
ram
me
Long
OK
OK
OK
OK
not p
erm
itted
Med
ium
OK
OK
OK
OK
not p
erm
itted
Sho
rt
OK
OK
OK
OK
not p
erm
itted
Am
oun
t o
fw
ater
+ 1.
5 l
Low
er b
aske
t
2 in
ject
or
mo
dul
es
X X X
Car
rier
for
vario
us in
sert
s
X X
Up
per
bas
ket
2 in
ject
or
mo
dul
es
X X
Car
rier
with
sp
ray
arm
for
vario
us in
sert
s
X X
Technical data
129
Height with machine lidHeight without machine lid
835 mm820 mm
Width 598 mm
DepthDepth with door open
598 mm1,200 mm
Wash cabinet dimensions: height width depth of upper basket/lower basket
520 mm530 mm474 mm/520 mm
Weight (net) 72 kg
Max. load capacity of open door 37 kg
Voltage, connected load, fuse rating See data plate
Mains cable Approx. 1.8 m
Water intake temperature: Cold water/hot water AD water
max. 65 °Cmax. 65 °C
Static water pressure Max. 1,000 kPa pressure
Minimum water intake flow pressure: Cold water/hot water AD water
40 kPa pressure30 kPa pressure
Recommended water intake flow pressure: Cold water/hot water AD water
≥ 200 kPa pressure≥ 200 kPa pressure
AD water connection without pressure (optional) 8.5-60 kPa
Delivery head min. 0.3 m, max. 1.0 m
Drainage length max. 4.0 m
Operation: Ambient temperature Relative humidity maximum linear decreasing to
5 °C to 40 °C80 % for temperatures up to 31 °C 50 % for temperatures up to 40 °C
Storage and transportation conditions: Ambient temperature Relative humidity Air pressure
- 20 °C to 60 °C10 % to 85 %500 hPa to 1060 hPa
Altitude above sea level to 1,500 m
Protection category (according to IEC 60529) IP21
Soiling level (according to IEC/EN 61010-1) 2
Overvoltage category (according to IEC 60664) II
Noise level in dB (A), sound pressure LpA during cleaning and drying phases
< 70
Test certificates awarded VDE, EMC radio suppressed
Disposal of the packing materialThe packaging is designed to protect the machine againsttransportation damage. The packaging materials used are selectedfrom materials which are environmentally friendly for disposal andshould be recycled.
Recycling the packaging reduces the use of raw materials in themanufacturing process and also reduces the amount of waste inlandfill sites.
Disposing of your old applianceElectrical and electronic appliances often contain valuable materials.They also contain specific materials, compounds and components,which were essential for their correct function and safety. Thesecould be hazardous to human health and to the environment ifdisposed of with your domestic waste or if handled incorrectly.Please do not, therefore, dispose of your old appliance with yourhousehold waste.
Please dispose of it at your local community waste collection /recycling centre for electrical and electronic appliances, or contactyour dealer or Miele for advice. You are also responsible (by law,depending on country) for deleting any personal data that may bestored on the appliance being disposed of. Please ensure that yourold appliance poses no risk to children while being stored prior todisposal.