42
pH 400, pH 600 pH Meter PRODUCT MANUAL Item # 2107, 2108
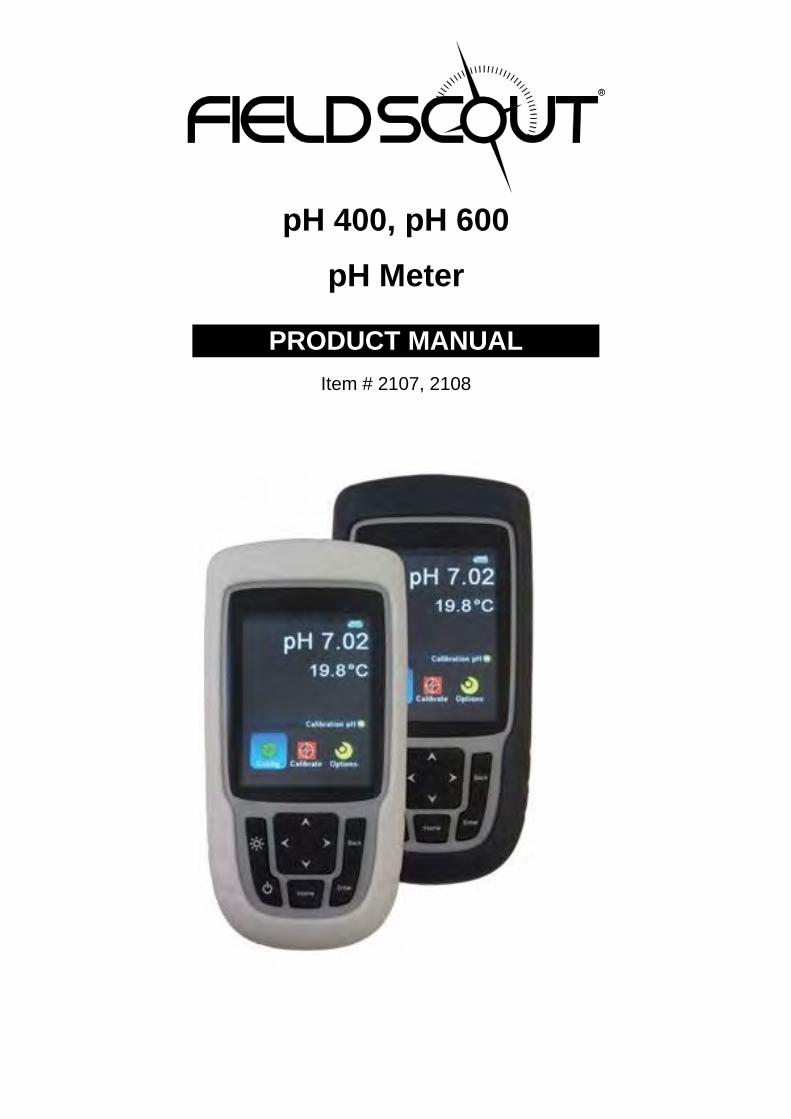
pH 400, pH 600
pH Meter
PRODUCT MANUAL
Item # 2107, 2108

2
This manual will familiarize you with the features and operation of your new FieldScout pH 400 and
pH 600 pH meters. Please read this manual thoroughly before using your instrument.
For customer support, or to place an order, call Spectrum Technologies, Inc.
(800)248-8873 or (815) 436-4440
between 7:30 am and 5:30 p.m. CST,
FAX (815)436-4460,
E-Mail: [email protected].
www.specmeters.com
Warning! The only user-replaceable parts in this meter are the batteries. These can be accessed by
opening the battery compartment. Do not open the meter casing. Opening the meter may
cause damage and will void the guarantee. Also, do not remove the SD memory card from
the meter unless instructed to do so by a Spectrum Technologies.
All information provided in this manual is applicable at the moment of publication. Spectrum holds the
right to change components, functions and procedures without notice.

3
Contents
1 General ............................................................................................................................................ 4
1.1 Declaration of compliance....................................................................................................... 4
1.2 Guarantee ................................................................................................................................ 4
1.3 Specifications ........................................................................................................................... 5
2 Installation ....................................................................................................................................... 6
2.1 Batteries .................................................................................................................................. 6
2.2 Connection of probe to meter ................................................................................................ 7
2.3 SD memory card ...................................................................................................................... 8
3 Operation ........................................................................................................................................ 8
3.1 Keypad ..................................................................................................................................... 8
3.2 Home screen ............................................................................................................................ 9
4 Configuration ................................................................................................................................. 12
4.1 Power save ............................................................................................................................ 12
4.2 Time ....................................................................................................................................... 14
4.3 Button sound ......................................................................................................................... 14
4.4 Temperature .......................................................................................................................... 15
4.5 Language ............................................................................................................................... 15
5 Calibration ..................................................................................................................................... 16
5.1 Determining the calibration type .......................................................................................... 17
5.2 Before calibration .................................................................................................................. 18
5.3 Performing a calibration ........................................................................................................ 19
5.4 Calibration reports ................................................................................................................ 20
5.5 Calibration reminder ............................................................................................................. 23
5.6 Buffer selection (pH 600 only) ............................................................................................... 24
6 Options .......................................................................................................................................... 27
6.1 Alarms (pH 600 only) ............................................................................................................. 27
6.2 Storing measurements .......................................................................................................... 30
6.3 Bias setting ............................................................................................................................ 38
7 Maintenance.................................................................................................................................. 39
8 Troubleshooting Guide .................................................................................................................. 40

4
1 General The FieldScout pH 400/600 meter allows you to perform accurate pH measurements. We advise you
to read the ‘Quick Start’ guide before use and keep this guide for future reference. We also advise you
to read this manual to learn about the meter’s many built in features.
The FieldScout pH meters and probes are designed for pH measurements. Do not use the meters or
probes for other applications as this may cause damage.
1.1 Declaration of compliance
The FieldScout pH 400/600 pH meters are designed and produced in accordance with EMC-standards
EN 61326-1: 2006.
As a result of this and adherence to other standards this meter is permitted to carry the CE-mark.
1.2 Warranty
This product is warranted to be free from defects in material or workmanship for one year
from the date of purchase for the meter and for 6 months from the date of purchase for the
probes. During the warranty period Spectrum will, at its option, either repair or replace
products that prove to be defective. This warranty does not cover damage due to improper
installation or use, lightning, negligence, accident, or unauthorized modifications, or to
incidental or consequential damages beyond the Spectrum product. Before returning a failed
unit, you must obtain a Returned Materials Authorization (RMA) from Spectrum. Spectrum is
not responsible for any package that is returned without a valid RMA number or for the loss
of the package by any shipping company.

5
1.3 Specifications
pH 400 pH 600

6
2 Installation To start using your FieldScout pH meter for the first time, you will need to connect a probe to the
meter and remove the battery isolator. In the sections below, you will find instructions on how to do
this. In the Batteries section, you will also find instructions for charging and replacing batteries.
2.1 Batteries
2.1.1 First time use
The FieldScout meter is delivered with three pre-installed pre-charged AA rechargeable batteries. To
activate the meter for the first time, pull the plastic strip (battery isolator) out of the battery
compartment and press the power button.
2.1.2 Recharging batteries
When fully charged, the three AA rechargeable batteries with which the FieldScout meter was shipped
provide 7 hours of operating under normal use.
To recharge the batteries, connect the meter to the power adapter using the supplied USB cable and
place the power adaptor in a power outlet. The meter will recharge in approximately 7 hours.
In case the meter batteries are empty and will not be recharged soon, remove the batteries.
2.1.3 Replacing batteries
The three AA batteries required for operation of the meter are replaceable. The rechargeable batteries
may lose capacity over their lifetime and replacement may be necessary when operating time on a
battery charge becomes too short. To replace the batteries, open the battery compartment cover by
turning the half turn screw counter clockwise and pulling the bottom of the battery cover outwards.
When inserting the batteries ensure the orientation of the batteries have the correct + and - alignment
as indicated in the figure below.
7
It is possible to temporarily install non-rechargeable batteries when the rechargeable batteries have
run out and there are no other fully charged rechargeable batteries available (i.e. when using the meter
in a remote location). This should be done with care as the non-rechargeable batteries should be
removed immediately after use and before the meter is connected to a power adaptor or USB port.
Warning! Do not connect the meter to the power adaptor or to a USB when non-rechargeable
batteries are installed. This may damage the batteries and/or meter.
2.1.4 Batteries and storage
In the event the meter is not used for a longer time period the batteries should be fully recharged and
removed from the meter.
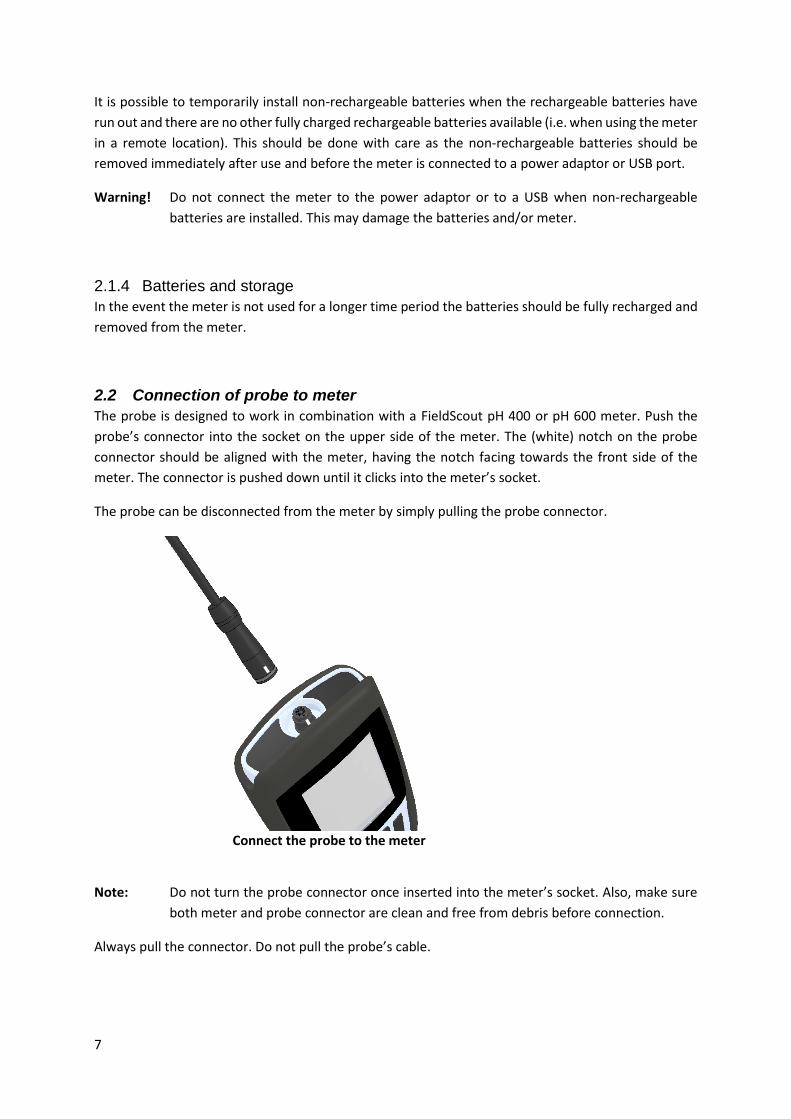
2.2 Connection of probe to meter
The probe is designed to work in combination with a FieldScout pH 400 or pH 600 meter. Push the
probe’s connector into the socket on the upper side of the meter. The (white) notch on the probe
connector should be aligned with the meter, having the notch facing towards the front side of the
meter. The connector is pushed down until it clicks into the meter’s socket.
The probe can be disconnected from the meter by simply pulling the probe connector.
Connect the probe to the meter
Note: Do not turn the probe connector once inserted into the meter’s socket. Also, make sure
both meter and probe connector are clean and free from debris before connection.
Always pull the connector. Do not pull the probe’s cable.

8
2.3 SD memory card
The battery compartment contains an SD card slot holder with a pre-installed SD card. This SD card is
required for the meter’s operation and should not be removed unless instructed by Spectrum
Technologies.
3 Operation Operation of the SI meter is done via the 6 keys below the screen.
3.1 Keypad
The FieldScout meter contains a keypad with six keys
Navigation
Display on/off
(save power) Move back one menu step
Power meter
on/off Confirm or select menu steps
Return to the main (Home) screen

9
3.2 Home screen
The home screen displays all the key information required when making pH measurements. It contains
five sections:
• Date, time, and battery status
• Measurement values
• Notifications
• Status bar
• Main menu
The FieldScout meter’s home screen
Data, time and battery status
Measurement values
Notifications
Status bar
Main menu
3.2.1
3.2.2 Date, time and battery status
The top of the screen contains the actual date (DD-MM-YYY) and the time (user settable as 12- or 24-
hour notation).
In the right hand corner the status of the battery is displayed:
Indicator Battery status
Charging
100% capacity
75% capacity
50% capacity
25% capacity
Almost empty
3.2.3 Measurement values
The measurement values section on the home screen contains the pH and temperature recorded by
the probe. When a probe is connected the pH value should be between 1 and 14. When no probe is
connected the pH value will be 16.00(0) and the temperature will read -20°C (or -4°F).

10
3.2.4 Notifications
When the main screen is displayed, some additional notifications regarding certain settings are
displayed on the status bar.
Alarm (pH 600 only):
An alarm can be set when pH and/or temperature values go beyond user definable upper and lower limits. See chapters 6.1.1 and 6.1.2 for setting or changing the pH and temperature alarm settings.
Notification
of a set Alarm Notification of
an activated Alarm
Calibration reminder:
A calibration reminder can be set to perform calibrations within a specific time interval. The time interval is user definable. See chapter 5.5 for setting or changing the calibration reminder function.
Notification of a set calibration reminder
Notification of an activated calibration
reminder
Stability check:
The stability check can be set to provide a warning when the rate of change of pH exceeds a certain threshold. See chapter 6.1.3 for setting or changing the stability check.
Notification of a set
stability check Notification of an
activated stability check
Bias:
A user definable bias value can be set to adjust the displayed pH measurement value. See chapter 6.3 for setting or changing the bias.
Notification of a set
bias
Range:
A range notification is a default alarm (not user definable) and provides a warning when pH and / or temperature conditions exceed the specification limits of the equipment.
Notification of a
range alarm

11
3.2.5 Status bar
The status bar displays additional information about the meter status. What is displayed depends on
whether the meter is on the home screen, in a sub menu or a function is being selected.
On the home screen, the status bar will display information regarding the probe, e.g. Probe
disconnected or Calibration OK. When a sub menu is selected, it will show the menu name. When a
function is being selected the status bar will provide useful instructions or status information such as
Place probe in next buffer, Take sample, Send data etc.
3.2.6 Main menu
The meter’s main menu has three icons: Config, Calibrate and Options. Selecting one of these main
menu icons will bring up that feature’s sub menu.
• The Config sub menu contains the general configuration options of the meter (e.g. display,
language, time settings ...).
• The Calibrate sub menu contains all functions and options related to the calibration of the
probe. These include performing a calibration, setting buffer type and recalling calibration
report(s).
• The Options sub menu allows the user to set parameters and perform actions related to
measurements and measurement values. In this sub menu, functions such as alarm thresholds,
data acquisition and bias settings can be accessed.

12
4 Configuration (Config) In the Config sub menu, a wide range of features such as energy saving, time and display language
settings can be selected. All features in this menu relate to the operation of the meter itself. Options
and settings related to the measurements can be found in the Options menu (Page 27).
4.1 Power save
The FieldScout meter has two options to save power and extend battery operation time: Display-off
and Meter-off. Set either one, or both, of the options to maximize use of the battery capacity:
Display-off: switch off the display after a user definable inactive time.
When the display-off option is activated, the screen will switch off when the time since the last key has
been pressed exceeds the selected duration. Pressing any key will turn the screen back on.
While the screen is turned off, the meter will still fully function and perform such actions as logging
and measuring the signals from the connected probe. Pressing a key during the display-off mode will
not prompt any action other than reactivating the display.
To set or change the Display-off setting:
Go to the Config menu, and choose Power save.
Select Display-off.
Toggle the on/off button and select the display-off time between 1 and 60 minutes.
Confirm and apply with the Set button, or exit with the Back button to discard any changes.

13
Meter-off: switch off the meter after a user definable inactive time period.
With the meter-off function activated, the meter will power down entirely after the selected time has expired since the last key action. The meter has to be turned back on in the same way as a “normal” power-up; by pressing the ON button on the keypad. When the meter is switched off using this function, the meter is entirely powered down. This means the ISFET pH sensor circuit will be powered down as well. Because a new calibration is recommended after a startup, it is therefore recommended to perform a new calibration after an automatic Meter-off as well.
The meter will not power-down when the AC-adapter is connected.
To set or change the Meter-off setting:
Go to the Config menu, and choose Power save.
Select Meter-off.
Toggle the on/off button and select the display-off time between 1 and 60 minutes.
Confirm and apply with the Set button, or exit with the Back button to discard any changes.
Note: For the pH 600, the meter-off function will be automatically disabled for the period of
active logging. Hence, setting this function will not affect measurements during
continuous logging.

14
4.2 Time
The FieldScout meter is equipped with a highly accurate internal clock. The date and time are factory
set to Central European Time (CET), which is 1 hour ahead of Coordinated Universal Time (UTC +01:00).
The meter’s time setting can be adjusted to the local time and either 12- or 24-hour display can be
selected.
To set the meter to your local time, adjust up to 24 hours forward or backward with respect to the
factory preset time. The date will adjust accordingly when the 0:00 time is crossed. Time zones west
of UTC should adjust time backward and time zones east of UTC should adjust time forward.
Daylight savings time is not set automatically and, if required, should be set manually.
To change the time and/or set the 12- or 24-hour clock:
Go to the Config menu, and select Time.
Toggle the 12/24 button to set the display into either a 12- or 24-hour clock notation.
Toggle the Hours and Minutes buttons to change the meter’s current setting.
Confirm and apply with the Set button, or exit with the Back button to discard any changes.
4.3 Button sound
When operating the FieldScout meter, audible sounds can be generated to provide feedback on button
operation. Sound can be set to on or off. The volume of the sound cannot be altered.
The button sound setting has no influence on the audible notifications for set alarms.
To set or disable the button sound:
Go to the Config menu. Select and enter the Button sound option.
Toggle and choose the button sound to on or off.
Confirm and apply with the Enter key, or exit with the Back key to discard any changes.

15
4.4 Temperature
The FieldScout meter can display temperature in either Celsius or Fahrenheit. The resolution is not
influenced by the chosen unit setting.
To change the temperature unit:
Go to the Config menu. Select and enter the Temperature option.
Toggle and choose the desired unit setting.
Confirm and apply with the Enter key, or exit with the Back key to discard any changes.
4.5 Language
The language in which the FieldScout meter displays menus and options can be changed into one of
the five pre-installed languages; Dutch, English, French, German, and Spanish.
To change the language:
Go to the Config menu. Select and enter the Language option.
Toggle and choose one of the available languages.
Confirm and apply with the Enter key, or exit with the Back key to discard any changes.
Spectrum
buffers
Celsius

16
5 Calibration In order to perform accurate pH measurement with the FieldScout meter, it must be calibrated before
use. Generally, a calibration should be performed each time the meter is switched on or when a
different probe is attached. In practice this means calibration should be performed, at least, daily.
The calibration process consists of placing a probe attached to the FieldScout pH meter in one, or more
buffer solutions of known pH. The type of calibration and the number of calibration points depend on
several factors. In general, the more buffers that are used, the more accurate the calibration will be. A
detailed explanation of the calibration process, and the considerations for choosing the number of
calibration points, can be found in section 5.1.
The FieldScout meter displays calibration results at the end of each calibration and stores the
calibration results in a report. This report is available for review at a later time. Please review section
5.4 for detailed information on accessing and interpreting calibration reports.
The FieldScout meter can provide a warning as a reminder to perform a calibration. The warning will
be activated after a user definable time period since the last calibration. It is recommended to set this
calibration reminder time at an appropriate setting for the intended application. This function is
explained in section 5.5
The FieldScout pH 400 meter can only be calibrated using Sentron buffer sets. The pH 600 meter can
be calibrated using Sentron, DIN, NIST and JIS buffer sets. The process for changing the buffer set
configuration is explained in section 5.6 below.

17
5.1 Determining the calibration type
When starting a new pH measurement, the first step is to determine what calibration process is most
appropriate for this application. Choosing the wrong calibration process may result in inaccurate
measurements and possibly require the measurements to be repeated.
Calibrations can be either single or multiple point. The pH 400 meter allows 1 and 2 point calibration.
The pH 600 allows 1, 2, 3 and 5 point calibration. In general, increasing the number of points used for
calibration will increase the measurement accuracy. However, the calibration range should be as close
as possible to the range over which measurements are expected to take place and extend to above
and below the minimum and maximum expected measurement values.
1 point calibration, an option for quick pH measurements spanning 1 – 2 pH. Example:
A single point calibration would be an option for measurements where the objective is to quickly detect a difference from one single point e.g. pH 7, and the variation is always lesser than 1 pH in either direction. For a 1 point calibration a buffer should be available with a pH close to the point from which the deviations are to be measured
2 point calibration, recommended for accurate pH measurements spanning < 3 pH and
quick measurements spanning 3 – 6 pH.
Examples: If, for instance, measurement values are expected to lie between pH 7 and pH 10, a 2 point calibration would be appropriate. A 2 point calibration would be performed with buffers with pH 7 and pH 10. If, on the other hand, measurement values are expected lie between pH 6 and pH 10, a 2 point calibration performed with a pH 4 and pH 10 buffer would be acceptable. For most accurate measurements, however, a 3 point calibration with pH 4, pH 7 and pH 10 buffers should be considered.
3 point calibration, recommended for accurate pH measurements spanning 3 – 6 pH and
quick measurements spanning >6 pH.
Examples: A series of measurements that are expected, for example, to take place between 4 and 10 pH would most accurately be performed when preceded by a 3 point calibration with pH 4 and pH 7 and pH 10 buffers. Measurements expected to take place over a wider range of 7 pH, for example, between pH 2 and pH 11 could also be performed using a 3 point calibration with pH 2, pH 7 and pH 12 buffers, but would more accurately be measured using a 5 point calibration.
18
5 point calibration, recommended for accurate pH measurements spanning > 6 pH. Examples:
Measurements expected to take place between pH 3 and pH 11 would require a full 5 point with pH 2, pH 4, pH 7, pH 10 and pH 12 buffers to achieve the most accurate measurements. A number of experiments conducted sequentially that each have a relatively narrow range of expected values, but whose values overall are spread over a wide range, for which pH will be taken without interim calibrations between the experiments will require a 5 point calibration
• Experiment 1 values are expected between pH 2 and pH 3
• Experiment 2 values are expected between pH 7 and pH 9
• Experiment 3 values are expected between pH 9 and pH 12
5.2 Before calibration
To ensure the best possible calibration results, always observe the following guidelines:
• Only use the buffer set for which your meter is configured
• Only use fresh buffers for a calibration
• Make sure your buffer sets are at the same temperature range as the sample to be measured
• Before, during and after calibration, always clean and flush your probe. Please see the probe
manual for instructions on how to clean the probe.
• Make use of the calibration reminder function to ensure calibrations are made at appropriate
time intervals (see chapter 5.5)
When a new probe is attached to a meter, or when a probe has not been used for a while, the probe
may react slowly or have low slope readings after calibration. In this case, the probe will need to be
“soaked” (conditioned). This will reactivate an inactive probe and ensure produces stable readings. For
more information on revitalization and treatment of the probe, please review the probe manual.

19
5.3 Performing a calibration
The calibration sequence is set up in such a way that it is easy to perform and minimal input is required.
To rule out erroneous multi-point calibrations, the calibration can only take place for an increasing or
decreasing pH sequence. Hence, a multi-point calibration must be started with either the highest or
lowest pH value in the intended range.
To perform a calibration, first choose the number of calibration points for which the calibration is to
be performed. Next, select the pH value of first buffer with which the calibration is to be started.
In most cases, the first selected buffer type, combined with the chosen number of calibration points,
is sufficient to determine the calibration path. In some multiple point calibrations cases, however, a
second buffer solution has to be selected in order for the meter to understand the desired calibration
path.
The screen will continuously provide information about the status of the calibration and which step is
to be taken next. After the calibration is completed, a report is shown with details of the performed
calibration. This includes time, date, temperature, slope, and buffer type used.
To perform a calibration:
Go to the Calibrate menu, and choose Calibrate.
Toggle and select number of calibration points.
Toggle and select the calibration value to start with. (some cases require a second calibration value to be entered)
Follow the instructions provided by the meter and when done, a calibration report is displayed. Exit the calibration report with the Close button.
Successful calibrations result in the display of the message calibration OK on the home screen status
bar. If for any reason the calibration process has not been successful, a message will be displayed on
the screen. Also, a calibration process may be aborted. In both cases the meter will automatically
revert back to the last successful calibration settings. Be aware that this last calibration may have
exceeded the recommended or user defined calibration interval.
5.3.1 Aborting a calibration
If a calibration is aborted by pressing the “back” or “home” button during the calibration process, the
message “probe disconnected” will be displayed for a maximum of 120 seconds on the status bar on
the main screen. Additionally, the measurement values will be out of range for this time period.
Therefore, the probe will return to the state it was in prior to the calibration.
Recommendation: disconnect the probe from the meter to interrupt the waiting time described
above. The calibration procedure must then be repeated completely.
20
5.4 Calibration reports
After each calibration, a report is generated and stored in the meter’s memory. The date of calibration,
the buffers used, measured temperature and, in the case of a multi-point calibration, the calculated
slopes are summarized in this report. Calibration reports are shown after each calibration and are
stored by the meter.
5.4.1 Review calibration reports
A calibration report reviews how the last calibration process was performed. The report and results
can also be opened from the calibration reports menu.
The pH 400 stores only the latest calibration report and only this last report can be reviewed:
To review a calibration report (pH 400):
Go to the Calibrate menu and choose Calibration report.
Exit the report with the Close button, or remove the report with the Delete button.
The pH 600 has the possibility to save, review and send the last seven calibration reports to a PC:
To review a calibration report (pH 600):
Go to the Calibrate menu and choose Calibration reports.
Select Browse reports.
Choose and select one of the calibration reports in the list.
Exit the report with the Close button, or remove the report with the Delete button.
5.4.2 Interpreting the displayed slope percentage
The slope percentage displayed in the calibration report is an indication of the calibration’s success
and the state of the probe.
Normal slopes should be between 105% – 95%.
Slopes outside these values, indicate polluted or aging probes. Although calibrations and
measurements can be performed the measured values may be less accurate. In this case, be sure to
replace the probe.
21
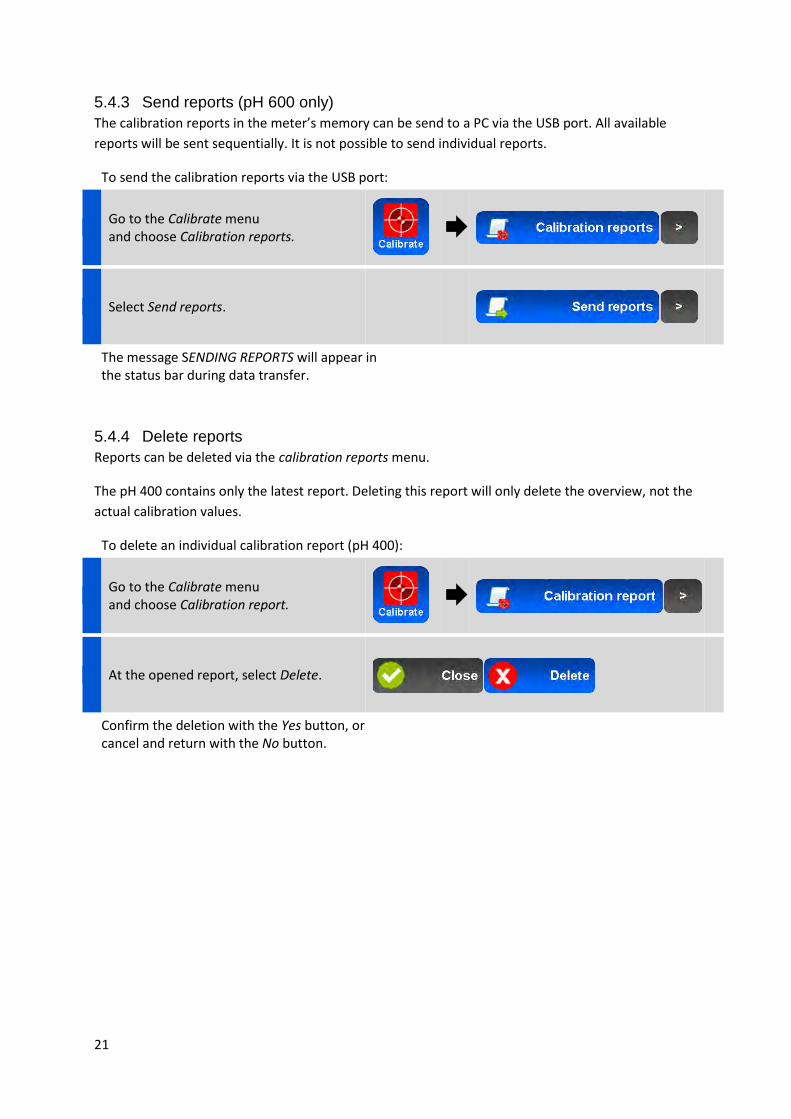
5.4.3 Send reports (pH 600 only)
The calibration reports in the meter’s memory can be send to a PC via the USB port. All available
reports will be sent sequentially. It is not possible to send individual reports.
To send the calibration reports via the USB port:
Go to the Calibrate menu and choose Calibration reports.
Select Send reports.
The message SENDING REPORTS will appear in the status bar during data transfer.
5.4.4 Delete reports
Reports can be deleted via the calibration reports menu.
The pH 400 contains only the latest report. Deleting this report will only delete the overview, not the
actual calibration values.
To delete an individual calibration report (pH 400):
Go to the Calibrate menu and choose Calibration report.
At the opened report, select Delete.
Confirm the deletion with the Yes button, or cancel and return with the No button.
22
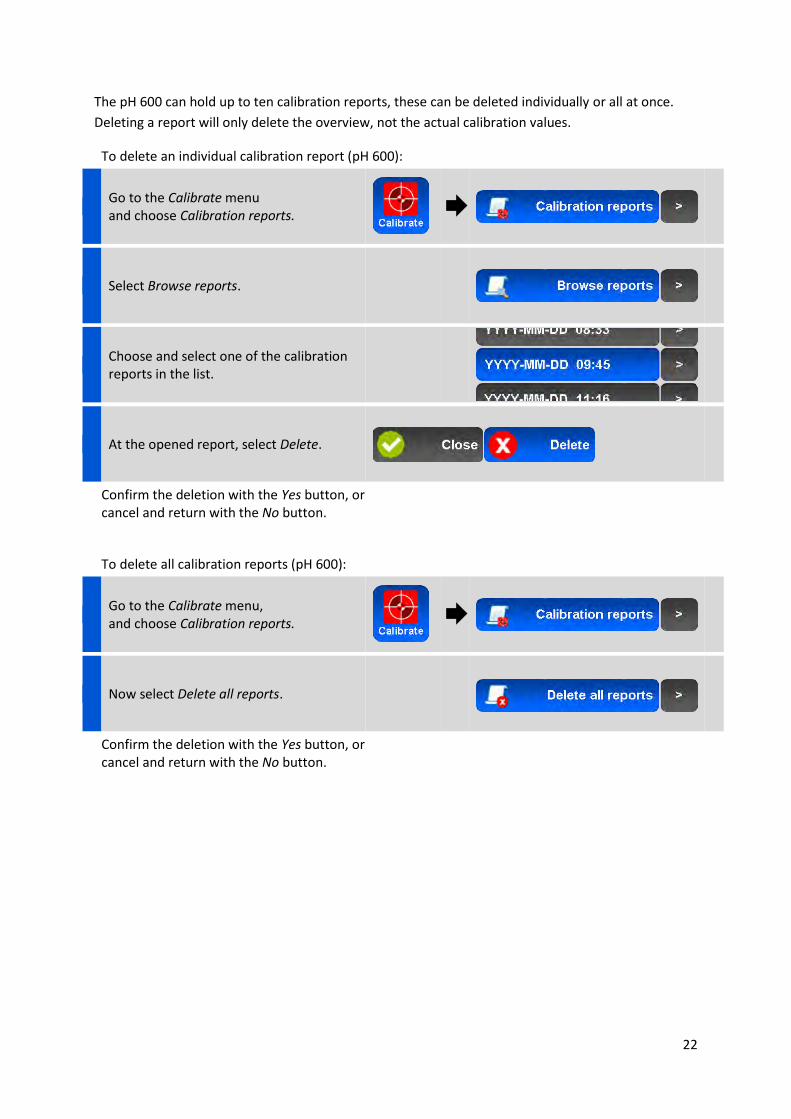
The pH 600 can hold up to ten calibration reports, these can be deleted individually or all at once.
Deleting a report will only delete the overview, not the actual calibration values.
To delete an individual calibration report (pH 600):
Go to the Calibrate menu and choose Calibration reports.
Select Browse reports.
Choose and select one of the calibration reports in the list.
At the opened report, select Delete.
Confirm the deletion with the Yes button, or cancel and return with the No button.
To delete all calibration reports (pH 600):
Go to the Calibrate menu, and choose Calibration reports.
Now select Delete all reports.
Confirm the deletion with the Yes button, or cancel and return with the No button.

23
5.5 Calibration reminder
In order to perform accurate measurements, it is necessary to periodically repeat the calibration
process. How often this is necessary will depend on the application and the chemical composition of
the samples measured.
To ensure that periodic calibrations take place on time for any specific application, it is possible to set
a user defined calibration reminder time after which a notification is displayed on the main screen.
It is always advisable, after a series of measurements have been performed, to place the probe in a
relevant pH buffer solution to check that the calibration is still accurate. The deviation of the displayed
value from the buffer solution value will provide an indication if, and how much, drift occurred during
the measurements. If this drift is too large, it may be necessary to repeat the measurements with
intermediate calibrations.
To set or change the calibration reminder:
Go to the Calibrate menu and choose Calibration reminder.
Toggle the on/off button and select the calibration reminder time between 1 minute and 60 hours.
Confirm and apply with the Set button, or exit with the Back button to discard any changes.
The Calibration reminder setting appears as a notification on the Home screen.
Notification of a set calibration
reminder
Notification of an activated
calibration reminder
After a new power-up or after (re-)connecting a probe, an automated calibration reminder will
always be displayed regardless of the manual calibration reminder setting.
24
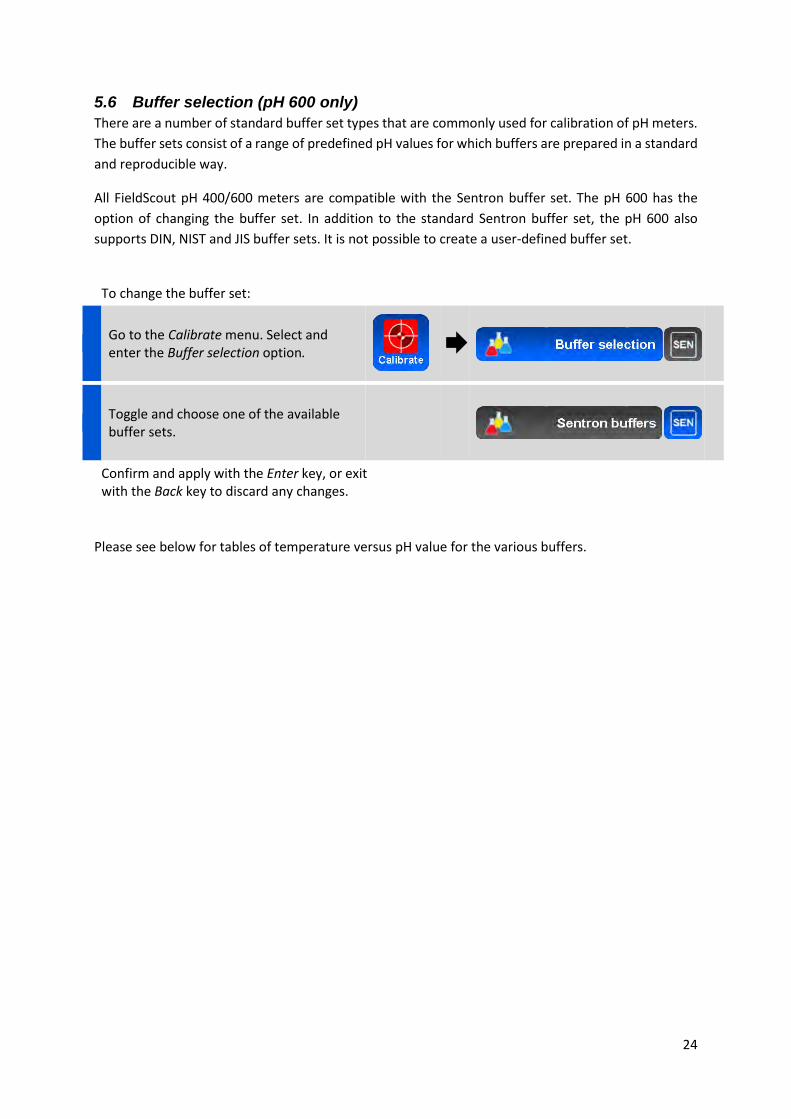
5.6 Buffer selection (pH 600 only)
There are a number of standard buffer set types that are commonly used for calibration of pH meters.
The buffer sets consist of a range of predefined pH values for which buffers are prepared in a standard
and reproducible way.
All FieldScout pH 400/600 meters are compatible with the Sentron buffer set. The pH 600 has the
option of changing the buffer set. In addition to the standard Sentron buffer set, the pH 600 also
supports DIN, NIST and JIS buffer sets. It is not possible to create a user-defined buffer set.
To change the buffer set:
Go to the Calibrate menu. Select and enter the Buffer selection option.
Toggle and choose one of the available buffer sets.
Confirm and apply with the Enter key, or exit with the Back key to discard any changes.
Please see below for tables of temperature versus pH value for the various buffers.

25
5.6.1 SENTRON buffer set
The default buffer set for which the meter is configured is the SENTRON buffer set.
The Sentron buffer set consists of a set of five NIST-traceable buffers with a pH of 2.00, 4.00, 7.00,
10.00 and 12.00 at 25°C. The table containing the temperature dependence of the buffer set is
presented in Table 1 below.
°C °F #1 #2 #3 #4 #5
5 41 2.01 4.00 7.10 10.22 12.70
15 59 2.01 4.00 7.04 10.14 12.38
25 77 2.00 4.00 7.00 10.00 12.00
35 95 2.00 4.02 6.98 9.91 11.63
45 113 2.00 4.04 6.96 9.81 11.38
55 131 2.00 4.07 6.96 9.76 11.12
65 149 2.00 4.10 6.95 9.71 10.86
75 167 2.00 4.12 6.94 9.66 10.60
85 185 2.00 4.15 6.93 9.61 10.34
95 203 2.00 4.17 6.92 9.56 10.08
Table 1: SENTRON
Buffer set
Note that since the SENTRON buffer set is based on the NIST standard, they are available from other
manufacturers as well.
5.6.2 DIN buffer set
The table containing the temperature dependence of the DIN buffer set as it is used in the FieldScout
meter is presented in Table 2 below.
°C °F #1 #2 #3 #4 #5
5 41 3.12 4.67 6.87 9.43 13.57
15 59 3.08 4.65 6.82 9.32 13.17
25 77 3.06 4.65 6.79 9.23 12.75
35 95 3.04 4.65 6.77 9.14 12.45
45 113 3.04 4.67 6.76 9.05 12.14
55 131 3.04 4.69 6.76 8.96 11.83
65 149 3.03 4.71 6.75 8.87 11.52
75 167 3.02 4.73 6.75 8.78 11.21
85 185 3.01 4.75 6.74 8.69 10.90
95 203 3.00 4.77 6.74 8.60 10.59
Table 2: DIN Buffer set

26
5.6.3 NIST buffer set
The table containing the temperature dependence of the NIST buffer set as it is used in the FieldScout
meter is presented in Table 3 below.
°C °F #1 #2 #3 #4 #5
5 41 1.67 4.00 6.95 9.40 13.21
15 59 1.67 4.00 6.90 9.28 12.81
25 77 1.68 4.01 6.87 9.18 12.45
35 95 1.69 4.02 6.84 9.10 12.13
45 113 1.70 4.05 6.83 9.04 11.84
55 131 1.72 4.08 6.83 8.99 11.57
65 149 1.73 4.11 6.84 8.94 11.33
75 167 1.75 4.15 6.85 8.90 11.11
85 185 1.78 4.18 6.87 8.88 10.91
95 203 1.81 4.23 6.89 8.83 10.73
Table 3: NIST Buffer set
5.6.4 JIS buffer set
The table containing the temperature dependence of the JIS buffer set as it is used in the FieldScout
meter is presented in Table 4 below.
°C °F #1 #2 #3 #4 #5
5 41 1.67 4.01 6.95 9.39 13.21
15 59 1.67 4.00 6.90 9.27 12.81
25 77 1.68 4.01 6.86 9.18 12.45
35 95 1.69 4.02 6.84 9.10 12.14
45 113 1.70 4.04 6.83 9.04 11.84
55 131 1.72 4.08 6.84 8.99 11.58
65 149 1.73 4.11 6.84 8.94 11.33
75 167 1.75 4.14 6.85 8.91 11.11
85 185 1.78 4.18 6.87 8.87 10.91
95 203 1.81 4.23 6.89 8.83 10.73
Table 4: JIS Buffer set

27
6 Options The options menu contains various features such as alarms and data acquisition options (note that
some options may only be available for the pH 600). All features in this menu relate to the actual
measurement and/or measurement values. See Configuration (p. 12) for information on meter
operation and settings (energy, time, display features, etc.).
6.1 Alarms (pH 600 only)
Alarms can be set to notify the user when measured values respectively surpass or fall below defined
maximum and minimum thresholds. Alarm thresholds can be set for pH, temperature and/or stability
(the rate of change of pH over time).
When an alarm is set, a notification will display on the main screen. A transparent indicator with the
letter A indicates that an alarm is set. When an alarm is activated, an audible sound can be heard and
the alarm indicator changes color to bright yellow.
Notification
of a set alarm Notification of
an activated alarm
6.1.1 pH alarm
The pH alarm can be set for a minimum and maximum value. When the pH value exceeds the maximum
value or falls below the minimum value of the set limits, the alarm is triggered and the meter will start
beeping and the alarm notification is displayed on the main screen. The pH alarm can be set between
a minimum of 0.00 and a maximum of 14.00. Setting the minimum to 0.00 or the maximum to 14.00
will, essentially, disable that portion of the alarm setting.
To set or change the pH alarm:
Go to the Options menu and choose Alarms.
Select pH.
Toggle the on/off button and select the minimum and maximum desired thresholds to trigger the alarm.
Confirm and apply with the Set button, or exit with the Back button to discard any changes.

28
6.1.2 Temperature alarm
The temperature alarm can be set for a minimum and maximum value. When the temperature exceeds
the maximum value or falls below the minimum value of the set limits, the alarm is triggered and the
meter will start beeping and the alarm notification is displayed on the main screen. The temperature
alarm can be set between a minimum of 0.0 and a maximum of 80.0 degrees Celsius (32.0 and 176.0
degrees Fahrenheit). Setting the minimum to 0°C (32°F) or the maximum to 80°C (176°F) will,
essentially, disable that portion of the alarm setting.
To set or change the temperature alarm:
Go to the Options menu and choose Alarms.
Select Temperature.
Toggle the on/off button and select the minimum and maximum desired thresholds to trigger the alarm.
Confirm and apply with the Set button, or exit with the Back button to discard any changes.
6.1.3 Stability check
The stability check can be used to give a warning when a measurement has become unstable and rapid
changes in the measured pH occur. The definition of “stable” may vary between applications and
industries, therefore the FieldScout meter has a user definable stability criterion.
When set, the stability check displays a notification (SC) on the main screen when the measured pH
value changes faster than the specified maximum rate of change. When the alarm is triggered the
meter will also start beeping.
Notification of a set SC
Notification of an activated SC
The stability is expressed in a certain pH change per time unit (30 seconds). The default is set to
0,02pH/30 sec. The stability criteria can be set between 0.01 and 0.10 pH per 30 seconds. The time
frame of 30 seconds cannot be changed. The meter’s internal algorithm, the meter allows it to
determine the set stability criterion within 8 seconds. Therefore, the stability check indication can be
provided within around 8 seconds.

29
To set or change the stability check:
Go to the Options menu and choose Alarms.
Select Stability check.
Toggle the on/off button and select the desired minimum stability value.
Confirm and apply with the Set button, or exit with the Back button to discard any changes.
6.1.4 Disable all alarms
When multiple alarms have been set and are no longer required, they can be deactivated by a single
Disable all alarms action.
To disable all alarms at once:
Go to the Options menu and choose Alarms.
Select Disable all alarms.
Confirm and apply with the Yes button, or discard and exit with the No button.

30
6.2 Storing measurements
FieldScout meters have several options for storing measurement data. These options, and how data
can be transferred to a PC, are described below.
The meter distinguishes between manual recording of an individual measurement value and
automated recording of a series of measurements. Storing a single measurement is referred to as
“sampling” where automated measurements are referred to as “logging”. The logging function is
available for pH 600 meters only.
6.2.1 Sampling
Sampling is storing the current pH and temperature measurement values to the meter’s memory.
Sampled values can be looked up at a later time and/or sent to a PC. The sample will remain in the
meter’s memory, even when batteries are replaced, until it is erased.
The maximum number of samples which can be stored to the meter’s memory is dependent on the
meter type. The pH 400 can store up to 10 samples, the pH 600 can store up to 500 samples.
To take a sample:
Go to the Options menu and choose Data acquisition.
Select Sample.
Press Take sample to record the momentary measurement values.
-“TAKING SAMPLE” - will appear in the status bar during sampling.
If the meter’s memory is full, a message will appear saying “MEMORY FULL”. One or more samples
should be transferred to a PC (pH 600 only) or deleted from the meter’s memory to proceed with
sampling.

31
6.2.2 Changing the sample name prefix
Samples are given a default four character prefix “SAMP” follow by an automated sequential
numbering of three digits starting with 000. Hence, the first samples taken with this prefix have names
SAMP000, SAMP001, SAMP002 etc.
In order to better identify samples that have been taken it is possible to adjust the standard prefix into
a custom one. The (default) name can be altered by four toggle buttons which can be set to the letters
A-Z, the numbers 0-9 and the _ (underscore sign).
When changing the sample prefix name, the names of all existing sample names remain unchanged. It
is not possible to change the name of an existing sample on the meter. Therefore, if a different sample
prefix is desired, it is necessary to set the desired sample name prefix before the sample is taken.
The follow-up number is raised automatically for every unique name existing in the meter’s memory,
starting with 000. Once a number is deleted, or the memory has been emptied, counting will start over
with the lowest possible number. It is possible to use multiple naming prefixes. In that case, each
prefix’s numbering sequence will be incremented independently.
To change the sample prefix:
Go to the Options menu and choose Data acquisition.
Select Sample.
Press Name sample.
Change the characters by toggling the displayed buttons to the desired prefix name.
Confirm and apply with the Set button, or exit with the Back button to discard any changes.

32
6.2.3 Review/delete a single sample
Stored and saved samples can be looked up and viewed individually on the meter. All stored samples
can be viewed using the Browse sample menu. After a sample is viewed, it can either be deleted or
closed and viewed again at a later time.
To review and/or delete a sample:
Go to the Options menu and choose Data acquisition.
Select Sample.
Press Sample overview.
Choose and select one of the stored samples in the list.
Exit the sample overview with the Close button or follow the instructions below to delete the sample:
At the opened sample overview, select Delete.
Confirm the deletion with the Yes button, or cancel and return with the No button.
Sample overview

33
6.2.4 Logging (pH 600 only)
The FieldScout pH 600 meter is capable of logging data to the internal memory automatically at a
predetermined time interval. This option can be used to analyze or monitor pH over a period of time
without having to be present at the meter to record the data.
The log file will remain in the meter’s memory until it is erased. This data will remain in the meter’s
memory when batteries are replaced. Section 6.2.7 gives instructions on how to send a log file to a PC
for analysis.
To start a log:
Go to the Options menu and choose Data acquisition.
Select Log.
Press Set log.
Toggle the on/off button and select the desired interval time.
Confirm and apply with the Set button, or exit with the Back button to discard any changes.
Once logging is setup and started, a recording icon will appear on the main screen.
Notification
of an activated log
The maximum number of measurements per log file is 65,000. The total capacity of the SD card is
approximately 49 million measurements. If a log file exceeds this amount of data points, a new file will
be generated automatically. If the meter’s memory is full, a “MEMORY FULL” message will appear. No
more new data points are recorded when the meter memory is full but existing data will not be
overwritten.
34
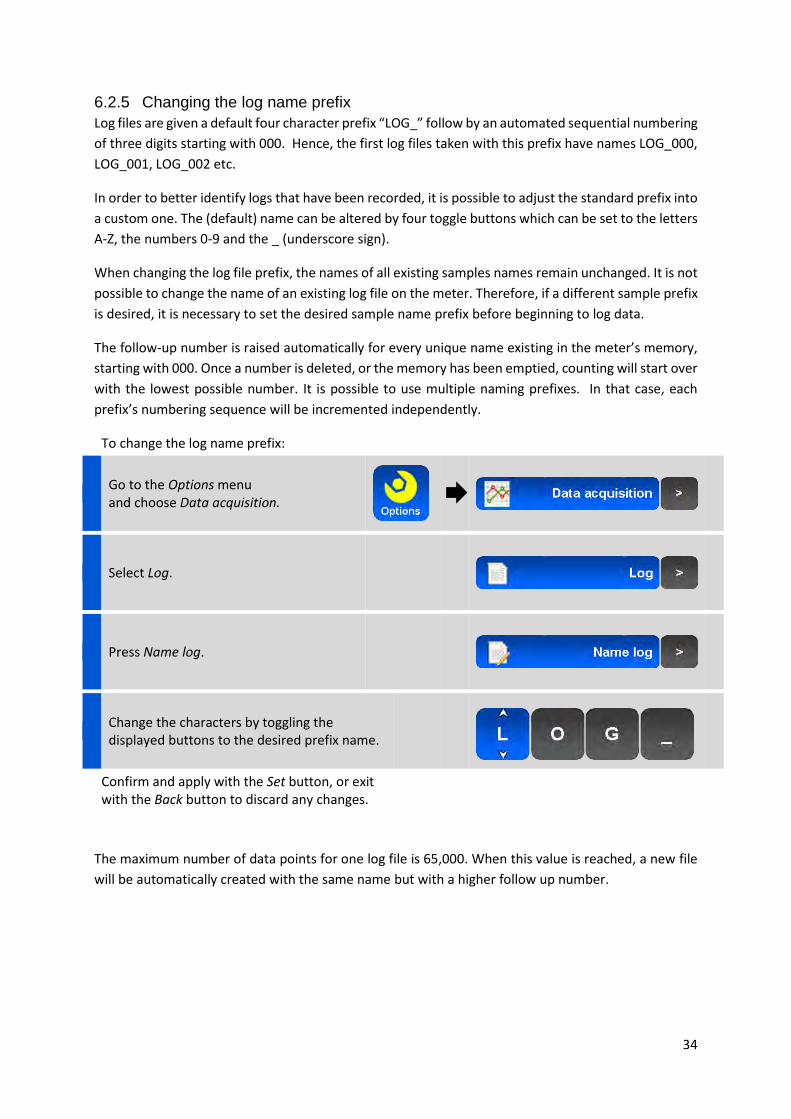
6.2.5 Changing the log name prefix
Log files are given a default four character prefix “LOG_” follow by an automated sequential numbering
of three digits starting with 000. Hence, the first log files taken with this prefix have names LOG_000,
LOG_001, LOG_002 etc.
In order to better identify logs that have been recorded, it is possible to adjust the standard prefix into
a custom one. The (default) name can be altered by four toggle buttons which can be set to the letters
A-Z, the numbers 0-9 and the _ (underscore sign).
When changing the log file prefix, the names of all existing samples names remain unchanged. It is not
possible to change the name of an existing log file on the meter. Therefore, if a different sample prefix
is desired, it is necessary to set the desired sample name prefix before beginning to log data.
The follow-up number is raised automatically for every unique name existing in the meter’s memory,
starting with 000. Once a number is deleted, or the memory has been emptied, counting will start over
with the lowest possible number. It is possible to use multiple naming prefixes. In that case, each
prefix’s numbering sequence will be incremented independently.
To change the log name prefix:
Go to the Options menu and choose Data acquisition.
Select Log.
Press Name log.
Change the characters by toggling the displayed buttons to the desired prefix name.
Confirm and apply with the Set button, or exit with the Back button to discard any changes.
The maximum number of data points for one log file is 65,000. When this value is reached, a new file
will be automatically created with the same name but with a higher follow up number.
35
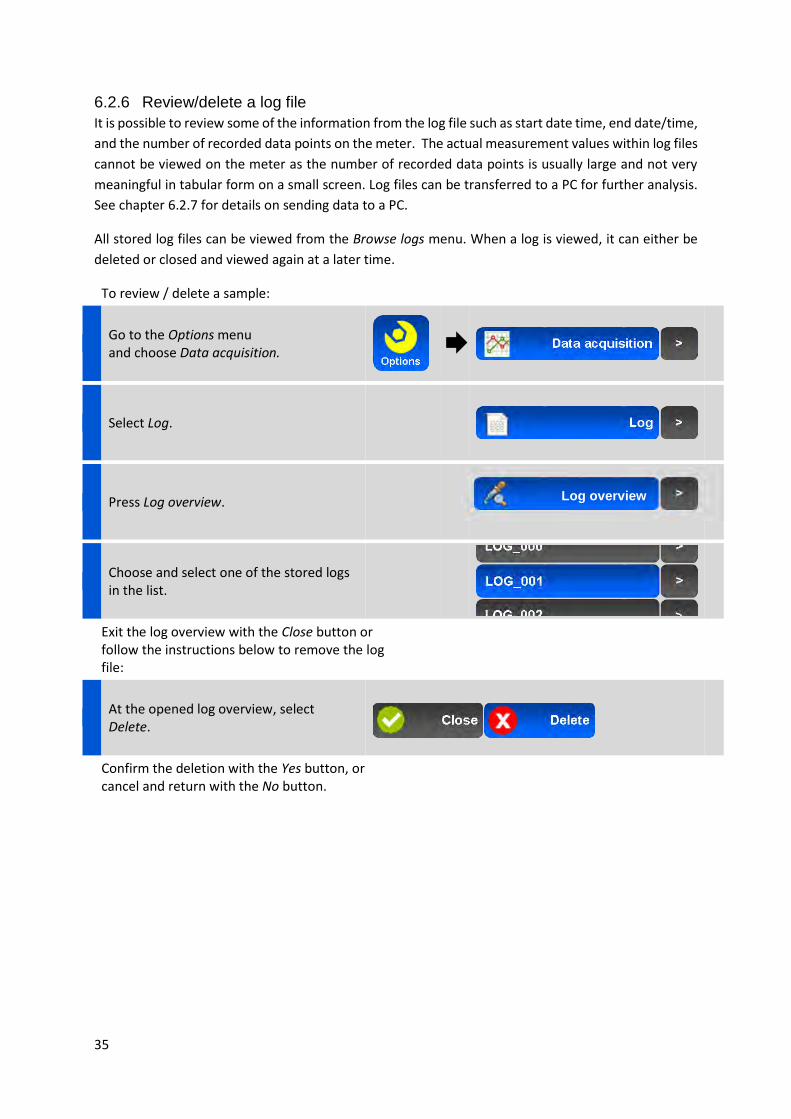
6.2.6 Review/delete a log file
It is possible to review some of the information from the log file such as start date time, end date/time,
and the number of recorded data points on the meter. The actual measurement values within log files
cannot be viewed on the meter as the number of recorded data points is usually large and not very
meaningful in tabular form on a small screen. Log files can be transferred to a PC for further analysis.
See chapter 6.2.7 for details on sending data to a PC.
All stored log files can be viewed from the Browse logs menu. When a log is viewed, it can either be
deleted or closed and viewed again at a later time.
To review / delete a sample:
Go to the Options menu and choose Data acquisition.
Select Log.
Press Log overview.
Choose and select one of the stored logs in the list.
Exit the log overview with the Close button or follow the instructions below to remove the log file:
At the opened log overview, select Delete.
Confirm the deletion with the Yes button, or cancel and return with the No button.
Log overview

36
6.2.7 Send data to a PC (pH 600 only)
To move a stored data point or data log to a PC, first connect the meter to the PC using the USB cable
supplied with the meter. Second, open a “listening” program (e.g. HyperTerminal or Putty) to receive
the data from the USB port. The Com port settings are as follows:
Data bits: 8 Stop bits: 1
Baud rate: 9600 bps Parity: None
Timing: 1 second
To send data to a PC (pH 600):
Go to the Options menu and choose Data acquisition.
Select the Send data menu.
Choose and select either to send all logs, send all samples or send all data.
- SENDING DATA - will appear in the status bar during the data transfer.
The downloaded data can be copied into a spreadsheet program for further analysis.
6.2.8 Query meter values
While connected to a PC, the pH 600’s momentary measurement values can be queried from as well.
This allows integration of pH measurements into a software application running on a PC. The meter
must be connected to the PC using a USB cable and suitable software needs to be running to read/write
to a USB port.
To query the meter, the string “ACT” needs to be sent to the USB port to which the meter is connected.
The meter will return a string that contains date, time and the momentary pH and temperature values
separated with a “space”. The string format is:
year – month – day hours : minutes: seconds pH value temperature
Y Y Y Y / M M / D D h h : m m : s s P P . P P P T T . T
The received data can be copied into a spreadsheet program or a custom program, for further analysis.
37
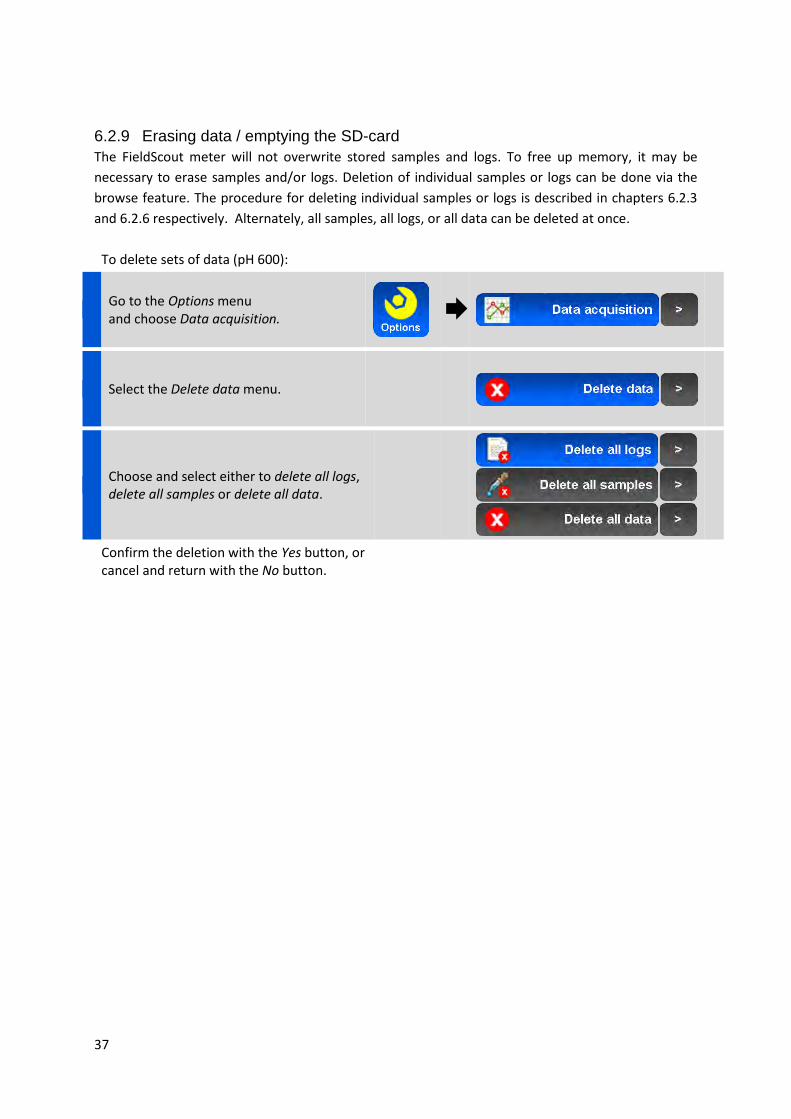
6.2.9 Erasing data / emptying the SD-card
The FieldScout meter will not overwrite stored samples and logs. To free up memory, it may be
necessary to erase samples and/or logs. Deletion of individual samples or logs can be done via the
browse feature. The procedure for deleting individual samples or logs is described in chapters 6.2.3
and 6.2.6 respectively. Alternately, all samples, all logs, or all data can be deleted at once.
To delete sets of data (pH 600):
Go to the Options menu and choose Data acquisition.
Select the Delete data menu.
Choose and select either to delete all logs, delete all samples or delete all data.
Confirm the deletion with the Yes button, or cancel and return with the No button.

38
6.3 Bias setting
In certain exceptional cases it may happen that the pH measured by the Spectrum ISFET pH sensor
differs from a glass pH electrode by a constant pH value. This difference occurs under certain
circumstances and is due to the differences in how pH is measured by glass and solid state electrodes.
The offset is often seen in comparison measurements between Glass and ISFET, particularly in lactose
products. Although both probes are calibrated simultaneously with the same buffer fluid, the
measurements from the sample material may differ slightly.
To compensate for this difference, an offset (bias) can be set so the measurement values are the same.
This setting can be done at either with the glass electrode or, when the glass measurement equipment
has only limited functions, on the FieldScout meter.
Note that with a fixed offset, the displayed pH value is changed with respect to the calibrated values.
Therefore measurement in a buffer fluid will contain the same offset in the readout.
To set or change the Bias:
Go to the Options menu and select Bias.
Toggle the on/off button and select the bias offset between -9.99 and 9.99 pH.
Confirm and apply with the Set button, or exit with the Back button to discard any changes.
The Bias setting appears as a notification on the Home screen.
Notification of a set Bias

39
7 Maintenance A FieldScout meter requires very little maintenance. In the event the meter becomes dirty, it can be
cleaned using a damp cloth.
To avoid having the USB connector become clogged by dirt, keep the dust cover closed except when
recharging or data transferring.

40
8 Troubleshooting guide
Screen message
Possible cause Solution uSDcard message
uSDcard could be damaged, is not present or has a bad connection.
Make sure the uSDcard is properly installed or replace with new one.
Probe disconnected
Probe not connected properly. Re-connect the probe.
Probe damaged. Allign connector on white mark. See chapter 2.2 of meter manual.
Probe cable damaged. Contact distributor for possibilities on repair or replacement.
Probe error
General probe error, unable to achieve high performance measurement values. Most likely due to wear and/or aging.
Contact distributor for advice and/or sales of replacement items.
Replace probe soon
ISFET and/or reference are showing signs of wear and/or ageing due to use. high performance is in jeopardy.
Be advised to replace probe soon.
Probe degrading
ISFET and/or reference are affected by wear and/or ageing due to use.
Soak/clean the probe. See chapter 3 of probe manual. Also, be advised to plan for probe replacement.
Operating symptoms
Possible cause Solution Fixed pH and/or
temperature value e.g.:
pH Temp.
16.00(0) -20.0 °C
Probe in general, and/or ISFET /reference is not responding properly.
Re-connect the probe. Allign connector on white mark. See chapter 2.2 of meter manual.
Contact distributor for possibilities on repair or replacement.
Slow calibration
Contaminated ISFET and/or reference.
Soak/clean the probe. See chapter 3 of probe manual. Brush the ISFET gently.
Fluctuating pH value
Contact distributor for possibilities on repair or replacement.
Slope to high/low
Calibration flaw. Recalibrate, make sure to always use fresh pH buffers and buffers of the correct (selected) types: SENTRON/DIN/NIST/JIS.
Contaminated ISFET and/or reference.
Soak/clean the probe. See chapter 3 of probe manual. Brush the ISFET gently.
Short working time of pH meter
Meter is not charged properly. Re-connect and check the connection between charger and meter.
Defect/degraded batteries. See chapter 2.1.2 of meter manual.
Defect charger and/or cable. Replace all batteries.

41
USB data connection issue
USB cable connection fail Re-connect the USB cable to meter and master (computer i.e.).
Baud rate mismatch Set master to right baud rate 9600 8 N 1

42
This product is warranted to be free from defects in material or workmanship for one year
from the date of purchase. During the warranty period Spectrum will, at its option, either
repair or replace products that prove to be defective. This warranty does not cover damage
due to improper installation or use, lightning, negligence, accident, or unauthorized
modifications, or to incidental or consequential damages beyond the Spectrum
product. Before returning a failed unit, you must obtain a Returned Materials Authorization
(RMA) from Spectrum. Spectrum is not responsible for any package that is returned without
a valid RMA number or for the loss of the package by any shipping company.
3600 Thayer Court
Aurora, IL 60504
(800) 248-8873 or (815) 436-4440
Fax (815) 436-4460
E-Mail: [email protected]
www.specmeters.com
Warranty
Revised 07/16


