PHAST Step-by-Step Guide: A Participatory Approach for the Control of Diarrhoeal Disease (PHAST - SIDA - UNDP - WB - WHO, 2000, 137 p.) PHAST Participatory Hygiene and Sanitation Transformation Series World Health Organization Geneva Sida Swedish International Development Agency
Transcript
PHAST Step-by-Step Guide: A Participatory Approach for the Control of Diarrhoeal Disease (PHAST - SIDA - UNDP - WB - WHO, 2000, 137 p.)
PHAST Participatory Hygiene and Sanitation Transformation Series
World Health Organization
Geneva
Sida
Swedish International Development Agency
UNDP-World Bank
Water and Sanitation Program
WHO/EOS/98.3 Original: English
Distr: General
Prepared by Ron Sawyer, Mayling Simpson-Hébert, Sara Wood
Illustrated by Regina Faul-Doyle and Victoria Francis
This guide is a collaborative effort of the Rural Environmental Health Unit, the Global Task Force on Cholera Control and the Cholera Sub-Regional team in Harare.
This document is not a formal publication of the World Health Organization (WHO), and all rights are reserved by the organization. The document may, however, be freely reviewed, abstracted, reproduced or translated, in part or in whole, but not for sale or for use in conjunction with commercial purposes. Please acknowledge the source of material taken from this document in the following way: Wood S, Sawyer R, Simpson-Hébert M. PHAST step-by-step guide: a participatory approach for the control of diarrhoeal disease. Geneva, World Health Organization (unpublished document WHO/EOS/98.3).
The views expressed in this document by named authors are solely the responsibility of those authors.
Designed by WHO Graphics and Marilyn Langfeld
Ordering information
PHAST Step-by-Step Guide: A Participatory Approach for the Control of Diarrhoeal Disease 1998, ix + 126 pages [E] WHO/EOS/98.3 Sw.fr. 16.–/US $14.40; in developing countries: Sw.fr. 11.20 Order no. 1930131
PHAST training and information
CREPA 03 BP 7112
Ouagadougou 03 Burkina Faso
NETWAS PO Box 15575 Nairobi Kenya
Division of Operational Support in Environmental Health World Health Organization 20 avenue Appia 1211 Geneva 27 Switzerland
IWSD University of Zimbabwe Box MP 422 Mt Pleasant Harare Zimbabwe
SARAR Transformación, SC AP 8, (Tepoztlán) Morelos 62520 Mexico
UNDP/World Bank RWSG/EA PO Box 30577 Nairobi Kenya
Welcome
This step-by-step guide can help you help communities improve their environments and manage their water and sanitation facilities, particularly for prevention of diarrhoeal disease. You won't need to do a lot of additional background reading, but you will need training in either the PHAST1 or SARAR2 methodology upon which this guide is based. You will also need some technical knowledge about diarrhoeal disease transmission to share with community members and to guide discussion.
1 A joint programme of WHO and the UNDP/World Bank Water and Sanitation Program. It began with a pilot study in four African countries in 1993 to test the use of participatory methods for promoting hygiene behaviours, sanitation improvements and community management of water and sanitation facilities. Since 1994 PHAST has been an official Ministry of Health programme in Zimbabwe and incorporated into sanitation programmes in Uganda and Kenya. For more details see: Simpson-Hébert, Sawyer & Clarke (1996).
2 SARAR stands for Self-esteem, Associative strengths, Resourcefulness, Action-planning, and Responsibility. It was developed during the 1970s and 1980s by Lyra Srinivason and colleagues for a variety of development purposes. See Srinivason, 1990.
The participatory techniques used in the PHAST initiative have proved to be very successful and rewarding for communities and for facilitators. So much so, that community workers who took part in the initial pilot study to test the use of participatory techniques for improving hygiene behaviours did not want to go back to their previous methods. They wanted to continue with the participatory approach because results were much better and the process was more enjoyable. But don't simply take our word for it. Invest time in learning about participatory techniques and how to use them. Enquire about training opportunities or ask to take part in ongoing projects that use a participatory approach.
We would very much like to hear about your experience of using this guide. We have therefore included an evaluation form and would be very grateful if you would complete it and return it to us. Your comments will help us to improve the next edition of the guide.
Good luck!
Evaluation form: PHAST
Please help us to improve the PHAST guide by answering the following questions and sending this evaluation form to:
Division of Operational Support in Environmental Health World Health Organization 1211 Geneva 27 Switzerland
Thank you for taking the time in fill in this evaluation form. Note: If you don't want to cut this page out, you can photocopy it.
Acknowledgements
The authors would like to recognize and thank all those who helped to make this guide a reality. First we thank the Institute of Water and Sanitation Development in Harare for a first draft of this document. We are grateful to those who field-tested the second draft: NETWAS in Kenya, Peace Corps volunteers and Leticia Addo in Ghana, the International Union of Health Promotion and Education in Delhi, India, and the University of Alabama at Birmingham, in the USA. They provided many insights, which helped to improve this guide. We also thank the UNDP/World Bank Water and Sanitation Program groups in Nairobi and New Delhi for their important roles in facilitating the field tests and for their continued partnership with WHO in the development and promotion of PHAST. Margarita Kenefic assisted in incorporating the results from the field tests into the guide. Final editing was provided by Jacqueline Sawyer.
The concepts, activities, tools and drawings used in PHAST have been borrowed largely from the earlier work of others. Please see Activity, tool and artist acknowledgements for details.
This guide could not have been produced without the input and even earlier field-testing carried out in 1994 in Botswana, Kenya, Uganda and Zimbabwe and with the support of the governments of those countries, UNICEF, WaterAid, CARE/Kenya, KWAHO, PLAN International, Mvuramanzi Trust, Lutheran World Federation, Africare, NETWAS and IWSD.
Last, but certainly not least, we would like to thank Sida and DANIDA for their financial support of PHAST since 1993.
Part I: Introduction to the PHAST
Purpose and overview of the guide
Why use this guide?
“The project has not come a day too soon. It has been an eye-opener for the team. It provided us with an opportunity to observe at close quarters the health problems of the underprivileged, undernourished and deprived inhabitants of the slums. The team could observe the problems of slum-dwellers in depth. These people have the zeal, understanding and willingness to improve their lot. With a little initiative, constant follow-up and some services, they could do away with unsanitary conditions, fight diseases and improve the environment through this participatory approach.”
Comments received from community workers after field tests of this guide in India
How many times have you seen something being done for a community, although the community neither saw the need for it, nor supported it? Failure is likely in such cases. The participatory approach outlined in this guide aims to prevent such situations. The steps in the guide can help you to enable community members to work out what they want to do, how it should be implemented, how it should be paid for and how to make sure that the community can sustain it in the future.
The participatory process leads to programmes that are much more likely to be successful than those which impose solutions on communities. Take the time to read on and see how straightforward this approach is. It will involve a little more of your time now but will save you a lot of time in the future. It will be worth the effort on your part because you will have better results. You will find that the groups you work with will be much more interested and involved in the activities you undertake together.
Figure
More particularly, in terms of hygiene and sanitation, this guide:
- provides those working in water supply and sanitation with a new model for changing hygiene behaviour
- provides those involved in the prevention of cholera and other diarrhoeal diseases with a tool for empowering communities to eliminate such water and sanitation-related diseases
- provides community workers with methods that can lead to community management of water and sanitation facilities.
The participatory methods described in this guide will lead to knowledge/empowerment and responsibility on the part of the community with whom you work. So by using them, you can make an important contribution to the fight for better environments and better health.
Who this guide is for
This guide helps community workers to use a methodology for community hygiene behaviour change and to improve water and sanitation facilities. The name of this methodology is PHAST (Participatory Hygiene and Sanitation Transformation). It is
based upon another participatory methodology called SARAR, which stands for Self-esteem, Associative strengths, Resourcefulness, Action-planning, and Responsibility. (See the inside back cover for details of how participatory approaches were developed.)
Before using this guide with communities, you must have received training in either PHAST or SARAR. (See inside front cover for information on training in participatory methods.) After training, the guide will serve as a reminder of how to facilitate each activity. Once you have become familiar with the sequence of activities, you will depend less on the guide.
If you are a project manager and interested in designing a participatory workshop for community workers, Tools for community participation: a manual for training trainers in participatory techniques, by Lyra Srinivasan, will provide you with further information.
What PHAST tries to achieve
PHAST seeks to help communities:
- improve hygiene behaviours - prevent diarrhoeal diseases - encourage community management of water and sanitation facilities. It does this by: - demonstrating the relationship between sanitation and health status - increasing the self-esteem of community members - empowering the community to plan environmental improvements and to own and operate water and sanitation facilities.
The methods for achieving these goals are called participatory methods.
What are participatory methods?
Participatory methods encourage the participation of individuals in a group process, no matter what their age, sex, social class or educational background. They are especially useful for encouraging the participation of women (who in some cultures are reluctant to express their views or unable to read and/or write.) Participatory methods are designed to build self-esteem and a sense of responsibility for one's decisions. They try to make the process of decision-making easy and fun. They are designed for planning at community level. Participants learn from each other and develop respect for each other's knowledge and skills.
Why use participatory methods?
Participatory methods have succeeded where other strategies have failed. They are based on principles of adult education and have been field-testing extensively.
Field experience has shown that participatory methods can lead to a far more rewarding experience for community workers. Having tried participatory techniques
and found the experience worthwhile, community workers usually do not want to return to their earlier methods.
The activities in this guide are based on principles of participatory learning for sanitation change. These principles are explained in a companion volume in this series entitled The PHAST initiative: Participatory Hygiene and Sanitation Transformation. A new approach to working with communities. (See References.)
PHAST and empowerment
The PHAST approach helps people to feel more confident about themselves and their ability to take action and make improvements in their communities. Feelings of empowerment and personal growth are as important as the physical changes, such as cleaning up the environment or building latrines. These personal development principles are well illustrated by the following quotations from people who have participated in a PHAST activity.
“I've been to a lot of community meetings over the years but have never been able to speak out. Because I can't read and write I lacked confidence. But with these methods I feel confident to speak. When I see a drawing of a problem in our community, I say to myself, “I know this problem and I can speak about it.””
“I used to think it was somebody else's problem and wait for others to do something. Now I don't want to wait, I want to start work now!”
“All my life people have been coming here and telling us what to do. This is the first time anyone ever listened to what we think.”
So it is important to evaluate the overall results of the activities both in terms of sanitation improvements and empowerment. Communities can find it very difficult, though, to evaluate their progress in terms of behaviour changes, improvement in facilities, such as clean properly functioning latrines, and effective use of these facilities. The guide therefore includes activities to enable a community group to evaluate its progress. This would be internal evaluation. Sometimes, an outside or external evaluation to provide specific information, perhaps for comparison with another programme, may also be required. If this is the case, you may need to involve someone with the skills to collect this information and to write a report of their findings. You should find out if information of this kind is needed before you start work with your community group. If so, a participatory approach to monitoring and evaluation should be used by the person(s) who will collect the information. They should be involved from the very start, attend all the meetings and be treated in the same way as any other participant. The outside evaluation person should involve the community as much as possible in information collection and most importantly report any findings to the group in a way it will understand and find interesting.
Suggestions for designing an external evaluation can be found in Hygiene evaluation procedures: approaches and methods for assessing water- and sanitation-related hygiene practices. (See References.)
Key definitions
A step may contain one or more activities, aimed at achieving one overall objective.
An activity is what the group works through in order to discover the information and skills necessary to reach understanding or take a decision.
A toolkit is the set of materials (such as drawings) that the facilitator uses as visual aids for facilitating activities. Different participatory toolkits can be created - for example, one for diarrhoeal diseases, another for nutrition and another for AIDS. Part III provides guidance on how to create a toolkit.
Tools are the techniques and materials used by the facilitator to help the group work through an activity. They should be adapted to the environment and circumstances of the group you are working with. You can also add to them on the basis of your own experience. See Part III for lists of sample drawings.
How the guide is organized
The guide has seven steps. The first five help you take the community group through the process of developing a plan to prevent diarrhoeal diseases by improving water supply, hygiene behaviours and sanitation. The sixth and seventh steps involve monitoring (that is, checking on progress) and evaluation. The information gained from these activities is used to work out whether the plan has been successful.
Each step contains between one and four activities. Instructions on how to facilitate each activity are provided under the following headings:
- Purpose - Time - Materials - What to do - Notes.
Most of the activities require the use of drawings or a chart, called “tools”, to help facilitate the discussion.
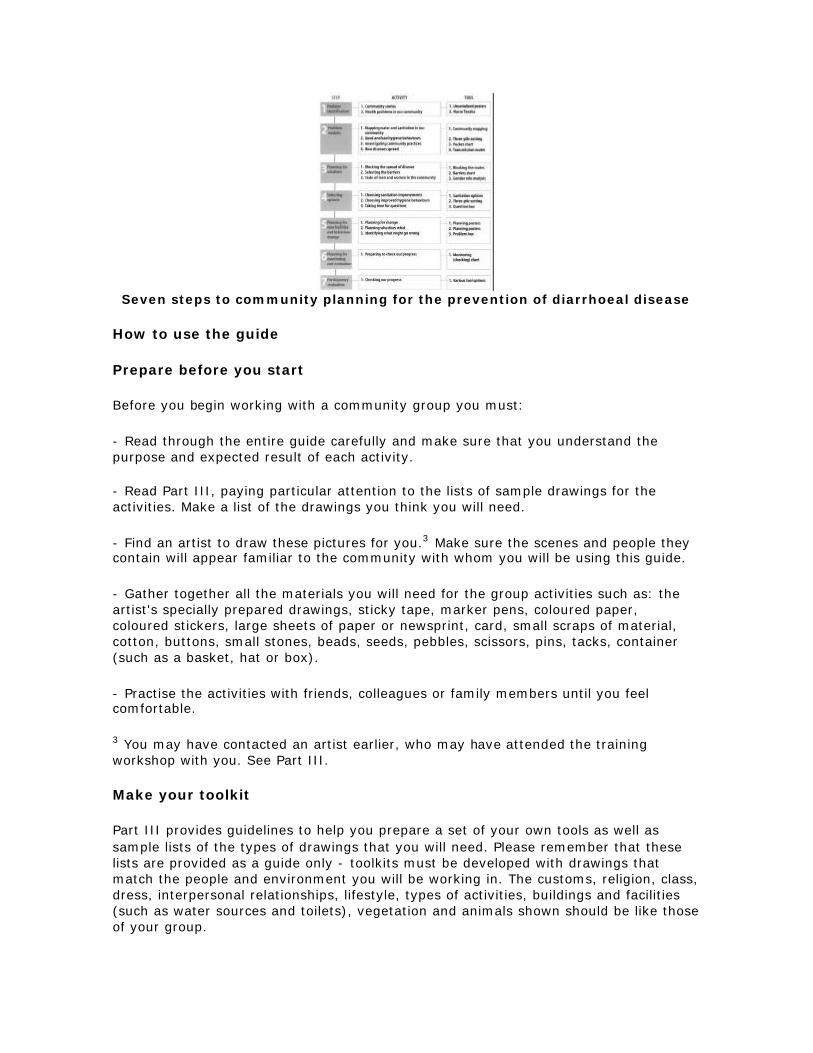
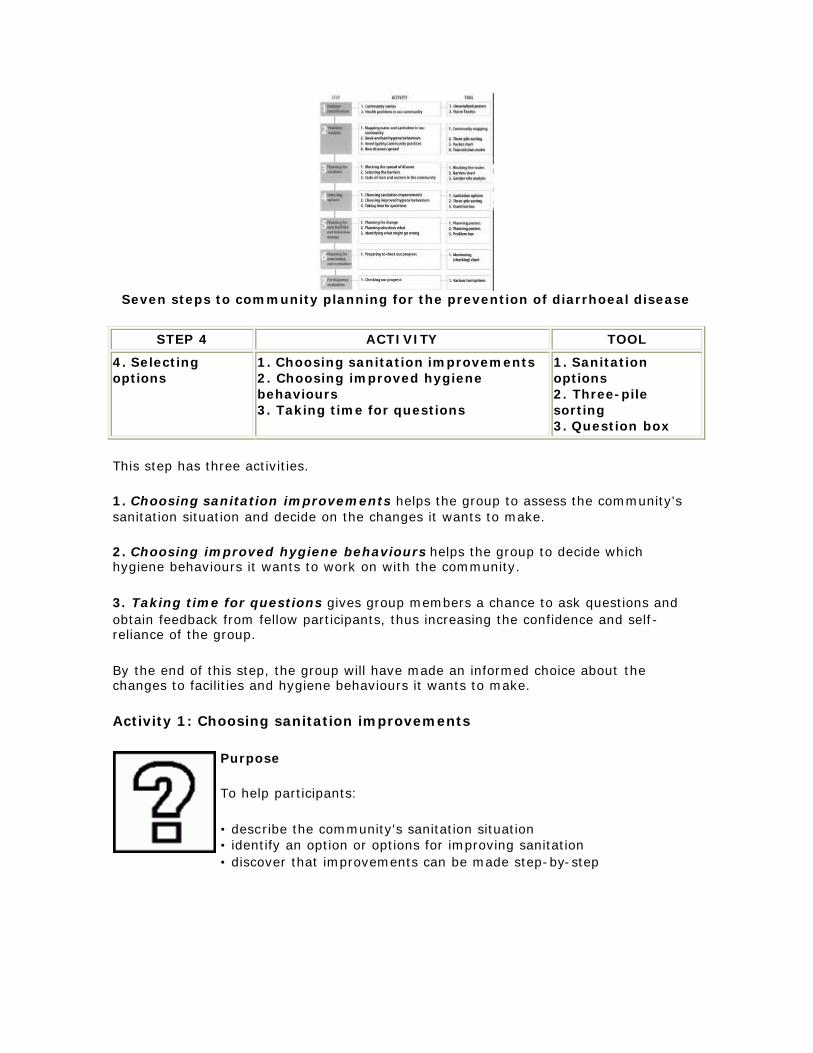
The diagram shows the seven steps, outlines the activities of each and the tools used. You may wish to tick off the activities and tools as you complete them.
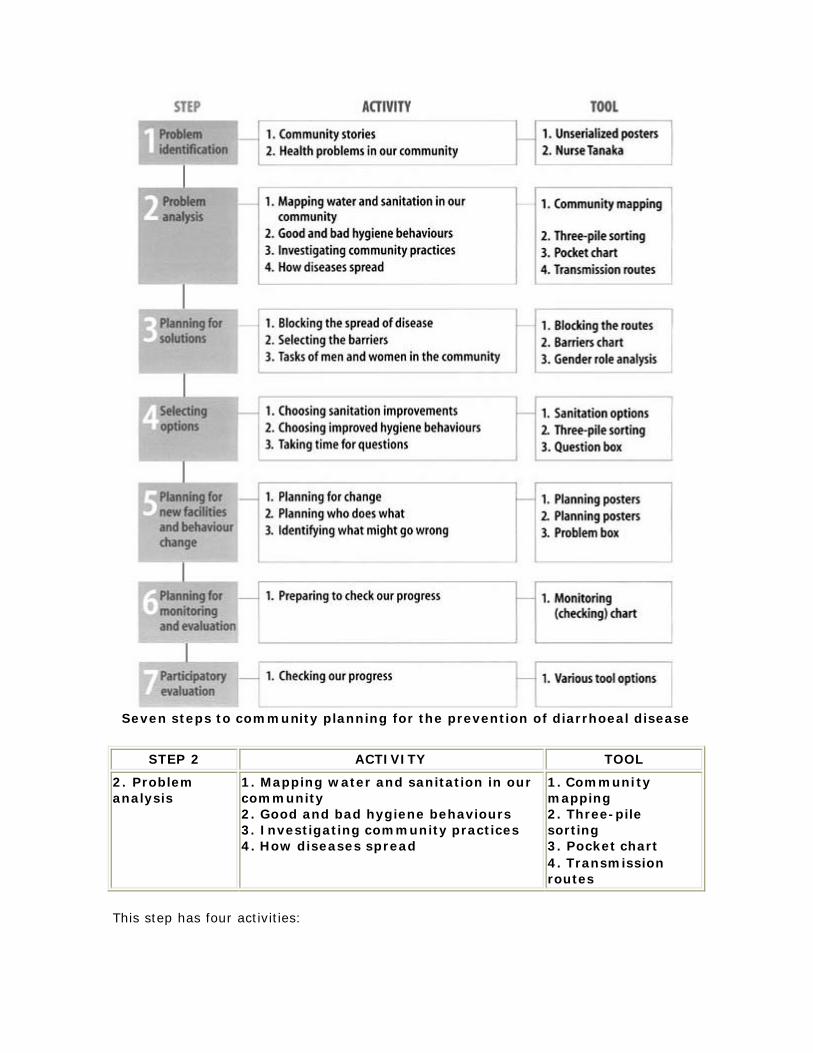
Seven steps to community planning for the prevention of diarrhoeal disease
How to use the guide
Prepare before you start
Before you begin working with a community group you must:
- Read through the entire guide carefully and make sure that you understand the purpose and expected result of each activity.
- Read Part III, paying particular attention to the lists of sample drawings for the activities. Make a list of the drawings you think you will need.
- Find an artist to draw these pictures for you.3 Make sure the scenes and people they contain will appear familiar to the community with whom you will be using this guide.
- Gather together all the materials you will need for the group activities such as: the artist's specially prepared drawings, sticky tape, marker pens, coloured paper, coloured stickers, large sheets of paper or newsprint, card, small scraps of material, cotton, buttons, small stones, beads, seeds, pebbles, scissors, pins, tacks, container (such as a basket, hat or box).
- Practise the activities with friends, colleagues or family members until you feel comfortable.
3 You may have contacted an artist earlier, who may have attended the training workshop with you. See Part III.
Make your toolkit
Part III provides guidelines to help you prepare a set of your own tools as well as sample lists of the types of drawings that you will need. Please remember that these lists are provided as a guide only - toolkits must be developed with drawings that match the people and environment you will be working in. The customs, religion, class, dress, interpersonal relationships, lifestyle, types of activities, buildings and facilities (such as water sources and toilets), vegetation and animals shown should be like those of your group.
Caution: During an activity do not use glue or any other permanent adhesive to attach the pictures because they will need to be moved around, removed and reused.
Select the group
Generally, participatory methods are used with small groups (15-40 people) who want to improve their community in some way. In selecting a group you will have to use your own judgement. But here are some examples of typical groups to give you an idea of the sort of group you might choose and for what purpose.
- A community wishes to improve the water and sanitation facilities at a school. The parent-teacher association would be an obvious group to work with. Some students could also be included to make the group even more representative.
- A community worker is asked to help a community carry out diarrhoeal disease prevention. After discussions with the health clinic staff and village leaders, a group of about 30 people, who represent different village interests, could be formed.
- The community already has a water committee of 15 persons. Community leaders decide that this group should represent the community.
- An urban community of squatters, living in extremely bad conditions without formal recognition by local government, is given an opportunity to improve its environmental conditions. Normally such a community has informal leaders. Discussions with these individuals lead to creation of a working group that is representative of that community.
Group size
The activities in this guide will work best with groups of less than 40 persons. Ideally, big groups will be divided into small groups of 5-8 persons for some of the activities, since they provide greater stimulus and opportunity for participation. If this is done, the members of the small groups should be swapped around for the different activities so that participants have the chance to work with one another. Some competition between groups is also quite healthy and desirable. Guidance is provided in the activity descriptions on when the larger group should be divided into smaller groups.
Small groups can be invited to report their findings to the whole group at the end of the activity. This can be done in one of two ways. Each of the small groups can report its findings. Or, at the end of the activity, just one small group (but a different one each time this method is used) can be asked to make a report and the other small groups asked for additional comments. The second method obviously takes less time. The presentation of different points of view will help you to show that there is no such thing as a single right answer.
Figure
Should I follow the steps in order?
The guide is divided into steps and each step is divided into activities. Be sure to follow the steps in order since each step equips participants with what they need to do or know to complete the next step. If a step is missed, the group could have trouble with the activities of the following step.
How much time does it take?
It could take from two weeks to six months to go through the entire guide with a community group. The method aims to stimulate learning and change, with enough time for information-sharing and feedback. Be sensitive, let the group set the pace.
Moving from step to step
How do I know when to move to tine next: step?
The group will make it clear when it is ready to move on. For example, when it is ready to move from Step 2: Problem analysis to Step 3: Planning for solutions, group members may start discussing among themselves what they can do to overcome the problems they have identified.
Do I have to follow the activity times strictly?
The times given in the activity instructions are estimates only. Be guided by the energy level and enthusiasm of the group. If the group appears restless or bored, or if you are
under time pressure, organize a break or plan the next meeting accordingly. But do not tell the group how long you think it should take to do an activity.
How can I move from one step to I he next?
If there has been a long break between steps, make sure the group remembers what stage it had reached and what was decided. Review the records (see next page) of the previous meeting. This is a good way of checking that the group has understood and still agrees with what it decided earlier.
Can I change the activities?
Once you have gained sufficient experience and confidence, you should feel free to make any changes in the order of the activities, or to delete or add activities.
Keep records and activity outputs
The group should keep a record of its findings and decisions for each step. Usually these findings and decisions will be clear from the product of the activity, such as a community map. The results of each activity can be displayed on walls, perhaps in a community centre where the rest of the community can see them. How records are made will depend on several factors, including the literacy level of the group. Keeping records means participants can quickly review their progress when they need to.
Certain ideas might have to be written down for display and to give to those not directly taking part. Generally, it is best if the group selects one or more volunteers to do this job. If no-one volunteers, you could ask someone whom you think would do the task well.
Make sure records are brought to each meeting so that the results of previous meetings can be reviewed easily. If the group is unsure what to do, confused, unable to reach agreement, or if participation is slowing, you may need to help the group review decisions and conclusions reached in past sessions.
Evaluate each activity
Feedback on the relevance of activities, on what the group thought was good or bad, and on where improvements could be made, is important. So each activity should be evaluated at its conclusion and again, if possible, before a new step or activity is started.
Some necessary background concepts
Diarrhoeal diseases and disease transmission
Diarrhoea is generally caused by eating food or drinking water that is contaminated with human faeces. Infants may suffer from diarrhoea after being hand-fed by someone with dirty hands, or after having put dirty objects into their mouths. The diagram below shows the usual ways diarrhoeal germs reach people: via fingers, flies (insects), fields and fluids, food, or directly into the mouth. Because of the use of so
many “F” words in English, it is often called the “F-diagram”. Yet such diarrhoea can mostly be prevented. The table gives further information on diarrhoeal disease.
Figure
Illustration source: Winblad U & Dudley E, 1997.
Diarrhoeal disease: further information
What causes diarrhoea?
Germs found in human faeces entering the mouth.
These germs can be spread in water, food and by dirty hands or objects.
For example, children may get diarrhoea if their mothers had dirty hands or dirt under their nails when they prepared food for them.
Measles and some other illnesses.
Why is diarrhoea dangerous?
Diarrhoea causes children and adults to lose too much liquid from their bodies and can result in death.
Diarrhoea can also cause or make malnutrition worse because:
- nutrients are lost from the body
- nutrients are used to repair damaged tissue rather than for growth - a person suffering from diarrhoea may not feel hungry - mothers may not feed their children normally if the latter have diarrhoea.
How can you tell if someone has diarrhoea?
When someone has diarrhoea their stool contains more water than normal and may also contain blood.
Evidence of diarrhoea is three or more loose or watery stools in a day (24 hours).
What should I do if someone has diarrhoea?
1. Give plenty of liquids to drink.
Give any of the following fluids:
- breast milk - oral rehydration solution - plain water (boiled and cooled) - soup, rice water, yoghurt - juices, weak tea, coconut water - cooked cereal.
2. Give food.
3. Seek trained help, if the diarrhoea is serious.
What can be done to stop people getting diarrhoea?
1. Safe disposal of faeces, particularly faeces of young children and babies and of people with diarrhoea.
2. Handwashing after defecation or handling faeces, before feeding, eating, or handling food.
3. Maintain drinking-water free from faecal contamination, in the home and at the source.
Preventing transmission
The aim of any community programme to prevent diarrhoeal diseases is to block the transmission routes of germs. The “F-diagram” stresses that good sanitation is a combination of facilities and behaviours. The following three key hygiene behaviours lead to the greatest reduction in diarrhoeal disease:
- Safer disposal of faeces, particularly those of babies, young children and people with diarrhoea.
- Handwashing, after defecation, after handling babies' faeces, before feeding and eating, and before handling food.
- Keeping drinking-water free from faecal contamination, in the home and at the source.
Health awareness and community change
Quality of life can improve considerably when a communal water supply is replaced by domestic water supplies. Domestic water supplies mean that users have more water for uses such as bathing and watering animals and gardens, and greater privacy for defecation. Benefits such as convenience, privacy and prestige are easily understood and can motivate a community to improve its environment.
However, people often do not understand clearly how health is linked to water and sanitation conditions. So bringing about such understanding can help create long-lasting change. This guide includes non-traditional teaching methods to help you do this.
How to increase health awareness
Health awareness comes about when people can describe how diseases are transmitted in their environment and through their own behaviours. This guide is based on the principle that people can and should understand how diarrhoeal diseases are transmitted, and that this understanding may inspire them to change their hygiene behaviours.
Once people understand how transmission occurs, they can identify the different ways to block the transmission routes. They can also weigh the advantages and disadvantages of blocking those routes in their households and communities. Will it involve a lot of trouble, time and money? What would be the benefit? Is it worth it? Three activities in the guide are built around this principle of understanding. Good and bad hygiene behaviours helps people to examine their existing hygiene behaviours, while How diseases spread and Blocking the spread of disease help them to understand how transmission takes place and how it can be prevented.
A further principle is that it is wise for communities to evaluate their current behaviours and facilities, and to make gradual changes to them. In this way, they can make step-by-step improvements, ensuring that each step is firmly in place (and can be sustained) before moving on to the next step. The Choosing sanitation improvements activity illustrates the process of defining steps for improving hygiene behaviour. (At the same time, communities should also consider factors such as convenience, privacy, status and dignity.)
Through participatory methods and better understanding of how health is related to well-being and community development, a community can become committed to implementing a plan for environmental improvement.
Other uses of this guide
SARAR participatory approaches have been used for a variety of different purposes. This guide has been designed for the control of diarrhoeal diseases and the development of community management of water supply and sanitation. But it could be modified and used for the control of other diseases closely related to the
environment, such as malaria, intestinal parasites, schistosomiasis and dengue fever. It can also be redesigned for dealing with issues other than those relating to environmental health, such as AIDS.
How to be a facilitator: some important points
The most important thing to remember about being a facilitator is that you are not a teacher!
Your role is to help or “facilitate”. Using the activities in the guide, you can help groups to:
- identify issues of importance to them - express their problems - analyse their problems - identify possible solutions - select appropriate options - develop a plan to implement the solutions they identify and agree on - evaluate the outcome of the plan.
So you must not:
- direct the group - give information instead of letting the group find it for itself - advise or suggest what the group should do - make assumptions about what is the right response to an activity - correct the group.
If, for instance, you supply external information during the early problem identification phase, you risk directing the group. The only exception that should be made to this is when the group clearly asks for specific technical information in order to move forward or if its information is incorrect. This may be the case during the analytical or planning steps.
Using participatory methods does not reduce the role of the community worker, but rather redefines it. What you do is encourage community involvement. You try to create an environment in which the group can discover information for itself. In so doing, participants will build the confidence and self-esteem necessary to analyse problems and work out solutions.
As a facilitator, you are not a leader who directs the group to where you think it should go. Instead, you help the group to better understand its own situation and to make informed decisions about how to improve that situation.
The only appropriate solution is the one that participants come up with. As an outsider, you cannot understand their situation in the way that they do, no matter how dedicated, interested or concerned you are. For this reason, the group's input is more important than what you think or feel. It is the group that will have to answer to the wider community and justify the decisions it makes. As a final note: never underestimate the untapped potential of the participants in your group and always provide them with the opportunity to surprise themselves, and probably you too.
Figure
All participants are equal
The activities in this guide have been developed so that the participation of each group member is considered equally important. Additionally, you must be seen to be on the same level as the partic ipants. So you should not present yourself as an authority figure. Information should flow from you to the group and from the group to you. By both sharing and receiving information, you and the group will remain equal. Evidently, good listening skills are essential.
There is no one right answer
PHAST activities are open-ended. This means that there is no correct answer or result. Decisions made by the group reflect what is right for the group and what it is prepared to take responsibility for.
Creating the right atmosphere
If the aim is to reach agreement on priorities for activities, or a plan for improving hygiene behaviours and sanitation, participants must be able to work well together. This is why participatory sessions often begin with a fun activity, something to break the ice and make people laugh. You need to maintain an atmosphere of relaxation throughout the planning process. Most cultures have traditional games and songs that can be used to build group spirit. The first activity which is called Community stories is also a good ice-breaker.
How to cope with dominant personalities
The SARAR methodology is specifically designed to stimulate full group participation, and to make it difficult for strong personalities to dominate the activities. However, from time to time the group process may not be able to proceed because one individual wants to control the group's thinking.
If this happens, find out whether the dominant individual is a designated leader, or simply a competitive or aggressive person with little or no significant support or influence in the group. Competitive or aggressive persons can either be taken aside and convinced of the importance of the group process, or they can be given separate tasks to keep them busy and allow the group to carry on. If the persons concerned are community leaders, approach them formally or privately early in the planning phase, explain the process, and try to gain their support. Hopefully, you will convince them that allowing community members to fully and equally participate will result in personal growth and betterment for all.
General instructions for all activities
1. Have all the materials for each activity ready before starting.
2. Make sure the materials are large enough to be seen by all participants.
3. Try to limit the size of your group to no more than 40 persons.
4. Make sure that people can talk to one another easily; use a circle where possible.
5. Begin each new session with a warm-up activity such as a game or song.
6. Go through each activity one step at a time and follow the instructions in the guide.
7. Be guided by the requirements of the group when facilitating activities. The time given for each activity is only an estimate.
8. When giving the group its task, use the exact words provided for this purpose.
9. Encourage and welcome the input that individuals make. Remember, there are no wrong answers.
10. Facilitate the group, do not direct it.
11. Try to encourage the active participation of each participant. Be careful not to find fault or make critical comments when you respond to people.
12. Take into account the participants' literacy level and work out ways in which they can keep records of what is discussed and agreed.
13. Have the group keep the materials and records in a safe place.
14. At the end of each activity, ask the group members to evaluate each activity on the basis of what they have learnt, what they liked and what they did not like.
15. At the end of each session, congratulate the group members on their efforts and explain briefly what will be covered at the next session.
16. At the beginning of each new meeting of the group, ask the group to review what it has done so far and the decisions it has taken.
Figure
Removing and storing PHAST materials for future use
Plan ahead on how you will remove and store the materials for future use. Organize a team well ahead of time to take pictures off the walls and pack materials away (in large envelopes or boxes which are carefully labelled) after the final meeting. If possible, prepare a checklist of all the materials so that nothing is left behind or lost.
Part II: Step-by-Step Activities
Step 1: Problem identification
Seven steps to community planning for the prevention of diarrhoeal disease
STEP 1 ACTIVITY TOOL
1. Problem identification
1. Community stories 2. Health problems in our community
1. Unserialized posters 2. Nurse Tanaka
This step has two activities:
1. Community Stories is designed to help the group express important concerns and issues facing its community
2. Health problems in our community aims to focus discussion on health-related issues.
By the end of these two activities, the group should have identified the main issues facing its community and have decided if diarrhoea is a priority problem. It should also be interested in and willing to follow the process trough to the next step.
Activity 1: Community stories
Purpose
• to enable group members to identify important issues and problems facing their community • to help build a feeling of team spirit and mutual understanding • to generate group self-esteem and creativity
Time
• 1-2 hours
Materials
• tool: unserialized posters • sticky tape
Sample unserialized posters
What to do
1. Ask the participants to form groups of 5-8 persons. Give each group a set of materials.
2. Give the groups the task using these words:
“Each group will choose 4 drawings from the set Working together, develop a story about your community using the 4 drawings you have selected. Give names to the people and to the place where the story is taking place. Your story should have a beginning, a middle and an ending.”
3. Give the groups about 15-20 minutes to make up their story.
4. When all the groups are ready, ask each group to tell its story to the other participants using the drawings it chose. Let the groups decide how they will tell their story to the other participants. Possible options include:
- a single person selected by the group - a number of persons selected by the group - participants act out their stories.
5. Invite the other participants to ask questions about the story and let the group answer them.
6. Once all the stories have been told, invite the group to discuss the main points of each story.
7. The following questions can be used to help stimulate the discussion, if the group is very quiet or silent:
- Are these stories about events happening now in this community? - What issues were raised that could be considered to be problems in the community? - How could these problems be resolved? - What other (or similar) problems does your community face?
8. If the group did not come up with any problems related to water and sanitation, try the activity again using a set of drawings which are less general. Use instead a set of drawings which are more directly related to health and sanitation issues. Facilitate the activity in the same way as before.
9. Facilitate a discussion with the group on what it has learned during this activity, what it liked and what it did not like about this activity.
Notes
1. Let the small groups make up their stories by themselves. Do not offer guidance or assistance on what the subject of the groups' stories might be.
2. The purpose of this activity is to help the group express issues that are of concern to it. Don't worry if health issues are not directly identified. (The next activity will help the group to do this.)
3. If it appears that the group would like to work on issues which are not related to environmental sanitation, try to put it in touch with appropriate institutions, government departments, development agencies or nongovernmental organizations.
4. Groups will frequently find this activity stimulating and enjoyable, and may come up with two stories or ask for a second chance. If time permits, carry out the activity again since it may help you to discover important information about the community.
Activity 2: Health problems in our community
Purpose
• to help identify important health problems in the community and to discover which of them can be prevented through community action
Time
• 1-1½ hours
Materials
• tool: Nurse Tanaka • pins, tacks or sticky tape • pens and paper • coloured stickers (optional)
Sample drawings for nurse Tanaka
What to do
1. If there has been a break between this activity and the previous one, start with a group discussion to review what was learned or decided at the previous meeting.
2. This activity can be carried out in a single group if does not contain more than 30 people. If the group is larger than this, you will need to split it into small groups. It is best to have enough drawings so that each person can participate.
3. Put up a drawing showing a health centre and a health worker such as a doctor or nurse. Give the drawing of the health centre the name of the nearest local health centre with which the group is familiar.
In many societies people go to traditional healers in addition to, or instead of, a health centre. If this applies to the group you are working with, include a drawing of a local traditional healer along with or instead of the health worker. Participants can then choose either the health worker, or the traditional healer, depending on who they would normally see when they suffer from particular symptoms or illnesses.
4. Show the drawings of the different people to the group. Give the group the task using these words:
“These people are coming to visit Nurse/Doctor [say local name] at the [say local name] health centre. Choose one drawing each and come and stick your person next to the health centre and explain why the person is visiting the health centre.”
5. Once all the drawings of people have been used, ask the group the following question:
“Are there any problems that we have forgotten?”
Record any additional problems that participants mention.
6. If the group is literate, ask a participant to write down on small strips of paper the reason why each person is visiting the health centre, and stick these next to the person. The writing should be large enough for all the group to see.
7. Now ask the group the following question for each problem identified:
“Do you have any ideas about why people might have [state the problem]?”
The group should be able to remember its answers but they can also be written down next to the problem if the group wishes.
If participants have questions about the causes of diseases, redirect them to the group to find out what other participants think. If the group cannot come up with certain answers, ask it to identify a way of obtaining the necessary information.
8. Continue the group discussion but this time ask the group to think about what it could do to deal with the causes of the problems. Go through the causes one at a time. Ask the group the following question:
“Does anyone have any ideas about how this problem could be prevented?”
Again, the group should be able to remember this information, but it could also be written up next to the causes.
9. Ask the group to sort the problems into those which could be prevented by community action and those which will continue to require treatment at the health centre.
10. Ask the group to identify and highlight those problems which could be prevented and which it thinks are related to water, sanitation and hygiene practices.
Underline words or use coloured stickers on the figures to show which problems the group thinks are related to these factors. Use local descriptions for the technical terms, for sicknesses, and for specific sanitation and hygiene practices.
11. Facilitate a discussion with the group on what it has learned during this activity, what it liked and what it did not like about this activity.
Notes
1. If the group describes symptoms (stomachache, fever, etc.) rather than naming specific diseases or conditions, this is OK.
2. Don't worry if the group “misses out” what you think are important diseases. This is a discovery in itself. It means that you will need to consider how to help the group discover this information by itself. Do not suggest diseases you know of and think the group has missed. Let the group make suggestions based on its knowledge and experience.
3. If participants hesitate to choose between the nurse/doctor and the traditional healer, you can help by reminding them that the type of health problem, not the choice of healer, is what is important.
4. This activity may have shown you that the group lacks health knowledge. If this is so, the next step will be to help the group find out for itself how disease can be spread by: the way people handle water; the way human waste is disposed of and personal hygiene behaviours.
This new knowledge may make the group change its opinion of how disease can spread through its community through its hygiene and sanitation practices.
Step 2: Problem analysis
Seven steps to community planning for the prevention of diarrhoeal disease
STEP 2 ACTIVITY TOOL
2. Problem analysis
1. Mapping water and sanitation in our community 2. Good and bad hygiene behaviours 3. Investigating community practices 4. How diseases spread
1. Mapping water and sanitation in our community helps participants to map those water and sanitation problems which could lead to diarrhoeal disease.
2. Good and bad hygiene behaviours helps the group to look more closely at common hygiene and sanitation practices and to identify how these may be good or bad for health.
3. Investigating community practices is optional. Participants use a pocket chart to collect and analyse data on actual practices in the community. What people are actually doing can then be compared with what the group has discovered to be good for health or bad for health in the Good and bad hygiene behaviours activity.
4. How diseases spread gets participants to look at how faeces can contaminate the environment and lead to diarrhoeal disease.
At the end of this step the group should understand how some of its common everyday hygiene and sanitation practices may be causing diarrhoeal disease. It will then be able to start considering what can be done to improve these practices in order to prevent diarrhoeal disease.
Important note
Let participants use the activities in this step to find out for themselves what causes diarrhoeal disease in their community.
Do not direct the group by telling it what you think it needs to know.
Have faith in the group's judgement. Communities in most parts of the world have been receiving modern, scientific health messages for many years. What has often been missing is the opportunity for communities to consider and discuss this information and to compare it with traditional health beliefs.
Activity 1: Mapping water and sanitation in our community
Purpose
• to map the community's water and sanitation conditions and show how they are linked • to develop a common vision and understanding of the community
Time
• 1-3 hours, depending on the complexity of the map required
Materials
• tool: community mapping • whatever is available: newsprint, marker pens, and spare bits and pieces such as cotton, buttons, small stones, beads and small scraps of material • coloured stickers, if available
Figure
Illustration source: Pretty JN et al., 1995.
What to do
1. If there has been a break between this activity and the previous one, start with a group discussion to review what was learned or decided at the previous meeting.
2. Give the group the task using these words:
“Make a map of your community. You can do this in any way you like. Here are some materials to start with and you can add to these anything else you want to use.
“You need to include on your map the following:
- important physical features and boundaries -roads, paths - housing - other buildings such as schools, churches, health facilities, businesses - farms, fields, forests, plantations, parks - water sources - sanitation facilities - waste disposal sites.”
3. When the map is completed, give the group the second task:
“Divide yourselves into two groups. The group on my left is to try to imagine that it is visiting the community for the first time. The people on my right are tour guides. Their task is to take the group of visitors around the community. It is the first time the visitors have been here and they want to find out everything they can. The tour guides will use the community map to take the visitors on a guided tour. Show the visitors as much as possible, including the water, sanitation and hygiene arrangements, and help them to understand what life is like here by describing the people and their lives. The visitors should ask questions about what they are being shown, to make sure the tour guides have shown them every aspect of life, both good and bad.”
The purpose of this “tour” is to enable the group to look at its community from a different point of view. The “tour guides” will probably only show the good things in the community while the “visitors” will try to point out that everything is not perfect.
4. Use the points raised during the “tour” to facilitate a discussion on water and sanitation. Ask the group to describe:
- the water and sanitation arrangements they are proud of (record, if possible)
- any common problems or difficulties that they have with these (record, if possible)
- the most important problems they have (these could be marked on the map with coloured stickers).
5. Explain to the group that in future meetings it will have the chance to discuss how to overcome these problems. Ideas should be recorded so that they can be reviewed later in the programme.
6. Ask the group to display its map where it can be seen by the whole community.
7. Explain that the map needs to be kept safely because it will be used again.
8. Facilitate a discussion with the group on what it has learned during this activity, what it liked and what it did not like about this activity.
Notes
1. Let the participants work without any suggestions and input from you.
2. This activity is very worthwhile but it can be time-consuming. Make allowances for this.
3. The community map will be a useful reference point during future steps. It will be referred to again when the group is:
- considering different ways to overcome problems (Step 4) - setting goals (Step 4) - developing the plan to introduce changes into the community (Step 5) - monitoring and evaluating its progress (Steps 6 and 7).
4. After drawing the map, a community walk can be organized so that other (additional) points can be added.
5. Specific health-related questions raised by participants can be recorded for examination at a later stage.
Activity 2: Good and bad hygiene behaviours
Purpose
• to exchange information and discuss common hygiene practices according to their good and bad impacts on health
Time
• 1-1½ hours
Materials
• tools: three pile sorting • 3 or 4 complete sets of about 30 three-pile sorting drawings • 3 or 4 sets of heading cards, one with the word “Good”, another with the word “Bad” and the third with the words “In-between”; symbols to represent these qualities could be used instead of the words
Sample three-pile sorting drawings
What to do
1. If there has been a break between this activity and the previous one, start with a group discussion to review what was learned or decided at the previous meeting.
2. Ask participants to form groups of 5-8 people.
3. Give the groups the materials and the task using these words:
“Sort the drawings into three piles:
- “Good”: those which you think show activities that are good for health
- “Bad”: those which you think show activities that are bad for health
- “In-between”: those which you think show activities that are neither good nor bad for human health, or which you are not sure about.”
4. Give each group a set of about 30 drawings showing different activities and the 3 heading cards. Each small group should work with an identical set of drawings.
5. After 20-30 minutes, ask each group to explain to the other participants its selection and why it made these choices. Let the group answer any questions that the other participants raise.
6. Facilitate a group discussion on the way the different small groups have sorted the drawings. The discussion should cover:
- the differences in selections made - the reasons for these.
This discussion will provide another chance for participants to share what they know with the rest of the group. The group as a whole may also realise that it has gaps in its knowledge and look for ways to fill these.
7. Ask the group to consider and discuss the common behaviours in its own community. Ask the group to consider whether these behaviours are similar to any of the “good” and “bad” practices it has identified.
8. Ask the group to keep a record of the activity by displaying the three-pile sorting drawings.
9. Facilitate a discussion with the group on what it has learned during this activity, what it liked and what it did not like about this activity.
Notes
1. It is best to include some drawings which can be interpreted in a number of different ways. This helps make the activity more challenging and stimulates increased discussion. The aim of using the drawings is not to test people's knowledge or to investigate or correct their personal habits, but rather to provide a starting point for a discussion of local hygiene and sanitation beliefs and practices.
2. Don't prompt or direct the choices of the group by giving it information. If people ask you specific questions, redirect the question back to the group for a reply. If it is unable to interpret any one drawing, suggest that it is set aside.
3. If the group wants to know how many people practise good and bad behaviours, the pocket chart can be a useful tool to help it find this information. (See next activity and Part III for other ideas about how to use a pocket chart).
4. At this stage, the group may start to discuss ways of overcoming the bad practices it has identified in its community. Encourage this discussion and have the group keep a record of suggestions made. These can be discussed again in Step 3: Planning for solutions.
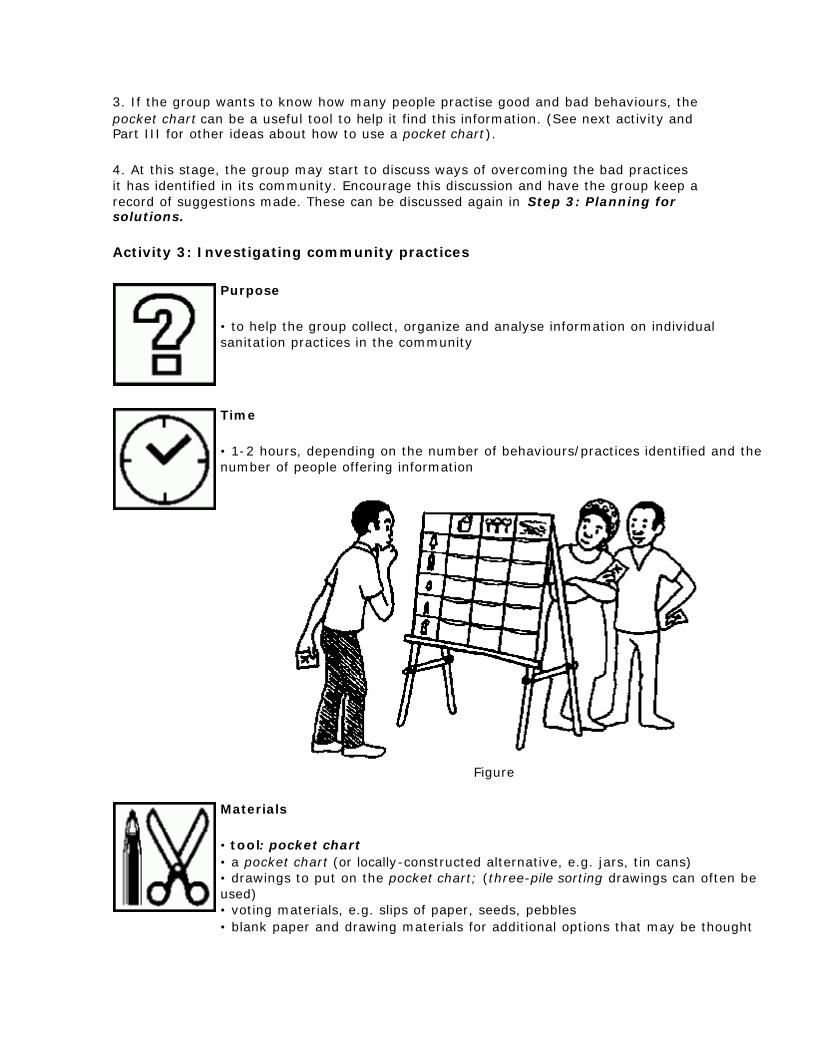
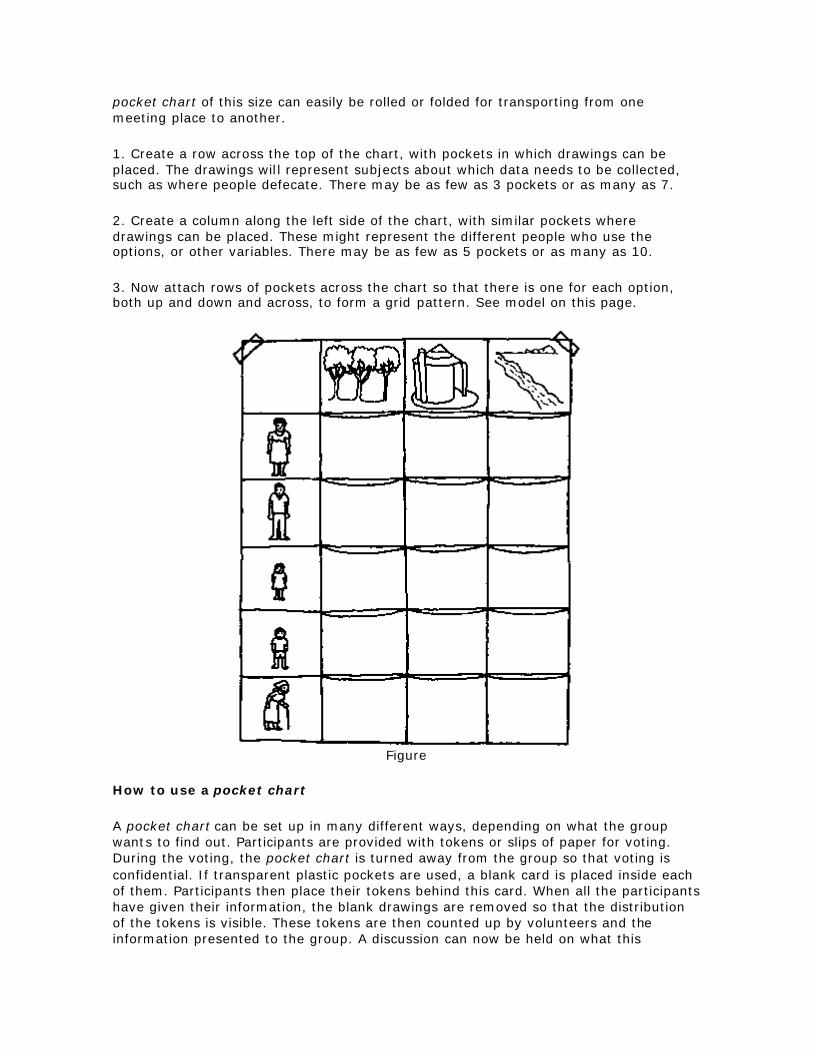
Activity 3: Investigating community practices
Purpose
• to help the group collect, organize and analyse information on individual sanitation practices in the community
Time
• 1-2 hours, depending on the number of behaviours/practices identified and the number of people offering information
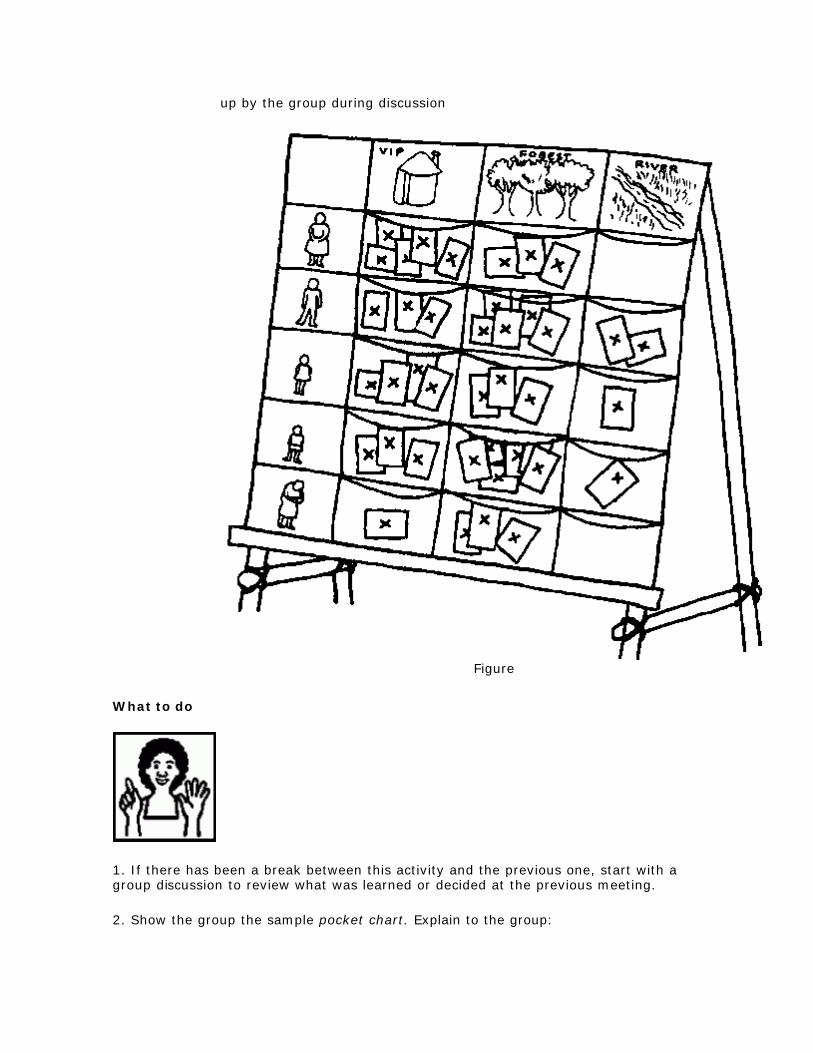
Figure
Materials
• tool: pocket chart • a pocket chart (or locally-constructed alternative, e.g. jars, tin cans) • drawings to put on the pocket chart; (three-pile sorting drawings can often be used) • voting materials, e.g. slips of paper, seeds, pebbles • blank paper and drawing materials for additional options that may be thought
up by the group during discussion
Figure
What to do
1. If there has been a break between this activity and the previous one, start with a group discussion to review what was learned or decided at the previous meeting.
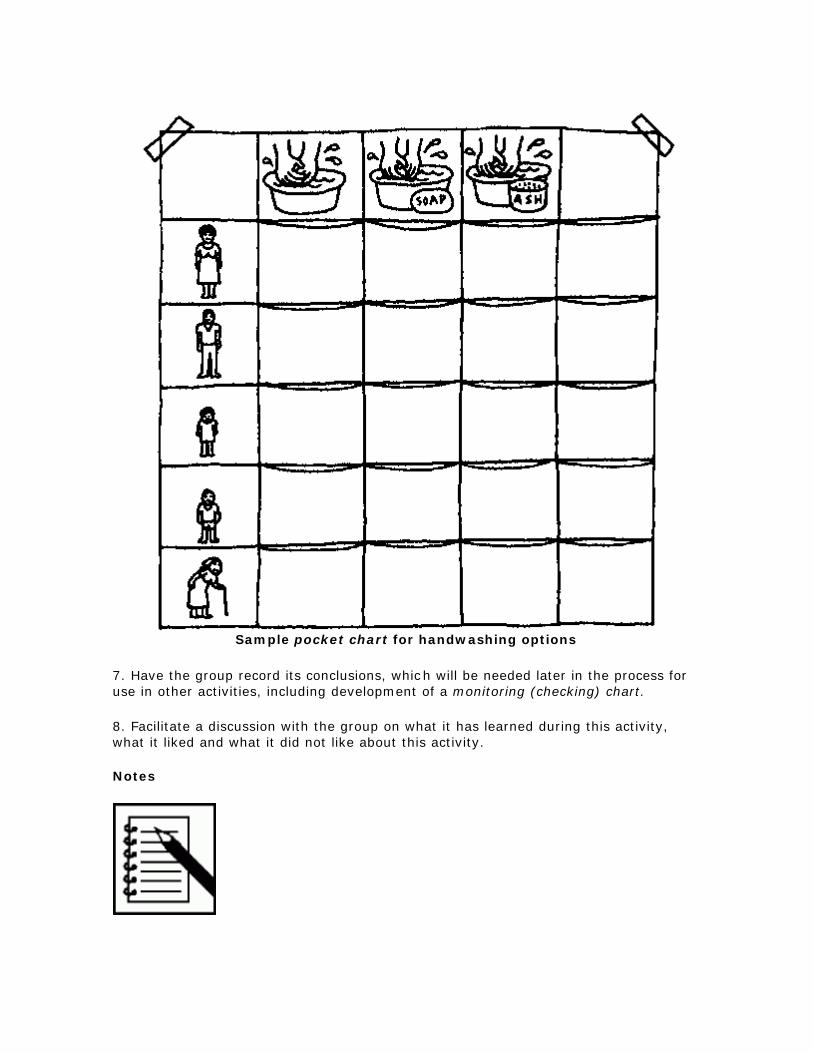
2. Show the group the sample pocket chart. Explain to the group:
- what a pocket chart is
- how it can be used to collect information confidentially on what people are actually doing in the community.
3. Ask the group to identify which behaviours or practices it would like to know more about. When these are clear, set up the pocket chart.
4. Once the chart has been set up, show how the information is collected by identifying your own position in the column on the left-hand side and then your option in the row along the top, and then placing a token to indicate the option you use. (The left-hand side column consists of pictures of different types of individuals, such as a woman, a man, a boy, a girl, an old woman. In other words, in placing your token, you identify what type of individual you are, as well as the option you use). Remove your token after the demonstration, emphasizing that this was just an example. You may have to check that participants identify the space in the column which they must start from, and then identify the option they use. In other words, there are two steps to this process: first, who/where am I?; second, which do I do/use?
5. The pocket chart must be set up in such a way that participants can place their tokens without being seen by others. Ask the participants to place their tokens.
6. Once all participants have placed their tokens, ask a volunteer to count the tokens and display the totals.
Participants should discuss the meaning of the totals. For example:
- Which options are the most (least) commonly used? Why?
- What environmental factors influence people's choices?
- What other options do people favour? Why?
- How do/would these choices affect the health or well-being of the community members?
- If the rest of the community voted, would its pocket chart look like the group's?
- How do actual practices compare with what the group identified as either good or bad for health during the Good and bad hygiene behaviours activity?
- What could be changed?
- What changes in behaviour would the group consider desirable or beneficial, and how could these be achieved?
7. You will need to discuss with the group how representative it wants to make the information collection:
- Does it want everyone in the community to be represented?
- Could a smaller group be chosen from among the community which would be representative of the total population?
- How could the group choose such representatives?
8. Facilitate a discussion with the group on what it has learned during this activity, what it liked and what it did not like about this activity.
Notes
1. When this tool is being used for the first time, confusion can be avoided if one drawing only at a time is placed in the left-hand side column. Participants then place their tokens to identify their options. After this, the next drawing can be placed below the first one in the left-hand side column. Continue in this way until all the drawings in the left-hand side column are in place. This process will inevitably be slower than setting all the drawings up at once at the beginning.
2. Stress the need for people to be honest when placing their tokens, that this is a learning exercise and that, as such, it is important that the information collected be true to life.
3. This activity can also be used to collect more information by asking more than one question and using more than one type, colour or shape of token. If the group, for example, wanted to know which options were used occasionally as well as which were used frequently, each participant could use one type of token (say green) to answer the first question, and a different type of token (say red) to answer the second question.
4. Make sure the set of drawings reflects all the options present in the community. Be prepared to include or make additional drawings to represent additional options mentioned or suggested by the group during the activity.
5. Be prepared with ways to keep the rest of the group busy while members are taking turns to place their tokens, since this process can be quite long. Or else, do the pocket chart activity during a break.
6. The tokens should be counted in front of the group so that everyone can see that the counting is done accurately. The tokens should be taped onto sheets of paper or directly onto the pocket chart in order to give immediate visual feedback of the results, and then counted so that none are lost or tampered with. If transparent plastic pockets are used, the tokens can be assessed visually by removing the card covering them.
7. The pocket chart is a good evaluation tool. Information collected at this early stage can be compared with information collected in the same way, later in the programme. By comparing the two sets of information, the group can see whether changes in behaviour are taking place. Remember that the pocket chart can be used over and over for different investigations, for each question or point the group wants to examine.
Activity 4: How diseases spread
Purpose
• to help participants discover and analyse how diarrhoeal disease can be spread through the environment
Time
• 1-1½ hours
Materials
• tool: transmission routes • large sheets of newsprint (paper) • coloured pens or marker pens • sticky tape
Sample transmission routes drawings
What to do
1. If there has been a break between this activity and the previous one, start with a group discussion to review what was learned or decided at the previous meeting.
2. Ask the participants to form groups of 5-8 people.
3. Give each group a set of materials and the task using these words:
“One drawing shows a person defecating openly [use local term]/an inadequate latrine [choose whichever is appropriate for the community]. Another shows a person's mouth. [Show the drawings.]
“Please use the rest of the drawings to try and create a diagram showing the different ways in which faecal matter [use an appropriate local description] might come in contact with the person. You can draw arrows between the different drawings to show the ways that this might happen.”
4. When the groups have made their diagrams, ask each group to show and explain its diagram to the other groups. Let it respond to any questions raised by the other groups.
5. Discuss the similarities and differences between the various diagrams.
6. Now facilitate a discussion to help the group use this new knowledge to examine its own situation.
Discuss and identify:
- the transmission routes in the community - the problem areas and hygiene behaviours that are putting people at risk of infection.
If possible, ask a participant to record the problem areas in the group's community as they are discussed.
7. Facilitate a discussion with the group on what it has learned during this activity, what it liked and what it did not like about this activity.
Notes
1. Some participants may at first be shocked at the content of this activity. There may be some disbelief that faeces can be transmitted to the mouth. The best way to deal with this situation is to get the group working together as quickly as possible. Those participants who are more receptive than others will help the disbelievers to become more involved.
2. Do not be concerned if each group does not identify all the faecal-oral routes or if its diagrams do not look like the “F-diagram”. It is enough if it has identified some of the routes. The routes must nevertheless be clearly defined in order to be useful in future activities. Other group members may identify additional, different routes. These can be discussed and a more complete drawing formed.
3. Do not prompt or direct the groups when they are trying to create their diagrams.
4. If the group as whole does not manage to clearly identify the transmission routes, try to find out why. It may be useful to hold a group discussion to evaluate the activity, which can then be tried a second time.
5. This activity can be adapted for use when investigating other diseases such as intestinal worms, schistosomiasis, guinea-worm disease and dengue fever.
Step 3: Planning for solutions
Seven steps to community planning for the prevention of diarrhoeal disease
STEP 3 ACTIVITY TOOL
3. Planning for 1. Blocking the spread of disease 1. Blocking the
solutions 2. Selecting the barriers 3. Tasks of men and women in the community
routes 2. Barriers chart 3. Gender role analysis
This step has three activities.
1. Blocking the spread of disease helps group members discover ways to prevent or “block” diarrhoeal disease from being spread via the transmission routes identified in the previous activity.
2. Selecting the barriers helps the group to analyse the effectiveness and ease of actions to block transmission routes and choose which they want to carry out themselves.
3. Tasks of men and women in the community helps the group identify who would be able to undertake additional tasks to introduce the changes necessary to prevent diarrhoeal disease.
After completing these activities, the group members should have identified various ways to prevent diarrhoea in the community.
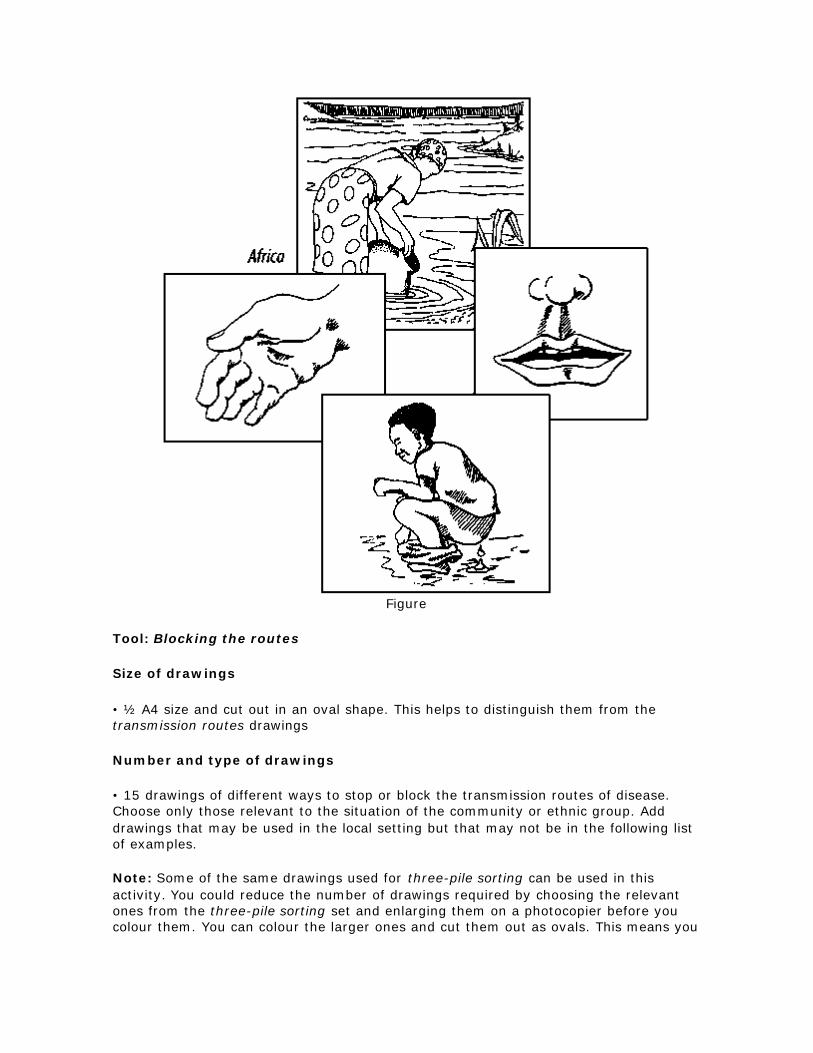
Activity 1: Blocking the spread of disease
Purpose
• to identify the actions that can be taken to block the disease transmission routes
Time
• 30 minutes to 1 hour
Materials
• tool: blocking the routes • blocking the routes drawings (1 set for each small group) • transmission routes diagrams made during the previous activity • paper • coloured pens or marker pens • sticky tape
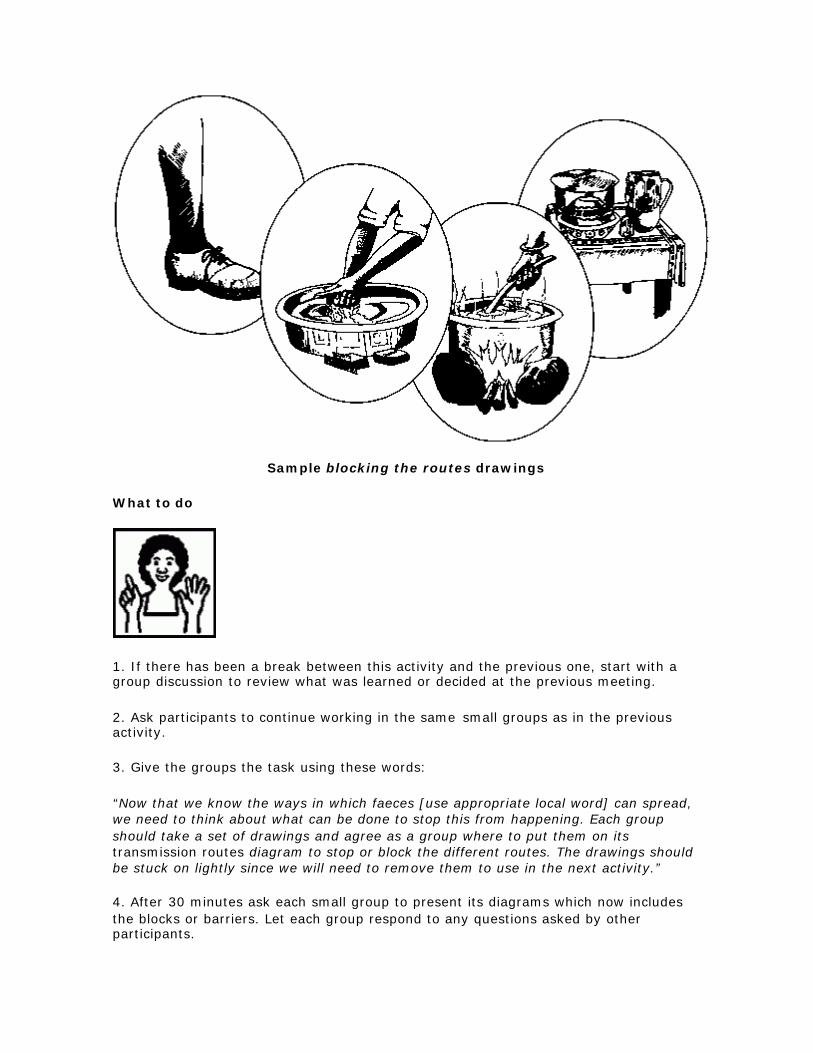
Sample blocking the routes drawings
What to do
1. If there has been a break between this activity and the previous one, start with a group discussion to review what was learned or decided at the previous meeting.
2. Ask participants to continue working in the same small groups as in the previous activity.
3. Give the groups the task using these words:
“Now that we know the ways in which faeces [use appropriate local word] can spread, we need to think about what can be done to stop this from happening. Each group should take a set of drawings and agree as a group where to put them on its transmission routes diagram to stop or block the different routes. The drawings should be stuck on lightly since we will need to remove them to use in the next activity.”
4. After 30 minutes ask each small group to present its diagrams which now includes the blocks or barriers. Let each group respond to any questions asked by other participants.
5. Facilitate a discussion with the group on what it has learned during this activity, what it liked and what it did not like about this activity.
Notes
1. Stress that this activity is a continuation of and builds on the transmission routes diagrams produced in the previous activity. The groups may want to change or add to some of the routes that they drew before, since they may have discussed these routes among themselves and gained additional knowledge in the meantime. These changes are productive. Ensure they are discussed.
2. Again, there is no one right answer as to which barrier should be put on which transmission route. The minimum requirement is that the group has tried to block all the routes it has identified.
3. It is useful to have blank paper and pens or marker pens so that the group can create its own blocks if the existing drawings do not cover all situations.
4. It would be a good idea to put the diagrams up on the wall of the community centre (or other meeting place), along with the community map and other materials.
Activity 2: Selecting the barriers
Purpose
• to analyse how effective the blocks are and how easy or difficult they would be to put in place
Time
• 30 minutes to 1 hour
Figure
Materials
• tool: barriers chart • group's transmission routes diagrams with blocks • sticky tape, pins, tacks, etc. • pens and paper
Figure
What to do
1. If there has been a break between this activity and the previous one, start with a group discussion to review what was learned or decided at the previous meeting.
2. Keeping the same small groups from the previous activity, give them the task using these words:
“Remove the blocks from the transmission routes diagram and place them where they belong on this chart. [Show the chart and explain how it works if necessary.]
You might use words such as the following to explain the chart and how it works:
“This column [point to column on the left-hand side of the chart] has these choices: “Very effective”, “In-between” and “Not very effective” Would you say this barrier [show drawing] is very effective, in-between, or not very effective? [Place drawing temporarily.]
“This row [point to the row across the top of the chart] has these choices: “Easy to do”, “In-between” and “Hard to do”. Would you say this barrier [point to the same drawing] is easy to do, in-between, or hard to do? [Point to choice.]
“Then we say that this barrier is this effective and this easy. [Point out the position that was created by selecting an option in the column and an option in the row.] This barrier, therefore, goes here. [Place drawing temporarily.] Now you do yours.”
3. When the groups have completed the task, invite them to share their charts and discuss:
- which barriers the group would like to use in its community - the practicalities that would be involved in putting the barriers in place.
4. Facilitate a discussion with the group on what it has learned during this activity, what it liked and what it did not like about this activity.
Notes
1. This type of chart may be a new concept for the group so it might be a good idea to explain its elements or components step by step. Make it clear that this is only an explanation. Participants should make their own placements.
2. If a group is unclear about the effectiveness of certain barriers, do not correct it. Instead, think of questions which might help it to come to a decision.
3. Do not be concerned at this stage if the group does not know enough to be able to judge how effective the barriers might be. There will be opportunities later in the process to introduce additional information to increase the quality of decision-making.
4. If the activity seems confusing, it may be done as follows. Divide the group in two and give each a complete set of barriers. Ask one to do a three-pile sorting for “effectiveness” (very effective, in-between, not very effective), and the other to do a three-pile sorting for “how easy the barriers are to put in place” (easy to do, in-between, hard to do). Then compare the two sets.
Another way of carrying out the activity is to do a three-pile sorting of the barriers aimed at “effectiveness”. Then take the “most effective” barriers and do another three-
pile sorting, this time aimed at “easy to do”. Repeat with a three-pile sorting for “in-between effective” barriers.
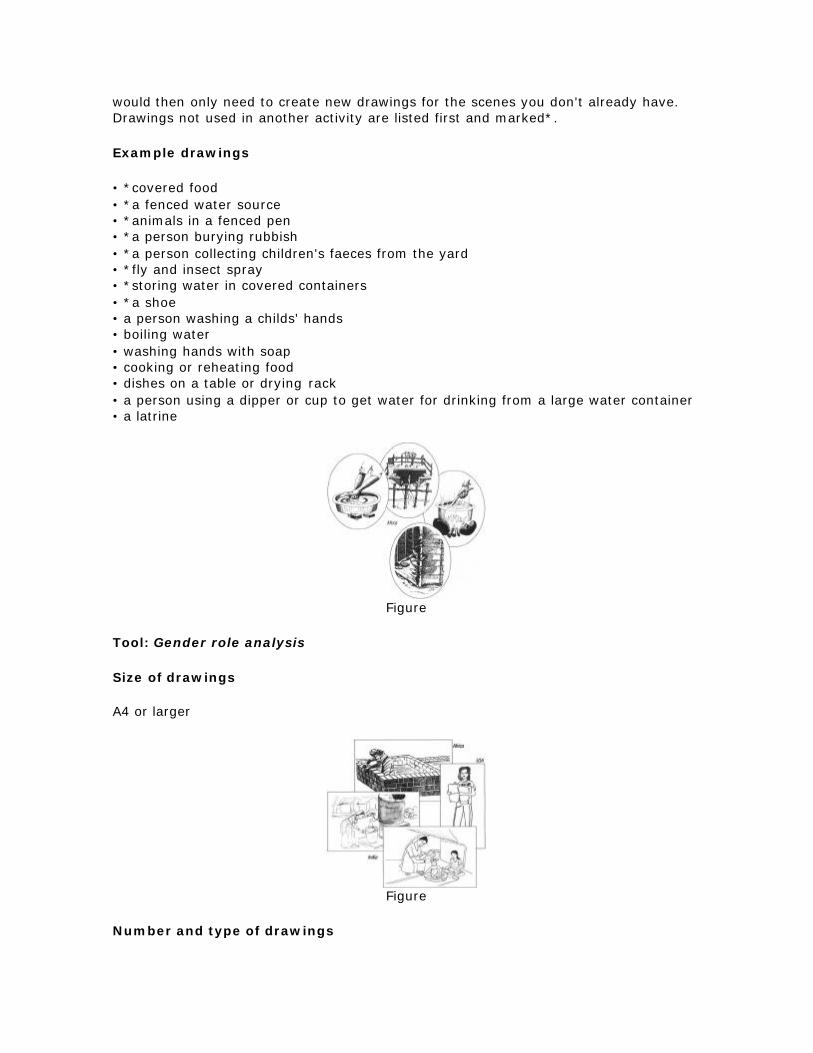
Activity 3: Task of men and women in the community
Purpose
• to raise awareness and understanding of which household and community tasks are done by women and which are done by men • to identify whether any change in task allocation would be desirable and possible
Time
• 1 hour
Materials
• tool: gender role analysis • 3 separate large drawings of: a man, a woman, and a man and a woman together • 12 or more task drawings • pens and paper
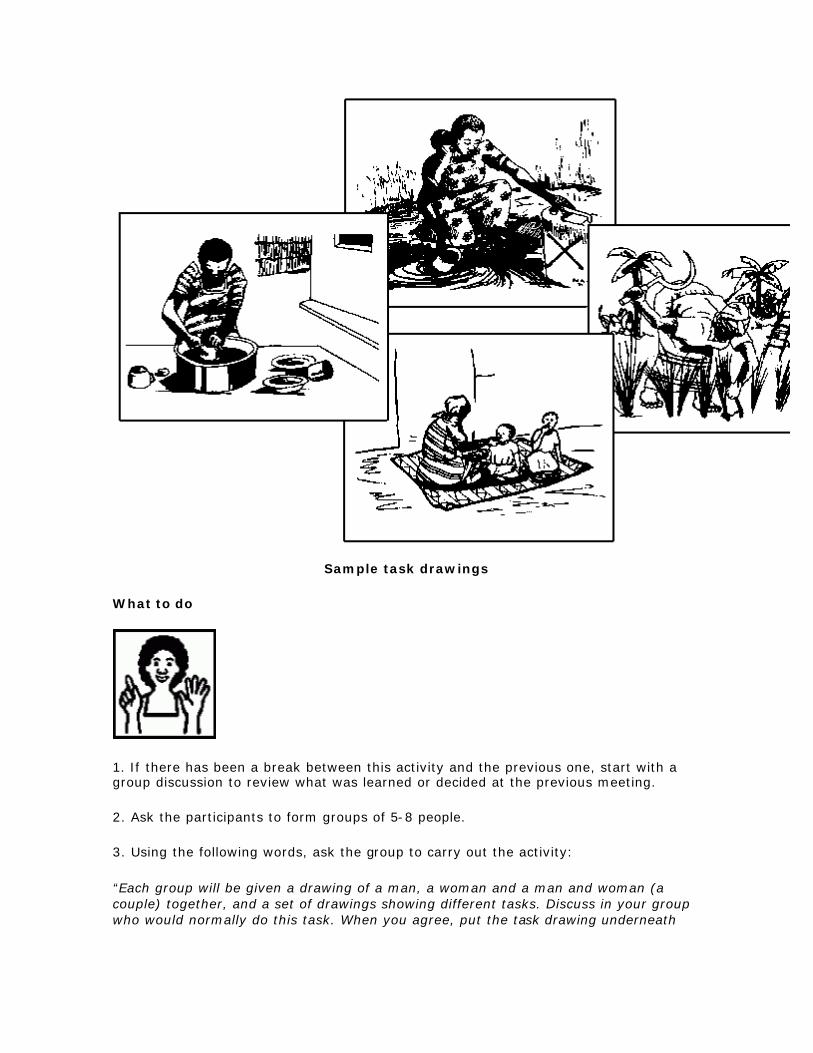
Sample task drawings
What to do
1. If there has been a break between this activity and the previous one, start with a group discussion to review what was learned or decided at the previous meeting.
2. Ask the participants to form groups of 5-8 people.
3. Using the following words, ask the group to carry out the activity:
“Each group will be given a drawing of a man, a woman and a man and woman (a couple) together, and a set of drawings showing different tasks. Discuss in your group who would normally do this task. When you agree, put the task drawing underneath
the drawing of the man, woman or couple based on what you decide. The drawing of the man and woman together means that both sexes perform the task.”
4. Let the groups work on their own and discuss their findings. They can draw and add other tasks. You should provide them with blank paper for this purpose.
5. Once the activity has been completed, ask each group to present its selection to the rest of the participants, explain its choice and answer any questions.
6. Facilitate a group discussion on:
- who does what tasks - the workloads of men and women - how differences in workloads might affect task allocation for overcoming diarrhoeal disease - the advantages and disadvantages of changing tasks done by men and women - the potential for changing the tasks done by men or women.
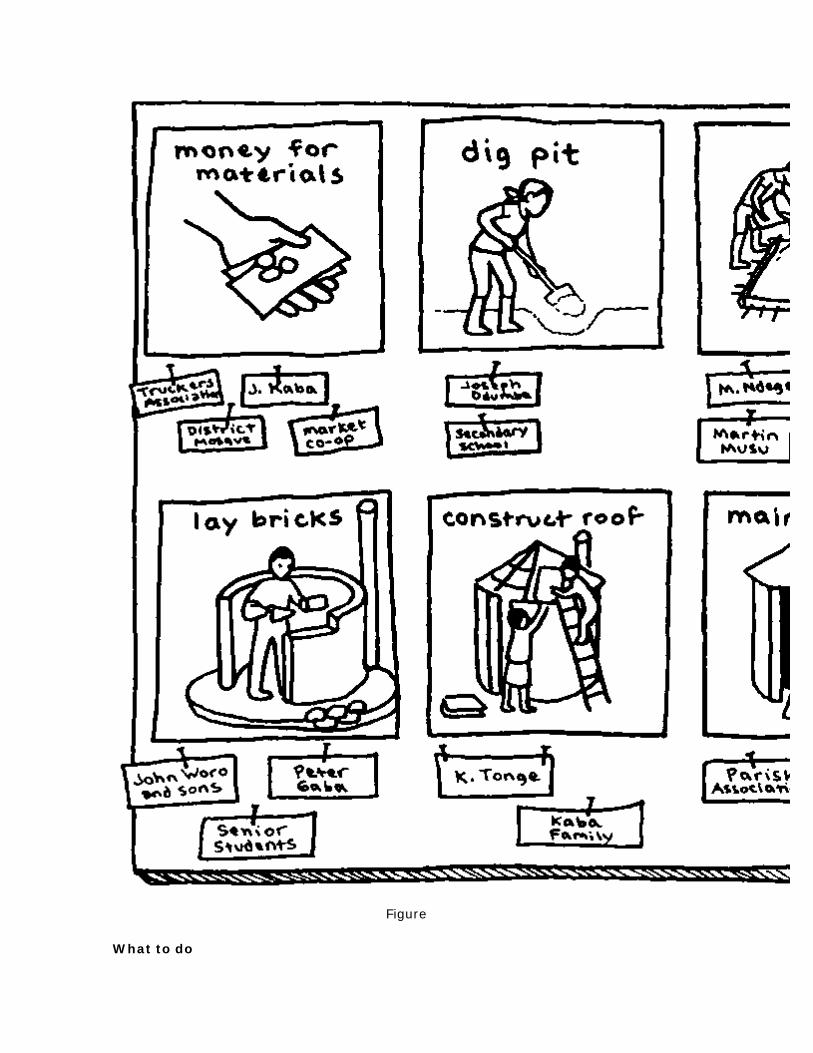
7. Ask the group to identify roles which could be changed or modified in order to improve sanitation and hygiene, and record these conclusions for use in monitoring (checking) later on.
8. Facilitate a discussion with the group on what it has learned during this activity, what it liked and what it did not like about this activity.
Notes
1. During this activity men sometimes complain that drawings of their usual tasks have not been included in the set. This is because the set focuses mostly on tasks related to domestic and community hygiene and sanitation, and in most societies these tasks fall to women. If this happens, ask the men to make drawings of tasks they perform, to add to the activity.
2. The group may decide that three drawings (man, woman, and both together) are not enough and choose to add drawings of boys and girls. This is fine, but the analysis should focus on gender and not age.
Step 4: Selecting options
Seven steps to community planning for the prevention of diarrhoeal disease
STEP 4 ACTIVITY TOOL
4. Selecting options
1. Choosing sanitation improvements 2. Choosing improved hygiene behaviours 3. Taking time for questions
1. Choosing sanitation improvements helps the group to assess the community's sanitation situation and decide on the changes it wants to make.
2. Choosing improved hygiene behaviours helps the group to decide which hygiene behaviours it wants to work on with the community.
3. Taking time for questions gives group members a chance to ask questions and obtain feedback from fellow participants, thus increasing the confidence and self-reliance of the group.
By the end of this step, the group will have made an informed choice about the changes to facilities and hygiene behaviours it wants to make.
Activity 1: Choosing sanitation improvements
Purpose
To help participants:
• describe the community's sanitation situation • identify an option or options for improving sanitation • discover that improvements can be made step-by-step
Time
• 1-2 hours
Materials
• tool: sanitation options • pens • large-sized paper to which drawings can be attached (optional) • sticky tape
Figure
What to do
1. If there has been a break between this activity and the previous one, start with a group discussion to review what was learned or decided at the previous meeting.
2. Ask the participants to form groups of 5-8 people.
3. Give the group the task, using these words:
“Each group will receive a set of sanitation options. Look at the options and arrange them as a “ladder” starting with the one you consider worst at the bottom and ending with the one you consider best at the top.”
4. Give each group an identical set of drawings.
5. It may be useful to have some paper and pens so that participants can draw any methods which they want to include but which are not in the set of drawings.
6. Give the groups about 20 minutes to make their ladders. Then visit each group and give it the next task.
“Now decide where the community is at the present time and where you would like it to be one year from now. Discuss the advantages and difficulties that you might meet in trying to move to different steps on the ladder.”
7. When the groups have completed this task, ask each one to explain its sanitation ladder to the other participants.
8. After the presentations, encourage a group discussion covering:
- the similarities and differences in the way the options have been arranged as steps
- the similarities and differences in terms of where the groups have placed the community now and in the future
- the options that have been identified as best for the community
- the advantages of each option
- the difficulties or obstacles that would make moving up the ladder difficult
- how these decisions were reached
- what information the group thinks it might need to be able to compare options more effectively.
9. Encourage the group to agree on one sanitation ladder.
10. Explain to the group that the next activity will help it to develop a plan to get from where it is now to the situation or situations it would like to move to in the future.
11. Facilitate a discussion with the group on what it has learned during this activity, what it liked and what it did not like about this activity.
Collecting information
It is a good idea at this time for the group to quantify the community's current sanitation situation. This is so that realistic goals can be set. The tools that can be used for this include:
- community map to locate and specify the types and number of sanitation facilities
- pocket chart so that the group can give information about individual or family use of different types of facilities
- a community census.
All the conclusions should be recorded for use in future activities which will include development of a monitoring chart.
Notes
1. Before you begin this activity it would be helpful to have information on:
- the design principles of different sanitation options - the effectiveness of different options - the maintenance and ongoing servicing requirements of each type of option - the costs of different sanitation options - the costs (time and money) of operation and maintenance - the subsidies available - the durability of the structure and the sustainability of each system.
2. The sanitation ladder shows that improvements can be made step by step. The idea that the community can progress up the ladder at different rates can be very appealing to groups. They realize that changes can be made over time, at a pace that is appropriate and manageable for them. When groups discover this, it can inspire them to become more involved.
3. When selecting sanitation options it is important to consider the amount of water each option would require. The risk of contaminating the environment and existing water sources must also be considered. Make sure the participants discuss these issues.
4. Some options are equally good. Thus two options can be placed side by side - that is, the ladders can have “branches”. The idea of progression and choosing for the future is more important than the shape of the ladder.
Other types of ladders
This activity can also be used to deal with other questions and other problems. For instance the sanitation ladder can be adapted to make a water ladder. The activity would be conducted in the same way as described for sanitation options, but using drawings showing different water options for improving the quality, quantity and access of water supply. The options shown would need to range from the most simple to the more complex. Additionally, drawings of unsafe or unprotected water collection would have to be included since some communities would be starting from this step. However, water supply options tend to be fewer, so a water ladder is likely to have fewer steps. Sometimes, in fact, only two situations apply: the current traditional water source and an alternative or improved water supply.
Activity 2: Choosing improved hygiene behaviours
Purpose
To help the group identify hygiene behaviours that it:
• wants to change • wants to encourage and reinforce • wants to introduce into the community
Time
• 1 hour
Materials
• tool: three-pile sorting drawings used in Step 2: Activity 2.
Sample drawings of hygiene behaviours
What to do
1. If there has been a break between this activity and the previous one, start with a group discussion to review what was learned or decided at the previous meeting.
2. Ask the participants to form groups of 5-8 people.
3. Give the groups the task using these words:
“Choose from the three-pile sorting drawings one or more hygiene behaviours that you agree on as being healthy and which you would like to encourage, and one or more that you agree on as being unhealthy and which you would like to discourage.
4. Give the groups 10-20 minutes to select their hygiene behaviours. Then ask each group to explain its selection to the other participants.
5. Facilitate a group discussion aimed at:
- reaching an agreement about which good and bad behaviours are the most important to work on
- how to influence the community to:
- use good practices all the time - accept new behaviours - stop bad practices.
6. At this point it may be important to know how common the selected behaviours are in the community. This information could be used for setting specific goals. The tools that can be used to obtain this information are: pocket chart and/or a community survey.
Below is an example of how a pocket chart can be used to measure the most common types of behaviour in the community in relation to hand washing after defecation.
Set up a pocket chart with the row across the top showing the following options for handwashing after defecation: water only, soap and water, dirt or ash, and nothing. The vertical column could show: man, woman and child. Participants then use two tokens of different colour and/or shape; one to indicate the options usually used, and another to indicate the options sometimes used.
Sample pocket chart for handwashing options
7. Have the group record its conclusions, which will be needed later in the process for use in other activities, including development of a monitoring (checking) chart.
8. Facilitate a discussion with the group on what it has learned during this activity, what it liked and what it did not like about this activity.
Notes
1. Past experience has shown that programmes which include changes both in hygiene behaviours and in facilities are more effective in controlling diarrhoeal disease than those which only include changes to facilities. There is often a tendency to concentrate more on physical facilities, so this activity aims to make sure that hygiene behaviours are not overlooked.
2. How to introduce new hygiene behaviours and/or reinforce existing ones will be addressed in Step 5: Planning for new facilities and behaviour change.
Activity 3: Taking time for questions
Purpose
• to provide an opportunity for participants to ask questions about the process (or other matters), and to obtain information and feedback from other participants • to help the group recognize the wealth of knowledge and information it possesses collectively
Time
• 1-2 hours
Materials
• tool: question box • paper and pens • container (such as a basket, a hat or a box)
Figure
What to do
1. If there has been a break between this activity and the previous one, start with a group discussion aimed at reviewing what was learned or decided at the previous meeting.
2. This activity can be carried out successfully as one group, provided the group does not contain more than 40 people.
3. Give the group the task using these words:
“Could everyone please write on a slip of paper or make a simple drawing of a question that they would like answered. Once you have written or drawn your question, fold the paper in half.”
4. Ask a participant to collect all the questions in the container. This container becomes the question box.
5. When all the questions have been collected, pass the question box to one person at a time and ask each person to pick out a slip of paper and answer the question. If
anyone picks their own question, they should be asked to replace it and pick another one.
6. If a participant cannot answer a question, encourage someone else in the group to provide an answer.
7. Facilitate a discussion with the group on what it has learned during this activity, what it liked and what it did not like about this activity.
Notes
1. Alternatively, if some participants cannot write, ask everyone to think of a question and then to mark their piece of paper. Or each participant can be given a piece of different coloured paper. The pieces of paper are then collected in the question box. Next, the question box is passed around and when that person's marked or coloured piece of paper is chosen, they say their question out loud. With this method, the questions are not anonymous but everyone can participate.
2. This activity can help to remind the group that it does not need to rely so much on outside experts. Collectively, it has most of the information and knowledge it needs.
3. Some of the questions may not relate directly to the subject. But they should not be put aside. They may indicate different concerns, and also serve as a positive distraction. Humour should not be discouraged!
Step 5: Planning for new facilities and behaviour change
Seven steps to community planning for the prevention of diarrhoeal disease
STEP 5 ACTIVITY TOOL
5. Planning for new facilities and behaviour change
1. Planning for change 2. Planning who does what 3. Identifying what might go wrong
1. Planning posters 2. Planning posters 3. Problem box
This step has three activities:
1. Planning for change helps the group plan the action steps for implementing the solutions it has decided on.
2. Planning who does what helps the group to assign responsibility for each action step.
3. Identifying what might go wrong enables the group to foresee possible problems and plan ways to overcome them.
Activity 1: Planning for change
Purpose
• to enable participants to develop a plan to implement changes in sanitation and hygiene behaviours
Time
• 2 hours
Materials
• tool: planning posters • the “now” and “future” sanitation options (from Step 4: Activity 1) • sticky tape • pens and paper
“Now” and “future” sanitation options and planning posters
What to do
1. If there has been a break between this activity and the previous one, start with a group discussion to review what was learned or decided at the previous meeting.
2. Put the sanitation option drawings (or drawings representing other options) developed in Step 4 up on the wall.
3. Ask the participants to work in groups of 5-8 persons. Give the participants the task using these words:
“Do you agree that this [point to the sanitation option(s) that the group considers represent their current situation] is a common situation in the community? And do you agree that this [point to the group's preferred “future” option] would be a desirable future situation?
“Let's now work out what needs to be done to move from the present situation to where you want to be. To do this we need to develop a plan to “fill in the gap” To help you do this, each group will be given a set of planning posters showing some of the steps that might be needed.
“Each group should look at the planning posters and arrange them in the order it thinks would bring about the desired change most effectively. Use the blank paper to draw any additional steps that you would like to include.”
4. Give each group an identical set of “now” and “future” drawings and planning posters.
5. Give the group about 30-45 minutes to work out its arrangements of steps, and then ask each group to explain its plan to the other participants. Each group should be prepared to answer any specific questions which might arise, although a more general discussion or debate should be limited until each group has had a chance to present its work.
6. After the presentations, encourage a group discussion aimed at reaching an agreement on a common plan.
The discussion should cover:
- the similarities among and differences between the steps chosen by each group, and their order
- what difficulties they might come across in trying to carry out these steps
- what resources they might need to carry out these steps
- the amount of time necessary to carry out the plan.
7. Facilitate a discussion with the group on what it has learned during this activity, what it liked and what it did not like about this activity.
Notes
1. The “now” and “future” drawings4 may refer to changes in both facilities and behaviour as identified by the group using the sanitation options and three-pile sorting tools.
4 In other guides, a tool using “now” and “future” drawings is called story with a gap.
2. Be prepared to do this planning activity for all the changes the group wants to introduce. Remember the purpose of the activity is to simplify the planning process.
One group may find it easier to make one plan for changes to facilities, one for improving maintenance of existing systems and a third for behavioural change.
Another may be able to look at the three together. There is no one way or right plan. Your role is to help the group simplify the process so that it becomes manageable.
3. Don't worry if the group is not willing to make a plan to introduce all the changes it has identified. It is enough at this time that it is willing to plan to introduce some of the changes. Once these have been introduced successfully, the results will inspire the group to keep on with its work and plan for further changes. A smaller plan which group members are highly committed to is more likely to be successful than a larger, less well-supported plan.
4. The original community map can be used to help the group think about the impact of the changes it is planning to introduce.
5. Discussion may already have taken place or questions may have been raised about who should have responsibility for doing certain parts of the plan. Planning who does what, the next activity, helps groups to assign responsibility for tasks effectively so that the tasks are done properly and on time.
Activity 2: Planning who does what
Purpose
• to help identify who will take responsibility for carrying out the steps in the plan • to set a timeframe for implementing the plan
Time
• 1-2 hours
Materials
• tool: the planning posters agreed cm at the previous session • pieces of paper or card for writing down names
Figure
Figure
What to do
1. If there has been a break between this activity and the previous one, start with a group discussion to review what was learned or decided at the previous meeting.
2. Put the planning posters - which the group agreed represented the steps in its plan - up on the wall, in one straight row, in the order that the group agreed to.
3. Give the group the task using these words:
“These planning posters [point to them] show the steps that you decided are required to put your plan into action. Now you need to decide who should carry out each of these steps. Discuss together each step and the type of personal qualities and skills needed to carry it out. Decide who should carry out each step. When you have decided who will be responsible and for what, write the names on pieces of paper or card. Write men's names in one colour and women's names in another. Then stick each piece of paper or card beneath the corresponding planning poster.”
4. Referring to earlier discussion and the conclusions reached during Tasks of men and women in the community, invite the group to review the task allocation in terms of the impact on men and the impact on women, and to make any adjustments at this time if it wishes.
5. When the tasks have been allocated, ask the group to discuss and agree on who will coordinate the carrying out of the steps in the plan. Write the name or names of the coordinators above the planning posters.
6. Invite the selected person or persons to coordinate the rest of the meeting. This will cover developing a timeframe for completing each part of the plan.
7. Ask the group to discuss and agree on the amount of time each step will take to complete. Record this information above the planning posters.
8. Facilitate a discussion on:
- the importance of seeing that things are being done on time - how the group can check that people are doing what they are responsible for - what the group can do if tasks are not carried out.
9. Facilitate a discussion with the group on what it has learned during this activity, what it liked and what it did not like about this activity.
Notes
1. Do not be surprised, if, during this task allocation, more steps are added to the plan. Once people become aware they are going to have to do something themselves, they will start to think more carefully about what it might take to do it.
2. If the group is reluctant to accept responsibility itself and allocates most of the tasks to outsiders, it will need to consider:
- why it is not prepared to take responsibility for tasks
- whether it really believes that hygiene behaviour or sanitation is a problem and, if so, whether this plan will help it overcome this problem
- why representatives of these external groups have not been included as participants
- how external representatives could be invited to join the group
- whether these external representatives would be committed to carrying out a plan they did not help to develop
- whether this plan will work on the basis of this task allocation.
If the group does not believe in the importance of sanitation, this could be a key reason why it does not support the plan. In which case, you may need to go back and repeat earlier activities or find other ways for the group to discover key information.
3. Deciding who should do what can be very time-consuming. This activity may have to be carried out over a series of sessions to ensure adequate discussion time. A pocket chart can be useful for choosing people for the tasks. Create a pocket chart as follows:
- Put drawings of each different task in the spaces of the horizontal row across the top of the chart.
- Put drawings, names or some other means of identifying the possible candidates in the spaces in the column on the left-hand side of the chart.
- Give each voter one token for each task.
- Show the group how it must place the token for each task in the pocket in the column below the drawing of the task, in the row that represents the person it thinks is best qualified to carry it out.
This activity could be preceded by a discussion of the possible qualities that one might look for in the person selected to perform a particular task.
4. There is no right way for the group to allocate tasks. You should keep in mind the local practices usually used for assigning tasks to people. Selections should not be based solely on favouritism or popularity.
You could suggest to the group that it takes into account the personal qualities and skills defined by the group as necessary to complete the task. You could also suggest that those selected should be asked whether they think that they are the right people for the tasks they have been assigned.
Encourage the group to achieve a cross-section of the community (in terms of age, ethnic background, religion, education, and other characteristics) when making their selection.
5. Help the group by reminding it that making plans for activities such as health education sessions, which will be necessary if the community is to be encouraged to change hygiene behaviours, is just as important as making plans for physical changes, such as building new latrines.
6. Don't worry if the group, having completed the Planning who does what for one plan, then wants to leave the other plans until later. It is enough if the planning has been carried out completely from start to finish for one of the changes the group wants to introduce. Hopefully, if one plan can be introduced successfully, this will inspire the group to continue with its work. Also, the group will have developed the skills necessary to follow later plans through.
7. Ask the group to display the planning posters, including the names of people responsible for each step, in a public place in the community. This will help to keep everyone informed of what is happening.
Activity 3: Identifying what might go wrong
Purpose
• to get the group to think about possible problems in implementing the plan, and devise ways of overcoming them
Time
• 1 hour
Materials
• tool: problem box • paper and pens • container (such as a basket, a hat or a box)
Figure
What to do
This activity is similar to the Taking time for questions activity carried out during Step 4, and is conducted in basically the same way.
1. If there has been a break between this activity and the previous one, start with a group discussion to review what was learned or decided at the previous meeting.
2. Present the task as follows:
“Could everyone please write on a slip of paper a problem they think might arise. Write this problem in the form of a question or a drawing. For example: “What would we do if the person trained to do the maintenance leaves the community?”
3. Ask a group member to collect all the problems in the container. This container becomes the problem box.
4. When all the problems have been collected, pass the problem box to one participant at a time and ask each participant to pick out a slip of paper and answer the question.
Participants who pick their own question should be asked to replace it and pick another.
5. Give the group plenty of time to discuss the answers. If a participant cannot answer a question, the question can be answered by someone else in the group.
6. Facilitate a discussion with the group on what it has learned during this activity, what it liked and what it did not like about this activity.
7. Optional: If there is time, it may be helpful to have the group sort the problems into different categories. Suggestions for two-pile sorting of problems are:
- pile 1:
start-up problems pile 2:
ongoing problems
- pile 1:
technical problems pile 2:
social problems
- pile 1:
problems the group can deal with by itself
pile 2:
problems the group needs outside help to solve
Notes
1. If necessary, more time can be allowed for participants to think of questions. For example, the activity could begin before a lunch break or at the end of the day, and continue after the break or on the next day.
Step 6: Planning for monitoring and evaluation
Seven steps to community planning for the prevention of diarrhoeal disease
STEP 6 ACTIVITY TOOL
6. Planning for monitoring and evaluation
1. Preparing to check our progress
1. Monitoring (checking) chart
This step has only one activity: Preparing to check our progress. In this activity, the group fills in a chart (see illustration) for monitoring (checking) its progress towards achieving its goals. Means are identified for measuring progress, how often this needs to be done and who will be responsible for doing it.
Important note
This activity can involve a lot of writing. However, if your participants have difficulty in reading and writing, you will need to work out ways of doing the activity using drawings and as little writing as possible. For example:
- instead of writing the goals in words on the chart, participants could place the drawings that represent the activities/facilities they want to carry out/construct under the goals headings
- write numbers only if people are able to understand them; for instance, participants could write the number of facilities the group wants to build beside the drawings of these facilities
- drawings or symbols can be used to represent ideas or words
- participants could choose a symbol such as a flower, bird or colour to represent themselves to put on the chart under the heading of who will be responsible for carrying out activities or ensuring that they are carried out.
Activity 1: Preparing to check our progress
Purpose
• to establish a procedure for checking progress • to decide how often checking should be done and who should be responsible for this • to set a date for the evaluation activity, which will take place with the wider community at some point in the future
Time
• 2 hours
Materials
• tool: monitoring (checking) chart • paper, pens, or whatever is available for drawing • sanitation option drawings of the facilities that the community would like to have (optional) • three-pile sorting drawings (optional) (chosen during the Choosing
improved hygiene behaviours activity)
Figure
What to do
1. If there has been a break between this activity and the previous one, start with a group discussion to review what was learned or decided at the previous meeting.
2. Have the participants work together in one group. Show the drawings which represent their goals.
3. Have a monitoring chart ready (see illustration on previous page).
4. Ask the persons who were selected to manage specific tasks (these were chosen during the Planning who does what activity) to facilitate this activity, using the following words:
“I would like those of you who were selected during the Planning who does what activity to lead the group in this activity. You will be helping the group to fill in those parts of the chart which it can fill in at this stage, and to agree on how it can continue to carry out this checking process in the future. “Stick the drawings which represent your goals on the left-hand side of the chart. Continue to fill in the rest of the chart.”
5. After the chart has been filled in, facilitate a group discussion on:
- how to measure the progress being made - how often progress should be measured - who should be responsible for measuring progress - how to involve other members of the community in checking progress and the achievement of project goals.
6. Ask the group to set a date for the project evaluation (Step 7).
7. Facilitate a discussion with the group on what it has learned during this activity, what it liked and what it did not like about this activity.
8. End the session with a party, celebration, prayer or other activity to celebrate the group's achievements.
Step 7: Participatory evaluation
Seven steps to community planning for the prevention of diarrhoeal disease
This step is carried out after the community has implemented its plan, perhaps six months or one year after the start of the programme.
The participatory evaluation should involve as many people as possible from the community as well as other community workers, officials, and perhaps representatives of neighbouring communities. This step should be fun and a celebration of the group's achievements. During the evaluation the group will identify:
- how much has been done in the community - how much of the plan still needs to be done - what has been successful - any problems or difficulties encountered - any corrective action that is needed.
The evaluation can be done in many different ways, for example:
- the group might carry out some evaluation activities itself and share the results with the wider community by displaying the materials where they can be seen by all
- the group might decide to involve the wider community in its evaluation activities; for instance, people could be invited to take part in a community event where everyone votes during a pocket chart activity
- or the group could combine the above activities by carrying out some specific evaluation activities separately, as well as organizing a community evaluation activity, such as presentation of a socio-drama about the programme to a wider group.
The group may therefore need to have planning meetings of its own to organize the evaluation or event for a wider group.
Your role is to help the group:
- work out what it wants to do to evaluate its progress - work out how it wants to involve a wider selection of community members - work out how to make the evaluation event enjoyable and satisfying for everyone.
It is important that the group decides what it wants to do. So instead of giving detailed guidance, a list of suggestions for different types of participatory evaluation activities follows. If the group has trouble deciding what to do for its evaluation activity, you could facilitate a discussion using some of these suggestions. Choose only those suggestions for the discussion which you think are suitable for the group. Consider the group's level of reading and writing ability, the different kinds of personalities and skills of group members, and how they work together as a team.
Try to encourage the group to prepare a socio-drama if the group is unwilling to try any of the other suggestions for evaluation activities. Community workers involved in PHAST have reported that this activity is usually very well received by the rest of the community and is a lot of fun to prepare.
Activity: Checking our progress
Option 1: Monitoring (checking) chart
Purpose
• to see if goals have been met
Time
• 2 hours
Materials
• tool: monitoring chart made during Step 6: Activity 1 • pens and paper
General guidance
1. Have the group look at the monitoring (checking) chart to review the goals it set. Then ask it to compare these goals with what has been achieved since it made the chart. The group might want to make a record of the differences between what was planned and what has been achieved. Encourage the group to make the comparison in any way it wants, using pens, paper, drawings, words, etc.
2. Once the comparison has been made, ask the group to discuss:
- what has been successful - any problems.
3. Ask the group to record (in drawings or words) the problems and sort them into:
- problems the community can deal with by itself - problems the participants do not fully understand - problems the community cannot solve by itself.
4. Stick the three groups of problems on a wall and ask the participants to decide:
- for the problems it can deal with: what action they will take
- for the problems they don't understand: how they will get more information, when will they do this, and whose responsibility it will be
- for the problems they can't solve: how they will get outside help to overcome these problems.
5. Finish up with a discussion on what was learned during the activity, what was liked, and not liked about this activity.
Option 2: Community map
Purpose
• to see if the community has undergone any physical changes
Time
• 2 hours
Materials
• tool: the community map created during Step 2: Activity 1 • pens and paper • coloured paper or stickers for marking the changes on the community map • additional map-making materials - the group might want to make a new map showing the changes
Figure
General guidance
1. Have the group look at the community map and either mark on it the changes that have taken place since it first made the map. Or if it wants to, and time allows, it could make a new map.
2. Once this has been done, ask the group to discuss:
- the changes that have taken place - the difference between what it planned and what it achieved.
3. Continue the activity by following the instructions from point 2 onwards in Option 1.
Option 3: Planning posters and who does what
Purpose
• to see if goals have been met
Time
• 2 hours
Materials
• tools: planning posters and chart from Step 5: Activity 2 • pens and paper
General guidance
1. Ask the group to look at the planning posters and Planning who does what chart and compare what it planned to do with what it has achieved. The group might want to record these differences. Encourage it to do this comparison in any way it wants, using pens, paper, drawings, words, marking the planning posters or Planning who does what chart.
2. Continue the activity by following the instructions from point 2 onwards in Option 1.
Option 4: Pocket chart
Purpose
• to see if hygiene behaviours have changed
Time
• this will depend on the number of people voting
Materials
• tool: pocket chart • drawings showing selected hygiene behaviours to put on the pocket chart • enough voting tokens for all the people attending
General Guidance
1. Ask a participant who is familiar with the pocket chart to facilitate this activity.
2. Set up the pocket chart with a behaviour that is to be measured and explain what it is and how it is used. Place a vote yourself to show how to use the pocket chart. Make sure you remove it and explain that it was a demonstration.
3. Position the chart so that people can vote without others seeing and then invite people to come up, one at a time, to place their votes.
4. Once everyone has had a chance to vote, ask a participant to count the votes and display the results. Make sure this is done in full view so that people can see this is being done correctly.
5. Facilitate a group discussion on:
- what the pocket chart has shown - whether this result is an improvement - how this result compares with the group's plan - the reasons why people voted as they did.
6. After this discussion, continue the activity by following the instructions from point 2 onwards in Option 1.
Note
More than one pocket chart activity can be carried out. Examples of subjects that can be investigated using this tool include:
- defecation places - handwashing - tasks performed by men and women - places where water is collected.
Option 5: Community walk
Purpose
• to observe the community conditions directly to see if goals have been met
Time
• this will depend on the size of the community
Materials (optional)
• pens and paper • drawing material • camera, if available guidance
General Guidance
1. Ask the participants to divide up into pairs. (Larger groups may attract too much attention.)
2. Suggest that each pair organize a separate walk around the community and record what it sees. Suggest to participants that they plan their walk at the time of day when they will be most likely to see things relevant to water and sanitation - probably early in the morning or at dusk. They should pay particular attention to:
- the physical changes (e.g. in facilities) that they planned to make - the types of behaviours they wanted to encourage - the types of behaviours they wanted to stop.
Encourage the participants to record what they see in any way they like, in words, using drawings, taking photos, etc.
3. Ask each pair of participants to report its findings to the other participants or to the wider community. The findings can be reported back in any way that the participants wish; for example, in the form of a talk, showing drawings, acting out what was seen, singing a song.
4. Facilitate a discussion comparing what was observed in the community and what was planned.
5. Continue the activity by following the instructions from point 2 onwards in Option 1.
Option 6: Socio-drama
Purpose
• to update the wider community on progress made to date • to provide an opportunity to celebrate project successes • to highlight aspects of the project to visitors from other communities, and to officials and donors
Time
• 1-2 hours preparation and rehearsal time
What to do
1. This activity can be carried out in groups of 4-8 people. Invited guests can be given the opportunity to join any of the groups.
2. Give the groups the task using these words:
“Working together, choose one part of the project and make up a short 10-minute story about it. Each group will tell different parts of the story. You can do this in any way you like, using whatever you think you need to tell the story in an entertaining way. Your short play should not take longer than 10 minutes to perform. You have 30 minutes to prepare and rehearse your activity.”
Make sure that each small group is telling a different part of the story.
3. When the groups are ready, ask them to perform their socio-dramas.
4. After the socio-dramas have been presented, participants may wish to discuss any particularly significant events that were not performed.
Notes
1. Let each group develop its socio-drama in its own way without your input.
2. Groups will probably use a variety of ways to tell their stories including: music, dancing, acting and humour.
3. This activity is designed to be enjoyable and to create an interesting way of summarizing what the group has experienced and felt during the course of the project. An alternative, more structured approach to this activity would be to ask the group to select 8-15 members to create a theatre performance based on the development of the project. This could be done as much as one or two days before the evaluation closing celebration, in order to give participants more time to prepare the performance.
4. Taking time to celebrate success is very important. Positive results increase the group's faith in itself and inspire it to continue working for change. Discussing problems can have the same effect because it shows that solving these is within the group's power.
5. The group now has the skill and self-determination to continue by itself with the process of introducing the planned improvements to combat diarrhoeal disease. It is also likely that the skills developed during this programme will be applied to other community problems. Over the long term, this should lead to a much improved quality of life for all concerned.
Conclusions
What you might find
You will encounter varying degrees of “success”. Some communities may be ahead of schedule and others may have stumbled early on. But any evidence of improvement provides a base on which the community can build. Moreover, people need to see the results of their efforts. Without these they will lose faith both in what they have learned and in themselves. In your facilitating role, you can help to prevent this from happening by getting the group to identify the improvements, no matter how small. If necessary, you can use the activities you are familiar with to begin the process again. In so doing, you can help the group identify the problems which caused it to achieve
less than it planned, analyse these, plan for solutions, select options, develop a new plan, allocate tasks, and monitor and evaluate its results.
Adjusting the programme
The process of monitoring and evaluation is continuous. It provides feedback to the group, enabling it to learn from its mistakes. On the basis of this information, the group can change its plans to avoid problems, thereby working towards a much more successful outcome.
Part III: Making a toolkit
Guidelines for PHAST facilitators and programme managers
In the countries where PHAST has been tested, the results have been inspiring: hygiene behaviours and sanitation have improved, and communities have taken over management of sanitation and water facilities. The investments made in developing the tools necessary for the approach paid off.
The toolkit materials are vital for helping group participants to develop the skills and confidence to think problems through, identify solutions and plan for change. We strongly recommend that you take the time to carefully plan the development of your toolkit with an artist, or artists, using the guidelines which follow here and in the Guidelines for PHAST artists. For further information about making a toolkit see Srinivasan (1991).
Types of toolkits
The ideal toolkit consists of drawings made by local artists to reflect the local culture and conditions. Most of the instructions which follow refer to this type of toolkit.
Prototype toolkits: These are drawings that are generally applicable over a wide cultural area where customs, housing and clothing are nearly the same. Once a prototype toolkit has been made, it may only be necessary to modify a few drawings to look like the specific local setting in which you will be working. Modification will be much simpler if the prototype toolkit drawings have been done as black and white line drawings. This makes it easier to adapt and modify the drawings to suit different situations. These modifications can be done by tracing or photocopying the original drawings and using colour to show regional variations. A prototype toolkit is a good investment at the national level. Remember, though, that rural and urban areas are very different physical environments and often have different water, sanitation and hygiene problems. For this reason you generally cannot use the same toolkit for rural and urban areas, even within the same country.
Creating new drawings for each toolkit can be expensive, but there are ways to cut costs by using a combination of different materials that may be available to you. Some suggestions follow.
Using photographs: Existing photographs can be used to help design specific tools. They can be reproduced in sizes appropriate to the activity and several sets made. This can be an effective technique for some of the tools, for example, for sanitation options
and for planning posters, especially if photographs of existing technologies and processes are readily available. But it is less than ideal because details in the photographs may distract participants from the purpose of the discussion. The presence of familiar people and places in the photos can also be misleading and can tend to personalize the discussions and even put people on the defensive.
Using existing materials: Existing hygiene education materials, such as posters and flip-charts can be used creatively and inexpensively to develop the materials for specific activities. Different drawings are separated or cut apart and used in three-pile sorting, for example. Such materials may need to be supplemented with additional drawings. The disadvantage of using existing materials is that they are often not open to different interpretations, which can create problems for the facilitator, particularly with the more open-ended activities. Technical and project manuals can also be a good source of pictures and drawings which can be cut out and separated for specific activities.
Timeframe to make a toolkit
In most instances you will already have a prototype toolkit - usually made up of black and white line drawings - obtained from a PHAST training workshop. This kit will need to be modified to suit local circumstances.
You should allow about one month to prepare the local toolkit because:
- you will need to find an artist, or artists
- you will need to explain to the artist the methodology underlying the PHAST approach so that the purpose of the drawings is clear5
- you will need to take the artist to the community to get familiar with the surroundings so that the drawings are very realistic
- the artist will need to do a few practice drawings
- the practice drawings will need to be pretested with community members
- a lot of drawings may have to be done.
5 A useful strategy for providing this explanation is to arrange to have the artist or artists attend a PHAST training workshop and to make the drawings during the workshop. See section entitled, “Involve artists in a training workshop”.
Cost
Artist's fees
You should make a budget for producing the toolkit. This will be based on the number of drawings needed. If possible, it would be best to get estimates of the cost for the same work from three artists, together with a sample of their work. You can then compare prices and the skills of the different artists. Sometimes the cheapest price will
not be the best choice. One of the artists might be a little more expensive. But the drawings may be a lot better and the artist may understand what you want much more clearly than the other artist(s) you are considering. In which case, provided you can afford it, it would be better to choose the slightly more expensive artist.
More experienced and professional artists tend to charge by the drawing, while others by the “set”, or by the time spent. If there is a clear work plan and timeframe, and particularly when a workshop is involved, it may be useful to draw up a contract for two, four, or even six weeks. In recruiting artists, it is also useful to consider the possibility of establishing a long-term relationship, giving preference to artists employed by development organizations or freelance artists with an interest in and sensitivity to participatory and development activities. Finally, when negotiating with artists, it is useful to keep in mind that their important skills are frequently undervalued.
Travel costs
Remember to make allowance for any travel costs that might arise when the artist visits the community.
Materials
There will be costs for materials (such as paper and paints), for making copies of the drawings and perhaps for having the drawings laminated to make them more durable.
Estimate form
You may find it useful to provide the artist with a form to estimate costs. You can use this form to compare the costs of several artists. It may also mean that costs are not forgotten at the start. It can be a real problem later on if an artist forgets to include, for example, the cost of paper, special drawing pens and inks, and then asks you for more money.
Finding an artist
Try to find an artist who lives in or close to the communities or ethnic group you will be working with. This will produce the best results and also save time and money, as the artist will need to visit the community more than once to observe the people, type of buildings and facilities, etc.
Explaining the task to an artist
Explain that a participatory approach is one that does not focus on transferring a particular message from the facilitator to group participants. Rather, the opposite is true, with more importance attached to getting the participants to share their experiences, ideas, feelings and beliefs, and through this process developing the ability to solve their own problems (see Srinivasan, 1991). Explain that the drawings will be used to help group members think for themselves and participate in the process of making environmental improvements. Give a brief outline of the activities, explain what they are designed to achieve, and show sample drawings.
Explain the number of drawings needed, what they should be of, and how you want the drawings done. Use the Guidelines for PHAST artists in Part III to help you.
Explain that the people, types of housing, vegetation, clothing and types of facilities drawn must look similar to the community or ethnic group you are working with and that this will help people to use the drawings more successfully.
Invite the artist to visit the community with you.
Visiting the community
Arrange a time to meet the artist when you can walk around the community together and get really familiar with the way people dress, where they live, the type of water and sanitation facilities they have, and any problem areas in the community, particularly those relating to water and sanitation.
Make notes and rough sketches of what you see, so that later it will be easier to discuss the drawings that will be needed.
After you have visited the community, either on the same day, or the day after, sit down somewhere quiet with the artist and discuss what you have seen together. Make a list of the drawings you will need.
Involve artists in a training workshop
If possible, the artists should attend a complete PHAST training workshop.
When the workshop participants visit a community, the artist should come along and make initial sketches. Then, while the training workshop continues, the artist should be making the drawings. The draft drawings can be used and discussed in the training sessions, and during further visits to the community, and modified as a result of these visits and discussions. This is a practical and participatory form of pretesting.
Supervise the artist's work
The artist's work should be carefully supervised. Regularly reviewing pencil sketches before they are completed and the final drawing made is advisable. Making changes to a completed drawing can be difficult.
Pretesting drawings
The drawings should also be pretested with community members. This is done by taking the drawings to the community and asking people what they see, and whether they think the drawings look like their area and show cultural features correctly. Drawings should be modified according to the feedback received.
Quality of drawings
Drawings made for PHAST or other SARAR activities are generally simple line drawings. They should be clear and uncluttered and preferably in colour. However, it is best if the original drawings created for a prototype toolkit are first made as black and white line
drawings and plenty of copies made, either by tracing or by photocopying the original drawings. These copies can be adapted to reflect local regional situations much more easily than coloured drawings.
Copies of drawings
Facilitators will generally need a number of sets of drawings. So keep a master set in black and white that can be photocopied; as many copies as needed can be coloured.
Guidelines for PHAST artists
General instructions
1. Drawings must match the community or ethnic group with whom they will be used. Therefore, the people, houses, water and sanitation facilities shown in the drawings must be similar to those in the community.
2. Visit the community or ethnic group with whom you will be working. You should make notes on how people live, dress, interact and work; what they do for entertainment; what problems they have, what they usually do to solve them. You should look in particular at how people use (or misuse) water, how they transport and store it, how sanitary (or unsanitary) the environment is. Make a note of some of the common hygienic (or unhygienic) practices in the community.
3. Attend a PHAST training workshop and do your drawings during the workshop - but do only a few drawings at first, consulting with the PHAST facilitator to make sure they are appropriate. Working in this way means you can get feedback on your drawings and advice from those running the training workshop.
4. Drawings should show men, women and children and combinations of people to reflect situations in the actual community.
5. Keep the drawings simple. Do not put in too much detail or too much background. Solid colours and simple outlines for figures work best. Too much detail can cause confusion.
This drawing was done in the USA.
You do not have to do perfect drawings. Quick, clear sketches in solid lines, of recognizable scenes are preferable.
6. In the PHAST approach, drawings don't usually give a definite message. Rather they reflect a situation or condition that people can discuss. A set of drawings should include some that could have different meanings for different people. See the sample drawing above.
Some people might think that the drawing is of a person going to work, while others might think it is of someone going to a doctor's appointment. This is intentional: it means people can use the drawing to create different stories or discuss different topics. This is the purpose of “open-ended” drawings. If, on the other hand, the drawing included more detail, for example, a sign over the door saying either “OFFICE” or “CLINIC”, the drawing would be “closed” to alternative interpretations, and the participants' possibilities for creativity, imagination and projection limited.
Checklist for artists
• attend a PHAST training workshop
• visit the community
• do a few drawings first
• keep them simple
• don't give a definite message
• pretest drawings and revise as needed
7. Pretest the drawings with representatives of the community or ethnic group.
Specific instructions
1. Do your first work as black and white line drawings and keep them as a master set.
2. Do each drawing on a separate sheet of paper.
3. Make the drawings large enough so that they can be seen from a distance.
4. Paper for the drawings should be at least 21 cm (8¼”) in width and 29.5 cm (11¾”) in height - in other words, A4 or standard letter size. Specific instructions for the size of the drawings are provided with the instructions for each activity.
5. Paper used for the master set and for the copies should be reasonably thick and strong as the drawings will be handled by a lot of people.
6. The drawings should be made in different sizes and shapes to suit the different purposes of the different ac tivities. These sizes are indicated in the instructions which follow. Sometimes the same drawings can be used in two or three different activities but it is best if they are different sizes. If you have access to a photocopy machine you can reduce the number of times you have to draw a drawing by using the photocopy machine to either make them bigger or smaller, as required. It is therefore recommended that you make your list of drawings first, so that you can identify those you will need to reduce in size or enlarge.
7. If you have access to a photocopy machine, make photocopies of the drawings before you colour them.
8. Colour the final drawings. Water colours tend to be the easiest and fastest method.
9. It is a good idea to laminate the drawings for community use.
Steps for PHAST artists
Lists of sample drawings for activities
The list which follows is intended to help you create your first toolkit on hygiene behaviours and excreta disposal, so that in future, when you wish to use these participatory methods for other issues, you will have a good idea about the range and type of drawings you may need. (See also Srinivasan, 1991.) If other water and sanitation issues are to be addressed, such as solid wastes, or other diseases such as dengue fever, malaria, or schistosomiasis, or other health issues such as AIDS, or alcoholism or smoking, then drawings relevant to those issues will have to be drawn.
The drawings listed on the following pages are suggestions only. Exclude those that are not relevant to the community you are working in. For example, if people do not bury faeces, do not include a drawing of this behaviour. Add drawings that seem more appropriate.
Tool: Unserialized posters
Size of drawings
• approximately 21 cm (8¼”) by 29.5 cm (11¾”), hereafter referred to as A4 size
Number and type of drawings
• 10-15 drawings showing scenes of everyday community life. Some drawings should be of dramatic but realistic aspects of everyday life, such as an illness, a disagreement between two people, a celebration or conflict between two people. Others should be quieter and more ordinary. The drawings should be drawn so that they can have more than one meaning. For example, a scene showing a person walking towards a building could be interpreted as a person is going to make a complaint, or going to work, or to register the birth of a child. Or a small group of people running could be interpreted as people chasing a criminal, an animal, or running away from some sort of disaster or pursuer. The drawings should be drawn in such a way that it is possible to put them together in lots of different orders to tell different stories. The drawings should not be numbered and should not be ordered. This is why they are called “unserialized posters”.
Example drawings
• two women talking together, one holding a baby • a man and a woman talking to each other • a celebration • a meeting • a man walking towards an official type of building • two people in discussion with a person who is sitting at a desk • a man or woman sitting and thinking deeply about something • a person carrying a large number of suitcases, boxes and bundles • a group of men socializing • a group of women socializing • a group of children playing • a disagreement between two people • a small group of people running • a woman crying • a small group of people laughing
Figure
Tool: Nurse Tanaka
Size of drawings
• A4
Number and type of drawings
• a drawing of a nurse/doctor at a health centre • a drawing of a traditional healer - if appropriate • up to 30 drawings of people in the community (they should not appear sick) or enough for everyone in the group to participate
Note: The figures can be cut out around the shape of the figure in question, or if preferred they can be made with flexible arms and legs - these are called “flex-flans”. These flex-flans can be combined with cut-outs of animals, plants, and buildings for use with other activities as well. (See Srinivasan, 1991.)
Figure
Example drawings of people
• an old man • woman with a baby • a pregnant woman • boys of various ages - e.g. teenage boy, primary school-age boy • girls of various ages - e.g. teenage girl, primary school-age girl • an adult man • an adult woman • an old woman • a grown-up with a young child
Figure
Note: Similar drawings of people may be needed for the pocket chart activity. It may be worthwhile to photocopy these drawings at a size that fits the pocket chart, before you colour them. This way, you can reduce the number of drawings you need to do.
Tool: Three-pile sorting
Size of drawings
¼ of A4 - so that they also fit a pocket chart
Number and type of drawings
• about 30 drawings
• the drawings should show everyday hygiene practices in the local culture, both good practices and bad practices
• the meaning of some of the drawings should not be immediately obvious; participants will then have to think carefully before they decide if the drawings should go in the “Good”, “Bad”, or “In-between” pile
• a card with the word “Good” on it; a card with the word “Bad” on it; a card with the word “In-between” on it. Or instead of using words, these cards can be replaced with symbols meaning the same thing. For example, a smiling face can be used for “Good”, a frowning face can be used for “Bad”, and a face without any expression can be used for “In-between”. Coloured cards can be used instead, for example, green for “Good”, red for “Bad”, and white for “In-between”.
Example drawings
On sanitation
• an adult wiping a baby's bottom
• an adult cleaning a latrine/toilet
• a child defecating in the backyard of a house
• an adult covering a latrine hole
• an adult sweeping up faeces from the backyard of a house
• an adult putting ash down a pit latrine
• a person using a latrine/toilet (show all types used in the local area)
• open defecation (such as in fields, in the bush, on railway lines - make drawings for all the different sites that could be used for open defecation in the local area)
• a person using water to flush a latrine/toilet (if relevant to the local area)
• a dog or pig eating faeces
Figure
On handwashing
• an adult showing a child how to wash hands • a boy washing his hands outside a latrine/toilet • handwashing with water • handwashing with water and soap • handwashing with water, ash or dirt
On water
• a tank of water outside a building
• a dog drinking from a water-collection container
• a chicken drinking from a water-collection container
• an adult washing the face of a child
• an adult washing children
• an adult using a jug to take water from a container to a cup for a child to drink
• an adult drinking from a water-collection bottle
• a child using a jug to get water from a large water-collection container
• an adult washing dishes
• an adult collecting water (make multiple drawings to show all the local sources used to obtain water such as a yard tap, house tap, water truck, water kiosk if relevant to the local area)
• woman boiling water in a container
• a person using his/her hands to scoop up water from a large container of water
• a person washing himself/herself
• a person watering a garden or crops
• people swimming and washing in a water source
• animals standing in and around a water source
On food preparation and handling
• an adult preparing food • an adult washing hands before preparing food • a child and a cat eating out of the same bowl • a family eating food with their fingers • an uncovered, full water container • household dishes, cups and eating utensils on the ground • dishes lying uncovered on a table outside a house • plates of uncovered food
Tool: Pocket chart
Horizontal drawings will be selected from the three-pile sorting cards by the facilitator. Most pocket charts hold about 6 drawings across the top. The number selected depends upon the issue to be investigated.
Vertical drawings are described below. The number of vertical drawings should be kept to a minimum, usually between 5 and 7.
Figure
Type of vertical drawings
• frequently, drawings are needed of the different types of people in the community or ethnic group; you may be able to use some of the drawings of the people from the Nurse Tanaka set depending on the type of pocket chart you are using
Example vertical drawings of people
• adult man • adult woman • boy • girl • old person • baby • sick person
Tool: Transmission routes
Size of drawings
A4
Number and type of drawings
• 10 or more
• draw situations where people could unintentionally come into contact with human faeces and the germs they carry. You will need to think carefully about the conditions in the community that might make this possible. Some examples of such situations are provided below. Draw those that are relevant and include any other situations you may have noticed in the community.
• also include situations where people do not come into contact with human faeces. Including such drawings helps people to think deeply about transmission routes.
Note: Some of the drawings from the three-pile sorting set could be used in this activity. However, they should be enlarged. You may be able to enlarge the relevant three-pile sorting drawings on a photocopier before you colour them. They would then be suitable for use during this activity. This could help reduce the number of drawings you need to do. Drawings not used in other activities are listed first and marked*.
Example drawings
On faecal-oral transmission routes
• *a person's mouth or face • *a hand • *fields of food crops or a vegetable garden • *a bare foot • *flies, cockroaches or any other common vermin • *milking a cow • *open defecation (if relevant) • animals in water sources • people washing in water sources • plates of uncovered food • someone collecting water • animals eating from household plates • uncovered water collection containers • household dishes, cups, eating utensils • a dirty latrine/toilet, or broken latrine/toilet, or flooded latrine/toilet • a person using their hands to drink water from a container • someone preparing food • dogs or pigs eating faeces
Figure
Tool: Blocking the routes
Size of drawings
• ½ A4 size and cut out in an oval shape. This helps to distinguish them from the transmission routes drawings
Number and type of drawings
• 15 drawings of different ways to stop or block the transmission routes of disease. Choose only those relevant to the situation of the community or ethnic group. Add drawings that may be used in the local setting but that may not be in the following list of examples.
Note: Some of the same drawings used for three-pile sorting can be used in this activity. You could reduce the number of drawings required by choosing the relevant ones from the three-pile sorting set and enlarging them on a photocopier before you colour them. You can colour the larger ones and cut them out as ovals. This means you
would then only need to create new drawings for the scenes you don't already have. Drawings not used in another activity are listed first and marked*.
Example drawings
• *covered food • *a fenced water source • *animals in a fenced pen • *a person burying rubbish • *a person collecting children's faeces from the yard • *fly and insect spray • *storing water in covered containers • *a shoe • a person washing a childs' hands • boiling water • washing hands with soap • cooking or reheating food • dishes on a table or drying rack • a person using a dipper or cup to get water for drinking from a large water container • a latrine
Figure
Tool: Gender role analysis
Size of drawings
A4 or larger
Figure
Number and type of drawings
• 3 separate large drawings of: a man, a woman, and a man and women together
• include drawings of a boy, a girl, and a boy and girl together if the community wants this. Remember, though, that this activity focuses on gender, not age.
• 12 or more task drawings • the drawings should be of daily household and community tasks that relate to water and hygiene activities as well as other community and household tasks. Make the drawings showing either a man or a woman doing all the tasks. The gender of the person is not important. It is the task that should be emphasized. One way to emphasize the task is to show only the hands, arms or body, or the person performing the task in such a way that the gender of the person is not obvious. Drawings not used in other activities are listed first and marked*.
Example drawings
• *washing clothes • *cleaning a baby after defecation • *showing children how to use a latrine • *feeding children • *making the walls for a latrine/toilet • *disposing of household rubbish • *digging a latrine pit • *collecting the building materials for a latrine/toilet • *cleaning up the inside of the house • *buying soap • *replacing soap when it runs out • *agricultural tasks (various different ones) • *a person at work (various types of jobs) • *collecting or carrying wood • *tending animals • washing or bathing children • showing children how to wash their hands • feeding children • preparing meals • washing dishes • cleaning up around the outside of the house • fetching water Tool: Sanitation options
Size of drawings
• A4
Number and type of drawings
• from 2 to 10 drawings, depending on options practised or available
• drawings should be of different human excreta disposal methods practised in or available to the community, both hygienic and unhygienic. You will need to have
drawings which show a range of options from the most basic form of excreta disposal (perhaps open defecation) to better options. The better options must be affordable and available to the community or ethnic group.
Note: These drawings can also be made for different water collection and transport methods (“water options”). Make sure that your drawings reflect the local situation and the disease being addressed.
Figure
Example drawings
• dogs or pigs eating faeces • open defecation • pit latrine • pit latrine with squat slab • pit latrine with drop hole cover • pit latrine with handwashing facilities • ventilated improved pit latrine • improved pit latrine with handwashing facilities • pour-flush latrine • flush toilet • someone burying faeces • communal toilet block
• flush toilet with handwashing facilities • connection to a sewerage system (low cost or standard)
Tool: Planning posters
Size of drawings
• A4
Number and type of drawings
• a set of planning posters that show some of the possible steps which could be taken to move from a problem situation to an improved situation. Remember to include different activities which people themselves can do to solve the problem, as well as those which will require additional outside help through collaboration with other groups and organizations.
• 2 large drawings, one showing a problem situation (a “now” scene) and another showing a greatly improved situation or solution to the problem (a “future” scene). Make sure the “now” scene looks like the local area and daily environment, and not too much worse. The “future” drawing should show improvements that can be made in a relatively short time at low cost without major changes in buildings, and roads etc. (which might be very expensive).
Note: In other guides, this tool is called story with a gap.
• the facilitator will advise you on which “now” and which “future” drawings to draw, together with the planning drawings relevant to the situation. The following are examples only, to give an indication of the sort of drawings that might be required.
Note: In this guide, the facilitator is advised to select “now” and “future” drawings from the sanitation and hygiene behaviour options.
Example 1
“Now” situation - drawing of open defecation
“Future” situation - drawing of latrines with handwashing facilities
Planning posters
- community meeting - collecting money - buying building materials - digging the pits for latrines - pouring the concrete for the slab - building the walls - putting the roof on - putting in the handwashing facilities - teaching children about handwashing - new latrine in use
Example 2
“Now” situation - drawing of water being collected
“Future” situation - drawing of water collection from unclean source from improved well
Planning posters
- community meeting - building a fence around the water collection site to keep animals out - collecting money - buying materials to build a new improved community well - building the well
Example 3
“Now” situation - drawing of schoolchildren defecating in the open
“Future” drawing - schoolchildren using a latrine
Planning posters
- community meeting - two or three people talking together - a visit to the school - improving latrines at the school - teachers teaching children to use latrines
Tool: Barriers chart
Size
• a sheet of flip-chart paper or newsprint approximately 40” (100 cm) by 27” (65 cm) • draw the chart as per example below; colours or symbols may be used instead of words
Figure
Tool: Monitoring chart
Size
• a sheet of flip-chart paper or newsprint approximately 40” (100 cm) by 27” (65 cm) • draw the chart as per example opposite; colours or symbols may be used instead of words
Note: If large sheets of paper are not available, the facilitator can make a chart using cards for the headings and string or tape to mark out the chart sections. Or else, a chart can be created on the floor, using sticks to mark out the chart sections.
Figure
How to make a pocket chart and more examples of how to use it
A pocket chart can be made of paper, plastic, cloth, or with jars. If made of paper, plastic or cloth, the most practical size to use is 1-1.5 metres square (3-4½ ft)- A
pocket chart of this size can easily be rolled or folded for transporting from one meeting place to another.
1. Create a row across the top of the chart, with pockets in which drawings can be placed. The drawings will represent subjects about which data needs to be collected, such as where people defecate. There may be as few as 3 pockets or as many as 7.
2. Create a column along the left side of the chart, with similar pockets where drawings can be placed. These might represent the different people who use the options, or other variables. There may be as few as 5 pockets or as many as 10.
3. Now attach rows of pockets across the chart so that there is one for each option, both up and down and across, to form a grid pattern. See model on this page.
Figure
How to use a pocket chart
A pocket chart can be set up in many different ways, depending on what the group wants to find out. Participants are provided with tokens or slips of paper for voting. During the voting, the pocket chart is turned away from the group so that voting is confidential. If transparent plastic pockets are used, a blank card is placed inside each of them. Participants then place their tokens behind this card. When all the participants have given their information, the blank drawings are removed so that the distribution of the tokens is visible. These tokens are then counted up by volunteers and the information presented to the group. A discussion can now be held on what this
information reveals about actual practices in the community. Other examples of how a pocket chart can be used are given below.
Other examples of pocket charts
Example 1: Defecation sites
• Drawings of different sites or facilities used for defecation are used to create the row across the top of the chart. The drawings can be taken from the three-pile sorting drawings.
• The column down the left-hand side shows a man, woman, boy, girl, elderly person, sick person, pregnant woman, etc.
Participants will identify themselves in the left-hand side column and then indicate the site or facility they normally use, then place their token in the corresponding pocket.
Additionally, participants can carry out the activity for urination sites. Give them two tokens of different colours (or shapes) (one to represent the defecation site and one to represent the urination site), which they then place to indicate the options they use for each function.
Figure
Example 2: Water sources and water uses
• The row across the top of the chart is created using drawings (from the three-pile sorting) of places where or the means by which water can be obtained; for example, spring, river, well, tap, pond, rainwater collectors, water vendor/truck.
• The column down the left-hand side shows potential different uses of water; for example, drinking, cooking, washing food, washing dishes, washing hands and face, washing baby, bathing, watering garden.
Participants will use several tokens to indicate the water source for each use applicable to them. Example: I wash my hands with water from the truck, I water my garden with water from the river, etc.
Activity, tool and artist acknowledgements
A number of the write-ups for the activities in this guide were based on earlier work by Lyra Srinivasan (1990) and Deepa Narayan and Lyra Srinivason (1994). These include:
The tools in this guide were developed as follows:
Unserialized posters Lyra Srinivasan
Nurse Tanaka Keith Wright
Three-pile sorting Jake Pfohl
Pocket chart Lyra Srinivasan
Transmission routes Ron Sawyer and William Samson
Blocking the routes Ron Sawyer
Barriers chart Ron Sawyer
Gender role analysis Deepa Narayan
Sanitation options Josiah Omotto
Question box Ron Sawyer
Problem box Ron Sawyer
Monitoring chart Mayling Simpson-Hébert, Sara Wood and Ron Sawyer
Tool drawings featured in the kit were produced by Mr M. Makolo (Department of Information, Botswana); Mr Charles Kut (CARE-Kenya); Mr Taffy T. de Naisho (Communication Concepts, Kenya); Ms Alicia Sawyer (SARAR Transformation SC, Mexico); Ms Christine Achieng (RUWASA, Uganda), Mr Bob Mugisha (Ministry of Environment; Uganda) and Ms Juliet Waterkynd (Studio A.H.E.A.D, Zimbabwe).
Participatory materials have been developed over a long period of time. They are the result of a great deal of joint collaboration. In acknowledging the above artists, we would also like to acknowledge those people whose names are no longer on record.
Glossary
activity: in this manual, what the group works through in order to discover the information and skills necessary to reach understanding or take a decision.
census: official counting of inhabitants by local authority, national government, etc.
empower: to help people to develop the ability and knowledge to take decisions on matters relating to themselves.
evaluation: occasional assessment carried out at important stages of a project.
facilitate: to assist an activity so that it runs smoothly and in an organized way, and so that participants gain maximum benefit from it.
faecal-oral routes: routes (e.g. contaminated drinking-water or eating utensils) via which faecal matter is transmitted to the mouth.
feedback: response or reaction to an activity, which serves as information to improve that activity.
goal: aim or objective.
latrine: place or building, not normally within a house or other building, for defecation and urination. “Latrine” and “toilet” are often used interchangeably; however, a latrine more commonly refers to a temporary structure.
methodology: system of methods and rules.
monitoring: routine checking or controlling of progress throughout the life of a project to ensure that e.g. goals are met and met efficiently.
poster: a poster is a large drawing of A4 size or larger; it is usually put up on a wall (commonly called “posting on the wall”) and is used for discussion purposes.
project: planned activity with realizable goals for a specified time period and with a budget.
programme: continuous undertaking for planned objectives with long-term support for operation and maintenance from an institution; may include a series of projects.
sanitation: measures to break the cycle of disease; community environmental sanitation usually involves hygienic (i.e. safe) disposal of human and animal excreta, wastewater and solid waste, and drainage and other hygiene behaviours.
sewer: a pipe or drain, usually underground, used to carry off wastewater.
step: one or more activities which together aim to achieve one overall objective.
sustainability: sustainability in relation to sanitation projects means that the community is able to keep the system working. This applies both to operation and maintenance, including financing, and to environmental aspects. Making effective use of resources, protecting against depletion and overuse, preventing pollution and ensuring conservation of resources are therefore important sustainability issues.
tool: in this guide, technique or materials used by the facilitator to help the group work through an activity. They may include whatever works best to aid the group in the activity.
toolkit: in this manual, a set of drawings or other materials, which show people, situations, customs, etc., that are familiar to participants, and which act as visual aids for facilitating activities.
unserialized posters: it should be possible to put the drawings used in these activities in lots of different orders to tell different stories. They are very different from other health education materials (such as a flip-chart or comic strip) which must be presented in a particular or “serialized” order.
wastewater: sewage.
References
Almedon AM, Blumenthal U & Manderson L. Hygiene evaluation, procedures: approaches and methods for assessing water- and sanitation-related hygiene practices. International Nutrition Foundation for Developing Countries (INFDC), 1997.
Narayan D. & Srinivasan L. Participatory development tool kit, training materials for agencies and communities. Washington, World Bank, 1994.
Pretty JN et al. A trainer's guide for participatory learning and action. London, International Institute for Environment and Development, 1995 (IIED Participatory Methodology Series).
Simpson-Hébert M, Sawyer R & Clarke L. The PHAST Initiative. Participatory Hygiene and Sanitation Transformation. A new approach to working with communities. Geneva, World Health Organization 1996 (unpublished document WHO/EOS/96.11).
Srinivasan L. Tools for community participation: a manual for training trainers in participatory techniques. New York, UNDP, 1990 (PROWWESS/UNDP Technical Series Involving Women in Water and Sanitation).
Srinivasan L. Designing SARAR materials. A manual for artists. New York, UNDP, 1991 (PROWWESS/UNDP Technical Series Involving Women in Water and Sanitation).
Winblad U & Dudley E. Primary school physical environment and health. WHO Global School Health Initiative. Geneva, World Health Organization (WHO Information Series on School Health: Document Two; unpublished document WHO/EOS/97.15).
Historical background to PHAST
The SARAR methodology was first conceived by Lyra Srinivasan in the 1970s. Over the years, Lyra and her close colleagues, Ron Sawyer, Chris Srini Vasan and Jake Pfohl worked to develop participatory activities that would increase the self-esteem of individuals and community groups and help them to acquire the skills to contribute effectively to decision-making and planning for meaningful change. In the early 1980s, the United Nations Development Programme (UNDP) created the PROWWESS Project (Promotion of the Role of Women in Water Supply and Environmental Sanitation Services) to identify strategies and tools for increasing the involvement of women in water supply and sanitation projects. Under the guidance of Lyra Srinivasan as training director, the PROWWESS team (which included Siri Melchior, Deepa Narayan, Aminata Traoré and Ron Sawyer) further developed and adapted the SARAR methodology to the special needs of the water supply and sanitation sector. In 1990, UNDP published, Tools for community participation: a manual for training trainers in participatory techniques.
In 1990, PROWWESS became part of the UNDP/World Bank Water and Sanitation Program, where it was possible to further consolidate its approach. As the participatory development specialists for the UNDP/World Bank Regional Water and Sanitation Group in Nairobi, Ron Sawyer and Rose Lidonde, together with other PROWWESS associates, were instrumental in training African community workers and in spreading the methodology to other African countries.
In 1992 the UNDP/World Bank Water and Sanitation Program and WHO joined forces to produce better methods for hygiene education by adapting the SARAR methodology more specifically for sanitation and hygiene behaviour change. Thus was born the PHAST initiative: Partic ipatory Hygiene and Sanitation Transformation.
A collaborative process was begun in 1993 in four African countries (Botswana, Kenya, Uganda and Zimbabwe) to further develop and field-test these methods. PHAST brought together and adapted a number of SARAR activities which had already been developed and validated under the PROWWESS Project, and created new ones. Among the activities transferred to the PHAST initiative were several designed by Ron Sawyer and associates, and piloted as a package in Mexico under the auspices of a UNICEF-supported national diarrhoea control programme. Through a series of creative design and training workshops, PHAST sought suggestions for activities from many others in Africa who had been working on hygiene behaviour change. The creators of individual activities are listed in the Activity, tool and artist acknowledgements.
UNICEF offices in Botswana, Kenya and Zimbabwe became involved at this stage and, together with government counterpart agencies, field-tested the approach in many of the districts in which they are active.
Since the field-test phase, PHAST has been adopted by several countries within and some countries outside the African Region.
World Health Organization Health and Environment Documentation Centre, EHG