430
PL7 JUNIOR/PRO Operate modes manual 35003084_03 March 2005 eng

PL7 JUNIOR/PROOperate modes manual
3500
3084
_03
March 2005eng

2

Document Set
Document Set
At a Glance This manual consists of 3 sections:� Part 1: General points on operate modes. � Part 2: Configuration and programming. � Part 3: Debugging, adjustment, documentation and appendices.
3

Document Set
4

Table of Contents
About the Book . . . . . . . . . . . . . . . . . . . . . . . . . . . . . . . . . . . . . .13
Part I Operating modes, general points . . . . . . . . . . . . . . . . . . 15Presentation . . . . . . . . . . . . . . . . . . . . . . . . . . . . . . . . . . . . . . . . . . . . . . . . . . . . 15
Chapter 1 Setting up . . . . . . . . . . . . . . . . . . . . . . . . . . . . . . . . . . . . . . . . . .17Presentation . . . . . . . . . . . . . . . . . . . . . . . . . . . . . . . . . . . . . . . . . . . . . . . . . . . . 17General points on PL7 software . . . . . . . . . . . . . . . . . . . . . . . . . . . . . . . . . . . . . 18Connections . . . . . . . . . . . . . . . . . . . . . . . . . . . . . . . . . . . . . . . . . . . . . . . . . . . . 20Software installation . . . . . . . . . . . . . . . . . . . . . . . . . . . . . . . . . . . . . . . . . . . . . . 21
Chapter 2 Presentation of PL7 functions. . . . . . . . . . . . . . . . . . . . . . . . . .23Presentation . . . . . . . . . . . . . . . . . . . . . . . . . . . . . . . . . . . . . . . . . . . . . . . . . . . . 23Configuration editor . . . . . . . . . . . . . . . . . . . . . . . . . . . . . . . . . . . . . . . . . . . . . . . 24Variables editor . . . . . . . . . . . . . . . . . . . . . . . . . . . . . . . . . . . . . . . . . . . . . . . . . . 25Editing in ladder language. . . . . . . . . . . . . . . . . . . . . . . . . . . . . . . . . . . . . . . . . . 26Instruction list language editing. . . . . . . . . . . . . . . . . . . . . . . . . . . . . . . . . . . . . . 27Structured text language editor. . . . . . . . . . . . . . . . . . . . . . . . . . . . . . . . . . . . . . 28Grafcet language editor. . . . . . . . . . . . . . . . . . . . . . . . . . . . . . . . . . . . . . . . . . . . 29Animation tables . . . . . . . . . . . . . . . . . . . . . . . . . . . . . . . . . . . . . . . . . . . . . . . . . 30Debugging. . . . . . . . . . . . . . . . . . . . . . . . . . . . . . . . . . . . . . . . . . . . . . . . . . . . . . 31Diagnostics . . . . . . . . . . . . . . . . . . . . . . . . . . . . . . . . . . . . . . . . . . . . . . . . . . . . . 33Operating screens. . . . . . . . . . . . . . . . . . . . . . . . . . . . . . . . . . . . . . . . . . . . . . . . 35Structure of the documentation file . . . . . . . . . . . . . . . . . . . . . . . . . . . . . . . . . . . 36General software ergonomics . . . . . . . . . . . . . . . . . . . . . . . . . . . . . . . . . . . . . . . 37
Chapter 3 Managing applications . . . . . . . . . . . . . . . . . . . . . . . . . . . . . . . . 41Presentation . . . . . . . . . . . . . . . . . . . . . . . . . . . . . . . . . . . . . . . . . . . . . . . . . . . . 41PL7 access security management . . . . . . . . . . . . . . . . . . . . . . . . . . . . . . . . . . . 42Accessing PL7 software . . . . . . . . . . . . . . . . . . . . . . . . . . . . . . . . . . . . . . . . . . . 43Launch Options . . . . . . . . . . . . . . . . . . . . . . . . . . . . . . . . . . . . . . . . . . . . . . . . . . 44Creating an application . . . . . . . . . . . . . . . . . . . . . . . . . . . . . . . . . . . . . . . . . . . . 46Opening an application . . . . . . . . . . . . . . . . . . . . . . . . . . . . . . . . . . . . . . . . . . . . 47Protecting an Application on a PLC. . . . . . . . . . . . . . . . . . . . . . . . . . . . . . . . . . . 48Saving an application . . . . . . . . . . . . . . . . . . . . . . . . . . . . . . . . . . . . . . . . . . . . . 51
5

Saving/restoring %MWi data on TSX 37 PLCs . . . . . . . . . . . . . . . . . . . . . . . . . . 52Offline/online operation . . . . . . . . . . . . . . . . . . . . . . . . . . . . . . . . . . . . . . . . . . . . 57Program Transfer Between the PC and PLC. . . . . . . . . . . . . . . . . . . . . . . . . . . . 59Program Transfer Between the PLC and PC. . . . . . . . . . . . . . . . . . . . . . . . . . . . 60Transferring data from file to PLC and vice versa . . . . . . . . . . . . . . . . . . . . . . . . 62Comparing applications . . . . . . . . . . . . . . . . . . . . . . . . . . . . . . . . . . . . . . . . . . . . 63Backing up in the internal Eprom Flash memory . . . . . . . . . . . . . . . . . . . . . . . . . 64Backing up on a TSX MFP BAK 032P memory card . . . . . . . . . . . . . . . . . . . . . . 65Accessing a PL7 through a network . . . . . . . . . . . . . . . . . . . . . . . . . . . . . . . . . . 67Memory Usage. . . . . . . . . . . . . . . . . . . . . . . . . . . . . . . . . . . . . . . . . . . . . . . . . . . 68Sending a command to the PL7. . . . . . . . . . . . . . . . . . . . . . . . . . . . . . . . . . . . . . 70
Part II Configuration and Programming . . . . . . . . . . . . . . . . . . .71Introduction . . . . . . . . . . . . . . . . . . . . . . . . . . . . . . . . . . . . . . . . . . . . . . . . . . . . . 71
Chapter 4 Micro and Premium: Configuring . . . . . . . . . . . . . . . . . . . . . . 73At a Glance . . . . . . . . . . . . . . . . . . . . . . . . . . . . . . . . . . . . . . . . . . . . . . . . . . . . . 73
4.1 Micro . . . . . . . . . . . . . . . . . . . . . . . . . . . . . . . . . . . . . . . . . . . . . . . . . . . . . . . . . . 74At a glance. . . . . . . . . . . . . . . . . . . . . . . . . . . . . . . . . . . . . . . . . . . . . . . . . . . . . . 74Accessing the application configuration. . . . . . . . . . . . . . . . . . . . . . . . . . . . . . . . 75Choosing/Changing the processor. . . . . . . . . . . . . . . . . . . . . . . . . . . . . . . . . . . . 76Configuring the processor . . . . . . . . . . . . . . . . . . . . . . . . . . . . . . . . . . . . . . . . . . 78Configuring the module positions. . . . . . . . . . . . . . . . . . . . . . . . . . . . . . . . . . . . . 81Configuration of each input/output module . . . . . . . . . . . . . . . . . . . . . . . . . . . . . 82Software configuration of the application. . . . . . . . . . . . . . . . . . . . . . . . . . . . . . . 83Configuring Grafcet objects . . . . . . . . . . . . . . . . . . . . . . . . . . . . . . . . . . . . . . . . . 84
4.2 Premium. . . . . . . . . . . . . . . . . . . . . . . . . . . . . . . . . . . . . . . . . . . . . . . . . . . . . . . . 85At a glance. . . . . . . . . . . . . . . . . . . . . . . . . . . . . . . . . . . . . . . . . . . . . . . . . . . . . . 85Accessing the application configuration. . . . . . . . . . . . . . . . . . . . . . . . . . . . . . . . 86Rack Configuration . . . . . . . . . . . . . . . . . . . . . . . . . . . . . . . . . . . . . . . . . . . . . . . 87Configuring the supply modules. . . . . . . . . . . . . . . . . . . . . . . . . . . . . . . . . . . . . . 89Choosing/Changing the processor. . . . . . . . . . . . . . . . . . . . . . . . . . . . . . . . . . . . 90Configuration of the processor. . . . . . . . . . . . . . . . . . . . . . . . . . . . . . . . . . . . . . . 92Configuring the module positions. . . . . . . . . . . . . . . . . . . . . . . . . . . . . . . . . . . . . 95Configuring inputs/outputs for each module . . . . . . . . . . . . . . . . . . . . . . . . . . . . 97Software configuration of the application. . . . . . . . . . . . . . . . . . . . . . . . . . . . . . . 99Configuring Grafcet objects . . . . . . . . . . . . . . . . . . . . . . . . . . . . . . . . . . . . . . . . 100
Chapter 5 Program access . . . . . . . . . . . . . . . . . . . . . . . . . . . . . . . . . . . . 101Introduction . . . . . . . . . . . . . . . . . . . . . . . . . . . . . . . . . . . . . . . . . . . . . . . . . . . . 101Introducing the application browser . . . . . . . . . . . . . . . . . . . . . . . . . . . . . . . . . . 102Creating or importing an LD, IL, ST section. . . . . . . . . . . . . . . . . . . . . . . . . . . . 105Creating or importing a Grafcet section . . . . . . . . . . . . . . . . . . . . . . . . . . . . . . . 107Creating or importing a subroutine (SR) . . . . . . . . . . . . . . . . . . . . . . . . . . . . . . 109Creating or importing an event. . . . . . . . . . . . . . . . . . . . . . . . . . . . . . . . . . . . . . 110Editing/emptying/suppressing a section, an event or a sub-program . . . . . . . . 111
6

Modifying the section execution order. . . . . . . . . . . . . . . . . . . . . . . . . . . . . . . . 112Accessing the runtime screens editor . . . . . . . . . . . . . . . . . . . . . . . . . . . . . . . . 113
Chapter 6 Programming in LD rung language. . . . . . . . . . . . . . . . . . . . . 115Introduction . . . . . . . . . . . . . . . . . . . . . . . . . . . . . . . . . . . . . . . . . . . . . . . . . . . . 115Structure of a program in Ladder language. . . . . . . . . . . . . . . . . . . . . . . . . . . . 117Creating a Ladder program . . . . . . . . . . . . . . . . . . . . . . . . . . . . . . . . . . . . . . . . 118Specific input . . . . . . . . . . . . . . . . . . . . . . . . . . . . . . . . . . . . . . . . . . . . . . . . . . . 120Modifying a network of contacts . . . . . . . . . . . . . . . . . . . . . . . . . . . . . . . . . . . . 121Displaying variables as symbols or addresses . . . . . . . . . . . . . . . . . . . . . . . . . 125Information box . . . . . . . . . . . . . . . . . . . . . . . . . . . . . . . . . . . . . . . . . . . . . . . . . 127 Online symbolization . . . . . . . . . . . . . . . . . . . . . . . . . . . . . . . . . . . . . . . . . . . . 128Input of a predefined function block (Ladder editor) . . . . . . . . . . . . . . . . . . . . . 129Function library . . . . . . . . . . . . . . . . . . . . . . . . . . . . . . . . . . . . . . . . . . . . . . . . . 131Operate block entry. . . . . . . . . . . . . . . . . . . . . . . . . . . . . . . . . . . . . . . . . . . . . . 133Horizontal and vertical block entry . . . . . . . . . . . . . . . . . . . . . . . . . . . . . . . . . . 135Assisted entry of a library function or of an instance of DFB type (Ladder editor). . . . . . . . . . . . . . . . . . . . . . . . . . . . . . . . . . . . . . . . . . . . . . . . . . 136Direct access to a subroutine . . . . . . . . . . . . . . . . . . . . . . . . . . . . . . . . . . . . . . 139Replacing a variable in the application . . . . . . . . . . . . . . . . . . . . . . . . . . . . . . . 140Cross Referencing a variable in an application . . . . . . . . . . . . . . . . . . . . . . . . . 142Animation of the Ladder program elements . . . . . . . . . . . . . . . . . . . . . . . . . . . 145Printing of a program. . . . . . . . . . . . . . . . . . . . . . . . . . . . . . . . . . . . . . . . . . . . . 146Export/Import of source files . . . . . . . . . . . . . . . . . . . . . . . . . . . . . . . . . . . . . . . 147
Chapter 7 Programming instruction list in LIST language. . . . . . . . . . . 149Introduction . . . . . . . . . . . . . . . . . . . . . . . . . . . . . . . . . . . . . . . . . . . . . . . . . . . . 149Structure of an Instruction List program . . . . . . . . . . . . . . . . . . . . . . . . . . . . . . 150Creating a program in Instruction List . . . . . . . . . . . . . . . . . . . . . . . . . . . . . . . . 151Accessing a statement or instruction (Instruction List) . . . . . . . . . . . . . . . . . . . 152Displaying variables as symbols or addresses . . . . . . . . . . . . . . . . . . . . . . . . . 154Information box . . . . . . . . . . . . . . . . . . . . . . . . . . . . . . . . . . . . . . . . . . . . . . . . . 155Online symbolization . . . . . . . . . . . . . . . . . . . . . . . . . . . . . . . . . . . . . . . . . . . . . 156Input of a predefined function block (List editor) . . . . . . . . . . . . . . . . . . . . . . . . 157Assisted entry of a library function (List editor) . . . . . . . . . . . . . . . . . . . . . . . . . 158Direct access to a subroutine . . . . . . . . . . . . . . . . . . . . . . . . . . . . . . . . . . . . . . 160Replacing a variable in the application . . . . . . . . . . . . . . . . . . . . . . . . . . . . . . . 161Cross Referencing a variable in an application . . . . . . . . . . . . . . . . . . . . . . . . . 163Animation of List program elements . . . . . . . . . . . . . . . . . . . . . . . . . . . . . . . . . 166Printing of a program. . . . . . . . . . . . . . . . . . . . . . . . . . . . . . . . . . . . . . . . . . . . . 167Export/Import of source files . . . . . . . . . . . . . . . . . . . . . . . . . . . . . . . . . . . . . . . 168
Chapter 8 Programming in Structured Text ST language . . . . . . . . . . . 169Introduction . . . . . . . . . . . . . . . . . . . . . . . . . . . . . . . . . . . . . . . . . . . . . . . . . . . . 169Structure of a program in Structured Text language. . . . . . . . . . . . . . . . . . . . . 170Creating a program in Structured Text (ST) . . . . . . . . . . . . . . . . . . . . . . . . . . . 171
7

Modifying a Structured Text program. . . . . . . . . . . . . . . . . . . . . . . . . . . . . . . . . 172Displaying variables as symbols or addresses . . . . . . . . . . . . . . . . . . . . . . . . . 175Information box . . . . . . . . . . . . . . . . . . . . . . . . . . . . . . . . . . . . . . . . . . . . . . . . . 177Online symbolization . . . . . . . . . . . . . . . . . . . . . . . . . . . . . . . . . . . . . . . . . . . . . 178Input of a predefined function block (ST editor) . . . . . . . . . . . . . . . . . . . . . . . . . 179Assisted entry of a library function (ST editor) . . . . . . . . . . . . . . . . . . . . . . . . . . 180Direct access to a subroutine. . . . . . . . . . . . . . . . . . . . . . . . . . . . . . . . . . . . . . . 182Replacing a variable in the application . . . . . . . . . . . . . . . . . . . . . . . . . . . . . . . 183Cross Referencing a variable in an application . . . . . . . . . . . . . . . . . . . . . . . . . 185Animation of Structured text program elements. . . . . . . . . . . . . . . . . . . . . . . . . 188Printing of a program . . . . . . . . . . . . . . . . . . . . . . . . . . . . . . . . . . . . . . . . . . . . . 189Export/Import of source files . . . . . . . . . . . . . . . . . . . . . . . . . . . . . . . . . . . . . . . 190
Chapter 9 Programming in Grafcet language . . . . . . . . . . . . . . . . . . . . 191Introduction . . . . . . . . . . . . . . . . . . . . . . . . . . . . . . . . . . . . . . . . . . . . . . . . . . . . 191Designing a program in Grafcet language . . . . . . . . . . . . . . . . . . . . . . . . . . . . . 192Structure of a Grafcet page . . . . . . . . . . . . . . . . . . . . . . . . . . . . . . . . . . . . . . . . 193Grafcet graphic objects . . . . . . . . . . . . . . . . . . . . . . . . . . . . . . . . . . . . . . . . . . . 194Creating a Grafcet module. . . . . . . . . . . . . . . . . . . . . . . . . . . . . . . . . . . . . . . . . 198Modifying a Grafcet program . . . . . . . . . . . . . . . . . . . . . . . . . . . . . . . . . . . . . . . 210Replacing a variable in the application . . . . . . . . . . . . . . . . . . . . . . . . . . . . . . . 213Cross Referencing a variable in an application . . . . . . . . . . . . . . . . . . . . . . . . . 215Animation of Grafcet program elements . . . . . . . . . . . . . . . . . . . . . . . . . . . . . . 218Printing of a program . . . . . . . . . . . . . . . . . . . . . . . . . . . . . . . . . . . . . . . . . . . . . 219Export/Import of source files . . . . . . . . . . . . . . . . . . . . . . . . . . . . . . . . . . . . . . . 220
Chapter 10 Editing variables . . . . . . . . . . . . . . . . . . . . . . . . . . . . . . . . . . . 221Introduction . . . . . . . . . . . . . . . . . . . . . . . . . . . . . . . . . . . . . . . . . . . . . . . . . . . . 221Accessing the variables editor . . . . . . . . . . . . . . . . . . . . . . . . . . . . . . . . . . . . . . 222Input/Modification/Suppression of symbols and comments . . . . . . . . . . . . . . . . 223Objects associated with a variable. . . . . . . . . . . . . . . . . . . . . . . . . . . . . . . . . . . 225Presymbolization . . . . . . . . . . . . . . . . . . . . . . . . . . . . . . . . . . . . . . . . . . . . . . . . 226Sorting variables by symbols or addresses . . . . . . . . . . . . . . . . . . . . . . . . . . . . 228Displaying variables in the editor . . . . . . . . . . . . . . . . . . . . . . . . . . . . . . . . . . . . 229Cutting/Copying/Pasting variables in a variables editor. . . . . . . . . . . . . . . . . . . 231Entering/Modifying constants. . . . . . . . . . . . . . . . . . . . . . . . . . . . . . . . . . . . . . . 232Parametrizing predefined function blocks (FB) . . . . . . . . . . . . . . . . . . . . . . . . . 233Printing variables . . . . . . . . . . . . . . . . . . . . . . . . . . . . . . . . . . . . . . . . . . . . . . . . 237Exporting/Importing variables . . . . . . . . . . . . . . . . . . . . . . . . . . . . . . . . . . . . . . 238
Chapter 11 Function modules . . . . . . . . . . . . . . . . . . . . . . . . . . . . . . . . . . 239Presentation. . . . . . . . . . . . . . . . . . . . . . . . . . . . . . . . . . . . . . . . . . . . . . . . . . . . 239Function modules. . . . . . . . . . . . . . . . . . . . . . . . . . . . . . . . . . . . . . . . . . . . . . . . 240Properties of a function module . . . . . . . . . . . . . . . . . . . . . . . . . . . . . . . . . . . . . 241Creating a functional module . . . . . . . . . . . . . . . . . . . . . . . . . . . . . . . . . . . . . . . 242Programming a functional module . . . . . . . . . . . . . . . . . . . . . . . . . . . . . . . . . . . 243
8

Debugging a functional module. . . . . . . . . . . . . . . . . . . . . . . . . . . . . . . . . . . . . 244Detaching/Deleting a functional module . . . . . . . . . . . . . . . . . . . . . . . . . . . . . . 245Export of a functional module . . . . . . . . . . . . . . . . . . . . . . . . . . . . . . . . . . . . . . 248Importing a functional module . . . . . . . . . . . . . . . . . . . . . . . . . . . . . . . . . . . . . . 249Creating, deleting, moving, dragging and dropping an animation table in a functional module . . . . . . . . . . . . . . . . . . . . . . . . . . . . . . . . . . . . . . . . . . . 250
Chapter 12 DFB function blocks. . . . . . . . . . . . . . . . . . . . . . . . . . . . . . . . . 253Presentation . . . . . . . . . . . . . . . . . . . . . . . . . . . . . . . . . . . . . . . . . . . . . . . . . . . 253DFB types . . . . . . . . . . . . . . . . . . . . . . . . . . . . . . . . . . . . . . . . . . . . . . . . . . . . . 254Creating a DFB type . . . . . . . . . . . . . . . . . . . . . . . . . . . . . . . . . . . . . . . . . . . . . 255Programming a DFB type . . . . . . . . . . . . . . . . . . . . . . . . . . . . . . . . . . . . . . . . . 256DFB type instance. . . . . . . . . . . . . . . . . . . . . . . . . . . . . . . . . . . . . . . . . . . . . . . 259Running a DFB instance . . . . . . . . . . . . . . . . . . . . . . . . . . . . . . . . . . . . . . . . . . 261Entering a DFB instance . . . . . . . . . . . . . . . . . . . . . . . . . . . . . . . . . . . . . . . . . . 262How to protect a DFB . . . . . . . . . . . . . . . . . . . . . . . . . . . . . . . . . . . . . . . . . . . . 263How to Import/Export a DFB type or an application containing DFB types. . . . 264
Part III Debugging, adjustment, documentation and appendices . . . . . . . . . . . . . . . . . . . . . . . . . . . . . . . 265Introduction . . . . . . . . . . . . . . . . . . . . . . . . . . . . . . . . . . . . . . . . . . . . . . . . . . . . 265
Chapter 13 Debugging . . . . . . . . . . . . . . . . . . . . . . . . . . . . . . . . . . . . . . . . . 267Introduction . . . . . . . . . . . . . . . . . . . . . . . . . . . . . . . . . . . . . . . . . . . . . . . . . . . . 267Introduction to the PLC debugging screen . . . . . . . . . . . . . . . . . . . . . . . . . . . . 269CPU screen designation zone. . . . . . . . . . . . . . . . . . . . . . . . . . . . . . . . . . . . . . 270Information zone . . . . . . . . . . . . . . . . . . . . . . . . . . . . . . . . . . . . . . . . . . . . . . . . 271Task Zones . . . . . . . . . . . . . . . . . . . . . . . . . . . . . . . . . . . . . . . . . . . . . . . . . . . . 272Operating mode zone . . . . . . . . . . . . . . . . . . . . . . . . . . . . . . . . . . . . . . . . . . . . 274Event zone . . . . . . . . . . . . . . . . . . . . . . . . . . . . . . . . . . . . . . . . . . . . . . . . . . . . 275Last stop zone. . . . . . . . . . . . . . . . . . . . . . . . . . . . . . . . . . . . . . . . . . . . . . . . . . 276Realtime clock zone . . . . . . . . . . . . . . . . . . . . . . . . . . . . . . . . . . . . . . . . . . . . . 277Modification of the program in Run mode . . . . . . . . . . . . . . . . . . . . . . . . . . . . . 278Animating program elements . . . . . . . . . . . . . . . . . . . . . . . . . . . . . . . . . . . . . . 279Grafcet debugging . . . . . . . . . . . . . . . . . . . . . . . . . . . . . . . . . . . . . . . . . . . . . . 282Executing the programme . . . . . . . . . . . . . . . . . . . . . . . . . . . . . . . . . . . . . . . . . 285Task properties . . . . . . . . . . . . . . . . . . . . . . . . . . . . . . . . . . . . . . . . . . . . . . . . . 286Executing the MAST task . . . . . . . . . . . . . . . . . . . . . . . . . . . . . . . . . . . . . . . . . 287Executing the FAST task. . . . . . . . . . . . . . . . . . . . . . . . . . . . . . . . . . . . . . . . . . 288Execution of a program with breakpoint . . . . . . . . . . . . . . . . . . . . . . . . . . . . . . 289Executing a program in step by step mode. . . . . . . . . . . . . . . . . . . . . . . . . . . . 292Forcing TOR input . . . . . . . . . . . . . . . . . . . . . . . . . . . . . . . . . . . . . . . . . . . . . . . 294Forcing analog inputs, Micro . . . . . . . . . . . . . . . . . . . . . . . . . . . . . . . . . . . . . . . 295Forcing analog inputs, Premium . . . . . . . . . . . . . . . . . . . . . . . . . . . . . . . . . . . . 296Adjustment of the application specific functions . . . . . . . . . . . . . . . . . . . . . . . . 297
9

Debugging a functional module . . . . . . . . . . . . . . . . . . . . . . . . . . . . . . . . . . . . . 298Debugging DFBs . . . . . . . . . . . . . . . . . . . . . . . . . . . . . . . . . . . . . . . . . . . . . . . . 300
Chapter 14 Adjustment of variables . . . . . . . . . . . . . . . . . . . . . . . . . . . . . 301Introduction . . . . . . . . . . . . . . . . . . . . . . . . . . . . . . . . . . . . . . . . . . . . . . . . . . . . 301Animation of variables: creating Animation tables . . . . . . . . . . . . . . . . . . . . . . . 302Working with animation tables . . . . . . . . . . . . . . . . . . . . . . . . . . . . . . . . . . . . . . 304Animation and modification of the variables: DFBs . . . . . . . . . . . . . . . . . . . . . . 306Modification of the variables: . . . . . . . . . . . . . . . . . . . . . . . . . . . . . . . . . . . . . . . 308List of forced bits . . . . . . . . . . . . . . . . . . . . . . . . . . . . . . . . . . . . . . . . . . . . . . . . 309
Chapter 15 Diagnostic functions . . . . . . . . . . . . . . . . . . . . . . . . . . . . . . . . 311Introduction . . . . . . . . . . . . . . . . . . . . . . . . . . . . . . . . . . . . . . . . . . . . . . . . . . . . 311Diagnostic of the PLC’s last stop . . . . . . . . . . . . . . . . . . . . . . . . . . . . . . . . . . . . 312Module/channel diagnostics. . . . . . . . . . . . . . . . . . . . . . . . . . . . . . . . . . . . . . . . 313Program diagnostics . . . . . . . . . . . . . . . . . . . . . . . . . . . . . . . . . . . . . . . . . . . . . 314Module call stacks . . . . . . . . . . . . . . . . . . . . . . . . . . . . . . . . . . . . . . . . . . . . . . . 316Diagnostics DFBs . . . . . . . . . . . . . . . . . . . . . . . . . . . . . . . . . . . . . . . . . . . . . . . 317Implementation of diagnostics DFB . . . . . . . . . . . . . . . . . . . . . . . . . . . . . . . . . . 318DFB diagnostics error messages. . . . . . . . . . . . . . . . . . . . . . . . . . . . . . . . . . . . 319
Chapter 16 Documentation. . . . . . . . . . . . . . . . . . . . . . . . . . . . . . . . . . . . . 323Presentation. . . . . . . . . . . . . . . . . . . . . . . . . . . . . . . . . . . . . . . . . . . . . . . . . . . . 323Contents of documentation file . . . . . . . . . . . . . . . . . . . . . . . . . . . . . . . . . . . . . 324Documentation: application documentation file . . . . . . . . . . . . . . . . . . . . . . . . . 326
Chapter 17 Import/Export . . . . . . . . . . . . . . . . . . . . . . . . . . . . . . . . . . . . . . 329Introduction . . . . . . . . . . . . . . . . . . . . . . . . . . . . . . . . . . . . . . . . . . . . . . . . . . . . 329General points on import/export. . . . . . . . . . . . . . . . . . . . . . . . . . . . . . . . . . . . . 331Import/Export source files . . . . . . . . . . . . . . . . . . . . . . . . . . . . . . . . . . . . . . . . . 332Exporting a Section , a Subroutine, an Event . . . . . . . . . . . . . . . . . . . . . . . . . . 338Importing a Grafcet/Ladder/List/Structured text section. . . . . . . . . . . . . . . . . . . 340Exporting an LD, IL, ST, Grafcet source file . . . . . . . . . . . . . . . . . . . . . . . . . . . 341Importing an LD, IL, ST, Grafcet source file. . . . . . . . . . . . . . . . . . . . . . . . . . . . 342Exporting variables . . . . . . . . . . . . . . . . . . . . . . . . . . . . . . . . . . . . . . . . . . . . . . 344Importing variables. . . . . . . . . . . . . . . . . . . . . . . . . . . . . . . . . . . . . . . . . . . . . . . 345Importing/Exporting variables in EXCEL format. . . . . . . . . . . . . . . . . . . . . . . . . 347Exporting a functional module . . . . . . . . . . . . . . . . . . . . . . . . . . . . . . . . . . . . . . 349Importing a functional module . . . . . . . . . . . . . . . . . . . . . . . . . . . . . . . . . . . . . . 351Importing a functional module using the wizard. . . . . . . . . . . . . . . . . . . . . . . . . 353 Exporting animation table(s) . . . . . . . . . . . . . . . . . . . . . . . . . . . . . . . . . . . . . . . 357Importing animation table(s) . . . . . . . . . . . . . . . . . . . . . . . . . . . . . . . . . . . . . . . 359Export of runtime screens . . . . . . . . . . . . . . . . . . . . . . . . . . . . . . . . . . . . . . . . . 361Import of runtime screens . . . . . . . . . . . . . . . . . . . . . . . . . . . . . . . . . . . . . . . . . 363Export of a DFB type . . . . . . . . . . . . . . . . . . . . . . . . . . . . . . . . . . . . . . . . . . . . . 365Importing a DFB type. . . . . . . . . . . . . . . . . . . . . . . . . . . . . . . . . . . . . . . . . . . . . 367
10

Exporting an application . . . . . . . . . . . . . . . . . . . . . . . . . . . . . . . . . . . . . . . . . . 369Importing an application . . . . . . . . . . . . . . . . . . . . . . . . . . . . . . . . . . . . . . . . . . 371Exporting an application in FNES format (Input/Output Neutral File) . . . . . . . . 373Importing an application in FNES format. . . . . . . . . . . . . . . . . . . . . . . . . . . . . . 374
Chapter 18 Configuring the Uni-telway link. . . . . . . . . . . . . . . . . . . . . . . .377Introduction . . . . . . . . . . . . . . . . . . . . . . . . . . . . . . . . . . . . . . . . . . . . . . . . . . . . 377General . . . . . . . . . . . . . . . . . . . . . . . . . . . . . . . . . . . . . . . . . . . . . . . . . . . . . . . 378Configuration of the terminal/PLC link. . . . . . . . . . . . . . . . . . . . . . . . . . . . . . . . 380Advanced configuration . . . . . . . . . . . . . . . . . . . . . . . . . . . . . . . . . . . . . . . . . . 386
Chapter 19 Configuring the FIPWAY link. . . . . . . . . . . . . . . . . . . . . . . . . .389Presentation . . . . . . . . . . . . . . . . . . . . . . . . . . . . . . . . . . . . . . . . . . . . . . . . . . . 389General . . . . . . . . . . . . . . . . . . . . . . . . . . . . . . . . . . . . . . . . . . . . . . . . . . . . . . . 390Configuring the terminal/FIPWAY link . . . . . . . . . . . . . . . . . . . . . . . . . . . . . . . . 392Advanced Configuration . . . . . . . . . . . . . . . . . . . . . . . . . . . . . . . . . . . . . . . . . . 395
Chapter 20 OS Loader . . . . . . . . . . . . . . . . . . . . . . . . . . . . . . . . . . . . . . . . .397Introduction . . . . . . . . . . . . . . . . . . . . . . . . . . . . . . . . . . . . . . . . . . . . . . . . . . . . 397The OS Loader: At a Glance. . . . . . . . . . . . . . . . . . . . . . . . . . . . . . . . . . . . . . . 398Displaying the PLC OS version. . . . . . . . . . . . . . . . . . . . . . . . . . . . . . . . . . . . . 400Downloading an OS . . . . . . . . . . . . . . . . . . . . . . . . . . . . . . . . . . . . . . . . . . . . . 401Communication error during downloading. . . . . . . . . . . . . . . . . . . . . . . . . . . . . 402Limitations of the OS Loader. . . . . . . . . . . . . . . . . . . . . . . . . . . . . . . . . . . . . . . 403
Chapter 21 Windows . . . . . . . . . . . . . . . . . . . . . . . . . . . . . . . . . . . . . . . . . .405Presentation . . . . . . . . . . . . . . . . . . . . . . . . . . . . . . . . . . . . . . . . . . . . . . . . . . . 405PL7 online help . . . . . . . . . . . . . . . . . . . . . . . . . . . . . . . . . . . . . . . . . . . . . . . . . 406Help Topics Browser . . . . . . . . . . . . . . . . . . . . . . . . . . . . . . . . . . . . . . . . . . . . . 407PL7 contextual Help . . . . . . . . . . . . . . . . . . . . . . . . . . . . . . . . . . . . . . . . . . . . . 409General points relating to Windows. . . . . . . . . . . . . . . . . . . . . . . . . . . . . . . . . . 410Equivalent Windows keyboard: Basic principle . . . . . . . . . . . . . . . . . . . . . . . . . 411The menu keys . . . . . . . . . . . . . . . . . . . . . . . . . . . . . . . . . . . . . . . . . . . . . . . . . 412Windows dialogue box keys . . . . . . . . . . . . . . . . . . . . . . . . . . . . . . . . . . . . . . . 413Keys for modifying text . . . . . . . . . . . . . . . . . . . . . . . . . . . . . . . . . . . . . . . . . . . 414Text selection keys . . . . . . . . . . . . . . . . . . . . . . . . . . . . . . . . . . . . . . . . . . . . . . 415Work station and Windows Explorer keys. . . . . . . . . . . . . . . . . . . . . . . . . . . . . 416Print management in Windows . . . . . . . . . . . . . . . . . . . . . . . . . . . . . . . . . . . . . 417
Glossary . . . . . . . . . . . . . . . . . . . . . . . . . . . . . . . . . . . . . . . . . . . . . 419
Index . . . . . . . . . . . . . . . . . . . . . . . . . . . . . . . . . . . . . . . . . . . . . 427
11

12

About the Book
At a Glance
Document Scope This manual describes the installation of software for Micro and Premium PLCs
Validity Note The update of this documentation takes into account the functions of PL7 V4.5.Nevertheless, it can be used to set up previous versions of PL7.
User Comments We welcome your comments about this document. You can reach us by e-mail at [email protected]
13

About the Book
14

I
Operating modes, general pointsPresentation
Subject of this part
This part describes how to set up the software tool and gives general points on managing applications.
What’s in this Part?
This part contains the following chapters:
Chapter Chapter Name Page
1 Setting up 17
2 Presentation of PL7 functions 23
3 Managing applications 41
15

Operating modes, general points
16

1
Setting upPresentation
Subject of this chapter
This chapter describes the software set up for the programming software.
What’s in this Chapter?
This chapter contains the following topics:
Topic Page
General points on PL7 software 18
Connections 20
Software installation 21
17

Setting up
General points on PL7 software
At a Glance PL7 Micro/Junior/Pro are programming and debugging tools for Micro and Premium PLCs.
There are three software variants:� the software suite that is used to install PL7 software,� the software update suite that is used to update a previous version to a new
version (Pl7 Micro V1.0 to P17 Micro V4.4),� the software upgrade suite that is used to upgrade a previous version to a new
version with a higher level of functionality (PL7 Micro V1.0 to P17 Junior V4.4, or PL7 Junior V1.0 to PL7 Pro V4.4).
A PL7 software suite comprises:� a PL7 software installation CD-ROM,� a CD-ROM containing the previous version of the TSX37 and TSX57 processor
operating systems,� a TSX07/37/57 PC UNI-TE terminal port cable (reference TSX PCX 1031 or
TSX PCX 3030, not supplied with updates or upgrades),� an installation and start up guide for PL7,� a product identification number. A record of this number should be kept because
it is needed each time the corresponding software is installed,� a CD containing documentation in French/English/German/Italian/Spanish.
18

Setting up
Functions The functions of PL7 software are as follows:
Pl7-Micro Pl7-Junior Pl7-Pro
Programming Micro Micro\Premium Micro\Premium
Grafcet ChartGrafcet Macro
yes yes yes
no Premium Premium
Ladder yes yes yes
List yes yes yes
Structured text yes yes yes
Sections yes yes yes
Functional modules
no no yes
Debugging yes yes yes
Adjustments yes yes yes
Diagnostics yes yes yes
Runtime screens no no creation/use
DFB types no use creation/use
DFB diagnostics no no TSX/PCX/PMX57
Storage of PLC symbols
Premium Premium
Application documentation file
yes yes yes
19

Setting up
Connections
Introduction This module deals with the connection of the terminal to the PLC via a cable. A description of how to make other specific connections to the terminal (monitor, keyboard, mouse, printer, mains) is provided in the manufacturer documentation. Other modes of connections are possible, such as connections via UNITELWAY bus or Modem (via the telephone network).
Connection of PC <-> PLC
To connect a PC you will require the 2.5m TSX PCX 1031 or TSX PCX 3030 link cable, supplied with new software packages (not supplied with update and upgrade variants).
Connection of FTX517/FT2000 <-> PLC
To connect a FTX 517 terminal you will require a 2.5m T FTX CBF 020 link cable.To connect an FT 2000 terminal you will require the 2.5m TSX PCX 1031 or TSX PCX 3030 link cable, supplied with new software package variants (not supplied with update and upgrade variants).
TSX PCU 1030
TSX PCU 1030
TSX 57
TSX 37 PC
Mains MainsMainsTSX PCX 1031/3030
TSX PCX 1031/3030
TSX PCU 1030
T FTX CBF 020
TSX PCU 1030
TSX 57
TSX 37FT 2000
FTX 517
Mains Mains
Mains
Serial linkconnector
TSX PCX 1031/3030
TSX PCX 1031/3030
20

Setting up
Software installation
Contents of PL7 You can choose which components of the PL7 software you wish to install. The standard installation is the most straightforward, but a customized installation allows you to optimize the space taken up by the software.Contents of a standard installation (in bold):
Software Contents
PL7-Micro Core, function library, Uni-Telway driver.Servers (security management).Demonstration application.FIP driversPL7-2 converter
PL7-Junior Core, function library, Uni-Telway driver.Servers (security management).Demonstration application.FIP driversPL7-2 converterPL7-3 converterS1000 converter
PL7-Pro Core, function library, Uni-Telway driver.Servers (security management).Demonstration application.FIP driversFNES Import/Export functionPL7-2 converterPL7-3 converterS1000 converter
21

Setting up
PL7 directories and files
Directories created on C:
Directories created on a path defined by the user (e.g.: D:\SOFTWARE\
Directories created in C:\WINDOWS\
Execution Carry out the following steps from the Start menu:
C:\PL7USER\ directory containing client and demonstration applications,
C:\PL7TEMP\ directory used as temporary space,
C:\CONGIG.SYS modified file incorporating the UNITELWAY and FIPWAY drivers
C:\CONFIG.001 Old configuration file
\OFLIB32\ directory containing the functions
\PL7Micro33\ directory containing the module descriptions and executables for PL7 Micro
\PL7Junior33\ directory containing the module descriptions and executables for PL7 Junior
\PL7Pro33\ directory containing the module descriptions and executables for PL7 Pro
\PL7SYS\ directory containing shared PL7 files
\XWAYDRV\ directory containing COM drivers
\PL7SYS\ directory containing history
\PL7SYS\HISTO.REF file containing installation history
\PL7SYS.INI initialization file
\START MENU\PROGRAMS\MODICON TELEMECANIQUE
directory containing the startup icons
Step Action
1 Select Programs from theStart menu.
2 Select the Modicon Telemecanique program group.
3 Select the software icon.
22

2
Presentation of PL7 functionsPresentation
Subject of this chapter
This chapter describes very generally the various components of the software product.
What’s in this Chapter?
This chapter contains the following topics:
Topic Page
Configuration editor 24
Variables editor 25
Editing in ladder language 26
Instruction list language editing 27
Structured text language editor. 28
Grafcet language editor 29
Animation tables 30
Debugging 31
Diagnostics 33
Operating screens 35
Structure of the documentation file 36
General software ergonomics 37
23

Presentation
Configuration editor
Hardware configuration
The configuration editor is used intuitively and graphically to declare and configure the various constituent parts of the PL7.� rack,� supply,� processor,� application specific modules.Editor:
Software configuration
The configuration editor also ensures the software parametrizing of the application by informing on the number of function blocks, registers and the size of the global variable fields.
Configuring Grafcet objects
If the Grafcet programming language has been used, the configuration editor is used to define the Grafcet objects (steps, macro steps,….) and the execution parameters (number of steps and active transitions).
Note In on-line mode the configuration editor also provides the debugging, adjustment and diagnostic functions.
24

Presentation
Variables editor
Presentation The variables editor is used:� to symbolize the various application objects,� to parametrize the predefined function blocks,� to enter the constant values and choose the display base,� to parametrize the DFB user function blocks.
Access to variables is gained by:� classifying by family and type,� sorting functions (symbols or addresses),� being able to pre-symbolize objects in certain applications,� being able to launch a search with a joker on the symbol or comment,� being able to filter the I/Os,� being able to Copy/Paste by variables block,� being able to remove pre-symbolization,� displaying the variables used in the program in bold.Editor:
I/O 1: TSX DEY 16D2 Input zoneParameters Addr
Variables
Address Type CommentSymbol
+
P
++
+
%CH1.MOD CH%I1.MOD.ERR EBOOL%MW1.MOD WORD%MW1.MOD.1 WORD%MW1.MOD.2 WORD%CH1.0 CH%KW 1.0 WORD%KW 1.0.1 WORD%KW 1.0.2 WORD%I1.0 EBOOL detects a part in front of cylinder v 1PRESENCE_PIECE
sensor for return position of cylinder v 1CAPTEUR_V1_ENTREE
starts systemINITstops automatic cycleARRET
%I1.1%I1.2%I1.3%I1.4%I1.5%I1.6%I1.7%I1.0.ERR
EBOOLEBOOLEBOOLEBOOLEBOOLEBOOLEBOOLBOOL
CAPTEUR_V2_ENTREECAPTEUR_V1_SORTIE
CAPTEUR_V2_SORTIE
sensor for out position of cylinder v 1sensor for return position of cylinder v 2sensor for out position of cylinder v 2
%CH1.MOD
++
25

Presentation
Editing in ladder language
At a Glance The Ladder editor offers a number of tools to help build a ladder in a user-friendly way:� a graphics palette,� the language objects can be entered at random and displayed in the form of
addresses, symbols or both at the same time,� a collapsed view.Editor:
The editor is used to immediately call up assisted entry functions:� to access function libraries,� to enter variables in the form of symbols or addresses.
When displayed, the ladders are shown in contracted form. It is thus possible to view several ladders in the same window and to access them using the scroll bar or their label.
A subroutine can be accessed directly from the call program.
1.F3 1.F4 1.F5 1S.F6 1.F81.F2F12F11F10 F8 F9 F6 F4 F3 F2P S R OPER COHP COHP
H V F (...) F5
N
1F7 F7
%MVV15:=%MVV13*500OPERATE
IN TM Q MODE TON TB: 1 s TM.P: 10 MODIF: Y
%I1.0 %M12 %I1.7 %Q2.
%TM4.Q
%I1.5 %M27 %MW0:X5 %M25
%M17
LD : MAST - test
%TM0
26

Presentation
Instruction list language editing
Introduction The Listeditor is used to input language instructions and operands via the keyboard, they are formatted automatically.
The operands can be input and viewed either as addresses or symbols.
To make program reading easier, key words of the language and comments are displayed in color.Instruction list editor.
The Instruction list language editor offers input help options :� for function block instructions (%TMi, %Ci,...),� for functions, via the functions library.
IL: MAST - SR0
! ( * Verification of part in drying position * )LD %I1.0AND %I1.1ST %Q2.2
! ( * Start motor * )LDN %I1.0ANDN %I1.4AND %I1.3ST %Q2.0
27

Presentation
Structured text language editor.
Introduction The editor is used to input program lines via the keyboard, using alphanumeric characters.
The operands can be input and viewed either as addresses or symbols.
The editor provides a help option for function input via the functions library.
To make program reading easier, key words of the language and comments are displayed in color.Structured text editor
ST : MAST - SR1
! (*Search for the first not null element in a 32 word tableDetermination of its value ( %MW10), and its rank (%MW11)This search is carried out if %M0 is set to 1%M1 is set to 1 if a not null element exists, if not it is set to 0*)
IF %M0 THENFOR %MW99: =0 TO31 DO
IF %MW100 [ %MW99 ] < >0 THEN%MW10: = %MW100 [ %MW99 ];%MW11: = %MW99;%M1: =TRUE;EXIT; (*Exit FOR loop*)
ELSE%M1: =FALSE;
END_IF;END_FOR;
ELSE%M1: FALSE;
END_IF;
28

Presentation
Grafcet language editor
Presentation The editor has a number of tools which are used to enter the chart in a user-friendly manner: � a range of graphic objects,� access to the actions or receptivity programs,� automatic numbering of steps,� a display of each Grafcet page with step and transition lines,� simplified entering of remarks,� a reduced view.
The graph is constructed by selecting the desired object from the graphics palette and putting it into the Grafcet page.
The graphics (fine lines) appear which ensures that the programmed graphic objects are displayed immediately.
Illustration Grafcet editor
The Grafcet editor behaves like an editing field by shifting onto a complete module of 8 Grafcet pages.
GRAFCET: MAST - Chart
F11F8F7F6F5F4F3 F10 F12 1F2F9F2
0
2 31 54
1
1
1
1
(*Display the Recipeon the Display*)(*Recipe Number*)
(*Copy theRecipe data*)
(*Select the Recipewith the Display key*)(*Start the cut/New Recipe*)(*Advance the high-speedbar*)(*Deceleration threshholdreached*)(*Advance the low-speedbar*)(*Length of cutreached*)(*Cut off a section*)
(*New section/Cut completed*)
29

Presentation
Animation tables
At a Glance Animation tables can be created by entering them or automatically initializing them from the rungs, selected sequences, or animated objects in the runtime screens.
The variables can then be:� modified,� forced to 0 or to 1 for the bit objects.
For each numerical variable it is possible to select the display base (decimal, binary, hexadecimal, floating, ASCII message).Animation table:
Modify
Display
Table: TABLE_TEST (Animated)*
0
1
Force 0
Force 1
Unforce
Forcing
Modification
Dec.
F6
F5
F4
F8
F7
F3
0
%Q3.0%Q3.1%I4.0%I4.1%M0%M1%TM0.V RETARD_ALLUMAGE-V
1000018
Address Symbol\Name Current value Nature Type7/8
TEMOIN_DEMARRAGETEMOIN_TEMPODEMARRAGEARRETMEMO_RETARD_ALLUMAGEMEMO_FONCTIONNEME
30

Presentation
Debugging
Debugging tools The PL7 software offers a complete range of tools for debugging applications.
A range of tools is used to access the main functions directly: � setting the break point,� running the program from step to step,� independent running of the MAST master task and the FAST rapid task.Debugging bar
CU debugging screen
This CU debugging screen has the following functions:� information on the application status,� controlling the running of the program,� access to the diagnostic module specific programs,� access to updating and display of the real time clock.Diagnostic tool:
RUN aGO cc c R 7cF
Mast Evt Debug Ap Surv.
RUN aRUN a
Fast
Designation: PROCESSOR TSX P 57302
Task
Operating Mode
Last stop Timestamp
Events
Time:
Number of events:
State:
Date:
TuesdayTuesdayCause
Outputs in fallback mode
Network address:Processor present:
Number of forced bits:Processor version:
TSX 57302 [RACK 0 POSITION 0]
Information
10:47:5524/02/1998
Change to Stop
Output fallback Warm restart
Cold startRUN active Fault Reset fault bit
0
OK
CancelUpd
24/02/1998
10:49:13
TSX 57302
SYS
3.0(35)
1
IO DIAG...ERRRUN
Debug
PeriodSet
MinimumDuration
CurrentDuration
MaximumDuration
Cycle timeFIPIO
Network
Watchdog
OperatingMode
State Cmd Activate task
Error Initduration
ResetFault
MASTFAST
CYCLIC5 0 1 2 Not pres 100 RUN a Stop Deactivate Fault Init Reset
2 6 12 Not pres 250 RUN a Stop Deactivate Fault Init Reset
31

Presentation
Grafcet debugging screen
This Grafcet debugging screen is used to give a hierarchical display of the graph with overlays of the CHART module and the macro steps.
This view is animated on line. The animation is represented by the absence and presence of flags.Debugging browser
The debugging bar is used to display the status of the graph, to modify the status of the graph, to inform on the status of the master task.Debugging bar
Debugging function modules
Organizing a function module, distributing the sections, events and Grafcet modules to the various modules has no effect on the running of the program. This is carried out according to the order shown in the structure view.
To debug a function module, the user has basic debugging functions and additional functions used for incremental debugging of the application, function module by function module.
These functions are:� deactivating all sections attached to a function module,� activating all sections attached to a function module,� cancelling the forcing of all sections attached to a function module.
PrlChart
Macro0Macro1
Post
Grafcet Debug Browser
LDLD
G7G7
G7G7
operate
G7G7
PRG RUN aFrozen Chart status Actions on chart Prepositioning Mast
Error
32

Presentation
Diagnostics
Diagnostics tool The software provides various diagnostics tools. To access the tools you need to be in online mode.
These tools are:� diagnostics for the PLC’s last operational stop,� module/channel diagnostics,� program diagnostics,� system diagnostics (See "Diagnostics functions installation manual"),� Diagnostics DFBs (See "Diagnostics functions installation manual").
33

Presentation
Diagnostics DFBs
Can be used with PL7 PRO. The diagnostics DFBs are composed of:� Application diagnostics DFBs, which are used to set up process monitoring via
the application program:� PL7 equation monitoring,� monitoring the reaction time of the process to a command,� monitoring safety conditions,� monitoring inputs, outputs and the ASI bus.
� Working part control and diagnostics DFBs which are used to control and monitor elements of the working part (EPOs):� monitoring sensor information,� monitoring actuator control requests,� monitoring the duration of a movement,� storing minimum and maximum movement durations,� learning the duration times of a movement,� controlling an actuator.
The library breaks down into the following DFBs:
Error message:
Each DFB has its own standard error message, which may be customized according to the type of DFB.
Error messages are displayed on a Viewer integrated into PL7 Pro. A Diagnostics Viewer is also available with the CCX17 V2.5Viewer:
EV_DIA Monitoring the status of 2 bits without taking a time factor into account.
MV_DIA Monitoring the status of two bits without taking a time factor into account, with the option of monitoring a movement’s changes (change of bit status within a given time period).
NEPO_DIATEPO_DIA
Monitoring, checking and diagnostics for a working part element.
IO_DIA Diagnostics for all the I/O modules.
ASI_DIA Diagnostics for an Asi input/output module.
ALRM_DIA Interface with a diagnostics buffer (storage of errors).
Ack Error Zone Appearance Disappearance Error Message Status0ALARM 10/03/1998... 10/03/1998... Silo empty or weighing ho
0EV_DIA 11/03/1998... 11/03/1998... DEF_1_DEFAUTS PLC 1 HO ISLAND... 0.2
0.2
34

Presentation
Operating screens
Presentation The operating screens editor is a tool integrated into the PRO PL7 program from version V3.0 onwards.
It is used to make running an automated process easier.
From the screen tab you can:� create operating screens, screen families,� manage importing and exporting screens and screen families,� manage the link between the screen number and the screen browser object,� list all the variables used in a screen,� parametrize the screen (size, elevator, full screen, mouse position….),� copy/paste one or more objects,� display the errors found by the diagnostic DFBs in the program.
From the message tab you can:� Create the messages used in the screens.
From the screen tab you can:� Create a library of graphics objects.Operating screen:
3- VOIT LINE DIAGRAM34 – PRO CUT DIAGRAM27 – DEF_1_DEFAUTS API1 CELL24 - SYNZ1_SYNOPTIQUE api 1
5 – Screen 1 blank for demo
7 – Valve management
1
0
1
0
1
0
00
0
0 0
1
0
VAL
VALS o l v e n t R e a g e n t
VALL I T E R V o l u m e
ContentsL I T E R
E v o l u t i o n at v e s s e l l e v e l
L I T E R S
A N O M A L Y A N O M A L Y
VAL L I T E R S
Screen
4 – Program debug2 – Chemical process111 - Clock
1 - Contents
Run-time screen IE2.14: Product mix
112 - Product mix
5 – Screen 2 blank for demo
a
35

Presentation
Structure of the documentation file
At a Glance The documentation editor is linked to the Documentation browser which shows the documentation file structure in tree diagram format.
The documentation editor is used to define:� a title page containing the name of the project and the designer,� general information pages,� a cartridge.
The documentation editor automatically generates:� the contents table,� the application documentation file (hardware/software configurations and
program),� the list of variables sorted by address or by symbol.
The documentation editor is also used:� to print all or part of the application documentation file,� to display documentation file pages before printing.Documentation browser:
For functional modules
When the documentation tool is launched, it detects whether there is at least one functional module referencing either program modules which are not empty (Section, Evt, Grafcet modules, Srs), or animation tables.If this is the case, an additional node "Function view" is added to the directory tree.
Documentation
Sr0Sr1
normal_cycle
Rack configurationModule parameters
Sections
Sr
VariablesFooter
ContentsConfiguration
Title page
Cross references
Application structureMAST Task
Software configurationProgram
Station Documentation File
Hardware configuration
36

Presentation
General software ergonomics
General points The PL7 software uses all the standard working tools for Windows: � mouse or keyboard,� drop-down menus,� browsers,� tool bars and palettes with icons,� several tools in parallel,� on-line help and tool tips.
Standard elements
PL7 software uses Windows ergonomics and looks like this:Example of a window:
OFFLINE U:SYS GR7 NOK OVRReady
STOPRUN ??? ???STOPRUN
File Edit ?
PL7 PRO: IE54VT
Services View Tools PLC Debug Options Window
GRAFCET: MAST - run - Chart
F11F8F7F6F5F4F3F2 F10 F12
0
1
5
M1
2M0
1F2F9
2 3 41 2 3 4
5 6 7
37

Presentation
This table describes the different zones:
Tool bar The tool bar provides a rapid means of access to the standard software functions:
This table shows what each element of the tool bar is for:
Number Description
1 Menu bar, which is used to access all the software functions.
2 Tool bar for rapid access to all basic functions using the mouse.
3 On-line help on how to use the software.
4 Context sensitive help for the software.
5 Comments zone.
6 Palette of graphics elements.
7 Work context.
Element Function Element Function
New application Offline mode
Open an application Online mode
Save the application Switch PLC to RUN mode
Print all or part of the application Switch the PLC to STOP mode
Undo Start / Stop animation
Confirm modifications Arrange the windows in a cascade
Go to Tile Horizontally
Application browser Tile Vertically
Cross references Help
Function library What’s This?
PLC transfer<-> terminal
38

Presentation
Status bar The PL7 status bar looks like this:
This table describes the different zones that make up the status bar:
Number Zone Function
1 Mini on-line help Provides help linked to the menu commands or tool bar icons when these are selected.
2 Operating mode Shows the current operating mode (offline, online).
3 PLC status Shows the PLC status (Run, Stop, faulty,etc.).
4 Network address Provides details of the PLC’s network address.
5 Grafcet mode Shows whether Grafcet mode is used in the application.
6 Modification in progress
Shows that the current application is not backed up or is different from the back up.
7 Animation flag Symbol for online mode.
8 Keyboard functions
Shows the status of the Insert and Caps functions of the keyboard.
ONLINE GR7 OK MODIF OVRReady STOP SHIFTU:SYS
39

Presentation
40

3
Managing applicationsPresentation
Subject of this chapter
This chapter shows the different tools used to manage an application.
What’s in this Chapter?
This chapter contains the following topics:
Topic Page
PL7 access security management 42
Accessing PL7 software 43
Launch Options 44
Creating an application 46
Opening an application 47
Protecting an Application on a PLC 48
Saving an application 51
Saving/restoring %MWi data on TSX 37 PLCs 52
Offline/online operation 57
Program Transfer Between the PC and PLC 59
Program Transfer Between the PLC and PC 60
Transferring data from file to PLC and vice versa 62
Comparing applications 63
Backing up in the internal Eprom Flash memory 64
Backing up on a TSX MFP BAK 032P memory card 65
Accessing a PL7 through a network 67
Memory Usage 68
Sending a command to the PL7 70
41

Managing applications
PL7 access security management
At a Glance PL7 access security management, administered by the super user, limits and controls access to the various PL7 functions.
It is applied to the terminal where the PL7 software is installed, not the application.
PL7 software provides 5 user profiles:� Read Only,� Operate,� Adjust,� Debug,� Program.
User information The User information box displays information on the current user.
When the PL7 Access security management option has not been implemented or is inactive, this information is as follows:� indication that PL7 access control is inactive,� the PL7.INI file path.
When PL7 Access security management is active, this information is as follows:� indication that PL7 access control is active,� user name,� user profile,� the "User".INI file name and path.� the start options file name and path.
PL7 software access management
The super user is the only one with the rights to manage PL7 access security.
From the "PL7 Access Security Management" dialog box the super user can:� create/ modify a list of users,� import a list of users,� export a list of users,� activate the "PL7 Access Security Management" function,� modify his/her password.
Note: The name reserved for the super user is Supervisor.
42

Managing applications
Accessing PL7 software
At a Glance It is possible to run several PL7 operations simultaneously (multi-instance) from the same station.
PL7 software also offers the possibility of setting the launch parameters for PL7 using a launch options (See Launch Options, p. 44) file. This is used, for example, to automatically launch an application in a given work environment using a customized short cut icon.
Access without launch option
Carry out the following operations:
Access with launch option
Carry out the following operations:
Notes:
The operating mode described above can vary slightly depending on the launch options.Depending on the launch options declared in the options file, different dialog boxes may appear.When the user is not known (name and/or password incorrect), only the minimum PL7 profile (read only) is available.
Step Action
1 Select the PL7 icon required (Micro, Junior or Pro) from the Modicon Telemecanique program group.
2 If PL7 Access Security Management is active (See PL7 access security management, p. 42), a dialog box is used to identify the user.Enter a user name.
3 Enter a password, where applicable.
4 Confirm with OK or press Enter.
Step Action
1 Select the icon for the launch option command line.
2 If PL7 Access Security Management is active, an information box warns that the program cannot be launched unless access rights have been granted.Click on OK.
3 A dialog box is then used to identify the user.Enter a password.
4 Confirm with OK or press ENTER.
43

Managing applications
Launch Options
At a Glance The launch options make it possible to launch PL7 within the appropriate operating context. This operating context is defined using parameters that are entered in a text file with a user-definable file name suffix. All these parameters are optional. Their presence or absence affects the behavior of the software when it is opened.
Description of the Parameters in the File
The table below provides a description of the parameters in the file:
Designation Comment
Name User name.The Name parameter makes it possible to determine the associated user profile and use a specific user option file.
Password The user’s password.
AutoOpenStx Automatically opens an application. The full path to the application file’s location must be entered in this field.
Address Address of the target PLC. The PLC’s address can be accessed in PL7 by selecting PLC/Define PLC address.
Driver Driver used for communications between the terminal and the PLC. The driver used for communications can be accessed in PL7 by selecting PLC/Define PLC address.
AutoConnect Attempts to open the application in online mode:� TRUE: opens in online mode,� FALSE: opens in offline mode.
AutoOpenTool Automatically opens tools (See PL7 Tools, p. 45) (e.g.: variables editor).Syntax: Tool’a’, Tool’b’,...
ShowIOModule Automatically opens modules in the mode:� configuration in the case of offline mode,� debugging in the case of online mode.Enter the rack number followed by the module number. Syntax: Rack’x’,Module’x1’;Rack’y’,Module’y1’;...
44

Managing applications
Example Launch Option File
[common]User nameName=FabienPassword=JokerAutoOpenStx=c:\pl7user\Count.stxAddress=SYSDriver=UNTLW01AutoConnect=FALSEAutoOpenTool=12,15ShowIOModule=0,2;0,3;1,1
PL7 Tools Description of PL7 tools:
Number Designation
5 Opens the LD editor
6 Opens the Grafcet editor
7 Opens the IL editor
8 Opens the ST editor
10 Opens the configuration editor
12 Opens the variables editor
13 Opens the cross-reference browser
14 Creates an animation table
15 Opens the documentation editor
188 Opens the application import tool
189 Opens the text editor
207 Opens the runtime screen
210 Opens the DFB type editor
212 Opens the application browser
214 Opens the Grafcet debug browser
215 Opens the DFB code editor in ST
45

Managing applications
Creating an application
Procedure Carry out the following actions:
Suggestion for setting up an application
Define the structure of the program to be used:� single task,� multi task,� fast task,� events,� function view.Define the structuring of the variables in:� bits,� words,� tables,� chains,� symbols.Define the PL7 configuration and the module parameters.
Step Action
1 Select the command File/New.
2 Select the hardware base.
3 Select the processor type.
4 Depending on which processor it is, select the type of memory card. The type of memory card can always be modified subsequently when configuring the processor.
5 Depending on the processor version, the Grafcet option must be selected before being used in the application.
46

Managing applications
Opening an application
Procedure This function is applied from a PL7 product that is already open.
Carry out the following actions:
Note:
The applications are saved by default in the directory defined when it was installed. This can be looked up and modified using the command Option/Personalize.The modifications will take effect after the next PL7 session.
Step Action
1 Select the command File/ Open.
2 Select the file for the application (*STX).
3 Click on Open.
47

Managing applications
Protecting an Application on a PLC
At a Glance The application’s Protection function can be accessed in offline mode from the Application properties screen.
This function provides:� Global application protection,� Protection of the sections, for which the type of protection can be defined:
� individually by section,� for all sections of an application or task.
Global Application Protection
Carry out the following actions:
This function is used after transferring the application to the PLC to provide read and write protection.Only the Run, Stop and Init functions, accessible via PLC/PLC command, are authorized in a protected PLC application.
Note: Protecting the sections does not work with PL7 Micro.
Step Action
1 From the Station directory select Properties via the contextual menu.
2 Select the Protection tab.
3 In the Application zone, check the Global application protection box.
WARNING
Protection cannot be removed once applied. A protected application cannot be modified. The only option is to load a new application onto the PLC.
Failure to follow this precaution can result in death, serious injury, or equipment damage.
48

Managing applications
Global Protection of all Sections
This is for sections included in either:� the program,� or a task.Carry out the following actions:
Individual Protection of Sections
Carry out the following actions:
Activating Section Protection
Notes:
The first time the application is used, the password must be confirmed.
The Clear button is used to delete the password.
The password is stored in the PLC when the application is transferred.
Step Action
1 Select the Programs, Tasks or Section directory.
2 Using the contextual menu select Protection of Included Sections.
3 Select the following from the drop-down menu: Write Protect, or Read and Write Protect.
Step Action
1 Select the section to be protected.
2 Using the contextual menu select Properties.
3 From the drop-down menu, select Protection: Write or Read and Write
Step Action
1 From the Station directory select Properties via the contextual menu.
2 Select the Protection tab.
3 Check the box protection activated, and enter the password. A padlock by the section shows that it is protected.
49

Managing applications
Deactivating Protection
Carry out the following actions:
Note It is not possible to modify a section if partial or total protection is activated.
A padlock shows that a type of protection has been activated:� open: protected section - protection deactivated,� closed: protected section - protection activated.
Step Action
1 From the Station directory select Properties via the contextual menu.
2 Select the Protection tab.
3 Check the Protection deactivated box, and enter password. An open padlock by the section shows that protection has been deactivated.
50

Managing applications
Saving an application
Saving a new application
Carry out the following actions:
Saving an existing application
Select the command File/Save.
Step Action
1 Select the command File/Save or File/Save as.
2 If necessary, select the application’s disk and/or save directory using the pull-down menu "In".
3 Enter the name of the file in the "Name" field (maximum of 215 characters).Caution: The characters given below cannot be used in naming a :\ / file: * ? " < > |.
4 Confirm using Save.
Note: When saving an application, which exceeds the capacity of one disk, dialog boxes will appear on the screen asking you to insert the disks one after another. This will continue until the save of the application is complete.You are advised to prepare several empty, formatted discs in advance, and to number them in the order in which you insert them.
51

Managing applications
Saving/restoring %MWi data on TSX 37 PLCs
At a Glance In order to meet the need to save configuration data in case a fault occurs with the processor battery or where no such battery is installed, TSX 37 PLCs provide the option of programmable copying of the first 1000 %MW words to internal FLASH EPROM.
Configuration of save mode
There are two save modes: � by using the %I1.9 input as a condition for "Save program and first %MWi" (to be
defined in the processor configuration screen),� from an adjustment terminal by setting the bit 0 of the system word %SW96 to 1.
Note: An %MW internal word backup is always accompanied by an application program backup when the application is stored in internal RAM.
Note: The save function cannot be performed once a TSX MFP BAK 032P Backup card with the WP switch set to OFF has been inserted into the PLC.
Note: The bit 0 of the %SW96 system word is always active while %I1.9 is only active when it has been configured. Furthermore, the "%MWi Reset on cold start" box in the processor configuration screen must not be checked.
52

Managing applications
Saving The save function is triggered either:� on the rising edge of the discrete input %I1.9,� on the rising edge of bit 0 of %SW96.
The number of words to be transferred shall be initialized in advance in the system word %SW97:� %SW97 = n (n = 1 to 1000): the application program in the internal RAM and the
first n %MW words are transferred to internal FLASH EPROM.� %SW97 = 0: only the application program contained in the internal RAM is
transferred to internal FLASH EPROM. This action is equivalent to the performing an application backup using PL7 software. In this case, the %MW backup is erased.
When saving is complete, the bit in position 2 of the word %MW96 provides the backup report (can also be viewed on the central display of the PLC by indicating that the backup was OK or NOK depending on the situation:� 0 = backup completed without errors (OK),� 1 = backup completed with errors (NOK).The OK or NOK message is cleared when the PLC changes to Run or by simply pressing the button on the central display.
Note: This function requires the PLC to be in Stop.
Note: If the application program is executed from the PCMCIA card (TSX 37 2•), performing the %MW backup (internal RAM -> internal FLASH EPROM) erases any program saved in the internal FLASH EPROM.
Note: In contrast, transferring a program stored in a TSX MFP BAK 032P Backup memory card with the WP switch set to ON to the internal memory of the PLC does not erase any %MW backup in internal FLASH EPROM.
Note: When the input %I1.9 is configured as a save input, you are advised to configure the %I1.8 input as a RUN/STOP input to be able to switch the PLC to STOP without having to use the terminal.
Note: If a power outage occurs during the backup, the system performs a warm restart upon power return and completes the backup in full transparency.
53

Managing applications
Restoring The saved %MWi internal words are transferred from internal FLASH EPROM memory to the internal RAM memory on a cold start.� following an internal RAM failure, in which case the application program is
transferred to RAM if the application backup is valid (TSX 37 05/08/10 or TSX 37 2• PLC without PCMCIA memory card),
� by pressing the RESET button on the front of the PLC,� by setting the system bit %S0 to 1 in adjust mode,� by clicking on the "cold start" button in the processor debugging screen,� as a result of the program being transferred to the PLC,� as a result of inserting a PCMCIA application memory card.
Note: If a cold start is caused by pressing the RESET button or by moving the TSX 37 2• handle and the backup is not yet complete, the application program and data saved in internal FLASH EPROM may be lost.
Note: In order for the saved %MW words to be restored to internal RAM, the "%MWi Reset on cold start" must not be checked in the processor configuration screen.
54

Managing applications
Operating mode without PCMCIA card
The flow diagram below shows the operating modes of the PLC on power up.
Power-up
Is the contents of the internal RAM valid?
Is the program backup valid?
PLC in NONCONF state,ERR LED flashing
Backup -> RAM transfer,Has an %MW reset been requested? (1)
Cold start with resetof all configured %MW words
Is the %MW backup valid?
Cold start with no action on %MW words
Cold start restoringthe saved %MW words (2)
Warm start
No
Yes
No
No
No
Yes
Yes
(1) this corresponds to checking the “%MWi Reset on cold start” checkbox in theprocessor configuration screen
(2) The %MWi internal words that have not been saved are left in the same state theywere in before the power outage. If necessary, they must be reset by the application.
55

Managing applications
Operating mode with PCMCIA
The flow diagram below shows the operating modes of the PLC on power up.
Power-up
Internal RAM context saved?
Has an %MW reset been requested? (1)
Cold start with resetof all configured %MW words
Is the %MW backup valid?
Cold start with no action on %MW words
Cold start restoringthe saved %MW words (2)
Warm start
No
Yes
No
No
Yes
Yes
(1) this corresponds to checking the “%MWi Reset on cold start” checkbox in theprocessor configuration screen
(2) The %MWi internal words that have not been saved are left in the same state theywere in before the power outage. If necessary, they must be reset by the application.
56

Managing applications
Offline/online operation
Offline mode Offline mode (no PLC connection) is used to Create/Modify an application on the terminal. The application being edited is stored on disk in the working directory.
The File/Save command or the icon must be used to save to disk in the applications directory.
Online mode Online mode (connected to the PLC) is used to Create/Modify an application in the PLC.
The following functions are available:� create/modify LD, IL, ST or Grafcet programs,� modify task period,� modify predefined function block parameters (apart from register size),� modify number of internal words,� modify module data and parameters,� import/export a source file or variables, PLC in Stop mode,� export an application, PLC in Stop mode,� debug, adjustment.
The following functions are not available:� add or remove a module,� modify the I/O channel association<->application-specific function,� add predefined function blocks,� modify register size,� modify number of bits and internal constants,� import an application� open an application.
Notes:When being modified in online mode, the application is updated on the PLC and on the disk in the working directory:� the save to the PLC is automatic,� the File/Save command or the icon must be used to save to disk in the
applications directory.
For functional modules
A functional module can be created, modified, and removed in offline or online mode, with the PLC in Stop or Run mode.
Commands Switching to online mode: Select PLC/Connect command.
57

Managing applications
Switching to offline mode: Select the PLC/Disconnect command.
58

Managing applications
Program Transfer Between the PC and PLC
PC -> PLC Transfer
Carry out the following actions:
Elements not transferred in the PLC:� Functional Module description sheets,� comments linked to DFB types (in the absence of a memory storage cartridge),� comments linked to DFB instances (in the absence of a memory storage
cartridge),� animation tables,� operator screens,� symbols and comments of variables (in the absence of a memory storage
cartridge).
Step Action
1Select the command AP/Transfer Program or click .
2 Select the transfer PC->PLC and confirm with OK.
3 If a cartridge enabling the storage of symbols and comments is declared in the configuration, the symbols box is available: you can choose to transfer now or postpone the symbols transfer until a later transfer phase.
59

Managing applications
Program Transfer Between the PLC and PC
PLC -> PC Transfer
Carry out the following actions:
Notes for PLC -> PC Transfer
Note 1:
The program can only be transferred when no application is open on the terminal (PC). If the symbols/comments base is present on the PLC, this is then transferred. Otherwise the local base is initialized (empty).
Note 2:
If an application is open on the PC when you launch a PLC -> PC transfer request, and changes have been made since the first save, the software will ask you if you want to save the changes before continuing.The software keeps the folder relating to the application, animation tables and operator screens present on the terminal (PC). For all other components, i.e. data (symbols) and comments of DFB instances, the software opens a dialog box and proposes that you either:� keep the components of the PC,� or replace the components of the PC with those of the PLC,� or delete the components of the PC.
This dialog box also displays information comparing:� the results of the comparison: application Identical or Different,� the date and time of the last application modification in the PLC,� the date and time of the last application modification in the PC.
Step Action
1Select the command AP/Transfer Program or click .
2 Select the transfer PLC->PC and confirm with OK.
WARNING
Inconsistency
In both cases where you can keep or replace the components (symbols and comments of DFB instances), there may be inconsistency between these components and the application.
Failure to follow this precaution can result in death, serious injury, or equipment damage.
60

Managing applications
Results of the Transfer
The results of the transfer are indicated in the status bar (at the bottom of the window).
The ESC key lets you interrupt the transfer at any time.
WARNING
Case of comments of DFB instances:
Comments of DFB instances are not kept in the variable editor, even when the user selects the option "Use DFB info from PC"To remedy this problem, you must:� either use a PCMCIA memory card enabling you to store symbols
and comments,� or Export the symbols and comments from the old application,
unload the new application, and Import the symbols and comments into the new application.
Failure to follow this precaution can result in death, serious injury, or equipment damage.
61

Managing applications
Transferring data from file to PLC and vice versa
File -> PLC data transfer
Carry out the following actions:
The range of values contained in the file can be displayed by clicking on
the icon .
The ">" command displays a dialog box which is used to choose a data file from the existing ones on the disk.
PLC -> File data transfer
Carry out the following actions:
The ">" command displays a dialog box which is used to choose the destination file.
Step Action
1 Select the PLC/Transfer Data command.
2 Select transfer direction, File -> PLC.
3 Enter the name of the file to be transferred then click on OK.
Step Action
1 Select the PLC/Transfer Data command.
2 Select transfer direction, PLC -> File.
3 Set the transfer parameters:� the range of %MW values to be transferred,� the name of the file in which the data will be stored.
4 Click on OK.
WARNING
A transfer in progress can only be interrupted if there is a fault of some kind (PLC fault, break in the PLC/PC link, etc.).
Failure to follow this precaution can result in death, serious injury, or equipment damage.
62

Managing applications
Comparing applications
Presentation Comparing applications is used to identify any differences between:� the application in the PL7 and the one in the terminal,� the application in the PL7’s RAM and the one in the EPROM FLASH memory,� the PC and PL7 symbol base.
Procedure Carry out the following actions:
Result The result is shown in a dialogue box with:� the date and the time of the last modification of the application run,� the version number,� the application name,� the comments.
With the symbol base the dialogue box shows:� the date and time of the last modification,� the signature,� the number of symbols,� the space occupied,� the total compressed size
Step Action
1 Select the command AP/Comparet.
2 Select the type of comparison:� PC program<->PL7 program,� RAM <->BACKUP field,� PC symbol<-> PL7 symbol.
3 Click on OK.
63

Managing applications
Backing up in the internal Eprom Flash memory
Presentation TSX 37-10 PL7s and TSX 37-20 PL7s can save the application (program and constants) in the internal PL7 EPROM FLASH memory if this is in the RAM and is not more than 15 associated symbol addresses.
This is used:� to reload the PL7 RAM manually (transferring BACK UP -> RAM field) using the
contents of the EPROM FLASH,� to reload the RAM automatically using the contents of the EPROM FLASH, when
the application in RAM is invalid.
This function must be carried out in offline mode.
Transferring Ram -> Back up field
Carry out the following steps:
Transferring Back up -> Ram field
Carry out the following steps:
The results of the transfer are shown on the status bar.
Step Action
1 Select the command AP/Backup.
2 Select the RAM->BACK UP field transfer and click on OK.
WARNING
If the %SW97 system word is initialized at 0, only the application program contained in the internal RAM is transferred to the Eprom Flash (equivalent to a program back up).Any saving of %MWi is deleted.
Failure to follow this precaution can result in death, serious injury, or equipment damage.
Step Action
1 Select the command AP/Backup.
2 Select the BACK UP->RAM field transfer and click on OK.
64

Managing applications
Backing up on a TSX MFP BAK 032P memory card
At a Glance Micro and Premium PLCs provide the option of backing up the application (program and constants) on a TSX MFP BAK 032P memory card.
The internal RAM memory can thus be reloaded using the contents of the Backup card without having to use a terminal.
This Backup function is not available if the application is already running on a RAM or EPROM memory card.
Ram -> Backup memory card transfer
Perform the following actions in offline mode:
Step Action
1 Save (1) the application held in the PLC’s internal RAM on the programming terminal.
2 Insert the TSX MFP BAK 032P memory card into the PLC (the write protection lock must be set to OFF).
3 Transfer (2) the application from the terminal to the PLC’s internal RAM memory. To do this, select PLC → Transfer Program → PC -> PLC then click OK.
4 Declare the memory card in the configuration editor.
5 Select PLC → Backup → RAM -> BACKUP Zone then click OK.
6 When the transfer is complete, remove the Backup card and set the WP switch to ON.
(1) For version V1.0 and V1.1 TSX 37 PLCs, it is essential that you ensure that the application in the PLC has been saved to the programming terminal before inserting the Backup PCMCIA card (lock set to OFF). Inserting the card completely clears the PLC’s internal RAM.
(2) For version V1.0 and V1.1 TSX 37 PLCs or when the application in the PLC is protected.
Note: For a RAM->Backup transfer on TSX 3720 PLCs with an external memory card, priority is given to transferring the application to the memory card.
65

Managing applications
Backup memory card -> Ram transfer
Carry out the following actions:
Notes on the PLC’s operating modes
At the end of transfer, with the Backup card in the processor, the PLC is forced to STOP even if the AUTO RUN option has been configured. The PLC can be set to RUN from the terminal.
As long as the Backup card is in the PLC, a power outage followed by a power return will systematically cause a start in forced STOP.
Removing the Backup memory card causes a cold start in RUN or STOP mode depending on the AUTO RUN configuration.
If internal word initialization on cold restart is not configured, the transfer from the Backup memory card into RAM retains the internal word values.
Step Action
1 As the transfer renders the backup of the %MW words in the internal FLASH EPROM invalid (%S97 = %SW96:x7 = 0), you are advised to back up these words prior to making the transfer (1).
2 Insert the TSX MFP BAK 032P memory card into the PLC (the write protection lock must be set to ON).Note: Inserting the memory card automatically transfers its contents into internal RAM and into FLASH EPROM.
(1) see Saving/restoring %MWi data on TSX 37 PLCs, p. 52
66

Managing applications
Accessing a PL7 through a network
Procedure Carry out the following actions:
Network address syntax
The network address syntax is as follows:� (network no. station no) module track no. PL7 address� (network no. station no.)SYS
{network no. station no.} = network address and destination station on FIPWAY (this part is omitted if the PL7 to be accessed is not on the FIPWAY network).
PL7 module.track address = UNI-TELWAY address (module = 0 or 254, track no. = 0 terminal point or 1 for the communication card, PL7 address = 0 to 98).
SYS = access to the system gate (or UNI-TE server) of the destination PL7.
Note Using the number 254 as a position when communicating between slaves allows it to stay on the same UNITELWAY bus by optimizing exchange routing.
Example {0.2}0.1.3 = PL7 having 3 for an address on the Unitelway link of the module 0 communication card, track 1 of station 2 on network 0.
SYS = default address of the PL7 physically linked to the terminal.
Step Action
1 Select the command AP/Enter PL7 address.
2 Select the type of drivers (e.g. UNTLW01).
3 Enter the network address.
67

Managing applications
Memory Usage
At a Glance The memory usage function can be accessed via the PLC/Memory usage command or from theApplication properties screen.
It provides information on:� PLC memory used (data, program, configuration and system),� memory mapping for an application (internal memory and memory card).
"User data" zone This zone groups together the objects linked to software configuration data:� Bits and I/O bits:
� %Mi bits,� %Si bits,� Input/output bits,� Bits associated with Grafcet, %Xi, %Xi,j,…
TSX37xx: zone set at 2560 bits and I/O bits outside the internal memory.TSX57xx: zone in the internal memory that can be configured.
� Words:� %MWi words,� %SWi system words,� Words linked to configured function blocks (%Ci:V, etc),� Words associated with Grafcet, %Xi, T, %Xi,j,T,…
� I/O data:� Data used for managing I/O modules and I/O words (%IW, %QW, %MW).
� DFB:� data for DFB type instances,� PL7 internal management.
"User program" zone
This zone gives user program consumption details.� Constants:
� constants %Kwi + display base (binary, etc.).� Executable code:
� code linked to the user program,� application EF code,� DFB type code + initialization value.
� Comments and graphic information:� user program decompilation information,� information linked to EFs,� information linked to DFBs.
68

Managing applications
"Other" zone This zone summarizes consumption linked to the application configuration and application structure.
The total of the values declared is equal to the total amount of memory available in the various memory spaces.
Mapping by memory type is displayed by positioning the mouse over the bars of the chart.� Configuration.
� hardware configuration (I/O, FIP),� software configuration (Timers, Registers, etc.),
� System:� Stack of tasks, catalogs, etc.
"Optimize" command
The Optimize command is used to reorganize the memory structure where possible.
It is also used to remove EFs which are not used in the application from the memory.
69

Managing applications
Sending a command to the PL7
Presentation The Command to a PL7 function is used to run (Run), stop (Stop) or initialize (Init) a PL7 application from the terminal in offline mode.
Procedure Carry out the following actions:
Step Action
1 Enter the communication driver type between the terminal and the PL7.
2 Enter the PL7’s network address.
3 Select the command Identify in order to establish communication with the target PL7. The following parameters are supplied:� the type of processor,� the current status of the PL7 (Run, Stop or Init),� the name and version of the PL7 application,� the date of the last modification,� any comments.
4 Select the type of command (Run, Stop or Init).
5 Select the Send command.
70

II
Configuration and ProgrammingIntroduction
Subject of this part
This part describes how to configure the hardware devices Micro/Premium and how to program an application.
What’s in this Part?
This part contains the following chapters:
Chapter Chapter Name Page
4 Micro and Premium: Configuring 73
5 Program access 101
6 Programming in LD rung language 115
7 Programming instruction list in LIST language 149
8 Programming in Structured Text ST language 169
9 Programming in Grafcet language 191
10 Editing variables 221
11 Function modules 239
12 DFB function blocks 253
71

Configuration and Programming
72

4
Micro and Premium: ConfiguringAt a Glance
Subject of this chapter
This chapter describes:� How to configure the software application.� How to configure the hardware application.
What’s in this Chapter?
This chapter contains the following sections:
Section Topic Page
4.1 Micro 74
4.2 Premium 85
73

Micro/Premium: Configuring the application
4.1 Micro
At a glance
Subject of this section
This section describes:� How to configure the software application with a Micro.� How to configure the hardware application with a Micro.
What’s in this Section?
This section contains the following topics:
Topic Page
Accessing the application configuration 75
Choosing/Changing the processor 76
Configuring the processor 78
Configuring the module positions 81
Configuration of each input/output module 82
Software configuration of the application 83
Configuring Grafcet objects 84
74

Micro/Premium: Configuring the application
Accessing the application configuration
Principles The configuration software displays the processor selected when the application was created.
The aim of this function is to: � replace the processor (if the one selected at the time of creation is not suitable),� configure the processor,� declare/parametrize the various input/output modules and integrated modules,� enter the software configuration,� enter the Grafcet configuration.
In online mode this function is used to:� diagnose module faults,� debug modules.
Procedure Carry out the following actions:
Note:
The Edit/Cancel modifications (CTRL+Z) command or the icon cancels all modifications made since the last confirmation.
Step Action
1 From the Application Browser, double left click on the "Configuration" directory or position the cursor over it using the arrow keys and press right arrow.
2 Select:� Hardware configuration to access the module racks,� Software configuration to define the application software parameters,� Grafcet object configuration to define the grafcet parameters specific to
the application.
3 The configuration entered is confirmed by the Edit/Confirm command, the
Confirm command from the contextual menu, or the icon .
75

Micro/Premium: Configuring the application
Choosing/Changing the processor
Choosing the processor
Choosing the processor is the first stage in setting up an application. This choice is reversible.Carry out the following actions:
Changing the processor
The configuration editor provides assistance when attempting to change the processor. A message is sent out if the change is not authorized.
Carry out the following actions:
Step Action
1 Select the commandFile/ New from the PL7 home screen.
2 Select the PLC type >Micro.
3 Select the processor type -> TSX37xx Vyy.
4 If necessary, select a memory extension card (PCMCIA - if the processor supports it).
5 Specify whether or not your application contains Grafcet.
6 Click on OK.
WARNING
When changing to a version V3.x processor
Using aV3.x processor in an application that has previously been configured with a lower processor version leads to an irreversible change in the application structure.This conversion involves:� the creation of program structure in sections,� the automatic creation of the Grafcet section when the initial program
module is written in Grafcet language,� an increase in the size of the application by approximately 100 bytes.
Failure to follow this precaution can result in death, serious injury, or equipment damage.
Step Action
1 Select the Edit/Change processor command.
2 Select the required processor.
3 Select a memory card if necessary.
4 Confirm and then click on OK or press ENTER.
76

Micro/Premium: Configuring the application
Note:It is possible to change the processor using the drop-down menu in the configuration editor.
77

Micro/Premium: Configuring the application
Configuring the processor
Procedure Carry out the following operations:
Step Action
1 From the application configurator select position 0.
2 Select Open module using the contextual menu or double click on the processor.
3 According to the application, enable the RUN/STOP input (See RUN/STOP input, p. 79).
4 According to the application, enable the Alarm (See Alarm output, p. 79) output.
5 According to the application, enable the Save program and first %MWi (See Saving/Restoring %MWi internal words, p. 79) input.
6 According to the application, enable Automatic start in RUN (See Automatic start in RUN, p. 79).
7 According to the application, enable the initialization of %MWi internal words on Cold restart.
8 Select the type of memory card for processors which have this option.
9 Select the type of MAST task execution:� Cyclical� Periodic: 1 to 255 ms (20 ms, default value). If the value is 0 execution will
be cyclical.
10 Enter the MAST task watchdog (See WatchDog, p. 80) value: 10 to 500 ms maximum (250ms, default value).
11 According to the application, enter the FAST task period value: 1 to 255 ms maximum (5ms, default value).
12 According to the application, enter the FAST task watchdog value: 10 to 500 ms maximum (100 ms, default value).
13Confirm using the Edit/ Confirm (CTRL + W) command or using the icon .
78

Micro/Premium: Configuring the application
RUN/STOP input The %I1.8 input parameters can be set to switch the PLC between RUN/STOP as follows:� %I1.8 to 1 -> the PLC switches to RUN (program running),� %I1.8 to 0 -> the PLC switches to STOP (program stops running).This is taken into account on rising edge.
A STOP command by the %I1.8 input takes priority over a RUN command from a terminal or a network command.
A fault on the RUN/STOP input causes the machine to STOP.
Alarm output An alarm function can be assigned to the %Q2.0 output.
After setting the PLC in RUN mode, if no blocking faults are detected (PLC in STOP mode or output in fallback mode, %S9=1), the safety output is set to 1.
This output can be used in safety circuits external to the PLC. For example:� to pace the supply of output pre-actuators,� to pace the PLC supply.
As soon as a blocking fault appears, the safety output is set to 0.
Saving/Restoring %MWi internal words
This function is only available on version V2.0 PL7s or later:� Saving
To save internal words in Flash EPROM the application must be in STOP.Saving %MWi internal words is always linked to an application program save.It is triggered according to the selection made during configuration:� by setting the discrete %I1.9 input to 1,� by setting the bit 0 of %SW96 to 1.
� RestoringThe saved %MWi’s are transferred from internal flash EPROM memory to RAM memory on a cold restart.To restore the %MWi internal words to internal RAM you need to deactivate the Reset %MWi on cold restart box in the processor configuration screen .
Automatic start in RUN
If this option is checked, the PLC will automatically switch to RUN on a cold start.
If there is no memory card, the PLC will start up using the contents of the processor’s internal RAM.
If a memory card is inserted, its contents determine the start up.
79

Micro/Premium: Configuring the application
WatchDog The duration of the master task operation when in cyclic or periodic mode, is controlled by the PLC (watchdog) and must not exceed the value set out in the T max configuration (250ms default, 500ms maximum, rollover 10ms).
If this value is exceeded, an error is declared in the application, which stops the PLC immediately:� Micro: setting the %Q2.0 alarm output to 0 if it has been configured.
Execution monitoring:� %S11: indicates that the watchdog has been exceeded. It is set to 1 by the
system when the cycle time exceeds the watchdog value.� %SW11: contains the watchdog value (in ms).� %S19 (periodic operation): indicates that the period has been exceeded. The
system sets it to 1 when the cycle time exceeds the task period.� %SW0 (periodic operation): this word contains the period value (in ms). It is
initialized on cold restart by the value set during configuration. It can be modified by the user.
80

Micro/Premium: Configuring the application
Configuring the module positions
Introduction Editor:
A standard format module takes up two positions.
A half format module takes up one position.
The 0 position is allocated to the processor and to integrated modules (such as the TSX 37-22).
Procedure Carry out the following operations:
Notes:If the module takes up 2 positions (as with all standard format modules), the software automatically updates the position configuration.
If no input/output modules are declared in the configuration, or if there are any format modules, the PL7 software gives access to the %Ix.0 to %Ix.15 bits and to the %Qx.0 to %Qx.15 outputs for each position (even if the half format module concerned has less inputs/outputs).
If there are any standard format modules, the PL7 software gives access to the %Ix.0 to %Ix.31 input bits for odd positions and to the %Qx+1.0 to %Qx+1.31 output bits for even positions (even if the standard format module concerned has less inputs/outputs).
0 3 5 7
TSX3710
1
8642
Positions of standard format and semi format modules
Main rack Extension rack
Step Action
1 Select the position of the module to be configured (using the mouse or arrow keys).
2 Select the Edit/Add module command or double click on the position selected. A dialogue box is displayed showing a list by family of the modules that can be configured for the selected position (standard format module or half format).
3 Select the family (using the mouse or arrow keys), the module (the TAB key is used to move between the different zones) and choose OK to confirm.
81

Micro/Premium: Configuring the application
Configuration of each input/output module
Procedure Carry out the following actions:
Channel management
When no input/output module is declared in a position in configuration mode, PL7 functions as if there was a 1/2 format 16 input / 16 output module present. PL7 thus gives access to input bits %Ix.0 to %Ix.15 and to output bits %Qx.0 to %Qx.15 for each position.When modules in 1/2 format are declared, PL7 gives access to input bits %Ix.0 to %Ix.15 and to output bits %Qx.0 to %Qx.15 for each position (even if the half-format module has less inputs/outputs).When mixed standard format modules are declared, PL7 gives access to input bits %Ix.0 to %Ix.31 for odd positions and to output bits %Q(x+1).0 to %Q(x+1).31 for even positions (even if the half-format module has less inputs/outputs).Standard format input or output modules are managed as two modules in half-format occupying two overlapping positions.
Configuration context
Select Configuration to set the parameters for the module.
The Adjust option can be selected for counting, movement and weighing modules in order to:� define the initial values of parameters in offline mode,� modify these parameters in online mode.
The Debug option (only accessible in online mode) can, depending on the module, be used to:� view the state of inputs,� display diagnostics for the module and channels,� write to outputs.
Step Action
1 Select the module to be configured (using the mouse or arrow keys).
2 Select the Utilities/Open Module command or double click on the selected module.For built-in modules, a window indicates:� the reference and the position of the module,� the current configuration context (See Configuration context, p. 82).
3 Enter the parameters and confirm with Edit/Confirm (CTRL + W). To enter the various parameters, please refer to the sections on the specific applications concerned.Depending on whether or not the command View/Module Zone is selected, the display will be different.
4 Close the window using the keys (CTRL+F4) and set the parameters for the next module.
82

Micro/Premium: Configuring the application
Software configuration of the application
Procedure Carry out the following operations:
Maximum number of authorized objects
For each of the objects this number is:
Step Action
1 Double left click on the Configuration directory or select it using the arrow keys, then press right arrow.
2 Select the Software configuration directory.Software configuration is used to set the following for the application:� the number of different types of function blocks,� the number of register words,� the number of %M internal bits,� the number of %M internal words,� the number of %KW constants.
3 For each of the fields to be modified, select the field and then enter the required value (entry is controlled to prevent values greater than the maximum authorized number (See Maximum number of authorized objects, p. 83)) from being entered.
4 Confirm the configuration with the Edit/Confirm (Ctrl + W) command.
Objects Maximum value
%TMi timers 64
%Ti Series 7 timers 64
%MNi monostables 8
%Ci counters 32
%Ri registers 4
%DRi drums 8
Number of words per register 255
%Mi internal bits depends on the size of memory available
%MWi internal words depends on the size of memory available
%KWi constants depends on the size of memory available
83

Micro/Premium: Configuring the application
Configuring Grafcet objects
Introduction Before configuring Grafcet objects the following action must be taken:� when setting up the application you must specify that it will contain a Grafcet
section, otherwise you will not be able to access the Grafcet configuration editor,� the processor version (See Processor version, p. 84) used must support Grafcet
language.
Grafcet object configuration is used to set the following for the application:� the number of steps,� the number of active steps,� the number of valid transitions.
Procedure Carry out the following actions:
Maximum number of authorized objects
For each of the objects this number is:
Processor version
Compatibility table
Step Action
1 Double left click on the Configuration directory or select it using the arrow keys, then press right arrow.
2 Select the Configure Grafcet Objects directory.
3 For each of the fields to be modified, select the field and then enter the required value (entry is controlled to prevent values greater than the maximum authorized number (See Maximum number of authorized objects, p. 84)) from being entered).
4 Confirm the configuration with the command Edit/ Confirm (Ctrl + W).
Objects Maximum values
Number of steps TSX3705/08/10: 1 to 96.TSX3721/22: 1 to 128.
Number of active steps TSX3705/08/10: 1 to 96.TSX3721/22: 1 to 128.
Number of valid transitions TSX3705/08/10: 1 to 192.TSX3721/22: 1 to 256.
V1.1 processor
This generation of processors does not support Grafcet.
V1.5, V2.0, V3.x, and V4.0 processors
If you are using Grafcet it must be declared when the application is set up.It is not possible to change this option subsequently.
84

Micro/Premium: Configuring the application
4.2 Premium
At a glance
Subject of this section
This section describes:� How to configure the software application with a TSX-Micro.� How to configure the hardware application with a TSX-Premium.
What’s in this Section?
This section contains the following topics:
Topic Page
Accessing the application configuration 86
Rack Configuration 87
Configuring the supply modules 89
Choosing/Changing the processor 90
Configuration of the processor 92
Configuring the module positions 95
Configuring inputs/outputs for each module 97
Software configuration of the application 99
Configuring Grafcet objects 100
85

Micro/Premium: Configuring the application
Accessing the application configuration
Principle The configuration software displays a supply module and the processor selected when the application was set up.
The object of this function is to: � replace the processor (if the one chosen at the beginning is not right),� configure the processor,� declare/parametrize the various input/output modules and integrated modules,� enter the software configuration,� enter the Grafcet configuration.
In on-line mode this function is used to:� diagnose module faults,� debug modules.
Procedure Carry out the following actions:
Note:
The command Edit/ Cancel modifications (CTRL+Z) or the icon cancels all
modifications made since the last confirmation.
Step Action
1 From the Application browser, double left click on the repertoire "Configurationor position the arrow keys on this and press the right arrow.
2 Select:� Hardware configuration to access the module racks,� Software configuration to define the software application parameters,� Grafcet objects configuration to define the specific grafcet parameters for
the application.
3 To confirm the configuration entered use the command Edit/Confirm or in the
contextual menu Confirm or use the icon .
86

Micro/Premium: Configuring the application
Rack Configuration
Introduction A rack with a 0 address is compulsory, as it contains the station processor.Number of racks managed by the different processor types:
For a station configured using TSX/PCX/PMX 57-2x/3x processors, it is not necessary to use successive addresses. It is possible to configure one station with a rack at address 0 and one rack at address 7.
Configuration with several racks must contain one rack that can be extended to address 0.
Extension Racks The following possibilities exist:
Processor type Number of racks managed
TSX/PCX/PMX 57-1x Up to 2 racks
TSX/PCX/PMX 57-2x/3x Up to 16 racks
You want then and
to add a rackselect an empty address
or the symbol (rack EX)
then the command Edit/Add a rack.
select the desired rack from the dialogue box displayed.
to select a rack click on the white rectangle containing the address of the rack or on the white rectangle associated with the EX rack. A dotted frame will surround the selected rack.
to replace a rack double click on the white rectangle containing the address of the rack or on the white rectangle associated with the EX rack.
select from the dialogue box displayed an extendible or non-extendible rack.
to delete a rack select the rack. press the Del key or select the command Edit/Delete rack (impossible to delete rack 0).
87

Micro/Premium: Configuring the application
Note:
The button only appears for processors of a version higher than or equal to V3.3 and for extendible racks.
Changing a V3.3 -> V3.0 processor can be refused if there are extension racks.
Use of TSX REY 200
This module allows the extension of two bus segments from the rack supporting the processor, up to a maximum distance of 250 meters. Each extended segment is able to support racks distributed along the X Bus to a maximum length of 100 meters.
Note: A configuration can only support one Bus X extension suite comprising a maximum of one master and two slaves:� 1 TSX REY 200 in rack 0 (except slots 0 and 1), it will automatically configure
itself as master,� 1 or 2 TSX REY 200 in any racks, except rack 0, they will automatically configure
themselves as slaves.
88

Micro/Premium: Configuring the application
Configuring the supply modules
Introduction The supply does not necessarily occupy the first position in a rack (the position furthest to the left). This position has no address.
Double format supplies occupy not only the first position but the 0 address position. In this case the processor is configured in the 1 address position.
Configuration There are the following possibilities:
You want….. then….. and…..
select a module click on the module.
adding a module select the extreme left position of the rack then the command Edit/ Add a module
select a module from the dialogue box displayed.
replacing a module select the module select a module from the dialogue box displayed (it is not possible to configure a double format supply if the position is already occupied).
suppressing a module select the module press the Suppr key or select the command Edit/Suppress the module.
moving a module select the module move the module without releasing the mouse button (this action is possible if the furthest left position in another rack is free).
copying a module select the module press the Ctrl key and move the module without releasing the mouse button (this action is possible if the furthest left position in another rack is free).
89

Micro/Premium: Configuring the application
Choosing/Changing the processor
Choosing the processor
Choosing the processor is the first stage in setting up an application. This choice is reversible.Carry out the following actions:
Step Action
1 Select the commandFile/ New from the PL7 home screen.
2 Select the PLC type>PREMIUM TSX.
3 Select the processor type -> TSX57xx Vyy.
4 Select an extension memory card if necessary (PCMCIA).
5 Specify (depending on the processor configured) whether or not your application contains Grafcet.
6 Click on OK.
90

Micro/Premium: Configuring the application
Changing the processor
The configuration editor provides assistance when attempting to change the processor. A message is sent out if the change is not authorized.
Carry out the following actions:
Note:It is possible to change the processor using the drop-down menu in the configuration editor.
WARNING
When changing to a version V3.x processor
Using aV3.x processor in an application that has previously been configured with a lower processor version leads to an irreversible change in the application structure.This conversion involves:� the creation of program structure in sections,� the automatic creation of the Grafcet section when the initial
program module is written in Grafcet language.� the automatic replacement of TSX SCY 21600 modules, if there are
any in the configuration, with TSX SCY 21601 modules. � an increase in the size of the application by approximately 10%,
which can cause the conversion to fail.
Failure to follow this precaution can result in death, serious injury, or equipment damage.
Step Action
1 Select the Edit/Change processor command.
2 Select the required processor.
3 Select a memory card if necessary.
4 Confirm and then click on OK or press ENTER.
91

Micro/Premium: Configuring the application
Configuration of the processor
Procedure Carry out the following actions:
RUN/STOP input The input %I1.8 can be parameterized to control the PLC’s switching between RUN/STOP in the following way:� %I1.8 = 1 -> the PLC switches to RUN (program executes),� %I1.8 = 0 -> the PLC switches to STOP (program stops executing).Retrieval is rising edge.
Step Action
1 From the application configurator, select position 0 or 1 from rack 0.
2 Select Open module from the context menu or double click on the processor.
3 Confirm, depending on the application, the RUN/STOP input (See RUN/STOP input, p. 92).
4 Confirm, depending on the application, the Automatic startup in RUN (See Automatic startup in RUN, p. 93).
5 Confirm, depending on the application, the memory protection, then, if need be, enter the input dedicated to this function.
6 Confirm, depending on the application, the initialization of internal words %MWi on Cold restart.
7 Select the type of memory card for processors with this option.
8 Select the type of MAST task execution:� Cyclic,� Periodic: 3 to 255 ms (20 ms, default value).If the value is 0, execution will be cyclic.
9 Enter the value of the watchdog (See Watchdog, p. 93) of the MAST task: 10 to 500 ms maximum (250ms, default value).
10 Enter, depending on the application, the value of the period of the FAST task: 2 to 255 ms maximum (5ms, default value).
11 Enter, depending on the application, the value of the FAST task watchdog: 10 to 500 ms maximum (100 ms, default value).
12 If necessary, select type of Fipio (See Fipio, p. 94) mode for the MAST task:� Controlled mode:the task is timed by a period (MAST in periodic execution).� Free mode: the task controlled variables are scanned in "Optimal" mode, but the scanning period may
be greater than the period of the task, while still less than the task watchdog.
13 If necessary, select type of Fipio mode for the FAST task (Controlled mode, Free mode).
14Confirm using the command Edit/Confirm (CTRL + W) or using the icon .
92

Micro/Premium: Configuring the application
A STOP command via %I1.8 input has priority over a RUN command via terminal or network command.
An error on the RUN/STOP input causes a switch to STOP.
Automatic startup in RUN
If this option is checked, the PLC will automatically switch to RUN during a cold start.
If there is no memory card, the PLC starts up according to the contents of the processor’s internal RAM.
If a memory card is inserted, it is the contents of the card which defines the startup.
Memory protection
This option enables the application contained in the PLC to be protected against any attempt to alter it.The protection is activated by setting the PLC input dedicated to this function to 1.
Watchdog The period of master task execution, in cyclic or periodic operation, is controlled by the PLC (watchdog) and must not exceed the value defined in Tmax configuration (250ms by default, 500ms maximum, modulo 10ms).
If overflow should occur, the application is declared in error, which causes the PLC to stop immediately:� Premium: supply alarm relay set to 0
Execution monitoring:� %S11: indicates a watchdog overflow, it is positioned to 1 by the system, when
the cycle time becomes greater than the watchdog.� %SW11: contains the value of the watchdog (in ms).� %S19 (periodic operation): indicates a period overflow, it is positioned to 1 by
the system, when the cycle time becomes greater than the task period.� %SW0 (periodic operation): this word contains the value of the period (in ms),
it is initialized on cold restart by the value defined at configuration, it can be changed by the user.
93

Micro/Premium: Configuring the application
Fipio The FIPIO bus allows 127 devices to be connected to the connection point which is built into the processor.
The software PL7-Junior or PL7-PRO and the processors, TSX P 5725x / 35x / 45x, TPCX 57351x, and TPMX 57352 /452 are used to configure and monitor the connected devices.
These devices can be any of the following:� FIPIO agent PLCs,� TBX TOR or ANA,� Momentum TOR or ANA,� CCX-17,� ATV16/58/66,� AS-i gateway TBX SAP10,� devices which comply with FIPIO standard profiles,� PCs.
94

Micro/Premium: Configuring the application
Configuring the module positions
Positioning a module
Carry out the following actions:
Notes:Double format modules (for example the TSX CAY41 movement module) only appear in the module list when both the position selected, and the position before or after it (depending on type) are not occupied.
Position 0 can only be occupied by a double format supply module or processor.
Moving a module Carry out the following actions:
Notes:Objects linked to the module at the former address are:� deleted then recreated automatically at the new address,� replaced in the program and variables editor (except for animation tables and
runtime screens) by objects at the new address.
Symbols associated with objects from the moved module are reattached to the objects at the new address.
The module that has been moved keeps all its parameters.
The processor can only be moved into positions 0 and 1 of rack 0.
Step Action
1 Select the position of the module to be configured (using the mouse or arrow keys). (The PgUp, PgDn, TAB and SHIFT+TAB keys are used to select a different rack).
2 Select the Edit/Add module command or double click on the position selected (ENTERkey). A dialogue box is displayed showing a list by family of modules that can be configured for the selected position
3 Select the family (using the mouse or arrow keys), the module (the TAB key is used to move between the different fields) and confirm by OK.
Step Action
1 Select the required module.
2 Move it to the new position while keeping the mouse button held down or select the Edit/Move a module command.
3 Select the Edit/Confirm command for the modifications to be taken into account.
95

Micro/Premium: Configuring the application
If you move a discrete module whose channel has been configured in RUN/STOP mode, the address of the RUN/STOP bit is not modified. You must ensure that the RUN/STOP input corresponds to an valid address for a discrete input.
When the module addresses are used in an EF (e.g. SEND_REQ, READ_VAR, etc.), they are not updated automatically.
Copying a module
Carry out the following actions:
Notes:The objects associated with a module with the old address are copied to the new address.
The module that has been copied keeps all its parameters.
Duplicating a module associated with an event (at least one module channel is associated with oneevent) is impossible. One event cannot be associated with several channels/modules at the same time.
Deleting a module
Carry out the following actions:
Notes If no input/output modules are declared in the configuration, or if there are any format modules, the PL7 software gives access to the %Ix.0 to %Ix.15 bits and to the %Qx.0 to %Qx.15 outputs for each position (even if the half format module concerned has less inputs/outputs).
If there are any standard format modules, the PL7 software gives access to the %Ix.0 to %Ix.31 input bits for odd positions and to the %Qx+1.0 to %Qx+1.31 output bits for even positions (even if the standard format module concerned has less inputs/outputs).
Step Action
1 Select the required module.
2 hold down Ctrl and drag the copy to the new position or select the Edit/Copy Module command.
3 Select the Edit/Confirm command for the modifications to be taken into account.
Step Action
1 Select the required module.
2 Select Edit/Delete or press the Del key.
3 Select the Edit/Confirm command for the modifications to be taken into account.
96

Micro/Premium: Configuring the application
Configuring inputs/outputs for each module
Procedure Carry out the following actions:
Special case for PCMCIA communication modules
Carry out the following actions:
Special case for FIPIO communication modules
Carry out the following actions:
Special case for integrated Adjustment modules (PMX 57102)
Carry out the following actions:
Step Action
1 Select the module to be configured (using mouse or arrow keys).
2 Select the command Services/Open the module or double click on the module selected.A window is displayed indicating:� the module reference and position,� the configuration context (See Configuration context in progress , p. 98) in
progress.
3 Enter the parameters and confirm with the command Edit/Confirm (CTRL + W). To find out about the various parameters, refer to the job headings concerned.Depending on whether the command View/ Module Zone is selected or not, the display is different.
4 Close the window by pressing (CTRL+F4) and parametrize the next module.
Step Action
1 Select the "Comm" position.
2 Double click or move the up/down arrows and press the ENTER key.
Step Action
1 Select the "FIPIO" position.
2 Double click or move the up/down arrows and press the ENTER key.
Step Action
1 Select the "Loops" position.
2 Double click or move the up/down arrows and press the ENTER key.
97

Micro/Premium: Configuring the application
Configuration context in progress
The Configuration selection is used to set the module’s parameters.
Adjust can be selected for counting, movement and weighing modules and is used to:� set initial parameter values offline,� modify these parameters on-line.
The Debugging selection (only accessible in on-line mode) is used, depending on the module to:� display the status of the inputs,� display the module diagnostics and the channels,� perform output writing.
98

Micro/Premium: Configuring the application
Software configuration of the application
Procedure Carry out the following operations:
Maximum number of authorized objects
For each of the objects this number is:
Step Action
1 Double left click on the Configuration directory or select it using the arrow keys, then press right arrow.
2 Select the Software configuration directory.Software configuration is used to set the following for the application:� the number of different types of function blocks,� the number of register words,� the number of %M internal bits,� the number of %M internal words,� the number of %KW constants.
3 For each of the fields to be modified, select the field and then enter the required value (entry is controlled to prevent values greater than the maximum authorized number (See Maximum number of authorized objects, p. 99)) from being entered.
4 Confirm the configuration with the Edit/Confirm (Ctrl + W) command
Objects Maximum value
%TMi timers 255
%Ti Series 7 timers 255
%MNi monostables 255
%Ci counters 255
%Ri registers 255
%DRi drums 255
Number of words per register 255
%Mi internal bits depends on the processor
%MWi internal words depends on the size of memory available
%KWi constants depends on the size of memory available
99

Micro/Premium: Configuring the application
Configuring Grafcet objects
Introduction Before configuring Grafcet objects the following action must be taken:� the processor version (See Processor version, p. 100) used must support Grafcet
language,� creation of the Grafcet section for >= V3.x processors.
Grafcet object configuration is used to set the following for the application:� the number of macro steps,� the number of (Chart + Macro steps),� the number of active steps,� the number of valid transitions.
Procedure Carry out the following actions:
Maximum number of authorized objects
For each of the objects this number is:
Processor version
Compatibility table:
Step Action
1 Double left click on the Configuration directory or select it using the arrow keys, then press right arrow.
2 Select the Configure Grafcet Objects directory.
3 For each of the fields to be modified, select the field and then enter the required value (a check is made so that entries higher than the maximum authorized number (See Maximum number of authorized objects, p. 100) cannot be made).
4 Confirm the configuration with the command Edit/ Confirm (Ctrl + W).
Objects Maximum values
Number of steps (Chart) 250
Number of Macro steps 64
Number of steps in Macro steps 250 per Macro step
Number of steps (Chart + Macro step) 1024
Number of active steps 250
Number of valid transitions 400
V1.5 and V2.0 processors
If you are using Grafcet it must be declared when the application is set up.This option cannot subsequently be changed.
V3.x and V4.0 processors
The choice of whether to use Grafcet is made when creating the Grafcet section.
100

5
Program accessIntroduction
Subject of this chapter
This chapter describes how to: � Creating a program module. � Access to a program module. � Modifying a module program’s execution order.
What’s in this Chapter?
This chapter contains the following topics:
Topic Page
Introducing the application browser 102
Creating or importing an LD, IL, ST section 105
Creating or importing a Grafcet section 107
Creating or importing a subroutine (SR) 109
Creating or importing an event 110
Editing/emptying/suppressing a section, an event or a sub-program 111
Modifying the section execution order 112
Accessing the runtime screens editor 113
101

Program access
Introducing the application browser
General points The application browser shows the contents of a PL7 application in two forms:� the structure view,� the function view.
Description The structure view
The structure view shows the contents of a PL7 application. It is used to navigate within an application and provides direct access:� to configurations,� to the program,� to the DFBs contained in the application,� to the data,� to the animation tables,� to certain parts of the documentation file (general information, title pages),� to tools such as runtime screens.Section execution order corresponds to display order, and this order can be modified.
The function view
The function view is a representation of the application split up into functional modules.This split does not take the order of their execution by the PLC into account.
Note: the default PL7 application directory is called STATION. This name can be modified in the Application propertiesdialog box.
WARNING
Only PL7 PRO can be used to set up functional modules on TSX/PMX/PCS57 PLCs.
Failure to follow this precaution can result in death, serious injury, or equipment damage.
102

Program access
Navigation between function view and structure view
The different browser application icons
Application properties
The Properties function (which can be accessed from the Functional View of the Application Browser by right clicking on the application directory) at application level is used to:� provide the user with information on the current application,� manage certain application parameters.
General tab� application name (the application’s default name is STATION),� type of processor used (cannot be modified),� version number (0 to 127) and revision number (0 to 255) manually managed by
the user or automatically managed by the system on each save when a modification has been made
� comments,� save.
Protection tab� application protection.
Identification tab� creation date,� date of last update,� application ID.
Diagnostics tabIf the box is checked, the alarms generated by the diagnostics DFBs are saved in the diagnostics buffer and can be viewed with the runtime screen viewer.
Is used to display the application structure view.
Is used to display the application function view.
Is used to display the structure and function views in series.
Is used to display the structure and function views in parallel.
103

Program access
Identification, application IDs
This information can be accessed via theIdentification tab.
The application is identified by a series of 8 numbers between 0 and 65535. Each of these represents the signature of an application segment.These signatures, which are automatically generated by the system, are used to authenticate a given status of the application.Each development of the application results in the modification of one or more signatures.
Numbers and designations:
Number Designation
0 Station ID (global application).
1 Local I/O configuration ID.
2 Remote I/O configuration ID.
3 PL7 application ID (code).
4 Reserved.
5 ID of constants.
6 Reserved.
7 Reserved.
104

Program access
Creating or importing an LD, IL, ST section
At a Glance Creating a section is authorized in offline and online mode with the PLC in Run or Stop mode.
Importing a section is authorized in offline and online mode with the PLC in Stop mode.
Section properties
A section’s properties are as follows:� section name,� associated task (only the MAST task supports Grafcet language),� programming language used,� execution condition (modifiable),� comments,� name of any associated functional module for PL7 Pro.
Display or modify a section’s properties
Carry out the following steps:
Note: � the language can be modified if the section is not programmed,� the language for a Grafcet section cannot be modified.
Step Action
1 go to the section (in the Application Browser of the Structure view) and select the Properties contextual menu (right click).
2 Carry out any necessary modifications.
3 Click on OK.
105

Program access
Creating a section
Carry out the following actions:
Importing a section
Carry out the following actions:
Step Action
1 Left click on the Section directory for the required task or position the cursor over it using the arrow keys.
2 Via the contextual menu or using the Shift+F10 keys select Create.
3 Fill in the name: maximum 16 characters.
4 Select the language you would like to use to program the section.
5 Specify the Type of Protection:� no protection,� write protection,� read/write protection.
6 Establish or if applicable modify the execution condition.
7 Where applicable select the functional module to be associated.
8 Where applicable enter the comment (250 characters max.).This comment can be modified from a section’s "Properties" dialog box.
9 Click on OK.
Step Action
1 Left click on the Section directory of the required task or position the cursor over it using the arrow keys.
2 Via the Context menu, the File menu or Shift+F10, select Import.
3 Select the file relating to the section to be imported.
4 Confirm with Open.
106

Program access
Creating or importing a Grafcet section
At a Glance A Grafcet section can be created in offline and online mode with the PLC in Run or Stop mode.
Importing a section is authorized in offline and online mode with the PLC in Stop mode.
By default the creation of a Grafcet section generates three directories. These correspond to:� preliminary processing (Prl),� sequential processing (Chart),� posterior processing (Post).
The creation of a macro-step generates an additional directory.
PRL, POST Properties
The properties are as follows:� name,� associated task,� associated section,� name of any associated functional module for PL7 Pro,� programming language used (the language can be modified if the module is not
programmed),� programmed attribute.
CHART, XM Properties
The properties of a Grafcet module or macro-step are as follows:� module or macro-step name,� number of steps configured (during software configuration),� programmed status (if the graph or macro-step are programmed),� called status if the macro-step is called in the Chart,� name of any associated functional module for PL7 Pro,� a comment (max. 250 characters) visible while editing the documentation file.
For a macro-step:� macro-step address and symbol,� a comment associated with the macro-step (defined using the variable editor).
107

Program access
Creating a section
Carry out the following actions:
Notes:A Grafcet section may not be created if the configuration is in the process of being modified.
A Grafcet section may not be deleted:� if a section module is in the process of being edited,� or if the configuration is in the process of being modified.
Importing a section
Carry out the following actions:
Step Action
1 Position the cursor over the section directory for the MAST, or FAST task using a left mouse click or the arrow keys.
2 Using the contextual menu or the Shift+F10 keys select Create.
3 Enter the Name, 16 characters maximum.
4 Select the language Grafcet (non modifiable).
5 Specify the type of protection: � no protection,� write protection,� read/write protection.
6 Establish or if applicable modify the execution condition.
7 Where applicable select the functional module to be associated.
8 Where applicable enter a comment (250 characters max.).This comment can be modified from the Properties dialog box of a section.
9 Click on OK.
Step Action
1 Position the cursor over the section directory for the MAST, or FAST task using a left mouse click or the arrow keys.
2 Using the File menu, the contextual menu or the Shift+F10 keys, select Import.
3 Select the file relating to the section to be imported.
4 Confirm with Open.
108

Program access
Creating or importing a subroutine (SR)
At a Glance Creating a subroutine is authorized in offline and online mode with the PLC in Run or Stop mode.
Importing a subroutine is authorized in offline and online mode with the PLC in Stop mode.
SR properties The properties are as follows:� name,� associated task,� programming language used (the language can be modified if the module is not
programmed),� programmed attribute,� called or non-called attribute in the task,� a comment associated with the subroutine (defined using the variable editor).
Creating a subroutine
Carry out the following actions:
Importing a subroutine
Carry out the following actions:
Note A subroutine can be called from any section of its associated task, or from other subroutines of that task.
Step Action
1 Left click on the SR directory of the required task or position the cursor over it using the arrow keys.
2 Using the contextual menu or the Shift+F10 keys select Create.
3 Select the language in which the SR is to be programmed.
4 Click on OK.
Step Action
1 Left click on the SR directory of the required task or position the cursor over it using the arrow keys.
2 Using the contextual menu, the File menu or the Shift+F10 keys select Import.
3 Select the file relating to the SR to be imported.
4 Confirm with Open.
5 Enter the SR number.
6 Click on OK.
109

Program access
Creating or importing an event
At a Glance Event creation is authorized in offline and online mode, with the PLC in Stop mode.
Importing an event is only authorized in offline mode.
Event Properties The properties are as follows:� name,� associated task,� name of any associated functional module for PL7 Pro,� programming language used (the language can be modified if the module is not
programmed),� programmed attribute,� called or non-called attribute in the task.
Creating an event
Carry out the following actions:
Importing an event
Carry out the following actions:
Step Action
1 Left click on the Event directory or position the cursor over it using the arrow keys.
2 Using the contextual menu select Create.
3 Select the language in which the event is to be programmed.
4 Where applicable select the functional module to be associated.
5 Click on OK.
Step Action
1 Left click on the Event directory or position the cursor over it using the arrow keys.
2 Using the contextual menu or the File menu, select Import.
3 Select the file relating to the event to be imported.
4 Confirm with Open.
5 Enter the event number.
6 Where applicable select the functional module to be associated.
7 Click on OK.
110

Program access
Editing/emptying/suppressing a section, an event or a sub-program
Editing Carry out the following:
Emptying Carry out the following:
Suppressing Carry out the following:
Note:It is not possible to perform a suppression operation on an event task.
Step Action
1 Select the module (section, sub-program, event) required using the mouse or the arrow keys.
2 Edit the module using the command contextual menu Open or double click or key ENTER.
Step Action
1 Select the module (section, sub-program, event task) required using the mouse or the arrow keys.
2 Select Edit/Empty, or use the command contextual menu Empty, or (Shift+F10) Empty.
3 Confirm with YES.
Step Action
1 Select the module (section, sub-program) required using the mouse or the arrow keys.
2 Select Edit/Suppress, or on the command contextual menu key Suppress, or (Shift+F10) Suppress.
3 Confirm with YES.
111

Program access
Modifying the section execution order
Principles This action can be carried out from within the same task from the structure view.
It is done in offline or online mode with the PLC in Stop mode.
Procedure Carry out the following actions:
Step Action
1 Left click (keeping the button held down) on the icon of the section to be moved.
2 Move the section to the desired place.
WARNING
Running the program.
The program runs in the order shown in structure view.
The distribution of the sections, events and Grafcet modules in the various functional modules has no impact on the running of the program.
Failure to follow this precaution can result in death, serious injury, or equipment damage.
112

Program access
Accessing the runtime screens editor
At a Glance Using PL7 you can access the runtime screens editor.
How to access the runtime screens editor
There are two potential scenarios:� The application does not contain runtime screens:Do the following:
� The application already contains runtime screens:First scenario:
Second scenario:
Step Action
1 Open the Application Browser.
2 Double click on the Runtime screens directory from the structure view:Result: The Runtime screens editor opens on a blank page, ready for the creation of a new screen or message.
Step Action
1 Open the Application Browser.
2 Double click on the Runtime screens directory from the structure view.Result: the editor appears, displaying the last screen open before the previous save:
Step Action
1 Open the Application Browser.
Runtime Screens: BLEND_PRODUCTS - Product - Blend - Titration
1
0
1
0
ie_1 Tré
eur
Screens Messages Objects
7 - System bit6 - Grafcet
3 - Read_me
DFB BEHAVIOR
2 - Screen_ monitoring
4 - DFB_Screen - behavior5 - Information_on_DFB_Debug
8 - Monitoring_mixerDIAGNOSTICS_APPLICA
TITRATION_PRODUCTS
SYSTEM INFORMATION
ScreenWELCOME!
1 - Welcome_screen
0 - Product_Blend_Titration
113

Program access
2 Double click on the desired screen or message from the structure or function view.Result: the editor displays the desired element immediately:
Step Action
Runtime Screens: TITRATION_PRODUCTS - Product - Blend - Titration
1
0
1
0
ie_1 Tré
eur
Screens Messages Objects
7 - System bit6 - Grafcet
3 -Read_me
DFB BEHAVIOR
2 - Screen_monitoring
4 - DFB_Screen - behavior5 - Information_on_DFB_Debug
8 - Monitoring_mixerDIAGNOSTICS_APPLICATION
TITRATION_PRODUCTS
SYSTEM INFORMATION
ScreenWELCOME!
1 - Welcome_screen
0- Product_Blend_Titration
114

6
Programming in LD rung languageIntroduction
Subject of this chapter
This chapter reminds you of the structure of a program in rung language.
It describes: � How to create a program.� How to use the different functions offered by the editor.� How to manage the different modules making up the application.
115

Programming in rung language
What’s in this Chapter?
This chapter contains the following topics:
Topic Page
Structure of a program in Ladder language 117
Creating a Ladder program 118
Specific input 120
Modifying a network of contacts 121
Displaying variables as symbols or addresses 125
Information box 127
Online symbolization 128
Input of a predefined function block (Ladder editor) 129
Function library 131
Operate block entry 133
Horizontal and vertical block entry 135
Assisted entry of a library function or of an instance of DFB type (Ladder editor) 136
Direct access to a subroutine 139
Replacing a variable in the application 140
Cross Referencing a variable in an application 142
Animation of the Ladder program elements 145
Printing of a program 146
Export/Import of source files 147
116

Programming in rung language
Structure of a program in Ladder language
Principal A program written in ladder language is composed of a series of networks executed sequentially by the PLC.
Laid out between two potential bars, a network is a group of graphical elements linked to each other by horizontal and vertical links. These elements represent:� The PLC’s inputs/outputs (push-buttons, sensors, relays, indicators…).� Automation functions (timers, counters…).� Arithmetic and logical operations and transfer operations.� The PLC’s internal variables.
Each network (known as a Rung) is made up of:� A label input area (cell situated in the top left of the rung).� A comment input area (first line to the right of the label).� A (Test and Action) input area for graphical elements:
� 7 lines and 11 columns (maximum size) for a level L1 application.� 16 lines and 11 columns (maximum size) for a level L2 application
The Test area (columns 1 to 10) accommodates:� Contacts.� Function blocks.� Comparison blocks.
The Action (column 11) accommodates:� Coils.� Operate blocks.
Example Network (Rung).
S.F3 S.F4 S.F5S.F2F12F11F10F9 F7 F6 F4 F3 F2P S R OPER COHP COHP
H V F5
N
%I 1.1
F8
%1 (*Verifying start group authorization*)CommentLabel
2- Place element on the input grid
1- Select element from the graphics palette
117

Programming in rung language
Creating a Ladder program
Procedure Carry out the following actions:
Moving within the editor
The possible moves are:� From cell to cell: arrow keys.� To the first column of the Rung: Home key.� To the last column of the Rung: End key.� To the next page: Page Down key.� To the previous page: Page Up key.� To the start of the module: Ctrl+Home keys.� To the end of the module: Ctrl+End keys.
Step Action
1 Creating or importing an LD, IL, ST section, p. 105.
2 Enter the label %Li (optional).Double click on the label area, or put the cursor in the area and press the Space bar, then confirm using Enter.
3 Enter the comment (optional).Double click on the comment area, or put the cursor in the area and press the Space bar, then confirm using Enter.
4 Enter the graphical elements:
Using the mouse:1. Click on the graphical element situated in the graphical palette.2. Click on the grid at the required place.3. Enter the corresponding variable (by default enter with comment mode is active) and confirm using ENTER.
Using the keyboard:1. Move the cursor over the grid to the required place.2. Press the function key corresponding to the graphical element situated in the graphical palette to be inserted.3. Enter the corresponding variable (by default enter with comment mode is active) and confirm using ENTER.4. Confirm the networks of contacts using the ENTER key, or using the command
Edit/Confirm or using the icon .
F4 F3 F2P
F5N
F9 F10 F11S
F12R
I F2
118

Programming in rung language
Notes The software offers 2 input modes for a network of contacts:� Without comments: allows you as a first step to build the network of contacts
without commenting the graphical elements and to comment them once the graphics are completed.
� With comments: menu Edit/Enter with comments.
If an error is detected during validation, the rung stays red, if none are detected, the variables associated to the graphical elements are blue.
119

Programming in rung language
Specific input
Input/Deletion of the vertical links.
Select the cell situated at the top and to the right of the connection then click on the
key F7 or click on the icon and position the cursor in the created cell
Input/Deletion of horizontal connections
Input: Select the cell where the link must be positioned and then click on the key F6 or F8
or click on the icons , and position the cursor in the created cell.Deletion:select the required cell or cells then press the key Del or on the Contextual menu choose the command Delete.
Inputting the codes: HALT, RETURN and CALL
Inputting instructions HALT (end of program), RETURN (return to the calling program), CALL (subroutine call) operates following the procedure:
Step Action
1
Click on the icon positioned in the graphic palette, the choice window
appears.
2 Select the required code and confirm with ENTER.
3 Place the cursor symbolizing the chosen code in the zone Action and click (in the case of a keyboard entry, the cursor should be positioned in the Action zone beforehand).
4 With codes, confirmation is direct HALT and RETURN. For the call, input the SR number (sub-routine created beforehand) and confirm with ENTER.
HALTCALLRETURN
120

Programming in rung language
Modifying a network of contacts
Accessing a network (Rung)
The program module being displayed, select the command Edit/Go to/Rung
(Crtl+A) or the icon .The possible choices are as follows:
The Move zone allows a movement relative to TOP/BUTTOM/%Li.
Selecting one or several networks (Rung)
The possible choices are as follows:
Note:The display of each selected rung is implemented by means of a rectangle equipped with 8 handles.
Selecting one or several graphical elements
This function supports operations on elements such as cut, copy, paste, move, delete, initialize an animation table or initialize a table of cross references.The possible choices are as follows:
Note:Acknowledgement of an element is shown by a rectangle equipped with 8 handles.
Select in the label field… position…
TOP at the beginning of the program module.
BUTTOM at the end of the program module.
%Li at the corresponding label number.
Select… by… or…
one network
positioning the cursor over the Rung and selecting the command Edit/Rung selection mode.
by clicking to the left of the gray vertical bar.
several networks
1. positioning the cursor on the first or the last Rung to be selected and by selecting the command Edit/Rung selection mode.
2. then by moving the mouse while keeping the left button down to select the other rungs.
by clicking to the left of the gray vertical bar.
by pressing the SHIFT key and the arrow, Page Up or Page Down keys.
Select… by… or…
an element left mouse click on the element positioning the cursor over it using the arrow keys.
a group of elements
a left mouse click on the start cell (keep the mouse button down) then move the cursor towards the end cell,
121

Programming in rung language
Modifying a network (Rung)
Modifying a variable:
Modifying a contact in a network:
Canceling a modification:To cancel a current modification on a network of contacts, select the command Edit/
Cancel modifications or click on the icon .
Deleting an element from a rung:The command Edit/Delete or the Delete key deletes the element and/or rung selected.
Moving to a current modification which is not visible on the screen:Select the command Edit/ Go to current modification .
Step Action
1 Position the cursor over the variable to be modified then press the Space bar or double click on the variable to be modified (except for SRs and DFB types).
2 Enter the modification (Escape cancels the current modification) and confirm the entry using ENTER.
3 Confirm the modification using the keys (CTRL+W) or click on the icon .
Step Action
1 Using the keyboard:Position the cursor over the cell containing the element to be modified.
Using the mouse:Select the graphical element in the graphical palette by clicking on the required element.
2 Using the keyboard:Select the graphical element in the graphical palette using the keys F2 to F12 and SHIFT+F2 to F8 and confirm the entry using ENTER.
Using the mouse:Position the cursor over the cell containing the element to be modified and confirm using ENTER.
3 Confirm using ENTER or select the command Edit/Confirm (CTRL+W) or
click on the icon .
122

Programming in rung language
Moving an element in a network (Rung)
Carry out the following actions:
Cutting/Copying/Pasting one or several graphical elements
Carry out the following operations:
Step Action
1 Using the keyboard:Position the cursor over the cell containing the element to be moved.
Using the mouse:Select the element to be moved, and maintain the selection.
2 Using the keyboard:Select Move using keyboard from the Edit menu or CTRL+L then move the cursor by means of the arrow keys towards the destination cell(s) and confirm using ENTER.
Using the mouse:Move the element’s ghost to the required cell.
3 Confirm using ENTER or select the command Edit/Confirm (CTRL+W) or
click on the icon .
To… you must… the selection…
copy one or several consecutive objects
select the element(s) to be copied and select the command Edit/Copy (CTRL+C)
is placed on the Windows clipboard.
paste one or several consecutive elements contained on the clipboard
select the cell which is the start point from which the element(s) contained on the clipboard are to be pasted and select the command Edit/Paste (CTRL+V)
is kept on the Windows clipboard.
cut one or several consecutive elements and place them on the clipboard
select the element(s) to be cut and select the command Edit/Cut (CTRL+X)
is placed on the Windows clipboard.
123

Programming in rung language
Cutting/Copying/Pasting one or several consecutive networks (Rungs)
Carry out the following operations:
Note:The Cut/Copy/Paste function works in the same way for a selection of multi-Rungs and between program modules.
Inserting a network (Rung)
To insert a rung between two networks of contacts (the inserted network is placed on top) or to place a rung at the top of the program module (TOP), after displaying the program module carry out the following actions:
To… you must… the selection…
copy one or several consecutive Rungs
select the Rung(s) to be copied and select the command Edit/Copy (CTRL+C)
is placed on the Windows clipboard.
paste one or several consecutive Rungs contained on the clipboard
select the Rung which is the start point from which the Rung(s) contained on the clipboard are to be pasted and select the command Edit/Paste (CTRL+V)
is kept on the Windows clipboard.
cut one or several consecutive Rungs and place them on the clipboard
select the Rung(s) to be cut and select the command Edit/Cut (CTRL+X)
is placed on the Windows clipboard.
Step Action
1 Select the command Edit/Select rung or point directly to an element of the rung using the mouse.
2 Select the command Edit/Insert rung (CTRL+l).
3 Enter the rung and confirm using CTRL+W or click on the icon .
124

Programming in rung language
Displaying variables as symbols or addresses
Procedure Carry out the following actions:
Note:
It is possible to run the language editor from the Options menu in:� addresses view,� symbols view,� symbols&addresses view (for the Ladder editor only).
Example of display
Ladder editor used with the 3 views.
Step Action
1 Open the program module with right click + Open or with a double click.
2 Select the command:� View/Addresses to display the variables as addresses.� View/Symbols to display the variables as symbols.� View/Symbols&addresses to display the variables as symbols/addresses
(Ladder editor only).
125

Programming in rung language
Note If a symbol or address has more than 8 characters, the display can be truncated. Select the element, which is then displayed in full in the status bar. You can also use the Information box.
The View/Collapsed command is used to reduce the size of the window whilst maintaining the same level of information.
The View/Normal command allows you to return to the normal sized window.
126

Programming in rung language
Information box
Functions This box, which can be accessed from all language objects, displays the symbols, address and comments for the selected object (except for the operate blocks and horizontal comparison) in an integrated format.
Display table according to object:
How to access the object information box
Carry out the following steps:
Note The information box remains visible when it is not explicitly closed by the user. The contents of the Information box is updated according to the current selection.
Single object Complex object (operate block, comparison and horizon block)
� symbolic format in blue� constructor name in black,� associated comments in
green.
� symbolic format in blue� constructor address in black,
Step Action
1 In the LD language editor, select the object.
2 Click on the right mouse button (contextual menu) and then select Information, or select theView → Informationcommand.
127

Programming in rung language
Online symbolization
Principal Online symbolization allows you, at the time of input of a Ladder, List, Structured Text program, to immediately (without opening the data editor) associate: � an address to a new symbol,� a symbol to a non symbolized address.
Procedure With the Ladder editor, start at Step 1, with the Structured Text or List editors, go straight to step 2.
Step Action
1 Select the cell where the variable is situated.
2 Select the variable (highlight it).
3 Right mouse click on the variable and select Associate Symbol&Address.
4 Enter the address or symbol and the comment.
128

Programming in rung language
Input of a predefined function block (Ladder editor)
Procedure From within the language editor, carry out the following actions:
Function blocks The different function blocks are:
Step Action
1 Using the mouse:
From the graphical palette, select the element .
Using the keyboard:Select the destination cell with the help of the arrow keys, and press the keys (Shift+F7).
2 Using the mouse:Select the item SFB (only Premium), and select the required function block, then click in the destination cell (Test zone) to position the function block. Using the keyboard:Select the item SFB with the help of the arrow keys and accept with ENTER (only Premium), then select the function block using the arrow keys and accept with ENTER.
3 Input the number of the function block and confirm with ENTER .
Function blocks Syntax
PL7-3 timer (%Ti) Timer block:
TP/TON/TOF timer (%TMi) Timer block:
129

Programming in rung language
Up/Down counter (%Ci) Block Up/down counter
Monostable (%MNi) Monostable block:
Register of FIFO/LIFO words (%Ri) Register block:
Drum-DRUM (%Dri) Drum controller block:
Function blocks Syntax
130

Programming in rung language
Function library
Introduction The functions library brings together all the associated information and utilities concerning functional elements (EFtab) and DFB function blocks (DFB tab).Two access modes exist:� in consult mode,� by calling a function from the editor.
Consulting an EF To access the library, select Library from the Tools menu then choose the EF tab (default selection).The functions library screen presents:� The list of available families defined by:
� family name,� the library version Lib.V,� the version of families used in the current application App V (open station
only).� The list of functions associated with each family defined by:
� function name,� comments.
Note: In order to display an entire set of truncated comments (>>symbol at the end of the line), double click on the function or place the cursor above and use the Space bar. � The parameters of the selected function, defined by:
� name,� type (eg: DWORD),� kind,� comments,� the result of a function (if there is one).
Note: In order to display the parameters of a function and its possible result, select Parameters in the Function Information field.
131

Programming in rung language
Consulting a DFB
To access the library, select Library from the Tools menu then choose the DFB tab.For each DFB instance, the library screen presents: � The list of DFBs in the application and defined by:
� the DFB name,� the version (which is automatically incremented with the confirmation of each
modification),� comments.
� The list of the instance for a given DFB(Select the instance),� The DFB parameters selected defined by:
� the nameof the parameters,� type (eg: DWORD),� kind,� comments.
Note: It is only possible to consult a DFB with Premiums.
Note: A new instance can be created from the screen for The list of the instance for a given DFB.
132

Programming in rung language
Operate block entry
Introduction There are various ways of selecting an operate block:� using the mouse,� using the keyboard,With PL7 there is also help to enter the contents of an operate block.
Select an operate block with the mouse
Carry out the following steps:
Select an operate block using the keyboard
Carry out the following steps:
Operate block entry help
The principles described below are illustrated using an example: %MWO:=ABS(%MW1).
To enter a function call, carry out the following steps:
Step Action
1 Click on the graphics element which corresponds to the operate block in the graphics palette at the bottom of the editor.
2 Click in the target cell ( Action zone) to position the operate block.
3 Enter the instruction string and confirm with Enter.
Step Action
1 Select the target cell with the arrow keys.
2 Press the key combination Shift+F3.
3 Enter the instruction string and confirm with Enter.
Step Action
1 Enter the instruction as far as the function call (example %MWO=).
2 Select the contextual menu Enter a function call (right click or SHIFT+F8).The "Parameters" option must be selected from the Function Information heading.
3 Select the EF group using the mouse or Tab and arrow keys (example: Single length integer).
4 Select thefunction name (example: ABS).
5 Enter the function variables and the entered function is displayed in the Call Display field.
133

Programming in rung language
Modifying the function call
Carry out the following steps:
Note: � some functions have additional entry screens which are accessed using the
Detail button,� when the function syntax is known, enter the syntax directly into the editor,� it is possible to directly enable assisted entry on a given function by selecting
the function name and then selecting the Service → Enter the function call command or right click,
� Tabulation and line feed characters are represented by $T and $N respectively, they must be entered in $$T and $$N format.
Step Action
1 Place the cursor on the function (example ABS).
2 Select the context menu (right click) Modify the call.
134

Programming in rung language
Horizontal and vertical block entry
Introduction There is the option of entering the comparison blocks in different ways:� using the mouse,� using the keyboard,
Entering a comparison block with the mouse
Carry out the following steps:
Entering a comparison block using the keyboard
Carry out the following steps:
Step Action
1 Click on the required graphic element in the graphics palette.
2 Click on the target cell ( Test zone) in order to position the selected comparison block.
3 Enter the comparison instruction and then confirm with Enter.
Step Action
1 Select the target cell with the arrow keys.
2 Press the key combination Shift+F4 or Shift+F5.
3 Enter the comparison instruction and then confirm with Enter.
135

Programming in rung language
Assisted entry of a library function or of an instance of DFB type (Ladder editor)
Entry procedure for a library function
The instruction to be entered is: Example below:
Perform the following actions to make an entry:
Notes:
Certain functions offer extra screens for parameter entry (e.g.: human-machine interface functions). These parameters are accessed with the Detail button that then appears at the bottom of the screen.
When the function syntax is known, enter syntax directly into the editor.
Step Action
1 Using the mouse:Select the command SHIFT+F8.Using the keyboard:Select the destination cell with the arrow keys (Action zone).
2 Using the mouse:Click in the destination cell (Action zone) to position the text function block.Using the keyboard:Press SHIFT+F8.
3 Select the tab EF (selection by default). The "Parameters" option must be selected under the heading Function Information.
4 Select the (EF) function family required (e.g.: Character string).
5 Select the (EF) function name (e.g. CONCAT).
6 Enter the (EF) function variables (%MB4:6; %MB14:9). The function entered can be viewed in the Display the call field.
7 Using the mouse:Confirm the selection with OK or ENTER .Using the keyboard:Select OK then confirm the selection with ENTER
8 With EFs, enter the variable to be associated with the function.%MB30:14:=
9 Click on ENTER.
136

Programming in rung language
It is possible to directly enable assisted entry on a given function by selecting the function name then selecting the command Service/Enter function call (SHIFT+F8).
Procedure for an instance of DFB type
Perform the following actions to make an entry:
Note:
Two instances of the DFB type connected in series must be separated by at least 2 columns.
Step Action
1 Using the mouse:
In the graphics palette click on the element Using the keyboard:Select the destination cell (Test Zone) with the arrow keys.
2 Using the mouse:Select DFB.Using the keyboard:Press on the key combination, (SHIFT+F7).
3 Using the mouse:Select the DFB type required.Using the keyboard:Select DFB using the arrow keys then enable with ENTER.
4 Using the mouse:Select the required instance from Choice of instance or create a new instance (name + possible comment) and confirm with Create.Using the keyboard:Using the Tab or arrow keys, select the required function block.
5 Using the mouse:Click on OK.Using the keyboard:Select the required instance in Choice of instance or create a new instance (name + possible comment), select Create then confirm withENTER.
6 Using the mouse:Click in the destination cell (Test zone) to position the DFB type.Using the keyboard:Select OK then confirm with ENTER.
137

Programming in rung language
WARNING
For EFs displayed in red:
EFs which are displayed in red in the function entry help screen cannot be used in the application. This limitation is encountered in the following instances:� when an earlier version of the EF is already used in the application,� when the EF name is used as a variable linked symbol, and only
concerns the EF ROUND (family of single precision reals).
Failure to follow this precaution can result in death, serious injury, or equipment damage.
138
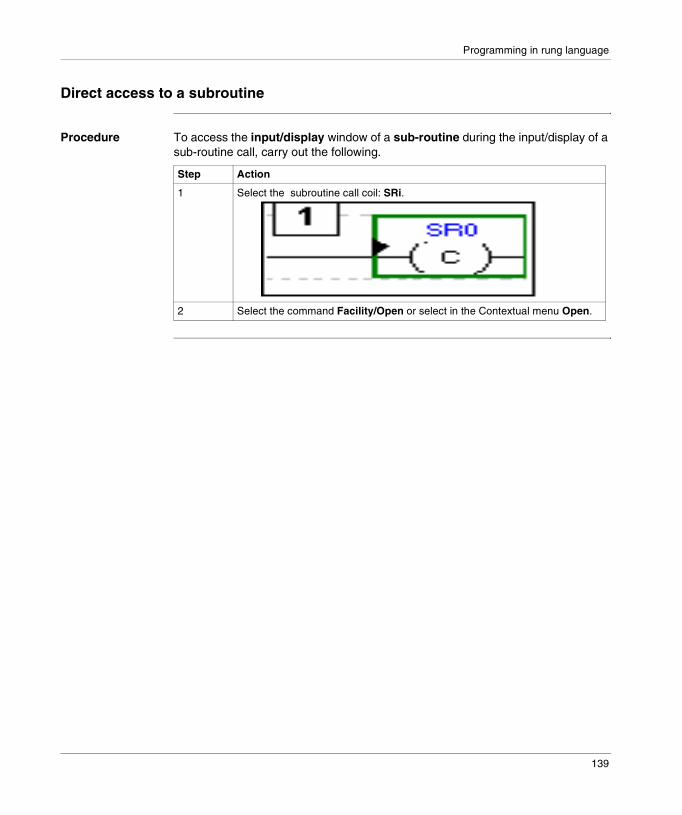
Programming in rung language
Direct access to a subroutine
Procedure To access the input/display window of a sub-routine during the input/display of a sub-routine call, carry out the following.
Step Action
1 Select the subroutine call coil: SRi.
2 Select the command Facility/Open or select in the Contextual menu Open.
139

Programming in rung language
Replacing a variable in the application
Introduction Finding and replacing an application variable as an address or a symbol (excluding variables used in operating screens). The replacement in the application may be total or partial, automatic or manual.
Replacement affects the indicated variable and its dependent objects as well (word extract bits…).Exception: for Grafcet steps bits the associated activity times (e.g. %Xi.T) are not replaced.
Replacement is carried out at the following levels:� Application (in all tasks).� Tasks (MAST, FAST, Evti).� Complete section.� Partial section (from address i to address j).� Replacement is also carried out at functional module level (complete functional
module, sub-modules included).
Procedure Carry out the following actions:
Step Action
1 Select the command Tools/Replace variables or position the cursor over the Station directory and select Replace variables from the contextual menu.
2 Put the variable to be replaced (as an address or a symbol) in the Findfield and confirm with ENTER or TAB.
3 Put the variable to be replaced (as an address or a symbol) in the Replacefield and confirm with ENTER.
4 Select the view:
� Structure view
� Function view
5 Select one or more modules:� if replacing in all the application, go to point 8,� if replacing in some of the modules, deselect the whole and select the modules, go
to point 6,� if replacing in one of the modules, deselect the whole and select the module, go to
point 6.
6 Select the label (if LD, ST, IL) or the page (if G7) at the beginning of the replacement by positioning the pointer on the list From.If more precision is required, use the up and down arrow keys.
140

Programming in rung language
7 Select the label (if LD, ST, IL) or the page (if G7) at the end of the replacement by positioning the pointer on the listTo.If more precision is required, use the up and down arrow keys.
8 Select the type of replacement:� if Replace, the replacement is carried out occurrence by occurrence,� if Replace All, the replacement is carried out on all occurrences.Notes:� The status bar indicates the number of replacements carried out, and a report on
the replacements not carried out.� The ESC key allows you to abort the function Replace, but the replacements
already carried out are kept.
Step Action
141

Programming in rung language
Cross Referencing a variable in an application
Introduction This function allows you to locate in the application:� variables in the form of labels or symbols (except those used in operating
screens),� DFB types (only on Premium with Pl7 Junior and Pro),� DFB instances (only on Premium with Pl7 Junior and Pro),� and to open modules/tasks/DFB types.
Principals of using debugging
The user realizes that the variable X is not the right value. To identify the cause he must therefore: � find the places where this variable is used,� obtain a list of statements, rungs and expressions,� to display and verify the activation conditions of the variable. Note:In order to record the path of this search, the list elements thus visited are marked with an asterisk (*).
Operational mode for objects
A variable can be a read variable (R), a write variable (W) or a read/write variable (R/W).
- "R" groups together the read operational modes, indexed read, indexed word, input or input/output parameter of a indexed or non-indexed function.
- "W" groups together the write operational modes, indexed write, output or input/output parameter of indexed or non-indexed function and execution of Block Functions (SFB and DFB).
Search source variables
Table of variables:
Bit %Ixi; %QXi; %Mi; %Si
Word %MWi; %MDi; %MFi; %KBi; %KWi; %KDi; KFi; %MBi; %SWi; %QWi; %QDi; %IWi; %IDi; %NWi
Instruction SRi; HALT
142

Programming in rung language
Other retrievable variables:
Search options For an indexed variable, the variable and the index are taken into account in the list.
Table of options:
Byte variables
Word extract bits
Bit table
Grafcet bit table
Character string
Table of words and constants
Table of double words and constants
Constant character string
Standard Block Function
Standard Block Function element
Step status
Step activity time
NANET variables
Extract Bit This option is for variables of types %MW, %KW, %IW, %NW, %QW.It adds to the list the variable and the referenced bits.
Table Object This option is for bit tables, word tables and immediate indexed variables.It adds to the list the immediate indexed table variables whose first element is the input variable.
Channel Object
This option is for channel objects.It adds to the list all the objects of the same referenced channel, including the tables and the extract bits.
Network Objects
This option is for the network variables.It allows you to obtain all the variables from the same remote module (NANET object).
FB Object This option allows you to expand the list of SFB block function elements and the DFB type elements.
FB Instance Only on Premium with PL7 Junior and Pro.This option is for DFB types.It allows you to obtain from the name of a DFB type the sections using its instances.
143

Programming in rung language
Searching for cross references
Carry out the following actions:
Selecting a variable from the list:� Select the variable from the list, the list of tasks, modules, labels is updated.Deleting a variable from the list:� Select the variable, enable the contextual menu (right click) then click on Delete.Displaying in structural view or in functional view:� Use the View menu or the Function button.
Step Action
1Select the icon
2 Enter the search source variable as an address or a symbol (E.g. %M10) and the possible options then confirm via Search.
3 To display a module, select the module, via the Contextual menu, select Open or double click on the module.
144

Programming in rung language
Animation of the Ladder program elements
At a Glance Refer to the "Debugging" Chapter of the Part "Debugging, Adjustment, Documentation and Appendices"-> (see Animating program elements, p. 279 ).
145

Programming in rung language
Printing of a program
Procedure Carry out the following steps:
Notes The print type depends on the type of display selected in the View menu.� Addresses: prints variables with addresses,� Symbols: prints variables with symbols,� Symbols&Addresses: prints variables with symbols/addresses.
Step Action
1 Open the module with right click + Open or a double click.
2Select the command File/Print (Ctrl+P) or click on the icon
3 Select a print range:� if for the entire module, go to step 6.� if for part of a module, go to step 4.
4 Select %Li/TOP/BOTTOM (if LD, ST, IL) or start page (if G7).If more precision is required, use the up and down arrow keys.
5 Select %Li/TOP/BOTTOM (if LD, ST, IL) or endpage (if G7).If more precision is required, use the up and down arrow keys.
6 Confirm with OK or ENTER.
146

Programming in rung language
Export/Import of source files
Refer to the "Import/Export" (See Import/Export, p. 329) Chapter of the Part "Debugging, Adjustment, Documentation and Appendices".
147

Programming in rung language
148

7
Programming instruction list in LIST languageIntroduction
Subject of this chapter
This chapter reminds you of the structure of a program in instruction list language.
It describes: � How to create a program.� How to use the different functions offered by the editor.� How to manage the different modules making up the application.
What’s in this Chapter?
This chapter contains the following topics:
Topic Page
Structure of an Instruction List program 150
Creating a program in Instruction List 151
Accessing a statement or instruction (Instruction List) 152
Displaying variables as symbols or addresses 154
Information box 155
Online symbolization 156
Input of a predefined function block (List editor) 157
Assisted entry of a library function (List editor) 158
Direct access to a subroutine 160
Replacing a variable in the application 161
Cross Referencing a variable in an application 163
Animation of List program elements 166
Printing of a program 167
Export/Import of source files 168
149

Programming instruction list in language
Structure of an Instruction List program
Principal A program written in instruction list language is composed of a series of instructions executed sequentially by the PLC.� An instruction takes up a maximum of one line.� The instructions are organized into instruction statements (equivalent to a
contacts network). Each instruction statement is made up of one or several instructions.
� Each instruction statement begins with an exclamation mark (generated automatically), it can include a comment and can be labeled with a label.
� A statement contains a maximum of 128 lines (instruction, comment, label).� In the editor a statement being input is displayed in red.� A selected statement is surrounded by a green frame. � The current statement is surrounded by a black frame. � The number of the current instruction (instruction line or label) as well as the total
number of instructions in the module are indicated in the bottom panel of the window (status bar).
Example ! (*Drying wait*)%L2: ->LabelLD %I1.0 ->Start of statementAND %M10 ->InstructionST %Q2.5 ->End of statement
Notes:Key-words (LD, AND, ST…) are colored blue.Comments are colored green.The remainder is colored black.
150

Programming instruction list in language
Creating a program in Instruction List
Procedure Carry out the following actions:
Rules They are:� At the time of confirmation, the input text is formatted giving you automatically
indented source code.� If an error is detected at confirmation, the cursor is positioned over the first error
detected, the error message is displayed at the bottom of the window.� In the editor, a statement is displayed in redwhile being entered.� A selected statement is surrounded by a green frame. � The current statement is surrounded by a black frame.
Step Action
1 Create a List section (See Creating or importing an LD, IL, ST section, p. 105).
2 1. Enter the first statement. As input begins, the statement is displayed in red.
2. Accept each line with ENTER.3. Use the TAB key to separate the code from the operand.4. On line symbolization (See Online symbolization, p. 156).
3 Confirm the input of the statement with the command Edit/Confirm
(CTRL+W)/SHIFT+ENTER) or via the icon .
151

Programming instruction list in language
Accessing a statement or instruction (Instruction List)
Accessing a statement or an instruction
When the program module is displayed, select the Edit/Go to (Ctrl+A) command or
the icon .Access by label -> select "Label":
The Move zone is used to make a movement relative to TOP/BOTTOM/%Li.
Access by instruction -> select "instruction":
The Edit/Go to current modification command allows you to position the cursor on the current modification.
Selecting one or several statements
The possible choices are as follows:
In the label zone, select… position…
TOP at the start of program module.
BOTTOM at the end of program module.
%Li at the corresponding label number.
In the instruction zone, select… position…
instruction number on the corresponding instruction.
Select… by… or…
one statement positioning the cursor over the statement and selecting the Edit/Select statement from the menu
by clicking in this zone, it is framed in green.Example:
several statements
by selecting the different statements while holding down the left mouse button
using the keys (Shift+Arrow).
part of a statement
by moving the cursor over the text to be selected while holding down the left mouse button (Shift+Arrow)
! ( * INIT 1 * )%L2:
STORLD % I1. 0
%M0%Q1 .0
152

Programming instruction list in language
Modifying a statement
Carry out the following actions:
The deletion possibilities are as follows:
Inserting a statement before the current statement
Carry out the following actions:
Cut/Copy/Paste part of a program module
Carry out the following operations:
Note:The Cut/Copy/Paste function works in the same way for a selection of statement(s) and between program modules.
Canceling a modification
To cancel a modification carried out on an unconfirmed statement, select the
Edit/Undo changes command or the icon .
This command allows you to return the sequence to its last confirmed state.
Step Action
1 Position the cursor over the point where the modification is to be made.
2 Make the modification.
3 Confirm the modification with the keys (Ctrl+W) or (Shift+Enter) or the Icon .
Delete… by… then by…
one statement selecting the statement to be deleted pressing the Delete key.
part of a statement selecting the part of the statement to be deleted pressing the Delete key.
a piece of text and place it on the clipboard
selecting the text to be cut selecting the Edit/Cut (Ctrl+X) command.
Step Action
1 Position the cursor on the statement before which the insertion must be made.
2 Select the Edit/Insert Statement command or (Ctrl+I).
To….. you must… the text…
copy part of a statement select the text to be copied and select the command Edit/Copy (Ctrl+C)
is placed on the Windows Clipboard.
paste the contents of the Clipboard into a document
select the point from where the text must be pasted and select the Edit/Paste (Ctrl+V) command
is kept on the Windows Clipboard.
cut a piece of text and place it on the clipboard
select the text to be cut and select the command Edit/Cut (Ctrl+X)
is placed on the Windows Clipboard.
153

Programming instruction list in language
Displaying variables as symbols or addresses
Procedure Carry out the following actions:
Note:
It is possible to run the language editor from the Options menu in:� addresses view,� symbols view,� symbols&addresses view (for the Ladder editor only).
Example of display
Ladder editor used with the 3 views.
Note If a symbol or address has more than 8 characters, the display can be truncated. Select the element, which is then displayed in full in the status bar. You can also use the Information box.
The View/Collapsed command is used to reduce the size of the window whilst maintaining the same level of information.
The View/Normal command allows you to return to the normal sized window.
Step Action
1 Open the program module with right click + Open or with a double click.
2 Select the command:� View/Addresses to display the variables as addresses.� View/Symbols to display the variables as symbols.� View/Symbols&addresses to display the variables as symbols/addresses (Ladder editor only).
154

Programming instruction list in language
Information box
Functions This box, which can be accessed from all language objects, displays the symbols, address and comments for the selected object (except for the operate and horizontal comparison blocks) in an integrated format.
Display table according to object:
How to access the object information box
Carry out the following steps:
Note The information box remains visible if it the user does not specifically close it. The contents of the Information box is updated according to the current selection.
Single object Complex object (operate block, horizon comparison block)
� symbol format in blue� constructor name in black,� associated comments in green.
� symbol format in blue� constructor address in black.
Step Action
1 In the LIST language editor, select the object.
2 Click on the right mouse button (contextual menu) and then select Information, or select theView → Informationcommand.
155

Programming instruction list in language
Online symbolization
Principal Online symbolization allows you, at the time of input of a Ladder, List, Structured Text program, to immediately (without opening the data editor) associate: � an address to a new symbol,� a symbol to a non symbolized address.
Procedure With the Ladder editor, start at Step 1, with the Structured Text or List editors, go straight to step 2.
Step Action
1 Select the cell where the variable is situated.
2 Select the variable (highlight it).
3 Right mouse click on the variable and select Associate Symbol&Address.
4 Enter the address or symbol and the comment.
156

Programming instruction list in language
Input of a predefined function block (List editor)
Procedure From within the language editor, carry out the following actions:
Function blocks The different function blocks and their instructions are:
Step Action
1 From the Contextual or the Service menu, select the command Input a block function call (Shift+F7).
2 Select the SFB type (counter, monostable…) using a double click (selection via the keyboard is done using the Arrow keys and ENTER). The input mask is displayed.
Function blocks Instruction Syntax
TP/TON/TOF timer (%TMi) StartInitialize
IN %TMi (Rising edge)IN %TMi (Falling edge)
Up/Down counter (%Ci) Reset to 0Set to Preset valueIncrement by 1Decrement by 1
R %CiS %CiCU %CiCD %Ci
Monostable (%MNi) Start S %MNi
Register of FIFO/LIFO words (%Ri)
Reset contentsSaving in %Ri;IRemoving from %Ri,O
R %Ri I %RiO %Ri
Drum-DRUM (%DRi) Position at step 0Change step
R %DRiU %DRi
157

Programming instruction list in language
Assisted entry of a library function (List editor)
Entry procedure for a library function
The instruction to be entered is:[%MW5:=%MW30 + 100 + ROL(%MW8,2)]
To enter a function, perform the following actions
Step Action
1 Enter the instruction as far as the ROL function call.
2 Via the Contextual or Service menu, select the Enter call for a function command.
3 Select the required tab (default selection). For an elementary function (EF) the "Parameters" option must be selected in the Function Information menu.
4 Select the (EF) function family (e.g.: Single length integer), or the required DFB block (only on Premium with PL7 Junior and Pro).
5 Select the (EF) function name (e.g. ROL), or the name of the DFB instance. An instance can be created for a DFB:1. Select Create.2. Enter the name.3. Enter a comment.4. Confirm using Create.
6 Enter the (EF) function variables or DFB type parameters in the parameter entry field. The function entered can be viewed in the Display the call field.
7 Confirm the selection with OK.
8 End the instruction entry (end character ]).
9 Confirm the entry with ENTER.
158

Programming instruction list in language
Notes Certain functions offer extra screens for parameter entry (e.g.: human-machine interface functions). These parameters are accessed with the Detail button that then appears at the bottom of the screen.
When the function syntax is known, enter syntax directly into the editor.
It is possible to directly enable assisted entry on a given function by selecting the name of the function then selecting the Service/Enter call for a function command or performing a RIGHT MOUSE CLICK.
WARNING
For EFs displayed in red:
EFs which are displayed in red in the function entry help screen cannot be used in the application. This limitation is encountered in the following instances:� When an earlier version of the EF is already used in the application,� when the EF name is used as a variable linked symbol, and only
concerns the EF ROUND (family of single precision reals).
Failure to follow this precaution can result in death, serious injury, or equipment damage.
159

Programming instruction list in language
Direct access to a subroutine
Procedure To access the subroutine’s input/viewing window during the input/viewing of a subroutine call, carry out the following actions:
Step Action
1 Select the subroutine call object: SRi%L1:LD%M0SR1
2 Select the command Facility/Open or in the Contextual menu select Open.
160

Programming instruction list in language
Replacing a variable in the application
Introduction Finding and replacing an application variable as an address or a symbol (excluding variables used in operating screens). The replacement in the application may be total or partial, automatic or manual.
Replacement affects the indicated variable and its dependent objects as well (word extract bits…).Exception: for Grafcet steps bits the associated activity times (e.g. %Xi.T) are not replaced.
Replacement is carried out at the following levels:� Application (in all tasks).� Tasks (MAST, FAST, Evti).� Complete section.� Partial section (from address i to address j).� Replacement is also carried out at functional module level (complete functional
module, sub-modules included).
161

Programming instruction list in language
Procedure Carry out the following actions:
Step Action
1 Select the commandTools/Replace variables or position the cursor over the Station directory and select Replace variables from the contextual menu.
2 Put the variable to be replaced (as an address or a symbol) in the Findfield and confirm with ENTER or TAB.
3 Put the variable to be replaced (as an address or a symbol) in the Replacefield and confirm with ENTER.
4 Select the view:
� Structure view ,
� Function view .
5 Select one or more modules:� if replacing in all the application, go to point 8,� if replacing in some of the modules, deselect the whole and select the modules, go to point 6,� if replacing in one of the modules, deselect the whole and select the module, go to point 6.
6 Select the label (if LD, ST, IL) or the page (if G7) at the beginning of the replacement by positioning the pointer on the listFrom.If more precision is required, use the up and down arrow keys.
7 Select the label (if LD, ST, IL) or the page (if G7) at the end of the replacement by positioning the pointer on the listTo.If more precision is required, use the up and down arrow keys.
8 Select the type of replacement:� if Replace, the replacement is carried out occurrence by occurrence,� if Replace All, the replacement is carried out on all occurrences.Notes:� The status bar indicates the number of replacements carried out, and a report on the replacements not
carried out.� The ESC key allows you to abort the function Replace, but the replacements already carried out are kept.
162

Programming instruction list in language
Cross Referencing a variable in an application
Introduction This function allows you to locate in the application:� variables in the form of labels or symbols (except those used in operating
screens),� DFB types (only on Premium with Pl7 Junior and Pro),� DFB instances (only on Premium with Pl7 Junior and Pro),� and to open modules/tasks/DFB types.
Principals of using debugging
The user realizes that the variable X is not the right value. To identify the cause he must therefore: � find the places where this variable is used,� obtain a list of statements, rungs and expressions,� to display and verify the activation conditions of the variable. Note:In order to record the path of this search, the list elements thus visited are marked with an asterisk (*).
Operational mode for objects
A variable can be a read variable (R), a write variable (W) or a read/write variable (R/W).
- "R" groups together the read operational modes, indexed read, indexed word, input or input/output parameter of a indexed or non-indexed function.
- "W" groups together the write operational modes, indexed write, output or input/output parameter of indexed or non-indexed function and execution of Block Functions (SFB and DFB).
163

Programming instruction list in language
Search source variables
Table of variables:
Other retrievable variables:
Bit %Ixi; %QXi; %Mi; %Si
Word % MWi; %MDi; %MFi; %KBi; %KWi; %KDi; KFi; %MBi; %SWi; %QWi; %QDi; %IWi; %IDi; %NWi
Instruction SRi; HALT
Byte variables
Word extract bits
Bit table
Grafcet bit table
Character string
Table of words and constants
Table of double words and constants
Constant character string
Standard Block Function
Standard Block Function element
Step status
Step activity time
Manet variables
164

Programming instruction list in language
Search options For an indexed variable, the variable and the index are taken into account in the list.
Table of options:
Searching for cross references
Carry out the following actions:
Selecting a variable from the list:� Select the variable from the list, the list of tasks, modules, labels is updated.Deleting a variable from the list:� Select the variable, enable the contextual menu (right click) then click on Delete.Displaying in structural view or in functional view:� Use the View menu or the Function button.
Extract Bit This option is for variables of types %MW, %KW, %IW, %NW, %QW. It adds to the list the variable and the referenced bits.
Table Object This option is for bit tables, word tables and immediate indexed variables. It adds to the list the immediate indexed table variables whose first element is the input variable.
Channel Object This option is for channel objects. It adds to the list all the objects of the same referenced channel, including the tables and the extract bits.
Network Objects This option is for the network variables. It allows you to obtain all the variables from the same remote module (nanet object).
FB Object This option allows you to expand the list of SFB block function elements and the DFB type elements.
FB Instance Only on Premium with PL7 Junior and Pro.This option is for DFB types. It allows you to obtain from the name of a DFB type the sections using its instances.
Step Action
1Select the icon
2 Enter the search source variable as an address or a symbol (E.g. %M10) and the possible options then confirm via Search.
3 To display a module, select the module, via the Contextual menu, select Open or double click on the module.
165

Programming instruction list in language
Animation of List program elements
At a Glance Refer to the "Debugging" Chapter of the Part "Debugging, Adjustment, Documentation and Appendices"-> (see Animating program elements, p. 279 ).
166

Programming instruction list in language
Printing of a program
Procedure Carry out the following steps:
Notes The print type depends on the type of display selected in the View menu.� Addresses: prints variables with addresses,� Symbols: prints variables with symbols,� Symbols&Addresses: prints variables with symbols/addresses.
Step Action
1 Open the module with right click + Open or a double click.
2Select the command File/Print (Ctrl+P) or click on the icon
3 Select a print range:� if for the entire module, go to step 6.� if for part of a module, go to step 4.
4 Select %Li/TOP/BOTTOM (if LD, ST, IL) or start page (if G7).If more precision is required, use the up and down arrow keys.
5 Select %Li/TOP/BOTTOM (if LD, ST, IL) or endpage (if G7).If more precision is required, use the up and down arrow keys.
6 Confirm with OK or ENTER.
167

Programming instruction list in language
Export/Import of source files
Refer to the "Import/Export" (See Import/Export, p. 329) Chapter of the Part "Debugging, Adjustment, Documentation and Appendices".
168

8
Programming in Structured Text ST languageIntroduction
Subject of this chapter
This chapter reminds you of the structure of a program in Structured Text language.
It describes: � How to create a program.� How to use the different functions offered by the editor.� How to manage the different modules making up the application.
What’s in this Chapter?
This chapter contains the following topics:
Topic Page
Structure of a program in Structured Text language. 170
Creating a program in Structured Text (ST) 171
Modifying a Structured Text program 172
Displaying variables as symbols or addresses 175
Information box 177
Online symbolization 178
Input of a predefined function block (ST editor) 179
Assisted entry of a library function (ST editor) 180
Direct access to a subroutine 182
Replacing a variable in the application 183
Cross Referencing a variable in an application 185
Animation of Structured text program elements 188
Printing of a program 189
Export/Import of source files 190
169

Programming in Structured Text language
Structure of a program in Structured Text language.
Introduction Structured Text (ST) can be used on PLCs Premium (V>=V1.0) and on the Micro (V>=V1.5).
Principal A module written in Structured Text language is composed of a series of statements executed sequentially by the PLC.� Each statement begins with an exclamation mark (generated automatically), it
can include one or several comments, one or several instructions and can be marked with a label.
� A statement contains a maximum of 128 lines of 300 characters (instructions, comments, label).
� In the editor a statement being input is displayed in red.� A selected statement is surrounded by a green frame.� The current statement is surrounded by a black frame.� The line number and the column number as well as the number of the current
statement are written in the bottom panel of the window (status bar).
Example ! (*Initialisation*)%L2: (*Label*)%MW0:=0; (* Init Index *)%MW2:=%MW99:2; (* length of table *)IF (%MW2 REM 2=0) THEN DEC %MW0;END_IF;(* while the index is < the length of the table carry out shift *)WHILE(%MW0<%MW2)DO %MW100[%MW0]:=(SHR(%MW100[%MW0],8))OR(SHL(%MW101[%MW0],8)); INC %MW0;END_WHILE;
Notes :Key-words (example AND, OR, IF…) are colored blue.Comments are colored green.The rest is colored black.
170

Programming in Structured Text language
Creating a program in Structured Text (ST)
Introduction Structured Text can be used on PLCs Premium (V>=V1.0) and on the Micro (V>=V1.5).
Procedure Carry out the following actions:
Rules They are:� When confirming the statement, superfluous spaces are ignored.� If an error is detected at confirmation, the cursor is positioned over the first error
detected, the error message is displayed at the bottom of the window.� In the editor, a statement is displayed in redwhile being entered.� A selected statement is surrounded by a green frame. � The current statement is surrounded by a black frame.
Step Action
1 Creating or importing an LD, IL, ST section, p. 105
2 1. Enter the first statement. As input begins, the statement is displayed in red.
2. Accept each line with ENTER.
3. Use the TAB key to indent the code.
4 .Online symbolization, p. 156
3 Confirm the input of the statement with the command Edit/Confirm
(CTRL+W)/(SHIFT+ENTER) or via the icon .
171

Programming in Structured Text language
Modifying a Structured Text program
Accessing a statement or instruction
The program module being displayed, select the command Edit/Go to (Ctrl+A) or
the icon .
The possible choices are as follows:
The Move zone allows a movement relative to TOP/BOTTOM/%Li.
The command Edit/ Go to current modification allows you to position the cursor on the statement which is currently being modified.
Selecting one or several statements
The possible choices are as follows:
Select in the label field… position…
TOP at the beginning of the program module.
BOTTOM at the end of the program module.
%Li at the corresponding label number.
Select… by… or…
one statement positioning the cursor over the statement and selecting the menu Edit/Select statement.
by clicking in this area, the latter is framed in green.
several statements move the mouse over the different statements while keeping the left button down.
by using the keys (SHIFT+Arrow).
a part of a statement
by moving the cursor over the text to be selected while keeping the left mouse button down (SHIFT+Arrow).
! ( * INIT * )%L1:
SR2;IF Mode-Auto_manu
END_IF;
THEN
172

Programming in Structured Text language
Modifying one statement
Carry out the following actions:
The deletion possibilities are as follows:
Inserting a statement before the current statement
Carry out the following actions:
Cut/Copy/Paste a part of a program module
Carry out the following operations:
Step Action
1 Position the cursor over the point to be modified.
2 Carry out the modification
3 Confirm the modification with the keys CTRL + W or SHIFT+ ENTER or the
icon .
Delete… by… then by…
one statement selecting the statement to delete
pressing the key Delete.
a part of a statement selecting the part of the statement to delete
pressing the key Delete.
a piece of text and place it on the clipboard
selecting the text to be cut selecting the command Edit/Cut (CTRL+X).
Step Action
1 Position the cursor on the statement before which the insertion must be carried out.
2 Select the command Edit/Insert statement or (Ctrl+I).
To… you must… the text…
Copy a part of a statement
select the text to be copied and select the command Edit/Copy (Ctrl+C)
is placed on the Windows clipboard.
Paste the contents of the clipboard into a document
select the start point from which the text must be pasted and select the command Edit/Paste (CTRL+V)
is kept on the Windows clipboard.
Cut a piece of text and place it on the clipboard
select the text to be cut and select the command Edit/Cut (CTRL+X)
is placed on the Windows clipboard.
173

Programming in Structured Text language
Note:The Cut/Copy/Paste function works in the same way for a selection of statement(s) and between program modules.
Canceling a modification
To cancel a modification carried out on an unconfirmed statement, select the
command Edit/Undo changes or the icon .This command allows you to return the statement to its last confirmed state.
174

Programming in Structured Text language
Displaying variables as symbols or addresses
Procedure Carry out the following actions:
Note:
It is possible to run the language editor from the Options menu in:� addresses view,� symbols view,� symbols&addresses view (only for the Ladder editor).
Example display Ladder editor used with the 3 views.
Step Action
1 Open the program module by right mouse click + Open or double mouse click.
2 Select the command:� View/Addresses to display the variables as addresses.� View/Symbols to display the variables as symbols.� View/Symbols&Addresses to display the variables as symbols/addresses (only
Ladder editor).
175

Programming in Structured Text language
Note If a symbol or an address has more than 8 characters, the display can be truncated. Select the element displayed in this way in the status bar. You can also use the Information box.
The command View/Reduced allows you to reduce the size of the window while keeping the same level of information.
The command View/Normal allows you to return to the normal sized window.
176

Programming in Structured Text language
Information box
Functions This box, which can be accessed from all language objects, displays the symbols, address and comments for the selected object (with the exception of the operate and horizontal comparison blocks) in an integrated format.
Display table according to object:
How to access the object information box
Carry out the following steps:
Note The information box remains visible if it the user does not specifically close it. The contents of the Information box is updated according to the current selection.
Single object Complex object (operate block, horizon comparison block)
� symbol format in blue� constructor name in black,� associated comments in green.
� symbol format in blue,� constructor address in black,
Step Action
1 In the ST language editor, select the object.
2 Click on the right mouse button (contextual menu) and then select Information, or select theView → Informationcommand.
177

Programming in Structured Text language
Online symbolization
Principal Online symbolization allows you, at the time of input of a Ladder, List, Structured Text program, to immediately (without opening the data editor) associate: � an address to a new symbol,� a symbol to a non symbolized address.
Procedure With the Ladder editor, start at Step 1, with the Structured Text or List editors, go straight to step 2.
Step Action
1 Select the cell where the variable is situated.
2 Select the variable (highlight it).
3 Right mouse click on the variable and select Associate Symbol&Address.
4 Enter the address or symbol and the comment.
178

Programming in Structured Text language
Input of a predefined function block (ST editor)
Procedure From within the language editor, input at the cursor position one of the instructions presented below corresponding to the desired function block.
Function blocks The different function blocks and their instructions are:
Function blocks Instruction Syntax
PL7-3 timer(%Ti) StartStopReinitialize
START %Ti;STOP %Ti;PRESET %Ti;
TP/TON/TOF timer (%TMi) StartInitialize
START %TMi;DOWN %TMi;
Up/Down counter (%Ci) Reset to 0Set to Preset valueIncrement by 1Decrement by 1
RESET %Ci;PRESET %Ci;UP %Ci;DOWN %Ci;
Monostable (%MNi) Start START %MNi;
Register of FIFO/LIFO words (%Ri) Reset contentsSaving in %Ri;IRemoving from %Ri,O
RESET %Ri;PUT %Ri;GET %Ri;
Drum-DRUM (%DRi) Position at step 0Change step
RESET %DRi;UP %DRi;
179

Programming in Structured Text language
Assisted entry of a library function (ST editor)
Procedure The instruction to be entered is:%MD5:=%MD30 AND 100 AND ROL(%MD8,2);
Perform the following actions to make an entry:
Step Action
1 Enter the instruction as far as the ROL function call.
2 Via the Contextual or Service menu, select the Enter call for a function command.
3 Select the required tab (default selection). For an elementary function (EF) the "Parameters" option must be selected in the Function Information menu.
4 Select the (EF) function family (e.g.: Double length integer, or the required DFB block (only on Premium with PL7 Junior and Pro).
5 Select the (EF) function name(e.g. ROL), or the name of the DFB instance. An instance can be created for a DFB:1. Select Create.2. Enter the name.3. Enter a comment.4. Confirm using Create.
6 Enter the (EF) function variables or DFB type parameters in the parameter entry field. The function entered can be viewed in the Display the call field.
7 Confirm the selection with OK.
8 End the instruction imput (end character ;).
9 Confirm the entry with ENTER.
180

Programming in Structured Text language
Notes Certain functions offer extra screens for parameter entry (e.g.: human-machine interface functions). These parameters are accessed with the Detail button that then appears at the bottom of the screen.
When the function syntax is known, enter syntax directly into the editor.
It is possible to directly enable assisted entry on a given function by selecting the name of the function then selecting the Service/Enter call for a function command or performing a RIGHT MOUSE CLICK.
Tabulation and Line Feed characters are represented by $T and $N respectively. They must be entered in $$T and $$N format.
WARNING
For EFs displayed in red:
EFs which are displayed in red in the function entry help screen cannot be used in the application. This limitation is encountered in the following instances:� when an earlier version of the EF is already used in the application,� the EF name is used as a variable linked symbol, and concerns the
EF ROUND (family of single precision reals).
Failure to follow this precaution can result in death, serious injury, or equipment damage.
181

Programming in Structured Text language
Direct access to a subroutine
Procedure To access the input/display window of a sub-routine during the input/display of a sub-routine call, carry out the following actions:
Step Action
1 Select the subroutine call object: SRi%L1:IF %M0 THEN SR1;END_IF;
2 Select the command Service/Open or select Open from the contextual menu.
182

Programming in Structured Text language
Replacing a variable in the application
Introduction Finding and replacing an application variable as an address or a symbol (excluding variables used in operating screens). The replacement in the application may be total or partial, automatic or manual.
Replacement affects the indicated variable and its dependent objects as well (word extract bits…).Exception: for Grafcet steps bits the associated activity times (e.g. %Xi.T) are not replaced.
Replacement is carried out at the following levels:� Application (in all tasks).� Tasks (MAST, FAST, Evti).� Complete section.� Partial section (from address i to address j).� Replacement is also carried out at functional module level (complete functional
module, sub-modules included).
183

Programming in Structured Text language
Procedure Carry out the following actions:
Step Action
1 Select the commandTools/Replace variables or position the cursor over the Station directory and select Replace variables from the contextual menu.
2 Put the variable to be replaced (as an address or a symbol) in the Findfield and confirm with ENTER or TAB.
3 Put the variable to be replaced (as an address or a symbol) in the Replacefield and confirm with ENTER.
4 Select the view:� Structure view� Function view
5 Select one or more modules:� if replacing in all the application, go to point 8,� if replacing in some of the modules, deselect the whole and select the modules,
go to point 6,� if replacing in one of the modules, deselect the whole and select the module, go
to point 6.
6 Select the label (if LD, ST, IL) or the page (if G7) at the beginning of the replacement by positioning the pointer on the listFrom.If more precision is required, use the up and down arrow keys.
7 Select the label (if LD, ST, IL) or the page (if G7) at the end of the replacement by positioning the pointer on the listTo.If more precision is required, use the up and down arrow keys.
8 Select the type of replacement:� if Replace, the replacement is carried out occurrence by occurrence,� if Replace All, the replacement is carried out on all occurrences.Notes:� The status bar indicates the number of replacements carried out, and a report on
the replacements not carried out.� The ESC key allows you to abort the function Replace, but the replacements
already carried out are kept.
184

Programming in Structured Text language
Cross Referencing a variable in an application
Introduction This function allows you to locate in the application:� variables in the form of labels or symbols (except those used in operating
screens),� DFB types (only on Premium with Pl7 Junior and Pro),� DFB instances (only on Premium with Pl7 Junior and Pro),� and to open modules/tasks/DFB types.
Principals of using debugging
The user realizes that the variable X is not the right value. To identify the cause he must therefore: � find the places where this variable is used,� obtain a list of statements, rungs and expressions,� to display and verify the activation conditions of the variable. Note:In order to record the path of this search, the list elements thus visited are marked with an asterisk (*).
Operational mode for objects
A variable can be a read variable (R), a write variable (W) or a read/write variable (R/W).
- "R" groups together the read operational modes, indexed read, indexed word, input or input/output parameter of a indexed or non-indexed function.
- "W" groups together the write operational modes, indexed write, output or input/output parameter of indexed or non-indexed function and execution of Block Functions (SFB and DFB).
185

Programming in Structured Text language
Search source variables
Table of variables:
Other retrievable variables:
Bit %Ixi; %QXi; %Mi; %Si
Word % MWi; %MDi; %MFi; %KBi; %KWi; %KDi; KFi; %MBi; %SWi; %QWi; %QDi; %IWi; %IDi; %NWi
Instruction SRi; HALT
Byte variables
Word extract bits
Bit table
Grafcet bit table
Character string
Table of words and constants
Table of double words and constants
Constant character string
Standard Block Function
Standard Block Function element
Step status
Step activity time
Manet variables
186

Programming in Structured Text language
Search options For an indexed variable, the variable and the index are taken into account in the list.
Table of options:
Searching for cross references
Carry out the following actions:
Selecting a variable from the list:� Select the variable from the list, the list of tasks, modules, labels is updated.Deleting a variable from the list:� Select the variable, enable the contextual menu (right click) then click on Delete.Displaying in structural view or in functional view:� Use the View menu or the Function button.
Extract Bit This option is for variables of types %MW, %KW, %IW, %NW, %QW. It adds to the list the variable and the referenced bits.
Table Object This option is for bit tables, word tables and immediate indexed variables. It adds to the list the immediate indexed table variables whose first element is the input variable.
Channel Object This option is for channel objects. It adds to the list all the objects of the same referenced channel, including the tables and the extract bits.
Network Objects This option is for the network variables. It allows you to obtain all the variables from the same remote module (nanet object).
FB Object This option allows you to expand the list of SFB block function elements and the DFB type elements.
FB Instance Only on Premium with PL7 Junior and Pro.This option is for DFB types. It allows you to obtain from the name of a DFB type the sections using its instances.
Step Action
1Select the icon
2 Enter the search source variable as an address or a symbol (E.g. %M10) and the possible options then confirm via Search.
3 To display a module, select the module, via the Contextual menu, select Open or double click on the module.
187

Programming in Structured Text language
Animation of Structured text program elements
At a Glance Refer to the "Debugging" Chapter of the Part "Debugging, Adjustment, Documentation and Appendices"-> (see Animating program elements, p. 279 ) .
188

Programming in Structured Text language
Printing of a program
Procedure Carry out the following steps:
Notes The print type depends on the type of display selected in the View menu.� Addresses: prints variables with addresses,� Symbols: prints variables with symbols,� Symbols&Addresses: prints variables with symbols/addresses.
Step Action
1 Open the module with right click + Open or a double click.
2Select the command File/Print (Ctrl+P) or click on the icon
3 Select a print range:� if for the entire module, go to step 6.� if for part of a module, go to step 4.
4 Select %Li/TOP/BOTTOM (if LD, ST, IL) or start page (if G7).If more precision is required, use the up and down arrow keys.
5 Select %Li/TOP/BOTTOM (if LD, ST, IL) or endpage (if G7).If more precision is required, use the up and down arrow keys.
6 Confirm with OK or ENTER.
189

Programming in Structured Text language
Export/Import of source files
Refer to the "Import/Export" (See Import/Export, p. 329) Chapter of the Part "Debugging, Adjustment, Documentation and Appendices".
190

9
Programming in Grafcet languageIntroduction
Subject of this chapter
This chapter reminds you of the structure of a program in grafcet language.
It describes:� how to create a program;� how to use the different functions offered by the editor;� how to manage the different modules making up the application.
What’s in this Chapter?
This chapter contains the following topics:
Topic Page
Designing a program in Grafcet language 192
Structure of a Grafcet page 193
Grafcet graphic objects 194
Creating a Grafcet module 198
Modifying a Grafcet program 210
Replacing a variable in the application 213
Cross Referencing a variable in an application 215
Animation of Grafcet program elements 218
Printing of a program 219
Export/Import of source files 220
191

Programming in Grafcet language
Designing a program in Grafcet language
Principal Gracet language (GR7) allows the sequential operation of automation to be represented graphically and in a structured way.
This description is carried out with help from single graphical objects (See Grafcet graphic objects, p. 194) representing:� the steps with which the actions can be associated (except the OUT step),� the macro-steps, (onlyTSX/PCX/PMX57)� the transitions with which the receptivity is associated,� the positioned links connecting a step to a transition or a transition to a step.
The graph is input by Grafcet pages (See Structure of a Grafcet page, p. 193) addressed from 0 to 7 in the status bar.
Example Grafcet editor:
F11F8F7F6F5F4F3F2 F10 F12
2 M0 0
1F2F9
1 2) Place the element onthe input grid
1) Select object from the graphicspalette
192

Programming in Grafcet language
Structure of a Grafcet page
Principles The Grafcet page is displayed in the form of a matrix made up of 14 lines and 11 columns defining 154 cells.
Each cell can receive a graphic object (See Grafcet graphic objects, p. 194).
There are two types of line:� step lines where steps, macro steps and connectors are entered,� transition lines where the transitions and source connectors are entered.
Comments can be entered. These are independent graphic objects, which are not attached to steps or transitions.
A program module is made up of 8 Grafcet pages, and a Grafcet page is accessed
via the Edit/Go to command, or the icon .
There are two Grafcet page viewing modes offered, which can be accessed from the View menu:� normal view (default display),� collapsed view.
Example Grafcet page:
0
1 4
2
3
5 Step line
Transition line
193

Programming in Grafcet language
Grafcet graphic objects
Steps Number of possible steps by PLC type:� TSX37-10 Max: 96,� TSX37-20 Max: 128,� TSX/PCX/PMX57 Max: 250.Type of steps:
Macro-steps Only enabled on TSX/PCX/PMX57, Max: 64.
Can be accessed from the graphics palette using the (Shift+F2) keys or
the icon .
Can be accessed from the graphics palette using the F3 and F4 keys or the icons
Initial Example: Defines the initial situation of the PLC,i = 0 to 63.
Standard Example: Defines the stable PLC state.
194

Programming in Grafcet language
Macro-Step steps
Only enabled on TSX/PCX/PMX57, Max: 250 per Macro-Step plus IN and OUT step.Types of Macro-step steps:
Step + Transition Step/Transition:
Can be accessed from the graphics palette using the keys F3, F4, (Shift+F2), (Shift+F3),
(Shift+F4) or the icons .
Initial Example: Defines the initial situation of the PLC,i= 0 to 63.
Standard Example: Defines the stable PLC state.
IN Example: Macro-Step input step.
OUT Example: Macro-Step output step.
Can be accessed from the graphics palette using the (F2) key or the icon .
Step + Transition
Example: Simultaneously lays down a step with a number and transition.
195

Programming in Grafcet language
Transitions Number of possible transitions by PLC type:� TSX37-10 Max: 192,� TSX37-20 Max: 256,� TSX/PCX/PMX57 Max: 1024.Type of transition:
Can be accessed from the graphics palette using the keys F6, F8, F9, F10 and F11 or the
icons .
Standard Example: Allows the transition from one step to another.
AND divergence
Example: Allows the simultaneous activation of a maximum of 11 steps.
AND convergence
Example: Allows the simultaneous deactivation of a maximum of 11 steps.
OR divergence Example Allows you to create a branch to a maximum of 11 steps.
OR convergence
Example Allows you to close a branch from a maximum of 11 steps.
196

Programming in Grafcet language
Connectors Connector types:
Oriented links Link types:
CommentsCan be accessed from the graphics palette via the F12 key or the icon .
Can be accessed from the graphics palette via the F5, and F7 keys or the icons
.
Destination Example: n = destination step number.
Origin Example: n = origin step number.
Can be accessed via the graphics palette via the F9key, or the icon .
Up Example: Allows the loop iteration of a chart (arrow keys).
Down Example:
Left or right Example:
197

Programming in Grafcet language
Creating a Grafcet module
Procedure Carry out the following actions:
Open the Grafcet module (chart)
Carry out the following actions from the Grafcet section previously created.
Step Action
1 Create a Grafcet section (See Creating or importing a Grafcet section, p. 107).
2 Open the Grafcet module (chart). (See Open the Grafcet module (chart), p. 198)
3 Enter the following graphical elements:� entering a step, a transition, a connector. (See Entering a step, an action, a
connector, p. 199)� entering a macro-step (See Entering a Macro-Step, p. 200) (only TSX 57).� carrying out an AND divergence (See Carrying out an AND divergence, p. 201).� carrying out an AND convergence (See Carrying out an AND convergence,
p. 202).� carrying out a Step -> Transition link (See Carrying out a Step -> Transition link,
p. 203).� carrying out a Transition -> Step link. (See Carrying out a Transition -> Step link.,
p. 204)� carrying out loop iteration. (See Carrying out a loop iteration, p. 205)
4 Program actions. (See Programming actions, p. 207)
5 Program the transition conditions. (See Programming the transition conditions, p. 208)
6 Enter comments. (See Entering comments, p. 209)
Step Action
1 Put the cursor on the Chart module in the Grafcet section.
2 Open the Chart module using the command Services/Open or using the contextual menu Open.
198

Programming in Grafcet language
Entering a step, an action, a connector
Carry out the following actions:
Step Action
1 Using the mouse:Click on the graphical object situated in the graphical palette.Using the keyboard:Position the cursor on the grid at the required place (using the arrow keys).
2 Using the mouse:Click on the grid at the required place, for:� a step, a number is offered by default, modify it if applicable, then confirm it using
ENTER.� a step+transition, a number is fixed by default.Using the keyboard:Press the function key corresponding to the graphical object situated in the graphical palette to be inserted, for:� a step, a number is proposed by default, modify it if applicable.� a step+transition, a number is fixed by default.
3 Using the mouse or the keyboard:Proceed in the same way for the other graphical objects.
4 Using the mouse:
Confirm the chart by clicking on the icon or by using the command Edit/Confirm.Using the keyboard:Confirm the chart using the ENTER key, or using the command Edit/Confirm.
199

Programming in Grafcet language
Entering a Macro-Step
A macro-step must be:� defined in order to be inserted in a Grafcet module (chart or macro-step),� created (using the application browser) in order to be entered in a Grafcet module
(chart + macro-step),� completed (number of the corresponding macro-step) in order to be validated.Carry out the following actions:
Note:When a chart is confirmed, the display changes:� the graphical objects change from red to black, � the page border becomes gray.
Step Action
1 Using the mouse:Click on the graphical object situated in the graphical palette.Using the keyboard:Position the cursor on the grid at the required place (using the arrow keys).
2 Using the mouse:Click on the grid at the required place.Using the keyboard:Press the function key corresponding to the Macro-step object (Shift +F2)
3 Using the mouse or the keyboard:Enter a macro-step number, then confirm with ENTER.
4 Using the keyboard:Confirm the chart using the ENTER key, or using the command Edit/Confirm.
200

Programming in Grafcet language
Carrying out an AND divergence
An AND divergence starts with a transition and goes to a step.
Carry out the following actions:
Step Action
1 Using the mouse:Click on the graphical object situated in the graphical palette (F11).Using the keyboard:Put the cursor on the start transition or on the pre-existing divergence segment [A] (in the case of multiple divergence) using the arrows.
2 Using the mouse:Click on the start transition or on the pre-existing divergence segment [A] (in the case of a multiple divergence).Using the keyboard:Press (F11).
3 Using the mouse:Draw the link by clicking on the break points of the line [B] (change of direction) in the transition lines.Using the keyboard:Draw the link using the arrow keys.
4 Using the mouse:Double click on the last break point or click again on the graphical object situated in the graphical palette (F11).Using the keyboard:Press F11 again on the last break point. If the destination cell is empty, a step is automatically created.
5 Using the mouse or the keyboard:Modify the step number if applicable, then confirm using ENTER.
201

Programming in Grafcet language
Note:An AND divergence is always represented from left to right, the segment represented by a double line cannot be cut by another link.
Carrying out an AND convergence
An AND convergence starts with a step and goes to a transition.
Carry out the following actions:
Step Action
1 Using the mouse:Click on the graphical object situated in the graphical palette (F10).Using the keyboard:Put the cursor on the start step using the arrow keys.
2 Using the mouse:Click on the start step [A].Using the keyboard:Press (F10).
3 Using the mouse:Draw the link by clicking on the break points of the line [B] (change of direction) in the transition lines.Using the keyboard:Draw the link using the arrow keys.
4 Using the mouse:If the destination cell is empty, double click on the last break point or click again on the graphical object situated in the graphical palette to create the transition.Using the keyboard:If the destination cell is empty, press (F10) again on the last break point to create the transition.
202

Programming in Grafcet language
Notes:The segment represented by a double line cannot be cut by another link.An AND convergence can only be entered from right to left.
Carrying out a Step -> Transition link
A step -> transition link starts with a step and goes to a transition.
Carry out the following actions:
Step Action
1 Using the mouse:Click on the graphical object situated in the graphical palette (F8).Using the keyboard:Put the cursor on the start step or on the pre-existing step -> transition link segment [A] (in the case of multiple link) using the arrows.
2 Using the mouse:Click on the start step or on the pre-existing step -> transition link segment [A] (in the case of a multiple link).Using the keyboard:Press (F8).
3 Using the mouse:Draw the link by clicking on the break points of the line [B] (change of direction) in the transition lines.Using the keyboard:Draw the line using the arrow keys.
4 Using the mouse:If the cell is empty, double click on the break point or click again on the graphical object situated in the graphical palette to create the transition.Using the keyboard:If the destination cell is empty, press (F8) again on the last break point to create the transition.
203

Programming in Grafcet language
Carrying out a Transition -> Step link.
A transition -> step link starts with a transition and goes to a step.
Carry out the following actions:
Step Action
1 Using the mouse:Click on the graphical object situated in the graphical palette (F9).Using the keyboard:Put the cursor on the start transition or the source connector using the arrow keys.
2 Using the mouse:Click on the start transition or the source connector [A]Using the keyboard:Press (F9).
3 Using the mouse:Draw the link by clicking on the break points of the line [B] (change of direction) in the transition lines.Using the keyboard:Draw the link using the arrow keys as far as the step or the destination connector.
4 Using the mouse:If the destination cell is empty, double click on the last break point or click again on the graphical object situated in the graphical palette to create the step.Using the keyboard:If the destination cell is empty, press (F9) again on the last break point to create the step.
5 Using the mouse or the keyboard:Modify the step number if applicable, then confirm using ENTER.
204

Programming in Grafcet language
Carrying out a loop iteration
Two types of loop iteration are available to complete a chart:
Using directed links:
Step Action
1 Using the mouse:Click on the graphical object situated in the graphical palette (F9).Using the keyboard:Put the cursor on the start transition [A] using the arrow keys.
2 Using the mouse:Click on the end of chart transition [A].Using the keyboard:Press (F9).
3 Using the mouse:Draw the link by clicking on the break points of the line [B] (change of direction) in the transition lines.Using the keyboard:Draw the link using the arrow keys as far as the step or the destination connector.
4 Using the mouse:Double click on the step to be linked or click again on the graphical object situated in the graphical palette to validate the object.
205

Programming in Grafcet language
Using connectors:
Example of loop iteration using connectors:
Step Action
1 Using the mouse:Click on the graphical object situated in the graphical palette (F5 or F7)Using the keyboard:Place the cursor in the required place.
2 Using the mouse:Click on the grid at the required place.Using the keyboard:Select the required graphical object by pressing (F5 or F7).
3 Using the mouse:Complete the source or destination step number, then confirm using ENTER.Using the keyboard:Complete the source or destination step number, then confirm using ENTER
206

Programming in Grafcet language
Programming actions
Carry out the following actions:
Step Action
1 Using the mouse:Select the step with a right click.Using the keyboard:Put the cursor on the step using the arrow keys, then confirm the selection by using the command (Shift+F10).
2 Using the mouse:Select the type of action associated with the step (activation action, continuous action or deactivation action).Using the keyboard:Use the arrow keys to select the type of action associated to the step that is to be modified, then confirm with ENTER.
3 Using the mouse:Select the type of language:� ladder language LD,� instruction list language IL,� structured text language ST,and confirm withOKUsing the keyboard:Select the type of language using the arrow keys:� ladder language LD,� instruction list language IL,� structured text language STand confirm with OK.
4 Complete the programming.
207

Programming in Grafcet language
Programming the transition conditions
Carry out the following operations:
Limitations:� in ladder language (LD) only the follow elements can be used:
� test graphical elements: contacts (Bi, I/O, Ti, D…), comparison blocks,� action graphical elements: only "transition condition" coils (other coils not
being relevant in this case). � in instruction list language (IL) the following objects are prohibited:
� no labels (%L),� no action instructions (bit objects, words or function blocks),� no jumps, sub-routine calls.
� in structured text language (ST) the following objects are prohibited:� no labels (%L),� no action statements, conditional statements or iterative statements,� no actions on bit objects,� no jumps, sub-routine calls,� no transfers, no action instructions on blocks.
step Action
1 Using the mouse:Select the transition with a right click.Using the keyboard:Put the cursor on the transition using the arrow keys, then confirm the selection by using the Service/Open command.
2 Using the mouse:Select OpenUsing the keyboard:Select the type of language using the arrow keys:� ladder language LD,� instruction list language IL,� structured text language ST,and confirm with ENTER.
3 Using the mouse:Select the type of language:� ladder language LD,� instruction list language IL,� structured text language STand confirm with OKUsing the keyboard:Complete the programming.
4 Using the mouse:Complete the programming.
208

Programming in Grafcet language
Entering comments
Carry out the following actions:
Notes:Comments are not mandatory.
They are stored on the PLC, as a consequence they take up memory.
Step Action
1 Using the mouse:
Click on the graphical object situated in the graphical palette .
Using the keyboard:Position the cursor on the grid at the required place (using the arrow keys).
2 Using the mouse:Click on the grid at the required place.Using the keyboard:Press the function key (F12).
3 Enter the comment (access the second line using (CTRL+ENTER).
4 Confirm with ENTER.
209

Programming in Grafcet language
Modifying a Grafcet program
Introduction A Grafcet module (Graphic object, Step number, Macro-step (TSX 57 only), Comment), is modified in the same way as it is created.
Actions and transition conditions are modified in the same way as they are created.
Rules for modifying a chart
A modification is authorized on any Grafcet page if:� no other modification is in progress in the editor,� no language editor is open on a transition condition or action module.
Modifications can only be entered on the page in the process of being modified (chart displayed in red).
Modifications can be only made in Offline or Online mode, with the PLC in STOP mode.
Modifications cannot be made:� in step by step program,� when a breakpoint is set in the program.
210

Programming in Grafcet language
Modifying a graphic object, comment, step number or connector
Carry out the following actions:
Modifying a Macro-Step
The procedure for modifying a macro-step or a macro-step number is the same as the procedure for modifying a step or a step number.
A macro-step can be accessed by selecting the macro-step in the application browser or by selecting the macro-step object in the Grafcet page.
Modifying an action
Carry out the following actions:
Step Action
1 Put the cursor on the required Grafcet page (See Structure of a Grafcet page, p. 193).
2 Using the mouse:Left double click on the element to be modified (the chart goes into modification mode, and is displayed in red). Using the keyboard:Put the cursor on the element to be modified.
3 Using the mouse:Make the modification.Using the keyboard:Press the space bar (the chart goes into modification mode, and is displayed in red).
4 Using the mouse:Confirm with ENTER.Using the keyboard:Make the modification.
5 Using the keyboard:Click on ENTER.
Step Action
1 Put the cursor on the required Grafcet page (See Structure of a Grafcet page, p. 193)
2 Using the mouse:Select the action to be modified by right clicking on the associated step.Using the keyboard:Using the arrow keys, put the cursor on the associated step then confirm the selection by using the Service/Open command.
3 Using the mouse:Select the type of action associated to the step that is to be modified. Using the keyboard:Use the arrow keys to select the type of action associated to the step that is to be modified, then confirm with ENTER.
4 Make the modification.
211

Programming in Grafcet language
Modifying a transition condition
Carry out the following actions:
Cut/Copy/Paste/Move one or more consecutive objects.
These actions can be performed on graphic objects and any programs associated with them. They can be made in offline and online mode, with the PLC in Stop mode.Carry out the following actions:
Step Action
1 Put the cursor on the required Grafcet page (See Structure of a Grafcet page, p. 193).
2 Using the mouse:Select the transition condition to be modified by right clicking on the associated step.Using the keyboard:Using the arrow keys, put the cursor on the associated step then confirm the selection by using the Service/Open command.
3 Using the mouse:Select Open.Using the keyboard:Make the modification.
4 Using the mouse:Make the modification.
To….. you must…
copy one object or several consecutive objects
� 1. Select the object or objects to be copied.� 2. Select Copy from the Edit menu or press CTRL+C
(keyboard shortcut) and the Grafcet objects are placed on the Windows clipboard.
paste one object or several consecutive objects from the clipboard
� 1. Select the cell where the object or objects on the clipboard are going to be pasted.
� 2. Select Paste from the Edit menu or press CTRL+V (keyboard shortcut) and the ghosted selection appears.
� 3. Click on the ghost or press ENTER to make the pasted objects appear.
cut (delete) one object or several consecutive objects and place them on the clipboard
� 1. Select the object or objects to be cut.� 2. Select Cut from the Edit menu or press CTRL+X
(keyboard shortcut) and the Grafcet objects are placed on the Windows clipboard.
move one object or several consecutive objects
� 1. Select the object or objects to be moved.� 2. According to your choice:
� Left click (keeping the button held down) on the selected cell or cells then move the cursor towards the destination cell or cells.
� Select Move from the Edit menu or CTRL+L (keyboard shortcut) then using the arrow keys move the cursor towards the destination cell(s).
212

Programming in Grafcet language
Replacing a variable in the application
At a Glance Finding and replacing an application variable in the form of an address or a symbol (excluding variables used in runtime screens). Replacement in the application may be total or partial, automatic or manual.
Replacement concerns the variable indicated and its dependent objects (word extract bits etc.).Exception: for Grafcet step bits the associated activity times (e.g. %Xi.T) are not replaced.
Replacement is carried out at the following levels:� Application (in all tasks).� Tasks (MAST, FAST, Evti).� Complete section.� Partial section (from address i to address j).� Replacement is also carried out at functional module level (complete functional
module, sub-modules included).
213

Programming in Grafcet language
Procedure Carry out the following actions:
Step Action
1 Select the commandTools/Replace variables or position the cursor over the Station directory and select Replace variables from the contextual menu.
2 Indicate the variable to be replaced (as an address or a symbol) in the Find zone and confirm with ENTER or TAB.
3 Indicate the replacement variable (as an address or a symbol) in the Replace field and confirm with ENTER.
4 Select the view:
� Structure view
� Function view
5 Select one or more modules:� if replacing throughout application, go to point 8,� if replacing in some of the modules, deselect all, select the modules, and go to
point 6,� if replacing in one of the modules, deselect all and select the module, and go to
point 6.
6 Select the label (if LD, ST, IL) or the page (if G7) at the beginning of the replacement by positioning the pointer on the listFrom.If more precision is required, use the up and down arrow keys.
7 Select the label (if LD, ST, IL) or the page (if G7) at the end of the replacement by positioning the pointer on the listTo.If more precision is required, use the up and down arrow keys.
8 Select the type of replacement:� if Next, the replacement is carried out occurrence by occurrence,� if Replace All, the replacement is carried out on all occurrences.Notes:� The status bar indicates the number of replacements carried out, and a report on
the replacements not carried out.� The ESC key is used to abort the function Replace, but the replacements already
carried out are retained.
214

Programming in Grafcet language
Cross Referencing a variable in an application
Introduction This function allows you to locate in the application:� variables in the form of labels or symbols (except those used in operating
screens),� DFB types (only on Premium with Pl7 Junior and Pro),� DFB instances (only on Premium with Pl7 Junior and Pro),� and to open modules/tasks/DFB types.
Principals of using debugging
The user realizes that the variable X is not the right value. To identify the cause he must therefore: � find the places where this variable is used,� obtain a list of statements, rungs and expressions,� to display and verify the activation conditions of the variable. Note:In order to record the path of this search, the list elements thus visited are marked with an asterisk (*).
Operational mode for objects
A variable can be a read variable (R), a write variable (W) or a read/write variable (R/W).
- "R" groups together the read operational modes, indexed read, indexed word, input or input/output parameter of a indexed or non-indexed function.
- "W" groups together the write operational modes, indexed write, output or input/output parameter of indexed or non-indexed function and execution of Block Functions (SFB and DFB).
Search source variables
Table of variables:
Bit %Ixi; %QXi; %Mi; %Si
Word % MWi; %MDi; %MFi; %KBi; %KWi; %KDi; KFi; %MBi; %SWi; %QWi; %QDi; %IWi; %IDi; %NWi
Instruction SRi; HALT
215

Programming in Grafcet language
Other retrievable variables:
Search options For an indexed variable, the variable and the index are taken into account in the list.
Table of options:
Byte variables
Word extract bits
Bit table
Grafcet bit table
Character string
Table of words and constants
Table of double words and constants
Constant character string
Standard Block Function
Standard Block Function element
Step status
Step activity time
Manet variables
Extract Bit This option is for variables of types %MW, %KW, %IW, %NW, %QW. It adds to the list the variable and the referenced bits.
Table Object This option is for bit tables, word tables and immediate indexed variables. It adds to the list the immediate indexed table variables whose first element is the input variable.
Channel Object This option is for channel objects. It adds to the list all the objects of the same referenced channel, including the tables and the extract bits.
Network Objects This option is for the network variables. It allows you to obtain all the variables from the same remote module (nanet object).
FB Object This option allows you to expand the list of SFB block function elements and the DFB type elements.
FB Instance Only on Premium with PL7 Junior and Pro.This option is for DFB types. It allows you to obtain from the name of a DFB type the sections using its instances.
216

Programming in Grafcet language
Searching for cross references
Carry out the following actions:
Selecting a variable from the list:� Select the variable from the list, the list of tasks, modules, labels is updated.Deleting a variable from the list:� Select the variable, enable the contextual menu (right click) then click on Delete.Displaying in structural view or in functional view:� Use the View menu or the Function button.
Step Action
1
Select the icon
2 Enter the search source variable as an address or a symbol (E.g. %M10) and the possible options then confirm via Search.
3 To display a module, select the module, via the Contextual menu, select Open or double click on the module.
217

Programming in Grafcet language
Animation of Grafcet program elements
At a Glance Refer to the "Debugging" Chapter of the Part "Debugging, Adjustment, Documentation and Appendices"-> (see Animating program elements, p. 279 ).
218

Programming in Grafcet language
Printing of a program
Procedure Carry out the following steps:
Notes The print type depends on the type of display selected in the View menu.� Addresses: prints variables with addresses,� Symbols: prints variables with symbols,� Symbols&Addresses: prints variables with symbols/addresses.
Step Action
1 Open the module with right click + Open or a double click.
2Select the command File/Print (Ctrl+P) or click on the icon
3 Select a print range:� if, the whole module, then go to step 6.� if for part of a module, go to step 4.
4 Select %Li/TOP/BOTTOM (if LD, ST, IL) or start page (if G7).If more precision is required, use the up and down arrow keys.
5 Select %Li/TOP/BOTTOM (if LD, ST, IL) or endpage (if G7).If more precision is required, use the up and down arrow keys.
6 Confirm with OK or ENTER.
219

Programming in Grafcet language
Export/Import of source files
Refer to the "Import/Export" (See Import/Export, p. 329) chapter within "Debugging, Adjustment, Documentation and Appendices".
220

10
Editing variablesIntroduction
Subject of this chapter
This chapter describes how to use the variables editor.
What’s in this Chapter?
This chapter contains the following topics:
Topic Page
Accessing the variables editor 222
Input/Modification/Suppression of symbols and comments 223
Objects associated with a variable 225
Presymbolization 226
Sorting variables by symbols or addresses 228
Displaying variables in the editor 229
Cutting/Copying/Pasting variables in a variables editor 231
Entering/Modifying constants 232
Parametrizing predefined function blocks (FB) 233
Printing variables 237
Exporting/Importing variables 238
221

Editing variables
Accessing the variables editor
Introduction The editor allows the input/modifation/display of all the variables with their parameters and attributes.
Accessing the editor
Carry out the following:
Step Action
1 Open the application browser and on the repertoire select Variables menu Edit/Select.
2 Left click on the directory Variables.
3 Open the editor on the type of variables required with a double left click or via the Open contextual menu or by pressing ENTER.
222

Editing variables
Input/Modification/Suppression of symbols and comments
Introduction The variables editor allows the input/modification/display/suppression of all the variables with their parameters and attributes.
Input/Modification procedure
Carry out the following:
Step Action
1 Open the application browser.
2 Double left click on the Variables directory or select this and then press the right arrow.
3 Select the variable type:� MEMORY OBJECTS,� SYSTEM OBJECTS,� CONSTANTS,� GRAFCET OBJECTS,� PRE-DEFINED FB,� I/O,� DFB INSTANCES (only on Premium TSX with Junior and Pro PL7)
4 Select the variable format:� EBOOL (bit): example %M1,� BYTE (octet): example %MB25,� WORD (16 bit word): example %MW0,� DWORD (32 bit word): example %MD2,� REAL (real 32 bit word): example %MF14,� CHART: example: %X0,� Macro module: example %XM0 (only Premium TSX with Junior and Pro PL7,� FB: example %TM0,� DFB type: example: Day_counter (only Premium TSX with Junior and Pro PL7).With inputs/outputs select the module position:� I/O: 0...710,� FIP: \adrUC.channel no. Point of connection no.\ module no.
5 Select the variable to be informed and make the entry:� either directly into the symbol and comments field,� or in an entry field (accessed by clicking on the entry field option).
6 Enter the symbol and press ENTER.
7 Enter the comment and press ENTER.
223

Editing variables
Select the whole line
Click on the rectangle to the left of the variable address or press the keys (SHIFT+SPACE).
Suppression procedure
Carry out the following actions:
Step Action
1 Select the symbol, the comment or the whole line with the (Shift+Space) keys or left click on the line.
2 Select the command Edit/Suppress or press the Del key.
224

Editing variables
Objects associated with a variable
Procedure In the variables editor, if the variable is preceded by the symbol "+", in order to know which objects are associated with the variable you must:
Step Action
1 In the variables editor select the type of variables you require.
2 Select the command View/Variables sorted by address if the display is in symbols.
3 Select the variable.
4 Select the command Edit/Expand or double click on the "+", the list of all the objects (bits, words..) associated with the variable is displayed.
5 To close the list of objects associated with the variable, select the command Edit/Contract or double click on the "-" associated with the variable.
225

Editing variables
Presymbolization
Introduction Presymbolization allows automatic association of constructive suffixes for a channel level (%Chxy.i) module language object with prefixes defined by the user.
The prefix defined by the user is the generic symbol given to the %Chxy.i channel (12 characters maximum).
The constructive suffix is the part of the symbol which corresponds to the bit object or %Chxy.i channel word (20 characters maximum).
The presymbolization function automatically generates a constructive comment. This succinctly reminds you of the role of the object.
Setting up Carry out the following actions:
Step Action
1 Open the variables editor (See Accessing the variables editor, p. 222). In the I/O variable type.
2 Double left click on the "T" associated with the channel object that is to be symbolized or position yourself on the channel object and select the Edit/ Presymbolize command.
3 Three illustrations can be displayed:� The channel object is not symbolized.
� Enter the prefix.� The channel object is already symbolized (symbol of less than 12
characters).� If necessary modify the prefix.
� The channel object is already symbolized (symbol of more than 12 characters).A dialogue box shows:� the actual channel symbol.� the prefix used (limited to 12 characters).
If necessary modify the prefix.
226

Editing variables
Suppressing presym-bolization
Cancelling presymbolization for a given logic channel is done to suppress all the object symbols described in the presymbolization file.Carry out the following actions:
Actions Step
1 Double left click on the "T" associated with the channel object that is to be symbolized or position yourself on the channel object and select the Edit/ Presymbolize command.
2 Only two options are suggested:� Erase all presymbols.
No prefix is chosen, all the symbols are erased (including those which the user would have modified directly in the editor).
� Erase the prefixed presymbols.The user indicates the prefix (example ANA) of the symbols to be erased: in this case only the symbols of objects with the entered prefix are erased.
227

Editing variables
Sorting variables by symbols or addresses
Procedure To classify variables in:� ascending order of address numbers, select the command View/Variables
sorted by addresses.In the case of I/Os, the variables are classified according to the type of module configured.
� alphanumeric order of symbols, select the command View/Variables sorted by symbols.
228

Editing variables
Displaying variables in the editor
Displaying variables used in the application
The variables used in the application (sections, subroutines, sequential tasks) are viewed in bold characters in the variables editor.
For this, input the Options\Variables editor\Usage in the application command before opening the variables editor.
Example:
Display of variables with overlapping
Overlapping is possible on the following variables: � %MB,� %MW,� %MD,� %MF,� %KB,� %KW,� %KD,� %MF.
Example:If %MW1 is used in the application, the overlapping is effective for:� %MD1,� %MF1,� %MB2,� %MB3.
Variables
MEMORY
%MD0%MD1%MD2%MD3%MD4%MD5%MD6%MD7%MD8%MD9%MD10%MD11%MD12%MD13
DWORDDWORD
Presel_trem1_aAddress Type Symbol
DWORDDWORDDWORDDWORDDWORDDWORD
DWORDDWORDDWORDDWORDDWORDDWORD
Presel_trem2_c
Presel_trem1_b
Presel_melang
Litres_tremie1
Litres_tremie2
Litres_melangeur
%MD0
parameters DWORD
229

Editing variables
The overlapping is represented by displaying the variables in red characters and it is managed providing that:� the variables are used in the application program (Sections, subroutines, events),� the Options\Variables editor\Overlapping command has been selected before
opening the variables editor. Example:
Simultaneous display of the variables used in the application with overlapping is possible by selecting the commands:� Options\Variables editor\Overlapping,� Options\Variables editor\Usage in the application.Example:
Variables
MEMORY
%MD0%MD1%MD2%MD3%MD4%MD5%MD6%MD7%MD8%MD9%MD10%MD11%MD12%MD13
DWORDDWORD
Presel_trem1_aVariable Type Symbol
DWORDDWORDDWORDDWORDDWORDDWORD
DWORDDWORDDWORDDWORDDWORDDWORD
Presel_trem2_c
Presel_trem1_b
Presel_melang
Litres_tremie1
Litres_tremie2
Litres_melangeur
%MD0
parameters DWORD
Variables
MEMORY
%MD0%MD1%MD2%MD3%MD4%MD5%MD6%MD7%MD8%MD9%MD10%MD11%MD12%MD13
DWORDDWORD
Presel_trem1_aVariable Type Symbol
DWORDDWORDDWORDDWORDDWORDDWORD
DWORDDWORDDWORDDWORDDWORDDWORD
Presel_trem2_c
Presel_trem1_b
Presel_melang
Litres_tremie1
Litres_tremie2
Litres_melangeur
%MD0
parameters DWORD
230

Editing variables
Cutting/Copying/Pasting variables in a variables editor
Introduction PL7 gives the option of Cutting or Pasting a selection of variables, within the variables editor.
How to Copy/Paste a block of variables in a variables editor
Carry out the following steps:
How to Cut/Paste a block of variables in a variables editor
Carry out the following steps:
Step Action
1 Select a block of variables by clicking and dragging from the first variable of the block through the whole block, keeping the Shiftkey held down, in the far left hand column of the variables editor.
2 Right click on the selection (contextual menu) and select Copy.
3 Place the cursor on the first variable in the block where the copied variables are to be pasted.
4 Right click (contextual menu) and select Paste.Result: the following window appears.
All the variables duplicated in this way should be renamed before you Paste them.
Paste
OK Cancel
Please modify all symbols before confirming
%M56%M57
Trig_sect_rempTrig_sect_vidan_mix_a Validation condition
Validation conditionCommentSymbolAddress
Step Action
1 Select a block of variables by clicking and dragging from the first variable of the block through the whole block, keeping the SHIFTkey held down, in the far left hand column of the variables editor.
2 Right click (contextual menu) on the selection and select Cut.
3 Place the cursor on the first variable in the block where you want to paste the copied variables.
4 Right click (contextual menu) and select Paste.
231

Editing variables
Entering/Modifying constants
Introduction The variables editor is used to enter/modify/display all the variables with their parameters and attributes.
Procedure Carry out the following operations:
Step Action
1 Open the application browser.
2 Double left click on the Variables repertoire or select this with the arrows and then press the right arrow.
3 Select the "CONSTANTS" variable type.
4 Select the variable format:� BYTE (octet): example %KB26,� WORD (16 bit constant): example %KW0,� DWORD (32 bit constant): example %KD2,� REAL (real 32 bit word): example %KF14.
5 Select the variable to be informed: example: %KW0.
6 Enter the symbol and press ENTER.
7 Enter the comment and press ENTER.
8 Select the Parameters option.
9 Select the entry/display base (optional):
10 Enter the value and press ENTER.The syntax of the value automatically updates the associated base (e.g.: if 16#AA is entered -> the base goes to hexadecimal). In the case of %KB messages:� enter the chain of characters in quotes then press ENTER (e.g.: "Number of
parts"),� To modify a message, select the %KB byte with the base ’Begin Mess.’.
11 Deselect the parameter option to close the parameter entry window.
232

Editing variables
Parametrizing predefined function blocks (FB)
Introduction The predefined function blocks are: � %TMi timer FB,� %Ti Series 7 timer FB,� %MNi Monostable FB.� %Ci Counter/down counter FB,� %Ri Register FB,� %DRi Drum FB.
The %Ti, %MNi and %DRi FBs must be declared in advance in software configuration.
The editor is used to enter/modify/display all the variables with their parameters and attributes.
Procedure Carry out the following actions:
Step Action
1 Open the application browser.
2 Double left click on the Variables repertoire or select this with the arrows and then press the right arrow.
3 Select the type: PRE-DEFINED FB.
4 Select the type of FB to be parametrized:� Parametrizing %TMi (See Parametrizing %TMi, p. 234),� Parametrizing %Ti (See Parametrizing the %Ti, p. 234),� Parametrizing %MNi (See Parametrizing the %MNi, p. 234),� Parametrizing %Ci (See Parametrizing the %Ci, p. 235),� Parametrizing %Ri (See Parametrizing the %Ri, p. 235),� Parametrizing %DRi (See Parametrizing the %DRi, p. 235),
233

Editing variables
Parametrizing %TMi
Carry out the following actions:
Parametrizing the %Ti
Carry out the following actions:
Parametrizing the %MNi
Carry out the following actions:
Step Action
1 Select the variable to be informed (e.g.: %TM0).
2 Enter the symbol and press ENTER.
3 Enter the comment and press ENTER.
4 Select the "parameters" option.
5 Enter the PRESET value (%TMi.P: 0 to 999) and press ENTER.
6 Select the operating mode of the block: TP,TON,TOF.
7 Select the value of the time base TB.
8 Select the Reg option depending on the case (Adjusting by terminal).
Step Action
1 Select the variable to be informed (e.g.: %T0).
2 Enter the symbol and press ENTER.
3 Enter the comment and press ENTER.
4 Select the "parameters" option.
5 Enter the PRESET value (%Ti.P) and press ENTER.
6 Select the value of the time base TB.
7 Select the Reg option depending on the case (Adjusting by terminal).
Step Action
1 Select the variable to be informed (e.g.: %MN0).
2 Enter the symbol and press ENTER.
3 Enter the comment and press ENTER.
4 Select the "parameters" option.
5 Enter the PRESET value (%MNi.P) and press ENTER.
6 Select the value of the time base TB.
7 Select the Reg option depending on the case (Adjusting by terminal).
234

Editing variables
Parametrizing the %Ci
Carry out the following actions:
Parametrizing the %Ri
Carry out the following actions:
Parametrizing the %DRi
Carry out the following actions:
Step Action
1 Select the variable to be informed (e.g.: %C0).
2 Enter the symbol and press ENTER.
3 Enter the comment and press ENTER.
4 Select the "parameters" option.
5 Enter the PRESET value (%Ci.P) and press ENTER.
6 Select the Reg option depending on the case (Adjusting by terminal).
Step Action
1 Select the variable to be informed (e.g.: %R0).
2 Enter the symbol and press ENTER.
3 Enter the comment and press ENTER.
4 Select the "parameters" option.
5 The length (1<LEN<255) of the registers can be modified in the software configuration.
6 Select the operating mode of the block: LIFO,FIFO.
Step Action
1 Select the variable to be informed (e.g.: %DR0).
2 Enter the symbol and press ENTER.
3 Enter the comment and press ENTER.
4 Select the "parameters" option.
5 Select the number of steps NB (1 to16).
6 Select the value of the time base TB.
7 Select the STEPS field to define the bit status for each step.1. Allocate a variable %Qi.j or %Mi to each bit.2. Show the value of variable for each step by clicking on the value 0 or 1 (flip flop).
235

Editing variables
Cop/Paste the pre-defined function block parameters
This function is used to Copy/Paste the parameters of one function block into one or more other function blocks of the same family to avoid tiresome entering.
Carry out the following actions:
Note:
The Paste function can only be done with consecutive objects.
Step Actions
1 From the variables editor select the PRE-DEFINED FB type.
2 Select the desired FB family.
3 Select the FB to be copied by clicking to the left of the name (the line goes to reverse video).
4 Select the Edit\Copy SFB parameters command or, using the contextual menu Copy SFB parameters.
5 Select the target FB(s) by:� clicking to the left of the name (for one FB),� clicking to the left of the name + pressing the Shift key, and move the mouse up
or down (for several FBs).
6 Select the Edit\Paste SFB parameters command or, using the contextual menu Paste SFB parameters.
236

Editing variables
Printing variables
Introduction This heading is use to print the list(s) of variables with their parameters.
Procedure Carry out the following actions:
Step Action
1 In the variables editor select the type of variables you require.
2 Select the ascending order of printing with the command View → Variables sorted by address or View → Variables sorted by symbols.
3 Configure printing using the command File → Configuring printing.
4 Select the command File → Print.
4 Select:� "All" to print all the variables configured in the application with the various
parameters.� "Current type" to print the variables of the selected type.
5 Confirm printing with OK.
237

Editing variables
Exporting/Importing variables
Refer to the "Debugging, adjusting, documentation and appendix" part chapter heading "Importing and exporting": � See: Exporting variables, p. 344.� See: Importing variables, p. 345.
238

11
Function modulesPresentation
Subject of this chapter
This chapter describes the function modules.
What’s in this Chapter?
This chapter contains the following topics:
Topic Page
Function modules 240
Properties of a function module 241
Creating a functional module 242
Programming a functional module 243
Debugging a functional module 244
Detaching/Deleting a functional module 245
Export of a functional module 248
Importing a functional module 249
Creating, deleting, moving, dragging and dropping an animation table in a functional module
250
239

Function modules
Function modules
Definition � A function module is a group of program elements )sections, sub-programs, macro steps, animation tables, operating screens…) used to carry out a PL7 function.
� A function module can itself be broken down into lower level function modules. In relation to the principle function these modules assume one or more PL7 sub-functions.
Attributes of a function module
A function module is composed of:� a short name : 8 characters (e.g.: TR371), this name must be unique in the
application,� a long name : 16 characters (e.g.: Continue/Withdraw for BT371),� function sub-modules : these are lower level function modules,� associated program code modules. sections, events, grafcet module (Prl,
Chart, macro steps Xm, Post),� a descriptive form (with no maximum number of characters), stored in the PL7,� associated animation tables,� operating screens.
240

Function modules
Properties of a function module
Properties to be defined
List of different properties to be defined:� the short name: composed of 8 characters (e.g.: TR371), this name must be
unique in the application,� the optional long name composed of 16 characters (e.g.: Continue/Withdraw for
BT371),� the optional descriptive form stored in the PL7.
How to display or modify the properties
Carry out the following steps:
Step Action
1 Right click on the function module, in the Function view of the Application browser.
2 Click on Properties.
2 Carry out the modifications.
3 Click on OK.
Note: The Apply button confirms the modifications without closing the window.
241

Function modules
Creating a functional module
At a Glance A functional module can be created offline, with the PLC in Stop or in Run.
It can be created at Station level or at the level of each existing functional module.
How to create a functional module
Carry out the following actions:
How to create a lower level functional module
Carry out the following actions:
Moving a functional module
A functional module can be moved offline, with the PLC in Stop or in Run (this has no effect on the execution of the application). The movement only corresponds to a modification in the functional architecture of the application (a module is linked directly to theStation directory level or to another functional module).
To move a functional module:
Step Action
1 From the functional view, right click on the Station directory, or on the directory of an existing functional module, or place the cursor on this directory and then press Shift+F10.
2 Select Create.
3 Fill in the short name, the long name, the comment and confirm with OK.
Step Action
1 Right click on the "higher level" module or position the cursor on it and press Shift + F10.
2 Select Create.
3 Fill in the short name, the long name, the comment and confirm with OK.
Step Action
1 Left click (keeping the button held down) on the module to be moved,
2 Move the module to the desired position.
242

Function modules
Programming a functional module
Introduction to programming a functional module
A functional module has aprogram directory which may contain:� LD, ST, or IL sections, � events,� of a Chart, Prl, Post, Macro-Steps module.
Several scenarios are possible during functional module programming:� 1st scenario: the section, event and graph already exist in structure view (See
Introducing the application browser, p. 102),� 2nd scenario: the section, event, and graph are created from function view (See
Introducing the application browser, p. 102),� 3rd scenario: the section, event and graph must be created from structure view.
1st scenario: the section, event and graph already exist in structure view,
The section has already been created in structure view;
2nd scenario: creating the section, event, or graph from function view
The principle is the same as for creating a section from structure view:
Rules Take the following rules into account:
Step Action
1 Select the section.
2 Move the section to the functional module.
Step Action
1 Right click on theProgram directory or place the cursor on the Program directory and then press Shift+F10,
2 Select Create,
3 Select the Section, Event or Macro step tab,
4 Fill in the various headings in the same way as for creating a section from the structure view. The name of the function module is stored at the structure view level.
1 A Grafcet section can only be created offline and only in the Mast task.
2 A macro step or an event can only be created offline.
3 The other actions can be carried out offline, with the PLC in Stop or in Run.
4 Module protection applies to all sections linked to the functional module.
243

Function modules
Debugging a functional module
At a Glance The organization of a functional module and the distribution of sections events and Grafcet modules in the different modules has no effect on the execution of the program. The program is executed in the order shown in the structure view. To debug a functional module there are:� standard debugging functions,� additional functions allowing incremental debugging of the application, functional
module by functional module.
Deactivating all sections linked to a functional module
This function is used to force to 0 all the execution conditions of the module sections.
Activating all sections linked to a functional module
This action is used to force to 1 all the execution conditions of the module sections.
Canceling the forcing of all sections linked to a functional module
This action is used to unforce all the execution conditions of the module sections.
Step Action
1 Select the functional module.
2 From the contextual menu, select the Activation condition for the included sections -> Force to 0 command.
Step Action
1 Select the functional module.
2 From the contextual menu, select the Activation condition for the included sections -> Force to 1 command.
Step Action
1 Select the functional module.
2 From the contextual menu, select the Activation condition for the included sections -> Unforce command.
244

Function modules
Detaching/Deleting a functional module
Detaching one or more functional module(s)
Detaching a functional module involves severing the links between a functional module and the associated objects (code modules and animation tables),� the sections contained in the module are not deleted, only detached,� the animation tables associated with the modules are not deleted but only
detached from the module.
To detach one or more of the functional modules, carry out the following steps:
Introduction to deleting a functional module
There are several different ways of deleting:� deleting one or more functional modules without deleting the code modules and
the animation tables,� deleting a functional module and deleting the code modules and animation
tables,� deleting all the functional modules and deleting the code modules and animation
tables,� deleting a section, a macro-step or an event in a functional module.
Deleting one or more functional modules without deleting the code modules and animation tables
To delete a functional module without deleting the code modules and animation tables, you must:
Step Action
1 Select the corresponding Station, Functional module, Program, Section, Event, or Animation Table directory in the Function View of the Application Browser.
2 Select the Detach or Detach All Included Elements contextual menu.
3 Confirm with Yes.
Note: this action is allowed in offline and in online mode, with the PLC in Stop or in Run.
Step Action
1 Detach the module and its sub-modules.
2 Delete the module or modules by right clicking (contextual menu) and selecting Delete.
Note: you must be in offline mode.
245

Function modules
Deleting a functional module and deleting the modules and animation tables
Carry out the following actions:
Deleting all the functional modules and deleting the code modules and animation tables
Carry out the following actions:
CAUTION
Deleting the module entails deleting the submodules.
- the sections contained in the module are deleted,- the animation tables associated with the module are deleted.
Failure to follow this precaution can result in injury or equipment damage.
Step Action
1 Select the module.
2 Select Delete.
3 Confirm with Yes.
Note: this action is authorized in offline mode, with the PLC in Stop and is not authorized in Run.
CAUTION
Deleting the module entails deleting the submodules.
- the sections contained in the modules are deleted,- the animation tables associated with the modules are deleted.
Failure to follow this precaution can result in injury or equipment damage.
Step Action
1 Select the Station directory.
2 Select Delete All Functional Modules.
3 Confirm with Yes.
Note: this action is authorized in offline mode, with the PLC in Stop and is not authorized in Run.
246

Function modules
Deleting a section, a macro-step or an event in a functional module
Carry out the following actions:
Rules Please observe the following rules
CAUTION
A section or a macro-step can be deleted in a functional module. They are then deleted in the module and in the associated task. Deleting an event only results in it being detached from the functional module because an event cannot be deleted from the application.
Failure to follow this precaution can result in injury or equipment damage.
Step Action
1 Select the desired section.
2 Select Delete.
3 Confirm with Yes.
1 Deletion is authorized in offline mode with the PLC in Stop, but it is not authorized in Run.
2 A Grafcet section or a macro-step can only be deleted in offline mode.
3 A PRL, Chart or POST module cannot be deleted, only detached.
247

Function modules
Export of a functional module
Exporting a functional module
See Exporting a functional module, p. 349 from the section "Debugging, Documentation and Annexes" chapter "Import/Export"
248

Function modules
Importing a functional module
Importing a functional module
See Importing a functional module, p. 351 from the section "Debugging, Adjustment, Documentation and Annexes" chapter "Import/Export".
249

Function modules
Creating, deleting, moving, dragging and dropping an animation table in a functional module
Introduction In a functional module, you can create, delete, move and drag and drop the animation table.
Creating an animation table
Steps to follow:
Deleting an animation table
Carry out the following actions:
Moving an animation table
Steps to follow:
If the table… Then…
already exists � select the animation table,� move the animation table to a functional module on the Animation
table directory’s level.
is to be created via the function view
� right mouse click on the module’s Animation table directory or put the cursor on this and press Shift+F10,
� select Create.
is to be created via the structure view
it is also necessary that you specify the functional module it is to be associated with.
Step Action
1 Select the table.
2 Select the Delete contextual menu.
If using… Then…
the drag and drop function
� left mouse click (and hold the mouse button down) on the table to be moved,
� move the table to the desired place.
the Properties contextual menu
� select the table,� select the Properties contextual menu.� select the module’s name in the localization zone.
250

Function modules
Detaching an animation table
Steps to follow:
If using the… Then…
Detach contextual menu
� select the animation table,� select the contextual menu,� confirm with Yes.
Properties contextual menu
� select the table,� select the Properties contextual menu.� select "none" in the localization zone.
251

Function modules
252

12
DFB function blocksPresentation
Subject of this chapter
This chapter describes how to set up DFB function blocks.
What’s in this Chapter?
This chapter contains the following topics:
Topic Page
DFB types 254
Creating a DFB type 255
Programming a DFB type 256
DFB type instance 259
Running a DFB instance 261
Entering a DFB instance 262
How to protect a DFB 263
How to Import/Export a DFB type or an application containing DFB types 264
253

DFB function blocks
DFB types
At a Glance DFB types (Derived Function Block) are function blocks which can be programmed by the user in Structured Text or Ladder language.
These DFBs are used in an application to:� simplify program design and entry,� improve program readability,� facilitate debugging (all variables manipulated by the DFB type are identified on
its interface),� reduce the volume of code generated (the code corresponding to the DFB is only
loaded once, regardless of the number of calls to the DFB).
PL7 Pro software is needed to create a DFB type.
A DFB type can be used with PL7 Pro or PL7 Junior on a TSX/PCX/PMX 57 type PLC.
A DFB type is called in an editor (LD, IL or ST) via an Instance of the DFB type that is the image of the DFB type.
A DFB type instance can be used several times in a single application.
How to gain access to the DFB types’ properties
Carry out the following actions:
The properties of a DFB type can be accessed by two tabs:� The "General" tab which gives the following information:
� version,� date of last modification,� programming language used,� protection.
� The "Information" tab which gives the following information:� number of elements (Inputs, Outputs, Inputs/Outputs, etc.),� size of data,� number of instances used in the application.
Step Action
1 Select the DFB Type directory in the application browser.
2 From the contextual menu select the Properties command.
254

DFB function blocks
Creating a DFB type
Presentation A DFB type can be made up in several steps:� creating the DFB type (empty structure),� DFB type parameters,� DFB type programming (Code).
Creating the DFB type
Carry out the following actions:
Note:
The choice of language Ladder or Structured text for the DFB code can be modified as long as the code is not entered.
Setting the parameters for the DFB type
This is done using the DFB type editor. It consists of declaring:� the input, input/output and output interfaces,� the public variables,� the private variables,� and documenting the description file.
DFB type programming
Programming a DFB is done using the DFB code editor which can be accessed from the DFB editor.
Step Action
1 Open the application browser.
2 Right click with the mouse on the DFB type directory and select Create from the context-sensitive menu.
3 Enter the name of the new DFB type.
4 Select the language Ladder or Structured tex.t.
5 Click on OK.
255

DFB function blocks
Programming a DFB type
Principles The code defines the processing that the DFB type must carry out depending on the declared interfaces.
All language instructions are permitted except for:� calling up standard function blocks,� calling up other DFB types,� jumping to a label (JUMP),� calling up a subroutine,� instructions using input/output module variables (e.g. READ_STS, SMOVE etc.).
The code of the DFB type may only use:� input/output objects (%I, %Q..),� global application objects (%MW,%KW...) excluding %S and %SW bits and
system words.
There are functions specific to development of a DFB type such as:� the timer functions, FTON, FTOF, FTP, FPULSOR, which can be used instead of
timer function blocks,� the instructions, LW, HW, COCATW which are used to handle double words,� the instructions, LENGTH_ARW, LENGTH_ARD, LENGTH_ARR, which are
used to calculate table lengths.
Programming rules
DFB instances can be used in various parts of the application, which use the languages LD, IL or ST (apart from in event tasks).� sections,� subroutines.
The programming rules are as follows:� All table type input parameters and input/output parameters must be entered.� Unconnected input parameters keep the value of the previous call or the
initialization value if the block has never been called with this entered or connected input.
� All the objects assigned to input, output and input/output parameters must be of the same type as those entered at the time DFB Type creation,
� Only BOOL and EBOOL types can be mixed for input or output parameters.
256

DFB function blocks
Entering and modifying code
Carry out the following steps:
Note:
DFB type code can only be entered or modified on an unprotected DFB type.
Code that has not been confirmed (in the process of being created or modified) is indicated by a red dash in the left hand margin of the editor.
Search/Replace: to find or replace an object in the code
This function is used to search for and/or replace an object (interface or variable) in the DFB code.
Searching for an object:
Search/Replace: to find/replace an object:
Step Action
1 Click on Code in the DFB editor or select Utilities/Open then click on ENTER to open the DFB code editor.
2 Enter the code.
3 Confirm the code.Any confirmation made at DFB editor level is global.
Step Action
1 Select Search/Replace... from the Edit menu
2 In the Search zone indicate the object to be searched for (e.g.: Input0).
3 Select Next to go to the different occurrences in the order in which they appear.
Step Action
1 Select Search/Replace... from the edit menu.
2 In the Search zone indicate the object to be searched for (e.g.: Input0).
3 In the Replace zone indicate the object to be replaced (e.g.: Input1).
4 Select:� Next to go to the first occurrence,� Replace to replace only the current occurrence,� Replace All to replace all occurrences.
257

DFB function blocks
Confirming a DFB type
Confirming a DFB type is a global operation which can be used to confirm the interfaces, the variables, descriptive form and the code.
Carry out the following actions:
Note:
To confirm a DFB type, it must have at leastone Boolean input.
The DFB editor cannot be closed until the DFB type has been confirmed or canceled.
How to access a line of code
This function is used to go to a line of code within the code of a given DFB type by entering its numeric position.Carry out the following steps to access a line of code:
Errors If there is an interface, variable or code error, the DFB type cannot be confirmed, and the system then positions itself at the first error.
You must:1. Correct the error(s).2. Reconfirm.
To confirm a DFB from… you must…
DFB editorclick on the icon or select Edit/Confirm then press ENTER.
DFB code editorclick on the icon or select Edit/Confirm DFB type then press ENTER.
Step Action
1 When the code is displayed, select the Edit → Go to command.
2 Enter the line number then click OK.
258

DFB function blocks
DFB type instance
Presentation A DFB type instance is a named copy of a validated DFB type.
The same instance can be used several times in an application.
One DFB type can have several instances, in this case the Input/Output interfaces, the public variables and the private variables are duplicated (one duplication per instance). The DFB code is not duplicated.
The name given to an instance cannot be:� a PL7 reserved word,� a symbol,� an EF (elementary function),� the name of a DFB type.
Creating an instance from an application browser
Carry out the following actions:
Creating an instance from the function library
Carry out the following actions:
Step Action
1 From the application browser, right click on the sub-directory DFB Variables/Instances DFB.
2 Select the command Open.
3 Select the DFB type to be instanced using the mouse or the Tab and arrow keys.
4 Enter the name of the new instance in the last line of the Name field (32 characters maximum).
5 Enter a comment in the Comments field (80 characters maximum).
6 Click on ENTER.
Step Action
1 Select Library from the Tools menu then select the DFB tab.
2 Select the type of DFB to be instanced in a line of the Name field.
3 Click on the button Create.
4 Enter the name of the new instance (32 characters maximum).
5 Enter any comments.
6 Click on Create.
259

DFB function blocks
Modifying an instance
An instance is modified if its name and/or comments are modified.
Modifying the name of an instance:� leads to the automatic updating of its sub-objects,� can only be carried out if it is not referenced.
Deleting an instance
Carry out the following actions:
Step Action
1 From the application browser, right click on the sub-directory DFB Variables/Instances DFB.
2 Select the command Open.
3 If the instance is not referenced in the application:Select the instance to be deleted in the Name column and delete it.If the instance is referenced in the application:1. Delete it in the corresponding language editor.2. Select the instance to be deleted in the Name column and delete it.
260

DFB function blocks
Running a DFB instance
Rules Running a DFB instance is done in the following order:
1. Loading the input and input/output parameters using the actual parameters.Any input left free takes on the initialization value defined in the DFB type when being initialized or starting from cold, then the current value of the parameter.The input parameters (except for table types) are sent by value, the input/output parameters are sent by address.
2. Running the text code, or ladder.
3. Writing the output parameters.
261

DFB function blocks
Entering a DFB instance
Presentation Entering a DFB instance is done from:� the ladder editor,� the list editor,� the structured text editor.
From the ladder editor
Carry out the following actions
From the list or structured text editor.
Carry out the following actions:
Step Action
1Click on the graphic element in the graphics palette.
2 Select DFB.
3 Select the type of DFB required.
4 Select an instance required in Choice of instance or create a new instance (name and any comments then click on Create.
5 Click on OK.
6 Click on the destination cell (Test zone) to set the type of DFB.
Step Action
1 Select the command Service/Enter function call or SHIFT+F8.
2 Select the DFB tab.
3 Select the required DFB block.
4 Select the required instance or create a new instance (any name + comments) then click on Create.
5 Enter the DFB type parameters in the entry field parameters.
5 Confirm your selection by OK.
6 Confirm your selection by ENTER.
262

DFB function blocks
How to protect a DFB
Presentation There are two protection levels for a DFB type:� modification protection which limits access to the DFB type editor to read only,� expertise protection which prevents access to the DFB type code and to its
private variables.
Protection is only applicable on a validated DFB type. It is managed by a password.
Protecting a DFB type
Carry out the following actions:
Modifying protection type for a DFB type
Carry out the following actions:
Modifying the password
Carry out the following actions:
Step Action
1 Open the DFB type editor.
2 Select Edit/Properties of the type.
3 Select the protection type.
4 Enter a password (8 characters maximum).
5 Confirm by entering the password again.
6 Click twice on OK.
Step Action
1 Open the DFB type editor.
2 Select Edit/Properties of the type.
3 Select the new protection type.
4 Enter the password.
5 Click on OK.
Step Action
1 Open the DFB type editor.
2 Select Edit/Properties of the type.
3 Select Change.
4 Enter the current password.
5 Enter the new password (8 characters maximum).
6 Confirm by entering the password again.
7 Click on OK.
263

DFB function blocks
How to Import/Export a DFB type or an application containing DFB types
Exporting/Importing a DFB type
Refer to the "Import/Export" Chapter of the Part "Debugging, Adjustment, Documentation and Appendices".
See Exporting a standard format DFB type, p. 366.
See Export of a binary format DFB type, p. 366.
See Importing a DFB type in binary format, p. 367.
See Importing a DFB type in binary format, p. 367.
Exporting/Importing an application containing DFB types
Refer to the "Import/Export" Chapter of the Part "Debugging, Adjustment, Documentation and Appendices".
See Exporting an application with DFB, p. 369.
See Importing an application with DFBs, p. 371.
264

III
Debugging, adjustment, documentation and appendicesIntroduction
Subject of this part
This part gives information about the application context and describes how to:� Debug an application.� Diagnose an application.� Export/Import application modules.
What’s in this Part?
This part contains the following chapters:
Chapter Chapter Name Page
13 Debugging 267
14 Adjustment of variables 301
15 Diagnostic functions 311
16 Documentation 323
17 Import/Export 329
18 Configuring the Uni-telway link 377
19 Configuring the FIPWAY link 389
20 OS Loader 397
21 Windows 405
265

Debugging, adjustment, documentation and appendices
266

13
DebuggingIntroduction
Subject of this chapter
This chapter describes the PL7 debugging functions.
267

Debugging
What’s in this Chapter?
This chapter contains the following topics:
Topic Page
Introduction to the PLC debugging screen 269
CPU screen designation zone 270
Information zone 271
Task Zones 272
Operating mode zone 274
Event zone 275
Last stop zone 276
Realtime clock zone 277
Modification of the program in Run mode 278
Animating program elements 279
Grafcet debugging 282
Executing the programme 285
Task properties 286
Executing the MAST task 287
Executing the FAST task 288
Execution of a program with breakpoint 289
Executing a program in step by step mode. 292
Forcing TOR input 294
Forcing analog inputs, Micro 295
Forcing analog inputs, Premium 296
Adjustment of the application specific functions 297
Debugging a functional module 298
Debugging DFBs 300
268

Debugging
Introduction to the PLC debugging screen
How to access the PLC debugging screen
Carry out the following steps:
PLC Debugging screen
ThePLC debugging screen offers different functions and information, which are divided up into zones:
PLC debugging screen :
� Designation (See CPU screen designation zone, p. 270) zone,� Information (See Information zone, p. 271) zone, � Task (See Task Zones, p. 272) zone, � Operating mode (See Operating mode zone, p. 274) zone, � Event (See Event zone, p. 275) zone, � Last stop (See Last stop zone, p. 276) zone, � Real time clock (See Realtime clock zone, p. 277) zone.
Step Action
1 Click on the Debug menu on the PL7 task bar.
2 Click on the Access PLC debugging screen sub-menu.
Note: To access the debugging functions you need to be in online mode (PLC → Connect).
Designation: PROCESSOR TSX P 57352
Task
Operating mode
Last stop Realtimeclock
Events
Time:
Number of events:Status:
Date:
WednesdayWednesday
Cause
Outputs in fallback mode
Network address: Number of forced bits:Processor version:
TSX 57352 [RACK 0 POSITION 0]
Information
10:16:3323/02/
Change to stop
Output fallback Warm RestartCold Start
Active STOP Error Bit error reset0
OK
CancelUpdate
23/02/10:27:08
TSX 57352SYS
3.7(88)0
IO DIAG...ERRRUN
Debugging
PeriodSet
Min.Duratio
CurrentDuration
Max.Durati
Cycle timeFipio
WatchDog
Opera-ting
Status
Cmd Enable task
Error Initduratio
ResetDef
MASTFAST
CYCLIC0 0 0 0 0 0 Not
2 6 6 0 250 STOP a Run Deactivate Def Init Reset
Processor present:
269

Debugging
CPU screen designation zone
At a Glance This zone allows you to find out the execution status of an application in the PLC.Designation Zone:
Description Elements and their functions:
RUN
Designation: PROCESSOR TSX P 57352
IO ERR DIAG...
Element Function
The RUN indicator
This indicates the state of the PLC:� it is constant when the PLC is in RUN,� it blinks when the PLC is in STOP.
The I/O indicator
Red light indicating the errors on another module in the station or a configuration error.
The ERR indicator
Red light indicating the errors relating to the processor and its on-board devices (PCMCIA memory card and PCMCIA communication card).
The DIAG button
It gives access to diagnostics information.
270

Debugging
Information zone
At a Glance This zone provides miscellaneous information:Information zone:
Description Fields and their function:
Processor present: Information
TSX 57352
Network address: SYS
Processor Version:
Number of forced bits:
3.7(88)
0
Field Function
Processor present Provides information about the type of processor in the PLC.
Network Address Provides information about the PLC network address.
Processor version Gives the version of the processor which is in the PLC.
Number of forced bits
Indicates the number of forced bits.
271

Debugging
Task Zones
At a Glance This zone gives access to the various FAST task and MAST task execution commands:� RUN/STOP commands, � Activate/Deactivate Task commands,� setting periods,� Period Initialization command,� Error Management commands.Task Zone:
MAST or FAST task RUN/STOP command
The RUN/STOP buttons associated with the MAST and FAST tasks are used to switch to RUN or STOP mode. In RUN mode the inputs are read, the program is executed and the outputs are refreshed. In STOP mode the inputs are read, the program is not executed and the outputs are not refreshed.
MAST or FAST task Activate/Deactivate command
The Activate/Deactivate buttons associated with the MAST and FAST tasks are used to activate or deactivate a task.When a task is activated, the code is scanned and executed. The inputs/outputs are refreshed.When a task is deactivated, the code is neither scanned nor executed. The inputs/outputs are still refreshed.
TasksCurrentDuration
40FAST 5MAST
PeriodSet
101
MinimumDuration
41
Cycle timeFipio network
MaximumDuration
43 0
55
CmdWatchDog
250100
OperatingModeRUNRUN
Status
aa
Enabletask
StopStop
DeactivateDeactivate
Fault
FaultFault
Initduration
InitInit
ResetFaultResetReset
Note: These functions are also accessible via the Debug menu.
Note: The Status field informs you of the status of a task:� a: for active (the system bits %S30 and %S31 are set at 1),� i: for inactive (the system bits %S30 and %S31 are set at 0).
272

Debugging
Setting periods In periodic operation, the "Period set" column is used to set the task period. This setting is lost on cold start. The value entered in the configuration is then taken into account. It is possible to save the period set using theUtility → Save task periods command.
Error initialization command
The minimum, current and maximum durations are provided by the PLC.The Init button in the Init column restores these values in order to carry out new measurements (except the current duration).
Error management commands
Buttons and functions:
Note: The Utility → Restore task periods command replaces the period set with the period defined in the configuration.
Button Function
Fault bit Enables any errors in the corresponding task to be viewed.
Reset Is used to reset the system bits associated with the task errors to zero, in order to be sure that the error(s) is/are still valid.
273

Debugging
Operating mode zone
At a Glance This zone gives access to various modeling buttons:� Warm restart,� Cold start,� Output fallback.Operating Mode Zone:
Description Buttons and functions:
Operating mode
Output fallback
Cold startOutputs in fallback mode
Warm restart
Button Function
Warm Restart
Click on this button to simulate a warm PLC restart.This sets the %S1 bit to 1, which for example is used to command a partial initialization program.
Cold start Click on this button to simulate a cold PLC start.This initializes the data, the system, and sets the %S0 bit to 1 which (in this case) is used for example to command a specific initialization program.
Output fallback
Is used to switch the outputs into fallback mode.When the outputs are in fallback, the Output fallback button becomes Maintain outputs. It is therefore used to exit the fallback mode.
274

Debugging
Event zone
At a Glance Event processing can be globally enabled or inhibited by the application program by means of the %S8 system bit or a terminal command (program debugging function). If one or several events occur whilst they are inhibited, the associated processing is lost.The Event zone gives access to different functions.Event Zone:
Description Elements and functions:
Status:
Events
RUN inactive Reset Fault BitFault
0Number of events:
Element Function
Number of events
Indicates the number of events executed.
Default button Is used to view the default bits and to access the events diagnostics program.
Reset fault bit button
Is used to reset the fault bits associated with the execution of events to zero.
Status field Informs about the status of an event (active/inactive, RUN/STOP).
Icon Is used to activate/deactivate events.
275

Debugging
Last stop zone
At a Glance This zone gives the diagnostics on the last stop of the PLC. Last stop zone:
Description Fields and functions:
Change to Stop
29/02/2000 09:31:59
Last stop
Cause
Tuesday,
Date: Time:
Field Function
Cause field Gives the causes for the last stop of the PLC.
Date field Gives the date of the last stop of the PLC.
Time field Gives the time of the last stop of the PLC.
276

Debugging
Realtime clock zone
At a Glance This zone gives access to the realtime clock settings.Realtime clock zone:
Description Buttons and functions:
Tuesday,
Realtimeclock
29/02/2000 OK
11:09:49 CancelUpdate
Button Function
OK button Is used to confirm once the date and the time have been set using the double arrows.
Update button
Updates the realtime clock according to the date and time of the terminal.
Cancel button
Cancels all modifications if the PLC update has not been confirmed.
277

Debugging
Modification of the program in Run mode
Introduction The program editor authorizes the modification of the application in RUN mode, except for the Grafcet structure part.
Principals Modification of program elements LD, IL, ST PLC in RUN, is possible at the level of a LD rung, of an IL statement or of an ST instruction, except if the contents are contained in an event processing (EVTi).
The situation with Grafcet: only the processing linked to steps and transitions can be modified, Grafcet can not be modified.
The operate modes
The operate modes are the same as for modification in PLC local mode or connected mode in STOP mode. However some modifications are applied:� no jump on an undefined label, � not to be in step by step mode or have set a breakpoint, � the PLC must not be at default, � the multi-rung functions are not authorized, � it is impossible to add a function block which is not already represented in the
applcation.
CAUTION
For security reasons, you are advised to start the PLC programming at the stopSTOP. Modification in RUNmode must be used for program modifications which do not require the application to be stopped and are under the responsibility of the user.
Failure to follow this precaution can result in injury or equipment damage.
278

Debugging
Animating program elements
At a Glance The animation of the parts of the program when the PLC is in RUN (rungs Ladder, instruction LIST sequence, Structured text sequence, Grafcet) is carried out directly in the language editors by activating the animation function when PL7 is connected to a PLC.
Ladder rung animation
The editor animates the following elements:� the rungs are highlighted when they are running,
� the coils are highlighted when the associated bit is set to 1,
� the FB outputs are highlighted when they are set to 1. Some internal parameters are animated by the display of their numerical value inside the block.
Animation of List sequences
The editor carries out animation in the following way:� a variable at 1 is indicated by a black rectangle,� a variable set at 0 is indicated by a white rectangle,� a forced variable is indicated by an F.
Example:
Note: A forced variable is indicated by F.
%M12
%M12
R
LDNSTLDST
%M0%M1%M2%M3
279

Debugging
Animation of Structured text sequences (PL7 Junior, PL7 Pro)
The editor animates by linking itself to the Animation tables tool in the following way:
Select the Option → Animation by tables, command after having started the Structured Text sequence editor, and the tool is then placed next to the editor.
Each language element displayed on the editor screen is entered in the table, keeping to the limit of 40 possible variables.
Animation of the Grafcet steps
The editor carries out animation in the following way:� an active step is indicated by a black rectangle, � an inactive step is indicated by a white rectangle, Example:
Animation of macro-steps
A macro-step is animated (highlighted) if at least one of these steps is active.
Animation of DFB code
If the DFB type has not been code protected, it is possible to view the code dynamically using animation tables.Select a call interface in a section then select the Opencontextual menu.
Note: For a table type variable, only the first element in the table is taken into account. It is therefore possible to add other elements from the table which may be important in the context of the application.
22
11
280

Debugging
Animation commands
Commands and functions:
Command Function
Utility → Stop Animation Suspends animation.
Utility → Animate Restarts animation.
Utility → Freeze The animation is frozen, the variables change but the display is no longer refreshed.
Note: � the animation is synchronous with the end of the MAST task cycle.� for all indexed objects, if index overflow occurs, there may be inconsistency in
the animation.Example:LD %M[%MW10] animation = status of indexed object even in the case of index overflow.ST %M1 animation = status of %M0 if there is index overflow.
281

Debugging
Grafcet debugging
At a Glance Grafcet debugging allows you to:� control charts in order to facilitate debugging,� perform maintenance actions.This makes it possible to check that the synchronization of operating modes and the coordination of tasks is being carried out correctly (forcing command).
When an installation is switched to manual mode, either for adjustment or because of an error, the context of the graph is saved (freeze command) and it is then possible to resume the cycle at the same place once the adjustment is finished or the fault has been acknowledged.
How to gain access to the Grafcet debugging bar
Carry out the following steps:
Step Action
1Click on the debugging bar icon .
2 The following bar appears:
PRG RUN aFrozen Chart status Actions on chart Prepositioning Mast
Error
282

Debugging
Grafcet debugging bar
The following illustration shows the arrangement of the command buttons in the debugging bar.
The animation of the Grafcet section’s activity condition is displayed on the far left of the debugging bar.
The button is used to switch from the Grafcet debugging bar to the program debugging bar.
Zone Functions
Chart status Provides information about the chart status:� Frozen:indicates whether or not the chart is frozen,� Error: indicates whether there is an error in the chart,� Button: can be activated when there is an error, is used to create an
information box with the list of active errors.
Actions on chart Contains buttons which are used to:� Freeze/Unfreeze the chart.
On Freeze, the active steps remain active and continuous actions only are executed.On Unfreeze, the operating cycle resumes from the same place.
� Initialize the chart on these initial steps. It develops from these steps and continues in its current operating mode.
� Position the chart in an empty location with no step on the chart being active.
Prepositioning Contains buttons which are used to:� Position the chart on the steps to be prepositioned that are selected
from the grafcet editor.Prepositioning is indicated by a full stop to the left of the step.
� Delete configured prepositions.To delete the prepositioning of a step, select the step from the editor and the Delete prepositioning command from the contextual menu.
Mast Provides information on the task status:� RUN a: Mast task active in Run,� STOP a: Mast task active in Stop,� RUN i: Mast task inactive in Run,� STOP i: Mast task inactive in Stop,� STEP: Step by Step program in progress,� ERR: execution error.
PRG RUN aFrozen Chart status Actions on chart Prepositioning Mast
Error
283

Debugging
How to gain access to the Grafcet debugging screen
Carry out the following steps:
The Grafcet debug browser
The Grafcet debug browser can be accessed from the Grafcet editor or from the application browser’s Grafcet section using the contextual menu.
This screen gives a hierarchical view of the chart with the nesting of the CHART module and macro-steps.
This view is animated in online mode with the animation indicated by the absence or presence of a token (an active macro-step is shown by the presence of a green circle).
A certain number of operations are possible via:� the contextual menu at the bottom of the screen,� the contextual menu on an item describing a macro-step:
� deactivating a macro-step,� activating a macro-step,� editing a macro-step.
Step Action
1 In the Application browser in the Structure view, look at the Program directory and right click (contextual menu) on the G7 icon.
2 The following screen appears:
PrlChart
Macro0Macro1
Post
Grafcet Debug Browser
LDLD
G7G7
G7G7
operate
G7G7
PrlChart
Macro0Macro1
Post
Grafcet Debug Browser
LDLD
G7G7
G7G7
operate
G7G7
284

Debugging
Executing the programme
At a glance Executing an application on a PLC can be controlled using the functions:� RUN, STOP, INIT PLC,� RUN, STOP at the level of a task (MAST or FAST),� breakpoint and step by step,� Grafcet debugging.
Finding out the confirmation conditions of a section
Carry out the following steps:
Accessing the contents of a section
Carry out the following steps:
Operating the programme
In runtime:� a green circle indicates that the section is confirmed,� a red circle indicates that the section is not confirmed (confirmation bit at zero).
Forcing the confirmation values of the section
Carry out the following steps:
Step Action
1 In the Application Browser of the structure view, choose the section.
2 Right click (contextual menu) and select Properties.
Step Action
1 Go to the Application Browser of the Structure View.
2 Double click on the section icon.
Step Action
1 In the Application Browser in the structure view, choose the section.
2 Select the contextual menu (right click) Force the activation condition to 0 orForce the activation condition to 1, this is indicated by a F on the green circle.
285

Debugging
Task properties
Task configuration
The MAST task may feature:� cyclical execution (default selection),� periodic execution.
In cyclic operation, the task executions follow on directly from one another.In periodic operation, the task executions are sequencced at a period set by the user.
Whatever the operating mode: whether periodic or cyclic, the task is controlled by a watch dog device which is used to detect an abnormal period in the application program. If overrun occurs, the S% system bit is positioned at t 1 and the application is declared in blocking fault mode for the PLC.
Task debugging The Operating mode zone indicates the status of the task execution.The Duration zone indicates the execution time of the MAST and FAST tasks.
286

Debugging
Executing the MAST task
Introduction In this procedure, only the MAST task is executed.
How to put the MAST task into RUN
There are several ways in which the MAST task can be put into RUN:� select the Debug → Run Mast command,� select the Debug → Access the PLC debugging screen command and click on
the RUN button associated with the MAST task.
How to put the MAST task into STOP
There are several ways in which the MAST task can be put into STOP:� select the Debug → Stop Mastcommand,� select the Debug → Access the PLC debugging screen command and click on
the STOP button associated with the MAST task.� click on the STOP icon on the general panel.
Duration adjustment
In periodic operation, the "Adjusted Period" column is used to adjust the task period. This adjustment is lost on cold start, it is the value entered in the configuration which is taken into account in this case, it is possible to save the adjusted period using the Services → Save the Set Period command.
Task activation-Fault management
The Activation/Deactivation button on theUC debugging screen is used to activate the MAST task when the latter is in RUN.
The Err button on theUC debugging screen displays the MAST task errors and the Reset button is used to reset the system bits associated with task errors to zero to ensure that the error(s) is/are still valid.
Note: The execution status of the task is shown in the debugging bar:� STOP, RUN,� a: the task is active (the %S30 system bit is at 1),� i: the task is inactive (the %S30 system bit is at 0),� Non Pr: the task is not programmed,� STEP: step by step function in progress,� ERR: execution error.
Note: The Service → Restore periods command replaces the period set with the period defined in the configuration.The mimimum, current, maximum durations are provided by the PLC, the duration button Init in the column Init resets these values in order to carry out new process values.
287

Debugging
Executing the FAST task
Introduction In this procedure, only the FAST task is executed.
How to put the FAST task into RUN
There are several options for putting the FAST task into RUN:� select the Debub → Run Fastcommand,� select the Debug → Access the UC debugging screen command and click on
the RUN button associated with the FAST task.
How to put the FAST task into STOP
There are several options for putting the FAST task into STOP:� select the Debug → Stop Fastcommand,� select the Debug → Access the UC debugging screen command and click on
the STOP button associated with the FAST task.� click on the STOP icon on the general panel.
Duration adjustment
In periodic operation, the "Adjusted Period" column is used to adjust the task period. This adjustment is lost on cold start, it is the value entered in the configuration which is taken into account in this case, it is possible to save the adjusted period using the Services → Save the Set Period command.
Task activation-Fault management
The Activation/Deactivation button on the UC debugging screen is used to activate the MAST task when the latter is in RUN.
The Err button on theUC debugging screen displays the FAST task errors and the Reset button is used to reset the system bits associated to task errors to zero in order to ensure that the error(s) present are still correct.
Note: The execution status of the task is shown in the debugging bar:� STOP, RUN,� a: the task is active (the %S30 system bit is at 1),� i: the task is inactive (the %S30 system bit is at 0),� Non Pr: the task is not programmed,� STEP: step by step function in progress,� ERR: execution error.
Note: The Service → Restore periods command replaces the period set with the period defined in the configuration.The mimimum, current, maximum durations are provided by the PLC, the duration button Init in the column Init resets these values in order to carry out new process values.
288

Debugging
Execution of a program with breakpoint
At a Glance The software manages a single breakpoint which can be set in on-line mode on any program element (LD rung or IL, ST, DFB sequence) that is contained in the MAST, FAST, or SR tasks.Setting these breakpoints is one of the functions of the debug bar.
How to access the debug bar
Carry out the following steps:
Step Action
1 Click on the Debug menu on the PL7 task bar.
2 Click on the Debug bar sub-menu.Result: the following bar appears at the bottom of your PL7 screen
289

Debugging
Setting a breakpoint
Breakpoint are positioned directly from the languages editors.Carry out the following actions:
With Structured Text:
Note:
Setting a new breakpoint deletes any existing breakpoint.
Step: Action:
1 Place the cursor on the program element (LD rung or IL, ST statement) that is to be the breakpoint.Example:
2Select the Debug/Set the breakpoint command or click on the button
on the debug bar.
Step: Action:
1 Select the Debug/Line mode command or click on the button on the
debug bar.
2 Place the cursor at the position on the instruction line at which the breakpoint is to be set,
3Select the Debug/Set breakpoint command or click on the button on the debug bar.
290

Debugging
Executing the program
Execute the PLC/Run, Debug/Run Mast, Debug/Run Fast program if the PLC is not already in Run.The program is executed until the rung, the statement or the instruction line (with Structured Text in line mode) associated with the point is reached. The statement, instruction line or the rung is not executed.The breakpoint is displayed in yellow (step in progress), so it is possible to execute the program in step by step mode.
Accessing the breakpoint
To place the cursor directly on the breakpoint set in the application (without first accessing the program module), select the Debug/Show Breakpoint Inserted
command or click on the button .
Accessing the step in progress
To place the cursor directly on the step in progress in the application (without first accessing the program module), select the Debug/Show Current Step command
or click on the button on the debug bar.
Deleting the breakpoint Select the Debug/Remove breakpoint command or click on the button on
the debug bar.
With DFBs A breakpoint cannot be directly inserted into the code of a DFB type (accessible in read mode).
It is recommended that you set the breakpoint directly on the calling code element, then enter the instance code via the Call Module menu.
Module Call Stack
For an error diagnosed in a SR or in a DFB, the Debug/Set up module call stack command is used to recognize the chronological sequence of calls that have led to the faulty module being executed.
The dialog box contains the following information:� the current task name,� the module call list as well as the line/statement number which have led to the
execution of the faulty module (the first in the list is the top of the stack).
The View button is used to view the module selected in the stack. This function is also accessible by double clicking on the List Box.
291

Debugging
Executing a program in step by step mode.
At a Glance The program is executed rung by rung, sequence by sequence or instruction line by instruction line (in line mode with ST). All the active tasks are executed, the inputs are acknowledged and the outputs are set.One of the functions of the debug bar is to execute the program in step by step mode.
How to access the debug bar
Carry out the following steps:
Step by step program execution
Carry out the following actions:
Step Action
1 Click on the Debug menu on the PL7 task bar.
2 Click on the Debug bar sub-menu.Result: the following bar appears at the bottom of your PL7 screen
RUN aGO cc c R7cF
Mast Evt Debug PLC Monit.
RUN aRUN a
Fast
Step: Action:
1 Insert a breakpoint in a module through which the program will pass when it is executed in step by step mode.
2 Give the AP/Run, Debug/Run Mastand Debug/Run Fast commands in program execution mode.
292

Debugging
Commands The commands are accessible via the debug bar or the Debug menu:
Debug bar Debug menu
Button: Menu/Start task (in step by step mode).
Button: Debug/Go to next rung/next sequence/next instruction line (execute the program element at the position at which it stopped and stop at the beginning of the following program element). With a SR call, this function does not enter the SR body and executes all of it.
Button: Debug/Call module (access SR module).
Button: Debug/Exit module (return to calling module).
Button: Debug/Abort Step by Step (the breakpoint is deleted and the task restarts).
Button: Debug/Show Current Step(move directly onto the current application step, without accessing the program module beforehand).
WARNING
With alarm relay:
At each step the alarm relay (or safety output) controlled by the PLC momentarily changes its status. At the end of the cycle, the outputs are refreshed for approximately 1 ms. To avoid these effects on the alarm relay and the physical outputs, the %S9 bit can be set at 1, which will force the physical outputs into fallback.
Failure to follow this precaution can result in death, serious injury, or equipment damage.
293

Debugging
Forcing TOR input
Introduction You must be in connected mode to access the forcing of TOR input .
How to force TOR inputs
Carry out the following steps:
To delete the forcing of a channel click on Unforce (select the channel then the contextual menu Command.
To delete the forcing of all of the module’s channels, click on the Global unforcing button.
Step Action
1 Select the command AP → Connect.
2 In Application Browser in the structure view, click on the Configuration directory, then double click (or contextual menu) on the Hardware configuration directory.
3 Select the module and then double click (or contextual menu).Each channel is viewed:� channel: input or output channel number, � symbol: symbol set by the user linked to the channel,� parametering: memory, event…
4 Next select the channel and right click, then click on Command.
5 Select the commandForce to 0(state F0) or Force to 1 (state F1).
294

Debugging
Forcing analog inputs, Micro
Introduction You must be in connected mode to access the forcing tools.
How to force analog inputs
Carry out the following steps:
Forcing an input When an analog input is forced, the value present in the module’s input is not available. The forced value is indicated in the Value and Forcing fields on the screen. The forcing of inputs is active whether the PLC is in RUN or in STOP mode.
Forcing an output
When an analog output is forced, the value present in the module’s output is indicated in the Forcing field on the screen. The value calculated by the application remains displayed in the screen’s Value field .
Deleting forcings To delete the forcing of a channel, select it and then press the Unforce button.
To delete the forcing of all of the module’s channels, click on the Global unforcing button.
Step Action
1 Select the command AP → Connect.
2 In Application Browser in the structure view, left mouse click on the Configuration directory then double click on the Hardware configuration directory.
3 Select the position of the module then double click on it.
4 Select the channel.
5 Select the forcing value.
6 Click on the Force button.
Note: When a channel is forced, the information F appears in the value’s display zone.
295

Debugging
Forcing analog inputs, Premium
Introduction You must be in connected mode to access the forcing tools.
How to force analog inputs
Carry out the following steps:
Forcing an input When an analog input is forced, the value present in the module’s input is not available. The forced value is indicated in the Value and Forcing fields on the screen. The forcing of inputs is active whether the PLC is in RUN or in STOP mode.
Forcing an output
The forcing is only possible if the task associated to the output is in RUN mode. If the task is in STOP mode the output is put into fallback/maintain.When an analog output is forced, the value present in the module’s output is indicated in the Forcing field on the screen. The value calculated by the application remains displayed in the Forcing on the screen field. The value calculated by the application remains displayed in the Value field on the screen.
Deleting forcings To delete the forcing of a channel, select it and then press the Unforce button.
To delete the forcing of all of the module’s channels, click on the Global unforcing button.
Step Action
1 Select the command AP → Connect.
2 In Application Browser in the structure view, left mouse click on the Configuration directory then double click on the Hardware configuration directory.
3 Select the position of the module then double click on it.
4 Select the channel.
5 Select the forcing value.
6 Click on the Force button.
Note: When a channel is forced, the information F appears in the value’s display zone.
296

Debugging
Adjustment of the application specific functions
Introduction You must be in connected mode to access the adjustment of the application specific functions.
How to adjust the application specific functions
Carry out the following steps:
In local: the input parameters correspond to the initial parameters (value of the parameters during the first start or during a cold re-start).
In connected: the input parameters correspond to the current parameters (they are lost during a cold re-start if they have not been saved beforehand).
The commands Commands and functions:
Step Action
1 Select the command AP → Connect.
2 In the structural view’s Application browser selectConfiguration → Hardware configuration.
3 Select the module position to be debugged then select the contextual menu (right click) Open the moduleor double click on the module.The attainable functions are:� viewing the parameters, � adjusting the selected channel.
4 Select the adjustment option to start the adjustment functions.
Command Function
Service → Save parameters
Allows you to save the current parameters (replacing the initial values with the current values) if the application is in RAM memory.
Service → Restore parameters
Allows you to replace the current values with the initial values.
Note: the functions and the commands which are available depend upon the application specific module which you are using.
297

Debugging
Debugging a functional module
At a Glance The organization of a functional module and the distribution of Grafcet sections, events and modules in the different modules has no effect on the execution of the program.
The program runs in the order shown in structure view.
In order to debug a functional module, the user can use of the following functions:� standard debugging functions. Refer to the "Access to debugging functions"
heading of the " Debugging" Chapter of the Part "Debugging, Adjustment, Documentation and Annexes".
� additional functions allowing incremental debugging of the application, functional module by functional module.
Execution condition of the sections
The execution condition is used to validate or inhibit a section by program.
The section is active if the condition is at 1 and it is inhibited if it is at 0 (on cold start, the execution conditions are at 0).
A section can be activated or deactivated by the user insofar as the condition is forcable.Types of objects accepted as conditions:
Objects Forcable
%Si
%Mi X
Grafcet Objects
%MW:Xj X
%SW:Xj
%KW:Xj
%Mi[%MWj
%Mi[%SWj]
%Mi[%KWj]
298

Debugging
Deactivation of all sections linked to a functional module
Action used to force to 0 all the execution conditions of the module sections.
Activation of all sections linked to a functional module
Action used to force to 1 all the execution conditions of the module sections.
Cancellation of the forcing of all sections which are linked to a functional model
Action used to unforce all the execution conditions of the module sections.
Step Action
1 Select the desired functional module.
2 From the contextual menu, select the Activation condition for the included sections command.
3 Select the Force to 0 command.
Step Action
1 Select the desired functional module.
2 From the contextual menu, select the Activation condition for the included sections command.
3 Select the Force to 1 command.
Step Action
1 Select the desired functional module.
2 From the contextual menu, select the Activation condition for the included sections command.
3 Select the Unforce command.
299

Debugging
Debugging DFBs
Procedure Refer to the section "Debugging, Adjustment, Documentation and Annexes" Chapter "Debugging" headings: � see : Animating program elements, p. 279,� see : Execution of a program with breakpoint, p. 289,� see : Executing a program in step by step mode., p. 292, � see : Animation and modification of the variables: DFBs, p. 306.
300

14
Adjustment of variablesIntroduction
Subject of this chapter
This chapter describes how to adjust variables.
What’s in this Chapter?
This chapter contains the following topics:
Topic Page
Animation of variables: creating Animation tables 302
Working with animation tables 304
Animation and modification of the variables: DFBs 306
Modification of the variables: 308
List of forced bits 309
301

Adjustment of variables
Animation of variables: creating Animation tables
At a Glance The software is used to create animation tables containing lists of variables and is used to ascertain the value of the variables using various display types and to force the bit variables. The variables tables can be created in offline or in online mode.
It is possible:� to create an animation table automatically,� to create an animation table manually,� to enter a table of variables of the same type.
Automatically creating an animation table
The software is used to automatically create animation tables by selecting one or more rungs LD (Ladder), statements IL (Instruction List), instructions ST (Structured Text), or a DFB in the language editors and by activating a utility which initializes a new table with all the objects contained in the selected program element.Procedure:
Manually creating an animation table
Procedure:
Step Action
1 Access the program module of the structure or function views, on which the table is to be created.
2 Select the rung, the statement, the instruction and the DFB then select the Initialize Animation Table contextual menu. The tables which are automatically created in this way can then be modified by deleting or adding new variables.
Step Action
1 Select Animation Table in the application browser.
2 Select Edit/Create or use the contextual menu.
3 Enter the variables in address or symbol format and confirm with ENTER. The current value of the variables is displayed.
4 When the table is created, close the entry box.
5 Specify the name of the table, enter any comments and confirm with ENTER or Confirm As.
302

Adjustment of variables
Entering a table of variables of the same type
Procedure:
Accessing an existing animation table
Carry out the following steps:
Animation table properties
Animation table properties are:� Table name: it is possible to modify the name, if the table is not open.� Location: this gives the name of any potential functional module associated with
the animation table when using PL7 Pro. The animation table can be assigned to a different functional module or detached from the functional module (select "None").
� Comment: the comment can be entered and modified.
How to display or modify the properties of an animation table
Carry out the following steps:
Step Action
1 Enter the first variable.
2 Enter the separator - to increment the position or -.. to increment the channel.
3 Enter the length.
4 Confirm with ENTER.
Step Action
1 In the Application browser go to structure view.
2 Double click on the Animation table directory.
3 Double click on the Animation table that you want to access.Result:the animation table editor appears.
Step Action
1 Select the animation table.
2 Select the Properties contextual menu.
3 Carry out the modifications.
4 Click on OK.
303

Adjustment of variables
Working with animation tables
At a Glance It is possible to perform several types of operation in an animation table:� selecting and deleting one or more lines,� entering a value for N consecutive variables,� changing the format of N consecutive variables,� inserting one or more lines,� saving the animation table on the PC,� deleting the table,� changing the name of the table,� masking the "Modification, Forcing" zone.
Selecting and deleting one or more lines
SelectingClick on the rectangle on the left of the variable address (SHIFT+SPACE) in order to select the line or click and drag to select more than one line (the selected lines are highlighted in black).
DeletingSelect the line or lines and press Delete.
Entering a value for N consecutive variables
Carry out the following steps:
Changing the display format for N consecutive variables
Carry out the following steps:
Step Action
1 Click on the first of the consecutive values in the Current value field.
2 SHIFT+Click on the last of the consecutive variables in the Current Value field.Result: the selected variables are highlighted in black.
3 Enter your value in the animation table entry field and confirm with Enter.Result: the selected variables all have the same value.
Step Action
1 Select N consecutive variables as explained above.
2 Press the F9 key until the required format is obtained.
304

Adjustment of variables
Inserting one or more lines
Select the line before which the insertion is to be made and select the Insert a line contextual menu.
Saving the animation table on the PC
Select the command Edit → Confirm as enter the name of the table and confirm with OK.
Deleting an animation table
Procedure:
Changing the name of an animation table
Procedure:
Masking the "Modification, Forcing" zone
Select the View → Command Zone command.
WARNING
Displaying digital values:
If numerical values of more than three figures are truncated, change the thousands separator value in the Windows Control Panel under Regional Settings, numbers section.
Failure to follow this precaution can result in death, serious injury, or equipment damage.
Step Action
1 Select the table in question from the application browser.
2 Select Edit → Delete from the menu or press the DELETE key or use the Delete contextual menu.
Step Action
1 Select the table.
2 Press the F2 key or select the Properties contextual menu.
3 Enter the new name and confirm with OK.
305

Adjustment of variables
Animation and modification of the variables: DFBs
Introduction With DFBs, there are several possibilities for the animation and the modification of the variables:� automatic creation via a DFB code,� automatic creation via a DFB instance call,� automatic creation via a DFB instance code,� contraction and expansion,� display and modification of a character string,� the operate mode for the tables.
Automatic creation via a DFB code
It is possible to automatically create an animation table from a DFB code. Select the instance in the list and confirm with OK. All the accessible variables on the animation table level will automatically be input.
Automatic creation via a DFB instance call
Proceed according to the following cases:
Note: You can only animate the instances used in the table.
If the DFB type… Then…
is not protected the call interface and the public variables are viewed and are modifiable.These standard functions are available only for the PL7 Pro product to enable debugging of the DFB type.For the PL7 Junior product, the variables are not modifiable.
is protected the call interface and the public variables are viewed in read-only. The instance variables are viewed in the table according to a Contract/Expand operate mode on the DFB types.
306

Adjustment of variables
Automatic creation via a DFB instance code
It is possible to automatically create an animation table from a DFB instance code. The variables of the instances depend on the level of protection.Several levels of protection are possible:
Contract/Expand If the variable in the animation table is preceded by the + symbol, to know the objects associated to the variable:� select the variable,� select the Edit → Expand command or double click on the +, so the list of
associated variables is displayed.
To contract the list of objects associated to the variable, select the Edit → Contract command or double click on the -.
Displaying/Modifying a character string
All the displayable ASCII characters (eg: 1,2,A,B,+,…) are displayed only in animation and the non-displayable ones are replaced by a vertical dash. The NULL character shows the end of the chain. It is not displayed. In animation, only the first 10 characters are displayed.
To Display/Modify a whole string, you can:� double click on the concerned cell,� select the Display → Modify menu (as a contextual menu or on the menu bar).
Modification: all the objects whose attributes are mandatory inputs (objects whose attributes are by reference) are not modifiable.
The operate mode for the tables
According to the type of table chosen in the DFB editor (static or dynamic), the Animation tables tool offers:� static tables: Contract/Expand expand to the same level as the number of the
element,� dynamic tables: (in connected mode with the PLC in RUN) Contract/Expand
expand when the instance is executed and the number of elements is known.
If the DFB type… Then…
is not protected the parameters and the public and private variables used in the code are viewed and are modifiable. These standard functions are available only for the PL7 Pro product to enable debugging of the DFB type. For the PL7 Junior product, the variables are not modifiable and the private variables are not viewed.
is write-protected the parameters and public variables used in the code are viewed in read-only.
is in know-how protection
no access is possible.
307

Adjustment of variables
Modification of the variable
Introduction The software allows you to create animation tables containing lists of variables, to know the value of the variables with different types of display and to force the bit variables.The variables tables can be created in local or in connected mode.
Viewing the state of the variables
In connected mode, you can activate (Service → Animate command) or deactivate a table’s animation (Service → Stop animation command). The animation is carried out asynchronously: all the values of the objects are read in the processor at the end of the MAST task’s cycle. You can view each value on the screen in different display modes. The available modes depend on the type of the object. It is also possible to individually modify the value of a variable and to force or unforce the value of a bit.
Modifying a variable
Steps to follow:
Forcing a bit in an animation table
Steps to follow:
Unforcing a bit in an animation table
Steps to follow:
Step Action
1 Select the variable and put the cursor on the Current value zone.
2 Input the variable’s value and confirm with Modify.
Step Action
1 Select the variable to be forced and put the cursor on the Current value zone.
2 Select Force 0 to force the bit to zero. The forcing is shown by the letter F. Select Force 1 to force the bit to 1 and the forcing is again shown by the letter F.
Step Action
1 Select the variable to be unforced and put the cursor on the Current value zone.
2 Select Unforce.
308

Adjustment of variables
List of forced bits
Introduction PL7 features a tool which allows you to view the list of forced bits in the PLC at any given time without having to go into the animation table in the usual way.
Principles The forced bits display function is available from the PLC menu in online mode only. Launch the forced bits search and the resulting list is displayed in the animation tables editor. The entire man-machine interface is therefore sub-processed to the animation tables editor.
The " Forced bits list" tool can be broken down into 2 components:� A component in the PLC’s OS environment, with the following functions:
� managing a forced bits trace table in order to optimize the search,� implementing a request to read the trace table.
� A component in the PL7 environment, with the following functions:� searching for forced bits and creating a list of forced bits,� initializing an animation table from this list.
"List of forced bits" tool
You must be in online mode to access this tool.Click on PLC → List of forced bits.There are two possible scenarios:
When the table is open, the PLC → List of forced bits command restarts the search creating another forced bits animation table.
If… Then…
the PLC contains no forced bits
the following message is displayed: "No forced bits."
there are forced bits.
a forced bits animation table appears:
Modify01
Forcing 0Force 1Unforce
F3F7F8
F4F5F6
Current value Kind9F1F1F1F1F1F1F1F1F1
%SW108 %M201 %M202 %M203 %M204 %M205 %M206 %M207 %M208 %M209
10/11Type
Forcing
Modification
Dec. Display
Symbol / NameAddressF 1
Comment
TABLE_1 (Animated)*
309

Adjustment of variables
Contents of the "List of forced bits" table
The contents of a list is identical to the contents of an animation table except that the system word %SW108 which gives information about the number of forced bits in the PLC, appears at the start of the list.
Review of table fields:� address,� symbol,� current value,� kind,� type,� comments.
Limits and restrictions
A List of forced bits table has a display capacity of 32 forced bits.If the table is full, no further new forced variables are stored and the %S108 bit system switches to 1. In the case of additional forcing, an OS internal flag will indicate this overflow.
When the maximum number of forced bits is reached, the OS component saves no further forcing/unforcing actions in the table. However, these actions are still carried out and there is no change to the operating procedures at the user and PL7 end.In this context, there is inconsistency between the table contents and the PLC memory. An information message is displayed, which could be:� "Overflow of number of forced bits",� "Cold start necessary to reinitialize the forced bits table",� "OK".
The forced bits list will be displayed again following a cold start (reinitializing all the forced bits and the forced bits table).
Note: the List of forced bits table displays the forced bits at a given time t in the PLC and this table is not refreshed. In fact, we have a static image of the data read in the PLC at the time at which the PLC → List of forced bits is executed. To obtain the list of forced bits at any given moment t+1 another List of forced bits table must be launched.
310

15
Diagnostic functionsIntroduction
Subject of this chapter
This chapter describes the diagnostic functions available for diagnosing the hardware and the application.
What’s in this Chapter?
This chapter contains the following topics:
Topic Page
Diagnostic of the PLC’s last stop 312
Module/channel diagnostics 313
Program diagnostics 314
Module call stacks 316
Diagnostics DFBs 317
Implementation of diagnostics DFB 318
DFB diagnostics error messages 319
311

Diagnostic functions
Diagnostic of the PLC’s last stop
Introduction To access the diagnostic of the PLC’s last stop, you need to be in connected mode.
How to access the diagnostic of the PLC’s last stop
The UC debugging screen which is accessible through the Debug → Access UC debugging screen command, allows you to know the cause of the last stop and the date when this stop happened. Refer to the debugging chapter, last stop zone (See Last stop zone, p. 276).
312

Diagnostic functions
Module/channel diagnostics
Introduction The software provides various diagnostics tools. You must be in online mode to access these tools.
How to access to module/channel diagnostics
Carry out the following steps:
Note: the diagnostics for the Discrete modules and for the analog modules are performed in the same way as those described below.
Step Action
1 Select the command PLC → Connect.
2 In the Application Browser in the structure view, select the Configuration directory then double click on Hardware configuration.When a module is faulty, a red indicator appears on the module position (see example below).
3 Select the position of the faulty module, then right click and choose the Open the module command or double click on the selected position.
4 Click on the Diag button.The Diagnostics module screen displays the errors classified by category: internal errors, external errors or other errors. The Channel Diagnostics screen which is accessible by the Diag button in the command zone is used to refine the results.
0 2 4
0
PSY
2600
TSX
57352
DEY
08D2
DSY
08R4D
10
DEY
16A2
DSY
16R5
91 3 8
313

Diagnostic functions
Program diagnostics
Introduction To access the diagnostics tools it is necessary to be in online mode. To connect, select the PLC → Connect command.
Program diagnostics is used to find out the cause and the source of the switch to error mode. Various types of error are signaled:� blocking errors (which cause the execution to be stopped),� non-blocking errors (which become blocking when the application monitoring
option is selected),� non-blocking errors.
Blocking errors (causing the execution to be stopped)
Blocking errors causing the execution to be stopped:� HALT instruction,� incomplete JUMP instruction, � watchdog overflow,� Grafcet table overflow (active steps, valid transitions),� undefined downstream step (rerouting to one step).
Non-blocking errors (which become blocking when the application monitoring option is selected)
Non-blocking errors which become blocking when the application monitoring option is selected:� index overflow,� division by zero,� capacity overflow of an unsigned arithmetic calculation,� character string error (the character string transfer zone is too small to
accommodate this string),� floating point calculation error (division by zero, capacity overflow, incompatibility
with the IEEE 754 format following the overlap of the memory zones etc.).
Non-blocking errors
the following are non-blocking errors:� cycle time overflow,� task inputs/output overflow,� capacity overflow during an arithmetic calculation.
A blocking error is signaled on the status bar.
314

Diagnostic functions
Diagnostics procedure for blocking errors
Carry out the following steps:
A dialog box provides the diagnostics details:� click on Show source to position the cursor on the faulty module,� click on Show Module call stack to ascertain the chronological sequence of calls
which led to the execution of the faulty module (from the most recent to the oldest).
Diagnostics procedure for non-blocking errors
These errors are indicated for each task.Carry out the following steps:
Application monitoring
To refine the diagnostics, or in other words, to make this fault type blocking in order to isolate it, choose the monitoring option (Mon.) on the debugging bar or use the Application monitoring command from the Debugmenu.Then execute the diagnostics procedure for non-blocking errors.
Step Action
1 Access the debugging screen (Debug → Access the PLC debugging screen). The ERR indicator flashes.
2 Click on the Diag button or select the PLC → Diagnostics command.
Step Action
1 In the PLC debugging screen, click on the Fault button which is associated with the task.
2 Click on the Reset Fault Bit button (reset bits systems to 0) to confirm the presence of the error on the different tasks (FAST, MAST, EVT).
315

Diagnostic functions
Module call stacks
Introduction The Module call stack display function lets you know the chronological chain of calls that have led to the execution of the faulty module (from the most recent to the oldest), for a diagnostics error in a SR or a DFB type.
Accessing the Module call stack
This function is accessible in diagnostics and in step by step program.
Click on Debug → Show module call stack.The dialog box contains:� the current task’s name. It is also possible to display the other tasks (only in
diagnostics mode),� the modules’ call list as well as the line/phrase which have led to the execution of
the faulty module (the first in the list is the top of the pile).
The View button allows you to view the module selected in the stack (or just double click on the module). This function is also accessible by double clicking on the ListeBox.
316

Diagnostic functions
Diagnostics DFBs
Introduction The diagnostics DFBs are accessible from PL7-Pro , and are used in the applications which run on TSX57/PCX57/PMX57 processors.
Diagnostics DFBs consist of:� diagnostics application DFBs which are used to set up process monitoring via the
application program:� PL7 equation monitoring,� monitoring the reaction time of the process to a command,� monitoring the inputs/outputs and the ASI bus,� monitoring the safety conditions.
� working part control and diagnostics DFBs which are used to control and monitor elements of the working part (EPOs):� monitoring sensor information,� monitoring actuator control requests,� monitoring the duration of a movement,� memorizing the minimum and maximum durations of a movement, � learning the duration times of a movement,� controlling an actuator.
At a Glance The DFB diagnostics provided with PL7-Pro are:
Descriptive form Every diagnostics DFB possesses a descriptive form describing the DFB function and its parameters (inputs, outputs and public variables).
This form is accessed by double clicking on a DFB type in the application browser, then by clicking on the Descriptive form tab in the DFB editor.
DFB Functions
EV_DIA Monitoring the status of 2 bits without taking a time factor into account.
MV_DIA Monitoring the status of two bits without taking a time factor into account, with the option of monitoring a movement’s changes (change of bit status within a given time period).
NEPO_DIATEPO_DIA
Monitoring, checking and diagnostics for a working part element.
IO_DIA Diagnostics for all the I/O modules.
ASI_DIA Diagnostics for an ASI inputs/output module.
ALRM_DIA Interface with diagnostics buffer (error storage).
317

Diagnostic functions
Implementation of diagnostics DFB
Configuration of the diagnostics buffer
To reserve a diagnostics buffer, carry out the following actions:
Registering diagnostic DFBs
Before using a DFB in the application, carry out the following actions:
Programming rule for diagnostics DFBs
A Diagnostic DFB:� must be executed in the MAST task for managing operate modes. So that it is
executed, it is necessary that: � the DFB is called (the program element to which it is assigned must be
executed)� the ED input must be at 1.
� can be instanced in any program module (Section, SR) written in Ladder language (LD), Structured Text (ST) or Instruction list (IL). It is strongly recommended that you only program the instance once,
� imposes a Label on the rung or the phrase containing it.
Information system
System words and bits acquire information relative to the diagnostics:
Step: Action:
1 Open the application’s Properties dialog box (Station directory in the application browser).
2 Choose the Diagnostics tab.
3 Tick the Activate the diagnostics in the application box.
Step: Action:
1 Import the binary DFB file (* .UFB) using Import binary from the contextual menu within the PL7’s installation directory (example C:\PL7\PL7PRO33\DIAG).
2 Create a DFB instance (See Creating an instance from an application browser, p. 259) in the PL7’s variables editor.
Object Information
%S101=1 Configured diagnostics buffer.
%S102=1 Full diagnostics buffer. If the diagnostics buffer cannot save an error, this error is lost and the %S102 bit passes to 1.
%SW162 The number of errors in the diagnostics buffer.
318

Diagnostic functions
DFB diagnostics error messages
Display window for error messages
All the error messages appear in a window in the lower part of the runtime screens tool.
The size of this window can be modified with the mouse, but its position is fixed. However, it can be hidden.
It consists of a list of messages and has:� a vertical scroll bar allowing you to view any obscured messages in the list,� a horizontal scroll bar used to view the entire contents of a line.
Illustration of the Viewer
Integrated Viewer in PL7-Pro
A Diagnostics viewer is also available with the CCX17 V2.5.
Structure of error messages
Every line displayed in the Viewer corresponds to an error and contains the following information:� the message status which is indicated by an icon plus text (the message having
to be acknowledged or not),� the faulty DFB type,� the geographical zone in which the source of the error is located,� the time and date when the error appeared,� the time and date when the error disappeared,� the message associated with the error,� the value of the word status at the time of the error.
The user can increase or decrease the size of the columns using the mouse. A column not displaying the information in its entirety ends in an ellipsis.
The width of each column is stored and retrieved while opening the runtime screens tool.
Message StatusAppearance: 5ZoneErrorAcknowledgment Disappearance: 5Without Ack…Ev_dia 0 01/03/2000 - 18:21:41 01/03/2000 - 18:21:46 Mixing time too short (< 5 s) 16#Without Ack…Alrm_dia 0 01/03/2000 - 18:21:43 01/03/2000 - 18:22:16 Maximum mixer level reached: 25 litersNot Ack... Alrm_dia 0 01/03/2000 - 18:22:16 01/03/2000 - 18:22:18 Maximum mixer level reached: 25 litersWithout Ack…Ev_dia 0 01/03/2000 - 18:22:25 01/03/2000 - 18:22:25 Mixing time too short (< 5 s) 16#Not Ack... Alrm_dia 0 01/03/2000 - 18:22:05 01/03/2000 - 18:23:11 Maximum mixer level reached: 25 liters
319

Diagnostic functions
Error message display
The number of messages it is possible to display is limited only by the size of the memory buffer. When there is not enough memory, a message warns the user and any messages of errors that have disappeared or have been acknowledged (if necessary) are then deleted.
It is possible to modify the color of the messages and the blinking associated with an acknowledged message.
In the viewer, it is possible to show only those messages which come from one or more specific zones.
The list of messages can be sorted according to each field. To do this, simply click on the column header containing the data on the basis of which the sort is to be carried out.A second click carries out the sort in opposite order.
By default, the error messages are inserted into the list in the chronological order in which they appear.
Error message management
Possible operations:
Operation Implementation
Navigation With the UP, Down, Page-Up, Page-Down, Home, and End keys.
Acknowledgement
By using the contextual menu having selected the corresponding item.Several messages can be acknowledged at the same time.After an acknowledgment, an order is sent to the PLC.The acknowledgment can come from another viewer, in which case the runtime screens tool is alerted and the message is displayed as acknowledged.
Deletion By using the contextual menu having selected the corresponding item or by using the Delete key.Only messages that have disappeared and been acknowledged (if necessary) are deleted.
Properties By using the contextual menu, or the Enter key.The following information is displayed:� the name and type of the faulty DFB instance,� the program address containing the faulty DFB instance,� the associated text and status bits.
320

Diagnostic functions
Error message archiving
Archiving is used to create a log file. The activation and the location of this file are configured in a window that can be accessed using the Service/Configure/Viewer tab command.
It is possible to modify the directory in which the archive file is located. By default, it is kept in C:\PL7USER\NameAppli.HIS.
This file is in ASCII format, so it is easy to import it into a text editor or a spreadsheet.
To stop the file from becoming too large, it is renamed in NameAppli.BAK every 1000 saves and a new file is created with its source name.
Error message customization
Messages can be customized for every diagnostics DFB instance.
The modification is made via the DFB variable editor menu and the new message is entered into the comment zone.
Note:The diagnostics DFBs that do not support error message customization are IO_IA and ASI_DIA.
WARNING
If a NameAppli.BAK file already exists, it is deleted without warning.
Failure to follow this precaution can result in death, serious injury, or equipment damage.
321

Diagnostic functions
322

16
DocumentationPresentation
Subject of this chapter
This chapter describes how to create the documentation file for the application.
What’s in this Chapter?
This chapter contains the following topics:
Topic Page
Contents of documentation file 324
Documentation: application documentation file 326
323

Documentation
Contents of documentation file
At a Glance The documentation file of an application contains the following different headings:� title page,� contents,� configuration,� function view,� program,� DFB types,� cross references,� animation table,� variables,� cartridges.
Description of the title page and the contents
Title page:this heading gives the name of the designer and the name of the project.
Contents:the contents table is created automatically by the software according to the selected options.
Description of the configuration heading
This heading has two sub-headings:� hardware configuration,� software configuration.
Hardware configuration:rack configuration, module parameters.This sub-heading allows you to print the PLC configuration as well as the different parameters of the input/output modules.
Software configuration:this sub-heading allows you to print the application software configuration.
Description of the Function View heading
This heading gives the function view contents list.
Description of the program heading
Choosing this heading automatically selects the existing modules in the application. For each language LD, IL and ST select printing in symbol or address format.The selected mode applies to all modules in the same language.The "With Variables Used" option allows you to print the list of the variables used after each rung or phrase.
324

Documentation
Several sub-headings are available:� application structure,� MAST task,� FAST task,� event task.
Application structure:this heading is used to print the application software structure as well as the tree structure subroutine calls.
MAST Task :this sub-heading is itself built up of sections (as well as PRL/CHART/POST modules if there is a GR7 section) and subroutines.
FAST Task :this sub-heading is also built up of sections and subroutines.
All of these headings are used to print the contents of the different sections that constitute the program.
Description of the DFB Type heading
The following details are given for each DFB type:� the properties,� the descriptive form,� the interface and public variables,� the code (except for Schneider Automation diagnostics DFBs),� the private variables.
Description of the cross references, animation tables and variables headings
Cross references:this heading allows you to print the list or lists of variable cross references.
Animation table:this heading allows you to print the different animation tables along with the addresses, the symbols, the types and the kind.
List of variables :this heading is used to print the list or lists of variables and their parameters.
Description of the footer heading
Select this heading to create a footer at the bottom of the documentation page:� the blank fields can be filled in by the user,� the shaded fields are filled in automatically.
325

Documentation
Documentation: application documentation file
Accessing the application documentation file
To access a documentation file, double click on the documentation file icon in the structure view of the application browser, a documentation window then displays the various components of the application documentation file.
Components of the application documentation file
Each element of the documentation file can be included or excluded by using the contextual menu: by right clicking.The elements included in the documentation file are marked with a red square.
To build the file carry out the following actions:
Setting the documentation file parameters
Various parameter settings are available for the documentation file:� setting the footer parameters,� setting the variable sorting parameters,� setting the cross reference sorting parameters,� setting the program printing parameters,� setting the DFB printing parameters.
Setting the footer parametersClick on the footer icon in the documentation window and select the Parameters contextual menu.� the blank fields can be filled in by the user,� the shaded fields are filled in automatically.
Step Action
1 Select each element to be included or excluded in the file using the Include heading or Exclude heading contextual menus or select Edit → Exclude heading from the menu.
2 Set the parameters for the various elements: Program, DFB type, Cross references, Variables, Footer.
3 Select the Build contextual menu via the general documentation file icon or select Edit → Build from the menu.
326

Documentation
Setting the variable sorting parametersCarry out the following actions:
Setting the cross reference sorting parametersCarry out the following actions:
Setting the program printing parametersClick on the Program icon in the documentation window and select the Parameters contextual menu to access the different tabs:� Instruction List tab
Select printing in either symbol or address format.Check the With variables used box to also print the variables of the program module.
� Structured Text tabSelect printing in either symbol or address format.Check the With variables used box to also print the variables of the program module.
� Ladder Language tabCheck the Long Text box to print all the symbols.Select printing in symbol and/or address format.Check the With variables used box to also print the variables of the program module.
Setting the DFB printing parametersCarry out the following actions:
Step Action
1 Click on the variables icon in the documentation window and select the Parameters contextual menu.
2 Select the variable sorting order: ascending order of symbols, ascending order of addresses or both.
Step Action
1 Click on the Cross references icon in the documentation window and select the Parameters contextual menu.
2 Select the variable sorting order: ascending order of symbols, ascending order of addresses or both.
Step Action
1 Click on the DFB type icon in the documentation window and select the contextual Parameters menu.
2 Select the components to be printed.
327

Documentation
Printing the documentation file
Documentation file print setup Carry out the following actions:
Note: It is necessary to rebuild the documentation file if the printer is changed.
Print PreviewCarry out the following actions:
Printing the documentation fileTwo printing options:� printing the documentation file,� printing a element of the documentation file.
Printing the documentation file
Printing an element of the documentation file
Step Action
1 Select the File → Print Setup menu.� if a printer is already configured in the Windows Print Manager as a default printer,
it is shown in the dialog box,� if several printers have been declared in the Windows Print Manager, select the
required printer from the list.
2 Configure the printer by clicking on Configuration.
Step Action
1 Select the element to be displayed from the documentation file.
2 Select the View contextual menu (right click).
Step Action
1 Click on the program icon in the documentation window.
2 Select Print from the contextual menu or click on the printer icon in the task bar.
Step Action
1 Click on icon of the element to be printed in the documentation window.
2 Select Print from the contextual menu or click on the printer icon in the task bar.
Note: It is possible to interrupt printing by clicking on Cancel.
328

17
Import/ExportIntroduction
Subject of this chapter
This chapter describes : � The application’s source files.� The export/import of the application’s source files.
329

Import/Export
What’s in this Chapter?
This chapter contains the following topics:
Topic Page
General points on import/export 331
Import/Export source files 332
Exporting a Section , a Subroutine, an Event 338
Importing a Grafcet/Ladder/List/Structured text section 340
Exporting an LD, IL, ST, Grafcet source file 341
Importing an LD, IL, ST, Grafcet source file. 342
Exporting variables 344
Importing variables 345
Importing/Exporting variables in EXCEL format 347
Exporting a functional module 349
Importing a functional module 351
Importing a functional module using the wizard 353
Exporting animation table(s) 357
Importing animation table(s) 359
Export of runtime screens 361
Import of runtime screens 363
Export of a DFB type 365
Importing a DFB type 367
Exporting an application 369
Importing an application 371
Exporting an application in FNES format (Input/Output Neutral File) 373
Importing an application in FNES format 374
330

Import/Export
General points on import/export
Introduction Import/Export functions for the PLC TSX 37 or TSX 57 applications allow you:� to insert or to duplicate all or part of IL, LD, ST, Grafcet program module.� to insert an IL, LD or ST section into a task (MAST, FAST, EVT...).� to insert a DFB type into the list of DFBs.� to insert symbolized variables in the table of variables.
File types The following file types can be imported or exported:� LD source denoted by *.LD.� IL source denoted by *.IL.� ST source denoted by *.ST.� Grafcet source denoted by *.GR7.� Symbols source denoted by *.SCY.� DFB type source denoted by *.DFB.� DFB type binary denoted by: *.UFB.� Application source denoted by *.FEF.
Notes:File source code is 8 bit ASCII conforming to ISO standard 8859-1.
The input of code is possible directly using WINDOWS compatible editors, such as Word in text format (*.TXT).
The code of a DFB type binary is not accessible (encrypted).
Possible commands
File/Export supports the export of:� All or part of a LD, IL, ST or Grafcet program module.� All or part of the symbols table.� A DFB type.
File/Import supports the import of:� An LD, IL, ST, G7 file.� A DFB type.� A symbol source.
Notes:In order to select the directory containing the application source files, use the command Options/Customize. (The file PL7.INI contains the pathname for the source files). The source directory becomes the current directory for import/export.
331

Import/Export
Import/Export source files
General points A source file is composed of a minimum of three blocks of information structured in lines of a maximum 1024 characters, terminating in one or two end of entry characters.
A block is identified by its name between [ ].
The end of the source file is identified by the "[EOF]" (End Of File) character string.
Description of the blocks
A file is made up of the following blocks:� A [HEADER] block, containing general information (Date, Manufacturer’s Name).� The [APPLICATION] block identifies:
� The name of the source application.� Date of creation.� Version.� Comments.
� The [VENDOR] block describes the configuration (number of timers, counters, internal bits, etc.).
� The [SOURCE UNIT] block for the program modules contains:� LD code for *.LD files.� IL code for *.IL files.� ST code for *.ST files.� GR7 code for *.GR7 files.� Properties, parameters and code for DFB files (*.DFB).
� The [DATA UNIT] block for the symbols files contains:� application variables (file denoted by "*.SCY").
332

Import/Export
LD source file Header Block
Application Block
Source Unit Block
[HEADER]DATE = date #1999-12-10STANDARD = ’PLCopen v0.1 1993’SENDER = ’Schneider Automation PL7 PRO V3.4’
[APPLICATION]NAME = ’MACHINE_DOSAGE’DATE = date_and_time#1999-12-10-14:52:06VERSION = ’0.125’
[SOURCE_UNIT]SU_TYPE = PROGNAME = ’MAST_MAIN’LANGUAGE = LDBODY =ADDRESS = MAST MAINPROGRAMRUNG (*Mixing timer*)P_CONTACT(%M17),BLOCK(%TM0),H_LINK(7),COIL(%M15);EMPTY_LINE;EMPTY_LINE;END_RUNGRUNG(*Management of mixer emptying*)OPEN_CONTACT(%X1.0),H_LINK,P_CONTACT(%M200),OPEN_CONTACT(%M16),H_LINK(3),OPERATE DEC %MD12 END_BLOCK;END_RUNGEND_PROGRAM[EOF]
333

Import/Export
IL source file Header Block
Application Block
Source Unit Block
[HEADER]DATE = date #1999-10-10STANDARD = ’PLCopen v0.1 1993’SENDER = ’Schneider Automation PL7 PRO V3.4’
[APPLICATION]NAME = ’MOP5’DATE = date_and_time#1999-10-10-14:52:06VERSION = ’0.125’
[SOURCE_UNIT]SU_TYPE = PROGNAME = ’MAST_SR1’LANGUAGE = ILBODY =ADDRESS = MAST SR1 PROGRAM(*PHRASE*)(* *) LDN %M0 ST %M1LD %M2 ST %M3(*END_PHRASE*)END_PROGRAM[EOF]
334

Import/Export
ST source file Header Block
Application Block
Source Unit Block
7 source file Header Block
Application Block
[HEADER]DATE = date #1999-08-10STANDARD = ’PLCopen v0.1 1993’SENDER = ’Schneider Automation PL7 PRO V3.4’
[APPLICATION]NAME = ’MOP6’DATE = date_and_time#1999-08-10-14:52:06VERSION = ’0.125’
[SOURCE_UNIT]SU_TYPE = PROGNAME = ’FAST_MAIN’LANGUAGE = STBODY =ADDRESS = FAST MAINPROGRAM(*PHRASE*)(*INIT*)%L1: IF %MW0=%MWW1 THEN %SR1; END_IF;(*END_PHRASE*)END_PROGRAM[EOF]
[HEADER]DATE = date #1999-06-10STANDARD = ’PLCopen v0.1 1993’SENDER = ’Schneider Automation PL7 PRO V3.4’
[APPLICATION]NAME = ’MOP7’DATE = date_and_time#1999-06-10-14:52:06VERSION = ’0.125’
335

Import/Export
Source Unit Block
[SOURCE_UNIT]SU_TYPE = PROGNAME = ’Sequential’LANGUAGE = OTHERSBODY =ADDRESS = MAST ChartPROG_LANGAGE = GR7VAR_GLOBALEND_VARPROGRAMMAST’Chart’NB_PAGES = 8PAGE 0INITIAL_STEP 0 AT (C 4,L 3) : ACTION (N1,LD) :RUNG EMPTY_LINE;OPEN_CONTACT(%M8),H_LINK(9),COIL(%M10);END_RUNGEND_ACTIONEND_STEPTRANSITION (*TOP*) (LD) AT (C 4,L 4) : RUNG OPEN_CONTACT(%M1),H_LINK(9),HASH_COIL;END_RUNGEND_TRANSITIONT_S_OR_LINK FROM (C 4,L 4) TO (C 4,L 3) := [H_LINK FROM (C 4,L 4)TO (C 5,L 4), V_LINK FROM (C 5,L 4) TO (C 5,L 2), H_LINK FROM (C 5,L 2) TO (C 4,L 2)]END_PAGEPAGE 1END_PAGEPAGE 2END_PAGEPAGE 3END_PAGEPAGE 4END_PAGEPAGE 5END_PAGEPAGE 6END_PAGEPAGE 7END_PAGEEND_PROGRAM[EOF]
336

Import/Export
Symbols source file
Header Block
Application Block
Data Unit Block
[HEADER]DATE = date #1999-12-10STANDARD = ’PLCopen v0.1 1993’SENDER = ’Schneider Automation PL7 PRO V3.4’
[APPLICATION]NAME = ’MOTOR’DATE = date_and_time#1998-12-02-14:52:06VERSION = ’0.125’
[DATA_UNIT]DA_TYPE =LOCATION =NAME =BODY =VAR_GLOBALSurv_niv_malax : Alrm_dia (*Maximum mixer level reached: 25 liters*);Gest_prod_silo_a : Cpt_remplissage;Gest_prod_silo_c : Cpt_remplissage;Gest_prod_silo_b : Cpt_remplissage;Gest_prod_melangeur : Cpt_remplissage;Surv_malax : Ev_dia (*Mixing time too short (<5secs)*);Vidange_cuve : Simul_vidange;Dcy AT %M0 : EBOOL (*Start cycle*);Evt_1 AT %M1 : EBOOL (*Silo A valve (=0 closed =1 open)*); Evt_2 AT %M2 : EBOOL (*Silo B valve (=0 closed =1 open)*); Evt_3 AT %M3 : EBOOL (*Silo C valve (=0 closed =1 open)*); Evt_4 AT %M4 : EBOOL (*Hopper B1 valve (=0 closed =1 open)*); Evt_5 AT %M5 : EBOOL (*Hopper B2 valve (=0 closed =1 open)*); Evt_6 AT %M6 : EBOOL (*Mixer valve (=0 closed =1 open)*);END_VAR[EOF]
337

Import/Export
Exporting a Section , a Subroutine, an Event
Introduction The Export function can be accessed in local mode and in connected mode, with the PLC in Stop mode.
It supports export of:� all or part of a program module from within a language editor (LD, IL, ST, Grafcet),� a whole section, a program module from within the application browser.
Exporting from within an editor
Carry out the following actions:
Exporting from within the application browser
Carry out the following actions:
Step Action
1 Open the section (LD, IL, ST orGrafcet).
2 Select the part of the program to be exported (if nothing is selected, the whole module is exported).For Grafcet, select either:� the whole module (default),� the current page (the one where the cursor is),� from page x to page y inclusive, between values 0 and 7.
3 Select the command File/Export.
4 Select the disk and/or the directory where the file is to be saved using the pull-down menu In.
5 Enter a file name in the field Name.
6 Confirm with Save.
Step Action
1 Left mouse click on the Section or the Module to be exported or move the cursor using the arrow keys.
2 Using the contextual menu or the File menu or the keys Shift+F10 select the command Export
3 Select the disk and/or the directory where the file is to be saved.
4 Enter a file name in the field Name.
5 Confirm with Save.
338

Import/Export
Notes During export, the message "Processing (Esc to cancel):1" is displayed in the status bar.
Pressing Esc followed by confirmation stops the export and the source file is not created.
Errors The only error that can arise is insufficient disk space available. If this happens, an error message is displayed.
The generation of the source file in progress is aborted.
339

Import/Export
Importing a Grafcet/Ladder/List/Structured text section
Importing a Grafcet section
See: Creating or importing a Grafcet section, p. 107.
Importing a Ladder/List/Structured text section
See: Creating or importing an LD, IL, ST section, p. 105.
340

Import/Export
Exporting an LD, IL, ST, Grafcet source file
Introduction The Export function can be accessed off-line or on-line, PLC at Stop).
It is used to export:� all or part of a program module from a language editor (LD, IL, ST, Grafcet),� a complete section or program module from the application browser.
Exporting from an editor
Carry out the following:
Exporting from an application browser
Carry out the following:
Errors The only error that can occur with an Export is lack of available disk space; in this case an error message is displayed.
Step Action
1 Open the (SR, EVT, PRL, POST) section or module.
2 Select the part of the program to be exported (if nothing is selected, all the module is exported).With Grafcet:Select either:� the whole module (by default),� the current page (the one the cursor is on),� from page x to page y with x, y between 0 and 7.
3 Select the command File/Export.
4 Select the disk and/or directory where the file is to be saved using the scrollable menu In.
5 Enter a filename in the field Name.
6 Confirm with Save.
Step Action
1 Right click on the section or module to be exported or select with the arrow keys and then press (Shift + F10).
2 Select the command Export.
3 Select the disk and/or directory where the file is to be saved.
4 Enter the filename in the field Name.
5 Confirm with Save.
341

Import/Export
Importing an LD, IL, ST, Grafcet source file.
Introduction The Import function can be accessed in local mode and in connected mode, with the PLC in Stop mode.
It supports import of:� A source file into a section (empty or already programmed) from a language
editor,� A section or a module from the application browser.
Importing from within an editor
Carry out the following actions:
Importing from within the application browser
� Importing a Section (See Creating or importing an LD, IL, ST section, p. 105),� Importing an SR (See Creating or importing a subroutine (SR), p. 109),� Importing an event (See Creating or importing an event, p. 110),� Importing a Grafcet source:
� This applies to all or part of the chart (CHART module, Step-Macro).� It can be carried out from any page referenced by the position of the cursor.
The imported pages replace the current pages. � If Grafcet objects (step activity bits, step time bits) are referenced in the
application, a message informs the user.� At the end of the import, the cursor is positioned on the last defined return key
symbol or on the page which follows the last imported page.� Special cases:
-If eight pages are read, the cursor remains on page seven.-If the user aborts the import part way through, the cursor is positioned on the first page of the import.-If the contents of a page are incorrect, the editor displays the page in error with the correction functions for the page and the look-up functions for the pages already imported.-The contents of a Macro-Step cannot be imported into the CHART and vice versa.
Step Action
1 Open the section, or the module (SR, EVT, PRL, POST).
2 Put the cursor in the editor in the position where you want to insert the code.
3 From the File menu select the command Import.
4 Select the source file relating to the section to be imported.
5 Carry out any necessary corrections (label %Li, Step number…).
6 Confirm the import with Enter or select the command Edit/Accept (CTRL+W) or click
on the icon .
342

Import/Export
Notes During import, the message "Processing (Esc to cancel): 1" is displayed in the status bar.
Pressing Esc followed by confirmation deletes the code already inserted.
Errors Two types of error are possible:� Non blocking errors, in this case:
� The corresponding editor is launched on the phrase, the contacts network or the chart containing the anomaly.
� The user can correct or abort the import. If the correction is carried out the import continues.
� Blocking error (source file modified in the editor), in this case:� The user can only abort the import, the import is interrupted.� The user must remedy the cause and restart the import procedure.
Note:If an object is not configured, accessing configuration to remedy the problem is possible, after validation the import can continue.
343

Import/Export
Exporting variables
Functionality The Export variables function can be accessed in local mode and in connected mode, with the PLC in Stop mode.
Procedure Carry out the following actions:
Notes:During the processing period the message "Processing object (Escape to cancel):xx" (number of the element being processed) is displayed in the status bar.
Pressing Esc followed by confirmation stops the processing and no source file is created.
Errors The only error that can arise is insufficient disk space available. If this happens, an error message is displayed.
The generation of the source file in progress is aborted.
Step Action
1 Open the variables editor from the application browser by double clicking with the left mouse button on one of the data families or by using the keys Shift+F10 or via the contextual menu command Open.
2 From the File menu select the command Export.
3 Select the disk and/or the directory where the file is to be saved using the pull-down menu In.
4 Enter a file name in the field Name.
5 Select the export mode.� All types: all the database entries are exported,� Current type: only the data relating to the current display type is processed.
6 Confirm withSave.
344

Import/Export
Importing variables
Introduction The Import variables function can be accessed in local mode and in connected mode, with the PLC in Stop mode.
It supports insertion of a data file into the application (%M, %S, %K, %X, E/S, SFB, EFB, DFB) from the variables editor.
Managing conflicts
There are three kinds of conflicts:� Address conflict:
� The symbol to be read already exists in the symbols database, but it represents a different address
� Symbol conflict:� The address to be read is already represented in the symbols database, but
by a different symbol.� Comments conflict:
� The address to be read is already represented in the symbols database with the same symbol, but the 2 comments which are associated with them are different.
Three modes of operation allow you to manage these situations:� Overwrite mode:
� Priority is given to the contents of the source file.� Do not overwrite mode:
� Priority is given to the contents of the symbols database.� Dialog mode:
� The user chooses the priority in relation to the conflict displayed.
Procedure Carry out the following actions:
Step Action
1 Open the variables editor from the application browser by double clicking with the left mouse button on one of the data families, or via the Contextual menu select the command Open.
2 Select the command File/Import.
3 Select the file .SCY to be imported.
4 Select the operation mode:� Overwrite,� Do not overwrite,� Dialog.
5 Accept with Open.
345

Import/Export
Notes:During the processing period the message "Processing object (Escape to cancel):xx" with xx the number of the element being processed is displayed in the status bar.
Pressing Esc causes the abort after restoring the current variable, the variables already restored are kept.
Errors On detecting collisions in the database the user can either:� Keep the contents of the database.� Overwrite the variable with that from the file being restored.� Abort the import.
346

Import/Export
Importing/Exporting variables in EXCEL format
Introduction This function concerns the unitary import/export of variables.It is possible to import/export application variables using a format which is compatible withEXCEL.This makes it easier to work with and create source files, using EXCEL.
General points TXT is the chosen format, using tabs as separators. Provision is made for this save format in the EXCEL tool.However, when reading these files in EXCEL, it must be indicated to EXCEL that the tabulation character is to be interpreted as a separator (standard principles of file import into EXCEL).
How to export variables in EXCEL format
Carry out the following steps:
Step Action
1 In the Structure View of the Application Browser double click on the Variables directory.
2 Right click (contextual menu) on one of the variable items.
3 Click on open.Result: a variables window appears.
4 Select File → Export.Result: the following window appears.
5 Choose the export destination directory and in the Type field select: "Text (separator: tabulations *TXT)".
6 Name the file and click on Save.
Export
Save
Cancel
Pl7user
FIRST screen
?
Export mode
In:
Name:
Type:
All types
Text (separator: tabulations *TXT)Source Symbols (*.SCY)Text (separator: tabulation *TXT)All (*.*)
347

Import/Export
How to import variables in EXCEL format
Carry out the following steps:
Step Action
1 In the Structure View of the Application Browser double click on the Variables directory.
2 Right click (contextual menu) on one of the variable items.
3 Click on open.Result: a variables window appears.
4 Select File → Import.Result: the following window appears.
5 Choose the directory from which the import should be carried out and in the Type field select: "Text (separator: tabulations *TXT)".
6 Select the file and click on Save.
Import
Open
Cancel
Pl7user
?
Import mode
Find:
Name:
Type:
Overwrite
Text (separator: tabulation *TXT)Source Symbols (*.SCY)Text (separator: tabulation *TXT)All (*.*)
test. TXT
test. TXT
Dialog
348

Import/Export
Exporting a functional module
Introduction Exporting a functional module carries out:� the export of the sections, events and Grafcet modules which make up the
functional module,� the export of the functional sub-modules which make up the functional module.
The short name and the function name are exported and then restored at the time of import.
The function Export an application can be accessed in local mode and in connected mode, with the PLC in Stop mode.
Procedure Carry out the following actions:
Notes:
It is forbidden to export a functional module if an associated section, event or Grafcet module is being modified.
Note: When the functional module has one or more DFB instances:The receiver application must contain the DFB type(s) corresponding to the functional module instances, in order to be able to subsequently import the functional module.
Step Action
1 Left mouse click on the module to be exported or position the cursor over it using the arrow keys.
2 Using the contextual menu or the File menu or using the Shift+F10 keys select the command Export.
3 Select the disk and/or the directory where the file is to be saved (default directory is PL7user).
4 Enter a file name in the field Name (the source file is of the type *.FM)
5 Confirm with Save.
349

Import/Export
Exporting a functional module with operating screen(s)
The export of a functional module leads to the creation of a directory NomRep.FM which contains:� a source file NomMod.FM,� a directory ECREXP in which the tree structure dedicated to the operating
screens is located.
The export procedure is identical to that described above.
Exporting a functional module with animation table(s)
The source file NomMod.FM contains the source of each animation table contained in the functional module.
The export of the functional module is allowed if no animation table is being modified.
The Export procedure is identical to that described above.
350

Import/Export
Importing a functional module
At a Glance The import of a functional module behaves like a creation with: � the import of the sections, events and Grafcet modules which make up the
functional module,� the import of the functional sub-modules which make up the functional module.
The short name and the function name are exported and then restored at the time of import.
If a section, event, Grafcet module, a functional sub-module making up the imported functional module already exists with the same name, the software allows you to enter a new name.
The Import function can be accessed in local mode and in connected mode, with the PLC in Stop mode.
Two import procedures are available:� import without reassignment,� import with reassignment, which allows you to make changes before starting the
import.
Procedure for importing without reassignment
Carry out the following actions:
Note:As only one Grafcet section is allowed in the MAST task, importing a module containing a Grafcet section is forbidden if a Grafcet section already exists.
Note: When the functional module has one or more DFB instances:The receiver application must contain the DFB type(s) corresponding to the functional module instances, in order to be able to import the functional module.
Step Action
1 Left mouse click on the destination directory (station or functional module directory) or position the cursor over it using the arrow keys.
2 Using the Contextual menu, the File menu or the Shift+F10 keys select the Import command.
3 Select the source file (*.FM) to be imported.
4 Accept with Open
351

Import/Export
Procedure for importing with reassignment
Carry out the following actions:
Note:For more information on the wizard, see "Importing functional module using the wizard" (See Importing a functional module using the wizard, p. 353).
Importing a functional module with animation table(s)
The contents of the file NOM.FM containing the source of each animation table in addition to the information linked to the functional module is imported.
The possible conflicts are dealt with in the section Importing animation table(s), p. 359.
If the procedure with reassignment is selected then:� it is impossible to reassign a variable present uniquely in an animation table,� reassigned variables are also reassigned at the level of the animation tables
which contain them.
Importing a functional module with operating screen(s)
If the procedure with reassignment is selected then:� it is impossible to reassign a variable present uniquely in an operating screen,� reassigned variables are also reassigned at the level of the operating screens
which contain them.
Step Action
1 Left mouse click on the destination directory (station or functional module directory) or position the cursor over it using the arrow keys.
2 Using the Contextual menu or the File menu or using the keys Shift+F10 select the command Import.
3 Select the source file (*.FM) to be imported.
4 Check the box Open with wizard.
5 Accept with Open.
352

Import/Export
Importing a functional module using the wizard
Introduction When importing with reassignment, if you want assistance check the box Open with wizard. This tool guides you through the reassignments.
Detailed below are the different Tabs in the tool.
353

Import/Export
Directory Tree Tab
Supports the modification of the different elements. The source name is quoted as a prefix to the new name: Source Name => Target Name.
The entry is enabled by a double left click on the object, confirmed by the Enter key, cancelled by the Esc key.
The different elements are:� Functional Module:
� The name is made up of a maximum of eight alphanumeric characters (‘A’..’Z’ and ‘0’..’9’) and underscore (‘_’), the first character obligatorily being a letter.
� The name must be unique.� The long name associated with a functional module can be displayed and
modified in the Long name field.� Section, Task:
� The name is made up of a maximum of sixteen alphanumeric characters (‘A’..’Z’ and ‘0’..’9’) and underscore (‘_’), the first character obligatorily being a letter.
� The name of a section must be unique.� The task associated with a section (not including the Grafcet section) can be
displayed and modified with the help of the associated pull-down menu (MAST, FAST).
� Grafcet and Macro-Steps:� When the Grafcet section is imported in its entirety, it appears in the graphical
representation of the functional module, and can thus be modified.� When Grafcet modules are imported independently of their Grafcet section,
the user can display and modify the name of the Grafcet section in the field "Grafcet Section". This field is visible as soon as a Grafcet module is highlighted in the tree directory.
� The name of the Grafcet entities PRL, POST and CHART cannot be modified.� For the macro-steps Macro<i>, the new name entered must not be more than
a maximum of 7 characters, only their number can be modified and this number must be between 0 and 63.
� The new macro-step Macro<i> must be unique, that is no other macro-step must have the same number, or correspond to a macro-step Target call.
� Events:� The name is made up of a maximum of five characters. Only the modification
of their number (0..63) is allowed.� The new event Evt<i> must be unique.
354

Import/Export
Addresses Tab Presents the symbols and addresses of the functional module and supports modification of the name of the different elements.
The entry is enabled by a double left click on the object, confirmed by the Enter key, cancelled by the Esc key.
The family field supports the selection of the different imported objects:� Standard objects are taken into account.� Derived objects are not taken into account:
� Indexed object.� Extract bits from indexed object.� Indexed extract bit.� Table.� Indexed table.
DFB Tab Presents the DFB instances which are declared in the functional module.
The entry is enabled by a double left click on the object, confirmed by the Enter key, cancelled by the Esc key.
The different elements are:� Comment:
� The comment associated with a DFB instance in the table can be displayed and modified in the Comments field.
� The comment is written on a single scrollable line. It can contain a maximum of 508 characters.
� Type, Source Name, Target Name:� Type: indicates the type of a DFB.� Source Name: indicates the source name of the instance.� Target Name: supports the modification of the target name of every instance.
1. The name is made up of a maximum of thirty-two alphanumeric characters (‘A’..’Z’ and ‘0’..’9’) and underscore (‘_’), the first character obligatorily being a letter.2. The Target name of the new instance must be unique, that is, no Target symbol nor other instance of Target DFB, nor any DFB type can have the same name.
� Ordering DFBs:� In alphabetical order by the DFB type.� In alphabetical order by the Source name of the instances.
355

Import/Export
External Calls Tab
Presents the calls to the SRs from the functional module, and the calls to the Macro-steps not imported with the functional module (see directory tree).
The entry is enabled by a double left click on the object, confirmed by the Enter key, cancelled by the Esc key.
The different calls are:� Source Call:
� Presents the source SRs and Macro steps.� Target Call:
� Supports the modification of the target SRs and Macro steps.� Only the modification of the SR<i> number is allowed. This number must be
between 0 and 254. The new Target call SR<i> must be unique.� Only the modification of the M<i> number is allowed. This number must be
between 0 and 63. The new Target call must be unique.� Ordering SRs and Macro-Steps
� First the calls to SRs then the calls to Macros-steps.� In alphabetical order by the number of the Source call.
Correspondence File Zone
This file in text format contains all the information concerning the reassignments carried out in the different tabs described above.
This information is that defined in the tabs:� Directory Tree.� Addresses.� DFB.� External Calls.
The commands available in the "Correspondence Files" zone are:� Save:
� Allows you to store in a file the reassignments carried out up to that time.� Retrieve:
� Allows you to automatically execute the reassignments previously stored in a file.
WARNING
The correspondence information is specific to the functional module analyzed. It is strongly recommended that you save your work to disk before exiting the "IMF" function, as once it is closed, all the work carried out on the functional module is lost.
Failure to follow this precaution can result in death, serious injury, or equipment damage.
356

Import/Export
Exporting animation table(s)
Introduction The Export function can be accessed in local mode and in connected mode, with the PLC in Run or Stop mode.
It supports export of:� a single animation table via:
� the application browser,� the animation table editor.
� a set of animation tables via:� the application browser,
Rules Exporting an animation table via the animation table editor or via the application browser is only possible if the table is not being modified.
Exporting a set of animation tables via the application browser is only possible if no animation table editor is open in modification mode.
The export can be interrupted at any moment by pressing the Escape key. After confirming this, the export is stopped and no source file (*.TAB) is created.
Exporting via the animation table editor
Carry out the following steps:
Step Action
1 Select the File/Export command, then the Export window is displayed on the screen.
2 Via the Export window choose:� in the In zone the path where the source file containing the animation table (by
default \PL7USER) is stored,� in the Name zone the name of the source file (Nom.TAB).
3 Confirm with Save.
357

Import/Export
Exporting a set of animation tables via the application browser
Carry out the following steps:
Exporting one animation table via the application browser
Carry out the following steps:
Errors The only error that can arise when processing an Export is insufficient disk space available. If this happens, an error message is displayed.
Step Action
1 Select the Animation tables directory.
2 Select the File/Export command, or from the contextual menu the Export command, then the Export window is displayed on the screen.
3 Via the Export window choose:� in the In zone the path where the source file containing the animation tables (by
default \PL7USER) is stored,� in the Name zone the name of the source file (Nom.TAB).
4 Confirm withSave.
Step Action
1 Double click on the Animation tables directory.
2 Select the animation table to be exported.
3 Select the File/Export command, or from the contextual menu the Export command, then the Export window is displayed on the screen.
4 Via the Export window choose:� in the In zone the path where the source file containing the animation table (by
default \PL7USER) is stored,� in the Name zone the name of the source file (Nom.TAB).
5 Confirm with Save.
358

Import/Export
Importing animation table(s)
At a Glance The Import function can be accessed in offline mode and in online mode, with the PLC in Run or Stop mode.
It is used to import the following via the application browser:� a single animation table,� a set of animation tables.
Rules When importing, if there is an identity problem between the name of the imported table and a table already existing in the application, a dialog box appears offering the option of renaming the table being imported.
When importing, only the addresses are imported but not the symbols. Therefore, the imported animation table is slaved the application’s existing symbols database.
The import can be aborted at any moment by pressing the Escape button and after confirming this, the import is stopped and the animation table being imported is not imported.For a source file containing several animation tables, the imported tables are not deleted.
Importing a table or a set of animation tables via the application browser
Carry out the following actions:
Step Action
1 Select the Animation tables directory.
2 Select the File/Import command, or from the contextual menu the select the Import command. The Import window is displayed on the screen.
3 From theImport window choose:� in the Search zone the path of the location from which the source file containing
the animation table(s) (by default \PL7USER) is to be read,� in the Name zone the name of the source file (NAME.TAB).
4 Confirm with Open.
359

Import/Export
Errors When importing, if the animation table contains a variable that is not configured in the application, a dialog box indicating the problem is displayed, giving the option:� of either ignoring the variable and continuing the import,� or of interrupting the import so that the table being imported is not imported, but
the tables already imported are not deleted.
If, when importing, the source file contains:� a reference to a DFB type that does not exist in the application, then a dialog box
is displayed indicating the conflict, giving the option:� of either ignoring the variable and continuing the import,� or of interrupting the import so that the table being imported is not imported,
but the tables already imported are not deleted.� a reference that does not exist in the application, but whose DFB type does exist,
then a dialog box is displayed indicating the conflict, and giving the option:� of either ignoring the variable and continuing the import,� or of interrupting the import so that the table being imported is not imported,
but the tables already imported are not deleted.
360

Import/Export
Export of runtime screens
Introduction PL7 is used to export runtime screens or families of runtime screens.
The Export function can be accessed in offline mode and in online mode, with the PLC in Run or Stop mode.
How to export a runtime screen (or a family)
Carry out the following steps:
Step Action
1 In the Application Browser in the structure view double click on the Runtime screens directory.Result:
2 Right click on one of the runtime screen items or on a family directory (example here: Home, Information system…).
Ecrans d’exploitation
Ecrans Messages Objets
7 - Bit systèmes6 - Grafcet
3 - Lisez_moi
COMPORTEMENT DFB
0 - Dosage_Melange_Produits2 - Ecran_ controle
4 - Ecran_comportement_DFB5 - Informations_sur_mise_au_point_DFB
8 - Surveillance_malaxeurDIAGNOSTIC_APPLICATION
DOSAGE_PRODUITS
INFORMATIONS SYSTEME
ACCUEILEcran
1 - Ecran_accueil
361

Import/Export
3 Select the Export command.Result:
4 Choose the directory from which you wish to import the screen or the family of screens.
5 Select the screen and click on Export.
Step Action
Exporter des écrans
Exporter Annuler
Parcourir...
Sélection des écrans
Exporter vers
c:\PL7USER
7 - Bit systèmesINFORMATIONS SYSTEME
ACCUEILEcran
Ecran_accueilCopie de Ecran_accueil
Lisez_moi
362

Import/Export
Import of runtime screens
Introduction PL7 can be used to import runtime screens or runtime screen families into your applications.
The Import function can be accessed in offline mode and in online mode, with the PLC in Run or Stop mode.
How to import a runtime screen (or a family)
Carry out the following steps:
Step Action
1 In the Application Browser in the structure view double click on the Runtime screens directory.Result:
2 Right click on one of the runtime screen items or on a family directory (example here: Home, Information system…).
Ecrans d’exploitation
Ecrans Messages Objets
7 - Bit systèmes6 - Grafcet
3 - Lisez_moi
COMPORTEMENT DFB
0 - Dosage_Melange_Produits2 - Ecran_ controle
4 - Ecran_comportement_DFB5 - Informations_sur_mise_au_point_DFB
8 - Surveillance_malaxeurDIAGNOSTIC_APPLICATION
DOSAGE_PRODUITS
INFORMATIONS SYSTEME
ACCUEILEcran
1 - Ecran_accueil
363

Import/Export
3 Select the import command.Result:
4 Choose the directory from which you wish to import the screen or the family of screens.
5 Select the screen(s) and click on import.
Step Action
Importer des écrans
Importer Annuler
Parcourir...
Sélection des écrans
Importer depuis
c:\PL7USER
ACCUEILEcran
Ecran_accueil
364

Import/Export
Export of a DFB type
At a Glance Export of a DFB type is global and includes:� the properties of the DFB type,� the descriptive form,� the description of public interfaces (inputs, inputs/outputs, outputs) and public
variables,� the description of private variables,� the code.
A DFB type can be exported from the application browser or the DFB type editor.
Two export formats are offered:� standard (unprotected DFB types ),� binary (protected (See How to protect a DFB, p. 263) or unprotected DFB types).
365

Import/Export
Exporting a standard format DFB type
The Export function can be accessed in local mode and in online mode, the PLC in Stop.
Carry out the following actions:
Comments:Export from the DFB type editor is authorized whether DFB type is enabled or not.
Only an enabled DFB type can be exported from the application browser.
Export of a binary format DFB type
The Export binary function can be accessed in local mode and in online mode, the PLC in Stop.
Carry out the following actions:
Comment:Export is possible if the DFB type is enabled.
Step Action
1 � Export from the application browser:1. Left mouse click on the DFB type or put the cursor over it using the arrow keys.2. From the context menu or the File menu or using the keys Shift+F10, select the Export command.
� Exporting from the DFB type editor:1. Left mouse click on the DFB type or put the cursor over it using the arrow keys.2. Edit the DFB type right mouse click + Open key.3. From the File menu, select the Export command.
2 Select the disk and/or directory where the file must be saved using the pull-down menu In.
3 Enter a file name in the Name field.
4 Confirm using Save.
Step Action
1 Left mouse click on the DFB type or put the cursor over it using the arrow keys.
2 From the context menu or using the keys Shift+F10 select Export binary.
3 Select the disk and/or directory where the file must be saved using the pull-down menu In.
4 Enter a file name in the Name field.
5 Confirm using Save.
366

Import/Export
Importing a DFB type
Introduction The Import function is only accessible in local mode.
The DFB type is imported from within the application browser.
The import of a DFB type is global and includes:� the properties of the DFB type,� the descriptive form,� the description of the public interfaces (inputs, inputs/outputs, outputs) and public
variables,� the description of the private variables,� the code.
Importing a DFB type in binary format
Carry out the following actions:
Importing a DFB type in binary format
carry out the following actions:
Step Action
1 Left mouse click on the directory DFB Type or position the cursor over it using the arrow keys.
2 Using the Contextual menu or the File menu or the keys Shift+F10 select the command Import.
3 Select the source file *.DFB relating to the type to be imported.
4 Confirm with Import.
Step Action
1 Left mouse click on the directory DFB Type or position the cursor over it using the arrow keys.
2 Using the Contextual menu select the command Import binary.
3 Select the source file *.UFB relating to the type to be imported.
4 Confirm with Import.
367

Import/Export
Specific cases It is possible that the DFB type to be imported is already present in the application.
Three cases are possible:� The DFB type present in the application is protected:
� In this case the import is impossible.� The DFB type present in the application is not protected and not instanced:
� A dialog box offers to replace, rename, cancel the import of the DFB type.� The DFB type present in the application is not protected but instanced:
� If the interfaces are identical, a dialog box offers to replace, rename or cancel the import of the DFB type.
� If the interfaces are different, the import is impossible. It is then necessary to delete the instances first.
368

Import/Export
Exporting an application
Introduction The Export an application function can be accessed in local mode and in connected mode, with the PLC in Stop mode.
Exporting an application without DFB
Carry out the following actions:
Exporting an application with DFB
Exporting an application only takes into account the enabled DFB types.
Two cases are possible:� Non protected DFB(s):
� All the contents of the DFB(s) are saved in the resulting export file *.FEF.� Protected DFB(s) or DFB(s) exported from PL7-Junior:
� Only the names of the DFB type are saved in the resulting file *.FEF.� The binary format of the DFB(s) (*.UFB) must also be exported (see Exporting
a DFB type (See Export of a DFB type, p. 365)).
In the two cases, the Export procedure is identical to that described above.
Exporting an application with animation tables
Exporting the application includes all the animation tables contained in the directory Animation tables in the application browser.
The source file of the application (NomAppli.FEF) contains the source of the animation tables.
The Export procedure is identical to that described above.
Step Action
1 Open the application to be exported.
2 On the File menu select the command Export an application, or from the directory Station using the Contextual menu or using the keys Shift+F10 select Export an application.
3 Select the disk and/or the directory where the file is to be saved using the pull-down menu In.
4 Enter a file name in the field Name.
5 Confirm with Save.
369

Import/Export
Exporting an application with operating screens
The export of the application leads to the creation of a directory.
This directory NomRep.FEF contains:� the source file NonAppli.FEF,� a directory ECREXP in which the tree structure dedicated to the operating
screens is located.
The Export procedure is identical to that described above.
370

Import/Export
Importing an application
At a Glance The Import application function can be accessed in offline and online mode, with the PLC in Stop mode.
The Import application function involves:� redefining the inputs/outputs,� finding and replacing modified objects,� initializing the station with the new application obtained.
Importing an application without DFBs
Carry out the following actions:
Importing an application with DFBs
The function Import an application with DFB is only accessible in offline mode.
There are two possible scenarios:� Non protected DFB(s):
� Their contents which are saved in the *.FEF are imported in the same way as the rest of the application.
� The Import procedure is the same as that described above.� Protected DFB(s):
� When Importing, a dialog box asks for the pathname of the binary file(s) (*.UFB) in order to import them.
Step Action
1 Create an empty application.
2 Using the Contextual menu, the File menu or the keys Shift+F10 select the command Import an application.
3 Select the *.FEF file to be imported.
4 Confirm with Open.
5 If applicable correct any non configured objects.
6 Click on OK.
371

Import/Export
Carry out the following actions:
Importing an application with animation tables
The application import incorporates all the animation tables contained in the file NAME.FEF.
If any non configured variables are present in the application, a list appears allowing the user to modify the current configuration and continue with the import.
The Import procedure is identical to those described above.
Errors Three possible scenarios:� Importing an application without DFBs:
� An error message is displayed.
� Importing an application with DFBs:� An error can appear if:
-The source file has been modified with a text editor.-The DFB type is not present on the station onto which the application is imported.-The DFB type is of a different application identification and is incompatible.
� An error message is displayed, and the station is reinitialized to the application by default.
� Importing an application with animation tables.
Step Action
1 Create an empty application.
2 Using the Contextual menu, the File menu or the keys Shift+F10 select the command Import an application.
3 Select the *.FEF file to be imported.
4 Confirm with Open.
5 If applicable correct any non configured objects.
6 Click on OK.
7 Using the Find drop-down menu, enter the name of the disk and/or directory where the first type of DFB in the (*.UFB) list is located.
8 Confirm withImport.
372

Import/Export
Exporting an application in FNES format (Input/Output Neutral File)
Introduction The FNES file (Input/Output Neutral File) generated by an export can only be used with a single PLC.
It contains the description of all the symbolized Inputs/Outputs, except for discrete Inputs/Outputs when all the Inputs/Outputs are described (symbolized or not).
This functionality is only accessible in local mode.
This functionality is not accessible (menu grayed out) if a modification is being carried out in the editor and vice versa, during the execution of an Export, no other action is possible in the editor.
Only the software PL7 Pro allows access to the Export/Import FNES functionality.
Procedure Carry out the following actions:
Notes:The export can be interrupted by the user using the Escape key, in this case, no FNE file is exported.
The default directory offered is that on the Customize Options/Source directory menu, subsequently, the offered directory will always be the last entered (for the current PL7 session).
Errors The errors that can arise when processing an Export are insufficient disk space available or a problem retrieving data.
An error message is displayed and the process is interrupted. If this happens, no file is generated.
Step Action
1 From the Station directory on the Contextual menu or using the File menu or the keys Shift+F10, select Export/Import FNES+Export FNE.
2 Select the destination directory and indicate the name of the file (*.FNE),
3 Click on Save.
373

Import/Export
Importing an application in FNES format
At a Glance Importing a FNES file (Input/Output Neutral File) allows you to increment the application’s symbols database, but does not modify its configuration data in any way.
Inserting symbols into an existing symbols database involves managing the following conflicts:� Address conflict:
� The symbol to be read already exists in the symbols database, but represents a different address.
� Symbol conflict:� The address to be read is already represented in the symbols database, but
by a different symbol.
� Comment conflict:� The address to be read is represented in the symbols database already, by the
same symbol, but the 2 comments associated with them are different.
To deal with this, 3 import modes are offered:� Overwrite mode (to overwrite symbol database):
� Priority is given to the contents of the FNES file.
� Do not overwrite mode (does not overwrite symbols database): � Priority is given to the contents of the symbols database.
� Dialog mode (default mode):� The user chooses the priority depending on the conflict displayed.
This function can only be accessed in offline mode.
This function cannot be accessed (menu grayed out) if a modification is in progress in the editor and conversely, during Import execution, no other actions are possible in the editor.
Only PL7 Pro software provides access to the Import/Export FNES function.
374

Import/Export
Procedure Carry out the following actions:
Notes:The import can be aborted by pressing the Escape key.The import is aborted after restoring the current object, but the objects that have already been imported remain.
The directory proposed by default is that specified in the Options/Customize/Source directory menu. Subsequently, the proposed directory will always be the last entered (for the current PL7 session).
If several PLCs are present in the file, a message is displayed giving the user the possibility of consulting the list of PLCs or of canceling the import.If the user chooses to continue the import, the list of associated applications and processors is displayed.
Errors There are two possible scenarios:� Blocking error:
� These errors interrupt the import. They can only occur if the FNE file was generated outside of PL7 Pro (e.g.: bad syntax in the FNE file).You must abort the import, correct the error (fix the FNE file), then restart the desired Import.
� Non blocking error:� Example: error caused by a collision or bad configuration.
You must replace the symbol or symbols already configured or cancel the import.
Step Action
1 From the Station directory using the Contextual menu, the File menu or the Shift+F10 keys, select Import/Export FNES + Import FNE.
2 Select the source directory and give the file name (*.FNE).
3 Select import mode:� overwrite mode,� do not overwrite mode,� dialog mode.
4 Confirm with Open.
375

Import/Export
376

18
Configuring the Uni-telway linkIntroduction
Subject of this chapter
This chapter describes how to configure the Uni-telway driver.
What’s in this Chapter?
This chapter contains the following topics:
Topic Page
General 378
Configuration of the terminal/PLC link 380
Advanced configuration 386
377

Configuring the Uni-telway link
General
At a Glance The Uni-telway tool is used to configure the operating parameters of the Uni-Telway driver depending on the PLC’s terminal port characteristics.
How to configure the UNITELWAY driver
The following table describes the procedure for configuring the UNITELWAY driver.
Step Action
1 From the Start menu select the Program group.
2 Select the Modicon Telemecanique program group.
3 Select XWAY Driver Manager.
4 Click on the UNITELWAY tab.Result: the following window appears:
Management properties of XWAY drivers
OK
UNITELWAY Driver V7.7 IE17Copyright © 1995-1999 Schneider Automation S.A.SStatus: In service
Configuration
XWAY Manager FPC10 Driver UNITELWAY Driver XWAY Test
FPWFPW
378

Configuring the Uni-telway link
5 Click on the Configuration button.Result: The dialog box below appears:
6 Configure:� the communication port,� the transmission speed,� the UNITELWAY address.
7 Click on Save.
Step Action
Configuration UNI -TELWAY - UNTLW01
Enregistrer
Ouvrir
Par défaut
Fichier Edition ?
300
Auto adaptation(en secondes)
Modem
Maître
31
1
Base Nombre
9600
600 19200
1200 38400
2400 57600
4800 115200
COM1
COM2
COM3
COM4
Vitesse (bauds) Port COM
Param...
Adresse UNI-TELWAY
379

Configuring the Uni-telway link
Configuration of the terminal/PLC link
At a Glance Various configuration parameters are available for the Uni-telway driver.Main configuration screen.
Description of the COM Port zone
This zone allows you to select the terminal serial port (COM1 to COM4), to be used for Uni-telway communication. The default value is COM1 (COM2 on TELEMECANIQUE FTX or CCX terminals).Use the other COMs according to the availability on your hardware.
The Param. button makes the following dialog box appear:
This allows you to force the hardware configuration of the selected serial port. By default, the configuration is determined automatically by the driver at start up.
UNI-TELWAY Configuration – UNTLW01
Save
Open
By default
File Edit ?
300
Auto adaptation(in seconds)
Modem
Master
31
1
Base Number
9600
600 19200
1200 38400
2400 57600
4800 115200
COM1
COM2
COM3
COM4
Baud rate COM Port
Param…
UNI-TELWAY Address
Cancel
OK
I/O Address
Automatic Configuration
Auto
Interrupt
RS485 Port
AutoBy default
UNI-TELWAY Configuration- Port
380

Configuring the Uni-telway link
Using the COM 2 port in RS 232 CThe FTX 417-40 terminal allows the use of the COM 2 port in serial link RS 232C. This type of use necessitates the deselection of theAutomatic configuration and RS485 Port boxes.
Description of the speed zone and the address zone
Speed Zone (bauds):This zone is used to select the standard speed of the serial link, from 300 to 115200 bauds. If the actual link speed is different from the selected speed, the auto driver adapts its speed. The Auto adaptation field defines the auto adaptation mechanism time in seconds. The driver automatically changes its speed after n seconds if the connection is not established at the current speed. Auto adaptation is disabled for a value of 0. The values by default are 9600 bauds for the speed and 1 second for the auto adaptation.
Uni-telway address zone:This zone is used to select the standard link address as well as the number of addresses to which the Uni-telway driver responds. The default values are 1 for the standard address and 3 for the number of addresses that respond to the following configuration: Ad0=1, Ad1=2, Ad2=3 (Ad0 corresponding to the server address, Ad1 to the client application address and Ad2 to the listening application address).
Description of the Save button
Save button:is used to save the Uni-telway driver configuration. The Save button appears in the following dialog box:
Note: apart from with the generally marginal use of serial link cards or internal modems which do not comply with the normal values used for the serial port’s hardware configuration, it is advisable to select Automatic configuration. When this box is ticked, you no longer have access to I/O address, Interrupt and RS 485 Port.
UNI-TELWAY Configuration- Save
Cancel
OK
Dynamically reinitialize driver (in the memory)
Save configuration file (DUNTLW.00?)
381

Configuring the Uni-telway link
Elements and their functions:
Description of the Open button
The Open button:is used to read the Uni-telway driver configuration.The Open button appears in the following dialog box:
Elements and their functions:
Element Function
Saving a configuration file (DUNTLW.00?
The configuration of the Uni-telway driver is saved in a configuration file on disk (usually DUNTLW.001 in the xwaydrv directory). This file is read by the driver when the computer boots up. The modifications will therefore be acknowledged the next time the computer is started.
Dynamically reinitialize the driver (in memory)
The configuration is directly described in the driver memory. Modifications are acknowledged immediately by the driver.Dynamic reinitialization is impossible:� if the driver is not loaded into the memory (at installation, for
example),� if the modifications relate to parameters that cannot be dynamically
modified (the COM port, for example),� if the driver is being used (if the PL7 is connected, for example).
Element Function
Open a configuration file (DUNTLW.00?)
The configuration of the Uni-telway driver is read in a configuration file on disk (usually DUNTLW.001). From this, you can view and modify the driver’s initial configuration (read upon start-up).
Read current driver configuration (in memory)
The configuration is read directly in the driver memory. From this you can view and modify the driver’s real time configuration. This selection is deactivated if the driver is not loaded into the memory (at installation, for example).
UNI-TELWAY Configuration- Open
Cancel
OK
Read current driver configuration (from memory).
Open configuration file (DUNTLW.00?)
382

Configuring the Uni-telway link
Description of the Default button and the Modem button
The Default button:is used to reset the values of the COM Port, Speed (bauds) and Uni-telway groups to their default values, to port COM1 (COM2 for FTX or CCX terminals), speed 9600 bauds, auto adaptation 1 second, standard address 1 and number of addresses 3.The Modem button:is used to select the use of a MODEM and the associated parameters.The Modem button makes the following dialog box appear:
Elements and their functions:
Description of the Master button
The Master button:is used to activate the Uni-telway protocol in master mode on the PC.The Master button makes the following dialog box appear:
The Uni-telway master check box is used to select the protocol management in master mode on the PC.
Element Function
Connection by MODEM
Is used to select the management of the MODEM by the driver.
Telephone number
Is used to enter the telephone number of the remote MODEM to be called.
HAYES Initialization
Is used to define the HAYES command string emitted by the driver in order to initialize the MODEM each time it connects.
Note: Consult the documentation of your MODEM to ensure that it is initialized correctly. By default the MODEM connection is disabled.
UNI-TELWAY Configuration- MODEM
Cancel
OK
Telephone number
MODEM connection
By defaultHAYES Initialization ATV1E0B0F0&M0X4&E0&D2D
UNI-TELWAY Configuration - Master
OK
Cancel
By default
UNITELWAY master
Base 1
Base 1 3
Number 31
Reserved slaves (not polled)
Polled slaves
TimeOut (ms) 100
Number
383

Configuring the Uni-telway link
The Base and Number fields respectively are used to input the first slave and the number of slaves on the PC which may or may not need to be scanned. The default values are base 1 and number 31.
With Polled Slaves the Base will inform the master of the slave address from which it will start to scan and the Number will be the number of slave addresses to scan.
With Reserved Slaves (not polled), these are the addresses that the PC reserves for applications using the Uni-telway driver which transmit to the slaves. The Base will therefore be the first address and the Number will depend on the application using the driver (with PL7, Number=3). These addresses must not be used by a slave.
The Time Out field gives the polling response time in milliseconds.
Note: it is not advisable to enter a value lower than the 100ms default value, because of the PC’s timing constraints (high CPU consumption for low timeouts). By default, master mode is disabled.
384

Configuring the Uni-telway link
The following diagram shows a configuration example:
In this case the configuration will be Uni-telway-Master:Polled slavesBase=1 and Number=10Reserved slaves (not polled)Base=11 and Number=3 (if the PL7 is using the Uni-telway driver).
Ad0=1Ad1=2Ad2=3
Ad0=4Ad0=5
Ad0=6Ad0=7Ad0=8
Ad0=9Ad0=10
Slave 1
Slave 2
Slave 3
Slave4
385

Configuring the Uni-telway link
Advanced configuration
At a Glance An advanced configuration is also available for the Uni-telway driver.
How to access advanced configuration for the Uni-telway driver
The following table describes how to access advanced configuration:
Step Action
1 From the configuration window click on File then select Advanced configuration, as shown in the following window:
2 Click on advanced configuration.
Result: the following window appears:
Configuration UNI -TELWAY - UNTLW01
Enregistrer
Ouvrir
Par défaut
Fichier Edition ?
300
Auto adaptation(en secondes)
Modem
Maître
31
1
Base Nombre
9600
600 19200
1200 38400
2400 57600
4800 115200
COM1
COM2
COM3
COM4
Vitesse (bauds) Port COM
Param...
Adresse UNI-TELWAY
Enregistrer Ctrl+EOuvrir Ctrl+O
Configuration Avancée Ctrl+ATous paramètres par Défaut Ctrl+D
Quitter
Configuration UNI-TELWAY - Avancée
Par défaut
OK
Annuler
Types de cable
Power Management
Bits de données
Dévalider l’APM en connecté
COM shareTous typesTSXSCA72TSXSCA72+TFTXCBP02RS232
7 Buffers driver
SBUF
RBUF
IBUFPage
ABUF
3
0
16
Version 3Version 5
SansImpairePaire
Link TimeOut
RXTX Delay
Ack TimeOut
-1
1000
Hold COMUse VCD
Read Enable FIFONUM PLC
Divers
8 Bits de
1 2
Adressage
Parité
-1
386

Configuring the Uni-telway link
CAUTION
Advanced parameters may only be modified by special instruction from the software using the Uni-telway driver or under the supervision of the technical support department of Schneider Automation S.A.S.
Failure to follow this precaution can result in injury or equipment damage.
387

Configuring the Uni-telway link
388

19
Configuring the FIPWAY linkPresentation
Subject of this chapter
This chapter describes configuration operations for the FIPWAY driver.
What’s in this Chapter?
This chapter contains the following topics:
Topic Page
General 390
Configuring the terminal/FIPWAY link 392
Advanced Configuration 395
389

Configuring the FIPWAY link
General
At a Glance The FIPWAY tool is used to configure the operating parameters of the terminal’s FIPWAY driver.
How to configure the FIPWAY driver
The following table describes the procedure for configuring the FIPWAY driver.
Step Action
1 From the Start menu select the Program group.
2 Select the Modicon Telemecanique program group.
3 Select XWAY Driver Manager.
4 Click on the FPC10 Driver tab.Result: the following window appears:
5 Click on the Configuration button.
Result: The dialog box below appears:
Management properties of XWAY drivers
OK
FPC10 Driver V2.3 IE 12Copyright © 1995-1999 Schneider Automation S.A.SStatus driver 1: Non operationalStatus driver 2: Non operational
Configuration
XWAY Manager FPC10 Driver UNITELWAY Driver XWAY Test
FPWFPW
Configuration FIP FPC 10 - Par défaut
Enregistrer
Ouvrir
Par défaut
Fichier Edition ?
Mode FIPWAY
Adresse FIPWAY Instance driver
Adresse FIPIO
Réseau
Mode FIPIO
63
FIP01
FIP02
Station
Point de raccordement FIPIO
31
0
390

Configuring the FIPWAY link
6 Configure:� the FIPWAY operating mode and address,� the driver instance,� the FIPIO operating mode and connection point.
7 Click on Save.
Step Action
391

Configuring the FIPWAY link
Configuring the terminal/FIPWAY link
At a Glance Various configuration parameters are available for the Fipway driver.Main configuration screen:
Description of the FIPWAY Address zone
This zone is used to select the FIPWAY operating mode (the driver is selected on the FIPWAY network), as well as the network parameters and associated stations.Network gives the network number and Station gives the station number.The default values are Network: 0 and Station: 31.
Description of the FIPIO Address zone
This zone is used to select the FIPIO operating mode (the driver is selected on a FIPIO bus) for the driver, as well as the associated Connection point The default connection point is 63.
Description of the Driver instance zone
This zone is used to select the driver instance to be modified. In most cases only one FPC10 card is installed on the computer for FIP communication. Thus, only the FIP01 driver instance will be used. However, if a second FPC10 card is installed, a second driver instance FIP02 is necessary.
FIP FPC 10 configuration – Default
Save
Open
By default
File Edit ?
FIPWAY mode
FIPWAY address Instance driver
FIPIO Address
Network
FIPIO Mode
63
FIP01
FIP02
Station
FIPIO connection point
31
0
392

Configuring the FIPWAY link
Description of the Save button
Save button:is used to save the FIP FPC10 driver configuration.The save button makes the following dialog box appear:
Elements and their functions:
Element Function
Save in a configuration file (DFPWAY.00?)
The FIP FPC10 driver configuration is saved on disk in a configuration file (usually DFPWAY.001). This file is read by the driver when the computer boots up. Modifications are taken into account the next time the computer is booted up.
Dynamically reinitialize the driver (in memory)
The configuration is written directly to the driver memory. Modifications are acknowledged immediately by the driver. Dynamic reinitialization is impossible:� if the driver is not loaded into the memory (at installation, for
example),� if the modifications apply to parameters which cannot be
dynamically modified (for some advanced parameters for example).
� if the driver is being used (if the PL7 is connected, for example).
FIP FPC10 Configuration - Save
Cancel
OK
Dynamically reinitialize the driver (in the memory)
Save a configuration file (DFPWAY.00?)
393

Configuring the FIPWAY link
Description of the Open button
The Open button:is used to read the FIP FPC10 driver configuration.The Open button causes the following dialog box to appear:
Elements and their functions:
Description of the Default Button
The Default button:is used to reinitialize the FIPWAY Address group values, FIPIO Address group values and Driver instance group values to their default values, either:� FIPWAY mode,� Network 0 and Station 31,� FIPIO connection point 63,� FIP01 Instance.
Element Function
Open a configuration file (DFPWAY.00?)
The FIP FPC10 driver configuration is read in a configuration file on disk (usually DFPWAY.001). From this, you can view and modify the driver’s initial configuration (read upon start-up).
Read current driver configuration (in memory).
The configuration is read directly in the driver memory. From this you can view and modify the driver’s real time configuration. This selection is deactivated if the driver is not loaded into the memory (at installation, for example).
FIP FPC10 Configuration - Open
Cancel
OK
Read the current driver configuration (from the memory).
Open a configuration file (DFPWAY.00?)
394

Configuring the FIPWAY link
Advanced Configuration
At a Glance An advanced configuration is also available for the FIPWAY driver.
How to access advanced configuration for the FIPWAY driver
The following table describes how to access advanced configuration:
Step Action
1 From the configuration window click on File then select Advanced configuration, as shown in the following window:
2 Click on Advanced Configuration.Result: the following window appears:
The I/O Address fields, the Interrupt, Transfer Mode and DNA Channel zones are used to adapt the driver configuration to the FPC10 card hardware configuration. Modify these values if you modify the hardware configuration of your FPC10 card in relation to the factory configuration.
Management properties of XWAY drivers
OK
FPC10 Driver V2.3 IE 12Copyright © 1995-1999 Schneider Automation S.A.SStatus driver 1: Non operationalStatus driver 2: Non operational
Configuration
XWAY Manager FPC10 Driver UNITELWAY Driver XWAY Test
FPWFPW
FIP FPC10 Configuration - Advanced
By default
OK
Cancel
I/O Address
Interrupt
DMA Channel
Transfer mode Buffers driver
SBUF
RBUF
IBUFPage align
IRQ 3
IRQ 5IRQ 10
IRQ 11
IRQ 15 Channel 7
Channel 5
Channel 6
Programmed I/O mode
DMA Mode
WorldFIPABUF
PRUC 0
210h
3
0
16
395

Configuring the FIPWAY link
CAUTION
Significant risks
The other advanced parameters may only be modified by special instruction from the software using the FIP FPC10 driver or under the supervision of the technical support department of Schneider Automation S.A.S.
Failure to follow this precaution can result in injury or equipment damage.
396

20
OS LoaderIntroduction
Subject of this chapter
This chapter presents the standard functions of the OS Loader.
What’s in this Chapter?
This chapter contains the following topics:
Topic Page
The OS Loader: At a Glance 398
Displaying the PLC OS version 400
Downloading an OS 401
Communication error during downloading 402
Limitations of the OS Loader 403
397

OS Loader
The OS Loader: At a Glance
Introduction This software is used to update the operating system on the Micro and Premium PLCs by a download via the terminal port.
It also gives the option of reinstalling a previous version of the OS.
The functions of the OS Loader
The OS Loader is used:� to display the OS version installed on the PLC,� to download the operating system into a PLC memory system.
How to access the OS Loader
Carry out the following steps:
CAUTION
The download operation includes a delicate phase during which any PLC power outage is likely to render it unusable.
Failure to follow this precaution can result in injury or equipment damage.
Step Action
1 Click on Start → Program.
2 Select the Modicon Telemacanique menu.Result:
AvertissementPrendre les précautions nécessaires pour qu’aucune coupure secteur n’ait lieu sur l’au-tomate pendant toute la durée du téléchargement (plusieurs minutes).
Si une coupure secteur intervient pendant ce téléchargement,l’automate peut passer dé-finitivement hors service.
Vérifier que l’on dispose d’une sauvegarde du programme applicatif de l’automate, si le programme est exécuté en RAM interne de l’automate.
(l’opération de téléchargement de l’Operating System peut provoquer l’effacement du programme applicatif dans la RAM interne de l’automate)
Les fichiers Operating System automate(*.bin) sont livrés sur la disquette “Disquette OS
OK
398

OS Loader
3 Next, click on OK.Result:
Step Action
Untitled - DS - LOADERFichier AP ?
Prêt
399

OS Loader
Displaying the PLC OS version
Introduction The OS Loader is used to display various information on the OS version installed on the PLC:� the product reference,� the specific-application type,� the hardware variant,� the software version (SV) of the operating system,� the development index (DI) of the operating system.
How to access the OS version display
Carry out the following steps:
Step Action
1 In the OS Loader window, click on the PLC menu.
2 Click on Display version.
Result:
Version de L’Operating System de l’automate
OK
Référence Commerciale
Type Métier
Variante Matérielle
VL
IE
TSX 57352
CPU
9
3.7
88
:
:
:
:
:
400

OS Loader
Downloading an OS
Preliminary operations
Before installing the new operating system on the PLC, you are advised to:� copy the contents of the CD-ROM containing the OS into a hard disk directory
and work from this directory (downloading time optimized),� consult the Readme.txt file document on the CD-ROM.
Disconnect the PLC from all networks before downloading.The Uni-telway driver must be installed on the terminal and must be the only resident driver.
Dedicated features of the Micro: set the "Write Project" micro-switch (situated in the battery recess), into the OFF position. When the download is complete, put the micro-switch back into the ON position.
How to select an OS
Carry out the following steps:
Downloading a new OS
Carry out the following steps:
Step Action
1 Select the File → Select command from the OS Loader window.
2 Select the drive containing the OS CD-ROM (or the hard disk directory to which it has been copied).
3 Select the file which relates to the type of processor in question.
Step Action
1 Select the PLC → Load Operating System command.A dialog box displays the information concerning:� the operating system on the PLC,� the new operating system to be installed.A warning message indicates:� the risks in the event of a power outage,� that the PLC has switched to STOP mode.
2 Click on the Load button.Once the download has been completed, there are two possible scenarios:� PLC without application or in STOP mode prior to downloading:
close the dialog box by double clicking on the system box.� PLC in RUN mode prior to downloading:
a dialog box offers to switch the application to RUN mode; confirm your choice by clicking on YESorNO.
3 Close the dialog box by double clicking on the system box.
401

OS Loader
Communication error during downloading
Introduction Communication errors are caused by certain events (loss of connection, power outage…).These errors can be classified into two types:� minor,� fatal.
Minor errors Example: disconnection of the terminal port.A dialog box offers whether to continue or to stop the download :� select the Repeat command after having fixed whatever was causing the
download to be interrupted or,� select the Abort load command : the PLC passes into "loading" mode, so you
will have to restart a new download of the operating system in order to use the PLC,
� click on OK to return to the main window.
Fatal errors Example: power outage.The PLC then becomes unusable. The leds RUN, I/O and ERR are constantly lit and the terminal/PLC dialog is impossible.
402

OS Loader
Limitations of the OS Loader
The limitations of the OS Loader
An operating system cannot be downloaded in the following cases :Carry out these actions in the event of these cases:
Case Action
the PLC is out of service or does not respond any more
Impossible to establish the connection!Check that the PLC has not suffered a power outage, that it is always connected to console and that no other tool is connected to the terminal port.
The PLC is still reserved by another tool
Cannot load Disconnect the unit which is reserving the PLC.
the binary file to be loaded is incompatible with the target processor
Cannot load Check the type of PLC then select the adapted binary file.
The selected file is not (*.Bin) type
Use a (*.Bin) type file.
the binary file to be loaded is incompatible with the application in the PLC
Warning : the application will be lost when the OS is loaded.
403

OS Loader
404

21
WindowsPresentation
Subject of this chapter
This chapter deals specifically with Windows.
What’s in this Chapter?
This chapter contains the following topics:
Topic Page
PL7 online help 406
Help Topics Browser 407
PL7 contextual Help 409
General points relating to Windows 410
Equivalent Windows keyboard: Basic principle 411
The menu keys 412
Windows dialogue box keys 413
Keys for modifying text 414
Text selection keys 415
Work station and Windows Explorer keys 416
Print management in Windows 417
405

Windows
PL7 online help
At a glance PL7 online help describes the set up of various software editors in a sequential fashion. It provides detailed information on: � users access rights,� PL7 general information (setting up an application, addressing bit objects and
words, memory management, etc.)� PL7 language instructions (functions, syntaxes, operands),� using PL7 (programming, debugging, diagnostics),� Micro and Premium application-specific functions (Process control, Upcounting,
Weighing, etc.).
Access mode using PLC
There are two access modes:� from a helpbrowser,� directly from a context sensitive Help PL7 screen.
406

Windows
Help Topics Browser
At a Glance The Help Topics browser provides for three types of search:� from the Contents, which displays a view of the all the different chapters of the
Help system,� using the Index, which displays an alphabetical list of key words,� using the Find mode, which displays all the words used in the on-line Help in
alphabetical order.
Illustration of the browser
The following illustration shows the browser open at Contents
?
Help topics: PL7 Help ?
Close CancelPrint…
????????????
Click on a topic, then on Display Or click on another tab, e.g. Index
Contents
Application management
Index Find
Application browserFunctional modulesApplication configurationEditing variablesProgramming in Ladder Language (LD)Programming in Instruction List Language (IL)Programming in Structured Text Language (ST)Programming in Grafcet Language (GR7)DFB function blocksDebuggingDiagnosticsDocumentation
Using the software
407

Windows
Accessing the browser
Contents tab
Index tab
Find tab
Step Action
1 Select the Index command from the ? menu or click on the icon .
2 Select then open the required directory.
Step Action
1 Select the Find ... command from the ? menu or click on the icon then select
the Index tab.
2 Enter the key word.
3 Select then open the required topic.
Step Action
1 Click on the icon then select the Find tab.
2 Enter the word to be found.
3 Select then open the required topic.
???
???
???
408

Windows
PL7 contextual Help
At a Glance Contextual Help is used to directly access information from the selected element.
Accessing the Contextual Help
Two exclusive modes of access are used to access Contextual Help.Standard screens
Modal dialog boxes
Step Action
1 Select the What’s this? command from the ? menu or click on the icon,
2 Select the element for which you require technical information (menu, screen, toolbar, etc.).
Step Action
1 Click on the icon of the current element.
???
???
409

Windows
General points relating to Windows
Introduction Some general points relating to Windows are explained below:� organization of workspace windows,� modification of the applications directory and the working directory.
Organization of workspace windows
You can open several windows at the same time on your PC.Example: Configuration editor, MAST task section, FAST task section, etc.In order to quickly reorganize all the open windows on the screen, select the PL7 Window menu and click on the appropriate sub-menu.
The following table shows you the different sub-menus and their functions:
Modification of the applications directory and the working directory
When PL7 opens an existing application, it copies it into the working directory; all modifications are made on this copy which must be saved using the File → Save command in the application archive directory.
The working directory disk and the application directory are defined at installation and can be modified with the Option → Custom command. The modifications will take effect after the next PL7 session.
Sub-menu Function
Cascade Arranges the open windows so that the title bar of each of them is visible.
Tile Horizontally
Tiles the open windows side by side so that they are all visible horizontally.
Tile Vertically Tiles the windows side by side so that they are all visible vertically.
Arrange Icons Aligns all the window icons.
Note: To quickly access one of the open windows, select its name at the bottom of the Windowmenu.
410

Windows
Equivalent Windows keyboard: Basic principle
Presentation Combination of keys producing the same effect as a command using the mouse.The screen displays the keys to press to activate the required function from the keyboard: you just need to type ALT + the underlined letter for the menus and the buttons and only the underlined letter for the sub-menus.
Illustration The following window is an example:
To open the File menu you must type ALT+F, and to open the sub-menu New... type N.
PL7 PROTools ?
RUNRUN STOPSTOP ??????PL Options
New...Open…
Exit Ctrl+Q
1 Demo5725.stx
File
411

Windows
The menu keys
Introduction The following keys or combination of keys can be used to select the menus and the commands.
The keys and their functions
This table shows the keys or combinations of keys and their functions:
Press… to…..
ALT or F10 Select the first menu from the menu bar or cancel the selection.
ALT + character key Choose the menu whose number or underlined letter corresponds to the one that you are typing.
Right and left arrows go from one menu to another
Up and down arrows go from one command to another.
ENTER Choose the menu name or the command selected.
A character key Choose the command whose number or underlined letter corresponds to the one that you are typing.
ESC � cancel the name of the menu selected,� or close the open menu.
412

Windows
Windows dialogue box keys
Introduction To work in a dialogue box you can use various keys or combinations of keys.
The keys and their functions
The following table shows the keys or combinations of keys and their functions:
Press… to…..
TAB Go from one option to another (from left to right and from top to bottom).
SHIFT+TAB Go from one option to another in the opposite direction.
CTRL+TAB Go to the next tab.
CTRL+SHIFT+TAB Go to the previous tab.
ALT + character key Select the option or the group whose number or underlined letter corresponds to the one you are typing.
An arrow key � move the cursor from selecting one option (e.g.: button) to another in a group of options,
� or move the cursor to the left, right, up or down in a list or text field.
HOME Select the first element or character in a list or text field.
END Select the last element or character in a list or text field.
Page Up and Page Down Scroll up or down a screen list.
ALT+Page Down Open a list.
SPACE � select an element or cancel a selection in a list,� confirm the button in question,� activate or deactivate a box to be checked.
CTRL+/(forward slash) Select all the elements in a list field.
CTRL+\ (back slash) Cancel all the selections except the current selection.
SHIFT+ arrows Delete or cancel the selection character by character in a text field.
SHIFT+HOME Delete or cancel the selection up to the first character in a text field.
SHIFT+END Delete or cancel the selection up to the last character in a text field.
ENTER � carry out a command,� choose the selected element from a list, then carry out the command,� click on the button with the bold border.
ESC or CTRL+F4 Close a dialogue box without carrying out the command.
Arrow keys Moving the cursor or insert point into the text fields or entry fields.
413

Windows
Keys for modifying text
Introduction You can modify text with keys or a combination of keys.
The keys and their functions
The following table shows the keys or combinations of keys and their functions:
Press… to…..
Go back � delete the character to the left of the insert point,� or delete the selected text.
DEL � delete the character to the right of the insert point,� or delete the selected text.
SHIFT+DEL Delete the selected text and put it in the clipboard.
SHIFT+INS Paste the text from the clipboard into the active window.
CTRL+INS Copy the selected text and put it in the clipboard.
SHIFT+Z Cancel the last modification.
414

Windows
Text selection keys
Introduction The following keys can be used in most Windows applications, but they do not necessarily work everywhere you can select text or in all applications. All the following selections start at the insert point. If a text is already selected, the keys cancel the selection.
The keys and their functions
The following table shows the keys or combinations of keys and their functions:
Press… To select or deselect…..
SHIFT+ left and right arrow One character at a time to the left or right.
SHIFT+ up and down arrow A text line up or down.
SHIFT+Page Up All the test from the previous screen.
SHIFT+Page Down All the test from the following screen.
SHIFT+HOME The text up to the beginning of the line.
SHIFT+END The text up to the end of the line.
CTRL+SHIFT+ left arrow The word before.
CTRL+SHIFT+ right arrow The word after.
CTRL+SHIFT+HOME The text up to the beginning of the document.
CTRL+SHIFT+END The text up to the end of the document.
415

Windows
Work station and Windows Explorer keys
Introduction To work in the windows or theProgram management group, you can use various keys and combinations of keys.
The keys and their functions
The table below shows the keys or combinations of keys and their functions:
Press… to…..
F2 Rename an element.
F3 Search for a file or data set.
CAP + DEL Delete the element directly without putting it in the recycle bin.
ALT+Enter Display the properties of the selected element.
CTRL+A Select all.
F5 Update the information in a window.
CAP while clicking on the Close button
Close the selected file and all its parent files.
416

Windows
Print management in Windows
Introduction Print management is a Windows application that manages print works.When you print a document from a Windows application this transmits to the print manager all the information on the printing, the fonts and the document file.
Description Print management:� takes care of printing the document while you continue to work on other Windows
applications,� indicates problems if an error occurs,� prints the documents on a local or network printer.
How to install a printer
Carry out the following steps:
Note: It is possible to print several documents at a time or one document after the other. The documents are then placed in a queue which is used to verify printing information.
Step Action
1 Click on Run.
2 Click on Parameters.
3 Click on Printers.
4 Click on add a printer and follow the instructions of the Add printer assistant.
417

Windows
418

Glossary
Animation table Table created by the user or created contextually from within a language editor or an operating screen.In connected mode allows you to view the development of the PLC’s variables and to force the values when debugging.
ASCII American Standard Code for Information Interchange.Is pronounced "aski".This is an American code (but has become an international standard) which allows by means of 7 bits the definition of all the alphanumeric characters used in English, punctuation marks, certain graphical characters as well as various commands.
Auto Run Function which allows you to automatically execute the application program on the PLC at initialization.
BIT Contraction of the English words Binary Digit.This is the binary unit of information which can represent two distinct values (or states) :0 or 1. A field of 8 bits makes up what we call 1 Byte or 1 octet.
A
B
419

Glossary
Block functions Blocks contained in the PL7 product (defined by Schneider Automation).The user has only to parameterize these blocs in the variables editor heading "Pre-defined FB".These blocks are:� Timer,� Monostable,� Up/down counter,� Drum,� Register.
Breakpoint Used in "debug" mode in the application.It is unique (only one at a time) and once reached, signals to the processor to stop the execution of the program.Used in connected mode, it can be positioned in one of the following program elements:� Ladder rung,� Structured Text or Instruction List statement,� Structured Text line (line mode).
Comment A comment of 508 characters can be associated to each address even if the latter does not have a symbol, from within the variables editor.
Comment for ST language
The comment (optional) can be integrated anywhere in a statement.It is separated at both ends by the characters (*and *) and can occupy a maximum of 128 lines.Its size is limited to 256 characters (new lines are included in the count).The comments are stored in the PLC and can be accessed at any time by the user.They therefore use up program memory.
Constants Memory unit (Bit, Word, Dword, etc.) whose contents cannot be modified by the program being executed.
C
420

Glossary
CPU Central Processing UnitThis is the microprocessor.It is made up of the control unit and the arithmetic logic unit.The purpose of the control unit is to extract from the central memory the instruction to be executed as well as the data necessary for the execution of this instruction, to establish the electric connections in the arithmetic logic unit and to start the data processing in this unit.You can sometimes find ROM or RAM memories included on the same chip, or even I/O interfaces or buffers.
CU Central Unit: generic name for Schneider Automation processors.
DFB The DFB types (Derived Function Blocks) are function blocks which can be programmed by the user in ST or LD language.Using these DFB types in an application:� simplifies the design and input of the program,� improves the readability of the program,� facilitates its debugging,� decreases the amount of code generated.PL7 Pro software is needed to create a DFB type.
DFB instance This regards a copy of a DFB type when the latter is called from within a language editor.The instance has a name. Input/output interfaces, public and private variables are duplicated (one duplication per instance, the code is not duplicated)A DFB type can have several instances.
Documentation Contains all the information on the application, the documentation is printed after being put together and is used for maintenance purposes.It contains information regarding:� hardware and software configuration,� the program,� the DFB types,� the variables and the animation tables,� the cross references.When putting the documentation together, it is possible to include only certain headings, if the user so wishes.
Driver Program which informs the operating system of the presence and characteristics of a peripheral.
D
421

Glossary
Events Software or hardware initiated modules (module operation). Events have priority over MAST or FAST tasks, they are executed as soon as they are detected.Event EVT0 has the highest priority, the others have the same level of priority.
FAST task Task activated periodically (the period controlled in the configuration of the processor) used to execute a part of an application with superior priority to a MAST (master) task.
Flash EPROM PCMCIA memory cards:� internal (TSX37) containing program, constants, memory %MW,� external (TSX37-57) containing program and constants.
FNES Fichiers Neutres d’Entrées Sorties (Input/Output Neutral Files).The FNES format describes the PLCs in terms of rack, cards and channels using a tree structure.It is based on the CNOMO standard (Comité de Normalisation des Outillages de Machines Outils).
Function Functions delivered with PL7 and accessed from the Tools/Library menu.The user has only to parameterize these functions. He can develop others with the help of a development kit SDKC which is an option of PL7.
Function view View allowing you to see the program part of the application by means of functional modules created by the user (see definition Functional module).
Functional module
A functional module is a grouping together of program elements (sections, subroutines, macro-steps, animation tables, operating screens…) intended to carry out an automation function.A functional module can itself be broken up into functional modules of a lower level, these modules taking on, in relation to the main function, one or several automation sub-functions.
E
F
422

Glossary
Grafcet Grafcet language.Grafcet language conforms to "Sequential Function Chart" language (SFC) of the IEC 1131-3 standard.Grafcet allows the operation of sequential automation to be represented graphically and in a structured manner.This graphical description of the automated sequential performance and the different situations which arise is carried out with the help of simple graphical symbols.
Instructions for ST language
An instruction can be either simple (Assign, Increment, Call SR…) or control structure (IF, WHILE, FOR, REPEAT...). The character ; is obligatory at the end of each instruction.
Label A label (optional) allows you to find a statement or a rung in a program module and is required to allow a jump after a GOTO instruction.The following syntax %Li: with i between 0 and 999.The label is positioned at the beginning of the statement or rung and can only be assigned to a single statement or rung within the same program module.The order of label address is not important, it is the input order of the statements or rungs which is taken into account by the system at scanning.
Ladder Rung language.A program written in rung language is composed of a series of rungs executed sequentially by the PLC.
LIST Instruction list language.A program written in instruction list language is composed of a series of instructions executed sequentially by the PLC.Each instruction is composed of an instruction code and an operand.
G
I
L
423

Glossary
Macro-step A macro-step is the symbolic representation of a unique set of steps and transitions, which starts with an input step (IN) and terminates with an output step (OUT).A macro-step can call another macro-step (nesting).
Mono task Application made up of a single task, has to be a MAST task (master task).
Multi task Application made up of several tasks (MAST, FAST, event).An order of priority for task execution is defined by the PLC’s operating system.
Operating screen This is a tool integrated into software applications PL7-PRO and PL7-PRODYN from version 3.0 onwards. It is intended to facilitate the operation of an automated process. The end-user controls and monitors the operation of the installation and in case of a problem, he can act quickly and easily.
Protection Function preventing the reading of the contents of a program module (read protection), or the reading and modifying of the contents of a program module (read/write protection).Protection is confirmed by a password.
RS 232C Communication series standard which defines among others the following service voltage:� a signal of +12V indicates a digital 0,� a signal of -12V indicates a digital 1.However detection to thresholds of +3V and –3V is allowed in case of a weakened signal.Between these two bounds, the signal will be considered invalid.
M
O
P
R
424

Glossary
RS 232 links are quite sensitive to interference.The standard recommends not exceeding 15metres in distance and 9600 bauds (bits/sec) maximum.
RS 485 Communication series standard which works differentially at 10V/+5V.It uses 2 wires for sending and receiving.Its "3-state" output allows it to go into listening mode, when the transmission has finished.
Run Function which allows you to execute the application program on the PLC.
Rung A rung is entered between two potential bars in a Ladder editor and is composed of a group of graphical elements joined to each other by horizontal or vertical links.The maximum dimensions of a rung are 16 lines and 11 columns (for PLCs TSX/PMX/PCX 57), or 7 lines and 11 columns (for PLCs TSX 37) split into two zones:the test zone and the editing zone.
Section Program module belonging to a task (MAST, FAST) which can be written in a language chosen by the programmer (Structured Text, Ladder, List, Grafcet).A task can be made up of several sections, the order of execution of the sections within the task corresponds to the order in which they were created. This order can be modified.
ST Structured text language.Structured text language allows you to create programs by writing lines of code composed of alpha-numeric characters.This language can only be used for the software PL7 Junior and PL7 Pro on PLCs TSX/PMX/PCX 57. In the version PL7 Pro, this language allows the creation of user function blocks DFB.
Statement Basic unit of List language or Structured Text language.A statement is made up of lines, which are themselves made up of instructions.It begins with an exclamation mark, can include a comment and can be marked with a label.
Step A Grafcet step designates a state of sequential operation of automation.Initial step defines the initial automation situation.Single step defines a stable automation situation.Actions can be associated.These can be expressed in Ladder, Structured Text or List language.
Stop Function which allows you to stop the execution of the application program on the PLC.
S
425

Glossary
Subroutine Program module belonging to a task (MAST, FAST) which can be written in a language chosen by the programmer (Structured Text, Ladder, List).A subroutine can only be called by a section or another subroutine (nesting) belonging to the task in which it is registered.
Symbol A symbol is a string of a maximum of 32 alpha-numeric characters, of which the first character is alphabetic.It allows you to personalize a PLC object in such a way as to facilitate the maintain-ability of the application, it is used on the PLC if the user wants to.
Task Group of sections and subroutines, executed cyclically or periodically for the MAST task or periodically for the FAST task.A task has a level of priority which is linked to the input and output.
Time Out Exceeding delay.Stopping of the application or deconnection following a too-long period of inactivity.
Transition A transition indicates the possibility of development between several steps.A transition condition called Receptivity is associated with it.The transition is valid if :� the upstream steps (directly linked to this step) are active,� the associated receptivity is true.The releasing of a transition provokes the change of status for the steps which are linked to it.The receptivities are expressed in Ladder, Structured Text or List language.
Variable Memory unit of a type (Bit, Word, Dword, etc.) whose contents cannot be modified by the program being executed.
T
V
426

CBAIndex
AAccess to a subroutine, 160Access to PL7, 43Accessing a statement or instruction list, 152Accessing a subroutine, 182Accessing the configuration, 86Adjustment of the application specific functions, 297Animating the program, 279Animating variables, 306Animation of variables, 302Application browser, 102Application opening, 47Assisted entry of a function in List, 158
BBacking up, 65Breakpoint, 289
CComments, 223Comparing applications, 63Configuration editor, 24Connections, 20Counter/ down counter, 235Create section, 105Creating a DFB instance, 259Creating a DFB type, 255Creating a functional module, 242Creating a Grafcet module, 198
Creating a Grafcet section, 107Creating a Ladder program, 118Creating a Structured Test program, 171Creating a Subroutine, 109Creating an animation table, 250Creating an application, 46Creating an event, 110Cross Referencing, 142, 163, 185, 215Cutting/Copying/Pasting variables, 231
DDebugging, 31Debugging functional modules, 298Designing a Grafcet program, 192Detaching/Deleting functional modules, 245DFB debugging, 300DFB Diag error messages, 319Display variables, 229Displaying variables, 125, 154, 175Documentation, 324, 326Downloading an OS, 401, 402Drum, 235
EEditing a section, 111Editing a sub-program, 111Editing an event, 111Entering a DFB instance, 262Eprom Flash Back up, 64Event, 110
427

Index
Export an application with DFB types, 264Export of runtime screens, 361Export Section/SR/EVT, 338Exporting a DFB type, 264Exporting a functional module, 349Exporting a source file, 341Exporting an application, 369Exporting an application in FNES format (Input/Output Neutral File), 373Exporting animation table(s), 357Exporting variables, 344
FFIPWAY Configuration, 390, 395Forcing analog inputs
Micro, 295Premium, 296
Function block, 179Function blocks and DFB instances in Ladder, 136Function modules, 240Functional module debugging, 244
GGrafcet configuration
TSX 37, 84TSX 57, 100
Grafcet debugging, 282Grafcet graphic objects, 194
HHardware configuration
TSX 37, 87
IImplementation of diagnostics DFB, 318Import of runtime screens, 363Import section, 105Import/Export source file, 332Importing a DFB type, 264Importing a functional module, 351, 353
428
Importing a Grafcet section, 107Importing a Subroutine, 109Importing an application, 371, 374Importing an application with DFB types, 264Importing an event, 110Importing animation table, 359Importing DFB, 367Importing LD, IL, ST, 342Importing variables, 345Input of a function block, 129Input of a predefined block, 157
LLadder Editing, 26Library function (ST editor), 180Limitation of the OS Loader, 403Link configuration, 380, 392List Editing, 27List of forced bits, 309
MMemory Usage, 68Modification of the program in Run mode, 278Modifying a network of contacts, 121Modifying a Structured Test program, 172Modifying Grafcet programs, 210Modifying section order, 112Modifying variables, 308Module call stack, 316Module configuration
TSX 37, 81, 82TSX 57, 95
Module/channel diagnostics, 313Monostable, 234
OOnline symbolization, 128, 156, 178Operating screen, 35

Index
PParametrizing the function blocks, 233PC PLC Program Transfer, 59PL7 address, 67PL7 Security, 42PLC PC Program Transfer, 60Presymbolization of variables, 226Print management in Windows, 417Printing variables, 237Processor
TSX 37, 76, 78TSX 57, 90, 92
Program diagnostics, 314Program printing, 146, 167, 189, 219Programming a DFB type, 256Programming a functional Module, 243Properties of a function module, 241Protecting a DFB type, 263Protecting an application, 48
RRegister, 235Replacing a variable, 140, 161, 183, 213Restoring %MWi words, 52Runtime screens, 113
SSaving %MWi words, 52Saving an application, 51Sending a command to the PL7, 70Series 7 timer, 234Short cut keyboard, 414, 415Software configuration
TSX 37, 83TSX 57, 99
Software installation, 21Sorting variables, 228Specific Ladder input, 120Step by step mode, 292Structure of a List program, 150Structure of an ST program, 170Structured language editor (ST), 28Symbols, 223
TTimer, 234Transferring data, 62TSX 37
supply configuration, 89TSX 57
module configuration, 97
UUni-telway Configuration, 378Uni-telway configuration, 386
VVariables editor, 25Variables in EXCEL format, 347
WWindows
short cut keyboard, 416short cut keyboards, 412, 413
Working with animation tables, 304
429

Index
430


