Planning and presenting with PowerPoint Practical workbook Aims and Learning Objectives To provide practical training on how to plan, prepare and make a PowerPoint presentation, and an opportunity to practice presentation skills in a supportive environment. By the end of the course participants will be able to: Plan and prepare an effective presentation using a PowerPoint slideshow Use a multi-media projector Make a short timed presentation to an audience of course members Recognise and respond to the needs of an audience Manage a question and answer session Evaluate their own presentation skills University of Bristol Information Services document ppt00-t2
Transcript
Planning andpresenting with
PowerPointPractical workbook
Aims and Learning Objectives
To provide practical training on how to plan, prepare and make a PowerPoint presentation, and an opportunity to practice presentation skills in a supportive environment.
By the end of the course participants will be able to:
Plan and prepare an effective presentation using a PowerPoint slideshow
Use a multi-media projector
Make a short timed presentation to an audience of course members
Recognise and respond to the needs of an audience
Manage a question and answer session
Evaluate their own presentation skills
University of Bristol Information Services document ppt00-t2
Planning and presenting with PowerPoint
Document information
Format conventionsThe following format conventions are used in this document:
Computer input that you type is shown in a bold Courier font
http://www.bristol.ac.uk
Computer output, menu names and options, buttons, URLs are shown in a Courier font
Save, Go to, Refresh
Text that you must replace is shown in italics Enter your username Computer keys that you must press are in a bold Courier font and enclosed in angle brackets
<Enter>, <n>, <N>, </>
Instructions for users of other software versions are displayed in a boxed area. Example text like this
Related documentationOther related documents are available from the web at:
Task 1 Planning the presentation..................................................................1
Task 2 Preparation – Designing your PowerPoint slideshow..................6
Task 3 Practice - Running through the presentation...............................9
Task 4 Presentation – Making and evaluating a presentation...............12
Introduction
This course aims to provide you with some simple guidelines on how to plan, design, develop and deliver presentations using Microsoft PowerPoint. The principles of good presentation design and delivery are just as relevant if you are using another presentation medium, for example OHP slides. They are based around a four-stage process:
Planning
Preparing
Practice
Presentation
Prerequisites
Basic Windows NT or 2000 skills. Familiarity and confidence with all the main functions of PowerPoint, e.g CC1SPP – Getting started with PowerPoint.
Planning and presenting with PowerPoint
Task 1 Planning the presentationObjectives To introduce the essential elements of the planning phase.
Method You will examine a range of planning issues and complete a planning exercise for a five minute presentation.
Comments Time spent making thorough plans for your presentation is never wasted. The issues you didn't consider in advance are most likely to be the ones which let you down on the day.
Guidelines for planning your presentation1.1 Begin by asking yourself the following questions:
What?
Etablish the topic of your presentation Decide on an appropriate title Be clear about what you intend to cover and what you can afford to leave out Make a list of the points you wish to make and the order in which you will
cover themTry using a Mind Map to get your ideas down on paper, then organise them into a list.
How to make a Mind Map Use plain paper, turned landscape Draw the focus (topic, issue, problem) Radiate thick branches, each a single-word sub-topic or theme From each branch, radiate secondary lines, with key words Use arrows or codes for further associations
1.2 Why?
Planning and presenting with PowerPoint (ppt00-t2) 1
Planning and presenting with PowerPoint
Why have you agreed to make this presentation? What particular knowledge or expertise do you have which makes you the
appropriate choice? You may wish to include this information in your introduction to establish your credibility with the audience
1.3 When?
How long do you have to make your presentation? Is it a 10 minute slot in a conference, a one-hour lecture, or a half-day training
course? Do you have a choice about the date or time? If you can choose the date, you can allow yourself plenty of time to prepare If you can choose the time, remember people are most receptive in the mornings
- after lunch and just before the end of the day, the attention of your audience may be more difficult to maintain!
Once the date has been agreed, work backwards in your diary and set your milestones, for example:
2 weeks before presentation - check venue and equipment 1 week before presentation - handouts to printers 2 days before presentation - schedule a run-through 1 day before presentation - panic!
1.4 How?
What method or methods can you use to get your message across?This will be determined by:
o The length of your presentation: a half-day training event gives you far more scope to try multiple methods of delivery than a 10 minute slot in a conference
o The nature of your topic: some topics lend themselves more readily to audience involvement than others
o The size of your audience: brainstorming is only possible with fairly small groups; practical demonstrations are problematic if only the first three rows can see what you are doing
In addition to a PowerPoint presentation, or a series of presentations in the case of a long time-slot, you might try:
o Brainstorming o Practical demonstrationso Question and answer sessionso Handouts to provide additional information/referenceso A short quizo Small group discussions with feedback
1.5 Where?
Planning and presenting with PowerPoint (ppt00-t2) 2
Planning and presenting with PowerPoint
Do you have any choice about the venue?o If you have a choice, check out the available rooms for facilities,
blackout, sightlines etc and select the besto If you have no choice, find out as much as you can about the room,
for example:
Does it have adequate blackout? Can you change the layout? Are the acoustics and sightlines good? Are the projection facilities fixed or do they have to be
booked? If equipment needs to be booked, are you required to do this
yourself? Can you get access in time to set up your presentation before
your audience arrive? Is a PC available and does it have PowerPoint installed? Is there someone who can provide technical backup if you
need it? What resources do you need to take with you?
If you are presenting off-site, for example at a conference, make a list of questions about the venue, facilities, contact names and technical support, and get answers well in advance so that you are not taken by surprise.
1.6 Who?
Find out as much as possible about your target audience
How many are likely to be present?
What are their expectations?
What do they know already?
Is there anything you should provide in advance of your presentation to prepare them, e.g. list of topics, background papers?
Planning and presenting with PowerPoint (ppt00-t2) 3
Planning and presenting with PowerPoint
Practical Exercise 1 - Planning your presentation1. Choose a topic for a five minute presentation from the list below, or select a
topic of your own choice
2. Plan your presentation, using the planning guidelines in Task 1 and the Presentation Planner overleaf
3. If you wish, try using the Mind Map technique to structure your presentation
4. Your audience will be the other course participants, and the venue will be the room in which this course is taking place
5. You have 20 minutes to complete this exercise.
Suggested Topics for a Five Minute Presentation1. Brief overview of your current department.
2. What your current job entails.
3. Where you see yourself in five years' time.
4. The City of Bristol (or your home town/village).
5. Your favourite hobby or sport.
6. A club or society to which you belong.
7. An interest or specialist skill.
8. Your favourite holiday destination.
9. Your pet hate.
10. Anything else you would like to talk about.
Planning and presenting with PowerPoint (ppt00-t2) 4
Planning and presenting with PowerPoint
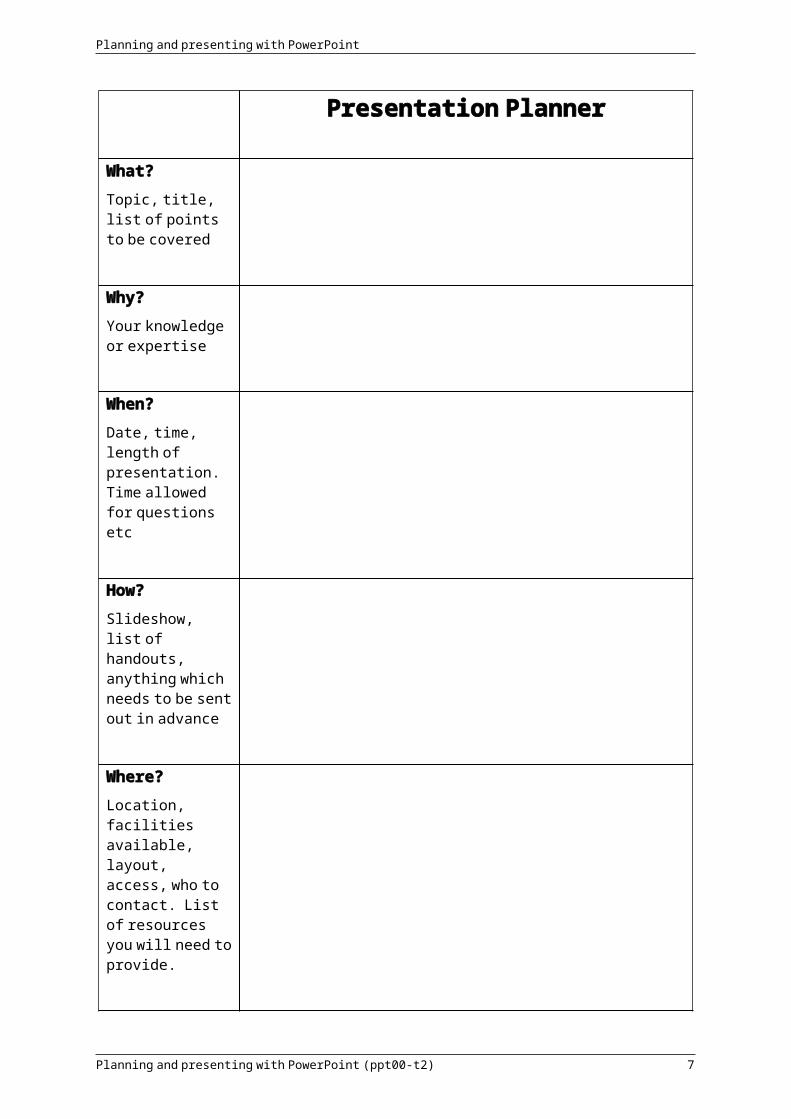
Presentation Planner
What?Topic, title, list of points to be covered
Why?Your knowledge or expertise
When?Date, time, length of presentation. Time allowed for questions etc
How?Slideshow, list of handouts, anything which needs to be sent out in advance
Where?Location, facilities available, layout, access, who to contact. List of resources you will need to provide.
Who?Number and nature of attendees. What are their expectations? Any pre-requisites? Information to be provided in advance?
Planning and presenting with PowerPoint (ppt00-t2) 5
Planning and presenting with PowerPoint
Task 2 Preparation – Designing your PowerPoint slideshow
Objectives To introduce some guidelines for good PowerPoint slideshow design and to provide an opportunity to put these into practice.
Method We will examine some of the features of PowerPoint and consider their use in designing effective presentations. During the practical exercise you will produce a short, simple PowerPoint slideshow for a 5 minute presentation on a topic of your choice.
Comments A good PowerPoint slideshow can considerably enhance your presentation, drawing attention to your key points; providing a structure to your talk and making a professional impact on your audience. A badly designed or inappropriate slideshow will irritate your audience; distract them from what you have to say; may even ruin your presentation.
Good Presentations - Bad Presentations1.7 Spend a few minutes thinking about presentations you have attended where
PowerPoint was used by the presenter. Note below some good and bad features you have observed.
Good features Bad features
Guidelines for PowerPoint slideshow design1.8 Keep it simple
Avoid using too many colourso Some colours are difficult for some people to see
Find a font you like and stick with ito Sans serif fonts are generally easier to read than serif fontso This is Arial - This is Times New Roman
Use special effects with cautiono Animation, slide transition and sound effects have their uses but may irritate
your audience if they are over-used Try to keep some empty space for contrast
o Resist the temptation to overcrowd your slideso Your important points will have more impact if they stand alone
Planning and presenting with PowerPoint (ppt00-t2) 6
Planning and presenting with PowerPoint
Be consistent - use the same style throughouto Find a template you like and make it your 'house style'o Develop your own design master and use it for all your presentationso Put anything you want to appear on all slides on the slide master to ensure it
will be in the same position on every slide
1.9 Keep it clear Aim for a maximum of 8 lines of text per slide Aim for a maximum of 10 words per line
o Practice writing concise bullet points - you can fill in the details when you speak
o Expanding a bullet point into a full sentence is preferable to reading a whole sentence from the slide
Use a font size everyone can read without difficulty - however far from the screen they areo PowerPoint templates use the following sizes:Main headings 44
Level 1 bullets 32
Level 2 bullets 28
Level 3 bullets 24
o Use colours which contrast well with the slide backgroundo The quality of projection equipment varies considerablyo Light text on a dark background makes the best use of available lighto Dark text on a light background may cause problems in poor blackout
Make use of bullet points and the 'build' feature in PowerPointo Information presented all at once on a slide may lead the audience to read
ahead instead of listening to youo Using the build effect to display bullet points concentrates the audience on
the point you are currently makingo You have the choice to leave all bullets displayed once they have appeared,
or fade them out, or even hide them altogether Use diagrams where appropriate to illustrate concepts
o Keep diagrams simple and check they can be seen from a distanceo Animate diagrams where possible so that they build up on the screen rather
than appearing all at once
1.10 Keep it relevant Use your slides to structure the presentation You may wish to begin with a short list of the topics you will cover. Expand on
each topic as you move through your slides Return to your list of topics at the end and tick off each to reinforce the fact that
all your objectives have been covered Use your slides to keep you on track Avoid the temptation to sidetrack - particularly in a timed slot Use notes pages to remind yourself what you wish to say
Planning and presenting with PowerPoint (ppt00-t2) 7
Planning and presenting with PowerPoint
Write your notes in a large font so that you can leave them on the desk and glance at them rather than holding them in front of your face
Decide whether to provide the audience with a hard copy of your slideshow Give out handouts (3 slides per page) in advance if you want them to write notes
as you speak Keep handouts for distribution at the end if you don't want to give the game
away - otherwise they will read them as soon as they arrive and you won't have any surprises!
If you provide handouts you will have to stick to your script! Check that the information you include on your slides is ACCURATE and UP
TO DATE Use the SpellCheck facility within PowerPoint - spelling errors stand out when
projected on a large screen
1.11 Keep it short Audience attention span is approximately 20 minutes If your slot is longer than 20 minutes, consider using another method to get your
message across You could make two shorter presentations with a break for questions As a general rule - work on an average of 1 minute per slide Remember the shorter your time slot - the more difficult it is to get the timing
right, you have no hope of speeding up a little to get through If you run out of slides - you can keep talking; if you run out of time before
you've covered all your slides, you are in trouble! Rehearse and time your presentation so that you know how long it takes to
cover all the topics you've included PowerPoint has a facility which will record rehearsal timings for you If your slideshow is too long - be ruthless, cut out some slides, rather than
aiming to get through them faster on the day Generally live presentations take up more time than rehearsals - not less!
Practical Exercise 2 - Designing a PowerPoint Slideshow1. Using PowerPoint, develop a slideshow to support the five minute
presentation you have chosen to make during the afternoon session
2. Refer to the Guidelines in Task 2
3. If you are confident with PowerPoint, use a design template or create your own master style
4. Add slide transitions and animate your bullet points if you have time
5. Save your presentation to the floppy disk provided
6. You have 30 minutes to complete this exercise
Planning and presenting with PowerPoint (ppt00-t2) 8
Planning and presenting with PowerPoint
Task 3 Practice - Running through the presentation
Objectives To stress the importance of doing a dummy run and to provide some simple guidelines for carrying this out.
Method You will have an opportunity to familiarise yourself with the multi-media projector in the training room and note any other considerations which you should take into account before making your live presentation.
Comments Work on the premise that 'If things can go wrong - they probably will!' Experienced presenters frequently miss out this stage of the process - many get away with it, some do not!
Guidelines for a presentation run-through1.12 Before your practice session:
Give someone a copy of your slides to check for accuracy, consistency and spellingo They will usually find something you have completely overlooked
If you have the opportunity - check out the projector and the room in which you will make your presentation
Check the sightlines and acoustics to ensure everyone can see and hear you Decide how you would like to change the room layout (if this is possible) Run through your checklist of the things you need to provide to ensure you
haven't forgotten anything1.13 During your practice session:
Run through your presentation and time yourselfo If you can't do this in the room allocated for the live presentation, try to
find a room with similar facilitieso If you've never worked with a multi-media projector borrow one and try it
out until you are confident with its use Get a colleague to sit in and provide you with constructive feedback Ask for questions and practice providing concise answers
1.14 After your practice session
IMMEDIATELY make a note of any problems you encountered Decide how you can prevent problems recurring Make any necessary changes to your slideshow Schedule another run through if you feel you need it
Guidelines for using a multi-media projector1. Check the connections BEFORE YOU SWITCH ON
If you are working with a desktop PC, there will usually be two cables between the projector and the PC:o One connects the PC monitor to the projector (instead of the PC)
Planning and presenting with PowerPoint (ppt00-t2) 9
Planning and presenting with PowerPoint
o One connects the projector to the PC (where the monitor would normally be connected)
If you are working with a portable or notebook PC, there will usually be just one cable which connects the projector to the PC
There will also be a power cable from the projector to the supply
2. Switch on the projector BEFORE the PC, and then switch on the PC.
If you switch on the PC before the projector you may not get an image on the PC monitor
On portable PCs there is usually a function key which switches the image between the PC screen, the projector screen and both PC and projector simultaneously
3. Project and adjust the image Remove the lens cover if there is one The projector may be on standby. Locate the button on the projector or remote
control which switches on the beam Most projectors allow adjustment to the size and focus of the image, generally
by rotating the adjustment ring(s) on the projector lens
4. Moving through slides Left click with the mouse to advance to the next slide Use PageUp or PageDown to advance to the next slide or to return to the
previous one Use the Space Bar to advance to the next slide Right click to access a menu of options which includes next slide, previous
slide, end show, go to (list of slides from which to select), and black screen
5. Go to black/white screenIf you wish to pause during your slideshow, you can use the following options:
Right click and go to black screen from the on-screen menu Use <Shift+ B> or <Shift+W> to go to a black/white screen - then repeat
to return to the original slide Use the black screen button on the projector or the remote control
6. At the end of your slideshow Press the Power button on the projector or remote control to switch off the
beam, leaving the fan running to cool down the bulb DO NOT switch off the projector's power supply until the fan cuts out and the
projector returns to stand-by mode, or you will shorten the life of the bulb
Planning and presenting with PowerPoint (ppt00-t2) 10
Planning and presenting with PowerPoint
Practical Exercise 3 - Working with a multi-media projector Using the guidelines for use of a multi-media projector on the previous page,
examine the projector in the training room to find out:o How it connects to the PCo How to switch it on, adjust the focus, display your slideso How to go to a black screen and return to your slideshow
Working in pairs, decide where you are going to stand and introduce yourself, checking that your partner, standing at the back of the room, can see and hear you clearly.
Consider how the layout of the room could be improved to make your presentation more effective.
You have 20 minutes to complete this exercise.
Planning and presenting with PowerPoint (ppt00-t2) 11
Planning and presenting with PowerPoint
Task 4 Presentation – Making and evaluating a presentation
Objectives To introduce some guidelines for presenters before, during and after a presentation, and to provide an opportunity to put these into practice.
Method You will have an opportunity to make a short presentation to an audience of your fellow course members and to evaluate your own presentation skills.
Comments The presentations will be strictly timed to allow every course member a total of 15 minutes to set up, make their presentation, take questions and participate in a short feedback session.
Guidelines for presenters1.15 Before you begin:
Arrive with plenty of time to prepare yourself and your set-up
Have the slideshow open and ready before the audience arriveYour opening slide should include your presentation title and your name. You may also wish to include the date, your role and your logo (if you have one).
Check the focus and the sightlines Give out copies of the slides and any additional notes or handouts (if
appropriate)o You may wish to keep these for distribution at the end
Stand up!o Your voice will carry further if you practice good posture
Get the audience's attentiono Your audience should fall silent and pay attention when you stand
1.16 Making a Start Introduce yourself Establish your objectives
o Briefly explain the purpose of your presentation - you may wish to include a slide for this
Outline your programmeo A slide which lists your main topics in the order you intend to cover them
State your expectationso Make it clear whether you are prepared to be interrupted (not
recommended!)o Inform your audience that there will be time for questions at the end
Smile and make eye contact Remember to breathe!
Planning and presenting with PowerPoint (ppt00-t2) 12
Planning and presenting with PowerPoint
1.17 General Advice Face the audience - not the screen Use your slides as prompts Avoid reading from your script if at all possible Use the mouse pointer to explain diagrams (or a laser pointer if you prefer) Be aware of and respond to audience reactions
1.18 Coping with Nerves Don't take shortcuts at the planning and preparation stages Remember - if things can go wrong, they probably will! Anticipate and prepare for all disaster scenarios Practice, practice and practice again until you are confident Have a glass of water ready in case your throat dries out Inhale slowly and deeply, exhale slowly, then take a normal breath before you
begin If your hands are shaking - anchor them Take your time and remember to breathe regularly throughout!
1.19 Using Your Voice Vary the pace - but not too much
o Avoid being the racing commentator or the station announcer Vary the pitch for emphasis
o Raise your voice but don't shouto Lower your voice but don't whisper
Pause to take more breath when you need to Stand up straight and keep your head up as this aids projection Be aware and try to eradicate speech appendages, e.g. Okay, Um, Actually
1.20 Body Language Maintain eye contact with the entire audience area
o Try not to focus on one person in the front row throughouto Vary your eye contact to take in those at the back and to the far right and
left Be aware of the body language of your audience - are they falling asleep! Match your facial expression to your topic Use your hands positively - but don't fiddle! Move about if you wish, but don't pace up and down
1.21 Dealing with Questions Establish at the outset when you will take questions - after, NOT during your
presentation! Expect to be asked questions Anticipate the likely questions and prepare your answers in advance
Planning and presenting with PowerPoint (ppt00-t2) 13
Planning and presenting with PowerPoint
Try to give everyone a chance Make sure the whole audience is aware of the question - repeat it if necessary Keep your answers as brief as possible Stick to your timing Provide contact details on your handouts for anyone who wants to find out more Admit when you don't know the answer, promise to follow up later
1.22 After the presentation Make notes and remember to follow up any outstanding questions Ask yourself 'How did it go?' - answer honestly! Ask a colleague who was present for feedback on how it might be improved Make a note of any problems you encountered and how you could overcome
them Note anything you would change if you were doing it again File your notes for future reference Ask yourself 'Did I enjoy it?' and if the answer is 'NO' try to establish why not
Exercise 4 - Understanding body languageLook at the pictures in the left column overleaf which depict the body language you may observe being displayed by members of your audience. Each one is communicating a non-verbal message from the list on the right. Try to match each of them, ticking the message you think is being expressed.
Planning and presenting with PowerPoint (ppt00-t2) 14
Planning and presenting with PowerPoint
A
Making a decision
Critically evaluating
Bored
Interested
Negative
Superior
Making a firm stand
B
Making a decision
Critically evaluating
Bored
Interested
Negative
Superior
Making a firm stand
C
Making a decision
Critically evaluating
Bored
Interested
Negative
Superior
Making a firm stand
D
Making a decision
Critically evaluating
Bored
Interested
Negative
Superior
Making a firm stand
Planning and presenting with PowerPoint (ppt00-t2) 15
Planning and presenting with PowerPoint
E
Making a decision
Critically evaluating
Bored
Interested
Negative
Superior
Making a firm stand
F
Making a decision
Critically evaluating
Bored
Interested
Negative
Superior
Making a firm stand
G
Making a decision
Critically evaluating
Bored
Interested
Negative
Superior
Making a firm stand
Answers to Exercise 4 - Understanding Body LanguageAInterested
Charles Darwin was the first to note that humans, as well as animals, tilt their heads to one side when they become interested in something.
Planning and presenting with PowerPoint (ppt00-t2) 16
Planning and presenting with PowerPoint
BCritically Evaluating
Critical evaluation cluster, includes hand-to-face gesture, with the index finger pointing up the cheek while another finger covers the mouth. The arm barrier and the crossed legs indicate the listener is defensive. Head and chin are down, indicating a degree of hostility.
CMaking a Decision
Chin stroking, combined with head to one side, indicate that a decision is about to be made. If followed by crossed arms and legs, the decision is likely to be negative.
DBored
Hand supporting the head, cupping the chin, combined with the facial expression and the loss of eye contact clearly indicate that there is no further interest.
ESuperior, confident
The hands behind the head gesture is typically used by those who are feeling confident, dominant or superior. This challenging pose is saying something like 'You can't tell me anything, I already have all the answers'.
FMaking a firm stand
Hands tightly gripping the upper arms to reinforce the arms crossed position and stop any attempt to unfold the arms and expose the body. Eyes are cast down to indicate unwillingness to make eye contact; lips are pressed tightly together.
GNegative
The folder has been used as a barrier, the arms and legs are folded, and his sunglasses hide any eye signals. A further barrier is displayed by the crossed legs.
For further information on body language:
Body Language : How to read others' thoughts by their gestures, Alan Pease, Sheldon Press, 1988.
Planning and presenting with PowerPoint (ppt00-t2) 17
Planning and presenting with PowerPoint
Practical Exercise 5 - Making your presentation
1. Make a 5 minute presentation on a topic of your choice, using a PowerPoint slideshow to illustrate your talk.
2. Your audience will be the other course participants.
3. The running order for the presentations will be decided by drawing numbers from a hat (or other suitable receptacle).
4. You have a total of 15 minutes in which to set up, make your presentation, answer questions and take part in a short feedback session.
5. A timer will be used to ensure that you don't overrun your 5 minute slot.
6. During the feedback session you will first be asked to comment on how YOU felt it went.
7. Your fellow course members will then be asked to make CONSTRUCTIVE suggestions.
8. This session is intended to provide a supportive environment in which you can try out your presentation skills.
Planning and presenting with PowerPoint (ppt00-t2) 18