20
Plate-Doh Plate Tectonics #24 in Geology Binder
| Date post: | 24-Dec-2015 |
| Category: |
Documents |
| Upload: | jodie-ball |
| View: | 216 times |
| Download: | 2 times |

Plate-Doh Plate Tectonics
#24 in Geology Binder

What landforms are created by the motion of the lithospheric plates?
Essential Question #3

Last week…
• We defined “plate boundary” as the place where two lithospheric plates meet.
• We discussed what happens at the three types of plate boundaries.
• We created a color coded map showing the locations of each type of plate boundary.

OVERVIEWGoal: To create models of landforms that are
created at convergent plate boundaries.
DAY ONE: Construct two sides of a lithospheric plate boundary with your table.
DAY TWO: Draw a scale model of your plate boundary and label all features.
DAY THREE: Use notes and book to predict what features will be created at this convergence.
DAY FOUR: Create a model of these new features.

Creating your Lithospheric Plate
DAY ONE

First…
• Write your code, date, period, and #24 in upper right hand corner of your paper.
• Label this assignment “Play-Doh Tectonics”
• Make a key at the top of your paper. List the Play-Doh colors and what each color will represent.– PINK= upper mantle= peridotite– BLUE= oceanic crust = basalt/gabbro– GREEN= continental crust = granite

With your table… • 1.) ♥ will obtain all supplies needed from
Table 1 (by the door). • 2.) ♣ will use scissors to cut your square
plate into two rectangles.• 3.) ♥ will pair with ♠, ♣ will pair with ♦. • 4.) With your partner, create a model of a
plate!• 5.) At end of period, ♦ will return all
supplies to Table 1 and ♠ will carry play doh plates to the cubby.

With your partner… – ♠ / ♦ will create the upper mantle by covering the
cardboard with pink Play Doh. – ♣ / ♥ Add one flat continent (using green) over top
of the upper mantle. It does not have to be in the middle of the plate!
– ♠ / ♦ Surround the continent with a thin layer of oceanic crust (blue). Oceanic and continental crust cannot overlap.
– ♣ / ♥ Add mountain(s) to the continent, and a few tiny (!) seamounts or tiny (!) mid-ocean ridges to the ocean.
– **If time permits, begin (individually) creating scale model drawings of these plates (actual size!)

Illustrating your Lithospheric Plate
DAY TWO

Today…• 1.) ♠ will go to cubby to get plates.• 2.) At your table, put the plates together and
decide where the “top” will be.• 3.) Create a scale drawing.
– Take turns tracing BOTH plates, as they would fit together, leaving a gap between them.
– Label any geographic/geologic features and color your plates using colored pencils and your key. (**Color your plate first, then trade with the other side of the table. **)
• 4.) ♣ will put plates back in cubby.

Label the different types of convergent plate boundary…
• Label the parts of the line that are made with oceanic crust, and the parts with continental crust. Use “C” or “O”.
• Using a ruler, separate all the different types of convergent plate boundary.– O/O = Oceanic crust meets Oceanic crust– C/C = Continental crust meets continental– O/C or C/O = Continental meets oceanic (or
vice versa)

Converging your Lithospheric Plate
DAY THREE

Predict what will happen at each area!
Let’s label each type of convergent plate boundary
with the possible outcomes…

Oceanic vs. Oceanic Convergent Plate Boundary…

Continental vs. Continental Convergent Plate Boundary…
EARTHQUAKES

Oceanic vs. Continental Convergent Plate Boundary
EARTHQUAKES

Your task…
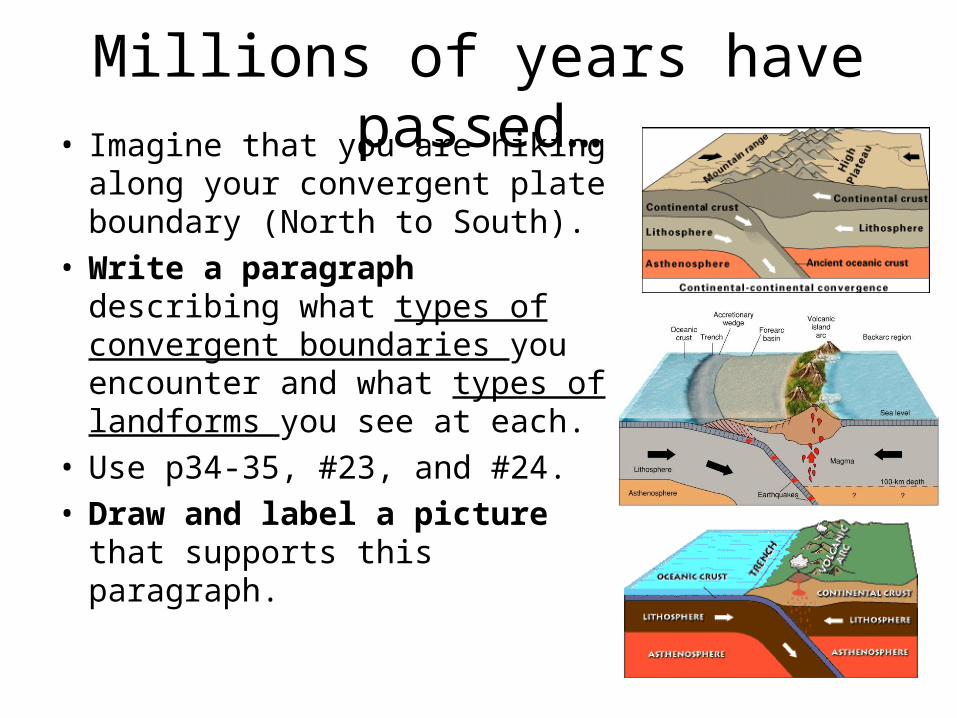
Millions of years have passed…• Imagine that you are hiking
along your convergent plate boundary (North to South).
• Write a paragraph describing what types of convergent boundaries you encounter and what types of landforms you see at each.
• Use p34-35, #23, and #24.• Draw and label a picture that
supports this paragraph.

Staple all of your #24 together (key, drawing, notes,
paragraph, and NEW drawing)and pass to the front.


