Page 1
27-001 www.powercommander.com 08-10 Royal Enfield All EFI Models PCV - 1
PARTS LIST
1 PowerCommander1 USBCable1 CD-ROM1 InstallationGuide2 PowerCommanderDecals2 DynojetDecals1 Alcoholswab2 Velcro1 O2Optimizer
YOU CAN ALSO DOWNLOAD THE POWER COMMANDER SOFTWARE AND LATEST MAPS FROM OUR WEB SITE AT:
www.powercommander.com
2008-2010 Royal Enfield All EFI Models
I ns ta l l a t i on I ns t ruc t i ons
PLEASE READ ALL DIRECTIONS BEFORE STARTING INSTALLATION
THE IGNITION MUST BE TURNED OFF BEFORE INSTALLATION!
2191 Mendenhall Drive North Las Vegas, NV 89081 (800) 992-4993 www.powercommander.com
FUEL AND IGNITION
Page 2
27-001 www.powercommander.com 08-10 Royal Enfield All EFI Models PCV - 2
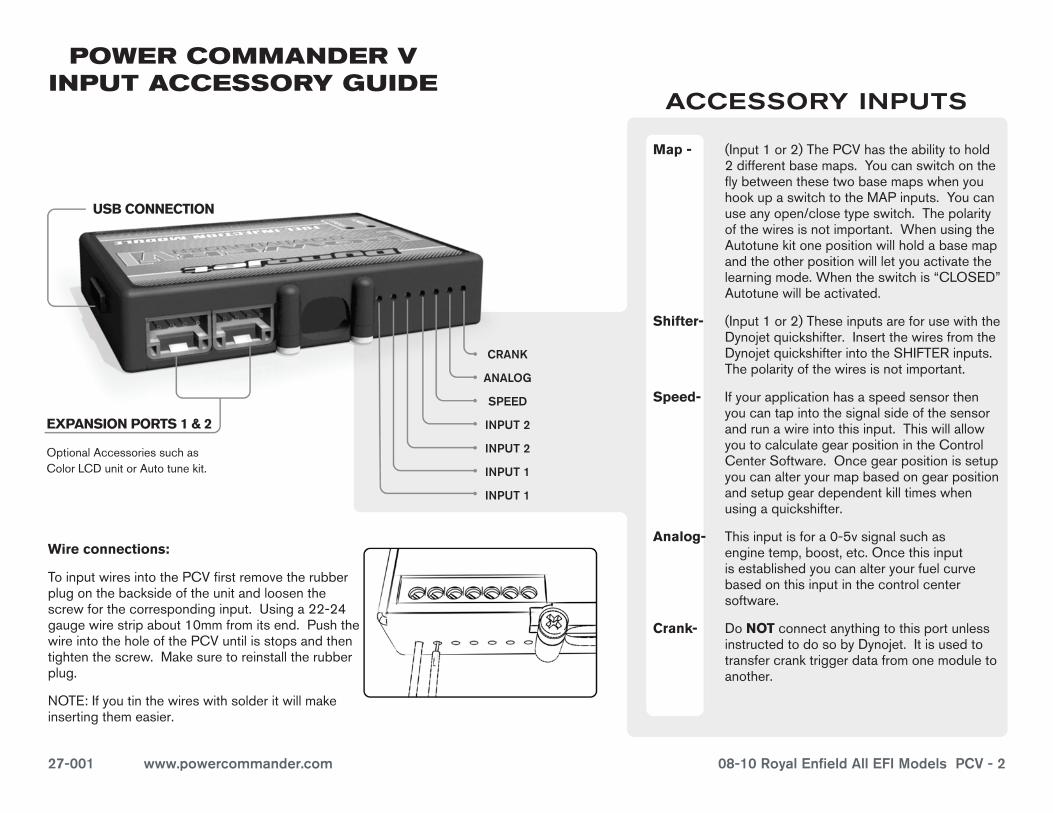
EXPANSION PORTS 1 & 2
OptionalAccessoriessuchasColorLCDunitorAutotunekit.
POWER COMMANDER V INPUT ACCESSORY GUIDE
Map - (Input1or2)ThePCVhastheabilitytohold2differentbasemaps.YoucanswitchontheflybetweenthesetwobasemapswhenyouhookupaswitchtotheMAPinputs.Youcanuseanyopen/closetypeswitch.Thepolarityofthewiresisnotimportant.WhenusingtheAutotunekitonepositionwillholdabasemapandtheotherpositionwillletyouactivatethelearningmode.Whentheswitchis“CLOSED”Autotunewillbeactivated.
Shifter- (Input1or2)TheseinputsareforusewiththeDynojetquickshifter.InsertthewiresfromtheDynojetquickshifterintotheSHIFTERinputs.Thepolarityofthewiresisnotimportant.
Speed- Ifyourapplicationhasaspeedsensorthenyoucantapintothesignalsideofthesensorandrunawireintothisinput.ThiswillallowyoutocalculategearpositionintheControlCenterSoftware.Oncegearpositionissetupyoucanalteryourmapbasedongearpositionandsetupgeardependentkilltimeswhenusingaquickshifter.
Analog- Thisinputisfora0-5vsignalsuchasenginetemp,boost,etc.Oncethisinputisestablishedyoucanalteryourfuelcurvebasedonthisinputinthecontrolcentersoftware.
Crank- DoNOTconnectanythingtothisportunlessinstructedtodosobyDynojet.Itisusedtotransfercranktriggerdatafromonemoduletoanother.
ACCESSORY INPUTS
Wire connections:
ToinputwiresintothePCVfirstremovetherubberplugonthebacksideoftheunitandloosenthescrewforthecorrespondinginput.Usinga22-24gaugewirestripabout10mmfromitsend.PushthewireintotheholeofthePCVuntilisstopsandthentightenthescrew.Makesuretoreinstalltherubberplug.
NOTE:Ifyoutinthewireswithsolderitwillmakeinsertingthemeasier.
CRANK
ANALOG
SPEED
INPUT 1
INPUT 1
INPUT 2
INPUT 2
USB CONNECTION
Page 3
27-001 www.powercommander.com 08-10 Royal Enfield All EFI Models PCV - 3
1 Removetheseatandthelefthandsidecover.
2 Removethefueltank.
This unit can be installed without completely removing the fuel tank, but it does make access much easier.
3 ChoosethebestlocationtomountthePCVmodule.
This location will vary dependent of the model. Good locations include the side of the battery or beneath the seat.
4 SecurethePCVwithsuppliedVelcrostrips.
Use the supplied alcohol swab to clean both surfaces prior to applying the Velcro.
5 RoutethePCVwiringharnessalongtheupperframerail.
6 Locateandunplugthestockwiringharnessfromthebike’sFuelInjectorandThrottlePositionSensor(Fig.A).
7 PlugthePCVwiringharnessin-lineoftheFuelInjectorandthestockwiringharness.
8 PlugthePCVwiringharnessin-lineoftheThrottlePositionSensorandthestockwiringharness(Fig.B).
9 Locateandunplugthestockwiringharnessfromthebike’sIgnitionCoil,locatedinfrontoftheenginehead(Fig.C).
FIG.A
FIG.C
FIG.B
Unplug
Unplug
Unplug
Page 4
27-001 www.powercommander.com 08-10 Royal Enfield All EFI Models PCV - 4
10 PlugthepairofPCVwiringharnessleadswiththeGREENcoloredwiresin-lineofthebike’sIgnitionCoilandstockwiringharness(Fig.D).
11 Locateandunplugthebike’sCrankPositionSensorconnector(Fig.E).
This is a 2-pin connector, located rear of the gearbox inside the frame rail.
12 PlugthepairofPCVwiringharnessleadswithBROWNcoloredwiresin-lineofthestockCrankPositionSensorconnectors(Fig.F).
FIG.D
FIG.F
FIG.E
Unplug
Page 5
27-001 www.powercommander.com 08-10 Royal Enfield All EFI Models PCV - 5
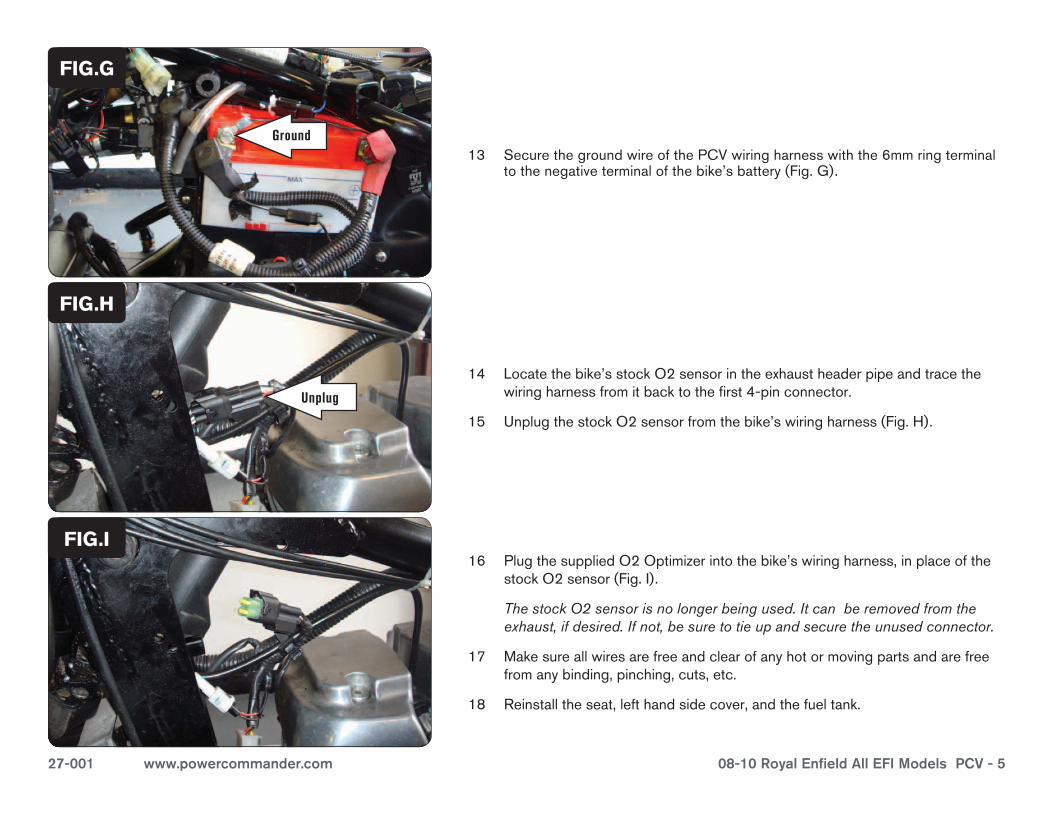
13 SecurethegroundwireofthePCVwiringharnesswiththe6mmringterminaltothenegativeterminalofthebike’sbattery(Fig.G).
14 Locatethebike’sstockO2sensorintheexhaustheaderpipeandtracethewiringharnessfromitbacktothefirst4-pinconnector.
15 UnplugthestockO2sensorfromthebike’swiringharness(Fig.H).
16 PlugthesuppliedO2Optimizerintothebike’swiringharness,inplaceofthestockO2sensor(Fig.I).
The stock O2 sensor is no longer being used. It can be removed from the exhaust, if desired. If not, be sure to tie up and secure the unused connector.
17 Makesureallwiresarefreeandclearofanyhotormovingpartsandarefreefromanybinding,pinching,cuts,etc.
18 Reinstalltheseat,lefthandsidecover,andthefueltank.
FIG.G
FIG.I
FIG.H
Ground
Unplug