32
SoundStation ® VTX 1000 OPERATION MANUAL User’s Guide Administrator’s Guide
| Date post: | 20-Oct-2015 |
| Category: |
Documents |
| Upload: | best4systems-ltd |
| View: | 40 times |
| Download: | 0 times |

SoundStation®
VTX
1000
OPERATIO
N M
AN
UA
L
User’s GuideAdministrator’s Guide
Table of Contents
User’s Guide ......................................................................................................... 1
Introduction .............................................................................................................. 3
SoundStation VTX 1000 Interface ................................................................. 4
Manage a Call ......................................................................................................... 5 Answer a Call ....................................................................................................... 5 Dial a Call ............................................................................................................. 5 Mute and Unmute a Call ....................................................................................... 6 Hold and Resume a Call ....................................................................................... 6 End a Call.............................................................................................................. 7 Redial a Call ......................................................................................................... 7 Dial a Call Using the Phone Book ........................................................................ 7 Speed Dial a Number ............................................................................................ 8 Add a Call ............................................................................................................. 8 Adjust Volumes ..................................................................................................... 9 Turn Wideband Off ............................................................................................... 10
Use the Phone Book ............................................................................................. 11 Access the Phone Book......................................................................................... 11 Sort the Entries...................................................................................................... 11 Find an Entry......................................................................................................... 12 Dial an Entry ......................................................................................................... 12 Add a New Entry .................................................................................................. 13 Assign a Speed Dial Number................................................................................ 14 Edit an Entry ......................................................................................................... 15 Remove an Entry................................................................................................... 15 Exit the Phone Book ............................................................................................. 15
Adjust the Settings ................................................................................................ 16 Access the Settings ............................................................................................... 16 Select a Setting to Display .................................................................................... 16 Adjust a Setting..................................................................................................... 16 Back Light....................................................................................................... 17 Ringer Type..................................................................................................... 17 Contrast ........................................................................................................... 17
Adjust the Audio Setup ....................................................................................... 17 Access the Audio Settings..................................................................................... 17 Select a Setting to Display .................................................................................... 18 Adjust an Audio Setting ........................................................................................ 18 Treble EQ.......................................................................................................... 19 Bass EQ............................................................................................................. 19 Subwoofer Volume.............................................................................................19 Aux Input .......................................................................................................... 19
Read and understand all instructions.
Follow all warnings and instructions marked on the instrument.
Installation must be performed in accordance with all national wiring rules.
The outlet to which this apparatus is connected must be installed near the equipment, and must always be readily accessible.
This instrument can be hazardous if immersed in water. To avoid the possibility of electrical shock, do not use the telephone equipment while you are in the bathtub or shower, or when you are wet. If you accidentally drop the equipment into water, do not retrieve it until you have first unplugged all cords. Do not reconnect the telephone equipment until it has dried thoroughly.
Avoid using the telephone equipment during electrical storms in your immediate area. There is a remote risk of electric shock from lightning. Urgent calls should be brief. Even though protective measures may have been installed to limit electrical surges from entering your home or business, absolute protection from lightning is impossible.
If you suspect a natural gas leak, report it immediately, but use a telephone away from the area in question. The telephone equipment's electrical contacts could generate a tiny spark. While unlikely, it is possible that this spark could ignite heavy concentrations of gas.
IMPORTANT SAFETYINSTRUCTIONS
SAVE THESE INSTRUCTIONS
Never push objects of any kind into the telephone equipment through housing slots as they may touch hazardous voltage points or short out parts that could result in a risk of electric shock. Never spill liquid of any kind on the telephone. If liquid is spilled, however, contact service personnel.
To reduce the risk of electric shock, do not disassemble this telephone equipment. Opening or removing covers may expose you to hazardous voltages. Using incorrectly reassembled equipment can cause electric shock. If your telephone equipment does not work properly, refer to the section describing how to connect service. The support telephone number can be found on the outside back cover of this book.
Never install telephone wiring during a lightning storm.
Never install telephone jacks in wet locations unless the jack is specifically designed for wet locations.
Never touch uninsulated telephone wires or terminals unless the telephone line has been disconnected from the network interface.
Always use caution when installing or modifying telephone lines.
When using your telephone equipment, the following safety precautions should always be followed to reduce the risk of fire, electric shock, and injury to people.
Aux Output............................................................................................................ 20 Console Mics ........................................................................................................ 20 Console Speaker.................................................................................................... 20 Automatic Gain Control........................................................................................ 21 Noise Reduction.................................................................................................... 21
View Phone and Software Information ........................................................ 21
Peripheral Devices ................................................................................................ 22 Using the VTX Subwoofer.................................................................................... 22 Using the Extended Microphones......................................................................... 22 Using the Polycom Wireless Microphone System................................................ 23
Troubleshooting ...................................................................................................... 24 No Dial Tone......................................................................................................... 24 SoundStation VTX 1000 Does Not Ring.............................................................. 24 Cannot Connect In Wideband Mode..................................................................... 24 No Caller ID.......................................................................................................... 25 Flickering LCD ..................................................................................................... 25 Quick Keypad Input Is Not Registered ................................................................. 25 Muffled or “In a Well” Reception ......................................................................... 25 Variable Sound Quality ......................................................................................... 25 Problematic Sound Quality or No Sound.............................................................. 26 Excessive Noise .................................................................................................... 26 Remote Party Cannot Hear You ............................................................................ 26 Reverting to Narrowband...................................................................................... 27 Short Silences, Echoes, or Clipped Speech .......................................................... 27 Physical Damage................................................................................................... 27
For Best Performance ........................................................................................... 28
Maintenance ............................................................................................................ 28
Administrator’s Guide .................................................................................... 29
Parts List.................................................................................................................... 30
Connection Diagram ............................................................................................. 31
Administrative Setup Overview ...................................................................... 32 Access Administrative Setup ................................................................................ 33 Select an Item to Display ...................................................................................... 33
Administrative Setup Navigation Overview .............................................. 34 From the Admin Setup Menu................................................................................ 34 From a Submenu................................................................................................... 34 From an Item Screen............................................................................................. 34
Enter Location Information ................................................................................ 35
Location Name...................................................................................................... 35 Character Entry ..................................................................................................... 35 This Phone # ........................................................................................................ 35 Save ...................................................................................................................... 35
Phone System .......................................................................................................... 36 Flash Timing ......................................................................................................... 36 Caller ID................................................................................................................ 36 Modem Setup ........................................................................................................ 36 Wideband Quality Monitor.....................................................................................37
Passcode .................................................................................................................... 38 Assign a Passcode ................................................................................................. 38 Remove a Passcode............................................................................................... 38 Assign a New Passcode......................................................................................... 39
Diagnostics ............................................................................................................... 40 Mic Test ................................................................................................................ 40 Console Speaker Test ............................................................................................ 40 External Speaker Test ........................................................................................... 41 Aux In and Aux Out Specification Table ............................................................. 41 Modem Statistics .................................................................................................. 42 Restore All Defaults .............................................................................................. 43
Software .................................................................................................................... 44 Upgrade Software ................................................................................................. 44 Configure Dialing Number ................................................................................... 45 Configure as DL Server ........................................................................................ 45
Specifications and Warranty Information.......................................... 47
Limited Warranty and Limitation of Liability ............................................ 48
FCC Rules ................................................................................................................... 50
Canadian Department of Communications Notice .................................... 50
US Telco Requirements ....................................................................................... 51
REN .............................................................................................................................. 51
Automatic Dialing .................................................................................................. 51
Telco Connector ....................................................................................................... 52
Canadian Telco Requirements........................................................................... 52
CE Mark R & TTE Directive ................................................................................. 53
Australia .................................................................................................................... 54
Japan ......................................................................................................................... 54
SoundSt
ation V
TX 1
00
0 O
pera
tion
Man
ual
1
Use
r’s
Guid
e
User’s Guide
SoundSt
ation V
TX 1
00
0 O
pera
tion
Man
ual
3
Use
r’s
Guid
e
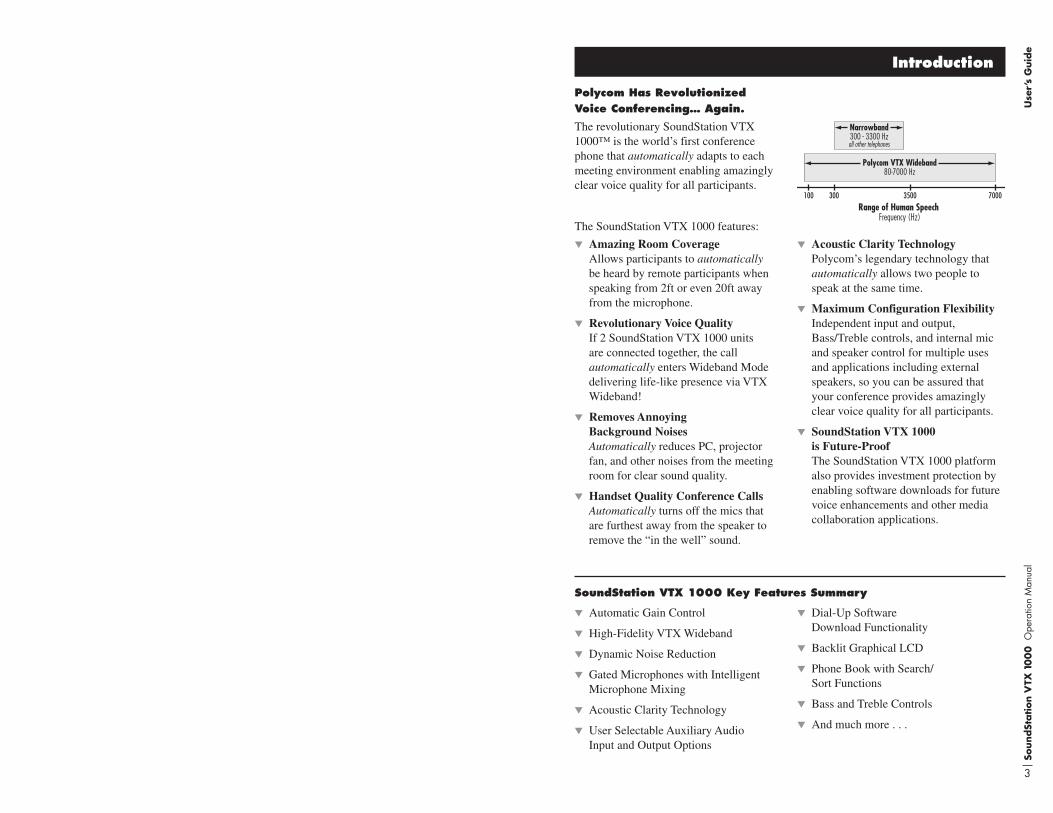
The revolutionary SoundStation VTX 1000™ is the world’s first conference phone that automatically adapts to each meeting environment enabling amazingly clear voice quality for all participants.
The SoundStation VTX 1000 features:
Introduction
Polycom VTX Wideband80-7000 Hz
Narrowband300 - 3300 Hzall other telephones
100 300 3500 7000
Range of Human Speech Frequency (Hz)
Narrowband300 - 3300 Hz
100 300 3500 7000
Range of Human Speech Frequency (Hz)
Automatic Gain Control
High-Fidelity VTX Wideband
Dynamic Noise Reduction
Gated Microphones with Intelligent Microphone Mixing
Acoustic Clarity Technology
User Selectable Auxiliary Audio Input and Output Options
Dial-Up Software Download Functionality
Backlit Graphical LCD
Phone Book with Search/Sort Functions
Bass and Treble Controls
And much more . . .
Polycom Has Revolutionized Voice Conferencing… Again.
SoundStation VTX 1000 Key Features Summary
Amazing Room Coverage Allows participants to automatically be heard by remote participants when speaking from 2ft or even 20ft away from the microphone.
Revolutionary Voice Quality If 2 SoundStation VTX 1000 units are connected together, the call automatically enters Wideband Mode delivering life-like presence via VTX Wideband!
Removes Annoying Background Noises Automatically reduces PC, projector fan, and other noises from the meeting room for clear sound quality.
Handset Quality Conference Calls Automatically turns off the mics that are furthest away from the speaker to remove the “in the well” sound.
Acoustic Clarity Technology Polycom’s legendary technology that automatically allows two people to speak at the same time.
Maximum Configuration Flexibility Independent input and output, Bass/Treble controls, and internal mic and speaker control for multiple uses and applications including external speakers, so you can be assured that your conference provides amazingly clear voice quality for all participants.
SoundStation VTX 1000 is Future-Proof The SoundStation VTX 1000 platform also provides investment protection by enabling software downloads for future voice enhancements and other media collaboration applications.
SoundSt
ation V
TX 1
00
0 O
pera
tion
Man
ual
4
Use
r’s
Guid
e
SoundSt
ation V
TX 1
00
0 O
pera
tion
Man
ual
5
Press the (Phone) button to pick up an incoming call.
Editable Dialing
1 Dial the phone number.
If you make an error, press the <DEL soft key to erase it.
If you want to cancel the call, press the CANCEL soft key.
Dial Tone Dialing
1 Press the (Phone) button to get a dial tone.
2 Dial the phone number. Each number is dialed when you press it.
You can dial a call the traditional way, getting a dial tone first, or you can dial the way cellular phones do, entering and editing all the numbers before you outpulse them, as shown below.
Speed Dial numbers are not supported by this method.
Dial a Call
Receiving an Additional Call
If you are on a call when another call is received, you may or may not hear a Call Waiting tone and/or see Caller ID.
If you are on a regular, narrowband call, and the most common types of Call Waiting and Caller ID* are ordinarily provided to you through your phone network, then these services will work in the usual way, as specified by your provider. (Note that it is not possible to join the incoming call to the ongoing one.)
Important: If you are on a wideband call, Call Waiting and Caller ID are unavailable and Call Waiting signals will actually disrupt wideband operation, preventing you from maintaining a wideband connection. It is highly recommended that Call Waiting be disabled by the phone company (or PBX administrator) for lines used for VTX 1000 wideband calls.
* Namely, Telcordia (formerly Bellcore) Standard Type I Caller ID.
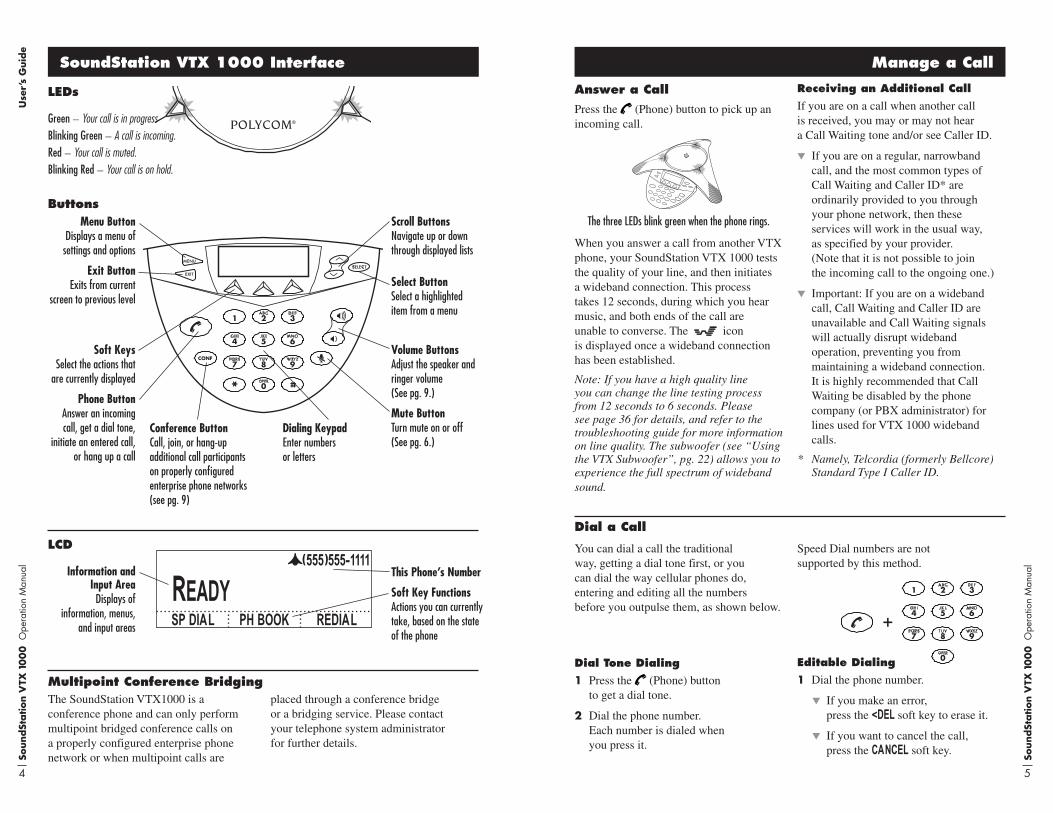
SoundStation VTX 1000 Interface
Menu ButtonDisplays a menu of settings and options
Exit ButtonExits from current
screen to previous level
Scroll ButtonsNavigate up or down through displayed lists
Select ButtonSelect a highlighted item from a menu
Conference ButtonCall, join, or hang-up additional call participants on properly configured enterprise phone networks(see pg. 9)
Dialing KeypadEnter numbers or letters
(555)555-1111
ReadyREDIALPH BOOKSP DIAL
LCD
Information and Input Area
Displays of information, menus,
and input areas
LEDs
Green – Your call is in progressBlinking Green – A call is incoming.Red – Your call is muted.Blinking Red – Your call is on hold.
This Phone’s Number
Soft Key FunctionsActions you can currently take, based on the state of the phone
Soft KeysSelect the actions that
are currently displayed
Phone ButtonAnswer an incoming call, get a dial tone,
initiate an entered call,or hang up a call
Volume ButtonsAdjust the speaker and ringer volume(See pg. 9.)
Mute ButtonTurn mute on or off (See pg. 6.)
Buttons
Manage a Call
Answer a Call
The three LEDs blink green when the phone rings.
OR
SEND
When you answer a call from another VTX phone, your SoundStation VTX 1000 tests the quality of your line, and then initiates a wideband connection. This process takes 12 seconds, during which you hear music, and both ends of the call are unable to converse. The icon is displayed once a wideband connection has been established.
Note: If you have a high quality line you can change the line testing process from 12 seconds to 6 seconds. Please see page 36 for details, and refer to the troubleshooting guide for more information on line quality. The subwoofer (see “Using the VTX Subwoofer”, pg. 22) allows you to experience the full spectrum of wideband sound.
The SoundStation VTX1000 is a conference phone and can only perform multipoint bridged conference calls on a properly configured enterprise phone network or when multipoint calls are
placed through a conference bridge or a bridging service. Please contact your telephone system administrator for further details.
Multipoint Conference Bridging
SoundSt
ation V
TX 1
00
0 O
pera
tion
Man
ual
6
SoundSt
ation V
TX 1
00
0 O
pera
tion
Man
ual
7
Use
r’s
Guid
e2 Press the button or the SEND soft key, and the complete number will be dialed.
If you place a call to another wideband-capable phone, will appear on your LCD, indicating that your call is benefitting from the enhanced audio quality of a wideband connection.
Note: The subwoofer (see “Using the VTX Subwoofer,” pg. 22) allows you to experience the full spectrum of wideband sound.
A wideband connection takes several seconds to establish. Music will play while you wait.
Please refer to “Dial an Entry,” in the Phone Book section, pg. 12, for instructions on calling a number in your Phone Book.
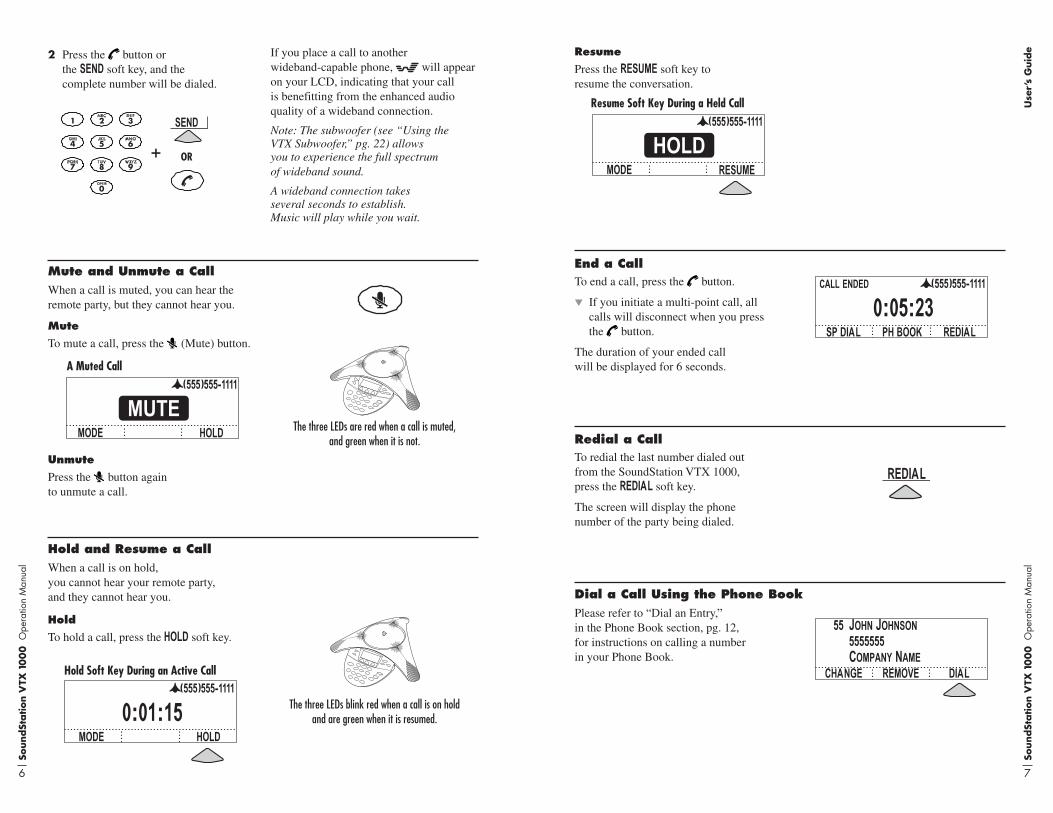
Redial a CallTo redial the last number dialed out from the SoundStation VTX 1000, press the REDIAL soft key.
The screen will display the phone number of the party being dialed.
REDIAL
CHANGE REMOVE
John Johnson555555555Company Name
DIALCHANGE REMOVE
Dial a Call Using the Phone Book
End a CallTo end a call, press the button.
If you initiate a multi-point call, all calls will disconnect when you press the button.
The duration of your ended call will be displayed for 6 seconds.
0:05:23SP DIAL PH BOOK REDIAL
(555)555-1111call endedMute and Unmute a CallWhen a call is muted, you can hear the remote party, but they cannot hear you.
The three LEDs are red when a call is muted, and green when it is not.
Mute
To mute a call, press the (Mute) button.
ADD CALL HOLD
MUTE(555)555-1111
AMDD CALL
0:01:15HOLD
(555)555-1111
MODE
MODE
A Muted Call
Unmute
Press the button again to unmute a call.
Hold
To hold a call, press the HOLD soft key.
MADD CALL RESUME
HOLD(555)555-1111
MO
0:01:15HOLD
(555)555-1111
MODE
MODE
MADD CALL RESUME
HOLD(555)555-1111
MO
0:01:15HOLD
(555)555-1111
MODE
MODE
The three LEDs blink red when a call is on holdand are green when it is resumed.
Hold and Resume a CallWhen a call is on hold, you cannot hear your remote party, and they cannot hear you.
Hold Soft Key During an Active Call
Resume Soft Key During a Held Call
Resume
Press the RESUME soft key to resume the conversation.
OR
SEND

SoundSt
ation V
TX 1
00
0 O
pera
tion
Man
ual
8
Use
r’s
Guid
e
SoundSt
ation V
TX 1
00
0 O
pera
tion
Man
ual
9
Use
r’s
Guid
e
2 At the dial tone, enter the next party’s phone number.
Note: Only conventional dialing is supported for added calls. Redial, Speed Dial, and dialing from the Phone Book are unavailable.
Adjust Speaker Volume
While the phone is in active use, press the button to lower the speaker volume, and the button to raise the speaker volume.
Adjust Ringer Volume
While the phone is in a ready state (not actively in use), press the button to lower the ringer volume and the button to raise the ringer volume.
Adjust Dial Tone
While the phone is in ready state, press the button to get dial tone, then use and to adjust the volume up or down.
Adjust Volumes
Volume Up
Volume Down
1 Press the CONF button.
If you prefer, you can press the HOLD soft key first, and then the CONF button. Either way, your original call is put on hold.
Important: If you have already connected as many parties as your system can support, then pressing CONF will drop the last party you connected. (This response is a function of how your phone company or PBX works, not the SoundStation VTX 1000.)
Note: All multi-party calls are narrowband calls. When you press the CONF button to add another party, any wideband connection you may have with your first party will revert to narrowband, and you will no longer see the symbol on your display. Your connection will also revert to narrowband if another party picks up a phone connected in parallel with your SoundStation VTX 1000. The CONF key provides identical functionality to FLASH or R on most phone networks.
If your phone system provides one of the typical forms of multi-party call conferencing, then you can establish multi-party calls with your SoundStation VTX 1000, as described next.
Please check with your System Administrator (not Polycom) to determine the number of parties that can be conferenced together, given your phone system’s multi-party capabilities.
If you cannot connect multiple parties using the method described below, please check with your System Administrator (not Polycom).
Your System Administrator may need to activate multi-party conferencing features, adjust the Flash Timing (as described in “Flash Timing,” pg. 36), or provide you with instructions specific to your phone system.
If your phone line supports Call Waiting, you can answer an incoming call using the CONF button, but the incoming call cannot be joined into the existing call. Only outgoing calls can be joined into a multi-point call.
Enter Number
CANCEL
(555)555-1111HOLD
3 When the next party has answered, press the CONF button again, or the JOIN soft key to join all the calls, so all parties can hear and speak to each other.
Note: If you change your mind before beginning to enter a phone number, press CONF again or the CANCEL soft key to return to your on-hold call, then press the RESUME soft key to reactivate that call, if you placed the caller on hold prior to pressing CONF .
During an ongoing call:
Speed Dial Number First
1 Enter the 1- or 2-digit Speed Dial number.
2 Press the button or the SEND soft key.
Soft Key First
1 Press the SP DIAL soft key.
2 Enter the 1- or 2-digit Speed Dial number (if you enter one digit, wait through the brief delay).
SEND
SP DIAL
ORSEND
SP DIAL
OR
You can speed dial any entry in your Phone Book, in either of these ways:
Note: For 1-digit numbers, you do not have to dial a leading 0 (e.g., for 02, you can also just press 2).Note: To create Phone Book entries and assign Speed Dial numbers, see “Add a New Entry,” pg. 13, and “Assign a Speed Dial Number,” pg. 14.
Speed Dial a Number
If a Speed Dial entry does not exist, a Not Assigned notice will appear. You can enter a new Speed Dial number or press the CANCEL soft key.
Add a Call
SoundSt
ation V
TX 1
00
0 O
pera
tion
Man
ual
10
Use
r’s
Guid
e
SoundSt
ation V
TX 1
00
0 O
pera
tion
Man
ual
11
Use
r’s
Guid
e
Soft Key
Press the PH BOOK soft key if it is on your screen.
Menu
Press the MENU button, use the button to highlight “Phone Book,” and press the SELECT button.
Use the Phone Book
To access the Phone Book, use either of these methods:
Access the Phone Book
SettingsPhone BookAudio SetupThis Phone
SettingsPhone BookAudio SetupThis Phone
Audio SetupPhone Book
This PhoneAdmin Setup
SettingsPhone BookAudio SetupThis Phone
SettingsPhone BookAudio SetupThis Phone
(555)555-1111
ReadyREDIALPH BOOKSP DIAL
To turn wideband off
1 Press the MODE soft key.
2 Press the OFF soft key (or press the BACK soft key to return to the Call Screen without turning wideband off).
3 Press the BACK softkey (or wait several seconds) to return to the Call Screen.
Turn Wideband Off
0:23:13MODE HOLD
(555)555-1111
BACK OFF
Wideband Is On: 4Press the SORT soft key to cycle through the entry views by name, company, or Speed Dial number.
When you access the Phone Book, the entries are listed in order by name, with the first entry name highlighted.
Note: When sorted by company, entries that lack company data are displayed at the top of the list, with the name in brackets.
Sort the Entries
23 George Washington2425 Nevin PenelopeSORT DIALNEW
SPEED DIAL #
George WashingtonHarlodHenry JohnsonSORT DIALNEW
NAMES
Acme Inc - George Washi...AdAfter Inc - Jane SmithSORT DIALNEW
COMPANIES
SoundSt
ation V
TX 1
00
0 O
pera
tion
Man
ual
12
Use
r’s
Guid
e
SoundSt
ation V
TX 1
00
0 O
pera
tion
Man
ual
13
Use
r’s
Guid
e
Entries in the Phone Book can be automatically dialed.
1 Highlight the entry you want to dial.(See “Find an Entry,” above.)
2 Press the DIAL soft key.
You will see and hear the call being dialed.
Note: You can also access the DIAL soft key after selecting an entry with the SELECT button.
Note: If another call is ongoing, the DIAL soft key will not appear.
Dial an Entry
George WilliamHarold SmithHenry JohnsonSORT DIALNEW
George William235555555678Acme Inc.
CHANGE DIALREMOVE
Dial From a List
Dial From a Selected Entry
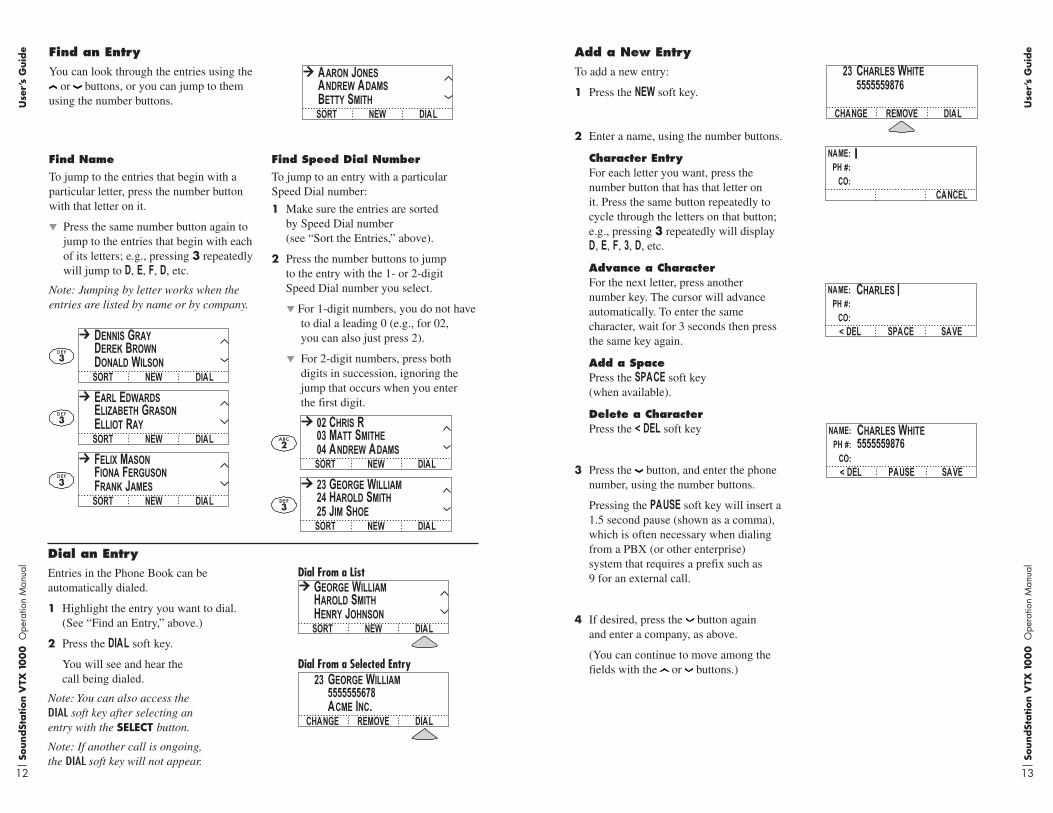
To add a new entry:
1 Press the NEW soft key.
2 Enter a name, using the number buttons.
Character Entry For each letter you want, press the number button that has that letter on it. Press the same button repeatedly to cycle through the letters on that button; e.g., pressing 3 repeatedly will display D, E, F, 3, D, etc.
Advance a Character For the next letter, press another number key. The cursor will advance automatically. To enter the same character, wait for 3 seconds then press the same key again.
Add a Space Press the SPACE soft key (when available).
Delete a Character Press the < DEL soft key
3 Press the button, and enter the phone number, using the number buttons.
Pressing the PAUSE soft key will insert a 1.5 second pause (shown as a comma), which is often necessary when dialing from a PBX (or other enterprise) system that requires a prefix such as 9 for an external call.
4 If desired, press the button again and enter a company, as above.
(You can continue to move among the fields with the or buttons.)
Add a New Entry
CANCEL OK
23 Charles White
REMOVE FROM PH BOOK?
Charles White235555559876
CHANGE DIALREMOVE
Charles White847769837_
BACK OK
24Speed Dial #:
Charles White5555559876
NAME:
PH #:
CO:
< DEL SAVEPAUSE
Charles
NAME:
PH #:
CO:
< DEL SAVESPACE
NAME:
PH #:
CO:
CANCEL
< DEL SAVE> ADV
Charles White847769837_
BACK OK
24Speed Dial #:
Charles White5555559876
NAME:PH #:
CO:< DEL SAVEPAUSE
Charles_
NAME:PH #:
CO:< DEL SAVESPACE
_
NAME:PH #:
CO:CANCEL
< DEL SAVE> ADV
Charles White847769837_
BACK OK
24Speed Dial #:
Charles White5555559876
NAME:
PH #:
CO:
< DEL SAVEPAUSE
Charles
NAME:
PH #:
CO:
< DEL SAVESPACE
NAME:
PH #:
CO:
CANCEL
< DEL SAVE> ADV
You can look through the entries using the or buttons, or you can jump to them
using the number buttons.
Find an Entry
Aaron JonesAndrew AdamsBetty SmithSORT DIALNEW
Dennis GrayDerek BrownDonald WilsonSORT DIALNEW
Earl EdwardsElizabeth GrasonElliot RaySORT DIALNEW
Felix MasonFiona FergusonFrank JamesSORT DIALNEW
Aaron JonesAndrew AdamsBetty SmithSORT DIALNEW
Dennis GrayDerek BrownDonald WilsonSORT DIALNEW
Earl EdwardsElizabeth GrasonElliot RaySORT DIALNEW
Felix MasonFiona FergusonFrank JamesSORT DIALNEW
Find Name
To jump to the entries that begin with a particular letter, press the number button with that letter on it.
Press the same number button again to jump to the entries that begin with each of its letters; e.g., pressing 3 repeatedly will jump to D, E, F, D, etc.
Note: Jumping by letter works when the entries are listed by name or by company.
Find Speed Dial Number
To jump to an entry with a particular Speed Dial number:
1 Make sure the entries are sorted by Speed Dial number(see “Sort the Entries,” above).
2 Press the number buttons to jump to the entry with the 1- or 2-digit Speed Dial number you select.
For 1-digit numbers, you do not have to dial a leading 0 (e.g., for 02, you can also just press 2).
For 2-digit numbers, press both digits in succession, ignoring the jump that occurs when you enter the first digit.
02 Chris R03 Matt Smithe04 Andrew AdamsSORT DIALNEW
23 George William24 Harold Smith25 Jim ShoeSORT DIALNEW
SoundSt
ation V
TX 1
00
0 O
pera
tion
Man
ual
14
Use
r’s
Guid
e
SoundSt
ation V
TX 1
00
0 O
pera
tion
Man
ual
15
Use
r’s
Guid
e
If you do not want to use the automatically assigned Speed Dial number (above), you can change it.
Enter the desired Speed Dial number with the number buttons, or use the or buttons to scroll through available Speed Dial numbers.
If you choose a Speed Dial number that has already been assigned to another entry, you will be asked whether you wish to reassign the Speed Dial number to the new entry. Press OK to do so and return to the Phone Book list, or CANCEL to back up one screen and choose another number.
To leave the New Entry screen without saving, press the EXIT button. You will be returned to the Phone Book list.
Assign a Speed Dial Number
5 Press the SAVE soft key.
The SAVE soft key appears once you have entered data in the name and phone number fields.
When you press the SAVE soft key, your entry will automatically be assigned the lowest available SpeedDial number.
6 Press the OK soft key, to accept the displayed Speed Dial number.
You will be returned to the Phone Book list, with your new entry included.
Note: To assign a different Speed Dial number, see “Assign a Speed Dial Number,” below.
Charles White847769837_
BACK OK
24Speed Dial #:
Charles White5555559876
NAME:
PH #:
CO:
< DEL SAVEPAUSE
Charles
NAME:
PH #:
CO:
< DEL SAVESPACE
NAME:
PH #:
CO:
CANCEL
< DEL SAVE> ADV
Charles White847769837_
BACK OK
24Speed Dial #:
Charles White5555559876
NAME:PH #:
CO:< DEL SAVEPAUSE
Charles_
NAME:PH #:
CO:< DEL SAVESPACE
_
NAME:PH #:
CO:CANCEL
< DEL SAVE> ADV
Charles White847769837_
BACK OK
24Speed Dial #:
Charles White847769837_
BACK OK
34Speed Dial #:
Charles White847769837_
BACK OK
28Speed Dial #:
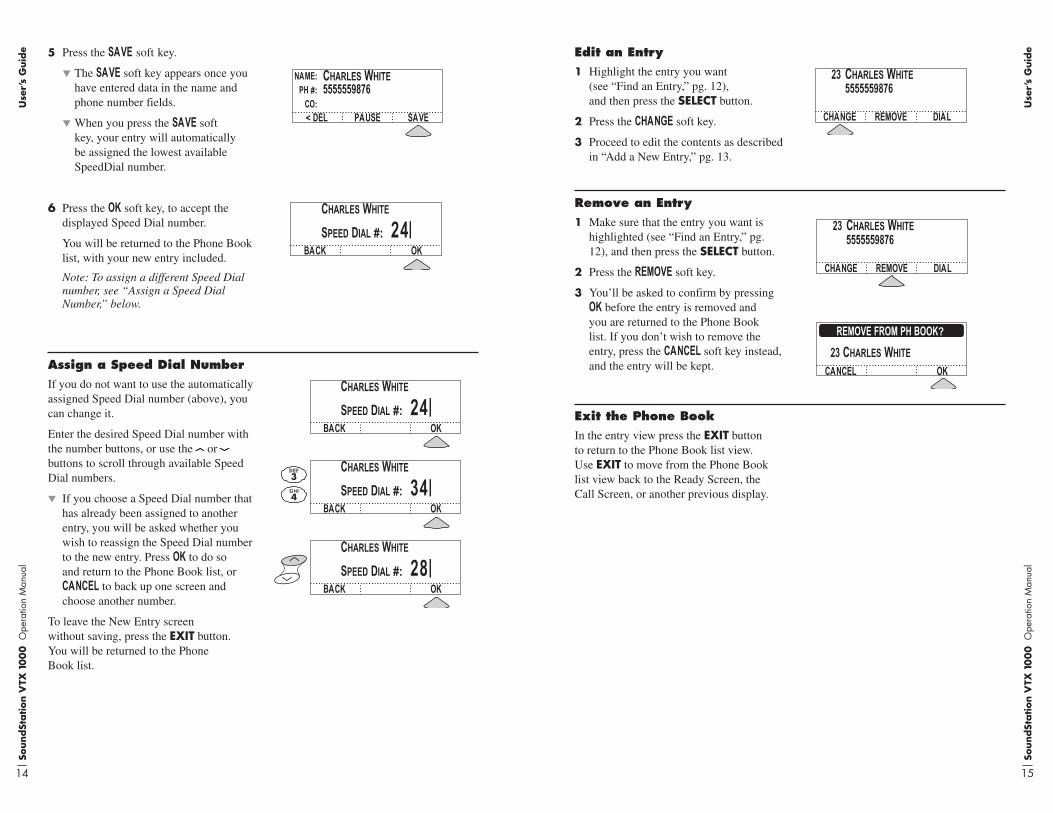
1 Make sure that the entry you want is highlighted (see “Find an Entry,” pg. 12), and then press the SELECT button.
2 Press the REMOVE soft key.
3 You’ll be asked to confirm by pressing OK before the entry is removed and you are returned to the Phone Book list. If you don’t wish to remove the entry, press the CANCEL soft key instead, and the entry will be kept.
Remove an Entry
In the entry view press the EXIT button to return to the Phone Book list view. Use EXIT to move from the Phone Book list view back to the Ready Screen, the Call Screen, or another previous display.
Exit the Phone Book
CANCEL OK
23 Charles White
REMOVE FROM PH BOOK?
Charles White235555559876
CHANGE DIALREMOVE
CANCEL OK
23 Charles White
REMOVE FROM PH BOOK?
Charles White235555559876
CHANGE DIALREMOVE
1 Highlight the entry you want (see “Find an Entry,” pg. 12), and then press the SELECT button.
2 Press the CHANGE soft key.
3 Proceed to edit the contents as described in “Add a New Entry,” pg. 13.
Edit an Entry
Charles White235555559876
CHANGE DIALREMOVE
SoundSt
ation V
TX 1
00
0 O
pera
tion
Man
ual
16
Use
r’s
Guid
e
SoundSt
ation V
TX 1
00
0 O
pera
tion
Man
ual
17
Use
r’s
Guid
e
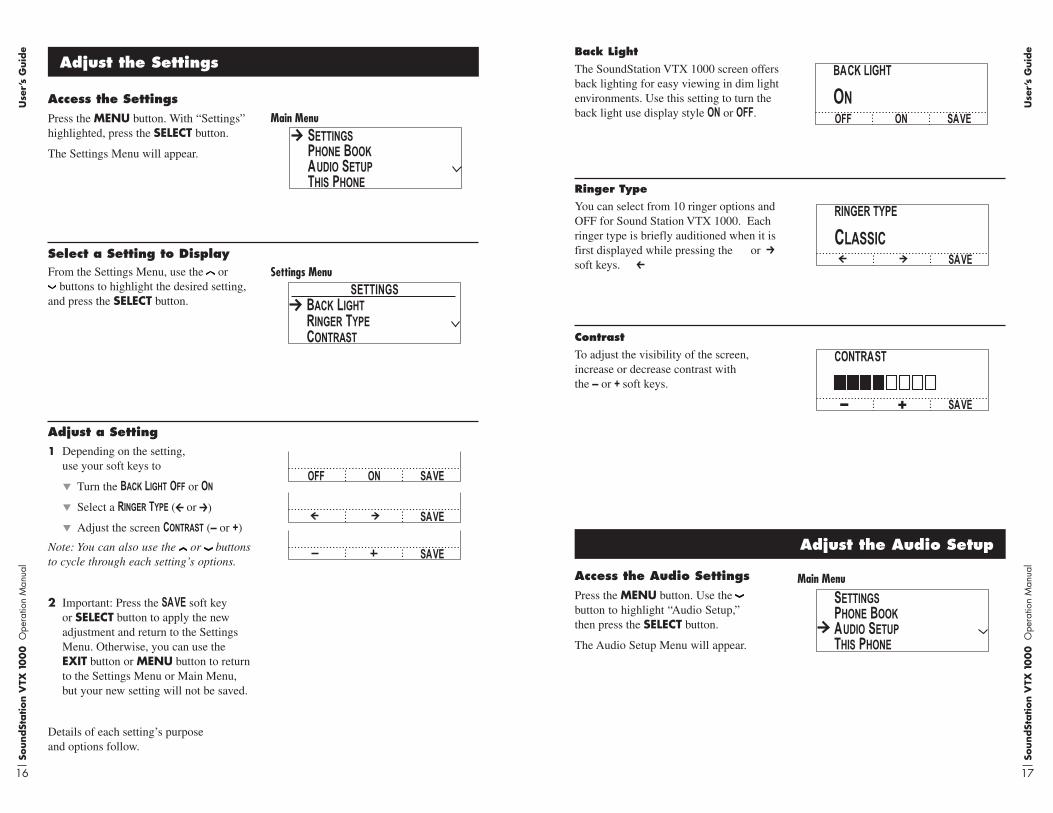
1 Depending on the setting, use your soft keys to
Turn the Back Light Off or On
Select a Ringer Type ( or )
Adjust the screen Contrast (– or +)
Note: You can also use the or buttons to cycle through each setting’s options.
2 Important: Press the SAVE soft key or SELECT button to apply the new adjustment and return to the Settings Menu. Otherwise, you can use the EXIT button or MENU button to return to the Settings Menu or Main Menu, but your new setting will not be saved.
Details of each setting’s purpose and options follow.
Press the MENU button. With “Settings” highlighted, press the SELECT button.
The Settings Menu will appear.
Adjust the Settings
SettingsPhone BookAudio SetupThis Phone
SettingsPhone BookAudio SetupThis Phone
Audio SetupPhone Book
This PhoneAdmin Setup
SettingsPhone BookAudio SetupThis Phone
SettingsPhone BookAudio SetupThis Phone
Tone PulseSETTINGS
Contrast
SETTINGSBack LightRinger TypeContrast
Main Menu
Settings Menu
Access the Settings
Adjust a Setting
From the Settings Menu, use the or buttons to highlight the desired setting,
and press the SELECT button.
Select a Setting to Display
Back Light
The SoundStation VTX 1000 screen offers back lighting for easy viewing in dim light environments. Use this setting to turn the back light use display style ON or OFF.
BACK LIGHT
OFF SAVEON
On
LANGUAGE
SAVE
English
RINGER TYPE
SAVE
Default
TONE PULSE
PULSE SAVETONE
Tone
- SAVE+
CONTRAST
Contrast
To adjust the visibility of the screen, increase or decrease contrast with the – or + soft keys.
BACK LIGHT
OFF SAVEON
On
LANGUAGE
SAVE
English
RINGER TYPE
SAVE
Classic
TONE PULSE
PULSE SAVETONE
Tone
- SAVE+
CONTRAST
Ringer Type
You can select from 10 ringer options and OFF for Sound Station VTX 1000. Each ringer type is briefly auditioned when it is first displayed while pressing the or soft keys.
BACK LIGHT
OFF SAVEON
On
LANGUAGE
SAVE
English
RINGER TYPE
SAVE
Default
TONE PULSE
PULSE SAVETONE
Tone
- SAVE+
CONTRAST
SAVE
OFF SAVEON
SAVE
Press the MENU button. Use the button to highlight “Audio Setup,” then press the SELECT button.
The Audio Setup Menu will appear.
SettingsPhone BookAudio SetupThis Phone
SettingsPhone BookAudio SetupThis Phone
Audio SetupPhone Book
This PhoneAdmin Setup
SettingsPhone BookAudio SetupThis Phone
SettingsPhone BookAudio SetupThis Phone
Main Menu
Adjust the Audio Setup
Access the Audio Settings
SoundSt
ation V
TX 1
00
0 O
pera
tion
Man
ual
18
Use
r’s
Guid
e
SoundSt
ation V
TX 1
00
0 O
pera
tion
Man
ual
19
Use
r’s
Guid
eSelect a Setting to Display
1 Depending on the setting, use your soft keys to
Adjust the Treble (– or +)
Adjust the Bass (– or +)
Indicate the presence and type of Aux Input device ( or )
Indicate the presence and type of Aux Output device ( or )
Turn the Console Mics Off or On
Turn the Console Speaker Off or On
Turn the Automatic Gain Control Off or On
Turn the Noise Reduction Off or On
Note: You can also use the or buttons to cycle through each setting’s options.
2 Important: Press the SAVE soft key or SELECT button to apply the new adjustment and return to the Audio Setup Menu. Otherwise, you can use the EXIT button or MENU button to return to the Audio Setup Menu or Main Menu, but your new setting will not be saved.
AUDIO SETUPTreble EqBass EqSubwoofer
Aux OutputAUDIO SETUP
Console MicsConsole Speaker
Audio Setup Menu
- SAVE+
SAVE
OFF SAVEON
Adjust an Audio Setting
Details of each setting’s purpose and options follow.
Use the or buttons to highlight the desired setting, and press the SELECT button.
Bass EQ
The Bass Equalizer adjusts the tone of the low frequency sound from the speakers. Use this setting to adjust the amount of bass – (down) or + (up).
Treble EQ
The Treble Equalizer adjusts the tone of the high frequency sound from the speakers. Use this setting to adjust the sharpness of the sound – (down) or + (up).
Treble Eq
- SAVE+
Bass Eq
- SAVE+
Aux Input
SAVEONOFF
On
Aux Output
SAVE
Subwoofer
Console Mics
OFF SAVEON
On
Console Speaker
OFF SAVEON
On
Automatic Gain Control
OFF ENTERON
On
Noise Reduction
OFF ENTERON
On
Vortex Mode
OFF SAVEON
Off
Aux Input
SAVE
Polycom Wireless Mic
Aux Input
Besides its built-in microphones and extension microphones, the SoundStation VTX 1000 can also accept audio input from external sources, such as an external wireless microphone or microphone mixer. (See “Using the Extension Microphones,” pg. 22, for one option, and see “Connection Diagram,” pg. 31, for installation.) To use these optional devices, the Aux Input setting must reflect the device connected. If no external source is in use, you can turn Aux Input Off, if you prefer.
Polycom Wireless Mic, Other Input, Off
Note: For specifications related to auxiliary input, see “Aux In and Aux Out Specification Table,” pg. 40.
Treble Eq
- SAVE+
Bass Eq
- SAVE+
Aux Input
SAVEONOFF
On
Aux Output
SAVE
Subwoofer
Console Mics
OFF SAVEON
On
Console Speaker
OFF SAVEON
On
Automatic Gain Control
OFF ENTERON
On
Noise Reduction
OFF ENTERON
On
Vortex Mode
OFF SAVEON
Off
Subwoofer Volume
The subwoofer volume adjusts the volume of low frequency sound from the subwoofer and is used in concert with the Bass EQ to drive the appropriate low frequency level for the room (80-300 Hz). When the system is balanced, users should not perceive any sound coming from the subwoofer during normal operation, and the speech from the console speaker should sound warm and natural. Use this setting to adjust the amount of subwoofer volume – (down) or + (up).
Subwoofer Volume
- SAVE+
Aux Input
SAVE
Polycom Wireless Mic
SoundSt
ation V
TX 1
00
0 O
pera
tion
Man
ual
20
Use
r’s
Guid
e
SoundSt
ation V
TX 1
00
0 O
pera
tion
Man
ual
21
Use
r’s
Guid
e
Treble Eq
- SAVE+
Bass Eq
- SAVE+
Aux Input
SAVEONOFF
On
Aux Output
SAVE
Subwoofer
Console Mics
OFF SAVEON
On
Console Speaker
OFF SAVEON
On
Automatic Gain Control
OFF ENTERON
On
Noise Reduction
OFF ENTERON
On
Vortex Mode
OFF SAVEON
Off
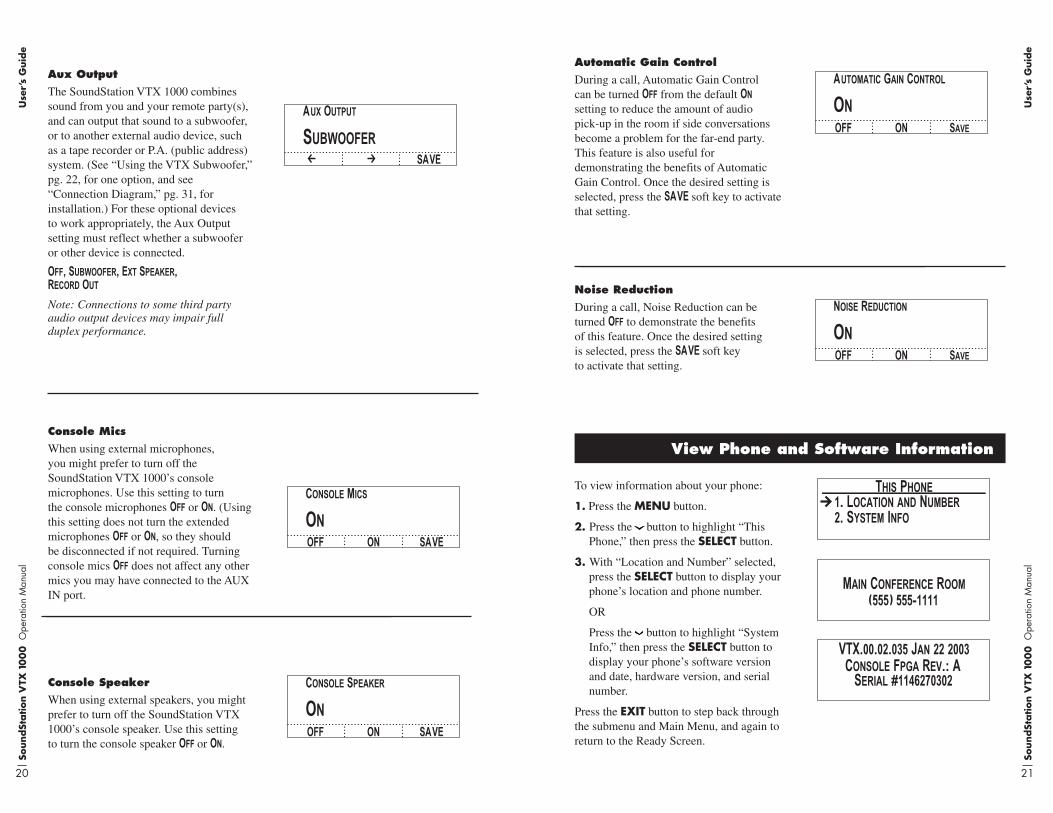
Console Speaker
When using external speakers, you might prefer to turn off the SoundStation VTX 1000’s console speaker. Use this setting to turn the console speaker Off or On.
To view information about your phone:
1. Press the MENU button.
2. Press the button to highlight “This Phone,” then press the SELECT button.
3. With “Location and Number” selected, press the SELECT button to display your phone’s location and phone number.
OR
Press the button to highlight “System Info,” then press the SELECT button to display your phone’s software version and date, hardware version, and serial number.
Press the EXIT button to step back through the submenu and Main Menu, and again to return to the Ready Screen.
View Phone and Software Information
(555) 555-1111Main Conference Room
VTX.00.02.035 Jan 22 2003Console Fpga Rev.: A
Serial #1146270302
2. System Info1. Location and Number
This Phone
Console Mics
When using external microphones, you might prefer to turn off the SoundStation VTX 1000’s console microphones. Use this setting to turn the console microphones Off or On. (Using this setting does not turn the extended microphones Off or On, so they should be disconnected if not required. Turning console mics Off does not affect any other mics you may have connected to the AUX IN port.
Treble Eq
- SAVE+
Bass Eq
- SAVE+
Aux Input
SAVEONOFF
On
Aux Output
SAVE
Subwoofer
Console Mics
OFF SAVEON
On
Console Speaker
OFF SAVEON
On
Automatic Gain Control
OFF ENTERON
On
Noise Reduction
OFF ENTERON
On
Vortex Mode
OFF SAVEON
Off
Treble Eq
- SAVE+
Bass Eq
- SAVE+
Aux Input
SAVEONOFF
On
Aux Output
SAVE
Subwoofer
Console Mics
OFF SAVEON
On
Console Speaker
OFF SAVEON
On
Automatic Gain Control
OFF SaveON
On
Noise Reduction
OFF SaveON
On
Vortex Mode
OFF SAVEON
Off
Automatic Gain Control
During a call, Automatic Gain Control can be turned Off from the default On setting to reduce the amount of audio pick-up in the room if side conversations become a problem for the far-end party. This feature is also useful for demonstrating the benefits of Automatic Gain Control. Once the desired setting is selected, press the SAVE soft key to activate that setting.
Treble Eq
- SAVE+
Bass Eq
- SAVE+
Aux Input
SAVEONOFF
On
Aux Output
SAVE
Subwoofer
Console Mics
OFF SAVEON
On
Console Speaker
OFF SAVEON
On
Automatic Gain Control
OFF SaveON
On
Noise Reduction
OFF SaveON
On
Vortex Mode
OFF SAVEON
Off
Noise Reduction
During a call, Noise Reduction can be turned Off to demonstrate the benefits of this feature. Once the desired setting is selected, press the SAVE soft key to activate that setting.
Aux Output
The SoundStation VTX 1000 combines sound from you and your remote party(s), and can output that sound to a subwoofer, or to another external audio device, such as a tape recorder or P.A. (public address) system. (See “Using the VTX Subwoofer,” pg. 22, for one option, and see “Connection Diagram,” pg. 31, for installation.) For these optional devices to work appropriately, the Aux Output setting must reflect whether a subwoofer or other device is connected.
Off, Subwoofer, Ext Speaker,Record Out
Note: Connections to some third party audio output devices may impair full duplex performance.
Treble Eq
- SAVE+
Bass Eq
- SAVE+
Aux Input
SAVEONOFF
On
Aux Output
SAVE
Subwoofer
Console Mics
OFF SAVEON
On
Console Speaker
OFF SAVEON
On
Automatic Gain Control
OFF ENTERON
On
Noise Reduction
OFF ENTERON
On
Vortex Mode
OFF SAVEON
Off
SoundSt
ation V
TX 1
00
0 O
pera
tion
Man
ual
22
Use
r’s
Guid
e
SoundSt
ation V
TX 1
00
0 O
pera
tion
Man
ual
23
Use
r’s
Guid
e
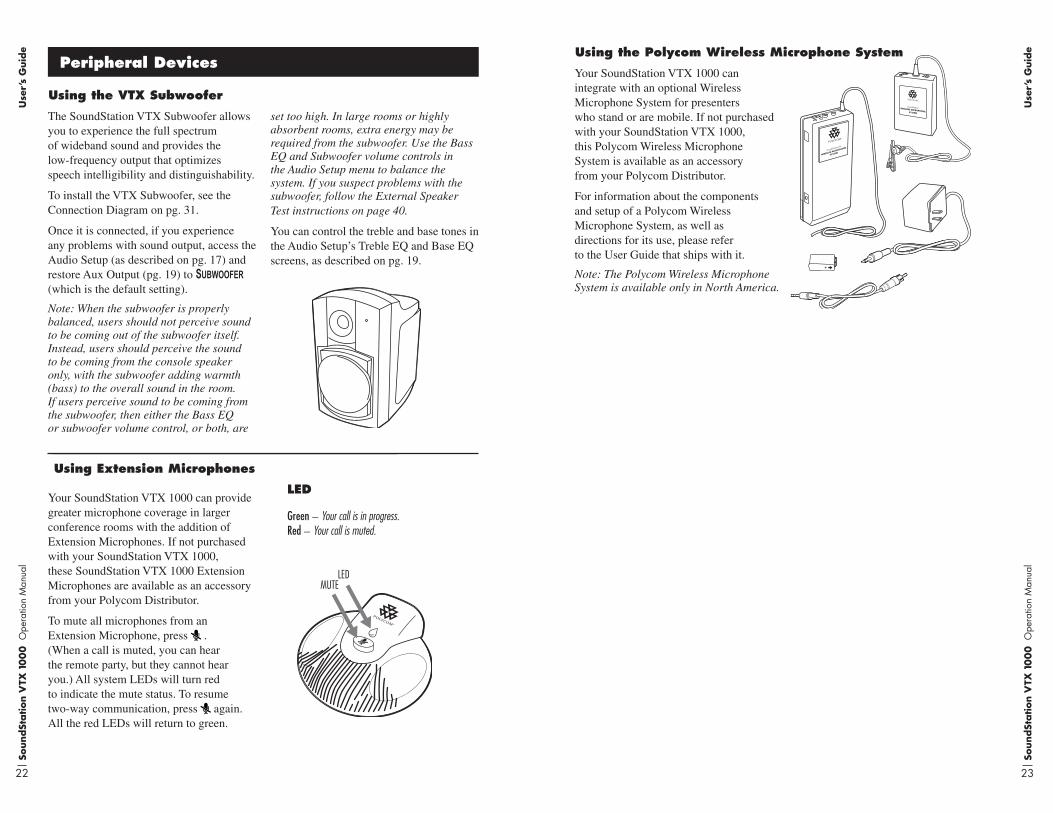
Your SoundStation VTX 1000 can integrate with an optional Wireless Microphone System for presenters who stand or are mobile. If not purchased with your SoundStation VTX 1000, this Polycom Wireless Microphone System is available as an accessory from your Polycom Distributor.
For information about the components and setup of a Polycom Wireless Microphone System, as well as directions for its use, please refer to the User Guide that ships with it.
Note: The Polycom Wireless Microphone System is available only in North America.
Using the Polycom Wireless Microphone System
SoundStation EX
WIRELESS MICROPHONE
SYSTEM
SoundStationWIRELESS MICROPHONESYSTEM
Your SoundStation VTX 1000 can provide greater microphone coverage in larger conference rooms with the addition of Extension Microphones. If not purchased with your SoundStation VTX 1000, these SoundStation VTX 1000 Extension Microphones are available as an accessory from your Polycom Distributor.
To mute all microphones from an Extension Microphone, press . (When a call is muted, you can hear the remote party, but they cannot hear you.) All system LEDs will turn red to indicate the mute status. To resume two-way communication, press again. All the red LEDs will return to green.
MUTELED
Using Extension Microphones
LED
Green – Your call is in progress.Red – Your call is muted.
Peripheral Devices
The SoundStation VTX Subwoofer allows you to experience the full spectrum of wideband sound and provides the low-frequency output that optimizes speech intelligibility and distinguishability.
To install the VTX Subwoofer, see the Connection Diagram on pg. 31.
Once it is connected, if you experience any problems with sound output, access the Audio Setup (as described on pg. 17) and restore Aux Output (pg. 19) to Subwoofer (which is the default setting).
Note: When the subwoofer is properly balanced, users should not perceive sound to be coming out of the subwoofer itself. Instead, users should perceive the sound to be coming from the console speaker only, with the subwoofer adding warmth (bass) to the overall sound in the room. If users perceive sound to be coming from the subwoofer, then either the Bass EQ or subwoofer volume control, or both, are
set too high. In large rooms or highly absorbent rooms, extra energy may be required from the subwoofer. Use the Bass EQ and Subwoofer volume controls in the Audio Setup menu to balance the system. If you suspect problems with the subwoofer, follow the External Speaker Test instructions on page 40.
You can control the treble and base tones in the Audio Setup’s Treble EQ and Base EQ screens, as described on pg. 19.
Using the VTX Subwoofer
SoundSt
ation V
TX 1
00
0 O
pera
tion
Man
ual
24
Use
r’s
Guid
e
SoundSt
ation V
TX 1
00
0 O
pera
tion
Man
ual
25
Use
r’s
Guid
e
This is caused by highly reverberant rooms and people speaking too far from a mic.
Speak closer to the unit so the microphones can pick up your speech.
Add more sound absorbency to the room.
Muffled or “In a Well” Reception
You will enjoy the highest sound quality when you are on a wideband call, which you can determine by the presence of
on your screen.
If you are on a multi-party call, or a call with a party whose phone is not wideband enabled, your SoundStation VTX 1000 establishes a narrowband call, and you may notice a change in sound quality.
Variable Sound Quality
Press the buttons more slowly. Because of system responsiveness, some buttons may not be recognized if you press them quickly.
If the problem you are experiencing is not resolved here, please contact your System Administrator.
Quick Keypad Input Is Not Registered
Check that the ringer is not turned off. (See “Ringer Type,” pg. 17.)
If the volume is turned all the way down, increase the volume with the
button.
Make sure that the console speaker is enabled. Refer to page 20.
Troubleshooting
Check that all connections are tight and in place.
Make sure all connections are correct. (See “Connection Diagram,” pg. 31.)
Make sure that the console speaker is enabled. Refer to page 20.
No Dial Tone
SoundStation VTX 1000 Does Not Ring
If your screen appears to flicker, it may be because you are using a certain type of older fluorescent
lighting in your building. Move the SoundStation VTX 1000 away from the lights or replace the lights.
Flickering LCD
Caller ID is supported only through your local phone company and only if you have subscribed to Caller ID service.
Type II “Caller ID on Call Waiting” is not supported, only Type I.
PBX (and other enterprise phone system Caller ID), which is proprietary, is not supported.
No Caller ID
You must be connected to another SoundStation VTX 1000 to enter wideband mode.
Modem Train Time: The short train mode (6 seconds) should only be used on high quality phone lines. If you consistently have problems achieving wideband mode, set the modem train time to long (12 seconds). Refer to page 36.
Bridged Calls: Wideband mode currently does not work with external conference bridges (i.e. multiple calls).
Line Quality: The VTX 1000’s modem operates in two modes, wideband voice mode and software download mode. In software download mode, the modem connects at higher rates, typically those rates achieved with a data modem on the same lines. However, in wideband mode, the connection rate is optimized for reliability rather than speed. The maximum rate used for wideband is 19.2 kbps while the maximum rate for software download is 33 kbps.
Poor line quality can prevent connections in wideband mode. The VTX 1000 will connect in wideband mode on connections as low as 12 kbps. However, if the line quality does not consistently support 12 kbps, the unit will connect in narrowband mode. This will be the case if your local loop is longer that 12,000 feet. Also, this can be the case with shorter loops if there is a problem on the line. Please contact your local phone company for resolution. In general, a typical data modem should be able to achieve 24 kbps connections in order to support a VTX call.
In order to test your line quality, perform the following test: Configure a VTX 1000 which has a good line as a software download server in accordance with instructions on page 44. Configure the unit with the line problems to receive a software download from the unit configured as a download server.
Cannot Connect In Wideband Mode
When the software download starts, note the connect rate that is displayed as the connection is established. You may cancel the software download once the connect rate has been displayed. If the software download connect rate is below 19.2 kbps, the line will not support wideband calls.
Call Waiting: Call Waiting signals will interfere with wideband operation. It is highly recommended that Call Waiting be disabled by the phone company (or PBX administrator) for lines used for VTX 1000 wideband calls.
SoundSt
ation V
TX 1
00
0 O
pera
tion
Man
ual
26
Use
r’s
Guid
e
SoundSt
ation V
TX 1
00
0 O
pera
tion
Man
ual
27
Use
r’s
Guid
e
All multi-party calls are narrowband calls. When you press the CONF button to add another party, any wideband connection you may have had with your first party will revert to narrowband, and you will no longer see on your screen.
Your connection will also revert to narrowband if another party picks up a phone which is connected in parallel with your SoundStation VTX 1000.
Excessive noise on the line will also cause the phone to automatically switch to narrowband. If this problem persists, contact your pone line telephone service provider or system administrator. VTX 1000 is designed to provide wideband service on business quality phone lines.
Reverting to Narrowband
If a remote party cannot hear you at all, cannot hear you well, or cannot hear you via particular microphones, first determine whether any external audio input devices are in use, such as a wireless microphone or mic mixer.
If such devices are in use, check that all the connections are secure. (See “Connection Diagram,” pg. 31.) Then, access the Audio Setup (as described on pg. 17) and make sure that Aux Input (pg. 19) is On, so that input from these devices is recognized.
If such devices are not in use, access the Audio Setup (as described on pg. 17) and make sure that Console Mics (pg. 20) are On.
If the only such devices in use are the VTX’s Extended Microphones, access the Audio Setup (as described on pg. 17) and make sure that Console Mics (pg. 20) are On. This setting controls both the internal microphones and the Extended Microphones.
Remote Party Cannot Hear You
If physical damage is severe enough that the internal parts become visible, disconnect the SoundStation VTX 1000 immediately. Do not reconnect it to the telephone network until the SoundStation VTX 1000 has been repaired.
Physical Damage
Do not move the SoundStation VTX 1000 console while it is in use.
Keep your hands away from the unit during calls.
Keep papers, cups, coffee pots, etc., away from the unit.
At the beginning of a call, let someone at each location speak in turn for a few moments, to enable SoundStation VTX 1000 to adapt to its environment.
The other party may be using lower-quality equipment or a half-duplex conference bridge, in which case there may be little you can do.
Try calling again to see if another line provides a better connection.
Short Silences, Echoes, or Clipped Speech
If sound quality is problematic, or there is no sound, first determine whether any external audio output devices are in use, such as a subwoofer, PA system, or tape recorder.
If such devices are in use, check that all the connections are secure. (See “Connection Diagram,” pg. 31.) Then, access the Audio Setup (as described on pg. 17) and make sure that Aux Output (pg. 19) is set correctly. If a Subwoofer is in use, set Aux Output to Subwoofer. If any other device is in use, set Aux Output to Ext Speaker, Record Out, or Off.
Problematic Sound Quality or No Sound
Noisy equipment, such as a computer or fan, may make it difficult for you to hear the other party. Both parties should turn off any noisy equipment.
Try calling again to see if another line provides a better connection.
Excessive Noise
SoundSt
ation V
TX 1
00
0 O
pera
tion
Man
ual
28
Use
r’s
Guid
e
SoundSt
ation V
TX 1
00
0 O
pera
tion
Man
ual
29
Adm
inis
trato
r’s
Guid
e
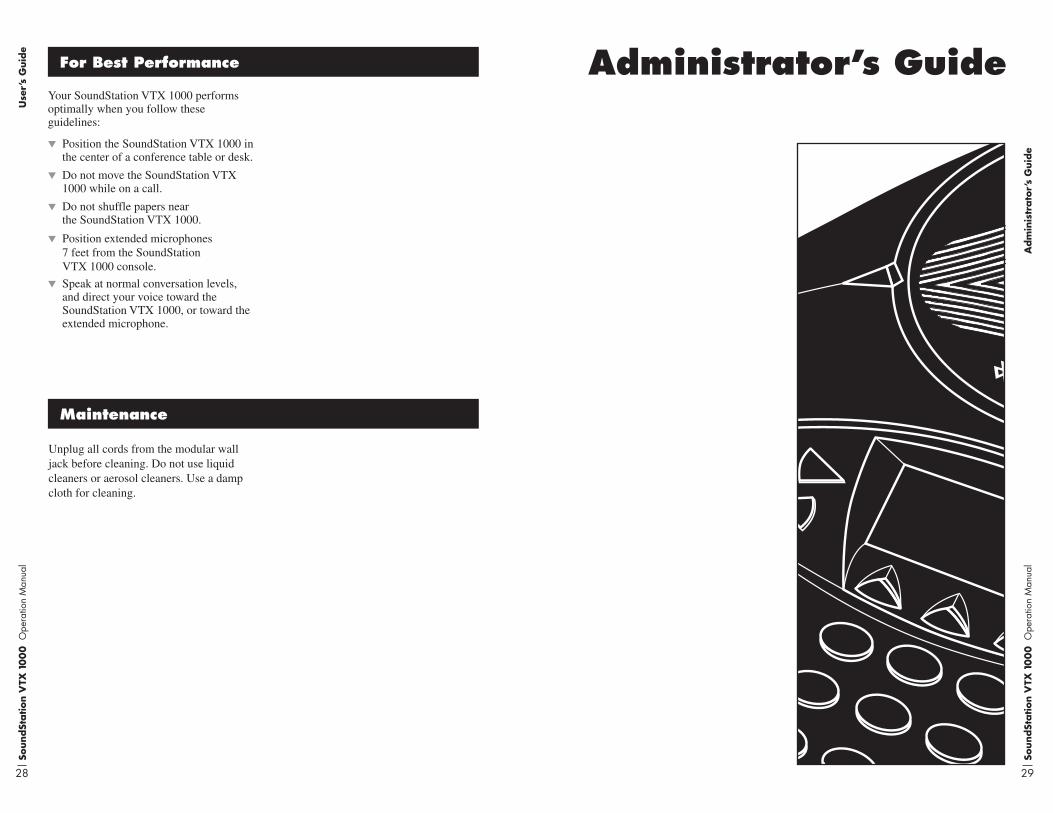
Administrator’s GuideYour SoundStation VTX 1000 performs optimally when you follow these guidelines:
Position the SoundStation VTX 1000 in the center of a conference table or desk.
Do not move the SoundStation VTX 1000 while on a call.
Do not shuffle papers near the SoundStation VTX 1000.
Position extended microphones 7 feet from the SoundStation VTX 1000 console.
Speak at normal conversation levels, and direct your voice toward the SoundStation VTX 1000, or toward the extended microphone.
For Best Performance
Unplug all cords from the modular wall jack before cleaning. Do not use liquid cleaners or aerosol cleaners. Use a damp cloth for cleaning.
Maintenance
SoundSt
ation V
TX 1
00
0 O
pera
tion
Man
ual
30
Adm
inis
trato
r’s
Guid
e
SoundSt
ation V
TX 1
00
0 O
pera
tion
Man
ual
31
Adm
inis
trato
r’s
Guid
e
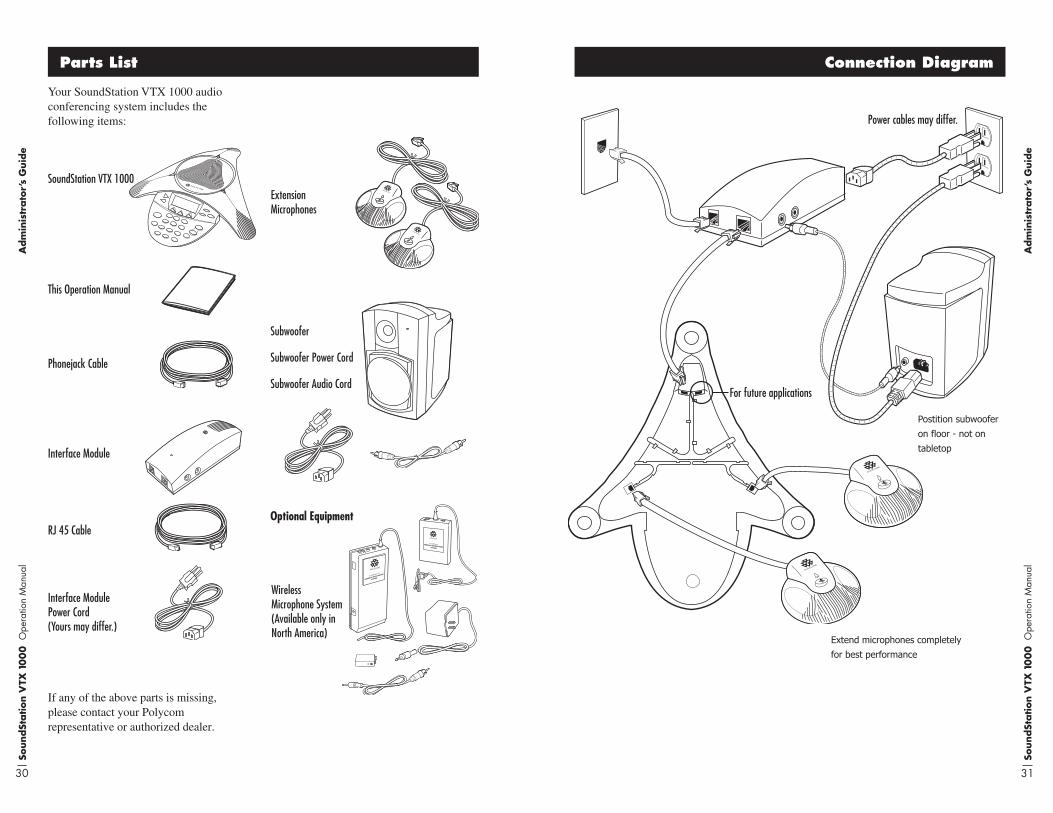
Parts List
Your SoundStation VTX 1000 audio conferencing system includes the following items:
SoundStation VTX 1000
This Operation Manual
ExtensionMicrophones
SoundStation EX
WIRELESS MICROPHONE
SYSTEM
SoundStationWIRELESS MICROPHONESYSTEM
Wireless Microphone System (Available only in North America)
Subwoofer
Subwoofer Power Cord
Subwoofer Audio Cord
RJ 45 Cable
Interface Module
Interface ModulePower Cord(Yours may differ.)
Phonejack Cable
If any of the above parts is missing, please contact your Polycom representative or authorized dealer.
Optional Equipment
Connection Diagram
Power cables may differ.
For future applications
Postition subwoofer
on floor - not on
tabletop
Extend microphones completely
for best performance
SoundSt
ation V
TX 1
00
0 O
pera
tion
Man
ual
32
Adm
inis
trato
r’s
Guid
e
SoundSt
ation V
TX 1
00
0 O
pera
tion
Man
ual
33
Adm
inis
trato
r’s
Guid
e
Administrative Setup Overview
The following items are part of the Administrative Setup area.
The following pages explain how to access, select, adjust, use, and exit these settings and functions.
1. Location 1 Location Name Enter a name for this SoundStation VTX 1000’s location.
2 This Phone # Enter this SoundStation VTX 1000’s telephone number.
2. Phone System 1 Flash Timing Set the flash delay to 75, 100, 300, or 600 milliseconds.
2 Caller ID Turn Caller ID (if available) on or off.
3 Modem Setup Select short train time (6seconds) for high quality line or long train (12 seconds) otherwise.
4 Wideband Monitor Selecting “ON” (default) monitors wideband calls for line quality degradation.
3. Passcode Set whether or not to require a passcode, and assign a new passcode.
4. Diagnostics 1 Mic Test View the relative level of the sample received by each individual microphone.
2 Console Spkr (Speaker) Test Select acoustic test signals to drive through the SoundStation VTX 1000 speakers
3 Ext Spkr Test Select acoustic test signals to drive through external audio output devices, such as speakers, PA systems, etc.
4 Modem Statistics View the SoundStation VTX 1000 modem performance for the last call that made use of a modem connection.
5 Restore Defaults Completely eliminate all settings and data that have been entered since the phone was first installed and restores original default settings.
5. Software 1 Upgrade Software Dial in to download updated software directly to the SoundStation VTX 1000.
2 Configure Dialing Number Enter the number to be dialed to upgrade software.
3 Configure as DL Server Activate or deactivate the SoundStation VTX 1000’s capability to provide software upgrades to other VTXs that call it.
(External Speaker)
Press the MENU button. Use the button to highlight Admin Setup, then press the SELECT button.
Access Administrative Setup
No Passcode Assigned
If there is no Passcode assigned, the Admin Setup Menu will be displayed.
Passcode Assigned
If there is a Passcode assigned, use the number keypad to enter your 3-digit code, and then press ENTER.
ADMIN SETUP
CANCEL ENTER< DEL>
Passcode:
Use the CANCEL soft key to return to the Main Menu.
If you make an error, press <DEL to delete characters.
Caution: Be sure to write down your passcode in a safe place in case you forget it. If you cannot remember or find your passcode, please contact Polycom Support at www.polycom.com/support and click on “How to Contact Support and Service” for your local support contact information.
Note: You can set whether or not to require a passcode in the “Passcode” section, pg. 37.
CANCEL
PASSCODE:
INCORRECT PASSCODE
ENTER< DEL>
If you enter an incorrect passcode, the digits you entered will disappear and you will be returned to the Admin Setup menu to re-enter your passcode.
Select an Item to DisplayStandard Selection
Use the or buttons to highlight the desired item, and press the SELECT button.
Selection Shortcuts
For quick selection of the desired item, press its number on the keypad.
Some Admin Setup sections have submenus, which are also numbered for quick selection, so you can enter a two-digit number for quickest access. For example, pressing 2 3 at the main Admin Setup Menu will select the 2. Phone system submenu’s 3. modem setup item.3. Passcode
4. Diagnostics5. Software
1. Location2. Phone System3. Passcode
ADMIN SETUP
ADMIN SETUP4. Diagnostics5. Software
1. Location2. Phone System3. Passcode
ADMIN SETUP
3. Passcode4. Diagnostics5. Software
1. Location2. Phone System3. Passcode
ADMIN SETUP
ADMIN SETUP4. Diagnostics5. Software
1. Location2. Phone System3. Passcode
ADMIN SETUP
SoundSt
ation V
TX 1
00
0 O
pera
tion
Man
ual
34
Adm
inis
trato
r’s
Guid
e
SoundSt
ation V
TX 1
00
0 O
pera
tion
Man
ual
35
Adm
inis
trato
r’s
Guid
e
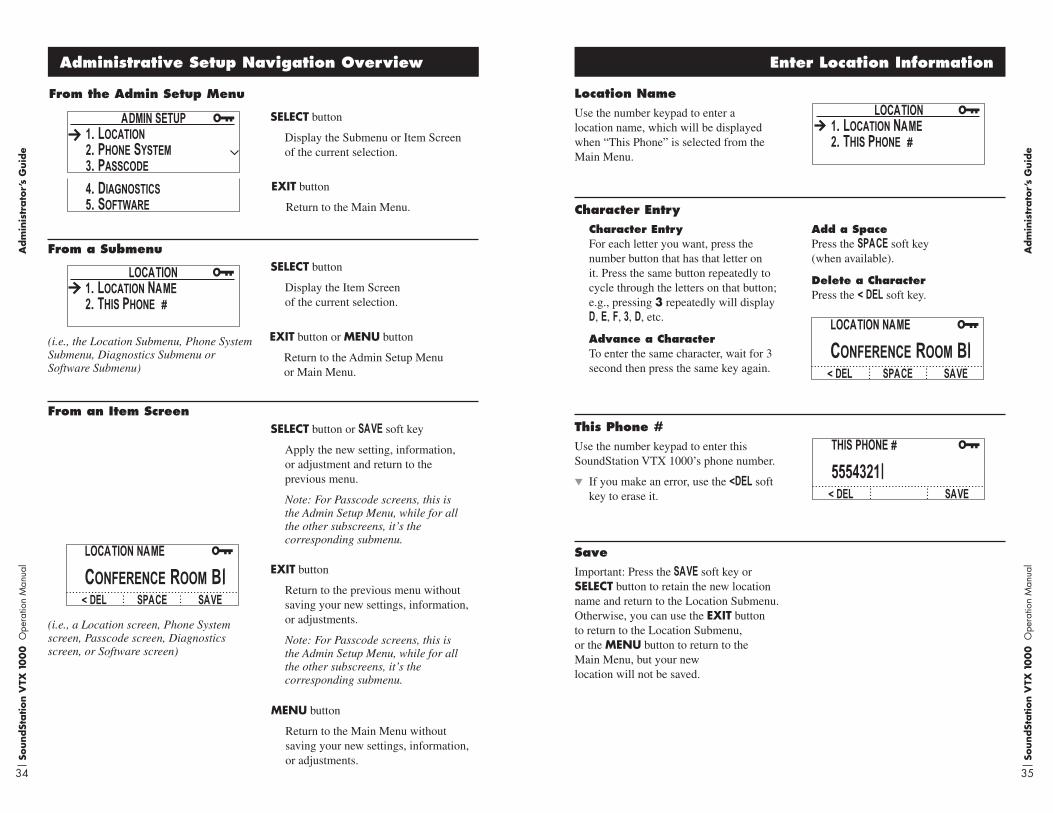
Administrative Setup Navigation Overview
From an Item Screen
SELECT button or SAVE soft key
Apply the new setting, information, or adjustment and return to the previous menu.
Note: For Passcode screens, this is the Admin Setup Menu, while for all the other subscreens, it’s the corresponding submenu.
MENU button
Return to the Main Menu without saving your new settings, information, or adjustments.
EXIT button
Return to the previous menu without saving your new settings, information, or adjustments.
Note: For Passcode screens, this is the Admin Setup Menu, while for all the other subscreens, it’s the corresponding submenu.
From a Submenu
From the Admin Setup Menu
3. Passcode4. Diagnostics5. Software
1. Location2. Phone System3. Passcode
ADMIN SETUP
ADMIN SETUP4. Diagnostics5. Software
1. Location2. Phone System3. Passcode
ADMIN SETUP
1. Location NAME2. THIS Phone #
LOCATION
< DEL SAVESPACE
LOCATION NAME
Conference Room B_
< DEL SAVE
THIS PHONE #
5554321_1. Location NAME
2. THIS Phone #
LOCATION
< DEL SAVESPACE
LOCATION NAME
Conference Room B
< DEL SAVE
THIS PHONE #
5554321
(i.e., the Location Submenu, Phone System Submenu, Diagnostics Submenu or Software Submenu)
(i.e., a Location screen, Phone System screen, Passcode screen, Diagnostics screen, or Software screen)
SELECT button
Display the Submenu or Item Screen of the current selection.
EXIT button
Return to the Main Menu.
SELECT button
Display the Item Screen of the current selection.
EXIT button or MENU button
Return to the Admin Setup Menu or Main Menu.
Character Entry For each letter you want, press the number button that has that letter on it. Press the same button repeatedly to cycle through the letters on that button; e.g., pressing 3 repeatedly will display D, E, F, 3, D, etc.
Advance a Character To enter the same character, wait for 3 second then press the same key again.
Add a Space Press the SPACE soft key (when available).
Delete a Character Press the < DEL soft key.
Enter Location Information
Use the number keypad to enter a location name, which will be displayed when “This Phone” is selected from the Main Menu.
Location Name
Character Entry
Use the number keypad to enter this SoundStation VTX 1000’s phone number.
If you make an error, use the <DEL soft key to erase it.
This Phone #
1. Location NAME2. THIS Phone #
LOCATION
< DEL SAVESPACE
LOCATION NAME
Conference Room B_
< DEL SAVE
THIS PHONE #
5554321_
1. Location NAME
2. THIS Phone #
LOCATION
< DEL SAVESPACE
LOCATION NAME
Conference Room B
< DEL SAVE
THIS PHONE #
5554321
1. Location NAME
2. THIS Phone #
LOCATION
< DEL SAVESPACE
LOCATION NAME
Conference Room B
< DEL SAVE
THIS PHONE #
5554321
Important: Press the SAVE soft key or SELECT button to retain the new location name and return to the Location Submenu. Otherwise, you can use the EXIT button to return to the Location Submenu, or the MENU button to return to the Main Menu, but your new location will not be saved.
Save
SoundSt
ation V
TX 1
00
0 O
pera
tion
Man
ual
36
Adm
inis
trato
r’s
Guid
e
SoundSt
ation V
TX 1
00
0 O
pera
tion
Man
ual
37
Adm
inis
trato
r’s
Guid
e
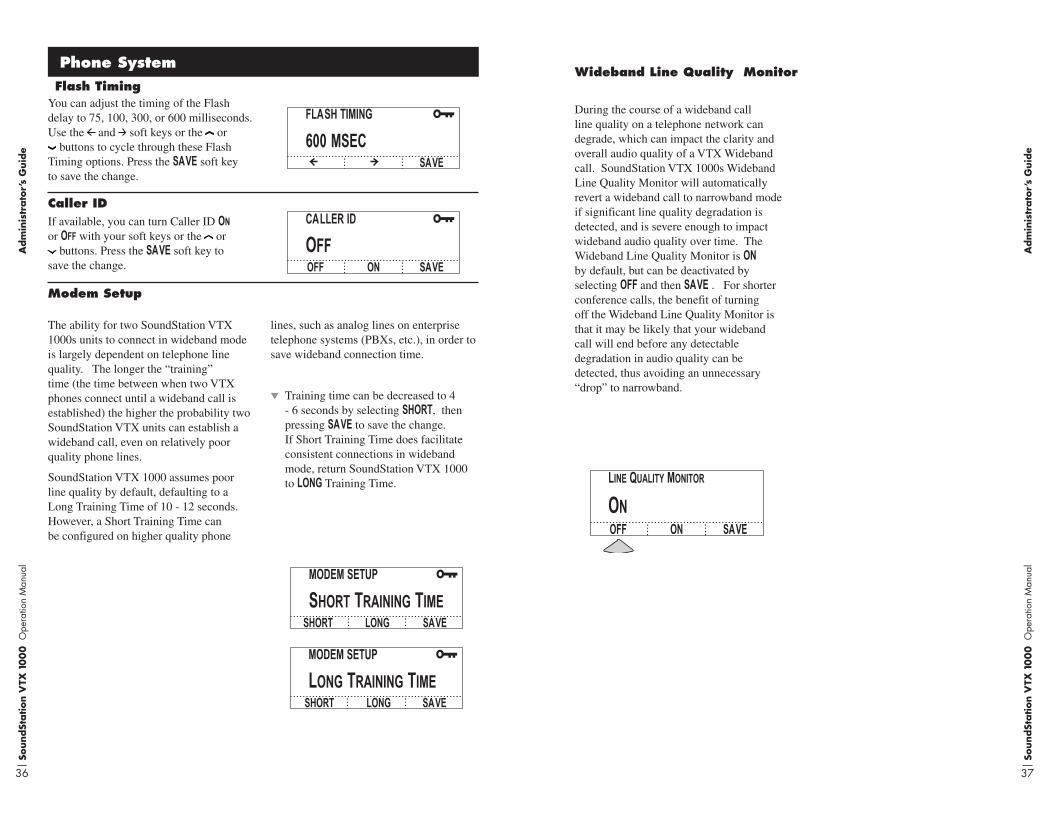
Phone System
You can adjust the timing of the Flash delay to 75, 100, 300, or 600 milliseconds. Use the and soft keys or the or
buttons to cycle through these Flash Timing options. Press the SAVE soft key to save the change.
Flash Timing
FLASH TIMING
SAVE
600 MSEC
If available, you can turn Caller ID On or Off with your soft keys or the or
buttons. Press the SAVE soft key to save the change.
Caller IDCALLER ID
SAVE
OFFOFF ON
The ability for two SoundStation VTX 1000s units to connect in wideband mode is largely dependent on telephone line quality. The longer the “training” time (the time between when two VTX phones connect until a wideband call is established) the higher the probability two SoundStation VTX units can establish a wideband call, even on relatively poor quality phone lines.
SoundStation VTX 1000 assumes poor line quality by default, defaulting to a Long Training Time of 10 - 12 seconds. However, a Short Training Time can be configured on higher quality phone
lines, such as analog lines on enterprise telephone systems (PBXs, etc.), in order to save wideband connection time.
Training time can be decreased to 4 - 6 seconds by selecting SHORT, then pressing SAVE to save the change. If Short Training Time does facilitate consistent connections in wideband mode, return SoundStation VTX 1000 to LONG Training Time.
Modem Setup
MODEM SETUP
SAVE
Short Training Time
MODEM SETUP
SAVE
Long Training Time
LONGSHORT
LONGSHORT
MODEM SETUP
SAVE
Short Training Time
MODEM SETUP
SAVE
Long Training Time
LONGSHORT
LONGSHORT
Line Quality Monitor
OFF SAVEON
On
Wideband Line Quality Monitor
During the course of a wideband call line quality on a telephone network can degrade, which can impact the clarity and overall audio quality of a VTX Wideband call. SoundStation VTX 1000s Wideband Line Quality Monitor will automatically revert a wideband call to narrowband mode if significant line quality degradation is detected, and is severe enough to impact wideband audio quality over time. The Wideband Line Quality Monitor is ON by default, but can be deactivated by selecting OFF and then SAVE . For shorter conference calls, the benefit of turning off the Wideband Line Quality Monitor is that it may be likely that your wideband call will end before any detectable degradation in audio quality can be detected, thus avoiding an unnecessary “drop” to narrowband.
SoundSt
ation V
TX 1
00
0 O
pera
tion
Man
ual
38
Adm
inis
trato
r’s
Guid
e
SoundSt
ation V
TX 1
00
0 O
pera
tion
Man
ual
39
Adm
inis
trato
r’s
Guid
e
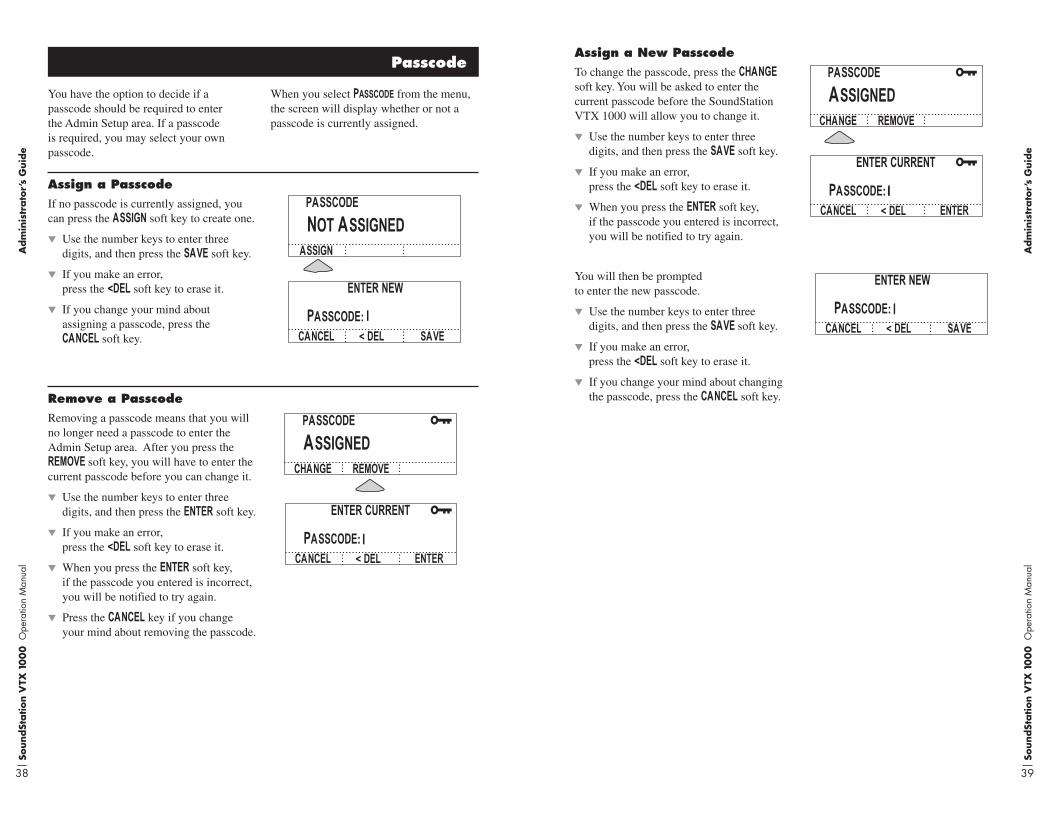
To change the passcode, press the CHANGE soft key. You will be asked to enter the current passcode before the SoundStation VTX 1000 will allow you to change it.
Use the number keys to enter three digits, and then press the SAVE soft key.
If you make an error, press the <DEL soft key to erase it.
When you press the ENTER soft key, if the passcode you entered is incorrect, you will be notified to try again.
You will then be prompted to enter the new passcode.
Use the number keys to enter three digits, and then press the SAVE soft key.
If you make an error, press the <DEL soft key to erase it.
If you change your mind about changing the passcode, press the CANCEL soft key.
Assign a New Passcode
CANCEL OKADV >
PASSCODE: 675 _
INCORRECT PASSCODE
Changing Passcode (3.3.3) Assigning Passcode (3.3.3)
Enter Passcode (3.4)
Notification (3.6)
Assigning New (3.4)
PASSCODE
CHANGE ENTERREMOVE
ASSIGNED
ENTER CURRENT
CANCEL ENTER< DEL>
PASSCODE:
PASSCODE
ASSIGN ENTER< DEL>
NOT ASSIGNED
_
3: ENTER NEW
CANCEL SAVE< DEL>
PASSCODE: _
CANCEL OKADV >
PASSCODE: 675 _
INCORRECT PASSCODE
Changing Passcode (3.3.3) Assigning Passcode (3.3.3)
Enter Passcode (3.4)
Notification (3.6)
Assigning New (3.4)
PASSCODE
CHANGE ENTERREMOVE
ASSIGNED
ENTER CURRENT
CANCEL ENTER< DEL>
PASSCODE:
PASSCODE
ASSIGN ENTER< DEL>
NOT ASSIGNED
3: ENTER NEW
CANCEL SAVE< DEL>
PASSCODE:
< DEL>
If no passcode is currently assigned, you can press the ASSIGN soft key to create one.
Use the number keys to enter three digits, and then press the SAVE soft key.
If you make an error, press the <DEL soft key to erase it.
If you change your mind about assigning a passcode, press the CANCEL soft key.
Passcode
You have the option to decide if a passcode should be required to enter the Admin Setup area. If a passcode is required, you may select your own passcode.
When you select Passcode from the menu, the screen will display whether or not a passcode is currently assigned.
Assign a Passcode
Removing a passcode means that you will no longer need a passcode to enter the Admin Setup area. After you press the REMOVE soft key, you will have to enter the current passcode before you can change it.
Use the number keys to enter three digits, and then press the ENTER soft key.
If you make an error, press the <DEL soft key to erase it.
When you press the ENTER soft key, if the passcode you entered is incorrect, you will be notified to try again.
Press the CANCEL key if you change your mind about removing the passcode.
Remove a Passcode
CANCEL OKADV >
PASSCODE: 675 _
INCORRECT PASSCODE
Changing Passcode (3.3.3) Assigning Passcode (3.3.3)
Enter Passcode (3.4)
Notification (3.6)
Assigning New (3.4)
PASSCODE
CHANGE ENTERREMOVE
ASSIGNED
ENTER CURRENT
CANCEL ENTER< DEL>
PASSCODE:
PASSCODE
ASSIGN ENTER< DEL>
NOT ASSIGNED
3: ENTER NEW
CANCEL SAVE< DEL>
PASSCODE:
< DEL>
CANCEL OKADV >
PASSCODE: 675 _
INCORRECT PASSCODE
Changing Passcode (3.3.3) Assigning Passcode (3.3.3)
Enter Passcode (3.4)
Notification (3.6)
Assigning New (3.4)
PASSCODE
CHANGE ENTERREMOVE
ASSIGNED
ENTER CURRENT
CANCEL ENTER< DEL>
PASSCODE:
PASSCODE
ASSIGN ENTER< DEL>
NOT ASSIGNED
_
3: ENTER NEW
CANCEL SAVE< DEL>
PASSCODE: _
CANCEL OKADV >
PASSCODE: 675 _
INCORRECT PASSCODE
Changing Passcode (3.3.3) Assigning Passcode (3.3.3)
Enter Passcode (3.4)
Notification (3.6)
Assigning New (3.4)
PASSCODE
CHANGE ENTERREMOVE
ASSIGNED
ENTER CURRENT
CANCEL ENTER< DEL>
PASSCODE:
PASSCODE
ASSIGN ENTER< DEL>
NOT ASSIGNED
3: ENTER NEW
CANCEL SAVE< DEL>
PASSCODE:
< DEL>
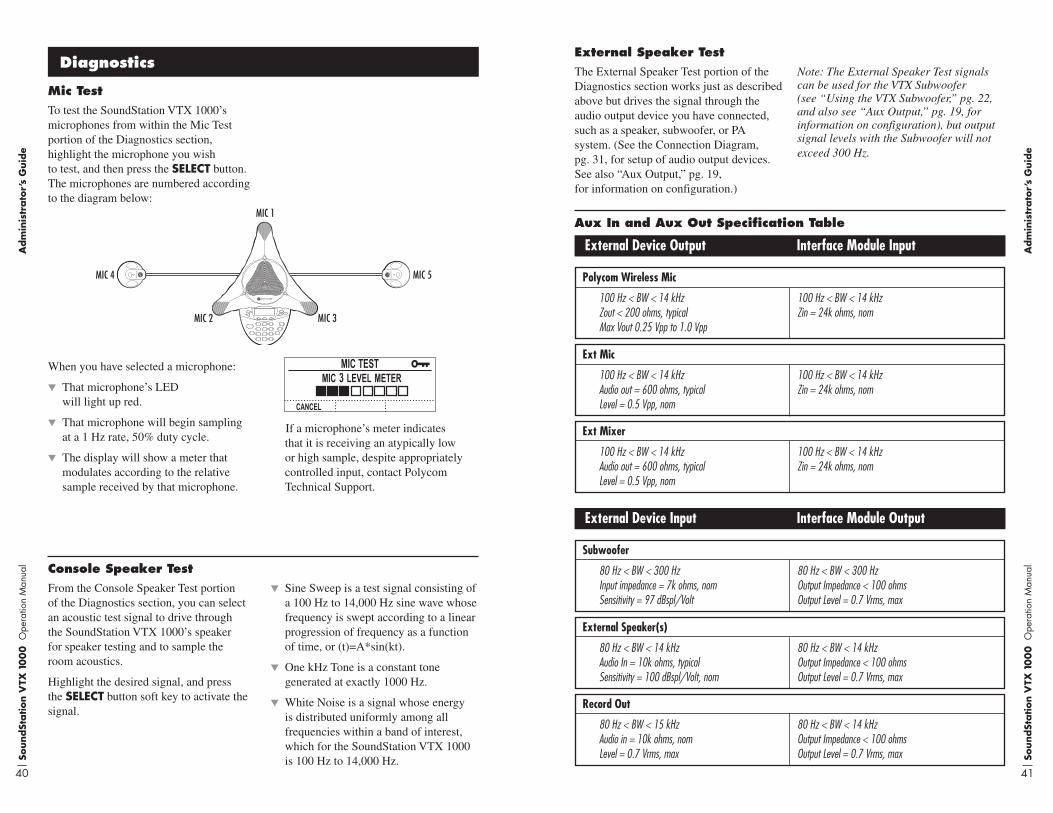
SoundSt
ation V
TX 1
00
0 O
pera
tion
Man
ual
40
Adm
inis
trato
r’s
Guid
e
SoundSt
ation V
TX 1
00
0 O
pera
tion
Man
ual
41
Adm
inis
trato
r’s
Guid
e
Diagnostics
To test the SoundStation VTX 1000’s microphones from within the Mic Test portion of the Diagnostics section, highlight the microphone you wish to test, and then press the SELECT button. The microphones are numbered according to the diagram below:
Mic Test
MIC 1
MIC 3MIC 2
MIC 4 MIC 5
When you have selected a microphone:
That microphone’s LED will light up red.
That microphone will begin sampling at a 1 Hz rate, 50% duty cycle.
The display will show a meter that modulates according to the relative sample received by that microphone.
If a microphone’s meter indicates that it is receiving an atypically low or high sample, despite appropriately controlled input, contact Polycom Technical Support.
MIC TEST
mic 3 level meter
cancel
From the Console Speaker Test portion of the Diagnostics section, you can select an acoustic test signal to drive through the SoundStation VTX 1000’s speakerfor speaker testing and to sample the room acoustics.
Highlight the desired signal, and press the SELECT button soft key to activate the signal.
Sine Sweep is a test signal consisting of a 100 Hz to 14,000 Hz sine wave whose frequency is swept according to a linear progression of frequency as a function of time, or (t)=A*sin(kt).
One kHz Tone is a constant tone generated at exactly 1000 Hz.
White Noise is a signal whose energy is distributed uniformly among all frequencies within a band of interest, which for the SoundStation VTX 1000 is 100 Hz to 14,000 Hz.
Console Speaker Test
Polycom Wireless Mic
100 Hz < BW < 14 kHz 100 Hz < BW < 14 kHz Zout < 200 ohms, typical Zin = 24k ohms, nom Max Vout 0.25 Vpp to 1.0 Vpp
The External Speaker Test portion of the Diagnostics section works just as described above but drives the signal through the audio output device you have connected, such as a speaker, subwoofer, or PA system. (See the Connection Diagram, pg. 31, for setup of audio output devices. See also “Aux Output,” pg. 19, for information on configuration.)
Note: The External Speaker Test signals can be used for the VTX Subwoofer (see “Using the VTX Subwoofer,” pg. 22, and also see “Aux Output,” pg. 19, for information on configuration), but output signal levels with the Subwoofer will not exceed 300 Hz.
External Speaker Test
External Device Output Interface Module Input
Ext Mic
100 Hz < BW < 14 kHz 100 Hz < BW < 14 kHz Audio out = 600 ohms, typical Zin = 24k ohms, nom Level = 0.5 Vpp, nom
Ext Mixer
100 Hz < BW < 14 kHz 100 Hz < BW < 14 kHz Audio out = 600 ohms, typical Zin = 24k ohms, nom Level = 0.5 Vpp, nom
Subwoofer
80 Hz < BW < 300 Hz 80 Hz < BW < 300 Hz Input impedance = 7k ohms, nom Output Impedance < 100 ohms Sensitivity = 97 dBspl/Volt Output Level = 0.7 Vrms, max
External Device Input Interface Module Output
External Speaker(s)
80 Hz < BW < 14 kHz 80 Hz < BW < 14 kHz Audio In = 10k ohms, typical Output Impedance < 100 ohms Sensitivity = 100 dBspl/Volt, nom Output Level = 0.7 Vrms, max
Record Out
80 Hz < BW < 15 kHz 80 Hz < BW < 14 kHz Audio in = 10k ohms, nom Output Impedance < 100 ohms Level = 0.7 Vrms, max Output Level = 0.7 Vrms, max
Aux In and Aux Out Specification Table
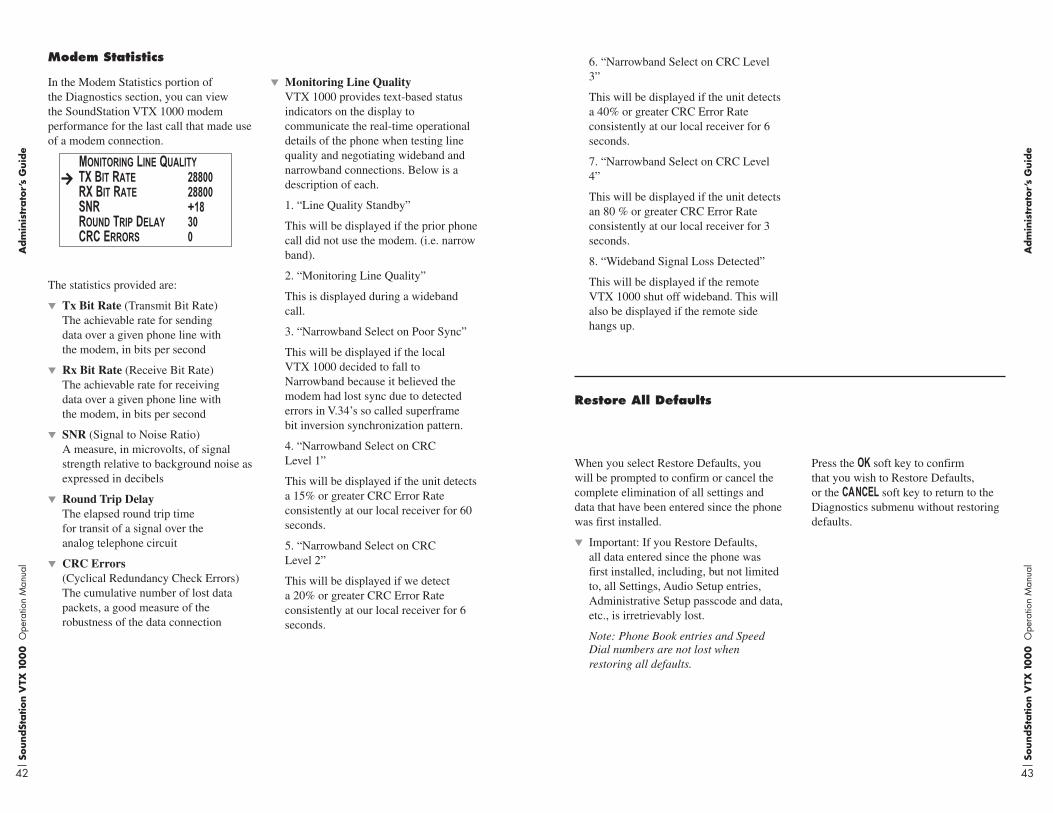
SoundSt
ation V
TX 1
00
0 O
pera
tion
Man
ual
42
Adm
inis
trato
r’s
Guid
e
SoundSt
ation V
TX 1
00
0 O
pera
tion
Man
ual
43
Adm
inis
trato
r’s
Guid
e
In the Modem Statistics portion of the Diagnostics section, you can view the SoundStation VTX 1000 modem performance for the last call that made use of a modem connection.
The statistics provided are:
Tx Bit Rate (Transmit Bit Rate) The achievable rate for sending data over a given phone line with the modem, in bits per second
Rx Bit Rate (Receive Bit Rate) The achievable rate for receiving data over a given phone line with the modem, in bits per second
SNR (Signal to Noise Ratio) A measure, in microvolts, of signal strength relative to background noise as expressed in decibels
Round Trip Delay The elapsed round trip time for transit of a signal over the analog telephone circuit
CRC Errors (Cyclical Redundancy Check Errors) The cumulative number of lost data packets, a good measure of the robustness of the data connection
Monitoring Line Quality VTX 1000 provides text-based status indicators on the display to communicate the real-time operational details of the phone when testing line quality and negotiating wideband and narrowband connections. Below is a description of each.
1. “Line Quality Standby”
This will be displayed if the prior phone call did not use the modem. (i.e. narrow band).
2. “Monitoring Line Quality”
This is displayed during a wideband call.
3. “Narrowband Select on Poor Sync”
This will be displayed if the local VTX 1000 decided to fall to Narrowband because it believed the modem had lost sync due to detected errors in V.34’s so called superframe bit inversion synchronization pattern.
4. “Narrowband Select on CRC Level 1”
This will be displayed if the unit detects a 15% or greater CRC Error Rate consistently at our local receiver for 60 seconds.
5. “Narrowband Select on CRC Level 2”
This will be displayed if we detect a 20% or greater CRC Error Rate consistently at our local receiver for 6 seconds.
Modem Statistics
TX Bit RateRX Bit RateSNRRound Trip DelayCRC Errors
Monitoring Line Quality2880028800+18300
When you select Restore Defaults, you will be prompted to confirm or cancel the complete elimination of all settings and data that have been entered since the phone was first installed.
Important: If you Restore Defaults, all data entered since the phone was first installed, including, but not limited to, all Settings, Audio Setup entries, Administrative Setup passcode and data, etc., is irretrievably lost.
Note: Phone Book entries and Speed Dial numbers are not lost when restoring all defaults.
Press the OK soft key to confirm that you wish to Restore Defaults, or the CANCEL soft key to return to the Diagnostics submenu without restoring defaults.
Restore All Defaults
6. “Narrowband Select on CRC Level 3”
This will be displayed if the unit detects a 40% or greater CRC Error Rate consistently at our local receiver for 6 seconds.
7. “Narrowband Select on CRC Level 4”
This will be displayed if the unit detects an 80 % or greater CRC Error Rate consistently at our local receiver for 3 seconds.
8. “Wideband Signal Loss Detected”
This will be displayed if the remote VTX 1000 shut off wideband. This will also be displayed if the remote side hangs up.
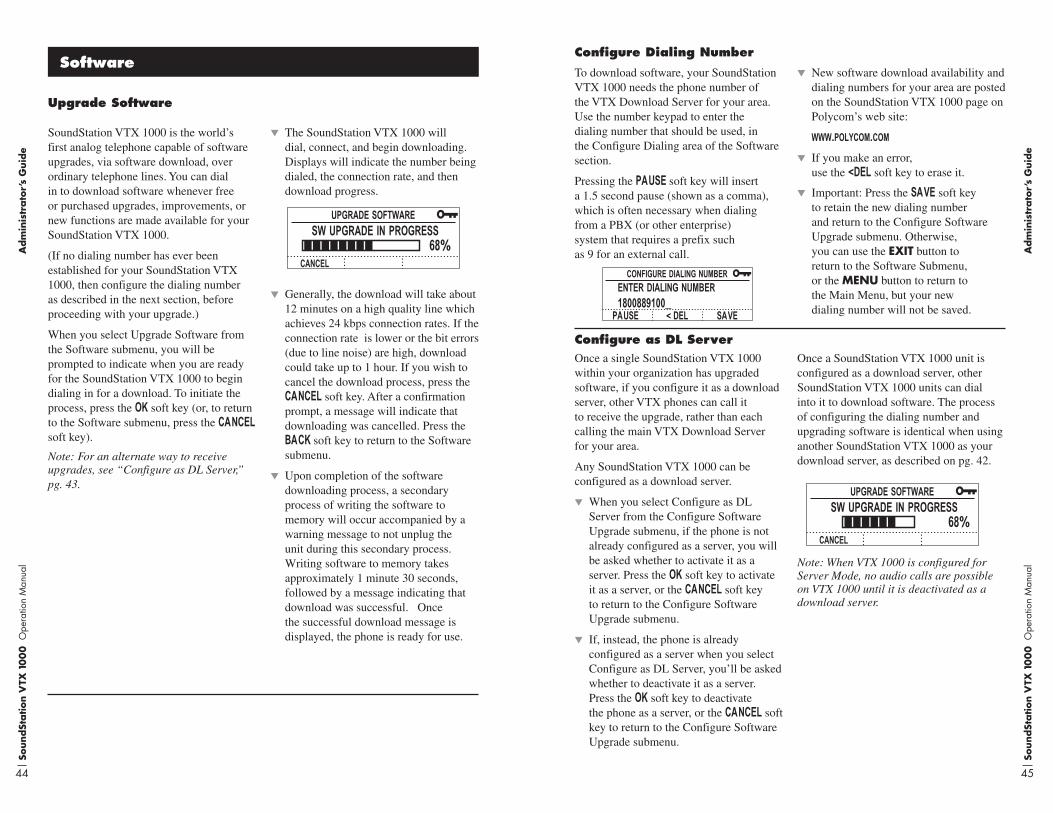
SoundSt
ation V
TX 1
00
0 O
pera
tion
Man
ual
44
Adm
inis
trato
r’s
Guid
e
SoundSt
ation V
TX 1
00
0 O
pera
tion
Man
ual
45
Adm
inis
trato
r’s
Guid
e
Software
SoundStation VTX 1000 is the world’s first analog telephone capable of software upgrades, via software download, over ordinary telephone lines. You can dial in to download software whenever free or purchased upgrades, improvements, or new functions are made available for your SoundStation VTX 1000.
(If no dialing number has ever been established for your SoundStation VTX 1000, then configure the dialing number as described in the next section, before proceeding with your upgrade.)
When you select Upgrade Software from the Software submenu, you will be prompted to indicate when you are ready for the SoundStation VTX 1000 to begin dialing in for a download. To initiate the process, press the OK soft key (or, to return to the Software submenu, press the CANCEL soft key).
Note: For an alternate way to receive upgrades, see “Configure as DL Server,” pg. 43.
The SoundStation VTX 1000 will dial, connect, and begin downloading. Displays will indicate the number being dialed, the connection rate, and then download progress.
Generally, the download will take about 12 minutes on a high quality line which achieves 24 kbps connection rates. If the connection rate is lower or the bit errors (due to line noise) are high, download could take up to 1 hour. If you wish to cancel the download process, press the CANCEL soft key. After a confirmation prompt, a message will indicate that downloading was cancelled. Press the BACK soft key to return to the Software submenu.
Upon completion of the software downloading process, a secondary process of writing the software to memory will occur accompanied by a warning message to not unplug the unit during this secondary process. Writing software to memory takes approximately 1 minute 30 seconds, followed by a message indicating that download was successful. Once the successful download message is displayed, the phone is ready for use.
Upgrade Software
upgrade softwaresw upgrade in progress
68%cancel
To download software, your SoundStation VTX 1000 needs the phone number of the VTX Download Server for your area. Use the number keypad to enter the dialing number that should be used, in the Configure Dialing area of the Software section.
Pressing the PAUSE soft key will insert a 1.5 second pause (shown as a comma), which is often necessary when dialing from a PBX (or other enterprise) system that requires a prefix such as 9 for an external call.
New software download availability and dialing numbers for your area are posted on the SoundStation VTX 1000 page on Polycom’s web site:
www.polycom.com
If you make an error, use the <DEL soft key to erase it.
Configure Dialing Number
configure dialing numberenter dialing number1800889100_
< DEL SAVEPAUSE
Once a single SoundStation VTX 1000 within your organization has upgraded software, if you configure it as a download server, other VTX phones can call it to receive the upgrade, rather than each calling the main VTX Download Server for your area.
Any SoundStation VTX 1000 can be configured as a download server.
When you select Configure as DL Server from the Configure Software Upgrade submenu, if the phone is not already configured as a server, you will be asked whether to activate it as a server. Press the OK soft key to activate it as a server, or the CANCEL soft key to return to the Configure Software Upgrade submenu.
If, instead, the phone is already configured as a server when you select Configure as DL Server, you’ll be asked whether to deactivate it as a server. Press the OK soft key to deactivate the phone as a server, or the CANCEL soft key to return to the Configure Software Upgrade submenu.
Once a SoundStation VTX 1000 unit is configured as a download server, other SoundStation VTX 1000 units can dial into it to download software. The process of configuring the dialing number and upgrading software is identical when using another SoundStation VTX 1000 as your download server, as described on pg. 42.
Note: When VTX 1000 is configured for Server Mode, no audio calls are possible on VTX 1000 until it is deactivated as a download server.
Configure as DL Server
upgrade software
sw upgrade in progress68%
cancel
Important: Press the SAVE soft key to retain the new dialing number and return to the Configure Software Upgrade submenu. Otherwise, you can use the EXIT button to return to the Software Submenu, or the MENU button to return to the Main Menu, but your new dialing number will not be saved.

SoundSt
ation V
TX 1
00
0 O
pera
tion
Man
ual
47
Warr
anty
Info
rmation
Specifications and Warranty Information
SoundSt
ation V
TX 1
00
0 O
pera
tion
Man
ual
48
Warr
anty
Info
rmation
SoundSt
ation V
TX 1
00
0 O
pera
tion
Man
ual
49
Warr
anty
Info
rmation
Limited Warranty and Limitation of Liability
Polycom warrants to the end user (“Customer”) that this product will be free from defects in workmanship and materials, under normal use and service, for one year from the date of purchase from Polycom or its authorized reseller.
Polycom’s sole obligation under this express warranty shall be, at Polycom’s option and expense, to repair the defective product or part, deliver to Customer an equivalent product or part to replace the defective item, or if neither of the two foregoing options is reasonably available, Polycom may, in its sole discretion, refund to Customer the purchase price paid for the defective product. All products that are replaced will become the property of Polycom. Replacement products or parts may be new or reconditioned. Polycom warrants any replaced or repaired product or part for ninety (90) days from shipment, or the remainder of the initial warranty period, whichever is longer.
Products returned to Polycom must be sent prepaid and packaged appropriately for safe shipment, and it is recommended that they be insured or sent by a method that provides for tracking of the package. Responsibility for loss or damage does not transfer to Polycom until the returned item
is received by Polycom. The repaired or replaced item will be shipped to Customer, at Polycom’s expense, not later than thirty (30) days after Polycom receives the defective product, and Polycom will retain risk of loss or damage until the item is delivered to Customer.
LIMITATION OF LIABILITY. TO THE FULL EXTENT ALLOWED BY LAW, POLYCOM EXCLUDES FOR ITSELF AND ITS SUPPLIERS ANY LIABILITY, WHETHER BASED IN CONTRACT OR TORT (INCLUDING NEGLIGENCE), FOR INCIDENTAL, CONSEQUENTIAL, INDIRECT, SPECIAL, OR PUNITIVE DAMAGES OF ANY KIND, OR FOR LOSS OF REVENUE OR PROFITS, LOSS OF BUSINESS, LOSS OF INFORMATION OR DATA, OR OTHER FINANCIAL LOSS ARISING OUT OF OR IN CONNECTION WITH THE SALE, INSTALLATION, MAINTENANCE, USE, PERFORMANCE, FAILURE, OR INTERRUPTION OF ITS PRODUCTS, EVEN IF POLYCOM OR ITS AUTHORIZED RESELLER HAS BEEN ADVISED OF THE POSSIBILITY OF SUCH DAMAGES, AND LIMITS ITS LIABILITY TO REPAIR, REPLACEMENT, OR REFUND OF THE PURCHASE PRICE PAID, AT POLYCOM’S OPTION. THIS DISCLAIMER OF LIABILITY FOR DAMAGES WILL NOT BE AFFECTED IF ANY REMEDY PROVIDED HEREIN SHALL FAIL OF ITS ESSENTIAL PURPOSE.
Limited Warranty
Polycom will not be liable under this limited warranty if its testing and examination disclose that the alleged defect or malfunction in the product does not exist or results from
Failure to follow Polycom’s installation, operation, or maintenance instructions;
Unauthorized product modification or alteration;
Unauthorized use of common carrier communication services accessed through the product;
Abuse, misuse, negligent acts or omis-sions of Customer and persons under Customer’s control; or
Acts of third parties, acts of God, accident, fire, lighting, power surges or outages, or other hazards.
Exclusions
Some countries, states, or provinces do not allow the exclusion or limitation of implied warranties or the limitation of incidental or consequential damages for certain products supplied to consumers, or the limitation of liability for personal injury, so the above limitations and exclusions may be
limited in their application to you. When the implied warranties are not allowed to be excluded in their entirety, they will be limited to the duration of the applicable written warranty. This warranty gives you specific legal rights which may vary depending on local law.
Disclaimer
This Limited Warranty and Limitation of Liability shall be governed by the laws of the State of California, U.S.A., and by the laws of the United States, excluding their conflicts of laws principles. The
United Nations Convention on Contracts for the International Sale of Goods is hereby excluded in its entirety from application to this Limited Warranty and Limitation of Liability.
Governing Laws
If you purchased your product from a Polycom Authorized Reseller, contact the Authorized Reseller for information about service agreements applicable to your product. For technical assistance
or information on service programs, please visit Polycom’s website at www.polycom.com and select the Support menu.
Service Agreements
WARRANTY EXCLUSIVE. IF A POLYCOM PRODUCT DOES NOT OPERATE AS WARRANTED ABOVE, CUSTOMER’S SOLE REMEDY FOR BREACH OF THAT WARRANTY SHALL BE REPAIR, REPLACEMENT, OR REFUND OF THE PURCHASE PRICE PAID, AT POLYCOM’S OPTION. TO THE FULL EXTENT ALLOWED BY LAW, THE FOREGOING WARRANTIES AND REMEDIES ARE EXCLUSIVE AND ARE IN LIEU OF ALL OTHER WARRANTIES, TERMS, OR CONDITIONS, EXPRESS OR IMPLIED, EITHER IN FACT OR BY OPERATION
OF LAW, STATUTORY OR OTHERWISE, INCLUDING WARRANTIES, TERMS, OR CONDITIONS OF MERCHANTABILITY, FITNESS FOR A PARTICULAR PURPOSE, SATISFACTORY QUALITY, CORRESPONDENCE WITH DESCRIPTION, AND NON-INFRINGEMENT, ALL OF WHICH ARE EXPRESSLY DISCLAIMED. POLYCOM NEITHER ASSUMES NOR AUTHORIZES ANY OTHER PERSON TO ASSUME FOR IT ANY OTHER LIABILITY IN CONNECTION WITH THE SALE, INSTALLATION, MAINTENANCE OR USE OF ITS PRODUCTS.
SoundSt
ation V
TX 1
00
0 O
pera
tion
Man
ual
50
Warr
anty
Info
rmation
SoundSt
ation V
TX 1
00
0 O
pera
tion
Man
ual
51
Warr
anty
Info
rmation
This device complies with part 15 of the FCC Rules. Operation is subject to the following two conditions:
(1) This device may not cause harmful interference, and
(2) This device must accept any interference received, including interference that may cause undesired operation.
NOTE: This equipment has been tested and found to comply with the limits for a Class B digital device, pursuant to part 15 of the FCC Rules. These limits are designed to provide reasonable protection against harmful interference in a residential installation. This equipment generates, uses and can radiate radio frequency energy and, if not installed and used in accordance with the instructions, may cause harmful interference to radio communications. However, there is no guarantee that interference will not occur in a particular installation. If this equipment does cause
harmful interference to radio or television reception, which can be determined by turning the equipment off and on, the user is encouraged to try to correct the interference by one or more of the following measures:
Reorient or relocate the receiving antenna.
Increase the separation between the equipment and receiver.
Connect the equipment into an outlet on a circuit different from that to which the receiver is connected.
Consult the dealer or an experienced radio/TV technician for help.
In accordance with part 15 of the FCC rules, the user is cautioned that any changes or modifications not expressly approved by Polycom Inc. could void the user’s authority to operate the equipment.
FCC Rules
This Class [B] digital apparatus complies with Canadian ICES-003.
Cet appareil numérique de la classe [B] est conforme à la norme N M B-003 du Canada.
Canadian Department of Communications Notice
This equipment complies with part 68 of the FCC Rules. Please refer to the labeling on equipment for the following information:
Registration Number
Ringer Equivalence
Grantee’s Name
Model Number
Serial Number and/or Date of Manufacture
Country of Origin
If requested this information must be provided to the telephone company
Notes:
This registered equipment may not be used with party lines or coin lines.
If trouble is experienced, the customer shall disconnect the registered equipment from the telephone line to determine if the registered equipment is malfunctioning and that if the registered equipment is malfunctioning, the use of such equipment shall be discontinued until the problem has been corrected.
If, in the unlikely event that this equipment causes harm to the network, the telephone company will notify you in advance that temporary discontinuance of service may be required. However if advance notice is not practical, the telephone company will notify you as soon as possible. Also, you will be advised of your right to file a complaint with the FCC if you believe it necessary.
The telephone company may make changes to its facilities, equipment, operations or procedures that could affect the operation of the equipment. If this happens, the telephone company will provide advance notice so you can make the necessary modifications to maintain uninterrupted service.
US Telco Requirements
The REN is used to determine the quantity of devices that may be connected to the telephone line. Excessive RENs on the telephone line may result in the devices not ringing in response to an incoming
call. Typically the sum of RENs should not exceed five (5.0). To be certain of the number of devices that may be connected to a line (as determined by the total RENs) contact the local telephone company.
REN
WHEN PROGRAMMING EMERGENCY NUMBERS AND/OR MAKING TEST CALLS TO EMERGENCY NUMBERS:
1. Remain on the line and briefly explain to the dispatcher the reason for the call.
2. Perform such activities in the off-peak hours, such as early morning or late evening.
Automatic Dialing
SoundSt
ation V
TX 1
00
0 O
pera
tion
Man
ual
52
Warr
anty
Info
rmation
SoundSt
ation V
TX 1
00
0 O
pera
tion
Man
ual
53
Warr
anty
Info
rmation
A FCC compliant telephone cord and modular plug is provided with this equipment. This equipment is designed to be connected to the telephone network or premises wiring using a compatible
modular jack that is Part 68 complaint. See the rest of these installation instructions for details.
Telco Connector
“NOTICE: The Industry Canada label identifies certified equipment. This certification means that the equipment meets telecommunications protective, operational and safety requirements as prescribed in the appropriate Terminal Equipment Technical Requirements document(s). The Department does not guarantee the equipment will operate to the user’s satisfaction.
Before installing this equipment, users should ensure that it is permissible to be connected to the facilities of the local telecommunications company. The equipment must also be installed using an acceptable method of connection. The customer should be aware that compliance with the above conditions may not prevent degradation of service in some situations. Repairs to certified equipment should be coordinated by a representative designated by the supplier. Any repairs or alterations made by the user to this equipment, or equipment malfunctions, may give the telecommunications company cause to request the user to disconnect the equipment.
Users should ensure for their own protection that the electrical ground connections of the power utility, telephone lines and internal metallic water pipe system, if present, are connected together. This precaution may be particularly important in rural areas.
Caution: Users should not attempt to make such connections themselves, but should contact the appropriate electric inspection authority, or electrician, as appropriate.’’
“NOTICE: The Ringer Equivalence Number (REN) assigned to each relevant terminal device provides an indication of the maximum number of terminals allowed to be connected to a telephone interface. The termination on an interface may consist of any combination of devices subject only to the requirement that the sum of the Ringer Equivalence Numbers of all the devices does not exceed 5.’’
The term “IC:” before the certification/registration number dignifies only that the Industry Canada technical specifications were met.
Canadian Telco Requirements
This SoundStation VTX 1000 has been marked with the CE mark. This mark indicates compliance with EEC Directives 89/336/EEC, 73/23/EEC 1999/5/EC. A full copy of the Declaration of Conformity can be obtained from Polycom Ltd, 270 Bath Road, Slough, Berkshire, SL1 4DX, UK.
Declaration of Conformity
Hereby, Polycom Ltd. declares that this SoundStation VTX 1000 is in compliance with the essential requirements and other relevant provisions of Directive 1999/5/EC.
Konformitetserklæring
Hermed erklærer Polycom Ltd., at indestående SoundStation VTX 1000 er i overensstemmelse med de grundlæggen-de krav og de relevante punkter i direktiv 1999/5/EF.
Konformitätserklärung
Hiermit erklärt Polycom Ltd., dass der SoundStation VTX 1000 die grundlegenden Anforderungen und sonstige maßgebliche Bestimmungen der Richtlinie 1999/5/EG erfüllt.
Vaatimustenmukaisuusvakuutus
Polycom Ltd. vakuuttaa täten, että SoundStation VTX 1000 on direktiivin 1999/5/EC keskeisten vaatimusten ja sen muiden tätä koskevien säännösten mukainen.
Déclaration de Conformité
Par la présente, Polycom Ltd. déclare que ce SoundStation VTX 1000 est conforme aux conditions essentielles et à toute autre modalité pertinente de la Directive 1999/5/CE.
Dichiarazione di Conformità
Con la presente Polycom Ltd. dichiara che il SoundStation VTX 1000 soddisfa i requisiti essenziali e le altre disposizioni pertinenti della direttiva 1999/5/CE.
Verklaring Van Overeenstemming
Hierbij verklaart Polycom Ltd. dat diens SoundStation VTX 1000 voldoet aan de basisvereisten en andere relevante voorwaarden van EG-richtlijn 1999/5/EG.
Declaração de Conformidade
Através da presente, a Polycom Ltd. declara que este SoundStation VTX 1000 se encontra em conformidade com os requisitos essenciais e outras disposições relevantes da Directiva 1999/5/CE.
Declaración de Conformidad
Por la presente declaración, Polycom Ltd. declara que este SoundStation VTX 1000 cumple los requisitos esenciales y otras cláusulas importantes de la directiva 1999/5/CE.
Överensstämmelseförklaring
Polycom Ltd. förklarar härmed att denna SoundStation VTX 1000 överensstämmer med de väsentliga kraven och övriga relevanta stadganden i direktiv 1999/5/EG.
CE Mark R & TTE Directive

SoundSt
ation V
TX 1
00
0 O
pera
tion
Man
ual
54
Warr
anty
Info
rmation
Mains Powered POT’s Voice Telephony Without Emergency 000 Dialing
Australia
WarningThis equipment will be inoperable
when mains power fails
VCCI Class B
Japan

1725-07246-001 Rev B
Polycom®, SoundStation®, and the Polycom logo design are registered trademarks of Polycom, Inc. in the U.S. and various countries. ©2003 Polycom, Inc. All Rights Reserved.
Technical Support in the United States Internet http://www.polycom.com/support
Polycom WW Headquarters:
Polycom, Inc. Corporate Headquarters4750 Willow Road
Pleasanton, CA 94588


