36
March 2009 Edition 1725-29222-002/A Version 2.0 Polycom® TPX ™ HD User Guide Version 2.0

March 2009 Edition1725-29222-002/A
Version 2.0
Polycom® TPX™ HD User GuideVersion 2.0
Trademark InformationPolycom® and the Polycom logo design are registered trademarks of Polycom, Inc. EagleEye™, HDX™, RealPresence™, RPX™, StereoSurround™, Telepresence Experience™, and TPX™ are trademarks of Polycom, Inc. in the United States and various other countries.
All other brand and product names are trademarks or registered trademarks of their respective companies.
Patent InformationThe accompanying product is protected by one or more U.S. and foreign patents and/or pending patent applications held by Polycom, Inc.
DisclaimerThis software is provided 'as is' with no explicit or implied warranties in respect of its properties, including, but not limited to, correctness and fitness for purpose.
Safety and Regulatory InformationPlease refer to all safety and regulatory information in the Polycom TPX HD 306M Installation Guide or the Polycom TPX HD 204M Installation Guide before making any modifications to the TPX HD 306M or TPX HD 204M.
© 2009 Polycom, Inc. All rights reserved.
Polycom Inc.4750 Willow RoadPleasanton, CA 94588-2708USA
No part of this document may be reproduced or transmitted in any form or by any means, electronic or mechanical, for any purpose, without the express written permission of Polycom, Inc. Under the law, reproducing includes translating into another language or format.
As between the parties, Polycom, Inc. retains title to, and ownership of, all proprietary rights with respect to the software contained within its products. The software is protected by United States copyright laws and international treaty provision. Therefore, you must treat the software like any other copyrighted material (e.g. a book or sound recording).
Every effort has been made to ensure that the information in this manual is accurate. Polycom, Inc. is not responsible for printing or clerical errors. Information in this document is subject to change without notice.

iii
About this Guide
This guide introduces you to the Polycom Telepresence Experience™ High Definition (TPX HD), explains how to use the Touch Panel, describes what you can expect to see on the displays during meetings in the TPX HD room, and provides general guidelines for conducting successful meetings.
This guide is intended for all users of the Polycom TPX HD 306M, Version 2.0, or the TPX HD 204M, Version 1.5.4.
For quick reference information about the TPX HD, refer to the Polycom RealPresence ™ Experience/Polycom Telepresence Experience Quick Reference document (part number 1725-27458-002). This document describes how to use the Touch Panel to perform basic user tasks, such as making and ending calls, and includes tips you may find helpful when conducting a meeting in an TPX HD room.
Additional Polycom documentation is available at the Polycom web site, http://www.polycom.com/videodocumentation.For support or service, please contact your Polycom distributor or go to Polycom Support at www.polycom.com/support.

Polycom TPX HD User Guide
iv
Contents
v
Contents
Introducing the TPX HD . . . . . . . . . . . . . . . . . . . . . . . . . . . 1-1Key Features and Benefits . . . . . . . . . . . . . . . . . . . . . . . . . . . . . . . . . . . . . . . . . . . . . . . 1-1
Using the Touch Panel . . . . . . . . . . . . . . . . . . . . . . . . . . . . 2-1Accessing the Home Screen . . . . . . . . . . . . . . . . . . . . . . . . . . . . . . . . . . . . . . . . . . . . . 2-1Making Calls . . . . . . . . . . . . . . . . . . . . . . . . . . . . . . . . . . . . . . . . . . . . . . . . . . . . . . . . . . 2-3
Making a Video Call . . . . . . . . . . . . . . . . . . . . . . . . . . . . . . . . . . . . . . . . . . . . . . . . . . . . . . . . 2-3Making an Audio Call . . . . . . . . . . . . . . . . . . . . . . . . . . . . . . . . . . . . . . . . . . . . . . . . . . . . . . 2-4
Answering Calls . . . . . . . . . . . . . . . . . . . . . . . . . . . . . . . . . . . . . . . . . . . . . . . . . . . . . . . 2-6Answering a Video Call . . . . . . . . . . . . . . . . . . . . . . . . . . . . . . . . . . . . . . . . . . . . . . . . . . . . . 2-6Answering an Audio Call . . . . . . . . . . . . . . . . . . . . . . . . . . . . . . . . . . . . . . . . . . . . . . . . . . . 2-6
Hanging Up Calls . . . . . . . . . . . . . . . . . . . . . . . . . . . . . . . . . . . . . . . . . . . . . . . . . . . . . . 2-6Hanging Up a Video Call . . . . . . . . . . . . . . . . . . . . . . . . . . . . . . . . . . . . . . . . . . . . . . . . . . . . 2-6Hanging Up an Audio Call . . . . . . . . . . . . . . . . . . . . . . . . . . . . . . . . . . . . . . . . . . . . . . . . . . 2-7
Understanding the Touch Panel Call Indicators . . . . . . . . . . . . . . . . . . . . . . . . . . . . 2-7Controlling Audio . . . . . . . . . . . . . . . . . . . . . . . . . . . . . . . . . . . . . . . . . . . . . . . . . . . . . 2-9Getting Help . . . . . . . . . . . . . . . . . . . . . . . . . . . . . . . . . . . . . . . . . . . . . . . . . . . . . . . . . 2-10
Understanding Error Messages . . . . . . . . . . . . . . . . . . . . . . . . . . . . . . . . . . . . . . . . . . . . . 2-10Calling the Help Desk . . . . . . . . . . . . . . . . . . . . . . . . . . . . . . . . . . . . . . . . . . . . . . . . . . . . . 2-10
Viewing People and Content . . . . . . . . . . . . . . . . . . . . . . . 3-1Viewing People . . . . . . . . . . . . . . . . . . . . . . . . . . . . . . . . . . . . . . . . . . . . . . . . . . . . . . . . 3-1Viewing Content . . . . . . . . . . . . . . . . . . . . . . . . . . . . . . . . . . . . . . . . . . . . . . . . . . . . . . 3-5
Accessing the Tabletop Content Displays . . . . . . . . . . . . . . . . . . . . . . . . . . . . . . . . . . . . . . 3-6Using a Laptop . . . . . . . . . . . . . . . . . . . . . . . . . . . . . . . . . . . . . . . . . . . . . . . . . . . . . . . . . . . . 3-7Using a Document Camera . . . . . . . . . . . . . . . . . . . . . . . . . . . . . . . . . . . . . . . . . . . . . . . . . . 3-8
Conducting Successful Meetings . . . . . . . . . . . . . . . . . . . . . 4-1Meeting Tips . . . . . . . . . . . . . . . . . . . . . . . . . . . . . . . . . . . . . . . . . . . . . . . . . . . . . . . . . . 4-1
Video Tips . . . . . . . . . . . . . . . . . . . . . . . . . . . . . . . . . . . . . . . . . . . . . . . . . . . . . . . . . . . . . . . . 4-1Audio Tips . . . . . . . . . . . . . . . . . . . . . . . . . . . . . . . . . . . . . . . . . . . . . . . . . . . . . . . . . . . . . . . . 4-1Document Camera Tips . . . . . . . . . . . . . . . . . . . . . . . . . . . . . . . . . . . . . . . . . . . . . . . . . . . . . 4-2Meeting Coordinator Tips . . . . . . . . . . . . . . . . . . . . . . . . . . . . . . . . . . . . . . . . . . . . . . . . . . . 4-2
Reserving a Polycom TPX HD Room . . . . . . . . . . . . . . . . . . . . . . . . . . . . . . . . . . . . . 4-3Caring for the Room . . . . . . . . . . . . . . . . . . . . . . . . . . . . . . . . . . . . . . . . . . . . . . . . . . . 4-4

Polycom TPX HD User Guide
vi
1 - 1
1Introducing the TPX HD
Imagine walking into a comfortable, professional meeting environment, taking a seat, and starting a conversation with your counterpart located across the world. Without any technology in the way, you can focus on the business at hand. Welcome to telepresence conferencing with the Polycom Telepresence Experience High Definition (TPX HD).
The TPX HD offers Polycom’s Ultimate High Definition video with true-to-life people dimensions. This real-size video, coupled with Polycom’s superb audio, will enable you to pick up minute facial expressions and gestures, and clearly hear every bit of conversation. Before long, the extraordinary realism will make you feel as if your colleagues were sitting across the table from you rather than being miles away.
Key Features and BenefitsThe key features and benefits of the Polycom TPX HD include:
Feature Benefit
Interoperability The TPX HD is interoperable with all standards-based video conferencing products including all TPX HD models (the TPX HD 306M and TPX HD 204M), other telepresence solutions (such as the Polycom RealPresence Experience RPX™ HD 400 or 200 Series), as well as traditional video conferencing equipment (such as Polycom HDX™ platforms).
High definition video plasmas
60-inch plasma displays lined end-to-end give you a wide window into the far site room. Three displays are included for TPX HD 306M rooms and two are included for TPX HD 204M rooms.
Network options When it comes to setting up your network, you can section off bandwidth from your existing infrastructure or you can install a separate network to support telepresence.

Polycom TPX HD User Guide
1 - 2
Superior audio quality
With Polycom’s HDX Ceiling Microphone Arrays, 22 kHz StereoSurround™ audio, and a professional grade sound system, the TPX HD offers an extraordinary sensory experience.
Outstanding video quality
Polycom HDX and Ultimate HD video solutions enable you to experience the highest quality video possible on the 60-inch plasma displays.
Unobtrusive technology
With the cameras in the credenza, the microphones suspended from the ceiling, the sound system out of view, and no remote controls on the table, the technology is hidden. Therefore, instead of spending time learning how to use the system, you can focus on your meeting.
Touch Panel convenience
The tabletop Touch Panel enables you to easily perform the most common video conferencing tasks, such as making, answering, and ending calls.
Multipoint capability
By utilizing the Video Network Operations Services (VNOC), you have the flexibility of connecting multiple telepresence rooms as well as traditional video conferencing systems at the same time. VNOC operators can provide various onscreen layouts so that all participants can be seen at the same time.
Multi-purpose room
When not used for telepresence conferencing, participants can be seated all around the TPX HD table. In this way, the room can be used as both a telepresence suite and a traditional conference room, maximizing the room’s use for your organization.
Room mobility The unique TPX HD design is a free-standing solution with independent credenza and table. If your organization moves or needs to re-allocate space, the TPX HD equipment can be disassembled in its entirety and moved to a new location, leaving the original room intact.
Feature Benefit

2 - 1
2Using the Touch Panel
The Touch Panel is your interface to the Polycom Telepresence Experience. It enables you to place video and audio calls, hang up calls, control the audio, and perform other telepresence conferencing tasks. The Touch Panel is located on the main table within easy reach of the center seats at the table.
Accessing the Home ScreenThe first screen you typically see on the Touch Panel is the Start screen:
Start Screen
Note If your organization has signed up for Video Network Operations Center (VNOC) services, the VNOC may handle many or all of the telepresence conferencing tasks for you. If so, you may not need to use the Touch Panel.

Polycom TPX HD User Guide
2 - 2
To access the Home screen from the Start screen:
! Touch Start.
The Home screen provides you with access to the buttons you may need to use during a telepresence conference. For example, you can use the Home screen to place, answer, and hang up calls, as well as view the call indicators.
Home Screen: Not in a Call
Keep the following in mind when using the Touch Panel:
• The Home screen you see will differ from the one shown above depending on which Speed Dial buttons your system administrator has set up.
• The TPX HD 306M and TPD HD 204M Touch Panel screens are identical except for the call indicator bars at the top of the screen. The TPX HD 306M has three call indicator bars, whereas the TPX HD 204M has two.
• Whenever you press a button on the Touch Panel, the Touch Panel will beep. Most buttons will also either immediately visually depress or change color. If a button indicates a state (such as mute), it may take up to a second for the button to visually indicate the changed state. If the response time is consistently longer than this or if you receive no response, contact the Help Desk as described in the Getting Help section on page 2-10.
• To access the Home screen at any time, simply touch the Polycom button.

Using the Touch Panel
2 - 3
Making CallsYou can use the Touch Panel to make both video calls and audio calls as described in this section.
Making a Video CallYou can make a video call either by speed dialing or by manually dialing.
Speed Dialing
To enable you to speed dial, your system administrator must first set up the speed dial numbers for your site. Each of these speed dial numbers will correspond to a Speed Dial button on the Home screen:
• Up to eighteen Speed Dial buttons can be set up.
• Up to nine Speed Dial buttons can appear on the Home screen at one time.
• No single word on a Speed Dial button can be longer than twelve characters.
• The maximum number of characters per Speed Dial button is twenty-four.
If you want to add or remove any of the Speed Dial buttons on your Touch Panel, contact your system administrator. Your system administrator can refer to the Polycom TPX HD 306M Installation Guide or the TPX HD 204M Installation Guide for information about how to edit the System_Config.ini file to change the Speed Dial buttons.
To make a video call by speed dialing:
1. If you are not on the Home screen, touch Polycom.
The Home screen appears as shown on the previous page.
2. Touch the Speed Dial button that corresponds to the site you want to call. For example, if you often call a site in Boston, you might see a Speed Dial button called “Boston”. You can simply touch that button to place a call to that site.
If more than nine speed dial numbers have been set up for your site, touch Previous Page or Next Page to view the additional Speed Dial
buttons.
Polycom TPX HD User Guide
2 - 4
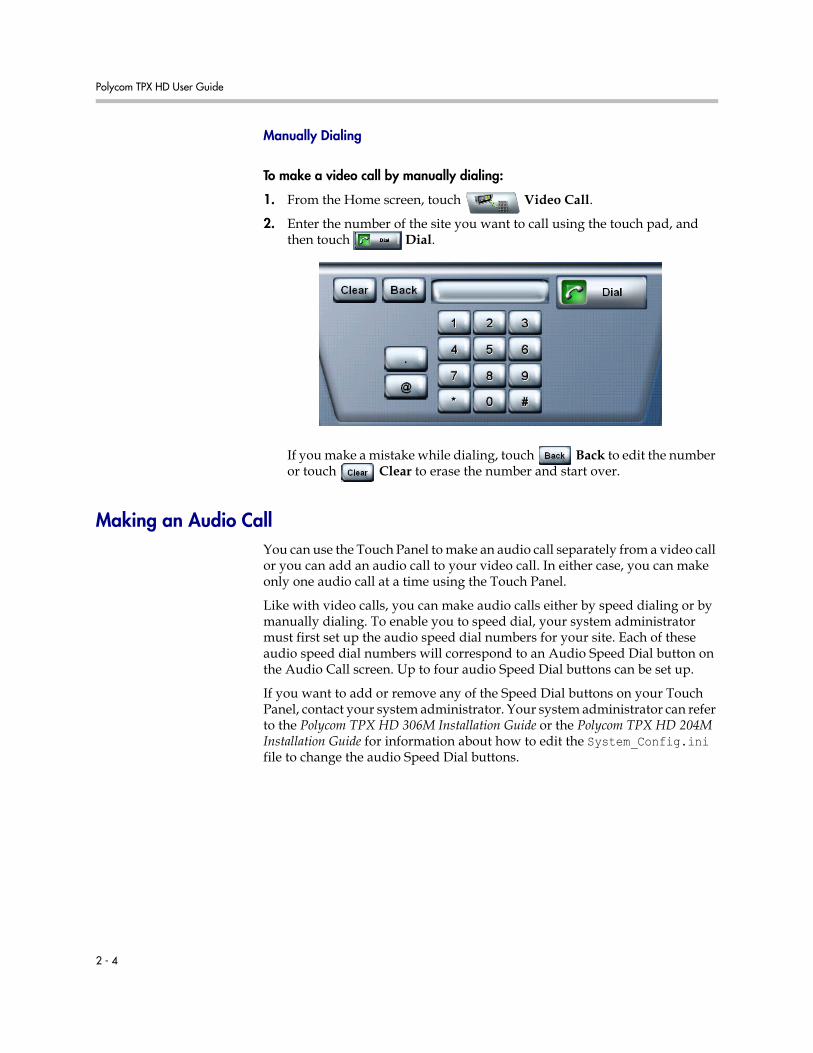
Manually Dialing
To make a video call by manually dialing:
1. From the Home screen, touch Video Call.
2. Enter the number of the site you want to call using the touch pad, and then touch Dial.
If you make a mistake while dialing, touch Back to edit the number or touch Clear to erase the number and start over.
Making an Audio CallYou can use the Touch Panel to make an audio call separately from a video call or you can add an audio call to your video call. In either case, you can make only one audio call at a time using the Touch Panel.
Like with video calls, you can make audio calls either by speed dialing or by manually dialing. To enable you to speed dial, your system administrator must first set up the audio speed dial numbers for your site. Each of these audio speed dial numbers will correspond to an Audio Speed Dial button on the Audio Call screen. Up to four audio Speed Dial buttons can be set up.
If you want to add or remove any of the Speed Dial buttons on your Touch Panel, contact your system administrator. Your system administrator can refer to the Polycom TPX HD 306M Installation Guide or the Polycom TPX HD 204M Installation Guide for information about how to edit the System_Config.ini file to change the audio Speed Dial buttons.
Using the Touch Panel
2 - 5
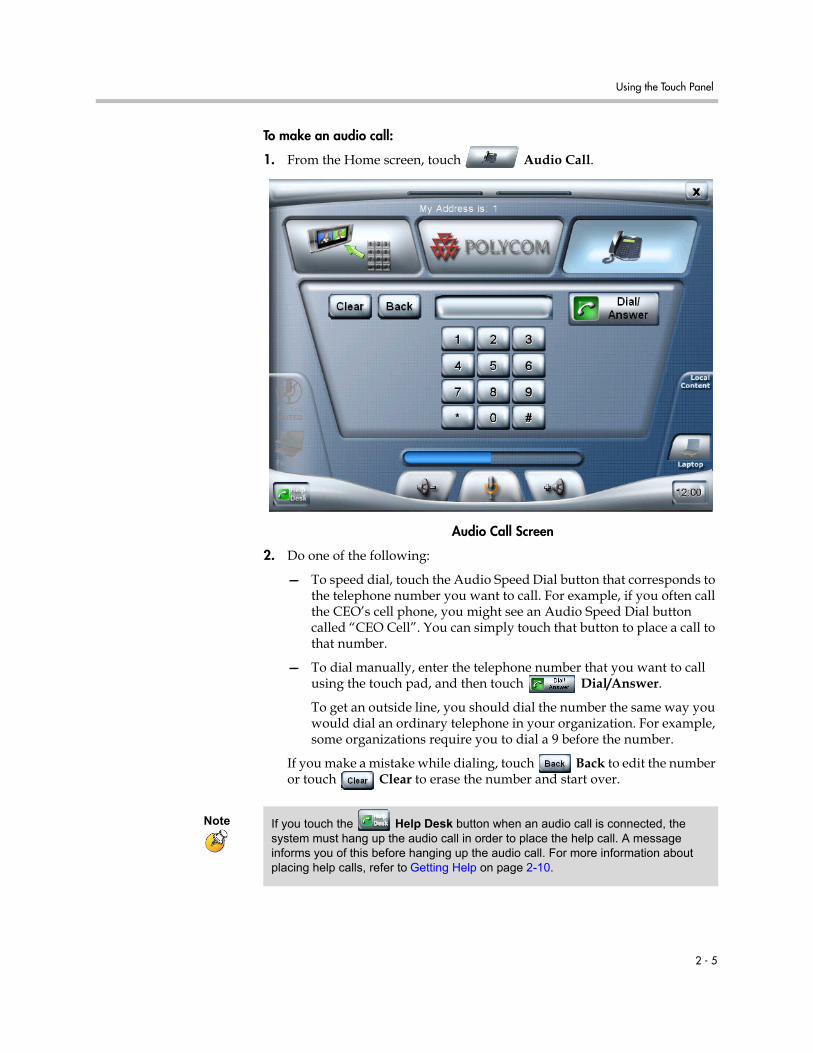
To make an audio call:
1. From the Home screen, touch Audio Call.
Audio Call Screen
2. Do one of the following:
— To speed dial, touch the Audio Speed Dial button that corresponds to the telephone number you want to call. For example, if you often call the CEO’s cell phone, you might see an Audio Speed Dial button called “CEO Cell”. You can simply touch that button to place a call to that number.
— To dial manually, enter the telephone number that you want to call using the touch pad, and then touch Dial/Answer.
To get an outside line, you should dial the number the same way you would dial an ordinary telephone in your organization. For example, some organizations require you to dial a 9 before the number.
If you make a mistake while dialing, touch Back to edit the number or touch Clear to erase the number and start over.
Note If you touch the Help Desk button when an audio call is connected, the system must hang up the audio call in order to place the help call. A message informs you of this before hanging up the audio call. For more information about placing help calls, refer to Getting Help on page 2-10.

Polycom TPX HD User Guide
2 - 6
Answering CallsThis section describes how to answer video or audio calls that you receive when in a TPX HD room.
Answering a Video CallWhen you receive a video call, you hear a ringing sound.
To answer a video call:
! You do not have to do anything to answer the call. The call will be automatically answered by the TPX HD.
Answering an Audio CallWhen you receive an audio call, you hear a ringing sound and the Touch Panel automatically displays the Audio Call screen so that you can easily answer the call.
To answer an audio call:
! Touch Dial/Answer.
Hanging Up CallsIf you are on a video call and an audio call concurrently, you must hang up the calls separately. This section describes how to hang up both types of calls.
Hanging Up a Video Call
To hang up a video call:
1. If you are not on the Video Call screen or the Home screen, touch either Video Call or Polycom.
2. Touch Hang Up.
The message “The call has ended” appears on the screen.

Using the Touch Panel
2 - 7
Hanging Up an Audio Call
To hang up an audio call:
1. If you are not on the Audio Call screen, touch Audio Call.
2. Touch Hang Up.
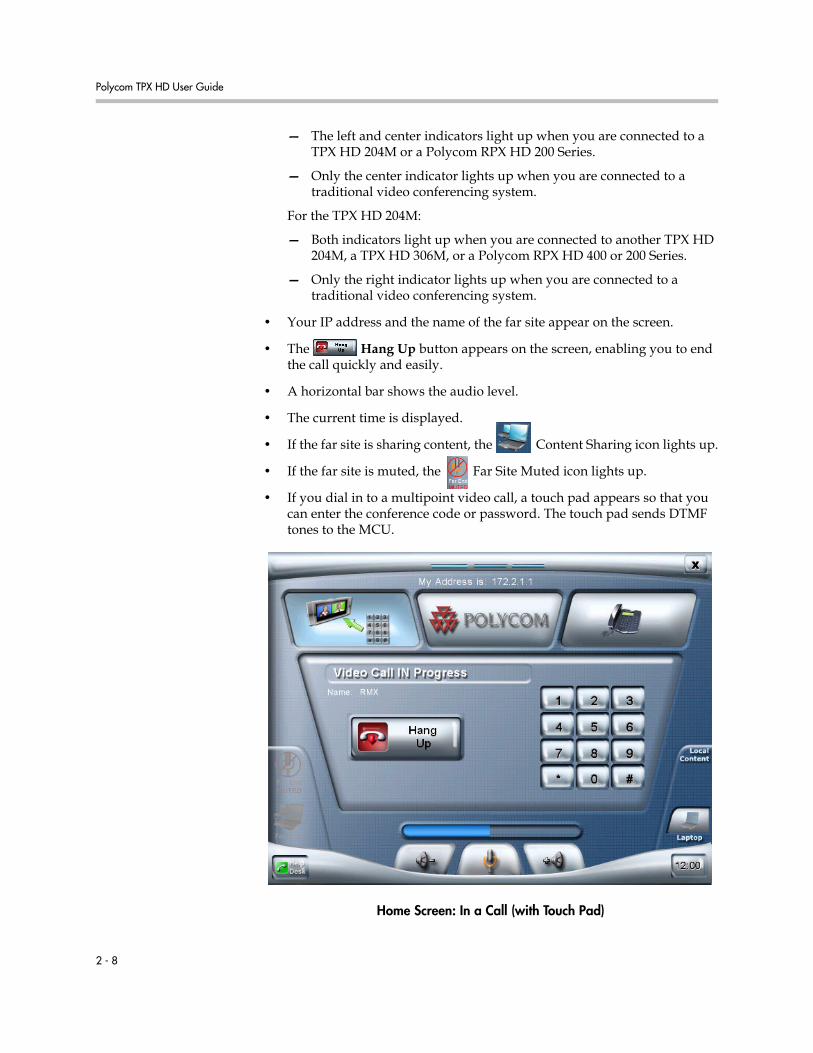
Understanding the Touch Panel Call IndicatorsWhen you are in a call, the Touch Panel Home screen changes to display information you may need during the call.
Home Screen: In a Call
These are the changes you can expect to see on the Touch Panel Home screen when you are in a call:
• Call connection indicators at the top of the screen light up to show you that you are connected to another video conferencing system:
For the TPX HD 306M:
— All three indicators light up when you are connected to a TPX HD 306M or a Polycom RPX HD 400 Series.
Current time
Your IP Address
Call connection bars
Audio level bar
Name of the far site
Hang Up button
Polycom TPX HD User Guide
2 - 8
— The left and center indicators light up when you are connected to a TPX HD 204M or a Polycom RPX HD 200 Series.
— Only the center indicator lights up when you are connected to a traditional video conferencing system.
For the TPX HD 204M:
— Both indicators light up when you are connected to another TPX HD 204M, a TPX HD 306M, or a Polycom RPX HD 400 or 200 Series.
— Only the right indicator lights up when you are connected to a traditional video conferencing system.
• Your IP address and the name of the far site appear on the screen.
• The Hang Up button appears on the screen, enabling you to end the call quickly and easily.
• A horizontal bar shows the audio level.
• The current time is displayed.
• If the far site is sharing content, the Content Sharing icon lights up.
• If the far site is muted, the Far Site Muted icon lights up.
• If you dial in to a multipoint video call, a touch pad appears so that you can enter the conference code or password. The touch pad sends DTMF tones to the MCU.
Home Screen: In a Call (with Touch Pad)

Using the Touch Panel
2 - 9
• The optional Close Up and Wide Shot camera view buttons appear if your system administrator has set up this option.
Home Screen: In a Call (with Camera Views Buttons)
— Touch Close Up if you want the near site camera to focus in on the two center seats at the main table (that is, seats 3 and 4).
— Touch Wide Shot if you want the near site cameras to fully zoom out. If you have EagleEye HD 1080i cameras, the Wide Shot button enables the far site to view the center four people at the main table (that is, seats 2, 3, 4, and 5). If you have EagleEye 720p cameras, the Wide Shot button enables the far site to view virtually all the seats at the main table.
Controlling AudioWhen you place a video call, the audio level defaults to the volume it was set at the last time the TPX HD was used. A horizontal bar on the Touch Panel shows the audio level. You can change the audio in these ways:
• During both video and audio calls, touch Volume Up or Volume Down to increase or decrease the sound you hear from the far site.

Polycom TPX HD User Guide
2 - 10
• During both video and audio calls, touch Mute to mute or unmute the sound you are sending from your site.
If the far site is muted, the Far Site Muted icon on the Home screen lights up.
Getting Help This section lists the error message that you may receive on the Touch Panel when you place a call that does not connect. It also describes how to contact the Help Desk whenever you need help with the TPX HD.
Understanding Error MessagesIf you make a call using the Touch Panel and the call does not connect, you will receive an error message. The following table describes these messages.
Calling the Help DeskWhen you experience technical difficulties or have a question about the TPX HD, you can call the Help Desk.
The Help Desk number is configured by the system administrator. If your Help Desk button is not working, contact your system administrator.
If your organization has signed up for Video Network Operations Center (VNOC) services, you may also be able to call the Help Desk to request a room reservation, extend or cancel a meeting, or inform them that your meeting is ending early. For more information, refer to Reserving a Polycom TPX HD Room on page 4-3.
Error Message Description
The call has ended. Your site or the far site hung up the call.
The far end system rejected the call. The far site is already in a call.
The far site could not be reached. You called the wrong IP address.
The site you called could not be located. Your site is registered to a gatekeeper, and the gatekeeper could not find the address or the alias.
Called Failed. Unknown error. The reason for the call failure is not known.
Using the Touch Panel
2 - 11
To get help:
1. Touch Help Desk.
2. Touch the larger Help Desk button that appears on the Touch Panel.
If your organization has signed up for VNOC services, you can also get help by calling the VNOC directly using the phone number provided by your organization.
Note If you touch Help Desk when an audio call is connected, the system must hang up the audio call in order to place the help call. A message informs you of this before hanging up the audio call.

Polycom TPX HD User Guide
2 - 12
3 - 1
3Viewing People and Content
What can you expect to see on the displays during a telepresence conference in a TPX HD room? That depends on the type of system you are calling at the other site and whether your call is to one site (point-to-point) or multiple sites (multipoint). This chapter describes what you can expect to see in these various scenarios.
This chapter also describes how to bring content (such as slides, spreadsheets, or other documents) into TPX HD room using a laptop or an optional document camera, and how to view that content on the tabletop content displays, the optional auxiliary content display (for the TPX HD 204M only), or the right display screen (for the TPX HD 306M only).
Viewing PeopleDifferent types of video conferencing systems use a different number of cameras and displays. The TPX HD automatically adapts by adjusting its camera views depending on how many displays are at the far site.
The following table describes what you can expect to see when you view the people at the other sites during a video conference in a TPX HD room.
If you make a call between a... And a...
This is what you will see in your TPX HD room... This is what the far site will see...
TPX HD 306M
TPX HD 306M
Two seats on each display. Two seats on each display.

Polycom TPX HD User Guide
3 - 2
TPX HD 306M
TPX HD 204M
Two seats on the center and left displays. The right display is blank.
Three seats on each display.
TPX HD 204M
TPX HD 204M
Two seats on each display. Two seats on each display.
TPX HD 306M
RPX HD 400 Series
The right six seats at the RPX HD main table. Two seats are shown on each display.
The entire TPX HD 306M room. Two seats are shown on the far right display, on the center right display, and on the center left display. The far left display is blank.
TPX HD 204M
RPX HD 400 Series
The center four seats at the RPX HD main table. Two seats are shown on each display.
The entire TPX HD 204M room. Two seats are shown on the center left display and two seats are shown on the center right display. The far left and far right displays are blank.
TPX HD 306M
RPX HD 200 Series
The entire RPX HD Suite. Two seats are shown on the left display and two seats are shown on the center display. The right display is blank.
The entire TPX HD 306M room. Three seats are shown on each display.
If you make a call between a... And a...
This is what you will see in your TPX HD room... This is what the far site will see...

Viewing People and Content
3 - 3
TPX HD 204M
RPX HD 200 Series
The entire RPX HD Suite. Two seats are shown on each display.
The entire TPX HD 204M room. Two seats are shown on each display.
TPX HD 306M
Traditional video con-ferencing system (such as Polycom HDX platforms)
The people at the far site on the center display. The left and right displays are blank.
The center four seats at TPX HD 306M main table on the People display (for TPX HD 306M, Version 2.0 sites with EagleEye HD 1080i cameras).
Note that if your TPX HD 306M is earlier than Version 2.0 or uses EagleEye 720p cameras, you will see more people at the TPX HD 306M main table.
TPX HD 204M
Traditional video con-ferencing system (such as Polycom HDX platforms)
The people at the far site on the right display. The left display is blank.
The entire TPX HD 204M room on the People display.
TPX HD 306M
More than one other site (multipoint call)
In multipoint calls, what you see and what the far site sees depends on a variety of factors including the number of sites in the call, the types of systems in the call, the cameras being used, and so forth. If a site is using the VNOC, the VNOC operator usually configures the layout so that every site sees all the other sites in the call.The following illustration shows what you would see in a TPX HD 306M, Version 2.0 room (using EagleEye HD 1080i cameras) when in a multipoint call with two other TPX HD 306M sites and one RPX HD 200 Series site. The left and center displays show the TPX HD 306M sites; the right display shows the RPX HD 200 site.
As noted, the illustration above shows the view with a TPX HD 306M, Version 2.0 with EagleEye HD 1080i cameras. If your TPX HD 306M is earlier than Version 2.0 or uses EagleEye 720p cameras, you will see more people at the main table.
If you make a call between a... And a...
This is what you will see in your TPX HD room... This is what the far site will see...
HDX
HDX

Polycom TPX HD User Guide
3 - 4
Because different types of video conferencing systems use different aspect ratios for their video images, the TPX HD automatically adjusts the video for your displays. Most systems use either 4:3 aspect ratio (such as the RPX HD solutions) or 16:9 aspect ratio (such as the TPX HD 306M or TPX HD 204M).
For example, if you call a Polycom TPX HD room from an RPX HD 200 Series Suite, the image on the displays in the RPX HD Suite adjusts for the 16:9 TPX HD room. Therefore, this is what you can expect to see on the displays in the RPX HD Suite:
TPX HD 204M
More than one other site (multipoint call)
Like with TPX HD 306M multipoint calls, what you see and what the far site sees depends on a variety of factors including the number of sites in the call, the types of systems in the call, the cameras being used, and so forth. If a site is using the VNOC, the VNOC operator usually configures the layout so that every site sees all the other sites in the call.The following illustration shows what you would see in a TPX HD 204M room when in a multipoint call with an RPX HD 200 Series and another TPX HD 204M. The left display shows the RPX HD 200 site; the right display shows the other TPX HD 204M site.
If you make a call between a... And a...
This is what you will see in your TPX HD room... This is what the far site will see...
16:9
TPX HD roomRight side of
Unused display area Unused display area
Unused display area Unused display area
16:9
TPX HD roomLeft side of
Viewing People and Content
3 - 5
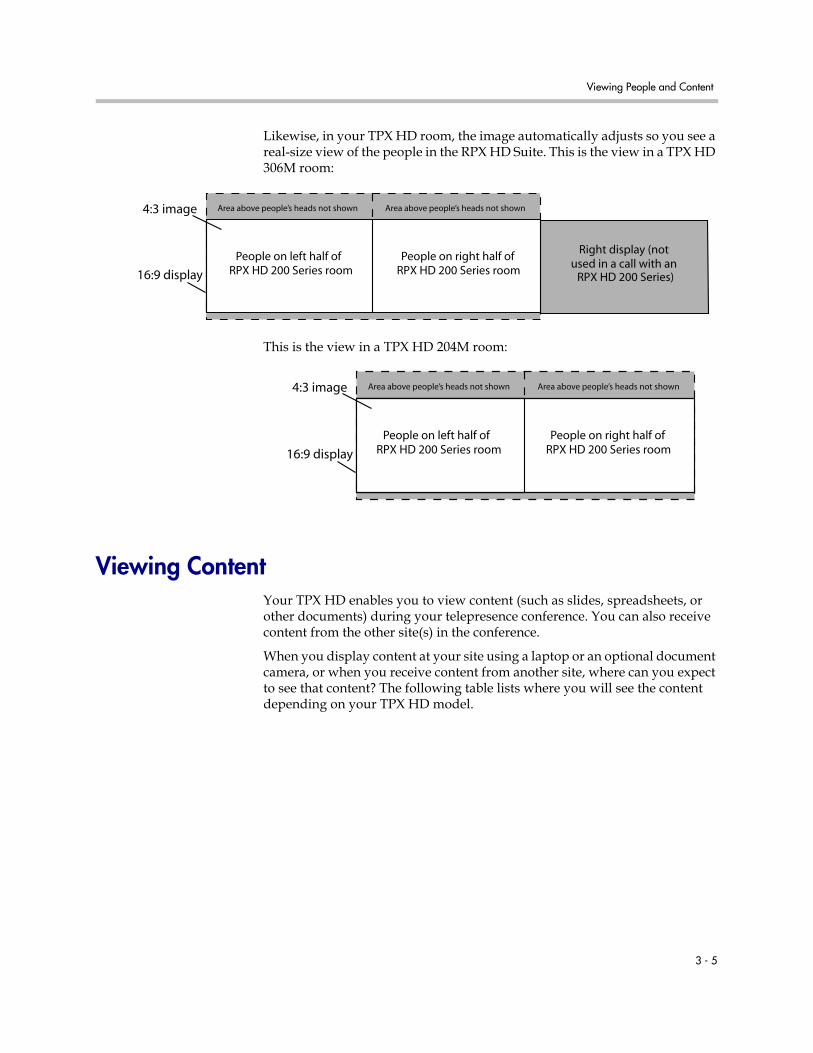
Likewise, in your TPX HD room, the image automatically adjusts so you see a real-size view of the people in the RPX HD Suite. This is the view in a TPX HD 306M room:
This is the view in a TPX HD 204M room:
Viewing ContentYour TPX HD enables you to view content (such as slides, spreadsheets, or other documents) during your telepresence conference. You can also receive content from the other site(s) in the conference.
When you display content at your site using a laptop or an optional document camera, or when you receive content from another site, where can you expect to see that content? The following table lists where you will see the content depending on your TPX HD model.
Area above people’s heads not shownArea above people’s heads not shown
16:9 display
4:3 image
Right display (notused in a call with an
RPX HD 200 Series)
People on right half of RPX HD 200 Series room
People on left half of RPX HD 200 Series room
Area above people’s heads not shownArea above people’s heads not shown
16:9 display
4:3 image
People on right half of RPX HD 200 Series room
People on left half of RPX HD 200 Series room

Polycom TPX HD User Guide
3 - 6
Even if you are using the Polycom TPX HD room for a regular meeting rather than for a telepresence conference, you can still view content on the tabletop content displays, the optional auxiliary content display, and/or the right display screen (for TPX HD 306M, Version 2.0 only) as described in the table above.
Accessing the Tabletop Content DisplaysIn TPX HD rooms equipped with tabletop content displays, there is one display available for every two seats at the main table.
To access the tabletop content displays:
1. Access the content displays by removing the wooden covers located in the tabletop.
2. Press the power button at the bottom right corner of each screen to power on the content displays.
3. Firmly pull up at the top of the content displays to tilt the screen forward.
If you have this TPX HD model... You will see content on...
TPX HD 306M, Version 2.0 or later
• The tabletop content displays.• The right display screen, if your system administrator
has set up this option and if you are in a video call with a TPX HD 204M, an RPX 200 Series, or a traditional video conferencing system. For example, if you are in a call with a TPX HD 204M, this is what you will see:
TPX HD 306M, versions earlier than Version 2.0
• The tabletop content displays, if your room is equipped with these.
• The auxiliary content display, if your room is equipped with one.
TPX HD 204M • The tabletop content displays.• The auxiliary content display, if your room is equipped
with one.
LaggardsLate
MajorityEarly
MajorityEarly
AdoptersInnovators
"The Chasm"
Technology Adoption P rocess

Viewing People and Content
3 - 7
4. To make room on the table, you can place the wooden covers behind the content displays so that the covers face the large displays at the front of the room.
5. When you are done using the content displays, power them off, push them back down, and replace the wooden covers.
Using a LaptopIf you want to share content that is stored on your laptop, you must connect the laptop to the VGA and audio cable. You can access this cable from the cable tray at the center of the main table.
To share content with a laptop:
1. Access the VGA and audio cable in the cable tray.
2. Connect the VGA connector on this cable to the VGA Out connector on your laptop.
Note that some laptops require you to enable VGA output (such as by pressing Shift-F5). Refer to your laptop documentation for more information.
3. If you want to transmit audio, connect the audio connector on this cable to the Audio Line Out connector on your laptop.
4. Display the content on your laptop screen, and then touch Laptop on the Touch Panel.
The following then occurs:
— The words “Local Content” and “Laptop” on the Touch Panel change from white to yellow:
— The content automatically appears on the tabletop content displays, the optional auxiliary content display, and/or the right display screen as described in the table on page 3-6.
— If the other site in the conference is a TPX HD 204M, a TPX HD 306M with tabletop content displays, or an RPX HD 400 or 200 Series, the content appears on their tabletop content displays.
Note Your system administrator may have set up your system so that content automatically displays when you connect a laptop to the VGA cable. If so, you do not need to use the Touch Panel to share content.
Polycom TPX HD User Guide
3 - 8
— If the other site in the conference uses traditional video conferencing equipment, the content appears on their Content display. If the site has only one display, the content appears on that display.
5. When you are done using the laptop, you can either touch Laptop on the Touch Panel or disconnect the cables from the laptop.
Using a Document CameraIf your TPX HD room is equipped with an optional document camera, you can use that document camera to show content to the other conference participants.
To use a document camera:
1. Access the VGA cable in the cable tray.
2. Connect the VGA cable to the document camera.
3. Power on the document camera.
4. Place your document on the document camera.
5. Touch Doc Cam on the Touch Panel. (Note that the icon label depends on what your system administrator chose as the label name).
The following then occurs:
— The content automatically appears on the tabletop content displays, the optional auxiliary content display, and/or the right display screen as described in the table on page 3-6.
— If the other site in the conference is a TPX HD 204M, a TPX HD 306M with tabletop content displays, or an RPX HD 400 or 200 Series, the content appears on their tabletop content displays.
— If the other site in the conference uses traditional video conferencing equipment, the content appears on their Content display. If the site has only one display, the content appears on that display.
6. When you are done using the document camera, touch Doc Cam on the Touch Panel.
4 - 1
4Conducting Successful Meetings
Conducting a successful meeting in a TPX HD room is easy. Because you don’t have to manage cameras, microphones, speakers, remote controls, and other equipment, you can be free to concentrate on making your meeting as effective as possible.
Meeting TipsThis section provides you with tips on how to take full advantage of the extraordinary video and audio in the room, and provides information that you should know if you are the meeting coordinator.
Video TipsPolycom TPX HD cameras are located at the top of the credenza. To achieve the best video from the cameras:
• Do not sit in front of the table seams. If you do, your image will look “split” to the far-site participants. You can be sure to avoid the seams by sitting in one of the designated seating locations.
• In a telepresence conference, all movements, expressions, and gestures are visible to everyone. As in any meeting, avoid repetitive motions that may distract other participants, such as tapping your pen or fingers on the tabletop.
Audio TipsPolycom’s superior audio and digital Ceiling Microphone Arrays are extremely sensitive. Keep in mind that they will pick up all sound in the room, even gentle noises and whispers — and even if you are not in camera range.
Other helpful audio tips you should consider include:
• When speaking, you do not have to direct your speech to a certain location or speak louder than normal. Simply speak in your normal tone of voice.

Polycom TPX HD User Guide
4 - 2
• As in any meeting, you should refrain from sidebar conversations. These can be distracting, especially in multipoint meetings where participants at a number of sites are present.
• Whenever you are in a TPX HD room, remember that the microphones may be on. If you want to have a private conversation, check that the microphones are muted.
Document Camera TipsIf your TPX HD is equipped with an optional document camera, you may find these tips helpful:
• If your room does not have a whiteboard, you can annotate on a document that you display using your document camera.
• When writing on a document, use a black marker or a dark pen so that your notations show more clearly.
Meeting Coordinator TipsWhen coordinating video meetings in a Polycom TPX HD room, you perform many of the same tasks as you would when you coordinate any other meeting. For example, you should try to begin and end your meeting on time and you may want to prepare an agenda.
As the meeting coordinator in a Polycom TPX HD room, follow these additional guidelines:
• Schedule a practice run if your meeting is using sound, video clips, or complicated graphic presentations.
• Arrive early to ensure that the room is ready to go and, if any room adjustments are necessary, they can be made prior to the meeting.
• Ask the primary participants in the video meeting to sit at the center seats at the table.
• If your meeting is going to end early or run long, you may have to inform your system administrator. If your organization has signed up for Video Network Operations Center (VNOC) services, you should typically inform the VNOC whenever you want to extend a meeting, cancel a meeting, or end a meeting early.

Conducting Successful Meetings
4 - 3
Reserving a Polycom TPX HD RoomIn some organizations, you can use a Polycom TPX HD room at any time, whereas at other organizations, you must reserve the room.
When reserving a TPX HD room, keep these guidelines in mind:
• If your organization has signed up for VNOC services, you can typically make your room reservation through the VNOC. The operators there will not only help you make a reservation, but they will also monitor the network and resources during the meeting, and provide remote site management to make sure your meeting runs as you planned.
• Whenever you schedule a telepresence conference, consider time zone differences for the various participants.
• If you want to schedule a conference with a video conferencing site that does not have Polycom TPX HD 306M, Polycom TPX HD 204M, or Polycom RealPresence Experience (RPX) equipment, your system administrator or the VNOC must ensure that the site’s equipment is compatible with the equipment in the TPX HD room.
To request a reservation:
1. Some organizations have reservation forms used to collect the information needed to schedule and set up telepresence conferences. If your organization has one of these forms, fill it out before you proceed to Step 2.
2. Do one of the following:
— Touch Help Desk on the Touch Panel, and then touch the larger Help Desk button that appears.
— If you have VNOC services, call the VNOC directly using the phone number or email address provided by your organization.
3. Schedule your reservation with the Help Desk or the VNOC operator.
Typically, the operator will then:
— Ensure that all the other sites in your telepresence conference have the same reservation.
— Email a confirmation of the reservation to you and the contacts at the other sites.
Note The following steps provide a general guideline for requesting a reservation. Your organization’s protocol may required you to veer slightly from these steps or to perform additional steps.

Polycom TPX HD User Guide
4 - 4
Caring for the RoomFollow these guidelines to help you properly maintain the TPX HD room:
• Do not allow anyone other than Polycom-certified technicians access to the electronics rack or the cabling in the credenza.
• If you need any of the TPX HD equipment powered on or powered off, you should contact your system administrator.
If your building loses power, all of the TPX HD equipment will automatically power back on when the power to the building is restored. When the power on process is complete, the Start screen appears on the Touch Panel. If the TPX HD does not power on normally, contact your system administrator to restart the system properly.
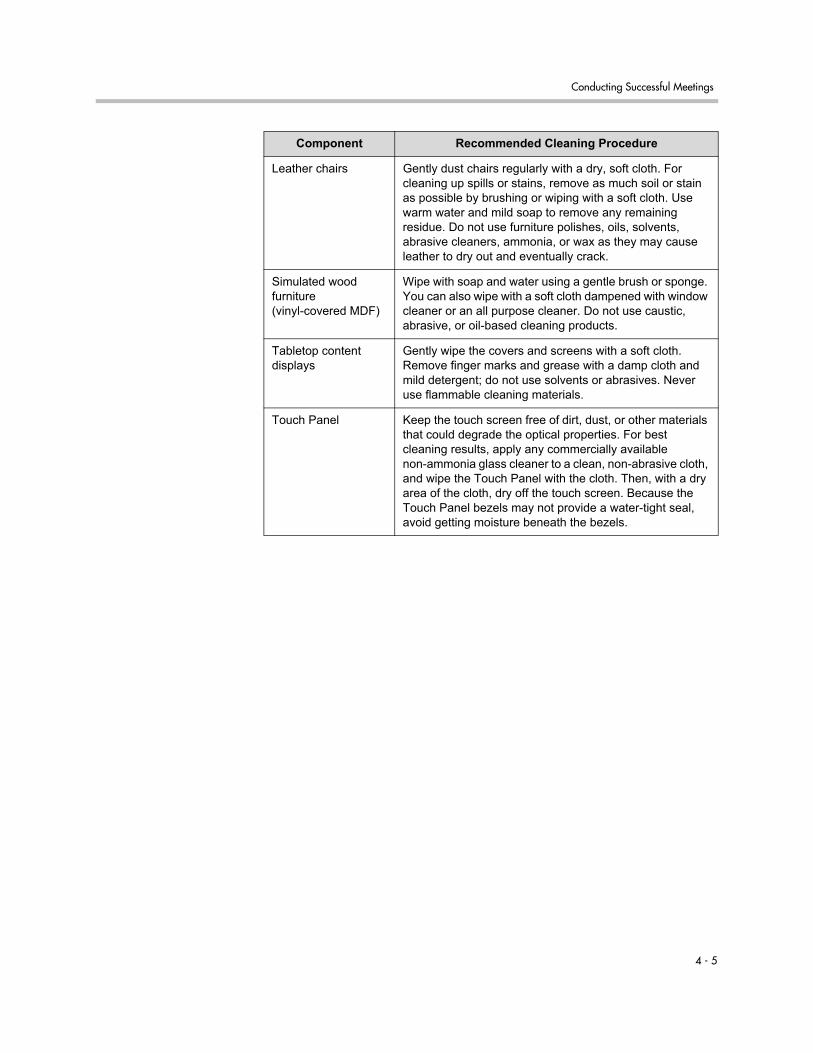
• To clean the components in the room, refer to the following table:
Component Recommended Cleaning Procedure
Cameras Do not clean the cameras, which are located at the top of the credenza. Doing so may misalign the cameras, resulting in compromised video.
Ceiling Microphone Arrays
Gently dust with a feather duster if needed.
Display screens To clean the screens: Dust the screens by wiping them gently with a soft cloth (cotton, flannel, etc.). Do not use tissue or a rough cloth. The surface of the screens is easily scratched, so do not rub it or hit it with a hard object. Do not clean the screens with a wet cloth; water droplets could enter into the product, resulting in malfunction. To clean the vents: Use a vacuum cleaner periodically to remove the dust buildup on the vents on the rear of the displays. Set the vacuum cleaner to its weakest setting when doing this. Using the displays without cleaning them of dust may cause the internal temperature to increase, resulting in possible breakdown or fire.To clean the display panel body and remote control: Wipe the display panel body and remote control gently with a soft cloth. If there is excessive dirt buildup, dampen a soft cloth with a diluted neutral cleaning detergent, wring the cloth thoroughly, wipe the display panel body or remote control, and then dry it with a dry, soft cloth. Never use solvents such as benzine or thinner for cleaning.
Conducting Successful Meetings
4 - 5
Leather chairs Gently dust chairs regularly with a dry, soft cloth. For cleaning up spills or stains, remove as much soil or stain as possible by brushing or wiping with a soft cloth. Use warm water and mild soap to remove any remaining residue. Do not use furniture polishes, oils, solvents, abrasive cleaners, ammonia, or wax as they may cause leather to dry out and eventually crack.
Simulated wood furniture (vinyl-covered MDF)
Wipe with soap and water using a gentle brush or sponge. You can also wipe with a soft cloth dampened with window cleaner or an all purpose cleaner. Do not use caustic, abrasive, or oil-based cleaning products.
Tabletop content displays
Gently wipe the covers and screens with a soft cloth. Remove finger marks and grease with a damp cloth and mild detergent; do not use solvents or abrasives. Never use flammable cleaning materials.
Touch Panel Keep the touch screen free of dirt, dust, or other materials that could degrade the optical properties. For best cleaning results, apply any commercially available non-ammonia glass cleaner to a clean, non-abrasive cloth, and wipe the Touch Panel with the cloth. Then, with a dry area of the cloth, dry off the touch screen. Because the Touch Panel bezels may not provide a water-tight seal, avoid getting moisture beneath the bezels.
Component Recommended Cleaning Procedure

Polycom TPX HD User Guide
4 - 6


