1 Moving a Resident from One Place to Another The term transfer can also refer to a resident moving to a new unit or wing in the facility. This term is also used to describe physically moving a resident from one place to another. When transferring a resident, safety must be your top priority. You must make sure that both you and the resident remain safe and avoid injury. Many facilities require using a guard belt (also called a safety belt, gait belt, or transfer belt) and other safety equipment (Figure 5-4). Figure 5-4 A guard belt (gait belt) is often used to help prevent injuries while transferring residents. Positioning, Moving, and Restorative Care Using a Guard Belt (Also Called a Gait Belt) A guard belt placed around the resident’s waist helps you move them safely and prevents injury. The belt prevents residents from straining or injuring their arms or legs. Residents feel more secure moving when a guard belt is used. Be sure you explain the use of the guard belt to the resident before you put it on. Note: Do not use a guard belt with residents who have a broken rib, abdominal wound, an abdominal tube such as a G-tube, or an abdominal opening such as a colostomy. Putting a Guard Belt on a Resident 1. Hold the belt with the label on the outside (most manu- facturers label the outside). 2. Place the belt around the resident’s waist over their clothes while they are either lying or sitting. 3. With the belt around the resident’s waist, put the end through the buckle (or attach the Velcro or connect the plastic latch), and tighten the belt firmly. Do not make it so tight that you cannot get your fingers under it to hold it when transferring the resident. Be sure to tighten it again after they stand (Figure 5-5). 4. Now you are ready to continue with any of the transfer- ring procedures. Figure 5-5
Transcript
1
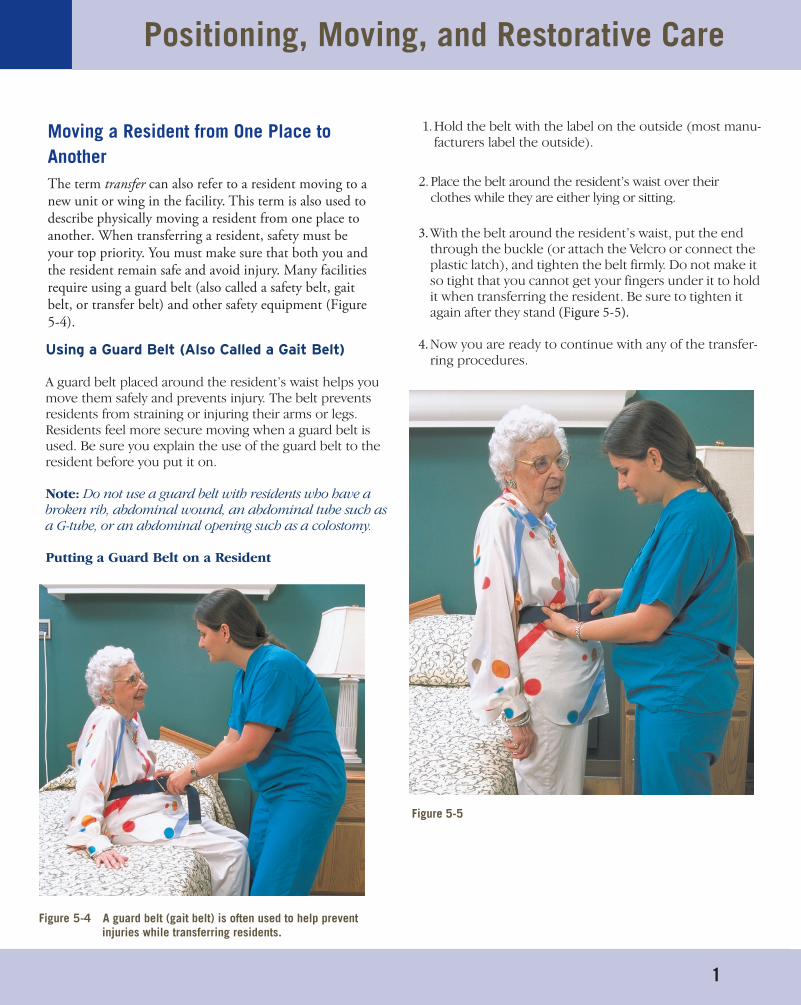
Moving a Resident from One Place to AnotherThe term transfer can also refer to a resident moving to a new unit or wing in the facility. This term is also used to describe physically moving a resident from one place to another. When transferring a resident, safety must be your top priority. You must make sure that both you and the resident remain safe and avoid injury. Many facilities require using a guard belt (also called a safety belt, gait belt, or transfer belt) and other safety equipment (Figure 5-4).
Figure 5-4 A guard belt (gait belt) is often used to help prevent injuries while transferring residents.
Positioning, Moving, and Restorative Care
Using a Guard Belt (Also Called a Gait Belt)
A guard belt placed around the resident’s waist helps youmove them safely and prevents injury. The belt preventsresidents from straining or injuring their arms or legs.Residents feel more secure moving when a guard belt isused. Be sure you explain the use of the guard belt to theresident before you put it on.
Note: Do not use a guard belt with residents who have abroken rib, abdominal wound, an abdominal tube such asa G-tube, or an abdominal opening such as a colostomy.
Putting a Guard Belt on a Resident
1.Hold the belt with the label on the outside (most manu-facturers label the outside).
2. Place the belt around the resident’s waist over theirclothes while they are either lying or sitting.
3.With the belt around the resident’s waist, put the end through the buckle (or attach the Velcro or connect the plastic latch), and tighten the belt firmly. Do not make it so tight that you cannot get your fingers under it to hold it when transferring the resident. Be sure to tighten it again after they stand (Figure 5-5).
4.Now you are ready to continue with any of the transfer-ring procedures.
Figure 5-5
Table 5-1 Problems and Solutions in Transferring a Resident from Bed to a Chair
Problem Solution
You lose your grip on the resident.
Help the resident sit back on the bed. Change your position so you have a better grip and can provide better support.
The resident’s legs cannot support their weight.
If a resident’s legs start to collapse once you are moving, place your legs in front of theirs and help them sit back on the bed. You may need to get help to complete the transfer.
The resident gets dizzy when they change position.
Changes in position can cause dizziness because blood pools in the extremities, and for a brief time less blood reaches the brain (postural hypotension). Wait a few minutes and begin again.
The resident becomes weak, unsteady, or starts to faint.
Help the resident sit back on the bed. Lower them to supine position, if necessary. Call the charge nurse immediately.
2
There are various types of transfers:
■ Stand-pivot transfer■ Transfer with an assistive device■ Sliding board and seated transfers (less common)■ Mechanical lift transfers■ Dependent lift using two or more staff
The stand-pivot transfer and assisted transfer with anassistive device are the methods most commonly used. See Procedures 5-11 through 5-16 for detailed steps for all transfer procedures.
Considerations in transferring a resident:■ Residents getting out of bed — The bed usually should
be at its lowest position or raised, if needed, for a tallresident. When transferring a resident out of bed,allow them to dangle their legs over the edge of thebed for a few minutes before standing. This helps toprevent dizziness due to a sudden change in posture.If the resident complains of dizziness, help them liedown and call the charge nurse. Do not leave a resi-dent unattended unless they are secure.
■ Residents who use wheelchairs — The wheelchair shouldbe locked and set alongside the bed with the arm ofthe chair next to the bed. The chair should be on theresident’s stronger side. For example, if the resident hasa weakened left side due to a stroke, put the chair ontheir right side.
■ Residents who use assistive devices — A resident’s walkeror cane should be next to or in front of them. A braceor other special equipment should be correctly inplace.
Before you can transfer a resident from bed to a chair,the resident must first roll onto their side and then sit up. When starting to transfer a resident from bed to chair, watch for any problems that may occur. Table 5-1 sum-marizes common problems and how to deal with them.
3
PROCEDURE
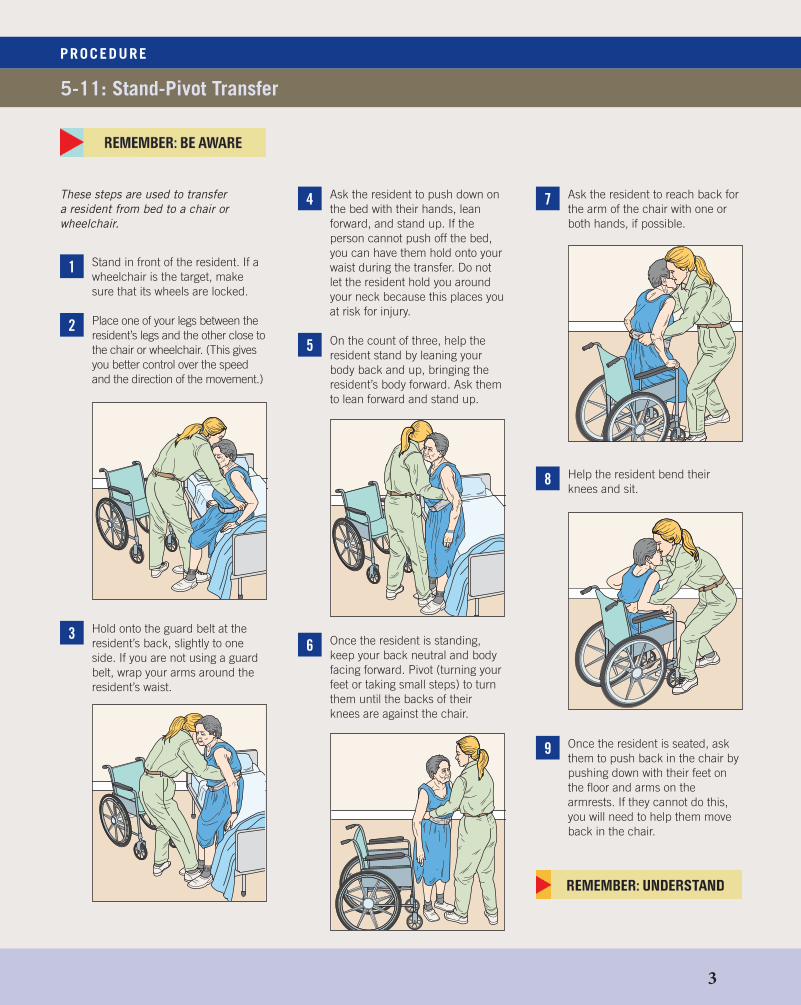
5-11: Stand-Pivot Transfer
These steps are used to transfer a resident from bed to a chair or wheelchair.
Stand in front of the resident. If a wheelchair is the target, make sure that its wheels are locked.
Place one of your legs between the resident’s legs and the other close to the chair or wheelchair. (This gives you better control over the speed and the direction of the movement.)
Hold onto the guard belt at the resident’s back, slightly to one side. If you are not using a guard belt, wrap your arms around the resident’s waist.
Ask the resident to push down on the bed with their hands, lean forward, and stand up. If the person cannot push off the bed, you can have them hold onto your waist during the transfer. Do not let the resident hold you around your neck because this places you at risk for injury.
On the count of three, help the resident stand by leaning your body back and up, bringing the resident’s body forward. Ask them to lean forward and stand up.
Once the resident is standing, keep your back neutral and body facing forward. Pivot (turning your feet or taking small steps) to turn them until the backs of their knees are against the chair.
Ask the resident to reach back for the arm of the chair with one or both hands, if possible.
Help the resident bend their knees and sit.
Once the resident is seated, ask them to push back in the chair by pushing down with their feet on the floor and arms on the armrests. If they cannot do this, you will need to help them move back in the chair.
1
2
3
4
5
6
7
8
9
4
PROCEDURE
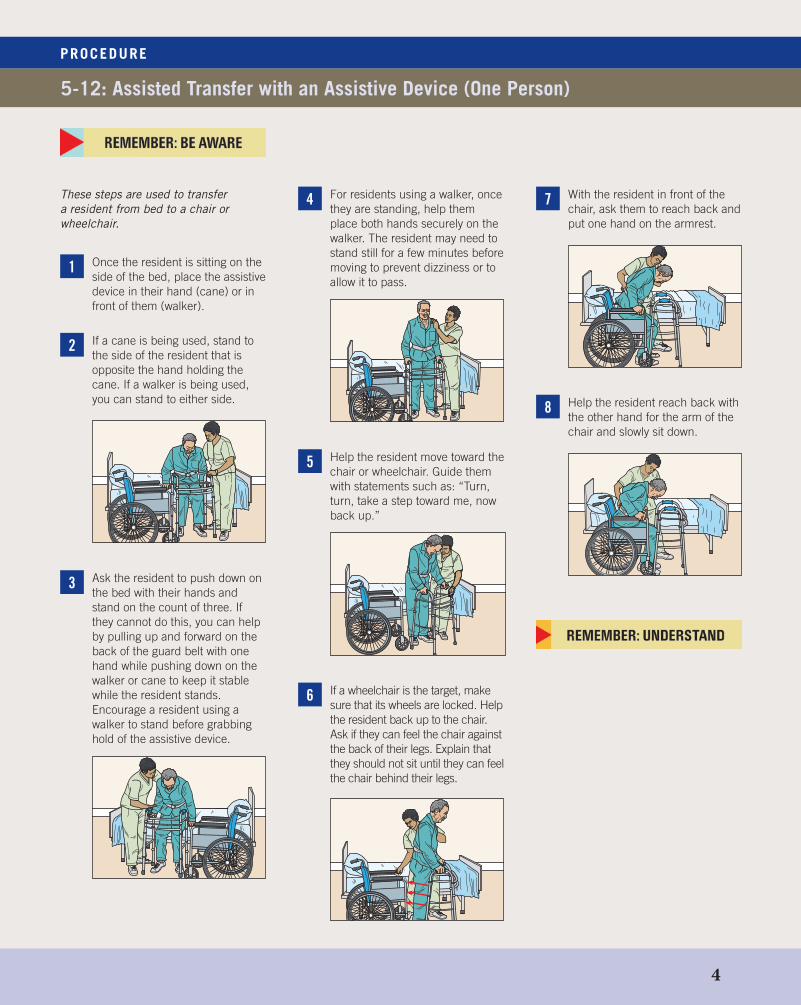
5-12: Assisted Transfer with an Assistive Device (One Person)
These steps are used to transfer a resident from bed to a chair or wheelchair.
Once the resident is sitting on the side of the bed, place the assistive device in their hand (cane) or in front of them (walker).
If a cane is being used, stand to the side of the resident that is opposite the hand holding the cane. If a walker is being used, you can stand to either side.
Ask the resident to push down on the bed with their hands and stand on the count of three. If they cannot do this, you can help by pulling up and forward on the back of the guard belt with one hand while pushing down on the walker or cane to keep it stable while the resident stands. Encourage a resident using a walker to stand before grabbing hold of the assistive device.
For residents using a walker, once they are standing, help them place both hands securely on the walker. The resident may need to stand still for a few minutes before moving to prevent dizziness or to allow it to pass.
Help the resident move toward the chair or wheelchair. Guide them with statements such as: “Turn, turn, take a step toward me, now back up.”
If a wheelchair is the target, make sure that its wheels are locked. Help the resident back up to the chair. Ask if they can feel the chair against the back of their legs. Explain that they should not sit until they can feel the chair behind their legs.
With the resident in front of the chair, ask them to reach back and put one hand on the armrest.
Help the resident reach back with the other hand for the arm of the chair and slowly sit down.
1
2
3
4
5
6
7
8
5
PROCEDURE
5-13: Transfer from a Chair to Bed, Commode, or Toilet
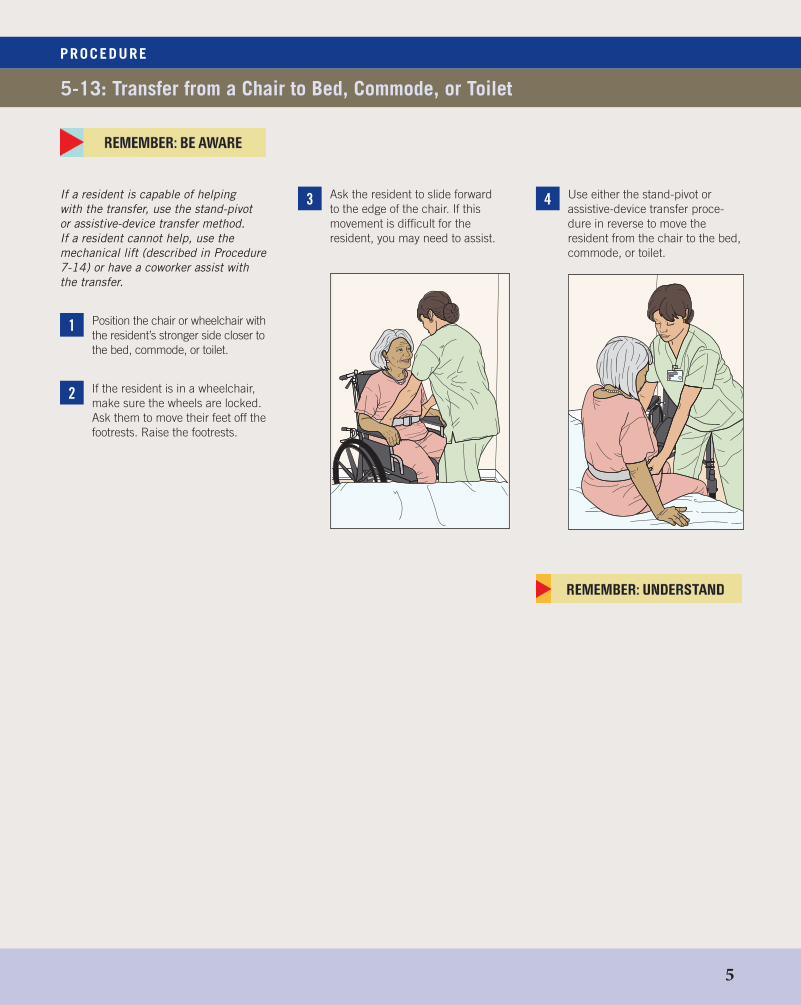
If a resident is capable of helping with the transfer, use the stand-pivot or assistive-device transfer method. If a resident cannot help, use the mechanical lift (described in Procedure 7-14) or have a coworker assist withthe transfer.
Position the chair or wheelchair with the resident’s stronger side closer to the bed, commode, or toilet.
If the resident is in a wheelchair, make sure the wheels are locked. Ask them to move their feet off the footrests. Raise the footrests.
Ask the resident to slide forward to the edge of the chair. If this movement is difficult for the resident, you may need to assist.
Use either the stand-pivot or assistive-device transfer proce-dure in reverse to move the resident from the chair to the bed, commode, or toilet.
1
2
3 4
PROCEDURE
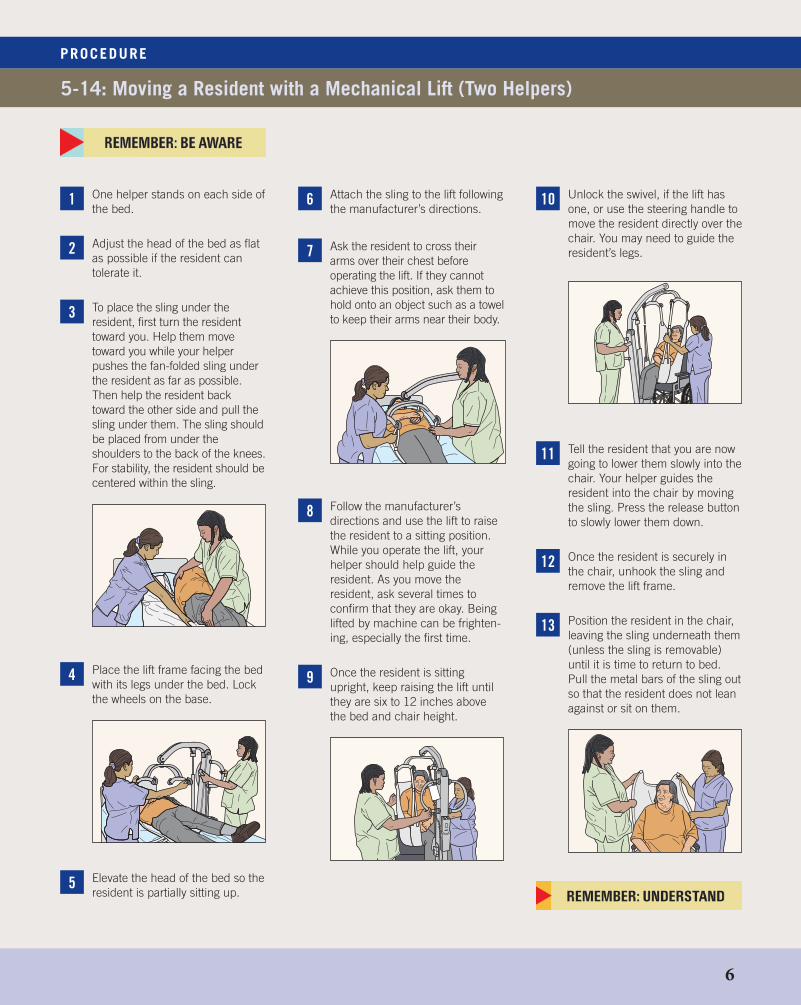
5-14: Moving a Resident with a Mechanical Lift (Two Helpers)
One helper stands on each side of the bed.
Adjust the head of the bed as flat as possible if the resident can tolerate it.
To place the sling under the resident, first turn the resident toward you. Help them move toward you while your helper pushes the fan-folded sling under the resident as far as possible. Then help the resident back toward the other side and pull the sling under them. The sling should be placed from under the shoulders to the back of the knees. For stability, the resident should be centered within the sling.
Place the lift frame facing the bed with its legs under the bed. Lock the wheels on the base.
Elevate the head of the bed so the resident is partially sitting up.
Attach the sling to the lift following the manufacturer’s directions.
Ask the resident to cross their arms over their chest before operating the lift. If they cannot achieve this position, ask them to hold onto an object such as a towel to keep their arms near their body.
Follow the manufacturer’s directions and use the lift to raise the resident to a sitting position. While you operate the lift, your helper should help guide the resident. As you move the resident, ask several times to confirm that they are okay. Being lifted by machine can be frighten-ing, especially the first time.
Once the resident is sitting upright, keep raising the lift until they are six to 12 inches above the bed and chair height.
Unlock the swivel, if the lift has one, or use the steering handle to move the resident directly over the chair. You may need to guide the resident’s legs.
Tell the resident that you are now going to lower them slowly into the chair. Your helper guides the resident into the chair by moving the sling. Press the release button to slowly lower them down.
Once the resident is securely in the chair, unhook the sling and remove the lift frame.
Position the resident in the chair, leaving the sling underneath them (unless the sling is removable) until it is time to return to bed. Pull the metal bars of the sling out so that the resident does not lean against or sit on them.
1
2
3
4
5
6
7
8
9
10
11
12
13
6
PROCEDURE
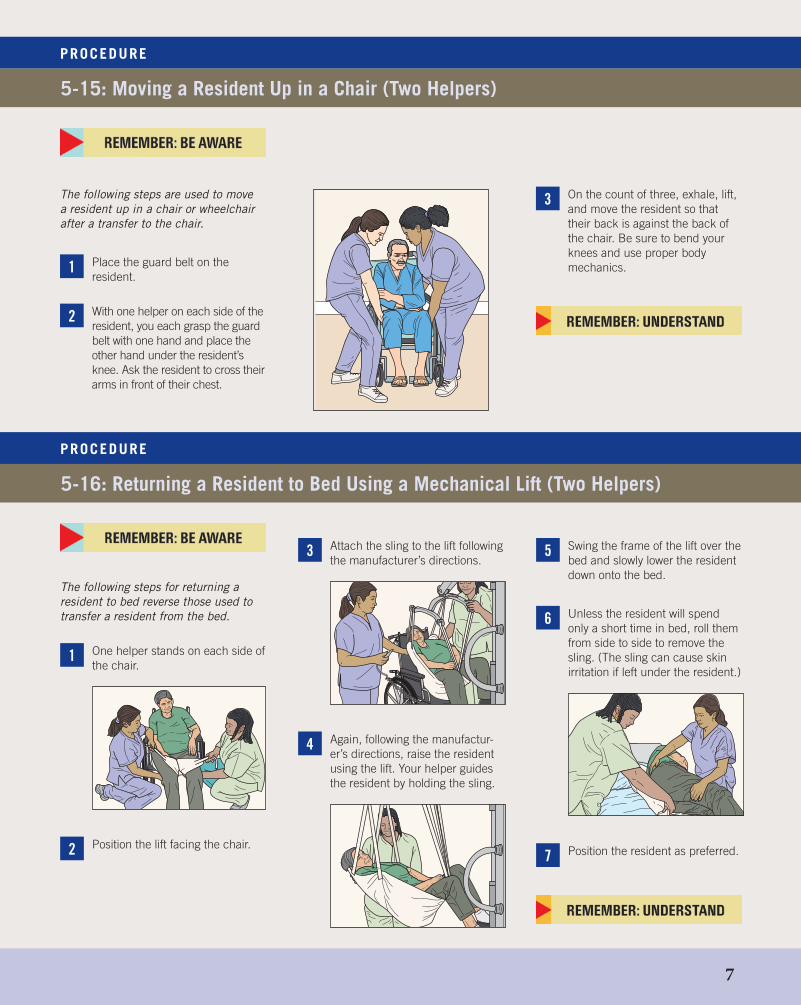
5-16: Returning a Resident to Bed Using a Mechanical Lift (Two Helpers)
The following steps for returning a resident to bed reverse those used to transfer a resident from the bed.
One helper stands on each side of the chair.
Position the lift facing the chair.
Attach the sling to the lift following the manufacturer’s directions.
Again, following the manufactur-er’s directions, raise the resident using the lift. Your helper guides the resident by holding the sling.
Swing the frame of the lift over the bed and slowly lower the resident down onto the bed.
Unless the resident will spend only a short time in bed, roll them from side to side to remove the sling. (The sling can cause skin irritation if left under the resident.)
Position the resident as preferred.
1
2
3
4
5
6
7
PROCEDURE
5-15: Moving a Resident Up in a Chair (Two Helpers)
The following steps are used to move a resident up in a chair or wheelchair after a transfer to the chair.
Place the guard belt on the resident.
With one helper on each side of the resident, you each grasp the guard belt with one hand and place the other hand under the resident’s knee. Ask the resident to cross their arms in front of their chest.
On the count of three, exhale, lift, and move the resident so that their back is against the back of the chair. Be sure to bend your knees and use proper body mechanics.1
2
3
7
DISCLAIMER: AHCA/NCAL has created these courses to assist providers to recruit and train temporary staff during the national emergency caused by the coronavirus pandemic. While the federal government has issued a blanket waiver for such temporary nurse aides, state requirements may need to be waived to permit individuals under this training program in your location. Employers should check with their state survey agencies and their state occupational licensing agencies, where applicable, to ensure individuals trained under this program are permitted to assist with care in your location.


![NARITA INTERNATIONAL AIRPORT ADMINISTRATIVE … · [Ground Re-positioning of Aircraft] Article 8 1. When re-positioning an aircraft on the ground (except when the aircraft is moving](https://static.documents.pub/doc/80x56/5e8421e18378dd36e93112fb/narita-international-airport-administrative-ground-re-positioning-of-aircraft.jpg)


