62
Power Manager Deployment Guide Updated:November, 2012
Power Manager Deployment Guide
Updated:November, 2012

Note: Before using this information and the product it supports, read the general information in Appendix B “Notices” on page 53.
Seventh Edition (November 2012)
© Copyright Lenovo 2008, 2012.
LIMITED AND RESTRICTED RIGHTS NOTICE: If data or software is delivered pursuant a General Services Administration “GSA” contract, use, reproduction, or disclosure is subject to restrictions set forth in Contract No. GS-35F-05925.

Contents
Preface . . . . . . . . . . . . . . . . iii
Chapter 1. Overview. . . . . . . . . . 1 Features . . . . . . . . . . . . . . . . . 1
Chapter 2. Installation . . . . . . . . . 3 Net Framework dependence . . . . . . . . . 3
Considerations for installation. . . . . . . . . 3
Installing Power Manager . . . . . . . . . . 3
Chapter 3. Working with Active Directory and ADM or ADMX files . . 5 Adding Administrative Templates . . . . . . . 5
General setting . . . . . . . . . . . . . . 6
Power Plan (Scheme) Deployments . . . . . . 8
Global Power Setting . . . . . . . . . . . . 30
Battery Maintenance . . . . . . . . . . . . 38
Power Agenda Deployments . . . . . . . . . 39
EnergyWise Configuration Deployments. . . . . 47
Appendix A. Deploying power schemes for non-administrator groups or users on Windows XP client computers . . . . . . . . . . . 51
Appendix B. Notices. . . . . . . . . . 53 Trademarks . . . . . . . . . . . . . . . . 54
© Copyright Lenovo 2008, 2012 i

Power ManagerDeployment Guide ii

Preface
This guide is intended for IT administrators, or those who are responsible for deploying the Power Manager program (hereafter refer to as Power Manager) to computers in their organization. The purpose of this guide is to provide the information required for installing Power Manager on one or more computers, and the information about the common administration tasks associated with managing Active Directory®. Implementing and enforcing a power management strategy on the computers throughout the entire organization can provide substantial savings.
ThinkVantage® Technologies are developed for IT professionals, addressing the unique challenges they may encounter. This deployment guide will provide instructions and solutions for working with Power Manager. If you have suggestions or comments, communicate with your Lenovo® authorized representative. To learn more about the technologies that can help you lower the total cost of ownership and to check for periodic updates to this guide, go to the following Web site: http://www.lenovo.com/thinkvantage
© Copyright Lenovo 2008, 2012 iii

iv Power ManagerDeployment Guide
Chapter 1. Overview
Power Manager helps users adjust power settings to achieve the best balance between system performance and power saving through slider control or power plans.
Power Manager provides a variety of power-saving features through two essential modes, Basic and Advanced. Basic mode is set as default when users open Power Manager for the first time. Users can specify the level of power saving by simply using the slider, without power plans. Advanced mode enables users to configure power plans and the full range of functions in Power Manager to meet specific power saving needs. Power Manager can also display the battery information, and help users monitor the battery status.
Power Management on a computer can save energy and money. When the IT administrator enforces power management strategy on computers throughout the entire organization, the savings can be far more substantial. Power Manager is configured by default to use its energy efficiency features. Power Manager also gives the IT administrator numerous options for tailoring power management settings to optimize energy efficiency throughout their organizations.
Note: Power Manager has two different versions. One is for Microsoft® Windows® XP operating systems and the other is for Microsoft Windows Vista® and Microsoft Windows 7 operating systems. In the Windows Vista and Windows 7 version, the term "power plan" is used. In the Windows XP version, the term "power scheme" is used. In this document, no distinction will be made and the term "power plan" will be used to cover both.
Features Power Manager includes the following functions:
• Balance the performance and power saving of the computer
Power Manager provides the slider to help users quickly and easily set the level of power to be used. Users can control the Central Processing Unit (CPU) speed and the brightness of the computer display by moving the slider. Moving the slider to the left, toward Maximum Performance, increases the CPU speed and the brightness of the computer display but uses more battery power. Moving the slider to the right, toward Maximum Battery Life, prolongs the battery life while limiting the CPU speed and the brightness of the computer display.
When users move the slider to the leftmost position, the power-saving settings in the predefined Maximum Performance power plan are applied. When users move the slider to the rightmost position, the power-saving settings in the predefined Maximum Battery Life power plan are applied.
• View, create, delete, and switch power plans
A power plan is a collection of hardware and system settings that manages how the computer is used and conserves power. Power Manager power plans provide more power-saving settings than Windows®
power plans. On the Power Plan tab, the user can view specific settings in any of the predefined power plans: Maximum Performance, Timers off (Presentation), Video Playback, Maximum Battery Life, Energy Saver (which is called as ThinkPad® Default or Energy Star on some systems), and Power Source Optimized. These predefined power plans are designed to meet the needs of most people. If the predefined power plans do not meet your needs, the Create Power Plan wizard can help you create your own custom power plans. You can easily switch between power plans by clicking the Battery Gauge icon on the taskbar and using the slider to apply a predefined power plan, or by pressing the F3+Fn keys to select a power plan from the Choose Power Plan menu.
• View battery information
Power Manager displays battery information and general battery status, such as remaining time, remaining capacity, charge and discharge status, cycle count and so on. The battery health indicator can indicate the battery health conditions in three colors: green (in good condition), yellow (in fair condition), and red
© Copyright Lenovo 2008, 2012 1
(in poor condition). When the battery has encountered an error, an error message or balloon message will display in the notification area.
• Maximize battery life span
If you primarily use the computer with an attached ac power adapter and only infrequently use battery power, you can increase the life span of the battery by changing the charge thresholds. This allows you to reduce the number of charge cycles by letting the battery discharge to a lower percentage before it begins to charge. You can change the battery charge thresholds on the Battery tab.
You can also set the maximum charge value to below 100%. This option is useful to prolong the life span of the batteries that you do not use frequently, because it is recommended to store batteries with less charge rather than full charge.
• Remotely configure Power Manager and deploy power plan
Power Manager enables an IT administrator to configure Power Manager and deploy a power plan using Active Directory. The IT administrator can select an active power plan in the client computers, inhibit the user's ability to switch between power plans, select a specific power plan, or create a power plan. For example, the IT administrator can disable the Maximum Performance power plan and users cannot select it.
Also, the IT administrator can configure settings for the General Setting policies, Power Plan (Scheme) Deployments policies, Global Power Settings policies, and Battery Maintenance policy.
Power ManagerDeployment Guide 2

Chapter 2. Installation
The following instructions provide installation procedures for Power Manager.
Net Framework dependence Power Manager requires Microsoft .NET Framework 3.0 or later. You need to install the .NET Framework before installing Power Manager. You can download a compatible version of the .NET Framework from the following Microsoft Web site: http://msdn.microsoft.com/en-us/netframework/default.aspx
Note: To use Power Manager in Windows 2000 operating systems, install Power Manager version 1.48.
Considerations for installation Various functions in Power Manager have dependency on hardware, BIOS, drivers, and other ThinkVantage Technologies (TVTs). When a function is not supported on a client computer, the function is hidden in Power Manager. Installing the latest version of the following software is strongly recommended to enable the full range of functions in Power Manager.
• BIOS update
• ThinkPad Power Management Driver
• Hotkey driver
• Access Connections™
Installing Power Manager To install Power Manager without user's interaction, do the following:
1. Start the Windows XP, Windows Vista, or Windows 7 operating system, and then log in with administrative privileges.
2. Extract the Power Manager software package to the hard disk drive. For example: C:\Drivers\Vista\PWRMGRV
3. Depending on the operating system, do one of the following:
• For Windows XP operating system users Click Start ➙ Run, and then type cmd in the Open box to open the command prompt window.
• For Windows Vista or Windows 7 operating system users Click Start, type cmd in the Start Search box, and then select run as administrator to open the command prompt window.
4. Install Power Manager silently with a default path for installation log by using the following command line: <path>\setup.exe -S –SMS
To install Power Manager interactively, do the following:
1. Start the Windows XP, Windows Vista, or Windows 7 operating system, and then log in with administrative privileges.
2. Double-click the Power Manager software package. The Ready to Install window opens.
3. In the Select Destination Location window, click Next. If you would like to select a different folder, click Browse.
4. In the Ready to Install window, click Install. All the necessary files will be extracted to the folder selected in step 3.
© Copyright Lenovo 2008, 2012 3

5. Make sure that you have selected the Install ThinkVantage Power Manager now option and click Finish.
6. Follow the instructions on the screen to complete installation and restart the computer.
Note: Power Manager has two different versions. One is for Windows XP operating systems and the other is for Windows Vista and Windows 7 operating systems. When you install Power Manager on your computer, match the Power Manager version with your operating system. Power Manager designed specifically for Windows Vista and Windows 7 operating systems might not function correctly on Windows XP operating systems, and vice versa.
Power ManagerDeployment Guide 4

Chapter 3. Working with Active Directory and ADM or ADMX files
Active Directory provides a mechanism that enables administrators to manage computers, groups, end users, domains, security policies, and any type of user-defined objects. The mechanism is known as Group Policy and Administrative Template (ADM or ADMX) files. With Group Policy and ADM or ADMX files, IT administrators define settings that can be applied to computers or users in the domain.
Lenovo provides Power Manager ADM or ADMX files with six policy settings categories for Windows XP, Windows Vista, and Windows 7 client computers:
• General setting
• Power Plan (Scheme) Deployments
• Global Power Settings
• Battery Maintenance
• Power Agenda Deployments
• EnergyWise Configuration Deployments
Adding Administrative Templates Designed to save you time and effort, Lenovo provides the administrative template files, "PWMGPO.ADM" and "PWMGPO.ADMX" for Windows XP operating systems, and "PMVGPO.ADM" and "PMVGPO.ADMX" for Windows Vista and Windows 7 operating systems, which can be used with Group Policy Editor to set the policies for Power Manager. These ADM or ADMX files can be downloaded from the Lenovo Support Web site at: http://www.lenovo.com/support/site.wss/document.do?lndocid=TVAN-ADMIN
Depending on the environment of Active Directory, the IT administrator selects either ADM or ADMX files and adds the files to the Group Policy Editor.
To add the Power Manager ADM files to the Group Policy Editor, do the following:
1. On the computer running the Active Directory, click Start ➙ Run, and type gpedit.msc. The Group Policy Editor window opens.
2. Under Computer Configuration, right-click Administrative Templates.
3. Click Add/Remove Templates, and the Add/Remove Templates window opens.
4. Click Add, and select the PWMGPO.ADM file for Windows XP client computers.
5. Click Add, and select the PMVGPO.ADM file for Windows Vista and Windows 7 client computers.
6. Click Close to close the Add/Remove Templates window.
7. Make sure that the ADM files have been added to the Group Policy Editor by doing the following:
• For Windows XP operating systems
a. Under Computer Configuration, expand Administrative Templates. A new item named Lenovo ThinkVantage Components is present.
b. Expand Lenovo ThinkVantage Components. A sub-item named Power Manager is present.
c. Under User Configuration, expand Administrative Templates. A new item named Lenovo ThinkVantage Components is present.
© Copyright Lenovo 2008, 2012 5

d. Expand Lenovo ThinkVantage Components. A sub-item named Power Manager is present.
• For Windows Vista and Windows 7 operating systems
a. Under Computer Configuration, expand Administrative Templates and navigate to Classic Administrative Templates. A new item named Lenovo ThinkVantage Components is present.
b. Expand Lenovo ThinkVantage Components. A sub-item named Power Manager for Vista/7 is present.
c. Under User Configuration, expand Administrative Templates and navigate to Classic Administrative Templates. A new item named Lenovo ThinkVantage Components is present.
d. Expand Lenovo ThinkVantage Components. A sub-item named Power Manager for Vista/7 is present.
To add the Power Manager ADMX files to the Group Policy Editor, do the following:
1. On the computer running the Active Directory that supports ADMX, extract the admx_tp_xp.zip and admx_tp_vista_7.zip files to a local directory.
2. Copy the PWMGPO.admx and PMVGPO.admx files to the C:\Windows\PolicyDefinitions directory.
3. Copy the PWMGPO.adml and PMVGPO.adml files to the C:\Windows\PolicyDefinitions\en-US directory.
4. Click Start ➙ Run, and type gpedit.msc. The Group Policy Editor window opens. The Local Group Policy Editor will automatically read all ADMX files saved in the C:\Windows\PolicyDefinitions directory.
5. Make sure that ADMX files have been added to the Group Policy Editor by doing the following:
a. Under Computer Configuration, expand Administrative Templates. A new item named Lenovo ThinkVantage Components is present.
b. Expand Lenovo ThinkVantage Components. A sub-item named Power Manager and Power Manager for Vista/7 is present.
c. Under User Configuration, expand Administrative Templates. A new item named Lenovo ThinkVantage Components is present.
d. Expand Lenovo ThinkVantage Components. A sub-item named Power Manager and Power Manager for Vista/7 is present.
Notes:
1. The policy settings in the Power Manager configuration item are for Windows XP client computers, and these policy settings do not affect Windows Vista and Windows 7 client computers.
2. The policy settings in the Power Manager for Vista/7 configuration item are for Windows Vista and Windows 7 client computers, and these policy settings do not affect Windows XP client computers.
General setting General Setting policies enable IT administrator to configure general settings such as selecting an active power plan.
To configure General Setting policies, do the following:
• For Windows XP client computers (ADM and ADMX files)
Under Computer Configuration, click Administrative Templates ➙ Lenovo ThinkVantage Components ➙ Power Manager ➙ General setting.
• For Windows Vista or Windows 7 client computers (ADM file)
Under Computer Configuration, click Administrative Templates ➙ Classic Administrative Templates ➙ Lenovo ThinkVantage Components ➙ Power Manager for Vista/7 ➙ General setting.
• For Windows Vista or Windows 7 client computers (ADMX file)
Under Computer Configuration, click Administrative Templates ➙ Lenovo ThinkVantage Components ➙ Power Manager for Vista/7 ➙ General setting.
Power ManagerDeployment Guide 6
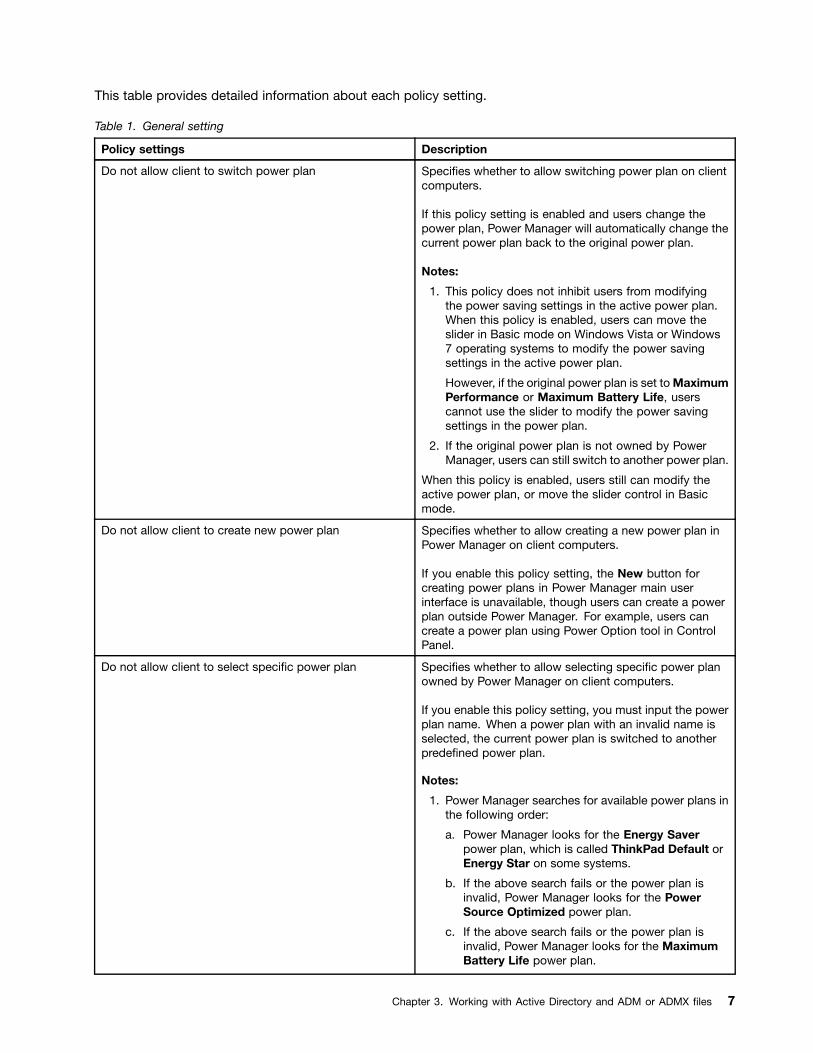
This table provides detailed information about each policy setting.
Table 1. General setting
Policy settings Description
Do not allow client to switch power plan Specifies whether to allow switching power plan on client computers.
If this policy setting is enabled and users change the power plan, Power Manager will automatically change the current power plan back to the original power plan.
Notes:
1. This policy does not inhibit users from modifying the power saving settings in the active power plan. When this policy is enabled, users can move the slider in Basic mode on Windows Vista or Windows 7 operating systems to modify the power saving settings in the active power plan.
However, if the original power plan is set to Maximum Performance or Maximum Battery Life, users cannot use the slider to modify the power saving settings in the power plan.
2. If the original power plan is not owned by Power Manager, users can still switch to another power plan.
When this policy is enabled, users still can modify the active power plan, or move the slider control in Basic mode.
Do not allow client to create new power plan Specifies whether to allow creating a new power plan in Power Manager on client computers.
If you enable this policy setting, the New button for creating power plans in Power Manager main user interface is unavailable, though users can create a power plan outside Power Manager. For example, users can create a power plan using Power Option tool in Control Panel.
Do not allow client to select specific power plan Specifies whether to allow selecting specific power plan owned by Power Manager on client computers.
If you enable this policy setting, you must input the power plan name. When a power plan with an invalid name is selected, the current power plan is switched to another predefined power plan.
Notes:
1. Power Manager searches for available power plans in the following order:
a. Power Manager looks for the Energy Saver power plan, which is called ThinkPad Default or Energy Star on some systems.
b. If the above search fails or the power plan is invalid, Power Manager looks for the Power Source Optimized power plan.
c. If the above search fails or the power plan is invalid, Power Manager looks for the Maximum Battery Life power plan.
Chapter 3. Working with Active Directory and ADM or ADMX files 7

Table 1. General setting (continued)
Policy settings Description
2. Only power plans visible in Power Manager can be specified, and Windows default power plans cannot be specified.
Select an Active Power Plan Specifies the name of the power plan owned by Power Manager to make it active on client computers.
Notes:
1. The specified power plan name should exist on client computers.
2. If you enable this policy setting, you must input the power plan name.
Power Manager applies power plan specified in this policy during startup. Even when an active power plan is specified by this policy, the user is able to change active power plan after Power Manager startup.
Hide Internet Access Specifies whether or not to hide the Internet access.
If you enable this policy setting, all Web links in Power Manager are hidden. Also, the Buy a battery link in Windows Power Option is deleted by selecting Delete in all pull-down menus.
Note: When the Buy a battery link is deleted by this policy, the link does not appear even when this policy is disabled.
Power Logging Specifies the log output setting of the AC/DC wattage.
If you enable this policy setting, you must set numeric values for the log output interval (minute) and log clearance interval (day).
The log output file name is PWMLDLOG.INI. The log output file will be created under Power Manager's installation folder.
Power Plan (Scheme) Deployments The policy settings in the Power Plan Deployments configuration item enable the IT administrator to create custom power plans and deploy those power plans. The IT administrator needs to configure every policy under this configuration item. Policy settings in the Power Plan Deployments configuration item cannot be used to edit existing power plans on client computers. Once a power plan is deployed, the IT administrator cannot edit the power plan from the server side. To deploy a new power plan, the IT administrator needs to configure a power plan with a different power plan name.
To configure the Power Plan (Scheme) Deployments policies, do the following:
• For Windows XP client computers (ADM and ADMX files)
Under Computer Configuration, click Administrative Templates ➙ Lenovo ThinkVantage Components ➙ Power Manager ➙ Power Plan (Scheme) Deployments.
• For Windows Vista or Windows 7 client computers (ADM file)
Power ManagerDeployment Guide 8

Under Computer Configuration, click Administrative Templates ➙ Classic Administrative Templates ➙ Lenovo ThinkVantage Components ➙ Power Manager for Vista/7 ➙ Power Plan (Scheme) Deployments.
• For Windows Vista or Windows 7 client computers (ADMX file)
Under Computer Configuration, click Administrative Templates ➙ Lenovo ThinkVantage Components ➙ Power Manager for Vista/7 ➙ Power Plan (Scheme) Deployments.
This table provides detailed information about each policy setting. In this table, (AC) means the policy setting for client computers with ac power adapter plugged, and (DC) means the policy setting for client computers on battery power.
Table 2. Power Plan (Scheme) Deployments
Policy settings Description
Plan Name Specifies the name of the power plan to deploy to client computers.
If you enable this policy setting, you must input the power plan name. A limit of the power plan name is 32 single-byte characters. If the power plan name is double-byte, limit the power plan name to 16 characters.
Note: Once a power plan is deployed, you cannot edit the power plan from the server side. When you change a power plan name, the power plan is deployed as a new power plan to client computers.
Maximum CPU Speed (AC) Specifies the maximum speed of CPU.
Possible maximum speeds include:
• Highest
• Adaptive
• Low
• Lowest
Maximum CPU Speed (DC) Specifies the maximum speed of CPU.
Possible maximum speeds include:
• Highest
• Adaptive
• Low
• Lowest
System Performance (AC) Specifies the system performance type.
Possible system performance types include:
• Maximum turbo
• Turbo
• Balance
• Low
Note: The system performance affects the Maximum CPU speed setting, Intel Graphics Power Plan setting, and turbo state. If the user has defined a system
Chapter 3. Working with Active Directory and ADM or ADMX files 9

Table 2. Power Plan (Scheme) Deployments (continued)
Policy settings Description
performance type, the Maximum CPU Speed setting and Intel Graphics Power Plan setting will be overwritten.
System Performance (DC) Specifies the system performance type.
Possible system performance types include:
• Maximum turbo
• Turbo
• Balance
• Low
Note: The system performance affects the Maximum CPU speed setting, Intel Graphics Power Plan setting, and turbo state. If the user has defined a system performance type, the Maximum CPU Speed setting and Intel Graphics Power Plan setting will be overwritten.
CPU Deeper Sleep (AC) Specifies whether to enable the CPU to enter the deeper sleep state. If you enable this policy setting, the CPU will go into the deeper sleep state.
CPU Deeper Sleep (DC) Specifies whether to enable the CPU to enter the deeper sleep state. If you enable this policy setting, the CPU will go into the deeper sleep state.
Optimize fan control to (AC) Specifies the fan control mode.
Possible fan control modes include:
• Maximize performance
• Balance all parameters
• Reduce noise dynamically
Note: The Reduce noise dynamically option does not take effect if the Maximum CPU speed (AC) option is set to "Low" or "Lowest."
Optimize fan control to (DC) Specifies the fan control mode.
Possible fan control modes include:
• Maximize performance
• Balance all parameters
• Reduce noise dynamically
Note: The Reduce noise dynamically option does not take effect if the Maximum CPU speed (AC) option is set to "Low" or "Lowest."
Display Brightness 16 (AC) Specifies the brightness level of client computer displays with 16 brightness levels. If a brightness level is high, the display gets bright.
Display Brightness 16 (DC) Specifies the brightness level of client computer displays with 16 brightness levels. If a brightness level is high, the display gets bright.
Display Brightness 8 (AC) Specifies the brightness level of client computer displays with eight brightness levels.
10 Power ManagerDeployment Guide

Table 2. Power Plan (Scheme) Deployments (continued)
Policy settings Description
Display Brightness 8 (DC) Specifies the brightness level of client computer displays with eight brightness levels.
Switchable Graphics (AC) Specifies the graphics mode of the NVIDIA switchable graphics.
Possible graphics modes include:
• Energy Saving
• High Performance
Notes:
1. If you enable this policy setting, you must select a graphics mode.
2. This setting is not supported on Windows XP client computers.
Switchable Graphics (DC) Specifies the graphics mode of the NVIDIA switchable graphics.
Possible graphics modes include:
• Energy Saving
• High Performance
Notes:
1. If you enable this policy setting, you must select a graphics mode.
2. This setting is not supported on Windows XP client computers.
Intel Graphics Power Plan (AC) Specifies the power plan of the Intel graphics subsystem.
Possible power plans include:
• Maximum Battery Life
• Balanced
• Maximum Performance
Note: If you enable this policy setting, you must select a power plan.
Intel Graphics Power Plan (DC) Specifies the power plan of the Intel graphics subsystem.
Possible power plans include:
• Maximum Battery Life
• Balanced
• Maximum Performance
Note: If you enable this policy setting, you must select a power plan.
Chapter 3. Working with Active Directory and ADM or ADMX files 11

Table 2. Power Plan (Scheme) Deployments (continued)
Policy settings Description
Automatic optical drive power off (AC) Specifies whether to automatically turn off the optical drive when the following conditions are met:
• System has started but no CD or DVD has been inserted within 10 minutes.
• The CD or DVD has been removed and has not been replaced within 10 minutes.
Automatic optical drive power off (DC) Specifies whether to automatically turn off the optical drive when the following conditions are met:
• System has started but no CD or DVD has been inserted within 10 minutes.
• The CD or DVD has been removed and has not been replaced within 10 minutes.
Airplane in-seat power plan (AC) Specifies whether to enable the Airplane in-seat power plan function.
Configurable options include:
• Not configured
• Enabled
• Disabled
If you enable this policy setting, the computer reduces the power consumption by limiting the battery charging rate and system performance. This function protects the airplane in-seat power supply. Airplane in-seat power plan works whether the ac power adapter is connected.
When this policy setting is enabled, an airplane icon is displayed next to the battery gauge icon on the taskbar. If another system power status icon is displayed, such as the battery stretch icon, the battery gauge reset icon, or the peak power scheduler icon, the airplane icon will be hidden.
Airplane in-seat power plan (DC) Specifies whether to enable the Airplane in-seat power plan function.
Configurable options include:
• Not configured
• Enabled
• Disabled
If you enable this policy setting, the computer reduces the power consumption by limiting the battery charging rate and system performance. This function protects the airplane in-seat power supply. Airplane in-seat power plan works whether the ac power adapter is connected.
When this policy setting is enabled, an airplane icon is displayed next to the battery gauge icon on the taskbar. If another system power status icon is displayed, such as the battery stretch icon, the battery gauge reset icon, or the peak power scheduler icon, the airplane icon will be hidden.
12 Power ManagerDeployment Guide

Table 2. Power Plan (Scheme) Deployments (continued)
Policy settings Description
Lower display brightness 16 (DC) Specifies the period of inactivity before lowering the display brightness and the brightness level when the Lower display brightness 16 setting takes effect after the specified period. The brightness level must be lower than the brightness level specified in the Display Brightness 16 setting. This setting is for the client computers with 16 brightness levels.
Possible time periods include:
• 1 minute (Windows XP only)
• 2 minutes (Windows XP only)
• 3 minutes (Windows XP only)
• 5 minutes (Windows XP only)
• 10 minutes (Windows XP only)
• 15 minutes
• 20 minutes
• 25 minutes
• 30 minutes
• 45 minutes
• Never
Note: This setting is not supported in AC mode and it is not supported on Windows 7 client computers.
Lower display brightness 8 (DC) Specifies the period of inactivity before lowering the display brightness when the Lower display brightness 8 setting takes effect after the specified period. The brightness level must be lower than the brightness level specified in the Display Brightness 8 setting. This setting is for the client computers with eight brightness levels.
Possible time periods include:
• 1 minute (Windows XP only)
• 2 minutes (Windows XP only)
• 3 minutes (Windows XP only)
• 5 minutes (Windows XP only)
• 10 minutes (Windows XP only)
• 15 minutes
• 20 minutes
• 25 minutes
• 30 minutes
• 45 minutes
• Never
Note: This setting is not supported in AC mode and it is not supported on Windows 7 client computers.
Chapter 3. Working with Active Directory and ADM or ADMX files 13

Table 2. Power Plan (Scheme) Deployments (continued)
Policy settings Description
Dim display (AC) Specifies the period of inactivity before Windows automatically reduces the display brightness and the brightness level when the Dim display setting takes effect after the specified period. You can specify the period of inactivity in seconds.
Note: This setting is supported only on Windows 7 client computers.
Dim display (DC) Specifies the period of inactivity before Windows automatically reduces the display brightness and the brightness level when the Dim display setting takes effect after the specified period. You can specify the period of inactivity in seconds.
Note: This setting is supported only on Windows 7 client computers.
Minimize display refresh rate (DC) Specifies the period of inactivity before minimizing the display refresh rate.
Possible time periods include:
• 1 minute (Windows XP only)
• 2 minutes (Windows XP only)
• 3 minutes (Windows XP only)
• 5 minutes (Windows XP only)
• 10 minutes (Windows XP only)
• 15 minutes
• 20 minutes
• 25 minutes
• 30 minutes
• 45 minutes
• Never
Note: This setting is not supported in AC mode.
Switch to Energy Saving Graphics (AC) Specifies the period of inactivity before switching to energy saving graphics.
Possible time periods include:
• 2 minutes
• 5 minutes
• 10 minutes
• 15 minutes
• 30 minutes
• 45 minutes
• 1 hour
• 2 hours
• 3 hours
• Never
14 Power ManagerDeployment Guide

Table 2. Power Plan (Scheme) Deployments (continued)
Policy settings Description
Notes:
1. If you enable this policy setting, you must select a time period.
2. This setting is not supported on Windows XP client computers.
Switch to Energy Saving Graphics (DC) Specifies the period of inactivity before switching to energy saving graphics.
Possible time periods include:
• 2 minutes
• 5 minutes
• 10 minutes
• 15 minutes
• 30 minutes
• 45 minutes
• 1 hour
• 2 hours
• 3 hours
• Never
Notes:
1. If you enable this policy setting, you must select a time period.
2. This setting is not supported on Windows XP client computers.
Monitor off Timer (AC) Specifies the period of inactivity before the Windows operating system turns off the display.
For Windows XP client computers, possible time periods include:
• 1 minute
• 2 minutes
• 3 minutes
• 5 minutes
• 10 minutes
• 15 minutes
• 20 minutes
• 25 minutes
• 30 minutes
• 45 minutes
• 1 hour
• 2 hours
• 3 hours
• 4 hours
Chapter 3. Working with Active Directory and ADM or ADMX files 15

Table 2. Power Plan (Scheme) Deployments (continued)
Policy settings Description
• 5 hours
• Never
For Windows Vista and Windows 7 client computers, you can specify the value in seconds.
If you specify the value as 0 second, the Monitor off Timer will be set to Never.
Monitor off Timer (DC) Specifies the period of inactivity before the Windows operating system turns off the display.
For Windows XP client computers, possible time periods include:
• 1 minute
• 2 minutes
• 3 minutes
• 5 minutes
• 10 minutes
• 15 minutes
• 20 minutes
• 25 minutes
• 30 minutes
• 45 minutes
• 1 hour
• 2 hours
• 3 hours
• 4 hours
• 5 hours
• Never
For Windows Vista and Windows 7 client computers, you can specify the value in seconds.
If you specify the value as 0 second, the Monitor off Timer will be set to Never.
HDD off Timer (AC) Specifies the period of inactivity before the Windows operating system turns off the hard disk drive.
For Windows XP client computers, possible time periods include:
• 3 minutes
• 5 minutes
• 10 minutes
• 15 minutes
• 20 minutes
• 25 minutes
• 30 minutes
16 Power ManagerDeployment Guide

Table 2. Power Plan (Scheme) Deployments (continued)
Policy settings Description
• 45 minutes
• 1 hour
• 2 hours
• 3 hours
• 4 hours
• 5 hours
• Never
For Windows Vista and Windows 7 client computers, you can specify the value in seconds.
If you specify the value as 0 second, the HDD off Timer will be set to Never.
HDD off Timer (DC) Specifies the period of inactivity before the Windows operating system turns off the hard disk drive. For Windows XP client computers, possible time periods include:
• 3 minutes
• 5 minutes
• 10 minutes
• 15 minutes
• 20 minutes
• 25 minutes
• 30 minutes
• 45 minutes
• 1 hour
• 2 hours
• 3 hours
• 4 hours
• 5 hours
• Never
For Windows Vista and Windows 7 client computers, you can specify the value in seconds.
If you specify the value as 0 second, the HDD off Timer will be set to Never.
Chapter 3. Working with Active Directory and ADM or ADMX files 17

Table 2. Power Plan (Scheme) Deployments (continued)
Policy settings Description
Standby Timer (AC) Specifies the period of inactivity before Windows enters the sleep mode.
For Windows XP client computers, possible time periods include:
• 1 minute
• 2 minutes
• 3 minutes
• 5 minutes
• 10 minutes
• 15 minutes
• 20 minutes
• 25 minutes
• 30 minutes
• 45 minutes
• 1 hour
• 2 hours
• 3 hours
• 4 hours
• 5 hours
• Never
For Windows Vista and Windows 7 client computers, you can specify the value in seconds.
If you specify the value as 0 second, the Standby Timer will be set to Never.
Standby Timer (DC) Specifies the period of inactivity before Windows enters the sleep mode.
For Windows XP client computers, possible time periods include:
• 1 minute
• 2 minutes
• 3 minutes
• 5 minutes
• 10 minutes
• 15 minutes
• 20 minutes
• 25 minutes
• 30 minutes
• 45 minutes
• 1 hour
• 2 hours
• 3 hours
18 Power ManagerDeployment Guide

Table 2. Power Plan (Scheme) Deployments (continued)
Policy settings Description
• 4 hours
• 5 hours
• Never
For Windows Vista and Windows 7 client computers, you can specify the value in seconds.
If you specify the value as 0 second, the Standby Timer will be set to Never.
Hibernation Timer (AC) Specifies the period of inactivity before the Windows operating system enters hibernation mode.
Possible time periods include:
• 1 minute
• 2 minutes
• 3 minutes
• 5 minutes
• 10 minutes
• 15 minutes
• 20 minutes
• 25 minutes
• 30 minutes
• 45 minutes
• 1 hour
• 2 hours
• 3 hours
• 4 hours
• 5 hours
• 6 hours
• Never
Note: The period should be longer than the period of inactivity specified in the Standby Timer setting on Windows XP client computers.
For Windows Vista and Windows 7 client computers, you can specify the value in seconds.
If you specify the value as 0 second, the Hibernation Timer will be set to Never.
Chapter 3. Working with Active Directory and ADM or ADMX files 19
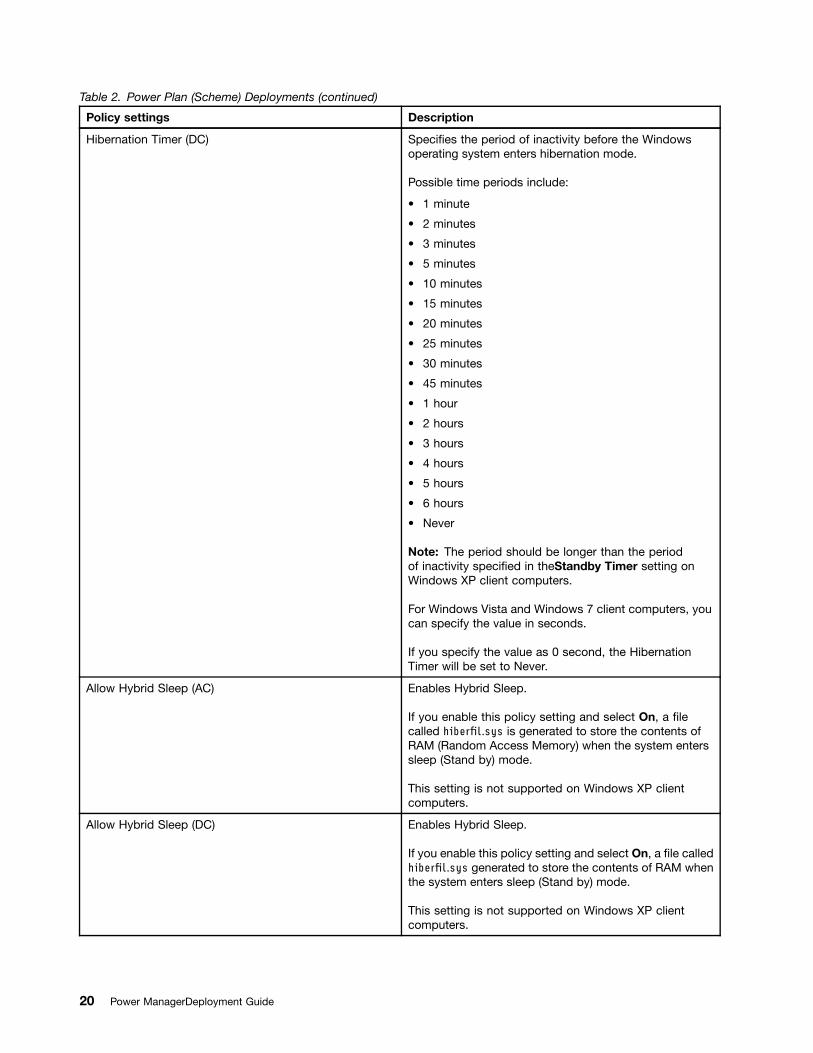
Table 2. Power Plan (Scheme) Deployments (continued)
Policy settings Description
Hibernation Timer (DC) Specifies the period of inactivity before the Windows operating system enters hibernation mode.
Possible time periods include:
• 1 minute
• 2 minutes
• 3 minutes
• 5 minutes
• 10 minutes
• 15 minutes
• 20 minutes
• 25 minutes
• 30 minutes
• 45 minutes
• 1 hour
• 2 hours
• 3 hours
• 4 hours
• 5 hours
• 6 hours
• Never
Note: The period should be longer than the period of inactivity specified in theStandby Timer setting on Windows XP client computers.
For Windows Vista and Windows 7 client computers, you can specify the value in seconds.
If you specify the value as 0 second, the Hibernation Timer will be set to Never.
Allow Hybrid Sleep (AC) Enables Hybrid Sleep.
If you enable this policy setting and select On, a file called hiberfil.sys is generated to store the contents of RAM (Random Access Memory) when the system enters sleep (Stand by) mode.
This setting is not supported on Windows XP client computers.
Allow Hybrid Sleep (DC) Enables Hybrid Sleep.
If you enable this policy setting and select On, a file called hiberfil.sys generated to store the contents of RAM when the system enters sleep (Stand by) mode.
This setting is not supported on Windows XP client computers.
20 Power ManagerDeployment Guide

Table 2. Power Plan (Scheme) Deployments (continued)
Policy settings Description
Allow Wake Timers (AC) Specifies whether to allow the Windows operating system to automatically wake your computer from sleep mode on a timer for scheduled tasks and other programs.
If you enable this policy setting, the system, for example, might wake automatically to install updates.
This setting is supported only on Windows 7 client computers.
Allow Wake Timers (DC) Specifies whether to allow the Windows operating system to automatically wake your computer from sleep mode on a timer for scheduled tasks and other programs.
If you enable this policy setting, the system, for example, might wake automatically to install updates.
This setting is not supported on Windows 7 client computers.
Wireless Power Saving Mode (AC) Specifies the performance of wireless adapters.
Possible performances include:
• Maximum Performance
• Low Power Saving
• Medium Power Saving
• Maximum Power Saving
This setting is not supported on Windows XP client computers.
Wireless Power Saving Mode (DC) Specifies the performance of wireless adapters.
Possible performances include:
• Maximum Performance
• Low Power Saving
• Medium Power Saving
• Maximum Power Saving
This setting is not supported on Windows XP client computers.
PCI Link State Power Management (AC) Specifies the active state when the PCI link is idle.
Possible states include:
• Off
• Moderate power savings
• Maximum power savings
This setting is not supported on Windows XP client computers.
Chapter 3. Working with Active Directory and ADM or ADMX files 21

Table 2. Power Plan (Scheme) Deployments (continued)
Policy settings Description
PCI Link State Power Management (DC) Specifies the active state when the PCI link is idle.
Possible states include:
• Off
• Moderate power savings
• Maximum power savings
This setting is not supported on Windows XP client computers.
Multimedia settings when sharing media (AC) Specifies the action that the Windows operating system allows when media files can be played.
Possible actions include:
• Allow the computer to sleep
• Prevent idling to sleep
• Allow the computer to enter away mode
This setting is not supported on Windows XP client computers.
Multimedia settings when sharing media (DC) Specifies the action that the Windows operating system allows when media files can be played.
Possible actions include:
• Allow the computer to sleep
• Prevent idling to sleep
• Allow the computer to enter away mode
This setting is not supported on Windows XP client computers.
Multimedia settings when playing video (AC) Specifies whether Windows Media® Player favors power saving or performance when playing video content.
Possible values include:
• Optimize video quality
• Balanced
• Optimize power savings
This setting is only supported on Windows 7 client computers.
Multimedia settings when playing video (DC) Specifies whether Windows Media Player favors power saving or performance when playing video content.
Possible values include:
• Optimize video quality
• Balanced
• Optimize power savings
This setting is only supported on Windows 7 client computers.
22 Power ManagerDeployment Guide
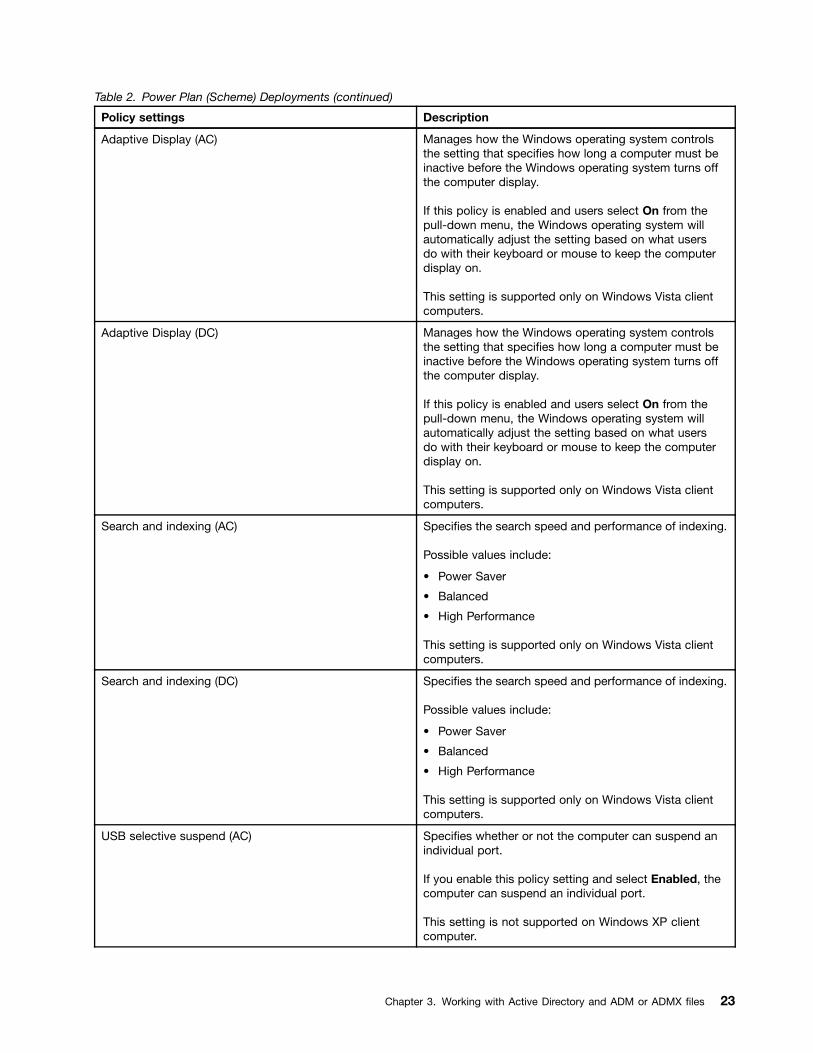
Table 2. Power Plan (Scheme) Deployments (continued)
Policy settings Description
Adaptive Display (AC) Manages how the Windows operating system controls the setting that specifies how long a computer must be inactive before the Windows operating system turns off the computer display.
If this policy is enabled and users select On from the pull-down menu, the Windows operating system will automatically adjust the setting based on what users do with their keyboard or mouse to keep the computer display on.
This setting is supported only on Windows Vista client computers.
Adaptive Display (DC) Manages how the Windows operating system controls the setting that specifies how long a computer must be inactive before the Windows operating system turns off the computer display.
If this policy is enabled and users select On from the pull-down menu, the Windows operating system will automatically adjust the setting based on what users do with their keyboard or mouse to keep the computer display on.
This setting is supported only on Windows Vista client computers.
Search and indexing (AC) Specifies the search speed and performance of indexing.
Possible values include:
• Power Saver
• Balanced
• High Performance
This setting is supported only on Windows Vista client computers.
Search and indexing (DC) Specifies the search speed and performance of indexing.
Possible values include:
• Power Saver
• Balanced
• High Performance
This setting is supported only on Windows Vista client computers.
USB selective suspend (AC) Specifies whether or not the computer can suspend an individual port.
If you enable this policy setting and select Enabled, the computer can suspend an individual port.
This setting is not supported on Windows XP client computer.
Chapter 3. Working with Active Directory and ADM or ADMX files 23

Table 2. Power Plan (Scheme) Deployments (continued)
Policy settings Description
USB selective suspend (DC) Specifies whether or not the computer can suspend an individual port.
If you enable this policy setting and select Enabled, the computer can suspend an individual port.
This setting is not supported on Windows XP client computer.
Slide show (AC) Specifies the behavior of the desktop background slide show.
Possible values include:
• Available
• Paused
This setting is supported only on Windows 7 client computers.
Slide show (DC) Specifies the behavior of the desktop background slide show.
Possible values include:
• Available
• Paused
This setting is supported only on Windows 7 client computers.
System cooling policy (AC) Specifies Windows thermal behavior on systems that support active cooling features.
Possible values include:
• Available
• Paused
This setting is supported only on Windows 7 client computers.
System cooling policy (DC) Specifies Windows thermal behavior on systems that support active cooling features.
Possible values include:
• Available
• Paused
This setting is supported only on Windows 7 client computers.
24 Power ManagerDeployment Guide

Table 2. Power Plan (Scheme) Deployments (continued)
Policy settings Description
Fn+F4 (AC) Specifies the action that the Windows operating system takes when pressing the Fn+F4 keys.
Possible actions include:
• Do nothing
• Sleep
• Hibernate
This setting is not supported on Windows XP client computers.
Fn+F4 (DC) Specifies the action that the Windows operating system takes when pressing the Fn+F4 keys.
Possible actions include:
• Do nothing
• Sleep
• Hibernate
This setting is not supported on Windows XP client computers.
Power button (AC) Specifies the action that the Windows operating system takes when a user presses the power button on the computer.
Possible actions include:
• Do nothing
• Sleep
• Hibernate
• Shut down
This setting is not supported on Windows XP client computers.
Power button (DC) Specifies the action that the Windows operating system takes when a user presses the power button on the computer.
Possible actions include:
• Do nothing
• Sleep
• Hibernate
• Shut down
This setting is not supported on Windows XP client computers.
Chapter 3. Working with Active Directory and ADM or ADMX files 25

Table 2. Power Plan (Scheme) Deployments (continued)
Policy settings Description
Lid closed (AC) Specifies the action that the Windows operating system takes when a user closes the lid on a notebook computer.
Possible actions include:
• Do nothing
• Sleep
• Hibernate
• Shut down
This setting is not supported on Windows XP client computers.
Lid closed (DC) Specifies the action that the Windows operating system takes when a user closes the lid on a notebook computer.
Possible actions include:
• Do nothing
• Sleep
• Hibernate
• Shut down
This setting is not supported on Windows XP client computer.
Start menu power button (AC) Specifies the action that the Windows operating system takes when a user selects the power button from the Start menu.
Possible actions include:
• Sleep
• Hibernate
• Shut down
This setting is supported only on Windows Vista client computers.
Start menu power button (DC) Specifies the action that the Windows operating system takes when a user selects the power button from the Start menu.
Possible actions include:
• Sleep
• Hibernate
• Shut down
This setting is supported only on Windows Vista client computers.
26 Power ManagerDeployment Guide

Table 2. Power Plan (Scheme) Deployments (continued)
Policy settings Description
Low battery alarm level (AC) Specifies the percentage of battery capacity remaining that triggers the low battery alarm action.
If you enable this policy setting, you must enter a numeric value (percentage) to set the battery level that triggers the low notification.
To set the action that is triggered, see the low battery action (AC) policy setting in Table 2 “Power Plan (Scheme) Deployments” on page 9 .
This setting is not supported on Windows XP client computers.
Low battery alarm level (DC) Specifies the percentage of battery capacity remaining that triggers the low battery alarm action.
If you enable this policy setting, you must enter a numeric value (percentage) to set the battery level that triggers the low notification.
To set the action that is triggered, see the low battery action (AC) policy setting in Table 2 “Power Plan (Scheme) Deployments” on page 9 .
This setting is not supported on Windows XP client computers.
Low battery alarm notification (AC) Enables a user notification when the battery capacity remaining equals the low battery alarm level.
If you enable this policy setting and select On, the Windows operating system will show a notification when the battery capacity remaining equals the low battery alarm level.
To configure the low battery alarm level, see the low battery alarm level (AC) policy setting in Table 2 “Power Plan (Scheme) Deployments” on page 9 . The notification will only be shown if the Low battery action policy setting is configured to Do nothing. If you disable this policy setting or do not configure it, users can see and change this setting.
This setting is not supported on Windows XP client computers.
Chapter 3. Working with Active Directory and ADM or ADMX files 27

Table 2. Power Plan (Scheme) Deployments (continued)
Policy settings Description
Low battery alarm notification (DC) Enables a user notification when the battery capacity remaining equals the low battery alarm level.
If you enable this policy setting and select On, the Windows operating system will show a notification when the battery capacity remaining equals the low battery alarm level.
To configure the low battery alarm level, see the low battery alarm level (AC) policy setting in Table 2 “Power Plan (Scheme) Deployments” on page 9 . The notification will only be shown if the Low battery action policy setting is configured to Do nothing. If you disable this policy setting or do not configure it, users can see and change this setting.
This setting is not supported on Windows XP client computers.
Low battery action (AC) Specifies the action that the Windows operating system takes when battery capacity reaches the low battery alarm level.
Possible actions include:
• Do nothing
• Sleep
• Hibernate
• Shut down
This setting is not supported on Windows XP client computers.
Low battery action (DC) Specifies the action that the Windows operating system takes when battery capacity reaches the low battery alarm level.
Possible actions include:
• Do nothing
• Sleep
• Hibernate
• Shut down
This setting is not supported on Windows XP client computers.
Reserve battery alarm level (AC) Specifies the percentage of battery capacity remaining that triggers reserve power mode.
If you enable this policy setting, you must enter a numeric value (percentage) to set the battery level that triggers the reserve power notification.
This setting is supported only on Windows 7 client computers.
28 Power ManagerDeployment Guide

Table 2. Power Plan (Scheme) Deployments (continued)
Policy settings Description
Reserve battery alarm level (DC) Specifies the percentage of battery capacity remaining that triggers reserve power mode.
If you enable this policy setting, you must enter a numeric value (percentage) to set the battery level that triggers the reserve power notification.
This setting is supported only on Windows 7 client computers.
Critical battery alarm level (AC) Specifies the percentage of battery capacity remaining that triggers the critical battery alarm action.
If you enable this policy setting, you must enter a numeric value (percentage) to set the battery level that triggers the critical notification.
Note: The value should be lower than the level specified by Low battery alarm level.
To set the action that is triggered, see the critical battery alarm action (AC) policy setting in Table 2 “Power Plan (Scheme) Deployments” on page 9 .
If you disable this policy setting or do not configure it, users can see and change this setting.
This setting is not supported on Windows XP client computers.
Critical battery alarm level (DC) Specifies the percentage of battery capacity remaining that triggers the critical battery alarm action.
If you enable this policy setting, you must enter a numeric value (percentage) to set the battery level that triggers the critical notification.
Note: The value should be lower than the level specified by Low battery alarm level.
To set the action that is triggered, see the critical battery alarm action (AC) policy setting in Table 2 “Power Plan (Scheme) Deployments” on page 9 .
If you disable this policy setting or do not configure it, users can see and change this setting.
This setting is not supported on Windows XP client computers.
Chapter 3. Working with Active Directory and ADM or ADMX files 29
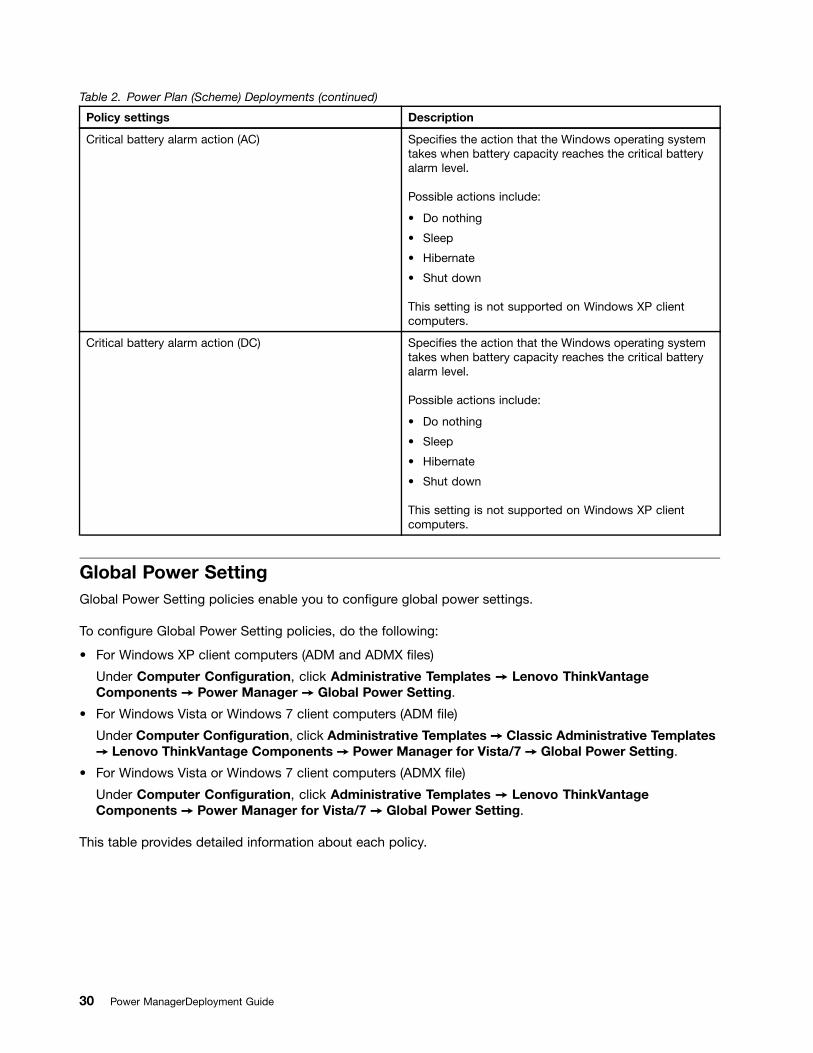
Table 2. Power Plan (Scheme) Deployments (continued)
Policy settings Description
Critical battery alarm action (AC) Specifies the action that the Windows operating system takes when battery capacity reaches the critical battery alarm level.
Possible actions include:
• Do nothing
• Sleep
• Hibernate
• Shut down
This setting is not supported on Windows XP client computers.
Critical battery alarm action (DC) Specifies the action that the Windows operating system takes when battery capacity reaches the critical battery alarm level.
Possible actions include:
• Do nothing
• Sleep
• Hibernate
• Shut down
This setting is not supported on Windows XP client computers.
Global Power Setting Global Power Setting policies enable you to configure global power settings.
To configure Global Power Setting policies, do the following:
• For Windows XP client computers (ADM and ADMX files)
Under Computer Configuration, click Administrative Templates ➙ Lenovo ThinkVantage Components ➙ Power Manager ➙ Global Power Setting.
• For Windows Vista or Windows 7 client computers (ADM file)
Under Computer Configuration, click Administrative Templates ➙ Classic Administrative Templates ➙ Lenovo ThinkVantage Components ➙ Power Manager for Vista/7 ➙ Global Power Setting.
• For Windows Vista or Windows 7 client computers (ADMX file)
Under Computer Configuration, click Administrative Templates ➙ Lenovo ThinkVantage Components ➙ Power Manager for Vista/7 ➙ Global Power Setting.
This table provides detailed information about each policy.
30 Power ManagerDeployment Guide
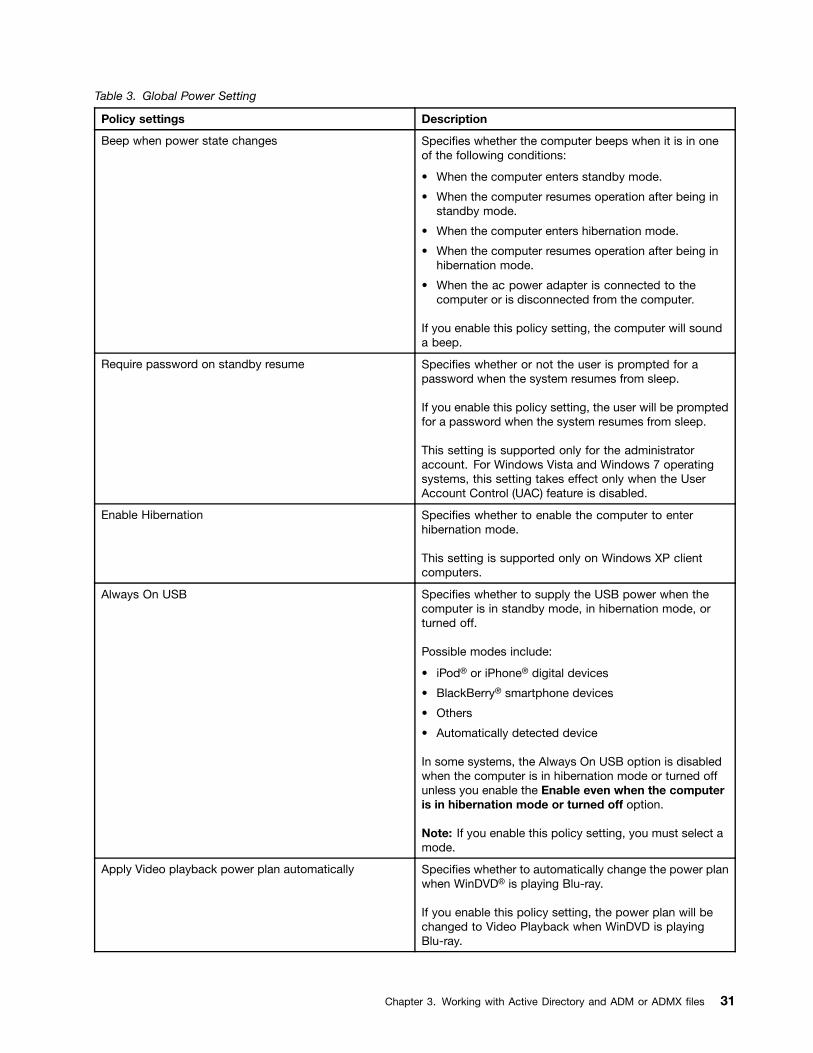
Table 3. Global Power Setting
Policy settings Description
Beep when power state changes Specifies whether the computer beeps when it is in one of the following conditions:
• When the computer enters standby mode.
• When the computer resumes operation after being in standby mode.
• When the computer enters hibernation mode.
• When the computer resumes operation after being in hibernation mode.
• When the ac power adapter is connected to the computer or is disconnected from the computer.
If you enable this policy setting, the computer will sound a beep.
Require password on standby resume Specifies whether or not the user is prompted for a password when the system resumes from sleep.
If you enable this policy setting, the user will be prompted for a password when the system resumes from sleep.
This setting is supported only for the administrator account. For Windows Vista and Windows 7 operating systems, this setting takes effect only when the User Account Control (UAC) feature is disabled.
Enable Hibernation Specifies whether to enable the computer to enter hibernation mode.
This setting is supported only on Windows XP client computers.
Always On USB Specifies whether to supply the USB power when the computer is in standby mode, in hibernation mode, or turned off.
Possible modes include:
• iPod® or iPhone® digital devices
• BlackBerry® smartphone devices
• Others
• Automatically detected device
In some systems, the Always On USB option is disabled when the computer is in hibernation mode or turned off unless you enable the Enable even when the computer is in hibernation mode or turned off option.
Note: If you enable this policy setting, you must select a mode.
Apply Video playback power plan automatically Specifies whether to automatically change the power plan when WinDVD® is playing Blu-ray.
If you enable this policy setting, the power plan will be changed to Video Playback when WinDVD is playing Blu-ray.
Chapter 3. Working with Active Directory and ADM or ADMX files 31
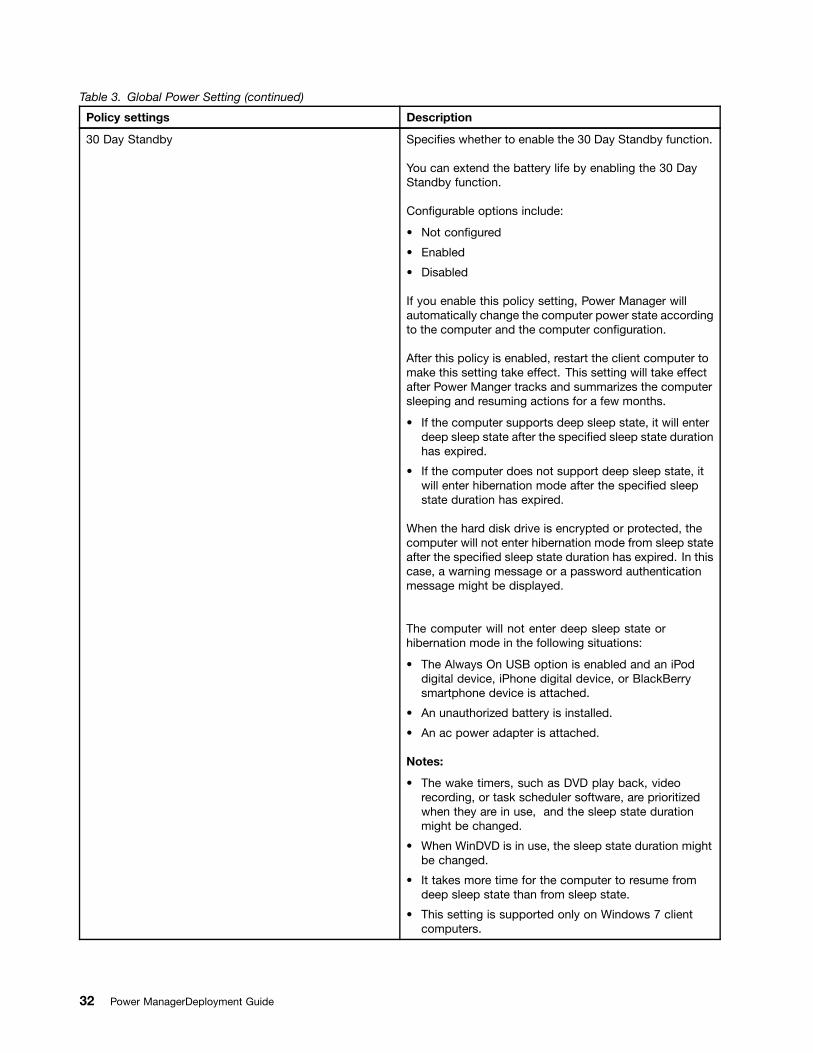
Table 3. Global Power Setting (continued)
Policy settings Description
30 Day Standby Specifies whether to enable the 30 Day Standby function.
You can extend the battery life by enabling the 30 Day Standby function.
Configurable options include:
• Not configured
• Enabled
• Disabled
If you enable this policy setting, Power Manager will automatically change the computer power state according to the computer and the computer configuration.
After this policy is enabled, restart the client computer to make this setting take effect. This setting will take effect after Power Manger tracks and summarizes the computer sleeping and resuming actions for a few months.
• If the computer supports deep sleep state, it will enter deep sleep state after the specified sleep state duration has expired.
• If the computer does not support deep sleep state, it will enter hibernation mode after the specified sleep state duration has expired.
When the hard disk drive is encrypted or protected, the computer will not enter hibernation mode from sleep state after the specified sleep state duration has expired. In this case, a warning message or a password authentication message might be displayed.
The computer will not enter deep sleep state or hibernation mode in the following situations:
• The Always On USB option is enabled and an iPod digital device, iPhone digital device, or BlackBerry smartphone device is attached.
• An unauthorized battery is installed.
• An ac power adapter is attached.
Notes:
• The wake timers, such as DVD play back, video recording, or task scheduler software, are prioritized when they are in use, and the sleep state duration might be changed.
• When WinDVD is in use, the sleep state duration might be changed.
• It takes more time for the computer to resume from deep sleep state than from sleep state.
• This setting is supported only on Windows 7 client computers.
32 Power ManagerDeployment Guide
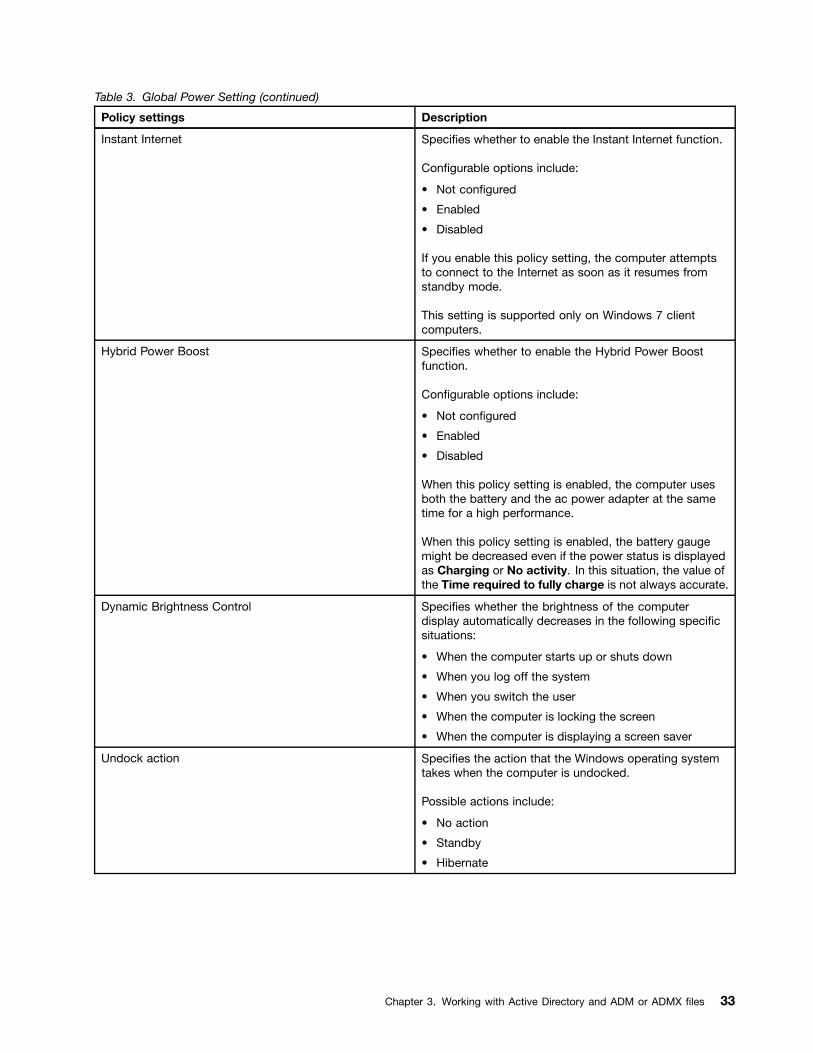
Table 3. Global Power Setting (continued)
Policy settings Description
Instant Internet Specifies whether to enable the Instant Internet function.
Configurable options include:
• Not configured
• Enabled
• Disabled
If you enable this policy setting, the computer attempts to connect to the Internet as soon as it resumes from standby mode.
This setting is supported only on Windows 7 client computers.
Hybrid Power Boost Specifies whether to enable the Hybrid Power Boost function.
Configurable options include:
• Not configured
• Enabled
• Disabled
When this policy setting is enabled, the computer uses both the battery and the ac power adapter at the same time for a high performance.
When this policy setting is enabled, the battery gauge might be decreased even if the power status is displayed as Charging or No activity. In this situation, the value of the Time required to fully charge is not always accurate.
Dynamic Brightness Control Specifies whether the brightness of the computer display automatically decreases in the following specific situations:
• When the computer starts up or shuts down
• When you log off the system
• When you switch the user
• When the computer is locking the screen
• When the computer is displaying a screen saver
Undock action Specifies the action that the Windows operating system takes when the computer is undocked.
Possible actions include:
• No action
• Standby
• Hibernate
Chapter 3. Working with Active Directory and ADM or ADMX files 33

Table 3. Global Power Setting (continued)
Policy settings Description
CD-ROM speed Specifies the speed of the CD-ROM drive.
Possible speeds include:
• High performance
• Normal
• Silent
Power Management CPU Specifies the action that the Windows operating system takes when there is no system activity for a specified interval.
Possible actions include:
• Automatic
• Disabled
If you select Automatic, then when there is no system activity for a specified interval, the power-saving function is enabled and the microprocessor clock will be stopped automatically.
If you select Disabled, the battery life will be shorter.
Power Management PCI bus Specifies the action that the Windows operating system takes when there is no system activity for a specified interval.
Possible actions include:
• Automatic
• Disabled
If you select Automatic, the PCI Bus clock is stopped if there is no activity.
If you select Disabled, the battery life will be shorter.
Fn+F4 Specifies the action that the Windows operating system takes when pressing the Fn+F4 keys.
Possible actions include:
• Do nothing
• Sleep
• Hibernate
Power button Specifies the action that the Windows operating system takes when a user presses the power button.
Possible actions include:
• Do nothing
• Sleep
• Hibernate
• Shut down
34 Power ManagerDeployment Guide

Table 3. Global Power Setting (continued)
Policy settings Description
Lid closed Specifies the action that the Windows operating system takes when a user closes the lid on a notebook computer.
Possible actions include:
• Do nothing
• Sleep
• Hibernate
• Shut down
Start menu power button Specifies the action that the Windows operating system takes when a user selects the power button from the Start menu.
Possible actions include:
• Sleep
• Hibernate
• Shut down
This setting is supported only on Windows Vista client computers.
Enable Low battery alarm Specifies whether or not the computer enables the low battery alarm.
This setting is supported only on Windows XP client computers.
Low battery alarm level Specifies the percentage of battery capacity remaining that triggers the low battery alarm action.
If you enable this policy setting, you must enter a numeric value (percentage) to set the battery level that triggers the low notification.
To set the action that is triggered, see the low battery alarm notification policy setting in Table 3 “Global Power Setting” on page 31.
Low battery alarm notification Enables a user notification when the battery capacity remaining equals the low battery alarm level.
For Windows XP client computers, possible notifications include:
• No action
• Message
• Beep
• Message and beep
For Windows Vista and Windows 7 client computers, possible notifications include:
• Off
• On
Chapter 3. Working with Active Directory and ADM or ADMX files 35

Table 3. Global Power Setting (continued)
Policy settings Description
Low battery action Specifies the action that the Windows operating system takes when battery capacity reaches the low battery alarm level.
For Windows XP client computers, possible actions include:
• No action
• Standby
• Hibernate
• Shutdown
• Maximize battery life
For Windows Vista and Windows 7 client computers, possible actions include:
• Do nothing
• Sleep
• Hibernate
• Shut down
• Maximize battery life
Enable Critical battery alarm Specifies whether or not the computer enables the critical battery alarm.
This setting is supported only on Windows XP client computers.
Critical battery alarm level Specifies the percentage of battery capacity remaining that triggers the critical battery alarm action.
If you enable this policy setting, you must enter a numeric value (percentage) to set the battery level that triggers the critical notification.
Note: The value should be lower than the level specified by Low battery alarm level.
To set the action that is triggered, see the critical battery alarm action policy setting in Table 3 “Global Power Setting” on page 31.
Critical battery alarm notification Enables a user notification when the battery capacity remaining equals the critical battery alarm level.
Possible notifications include:
• No action
• Message
• Beep
• Message and beep
Note: This setting is supported only for the administrator account on Windows XP client computers.
36 Power ManagerDeployment Guide

Table 3. Global Power Setting (continued)
Policy settings Description
Critical battery alarm action Specifies the action that the Windows operating system takes when battery capacity reaches the critical battery alarm level.
For Windows XP client computers, possible actions include:
• No action
• Standby
• Hibernate
• Shutdown
For Windows Vista and Windows 7 client computers, possible actions include:
• Do nothing
• Sleep
• Hibernate
• Shut down
External monitor brightness Specifies the brightness level of the external monitor with 100 brightness levels.
If you enable this policy setting, you must select the desired brightness level. The external monitor brightness increases when you select a higher brightness level.
This setting is supported only when both the client computer and the external monitor support the Display Data Channel / Command Interface (DDC/CI) protocol.
Notes:
1. The range of the brightness level is from 0 to 100. The external monitor brightness increases when you select a higher brightness level. This policy setting does not support monitors with a brightness level higher than 100.
2. This setting is not supported on Windows XP client computers.
Dim external monitor brightness Specifies the period of inactivity before the client computer automatically decreases the external monitor brightness and the brightness level when the Dim external monitor brightness setting takes effect after the specified period.
You can specify the period of inactivity in seconds.
This setting is supported only when both the client computer and the external monitor support the Display Data Channel / Command Interface (DDC/CI) protocol.
Notes:
1. The range of the brightness level is from 0 to 100. The monitor brightness increases when you select a higher brightness level. This policy setting does
Chapter 3. Working with Active Directory and ADM or ADMX files 37

Table 3. Global Power Setting (continued)
Policy settings Description
not support monitors with a brightness level higher than 100.
2. This setting is not supported on Windows XP client computers.
Battery Maintenance The Battery Maintenance policy enables you to configure the battery maintenance settings.
To configure the Battery Maintenance policy, do the following:
• For Windows XP client computers (ADM and ADMX files)
Under Computer Configuration, click Administrative Templates ➙ Lenovo ThinkVantage Components ➙ Power Manager ➙ Battery Maintenance.
• For Windows Vista or Windows 7 client computers (ADM file)
Under Computer Configuration, click Administrative Templates ➙ Classic Administrative Templates ➙ Lenovo ThinkVantage Components ➙ Power Manager for Vista/7 ➙ Battery Maintenance.
• For Windows Vista or Windows 7 client computers (ADMX file)
Under Computer Configuration, click Administrative Templates ➙ Lenovo ThinkVantage Components ➙ Power Manager for Vista/7 ➙ Battery Maintenance.
This table provides detailed information about each policy setting.
Table 4. Battery Maintenance
Policy settings Description
Battery charge thresholds Specifies the battery charge thresholds.
This policy applied to normal batteries only.
Possible charge thresholds include:
• Always fully charge (Start when below 96%; stop at 100%)
• Optimize for battery lifespan (automatically change for me)
Note: If you select this option, the Notify me when thresholds change setting is available for selection.
• Custom
Note: If you select this option, the value in the Stop charging at spinbox must be set at least 4% above the value of the Start charging when below spinbox. Otherwise, you will deploy the Always fully charge (Start when below 96%; stop at 100%) setting to the client computers.
Battery charge modes Specifies the battery charge modes.
This policy applies to dual mode batteries only.
Possible charge modes include:
38 Power ManagerDeployment Guide

Table 4. Battery Maintenance (continued)
Policy settings Description
• Always fully charge (Start when below 96%; stop at 100%)
• Optimize for battery lifespan (automatically change for me)
Note: If you select this option, the Notify me when thresholds change setting is available for selection.
• Custom
Note: If you select this option, the value in the Stop charging at spinbox must be set at least 4% above the value of the Start charging when below spinbox. Otherwise, you will deploy the Always fully charge (Start when below 96%; stop at 100%) setting to the client computers.
Battery firmware update automatic check Automatically check for battery firmware updates, and update Last checked date after a check.
Configurable options include:
• Not configured
• Enabled
Note: If you select this option, you must select Automatic mode enable to enable this policy setting.
• Disabled
This setting is supported only on Windows 7 client computers.
Power Agenda Deployments The Power Agenda Deployments policy enables you to configure the Power Agenda Deployments settings.
To configure the Power Agenda Deployments policy, do the following:
• For Windows XP client computers (ADM and ADMX files)
Under User Configuration, click Administrative Templates ➙ Lenovo ThinkVantage Components ➙ Power Manager ➙ Battery Power Agenda Deployments.
• For Windows Vista or Windows 7 client computers (ADM file)
Under User Configuration, click Administrative Templates ➙ Classic Administrative Templates ➙ Lenovo ThinkVantage Components ➙ Power Manager for Vista/7 ➙ Power Agenda Deployments.
• For Windows Vista or Windows 7 client computers (ADMX file)
Under User Configuration, click Administrative Templates ➙ Lenovo ThinkVantage Components ➙ Power Manager for Vista/7 ➙ Power Agenda Deployments.
The following table provides detailed information about each policy.
Chapter 3. Working with Active Directory and ADM or ADMX files 39
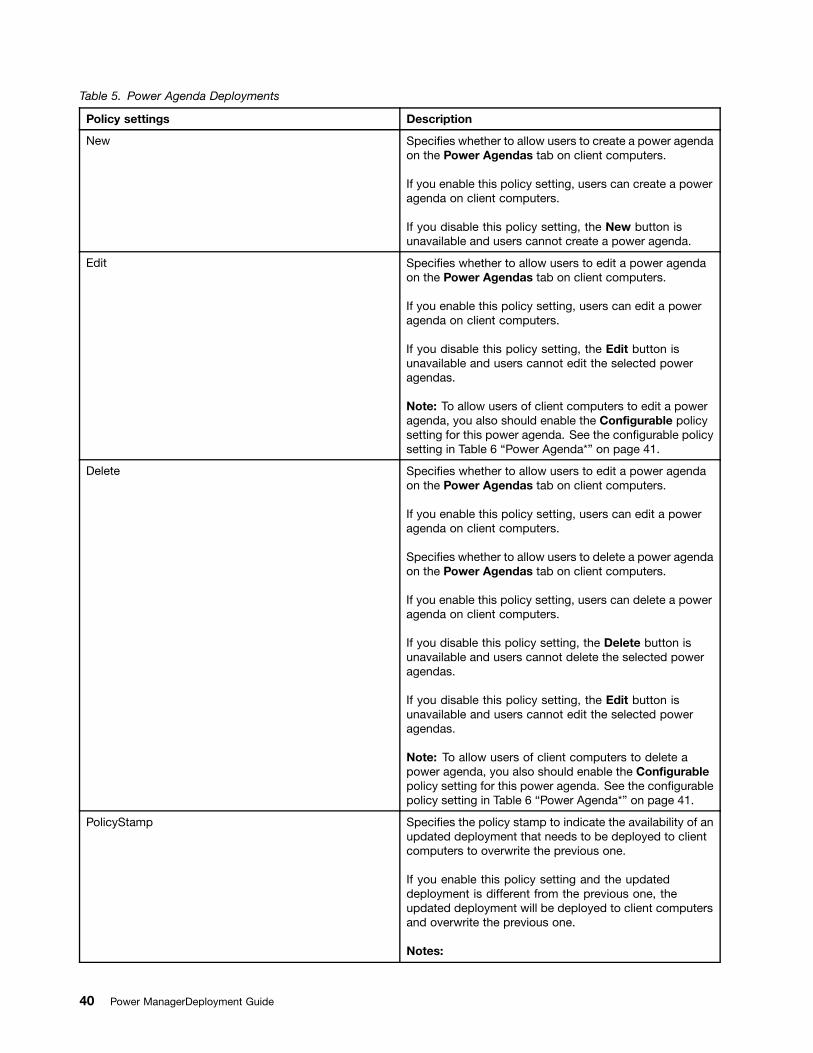
Table 5. Power Agenda Deployments
Policy settings Description
New Specifies whether to allow users to create a power agenda on the Power Agendas tab on client computers.
If you enable this policy setting, users can create a power agenda on client computers.
If you disable this policy setting, the New button is unavailable and users cannot create a power agenda.
Edit Specifies whether to allow users to edit a power agenda on the Power Agendas tab on client computers.
If you enable this policy setting, users can edit a power agenda on client computers.
If you disable this policy setting, the Edit button is unavailable and users cannot edit the selected power agendas.
Note: To allow users of client computers to edit a power agenda, you also should enable the Configurable policy setting for this power agenda. See the configurable policy setting in Table 6 “Power Agenda*” on page 41.
Delete Specifies whether to allow users to edit a power agenda on the Power Agendas tab on client computers.
If you enable this policy setting, users can edit a power agenda on client computers.
Specifies whether to allow users to delete a power agenda on the Power Agendas tab on client computers.
If you enable this policy setting, users can delete a power agenda on client computers.
If you disable this policy setting, the Delete button is unavailable and users cannot delete the selected power agendas.
If you disable this policy setting, the Edit button is unavailable and users cannot edit the selected power agendas.
Note: To allow users of client computers to delete a power agenda, you also should enable the Configurable policy setting for this power agenda. See the configurable policy setting in Table 6 “Power Agenda*” on page 41.
PolicyStamp Specifies the policy stamp to indicate the availability of an updated deployment that needs to be deployed to client computers to overwrite the previous one.
If you enable this policy setting and the updated deployment is different from the previous one, the updated deployment will be deployed to client computers and overwrite the previous one.
Notes:
40 Power ManagerDeployment Guide

Table 5. Power Agenda Deployments (continued)
Policy settings Description
1. You need to set a policy stamp for the deployment each time, and use a policy stamp that is different from the previous deployment. For example, you can set the current date and time as a policy stamp.
2. If you disable or do not configure this policy setting, the updated deployment will not be deployed to client computers and will not overwrite the previous one.
3. If you deploy power agendas, all power agendas that are created by end users will be overwritten.
4. When deploying power agenda policies, the computer will not check whether the policies conflict with other policy settings automatically. If conflicts exist, the deployment process might be stopped without an alert. Therefore, you should check whether the power agenda deployment process has competed or not.
You can specify a maximum of 10 power agendas every time you deploy power agendas.
To configure the power agendas from 1 to 10, do the following:
• For Windows XP client computers (ADM and ADMX files)
Under User Configuration, click Administrative Templates ➙ Lenovo ThinkVantage Components ➙ Power Manager ➙ Power Agenda Deployments ➙ Power Agenda*.
• For Windows Vista or Windows 7 client computers (ADM file)
Under User Configuration, click Administrative Templates ➙ Classic Administrative Templates ➙ Lenovo ThinkVantage Components ➙ Power Manager for Vista/7 ➙ Power Agenda Deployments ➙ Power Agenda*.
• For Windows Vista or Windows 7 client computers (ADMX file)
Under User Configuration, click Administrative Templates ➙ Lenovo ThinkVantage Components ➙ Power Manager for Vista/7 ➙ Power Agenda Deployments ➙ Power Agenda*.
Note: * stands for number 1 to 10.
To deploy a specific power agenda on client computers, you can configure the power agenda settings described in the following table.
Table 6. Power Agenda*
Policy settings Description
Run Specifies whether to run this power agenda.
If you enable or do not configure this policy setting, the check box for this power agenda on the Power Agendas tab is selected, and this power agenda will run on client computers.
If you disable this policy setting, the check box for this power agenda is cleared, and this power agenda will not run on client computers.
Configurable Specifies whether users can edit or delete this power agenda on client computers.
Chapter 3. Working with Active Directory and ADM or ADMX files 41
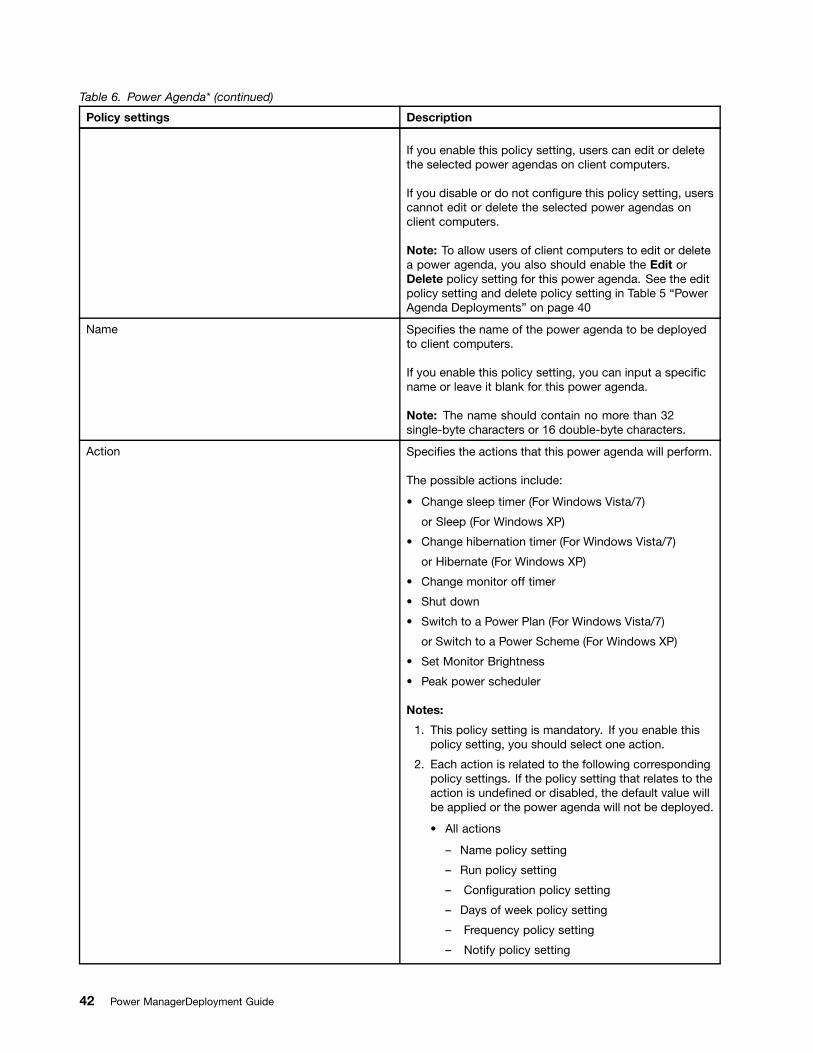
Table 6. Power Agenda* (continued)
Policy settings Description
If you enable this policy setting, users can edit or delete the selected power agendas on client computers.
If you disable or do not configure this policy setting, users cannot edit or delete the selected power agendas on client computers.
Note: To allow users of client computers to edit or delete a power agenda, you also should enable the Edit or Delete policy setting for this power agenda. See the edit policy setting and delete policy setting in Table 5 “Power Agenda Deployments” on page 40
Name Specifies the name of the power agenda to be deployed to client computers.
If you enable this policy setting, you can input a specific name or leave it blank for this power agenda.
Note: The name should contain no more than 32 single-byte characters or 16 double-byte characters.
Action Specifies the actions that this power agenda will perform.
The possible actions include:
• Change sleep timer (For Windows Vista/7)
or Sleep (For Windows XP)
• Change hibernation timer (For Windows Vista/7)
or Hibernate (For Windows XP)
• Change monitor off timer
• Shut down
• Switch to a Power Plan (For Windows Vista/7)
or Switch to a Power Scheme (For Windows XP)
• Set Monitor Brightness
• Peak power scheduler
Notes:
1. This policy setting is mandatory. If you enable this policy setting, you should select one action.
2. Each action is related to the following corresponding policy settings. If the policy setting that relates to the action is undefined or disabled, the default value will be applied or the power agenda will not be deployed.
• All actions
– Name policy setting
– Run policy setting
– Configuration policy setting
– Days of week policy setting
– Frequency policy setting
– Notify policy setting
42 Power ManagerDeployment Guide
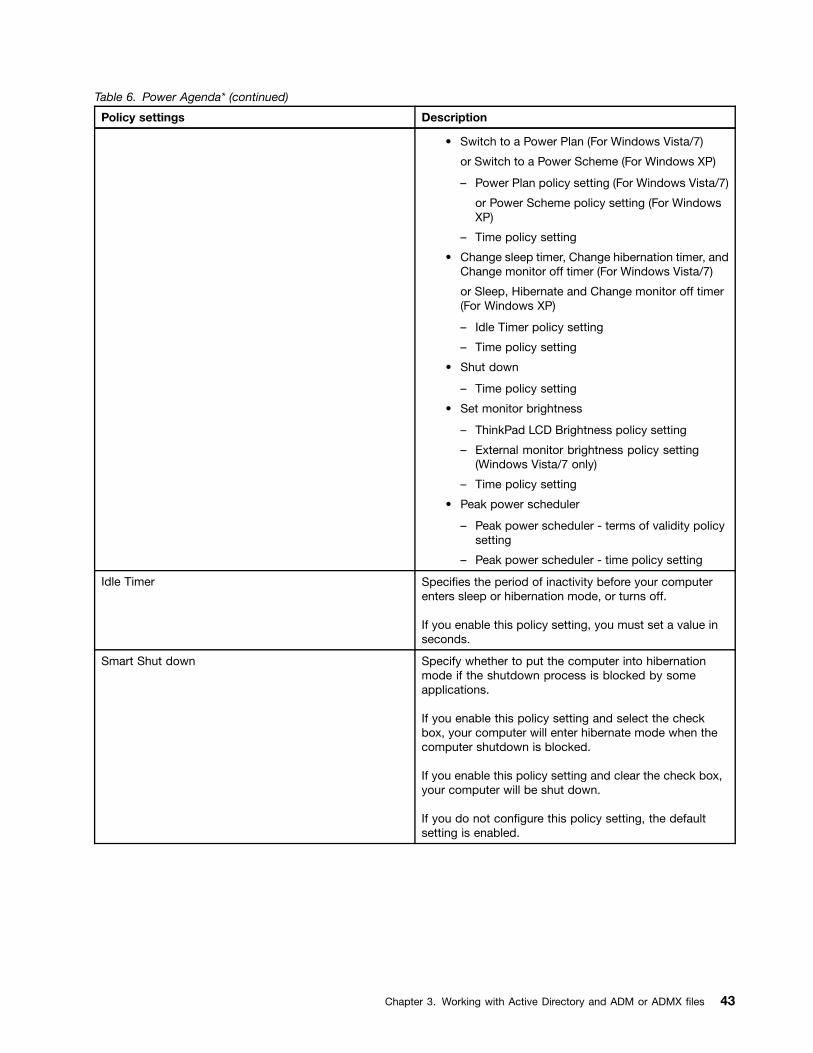
Table 6. Power Agenda* (continued)
Policy settings Description
• Switch to a Power Plan (For Windows Vista/7)
or Switch to a Power Scheme (For Windows XP)
– Power Plan policy setting (For Windows Vista/7)
or Power Scheme policy setting (For Windows XP)
– Time policy setting
• Change sleep timer, Change hibernation timer, and Change monitor off timer (For Windows Vista/7)
or Sleep, Hibernate and Change monitor off timer (For Windows XP)
– Idle Timer policy setting
– Time policy setting
• Shut down
– Time policy setting
• Set monitor brightness
– ThinkPad LCD Brightness policy setting
– External monitor brightness policy setting (Windows Vista/7 only)
– Time policy setting
• Peak power scheduler
– Peak power scheduler - terms of validity policy setting
– Peak power scheduler - time policy setting
Idle Timer Specifies the period of inactivity before your computer enters sleep or hibernation mode, or turns off.
If you enable this policy setting, you must set a value in seconds.
Smart Shut down Specify whether to put the computer into hibernation mode if the shutdown process is blocked by some applications.
If you enable this policy setting and select the check box, your computer will enter hibernate mode when the computer shutdown is blocked.
If you enable this policy setting and clear the check box, your computer will be shut down.
If you do not configure this policy setting, the default setting is enabled.
Chapter 3. Working with Active Directory and ADM or ADMX files 43

Table 6. Power Agenda* (continued)
Policy settings Description
Power Plan (Scheme) Specifies the name of the power plan (scheme) that the power agenda will switch to.
If you set the Action policy setting to Switch to a Power Plan (For Windows Vista/7) or Switch to a Power Scheme (For Windows XP), you should enable this policy setting and input a power plan (scheme) name. See the action policy setting in Table 6 “Power Agenda*” on page 41.
If the power plan (scheme) name does not exist on client computers, the power agenda will not switch to this power plan (scheme).
Notes:
1. The power plan (scheme) name should contain no more than 32 single-byte characters or 16 double-byte characters.
2. If you disable or do not configure this policy setting, but set the Action policy setting to Switch to a Power Plan (For Windows Vista/7) or Switch to a Power Scheme (For Windows XP), users cannot use this power agenda on client computers. See the action policy setting in Table 6 “Power Agenda*” on page 41.
ThinkPad LCD Brightness 16 Specifies the brightness level (from 0 to 15) of client computer monitors with 16 brightness levels.
If you set the Action policy setting to Change monitor brightness, you should enable this policy setting and input a brightness level. See the action policy setting in Table 6 “Power Agenda*” on page 41.
If you disable or do not configure this policy setting, but set the Action policy setting to Change monitor brightness, users cannot use this power agenda on client computers. See the action policy setting in Table 6 “Power Agenda*” on page 41.
Note: The range of the brightness level is from 0 to 15. The monitor brightness increases when you select a higher brightness level. This policy setting does not support monitors with a brightness level higher than 15.
ThinkPad LCD Brightness 8 Specifies the brightness level (from 0 to 7) of client computer monitors with 8 brightness levels.
If you set the Action policy setting to Change monitor brightness, you should enable this policy setting and input a brightness level. See the action policy setting in Table 6 “Power Agenda*” on page 41.
If you disable or do not configure this policy setting, but set the Action policy setting to Change monitor brightness, users cannot use this power agenda on client computers. See the action policy setting in Table 6 “Power Agenda*” on page 41.
44 Power ManagerDeployment Guide

Table 6. Power Agenda* (continued)
Policy settings Description
Note: The range of the brightness level is from 0 to 7. The monitor brightness increases when you select a higher brightness level. This policy setting does not support monitors with a brightness level higher than 7.
External monitor brightness Specifies the brightness level (from 0 to 100) of the external monitor.
If you set the Action policy setting to Change monitor brightness, you should enable this policy setting and input a brightness level. See the action policy setting in Table 6 “Power Agenda*” on page 41.
If you disable or do not configure this policy setting, but set the Action policy setting to Change monitor brightness, users cannot use this power agenda on client computers. See the action policy setting in Table 6 “Power Agenda*” on page 41.
Notes:
1. The range of the brightness level is from 0 to 100. The external monitor brightness increases when you select a higher brightness level. This policy setting does not support monitors with a brightness level higher than 100.
2. This setting is not supported on Windows XP client computers.
Frequency Specifies the time interval of the power agenda execution.
Possible frequency includes:
• Daily
• Weekly
If you disable or do not configure this policy setting, users cannot use this power agenda on client computers.
Note: This policy setting is mandatory. If you enable this policy setting, you should select one frequency.
Peak power scheduler - terms of validity Specifies the effective term of Peak power scheduler.
If you set the Action policy setting to Peak power scheduler, you should enable this policy setting.
The Peak power scheduler setting is enabled only during the period specified by this policy setting.
Note: If you set the invalid term, it is automatically adjusted by Power Manager.
Chapter 3. Working with Active Directory and ADM or ADMX files 45

Table 6. Power Agenda* (continued)
Policy settings Description
Time Specifies the start time and end time, including the hours and minutes, when the power agenda runs or stops.
If you enable this policy setting, you should set the specific time.
If you disable or do not configure this policy setting, but set the Action policy setting to Peak power scheduler, users cannot use this power agenda on client computers. See the action policy setting in Table 6 “Power Agenda*” on page 41.
Notes:
1. If you set the Action policy setting to Shut down, you only need to set the start time.
2. If you set the Action policy setting to Peak power scheduler, the power agenda will use the Peak power scheduler - time policy setting instead of this time policy setting.
Peak power scheduler - time Specifies when the Peak power scheduler setting is effective.
If you set the Action policy setting to Peak power scheduler, you should enable this policy setting.
The Peak power scheduler setting is enabled only during the period specified in this policy setting.
Days of week Specifies the days of a week that the power agenda runs weekly.
If you enable this policy setting, you should select the days of a week.
If you disable or do not configure this policy setting, but set the Frequency policy setting to Weekly, users cannot use this power agenda on client computers. See the frequency policy setting in Table 6 “Power Agenda*” on page 41.
Notify Specifies whether or not to notify users before the power agenda runs.
If you enable this policy setting, you can select the notification time before the power agenda runs on client computers. The range of the notification time is from 1 to 60 minutes.
If you disable or do not configure this policy setting, users will not be notified before the power agenda runs on client computers.
Note: If you enable this policy setting, but clear the notification check box, users will not be notified before the power agenda runs on client computers.
Disable peak power scheduler Specifies the situations for the Peak power scheduler setting to be disabled.
46 Power ManagerDeployment Guide

Table 6. Power Agenda* (continued)
Policy settings Description
If you enable when remaining battery level is less than, you must provide a value in percentage. When a battery remaining percentage is less than this value, the Peak power scheduler setting will be disabled.
If you enable automatically by monitoring the battery usage, the Peak power scheduler setting will be automatically disabled according to the battery usage.
EnergyWise Configuration Deployments The EnergyWise Configuration Deployments policy enables you to configure the EnergyWise Configuration Deployments settings.
To configure the EnergyWise Configuration Deployments policy, do the following:
• For Windows XP client computers (ADM and ADMX files)
Under Computer Configuration, click Administrative Templates ➙ Lenovo ThinkVantage Components ➙ Power Manager ➙ EnergyWise Configuration Deployments.
• For Windows Vista or Windows 7 client computers (ADM file)
Under Computer Configuration, click Administrative Templates ➙ Classic Administrative Templates ➙ Lenovo ThinkVantage Components ➙ Power Manager for Vista/7 ➙ EnergyWise Configuration Deployments.
• For Windows Vista or Windows 7 client computers (ADMX file)
Under Computer Configuration, click Administrative Templates ➙ Lenovo ThinkVantage Components ➙ Power Manager for Vista/7 ➙ EnergyWise Configuration Deployments.
The following table provides the detailed information about each policy setting.
Table 7. EnergyWise Configuration Deployments
Policy settings Description
EnergyWise Specifies whether to use the EnergyWise solution.
Configurable options include:
• Not configured
• Enabled
• Disabled
If you enable this policy setting, the EnergyWise solution is enabled on all client computers.
If you disable this policy setting, the EnergyWise solution is disabled on all client computers.
This setting is supported only on Windows 7 client computers.
Port No Specifies the port number used to communicate with the EnergyWise solution.
Configurable options include:
Chapter 3. Working with Active Directory and ADM or ADMX files 47

Table 7. EnergyWise Configuration Deployments (continued)
Policy settings Description
• Not configured
• Enabled
• Disabled
If you enable this policy setting, you must provide a port number.
Note: The default port number is 43440.
Domain Specifies the domain name of the EnergyWise solution.
Configurable options include:
• Not configured
• Enabled
• Disabled
If you enable this policy setting, you must input the domain name of the EnergyWise solution.
Note: The default domain name is cisco.
Secret Specifies the join password of the EnergyWise domain.
Configurable options include:
• Not configured
• Enabled
• Disabled
If you enable this policy setting, you must input the join password of the EnergyWise domain.
Note: The default join password is cisco.
Name Specifies the name of the client computer.
Configurable options include:
• Not configured
• Enabled
• Disabled
If you enable this policy setting, you must input name of the client computer.
If you disable or do not configure this policy setting, the name will be restored to the default value.
Note: The client computer name is used as the default name value. Therefore, the default name value is different on each client computer.
48 Power ManagerDeployment Guide
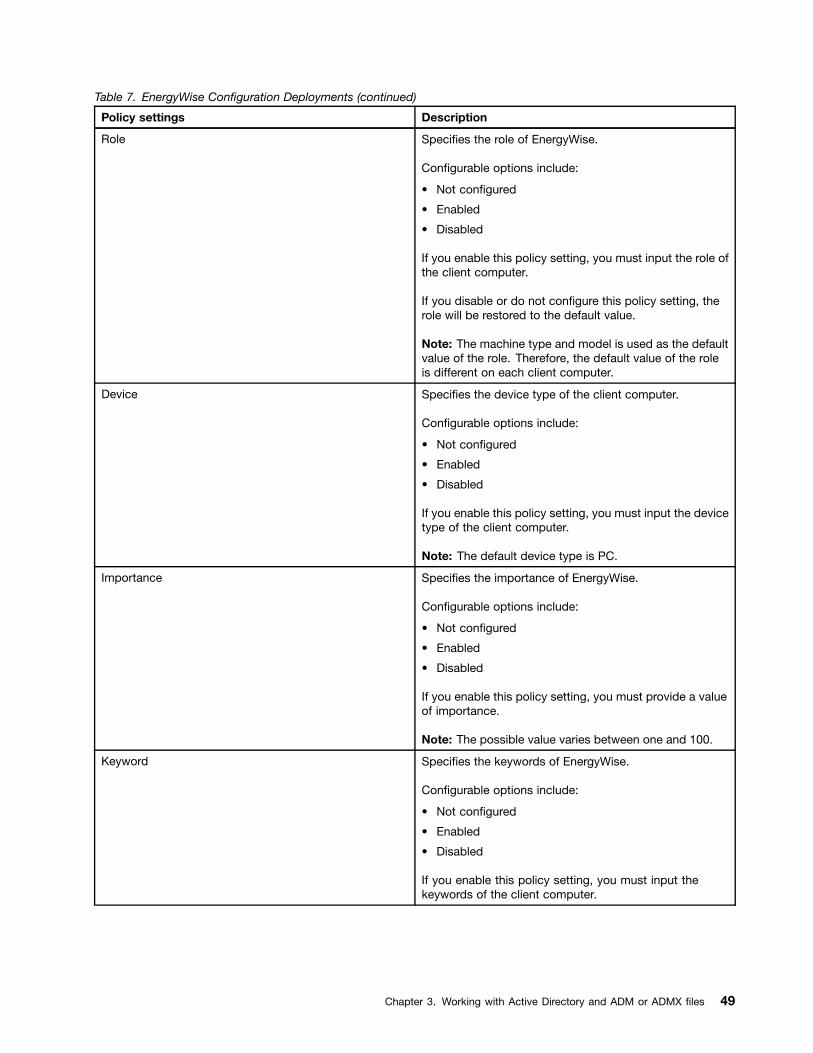
Table 7. EnergyWise Configuration Deployments (continued)
Policy settings Description
Role Specifies the role of EnergyWise.
Configurable options include:
• Not configured
• Enabled
• Disabled
If you enable this policy setting, you must input the role of the client computer.
If you disable or do not configure this policy setting, the role will be restored to the default value.
Note: The machine type and model is used as the default value of the role. Therefore, the default value of the role is different on each client computer.
Device Specifies the device type of the client computer.
Configurable options include:
• Not configured
• Enabled
• Disabled
If you enable this policy setting, you must input the device type of the client computer.
Note: The default device type is PC.
Importance Specifies the importance of EnergyWise.
Configurable options include:
• Not configured
• Enabled
• Disabled
If you enable this policy setting, you must provide a value of importance.
Note: The possible value varies between one and 100.
Keyword Specifies the keywords of EnergyWise.
Configurable options include:
• Not configured
• Enabled
• Disabled
If you enable this policy setting, you must input the keywords of the client computer.
Chapter 3. Working with Active Directory and ADM or ADMX files 49

50 Power ManagerDeployment Guide

Appendix A. Deploying power schemes for non-administrator groups or users on Windows XP client computers
Non-administrator groups or users on Windows XP client computers have no permission to change the power scheme settings. By design, this is a feature of the Windows XP operating system. To deploy Power Manager plans successfully to Windows XP client computers for non-administrator groups or users, the IT administrator needs to configure the domain server by doing the following:
1. On a domain server, click Start ➙ Run, and type dsa.msc in the Open box. The Active Directory Users and Computers window opens.
2. Right-click on a domain container and select Properties. The Properties window opens.
3. Click the Group Policy tab, and click the New button to create a group policy object.
4. Rename the group policy object with Power Configuration Policy and press Enter.
5. Click Edit. The Group Policy Object Editor opens.
6. Set the security permission for the following key: MACHINE\SOFTWARE\Microsoft\Windows\CurrentVersion\Controls Folder\PowerCfg by doing the following:
a. Under Computer Configuration, click Windows Settings ➙ Security Settings, right-click Registry, and select Add Key. The Select Registry Key window opens.
b. Type the following key in the Selected key box: MACHINE\SOFTWARE\Microsoft\Windows\CurrentVersion\Controls Folder\PowerCfg
c. Click OK. The Database Security window opens.
d. On the Security tab, select the non-administrator group(s) or user(s) you want to give permission to, assign Full Control permission to the group(s) or user(s), and click Apply.
e. Click Advanced. The advanced window opens.
f. On the Permissions tab, select the group(s) or user(s), select the Allow inheritable permissions from the parent to propagate to this object and all child objects. Include these with entries explicitly defined here." option, and click OK. The Add Object window opens.
g. Select the Propagate inheritable permissions to all subkeys option, and click OK.
7. Set the security permission for the following key: USERS\.DEFAULT\Control Panel\PowerCfg by doing the following:
a. Under Computer Configuration, click Windows Settings ➙ Security Settings, right-click Registry, and select Add Key. The Select Registry Key window opens.
b. Type the following key in the Selected key box: USERS\.DEFAULT\Control Panel\PowerCfg
c. Click OK. The Database Security window opens.
d. On the Security tab, select the non-administrator group(s) or user(s) you want to give permission to, assign Full Control permission to the group(s) or user(s), and click Apply.
e. Click Advanced. The advanced window opens.
f. On the Permissions tab, select the group(s) or user(s), select the Allow inheritable permissions from the parent to propagate to this object and all child objects. Include these with entries explicitly defined here." option, and click OK. The Add Object window opens.
g. Select the Propagate inheritable permissions to all subkeys option, and click OK.
8. Check there are two group policy objects generated in the Active Directory Users and Computers window:
© Copyright Lenovo 2008, 2012 51

• MACHINE\SOFTWARE\Microsoft\Windows\CurrentVersion\Controls Folder\PowerCfg
• USERS\.DEFAULT\Control Panel\PowerCfg
Notes:
1. Non-administrator groups or users on Windows XP client computers must have the write permission for the following registry subkeys:
• HKEY_LOCAL_MACHINE\SOFTWARE\Microsoft\Windows\CurrentVersion\Controls Folder\PowerCfg
• HKEY_ USERS\.DEFAULT\Control Panel\PowerCfg
2. For further information on how to use the powercfg.exe utility for power schemes in Windows XP operating systems, refer to the Web site at: http://support.microsoft.com/default.aspx/kb/915160
After completing the configuration, the non-administrator group or user in the Windows XP client computers can have the permission to apply the deployed Power Manager power scheme.
52 Power ManagerDeployment Guide
Appendix B. Notices
Lenovo may not offer the products, services, or features discussed in this document in all countries. Consult your local Lenovo representative for information on the products and services currently available in your area. Any reference to a Lenovo product, program, or service is not intended to state or imply that only that Lenovo product, program, or service may be used. Any functionally equivalent product, program, or service that does not infringe any Lenovo intellectual property right may be used instead. However, it is the user's responsibility to evaluate and verify the operation of any other product, program, or service.
Lenovo may have patents or pending patent applications covering subject matter described in this document. The furnishing of this document does not give you any license to these patents. You can send license inquiries, in writing, to:
Lenovo (United States), Inc. 1009 Think Place - Building One Morrisville, NC 27560 U.S.A. Attention: Lenovo Director of Licensing
LENOVO PROVIDES THIS PUBLICATION “AS IS” WITHOUT WARRANTY OF ANY KIND, EITHER EXPRESS OR IMPLIED, INCLUDING, BUT NOT LIMITED TO, THE IMPLIED WARRANTIES OF NON-INFRINGEMENT, MERCHANTABILITY OR FITNESS FOR A PARTICULAR PURPOSE. Some jurisdictions do not allow disclaimer of express or implied warranties in certain transactions, therefore, this statement may not apply to you.
This information could include technical inaccuracies or typographical errors. Changes are periodically made to the information herein; these changes will be incorporated in new editions of the publication. Lenovo may make improvements and/or changes in the product(s) and/or the program(s) described in this publication at any time without notice.
The products described in this document are not intended for use in implantation or other life support applications where malfunction may result in injury or death to persons. The information contained in this document does not affect or change Lenovo product specifications or warranties. Nothing in this document shall operate as an express or implied license or indemnity under the intellectual property rights of Lenovo or third parties. All information contained in this document was obtained in specific environments and is presented as an illustration. The result obtained in other operating environments may vary.
Lenovo may use or distribute any of the information you supply in any way it believes appropriate without incurring any obligation to you.
Any references in this publication to non-Lenovo Web sites are provided for convenience only and do not in any manner serve as an endorsement of those Web sites. The materials at those Web sites are not part of the materials for this Lenovo product, and use of those Web sites is at your own risk
Any performance data contained herein was determined in a controlled environment. Therefore, the result in other operating environments may vary significantly. Some measurements may have been made on development-level systems and there is no guarantee that these measurements will be the same on generally available systems. Furthermore, some measurements may have been estimated through extrapolation. Actual results may vary. Users of this document should verify the applicable data for their specific environment.
© Copyright Lenovo 2008, 2012 53
Trademarks The following terms are trademarks of Lenovo in the United States, other countries, or both:
Access Connections Lenovo ThinkPad ThinkVantage
Microsoft, Active Directory, Windows, Windows Media, and Windows Vista are trademarks of the Microsoft group of companies.
Other company, product, or service names may be trademarks or service marks of others.
54 Power ManagerDeployment Guide


