63
UC BERKELEY – CENTRAL PAYROLL 2195 HEARST AVE. SUITE 120 BERKELEY, CA 94720‐1104 Last Revised March 2015 PPS Guide for Payroll Administrators
UC BERKELEY – CENTRAL PAYROLL 2195 HEARST AVE. SUITE 120 BERKELEY, CA 94720‐1104
Last Revised March 2015
PPS Guide for Payroll Administrators
1
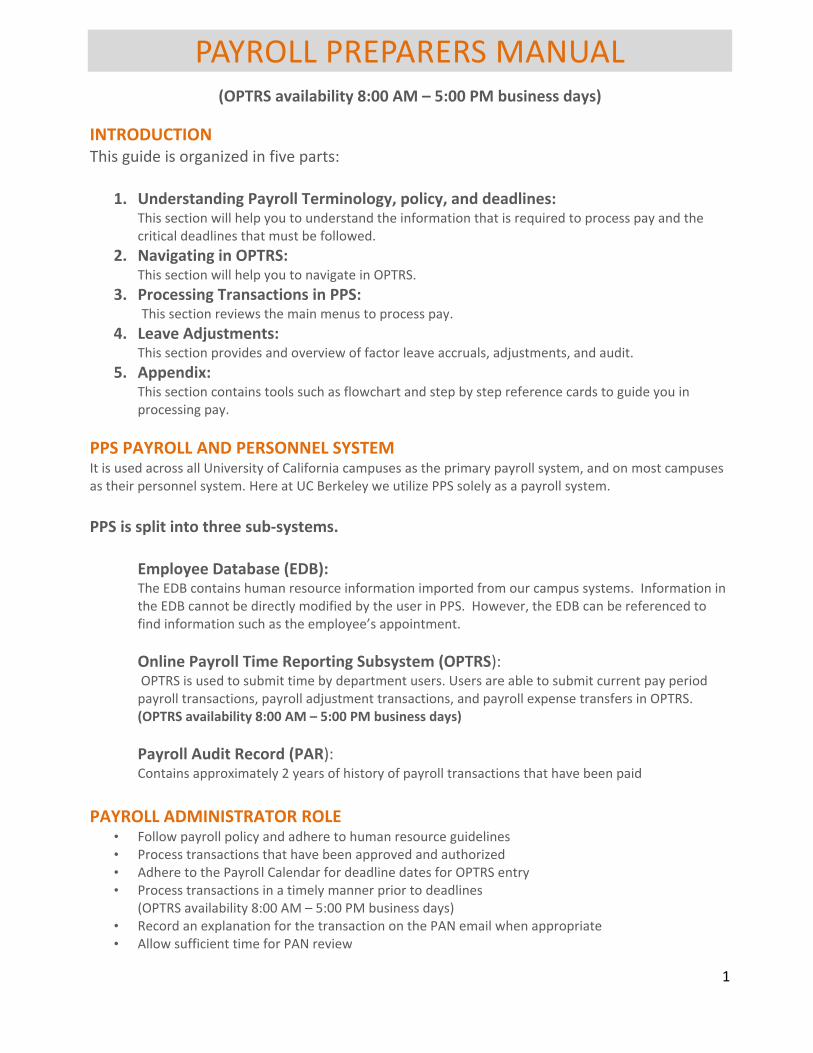
PAYROLL PREPARERS MANUAL (OPTRS availability 8:00 AM – 5:00 PM business days)
INTRODUCTION This guide is organized in five parts:
1. Understanding Payroll Terminology, policy, and deadlines: This section will help you to understand the information that is required to process pay and the critical deadlines that must be followed.
2. Navigating in OPTRS: This section will help you to navigate in OPTRS.
3. Processing Transactions in PPS: This section reviews the main menus to process pay.
4. Leave Adjustments: This section provides and overview of factor leave accruals, adjustments, and audit.
5. Appendix: This section contains tools such as flowchart and step by step reference cards to guide you in processing pay.
PPS PAYROLL AND PERSONNEL SYSTEM
It is used across all University of California campuses as the primary payroll system, and on most campuses as their personnel system. Here at UC Berkeley we utilize PPS solely as a payroll system.
PPS is split into three sub‐systems.
Employee Database (EDB): The EDB contains human resource information imported from our campus systems. Information in the EDB cannot be directly modified by the user in PPS. However, the EDB can be referenced to find information such as the employee’s appointment.
Online Payroll Time Reporting Subsystem (OPTRS): OPTRS is used to submit time by department users. Users are able to submit current pay period payroll transactions, payroll adjustment transactions, and payroll expense transfers in OPTRS. (OPTRS availability 8:00 AM – 5:00 PM business days)
Payroll Audit Record (PAR): Contains approximately 2 years of history of payroll transactions that have been paid
PAYROLL ADMINISTRATOR ROLE
• Follow payroll policy and adhere to human resource guidelines • Process transactions that have been approved and authorized • Adhere to the Payroll Calendar for deadline dates for OPTRS entry • Process transactions in a timely manner prior to deadlines
(OPTRS availability 8:00 AM – 5:00 PM business days) • Record an explanation for the transaction on the PAN email when appropriate • Allow sufficient time for PAN review

2
TABLE OF CONTENTS
UNDERSTANDING TERMINOLOGY AND DEADLINES ......................................................... 3
PAYROLL SYSTEM FLOW ........................................................................................................................ 3 DEPARTMENTAL TIME KEEPING FLOW ................................................................................................. 4 EMPLOYEE OVERVIEW .......................................................................................................................... 4 PAY SCHEDULES ..................................................................................................................................... 5 PAYROLL CALENDAR .............................................................................................................................. 6 PPS, A CODE BASED SYSTEM ................................................................................................................. 8 PAY CYCLES ............................................................................................................................................ 8 POSITIVE TIME VS. EXCEPTION TIME .................................................................................................... 8 RATE CODE ............................................................................................................................................ 9 TIME CODE ............................................................................................................................................ 9 VALID RATE & TIME CODE COMBINATIONS ........................................................................................ 10 DESCRIPTION OF SERVICE CODES (DOS CODES) ................................................................................. 10 FORMATTING TIME AND AMOUNTS ................................................................................................... 10 WORKING HOURS ................................................................................................................................ 11 PARTIAL MONTH CALCULATION (FOR EXEMPT EMPLOYEES) ............................................................. 11
NAVIGATING IN OPTRS ................................................................................................. 12 SYSTEM ACCESS AND SETUP ............................................................................................................... 12 HOW TO LOGIN TO PPS ....................................................................................................................... 12 HOW TO LOG OUT OF PPS ................................................................................................................... 13 NAVIGATING WITHIN THE SYSTEM ..................................................................................................... 14 FUNCTION KEYS (F‐Keys) ..................................................................................................................... 14 SCREEN LAYOUT (MAIN MENU SCREEN) ............................................................................................. 16 DEFINING “Next Func” SCREENS AVAILABLE IN PPS ........................................................................... 17 COMMONLY USED SCREENS (used for informational purposes) ........................................................ 18 OPTRS SCREENS (Most frequently Used to Process Pay) .................................................................... 19 PPS SCREENS ....................................................................................................................................... 20
PROCESSING PAY TRANSACTIONS IN PPS ...................................................................... 23 SELECTING THE APPROPRIATE OPTRS PAY CYCLE ............................................................................... 23 ONLINE TIME INPUT ROSTER .............................................................................................................. 24 EDAT‐ ADJUSTMENT TRANSACTION MENU ........................................................................................ 26 PAY PROCESSING “HOW TO” REFERENCES CARDS: ............................................................................ 27 POST AUTHORIZATION NOTIFICATION (PANS): .................................................................................. 29
LEAVE ADJUSTMENTS ................................................................................................... 33 LEAVE ACCRUAL CALCULATION FOR NON‐EXEMPT EMPLOYEES ....................................................... 34 LEAVE ACCRUAL CALCULATION FOR EXEMPT EMPLOYEES ................................................................ 35 PROCESSING LEAVE ADJUSTMENTS FOR BOTH EXEMPTS AND NON EXEMPTS ................................. 36 AUDITING VACATION AND SICK LEAVE ACCRUALS ............................................................................. 37 ADDITIONAL LEAVE PROCESSING INFORMATION ............................................................................... 38
APPENDIX ..................................................................................................................... 39 PAYROLL RESOURCES .......................................................................................................................... 39 FREQUENTLY ASKED QUESTIONS ........................................................................................................ 41 LIST OF DOS CODES ............................................................................................................................. 42 PPP5302 PAYROLL SALARY EXPENSE ................................................................................................... 44 EDAT ADJUSTMENT FLOWCHART ....................................................................................................... 46

3
UNDERSTANDING TERMINOLOGY AND DEADLINES
PAYROLL SYSTEM FLOW The PPS system interfaces with many different systems on campus. There is information systems,
timekeeping, and reporting and financial system. Each system may have a different timeline in which PPS or
the external system is updated.
Information Systems: Student Information System: Receive student units to adjust FICA eligibility
Timekeeping: Receive employee timecard hours from the CalTime timekeeping system every biweekly
cycle and monthly cycle
Audit, Reporting, Financial: PageCenter is the primary payroll reporting tool that is used (it is a text file
based reporting system). A monthly file of payroll salary costs is sent to BAIRS and the Berkeley Financial
System. Payroll Authorization Notification emails (email audits of manual transactions entered by the
timekeeper) are emailed to designated department auditors.
PPSPayroll Personnel System
EDBEmployee Data Base
OPTRS Time Reporting
PARPayroll Audit Record
PANPayroll Authorization notification Emails
PageCenterPPS Reporting Tool
BFSBerkeley Financial System
Salary Transactions
EDWEnterprise Datawarehouse
BAIRSHR and Financial Reports
SISStudent Info System
AYSOAtYourservice
Subsidiary Systems(Ex. Wage Works)
HCMHuman Capital Management
CalTimeTimekeeping System
Manual Time EntryPPS admins that enter timecards directly in PPS
Information System
Time Entry
Audit, Reporting, Financial
Payroll System
Varies
Night ly
Varies
Night ly
Per
Cycle
Daily
Immediately
Daily
Month End
Varies
Night ly

4
DEPARTMENTAL TIME KEEPING FLOW This is a high level overview of the Payroll process to get an employee paid and ensure data integrity.
Data Entry
OPTRS Time Roster and/or Adjustments
Paycheck Produced
BFS General Ledger
Distribution of Payroll expense
(PPP5302)
Employee Submits Time (Via CalTIme or manual
entry to PPS)
Is Data Valid?
Is time Approved/Accurate?
YES
NO
Is Expense Transfer required?
Process complete until next paycycle
NO
Note: Ledgers are produced after all pay cycles (BW and MO) have run for
the month.
Employee is setup in HCM ( upon hire)
Supervisor validates and approves time
YES
YES
NO
EMPLOYEE OVERVIEW As a Payroll Preparer, it is necessary to understand the information below in order to process pay for an
employee. The following pages of this book will explain the importance of appointment based information
and transaction based information.
FOR EMPLOYEE PAY PROCESSING
Appointment based information Transaction Based Information
Pay Schedule: MO or BW Time Code: % or H Distribution # Rate Code: A or H Positive or Exception Time Title code: 4 digit employee job code
Transaction Type: LX, RX, AP, TX, FT, RA Amount of Time worked Pay Cycle Description of service code “Pay Type” Pay Period End Date Chart String
The majority of appointment based information is entered in the Human Capital Management System
(HCM) which is passed to our Payroll system on a nightly basis. This includes information such as home
department, pay cycle (biweekly or monthly), exception pay or positive, job, pay rate, direct deposit
account and routing number, and additional job based information. An employee cannot exist in Payroll
system or be paid unless a record is created in HCM first. Transaction Based Information (pay information)
is sent from the CalTime timekeeping system to PPS or in some cases entered directly in PPS.
FAIR LABOR STANDARDS ACT govern certain pay and time tracking rules for exempt and non‐exempts.
Exempt Employees Non‐Exempt Employees
• Not eligible for overtime or comp time • Record leave in whole day increments • Paid an established monthly or annual salary
• Subject to Fair Labor Standards Act (FLSA) • Eligible for overtime & comp‐time • Report time and leave to the nearest quarter hour • Hourly Paid

5
STANDARD EMPLOYEE PAY PROFILES
Beginning from the far left of the table below, an employee is either hired into a Non‐Academic position or
an Academic position. They are classified as exempt if the position is not eligible for overtime or non‐
exempt if they are eligible for overtime pay. Read each row to determine how the employee will record
leave, receive pay, and accrue time.
Employee Type
Employee Description
Pay Date
Pay Period
Primary Pay Schedule
Leave Accrual Method
Pay Type
Non‐
Academic
Staff &
Students
*Exempt Record Leave in whole day increments
1st (12 checks per year)
1‐EOM Monthly (MO)
Based on Factor Rate
Salaried (Exception Paid)
Non‐Exempts
Record Time to the nearest quarter hour. Eligible for Overtime
Every other Wed. (26, max 27 checks per year)
Pay Period Sun‐Sat work week (two week intervals)
Biweekly (BW)
Based on Factor Rate
Hourly (Paid for hours reported)
Academic
Staff &
Students
*Exempt Record Time worked/Leave in whole day increments
1st (12 checks per year)
1‐EOM Monthly (BW)
Based on Table Method
Salaried (Exception Paid)
PAY SCHEDULES A Payroll preparer schedules transaction in OPTRS based on an employee’s pay schedule (Biweekly pay or
Monthly Pay). All employees must be assigned a pay schedule in HCM.
Description Purpose/Use Type
Pay Schedule One of two pay schedules is assigned to an employee upon hire. Exempt employees are assigned a monthly pay schedule. Non‐exempt employees are assigned a biweekly pay schedule.
MO = Pay on 1st BW = Pay every other Wednesday (Calendar is available on payroll website) http://controller.berkeley.edu/departments/payroll

6
PAYROLL CALENDAR In order to have paychecks ready in time for a particular pay date,
1. All payroll data entry must be entered by a deadline. 2. Information that affects pay (deductions, tax withholding) must be in the system by the deadline.
These deadlines are published on a Payroll calendar. The Payroll Calendar is provide every six months and published in two parts:
1. July‐December 2. January‐July
(Each part corresponds to one half of the fiscal year and each month is split out by BFS processing
month)
It may be located at: http://controller.berkeley.edu/payroll/Schedules/index.htm
Example of calendar:
The alternate grey and white differentiate ledger months.
Reading the Payroll Calendar To find what cycle we are in on any given date within the year, you will need to follow the steps below
when looking at the Payroll calendar.
1. Look at ‘OPTRS Final Deadline Date’ Column. Find the date that is closest to, but still greater than
the OPTRS deadline date.
2. In the same row, move to the left until you reach the ‘Time Roster Available’ column. Make sure
that today’s date is equal to or greater than that date as well.
3. Continue to the left until you get to the ‘Cycle’ and ‘Pay Cycle End Date’ columns. This is the
current open cycle.
NOTE: Every process month has a B1, B2 and an MO cycle. That pattern is repeated every month and through the year. It is a combination of the cycle and the cycle end date that specifies the check date for any given cycle. You will always need to be aware of the cycle and cycle end date when scheduling transactions in OPTRS.
Column Headings on Calendar
ALL COLUMNS ARE
IMPORTANT BUT…You need
the cycle and pay cycle end
date to enter a transaction in
OPTRS and must enter it by
the OPTRS final deadline.

7
CYCLE:
There are typically 3 cycles in the month and each month the cycles repeat (as conveyed by the alternating shades of grey and white to designate different ledger months)
PAY CYCLE END DATE:
This is essentially the final day of the pay that will be included in the cycle. You will need to know the pay cycle end date to enter pay in OPTRS.
HCM FINAL TO SET UP ROSTER FOR BEGINNING OF CYCLE
This is the final day that HCM administrators can update a record in HCM for positive pay employees so that it updates the Roster correctly in OPTRS
TIME ROSTER AVAILABLE:
This is the first day that you can begin entering time in OPTRS LEAVE ROSTER AVAILABLE:
This is the first day that you can begin entering Leave adjustments in OPTRS. AYSO (at yourservice website):
Employees can update information on the AYSO website that affects pay deductions (i.e taxes). Information must be updated by the deadline date in that column in order for it to be process for that specified pay date.
HCM FINAL UPDATE FOR PAY POSITIVE TIME EMPLOYEES
This is the final day HCM (Human Capital Management) Administrators can update HCM for positive pay employees so that it will update OPTRS correctly.
HCM FINAL UPDATE FOR PAY EXCEPTION TIME EMPLOYEES:
HCM (Human Capital Management) Administrator must enter all changes into HCM by the deadline listed on this column otherwise the update will not go into effect for pay cycle listed on the calendar.
OPTRS FINAL DEADLINE:
All entries for an open pay cycle must be entered by this deadline date. Once the Final deadline date passes that pay cycle has ended for the month. For example, you are trying to get an employee paid by a check date; you want to look at the corresponding cycle that row for the current month. Entry must be made on or after the Roster is available and before or on the OPTRS Final Deadline.
CHECK DATE:
The check date on each row on the calendar is associated with the cycle on the same row located to the far left on the calendar

8
PPS, A CODE BASED SYSTEM The PPS system is operated by the use of many acronyms or codes to represent Payroll processing terms.
PPS is not a system in which the user can click on a field and a new screen will open as many web based
systems are. The user must enter function codes which will be discussed later in this book to maneuver
through screens as well as codes to specify the type of pay. For a list of acronym’s and codes please see the
appendix of this book.
PAY CYCLES There are two cycles in which a Payroll Preparer may schedule a pay transaction. A cycle is open during specified dates on a predetermined payroll calendar. OPTRS PAY CYCLE: cycle in which Payroll Preparer can schedule pay EMPLOYEE TYPE: Type of Employee that may be paid on a particular cycle PAY PERIOD: A predetermined period of time in which an employee reports time to be paid CHECK DATE: Check date is associated with a pay period and communicated on the payroll calendar
OPTRS PAY CYCLE EMPLOYEE TYPE PAY PERIOD CHECK DATE BW (Biweekly) Non‐Exempt employee, paid based on
hours reported, hourly paid Sun‐Sat (two week intervals)
Every other Wednesday
MO (Monthly Current) Exempt employee, typically salaried, positive or exception paid
1‐31 1st
NOTE: An employee can be paid late pay on any cycle regardless of their primary pay cycle.
POSITIVE TIME VS. EXCEPTION TIME Two types of processing exist in OPTRS. There is different pay processing rules depending if the employee is positive time or exception time.
POSITIVE TIME EMPLOYEES Z= symbol for positive emp.
EXCEPTION TIME EMPLOYEES E=symbol for exception emp.
TIME Time must be entered in PPS via CalTime timecard or directly entered in PPS by the PPS Preparer .
Pay is automatically generated and paid based on HCM appointment and percentage.
TYPE OF EMPLOYEE
All Non‐Exempt Employees are positive time and have (Z) code. A few Exempts may be setup as positive pay because their job is variable and their pay must be manually process in PPS.
Exempt Employees who have fixed, salary based appointments with a constant funding source.
PAY Based on the hours that are entered in OPTRS by the final deadline.
Based on pay rate and distribution percentages in the PPS (derived from HCM) at the time of the final OPTRS payroll deadline
9
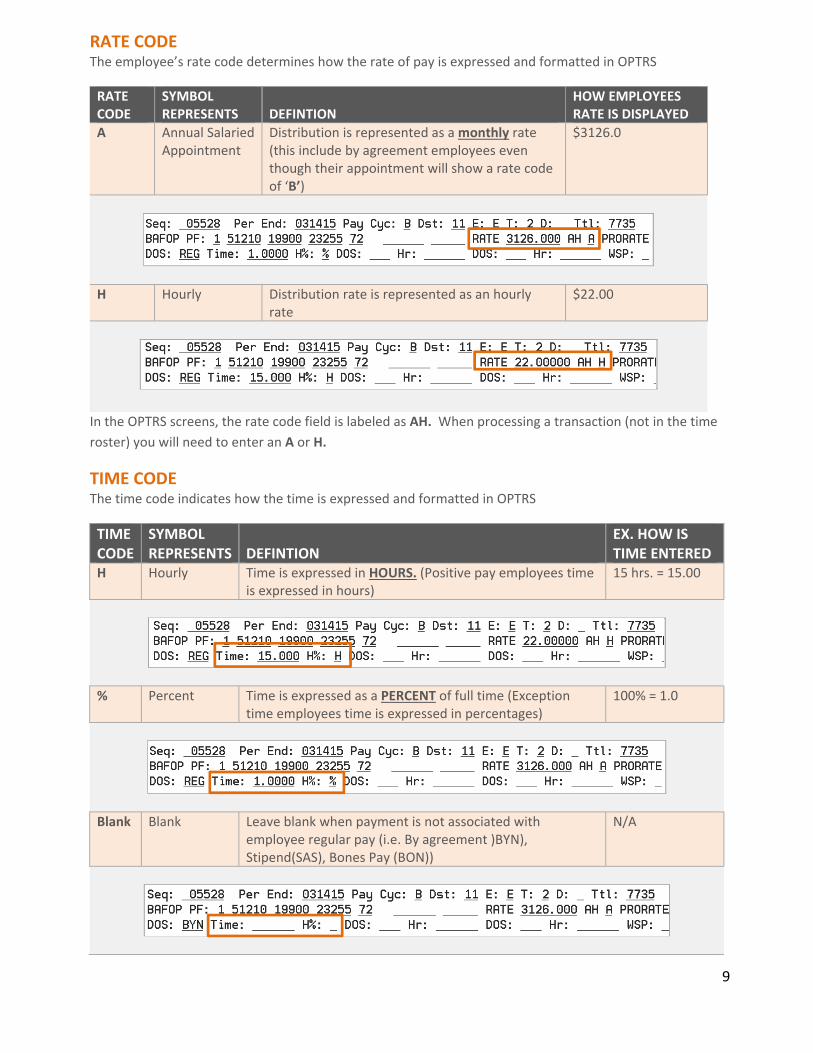
RATE CODE The employee’s rate code determines how the rate of pay is expressed and formatted in OPTRS
RATE CODE
SYMBOL REPRESENTS DEFINTION
HOW EMPLOYEES RATE IS DISPLAYED
A Annual Salaried Appointment
Distribution is represented as a monthly rate (this include by agreement employees even though their appointment will show a rate code of ‘B’)
$3126.0
H Hourly Distribution rate is represented as an hourly rate
$22.00
In the OPTRS screens, the rate code field is labeled as AH. When processing a transaction (not in the time
roster) you will need to enter an A or H.
TIME CODE The time code indicates how the time is expressed and formatted in OPTRS
TIME CODE
SYMBOL REPRESENTS DEFINTION
EX. HOW IS TIME ENTERED
H Hourly Time is expressed in HOURS. (Positive pay employees time is expressed in hours)
15 hrs. = 15.00
% Percent Time is expressed as a PERCENT of full time (Exception time employees time is expressed in percentages)
100% = 1.0
Blank Blank Leave blank when payment is not associated with employee regular pay (i.e. By agreement )BYN), Stipend(SAS), Bones Pay (BON))
N/A

10
In OPTRS screens, Time code field is labeled as H%. When processing a transaction (not in the time roster)
you will need to enter an H or %. This will tell the system whether this employee is Hourly or Percent.
VALID RATE & TIME CODE COMBINATIONS To ensure accurate generation of pay, the rate code must match the time code.
Examples of valid rate code and time code combinations below.
STANDARD PAY
PAY SCHEDULE
RATE RATE CODE
TIME TIME CODE
EXPLANATION
MO (Monthly)
Monthly Rate
A % of Full Time1.00 – 100%
% This is an employee that is paid once a month on the 1st on a monthly rate (ex. $2,000) and gets paid a percentage of the month. Their pay will automatically be generated based on the appointment percentage in PPS at the time the pay is run in PPS.
BW (Biweekly)
Hourly Rate
H Hours Worked 20. – 20 hours
H This is employee is paid every other Wednesday. Employee has an hourly pay rate (ex. $10.00. Time must be recorded on CalTime timecard in order for employee to be paid.
EXCEPTIONS CASES
PAY SCHEDULE
RATE RATE CODE
TIME TIME CODE
EXPLANATION
BW By agreement rate
B Leave blank Leave blank
Can be used to pay non‐exempt employees pay that is not associated with the employees regular pay or hours such as stipends, spot awards, bonus pay etc.
DESCRIPTION OF SERVICE CODES (DOS CODES) A description of service code also known as a DOS code is a three letter code used to reference a specific
type of pay. To enter a payroll transaction for vacation, DOS code “VAC” is entered in the DOS code field.
This three letter code tells the system what kind of pay is being processed. A list of DOS codes is available
on the payroll website at http://controller.berkeley.edu/departments/payroll/optrs/optrs‐tools#doscode
FORMATTING TIME AND AMOUNTS When entering time in OPTRS you will need to make sure that you always format the time appropriately
HOURS: Always round to the nearest quarter with no more than 2 digits after the decimal
PERCENTAGE: Always format with no more than 4 digits after the decimal, and with no more than 1 zero after the decimal. (100% is 1.0)
DOLLAR AMOUNTS: Always format with no more than 2 digits after the decimal, and with no more than 1 zero after the decimal.

11
WORKING HOURS For Monthly paid employees (MO pay cycle)
Every month has set number of working hours in the month. The number of working hours in the month is what Payroll uses as a base for working 100% of the month. The monthly hours may be printed at http://controller.berkeley.edu/payroll/Tools/monthlyWorkingHours.htm.
For Biweekly paid employees (B1 and B2 pay cycle)
The calendar month does not apply; every biweekly pay period is a 14 day period (two week intervals of a Sunday‐Saturday workweek).
PARTIAL MONTH CALCULATION (FOR EXEMPT EMPLOYEES) When you process a pay transaction for an exempt salaried paid employee (not applicable to non‐exempts)
you may need to do a partial month calculation. The only valid way of reporting regular hours for an
employee with a salaried amount is by reporting the percentage of time. You many need to calculate the
percentage of time if they did not work 100% of the time for the month.
A few things to note:
1. The monthly working hours in each calendar month change every month
2. There is 8 hours in a working day (work days are considered Monday through Friday)
3. Partial Month calculation to figure percentage for Salaried Employee:
a. Hours of absence divided by the number of working hours in the month
4. An online partial month calculator is available at
http://controller.berkeley.edu/payroll/OPTRS/tools.htm
HOW TO USE CALCULATOR
Some Examples:
A salaried employee took 2 days (16 hrs.) off from work (leave without pay) which means he did not work
100% of the monthly working hours. You now need to figure what percentage to reduce the pay by. For
this example, there is 176 hours in the month Calculation: 16 hrs. /176 = .0909
Review: To perform the partial month calculation, we take the number of hours in the month the
employee was absent from work and divided it by the total number of working hours in the month. The
answer .0909 is the amount you will input in OPTRS to reduce the salaried employees pay.
Step 1: Click the down arrow to change to the desired month Step 2: Click the down arrow to select hours or days. If you select days, it will calculate as 8 hrs. per day. Step 3: Depending on where you selected day or hours in step 2. Input the number of hours or days. Step 5: Click Calculate. Percentage will appear at
bottom of screen.

12
NAVIGATING IN OPTRS
SYSTEM ACCESS AND SETUP To obtain a login ID and password: a SARA request must be submitted by your supervisor. Once Login and Password have been created, you will receive an email notification. Training is required for update access. Additional information may be found at http://controller.berkeley.edu/ppsoptrs‐access‐request. Forgot password: Send an e‐mail to mfs‐[email protected]. The information needed is: user name, user id, employee id and phone number. Once your password has been reset the user will be contacted by IT with the new password. The PPS system is accessed through the Hummingbird HostExplorer client. If you do not have Hummingbird HostExplorer, the latest version is available from IST Software Central (https://software.berkeley.edu/hostexplorer). Your IT support should be able to assist you with setup of PPS on your desktop (Setup Instructions http://ist.berkeley.edu/as/mainframe/pps/settings).
HOW TO LOGIN TO PPS 1. Click on the PPS icon on your desktop 2. Enter your User id 3. Press the Tab button to go down to the Password field. 4. Enter your Password. You will not be able to see your password while you are entering it, but you
should see the cursor move to the right as you type. 5. Press Enter
6. Put your cursor on the blank line next to CICSPP1 (Berkeley Payroll Prod – Campus)
7. Press Enter

13
You are now logged in to PPS.
HOW TO LOG OUT OF PPS To log out of PPS, you must follow the following steps:
1. Press the F12 key 2. You should now be back at the Supersession Main Menu. Press the F3 key 3. Put an “X” in the blank box next to “Exit” and press Enter
You are now logged out of PPS, and can close your session window if it did not automatically close.
Enter an “X”
to exit and
press Enter
14
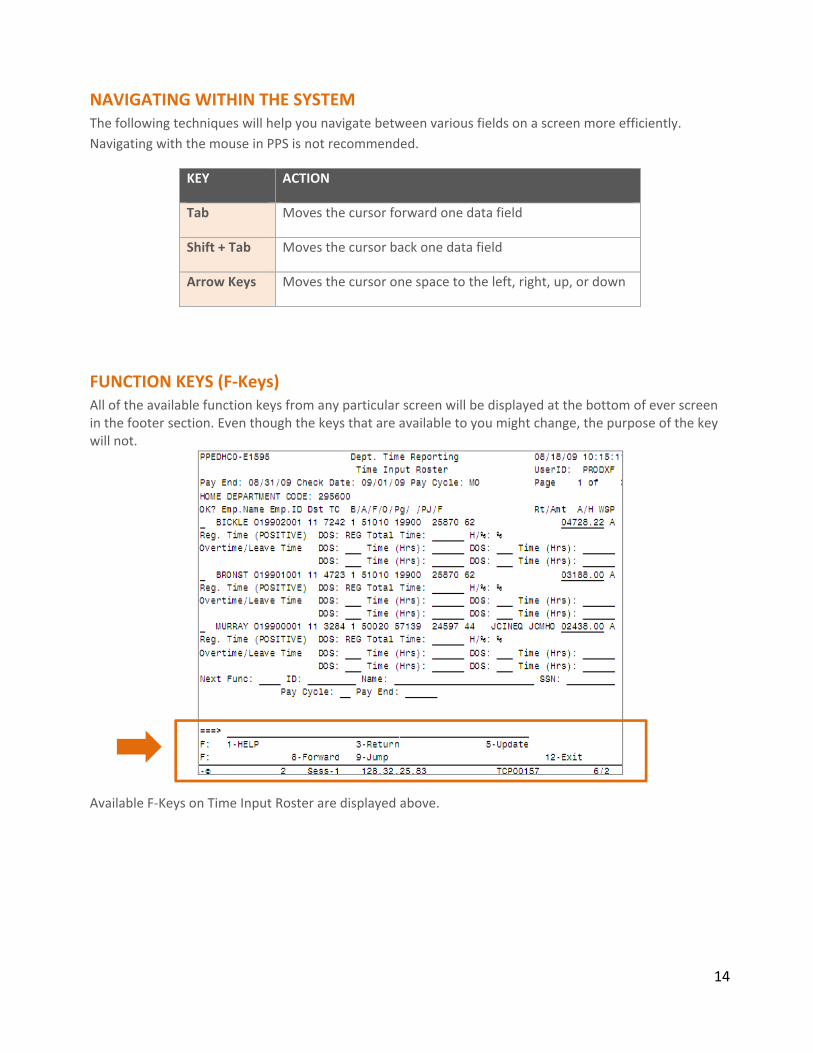
NAVIGATING WITHIN THE SYSTEM The following techniques will help you navigate between various fields on a screen more efficiently.
Navigating with the mouse in PPS is not recommended.
KEY ACTION
Tab Moves the cursor forward one data field
Shift + Tab Moves the cursor back one data field
Arrow Keys Moves the cursor one space to the left, right, up, or down
FUNCTION KEYS (F‐Keys) All of the available function keys from any particular screen will be displayed at the bottom of ever screen in the footer section. Even though the keys that are available to you might change, the purpose of the key will not.
Available F‐Keys on Time Input Roster are displayed above.
15
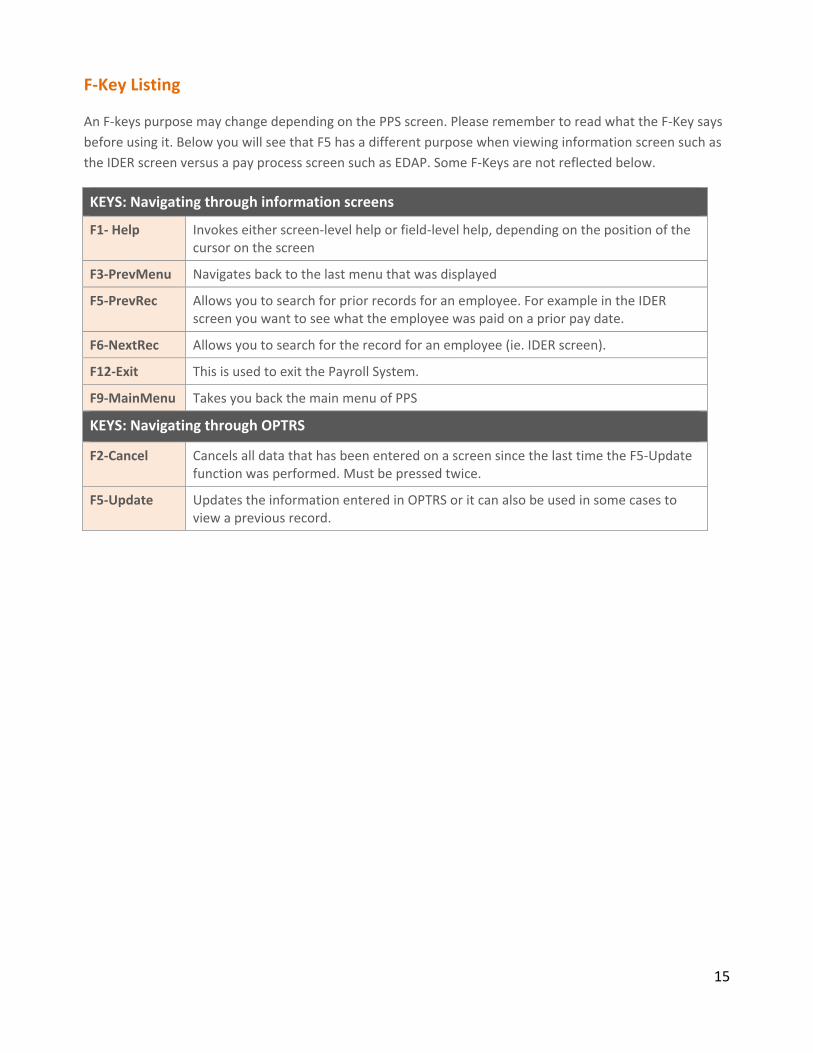
F‐Key Listing
An F‐keys purpose may change depending on the PPS screen. Please remember to read what the F‐Key says
before using it. Below you will see that F5 has a different purpose when viewing information screen such as
the IDER screen versus a pay process screen such as EDAP. Some F‐Keys are not reflected below.
KEYS: Navigating through information screens
F1‐ Help Invokes either screen‐level help or field‐level help, depending on the position of the cursor on the screen
F3‐PrevMenu Navigates back to the last menu that was displayed
F5‐PrevRec Allows you to search for prior records for an employee. For example in the IDER screen you want to see what the employee was paid on a prior pay date.
F6‐NextRec Allows you to search for the record for an employee (ie. IDER screen).
F12‐Exit This is used to exit the Payroll System.
F9‐MainMenu Takes you back the main menu of PPS
KEYS: Navigating through OPTRS
F2‐Cancel Cancels all data that has been entered on a screen since the last time the F5‐Update function was performed. Must be pressed twice.
F5‐Update Updates the information entered in OPTRS or it can also be used in some cases to view a previous record.

16
SCREEN LAYOUT (MAIN MENU SCREEN) Every screen in the system contains:
1. Header: The header will always tell you what screen you are on, 2. Body: Is where the content is located 3. Footer: Is where all the navigation is located.
All screens are separated by which portion of the system they access, and contain the function code as well
as a description of the screen.
Move From Screen to Screen To access a particular screen, tab to the Next Func field in the footer area and type the corresponding function code. For example, you may type EDAP to access the Additional Pay screen. The <F9 Jump> key may be used to move from the body of a screen to the Next Func field. If you have a unique identifier, such as the employee’s ID number, tab to the appropriate field and type the number. If you do not have an employee ID, type the employee name. If the name is non‐unique or incomplete, the Employee Browse screen will automatically appear. Use the Employee Browse screen to locate the employee ID you need. If applicable, type the scheduling information. Pay Cycle is entered as B1, B2 or MO. Pay End date is entered in the format MMDDYY. The Pay Cycle and Pay End tell the system when this transaction is to be processed. Press Enter to display the detail screen for the specified transaction.
IDDB‐
Departmenta
l EDB Inquiry
Submenu
IDPR‐ Dept.
PAR Inquiry
Submenu
Footer
OPTRS IDTC‐ Time/Leave
Rosters EDAT‐
Adjustment Transaction Submenu
17
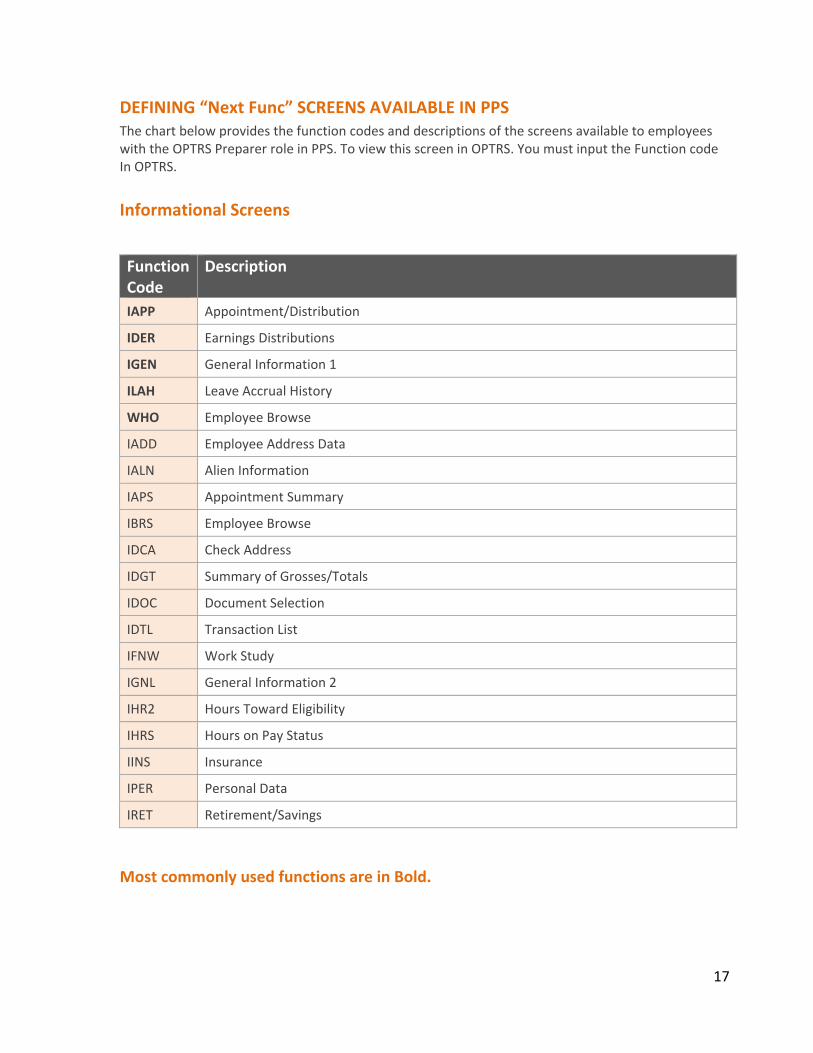
DEFINING “Next Func” SCREENS AVAILABLE IN PPS The chart below provides the function codes and descriptions of the screens available to employees with the OPTRS Preparer role in PPS. To view this screen in OPTRS. You must input the Function code In OPTRS.
Informational Screens
Function Code
Description
IAPP Appointment/Distribution
IDER Earnings Distributions
IGEN General Information 1
ILAH Leave Accrual History
WHO Employee Browse
IADD Employee Address Data
IALN Alien Information
IAPS Appointment Summary
IBRS Employee Browse
IDCA Check Address
IDGT Summary of Grosses/Totals
IDOC Document Selection
IDTL Transaction List
IFNW Work Study
IGNL General Information 2
IHR2 Hours Toward Eligibility
IHRS Hours on Pay Status
IINS Insurance
IPER Personal Data
IRET Retirement/Savings
Most commonly used functions are in Bold.

18
COMMONLY USED SCREENS (used for informational purposes)
When using PPS, there will always be screens that you find that you use more than
others. Some of those screens are:
Function
Code
Description Purpose
WHO Employee
Browse
You are able to search for an employee’s id by entering a partial name. Able to view the employee id, the full name, employee status, and home department for all employees on campus. You will only be able to view details for employees that you have access to.
IAPP Appointment/
Distribution
Information
You are able to view: 1. Home department 2. Appointment information (including pay schedule, FLSA and
time reporting information) 3. Distribution information (including distribution percentage and
distribution rate)
IDER Payment
Inquiry
You are able to view: 1. Exactly how much an employee was paid on a particular date
for a particular pay period 2. The COA and DOS that was used 3. Any offsetting (adjustment) transactions that also affected pay
ILAH Leave
Accrual
History
You are able to view: 1. How many accrual eligible hours an employee worked 2. What the system given accrual amount was for a particular
month, and any hours that were lost due to an employee reaching their max
3. What the current vacation, sick and comp time balance is
IGEN General
Information
You are able to view:
1. Hire date 2. Citizenship information 3. Tax withholdings 4. Former names 5. Check dispositions (also available on IDCA) 6. Retirement and BELI information

19
OPTRS SCREENS (Most frequently Used to Process Pay) The screens below are used to process Pay.
Function Code
Description Purpose
IDTC Dept. Time Collect
1. Time Roster and the leave roster.
2. Time should be recorded in CalTime. However on an exception
basis IDTC can be used to input current pay period time for all
positive time employees.
3. Leave Roster is used to input all leave usage for the prior
month.
EDAT > EDAP Additional Pay
1. Enter any additional pay for the current pay period for positive
time employees who do not appear on the roster, or exception
time employees who have additional amounts owed to them.
EDAT > EDLR Late/Reduce Pay
1. Late pay can be entered for any employee owed additional
time from previous pay periods.
2. Reductions in pay should be entered to offset an exception time employee owed less money for the current pay period, OR employees that have been overpaid. Reductions entered due to overpayments cannot be completed until after receiving written consent from the employee.
EDAT > EDFT One Time Payment
This screen is used to enter flat dollar amount, one‐time payments
for employees.
EDAT > EDRA Retroactive Pay
This screen is used to enter retroactive pay for an employee who
has a change to their pay rate only. If there is a change to anything
other than the pay rate, you must use the EDLR screen.
EDAT > EDTS Single Expense Transfer
This screen is used to process expense transfer from one chart of
account to another. This screen should only be used if there is no
change to what the employee has received. In addition, you can
only complete single expense transfers after the PPP5302
(Distribution of Payroll expense) report for the fiscal month in
which the transaction has occurred has been generated.
20
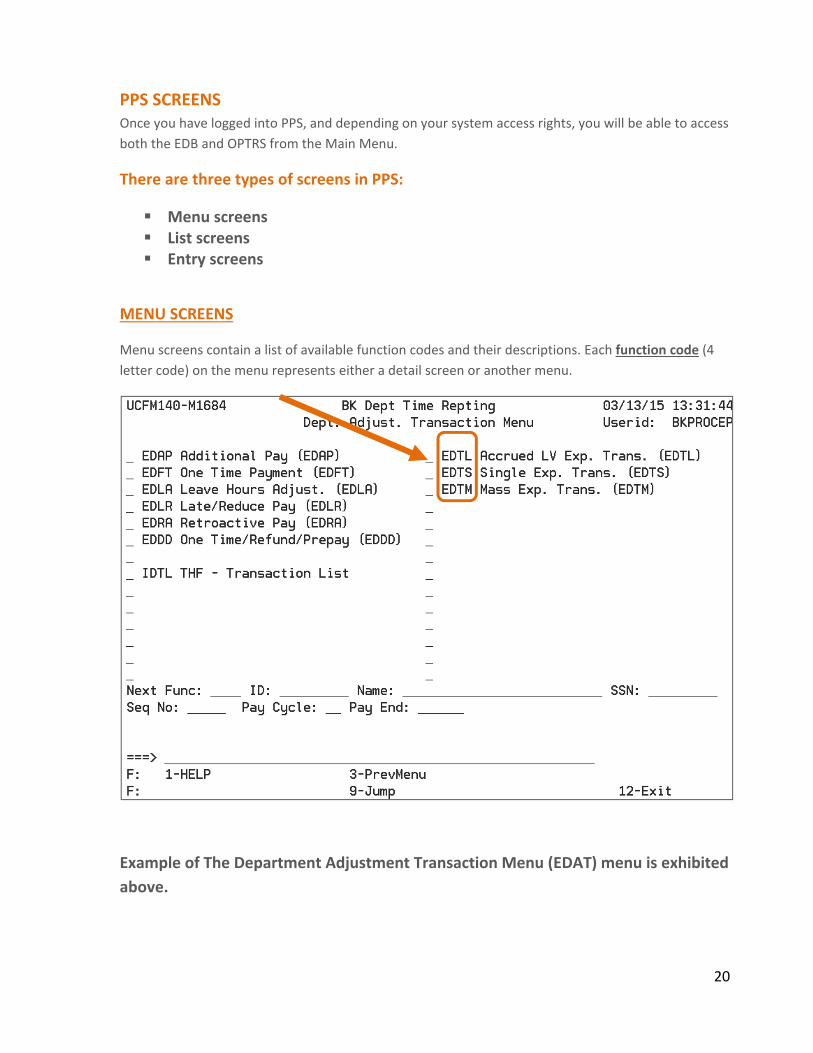
PPS SCREENS Once you have logged into PPS, and depending on your system access rights, you will be able to access
both the EDB and OPTRS from the Main Menu.
There are three types of screens in PPS:
Menu screens List screens Entry screens
MENU SCREENS
Menu screens contain a list of available function codes and their descriptions. Each function code (4
letter code) on the menu represents either a detail screen or another menu.
Example of The Department Adjustment Transaction Menu (EDAT) menu is exhibited
above.

21
LIST SCREENS
There are two types of list screens:
1. The Employee Browse screen: (shown below) provides a list of employees in the Employee Database (EDB).
2. The Check List: (below) provides a list of positive time employees who meet the criteria for a specified pay cycle and pay period. This is the same set of employees who will appear on the Time Input Roster.
EMPLOYEE BROWSE SCREEN
CHECKLIST

22
ENTRY SCREENS
Time Input Roster
The time input roster is only used in cases where CalTime cannot or did not send the time to PPS. No
changes to chart string, DOS, pay rate or title code can be entered here. You are simply adding hours
to be paid on a predefined distribution.
(95% of time entry should be entered in the CalTime Time reporting System, the time roster should
be used on an exception basis only)
1. Contain multiple entry fields, each representing a single distribution on the employees record. The employees last name is only partially displayed and full employee ID is dispalyed
2. Is used to generate positive time/pay transactions (if time cannot be entered in CalTime). 3. Displays data for a particular type of payroll transaction 4. You must input a ‘Y’ if you want the transaction to be paid
The Time Input Roster shown above is an example of an entry screen that allows reporting of time for
positive time employees based on their appointment pay.

23
PROCESSING PAY TRANSACTIONS IN PPS
OPTRS is split into two sections for departmental users. To process a transaction, you use the time leave rosters or the adjustment screens.
1. Time and Leave Rosters 2. Adjustment transactions
To access the Time and Leave Rosters: 1. Input IDTC in the “Next Func” field at the bottom of the screen,
To access adjustment Transactions screen: 2. Input EDAT in the “Next Func” field at the bottom of the screen.
Enter IDTC in space next ‘Next Func:’ and press <Enter> to access the Time and/or Leave Rosters. Enter
EDAT and press <Enter> to access the Adjustment Transaction sub‐menu
SELECTING THE APPROPRIATE OPTRS PAY CYCLE 1. Pay for the current period (including additional pay) must be paid on the employees regular pay
schedule and never in advance
2. Pay activity and adjustments to time may occur on any OPTRS pay cycle (as appropriate) and late
pay should be paid as soon as possible.
3. Expense Transfers must be scheduled for the current (open) pay cycle (regardless of the
employees regular pay schedule) and must never be scheduled for a future cycle.
4. Reduction in pay (due to prior overpayment) should be scheduled for a cycle when the employee
will receive pay (prior written consent from the employee is required)
Roster Menu (IDTC) Checklist, Time Roster, Leave Roster
Adjustment Menu (EDAT) EDAP: Additional Pay EDFT: One‐Time Payment EDLR: Late/Reduce Pay EDRA: Retroactive Pay EDTS: Single Expense Transfer IDTL: THF – Transaction List
24
5. Leave Usage and all leave balance adjustments are always scheduled depending on the employee
primary pay cycle. Non Exempts submit leave usage on the biweekly pay cycle. Non‐exempt
submit leave usage on the MO pay cycle for the prior months leave usage.
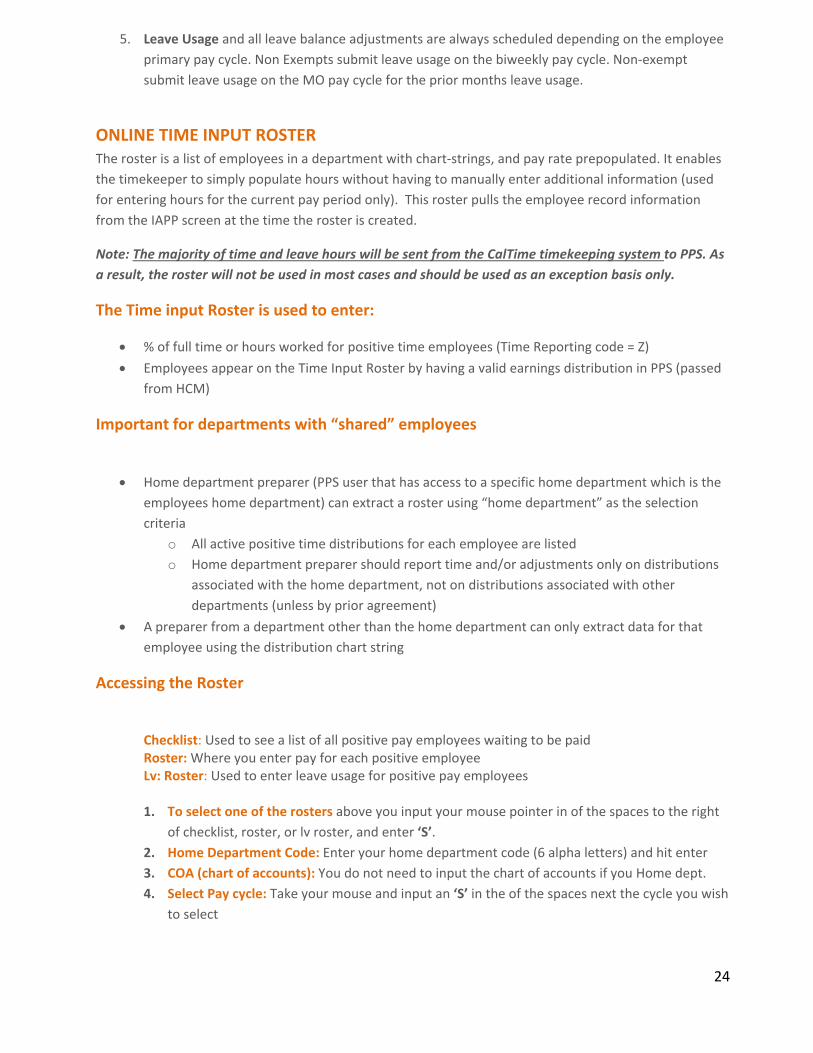
ONLINE TIME INPUT ROSTER The roster is a list of employees in a department with chart‐strings, and pay rate prepopulated. It enables
the timekeeper to simply populate hours without having to manually enter additional information (used
for entering hours for the current pay period only). This roster pulls the employee record information
from the IAPP screen at the time the roster is created.
Note: The majority of time and leave hours will be sent from the CalTime timekeeping system to PPS. As
a result, the roster will not be used in most cases and should be used as an exception basis only.
The Time input Roster is used to enter:
% of full time or hours worked for positive time employees (Time Reporting code = Z)
Employees appear on the Time Input Roster by having a valid earnings distribution in PPS (passed
from HCM)
Important for departments with “shared” employees
Home department preparer (PPS user that has access to a specific home department which is the
employees home department) can extract a roster using “home department” as the selection
criteria
o All active positive time distributions for each employee are listed
o Home department preparer should report time and/or adjustments only on distributions
associated with the home department, not on distributions associated with other
departments (unless by prior agreement)
A preparer from a department other than the home department can only extract data for that
employee using the distribution chart string
Accessing the Roster
Checklist: Used to see a list of all positive pay employees waiting to be paid Roster: Where you enter pay for each positive employee Lv: Roster: Used to enter leave usage for positive pay employees 1. To select one of the rosters above you input your mouse pointer in of the spaces to the right
of checklist, roster, or lv roster, and enter ‘S’.
2. Home Department Code: Enter your home department code (6 alpha letters) and hit enter
3. COA (chart of accounts): You do not need to input the chart of accounts if you Home dept.
4. Select Pay cycle: Take your mouse and input an ‘S’ in the of the spaces next the cycle you wish
to select

25
5. Enter Pay cycle and Pay End: at bottom of scree you must input the current pay cycle and pay
end date to access roster. Please refer to payroll calendar for dates.
Example of Roster above.
BLOCKED transactions
Current Time Reporting transaction (IDTC) may be blocked from processing if underlying
appointment/distribution data in the EDB does not support distribution information used to report time
on the Time input Roster.

26
How to keep a roster entry from being “picked up” and used during the pay compute
process
To keep an entry on the roster from paying an employee you simply do not include a Y under the ‘OK’ for
the designated employee. If you do want pay to process, you must include the Y.
EDAT‐ ADJUSTMENT TRANSACTION MENU To process an adjustment you will need to enter the required information below.
Example Below
Enter Function Specify Employee Identifier: Employee ID or Last Name, First Name
Current Cycle Current Cycle Pay Period End Date
Y

27
PAY PROCESSING “HOW TO” REFERENCES CARDS: Cards that assist you in step by step instructions to process a particular type of pay transaction in PPS can
be found in the appendix of this book. You can print the reference cards on the Payroll website by going to
the following link: http://controller.berkeley.edu/departments/payroll/optrs/optrs‐reference‐materials
CODE FOR PPS SCREEN
TYPE OF PAY TRANSACTION DESCRIPTION OF USE
IDTC OPTRS Time Roster Transactions
For enter hours for positive paid employees if CalTime did not send time. Use for current pay period hours only.
EDAT OPTRS Department Adjustment Transactions
Main menu to access EDAP, EDLR, EDFT, EDRA, and EDTS adjustment screens
EDAP Payroll Additional Pay Time
EDAP is used to pay employees that were not paid by CalTime.
a positive time employee for the current period who doesn’t appear on the time roster
a positive time employee for the current period who appears on the Roster, but for whom the distribution information is incorrect
An exception time employee for additional hours worked for the current period
Important: The Additional Pay screen is only to be used to report time worked in the current period. To schedule payments for prior periods, enter an LX transaction on the EDLR screen.
EDLR
Payroll Late/Reduce Pay Time
The Late/Reduce Pay screen (EDLR) is a multi‐purpose transaction screen used to:
Generate late pay (LX) (LX typically means late pay)
Reduce pay (RX) (RX typically means reduction)
Reverse an LX transaction with an RX transaction or vice versa
Reverse an Additional Pay transaction with an RX transaction
Process leave usage and accrual adjustments using LX and RX transactions
EDLR Leave without Pay: Reduce Pay for exception employee
The Late/Reduce Pay screen (EDLR) is used to report absences without pay of less than 30 days, for staff employees on Exception Time. (This function is not used for academic titles.)
EDFT Payroll one Time Payment
A one‐time payment is a payment made to an employee for a unique personnel action that is outside of the normal conditions of employment. Payment is in the form of a flat dollar amount (not hours). Some of the one‐time payments that can be processed on the EDFT screen include: • Honoraria (HON) • University extension pay (UNX) • By Agreement (BYA OR BYN)*
28
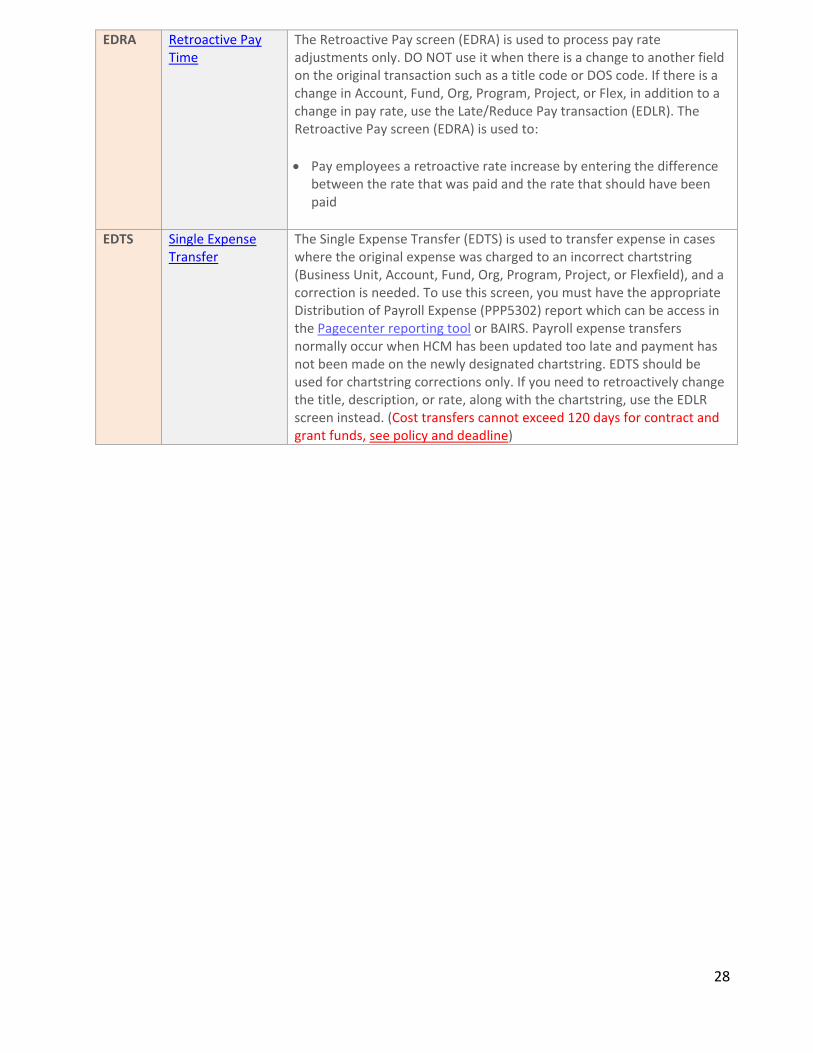
EDRA Retroactive Pay Time
The Retroactive Pay screen (EDRA) is used to process pay rate adjustments only. DO NOT use it when there is a change to another field on the original transaction such as a title code or DOS code. If there is a change in Account, Fund, Org, Program, Project, or Flex, in addition to a change in pay rate, use the Late/Reduce Pay transaction (EDLR). The Retroactive Pay screen (EDRA) is used to:
Pay employees a retroactive rate increase by entering the difference between the rate that was paid and the rate that should have been paid
EDTS Single Expense Transfer
The Single Expense Transfer (EDTS) is used to transfer expense in cases where the original expense was charged to an incorrect chartstring (Business Unit, Account, Fund, Org, Program, Project, or Flexfield), and a correction is needed. To use this screen, you must have the appropriate Distribution of Payroll Expense (PPP5302) report which can be access in the Pagecenter reporting tool or BAIRS. Payroll expense transfers normally occur when HCM has been updated too late and payment has not been made on the newly designated chartstring. EDTS should be used for chartstring corrections only. If you need to retroactively change the title, description, or rate, along with the chartstring, use the EDLR screen instead. (Cost transfers cannot exceed 120 days for contract and grant funds, see policy and deadline)

29
POST AUTHORIZATION NOTIFICATION (PANS):
• The PAN (Post Authorization Notification) e‐mail is a notification that an adjustment transaction has been entered and saved in OPTRS (EDAP, EDLR, EDFT, and EDRA transactions)
• The e‐mail is automatically routed to the designated mandatory recipients. Additional recipients can be added as needed
• A PAN e‐mail is an after‐the‐fact notification, it cannot be used as approval for a transaction • If there is an error in the transaction that is discovered through PAN recipient review, the PAN
recipient must notify the OPTRS preparer and action must be taken to correct the transaction To submit a request to setup, update, or remove a PAN recipient, complete the form on the payroll website: http://controller.berkeley.edu/post‐authorization‐notification‐e‐mail
PAN email example below
Received: from uclink.berkeley.edu by ironwood.Berkeley.EDU (IBM MVS SMTP CS V1R7) with BSMTP id STC41078; Fri, 21 Sep 07 09:53:06 PDT Date: Fri, 21 Sep 2007 09:52:55 ‐0700 From: Post‐Authorization Notification System <[email protected] Subject: EMPLOYEE WHO WAS PAID; Single Expense Transfer; ERL0KRG; To: YOUR NAME ‐‐‐‐‐‐‐‐‐‐‐‐‐‐‐‐‐‐‐‐‐‐ Employee and Preparer Information ‐‐‐‐‐‐‐‐‐‐‐‐‐‐‐‐‐‐‐‐‐‐ Employee: EMPLOYEE WHO WAS PAID Preparer: PREPARER, OPTRS ID: 011111111 Phone: (510) 642‐5555 Action: TS‐Single Expense Transfer Email: [email protected] ‐‐‐‐‐‐‐‐‐‐‐‐‐‐‐‐‐‐‐‐‐‐‐‐‐‐‐‐‐‐‐‐‐‐‐< EDTS >‐‐‐‐‐‐‐‐‐‐‐‐‐‐‐‐‐‐‐‐‐‐‐‐‐‐‐‐‐‐‐‐‐‐‐‐ Employee Name: EMPLOYEE WHO WAS PAID ID Number: 011111111 TS (Single Transfer) Check Date: 10/01/07 Pay Cycle: MO The following pay transaction has been processed. PPP5302 Reference: Month: 0802 Page: 23107 Line: 2 Transfer from: 1/50020/59989/23795/44/ /ND0999/NDLPL Transfer to: 1/50020/25539/23795/44/ / /EFLPL Pay Period End: 08/31/07 Title: 3282 DOS: REG Original Gross Earnings: 913.65 Original Benefits: 15.71 Transfer Gross Earnings: 913.65 Reason: B ‐‐‐‐‐‐‐‐‐‐‐‐‐‐‐‐‐‐‐‐‐‐‐‐‐‐‐‐‐‐ List of Reviewers ‐‐‐‐‐‐‐‐‐‐‐‐‐‐‐‐‐‐‐‐‐‐‐‐‐‐‐‐‐‐ Name UserID or e‐mail ‐Type‐ ‐Status‐ ADDITIONAL PAN RECIPIENT [email protected] M N ADDITIONAL PAN RECIPIENT PANRECIPIENT2@ BERKELEY.EDU M N ADDITIONAL PAN RECIPIENT [email protected] U N
Email Header
Transaction
Information
List of PAN
reviewers

30
Pay Processing Short Cuts When entering a pay transaction in PPS, a payroll processor typically enters information in each field one by one until all necessary fields are complete. However there is a short cut for prepopulating the information into the fields as well as copying information from an existing payroll transaction. This short cut function can be used for the following pay screes: EDAP, EDLR. To retrieve information (from the distribution in IAPP screen)
1. Follow the steps 1‐5 on the EDAT reference card (found in appendix of this book) above to get to the EDAP screen.
2. Enter the letter “R” in the command field 3. Enter “IAPP” in the next function field and hit enter (you will be taken to the employee IAPP
screen and will see a message at the bottom right of the screen that says <Upd In Prog>…this means you are performing the action correctly and the system is currently in update in progress mode).
4. Review the distribution numbers and visually choose and remember the distribution number that you would like to “Retrieve.’
31
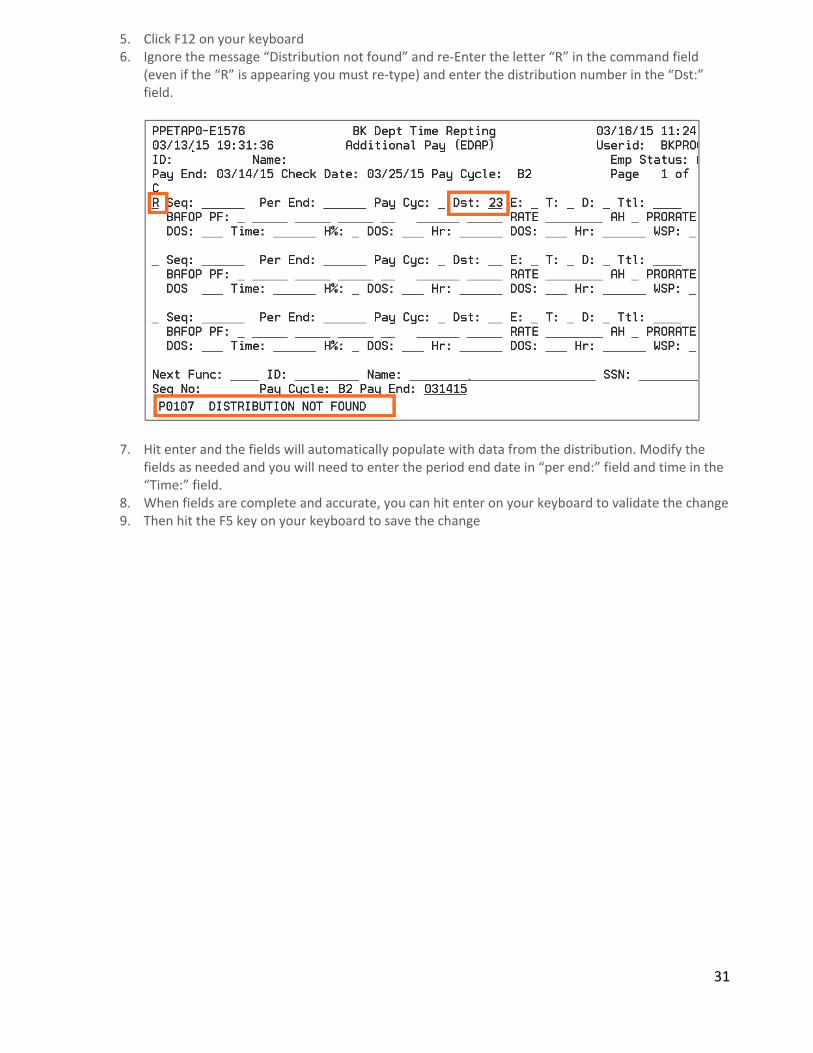
5. Click F12 on your keyboard 6. Ignore the message “Distribution not found” and re‐Enter the letter “R” in the command field
(even if the “R” is appearing you must re‐type) and enter the distribution number in the “Dst:” field.
7. Hit enter and the fields will automatically populate with data from the distribution. Modify the fields as needed and you will need to enter the period end date in “per end:” field and time in the “Time:” field.
8. When fields are complete and accurate, you can hit enter on your keyboard to validate the change 9. Then hit the F5 key on your keyboard to save the change

32
To copy information (from an existing transaction that has been processed)
The copy short cut permits a PPS processor to copy a transaction that has been processed in the current open pay processing cycle. For example, I enter one transaction with 8 hours and I need to enter another transaction for 7 hours. All the information is the same except I am changing the hours from 8 to 7. I can copy the transaction that contains the 8 hours to save some time instead of having to enter all the information in each individual field.
1. Enter “C” in the command field (see snapshot below)
2. Hit enter on your keyboard CAUTION: Once you complete this step it may not look like you copied the data but you did and you can verify this by seeing the F‐Key “2‐Cancel” will appear at the bottom of the screen which conveys that you have the option to cancel the transaction.
3. Proceed to modify the information in each applicable field that was copied and hit enter to validate the data
4. Hit F5 on your keyboard to save the transaction.

33
LEAVE ADJUSTMENTS The Payroll System is the system of record for vacation and sick leave accruals and balances.
Effective November 1, 2014 UC Berkeley implemented factor leave accruals for Non‐Academic Exempt and
Non‐Exempt employees. Academic Employees did not transition to factor leave accruals and remain on
the old “Table method” of accruing vacation and sick leave.
CalTime sends leave usage to PPS or leave usage is manually entered in PPS, PPS calculates the leave
accruals and updates the employees balances and refreshes CalTime with a new leave balance.
What are Factor Leave Accruals?
Factor leave accrual is a method of accruing vacation and sick leave. The factor accrual method uses a
factor rate* multiplied against the hours an employee is on pay status in order to calculate vacation and
sick leave accruals.
How is Factor Leave Accruals Calculated?
All employees are assigned a leave code; this represents a “factor leave accrual rate” based on years of
service in the HR system (HCM). The leave code and employee record passes to the payroll system nightly.
Leave accruals are calculated in the payroll system (system of record) based on the employees hours in
pay status reported in the payroll system. The calculation for exempt employees is slightly different than
non‐exempts because exempts accrue on a monthly (MO Cycle) and Non‐Exempts accrue every two
biweekly pay cycles (4 weeks).
Non‐Exempt Employee Exempt Employee
Eligibility Eligibility to accrue and use leave is subject to union contract or personnel policy.
Period of Accrual
Quadra‐weekly cycle(two biweekly pay cycles, 160 hour work period.
Calendar Month (based on number of working hours in the calendar month)
Calculation Factor rate X hours on pay status (during two biweekly pay cycles, 160 hour period)
Factor rate X hours on pay status during calendar month
Factor Rate Factor rate is assigned based on employees number of years of service
Accrual Granted The business day follow the close of the quadra‐weekly cycle (two biweekly pay cycles)
1st of the month following the close of the calendar month (monthly pay period)

34
LEAVE ACCRUAL CALCULATION FOR NON‐EXEMPT EMPLOYEES The factor rate is multiplied by the employee’s regular hours on pay status every 4 weeks (two biweekly
pay periods).
HCM PPS CalTime PPS
Employee is assigned leave code in HCM
Employee record and leave code is updated in Payroll
system (PPS)
1st BW pay period: employee records 80160 hours X Factor rate =
Accrual earned every 4 weeksSent
Nightly
Time sent every two
weeks1st BW pay period: employee records 80
For example, a non‐exempt employee has been assigned Leave Code A, vacation factor rate of 0.057692 and sick
leave rate of .046154 (factor rate chart available on Controllers website). During the two biweekly pay periods he
worked full‐time, so he has a total of 160 regular hours on pay status during this 4 week period.
To calculate his accrued vacation and sick leave accruals we multiply Hours on Pay Status X Factor Rate.
Accrual Type Hours on Pay Status Factor Rate Leave Accrued
Vacation 160 X .057692 = 8.653800
Sick Leave 160 X .046154 = 6.923100
When are non‐exempt employee balances updated in CalTime?
Employee records time and
leave usage in CalTime
Vacation and sick leave is accrued
and balance is updated
Leave is recorded in CalTime and when entered will adjust the CalTime balance; leave usage is sent to the
payroll system. The payroll system calculates the leave accrual based on the time and leave usage it
receives from CalTime including manual adjustments entered in the payroll system by a timekeeper. The
Payroll system will then refresh the CalTIme system each Biweekly pay period on the day after the PPS
OPTRS Deadline. Balance update is typically completed by 3pm the day after the Biweekly OPTRS deadline.
Balance update is sent every 2 weeksAccruals are sent every 4 weeks
Time & vacation and sick recorded is sent to the payroll system every 2 weeks
CALTIME PPS

35
LEAVE ACCRUAL CALCULATION FOR EXEMPT EMPLOYEES The factor rate is multiplied by the employee’s regular hours on pay status every month (on the MO
Cycle).
HCM PPS CalTime PPS
Employee is assigned leave code in HCM
Employee record and leave code is updated in Payroll
system (PPS)
Monthly Pay Period: Employee leave usage and leave without pay in CalTime
Hours on pay status X factor rate = accrual
earned on 1st of monthSent
NightlyTime sent on
MO cycle
When are non‐exempt employee balances updated in CalTime?
Employee records time and
leave usage in CalTime
Vacation and sick leave is accrued
and balance is updated
Leave is recorded in CalTime and when entered will adjust the CalTIme balance; leave usage is sent to the
payroll system. The payroll system calculates the leave accrual based on the time and leave usage it
receives from CalTime including manual adjustments entered on the MO pay cycle in the payroll system by
a timekeeper. The Payroll system will then refresh the CalTIme system each MO pay period on the day
after the PPS OPTRS Deadline. Balance update is typically completed by 3pm the day after the MO
(Monthly) OPTRS deadline.
Lost Accruals for Exempt Employees close to vacation max:
Payroll/leave accruals are processed for exception paid exempt employees the 3rd week of the month but
exempt employees turn in their time sheet after the fact.
For example,
3rd week of March payroll is processed to pay exempt employees on the 1st of April.
1st week of April, exempt employees turn in timecards for time worked in March
As a result, exempt employees that are close to vacation max may lose accruals even though they may
have used vacation to bring their balance down during March. When an exempt employee uses vacation
or sick leave to bring their leave balance down in the month in which they lost accruals….a payroll
administer should process an adjustment in PPS to restore the lost accruals.
Balance/Accrual update is sent once per month (day after MO OPTRS deadline)
Leave taken is recorded and sent to thePayroll system every MO Cycle
CALTIME PPS

36
PROCESSING LEAVE ADJUSTMENTS FOR BOTH EXEMPTS AND NON EXEMPTS If you have an employee that you need to process a leave accrual adjustment for you will need do the
following:
1. Look at the IAPP screen and find the employee leave code
2. Determine if employee is exempt or non‐exempt (non‐exempt leave adjustments should only be
processed on a biweekly pay cycle, exempt leave adjustments should only be processed on a
monthly pay cycle)
3. Find the applicable factor leave rate based on leave code (you can see the factor rate chart
1. Non‐Exempt Factor leave rate chart
http://controller.berkeley.edu/sites/default/files/FactorLeaveAccrualChartforBiweeklyPai
dNonexemptEmployees_031114.pdf
2. Exempt Factor Leave rate chart:
http://controller.berkeley.edu/sites/default/files/FactorAccrualChartExempt_031414.pdf
4. Determine the hours on pay status (additional hours or hours you plan on reducing)
5. Calculate: Hours on pay status X factor rate = leave accrued
6. Process applicable RX or LX transaction based on desire to reduce or increase accruals. Remember
to round to the 4th decimal place when entering the transaction in PPS. Please use chart
below……..Remember that the combination of an LX or RX transaction and leave code (i.e VAC, SKl) can have
different effects of increasing or decreasing the leave balance. For example, an LX transaction for SKL (sick
leave) will increase the employees sick leave where an RX transaction for SKL will decrease the balance.
DOS CODE
DEFINITION IMPACT OF TRANSACTION TYPE ON LEAVE BALANCES
Input of an LX Input of and RX
VAC Vacation Leave Taken
DECREASES Balance
INCREASES Balance SKL Sick Leave Taken
CTO Compensatory Time off
VAX Prorates Vacation Leave TakenN/A
SKX Prorates Sick leave Taken
VLA Vacation Leave Accrued Adjustment
INCREASES Balance DECREASES Balance
SLA Sick Leave Accrued
CTA Compensatory Time Accrued
CMP Compensatory Time PaidPayment
TRM Terminal Vacation Pay Reduction in Pay
The leave input roster is used to enter:
Typically leave is entered in CalTime and sent to PPS however in the few cases in which leave is not sent by
CalTime, the leave roster can be used to enter leave taken for the current pay period only. The leave
roster is a list of all employees that can be used to enter leave taken. Distribution information and pay
rate is already prepopulated. The roster is merely used to enter hours.

37
1. Vacation, Sick Leave, and Compensatory time usage for all eligible employees
a. Vacation and sick leave usage will be prorated across all distributions
2. Compensatory time accrued in the prior month
a. Employees with a valid accrual code in PPS (passed from HCM) appear on the leave roster
AUDITING VACATION AND SICK LEAVE ACCRUALS
The best way to view if the employee received their leave accruals is to login to PPS and go to the ‘ILAH’
screen. You can browse through prior history leave accrual by using the F‐Keys displayed at the bottom of
the PPS screen.
Screen shot of the ILAH leave accrual screen in PPS
Hours toward
accrual also
known as hours
on pay status
Pay period in
which employee
accrued
Vacation and
Sick leave
accrued
Leave Accrual
Code

38
To view accrued vacation and sick leave usage recorded in PPS.
Go to the ‘IDER screen’ and use the F‐keys to sort past history and search for the leave dos codes (i.e. SKL,
SLA, VAC, VLA). Compare this information to the leave usage that was recorded on the CalTime time card.
To view Leave usage that was entered in the payroll system, use the IDER screen and search DOS codes
(SKL, SKL, CTO, CTA, VAC, VLA, VAX).
You can compare leave transactions entered in the PPS system and corresponding pay period against the
employees timecard in CalTime to determine if leave usage was not entered in PPS.
ADDITIONAL LEAVE PROCESSING INFORMATION When should I update a leave balance adjustment in the payroll system for employees?
1. Exempt employee leave adjustments should be processed in a Monthly Pay cycle
2. Non‐Exempt leave adjustments should be processed on a Biweekly pay cycle
Note: PPS will not update CalTime balances for non‐exempts on a monthly cycle and exempt
employee balances will not be updated on a biweekly pay cycle.
A leave adjustment may be required in some cases where historical edits (late adjustments) are needed
after the PPS pay cycle has closed and CalTime sign‐off has been performed. Similarly in cases where
CalTime did not successfully pass the time to the Payroll system because the employee may have
appeared on the CalTime error report due to timing or perhaps the department did not extend the HCM
appointment. As a result, you may need to process a manual leave adjustment in the Payroll system.
Should I notify the employee if I make a manual correction to vacation and sick leave in CalTime or the
payroll system?
Yes. The employee should be notified. Remember the employee will see a change in their balance the next
time PPS updates CalTime balances and it may be confusing if they are unaware that an adjustment was
made but see a drop or increase in their vacation or sick leave balance.

39
Compensatory time “Comp Time” information
Compensatory time is accrued within CalTime and the accrued amount is automatically sent to PPS. It can
also be manually added to PPS by a payroll administer by processing a manual transaction. PPS does not
calculate comp‐time accruals. When comp‐time is used it either recorded in CalTime and automatically
sent to PPS or a payroll administrator must manually record the comp time usage within in PPS. The comp‐
time balance can be found on the ILAH screen in PPS. Please refer to the union contracts for policy
regarding comp time max, accruals, usage and payout policy.
DOS CODE
DEFINITION IMPACT OF TRANSACTION TYPE ON LEAVE BALANCES
Input of an LX Input of an RX
CTO Compensatory Time off DECREASES Balance INCREASES Balance
CTA Compensatory Time Accrued INCREASES Balance DECREASES Balance
CMP Compensatory Time Paid Payment (Decreases Balance)
Reduction in Pay
APPENDIX
PAYROLL RESOURCES Payroll Website: Contains our Payroll deadline calendar and information about our Payroll processes. http://controller.berkeley.edu/payroll/ Number of working hours in the month: http://controller.berkeley.edu/payroll/Tools/monthlyWorkingHours.htm Payroll Calendar and Partial Month Calculator: http://controller.berkeley.edu/payroll/OPTRS/tools.htm How to Separate an Employee: http://controller.berkeley.edu/payroll/Separations/index.htm Request Access to OPTRS https://sara.berkeley.edu/ Request Access to Page Center to view ledgers: Supervisor must request access on employee’s behalf and must include the following information: Employee Name, Calnet Id, UCB ID Number, and processing Units. Email request to [email protected].
Requesting BAIRS reporting access
A reporting tool to access the PPP5302 payroll expense report used to find the information needed to process a expense transfer and view employee vacation and sick leave reports. Request access via sara.berkeley.edu
40
CalTime Timekeeping system
The standardized timekeeping system used by UC Berkeley. Caltime.berkeley.edu
Human Resource Information
Includes information regarding union contracts, HRMS (human resource system), and Training.
http://hrweb.berkeley.edu/
Union Contracts: http://hrweb.berkeley.edu/labor/contracts
Atyourservice
A website where you can view your benefits information, paycheck statements and make changes to your
W‐4 paycheck taxes.
http://atyourservice.ucop.edu/
Human Capital Management System (HCM) HCM systems where all employee records are maintain. This system interfaces with our PPS system and the record information appears in IAPP screen in PPS. http://hrweb.berkeley.edu/hcm
Page Center Reporting Tool Application used to produce text file reports for Payroll and access the PPP5302 salary expense report used to process expense transfer. http://controller.berkeley.edu/pagecenter‐reporting‐tool “PAN” Payroll Authorization Notification. This are automated notices that are generated when a timekeeper processes a transaction in PPS. However in order to be setup for these notices a PAN request must be submitted. http://controller.berkeley.edu/post‐authorization‐notification‐e‐mail Title code system lookup Web based database that has title codes, salary range, and union/policy codes. This data base can be used to lookup a specific title code to find out whether it is represented or not, exempt or non‐exempt, and salary range. UCOP Accounting Manual UC office of the president guiding payroll policies. Also has a list of pay periods and pay dates through 2017. http://policy.ucop.edu/manuals/accounting‐manual.html
Composite Benefit rates http://www.spo.berkeley.edu/policy/benefits/benefits.html

41
FREQUENTLY ASKED QUESTIONS
1. When I login I get a message saying “Access revoked” and it does not permit me to go any
further.
To reset password please send an e‐mail to mfs‐[email protected]. Include: user name, user
id, employee id and phone number. IT will call you with new password.
2. OPTRS has frozen and is not letting me logout of transaction. Take your mouse and click on pink eraser on tool bar of PPS web page or click on the pause/break button on your keyboard to refresh the screen.
3. I entered the wrong pay in OPTRS, how do I prevent the transaction from going being paid. Do not include ‘Y’ in OK column of roster. It will not process pay. You may also email Central Payroll at [email protected] and request to block the transaction. If submitting a request to block the transaction, please provide as much detail as possible, employee id, name, transaction information (or screen shot) and reason for request.
4. Where can I find a list of DOS codes? You can print online at: http://controller.berkeley.edu/sites/default/files/DOS_Codes_SalaryAcct_Chart.pdf

42
LIST OF DOS CODES
This list below is not a complete list of DOS code but a list of dos codes that are primarily used for
timekeeping within CalTime.
PPS DESCRIPTION CODE (DOS Code) CALTIME Pay Code
DOES CALTIME SEND PAY CODE TO PPS (YES OR NO)
REG Administrative Leave with Pay YES (For Non‐Exempts)
REG Alternate Holiday Taken YES (For Non‐Exempts)
SKL Bereavement‐Sick Leave Taken YES (For Non‐Exempts and Exempts)
REG Call In YES (For Non‐Exempts)
REG Callback Minimum YES (For Non‐Exempts)
REG Callback Worked YES (For Non‐Exempts)
CHD Charge Nurse Diff YES (For Non‐Exempts)
CNX Clin Nurse II‐III Diff YES (For Non‐Exempts)
CTA Comp Time Double YES (For Non‐Exempts)
CTO Comp Time Off YES (For Non‐Exempts)
CTO Comp Time Off PD1 YES (For Non‐Exempts)
CTO Comp Time Off PD2 YES (For Non‐Exempts)
CMP Comp Time Paid YES (For Non‐Exempts)
CTA Comp Time Premium YES (For Non‐Exempts)
CTA Comp Time Straight YES (For Non‐Exempts)
CDP Consecutive Day Premium YES (For Non‐Exempts)
REG Court Time YES (For Non‐Exempts)
REG Court Time Worked YES (For Non‐Exempts)
ERT ERIT‐Empl. Reduction In Time YES (For Non‐Exempts)
ESL Extended Sick Leave YES (For Non‐Exempts)
SKL FMLA‐Sick YES (For Non‐Exempts and Exempts)
VAC FMLA‐Vacation YES (For Non‐Exempts and Exempts)
REG Holiday Credit OTP YES (For Non‐Exempts)
REG Holiday Credit OTS YES (For Non‐Exempts)
REG Jury Duty YES (For Non‐Exempts)
REG Medical Leave Paid ‐ Academics YES (For Non‐Exempts)
REG Military Leave Paid YES (For Non‐Exempts)
MBP Missed Meal Breaks YES (For Non‐Exempts)
OT2 Overtime Double YES (For Non‐Exempts)
OTP Overtime Premium YES (For Non‐Exempts)
OTS Overtime Straight YES (For Non‐Exempts)
PTO PTO Taken YES (For Non‐Exempts and Exempts)
PFM Perquisite‐Free Meal YES (For Non‐Exempts)
REG Professional Development YES (For Non‐Exempts)
REG Regular YES (For Non‐Exempts)
SDF Shift Diff Evening YES (For Non‐Exempts)
43
SDL Shift Diff Lead YES (For Non‐Exempts)
SDM Shift Diff Night YES (For Non‐Exempts)
SDW Shift Diff Weekend YES (For Non‐Exempts)
SKL Sick Leave Taken YES (For Non‐Exempts)
TOC Time On Call Restricted YES (For Non‐Exempts)
TOC Time On Call Unrestricted YES (For Non‐Exempts)
REG Travel Time YES (For Non‐Exempts)
REG Travel Time Worked YES (For Non‐Exempts)
REG Union Business Leave YES (For Non‐Exempts)
VAC Vacation Leave Taken YES (For Non‐Exempts and Exempts)
SWC Workers' Comp‐Safety TX Exempt YES (For Non‐Exempts)
SKL Workers' Comp‐Sick YES (For Non‐Exempts and Exempts)
VAC Workers' Comp‐Vacation YES (For Non‐Exempts and Exempts)
VAC More Than 2 Bi‐Weekly Old YES (For Non‐Exempts)
SKL More Than 2 Bi‐Weekly Old YES (For Non‐Exempts)
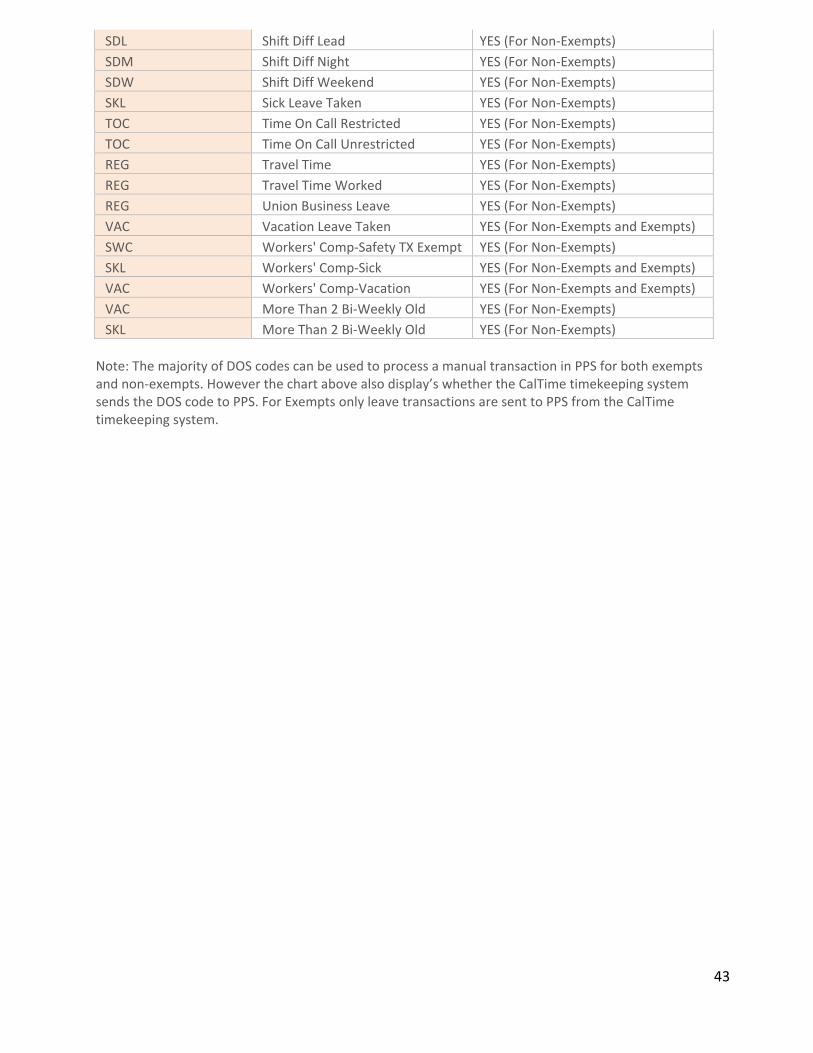
Note: The majority of DOS codes can be used to process a manual transaction in PPS for both exempts and non‐exempts. However the chart above also display’s whether the CalTime timekeeping system sends the DOS code to PPS. For Exempts only leave transactions are sent to PPS from the CalTime timekeeping system.

44
PPP5302 PAYROLL SALARY EXPENSE
The PPP5302 used to obtain the information needed in order to process an expense transfer has several different column headers. Below is description of each column Header. This PPP5302 is located in PageCenter and BAIRS reporting. To obtain access to pagecenter: http://controller.berkeley.edu/pagecenter‐reporting‐tool To obtain access to BAIRS: sara.berkeley.edu
HEADER DESCRIPTION OF COLUMN HEADER
LINE NO A consecutive count of detail lines on each page. This number must be referenced when preparing a Payroll Expenditure Transfer form.
PAR CTL DIS The first three digits of this five digit number is the PAR Control number. It is set to zero on an employee's initial employment. From that time on, every time a PAR record is issued, this control number is incremented by 1 and copied to the PAR record. The last three digits are called the distribution number (DIS) which is the line number with the account information on it from the PAR.
EMPLOYEE NAME
The employee's last name followed by first name. The name appears on only the initial line if more than one detail line applies to the employee.
EMPLOYEE I.D. The nine‐digit employee identification number.
TITLE CODE Identifies the title under which this expense was charged.
PERIOD END DATE
The six‐digit pay period end date in MMDDYY format.
DOS Description of Service is a three‐character code which identifies the type of service the employee provided for payment. Refer to DOS Codes ‐ Alphabetical Order for a list of DOS codes.
TIME The pay period time in hours or in percent for which the payment was made. Hours are printed with two decimal places, followed by the indicator "H". Percent is printed with four decimal places, with the indicator "%". Time is not present on the report for by‐agreement type payments because no time is associated with by agreement type payments.
PAY RATE The monthly (two decimal places) or hourly rate (four decimal places) on the pay transaction or expense transfer is shown here.
ADJ The Adjustment Code is an indicator used to identify the line item as one of the following types of adjustments: E = Expense Transfer H = Hand‐Drawn Check O = Overpayment ‐ the account was credited due to the processing of an overpayment. It does not necessarily mean the overpayment has been repaid. Contact Payroll to verify. R = Rush Check
GROSS EARNINGS
The amount of salary charged to the department for the employee's services during the pay period. A negative sign following the amount denotes a credit item.
PLAN identifies the employee's retirement plan: H = Safe Harbor/DCP Casual Plan N = Not Eligible P = Public Employees Retirement System (PERS) U = University of California Retirement Plan (UCRP)

45
MATCHING CONTRIB NFSS/SMS
The amount of employer contribution to the employee's retirement plan and/or the amount of the employer contribution to the Defined Contribution Plan (DCP) for faculty with summer salaries and/or the Senior Management Severance Plan benefit amount.
GSTR/IAPOF/UCRPSU
The amount of Fee Remission for an eligible graduate student and/or the matching credit amount from the liability account to fund the benefits from an IAP award and/or the UCRP supplemental rate.
OASDI/MEDCR The amount of employer contribution to the Social Security Administration for eligible employees. The amount is determined by the FICA eligibility code on the EDB and the employee's eligible gross wages paid to date.
DENTAL/VISION/HLTH/OPEB/
The combined amount of employer contributions for health insurance for employees, Postdoctoral Scholars and the annuitant. The annuitant is assessed on the salary of employees in either UCRP or PERS and funds the cost of health insurance for currently retired employees. OPEB is the "other post‐employment benefits" expenses for the assessment for the dental, vision, health annuitant rate including the "other post‐employment benefits" expenses for the benefits administration rate.
UI/GSH Premiums for Unemployment Insurance for eligible employees and/or Graduate Student Health for eligible graduate students.
WC/ESP & GSPF2
Charges include Workers Compensation and Employee Support Programs as well as Graduate Student Partial Fee Remission 2 (GSPF2). GSPF2 covers a specified portion of certain mandatory registration and educational fees.
LIFE & UCDI & GSFR
The combined amount of premiums for (1) Term Life Insurance for employees who are UCRP members, and (2) Non‐industrial Disability Insurance for employees who are members of either UCRP or PERS, or (3) Office of the President mandated fee remission for eligible graduate students.
IAP/LEAVE This column contains the combined charges for Vacation Leave Benefits and the Incentive Award Program (IAP) assessments.
TOTAL BENEFITS The sum of all benefit expenses on the line for an employee's payment.

46
EDAT ADJUSTMENT FLOWCHART
Schedule during current open cycle
Must be scheduled when the employee is receiving pay
Does the employee have a change in the amount of hours/$$ they have received?
EDTS SCREENProcess a single expense transfer
Addition hours/$$ or reduction in the
amount of hours/$$?
Is this is retroactive change in pay rate
only?
Is this vacation or sick leave?
EDLR SCREENProcess a reduction in pay, Produce an RX transaction
Is it a one time payment? (ex.
Housing allowance, by agreement, stipend)?
Has the final deadline date for the pay
period in which the activity occurred already passed?
YES
NO REDUCTION
NO
YES
ADDITIONAL
NO
NO
YES
YES
START
Can only be scheduled for the BW cycle for non‐exempts or the MO cycle for exempts
EDLR SCREENProcess a leave adjustment
Should be scheduled during employee regular pay cycle
EDAP SCREENProcess an additional pay
transaction
NO
Should be scheduled using the current open cycle
EDLR SCREENProcess an LX transaction
Can be scheduled during a current open cycle
EDRA SCREENProcess a retroactive
adjustment
Can be scheduled for any cycle
EDFT SCREENProcess a one time payment
YES

EDAT: OPTRS DEPARTMENT
ADJUSTMENT TRANSACTIONS
OPTRS users can schedule adjustments for current or previously reported pay using options available on the Department Adjustment Transaction (EDAT) menu. Adjustment transactions may include: • Additional Pay (EDAP) • One-Time Payment (EDFT) • Late Pay (EDLR) • Reduced Pay (EDLR) • Retroactive Pay (EDRA) • Single Expense Transfer (EDTS)
Step 1. Preparation Off-System
1. Gather employee time records.
2. Secure the necessary approvals.
On-System
1. Log onto the Payroll/Personnel System. Note: When processing an Additional Pay, Late Pay, or Reduced Pay transaction for an existing distribution, you must enter the distribution number in the Dst field on the detail screen. If you do not know the distribution number, use the IAPP function to find it.
2. At the Next Func field on the Online Applications Main Menu, type “EDAT” and press <Enter> to navigate to the Department Adjustment Transaction menu.
3. On the Department Adjustment Transaction menu, type the 4-character function code in the Next Func field.
• EDAP for Additional Pay
• EDFT for One-Time Payment
• EDLR for Late Payment or Pay Reduction
• EDRA for Retroactive Pay
• EDTS for Single Expense Transfer
4. The cursor will automatically jump to the ID field. Type the employee identification number in the ID field.
5. Schedule the transaction. The values in the Pay Cycle and Pay End fields tell the system when to process the transaction.
• Tab to the Pay Cycle field and type the pay cycle in which the transaction will be processed.
• The cursor will jump to the Pay End field. In the Pay End field, type the pay cycle end date to be used for scheduling, in the format: MMDDYY.
6. Press <Enter> to display the appropriate transaction screen (EDAP, EDLR, etc.).
Step 2. Data Entry
EDAP, EDFT, EDLR, EDRA, EDTS Function
To Enter Data
1. See the reference card for the specific screen you are using.
2. To view the help panel for a screen field, place your cursor on the field and press <F1-Help>.
Step 3. Review the Data
1. Verify the data on the screen against the source document for each employee. Make sure you have completed all necessary entries, changes, or deletions accurately.
2. Press <Enter> to format and validate the data.
Edit messages are displayed in the system message area at the bottom of the screen. If <F6-Nxt Msg> appears in the screen footer, press <F6> to see additional edit messages.
3. Resolve any edit messages as necessary.
4. Remember that decimal point placement in OPTRS is critical. To ensure accuracy, always include the decimal point when entering rate and time data. To help prevent overpayments and underpayments, take the time to double-check decimal placement after pressing the <Enter> key and before pressing <F5-update>.

Step 4. Update the Transaction Holding File
1. Press <F5 Update>.
2. The Post Authorization Notification (PAN) Preparation screen displays.
3. Optional: To add PAN recipients, Press <F6 Directory> to search for and select a recipient OR tab to the Email field (1st line), type the PAN recipient’s Employee ID and press <Enter> OR tab to the Email field (2nd line) and type the PAN recipient’s fully-qualified email address (e.g., [email protected]).
4. Press <F10 Comments> to add optional comments in the PAN Comments screen. After you complete the PAN Comments screen, you may choose to take one of the following actions prior to the Update step:
• Press <F10 NotfPrep> to return to the Notification Preparation screen.
• Press <F11 Detail> to view the notification detail that will be sent.
• Press <F3> to return to the data entry screen and make changes, then press <F5 Update> to return to the PAN screen.
5. Press <F5 Update> to complete the update and send the notification.
6. If the update is successful, the transaction screen (EDAP, EDFT, EDLR, EDRA, EDTS) is displayed with the “Update Process Complete” message. To process another transaction:
• Press <F3 Return> to return to the Department Adjustment Transaction screen, then follow steps 3-6 under Step 1 Preparation On-System. OR If you know the code for the next transaction screen, you can navigate to it directly as follows: complete the Next Func, ID, Pay Cycle, and Pay End fields and then press <Enter>. Note: After moving to a new screen, always verify the information in the header to make sure that the Employee Name/ID, adjustment transaction, Pay Cycle and Pay Cycle End Date are correct. These fields are not automatically cleared after each transaction, and must be changed at the bottom of the screen as necessary. Based on the Pay Cycle and Pay Cycle End date you specified, the system will display the Check Date.
To exit PPS, press <F12 Exit>.
Note: Once a transaction has been updated, it is released to the Transaction Holding File and cannot be changed by the preparer. If a correction needs to be made, the entire transaction must be reversed using the EDLR (Late/Reduce Pay) function, and then re-entered on the appropriate screen. For example, an Additional Pay or a Late Pay transaction would be reversed using an RX transaction on the EDLR screen. An RX transaction would be reversed with an LX transaction on the EDLR screen.
Step 5. (Optional) IDTL Transaction Listing Inquiry
1. At the Next Func field, type “IDTL” to select the Transaction List function.
2. In the ID field, type the unique employee identification (ID) number.
3. Press <Enter>. The screen will display a list of transactions residing in the Transaction Holding File.
4. Press <F8> to display a list of transactions for other paydays, if any exist.
5. To view detail for a pay transaction, place your cursor next to the transaction you want to view and press <Enter>.
Note: You cannot access the detail screen for an expense transfer.
EDAT/01-2006

OPTRS TIME ROSTER
TRANSACTIONS
The Check List, Time Input Roster, and Leave Roster are all accessed using the Department Time Collection option on the main menu (IDTC).
The Check List shows pre-listed employees eligible for current time reporting. The Time Input Roster is used to enter or change positive time or confirm/update by agreement amounts.
The Leave Roster is used to report sick leave, vacation, and comp time usage and accrual, in hours, for all employees with a valid leave plan code. B1 (biweekly)
Step 1. Preparation Off-System
1. Determine the pay cycle (MO, B1, B2).
2. Consult the departmental calendar for internal deadlines and the current OPTRS Time Reporting Schedule to determine the data entry window.
3. Collect time records from employees, verify the time, and secure necessary approvals.
• Determine if employees are eligible for overtime pay, shift differential, or any other type of pay.

4. Choose a selection criterion of Home Department Code or Chartstring, based on how you want to group employees for time reporting.
5. Arrange employees’ time records alphabetically by last name.
On-System
Displaying the Check List
1. Log onto the PPS System.
2. At the Next Func field on the Online Applications Main Menu, type “IDTC” and press <Enter> to display the Time Collection Selection Criteria screen.
3. Type “S” in the Check List field.
4. In the Selection Criteria area, type a Home Department Code, chartstring, or partial chartstring:
• Org • Fund/Org • Org/Flex • Business Unit/BFS Account/
Fund/Org/Program • Business Unit/BFS Account/
Fund/Org/Program/Project/Flex
5. In the Compute Process section, type “S” in the Command column next to the appropriate pay cycle.
6. Press <Enter> to display the Check List.
Validating the Check List
7. Compare the Check List with the source documents to make sure all employees with timesheets appear on the roster.
8. Reconcile or justify any missing or extra employees on the list. An employee may not appear if: • Employee was changed to a
different chartstring. • Employee is shared with another
department who is the home unit. (Bring the roster for these employees up by chartstring)
• Time reporting code not set to “Z.”
9. Press <F3-PrevMenu> to return.
Step 2. Data Entry
Entering or Confirming Data on the Roster
1. At the IDTC screen, delete the “S” from the Check List field if necessary.
2. Tab to the Roster field and type “S.”
3. Make sure the Selection Criteria section reflects the correct home department code or chartstring.
4. Type “S” in the Command (“C”) column of the Compute Process section to select a pay cycle.
5. Press <Enter> to display the Roster.
6. Enter data in the appropriate fields.
Step 3. Review the Data
1. Review all data for accuracy and consistency.
2. Press <Enter> to format and validate the data. Double-check decimal point placement. Note: On the MO Roster, 1.0 represents 100%.
Edit messages appear at the bottom of the screen. Press <F6-Nxt Msg> to see additional edit messages, if applicable.
3. Resolve any edits as necessary. Note: You must resolve any Reject edit conditions before continuing.
Step 4. Update the Transaction Holding File
1. Press <F5 Update>. Note: You must press <F5 Update> before scrolling between pages with <F7> or <F8>.
2. ”Update Process Complete” will appear in the message area.
The OK? field should show “Y” for all time records reported. To pay a by agreement employee whose pre-filled rate is correct, type a “Y” in the OK? field, then press <F5 Update>.
• To continue to the next Roster page, press <F8 Forward>.
• To return to the IDTC screen, press <F3 Return>.
• To exit PPS, press <F12 Exit>.
Step 5. Changing Updated Data
Note: You may access the roster as many times as necessary until 5:00 pm on the final deadline date for the pay cycle. 1. To change data or add new data, see
Steps 2 through 4 above.
2. To delete the “Y” indicator in the OK? field, type “*” over “Y” and press <Enter>. Press <F5 Update>.
TIMEROST/12-2006

Payroll Additional Pay Time Reporting Function (EDAP)
To schedule an Additional Pay Transaction: 1. On the Online Applications Main Menu, type “EDAT” to select the Department Adjustment Transaction menu, and then press <Enter>. 2. On the Department Adjustment Transaction menu, type “EDAP” in the Next Func field to select the Additional Pay function. 3. The cursor will jump to the ID field. In the ID field, type the unique employee identification number. 4. Schedule the transaction: Tab to the Pay Cycle field and type the pay cycle in which the transaction will be processed (MO, B1, B2). In the Pay End
field, type the pay cycle end date for scheduling the transaction, in the format MMDDYY. 5. Press <Enter> to display the Additional Pay screen. 6. Enter data in the unprotected fields on the screen (see field descriptions on the back of this reference card). 7. Review the data for accuracy. 8. Press <Enter>. The system will format and validate data on the screen. 9. Resolve any error messages as necessary. Make sure decimal point placement is correct before proceeding. 10. Press <F5 Update> to display the PAN (Post Authorization Notification) Notification Preparation screen. 11. Complete fields on the PAN Notification Preparation screen as necessary. 12. If desired, press <F10 Comments> to enter optional comments. 13. Press <F5 Update> to complete the update and send the PAN notification. You will return to the Additional Pay screen, and the “Update Process
Complete” message will display.
The Additional Pay screen (EDAP) is used to pay: (1) a positive time employee for the
current period who doesn’t appear on the Roster
(2) a positive time employee for the current period who appears on the Roster, but for whom the distribution information is incorrect
(3) An exception time employee for additional hours worked for the current period
Important: The Additional Pay screen is only to be used to report time worked in the current period. To schedule payments for prior periods, enter an LX transaction on the EDLR screen. On the sample screen to the right, the circled numbers in the fields correspond with the numbers on the back of this card.
4 5 6
12 14 15 18 20
n/a n/a n/a
1
7 8 9
13 16 17 19
2 3
10 11 21

Field Description Required* Comments
1 ID Employee ID R 9 digits
2 Pay Cycle Pay Cycle R Pay Cycle in which the transaction will be processed. Values: MO (monthly), B1 (biweekly), B2 (Biweekly)
3 Pay End Pay Cycle End Date R Pay cycle end date for scheduling; MMDDYY
4 C Command O Tab through the field. (This field is used for the optional copy and retrieve commands.)
5 Seq Sequence System-derived number
6 Per End Earnings Period End Date
R The end date for the pay period in which the pay was earned - independent of the pay cycle end date entered when scheduling the transaction; MMDDYY
7 Pay Cyc Pay Cycle Type R Pay Schedule associated with the employee’s appointment. Values: M (monthly), B (biweekly)
8 Dst Distribution Number O Number identifying the payroll distribution associated with the employee PPS appointment.
E,T,D N/A N/A Fields labeled E, T, and D are not currently in use.
9 Ttl Title Code R The position or classification title for the appointment.
10 BAFOP PF Business Unit, Account, Fund, Org, Program, Project, Flex
R
Chartstring. Project and Flex are optional. If no Project, tab to Flex. If no Flex, tab to Rate.
11 Rate Rate/Amount
R Enter hourly rate as 4 decimal places (enter 8.7500 for $8.75). Enter monthly rate or by agreement amount as 2 decimal places (enter 2400.00 for $2,400).
12 AH Appointment Rate Code R Values: A (monthly or by agreement), or H (hourly)
13 PRORATE Prorate Flag O On the EDAP screen, leave this field blank.
14 DOS (#1) Regular Time Description of Service
O Type of service for which the payment is rendered. Use this field for payment types other than overtime or leave time. Examples: REG (Regular), SDF (Shift Differential), BYN (By Agreement not subject to retirement).
15 Time Regular Time associated with the transaction
C** Time expressed in hours or percent of month. Enter hours as 2 decimal places (22.00 for 22 hours). Enter monthly percent as 4 decimal places (.2500 for 25%).
**By agreement amount should not carry time value.
16 H%
Hours/Percent of Time Code
C** Values: H (hourly), or % (percentage of a salaried pay rate).
**By agreement amount should not carry an H% code.
17 DOS (#2) Overtime or Leave Time Description of Service
O Type of service for the overtime or leave hours. This field is not used for regular time.
18 Hr Overtime or Leave Time in Hours
C Enter hours with two decimal places
19 DOS (#3) Overtime or Leave Time Description of Service
O Type of service for additional overtime or leave hours. This field is not used for regular time.
20 Hr Overtime or Leave Time in Hours
C Enter hours with two decimal places
21 WSP Work Study Program Type
O Press F1-Help for a list of valid codes. Leave blank if the employee is not participating in a Work Study Program for the reporting period.
* R (Required); O (Optional); C (Conditional) EDAP/01-2006

Payroll One Time Payment Time Reporting Function (EDFT)
4 5 6 7 9 n/a
1
8 12 13 14 15 16 17
2 3
11 10
To schedule a One-Time Payment: 1. On the Online Applications Main Menu, type “EDAT” to select the Department Adjustment Transaction
menu, and then press <Enter>. 2. On the Department Adjustment Transaction menu, type “EDFT” in the Next Func field to select the One-
Time Payment function. 3. The cursor will jump to the ID field. In the ID field, type the unique employee identification number. 4. Schedule the transaction: Tab to the Pay Cycle field and type the pay cycle in which the transaction will
be processed (MO, B1, B2). In the Pay End field, type the pay cycle end date for scheduling the transaction in the format MMDDYY.
5. Press <Enter> to display the One-Time Payment screen. 6. Enter data in the unprotected fields on the screen (see field descriptions on the back of this reference
card). 7. Review the data for accuracy. 8. Press <Enter>. The system will format and validate the data on the screen. 9. Resolve any error messages as necessary. Make sure decimal point placement is correct before
proceeding. 10. Press <F5 Update> to display the PAN (Post Authorization Notification) Notification Preparation screen. 11. Complete fields on the PAN Notification Preparation screen as necessary. 12. If desired, press <F10 Comments> to enter optional PAN comments. 13. Press <F5 Update> to complete the update and send the PAN notification. The One-Time payment screen
will be displayed and the message “Update Process Complete” will appear.
A one-time payment is a payment made to an employee for a unique personnel action that is outside of the normal conditions of employment. Payment is in the form of a flat dollar amount. Some of the one-time payments that can be processed on the EDFT screen include: • Honoraria (HON) • University extension pay
(UNX) • Staff Recognition and
Development Award (SRD)*
This transaction requires the same approvals as other personnel actions. On the sample screen to the right, the circled numbers in the fields correspond with the numbers on the back of this card. * For more information about processing Spot Awards using OPTRS, please see "Processing Spot Awards using OPTRS One Time Payment (EDFT) Screen" in the OPTRS section of the Payroll web site at payroll.berkeley.edu/OPTRS/docs/SRDCodeOPTRS.pdf.

Field Description Required* Comments
1 ID Employee ID R 9 Digits
2 Pay Cycle Pay Cycle R Pay Cycle in which the transaction will be processed. Values: MO (monthly), B1 (biweekly), B2 (biweekly)
3 Pay End Pay End Date R Pay cycle end date for scheduling purposes; MMDDYY
4 C Command O Tab through the field. (This field is used for the optional copy and retrieve commands.)
5 Seq Sequence System-derived number
6 B Business Unit R 1-digit
7 BFSAc BFS Account R 5-digit
8 Fund Fund R 5-digit
9 Org Organization R 5-digit
10 Pr Program R 2-digit
11 Proj Project O 6-digit; if no Project, tab to Flex.
12 Flex Flexfield O 5-digit; if no Flex, tab to Title Code.
ETD RYU CPC
N/A These fields not currently in use. Tab through these fields.
13 Ttl Title Code R The position or classification title for the payment.
14 DOS Description of Service R Type of service for which the payment is rendered. Examples of appropriate DOS codes are:
ADL (Additional Compensation)
AHA (Academic Housing Allowance)
BYA (By Agreement)
BYN (By Agreement – not subject to retirement)
HON (Honorarium)
UNX (University Extension)
SRD (Staff Recognition and Development Award)
CEL (Cell Phone-Imputed Income)
CE2 (Cell Phone- Cash Allowance)
15 Amount Amount of Payment R By agreement amount to be paid; enter amount with two decimal places.
16 PerEnd Pay Period End Date R Pay period end date corresponding to when this pay was earned. Independent of the pay cycle end date entered when scheduling the transaction. MMDDYY
17 WSP Work Study Program Type
C Press F1-Help for a list of valid codes. Leave blank if the employee is not participating in a Work Study Program for the reporting period.
* R (Required); O (Optional); C (Conditional) EDFT/08-2006

Payroll Reduce Pay Time Reporting Function (EDLR) RX transaction: Absence Notice for Exception Time Employee
To schedule a Reduce Pay transaction to reflect absence: 1. On the Online Applications Main Menu, type “EDAT” to select the Department Adjustment Transaction menu, and then press <Enter>. 2. On the Department Adjustment Transaction menu, type “EDLR” in the Next Func field to select the Late/Reduce Pay function. 3. The cursor will jump to the ID field. In the ID field, type the unique employee identification number. 4. Schedule the transaction: Tab to the Pay Cycle field and type the pay cycle in which the transaction will be processed (this will always be MO for an
exception time employee). In the Pay End field, type the pay cycle end date for scheduling the transaction, in the format MMDDYY. 5. Press <Enter> to display the Late/Reduce Pay screen. 6. Enter data in the unprotected fields on the screen (see field descriptions on the back of this reference card). The transaction type (TR) for reducing pay is RX. 7. Review the data for accuracy. 8. Press <Enter>. The system will validate and format data on the screen. 9. Resolve any error messages as necessary. Make sure decimal point placement is correct before proceeding. 10. Press <F5 Update> to display the PAN (Post Authorization Notification) Notification Preparation screen. 11. Complete fields on the PAN Notification Preparation screen as necessary. 12. If desired, press <F10 Comments> to enter optional PAN comments. 13. Press <F5 Update> to complete the update and send the PAN notification. The message “Update Process Complete” will be displayed on the EDLR screen.
The Late/Reduce Pay screen (EDLR) is used to report absences without pay of less than 30 days, for staff employees on Exception Time. (This function is not used for academic titles.) Enter “RX” in the Transaction Type (TR) field to reduce the pay. For the Time field, you will need to calculate the percent to reduce based on the number of hours absent, as follows: Use the Partial Month Calculator at http://tools.ohr.berkeley.edu or calculate the percentage by dividing total hours absent by the total working hours in the month when the absence occurred. The Monthly Working Hours table on the Payroll Web site shows the number of working hours in each month. Be sure to schedule the transaction for a pay cycle when the employee will be receiving pay. You cannot recover more salary than the employee is currently due.
5 6 7 8
13 16 21
n/a n/a n/a
1
4 9
12 14 15 17 18 19 20
2 3
10
11 22

Field Description Required* Comments
1 ID Employee ID R 9 digits
2 Pay Cycle Pay Cycle R Pay Cycle in which the transaction will be processed. Value: MO (monthly)
3 Pay End Pay End Date R Pay cycle end date for scheduling purposes; MMDDYY
4 C Command O Tab through the field. (This field is used for the optional copy and retrieve commands.)
5 Seq Sequence System-derived number
6 Tr Transaction Type R Value: RX (Reduced Time)
7 Per End Pay Period End Date R The end date for the pay period in which the absence took place - independent of the pay cycle end date entered when scheduling the transaction and on which the pay reduction will occur; MMDDYY
8 Pay Cy Pay Cycle Type R Pay cycle associated with the employee’s appointment. Value: M (monthly)
9 Dst Distribution Number O Number identifying the payroll distribution associated with the employee’s PPS appointment.
E,T,D N/A Fields labeled E, T, and D are not currently in use.
10 Ttl Title Code R The position or classification title for the appointment.
11 BAFOP PF Business Unit, Account, Fund, Org, Program, Project and Flex
R
Chartstring. Project and Flex are optional. If no Project, tab to Flex. If no Flex, tab to Rate.
12 Rate Rate/Amount
R Enter monthly rate as 2 decimal places (for example, enter 2400.00 for $2,400, or 100.00 for $100).
13 AH Appointment Rate Code
R Value: A
14 PRORATE Prorate Flag N/A Not applicable for absence notice
15 DOS (#1) Regular Time Description of Service
O Type of service for which the payment is rendered. Value: REG (Regular)
16 Time Regular Time associated with the transaction
R
Time absent - expressed as a percent of the month. Enter Monthly percent as 4 decimal places (for example, .2500 for 25%).
17 H%
Hours/Percent of Time Code
R Value: % (percentage of month).
18 DOS (#2) Overtime or Leave Time Description of Service
N/A Not applicable for absence notice
19 Hr Overtime or Leave Time in Hours
N/A Not applicable for absence notice
20 DOS (#3) Overtime or Leave Time Description of Service
N/A Not applicable for absence notice
21 Hr Overtime or Leave Time in Hours
N/A Not applicable for absence notice
22 WSP Work Study Program Type
N/A Not applicable for absence notice
* R (Required); O (Optional); C (Conditional) EDLRABS/01-2006
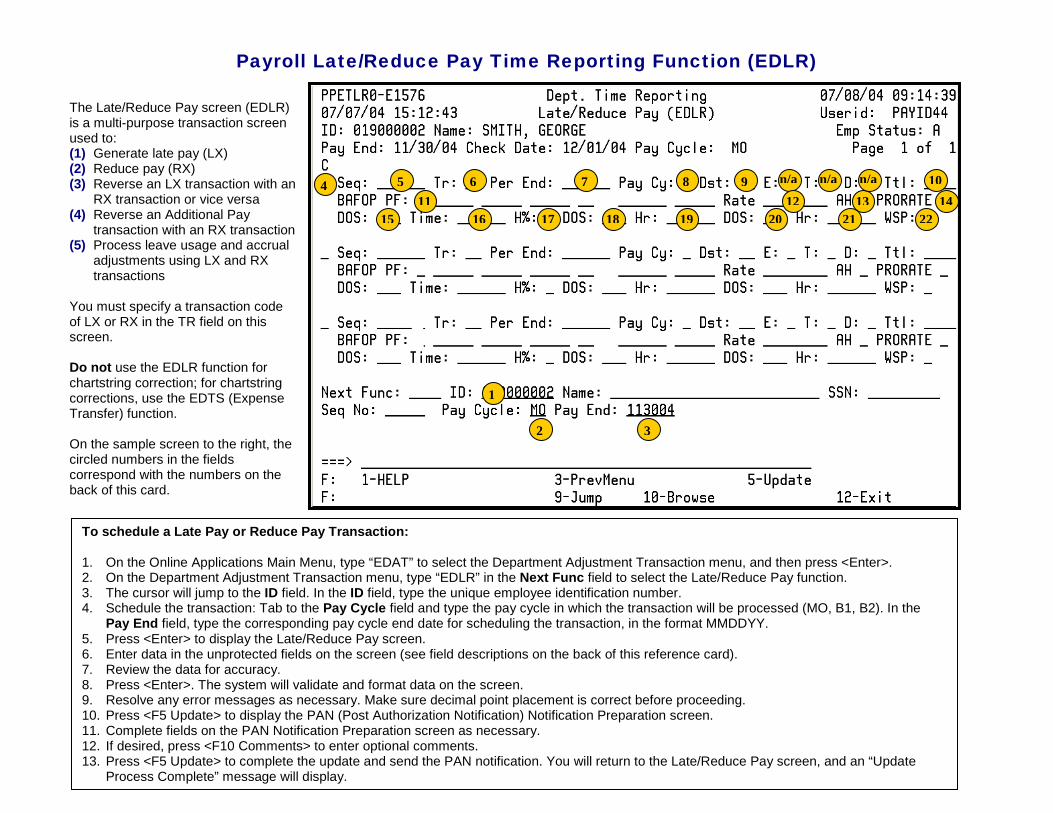
Payroll Late/Reduce Pay Time Reporting Function (EDLR)
5 6 7 8
13 16 21
n/a n/a n/a
1
4 9
12 14 15 17 18 19 20
2 3
10
11 22
The Late/Reduce Pay screen (EDLR) is a multi-purpose transaction screen used to: (1) Generate late pay (LX) (2) Reduce pay (RX) (3) Reverse an LX transaction with an
RX transaction or vice versa (4) Reverse an Additional Pay
transaction with an RX transaction (5) Process leave usage and accrual
adjustments using LX and RX transactions
You must specify a transaction code of LX or RX in the TR field on this screen. Do not use the EDLR function for chartstring correction; for chartstring corrections, use the EDTS (Expense Transfer) function. On the sample screen to the right, the circled numbers in the fields correspond with the numbers on the back of this card.
To schedule a Late Pay or Reduce Pay Transaction: 1. On the Online Applications Main Menu, type “EDAT” to select the Department Adjustment Transaction menu, and then press <Enter>. 2. On the Department Adjustment Transaction menu, type “EDLR” in the Next Func field to select the Late/Reduce Pay function. 3. The cursor will jump to the ID field. In the ID field, type the unique employee identification number. 4. Schedule the transaction: Tab to the Pay Cycle field and type the pay cycle in which the transaction will be processed (MO, B1, B2). In the
Pay End field, type the corresponding pay cycle end date for scheduling the transaction, in the format MMDDYY. 5. Press <Enter> to display the Late/Reduce Pay screen. 6. Enter data in the unprotected fields on the screen (see field descriptions on the back of this reference card). 7. Review the data for accuracy. 8. Press <Enter>. The system will validate and format data on the screen. 9. Resolve any error messages as necessary. Make sure decimal point placement is correct before proceeding. 10. Press <F5 Update> to display the PAN (Post Authorization Notification) Notification Preparation screen. 11. Complete fields on the PAN Notification Preparation screen as necessary. 12. If desired, press <F10 Comments> to enter optional comments. 13. Press <F5 Update> to complete the update and send the PAN notification. You will return to the Late/Reduce Pay screen, and an “Update
Process Complete” message will display.

Field Description Required* Comments
1 ID Employee ID R 9 digits
2 Pay Cycle Pay Cycle R Pay Cycle in which the transaction will be processed. Values: MO (monthly), B1 (biweekly), B2 (biweekly)
3 Pay End Pay Cycle End Date R Pay cycle end date for scheduling purposes; MMDDYY
4 C Command O Tab through the field. (This field is used for the optional copy and retrieve commands.)
5 Seq Sequence System-derived number
6 Tr Transaction Type R Values: LX (Late Time), RX (Reduced Time)
7 Per End Pay Period End Date R The end date for the pay period in which the pay was earned - independent of the pay cycle end date entered when scheduling the transaction; MMDDYY
8 Pay Cy Pay Cycle Type R Pay cycle associated with the employee’s appointment. Values: M (monthly), B (biweekly)
9 Dst Distribution Number O Number identifying the payroll distribution associated with the employee’s PPS appointment.
E,T,D N/A N/A Fields labeled E, T, and D are not currently in use.
10 Ttl Title Code R The position or classification title for the appointment.
11 BAFOP PF Business Unit, Account, Fund, Org, Program, Project, Flex
R
Chartstring. Project and Flex are optional. If no Project, tab to Flex. If no Flex, tab to Rate.
12 Rate Rate/Amount
R Enter hourly rate as 4 decimal places (for example, enter 8.7500 for $8.75). Enter monthly rate or by agreement amount as 2 decimal places (for example, enter 2400.00 for $2,400, or 100.00 for $100).
13 AH Appointment Rate Code R Values: A (monthly or by agreement), or H (hourly)
14 PRORATE Prorate Flag O Leave blank on EDLR screen.
15 DOS (#1) Regular Time Description of Service
O Type of service for which the payment is rendered. Use this field for payment types other than overtime or leave time. Examples: REG (Regular), SDF (Shift Differential), BYN (By Agreement not subject to retirement).
16 Time Regular Time associated with the transaction
C**
Time expressed in hours or percent of month. Enter hours as 2 decimal places (22.00 for 22 hours). Enter monthly percent as 4 decimal places (.2500 for 25%).
**By agreement amount should not carry time value.
17 H%
Hours/Percent of Time Code
C** Values: H (hourly), or % (percentage of salaried pay rate).
**By agreement amount should not carry an H% code.
18 DOS (#2) Overtime or Leave Time Description of Service
O Type of service for the overtime or leave hours. This field is not used for regular time.
19 Hr Overtime or Leave Time in Hours
C Enter hours with two decimal places.
20 DOS (#3) Overtime or Leave Time Description of Service
O Type of service for additional overtime or leave hours. This field is not used for regular time.
21 Hr Overtime or Leave Time in Hours
C Enter hours with two decimal places.
22 WSP Work Study Program Type
O Press F1-Help for a list of valid codes. Leave blank if the employee is not participating in a Work Study Program for the reporting period.
* R (Required); O (Optional); C (Conditional) EDLR/01-2006

Payroll Retroactive Pay Time Reporting Function (EDRA)
4 5 6 7 8 9 12 13 14 15 16 17 18
19 20 21 22
n/a n/a n/a
1
2 3
10 11
To schedule a Retroactive Pay Transaction: 1. On the Online Applications Main Menu, type “EDAT” to select the Department Adjustment Transaction
menu, and then press <Enter>. 2. On the Department Adjustment Transaction menu, type “EDRA” in the Next Func field to select the
Retroactive Pay function. 3. The cursor will jump to the ID field. In the ID field, type the unique employee identification number. 4. Schedule the transaction: Tab to the Pay Cycle field and type the pay cycle in which the transaction will
be processed (MO, B1, B2). In the Pay End field, type the pay cycle end date for scheduling the transaction, in the format MMDDYY. Retroactive Pay transactions can be scheduled for the current, open pay cycle.
5. Press <Enter> to display the Retroactive Pay screen. 6. Enter data in the unprotected fields on the screen (see field descriptions on the back of this card). 7. Review the data for accuracy. 8. Press <Enter>. The system will format and validate data on the screen. 9. Resolve any error messages as necessary. Make sure decimal point placement is correct before
proceeding. 10. Press <F5 Update> to display the PAN (Post Authorization Notification) Notification Preparation screen. 11. Complete fields on the PAN Notification Preparation screen as necessary. 12. If desired, press <F10 Comments> to enter PAN comments. 13. Press <F5 Update> to complete the update and send the PAN notification. The Retroactive Pay screen
will be displayed with the message “Update process complete” at the bottom of the screen.
The Retroactive Pay screen (EDRA) is used to process pay rate adjustments only. DO NOT use it when there is a change to another field on the original transaction such as a title code or DOS code. If there is a change in Account, Fund, Org, Program, Project, or Flex, in addition to a change in pay rate, use the Late/Reduce Pay transaction (EDLR). The Retroactive Pay screen (EDRA) is used to: (1) Pay employees a retroactive
rate increase by entering the difference between the rate that was paid and the rate that should have been paid;
(2) Increase or decrease a “by agreement” payment to an employee.
On the sample screen to the right, the circled numbers in the fields correspond with the numbers on the back of this card.

Field Description Required* Comments
1 ID Employee ID R 9 Digits
2 Pay Cycle Pay Cycle R Pay Cycle in which the transaction will be processed. Values: MO (monthly), B1 (biweekly), B2 (biweekly),
3 Pay End Pay End Date R Pay cycle end date for scheduling purposes; MMDDYY
4 C Command O Tab through the field. (This field is for the optional copy and retrieve commands.)
5 Seq Sequence System-derived number
6 B Business Unit R 1-digit
7 Acct Account R 5-digit
8 Fund Fund R 5-digit
9 Org Organization R 5-digit
10 PG Program R 2-digit
11 Prjct Project O 6-digit; if no Project, tab to Flex.
12 Flex Flexfield O 5-digit; if no Flex, tab to Title Code.
13 Ttl Title Code R The position or classification title for the appointment.
14 DOS Regular Time
Description of Service
R Type of service for which the payment was reported.
15 Rate Rate/Amount R Difference between the old pay rate and the new pay rate.
16 S Sign O If the rate/amount decreased, a minus sign is entered in the Sign field.
17 Time Regular Time associated with the transaction
C**
Time expressed in hours or percent of month. Hours contain 2 decimal places (for example, 22.00 for 22 hours). Monthly percent contains 4 decimal places (for example, .2500 for 25%).
**By agreement amount should not carry time value.
18 H% Hours/Percent of Time Code
C** Values: H (hourly), or % (percentage of a salaried pay rate).
**By agreement amount should not carry an H% code.
19 PerEnd Pay Period End Date R The end date for the pay period in which the pay was earned – independent of the pay cycle end date entered when scheduling the transaction; MMDDYY.
20 Pay Cyc Pay Cycle Type R Pay cycle associated with the employee’s appointment. Values: M (monthly), B (biweekly)
21 RAI Rate Adjustment Indicator
System-derived code.
An “A” in this field tells the system that the rate is being adjusted, not the hours or percent of time.
22 WSP Work Study Program Type
C Press F1-Help for a list of valid codes. Leave blank if the employee is not participating in a Work Study Program for the reporting period.
* R (Required); O (Optional); C (Conditional EDRA/01-2006

Payroll Single Expense Transfer Function (EDTS)
Note: Use the Payroll Single Expense Transfer (EDTS) to transfer expenses recorded on or subsequent to the Distribution of Payroll Expense report from 24 months ago. Use Form UPAY 646-1 to transfer expenses recorded prior to 24 months ago.
4 5 6 7
9
1
8
12 13
14 15
2 3
11 10
n/a
The Single Expense Transfer (EDTS) is used to transfer expense in cases where the original expense was charged to an incorrect chartstring (Business Unit, Account, Fund, Org, Program, Project, or Flexfield), and a correction is needed. To use this screen, you must have the appropriate Distribution of Payroll Expense (PPP5302) report.
Payroll expense transfers normally occur when HCM has been updated too late and payment has not been made on the newly designated chartstring. Payroll expense transfers are processed through the Personnel/Payroll System (PPS) to generate the necessary employee benefit expense transfers and record the data on individual earnings records.
EDTS should be used for chartstring corrections only. If you need to retroactively change the title, description, or rate, along with the chartstring, use the EDLR screen instead.
To schedule a Single Expense Transfer: 1. On the Online Applications Main Menu, type EDAT to select the Department Adjustment Transaction menu. 2. On the Department Adjustment Transaction menu, type “EDTS” in the Next Func field to select the Single Expense Transfer function. 3. In the ID field, type the unique employee identification number. 4. Schedule the transaction for the current, open pay cycle: Tab to the Pay Cycle field and type the pay cycle in which the transaction will be
processed (MO, B1, B2). Tab to the Pay End field and type the pay cycle end date for scheduling the transaction, in the format MMDDYY. 5. Press <Enter> to display the Single Expense Transfer screen. 6. Enter data in the following fields (see back for field descriptions): ET Month, ET Page, ET Line, Reason. Copy ET Month, ET Page, and ET Line
directly from the ET MO, PG and ET Line on the PPP5302 Distribution of Payroll Expense report. 7. Review the data for accuracy. 8. Press <Enter>. The Transfer From (Credit) chartstring fields are retrieved from the TOE (Transfer of Expense) file. 9. The cursor is positioned on the Transfer To (Debit) fields. Enter the Transfer To (Debit) chartstring. 10. Enter data in the Original Gross Earnings and Original Benefits fields as shown on the Distribution of Payroll Expense report. In the Transfer
Gross Earnings field, type the dollar amount of the salary expense you want to transfer to the new chartstring. 11. Press <Enter> to format and validate the data. Resolve edit messages as necessary. 12. Press <F5 Update> to display the PAN (Post Authorization Notification) subsystem Notification Preparation screen. 13. Complete fields on the PAN Notification Preparation screen and other PAN screens as necessary. 14. Press <F5 Update> to complete the update and send the PAN notification. The Single Expense Transfer screen will be displayed, with the
message “Update Process Complete”.

Field Description Required* Comments
1 ID Employee ID R 9 digits
2 Pay Cycle Pay Cycle R Pay Cycle in which the transaction will be processed. Values: MO (monthly), B1 (biweekly), B2 (biweekly)
3 Pay End Pay End Date R Corresponding pay cycle end date for scheduling purposes; MMDDYY
4 ET Month Expense Transfer Month
R 4-digit number indicating the fiscal year end and the fiscal month within that year. For example, 0405 represents the fifth fiscal month (November) of the fiscal year 2003/2004.
On report PPP5302, ET Month is on the third line in the top-right corner.
5 ET Page Expense Transfer Page R 5-digit number indicating the page on the PPP5302 report where the line is located. Include leading zeroes.
On report PPP5302, ET Page is to the right of ET Month.
6 ET Line Expense Transfer Line R 2-digit number indicating the line of expense (on PPP5302) to be transferred.
On report PPP5302, ET Line number is the first two digits (first column) in the line.
7 Reason Reason for the Expense Transfer
After you enter the Reason, press <Enter>.
R A -- One-time expenditure adjustment; employee is not expected to perform services again under this chartstring. (HCM entry is not required.)
B -- Employee is expected to perform services again under this chartstring. (HCM entry is required.)
C -- Other
8 Transfer From (Credit)
B (Business Unit), BSFAcct (Account), Fund, Org, Pg (Program), Proj (Project) and Flex
Provided by
System
Chartstring from which you are transferring the expense. System retrieves chartstring from the Transfer of Expense (TOE) history file.
9 Transfer To (Debit)
B (Business Unit), BSFAcct (Account), Fund, Org, Pg (Program), Proj (Project) and Flex
R
Chartstring to which you are transferring the expense.
If no Project, tab to Flex. If no Flex, tab to the next field.
10 Original Gross Earnings
Amount of gross earnings (not pay rate)
R Enter exactly as on Gross Earnings column of PPP5302. Enter digits representing cents; decimal point is optional.
11 Sign Minus sign C Enter a minus sign to indicate that the Original Gross Earnings amount is a credit if PP5302 shows it as a credit.
12 Benefits Amount of benefits earning
R Enter exactly as on Total Benefits column of the PPP5302. Enter digits representing cents; decimal point is optional.
13 Sign Minus sign C Enter a minus sign to indicate that the Benefits amount is a credit (usually corresponds to a gross earnings credit).
14 Transfer Gross Earnings
Requested amount of the original expense being transferred
R If the amount transferred is less than the original gross, the system will calculate benefit amounts to be transferred.
15 Sign Minus sign C Must match the entry in Original Gross Earnings Sign field.
16 Override Employee ID
Override Employee ID N/A Not applicable at UC Berkeley
* R (Required); O (Optional); C (Conditional) EDTS/01-2006


