Practical Uses for GDIPlusX Doug Hennig Stonefield Software Inc. 2323 Broad Street Regina, SK Canada S4P 1Y9 Email: [email protected]Web sites: www.stonefield.com www.stonefieldquery.com Blog: DougHennig.BlogSpot.com Twitter: DougHennig GDIPlusX is a VFPX project that exposes GDI+ to VFP applications as a set of VFP class libraries. GDIPlusX makes it easy to add new graphical abilities to your applications, allowing you to provide a fresher and more powerful user interface. This document looks at some practical uses for GDIPlusX, including creating gradients, resizing images, fully justifying text in reports, creating screen snapshots, adding text to images, reading image information, and many other uses.
GDIPlusX is a VFPX project that exposes GDI+ to VFP applications as a set of VFP class libraries. GDIPlusX makes it easy to add new graphical abilities to your applications, allowing you to provide a fresher and more powerful user interface. This document looks at some practical uses for GDIPlusX, including creating gradients, resizing images, fully justifying text in reports, creating screen snapshots, adding text to images, reading image information, and many other uses.
Introduction GDI+ is the part of Windows responsible for displaying information on devices such as screens and printers. As its name suggests, GDI+ is the successor to Graphics Device Interface (GDI), the graphics application programming interface (API) included with earlier versions of Windows.
GDI+ allows developers to display information on a display device without worrying about the details of the device. The developer calls methods of the GDI+ classes and those methods in turn make the appropriate calls to specific device drivers. GDI+ insulates the application from the graphics hardware, and this insulation allows developers to create device-independent applications.
Although the GDI+ API is well-documented, calling it from VFP applications can be quite complex, as you have to keep track of things such as handles for every object you use. Also, the API consists of function calls, whereas most VFP developers prefer to work with objects. Fortunately, three expert VFP developers, Craig Boyd, Bo Durban, and Cesar Chalom, spent a lot of time and hard work to create a set of wrapper classes for the GDI+ classes. This set is called GDIPlusX.
One of the most interesting things about GDIPlusX is that it was designed to as closely match as possible the GDI+ wrapper classes the .Net framework provides. The class, property, and method names of GDIPlusX mirror those in the System.Drawing namespace in .Net. The advantage of this is that VFP developers can use the thousands of examples of GDI+ code available for .Net in VFP with very little translation required.
GDIPlusX is a project of VFPX (http://vfpx.codeplex.com), the collaborative community site for VFP add-ons and extensions. You can download GDIPlusX from its page on VFPX and review the many sample and reference articles available. The sample code accompanying this document includes the latest version of GDIPlusX (as of the time of writing).
This document isn’t intended to be a primer on GDI+ or GDIPlusX. Instead, its goal is to focus on several practical uses of GDIPlusX. You can use the sample code provided with this document as is without understanding GDI+ or GDIPlusX, but hopefully your interest will be whetted enough to dig into GDIPlusX to learn some of its other capabilities.
To help make sense of the examples, I provide a brief introduction to both GDI+ and GDIPlusX.
Background GDIPlusX provides an object-oriented wrapper for the classes in GDI+. Like the .Net classes, GDIPlusX is organized into a set of “namespaces.” The concept of a namespace doesn’t really exist in VFP, but think of them as a containership hierarchy. At the top of the hierarchy is the System class. It doesn’t have many properties or methods itself, but its three main contained classes, Drawing, Imaging, and Text do.
Although you can add the PRGs containing the classes that make up GDIPlusX to your project and include them in your executable, GDIPlusX is also provided as a compiled APP, System.APP, you can simply distribute with your application. Somewhere in your application, DO System.APP. That adds a new member to _SCREEN, System, which is an instance of the xfcSystem class, defined in System.PRG. From there, you simply reference _SCREEN.System and VFP provides full IntelliSense on its members.
GDI+ provides three categories of services: 2-D vector graphics, imaging, and typography.
2-D vector graphics
2-D vector graphics involves drawing objects, such as lines and curves, by specifying sets of points in a coordinate system. For example, a straight line can be specified by its two endpoints, and a rectangle can be specified by the location of its upper-left corner and its width and height.
GDI+ provides classes that store information about the drawing objects, classes that store information about how the objects are to be drawn, and classes that actually do the drawing. For example, the Rect class stores the location and size of a rectangle; the Pen class stores information about line color, line width, and line style; and the Graphics class has methods for drawing lines, rectangles, paths, and other objects.
GDIPlusX has a set of classes in the System.Drawing and System.Drawing.Drawing2D namespaces that provide the functionality for drawing with 2-D vector graphics. Here’s an example, taken from DemoDrawing.PRG included with the sample code accompanying this document, which draws a filled blue ellipse surrounded by a red rectangle on the screen (Figure 1):
local loGfx as xfcGraphics of Source\System.Drawing.PRG, ; loPen as xfcPen of Source\System.Drawing.PRG * Ensure GDIPlusX is available. do System.app clear with _screen.System.Drawing as xfcDrawing of Source\System.PRG * Create a Graphics object. We'll create it by calling FromHWnd and passing it * the handle (HWnd) to _SCREEN, which means we'll be drawing directly on * _SCREEN. loGfx = .Graphics.FromHWnd(_screen.HWnd) * Fill an ellipse using a blue brush. System.Drawing.Brushes provides a set of * brushes with pre-defined colors, such as blue. The other parameters are the X * and Y location of the upper-left corner of the ellipse and its width and * height. loGfx.FillEllipse(.Brushes.Blue, 30, 30, 400, 200)
* Create a red pen. The New method of System.Drawing.Pen creates a pen using a * specified color and width. Note that the color is specified as a color * brush. In this case, we'll use the Red member of System.Drawing.Color. loPen = .Pen.New(.Color.Red, 2) * Draw a rectangle using the pen. As with ellipses, the parameters specify the * X and Y location of the upper-left corner and its width and height. loGfx.DrawRectangle(loPen, 20, 20, 420, 220) endwith
Figure 1. Drawing using GDIPlusX System.Drawing classes.
Note that GDIPlusX methods are quite flexible in terms of the parameters they accept. For example, in this code, we passed DrawRectangle the location and size of the rectangle using four values. However, we can also create a GDIPlusX RectangleF object with the same location and size and pass it to DrawRectangle instead:
Also note that some parameters must be objects. Colors are specified using a GDIPlusX Color object, either one of the members of the Color class (such as System.Drawing.Color.Red) or by passing the desired colors to one of the methods of the Color class, such as FromRGB:
loColor = .Color.FromRGB(rgb(100, 150, 175))
Not all parameters are required in every method. For example, the DrawImage method we’ll see in the next section can accept many more parameters than the sample code passes. Default values, such as 0 for X and Y values, are used in place of missing parameters.
Imaging
It doesn’t make sense to display certain kinds of pictures, such as icons and photographs, using vector graphics. Instead, images of this type are stored as bitmaps, arrays of numbers that represent the colors of individual dots on the screen.
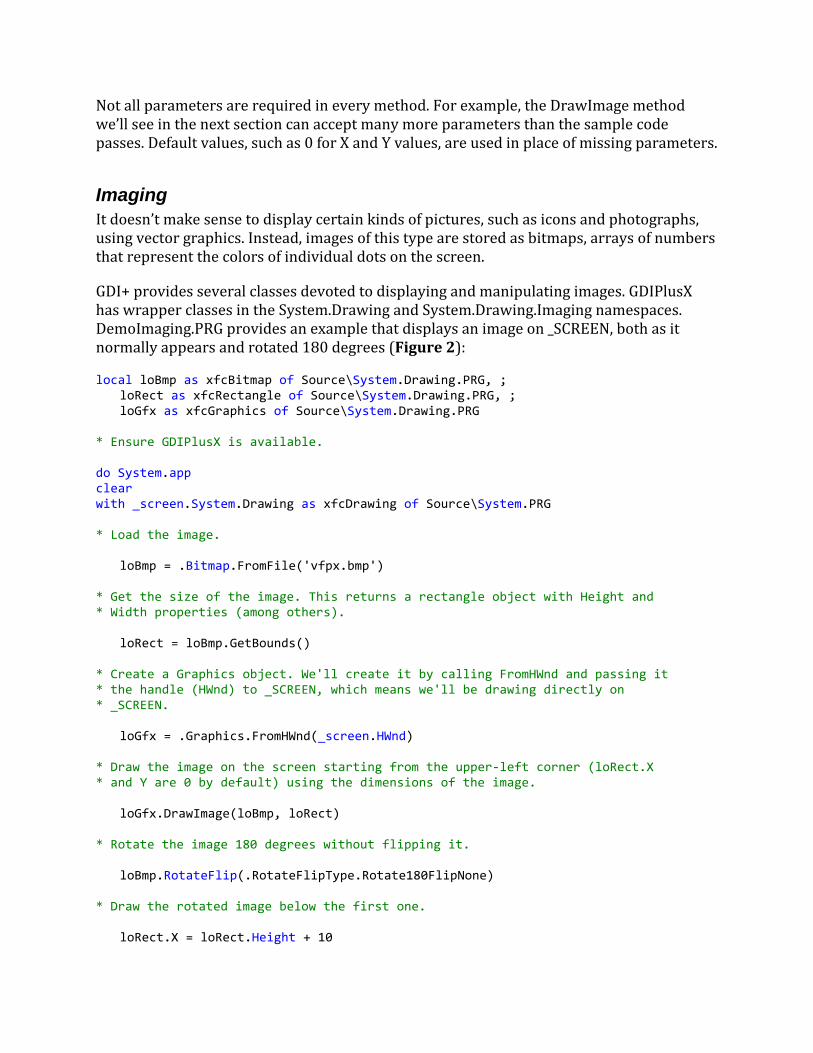
GDI+ provides several classes devoted to displaying and manipulating images. GDIPlusX has wrapper classes in the System.Drawing and System.Drawing.Imaging namespaces. DemoImaging.PRG provides an example that displays an image on _SCREEN, both as it normally appears and rotated 180 degrees (Figure 2):
local loBmp as xfcBitmap of Source\System.Drawing.PRG, ; loRect as xfcRectangle of Source\System.Drawing.PRG, ; loGfx as xfcGraphics of Source\System.Drawing.PRG * Ensure GDIPlusX is available. do System.app clear with _screen.System.Drawing as xfcDrawing of Source\System.PRG * Load the image. loBmp = .Bitmap.FromFile('vfpx.bmp') * Get the size of the image. This returns a rectangle object with Height and * Width properties (among others). loRect = loBmp.GetBounds() * Create a Graphics object. We'll create it by calling FromHWnd and passing it * the handle (HWnd) to _SCREEN, which means we'll be drawing directly on * _SCREEN. loGfx = .Graphics.FromHWnd(_screen.HWnd) * Draw the image on the screen starting from the upper-left corner (loRect.X * and Y are 0 by default) using the dimensions of the image. loGfx.DrawImage(loBmp, loRect) * Rotate the image 180 degrees without flipping it. loBmp.RotateFlip(.RotateFlipType.Rotate180FlipNone) * Draw the rotated image below the first one. loRect.X = loRect.Height + 10
loGfx.DrawImage(loBmp, loRect) endwith
Figure 2. Drawing images using GDIPlusX.
Typography
Typography involves displaying text in a variety of fonts, sizes, and styles. This includes the ability to add text to images and draw text in interesting ways, such as shadowed, curved, or haloed. GDI+ provides many classes related to typography, and GDIPlusX wraps those classes in its System.Drawing and System.Drawing.Text namespaces.
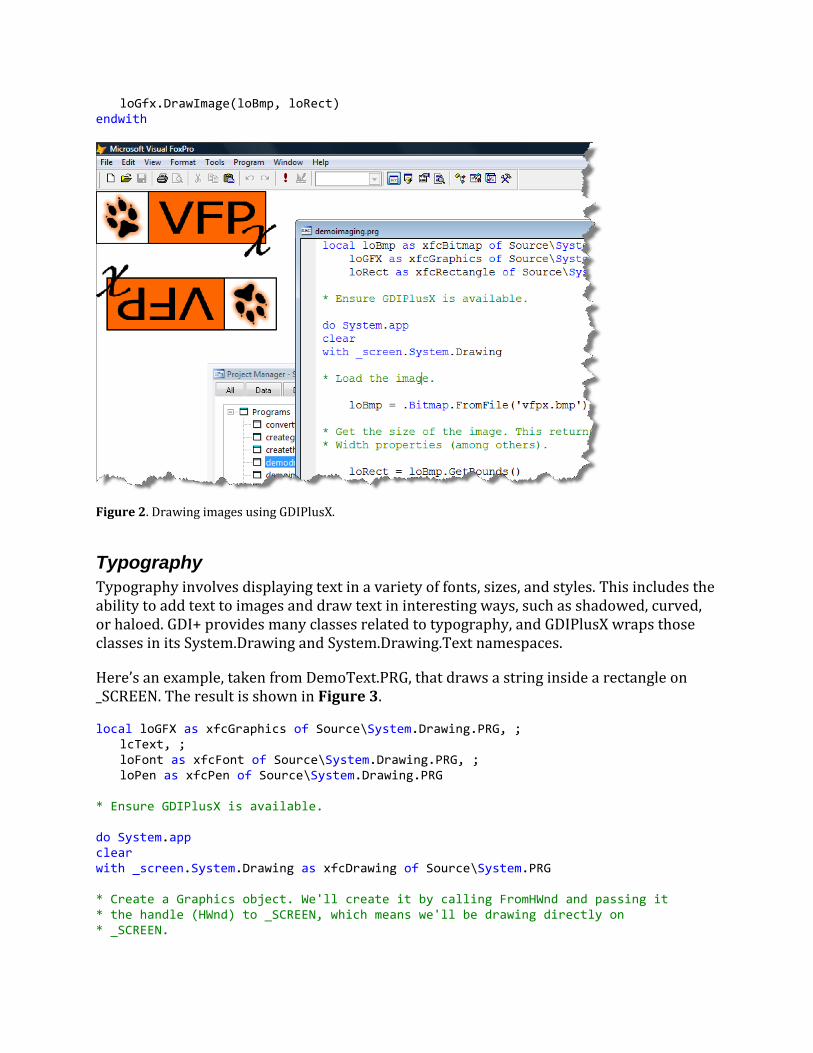
Here’s an example, taken from DemoText.PRG, that draws a string inside a rectangle on _SCREEN. The result is shown in Figure 3.
local loGFX as xfcGraphics of Source\System.Drawing.PRG, ; lcText, ; loFont as xfcFont of Source\System.Drawing.PRG, ; loPen as xfcPen of Source\System.Drawing.PRG * Ensure GDIPlusX is available. do System.app clear with _screen.System.Drawing as xfcDrawing of Source\System.PRG * Create a Graphics object. We'll create it by calling FromHWnd and passing it * the handle (HWnd) to _SCREEN, which means we'll be drawing directly on * _SCREEN.
loGfx = .Graphics.FromHWnd(_screen.HWnd) * The text to draw. lcText = 'This program demonstrates drawing text inside a rectangle' * Create a font object. The New method of System.Drawing.Font creates a font * object using specified font, size, and style. Note that style is specified as * an object; in this case, the Bold member of System.Drawing.FontStyle. loFont = .Font.New('Tahoma', 16, .FontStyle.Bold) * Create a rectangle object to hold the dimensions we'll draw at. loRect = .RectangleF.New(10, 10, 200, 150) * Create a red solid brush. The New method of System.Drawing.SolidBrush creates * a brush using a specified color. In this case, we'll use the Red member of * System.Drawing.Color. loBrush = .SolidBrush.New(.Color.Red) * Draw the text using the desired font and brush in the desired dimensions. loGfx.DrawString(lcText, loFont, loBrush, loRect) * Create a black pen. The New method of System.Drawing.Pen creates a pen using a * specified color and width. Note that the color is specified as a color * brush. In this case, we'll use the Black member of System.Drawing.Color. loPen = .Pen.New(.Color.Black, 2) * Draw a rectangle using the pen at the desired location and size. loGfx.DrawRectangle(loPen, loRect) endwith
Figure 3. Drawing text using GDIPlusX methods.
Let’s take a look at some practical examples of using GDIPlusX in applications.
Measuring text For years, we've used code like the following to determine the width of a string:
This code works OK in many situations, but not in one in particular: when defining how wide to make an object in a report. The value calculated above is in pixels, so you must convert the value to FRUs (FoxPro Reporting Units, the units used in reports, which are 1/10000th of an inch); you need to multiply by 104.166 (10000 FRUs per inch / 96 pixels per inch). Instead of doing all that work, you could use the GetFRUTextWidth method of the FFC _FRXCursor helper object:
The problem is this doesn’t actually give you the correct value. The reason is because reports use GDI+ for rendering and GDI+ renders objects a little larger than you’d expect it to. To see this problem, run the following code (CalcWidthTXTWIDTH.PRG). It calculates the width of the longest company name in the Customer table in FRUs.
use home() + 'samples\data\customer'
loFRXCursor = newobject('FRXCursor', home() + 'FFC\_FRXCursor.vcx') select max(loFRXCursor.GetFRUTextWidth(trim(company), 'Arial', 10)) ; from customer into array laWidth wait window laWidth[1]
I get 35833.333. Now create a report, add a field, enter “company” as the expression, and make it 3.584 inches wide (35833.333 FRUs / 10000 FRUs per inch). Preview the report. The telltale ellipsis at the end of some values indicates the field wasn’t sized wide enough. This drove me crazy for years. I figured out an empirical “fudge” factor to add to the calculated width; 19 pixels (1979.154 FRU) seemed to work most of the time, but occasionally I’d find that wasn't enough for some values. Fortunately, since reports use GDI+, we can use GDIPlusX to accurately calculate the width. The SFGDIMeasureString class, defined in SFGDIMeasureString.PRG, provides a wrapper that performs string measurement. SFGDIMeasureString uses several GDIPlusX objects, including System.Drawing.Graphics, System.Drawing.StringFormat, System.Drawing.Font, and System.Drawing.SizeF. The properties of this class are shown in Table 1 and the methods in
Table 2.
Table 1. Properties of SFGDIMeasureString.
Property Description
oGDI A reference to a System.Drawing.Graphics object. You can set properties of this object before calling methods of this class if necessary.
oFormat A reference to a System.Drawing.StringFormat object. You can set properties of this object before calling methods of this class if necessary.
oFont A reference to a System.Drawing.Font object. You can ignore this object as its properties are set using the SetFont method or by passing parameters to other methods.
oSize A reference to a System.Drawing.SizeF object. You can ignore this object as its properties are set using the SetSize method.
nWidth The width of the string in pixels (varies with the width of the bounding box).
nHeight The height of the string in pixels (varies with the width of the bounding box).
nChars The number of characters in the string.
nLines The number of lines the string takes up (varies with the width of the bounding box).
Measures the specified string and sets the nWidth, nHeight, nChars, and nLines properties. You must either pass tcFontName and tnFontSize (and optionally tcStyle) or call SetFont before calling MeasureString.
GetWidth(tcString [, tcFontName , tnFontSize [, tcStyle]]) as Numeric
Returns the width of the specified string (internally, it calls MeasureString and returns the nWidth property).
GetFRUWidth(tcString [, tcFontName , tnFontSize [, tcStyle]]) as Numeric
Returns the width of the specified string in FRUs (internally, it calls MeasureString and returns the nWidth property multiplied by a factor converting pixels to FRUs).
GetHeight(tcString, tnWidth [, tcFontName , tnFontSize [, tcStyle]]) as Numeric
Returns the height of the specified string constrained to the specified width (internally, it calls SetSize to set the width, then calls MeasureString and returns the nHeight property).
SetSize(tnWidth, tnHeight) Sets the bounding box for the string to the specified size. Call this if the string to be measured is constrained to a certain bounding box.
SetFont(tcFontName , tnFontSize [, tcStyle])
Sets the font properties used to measure the string. Useful if you call one of the other methods several times for the same font properties.
We won’t look at all the code in this class, just the important, GDIPlusX-related stuff.
The Init method creates some GDIPlusX helper objects and sets the bounding box for measurements to a very large box so size isn’t a factor for measurements.
function Init with _screen.System.Drawing as xfcDrawing of Source\System.PRG * Create the helper objects we need so we don't have to do it later (for * performance reasons). This.oGDI = .Graphics.FromHwnd(_screen.HWnd) This.oFormat = .StringFormat.New() * Use anti-aliasing: it seems to give more accurate results. This.oGDI.TextRenderingHint = .Drawing2D.SmoothingMode.AntiAlias * If the size of the layout box isn't specified, use a very large box so size * isn't a factor. This.SetSize(100000, 100000) endwith endfunc
MeasureString does the job of measuring the specified string (parameter checking code is removed from this listing for brevity). If the font specifications were passed, it calls SetFont to set up the System.Drawing.Font object. If not, you must call SetFont yourself before calling MeasureString or you’ll get an error. If the string has carriage returns without linefeeds, linefeeds are added because otherwise the measurements are inaccurate. The code uses the MeasureString method of System.Drawing.Graphics to measure the string.
function MeasureString(tcString, tcFontName, tnFontSize, tcStyle) local lcStyle, ; lnChars, ; lnLines, ; lcString, ; loStringSize do case * Set up the font object if the font and size were specified.
case pcount() > 1 lcStyle = iif(vartype(tcStyle) = 'C', tcStyle, '') This.SetFont(tcFontName, tnFontSize, lcStyle) * If no font or size were specified, bug out with an error. case vartype(This.oFont) <> 'O' error cnERR_TOO_FEW_ARGS return endcase with This * Initialize output variables used in GdipMeasureString. lnChars = 0 lnLines = 0 * If the string has CHR(13) but not CHR(10), insert them. if ccCR $ tcString and not ccLF $ tcString lcString = strtran(tcString, ccCR, ccCRLF) else lcString = tcString endif ccCR $ tcString ... * Call MeasureString to get the dimensions of the bounding box for the * specified string. loStringSize = .oGDI.MeasureString(lcString, .oFont, .oSize, ; .oFormat, @lnChars, @lnLines) .nChars = lnChars .nLines = lnLines .nWidth = loStringSize.Width .nHeight = loStringSize.Height endwith endfunc
SetSize creates a System.Drawing.SizeF object to specify the size of the bounding box for the string.
function SetSize(tnWidth, tnHeight) if vartype(tnWidth) = 'N' and tnWidth >= 0 and ; vartype(tnHeight) = 'N' and tnHeight >=0 This.oSize = _screen.system.Drawing.SizeF.New(tnWidth, tnHeight) else error cnERR_ARGUMENT_INVALID endif vartype(tnWidth) = 'N' ... endfunc
SetFont sets up a System.Drawing.Font object to the specified font name, size, and style. Note that it uses enumerations of System.Drawing.FontStyle for the font style.
function SetFont(tcFontName, tnFontSize, tcStyle)
local lcStyle, ; lnStyle do case case pcount() < 2 error cnERR_ARGUMENT_INVALID return case pcount() >= 2 and (vartype(tcFontName) <> 'C' or ; empty(tcFontName) or vartype(tnFontSize) <> 'N' or ; not between(tnFontSize, 1, 128)) error cnERR_ARGUMENT_INVALID return case pcount() = 3 and vartype(tcStyle) <> 'C' error cnERR_ARGUMENT_INVALID return endcase lcStyle = iif(vartype(tcStyle) = 'C', tcStyle, '') with _screen.System.Drawing as xfcDrawing of Source\System.PRG do case case lcStyle = 'BI' lnStyle = .FontStyle.BoldItalic case lcStyle = 'B' lnStyle = .FontStyle.Bold case lcStyle = 'I' lnStyle = .FontStyle.Italic otherwise lnStyle = .FontStyle.Regular endcase This.oFont = .Font.New(tcFontName, tnFontSize, lnStyle) endwith endfunc
Let’s calculate the maximum length of the company name using GDI+. Run this code (CalcWidthGDI.PRG):
loGDI = newobject('SFGDIMeasureString', 'SFGDIMeasureString.PRG') select max(loGDI.GetFRUWidth(trim(company), 'Arial', 16)) ; from customer into array laWidth messagebox(laWidth[1])
This displays 38228.922, so change the width of the field in the report to 3.823 inches and run it again. This time, no text is cut off.
Now that we have a class that measures strings, let’s look at some uses for it.
Dynamically positioning controls
If you have a label with WordWrap = .T. and the caption of that label can change at runtime (for example, for localization), you need to set its Height large enough at design time to accommodate the longest string possible. As a result, controls below the label have to be placed far enough down to respect the label’s height. If the actual caption used for the label at runtime is fairly short, there’s a lot of empty space between the bottom of the text the user sees and the next control.
Instead, use SFGDIMeasureString to calculate the height needed for the caption and adjust the positions of the other controls accordingly. The following code was taken from the Init method of DynamicControls.SCX:
loSFGDI = newobject('SFGDIMeasureString', 'SFGDIMeasureString.prg') with This.lblDescription .Caption = lcCaption .Height = loSFGDI.GetHeight(.Caption, .Width, .FontName, .FontSize, ; iif(.FontBold, 'B', '')) endwith with This .oFile.Top = .lblDescription.Top + .lblDescription.Height + 5 endwith
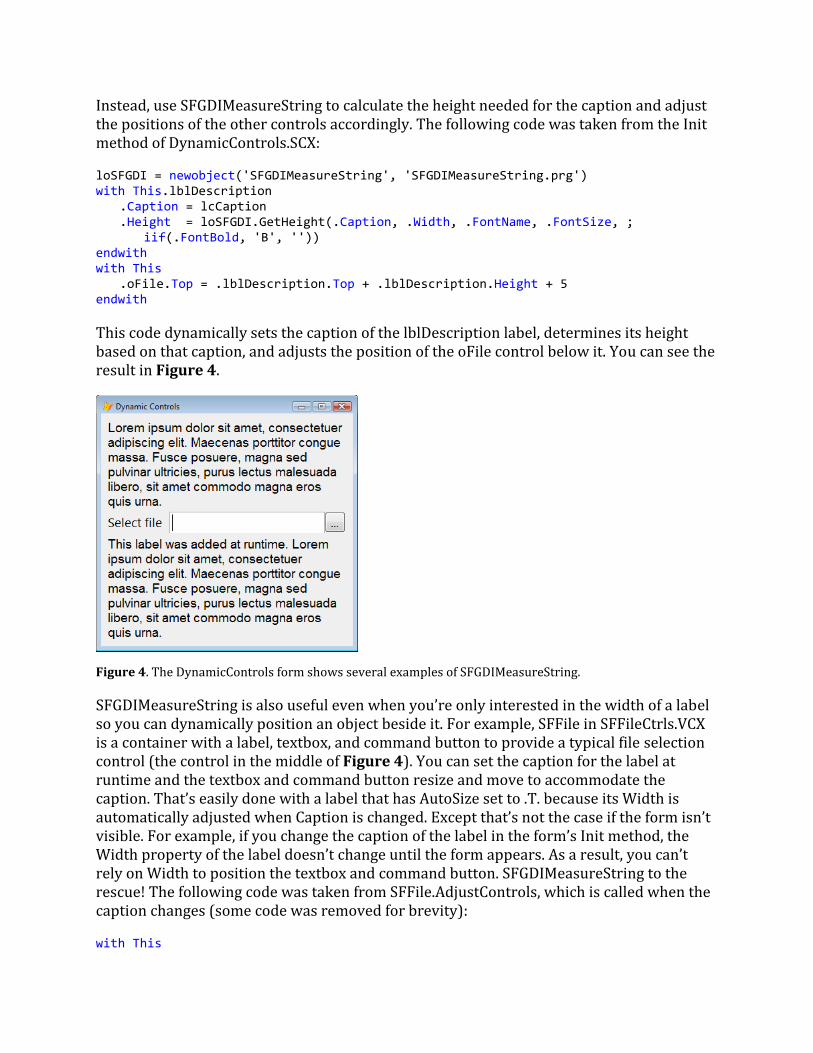
This code dynamically sets the caption of the lblDescription label, determines its height based on that caption, and adjusts the position of the oFile control below it. You can see the result in Figure 4.
Figure 4. The DynamicControls form shows several examples of SFGDIMeasureString.
SFGDIMeasureString is also useful even when you’re only interested in the width of a label so you can dynamically position an object beside it. For example, SFFile in SFFileCtrls.VCX is a container with a label, textbox, and command button to provide a typical file selection control (the control in the middle of Figure 4). You can set the caption for the label at runtime and the textbox and command button resize and move to accommodate the caption. That’s easily done with a label that has AutoSize set to .T. because its Width is automatically adjusted when Caption is changed. Except that’s not the case if the form isn’t visible. For example, if you change the caption of the label in the form’s Init method, the Width property of the label doesn’t change until the form appears. As a result, you can’t rely on Width to position the textbox and command button. SFGDIMeasureString to the rescue! The following code was taken from SFFile.AdjustControls, which is called when the caption changes (some code was removed for brevity):
In Figure 4, you can see that the textbox and command button are positioned to accommodate the label caption.
Dynamically adding controls
Suppose you have to add a label to a form at runtime under certain conditions (such as configuration or security). You can easily do that using the AddObject method of the form, but if the caption for the label is long, you likely want to set WordWrap to .T. so the label spans several lines. The problem, then, is how high to make the label. That’s easy using SFGDIMeasureString. The following code was taken from the Init method of DynamicControls.SCX:
As you can see in Figure 4, the bottom label is sized as necessary.
Other text functions Let’s look at some other text-related functions: creating an image from text, displaying shadowed text, and fully justifying text in reports.
Creating an image from text
There are times when it’s useful to create an image on the fly containing text. For example, one thing I’ve always wanted to do in drag and drop operations is to use an image representing the item being dragged, including its text.
Cesar Chalom provided some code using GDIPlusX to do this (http://weblogs.foxite.com/vfpimaging/archive/2007/11/24/5428.aspx). I used his code to create a generic utility PRG, TextToImage.PRG.
TextToImage.PRG accepts seven parameters: the name of the image file to create, the text to use in the image, the font, size and style for the text, and the foreground and background colors, specified either as RGB values or color names (such as “Red”). The code is well-commented to describe what it does (parameter checking code and the LOCAL statement removed for brevity):
lparameters tcFileName, ; tcText, ; tcFontName, ; tnFontSize, ; tcStyle, ; tuForeColor, ; tuBackColor * Ensure GDIPlusX is available for use. do System.app with _screen.System.Drawing as xfcDrawing of Source\System.PRG * Determine the image type from the file extension. lcExt = upper(justext(tcFileName)) do case case lcExt = 'PNG' loFormat = .Imaging.ImageFormat.Png case lcExt = 'BMP' loFormat = .Imaging.ImageFormat.Bmp case lcExt = 'GIF' loFormat = .Imaging.ImageFormat.Gif case inlist(lcExt, 'JPG', 'JPEG') loFormat = .Imaging.ImageFormat.Jpeg case lcExt = 'ICO' loFormat = .Imaging.ImageFormat.Icon case inlist(lcExt, 'TIF', 'TIFF') loFormat = .Imaging.ImageFormat.Tiff case lcExt = 'WMF' loFormat = .Imaging.ImageFormat.Wmf endcase * Get the foreground and background colors from their RGB values or names. If * the foreground color wasn't specified, use black. If the background color * wasn't specified, use white.
do case case vartype(tuForeColor) = 'N' loForeColor = .Color.FromRGB(tuForeColor) case vartype(tuForeColor) = 'C' loForeColor = .Color.FromName(tuForeColor) otherwise loForeColor = .Color.Black endcase do case case vartype(tuBackColor) = 'N' loBackColor = .Color.FromRGB(tuBackColor) case vartype(tuBackColor) = 'C' loBackColor = .Color.FromName(tuBackColor) otherwise loBackColor = .Color.White endcase * Figure out the size required for the text, create an image that size, and * get a Graphics object from it. Note that we have to round the size up so the * image has enough room for the text. loGDI = newobject('SFGDIMeasureString', 'SFGDIMeasureString.PRG') loGDI.MeasureString(tcText, tcFontName, tnFontSize, evl(tcStyle, '')) loFont = loGDI.oFont loSize = loGDI.oStringSize loSize.Width = ceiling(loSize.Width) loSize.Height = ceiling(loSize.Height) loBmp = .Bitmap.New(loSize) loGfx = .Graphics.FromImage(loBmp) * Clear the background to the desired color. loGfx.Clear(loBackColor) * Create a solid brush in the desired forecolor. loBrush = .SolidBrush.New(loForeColor) * Create an StringFormat object to center the text in the image. loStringFmt = .StringFormat.New() loStringFmt.Alignment = .StringAlignment.Center * Use anti-aliasing for better results. loGfx.SmoothingMode = .Drawing2D.SmoothingMode.AntiAlias * Draw the string and save the image. loGfx.DrawString(tcText, loFont, loBrush, loSize, loStringFmt) loBmp.Save(tcFileName, loFormat) endwith
TestTextToImage.PRG shows a simple example using this program. The following line creates an image with “This is my text” in red text on a green background:
TextToImage('image2.png', 'This is my text', 'Tahoma', 14, 'B', ; 'Red', 'Green')
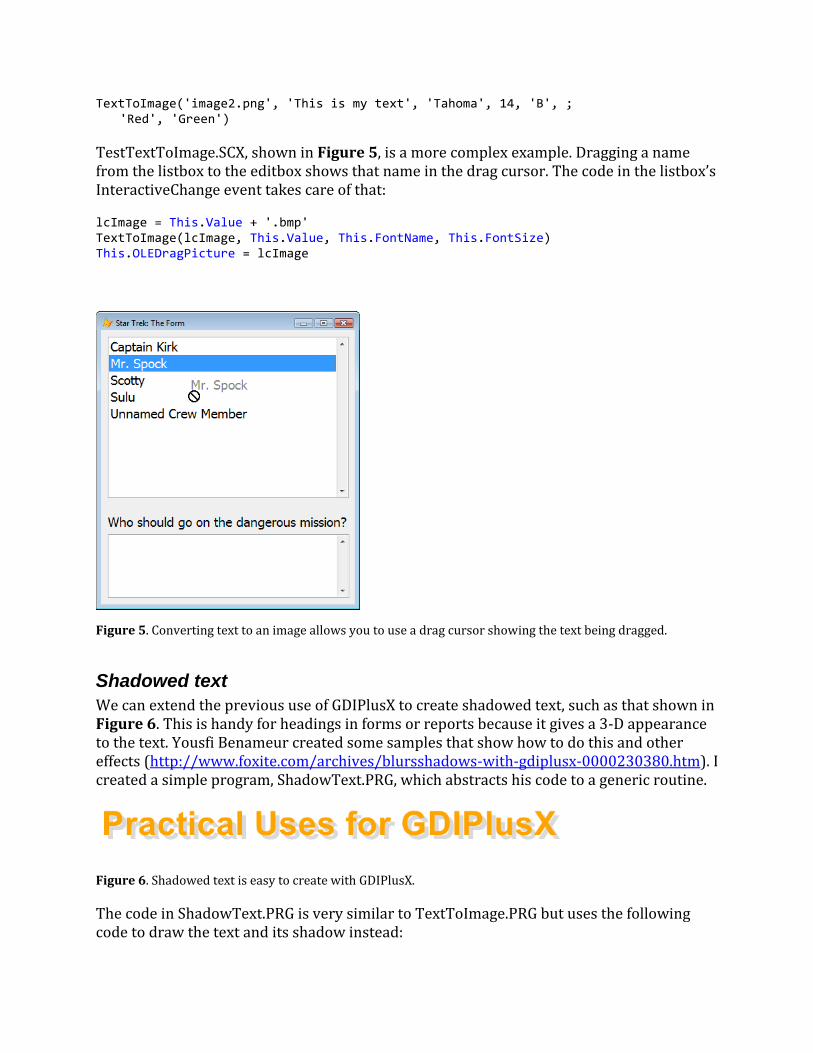
TestTextToImage.SCX, shown in Figure 5, is a more complex example. Dragging a name from the listbox to the editbox shows that name in the drag cursor. The code in the listbox’s InteractiveChange event takes care of that:
Figure 5. Converting text to an image allows you to use a drag cursor showing the text being dragged.
Shadowed text
We can extend the previous use of GDIPlusX to create shadowed text, such as that shown in Figure 6. This is handy for headings in forms or reports because it gives a 3-D appearance to the text. Yousfi Benameur created some samples that show how to do this and other effects (http://www.foxite.com/archives/blursshadows-with-gdiplusx-0000230380.htm). I created a simple program, ShadowText.PRG, which abstracts his code to a generic routine.
Figure 6. Shadowed text is easy to create with GDIPlusX.
The code in ShadowText.PRG is very similar to TextToImage.PRG but uses the following code to draw the text and its shadow instead:
* Create a GraphicsPath object for the main text and add the text to it. loTextPath = .Drawing2D.GraphicsPath.New() loTextPath.AddString(tcText, .FontFamily.New(tcFontName), loFont.Style, ; tnFontSize, .Point.New(0, 0)) * Create a GraphicsPath object for the shadowed text and add the text to it. loShadowPath = .Drawing2D.GraphicsPath.New() loShadowPath.AddString(tcText, .FontFamily.New(tcFontName), loFont.Style, ; tnFontSize, .Point.New(lnShadowOffset, lnShadowOffset)) * Draw the shadowed text first (because the main text will overlay it), then * draw the main text. loGfx.FillPath(.SolidBrush.New(loShadowColor), loShadowPath) loGfx.FillPath(.SolidBrush.New(loTextColor), loTextPath)
This code uses a different technique to add text to an image: using the AddString method of System.Drawing.Drawing2D.GraphicsPath. Note that AddString requires a reference to a FontFamily object rather than a Font object. The text is then colored using System.Drawing.Graphics.FillPath with a brush of the specified color.
Pass this PRG the name of the image file to create, the text to use in the image, the font, size and style for the text, the text color (black if used if it isn’t passed) and shadow color (gray is used as default), specified either as RGB values or color names (such as “Red”), the shadow alpha value (50 is the default), and the shadow offset from the text (the default is 6 pixels). Here’s the code used to create the image in Figure 6:
One question I see frequently in various VFP forums is how to fully-justify text in reports. VFP provides left, center, and right alignment for text but not full justification. Fortunately, this is easy to do using a custom ReportListener and GDIPlusX. Cesar Chalom provided the complete code in a blog entry (http://weblogs.foxite.com/vfpimaging/archive/2007/04/05/3641.aspx). I simplified the code slightly in the FullJustifyListener class in FJListener.PRG.
The BeforeReport method of the listener ensures that GDIPlusX is available, creates a System.Drawing.Graphics object we’ll see later, and goes through all the records in the FRX, looking for any with “<FJ>” in the USER memo. This is an indicator that this object should be fully justified. If it finds any, the code sets the second element of a custom aRecords array to .T. for the row representing the FRX object.
* Ensure GDIPlusX is available for use and create a graphics object. do System.App .oGDIGraphics = _screen.System.Drawing.Graphics.New() * Switch to the FRX cursor's datasession and for every record with the "<FJ>" * directive in the USER memo, flag in This.aRecords that we need to process it. * Then restore the datasession. .SetFRXDataSession() dimension .aRecords[reccount(), 2] scan for '<FJ>' $ upper(USER) .aRecords[recno(), 2] = .T. endscan for '<FJ>' $ upper(USER) .ResetDataSession() endwith endfunc
The VFP report engine calls the EvaluateContents method just before it outputs a text object, passing it the record number in the FRX cursor for the text object and an object containing properties about how the text object is rendered (font, color, etc.). The code in this method stores the properties object into the first column of the aRecords row for the text object if it’s being fully justified.
function EvaluateContents(tnFRXRecNo, toObjProperties) if This.aRecords[tnFRXRecno, 2] This.aRecords[tnFRXRecno, 1] = toObjProperties endif This.aRecords[tnFRXRecno, 2] endfunc
Render does the actual output of the report object to the report. The code is well-commented, but the important GDIPlusX-related item here is calling the DrawStringJustified of the graphics object to do all the hard work.
procedure Render(tnFRXRecNo, tnLeft, tnTop, tnWidth, tnHeight, ; tnObjectContinuationType, tcContentsToBeRendered, toGDIPlusImage) local loObject, ; loRect, ; loFont, ; lnAlpha, ; loBrush * If the current object is supposed to be fully-justified, do so. Start by * setting the GDI+ handle for our graphics object to the same one the report * uses (the property to use depends on whether this is a successor or not). if This.aRecords[tnFRXRecNo, 2] loObject = This.aRecords[tnFRXRecNo, 1] This.oGDIGraphics.Handle = iif(This.IsSuccessor, ; This.SharedGDIPlusGraphics, This.GDIPlusGraphics) with _screen.system.Drawing as xfcDrawing of Source\System.PRG
* Create a GDI+ rectangle which specifies where on the surface we're drawing * the text. loRect = .RectangleF.New(tnLeft, tnTop, tnWidth, tnHeight) * Create a font object using the text object's settings. loFont = .Font.New(loObject.FontName, loObject.FontSize, ; loObject.FontStyle) * If the text uses an opaque background, draw a rectangle in the chosen * background color using a solid brush. lnAlpha = loObject.FillAlpha if lnAlpha <> 0 loBrush = .SolidBrush.New(.Color.FromArgb(lnAlpha, ; loObject.FillRed, loObject.FillGreen, ; loObject.FillBlue)) This.oGDIGraphics.FillRectangle(loBrush, tnLeft, ; tnTop, tnWidth, tnHeight) endif lnAlpha <> 0 * Create a solid brush and draw the text in full-justified mode. loBrush = .SolidBrush.New(.Color.FromArgb(loObject.PenAlpha, ; loObject.PenRed, loObject.PenGreen, loObject.PenBlue)) This.oGDIGraphics.DrawStringJustified(loObject.Text, loFont, ; loBrush, loRect) endwith else * If we're not drawing a full justified string, let VFP draw the text as usual. dodefault(tnFRXRecNo, tnLeft, tnTop, tnWidth, tnHeight, ; tnObjectContinuationType, tcContentsToBeRendered, ; toGDIPlusImage) endif This.aRecords[tnFRXRecNo, 2] * Since we already drew the text, we don't want the default behavior to occur. nodefault endproc
Using the listener is easy: instantiate the FullJustifyListener class and use it in the OBJECT clause of a REPORT FORM statement. This is taken from TestFJListener.PRG:
loReportListener = newobject('FullJustifyListener', 'FJListener.prg') report form TestFJListener preview object loReportListener
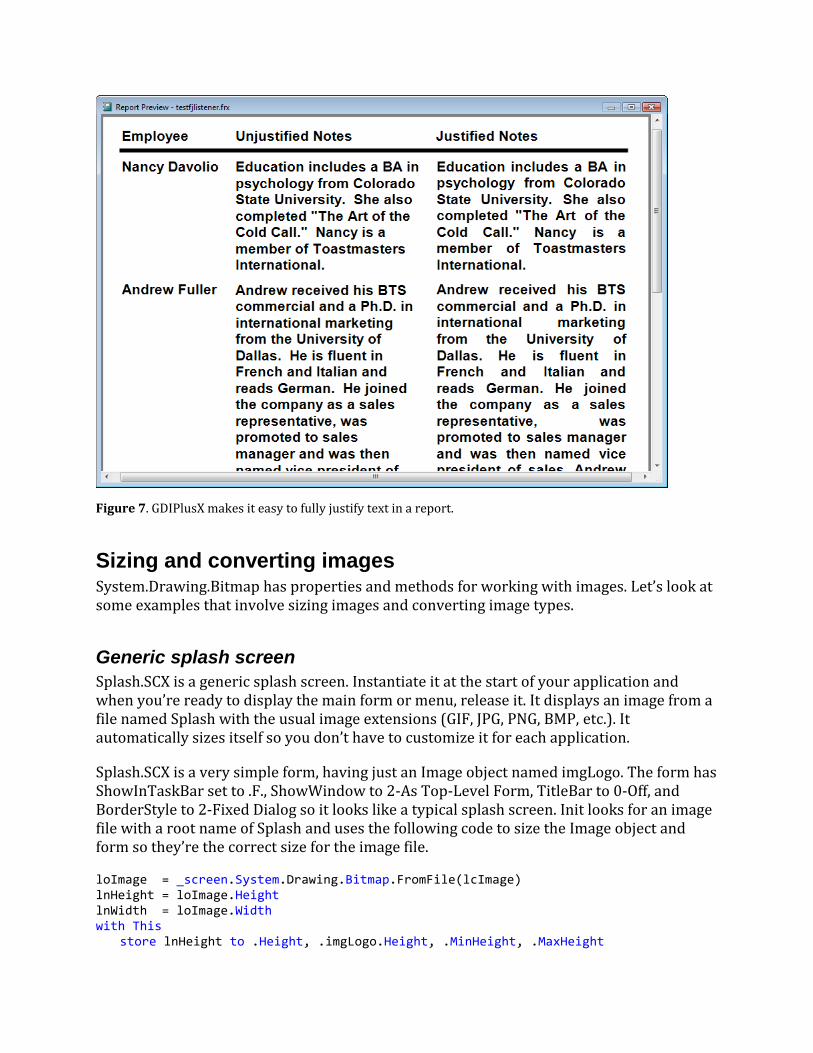
Figure 7 shows the result of running TestFJListener.PRG. The “Unjustified Notes” column shows the Notes field from the Northwind Employees table. The “Justified Notes” column shows the same field but using the “<FJ>” directive in Notes for the report object.
Figure 7. GDIPlusX makes it easy to fully justify text in a report.
Sizing and converting images System.Drawing.Bitmap has properties and methods for working with images. Let’s look at some examples that involve sizing images and converting image types.
Generic splash screen
Splash.SCX is a generic splash screen. Instantiate it at the start of your application and when you’re ready to display the main form or menu, release it. It displays an image from a file named Splash with the usual image extensions (GIF, JPG, PNG, BMP, etc.). It automatically sizes itself so you don’t have to customize it for each application.
Splash.SCX is a very simple form, having just an Image object named imgLogo. The form has ShowInTaskBar set to .F., ShowWindow to 2-As Top-Level Form, TitleBar to 0-Off, and BorderStyle to 2-Fixed Dialog so it looks like a typical splash screen. Init looks for an image file with a root name of Splash and uses the following code to size the Image object and form so they’re the correct size for the image file.
loImage = _screen.System.Drawing.Bitmap.FromFile(lcImage) lnHeight = loImage.Height lnWidth = loImage.Width with This store lnHeight to .Height, .imgLogo.Height, .MinHeight, .MaxHeight
store lnWidth to .Width, .imgLogo.Width, .MinWidth, .MaxWidth .AutoCenter = .T. .imgLogo.Picture = lcImage endwith
Creating thumbnail images
CreateThumbnails.PRG goes through all the image files in a folder and resizes them into image files in a Thumbnails subdirectory of the folder. All of the work of resizing an image is handled in just three lines of code:
with _screen.System.Drawing as xfcDrawing of Source\System.PRG * Load the original image. loSrcImage = .Bitmap.New(lcFile) * Get the resized version of the image. loResized = .Bitmap.New(loSrcImage, lnWidth, lnHeight) * Save the resized image as a JPEG. loResized.Save(lcNewFile, .Imaging.ImageFormat.JPEG) endwith
Note the overloaded New method of System.Drawing.Bitmap. The first use loads an image from the specified filename and the second use loads an image from another image object. The first line can be replaced with:
loSrcImage = .Bitmap.FromFile(lcFile)
The Save method saves the image to the specified filename using the desired image format specified as a System.Drawing.Imaging.ImageFormat enumeration.
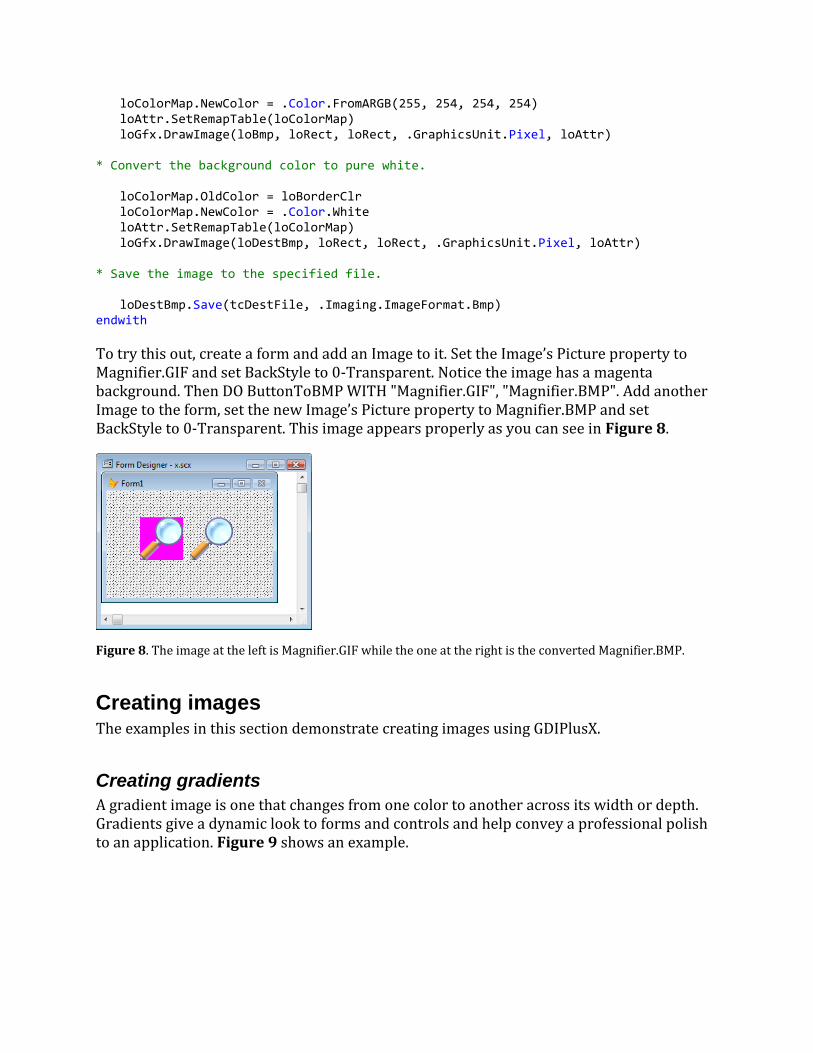
Converting images to BMPs
For a variety of reasons, BMP is the best format to use for VFP images: it’s has the best support in various VFP functions and the Image object. However, in his article on image formats in VFP (http://www.ctl32.com.ar/articles/what_is_the_best_image_format_for_VFP.asp), Carlos Alloatti discusses the problem with transparency in BMP files. He notes that while BMPs don’t support transparency, VFP automatically uses white in BMPs as a transparent color. The problem is many images, such as icon files, use other colors as their “transparent” color, the most common being magenta, and come in other formats, such as ICO or PNG.
Fortunately, as Cesar Chalom points out in his blog (http://weblogs.foxite.com/vfpimaging/archive/2008/12/15/7441.aspx), it’s easy to use GDIPlusX to convert image files from one type to another. He also presents an interesting
technique: since the upper-left pixel of an image is likely the background of the image, which should be transparent, changing all pixels in the image using that color to white should result in a nice image with a transparent background in VFP. However, what if the image legitimately uses white for some pixels? They’d be transparent too, which isn’t likely what you’d want. So, Cesar changes white pixels (RGB 255,255,255) to slightly off-white (254,254,254), which isn’t noticeable to the eye but is to VFP.
Here’s the code for ButtonToBMP.PRG (changed slightly from the code in Cesar’s blog article and some code removed in this listing for brevity):
lparameters tcSourceFile, ; tcDestFile * Ensure GDIPlusX is available for use. do System.app with _screen.System.Drawing as xfcDrawing of Source\System.PRG * Read the image file, create a Graphics object from it, and get its * dimensions. loBmp = .Bitmap.FromFile(tcSourceFile) loRect = loBmp.GetBounds() * Create a new 24-bit BMP using the dimensions of the original, and create a * Graphics object from it. loDestBmp = .Bitmap.New(loBmp.Width, loBmp.Height, ; .Imaging.PixelFormat.Format24bppRGB) loGfx = .Graphics.FromImage(loDestBmp) * Clear the new bitmap loGfx.Clear(.Color.White) * As per Craig Boyd, use these setting to enhance the smoothness and quality. loGfx.SmoothingMode = .Drawing2D.SmoothingMode.HighQuality loGfx.InterpolationMode = .Drawing2D.InterpolationMode.HighQualityBicubic loGfx.PixelOffsetMode = .Drawing2D.PixelOffsetMode.HighQuality * Get the color of the upper-left pixel, presuming this color is the background * color to become transparent. In our case, this will become pure white - * RGB(255,255,255) - that becomes transparent when used in VFP objects. loBorderClr = loBmp.GetPixel(0, 0) * Convert pure white to off-white - RGB(254,254,254) - by remapping the colors * and drawing the image to the new BMP. loColorMap = .Imaging.ColorMap.New() loAttr = .Imaging.ImageAttributes.New() loColorMap.OldColor = .Color.White
loColorMap.NewColor = .Color.FromARGB(255, 254, 254, 254) loAttr.SetRemapTable(loColorMap) loGfx.DrawImage(loBmp, loRect, loRect, .GraphicsUnit.Pixel, loAttr) * Convert the background color to pure white. loColorMap.OldColor = loBorderClr loColorMap.NewColor = .Color.White loAttr.SetRemapTable(loColorMap) loGfx.DrawImage(loDestBmp, loRect, loRect, .GraphicsUnit.Pixel, loAttr) * Save the image to the specified file. loDestBmp.Save(tcDestFile, .Imaging.ImageFormat.Bmp) endwith
To try this out, create a form and add an Image to it. Set the Image’s Picture property to Magnifier.GIF and set BackStyle to 0-Transparent. Notice the image has a magenta background. Then DO ButtonToBMP WITH "Magnifier.GIF", "Magnifier.BMP". Add another Image to the form, set the new Image’s Picture property to Magnifier.BMP and set BackStyle to 0-Transparent. This image appears properly as you can see in Figure 8.
Figure 8. The image at the left is Magnifier.GIF while the one at the right is the converted Magnifier.BMP.
Creating images The examples in this section demonstrate creating images using GDIPlusX.
Creating gradients
A gradient image is one that changes from one color to another across its width or depth. Gradients give a dynamic look to forms and controls and help convey a professional polish to an application. Figure 9 shows an example.
Figure 9. Gradients add a dynamic appearance to forms.
Gradients are easy to create in GDIPlusX because it’s a simple matter to draw with a gradient brush. CreateGradient.PRG is a utility program that creates a gradient image using the specified filename, from and to color, and image size. Here’s the GDIPlusX code that does that:
with _screen.System.Drawing as xfcDrawing of Source\System.PRG * Determine the image type from the file extension.
lcExt = upper(justext(tcFileName)) do case case lcExt = 'PNG' loFormat = .Imaging.ImageFormat.Png case lcExt = 'BMP' loFormat = .Imaging.ImageFormat.Bmp case lcExt = 'GIF' loFormat = .Imaging.ImageFormat.Gif case inlist(lcExt, 'JPG', 'JPEG') loFormat = .Imaging.ImageFormat.Jpeg case lcExt = 'ICO' loFormat = .Imaging.ImageFormat.Icon case inlist(lcExt, 'TIF', 'TIFF') loFormat = .Imaging.ImageFormat.Tiff case lcExt = 'WMF' loFormat = .Imaging.ImageFormat.Wmf endcase * Create a bitmap and a rectangle of the desired size.
loBmp = .Bitmap.New(tnWidth, tnHeight) loRect = .Rectangle.New(0, 0, tnWidth, tnHeight) * Create a graphics object and clear the bitmap to white. loGfx = .Graphics.FromImage(loBmp) loGfx.Clear(.Color.White) * Use a horizontal gradient if width > height or vertical if height > width. if tnWidth > tnHeight lnMode = .Drawing2D.LinearGradientMode.Horizontal else
lnMode = .Drawing2D.LinearGradientMode.Vertical endif tnWidth > tnHeight * Create a linear gradient brush. loBrush = .Drawing2D.LinearGradientBrush.New(loRect, ; .Color.FromRgb(lnColor1), .Color.FromRgb(lnColor2), lnMode) * Fill the rectangle with the gradient brush. loGfx.FillRectangle(loBrush, loRect) * Save the image to the specified file. loBmp.Save(tcFileName, loFormat) endwith
This code starts by deciding what type of image to create, choosing the appropriate System.Drawing.Imaging.ImageFormat enumeration based on the file extension. It then create a new bitmap and rectangle of the specified size, creates a graphics object from the bitmap and clears the image to white. If the image should be wider than tall, a horizontal gradient is used; otherwise, it’s a vertical gradient. Next, a gradient brush is created using the from and to colors and the desired gradient type. The image is then filled with that brush and the file saved.
TestCreateGradient.PRG exercises CreateGradient by creating a displaying two gradients: a horizontal one going from white to blue and a vertical one from red to black.
A couple of classes in GradientImage.VCX make it even easier to add gradients to a form. Drop an instance of the GradientImage class on the form, set the Height and Width as necessary, and specify the values for the from and to colors (the nFromColor and nToColor properties, respectively) to create a gradient image. The CreateGradientImage method, called from Init, has code similar to CreateGradient.PRG but simplified for the class. It creates a gradient image and sets PictureVal to the image bytes.
You can easily add a gradient background to a form by dropping an instance of the GradientBackground class on the form. GradientBackground is a subclass of GradientImage, with the only changes being that Init sizes and positions the image to cover the entire form and sends the image to the back so it’s in the background, Anchor is set to 15 so the image resizes as the form does, and Stretch is set to 2-Stretch so the gradient image stretches as the control is resized. To try this class, drop an instance on one of the sample forms, such as DynamicControls.SCX, and run it. Figure 10 shows what this looks like.
Figure 10. Adding a gradient background to a form is easy using the GradientBackground class.
Screen snapshots
Screen snapshots are important in application documentation because they provide a visual clue to the user about what a form looks like. They are especially useful if the user is reading the documentation (like that ever happens <g>) without running the application. I use SnagIt from TechSmith to do screen shots but if your application has a lot of forms, it can be time-consuming and tedious to take a snapshot of every form. My need was even more unique: because Stonefield’s main product, Stonefield Query, can be customized by developers, some of their forms may look different than the standard forms. To make it easier for them to create documentation for their customized version, I needed a way to automate shooting all of the forms in the application. Once again, GDIPlusX made this easy.
The ScreenShot class defined in ScreenShot.PRG creates an image file as a snapshot of the specified form. Instantiate the class, set up the form as necessary, and call the TakeScreenShot method, passing it a reference to the form, the name of the image file to create, and .T. if the form should be sized to its smallest possible size (helps to keep the image to the minimum size but only a good idea if MinHeight and MinWidth are set to reasonable values). Alternatively, if you want to take a shot of the form for each page in a pageframe, you can call ShootAllPageFramePages, passing a reference to the form, a reference to the pageframe, the root name of the image files to create (they’ll actually be named Root1.PNG, Root2.PNG, etc., where Root is root name you specify), and .T. if the form should be sized to its smallest possible size.
The actual GDIPlusX code responsible for taking and saving the screen shot is just two lines long. System.Drawing.Bitmap.FromScreen creates an image from a window and System.Drawing.Bitmap.Save saves the image to a file. The file type is taken from the extension of the file name using similar code used in CreateGradient.PRG.
with _Screen.System.Drawing as xfcDrawing of Source\System.PRG loCaptureBmp = .Bitmap.FromScreen(toForm.hWnd)
loCaptureBmp.Save(tcImageFile, loFormat) endwith
In order to automate ScreenShot, you need a driving program that instantiates each of your forms and calls TakeScreenShot or ShootAllPageFramePages to take the shots. You can do this with a hard-coded program but a data-driven approach might be better. TestScreenShot.PRG is an example of the former. Keep in mind that some forms may need additional set up code to make them appear the way you want the screen shot to look. Here’s an example taken from production code for the Export Reports dialog in Stonefield Query:
If the lPlaySound property is .T., the sound file specified in the cSoundFile property is played after taking the screen shot. Although this can be useful, it slows the screen shot process considerably and can get annoying if there are a lot of forms to shoot.
If the form being shot has Desktop set to .T. or ShowWindow set to 2-As Top-Level Form, a white background window is laid behind the form. This is necessary in Windows Vista to avoid blurred background images in the window frame when Aero Glass is turned on.
For obvious reasons, ScreenShot only works with modeless forms, so it works best if you instantiate the form class and pass the reference to the form to TakeScreenShot without calling the form’s Show method. TakeScreenShot calls the form’s Show method with 0 as a parameter so the form is modeless. For an SCX form, DO FORM FormName NOSHOW NAME loForm and pass loForm to TakeScreenShot. TakeScreenShot takes care of making the form visible.
Lightbox
UseIt.com named the lightbox technique “dialog design technique of the year for 2008” (http://www.useit.com/alertbox/application-design.html). The lightbox technique involves dimming a dialog to focus the user's attention on a dialog in the middle of the screen. Figure 11 shows an example: the form is dimmed so the user doesn’t miss seeing the dialog.
Figure 11. The lightbox technique focuses the user's attention on a dialog.
Bernard Bout blogged about the lightbox technique (http://weblogs.foxite.com/bernardbout/archive/2008/08/18/6536.aspx and http://weblogs.foxite.com/bernardbout/archive/2008/09/13/6768.aspx) and provided a class to do all the work. I created a simpler version of his class in Lightbox.PRG that doesn’t require adding an object to a form: simply DO Lightbox WITH This to disable the form and DO Lightbox WITH This, .T. to re-enable it.
Lightbox “disables” the form by dynamically adding an Image object to it and setting the Image’s ZOrder so it covers everything else on the form. Lightbox takes a snapshot of the form, then applies a semi-transparent color mask over the snapshot and uses that as the image displayed in the Image object. Here’s the GDIPlusX-related code from Lightbox.PRG:
lnFactor = 0.90 && 0 = Dark 1 = Bright lnRed = bitand(lnColor, 0x000000FF) / 255 * lnFactor lnGreen = bitrshift(bitand(lnColor, 0x0000FF00), 8) / 255 * lnFactor lnBlue = bitrshift(bitand(lnColor, 0x00FF0000), 16) / 255 * lnFactor * Create a BMP of the desired color and use it as the picture for the image. with _Screen.System.Drawing as xfcDrawing of Source\System.PRG loClrMatrix = .Imaging.ColorMatrix.New( ; lnRed, 0, 0, 0, 0, ; 0, lnGreen, 0, 0, 0, ; 0, 0, lnBlue, 0, 0, ; 0, 0, 0, 1, 0, ; 0, 0, 0, 0, 1) loBmp = .Bitmap.FromScreen(toForm.imgLightBox) loBmp.ApplyColorMatrix(loClrMatrix) loGfx = .Graphics.FromImage(loBmp) loGfx.FillRectangle(.SolidBrush.New(.Color.FromARGB(128, 0, 0, 0)), ; 0, 0, lnWidth, lnHeight) endwith
Like ScreenShot.PRG, Lightbox.PRG uses System.Drawing.Bitmap.FromScreen to take a snapshot of the screen. However, instead of passing toForm.HWnd to take a shot of the entire form, including the window frame, a reference to the Image object on the form (which is sized to the same dimensions as the form) is passed instead. This takes a snapshot of just the content of the window. Next, a color matrix is applied to the snapshot to reduce the brightness of the colors in the image to 90% (see http://msdn.microsoft.com/en-us/library/ms533809(VS.85).aspx for links to articles on using color matrixes to recolor an image). System.Drawing.Graphics then fills the image with a 50% transparent black rectangle using a solid brush. (System.Drawing.Color.FromARGB(128, 0, 0, 0) means the alpha, or transparency, is 128/255 or 50% and the red, green, and blue elements are 0, giving black.) To avoid writing an image file to disk, the PictureVal property of the Image object is set to the bytes that make up the screen shot image (System.Drawing.Bitmap.GetPictureValFromHBitmap takes care of that).
To see Lightbox in action, run TestLightbox.SCX and click the Cancel button.
Disabling a TreeView
Although disabling a TreeView control is easy (you have to set oTree.Object.Enabled rather than oTree.Enabled), making it appear disabled is a different matter. Nothing visually changes when you set Enabled to .F., so the user can’t tell that the TreeView is disabled, and may wonder why clicking it does nothing. One way to do it is to set the background color of the control to a disabled-looking color. However, when you try to do that, you’ll discover the TreeView doesn’t have a BackColor property.
I blogged a solution to this (http://doughennig.blogspot.com/2008/11/setting-background-color-of-treeview.html) using Windows API calls to send a message to the TreeView to tell it to draw itself in a disabled color, but a reader named Alberto pointed out that indented nodes have an ugly white background in front of them. I played with this a bit but couldn’t come up with a way to fix it.
Then it occurred to me to use the lightbox technique discussed in the previous section. Sure enough, it worked great. The code in DisableTreeView.PRG is nearly identical to LightBox.PRG except it’s specific for a form with a TreeView control on it. One of the secrets to getting it to work is to hide the TreeView since a VFP control (the Image control in this case) can’t appear in front of an ActiveX control.
To see DisableTreeView in action, run TestDisableTreeView.SCX and check and uncheck the Enabled checkbox.
Resources Several VFP developers have great blogs that focus on GDIPlusX, including Cesar Chalom (http://weblogs.foxite.com/vfpimaging), Bernard Bout (http://weblogs.foxite.com/bernardbout), and Bo Durban (http://blog.moxiedata.com). The GDIPlusX References page on VFPX (http://vfpx.codeplex.com/Wiki/View.aspx?title=GDIPlusX%20References) has links to many GDI+ and GDIPlusX articles. Also, GDIPlusX comes with a lot of samples that show individual techniques, so it’s worth trying them out.
Summary GDIPlusX is one of the most important projects on VFPX because it forms the foundation for several other projects. GDIPlusX makes it easy to add new graphical abilities to your applications, allowing you to provide a fresher and more powerful user interface. You can use the code provided with this document directly in your applications or use it as a starting point for your own uses of GDIPlusX.
Biography Doug Hennig is a partner with Stonefield Systems Group Inc. and Stonefield Software Inc. He is the author of the award-winning Stonefield Database Toolkit (SDT); the award-winning Stonefield Query; the MemberData Editor, Anchor Editor, and CursorAdapter and DataEnvironment builders that come with Microsoft Visual FoxPro; and the My namespace and updated Upsizing Wizard in Sedna.
Doug is co-author of “Making Sense of Sedna and SP2,” the “What’s New in Visual FoxPro” series (the latest being “What’s New in Nine”), “Visual FoxPro Best Practices For The Next Ten Years,” and “The Hacker’s Guide to Visual FoxPro 7.0.” He was the technical editor of “The Hacker’s Guide to Visual FoxPro 6.0” and “The Fundamentals.” All of these books are from Hentzenwerke Publishing (http://www.hentzenwerke.com). He wrote over 100 articles in 10 years for FoxTalk and has written numerous articles in FoxPro Advisor, Advisor Guide to Visual FoxPro, and CoDe. He currently writes for FoxRockX (http://www.foxrockx.com).
Doug spoke at every Microsoft FoxPro Developers Conference (DevCon) starting in 1997 and at user groups and developer conferences all over the world. He is one of the organizers of the annual Southwest Fox conference (http://www.swfox.net). He is one of the administrators for the VFPX VFP community extensions Web site (http://vfpx.codeplex.com). He has been a Microsoft Most Valuable Professional (MVP) since 1996. Doug was awarded the 2006 FoxPro Community Lifetime Achievement Award (http://fox.wikis.com/wc.dll?Wiki~FoxProCommunityLifetimeAchievementAward~VFP).