19
Practix RSD Guide HealthLink Messaging System (HMS) 6.5.x

Practix RSD Guide HealthLink Messaging System (HMS) 6.5.x

Disclaimer
Copyright � HealthLink Limited 2007.
All rights reserved. No reproduction, transmission, transcription, storage in a retrieval system, or translation into any language or by any means, electronic, mechanical,
optical, chemical, manual, or otherwise, any part of the this document with the express permission of HealthLink Ltd.
Liability Notice: Every effort has been made to ensure that the information in this document, supplied by HealthLink Limited, is accurate and complete. However, as use and interpretation of this document is beyond the control of HealthLink Limited, no liability, either direct or consequential, can be entertained by HealthLink Limited,
its agents, or its suppliers.

Document Control Document Name Practix RSD Guide
This Guide is Applicable To • IBA Health Practix • HealthLink SIX version 6.5.x
File Name Practix RSD User guide v1.00.10
Date/Time Created Wednesday, 10 October 2007
Author(s) Lawrence Peterson
Revision
Date Revision Number
Author(s) Summary of Changes Changes marked
10/10/2007
V1.00 Lawrence Peterson
First release for review N

Practix RSD User guide v1.00.doc Page 4 of 19
Table of contents Disclaimer ................................................................................................................. 2 1 What is RSD?.................................................................................................... 6 2 How does messaging work?.............................................................................. 7 3 Benefits for using RSD ...................................................................................... 8 4 Getting Started .................................................................................................. 9 5 Setting up Practix Services.............................................................................. 10 6 Setting up the Practix Contact Entry ................................................................ 11
6.1 Setting up to Receive Messages (General Practice) ................................ 11 6.2 Setting up to Send Messages (Specialist Practice) .................................. 13
7 Sending electronic referrals/reports ................................................................. 15 8 How do I know that my message has been received? ..................................... 16

Practix RSD User guide v1.00.doc Page 5 of 19
1 What is RSD? RSD (Referral, Status and Discharge) refers to a particular subset of the Health Level 7 messaging standard that is specifically concerned the exchange of correspondence between health care providers including referrals, status reports, and discharge summaries. It should be noted here that the term “discharge” refers to the discharge of care from one provider to another. As such this standard includes for the exchange of reports between Specialist and GP as well as the Hospital Discharge Summary. The objective of the RSD standard is to provide a secure, efficient and auditable messaging service which provides an entirely electronic method of communications between health care providers. Currently, there are many different clinical software packages that provide RSD messaging functionalities and they vary in terms of how messages are handled and processed. It is important that for RSD to function correctly, messages must meet minimum specifications to eliminate any potential issues that may be caused by the processing of different clinical software. HealthLink tests messages, and works closely with vendors to ensure compatibility between software. Longer term, the service will be extended to include more organisations and will be involved at a different level due to greater technical possibilities such as diagrams, and photos.

Practix RSD User guide v1.00.doc Page 6 of 19
2 How does messaging work? Your practice will be allocated an EDI Account, within HealthLink's Messaging Exchange. This account holds all your outgoing and incoming messages that are collected on a regular basis. It is likely that you already have an EDI Account if you receive lab results electronically through HealthLink. If you do not have a HealthLink EDI then you can apply for a HealthLink account online at:
www.healthlink.net/apply Your EDI Account will be given to organisations that you wish to receive messages from e.g. specialists, or you will use other organisations EDI account to send information to. All the messaging transfer happens through HealthLink’s secure network over an internet connection at your surgery.
Hospitals
GP’s, Specialists, Midwives, Physiotherapists, etc.
Practix RSD User guide v1.00.doc Page 7 of 19
3 Benefits for using RSD Once an RSD message file has been received into your system, it will automatically match to a patient (if they are already on your database) and you will always be able to find that document again linked to that patient. For the General Practice this means that you will not have to scan patient documents which will cut down on time spent by staff. The size of the RSD files sent range from 1kb to 5kb, which is substantially smaller than the size of scanned images, a text scan with basic graphics will normally take approximately 300kb to 1000 kb, sometimes more. For the specialist practice this means that you could significantly cut down on the manual handling of reports and the cost of postage or facsimile transmission saving your practice thousands of dollars per annum. As part of the RSD process, once an electronic file has been received, an acknowledgement will be sent back to the original sender to notify them that the message has imported successfully into their software system. This is a full tracking system which gives greater confidence that messages are received as expected.

Practix RSD User guide v1.00.doc Page 8 of 19
4 Getting Started It is beneficial to having the HealthLink Messaging Client running on your server as a service. This is because everything becomes much more easy to manage and configure and that your HealthLink software is not reliant on any one workstation to be on or have network communications with your server if it is already installed on your server. If the HealthLink software is not on your server then you should share the C:\HLINK directory on the workstation and in the following configuration sections use a UNC path to this location rather than what is shown in the figures below. I.e. you will use \\computername\hlink\hlink_out\rsdau rather than c:\hlink\hl7_out\rsdau. Share the HLINK Directory Browse to the c: drive either using the my computer icon or explorer whichever you feel more comfortable with. In the C:\ drive you will find a directory or folder called HLINK. Right mouse click this folder and select sharing. On a Windows XP computer you will need to click the share this folder option. Click the permissions button and then make sure everyone has “full control”. If the workstation is a Windows2000 computer then you will need to select the security tab and once again make sure the “everyone” group has “full control”. If you don’t see the everyone group you can add it by clicking add and selecting the group or typing in everyone. To find out the computer name (you will need this for the UNC path for configuration later) right mouse click on the “my computer” icon, go to computer name, and it will be on this tab about half way down. If this bit all gets a bit too much please feel free to contact the HelpDesk on 1800 125 036 who will be more than happy to give you a hand in setting this up. The following section describes the set up procedures for sending any type of electronic RSD messages. Listed below are software packages that are able to receive electronic messages:
Software Name Software Vendor
MedTech32 MedTech Mercury
MedTech Global
Medical Director 2 Medical Director 3
Health Communication Network
Profile Intrahealth PractiX IBA Health Genie Genie Solutions Best Practice Best Practice Before initially sending any messages, you might like to notify the recipient of your intent to being sending, so that your reports or referrals are expected.

Practix RSD User guide v1.00.doc Page 9 of 19
5 Setting up Practix Services
Practix Services is a little application that runs on the designated server machine in your practice and does all sorts of useful things like the compilation of rosters, the shrink and export of your databases so that they can be backup up without the need for expensive smart SQL aware backup applications, the generation of messages to be sent, and of course the import of messages from other providers such as pathology and radiology companies. The services application should already be set on your server to run as a scheduled task on a regular basis so that should it go off for any reason it should restart automatically for you after a defined period of time. By default it is usually minimised to the system tray of the server and looks like a little green Px symbol. You should configure practice services to run in a no-tray configuration so that messages are formatted properly. The following screenshot displays the command you need to enter into the scheduled task “Run” field if it is not already there. If a default setup has been done then the run field will probably only have the command “ c:\msp\mspservices.exe “ in it. If this is the case then you will need to add the text “ blank notray “. A caution here, in that when you adjust a scheduled task it will prompt you for a username and password which is usually the administrator username and password on a server, so make sure you have this information at hand before you start editing the scheduled task. Then end the task and then re-start it using the scheduled task window. Right mouse click the mspservices task and select end task, then right mouse click on it again and select run. The Practix services windows should then come up on the screen and you may minimise it (not close) if it is in the road.
Contact Lawrence on 1300 554 563 if you find your practice does not have a scheduled task set up or you find Practix Services is not running on the server but on a workstation.

Practix RSD User guide v1.00.doc Page 10 of 19
6 Setting up the Practix Contact Entry
6.1 Setting up to Receive Messages (General Practice) Some of the information required for the configuration of the messages in function requires knowledge of what the senders file contains. As such you should get the specialist to send you a test message first so that you can get this information. Do this setup on the machine with the HealthLink Client Software installed on it (preferably your server). Browse to the c:\hlink\hl7_in\rsdau folder. In this folder should be a two more folders and one or more files. Find the file which has in brackets the EDI of the specialist you are about to set up, and double click it to open it. You may find that the computer asks you for a program to open this file with in which case something like Wordpad or notepad will suffice. The file will open and look something like the following minus the colour coding which has been added to make it easier to highlight the text you will need. MSH|^~\&|Genie v7.48|drbrianf||lpetersn|20071017142629+1000|PKI|REF^I12|16366|P|2.3.1 The data you will need to copy down for use later is The sending application – in this case “Genie v7.48” And the sending facility – in this case “drbiranf” Search for and bring up the contact that you wish to set up electronic communications with, or if they are not in your contact database, set up a new entry for them, save it and then search for the new contact and select it. On the right hand side of the contact window, just below the other actions button is a “messages in” button. Click this button to bring up the messages in configuration window. Click New. 1. In the Description field Type HealthLink 2. In the Sending Application field type The Sending Application 3. In the Sending Facility field type The Sending Facility 4. In the Transport Type field select File 5. In the Folder Name field type or browse to c:\hlink\hl7_in\rsdau 6. In the Filename Mask field type *.hl7 7. In the Acknowledgement Type Field select Original Mode 8. In the Ack Folder Name field type or browse to c:\hlink\hl7_out\rsdau 9. In the Ack Filename Scheme select Unique Remember, if you have the HealthLink client installed on a different machine from the server you will need to use the UNC path as described in Section 4 of this document instead of the text used in items 5 and 8 above. So c:\hlink\hl7_in\rsdau becomes \\computername\hlink\hl7_in\rsdau and c:\hlink\hl7_out\rsdau becomes \\computername\hlink\hl7_out\rsdau where “computername” is the name of the computer on which the HealthLink Client resides. Finally, click the add button to the right of the message details box. Select Ref^I12 – Patient Referral/Generic Report, and then click OK. The “Receive Messages From” window should now look something like the Following.

Practix RSD User guide v1.00.doc Page 11 of 19
Click Save. On the left hand side of the Contact Window about half way down there is a “Short Name” field. Type the EDI name of the sending practice into this field. This may allow technical support to better assist you should things go wrong in the future. The last part of it is to configure where the reports will show in Practix. Go to the bottom of the “Contact” window where you will see the tab “Other Requests”. Make sure you click the “Allow Other Requests” tick box. This will enable the display of these reports in the other Results/Reports section of the selector in the clinical area. You are now set up to receive Specialist reports from this specialist practice. You will only need to do this once per practice even If the practice has multiple specialists who will be sending to you. Once you have configured Practix for that EDI account (sending facility) it will be configured for all senders on that account.

Practix RSD User guide v1.00.doc Page 12 of 19
6.2 Setting up to Send Messages (Specialist Practice) Search for and bring up the contact that you wish to set up electronic communications with, or if they are not in your contact database, set up a new entry for them, save it and then search for the new contact and select it. Please ensure you have entered the correct Provider Number into the provider number field as some applications utilise this information to make sure the right reports get delivered to the right Referring doctor. To complete this configuration you will need to know the clinical application used by the receiving practice and the HealthLink EDI account for the practice. On the right hand side of the contact window, just below the “Messages In” button is a “Messages Out” button. Click this button to bring up the Send Messages To configuration window. Click New. 1. In the Description field Type Healthlink 2. In the Receiving Application field type The Receiving Application i.e. MD2 3. In the Receiving Facility field type The EDI Account of the Receiver 4. In the HL7 Report Format field select Plain Text 5. In the Transport Type field select File 6. In the Folder Name field type or browse to c:\hlink\hl7_out\rsdau 7. In the Filename Scheme field select Unique 8. In the Acknowledgement Type Field select Original Mode 9. In the Ack Folder Name field type or browse to c:\hlink\hl7_in\rsdau 10. In the Filename Mask field type *.rri 11. In the Retry Count Field type 3 12. In the Retry Delay field type 4302 Remember, if you have the HealthLink client installed on a different machine from the server you will need to use the UNC path as described in Section 4 of this document instead of the text used in items 5 and 8 above. So c:\hlink\hl7_out\rsdau becomes \\computername\hlink\hl7_out\rsdau and c:\hlink\hl7_in\rsdau becomes \\computername\hlink\hl7_in\rsdau where “computername” is the name of the computer on which the HealthLink Client resides. Items 11 and 12 above pertain to the automatic resend of messages after a given period of time if no acknowledgement is received from the receiving party is forthcoming. The settings above ensure that if an acknowledgement is not received within three days it will resend the message. It is recommended that you keep these settings as they are unless you have an overwhelming need to change them, or indeed if the receiving practice says they are getting duplicate reports from you in which case change the retry count to 0. Click the add button to the right of the message details box. Select MessageReport, andHL7 2.3.1 (Aust), and then click OK. The “Send Messages To” window should now look something like the Following.

Practix RSD User guide v1.00.doc Page 13 of 19
Click Save. On the left hand side of the Contact Window about half way down there is a “Short Name” field. Type the EDI name of the sending practice into this field. This may allow technical support to better assist you should things go wrong in the future. You are now set up to send reports to this Specific Referring Doctor. You will need to do this once for each referring Doctor in that particular practice who wished to receive electronically from you.

Practix RSD User guide v1.00.doc Page 14 of 19
7 Sending electronic referrals/reports Once the configuration is completed, any document chosen from the documents sent area of your templates and addressed to a contact that has a messages out entry configured will be generated in HL7 format and place in the HLINK upon release of the letter. For this reason it is important that you ensure that staff and doctors (if they do their own correspondence) are made aware that all letters to referring doctors are checked or proofed before they are released. Once a document is released the Practix Services application will take the within 15 seconds and generate its HL7 message. In most specialist practices, you will be using the flag for further action functionality to save the letter for further work and to mark it to the attention of the next person in the “work flow” line of activities. The following takes us through a standard work flow to demonstrate the correct use of the “further action” functionality in Practix. Practitioner dictates letter and leaves for typist to do. Typist then types letter and selects to be reviewed from the Next action Required list and selects the appropriate person for the review (in this case the doctor) and click submit for next action.
The doctor will then see this under his “Documents Requiring Attention” area in which he can open and read the document, make or dictate changes, and then mark it for the attention of the appropriate person or group with either an action of to be revised or to be released. Obviously lots of to and fro may occur as the report gets reviewed and then revised to a completed state. When the staff member comes to release the letter, if the letter is addressed to a contact that has been set up for electronic correspondence there will be a send and a don’t send button on the right hand side of the screen. If the contact has not been set up then these buttons are not available and are replaced by a no further action required button. If there is NO option to send then the staff member would assume that the contact does not receive electronically and should open and print the letter and distribute it in the usual way, then select no further action required.
Practix RSD User guide v1.00.doc Page 15 of 19
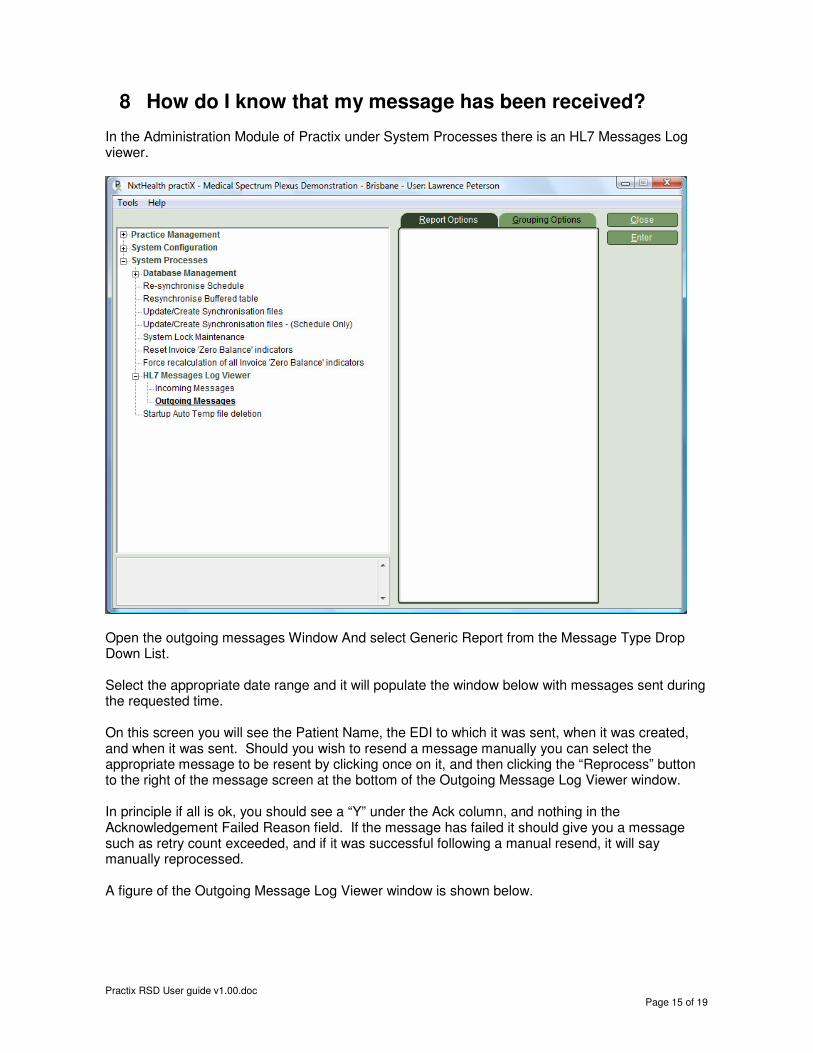
8 How do I know that my message has been received? In the Administration Module of Practix under System Processes there is an HL7 Messages Log viewer.
Open the outgoing messages Window And select Generic Report from the Message Type Drop Down List. Select the appropriate date range and it will populate the window below with messages sent during the requested time. On this screen you will see the Patient Name, the EDI to which it was sent, when it was created, and when it was sent. Should you wish to resend a message manually you can select the appropriate message to be resent by clicking once on it, and then clicking the “Reprocess” button to the right of the message screen at the bottom of the Outgoing Message Log Viewer window. In principle if all is ok, you should see a “Y” under the Ack column, and nothing in the Acknowledgement Failed Reason field. If the message has failed it should give you a message such as retry count exceeded, and if it was successful following a manual resend, it will say manually reprocessed. A figure of the Outgoing Message Log Viewer window is shown below.

Practix RSD User guide v1.00.doc Page 16 of 19

Practix RSD User guide v1.00.doc Page 17 of 19
NOTES

Practix RSD User guide v1.00.doc Page 18 of 19
NOTES

Practix RSD User guide v1.00.doc Page 19 of 19
Australia
Phone toll free: 1800 125 036
7.00am – 7.00 pm Monday-Friday
(AEST)
If there is a communication problem
Make it our problem
www.healthlink.net


