35
PREDICTIVE DATA ANALYTICS R 100.1 ___________________________________ User Guide ___________________________________ Document ID: PDADOC-x595-en-1001A Release Date: May 2019

PREDICTIVE DATA ANALYTICS
R 100.1
___________________________________
User Guide
___________________________________
Document ID: PDADOC-x595-en-1001A
Release Date: May 2019

2
DISCLAIMER
This document contains Honeywell proprietary information. Information contained herein
is to be used solely for the purpose submitted, and no part of this document or its contents
shall be reproduced, published, or disclosed to a third party without the express
permission of Honeywell International Sàrl.
While this information is presented in good faith and believed to be accurate, Honeywell
disclaims the implied warranties of merchantability and fitness for a purpose and makes
no express warranties except as may be stated in its written agreement with and for its
customer.
In no event is Honeywell liable to anyone for any direct, special, or consequential damages.
The information and specifications in this document are subject to change without notice.
Copyright 2019- Honeywell International Sàrl

PDADOC-X595-en-1001A 3
Table of contents 1 ABOUT THIS GUIDE ......................................................................................................................................... 4
1.1 Scope ............................................................................................................................................................................ 4
1.2 Revision history ....................................................................................................................................................... 4
1.3 Intended audience ................................................................................................................................................. 4
1.4 Related documents ............................................................................................................................................... 4
2 PREDICTIVE DATA ANALYTICS DASHBOARD ........................................................................................ 5
2.1 SPA on-boarding..................................................................................................................................................... 5
2.2 Request Access for PDA Portal ........................................................................................................................ 6
2.3 Login to PDA Dashboard .................................................................................................................................... 8
3 ALERT NAVIGATION TO SYSTEM LEVEL .............................................................................................. 11
3.1 Global View .............................................................................................................................................................. 11
3.2 Severity Based Navigation .............................................................................................................................. 13
3.3 User Preference .................................................................................................................................................... 14
3.3.1 Set Your Preference ........................................................................................................................................ 14
3.3.2 Reset Your Preference ................................................................................................................................... 16
3.4 Navigate through Search ................................................................................................................................ 16
3.5 System Dashboard ............................................................................................................................................. 17
3.5.1 System Health.................................................................................................................................................... 18
3.5.2 Active Alerts ......................................................................................................................................................... 19
3.5.3 Alert History ......................................................................................................................................................... 20
3.5.4 Benchmark & Deviation ................................................................................................................................ 20
4 ALERT LIST AND ACTIONS ........................................................................................................................ 22
4.1 Alert Detail ............................................................................................................................................................... 23
4.2 Alert Lifecycle ........................................................................................................................................................ 24
4.2.1 Acknowledge the Alerts ................................................................................................................................. 24
4.2.2 Record Progress for an Alert ....................................................................................................................... 25
4.2.3 Suppress and Unsuppress an Alert......................................................................................................... 26
4.2.4 Close an Alert...................................................................................................................................................... 27
5 BENCHMARK AND DEVIATION ................................................................................................................ 29
5.1 Set Benchmark...................................................................................................................................................... 29
6 NOTICES.......................................................................................................................................................... 33

ABOUT THIS GUIDE
PDADOC-X595-en-1001A 4
1 About this guide
1.1 Scope This guide describes how to use the Predictive Data Analytics (PDA).
1.2 Revision history
Revision Supported Release
Date Description
A 100.1 May 2019 Initial release of Predictive Data Analytics (PDA).
1.3 Intended audience This guide is primarily intended for Honeywell Premium Support Center (PSC) personnel
who use the Predictive Data Analytics (PDA).
1.4 Related documents The following list identifies publications that may contain information relevant to the
information in this document.
Document Links
PDA Software Change Notification PDADOC-X594-en-1001A
PDA Installation Guide PDADOC-X541-en-1001C
PREDICTIVE DATA ANALYTICS DASHBOARD
PDADOC-X595-en-1001A 5
2 Predictive Data Analytics Dashboard
Predictive Data Analytics (PDA) is an intuitive dashboard that projects the health status of
the various sites on the World Map providing a centralized view of severity of each site.
System Performance Analyzer (SPA) data is used to analyze and predict the site (systems)
health and notify PSC Engineers. It provides a centralized view of different control system
health parameters such as Network, Servers, Work Stations, Gateways, and Controllers
performance.
This section provides information about how to login and use the PDA Dashboard.
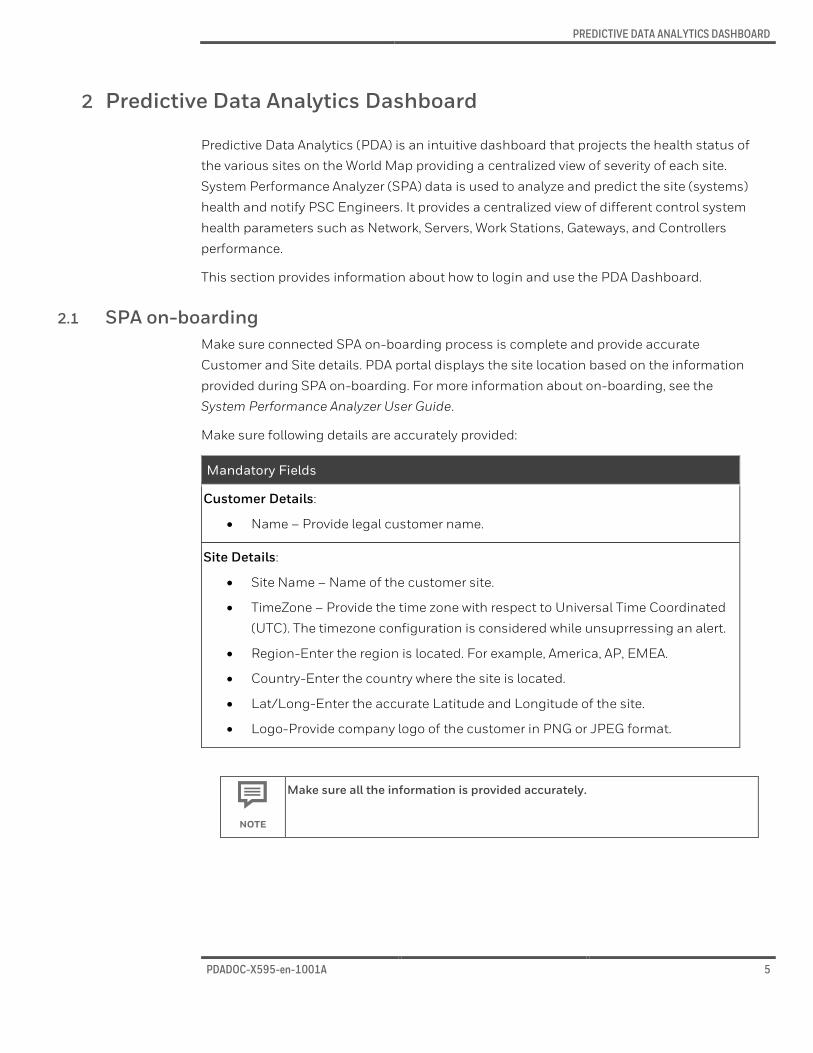
2.1 SPA on-boarding Make sure connected SPA on-boarding process is complete and provide accurate
Customer and Site details. PDA portal displays the site location based on the information
provided during SPA on-boarding. For more information about on-boarding, see the
System Performance Analyzer User Guide.
Make sure following details are accurately provided:
Mandatory Fields
Customer Details:
Name – Provide legal customer name.
Site Details:
Site Name – Name of the customer site.
TimeZone – Provide the time zone with respect to Universal Time Coordinated
(UTC). The timezone configuration is considered while unsuprressing an alert.
Region-Enter the region is located. For example, America, AP, EMEA.
Country-Enter the country where the site is located.
Lat/Long-Enter the accurate Latitude and Longitude of the site.
Logo-Provide company logo of the customer in PNG or JPEG format.
NOTE
Make sure all the information is provided accurately.

PREDICTIVE DATA ANALYTICS DASHBOARD
PDADOC-X595-en-1001A 6
2.2 Request Access for PDA Portal You must request access to the PDA Portal. Typically, once the request is approved it
would take 15 days to receive the access to the portal. It is recommended to schedule the
request earlier to start using the portal immediately.
1. Launch the https://id.honeywell.com/ site.
2. Under the Access Management, select Manage Groups. The Manage Groups page
appears.

PREDICTIVE DATA ANALYTICS DASHBOARD
PDADOC-X595-en-1001A 7
3. Select the following options:
a. Under the Select User, select SELF option.
b. In the Employee ID field, your employee ID will be auto-populated.
c. In the Operation, select the ADD USER TO GROUP option.
Based on the operation selected, additional fields are displayed.
4. Provide following details:

PREDICTIVE DATA ANALYTICS DASHBOARD
PDADOC-X595-en-1001A 8
a. In the DOMAIN field, select the domain you belong to (for example, PACRIM1or
GLOBAL).
b. In the GROUP NAME field, enter HCE.Predictive_Data_Analytics_Production
as value.
c. In the USE/PERMISSION/PURPOSE field, enter PSC user to access PDA
portal as purpose.
d. In the EXPORT CONTROLLED, select NO option.
Once the mandatory field are filled, then SUBMIT button is displayed.
5. Click SUBMIT.
The access request mail is triggered to your Manager for further action.
2.3 Login to PDA Dashboard 1. Make sure you are connected to a network with internet connectivity.
2. Open the Google Chrome browser version 70.0 or higher.
3. Click the following URL to launch the Predictive Data Analytics Dashboard:
https://pdaprodwebappui.pdaprod.honeywell.com/web/home. Click Sign In.

PREDICTIVE DATA ANALYTICS DASHBOARD
PDADOC-X595-en-1001A 9
4. You are redirected to Microsoft Sign in page wherein you are prompted to enter
credentials.
5. Enter your Honeywell mail address and click Next. The Password page appears.
6. In the Enter password field, enter your password and click Sign in.
The Predictive Data Analytics Dashboard is loaded with view of World Map and customer
sites entered in System Performance Analyzer (SPA).

PREDICTIVE DATA ANALYTICS DASHBOARD
PDADOC-X595-en-1001A 10

ALERT NAVIGATION TO SYSTEM LEVEL
PDADOC-X595-en-1001A 11
3 Alert Navigation to System Level
You can use one of the following methods to drill-down to the alerts:
Global View (Site Based Navigation): Click the site on the Map where you want to
resolve the alert.
Alert Severity Based: You drill-down based on the severity of the alerts such as
High, Medium, or Low.
User Preference: Use USER PREFERENCE option to set favorite based on the
Region, Country, Customer, Plant/Site.
Search: Use Search to view Customer or Plant/Site based alert details.
3.1 Global View All sites with varying severity are displayed providing a central view for the user. You can
click the specific site which you need for the prediction detail.

ALERT NAVIGATION TO SYSTEM LEVEL
PDADOC-X595-en-1001A 12
Legend
Color Index Description
Site with Healthy systems and zero alert.
Site wherein High alerts are reported. This site can also contain Medium and
Low alerts.
Site wherein Medium alerts are reported. This site can have Low alerts but
currently no High alerts are reported.
Site wherein only Low alerts are reported with currently High and Medium
alerts’ count zero.
Once you know the Site that you require to view alerts, navigate as following.

ALERT NAVIGATION TO SYSTEM LEVEL
PDADOC-X595-en-1001A 13
3.2 Severity Based Navigation Site with highest number of High alerts will be displayed first in the hierarchy followed by
site with second highest number of High alerts.

ALERT NAVIGATION TO SYSTEM LEVEL
PDADOC-X595-en-1001A 14
Navigate as depicted in the following diagram to view alert detail.
3.3 User Preference You can opt to view prediction alerts of a specific site that you are interested by adding the
site to the Favourite’s list through User Preference. Once your favourite site is set, you will
view prediction alerts related to the preferred site only. Alerts of other Regions, Customers,
Sites, or Plants are not displayed until the preference is cleared.
3.3.1 Set Your Preference
Following are the steps to set your preferred site:
1. On the top-right corner, click . The USER PREFERENCE pane appears.

ALERT NAVIGATION TO SYSTEM LEVEL
PDADOC-X595-en-1001A 15
2. Based on the sites registered during SPA on-boarding options are displayed.
a. Select Region to view alerts for all the Customers and Plants across Countries in
the specific Region.
b. Select Country to view alerts for all Customers and Plants in that Country.
c. Select Customer to view alerts for only the Plants/Sites of the Customer.
d. Select Plant/Site to view alerts for only that Plant or Site.
3. Click Add to Favourite. A success message is displayed.
On closing the User Preference pane, a check mark appears on the USER PREFERENCE
icon indicating that the preference is set.

ALERT NAVIGATION TO SYSTEM LEVEL
PDADOC-X595-en-1001A 16
3.3.2 Reset Your Preference
You can reset the preference If you want to change your preference or view alerts from all
poles. To remove the preference, follow the steps:
1. Clear the selection from the Region, Country, Customer, and Plant/Site options.
2. Click Reset.
3. Click Add to Favourite.
3.4 Navigate through Search Search feature enables you to locate specific Customer or Plant/Site for which you want
the alert details.
1. On the top-right corner, click .
2. Enter the Customer or Plant/Site name that you want to view. Alternatively, you can
select the Customer and Plant/Site title from the site prompts. Alerts for various
system in the Plant/Site of the Customer is displayed.
3. Select the alert based on severity for the required system to view the alert details.

ALERT NAVIGATION TO SYSTEM LEVEL
PDADOC-X595-en-1001A 17
3.5 System Dashboard When you have navigated to the specific system (cluster) for which you want to view the
system performance, then various metrics are provided to understand the performance.
Following image depicts the metrics for a system that consist of System Health, Active
Alerts, Alert History, and Benchmark & Deviation.

ALERT NAVIGATION TO SYSTEM LEVEL
PDADOC-X595-en-1001A 18
3.5.1 System Health
Predictive Data Analytics (PDA) runs the diagnostics on the historical data to analyze the
system health regarding Network, Servers, Work Stations, Gateways, and Controllers.
System Health provides alert severity for each model. You can opt to analyze and resolve
the alert pertaining to model and severity that has high impact on the system
performance.

ALERT NAVIGATION TO SYSTEM LEVEL
PDADOC-X595-en-1001A 19
Following table provides detail about the PDA models and the parameters that are
considered for alert generation.
Models Alert types for the model
Network
Network Loop Detection – P2P Port
Network Degradation - Output Discard
Network Degradation - CRC Error
Network Degradation - Input Error
Network Storm Degradation
Network Loop Detection – P2P Edge Port
Network MAC Flap
Server CommittedByteInUse Degradation
Handle Count Increase
Processor Degradation
Memory Increase
CDA Scatter Timeout
Workstation
Controller
Control Degradation
CDA P2P Degradation - ICYCIMRAVAIL
CDA P2P Degradation - ICYCLGREQAVAIL
CDA P2P Degradation - ICYCSMREQAVAIL
CDA P2P Degradation - RPEERDEGIMRCONN
For more information about alert actions, see the section Alert List and Actions.
3.5.2 Active Alerts
All alert in any state other than Close is considered as Active alert. Active Alerts provides a
cumulative report of alert count across various models. This enables you to view alert
based on severity. You can also export and share the alert list in CSV format.

ALERT NAVIGATION TO SYSTEM LEVEL
PDADOC-X595-en-1001A 20
For more information about alert actions, see the section Alert List and Actions.
3.5.3 Alert History
Alert History provides trend of alert based on the severity for a period of one week which
spans previous 7 days. Trend for all severity High, Medium, or Low are displayed.
3.5.4 Benchmark & Deviation
Benchmark is period when the control system is in a healthy running state with minimal
alerts and parameters’ value range are within permissible limits.
Deviation is period wherein the parameter’s value degrades (exceeds the limit) in
comparison to the value variation during the benchmark.
You can identify the benchmark period against which successive process data will be
compared to derive the deviation from the ideal state of the control system.

ALERT NAVIGATION TO SYSTEM LEVEL
PDADOC-X595-en-1001A 21
By default, this graph contains details about PDA alerts, Benchmark, Benchmark Not
Processed, and Deviation. You can opt to view one or multiple data of your choice by
clearing additional data in the legend section of the graph.
For complete Benchmark & Deviation detail, click VIEW DETAIL. For more information
about setting benchmark, see the section Set Benchmark.

ALERT LIST AND ACTIONS
PDADOC-X595-en-1001A 22
4 Alert List and Actions
After identify the hierarchy and severity that must be resolved primarily and navigating, a
list of alert pertaining to the selection is displayed.
1. Select the checkbox against individual alert that you want to start the analysis. Select
the checkbox against Alert ID to perform action across all the alerts.
2. Based on the state of the alert, select one of the following actions:
Action Description
Acknowledge You can start by acknowledging the alert when reported.
Record Progress You can record progress of mitigating the alert at various stages.
Suppress You can suppress an alert for a period. Alert status changes are not
possible during the suppression period.
Unsuppress You can unsuppress the alert to continue with the normal life cycle.
Close Once root-cause for the alert is identified and remedial action is
performed, you can close the alert.

ALERT LIST AND ACTIONS
PDADOC-X595-en-1001A 23
4.1 Alert Detail Alert Details provide alert summary, alert event detail, recommended action for
remediation and alert timeline and action performed till date, and the previous alert
occurrence (history).
Alert Timeline provides the detail about the time of various stage of the alert. Alert History
provides number of times same alert is reported previously. In case the alert has occurred
previously, then recommendation and resolution history are updated in the process.
NOTE
At times, the alert closure time can be ahead of newly raised
alert time. PDA runs the diagnostics on the historical data and
not real-time data. In case the alert is unresolved in the interval
of the diagnostic and alert is resolved in the current time, then
the alert is still listed in alert occurred.

ALERT LIST AND ACTIONS
PDADOC-X595-en-1001A 24
4.2 Alert Lifecycle This chapter provides detail about various action that be performed when an alert is
reported. Following diagram depict the lifecycle of an alert traversing through various
states based on the user and model responses.
4.2.1 Acknowledge the Alerts
First step on receiving an alert is to acknowledge the alert as following:
1. Drill-down to the system in the site where the alert is reported.
2. In the first column, select the checkbox against the alert.
3. Click the Action drop-down and select Acknowledge. You can select checkboxes
against multiple alerts to acknowledge all alerts at once.
4. Enter note and click Submit. It is recommended to add your user name in the note to
trace the user who has acknowledged.
NEW
ACKNOWLEDGE SUPPRESS
UNSUPPRESS
Alert Status goes
back to before
Suppression
status
RECORD
PROGRESS
RETURN TO
NORMAL
CLOSEUSER
USER USER
TIME or
USER
MODEL
USER
MODEL
MODEL
USER
USER

ALERT LIST AND ACTIONS
PDADOC-X595-en-1001A 25
A success message is displayed.
4.2.2 Record Progress for an Alert
In case the remedial action must be performed in stages or if there is time lag between
performing subsequent task, then you can use this option to record the current state of the
alert. Or either you must investigate the alert further before closing, you can enter the
current finding so that other users are updated on the findings and progress made with
respect to mitigating the alert.
1. Drill-down to the system in the site where the alert is reported.
2. In the first column, select the checkbox against the alert. In case same progress must
be recorded across multiple alerts, then select the checkboxes against required alerts.
3. Click the Action drop-down and select Record Progress.
4. Enter your alert analysis and click Submit. It is recommended to add your user name
in the note to trace the user who has recorded alert progress.
A success message is displayed.

ALERT LIST AND ACTIONS
PDADOC-X595-en-1001A 26
4.2.3 Suppress and Unsuppress an Alert
Suppress an Alert
You can suppress a specific alert or multiple alerts to aid further analysis of the system
behavior without altering the active alert count.
1. Drill-down to the system in the site where the alert is reported.
2. In the first column, select the checkbox against the alert.
3. Click the Action drop-down and select Suppress.
4. Select the duration for which the alert must be suppressed. Set both FROM and TO
dates.
NOTE
Currently, you can suppress alerts only on day basis.
5. Click APPLY.

ALERT LIST AND ACTIONS
PDADOC-X595-en-1001A 27
6. Enter the reason for suppressing the alert and click Submit. It is recommended to add
your user name in the note to trace the user who has suppressed the alert.
A success message is displayed.
UnSuppress an Alert
You can unsuppress an alert when you want the alert to be considered for system
performance. Unsuppressing can be scheduled or manually performed as required.
1. Drill-down to the system in the site where the alert is reported.
2. In the first column, select the checkbox against the already suppressed alert. If the
alert in any other state, then you cannot unsuppress alert. An error message stating
This alert is not suppressed is displayed.
3. Click the Action drop-down and select UnSuppress.
NOTE
When the alert is returned from suppressed state an addition of site time
zone offset hours is added to the current suppression time. This offset
addition may result is displaying mismatch in Alert Timeline.
4.2.4 Close an Alert
Once you have performed all the remedial action to resolve the cause for the alert, you can
close the alert as following:
1. Drill-down to the system in the site where the alert is reported.
2. In the first column, select the checkbox against the alert.
3. Click the Action drop-down and select Close. You can select checkboxes against
multiple alerts to acknowledge all alerts at once.
4. Enter the Resolution note and click Submit. It is recommended to add your user name
in the note to trace the user who has acknowledged.
A success message is displayed.

ALERT LIST AND ACTIONS
PDADOC-X595-en-1001A 28
After the alert is closed, the alert is listed in Inactive Alerts. Total number of closed, closed
alert of each severity, alert age (duration for which the alert was active) and time of closure
are detailed for every Inactive Alert.
NOTE
For the Alert Type - Network Storm Degradation, you must manually
ensure that the network performance returns to normal and then update
the alert status to close.

BENCHMARK AND DEVIATION
PDADOC-X595-en-1001A 29
5 Benchmark and Deviation
You can observe the system performance overtime and select the duration for which the
system performance was good (near ideal state) wherein the alerts are minimal or nil. You
can set this period as benchmark against which the system must be evaluated. PDA model
runs the parameter analysis against the set benchmark to derive the deviation. The
deviation is parameter value variation in comparison with the benchmark parameter range
not to be considered as system alerts.
5.1 Set Benchmark 1. After you drill-down to system health page, click VIEW DETAIL. The BENCHMARK &
DEVIATION ANALYSIS page appears.
2. Click SET BENCHMARK and select the FROM and TO duration and click Benchmark.
It is recommended to select benchmark period wherein PDA alerts are minimal.

BENCHMARK AND DEVIATION
PDADOC-X595-en-1001A 30
3. Select the period for which data must be processed against the set benchmark. Click
period indicator next to SET BENCHMARK option. Select the FROM and TO date for
the data process and click APPLY.
4. PDA models are run to derive the deviation based benchmark value on the Asset-
Instance-Parameter basis. Green bars indicate the benchmark period and the purple
bars indicates the deviation period wherein the parameter varies from the benchmark
limit. Blue line graph visible along with benchmark & deviation and below is the PDA
alert graph.

BENCHMARK AND DEVIATION
PDADOC-X595-en-1001A 31
5. In the CUMULATIVE DEGRADATION section, click the required category to view the
detailed deviation.
Controllers’ degradation is selected in the following image as example to describe the
details. First row details the Model category and the total alert due to the degradation. In
the second row left-pane, provides further detail for each alert such as Parameter Name
(parameter that the model monitors), deviation type (counter or value), instance ID and
date when the first deviation was detected are detailed. Based on the asset selected from
the list, deviation trend is plotted for the unique asset-parameter-instance.
In the Deviation Trend, the green band represents the benchmark value and duration and
orange line graph displays the variation in the parameter value that the model analysis.
When the Parameter value breaches the benchmark value then the purple band
representing the deviation is plotted for the duration deviation is detected.

BENCHMARK AND DEVIATION
PDADOC-X595-en-1001A 32

NOTICES
PDADOC-X595-en-1001A 33
6 Notices
Trademarks
Experion® and TDC 3000® are registered trademarks of Honeywell International, Inc.
Other trademarks
Microsoft and SQL Server are either registered trademarks or trademarks of Microsoft
Corporation in the United States and/or other countries.
Trademarks that appear in this document are used only to the benefit of the trademark
owner, with no intention of trademark infringement.
Third-party licenses
This product may contain or be derived from materials, including software, of third parties.
The third party materials may be subject to licenses, notices, restrictions and obligations
imposed by the licensor.
The licenses, notices, restrictions and obligations, if any, may be found in the materials
accompanying the product, in the documents or files accompanying such third party
materials, in a file named third_party_ licenses on the media containing the product, or at
http://www.honeywell.com/ps/thirdpartylicenses.
Documentation feedback
You can find the most up-to-date documents on the Honeywell Process Solutions support
website at:
http://www.honeywellprocess.com/support
If you have comments about Honeywell Process Solutions documentation, send your
feedback to:
Use this email address to provide feedback, or to report errors and omissions in the
documentation. For immediate help with a technical problem, contact your local
Honeywell Process Solutions Customer Contact Center (CCC) or Honeywell Technical
Assistance Center (TAC).
How to report a security vulnerability
For the purpose of submission, a security vulnerability is defined as a software defect or
weakness that can be exploited to reduce the operational or security capabilities of the
software.
Honeywell investigates all reports of security vulnerabilities affecting Honeywell products
and services.

NOTICES
PDADOC-X595-en-1001A 34
To report a potential security vulnerability against any Honeywell product, please follow the
instructions at:
https://honeywell.com/pages/vulnerabilityreporting.aspx
Submit the requested information to Honeywell using one of the following methods:
Send an email to [email protected].
or
Contact your local Honeywell Process Solutions Customer Contact Center (CCC) or
Honeywell Technical Assistance Center (TAC) listed in the “Support” section of this
document.
Support
For support, contact your local Honeywell Process Solutions Customer Contact Center
(CCC). To find your local CCC visit the website, https://www.honeywellprocess.com/en-
US/contactus/customer-support-contacts/Pages/default.aspx.
Training classes
Honeywell holds technical training classes that are taught by process control systems
experts. For more information about these classes, contact your Honeywell representative,
or see http://www.automationcollege.com.

PDADOC-x595-en-1001A May 2019 © 2019 Honeywell International Sàrl


