72
Presence Services with Communication Server 1000 Avaya Communication Server 1000 Release 7.6 NN43001-141 Issue 04.01 March 2013

Presence Services with CommunicationServer 1000Avaya Communication Server 1000
Release 7.6NN43001-141
Issue 04.01March 2013
© 2013 Avaya Inc.
All Rights Reserved.
Notice
While reasonable efforts have been made to ensure that theinformation in this document is complete and accurate at the time ofprinting, Avaya assumes no liability for any errors. Avaya reserves theright to make changes and corrections to the information in thisdocument without the obligation to notify any person or organization ofsuch changes.
Documentation disclaimer
“Documentation” means information published by Avaya in varyingmediums which may include product information, operating instructionsand performance specifications that Avaya generally makes availableto users of its products. Documentation does not include marketingmaterials. Avaya shall not be responsible for any modifications,additions, or deletions to the original published version ofdocumentation unless such modifications, additions, or deletions wereperformed by Avaya. End User agrees to indemnify and hold harmlessAvaya, Avaya's agents, servants and employees against all claims,lawsuits, demands and judgments arising out of, or in connection with,subsequent modifications, additions or deletions to this documentation,to the extent made by End User.
Link disclaimer
Avaya is not responsible for the contents or reliability of any linkedwebsites referenced within this site or documentation provided byAvaya. Avaya is not responsible for the accuracy of any information,statement or content provided on these sites and does not necessarilyendorse the products, services, or information described or offeredwithin them. Avaya does not guarantee that these links will work all thetime and has no control over the availability of the linked pages.
Warranty
Avaya provides a limited warranty on its hardware and Software(“Product(s)”). Refer to your sales agreement to establish the terms ofthe limited warranty. In addition, Avaya’s standard warranty language,as well as information regarding support for this Product while underwarranty is available to Avaya customers and other parties through theAvaya Support website: http://support.avaya.com. Please note that ifyou acquired the Product(s) from an authorized Avaya reseller outsideof the United States and Canada, the warranty is provided to you bysaid Avaya reseller and not by Avaya. “Software” means computerprograms in object code, provided by Avaya or an Avaya ChannelPartner, whether as stand-alone products or pre-installed on hardwareproducts, and any upgrades, updates, bug fixes, or modified versions.
Licenses
THE SOFTWARE LICENSE TERMS AVAILABLE ON THE AVAYAWEBSITE, HTTP://SUPPORT.AVAYA.COM/LICENSEINFO AREAPPLICABLE TO ANYONE WHO DOWNLOADS, USES AND/ORINSTALLS AVAYA SOFTWARE, PURCHASED FROM AVAYA INC.,ANY AVAYA AFFILIATE, OR AN AUTHORIZED AVAYA RESELLER(AS APPLICABLE) UNDER A COMMERCIAL AGREEMENT WITHAVAYA OR AN AUTHORIZED AVAYA RESELLER. UNLESSOTHERWISE AGREED TO BY AVAYA IN WRITING, AVAYA DOESNOT EXTEND THIS LICENSE IF THE SOFTWARE WAS OBTAINEDFROM ANYONE OTHER THAN AVAYA, AN AVAYA AFFILIATE OR ANAVAYA AUTHORIZED RESELLER; AVAYA RESERVES THE RIGHTTO TAKE LEGAL ACTION AGAINST YOU AND ANYONE ELSEUSING OR SELLING THE SOFTWARE WITHOUT A LICENSE. BYINSTALLING, DOWNLOADING OR USING THE SOFTWARE, ORAUTHORIZING OTHERS TO DO SO, YOU, ON BEHALF OFYOURSELF AND THE ENTITY FOR WHOM YOU ARE INSTALLING,DOWNLOADING OR USING THE SOFTWARE (HEREINAFTERREFERRED TO INTERCHANGEABLY AS “YOU” AND “END USER”),AGREE TO THESE TERMS AND CONDITIONS AND CREATE ABINDING CONTRACT BETWEEN YOU AND AVAYA INC. OR THEAPPLICABLE AVAYA AFFILIATE (“AVAYA”).
Heritage Nortel Software
“Heritage Nortel Software” means the software that was acquired byAvaya as part of its purchase of the Nortel Enterprise SolutionsBusiness in December 2009. The Heritage Nortel Software currentlyavailable for license from Avaya is the software contained within the listof Heritage Nortel Products located at http://support.avaya.com/LicenseInfo under the link “Heritage Nortel Products”. For HeritageNortel Software, Avaya grants Customer a license to use HeritageNortel Software provided hereunder solely to the extent of theauthorized activation or authorized usage level, solely for the purposespecified in the Documentation, and solely as embedded in, forexecution on, or (in the event the applicable Documentation permitsinstallation on non-Avaya equipment) for communication with Avayaequipment. Charges for Heritage Nortel Software may be based onextent of activation or use authorized as specified in an order or invoice.
Copyright
Except where expressly stated otherwise, no use should be made ofmaterials on this site, the Documentation, Software, or hardwareprovided by Avaya. All content on this site, the documentation and theProduct provided by Avaya including the selection, arrangement anddesign of the content is owned either by Avaya or its licensors and isprotected by copyright and other intellectual property laws including thesui generis rights relating to the protection of databases. You may notmodify, copy, reproduce, republish, upload, post, transmit or distributein any way any content, in whole or in part, including any code andsoftware unless expressly authorized by Avaya. Unauthorizedreproduction, transmission, dissemination, storage, and or use withoutthe express written consent of Avaya can be a criminal, as well as acivil offense under the applicable law.
Third Party Components
“Third Party Components” mean certain software programs or portionsthereof included in the Software that may contain software (includingopen source software) distributed under third party agreements (“ThirdParty Components”), which contain terms regarding the rights to usecertain portions of the Software (“Third Party Terms”). Informationregarding distributed Linux OS source code (for those Products thathave distributed Linux OS source code) and identifying the copyrightholders of the Third Party Components and the Third Party Terms thatapply is available in the Documentation or on Avaya’s website at: http://support.avaya.com/Copyright. You agree to the Third Party Terms forany such Third Party Components.
Note to Service Provider
The Product may use Third Party Components that have Third PartyTerms that do not allow hosting and may need to be independentlylicensed for such purpose.
Preventing Toll Fraud
“Toll Fraud” is the unauthorized use of your telecommunications systemby an unauthorized party (for example, a person who is not a corporateemployee, agent, subcontractor, or is not working on your company'sbehalf). Be aware that there can be a risk of Toll Fraud associated withyour system and that, if Toll Fraud occurs, it can result in substantialadditional charges for your telecommunications services.
Avaya Toll Fraud intervention
If you suspect that you are being victimized by Toll Fraud and you needtechnical assistance or support, call Technical Service Center TollFraud Intervention Hotline at +1-800-643-2353 for the United Statesand Canada. For additional support telephone numbers, see the AvayaSupport website: http://support.avaya.com. Suspected securityvulnerabilities with Avaya products should be reported to Avaya bysending mail to: [email protected].
Trademarks
The trademarks, logos and service marks (“Marks”) displayed in thissite, the Documentation and Product(s) provided by Avaya are theregistered or unregistered Marks of Avaya, its affiliates, or other third
2 Presence Services with Communication Server 1000 March 2013Comments? [email protected]

parties. Users are not permitted to use such Marks without prior writtenconsent from Avaya or such third party which may own the Mark.Nothing contained in this site, the Documentation and Product(s)should be construed as granting, by implication, estoppel, or otherwise,any license or right in and to the Marks without the express writtenpermission of Avaya or the applicable third party.
Avaya is a registered trademark of Avaya Inc.
All non-Avaya trademarks are the property of their respective owners,and “Linux” is a registered trademark of Linus Torvalds.
Downloading Documentation
For the most current versions of Documentation, see the AvayaSupport website: http://support.avaya.com.
Contact Avaya Support
See the Avaya Support website: http://support.avaya.com for productnotices and articles, or to report a problem with your Avaya product.For a list of support telephone numbers and contact addresses, go tothe Avaya Support website: http://support.avaya.com, scroll to thebottom of the page, and select Contact Avaya Support.
Presence Services with Communication Server 1000 March 2013 3

4 Presence Services with Communication Server 1000 March 2013Comments? [email protected]
Contents
Chapter 1: New in this release........................................................................................... 9Features.................................................................................................................................................... 9Other changes........................................................................................................................................... 9
Revision History............................................................................................................................... 9Chapter 2: Customer service............................................................................................. 11
Navigation................................................................................................................................................. 11Getting technical documentation............................................................................................................... 11Getting product training............................................................................................................................. 11Getting help from a distributor or reseller.................................................................................................. 11Getting technical support from the Avaya Web site.................................................................................. 12
Chapter 3: Introduction...................................................................................................... 13Navigation................................................................................................................................................. 13Subject...................................................................................................................................................... 13Technical documentation.......................................................................................................................... 14
Chapter 4: Fundamentals................................................................................................... 15Navigation................................................................................................................................................. 15Deployment model.................................................................................................................................... 15System component description................................................................................................................. 16System component requirements............................................................................................................. 17Supported IM and Presence clients.......................................................................................................... 17Supported telephony Publishing Presence clients.................................................................................... 18
Chapter 5: Planning and Engineering............................................................................... 19Navigation................................................................................................................................................. 19IM and Presence server capacity.............................................................................................................. 19Presence Publisher capacity..................................................................................................................... 19Converged Desktop ISM License............................................................................................................. 19
Chapter 6: Installation and Commissioning..................................................................... 21Navigation................................................................................................................................................. 21Installing Avaya Aura System Manager.................................................................................................... 21Installing Avaya Aura Session Manager................................................................................................... 21Installing Avaya Aura Presence Server..................................................................................................... 22Installing new CS 1000 Signaling Server package................................................................................... 22Configuring Presence Publisher............................................................................................................... 22
TLS configuration between CS 1000 and Session Manager............................................................ 24Chapter 7: User profile configuration............................................................................... 29Chapter 8: Migration of CS 1000 7.5 and later IM and Presence to System Manager.. 31
Navigation................................................................................................................................................. 31Migrating CS 1000 Subscriber data from UCM to System Manager........................................................ 31Replace Openfire Server by Avaya Aura Presence Server...................................................................... 32Migrating XMPP client............................................................................................................................... 32
Chapter 9: Maintenance...................................................................................................... 33Navigation................................................................................................................................................. 33Call Server CLI commands....................................................................................................................... 33Presence Publisher Service CLI commands............................................................................................. 34
Presence Services with Communication Server 1000 March 2013 5

Presence Publisher Service application status commands.............................................................. 34Presence Publisher Service application trace commands............................................................... 36
IM and Presence server commands......................................................................................................... 38Start/Stop/Restart or check status of Presence server process....................................................... 38Unified Communication (Presence) server file location.................................................................... 38Presence server traces.................................................................................................................... 39
Diagnostic logs.......................................................................................................................................... 39Signaling Server logs....................................................................................................................... 40One-X Communicator diagnostics.................................................................................................... 40
Chapter 10: IM and Presence user information................................................................ 41Navigation................................................................................................................................................. 41Presence Aggregation.............................................................................................................................. 41Personal Agent.......................................................................................................................................... 41
Changing your password for Presence and Instant Messaging....................................................... 42Synchronizing your password.......................................................................................................... 42
Chapter 11: Avaya one-X Communicator CS 1000 client configuration........................ 45Navigation................................................................................................................................................. 45Active Directory configuration................................................................................................................... 45
Creating an organization unit in Active Directory............................................................................. 46Creating a user in Active Directory................................................................................................... 47Configuring a user in Active Directory.............................................................................................. 49
Client configuration for Avaya one-X Communicator................................................................................ 50Enabling the public directory............................................................................................................ 50Configuring public directory.............................................................................................................. 51Adding a contact............................................................................................................................... 52
Configuring IM and Presence................................................................................................................... 55Configuring Phones................................................................................................................................... 56TLS certificates for Avaya one-X Communicator...................................................................................... 56
Adding a UCM primary certificate authority...................................................................................... 56Adding an Avaya one-X Communicator root certificate authority to UCM........................................ 57Creating a certificate for SIP TLS..................................................................................................... 57
Configuring Avaya one-X Communicator for Best Effort Cap negotiation................................................. 58Feature Interactions.................................................................................................................................. 59
Chapter 12: Troubleshooting............................................................................................. 61Navigation................................................................................................................................................. 61Presence Server—local database............................................................................................................ 61Presence Server—XCP database............................................................................................................ 61AML link is not up...................................................................................................................................... 62Presence is not updated when a telephone makes a call......................................................................... 63Presence Publisher not operational.......................................................................................................... 64Presence publisher configuration not displayed....................................................................................... 64TLS status................................................................................................................................................. 64CDN or PSDN ASID VALUE is incorrect................................................................................................... 65one-X Communicator Fails to Register to CS1000................................................................................... 66IM and Presence does not work for the one-X Communicator................................................................. 67
Appendix A: Overlay commands....................................................................................... 69Navigation................................................................................................................................................. 69
6 Presence Services with Communication Server 1000 March 2013

Overlay commands—LD 17...................................................................................................................... 69Overlay commands—LD 11 and LD 23..................................................................................................... 70
Presence Services with Communication Server 1000 March 2013 7

8 Presence Services with Communication Server 1000 March 2013

Chapter 1: New in this release
The following sections detail what is new in the Presence Services with Communication Server 1000,NN43001-141. for Avaya Communication Server 1000 Release 7.6.
• Features on page 9• Other changes on page 9
FeaturesThere were no feature changes made to this document for Release 7.6.
Other changesSee the following section for information about changes that are not feature-related.
Revision History
March 2013 Standard 04.01. This document is up-issued to support AvayaCommunication Server 1000 Release 7.6.
April 2012 Standard 03.03. This document is up-issued to add details needed forPresence services for Avaya Communication Server 1000 Release 7.5.
December2011
Standard 03.02. This document is up-issued to support CommunicationServer 1000 Release 7.5. A note is added in chapter Installation andCommissioning to indicate that a presence account is required for eachPresence Publisher user.
December2011
Standard 03.01. This document is up-issued to support CommunicationServer 1000 Release 7.5 and reflects changes in technical content forAppendix A, Adding a Subscriber, XMPP message traces and PersonalAgent, IM and Presence server commands, and the Overlay commandssection.
Presence Services with Communication Server 1000 March 2013 9

June 2010 Standard 02.01. This document is up-issued to address content changesto the Avaya Communication Server 1000 IM and Presence Web Tool forCommunication Server 1000 Release 7.0.
November2009
Standard 01.03. This document is up-issued to address content changesto the Communication Server 1000 IM and Presence Web Tool chapter,graphics, and to address adding profile information through SubscriberManager.
October 2009 Standard 01.02. This document is up-issued to address content changesto the Communication Server 1000 IM and Presence Web Tool chapter,graphics, and provide additional procedural information.
October 2009 Standard 01.01 This document is released to support the Instant Messagingand Presence Services for Communication Server 1000 Release 6.0.
New in this release
10 Presence Services with Communication Server 1000 March 2013Comments? [email protected]
Chapter 2: Customer service
Visit the Avaya Web site to access the complete range of services and support that Avaya provides. Goto www.avaya.com or go to one of the pages listed in the following sections.
Navigation• Getting technical documentation on page 11
• Getting product training on page 11
• Getting help from a distributor or reseller on page 11
• Getting technical support from the Avaya Web site on page 12
Getting technical documentationTo download and print selected technical publications and release notes directly from theInternet, go to www.avaya.com/support.
Getting product trainingOngoing product training is available. For more information or to register, go to www.avaya.com/support. From this Web site, locate the Training link on the left-handnavigation pane.
Getting help from a distributor or resellerIf you purchased a service contract for your Avaya product from a distributor or authorizedreseller, contact the technical support staff for that distributor or reseller for assistance.
Presence Services with Communication Server 1000 March 2013 11

Getting technical support from the Avaya Web siteThe easiest and most effective way to get technical support for Avaya products is from theAvaya Technical Support Web site at www.avaya.com/support.
Customer service
12 Presence Services with Communication Server 1000 March 2013Comments? [email protected]
Chapter 3: Introduction
This document is a global document. Contact your system supplier or your Avaya representative to verifythat the hardware and software described are supported in your area.
NavigationThis document contains the following chapters.
• Introduction on page 13• Fundamentals on page 15• Planning and Engineering on page 19• Installation and Commissioning on page 21• Migration of CS 1000 7.5 and later IM and Presence to System Manager on page 31• Maintenance on page 33• IM and Presence user information on page 41• Avaya one-X Communicator CS 1000 client configuration on page 45• Troubleshooting on page 61• Overlay commands on page 69
SubjectThis document supports the Instant Messaging (IM) and Presence Services to the AvayaCommunication Server 1000 (CS 1000). The Avaya CS 1000 IM and Presence Servicesprovides IM capability and phone presence information for all CS 1000 users. Only CS 1000one-X Communicator users can view presence information and exchange instant messages.
Presence Services with Communication Server 1000 March 2013 13

Note:
• On systems where System Manager is available, the term UCM in the documentationrefers to UCM in System Manager. On systems where System Manager is not available,the term UCM in the documentation remains unchanged.
• There is no Subscriber Manager in System Manager 6.2. On systems where SystemManager is not available, the term Subscriber Manager in the documentation remainsunchanged.
Technical documentationThe following technical documents are referenced in this document:
• Avaya Subscriber Manager Fundamentals, NN43001-120
• Avaya Unified Communications Management, NN43001-116
• Avaya Linux Platform Base and Applications Installation and Commissioning,NN43001-315
• Avaya Signaling Server IP Line Applications Fundamentals, NN43001-125
• Avaya Element Manager System Reference - Administration, NN43001-632
• Avaya SIP Line Fundamentals, NN43001-508
• Avaya Software Input Output Reference — Maintenance, NN43001-711
• Overview and Planning for Avaya one-X® Communicator for CS 1000 (for administrator)
• Administering Avaya one-X® Communicator for CS 1000 (for administrator)
• Implementing Avaya one-X® Communicator for CS 1000 (for user)
• Using Avaya one-X® Communicator for CS 1000 (for user)
• Administering Avaya Aura® System Manager
Introduction
14 Presence Services with Communication Server 1000 March 2013Comments? [email protected]

Chapter 4: Fundamentals
This chapter explains the concepts that are necessary to understand for implementation of the IM andPresence Services.
Navigation• Deployment model on page 15• System component description on page 16• Supported IM and Presence clients on page 17• Supported telephony Publishing Presence clients on page 18
Deployment modelThe following diagram shows the system components and architecture used to support the IMand Presence Services.
Presence Services with Communication Server 1000 March 2013 15

Figure 1: IM and Presence architecture
System component descriptionThe following table provides an overview of the system components used to support the IMand Presence Services.
Table 1: Presence Component Overview
Component DescriptionAvaya Aura® SystemManager
This management system coordinates the overall systemmanagement. This is the CS 1000 primary security domain andall of the CS 1000 components must join this security domain.
Avaya Aura® SessionManager
CS 1000 Presence Publisher sends the presence statusthrough Session Manager.
CS 1000 PresencePublisher (PP)
A software application running on the Signaling Server workswith the CS 1000 Call Server to provide telephony presenceupdates to the IM Presence server through the SIP Publishmessage. The CS 1000 PP sends status of the non-XMPPphones to the Presence Service (directly or through the SessionManager).
Fundamentals
16 Presence Services with Communication Server 1000 March 2013Comments? [email protected]
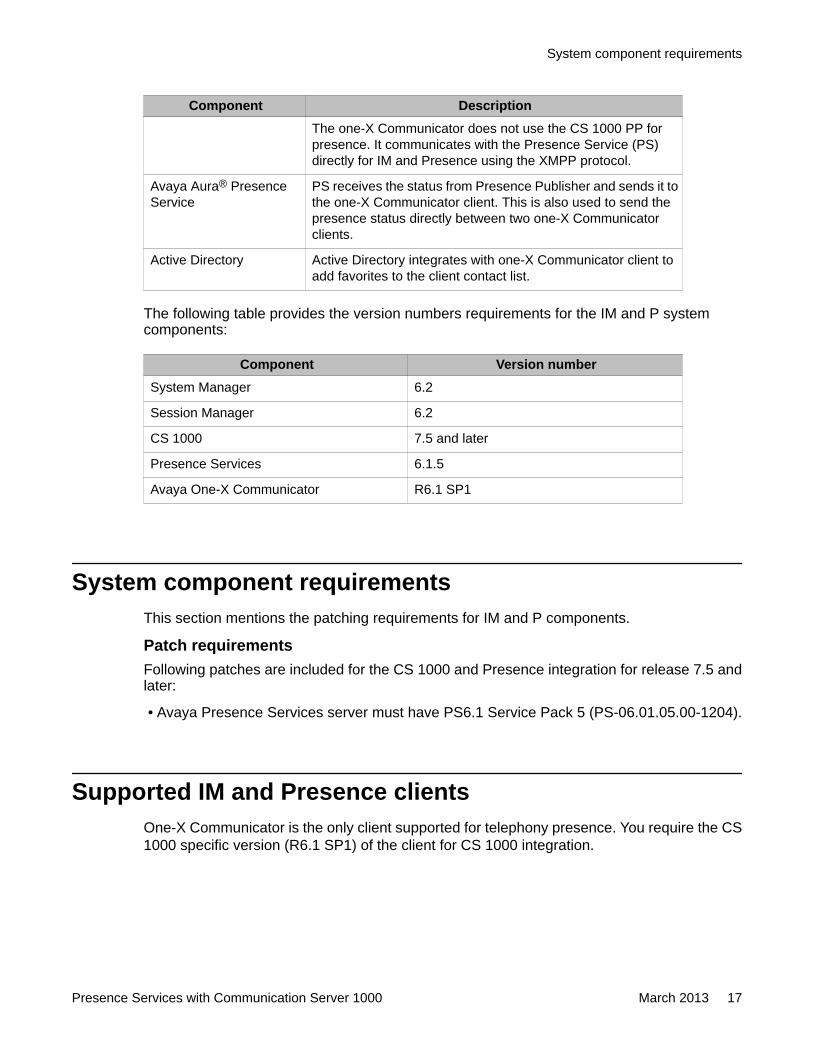
Component DescriptionThe one-X Communicator does not use the CS 1000 PP forpresence. It communicates with the Presence Service (PS)directly for IM and Presence using the XMPP protocol.
Avaya Aura® PresenceService
PS receives the status from Presence Publisher and sends it tothe one-X Communicator client. This is also used to send thepresence status directly between two one-X Communicatorclients.
Active Directory Active Directory integrates with one-X Communicator client toadd favorites to the client contact list.
The following table provides the version numbers requirements for the IM and P systemcomponents:
Component Version numberSystem Manager 6.2
Session Manager 6.2
CS 1000 7.5 and later
Presence Services 6.1.5
Avaya One-X Communicator R6.1 SP1
System component requirementsThis section mentions the patching requirements for IM and P components.
Patch requirementsFollowing patches are included for the CS 1000 and Presence integration for release 7.5 andlater:
• Avaya Presence Services server must have PS6.1 Service Pack 5 (PS-06.01.05.00-1204).
Supported IM and Presence clientsOne-X Communicator is the only client supported for telephony presence. You require the CS1000 specific version (R6.1 SP1) of the client for CS 1000 integration.
System component requirements
Presence Services with Communication Server 1000 March 2013 17

Supported telephony Publishing Presence clientsThe one-X Communicator Client views the Idle or Busy status of Analog, Digital, VoIP-Unistim,SIP Line, MobileX, MC 3100 and IP softphone clients.
Fundamentals
18 Presence Services with Communication Server 1000 March 2013Comments? [email protected]
Chapter 5: Planning and Engineering
This chapter provides information about system planning and engineering.
Navigation• IM and Presence server capacity on page 19• Presence Publisher capacity on page 19• Converged Desktop ISM License on page 19
IM and Presence server capacityThe IM and Presence server can support the following:
• A maximum of 10 000 users per server with an average of 25 contacts per user.• A maximum of 15 Instant Messages (IM) for each user in a one hour period.• A maximum of 12 presence status changes for each user in a one hour period.• A maximum of 50 contacts in a user contact list.
Presence Publisher capacityA Presence Publisher is expected to handle more then 5000 users based on the IM andPresence server capacity described above. In the event that one Presence Publisher instancecannot handle all telephony presence from non IM and Presence clients (Analog, Digital, VoIP-Unistim, SIP Line, MobileX, and MC 3100 and IP Softphone) then additional PresencePublishers can be deployed on existing Signaling Servers available in the system.
Converged Desktop ISM LicenseEvery subscriber Terminal Number (TN) with Class of Service Presence Allowed (PREA)enabled requires one Converged Desktop ISM License. The SIP Presence publishing feature
Presence Services with Communication Server 1000 March 2013 19

requires a SIP Converged Desktop ISM. Class of Service PREA is required for phones that donot support the Extensible Messaging and Presence Protocol (XMPP). The one-XCommunicator feature does not require PREA as it supports XMPP.
Planning and Engineering
20 Presence Services with Communication Server 1000 March 2013Comments? [email protected]

Chapter 6: Installation and Commissioning
This chapter provides information for installing and commissioning CS 1000 7.6 IM and Presence Service.Perform the installation procedures according to the order of appearance in this chapter.
Navigation• Installing Avaya Aura System Manager on page 21• Installing Avaya Aura Session Manager on page 21• Installing Avaya Aura Presence Server on page 22• Installing new CS 1000 Signaling Server package on page 22• Configuring Presence Publisher on page 22
Installing Avaya Aura System ManagerInstall Avaya Aura® System Manager on a new Commercial off-the-shelf (COTS) server.
For more information about the installation of System Manager, see Installing and UpgradingAvaya Aura® System Manager.
Installing Avaya Aura Session Manager If the Presence Publisher connects to Presence Server through Session Manager, configurethe Session Manager to route the presence messages.
For information about Session Manager configuration, see Installing and Configuring AvayaAura® Session Manager.
Presence Services with Communication Server 1000 March 2013 21
Installing Avaya Aura Presence Server Install Avaya Aura® Presence Server on a new COTS server for standalone deployment or ahigh-end server for system platform deployment.
For more information about Presence Server installation, see Installing Avaya Aura® PresenceServices.
Installing new CS 1000 Signaling Server package Presence Publisher service is bundled under the Signaling Server deployment package.Deploy the Presence Publisher service by selecting the Signaling Server deployment packageavailable in UCM Deployment Manager.
For more information about installing the Signaling Server, see Linux Platform Base andApplications Installation and Commissioning, NN43001–315.
Configuring Presence PublisherConfigure the CS 1000 Presence Publisher (PP) for sending the Presence Server telephonystatus of all CS 1000 line types that do not use XMPP protocol.
1. Click UCM Services in System Manager.
The system displays the UCM Services page of the CS 1000 UnifiedCommunications Management (UCM).
2. On the Elements page, select the Element Manager element with Element typeCS1000.
The System Overview page displays.3. Under System, click IP Network to open a sub-menu.4. Click Nodes: Servers, Media Cards.
The IP Telephony Nodes displays.5. Click the node in which the Presence Publisher is to be configured.
The Node Details page displays.6. To configure Presence publisher, select the Presence Publisher application.
Installation and Commissioning
22 Presence Services with Communication Server 1000 March 2013Comments? [email protected]

Presence Publisher Configuration Details page appears.7. Check the box Enable presence publisher service to enable the Presence
Publisher.8. From the IM and Presence server type drop-down list, select the server type Aura
PS.9. Under Security Policy, select Best Effort for TLS connection or Security
Disabled for TCP connection.
Note:Select Security Disabled option when you do not want to connect the PresencePublisher to the Session Manager over TLS. The Session Manager SIP EntityLink must be set up to match this security selection. However, you must use TLSif you want to connect the Presence Publisher directly to the Presence Server.
10. Enter the presence SIP domain name in IM and presence server FQDN.
This entry should match with the value that is configured in "Domain Substituion -To" in /Home/Elements/Presence/Configuration web page of the System Manager
11. Enter the IP address of the Presence Server in the IM an Presence server IP.12. Enter the port number of the Presence Server in Port and select TLS in SIP
transport if Best Effort is selected for Security Policy. Otherwise, select TCP.
You can use the default ports, however they should not be used by otherapplications. Also, they should match the actual port numbers of the targetservers.
13. Check the box Client Authentication if you want the client to share its certificateand the server authenticates it so that a two-way authentication is achieved. Un-check this option to provide server authentication only - the server shares itscertificate and the clients authenticates it.
Check the box x509 Certificate Authentication enabled if you want the SIP TLSto provide both encryption and identity verification. Un-check this box to allow thesystem to accept self-signed certificates from the server side, when operating onthe client side of the SIP/TLS connection. In this case, the system providesencryption only and does not verify the identity.
14. In the Outbound Proxy server section, select send the SIP publish message directlyto the Presence server or send it to Session Manager, for routing messages to thePresence server.
Note:To be consistent with the Avaya Aura® deployment practice, Avaya recommendssending the messages through the Session Manager.
15. Enter the IP address of the Presence Server in the Outbound Proxy settings ifyou want to send the SIP publish messages directly to the Presence Server.
Configuring Presence Publisher
Presence Services with Communication Server 1000 March 2013 23

16. If you are using Session Manager to route the SIP publish messages, configure thefollowing:
• Enter the IP address of the Session Manager in the Outbound Proxysettings.
• Select TLS if you have selected Bet Effort for security, otherwise select TCP.
Note:Do not use UDP.
• Configure a Presence server SIP Entity and a Session Manager to Presenceserver SIP Linkage in the System Manager.
17. Under Server Settings, enter the customer name and the presence service DN(PSDN).
The values entered here should match the values configured in LD 23. For moreinformation about LD 23 configuration, refer Software Input Output Reference —Administration NN43001–611.
18. Click Save to save the configuration of the Presence Publisher, and then click Saveon the Nodes Detail page.
The configuration is saved to the Call Server. A Node Saved page displays.19. Click Transfer Now to transfer the configuration to the signaling server.20. Click Restart Application to start the Presence Publisher service on the designated
server.
Note:AML, VAS, and PSDN must be configured for Presence Publisher to work. For moreinformation about these configurations, see Overlay commands—LD 17 on page 69.
Note:To configure ACL in the System Manager set the Default Policy for Presence ACL to Allowby navigating to Users > User Management > System Presence ACLs in the SystemManager.
Related topics:TLS configuration between CS 1000 and Session Manager on page 24
TLS configuration between CS 1000 and Session ManagerThe following sections provide the procedures for configuring TLS between the CS 1000 andSession Manager.
Related topics:Adding a CS 1000 UCM Primary Certificate Authority on Session Manager on page 25
Installation and Commissioning
24 Presence Services with Communication Server 1000 March 2013Comments? [email protected]

Updating installed certificates on page 26Replacing the Session Manager default certificate on page 26Changing the Session Manager operating certificate on page 26TLS configuration if Presence Publisher is to Connect To PS Directly on page 27
Adding a CS 1000 UCM Primary Certificate Authority on Session Manager
Add a CS 1000 UCM Primary Certificate Authority on Session Manager.
1. Log on to UCM and download the UCM Private Certificate Authority to your PC.
a. In the UCM navigation tree, click Security > Certificates.
The Certificate Management Web page appears.
b. On the UCM Certificates page, download the “UCM Private CertificateAuthority” ca.cer file to your PC.
c. Click the Private Certificate Authority tab.
The Private Certificate Authority page displays.
d. Click Download.
e. Click Save to save the ca.cer to your PC.
2. Add the UCM ca.cer file as a trusted certificate for Session Manager.
a. In System Manager, navigate to Elements > Inventory.
b. In the navigation tree, click Manage Elements.
c. In the Entities section, select a Session Manager Application from thetable for the required Session Manager instance.
If you do not find Session Manager Application in the table, create a newSession Manager Application entity. For information on these steps, referUnified Communications Management Common ServicesFundamentals NN43001–116.
d. From the More Actions menu, choose Configure TrustedCertificates.
e. Click Add to add a UCM Primary certificate.
f. Choose Import from file.
g. Click Browse to select the ca.cer file on your PC.
h. Click Retrieve Certificate and review the certificate details before youcontinue.
i. Click Commit to add the trusted certificate.
Configuring Presence Publisher
Presence Services with Communication Server 1000 March 2013 25
Updating installed certificates
Update installed certificates for Session Manager.
1. In System Manager, navigate to Elements > Session Manager > SystemStatus.
The System Status page appears.
2. In the navigation tree, click Security Module Status.
3. In the Entities section, select a Session Manager Application from the table for theSession Manager instance you require.
4. Click Update Installed Certificates to update the imported UCM certificates.
5. Click Confirm to confirm the selected Session Manager.
Replacing the Session Manager default certificate
Replace the Session Manager default certificate as it uses a hard coded Common Name.
1. In System Manager, navigate to Elements > Inventory.
2. In the navigation tree, click Manage Elements.
3. In the Entities section, select a Session Manager instance.
4. From the More Actions menu, click Configure Identity Certificates.
5. Click security module, and click the Replace.
6. Click Replace this Certificate with Internal CA Signed Certificate.
7. Configure the following values and click Key Algorithm and Key Size.
• Common Name: FQDN of the Session Manager server
• Organization: Your company name.
• Country: Select a country from the list.
• Organization Unit: A division within your company.
8. Verify your data, and click Commit.
Changing the Session Manager operating certificate
Change the Session Manager operating certificate.
Installation and Commissioning
26 Presence Services with Communication Server 1000 March 2013Comments? [email protected]
1. In System Manager, navigate to Elements > Session Manager > SystemStatus.
The System Status page appears.
2. In the navigation tree, click Security Module Status.
3. In the Entities section, select the Session Manager instance.
4. Click Certificate Management > Use Customer Certificate.
5. Click Confirm.
Ensure you configure the IP address and FQDN of the Session Manager in the DNS, orin /etc/hosts file on the Signaling Server where the PP resides.
TLS configuration if Presence Publisher is to Connect To PS Directly
If the Presence Publisher (PP) is to connect to the PS directly (instead of routing through theSM), the administrator needs to add the CS1000 CA certificate into the PS.
1. In UCM CA, download CS1000’s CA certificate (for example, “ca.cer”).
2. FTP or SFTP the downloaded file to your PS Server and run: /opt/Avaya/Presence/presence/bin/prescert import pem <ca.cer> /opt/Avaya/Presence/presence/bin/prescert exportTS
(The certificate is in /opt/Avaya/Presence/jabber/xcp/certs)
3. Login to the XCP Controller – presence.
4. Click Core Router ->Edit.
5. Set Configuration View to “Advanced”.
6. Add your PP host to “Mutually Trusted TLS Hostnames”.
7. Restart PS.
Configuring Presence Publisher
Presence Services with Communication Server 1000 March 2013 27

Installation and Commissioning
28 Presence Services with Communication Server 1000 March 2013Comments? [email protected]

Chapter 7: User profile configuration
User profile configuration is done in System Manager (SMGR) using the User Profile Management (UPM)service. Using UPM, you can add, view, modify or delete user profiles. For information and proceduresabout configuring user profiles, see Administering Avaya Aura® System Manager.
Use the following guidelines when you configure user profiles:
Important:CS 1000 users require additional configuration in UPM. The following list provides necessaryconfiguration actions that are not found in the SMGR documentation. When you configure user profilesin UPM, ensure that you perform the following configurations in addition to the actions listed in theSMGR documents.
• Configure the user in UPM in SMGR by navigating to Home > Users > User Management >Manager Users.
• The format for the Login Name is <username>@<domain name>. For example,[email protected].
• Configure the Communication Profile password.
• Select the CS 1000 Endpoint Profile check box and open the drop-down menu to do configurationfor the user's devices.
• For non-XMPP phones, such as CS 1000 Unistim phones, configure the following additional data:
- PREA presence Allowed
- Presence Service DN (PSDN)
The <username> is pushed to the CS1000 Call Server automatically to fill in the PUID, which isnecessary for presence to work with non-XMPP phones.
For additional configuration details, refer to the UPM section of Administering Avaya Aura® SystemManager.
Presence Services with Communication Server 1000 March 2013 29

User profile configuration
30 Presence Services with Communication Server 1000 March 2013Comments? [email protected]

Chapter 8: Migration of CS 1000 7.5 andlater IM and Presence to SystemManager
This chapter provides information about migrating CS 1000 7.5 and later IM and Presence to SystemManager.
All CS 1000 servers need to join the System Manager security domain as member servers. For moreinformation about migration to System Manager, see Unified Communications Management CommonServices Fundamentals, NN43001-116.
Navigation• Migrating Subscriber data from UCM to System Manager on page 31• Replace Openfire Server by Avaya Aura Presence Server on page 32• Migrating XMPP client on page 32
Migrating CS 1000 Subscriber data from UCM to SystemManager
System Manager uses User Profile Management (UPM) to administer IM and Presence data.Migrate the CS 1000 Subscriber data to System Manager UM using one of the followingoptions:
• Using the active primary CS 1000 Subscriber Manager server to LDAP syncnchronizethe Subscriber Manager data.
• Using the CND or LDAP Data Interchange Format (LDIF) output to capture the CS 1000Subscriber Manager data.
For information and procedures about migrating CS 1000 Subscriber data to System ManagerUM, see the section “Importing users from CS 1000 Subscriber Manager to User Management”in Administering Avaya Aura® System Manager.
Presence Services with Communication Server 1000 March 2013 31

Replace Openfire Server by Avaya Aura Presence ServerIn CS 1000 Release 7.6, the Openfire Server is not supported. It is replaced by the AvayaAura® Presence Server. Configure the following to support Avaya Aura® Presence Server.
• CS 1000 Presence Publisher:
- Reconfigure the CS 1000 Presence Publisher to point to the Avaya Aura® PresenceServer. For more information, see Configuring Presence Publisher on page 22.
• For XMPP IM and Presence:
- Configure the users in User Management in SMGR if you cannot migrate themSMGR.
Migrating XMPP clientIn Release 7.5 and later, Communication Server 1000 supports only the one-X Communicatorclient. Therefore, all existing XMPP clients must switch to one-X Communicator clients.
Configure the PREA status on your existing XMPP clients from Allowed to Denied. Thisconfiguration change prevents sending duplicate call status changes to the Presence Server.For example, a call status change being sent using SIP Publish through the Presence Publisherand the other using XMPP.
For more information about this configuration, see LD 11 Configure client on page 70.
Migration of CS 1000 7.5 and later IM and Presence to System Manager
32 Presence Services with Communication Server 1000 March 2013Comments? [email protected]

Chapter 9: Maintenance
This chapter provides information about CLI commands and logs for maintenance on the IM and PresenceServices.
Navigation• Call Server CLI commands on page 33• Presence Publisher Service CLI commands on page 34• IM and Presence server commands on page 38• Diagnostic logs on page 39
Call Server CLI commandsTurn on the AML trace using LD 48.
The following is an example of an AML trace to help verify that the Call Server sends the USMmessage to the Presence Publisher application.
AML trace
--- Turn on AML trace
>48LNK000.enl msgo 32
ELAN32 O MTYP=1A USM TN=096 0 00 26 TIME=07:12:36ELAN32 IN 7D311A47 OUT 00000000 QSIZE 00000000ELAN32 03 36 00 00 61 82 16 1A 00 00 00 00 37 02 61 82 36 02 85 29ELAN32 3B 01 08 38 01 02 39 02 85 12 96 04 00 00 7E 58 F2 08 63 6FELAN32 72 65 73 69 70 6C 5F 07 01 06 14 0B 07 0C 24
--- Turn off AML trace
>48LNK000
Presence Services with Communication Server 1000 March 2013 33
.dis msgo 32
Note:In the preceding output, look for USM messages that are output to the Presence Publisherapplication.
For example:
38—Code for the status of the party:
01—The number of bytes that follow
02—Off-hook (04 is Active and 05 is USMDisc)
F2—code for PUID:
08—The number of characters.
63 6F 72 65 73 69 70 6C – coresipl
Presence Publisher Service CLI commandsThe following are some useful Presence Integration Service CLI commands.
Presence Publisher Service application status commandspuaAmlShowUse puaAmlShow to display the status of the AML link.
vxShell vtrk puaAmlShow
hAppBlk TaskName Tid LinkState NumRetry LinkNum Trace
0x9c5ef8 PUA 0xf300 UP 0 32 0
AML LinkTimer:
NotActive.
puaShowThe puaShow commands displays the summary of the Presence Integration Serviceapplication. It shows the state of the Presence Integration Service application and the statusof the AML link.
puaShow
Maintenance
34 Presence Services with Communication Server 1000 March 2013Comments? [email protected]
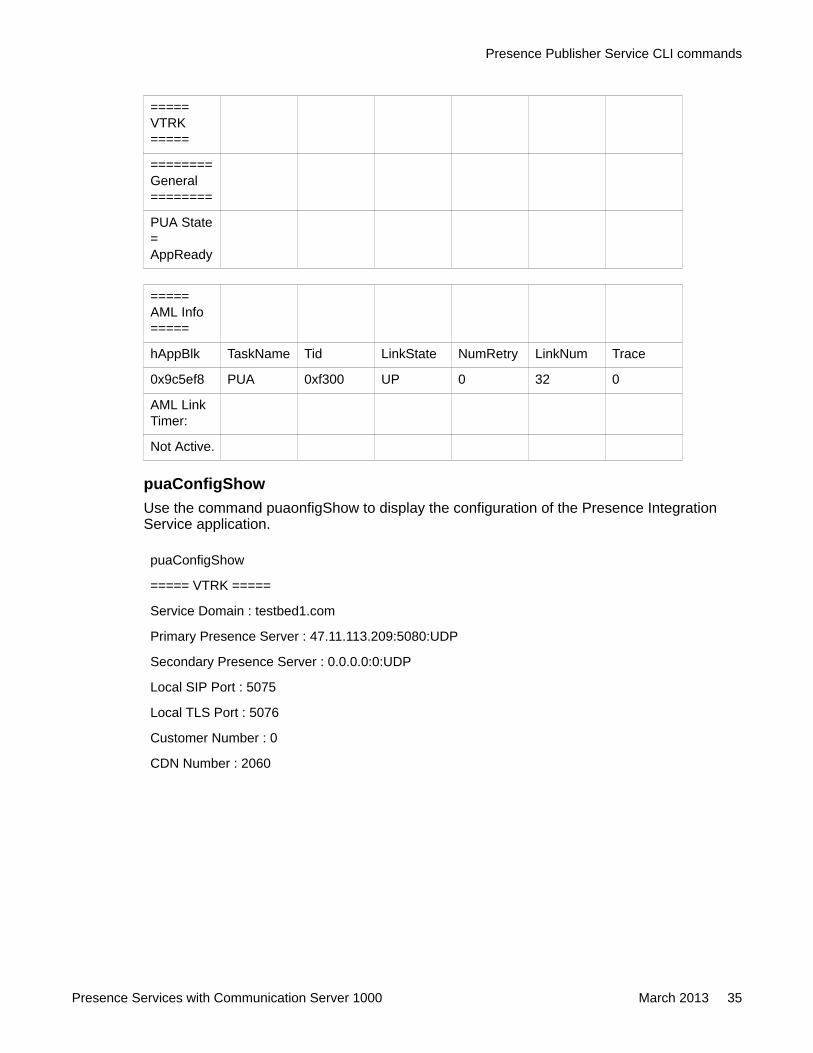
=====VTRK=====
========General========
PUA State=AppReady
=====AML Info=====
hAppBlk TaskName Tid LinkState NumRetry LinkNum Trace
0x9c5ef8 PUA 0xf300 UP 0 32 0
AML LinkTimer:
Not Active.
puaConfigShowUse the command puaonfigShow to display the configuration of the Presence IntegrationService application.
puaConfigShow
===== VTRK =====
Service Domain : testbed1.com
Primary Presence Server : 47.11.113.209:5080:UDP
Secondary Presence Server : 0.0.0.0:0:UDP
Local SIP Port : 5075
Local TLS Port : 5076
Customer Number : 0
CDN Number : 2060
Presence Publisher Service CLI commands
Presence Services with Communication Server 1000 March 2013 35

Presence Publisher Service application trace commandspuaAmlTraceUse puaAMLTrace to run a Presence Integration Service application trace. The most practicallevel to set the trace is 5. This enables message printing and full decoding. To turn off AMLtrace, use level 0.
The logs are captured in /var/log/nortel/ss_common.log file.
vxShell vtrk puaAmlTrace 5
Set PUA AML message trace level: 5value = 0x23 (35)
Aug 28 14:20:38 mhou-cppm vtrk: (INFO) tPUA: Message Type: USM (0x1a)
Aug 28 14:20:38 mhou-cppm vtrk: (INFO) tPUA: Application : TPS (0x16)
Aug 28 14:20:38 mhou-cppm vtrk: (INFO) tPUA: IE (0x37) = ThisPartyTN, Len 0x2, Data =[60 48]
Aug 28 14:20:38 mhou-cppm vtrk: (INFO) tPUA: IE (0x36) = ThisPartyDN, Len 0x2, Data =3124 [31 24]
[05]Aug 28 14:20:38 mhou-cppm vtrk: (INFO) tPUA: IE (0x3b) = ThisPartyDNType, Len 0x1,Data = Internal [08]
Aug 28 14:20:38 mhou-cppm vtrk: (INFO) tPUA: IE (0x38) = ThisPartyStatus, Len 0x1, Data= Disconnect [05]
Aug 28 14:20:38 mhou-cppm vtrk: (INFO) tPUA: IE (0x96) = CallID, Len 0x4, Data = [07 654e 02]
Aug 28 14:20:38 mhou-cppm vtrk: (INFO) tPUA: IE (0xf2) = UserId, Len 0xf, Data [email protected] [33 31 32 34 40 4e 4f 52 54 45 4c 2e 43 4f 4d]
Aug 28 14:20:38 mhou-cppm vtrk: (INFO) tPUA: IE (0x5f) = EnhancedTimeStamp, Len 0x7,Data = [1c 08 14 09 0e 14 2b]
sipNpmAppDebugSetSet a global debug field for Presence Integration Service application. The “debugField” is astring name of the debug flag. This trace command is common to all SIPNPM basedapplications (SSG, SLG, PUA).
For a list of all sipNpmAppDebugSet commands refer to, Avaya SIP Line Fundamentals ,NN43001-508.
sipNpmAppDataShowUse sipNpmAppDataShow to print details of an SIPNPM-based application data.
vxshell> vtrk sipNpmAppDataShow tPUA 5
Application = tPUA, tid = 0x8aa6a40, Category = 0xf300
Maintenance
36 Presence Services with Communication Server 1000 March 2013Comments? [email protected]
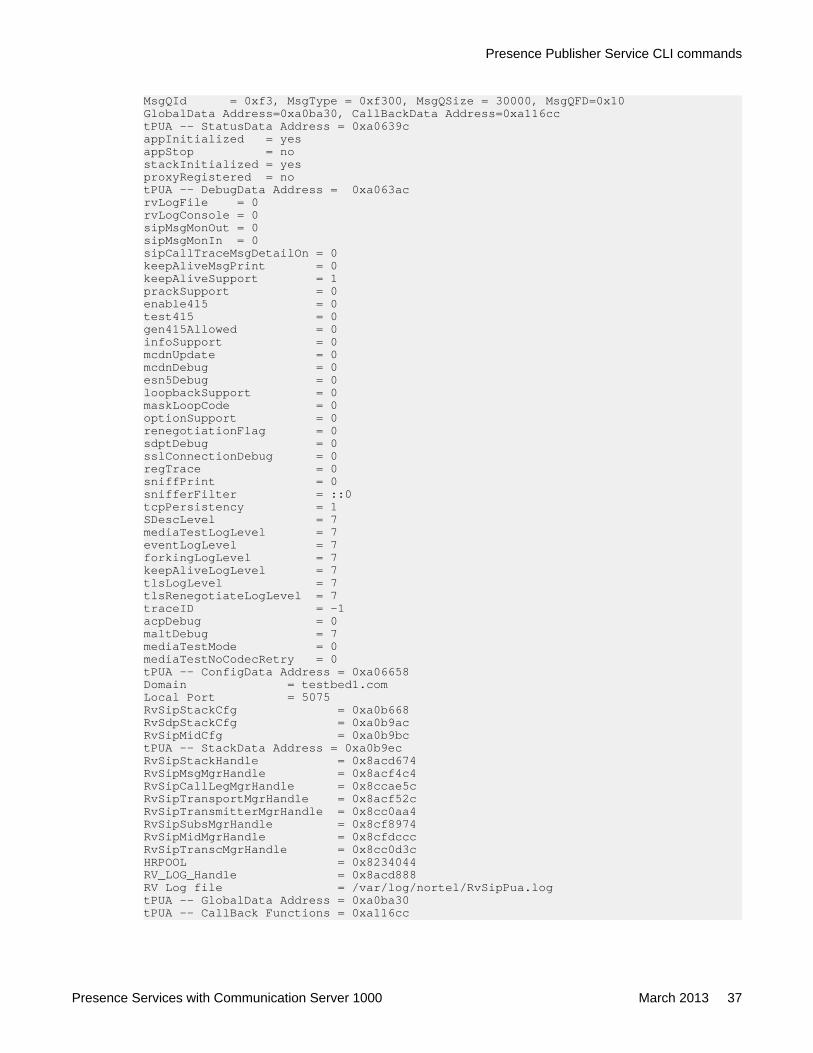
MsgQId = 0xf3, MsgType = 0xf300, MsgQSize = 30000, MsgQFD=0x10GlobalData Address=0xa0ba30, CallBackData Address=0xa116cctPUA -- StatusData Address = 0xa0639cappInitialized = yesappStop = nostackInitialized = yesproxyRegistered = notPUA -- DebugData Address = 0xa063acrvLogFile = 0rvLogConsole = 0sipMsgMonOut = 0sipMsgMonIn = 0sipCallTraceMsgDetailOn = 0keepAliveMsgPrint = 0keepAliveSupport = 1prackSupport = 0enable415 = 0test415 = 0gen415Allowed = 0infoSupport = 0mcdnUpdate = 0mcdnDebug = 0esn5Debug = 0loopbackSupport = 0maskLoopCode = 0optionSupport = 0renegotiationFlag = 0sdptDebug = 0sslConnectionDebug = 0regTrace = 0sniffPrint = 0snifferFilter = ::0tcpPersistency = 1SDescLevel = 7mediaTestLogLevel = 7eventLogLevel = 7forkingLogLevel = 7keepAliveLogLevel = 7tlsLogLevel = 7tlsRenegotiateLogLevel = 7traceID = -1acpDebug = 0maltDebug = 7mediaTestMode = 0mediaTestNoCodecRetry = 0tPUA -- ConfigData Address = 0xa06658Domain = testbed1.comLocal Port = 5075RvSipStackCfg = 0xa0b668RvSdpStackCfg = 0xa0b9acRvSipMidCfg = 0xa0b9bctPUA -- StackData Address = 0xa0b9ecRvSipStackHandle = 0x8acd674RvSipMsgMgrHandle = 0x8acf4c4RvSipCallLegMgrHandle = 0x8ccae5cRvSipTransportMgrHandle = 0x8acf52cRvSipTransmitterMgrHandle = 0x8cc0aa4RvSipSubsMgrHandle = 0x8cf8974RvSipMidMgrHandle = 0x8cfdcccRvSipTranscMgrHandle = 0x8cc0d3cHRPOOL = 0x8234044RV_LOG_Handle = 0x8acd888RV Log file = /var/log/nortel/RvSipPua.logtPUA -- GlobalData Address = 0xa0ba30tPUA -- CallBack Functions = 0xa116cc
Presence Publisher Service CLI commands
Presence Services with Communication Server 1000 March 2013 37

appMsgHandler = 0x6fe39bcardEventHandler = 0x6fe47fconfigParaGet = 0x701281tlsConfigGet = (nil)appInit = 0x6fe34dappShutdown = 0x6fe37astackCallbackSet = (nil)sipUriCreate = (nil)sipSessionDel = (nil)callLegStateChgEv = (nil)callLegMsgToSendEv = (nil)transactionStateChangedEv = 0x6ffb88NameToNumConvert = (nil)IsReInviteSendAllowed = (nil)callLegReferStateChgEv = (nil)callLegModifyStateChgEv = (nil)reInviteAnswerSent = (nil)audioCapHandler = (nil)sendAcsUiFwdSdp = (nil)earlyMediaUpdateSend = (nil)delayRetrieveHandler = (nil)value = 0x0 (0)
IM and Presence server commands
Start/Stop/Restart or check status of Presence server processStart or restart the Presence server process:
/opt/Avaya/Presence/presence/bin/start.shStop the Presence server process:
/opt/Avaya/Presence/presence/bin/stop.sh
Check the status of the Presence server process:
/opt/Avaya/Presence/presence/bin/presstatus
Unified Communication (Presence) server file locationThe /var/log/presence is the file location for IM and Presence Services server files.
Maintenance
38 Presence Services with Communication Server 1000 March 2013Comments? [email protected]

Presence server traces
SIP message traces
There are two ways to see SIP message traces on the presence server:
• Use Wireshark• Get the SIP log file on Unified Communication (Presence) server (file location, check the
server configuration page)
XMPP message traces
Use Wireshark to get XMPP message traces on the Unified Communication (Presence) server.Log files for one-X Communicator can be found at C:\Documents and Settings\\Application Data\Avaya\Avaya one-X Communicator\Log Files.
For more information about enabling diagnostics for one-X Communicator, see One-XCommunicator diagnostics on page 40.
SM traces
Use traceSM-x command if presence service does not receive the SIP publish message.
1. Log into the SM shell as root.2. Enter the command traceSM -x.
3. Press s to start tracing.4. Perform the testing.5. Press s to stop tracing.
You can find the traceSM.log in the directory /var/log/Avaya/sm/ServiceHost.
Diagnostic logsThis section provides the diagnostic logs for IM and Presence Service.
Diagnostic logs
Presence Services with Communication Server 1000 March 2013 39
Signaling Server logsYou can view log messages in the /var/log/nortel/ss_common.log file.
Debug log:
To enable debug log, enter syslogLevelSet vtrk tPUA 7To disable debug log, enter syslogLevelSet vtrk tPUA 6AML Log:
To enable AML log, enter vxShell vtrk puaAmlTrace 5To disable AML log, enter vxShell vtrk puaAmlTrace 0SIP Message Log:
SIP messages are included in the debug log.
One-X Communicator diagnostics
1. Navigate to Settings > General Settings > Advanced.2. Click Diagnostic Logging.3. Select the Enable Diagnostic Logging check box.4. Click the type of logging, and click OK.
Maintenance
40 Presence Services with Communication Server 1000 March 2013Comments? [email protected]

Chapter 10: IM and Presence userinformation
Avaya Communication Server 1000 (Avaya CS 1000) IM and Presence Services provides presenceinformation and IM capability for all Avaya CS 1000 users. A CS 1000 user can view presence informationand exchange Instant Messages using the one-X Communicator CS 1000 Client.
For more information about the configuration of one-X Communicator client, see Avaya one-XCommunicator CS 1000 client configuration on page 45.
Navigation• Presence Aggregation on page 41• Personal Agent on page 41
Presence AggregationPresence Aggregation is to ensure uniform presence regardless of the client being used.
Personal AgentUse the Personal Agent (PA) application to change your password and to synchronize yourpasswords so that you use the same password for Presence and Instant Messaging, loggingon to the one-X Communicator, and SIP Line phones.
Note:Whether or not the password has been changed, you must synchronize the password atleast once to ensure logon access to one-X Communicator and for IM and Presence to workproperly.
The PA is a standalone application that is automatically installed on the same server as SMGR.The Personal Agent application is accessed from your Web browser as a single page and nologon is required.
Presence Services with Communication Server 1000 March 2013 41
Changing your password for Presence and Instant MessagingChange your Presence and Instant Messaging password.
Note:The new password is subject to the restrictions as configured in Unified CommunicationsManagement (UCM) by the security administrator and these rules are displayed on thePersonal Agent screen. The rules displayed and the details of the rules depend on thepassword configuration in UCM.
1. On your Web browser, enter the URL of the Personal Agent provided by your systemadministrator. For example, https://<FQDN of SMGR>/pa.
The Personal Agent page opens.
2. In the User ID field, enter your login name.
3. In the Current Password field, enter your current password.
4. In the New Password field, enter the new password.
Note:The new password must follow the rules displayed on the screen.
5. In the Confirm Password field, enter the new password again.
6. Click Save.
Any messages relating to the success or failure of the password change appearsbelow the page title. If the password is not accepted, check the passwordrestrictions and try again.
Synchronizing your passwordAfter the Presence and Instant Messaging password has been changed, synchronize thepassword with all the presence and telephony accounts belonging to the subscriber.
1. On the Personal Agent Web page, click Synchronize Account Passwords.2. In the Login Name field, enter your login name.3. In the Password field, enter the password.4. Click Show Accounts.
The accounts for the user appear at the bottom of the page.5. Click Synchronize Password.
IM and Presence user information
42 Presence Services with Communication Server 1000 March 2013Comments? [email protected]
Upon successful completion, the message Succeeded appears in the Statuscolumn.
Note:Password synchronization fails for non-SIP Line phone accounts as the UnifiedCommunications (UC) password is only used by SIP Lines.
Personal Agent
Presence Services with Communication Server 1000 March 2013 43

IM and Presence user information
44 Presence Services with Communication Server 1000 March 2013Comments? [email protected]

Chapter 11: Avaya one-X Communicator CS1000 client configuration
This chapter provides the procedures for configuring the Avaya one-X® Communicator CommunicationServer 1000 client for viewing presence information and exchange Instant Messaging (IM) with theExtensible Messaging and Presence Protocol (XMPP).
For more information about Avaya one-X® Communicator for Communication Server 1000, download thefollowing documents from the Avaya Web site at www.avaya.com.
• Overview and Planning for Avaya one-X® Communicator for CS 1000 (for administrator)• Administering Avaya one-X® Communicator for CS 1000 (for administrator)• Implementing Avaya one-X® Communicator for CS 1000 (for user)• Using Avaya one-X® Communicator for CS 1000 (for user)
Navigation• Configuring IM and Presence on page 55• Configuring Phones on page 56• Active Directory configuration on page 45• Client configuration for Avaya one-X Communicator on page 50• TLS certificates for Avaya one-X Communicator on page 56• Configuring Avaya one-X Communicator for Best Effort Cap negotiation on page 58• Feature Interactions on page 59
Active Directory configurationActive Directory is not part of the one-X Communicator, but it is necessary for searching andadding contacts or favorites to the one-X Communicator.
This section provides the procedures to configure Active Directory (AD).
For example purposes, the procedures in this section use the following common configurationdata.
Presence Services with Communication Server 1000 March 2013 45

Table 2: Common configuration example data
Active Directory IP address 100.20.52.3
AD domain interop.com
Organization Unit ps
Presence User ID (PUID)configured in UPM. It is theusername portion of the LoginName.
Note:There is a maximum of 16 PUIDsfor each user.
1347
Presence domain presence.interop.com
Creating an organization unit in Active DirectoryCreate an organization unit in AD.
1. From the Start menu, select Run, and type dsa.msc.
The Active Directory Users and Computers window appears, as shown in thefollowing figure.
Avaya one-X Communicator CS 1000 client configuration
46 Presence Services with Communication Server 1000 March 2013Comments? [email protected]

Figure 2: Active Directory Users and Computers
2. Right-click the folder where you want the organization unit to be created.
3. Click New > Organizational Unit.
The new organization unit appears in the left pane. In this example, the organizationunit is ps.
Creating a user in Active DirectoryCreate a user in AD.
1. Right-click the organization unit you just created. For example, ps
Active Directory configuration
Presence Services with Communication Server 1000 March 2013 47

2. Click New > User.
The New Object — User window appears, as shown in the following figure.
Avaya one-X Communicator CS 1000 client configuration
48 Presence Services with Communication Server 1000 March 2013Comments? [email protected]

Figure 3: New Object — User
3. In the First name field, type the first name of the organization unit.
4. In the Last name field, type the last name of the organization unit.
5. In the Full name field, type the full name of the organization unit.
6. In the User logon name field, type the user logon name.
7. Click Next.
8. In the Password field, type a password.
9. In the Confirm password field, type the password again to confirm.
10. Select the options User cannot change password and Password neverexpires.
11. Click Next.
12. Click Finish.
Configuring a user in Active DirectoryConfigure the data for the user.
Active Directory configuration
Presence Services with Communication Server 1000 March 2013 49

1. In the Active Directory Users and Computers page, right-click the name in the rightpane, and select Properties. For example, PS CS1K 47.
2. Click the General tab.
3. Complete the following fields:
• First name
• Last name
• Display name
• Telephone number
4. Click OK.
Client configuration for Avaya one-X Communicator This section provides the procedures for configuring the Avaya one-X® Communicator client.
Enabling the public directoryEnable the public directory.
1. Log on to the Avaya one-x Communicator.
2. In the General Settings window, click Desktop Integration in the left pane.
The desktop integration options appear in the right pane, as shown in the followingfigure:
Avaya one-X Communicator CS 1000 client configuration
50 Presence Services with Communication Server 1000 March 2013Comments? [email protected]

3. In Name Look-Up, select Public Directory.
4. Click OK.
Configuring public directoryConfigure the public directory information.
1. In the General Settings window, click Public Directory in the left pane.
Public Directory options appear in the right pane.
Client configuration for Avaya one-X Communicator
Presence Services with Communication Server 1000 March 2013 51

2. Complete the fields, and click OK.
Note:You may be required to restart the one-X application.
Note:The user portion of the email address or the phone number selected for the IMhandle mapping is used for searching and creating IM handles for users in thePresence server. Therefore, the selection must match the IM username enteredin the IM and Presence window. If the email address, “[email protected]” isselected, then “id” must also be entered for the IM username. If the work numberis selected, then the work number must be entered for the IM username.
Adding a contactAdd a contact to the one-X Communicator.
1. In the Search field, type the contact, and click the search icon.
The name appears in the bottom pane.
Avaya one-X Communicator CS 1000 client configuration
52 Presence Services with Communication Server 1000 March 2013Comments? [email protected]

2. Right-click the name you want to add the contact, and click Add to Favorites, asshown in the following figure.
Client configuration for Avaya one-X Communicator
Presence Services with Communication Server 1000 March 2013 53

The name is added to the favorite list, as shown in the following figure.
Avaya one-X Communicator CS 1000 client configuration
54 Presence Services with Communication Server 1000 March 2013Comments? [email protected]

Note:You may be required to log off and log on to one-X Communicator for the updatedview.
Configuring IM and Presence Configure IM and Presence.
1. In the General Settings, in the left pane, click IM and Presence.
The Instant Message and Presence Service settings window appears in the rightpane.
2. Select Enable Instant Messaging and Presence to enable the Instant Messageand Presence Service settings.
3. In the Server field, type the IP address of the Presence Server.4. Enter the presence SIP domain name.
Configuring IM and Presence
Presence Services with Communication Server 1000 March 2013 55

This entry should match with the value that is configured in "Domain Substituion -To" in /Home/Elements/Presence/Configuration web page of the SystemManager.
5. In the IM username field, type the username of the login name configured in UserProfile Management (UPM). The login name consists of the username and domainname, as in <username>@<domain name>.
6. In the IM password field, type the synchronized password for the subscriber.
Configuring PhonesConfigure phones.
1. In the General Settings, in the left pane, click Phone.
The Phone settings screen appears in the right pane.2. In the Login field, type the phone extension number or the user name. This is the
SIP User Name field in the SIP Line phone account configuration in ElementManager.
3. In the Phone password field, type the synchronized password for the subscriber.4. In the Domain field, type the SIP domain name.5. In the SIP Line Gateway (SLG) node field, type the IP address and port.
TLS certificates for Avaya one-X CommunicatorThis section provides the procedures in the order of installation for installing certificates for theAvaya one-X® Communicator and registering to the SIP Line Gateway (SLG) using TLS.
Adding a UCM primary certificate authorityAdd the UCM primary certificate authority on the same system where the Avaya one-X®
Communicator is installed.
1. In System Manager, navigate to Services > UCM Services.
2. From the UCM navigation tree, click Security > Certificates.
3. Click the Private Certificate Authority tab.
The private Certificate Authority window appears.
4. In the Private Certificate Authority Details section, click Download to download thecertificate contents as a security certificate file to the PC.
Avaya one-X Communicator CS 1000 client configuration
56 Presence Services with Communication Server 1000 March 2013Comments? [email protected]

The File Download – Security Warning window appears.
5. Click Save.
The Certificate Details window appears showing the details of the certificate.
6. Click Ok.
7. After the UCM certificate is saved to the Avaya one-X® client PC, open the certificatefile and follow the instructions for installation to your Windows PC.
Adding an Avaya one-X Communicator root certificate authority toUCM
Add the Avaya one-X® Communicator root Certificate Authority (CA) to UCM. The one-X®
Communicator Root Certificate Authority can be downloaded from the Avaya one-X®
Communicator page at https://support.avaya.com.
1. In System Manager, navigate to Services > UCM Services.
2. From the UCM navigation tree, click Security > Certificates.
3. Click the Certificate Endpoints tab.
The private Certificate Endpoints screen appears.
4. In the Certificate Endpoints section, click the option next to the SIP Line Gateway(SLG) node.
5. In the Certificate Authorities section, click Add.
6. Copy the one-X Communicator root CA contents and paste into the text area.
7. Click Submit.
Creating a certificate for SIP TLSCreate a certificate for SIP TLS.
1. In System Manager, navigate to Services > UCM Services.
2. From UCM navigation tree, click Security > Certificates.
3. Click Certificate Endpoints tab.
The private Certificate Endpoints window appears.
4. In the Certificate Endpoints section, click the option next to the SIP Line Gateway(SLG) node.
5. Click SIP TLS.
TLS certificates for Avaya one-X Communicator
Presence Services with Communication Server 1000 March 2013 57
6. Click Create a new certificate, signed by local private Certificate Authority, andclick Next.
7. Type values for Friendly name and Bit Length, and click Next.
For example:
• Friendly name: Type a string that would be used to identify the certificate, forexample, SIP TLS.
• Bit Length: Type a value that represents the number of bits used for encryption.Values can be 512, 1024, and 2048. More CPU is required for processing asthe bit value increases.
8. Type the Organization and Organization unit, and click Next.
For example:
• Organization: Your company name.
• Organization unit: A division within your company.
9. Type a value for Common Name. For example, type the FQDN of the server youare configuring. The default is a combination of Windows environment variablesComputername and Userdnsdomain. Ensure this field matches the hostname of thesystem the certificate is on.
10. In the Subject Alt Name field, click Other, and type critical,DNS: domainname, where the domain name is the domain name on the SIP Line Gateway.
11. Click Next.
12. Complete the Geographical information, and click Next.
The Certificate Summary page appears.
13. Verify the information, and click Commit to generate a certificate in X.509 format.
The Certificate Summary page shows the certificate information.
14. Click Finished.
The status is changed to signed.
15. Restart the server.
Configuring Avaya one-X Communicator for Best Effort Capnegotiation
Configure the Avaya one-X® Communicator for Best Effort negotiation.
1. In the General Settings, click Advanced > SRTP Settings.2. Select Enable SRTP to enable SRTP on one-X Communicator.
Avaya one-X Communicator CS 1000 client configuration
58 Presence Services with Communication Server 1000 March 2013Comments? [email protected]

3. Configure Cipher1 or Cipher2 to AES_CM_128_HMAC_SHA1_80.4. Configure the mapping table for one-X Communicator capability and Class of
Service for UEXT.
For example,
• SRTP enabled <-> MSBT• SRTP not enabled <-> MSNV
Feature InteractionsSigma telephone:
Sigma telephones cannot make outgoing calls if the phone is configured with Best Effort Capnegotiation and TN is configured with MSBT Class of Service. Attempts to make an outgoingcall result in the destination phone ringing and the originator receiving an overflow tone.
Best Effort negotiation implementation:
If Avaya one-X® Communicator for Best Effort negotiation is implemented through an m-line(using tcap and pcfg attributes) and MSBT Class of Service is configured, the Avaya one-X®Communicator cannot make outgoing calls, the destination phone does not ring, and theoriginator does not receive the overflow tone.
Feature Interactions
Presence Services with Communication Server 1000 March 2013 59

Avaya one-X Communicator CS 1000 client configuration
60 Presence Services with Communication Server 1000 March 2013Comments? [email protected]

Chapter 12: Troubleshooting
This section provides information to assist in troubleshooting problems related to Presence Services orthe one-X Communicator client for Communication Server 1000.
Navigation• Presence Server—local database on page 61• Presence Server—XCP database on page 61• AML link is not up on page 62• Presence is not updated when a telephone makes a call on page 63• Presence Publisher not operational on page 64• Presence publisher configuration not displayed on page 64• TLS status on page 64• CDN or PSDN ASID VALUE is incorrect on page 65
Presence Server—local databaseVerify that the user data is successfully replicated to the Presence Server. For local database,enter the following command in the Presence Server shell:
psql -U postgres -d presence -c "select* from csuser"For example, if the user name is John Smith, the display is:
374 | 2011-01-06 16:27:42.339 |0 | FMVqzkyG5PNIjssq3wjcWw== |728ab064-82fc-4873-ac3c-db4c645446fc | f| t| [email protected] |||86|
Presence Server—XCP databaseVerify that the user data is successfully replicated to the Presence Server. For the XCPdatabase, enter the following command in the Presence Server shell:
Presence Services with Communication Server 1000 March 2013 61

psql -U postgres -d xcp -c "select * from users"For example, if the user name is John Smith, the display is:
10343 | [email protected] | -| F| 2011-01-06 16:23:35 |2011-01-06 16:23:35 | 0 | 2011-01-06 |
AML link is not upCheck if ELAN links is configured for in LD 22. There must be at least 2 built for SLG.
Example output of LD 22.
>LD 22
PT2000MARP NOT ACTIVATED
Table 3: LD 22
Prompt ResponseREQ PRT
TYPE ADAN ELAN
ADAN ELAN 32CTYP ELANDES elan_slgN1 512ADAN ELAN 33CTYP ELANDES SIPLN1 512ADAN ELAN 34CTYP ELANDES AMLCDN1 512
Example output
>LD 23
ACD000MEM AVAIL: (U/P): 48592002 USED U P: 2864309 173766 TOT: 51630077DISK SPACE NEEDED: 254 KBYTESACD DNS AVAIL: 23991 USED: 9 TOT: 24000
Table 4: LD 23
Prompt ResponseREQ PRT
Troubleshooting
62 Presence Services with Communication Server 1000 March 2013Comments? [email protected]

Prompt ResponseTYPE CDN
CUST 0
CDN <CR> Carriage Return
TYPE CDNCUST 0CDN 5280FRRTSRRTFROA NOUUI NOMURTCDSQ YESDFDN 8990NAME NOCMB NOCEIL 2047CLRO NOOVFL NOTDNS NOAACQ YESASID 32SFNBUSFBCALB 0 1 2 3 4 5 6 7 8 9 10 11CNTL YESVSIDHSIDCWTH 1BYTH 0OVTH 2047
Does the CDN/PSDN configured on CS match the one in the Presence Publisherconfiguration? : Check Presence Publisher Configuration page in Element Manager.
Presence is not updated when a telephone makes a call• Is CLS PREA configured for the set? : Print set configuration in LD 10 / LD 11, or in
Element Manager.• Is PSDN properly configured for the set? : Print set configuration in LD 10 / LD 11, or in
Element Manager.• Is PUID configured properly for the set? : Print set configuration in LD 10 / LD 11, or in
Element Manager.• Are USM messages sent from CS? : Enable AML traces in LD 48. See Call Server CLI
commands on page 33.• Are USM messages received on the Presence Publisher Server? : Run puaAmlTrace 5.
See Presence Publisher Service application trace commands on page 36.
Presence is not updated when a telephone makes a call
Presence Services with Communication Server 1000 March 2013 63

• Are PUBLISH messages sent from the Presence Publisher Server? : Run syslogLevelSetvtrk tPUA 7, or pcap start/stop, or wireshark on the Presence Publisher Server.
• Are PUBLISH messages received on the IM and Presence server? Run wireshark on theIM and Presence Services server.
Presence Publisher not operationalInvoke the following command in the Signaling Server in which the Presence Publisher (PP)resides:
puaShowExample display for an operational PP:=== VTRK ======== General ====== PUA State = AppReady Server Type = Avaya Aura PS===== AML Info ====== hAppBlk TaskName Tid LinkState NumRetry LinkNum Trace0xb921c0 PUA 0xf300 Up 0 32 0
Presence publisher configuration not displayedInvoke the following command in the to display the presence publisher configuration:
puaConfigShowFor example:=== VTRK ===Service Domain : pspit.ca.nortel.com Primary Outbound Server : 47.11.112.242:5061:TLS Secondary Outbound Server : 47.11.253.179:15061:TLSLocal SIP Port : 5080Local TLS Port : 15061Presence Server : 47.11.253.179:15061:TLSCustomer Number : 0CDN Number : 5280
TLS statusCheck the /var/log/nortel/ss_common.log file to see if there is a TLS up message. Ifnot, check TLS configuration and the network status.
For example:
Troubleshooting
64 Presence Services with Communication Server 1000 March 2013Comments? [email protected]

May 26 17:43:34 fb-04-ldr vtrk: (INFO) tPUA: sipNpmTlsCheckSANandCN:Remote IP=100.20.25.130 from Session Manager, grant
CDN or PSDN ASID VALUE is incorrectOn the Call Server, load overlay 23 and print the CDN data.Ld 23 REQ PrtTYPE Cdn CUST <customer #>CDN <cdn #>
For example:TYPE CDNCUST 0CDN 5280FRRTSRRTFROA NOUUI NOMURTCDSQ YESDFDN 8990NAME NO CMB NOCEIL 2047CLRO NOOVFL NOTDNS NOAACQ YES ASID 32 -----------------------This number must be the same as the ELAN number for thePPSFNBUSFBCALB 0 1 2 3 4 5 6 7 8 9 10 11CNTL YESVSIDHSIDCWTH 1BYTH 0OVTH 2047
If the ASID number is not the same as the ELAN number for the PP, configure the same CDNagain. Then, type appstart vtrk restart on the Signaling Server where the PP resides.To find the ELAN number for the PP, enter the following:>ld 48 LNK000stat elan
Example display: SERVER TASK: DISABLED ELAN #: 032 APPL_IP_ID: 47 .11 .71 .72 : 0000F300 LYR7: ACTIVE EMPTY APPL ACTIVEELAN #: 033
CDN or PSDN ASID VALUE is incorrect
Presence Services with Communication Server 1000 March 2013 65

APPL_IP_ID: 47 .11 .71 .72 : 0000FB00 LYR7: ACTIVE EMPTY APPL ACTIVEELAN #: 034 APPL_IP_ID: 47 .11 .71 .72 : 0000F800 LYR7: ACTIVE EMPTY APPL ACTIVE ELAN #: 035 APPL_IP_ID: 47 .11 .71 .72 : 0000F700 LYR7: ACTIVE EMPTY APPL ACTIVE
Get the ELAN number that has type 0000F300 (In this example, it is 32).
one-X Communicator Fails to Register to CS1000• Make sure that the root certificate authority for the one-X Communicator has been
installed in the UCM.• Make sure that the SIP TLS certificate is re-created if the domain name for the SIP Line
gateway is changed.• Make sure that password synchronization has been done and the UC password is used
instead of the SCPW.
After adding a user in UPM, you must sync password before you can login. For moreinformation, see page 45.
• Print a TNB and verify PUID is the username as defined in UPM. See example below:
ExampleDES P TN 252 0 05 19 VIRTUALTYPE UEXTCDEN 8DCTYP XDLCCUST 0 UXTY SIPLMCCL NO SIPN 1 SIP3 0 FMCL 0 TLSV 0 SIPU 5443 NDID 5SUPR NO UXID NUID NHTN CFG_ZONE 00001 CUR_ZONE 00001 MRT ERL 0 ECL 0 FDN TGAR 1 LDN NONCOS 0 SGRP 0 RNPG 0 SCI 0 SSU XLST SCPW 0000
Troubleshooting
66 Presence Services with Communication Server 1000 March 2013Comments? [email protected]

CLS CTD FBD WTA LPR MTD FND HTD TDD HFD CRPD MWD LMPN RMMD AAD IMD XHD IRD NID OLD VCE DRG1 POD SLKD CCSD SWD LND CNDD CFTD SFD MRD DDV CNID CDCA MSID DAPA BFED RCBD ICDD CDMD LLCN MCTD CLBD AUTU GPUD DPUD DNDD CFXD ARHD CLTD ASCD CPFA CPTA ABDD CFHD FICD NAID BUZZ AGRD MOAD AHA DDGA NAMA DRDD EXR0 USMD USRD ULAD RTDD RBDD RBHD PGND OCBD FLXD FTTC DNDY DNO3 MCBN VOLA VOUD CDMR PRED RECD MCDD T87D SBMD ELMD MSNV FRA PKCH MWTD DVLD CROD ELCD CPND_LANG ENGHUNT PLEV 02 PUID 5443 <<<<< This is the USERNAME in UPMUPWD ********** <<<<< This is the password defined in UPM DANI NOAST IAPG 0 AACS NOITNA NO DGRP MLWU_LANG 0 MLNG ENGDNDR 0 KEY 00 SCR 5443 0 MARP CPND NAME Barry, Lunt XPLN 24 DISPLAY_FMT FIRST,LAST 01 HOT U 25443 MARP 0 02 03 04
IM and Presence does not work for the one-XCommunicator
• Make sure that the domain name entered on the IM and Presence page of the one-XCommunicator is the domain name for the PS.
IM and Presence does not work for the one-X Communicator
Presence Services with Communication Server 1000 March 2013 67

Troubleshooting
68 Presence Services with Communication Server 1000 March 2013Comments? [email protected]

Appendix A: Overlay commands
Navigation• Overlay commands—LD 17 on page 69• Overlay commands—LD 11 and LD 23 on page 70
Overlay commands—LD 17The following Overlay commands can be used to enable Presence service on the CallServer.
Build 2 ELAN and VAS for SLG server, eg: 32 and 33.
Table 5: LD 17 Configure ELAN AML link
Prompt Response DescriptionREQ CHG Change ADAN
TYPE ADAN
ADAN New ELAN <ELANnumber>
New AML ELAN link. The link number should begreater than or equal to 32
CTYP ELAN
Every AML over ELAN link configured on the Avaya Communication Server 1000 (Avaya CS1000) system requires a Value Added Server (VAS) ID for the AML messages to be sent. Usethe following overlay commands to associate a Value Added Server (VAS) with AML overELAN.
Table 6: LD 17 Configure VAS ID for AML link
Prompt Response DescriptionREQ CHG Change ADAN
TYPE VAS
VAS New New VAS
Presence Services with Communication Server 1000 March 2013 69
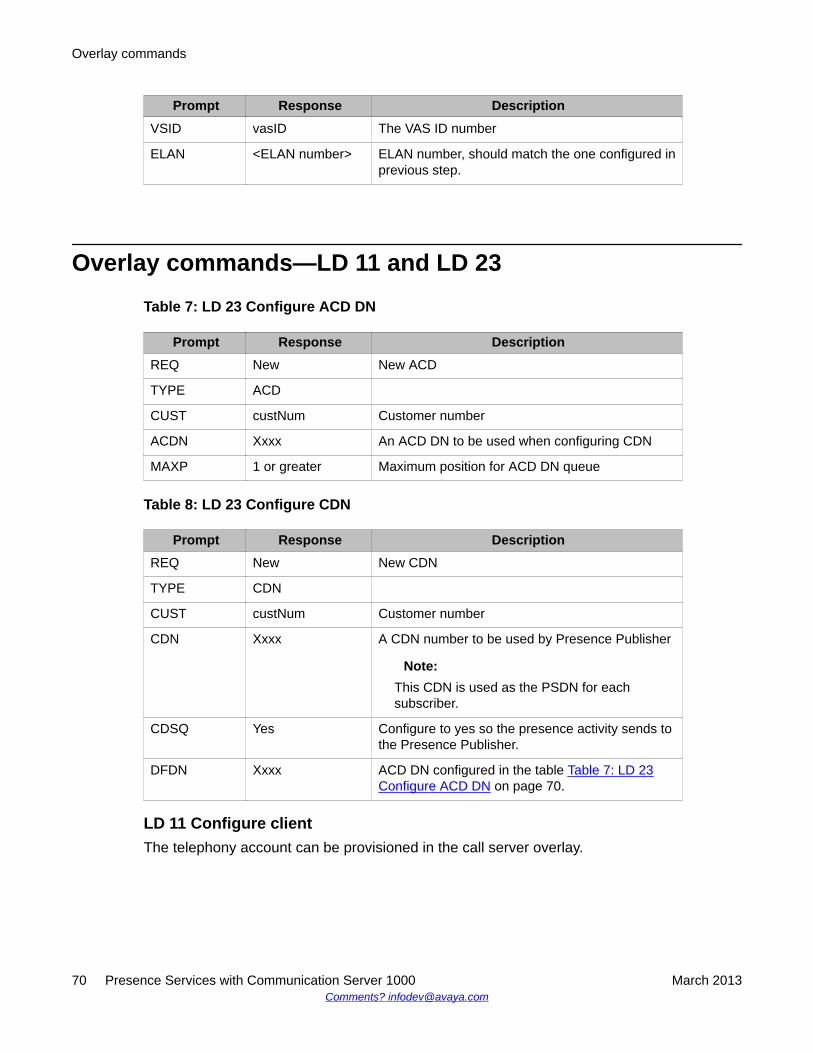
Prompt Response DescriptionVSID vasID The VAS ID number
ELAN <ELAN number> ELAN number, should match the one configured inprevious step.
Overlay commands—LD 11 and LD 23Table 7: LD 23 Configure ACD DN
Prompt Response DescriptionREQ New New ACD
TYPE ACD
CUST custNum Customer number
ACDN Xxxx An ACD DN to be used when configuring CDN
MAXP 1 or greater Maximum position for ACD DN queue
Table 8: LD 23 Configure CDN
Prompt Response DescriptionREQ New New CDN
TYPE CDN
CUST custNum Customer number
CDN Xxxx A CDN number to be used by Presence Publisher
Note:This CDN is used as the PSDN for eachsubscriber.
CDSQ Yes Configure to yes so the presence activity sends tothe Presence Publisher.
DFDN Xxxx ACD DN configured in the table Table 7: LD 23Configure ACD DN on page 70.
LD 11 Configure clientThe telephony account can be provisioned in the call server overlay.
Overlay commands
70 Presence Services with Communication Server 1000 March 2013Comments? [email protected]

Table 9: LD 11 Configure client
Prompt Response DescriptionREQ New/Chg New TN or change an
existing TN
TYPE <TN Type>
CUST custNum Customer number
CLS PREA (PRED) New CLS PREA is used toenable presence service forphones that do not supportExtensible Messaging andPresence Protocol (XMPP).The one-X Communicatorfeature does not requirePREA as it supports XMPP.The default value is PRED
PSDN CDN number Enter the CDN number.
PUID <> The Presence User ID(PUID) is the user name forthe subscriber to which thetelephony account belongs.
Note:Configure the PUID usingUPM and from the Phonessection in ElementManager. You cannot usethe CLI.
UPWD <> UC password is used for SIPLine login.
Note:Configure theCommunication Profilepassword using UPM andperform passwordsynchronization. Youcannot use the CLI.
Overlay commands—LD 11 and LD 23
Presence Services with Communication Server 1000 March 2013 71

Overlay commands
72 Presence Services with Communication Server 1000 March 2013Comments? [email protected]


