38
Use, Care, and Installation Guide www.zephyronline.com PRW24F01AG Presrv Wine Cooler AUG19.0301 © Zephyr Ventilation LLC.

Use
, Car
e, a
nd In
stal
latio
n G
uide
www.zephyronline.com
PRW24F01AGPresrv Wine Cooler
AUG19.0301 © Zephyr Ventilation LLC.

ii
Important Safety Informa on Improper handling can cause serious damage to the Zephyr wine cooler and/or injury to the user. This wine cooler is designed for dome c indoor use only. Do not use the unit for industrial or commercial use. Any other use may invalidate the warranty. Please review the ra ng label located on the rear panel of the unit for electrical and other technical data related to this unit. The unit must be used in a properly grounded wall outlet. Please read and follow the safety inform n listed below to reduce the risk of electric or injury.
ELECTRICAL SAFETY
Do not exceed the power outlet ra ngs. It is recommended the wine cooler be connected on its own circuit. The unit must be installed in accordance with state and local electrical codes. A standard electrical supply (115 V, 60Hz), that is properly grounded in accordance with the N Electrical Code and local codes and ordinances is required. Use outlets that cannot be turned by a switch or pull chain. Always turn the unit and unplug it from the outlet when cleaning. Unplug the unit if it is not going to be used for an extended period of me. Do not operate the unit with a power plug missing the ground plug, a damaged cord, or a loose socket. Be sure the wine cooler is properly grounded. Never plug or unplug the unit with wet hands. Do not bypass, cut, or remove the grounding plug. Do not use extension cords or power strips with this unit. You may need to contact your electrician if it is necessary to use a longer cord or if you do not have a grounded outlet. Do not modify the power cord’s length or share the outlet with other appliances. Do not start or stop the unit by switching the circuit’s power on and If the power cord is damaged, it must be replaced by the manufacturer or a quali ed technician. Never repair the unit while it is plugged in. Immediately unplug the unit if it makes strange sounds, emits smells, or smoke comes out of it, and contact customer service. Do not remove any part of the casing unless instructed to do so by an authorized technician. You should never to repair the unit yourself. Contact customer service for service if the unit needs service.

iii
GENERAL SAFETY
To prevent back and other types of injuries, use at least two people to move and install the wine cooler. This appliance is not intended for use by persons, including children, with reduced physical, sensory, or mental
es, unless they have been given supervision or instr concerning the use of the appliance by the person(s) responsible for their safety. Install the wine cooler in a well ve ed area where the ambient temperature is above 50° F and below 90° F. The temperature range for this cooler is op mized for wine storage. Perishable food items may require a di erent storage environment. Do not place hot or warm items into the wine cooler before they cool down to room temperature. This unit is designed to be installed indoors, and protected from rain, sleet, snow, and / or moisture. Never allow children to crawl inside the wine cooler. If you are disposing of the unit, remove the door. Do not use this appliance near mmable gas or com es, such as gasoline, benzene, thinner, etc. Do not place the unit near heat sources such as ovens, grills, or direct sunlight. Only use in an upright on a at, level surface and provide proper ve Do not pinch or kink the power supply line between the unit and cabinet. Do not place any other appliances on top of the unit. Do not turn the unit upside down, on its side, or at an angle level. If your model of wine cooler is equipped with a lock, take care to keep the keys away from children. Do not move the unit without removing the contents and securing the door in a closed
Note: Flammable Refrigerant Used! When handling, moving, and using the cooler, make sure to avoid either damaging the refrigerant tubing, or increasing the risk of a leak.
WARNING: This product may contain chemicals known to the State of California to cause cancer, birth Prop. 65 Warning for California Residents

iv
Table of Contents Important Safety Informa ………………………………………………………………………………………………………………………………………. ii
Table of Contents…………………………………………………………………………………………………………………………………………………………. iv
First Time Instruc .v
Introduc n…………………………………………………………………………………………………………………………………………………………………. 1
Parts Iden n & Dimensions………………………………………………………………………………………………………………………………. 2 - 3
Installing Your Wine Cooler……….............…………………………………………………………………………………………………………………… 3 - 5
Installing Your Door Handle and Shelves…………….……………………………………………………………………………………………………. 5 - 6
Oper on…………………………………………………………………………………………………………………………………………………………………….. 8 - 9
Internal Light……………………………………………………………………………………………………………………………………………………………….. 9
Defr ng……………………………………………………………………………………………………………………………………………………………………. 10
Normal Sounds…………………………………………………………………………………………………………………………………………………………….. 10
Cleaning and Maintenance…………………………………………………………………………………………………………………………………………… 10
Preparing Your Wine Cooler for Storage………………………........………………………………………………………………………………....... 11
Reversing Door Handle Placement 7
Troubleshoo ng…………………………………………………………………………………………………………………………………………………………… 11 - 12
Spe c ns……………………………………………………………………………………………………………………………………………………………….. 13
Zephyr Product Warranty………………………………………………………………………………………………………………………………………….... 14
6
v
First Time Oper ruc Before use, make sure all packaging labels and materials are removed from the unit. Be sure to keep track of all included parts and pieces before discarding packaging materials. It is advised that you keep the original box and packaging materials in case you need to move or ship the appliance in the future.
Allow the unit to stand for at least 24 hours before you use it; this allows the cooling components to from transit. The instruc on manual should be read before use.
This owner’s manual is provided for reference use only. may change without prior Refer to the product label on the back of your wine cooler for the latest technical

Thank you for purchasing your Zephyr wine cooler. Zephyr is dedicated to developing products that will enhance your lifestyle with superior quality and features. Please visit www.zephyronline.com for more on your product and other Zephyr products.
This manual contains important regarding the proper use and maintenance of your wine cooler. Following this manual will ensure that your product will work at its peak performance and e ciency.
Please save the original product packaging in case you need to safely transport your wine cooler.
For Your Records:
Please write down the model number and serial number below for future reference. Both numbers are located on the label on the back of your unit and are needed to obtain warranty service. You may also want to staple your receipt to this manual as it is the proof of your purchase and is also needed for service under your warranty.
Model Number:
Serial Number:
Date of Purchase:
To be er serve please do the following before customer service:
If you received a damaged immediately contact the retailer or dealer that sold you the
product.
Read and follow this manual carefully to help you use and maintain your wine refrigerator.
Read the tro of this manual as it will help you diagnose and solve common
issues.
Visit us on the web at to download product and up-to-date
If you need warranty our friendly customer service represe es are available via email at [email protected] or by telephone at 888-880-8368.
2
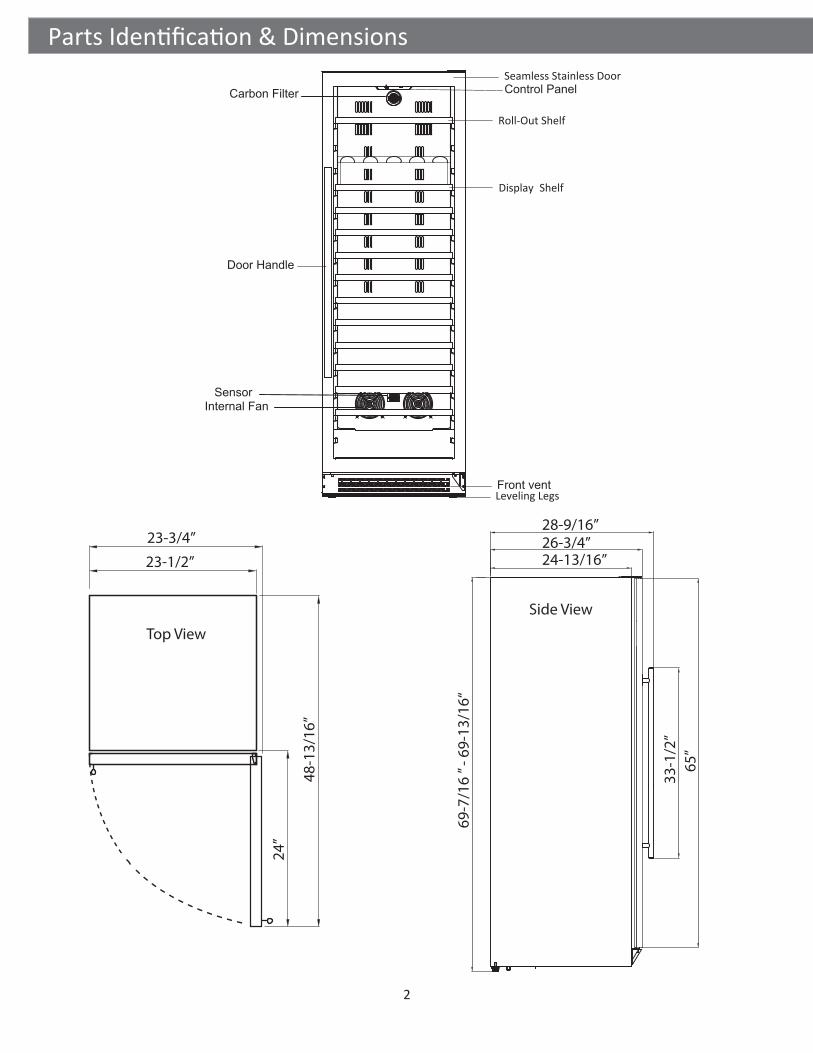
Parts
28-9/16”26-3/4”24-13/16”
69-7
/16
” - 6
9-13
/16“
33-1
/2”
65”
23-3/4”
23-1/2”
48-1
3/16
”
24”
Top View
Side View
Front vent
Carbon Filter
Internal FanSensor
Door Handle
Control Panel

3
Carbon Filter A built-in carbon er protects your beverages by ac as a natural barrier against harmful odors.
Internal Fan This is an air-cooled unit equipped with an internal fan that maintains a consistent internal temperature.
Installing Your Wine Cooler
The wine cooler should be installed in accordance with local electrical code requirements. It should also be placed in a that is strong enough to support its total weight, keeping in mind that it will weigh more when fully loaded than when empty. Before you plug the wine cooler into a power supply, be sure to let it stand upright for at least 24 hours to allow the compressor’s oils to se e.
Note: The carbon er should be replaced every 3-6 months depending on the unit’s exposure level to odor. If the unit is placed in a kitchen, regular replacement every three (3) months is ideal.
Tip: Gather the model and serial number from the product label and write them down before installing the wine cooler.
Warning: Use two or more people to move and install the wine cooler. Failure to do so can result in back or other injury. Carefully remove the packaging materials. Remove any shipping tape and glue from your wine cooler before using. Do not use sharp instruments, rubbing alcohol, e or abrasive cleaners to remove tape or glue. These products can damage the surface of your wine cooler.
Important: Do not remove any safety, warning, or product infor labels from your wine cooler.
Carbon Filter Replacement Part #: Z0F-C004

4
TYPES OF INSTALLATION: This wine cooler has been designed for free-standing or built-in In every case, there must be adequate and access for service Free-standing
A free-standing will allow you to install the wine cooler in almost any place you desire You must follow the stated instruc s for electrical requirements and leveling the wine
Built-in
A recessed installa on will allow you to install the wine cooler in a kitchen cabinet provided the clearance space requirements around the wine cooler are It is necessary to allow adequate ven a on space around the unit (make sure there is at least some
room for the back of the The following items must be observed: 1 Place the wine cooler in front of the 2 Adjust the feet and place the unit on the or on a pl depending on your
requiremen 3 If the electrical outlet for the wine cooler is behind the cabinet, plug in the 4 Push the wine cooler into
Installa on Clearance Requirements: When installing the wine cooler follow the recommended spacing dimensions shown
To ensure proper service access and ve allow between 1 - 2 inches of clearance at the back as shown in the The installa on should allow the unit to be pulled forward for servicing, if necessary A standard electrical supply (115 VAC only, 60 Hz), properly grounded in accordance with Na Electrical Code and local codes and ordinances, is requi
Warning: DO NOT install the wine cooler behind a closed cabinet doo
Important: Once you are ready to install the unit in a cabinet or directly on the oor, you must adjust the feet to level the wine
Wal
l
2-1/4”Min.
A
1”- 2”

5
LEVELING: The wine cooler should be installed on a rm and level surface that will be able to support the e e weight of a fully loaded unit. It is important for the wine cooler to be leveled in order to work properly. It can be raised or lowered by rota the sheaths around each of the feet on the
of the machine. If you that the surface is not level, rotate the feet the wine cooler becomes level. You may need to make several adjustments to level it. We recommend using a carpenter’s level to check the machine. Turn the leveling feet to the right to lower that side of the cooler. Turn the leveling feet to the le to raise that side of the cooler.
RECOMMENDED GROUNDING METHOD: For your personal safety, this appliance must be grounded. It is equipped with a power supply cord having a 3-prong grounding plug. To minimize possible shock hazard, the cord must be plugged into a ma 3-pronged wall socket, and grounded in accordance with the N Electrical Code and local codes and ordinances. If a ma wall socket is not available, it is the personal responsibility of the customer to have a properly grounded, 3-prong wall receptacle installed by a quali ed electrician.
Before you move your wine cooler into its it is important to make sure you have the proper electrical A standard electrical supply (115 V, 60Hz), properly grounded in accordance with the N Electrical Code and local codes and ordinances, is required. It is recommended that a separate circuit, serving only your wine cooler, be provided. Use receptacles that cannot be turned by a switch or pull chain. The fuse (or circuit breaker) size should be 15 Amps.
Installing Your Door Handle and Shelves
INSTALLING THE DOOR HANDLE: 1. Open the door and carefully pull the door gasket around the area where the handle is to be installed. 2. Insert each Phillips head screw through the gasket side of the door un l the screw passes through the
door. 3. Align the handle with the screws and ghten using a Phillips head screwdriver the handle is
against the door frame. Do not over- ghten the screws as this may cause damage to the handle or to the stainless steel
door. 4. Carefully press the door gasket into its original
Electrical Shock Hazard!
� Plug into a grounded 3-prong outlet. � Never remove the grounding prong from the plug. � Never use an adapter to bypass the grounding prong. � DO NOT use an extension cord. � Failure to follow these instr can result in re, electrical shock, or personal injury.

6
REMOVING THE SHELVES: 1. Open the door completely. 2. Remove all of the contents loaded on the shelf, if applicable. 3. Pull the shelf towards yourself it is fully extended outward. 4. The shelf has posts on both sides as indicated in the diagram below. While facing the unit, press
the post on the right side down while pulling up on the le plas c post. You may choose to do this by hand or by using a ead screwdriver.
5. Evenly pull out the shelf from the track it is completely removed from the inner compartment.
Tip: To prevent damaging the door gasket, make sure to open the door fully before pulling the shelves out of their tracks.
Note: The cooler may experience decreased cooling e ciency if air is restricted due to a fully loaded cabinet.
Note:
INSTALLING ANTI-TIP BRACKET:
2. 1.
3.
8”

7
Reversing Door Handle Placement
REVERSING THE DOOR:
WARNING: Disconnect power before removing doors.
Note:
7
7
4
3
2
3
2
1
1
4 5 6
8
2
5
1. Open the door and using a Phillips screwdriver, remove the bottom screws from the lower hinge.2. Remove the door and place it in a safe place.3. Remove the door axix and bushing from the lower right hinge.4. Remove 3 screws from the lower right hinge. Place the lower right hinge in a safe plate in case you need to reverse the door in the future. Remove the decorative screws from the lower left hinge corner. Install the lower left hinge. Insert the decorative screws into the lower right corner.5. Remove the screws from the upper right hinge. Place the upper right hinge in a safe place in case you need to reverse the door in the future. Remove teh plastic caps from the upper left hinge corner. Install the upper left hinge by fastening the screws through the left hinge to the cabinet. Insert the plastic caps to the upper right hinge.6. Unscrew 2 screws at the bottom of the door and remove the Reed Switch, then install the Reed Switch at the top of the door frame. 7. Install the door axis and busing on the lower left hinge.8. Carefully insert the door into the upper left hinge, then slide the door on top of the lower hinge and secure the door by installing the lower screws.

8
INSTALLATION CHECK-LIST BEFORE OPERATION: 1. Have all pac ria e e r
re e ? 2. Ha s e l i c e c e rici y? 3. H ee e r ri a ? 4. Ha vele 5. Is re r e a e per r e 0° 0° F all year
6. Is e a cleara ce ” ea
USING YOUR CONTROL PANEL:
s per r 65° F.
Power Bu r e p
T ture s rea re 65° F
e .
Tempe ure s ecre e re 40° F
e e e .
terior Light Pres cycle e i r al li s. T ere are se : A Cl
Deep Ope cl c eck i l li er e i e r cl
e l a y a c e a “I l e e e r e ail.
Pres

9
Warning: Allow at least 24 hours for your wine cooler to run before storing your beverages and to allow the temperature to acclimate. Whether your wine cooler can reach the actual set temperature depends on the ambient environmental condi ons.
Internal Light
This cooler is equipped with side internal lights that can be set to Amber, Cloud White or Deep Blue color. Because the unit comes with a glass door, the inside will be seen whether the door is open or closed. You can choose to display each color of light in two ent modes: Display Display Mode
The internal lights will stay constantly illuminated whether the door is open or closed. Auto Mode
The internal lights will illuminate eac the door is opened and fade e door is closed. This feature is triggered by a sensor located on the front vent. This sensor allows the cooler to recognize when the door is open or closed. To change to between Display e, press and hold Light b for 3 seconds.
Note: Pressing and holding the increase and decrease temperature o e will switch the temperature display from °F to °C.
Tip: If you powered the unit o e wait at lea ve (5) minutes before powering it back on.
Note: We run test every unit that we produce in our factory. Because of this, your model may default to any of the abov the box. Simply cycle through the progression of se u ou reach your desired light .
Tip: Close the door to determine if the light is currently in Display Mode o c Mode. In Display Mode the lights will remain on, once the door is closed.
Note: closed.
Note: is restored.
Note:
If the interior temperature is higher than 73°F (23°C), “HI” is shown on the display panel and the
high, and you should look for the reason. If the inner temperature is lower than 32°F (0°C), “LO” is

10
Note that most the will efrost most ambie
However o er se some frost ma the more the ambie the more frost ma Keep the r e as mu h as possible avoi
the r e e to frost - If frost is the r from los proper ma ee to power the o the frost Use a so absorbe towel to the
Normal
Your ew ma make s s that are t familiar to Most of the ew s s are Har surfa s like the r or walls make the s s seem the are The
e the k s of that be ew to what ma be the ma me from the w of the refri or the water
Items o top of the also make The ma make a pulsa or hi h- e s The er will to e a i ter al temperature ro Water r from the evaporator to the water ma make a As ea h le ma hear a sou to the refri er our
You ma hear air for over the the o e er
e
proper will e ie top life
INTERIOR CLEANING: 1 power to the 2 Ope the remove the 3 Wait the 4 With a wipe the erior of the 5 Re ert the shelves 6 Re e power to the
EXTERIOR CLEANING: The r et ma be le e with a et lukewarm water solu as two (2)
of a to e (1) quart of water Do use solve t or abrasive lea ers Use a so sp with water Wipe with a so towel to preve water spo If the r
el is stee it olor whe expose to Clea steel with a ampe e with a warm water solu Never use abrasive or le
Never empt to remove frost with a sharp

11
Preparing Your Wine Cooler for Storage
If the wine cooler will not be used for a long me, or is to be moved to another place, it will be necessary to defrost the unit and dry the interior. 1. Disconnect the cooler from the power supply by removing the power plug from the wall socket. 2. Leave the door open to allow for air circula and to prevent mold, mildew, and unpleasant smells. 3. Once the interior is dry and clean the unit will be ready for storage.
ISSUE POSSIBLE CAUSE SOLUTION The wine cooler turns on and o frequently.
The room temperature is higher than the recommended ambient environment.
Run the cooler at the appropriate ambient temperature.
The door is being opened
Minimize the number of mes the door is opened.
The door is not completely closed. Make sure the door is completely closed.
The door gasket is not sealing properly.
Make sure the door gasket is properly sealed.
The cooler does not have the suggested
Read and follow the Clearance Requirements”
The wine cooler does not turn on.
There is a power failure.
Ensure the cooler is plugged in and the outlet has power.
The cooler is not plugged in.
Plug the unit in to a power outlet that has ent amperage.
A house fuse has blown or the circuit breaker is tripped.
Replace the broken fuse in your fuse box or reset the breaker.
Important: Do NOT touch the power plug when your hands are wet. NEVER unplug the unit by pulling the plug.
Store the unit out of the reach of children. If you have children, you may want to take such as removing the door to prevent a child from being trapped inside the cooler.
Sabbath mode is disabled.Sabbath mode may be enabled.

12
ISSUE POSSIBLE CAUSE SOLUTION The wine cooler will not reach the desired temperature.
The cooler is placed too
close to a heat source. Keep the cooler away from direct sunlight or other heat sources.
The cooler does not have
Read and follow the Clearance Requirements”
The door is opened too frequently or for long periods of me.
Close the door and do not open the door too frequently or for long periods of me.
The wine cooler is making strange noises.
Certain sounds are normal
Read the “Normal Sounds”
The unit is not level or is touching another appliance.
Check to make sure the cooler is level and that it is not in contact with another appliance or furniture.
The body of the wine cooler is electr ed.
The unit is not properly grounded. Contact your local electrician to test your electrical grounding system.
Frost is forming in the wine cooler.
The environment is humid. Through the unit uses an “auto-defrost” system, under certain
manual defros ng may be required. If frost builds up, you can try running the cooler on a warmer temperature minimizing the number of mes you open the door, or unplugging the unit to allow the frost to melt.
The ambient temperature is too low. The door is being opened too frequently.
The door will not shut properly. The cooler is not level.
Make sure the cooler is on a level surface.
The door gasket is dirty. Clean the door gasket. The door gasket is not installed correctly.
Make sure the door gasket is properly installed.
The shelves are incorrectly installed.
Install the shelves correctly.
13
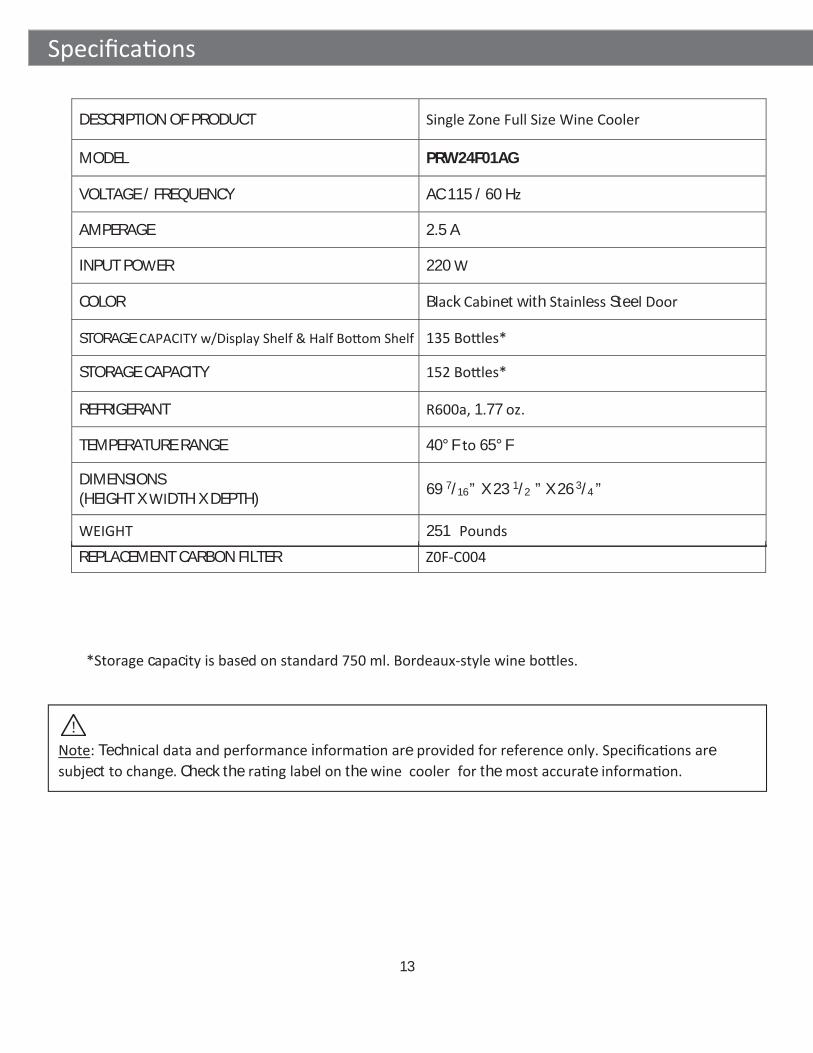
DESCRIPTION OF PRODUCT
MODEL PRW24F01AG
VOLTAGE / FREQUENCY AC 115 / 60 H
AMPERAGE 2.5 A
INPUT PO ER 220
COLOR B k et with e Stee
STORAGE
REFRIGERANT 1.77 .
TEMPERATURE RANGE 40° F 65° F
DIMENSIONS (HEIGHT X DTH X DEPTH) 69 7/16” X 23 1/2 ” X 26 3/4 ”
251 c c e
Tech i e e ect e. Check the e the the te
REPLACEMENT CARBON FILTER
STORAGE CAPACITY

Limited Warranty
Five Year Limited Warranty for Compressor: For five years from the date of your original purchase of the Products, we will provide, free of charge, compressor parts to replace those that failed due to manufactur-ing defects subject to the exclusions and limitations below. We may choose, in our sole discretion, to repair or replace parts before we elect to replace the Products.
Two Year Limited Warranty for Parts: For two years from the date of your original purchase of the Products, we will provide, free of charge, Products or parts (including LED light bulbs, if applicable) to replace those that failed due to manufacturing defects subject to the exclusions and limitations below. We may choose, in our sole discretion, to repair or replace parts before we elect to replace the Products.
One Year Limited Warranty for Labor: For one year from the date of your original purchase of the Prod-ucts, we will provide, free of charge, the labor cost associated with repairing the Products or parts to replace those that failed due to manufacturing defects subject to the exclusions and limitations below. After the first year from the date of your original purchase, you are responsible for all labor costs associated with this warranty.
To Obtain Service Under Limited Warranty: To qualify for warranty service, you must: (a) notify us at the address or telephone number stated below within 60 days of the discovery of the defect; (b) give the model number and serial number; and (c) describe the nature of any defect in the Product or part. At the time of the request for warranty service, you must present evidence of your proof of purchase and proof of the original purchase date. If we determine that the warranty exclusions listed above apply or if you fail to provide the necessary documentation to obtain service, you will be responsible for all shipping, travel, labor and other costs related to the services. This warranty is not extended or restarted upon warranty repair or replacements.
Zephyr Ventilation, LLC (referred to herein as “we” or “us”) warrants to the original consumer purchaser (referred to herein as “you” or “your”) of Zephyr products (the “Products”) that such Products will be free from defects in materials or workmanship as follows:
Warranty Exclusions: This warranty covers only repair or replacement, at our option, of defective Products or parts and does not cover any other costs related to the Products including but not limited to: (a) normal maintenance and service required for the Products and consumable parts such as filters, light bulbs, fuses; (b) any Products or parts which have been subject to freight damage, misuse, negligence, accident, faulty installation or installation contrary to recommended installation instructions, improper maintenance or repair (other than by us); (c) commercial or government use of the Products or use otherwise inconsistent with its intended purpose; (d) natural wear of the finish of the Products or wear caused by improper maintenance, use of corrosive and abrasive cleaning products, pads, and oven cleaner products; (e) chips, dents or cracks caused by abuse or misuse of the Products; (f) service trips to your home to teach you how to use the Products; (g) damage to the Products caused by accident, fire, floods, acts of God; or (h) Custom installations or alterations that impact serviceability of the Products. (I) Damage to personal property or food spoilage from use of this product. If you are outside our service area, additional charges may apply for shipping costs for warranty repair at our designated service locations and for the travel cost to have a service technician come to your home to repair, remove or reinstall the Products. After the first year from the date of your original purchase, you are also responsible for all labor costs associated with this warranty. All Products must be installed by a qualified professional installer to be eligible for warranty repairs or service.Limitations of Warranty: OUR OBLIGATION TO REPAIR OR REPLACE, AT OUR OPTION, SHALL BE YOUR SOLE AND EXCLUSIVE REMEDY UNDER THIS WARRANTY. WE SHALL NOT BE LIABLE FOR INCIDENTAL, CONSEQUENTIAL OR SPECIAL DAMAGES ARISING OUT OF OR IN CONNECTION WITH THE USE OR PERFORMANCE OF THE PRODUCTS. THE EXPRESS WARRANTIES IN THE PRECEDING SECTION ARE EXCLUSIVE AND IN LIEU OF ALL OTHER EXPRESS WARRANTIES. WE HEREBY DISCLAIM AND EXCLUDE ALL OTHER EXPRESS WARRANTIES FOR THE PRODUCTS, AND DISCLAIM AND EXCLUDE ALL WARRANTIES IMPLIED BY LAW, INCLUDING THOSE OF MERCHANTABILITY AND FITNESS FOR A PARTICULAR PURPOSE. Some states or provinces do not allow limitations on the duration of an implied warranty or the exclusion or limitation of incidental or consequential damages, so the above limitations or exclusions may not apply to you. To the extent that applicable law prohibits the exclusion of implied warranties, the duration of any applicable implied warranty is limited to the same two-year and one-year periods described above if permitted by applicable law. Any oral or written descrip-tion of the Products is for the sole purpose of identifying the Products and shall not be construed as an express warranty. Prior to using, implementing or permitting use of the Products, you shall determine the suitability of the Products for the intended use, and you shall assume all risk and liability whatsoever in connection with such determination. We reserve the right to use functionally equivalent refurbished or reconditioned parts or Products as warranty replacements or as part of warranty service. This warranty is not transferable from the original purchaser and only applies to the consumer residence where the Product was originally installed located in the United States and Canada. This warranty is not extended to resellers.
Please check our website for any additional Product information, www.zephyronline.com.
Zephyr Ventilation Service Department, 2277 Harbor Bay Parkway, Alameda, CA 94502 1-888-880-8368
JAN18.0101

Gui
de d
’util
isat
ion,
d’e
ntre
tien
et d
’inst
alla
tion
www.zephyronline.com
PRW24F01AGRefroidisseur de vin Preserv
AUG19.0301 © Zephyr Ventilation LLC.

ii
Renseignements de sécurité importants
SÉCURITÉ ÉLECTRIQUE

iii
SÉCURITÉ GÉNÉRALE
Note
Proposition 65 à l’intention des résidents de la Californie

iv
ii
iv
v
Int uc n……………………………………………………………………………………………………………………………………………… …………… 1
2 - 3
3 - 5
5 - 6
……………………………………………………………………………………………………………………………………………… 8 - 9
9
…………………………………………………………………………………………………………………………………………………………… 10
10
10
11
…………………………………………………………………………………………………………………… 7
……… ……………………………………………………………………………………………………………………………………… 11 - 12
…………………………………………………………………………………………………………………………………………………… 13
14
6

v
Avant d’utiliser pour la première fois l’appareil, assurez-vous d’enlever l’emballage et les étiquettes. Assurez-vous d’avoir en votre possession toutes les pièces incluses avant de jeter le matériel d’emballage. Nous vous recommandons de conserver la boîte et le matériel d’emballage pour tout futur déplacement ou expédition de l’appareil.
Laissez reposer l’appareil au moins 24 heures avant de l’utiliser pour permettre aux composantes du système de refroidissement de se stabiliser. Veuillez lire le manuel d’instruction dans son intégralité avant d’utiliser l’appareil.
Le manuel du propriétaire n’est fourni qu’à des fins de référence. Les spécifications de l’appareil peuvent changer sans préavis. Consultez l’étiquette du produit, situé à l’arrière du refroidisseur de boissons, pour connaître les plus récentes données techniques.

Merci de vous être procuré un refroidisseur de boissons Zephyr. Zephyr se spécialise dans l’élaboration de produits de qualité supérieure dotés de fonctionnalités distinctives qui améliorent votre style de vie. Veuillez visiter www.zephyronline.com pour obtenir de plus amples renseignements sur votre appareil et d’autres produits Zephyr.
Ce manuel contient des renseignements importants relatifs à l’installation, à l’utilisation et à l’entretien adéquats de votre refroidisseur de boissons. Suivez les instructions de ce manuel pour maximiser le rendement et l’efficacité de votre appareil.
Veuillez conserver l’emballage original de l’appareil pour faciliter le transport éventuel de votre refroidis-seur de boissons.
Pour vos dossiers :Veuillez prendre note du numéro de modèle et du numéro de référence de votre appareil ci-dessous en vue de consultations ultérieures. Ces deux numéros, nécessaires pour obtenir les services d’entretien et de réparation couverts par la garantie, se trouvent sur la plaque signalétique située à l’arrière de l’appareil. Vous pouvez également agrafer votre reçu au manuel, puisqu’il s’agit de la preuve d’achat dont vous aurez aussi besoin pour obtenir du service pendant la période de garantie.
Numéro de modèle : Numéro de série : Date d’achat :
Pour que nous puissions vous offrir un service optimal, veuillez suivre les instructions suivantes lorsque vous communiquez avec le service à la clientèle de Zephyr :
détaillant qui vous a vendu le produit.
votre refroidisseur de boissons, et en effectuer l’entretien.
fréquents.
produits, des ressources de dépannage supplémentaires et des informations actualisées.
représentants du service à la clientèle par courriel à [email protected] ou au téléphone au 888-880-8368.

2
Parts
28-9/16”26-3/4”24-13/16”
69-7
/16
” - 6
9-13
/16“
33-1
/2”
65”
23-3/4”
23-1/2”
48-1
3/16
”
24”
Vue en plan
Vue de côté
Évent avant
Filtre à charbon
Ventilateur interneCapteur
Poignée de porte
Tableaux de commande

3
Filtre à charbon
Note : Vous devriez remplacer le filtre à charbon tous les trois à six mois, selon le niveau d’exposi-tion de votre appareil aux mauvaises odeurs. Si vous installez l’appareil dans une cuisine, il est idéal de remplacer le filtre tous les trois mois.No de pièce du filtre à charbon de remplacement : Z0F-C004
Astuce : Prenez note du numéro de modèle et du numéro de série se trouvant sur l’étiquette avant d’installer le refroidisseur de boissons.
Le refroidisseur de boissons doit être installé en conformité avec les exigences du code de l’électricité local. Il doit également être installé à un endroit qui est assez solide pour soutenir son poids tout en gardant à l’esprit que l’appareil est beaucoup plus lourd lorsqu’il est plein que lorsqu’il est vide.Avant de brancher le refroidisseur de boissons à l’alimentation électrique, assurez-vous de le laisser repos-er dans une position verticale pendant au moins 24 heures pour permettre à l’huile du compresseur de se stabiliser.
Avertissement : Deux personnes ou plus sont requises pour déplacer et installer le refroidisseur de boissons. Le non-respect de cette recommandation peut entraîner une blessure au dos ou d’autres blessures. Enlevez délicatement le matériel d’emballage. Retirez le ruban et la colle du matériel d’emballage de votre refroidisseur de boissons avant de l’utiliser. N’utilisez pas d’instruments coupants, d’alcool à friction, de liquides inflammables ou de produits nettoyants abrasifs pour enlever les rubans et la colle. Ces produits peuvent endommager la superficie de votre refroidisseur de boissons.Important : N’enlevez aucune étiquette comprenant des consignes de sécurité, des avertissements ou des renseignements sur le produit.

4
TYPES D’INSTALLATION :
mur
2-1/4”Min.
1”- 2”
Ce refroidisseur de boissons a été conçu pour une installation autonome ou encastrée. Dans tous les cas, l’appareil doit se trouver dans un endroit adéquatement aéré et facile d’accès pour des travaux d’entretien.
Installation autonomeLes instructions d’installation autonome vous permettent de placer le refroidisseur de boissons presque n’importe où. Vous devez suivre les exigences électriques et les instructions relatives au nivelage du refroidisseur de boissons.
Installation encastréeLes instructions d’installation encastrée vous permettent de placer le refroidisseur de boissons sous un comptoir ou dans une armoire de cuisine. Assurez-vous de respecter les exigences relatives à l’espace libre requis autour de l’appareil. Un espace de ventilation adéquat est nécessaire autour de l’appareil (assurez-vous qu’il y a au moins de l’espace à l’arrière de l’appareil). Vous devez également suivre les règles suivantes :1. Placez le refroidisseur de boissons face au lieu d’installation.2. Ajustez les pattes et placez l’appareil de niveau sur le plancher ou sur une plate-forme, selon les exigences d’installation.3. Si la prise de courant où vous comptez brancher le refroidisseur de boissons se trouve derrière l’armoire, branchez l’appareil.4. Poussez le refroidisseur de boissons dans sa position définitive.
Avertissement : N’installez PAS le refroidisseur de boissons derrière une porte d’armoire close.
Lors de l’installation du refroidisseur de boissons sous un comptoir, veuillez respecter les espaces libres recommandés apparais-sant ci-dessous.
d’un ou deux pouces à l’arrière de l’appareil, comme illustré sur le diagramme.
besoin.
conformité avec le Code national de l’électricité ainsi qu’avec les codes et ordonnances locaux.
Important : Une fois que vous êtes prêt à installer l’appareil dans une armoire ou directement sur le plancher, ajustez les pattes pour niveler le refroidisseur de boissons.

5
NIVELAGE :
MÉTHODE DE MISE À LA TERRE RECOMMANDÉE :
INSTALLATION DE LA POIGNÉE DE LA PORTE :
� � �� �
Le refroidisseur de boissons doit être installé sur une surface ferme et de niveau pouvant supporter le poids d’un appareil rempli au maximum de ses capacités. Il est important de niveler le refroidisseur de boissons pour assurer son bon fonctionnement. Vous pouvez lever ou baisser l’appareil en faisant tourner les gaines autour de chaque patte à la base de l’appareil. Si vous vous rendez compte que la surface n’est pas de niveau, faites tourner les pattes de l’appareil jusqu’à ce qu’il soit nivelé. Il se peut que vous ayez à procéder à plusieurs ajustements pour bien niveler l’appareil. Nous recommandons l’utilisation d’un niveau de menuisier pour vérifier le nivelage de l’appareil. Faites tourner les pattes de nivelage vers la droite pour baisser le côté de l’appareil où elles se trouvent. Faites tourner les pattes de nivelage vers la gauche pour lever le côté de l’appareil où elles se trouvent.
Pour votre sécurité personnelle, cet appareil doit être mis à la terre. Il est muni d’un cordon d’alimentation à trois broches avec mise à la terre. Pour minimiser tout risque de décharge électrique, le câble doit être branché dans une prise de courant triphasée avec mise à la terre, en conformité avec le Code national de l’électricité ainsi qu’avec les codes et ordonnances locaux. Si aucune prise de courant murale adéquate n’est disponible, il est de la responsabilité personnelle du client de faire installer par un électricien qualifié une prise murale triphasée avec mise à la terre.
Avant de placer le refroidisseur de boissons à son emplacement définitif, il est important que vous vous assuriez que la connexion électrique est adéquate. Une alimentation électrique standard (115 V, 60 Hz) est requise avec une mise à la terre adéquate et en conformité avec le Code national de l’électricité ainsi qu’avec les codes et ordonnances locaux. Il est recommandé d’utiliser un circuit dédié servant exclusivement à refroidisseur de boissons. Utilisez des prises qui ne peuvent pas être mises hors tensions par un interrupteur à bascule ou à tirage.Le fusible (ou disjoncteur) doit être de 15 ampères.
1. Ouvrez doucement la porte et enlevez le joint d’étanchéité entourant l’endroit où sera installée la poignée.2. Du côté où se trouve le joint d’étanchéité, insérez les vis cruciformes jusqu’à ce qu’elles transpercent la porte.3. Alignez la poignée aux vis et serrez les vis avec un tournevis cruciforme jusqu’à ce que la poignée s’appuie contre le bâti de la porte. Attention : Pour éviter d’endommager la poignée ou la porte en acier inoxydable, ne serrez pas trop les vis.4. Remettez doucement le joint d’étanchéité de la porte dans sa position originale.

6
RETRAIT DES TABLETTES :1. Ouvrez complètement la porte.2. Enlevez tout ce qui se trouve sur la tablette s’il y a lieu.3. Tirez la tablette vers vous jusqu’à ce qu’elle atteigne la position d’extension maximale.4. La tablette est munie de supports en plastique latéraux, comme indiqué sur le diagramme ci-dessous. Poussez le support en plastique du côté droit vers le bas tout en levant le support en plastique du côté gauche. Vous pouvez utiliser vos doigts ou un tournevis à tête plate.5. Tirez de façon constante la tablette à l’extérieur des rails jusqu’à ce qu’elle sorte complètement du compartiment intérieur.
Astuce : Pour éviter d’endommager le joint d’étanchéité de la porte, assurez-vous d’ouvrir complètement la porte avant de retirer les tablettes de leurs rails.
Note : Le rendement du refroidisseur peut diminuer quelque peu si la circulation d’air est restreinte parce que l’appareil est rempli au maximum de ses capacités.
Note : La capacité des bouteilles de vin diminue à 135 bouteilles avec le présentoir et la demi-étagère inférieure installée.
205 mm
Positionnez le support antibasculement à au moins 205 mm de gauche ou de droite du côté du refroidisseur.
Installez le support antibasculement au sol à l’aide des vis fournies de 50 mm.
Repoussez le refroidisseur dans le support antibasculement en veillant à ce que le support chevauche le bas du refroidisseur.

7
INVERSION DE LA PORTE:
N e:
7
7
4
3
2
3
2
1
1
4 5 6
8
2
5
1. Ouvrez la porte et à l'aide d'un tournevis cruciforme, retirez les vis inférieures de la charnière inférieure.2. Retirez la porte et placez-la dans un endroit sûr.3. Retirez l'axe de la porte et la bague de la charnière inférieure droite.4. Retirez les 3 vis de la charnière inférieure droite. Placez la charnière inférieure droite dans une plaque de sécurité au cas où vous auriez besoin d’inverser la porte ultérieurement. Retirez les vis décoratives du coin inférieur gauche de la charnière. Installez la charnière inférieure gauche. Insérez les vis décoratives dans le coin inférieur droit.5. Retirez les vis de la charnière supérieure droite. Placez la charnière supérieure droite dans un endroit sûr au cas où vous deviez inverser la porte ultérieurement. Retirez les capuchons en plastique du coin supérieur gauche de la charnière. Installez la charnière supérieure gauche en serrant les vis à travers la charnière gauche sur le boîtier. Insérez les capuchons en plastique sur la charnière supérieure droite.6. Dévissez les 2 vis situées au bas de la porte et retirez le Capteur Magnétique, puis installez le Capteur Magnétique au sommet du cadre de la porte.7. Installez l'axe de la porte et le bus sur la charnière inférieure gauche.8. Insérez délicatement la porte dans la charnière supérieure gauche, puis faites-la glisser vers le haut de la charnière inférieure et fixez la porte en installant les vis inférieures.

8
LISTE DE VÉRIFICATION AVANT L’INSTALLATION :
UTILISATION DU TABLEAU DE COMMANDE :
Touche de mise en marche
Mode Shabbath
1. Est-ce que tout le matériel d’emballage et le ruban ont été retirés à l’extérieur et à l’intérieur du refroid isseur de boissons?2. Est-ce que les instructions d’installation ont été suivies, y compris celles relatives au raccordement électrique de l’appareil?3. Est-ce que la mise à la terre du refroidisseur de boissons a été bien effectuée?4. Est-ce que l’appareil a été nivelé?5. Le refroidisseur de boissons se trouve-t-il dans un endroit où la température ambiante varie entre 50 °F et 90 °F à longueur d’année?6. Y a-t-il un espace libre d’au moins un ou deux pouces à l’arrière de l’appareil pour assurer une circula tion d’air adéquate?

9
Éclairage intérieur
Le refroidisseur est équipé de lampes intérieures latérales à trois réglages de couleur : ambré, blanc nuage ou bleu foncé. Puisque l’appareil est vendu avec une porte en verre, l’intérieur est visible, que la porte soit
Mode vitrine
L’intérieur est constamment illuminé, que la porte soit ouverte ou fermée.
L’intérieur s’illumine chaque fois que la porte est ouverte et s’éteint en s’estompant lorsque la porte
refroidisseur de détecter si la porte est ouverte ou fermée.
trois secondes.
Note : Pour faire passer l’affichage de la température de °F à °C, tenez les touches d’augmentation et de réduction de la température enfoncées en même temps.
Astuce : Si vous éteignez l’appareil, attendez au moins cinq minutes avant de le rallumer.
Avertissement : Laissez fonctionner votre refroidisseur de boissons pendant au moins 24 heures avant d’y entreposer vos boissons pour que l’appareil ait le temps d’atteindre la température désirée. La capacité de votre refroidisseur de boissons d’atteindre la température programmée dépend des conditions environnementales ambiantes.
Note : Si une porte est laissée entrouverte pendant trois minutes ou plus, une alarme sonore se fera entendre jusqu’à ce que la porte soit fermée.
Note : Nous testons tous les appareils que nous fabriquons dans notre usine. Pour cette raison, il est possible que votre modèle ait par défaut l’un ou l’autre des réglages lorsque vous l’utilisez pour la première fois. Parcourez simplement les réglages disponibles jusqu’à ce que l’éclairage corresponde à ce que vous désirez.
Astuce : Fermez la porte pour voir si l’éclairage est en mode vitrine ou automatique. En mode vitrine, l’éclairage reste allumé, alors qu’en mode automatique, l’éclairage s’estompe lorsque la porte se referme.
Note: est soudainement perdu, le la température précédemment réglée sera sauvegardée et le réfrigérateur reviendra à ce réglage une fois que est restauré.
Note:

10
Dégivrage
Bruits normaux
NETTOYAGE INTÉRIEUR :
NETTOYAGE EXTÉRIEUR :
Veuillez noter que l’appareil se décongèle automatiquement dans la plupart des conditions ambiantes. Toutefois, dans des environnements plus froids, il est possible que du givre s’accumule. Aussi, plus les condi-tions ambiantes sont humides, plus il est possible que du givre s’accumule. Dans la mesure du possible, gardez la porte fermée et évitez de l’ouvrir inutilement pour minimiser l’accumulation de givre.Si le givre empêche la porte de se refermer adéquatement, il est possible que vous ayez à éteindre l’appareil jusqu’à ce que le givre soit complètement fondu.Utilisez un chiffon absorbant pour sécher l’appareil.
Avertissement : Ne tentez jamais d’enlever le givre avec un objet coupant.
Votre refroidisseur de boissons peut émettre des bruits auxquels vous n’êtes pas habitués. La plupart des bruits sont normaux. Les surfaces dures comme les planchers ou les murs peuvent donner l’impression que les bruits sont plus forts qu’ils le sont en réalité. Veuillez trouver ci-dessous une liste de bruits auxquels vous n’êtes pas habitués ainsi que leur source.
l’intérieur de l’appareil.
émettre des gargouillis.
1. Débranchez l’appareil.2. Ouvrez la porte, puis enlevez le contenu et les tablettes.3. Attendez que l’appareil soit complètement dégivré.4. Avec un chiffon propre, essuyez l’intérieur de l’appareil.5. Réinsérez les tablettes et les boissons.6. Rebranchez l’appareil.
Vous pouvez nettoyer la porte et le bâti avec un détergent doux et une solution contenant deux cuillères à table de bicarbonate de soude pour chaque pinte d’eau tiède. N’utilisez pas de produits nettoyants abrasifs ou à base de solvant. Utilisez une éponge douce et rincez avec de l’eau propre. Essuyez avec un chiffon doux propre pour prévenir les taches d’eau. Si le panneau de la porte est fait d’acier inoxydable, il peut se décolorer lors d’une exposition à du chlore gazeux et à l’humidité. Nettoyez l’acier inoxydable avec un chiffon humide ainsi qu’une solution d’eau chaude et de détergent doux. N’utilisez jamais de produits nettoyants abrasifs ou corrosifs.

11
PROBLÈME CAUSE POTENTIELLE SOLUTION
Si vous ne comptez pas utiliser le refroidisseur de boissons pendant une longue période ou si vous devez le déplacer, vous devez d’abord procéder au dégivrage de l’appareil et en sécher l’intérieur.1. Débranchez le câble d’alimentation électrique du refroidisseur de la prise murale.2. Laissez la porte ouverte pour permettre la circulation de l’air et prévenir la formation de moisissure et de mauvaises odeurs.3. Une fois que l’intérieur est sec et propre, vous pouvez entreposer l’appareil.
Attention : Entreposez l’appareil hors de la portée des enfants. Si vous avez des enfants, vous pouvez prendre une mesure de précaution supplémentaire en enlevant la porte et ainsi éviter que l’un d’eux reste emprisonné dans le refroidisseur.
Important : NE touchez PAS le cordon d’alimentation si vos mains sont mouillées. Ne débranchez JAMAIS l’appareil en tirant sur le cordon.

12
PROBLÈME CAUSE POTENTIELLE SOLUTION Le refroidisseur de boissons

13
DESCRIPTION DU PRODUIT
MODÈLE PRW24F01AG
TENSION/FRÉQUENCE
INTENSITÉ DE COURANT 2,5 A. A
PUISSANCE D’ENTRÉE 220 W
COULEUR
CAPACITÉ D’ENTREPOSAGE
RÉFRIGÉRANT
PLAGE DE TEMPÉRATURES 40 °F à 65 °F
DIMENSIONS(HAUTEUR X LARGEUR X PROFONDEUR)
POIDS 251
FILTRE À CHARBON DE REMPLACEMENT Z0F-C004
Note : Les données techniques et les renseignements sur le rendement ne sont fournis qu’à des fins de référence. Les spécifications sont sujettes à changement. Consultez la plaque signalétique du refroidisseur de vin pour obtenir des renseignements plus précis.

Garantie limitée
Garantie limitée de cinq ans sur le compresseur : Pour une période de cinq ans à partir de la date d’achat originale des produits, nous fournirons sans frais les pièces de remplacement du compresseur qui ont cessé de fonction-ner en raison d’un défaut de fabrication, sous réserve des exclusions et limites énumérées ci-dessous. Nous pouvons choisir, à notre discrétion exclusive, de réparer ou de remplacer les pièces avant de décider de remplacer les produits.
Garantie limitée de deux ans sur les pièces : Pour une période de deux ans à partir de la date d’achat originale des produits, nous fournirons sans frais les produits ou les pièces de remplacement (hormis les ampoules DEL, s’il y a lieu) qui ont cessé de fonctionner en raison d’un défaut de fabrication, sous réserve des exclusions et limites énumérées ci-dessous. Nous pouvons choisir, à notre discrétion exclusive, de réparer ou de remplacer les pièces avant de décider de remplacer les produits.
Garantie limitée d’un an sur la main-d’œuvre : Pour une période d’un an à partir de la date d’achat originale des produits, nous fournirons sans frais la main-d’œuvre requise pour procéder à la réparation des produits ou des pièces qui ont cessé de fonctionner en raison d’un défaut de fabrication, sous réserve des exclusions et limites énumérées ci-dessous. Un an après la date d’achat original, vous êtes responsable de tous les frais de main-d’œuvre associés à la présente garantie.
Pour obtenir du service en vertu de la garantie limitée : Pour être admissible au service de garantie, vous devez (a) nous aviser à l’adresse ou au numéro de téléphone se trouvant ci-dessous dans les soixante jours qui suivent la découverte du défaut; (b) nous fournir le numéro de modèle et le numéro de série; (c) décrire la nature de tout défaut du produit ou de la pièce. Au moment de présenter la demande de service de garantie, vous devez fournir une preuve d’achat ainsi qu’une preuve de la date d’achat originale. Si nous déterminons que l’une ou l’autre des exclusions de garantie énumérées ci-dessus s’applique à votre cas ou si vous ne nous fournissez pas les documents nécessaires pour obtenir du service, vous serez responsable de tous les frais associés à l’expédition, au déplacement et à la main-d’œuvre, ainsi que tous les autres frais liés aux services obtenus. La présente garantie ne se prolonge pas et ne recommence pas lors d’une réparation ou d’un remplacement couvert par la garantie.
Zephyr Ventilation, LLC (appelé aux présentes « nous ») garantit au premier acheteur (appelé aux présentes « vous ») des produits Zephyr (les « produits ») que ces produits sont exempts de défauts de matériau et de fabrication, comme suit :
Exclusions de la garantie : Cette garantie ne couvre que la réparation ou le remplacement, à notre discrétion, des pièces ou produits défectueux. Elle ne couvre aucun autre coût lié aux produits, y compris, sans s’y limiter, ce qui suit : (a) services d’entretien et de réparation normaux requis pour les produits et les pièces non durables, comme des filtres, des ampoules et des fusibles; (b) dommage à un produit ou à une pièce qui a été endommagé lors de l’expédition ou en raison d’un mauvais usage, de négligence, d’un accident, d’une installation fautive ou contraire aux instructions, de travaux d’entretien inadéquats ou d’une réparation inadéquate (autre que par nous); (c) utilisation commerciale ou gouvernementale des produits, utilisation allant à l’encontre de l’usage prévu; (d) usure naturelle du fini ou usure causée par un entretien inadéquat, utilisation de produits nettoyants abrasifs ou corrosifs, de tampons nettoyeurs et de produits à nettoyer les fours; (e) éclats, bosselures ou craquelures causés par une mauvaise utilisation des produits; déplacements à votre domicile pour vous montrer comment utiliser les produits; dommages aux produits causés par un accident, un incendie, une inondation, une catastrophe naturelle; (h) installation personnalisée ou modification ayant une incidence sur l’état de fonctionnement des produits; (i) dommages à des biens personnels ou altération d’aliments en raison de l’utilisation des produits. Si vous vous trouvez à l’extérieur de la région que nous desservons, des coûts supplémentaires pourraient s’appliquer à l’expédition de pièces pour une réparation sous garantie à l’un de nos points de service désignés et au déplacement d’un technicien de service à votre domicile pour réparer, désinstaller ou réinstaller les produits. Un an après la date d’achat original, vous êtes également responsable de tous les frais de main-d’œuvre associés à la présente garantie. Tous les produits doivent être installés par un installateur professionnel qualifié pour pouvoir recevoir des services d’entretien ou de réparation sous garantie.Limites de la garantie : NOTRE OBLIGATION DE RÉPARER OU DE REMPLACER LES PRODUITS, À NOTRE DISCRÉTION, CONSTITUE VOTRE RECOURS UNIQUE ET EXCLUSIF EN VERTU DE LA PRÉSENTE GARANTIE. NOUS NE POURRONS EN AUCUN CAS ÊTRE TENUS RESPONSABLES DE TOUT DOMMAGE INDIRECT, CONSÉCUTIF OU PARTICULIER ATTRIBUABLE OU LIÉ À L’UTILISATION OU AU RENDEMENT DES PRODUITS. LES GARANTIES EXPRESSES DE LA SECTION ANTÉRIEURE SONT EXCLUSIVES ET REMPLACENT TOUTES LES AUTRES GARANTIES EXPRESSES. NOUS REJETONS ET EXCLUONS AUX PRÉSENTES TOUTES LES AUTRES GARANTIES EXPRESSES COUVRANT LES PRODUITS AINSI QUETOUTES LES GARANTIES IMPLICITES EN VERTU DE LA LOI, Y COMPRIS CELLES RELATIVES À LA QUALITÉ MARCHANDE ET À L’ADÉQUATION À UN USAGE PARTICULIER. Dans les états ou provinces ne permettant pas une limite de la durée d’une garantie implicite, ou une exclusion ou limite des dommages indirects ou consécutifs, les limites et exclusions mentionnées ci-dessus ne s’appliquent pas. Dans la mesure où les lois en vigueur interdisent l’exclusion de garanties implicites, la durée de toute garantie implicite pertinente se limite aux mêmes périodes d’un an et de deux ans décrites ci-dessus, si les lois en vigueur le permettent. Toute description orale ou écrite des produits ne sert qu’à identifier les produits et ne peut être considérée comme une garantie expresse. Avant d’utiliser, de mettre en marche ou de permettre l’utilisation des produits, vous devez déterminer la pertinence des produits pour leur usage prévu, et vous devez assumer tous les risques et toutes les responsabilités liés d’une manière ou d’une autre à cette décision. Nous nous réservons le droit d’utiliser des pièces ou produits réparés ou remis en état dont le fonctionnement est équivalent aux pièces originales lorsque nous effectuons un remplacement ou une réparation sous la garantie. Le premier acheteur ne peut transférer cette garantie, qui n’est valide que dans le domicile du consommateur où le produit a été installé à l’origine, aux États-Unis ou au Canada. Cette garantie ne peut être transférée à un revendeur.
Veuillez consulter notre site Web pour obtenir de plus amples renseignements sur nos produits à www.zephyronline.com.
Zephyr Ventilation Service Department, 2277 Harbor Bay Parkway, Alameda, CA 94502 1-888-880-8368
JAN18.0101


