37
PRESSURE TEAM DEFENSE
PRESSURETEAM DEFENSE

DEFENSIVE SYSTEM
Point of Attack Man to Man (FIST)(Contain)
Man to Man“Scramble”(“Thumb up / Thumb down)
ZONE“HEAT”
FULL 4 44
(1 - 2 – 1 – 1)MADE BASKETS or
DEAD BALL
3/4 COURT 3 33
(2 - 2 - 1)MISSED
1 / 2 COURT 2 2 n/a
19'9 1(MAN SWITCH)
1
23(Amoeba ZONE)
“23 HEAT”(2-3 ZONE TRAP)
DIAMOND and 1: 11
TRIANGLE and 2: 12
DEFENSIVE PHILOSOPHY
Our defensive philosophy is based on one main concept; a pressure defensive system geared to “getting the ball stopped, as early as possible, before it penetrates either by dribble or pass”. The number one priority of our pressure defensive system is to apply tremendous pressure on the ball while providing defensive help, both on the ball side and the help side
Our pressure defensive system will consist of four core defenses: (1) man to man, (2) 1-1-3 Amoeba Zone, (3) 1-2-1-1 full court press, (4) 2-2-1 three quarter court press. These defenses will be broken down for you (“PART METHOD”), taught and re-taught, and put back together and re-explained (“WHOLE METHOD”). You will be expected to learn each one of them and their concepts. We as a coaching staff believe that once you have learned them and fully understand the concepts, you will be convinced that they will work and we as a team will be successful. These defenses will be the foundation for which we will apply intense defensive pressure on our opponents.
Everything you will be taught will be geared to our major philosophy of stopping the ball as far out on the floor as we possibly can. We will pressure baseline to baseline with the goal of getting our opponents to stop its dribble in the backcourt.
The following defensive concepts will be used in all three of our core defenses. However, they will make-up our man-to-man defense, which will serve as the foundation for which the 1-1-3, 1-2-1-1 and the 2-2-1 core defenses are built. For us to play intense pressure defense, whether full-court, ¾ court or ½ court, we must be able to effectively defend man to man. Without these man-to-man concepts, we won’t be able to play the type of intense pressure defense that we need to make us successful.
WOLVERINE DEFENSE
MAN-TO MAN CONCEPTS
Remember, everything is geared to getting the ball stopped as early as possible. To accomplish this we will use the following concepts:
ANTICIPATION: is the frame of mind that we want you to have. We don’t want you to react on defense (or to the defense), but we MUST anticipate. In fact we want you to have a gambling, reckless abandonment as your attitude. We don’t want you thinking reaction, but domination, control, attack. We want you to control everything that the offensive player does from where they pick up the dribble to where they even dribble the ball.
CONVERTING: is the way we will get back on defense. You will be expected to sprint back as quickly as possible once we lose possession of the ball. I’m talking about an ALL OUT SPRINT WITHOUT HESITATION!!! The one time you will immediately be taken out of the game is when we feel you are loafing back on defense. Converting is absolutely critical because it’s impossible for us to play pressure defense if we are in a retreating posture. We believe playing against five set defensive players is extremely difficult; we want you to sprint back, set up, and ATTACK THE OFFENSE!!
PURSUE: when CONVERTING back on defense we will continue to follow the ball (on a dead sprint and trap. This is a perfect time to trap because the defense, once they beat the defense, will relax (unless they are in an attacking mode – if they are they are falling right into OUR tempo. A quick hot is as good as a steal.)/
BALL PRESSURE: this is probably the most important individual concept that you will be taught. It is paramount that you put intense and constant pressure on the basketball, especially in the backcourt. If you don’t apply intense and constant ball pressure, then the rest of what we do will not be very successful. All defensive players, including the post, will be expected to apply intense ball pressure, even when on the perimeter. We want all defensive players playing on the basketball to take away the outside shot, the free look inside, and dribble penetration back to the middle, in fact the only thing the offense can do is put the ball on the floor to the outside. We simply want to give them one thing to do and that’s to dribble the ball to the outside of the floor. However, that becomes difficult if the ball stays in the middle of the floor. The man with the ball must be made to dribble to one side of the court.
WOLVERINE DEFENSE CONT…
MAN-TO MAN CONCEPTS CONT…
EARLY HELP: deals with players who are helping the person who is guarding the ball. Those players who are playing off the ball defense, both on the ball side and the help side of the floor must be ready to HELP if we are going to be successful at applying this kind of intense and constant ball pressure. It is critical that when you are guarding an offensive player without the basketball you be aware of how important your help is. The earlier you help the better. You can never help to early. Your help MUST be there and it must be there EARLY. You will be taught when pressuring the ball to steer the ball to the outside where your help will be – AGAIN, early help. It’s extremely important that we fill the gap between the ball and next offensive player to the outside with a defensive player. The player helping will be positioned in such a way that when the ball is forced into the gap that the help is there. Early help is not a suggestion but a requirement.
NO BALL REVERSAL: We want you to get the ball to one side of the floor and keep it there. That will make our defense much quicker and stronger because we will end up with five defensive players ready to defend, usually against three, or at the most, four offensive players. If we allow the offense to swing the ball from side to side without a very intense struggle, it’s going to breakdown our defensive positioning and take away our ball side toughness.
DEAD FRONT: we will simply dead front all post players for two reasons: (1) To keep the ball out of the post and (2) To put the post in a helping position - remember all on ball defenders are turning the ball to the outside. When we say “DEAD FRONT” the post keeps in mind that any player that is below the broken line circle is a low post player and we will only “DEAD FRONT” the post when the ball is below the free-throw line extended. If the ball above the free-throw line extended the post is to be defended like a perimeter player with a closed ¾ stance, up the line to the ball.
FILL AND SINK: refers to the players on the help side of the floor. These players must fill in the spot left open under the basket when there is no defensive post player. The closest player, on the help side of the floor to the baseline, must step in and fill on the baseline. He must in fact take the place of the post defender. Sinking means that help side players must drop down to the level of the ball. BALLSIDE DEFENSE MAKES THE DEFENSE TOUGH AND HELPSIDE DEFENSE MAKES THE DEFENSE SUCESSFUL!!
ALL SINK: When the ball does enter the post, whether by dribble or pass, all defenders must sink to the level of the ball. Perimeter players must turn and aggressively dig the ball out. The only option that we must give up is a return pass to the outside. ALL SINK WHEN THE BALL PENETRATES!!
BALL SCREEN: We will TRAP HARD on all ball screens. The man guarding the screener MUST get his body up court and NOT allow the ball handler to “turn the corner”. Everyone else MUST sag in GREAT help side defense so ROTATION can occur. The help side MUST anticipate passes for steals or deflections.
WOLVERINE DEFENSE CONT…
MAN-TO MAN CONCEPTS CONT…
The following are some variations and adjustments to our basic man-to-man offense:
MAN CONTAIN (“4” / “3” / or “2” FIST): The main philosophy is containing the dribble, good help side, and taking away ALL layups. BALL PRESSURE is a MUST in ALL defenses. When in “4” (Full court Man Contain) ball pressure BUT containing dribble all the way up court. Off ball in good help side up line on line – help & recover position.
MAN SWITCH (“1” FIST): Switch ALL screens at ALL positions. Possible no switch w/ one or two players.
SCRAMBLE (“1” / “4” / “3”): • “1” Scramble – PRESSURE the ball and MAKE them make a PLAY! See BALL and MAN.
All penetrating passes are denied. All non-penetrating passes (back out) are allowed. ALL must be in a sag help-side – when “jumping to the ball” we will DROP lower than the “ball line” – this will allow us to TRAP on penetration.. ALL penetration that gets to the paint is trapped with the closest person in the area from the TOP. We MUST face front the post. All penetration to the baseline soft spot are trapped with the post man-all others must rotate to the level of the ball and cover the post. When the ball is passed into the post it MUST be trapped from the TOP not the wing. Try and steal ALL LOB passes and BOUNCE passes. NO second shots – ONE and DONE!! *Special* KEY: Closest man off the ball CAN leave his man and TRAP if the offensive man has his BACK to the trap coming. The TRAPPER MUST talk once he leaves to TRAP yelling “SCRAMBLE”!!
• “3” / “4” Scramble (”Thumb up”) – There will be ball pressure full or ¾ court sending one other player at the ball handler to trap or force the ball handler to give up ball. MUST sprint back if ball is passed over double team’s head. KEY: Closest man off the ball CAN leave his man and TRAP if the offensive man has his BACK to the trap coming. The TRAPPER MUST talk once he leaves to TRAP.
• “2” / “3” / “4” Scramble (“Thumb down”) - There will be ball pressure full (“4”), ¾ (“3”), of ½ (“2”) court sending player guarding the ball to trap on the pass. When this occurs everyone else must be ready to anticipate the pass out of the trap for a steal. If a steal does not happen, rotation to cover the ball MUST occur (*note* ROTATION Rules to be explained)
You have been presented with all the concepts that will be our pressure man-to-man defense. This will be the foundation that our other two core defenses will be built. Remember we are talking about a pressure defensive system, in which these core defenses are all tied together and will compliment each other.
WOLVERINE DEFENSE
ZONE CONCEPTS
AGAIN, we MUST remember, whether it is MAN or ZONE, everything is geared to getting the ball stopped as early as possible. Those concepts (SEE full description under MAN CONCEPTS) are: ANTICIPATION, CONVERTING, PURSUE, BALL PRESSURE, EARLY HELP, NO BALL REVERSAL, DEAD FRONT, FILL AND SINK, and ALL SINK.
The following are some variations of our ZONE DEFENSE:
“23” (1 – 1 – 3 Amoeba Zone):
“23” HEAT (2-3 ZONE TRAP): This is an aggressive 2-3 ZONE trapping defensive which will speed up tempo of the game and create turnovers or quick shots.
“3” HEAT (2 – 2 – 1 Three Quarter Court TRAP): This is a 2 – 2 – 1 three quarter court trapping defense which will speed up tempo of the game and create turnovers or quick shots. *NOTE* Will use MOSTLY after MISSED SHOTS!!
“4” HEAT (1 – 2 – 1 – 1 Full Court TRAP): This is a 1 – 2 – 1 - 1 full court trapping defense which will transform into a 1 – 2 – 2 full court TRAP. This defense will speed up the TEMPO. *NOTE* Will use after MADE BASKETS and DEAD BALLS!!
“11” (DIAMOND and ONE): A zone / man mix in which we will play the other team’s STAR player man to man FACE GUARD while the other defenders plays in a ZONE formation (i.e. Diamond, BOX, 1-3 or 3-1)
“12” (TRIANGLE and TWO): A zone / man mix in which we will play the other team’s 2 STAR players man to man FACE GUARD while the other defenders plays in a ZONE formation (i.e. standard TRIANGLE or an INVERTED TRIANGLE).
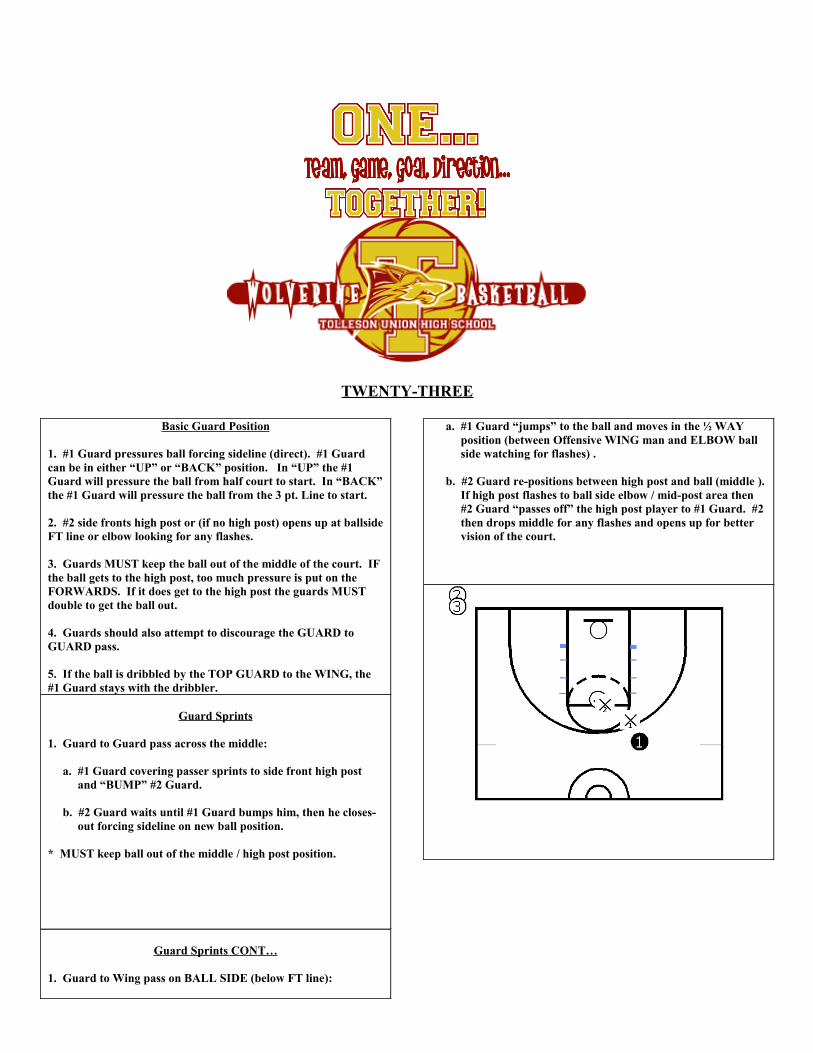
TWENTY-THREE
Basic Guard Position
1. #1 Guard pressures ball forcing sideline (direct). #1 Guard can be in either “UP” or “BACK” position. In “UP” the #1 Guard will pressure the ball from half court to start. In “BACK” the #1 Guard will pressure the ball from the 3 pt. Line to start.
2. #2 side fronts high post or (if no high post) opens up at ballside FT line or elbow looking for any flashes.
3. Guards MUST keep the ball out of the middle of the court. IF the ball gets to the high post, too much pressure is put on the FORWARDS. If it does get to the high post the guards MUST double to get the ball out.
4. Guards should also attempt to discourage the GUARD to GUARD pass.
5. If the ball is dribbled by the TOP GUARD to the WING, the #1 Guard stays with the dribbler.
Guard Sprints
1. Guard to Guard pass across the middle:
a. #1 Guard covering passer sprints to side front high post and “BUMP” #2 Guard.
b. #2 Guard waits until #1 Guard bumps him, then he closes- out forcing sideline on new ball position.
* MUST keep ball out of the middle / high post position.
Guard Sprints CONT…
1. Guard to Wing pass on BALL SIDE (below FT line):
a. #1 Guard “jumps” to the ball and moves in the ½ WAY position (between Offensive WING man and ELBOW ball side watching for flashes) .
b. #2 Guard re-positions between high post and ball (middle ). If high post flashes to ball side elbow / mid-post area then #2 Guard “passes off” the high post player to #1 Guard. #2 then drops middle for any flashes and opens up for better vision of the court.
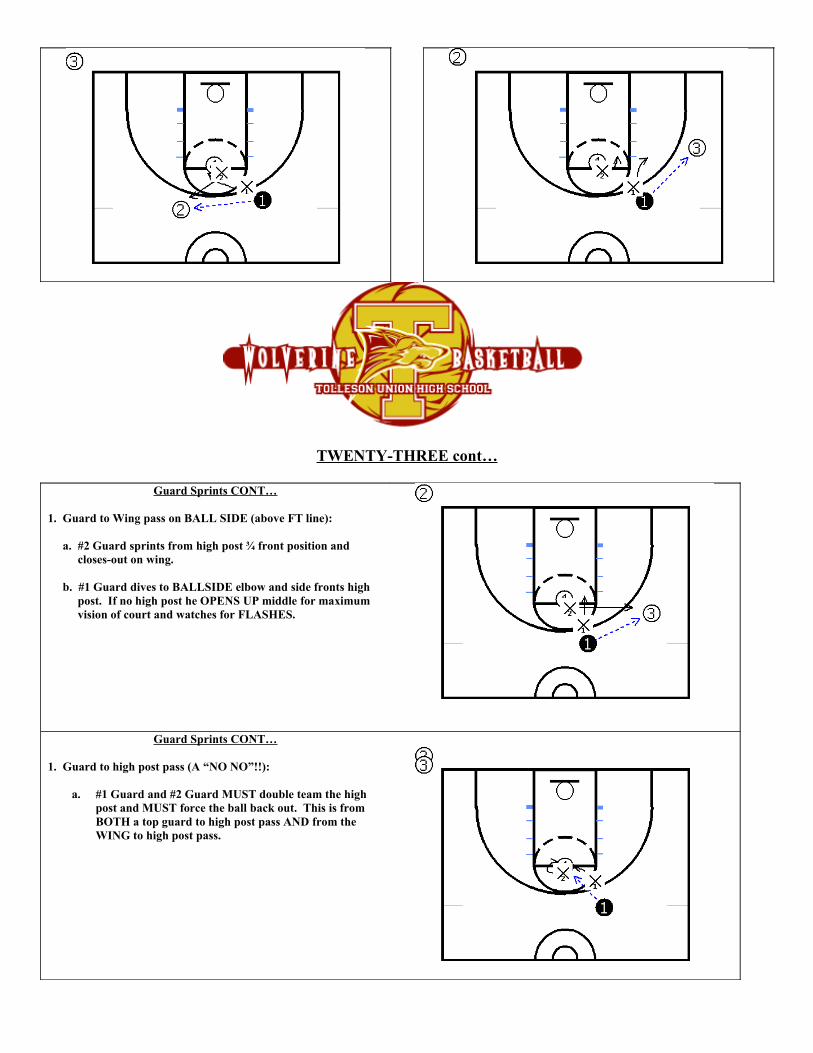
TWENTY-THREE cont…
Guard Sprints CONT…
1. Guard to Wing pass on BALL SIDE (above FT line):
a. #2 Guard sprints from high post ¾ front position and closes-out on wing.
b. #1 Guard dives to BALLSIDE elbow and side fronts high post. If no high post he OPENS UP middle for maximum vision of court and watches for FLASHES.
Guard Sprints CONT…
1. Guard to high post pass (A “NO NO”!!):
a. #1 Guard and #2 Guard MUST double team the high post and MUST force the ball back out. This is from BOTH a top guard to high post pass AND from the WING to high post pass.
Guard Sprints CONT…
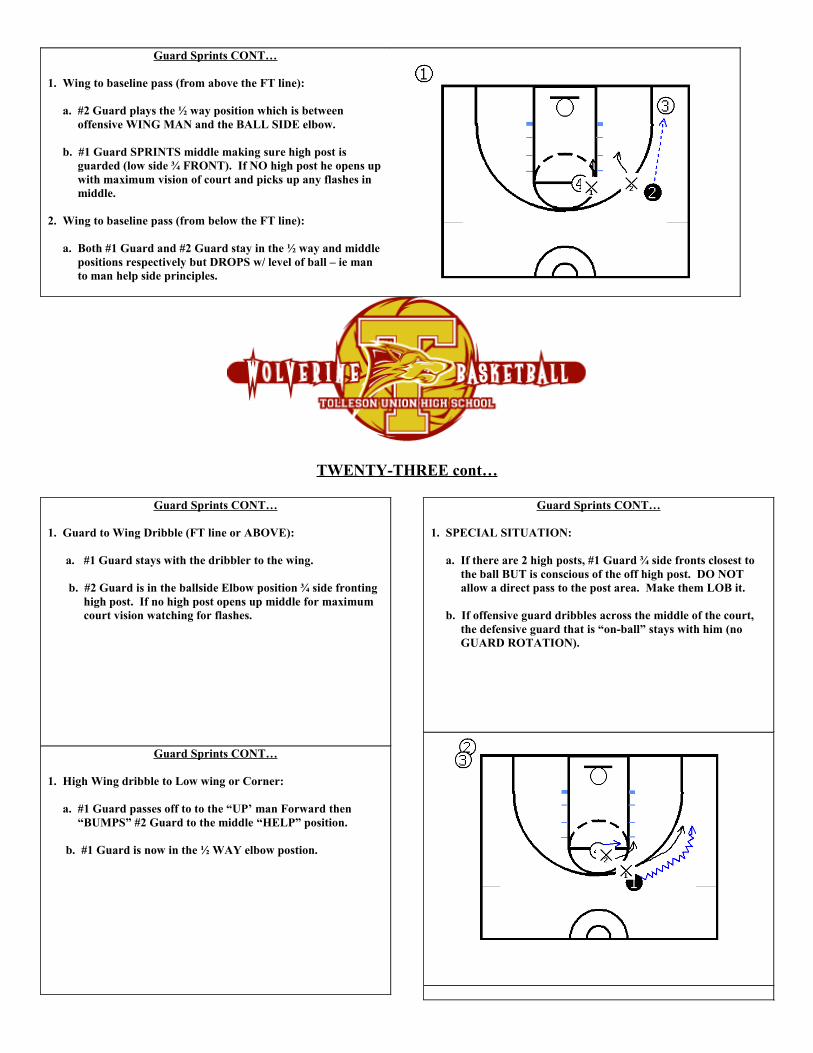
1. Wing to baseline pass (from above the FT line):
a. #2 Guard plays the ½ way position which is between offensive WING MAN and the BALL SIDE elbow.
b. #1 Guard SPRINTS middle making sure high post is guarded (low side ¾ FRONT). If NO high post he opens up with maximum vision of court and picks up any flashes in middle.
2. Wing to baseline pass (from below the FT line):
a. Both #1 Guard and #2 Guard stay in the ½ way and middle positions respectively but DROPS w/ level of ball – ie man to man help side principles.
TWENTY-THREE cont…
Guard Sprints CONT…
1. Guard to Wing Dribble (FT line or ABOVE):
a. #1 Guard stays with the dribbler to the wing.
b. #2 Guard is in the ballside Elbow position ¾ side fronting high post. If no high post opens up middle for maximum court vision watching for flashes.
Guard Sprints CONT…
1. High Wing dribble to Low wing or Corner:
a. #1 Guard passes off to to the “UP’ man Forward then “BUMPS” #2 Guard to the middle “HELP” position.
b. #1 Guard is now in the ½ WAY elbow postion.
Guard Sprints CONT…
1. SPECIAL SITUATION:
a. If there are 2 high posts, #1 Guard ¾ side fronts closest to the ball BUT is conscious of the off high post. DO NOT allow a direct pass to the post area. Make them LOB it.
b. If offensive guard dribbles across the middle of the court, the defensive guard that is “on-ball” stays with him (no GUARD ROTATION).
TWENTY-THREE cont…
Basic Forward Positions
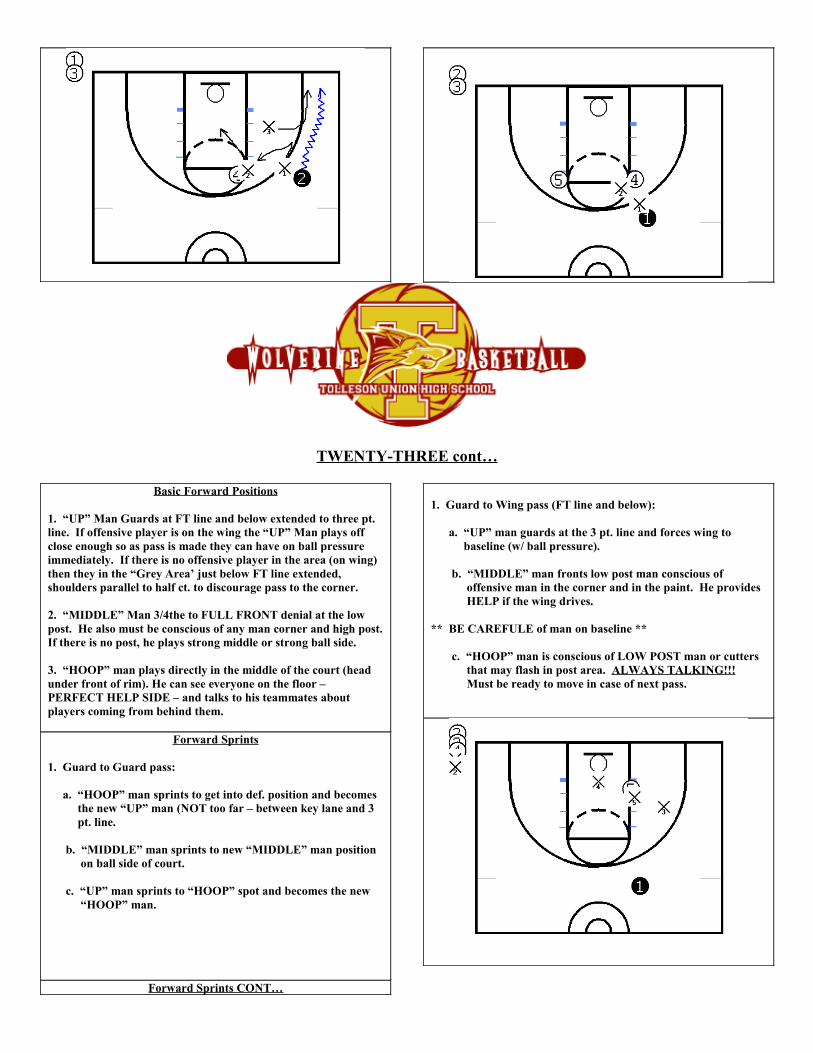
1. “UP” Man Guards at FT line and below extended to three pt. line. If offensive player is on the wing the “UP” Man plays off close enough so as pass is made they can have on ball pressure immediately. If there is no offensive player in the area (on wing) then they in the “Grey Area’ just below FT line extended, shoulders parallel to half ct. to discourage pass to the corner.
2. “MIDDLE” Man 3/4the to FULL FRONT denial at the low post. He also must be conscious of any man corner and high post. If there is no post, he plays strong middle or strong ball side.
3. “HOOP” man plays directly in the middle of the court (head under front of rim). He can see everyone on the floor – PERFECT HELP SIDE – and talks to his teammates about players coming from behind them.
Forward Sprints
1. Guard to Guard pass:
a. “HOOP” man sprints to get into def. position and becomes the new “UP” man (NOT too far – between key lane and 3 pt. line.
b. “MIDDLE” man sprints to new “MIDDLE” man position on ball side of court.
c. “UP” man sprints to “HOOP” spot and becomes the new “HOOP” man.
Forward Sprints CONT…
1. Guard to Wing pass (FT line and below):
a. “UP” man guards at the 3 pt. line and forces wing to baseline (w/ ball pressure).
b. “MIDDLE” man fronts low post man conscious of offensive man in the corner and in the paint. He provides HELP if the wing drives.
** BE CAREFULE of man on baseline **
c. “HOOP” man is conscious of LOW POST man or cutters that may flash in post area. ALWAYS TALKING!!! Must be ready to move in case of next pass.
TWENTY-THREE cont…
Forward Sprints CONT…
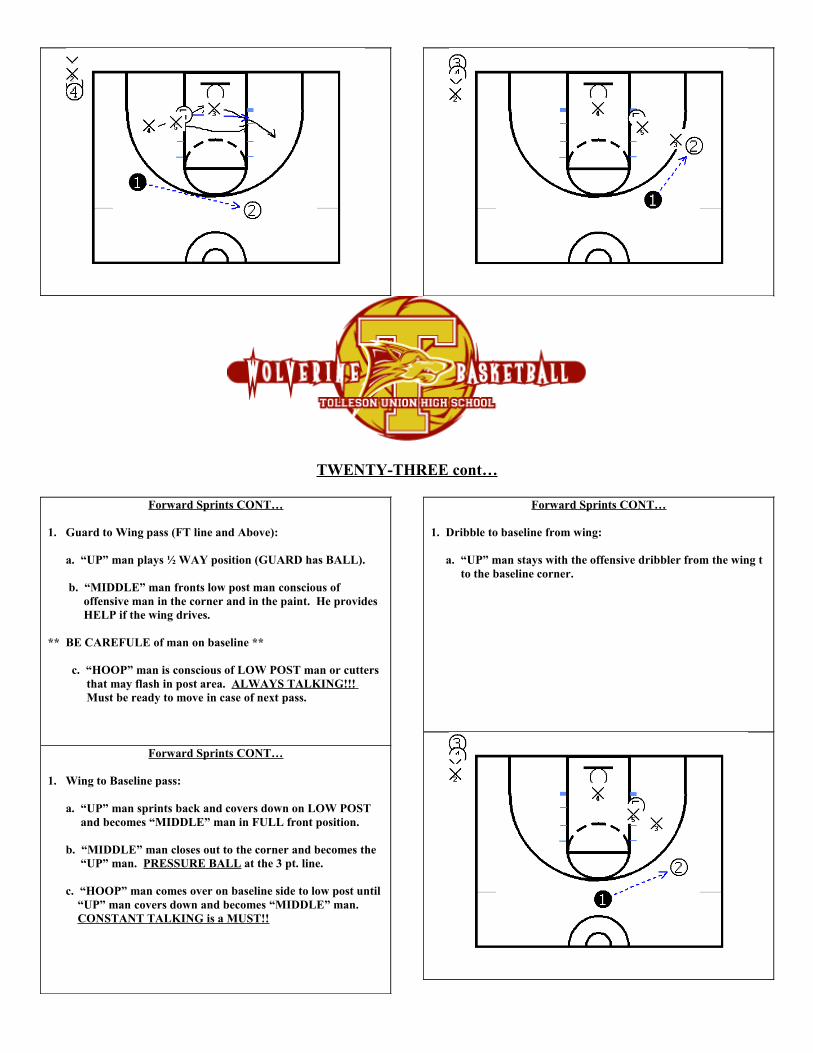
1. Guard to Wing pass (FT line and Above):
a. “UP” man plays ½ WAY position (GUARD has BALL).
b. “MIDDLE” man fronts low post man conscious of offensive man in the corner and in the paint. He provides HELP if the wing drives.
** BE CAREFULE of man on baseline **
c. “HOOP” man is conscious of LOW POST man or cutters that may flash in post area. ALWAYS TALKING!!! Must be ready to move in case of next pass.
Forward Sprints CONT…
1. Wing to Baseline pass:
a. “UP” man sprints back and covers down on LOW POST and becomes “MIDDLE” man in FULL front position.
b. “MIDDLE” man closes out to the corner and becomes the “UP” man. PRESSURE BALL at the 3 pt. line.
c. “HOOP” man comes over on baseline side to low post until “UP” man covers down and becomes “MIDDLE” man. CONSTANT TALKING is a MUST!!
Forward Sprints CONT…
1. Dribble to baseline from wing:
a. “UP” man stays with the offensive dribbler from the wing t to the baseline corner.
TWENTY-THREE cont…
Forward Sprints CONT…
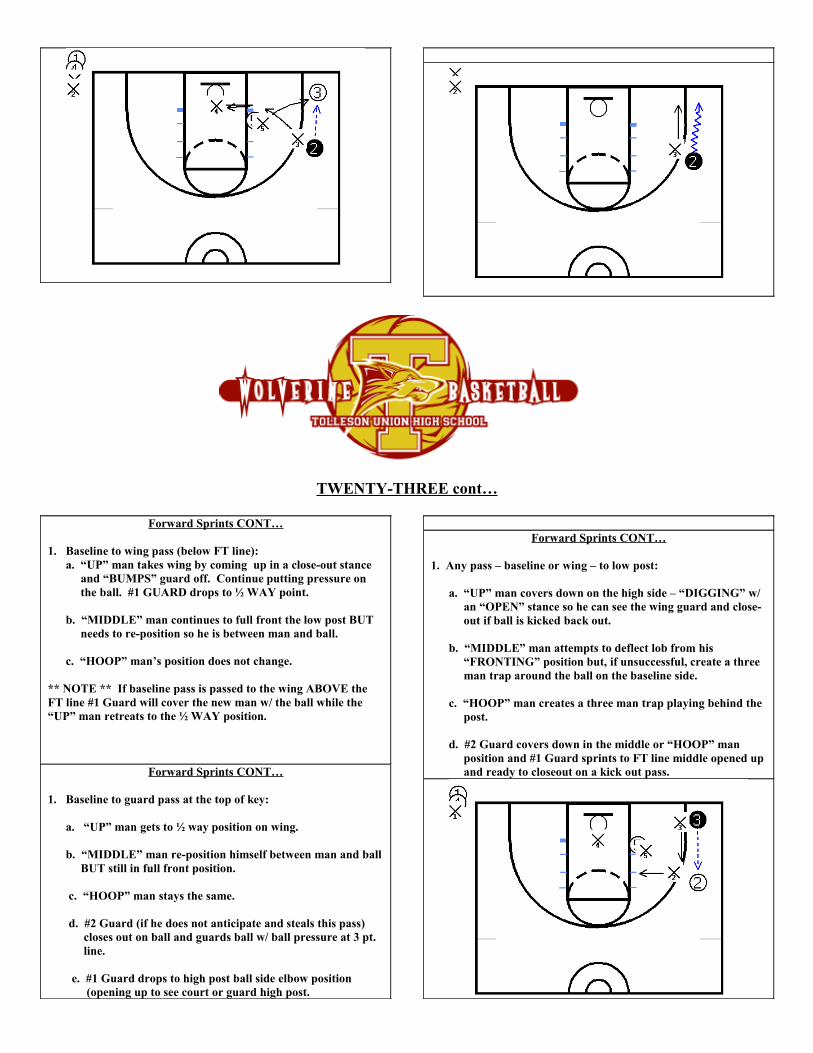
1. Baseline to wing pass (below FT line): a. “UP” man takes wing by coming up in a close-out stance and “BUMPS” guard off. Continue putting pressure on the ball. #1 GUARD drops to ½ WAY point.
b. “MIDDLE” man continues to full front the low post BUT needs to re-position so he is between man and ball.
c. “HOOP” man’s position does not change.
** NOTE ** If baseline pass is passed to the wing ABOVE the FT line #1 Guard will cover the new man w/ the ball while the “UP” man retreats to the ½ WAY position.
Forward Sprints CONT…
1. Baseline to guard pass at the top of key:
a. “UP” man gets to ½ way position on wing.
b. “MIDDLE” man re-position himself between man and ball BUT still in full front position.
c. “HOOP” man stays the same.
d. #2 Guard (if he does not anticipate and steals this pass) closes out on ball and guards ball w/ ball pressure at 3 pt. line.
e. #1 Guard drops to high post ball side elbow position (opening up to see court or guard high post.
Forward Sprints CONT…
1. Any pass – baseline or wing – to low post:
a. “UP” man covers down on the high side – “DIGGING” w/ an “OPEN” stance so he can see the wing guard and close- out if ball is kicked back out.
b. “MIDDLE” man attempts to deflect lob from his “FRONTING” position but, if unsuccessful, create a three man trap around the ball on the baseline side.
c. “HOOP” man creates a three man trap playing behind the post.
d. #2 Guard covers down in the middle or “HOOP” man position and #1 Guard sprints to FT line middle opened up and ready to closeout on a kick out pass.
TWENTY-THREE cont…
OTHER CONSIDERATIONS
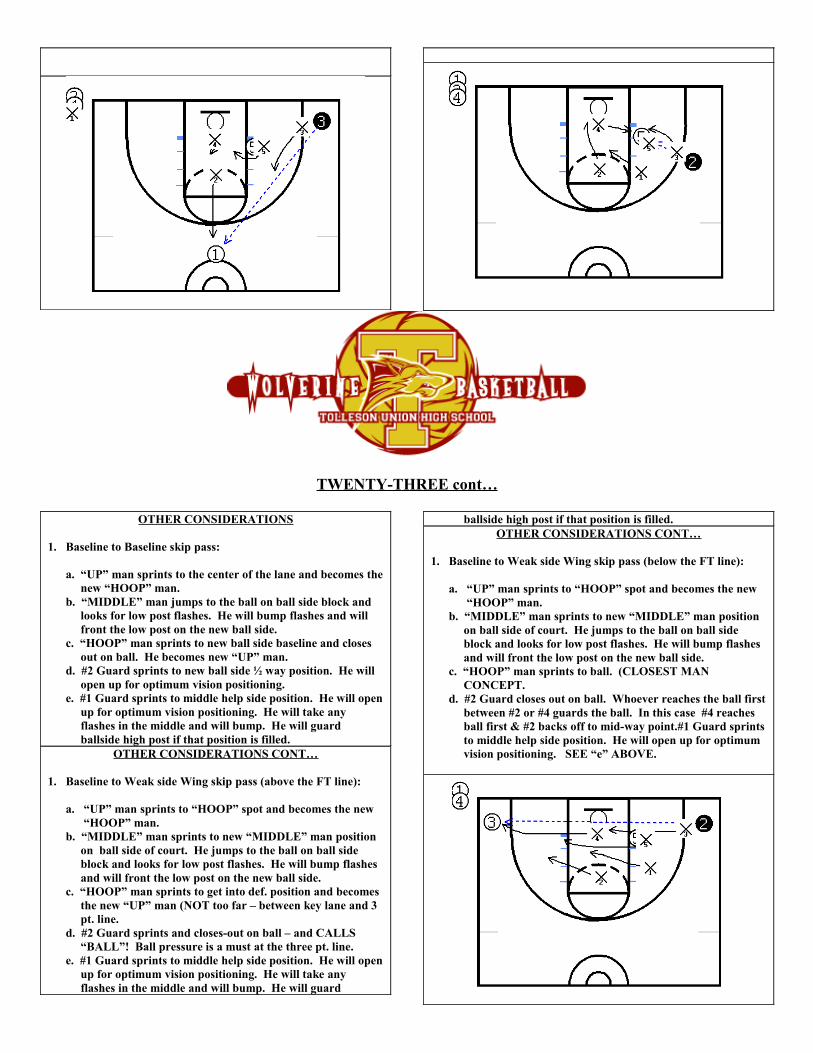
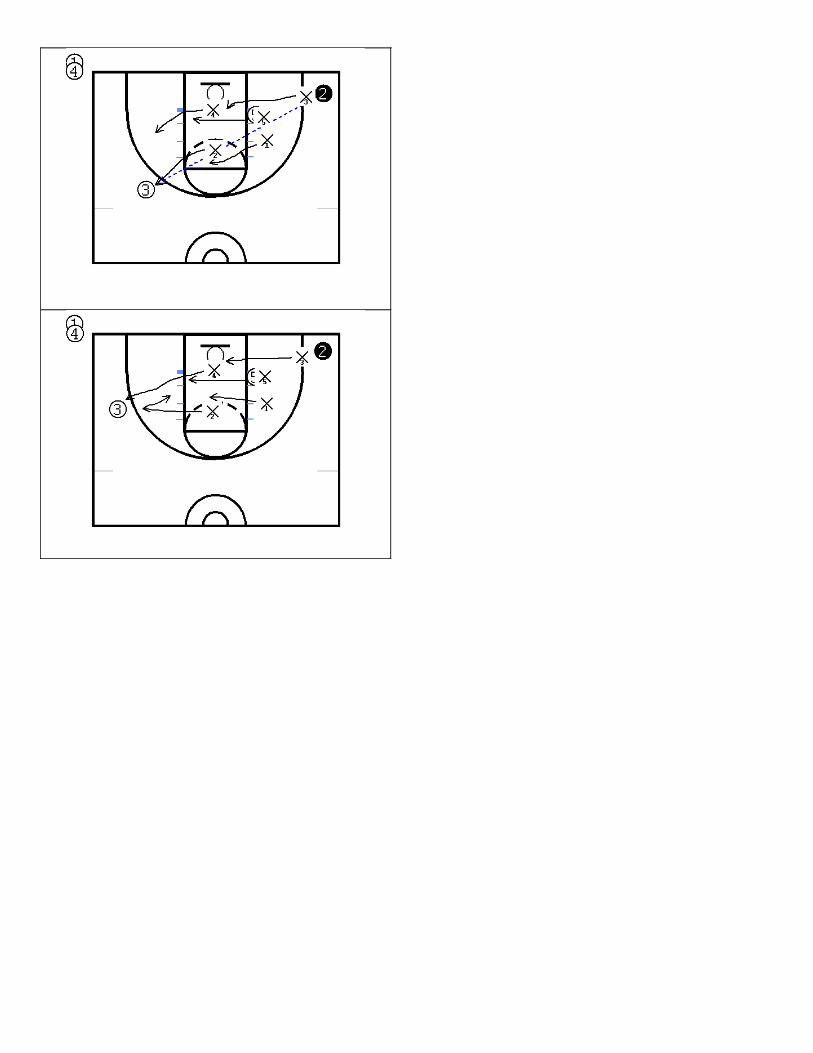
1. Baseline to Baseline skip pass:
a. “UP” man sprints to the center of the lane and becomes the new “HOOP” man. b. “MIDDLE” man jumps to the ball on ball side block and looks for low post flashes. He will bump flashes and will front the low post on the new ball side. c. “HOOP” man sprints to new ball side baseline and closes out on ball. He becomes new “UP” man. d. #2 Guard sprints to new ball side ½ way position. He will open up for optimum vision positioning. e. #1 Guard sprints to middle help side position. He will open up for optimum vision positioning. He will take any flashes in the middle and will bump. He will guard ballside high post if that position is filled.
OTHER CONSIDERATIONS CONT…
1. Baseline to Weak side Wing skip pass (above the FT line):
a. “UP” man sprints to “HOOP” spot and becomes the new “HOOP” man. b. “MIDDLE” man sprints to new “MIDDLE” man position on ball side of court. He jumps to the ball on ball side block and looks for low post flashes. He will bump flashes and will front the low post on the new ball side. c. “HOOP” man sprints to get into def. position and becomes the new “UP” man (NOT too far – between key lane and 3 pt. line. d. #2 Guard sprints and closes-out on ball – and CALLS “BALL”! Ball pressure is a must at the three pt. line. e. #1 Guard sprints to middle help side position. He will open up for optimum vision positioning. He will take any flashes in the middle and will bump. He will guard
ballside high post if that position is filled.OTHER CONSIDERATIONS CONT…
1. Baseline to Weak side Wing skip pass (below the FT line):
a. “UP” man sprints to “HOOP” spot and becomes the new “HOOP” man. b. “MIDDLE” man sprints to new “MIDDLE” man position on ball side of court. He jumps to the ball on ball side block and looks for low post flashes. He will bump flashes and will front the low post on the new ball side. c. “HOOP” man sprints to ball. (CLOSEST MAN CONCEPT. d. #2 Guard closes out on ball. Whoever reaches the ball first between #2 or #4 guards the ball. In this case #4 reaches ball first & #2 backs off to mid-way point.#1 Guard sprints to middle help side position. He will open up for optimum vision positioning. SEE “e” ABOVE.
TWENTY-THREE cont…
FINAL NOTES
1. All players need to have HANDS UP and take up a lot of space. “BE BIG!!!”
2. All players need to be CONSTANTLY TALKING. a. Calling “Ball”.b. “Help”.c. “FRONT”.d. Calling flashes, etc… so teammates know where flashes, etc… are.e. calling ALL “BUMPS” so that the ball is ALWAYS covered and PRESSURED.f. ETC…
3. All players MUST play this “ZONE” with LOTS of ENERGY and emotion. CANNOT play in slow motion or w/ out energy.
4. “BALL PRESSURE” is a MUST! WE MUST “jump” the ball handler to get pressure on at all times.
5. The ball MUST be kept out of the LOW or HIGH posts. If the ball gets into the LOW or HIGH posts it MUST be double or triple teamed so it is kicked back out.
WOLVERINE DEFENSE Cont…
“23” HEAT CONCEPTS
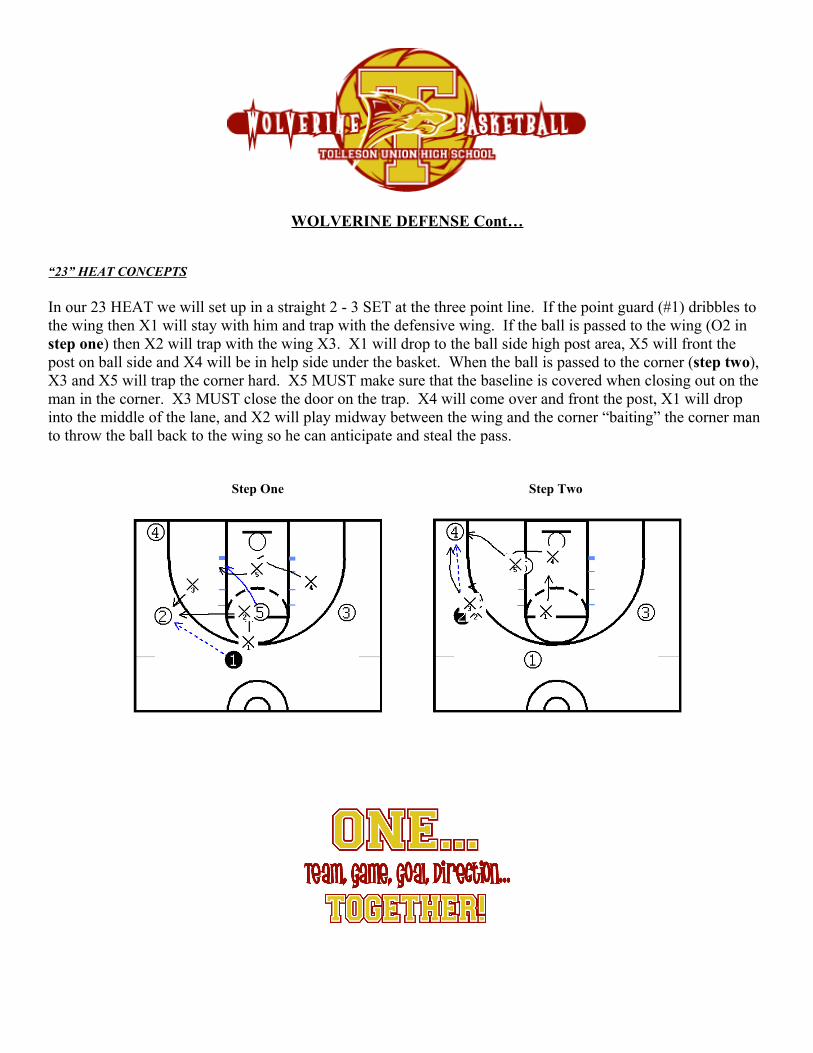
In our 23 HEAT we will set up in a straight 2 - 3 SET at the three point line. If the point guard (#1) dribbles to the wing then X1 will stay with him and trap with the defensive wing. If the ball is passed to the wing (O2 in step one) then X2 will trap with the wing X3. X1 will drop to the ball side high post area, X5 will front the post on ball side and X4 will be in help side under the basket. When the ball is passed to the corner (step two), X3 and X5 will trap the corner hard. X5 MUST make sure that the baseline is covered when closing out on the man in the corner. X3 MUST close the door on the trap. X4 will come over and front the post, X1 will drop into the middle of the lane, and X2 will play midway between the wing and the corner “baiting” the corner man to throw the ball back to the wing so he can anticipate and steal the pass.
Step One Step Two
WOLVERINE DEFENSE Cont…
“23” HEAT CONCEPTS CONT…
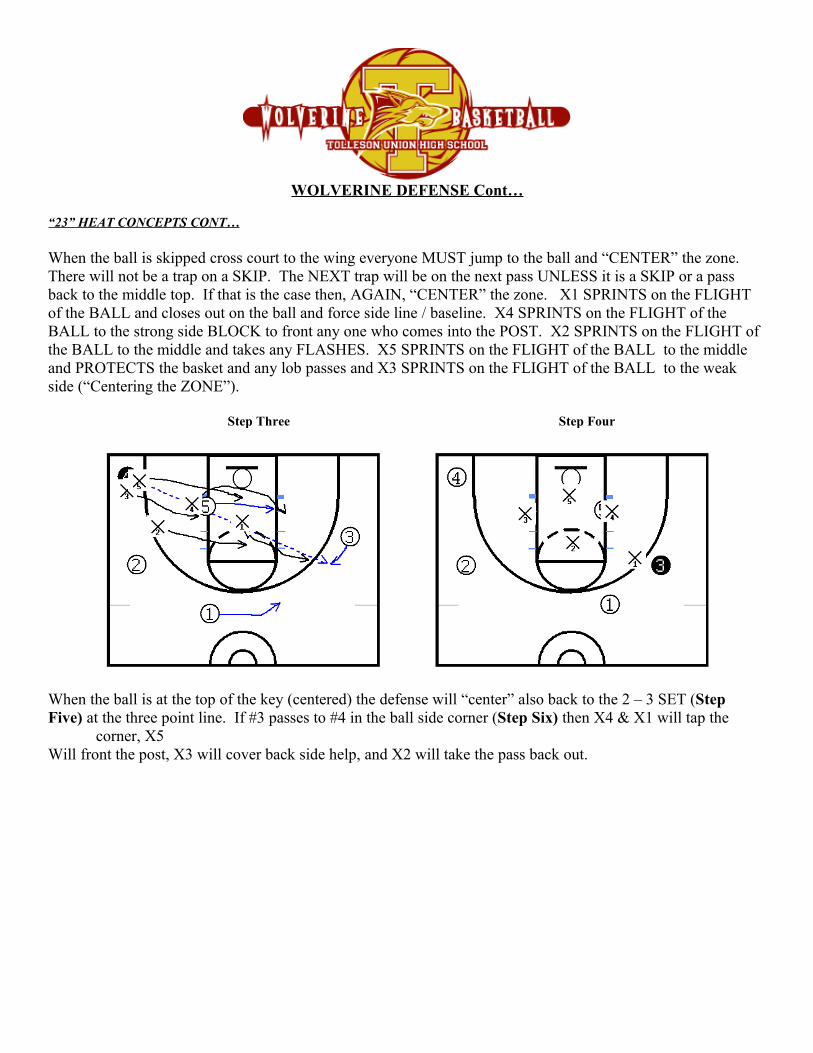
When the ball is skipped cross court to the wing everyone MUST jump to the ball and “CENTER” the zone. There will not be a trap on a SKIP. The NEXT trap will be on the next pass UNLESS it is a SKIP or a pass back to the middle top. If that is the case then, AGAIN, “CENTER” the zone. X1 SPRINTS on the FLIGHT of the BALL and closes out on the ball and force side line / baseline. X4 SPRINTS on the FLIGHT of the BALL to the strong side BLOCK to front any one who comes into the POST. X2 SPRINTS on the FLIGHT of the BALL to the middle and takes any FLASHES. X5 SPRINTS on the FLIGHT of the BALL to the middle and PROTECTS the basket and any lob passes and X3 SPRINTS on the FLIGHT of the BALL to the weak side (“Centering the ZONE”).
Step Three Step Four
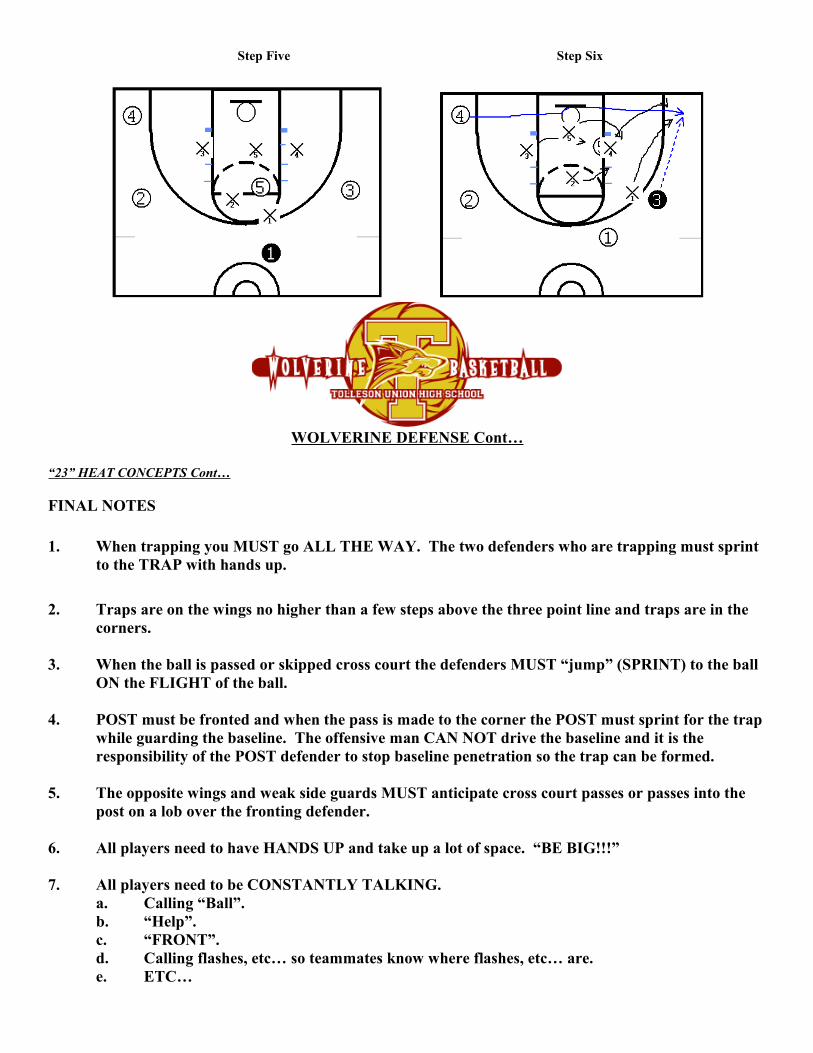
When the ball is at the top of the key (centered) the defense will “center” also back to the 2 – 3 SET (Step Five) at the three point line. If #3 passes to #4 in the ball side corner (Step Six) then X4 & X1 will tap the
corner, X5Will front the post, X3 will cover back side help, and X2 will take the pass back out.
Step Five Step Six
WOLVERINE DEFENSE Cont…
“23” HEAT CONCEPTS Cont…
FINAL NOTES
1. When trapping you MUST go ALL THE WAY. The two defenders who are trapping must sprint to the TRAP with hands up.
2. Traps are on the wings no higher than a few steps above the three point line and traps are in the corners.
3. When the ball is passed or skipped cross court the defenders MUST “jump” (SPRINT) to the ball ON the FLIGHT of the ball.
4. POST must be fronted and when the pass is made to the corner the POST must sprint for the trap while guarding the baseline. The offensive man CAN NOT drive the baseline and it is the responsibility of the POST defender to stop baseline penetration so the trap can be formed.
5. The opposite wings and weak side guards MUST anticipate cross court passes or passes into the post on a lob over the fronting defender.
6. All players need to have HANDS UP and take up a lot of space. “BE BIG!!!”
7. All players need to be CONSTANTLY TALKING. a. Calling “Ball”.b. “Help”.c. “FRONT”.d. Calling flashes, etc… so teammates know where flashes, etc… are.e. ETC…
8. All players MUST play this “ZONE” with LOTS of ENERGY and emotion. CANNOT play in slow motion or w/ out energy.
9. The ball MUST be kept out of the LOW or HIGH posts. If the ball gets into the LOW or HIGH posts it MUST be double or triple teamed so it is kicked back out.
10. NO traps on a SKIP PASS.
WOLVERINE DEFENSE Cont…
“3” HEAT ZONE PRESS CONCEPTS (2-2-1 ¾ Court Zone Press) – AFTER MISSED SHOTS
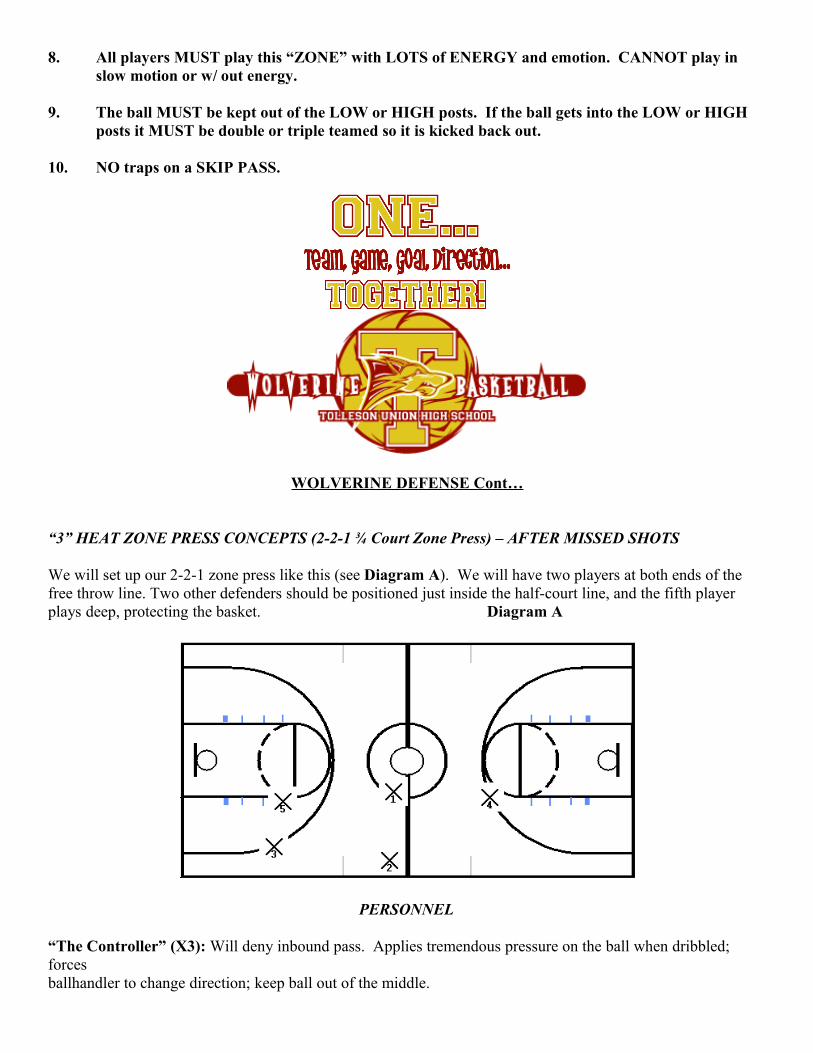
We will set up our 2-2-1 zone press like this (see Diagram A). We will have two players at both ends of the free throw line. Two other defenders should be positioned just inside the half-court line, and the fifth player plays deep, protecting the basket. Diagram A
PERSONNEL
“The Controller” (X3): Will deny inbound pass. Applies tremendous pressure on the ball when dribbled; forces ballhandler to change direction; keep ball out of the middle.
“The Gapper” (X5): Traps and cuts off ball handler.
“The Taker” (X2): Plays in the passing lane on the ball side sideline; takes away all sideline ball advancement. .“The Reader / Interceptor” (X1): Plays in the middle of the floor; defending all cutters and skip passes.
“The Teaser / Protctor” (X4): Protects the basket and defends long skip passes.
In our 2-2-1 Zone Press, the inbound pass will be contested and guarded. Do not allow a pass to the middle of the floor. Defenders X1 and X2 should only allow a pass to the corner. Once the ball is inbounded, they will wait until the ball handler commits and start dribbling. The defense doesn’t start until the ball handler starts dribbling. Once the dribble is started, X1 should attack and force the ball handler up the sideline. X2 will cut off the ball handler and trap with X1. X3 will deny sideline passing lane to take away any pass up the sideline. X4 will move up to the middle of the floor to defend all passes to the middle and pick up and cutters. X5 will drop back and protect the basket and look to intercept any skip passes.
WOLVERINE DEFENSE Cont…
“3” HEAT ZONE PRESS CONCEPTS (2-2-1 ¾ Court Zone Press) – AFTER MISSED SHOTS
Diagram B
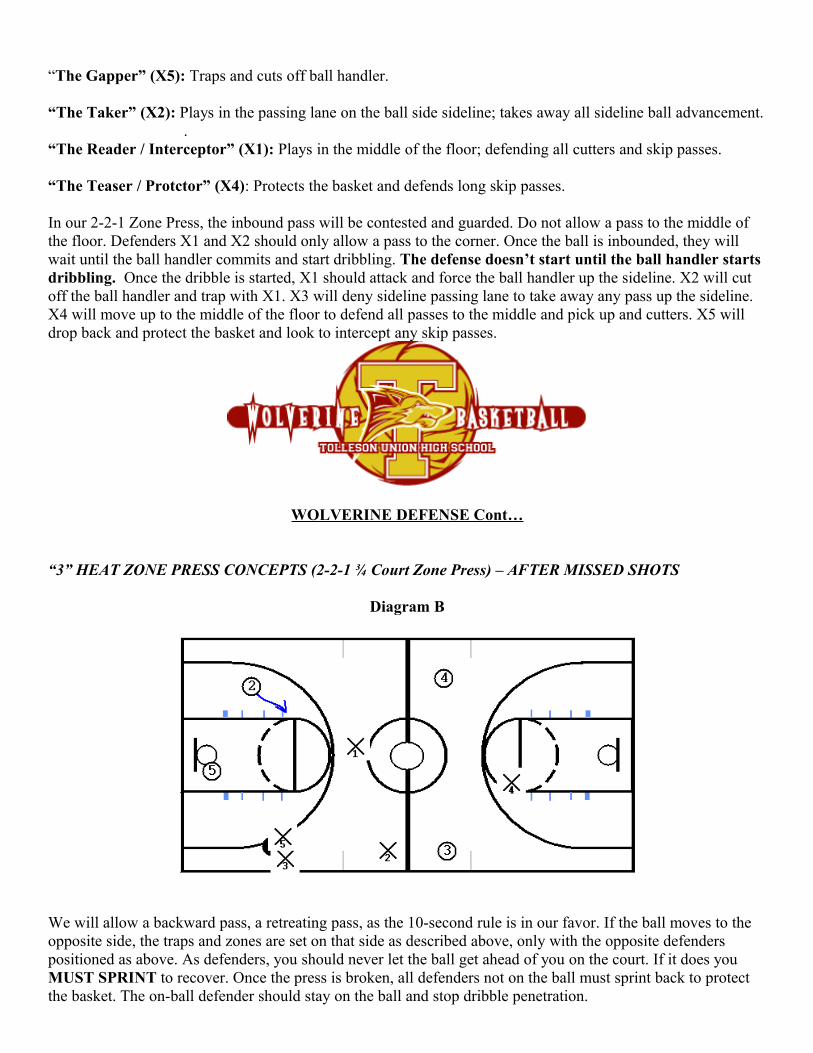
We will allow a backward pass, a retreating pass, as the 10-second rule is in our favor. If the ball moves to the opposite side, the traps and zones are set on that side as described above, only with the opposite defenders positioned as above. As defenders, you should never let the ball get ahead of you on the court. If it does you MUST SPRINT to recover. Once the press is broken, all defenders not on the ball must sprint back to protect the basket. The on-ball defender should stay on the ball and stop dribble penetration.
WOLVERINE DEFENSE Cont…
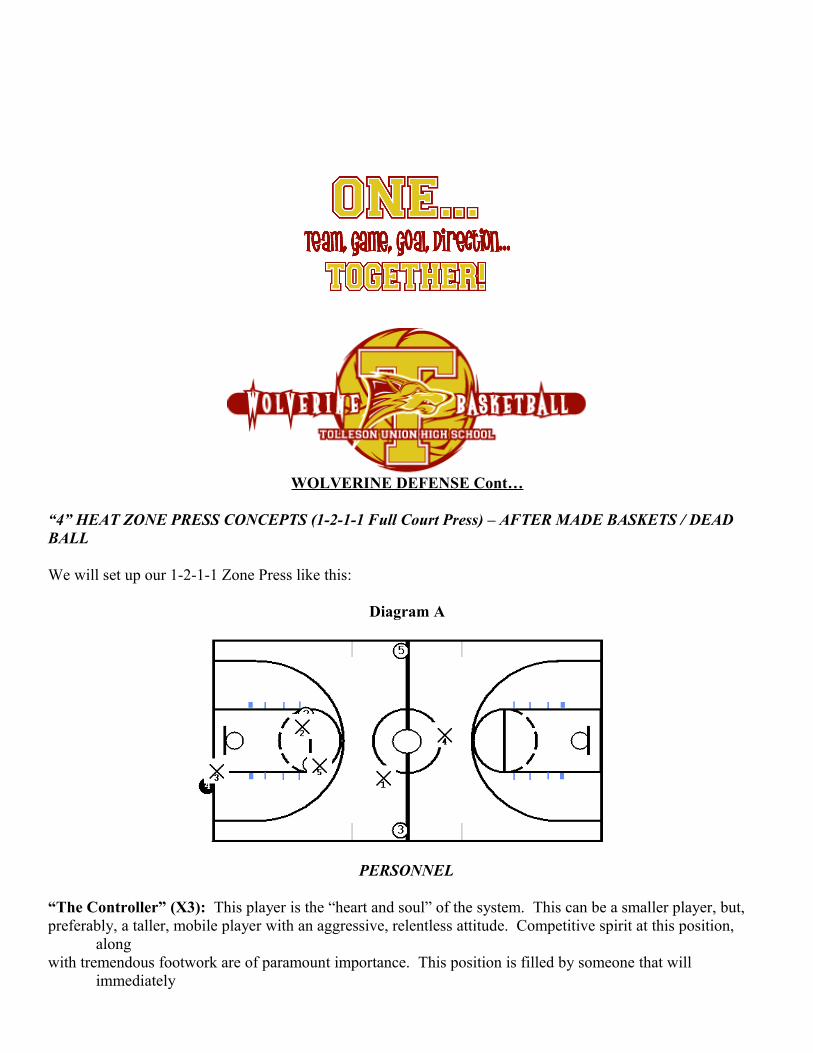
“4” HEAT ZONE PRESS CONCEPTS (1-2-1-1 Full Court Press) – AFTER MADE BASKETS / DEAD BALL
We will set up our 1-2-1-1 Zone Press like this:
Diagram A
PERSONNEL
“The Controller” (X3): This player is the “heart and soul” of the system. This can be a smaller player, but, preferably, a taller, mobile player with an aggressive, relentless attitude. Competitive spirit at this position,
along with tremendous footwork are of paramount importance. This position is filled by someone that will
immediately
find the man out of bounds EVERY time on made baskets and ATTACK and trap when passed in.
“The Gapper / Interceptor” (X5): This is a taller point guard who will be involved in numerous possible “first
traps”. This player must be quick enough to keep the man from catching the ball in the middle and able to force his
man to the corner so the “first trap” can be executed. When the ball is reversed he to MUST be able to cover the middle from the FT line to half court
“The Taker / Interceptor (X2): The smaller of the two wing players. This player must exert patience when the ball
is reversed and must be able to cover the middle from the FT line to half court when the ball is opposite to him.
“The Reader / Interceptor” (X1): This player is the quickest of the two point guards. This point guard is often
called the “interceptor” since basic responsibility for X1 is to play passes. He will always be in line with the ball.
Quickness and anticipation are of great value at this spot.
“The Teaser / Protector” (X4): This is our POST player. Must protect the basket, normally, and become adept at
defensive faking and “buying some time” for teammates to recover in defensive transition. X4 MUST communicate
with teammates as this player can see the press attack of the opponent.
WOLVERINE DEFENSE Cont…
“4” HEAT ZONE PRESS CONCEPTS (1-2-1-1 Full Court Press) – AFTER MADE BASKETS / DEAD BALL
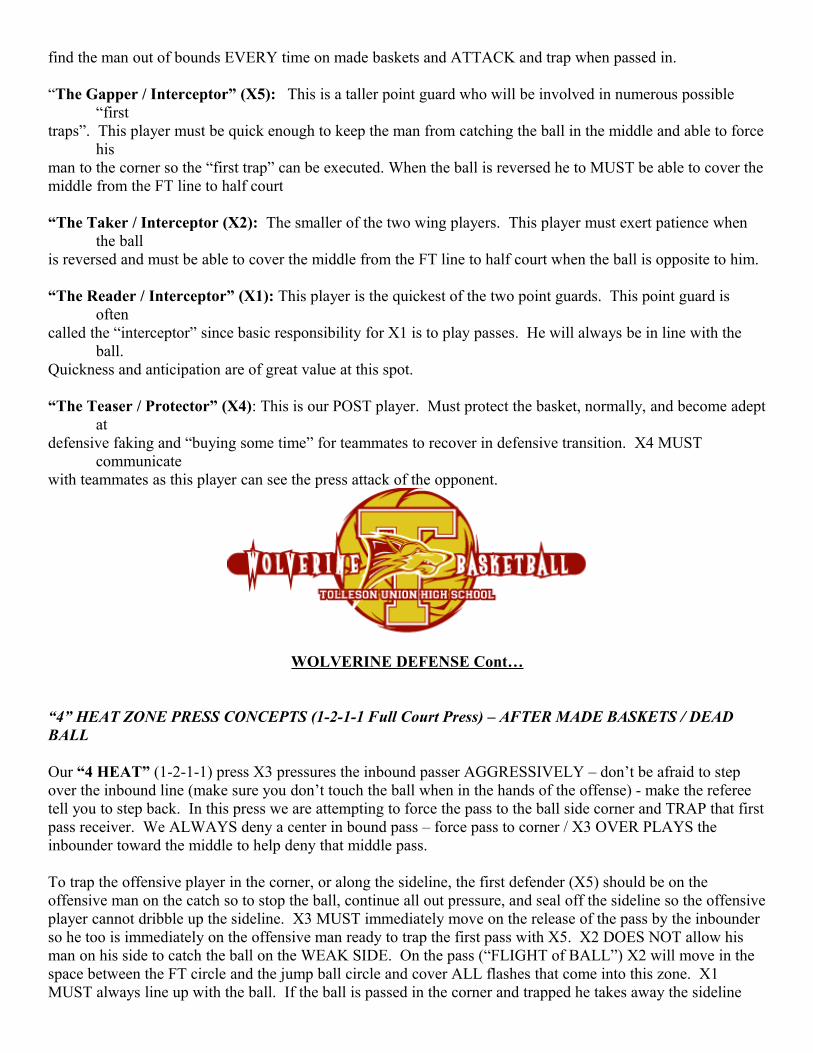
Our “4 HEAT” (1-2-1-1) press X3 pressures the inbound passer AGGRESSIVELY – don’t be afraid to step over the inbound line (make sure you don’t touch the ball when in the hands of the offense) - make the referee tell you to step back. In this press we are attempting to force the pass to the ball side corner and TRAP that first pass receiver. We ALWAYS deny a center in bound pass – force pass to corner / X3 OVER PLAYS the inbounder toward the middle to help deny that middle pass.
To trap the offensive player in the corner, or along the sideline, the first defender (X5) should be on the offensive man on the catch so to stop the ball, continue all out pressure, and seal off the sideline so the offensive player cannot dribble up the sideline. X3 MUST immediately move on the release of the pass by the inbounder so he too is immediately on the offensive man ready to trap the first pass with X5. X2 DOES NOT allow his man on his side to catch the ball on the WEAK SIDE. On the pass (“FLIGHT of BALL”) X2 will move in the space between the FT circle and the jump ball circle and cover ALL flashes that come into this zone. X1 MUST always line up with the ball. If the ball is passed in the corner and trapped he takes away the sideline
pass (AGAIN, in line with the ball). X4 shades ball side and READ the play (READ the eyes of the person with the ball) BUT his MAIN responsibility is to PROTECT the basket and give up NO LAYUPS (Diagram B and C).
Diagram B Diagram C
WOLVERINE DEFENSE Cont…
“4” HEAT ZONE PRESS CONCEPTS (1-2-1-1 Full Court Press) – AFTER MADE BASKETS / DEAD BALL
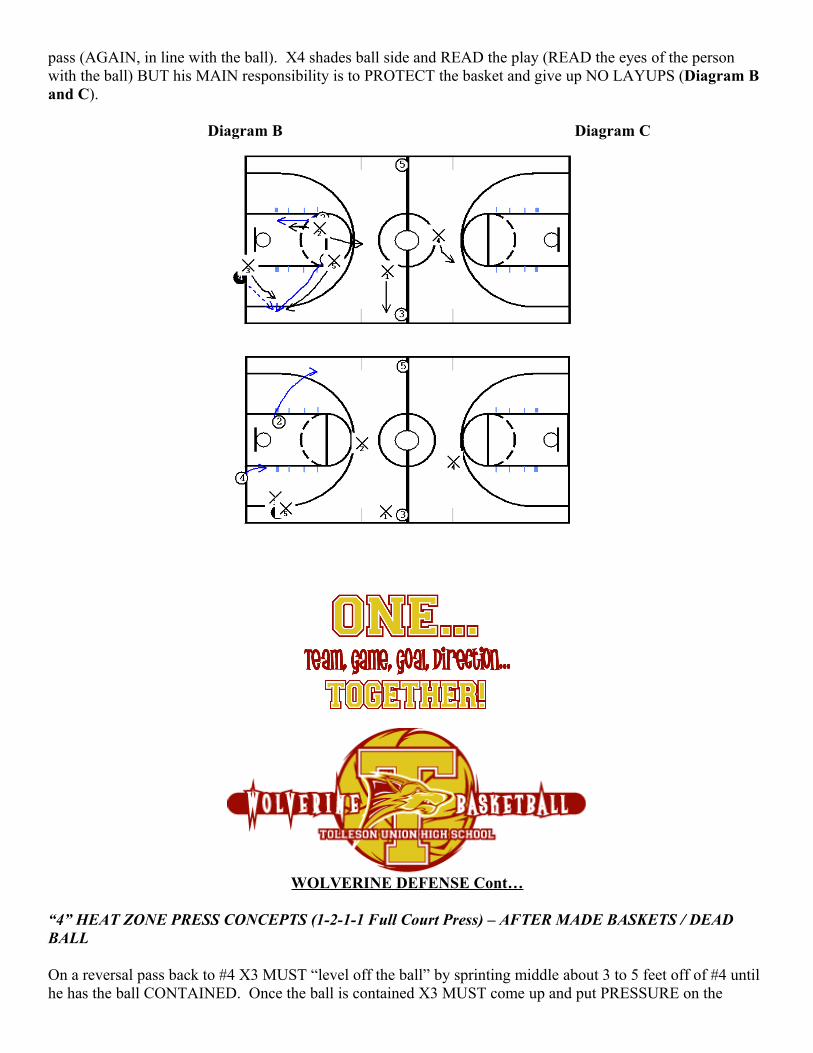
On a reversal pass back to #4 X3 MUST “level off the ball” by sprinting middle about 3 to 5 feet off of #4 until he has the ball CONTAINED. Once the ball is contained X3 MUST come up and put PRESSURE on the
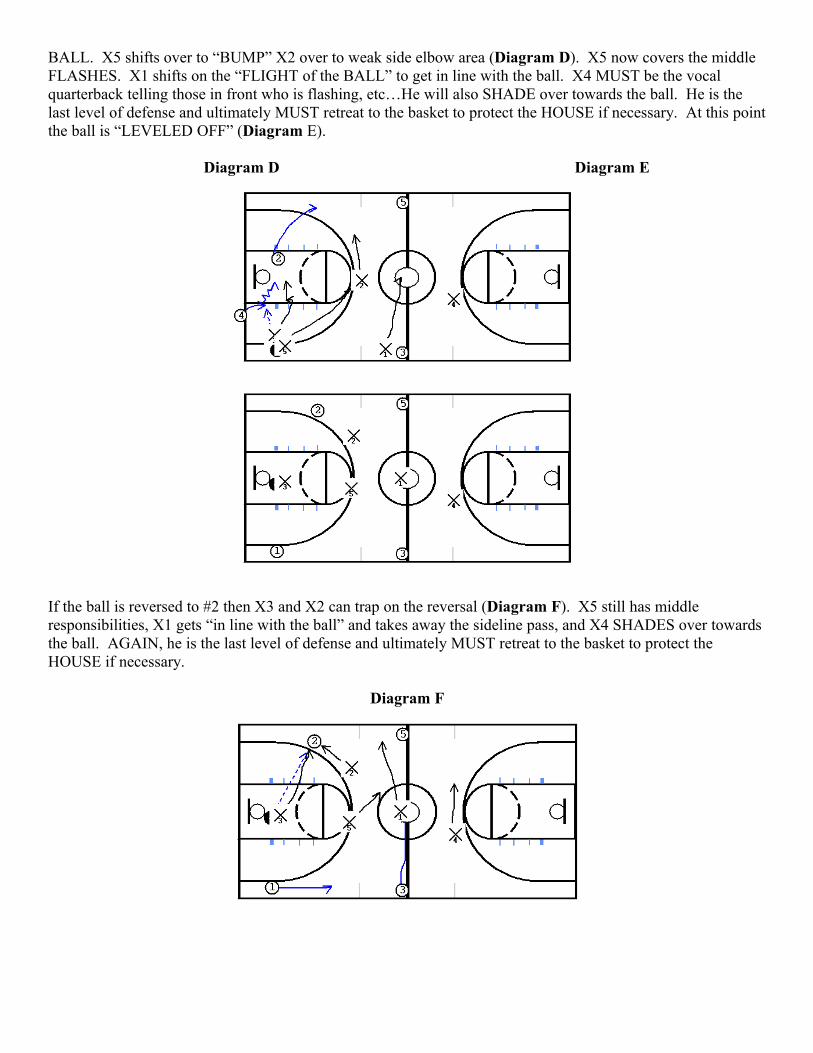
BALL. X5 shifts over to “BUMP” X2 over to weak side elbow area (Diagram D). X5 now covers the middle FLASHES. X1 shifts on the “FLIGHT of the BALL” to get in line with the ball. X4 MUST be the vocal quarterback telling those in front who is flashing, etc…He will also SHADE over towards the ball. He is the last level of defense and ultimately MUST retreat to the basket to protect the HOUSE if necessary. At this point the ball is “LEVELED OFF” (Diagram E).
Diagram D Diagram E
If the ball is reversed to #2 then X3 and X2 can trap on the reversal (Diagram F). X5 still has middle responsibilities, X1 gets “in line with the ball” and takes away the sideline pass, and X4 SHADES over towards the ball. AGAIN, he is the last level of defense and ultimately MUST retreat to the basket to protect the HOUSE if necessary.
Diagram F
WOLVERINE DEFENSE Cont…
“4” HEAT ZONE PRESS CONCEPTS (1-2-1-1 Full Court Press) – AFTER MADE BASKETS / DEAD BALL
SIDELINE OPTIONS
OPTION One (Reverse back same side)
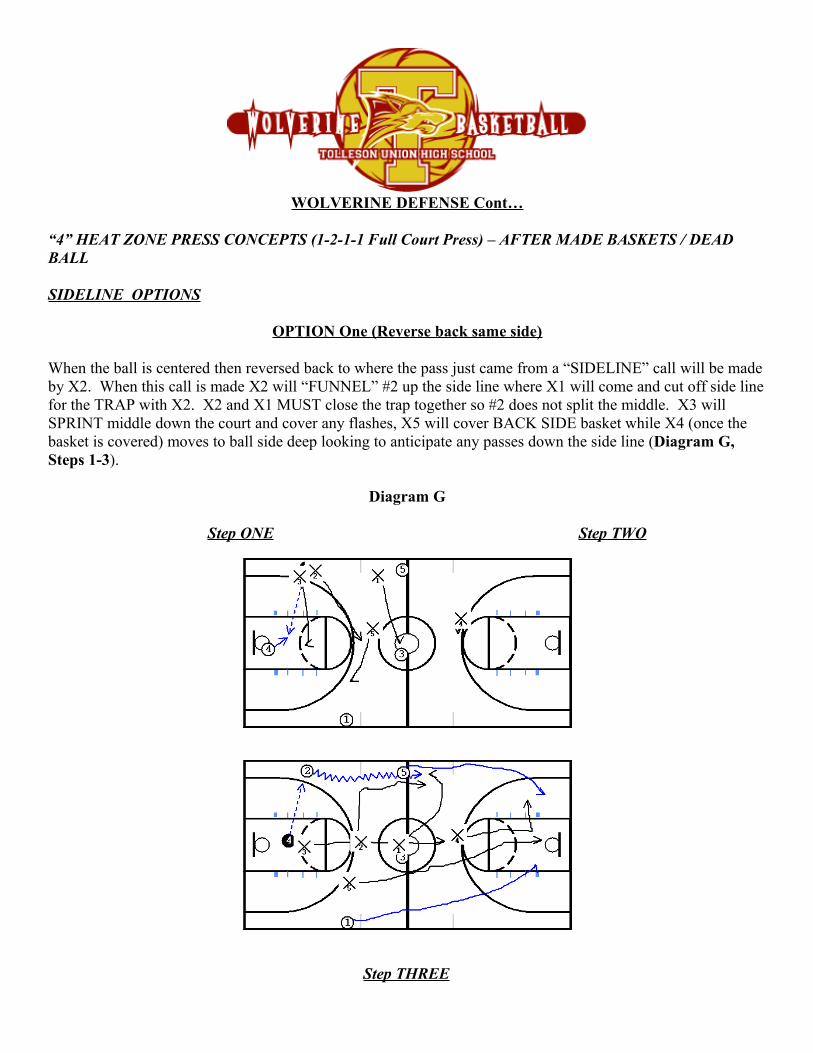
When the ball is centered then reversed back to where the pass just came from a “SIDELINE” call will be made by X2. When this call is made X2 will “FUNNEL” #2 up the side line where X1 will come and cut off side line for the TRAP with X2. X2 and X1 MUST close the trap together so #2 does not split the middle. X3 will SPRINT middle down the court and cover any flashes, X5 will cover BACK SIDE basket while X4 (once the basket is covered) moves to ball side deep looking to anticipate any passes down the side line (Diagram G, Steps 1-3).
Diagram G
Step ONE Step TWO
Step THREE
WOLVERINE DEFENSE Cont…
“4” HEAT ZONE PRESS CONCEPTS (1-2-1-1 Full Court Press) – AFTER MADE BASKETS / DEAD BALL
OPTION Two (Skip)
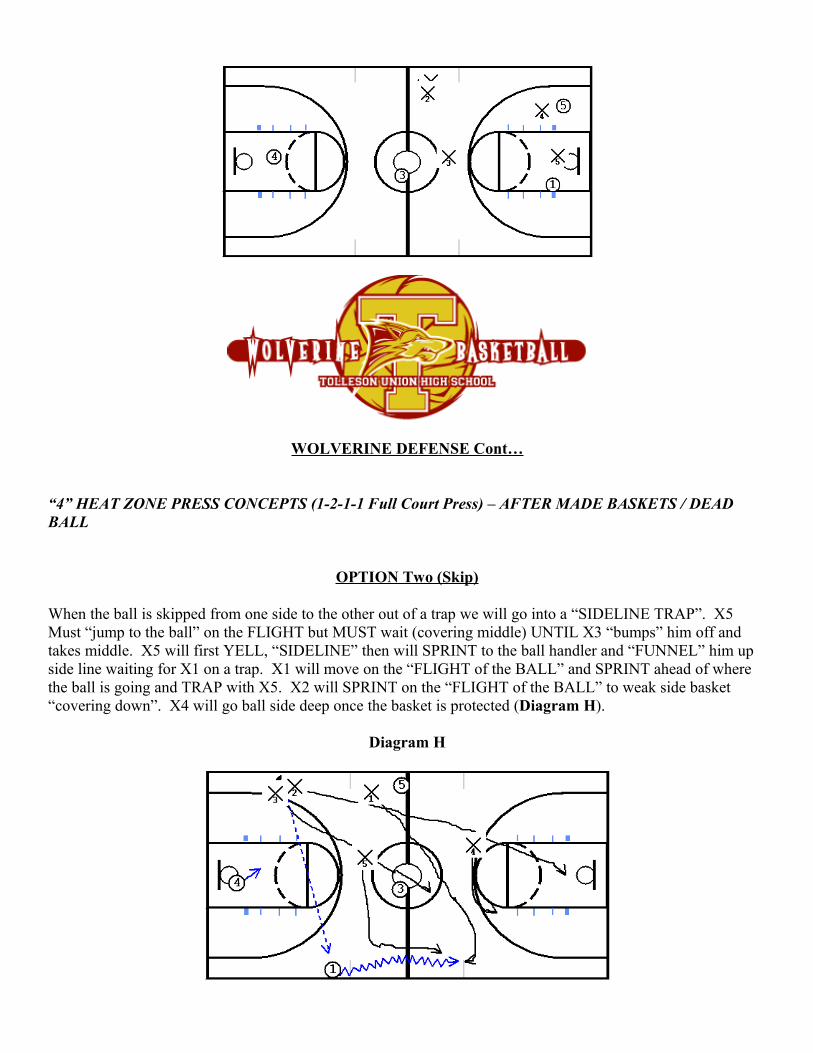
When the ball is skipped from one side to the other out of a trap we will go into a “SIDELINE TRAP”. X5 Must “jump to the ball” on the FLIGHT but MUST wait (covering middle) UNTIL X3 “bumps” him off and takes middle. X5 will first YELL, “SIDELINE” then will SPRINT to the ball handler and “FUNNEL” him up side line waiting for X1 on a trap. X1 will move on the “FLIGHT of the BALL” and SPRINT ahead of where the ball is going and TRAP with X5. X2 will SPRINT on the “FLIGHT of the BALL” to weak side basket “covering down”. X4 will go ball side deep once the basket is protected (Diagram H).
Diagram H
Yes, we will continue to trap in the back court and continue to keep pressure on the ball, force the defense to make decisions while moving faster than they want to, an increase TEMPO.
WOLVERINE DEFENSE Cont…
“4” HEAT ZONE PRESS CONCEPTS (1-2-1-1 Full Court Press) – AFTER MADE BASKETS / DEAD BALL
Adjustment: Changing “4 HEAT” 1-2-1-1 to a 1-2-2 Press.
The 1-2-1-1 diamond press is vulnerable up the sidelines. If the opponent is beating your press up the sidelines, then you can adjust your defense to a 1-2-2 zone press. X2 and X5 stop the sideline passing and dribble penetration.
Of course, this press is a gamble and makes you more susceptible to getting beat long for a lay-up. Have a rule that if one offensive player goes long, then the mid-court weak-side defender (opposite the ball) will move back to prevent the long pass. For example, if the ball is on the offense's right side (X5's side), or in the center, and a player goes long, then X4 should drop back. If the ball is on the offense's left side (X2's side), then X1 drops back.
Basic Principles Apply to All Presses
1. Always have one player back in prevent mode to prevent the easy lay-up.
2. Sprint back to the paint when you are beaten and the closest man stops ball and the next closest man PURSUES and tries to TIP or TRAP.
3. When trapping, or trying to stop the dribbler, don't reach in! Rather, you must move your feet to get into position and deny the sideline. The referee is watching closely for the reach-in foul. Back-court fouls are usually "stupid" fouls, created when the opponent was not even in position to score. It's especially "stupid" if the opponent is in the two-shot bonus, or if it is committed with only seconds remaining in a period.
4. Trapping: In trapping, one defender should first stop the dribbler, often along the sideline or baseline, or in one of the "trapping zones" (see below). Trapping zones are those areas where the offensive player definitely does not want to get caught losing the dribble. It's like getting caught in a corner.
Once the ball is stopped, the second defender sprints over and double-teams the ball. They cut off the ball-handler's view, and get into the passing lane. The position of their hands should be at the same height as the ball. If the offensive player holds the ball high to "throw over the top", the hands should be high. If the ball is low, the hands should be low to prevent the bounce pass. Do not reach in! This only transforms a good situation into a bad one (now the player goes to the free throw line). Instead, the defenders should deny the offensive player from getting the pass off and get the 5-second call, or try to tip the pass, or force her to make a bad pass, which is intercepted by one of your teammates.
5. Gapping (zone press): The other defenders who are not actively trapping, try to get into the gaps between the ball-handler and his teammates. They play the passing lanes and deny and intercept passes from the trapped player.
WOLVERINE DEFENSE Cont…
“4” HEAT ZONE PRESS CONCEPTS (1-2-1-1 Full Court Press) – AFTER MADE BASKETS / DEAD BALL
6. If the opponent is successful in running a fast-break, your "prevent" man may have a 2-on-1, or 3-on-1 situation, being the only defender back. In this situation, the prevent defender should be taught to first prevent the lay-up. If the opponent chooses to shoot the outside jumper, give it to them, as it is a lower percentage shot than the lay-up, you avoid getting a foul, and you may get the rebound, or delay the offense long enough for your teammates to arrive on defense. Often players make the mistake of coming up away from the basket and challenging the ball, only to get beaten by an easy pass to another player under the basket for a lay-up. Again, the defender must stay back, head under the hoop, and cut off the passing lanes to the easy lay-up.
Diagram I
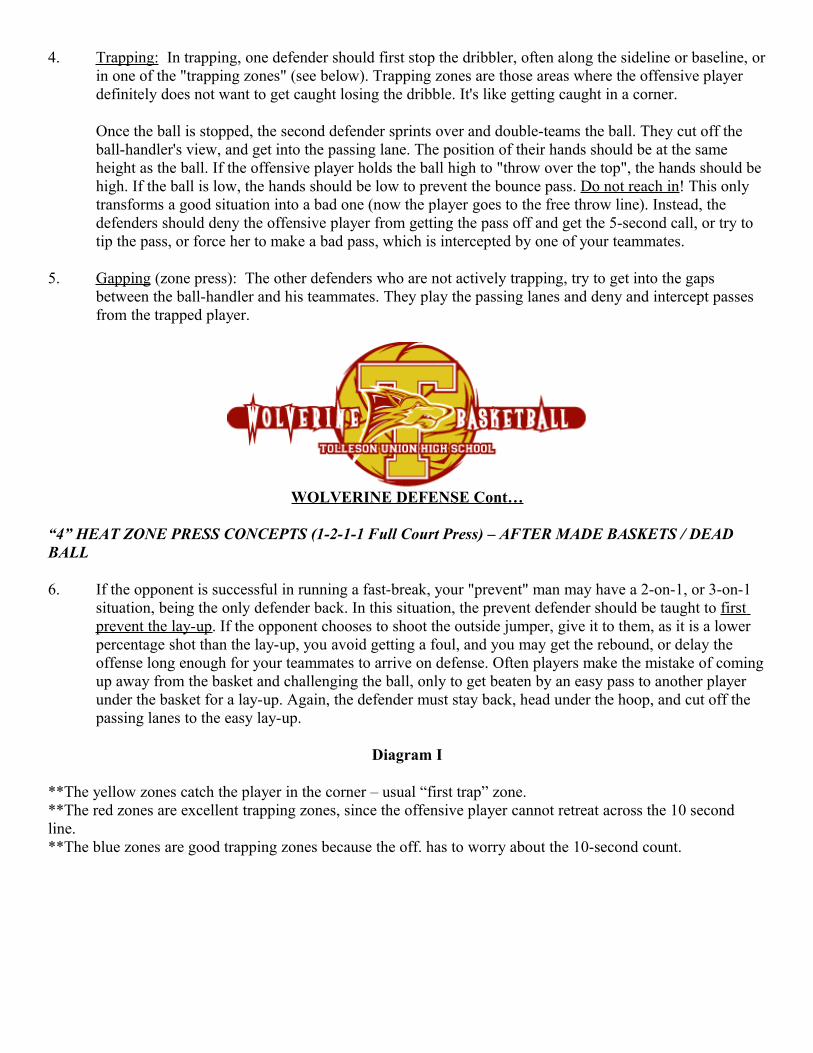
**The yellow zones catch the player in the corner – usual “first trap” zone.**The red zones are excellent trapping zones, since the offensive player cannot retreat across the 10 second line. **The blue zones are good trapping zones because the off. has to worry about the 10-second count.
WOLVERINE DEFENSE Cont…
“Junk” Defense INTRODUCTION
No matter if we play “11” or “12”, we MUST make the "star" player (s) work hard, and not only for his shots on offense, but also make him / them play defense. Don’t let him / them rest on the defensive end. We MUST take the ball to the player (s) and force him / them to play defense, and expose the player (s) to picking up some early fouls. If they try to protect the player (s) by using a zone defense against you, put your better shooters on that side of the floor, and try to get most of your shots in his / their "zone". If they play man-to-man, find out which one of your players he / they is / are guarding. As soon as the opponent shoots the ball, send this player down court on the quick breakaway. This may cause the "star" to drop back on defense, and not pursue the offensive rebound, and may be a constant worry to him / them, perhaps affecting his offensive play.
In our OFFENSIVE style, as you know, we want to push the ball every single time we have possession and by fast breaking every opportunity we WILL tire the star, and make him less of a factor than he is in a "half-court" game.
On defense, know the "star’s" tendencies. Whether he wants to shoot or drive, play accordingly. One constant is we WILL face guard this player everywhere he goes. If he goes to the bathroom make sure you are there to flush the toilet for him!!! We MUST stay FACE to FACE with this player (s). We MUST, as a TEAM, understand that the person who has the assignment of guarding the "star" will not be able to help out on team defense, as he must stay with the star at all times.
“11” CONCEPTS
In our “11” defense, our standard formation is the Diamond and One. We will also alter the standard formation depending upon the situation and what needs to be covered. Other formations we will use are: 1-3 formation, 3-1 formation, and a BOX formation. I will discuss each of these formations starting with the DIAMOND.
WOLVERINE DEFENSE Cont…
“11” CONCEPTS CONT…
DIAMOND and ONE Formation
This defense would work best against a team whose star is an all around good athlete who not only plays the wings and corners, but will also go inside. Again, your chaser is your best defender, and plays man-to-man against this star player. The other four defenders are set up in a diamond formation and play this as a zone. The diamond consists of a defender at the point, two wing defenders and a low post, middle defender. Weaknesses in this defense may come in the high post area or the corners. We MUST make the ball handler determine a side and have GREAT help side defense to cover the high post area. We MUST SPRINT corner to corner (NOT shuffle) so that we put our self in position to cover the weak spots in our DIAMOND. Again, ball pressure is still our main objective in any defense we run.
Diagram One
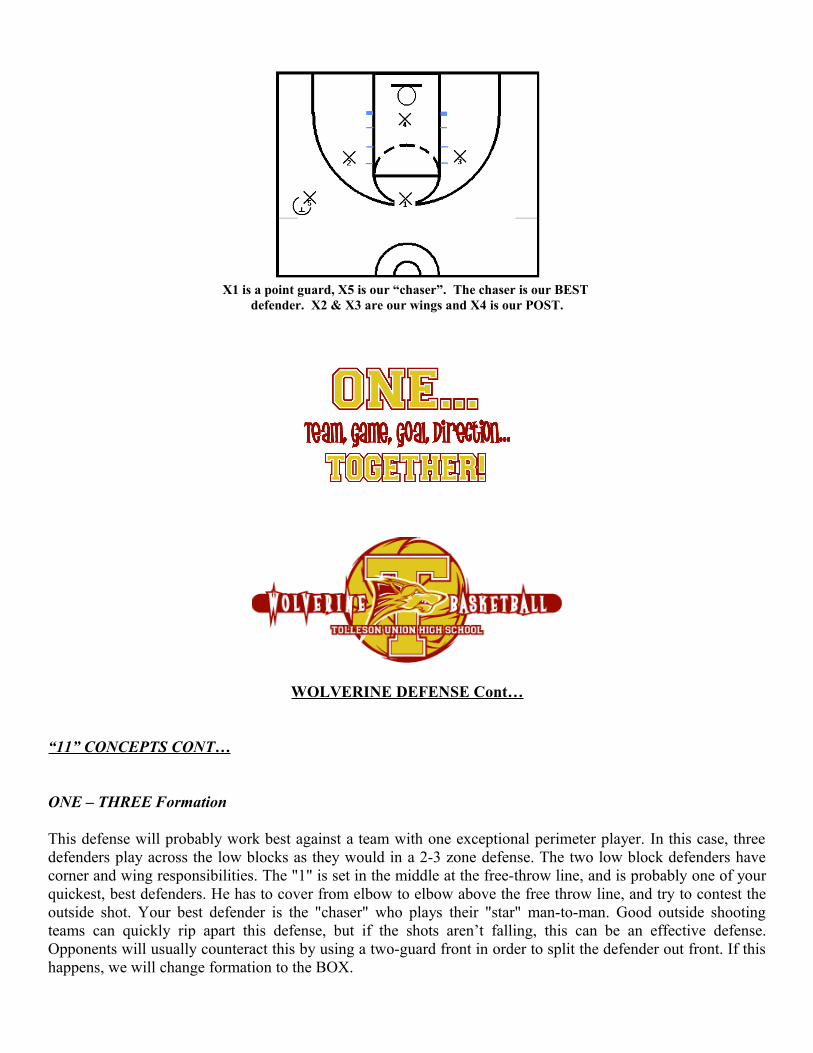
X1 is a point guard, X5 is our “chaser”. The chaser is our BEST defender. X2 & X3 are our wings and X4 is our POST.
WOLVERINE DEFENSE Cont…
“11” CONCEPTS CONT…
ONE – THREE Formation
This defense will probably work best against a team with one exceptional perimeter player. In this case, three defenders play across the low blocks as they would in a 2-3 zone defense. The two low block defenders have corner and wing responsibilities. The "1" is set in the middle at the free-throw line, and is probably one of your quickest, best defenders. He has to cover from elbow to elbow above the free throw line, and try to contest the outside shot. Your best defender is the "chaser" who plays their "star" man-to-man. Good outside shooting teams can quickly rip apart this defense, but if the shots aren’t falling, this can be an effective defense. Opponents will usually counteract this by using a two-guard front in order to split the defender out front. If this happens, we will change formation to the BOX.
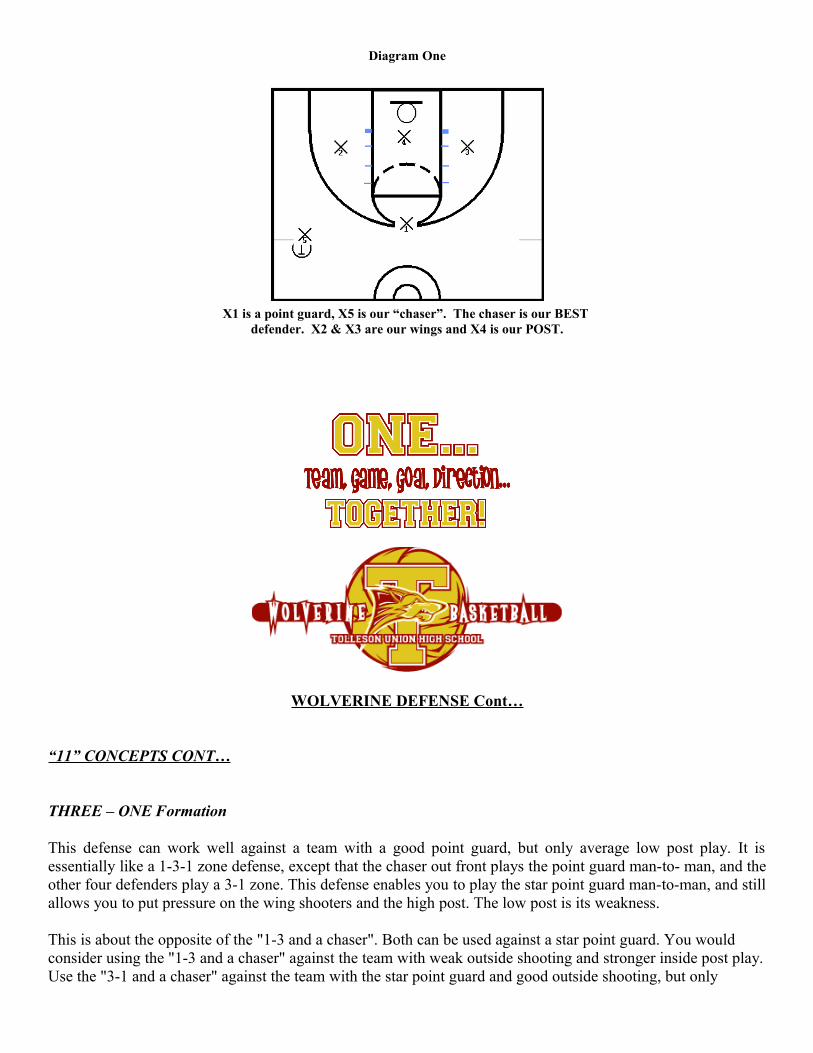
Diagram One
X1 is a point guard, X5 is our “chaser”. The chaser is our BEST defender. X2 & X3 are our wings and X4 is our POST.
WOLVERINE DEFENSE Cont…
“11” CONCEPTS CONT…
THREE – ONE Formation
This defense can work well against a team with a good point guard, but only average low post play. It is essentially like a 1-3-1 zone defense, except that the chaser out front plays the point guard man-to- man, and the other four defenders play a 3-1 zone. This defense enables you to play the star point guard man-to-man, and still allows you to put pressure on the wing shooters and the high post. The low post is its weakness.
This is about the opposite of the "1-3 and a chaser". Both can be used against a star point guard. You would consider using the "1-3 and a chaser" against the team with weak outside shooting and stronger inside post play. Use the "3-1 and a chaser" against the team with the star point guard and good outside shooting, but only
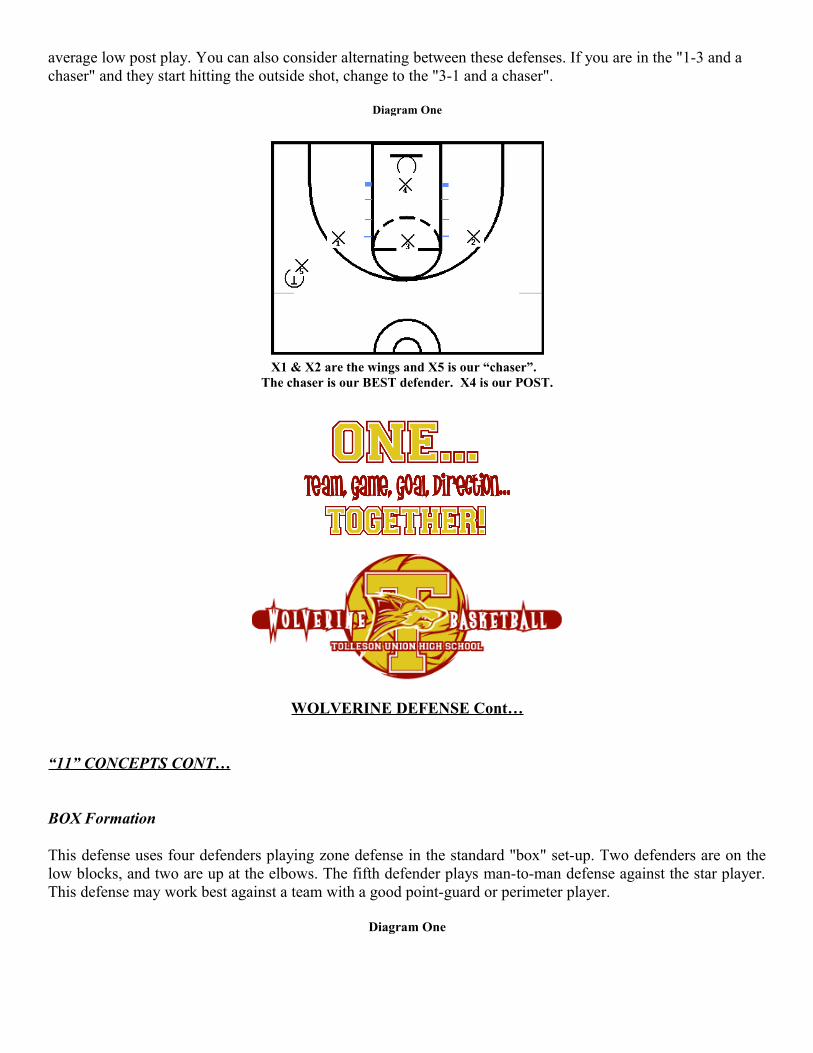
average low post play. You can also consider alternating between these defenses. If you are in the "1-3 and a chaser" and they start hitting the outside shot, change to the "3-1 and a chaser".
Diagram One
X1 & X2 are the wings and X5 is our “chaser”. The chaser is our BEST defender. X4 is our POST.
WOLVERINE DEFENSE Cont…
“11” CONCEPTS CONT…
BOX Formation
This defense uses four defenders playing zone defense in the standard "box" set-up. Two defenders are on the low blocks, and two are up at the elbows. The fifth defender plays man-to-man defense against the star player. This defense may work best against a team with a good point-guard or perimeter player.
Diagram One
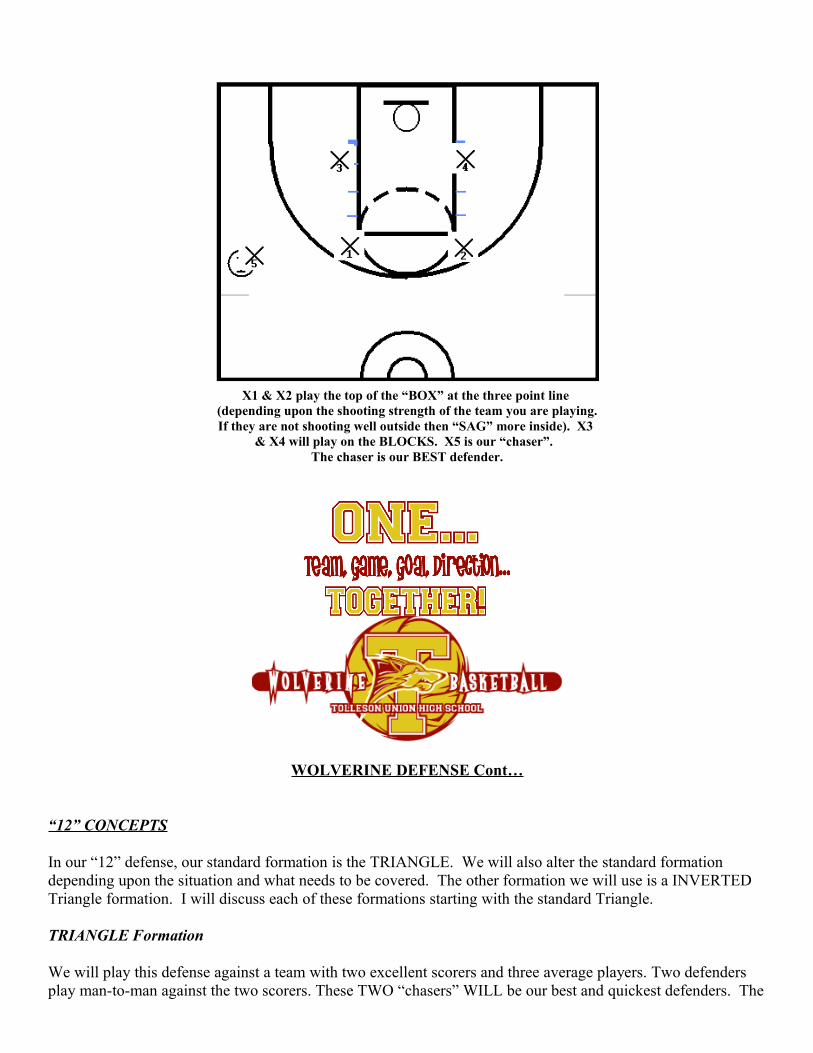
X1 & X2 play the top of the “BOX” at the three point line (depending upon the shooting strength of the team you are playing.If they are not shooting well outside then “SAG” more inside). X3
& X4 will play on the BLOCKS. X5 is our “chaser”. The chaser is our BEST defender.
WOLVERINE DEFENSE Cont…
“12” CONCEPTS
In our “12” defense, our standard formation is the TRIANGLE. We will also alter the standard formation depending upon the situation and what needs to be covered. The other formation we will use is a INVERTED Triangle formation. I will discuss each of these formations starting with the standard Triangle.
TRIANGLE Formation
We will play this defense against a team with two excellent scorers and three average players. Two defenders play man-to-man against the two scorers. These TWO “chasers” WILL be our best and quickest defenders. The
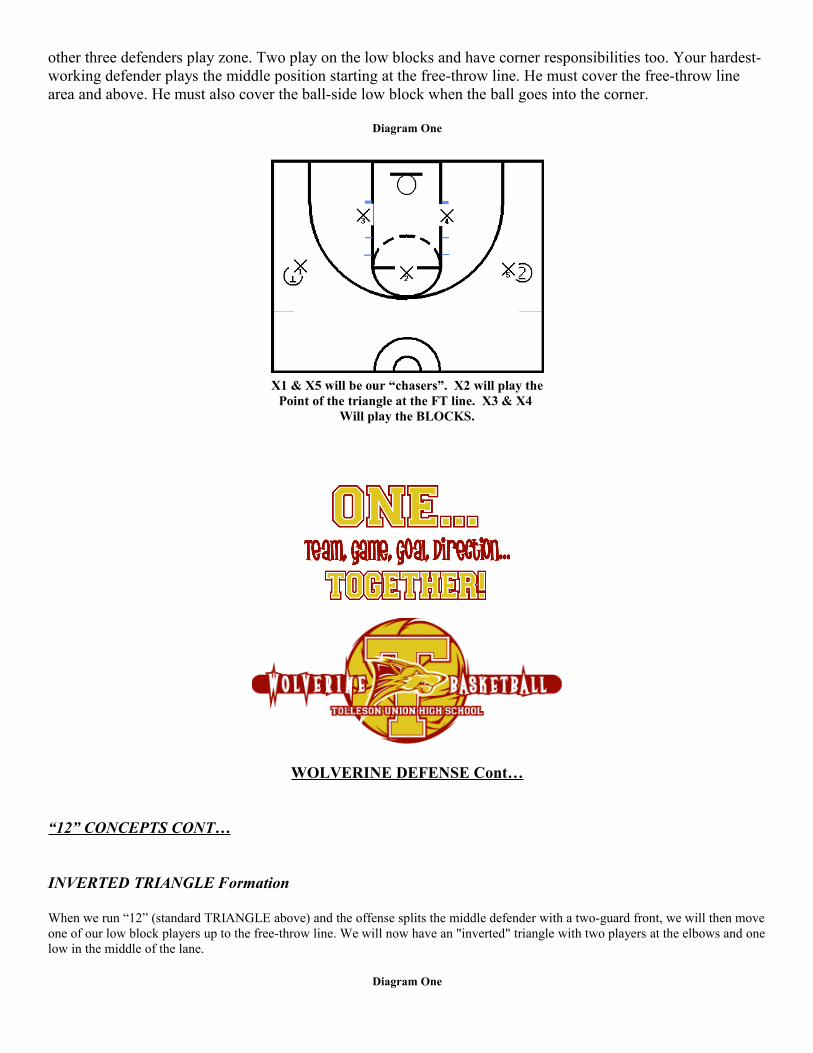
other three defenders play zone. Two play on the low blocks and have corner responsibilities too. Your hardest-working defender plays the middle position starting at the free-throw line. He must cover the free-throw line area and above. He must also cover the ball-side low block when the ball goes into the corner.
Diagram One
X1 & X5 will be our “chasers”. X2 will play thePoint of the triangle at the FT line. X3 & X4
Will play the BLOCKS.
WOLVERINE DEFENSE Cont…
“12” CONCEPTS CONT…
INVERTED TRIANGLE Formation
When we run “12” (standard TRIANGLE above) and the offense splits the middle defender with a two-guard front, we will then move one of our low block players up to the free-throw line. We will now have an "inverted" triangle with two players at the elbows and one low in the middle of the lane.
Diagram One
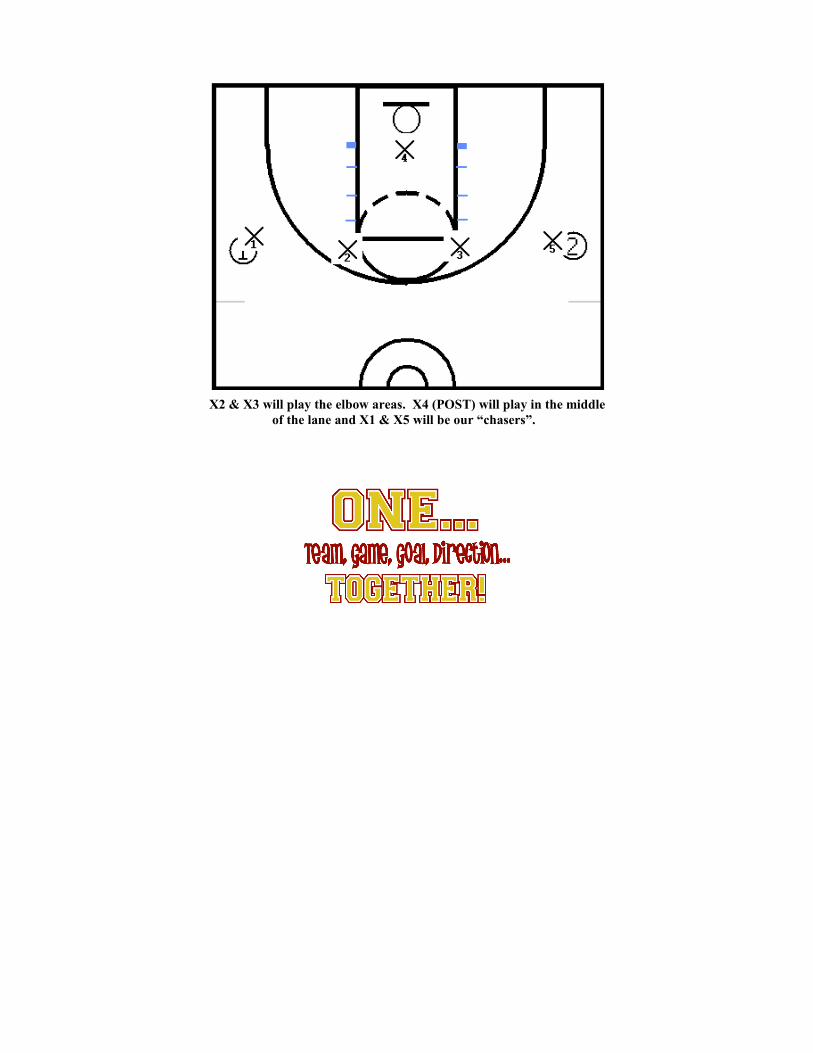
X2 & X3 will play the elbow areas. X4 (POST) will play in the middleof the lane and X1 & X5 will be our “chasers”.


