85
Version 4.1.3 PrinterOn Print Delivery Station Installation and Administration Guide

Version 4.1.3
PrinterOn Print Delivery Station
Installation and Administration Guide
1
Chapter 1: Introduction .............................................................................................................................. 5About the Print Delivery Station software ........................................................................................................... 5
PDS instances ............................................................................................................................................................ 5Print Delivery Station components ................................................................................................................... 6
PrinterOn Server editions ........................................................................................................................................... 7PrinterOn printers and pools .................................................................................................................................... 8
PrinterOn printers .................................................................................................................................................... 8Secure Release Anywhere pools ........................................................................................................................ 8
New in this release ........................................................................................................................................................ 9
Chapter 2: Installing the Print Delivery Station ................................................................................ 10System requirements ................................................................................................................................................. 10
Hardware requirements ...................................................................................................................................... 11Software requirements ........................................................................................................................................ 11Printer requirements ............................................................................................................................................ 11Service requirements ........................................................................................................................................... 12Network communication requirements ........................................................................................................ 12
Installing the Print Delivery Station software ................................................................................................... 12Logging into the Configuration Manager for the first time ....................................................................... 15
Importing your PDS customization file (PrinterOn Hosted only) ....................................................... 16Locating your APIsiteAuth value ..................................................................................................................... 17
Uninstalling a Print Delivery Station .................................................................................................................... 17
Contents
PrinterOn Print Delivery Station v4.1.3 Installation and Administration Guide | 2
Chapter 3: Exploring the Configuration Manager ........................................................................... 18Launching the Configuration Manager ............................................................................................................... 18
Accessing PDS settings when multiple PrinterOn components are installed ................................ 19Configuration Manager security ...................................................................................................................... 20
The Configuration Manager workspace ............................................................................................................. 20Tabbed interface .................................................................................................................................................... 20
Administering the Configuration Manager ....................................................................................................... 21Changing your Configuration Manager password ................................................................................... 21Connecting remote servers to a parent Configuration Manager ....................................................... 23Logging out ............................................................................................................................................................. 24
Chapter 4: Working with multiple PDS instances ............................................................................ 25Adding PDS instances ................................................................................................................................................ 26
Adding PDS instances to PrinterOn Enterprise/Express ......................................................................... 26Adding a PDS instance to your PrinterOn Hosted deployment .......................................................... 27
Opening a PDS configuration in Configuration Manager ........................................................................... 27Resetting the PDS configuration ........................................................................................................................... 28
Chapter 5: Managing printers and printer pools ............................................................................ 30Managing the printers attached with the PDS ................................................................................................. 31
Editing printer settings ........................................................................................................................................ 31Configuring the printer Output Destination ............................................................................................... 34Synchronizing printers lists ................................................................................................................................ 35
Managing Secure Release Anywhere printer pools ....................................................................................... 36
Chapter 6: Configuring how PDS manages print data .................................................................. 38Configuring print processing settings ................................................................................................................. 39Configuring Advanced Job Handling settings ................................................................................................. 41
Chapter 7: Managing print jobs ............................................................................................................ 43Using the local Queue Monitor .............................................................................................................................. 43
Print job status values .......................................................................................................................................... 44Using the Remote Queue Monitor ....................................................................................................................... 45Reprinting documents ............................................................................................................................................... 46
Chapter 8: Configuring network communication settings ........................................................... 47Configuring communication between PrinterOn services ........................................................................... 48
Configuring local listening ports ..................................................................................................................... 50
PrinterOn Print Delivery Station v4.1.3 Installation and Administration Guide | 3
Configuring remote queue monitors ............................................................................................................. 51Configuring proxy settings ................................................................................................................................ 52
Configuring the remote listener ............................................................................................................................ 53Configuring PDH network settings ................................................................................................................. 53Configuring authentication settings for the listener ............................................................................... 55Configuring the port used by the Check Jobs service ............................................................................ 55Configuring push notification ........................................................................................................................... 57
Adding and managing PrintValets ........................................................................................................................ 58Configuring PrintValet communication settings ....................................................................................... 58
Chapter 9: Securing your Print Delivery Station .............................................................................. 61Configuring PDS security .......................................................................................................................................... 61
Configuring PDS encryption ............................................................................................................................. 62Configuring your SSL keystore ......................................................................................................................... 63Entering SSL information .................................................................................................................................... 64
Configuring and managing user access to PDS .............................................................................................. 64Configuring PDS user settings ......................................................................................................................... 65
Chapter 10: Managing and monitoring system health .................................................................. 66Configuring logging settings .................................................................................................................................. 67
Configuring debug logging levels and storage information ................................................................ 67Logging print activity managed by a third-party system ...................................................................... 68Notifying third-party print management systems of print activity .................................................... 69
Configuring Quality of Service (QoS) settings ................................................................................................. 69Managing the PDS service ....................................................................................................................................... 71
Stopping and starting the PDS service ......................................................................................................... 71Creating a package of diagnostic information .......................................................................................... 71Updating your PrinterOn license information ............................................................................................ 72
Appendix A: Advanced configuration settings ................................................................................. 73Advanced settings list ................................................................................................................................................ 74
Appendix B: Installing PDS from the command line ...................................................................... 76
Appendix C: The data encryption process ........................................................................................ 79
Appendix D: Obtaining a signed SSL certificate .............................................................................. 80Generating Private/Public KeyPair ........................................................................................................................ 80Generating a certificate signing request ............................................................................................................ 81
PrinterOn Print Delivery Station v4.1.3 Installation and Administration Guide | 4
Submitting your signing request to a Certificate Authority ....................................................................... 81Importing your signed certificate into your Keystore ................................................................................... 81Configuring PDS to use SSL and your Keystore .............................................................................................. 82Testing SSL Communications ................................................................................................................................. 82

5
1
Introduction
This guide explains how to configure and monitor the Print Delivery Station software.
1.1 About the Print Delivery Station softwareA Print Delivery Station (PDS) is software that acts as an intermediary between the PrinterOn Server and a physical printer. You can attach multiple printers to a single PDS; the PDS links to a list of one or more virtual PrinterOn printers, each of which is mapped to a physical printer. The physical printer is known as the output destination or release station; it is the printer or MFP which prints the job. The PDS receives print jobs sent to its attached printers, and is responsible for directing the print data to the appropriate release station.
1.1.1 PDS instancesYour PrinterOn service supports unlimited PDS instances, which you can deploy based on your needs. You’ll need to install the PDS software on each computer that will host a PDS instance.
Typically, the need for additional PDS instances is determined by physical location and/or network architecture. For example, an organization may install one PDS to service all printers in one building, and another instance to service printers in a different building. Larger organizations with multiple networks might install one or more PDS instances to service each network.

Introduction
PrinterOn Print Delivery Station v4.1.3 Installation and Administration Guide | 6
However, there may be other logical reasons to add PDS instances to your PrinterOn service. For example, a hotel may choose to connect all publicly accessible printers to one PDS instance, and all employee-only printers to another.
Each PDS instance services a collection of printers. Printers can only be attached to a single PDS instance at any given time. If you attach a printer to a PDS when it was already attached to another PDS, it is automatically detached from the original PDS instance.
When you create a PDS instance, that PDS instance receives a unique ID, referred to as a serial number, to help identify it. The PrinterOn service uses this serial number to associate the PDS with its printers.
1.1.2 Print Delivery Station componentsThe PrinterOn PDS is comprised of the following components:
• Configuration Manager: The Configuration Manager is a web-based management console that lets you configure and administer your PDS instances through a browser.
• PrinterOn Print Delivery Station (PDS): One or more PDS instances can be installed within your organization, behind your firewall. The PDS collects print jobs sent from the PrinterOn Server and releases them to your printers. Data is pulled securely through your firewall; there is no need to open any inbound ports. Documents are held in the PDS until they are released by an administrator or user from the web page interface or a PrintValet keypad. The PDS has the following subcomponents:• Queue Monitor: The Print Delivery Station's Queue Monitor is a tab within the
Configuration Manager for managing print requests. All print jobs collected by the PDS are listed in the Queue Monitor. The standard Queue Monitor is designed to be used by printer administrators. Depending on printer and Queue Monitor configuration, administrators may monitor and/or manage (print/pause/delete) current and completed print jobs for all of the printers attached to the PDS.
• Remote Queue Monitor: The Remote Queue Monitor is a web (HTML) version of the Queue Monitor and may be used in a variety of scenarios. A typical example is environments where printers are available to the public; the Remote Queue Monitor can be made available as a secure release mechanism. The Remote Queue Monitor presents a simple interface for entering user information to retrieve print jobs for release. By allowing users to release their

Introduction
PrinterOn Print Delivery Station v4.1.3 Installation and Administration Guide | 7
own print jobs, this setup provides a level of privacy for users concerned with printing in public locations.
• PrinterOn Print Delivery Hub (PDH): The PDH creates an Internet Printing Protocol (IPP) interface for your printers and provides a secure means of transferring print jobs through your firewall. The Print Delivery Hub is hosted by PrinterOn in all our cloud solutions. When using an on-premise solution, however, it may be necessary to host a PDH within your organization.
The PrinterOn solution can be configured for several popular system integration models or customized as needed using the available HTML and Java source code. It is easy to deploy and can be hosted in multiple local or remote network scenarios. The PrinterOn software has been designed for optional integration with existing network infrastructures, including LDAP and Print Management Systems.
1.2 PrinterOn Server editionsThere are several editions of the PrinterOn software:
• On-premise solutions:• PrinterOn Enterprise is a full-featured print solution. This edition supports
advanced features such as multi-server deployment, scalability through clustering, and integration with MDM/EDM solutions.
• PrinterOn Express is the starter package. Although it shares all the same basic features as PrinterOn Enterprise, it excludes many of the advanced configuration features of the Enterprise edition that are typically unnecessary for a small- to medium-sized business or organization.
You can upgrade your Express edition to Enterprise at any time. • Cloud-Based solution: With PrinterOn Hosted, PrinterOn hosts all of the
components of the PrinterOn solution, except for the PDS. If you are a PrinterOn Hosted subscriber, the only component that you need to install on your computers is the PDS software.
Introduction
PrinterOn Print Delivery Station v4.1.3 Installation and Administration Guide | 8
1.3 PrinterOn printers and poolsBefore working with the PrinterOn solution, it is useful to understand two key concepts:
• PrinterOn printers• Secure Release Anywhere pools
1.3.1 PrinterOn printersA PrinterOn printer is not a physical printer, but rather a virtual printer. That is, it is a definition that points to a physical printer and defines the printing behavior. The PrinterOn server acts as middleware between the user and a physical printer. When users submit jobs to a PrinterOn printer, the PrinterOn server directs those jobs to the physical printer or print queue defined for that printer, referred to as an output destination. Before users can submit print jobs to a PrinterOn printer, you must point define that printer’s output destination.
PrinterOn printers need not map to physical printers on a one-to-one basis. The benefit of creating virtual printers is that you can specify different printing behavior or access privileges for the same physical printer. You simply create multiple PrinterOn printer definitions, apply different configuration settings to each, and then map them to the same physical printer. Although it is the same physical printer printing the jobs in each case, to the user, they appear as distinct printers with different available features.
For example, consider a hotel with a color printer. The hotel could create one printer definition that points to their color printer and allows users to print in colour at a specific price per sheet. They could then create a second printer definition that points to the same physical printer, but restricts print jobs to black and white, and charges a lower rate per sheet. For frequent guests, they could also create a third printer definition for the same printer that does not charge a fee at all.
1.3.2 Secure Release Anywhere poolsSecure Release Anywhere pools are groups of PrinterOn printers. To the user, a printer pool appears as just another printer. However, instead of distributing jobs to a single output destination, a printer pool can distribute print jobs to any of its member printers. Users can go to the output destination of any member printer and pull the print job down using their credentials or a secure release code.

Introduction
PrinterOn Print Delivery Station v4.1.3 Installation and Administration Guide | 9
The printers in a Secure Release Anywhere pool are not limited to a single network; you can include printers from disparate networks in a single printer pool. For example, a hotel chain could create a single Secure Release Anywhere pool that contains all the printers from their business centers in all their hotels worldwide. A guest in the Singapore location can print to the printer pool, go to the business center, and pull the job down. The same guest could travel to Seoul the next day, print to the same pool, go to the business center at the Seoul location, and pull the job down there.
The Secure Release Anywhere service is not enabled by default. To enable Secure Release Anywhere for your PrinterOn service, contact PrinterOn.
1.4 New in this releaseThis guide documents PrinterOn Print Delivery Station v4.1.3. This release follows on previous releases of the product. New features added with this release include:
Feature DescriptionPDS Synchronization Support has been added to the stand-alone PDS Configuration
Manager to allow administrators to create a PDS-specific schedule for synchronizing printer lists, without requiring a connection to a parent Configuration Manager.
For more information, see Synchronizing printers lists.
10
2
Installing the Print Delivery Station
This chapter describes how to install the Print Delivery Station software and log into the Configuration Manager for the first time.
• System requirements• Installing the Print Delivery Station software • Logging into the Configuration Manager for the first time • Uninstalling a Print Delivery Station
2.1 System requirementsTo successfully deploy a standalone Print Delivery Station, you should ensure that your system meets the following requirements. These requirements apply to both the cloud and on-premise solutions.
• Hardware requirements • Software requirements • Printer requirements• Service requirements• Network communication requirements

Installing the Print Delivery Station
PrinterOn Print Delivery Station v4.1.3 Installation and Administration Guide | 11
2.1.1 Hardware requirementsThe PrinterOn Print Delivery Station has the following hardware requirements:
2.1.2 Software requirementsThe PrinterOn Print Delivery Station requires that the Java Runtime Environment be installed on the machine hosting the PDS. To avoid JRE version conflicts, the PDS Installation Wizard installs a dedicated JRE for the PDS.
2.1.3 Printer requirementsThe PrinterOn Print Delivery Station has the following printer requirements:
Consideration RequirementOperating System PrinterOn Print Delivery Station supports the following:
• Windows 7 SP1 (32 or 64-bit) or later, with current patches installed
• Windows Server 2012 (64-bit), with current patches installed (Datacenter and Standard Editions)
• Windows Server 2016 (Datacenter and Standard Editions)Processor Intel compatible processor with 2GHz multi-core processorMemory 2 GB RAM minimum (4 GB recommended)Disk Space 2 GB of free disk space
Consideration RequirementAccess You must have local or network access to the printer.Credentials For networked printers, you must have Administrator credentials. Printing Protocols Printers that support PCL or PostScript are recommended. Host-based printers Host-based printers are not recommended.

Installing the Print Delivery Station
PrinterOn Print Delivery Station v4.1.3 Installation and Administration Guide | 12
2.1.4 Service requirementsThe Print Delivery Station has the following service requirements:
2.1.5 Network communication requirementsTo ensure that your Print Delivery Station has no network communication issues, make sure that your server meets the following requirements:
2.2 Installing the Print Delivery Station softwareOnce you have ensured that you have met all the System requirements, you’re ready to install your software.
You can run the Print Delivery Station installer in two ways:• Using the standard UI Installation Wizard, which walks you through the installation
process, described in the task that follows. • Using the command-line installer. The command-line installer lets you enter all of
your installation information in a single command. Once you enter the command, no further input is required to complete the installation. For information, see Appendix B: Installing PDS from the command line.
Consideration RequirementPrinterOn Subscription or License
You must have an active PrinterOn Hosted subscription or a PrinterOn Enterprise or PrinterOn Express license.
Secure Release Anywhere pools
To support Secure Release Anywhere pools, you must contact PrinterOn to enable the Secure Release Anywhere service for your PrinterOn deployment.
Consideration RequirementPort For internal network communication, ensure that the computer has
inbound and outbound access on port 443.
It is recommended, but not required, to have ports 80 and 631 available also.
Internet access If you intend to set up a Hybrid deployment of PrinterOn, ensure that Internet access is available at all times.

Installing the Print Delivery Station
PrinterOn Print Delivery Station v4.1.3 Installation and Administration Guide | 13
To install the PDS software:1. Run PrintDeliveryStation.exe to launch the Print Delivery Station Installation
Wizard. The wizard guides you through the installation of the PDS software. 2. Click Next at the Welcome screen.3. Accept the License Agreement to proceed with the installation.4. On the Setup Type screen, choose which type of install you want to perform.
5. Click Next. • If you are selected a PrinterOn Hosted installation, the installer begins to
install the PDS software. Proceed to Step 8. • If you selected a Custom License installation, the License Summary File screen
appears. Proceed to Step 6.
Setup Type DescriptionPrinterOn Hosted Installs a standalone PDS that is used in conjunction with the
PrinterOn Hosted service. When you complete the installation, you’ll need to import your customization file.
Custom License Installs a remote PDS that is to be used in conjunction with PrinterOn Enterprise or PrinterOn Express.
A Custom License installation requires that you supply your PrinterOn license file.
Installing the Print Delivery Station
PrinterOn Print Delivery Station v4.1.3 Installation and Administration Guide | 14
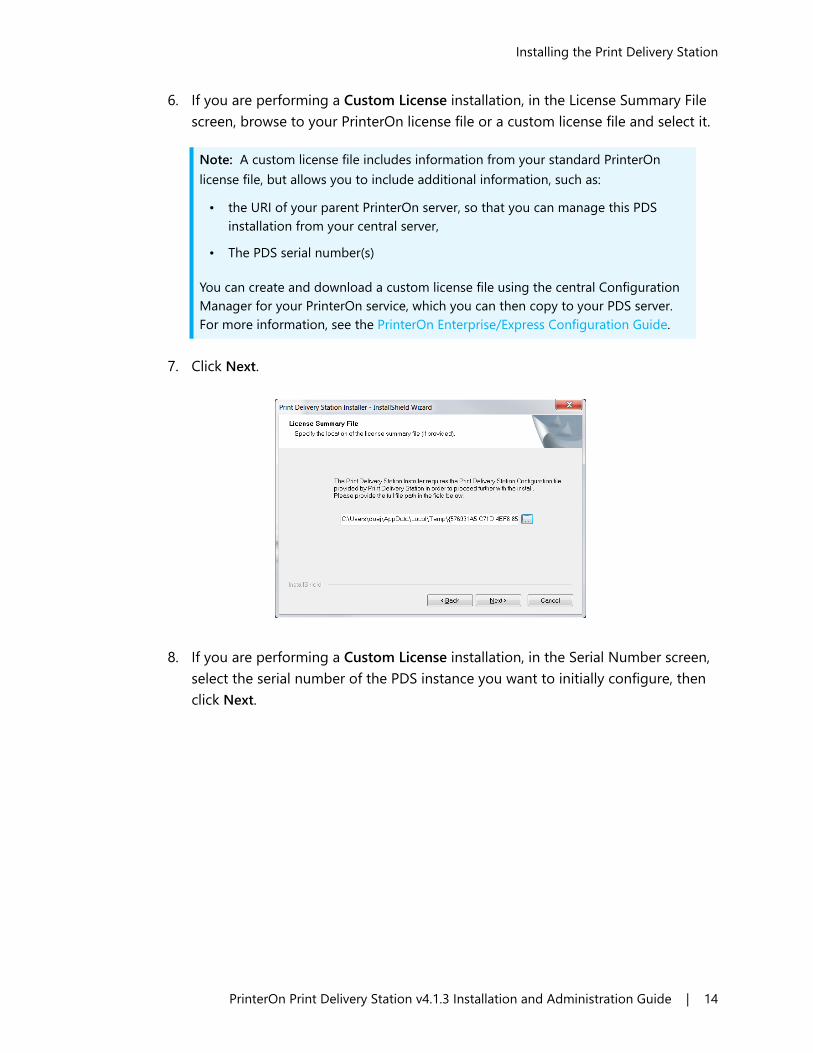
6. If you are performing a Custom License installation, in the License Summary File screen, browse to your PrinterOn license file or a custom license file and select it.
7. Click Next.
8. If you are performing a Custom License installation, in the Serial Number screen, select the serial number of the PDS instance you want to initially configure, then click Next.
Note: A custom license file includes information from your standard PrinterOn license file, but allows you to include additional information, such as:
• the URI of your parent PrinterOn server, so that you can manage this PDS installation from your central server,
• The PDS serial number(s)
You can create and download a custom license file using the central Configuration Manager for your PrinterOn service, which you can then copy to your PDS server. For more information, see the PrinterOn Enterprise/Express Configuration Guide.

Installing the Print Delivery Station
PrinterOn Print Delivery Station v4.1.3 Installation and Administration Guide | 15
9. When the installation is complete, click Finish, and then reboot the computer.
2.3 Logging into the Configuration Manager for the first timeAfter you install the Print Delivery Station software, you’ll be able to log in to the Configuration Manager using the default credentials. The Configuration Manager runs in your browser and serves as the central dashboard for your PDS service. From there, you can monitor your system health, administer your printers, and, of course, configure all your PDS settings.
To open the Configuration Manager:1. Choose Start > All Programs > PDS > PDS Configuration Manager.
The Configuration Manager immediately prompts you to change your password.2. Enter and confirm a new password. Your new password must meet the following
criteria:• It must not contain your Username. • It must not have 4 or more consecutive letters or digits. • It must be at least 8 characters in length, with at least 1 letter, 1 number, and 1
special character. Passwords of 10 or more characters must have at least 2 letters, 2 numbers and/or 2 special characters.
Note: On Windows 2010, search for PDS Configuration Manager from the Start menu, or go to http://127.0.0.1:8057.

Installing the Print Delivery Station
PrinterOn Print Delivery Station v4.1.3 Installation and Administration Guide | 16
3. Click Login. The Configuration Manager opens. • If you are a PrinterOn Hosted subscriber, the Import Data tab appears, where
you’ll need to import the PDS customization file before configuring the PDS software. The customization file contains the information about the PDS instance you want to configure.
• If you are using PrinterOn Enterprise/Express, information about the PDS instance was imported when you selected your PrinterOn license file during the installation.
For an overview of the Configuration Manager, see Exploring the Configuration Manager.
2.3.1 Importing your PDS customization file (PrinterOn Hosted only)When you create a new PDS instance in the PrinterOn Admin Portal, the portal creates a customization file for that instance. The customization file associates the instance-specific Serial Number with your PrinterOn account, and contains all the configuration information for that PDS.
The first time you log into Configuration Manager, you’ll need to import the customization file for a PDS instance so that you can modify its configuration settings as necessary. After you import the customization file, you don’t need to import it again; the next time you log into Configuration Manger, that PDS configuration will already be loaded.
If you have more than one PDS instance, you can change which PDS instance you are configuring at any time by importing the customization file associated with another PDS. For more information, see Opening a PDS configuration in Configuration Manager.
To import PDS data:1. When you log into the Configuration Manager for the first time, the Import Data
tab appears.

Installing the Print Delivery Station
PrinterOn Print Delivery Station v4.1.3 Installation and Administration Guide | 17
2. Enter your PrinterOn Administration Username and Password. 3. If you know the Serial Number of the PDS instance that you want to configure,
enter it in the Serial Number field. If you don’t know the serial number, you can leave the field blank.
4. Click Import Settings. If you left Serial Number blank:• If you have only one site and/or PDS serial number, Configuration Manager
selects the serial number for you and imports the PDS configuration details. • If you have more than one site and/or PDS serial number, Configuration
Manager prompts you to choose which site and/or PDS instance you want to configure.
2.3.2 Locating your APIsiteAuth valueWhen you first install a licensed version of the PrinterOn software, your Configuration Manager uses your APIsiteAuth value as your password. The APIsiteAuth value is a an entry in the PrinterOn license file, unique to every organization that receives a license from PrinterOn.
To locate your APIsiteAuth value:1. Locate your PrinterOn license file (PrinterOnConfig.txt) and open it in a text editor. 2. In the file, locate the [Site] section. This section includes the APIsiteAuth value.
[site]
APIsiteUID = 562873393017
APIsiteAuth = SzNQJxV7
AdminEmail = [email protected]

Installing the Print Delivery Station
PrinterOn Print Delivery Station v4.1.3 Installation and Administration Guide | 18
2.4 Uninstalling a Print Delivery StationTo uninstall the Print Delivery Station software:
1. Run PrintDeliveryStation.exe to launch the Print Delivery Station Installation Wizard.
2. When the wizard prompts you to choose a modification option, select Remove, then click Next. The installer removes all PDS software from the machine.
3. Restart your computer to complete the uninstall process.

18
3
Exploring the Configuration Manager
The Configuration Manager allows you to configure all PDS settings, monitor the health of the PDS, and manage and monitor the print jobs sent to any attached printer.
3.1 Launching the Configuration ManagerTo open the Configuration Manager:
1. Choose Start > All Programs > PDS > PDS Configuration Manager.
2. Log in to the Configuration Manager.
Note: If on Windows 2010 or 2012, search for PDS Configuration Manager from the Start menu, or go to http://127.0.0.1:8057.

Exploring the Configuration Manager
PrinterOn Print Delivery Station v4.1.3 Installation and Administration Guide | 19
After you successfully log in, the Configuration Manager appears.
3.1.1 Accessing PDS settings when multiple PrinterOn components are installed
The Configuration Manager UI adapts based on which PrinterOn components are present on the server. Because the PrinterOn Enterprise/Express software can be deployed in a variety of ways based on the needs of an organization, the Configuration Manager only displays settings for the component(s) installed on the computer. As a result, depending on your deployment and the server you are configuring, you may see additional screens or settings beyond those described in this guide.
This guide assumes that the PDS is the only PrinterOn component installed on the computer. If you have multiple components installed on the same computer, for example a PDS and a PDH, you can access the PDS-specific settings though the Advanced menu.
To open the PDS settings in a multi-component Configuration Manager:1. In the Configuration Manager, click Advanced > Components. 2. Click the Configure button adjacent to the Print Delivery Station component. The
PDS component configuration appears.
Note: If you have multiple PrinterOn components installed on this computer, you may see the Configuration Manager’s Home tab by default. In this case, you can access the PDS configuration settings from the Advanced menu. For more information, see Accessing PDS settings when multiple PrinterOn components are installed.

Exploring the Configuration Manager
PrinterOn Print Delivery Station v4.1.3 Installation and Administration Guide | 20
3.1.2 Configuration Manager securityConfiguration Manager enforces the following security policies:
• After three failed log in attempts, Configuration Manager locks the Log In screen for one minute.
• For each subsequent failed log in attempt, it increases the lockout by one minute.• After 15 minutes of inactivity, the Configuration Manager session times out, after
which you must log in again to continue configuration.
3.2 The Configuration Manager workspace
3.2.1 Tabbed interfaceThe Configuration Manager workspace contains a number of tabs from which you can configure all aspects of your PDS software.
Tab/Menu FeaturesQueue Monitor Displays the local queue monitor, which lists current and completed
print jobs. Printers Displays a list of all the printers that are currently attached to the PDS.
From this tab, you can also modify the output destination (that is, the physical location) for a PrinterOn printer, specify the release and privacy mode, or define reprint settings for the printer.
Import Data Lets you import a customization file for the PDS, or reset the PDS software to the default configuration settings.
Networking Lets you configure communication between the PDS and other PrinterOn services.
Logging Lets you define what printing events should logged and where the logs should be stored. If you are integrating with a third-party print management system, the Logging tab also lets you define logging and notification interaction between PDS and the third-party system.
Secure Remote Release Pools
Displays a list of the Secure Release Anywhere printer pools that are attached to your PDS.Note: This tab is only available if you have Secure Remote Release enabled for your PrinterOn service.
PrintValet Lets you configure the PDS to communicate with PrintValet keypads, and to manage the PrintValet devices with which it communicates.

Exploring the Configuration Manager
PrinterOn Print Delivery Station v4.1.3 Installation and Administration Guide | 21
3.3 Administering the Configuration ManagerThe Settings menu, identified by the gear icon ( ), lets you perform some general administration tasks, such as:
• Toggling between Basic and Advanced views • Changing your Configuration Manager password • Connecting remote servers to a parent Configuration Manager • Logging out
3.3.1 Changing your Configuration Manager passwordYou can change your password at any time from the Configuration Manager Settings menu.
To change your Configuration Manager password:1. In the Configuration Manager, click the Settings button ( ).
Users Lets you view and modify a list of the operators and administrators who have access to manage any print jobs sent to this PDS.
Print Processing Lets you define how the PDS manages print data.Security Lets you configure general security settings, including encryption of
print job data, and SSL certificate information.QoS Lets you configure PDS to work with PrinterOn’s Release Agent Status
Monitoring service to report its state to the PrinterOn Cloud Directory.Note: This tab is only available if you have subscribed to the Release Agent Status Monitoring Service.
Service and Support Lets you manage the PDS service and download a support package you can send to PrinterOn Support for troubleshooting assistance.
(Settings menu) Provides access to general administration tasks. For more information, see Administering the Configuration Manager.
Tab/Menu Features
Exploring the Configuration Manager
PrinterOn Print Delivery Station v4.1.3 Installation and Administration Guide | 22
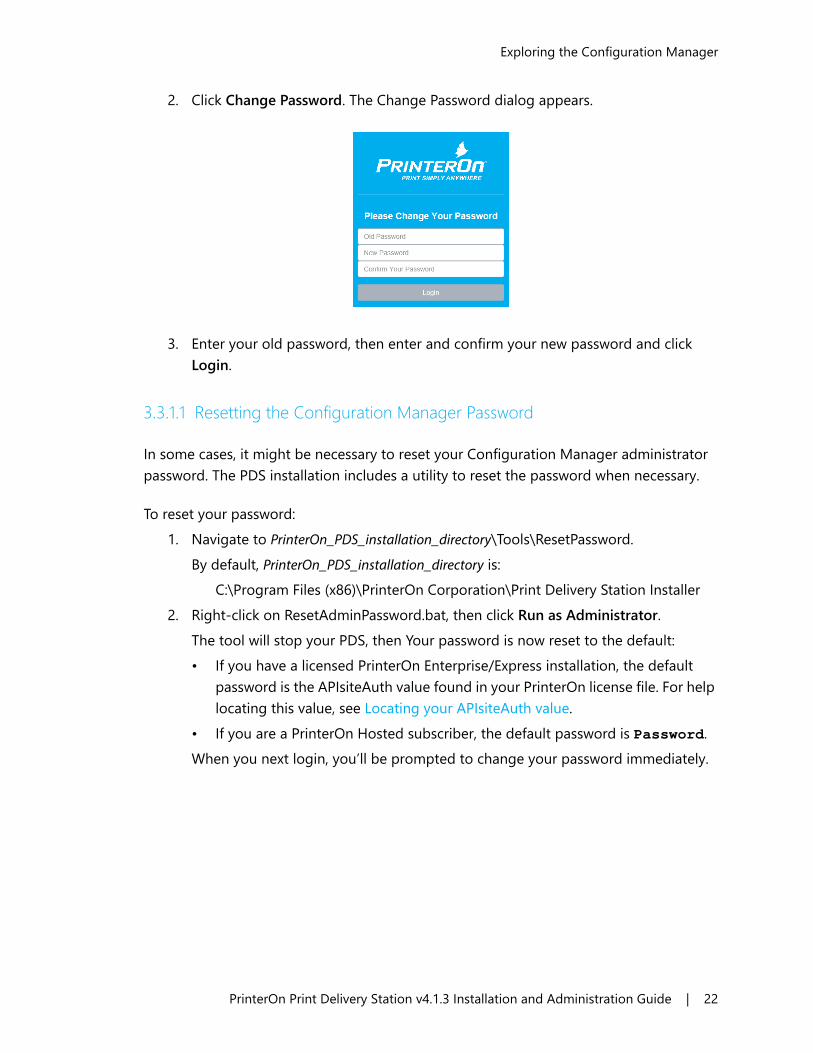
2. Click Change Password. The Change Password dialog appears.
3. Enter your old password, then enter and confirm your new password and click Login.
3.3.1.1 Resetting the Configuration Manager Password
In some cases, it might be necessary to reset your Configuration Manager administrator password. The PDS installation includes a utility to reset the password when necessary.
To reset your password:1. Navigate to PrinterOn_PDS_installation_directory\Tools\ResetPassword.
By default, PrinterOn_PDS_installation_directory is:C:\Program Files (x86)\PrinterOn Corporation\Print Delivery Station Installer
2. Right-click on ResetAdminPassword.bat, then click Run as Administrator. The tool will stop your PDS, then Your password is now reset to the default:• If you have a licensed PrinterOn Enterprise/Express installation, the default
password is the APIsiteAuth value found in your PrinterOn license file. For help locating this value, see Locating your APIsiteAuth value.
• If you are a PrinterOn Hosted subscriber, the default password is Password.When you next login, you’ll be prompted to change your password immediately.

Exploring the Configuration Manager
PrinterOn Print Delivery Station v4.1.3 Installation and Administration Guide | 23
3.3.2 Connecting remote servers to a parent Configuration ManagerThe Configuration Manager allows you to manage PDS installations from a single location. To complete this process, you must log into the Configuration Manager on the remote server and select a parent configuration server.
To connect to a parent server:1. On the remote server, log into the Configuration Manager and click Settings ( )
> Parent.
The Parent Status page appears.
2. In the Parent URI field, enter the IP address and port of the computer that will serve as the central configuration server. The default port is 8057.
3. Press Connect.
You can now log into Configuration Manager on your parent server to manage and configure the PDS that is installed remotely.
Note: You can still configure individual servers locally on each remote server, regardless of the parent configuration.
Note: If this is the first time you’re logging into the Configuration Manager on the remote server, you’ll need to use the default credentials:
• Username: root• Password:
• For PrinterOn Hosted: Password• For PrinterOn Enterprise/PrinterOn Express: The APIsiteAuth value found in
your PrinterOn license file.

Exploring the Configuration Manager
PrinterOn Print Delivery Station v4.1.3 Installation and Administration Guide | 24
3.3.3 Logging outTo log out of the Configuration Manager:
1. Click Settings ( ) > Logout.
25
4
Working with multiple PDS instances
Your PrinterOn service supports unlimited PDS instances, which you can deploy based on your needs. For example, a hotel may choose to connect all publicly accessible printers to one PDS instance, and all employee-only printers to another. You’ll need to install the PDS software on each computer that will host a PDS instance.
You can create additional PDS instances at any time. For more information, see Adding PDS instances.
When you create a PDS instance, that PDS instance receives a serial number to help identify it. After creating a PDS instance, you can open the Import Data tab in the Configuration Manager where you can specify the instance-specific serial number. The configuration information for that PDS instance is then loaded into the Configuration Manager so you can modify and manage it.
For more information, see Opening a PDS configuration in Configuration Manager.
Working with multiple PDS instances
PrinterOn Print Delivery Station v4.1.3 Installation and Administration Guide | 26
4.1 Adding PDS instancesWith any edition of the PrinterOn software, one PDS instance is created by default. You can create additional PDS instances at any time. Once created, you can use the PDS Serial Number to open and administer that PDS instance in the Configuration Manager.
You can create a PDS instance in the following ways:• For PrinterOn Enterprise/Express: In the Configuration Manager on your central
PrinterOn server, create a new PDS Instance in the Home > Serial Number tab. For more information on creating PDS instance for PrinterOn Enterprise/Express, see the PrinterOn Enterprise/Express Configuration Guide.
• For PrinterOn Hosted: Create a new PDS instance in the Software page of the PrinterOn Admin Portal. For more information, see Adding a PDS instance to your PrinterOn Hosted deployment.
4.1.1 Adding PDS instances to PrinterOn Enterprise/ExpressYou can create new PDS instances from the Configuration Manager on your central PrinterOn server.
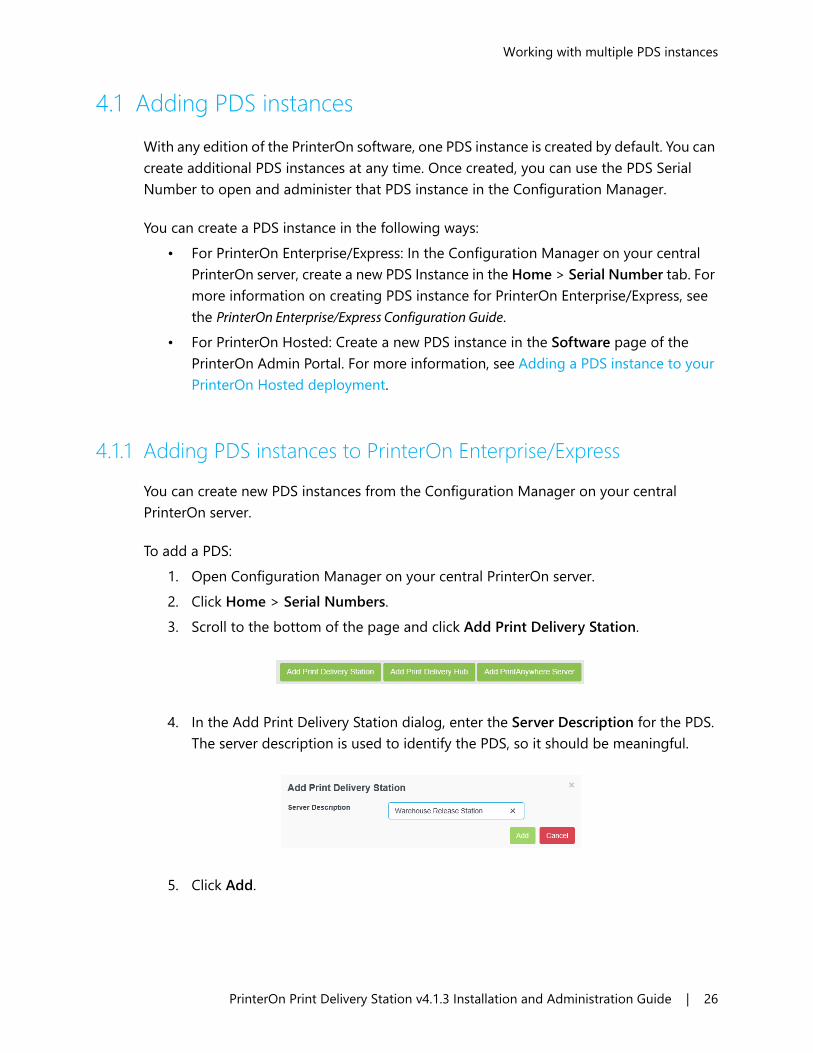
To add a PDS:1. Open Configuration Manager on your central PrinterOn server. 2. Click Home > Serial Numbers.3. Scroll to the bottom of the page and click Add Print Delivery Station.
4. In the Add Print Delivery Station dialog, enter the Server Description for the PDS. The server description is used to identify the PDS, so it should be meaningful.
5. Click Add.

Working with multiple PDS instances
PrinterOn Print Delivery Station v4.1.3 Installation and Administration Guide | 27
4.1.2 Adding a PDS instance to your PrinterOn Hosted deploymentYou can create new PDS instances for your PrinterOn Hosted service from the PrinterOn Admin Portal.
To create PDS instance:1. Log in to the PrinterOn.com Admin Portal at www.printeron.com/administrators.
2. Click the Software icon . The Print Delivery software page appears. 3. Locate the Add Another Print Delivery Station panel at the bottom of the page.
4. Enter a Description for the new PDS, then click Add PDS. The PDS is created, and is listed in the Print Delivery software panel.
5. Attach printers and Secure Release Anywhere pools to the PDS instance as necessary:a) In the Print Delivery software panel, select the new PDS instance.b) In the Manage Printers panel, select a printer or printer pool from the
Available Printers list, then click Add to move it to the Attached Printers list.
6. Open the configuration for the new PDS instance in the Configuration Manager and configure the settings for this instance as necessary. For more information, see Opening a PDS configuration in Configuration Manager.
4.2 Opening a PDS configuration in Configuration ManagerIf you have multiple PDS instances, you can change which instance is displayed in the Configuration Manager at any time by opening a new PDS configuration.
The Configuration Manager displays the configuration for the PDS with the Serial Number displayed in the Import Data tab. You can open a different configuration by changing the this value to the Serial Number of the desired PDS instance.
Note: You can attach or detach printers in the Configuration Manager or in the PrinterOn Admin Portal. However, you can only attach Secure Release Anywhere pools to a PDS instance from the Admin Portal.

Working with multiple PDS instances
PrinterOn Print Delivery Station v4.1.3 Installation and Administration Guide | 28
To change which PDS configuration is displayed in Configuration Manager:1. In the Configuration Manager, click Import Data. The Import Data tab appears.
2. Click Reset Settings to clear the current PDS configuration from the Configuration Manager.
3. If you are a PrinterOn Hosted subscriber, enter your PrinterOn Administration Username and Password.
4. If you know the Serial Number of the PDS instance that you want to configure, enter it in the Serial Number field. If you don’t know the Serial Number, you can leave the field blank.
5. Click Import Settings. If you left Serial Number blank:• If you have only one site and/or PDS Serial Number, Configuration Manager
selects the Serial Number for you and imports the PDS configuration details. • If you have more than one site and/or PDS Serial Number, Configuration
Manager prompts you to choose which site and/or PDS instance you want to configure.
4.3 Resetting the PDS configurationResetting the PDS configuration will discard any customizations you have configured and return all PDS settings to the defaults. Should you need to reset a PDS to its default state, you can do so from the Import tab.
To reset the PDS software and Serial Number to their defaults:1. In the Configuration Manager, click Import Data. The Import Data tab appears.
Working with multiple PDS instances
PrinterOn Print Delivery Station v4.1.3 Installation and Administration Guide | 29
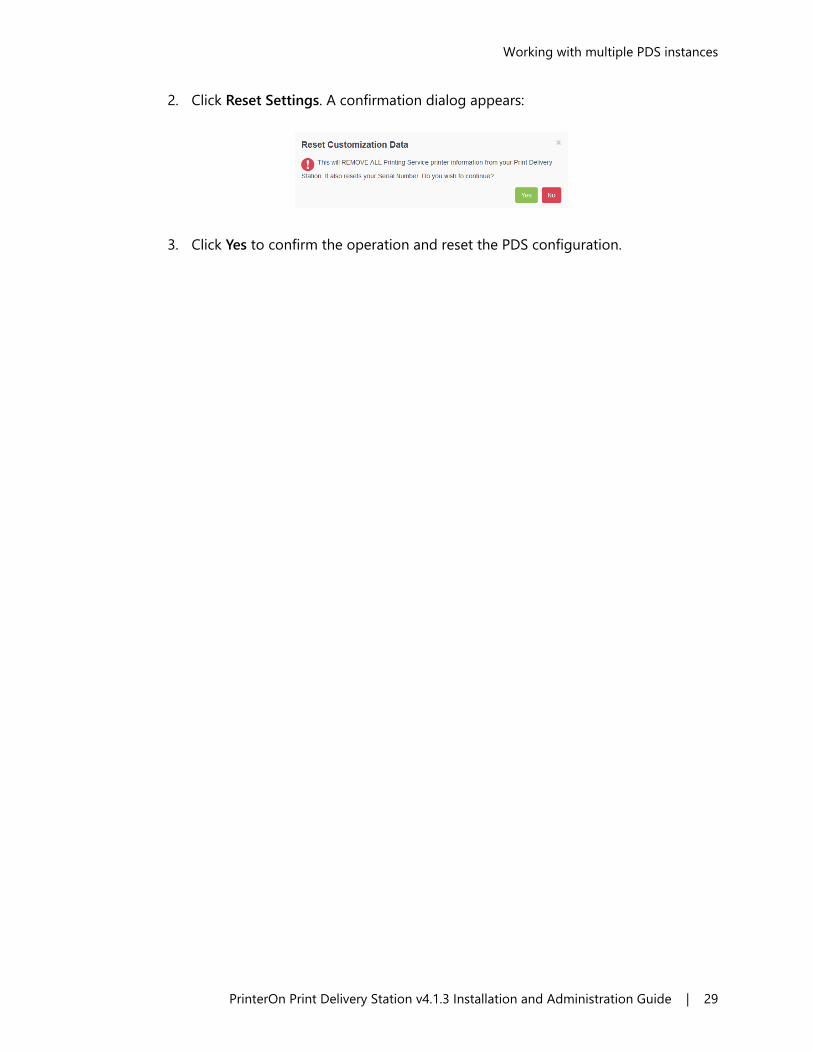
2. Click Reset Settings. A confirmation dialog appears:
3. Click Yes to confirm the operation and reset the PDS configuration.
30
5
Managing printers and printer pools
PrinterOn supports delivery of print jobs to a wide range of printers, print protocols and print queues. The Print Delivery Station (PDS) represents the release station that communicates with the printer or print queue.
• The Printers tab lets you manage and configure the PrinterOn printers attached to your PDS. For more information, see Managing the printers attached with the PDS.
• The Secure Release Anywhere Pools tab lets you view a list of the Secure Release Anywhere printer pools that are attached to your PDS. For more information, see Managing Secure Release Anywhere printer pools.

Managing printers and printer pools
PrinterOn Print Delivery Station v4.1.3 Installation and Administration Guide | 31
5.1 Managing the printers attached with the PDSTo manage the printers that are associated with the PDS:
1. In the Configuration Manager, click Printers. The printers list appears.
2. Perform one of the following tasks:• To attach another PrinterOn printer to the PDS, click Add, then edit the printer
settings. • To edit an existing printer, select the printer from the list, click the adjacent Edit
button, then edit the printer settings.• To unlink a printer and the PDS, select the printer from the list, then click
Delete. • To link a local printer with the PDS, click Map, then select the local printer to
attach. • To define how often this PDS server synchronizes the printers list with the
printers list on the parent server, set the PDS synchronization settings.
5.1.1 Editing printer settingsYou can edit settings for any of the PrinterOn printers that are linked to the PDS. The Edit Printer page lets you change the output destination for a PrinterOn printer, specify the release and privacy mode, or define reprint settings for the printer. By default, only the Output Destination settings is displayed. To configure the privacy mode or reprint settings, you’ll need to turn on Advanced View.
The most common reason to edit the settings for a printer is to change the output destination associated with a PrinterOn printer (that is, the network address of the physical printer to which the PDS sends print jobs). For example, if you replace a printer, rather than
Managing printers and printer pools
PrinterOn Print Delivery Station v4.1.3 Installation and Administration Guide | 32
create a new PrinterOn printer definition for that printer, you can simply modify the output destination to associate an existing PrinterOn printer with the network address of the new printer.
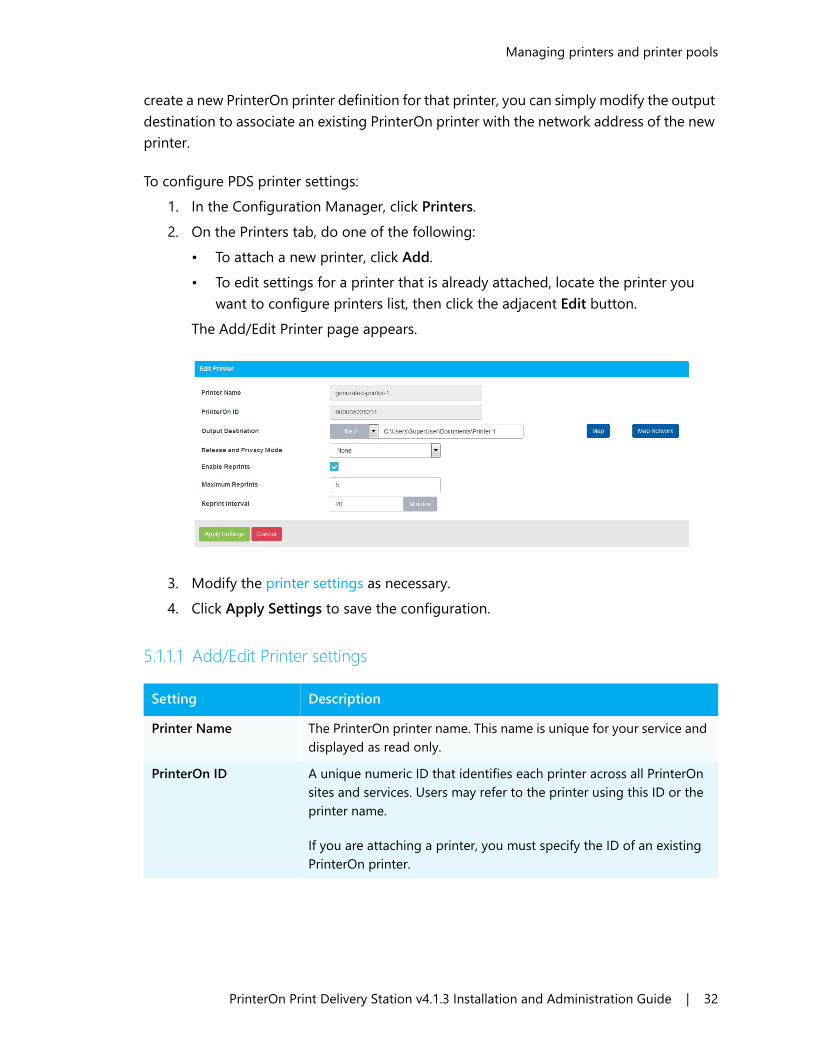
To configure PDS printer settings:1. In the Configuration Manager, click Printers. 2. On the Printers tab, do one of the following:
• To attach a new printer, click Add. • To edit settings for a printer that is already attached, locate the printer you
want to configure printers list, then click the adjacent Edit button. The Add/Edit Printer page appears.
3. Modify the printer settings as necessary. 4. Click Apply Settings to save the configuration.
5.1.1.1 Add/Edit Printer settings
Setting DescriptionPrinter Name The PrinterOn printer name. This name is unique for your service and
displayed as read only. PrinterOn ID A unique numeric ID that identifies each printer across all PrinterOn
sites and services. Users may refer to the printer using this ID or the printer name.
If you are attaching a printer, you must specify the ID of an existing PrinterOn printer.

Managing printers and printer pools
PrinterOn Print Delivery Station v4.1.3 Installation and Administration Guide | 33
Output Destination The physical printer, print queue, or file to which the PrinterOn printer directs print jobs. You must define the Output Destination for the PrinterOn Server to communicate with your physical printers, or with a print queue.
For detailed information about defining the output destination, see Configuring the printer Output Destination.
Release and Privacy Mode(Advanced view only)
How the print jobs are handled upon delivery to the PDS.
Select one of the following values:• None: Print jobs are released to the destination queue
immediately. The Print Mode must be set to Automatic. For more information on setting the Print Mode, see Configuring print processing settings.
• Optional: The PDS uses the Release and Privacy Mode configured for the printer in the PrinterOn Directory. No local overriding rules are applied.
• General Delivery: Print jobs will only be released when using the Remote Queue Monitor or the PrintValet keypad.
• Members Only: Only users with a PrinterOn Membership can release print jobs.
• Operators Only: Only users listed as Operators can release print jobs.
Anonymity Level(Advanced view only)
Defines what information is reported from PDS to the reporting server. Typically, reported information includes print job results and some page metrics, such as page counts and formats.
Select one of the following values:• None: No anonymity is applied.• Optional: The PDS uses the Anonymity Level configured for the
printer in the PrinterOn Directory. No local overriding rules are applied.
• Anonymous: Suppresses Job Name and Job Owner.• Minimal: Includes basic job details, such as page count and job
size.• Anonymous + Minimal: Combines options from both
Anonymous and Minimal.
Setting Description
Managing printers and printer pools
PrinterOn Print Delivery Station v4.1.3 Installation and Administration Guide | 34
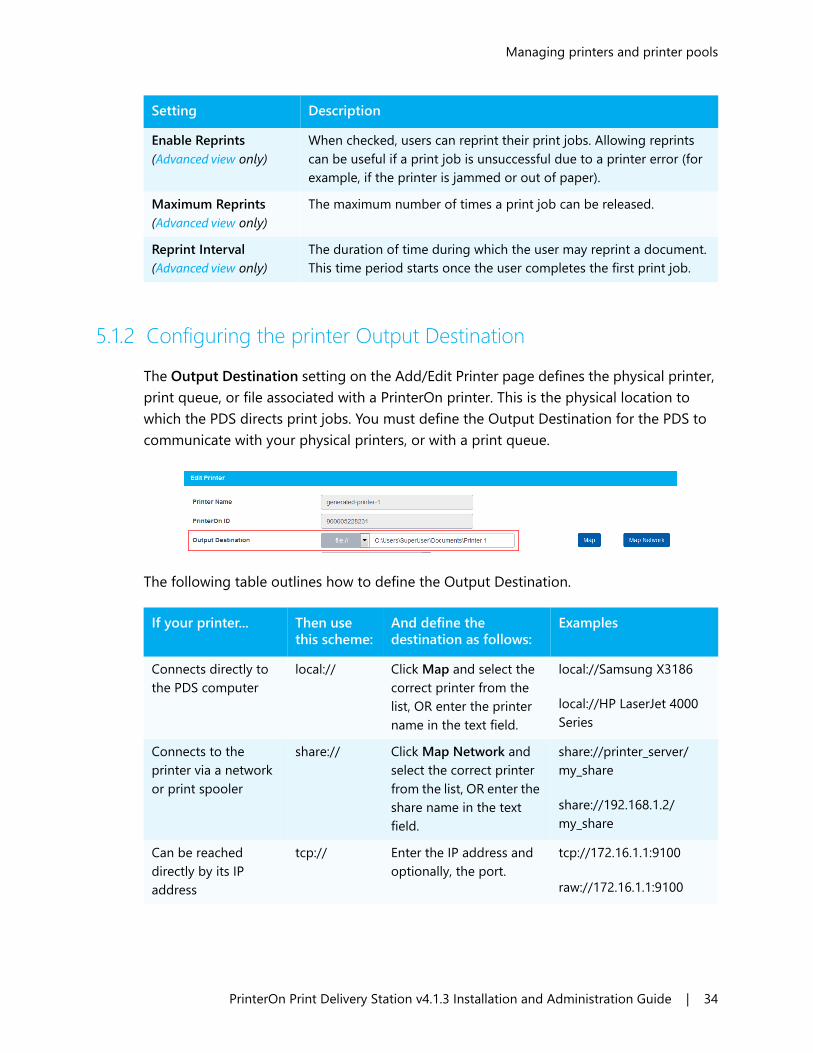
5.1.2 Configuring the printer Output DestinationThe Output Destination setting on the Add/Edit Printer page defines the physical printer, print queue, or file associated with a PrinterOn printer. This is the physical location to which the PDS directs print jobs. You must define the Output Destination for the PDS to communicate with your physical printers, or with a print queue.
The following table outlines how to define the Output Destination.
Enable Reprints(Advanced view only)
When checked, users can reprint their print jobs. Allowing reprints can be useful if a print job is unsuccessful due to a printer error (for example, if the printer is jammed or out of paper).
Maximum Reprints(Advanced view only)
The maximum number of times a print job can be released.
Reprint Interval(Advanced view only)
The duration of time during which the user may reprint a document. This time period starts once the user completes the first print job.
Setting Description
If your printer... Then use this scheme:
And define the destination as follows:
Examples
Connects directly to the PDS computer
local:// Click Map and select the correct printer from the list, OR enter the printer name in the text field.
local://Samsung X3186
local://HP LaserJet 4000 Series
Connects to the printer via a network or print spooler
share:// Click Map Network and select the correct printer from the list, OR enter the share name in the text field.
share://printer_server/my_share
share://192.168.1.2/my_share
Can be reached directly by its IP address
tcp:// Enter the IP address and optionally, the port.
tcp://172.16.1.1:9100
raw://172.16.1.1:9100

Managing printers and printer pools
PrinterOn Print Delivery Station v4.1.3 Installation and Administration Guide | 35
5.1.3 Synchronizing printers lists Both the remote PDS server and the parent PrinterOn server maintains a list of printers which the remote PDS services. As you add and remove definitions for printers on various servers, the printers list of the remote PDS server may become out of sync with that of the parent PrinterOn server.
Being out of sync can result in issues printing, since PDS server or other components may not have they information it need to properly direct print jobs to the destination printers. You may add or modify a printer listing, or may remove a printer from the list of printers serviced by the remote PDS, which can result in the PDS being unable to distribute the job to the destination printer.
Supports the IPP protocol
ipp://ipps://https://
Enter the IP address or URI of the printer followed by the printer queue.
If your printer supports SSL, use the https:// or ipps:// schema.
ipp://172.16.1.1/ipp/port1
ipps://172.16.1.1/ipp/port1
https://172.16.1.1/ipp/port1
Supports the LPR protocol
lpr:// Enter the IP address or URI of the printer.
lpr://172.16.1.1
Outputs print jobs to file
file:// Enter the folder to save the printed jobs.
file://C:\Documents\printjobs
Is integrated with the LRS VPSX server
lrsq:// The LRS VPSX server as well as port and queue name.Note: When using an LRS queue, the LRS Queue Data Transmission Application should be installed on the same machine that is hosting PDS.
lrsq://192.168.3.2:6612/my_docs
If your printer... Then use this scheme:
And define the destination as follows:
Examples

Managing printers and printer pools
PrinterOn Print Delivery Station v4.1.3 Installation and Administration Guide | 36
To mitigate this situation, the Configuration Manager allows you to automate the synchronization of printer lists by defining a regular interval at which the remote PDS synchronizes listings with the parent server.
To set an automatic synchronization interval:1. In the Configuration Manager, click Printers. The printers list appears.
2. Click the gear icon above the printers list ( ), then set the PDS synchronization settings. The PDS Synchronization settings dialog appears.
3. Click Enable Auto Synchronization. 4. In the Synchronization Interval field, specify how often, in minutes, the remote
PDS synchronizes its printer list with the parent server. 5. Click Apply Settings.
5.2 Managing Secure Release Anywhere printer poolsThe Secure Release Anywhere Pools tab lets you view a list of the Secure Release Anywhere printer pools that are attached to your PDS.
You cannot attach a Secure Release Anywhere pool to your PDS from within the Configuration Manager. You must create the printer pool and attach it to a PDS from the

Managing printers and printer pools
PrinterOn Print Delivery Station v4.1.3 Installation and Administration Guide | 37
PrinterOn Admin Portal.
To view the printers that are part of the printer pool:1. In the Configuration Manager, click Printers. 2. On the Printers tab, click Show Printers.
38
6
Configuring how PDS manages print data
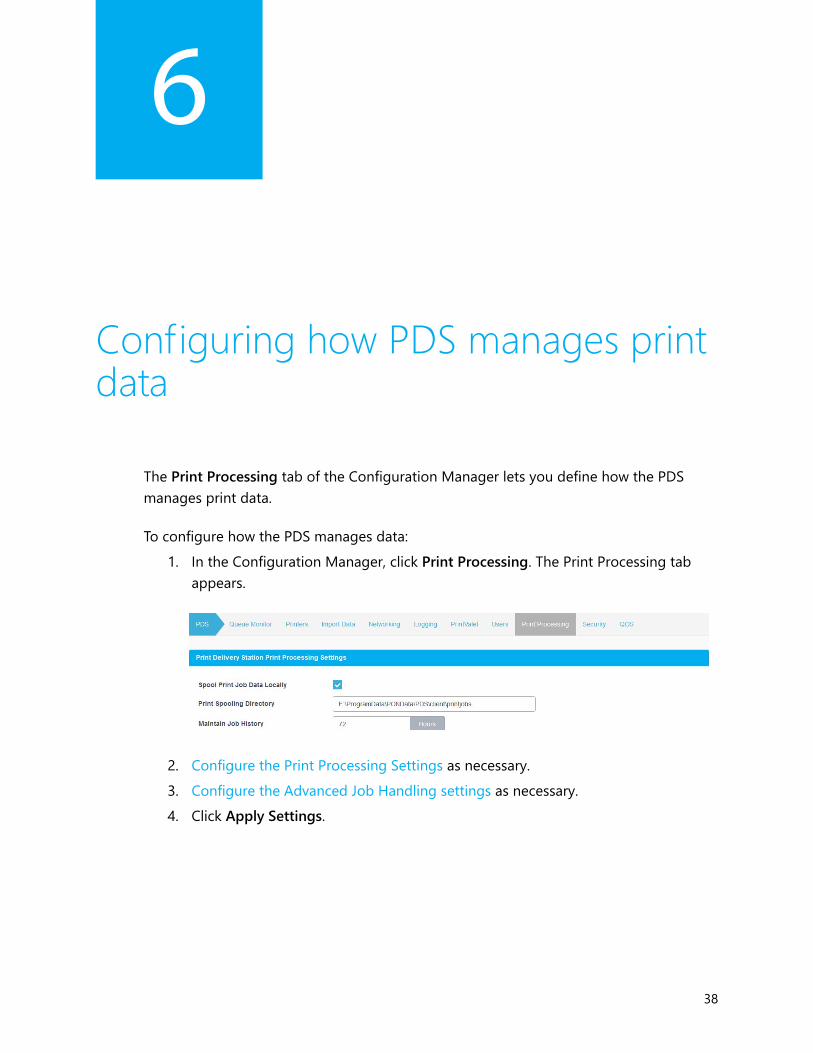
The Print Processing tab of the Configuration Manager lets you define how the PDS manages print data.
To configure how the PDS manages data:1. In the Configuration Manager, click Print Processing. The Print Processing tab
appears.
2. Configure the Print Processing Settings as necessary. 3. Configure the Advanced Job Handling settings as necessary. 4. Click Apply Settings.

Configuring how PDS manages print data
PrinterOn Print Delivery Station v4.1.3 Installation and Administration Guide | 39
6.1 Configuring print processing settingsThe Print Processing panel lets you define where print data is stored before being sent to the printer, the print mode, size limits, other settings.
6.1.0.1 Print Delivery Station Print Processing settings
Setting DescriptionSpool Print Job Data Locally
When enabled, PDS downloads print job data from the PDH and stores it on the local machine.
Print Spooling Directory
The directory in which print job data is stored when it is spooled locally.
Maintain Job History The length of time PDS makes a print job available for release. By default, the PDS is configured to remove a print job from the job history after 72 hours.
Print Mode How PDS handles print jobs. The Print Mode can be one of:• Automatic: Printers set with a Privacy Mode of None release
prints as soon as the job arrives at the PDS. For printers with any other Privacy mode, print jobs are held until the user or an administrator releases it via the PrintValet keypad or Remote Queue Monitor.
• Manual: All print jobs, regardless of Privacy Mode selected, are held until the user or an administrator releases it via the PrintValet or Remote Queue Monitor.

Configuring how PDS manages print data
PrinterOn Print Delivery Station v4.1.3 Installation and Administration Guide | 40
Enforce Job Size Limit When checked, the Job Size Limit is enforced and applied to new print jobs.
Job Size Limit When Enforce Job Size Limit is enabled, PDS rejects incoming print jobs whose size exceeds the specified limit.
The maximum file size you can specify limit is 512MB. Reject Duplicate Jobs(Advanced view only)
When checked, PDS rejects duplicate print jobs. Print jobs are identified by a Job ID number (as defined by the Internet Printing Protocol (IPP) RFC). The cause of duplicate print jobs is usually an unreliable network connection that causes the software that transmitted the print job to miss the acknowledgment that the print job had been received properly. When that happens, the print client software can re-transmit the print job.
Accept Jobs from PrinterOn Clients Only(Advanced view only)
When checked, PDS does not accept incoming print jobs from non-PrinterOn Clients. Otherwise, the PDH server will accept IPP-compliant print jobs from any IPP print client.
Use Print Job Data Compression
How print job data compressions is managed by PDS. There are three options:
• Optionally: Indicates that the PDH supports compression and the submitting client can optionally compress new prints jobs prior to submitting to PDH. Release station clients, such as PDS, can choose to download the print data in a compressed or uncompressed state depending on the capabilities of the print device.
• Never: PDH reports to the sending client that compression is not supported. Release station software, such as PDS, will receive all jobs in an uncompressed state when downloading jobs.
• Always: PDH reports to the sending client that compression is supported. Release station software, such as PDS, will receive all jobs in a compressed state when downloading jobs.
For best compatibility, this setting should be set to Optionally.Enable LRSQ Separator Commands(Advanced view only)
When checked, the PDS supports LSRQ commands, which are used to insert separator pages into print jobs.
Assign Job Reference # If Missing In Request(Advanced view only)
When checked, PDS assigns a reference number to the print job if none exists in the original request,
Setting Description

Configuring how PDS manages print data
PrinterOn Print Delivery Station v4.1.3 Installation and Administration Guide | 41
6.2 Configuring Advanced Job Handling settingsThe Advanced Job Handling settings let you define how PDS handles failed requests.
6.2.0.1 Advanced Job Handling settings
Pull Mode How jobs are handled after being delivered to the Print Delivery Hub. You can choose one of the following values:
• Local Download: PDS downloads print jobs locally. The jobs are not removed from the PDH after download.
• Central Store: PDS does not download print jobs. They are held on the PDH and only downloaded by the PDS when the user releases the job to a printer.
Post Print Option How jobs are handled after being printed. You can choose one of the following values:
• Delete from Store: PDH deletes print jobs after the user release them to the printer.
• None: PDH holds the print jobs even after the user release them to the printer. Jobs are be purged automatically by PDH after its configured time.
Setting Description
Setting DescriptionEnable Failed Job Retry(Advanced view only)
When checked, PDS resends print jobs that have previously failed.
Retry Failed Job Attempts(Advanced view only)
The number of times PDS retries to print a failed print job when Enable Failed Job Retry is checked.

Configuring how PDS manages print data
PrinterOn Print Delivery Station v4.1.3 Installation and Administration Guide | 42
Retry Failed Job Interval(Advanced view only)
The amount of time PDS waits before retrying to print a failed print job when Enable Failed Job Retry is checked.
Enable Failed Job Purge(Advanced view only)
When checked, PDS deletes print jobs that fail.
Purge Failed Job Interval(Advanced view only)
The length of time before PDS deletes a failed print job when Enable Failed Job Purge is checked.
Enable Abandoned Job Purge
When checked, PDS permanently deletes jobs that are downloaded by PDS but are not released.
Purge Abandoned Job Interval
The length of time PDS holds an unreleased print job before purging it when Enable Abandoned Job Purge is checked. The time starts as soon as the print job is downloaded to the PDS.
Setting Description

43
7
Managing print jobs
The Print Delivery Station software provides two interfaces to manage print jobs:• Local Queue Monitor: The Local Queue Monitor can be view on the Queue
Monitor tab of the Configuration Manager. Depending on printer and Queue Monitor configuration, you can monitor and/or manage (print/pause/delete) current and completed print jobs for all of the printers attached to the PDS.For more information, see Using the local Queue Monitor.
• Remote Queue Monitor: The Remote Queue Monitor is a central URL hosted by the PDS where users can access the Privacy Release web pages. Users can navigate to this queue to view their print jobs and release them to the printer. For more information, see Using the Remote Queue Monitor.
7.1 Using the local Queue Monitor The Queue Monitor lists current and completed print jobs that have been sent to printers that are attached to the PDS. Administrators can use the PDS Queue Monitor to manage print jobs and to monitor printer usage. Two settings determine how print jobs
• If the Print Mode for the PDS is set to Manual, the PDS holds all print jobs until users release them to printers.
• If the Privacy Mode for a printer is set to anything other than None, the PDS holds all print jobs for that printer until the user releases them.

Managing print jobs
PrinterOn Print Delivery Station v4.1.3 Installation and Administration Guide | 44
To use the Queue Monitor: 1. In the Configuration Manager, click Queue Monitor. The Queue Monitor opens.
2. To change the Print Mode, from the Print Mode drop-down, select Automatic or Manual. For more information about Print Modes, see Configuring print processing settings.
3. If Manual Mode is selected, select a print job, then click Print or Delete. 4. To sort print jobs, click the column title that you want to sort by.
7.1.1 Print job status valuesThe following table explains the status messages you might see in the Queue Monitor.
Status DefinitionData Missing Data file for the request cannot be found by PDS.Deleted Data file for the request has been deleted.Done Print job has been printed and is no longer available to reprint.Download Pending PDS has queried PDH and is retrieving details about pending documents.Downloading Data file for the request is being downloaded from PDH.New Print job is being held pending release.Partially Downloaded
Data file for the request was partially downloaded from PDH and was interrupted.
Pending Paused – must be printed in Manual mode.Printed Printing completed – job can still be reprinted.Printing Being sent to a printer or queue.
Managing print jobs
PrinterOn Print Delivery Station v4.1.3 Installation and Administration Guide | 45
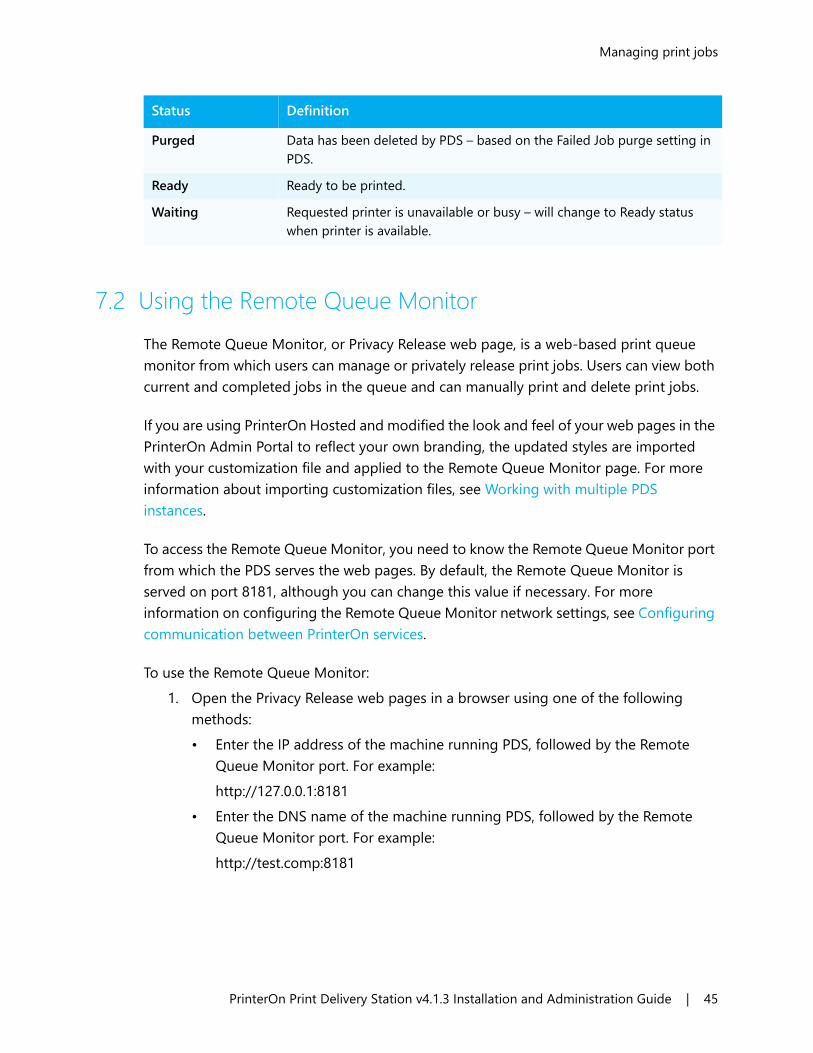
7.2 Using the Remote Queue MonitorThe Remote Queue Monitor, or Privacy Release web page, is a web-based print queue monitor from which users can manage or privately release print jobs. Users can view both current and completed jobs in the queue and can manually print and delete print jobs.
If you are using PrinterOn Hosted and modified the look and feel of your web pages in the PrinterOn Admin Portal to reflect your own branding, the updated styles are imported with your customization file and applied to the Remote Queue Monitor page. For more information about importing customization files, see Working with multiple PDS instances.
To access the Remote Queue Monitor, you need to know the Remote Queue Monitor port from which the PDS serves the web pages. By default, the Remote Queue Monitor is served on port 8181, although you can change this value if necessary. For more information on configuring the Remote Queue Monitor network settings, see Configuring communication between PrinterOn services.
To use the Remote Queue Monitor: 1. Open the Privacy Release web pages in a browser using one of the following
methods: • Enter the IP address of the machine running PDS, followed by the Remote
Queue Monitor port. For example: http://127.0.0.1:8181
• Enter the DNS name of the machine running PDS, followed by the Remote Queue Monitor port. For example:http://test.comp:8181
Purged Data has been deleted by PDS – based on the Failed Job purge setting in PDS.
Ready Ready to be printed.Waiting Requested printer is unavailable or busy – will change to Ready status
when printer is available.
Status Definition

Managing print jobs
PrinterOn Print Delivery Station v4.1.3 Installation and Administration Guide | 46
• Enter localhost followed by the Remote Queue Monitor port. For example: http://localhost:8181
2. To access a print job, enter the Privacy Release Code for the print job and then click Find. The Privacy Release Code may be the code or email address used when printing.
In a typical public printing environment, the Remote Queue Monitor is accessible on a computer near the destination printer(s). For ease of use, we recommend making the Remote Queue the default web page for the computer’s browser, or making it available from a link on the desktop.
There are also options for logging in as a PrinterOn Member or Operator/Administrator.
7.3 Reprinting documents Depending on how a printer is configured, it may be possible for users and/or operators to reprint a document.
If you enable this feature for a printer, users can print the document again while a job's status is Printed (and has not changed to Done). A document can only be reprinted if the Release Code or the user’s email address is provided.
You enable reprints for each printer individually. For information about enabling reprints for a printer, see Editing printer settings.
Note: You can only use localhost if you are accessing the Remote Queue Monitor from the machine running PDS.
Note: There is a limit to the number of reprints allowed, and that there is a designated time limit on sending reprints.

47
8
Configuring network communication settings
The Configuration Manager includes two tabs that let you configure network communication settings for the PDS:
• The Networking tab lets you configure settings for communication between the PDS and other PrinterOn services. For more information, see Configuring communication between PrinterOn services.
• The PrintValet tab lets configure settings for communication between PDS and PrintValet keypads, and to manage the PrintValet devices with which PDS communicates. For more information, see Adding and managing PrintValets.

Configuring network communication settings
PrinterOn Print Delivery Station v4.1.3 Installation and Administration Guide | 48
8.1 Configuring communication between PrinterOn servicesTo ensure proper communication between PDS and other PrinterOn services, you need to define some network communication settings. The Networking tab lets you configure the following settings:
• the URI for the PrinterOn Services Manager• the port(s) on which PDS listens for requests from the PrintWhere Universal Driver• the URI where users can access the Remote Queue Monitor to release their jobs• the URI and port at which the PDH listens for poll requests from PDS • the network communication used by your proxy server, if you have one
To modify network communication settings:1. In the Configuration Manager, click Networking. The Networking tab appears.
2. In the Web Services Manager panel, specify the Services Manager URL.The Services Manager controls how the components of the server communicate to retrieve printer information and license information.
3. Configure your local listening ports, if you need to accept print jobs from the PrintWhere driver.
4. Configure your remote queue monitor settings.
Note: If you enable both Local and Remote Listeners, you must ensure the communication ports are unique for both.
Note: The Web Services Manager panel is only available in Advanced view. Typically, you should not need to change this value.
Configuring network communication settings
PrinterOn Print Delivery Station v4.1.3 Installation and Administration Guide | 49
5. In the Remote Listener panel, view the network address and port used by the PDH to this listen for poll requests from PDS. If you are using PrinterOn Enterprise and have a PDH, click Edit to configure the remote listener information.
6. Configure your proxy settings, if you are using a proxy server to allow communication outside your local network.
7. Click Apply Settings.
Note: • The Remote Listener panel is only available in Advanced view. • You only need to define remote listener settings if you are using PrinterOn
Enterprise and have installed a Print Delivery Hub. • PrinterOn Express does not support the use of a PDH, so these settings are
ignored.• PrinterOn Hosted is pre-configured to communicate with the PDH hosted by
PrinterOn. You should not change these settings if you are PrinterOn Hosted subscriber.

Configuring network communication settings
PrinterOn Print Delivery Station v4.1.3 Installation and Administration Guide | 50
8.1.1 Configuring local listening portsThe Local Listeners panel of the Networking tab allows you to set the ports used by PDS to accept print jobs from PrinterOn’s Windows universal print driver, PrintWhere. It is enabled by default.
To receive only local print requests, you’ll need to modify your PrinterOn printer listing in the PrinterOn Admin Portal.
8.1.1.1 Local Listeners settings
Setting DescriptionDefault IPP Port The default port on which the IPP Listener service listens for print
jobs from PrintWhere. The default port is 631; whenever possible, the you should use the default IPP printing port.
• To enable the port, check Enable.• To transfer the print data securely, check SSL. This setting is
checked by default for the Default IPP Port.Additional Port 1
Additional Port 2(Advanced view only)
An additional port on which the IPP Listener service listens for print jobs, to be used when the default port is blocked. By default, Additional Port 1 is enabled. Additional Port 2 is disabled by default, and is only available in Advanced view.
• To enable or disable the port, toggle the Enable check box.• To transfer the print data securely to the port, check SSL.
The PDS must accept print request data (HTTP content with a MIME type of Application/IPP).Note: If you enable a port other than 631 or 80, you must edit the configuration of your PrinterOn printer listing at the PrinterOn Admin Portal to specify the ports used.
Enable Focus API on These Ports(Advanced view only)
When checked, the PDS integrates using API commands. This feature is intended for use with other PrinterOn solutions.

Configuring network communication settings
PrinterOn Print Delivery Station v4.1.3 Installation and Administration Guide | 51
8.1.2 Configuring remote queue monitorsThe Remote Queue Monitors panel of the Networking tab allows you to set the ports used by the PDS to display the remote queue monitors. Users can access the remote queue monitors through their web browsers to remotely release print jobs.
8.1.2.1 Remote Queue Monitors settings
Setting DescriptionRemote Queue Monitor
The port used to access the Remote Queue Monitor. By default, the Remote Queue Monitor communicates over port 8181.
• To enable the port, check Enable.• To communicate with the Remote Queue Monitor securely,
check SSL. BSI Remote Queue Monitor
The port used to access the BSI Remote Queue Monitor. The BSI Remote Queue Monitor requires a custom URL to receive Brother-specific content. By default, the BSI Remote Queue Monitor communicates over port 8182.
• To enable the port, check Enable.• To transfer the print data securely, check SSL.
Show Print Jobs That Cannot Be Released(Advanced view only)
When checked, the PDS displays print jobs in the queue even if they cannot be released by the user or administrator. By default, the remote queue hides print jobs that can’t be released.

Configuring network communication settings
PrinterOn Print Delivery Station v4.1.3 Installation and Administration Guide | 52
8.1.3 Configuring proxy settingsIf you need to set up a proxy server to allow communication outside your local network, the Proxy Settings panel of the Networking tab allows you to define the necessary settings to enable communication.
Once you have configured the settings, click Test Proxy Connection to ensure that the PDS can communicate with the proxy server as intended.
8.1.3.1 Proxy Settings
Setting DescriptionProxy Enabled When checked, the proxy is used for communication outside the
local network. Proxy Server URI The URL or IP address of the proxy server with which to
communicate.Proxy Port The network port number with which the proxy server has been
configured to communicate.Proxy Username The user name required to authenticate against the proxy server, if
required.Note: For NTLM Proxies, ensure that the Windows Domain name is added to the Username. This will automatically cause the server to use NTLM proxy options.
Proxy Password The password required to authenticate against the proxy server, if required.
Proxy Test Result Non-SSL, SSL
Displays the results for non-SSL and SSL communication when you click Test Proxy Connection.

Configuring network communication settings
PrinterOn Print Delivery Station v4.1.3 Installation and Administration Guide | 53
8.2 Configuring the remote listenerFrom the Networking tab, you can modify the settings for the remote listener. The remote listener defines the address and port at which the PDH listens for poll requests from the PDS. To successfully poll the PDH, the settings you define here must match the setting defined on the PDH server.
To configure a remote listener:1. In the Configuration Manager, click Settings ( ) and ensure that Advanced view
is turned on.2. Click Networking. The Networking tab appears. 3. In the Remote Listeners panel of the Networking tab, click Edit. The Edit Remote
Listener page appears. 4. Configure your remote listener network settings to define the URL and port that
the PDH listens on. 5. Configure the network gateway authentication settings, if necessary. 6. Configure the Check Jobs service settings, if intend to use the Check Jobs service.7. Configure the push notification settings, if you intend to use these. 8. Click Apply Settings.
8.2.1 Configuring PDH network settingsTo allow the PDS to poll the Print Delivery Hub for print jobs, it must first know where to send its poll requests. The Remote Listener panel lets you define the network settings for your PDH, if you have one, so that PDS can successfully communicate with it.
Note: You only need to define remote listener settings if you are using PrinterOn Enterprise and have installed a Print Delivery Hub.
• PrinterOn Express does not support the use of a PDH, so these settings are ignored.• PrinterOn Hosted is pre-configured to communicate with the PDH hosted by PrinterOn.
You should not change these settings if you are PrinterOn Hosted subscriber.

Configuring network communication settings
PrinterOn Print Delivery Station v4.1.3 Installation and Administration Guide | 54
Once you have configure the network settings for the PDH host machine, click Test Remote Listener to ensure that communication is successful.
8.2.1.1 Remote Listener settings
Setting DescriptionEnable When checked, the remote listener is enabled. Host Address The PDH server address.Host Port The port on the PDH server to which PDS sends poll requests. If you
adjust this value, it must correspond to a port that PDH is listening on. The default port is 443. Note: If you are communicating with PrinterOn’s hosted PDH, you must specify one of the following ports: 80, 443 or 631. PrinterOn highly recommends using SSL on port 443 when possible. If this port is changed to 80 or 631, your firewall must allow requests from PDS to the Internet using 80 or 631. You must also uncheck Use SSL.
Use SSL When checked, SSL is enabled on the Host Port. Authentication SchemePassword A password that ensures communication between PDS and PDH is
secure. The Password value entered in PDS must be entered into the corresponding Password field in the PDH Configuration Settings.
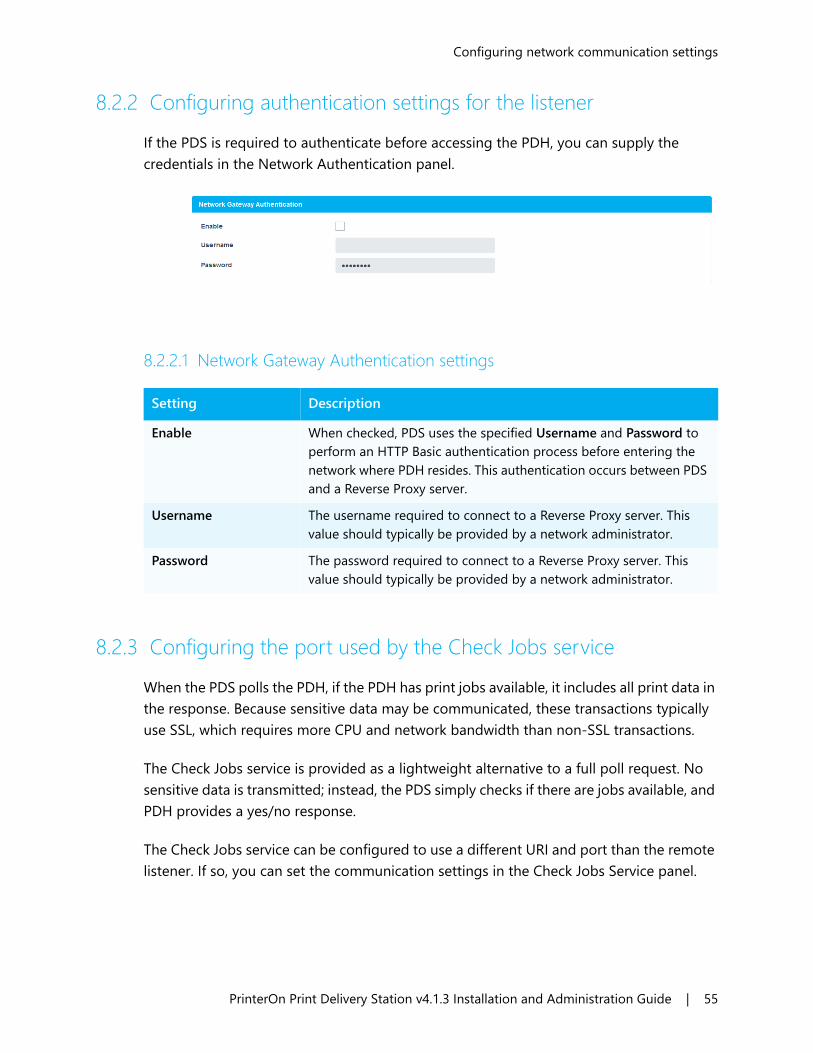
Configuring network communication settings
PrinterOn Print Delivery Station v4.1.3 Installation and Administration Guide | 55
8.2.2 Configuring authentication settings for the listenerIf the PDS is required to authenticate before accessing the PDH, you can supply the credentials in the Network Authentication panel.
8.2.2.1 Network Gateway Authentication settings
8.2.3 Configuring the port used by the Check Jobs serviceWhen the PDS polls the PDH, if the PDH has print jobs available, it includes all print data in the response. Because sensitive data may be communicated, these transactions typically use SSL, which requires more CPU and network bandwidth than non-SSL transactions.
The Check Jobs service is provided as a lightweight alternative to a full poll request. No sensitive data is transmitted; instead, the PDS simply checks if there are jobs available, and PDH provides a yes/no response.
The Check Jobs service can be configured to use a different URI and port than the remote listener. If so, you can set the communication settings in the Check Jobs Service panel.
Setting DescriptionEnable When checked, PDS uses the specified Username and Password to
perform an HTTP Basic authentication process before entering the network where PDH resides. This authentication occurs between PDS and a Reverse Proxy server.
Username The username required to connect to a Reverse Proxy server. This value should typically be provided by a network administrator.
Password The password required to connect to a Reverse Proxy server. This value should typically be provided by a network administrator.
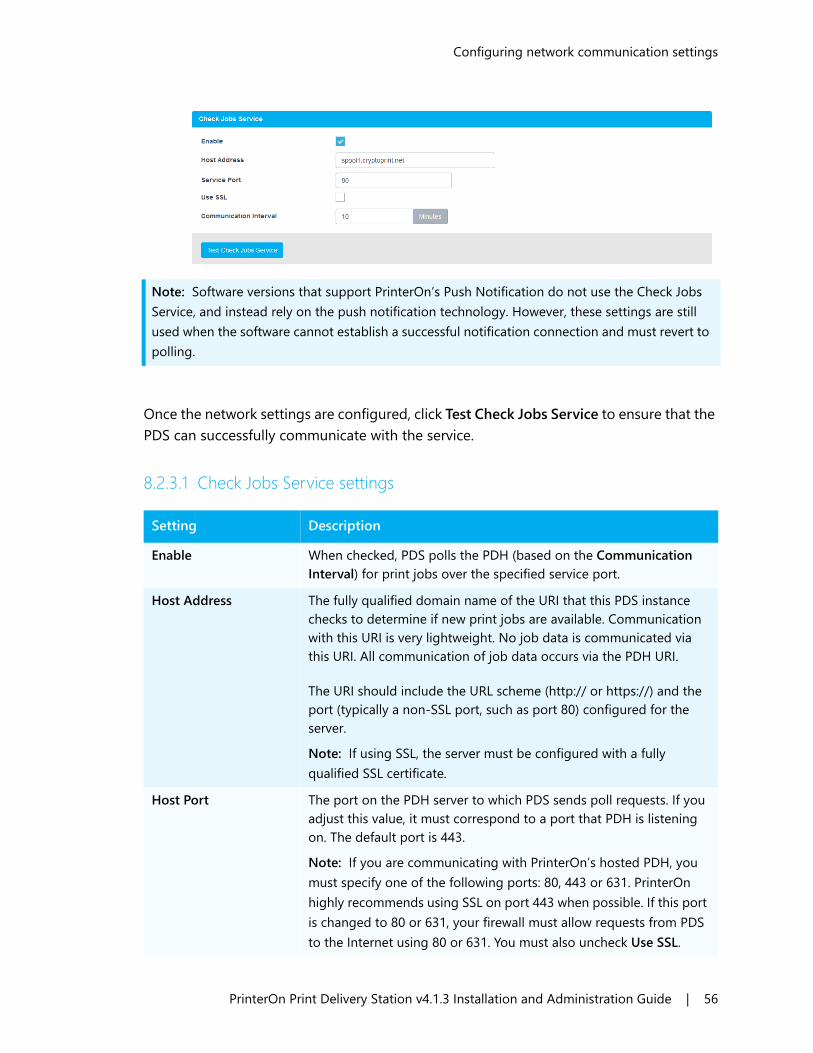
Configuring network communication settings
PrinterOn Print Delivery Station v4.1.3 Installation and Administration Guide | 56
Once the network settings are configured, click Test Check Jobs Service to ensure that the PDS can successfully communicate with the service.
8.2.3.1 Check Jobs Service settings
Note: Software versions that support PrinterOn’s Push Notification do not use the Check Jobs Service, and instead rely on the push notification technology. However, these settings are still used when the software cannot establish a successful notification connection and must revert to polling.
Setting DescriptionEnable When checked, PDS polls the PDH (based on the Communication
Interval) for print jobs over the specified service port. Host Address The fully qualified domain name of the URI that this PDS instance
checks to determine if new print jobs are available. Communication with this URI is very lightweight. No job data is communicated via this URI. All communication of job data occurs via the PDH URI.
The URI should include the URL scheme (http:// or https://) and the port (typically a non-SSL port, such as port 80) configured for the server.Note: If using SSL, the server must be configured with a fully qualified SSL certificate.
Host Port The port on the PDH server to which PDS sends poll requests. If you adjust this value, it must correspond to a port that PDH is listening on. The default port is 443. Note: If you are communicating with PrinterOn’s hosted PDH, you must specify one of the following ports: 80, 443 or 631. PrinterOn highly recommends using SSL on port 443 when possible. If this port is changed to 80 or 631, your firewall must allow requests from PDS to the Internet using 80 or 631. You must also uncheck Use SSL.
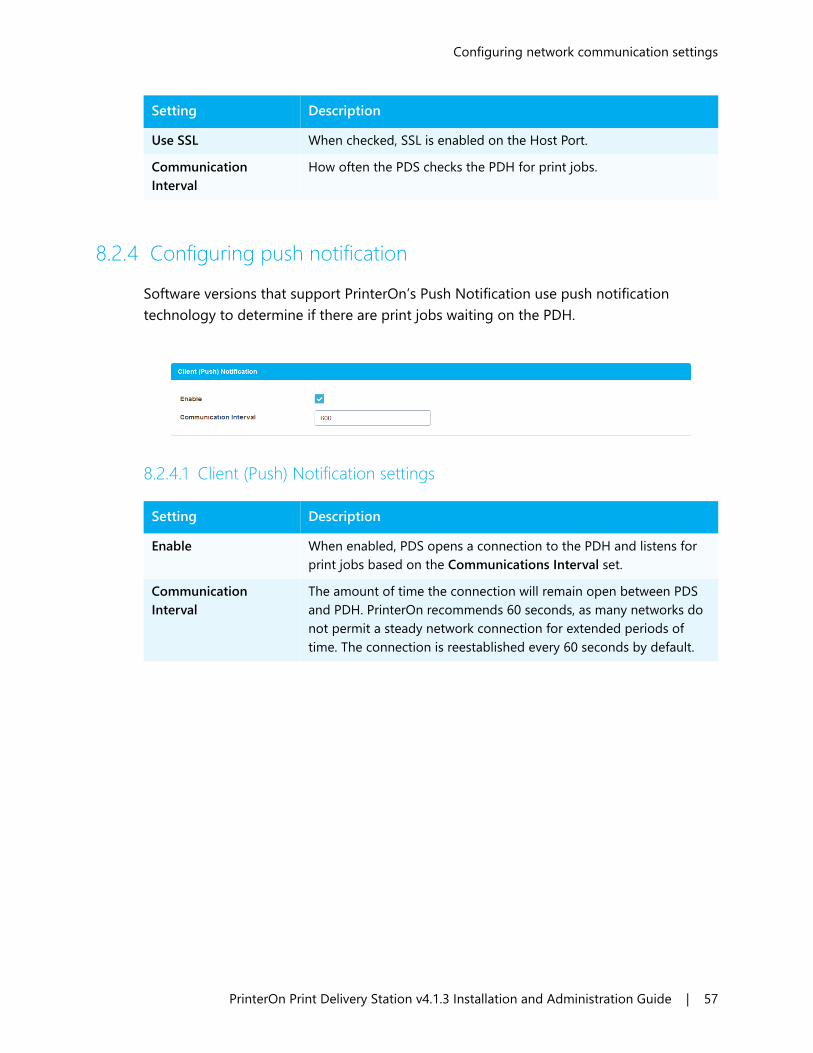
Configuring network communication settings
PrinterOn Print Delivery Station v4.1.3 Installation and Administration Guide | 57
8.2.4 Configuring push notification Software versions that support PrinterOn’s Push Notification use push notification technology to determine if there are print jobs waiting on the PDH.
8.2.4.1 Client (Push) Notification settings
Use SSL When checked, SSL is enabled on the Host Port. Communication Interval
How often the PDS checks the PDH for print jobs.
Setting Description
Setting DescriptionEnable When enabled, PDS opens a connection to the PDH and listens for
print jobs based on the Communications Interval set. Communication Interval
The amount of time the connection will remain open between PDS and PDH. PrinterOn recommends 60 seconds, as many networks do not permit a steady network connection for extended periods of time. The connection is reestablished every 60 seconds by default.

Configuring network communication settings
PrinterOn Print Delivery Station v4.1.3 Installation and Administration Guide | 58
8.3 Adding and managing PrintValetsThe PrintValet tab lets you configure settings for communication between PDS and PrintValet keypads, and to manage the PrintValet devices with which PDS communicates.
A PrintValet keypad provides users with a way to interact with printers that don’t have their own means of securely entering print release codes. Submitted print jobs remain at the PDS until the user enters their release code on the PrintValet keypad and the job is released.
1. In the Configuration Manager, click PrintValet. The PrintValet tab appears.
2. To associate a new PrintValet with your PDS, click Add and configure the settings in the Edit PrintValet page as necessary.
3. To edit a PrintValet, click the adjacent Edit button and edit the settings in the Edit PrintValet page as necessary.
4. To disassociate a PrintValet from the PDS, click the adjacent Delete button. 5. In the Print Valet Settings panel, check 6. Click Apply Settings.
8.3.1 Configuring PrintValet communication settings The Edit PrintValet page lets you configure the communication settings between the PDS and a PrintValet.
To configure PrintValet communication settings:1. In the Configuration Manager, click PrintValet. The PrintValet tab appears.
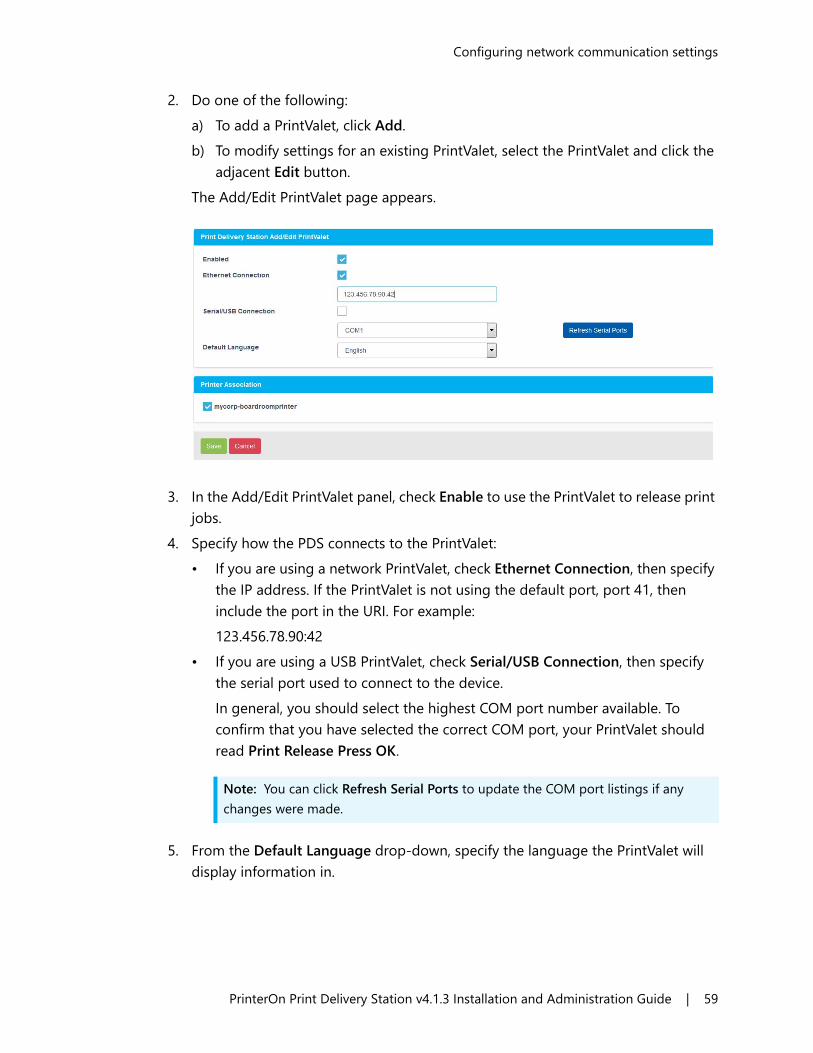
Configuring network communication settings
PrinterOn Print Delivery Station v4.1.3 Installation and Administration Guide | 59
2. Do one of the following: a) To add a PrintValet, click Add. b) To modify settings for an existing PrintValet, select the PrintValet and click the
adjacent Edit button. The Add/Edit PrintValet page appears.
3. In the Add/Edit PrintValet panel, check Enable to use the PrintValet to release print jobs.
4. Specify how the PDS connects to the PrintValet:• If you are using a network PrintValet, check Ethernet Connection, then specify
the IP address. If the PrintValet is not using the default port, port 41, then include the port in the URI. For example:123.456.78.90:42
• If you are using a USB PrintValet, check Serial/USB Connection, then specify the serial port used to connect to the device.In general, you should select the highest COM port number available. To confirm that you have selected the correct COM port, your PrintValet should read Print Release Press OK.
5. From the Default Language drop-down, specify the language the PrintValet will display information in.
Note: You can click Refresh Serial Ports to update the COM port listings if any changes were made.
Configuring network communication settings
PrinterOn Print Delivery Station v4.1.3 Installation and Administration Guide | 60
6. In the Printer Association panel, select the printers for which the PrintValet will release print jobs.
7. Click Save.
Note: It is possible to configure different printers to different Network PrintValets when more than one printer is assigned to the PDS.

61
9
Securing your Print Delivery Station
The Configuration Manager lets you control the security of your PDS:• The Security tab lets you configure general security settings, including encryption
of print job data, and SSL certificate information. For more information, see Configuring PDS security.
• The Users tab lets you control who has access to manage print jobs handled by the PDS. For more information, see Configuring and managing user access to PDS.
9.1 Configuring PDS securityThe Security tab lets you configure a number of security settings for your PDS and PrinterOn service. From the Security tab, you can define:
• whether encryption is enabled• authentication credentials, if required, for communication with the PrinterOn
Server• your keystore information
From this tab, you can also create a new keystore, create a new key, or delete a key.

Securing your Print Delivery Station
PrinterOn Print Delivery Station v4.1.3 Installation and Administration Guide | 62
To configure PDS security settings:1. In the Configuration Manager, click Security. The Security tab appears. 2. Configure PDS encryption settings. 3. Configure your key store. 4. Click Apply Settings.
9.1.1 Configuring PDS encryptionPDS uses asymmetric (public key) encryption. With asymmetric encryption, a pair of keys is created:
• a public key, which is posted to the PrinterOn web site• a private key, which remains with PDS
To send an encrypted job, you will need access to the public key. The PDS encryption tab lets you specify whether your PDS encrypts data.
9.1.1.1 Print Delivery Station Security Settings
Setting DescriptionUse Data Encryption Whether or not PDS uses data encryption. The value can be one of:
• Always: PDS only accepts encrypted print data.• Optionally: PDS accepts any print data, regardless of encryp-
tion type. This is the default. • Never: PDS does not accept encrypted data.
RSA KeyPair The date and time that the KeyPair was created. By default, a KeyPair is created when the customization file is imported.
If necessary, you can create a new key by clicking the Create RSA KeyPair button at the bottom of the tab. When you create a new key, the RSA KeyPair creation date will be updated to the current date and time.
You can remove a key by clicking Delete at the bottom of the tab.

Securing your Print Delivery Station
PrinterOn Print Delivery Station v4.1.3 Installation and Administration Guide | 63
9.1.2 Configuring your SSL keystoreIf either the Local Listener or Remote Queue Monitor port is configured to use SSL, the SSL Certificate Keystore panel becomes active, letting you define details for the SSL Certificate. PDS uses a standard format file for storing SSL Certificates, known as a keystore. As defined by Oracle (Sun), the keystore file can contain multiple certificates.
You can click Generate New Keystore at the bottom of the tab to create an SSL Certificate based on the Private/Public KeyPair method provided by Sun Microsystems’ keytool.
9.1.2.1 SSL Certificate Keystore settings
Note: The generated certificate is not signed by a Certificate Authority but is an unsigned certificate still allows for the use of SSL. Web browsers may prompt the user to accept or reject the certificate; both Internet Explorer and Firefox allow for the permanent importing of an unsigned certificate.
For information on submitting a certificate to be signed by a Certificate Authority, seeAppendix D: Obtaining a signed SSL certificate.
Setting DescriptionSSL Keystore File The file path for the keystore’s location. If you created your own
certificate, the file path where it was stored is displayed here.SSL Keystore Passphrase
The keystore password used when generating the keystore file.
Key Name The key alias used to store the Certificate in the keystore file.Key Passphrase The key password used when storing the Certificate in the keystore
file.

Securing your Print Delivery Station
PrinterOn Print Delivery Station v4.1.3 Installation and Administration Guide | 64
9.1.3 Entering SSL information The Enter SSL Information panel lets you provide the information associated with your certificate.
9.2 Configuring and managing user access to PDSThe Users tab displays a list of the operators and administrators who have access to manage any print jobs sent to this PDS. From this tab, you can add or remove users and configure the user credentials and role.
To view the list of users with access:1. In the Configuration Manager, click Users. The Users tab appears, displaying a list
of users.
2. To grant access to additional users, click Add and configure the settings in the Edit/Add User page as necessary.
3. To edit a user’s credentials or change their role, click the adjacent Edit button and edit the settings in the Edit/Add User page as necessary.
4. To remove a user from the list of PDS users, click the adjacent Delete button.

Securing your Print Delivery Station
PrinterOn Print Delivery Station v4.1.3 Installation and Administration Guide | 65
9.2.1 Configuring PDS user settingsThe Edit/Add User page allows you to configure the user credentials and role for each user that has access to the PDS.
To grant PDS access to additional users:1. In the Configuration Manager, click Users. The Users tab appears. 2. Click Add. The Add user page appears.
3. In the Username and Password fields, specify the credentials the new user will use to access the PDS.
4. From the Class drop-down, specify whether the user is an Administrator, or an Operator. Currently, there is no difference in privileges granted to the two roles.
5. Click Save.
66
10
Managing and monitoring system health
Configuration Manager includes several tabs that let you configure and monitor the health of your PDS:
• The Logging tab lets you define how much information is included in the log files, and to define logging and notification between PDS and third-party print management systems. For more information, see Configuring logging settings.
• The QoS tab lets you configure PDS to work with PrinterOn’s Release Agent Status Monitoring service so that PDS reports its health state to the PrinterOn Cloud Directory. For more information, see Configuring Quality of Service (QoS) settings.
• The Service and Support tab lets you stop and start the PDS service and to download packages for the PrinterOn Support team to help them troubleshoot any issues. For PrinterOn Enterprise/Express users, you can also upload an updated license file from this tab. For more information, see Managing the PDS service.

Managing and monitoring system health
PrinterOn Print Delivery Station v4.1.3 Installation and Administration Guide | 67
10.1 Configuring logging settingsThe Logging tab lets you define what printing events should logged and where the logs should be stored. If you are integrating with a third-party print management system, the Logging tab also lets you define logging and notification interaction between the PDS and the third-party system.
To configure PDS logging settings:1. In the Configuration Manager, click Logging. The Logging tab appears.
2. Specify the Debug Logging settings.3. Specify the Local Print Logging location, which lets you configure PDS to store log
files from a third-party print management system (Available in Advanced view only).
4. Specify the Blind Job Notification settings, which let you configure PDS to send notifications of print activity to third-party print management systems (Available in Advanced view only).
5. Click Apply Settings.
10.1.1 Configuring debug logging levels and storage informationYou can use debug logs to help you troubleshoot printing problems. Debug logs are plain text files that you can view in any text editor. The Debug Logging panel of the Logging tab lets you configure basic logging settings for debugging.

Managing and monitoring system health
PrinterOn Print Delivery Station v4.1.3 Installation and Administration Guide | 68
To configure debug logging. 1. In the Debug Logging panel, in the Log Level drop-down, specify the level of
detail of the information saved to the log file. Higher levels of detail are most useful when troubleshooting.
2. In the Output Directory field, specify the location where the log file is stored. 3. Set the Maximum File Size of an individual log file. 4. Set the Total Size Limit for all logs. When this limit is met, the oldest log file is
purged.
10.1.2 Logging print activity managed by a third-party system
You can configure PDS to record print jobs being released to a printer by a third-party print management system. The Local Print Logging panel specifies a location for a third-party integration’s log files, which record print jobs being released to a printer.
Log Level DescriptionOff All logging is disabled.Fatal Only records non-recoverable or fatal errors.Error Records all errors.Warning Records warning messages (recoverable errors or unexpected
conditions that interfere with normal operations).Information Records all informational messages (default).Debug Records detailed troubleshooting logs that are useful for
debugging.Trace Records more detailed troubleshooting logs than Debug.All Records all loggable information, providing the most detailed
logs.
Note: This panel appears in Advanced view only.
Note: Another application must be used to read and process these XML logs.
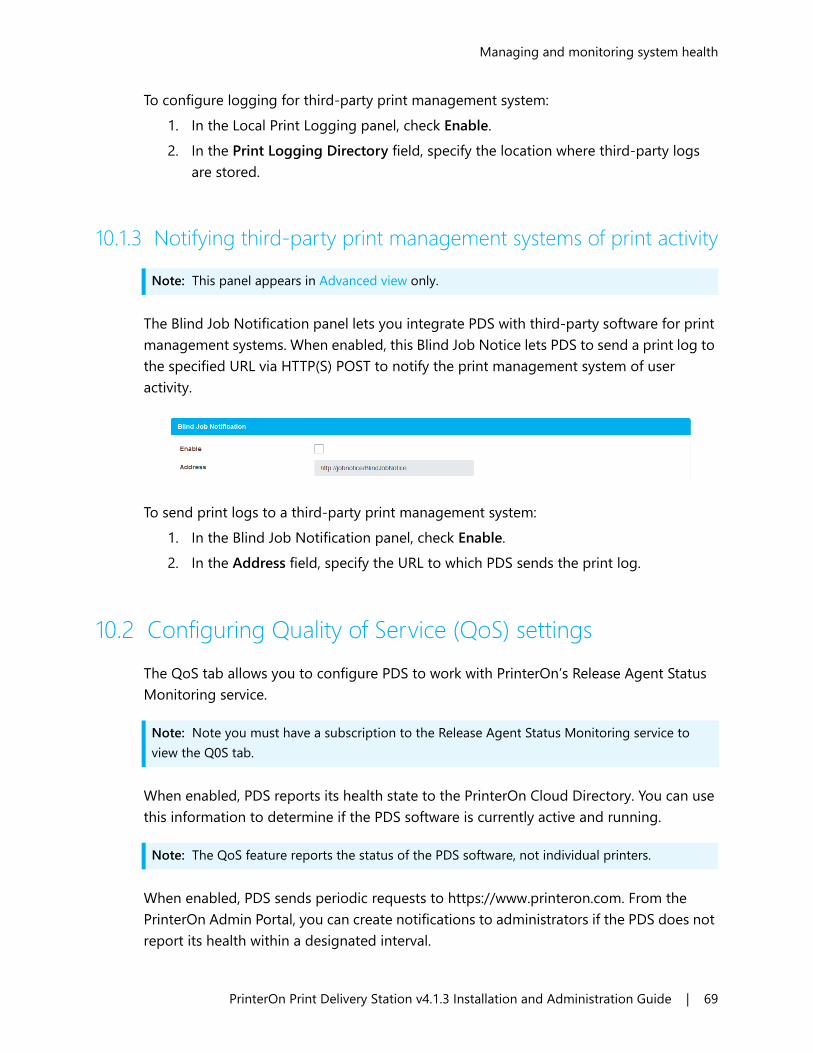
Managing and monitoring system health
PrinterOn Print Delivery Station v4.1.3 Installation and Administration Guide | 69
To configure logging for third-party print management system:1. In the Local Print Logging panel, check Enable. 2. In the Print Logging Directory field, specify the location where third-party logs
are stored.
10.1.3 Notifying third-party print management systems of print activity
The Blind Job Notification panel lets you integrate PDS with third-party software for print management systems. When enabled, this Blind Job Notice lets PDS to send a print log to the specified URL via HTTP(S) POST to notify the print management system of user activity.
To send print logs to a third-party print management system:1. In the Blind Job Notification panel, check Enable. 2. In the Address field, specify the URL to which PDS sends the print log.
10.2 Configuring Quality of Service (QoS) settingsThe QoS tab allows you to configure PDS to work with PrinterOn’s Release Agent Status Monitoring service.
When enabled, PDS reports its health state to the PrinterOn Cloud Directory. You can use this information to determine if the PDS software is currently active and running.
When enabled, PDS sends periodic requests to https://www.printeron.com. From the PrinterOn Admin Portal, you can create notifications to administrators if the PDS does not report its health within a designated interval.
Note: This panel appears in Advanced view only.
Note: Note you must have a subscription to the Release Agent Status Monitoring service to view the Q0S tab.
Note: The QoS feature reports the status of the PDS software, not individual printers.

Managing and monitoring system health
PrinterOn Print Delivery Station v4.1.3 Installation and Administration Guide | 70
To configure QoS settings for the PDS:1. In the Configuration Manager, click QoS. The QoS tab appears.
2. To enable Quality of Service, check Enable. 3. In the QoS Server URI field, specify the URL at which the PrinterOn server receives
health status updates from attached PDS. 4. In the Update Interval field, specify how often the PDS software contacts
PrinterOn to provide its health status. 5. If you want to also report on the status of the printers that are attached to this
PDS, check Report Printer(s) Status.6. Click Apply Settings.

Managing and monitoring system health
PrinterOn Print Delivery Station v4.1.3 Installation and Administration Guide | 71
10.3 Managing the PDS serviceThe Service and Support tab lets you manage the PDS service and download a support package that you can send to PrinterOn Support for troubleshooting assistance.
10.3.1 Stopping and starting the PDS serviceTo stop the PDS service:
1. In the Configuration Manager, click Service and Support. The Service and Support tab appears.
2. In the Services panel, click Stop.3. To restart the service, click Restart.
10.3.2 Creating a package of diagnostic informationTo help diagnose an issue with your Print Delivery Station, you may need to send PrinterOn Support log and system information. You can quickly create a package of this information from the Service and Support tab.
To create a package for PrinterOn support:1. In the Configuration Manager, click Service and Support. The Service and Support
tab appears. 2. In the Services panel, click Download Support Package. The Configuration
Manager creates a ZIP file with comprehensive server information and all PDS logs.

Managing and monitoring system health
PrinterOn Print Delivery Station v4.1.3 Installation and Administration Guide | 72
10.3.3 Updating your PrinterOn license informationIf you are using PrinterOn Enterprise/Express and make chances to your deployment (for example, by adding another PDS or PrintAnywhere Server), you can update the changes to your PDS so that it has the latest information about your service.
To update your license:1. In the Configuration Manager, click Services and Support. The Services and
Support tab appears. 2. Click Update License. The Upload a New License dialog appears.
3. Browser to the license file you want to upload, then click Upload. The Select a PDS Server dialog appears.
4. Choose the PDS instance that you want to display in the Configuration Manager, then click Upload.
Your license information is uploaded, and the PDS configuration, if changed, is loaded into the Configuration Manager.

73
A
Advanced conf iguration settings
You can display the Configuration Manager in two views:• Basic view: Displays commonly configured settings.• Advanced view: Displays all Basic view settings plus additional advanced settings.
Advanced settings are those that are only rarely configured.
By default, the Configuration Manager opens in Basic view. You can toggle between the two views using the Show Advanced Settings switch on the Settings ( ) menu. As you turn Advanced view on and off, the interface is updated in real time.
This chapter provides a list of Advanced settings. In most cases, you won’t need to configure these settings.
To view these settings, you must turn on the Show Advanced Settings toggle.
To show or hide advanced settings:1. In the Configuration Manager, click Settings ( ). 2. Click Show Advanced Settings to toggle advanced settings on or off.

PrinterOn Print Delivery Station v4.1.3 Installation and Administration Guide | 74
Advanced settings listThe following table lists all settings that only appear in the Configuration Manager in Advanced view.
Location Advanced SettingsPrinters tab Advanced settings in the Add/Edit Printers page:
• Release and Privacy Mode• Anonymity Level• Enable Reprints• Maximum Reprints• Reprint Interval
Networking tab Panels displayed only in Advanced view:• Services Manager URL panel• Remote Listener panel
Advanced settings in the Local Listeners panel:• Additional Port 2 • Enable Focus API on These Ports
Advanced settings in the Remote Queue Monitors panel:• Show Print Jobs That Cannot Be Released
Logging tab Panels displayed only in Advanced view:• Local Print Logging panel• Blind Job Notification panel

PrinterOn Print Delivery Station v4.1.3 Installation and Administration Guide | 75
Print Processing tab Advanced settings in the Print Delivery Station Print Processing panel:
• Reject Duplicate Jobs• Accept Jobs From PrinterOn Clients Only• Enable LRSQ Separator Commands• Assign Job Reference # If Missing In Request
Advanced settings in the Advanced Job Handling panel:• Enable Failed Job Retry• Retry Failed Job Attempts• Retry Failed Job Interval• Enable Failed Job Purge• Purge Failed Job Interval
Location Advanced Settings

76
B
Installing PDS from the command line
In addition to using the standard UI to install the PDS software, you can also run the installation directly from the command line. Once you enter the command, no further input is required to complete the installation.
To install the software from the command line:1. On the command line, navigate to the folder containing the PDS installation file
(psim.exe).2. Type the following command:
printdeliverystation.exe "Mode:Auto|InstallType:Install|
ConfigFile:C:\PrinterOnConfig.txt|
PDSKey:MNOP-QRST-UVWX|
PonConfPort:8057|
InstallRootDir:D:\|
DataRootDir:C:\Program Files\PDS\Data”
Options and their values are colon-separated. Option/value pairs are separated by a pipe symbol. The entire list of options must be enclosed in quotation marks. A full description of each option is described in the table below:
Option Description ExampleMode Required. The mode of the installer. This
option only supports one value:• Auto: Automates the install so it doesn’t
prompt the user for information.
Mode:Auto

PrinterOn Print Delivery Station v4.1.3 Installation and Administration Guide | 77
InstallType The type of install you want to perform. This option supports the following values:
• Install: Installs the specified component(s) on the server.
• Uninstall: Removes all PrinterOn components from the server.
If omitted, a regular installation is performed.
InstallType:Install
ConfigFile The location of the PrinterOn Enterprise/Express license file (PrinterOnConfig.txt) used to install the PDS. You must specify the full path to the license file. If the PDS is to be used in conjunction with a PrinterOn Enterprise/Express, you must specify a valid license file.
If omitted, the installer assumes a PrinterOn Hosted setup type, that is, a standalone PDS that is used in conjunction with the PrinterOn Hosted service.
ConfigFile:C:\PrinterOnConfig.txt
PDSKey The serial number for the Print Delivery Station that you are installing.
If omitted, the installer chooses the first serial number listed in the custom license file, if one was included.
If no serial number is included, or no license file is provided, the PDS software is installed but does not link to an existing PDS instance. You will need to manually specify the serial number after launching Configuration Manager.
PDSKey:MNOP-QRST-UVWX
PonConfPort The port used by the software to create the Configuration Manager listener during installation. The port must be an open port between 1024 and below 65535.
If omitted, by default, the Configuration Manager listens on 8057.
PonConfPort:8057
Option Description Example

PrinterOn Print Delivery Station v4.1.3 Installation and Administration Guide | 78
InstallRootDir The partition/drive where the software is installed.
If omitted, the software is installed in the Program Files or Program Files x86 folder on the C: drive.
D:\
DataRootDir The folder where PDS configuration information is stored.
If omitted, the PDS configuration information is stored in the \PDS\Data directory within the installation directory.
C:\PDS\Data
Option Description Example

79
C
The data encryption process
A Print Delivery Station can be set to use RSA asymmetric (public key) and AES symmetric encryption to secure print jobs in a two-phase process.
First, an asymmetric KeyPair is created in the Encryption panel of the Security tab. For more information, see Configuring PDS encryption.
When you create a new KeyPair, the public key is posted to the PrinterOn web site, while the private key remains secure in PDS. PDS uses the private key to decrypt the data.
When transmitting an encrypted document, the print client first determines that the printer supports encryption and obtains the public key for the printer. Then, the print client generates a random symmetric encryption key for the AES algorithm and uses the symmetric key to encrypt the print data. The print client then encrypts the symmetric key with the asymmetric (public) key and transmits both the encrypted print data and encrypted symmetric key to PDS.
PDS uses the private key to decrypt the encrypted symmetric key, and then uses the decrypted symmetric key to decrypt the encrypted print data.
This two-phase process is necessary because asymmetric encryption, while very secure, is inefficient. Symmetric encryption is much more efficient, especially for large jobs like print data streams. This two-phase encryption scheme provides two desirable features: strong encryption security and efficiency of processing.

80
D
Obtaining a signed SSL certif icate
This appendix outlines the steps required to generate an SSL Certificate and get it signed by a Certificate Authority.
This method uses Sun Microsystems’ keytool. This tool is part of the Java Runtime Environment (JRE), which is included with your download of PDS.
To obtain and install an SSL Certificate, you need to complete the following tasks:1. Generate a Private/Public KeyPair. 2. Generate a Certificate Signing Request. 3. Submit a signing request to a Certificate Authority to receive a signed certificate.4. Import the signed certificate into your Keystore.5. Configure PDS to use your Keystore and SSL.6. Test SSL Communications.
Generating Private/Public KeyPair You can generate a KeyPair from the Security tab of the Configuration Manager.
To generate a KeyPair:1. In the Configuration Manager, click Security. The Security tab appears. 2. Click the Create RSA KeyPair at the bottom of the page.

PrinterOn Print Delivery Station v4.1.3 Installation and Administration Guide | 81
Alternatively, you can use a keytool to generate a KeyPair. For details on generating a Private/Public KeyPair, view this article from Verisign.
Generating a certificate signing request For details on generating a CSR, view this article from Verisign.
Submitting your signing request to a Certificate Authority The precise steps to follow to get your certificate signed vary depending on which Certificate Authority (CA) you choose. Several companies, such as Verisign, Thawte, and RSA Security, provide this service.
Most CAs charge a fee for this service, depending on the nature of the Certificate being signed, the validity period, and other factors.
Example steps for using Verisign to generate a Test Certificate: 1. On the Verisign web site, www.verisign.com, sign up for a Test Certificate. 2. When prompted, paste a copy of the text from the Certificate Signing Request file
(certreq.crq) into the provided text entry box on one of the web pages. 3. Submit the request.
Verisign processes the request and returns a text file via email. The file represents the Signed Certificate.
Note that the process to obtain a real certificate will vary from obtaining a Test Certificate.
Importing your signed certificate into your KeystoreFor details on importing a certificate into a Keystore, view this article from Apache Tomcat.
Notes: • All keytool commands consist of a single line• You may require quotation marks around long path names

PrinterOn Print Delivery Station v4.1.3 Installation and Administration Guide | 82
Configuring PDS to use SSL and your KeystoreTo securely transmit data, you need to enable SSL communication in the PDS. You can enable SSL from the Networking tab or the PDS Configuration Manger. There several settings where you can enable SSL:
• Local listening ports, used by PDS to listen for printing requests from PrinterOn PrintWhere Universal Driver.
• Remote Queue Monitor ports, accessed by users to view the remote queue monitors.
• Remote listening ports, used by PDH to receive poll requests from PDS.
If SSL is active for a particular port, all communication using that port must use SSL. Activation is done on a port-by-port basis.
Once you active SSL on any of these ports, the SSL Certificate Keystore panel of the Security tab becomes active. This tab lets you define your Keystore information and password. For more information, see Configuring your SSL keystore.
Testing SSL CommunicationsAfter installation the certificate in PDS, you can verify SSL communications in your browser.
To test your SSL certificate:1. From an SSL-capable browser, open the Remote Queue Monitor.2. If the web address changes from http:// to https://, your SSL certificate is active.
PrinterOn Print Delivery Station v4.1.3 Installation and Administration Guide | 83
Trademarks and service marksThe following are trademarks or registered trademarks of PrinterOn Inc. in Canada and other countries:
PrinterOn®, PrintAnywhere®, Print Simply Anywhere®, PrintWhere®, PRINTSPOTS®, the PrinterOn Logo, the PrinterOn Symbol, PrintConnect™, Secure Release Anywhere™, and PrintValet™ are trademarks and/or registered trademarks of PrinterOn.
The following are trademarks or registered trademarks of other companies:
Windows, Internet Explorer, Microsoft Word, Microsoft Excel, Microsoft PowerPoint, and Microsoft Visio are trademarks or registered trademarks of Microsoft Corporation.
iPad, iPhone, AirPrint, and OS X are trademarks or registered trademarks of Apple.
iOS is a trademark or registered trademark of Cisco in the U.S. and other countries and is used by Apple under license.
Android, Chrome OS, and Chromebook are trademarks or registered trademarks of Google Inc.
BlackBerry is a registered trademark of BlackBerry, Ltd.
Other brands and their products are trademarks or registered trademarks of their respective holders.
Copyright notice© Copyright 2018 by PrinterOn Inc.
All rights reserved. No part of this publication may be reproduced, stored in a retrieval system, or transmitted, in any form or by any means, electronic, mechanical, photocopy, recording, or otherwise, without the prior written permission of PrinterOn Inc.
Disclaimer:
PrinterOn Inc. makes no warranty with respect to the adequacy of this documentation, programs, or hardware, which it describes for any particular purpose, or with respect to the adequacy to produce any particular result. In no event shall PrinterOn Inc. be held liable for special, direct, indirect, or consequential damages, losses, costs, charges, claims, demands, or claim for lost profits, fees, or expenses of any nature or kind.
Version 4.1.3 | February 20, 2018


