69
Product realisation Catherine McAleer
| Date post: | 16-Mar-2016 |
| Category: |
Documents |
| Upload: | catherine-mcaleer |
| View: | 227 times |
| Download: | 2 times |

Product realisation
Catherine McAleer

2

3
Product Development Record
Design 1 ‘ Rococco Stone’ 5 - 24
Heel development 25 - 36
Final product 37 - 41
Design 2 ‘Guilded Statue’ 42 - 51
Heel development 53 - 55
Final product 56 - 61
Marketing
Point of sale 62 - 64
Online presence 65
Location photoshoot 66 - 69
Product Evaluation 70
PPD 71
CONTENTSTable of

4

5
Mock-upsChosen Design 1.
I was pleased with the outcome of this initial mock-up as I felt it worked well,
the following points were be taken into consideration for the next attempt.
- Change position of zip, bring forward towards front of boot.
- Change position of lap seam (as shown above.)
- Create opening at top of zip for puller.
This design was chosen to be made because of its
simple shape, quirky construction and the obvious
contrast between old and new styles which I feel
represents the collection, ‘Baroquen Empire.’
‘Rococco Stone’
Mock-up 1
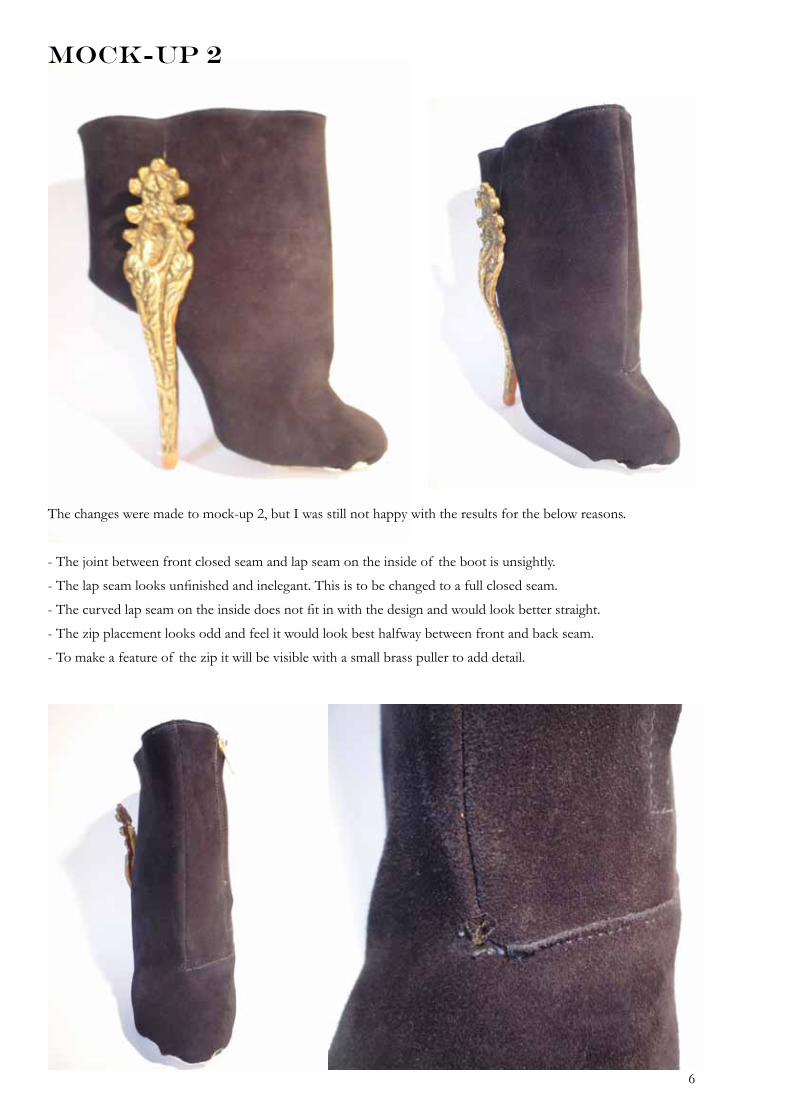
6
Mock-up 2
The changes were made to mock-up 2, but I was still not happy with the results for the below reasons.
- The joint between front closed seam and lap seam on the inside of the boot is unsightly.
- The lap seam looks unfinished and inelegant. This is to be changed to a full closed seam.
- The curved lap seam on the inside does not fit in with the design and would look better straight.
- The zip placement looks odd and feel it would look best halfway between front and back seam.
- To make a feature of the zip it will be visible with a small brass puller to add detail.

7
Mock-up 2b
As part of the design of mock-up 1 and 2, an inside shoe is needed for it to fit the wearer. The gold shoe above
shows how this would look. The images at the top of the page illustrate how the two would look together.
This design was rejected as it looks chunky and stiff, which would not suit the customer. I could now see clearly
how another design from my developments file would work.

8
As the previous design did not
work, I reverted to my original
design choice. I was advised
that this construction would not
work, but once I had mocked
up the previous design I could
see clearly how this one would
be made.
After enquiring how the
previous product would be
manufactured in a factory,
a separate last piece would
need to be made for each size
- which could prove costly
especially if it would be only
used for one season.
A/W 2012/13
ROCOCCO Stone
Suede Upper
Dark NavySheep lining
Navy BlueKid Lining
Burnished GoldDesign Detail
Zip puller and brass teeth, used on all designs with exposed zip. Shoe backmoulded before Back part stitched as lapseam.
The new design choice means
that it will not require an inside
part to hold the foot as it is
fitted at the back and the vamp
point is high enough for the
boot to stay on.

9
Mock-up 3
Back part
Change to lap seam
I was really pleased how this
quick mock-up turned out and I
felt I made the right decision to
change designs.

10
Corrections to be made
- Add cushion between lining and upper to create
comfort as the heel may be stiff against the ankle
(see sample box for different glue and sponge
experimentations.)
If the heel is pressed into the leather to leave an
imprint, this will make it look like it fits even if it is
not perfect.
- The heels positioning must avoid the ankle bone.
- The upper leather is perfect as it is heavy and
luxurious but the lining sample is stiff, cheap and
plastic looking - a better option is to be sourced.
- The opening at the top of the zip looks unfinished.
If the edges were coated, this would make it more
aesthetically pleasing to the eye.
- A zip guard is needed.
- The back part of mock-up 3 was slotted into the
upper and stitched in but after doing this I realised it
is not necessary and can be left as a raw edge as the
side heel will cover it.

11
- On the inside of the boot, the back part
should be extended to the stitch line of the zip
and be attached in the second line of stitching
around the zip. The upper edges along the zip
should be folded and the lining left raw and
unseen.
- When making, I must pay closer attention to
the ensure the top lines are parallel .
- The leather needs a backer to ensure it holds
the shape and achieves the angular effect.
- The closed seam at the front inside should
look parallel to the zip from the inside view.
- I must be careful not to leave any gaps at the
front when stitching and any viable threads are
tucked in.
- When originally making the pattern I did
not have a seam at the back but decided it was
better to be fitted so inserted a seam. I thought
the counter would then not be seen under the
back part but it was so this will be changed to a
full closed seam down the back.

12
Mock-up 4
After applying all the changes from previous mock-ups I went on to made a full shoe.
Corrections:
- The backer I used was too stiff and although it gave the shoe a good shape, in parts, like the toe, it made it look
bulky and unrefined.
- It was more obvious that the pattern was wrong as the front line was tilted forward too much. This is to be
corrected.
- The gap for the zip is too wide and should be close to the zip teeth.
- The stitching length is too big and needs to be neater.
- When lasting, the closed seam on the inside at the front must be pulled so that it is parallel to zip.

13

14
Further Corrections:
- The lining has a top rim with is attached to the bottom part with a lap seam, this
should be changed to a closed seam.
- The top rim of the lining should be gold and the bottom be navy sheep skin
- The top rim at the back has a closed seam which makes it look bulky. This seam can
be removed as it is unnecessary as there is a split where the zip is.
- The zip guard should be stitched with the upper as it is too low at the minute.

15
Mock-up 5I made this shoe, with the thought that it
would be my final piece, but there were
some changes that I wanted to make.

16
Corrections:
- The top line of the lining is not stiff enough and looks flimsy. More experimentations with binding, cord
and backer must be done before finalising a solution to this problem. (see sketchbook)
- Even though I glued down the edges of the lining at the zip opening, it still looked untidy. (see more
samples in sketchbook)
- The folded edge of the upper which meets the zip edge looks bulky and needs to be skived more to create
a clean line. Careful attention must be paid when stitching down this line.
- The back part is not stiff enough. This needs a small bit of back stiffener to create the same look as
mock-up 4.

17
The above images illustrate the particular parts which worked well and hope to carry over to the
final shoe. Overall I feel this mock up was very close to what I imagined the design to look like,
and by following all the final corrections I hope to have a more successful final product.

18
Zip pullerDesign Detail
I decided to make a feature
out of the zip by leaving
it visible and creating an
unusual puller. The piece
in the picture was a found
jewellery piece. I have tried
various ways of making it a
workable piece. (See sample
box for original)
I sanded off two holes on each side at the back leaving two holes available to insert a screw bar.
Using a Dremel I carved out a space for it to slot into the zip mechanism.
I glued on a piece of suede as the back was quite rough. When making the final zip pulls, the amount
of glue used must be reduced as it pushes through the design and is visible.

19
The zip puller shown above would be used in all the designs within the collection which require a zip. The suede
used on each one should be the same colour as the upper. The image below shows an example of the zip puller
of the ‘ Guilded Statue’ design.

20
Final Product:
Rococco Stone
The production of this shoe
went very smoothly. There
were a few minor corrections
I made the decision to make
whilst making. Snapshots of
the process, the corrections and
issues faced are illustrated in the
following pages.
21
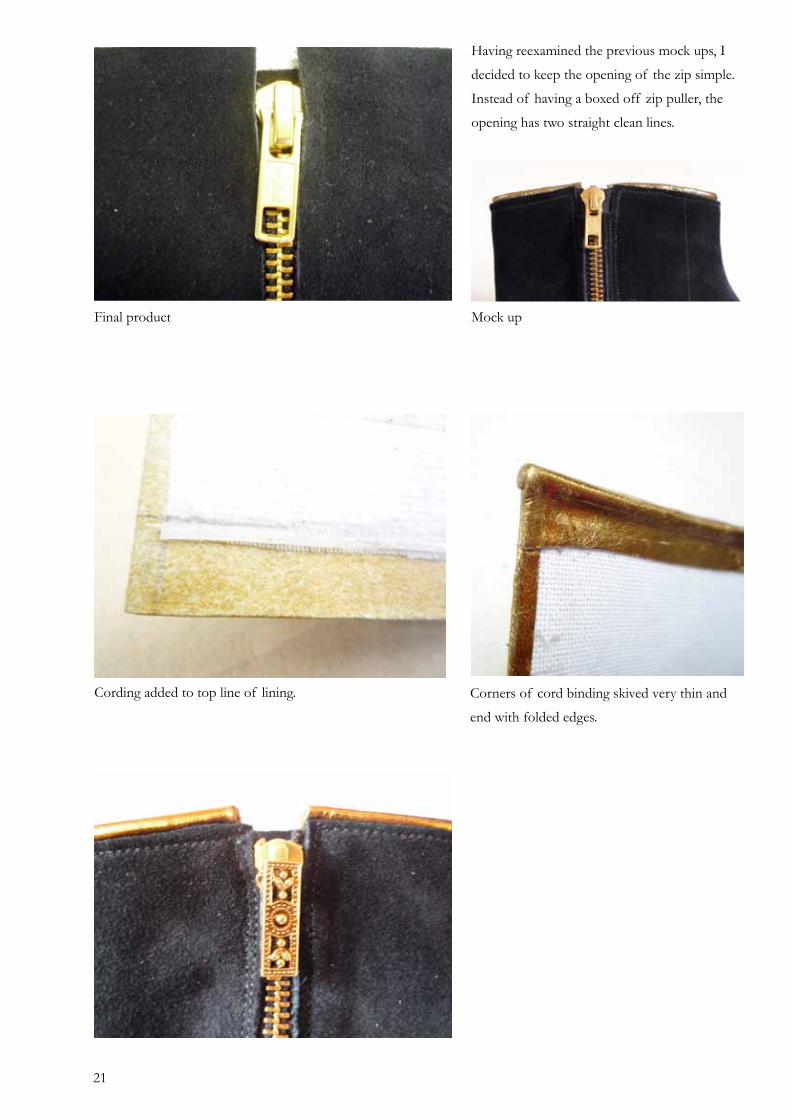
Having reexamined the previous mock ups, I
decided to keep the opening of the zip simple.
Instead of having a boxed off zip puller, the
opening has two straight clean lines.
Mock upFinal product
Cording added to top line of lining. Corners of cord binding skived very thin and
end with folded edges.

22
Back part stitched on last with the second row of
stitches around zip.
Did not stitch back part on until back-moulded.
Inserted padding between upper and lining.
It was decided not to add glue as originally planned
as the heel shape was not fully finalised. If in
production, this would be done.
Back moulded then back part stitched in so not to
damage it in the process.

23
Lasting the upper was a particular challenge. As there is five layers
altogether as well as backer it took careful precision to make it look good.
I was really pleased with the results - once hammered down it obtained a
good look and a refined silhouette.
24

25
Heel Development
Original vintage brass piece
I originally planned to use the rapid-prototyping
method to redesign this vintage piece but due to
financial restraints, choose a different route. These
images show my first attempt at trying to mould
the piece into my chosen design. Firstly heating up,
hammering and bending around the shoe. This was
difficult to do because brass is quite brittle and it
eventually snapped in two.
I then attempted to build up the piece with Milliput
and mend the broken piece with a view that I would
cast it in wax and use the lost wax process to then
cast a new heel in brass. This again did not give
the desired affect and I realised it would be easier
to work in wax and carve the piece from scratch.
This way I could change and adapt the design to
my preferences. The following pages illustrate this
process.

26
An object was placed inside the shoe to resemble the foot and ankle bone, it was pitched at the right height
and then measurements taken of the outside of the boot.
These measurements were then transferred onto hard wax.
The general shape was cut out and sanded down to the approximate shape.

27
The wax piece was slowly heated up in the oven to 90 degrees and let cool down slightly before pressing it into
the shoe in position.
This was then strapped down to hold its position and let cool completely.
As the wax block was not big enough to cut the hole shape out in one, a second piece was cut out and carved.
This was then melted together with the side piece and sanded down to blend together.

28
I carved the wax, firstly by using a Dremel to get the
correct shaped outlines and then using specialised wax
carving tools, I etched more details.
The wax heel was then separated into three pieces as it
is easier to make moulds from simpler shapes.
A hole was drilled and a metal rod was inserted into
each piece and glued in place. This would create a tun-
nel through which the moulten wax would travel.
29
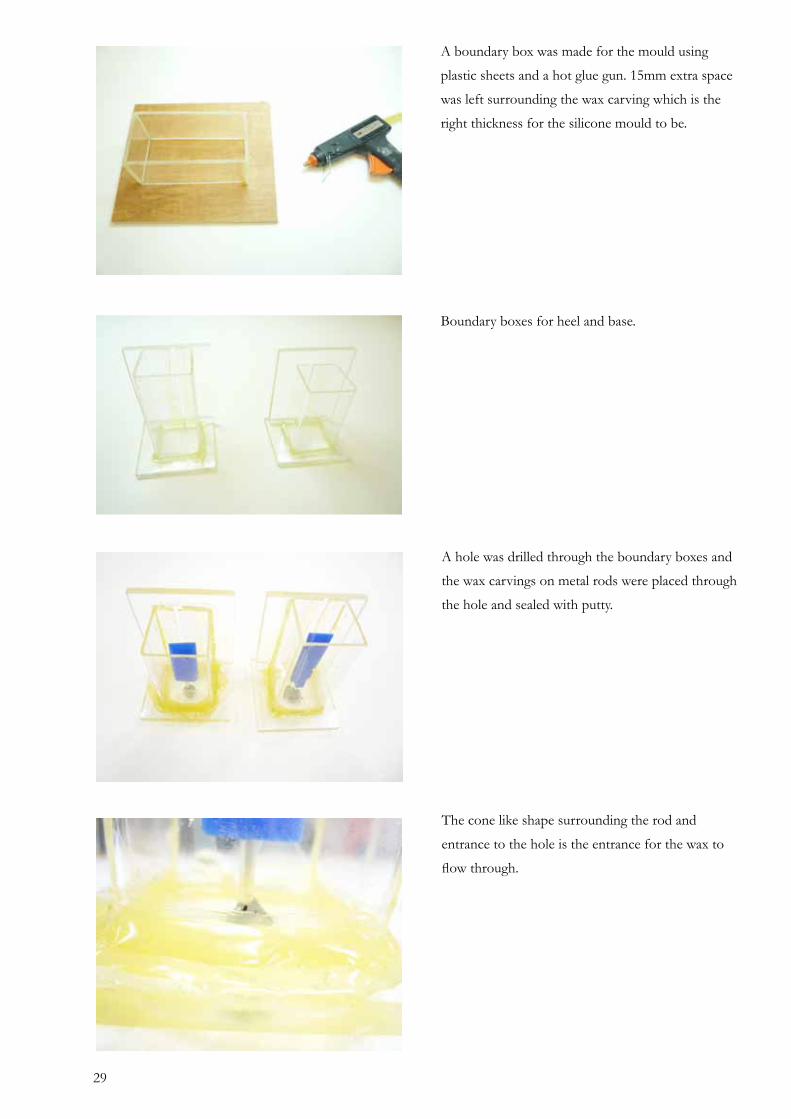
A boundary box was made for the mould using
plastic sheets and a hot glue gun. 15mm extra space
was left surrounding the wax carving which is the
right thickness for the silicone mould to be.
A hole was drilled through the boundary boxes and
the wax carvings on metal rods were placed through
the hole and sealed with putty.
The cone like shape surrounding the rod and
entrance to the hole is the entrance for the wax to
flow through.
Boundary boxes for heel and base.
30
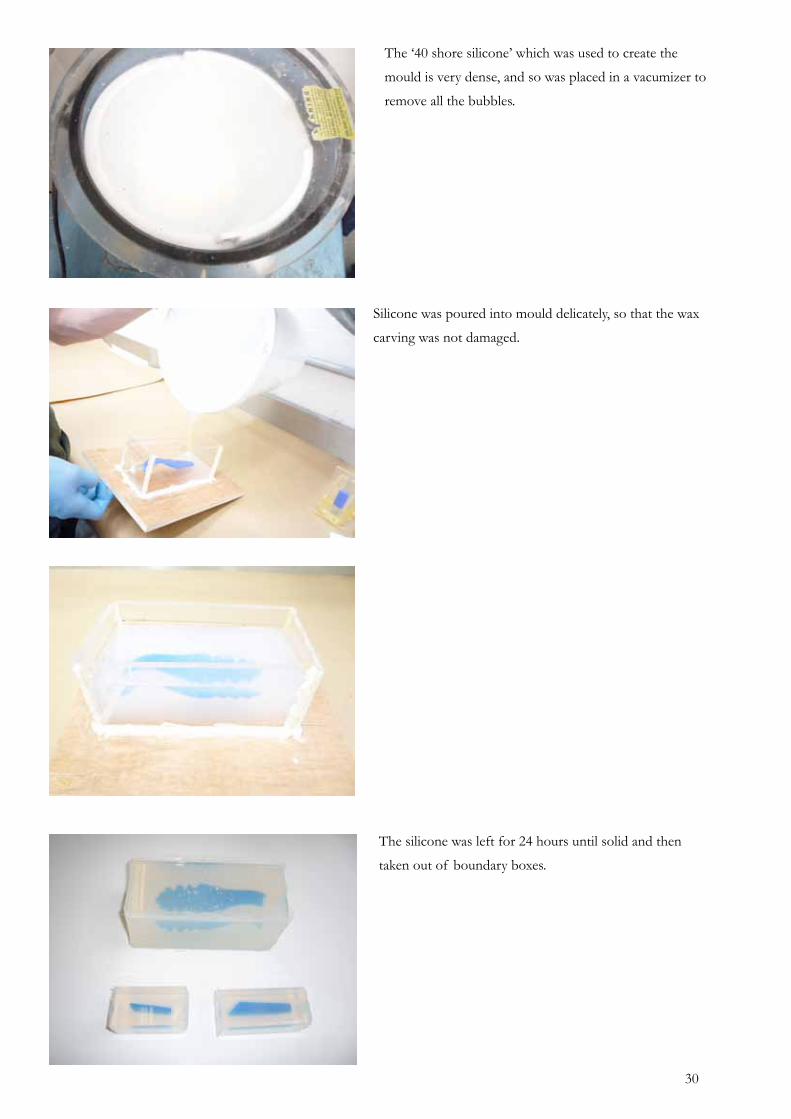
The ‘40 shore silicone’ which was used to create the
mould is very dense, and so was placed in a vacumizer to
remove all the bubbles.
Silicone was poured into mould delicately, so that the wax
carving was not damaged.
The silicone was left for 24 hours until solid and then
taken out of boundary boxes.

31
The silicone mound was slit in two using a long
scalpel, following the horizontal line of the wax
carving, being careful not to scratch it.
The original wax was then taken out to leave a perfect
mould.
Holding the mould horizontal tightly, moulten wax
was then pumped into the mould.
The wax was left to cool for four minutes before being carefully taken out.

32
- The same process was repeated for the other two
moulds. I make several moulds as sometimes trapped
air bubbles can ruin the casting. (samples can be found
in the Heel and Mould Samples box)
- This process was completed in order to provide
me with spare wax carvings. Once the wax carving
was sent to Quality Castings to be cast in brass I
would lose control over the process. Taking a number
of extra wax carvings provided insurance should
anything go wrong during the brass casting process.
- The three wax pieces where then melted together to
create the whole heel. I then spent some more time
touching up and sanding down the wax to ensure
perfection prior to casting in brass.

33

34
The brass casting process was a success, it was sent on a
Tuesday and came back on the Thursday. The price was
prearranged at £60.
During the brass casting process the heel became distorted and no longer fitted as perfectly as the wax carving did.
There were two options to make the heel fit again. One (on the left) was to hammer the heel at the part touching
the sole or the second was to hammer it on the side part. I made the decision to use the first option, which made it
fit perfectly. A slight distortion also caused the side heel part to tilt forward towards the front of the shoe whereas
it should have been little straighter. I tried heating it up and hammering but this would only cause the rest of the
heel to distort. In this case I decided to leave it as it was as I didn’t want to break it. If time had permitted I would
have used the spare wax mouldings and had them recast!

35
As brass has different properties and
different casting companies use different
brass, the original and the new one
differed in colour. I experimented
with different methods of changing
this including oxidation, bleaching and
inking.
With this version I blackened it with
polish and then buffed the highlights,
but it was still wrong.

36
Final brass heel
The final process to acquire an
antique look to the heel required
dipping in a copper oxidising
solution followed by soaking in
vinegar. Excess particles were
rubbed off. The piece was then
inked to the required colour. I
was extremely happy with the
outcome and felt I had achieved
exactly the look I desired. I
finally soldered on a cap rivet on
to the inside of the heel o that
once it was screwed into position
n the shoe I could piece a hole
for the ritet to ensure the side
heel sits flat against the boot
without having to use any glue.

37
Rococco StoneFinal Product

38
39

40

41

42
Mock-upsChosen Design 2.
Whilst designing this boot I created some mock ups of the top of the boot to get an idea what would flatter the leg.

43
Embroidery Placement
This placement of shapes and designs on samples of the knee area of the boot gave me an idea of
how it would look as it is a very important part of the design and was considered when making the
mock-ups.

44
Mock-up 1
After the initial fitting of the boot (samples can be found in ‘Guilded Statue Mock-ups’ bag) I then moved on to
make a mock up of the boot.
The first mock up fitted well but some of the main design features needed to be changed.
- The vamp which runs up the front of the leg is too wide and needs to be reduced in length and width (as drawn
on the mock up)
- Try a different shape at the knee part to see what it wold look like on and add elastic at the back.
- Zip is placed too far to the back of the boot, and needs to be moved to the middle.
Mock-up 2 on the next page had further changes to be made. The vamp was cut out in a different colour
so I could see the shape better and get a better idea of how it worked.
- The change in the top knee pard did not work as it is really unflattering and I decided to revert to the original
design. It is also too long and goes too far up the thigh
- Do not include elastic.
- The vamp is too wide and needs to be much narrower - try 20mm on next attempt.
New vamp shape

45
Mock-up 3
Corrections to be made to the mock-up below
- Zip to be parallel to vamp running up front of leg.
- Shorten vamp by 100mm
- Wings of vamp should not run all the way around the heel and need to be like the original pattern where it
was 30mm from back of heel.
- Add 40mm of elastic at back of knee bend.
Mock-up 2
Place elastic here
New zipplacement

46
Mock-up 4
I was really pleased with the outcome
of the mock-up including the lining
but decided not to last it as there were
a few minor changes I want to make
before making a full mock up.
- Change zip positioning
- Change top line of boot to be bagged
edge, turning into folded edges around
elastic.
New zip positioning
Bagged edge
Folded edge

47
- Getting the elastic positioning was difficult with this mock
up, it was taken out and replaced a few times to get it right.
Sourcing the right elastic colour so that it doesn’t not look
cheap was very difficult, so I tested dying it here. (See sample
box for further elastic experimentation.)
- There is too much elastic and should be half the amount.
- The vamp has a folded edge but looks chunky and not as
elegant as I thought it would. The next mock up should be
tested with a skived raw edge.
- The corners of the top of top line stick out and it would
look better if it curved around the leg. Place wire in the lining
to create shape. (See sample box for corner piece experiments.)
- As part of the design, the boot leg which goes over the knee can be rolled down over itself so that you can no
longer see the embroidery and it becomes a knee high boot. This mock up I used a lap seam but think it would
look and work better as a closed seam - this is to be tested on the next mock up.

48
This mock up worked really well even
thought the coated leather was poor quality
it was good to see it in a close colour to the
final product. I managed to crudely stitch
together the vamp and upper after it tore
(because of too much skiving), so that I
could see the shape and how it would look.
Corrections to be made to final piece:
-Do not skive around vamp as it makes it
weak. Instead wax around raw edges.
- Change bagged edge at top to a run and
turn seam all the way around.
- Ensure closed seam on lining is hammered
down enough so it is not visible on the
outside of the boot.
- I originally planned that the sole would
be made from the same leather as the
upper and waxed around the edge like the
vamp and this would show off the brass
heel. When mocked up I didn’t like this so
decided the sole would be waxed and buffed
leather.
- I decided after much deliberation to
remove the elastic from the design. When I
tried it on, I could walk easily without it and
it did not fall down or move much and I felt
it was an unnecessary design feature which
would take away from the embroidery on
the knee area.
Mock-up 5

49
Final Product:‘Guilded Statue’
The making process for this product went
very well without many issues.
- The heel stiffener used did not work well,
although it eventually gave the right shape it
was difficult to manipulate and in hindsight
would have used a different type.
- Leather stretch liquid was used in abun-
dance so that both the upper and lining
would stretch to the right shape of the last.
If it were to be done again I would have
hand blocked it for a longer period of time.
- The main concern when lasting the shoe
was that because of the height of the last,
the vamp upper would be difficult to last
around the toe without causing wrinkles
and buckling. It was a long process trying to
get the shape of the toe right and a mixture
of steaming, heating, pulling and tacking
was used and finally the wrinkle chaser was
used to create the shape and even out all the
creases.
- I was extremely pleased with the end result
and the simple design and shape worked
well and I have achieved the look I wanted.

50

51
After completing the prototype there still remained one main problem.
Although the product looked great, when folded down over the knee it
became bulky an inelegant. If I had more time to redo this I would split
the upper and lining more and decrease the thickness of the padding in
the embroidery. Another option would be to reconsider the location of
the seams around the centre back folded area as the build up of leather
has caused it look unsightly. Unfortunately at this stage I did not have
time to go back to change it.

52

53
Heel Development
Original vintage piece.
I decided to use the actual vintage piece to create my heel. I was originally going to re-cast it to include the
brass plate, using the same process as the ‘Rococco Stone’ heel, but believed I can get a similar effect by
soldering one on to match the worn look of the original piece.
- The plate would then be attached using two Chicago screws which are soldered onto the back of the brass
plate and slot into two holes made in the sole. The ends of the screws are then tightened on the inside to fit on
the heel.
- After completing the shoe I could get the right pitch
and knew exactly where to sand down the heel to be
level with the sole and leave enough space for the 3mm
brass plate.
The next page illustrates how the brass plate was made.
Sand off this much

54
Plate hammered to fit flush against sole Plate sanded into shape
Outline of shape measured.
Sole bevelled out using a Dremel.
As it was impossible to get the plate to sit
flush against sole, I decided to made a dent
in the sole for the plate to sit in.
Two holes drilled out

55
Chicago screws Chicago screws soldered onto back of plate
in this position.
Soldered plate to heel.
A/W 2012/13
Guilded Statue
4mm
33mm
127mm
36mm
8mm 70mm
6mm
Screw head
Sole
The heel was then cleaned and dipped
in oxidising fluid to restore it back to its
antique look. It was polished with black
polish so that it would get into the cracks to
emphasise and darken them. A heel tip was
then made from leather and attached.

56
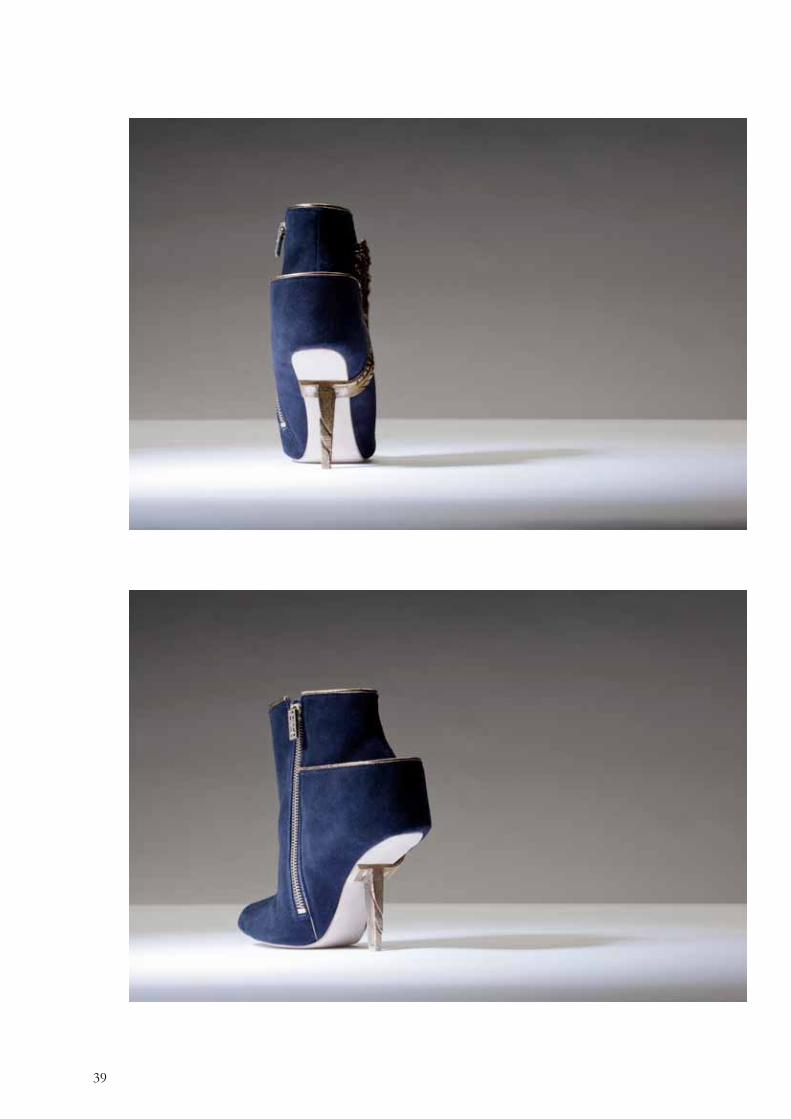
Guilded StatueFinal Product

57
Guilded Statue

58

59

60

61

62

63
MaterialMarketing
As CMA will be sold through stockists and will initially not have a shop premises, there will be a certain
amount of control lost over how the product is displayed and sold. Therefore due care has been made to
ensure the product offers something extra to the customer.
Point of Sale
Package which customer would receive:
Heavy weight branded paper bag, with gold trim handles
Navy branded box with barcoded label on the side
Navy tissue paper
1x Gold dust bag
Navy envelope containing information on the footwear designer
and current collection, care tag and contact details card.
2x Perfumed shoe cushions
Pair of shoes
Examples can be found in prototype box for ‘Rococco Stone’

64
The advantages of display and
promotion of the product in a
stand alone store are obvious and
in order to highlight the quality of
the product when presented for sale
in stockist stores a brief synopsis
of the product and company are
included in the product box, as
many clients like to know the
background of the company.
Although they are not able to
enjoy the same luxury experience
that an own store would offer, the
additional items included in the box
adds a personal touch and makes
the buyer feel emotionally attached
to the brand.
- Brand name is always embossed in
dark metallic gold foil, usually in the
right hand corner.
- Burnished gold trim is used on the
bag handles, shoe bag drawstring
and also to bind the perfumed
cushion.
- Magnetic, snap shut boxes come in
a range of sizes, as do the bags.
- Label on side of boxes hold key
information about the product
inside. (example below left).
Catherine McAleer
Ref. Style: 1215; 100mm‘Rococco Stone’
Colour: Deep Navy, Burnished Gold
Size: 37
705,00 GBP Made in Ireland
Baroque
The first collection released by Irish designer, Catherine McAleer, holds a deep memory of the
past, which has been thrust into the future. This Autumn/Winter 2013 luxury women’s footwear
collection combines traditional Irish craftsmanship techniques, with modern silhouettes. The
collection of designs are inspired by the juxtaposition of ideas; strong influences from the
Baroque era, contrasting with minimalist design details, creating dramatic statement pieces. Much
emphasis is placed on the quality and the construction used within the making of the products
which are produced in Ireland.
EmpireProduct Care
You have purchased a beautiful pair of Catherine McAleer shoes or boots. In order to maintain
their beauty and care for them, ensure they are stored in their orginal shoe bag to protect them
and keep away from direct sunlight when not in use. Use suede or leather brushes to clean the
leather.
We uphold a strong duty of care to our customers and hope that you are happy with your
purchase. In the case that you may require a repair, you are welcome to send the products to us,
and they will be mended free of charge.
Riverhouse Millbrook,
Naas,
Co. Kildare,
Ireland
+353 (0)45 876879
www.catherinemcaleer.com
Pantone 533c Pantone 871c

65
The shoes will also be available for sale online and it is essential to have an easy to use website. I feel the concept
‘less is more’ is something which is needed for the CMA brands online presence. A snapshot of how the ‘Home’
page may look and be used by the customer.
atherineMcAleerAutumn/Winter 2012/13
Home Contactcollectionsabout Press
PresenceOnline
atherineMcAleerAutumn/Winter 2012/13
Home Contactcollectionsabout Press

66
PhotoshootLocation
A location photoshoot was held at Westland London. A lot of inspiration for the designs in the collection were taken
from the antique pieces sold at this company. I felt it was fitting to capture the essence of the place and create an
editorial-like shoot.
Baroquen WarriorThis page:Gold necklace, vintage;Silk shirt, stylists own; grey tights, Donna Karan; leather boots, Catherine McAleer.Photographer: Jessica SeamenModel Hannah O’Brein
Sumptuous fabrics, pewter and gold metals. Encrusted details bring a bit of edge to
this 17th Century Baroque royal, bringing her out of her period and into the modern
day. This warrior is ready to on into the season in fierce elegance.

67
Baroquen Warrior

68

69


