40
ProEXR Advanced OpenEXR plug-ins

ProEXRAdvanced OpenEXR plug-ins
1

ProEXRby Brendan Bolles
Version 1.8April 4, 2013
fnord software671 Ashbury StreetSan Francisco, CA 94117www.fnordware.com
For support, comments, feature requests, and insults, send email to [email protected] or participate in the After Effects email list, available through www.media-motion.tv.
Plain English License AgreementYou know the drill. While actually much of the software in this package is free, not all of it is (spe-cifically ProEXR for Photoshop, ProEXR AE for After Effects, and ProEXR for Premiere). If you use it past the trial period, you should buy it. If other people you know want to use it too, they should buy their own copies. Companies should buy a copy for every employee who uses it it. The license is tied to the person, so if you use ProEXR on multiple computers you may freely install your one serial number on each.
A lot of work went into writing these plug-ins and creating this manual. If a few people pay for them, I’ll go out and make some more neat-o graphics plug-ins. I promise.
Oh, and please enjoy using this software. Really, I insist.
© 2007–2013 fnord. All rights reserved.
2

About ProEXRIndustrial Light and Magic’s (ILM’s) OpenEXR format has quickly gained wide adoption in the high-end world of computer graphics. It’s now the preferred output format for most 3D renderers and is starting to become the standard for digital film scanning and printing too.
But while many programs have basic support for the format, hardly any provide full access to all of its capabilities. And OpenEXR is still being developed—new compression strategies and other features are being added while some big application developers are not interested in keeping up.
And that’s where ProEXR comes in. It fully supports OpenEXR in Adobe Photoshop, After Ef-fects, and Premiere Pro, at least to the extent that it’s reasonably possible to do so in those pro-grams. In particular, ProEXR does these things that Adobe’s shipping plug-ins do not:
• It can read in all the channels present in an EXR, not just the standard R, G, B, and A.
• It can output layers from Photoshop and After Effects, following OpenEXR layer-channel naming conventions.
• It reads and writes information about the project’s color space.
• It can greatly reduce a file’s size through Luminance/Chroma subsampling.
• It can save images in 32-bit float as well as 16-bit float.
In this manual, “ProEXR” refers to the entire suite of plug-ins, although most of the After Effects plug-ins actually ship with the program and are open source. But since they are developed in paral-lel and share the OpenEXR codebase, it makes sense to talk about them together.
3

System RequirementsTo use ProEXR, you’ll need Photoshop and After Effects versions CS3 or later. Photoshop Extended is required for layered floating point files in CS6 and earlier. For Premiere, you’ll need version CS5.5 or later.
InstallationPhotoshopDrag ProEXR or ProEXR EZ to Photoshop’s plug-in folder. As of CS5, Photoshop’s built-in OpenEXR plug-in can not be disabled, but ProEXR will work alongside it and take priority over it.
After EffectsAfter Effects CS4 and later already ship with three of the ProEXR plug-ins: OpenEXR (in Plug-ins/Format), EXtractoR, and IDentifier (in Plug-ins/Effect). If you want to upgrade to the latest versions, replace them with the ones included in the ProEXR package.
In addition, you’ll want to install the “ProEXR AE” plug-in, which provides automatic comp crea-tion and layered file export. This plug-in is not included with After Effects.
PremiereFor Premiere, drop the ProEXR plug-in into a place where both Premiere and Adobe Media En-coder can see it. Here are the folders for each platform (replace “CSX” with your version):
Mac
Windows
/Library/Application Support/Adobe/Common/Plug-ins/CSX/MediaCore
C:\Program Files\Adobe\Common\Plug-ins\CSX\MediaCore
4

Quick StartIf you need a multi-channel EXR file to try out the extra features in ProEXR, download one here:
http://www.fnordware.com/OpenEXR/x35_3a.exrThis file was created by Rob Nederhorst.
A sample After Effects project using this file is also available.
PhotoshopTo save an EXR, your document must be in 32 Bits/Channel mode, as set from the Image menu. Any OpenEXR files you read in will already be set to this mode.
Go to File ➤ Save As. Select ProEXR (or ProEXR EZ) as the Format.
Configure settings in the Options dialog. Click OK.
Alternatively, you can export a series of layers as individual EXR files by choosing File ➤ Export ➤ ProEXR Layer Export.
5

When opening an .exr file in Photoshop’s Open dialog, ProEXR should appear as the format and any additional channels should appear as extra layers.
After Effects OpenEXR files will appear to import and render as before with the replacement file format plug-in installed. When using an OpenEXR Output Module in the Render Queue, you’ll notice that the Format Options button is enabled and a settings dialog appears when clicked.
On import, EXR files appear mostly normal, although the Footage status information now also tells which compression method was used and which extra channels are included in the file, if any.
To access the extra channels, use one of the plug-ins in the 3D Channel category, particularly EXtractoR or IDentifier. Or select the EXR file and choose “Create ProEXR Layer Comps” from the File menu and a series of comps will be created and configured for you.
PremiereWith the ProEXR plug-in installed, OpenEXR file sequences be be available through the standard import dialog and ProEXR will be a format option in Premiere’s Export Settings dialog.
Common IssuesWhen users write to us to say that ProEXR doesn’t appear to be working, 99% of the time it’s be-cause the instructions above weren’t followed closely. The most common mistakes are:
6

1. Opening files with the built-in Photoshop plug-in. Verify that ProEXR is the format used in the Open dialog.
2. Not running Photoshop Extended, which is required to open and save multi-layered OpenEXR files in CS6 and earlier. ProEXR EZ can be used with regular Photoshop.
3. Installing the 32-bit version of the plug-in in the 64-bit version of the program. To verify Pro-EXR is installed in Photoshop, find the About Plug-In menu and see if ProEXR is listed.
4. Installing ProEXR EZ and loading a multi-layer EXR. Only full ProEXR (without “EZ”) will show the extra layers.
RegistrationMany of the plug-ins in this package are free, but ProEXR for Phothsop, ProEXR AE for After Effects, and ProEXR for Premiere are not. After installation, you are given 15 days to try them out before they will refuse to run any longer with-out a serial number. To purchase a serial number, visit this link:
http://www.fnordware.com/ProEXR/buy_proexr.html
ProEXR HistoryThe plug-ins in this package began their life while I was working as a visual effects artist and occa-sional programmer at The Orphanage. Around 2002, HDR images and floating point compositing were becoming all the rage at Siggraph and other places but After Effects, with its 16-bit limita-tion, was largely left out of the party.
7

To try to work around this, Stu Maschwitz, Ryan Tudhope, myself, and other Orphans created eLin, originally through some AE presets and later through custom plug-ins I wrote. These plug-ins were first used on Hellboy, and then refined for The Day After Tomorrow. They seemed to do the trick, so eLin was released as a commercial package around this time. The release also con-tained our first OpenEXR format module—a Photoshop plug-in that presented images to AE in log space.
When ramping up on Sin City, the need to access 3D Channels in an EXR was apparent, so an AE-native plug-in was created that could pass on Z-Depth and Velocity channels. Most of the motion blur in our shots was rendered in After Effects using the Velocity channels.
Years later, there was some talk of updating the AE plug-in for After Effects 7, which finally had real floating point but no 3D channel support for EXR files. The Orphanage graciously agreed to let me take the code I had written there and release it publicly. Everything was fine until Steve Cho sent me an image by Rob Nederhorst that didn’t just have a few standard 3D channels, but a total of 49 channels containing various render passes, image layers, velocity channels, etc. Steve men-tioned that Nuke could easily pull all the channels from this file, and so I decided I had to get the same functionality into After Effects, which involved writing some additional 3D channel plug-ins as well as generalizing the format importer.
At some point in this process, it occurred to me that a similar plug-in would also be great to have in Photoshop. While the interface for loading layers into Photoshop was completely undocu-mented, I managed to figure it out and was amazed that it all actually worked more or less. Several versions later I added layered exporting to After Effects as well as Premiere Pro support.
And now after all that, I’m really excited to get to use ProEXR in my own work. And even more excited to share it with the global graphics community…and you (awwww).
8

AcknowledgmentsFirst and foremost, I have to thank everyone who has contributed to the OpenEXR code at ILM. After all, their code makes up the bulk of this package. I have the individual contributors’ names listed later on in this manual.
Special thanks to Florian Kainz for heading up the project at ILM and for answering many of my stupid questions.
Thanks also to whatever corporate big-wig(s) at ILM decided it was OK to release the OpenEXR code to the public. We all owe you.
Thank you to the After Effects team at Adobe, who make a program I really love using. Special thanks to Dan Wilk (DWilk), Dave Simons (DaveS), Bruce Bullis (bbb), Vladimir Potapyev (Vlad), and Zac Lam (Zac) who have helped me fix my own bugs, fixed some of their own, and generally helped me figure out what’s going on.
Thanks to Lars Borg, Manish Kulkarni, and Tom Raurk also from Adobe, who have helped me over the years.
Thanks to everyone I have ever worked with at The Orphanage. Especially Stu Maschwitz, Luke O’Byrne, Alex Prichard, Ralph Procida, Tim Dobbert, Ben Grossmann, and Steve Cho.
Thanks to Jean-loup Gailly and Mark Adler for zlib. Thanks to Marti Maria for Little CMS. Both open source libraries are used throughout ProEXR.
Thanks to everyone who buys these plug-ins—it really means a lot to me.
And thanks to everyone else who ought to be listed here, but is escaping my mind as I write this at 4:45 in the morning.
9

ProEXR in PhotoshopProEXR vs. ProEXR EZIn Photoshop, two different plug-ins are provided: the full-featured ProEXR plug-in and a simpler version called ProEXR EZ. Here’s a quick comparison:
ProEXR ProEXR EZ
Free ✔
Multiple Layers/Channels ✔
Layer Exporting ✔
Always creates standard RGBA EXRs ✔
Can use Photoshop Grayscale mode ✔
Alpha always appears in a layer ✔
Alpha can appear in the Channels palette ✔
10

Most users will want to install either ProEXR or ProEXR EZ. If you choose to install both, files dragged to Photoshop will open with the full ProEXR. ProEXR EZ is a simpler plug-in, augment-ing the Photoshop version with a few options. The rest of this section describes the full ProEXR.
File ReadingThe OpenEXR format can support any number of channels, each one defined by a unique name. But most readers (includ-ing Adobe’s) only pay attention to the channels “R”, “G”, “B”, and “A” to create a single image. ProEXR reads those channels along with any other image channel found in the file.
The best way to see how ProEXR works is to open a multi-channel EXR file with it. Each channel will appear, with some channels grouped together in layers. For more information about how layers are formed from channels in an EXR, see Channel Info.
By default, each layer will be given transparency if an alpha channel (“A”) is present in the file or if a layer is explicitly as-signed its own alpha. For ways to override this behavior, see Import Options.
OpenEXR files always appear in Photoshop in 32-bit (float) mode.
11

File WritingProEXR will appear as a format option in the Save As dialog when your document is in 32-bit (float) mode. Unlike most other formats, you will be allowed to save your Photoshop layers. You will then be presented with this nifty options dialog:
Compression!Choose from the available compression methods. For more information, see OpenEXR Compression.
Luminance/Chroma!Translate RGB into Luminance/Chroma channels and subsample. Only available for single-layer files. See the Luminance/Chroma section.
32-bit float!By default, OpenEXR stores pixels in a 16-bit float format. This is usually ideal, but if you have a need for 32-bit float pixels (perhaps because you have values over 65,504.0?), check this box. Otherwise it will just increase your file size unnecessarily.
12

Include layer composite!ProEXR lets you explicitly say which channels will be saved in the file, but under this method you will not end up with the standard “R”, “G”, “B” channels unless you create a layer called “RGB”. With this box checked, ProEXR will take a snapshot of your composited layers and use that for the standard RGBA channels that most programs look for (so it’s good for compatibility’s sake). In general you’ll want to leave it on.
Include hidden layers!Unless this is checked, hidden layers will be ignored.
About AlphasIf an EXR has an alpha channel (named “A”), ProEXR will assume that it should be applied to every layer, burning transparency into all of them. If for some reason you disagree with this behav-ior, you may change the Import Options. On output, the alpha channel is re-saved.
Here’s where it gets tricky: OpenEXR files with alpha channels are stored as premultiplied, while Photoshop and After Effects uses straight images internally. By default, ProEXR handles all the conversion back and forth between the two formats. There may be times when you want to over-rule ProEXR’s alpha conversion—for those times I’ll once again point you to our section about Import Options.
If all this alpha talk is making your head spin, or maybe you can’t ever hear enough about alpha channels (I know I can’t), see the section called “All About Alphas”.
Layer ExportWhile we all know it’s great to be able to save all our lay-ers into a single OpenEXR file [insert pat on back here], the fact is that many programs don’t understand such files (including umm…stock Photoshop). To work bet-
13

ter with such programs, ProEXR has the ability to save out each layer as a separate EXR file. Sim-ply go to File ➤ Export ➤ ProEXR Layer Export.
Upon selecting this option, you will be asked to enter a file name which will serve as the basis for the layers to be exported. So if you had layers called “sky”, “buildings”, and “lights” and exported a base file called “painting.exr”, your layered files would be called “painting_sky.exr”, “painting_buildings.exr”, and “painting_lights.exr”.
If you check the box to “Include layer composite,” a full layered EXR with composited RGB chan-nels will be placed as the base file.
Suggested WorkflowBecause there are some items in a Photoshop project that aren’t supported in an EXR file, we rec-ommend that all Photoshop work be saved as real, honest-to-dog Photoshop files. And then when it’s time to export your project to another program using an industry-standard, open-source, production-tested, layer-friendly, floating point format, we’ll that’s where ProEXR comes in.
In some cases, you may have to do a little project clean-up before exporting, merging this, or ras-terizing that. In those cases we hope you can find a way to automate the process using the script-ing built in to Photoshop. To help you in this endeavor, ProEXR supports the Photoshop Actions scripting model.
14

Below is a table of some things ProEXR supports and doesn’t, and even why:
Photoshop item Support? eh?
Layers Yes! That was the whole point, right?
Text Layers Sort of They get rasterized into pixels.
Adjustment Layers Not really They appear in the file, but without an adjustment.
Layer Sets Not really The layers do appear, just not in a set.
Transparency Yes We like to call it the alpha channel.
Layer Masks Yes It gets combined with transparency.
Vector Masks No Try a vector format, bub.
Layer order Yes Gets stored as a custom attribute read by PS and AE.
Visibility Yes Stored in the same custom attribute.
Transfer Mode Yes That custom attribute again.
Opacity Yes Yeah, custom attribute.
Color Space Yes See OpenEXR Color.
Channels Palette … ProEXR: No, only the Layers palette is used.
ProEXR EZ: Yes, can be used for an Alpha (“A”).
Paths No Try EPS.
Layer Styles No Ha!
Smart Filters No See Layer Styles.
Some other item Not likely EXR is a bitmap format, man. This ain’t TIFF.
15

Import OptionsAs mentioned before, ProEXR has a certain default behavior when it comes to alpha channels. While we at fnord software think we’re really doing the right thing there, we’ve also provided a secret dialog (well, it was secret) to effect the process. To bring up this dialog, hold down the Shift key right as an EXR file begins to open in Photoshop. It lets you control the following:
Alpha Mode!The default behavior in ProEXR is to use the Alpha channel(s) to make layers transparent. You can select an alternate mode where no transparency is used and Alpha channels are placed on their own layer. (In ProEXR EZ, this option puts the alpha in the Channels palette.)
UnMultiply!When using the second alpha mode, all channels typically appear as they do in the file: premultiplied. An option is provided to UnMultiply the RGB channels by the alpha. You’ll see straight pixels in all their jaggy glory! Hope you know what you’re doing.
Layering Attribute!Option to ignore the neat-o custom attribute ProEXR stored to remind Photoshop what the original layer names and order was. Instead, layers get assembled old-school. (Not found in ProEXR EZ, which ignores all layers.)
Memory Mapping!Reads the entire binary EXR into memory with one big read operation before unpacking into Photoshop. Can improve read times for files read over a network, but will use up more memory.
16

Always Use Dialog!If you want to be bugged for import options every time, you can tell the dialog to always come up. Otherwise you will need to use the Shift key.
Every time an EXR is opened, the default settings will be reloaded, regardless of what was used used for the previous file. Use the Set Defaults button to customize those settings.
Channel InfoPhotoshop and OpenEXR have different notions of how to store layers, and getting them to sync up isn’t always easy. Photoshop thinks of each layer as a group of 4 RGBA channels with a layer name that isn’t necessarily unique. Layers also have a stacking order, transfer modes, layer masks, opacity, etc.
OpenEXR, on the other hand, only has a list of channels, each with a unique name. A weakly-enforced layering method has been created through a naming convention: if you have a layer named “reflection” and it has three RGB channels, what you actually have in the EXR are three channels called “reflection.R”, “reflection.G”, and “reflection.B”. You might not have any “reflection.A”, and in some cases you may have fewer channels with different names such as “velocity.X” and “velocity.Y”.
The goal with ProEXR was to retain all the original channel information so that you could open an EXR, make some changes, and the save it with the same channels it originally came in with. So in order to remember what the original channels were, we format the layer names in a special way. Don’t be afraid to ignore these formatting rules—ProEXR will just assume you want all 4 RGBA channels in that case. But if you want more control, follow the examples below:
17

Photoshop layer name OpenEXR channels
spaceship spaceship.R, spaceship.G, spaceship.B, spaceship.A
dinosaur.RGBA dinosaur.R, dinosaur.G, dinosaur.B, dinosaur.A
alien.RGB alien.R, alien.G, alien.B
alien.[R][G][B] alien.R, alien.G, alien.B
velocity.XY velocity.XY.R, velocity.XY.G, velocity.XY.B, velocity.XY.A
velocity.[X][Y] velocity.X, velocity.Y
depth.[Z] depth.Z
normals.[NX][NY][NZ] normals.NX, normals.NY, normals.NZ
texture.[U][V][A] texture.U, texture.V, texture.A
[Transparency] Transparency (an EXR channel without any layer association)
Specular Specular.R, Specular.G, Specular.B, Specular.A
RGB R, G, B (RGB and RGBA are special names that don’t become RGB.R, RGB.G, etc)
RGBA R, G, B, A
In general, channels are retrieved from Photoshop in RGBA order. The exception is that any channel.[A] will get the alpha channel. So in the texture.[U][V][A] example, red is texture.U, green is texture.V, and alpha (not blue) is texture.A. Brackets can be used to collect one word into a channel name, so the “Transparency” channel will live alone and come from that layer’s red channel.
If you have duplicate layer names, ProEXR will increment the name to prevent duplicate channel names in the EXR, which aren’t allowed.
18

Note that some programs, including the current version of Nuke, do not support EXR files with channel names over 32 characters, even though the OpenEXR format now supports up to 255. If you are worried about compatibility, keep you channel names short.
Finally, ProEXR saves a custom chunk of data with the file so that if you re-open a layered file, the layers will appear as you originally labeled them, not with the layer formatting. (You can use im-port options to ignore this data and force the layer formatting if you like.) This data can also be used in Nuke 6.3 and later to build a comp automatically using the included Python script “ProEXR_Comp_Builder.py”.
File DescriptionWhile ProEXR exposes all floating point channels to Photoshop, an EXR file may have any num-ber of attributes that generally remain unseen. A complete report of all components in the file is inserted into the Description field in Photoshop’s File Info window.
19

ProEXR in After EffectsCaveatOK, actually many of the After Effects plug-ins aren’t really considered part of the commercial ProEXR package. For one thing , they’re free, open source, and even ship in After Effects (CS4 and later). But since they were written in paral-lel with the Photoshop plug-in and share so much with it, it seemed silly to put them in a separate manual.
OpenEXR file moduleReadingOpenEXR files appear as floating point, premultiplied image files. A standard EXR file contains channels “R”, “G”, “B”, plus alpha channel “A”, and these are the channels you initially see when us-ing the footage.
Any extra channels in an EXR file can be accessed with 3D Channel plug-ins, some of which are included with this package and described below.
If you have an EXR with many channels, you may want to turn on the option to Cache Channels, found in the input options dialog (click the More Options button in AE’s Interpret Footage dialog). With this option enabled, all the channels in the file will be read at once and stored in a memory cache. Subsequent accesses of that file (such as when 3D channels are extracted) will pull from the cache, avoiding the need to read the file again.
The Cache Size preference determined how many different files will be stored in memory at once. For maximum speed, this
20
number should be at least as big as the number of cached EXR files that you have on any given frame in your comp. The cache size setting is set at the machine level, so you may have to change this setting for different projects and propagate it to different machines you use.
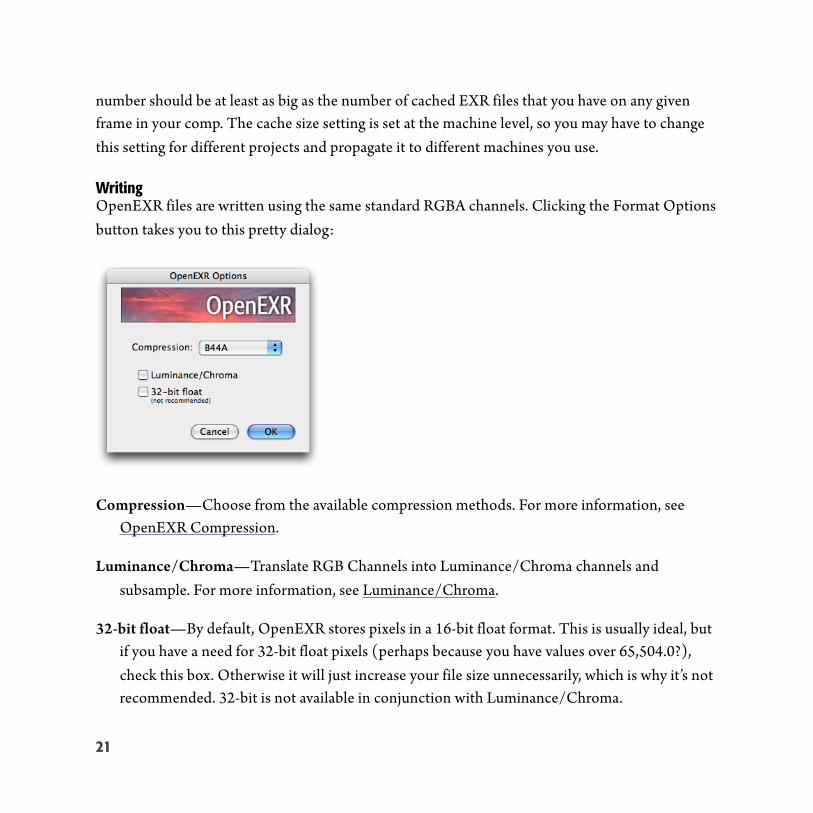
WritingOpenEXR files are written using the same standard RGBA channels. Clicking the Format Options button takes you to this pretty dialog:
Compression!Choose from the available compression methods. For more information, see OpenEXR Compression.
Luminance/Chroma!Translate RGB Channels into Luminance/Chroma channels and subsample. For more information, see Luminance/Chroma.
32-bit float!By default, OpenEXR stores pixels in a 16-bit float format. This is usually ideal, but if you have a need for 32-bit float pixels (perhaps because you have values over 65,504.0?), check this box. Otherwise it will just increase your file size unnecessarily, which is why it’s not recommended. 32-bit is not available in conjunction with Luminance/Chroma.
21
Channel MappingWhile the ProEXR package comes with tools to easily extract any channel from a piece of footage, some plug-ins rely on channels being categorized. To play nice with these plug-ins, there is a edit-able text file that accompanies the OpenEXR reader called OpenEXR_channel_map.txt. Instruc-tions for use are found in the file itself.
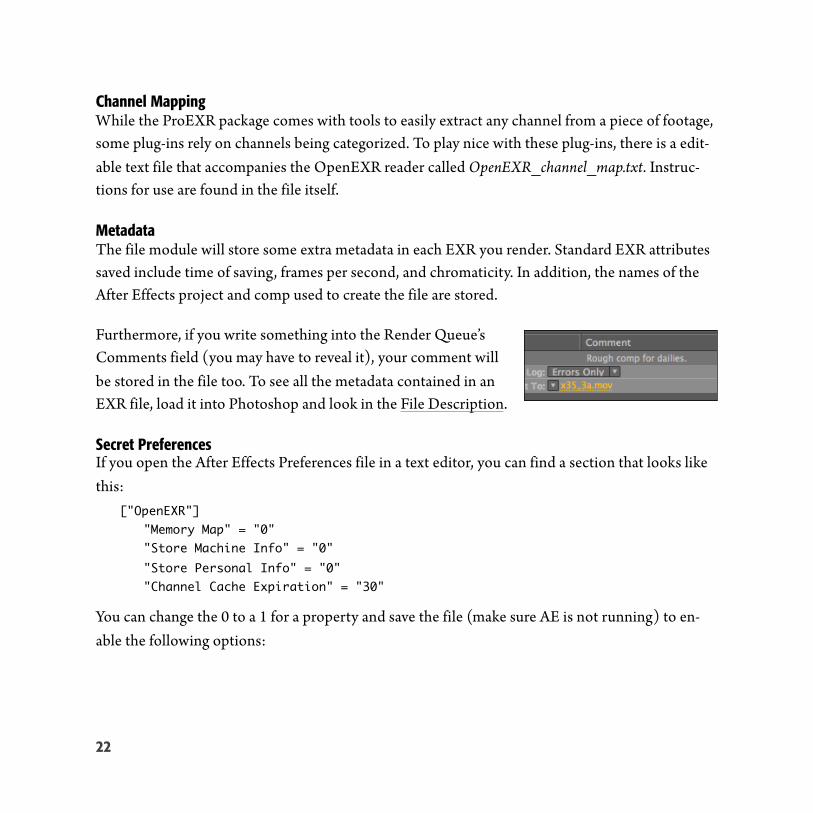
MetadataThe file module will store some extra metadata in each EXR you render. Standard EXR attributes saved include time of saving, frames per second, and chromaticity. In addition, the names of the After Effects project and comp used to create the file are stored.
Furthermore, if you write something into the Render Queue’s Comments field (you may have to reveal it), your comment will be stored in the file too. To see all the metadata contained in an EXR file, load it into Photoshop and look in the File Description.
Secret PreferencesIf you open the After Effects Preferences file in a text editor, you can find a section that looks like this:
["OpenEXR"]"Memory Map" = "0""Store Machine Info" = "0""Store Personal Info" = "0""Channel Cache Expiration" = "30"
You can change the 0 to a 1 for a property and save the file (make sure AE is not running) to en-able the following options:
22

Memory Map!The EXR file will be completely copied into a memory buffer with one read operation and then decompressed form there. This can lead to speed improvements, particularly when files are accessed via a network. It will also use up more memory, however.
Store Machine Info!Tags each EXR with the computer’s network name. Can be useful for tracking down the render node that created a problematic file.
Store Personal Info!Tags each EXR with the user’s name.
Channel Cache Expiration!The length of time in seconds before an un-accessed EXR cache will automatically free itself from memory.
EXtractoRWhereas most 3D Channel plug-ins are limited to a certain set of pre-defined channels, EXtractoR will open any chan-nels available so long as they’re floating point. The extracted channel names are listed in the Channel Info pane. As with all 3D Channel plug-ins, you must apply EXtractoR directly to the footage layer, not to a pre-comp.
When you click on said Channel Info pane, a dialog will pop up allowing you to pick from menus that reflect channels pre-sent in the current image. You may also choose to simply copy a channel from the input.
23

The Black Point and White Point controls are provided to re-scale the floating point values. At their defaults, no re-scaling will take place. If a project is in floating point mode, the user may mouse over the image and see the raw values in the Info Panel.
Channel values will depend on the renderer. Z-depth values are often negative, which might call for setting the White Point to a negative number, perhaps a large one. Velocity channels can be positive or negative, but usually should be scaled to 0-1 range with 0.5 meaning no movement. This can be done by setting the white and black points to opposite values like 50 and -50.
Most 3D renderers output images premultiplied, while AE holds them as straight internally. If you are bringing in premultiplied RGB channels, you probably want to click the UnMult checkbox. More detail on this exciting topic available in the All About Alphas section.
A note about color managementThe extraction plug-ins take floating point data from an EXR file and put it right into AE’s pixel buffer. As a result, the pixels are simply assumed to be in your project’s working space, although that may not be true. After Effects tags incoming floating point files as being in linear sRGB color space or applies color space information if it is available in the EXR. Usually this is all taken care of automatically on the file import end, but EXtractoR is circumventing that step.
To use color management with extracted images, apply the Color Profile Converter, select sRGB as the input profile (or another color space if you have one), and check “Linearize Input Profile.” Keep the project working space as your output profile, and now the layer is once again color man-aged.
24

Non-image data channels such as Z-depth and Velocity don’t have any notion of color space, so you’ll usually want to leave them unmanaged.
Note that the importer will tell AE about any color information found in the EXR, but the result-ing profile will not be available in the Color Profile Converter. Sounds like an Adobe feature re-quest to me.
IDentifierWhereas EXtractoR pulls floating point channels out of an EXR file, this plug-in gets the non-image channels such as Object and Material ID. It uses a dialog similar to EXtractoR's.
The default "Colors" display is meant to provide an easy pre-view, showing that the ID channel has been found and that objects in the scene have different IDs. The Luma and Alpha matte options are what you will probably end up using in a comp. Raw output (scaled to 8-bit) is also provided if you want to sample ID numbers with your mouse.
ProEXR AEAs the name suggests, this plug-in is considered part of the non-free portion of ProEXR and does not ship with After Effects. It is responsible for two separate functions: saving layered EXR files from an After Effects comp, and building AE comps from a layered EXR file.
25

Building CompsSelect an EXR file in the Project pane and select “Create ProEXR Layer Comps” from the File menu. ProEXR will create source comps for each layer in the file, apply the ap-propriate extraction plug-in, and add each source comp to an assemble comp. Files originally created with ProEXR will retain layer ordering, transfer mode, etc. through a custom attribute saved in the file. Not bad!
For times when you need extra control over the set-up of source comps, you can get things started by dropping the EXR into a new comp and positioning it as you like. Then select the layer, apply the menu command, and all the source comps will match your original comp, which then be-comes the assemble comp.
Some EXR files may have a “Display Window” set up differently from the “Data Window.” In this case, the Comp Creator will create a display comp to show how the file is intended to be viewed.
Saving Layered EXR FilesWith the plug-in installed, you will find another file format option in AE’s output module: “ProEXR Layers Sequence.” As the name implies, this will write out layered EXRs from your After Effects comp. That also means it follows the same layer naming convention. Read more about the naming rules in the Channel Info section above.
This plug-in has to do a few backflips to convert your layered comp to a single EXR. You can help it out by using plain layer names, simple transfer modes, and using a standard arrangement for your output file (something like “my_file.[####].exr” would be nice).
26

Note that the layers in this file do not flow through the standard AE output module, so any color transformations happening there will be applied to the composite layer only. Working in a linear color space will help prevent the discrepancy.
Unlike the regular OpenEXR file module, ProEXR AE will include timecode in the files it saves. If you would like to create standard RGBA files with timecode, create a render comp with only a sin-gle layer called “RGBA” (“RGB” if you don’t want an alpha) and turn off “Include Layer Compos-ite” in the format options dialog. The Comp Creator will read timecode and use it when setting up your project.
27

ProEXR in Premiere ProOverviewThe ProEXR plug-in for Premiere Pro lets you import and export OpenEXR sequences as you would the natively supported image sequences such as PNG and TIFF. Premiere actually supports linear floating point image buffers natively, so that is how EXRs are presented, with Premiere re-sponsible for any conversion to and from the more common video color spaces. Timecode is sup-ported on both input and output.
ReadingA standard OpenEXR file has channels “R”, “G”, “B”, and possibly “A” for an alpha channel. These are the channels ProEXR will generally look for when reading into Premiere. If you have extra channels in your file, you may access them via a dialog found using Clip > Source Settings.
Writing“ProEXR” will appear as a file format option in Premiere’s Export Settings dialog. The same compression options provided in the standard After Effects OpenEXR output module are provided in ProEXR for Premiere.
Unlike After Effects, Premiere’s image size and frame rate options may not always match the settings for your edit sequence, so make sure you verify them. Also double-check the “Render to Se-quence” option, which is off by default. It is recommended that you create your own output presets for use with ProEXR.
28

General OpenEXR InfoAbout OpenEXRIn recent years as computing power has continued to increase, most everyone working at the bleeding edge of computer graphics is working in floating point. And that means a floating point format is needed. And the format of choice is OpenEXR, created by some folks known to trip right over the bleeding edge—Industrial Light and Magic.
OpenEXR’s predecessors were never ideally suited for the job. Formats like floating point TIFF and Radiance were either inefficient with their storage of floating point data, limited from a pro-duction standpoint, or both. ILM needed a format to suit their needs, so they went out and cre-ated one. Then they released the code for it as open source.
The OpenEXR format is very flexible. It can hold any user-defined attributes in addition to a set of standard ones. An EXR can hold any number of channels, each identified by an arbitrary name, although I should mention that since many programs only seek out the following sets of reserved channels, so it’s always good to have them present to insure maximum compatibility:
RGB Grayscale Luminance/Chroma Alpha channel Z-Depth
“R” “G” “B” “Y” “Y” “RY” “BY” “A” “Z” (unofficial)
OpenEXR images are always floating point. But because full 32-bit floating point image data tends to be unwieldy and compresses poorly, OpenEXR uses a 16-bit (“Half ”) floating point format that matches what is found in some modern graphics cards. For digital images which generally have
29

some degree of noise or sampling error, the extra precision from a 32-bit float file is really mean-ingless. Of course, OpenEXR does support full 32-bit float if you need it, as well as integer pixels for non-image data like Object ID.
To store pixel data more effectively, OpenEXR utilizes image compression, typically lossless to avoid any kind of image degradation, yet still provide a significant reduction in file size. When im-age fidelity is less crucial, lossy compression and chroma subsampling are available to further crush file sizes.
So all in all, OpenEXR is a pretty amazing format. Let’s give a shout-out to the ILM authors who made it for us, shall we?
Florian KainzRod BogartDrew Hess
Paul SchneiderBill Anderson
Wojciech JaroszAndrew KunzPiotr Stanczyk
Thanks guys!
For more information on OpenEXR, visit the official site:http://www.openexr.com/
30

OpenEXR CompressionOpenEXR supports a variety of compression methods, described in the table below:
None
RLE
Zip
Zip16
Piz
PXR24
B44
B44A
No compression, but reads quickly.
Run Length Encoding. Still reads fast, but somewhat smaller.
Compresses each line with Zip. Slow compression, but faster decompression.
Zip 16 lines together. Particularly ideal for CG renders, textures.
Wavelet encoded, then Zipped. Best for photographic HDRs.
Use with 32-bit float. Rounds to 24-bit for better compression.
Good lossy compression, squeezing channels to 44% their original size.
Same as B44, but with extra compression on areas with flat color.
Except for the last three, EXR compression methods are lossless.
Compression performance depends on the image content. For images with a lot of continuous color (such as motion graphics or CG renders), Zip16 is almost always the best-performing method, beating even B44 in both file size and speed. B44A was created for lossy compression of such images.
For photographic HDR images (especially with film grain), 16-bit Piz usually gives the best com-bination of image fidelity and file size. If you are less concerned about fully lossless compression, Luminance/Chroma sampling and B44A compression will make a much smaller file.
31

For example, I created a 32-bit HDR photograph in Photoshop and saved it using various file for-mats and settings. In descending order of size they were:
File Settings Size
TIFF 32bpc 3.9 MB
Photoshop (PSD) 32bpc 3.9 MB
OpenEXR 32bpc, None 3.9 MB
OpenEXR 32bpc, Piz 3.7 MB
OpenEXR 32bpc, PXR24 2.1 MB
OpenEXR 16bpc, None 2.0 MB
OpenEXR 16bpc, RLE 1.7 MB
OpenEXR 16bpc, Zip 1.4 MB
OpenEXR 16bpc, Zip16 1.3 MB
OpenEXR 16bpc, Piz 1.3 MB
OpenEXR 16bpc, B44, L/C 443 K
The first two EXR formats held the original 32-bit float pixels without any change at all. Using PXR24 compression and then 16bpc pixels results in progressively more loss, but the changes are mostly academic, resulting in no loss that could possibly be detected visually. While B44 compres-sion and Luminance/Chroma sampling made significant changes to pixel values, the image still had no visual artifacts, and slight differences were only detectable in areas of high contrast and saturation. (Note that B44 compression and Luminance/Chroma are newer features of the OpenEXR format and may not be supported by all readers.)
32

Luminance/ChromaIn any level of graphics production, it’s never desirable to use formats such as JPEG that will de-grade the quality of the image you’re working on. Such formats are valuable at the final delivery stage where they can dramatically shrink file size without compromising too much image fidelity, but fidelity should always be maintained in production.
OpenEXR was created for a production environment, so image fidelity was always a top consid-eration. Like TIFF and PNG, OpenEXR files are generally saved losslessly, even if the the image data is compressed within the file. No pixels are harmed.
But now OpenEXR has added some lossy compression features to emulate JPEG compression in floating point. The first feature is the B44 (and B44A) compression mentioned above. B44 is simi-lar to the lossy DCT compression used in JPEG for compressing blocks of pixels.
The second feature, also found in JPEG, is the breaking down of standard RGB channels into Lu-minance and Chroma channels (“Y”, “RY”, and “BY”), and then shrinking (subsampling) the color-difference channels separately.
Because the RY and BY channels contain ¼ the number of pixels, the overall file data is reduced by ½. And yet, in most cases there is no visual difference due to human perception being more sensitive to slight changes in brightness and less to slight changes in color. Combine Luminance/Chroma sampling with B44A compression and you have an ideal way to save bandwidth when sending EXR files through email.
33

Linear color spaceMost floating point formats, including OpenEXR, assume that pixels are stored in a linear color space. This means that pixel values displayed directly on a monitor will appear unusually dark be-cause your display is non-linear (it has a gamma of 2.2 or so) and is darkening the image. Other formats such as JPEG store pixels brightened up to compensate for this darkening (using the in-verse gamma), which is why they appear normal.
The reason linear color space is important is because that is the color space of the real world. Gamma encoding is something made up for use by computers and their 8-bit displays. By per-forming all your image transformations in linear color space, you are therefore better simulating real light. Many happy accidents are the result, such as blurry highlights spreading out more realis-tically and blowing through a motion blurred object in the foreground.
Visual effects are generally trying to simulate happenings in the real world. That, and the need to represent overbright (> 1.0) pixel values, is why ILM created OpenEXR as a linear floating point format.
However, some operations are in fact not trying to simulate natural phenomena. One good exam-ple is the adding of grain, which in the real world happens on a piece of film or in a camera’s CCD—on the encoding end. To simulate the adding of grain, you should convert the image to the appropriate color space (such as Cineon Log), add the grain, and then convert back.
You'll find that by using color space to your advantage and performing operations the “right” way, your work will tend to elevate and your process will make sense.
All 32-bit Photoshop documents are automatically assigned a linear color space. In After Effects, enter the Project Settings, choose a Working Space profile, and check “Linearize Working Space” to composite in linear. And of course, always set your AE project depth to 32-bit float.
34

OpenEXR color informationAll Adobe color management is done using ICC Profiles. Profiles define the color space for a document—the mapping of RGB pixel values in the computer to their actual appearance when viewed on a particular device. The idea is that if we know the color space a file was created with and also know the color space our new device, color management software can tweak values so that the actual appearance is the same on both. Well, that’s the theory.
ICC profiles typically define the RGB color primaries and then pro-vide a gamma-ish response curve. Since OpenEXR files are always defined to use a linear response curve, a full ICC Profile was not deemed necessary and instead the RGB primaries are defined using chromaticity, which is then stored in the EXR.
You may recognize the diagram to the right—it’s a chromaticity dia-gram. Chromaticity for a color is specified with a pair of coordinates (x, y) on this graph. As the name implies, chromaticity only contains information about color without containing any information about brightness. The colored area of the graph represents all the colors that a human can see.
A complete description of a linear color space can be made by providing (x, y) color coordinates for each of the three RGB “tristimuli”, along with the white point coordinates (the D65 dot in the diagram).
To pass color space information to the Adobe apps, ProEXR converts between the ICC Profiles from the host and Chromaticity settings in the EXR. A custom attribute is also saved to remember the color space’s name as well as a copy of the original ICC profile for programs that support them.
35

OpenEXR support in other appsWondering who you might exchange these fancy EXR files with? Wonder no more…
Application OpenEXR support
Maya Basic support with included Mental Ray renderer. 3Delight, Render-man, V-Ray, other renderers also support multi-channel OpenEXR.
3DS Max As of 3DS Max 2011, full support.
Lightwave Full multi-channel output support using exrTrader, www.exrtrader.com.
Softimage Multiple channel support possible using Mental Ray shaders.
Cinema 4D Basic RGBA support.
Houdini Full support for piping arbitrary data to EXR channels.
Shake Full access to all channels from the FileIn node.
Fusion Good multi-channel input and pipeline support.
Nuke Full support for multiple channels through the entire pipeline.
All About AlphasTransparency in an image is indicated through the use of an alpha channel. A 3D renderer will in-clude an alpha and transparent parts of a Photoshop layer (made with the eraser, a layer mask, or other means) become the alpha channel.
When an alpha channel is present, the RGB channels can be in one of two forms: premultiplied or straight. The difference between the two is seen in translucent areas of the image, such as the
36
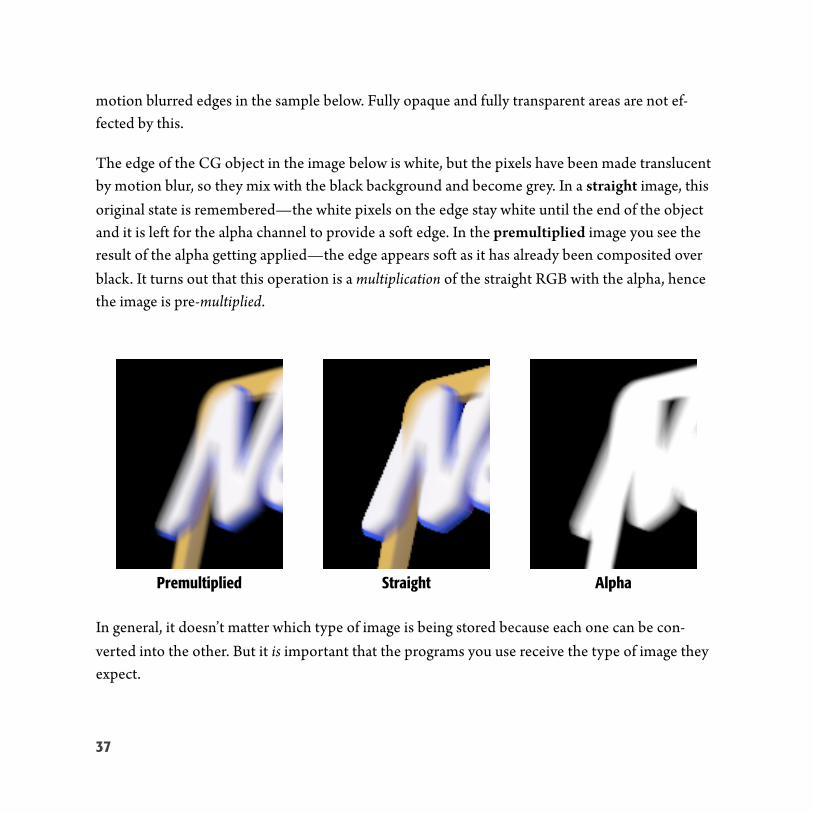
motion blurred edges in the sample below. Fully opaque and fully transparent areas are not ef-fected by this.
The edge of the CG object in the image below is white, but the pixels have been made translucent by motion blur, so they mix with the black background and become grey. In a straight image, this original state is remembered—the white pixels on the edge stay white until the end of the object and it is left for the alpha channel to provide a soft edge. In the premultiplied image you see the result of the alpha getting applied—the edge appears soft as it has already been composited over black. It turns out that this operation is a multiplication of the straight RGB with the alpha, hence the image is pre-multiplied.
Premultiplied Straight Alpha
In general, it doesn’t matter which type of image is being stored because each one can be con-verted into the other. But it is important that the programs you use receive the type of image they expect.
37

If they make an assumption, most programs today assume a premultiplied image is being used. Conveniently, the OpenEXR spec specifically speci-fies premultiplied images. 3D renderers usually create premultiplied im-ages and most compositing programs expect them…except for the Adobe programs. Both Photoshop and After Effects use straight pixels internally, so ProEXR must un-multiply (UnMult) the RGB channels to create a transparent layer. In After Effects, you can view raw straight pixels using the channel view pulldown. These straight pixels should look jagged around the edges—if they don’t, maybe you forgot to interpret them premultiplied or click UnMult in EXtractoR.
On the way out, ProEXR premultiplies layers in Photoshop before saving them in the EXR. In Af-ter Effects, the user should leave the color premultiplied in the output module.
There may be times in Photoshop where you don’t want ProEXR to UnMult the RGB channels or when you want to use them without the alpha being ap-plied to the layer. See the Import Options section for information on how to do that.
One specific case of alpha manipulation appears when you want to use multi-ple render passes to make a composite in Photoshop. To do this correctly, you must load the EXR with channels UnMulted. Then create a layer mask on your bottom layer and copy the alpha channel into it. From there, other layers can be dropped on top of the base layer and then grouped by option-clicking on the lines between them in the layers palette. Only when your channels are straight and the layers are grouped together will the edges merge together properly in Photoshop. It ain’t pretty, I know.
38

I should mention one more thing: when you copy the alpha channel into the layer mask, Photoshop will think it’s doing you a big favor by converting it from linear space to perceptual space, therefore brighten-ing it up. For best results, counteract this move by applying a Levels call to the layer mask with a gamma of 0.4545.
Version History1.0!August 20, 2007!Initial release using OpenEXR version 1.6.01.1!September 6, 2007!Added File Info description, enhanced Comp Creator1.2!October 23, 2007!Writing additional metadata, some bug fixes1.3!September 12, 2008!Import options dialog in Photoshop1.5!February 13, 2010!Complete re-write and addition of ProEXR EZ1.6!October 27, 2011!ProEXR AE, memory mapping1.7!April 26, 2012!ProEXR for Premiere, speed optimizations, ProEXR EZ now free1.8!April 4, 2013!Channel Caching in AE, UTF-8 support
OpenEXR CopyrightAll ILM wants me to do in return for using their free OpenEXR library is print this message:
Copyright ©2006, Industrial Light & Magic, a division of Lucasfilm Entertainment Company Ltd. Portions contributed and copyright held by others as indicated. All rights reserved.
Redistribution and use in source and binary forms, with or without modification, are permitted provided that the following conditions are met:
• Redistributions of source code must retain the above copyright notice, this list of conditions and the following disclaimer.
39

• Redistributions in binary form must reproduce the above copyright notice, this list of conditions and the following disclaimer in the documentation and/or other materials provided with the distribution.
• Neither the name of Industrial Light & Magic nor the names of any other contributors to this software may be used to endorse or promote products derived from this software without specific prior written permission.
This software is provided by the copyright holders and contributors “as is” and any express or implied warranties, including, but not limited to, the implied warranties of merchantability and fitness for a particular purpose are disclaimed. In no event shall the copyright owner or contributors be liable for any direct, indirect, incidental, special, exemplary, or consequential damages (including, but not limited to, procurement of substitute goods or services; loss of use, data, or profits; or business interruption) however caused and on any theory of liability, whether in contract, strict liability, or tort (including negligence or otherwise) arising in any way out of the use of this software, even if advised of the possibility of such damage.
Fin
40


