30
The i300 Professional Ironing System INSTRUCTION MANUAL GUIDE D’UTILISATION MANUAL DE INSTRUCCIONES
| Date post: | 06-Mar-2018 |
| Category: |
Documents |
| Upload: | nguyenxuyen |
| View: | 217 times |
| Download: | 2 times |

The i300 Professional Ironing System
INSTRUCTION MANUALGUIDE D’UTILISATIONMANUAL DE INSTRUCCIONES

ENGLISH 01FRANÇAIS 09ESPAÑOL 18


01
THE i300 PROFESSIONAL IRONING SySTEMINSTRUCTION MANUALENGLISH

CONGRATULATIONS
We would like to thank you and congratulate you for purchas-ing the Reliable i300 professional ironing station from Reliable Corporation. With it’s stainless steel construction, and profes-sional iron; the i300 will allow you to obtain the benefits of professional pressing in a compact and convenient format.
For your safety and to fully enjoy the advantages of this product, please take a few minutes to read all the important safeguards and care instructions. Keep this manual handy and review the product warranty card for your reference.
02

03
IMPORTANT SAFETy INSTRUCTIONS – SAVE THESE INSTRUCTIONS IN A SAFE PLACE FOR FUTURE REFERENCEREAD ALL INSTRUCTIONS BEFORE USE When using your Reliable™ steam station, basic safety precautions should always be followed. Please read the following instructions carefully as they provide impor-tant information concerning how to install, use and care for this product.
1. To protect against the risk of electric shock, do not immerse the appliance in water.
2. Do not allow the cord to touch hot surfaces.
3. Always allow the appliance to cool for at least thirty minutes before storing.
4. Always put the appliance in a secure place on a table or counter when using.
5. Do not move the appliance without unplugging it first.
6. Always disconnect the appliance from the outlet before filling with or removing water. Be careful to avoid spilling water on the appliance when filling.
7. Use tap water or 50/50 tap/distilled water in the appliance. Do not use per-fumed or products containing alcohol in the appliance.
8. Always disconnect the appliance when not in use.
9. Do not use the appliance if the cord is damaged. Return the appliance or have the cord repaired by the manufacturer, or their service agent.
10. Do not operate the appliance if it has been dropped or damaged. Do not disas-semble the appliance. Incorrect reassembly can cause a risk of electric shock. Send it to an authorized service center for repair.
11. Do not operate another high wattage appliance on the same circuit.
12. This appliance must be grounded. Do not alter the plug or attempt to remove this feature.
13. Be careful. Burns can occur from touching hot metal parts or steam.
14. This appliance is not intended for use by young children.
15. While using the appliance, never unscrew or remove the cap (1) while the boiler is under pressure.
16. Before removing the cap, make sure there’s no more steam in the steam cham-ber by shutting the boiler switch (4) to the off position, and pressing the steam iron button (7) to release all of the remaining steam.
17. To ensure your safety, the safety cap (1) and all other components must be replaced with original parts only.

04
FOR HOUSEHOLD AND LIGHT COMMERCIAL USE ONLy
FEATURES • Yournewironingstationprovidesclean,professionalresultseverytime
• Theprofessionalironsoleplateismadefromdurable,andfast heating aluminum
• Stainlesssteeloutershellconstructionforlonglife
• Adjustablethermostatallowsforaccuratetemperaturesettings
• Corkhandleironiscomfortableandstayscool
• Lowwaterlightindicator
• Regulartapwateror50/50tap/distilledwater
• 35p.s.ioperatingpressure
• 12-gaugeheavy-dutywiring
• Upto2hoursofsteam
IMPORTANT: When you want to dispose of the appliance, NEVER throw it in the garbage. Instead, go to your closest recycling station or waste collection centre for subsequent treatment. In this way, you will be contributing to looking after the environment.
HOW TO ASSEMBLE AND USE1. Remove the ironing station from its packing and make sure all packing has
been removed (including the protective bags). Put the station on a flat and solid surface.
2. It is recommended to put the iron on the iron pad, (supplied) as the pad will withstand the temperature of the iron
3. Insert the two-piece wand (2) into the flange on top of the boiler, tighten with the side screw and attach the spring on the iron hose to the coil end of the wand.
4. Unscrew the safety cap (1). Fill the boiler with a maximum of 4.65 cups (1.1 litres) of water for the i300. Use the funnel supplied, making sure you do not overfill the tank (you can also use the water stick to determine the water level in the steam tank).
5. Insert the plug into the electrical outlet; switch on the boiler (4) and steam button (3). When the two button lights come on, the iron and boiler are working.

05
6. Turn the iron plate’s temperature regulating knob (6) to the position “cotton°°°” (indicated on the iron knob).
7. Wait for the boiler button’s red light (4) to turn off (it takes about 10 min-utes). NOTE: While ironing, the boiler button’s red light normally turns on and off, indicating the heating element is activated or not.
8. NOTE: When you call for steam for the first time (after having turned the boiler on) you might notice a fast decrease in pressure. This is normal for the first time.
9. The steam station is ready for use.
10. Push the steam button (7) on the iron for steam.
11. This steam product is equipped with a low water warning light (5). During operation, if the light comes on, it indicates that the unit requires more water to operate. If this occurs, please follow these steps.
a) Turn off the boiler switch (4).
b) Press the steam iron button (7) to ensure there is no more steam in the boiler.
c) Slowly open the pressure cap (1) and refill to the required level with warm water.
d) Replace the cap, tighten and wait for it to build up pressure again.
e) NOTE: Failure to shut off the boiler when the warning light is on may result in damaging the heating element, which will void the warranty.
IMPORTANT When you are finished using the boiler for the day, unscrew the fill cap one-turn on the unit to release the steam/air from the tank. This will eliminate the vacuum that may cause damage to the pressure gauge.
The boiler must be cleaned periodically and any sediment/mineral buildup removed from inside the unit; otherwise, it may become clogged. The period between cleanings depends on the frequency of use and the quality/hardness of the water used. If the unit is in daily use with regular municipal tap water, we recommend a cleaning every two weeks to a month.
TO CLEAN THE BOILER UNIT
1. Unplug the unit from the wall.
2. Add a mixture of 1 part white vinegar to 5 parts water and pour inside the boilertanktocapacity.Letthevinegarsolutionsitovernight.
3. Pick up the boiler unit and pour approximately half of the solution out of the boiler tank. Vigorously shake/swirl the remaining solution around the tank to

06
loosen and pick up any softened sediment that may have accumulated inside. Pourtheremainingsolutionoutofthetank.Youmayseebitsofsedimentandmineral come out at this point.
4. Rinse the tank with clean water until there is no smell of vinegar or any sedi-ment bits coming from inside the tank. NOTE: Sediment/mineral pieces can be blown into the solenoid valve or the steam nozzle during operation so it is important that they are not left in the tank after cleaning.
5. The unit is now ready for use.
WATER INSTRUCTIONSUse tap water or 50/50 tap/distilled water in the appliance. Do not use perfume or products containing alcohol in the appliance.
DESCRIPTION OF THE IRON STATION1. Safety cap2. Wand to hold mono-hose up3. Iron button4. Boiler button5. Lightforlowwater6. Temperature regulating knob 7. Steam button
TECHNICAL DATA Adjustableironthermostatsetfrom60°Cto215°CBimetallicsafetyironthermostatwithmanualresetat275°CFull aluminium-plated heating element at 800W – 120VBoiler power i300: 700WWorking pressure i300: 2,5 barTank nominal capacity of model i300: 1.4 litres

07
PARTS DRAWING
08
LIMITED 1 YEAR WARRANTY
For a period of one year from date of purchase we will, free of charge, repair defects in material or workmanship which appear in the mechanical or electrical parts of all Reliable™ brand products excluding all wear and tear components.
Wear&TearComponentList:
• SteamEquipment:presspadandcover,Teflon® seals, Teflon® shoe, steam-electric hoses
• SewingEquipment:hooks,loopers,stitchplates,feeddogs,needles, motor clutch disc, brushes
• ClothCuttingEquipment:blades,stones,sharpeningbands,shoe
LIMITED 90-DAY WARRANTY
For a period of 90 days from date of purchase we will, free of charge, provide required adjustmentsandrepairstoyourReliable™product.
Warranty service is available by returning the product with this warranty document and proof of purchase to your nearest authorized Reliable™ service center.
This limited warranty is in effect provided that your product is used for normal purposes for which it was intended, and is given reasonable good care and maintenance in accordance with the instructions contained in the instruction booklet.
Yourauthorizeddealer(orReliableCorporation)willnotbeheldresponsiblefordamage if the product has been repaired by an unauthorized dealer.
These warranties give you specific legal rights and you may have other rights, which vary from province/state to province/state.
If you have any questions regarding these warranties, you may write to:
ReliableCorporation 100 Wingold Avenue, Unit 5 Toronto, Ontario CanadaM6B4K7 www.reliablecorporation.com
RELIABLEPRODUCTSWARRANTY

09
SySTÈME DE REPASSAGE PROFESSIONNEL i300MODE D’EMPLOI FRANÇAIS

10
FÉLICITATIONS
Nous aimerions vous remercier et vous féliciter pour votre achat du système de repassage professionnel i300 de Reliable Corporation. Avec son armature d’acier inoxydable et son fer professionnel, le i300 vous permettra d’obtenir les avantages d’un pressage professionnel dans un format compact et pratique.
Pour votre sécurité et afin de profiter pleinement des avantages de ce produit, veuillez prendre quelques minutes pour lire toutes les mesures de sécurité importantes et les instructions d’entretien. Gardez ce manuel à portée de la main et révisez la carte de garantie du produit pour votre référence.

11
DIRECTIVES DE SÉCURITÉ IMPORTANTES – CONSERVEZ CES INSTRUCTIONS DANS UN ENDROIT SÉCURITAIRE POUR RÉFÉRENCE FUTURE. LISEZ TOUTES LES INSTRUCTIONS AVANT L’UTILISATION
LorsquevousutilisezvotrestationàlavapeurReliable™,lesprécautionssécuritairesdebasedoiventtoujoursêtresuivies.Veuillezlirelesinstructionssuivantesattentivement car elles vous donneront de l’information importante sur l’installation, l’utilisation et l’entretien de ce produit.
1. Pourprotégercontrelerisquedechocélectrique,nepasimmergerl’appareildans l’eau.
2. Nelaissezpaslecordonélectriquetoucherdesurfaceschaudes.
3. Laisseztoujoursl’appareilrefroidirpendantaumoinstrenteminutesavant de le ranger.
4. Installeztoujoursl’appareildansunendroitsécuritairesurunetableouuncomptoir pendant l’utilisation.
5. Nedéplacezpasl’appareilsansl’avoirdébranchéavant.
6. Débrancheztoujoursl’appareildelaprisedecourantélectriqueavantderemplirouretirerl’eau.Soyezprudentafind’éviterd’éclabousserl’appareilavecdel’eaulors du remplissage.
7. Utilisezl’eaudurobinetouunmélanged’eaudistilléeetdurobinetàunmélangede 50/50. Ne pas utiliser de parfum ou tout autre produit contenant de l’alcool dans l’appareil.
8. Débrancheztoujoursl’appareillorsquecelui-cin’estpasutilisé.
9. N’utilisezpasl’appareilsilecordonélectriqueestendommagé.Retournezl’appareiloufaitesréparerlecordonélectriqueparlemanufacturierouunagentautorisé.
10.Nefaitespasfonctionnerl’appareilsicelui-ciaétééchappéouendommagé.Nepasouvrirl’appareil.Unréassemblageincorrectpeutcauserunrisquedechocélectrique.Envoyez-leàuncentred’entretienautorisépourréparation.
11. Nepasfairefonctionnerunautreappareilsurlemêmecircuitélectriquesicelui-ciestàhautvoltage.
12. Cetappareildoitêtremisàlaterre.Nepasmodifieroutenterderetirercettecaractéristiquedelafiched’alimentation.
13. Soyez prudent. Des brûlures peuvent survenir si vous touchez des pièces métalliqueschaudesoulavapeur.

12
14. Cetappareiln’estpasconçupourêtreutilisépardesenfants.
15. Lorsquevousutilisezl’appareil,nejamaisdévisserouretirerlebouchon(1)pendant que la bouilloire est sous pression.
16. Avantderetirerlebouchon,assurez-vousqu’iln’yaplusdevapeurprésentedanslachambreàvapeur.Pourcefaire,vousdevezfermerl’interrupteurde labouilloire(4)etappuyezsurleboutondevapeur(7)pourlibérertoutelavapeur restante.
17. Pourassurervotresécurité,lebouchondesécurité(1)ettouteslesautrescomposantesdoiventêtreremplacéesavecdespiècesd’origineseulement.
POUR UNE UTILISATION RÉSIDENTIELLE ET COMMERCIALE LÉGÈRE SEULEMENT CARACTÈRISTIQUES • Votrenouveaupostederepassagevousdonneradesrésultatspropreset
professionnelsàchaquefois
• Laplaqued’assemblageduferprofessionnelleestfaited’unaluminiumdurable,àchauffagerapide
• Constructionducorpsextérieurenacierinoxydablepouruneduréede vieprolongée
• Thermostatajustablevouspermettantderégleravecprécisionlatempérature
• Lapoignéeenliègeestconfortableetdemeurefroide
• Indicateurlumineuxdebasniveaud’eau
• Utiliseravecdel’eaudurobinetouunmélange50/50d’eaudurobinet etdistillée.
• Pressiondefonctionnementà35psi
• Câblagerobustede12Ga.
• Jusqu’à2heuresdevapeur
IMPORTANT : Lorsque vous désirez vous départir de l’appareil, NE JAMAIS le jeter aux ordures. Rendez-vous plutôt à votre centre de recyclage le plus près ou à un centre d’enlèvement des ordures ménagères pour un traitement adéquat. De cette façon, vous contribuerez à protéger l’environnement.

13
DIRECTIVES D’ASSEMBLAGE ET D’UTILISATION1. Retirez le poste de repassage de son emballage et assurez-vous que toutes
lespiècesontétéretiréesdel’emballage(ycomprislessacsprotecteurs).Installez le poste sur une surface droite et solide.
2. Ilestrecommandédemettrelefersurlecoussinetdufer(fourni)puisquelecoussinetrésisteraàlatempératuredufer.
3. Insérezlesdeuxtringlesrotatives(2)danslesrebordssurledessusdelabouilloire,serrezaveclesvislatéralesetfixezleressortsurletuyauduferàl’extrémitéduserpentindelatringle.
4. Dévissezlebouchondesûreté(1).Remplissezlabouilloireavecunmaximumde 4.65 tasses (1.1 litre) d’eau pour le i300. Utilisez l’entonnoir fournie en vousassurantdenepastropremplirleréservoir(vouspouvezaussiutiliserlabaguetted’eaupourdéterminerleniveaud’eaudansleréservoiràvapeur).
5.Insérezlafiched’alimentationdanslapriseélectrique;allumezlabouilloire(4)etleboutondevapeur(3).Lorsqueleslumièresdesdeuxboutonss’allument, le fer et la bouilloire fonctionnent.
6.Tournezleboutonderéglagedelatempératuredelaplaquedufer(6)àlaposition « coton » (inscrit sur le bouton du fer).
7. Attendezquelalumièrerouge(4)duboutondelabouilloires’éteigne(celaprendenviron10minutes).REMARQUE:Pendantlerepassage,lalumièrerougeduboutondelabouilloires’allumeets’éteint,indiquantlorsquel’élémentchauffantestactivéounon.
8. REMARQUE:Lorsquevousdemandezdelavapeurpourlapremièrefois(aprèsavoirallumélabouilloire)vouspourriezremarquerunebaissedepression.Celaestnormallorsdelapremièreutilisation.
9. Leposteàvapeurestmaintenantprêtàêtreutilisé.
10. Poussez le bouton de vapeur (7) sur le fer pour obtenir de la vapeur.
11. Ceproduitdevapeurestmunid’untémoind’avertissementdebasniveaud’eau (5) Pendant le fonctionnement, si la lumière s’allume, cela indique que l’appareilnécessitedavantaged’eaupourfonctionner.Sicettesituationseproduit,veuillezsuivrelesétapessuivantes.
a) Fermez l’interrupteur de la bouilloire (4).
b) Appuyez sur le bouton de vapeur du fer (7) pour vous assurer qu’il n’y a plus de vapeur dans la bouilloire.
c) Ouvrez lentement le bouchon de pression (1) et remplissez au niveau requis avec de l’eau tiède.
d) Réinstallezlebouchon,serrezetattendezpouruneaccumulation de pression.
e) REMARQUE:Àdéfautd’arrêterlabouilloirelorsqueletémoin d’avertissementestallumé,pourraitendommagerl’élémentchauffant, ce qui annulera la garantie.
14
IMPORTANT Lorsquevousavezterminéd’utiliserlabouilloirepourlajournée,dévissezlebou-chonderemplissageun–allumezl’appareilpourlibérerlavapeur/airduréservoir.Celaélimineral’aspirationpouvantcauserdesdommagesàlajaugedepression.
Labouilloiredoitêtrenettoyéepériodiquementettouteaccumulationdesédi-ments/minérauxdoitêtreretiréedel’intérieurdel’appareil;autrement,ellepourraitcréeruneobstruction.Lapériodeentrelesnettoyagesdépenddelafréquenced’utilisationetlaqualité/duretédel’eauutilisée.Sil’appareilestutiliséquotidiennementavecdel’eaurégulièreprovenantdurobinet,nousrecomman-donsunnettoyageàtouteslesdeuxsemainesouunefoisparmois.
POUR NETTOyER LA BOUILLOIRE
1. Débranchezl’appareildelaprisemurale.
2. Ajoutezunmélangede1partiedevinaigreblancpour5partiesd’eau.Versezàl’intérieurduréservoirdelabouilloire.Laissezlasolutiondevinaigrereposertoute la nuit.
3. Prenezlabouilloireetversezenvironlamoitiédelasolutionhorsduréservoirdecelle-ci.Brassez/mélangezvigoureusementlasolutionrestanteautourduréservoirafindelibéreretramassertoutsédimentpouvants’êtreaccumuléàl’intérieur.Versezlerestantdelasolutionhorsduréservoir.Vouspourriezvoiràcemoment-cidesparticulesdesédimentsetminérauxsortir.
4. Rincezleréservoiravecdel’eauclairjusqu’àcequel’odeurdevinaigreaitdis-parueouqu’aucuneparticuledesédimentsnesortedel’intérieurduréservoir.REMARQUE:Lesparticulesdesédiments/minérauxpeuventfairesurchaufferl’électrovalvedugicleurdevapeurpendantlefonctionnement.Ilestdoncimportantqu’ellesnesoientpaslaisséesdansleréservoiraprèslenettoyage.
5. L’apparielestmaintenantprêtàêtreutilisé.
MODE D’EMPLOI POUR L’EAUUtilisezl’eaudurobinetouunmélanged’eaudistilléeetdurobinetàunmélangede 50/50. Ne pas utiliser de parfum ou tout autre produit contenant de l’alcool dans l’appareil.
15
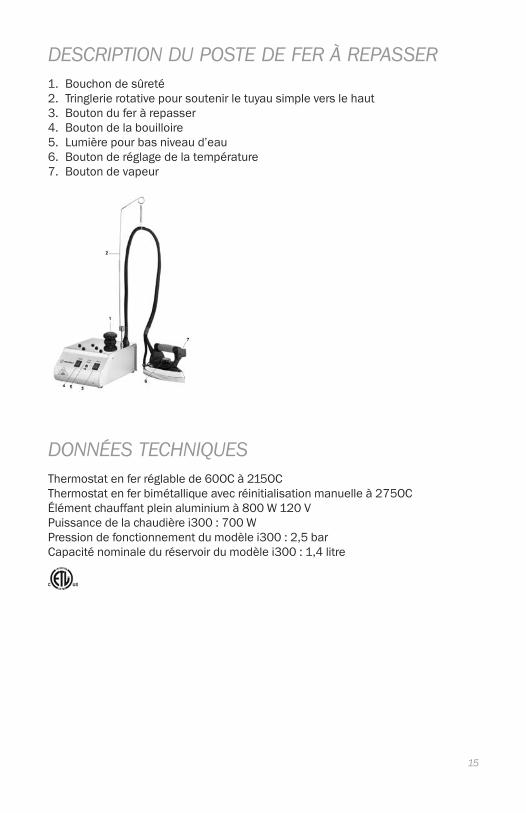
DESCRIPTION DU POSTE DE FER À REPASSER1. Bouchondesûreté2. Tringlerie rotative pour soutenir le tuyau simple vers le haut3. Boutonduferàrepasser4. Bouton de la bouilloire5. Lumièrepourbasniveaud’eau6. Boutonderéglagedelatempérature7. Bouton de vapeur
DONNÉES TECHNIQUES Thermostatenferréglablede60OCà215OCThermostatenferbimétalliqueavecréinitialisationmanuelleà275OCÉlémentchauffantpleinaluminiumà800W120VPuissance de la chaudière i300 : 700 W Pression de fonctionnement du modèle i300 : 2,5 bar Capaciténominaleduréservoirdumodèlei300:1,4litre

16
DESSIN DES PIÈCES DU i300

17
GARANTIE LIMITÉE D’UN AN
Pourunepérioded’unanàpartirdeladated’achat,nousréparerons,sansfrais,toutdéfautdematériauoudemain-d’œuvrequiparaîtdanslescomposantsmécaniques ouélectriquesdetoutproduitdemarqueReliableMC,saufdanslescomposantssujetsàl’usure.
Listedescomposantssujetsàl’usure:
• Appareilsàvapeur:Tampondepresseetcouverture,jointsTeflon®, semelle Teflon®,boyauxàvapeur-électriques
• Machinesàcoudre:Crochets,boucleurs,plaquedecouture,griffesd’entraînement,aiguilles,disqued’embrayagedumoteur,balais,fusible
• Coupeusesd’étoffes:Lames,pierres,bandesd’affûtage,semelle
GARANTIE LIMITÉE DE 90 JOURS SUR TOUTES LES PIÈCES ET LES RÉGLAGES
Pourunepériodede90jourssuivantladated’achat,nouseffectuerons,sansfrais,lesréglagesetréparationsrequissurvotreproduitReliableMC.
Le service en vertu de la garantie est offert en retournant votre produit, accompagné de ce document de garantie et de la preuve d’achat, à votre centre de service après-vente autorisé ReliableMC le plus proche.
Cettegarantielimitéedemeureraenvigueurpourvuquevotreproduiteaétéutilisée auxfinspourlesquelleselleaétéconçue,etpourvuqu’elleaitéténettoyéeetentretenuedemanièreappropriéeetconformémentauxinstructionsfourniesdansleguide d’utilisation.
Votredétaillantautorisé(ouReliableCorporation)neserapasresponsabledes dommagessileproduitaétéréparéeparundétaillantnonautorisé.
Cesgarantiesvousconfèrentcertainsdroitsspécifiquesetvouspourriezavoird’autresdroitsquivarientd’uneprovince/étatàl’autre.
Sivousavezdesquestionsconcernantcesgaranties,veuilleznousécrireà:
ReliableCorporation 100 Wingold Avenue, Unit 5 Toronto, Ontario CanadaM6B4K7 www.reliablecorporation.com
GARANTIESURLESPRODUITSRELIABLE

18
EL i300 SISTEMA DE PLANCHADO PROFESIONALMANUAL DE INSTRUCCIONESESPAÑOL

19
FELICIDADES
Queremos felicitarlo y agradecerle por comprar el sistema de planchado profesional i300 de Reliable Corporation. Con su construcción de acero inoxidable y plancha profesional, la i300 le permitirá obtener los beneficios del planchado profesional en un formato compacto y conveniente.
Por su seguridad, y para poder disfrutar plenamente de las ventajas de este producto, tómese unos minutos para leer todas las recomendaciones de seguridad e instrucciones. Mantenga este manual a mano y lea la tarjeta de garantía como referencia.

20
INSTRUCCIONES IMPORTANTES DE SEGURIDAD – CONSERVE ESTAS INSTRUCCIONES EN UN LUGAR SEGURO PARA FUTURA REFERENCIALEA COMPLETAMENTE LAS INSTRUCCIONES ANTES DE UTILIZARLO Siempre debe seguir algunas precauciones básicas de seguridad al utilizar su est-acióndevaporReliable™.Leacuidadosamentelassiguientesinstruccionesyaqueleproporcionan información importante con respecto a cómo instalar, usar y cuidar de este producto.
1. Paraprotegersecontraelriesgodesufrirunadescargaeléctrica,nosumerjaesteartefacto en agua.
2. Nodejequeelcableentreencontactoconsuperficiescalientes.
3. Siempre permita que el artefacto se enfríe durante al menos treinta minutos antes de guardarlo.
4. Siempre coloque el artefacto en un lugar seguro sobre una mesa o una mesada cuando lo utiliza.
5. No mueva el artefacto sin desenchufarlo previamente.
6. Siempre desconecte el artefacto del tomacorriente antes de colocarle o quitarle el agua. Tenga la precaución de no derramar agua sobre el artefacto cuando lo llena.
7. Use agua del grifo o 50% agua del grifo y 50% agua destilada en este artefacto. No utilice perfume ni productos que contengan alcohol en el artefacto.
8. Siempre desenchufe el artefacto cuando no lo utilice.
9. No use el artefacto si el cable está dañado. Devuelva el artefacto o haga reparar el cable por el fabricante o su agente de reparaciones.
10. No utilice el artefacto si se ha caído o dañado. No desarme el artefacto. Un armadoincorrectopuedeprovocarelriesgodeunadescargaeléctrica.Envíeloauncentrodeserviciotécnicoautorizadoparaqueloreparen.
11. No utilice otro artefacto de alto consumo en el mismo circuito.
12. Este artefacto debe ser conectado a tierra. No modifique el cable ni intente remover este dispositivo.
13. Tenga precaución. El tocar partes metálicas calientes o vapor puede causar quemaduras.
14. Este artefacto no debe ser utilizado por los niños.
21
15. Mientrasuseelartefacto,nuncadesenrosqueosaquelatapa(1)mientraslacal-deraestéconpresión.
16. Antes de sacar la tapa, verifique que no haya más vapor en la cámara de vapor colo-cando la llave de la caldera (4) en la posición de apagado y presionando el botón de planchado con vapor (7) para liberar todo el vapor que haya quedado.
17. Para garantizar su seguridad, la tapa de seguridad (1) y todos los demás componen-tes deben ser reemplazados por partes originales únicamente.
PARA USO HOGAREÑO y COMERCIAL LIVIANO ÚNICAMENTEFUNCIONES • Sunuevaestacióndeplanchadobrindaresultadoslimpiosyprofesionales
cada vez que se la usa
• Labasedeplanchaprofesionalestáhechaconaluminioduraderoydecalen-tamiento rápido
• Cubiertaexteriorhechadeaceroinoxidableparamayordurabilidad
• Termostatoajustablequepermiteajustarlatemperaturaconprecisión
• Planchaconmangodecorchoqueescómodoysemantienefrío
• Indicadordebajoniveldeagua
• Aguacomúndelgrifoo50%aguadelgrifoy50%aguadestilada
• 35psidepresióndefuncionamiento
• Cableadoindustrialcalibre12
• Hasta2horasdevapor
IMPORTANTE: Cuando desee desechar el artefacto, NUNCA lo arroje a la basura. En su lugar, diríjase a la estación de reciclado o al centro de recolección de residuos mas cercano para su posterior tratamiento. De este modo, estará contribuyendo con la protección del medio ambiente.

22
CÓMO ARMARLA y USARLA1. Saquelaestacióndeplanchadodesucajayverifiquequehayasacadotodoel
materialdeempaque(incluyendolasbolsasprotectoras).Coloquelaestaciónsobre una superficie plana y sólida.
2. Lerecomendamosponerlaplanchaensubasedeapoyo(incluida)yaquesoportará la temperatura de la plancha.
3. Inserte la varilla de 2 piezas (2) dentro de la pestaña en la parte superior delacaldera,ajústelaconeltornillodelcostadoyengancheelresortedelamanguera de la plancha al extremo de la bobina de la varilla.
4. Desatornillelatapadeseguridad(1).Llenelacalderaconunmáximode4,65 tazas (1,1 litro) de agua para el i300. Use el embudo incluido, asegurándose de no llenardemáseltanque(tambiénpuedeusarlavarillaparadeterminarelnivel del agua dentro del tanque).
5. Inserte el enchufe en un tomacorriente; encienda la caldera (4) y el botón de vapor (3).Cuandolaslucesdelosdosbotonessenenciendan,laplanchaylacaldera estarán funcionando.
6. Girelaperilladeajustedetemperaturadelaplacadelaplancha(6)hastalaposición “cotton °°°” (indicada en la perilla de la plancha).
7. Esperehastaqueseapaguelaluzrojadelbotóndelacaldera(4)(tardaunos10minutos).NOTA:Mientrasplanche,laluzrojadelbotóndelacalderaseenciende y se apaga indicando cuando el elemento calefactor está activado y cuando no.
8. NOTA:Cuandouseelvaporporprimeravez(luegodehaberencendidolacaldera)puede notar un rápido aumento en la presión. Esto es normal la primera vez.
9. Laestacióndevaporestálistaparaserusada.
10. Presione el botón de vapor (7) de la plancha para que salga vapor.
11. Esteproductovieneequipadoconunaluzdeadvertenciadebajonivelde agua (5). Durante el uso, si se enciende esta luz, indica que la unidad necesita más agua para seguir funcionando. Si pasa esto, haga lo siguiente.
a) Apague la llave de la caldera (4).
b) Presione el botón de vapor de la plancha (7) para asegurar que no quede nada de vapor en la caldera.
c) Abralentamentelatapadepresión(1)yllénelahastaelnivelnecesario con agua tibia.
d) Vuelvaacolocarlatapa,ajústelayespereaquevuelvaalevantarpresión.
e) NOTA: El no apagar la caldera cuando se enciende la luz de advertencia puede llegar a dañar el elemento calefactor, lo que anularía la garantía.

23
IMPORTANTECuandoterminedeusarlacaldera,desenrosqueunavueltadelatapadellenadode la unidad para liberar el vapor/aire del tanque. Esto eliminará el vacío que podría dañar el medidor de presión.
Lacalderadebelimpiarseperiódicamenteysedeberemovertodaacumu-lación de sedimento/minerales del interior de la unidad; de lo contrario, podría atascarse. El período entre limpiezas depende de la frecuencia de uso y de la calidad/dureza del agua que se utilice. Si la unidad se usa todos los días con agua normal del grifo, le recomendamos limpiarla cada dos semanas o una vez por mes.
PARA LIMPIAR LA CALDERA
1. Desenchufe la unidad del tomacorriente.
2. Hagaunamezclade1partedevinagrey5partesdeaguayviértaladen-trodeltanquedelacalderahastallenarsucapacidad.Dejelasolucióndevinagre durante toda la noche.
3. Levantelacalderayviertaaproximadamentelamitaddelasoluciónfueradeltanque. Sacuda/agite vigorosamente lo que quede de solución en el tanque paraaflojaryremovertodoelsedimentoablandadoquesehayaacumuladoen el interior. Vierta el resto de la solución fuera del tanque. Puede llegar a ver que salen trozos de sedimento y minerales en ese momento.
4. Enjuagueeltanqueconagualimpiahastaquenotengamásoloravinagreoquenosalganmástrozosdesedimentodelmismo.NOTA:Lostrozosdesedimento/minerales pueden llegar a entrar en la válvula del solenoide o en la boquilla de vapor durante el funcionamiento, por lo que es importante que noquedeneneltanquedespuésdelimpiarlo.
5. Launidadestálistaparaserutilizada.
INSTRUCCIONES DEL AGUAUse agua del grifo o 50% agua del grifo y 50% agua destilada en este artefacto. No utilice perfume ni productos que contengan alcohol en el artefacto.
24
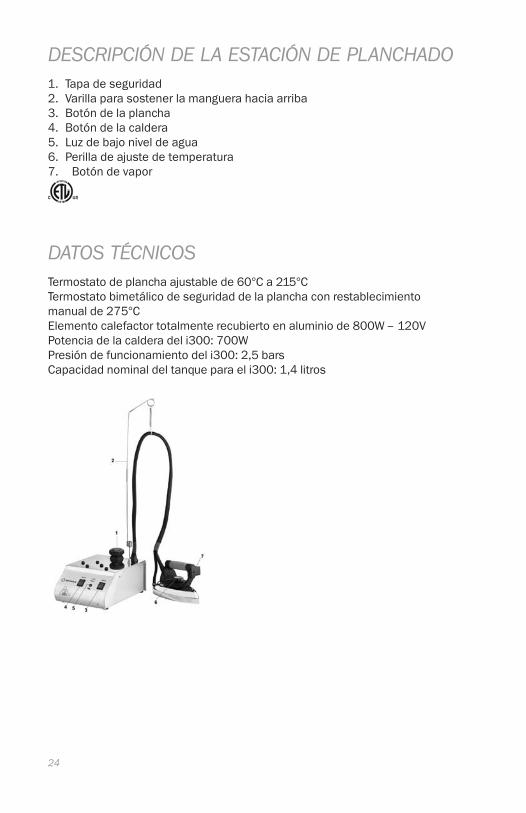
DESCRIPCIÓN DE LA ESTACIÓN DE PLANCHADO1. Tapa de seguridad2. Varilla para sostener la manguera hacia arriba3. Botón de la plancha4. Botón de la caldera5. Luzdebajoniveldeagua6. Perilladeajustedetemperatura7. Botón de vapor
DATOS TÉCNICOS Termostatodeplanchaajustablede60°Ca215°CTermostato bimetálico de seguridad de la plancha con restablecimiento manualde275°CElemento calefactor totalmente recubierto en aluminio de 800W – 120VPotencia de la caldera del i300: 700WPresión de funcionamiento del i300: 2,5 barsCapacidadnominaldeltanqueparaeli300:1,4litros

DIAGRAMA DE PARTES DEL i300
25

00
GARANTÍA LIMITADA DE 1 AÑO
GarantizamostodoslosproductosdelamarcaReliable™porunañoapartirde la fecha de compra contra defectos de material o de fabricación a cualquier pieza que figureenlalistaderepuestosmecánicosoeléctricos,exceptoalassujetasa desgaste por el uso.
Listadepiezassujetasadesgasteporeluso:
• Equiposdevapor:Empaquedepresiónytapa,sellosdeTeflón,® zapata de Teflón,® manguerasdevaporycordoneseléctricos
• Equiposparacoser:Ganchos,lanzaderas,placasparapuntada, elementosalimentadores,agujas,discodeembraguedel motor, escobillas de carbones, fusibles
• Equiposcortadoresdetelas:Cuchillas,piedras,bandas afiladoras, zapatas
GARANTÍA LIMITADA DE 90 DÍAS PARA TODAS LAS PIEZAS Y REGULACIONES
Durante el periodo de 90 días a partir de la fecha de compra haremos las regulaciones necesarias y reparaciones a su producto Reliable™ sin costo.
El servicio de garantía está disponible remitiendo el producto con este documento de garantía y el comprobante de compra al servicentro más cercano autorizado por Reliable™.
Esta garantía se aplica si ha usado su producto para los fines normales para los que está diseñada y que se le haya dado un cuidado y mantenimiento razonablemente bueno de acuerdo a su manual de instrucciones.
Sudistribuidorautorizado(oReliableCorp.)noseránresponsablespordaños niperjuiciossielproductohubiesesidoreparadaporundistribuidoroservicentro no autorizado.
Estas garantías le otorgan derechos específicos y usted podría tener otros derechos que varían entre los diferentes estados o provincias.
Si tiene cualquier pregunta sobre estas garantías, escríbanos a:
ReliableCorporation 100 Wingold Avenue, Unit 5 Toronto, Ontario CanadaM6B4K7 www.reliablecorporation.com
GARANTÍADELOSPRODUCTOSRELIABLE

1 800 268 1649www.reliablecorporation.com


![Untitled-1 [] · Truva KONÖNAL 000 EPETL . LltLi Masas / Ironing Board Optima KONÖNAL oo o . Lltü Masas / Ironing Board Simge KONÖNAL eee EPETL [ltü Msasast / Ironing Electra](https://static.documents.pub/doc/80x56/6024c5ed25ccc9167a48fc73/untitled-1-truva-konnal-000-epetl-lltli-masas-ironing-board-optima-konnal.jpg)


