88
® Professional PowerCenter ™ Signature PRO 5100 Owner’s Manual

®
Professional PowerCenter™
Signature PRO 5100 Owner’s Manual


TABLE OF CONTENTS Page
Important Safety Information . . . . . . . . . . . . . . . . . . . . . iProper Grounding and Installation . . . . . . . . . . . . . . . . . iiiA Note from The Head Monster . . . . . . . . . . . . . . . . . . . 1Monster Exclusive T2™ Technology . . . . . . . . . . . . . . . . . 3Monster Patented Clean Power™ Stages . . . . . . . . . . . . . 4The Minds Behind The Monster PowerCenter™ Design. . . 5Monster Signature PRO 5100 PowerCenter Features . . . . 6Hook-Up Guide . . . . . . . . . . . . . . . . . . . . . . . . . . . . . . 11Digital Outlets . . . . . . . . . . . . . . . . . . . . . . . . . . . . . . . 11Video Outlets . . . . . . . . . . . . . . . . . . . . . . . . . . . . . . . . 12Analog Audio Outlets . . . . . . . . . . . . . . . . . . . . . . . . . . 13Ultra-High Current Audio Outlets . . . . . . . . . . . . . . . . . 14Outlet Programming. . . . . . . . . . . . . . . . . . . . . . . . . . . 15Audible Alarm Setting . . . . . . . . . . . . . . . . . . . . . . . . . 17Automatic Shutdown Setting . . . . . . . . . . . . . . . . . . . . 18Coaxial Connections. . . . . . . . . . . . . . . . . . . . . . . . . . . 19Phone Connections . . . . . . . . . . . . . . . . . . . . . . . . . . . 20Ethernet Connections . . . . . . . . . . . . . . . . . . . . . . . . . . 21Remote “DC In” Control . . . . . . . . . . . . . . . . . . . . . . . 22Remote “AC In” Control. . . . . . . . . . . . . . . . . . . . . . . . 22Remote “DC Out” Control . . . . . . . . . . . . . . . . . . . . . . 23Rack Mounting. . . . . . . . . . . . . . . . . . . . . . . . . . . . . . . 24Rack Handles . . . . . . . . . . . . . . . . . . . . . . . . . . . . . . . . 25Troubleshooting . . . . . . . . . . . . . . . . . . . . . . . . . . . . . . 26Specifications . . . . . . . . . . . . . . . . . . . . . . . . . . . . . . . . 30
Appendix
Warranty Information . . . . . . . . . . . . . . . . . . . . . . . . . . 31

i
IMPORTANT SAFETY INFORMATION
Please read and observe the following safety points at all times.
WARNING – Power SourcesDo not plug this Monster PowerCenter™ into a power outlet that differs from the source indicated for safe use on the PowerCenter. If you don’t know the type of electrical power that is supplied to your home, consult your local power company or a qualified electrician.
WARNING – Grounding and PolarizationA. Do not force your Monster PowerCenter plug into an outlet that is not designed to accept a three-wire grounded-type
AC plug (a three-prong plug). This plug is designed to be inserted into a grounded-type outlet only. If this plug doesn’t fit directly inside your outlet, do not attempt to force it into the outlet. Never attempt to dismantle the plug in any way (or to alter the power cord). Do not attempt to defeat the grounding feature by using a 3-to-2 prong adaptor. If you have questions about grounding, consult your local power company or a qualified electrician.
B. If you use rooftop devices such as satellite dishes, antennas, or any other component with wire that connects to your Monster PowerCenter, be sure the wire(s) is properly grounded. Use grounding techniques specified in Section 810 of the National Electrical Code (NEC), ANSI/NFPA 70 (in Canada, Part 1 of the Canadian Electrical Code). This protects against voltage surges and static charges.
C. Do not place any antenna near overhead power lines or any other power circuit. Do not touch any power line or power circuit. Doing so may cause severe physical injury or possibly death.
WARNING – Liquid: Avoiding Electrical ShocksA. Do not operate your Monster PowerCenter if liquid of any kind is spilled onto or inside the unit.
B. Do not operate your Monster PowerCenter near rain or water that’s spilled or contained (e.g., bathtub, kitchen or sink).

ii
WARNING – Power Cord SafetyA. When routing your Monster PowerCenter’s AC power cord, do not place it near heavy foot traffic areas
(e.g., hallways, doorways, and floors). Do not create a trip hazard with the power cord.
B. If your power cord’s protective jacket begins to rip or fray, exposing the internal wiring, shielding, etc., disconnect it from the power source and discontinue use of the Monster PowerCenter immediately. See the Warranty Information section of this owner’s manual for important details.
WARNING – Storm Precautions
In the event of a lightning storm, it’s always a good idea to disconnect your Monster PowerCenter; there is no need to disconnect your separate components. Make sure that ALL of your components and PC products are protectedwith Monster Power.
WARNING – No User Serviceable Parts Inside If, for any reason, your PowerCenter is not operating properly, do not remove any part of the unit (cover, etc.) for repair. Unplug the unit and consult the Warranty Information section of this owner’s manual for important details.
CAUTION – Exposure To Heat Do not expose your Monster PowerCenter to direct sunlight or place it near wall heaters, space heaters, or any enclosed space prone to temperature increase.
CAUTION – Proper CleaningIn general, the only cleaning necessary for your Monster PowerCenter is a light dusting. Unplug your component from the wall before cleaning it. Do not use any type of liquid or aerosol cleaners.

iii
PROPER GROUNDING AND INSTALLATION
WARNING – Proper Grounding Monster PowerCenters require a properly grounded outlet for safety and to protect connected equipment. If you’re not sure if your home’s electrical wiring is properly grounded, have it checked by a qualified electrician.
Important Note – Proper Power and Protection To completely protect your equipment against electrical surges, every AC power cable, coaxial cable, phone line and Ethernet line in the system must be connected to an appropriate PowerCenter.
Important Note – Proper Protection and the Limited Connected Equipment WarrantyThe Limited Connected Equipment Warranty becomes invalid if any wire (AC, coax, phone or Ethernet) or audio or video interconnect leading into the equipment comes from a component that is not properly protected by the PowerCenter.
The Limited Connected Equipment Warranty becomes invalid when the PowerCenter is operated in a non-fixed install environment.
See the Warranty Information section of this owner’s manual for important details.

1
A NOTE FROM THE HEAD MONSTER
THANK YOU for purchasing the Monster Power® Professional Reference PowerCenter™ Signature PRO 5100, designed to offer you the best performance and most comprehensive home theater and A/V system protection available. The Signature PRO 5100 is designed for the professional A/V installer working on high-end home systems, recording and touring environments, and many other listening & viewing environments where top performance is a must. The Signature PRO 5100’s many enhanced features were incorporated into the design with these users and environments in mind.
The Signature PRO 5100 features patented Monster Clean Power™ stage 4 v.2.0 filter circuitry that virtually stops the electromagnetic and radio frequency which can degrade sound and picture quality. In addition, your PowerCenter also features patented noise isolation circuits that separate analog audio, video, digital, and ultra-high current audio outlets. The result is high quality sound and picture that’s free from performance-damaging interference.
Other Monster Power breakthroughs include exclusive T2™ automatic disconnect/reconnect protection circuitry and patented Tri-Mode™ protection featuring an audible alarm. These features automatically disconnect power from your electronics if you’re hit by a big surge. We’ve included surge-protected coax, phone, and Ethernet connections to ensure protection for all of your components. The Signature PRO 5100 also features a patent pending color-coding system, which identifies where each component should be connected.
Noel Lee

2
As fellow audiophiles and videophiles, Monster designed the Signature PRO 5100 to help you get the best possible sound and picture, and we hope you enjoy it as an integral part of your A/V and home theater systems.
Noel Lee, The Head Monster

3
MONSTER EXCLUSIVE T2™ TECHNOLOGY
The Monster Power Signature PRO 5100 PowerCenter features exclusive Monster T2 technology. T2 is an active electronic microprocessor-controlled circuit that sits in front of the surge protection circuitry in select Monster Power products. T2 monitors the line, neutral and ground lines and automatically disconnects the PowerCenter from the AC power line when a long duration low-voltage sag or high-voltage swell occurs (continuous voltage below 80Vrms or above 132Vrms).
When the voltage sags or swells to these potentially damaging levels, ultra-fast T2 auto-disconnect protection circuitry shuts down the Monster PowerCenter for 15 seconds. When the under-voltage or over-voltage condition returns to normal, T2 reconnects the PowerCenter to full operation after 15 seconds. If the fault condition does not clear, the T2 comparator circuit keeps the unit shut down.
Unlike ordinary power management devices, T2 will shut down your PowerCenter before the MOVs (Metal Oxide Varistors) and thermal fuses sense an overload condition and sacrifice themselves to protect your connected components. This will extend the PowerCenter’s life, while providing the system protection you need.

4
MONSTER PATENTED CLEAN POWER™ STAGES
Monster Clean Power performs two tasks that are vital to maintaining optimum home theater performance: 1) noise filtration and 2) noise isolation. The higher the Clean Power stage number (1-5), the more sophisticated and advanced the filters are that reject noise generated on the AC powerline. In addition, the higher the Clean Power stage number, the more isolation that exists between connected equipment for maximum rejection of component-generated noise.
Monster PowerCenters featuring Clean Power circuitry are each designated with a Clean Power Stage. The Signature PRO 5100 incorporates Monster Clean Power Stage 4 v.2.0 circuitry which filters both AC powerline noise and reduces noise generated by your connected equipment. Clean Power Stage 4 features five ultra-advanced, isolated filters that include analog audio, video and digital, plus an ultra-high current audio filter to provide for the best possible AC powerline noise rejection and inter-component isolation for improved component-generated noise rejection. All of these features make the Signature PRO 5100 ideal for your home theater system. To learn more about patented Monster Clean Power and the complete product family of PowerCenters, voltage stabilizers and amplifiers, please visit MonsterPower.com.
Actual spectrum analyzer photo of AC power pollution
AC power line filtered by Monster Clean Power™

5
THE MINDS BEHIND THE MONSTER POWERCENTER DESIGN
Richard Marsh – There are few experts able to solve the complex problems associated with AC power and complex home theater systems. Richard Marsh is one of these illustrious few. He has designed best selling power conditioning components costing more than $3,000 and now brings his expertise to Monster Power. Richard developed Monster’s patented Clean Power™ circuitry which is incorporated into many of Monster’s PowerCenters. He is also responsible for several other groundbreaking designs. Richard’s background and research into amplifier and capacitor design led to his development of the Servo-DC feedback concept in power amplifiers—a concept that is used by virtually every amplifier manufacturer today. His status as both the inventor of the MultiCap™ internal bypass capacitor and as the driving force behind the high-end audio balanced circuit design concept has influenced the audiophile community for years. Richard is responsible for some of the high-end audio world’s most respected product designs, essays and articles, and has contributed to The Absolute Sound and Audio magazines. He is included in Who’s Who in the West.
Demian Martin – Demian Martin has been solving complex AC power problems for several years. As a technical consultant for successful paper and steel mills, Demian helped create several innovative AC power solutions. He developed techniques to dramatically improve the efficiency of these factories’ high power motor control systems—up to 50,000 watts—helping them avoid the costly premiums many factories must pay for AC power inefficiency. Demian was also the co-founder of Spectral Audio and was the chief designer of their many pioneering designs for amplifiers, D/A converters, and other high-end audio designs. He now brings his expertise to Monster Power’s elite research and development team.
Noel Lee – Noel Lee, The Head Monster, is best known for popularizing the concept of high performance audio cable 25 years ago with his creation of Monster Cable. Originally a laser-fusion design engineer at Lawrence Livermore National Laboratory and later a touring musician, Noel has invented or co-invented over 250 U.S. and international patents and drives the explosive growth of The Monster Group companies in more than 80 countries worldwide. Monster Power is Noel’s realization of a long-nurtured vision of making affordable power solutions that deliver the best possible sound and picture.

MONSTER SIGNATURE PRO 5100 POWERCENTER FEATURES
6 IN OUTTV/CABLE
AC IN110V
OUT 1IN OUT 2 OUT 3OUTIN
IN OUTSATELLITE
IN OUTANTENNA
LAMP DIMMER
LAMP
WIRINGOK
ABNORMALVOLTAGE
GROUNDOK
TIMEDON
SWITCHEDON
UNSWITCHEDON
CLEAN POWER ON
AUDIOFILTER
HIGH CURRENT
FILTER
DIGITALFILTER 2
DIGITALFILTER 1
VIDEOFILTER
PROTECTIONON
ON/OFF MENU SELECT DIMMER
U.S. Patent Nos. 6,456,091 B1, 6,473,510 B1, 6,614,636 B1, D467,227 S, D468,263 S, D468,689 S, Taiwan NI-174352, other patents pending in U.S., Taiwan, and China
11 2 3 4 5
DC IN3~30V
MANUFACTURED TO MONSTER® QUALITY SPECIFICATIONS IN CHINA
INPUT VOLTAGE•
CURRENT USAGE
REMOTE TURN ON/OFF
DC OUT 112V
DC OUT 212V
DC OUT 312V
PRO 5100 PROFESSIONALPOWERCENTER™
CAUTION: DISCONNECT MAIN POWER CORD AND AC REMOTE TRIGGER CORD BEFORE SERVICING
PHONE LINE SURGE PROTECTIONNETWORK SURGE PROTECTION
1800WMAX TOTAL
LAMP
Professional Reference PowerCenterwith Clean Power™ Stage 4 v.2.0 Filtering
™
GROUND
BREAKER 15APRESS TO RESET
DIMMER
LAMP
Signature
UNSWITCHED CONVENIENCE OUTLETS
ON/OFF MENU SELECT DIMMER
INPUT VOLTAGE • CURRENT USAGEONON ON ON ON ON
SIGNATURE PRO 5100FRONT VIEW
1 2 3 4 9 10 11 12 13
5
6 7 8 16 17 18 19 20
21
1514

MONSTER SIGNATURE PRO 5100 POWERCENTER FEATURES
7
IN OUTTV/CABLE
AC IN110V
OUT 1IN OUT 2 OUT 3OUTIN
IN OUTSATELLITE
IN OUTANTENNA
LAMP DIMMER
LAMP
WIRINGOK
ABNORMALVOLTAGE
GROUNDOK
TIMEDON
SWITCHEDON
UNSWITCHEDON
CLEAN POWER ON
AUDIOFILTER
HIGH CURRENT
FILTER
DIGITALFILTER 2
DIGITALFILTER 1
VIDEOFILTER
PROTECTIONON
ON/OFF MENU SELECT DIMMER
U.S. Patent Nos. 6,456,091 B1, 6,473,510 B1, 6,614,636 B1, D467,227 S, D468,263 S, D468,689 S, Taiwan NI-174352, other patents pending in U.S., Taiwan, and China
11 2 3 4 5
DC IN3~30V
MANUFACTURED TO MONSTER® QUALITY SPECIFICATIONS IN CHINA
INPUT VOLTAGE•
CURRENT USAGE
REMOTE TURN ON/OFF
DC OUT 112V
DC OUT 212V
DC OUT 312V
PRO 5100 PROFESSIONALPOWERCENTER™
CAUTION: DISCONNECT MAIN POWER CORD AND AC REMOTE TRIGGER CORD BEFORE SERVICING
PHONE LINE SURGE PROTECTIONNETWORK SURGE PROTECTION
1800WMAX TOTAL
LAMP
Professional Reference PowerCenterwith Clean Power™ Stage 4 v.2.0 Filtering
™
GROUND
BREAKER 15APRESS TO RESET
DIMMER
LAMP
Signature
UNSWITCHED CONVENIENCE OUTLETS
ON/OFF MENU SELECT DIMMER
INPUT VOLTAGE • CURRENT USAGEONON ON ON ON ON
SIGNATURE PRO 5100REAR VIEW
28
22
PROCESSOR PROCESSOR
DVD DVD
DVD DVD
CABLE/SAT
TV/PROJECTOR TV/PROJECTOR
TV/PROJECTOR TV/PROJECTOR
VCR VCR
VCR VCR
Monster Power® PRO 5100 ID Labels Place one label at the end of the corresponding power cord.
RECEIVER RECEIVER
RECEIVER RECEIVER
PROCESSOR PROCESSOR
MAIN AMP MAIN AMP
MAIN AMP MAIN AMP
SPARE SPARE
SPARE SPARE
CD CD
CD CD
DVR DVR
DVR DVR
CABLE/SAT
CABLE/SAT CABLE/SAT
46
29 30 31 32
24 25 22 23 26
43 44 4539 40
41
42
36
383734
27
33
35

8
SIGNATURE PRO 5100 POWERCENTER FEATURES
1. “Clean Power On” Indicator: Indicates Monster Clean Power circuitry is functioning properly.
2. “Unswitched On” Indicator: Indicates power is being supplied to the unswitched outlets.
3. “Switched On” Indicator: Indicates power is being supplied to the switched outlets.
4. “Timed On” Indicator: Indicates power is being supplied to outlets with the sequential turn-on feature.
5. “Protection On” Indicator: Indicates Monster surge protection circuitry is functioning properly.
6. “Ground OK” Indicator: Indicates the PowerCenter is plugged into a properly grounded 120V AC outlet.
7. “Wiring OK” Indicator: Indicates the line and neutral wires at the wall outlet are wired properly. If the indicator is not lit, consult your local power company or a qualified electrician.
8. “Abnormal Voltage” Indicator: Indicates that the incoming voltage is below approximately 80V AC
or above approximately 125V AC.
9. Digital Input Voltage and Current Usage Meter: Indicates input voltage and amperage draw.
10. “On/Off” Button: Turns ON/OFF the outlets programmed as “SWITCHED ON” or “SWITCHED ON AFTER DELAY”.
11. “Menu” Button: Press to begin programming mode.
12. “Select” Button: Press to set parameters or options selected by the “Menu” button.
13. “Dimmer” Button: Adjusts the brightness of the alphanumeric display.
14. LED Lamp: Provides light to illuminate the front panel of the PowerCenter. For convenience, this lamp retracts into the PowerCenter.
15. Dimmer Knob: Adjusts the brightness of the LED lamps.
16. “Video Filter” Indicator: Indicates power is being supplied to the video outlets.
17. “Digital Filter 1” Indicator: Indicates power is being supplied to the digital outlets.

9
18. “Digital Filter 2” Indicator: Indicates power is being supplied to the digital outlets.
19. “Audio Filter” Indicator: Indicates power is being supplied to the analog audio outlets.
20. “High Current Filter” Indicator: Indicates power is being supplied to the ultra-high current outlets.
21. Unswitched Convenience Outlets: These outlets are located on the front of the PowerCenter for easy access. These outlets have a specially designed filter circuit for high current audio components.
22. LED Lamp: Provides light to illuminate the front panel of the PowerCenter. For convenience, this lamp retracts into the PowerCenter.
23. Dimmer Knob: Adjusts the brightness of the LED lamps.
24. Ethernet Line Surge Suppression: Provides surge protection against damaging voltage surges and spikes from the Ethernet line.
25. Phone Line Surge Suppression: Provides surge protection against damaging voltage surges and spikes from the phone line.
26. Digital Input Voltage and Current Usage Meter: Indicates input voltage and amperage draw.
27. “Outlet On” Indicator: Indicates power is being supplied to the designated outlet bank.
28. Digital Filter 1: These outlets have a specifically designed filter circuit that reduces interference to your digital components.
29. Digital Filter 2: These outlets have a specifically designed filter circuit that reduces interference to your digital components.
30. Video Filter: These outlets have a specifically designed filter circuit that reduces interference to your video components.
31. Analog Audio Filter: These outlets have a specifically designed filter circuit that reduces interference to your audio components.
32. Ultra-High Current Audio Filter: These outlets have specifically designed filter circuits that reduce interference to your high current audio components, such as amplifiers and pre-amplifiers.
33. TV/Cable Protection: Provides surge protection for a TV/cable connection. The input connects the coaxial cable from your antenna. The output connects the coaxial cable to your TV or cable box input.

10
34. Satellite Protection: Provides surge protection for a satellite connection. The input connects the coaxial cable from your satellite dish. The output connects the coaxial cable to your satellite receiver input.
35. Antenna Protection: Provides surge protection for a antenna connection. The input connects the coaxial cable from your radio antenna. The output connects the coaxial cable to your antenna input.
36. Remote “DC In” Control: Allows the PowerCenter to be turned on automatically via the Remote “DC Out” on another component, such as an A/V receiver.
37. Remote “AC In” Control: Allows the PowerCenter to be automatically turned on by a remote AC trigger plugged into an outlet on another component, such as an A/V receiver.
38. Remote “DC Out” Control: Allows you to turn a remote device on automatically when the PowerCenter is turned on.
39. “On/Off” Button Turns ON/OFF the outlets programmed as “SWITCHED ON” or “SWITCHED ON AFTER DELAY”.
40. “Menu” Button: Press to begin programming mode.
41. “Select” Button: Press to set parameters or options selected by the “Menu” button.
42. “Dimmer” Button: Adjusts the brightness of the alphanumeric display.
43. Ultra-High Current PowerLine™ 400 AC Power Cable: High density double shielded AC power cord specially designed to maximize power transfer.
44. Ground Screw: Provides a ground reference point for any ungrounded components.
45. Resettable 20 Amp Circuit Breaker: Protects the PowerCenter from continuous power overload.
46. Monster Power Color - Coded Audio/Video ID labels: For easy identification of your components.

11
HOOK-UP GUIDE
Digital Outlet Hook-UpThese outlets have a special filter circuit that is optimized to reduce interference to your digital components.
A) Attach a Monster Power identification label to each component’s power cord before you plug it into the appropriate color-coded PowerCenter outlet.
B) Plug each component’s power cord (Cable/SAT, DVD, etc.) into the PowerCenter’s corresponding outlet. For components not listed, determine if they are audio, video, digital or ultra-high current audio components, and use a corresponding outlet for best performance.
IMPORTANT NOTE It does not harm analog audio, video, or high current audio components to be connected to the digital outlets. However, for best performance, we recommend plugging in only digital components to the digital outlets.
IN OUTTV/CABLE
AC IN110V
OUT 1IN OUT 2 OUT 3OUTIN
IN OUTSATELLITE
IN OUTANTENNA
LAMP DIMMER
LAMP
WIRINGOK
ABNORMALVOLTAGE
GROUNDOK
TIMEDON
SWITCHEDON
UNSWITCHEDON
CLEAN POWER ON
AUDIOFILTER
HIGH CURRENT
FILTER
DIGITALFILTER 2
DIGITALFILTER 1
VIDEOFILTER
PROTECTIONON
ON/OFF MENU SELECT DIMMER
U.S. Patent Nos. 6,456,091 B1, 6,473,510 B1, 6,614,636 B1, D467,227 S, D468,263 S, D468,689 S, Taiwan NI-174352, other patents pending in U.S., Taiwan, and China
11 2 3 4 5
DC IN3~30V
MANUFACTURED TO MONSTER® QUALITY SPECIFICATIONS IN CHINA
INPUT VOLTAGE•
CURRENT USAGE
REMOTE TURN ON/OFF
DC OUT 112V
DC OUT 212V
DC OUT 312V
PRO 5100 PROFESSIONALPOWERCENTER™
CAUTION: DISCONNECT MAIN POWER CORD AND AC REMOTE TRIGGER CORD BEFORE SERVICING
PHONE LINE SURGE PROTECTIONNETWORK SURGE PROTECTION
1800WMAX TOTAL
LAMP
Professional Reference PowerCenterwith Clean Power™ Stage 4 v.2.0 Filtering
™
GROUND
BREAKER 15APRESS TO RESET
DIMMER
LAMP
Signature
UNSWITCHED CONVENIENCE OUTLETS
ON/OFF MENU SELECT DIMMER
INPUT VOLTAGE • CURRENT USAGEONON ON ON ON ON
Digital Outlets

12
IN OUTTV/CABLE
AC IN110V
OUT 1IN OUT 2 OUT 3OUTIN
IN OUTSATELLITE
IN OUTANTENNA
LAMP DIMMER
LAMP
WIRINGOK
ABNORMALVOLTAGE
GROUNDOK
TIMEDON
SWITCHEDON
UNSWITCHEDON
CLEAN POWER ON
AUDIOFILTER
HIGH CURRENT
FILTER
DIGITALFILTER 2
DIGITALFILTER 1
VIDEOFILTER
PROTECTIONON
ON/OFF MENU SELECT DIMMER
U.S. Patent Nos. 6,456,091 B1, 6,473,510 B1, 6,614,636 B1, D467,227 S, D468,263 S, D468,689 S, Taiwan NI-174352, other patents pending in U.S., Taiwan, and China
11 2 3 4 5
DC IN3~30V
MANUFACTURED TO MONSTER® QUALITY SPECIFICATIONS IN CHINA
INPUT VOLTAGE•
CURRENT USAGE
REMOTE TURN ON/OFF
DC OUT 112V
DC OUT 212V
DC OUT 312V
PRO 5100 PROFESSIONALPOWERCENTER™
CAUTION: DISCONNECT MAIN POWER CORD AND AC REMOTE TRIGGER CORD BEFORE SERVICING
PHONE LINE SURGE PROTECTIONNETWORK SURGE PROTECTION
1800WMAX TOTAL
LAMP
Professional Reference PowerCenterwith Clean Power™ Stage 4 v.2.0 Filtering
™
GROUND
BREAKER 15APRESS TO RESET
DIMMER
LAMP
Signature
UNSWITCHED CONVENIENCE OUTLETS
ON/OFF MENU SELECT DIMMER
INPUT VOLTAGE • CURRENT USAGEONON ON ON ON ON
Video Outlets
HOOK-UP GUIDE
Video Outlet Hook-UpThese outlets have a special filter circuit that is optimized to reduce interference to your video components.
A) Attach a Monster Power identification label to each component’s power cord before you plug it into the appropriate color-coded PowerCenter outlet.
B) Plug each component’s power cord (TV/Monitor, VCR) into the PowerCenter’s corresponding outlet. For components not listed, determine if they are audio, video, digital or ultra-high current audio components, and use a corresponding outlet for best performance.
IMPORTANT NOTE It does not harm analog audio, digital, or high current audio components to be connected to the video outlets. However, for best performance, we recommend plugging in only video components to the video outlets.

13
IN OUTTV/CABLE
AC IN110V
OUT 1IN OUT 2 OUT 3OUTIN
IN OUTSATELLITE
IN OUTANTENNA
LAMP DIMMER
LAMP
WIRINGOK
ABNORMALVOLTAGE
GROUNDOK
TIMEDON
SWITCHEDON
UNSWITCHEDON
CLEAN POWER ON
AUDIOFILTER
HIGH CURRENT
FILTER
DIGITALFILTER 2
DIGITALFILTER 1
VIDEOFILTER
PROTECTIONON
ON/OFF MENU SELECT DIMMER
U.S. Patent Nos. 6,456,091 B1, 6,473,510 B1, 6,614,636 B1, D467,227 S, D468,263 S, D468,689 S, Taiwan NI-174352, other patents pending in U.S., Taiwan, and China
11 2 3 4 5
DC IN3~30V
MANUFACTURED TO MONSTER® QUALITY SPECIFICATIONS IN CHINA
INPUT VOLTAGE•
CURRENT USAGE
REMOTE TURN ON/OFF
DC OUT 112V
DC OUT 212V
DC OUT 312V
PRO 5100 PROFESSIONALPOWERCENTER™
CAUTION: DISCONNECT MAIN POWER CORD AND AC REMOTE TRIGGER CORD BEFORE SERVICING
PHONE LINE SURGE PROTECTIONNETWORK SURGE PROTECTION
1800WMAX TOTAL
LAMP
Professional Reference PowerCenterwith Clean Power™ Stage 4 v.2.0 Filtering
™
GROUND
BREAKER 15APRESS TO RESET
DIMMER
LAMP
Signature
UNSWITCHED CONVENIENCE OUTLETS
ON/OFF MENU SELECT DIMMER
INPUT VOLTAGE • CURRENT USAGEONON ON ON ON ON
HOOK-UP GUIDEAnalog Audio Outlet Hook-UpThese outlets have a special filter circuit that is optimized to reduce interference to your audio components.
A) Attach a Monster Power® identification label to each component’s power cord before you plug it into the appropriate color-coded PowerCenter outlet.
B) Plug each component’s power cord (Receiver, Processor, etc.) into the PowerCenter’s corresponding outlet. For components not listed, determine if they are audio, video, digital, or ultra-high current audio, and use a corresponding outlet for best performance.
IMPORTANT NOTE It does not harm video, digital, or high current audio components to be connected to the analog audio outlets. However, for best performance, we recommend plugging in only analog audio components to the analog audio outlets.
Analog Audio Outlets

14
HOOK-UP GUIDE
Ultra-High Current Audio Outlet Hook-UpThese outlets are designed to deliver maximum current to power hungry components like amplifiers and pre-amplifiers.
A) Attach a Monster Power® identification label to each component’s power cord before you plug it into the appropriate color-coded PowerCenter outlet.
B) Plug each component’s power cord (Amplifier, etc.) into the PowerCenter’s corresponding outlet. For components not listed, determine if they are audio, video, digital, or ultra-high current audio, and use a corresponding outlet for best performance.
IMPORTANT NOTE It does not harm analog audio, video, or digital components to be connected to the ultra-high current audio outlets. However, for best performance, we recommend plugging in only high-current audio components to the ultra-high current audio outlets.
IN OUTTV/CABLE
AC IN110V
OUT 1IN OUT 2 OUT 3OUTIN
IN OUTSATELLITE
IN OUTANTENNA
LAMP DIMMER
LAMP
WIRINGOK
ABNORMALVOLTAGE
GROUNDOK
TIMEDON
SWITCHEDON
UNSWITCHEDON
CLEAN POWER ON
AUDIOFILTER
HIGH CURRENT
FILTER
DIGITALFILTER 2
DIGITALFILTER 1
VIDEOFILTER
PROTECTIONON
ON/OFF MENU SELECT DIMMER
U.S. Patent Nos. 6,456,091 B1, 6,473,510 B1, 6,614,636 B1, D467,227 S, D468,263 S, D468,689 S, Taiwan NI-174352, other patents pending in U.S., Taiwan, and China
11 2 3 4 5
DC IN3~30V
MANUFACTURED TO MONSTER® QUALITY SPECIFICATIONS IN CHINA
INPUT VOLTAGE•
CURRENT USAGE
REMOTE TURN ON/OFF
DC OUT 112V
DC OUT 212V
DC OUT 312V
PRO 5100 PROFESSIONALPOWERCENTER™
CAUTION: DISCONNECT MAIN POWER CORD AND AC REMOTE TRIGGER CORD BEFORE SERVICING
PHONE LINE SURGE PROTECTIONNETWORK SURGE PROTECTION
1800WMAX TOTAL
LAMP
Professional Reference PowerCenterwith Clean Power™ Stage 4 v.2.0 Filtering
™
GROUND
BREAKER 15APRESS TO RESET
DIMMER
LAMP
Signature
UNSWITCHED CONVENIENCE OUTLETS
ON/OFF MENU SELECT DIMMER
INPUT VOLTAGE • CURRENT USAGEONON ON ON ON ON
High Current Audio Outlets

15
HOOK-UP GUIDEOutlet ProgrammingAll PowerCenter outlets on the rear panel are programmable via the menu and select buttons on the front panel. To set up each outlet pair, use the front panel MENU and SELECT buttons to choose between SWITCHED ON, SWITCHED ON AFTER DELAY and UNSWITCHED (Always On) independently for each outlet pair. You can change the settings, whenever you like. Using the outlet pair labeled ANALOG FILTER as an example, the following diagrams illustrate how it’s done:
A) Power up the PowerCenter: Press the ON/OFF switch one time to power the unit and start the process. Once the PowerCenter is on, the display will show the AC line voltage.
Note: The power-on process may take up to 60 seconds since any outlet pair can be configured as SWITCHED ON AFTER DELAY. You can see any outlet pair’s power status by referring to its indicator on the front panel.
B) Set Outlet Pair to SWITCHED ON: Press MENU until the second line display shows the status of the ANALOG outlet pair. Press the SELECT button until the time delay changes to 0 (zero).
The 0 (zero) time delay setting indicates SWITCHED ON mode for the ANALOG outlet pair. This pair will be live once the PowerCenter is powered up by pressing the front panel ON/OFF button, or triggered by an external signal.

16
HOOK-UP GUIDE
C) Set the Outlet Pair to SWITCHED ON AFTER DELAY: Press MENU until the display shows the status of the Analog outlet pair. Press the SELECT button until the time delay changes to the required delay in seconds before the outlet pair will turn on after the ON/OFF button is pressed.
When the PowerSource is SWITCHED ON by pressing the front panel ON/OFF button, or by an external trigger signal, the outlet pair will go “live” after the time delay set as described above — 20 seconds in this case. The outlet pair with the maximum time delay setting will still turn off immediately when the ON/OFF button is pressed, or when triggered by an external signal.
D) Set the Outlet Pair to UNSWITCHED (Always On): Press the MENU button until the display shows the status of the Analog outlet pair. Press the SELECT button until you see the display.
Once UNSWITCHED is selected, any component plugged into those outlets will receive power continuously as long as your PowerCenter is plugged into a 120 volt outlet that is on.
Note: The unit is shipped with all outlet pairs set to SWITCHED ON.

17
HOOK-UP GUIDE
Over-Voltage and Under-Voltage Audible Alarm SettingThis feature enables or disables the audible alarm indicating an abnormal line voltage condition. When set to ENABLE, the unit will sound an alarm when the line voltage tops 130V or drops below 100V.
A) Press MENU until the displays shows the alarm setting.
B) Press SELECT to toggle between ENABLE and DISABLE.

18
HOOK-UP GUIDE
Over-Voltage and Under-Voltage Automatic Shutdown SettingThis feature enables or disables the automatic shutdown feature for abnormal line voltage. When set to ENABLE, the unit will shut itself down whenever the line voltage tops 134V or drops below 96V.
A) Press MENU until the display shows:
B) Press SELECT to toggle between ENABLE and DISABLE.

19
From properly grounded Antenna
From properly grounded Satellite Dish
HOOK-UP GUIDE
Coaxial Connections Hook-UpCoaxial Connections provide surge protection against damaging voltage surges and spikes on the incoming coax cable.
Protect TV/Cable, Satellite and Antenna Connections as Follows:
�� �����������
�� ������������
�� ����������
Note: You will need additional coaxial cables to connect the Signature PRO 5100 to your components.
To TV/Cable Box
To Television
From properly grounded TV /Cable Line
To Satellite Receiver

20
HOOK-UP GUIDE
Phone Connections Hook-UpPhone connections provide surge protection against damaging voltage surges and spikes coming from the phone line. This PowerCenter also incorporates a 3-way phone splitter for convenience.
Protect Phone Line Connections as Follows:
NOTE: The Signature PRO 5100 is not intended for hook-up of any phone which carries two separate phone lines on a single 4-pin RJ11 jack.
From Telephone Wall Jack
To Satellite Receiver, Digital Video Recorder (DVR) or Telephone
������� ����� �����
���������������������������

21
HOOK-UP GUIDE
Ethernet Connections Hook-UpEthernet connections provide surge protection against damaging voltage surges and spikes coming from Ethernet line.
Protect Ethernet Connections as Follows:
From incoming Ethernet Line
To the Ethernet connection on your component
�����
������������������������������

22
HOOK-UP GUIDERemote “DC In” Control Hook-Up
This feature connects your PowerCenter to an automated Home Theater control system or allows another component with a Remote “DC Out” connection to automatically turn on and off your PowerCenter.
A) Plug the AC power cable of the component you are using to control the PowerCenter into an unswitched outlet on the PowerCenter. Note: This component must deliver a control voltage between 3-30 volts DC.
B) Plug one end of the 1/8" miniplug (supplied) into the corresponding Remote “DC In” connection on the PowerCenter.
C) Plug the other end of the 1/8" miniplug into the Remote “DC Out” connection on the component that you want to turn on and off the PowerCenter’s Switched Outlets when it is turned on.
Remote “AC In” Control Hook-Up
This feature connects your PowerCenter to an automated Home Theater control system or allows another component with an AC outlet connection (for example, an AV receiver or preamplifier for example) to automatically turn on and off your PowerCenter.
A) Insert the Remote “AC IN” Control cord’s female plug into the “AC IN” 120V connection.
B) Insert the Remote “AC IN” Control cord’s 2-prong male plug into a switched AC power outlet on the component (AV receiver or preamplifier). When this device is turned on, the outlets programmed as “Switched On” on the PowerCenter will turn on immediately. The outlets programmed as “Switched On After Delay” will turn on after the set time delay.

23
Remote “DC Out” Control Hook-Up
This feature connects your PowerCenter to an automated Home Theater control system or allows the PowerCenter to automatically turn on and off another component with a Remote “DC In” connection.
A) Plug one end of the 1/8" mini-plug into the corresponding Remote “DC Out” connection on the PowerCenter.
B) Plug the other end of the 1/8" mini-plug into the Remote “DC In” connection on the component that you want the PowerCenter to control. Note: This component may not label the connection “DC In”. Make sure it accepts control voltages between 3-30 volts DC.
Note 1: One (1) 1/8" mini-plug cable is supplied with the PowerCenter. Note 2: The DC Out 1 trigger activates when the PoweCenter is turned on. The DC Out 2 trigger activates 5 seconds after the DC Out trigger 1. The DC Out 3 trigger activates 5 seconds after the DC Out trigger 2.
IN OUTTV/CABLE
AC IN110V
OUT 1IN OUT 2 OUT 3OUTIN
IN OUTSATELLITE
IN OUTANTENNA
LAMP DIMMER
LAMP
WIRINGOK
ABNORMALVOLTAGE
GROUNDOK
TIMEDON
SWITCHEDON
UNSWITCHEDON
CLEAN POWER ON
AUDIOFILTER
HIGH CURRENT
FILTER
DIGITALFILTER 2
DIGITALFILTER 1
VIDEOFILTER
PROTECTIONON
ON/OFF MENU SELECT DIMMER
U.S. Patent Nos. 6,456,091 B1, 6,473,510 B1, 6,614,636 B1, D467,227 S, D468,263 S, D468,689 S, Taiwan NI-174352, other patents pending in U.S., Taiwan, and China
11 2 3 4 5
DC IN3~30V
MANUFACTURED TO MONSTER® QUALITY SPECIFICATIONS IN CHINA
INPUT VOLTAGE•
CURRENT USAGE
REMOTE TURN ON/OFF
DC OUT 112V
DC OUT 212V
DC OUT 312V
PRO 5100 PROFESSIONALPOWERCENTER™
CAUTION: DISCONNECT MAIN POWER CORD AND AC REMOTE TRIGGER CORD BEFORE SERVICING
PHONE LINE SURGE PROTECTIONNETWORK SURGE PROTECTION
1800WMAX TOTAL
LAMP
Professional Reference PowerCenterwith Clean Power™ Stage 4 v.2.0 Filtering
™
GROUND
BREAKER 15APRESS TO RESET
DIMMER
LAMP
Signature
UNSWITCHED CONVENIENCE OUTLETS
ON/OFF MENU SELECT DIMMER
INPUT VOLTAGE • CURRENT USAGEONON ON ON ON ON
From Control Component
To Control Component
To Control Component
To Control Component
From Control Component

24
HOOK-UP GUIDE
Rack Mounting Your PowerCenterThis Monster PowerCenter incorporates mounting plates built into the chassis for installation into a standard size equipment rack. Place the PowerCenter into the rack and align the holes with the holes of your rack. Insert rack screws (not provided) and turn clockwise until tight.
Rack Mounting Holes
Rack Mounting Holes
IN OUTTV/CABLE
AC IN110V
OUT 1IN OUT 2 OUT 3OUTIN
IN OUTSATELLITE
IN OUTANTENNA
LAMP DIMMER
LAMP
WIRINGOK
ABNORMALVOLTAGE
GROUNDOK
TIMEDON
SWITCHEDON
UNSWITCHEDON
CLEAN POWER ON
AUDIOFILTER
HIGH CURRENT
FILTER
DIGITALFILTER 2
DIGITALFILTER 1
VIDEOFILTER
PROTECTIONON
ON/OFF MENU SELECT DIMMER
U.S. Patent Nos. 6,456,091 B1, 6,473,510 B1, 6,614,636 B1, D467,227 S, D468,263 S, D468,689 S, Taiwan NI-174352, other patents pending in U.S., Taiwan, and China
11 2 3 4 5
DC IN3~30V
MANUFACTURED TO MONSTER® QUALITY SPECIFICATIONS IN CHINA
INPUT VOLTAGE•
CURRENT USAGE
REMOTE TURN ON/OFF
DC OUT 112V
DC OUT 212V
DC OUT 312V
PRO 5100 PROFESSIONALPOWERCENTER™
CAUTION: DISCONNECT MAIN POWER CORD AND AC REMOTE TRIGGER CORD BEFORE SERVICING
PHONE LINE SURGE PROTECTIONNETWORK SURGE PROTECTION
1800WMAX TOTAL
LAMP
Professional Reference PowerCenterwith Clean Power™ Stage 4 v.2.0 Filtering
™
GROUND
BREAKER 15APRESS TO RESET
DIMMER
LAMP
Signature
UNSWITCHED CONVENIENCE OUTLETS
ON/OFF MENU SELECT DIMMER
INPUT VOLTAGE • CURRENT USAGEONON ON ON ON ON

25
HOOK-UP GUIDE
This Monster PowerCenter features attachable/removeable rack handles.
To add the rack handles to this PowerCenter:A) Remove the decorative plates on the front right and front left sides of the PowerCenter by using a screwdriver,
placing it on top of the screws, and turning it counterclockwise. There are two screws total, which will also be used to fasten the rack handles to the PowerCenter.
B) Now, place a rack handle over the screw holes, place one screw in each of the two holes of the rack handles, align the screw holes with the screws, and using a screwdriver, turn it clockwise until the rack handle rests firmly against the PowerCenter and a tight connection is made. If a tight connection is not made, remove the screw from the PowerCenter and repeat Step B.
C) Repeat this step with the second rack handle.
To remove the rack handles from this PowerCenter:
A) Remove the rack handles on the front right and front left sides of the PowerCenter by using a screwdriver, placing it in each of the two holes in the rack handles, aligning the screw holes with the screws, and turning it counterclockwise. There are two screws attaching each rack handle, four screws total, which will also be used to fastening the decorative plates to the PowerCenter.
B) Now, place a decorative plate over the screw holes, place one screw in each of the two holes in the decorative plates, align the screw holes with the screws, and using a screwdriver, turn it clockwise until the decorative plate rests firmly against the PowerCenter and a tight connection is made. If a tight connection is not made, remove the screw from the PowerCenter and repeat Step B.
C) Repeat this step with the second rack handle.

26
TROUBLESHOOTING
Symptom Possible Cause Remedy
The PowerCenter is not receiving power.
The PowerCenter is not turned On.
• Turn the PowerCenter switch on.
• Make sure the PowerCenter’s AC power plug is plugged into a properly grounded 120 volts (nominal) wall outlet.
• In some households, a wall switch may need to be thrown to make the wall plug active. Try turning on the light switches located near the wall unit.
Too many devices are connected, causing an overload, tripping the Thermal Circuit Breaker.
• Press the PowerCenter Thermal Circuit Breaker button in to reset. Please allow 10 minutes before attempting to reset. If you reset too soon, the breaker will prematurely sense power overload and not allow unit to operate.
• If the Circuit Breaker continues to trip, try moving one or more components to another PowerCenter. You may be drawing too much current through one PowerCenter.

27
TROUBLESHOOTING
Symptom Possible Cause Remedy
Component is not receiving power.
The component is plugged into a switched outlet and the PowerCenter has not been turned On.
• Turn the PowerCenter On.
• Or, plug the component into an Unswitched outlet.
The PowerCenter is plugged into a Switched outlet, but power on the component is not On. In some instances, a component plugged into a switched outlet won’t receive power when the PowerCenter is turned On unless the component power is also switched On.
• Turn the component power On.
Speakers emit a humming or buzzing noise.
The PowerCenter is sharing AC power with equipment that is not properly grounded.
• Connect your PowerCenter to a dedicated outlet.
• Try unplugging different components from the PowerCenter one at a time to see if the noise stops. If a component is discovered to be improperly grounded, attach a copper wire from the component’s chassis to the PowerCenter’s grounding post.

28
TROUBLESHOOTING
Symptom Possible Cause Remedy
The Unswitched LED on front panel is Off.
The PowerCenter is not plugged in. • Plug the PowerCenter into a properly grounded 120 volts (nominal) outlet and make sure it is on.The PowerCenter is plugged in,
but the outlet is not receiving power.
The Switched LED is Off. You are using the Switched Outlet Remote Turn-On feature and haven’t plugged the plug into the component you wish to use to activate the Remote Turn-On.
• Plug the plug into the component you wish to use to activate the Remote Turn-On.
The component remote control you are using to power the Remote turn-on has a dead battery.
• Replace the battery powering the component remote control.
• Plug the component into a properly grounded 120 volt (nominal) outlet.
The component you wish to use to activate the Remote Turn-On isn’t plugged into a properly grounded 120 volt (nominal) outlet.
• Plug the PowerCenter into a properly grounded 120 volts (nominal) outlet.

29
TROUBLESHOOTING
Symptom Possible Cause Remedy
“Timed On” indicator on front panel is Off.
You are using the Remote Turn-On feature (Same as Switched) and haven’t plugged the plug into the component you wish to use to activate the Remote Turn-On.
• Plug the plug into component you wish to use to activate the Remote Turn-On.
The component remote control you are using to power the Remote turn-on has a dead battery.
• Replace the battery powering the component remote control.
The component you wish to use to activate the Remote Turn-On isn’t plugged into a properly grounded 120 volt (nominal) outlet.
• Plug the component into a properly grounded 120 volt (nominal) outlet.
Video picture has rolling bars or ghosting.
The incoming video signal is not properly grounded.
• Contact your cable or satellite provider to correct your installation.
The PowerCenter is emitting a loud buzzing alarm.
The PowerCenter protection circuitry has sacrificed itself to protect connected equipment from a catastrophic surge.
• The PowerCenter must be replaced. See the Warranty Information section for important details.

30
SPECIFICATIONS
Continuous Duty Electrical Rating
120V/60Hz
Maximum Current Rating 20A/2400W
Protection ModesLine-Neutral (L-N) Line-Ground (L-G) Neutral-Ground (N-G)
Total Energy Dissipation 6814 Joules
Clamping Level (TVSS Voltage) 330 Volts
Clamping Response Time Less than 1 Nanosecond (<1Ns)
Remote “DC In” Control 3 – 30V DC
Remote “DC Out” Control 12V DC 100mA
Dimensions Width:
Height with Feet:
Height without Feet:
Depth with Handle:
Depth without Handle:
SIGNATURE PRO 5100 POWERCENTER
17.125" 434mm
5.25" 133.35mm
5.75" 146.05mm
14.5" 368.3mm
16.5" 419.1mm
31
LIMITED WARRANTY FOR CONSUMERS
Monster, LLC, 7251 West Lake Mead Blvd., Las Vegas, NV, USA (“Monster”) extends You this Limited Warranty. Statutory or common law may provide You with additional rights or remedies, which shall not be affected by this Limited Warranty.
DEFINITIONS“Adequate Use” means use of the Product and Connected Equipment (i) within a home or dwelling, (ii) for private (as opposed to commercial) purposes, (iii) in conformance with all applicable local, state or federal law, code or regulations (including without limitation building and/or electrical codes), (iv) in accordance with manufacturer recommendations and/or instructions in the materials and documentation that accompany the Product and any Connected Equipment, (v) with proper electrical grounding, (vi) with proper and direct connection between the Product and an AC power source that has protective grounding (excluding gas or diesel powered generators), (vii) with cable or telephone lines to any Connected Equipment properly connected to the Product, and (viii) without a connection in a “daisy-chain” fashion to or with any extension cord, surge suppressor, power strip, uninterruptible power supply (“UPS”) or other equipment.
“Authorized Dealer” means any distributor, reseller or retailer that (i) was duly authorized to do business in the jurisdiction where it sold the Product to You, (ii) was permitted to sell You the Product under the laws of the jurisdiction where You bought the Product, and (iii) sold You the Product new and in its original packaging.
“Connected Equipment” means any device that is (i) generally suited to be used with the Product or products of the same kind, (ii) meets the requirements of all applicable laws and safety standards, (iii) contains only parts manufactured, sold or recommended by the original manufacturer of the Connected Equipment, and (iv) has not been altered, tampered with or modified by any person other than its manufacturer or service personnel authorized or recommended by the manufacturer of the Connected Equipment.
“Connected Equipment Damage” means physical damage caused to Connected Equipment due to a Product Defect (i) by a transient AC power, cable, telephone, or lightning surge while connected to a properly installed Product, (ii) not by a defect or unrelated damaging of the Connected Equipment or a surge/spike or lightning strike through a source, medium

32
or connection other than through the Product, and (iii) does not extend to loss of data or consequential, indirect or special damages resulting from the Connected Equipment Damage.
“Fair Market Value” (“FMV”) means the fair market value of the Connected Equipment at the time Connected Equipment Damage occurs.
“Formal Warranty Claim” means a claim made in accordance with the section “Formal Warranty Claims” herein.
“Maximum Coverage Amount” means the maximum amount that Monster will pay to You under this Limited Warranty for Connected Equipment Damages and is defined in relation to each Product in the Specifications Table below.
“Product” means a Product (i) that is listed in the Specifications Table below, (ii) that You bought from an Authorized Dealer new and in its original packaging, and (iii) whose serial number, if any, has not been removed, altered, or defaced.
“Product Defect” means an inadequacy of the Product that existed at the time when You received the Product from an Authorized Dealer and that causes a failure of the Product to perform in accordance with Monster’s documentation accompanying the Product, unless such failure has been caused completely or partly by (a) any use other than Adequate Use, (b) transportation, neglect, misuse or abuse by anyone other than Monster’s employees; (c) alteration, tampering or modification of the product by anyone other than a Monster employee; (d) accident (other than a malfunction that would otherwise qualify as a Product Defect); (e) maintenance or service of the Product by anyone other than a Monster employee; (f) exposure of the Product to heat, bright light, sun, liquids, sand or other contaminants; or (g) acts outside the control of Monster, including without limitation acts of God, fire, storms (excluding lightning surges), earthquake or flood.
“Warranty Period” means the time period during which Monster must have received Your Formal Warranty Claim. The different Warranty Periods related to Product Defects and Connected Equipment Damage are defined in the Specifications Table below. The Warranty Period commences on the date when You purchased or received (whichever occurs later) the Product from an Authorized Dealer as evidenced by the Authorized Dealer’s invoice, sales receipt or packing slip. If You do not have written proof of the date of purchase or receipt, then the Warranty Period commences three (3) months after the date when the Product left Monster’s or its factory as evidenced by Monster’s records. The Warranty Period ends after

33
the time defined in the Specifications Table has expired, or after You have transferred ownership of the Product, whichever occurs earlier. Also, You must call Monster and obtain a Return Authorization Number (as described under “How to Make a Claim”) within two (2) months after You discover a Product Defect (or should have discovered it, if such Product Defect was obvious).
“You” means the first individual person that purchased the Product in its original packaging from an Authorized Dealer. This Limited Warranty does not apply to persons or entities that bought the Product (i) in used or unpackaged form, (ii) for resale, lease or other commercial use, or (iii) from someone other than an Authorized Dealer.
SCOPE OF THIS LIMITED WARRANTY
PRODUCTS. If a Product contained a Product Defect when You bought it from an Authorized Dealer and Monster receives a Formal Warranty Claim from You within two (2) months after You discover such Product Defect (or should have discovered it, if such Product Defect was obvious) and before the end of the Warranty Period for Product Defects applicable to the affected Product, then Monster will provide You with one of the following remedies: Monster will (1) repair or, at Monster’s sole discretion, replace the Product, or (2) refund to You the purchase price You paid to the Authorized Dealer for the affected Product if repair or replacement is not commercially practicable or cannot be timely made.
CONNECTED EQUIPMENT DAMAGE. Monster will also provide You with a remedy regarding Connected Equipment Damage if (i) You have a claim under the Limited Warranty for Products because of a Product Defect that causes Connected Equipment Damage despite Adequate Use, and (ii) Monster receives a Formal Warranty Claim from You before the end of the Warranty Period for Connected Equipment Damage applicable to the affected Product. If the conditions listed in the preceding sentence are met, Monster will provide You with one of the following remedies provided that Monster may decide at its sole discretion which of the three remedies it provides: Monster will (1) replace the damaged Connected Equipment; (2) pay to repair the damaged Connected Equipment; or (3) pay You the FMV of the Connected Equipment, provided that such payments shall not exceed (i) the Maximum Coverage Amount for the Product, or (ii) the actual damage having arisen from power surges due to a Product Defect. NOTE: COMPENSATION FOR RESTORATION OF DATA LOSS IS NOT COVERED AND MONSTER DOES NOT ASSUME ANY LIABILITY FOR ANY INCIDENTAL, CONSEQUENTIAL OR INDIRECT DAMAGES UNDER THIS LIMITED WARRANTY.

34
GENERAL PROVISIONS
CHOICE OF LAW/JURISDICTION. This Limited Warranty and any disputes arising out of or in connection with this Limited Warranty (“Disputes”) shall be governed by the laws of the State of California, USA, excluding conflicts of law principles and excluding the Convention for the International Sale of Goods. The courts located in the State of California, USA shall have exclusive jurisdiction over any Disputes.
OTHER RIGHTS. THIS LIMITED WARRANTY GIVES YOU SPECIFIC LEGAL RIGHTS, AND YOU MAY ALSO HAVE OTHER RIGHTS, WHICH VARY FROM STATE TO STATE AND JURISDICTION TO JURISDICTION, AND WHICH SHALL NOT BE AFFECTED BY THIS LIMITED WARRANTY. THIS WARRANTY EXTENDS ONLY TO YOU AND CANNOT BE TRANSFERRED OR ASSIGNED. If any provision of this Limited Warranty is unlawful, void or unenforceable, that provision shall be deemed severable and shall not affect any remaining provisions. In case of any inconsistency between the English and other versions of this Limited Warranty, the English version shall prevail.
REGISTRATION. Please register Your Product at MonsterPower.com. Failure to register will not diminish Your warranty rights.

35
SPECIFICATIONS TABLE
*”Lifetime” means the lifetime of the original individual purchaser of the Product, or for as long as the original individual purchaser owns the Product, whichever is less in time.
Product Model No.
Warranty Period for Products
Maximum Coverage Amount
Warranty Period for Connected Equipment Damage
Signature PRO 5100
5 Years $500,000 5 Years

36
FORMAL WARRANTY CLAIM
HOW TO MAKE A CLAIM. In the event damage has occurred to Products, You must follow these instructions: (1) Call Monster within two (2) months after You discover a Product Defect (or should have discovered it, if such Product Defect was obvious); (2) Give a detailed explanation of how the damage occurred; (3) Obtain a Return Authorization Number; (4) Upon receipt of a claim form (which may be sent to You after You filed Your Formal Warranty Claim), fill out the claim form entirely; (5) Return the Products, shipping prepaid by You (to be refunded if You are entitled to a remedy under the Scope of this Limited Warranty), to Monster for verification of damage, along with a copy of Your original sales receipts and proof of purchase (UPC label or packing slip) for such Products, the completed claim form, and printed Return Authorization Number on the outside of the return package (the claim form will include instructions for return).
FURTHER PROCEEDINGS. Monster will determine whether a Product Defect existed. Monster may, at its discretion, direct You to obtain a repair estimate at a service center. If a repair estimate is required, You will be instructed on how to properly submit the estimate and the resulting invoice to Monster for payment. Any fees for repairs may be negotiated by Monster.
TIMING. If You bring a Formal Warranty Claim and fully comply with all terms and conditions of this Limited Warranty, Monster will use its best efforts to provide You with a remedy within thirty (30) days after receipt of Your Formal Warranty Claim (if You reside in the United States – forty-five (45) days if You reside elsewhere), unless obstacles outside Monster’s control delay the process.
Ver.121703 – US/EU ©2004 Monster, LLC.

37
NOTES

We invite you to visit the Monsters at: MonsterPower.com
Designed in the USA and manufactured for Monster to its quality specifications.
Made in China.
© 2005 Monster, LLC 7251 West Lake Mead Blvd. Las Vegas, NV 89128, USA
1-877-800-8989
Monster Technology International Ltd. Ballymaley Business Park
Gort Road, Ennis, Co. Clare, Ireland 001-866-348-4171
The Monster Power Professional Reference PowerCenter Signature PRO 5100 is protected under U.S. Pat. No. 5,589,718. Other Patents Pending.
”Monster”, ”Monster Cable“, ”Monster Power“, ”Clean Power“, ”PowerCenter“, ”PowerLine“, “T2”, and “Tri-Mode” are registered and unregistered trademarks
of Monster Cable Products, Inc. and its subsidiaries in the US and other locations.

®
Professional PowerCenter™
Signature PRO 5100 Manuel de l’utilisateur
rm MPP5100SIG_MAN


TABLE DES MATIÈRES Page
Importantes informations de sécurité ............................... iMise à la terre et installation adéquates ......................... iiiNote de la direction de Monster ..................................... 1Technologie T2 exclusive de Monster™ ............................ 3Étages brevetés Clean Power de Monster™ ..................... 4Les cerveaux derrière la conception du PowerCenter™ de Monster. .................................................................................................................. 5Spécifications du Monster PowerCenter Signature PRO 5100 .......................................................................................................................... 6Guide de raccordement ................................................. 11
Prises numériques ....................................... 11Prises vidéo ................................................. 12Prises audio analogiques ............................. 13Prises audio de puissance ............................ 14Programmation des prises ........................... 15Réglage de l’alarme sonore ......................... 17Réglage de l’extinction automatique ............ 18Connexions coaxiales .................................. 19Connexions téléphoniques ........................... 20Connexions Ethernet ................................... 21Contrôle de l’alimentation d’entrée c.c. “DC In” à distance ......................................................................................................... 22Contrôle de l’alimentation d’entrée c.a. “AC In” à distance ......................................................................................................... 22Contrôle de l’alimentation de sortie c.c “DC Out” à distance ....................................................................................................... 23Montage dans une armoire ......................... 24Poignées d’armoire ..................................... 25
Dépannage ................................................................... 28Spécifications ................................................................ 30
Annexe
Informations sur la garantie .......................................... 31

i
IMPORTANTES INFORMATIONS DE SÉCURITÉ
Veuillez lire et observer les points de sécurité suivants en tout temps.
MISE EN GARDE – Sources d’alimentationPour vous assurer d’une utilisation sécuritaire, ne branchez pas ce PowerCenter™ dans une sortie d’alimentation qui diffère de la source indiquée sur le PowerCenter. Si vous ne connaissez pas la tension électrique délivrée dans votre maison, veuillez consulter votre compagnie d’électricité locale ou un électricien qualifié.
MISE EN GARDE – Mise à la terre et polarisation A. Ne forcez pas la fiche du PowerCenter™ dans une prise d’alimentation qui n’est pas conçue pour accepter le type de prise c.a. à trois
fils (une prise à trois lames). Cette fiche est conçue pour être insérée dans une prise électrique avec mise à la terre uniquement. Si cette fiche ne s’adapte pas directement à votre prise murale, n’essayez pas de la forcer. N’essayez jamais de démonter la fiche d’aucune façon que ce soit (ou de d’altérer le cordon d’alimentation). N’essayez pas de contourner la mise à la terre en utilisant un adaptateur de lame 3-2. Si vous avez des questions à propos de la mise à la terre, consultez votre compagnie locale d’électricité ou un électricien qualifié.
B. Si vous utilisez des dispositifs qui doivent être installés sur le toit comme un satellite, une antenne ou tout autre composant avec un câble branché à votre PowerCenter™, assurez-vous que les câbles sont correctement mis à la terre. Utilisez les méthodes de mise à la terre décrites dans la section 810 du Code national de l’électricité, ANSI/NFPA 70 (au Canada, 1ère partie du Code canadien de l’électricité). Cela vous protègera contre les surtensions et les charges électrostatiques.
C. Ne placez jamais une antenne près d’une ligne électrique aérienne ni près d’aucun autre circuit électrique. Ne touchez aucune ligne électrique ni circuit électrique. Ce faisant, vous pourriez vous causer de graves blessures physiques et éventuellement la mort.
MISE EN GARDE – Liquides : Éviter les chocs électriques A. N’utilisez pas votre PowerCenter de Monster si un liquide a été renversé sur ou à l’intérieur de l’appareil.
B. N’utilisez pas votre PowerCenter de Monster près d’un endroit où l’on retrouve de l’eau ou de la pluie (par exemple un bain, une cuisine ou un évier).

ii
MISE EN GARDE – Sécurité du cordon d’alimentation A. Lorsque vous acheminez le cordon d’alimentation c.a. de votre PowerCenter, ne le placez pas dans des zones de passage (par
exemple un couloir, une entrée de porte ou un plancher). Ne créez pas un risque de trébucher sur le cordon d’alimentation.
B. Si l’enveloppe protectrice du cordon d’alimentation commence à se déchirer ou à s’effilocher, exposant ainsi le filage interne, le blindage, etc., débranchez-le de la source d’alimentation et cessez immédiatement d’utiliser le PowerCenter de Monster. Consultez la section Informations sur la garantie de ce manuel de l’utilisateur pour les détails importants.
MISE EN GARDE – Précautions en cas d’orageEn cas d’orage électrique, nous vous conseillons de débrancher votre PowerCenter de Monster ; il n’y a toutefois aucune nécessité de débrancher les appareils connectés au PowerCenter. Assurez-vous que TOUS vos produits informatiques et autres appareils sont protégés par Monster Power.
MISE EN GARDE – Aucune pièce ne devant être entretenue par l’utilisateur ne se trouve à l’intérieur du PowerCenterSi, pour quelque raison que ce soit, votre PowerCenter ne fonctionne pas correctement, ne retirez aucune pièce de l’appareil (couvercle, etc.) pour tenter une réparation. Débranchez l’appareil et consultez la section Informations sur la garantie de ce manuel de l’utilisateur pour les détails importants.
ATTENTION – Exposition à la chaleurN’exposez pas votre PowerCenter à la lumière directe du soleil et ne le placez pas près des calorifères, des sources de chaleur, ou dans un endroit propice à une élévation de la température.
ATTENTION – Nettoyage appropriéEn général, le seul nettoyage nécessaire à votre PowerCenter de Monster est un léger époussetage. Débranchez cet appareil de la prise murale avant de le nettoyer. N’utilisez aucun type de nettoyant liquide ou en aérosol.

iii
MISE À LA TERRE ET INSTALLATION ADÉQUATES
MISE EN GARDE – Mise à la terre adéquate Le PowerCenter de Monster requiert une sortie adéquatement mise à la terre pour la sécurité de l’utilisateur de même que pour la protection de l’équipement branché. Si vous n’êtes pas certain que le câblage électrique de votre foyer est adéquatement mis à la terre, faites-le vérifier par un électricien qualifié.
Remarque importante – Protection et alimentation adéquatesPour protéger complètement votre équipement contre les surtensions électriques, chaque câble d’alimentation c.a., chaque câble coaxial et chaque ligne téléphonique et éthernet du système doit être relié au PowerCenter approprié.
Remarque importante – Protection adéquate et garantie limitée sur l’équipement branchéLa garantie limitée sur l’équipement branché sera invalide si un câble (c.a., coaxial, téléphonique ou Ethernet) ou un fil de raccordement vidéo ou audio de l’équipement provient d’un appareil qui n’est pas relié au PowerCenter.
La garantie limitée sur l’équipement branché sera invalide si le PowerCenter est utilisé dans un environnement d’installation mobile.
Consultez la section Informations sur la garantie de ce manuel de l’utilisateur pour les détails importants.

1
NOTE DE LA DIRECTION DE MONSTER
MERCI de vous être procuré le PowerCenter de référence professionnel de Monster Power®™ Signature PRO 5100, conçu pour vous offrir la meilleure performance et le plus complet système de protection de cinéma maison et audio/vidéo disponible. Le Signature PRO 5100 est conçu pour l’installateur professionnel de systèmes audio/vidéo haut de gamme, les milieux de l’enregistrement et des tournées, ainsi que pour beaucoup d’autres milieux où la qualité du son et de l’image s’impose. Les caractéristiques améliorées du Signature PRO 5100ont été incorporées à la conception avec en tête, ces utilisateur et ces environnements.
Le Signature PRO 5100 comprend le circuit de filtre breveté Monster Clean Power™ qui bloque pratiquement les fréquences électromagnetiques et radio qui peuvent dégrader la qualité du son et de l’image. En plus, votre PowerCenter comprend aussi des circuits d’isolation de bruit qui sépare l’audio analogique, le vidéo, le numérique et les sorties audio avec courant très haut. Le résultat est une haute qualité de son et d’image libre d’interférence qui pourrait endommager la performance.
Les autres percées de Monster Power inclut le circuit de protection de déconnection/reconnection automatique T2™ et le système de protection Tri-Mode™ comprenant une alarme sonore. Ces options débranchent automatiquement l’alimentation de vos équipements électroniques si une surtension importante se produit. Nous avons également inclus des connexions coaxiales, téléphoniques et éthernet protégées contre les surtensions pour assurer la protection de tous vos
Noel Lee

2
appareils. Le Signature PRO 5100 comprend aussi un système de code de couleur en attente de brevet, qui identifie où chacune des composantes doit être connectée.
Comme ses collègues audiophiles et vidéophiles, Monster a conçu le Signature PRO 5100 pour vous aider à obtenir le meilleur son et la meilleure image possible. Nous espérons que vous considérez cet appareil comme partie intégrante de votre système audio/vidéo et de votre cinéma maison.
Noel Lee, Direction de Monster

3
TECHNOLOGIE T2™ EXCLUSIVE À MONSTER
Le Monster Power Signature PRO 5100 PowerCenter comprend la technologie T2 exclusive à Monster. Le T2 est un circuit électronique actif contrôlé par microprocesseur logé à l’avant du circuit de protection contre les surtensions dans tous les produits Monster Power. Le T2 surveille le conducteur, le neutre et le conducteurs de mise à la masse et déconnecte automatiquement le PowerCenter du conducteur d’alimentation c.a. lorsque se produit une variation prolongée de voltage vers le haut ou vers le bas (tension continue en-dessous de 80Vrms ou au-dessus de 132 Vrms).
Lorsque l’alimentation atteint l’un de ces niveaux potentiellement dangereux, le circuit de protection ultra-rapide T2 éteint le PowerCenter de Monster pendant 15 secondes. Lorsque les conditions d’alimentation reviennent à la normale, la technologie T2 réactive le PowerCenter après 15 secondes. Dans le cas contraire où le problème persiste, le circuit comparateur de la technologie T2 laisse l’appareil éteint.
Contrairement aux appareils de protection d’alimentation classiques, la technologie T2 éteint votre PowerCenter avant que les varistors à oxyde métallique et fusibles thermiques ne détectent les conditions de surtension et protègent vos équipements en brûlant. Cette caractéristique étendra la durée de vie du PowerCenter tout en protégeant votre installation.

4
ÉTAGES BREVETÉS CLEAN POWER™ DE MONSTER
La technologie Clean Power de Monster effectue deux tâches vitales au maintien de la qualité optimisée pour le cinéma maison : 1) le filtrage du bruit et 2) l’isolation du bruit. Plus le nombre d’étages Clean Power est élevé (1-5) et plus les filtres d’élimination du bruit généré sur l’alimentation c.a. sont complexes et avancés. En parallèle, plus le nombre d’étages Clean Power est élevé et plus l’isolation entre les équipements est élevée, optimisant ainsi l’élimination du bruit généré par les composants.
Les appareils de la catégorie PowerCenter de Monster qui offrent la technologie Clean Power sont tous conçus avec un nombre d’étages Clean Power spécifique. Le Signature PRO 5100 intègre un circuit Clean Power à quatre étages qui filtre à la fois le bruit sur l’alimentation c.a. ainsi que le bruit généré par votre propre équipement. L’étage de niveau 4 de Clean Power implique cinq filtres isolés très avancés constitués par des filtres analogiques audio, vidéo et numériques, ainsi qu’un filtre audio de puissance qui permettent la meilleure élimination du bruit sur l’alimentation c.a. et la meilleure isolation entre appareils. Toutes ces caractéristiques font du Signature PRO 5100 l’appareil idéal pour votre système de cinéma maison. Pour en apprendre plus sur la technologie brevetée Clean Power de Monster et pour connaître l’ensemble des produits des catégories PowerCenter, de stabilisateurs de tensions et d’amplificateurs, n’hésitez pas à visiter le site MonsterPower.com.
Analyseur de spectre actuel photo de la pollution sur
l’alimentation c.a.
Conduit d’alimentation c.a. filtré par Monster
Clean Power™

5
LES CERVEAUX DERRIÈRE LA CONCEPTION DU POWERCENTER DE MONSTER
Richard Marsh – Il n’y a que peu d’experts capables de résoudre les problèmes complexes associés à l’alimentation c.a. et aux systèmes de cinéma maison. Richard Marsh est l’un d’entre eux. Tout au long de sa carrière, il a conçu les meilleurs systèmes de gestion d’alimentation d’une valeur de plus de 3000$ et apporte maintenant son expertise à Monster Power. Richard a développé le circuit breveté Clean Power™ de Monster qui est intégré dans la gamme PowerCenter de Monster. Il est également à l’origine de plusieurs autres concepts révolutionnaires. L’expérience de Richard dans le domaine de la recherche au niveau de la conception d’amplificateurs et de condensateurs l’a conduit au développement du concept d’asservissement à courant continu et à rétroaction dans les amplificateurs de puissance – un concept qui est aujourd’hui utilisé virtuellement par tous les fabricants d’amplificateurs. Son statut d’inventeur du condensateur de dérivation interne MultiCap™ et la reconnaissance publique du concept de circuit audio symétrique de haute fidélité élaboré par lui ont influencé la communauté audiophile pendant des années. Richard est à la tête de plusieurs inventions et concepts, travaux de recherche et articles réputés dans le monde de l’audio de haute fidélité. Il a contribué aux magazines The Absolute Sound et Audio . Il fait partie du Who’s Who in the West.
Demian Martin – Demian Martin a travaillé sur la résolution de problèmes d’alimentation complexes pendant des années. En tant que consultant technique dans les industries du papier et de l’aciérie, Demian a participé à la création de plusieurs solutions d’alimentation c.a. innovatrices. Il a développé des techniques pour améliorer de façon drastique l’efficacité des systèmes de contrôle des moteurs de puissance – jusqu’à 50 000 Watts – permettant à ces usines d’effectuer des économies conséquentes liées au rendement des systèmes. Demian fut également l’un des fondateurs de Spectral Audio et le chef concepteur de plusieurs de leurs concepts pilotes pour des amplificateurs, des convertisseurs numériques/analogiques et d’autres inventions dans le domaine de l’audio de haute fidélité. Il apporte maintenant son expertise à l’équipe de recherche et de développement d’élite de Monster Power.
Noel Lee – Noel Lee, à la direction de Monster, est mieux connu pour avoir popularisé le concept de câble audio de haute qualité il y a 25 ans avec la création de Monster Cable. Au départ ingénieur dans la conception de fusion laser au Lawrence Livermore National Laboratory puis quelques années plus tard musicien professionnel, Noel a inventé ou co-inventé plus de 250 brevets américains et internationaux et a mené la croissance spectaculaire des compagnies du groupe Monster dans plus de 80 pays. Monster Power est pour Noel la réalisation d’une vision longuement entretenue d’offrir des solutions d’alimentation abordables qui délivrent le meilleur son et la meilleure image possibles.

CARACTÉRISTIQUES DE MONSTER SIGNATURE PRO 5100 POWERCENTER
6 IN OUTTV/CABLE
AC IN110V
OUT 1IN OUT 2 OUT 3OUTIN
IN OUTSATELLITE
IN OUTANTENNA
LAMP DIMMER
LAMP
WIRINGOK
ABNORMALVOLTAGE
GROUNDOK
TIMEDON
SWITCHEDON
UNSWITCHEDON
CLEAN POWER ON
AUDIOFILTER
HIGH CURRENT
FILTER
DIGITALFILTER 2
DIGITALFILTER 1
VIDEOFILTER
PROTECTIONON
ON/OFF MENU SELECT DIMMER
U.S. Patent Nos. 6,456,091 B1, 6,473,510 B1, 6,614,636 B1, D467,227 S, D468,263 S, D468,689 S, Taiwan NI-174352, other patents pending in U.S., Taiwan, and China
11 2 3 4 5
DC IN3~30V
MANUFACTURED TO MONSTER® QUALITY SPECIFICATIONS IN CHINA
INPUT VOLTAGE•
CURRENT USAGE
REMOTE TURN ON/OFF
DC OUT 112V
DC OUT 212V
DC OUT 312V
PRO 5100 PROFESSIONALPOWERCENTER™
CAUTION: DISCONNECT MAIN POWER CORD AND AC REMOTE TRIGGER CORD BEFORE SERVICING
PHONE LINE SURGE PROTECTIONNETWORK SURGE PROTECTION
1800WMAX TOTAL
LAMP
Professional Reference PowerCenterwith Clean Power™ Stage 4 v.2.0 Filtering
™
GROUND
BREAKER 15APRESS TO RESET
DIMMER
LAMP
Signature
UNSWITCHED CONVENIENCE OUTLETS
ON/OFF MENU SELECT DIMMER
INPUT VOLTAGE • CURRENT USAGEONON ON ON ON ON
SIGNATUREPRO 5100VUE AVANT
1 2 3 4 9 10 11 12 13
5 6 7 8
16 17 18 19 20
21
14 15

CARACTÉRISTIQUES DE MONSTER SIGNATURE PRO 5100 POWERCENTER
PROCESSOR PROCESSOR
DVD DVD
DVD DVD
CABLE/SAT
TV/PROJECTOR TV/PROJECTOR
TV/PROJECTOR TV/PROJECTOR
VCR VCR
VCR VCR
Monster Power® PRO 5100 ID Labels Place one label at the end of the corresponding power cord.
RECEIVER RECEIVER
RECEIVER RECEIVER
PROCESSOR PROCESSOR
MAIN AMP MAIN AMP
MAIN AMP MAIN AMP
SPARE SPARE
SPARE SPARE
CD CD
CD CD
DVR DVR
DVR DVR
CABLE/SAT
CABLE/SAT CABLE/SAT
7
IN OUTTV/CABLE
AC IN110V
OUT 1IN OUT 2 OUT 3OUTIN
IN OUTSATELLITE
IN OUTANTENNA
LAMP DIMMER
LAMP
WIRINGOK
ABNORMALVOLTAGE
GROUNDOK
TIMEDON
SWITCHEDON
UNSWITCHEDON
CLEAN POWER ON
AUDIOFILTER
HIGH CURRENT
FILTER
DIGITALFILTER 2
DIGITALFILTER 1
VIDEOFILTER
PROTECTIONON
ON/OFF MENU SELECT DIMMER
U.S. Patent Nos. 6,456,091 B1, 6,473,510 B1, 6,614,636 B1, D467,227 S, D468,263 S, D468,689 S, Taiwan NI-174352, other patents pending in U.S., Taiwan, and China
11 2 3 4 5
DC IN3~30V
MANUFACTURED TO MONSTER® QUALITY SPECIFICATIONS IN CHINA
INPUT VOLTAGE•
CURRENT USAGE
REMOTE TURN ON/OFF
DC OUT 112V
DC OUT 212V
DC OUT 312V
PRO 5100 PROFESSIONALPOWERCENTER™
CAUTION: DISCONNECT MAIN POWER CORD AND AC REMOTE TRIGGER CORD BEFORE SERVICING
PHONE LINE SURGE PROTECTIONNETWORK SURGE PROTECTION
1800WMAX TOTAL
LAMP
Professional Reference PowerCenterwith Clean Power™ Stage 4 v.2.0 Filtering
™
GROUND
BREAKER 15APRESS TO RESET
DIMMER
LAMP
Signature
UNSWITCHED CONVENIENCE OUTLETS
ON/OFF MENU SELECT DIMMER
INPUT VOLTAGE • CURRENT USAGEONON ON ON ON ON
SIGNATURE PRO 5100VUE ARRIÈRE
28
22
46
29 30 31 32
24 25 22 23
35
26
45 44 43
39 40 41 4236
3837
34
3327

8
CARACTÉRISTIQUES DU SIGNATURE PRO 5100 POWERCENTER 1. Témoin de fonctionnement de la technologie “Clean Power” : Indique si le circuit Clean Power de Monster fonctionne correctement.
2. Témoin de fonctionnement des prises non commutées : Indique si les prises d’alimentation non commutées de l’appareil sont mises sous tension.
3. Témoin de fonctionnement des prises commutées : Indique si les prises d’alimentation commutées de l’appareil sont mises sous tension.
4. Témoin de fonctionnement de l’alimentation séquentielle : Indique si les prises de sortie utilisant la fonction d’alimentation séquentielle sont mises sous tension.
5. Témoin de fonctionnement du mode de protection : Indique si le circuit de protection des surtensions de Monster fonctionne correctement.
6. Témoin de vérification de la mise à la terre : Indique si le PowerCenter est branché dans une prise d’alimentation de 120 V c.a. avec une mise à la terre adéquate.
7. Témoin de vérification du câblage : Indique si les câbles de phase et du neutre sont bien câblés dans la prise murale. Si l’indicateur n’est pas allumé, consultez votre compagnie locale d’électricité ou un électricien qualifié.
8. Indicateur d’une condition de tension anormale : Indique que la tension d’entrée se situe hors de la gamme tolérée située entre 90 V c.a. et 125 V c.a. environ.
9. Affichage numérique de la tension d’entrée et de l’ampérage utilisé : Indique la tension d’entrée et le débit en ampères.
10. Bouton de déclenchement ou d’extinction de l’alimentation : Éteint ou allume les prises programmées par commutation “SWITCHED ON” ou par commutation avec retard d’allumage “SWITCHED ON AFTER DELAY”.
11. Bouton “Menu” : Appuyez pour démarrer le mode de programmation.
12. Bouton de sélection “Select” : Appuyez pour valider les paramètres ou les options sélectionnées par le bouton “Menu”.
13. Bouton gradateur “Dimmer” : Ajuste la luminosité de l’affichage alphanumérique.
14. Ampoule DEL: Illumine le panneau avant du PowerCenter. Pour l’aspect pratique, cette lampe se rétracte dans le PowerCenter.
15. Gradateur “Dimmer” : Ajuste la luminosité des lampes DEL.
16. Indicateur du filtre vidéo : Indique si les prises d’alimentation vidéo de l’appareil sont mises sous tension.
17. Indicateur du “filtre numérique 1” : Indique si les prises d’alimentation numériques de l’appareil sont mises sous tension.

9
18. Indicateur du “filtre numérique 2” : Indique si les prises d’alimentation numériques de l’appareil sont mises sous tension.
19. Indicateur du “filtre audio” : Indique si les prises d’alimentation audio de l’appareil sont mises sous tension.
20. Indicateur du “filtre de puissance” : Indique si les prises d’alimentation de puissance de l’appareil sont mises sous tension.
21. Prises d’alimentation non commutées : Ces prises sont situées à l’avant du PowerCenter pour un accès facilité. Elles incluent un circuit de filtrage spécifiquement conçu pour les appareils audio à puissance élevée.
22. Ampoule DEL : Illumine le panneau avant du PowerCenter. Pour l’aspect pratique, cette lampe se rétracte dans le PowerCenter.
23. Bouton gradateur “Dimmer” : Ajuste la luminosité des lampes DEL.
24. Suppression des surtensions sur la connexion éthernet : Protège la ligne téléphonique/réseau contre les surtensions et contre les pics de tension.
25. Suppression des surtensions sur la ligne téléphonique : Protège la ligne téléphonique/réseau contre les surtensions et contre les pics de tension.
26. Affichage numérique de la tension d’entrée et de l’ampérage utilisé : Indique la tension d’entrée et le débit en ampères.
27. Témoin de fonctionnement des prises : Indique si les prises d’alimentation situées du côté de l’indicateur sont mises sous tension.
28. Filtre numérique 1 : Ces prises incluent un circuit de filtrage spécifiquement conçu pour réduire les interférences entre vos équipements numériques.
29. Filtre numérique 2 : Ces prises incluent un circuit de filtrage spécifiquement conçu pour réduire les interférences entre vos équipements numériques.
30. Filtre vidéo : Ces prises incluent un circuit de filtrage spécifiquement conçu pour réduire les interférences entre vos équipements vidéo.
31. Filtre audio analogique : Ces prises incluent un circuit de filtrage spécifiquement conçu pour réduire les interférences entre vos équipements audio.
32. Filtre audio de puissance : Ces prises incluent un circuit de filtrage spécifiquement conçu pour réduire les interférences entre vos équipements audio haute-puissance tels que des amplificateurs et des préamplificateurs.
33. Protection pour le câble de télévision : Protège le câble de télévision contre les surtensions. Le câble coaxial se branche sur l’entrée. La prise de sortie coaxiale se branche sur la télévision ou sur le décodeur du câble.
34. Protection de système satellite : Protège la connexion satellite contre les surtensions. Le câble coaxial de l’antenne satellite se branche sur l’entrée. La prise de sortie coaxiale se branche sur l’entrée du décodeur satellite.

10
35. Protection d’antenne : Protège la connexion d’antenne contre les surtensions. Le câble coaxial de l’antenne de radio se branche sur l’entrée. La prise de sortie coaxiale se branche sur l’entrée d’antenne.
36. Contrôle de l’alimentation d’entrée c.c. “DC In” à distance : Permet d’allumer automatiquement le PowerCenter par la commande d’alimentation de sortie c.c. “DC Out” à distance d’un autre appareil tel qu’un récepteur audio/vidéo.
37. Contrôle de l’alimentation d’entrée c.a. “AC In” à distance : Permet au PowerCenter se s’allumer automatiquement grâce à un déclencheur c.a. à distance branché dans une prise d’un autre appareil tel qu’un récepteur audio/vidéo.
38. Contrôle de l’alimentation de sortie c.c. “DC Out” à distance : Vous permet de mettre un appareil contrôlé à distance automatiquement en marche lorsque le PowerCenter est allumé.
39. Bouton de mise en marche/arrêt Éteint ou allume les prises programmées par commutation “SWITCHED ON” ou par commutation avec retard d’allumage “SWITCHED ON AFTER DELAY”.
40. Bouton “Menu” : Appuyez pour démarrer le mode de programmation.
41. Bouton “Menu” : Appuyez pour valider les paramètres ou les options sélectionnées par le bouton “Menu”.
42. Bouton “Menu” : Ajuste la luminosité de l’affichage alphanumérique.
43. Câble d’alimentation c.a. à haute capacité PowerLine™ 400 : Cordon d’alimentation à haute densité et à double blindage spécialement conçu pour optimiser l’alimentation en courant.
44. Vis de mise à la terre : Fournit une masse de référence pour tout appareil sans mise à la terre.
45. Disjoncteur de 20 A : Protège le PowerCenter d’une surcharge continue.
46. Étiquettes Monster Power identifiées par un code de couleurs pour l’audio/vidéo : Pour une identification facilitée de vos appareils.

11
IN OUTTV/CABLE
AC IN110V
OUT 1IN OUT 2 OUT 3OUTIN
IN OUTSATELLITE
IN OUTANTENNA
LAMP DIMMER
LAMP
WIRINGOK
ABNORMALVOLTAGE
GROUNDOK
TIMEDON
SWITCHEDON
UNSWITCHEDON
CLEAN POWER ON
AUDIOFILTER
HIGH CURRENT
FILTER
DIGITALFILTER 2
DIGITALFILTER 1
VIDEOFILTER
PROTECTIONON
ON/OFF MENU SELECT DIMMER
U.S. Patent Nos. 6,456,091 B1, 6,473,510 B1, 6,614,636 B1, D467,227 S, D468,263 S, D468,689 S, Taiwan NI-174352, other patents pending in U.S., Taiwan, and China
11 2 3 4 5
DC IN3~30V
MANUFACTURED TO MONSTER® QUALITY SPECIFICATIONS IN CHINA
INPUT VOLTAGE•
CURRENT USAGE
REMOTE TURN ON/OFF
DC OUT 112V
DC OUT 212V
DC OUT 312V
PRO 5100 PROFESSIONALPOWERCENTER™
CAUTION: DISCONNECT MAIN POWER CORD AND AC REMOTE TRIGGER CORD BEFORE SERVICING
PHONE LINE SURGE PROTECTIONNETWORK SURGE PROTECTION
1800WMAX TOTAL
LAMP
Professional Reference PowerCenterwith Clean Power™ Stage 4 v.2.0 Filtering
™
GROUND
BREAKER 15APRESS TO RESET
DIMMER
LAMP
Signature
UNSWITCHED CONVENIENCE OUTLETS
ON/OFF MENU SELECT DIMMER
INPUT VOLTAGE • CURRENT USAGEONON ON ON ON ON
GUIDE DE RACCORDEMENT
Raccordement aux prises numériquesCes prises incluent un circuit de filtrage spécifiquement conçu pour réduire les interférences entre vos équipements numériques.
A) Attachez une étiquette d’identification Monster Power au cordon d’alimentation de chaque appareil avant de le brancher dans la prise appropriée du PowerCenter identifiée par un code de couleurs.
B) Branchez le cordon d’alimentation de chaque appareil (câble/satellite, DVD, etc.) dans la prise correspondante du PowerCenter. Pour les appareils non indiqués sur la liste, voyez s’ils correspondent au type audio, vidéo, numérique ou audio de puissance et branchez-les dans la prise correspondante pour obtenir le meilleur résultat.
NOTE IMPORTANTEIl n’y a aucun danger à brancher un appareil audio analogique, vidéo ou de puissance dans une prise numérique. Cependant, pour obtenir le meilleur rendement, nous recommandons de ne brancher que des composants numériques dans les prises numériques.
Prises numériques

12
IN OUTTV/CABLE
AC IN110V
OUT 1IN OUT 2 OUT 3OUTIN
IN OUTSATELLITE
IN OUTANTENNA
LAMP DIMMER
LAMP
WIRINGOK
ABNORMALVOLTAGE
GROUNDOK
TIMEDON
SWITCHEDON
UNSWITCHEDON
CLEAN POWER ON
AUDIOFILTER
HIGH CURRENT
FILTER
DIGITALFILTER 2
DIGITALFILTER 1
VIDEOFILTER
PROTECTIONON
ON/OFF MENU SELECT DIMMER
U.S. Patent Nos. 6,456,091 B1, 6,473,510 B1, 6,614,636 B1, D467,227 S, D468,263 S, D468,689 S, Taiwan NI-174352, other patents pending in U.S., Taiwan, and China
11 2 3 4 5
DC IN3~30V
MANUFACTURED TO MONSTER® QUALITY SPECIFICATIONS IN CHINA
INPUT VOLTAGE•
CURRENT USAGE
REMOTE TURN ON/OFF
DC OUT 112V
DC OUT 212V
DC OUT 312V
PRO 5100 PROFESSIONALPOWERCENTER™
CAUTION: DISCONNECT MAIN POWER CORD AND AC REMOTE TRIGGER CORD BEFORE SERVICING
PHONE LINE SURGE PROTECTIONNETWORK SURGE PROTECTION
1800WMAX TOTAL
LAMP
Professional Reference PowerCenterwith Clean Power™ Stage 4 v.2.0 Filtering
™
GROUND
BREAKER 15APRESS TO RESET
DIMMER
LAMP
Signature
UNSWITCHED CONVENIENCE OUTLETS
ON/OFF MENU SELECT DIMMER
INPUT VOLTAGE • CURRENT USAGEONON ON ON ON ON
Prises vidéo
GUIDE DE RACCORDEMENT
Raccordement aux prises vidéoCes prises incluent un circuit de filtrage spécifiquement conçu pour réduire les interférences entre vos équipements vidéo.
A) Attachez une étiquette d’identification Monster Power au cordon d’alimentation de chaque appareil avant de le brancher dans la prise appropriée du PowerCenter identifiée par un code de couleurs.
B) Branchez le cordon d’alimentation de chaque appareil (TV/moniteur, magnétoscope) dans la prise correspondante du PowerCenter. Pour les appareils non indiqués sur la liste, voyez s’ils correspondent au type audio, vidéo, numérique ou audio de puissance et branchez-les dans la prise correspondante pour obtenir le meilleur résultat.
NOTE IMPORTANTEIl n’y a aucun danger à brancher un appareil audio analogique, numérique ou de puissance dans une prise vidéo. Cependant, pour obtenir le meilleur rendement, nous recommandons de ne brancher que des composants vidéo dans les prises vidéo.

13
GUIDE DE RACCORDEMENTRaccordement aux prises audio analogiqueCes prises incluent un circuit de filtrage spécifiquement conçu pour réduire les interférences entre vos équipements audio.
A) Attachez une étiquette d’identification Monster Power® au cordon d’alimentation de chaque appareil avant de le brancher dans la prise appropriée du PowerCenter identifiée par un code de couleurs.
B) Branchez le cordon d’alimentation de chaque appareil (récepteur, processeur, etc.) dans la prise correspondante du PowerCenter. Pour les appareils non indiqués sur la liste, voyez s’ils correspondent au type audio, vidéo, numérique ou audio de puissance et branchez-les dans la prise correspondante pour obtenir le meilleur résultat.
NOTE IMPORTANTEIl n’y a aucun danger à brancher un appareil vidéo, numérique ou audio de puissance dans une prise audio analogique. Cependant, pour obtenir le meilleur rendement, nous recommandons de ne brancher que des composants audio analogiques dans les prises audio analogiques.
IN OUTTV/CABLE
AC IN110V
OUT 1IN OUT 2 OUT 3OUTIN
IN OUTSATELLITE
IN OUTANTENNA
LAMP DIMMER
LAMP
WIRINGOK
ABNORMALVOLTAGE
GROUNDOK
TIMEDON
SWITCHEDON
UNSWITCHEDON
CLEAN POWER ON
AUDIOFILTER
HIGH CURRENT
FILTER
DIGITALFILTER 2
DIGITALFILTER 1
VIDEOFILTER
PROTECTIONON
ON/OFF MENU SELECT DIMMER
U.S. Patent Nos. 6,456,091 B1, 6,473,510 B1, 6,614,636 B1, D467,227 S, D468,263 S, D468,689 S, Taiwan NI-174352, other patents pending in U.S., Taiwan, and China
11 2 3 4 5
DC IN3~30V
MANUFACTURED TO MONSTER® QUALITY SPECIFICATIONS IN CHINA
INPUT VOLTAGE•
CURRENT USAGE
REMOTE TURN ON/OFF
DC OUT 112V
DC OUT 212V
DC OUT 312V
PRO 5100 PROFESSIONALPOWERCENTER™
CAUTION: DISCONNECT MAIN POWER CORD AND AC REMOTE TRIGGER CORD BEFORE SERVICING
PHONE LINE SURGE PROTECTIONNETWORK SURGE PROTECTION
1800WMAX TOTAL
LAMP
Professional Reference PowerCenterwith Clean Power™ Stage 4 v.2.0 Filtering
™
GROUND
BREAKER 15APRESS TO RESET
DIMMER
LAMP
Signature
UNSWITCHED CONVENIENCE OUTLETS
ON/OFF MENU SELECT DIMMER
INPUT VOLTAGE • CURRENT USAGEONON ON ON ON ON
Prises audio analogiques

14
GUIDE DE RACCORDEMENT
Raccordement aux prises audio de puissanceCes prises sont conçues pour fournir le maximum de courant aux composants de puissance comme des amplificateurs ou des préamplificateurs.
A) Attachez une étiquette d’identification Monster Power® au cordon d’alimentation de chaque appareil avant de le brancher dans la prise appropriée du PowerCenter identifiée par un code de couleurs.
B) Branchez le cordon d’alimentation de chaque appareil (amplificateur, etc.) dans la prise correspondante du PowerCenter. Pour les appareils non indiqués sur la liste, voyez s’ils correspondent au type audio, vidéo, numérique ou audio de puissance et branchez-les dans la prise correspondante pour obtenir le meilleur résultat.
NOTE IMPORTANTE Il n’y a aucun danger à brancher un appareil audio analogique, vidéo ou numérique dans une prise audio de puissance. Cependant, pour obtenir le meilleur rendement, nous recommandons de ne brancher que des composants audio analogiques de puissance dans les prises audio analogiques de puissance.
IN OUTTV/CABLE
AC IN110V
OUT 1IN OUT 2 OUT 3OUTIN
IN OUTSATELLITE
IN OUTANTENNA
LAMP DIMMER
LAMP
WIRINGOK
ABNORMALVOLTAGE
GROUNDOK
TIMEDON
SWITCHEDON
UNSWITCHEDON
CLEAN POWER ON
AUDIOFILTER
HIGH CURRENT
FILTER
DIGITALFILTER 2
DIGITALFILTER 1
VIDEOFILTER
PROTECTIONON
ON/OFF MENU SELECT DIMMER
U.S. Patent Nos. 6,456,091 B1, 6,473,510 B1, 6,614,636 B1, D467,227 S, D468,263 S, D468,689 S, Taiwan NI-174352, other patents pending in U.S., Taiwan, and China
11 2 3 4 5
DC IN3~30V
MANUFACTURED TO MONSTER® QUALITY SPECIFICATIONS IN CHINA
INPUT VOLTAGE•
CURRENT USAGE
REMOTE TURN ON/OFF
DC OUT 112V
DC OUT 212V
DC OUT 312V
PRO 5100 PROFESSIONALPOWERCENTER™
CAUTION: DISCONNECT MAIN POWER CORD AND AC REMOTE TRIGGER CORD BEFORE SERVICING
PHONE LINE SURGE PROTECTIONNETWORK SURGE PROTECTION
1800WMAX TOTAL
LAMP
Professional Reference PowerCenterwith Clean Power™ Stage 4 v.2.0 Filtering
™
GROUND
BREAKER 15APRESS TO RESET
DIMMER
LAMP
Signature
UNSWITCHED CONVENIENCE OUTLETS
ON/OFF MENU SELECT DIMMER
INPUT VOLTAGE • CURRENT USAGEONON ON ON ON ON
Prises audio de puissance

15
GUIDE DE RACCORDEMENTProgrammation de sortieToutes les prises du panneau arrière du PowerCenter sont programmables par les boutons de menu et de sélection du panneau avant. Pour régler chaque paire de prise, utilisez les boutons MENU et SELECT du panneau avant pour choisir entre les modes de commutation SWITCHED ON, commutation avec retard d’allumage SWITCHED ON AFTER DELAY et non commuté UNSWITCHED (prise toujours alimentée) indépendamment pour chaque paire de prise. Vous pouvez changer les réglages, à votre convenance. En utilisant une paire de prise étiquetée ANALOG FILTER par exemple, les schémas suivants illustrent comment cela est fait :
A) Allumer le PowerCenter : Appuyez sur l’interrupteur ON/OFF une fois pour démarrer l’appareil et commencer le processus. Une fois que le PowerCenter est allumé, l’afficheur indique la tension c.a.
Remarque : Le processus d’allumage peut prendre jusqu’à 60 secondes puisque n’importe quelle paire de prise peut être configurée dans le mode de commutation avec retard d’allumage SWITCHED ON AFTER DELAY. Vous pouvez voir le statut de toute paire de prises en vous référant à l’indicateur correspondant sur le panneau avant.
B) Régler la paire de prises en mode commuté SWITCHED ON : Appuyez sur MENU jusqu’à ce que la seconde ligne de l’afficheur indique le statut de la paire de prises analogiques ANALOG. Appuyez sur le bouton de sélection SELECT jusqu’à ce que le délai passe à 0 (zéro).
Le délai de 0 (zéro) signifie que la paire de prises analogiques ANALOG fonctionne en mode commuté SWITCHED ON. Cette paire sera activée une fois que le PowerCenter est allumé en appuyant sur le bouton ON/OFF du panneau avant, ou une fois que l’allumage du PowerCenter est déclenché automatiquement par un signal extérieur.
��������
��������

16
GUIDE DE RACCORDEMENT
C) Régler la paire de prises en mode de commutation avec retard d’allumage SWITCHED ON AFTER DELAY : Appuyez sur MENU jusqu’à ce que l’afficheur indique le statut de la paire de prises analogiques ANALOG. Appuyez sur le bouton de sélection SELECT jusqu’à ce que l’afficheur indique le délai en secondes que vous
désirez appliquer sur la paire de prises après avoir appuyé sur le bouton ON/OFF.
Une fois que le PowerSource est allumé en appuyant sur le bouton ON/OFF du panneau avant, ou une fois que l’allumage du PowerSource est déclenché automatiquement par un signal extérieur, la paire de prises sera alimentée après le délai choisi ci-dessus — 20 secondes dans ce cas. Les prises réglées avec le délai d’allumage maximal
s’éteindront cependant dès l’instant où le bouton ON/OFF est activé, ou lorsque l’extinction du PowerSource est déclenchée par un signal extérieur.
D) Régler la paire de prises en mode non commuté UNSWITCHED (prises toujours alimentées) : Appuyez sur le bouton MENU jusqu’à ce que l’afficheur indique le statut de la paire de prises analogiques ANALOG. Appuyez sur le bouton de sélection SELECT jusqu’à ce que vous obteniez l’affichage.
Uen fois que le mode non commuté UNSWITCHED est sélectionné, tout appareil branché dans ces prises sera alimenté en continu tant que le PowerCenter est branché dans une prise murale de 120V qui est elle-même alimentée.
Remarque : L’appareil est réglé en usine avec toutes les paires de prises réglées en mode commuté SWITCHED ON.
��������
��������

17
��������
��������
GUIDE DE RACCORDEMENT
Réglage de l’alarme sonore de surtension et de sous-tensionCette fonction active ou désactive l’alarme sonore indicant une condition d’alimentation anormale sur la ligne. Lorsque l’alarme est en mode activé ENABLE, l’alarme sonnera lorsque la tension d’alimentation dépasse 130V ou tombe sous 100V.
A) Appuyez sur le bouton MENU jusqu’à ce que l’afficheur indique le réglage de l’alarme.
B) Appuyez sur SELECT pour alterner entre ENABLE (activé) et DISABLE (désactivé).

18
GUIDE DE RACCORDEMENT
Réglage de l’extinction automatique lors de surtension et de sous-tensionCette fonction active ou désactive l’extinction automatique lors d’une condition d’alimentation anormale sur la ligne. Lorsque la fonction est en mode activé ENABLE, l’appareil s’éteindra automatiquement lorsque la tension d’alimentation dépasse 134V ou tombe sous 96V.
A) Appuyez sur le bouton MENU jusqu’à ce que l’afficheur indique :
B) Appuyez sur SELECT pour alterner entre ENABLE (activé) et DISABLE (désactivé).
��������
��������

19
D’une connexion d’antennecorrectement mise à la terre
D’une connexion d’antennecorrectement mise à la terre
GUIDE DE RACCORDEMENT
Raccordement aux connexions coaxialesLes connexions coaxiales protègent les entrées coaxiales contre les surtensions et les pics de tension.
Protégez les connexions du câble, du satellite et de l’antenne comme suit :
�� �����������
�� ������������
�� ����������
Note : Vous aurez besoin de câbles coaxiaux supplémentaires pour connecter le Signature PRO 5100 à vos équipements.
Vers la télévision/le décodeur du câble
Vers la télévision
D’une connexion d’antennecorrectement mise à la terre
Vers le récepteur de satellite

20
GUIDE DE RACCORDEMENT
Raccordement aux connexions téléphoniquesLes connexions téléphoniques protègent la ligne téléphonique contre les surtensions et contre les pics de tension. Ce PowerCenter intègre également un doubleur de prise téléphonique à trois voies.
Protégez les connexions téléphoniques comme suit :
Note : Le Signature PRO 5100 n’est pas prévu pour connecter un téléphone à deux lignes sur un connecteur 4 pins RJ1.
De la prise téléphonique
Vers le récepteur de satellite, Vidéo numérique Enregistreuse (DVR)ou le téléphone
������� ����� �����
���������������������������
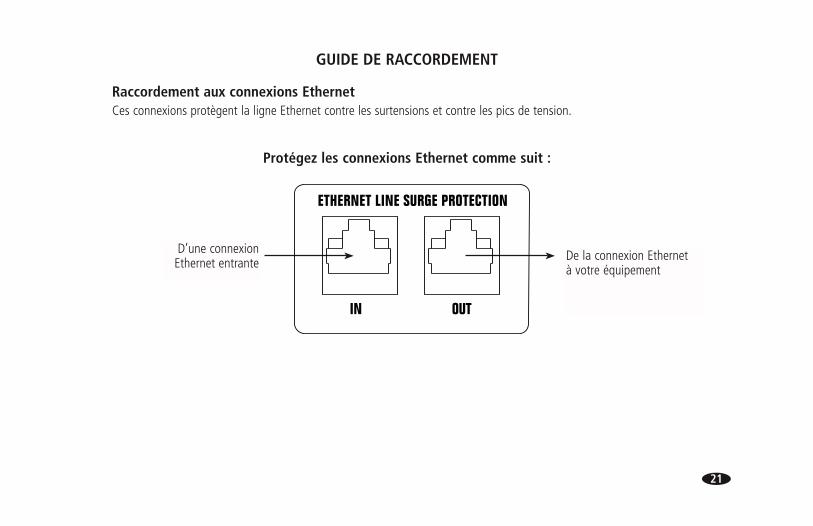
21
GUIDE DE RACCORDEMENT
Raccordement aux connexions EthernetCes connexions protègent la ligne Ethernet contre les surtensions et contre les pics de tension.
Protégez les connexions Ethernet comme suit :
D’une connexion Ethernet entrante De la connexion Ethernet
à votre équipement
�����
������������������������������

22
GUIDE DE RACCORDEMENT
Raccordement du contrôle de l’alimentation d’entrée c.c. “DC In” à distanceCette fonction connecte votre PowerCenter à un système de contrôle de cinéma maison automatisé ou permet à un autre appareil possédant une connexion de commande de sortie c.c. “DC Out” d’allumer ou d’éteindre automatiquement votre PowerCenter.
A) Branchez le cordon d’alimentation de l’appareil que vous utilisez pour contrôler le PowerCenter dans une prise non commutée désignée “unswitched” du PowerCenter. Remarque : Cet appareil doit délivrer une tension de contrôle entre 3 et 30 V c.c.
B) Branchez une des prises jack de 1/8 po du cordon (fourni) dans la connexion “DC In” correspondante sur le PowerCenter.
C) Branchez l’autre prise de 1/8 po dans la connexion de sortie c.c. “DC Out” de l’appareil que vous désirez mettre en marche et éteindre les prises commutées du PowerCenter une fois allumé.
Raccordement du contrôle de l’alimentation d’entrée c.a. “AC In” à distanceCette fonction connecte votre PowerCenter à un système de contrôle de cinéma maison automatisé ou permet à un autre appareil avec une connexion de prise c.a. (par exemple, un récepteur AV ou préamplificateur) pour automatiquement mettre en marche et éteindre votre PowerCenter.
A) Insérez la prise femelle du cordon de contrôle d’entrée c.a. “AC IN” dans la connexion de 120 V “AC IN” du PowerSource.
B) Insérez la prise mâle à deux broches du cordon de contrôle d’entrée c.a. “AC IN” dans une prise de sortie c.a. commutée de l’appareil qui doit contrôler le PowerCenter (par exemple un récepteur audio/vidéo ou un préamplificateur). Lorsque votre appareil est allumé, les prises commutées “Switched On” programmées du PowerCenter s’allument immédiatement. Les prises “Switched On After Delay” programmées s’allument après le délai imparti.

23
Raccordement du contrôle de l’alimentation de sortie c.c. “DC Out” à distanceCette fonction connecte votre PowerCenter à un système de contrôle de cinéma maison automatisé ou permet au PowerCenter d’allumer ou d’éteindre automatiquement un autre appareil possédant une connexion de commande d’entrée c.c. “DC In”.
A) Branchez une des prises Jack de 1/8 po du cordon dans la connexion de sortie c.c “DC Out” correspondante du PowerCenter.
B) Branchez l’autre prise de 1/8 po dans la connexion d’entrée c.c. “DC In” de l’appareil qui doit être contrôlé par le PowerCenter. Remarque : Il se peut que cet appareil ne comporte pas d’étiquette “DC In”. Cet appareil doit accepter une tension de contrôle entre 3 et 30 V c.c.
Remarque 1 : Un cordon avec prise Jack de 1/8 po est fourni avec le PowerCenter.Remarque 2 : Le déclencheur “DC Out” 1 s’active lorsque le PowerCenter est mis en marche.
Le déclencheur “DC Out 2” s’active 5 secondes après le déclencheur “DC Out 1”. Le déclencheur “DC Out 3” s’active 5 secondes après le déclencheur “DC Out 2”.
IN OUTTV/CABLE
AC IN110V
OUT 1IN OUT 2 OUT 3OUTIN
IN OUTSATELLITE
IN OUTANTENNA
LAMP DIMMER
LAMP
WIRINGOK
ABNORMALVOLTAGE
GROUNDOK
TIMEDON
SWITCHEDON
UNSWITCHEDON
CLEAN POWER ON
AUDIOFILTER
HIGH CURRENT
FILTER
DIGITALFILTER 2
DIGITALFILTER 1
VIDEOFILTER
PROTECTIONON
ON/OFF MENU SELECT DIMMER
U.S. Patent Nos. 6,456,091 B1, 6,473,510 B1, 6,614,636 B1, D467,227 S, D468,263 S, D468,689 S, Taiwan NI-174352, other patents pending in U.S., Taiwan, and China
11 2 3 4 5
DC IN3~30V
MANUFACTURED TO MONSTER® QUALITY SPECIFICATIONS IN CHINA
INPUT VOLTAGE•
CURRENT USAGE
REMOTE TURN ON/OFF
DC OUT 112V
DC OUT 212V
DC OUT 312V
PRO 5100 PROFESSIONALPOWERCENTER™
CAUTION: DISCONNECT MAIN POWER CORD AND AC REMOTE TRIGGER CORD BEFORE SERVICING
PHONE LINE SURGE PROTECTIONNETWORK SURGE PROTECTION
1800WMAX TOTAL
LAMP
Professional Reference PowerCenterwith Clean Power™ Stage 4 v.2.0 Filtering
™
GROUND
BREAKER 15APRESS TO RESET
DIMMER
LAMP
Signature
UNSWITCHED CONVENIENCE OUTLETS
ON/OFF MENU SELECT DIMMER
INPUT VOLTAGE • CURRENT USAGEONON ON ON ON ON
De l’appareil de contrôle
Vers les appareils de contrôle
Vers les appareils de contrôle
Vers les appareils de contrôle
De l’appareil de contrôle

24
GUIDE DE RACCORDEMENT
Montage de votre PowerCenter dans une armoireCe PowerCenter de Monster comprend les plaques d’intallation fixées au chassis pour installation dans une armoire d’équipement de dimension courante. Placez le PowerCenter dans l’armoire et alignez les trous correspondants. Insérez des vis de montage (non incluses) et serrez dans le sens des aiguilles d’une montre.
Trous d’installation d’armoire
IN OUTTV/CABLE
AC IN110V
OUT 1IN OUT 2 OUT 3OUTIN
IN OUTSATELLITE
IN OUTANTENNA
LAMP DIMMER
LAMP
WIRINGOK
ABNORMALVOLTAGE
GROUNDOK
TIMEDON
SWITCHEDON
UNSWITCHEDON
CLEAN POWER ON
AUDIOFILTER
HIGH CURRENT
FILTER
DIGITALFILTER 2
DIGITALFILTER 1
VIDEOFILTER
PROTECTIONON
ON/OFF MENU SELECT DIMMER
U.S. Patent Nos. 6,456,091 B1, 6,473,510 B1, 6,614,636 B1, D467,227 S, D468,263 S, D468,689 S, Taiwan NI-174352, other patents pending in U.S., Taiwan, and China
11 2 3 4 5
DC IN3~30V
MANUFACTURED TO MONSTER® QUALITY SPECIFICATIONS IN CHINA
INPUT VOLTAGE•
CURRENT USAGE
REMOTE TURN ON/OFF
DC OUT 112V
DC OUT 212V
DC OUT 312V
PRO 5100 PROFESSIONALPOWERCENTER™
CAUTION: DISCONNECT MAIN POWER CORD AND AC REMOTE TRIGGER CORD BEFORE SERVICING
PHONE LINE SURGE PROTECTIONNETWORK SURGE PROTECTION
1800WMAX TOTAL
LAMP
Professional Reference PowerCenterwith Clean Power™ Stage 4 v.2.0 Filtering
™
GROUND
BREAKER 15APRESS TO RESET
DIMMER
LAMP
Signature
UNSWITCHED CONVENIENCE OUTLETS
ON/OFF MENU SELECT DIMMER
INPUT VOLTAGE • CURRENT USAGEONON ON ON ON ON
Trous d’installation d’armoire

25
GUIDE DE RACCORDEMENT
Ce PowerCenter de Monster comprend des poignées d’armoire amovibles.
Pour ajouter des poignées d’armoire à ce PowerCenter : A) Retirez les plaques décoratives sur le coté avant droit et gauche du PowerCenter à l’aide d’un tournevis, en
le placant sur le dessus des vis et en les tournant dans le sens antihoraire. Il y a un total de deux vis, qui sont également utilisées pour fixer les poignées d’armoire au PowerCenter.
B) À présent, placez une poignée par-dessus les trous des vis, placez une vis dans chacun des deux trous des poignées, alignez les trous des vis avec les vis et, à l’aide d’un tournevis, tournez dans le sens des aiguilles d’une montre jusqu’à ce que la poignée s’appuie fermement contre le PowerCenter et qu’une solide connexion ait été faite. Si la connexion n’est pas solide, retirez la vis du PowerCenter et répétez l’étape B.
C) Répétez cette étape avec la seconde poignée d’armoire.
Pour retirer des poignées d’armoire de ce PowerCenter : A) Retirez les poignées d’armoire des cotés avant droit et gauche du PowerCenter à l’aide d’un tournevis, en
l’insérant dans les deux trous des poignées d’armoire, en alignant les trous avec les vis et en tournant dans le sens inverse des aiguilles d’une montre. Il y a deux vis retenant chaque poignée d’armoire, pour un total de quatre vis, qui sont également utilisées pour fixer les plaques décoratives au PowerCenter.
B) À présent, placez une plaque décorative par-dessus les trous des vis, placez une vis dans chacun des deux trous dans les plaques décoratives, alignez les trous des vis avec les vis et, à l’aide d’un tournevis, tournez dans le sens des aiguilles d’une montre jusqu’à ce que la plaque s’appuie fermement contre le PowerCenter et qu’une solide connexion ait été faite. Si la connexion n’est pas solide, retirez la vis du PowerCenter et répétez l’étape B.
C) Répétez cette étape avec la seconde poignée d’armoire.

26
DÉPANNAGE
Symptôme Cause possible Solution
Le PowerCenter n’est n’est pas alimenté.
Le PowerCenter n’est pas allumé.
• Allumez le PowerCenter.
• Assurez-vous que le cordon électrique du PowerCenter est bien branché dans une prise murale de 120 volts (nominal) correctement mise à la terre.
• Certaines prises murales sont activées par un interrupteur. Allumez les interrupteurs muraux situés à proximité de la prise.
Trop d’appareils sont connectés sur le PowerCenter, causant ainsi une surcharge qui déclenche le disjoncteur thermique.
• Appuyez sur le disjoncteur thermique du PowerCenter pour l’enclencher. Attendez 10 minutes avant de réinitialiser le disjoncteur.Si vous le réinitialisez trop tôt, le disjoncteur détectera prématurément une surcharge et se déclenchera à nouveau, ne permettant pas au système de fonctionner.
• Si le disjoncteur continue à se déclencher, déchargez un ou plusieurs des équipements vers un second PowerCenter. Il se peut en effet que les appareils branchés consomment trop de courant pour un seul PowerCenter.

27
DÉPANNAGE
Symptôme Cause possible Solution
Un appareil n’est pas alimenté.
L’appareil est branché dans une prise commutée par le PowerCenter qui n’est pas allumé.
• Allumez le PowerCenter.
• Ou branchez l’appareil dans une prise non commutée.
Le PowerCenter est branché à la prise commutée d’un appareil qui est éteint. Dans certains cas, un appareil branché sur une prise commutée par le PowerCenter ne sera pas alimenté lorsque lePowerCenter est allumé à moins que l’appareil soit aussi allumé.
• Allumez l’appareil.
Les haut-parleurs émettent un bourdonnement.
Le PowerCenter partage son alimentation c.a. avec un appareil qui n’est pas correctement mis à la terre.
• Connectez votre PowerCenter à une prise murale dédiée.
• Essayez de débrancher vos appareils du PowerCenter l’un après l’autre pour voir si le bruit s’arrête. Si un appareil n’est pas correctement mis à la terre, vous pouvez tenter d’attacher un fil de cuivre entre le châssis de l’appareil et la borne de mise à la terre du PowerCenter.

28
DÉPANNAGE
Symptôme Cause possible Solution
La DEL de la prise non commutée sur le panneau avant est éteinte.
Le PowerCenter n’est pas branché. • Branchez le PowerCenter dans une prise de 120 V (nominale) correctement mise à la terre et allumez le PowerCenter.Le PowerCenter est branché,
mais la prise n’est pas alimentée.
La DEL des prises commutées par le PowerCenter est éteinte.
Vous utilisez la fonction de contrôle des prises à distance sans avoir branché le cordon dans l’appareil que vous souhaitez utiliser pour contrôler le PowerCenter à distance.
• Branchez la prise électrique du PowerCenter dans l’appareil que vous souhaitez utiliser pour contrôler le PowerCenter à distance.
La pile de la télécommande de l’appareil que vous utilisez pour contrôler la fonction d’alimentation à distance est trop faible.
• Remplacez la pile alimentant la télécommande de votre appareil.
• Branchez l’appareil dans une prise de 120 V (nominal) correctement mise à la terre.
L’appareil que vous souhaitez utiliser pour activer la fonction de commande à distance du PowerCenter n’est pas branché dans une prise de 120 V (nominal) correctement mise à la terre.
• Branchez l’appareil dans une prise de 120 V (nominal) correctement mise à la terre.

29
DÉPANNAGE
Symptôme Cause possible Solution
Le témoin “Timed On” de fonctionnement de l’alimentation séquentielle est éteint.
Vous utilisez la fonction de contrôle des prises à distance sans avoir branché le cordon dans l’appareil que vous souhaitez utiliser pour contrôler le PowerCenter.
• Branchez la prise du PowerCenter dans l’appareil que vous souhaitez utiliser pour contrôler le PowerCenter à distance.
La pile de la télécommande de l’appareil que vous utilisez pour contrôler la fonction d’alimentation à distance est trop faible.
• Remplacez la pile alimentant la télécommande de votre appareil.
L’appareil que vous souhaitez utiliser pour activer la fonction de commande à distance du PowerCenter n’est pas branché dans une prise de 120 V (nominal) correctement mise à la terre.
• Branchez l’appareil dans une prise de 120 V (nominal) correctement mise à la terre.
L’image vidéo est mauvaise et comporte du bruit ou des images fantômes.
Le signal vidéo entrant n’est pas correctement mis à la terre.
• Contactez votre fournisseur de câble ou de satellite pour vérifier votre installation.
Le PowerCenter émet un son strident.
Le circuit de protection du PowerCenter a brûlé pour protéger votre équipement d’une importante surtension.
• Le PowerCenter doit être remplacé. Consultez la section Informations sur la garantie de ce manuel pour les détails importants.

30
SPÉCIFICATIONS
Tâche continue Classification électrique
120V/60Hz
Courant maximum 20A/2400W
Modes de protectionPhase-Neutre (P-N) Phase-Terre (P-T) Neutre-Terre (N-T)
Dissipation d’énergie totale 6814 Joules
Niveau de blocage (tension de suppression des surtensions transitoires)
330 Volts
Temps de réponse de blocage Moins de 1 nanoseconde (<1ns)
Contrôle de l’alimentation d’entrée c.c. “DC In” à distance
3 – 30V c.c.
Contrôle de l’alimentation de sortie c.c “DC Out” à distance
12V c.c. 100mA
Dimensions Largeur :
Hauteur avec les pieds :
Hauteur sans les pieds :
Profondeur avec les poignées :
Profondeur sans les poignées :
SIGNATURE PRO 5100 POWERCENTER
17,125 po 434,98mm
5,25 po 133,35mm
5,75 po 146,05mm
14,5” 368,3mm
16,5” 419,1mm

31
LIMITED WARRANTY FOR CONSUMERS
Monster, LLC, 7251 West Lake Mead Blvd., Las Vegas, NV, USA (“Monster”) extends You this Limited Warranty. Statutory or common law may provide You with additional rights or remedies, which shall not be affected by this Limited Warranty.
DEFINITIONS“Adequate Use” means use of the Product and Connected Equipment (i) within a home or dwelling, (ii) for private (as opposed to commercial) purposes, (iii) in conformance with all applicable local, state or federal law, code or regulations (including without limitation building and/or electrical codes), (iv) in accordance with manufacturer recommendations and/or instructions in the materials and documentation that accompany the Product and any Connected Equipment, (v) with proper electrical grounding, (vi) with proper and direct connection between the Product and an AC power source that has protective grounding (excluding gas or diesel powered generators), (vii) with cable or telephone lines to any Connected Equipment properly connected to the Product, and (viii) without a connection in a “daisy-chain” fashion to or with any extension cord, surge suppressor, power strip, uninterruptible power supply (“UPS”) or other equipment.
“Authorized Dealer” means any distributor, reseller or retailer that (i) was duly authorized to do business in the jurisdiction where it sold the Product to You, (ii) was permitted to sell You the Product under the laws of the jurisdiction where You bought the Product, and (iii) sold You the Product new and in its original packaging.
“Connected Equipment” means any device that is (i) generally suited to be used with the Product or products of the same kind, (ii) meets the requirements of all applicable laws and safety standards, (iii) contains only parts manufactured, sold or recommended by the original manufacturer of the Connected Equipment, and (iv) has not been altered, tampered with or modified by any person other than its manufacturer or service personnel authorized or recommended by the manufacturer of the Connected Equipment.
“Connected Equipment Damage” means physical damage caused to Connected Equipment due to a Product Defect (i) by a transient AC power, cable, telephone, or lightning surge while connected to a properly installed Product, (ii) not by a defect or unrelated damaging of the Connected Equipment or a surge/spike or lightning strike through a source, medium

32
or connection other than through the Product, and (iii) does not extend to loss of data or consequential, indirect or special damages resulting from the Connected Equipment Damage.
“Fair Market Value” (“FMV”) means the fair market value of the Connected Equipment at the time Connected Equipment Damage occurs.
“Formal Warranty Claim” means a claim made in accordance with the section “Formal Warranty Claims” herein.
“Maximum Coverage Amount” means the maximum amount that Monster will pay to You under this Limited Warranty for Connected Equipment Damages and is defined in relation to each Product in the Specifications Table below.
“Product” means a Product (i) that is listed in the Specifications Table below, (ii) that You bought from an Authorized Dealer new and in its original packaging, and (iii) whose serial number, if any, has not been removed, altered, or defaced.
“Product Defect” means an inadequacy of the Product that existed at the time when You received the Product from an Authorized Dealer and that causes a failure of the Product to perform in accordance with Monster’s documentation accompanying the Product, unless such failure has been caused completely or partly by (a) any use other than Adequate Use, (b) transportation, neglect, misuse or abuse by anyone other than Monster’s employees; (c) alteration, tampering or modification of the product by anyone other than a Monster employee; (d) accident (other than a malfunction that would otherwise qualify as a Product Defect); (e) maintenance or service of the Product by anyone other than a Monster employee; (f) exposure of the Product to heat, bright light, sun, liquids, sand or other contaminants; or (g) acts outside the control of Monster, including without limitation acts of God, fire, storms (excluding lightning surges), earthquake or flood.
“Warranty Period” means the time period during which Monster must have received Your Formal Warranty Claim. The different Warranty Periods related to Product Defects and Connected Equipment Damage are defined in the Specifications Table below. The Warranty Period commences on the date when You purchased or received (whichever occurs later) the Product from an Authorized Dealer as evidenced by the Authorized Dealer’s invoice, sales receipt or packing slip. If You do not have written proof of the date of purchase or receipt, then the Warranty Period commences three (3) months after the date when the Product left Monster’s or its factory as evidenced by Monster’s records. The Warranty Period ends after

33
the time defined in the Specifications Table has expired, or after You have transferred ownership of the Product, whichever occurs earlier. Also, You must call Monster and obtain a Return Authorization Number (as described under “How to Make a Claim”) within two (2) months after You discover a Product Defect (or should have discovered it, if such Product Defect was obvious).
“You” means the first individual person that purchased the Product in its original packaging from an Authorized Dealer. This Limited Warranty does not apply to persons or entities that bought the Product (i) in used or unpackaged form, (ii) for resale, lease or other commercial use, or (iii) from someone other than an Authorized Dealer.
SCOPE OF THIS LIMITED WARRANTY
PRODUCTS. If a Product contained a Product Defect when You bought it from an Authorized Dealer and Monster receives a Formal Warranty Claim from You within two (2) months after You discover such Product Defect (or should have discovered it, if such Product Defect was obvious) and before the end of the Warranty Period for Product Defects applicable to the affected Product, then Monster will provide You with one of the following remedies: Monster will (1) repair or, at Monster’s sole discretion, replace the Product, or (2) refund to You the purchase price You paid to the Authorized Dealer for the affected Product if repair or replacement is not commercially practicable or cannot be timely made.
CONNECTED EQUIPMENT DAMAGE. Monster will also provide You with a remedy regarding Connected Equipment Damage if (i) You have a claim under the Limited Warranty for Products because of a Product Defect that causes Connected Equipment Damage despite Adequate Use, and (ii) Monster receives a Formal Warranty Claim from You before the end of the Warranty Period for Connected Equipment Damage applicable to the affected Product. If the conditions listed in the preceding sentence are met, Monster will provide You with one of the following remedies provided that Monster may decide at its sole discretion which of the three remedies it provides: Monster will (1) replace the damaged Connected Equipment; (2) pay to repair the damaged Connected Equipment; or (3) pay You the FMV of the Connected Equipment, provided that such payments shall not exceed (i) the Maximum Coverage Amount for the Product, or (ii) the actual damage having arisen from power surges due to a Product Defect. NOTE: COMPENSATION FOR RESTORATION OF DATA LOSS IS NOT COVERED AND MONSTER DOES NOT ASSUME ANY LIABILITY FOR ANY INCIDENTAL, CONSEQUENTIAL OR INDIRECT DAMAGES UNDER THIS LIMITED WARRANTY.
34
GENERAL PROVISIONS
CHOICE OF LAW/JURISDICTION. This Limited Warranty and any disputes arising out of or in connection with this Limited Warranty (“Disputes”) shall be governed by the laws of the State of California, USA, excluding conflicts of law principles and excluding the Convention for the International Sale of Goods. The courts located in the State of California, USA shall have exclusive jurisdiction over any Disputes.
OTHER RIGHTS. THIS LIMITED WARRANTY GIVES YOU SPECIFIC LEGAL RIGHTS, AND YOU MAY ALSO HAVE OTHER RIGHTS, WHICH VARY FROM STATE TO STATE AND JURISDICTION TO JURISDICTION, AND WHICH SHALL NOT BE AFFECTED BY THIS LIMITED WARRANTY. THIS WARRANTY EXTENDS ONLY TO YOU AND CANNOT BE TRANSFERRED OR ASSIGNED. If any provision of this Limited Warranty is unlawful, void or unenforceable, that provision shall be deemed severable and shall not affect any remaining provisions. In case of any inconsistency between the English and other versions of this Limited Warranty, the English version shall prevail.
REGISTRATION. Please register Your Product at MonsterPower.com. Failure to register will not diminish Your warranty rights.

35
SPECIFICATIONS TABLE
*”Lifetime” means the lifetime of the original individual purchaser of the Product, or for as long as the original individual purchaser owns the Product, whichever is less in time.
Product Model No.
Warranty Period for Products
Maximum Coverage Amount
Warranty Period for Connected Equipment Damage
Signature PRO 5100
5 Years $500,000 5 Years

36
FORMAL WARRANTY CLAIM
HOW TO MAKE A CLAIM. In the event damage has occurred to Products, You must follow these instructions: (1) Call Monster within two (2) months after You discover a Product Defect (or should have discovered it, if such Product Defect was obvious); (2) Give a detailed explanation of how the damage occurred; (3) Obtain a Return Authorization Number; (4) Upon receipt of a claim form (which may be sent to You after You filed Your Formal Warranty Claim), fill out the claim form entirely; (5) Return the Products, shipping prepaid by You (to be refunded if You are entitled to a remedy under the Scope of this Limited Warranty), to Monster for verification of damage, along with a copy of Your original sales receipts and proof of purchase (UPC label or packing slip) for such Products, the completed claim form, and printed Return Authorization Number on the outside of the return package (the claim form will include instructions for return).
FURTHER PROCEEDINGS. Monster will determine whether a Product Defect existed. Monster may, at its discretion, direct You to obtain a repair estimate at a service center. If a repair estimate is required, You will be instructed on how to properly submit the estimate and the resulting invoice to Monster for payment. Any fees for repairs may be negotiated by Monster.
TIMING. If You bring a Formal Warranty Claim and fully comply with all terms and conditions of this Limited Warranty, Monster will use its best efforts to provide You with a remedy within thirty (30) days after receipt of Your Formal Warranty Claim (if You reside in the United States – forty-five (45) days if You reside elsewhere), unless obstacles outside Monster’s control delay the process.
Ver.121703 – US/EU ©2004 Monster, LLC.

37
REMARQUES

Nous vous invitons à visiter les monstres à l’adresse : MonsterPower.com
Conçu aux États-Unis et fabriqué pour Monster selon ses spécifications de qualité.
Fabriqué en Chine.
Amérique du Nord : © 2005 Monster, LLC 7251 West Lake Mead Blvd.
Las Vegas, NV 89128, États-Unis 1-877-800-8989
UnionEuropéenne : Monster Technology International Ltd. Ballymaley Business Park
Gort Road, Ennis, Co. Clare, Irlande 001-866-348-4171
Le Monster Power professionnel de référence PowerCenter Signature PRO 5100 est protégé par le brevet américain no. 5,589,718. D’autres brevets sont en cours.
”Monster”, ”Monster Cable“, ”Monster Power“, ”Clean Power“, ”PowerCenter“, ”PowerLine“, “T2”, et “Tri-Mode” ”PowerLine“ “T2” et “Tri-Mode” sont des marques déposées et non déposées
de Monster Cable Products inc. et des subsidiaires de la marque aux États-Unis et ailleurs.


