29
PROVIDING AN INTEGRATED DELIVERY LANDSCAPE FOR PROGRAMMES VERSION 1.0 DATE:2021 PROGRAMME AND PROJECT MANAGEMENT GUIDE FOR JIRA

PROVIDING AN INTEGRATED DELIVERY LANDSCAPE
FOR PROGRAMMES
VERSION 1.0
DATE:2021
PROGRAMME AND PROJECT MANAGEMENTGUIDE FOR JIRA
Content 2
3
Structure4
Overview / Purpose
5 Definitions
6 Default Jira Terms
7 Managing a New Project
8
Default Issue Hierarchy
21
Creating Dependencies
22
Using Time Tracking
23 BigPicture Gantt View
24EazyBI Dashboards26
27
29
Access and Permissions
Managing Sprints & PI’s
9
Creating Epics
11 Creating Features
12 Project Tasks
13
14
17
Project Releases
Design for Run Framework
Issue Management
19Creating Jira Boards20
Mitigations
Activities Index
Acronyms
10
15 Risk Management Module

Overview / Purpose 3
Introduction
How to use this guide
Zenneo Design has provided an agency wide Jira design for programmes / projects to use, reducing the
need for the development of individual Jira solutions. This solution is known as the Integrated Delivery
Landscape (IDL), and can be applied across the delivery of a programme.
The IDL was initially developed to support large scale programmes of work with visibility of the backlog,
tracking dependencies between projects, reducing the time requirement of reporting, and allowing
project managers to focus on delivery rather than tool configuration.
Use of the unified design enables reduction in the time it takes to set up Jira for a project, creates
consistency in the Jira data structure, and promotes the use of organisational processes and
knowledge.
The IDL also enables tracing individual tasks and features back to agency level strategic objectives and
themes.
Features of the Jira solution include:
➢ Automated Jira project setup
➢ Project management and reporting tools
➢ Issue hierarchy and taxonomy
➢ Activity templates
➢ Automated activity creation
➢ Jira governance
This guide has been produced to inform project managers, release train engineers, scrum masters, and
teams on how to complete Agile projects within Jira in the agencies environment. It is intended as a
reference document, and so it should be referred to when there are questions about the use of particular
features of the IDL.
This guide contains information and pull-outs including:
➢ Creating programmes, projects and Gantt views
➢ Agile definitions
➢ Defined processes and workflows
➢ How to create reports and dashboards
➢ How to update activities

Structure 4
Used for Programme / Project Management Used for Dashboards and Reports
Main Tool for tracking and updating activities
Integrated Delivery Landscape
Tool Description Primary Users
JIRAIssue tracking software with workflows
and process definitions.
All project teams (MDT,
Discovery, BAU, etc.)
BigPicture
Portfolio/Programme/Project
Management Tool. Provides graphical
hierarchy view, GANTT chart, Agile
Dependency Map, Agile risks and issues.
- Scrum Masters
- Project Managers
- Product Owners
- Product Managers
- RTE
- Programme Management
Office
EazyBI Dashboard and reporting solution.
- Scrum Masters
- Project Managers
- Product Owners
- Product Managers
- RTE
- Programme Management
Office
The IDL consists of three main tools: Jira, and two plugins that have been integrated into and are
directly accessible from Jira. BigPicture has been integrated to provide portfolio, programme and project
management capabilities including Gantt views and risk management. EazyBI is a dashboard and
reporting tool that allows for the creation of charts that can be added to real-time dashboards. These
dashboards can be automated to send daily snapshots to users, or customised by users to meet
specific one-off reporting requirements.
Table 1: IDL tool details describing capabilities and primary users

Definitions 5
Term Definition
ActivityActivities are the smallest unit of work for a deliverable, and are automatically generated for each phase. These usually are items that can be delivered within hours or 1-2 days.
Acceptance Criteria
The set of predefined requirements that must be met in order to mark a feature as complete. Acceptance criteria are created for each feature individually as part of feature definition.
Board
A board displays issues from one or more projects, allowing for the viewing, managing, and reporting of work in progress. There are two types of boards in Jira Software:Scrum board: For teams that plan their work in sprints. Includes a backlog. Kanban board: For teams that focus on managing and constraining their work-in-progress. Includes the option of a Kanban backlog. A project can have multiple boards, and a combination of Scrum and Kanban boards.
DoneDefinition of Done is an agreement between Development Team and the Product Owner on what needs to be completed for each feature in order for it to be considered 'done'
EpicAn Epic is a set of requirements that together deliver business value greater and touch the same portion of the service, either functional or logical.
FeatureA Feature is a service that fulfils a stakeholder need. Each feature includes a benefit hypothesis and acceptance criteria, and is sized or split as necessary to be delivered by a single project or Agile Release Train (ART) in a Programme Increment (PI).
FieldFields hold the information about an issue, and each issue type can have different fields. How these fields behave is defined by a field configuration.
Issues (risk management)
An issue can be defined as an unplanned event that has happened, which requires management actions. In other words, an issue is a risk that has been realised.
MitigationA mitigation is an action that has been or will be taken to reduce the likelihood of a risk, or the risk's impact if it does occur.
Priority Priority defines an issue's importance in relation to other issues.
Programme Increment (PI)
Programme Increment: A Programme Increment (PI) is a period during which an Agile project plans and delivers features in the form of working, tested software and systems. PIs are typically 8 weeks long.
ProgrammeA programme is a high-level view that helps you track status and progress across multiple projects. Programmes provide visibility of deliverables and releases across work streams, and aggregate data into tables and schedule views.
ProjectIn Jira, a project is simply a collection of issues (activities, releases, tasks, etc). A project typically represents the development work for a product, project, or service.
ReadyThe criteria that a specific feature has to meet before being considered for estimation or inclusion into a programme increment.
ReleaseA release is the process leading up to and following the deployment of features into the production environment. To be accepted, a release must meet criteria set out in the Design for Run Framework (DRF).
RiskRisk is the possibility of an event or activity preventing an organisation from achieving its outcomes or objectives. An effect is a positive, negative or both, and can address, create or result in opportunities and threats. Risk is measured in terms of impact and likelihood.
ScreenA screen defines how fields are displayed for an issue. Different screens can be used when an issue is created, viewed, edited, or transitioned through a workflow.
SprintA sprint is a short, time-boxed period when a scrum team works to complete a set amount of work. Sprints are at the very heart of scrum and agile methodologies, and getting sprints right will help your agile team ship better software with fewer headaches.
TaskA Task is the smallest unit of work that can be registered. These usually are items that can be delivered within hours or 1-2 days.
WorkflowA workflow is made up of statuses and transitions. An issue moves between statuses via a transition. The workflow defines what transitions and statuses an issue type can use.

Default Jira Terms 6
Jira Term Description
IssuesJira refers to all ticket types as ‘issues’. Issues can represent any piece of work, from whole
programmes of work down to tasks for running workshops. This is especially important to
note when creating reports to ensure the correct issue type is used when reporting risks.
WorkflowA workflow is made up of statuses and transitions. An issue moves between statuses via a
transition. The workflow defines what transitions and statuses an issue type can use.
BoardsThe Board provides filters that determine which issues appear on the board. It can be based
on one or more projects, processes, or custom Jira Query Language (JQL) depending on your
needs.
Project
A Jira project is a shared workspace, used by project managers, delivery teams, executives, and other internal teams. In Jira, a project is simply a collection of issues (activities, releases, tasks, etc). A project typically represents the development work for a product, project, or service.
There are some terms that are defaulted in Jira that cannot be changed. These have been identified
below for clarity and to prevent communication issues, as there can be differences between programme
and project terms and Jira terms.
What are issues?
Issues are the building blocks of any Jira project. Issues can represent any piece of work, from whole
programmes of work down to tasks for running workshops.
Who can create issues?
Everyone involved in a programme can create different types of issues for different purposes.
What is an issue phase?
Every issue type has its own lifecycle. Different stages in that lifecycle are called ‘phases’. Generally,
there will be rules that determine when an issue is able to move to the next phase in its lifecycle. These
rules are elaborated in the section for each issue type, below.
What is an issue field?
Each issue type will have a number of fields that can be filled by the user. These are the qualities that
distinguish one issue from another, for example, the name of the issue, who it is assigned to, and when
it is expected to be completed.
What are activities?
Activities are a special type of issue that are automatically generated by the system. In order to move an
issue from one phase to another, for example moving a release issue into the ‘release staging’ phase,
you must complete all of the activities that are associated with the current phase.
Types of issues include:
➢ Features
➢ Activities
➢ Tasks
➢ Risks
➢ Mitigations
➢ Epics
➢ Releases
More About Issues

Managing a Jira project 7
A Jira project is a shared workspace for project managers, delivery teams, executives, and other
internal teams. It contains all the information that is relevant to the delivery of a particular project, such
as deliverables, issues, dependencies, and timelines. In order to meet the needs of all its users, a Jira
project will utilise a number of plugins, for example BigPicture and EazyBI, in order to give users
access to information and features that support their role.
Configuration and tailoring of a Jira project may be required in order to meet user needs, but these
changes will be based on a standard template in order to prevent Jira project setup becoming a major
deliverable for projects.
Project creation and configuration
During project operation, delivery teams will update activities, tasks, and features which are assigned
to them on their Jira boards. Project managers will be able to manage delivery, risks, and issues
using BigPicture. Programme office staff will produce reports across the programme using EazyBI.
How do I kick off project operations?
When your project is created, it will not contain any information on deliverables, risks, or issues. The
first activity required of project managers will be to populate their project with known deliverables.
After this, work can be assigned to teams for completion.
Project operation and management
The first step in Jira configuration is creating a new project. Each project will have a number of
settings automatically imported from the IDL template, but can be customised as needed to meet user
needs. A project also has its own access permissions, and so can restrict the ability to edit and view
project information to only the required staff.
Who do I need to contact to have a project created?
Creation of Jira projects is managed centrally by the Jira admin team
What information do I need to provide?
• Project name
• Project start and end date
• Staff requiring access, and access level required
Project closureWhen projects are closed in the your agencies environment, access is removed from all users, and
the project is put into a dormant state. The data of the project is preserved for archival purposes.
Who do I need to contact to have a project closed?
Closure of Jira projects is managed centrally by the Jira admin team

Access & Permissions 8
Access to the Jira web service, individual Jira projects, and BigPicture are all managed separately. A
user must first request access to the Jira web service through ISP, and then request an access role
from the Project Administrator. BigPicture access is managed centrally by the Jira admin team. EazyBI
will automatically inherit a user’s Jira project access.
Access Level Description
Project Administrator
A Project Administrator has access to configure their Jira Project. This is the highest level of access available to users. Ideally there would be no more than 2 to 3 people per project with this role.
Board AdministratorA Board Administrator has access to configure a particular Jira Board. The default is the Board creator, but other Board Administrators can be added manually.
Sprint AdministratorA Sprint Administrator has the access to the functions required to set up and manage a sprint for the project. This role should be limited to the scrum master and their back-up.
Team MemberTeam Member is the standard level user access. This access allows a user to create, edit, and manage Issues within their Jira Project.
ReviewerReviewer is a basic level of access that allows a project collaborator to view and comment on Issues within a Jira Project. This level is commonly used when external parties are working on dependencies, and need a view of the work within your Jira Project.
Read OnlyRead Only is a basic level of access that allows a user to only view issues and there is no ability to update, move or make comments on issues. It is a view only access.
Jira web service access
Access Level Description
Team Member Able to manage most of the BigPicture functionality associated with their project.
Read Only Able to view a project in BigPicture.
BigPicture Access
Jira Project Access
Like most non-standard tools on the DHS common desktop environment, Jira requires a user to
request access via ISP. Your request must be approved by your line manager before access will be
granted.
Further information on access within Jira can be found on the Jira SharePoint page.
https://oursites.internal.dept.local/communities/PPO/JIRA/SitePages/Access.aspx
The Jira web service can be accessed at https://jira-prod.csda.gov.au/
Access to Big Picture is managed separately to Jira access. Access to BigPicture is managed
centrally by the Jira admin team.

Default Issue Hierarchy 9
The Issue Hierarchy determines parent/child relationships between Issues in Big Picture. It is
automatically generated by the links that are created in Issues. For example, if a Feature has the
‘belongs to Epic’ link, the feature will appear under that Epic in Big Picture.
Hierarchy
Links
Pictured on the left is the Big Picture issue
hierarchy.
The hierarchy controls how Jira issues are
organised in the Gantt view. Programmes exist at
the top level, and can have multiple projects
underneath them. Projects then have multiple epics
for delivery, and epics are broken down into
multiple features, etc.
To function correctly, the hierarchy requires that
issues be correctly linked together.
Vertical Links Horizontal Links
Belongs to Parent Blocks
Is Parent for Is blocked by
Is related to
Is dependent on
DefinitionA link is a connection between two items in
Jira. Links can be vertical (parent/child) or
horizontal (relationships, e.g.
dependencies). Vertical links are used to
maintain the Big Picture Issue Hierarchy.
Usage
The Hierarchy
The type of link used between Jira issues will
affect the way the relationship between those
issues is displayed in Big Picture. Link types are
generally in pairs, e.g. ZEN is programme for
NEO, NEO belongs to programme ZEN.

Creating Epics 10
Preparation of an epic often has a different process than requirements themselves. A ‘Portfolio Kanban’
is recommended for the preparation of epics. A separate Kanban board with multiple statuses exists on
which the momentum of the epic realization is transparently displayed. This creates space for regular
meetings of a small team preparing requirements ahead and continuous improvement of epic details.
DefinitionAn Epic is a set of requirements that together
deliver some business value and touch the
same portion of the service, either functional
or logical.
WorkflowThe below diagram illustrates how epics move through their workflow. The statuses and transitions have
been standardised and begin with ‘Proposal’. Once the epic is approved it can progress through to
‘Definition’, ‘In Progress’ and ‘Done’. If the epic not approved or not required it can be ‘Abandoned’.
Field Description
Assignee The person responsible for managing the delivery of the epic.
AttachmentExternal files attached to the epic. Most file types can be attached to Jira issues, e.g. .doc,
.pdf, .xls, etc.
Business Benefit The anticipated value of the Epic to the customer/business.
Component/s Used for grouping work according to impacted components, e.g. DB, Web Service, etc.
Cost The projected cost of the epic.
Description The description of the epic.
Fix Version/sUsed to record information about programme increments. If an epic is delivered across
multiple PI’s, this information can be recorded in this field.
Labels Used to tag epics with search terms to assist with finding information that shares labels.
Linked IssuesUsed to create links between epics, and from epics to other issue types such as features,
project, or risks.
Priority The relative priority of the epic, e.g. Highest/High/Medium, etc.
Reporter The person accountable for the delivery of the epic. This will generally be the SRO.
Source The origin point of the epic, e.g. Email, Front Door, Direct engagement, SES, Costing.
Start Date/End DateThe expected start and end date of the epic. This information is used to update the project
Gantt chart.
Summary A brief summary of the epic.
Title The name of the epic.
Naming ConventionStandardised naming convention for Epics:
PROJECT-<Tranche>-<Epic Title>
NEO-Y4-CMS
Fields

Creating Features 11
When epics are broken down into specific deliverables, these deliverables are referred to as 'features'.
A feature is a piece of work which will eventually be delivered into production as part of a release, and it
should provide some benefit to the business. Features have complex workflows because they require
development and testing and have a large impact on the overall environment.
DefinitionA Feature is a service that fulfils a stakeholder
need. Each feature includes a benefit hypothesis
and acceptance criteria, and is sized or split as
necessary to be delivered by a single Agile
Release Train (ART) in a Program Increment (PI).
WorkflowThe below diagram illustrates how features move through their workflow. The statuses and transitions
have been standardised and begin with ‘Proposal’. Once the feature is approved it can progress through
the rest of its workflow. If the feature not approved or not required it can be ‘Abandoned’.
Field Description
Assigned Team The team that the feature is currently assigned to.
Assignee The person responsible for managing the delivery of the feature.
AttachmentExternal files attached to the feature. Most file types can be attached to Jira issues, e.g. .doc,
.pdf, .xls, etc.
Business Benefit The anticipated value of the feature to the customer/business.
Change ID The ID of the Service Manager change record that corresponds with the feature.
Component/s Used for grouping work according to impacted components, e.g. DB, Web Service, etc.
Cost The projected cost of the feature.
Description The description of the feature.
Fix Version/sUsed to record information about programme increments. If a feature is delivered across
multiple PIs, this information can be recorded in this field.
Labels Used to tag features with search terms to assist with finding information that shares labels.
Linked IssuesUsed to create links between features, and from features to other issue types such as epics,
project, or risks.
Original Estimate/RemainingEstimate
Used for tracking the number of hours required to deliver the feature.
Priority The relative priority of the feature, e.g. Highest/High/Medium, etc.
Reporter The person accountable for the delivery of the feature.
Source The origin point of the feature, e.g. Email, Front Door, Direct engagement, SES, Costing.
Start Date/End DateThe expected start and end date of the feature. This information is used to update the project
Gantt chart.
Story Points The relative size of the feature.
Summary A brief summary of the feature.
Title The name of the feature.
Naming ConventionStandardised naming convention for Features:
<Epic Title>-<Feature Name>
CMS – Partner Consent
Fields
Project Activities and Tasks12
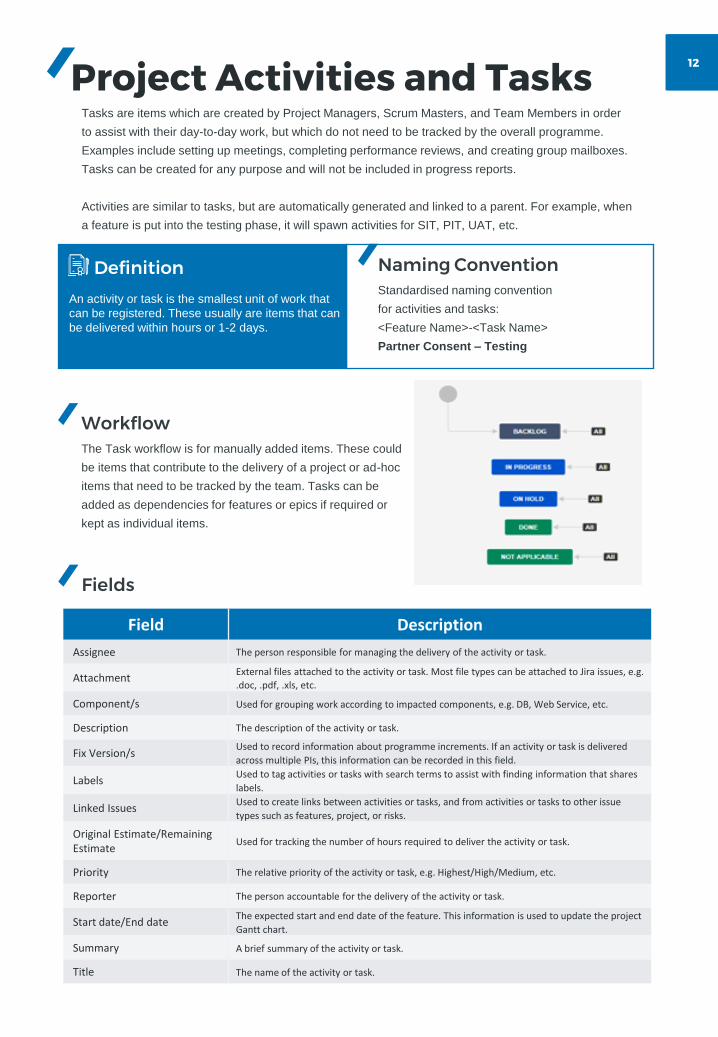
Tasks are items which are created by Project Managers, Scrum Masters, and Team Members in order
to assist with their day-to-day work, but which do not need to be tracked by the overall programme.
Examples include setting up meetings, completing performance reviews, and creating group mailboxes.
Tasks can be created for any purpose and will not be included in progress reports.
Activities are similar to tasks, but are automatically generated and linked to a parent. For example, when
a feature is put into the testing phase, it will spawn activities for SIT, PIT, UAT, etc.
Definition
An activity or task is the smallest unit of work that
can be registered. These usually are items that can
be delivered within hours or 1-2 days.
Naming ConventionStandardised naming convention
for activities and tasks:
<Feature Name>-<Task Name>
Partner Consent – Testing
Fields
Field Description
Assignee The person responsible for managing the delivery of the activity or task.
AttachmentExternal files attached to the activity or task. Most file types can be attached to Jira issues, e.g.
.doc, .pdf, .xls, etc.
Component/s Used for grouping work according to impacted components, e.g. DB, Web Service, etc.
Description The description of the activity or task.
Fix Version/sUsed to record information about programme increments. If an activity or task is delivered
across multiple PIs, this information can be recorded in this field.
LabelsUsed to tag activities or tasks with search terms to assist with finding information that shares
labels.
Linked IssuesUsed to create links between activities or tasks, and from activities or tasks to other issue
types such as features, project, or risks.
Original Estimate/RemainingEstimate
Used for tracking the number of hours required to deliver the activity or task.
Priority The relative priority of the activity or task, e.g. Highest/High/Medium, etc.
Reporter The person accountable for the delivery of the activity or task.
Start date/End dateThe expected start and end date of the feature. This information is used to update the project
Gantt chart.
Summary A brief summary of the activity or task.
Title The name of the activity or task.
WorkflowThe Task workflow is for manually added items. These could
be items that contribute to the delivery of a project or ad-hoc
items that need to be tracked by the team. Tasks can be
added as dependencies for features or epics if required or
kept as individual items.

Project Releases 13
Project release items are used to put a number of changes into the production environment. Your
agencies Release Management team will define release windows for a number of different release types
(Major, Infrastructure, Problem Only) on their release calendar. Projects should create release items for
the releases they are targeting to show what will be deployed.
Field Description
Assignee The person responsible for managing the delivery of the release.
AttachmentExternal files attached to the feature. Most file types can be attached to Jira issues, e.g. .doc,
.pdf, .xls, etc.
Change ID The ID of the Service Manager change record that corresponds with the release.
Component/s Used for grouping work according to impacted components, e.g. DB, Web Service, etc.
Description The description of the release.
Labels Used to tag releases with search terms to assist with finding information that shares labels.
Linked IssuesUsed to create links between releases, and from releases to other issue types such as
features, project, or risks.
Priority The relative priority of the release, e.g. Highest/High/Medium, etc.
Release Date The date the release window is scheduled to open.
Release Type The type of release, e.g. major, infrastructure, problem only.
Reporter The person accountable for the delivery of the release.
Summary A brief summary of the Release.
Title The name of the release.
Fields
DefinitionThe process leading up to and following the
deployment of features into the production
environment. To be accepted, a programme must
have completed the Design for Run Framework
(DRF).
Naming ConventionStandardised naming convention for Releases:
<Release Type & Number>-<Project Name>
Soft Release 01 – NEO
WorkflowThe Release workflow follows the Agency’s release process.
Features, Epics, Tasks, and Activities can all be linked to a release to show what will be delivered in the
release.

Design for Run Framework 14
The Design for Run Framework (DRF) is a requirement for programmes to improve the quality of
releases. When a DRF item is created, it will spawn activities for all of the documents and stage gates
that are required for the project to be able to release changes. This is intended to assist project
managers to allocate time to DRF activities. The DRF checklist must also be completed on the release
management intranet page. Examples of DRF activities include architectural documentation, testing
strategy, and knowledge management.
Definition
A checklist of required activities which a project
must complete in order to be able to release
changes into the production environment.
Naming ConventionStandardised naming convention
for activities and tasks:
<Programme Name>-DRF
ZEN – DRF
Fields
Field Description
Assignee The person responsible for managing the delivery of the activity or task.
AttachmentExternal files attached to the activity or task. Most file types can be attached to Jira issues, e.g.
.doc, .pdf, .xls, etc.
Component/s Used for grouping work according to impacted components, e.g. DB, Web Service, etc.
Description The description of the activity or task.
LabelsUsed to tag activities or tasks with search terms to assist with finding information that shares
labels.
Linked IssuesUsed to create links between activities or tasks, and from activities or tasks to other issue
types such as features, project, or risks.
Priority The relative priority of the activity or task, e.g. Highest/High/Medium, etc.
Reporter The person accountable for the delivery of the activity or task.
Start date/End dateThe expected start and end date of the feature. This information is used to update the project
Gantt chart.
Summary A brief summary of the activity or task.
Title The name of the activity or task.
WorkflowThe DRF workflow allows for the tracking of the status of the
overall DRF completion task. In order to move the DRF item
into the ‘Done’ phase, all linked DRF activities must be
completed.
NOTE: This section is interchangeable with your organisations change and release management
procedures. This process below can also be removed if you are a small organisation and you
don’t have lots of competing released throughout the year however, some sort of release
governance is good to have in place to track from a programme governance perspective.

Risk Management Module 15
The risk module is used to assess risk probability and consequence, and show your risks on the heat map.
The risks module consists of two main elements:
• Customizable risk heat map
• Customizable risk list (register)
The dimensions of the heat map depend on the number of selected options. The current dimension is 5x5,
and it is the recommended size because it maps to the organisational dimensions.
DefinitionRisk is the possibility of an event or activity
preventing a programme/project/team from
achieving its outcomes or objectives.
Naming ConventionStandardised naming convention for risks:
R####.<Risk Name>
R0001. Lack of communication may cause lack of
clarity and confusion.
Fields
Field Description
Areas The areas that will be affected if the risk occurs, e.g. reputation, project delivery.
Assignee The person responsible for managing the risk.
Description The description of the risk.
Expected Resolution Date The date the risk is expected to be resolved.
ImpactThe organisational impact that will happen if the risk occurs. This is prior to the effect of any
mitigations.
Level The level at which the risk exists, e.g. programme, project, team.
Next Review Date The date the risk is next due to be reviewed.
Reporter The person accountable for the management of the risk.
Residual Risk Impact The risk impact that remains once existing mitigations are accounted for.
Residual Risk Probability The risk probability that remains once existing mitigations are accounted for.
Residual Risk Rating The rating of the risk once existing mitigations are accounted for.
Response TypeThe decision that has been taken on how to respond to the risk, i.e. mitigate, investigate,
transfer, avoid, accept.
Risk Probability The probability of the risk occurring. This is prior to the effect of any mitigations.
Risk RatingThe risk rating, as determined by the risk impact and risk probability. This is prior to the effect
of any mitigations.
Summary A brief summary of the risk.
Treatment Effectiveness Assessment
The assessment of how effective the mitigations are for controlling the risk.
WorkflowThe below diagram illustrates the risks workflow. Risks can be raised at the programme, project or
activity/task level. Once a new risk is proposed it can be assessed to ensure the it is not a duplicate and is
well defined. Once ‘In Progress’, it can be managed and tracked until it can be closed.

Risk Management (Cont.) 16
Risk Heat MapThe below images is an example of a risk heat map. Risks can be entered by clicking onto the
corresponding area on the heat map and selecting ‘Create New Issue’. Proceed by filling in the details for
your risk, and finish by clicking on the blue ‘Create’ button.
Risk List (Register)The Risk Register is located below the heat map (if heat map is enabled). Fields can be added or
removed and filters can be applied to show only the risks you want to see. For example, project managers
may want to only view risks listed for their project and not the entire programme.
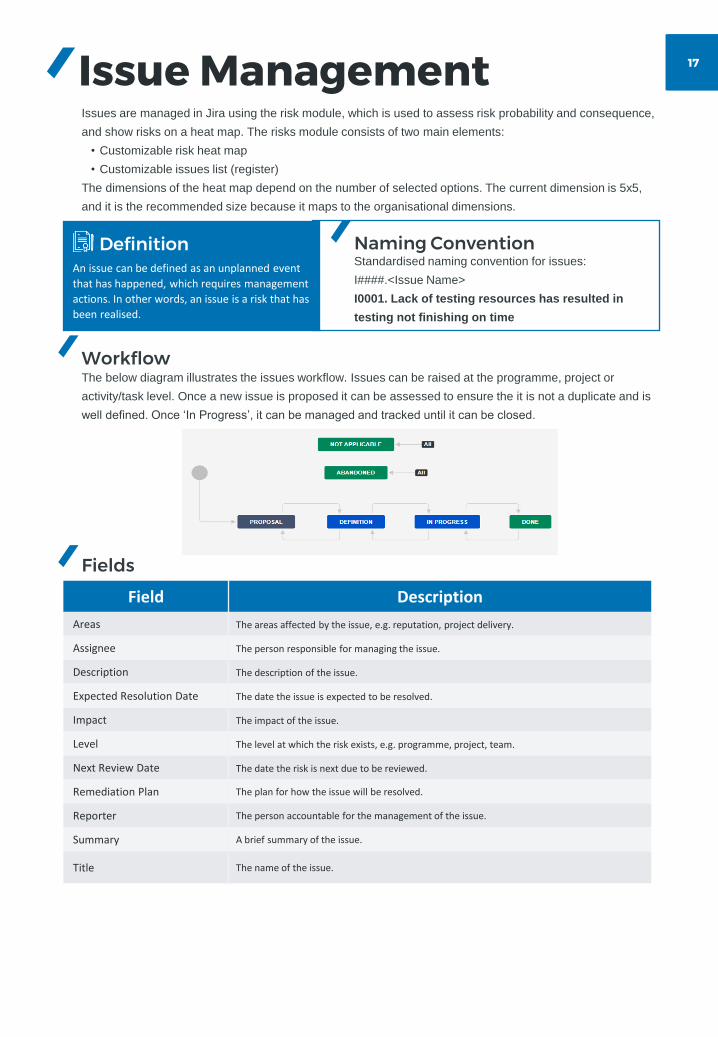
Issue Management 17
Issues are managed in Jira using the risk module, which is used to assess risk probability and consequence,
and show risks on a heat map. The risks module consists of two main elements:
• Customizable risk heat map
• Customizable issues list (register)
The dimensions of the heat map depend on the number of selected options. The current dimension is 5x5,
and it is the recommended size because it maps to the organisational dimensions.
DefinitionAn issue can be defined as an unplanned event
that has happened, which requires management
actions. In other words, an issue is a risk that has
been realised.
Naming ConventionStandardised naming convention for issues:
I####.<Issue Name>
I0001. Lack of testing resources has resulted in
testing not finishing on time
Fields
Field Description
Areas The areas affected by the issue, e.g. reputation, project delivery.
Assignee The person responsible for managing the issue.
Description The description of the issue.
Expected Resolution Date The date the issue is expected to be resolved.
Impact The impact of the issue.
Level The level at which the risk exists, e.g. programme, project, team.
Next Review Date The date the risk is next due to be reviewed.
Remediation Plan The plan for how the issue will be resolved.
Reporter The person accountable for the management of the issue.
Summary A brief summary of the issue.
Title The name of the issue.
WorkflowThe below diagram illustrates the issues workflow. Issues can be raised at the programme, project or
activity/task level. Once a new issue is proposed it can be assessed to ensure the it is not a duplicate and is
well defined. Once ‘In Progress’, it can be managed and tracked until it can be closed.

Issue Management (Cont.) 18
Issue Heat MapThe below images is an example of a issue heat map. Issues can be entered by clicking onto the
corresponding area on the heat map and selecting ‘Create New Issue’. Proceed by filling in the details for
your issue, and finish by clicking on the blue ‘Create’ button.
Issue List (Register)The Issue Register is located below the heat map (if heat map is enabled). Fields can be added or
removed and filters can be applied to show only the issues you want to see. For example, project
managers may want to only view issues listed for their project and not the entire programme.

Mitigations 19
Mitigations, (also known as controls), can be created by any user and can be linked to single or multiple risks
and issues at any level within a program.
DefinitionA mitigation is an action that has been or will be
taken to reduce the likelihood of a risk, or the
risk's impact if it does occur.
Naming ConventionStandardised naming convention for mitigations:
M####.<Mitigation Name>
M0001. Lack of communication may cause lack of
clarity and confusion.
Fields
Field Description
Assignee The person responsible for managing the delivery of the mitigation.
Description The description of the mitigation.
Next Review Date The date the mitigation is next due to be reviewed.
Reporter The person accountable for the management of the mitigation.
Summary A brief summary of the mitigation.
Treatment Effectiveness Assessment
The assessment of how effective the mitigation is for controlling the risk.
Title The name of the mitigation.
WorkflowThe below diagram illustrates the mitigations workflow. Mitigations can be created at the programme, project
or activity/task level. Once a new mitigations is proposed it can be assessed to ensure the it is not a
duplicate and is well defined. Once ‘In Progress’, it can be managed and tracked until it can be closed.

Creating Jira Boards 20
A board displays issues from one or more projects, giving you a flexible way of viewing, managing, and
reporting on work in progress. Boards are available as either Scrum or Kanban. You can use a board
that someone else has created, or create your own. You can create as many boards as you like. A
project can have multiple boards, and a combination of Scrum, Kanban, and agility boards.
Definition (Scrum Board)
Scrum boards are used for teams that plan their
work in sprints. Utilises the Jira sprint functionality
and includes a backlog.
Definition (Kanban Board)
Kanban is based on the continuous delivery of work.
Rather than plan iterations, the flow of work is
constantly monitored to ensure that there are always
tasks being worked on. This means that when tasks are
completed, new tasks are pulled into work-in-progress.
In Jira Software, a board must belong to either a project, or a person—this is known as the
board's location. A project can have multiple boards, even a combination of classic Scrum and Kanban
boards, depending on the needs of your team.
To see all the boards in your Jira site:
1. Click in the search field (or press /) and choose View all boards.
To see boards that belong to you, choose Your profile and settings () > Your boards.
To access a board that belongs to your project:
1. Choose Projects in the navigation bar.
2. Select a project.
3. Navigate to the project's board (for Scrum, that'll be Active Sprints).
To switch boards in a project that has multiple boards:
1. Navigate to your project.
2. Select the board switcher, which you'll find under your project's name.
Accessing a Board
Board usage recommendationsAlthough any number of boards can be created in any structure for a Jira project, it is recommended to
begin with the following configuration and adapt as needed:
Admin Board
A scrum board used by project administration for tracking tasks and activities that relate directly to
general management of the project
Epic Board
A Kanban board used to tracking the status of all epics within the project
Feature Board
A Kanban board used to tracking the status of all features within the project
Release Board
A Kanban board used for tracking the status of releases and the completion of release activities.
Team Boards
Scrum boards created for each team to track the status of assigned tasks and activities

Using Time Tracking 21
Time tracking in Jira enables the automated updating of the BigPicture Gantt chart for project managers,
and forecasting of time to completion for features, activities, and tasks. Time tracking is done by
updating fields within the Jira issue.
[RJ1]
Start and end dates
Time tracking
Start and end dates are used primarily for updating
the BigPicture Gantt chart. By estimating when
work will begin and end on issues, a visual
representation of the project’s timeline of work will
be automatically generated in Big Picture.
Time tracking is used to estimate the
number of workhours remaining to
complete a feature, activity, or task. When
work is logged against an issue, it will
automatically update the remaining time,
which can be used to keep work on track.

Managing sprints and PI’s 22
Sprints and programme increments are the primary units of time for tracking delivery in agile projects. A
programme increment is standardised to be 8 weeks (4 sprints) long. It will generally be required for
projects within a programme to maintain a cadence with programme increments, so that they start and
finish at the same time.
Sprints are managed with a native Jira capability by creating scrum boards for delivery teams. Sprints are
at the very heart of scrum and agile methodologies, and getting sprints right will help your agile team ship
better software with fewer headaches.
Sprints are started in the backlog of a scrum board. Sprint objectives are set at the beginning of the
sprint, and at the end of the sprint will either be marked as completed, or carried forward.
Project managers should ensure that all delivery teams in their projects start and finish their sprints at the
same time.
Managing sprints
DefinitionA sprint is a short, time-boxed period when a
scrum team works to complete a set amount of
work. Sprints are 2 weeks long by default.
Naming Convention
Standardised naming convention for Sprints:
<Project Tranche/Year>-<Project PI number>-
<Team ID>-<Sprint Number>
ZEN Year 4 – PI1 – NEO02 – Sprint 3
Jira does not have a native function for tracking and managing programme increments, and so a
solution has been configured for the as part of this programme environment.
Jira issues for deliverables (epics, features, activities, tasks) have a field available, which is the ‘Fix
Version/s’ field. The programme increment to which a deliverable belongs should be recorded in this
field.
Definition
A Programme Increment (PI) is a period during
which an Agile project plans and delivers features
in the form of working, tested software and
systems. PI’s are typically 8 weeks long.
Naming Convention
Standardised naming convention for Programme
Increments:
<Project Tranche/Year>-<Project PI number>
ZEN Year 4 – PI1
Managing programme increments

BigPicture Gantt View 23
The BigPicture Gantt module is all you need to manage your project or programme. Use it to prepare
and visualize your project schedule or roadmap, monitor and control the execution, and generate
reports by aggregating your task data or using advanced export features.
The Gantt module includes four key elements:
1. Task list (WBS) that presents almost any Jira or built-in fields as columns with aggregated data
2. Timeline with tasks and dependencies that visualizes your work items and includes auto-scheduling
3. Resources panel that shows your resources’ workload
4. Infobar that highlights the most important information related to your project, e.g. Overdue tasks,
Critical path, Dependencies, and Milestones
Use the Gantt to show your project schedule or to visualise your product roadmap. Gantt views can be
created to show different information to different stakeholders. For example: a programme view can be
created to summarise multiple projects alongside individual project views.
Gantt Features
Feature Description
Add task
Use this option to add tasks by:• Creating new tasks in the Host platform (the Host platform is the Jira instance you are
currently using)• Cloning existing tasks
View
Change the view options to include more information in the Gantt chart or show additional features:
• Layout - adjust the row height so that you can fit more more tasks on the screen and show larger portion of your schedule. You can also add grid lines to distinguish between dates.
• Baselines - set project baselines to compare initial and actual schedules• Critical path - highlight tasks on the critical path that determine project duration• Period warning - show the position of parent tasks calculated based on its children
tasks• Progress - show task progress directly on the taskbar
Dependency Visualise both strong links and soft links
FilterAdd your favourite filters to the header and filter the list tasks to see only the items which you are interested in. There are two types of filters (quick filters and date range filters).
InfobarProvides you more information about your tasks including milestones, overdue tasks,
dependencies and critical paths.
Mini Map Enable a mini map to navigate through the whole timeline with a single click.
Task Structure
Indent and outdent your tasks manually or move them up and down the list. The manual
structure might be in conflict with the active structure builders in which case a warning will be
displayed.

Creating Dependencies 24
Dependencies specify the relationships between tasks, milestones, and other items which can be
presented on the timeline and can be displayed by the Gantt and Board type modules (Gantt and Board
are the default module names used). By defining dependencies, you can not only automate task
scheduling but also highlight relations between tasks without impacting the schedule. Keep in mind, that
the items presented on the Gantt chart are system-wide and changing their dependencies might affect
tasks in other Boxes or connected tools.
The Gantt module takes linking to the next level and you can use non-Jira links to define dependencies
between Issues and non-issues, such as Projects, Versions, Components, Sprints and Backlog,
Checklists, etc. You can visualize up to five different links. Almost any native Jira link or custom link can
be synchronized.
The Board module dependencies are colour coded so that you can easily find the tasks which need your
attention.
The strong dependencies between tasks impact the scheduling of those tasks (does not apply to Soft
links). Linked tasks will push and pull each other in time, according to the properties of the dependency
between them.
Displaying Dependency LinksDepending on the business rules links will be displayed differently. For example, the links displayed
using the Gantt module will display by default as per the below table:
Creating DependenciesYou can create the dependencies using drag and drop or by clicking the rings (or dots) which appear
when you hover over the task using the pointer. Alternatively, you can create the link using Jira or
connected tools.

Creating Dependencies (Cont.) 25
You can also use the add link pop-up as show below:
Strong Links (Dependencies)You can create the dependencies using drag and drop or by clicking the rings (or dots) which appear
when you hover over the task using the pointer. Alternatively, you can create the link using Jira or
connected tools.
Soft Links (Dependencies)Soft links are just and information about a dependency between to tasks and have no scheduling
impact. By default, Soft links are not visible as this type of link is dedicated for showing dependencies
using the Board module. Such links are displayed using a dashed-line:
External Links (Dependencies)External links show dependencies between tasks within the scope of different Boxes. Such a
dependency might constrain and therefore the task period mode is set to "locked":

EazyBI Dashboards 26
EazyBI allows users to build custom reports in Jira along with visualising and analysing Jira metrics.
Users can instantly access all their data including that gained from workflows, projects, epics, stories,
sub-tasks and custom fields. There are a series of pre-build charts and dashboards that are initially
available but as users learn the tool and its capabilities they can modify or create their own charts and
dashboards for reporting.
Custom Reports, Charts, and DashboardsCreate custom reports, charts, and dashboards
with an easy-to-use drag-and-drop report
builder. Create new tables, charts, reports, and
dashboards with just a couple of clicks. Quickly
discover new insights and opportunities with all
your data at your fingertips.
Interactive Data Analysis and VisualizationExplore and analyze your data with an instant
feedback. Start with a summary and dig into
details to examine your business data with
multi-dimensional analysis. Drill-in or across
other dimensions right from the report. Find
actionable insights, trends, and opportunities,
make smart and data-driven decisions.
Powerful Calculations for Advanced UsersGo way beyond basic analysis by creating new
measures and powerful calculations. Start with
many predefined calculations or write your own
using the built-in MDX editor with auto-complete
and syntax highlighting. Perform multi-
dimensional analysis and examine your
business data in almost any way you need.
More InformationDetailed user guides and videos are available online for everything from how to create a chart to creating
dashboards and calculated measures https://docs.eazybi.com/eazybi . You will also find best practice
information for creating your own dashboards and reports here: https://docs.eazybi.com/eazybi/analyze-
and-visualize/best-practices-for-report-creation .

Activities Index 27
Activity Parent Phase
DRF – Architecture DRF Backlog
DRF – Environments Management Plan DRF Backlog
DRF – Test Strategy DRF Backlog
DRF – Privacy Assessment DRF Backlog
DRF – Cyber Engagement DRF Backlog
DRF – Monitoring Planning DRF Backlog
DRF – Capacity Planning DRF Backlog
DRF – Availability Planning DRF Backlog
DRF – MI & OI Reports DRF Backlog
DRF – Data Governance DRF Backlog
DRF – Design Document – Architecture DRF Backlog
DRF – Design Document – Disaster Recovery DRF Backlog
DRF – Service Agreement/s DRF Backlog
DRF – High Level Testing Plan DRF Backlog
DRF – Test Status Report DRF Backlog
DRF – Configuration Management DRF Backlog
DRF – Service Catalogue Update DRF Backlog
DRF – Detailed Run Sheet DRF Backlog
DRF – Change Communications DRF Backlog
DRF – Knowledge Management DRF Backlog
DRF – Hypercare Arrangements DRF Backlog
DRF – Planning for Support DRF Backlog
DRF – Code Review DRF Backlog
BVT Release Deployment and Hypercare
TVT Release Deployment and Hypercare
Post-Implementation Review Release Release Review

Activities Index (Cont.) 28
Activity Parent Phase
Decommission Strategy Epic Definition
Risk Assessment Epic Definition
Communications Plan Epic Definition
High Level Design Feature Engagement
Risk Assessment Feature Engagement
UX Statement Feature Engagement
KPIs Feature Engagement
Prioritisation Feature Engagement
Schedule Feature Discovery
Architecture Feature Discovery
Dependency Mapping Feature Discovery
Environments Plan Feature Discovery
Data Migration Plan Feature Discovery
Detailed Design Feature Design
Prototype Feature Design
PIT Feature Test
SIT Feature Test
UAT Feature Test
PEN Feature Test
PST Feature Test
Benefits Measurement Feature Hypercare

Acronyms 29
Acronym Description
PI Program Increment
DRF Design for Run Framework
UX User Experience
PIT Product Integration Testing
SIT System Integration Testing
UAT User Acceptance Testing
PST Performance Stress Testing
PEN Penetration Testing
ROAM Resolved, Owned, Accepted, Mitigated
RTE Release Train Engineer
MDT Multi Disciplinary Team
BAU Business As Usual
IDL Integrated Delivery Landscape
WBS Work Breakdown Structure


