135
| Date post: | 15-Apr-2018 |
| Category: |
Documents |
| Upload: | duongthien |
| View: | 218 times |
| Download: | 2 times |


©2013 C# CORNER. SHARE THIS DOCUMENT AS IT IS. PLEASE DO NOT REPRODUCE, REPUBLISH, CHANGE OR COPY.
2
Programming ASP.NET MVC 5 A Problem Solution Approach This free book is provided by courtesy of C# Corner and Mindcracker Network and its
authors. Feel free to share this book with your friends and co-workers.
Please do not reproduce, republish, edit or copy this book.
Nimit Joshi
Software Developer
Sam Hobbs
Editor, C# Corner
©2013 C# CORNER. SHARE THIS DOCUMENT AS IT IS. PLEASE DO NOT REPRODUCE, REPUBLISH, CHANGE OR COPY.
3
This book is a basic introduction to Programming ASP.NET MVC 5, basically for beginners who
want to learn complete basic with example of ASP.NET MVC 5.
Table of Contents
1. Getting Started with ASP.NET MVC 5
1.1 Adding a Controller
1.2 Adding a View
1.3 Adding a Model
2. Working with Database
2.1 Creating Connection String
2.2 CRUD Operations
2.3 Working with LocalDB
3. Editing Application
3.1 Introduction of Code First Migration and Adding new field
3.2 Searching Panel
3.3 View Editing
3.4 Working with Validation
4. Working with External Authentication
4.1 Configure the Login Options
4.2 Google and Facebook Authentication
4.3 Twitter Authentication
5. Entity Framework Database First Approach
5.1 Working with Existing Database
5.2 Associating Database with Application
5.3 Application Modification and Validation
6. IIS Hosting and Publishing of Application
7. Introduction of ASP.NET SignalR

©2013 C# CORNER. SHARE THIS DOCUMENT AS IT IS. PLEASE DO NOT REPRODUCE, REPUBLISH, CHANGE OR COPY.
4
1 Getting Started with ASP.NET MVC 5
Microsoft has released Visual Studio 2013 Preview. There are many new features introduced with this release of Visual
Studio. One of them is MVC 5, it is the latest version of MVC. I would like to tell you something about the MVC. MVC is
an architectural pattern that separates an application into three major parts called the Model, the View and the
Controller. MVC is a recognized way to develop applications.
Now, I am describing ASP.NET MVC 5 in here. As you know MVC 5 is the latest update with the popular Visual Studio
with which you can build dynamic, data-driven websites. It adds cool features such as single page applications, mobile
optimization and adaptive rendering.
There are some important characteristics in MVC 5 as given below:
One ASP.NET
ASP.NET Identity
Bootstrap
Authentication Filters
Filter Overrides
One ASP.NET
As you know, there are many project templates available to develop web applications. One of them is the MVC project
template. It coordinates flawlessly with the new One ASP.NET experience. Using the One ASP.NET project creation
wizard you can personalize your MVC application and you can configure your authentication also. The MVC
applications are now standard Web Applications and it does not use their own project GUID (Globally Unique
Identifier). It helps you to mix and match various technologies of your preferred app. Any developer would love
ASP.NET now because One ASP.NET makes the things very easier and useful in ASP.NET.
ASP.NET Identity
There is a new characteristic used for building ASP.NET Web applications called ASP.NET Identity. Now, when you'll
create an application using a MVC project template, you can use an ASP.NET Identity for authentication and identity
management. It helps you to integrate the individual profile data of the user with the application data. You can also
store the data into the SQL Server database or another persistence store.

©2013 C# CORNER. SHARE THIS DOCUMENT AS IT IS. PLEASE DO NOT REPRODUCE, REPUBLISH, CHANGE OR COPY.
5 There are the following two main features that we can use in it:
Claims-based authentication
ASP.NET Identity supports claim-based authentication in which the identity of any user is defined as a set of claims
from a trusted issuer. The user needs to be authenticated with their login credentials and they may login with their
social identity providers, such as Facebook, Google, Twitter or they can login with an organizational account like
Windows Azure Active Directory.
OAuth 2.0
If you want to authorize requests from client applications to your Web API, now it can be done by OAuth 2.0 bearer
tokens. The client authorizations is also done by organizational authorization servers like Windows Azure Active
Directory or by custom authorization.
Use of WAAD and WSAD
You can now create your ASP.NET project with the advantages of Windows Azure Active Directory (WAAD) and
Windows Server Active Directory (WSAD) for authentication.
Bootstrap
As you know, there are many themes and CSS templates used in web applications to look and feel better for the user.
Microsoft now uses the Bootstrap technology to provide a polished, spontaneous and powerful mobile-first front end
framework for faster and easier web development. This Bootstrap technology is used in MVC project templates. Now
the home page of your MVC project looks as in the picture shown below:
Authentication Filters

©2013 C# CORNER. SHARE THIS DOCUMENT AS IT IS. PLEASE DO NOT REPRODUCE, REPUBLISH, CHANGE OR COPY.
6 As the name Authentication Filters indicates, it is a kind of filter in ASP.NET MVC that runs prior to authorization filters
in the ASP.NET MVC pipeline and it also allows you to determine authentication logic per-action, per-controller or
globally for all controllers. It can also add authentication challenges in response to unauthorized requests.
Filter Overrides
Override filters determine a set of filter types that should not be run for a given scope. With this you can allow
configuration of filters that apply globally but then exclude certain global filters from applying to specific actions or
controllers.
1.1 Adding a Controller
In here, I am creating MVC 5 Web Application in which I introduce you the all aspects of MVC 5. As you know that MVC
stands for Model View Controller and here we also create a new controller for the web application.
Prerequisites
There are some prerequisites to start the MVC 5 application. Given below:
Visual Studio 2013 Preview or later
ASP.NET Web Tools for Visual Studio 2013
NuGet Package Manager for Visual Studio 2013
Create Application in MVC 5
So let’s start to create an ASP.NET Web Application with the MVC 5 Project template. Follow the steps given below:
Step 1: Open Visual Studio 2013. (I am using Visual Studio 2013 RC)

©2013 C# CORNER. SHARE THIS DOCUMENT AS IT IS. PLEASE DO NOT REPRODUCE, REPUBLISH, CHANGE OR COPY.
7 Step 2: Click on New Project to create a web application
Step 3: Select the MVC template
Step 4: Click on Create Project.
When you click on Create Project, Visual Studio automatically creates a MVC web application in which you can see the
folders like Models, Controllers and Views. There are two files named Account and Home present in Controller and View
folders. As you can see in the following figure that HomeController.cs file have the corresponding view in the Views
folder.

©2013 C# CORNER. SHARE THIS DOCUMENT AS IT IS. PLEASE DO NOT REPRODUCE, REPUBLISH, CHANGE OR COPY.
8
Debug Application
Now, you have created an application, so its time to debug the application. Press F5 to debug your application. Visual
Studio allows IIS Express to debug the application. Browser will open and show the application's home page.

©2013 C# CORNER. SHARE THIS DOCUMENT AS IT IS. PLEASE DO NOT REPRODUCE, REPUBLISH, CHANGE OR COPY.
9 In the browser's URL, you will see the localhost and a port number. Localhost represents that you are running it on local
computer and port number generated by Visual Studio which is used for the web server.
Working with Controller
As you know that there are different controller already present in the application. So, let’s start to create a new controller
with the following steps:
Step 1: Right click on your Controller folder
Step2: Click on Add Scaffold
Step 3: In the next wizard, enter your Controller name as "MYCrikceters"
Visual Studio will create the MYCricketersController.cs file and display your new controller

©2013 C# CORNER. SHARE THIS DOCUMENT AS IT IS. PLEASE DO NOT REPRODUCE, REPUBLISH, CHANGE OR COPY.
10
Step 4: Modify your code with the following code:
using System.Web.Mvc;
namespace MvcCricket.Controllers
{
public class MYCricketersController : Controller
{
// GET: /MYCricketers/
public string Index()
{
return "Hello this is My First Controller";
}
public string Welcome()
{
return "Welcome to My Cricketer Controller";
}
}
}
There are two controller methods used in here. These methods will return a string .
Step 5: Debug your application

©2013 C# CORNER. SHARE THIS DOCUMENT AS IT IS. PLEASE DO NOT REPRODUCE, REPUBLISH, CHANGE OR COPY.
11 Visual Studio by default opens HomeController. You have to provide your controller name with the localhost like
localhost:1234/MYCricketers. Enter your controller name with the localhost. In here, MYCricketersController is the first
method named as Index.
Similarly open the Welcome method will open by providing it with the url as shown below:
1.2 Adding a View
before starting replace your previous code (as shown in Step 3) in the MYCricketersController.cs file.
I am creating an app to add a view in my MVC Project.
Step 1: Open Visual Studio 2013 Preview.
Step 2: "File" -> "New" -> "Project..."

©2013 C# CORNER. SHARE THIS DOCUMENT AS IT IS. PLEASE DO NOT REPRODUCE, REPUBLISH, CHANGE OR COPY.
12 Step 3: Select MVC Project Template and click "Create Project".
Note: Ensure you have a Controller class to generate a responsive view. You must have the same name as the Controller
class and view. If you don't have the controller class then make a controller class and provide the same name as the view
name.
Step 4: In Solution Explorer, go to the view and create a new folder.
Step 5: Select your folder, right-click to add a Scaffold.

©2013 C# CORNER. SHARE THIS DOCUMENT AS IT IS. PLEASE DO NOT REPRODUCE, REPUBLISH, CHANGE OR COPY.
13 Step 6: Select "MVC 5 View- Empty Without Model" in the Add Scaffold wizard.
Step 7: Enter your View name in the next Add View wizard.
Step 8: Select and open your view in Solution Explorer.

©2013 C# CORNER. SHARE THIS DOCUMENT AS IT IS. PLEASE DO NOT REPRODUCE, REPUBLISH, CHANGE OR COPY.
14 Step 9: Provide your description of the app in your view.
Step 10: Inspect your view from the Page Inspector.
Step 11: Debug your application and append your view name after the / sign in URL.

©2013 C# CORNER. SHARE THIS DOCUMENT AS IT IS. PLEASE DO NOT REPRODUCE, REPUBLISH, CHANGE OR COPY.
15
Change View and Layout Pages
Step 1: Go to your Layout page in the Shared Folder.
Step 2: To change your application name and title with your own app name, you need to go to ActionLink and change it
with yours in the "layout.cshtml" file.

©2013 C# CORNER. SHARE THIS DOCUMENT AS IT IS. PLEASE DO NOT REPRODUCE, REPUBLISH, CHANGE OR COPY.
16
Step 3: Debug your app and see your App name.

©2013 C# CORNER. SHARE THIS DOCUMENT AS IT IS. PLEASE DO NOT REPRODUCE, REPUBLISH, CHANGE OR COPY.
17 Step 4: In your "Index.cshtml" file code, change your view title and heading. Just type yours in as in the following:
@{
ViewBag.Title = "Top Cricketers";
}
<h2>My Top Cricketers</h2>
<p>This Template shows the Top Cricketers in this World</p>
Step 3: Debug your app and see your App name with changes.
Step 4: Now add an another Method to show your work in the Controller class.
public class MYCricketersController : Controller
{
//
// GET: /MYCricketers/
public ActionResult Index()
{
return View();
}
public ActionResult Welcome()
{
ViewBag.Message = "Sachin Tendulkar";
return View();
}
}
Step 5: Build your app to ensure that your app builds successfully.
Step 6: Go to your folder and add a Scaffold.

©2013 C# CORNER. SHARE THIS DOCUMENT AS IT IS. PLEASE DO NOT REPRODUCE, REPUBLISH, CHANGE OR COPY.
18
Step 7: Provide your view name.

©2013 C# CORNER. SHARE THIS DOCUMENT AS IT IS. PLEASE DO NOT REPRODUCE, REPUBLISH, CHANGE OR COPY.
19
Step 8: Go to your "Welcome.cshtml" file and write the code as in the following:
@{
ViewBag.Title = "Welcome";
}
<h2>Welcome</h2>
<ul>
<li>@ViewBag.Message</li>
</ul>
Step 9: Debug your app with the "Welcome.cshtml" page.
1.3 Adding a Model
This part introduces how to work with Models and Connection Strings. This topic will help you to add some classes for
the application that help manage databases and to create or maintain the Connection Strings that provide the path to
connect to a database.
Let's start first by adding a class in the Model. The class will be the "model" part of the ASP.NET MVC application. The
prerequisites for working in Model are the following:
MVC 5 template for creating project
Visual Studio 2013 Preview
Entity Framework
Model Classes

©2013 C# CORNER. SHARE THIS DOCUMENT AS IT IS. PLEASE DO NOT REPRODUCE, REPUBLISH, CHANGE OR COPY.
20 In this section you will learn about adding a Model Class in a MVC 5 application. You should have an MVC 5 application
for working in it.
Step 1: Go to Solution Explorer and select your app.
Step 2: Right-click on Model and select go "Add" then "Class".
Step 3: Enter your class name.

©2013 C# CORNER. SHARE THIS DOCUMENT AS IT IS. PLEASE DO NOT REPRODUCE, REPUBLISH, CHANGE OR COPY.
21
You can see your new class as in the following:
using System;
using System.Collections.Generic;
using System.Linq;
using System.Web;
namespace MvcCricket.Models
{
public class Cricketer
{
}
}
After adding the class in the Model, let's add some properties:
using System;
using System.Collections.Generic;
using System.Linq;
using System.Web;
namespace MvcCricket.Models
{
public class Cricketer
{
public int ID { get; set; }
public string Name { get; set; }
public int ODI { get; set; }
public int Test { get; set; }

©2013 C# CORNER. SHARE THIS DOCUMENT AS IT IS. PLEASE DO NOT REPRODUCE, REPUBLISH, CHANGE OR COPY.
22 }
}
The Cricketer class represents Crickerters in the database. In the preceding example, each instance of the Cricketer object
represents a row element within a database table and each property of this Cricketer class will map to a column in the
table.
Now, after adding the Model class add the CricketerDBContext class in the same Cricketer class file:
using System;
using System.Collections.Generic;
using System.Linq;
using System.Web;
namespace MvcCricket.Models
{
public class Cricketer
{
public int ID { get; set; }
public string Name { get; set; }
public int ODI { get; set; }
public int Test { get; set; }
}
public class CricketerDBContext : DbContext
{
public DbSet<Cricketer> Cricketers { get; set; }
}
}
The class named CricketerDBContext class corresponds to the Entity Framework cricketer database context. That is helpful
for retrieving, storing and updating the Cricketer class instances in the database. The DbContext class that is provided by
the Entity Framework is the base class of CricketerDBConetext.
For using the Entity Framework in this app or accessing the DbContext and DbSet, you need to add the following
statement:
using System.Data.Entity;
Visual Studio 2013 Preview also provides the facility to manually add an assembly reference. For adding manually review
the following statements:
Right-click on the red squiggly lines and select "Resolve" and then click the corresponding assembly reference.

©2013 C# CORNER. SHARE THIS DOCUMENT AS IT IS. PLEASE DO NOT REPRODUCE, REPUBLISH, CHANGE OR COPY.
23
or
Click on the red squiggly lines and move your cursor to the stating point and you'll notice that it'll show you to resolve
the problem.
Note: In the application there are many using statements that are unused. So, you can remove the unused using
statements by right-clicking on your app and select "Organize Usings" and click "Remove Unused Usings":

©2013 C# CORNER. SHARE THIS DOCUMENT AS IT IS. PLEASE DO NOT REPRODUCE, REPUBLISH, CHANGE OR COPY.
24
You can add a model using the the preceding information.
2. Working with Database
2.1 Creating Connection String
In the application, the CricketerDBConetext class is responsible for handling the task of connecting the database and to
map the Cricketer objects to database records. The Entity Framework automatically connects the database and uses it.
The default database is LocalDB. Now, I am adding a connection string explicitly in the Web.Config file in the application.
Working with SQL Server Express LocalDB
The SQL Server Express Database Engine has the LocalDB. It is very lightweight that automatically starts on demand and
runs in the user mode. SQL Server Express has the special execution mode in which LocalDB runs that facilitates you to
work with the database as .mdf files. The .mdf file of any database is stored in the App_datafolder in the application.
You should not use the LocalDB in particular for production with a web application because it is designed to work
with Internet Information Services (IIS). You can easily migrate your LocalDB database to SQL Server or SQL Azure. It is
installed by default in Visual Studio 2012 and 2013 Preview versions of Visual Studio.
You can add a connection string to your app using the following procedure.
Step 1: Open your project
Step 2: In Solution Explorer open the Web.Config file

©2013 C# CORNER. SHARE THIS DOCUMENT AS IT IS. PLEASE DO NOT REPRODUCE, REPUBLISH, CHANGE OR COPY.
25
Step 3: Find the <connectionStrings> element in the file.
Step 4: Add the following connection string to the <connectionStrings> element after the previous connection string:
<add name="CricketerDBContext" connectionString="Data
Source=(LocalDB)\v11.0;AttachDbFileName=|DataDirectory|\Cricketers.mdf;Integrated
Security=True"providerName="System.Data.SqlClient" />
Now there are two connection strings available in your Web.Config file. The connection string named DefaultConnection
is used for the membership database and the connection string named CricketerDBConetext determines a LocalDB
database that is located in the App_Data folder as Cricketers.mdf.
Note: You need to note that the connection string must match the name of DbContext class.

©2013 C# CORNER. SHARE THIS DOCUMENT AS IT IS. PLEASE DO NOT REPRODUCE, REPUBLISH, CHANGE OR COPY.
26
2.2 CRUD Operations
Microsoft released MVC 5 with Visual Studio 2013 Preview. As you know, CRUD Operations are done with MVC 4 in
previous versions of Visual Studio. Now, in this part I'll introduce you to how to create CRUD Operations by MVC 5. There
are some changes in Visual Studio 2013 Preview for CRUD Operations by MVC 5.
In that context, I am developing an app in which you will learn how to access your Model's data from a Controller. For
accessing your Model's Data from a Controller, you need to follow the sections given below:
Scaffold
Create
Read
Update
Delete
Connect with SQL Server LocalDB
Scaffold
Step 1: Before proceeding to the next step please build you solution. If you do not build your application then you might
get an error when you add the Controller.

©2013 C# CORNER. SHARE THIS DOCUMENT AS IT IS. PLEASE DO NOT REPRODUCE, REPUBLISH, CHANGE OR COPY.
27
Step 2: Select your application in Solution Explorer.
Step 3: Right-click on your Controllers folder to add a Controller.

©2013 C# CORNER. SHARE THIS DOCUMENT AS IT IS. PLEASE DO NOT REPRODUCE, REPUBLISH, CHANGE OR COPY.
28 Step 4: After selecting scaffold, select MVC 5 Controller with read/write.
Step 5: Enter your Controller name as CricketersController, select your Model Class and Data context class.
Click the "Add" button to add a Controller named CricketersController. (If you get an error then maybe you did not build
your solution before adding the Controller.) When you click on "Add", Visual Studio automatically creates and adds many
files and folders to your application. You can view files and folders in your Solution Explorer.

©2013 C# CORNER. SHARE THIS DOCUMENT AS IT IS. PLEASE DO NOT REPRODUCE, REPUBLISH, CHANGE OR COPY.
29
You can also view you CRUD action methods like Create, Read, Update and Delete inyour CricketersController.csfile. When
you debug your application, open your application in the browser in URL format like "http://localhost:(your port
number)/Cricketers". In that page you can Create, Read, Update and Delete your data as you want.
©2013 C# CORNER. SHARE THIS DOCUMENT AS IT IS. PLEASE DO NOT REPRODUCE, REPUBLISH, CHANGE OR COPY.
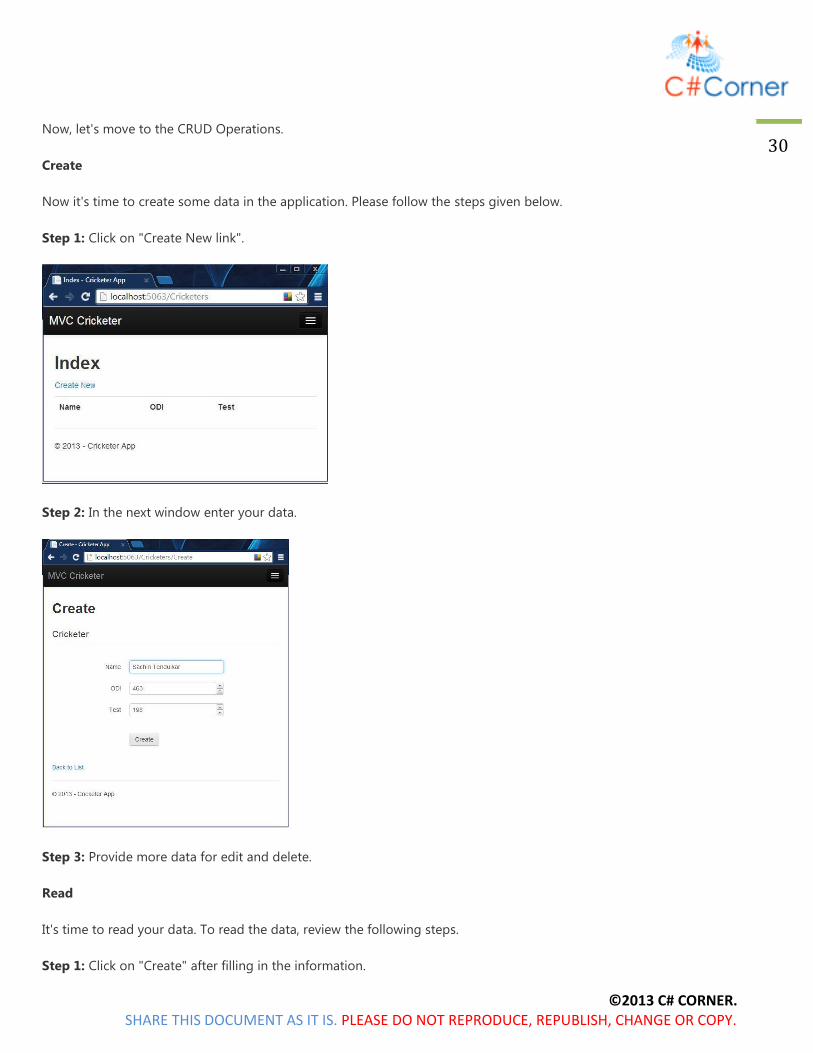
30 Now, let's move to the CRUD Operations.
Create
Now it's time to create some data in the application. Please follow the steps given below.
Step 1: Click on "Create New link".
Step 2: In the next window enter your data.
Step 3: Provide more data for edit and delete.
Read
It's time to read your data. To read the data, review the following steps.
Step 1: Click on "Create" after filling in the information.
©2013 C# CORNER. SHARE THIS DOCUMENT AS IT IS. PLEASE DO NOT REPRODUCE, REPUBLISH, CHANGE OR COPY.
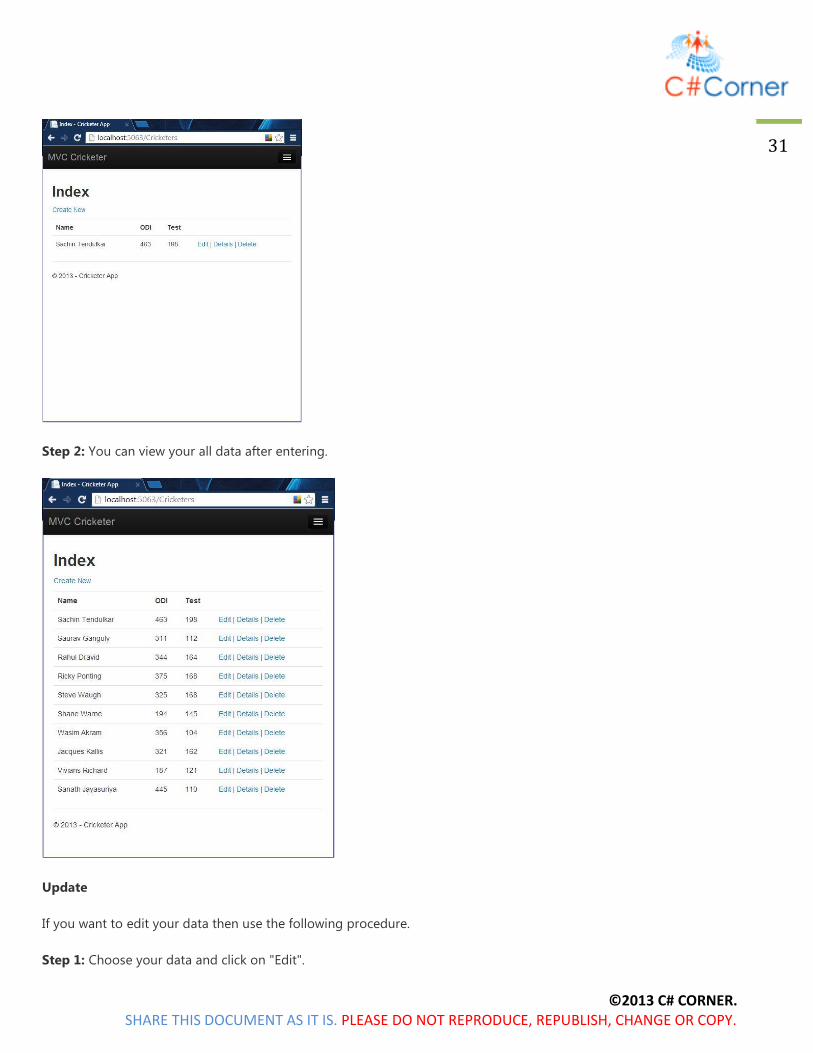
31
Step 2: You can view your all data after entering.
Update
If you want to edit your data then use the following procedure.
Step 1: Choose your data and click on "Edit".

©2013 C# CORNER. SHARE THIS DOCUMENT AS IT IS. PLEASE DO NOT REPRODUCE, REPUBLISH, CHANGE OR COPY.
32
Step 2: Update your information and click on "Save".
Step 3: You can view your data with the updated values.

©2013 C# CORNER. SHARE THIS DOCUMENT AS IT IS. PLEASE DO NOT REPRODUCE, REPUBLISH, CHANGE OR COPY.
33
Delete
Let us delete some data.
Step 1: Choose your data and click on "Delete".

©2013 C# CORNER. SHARE THIS DOCUMENT AS IT IS. PLEASE DO NOT REPRODUCE, REPUBLISH, CHANGE OR COPY.
34 Step 2: In the next window click on "Delete" to delete the data permanently.
You can view your updated list.
2.3 Working with LocalDB
SQL Server LocalDB is the data source used by default by Visual Studio. When you work with the Entity Framework Code
First approach, it automatically creates a database, if the database did not exist. You can view it from the "App_Data"
folder in the Solution Explorer. Let's work with LocalDB using the following procedure.

©2013 C# CORNER. SHARE THIS DOCUMENT AS IT IS. PLEASE DO NOT REPRODUCE, REPUBLISH, CHANGE OR COPY.
35 Step 1: Click on the "Show All Files" button in the Solution Explorer and expand the "App_Data" Folder .
Step 2: After clicking, you can view your mdf file in the "App_Data" Folder.
Step 3: Open the mdf file by double-clicking. It will be opened in the Server Explorer.
Step 4: If you want to show your Table data then right-click on your table and select "Show Table Data".

©2013 C# CORNER. SHARE THIS DOCUMENT AS IT IS. PLEASE DO NOT REPRODUCE, REPUBLISH, CHANGE OR COPY.
36
After clicking on "Show Data":
Step 5: You can view your table structure by right-clicking on the table and select "Table Definition".
After clicking on "Table Definition":

©2013 C# CORNER. SHARE THIS DOCUMENT AS IT IS. PLEASE DO NOT REPRODUCE, REPUBLISH, CHANGE OR COPY.
37
Step 6: Click on "Close Connection" by right-clicking on your DbContext. You need to close the connection otherwise
you might receive an error when you work with your project in the future.
3. Editing Application
3.1 Introduction of Code First Migration and Adding new field

©2013 C# CORNER. SHARE THIS DOCUMENT AS IT IS. PLEASE DO NOT REPRODUCE, REPUBLISH, CHANGE OR COPY.
38 In here, I am introducing you to migration of your code for changes in the Model Class. Now in here you will learn to
work with Entity Framework Code First Migration that will help you to convert any type of change in the Model Class and
the change will implement the database also.
In that context, here I am describing my work in two main parts as given below:
Migration in Entity Framework Code First
Adding New Property
Migration in Entity Framework Code First
Let's proceed to the procedure.
Step 1: At first, delete your mdf file located in your "App_Data" Folder in Solution Explorer.
Step 2: Debug your application to ensure that there are no errors.
Step 3: Go to "Package Manager Console" in the "Library Package Manager".
©2013 C# CORNER. SHARE THIS DOCUMENT AS IT IS. PLEASE DO NOT REPRODUCE, REPUBLISH, CHANGE OR COPY.
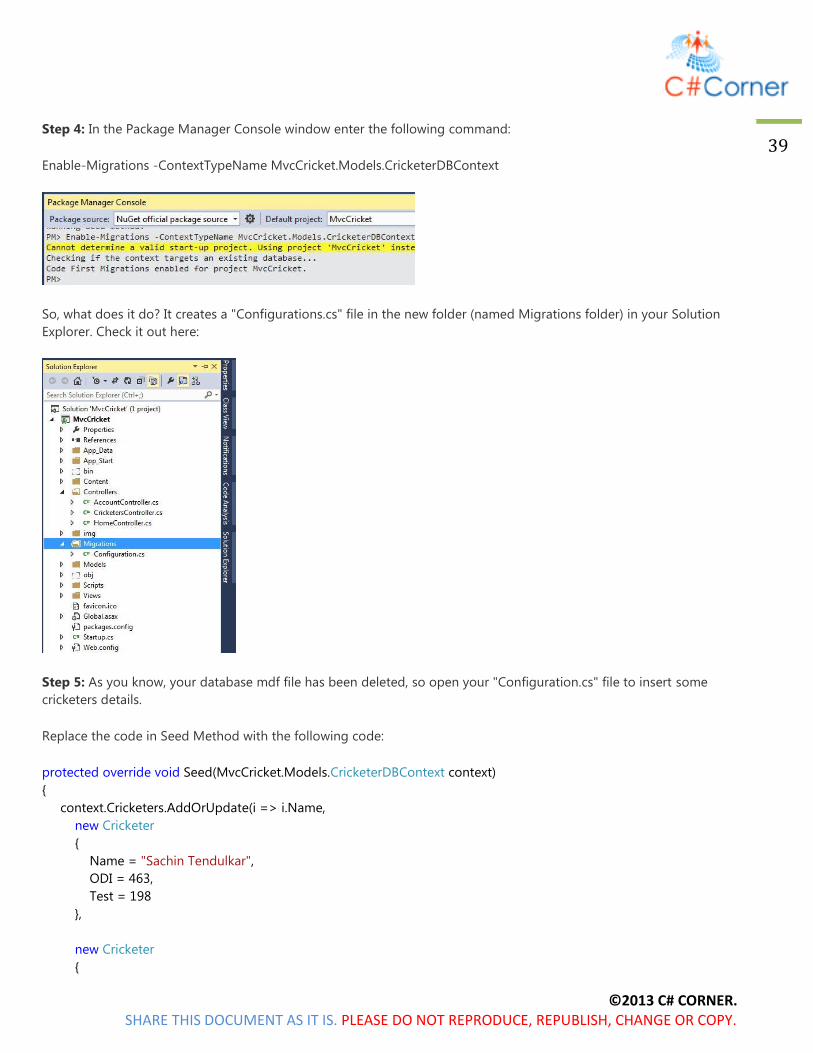
39 Step 4: In the Package Manager Console window enter the following command:
Enable-Migrations -ContextTypeName MvcCricket.Models.CricketerDBContext
So, what does it do? It creates a "Configurations.cs" file in the new folder (named Migrations folder) in your Solution
Explorer. Check it out here:
Step 5: As you know, your database mdf file has been deleted, so open your "Configuration.cs" file to insert some
cricketers details.
Replace the code in Seed Method with the following code:
protected override void Seed(MvcCricket.Models.CricketerDBContext context)
{
context.Cricketers.AddOrUpdate(i => i.Name,
new Cricketer
{
Name = "Sachin Tendulkar",
ODI = 463,
Test = 198
},
new Cricketer
{

©2013 C# CORNER. SHARE THIS DOCUMENT AS IT IS. PLEASE DO NOT REPRODUCE, REPUBLISH, CHANGE OR COPY.
40 Name = "Saurav Ganguly",
ODI = 311,
Test = 113
},
new Cricketer
{
Name = "Rahul Dravid",
ODI = 344,
Test = 164
},
new Cricketer
{
Name = "Ricky Ponting",
ODI = 375,
Test = 168
},
new Cricketer
{
Name = "Wasim Akram",
ODI = 356,
Test = 104
},
new Cricketer
{
Name = "Jacques Kallis",
ODI = 321,
Test = 162
},
new Cricketer
{
Name = "Sanath Jayasuriya",
ODI = 445,
Test = 110
}
);
}
Note: You will receive an error when you create Cricketer, please resolve it by adding the following library:
using MvcCricket.Models;
Step 6: Build your application

©2013 C# CORNER. SHARE THIS DOCUMENT AS IT IS. PLEASE DO NOT REPRODUCE, REPUBLISH, CHANGE OR COPY.
41 Step 7: Now, you need to start the migration, called Initial Migration. For this you need to create a DbMigration class.
What does it do? The Migration class you create helps to create a database, this is the reason for deleting your database
mdf file.
In that context, go to your Package Manager Console and enter the following command:
add-migration Initial
The add-migration Initial command creates a new class file in your Migration folder. The new class named
"(DataStamp)_initial.cs code" helps to create a schema for the database. This file's code implements the Cricketers table in
your Cricketer database.

©2013 C# CORNER. SHARE THIS DOCUMENT AS IT IS. PLEASE DO NOT REPRODUCE, REPUBLISH, CHANGE OR COPY.
42 Step 8: Enter the following command in your Package Manager Console:
update-database
Note: If you receive an error then you need to ensure that the mdf file is deleted permanently from the App_Data folder.
Otherwise you can go to the SQL Server Object Explorer, expand the localDb server and in the Database option ensure
that the mdf file is deleted.
Step 9: Debug your application. You can see your Cricketers Details (that you inserted into "Configuration.cs") in your
index file of Cricketers.
Adding New Property
We have mainly three properties in our CricketerDBContext. Let's add a new Grade property to our context. For adding
the new property, please follow the procedure given below.
Step 1: Open your "Cricketer.cs" file and add the following property:
public string Grade { get; set; }
Your Cricketer.cs file will now look like the following code:

©2013 C# CORNER. SHARE THIS DOCUMENT AS IT IS. PLEASE DO NOT REPRODUCE, REPUBLISH, CHANGE OR COPY.
43 namespace MvcCricket.Models
{
public class Cricketer
{
public int ID { get; set; }
public string Name { get; set; }
public int ODI { get; set; }
public int Test { get; set; }
public string Grade { get; set; }
}
}
Step 2: Build your solution by pressing "Ctrl+Shift+B".
Step 3: You have successfully added a new property but you need to change your "Index.cshtml" and "Create.cshtml"
files to view the Grade field in the browser. So, let's first change your "Index.cshtml" file.
Change your "Index.cshtml" file with the following code. There are some changes.
<table class="table">
<tr>
<th>
@Html.DisplayNameFor(model => model.Name)
</th>
<th>
@Html.DisplayNameFor(model => model.ODI)
</th>
<th>

©2013 C# CORNER. SHARE THIS DOCUMENT AS IT IS. PLEASE DO NOT REPRODUCE, REPUBLISH, CHANGE OR COPY.
44 @Html.DisplayNameFor(model => model.Test)
</th>
<th>
@Html.DisplayNameFor(model=>model.Grade)
</th>
<th></th>
</tr>
@foreach (var item in Model) {
<tr>
<td>
@Html.DisplayFor(modelItem => item.Name)
</td>
<td>
@Html.DisplayFor(modelItem => item.ODI)
</td>
<td>
@Html.DisplayFor(modelItem => item.Test)
</td>
<td>
@Html.DisplayFor(modelItem=>item.Grade)
</td>
<td>
@Html.ActionLink("Edit", "Edit", new { id=item.ID }) |
@Html.ActionLink("Details", "Details", new { id=item.ID }) |
@Html.ActionLink("Delete", "Delete", new { id=item.ID })
</td>
</tr>
}
</table>
Change your "Create.cshtml" file with the following code. There are some changes.
<div class="control-group">
@Html.LabelFor(model => model.Test, new { @class = "control-label" })
<div class="controls">
@Html.EditorFor(model => model.Test)
@Html.ValidationMessageFor(model => model.Test, null, new { @class = "help-inline" })
</div>
</div>
<div class="control-group">
@Html.LabelFor(model => model.Grade, new { @class = "control-label" })
<div class="controls">
@Html.EditorFor(model=>model.Grade)
@Html.ValidationMessageFor(model => model.Grade, null, new { @class = "help-inline" })
</div>
</div>

©2013 C# CORNER. SHARE THIS DOCUMENT AS IT IS. PLEASE DO NOT REPRODUCE, REPUBLISH, CHANGE OR COPY.
45 <div class="form-actions no-color">
<input type="submit" value="Create" class="btn" />
</div>
Step 4: You have successfully added a new property, now debug your application.
Note: You will receive an error when accessing your Cricketers folder in the browser URL.
To solve this error, I am using Code First Migration. Update your Seed method in the "Configurtion.cs" file and add a
Grade field in each Cricketer object. For example:
new Cricketer
{
Name = "Sachin Tendulkar",
ODI = 463,
Test = 198,
Grade="A"
},
new Cricketer
{
Name = "Saurav Ganguly",
ODI = 311,
Test = 113,
Grade="A"
},
Step 5: Build your solution by pressing "Ctrl+Shift+B".

©2013 C# CORNER. SHARE THIS DOCUMENT AS IT IS. PLEASE DO NOT REPRODUCE, REPUBLISH, CHANGE OR COPY.
46 Step 6: Open Package Manager Console and enter the following command:
add-migration Grade
When the command completes, the new DbMigration class will open automatically. In that code you can see that the new
column has been added. For example:
namespace MvcCricket.Migrations
{
using System;
using System.Data.Entity.Migrations;
public partial class Grade : DbMigration
{
public override void Up()
{
AddColumn("dbo.Cricketers", "Grade", c => c.String());
}
public override void Down()
{
DropColumn("dbo.Cricketers", "Grade");
}
}
}
Step 7: Build your solution by pressing "Ctrl+Shift+B".
Step 8: Enter the following command in your Package Manager Console:
update-database
Step 9: Debug your application. Move to the Cricketers folder.

©2013 C# CORNER. SHARE THIS DOCUMENT AS IT IS. PLEASE DO NOT REPRODUCE, REPUBLISH, CHANGE OR COPY.
47
Step 10: Click on the "CreateNew" link to add more Cricketers.
Click on "Create".

©2013 C# CORNER. SHARE THIS DOCUMENT AS IT IS. PLEASE DO NOT REPRODUCE, REPUBLISH, CHANGE OR COPY.
48
3.2 Searching Panel
I developed an ASP.NET MVC Application in which I used CRUD Operations, working process of LocalDB, Adding
View, Working with Model Class and adding a new field using MVC 5 in Visual Studio 2013 Preview. Today I am adding a
Search Panel in it to retrieve the information of Cricketers. You can search the information of Cricketer.
In that context, I am developing a search in two ways as in the following:
1. By Name
2. By Grade
Search By Name
Let's start with searching Cricketer by name with the following procedure.
Step 1: At first debug your application and open Cricketers in your browser URL.

©2013 C# CORNER. SHARE THIS DOCUMENT AS IT IS. PLEASE DO NOT REPRODUCE, REPUBLISH, CHANGE OR COPY.
49
Step 2: Open your "CricketersController.cs" file and change the Index method code with the following code:
public ActionResult Index(string SearchName)
{
var cricketers = from cr in db.Cricketers select cr;
if (!String.IsNullOrEmpty(SearchName))
{
cricketers = cricketers.Where(c => c.Name.Contains(SearchName));
}

©2013 C# CORNER. SHARE THIS DOCUMENT AS IT IS. PLEASE DO NOT REPRODUCE, REPUBLISH, CHANGE OR COPY.
50 return View(cricketers);
}
In the code above I used a LINQ query that will select the name of Cricketers:
var cricketers = from cr in db.Cricketers select cr;
There is a Lambda Expression ("c=>c.Name") in the code above that is used in the method-based queries of LINQ. This
LINQ query is executed in the "index.cshtml" file.
Note: If you want to learn more about Query Execution, Click Here.
Step 3: Go to your "Views\Cricketers\Index.cshtml" file to represent the search.
Modify your code to be as shown below:
<p>
@Html.ActionLink("Create New", "Create")
@using (Html.BeginForm())
{
<p>Name: @Html.TextBox("SearchName")<br />
<input type="submit" value="Search" />
</p>
}
</p>
Step 4: Debug your application.

©2013 C# CORNER. SHARE THIS DOCUMENT AS IT IS. PLEASE DO NOT REPRODUCE, REPUBLISH, CHANGE OR COPY.
51
Search the Cricketer.
Search By Grade
In the preceding option we were searching Cricketer by name, here we'll search Cricketer by grade also. For searching for
a grade use the following procedure.
Step 1: Open your "CricketersController.cs" file and change the Index method code so it has the following code:

©2013 C# CORNER. SHARE THIS DOCUMENT AS IT IS. PLEASE DO NOT REPRODUCE, REPUBLISH, CHANGE OR COPY.
52
public ActionResult Index(string CricketerGrade, string SearchName)
{
var GradeList = new List<string>();
var GradeQuery = from gq in db.Cricketers orderby gq.Grade select gq.Grade;
GradeList.AddRange(GradeQuery.Distinct());
ViewBag.CricketerGrade = new SelectList(GradeList);
var cricketers = from cr in db.Cricketers select cr;
if (!String.IsNullOrEmpty(SearchName))
{
cricketers = cricketers.Where(c => c.Name.Contains(SearchName));
}
if (!string.IsNullOrEmpty(CricketerGrade))
{
cricketers = cricketers.Where(g => g.Grade == CricketerGrade);
}
return View(cricketers);
}
In the code above there are two parameters passed in the Index method. The following code elaborates that a List object
is created that will hold the grade of cricketers from the database:
var GradeList = new List<string>();

©2013 C# CORNER. SHARE THIS DOCUMENT AS IT IS. PLEASE DO NOT REPRODUCE, REPUBLISH, CHANGE OR COPY.
53 There is again a LINQ query used to retrieve all grades of cricketers from the database as in the following:
var GradeQuery = from gq in db.Cricketers orderby gq.Grade select gq.Grade;
The preceding query is not run on the database untill the movie list is iterated over.
Step 2: Now to add code to the UI layer by adding markup. Go to your "Views\Cricketers\Index.cshtml" file and change
the code as in the following:
<p>
@Html.ActionLink("Create New", "Create")
@using (Html.BeginForm("Index", "Cricketers", FormMethod.Get))
{
<p>
Name: @Html.TextBox("SearchName")
Grade:@Html.DropDownList("CricketerGrade", "All")
<input type="submit" value="Search" />
</p>
}
</p>
In the code above, I designed a DropDownList and a TextBox to search Cricketer. From the code above the following line
contains a parameter named "CricketerGrade". The code above provides the key for the DropDownList helper to find an
"IEnumerable<ListItem>" in the ViewBag.

©2013 C# CORNER. SHARE THIS DOCUMENT AS IT IS. PLEASE DO NOT REPRODUCE, REPUBLISH, CHANGE OR COPY.
54 Step 3: Debug your application.
Select your grade from the DropDownList and click on "Search".
Step 4: You can also provide a specific grade like "A". If you provide "A" in the code as I did in the following code then
only A Grade will display at first:

©2013 C# CORNER. SHARE THIS DOCUMENT AS IT IS. PLEASE DO NOT REPRODUCE, REPUBLISH, CHANGE OR COPY.
55 Grade:@Html.DropDownList("CricketerGrade", "A")
3.3 View Editing
In here, I am introducing you to adding information in Edit, Details and Delete links. So now in here you will learn to add
information related to the property in an Edit link, Details link and Delete link.
In that context, we need to change some code in the following files:
Edit.cshtml file
Details.cshtml file
Delete.cshtml file
Update in Edit link
As you can see in the following image that the new property named Grade that is present in the Index page, isn't present
when the user clicks on the Edit link, because we didn't change the Edit.cshtml file.

©2013 C# CORNER. SHARE THIS DOCUMENT AS IT IS. PLEASE DO NOT REPRODUCE, REPUBLISH, CHANGE OR COPY.
56
Click on the Edit link.
So, let's start with the following procedure.
Step 1: Select the Edit.cshtml file from the Solution Explorer.

©2013 C# CORNER. SHARE THIS DOCUMENT AS IT IS. PLEASE DO NOT REPRODUCE, REPUBLISH, CHANGE OR COPY.
57
Step 2: Change your code with the following code. I have added some extra code in my previous code:
<h2>Edit</h2>
@using (Html.BeginForm()) {
@Html.AntiForgeryToken()
@Html.ValidationSummary(true)
<fieldset class="form-horizontal">
<legend>Cricketer</legend>
@Html.HiddenFor(model => model.ID)
<div class="control-group">
@Html.LabelFor(model => model.Name, new { @class = "control-label" })
<div class="controls">
@Html.EditorFor(model => model.Name)
@Html.ValidationMessageFor(model => model.Name, null, new { @class = "help-inline" })
</div>
</div>
<div class="control-group">
@Html.LabelFor(model => model.ODI, new { @class = "control-label" })
<div class="controls">

©2013 C# CORNER. SHARE THIS DOCUMENT AS IT IS. PLEASE DO NOT REPRODUCE, REPUBLISH, CHANGE OR COPY.
58 @Html.EditorFor(model => model.ODI)
@Html.ValidationMessageFor(model => model.ODI, null, new { @class = "help-inline" })
</div>
</div>
<div class="control-group">
@Html.LabelFor(model => model.Test, new { @class = "control-label" })
<div class="controls">
@Html.EditorFor(model => model.Test)
@Html.ValidationMessageFor(model => model.Test, null, new { @class = "help-inline" })
</div>
</div>
<div class="control-group">
@Html.LabelFor(model => model.Grade, new {@class = "control-label" })
<div class="controls">
@Html.EditorFor(model=>model.Grade)
@Html.ValidationMessageFor(model => model.Grade, null, new { @class="help-inline" })
</div>
</div>
<div class="form-actions no-color">
<input type="submit" value="Save" class="btn" />
</div>
</fieldset>
}
Step 3: Debug your application.

©2013 C# CORNER. SHARE THIS DOCUMENT AS IT IS. PLEASE DO NOT REPRODUCE, REPUBLISH, CHANGE OR COPY.
59 Step 4: Click on the Edit link.
You can now see that the Grade field is present on the Edit Page.
Update in Details link
As you can see in the following image, the new property named Grade in the Index page, isn't present when a user clicks
on the Details link, because we didn't change the Details.cshtml file.
©2013 C# CORNER. SHARE THIS DOCUMENT AS IT IS. PLEASE DO NOT REPRODUCE, REPUBLISH, CHANGE OR COPY.
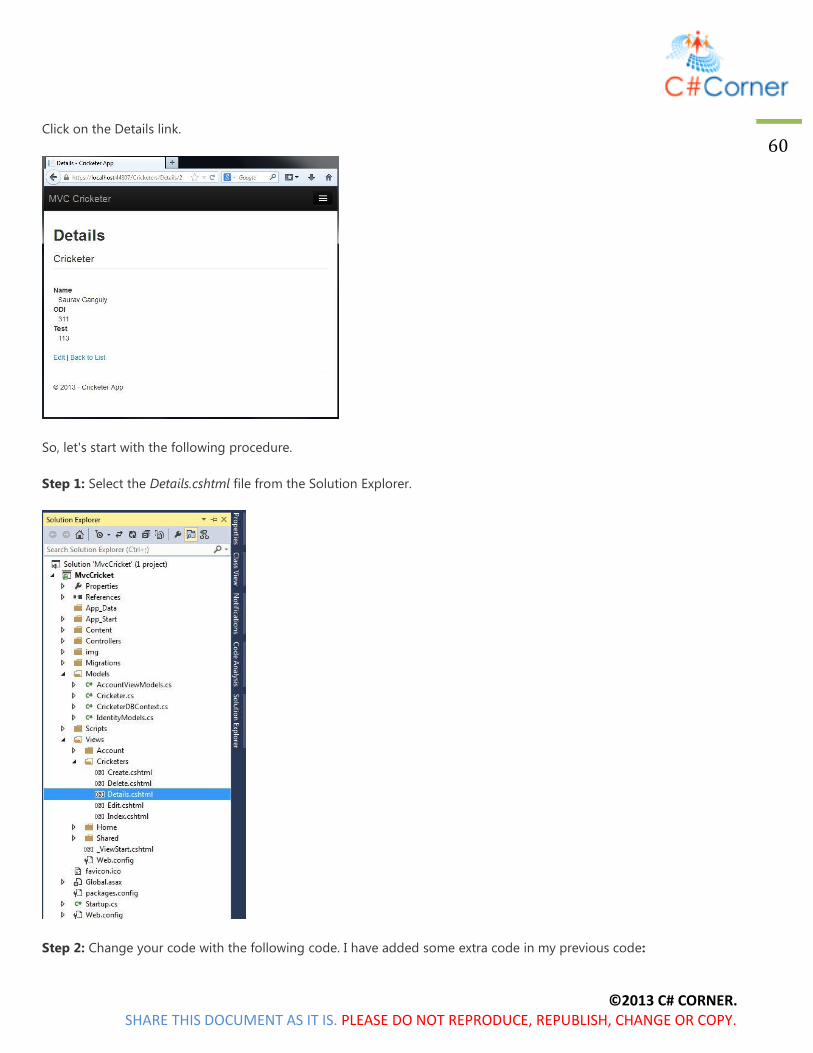
60 Click on the Details link.
So, let's start with the following procedure.
Step 1: Select the Details.cshtml file from the Solution Explorer.
Step 2: Change your code with the following code. I have added some extra code in my previous code:

©2013 C# CORNER. SHARE THIS DOCUMENT AS IT IS. PLEASE DO NOT REPRODUCE, REPUBLISH, CHANGE OR COPY.
61 <h2>Details</h2>
<fieldset>
<legend>Cricketer</legend>
<dl>
<dt>
@Html.DisplayNameFor(model => model.Name)
</dt>
<dd>
@Html.DisplayFor(model => model.Name)
</dd>
<dt>
@Html.DisplayNameFor(model => model.ODI)
</dt>
<dd>
@Html.DisplayFor(model => model.ODI)
</dd>
<dt>
@Html.DisplayNameFor(model => model.Test)
</dt>
<dd>
@Html.DisplayFor(model => model.Test)
</dd>
<dt>
@Html.DisplayNameFor(model => model.Grade)
</dt>
<dd>
@Html.DisplayFor(model => model.Grade)
</dd>
</dl>
</fieldset>
Step 3: Debug your application.

©2013 C# CORNER. SHARE THIS DOCUMENT AS IT IS. PLEASE DO NOT REPRODUCE, REPUBLISH, CHANGE OR COPY.
62
Step 4: Click on the Details link.
You can now see that the Grade field is present on the Details Page.
Update in Delete link
As you can see in the following image, the new property named Grade in the Index page, isn't present when a user clicks
on the Delete link, because we didn't change the Delete.cshtml file.

©2013 C# CORNER. SHARE THIS DOCUMENT AS IT IS. PLEASE DO NOT REPRODUCE, REPUBLISH, CHANGE OR COPY.
63
Click on the Delete link.
So, let's start with the following procedure.
Step 1: Select the Delete.cshtml file from the Solution Explorer

©2013 C# CORNER. SHARE THIS DOCUMENT AS IT IS. PLEASE DO NOT REPRODUCE, REPUBLISH, CHANGE OR COPY.
64
Step 2: Change your code with the following code. I have added some extra code in my previous code:
<h3>Are you sure you want to delete this?</h3>
<fieldset>
<legend>Cricketer</legend>
<dl>
<dt>
@Html.DisplayNameFor(model => model.Name)
</dt>
<dd>
@Html.DisplayFor(model => model.Name)
</dd>
<dt>
@Html.DisplayNameFor(model => model.ODI)
</dt>
<dd>
@Html.DisplayFor(model => model.ODI)
</dd>
<dt>
@Html.DisplayNameFor(model => model.Test)

©2013 C# CORNER. SHARE THIS DOCUMENT AS IT IS. PLEASE DO NOT REPRODUCE, REPUBLISH, CHANGE OR COPY.
65 </dt>
<dd>
@Html.DisplayFor(model => model.Test)
</dd>
<dt>
@Html.DisplayNameFor(model=>model.Grade)
</dt>
<dd>
@Html.DisplayFor(model=>model.Grade)
</dd>
</dl>
</fieldset>
Step 3: Debug your application.
Step 4: Click on the Delete link.

©2013 C# CORNER. SHARE THIS DOCUMENT AS IT IS. PLEASE DO NOT REPRODUCE, REPUBLISH, CHANGE OR COPY.
66
3.4 Working with Validations
In here, I am introducing the use of Data Annotations in MVC 5 using Microsoft Visual Studio 2013 Preview. As you know
I previously deployed a MVC Application in which I used various types of techniques like Adding View,Adding
Model, Login, CRUD Operations, Code Migration, Searching. These are very necessary in MVC Applications but when you
develop applications, it is necessary to apply validations on that app. So, here you will learn how to validate an app in
MVC 5.
In that context, validations are applied in MVC applications by the following assembly:
using System.ComponentModel.DataAnnotations;
Here I will tell you that I am creating validation logic in my Cricketers Model. When a user creates or edits any cricketer.
You can see the validation on my page in the following image:
Don't Repeat Yourself

©2013 C# CORNER. SHARE THIS DOCUMENT AS IT IS. PLEASE DO NOT REPRODUCE, REPUBLISH, CHANGE OR COPY.
67 Whenever you design an ASP.NET MVC application, Don't Repeat Yourself (DRY) is the basic assumption that you need to
use. This makes your code clean, reduces the amount of code and easy to maintain because the more code you write
with fewer errors the more your code functions better.
In ASP.NET MVC applications, validations are defined in the Model Class and applied all over the application. The Entity
Framework Code First approach and MVC are the pillar for the validation.
So, let's begin to take advantage of Data Annotation of MVC in your application with the following criteria.
Use of Data Annotation
You need to add some logic for validation in your MVC application. For adding let's start step-by-step.
Step 1: Open Cricketers.cs from the Solution Explorer.
Step 2: Add the following assembly reference at the top of your Cricketers.cs file:
using System.ComponentModel.DataAnnotations;
Step 3: Change your code with the following code (depends on your logic):
using System.ComponentModel.DataAnnotations;
using System.Data.Entity;
namespace MvcCricket.Models
{
public class Cricketer
{
public int ID { get; set; }
[Required]
[StringLength(50, MinimumLength=4)]
public string Name { get; set; }
[Required]
[Range(1,500)]

©2013 C# CORNER. SHARE THIS DOCUMENT AS IT IS. PLEASE DO NOT REPRODUCE, REPUBLISH, CHANGE OR COPY.
68 public int ODI { get; set; }
[Required]
[Range(1,200)]
public int Test { get; set; }
[Required]
public string Grade { get; set; }
}
}
In the code above, you can see that the Required attribute is used in each property. That means that the user needs to
enter the value in it. In the Name property the StringLength attribute defines the min and max length of the Name. In the
ODI and TEST property the Range attribute is defined to min and max length.
Step 4: Open a Library Package Manager Console and write the following command in it:
add-migration DataAnnotations
After pressing Enter:
Step 5: Again write the following command in the Library Package Manager Console:
update-database
What does Visual Studio do? Visual Studio opens the DataAnnotations.cs file and you will see the DbMigration class is
the base class of DataAnnotations. There are two methods in it. In the Up() and Down(), you will see the updated
database schema. Check it out with the following code:
namespace MvcCricket.Migrations
{
using System;
using System.Data.Entity.Migrations;
public partial class DataAnnotations : DbMigration
{
public override void Up()
{
AlterColumn("dbo.Cricketers", "Name", c => c.String(nullable: false, maxLength: 50));
AlterColumn("dbo.Cricketers", "Grade", c => c.String(nullable: false));
©2013 C# CORNER. SHARE THIS DOCUMENT AS IT IS. PLEASE DO NOT REPRODUCE, REPUBLISH, CHANGE OR COPY.
69 }
public override void Down()
{
AlterColumn("dbo.Cricketers", "Grade", c => c.String());
AlterColumn("dbo.Cricketers", "Name", c => c.String());
}
}
}
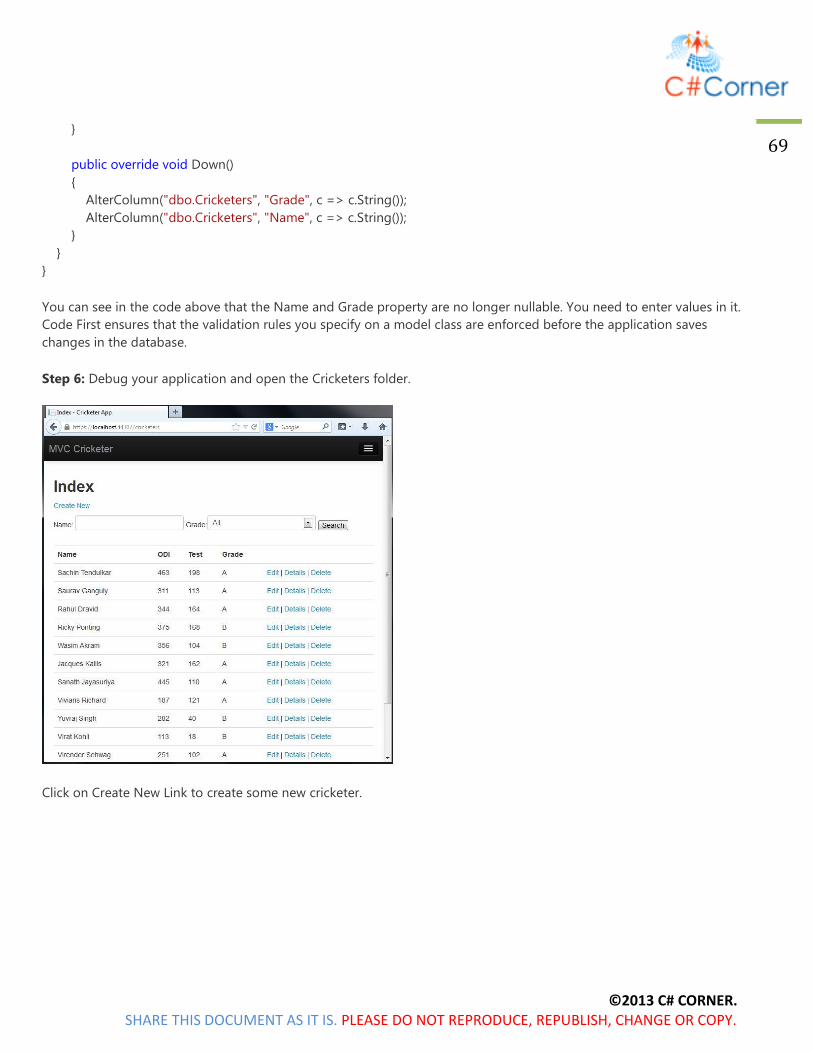
You can see in the code above that the Name and Grade property are no longer nullable. You need to enter values in it.
Code First ensures that the validation rules you specify on a model class are enforced before the application saves
changes in the database.
Step 6: Debug your application and open the Cricketers folder.
Click on Create New Link to create some new cricketer.

©2013 C# CORNER. SHARE THIS DOCUMENT AS IT IS. PLEASE DO NOT REPRODUCE, REPUBLISH, CHANGE OR COPY.
70
That's It. If you want to know the working process of validation process then you to notice my following paragraph.
Validation Process
public ActionResult Create()
{
return View();
}
//
// POST: /Cricketers/Create
[HttpPost]
[ValidateAntiForgeryToken]
public ActionResult Create(Cricketer cricketer)
{
if (ModelState.IsValid)
{
db.Cricketers.Add(cricketer);
db.SaveChanges();
return RedirectToAction("Index");
}
return View(cricketer);
}
In the code above when the form opens in the browser the HTTP GET method is called and in the Create action method
initiates. The second method HttpPost handles the post method. This method checks that the validation errors in the
form and if the object finds the errors then the Create method re-creates the form, otherwise the method saves the data

©2013 C# CORNER. SHARE THIS DOCUMENT AS IT IS. PLEASE DO NOT REPRODUCE, REPUBLISH, CHANGE OR COPY.
71 in the database. In here, the form is not posted to the server, because the validation error occurs in the client-side. You
can also disable your JavaScript to see the error using a breakpoint.
The following is an example of that.
In Internet Explorer
In Google Chrome

©2013 C# CORNER. SHARE THIS DOCUMENT AS IT IS. PLEASE DO NOT REPRODUCE, REPUBLISH, CHANGE OR COPY.
72
Validation Summary
You can also see the changes in your Create.cshtml file when you apply the Validation in your application. Check it out in
my file:
@using (Html.BeginForm())
{
@Html.AntiForgeryToken()
@Html.ValidationSummary(true)
<fieldset class="form-horizontal">
<legend>Cricketer</legend>
<div class="control-group">
@Html.LabelFor(model => model.Name, new { @class = "control-label" })
<div class="controls">
@Html.EditorFor(model => model.Name)
@Html.ValidationMessageFor(model => model.Name, null, new { @class = "help-inline" })
</div>
</div>
<div class="control-group">
@Html.LabelFor(model => model.ODI, new { @class = "control-label" })
<div class="controls">
@Html.EditorFor(model => model.ODI)
@Html.ValidationMessageFor(model => model.ODI, null, new { @class = "help-inline" })
</div>
</div>
<div class="control-group">
@Html.LabelFor(model => model.Test, new { @class = "control-label" })
<div class="controls">

©2013 C# CORNER. SHARE THIS DOCUMENT AS IT IS. PLEASE DO NOT REPRODUCE, REPUBLISH, CHANGE OR COPY.
73 @Html.EditorFor(model => model.Test)
@Html.ValidationMessageFor(model => model.Test, null, new { @class = "help-inline" })
</div>
</div>
<div class="control-group">
@Html.LabelFor(model => model.Grade, new { @class = "control-label" })
<div class="controls">
@Html.EditorFor(model=>model.Grade)
@Html.ValidationMessageFor(model => model.Grade, null, new { @class = "help-inline" })
</div>
</div>
<div class="form-actions no-color">
<input type="submit" value="Create" class="btn" />
</div>
</fieldset>
}
4 Working with External Authentication
4.1 Configure the Login Options
This topic explains configuration of various login options for logging into your ASP.NET Web Application developed in
MVC Project Templates. I will use Visual Studio 2013 Preview and MVC 5 in my ASP.NET Web Application. Here, I am
telling you that there are various login options to login your MVC app.
In that context, you will see in the following image that there is no login option available in my application:

©2013 C# CORNER. SHARE THIS DOCUMENT AS IT IS. PLEASE DO NOT REPRODUCE, REPUBLISH, CHANGE OR COPY.
74 So, let's start to design and configure the MVC app. If you have not created a MVC 5 app with Visual Studio then use the
procedure given below.
Step 1: Open Visual Studio 2013 Preview.
Step 2: "File" -> "New" -> "Project...".
Step 3: Select "MVC Project template for MVC application".

©2013 C# CORNER. SHARE THIS DOCUMENT AS IT IS. PLEASE DO NOT REPRODUCE, REPUBLISH, CHANGE OR COPY.
75 Step 4: In Solution Explorer, go to Views and open "_Layout.cshtml" to design your own app.
Step 5: Change your "_Layout.cshtml" with your own app name.
You need to change the following three lines:
<title>@ViewBag.Title - My ASP.NET Application</title>

©2013 C# CORNER. SHARE THIS DOCUMENT AS IT IS. PLEASE DO NOT REPRODUCE, REPUBLISH, CHANGE OR COPY.
76 @Html.ActionLink("Application name", "Index", "Home", null, new { @class = "brand" })
<p>© @DateTime.Now.Year - My ASP.NET Application</p>
into the following lines:
<title>@ViewBag.Title - Cricketer App</title>
@Html.ActionLink("MVC Cricketer", "Index", "Home", null, new { @class = "brand" })
<p>© @DateTime.Now.Year - Cricketer Application</p>
Step 6: Debug your application.
Now you will see the changes like your Title Bar, your logo and your copyright name.
Let's proceed to the next step in which we configure the Login options. I am using two login options here. They are:
Configure app to Login with Facebook
©2013 C# CORNER. SHARE THIS DOCUMENT AS IT IS. PLEASE DO NOT REPRODUCE, REPUBLISH, CHANGE OR COPY.
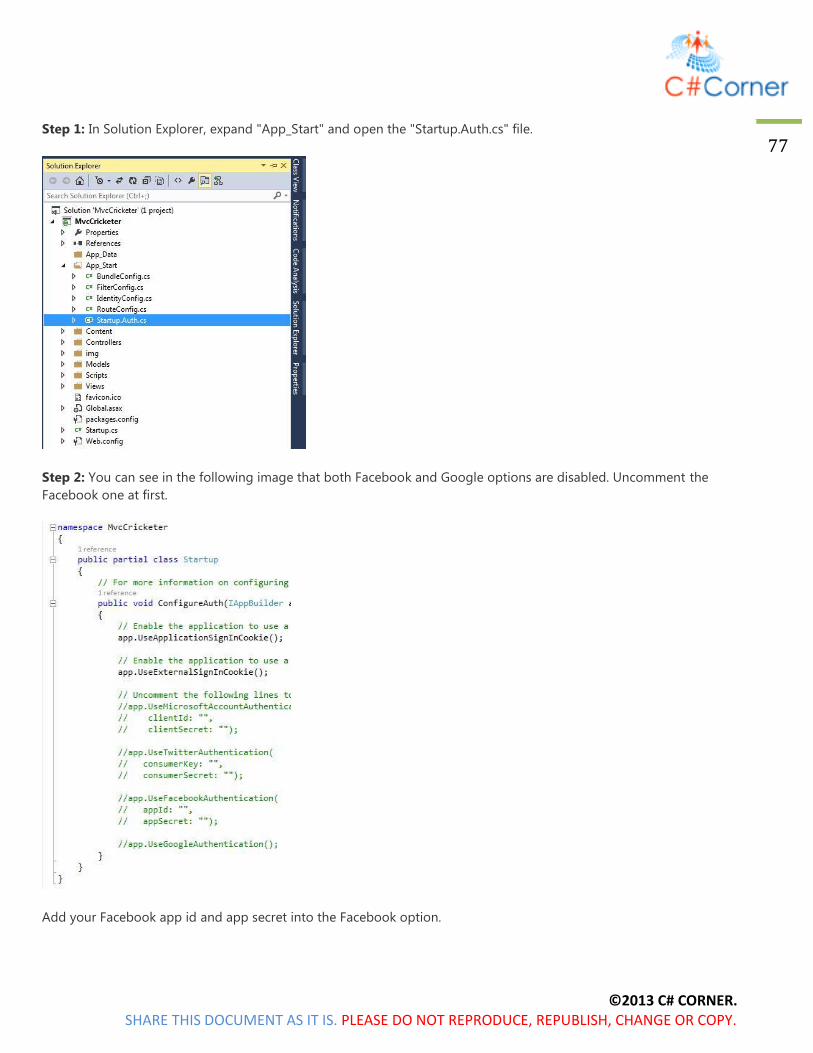
77 Step 1: In Solution Explorer, expand "App_Start" and open the "Startup.Auth.cs" file.
Step 2: You can see in the following image that both Facebook and Google options are disabled. Uncomment the
Facebook one at first.
Add your Facebook app id and app secret into the Facebook option.

©2013 C# CORNER. SHARE THIS DOCUMENT AS IT IS. PLEASE DO NOT REPRODUCE, REPUBLISH, CHANGE OR COPY.
78
Step 3: Enter your App Id and App Secret and debug your application.
Follow the preceding image to go to the Login page.
©2013 C# CORNER. SHARE THIS DOCUMENT AS IT IS. PLEASE DO NOT REPRODUCE, REPUBLISH, CHANGE OR COPY.
79
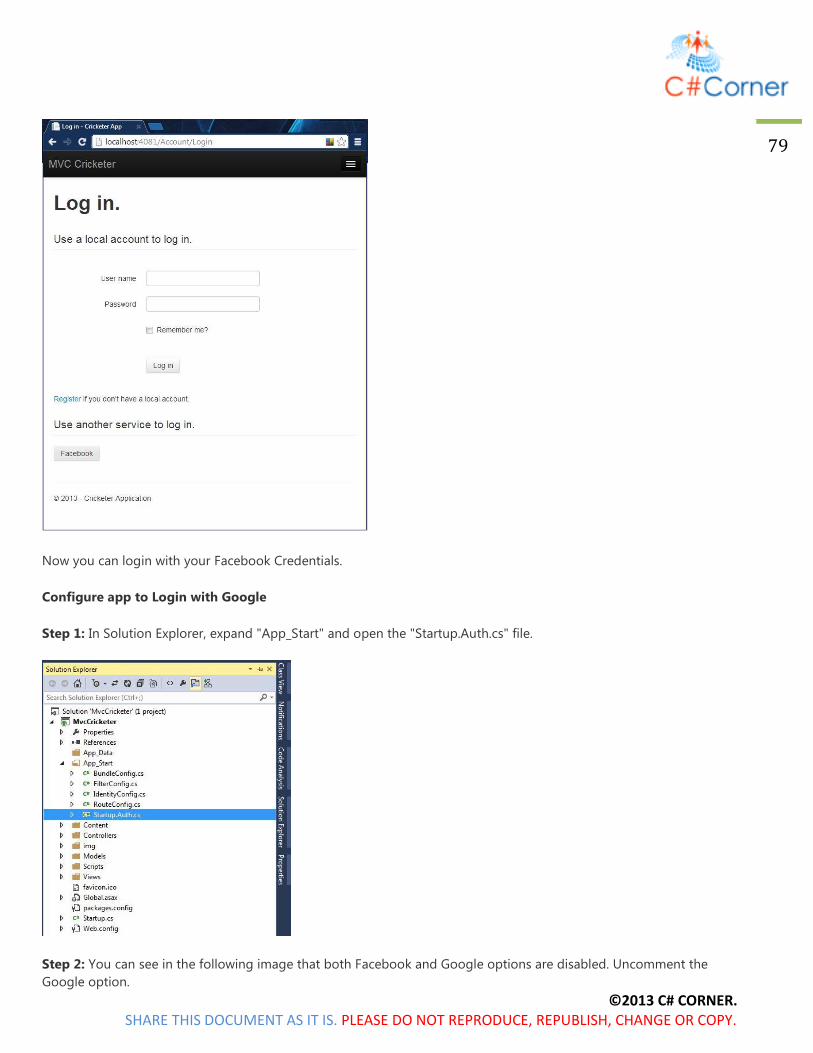
Now you can login with your Facebook Credentials.
Configure app to Login with Google
Step 1: In Solution Explorer, expand "App_Start" and open the "Startup.Auth.cs" file.
Step 2: You can see in the following image that both Facebook and Google options are disabled. Uncomment the
Google option.

©2013 C# CORNER. SHARE THIS DOCUMENT AS IT IS. PLEASE DO NOT REPRODUCE, REPUBLISH, CHANGE OR COPY.
80
After the uncomment:
Step 3: That's it. Debug your application .

©2013 C# CORNER. SHARE THIS DOCUMENT AS IT IS. PLEASE DO NOT REPRODUCE, REPUBLISH, CHANGE OR COPY.
81
Follow the preceding image to go to the Login page.
Now you can login with your Google Credentials.

©2013 C# CORNER. SHARE THIS DOCUMENT AS IT IS. PLEASE DO NOT REPRODUCE, REPUBLISH, CHANGE OR COPY.
82 4.2 Google and Facebook Authentication
This topic explains how to login with various login options to login to your ASP.NET Web Application developed in MVC
Project Templates. I will use Visual Studio 2013 Preview and MVC 5 in my ASP.NET Web Application. As I described in my
earlier I introduced you to the configuration of various login options available in MVC 5 applications. Here, I am
explaining how to login with your login options to login your MVC app.
In that context, you can see in the following image that there are two login options available in the sample application
showing how to login.
I am using the following two login options for the login:
1. Google
2. Facebook
Google Login in MVC 5
Let's start with Google authorization for login. Since you already know the configuration, let's start with the login using
the following procedure.
Step 1: Click on the "Google" button for login.

©2013 C# CORNER. SHARE THIS DOCUMENT AS IT IS. PLEASE DO NOT REPRODUCE, REPUBLISH, CHANGE OR COPY.
83
Step 2: Enter your Google Account Credentials for login.
Step 3: Authorize your app because it is requesting your permission to authorize.
Step 4: Register yourself and enter a unique user name for registration.

©2013 C# CORNER. SHARE THIS DOCUMENT AS IT IS. PLEASE DO NOT REPRODUCE, REPUBLISH, CHANGE OR COPY.
84
Step 5: You will see your user name in your MVC app.
Step 6: Please log off after finishing your work.

©2013 C# CORNER. SHARE THIS DOCUMENT AS IT IS. PLEASE DO NOT REPRODUCE, REPUBLISH, CHANGE OR COPY.
85 Facebook Login in MVC 5
I am using Facebook authorization for the login. Since you know the configuration of Facebook authorization in a MVC
app, let's start using the following procedure.
Step 1: Click on the "Facebook" button to login.
Step 2: Enter your Facebook Account Credentials for login.

©2013 C# CORNER. SHARE THIS DOCUMENT AS IT IS. PLEASE DO NOT REPRODUCE, REPUBLISH, CHANGE OR COPY.
86 Step 3: Since you have already registered yourself as a developer in Facebook and configured your app in your MVC app,
there is no authentication required.
Step 4: Register yourself and enter a unique user name for registration in the MVC app.
Step 5: You will see your user name in your MVC app.
Step 6: Please log off after finishing your work.

©2013 C# CORNER. SHARE THIS DOCUMENT AS IT IS. PLEASE DO NOT REPRODUCE, REPUBLISH, CHANGE OR COPY.
87
4.3 Twitter Authentication
This topic explains Twitter Authentication for logging into your ASP.NET Web Application developed in MVC Project
Templates. I will use Visual Studio 2013 Preview and MVC 5 in my ASP.NET Web Application. Here, I am describing for
you how to authenticate your MVC Application with Twitter.
In that context, you will see in the following image that there are three login options available in my application with
which you can login:
As you can see, the following are the login options available in my MVC Application and I am using Twitter
Authentication in my application:

©2013 C# CORNER. SHARE THIS DOCUMENT AS IT IS. PLEASE DO NOT REPRODUCE, REPUBLISH, CHANGE OR COPY.
88 Facebook
Twitter Authentication for MVC Application
So, let's start to authenticate the MVC Application with Twitter using the following sections:
Twitter App Creation
MVC App Creation
Twitter App Creation
Register yourself as a App Developer in Twitter.
Let's start to create an Twitter app with the following procedure.
Step 1: At first, create an app in Twitter as a developer by https://dev.twitter.com/apps
Step 2: After login, create an app by clicking on "Create a New Application".

©2013 C# CORNER. SHARE THIS DOCUMENT AS IT IS. PLEASE DO NOT REPRODUCE, REPUBLISH, CHANGE OR COPY.
89
Step 3: Enter your unique App name and other necessary details.
Note: You need to enter the CallBack URL and choose Read and Write options to authorize . If you do not have any
domain then you can enter an URL like http://www.website.com/
Step 4: After accepting the license agreement, click on "Create your Twitter Application".
Step 5: Copy your Consumer Key and Consumer Secret values from the next window.

©2013 C# CORNER. SHARE THIS DOCUMENT AS IT IS. PLEASE DO NOT REPRODUCE, REPUBLISH, CHANGE OR COPY.
90
That's it. Now, move to the next session.
MVC App Creation
Let's start to create an MVC app with the following procedure.
Step 1: Create an ASP.NET MVC Application.

©2013 C# CORNER. SHARE THIS DOCUMENT AS IT IS. PLEASE DO NOT REPRODUCE, REPUBLISH, CHANGE OR COPY.
91 Step 2: In your Solution Explorer, open the "Startup.Auth.cs" file .
Step 3: As you can see in the following figure, my Twitter authentication is disabled:
Please un-comment it and paste your Consumer Key value and Consumer Secret value in the file as I mentioned below:

©2013 C# CORNER. SHARE THIS DOCUMENT AS IT IS. PLEASE DO NOT REPRODUCE, REPUBLISH, CHANGE OR COPY.
92
Save the changes.
Step 4: Debug your application and move to the Login link.
©2013 C# CORNER. SHARE THIS DOCUMENT AS IT IS. PLEASE DO NOT REPRODUCE, REPUBLISH, CHANGE OR COPY.
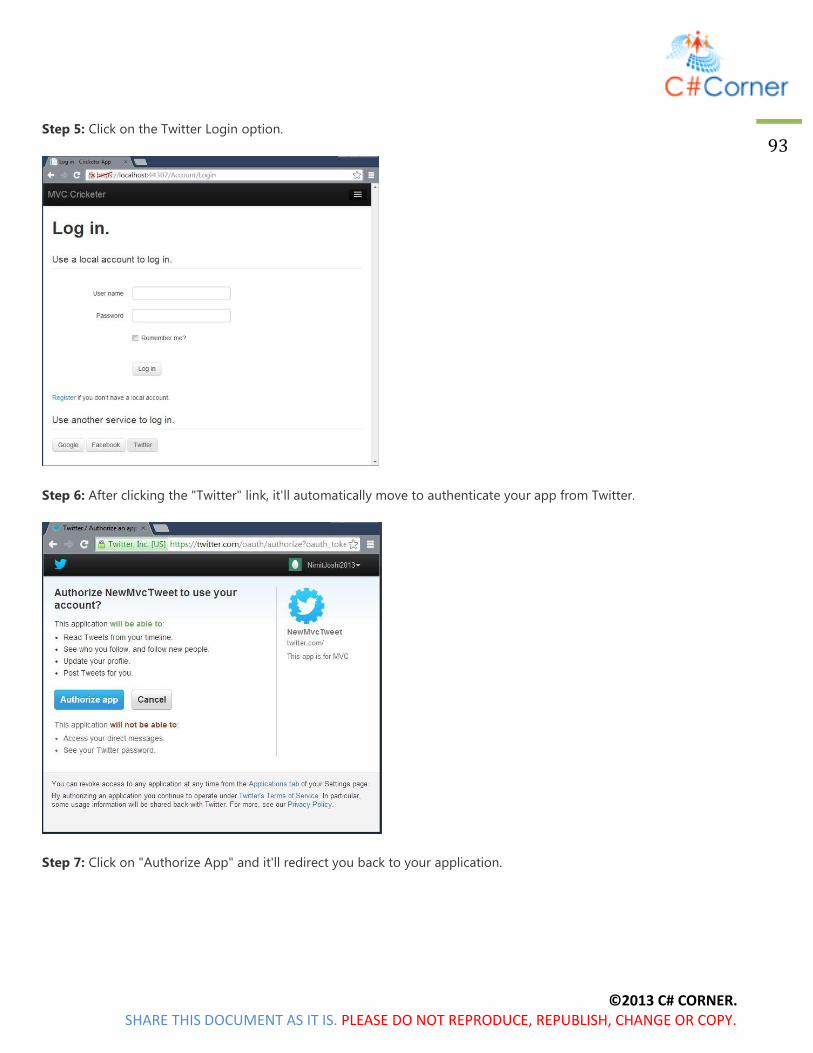
93 Step 5: Click on the Twitter Login option.
Step 6: After clicking the "Twitter" link, it'll automatically move to authenticate your app from Twitter.
Step 7: Click on "Authorize App" and it'll redirect you back to your application.

©2013 C# CORNER. SHARE THIS DOCUMENT AS IT IS. PLEASE DO NOT REPRODUCE, REPUBLISH, CHANGE OR COPY.
94
Step 8: Register yourself to associate with a Twitter account.
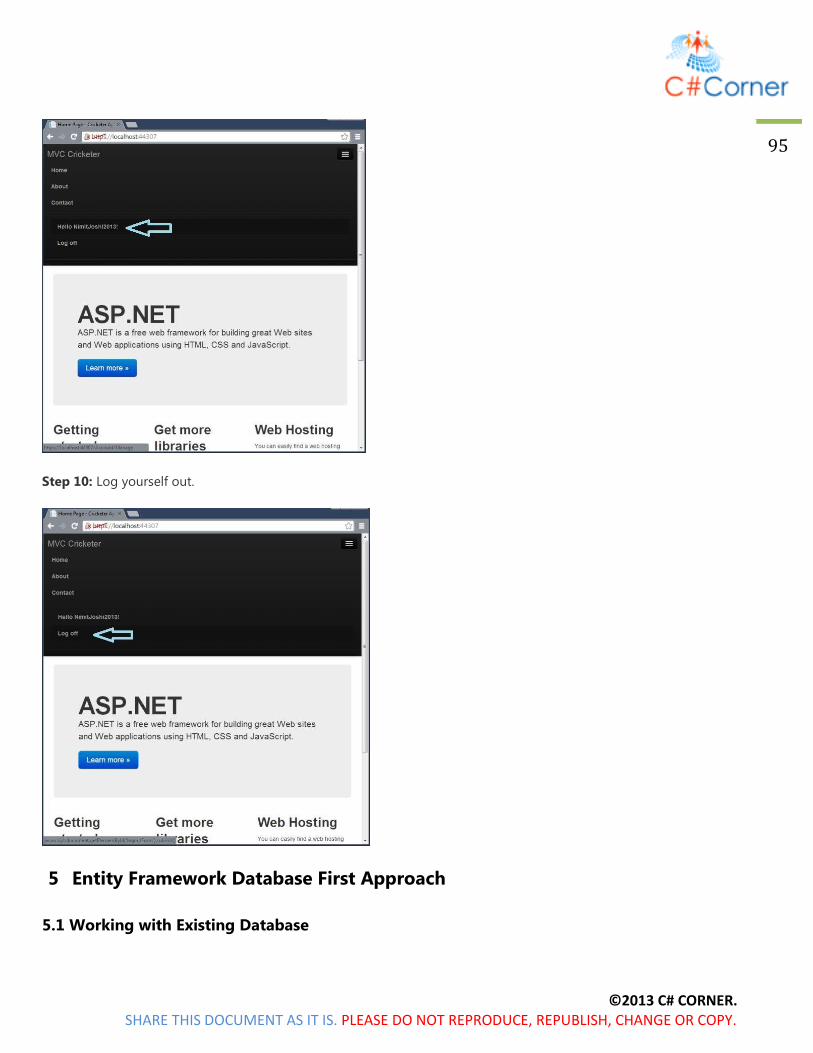
Step 9: Now, you will see your User Name in your MVC Application.
©2013 C# CORNER. SHARE THIS DOCUMENT AS IT IS. PLEASE DO NOT REPRODUCE, REPUBLISH, CHANGE OR COPY.
95
Step 10: Log yourself out.
5 Entity Framework Database First Approach
5.1 Working with Existing Database

©2013 C# CORNER. SHARE THIS DOCUMENT AS IT IS. PLEASE DO NOT REPRODUCE, REPUBLISH, CHANGE OR COPY.
96 This topic describes the development of an ASP.NET Web application in a MVC 5 project template that connects with a
database that exists already and allows the users to interact with the data. It is all possible using MVC, Entity Framework
and Scaffolding in Visual Studio 2013. I am describing this in various parts.
In that context, I am describing here the database connectivity with the Entity Framework Database First Approach. Using
Scaffolding, we can generate code for Create, Read, Update, Delete (CRUD) Operations automatically. In this part we will
explain the Database composition with the web application. I am using Visual Studio 2013 RC in which MVC 5 and Entity
Framework 6 is used.
Prerequisites
There are the following prerequisites to start this:
Visual Studio 2013
Database Source
Database Interaction
Before starting, you need to have a database with which you can interact with the web application based on MVC 5. If
you don't have the database then create a database first and create some tables in that database. Now, let's start the
setup of the database in the Visual Studio 2013 using the following procedure.
Step 1: Open Visual Studio 2013 and in it open the Server Explorer to add a new Data Connection.
Note: If you are creating a new data connection the first time, a Choose Data Source wizard will open and you need to
choose Microsoft SQL Server from that menu.
Step 2: In the next wizard enter the server name and database name as entered in the following image:

©2013 C# CORNER. SHARE THIS DOCUMENT AS IT IS. PLEASE DO NOT REPRODUCE, REPUBLISH, CHANGE OR COPY.
97
Step 3: A new data connection is added in your Server Explorer. Now right-click on your connection and click on New
Query.
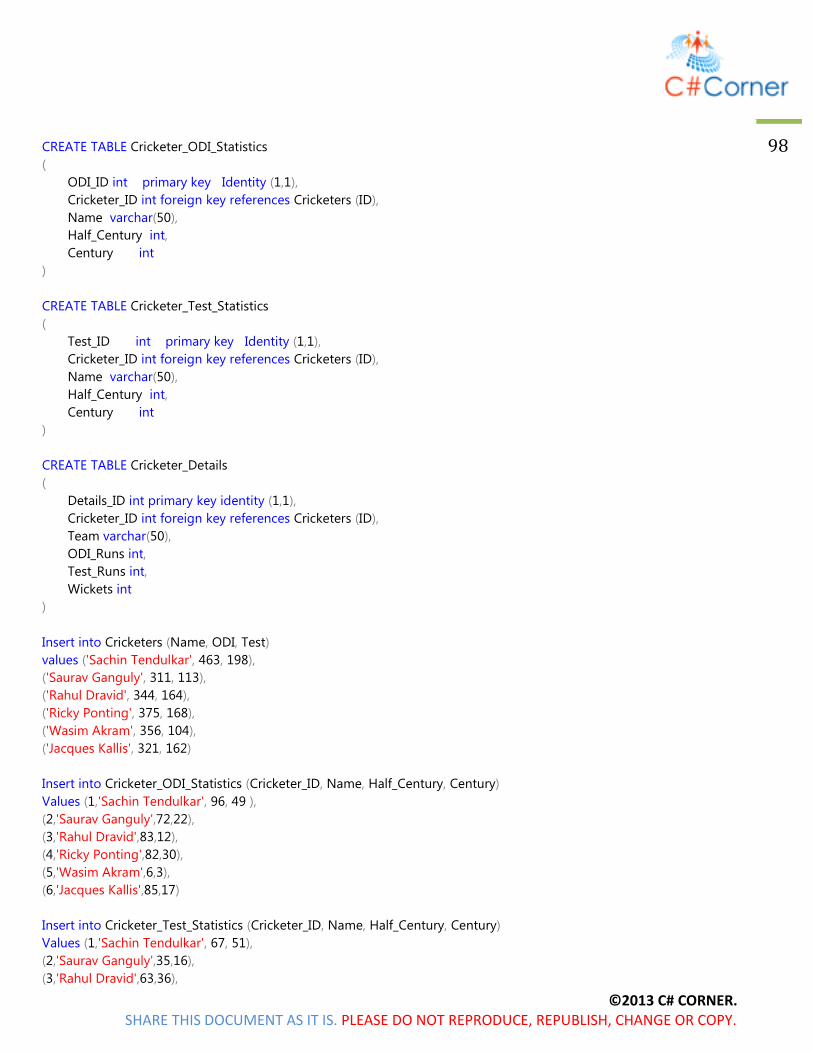
Step 4: In the New Query window, enter the following queries:
CREATE TABLE Cricketers
(
ID int primary key identity (1,1),
Name varchar(50),
ODI int,
Test int
)
©2013 C# CORNER. SHARE THIS DOCUMENT AS IT IS. PLEASE DO NOT REPRODUCE, REPUBLISH, CHANGE OR COPY.
98
CREATE TABLE Cricketer_ODI_Statistics
(
ODI_ID int primary key Identity (1,1),
Cricketer_ID int foreign key references Cricketers (ID),
Name varchar(50),
Half_Century int,
Century int
)
CREATE TABLE Cricketer_Test_Statistics
(
Test_ID int primary key Identity (1,1),
Cricketer_ID int foreign key references Cricketers (ID),
Name varchar(50),
Half_Century int,
Century int
)
CREATE TABLE Cricketer_Details
(
Details_ID int primary key identity (1,1),
Cricketer_ID int foreign key references Cricketers (ID),
Team varchar(50),
ODI_Runs int,
Test_Runs int,
Wickets int
)
Insert into Cricketers (Name, ODI, Test)
values ('Sachin Tendulkar', 463, 198),
('Saurav Ganguly', 311, 113),
('Rahul Dravid', 344, 164),
('Ricky Ponting', 375, 168),
('Wasim Akram', 356, 104),
('Jacques Kallis', 321, 162)
Insert into Cricketer_ODI_Statistics (Cricketer_ID, Name, Half_Century, Century)
Values (1,'Sachin Tendulkar', 96, 49 ),
(2,'Saurav Ganguly',72,22),
(3,'Rahul Dravid',83,12),
(4,'Ricky Ponting',82,30),
(5,'Wasim Akram',6,3),
(6,'Jacques Kallis',85,17)
Insert into Cricketer_Test_Statistics (Cricketer_ID, Name, Half_Century, Century)
Values (1,'Sachin Tendulkar', 67, 51),
(2,'Saurav Ganguly',35,16),
(3,'Rahul Dravid',63,36),

©2013 C# CORNER. SHARE THIS DOCUMENT AS IT IS. PLEASE DO NOT REPRODUCE, REPUBLISH, CHANGE OR COPY.
99 (4,'Ricky Ponting',62,41),
(5,'Wasim Akram',7,3),
(6,'Jacques Kallis',58,44)
Insert into Cricketer_Details (Cricketer_ID, Team, ODI_Runs, Test_Runs, Wickets)
Values (1, 'India', 18426, 15837, 199),
(2, 'India', 11363, 7212, 132),
(3, 'India', 10889, 13288, 5),
(4, 'Australia', 13704, 13378, 8),
(5, 'Pakistan', 3717, 2898, 916),
(6, 'South Africa', 11498, 13128, 558)
Step 5: Confirm that all tables now exist in your data connection.
Step 6: Right-click on any table to show the table data.
You can see your table data that can also be edited.

©2013 C# CORNER. SHARE THIS DOCUMENT AS IT IS. PLEASE DO NOT REPRODUCE, REPUBLISH, CHANGE OR COPY.
100
5.2 Associating Database with Application
This topic describes the development of an ASP.NET Web application in a MVC 5 project template that connects with an
existing database. I have a database with which we can create a model that supports interaction with the application and
the performance of Create, Read, Update, Delete (CRUD) operations.
Web Application in MVC
Let's create an ASP.NET Web Application with the MVC 5 project template with the following procedure.
Step 1: Open Visual Studio 2013 and create a new project.
Step 2: Select MVC project template to create an application.

©2013 C# CORNER. SHARE THIS DOCUMENT AS IT IS. PLEASE DO NOT REPRODUCE, REPUBLISH, CHANGE OR COPY.
101 Step 3: In your Solution Explorer, right-click on your Models to add a New Item.
Step 4: Select ADO.NET Entity Data Model.
Step 5: In the next wizard, select the data connection that was created earlier. Provide also the Connection String name.

©2013 C# CORNER. SHARE THIS DOCUMENT AS IT IS. PLEASE DO NOT REPRODUCE, REPUBLISH, CHANGE OR COPY.
102 Step 6: The next wizard will help you to choose the tables.
Step 7: Visual Studio automatically creates the Model and generates a view for the model.
You can also see in your Solution Explorer that the CricketerModel has many new files related with the database.

©2013 C# CORNER. SHARE THIS DOCUMENT AS IT IS. PLEASE DO NOT REPRODUCE, REPUBLISH, CHANGE OR COPY.
103
So far we have created a model, now we move to add the Controllers and Views for our Model. So Let's proceed with the
following section:
Adding Controller & View
Working with View
Adding Controller & View
MVC 5 can create a Controller with the corresponding views using Entity Framework 6. We need to just use Scaffolding.
So let's start with the following procedure.
Step 1: In your Solution Explorer, Right-click on your Controller to Scaffold
Step 2: In the next wizard, select the controller with the views option as shown below:

©2013 C# CORNER. SHARE THIS DOCUMENT AS IT IS. PLEASE DO NOT REPRODUCE, REPUBLISH, CHANGE OR COPY.
104
Step 3: In the next wizard enter the controller name and choose the corresponding model and the DbContext class as
shown below:
Click on Add. You might get an error, if you didn't build your project. So build your solution and again follow the step.
After adding the controller, Visual Studio automatically creates a Cricketer Controller and the corresponding Cricketer
View. You can see that in the following image:

©2013 C# CORNER. SHARE THIS DOCUMENT AS IT IS. PLEASE DO NOT REPRODUCE, REPUBLISH, CHANGE OR COPY.
105 Step 4: Now, add a controller for your remaining classes, like Cricker_Details, Cricketer_ODI_Statistics,
Cricketer_Test_Statistics by performing the same steps as above. You can see all controller and corresponding views in
the following image:
Working with View
Now your controller and view are ready. You can create and view all your data (added in the database) in the browser. To
work with them use the following procedure.
Create and Read Operations
Cricketer
Let's add some Cricketer with the following procedure:
Step 1: To work with the Cricketer, select the Index.cshtml in the Cricketer view and open it in the browser

©2013 C# CORNER. SHARE THIS DOCUMENT AS IT IS. PLEASE DO NOT REPRODUCE, REPUBLISH, CHANGE OR COPY.
106
Step 2: Click on Create New. Enter some new cricketers.
Step 3: You can see your Cricketer as shown below:
©2013 C# CORNER. SHARE THIS DOCUMENT AS IT IS. PLEASE DO NOT REPRODUCE, REPUBLISH, CHANGE OR COPY.
107
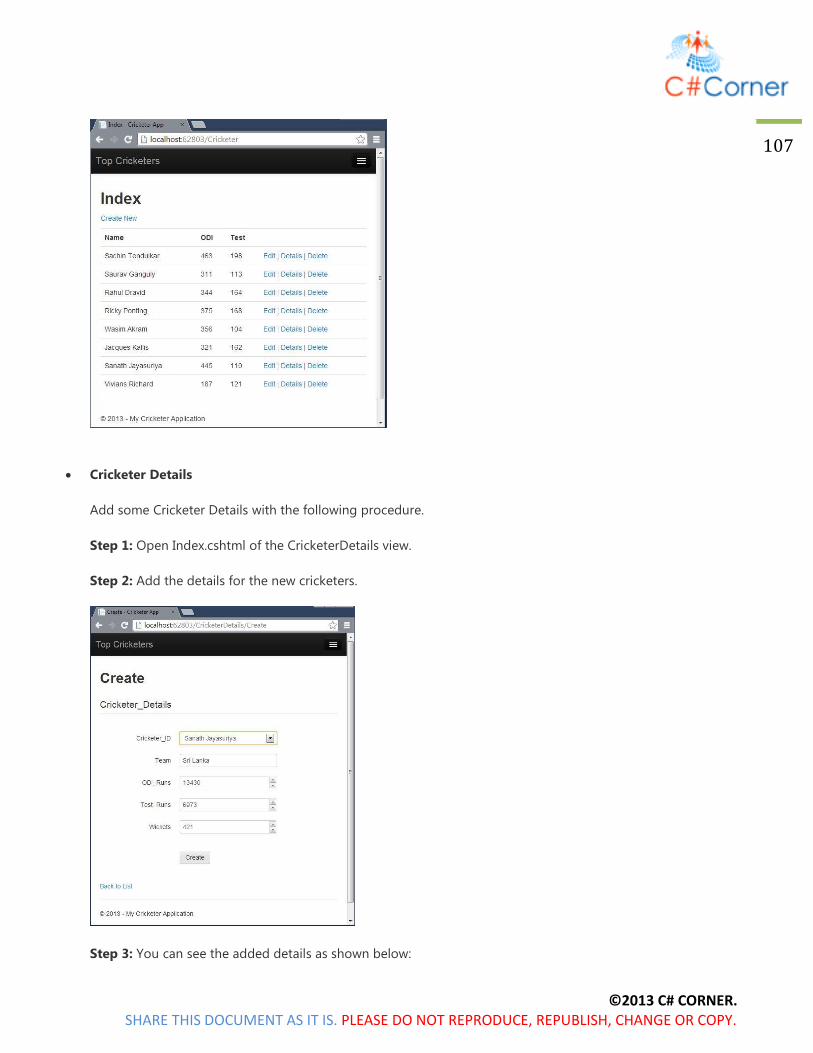
Cricketer Details
Add some Cricketer Details with the following procedure.
Step 1: Open Index.cshtml of the CricketerDetails view.
Step 2: Add the details for the new cricketers.
Step 3: You can see the added details as shown below:

©2013 C# CORNER. SHARE THIS DOCUMENT AS IT IS. PLEASE DO NOT REPRODUCE, REPUBLISH, CHANGE OR COPY.
108
Note: Perform the same steps for the remaining views to create the cricketer details and information.
In the preceding steps you have performed Create and Read operations. Now let's do Edit and Delete operations.
Edit & Delete Operations
Edit
To edit or update the information use the following procedure.
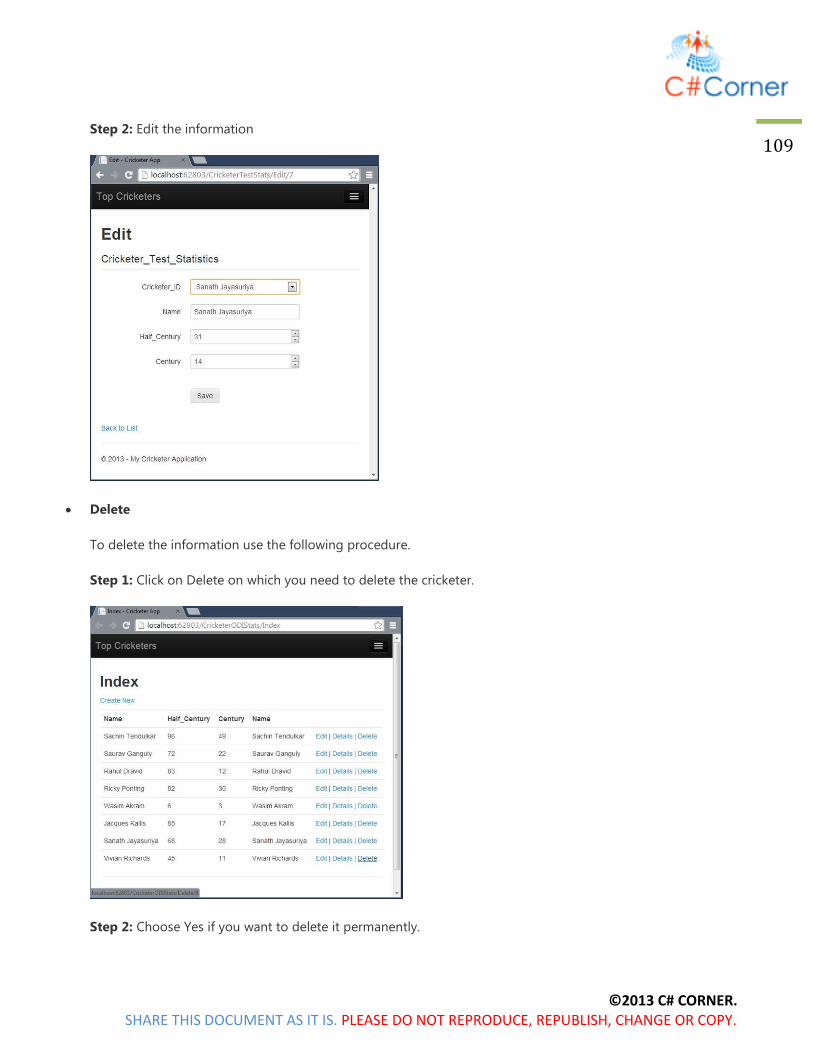
Step 1: Click on Edit on which you need to edit the information
©2013 C# CORNER. SHARE THIS DOCUMENT AS IT IS. PLEASE DO NOT REPRODUCE, REPUBLISH, CHANGE OR COPY.
109 Step 2: Edit the information
Delete
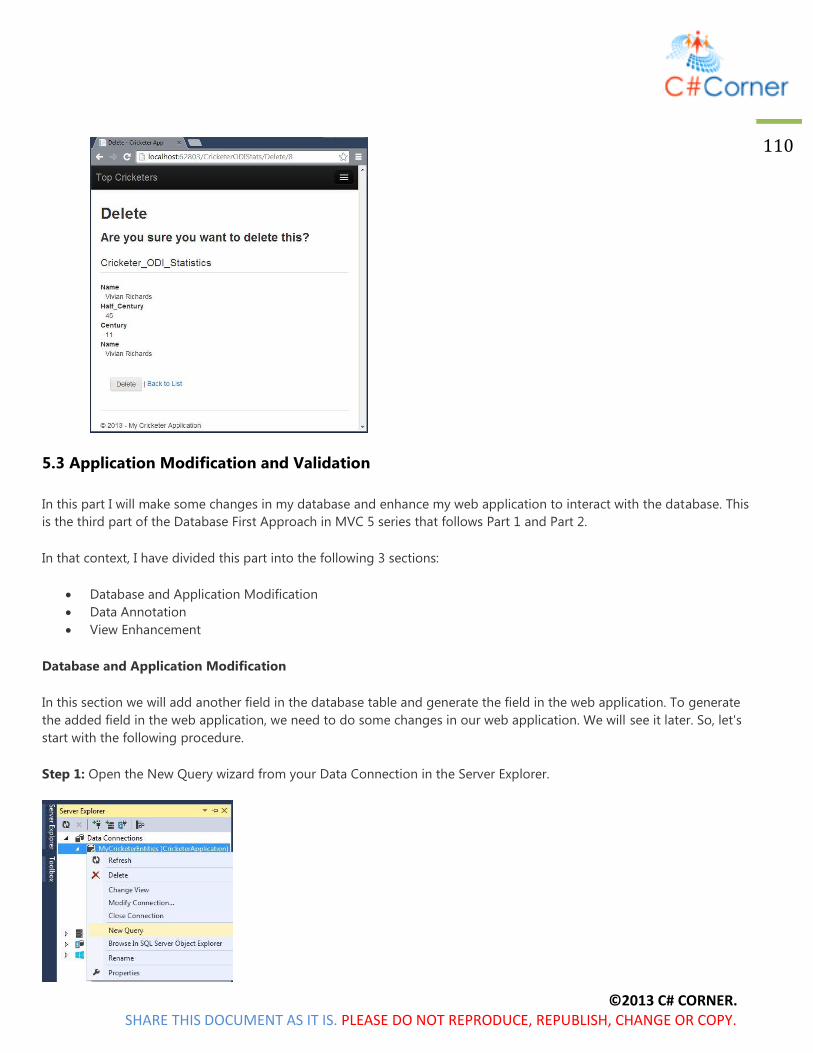
To delete the information use the following procedure.
Step 1: Click on Delete on which you need to delete the cricketer.
Step 2: Choose Yes if you want to delete it permanently.
©2013 C# CORNER. SHARE THIS DOCUMENT AS IT IS. PLEASE DO NOT REPRODUCE, REPUBLISH, CHANGE OR COPY.
110
5.3 Application Modification and Validation
In this part I will make some changes in my database and enhance my web application to interact with the database. This
is the third part of the Database First Approach in MVC 5 series that follows Part 1 and Part 2.
In that context, I have divided this part into the following 3 sections:
Database and Application Modification
Data Annotation
View Enhancement
Database and Application Modification
In this section we will add another field in the database table and generate the field in the web application. To generate
the added field in the web application, we need to do some changes in our web application. We will see it later. So, let's
start with the following procedure.
Step 1: Open the New Query wizard from your Data Connection in the Server Explorer.

©2013 C# CORNER. SHARE THIS DOCUMENT AS IT IS. PLEASE DO NOT REPRODUCE, REPUBLISH, CHANGE OR COPY.
111 Step 2: Enter the following command:
ALTER TABLE Cricketers
ADD Grade varchar(5)
Step 3: Execute the command and check out the changes in the table.
Now, you have added the new field in the database. This new field will not be present in your model in the application,
you must improve your model for this new added field. Use the following procedure for that.
Step 4: Select your Cricketers Model from the CricketerModel.edmx file. Now, right-click on your workspace and select
"Update Model from Database".
You can see that the Grade field is not present.
Step 5: In the next wizard, click on the Refresh Tab and select your table.
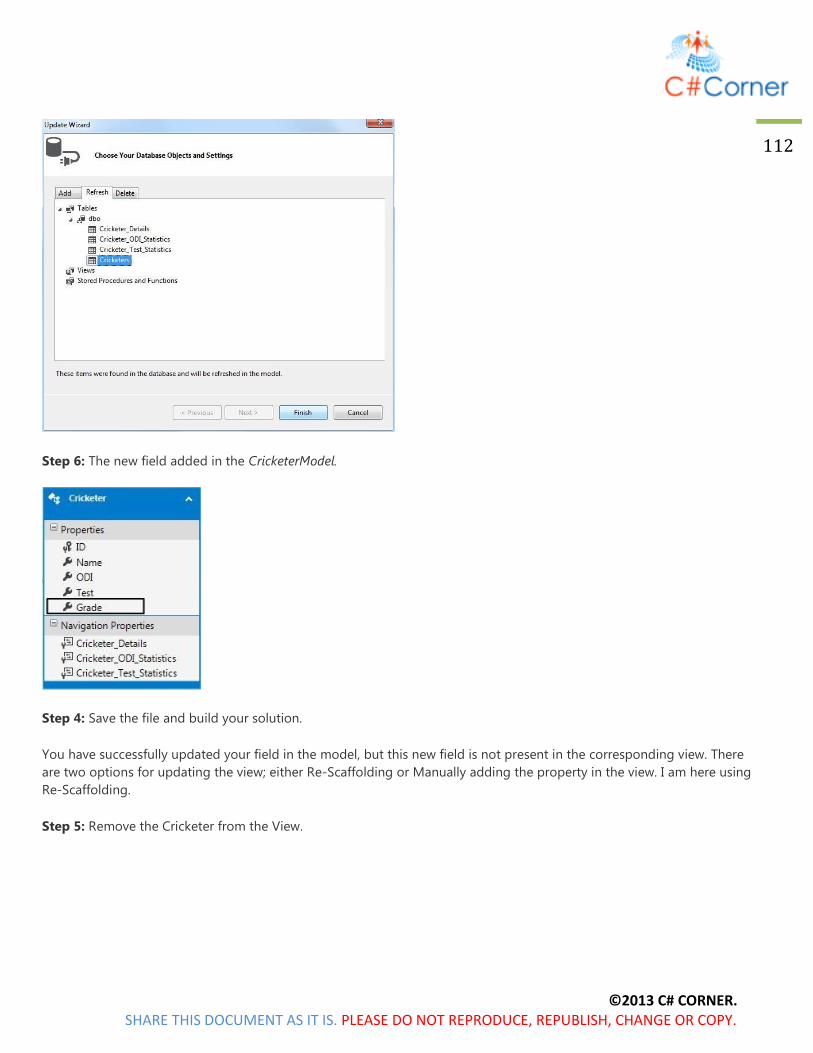
©2013 C# CORNER. SHARE THIS DOCUMENT AS IT IS. PLEASE DO NOT REPRODUCE, REPUBLISH, CHANGE OR COPY.
112
Step 6: The new field added in the CricketerModel.
Step 4: Save the file and build your solution.
You have successfully updated your field in the model, but this new field is not present in the corresponding view. There
are two options for updating the view; either Re-Scaffolding or Manually adding the property in the view. I am here using
Re-Scaffolding.
Step 5: Remove the Cricketer from the View.

©2013 C# CORNER. SHARE THIS DOCUMENT AS IT IS. PLEASE DO NOT REPRODUCE, REPUBLISH, CHANGE OR COPY.
113
Step 6: Add Scaffold again from the Controller folder named CricketerController. Click OK for replacing the existing file.
Visual Studio automatically replaces the existing file with the new CricketerController. It also creates the Cricketer folder in
the View folder.
Step 7: Open the Index.cshtml file in the browser. Click on "Create New" to enter details.

©2013 C# CORNER. SHARE THIS DOCUMENT AS IT IS. PLEASE DO NOT REPRODUCE, REPUBLISH, CHANGE OR COPY.
114
Data Annotation
In this section we apply the validations rules using Data Annotation. This is to be applied to the specific property. Use the
following procedure.
Step 1: Open the Cricketer.cs file from the Model folder in Solution Explorer and modify your code with the following
code:
namespace CricketerApplication.Models
{
using System;
using System.Collections.Generic;
using System.ComponentModel.DataAnnotations;
public partial class Cricketer
{
public Cricketer()
{
this.Cricketer_Details = new HashSet<Cricketer_Details>();
this.Cricketer_ODI_Statistics = new HashSet<Cricketer_ODI_Statistics>();
this.Cricketer_Test_Statistics = new HashSet<Cricketer_Test_Statistics>();
}
public int ID { get; set; }
[Required]
[StringLength(50, MinimumLength = 4)]

©2013 C# CORNER. SHARE THIS DOCUMENT AS IT IS. PLEASE DO NOT REPRODUCE, REPUBLISH, CHANGE OR COPY.
115 public string Name { get; set; }
[Required]
[Range(1, 500)]
public Nullable<int> ODI { get; set; }
[Required]
[Range(1, 500)]
public Nullable<int> Test { get; set; }
[Required]
public string Grade { get; set; }
public virtual ICollection<Cricketer_Details> Cricketer_Details { get; set; }
public virtual ICollection<Cricketer_ODI_Statistics> Cricketer_ODI_Statistics { get; set; }
public virtual ICollection<Cricketer_Test_Statistics> Cricketer_Test_Statistics { get; set; }
}
}
Step 2: Build your solution. Browse the page and see the validation as shown below:
View Enhancement
We are watching the view that was created automatically by Visual Studio. Now let's make some changes to enhance the
view depending on our condition. Suppose we want to see the Cricketer Details in the Cricketer page, then we need to do
some changes in our application. Start with the following procedure.
©2013 C# CORNER. SHARE THIS DOCUMENT AS IT IS. PLEASE DO NOT REPRODUCE, REPUBLISH, CHANGE OR COPY.
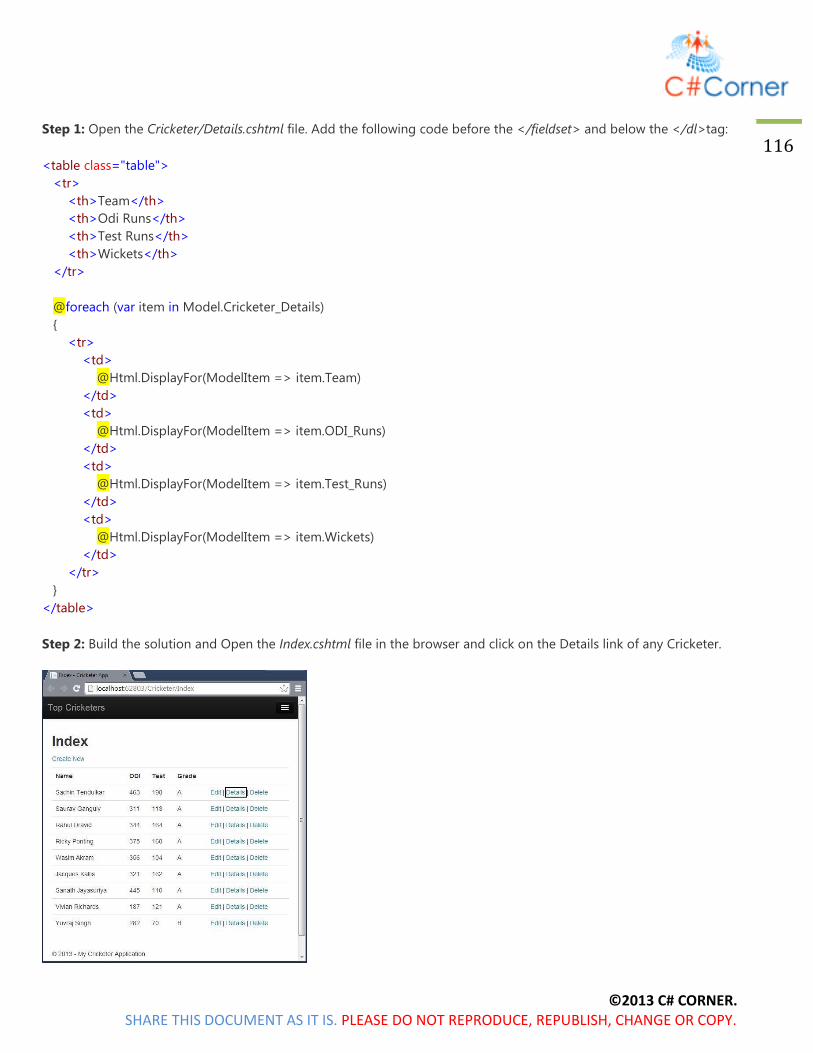
116 Step 1: Open the Cricketer/Details.cshtml file. Add the following code before the </fieldset> and below the </dl>tag:
<table class="table">
<tr>
<th>Team</th>
<th>Odi Runs</th>
<th>Test Runs</th>
<th>Wickets</th>
</tr>
@foreach (var item in Model.Cricketer_Details)
{
<tr>
<td>
@Html.DisplayFor(ModelItem => item.Team)
</td>
<td>
@Html.DisplayFor(ModelItem => item.ODI_Runs)
</td>
<td>
@Html.DisplayFor(ModelItem => item.Test_Runs)
</td>
<td>
@Html.DisplayFor(ModelItem => item.Wickets)
</td>
</tr>
}
</table>
Step 2: Build the solution and Open the Index.cshtml file in the browser and click on the Details link of any Cricketer.
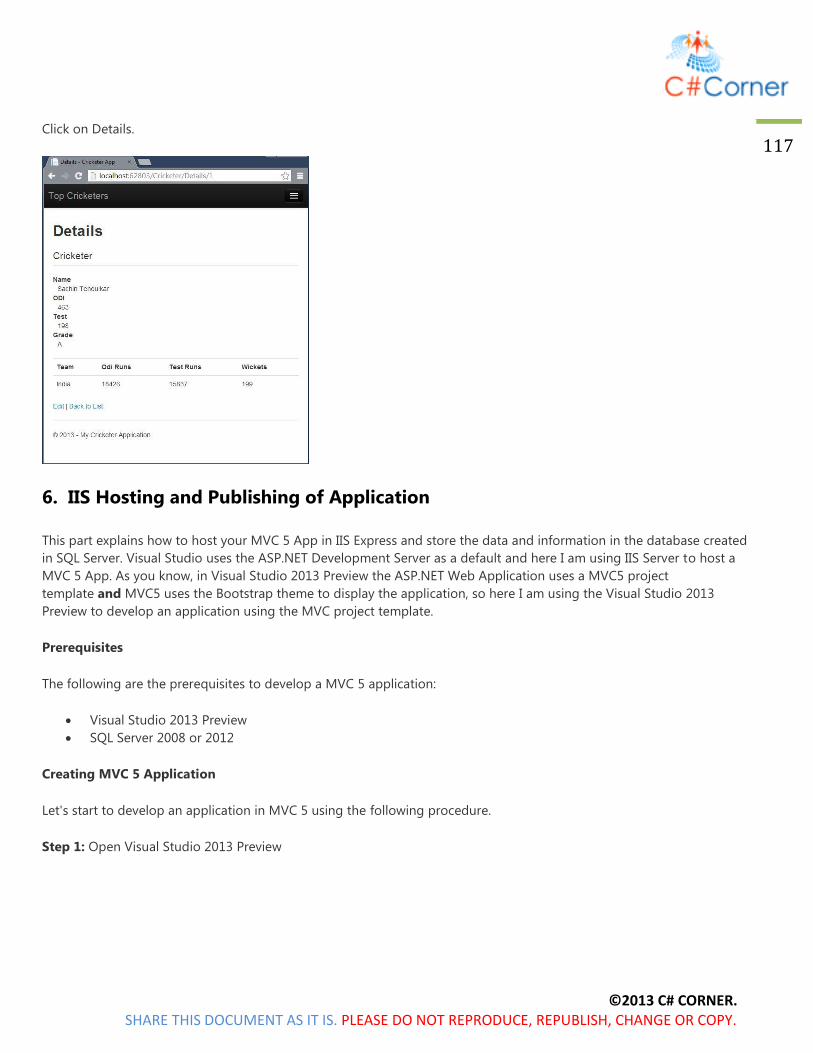
©2013 C# CORNER. SHARE THIS DOCUMENT AS IT IS. PLEASE DO NOT REPRODUCE, REPUBLISH, CHANGE OR COPY.
117 Click on Details.
6. IIS Hosting and Publishing of Application
This part explains how to host your MVC 5 App in IIS Express and store the data and information in the database created
in SQL Server. Visual Studio uses the ASP.NET Development Server as a default and here I am using IIS Server to host a
MVC 5 App. As you know, in Visual Studio 2013 Preview the ASP.NET Web Application uses a MVC5 project
template and MVC5 uses the Bootstrap theme to display the application, so here I am using the Visual Studio 2013
Preview to develop an application using the MVC project template.
Prerequisites
The following are the prerequisites to develop a MVC 5 application:
Visual Studio 2013 Preview
SQL Server 2008 or 2012
Creating MVC 5 Application
Let's start to develop an application in MVC 5 using the following procedure.
Step 1: Open Visual Studio 2013 Preview

©2013 C# CORNER. SHARE THIS DOCUMENT AS IT IS. PLEASE DO NOT REPRODUCE, REPUBLISH, CHANGE OR COPY.
118
Step 2: Click on "New Project" and enter the application name.
Step 3: Select MVC project template to create the project.
Step 4: In your Solution Explorer, open the Web.Config file.

©2013 C# CORNER. SHARE THIS DOCUMENT AS IT IS. PLEASE DO NOT REPRODUCE, REPUBLISH, CHANGE OR COPY.
119 As you can see, the connection property is available on my file:
<add name="DefaultConnection"
connectionString="Data Source=(LocalDb)\v11.0;AttachDbFilename=|DataDirectory|\aspnet-MvcIISDemo-
20130911053147.mdf;Initial Catalog=aspnet-MvcIISDemo-20130911053147;Integrated Security=True"
providerName="System.Data.SqlClient" />
Now, change the code above as shown below:
Step 5: Debug your application and click on the "Register Link" as shown below:
Step 6: Enter the details and click on the "Register" button.

©2013 C# CORNER. SHARE THIS DOCUMENT AS IT IS. PLEASE DO NOT REPRODUCE, REPUBLISH, CHANGE OR COPY.
120
You will see your UserName in your next page window:
Verify in SQL Server 2012
As you can see, I did not create a database nor any table in my SQL Server 2012. When I declared my connection string, it
automatically created a database and table in my SQL Server. You do not need to worry about that.
Let's see my database in my SQL Server Object Explorer.

©2013 C# CORNER. SHARE THIS DOCUMENT AS IT IS. PLEASE DO NOT REPRODUCE, REPUBLISH, CHANGE OR COPY.
121
Select your database and open the Users Table. You can see the user information as shown below:
Publish Application
The next step is to host in IIS 8 (IIS Express). For that use the following procedure:
Step 1: In your Solution Explorer select your project and right-click to select Publish.
Step 2: Select NewProfile and click Next as shown below:

©2013 C# CORNER. SHARE THIS DOCUMENT AS IT IS. PLEASE DO NOT REPRODUCE, REPUBLISH, CHANGE OR COPY.
122
Step 3: Enter Profile Name and click OK.
Step 4: Select File System in Publish Method and select your preferred location in the Target Folder.
Step 5: Select Release in Configuration in the next window and click "Next".

©2013 C# CORNER. SHARE THIS DOCUMENT AS IT IS. PLEASE DO NOT REPRODUCE, REPUBLISH, CHANGE OR COPY.
123
Step 6: Click on "Publish" in the next wizard.
You will see that the application will publish successfully.
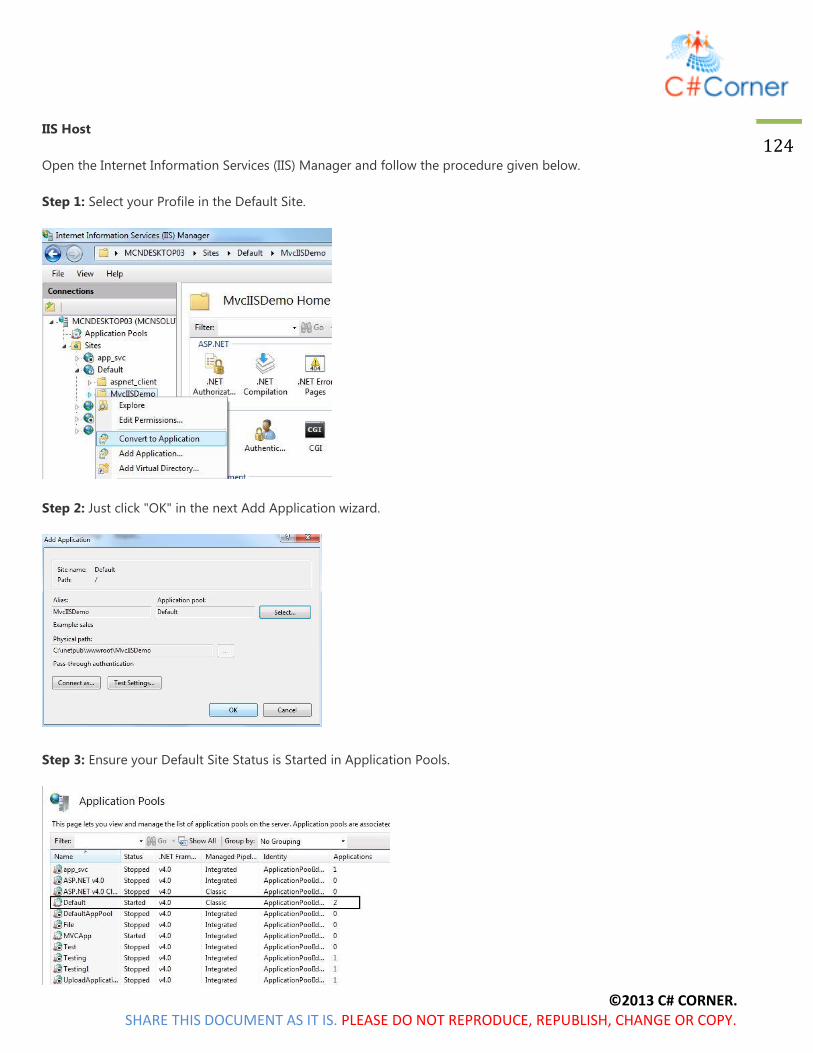
©2013 C# CORNER. SHARE THIS DOCUMENT AS IT IS. PLEASE DO NOT REPRODUCE, REPUBLISH, CHANGE OR COPY.
124 IIS Host
Open the Internet Information Services (IIS) Manager and follow the procedure given below.
Step 1: Select your Profile in the Default Site.
Step 2: Just click "OK" in the next Add Application wizard.
Step 3: Ensure your Default Site Status is Started in Application Pools.

©2013 C# CORNER. SHARE THIS DOCUMENT AS IT IS. PLEASE DO NOT REPRODUCE, REPUBLISH, CHANGE OR COPY.
125 Step 4: Right-click your Profile in the Select Browse in Manage Application.
Step 5: You will see an error such as "This Operation requires IIS integrated pipeline mode" in your browser.
Note: Please don't close the browser.
Step 6: Select "Advanced Settings" of your site in the Application Pool by right-clicking and selecting "Advanced
Settings".

©2013 C# CORNER. SHARE THIS DOCUMENT AS IT IS. PLEASE DO NOT REPRODUCE, REPUBLISH, CHANGE OR COPY.
126
Step 7: Select Integrated in the Managed Pipeline Mode.
Step 8: Reload your browser and you will see the Home Page.
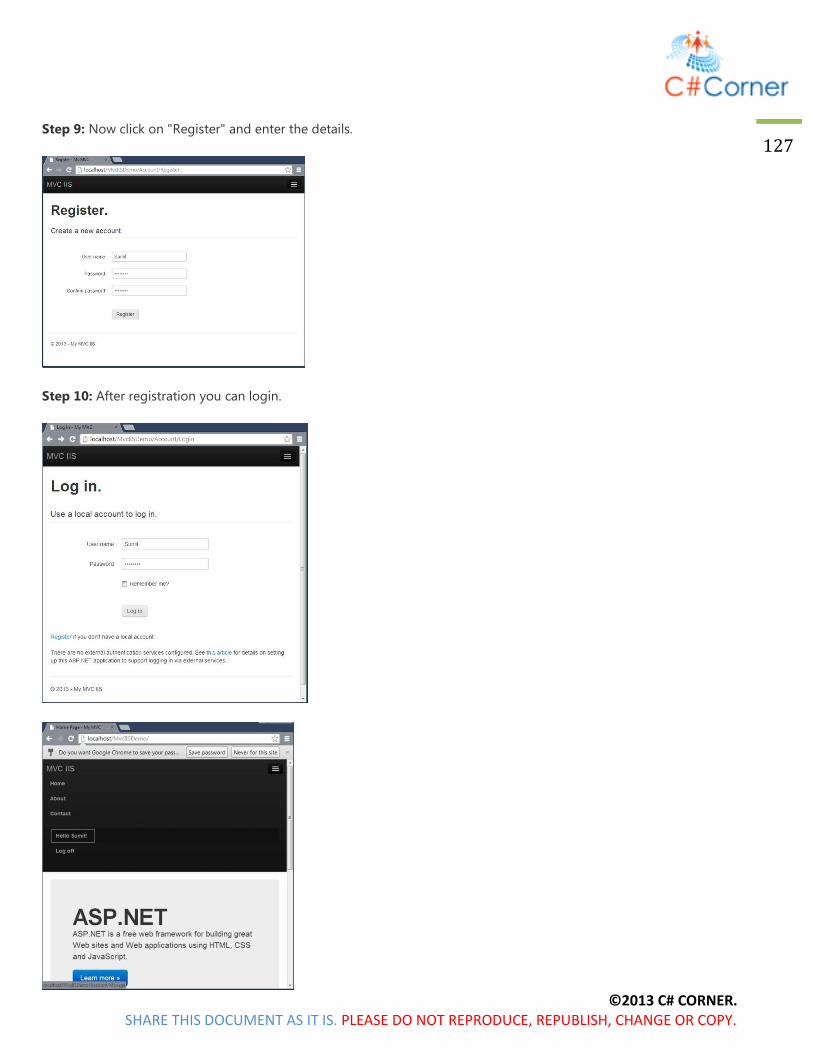
©2013 C# CORNER. SHARE THIS DOCUMENT AS IT IS. PLEASE DO NOT REPRODUCE, REPUBLISH, CHANGE OR COPY.
127 Step 9: Now click on "Register" and enter the details.
Step 10: After registration you can login.

©2013 C# CORNER. SHARE THIS DOCUMENT AS IT IS. PLEASE DO NOT REPRODUCE, REPUBLISH, CHANGE OR COPY.
128 7. Introduction of ASP.NET SignalR
In here, I am using the ASP.NET SignalR library in the latest MVC 5 project template. Let me give you a glimpse of
SignalR, it is a library that adds real-time web functionality to the ASP.NET applications. Now, what is this real-time
functionality? It is used to access the server code and push the content to the connected clients instantly instead of the
server waiting for the client's request.
In that context, I am developing an ASP.NET Web application using the MVC Project template and in it using a real-time
web application with ASP.NET SignalR.
Prerequisites
I am using Visual Studio 2013. There are some prerequisites to develop the application:
Visual Studio 2010 SP1 or Visual Studio 2012.
ASP.NET and Web Tools 2012.2
Let's create an application for SignalR development using the following sections:
MVC 5 Application
Code Execution
MVC 5 Application
Step 1: Open Visual Studio 2013 and create a New Project.
Step 2: Select MVC project template.

©2013 C# CORNER. SHARE THIS DOCUMENT AS IT IS. PLEASE DO NOT REPRODUCE, REPUBLISH, CHANGE OR COPY.
129
Step 3: Open the Package Manager Console.
And write the following command:
install-package Microsoft.AspNet.SignalR
Step 4: You can see in your Solution Explorer that the SignalR was successfully added to your application.

©2013 C# CORNER. SHARE THIS DOCUMENT AS IT IS. PLEASE DO NOT REPRODUCE, REPUBLISH, CHANGE OR COPY.
130
Step 5: Add a new folder named Hubs in your application and add a class in it.
Give the name of your class ChatHub as shown below:
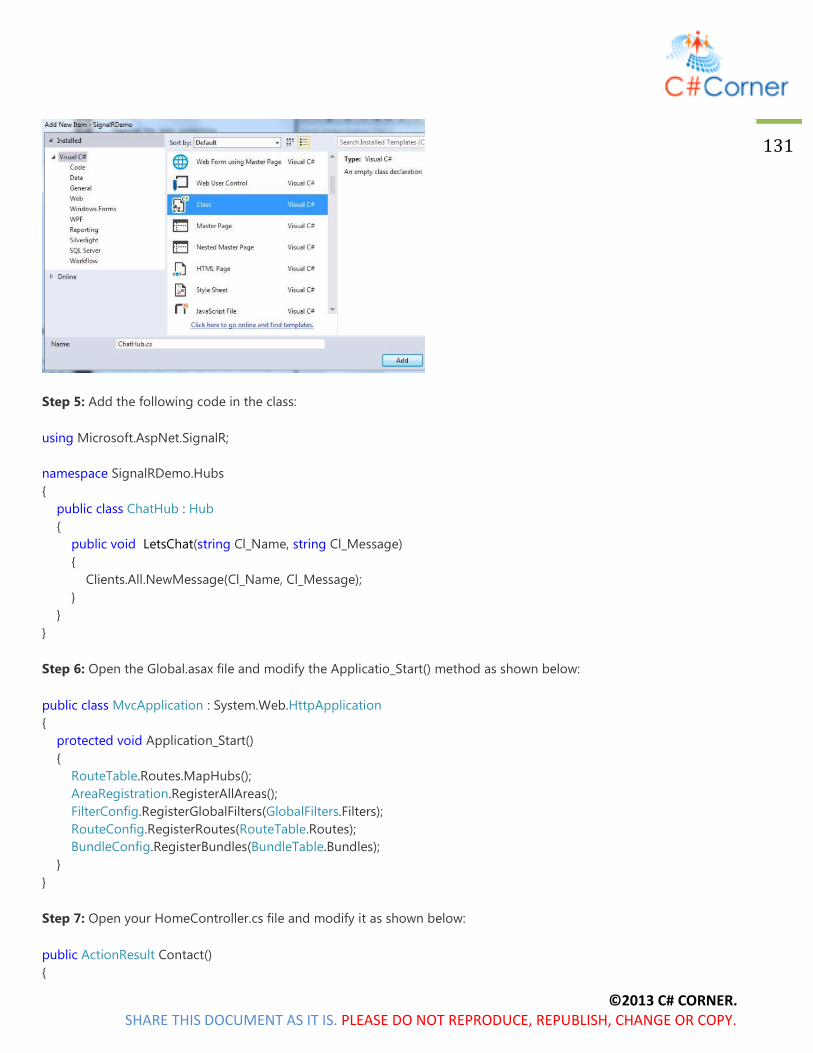
©2013 C# CORNER. SHARE THIS DOCUMENT AS IT IS. PLEASE DO NOT REPRODUCE, REPUBLISH, CHANGE OR COPY.
131
Step 5: Add the following code in the class:
using Microsoft.AspNet.SignalR;
namespace SignalRDemo.Hubs
{
public class ChatHub : Hub
{
public void LetsChat(string Cl_Name, string Cl_Message)
{
Clients.All.NewMessage(Cl_Name, Cl_Message);
}
}
}
Step 6: Open the Global.asax file and modify the Applicatio_Start() method as shown below:
public class MvcApplication : System.Web.HttpApplication
{
protected void Application_Start()
{
RouteTable.Routes.MapHubs();
AreaRegistration.RegisterAllAreas();
FilterConfig.RegisterGlobalFilters(GlobalFilters.Filters);
RouteConfig.RegisterRoutes(RouteTable.Routes);
BundleConfig.RegisterBundles(BundleTable.Bundles);
}
}
Step 7: Open your HomeController.cs file and modify it as shown below:
public ActionResult Contact()
{

©2013 C# CORNER. SHARE THIS DOCUMENT AS IT IS. PLEASE DO NOT REPRODUCE, REPUBLISH, CHANGE OR COPY.
132 ViewBag.Message = "Your contact page.";
return View();
}
public ActionResult Chat()
{
ViewBag.Message = "Your chat page";
return View();
}
Step 8: Generate the view for the Chat method as shown in the following parts:
Select Home folder and right-click to add Scaffold
Select MVC 5 View in the Add Scaffold wizard

©2013 C# CORNER. SHARE THIS DOCUMENT AS IT IS. PLEASE DO NOT REPRODUCE, REPUBLISH, CHANGE OR COPY.
133 Do as directed in the following image:
Step 9: Add the following code in the Chat.cshtml file:
@{
ViewBag.Title = "Chat";
}
<hgroup>
<h2>@ViewBag.Title.</h2>
<h3>@ViewBag.Message</h3>
</hgroup>
<div class="container">
<input type="text" id="TxtMessage" />
<input type="button" id="BtnSend" value="Send" />
<input type="hidden" id="UserName" />
<ul id="Chats"></ul>
</div>
@section scripts {
<script src="~/Scripts/jquery.signalR-1.1.3.js"></script>
<script src="~/signalr/Hubs"></script>
<script>
$(function () {
var chat = $.connection.chatHub;
chat.client.NewMessage=function(Cl_Name, Cl_Message) {
$('#Chats').append('<li><strong>' + htmlEncode(Cl_Name)
+ '</strong>: ' + htmlEncode(Cl_Message) + '</li>');
};
$('#UserName').val(prompt('Please Enter Your Name:', ''));

©2013 C# CORNER. SHARE THIS DOCUMENT AS IT IS. PLEASE DO NOT REPRODUCE, REPUBLISH, CHANGE OR COPY.
134 $('#TxtMessage').focus();
$.connection.hub.start().done(function () {
$('#BtnSend').click(function () {
chat.server.LetsChat($('#UserName').val(), $('#TxtMessage').val());
$('#TxtMessage').val('').focus();
});
});
});
function htmlEncode(value) {
var encodedValue = $('<div />').text(value).html();
return encodedValue;
}
</script>
}
Code Execution
Save all your application and debug the application. Use the following procedure.
Step 1: Debug your application. Open /Home/Chat in your browser like: http://localhost:12345/Home/Chat
Step 2: Enter your name in the prompt:
Step 3: Enter message and send:

©2013 C# CORNER. SHARE THIS DOCUMENT AS IT IS. PLEASE DO NOT REPRODUCE, REPUBLISH, CHANGE OR COPY.
135 After clicking on Send:
Step 4: Copy the browser URL and open more browsers, paste the URL in the address bar and do the same thing as
above.


