383
| Date post: | 27-Dec-2016 |
| Category: |
Documents |
| Upload: | chris-smith |
| View: | 337 times |
| Download: | 1 times |
O’Reilly Media, Inc. 4/2/2012
Preface
Have you ever been in a hurry and pounded in a nail using something other than a hammer? Or perhaps settled an argument concerning distances with “the length of my arm is about 20 inches, and that’s about two arm-lengths…?” You might not be willing to fall for such obviously flawed short-cuts, but as your humble author I will admit that I have.
There is elegance to using the right tool for the job. And, just like a hammer or a tape measure, programming languages are tools like any other. Throughout this book you will discover that while F# isn’t the best tool for every situation, it is the perfect tool for some situations.
This book is about showing you how to use the F# programming language as a general-purpose tool, with an emphasis on the specific domains where it can lead to dramatic boots in productivity.
Along the way you will pick up a knack for functional programming; a semi-mysterious collections of concepts that can help you rethink your programs regardless of the host programming language.
Introducing F# So what actually is F#? In a nutshell, F# is a multi-paradigm programming language built on .NET, meaning that it supports several different styles of programming natively. I’ll spare you the history of the language and instead just go over the big bullets:
• F# supports imperative programming. In F# you can modify the contents of memory, read and write files, send data over the network, and so on.
• F# supports object-oriented programming. In F# you can abstract code into classes and objects enabling you to simplify your code.
• F# supports functional programming, which is a style of programming which emphasizes what a program should do, not explicitly how the program should work.
• F# is statically typed. Being statically typed means that type information is known at compile time, leading to type-safe code. F# won’t allow you to put a square peg into a round hole.
• F# is a .NET language. It runs on the Common Language Infrastructure (CLI) and so it gets things like garbage collection (memory management) and powerful class
1
O’Reilly Media, Inc. 4/2/2012
libraries for free. F# also supports all .NET concepts natively, such as delegates, enumerations, structures, P/Invoke, and so on.
Even without all the jargon, it is clear that F# is powerful language. But don’t worry; we’ll cover it all step by step.
Who This Book Is For This book isn’t intended to be an introductory text on programming and assumes familiarity with basic concepts like looping, functions, and recursion. However, no previous experience with functional programming or .NET is required.
If you come from a C# or VB.NET background then you should feel right at home. While F# approaches programming from a different viewpoint, you can apply all of your existing .NET know-how to programming in F#.
If you come from an OCaml or Haskell background then the syntax of F# should look very familiar. F# has most of the features of those languages, and adds many more to integrate well with .NET.
What You Need to Get Going F# is “in the box” of Visual Studio 11. This includes the F# compiler and project system, and contains all the features such as syntax highlighting and IntelliSense that you would expect. Outside of Visual Studio and on non-Microsoft platforms, you can still write and deploy F# applications using the open source Mono platform (http://www.mono-project.com/).
If you are running F# on Windows, then the first chapter of this book will show you how to get set up using Visual Studio. Otherwise, Appendix A will walk you through getting F# set up on non-Microsoft platforms.
Also, it is important to note that all of the examples printed in this book (as well as many more) may be found on GitHub. The best way to learn any new skill is to just start using it, so I highly recommended that you take a moment to fork and explore the repository for this book’s source code at: http://github.com/aChrisSmith/Programming-FS-Examples/.
How the Book Is Organized This book is divided into three parts. Part I focuses on multi-paradigm programming in F#. Early chapters will be devoted to programming in a specific F# paradigm, while later ones will help flesh out your understanding of language capabilities. By the end of Part I you will be fluent in the F# language and its idioms.
Part II will introduce a few lingering concepts but primarily focus on applying F# in specialized areas. By the end of Part II you will know how to utilize F# as a scripting language, for parallel programming, and for creating domain specific languages.
Part III should be considered optional for most F# developers, and focuses on advanced language features that allow you to modify and extend the F# language.
2
O’Reilly Media, Inc. 4/2/2012
Part I, Multi-Paradigm Programming Chapter 1, Introduction to F#, presents the F# language and the Visual Studio 11 integrated development environment (IDE). Even if you are familiar with Visual Studio I recommend you read this chapter as F# has some unique characteristics when it comes to building and running projects.
Chapter 2, Fundamentals, introduces the core types and concepts which will be the foundation for all other chapters.
Chapter 3, Functional Programming, introduces functional programming and how to write F# code using this style.
Chapter 4, Imperative Programming, describes how to mutate values and change program state in an imperative manner.
Chapter 5, Object-oriented Programming, covers object-oriented programming from creating simple types to inheritance and polymorphism.
Chapter 6, .NET Programming, goes over some style independent concepts exposed by the .NET Framework and CLI.
Part II, Programming F# Chapter 7, Applied Functional Programming, covers more advanced topics in functional programming such as tail recursion and functional design patterns.
Chapter 8, Applied Object-Oriented Programming, describes how to develop and take advantage of a rich type system. Special attention will be paid on how to leverage the functional aspects of F# to make object-oriented code better.
Chapter 9, Asynchronous and Parallel Programming, takes a look at how to use F# to take advantage of multiple cores on a processor and the facilities in the F# and .NET libraries for parallel programming.
Chapter 10, Scripting, examines F# as a scripting language and how to make the most of F# script files.
Chapter 11, Data Processing, focuses exclusively on using F# in “real world” scenarios for doing distributed computations, interacting with web services, and working in information-rich environments.
Part III, Extending the F# Language Chapter 12, Reflection, provides a look at the .NET reflection library and how to use it to create declarative programs.
Chapter 13, Computation Expressions¸ introduces an advanced F# language feature which will enable you to eliminate redundant code and add new capabilities to the core F# language.
Chapter 14, Quotations, introduces F# quotation expressions and how they can be used to do metaprogramming as well as execute F# code on other computational platforms.
3

O’Reilly Media, Inc. 4/2/2012
Chapter 15, Type Providers, explains the F# compiler’s special machinery for integrating typed data across multiple domains. (Don’t fret, that sentence will make sense when you start the chapter.)
Appendixes
This book also features a couple of appendixes to flesh out any extra concepts you might be interested in.
Appendix A, Overview of the .NET Libraries, does a quick sweep through the existing technologies available on the .NET platform and how to use them from F#.
Appendix B, F# Interop, covers how to write F# to interoperate with existing libraries as well as unmanaged code using P/Invoke and COM-interop.
Conventions Used in This Book The following font conventions are used in this book:
Italic
Used for new concepts as they are defined.
Constant width
Used for code examples and F# keywords.
Constant width bold
Used for emphasis within program code.
Pay special attention to note styles within this text.
Notes like this are used to add more detail to the curious reader.
Warnings are indicated in this style are to help you avoid common mistakes.
I’d Like to Hear from You Although I’ve tested and verified the information in this book, you may find some aspects of the F# language has changed since the writing (or perhaps even a bug in the example!) Please let me know of any errors you find, as well as your suggestions for future editions, at: http://oreilly.com/catalog/errata.csp?isbn=9780596153656.
In addition, you can use analog-mail by writing to:
O’Reilly Media, Inc.
1005 Gravenstein Highway North
Sebastopol, CA 95472
(800) 998-9938 (in the U.S. or Canada)
(707) 829-0515 (international/local)
4

O’Reilly Media, Inc. 4/2/2012
5
(707) 829-0104 (fax)
You can also send messages electronically. To be put on the mailing list or request a catalog, send email to:
To comment on the book, send email to:
For information about this book and others, as well as additional technical articles and discussion on F#, see the O’Reilly website:
http://www.oreilly.com
or the O’Reilly .NET DevCenter:
http://www.oreillynet.com/dotnet
or the Microsoft Developer Network portal for F#:
http://www.msdn.com/fsharp
Safari® Books Online When you see a Safari® Books Online icon on the cover of your favorite technology book it means the book is available online through the O’Reilly Network Safari Bookshelf.
Safari offers a solution that’s better than e-books. It’s a virtual library that lets you easily search thousands of top tech books, cut and paste code samples, download chapters, and find quick answers when you need the most accurate, current information. Try it for free at http://my.safaribooksonline.com.
Acknowledgments In addition to the F# team at Microsoft for putting out a fantastic product, I’d like to thank the following people for helping make the second edition of this book awesome:
Matt Douglass-Riely X

O’Reilly Media, Inc. 4/2/2012
Preface Preface to the Second Edition
Hello! I’m writing this about three-years to the day that the first edition of Programming F# came out. (And about one year before the second edition will be generally available.) And it has been quite an experience.
Three years ago F# was just about to get its first official release in Visual Studio 2010. Everyone on the team knew that developers would love our language, but we weren’t sure where it would go. How it would be preceived.
But F# has not only been loved, it’s also achieved several important milestones. The first one, was that this last year at the International Conference on Functional Programming F# received the title as “the language for discriminating hackers”. While the programming competition and “award” are just for fun, it demonstates that the language isn’t just a toy.
Outside of the F# language front, the applications are growing. Job boards for F# programmers are getting almost to much attention from head-hunters and recrutiers aggressively looking to put F# developers in data mining, finance, and other technical positions.
With that as the backdrop, there were a few key changes to the book for this second edition aside from incorporating language advances for the F# 3.0 release.
First of all is the emphasis on more real-world examples. The first edition did a good job of being a concise reference for the core language, but some readers left unsure of how to actually apply F# to projects. This time around I’ve written dozens of large-scale applications. To save space – again, to be concise – I’ve posted all the code on gitHub so you can browse it freely and at your own pace at (github.com/achrissmith/programming-fsharp/).
While with the explosive growth of mobile computing, F# in use as a server backend for websites, and the unknown Windows 8 and the “Metro” UI style. It’s an exciting time to be learning F# again!
1

O’Reilly Media, Inc. 4/2/2012
2
-Chris Smith
10/2011
Redmond, WA

O’Reilly Media, Inc. 4/2/2012
Part I Multi-Paradigm Programming
1

O’Reilly Media, Inc. 4/2/2012
1 Introduction to F#
F# is a powerful language that spans multiple paradigms of development. This chapter provides a brief introduction to the heart of F# – the F# compiler, tools, and its place in Visual Studio 11.
In this chapter, you will create a couple of simple F# applications and then I’ll point out key Visual Studio features for F# development. I won’t cover much of Visual Studio here, so I encourage you to explore the IDE on your own.
If you are already familiar with Visual Studio, you should still skim through this chapter. Creating and debugging F# projects works just like C# or VB.NET; however, F# has a unique characteristic when it comes to multiple-file projects. In addition, F# has a feature called F# Interactive which will dramatically increase your productivity. Not to be missed!
Getting to Know F# As with all programming books, it is customary to write a Hello, World application, and I don’t want to deviate from tradition. Open up Notepad or your favorite text editor and create a new file named HelloWorld.fs with the following text:
// HelloWorld.fs printfn "Hello, World"
Success! You’ve just written your first F# program. To compile this application use the F# compiler, fsc.exe, located in the Program Files (x86)\Microsoft SDKs\F#\3.0\Framework\v4.0 folder. (Don’t worry, you won’t have to remember that.)
The following snippet shows calling the F# compiler on the command line to build and run your application.
C:\Programming F# Source\Ch01>fsc HelloWorld.fs Microsoft (R) F# 3.0 Compiler build 4.0.30319.16909
` 1

O’Reilly Media, Inc. 4/2/2012
Copyright (c) Microsoft Corporation. All Rights Reserved. C:\Programming F# Source\Ch01>HelloWorld.exe Hello, World!
Visual Studio 11 Tools are the lifeblood of any programming language, and F# is no different. While you can be successful writing F# code in your favorite text editor and invoking the compiler from the command line, you’ll likely be more productive using tools. Like C# and VB.NET, F# is a first-class citizen in Visual Studio with all the features that you might expect, such as debugger support, IntelliSense, project templates, and so on.
Alternatively, you can try F# out in your browser at http://www.tryfsharp.org/.
Let’s revisit our Hello, World application, but this time using Visual Studio.
To create your first F# project, open up the Visual Studio IDE and select File → New Project from the menu bar to open the New Project dialog, as shown in Figure 1-1. Select Visual F# in the left pane, select F# Application in the right pane, and then click OK.
Figure 1-1. Select F# Application to start your first F# project
After you click OK in the New Project dialog, you’ll see an empty code editor – a blank canvas ready for you to create your F# masterpiece. Next, type the following code into the F# editor:
printfn "Hello, World"
Now press Control + F5 to run your application. When your application starts, a console window will appear and display the entirely unsurprising result shown in Figure 1-2.
` 2

O’Reilly Media, Inc. 4/2/2012
Figure 1-2. Hello World in F#
Your Second F# Program It may be startling to see a program work without an explicit Main method. You will see why this is admissible in the next chapter, but for now let’s create a more meaningful Hello, World-type program to get a feel for basic F# syntax.
The code in Example 1-1 will create a program that accepts two command-line parameters and prints them to the console. In addition, it displays the current time.
Example 1-1. Mega Hello World // Mega Hello World // // Take two command line parameters and then print // them along with the current time to the console. open System [<EntryPoint>] let main (args : string[]) = if args.Length <> 2 then failwith "Error: Expected arguments <greeting> and <thing>" let greeting, thing = args.[0], args.[1] let timeOfDay = DateTime.Now.ToString("hh:mm tt") printfn "%s, %s at %s" greeting thing timeOfDay // Program exit code 0
Hopefully you are curious about what is going on. Let’s look at this program line-by-line to see how it works.
` 3

O’Reilly Media, Inc. 4/2/2012
Values Example 1-1 introduces three values named greeting, thing, and timeOfDay.
let greeting thing = args.[0], args.[1] , let timeOfDay = DateTime.Now.ToString("hh:mm tt")
The key thing here is that the let keyword binds a name to a value. It is worth pointing out that unlike most other programming languages, in F# values are immutable by default, meaning they cannot be changed once initialized. We will cover why values are immutable in Chapter 3, but for now it is sufficient to say it has to do with “functional programming”.
F# is also case-sensitive, so any two values with names that only differ by case are considered different.
let number = 1 let Number = 2 let NUMBER = 3
A value’s name can be any combination of letters, numbers, underscores _, and apostrophes '. However, the name must begin with a letter or an underscore.
You can enclose the value’s name with a pair of tick-marks, in which case the name can contain any character except for tabs and new lines. This allows you to refer to values and functions exposed from other .NET languages that may conflict with F# keywords. let ``this.Isn’t %A% good value Name$!@#`` = 5
Whitespace Matters Other languages like C# use semicolons and curly braces to indicate when statements and blocks of code are complete. However, programmers typically indent their code to make it more readable anyways, so these extra symbols often just add syntactic clutter.
In F#, whitespace – spaces and newlines – is significant. The F# compiler allows you to use whitespace to delimit code blocks. For example, anything indented more than the if keyword is considered to be in the body of the if statement. Because tab characters can indicate an unknown number of space characters, they are prohibited in F# code.
You can configure the Visual Studio editor to automatically convert tab characters into spaces by changing the relevant setting under Tools → Options → Text Editor → F#.
Reviewing Example 1-1, notice that the body of the main method was indented by four spaces, and the body of the if statement was indented by another four spaces.
let main (args : string[]) = if args.Length <> 2 then failwith "Error: Expected arguments <greeting> and <thing>" let greeting, thing = args.[0], args.[1] let timeOfDay = DateTime.Now.ToString("hh:mm tt")
` 4

O’Reilly Media, Inc. 4/2/2012
printfn "%s, %s at %s" greeting thing timeOfDay // Program exit code 0
If the body of the if statement, the failwith "..." expression, was dedented four spaces and therefore lined up with the if keyword, the F# compiler would produce a warning. This is because the compiler wouldn’t be able to determine whether the failwith was meant for the body of the if statement or the main function.
[<EntryPoint>] let main (args : string[]) = if args.Length <> 2 then failwith "Error: Expected arguments <greeting> and <thing>" Warning FS0058: Possible incorrect indentation: this token is offside of context started at position (25:5). Try indenting this token further or using standard formatting conventions.
The general rule is that anything belonging to a method or statement must be indented further than the keyword that began the method or statement. So in Example 1-1 everything in the main method was indented past the first let and everything in the if statement was indented past the if keyword. As you see and write more F# code you will quickly find that omitting semicolons and curly braces makes the code easier to write and much easier to read.
.NET Interop Example 1-1 also demonstrates how F# can interoperate with existing .NET libraries.
open System // ... let timeOfDay = DateTime.Now.ToString("hh:mm tt")
This example shows the DateTime.Now property from the System namespace in the mscorlib.dll assembly in use.
The .NET Framework contains a broad array of libraries for everything from graphics to databases to web services. F# can take advantage of any .NET library natively by calling directly into it. Conversely, any code written in F# can be consumed by other .NET languages. This also means that F# applications can run on any platform that supports .NET. So the F# programs you write can run on phones, tablets, PCs, and so on.
For more information on .NET libraries see Appendix A, Overview of .NET Libraries. for a quick tour of what’s available. For more information about F# inter-operating with other .NET languages refer to Appendix B, F# Interop.
Comments F# allows you to comment your code. To declare a single-line comment use two slashes //; everything after them until the end of the line will be ignored by the compiler.
` 5

O’Reilly Media, Inc. 4/2/2012
// Program exit code
For larger comments you can use (* and *). Everything between the two tokens will be ignored.
(* Comment spanning multiple lines *)
For F# applications written in Visual Studio, there is a third type of comment – an XML documentation comment. If a comment starting with three slashes, ///, is placed above an identifier, Visual Studio will display the comment’s text when you hover the mouse over the identifier.
Figure 1-3 shows applying an XML documentation comment and its associated tooltip.
Figure 1-3. XML documentation comments
F# Interactive So far you have written some F# code and executed it, and the rest of the book will have many more examples. While you could leave a wake of new projects to test out code, Visual Studio comes with a tool called F# Interactive or FSI. The FSI window will not only make it much easier to work through the examples in this book, but it will also help you write applications.
F# Interactive is a tool known as a REPL, which stands for read, evaluate, print, loop. It accepts F# code, compiles and executes it, then prints the results. This allows you to quickly and easily experiment with F# without needing to create new projects or build a full application to test the results of a code snippet.
Most Visual Studio configurations launch the F# Interactive window with the Control+Alt+F keyboard combination. Once the FSI window is available, it accepts F#
` 6
O’Reilly Media, Inc. 4/2/2012
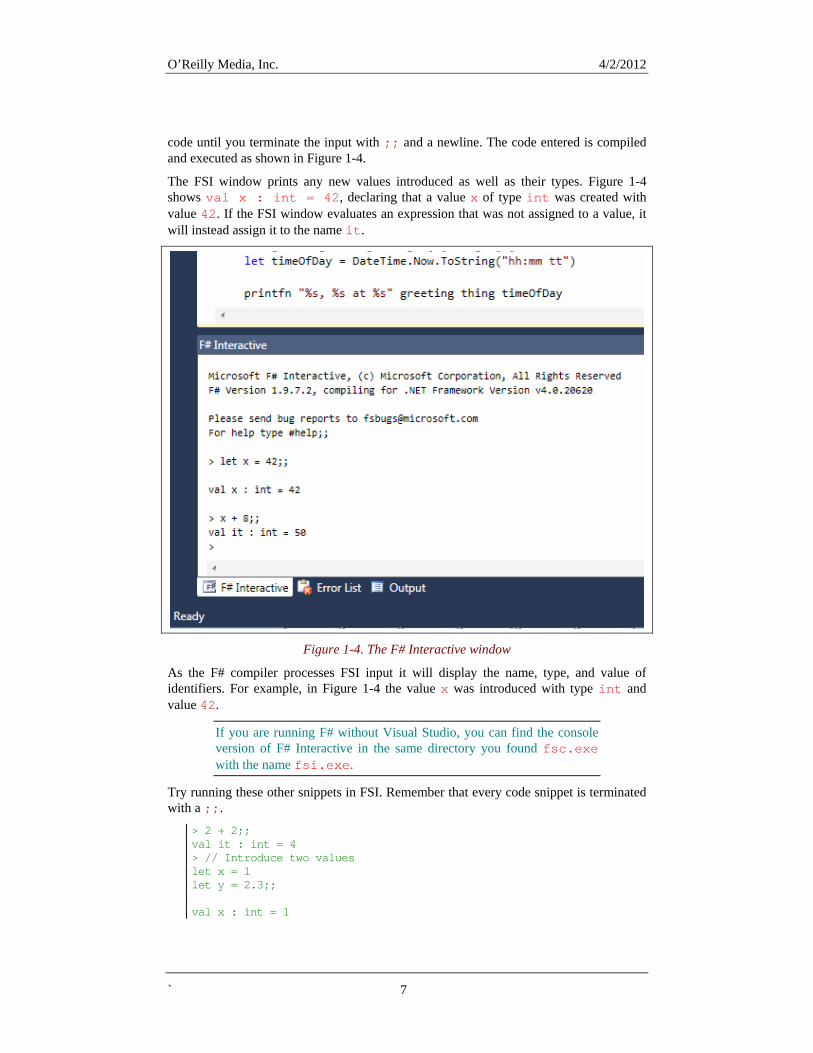
code until you terminate the input with ;; and a newline. The code entered is compiled and executed as shown in Figure 1-4.
The FSI window prints any new values introduced as well as their types. Figure 1-4 shows val x : int = 42, declaring that a value x of type int was created with value 42. If the FSI window evaluates an expression that was not assigned to a value, it will instead assign it to the name it.
Figure 1-4. The F# Interactive window
As the F# compiler processes FSI input it will display the name, type, and value of identifiers. For example, in Figure 1-4 the value x was introduced with type int and value 42.
If you are running F# without Visual Studio, you can find the console version of F# Interactive in the same directory you found fsc.exe with the name fsi.exe.
Try running these other snippets in FSI. Remember that every code snippet is terminated with a ;;.
> 2 + 2;; val it : int = 4 > // Introduce two values let x = 1 let y = 2.3;; val x : int = 1
` 7

O’Reilly Media, Inc. 4/2/2012
val y : float = 2.3 > float x + y;; val it : float = 3.3 > let cube x = x * x * x;; val cube : int -> int > cube 4;; val it : int = 64
FSI can dramatically simplify testing and debugging your applications because you can send F# code from your current project to the FSI window by highlighting it and pressing Alt+Enter.
After selecting all the code in Example 1-1 within the code editor and pressing Alt+Enter you will see the following in the FSI window:
> val main : string [] -> int
This allows you to write code in the Visual Studio editor – which offers syntax highlighting and IntelliSense – but test your code using the FSI window. You can check the main ‘smethod's implementation by calling it from FSI.
> main [| "Hello"; "World" |];; Hello, World at 10:52 AM val it : int = 0
The majority of the examples in this book are taken directly from FSI sessions. I encourage you to use FSI to follow along and experiment with the F# language’s syntax.
You can find a copy of the source code for all examples in the book on GitHub at https://github.com/aChrisSmith/Programming-FS-Examples/.
Managing F# Source Files When you are starting out with F# programming, most of the programs you write will live only in FSI or perhaps in a single code file. Your F# projects however will quickly grow and be broken up across multiple files and eventually multiple projects.
The F# language has some unique characteristics when it comes to managing projects with multiple source files. In F# the order in which code files are compiled is significant.
You can only call into functions and classes defined earlier in the code file or in a separate code file compiled before the file where the function or class is used. If you rearrange the order of the source files your program may no longer build!
The reason for this significance in compilation order is type inference, a topic covered in the next chapter.
F# source files are compiled from top to bottom in the order they are displayed in Visual Studio’s Solution Explorer. Whenever you add a new code, file it is added at the bottom
` 8

O’Reilly Media, Inc. 4/2/2012
of the list, but if you want to rearrange the source files you can right click a code file and select “Move Up” or “Move Down” as seen in Figure 1-5. The keyboard shortcut for reordering project files is Alt+Up and Alt+Down.
Figure 1-5. Reordering files within an F# project
A feature sorely missing from Visual Studio is the ability to organize an F# project’s source code files into subfolders. While not exposed by the Visual Studio UI, you can edit the project file directly to achieve this. Many of the in-depth examples of this book utilize this technique.
Now that you are armed with the logistical know-how for creating, compiling, and testing F# applications, the rest of this book will focus exclusively on the syntax and semantics of the F# programming language.
` 9

O’Reilly Media, Inc. 4/2/2012
` 10
In just a few chapters you’ll master the syntax of the F# language as well as be able to apply it across several programming paradigms. Good luck and have fun!

O’Reilly Media, Inc. 4/2/2012
2 Fundamentals
In Chapter 1, you wrote your first F# program. I broke it down to give you a feel for what you were doing, but much of the code is still a mystery. In this chapter, I’ll provide the necessary foundation for you to understand that code fully, but more importantly, I’ll present several more examples that you can use to grasp the basics of F# before you move on to the more complex features.
The first section of this chapter covers primitive types, like int and string, which are the building blocks for all F# programs. I’ll then cover functions so you can manipulate data.
The fourth section details foundational types such as list, option, and unit. Mastering these types will enable you to expand into the object-oriented and functional styles of F# code covered in later chapters.
By the end of this chapter you will be able to write simple F# programs for processing data. In future chapters you will learn how to add power and expressiveness to your code, but for now let’s master the basics.
Primitive Types A type is a concept or abstraction and is primarily about enforcing safety. Types represent a proof of sorts if a conversion will work. Some types are straightforward – representing an integer – while others are far more abstract – like a function. F# is statically typed, meaning that type checking is done at compile-time. For example, if a function accepts an integer as a parameter you will get a compiler error if you try to pass in a string.
Like C# and VB.NET, F# supports the full cast and crew of primitive .NET types. (Which are standard across most programming languages.) They are built into the F# language and separate from user-defined types which you define yourself.
To create a value, simply use a let binding via the let keyword. For example, the following code defines a new value x in an FSI session. You can do much more with let bindings, but we’ll save that for Chapter 3.
1
O’Reilly Media, Inc. 4/2/2012
> let x = 1;; val x : int = 1
Numeric Primitives Numeric primitives come in two varieties: integers and floating-point numbers. Integer types vary by size, so that some types take up less memory and can represent a smaller range of numbers. Integers can also be signed or unsigned based on whether or not they can represent negative values.
Floating-point types vary in size too; in exchange for taking up more memory they provide more precision for the values they hold.
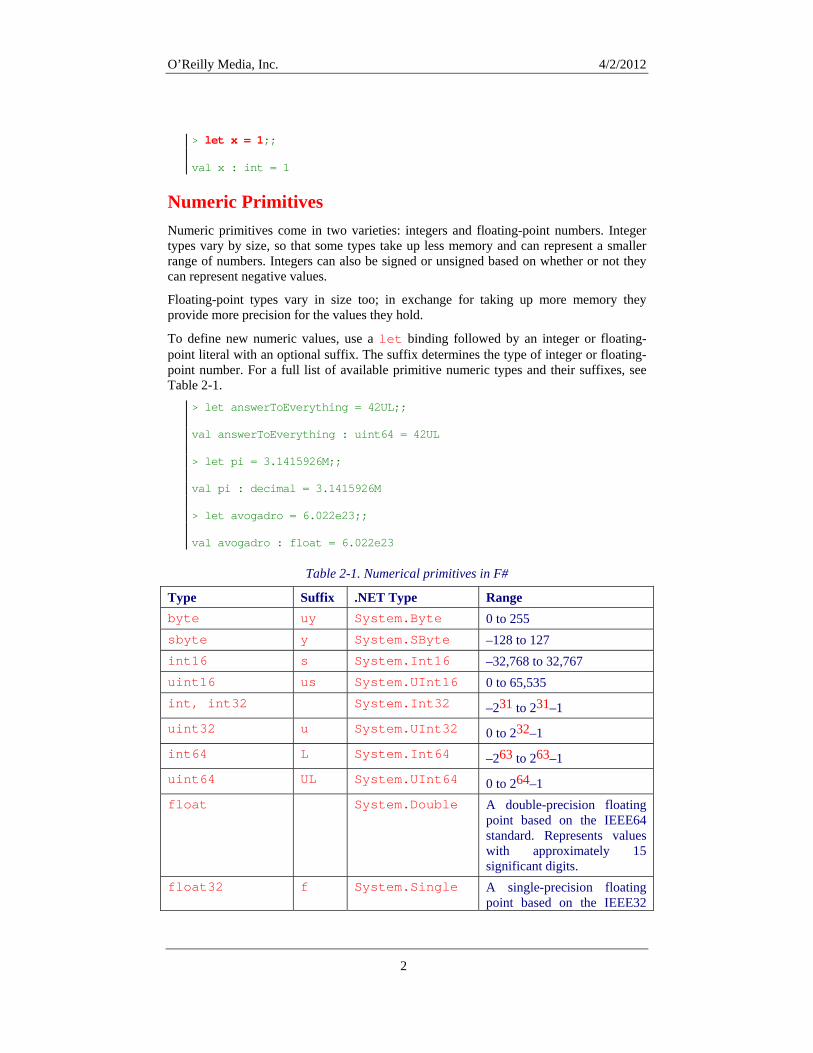
To define new numeric values, use a let binding followed by an integer or floating-point literal with an optional suffix. The suffix determines the type of integer or floating-point number. For a full list of available primitive numeric types and their suffixes, see Table 2-1.
> let answerToEverything = 42UL;; val answerToEverything : uint64 = 42UL > let pi = 3.1415926M;; val pi : decimal = 3.1415926M > let avogadro = 6.022e23;; val avogadro : float = 6.022e23
Table 2-1. Numerical primitives in F#
Type Suffix .NET Type Range byte uy System.Byte 0 to 255 sbyte y System.SByte –128 to 127 int16 s System.Int16 –32,768 to 32,767 uint16 us System.UInt16 0 to 65,535 int, int32 System.Int32 –231 to 231–1 uint32 u System.UInt32 0 to 232–1 int64 L System.Int64 –263 to 263–1 uint64 UL System.UInt64 0 to 264–1 float System.Double A double-precision floating
point based on the IEEE64 standard. Represents values with approximately 15 significant digits.
float32 f System.Single A single-precision floating point based on the IEEE32
2
O’Reilly Media, Inc. 4/2/2012
standard. Represents values with approximately 7 significant digits.
decimal M System.Decimal A fixed-precision floating-point type with precisely 28 digits of precision.
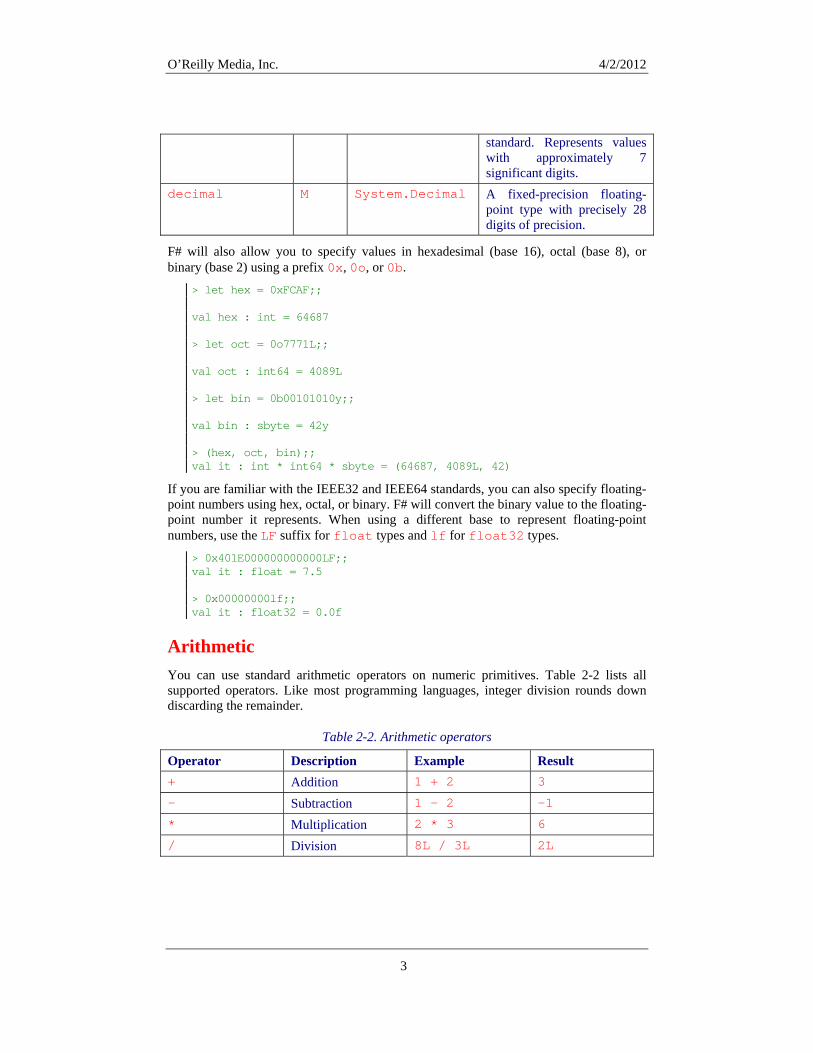
F# will also allow you to specify values in hexadesimal (base 16), octal (base 8), or binary (base 2) using a prefix 0x, 0o, or 0b.
> let hex = 0xFCAF;; val hex : int = 64687 > let oct = 0o7771L;; val oct : int64 = 4089L > let bin = 0b00101010y;; val bin : sbyte = 42y > (hex, oct, bin);; val it : int * int64 * sbyte = (64687, 4089L, 42)
If you are familiar with the IEEE32 and IEEE64 standards, you can also specify floating-point numbers using hex, octal, or binary. F# will convert the binary value to the floating-point number it represents. When using a different base to represent floating-point numbers, use the LF suffix for float types and lf for float32 types.
> 0x401E000000000000LF;; val it : float = 7.5 > 0x00000000lf;; val it : float32 = 0.0f
Arithmetic You can use standard arithmetic operators on numeric primitives. Table 2-2 lists all supported operators. Like most programming languages, integer division rounds down discarding the remainder.
Table 2-2. Arithmetic operators
Operator Description Example Result + Addition 1 + 2 3
- Subtraction 1 – 2 -1
* Multiplication 2 * 3 6
/ Division 8L / 3L 2L
3

O’Reilly Media, Inc. 4/2/2012
4
** Power1 2.0 ** 8.0 256.0
% Modulus 7 % 3 1
By default arithmetic operators do not check for overflow, so if you exceed the range allowed by an integer value by addition it will overflow to be negative. (Similarly, subtraction will result in a positive number if the number is too small to be stored in the integer type.)
> 32767s + 1s;; val it : int16 = -32768s > -32768s + -1s;; val it : int16 = 32767s
If integer overflow is a cause for concern, you should consider using a larger type or using checked arithmetic, discussed in Chapter 7.
F# features all the standard mathematical functions you would expect, with a full listing in Table 2-3.
Table 2-3. Common mathematical functions
Routine Description Example Result abs Absolute value of a number abs -1.0 1.0
ceil Round up to the nearest integer ceil 9.1 10.0
exp Raise a value to a power of e. exp 1.0 2.718
floor Round down to the nearest integer floor 9.9 9.0
sign Sign of the value sign -5 -1
log Natural logarithm log 2.71828 1.0
log10 Logarithm in base 10 log10 1000.0 3.0
sqrt Square root sqrt 4.0 2.0
cos Cosine cos 0.0 1.0
sin Sine sin 0.0 0.0
tan Tangent tan 1.0 1.557
pown Compute the power of an integer pown 2L 10 1024L
Conversion Routines One of the tenets of the F# language is that there are no implicit conversions. This means that the compiler will not automatically convert primitive data types for you behind the scenes, such as converting an int16 to an int64. This eliminates subtle bugs by removing surprise conversions. Instead, to convert primitive values you must use an
1 Power, the ** operator, only works for float and float32 types. To raise the power of an integer value you must either convert it to a floating-point number first or use the pown function.

O’Reilly Media, Inc. 4/2/2012
explicit conversion function listed in Table 2-4. All of the standard conversion functions accept all other primitive types – including strings and chars.
Table 2-4. Numeric primitive conversion routines
Routine Description Example Result sbyte Converts data to an sybte sbyte -5 -5y
byte Converts data to a byte byte "42" 42uy
int16 Converts data to an int16 int16 'a' 97s
uint16 Converts data to a unit16 uint16 5 5us
int32, int Converts data to an int int 2.5 2
uint32 Converts data to a uint32 uint32 0xFF 255
int64 Converts data to an int64 int64 -8 -8L
uint64 Converts data to a unit64 uint64 "0xFF" 255UL
float Converts data to a float float 3.1415M 3.1415
float32 Converts data to a float32 float32 8y 8.0f
decimal Converts data to a decimal decimal 1.23 1.23M
While these conversion routines accept strings, they parse strings using the underling System.Convert family of methods, meaning that for invalid inputs they throw System.FormatException exceptions.
BigInteger
If you are dealing with data larger than 264 F# has the bigint type for representing arbitrarily large integers. (bigint type is simply an alias for the System.Numerics.BigInteger type.)
bigint is integrated into the F# language; by using the I suffix for literals. Example 2-1 defines data storage sizes as bigints.
Example 2-1. The BigInt type for representing large integers > open System.Numerics // Data storage units let megabyte = 1024I * 1024I let gigabyte = megabyte * 1024I let terabyte = gigabyte * 1024I let petabyte = terabyte * 1024I let exabyte = petabyte * 1024I let zettabyte = exabyte * 1024I;; val megabyte : BigInteger = 1048576 val gigabyte : BigInteger = 1073741824 val terabyte : BigInteger = 1099511627776 val petabyte : BigInteger = 1125899906842624 val exabyte : BigInteger = 1152921504606846976
5

O’Reilly Media, Inc. 4/2/2012
val zettabyte : BigInteger = 1180591620717411303424
Although bigint is heavily optimized for performance, it is much slower than using the primitive integer data types.
Bitwise Operations Primitive integer types support bitwise operators for manipulating values at a binary level. Bitwise operators are typically used when reading and writing binary data from files. See Table 2-5.
Table 2-5. Bitwise operators
Operator Description Example Result &&& Bitwise And 0b1111 &&& 0b0011 0b0011
||| Bitwise Or 0xFF00 ||| 0x00FF 0xFFFF
^^^ Bitwise Exclusive Or 0b0011 ^^^ 0b0101 0b0110
<<< Left Shift 0b0001 <<< 3 0b1000
>>> Right Shift 0b1000 >>> 3 0b0001
Characters The .NET platform is based on Unicode, so most text is represented using 2-byte UTF-16 characters. To define a character value, you can put any Unicode character in single quotes. Characters can also be specified using a Unicode hexadecimal character code.
The following snippet defines a list of vowel characters and prints the result of defining a character using a hexadecimal value.
> let vowels = ['a'; 'e'; 'i'; 'o'; 'u'];; val vowels : char list = ['a'; 'e'; 'i'; 'o'; 'u'] > printfn "Hex u0061 = '%c'" '\u0061';; Hex u0061 = 'a' val it : unit = ()
To represent special control characters you need to use an escape sequence, listed in Table 2-6. An escape sequence is a backslash followed by a special character.
Table 2-6. Character escape sequences
Character Meaning \' Single quote
\" Double quote
\\ Backslash \b Backspace \n Newline
6

O’Reilly Media, Inc. 4/2/2012
\r Carriage return \t Horizontal tab
If you want to get the numeric representation of a .NET character’s Unicode value you can pass it to any of the conversion routines listed in Table 2-3. Alternatively, you can get the byte representation of a character literal by adding a B suffix.
> // Convert value of 'C' to an integer int 'C';; val it : int = 67 > // Convert value of 'C' to a byte 'C'B;; val it : byte = 67uy
Strings String literals are defined by enclosing a series of characters in double quotes, which can span multiple lines. To access a character from within a string use the indexer syntax, .[ ], and pass in a zero-based character index.
> let password = "abracadabra";; val password : string = "abracadabra" > let multiline = "This string takes up multiple lines";; val multiline : string = "This string takes up multiple lines" > multiline.[0];; val it : char = 'T' > multiline.[1];; val it : char = 'h' > multiline.[2];; val it : char = 'i' > multiline.[3];; val it : char = 's'
If you want to specify a long string, you can break it up across multiple lines using a single backslash \. If the last character on a line in a string literal is a backslash, the string will continue on the next line after removing all leading whitespace characters.
> let longString = "abc-\ def-\ ghi";; val longString : string = "abc-def-ghi"
You can use the escape sequence characters such as \t or \\ within a string if you want, but this makes defining file paths and registry keys problematic. You can define a verbatim string using the @ symbol, which takes the verbatim text between the quotation marks and does not encode any escape sequence characters.
7

O’Reilly Media, Inc. 4/2/2012
> let normalString = "Normal.\n.\n.\t.\t.String";; val normalString : string = "Normal. . . . .String > let verbatimString = @"Verbatim.\n.\n.\t.\t.String";; val verbatimString : string = "Verbatim.\n.\n.\t.\t.String"
Similar to adding the B suffix to a character to return its byte representation, adding B to the end of a string will return the string’s characters in the form of a byte array. (Arrays will be covered in Chapter 4.)
> let hello = "Hello"B;; val hello : byte [] = [|72uy; 101uy; 108uy; 108uy; 111uy|]
Boolean Values For dealing with values that can only be true or false, F# has the bool type (System.Boolean) as well as standard Boolean operators listed in Table 2-7.
Table 2-7. Boolean operators
Operator Description Example Result && Boolean And true && false false
|| Boolean Or true || false true
not Boolean Not not false true
Example 2-2 builds truth tables for Boolean functions and prints them. It defines a function called printTruthTable that takes a function named f as a parameter. That function is called for each cell in the truth table and its result is printed. Later the operators && and || are passed to the printTruthTable function.
Example 2-2. Printing truth tables > // Print the truth table for the given function let printTruthTable f = printfn " |true | false |" printfn " +-------+-------+" printfn " true | %5b | %5b |" (f true true) (f true false) printfn " false | %5b | %5b |" (f false true) (f false false) printfn " +-------+-------+" printfn "" ();; val printTruthTable : (bool -> bool -> bool) -> unit > printTruthTable (&&);; |true | false | +-------+-------+ true | true | false | false | false | false | +-------+-------+
8

O’Reilly Media, Inc. 4/2/2012
val it : unit = () > printTruthTable (||);; |true | false | +-------+-------+ true | true | true | false | true | false | +-------+-------+ val it : unit = ()
F# uses short circuit evaluation when evaluating Boolean expressions, meaning that if the result can be determined after evaluating the first of the two expressions then the second value won’t be evaluated. For example:
true || f()
will evaluate to true, without executing function f. Likewise:
false && g()
will evaluate to false, without executing function g.
Comparison and Equality You can compare numeric values using standard greater than, less than, and equality operators listed in Table 2-8. All comparison and equality operators evaluate to a Boolean value; the compare function returns -1, 0, or 1 depending on whether the first parameter is less than, equal to, or greater than the second.
Table 2-8. Comparison operators
Operator Description Example Result < Less than 1 < 2 true
<= Less than or equal 4.0 <= 4.0 true
> Greater than 1.4e3 > 1.0e2 true
>= Greater than or equal 0I >= 2I false
= Equal to "abc" = "abc" true
<> Not equal to 'a' <> 'b' true
compare Compare two values compare 31 31 0
Equality in .NET is a complex topic. There is value equality and referential equality. For value types, comparison means that the values are identical, such as 1 = 1. For reference types however, equality is determined by overriding the System.Object method Equals. For more information refer to section Object Equality in Chapter 5.
9

O’Reilly Media, Inc. 4/2/2012
Functions Now that we have all of F#’s primitive types under our control, let’s define functions in order to manipulate them.
You define functions the same way you define values, except everything after the name of the function serves as the function’s parameters. The following defines a function called square that takes an integer, x, and returns its square.
> let square x = x * x;; val square : int -> int > square 4;; val it : int = 16
F# has no return keyword. So when you define a function, the last expression to be evaluated in the function is what the function returns.
Let’s try another function to add 1 to the function’s input:
> let addOne x = x + 1;; val addOne : int -> int
The output from FSI shows the function has type int -> int, which is read as “a function taking an integer and returning an integer.” The signature gets a bit more complicated when you add multiple parameters:
> let add x y = x + y;; val add : int -> int -> int
Technically speaking, the type int -> int -> int is read as “a function taking an integer which returns a function which takes an integer and returns an integer.” Don’t worry about this “functions returning functions” jazz just yet. The only thing you need to know for now is that in order to call a function, simply provide its parameters separated by spaces.
> add 1 2;; Val it : int = 3
Type Inference Because F# is statically typed, calling the add method you just created with a floating-point value will result in a compiler error.
> add 1.0 2.0;; add 1.0 2.0;; ----^^^^ stdin(3,5): error FS0001: This expression was expected to have type int but here has type float.
10
O’Reilly Media, Inc. 4/2/2012
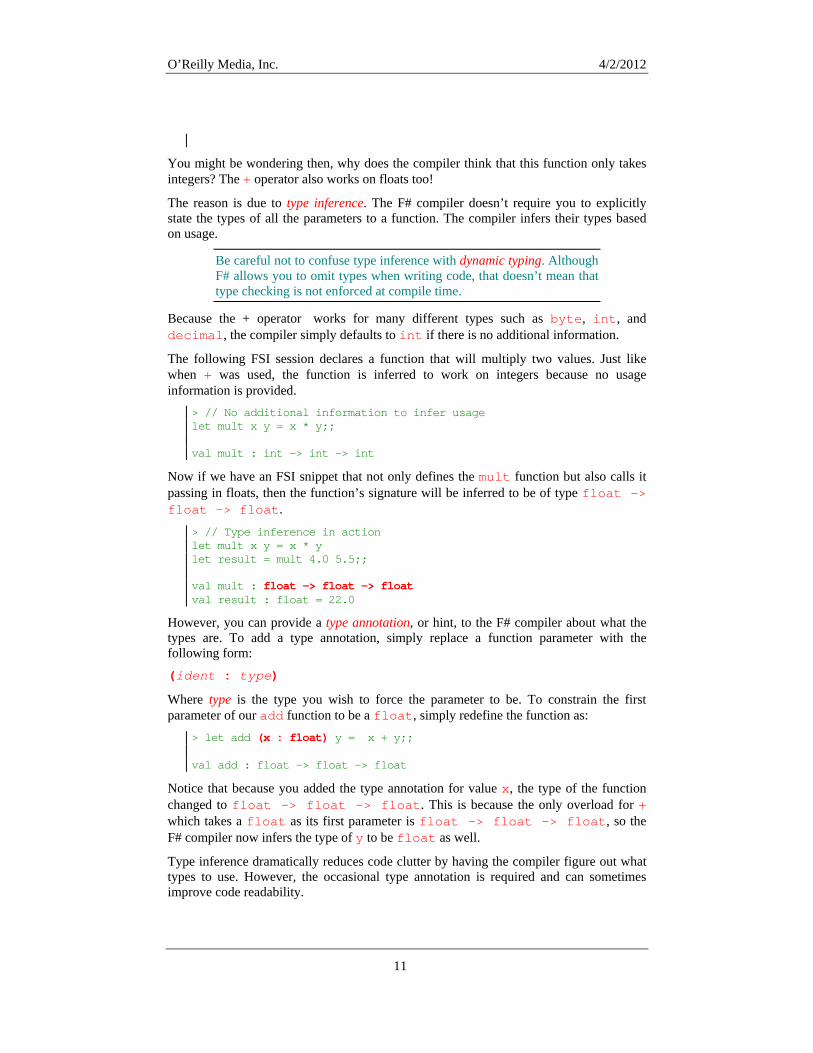
You might be wondering then, why does the compiler think that this function only takes integers? The + operator also works on floats too!
The reason is due to type inference. The F# compiler doesn’t require you to explicitly state the types of all the parameters to a function. The compiler infers their types based on usage.
Be careful not to confuse type inference with dynamic typing. Although F# allows you to omit types when writing code, that doesn’t mean that type checking is not enforced at compile time.
Because the + operator works for many different types such as byte, int, and decimal, the compiler simply defaults to int if there is no additional information.
The following FSI session declares a function that will multiply two values. Just like when + was used, the function is inferred to work on integers because no usage information is provided.
> // No additional information to infer usage let mult x y = x * y;; val mult : int -> int -> int
Now if we have an FSI snippet that not only defines the mult function but also calls it passing in floats, then the function’s signature will be inferred to be of type float -> float -> float.
> // Type inference in action let mult x y = x * y let result = mult 4.0 5.5;; val mult : float -> float -> float val result : float = 22.0
However, you can provide a type annotation, or hint, to the F# compiler about what the types are. To add a type annotation, simply replace a function parameter with the following form:
(ident : type)
Where type is the type you wish to force the parameter to be. To constrain the first parameter of our add function to be a float, simply redefine the function as:
> let add (x : float) y = x + y;; val add : float -> float -> float
Notice that because you added the type annotation for value x, the type of the function changed to float -> float -> float. This is because the only overload for + which takes a float as its first parameter is float -> float -> float, so the F# compiler now infers the type of y to be float as well.
Type inference dramatically reduces code clutter by having the compiler figure out what types to use. However, the occasional type annotation is required and can sometimes improve code readability.
11

O’Reilly Media, Inc. 4/2/2012
Generic Functions You can write functions that work for any type of a parameter, for example an identity function that simply returns its input.
> let ident x = x;; val ident : 'a -> 'a > ident "a string";; val it : string = "a string" > ident 1234L;; val it : int64 = 1234L
Because the type inference system did not require a fixed type for value x in the ident function, it was left generic. If a parameter is generic, it means that the parameter can be of any type, such as an integer, string, or float.
The type of a generic parameter can have the name of any valid identifier prefixed with an apostrophe, but are typically letters of the alphabet starting with ‘a’. The following code redefines the ident function using a type annotation that forces x to be generic:
> let ident2 (x : 'a) = x;; val ident2 : 'a -> 'a
Writing generic code is important for maximizing code reuse. We will continue to dive into type inference and generic functions as the book progresses, so don’t sweat the details just yet. Just note that whenever you see 'a, it can be an int, float, string, a user-defined type, etc.
Scope Each value declared in F# has a specific scope, which is the range of locations where the value can be used. (More formally, this is called a declaration space.) By default, values have module scope, meaning that they can be used anywhere after their declaration. However, values defined within a function are scoped only to that function. So a function can use any value defined previously on the “outside” of the function, but the outside’ cannot refer to values defined inside of a function.
In the following example a value named moduleValue is defined with module scope and used inside of a function, while another value named functionValue is defined within a function and raises an error when used outside of its scope.
> // Scope let moduleValue = 10 let functionA x = x + moduleValue;; val moduleValue : int = 10 val functionA : int -> int > // Error case let functionB x = let functionValue = 20 x + functionValue
12

O’Reilly Media, Inc. 4/2/2012
// 'functionValue' not in scope functionValue;; functionValue;; ^^^^^^^^^^^^^ error FS0039: The value or constructor 'functionValue' is not defined.
The scoping of values may not seem like that important of a detail, but one reason you should be aware of it is because F# allows nested functions. You can declare new function values within the body of a function. Nested functions have access to any value declared in a higher scope, such as the parent function or module, as well as any new values declared within the nested function.
The following code shows nested functions in action. Notice how function g is able to use its parent function f ’s parameter fParam.
> // Nested functions let moduleValue = 1 let f fParam = let g gParam = fParam + gParam + moduleValue let a = g 1 let b = g 2 a + b;; val moduleValue : int = 1 val f : int -> int
It may seem like defining functions within functions can only lead to confusion, but the ability to limit the scope of functions is very useful. It helps prevent pollution of the surrounding module by allowing you to keep small, specific functions local to just where they are needed. This will become more apparent once we start programming in the functional style next chapter.
Once you do start using nested functions, it might become tedious to keep all the values in scope straight. What if you want to declare a value named x, but that value is already used in a higher scope? In F# having two values with the same name doesn’t lead to a compiler error, rather it simply leads to shadowing. When this happens, both values exist in memory, except there is no way to access the previously declared value. Instead, the last one declared “wins.”
The following code defines a function which takes a parameter x, and then defines several new values each named x as well.
> open System.Numerics // Convert bytes to gigabytes let bytesToGB x = let x = x / 1024I // B to KB let x = x / 1024I // KB to MB let x = x / 1024I // MB to GB x;; val bytesToGB : BigInteger -> BigInteger > let hardDriveSize = bytesToGB 268435456000I;;
13
O’Reilly Media, Inc. 4/2/2012
val hardDriveSize : BigInteger = 250
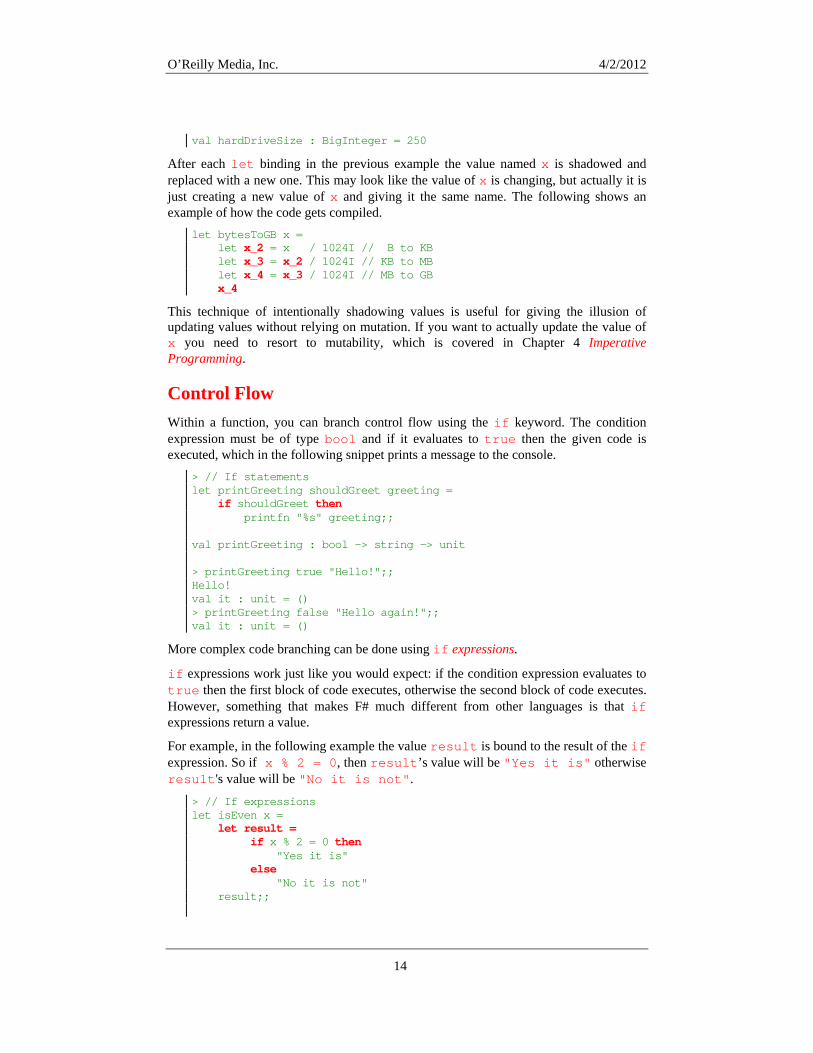
After each let binding in the previous example the value named x is shadowed and replaced with a new one. This may look like the value of x is changing, but actually it is just creating a new value of x and giving it the same name. The following shows an example of how the code gets compiled.
let bytesToGB x = let x_2 = x / 1024I // B to KB let x_3 = x_2 / 1024I // KB to MB let x_4 = x_3 / 1024I // MB to GB x_4
This technique of intentionally shadowing values is useful for giving the illusion of updating values without relying on mutation. If you want to actually update the value of x you need to resort to mutability, which is covered in Chapter 4 Imperative Programming.
Control Flow Within a function, you can branch control flow using the if keyword. The condition expression must be of type bool and if it evaluates to true then the given code is executed, which in the following snippet prints a message to the console.
> // If statements let printGreeting shouldGreet greeting = if shouldGreet then printfn "%s" greeting;; val printGreeting : bool -> string -> unit > printGreeting true "Hello!";; Hello! val it : unit = () > printGreeting false "Hello again!";; val it : unit = ()
More complex code branching can be done using if expressions.
if expressions work just like you would expect: if the condition expression evaluates to true then the first block of code executes, otherwise the second block of code executes. However, something that makes F# much different from other languages is that if expressions return a value.
For example, in the following example the value result is bound to the result of the if expression. So if x % 2 = 0, then result’s value will be "Yes it is" otherwise result's value will be "No it is not".
> // If expressions let isEven x = let result = if x % 2 = 0 then "Yes it is" else "No it is not" result;;
14
O’Reilly Media, Inc. 4/2/2012
val isEven : int -> string > isEven 5;; val it : string = "No it is not"
You can nest if expressions to model more complicated branching, but this quickly becomes difficult to maintain.
let isWeekend day = if day = "Sunday" then true else if day = "Saturday" then true else false
F# has some syntactic sugar to help you combat deeply nested if expressions with the elif keyword. With it you can chain together multiple if expressions without the need for nesting.
let isWeekday day = if day = "Monday" then true elif day = "Tuesday" then true elif day = "Wednesday" then true elif day = "Thursday" then true elif day = "Friday" then true else false
Because the result of the if expression is a value, every clause of an if expression must return the same type.
> // ERROR: Different types for if expression clauses let x = if 1 > 2 then 42 else "a string";; else "a string";; ------------------^^^^^^^^^^^ stdin(118,19): error FS0001: This expression was expected to have type int but here has type string. stopped due to error
But what if you only have a single if and no corresponding else? In that case, the clause must return unit. unit is a special type in F# that means essentially no value. (Alternatively you can think of unit as a manifestation of void from other programming languages.) We’ll cover unit in more detail shortly.
Core Types Previously we covered the primitive types available on the .NET platform, but those alone are insufficient for creating meaningful F# programs. The F# library includes
15

O’Reilly Media, Inc. 4/2/2012
several core types that will allow you to organize, manipulate, and process data. Table 2-9 lists a set of foundational types you will use throughout your F# applications.
In fact, these foundational types enable programming in the functional style, as we will see in the next chapter.
Table 2-9. Core types in F#
Signature Name Description Example unit Unit The unit value ()
int, float Concrete type A concrete type 42, 3.14
'a, 'b Generic type A generic (free) type
'a -> 'b Function type A function returning a value
fun x -> x + 1
'a * 'b Tuple type An ordered grouping of values
("eggs", "ham")
'a list List type A list of values [ 1; 2; 3], [1 .. 3]
'a option Option type An optional value Some(3), None
Unit The unit type is a value signifying nothing of consequence and is represented in code via ().
> let x = ();; val x : unit > ();; val it : unit = ()
if expressions without a matching else must return unit because if they did return a value, what would happen if else-clause was executed instead? Also, in F# every function must return a value, so if the function doesn’t conceptually return anything – like printf – then it should return a unit value.
The ignore function can swallow a function’s return value if you want to return unit. It is typically used when calling a function for its side effect and you want to ignore its return value.
> let square x = x * x;; val square : int -> int > ignore (square 4);; val it : unit = ()
16

O’Reilly Media, Inc. 4/2/2012
Tuple A tuple – which can be pronounced as either “two-pull” or “tuh-pull” – is an ordered collection of data and an easy way to group common pieces of data together. For example, tuples can be used to track the intermediate results of a computation.
F# tuples use the underlying System.Tuple<_> type, though in practice you will never use the Tuple<_> class directly.
To create an instance of a tuple, separate a group of values with commas, and optionally place them within parentheses. A tuple type is described by a list of the tuple’s element’s types, separated by asterisks. In the following example, dinner is an instance of a tuple while string * string is the tuple’s type.
> let dinner = ("green eggs", "ham");; val dinner : string * string = ("green eggs", "ham")
Tuples can contain any number of values of any type. In fact, you can even have a tuple that contains other tuples!
The following code snippet defines two tuples. The first, named zeros, defines a tuple of various manifestations of zero. The second, nested, defines a nested tuple. The tuple has three elements, the second and third of which are themselves tuples.
> let zeros = (0, 0L, 0I, 0.0);; val zeros : int * int64 * BigInteger * float = (0, 0L, 0I, 0.0) > let nested = (1, (2.0, 3M), (4L, "5", '6'));; val nested : int * (float * decimal) * (int64 * string * char) = ...
To extract values from two-element tuples you can use the fst and snd functions. fst returns the first element of the tuple and snd returns the second.
> let nameTuple = ("John", "Smith");; val nameTuple : string * string = ("John", "Smith") > fst nameTuple;; val it : string = "John" > snd nameTuple;; val it : string = "Smith"
Alternately, you can extract values from tuples by simply using a let binding. If you have let followed by multiple identifiers separated by commas, then those names capture the tuple’s values.
The following example creates a tuple value named snacks. Later the tuple’s values are extracted into new identifiers named x, y, and z.
> let snacks = ("Soda", "Cookies", "Candy");; val snacks : string * string * string = ("Soda", "Cookies", "Candy") > let x, y, z = snacks;;
17

O’Reilly Media, Inc. 4/2/2012
val z : string = "Candy" val y : string = "Cookies" val x : string = "Soda" > y, z;; val it : string * string = ("Cookies", "Candy")
You will get a compile error if you try to extract too many or too few values from a tuple. > let x, y = snacks;; let x, y = snacks;; -----------^^^^^^ stdin(8,12): error FS0001: Type mismatch. Expecting a string * string but given a
string * string * string. The tuples have differing lengths of 2 and 3.
It is possible to pass tuples as parameters to functions, like any value. Likewise, a function can return a tuple. In the following example the function tupledAdd takes two parameters, x and y, in tupled form. Notice the difference in type signature between the add and the tupledAdd functions.
> let add x y = x + y;; val add : int -> int -> int > let tupledAdd(x, y) = x + y;; val tupledAdd : int * int -> int > add 3 7;; val it : int = 10 > tupledAdd(3, 7);; val it : int = 10
Functions taking a single tuple as a parameter have a much different meaning when it comes to the functional style of programming;, see Partial Function Application in Chapter 3.
Lists Whereas tuples group values into a single entity, lists allow you link data together to form a chain. Doing so allows you to process list elements in bulk using aggregate operators, discussed shortly.
The simplest way to define a list is as a semicolon-delimited collection of values enclosed in brackets, though later you will learn to declare lists using the more powerful list comprehension syntax. The empty list, which contains no items, is represented by [].
> // Declaring lists let vowels = ['a'; 'e'; 'i'; 'o'; 'u'] let emptyList = [];;
18

O’Reilly Media, Inc. 4/2/2012
val vowels : char list = ['a'; 'e'; 'i'; 'o'; 'u'] val emptyList : 'a list = []
In our example the empty list had type 'a list because the empty list could be of any type. With more information based on usage, the type inference system would be able to pin it down to a more specific type.
Unlike list types in other languages, F# lists are quite restrictive in how you access and manipulate them. In fact, for a list there are only two operations you can perform. (To see how this limitation can be used to your advantage, refer to Chapter 7, Applied Functional Programming.)
The first primitive list operation is cons, represented by the :: or cons operator. This joins an element to the front or head of a list. The following example attaches the value 'y' to the head of the vowels list.
> // Using the cons operator let sometimes = 'y' :: vowels;; val sometimes : char list = ['y'; 'a'; 'e'; 'i'; 'o'; 'u']
The second primitive list operation, known as append, uses the @ operator. Append joins two lists together. The following example joins the list odds and the list evens together, resulting in a new list.
> // Using the append operator let odds = [1; 3; 5; 7; 9] let evens = [2; 4; 6; 8; 10] val odds : int list = [1; 3; 5; 7; 9] val evens : int list = [2; 4; 6; 8; 10] > odds @ evens;; val it : int list = [1; 3; 5; 7; 9; 2; 4; 6; 8; 10]
List ranges
Declaring list elements as a semicolon-delimited list quickly becomes tedious, especially for large lists. To declare a list of ordered numeric values you can use the list range syntax.
The first expression specifies the lower bound of the range and the second specifies the upper bound. The result then is a list of values from the lower bound to the upper bound, each incremented by one.
> let x = [1 .. 10];; val x : int list = [1; 2; 3; 4; 5; 6; 7; 8; 9; 10]
If an optional step value is provided, then the result is a list of values in the range between two numbers separated by the stepping value. Note that the stepping value can be negative.
> // List ranges let tens = [0 .. 10 .. 50] let countDown = [5L .. -1L .. 0L];; val tens : int list = [0; 10; 20; 30; 40; 50] val countDown : int64 list = [5L; 4L; 3L; 2L; 1L; 0L]
19

O’Reilly Media, Inc. 4/2/2012
List comprehensions
The most expressive method for creating lists is to use list comprehensions, a rich syntax that allows you to generate lists inline with F# code. At the simplest level a list comprehension is some code surrounded by rectangular brackets [ ]. The body of the list comprehension will be executed until it terminates, and the list will be made up of elements returned via the yield keyword. (Note that the list is fully generated in memory when created. If you find yourself creating lists with thousands of elements, consider using a seq<_>, discussed in the next chapter, instead.)
> // Simple list comprehensions let numbersNear x = [ yield x - 1 yield x yield x + 1 ];; val numbersNear : int -> int list > numbersNear 3;; val it : int list = [2; 3; 4]
Most any F# code can exist inside of list comprehensions, including things like function declarations and for loops. The following code snippet shows a list comprehension that defines a function negate and returns the numbers 1 through 10, negating the even ones.
> // More complex list comprehensions let x = [ let negate x = -x for i in 1 .. 10 do if i % 2 = 0 then yield negate i else yield i ];; val x : int list = [1; -2; 3; -4; 5; -6; 7; -8; 9; -10]
When using for loops within list comprehensions, you can simplify the code by using -> instead of do yield. The following two code snippets are identical.
// Generate the first ten multiples of a numberlet multiplesOf x = [ for i in 1 .. 10 do yield x * i ] // Simplified list comprehension let multiplesOf2 x = [ for i in 1 .. 10 -> x * i ]
Using list comprehension syntax will enable you to quickly and concisely generate lists of data, which can then be processed in your code. Example 2-3 shows how you can use list comprehensions to generate all prime numbers smaller than a given integer.
The example works by looping through all numbers between 1 and the given max value. Then, it uses a list comprehension to generate all the factors of that number. It checks if the generated list of factors has only two elements, then it yields the value because it is prime. There certainly are more efficient ways to compute primes, but this demonstrates just how expressive list comprehensions can be.
20

O’Reilly Media, Inc. 4/2/2012
Example 2-3. Using list comprehensions to compute primes > // List comprehension for prime numbers let primesUnder max = [ for n in 1 .. max do let factorsOfN = [ for i in 1 .. n do if n % i = 0 then yield i ] // n is prime if its only factors are 1 and n if List.length factorsOfN = 2 then yield n ];; val primesUnder : int -> int list > primesUnder 50;; val it : int list = [2; 3; 5; 7; 11; 13; 17; 19; 23; 29; 31; 37; 41; 43; 47]
List module functions
The F# Library’s List module contains many methods to help you process lists. These built-in methods listed in Table 2-10 are the primary way you will interact with lists in F#.
Table 2-10. Common List module functions
Function and type Description List.length 'a list -> int
Returns the length of a list.
List.head 'a list -> 'a
Returns the first element in a list.
List.tail 'a list -> 'a list
Returns the given list without the first element.
List.exists ('a -> bool) -> 'a list -> bool
Returns whether or not an element in the list satisfies the search function.
List.rev 'a list -> 'a list
Reverses the elements in a list.
List.tryfind ('a -> bool) -> 'a list -> 'a option
Returns Some(x)where x is the first element for which the given function returns true. Otherwise returns None. (Some and None will be covered shortly.)
List.zip 'a list -> 'b list -> ('a * 'b) list
Given two lists with the same length, returns a
21

O’Reilly Media, Inc. 4/2/2012
joined list of tuples. List.filter ('a -> bool) -> 'a list -> 'a list
Returns a list with only the elements for which the given function returned true.
List.partition ('a -> bool) -> 'a list -> ('a list * 'a list)
Given a predicate function and a list returns two new lists, the first where the function returned true, the second where the function returned false.
Initially, it may not be clear how to use some of the List module functions, but you’ll soon be able to identify what a function does by simply looking at its type signature.
The following example demonstrates the List.partition function, partitioning a list of numbers from 1 to 15 into two new lists: one comprised of multiples of five and the other list made up of everything else. The tricky part to note is that List.partition returns a tuple, and in the example values multOf5 and nonMultOf5 are elements of that tuple being bound at the same time.
> // Using List.partition let isMultipleOf5 x = (x % 5 = 0) let multOf5, nonMultOf5 = List.partition isMultipleOf5 [1 .. 15];; val isMultipleOf5 : int -> bool val nonMultOf5 : int list = [1; 2; 3; 4; 6; 7; 8; 9; 11; 12; 13; 14] val multOf5 : int list = [5; 10; 15]
What is List anyways? All of these functions are defined in the List module in the Microsoft.FSharp.Collections namespace. Because the Microsoft.FSharp.Collections module is imported by default, to access any of these methods you just need to specify the List module and the function name.
Aggregate Operators Although lists offer a way to chain together pieces of data, there really isn’t anything special about them. The true power of lists lies in aggregate operators, which are a set of powerful functions that are useful for any collection of values. You’ll see this set of methods again during the discussion of sequences (Chapter 3) and arrays (Chapter 4).
List.map
List.map is a projection operation that creates a new list based on a provided function. Each element in the new list is the result of applying the function to an element of the original list. It has type:
('a -> 'b) -> 'a list -> 'b list
22

O’Reilly Media, Inc. 4/2/2012
Visually you can represent mapping a function f to list [x; y; z] as shown in Figure 2-1.
Figure 2-1. Visualizing List.map
Example 2-4 shows the result of mapping a square function to a list of integers.
Example 2-4. Using List.map to square numbers in a list > let square x = x * x;; val square : int -> int > List.map square [1 .. 10];; val it : int list = [1; 4; 9; 16; 25; 36; 49; 64; 81; 100]
It may not seem like it right now, but List.map is one of the most useful functions in the F# language. It provides an elegant way for you to transform data and when used repeatedly can simplify the structure of code you write.
List.fold
Folds represent the most powerful type of aggregate operator and not surprisingly the most complicated. When you have a list of values and you want to distill it down to a single piece of data, you use a fold.
There are two main types of folds you can use on lists. Let’s start with List.reduce, which has type:
('a -> 'a -> 'a) -> 'a list -> 'a
List.reduce iterates through each element of a list, building up an accumulator value, which is the summary of the processing done on the list so far. Once every list item has been processed, the final accumulator value is returned. The accumulator’s initial value in List.reduce is the first element of the list.
23

O’Reilly Media, Inc. 4/2/2012
Example 2-5 demonstrates how to use List.reduce to comma-separate a list of strings. The function insertCommas takes the accumulator and a value and simply returns a new string that joins the accumulator and the value separated by a comma. When passed to List.reduce, the initial value of the accumulator is the first item in the list, so the net result after processing every item in the list is a single string containing all of the list’s values separated by commas.
Example 2-5. Comma separating a list of strings using List.reduce > let insertCommas (acc : string) item = acc + ", " + item;; val insertCommas : string -> string -> string > List.reduce insertCommas ["Jack"; "Jill"; "Jim"; "Joe"; "Jane"];; val it : string = "Jack, Jill, Jim, Joe, Jane"
The following table shows how the accumulator was built up after processing each list element.
Accumulator List element “Jack” (the first list element) “Jill” (the second list element) “Jack, Jill” “Jim” “Jack, Jill, Jim” “Joe” “Jack, Jill, Jim, Joe” “Jane”
While the reduce fold is helpful, it forces the type of the accumulator have the same type as the list. But what if you want something more powerful? For example, reducing a list of items in a shopping cart to a cash value.
If you want to use a custom accumulator type you can use List.fold. The fold function takes three parameters. First, a function that when provided an accumulator and list element returns a new accumulator. Second, an initial accumulator value. The final parameter is the list to fold over. The return value of the fold is the final state of the accumulator. Officially the type is:
('acc -> 'b -> 'acc) -> 'acc -> 'b list -> 'acc
To provide a simple example, consider folding a list of integers into their sum. > let addAccToListItem acc i = acc + i;; val addAccToListItem : int -> int -> int > List.fold addAccToListItem 0 [1; 2; 3];; val it : int = 6
But again, the accumulator for fold does not need to be the same as the list’s elements. Example 2-6 folds the characters of a string into a tuple counting the occurrences of each vowel. (The number of a’s, e’s, i’s, etc.)
The folding function is applied to each letter in the list; if the letter is a vowel we return an updated accumulator value, otherwise we just return the existing accumulator.
Example 2-6. Counting vowels using List.fold > // Count the number of vowels in a string
24

O’Reilly Media, Inc. 4/2/2012
let countVowels (str : string) = let charList = List.ofSeq str let accFunc (As, Es, Is, Os, Us) letter = if letter = 'a' then (As + 1, Es, Is, Os, Us) elif letter = 'e' then (As, Es + 1, Is, Os, Us) elif letter = 'i' then (As, Es, Is + 1, Os, Us) elif letter = 'o' then (As, Es, Is, Os + 1, Us) elif letter = 'u' then (As, Es, Is, Os, Us + 1) else (As, Es, Is, Os, Us) List.fold accFunc (0, 0, 0, 0, 0) charList;; val countVowels : string -> int * int * int * int * int > countVowels "The quick brown fox jumps over the lazy dog";; val it : int * int * int * int * int = (1, 3, 1, 4, 2)
Folding right-to-left
List.reduce and List.fold process the list in a left-to-right order. There are alternative functions List.reduceBack and List.foldBack for processing lists in right-to-left order. Depending on what you are trying to do, processing a list in reverse order can have a substantial impact on performance. For a more in-depth look at the performance implications of list processing, refer to Chapter 7, Applied Functional Programming.
List.iter
The final aggregate operator, List.iter, iterates through each element of the list and calls a function that you pass as a parameter. It has type:
('a -> unit) -> 'a list -> unit
Because List.iter returns unit, it is predominately used for evaluating the side effect of the given method. The term side effect simply means that executing the function has some side effect other than its return value: for example, printfn has the side effect of printing to the console in addition to returning unit.
Example 2-7 uses List.iter to iterate through each number in a list and print it to the console.
Example 2-7. Using List.iter to print numbers in a list > // Using List.iter let printNumber x = printfn "Printing %d" x List.iter printNumber [1 .. 5];; Printing 1 Printing 2 Printing 3 Printing 4 Printing 5 val printNumber : int -> unit
25

O’Reilly Media, Inc. 4/2/2012
Option If you want to represent a value that may or may not exist, the best way to do so is to use the option type. The option type has only two possible values: Some('a) and None.
Consider the problem of parsing a string as an int. If the string is properly formatted, the function should return the integer value, but what if the string is improperly formatted? This is a prime situation where you would use an option type.
A common idiom in other languages is to use null to mean the absence of a value. However, null is also used to indicate an uninitialized value. This duality can lead to confusion and bugs. If you use the option type, there is no question what the value represents.
option can be thought of as similar to the System.Nullable type, covered in Chapter 4.
Example 2-8 defines a function isInteger which tries to parse an integer using the Int32.TryParse function. If the parsing is successful the function will return Some(result) otherwise None. This enables consumers of the function to know that for some inputs the result may not be defined, hence returning None.
Example 2-8. The option type storing if a string parses as an integer > // Using option to return a value (or not) open System let isInteger str = let successful, result = Int32.TryParse(str) if successful then Some(result) else None;; val isInteger : string -> int option > isInteger "This is n n int";; ot aval it : int option = None > isInteger "400";; val it : int option = Some 400
To retrieve the value of an option you can use Option.get. (If Option.get is called on None, an exception will be thrown.) The following snippet defines a function containsNegativeNumbers which returns Some(_) for all negative numbers in a list. Then, the list’s negative numbers are retrieved using Option.get.
> // Using Option.get let isLessThanZero x = (x < 0) let containsNegativeNumbers intList = let filteredList = List.filter isLessThanZero intList if List.length filteredList > 0 then Some(filteredList) else None;; val isLessThanZero : int -> bool
26

O’Reilly Media, Inc. 4/2/2012
val containsNegativeNumbers : int list -> int list option > let negativeNumbers = containsNegativeNumbers [6; 20; -8; 45; -5];; val negativeNumbers : int list option = Some [-8; -5] > Option.get negativeNumbers;; val it : int list = [-8; -5]
The Option module contains other helpful functions listed in Table 2-11.
Table 2-11. Common Option module methods
Function and type Description Option.isSome 'a option -> bool
Returns true if the option is Some, otherwise false
Option.isNone 'a option -> bool
Returns false if the option is Some, otherwise true
Printf Writing data to the console is the simplest way to perform IO and is done using the printf family of functions. printf comes in three main flavors: printf, printfn, and sprintf.
printf takes the input and writes it to the screen, whereas printfn writes it to the screen and adds a line continuation.
> // printf and printfn printf "Hello, " printfn "World";; Hello, World
The existing .NET System.Console class can be used for writing text to the screen, but printf is better suited for the functional style because its arguments are strongly typed and therefore contribute to type inference. System.Console.Read should still be used for input however.
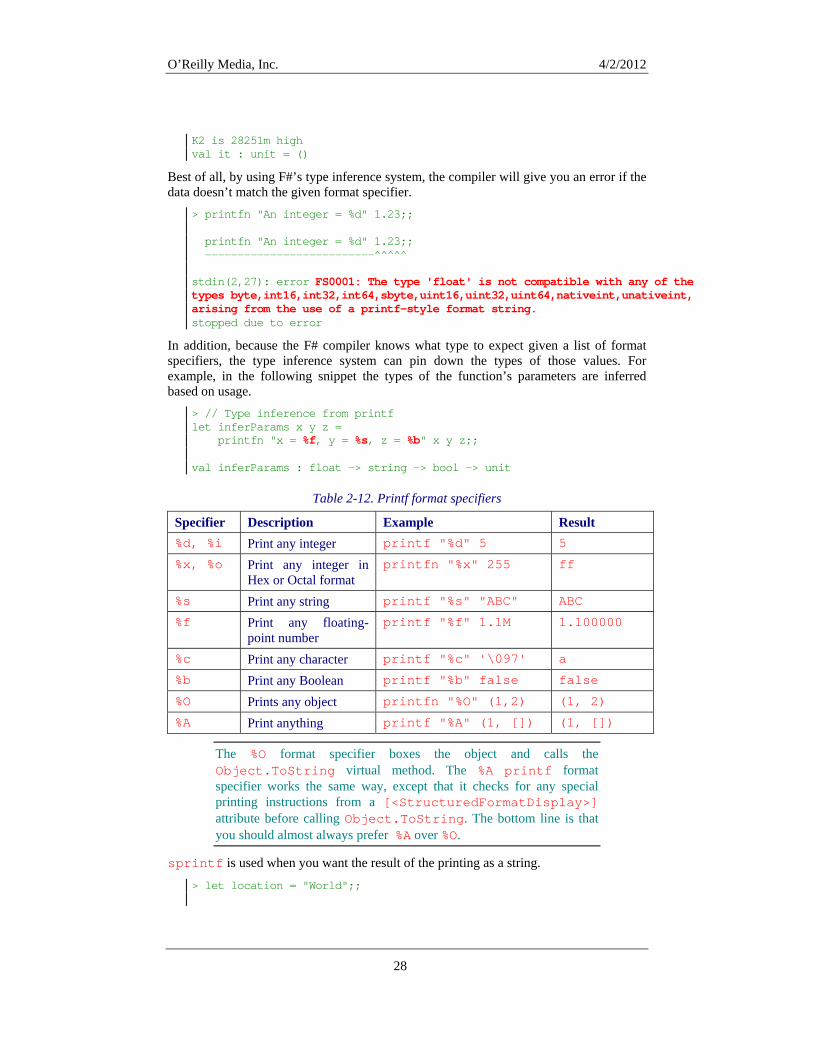
Printing text to the console isn’t especially exciting, but printf adds a lot of power in that it has formatting and checking built in. By providing a format specifier, listed in Table 2-12, you can drop in data as well.
> // Format specifiers let mountain = "K2" let height = 8611 let units = 'm';; val mountain : string = "K2" val height : int = 8611 val units : char = 'm' > printfn "%s is %d%c high" mountain height units;;
27
O’Reilly Media, Inc. 4/2/2012
K2 is 28251m high val it : unit = ()
Best of all, by using F#’s type inference system, the compiler will give you an error if the data doesn’t match the given format specifier.
> printfn "An integer = %d" 1.23;; printfn "An integer = %d" 1.23;; --------------------------^^^^^ stdin(2,27): error FS0001: The type 'float' is not compatible with any of the types byte,int16,int32,int64,sbyte,uint16,uint32,uint64,nativeint,unativeint, arising from the use of a printf-style format string. stopped due to error
In addition, because the F# compiler knows what type to expect given a list of format specifiers, the type inference system can pin down the types of those values. For example, in the following snippet the types of the function’s parameters are inferred based on usage.
> // Type inference from printf let inferParams x z = y printfn "x = %f, y = %s, z = %b" x y z;; val inferParams : float -> string -> bool -> unit
Table 2-12. Printf format specifiers
Specifier Description Example Result %d, %i Print any integer printf "%d" 5 5
%x, %o Print any integer in Hex or Octal format
printfn "%x" 255 ff
%s Print any string printf "%s" "ABC" ABC
%f Print any floating-point number
printf "%f" 1.1M 1.100000
%c Print any character printf "%c" '\097' a
%b Print any Boolean printf "%b" false false
%O Prints any object printfn "%O" (1,2) (1, 2)
%A Print anything printf "%A" (1, []) (1, [])
The %O format specifier boxes the object and calls the Object.ToString virtual method. The %A printf format specifier works the same way, except that it checks for any special printing instructions from a [<StructuredFormatDisplay>] attribute before calling Object.ToString. The bottom line is that you should almost always prefer %A over %O.
sprintf is used when you want the result of the printing as a string.
> let location = "World";;
28
O’Reilly Media, Inc. 4/2/2012
val location : string = "World" > sprintf "Hello, %s" location;; val it : string = "Hello, World"
Organizing F# Code By now you probably want to take the F# code we have been writing in the FSI window and convert it into actual programs. But in reality, every code snippet you have seen so far has been a full program. (Though, admittedly, not the type of programs you imagined.)
Don’t worry though. You will see a more “real world” view of F# in Chapter 11. For now, we need to focus on the organizational building blocks of any F# application: modules and namespaces.
Modules All the code we have written so far has been in a module. By default, F# puts all your code into an anonymous module with the same name as the code file with the first letter capitalized. So, if you have a value named value1, and your code is in file1.fs, you can refer to it by using the fully qualified path: File1.value1.
Creating modules
You can explicitly name your code’s module by using the module keyword at the top of a source file. After that point, every value, function, or type defined will belong to that module.
module Alpha // To refer to this value outside the module // use: Alpha.x let x = 1
Nested modules
Files can contain nested modules as well. To declare a nested module, use the module keyword followed by the name of your module and an equals sign =. Nested modules must be indented to be disambiguated from the “top-level” module.
module Utilities module ConversionUtils = // Utilities.ConversionUtils.intToString let intToString (x : int) = x.ToString() module ConvertBase = // Utilities.ConversionUtils.ConvertBase.convertToHex let convertToHex x = sprintf "%x" x // Utilities.ConversionUtils.ConvertBase.convertToOct let convertToOct x = sprintf "%o" x
29
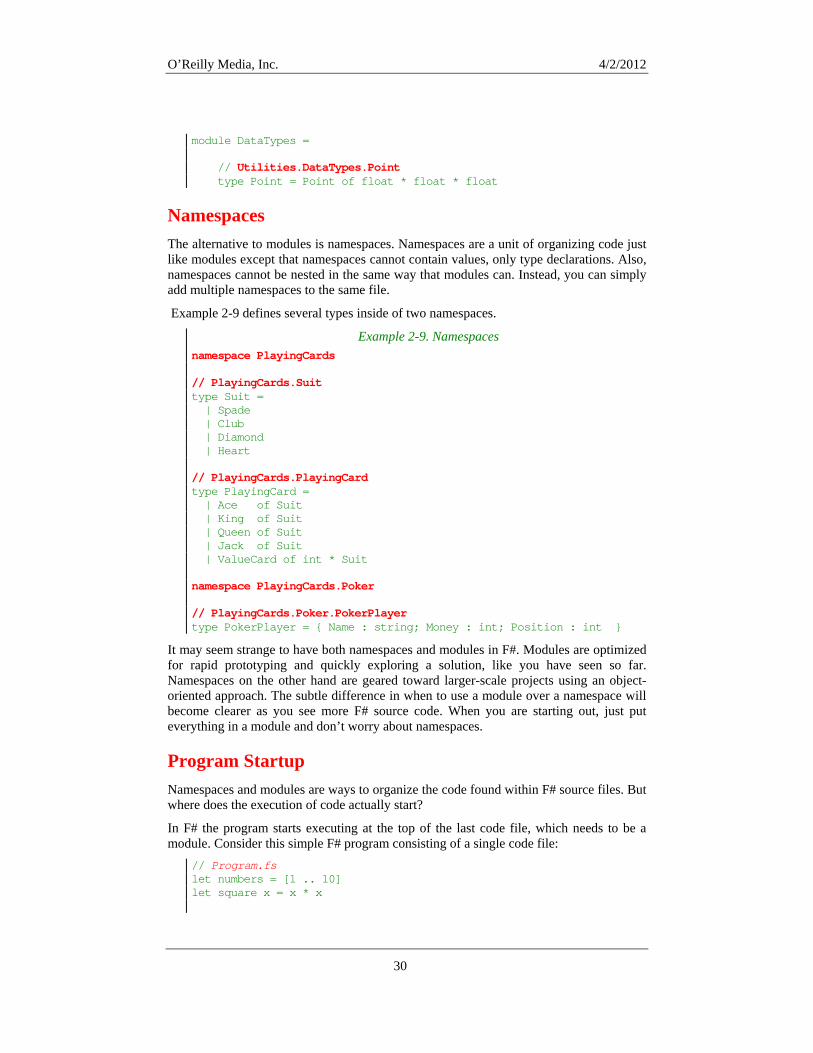
O’Reilly Media, Inc. 4/2/2012
module DataTypes = // Utilities.DataTypes.Point type Point = Point of float * float * float
Namespaces The alternative to modules is namespaces. Namespaces are a unit of organizing code just like modules except that namespaces cannot contain values, only type declarations. Also, namespaces cannot be nested in the same way that modules can. Instead, you can simply add multiple namespaces to the same file.
Example 2-9 defines several types inside of two namespaces.
Example 2-9. Namespaces namespace PlayingCards // PlayingCards.Suit type Suit = | Spade | Club | Diamond | Heart // PlayingCards.PlayingCard type PlayingCard = | Ace of Suit | King of Suit | Queen of Suit | Jack of Suit | ValueCard of int * Suit namespace PlayingCards.Poker // PlayingCards.Poker.PokerPlayer type PokerPlayer = { Name : string; Money : int; Position : int }
It may seem strange to have both namespaces and modules in F#. Modules are optimized for rapid prototyping and quickly exploring a solution, like you have seen so far. Namespaces on the other hand are geared toward larger-scale projects using an object-oriented approach. The subtle difference in when to use a module over a namespace will become clearer as you see more F# source code. When you are starting out, just put everything in a module and don’t worry about namespaces.
Program Startup Namespaces and modules are ways to organize the code found within F# source files. But where does the execution of code actually start?
In F# the program starts executing at the top of the last code file, which needs to be a module. Consider this simple F# program consisting of a single code file:
// Program.fs let numbers = [1 .. 10] let square x = x * x
30

O’Reilly Media, Inc. 4/2/2012
31
let squaredNumbers = List.map square numbers printfn "SquaredNumbers = %A" squaredNumbers open System printfn "(press any key to continue)" Console.ReadKey(true)
Now open that project in Visual Studio, and then add a new, empty F# code file. When you press F5 to run your program, nothing will happen. This is because the newest file added to the project – which is blank – was added “last” and thus is what ran when the program started up. (Again, because Program.fs comes before File1.fs in Solution Explorer.)
This feature is convenient for rapid prototyping and saves you a few keystrokes, but in larger projects it is better to explicitly define the entry point.
For more formal program startup semantics, you can use the [<EntryPoint>] attribute to define a main method. To qualify, your main method must satisfy the following requirements:
• Be the last function defined in the last compiled file in your project. This ensures there is no confusion on where the F# program starts.
• Take a single parameter of type string array, which are the arguments to your program. (Arrays will be covered in Chapter 4.)
• Return an integer, which is your program’s exit code.
To make the main method explicit then, you could rewrite the previous application as: // Program.fs open System [<EntryPoint>] let main (args : string[]) = let numbers = [1 .. 10] let square x = x * x let squaredNumbers = List.map square numbers printfn "SquaredNumbers = %A" squaredNumbers printfn "(press any key to continue)" Console.ReadKey(true) |> ignore // Return 0 0
Now you have all the tools you need to write simple F# programs. In the next chapter you will learn to program using the functional style, enabling you to write more powerful F# applications and advance on your journey toward becoming a level-9 F# ninja master.

O’Reilly Media, Inc. 4/2/2012
3 Functional Programming
With the basics out of the way, you can begin to examine F# from the approach of a particular style. This chapter is devoted to F#’s main paradigm: functional programming. In a nutshell, functional programming is about being more declarative in your code. In imperative programming – Chapter 4 – you spend your time listing out the specific steps to perform a task. In functional programming, you specify what is to be done, but not how. Even though functional programming is no silver bullet, the result is that programs are much clearer, and some problems like concurrency and parallel programming are made much easier.
Functional programming isn’t going to replace imperative or object-oriented programming on its own; rather, it just provides a different approach to use so that in certain applications you can be much more productive.
For a language to be considered “functional” it typically needs to support a few key features:
• Immutable data • Ability to compose functions • Functions can be treated as data • Lazy evaluation • Pattern matching
We will go into each of these raw, functional concepts and what they offer throughout the chapter. By the end you will be able to write purely functional code, and leverage the elegance and simplicity of declarative programming. A deeper look at functional concepts, such as tail recursion and closures, will come later in Chapter 7.
Understanding Functions The heart of functional programming is thinking about code in terms of mathematical functions. Consider two functions f and g.
1

O’Reilly Media, Inc. 4/2/2012
f(x) = x^2 + x g(x) = x + 1
It follows that: f(2) = (2)^2 + (2) g(2) = (2) + 1
And if you compose the two functions, or put them together, you get: f g (2) = f(g(2)) = (g(2))^2 + (g(2)) = (2+1)^2 + (2+1) = 12
You don’t have to be a mathematician to program in F#, but many of the foundations of functional programming are rooted in mathematics.. For example, in the previous snippets there was no explicit return type specified. Does f(x) take an integer or a float? This mathematical notation isn’t concerned with data types or return values. The equivalent F# code is:
let f x = x ** 2.0 + x let g x = x + 1.0
The fact that the F# code resembles the mathematical notation isn’t a coincidence. Functional programming in essence is thinking about computations in an abstract way – again, what is to be computed but not how it gets computed.
You can even think of entire programs as functions with their inputs being mouse and keyboard states and the output being the process exit code. When you begin to view programming in this way, some of the complexity associated with normal programming models goes away.
First, if you think about your program as a series of functions, then you don’t need to spend all your time in the details explaining the step-by-step of how to complete a task. Functions simply take their input and produce an output. Second, algorithms are expressed in terms of functions and not classes or objects, so it is easier to translate these concepts using functional programming.
You will see examples of how functional programming can simplify complex code throughout the chapter, but first you need to start thinking in terms of functions. To do so you need to abandon some of the mindset built up from existing imperative languages. In the next sections we will introduce the notion of immutability, functions as values, and function composition to demonstrate how to begin to program in the functional style.
Immutability You may have noticed that I have suspiciously not used the word variable before, and instead referred to everything as a value. The reason for this is that in functional programming the names of things you declare are immutable by default, meaning they cannot be changed.
If a function somehow changes the state of the program – such as writing to a file or mutating a global variable in memory—that is known as a side effect. For example, calling the printfn function returns unit but has the side effect of printing text to the screen. Similarly, if a function updates the value of something in memory, that too is a side effect—something extra the function does in addition to returning a value.
2

O’Reilly Media, Inc. 4/2/2012
Side effects aren’t all that bad, but unintended side effects are the root of many bugs. Even the most well-intentioned programmers can make mistakes if they aren’t aware of the side effects of a function. Immutable values help you write safer code because you can’t screw up what you can’t change.
If you are used to an imperative programming language, then not being able to have variables may seem like a burden. But immutability offers some significant benefits.
Consider the two functions in Example 3-1. Both functions simply sum the squares of a list of numbers with one using the imperative style of mutating data and the other using the functional style. The imperative style makes use of a mutable variable, meaning that the value of total changes during the execution of imperativeSum.
Example 3-1. Summing a list of squares using imperative and functional styles let square x = x * x let imperativeSum numbers = let mutable total = 0 for i in numbers do let x = square i total <- total + x total let functionalSum numbers = numbers |> Seq.map square |> Seq.sum
The first thing you might notice is that the second, functional example is shorter. It starts with the list of numbers, squares each one, and then sums them all up. While the F# syntax may be unfamiliar, the code is more declarative and maps directly to what you want to have happen.
The imperative version, while easier to walk through in your head, requires you to read through the code to understand what is going on.
You might be thinking that even if it is a little more verbose, the imperative example is better than the functional one because it is more familiar. Please resist this urge, at least for now, because there are some subtle advantages to learning to approach problems in the functional style.
For example, if you wanted to run the imperative version in parallel then you would have to rewrite the code entirely. Because you were so detailed in how you specified the program to be run, you would need to restate how the program should work in parallel. The functional version however wasn’t prescriptive on how to do things, so you can easily replace the map and sum functions with implementations that work in parallel. You will see just how easy F# makes parallel programming in Chapter 11.
Functional programming languages are referred to as pure if they do not allow side effects. F# in this regard is considered impure as it will allow you to change the values of variables when programming in the imperative style.
3

O’Reilly Media, Inc. 4/2/2012
Function Values In most other programming languages, functions and data are regarded as two very different things. However, in a functional programming language, functions are treated just like any other piece of data. For example, functions can be passed as parameters to other functions. In addition, functions can create and return new functions! Functions that take or return other functions as their inputs or outputs are known as higher-order functions, and are key for idiomatic functional programming.
This capability enables you to abstract and reuse algorithms in your code. You saw an example of this in the previous chapter with List.iter, List.map, and List.fold.
Example 3-2 defines a function, negate, which negates a single integer. When that function is passed as a parameter to List.map, the function is then applied to a whole list, negating every element.
Example 3-2. Example of higher-order functions > let negate x = -x;; val negate : int -> int > List.map negate [1 .. 10];; val it : int list = [-1; -2; -3; -4; -5; -6; -7; -8; -9; -10]
Using function values is very convenient, but the result is that you end up writing many simple functions that don’t have a lot of value on their own. For example, our negate function in Example 3-2 will probably never be used anywhere else in the program except when negating a list.
Rather than naming all the little functions you pass as parameters you can use an anonymous function, also known as a lambda expression, to create a function inline.
To create a lambda expression, simply use the fun keyword followed by the function’s parameters and an arrow ->.
The following snippet creates a lambda expression and passes the value five as a parameter. When the function is executed, the parameter x is incremented by three and the result is eight.
> (fun x -> x + 3) 5;; val it : int = 8
We can rewrite our negate list example using a lambda that takes a single parameter i. > List.map (fun i -> -i) [1 .. 10];; val it : int list = [-1; -2; -3; -4; -5; -6; -7; -8; -9; -10]
Be careful to keep lambdas simple. As they grow larger, they become more difficult to debug. This is especially true if you find yourself copying and pasting lambdas around in your code.
Partial function application
Another example of how functional programming’s focus on small functions is partial function application. Partial function application is the ability to specify some subset of
4

O’Reilly Media, Inc. 4/2/2012
the parameters of a function, and produce a new function where those parameters are fixed. For example f(x, y, z) can be partially applied with x and y to just be f'(z).
Let’s look at a practical example which appends text to a file using the .NET libraries. > // Append text to a file open System.IO let appendFile (fileName : string) (text : string) = use file = new StreamWriter(fileName, true) file.WriteLine(text) file.Close();; val appendFile : string -> string -> unit > appendFile @"D:\Log.txt" "Processing Event X...";; val it : unit = ()
The appendFile function seems simple enough, but what if you wanted to repeatedly write to the same log file? You would have to keep around the path to your log file and always pass it in as the first parameter. It would be nice however to create a new version of appendFile where the first parameter is fixed to our verbatim string @"D:\Log.txt".
You can achieve this by partially applying the first parameter of appendFile, which produces a new function that only takes one parameter, the message to be logged.
> // Create a new function, with a partially applied call to appendFile. let appendLogFile = appendFile @"D:\Log.txt";; val appendLogFile : (string -> unit) > // Appends text to to 'D:\Log.txt' appendLogFile "Processing Event Y...";; val it : unit = ()
Partial function application is why function types have arrows between their arguments. The appendFile function had type:
string -> string -> unit
So after the first string parameter was passed in, the result was a function that took a string and returned unit, or string -> unit.
To understand what is going on behind the scenes, let me introduce currying. The ability to transform a function taking n arguments into a chain of n functions each taking one-argument is called currying. The F# compiler “curries” functions to enable partial function application.
There is a huge difference between string * string -> int and string -> string -> int. Both are function types that take two string parameters and return an integer. However, one only accepts its argument in tuple-form (string * string). This means that all parameters must be specified at the same time. The other function has had its arguments curried (string -> string -> unit), and so applying a single parameter results in a new function value.
5
O’Reilly Media, Inc. 4/2/2012
Currying and partial function application may not look particularly powerful, but it can dramatically improve the elegance of your code. Consider the printf function that takes a format string as a parameter followed by the values to fill in that format string. If you just supply the first parameter of "%d", the result is a partially applied function that accepts an integer and prints it to the screen.
The following example shows how you can pass a partially applied version of printf to avoid the need for a lambda expression.
> // Non partially applied List.iter (fun i -> printfn "%d" i) [1 .. 3];; 1 2 3 val it : unit = () > // Using printfn applying the "%d" parameter, which returns a new // functio t -> unit opposed to string -> int -> unit. n with type inList.iter (printfn "%d") [1 .. 3];; 1 2 3 val it : unit = ()
You will see how to take full advantage of partial function application later this chapter when we get to function composition and the pipe-forward operator.
While partially applied functions can make code simpler, they can also make code harder to debug. Be careful not to abuse currying to make your programs any more complex than they need to be.
Functions returning functions
With functional programming treating functions like data, it is possible for functions to return other functions as values. This can cause some interesting situations when you consider the lifetime of local values…
Example 3-3 defines a function generatePowerOfFunc, which returns a function that raises a given number to a power. Two functions are created, powerOfTwo and powerOfThree, which raise two or three to a given power.
Example 3-3. Functions returning functions > // Functions returning functions let generatePowerOfFunc baseValue = (fun exponent -> baseValue ** exponent);; val generatePowerOfFunc : float -> float -> float > let powerOfTwo = generatePowerOfFunc 2.0;; val powerOfTwo : (float -> float) > powerOfTwo 8.0;; val it : float = 256.0 > let powerOfThree = generatePowerOfFunc 3.0;; val powerOfThree : (float -> float)
6

O’Reilly Media, Inc. 4/2/2012
> powerOfThree 2.0;; val it : float = 9.0
If you look closer at our generatePowerOfFunc function, notice that its parameter baseValue is used in the two lambdas it returned. But when you call values powerOfTwo and powerOfThree later, where does baseValue come from if it isn’t a parameter to the function? When generatePowerOfFunc was initially called with the value 2.0 as a parameter, you might be wondering where was that 2.0 was stored?
There is a bit of magic going on here known as a closure. Don’t concern yourself with this concept or how it works for now. Just know that if a value is in scope, it can be used and perhaps returned by a function. In Chapter 7 we will cover closures in depth and see the sorts of things you can do by abusing this magic performed by the F# compiler.
Recursive Functions A function that calls itself is recursive, and when programming in the functional style these can be very useful as you will see shortly.
To define a recursive function you simply need to add the rec keyword. The following snippet defines a function for calculating the factorial of a number. (The factorial of a number is the product of all positive integers up to and including the number. For example, the factorial of 4 is 4 * 3 * 2 * 1.)
> // Define a recursive function let rec factorial x = if x <= 1 then 1 else x * factorial (x - 1);; val factorial : int -> int > factorial 5;; val it : int = 120
The rec keyword may standout as an artifact because other languages don’t require you to explicitly call out recursive functions. The actual purpose of the rec keyword is to inform the type inference system to allow the function to be used as part of the type inference process. rec allows you to call the function before the type inference system has determined the function’s type.
By using recursion combined with higher-order functions you can easily simulate the sort of looping constructs found in imperative languages, only without the need for mutating values. The following example creates functional versions of common for and while loops. Notice that in the example of the for loop, an updated counter is simply passed as a parameter to the recursive call.
> // Functional for loop let rec forLoop body times = if times <= 0 then ()
7

O’Reilly Media, Inc. 4/2/2012
else body() forLoop body (times - 1) // Functional while loop let rec whileLoop predicate body = if predicate() then body() whileLoop predicate body else ();; val forLoop : (unit -> unit) -> int -> unit val whileLoop : (unit -> bool) -> (unit -> unit) -> unit > forLoop (fun () -> printfn "Looping...") 3;; Looping... Looping... Looping... val it : unit = () > // A typical work week... open System whileLoop (fun () -> DateTime.Now.DayOfWeek <> DayOfWeek.Saturday) (fun () -> printfn "I wish it were the weekend...");; I wish it were the weekend... I wish it were the weekend... I wish it were the weekend... * * * This goes on for several days * * * val it : unit = ()
In fact, in most functional programming languages recursion is the only way to setup looping constructs. (Remember, if you can’t mutate variables you can’t increment a loop counter.) F# programs which adhere to the strict functional style prefer the use of recursive functions instead of loops. However, you should always keep your code as clear and simple as possible.
Mutual recursion
Two functions that call each other are known as mutually recursive, and present a unique challenge to the F# type inference system. In order to determine the type of the first function you need to know the type of the second function and vice versa.
In Example 3-4 the mutually recursive functions fail to compile, because when processing the isOdd function, the isEven function has not been declared yet.
Example 3-4. Mutually recursive functions > // Error: Can’t define isOdd without isEven and vice versa. let isOdd x = if x = 0 then false elif then true x = 1 else isEven(x - 1) let isEven x = if x = 0 then true elif x = 1 then false else isOdd(x - 1);;
8

O’Reilly Media, Inc. 4/2/2012
else isEven(x - 1) ---------^^^^^^ C:\Users\chrsmith\AppData\Local\Temp\stdin(15,15): error FS0039: The value or constructor 'isEven' is not defined
In order to define mutually recursive functions you must join them together with the and keyword, which tells the F# compiler to perform type inference for both functions at the same time.
> // tually recursive functions using "rec" and "and". Mulet rec isOdd x = if x = 0 then false elif x = 1 then true else isEven(x - 1) and isEven x = if x = 0 then true elif x = 1 then false else isOdd(x - 1);; val isOdd : int -> bool val isEven : int -> bool > isOdd 314;; val it : bool = false > isEven 314;; val it : bool = true
Symbolic Operators Think how difficult programming would be if you couldn’t write 1 + 2 and instead had to write add 1 2 every time. Fortunately F# not only has built-in symbolic operators for things like addition and subtraction but also allows you to define your own symbolic operators. This allows you to write code in a cleaner and more elegant way.
Don’t think of symbolic functions as a form of operator overloading, but rather as functions whose names are made out of symbols.
A symbolic operator can be made up of any sequence of !%&*+-./<=>@^|? symbols. The following code defines a new function ! that computes the factorial of a number.
> // Factorial let rec (!) x = if x <= 1 then 1 else x * !(x - 1);; val ( ! ) : int -> int > !5;; val it : int = 120
By default, symbolic functions use infix notation when they have more than one parameter. This means that the first parameter comes before the symbol, which is how you most commonly apply symbolic functions. The following example defines a function === which compares a string with a regular expression.
9

O’Reilly Media, Inc. 4/2/2012
> // Define (===) to compare strings based on regular expressions open System.Text.RegularExpressions;; let (===) str (regex : string) = Regex.Match(str, regex).Success;; val ( === ) : string -> string -> bool > "The quick brown fox" === "The (.*) fox";; val it : bool = true
In addition to allowing you to name functions that map more closely to mathematics, symbolic operators can be passed around to higher-order functions if you simply put parentheses around the symbol. For example, if you wanted to sum or multiply the elements of a list you can write:
> // Sum a list using the (+) symbolic function List.fold (+) 0 [1 .. 10];; val it : int = 55 > // Multiply all elements using the (*) symbolic function List.fold (*) 1 [1 .. 10];; val it : int = 3628800 > let minus = (-);; val minus : (int -> int -> int) > List.fold minus 10 [3; 3; 3];; val it : int = 1
Function Composition Once you get a strong grasp on functions, you can begin to look at combining them to form larger, more powerful functions. This is known as function composition and is another tenet of functional programming.
Before we go over how to combine functions, let’s look at the problem it solves. Here is an example of what not to do: put everything into one massive function. Consider this code for getting the size of a given folder on disk. I’ve added type annotations to help clarify return values.
open System open System.IO let sizeOfFolder folder = // Get all files under the path let filesInFolder : string [] = Directory.GetFiles( folder, "*.*", SearchOption.AllDirectories) // Map those files to their corresponding FileInfo object let fileInfos : FileInfo [] = Array.map (fun (file : string) -> new FileInfo(file)) filesInFolder
10

O’Reilly Media, Inc. 4/2/2012
// Map those fileInfo objects to the file's size let fileSizes : int64 [] = Array.map (fun (info : FileInfo) -> info.Length) fileInfos // Total the file sizes let totalSize = Array.sum fileSizes // Return the total size of the files totalSize
There are three main problems with this code:
• The type inference system cannot determine the correct types automatically, so we must provide a type annotation to the parameters in each lambda expression. This is because type inference processes code from left-to-right top-to-bottom, so it sees the lambda passed to Array.map before it sees the type of the array elements passed. (Therefore, the type of the lambda’s parameter is unknown.)
• The result of each computation is just fed as a parameter into the next step of the computation, so the function is littered with unnecessary let statements.
• It’s kind of ugly. It takes more time to decipher what is going on than it should.
Function composition is about taking code like this and breaking it down into smaller functions, then composing those into a final result.
The previous example kept feeding the computation of one function into the next. Mathematically, if we want the result of f(x) passed into g(x), we write: g(f(x)). We could have avoided all those let bindings by nesting all the intermediate results, but that is extremely unreadable, as you can see here:
let uglySizeOfFolder folder = Array.sum (Array.map (fun (info : FileInfo) -> info.Length) (Array.map (fun file -> new FileInfo(file)) (Directory.GetFiles( folder, "*.*", SearchOption.AllDirectories))))
Pipe-forward operator
Fortunately, F# solves this problem of passing an intermediate result onto the next function concisely with the pipe-forward operator, |>. It is defined as:
let (|>) x f = f x
The pipe-forward operator allows you to rearrange the parameters of a function so that you present the last parameter of the function first. Whereas the last parameter to List.iter is the list to iterate through, by using the pipe-forward operator you can now “pipe” the list into List.iter so you specify which list to iterate through first.
> [1 .. 3] |> List.iter (printfn "%d");; 1 2 3
11

O’Reilly Media, Inc. 4/2/2012
val it : unit = ()
Technically speaking, the pipe-forward operator and its sister function, the pipe-backward operator, are not actually composing functions. Rather they just deal in function application.
The benefit of the pipe-forward operator is that you can continually reapply it to chain functions together. So, the result of one function is then piped into the next. We can then rewrite our sizeOfFolder function as the following. Note that Directory.GetFiles takes its parameters as a tuple and therefore cannot be partially applied; all of its parameters must be specified at the same time.
let sizeOfFolderPiped folder = let getFiles path = Directory.GetFiles(path, "*.*", SearchOption.AllDirectories) let ze = totalSi folder |> getFiles |> Array.map (fun file -> new FileInfo(file)) |> Array.map (fun info -> info.Length) |> Array.sum totalSize
The simplicity achieved by using the pipe-forward operator is an example of how useful function currying is. The pipe-forward operator takes a value and a function that only takes one parameter, however the functions that we used, such as Array.map, clearly take two (a function to map and the array itself). The reason this works is that we partially apply the first argument, resulting in a function that takes only one parameter and therefore can easily be used with the pipe-forward operator.
While the pipe-forward operator can greatly simplify code by removing unnecessary declarations for immediate results, this makes debugging piped sequences more difficult because you cannot inspect the value of any intermediate results.
An added benefit of the pipe-forward operator is that it can help the type inference process. You cannot access any properties or methods of a value if the compiler doesn’t know what its type is. Therefore, you must use a type annotation to specifically pin down types.
> // ERROR: Compiler doesn't know s has a Length property List.iter (fun s -> printfn "s has length %d" s.Length) ["Pipe"; "Forward"];; (fun s -> printfn "s has length %d" s.Length) ----------------------------------------^^^^^^^^^ stdin(89,41): error FS0072: Lookup on object of indeterminate type based on information prior to this program point. A type annotation may be needed prior to this program point to constrain the type of the object. This may allow the lookup to be resolved stopped due to error
12

O’Reilly Media, Inc. 4/2/2012
Because the pipe-forward operator allows the compiler to “see” the last parameter of a function earlier, the type inference system can determine the correct types of a function sooner, reducing the need for type annotations.
In the following snippet, because the pipe-forward operator is used, the parameter of the lambda passed to List.iter is known to be of type string, and therefore does not need a type annotation.
> // Using the pipe-forward operator to aid type inference. ["Pipe"; "Forward"] |> List.iter (fun s -> printfn "s has length %d" s.Length);; s has length 4 s has length 7 val it : unit = ()
Forward composition operator
The forward composition operator, >>, joins two functions together with the function on the left being called first.
let (>>) f g x = g(f x)
When using the pipe-forward operator in functions, you need a placeholder variable to “kick off” the pipelining. In our last example, the function took a folder parameter that we directly passed into the first piped function.
let sizeOfFolderPiped2 folder = let getFiles folder = Directory.GetFiles(folder, "*.*", SearchOption.AllDirectories) folder |> getFiles |> Array.map (fun file -> new FileInfo(file)) |> Array.map (fun info -> info.Length) |> Array.sum
Using the function composition operator, however, no parameter is needed. We simply compose all of those functions together, resulting in a new function that takes a parameter and computes the result.
> // Function Composition open System.IO let sizeOfFolderComposed (*No Parameters!*) = let getFiles folder = Directory.GetFiles(folder, "*.*", SearchOption.AllDirectories) // The result of this expression is a function that takes // one parameter, which will be passed to getFiles and piped // through the following functions. tFiles ge >> Array.map (fun file -> new FileInfo(file)) >> Array.map (fun info -> info.Length) >> Array.sum;; val sizeOfFolderComposed : (string -> int64)
13
O’Reilly Media, Inc. 4/2/2012
> sizeOfFolderComposed (Environment.GetFolderPath(Environment.SpecialFolder.MyPictures));; val it : int64 = 904680821L
Here is another example of function composition. The following snippet calculates the number of digits in the square of an integer:
> // Basic Function Composition let square x = x * x let toString (x : int) = x.ToString() let strLen (x : string) = x.Length let lenOfSquare = square >> toString >> strLen;; val square : int -> int val toString : int -> string val strLen : string -> int val lenOfSquare : (int -> int) > square 128;; val it : int = 16384 > lenOfSquare 128;; val it : int = 5
Pipe-backward operator
At first glance, the pipe-backward operator, <|, accepts a function on the left and applies it to a value on the right. This seems unnecessary because all it does is separate a function and its last parameter, which you can do without the need of some special operator.
let (<|) f x = f x
Here’s an example of the pipe-backward operator in action: > List.iter (printfn "%d") [1 .. 3];; 1 2 3 val it : unit = () > List.iter (printfn "%d") <| [1 .. 3];; 1 2 3 val it : unit = ()
You might be surprised, but the pipe-backward operator actually does serve an important purpose: it allows you to change precedence. I’ve avoided mentioning operator precedence so far, but it is the order in which functions are applied. Functions arguments are evaluated left-to-right, meaning if you want to call a function and pass the result to another function, you have two choices: add parentheses around the expression or use the pipe-backward operator.
> printfn "The result of sprintf is %s" (sprintf "(%d, %d)" 1 2);; The result of sprintf is (1, 2) val it : unit = () > printfn "The result of sprintf is %s" <| sprintf "(%d, %d)" 1 2;; The result of sprintf is (1, 2) val it : unit = ()
14

O’Reilly Media, Inc. 4/2/2012
The pipe-backward operator isn’t as common as the pipe-forward or function composition operators, but it serves a solid role in cleaning up F# code.
Backward composition operator
Just like the pipe-backward operator, the composable equivalent is the backward composition operator, <<. The backward composition operator takes two functions and applies the right function first and then the left. It is useful when you want to express ideas in reverse order. It is defined as:
let (<<) f g x = f(g x)
The following code shows how to take the square of the negation of a number. Using the backward composition operator allows the program text to read exactly like how the function operates.
> // Backward Composition let square x = x * x let negate x = -x;; val square : int -> int val negate : int -> int > // Using (>>) negates the square (square >> negate) 10;; val it : int = -100 > (* But what we really want is the square of the negation so we need to use (<<) *) (square << negate) 10;; val it : int = 100
Another example of the backward composition operator is to use it to filter out empty lists in a list of lists. Again, the backward composition operator is used to change the way the code reads to the programmer.
> // Filtering lists [ [1]; []; [4;5 []; [9] ] ;6]; [3;4]; []; [];|> List.filter(not << List.isEmpty);; val it : int list list = [[1]; [4; 5; 6]; [3; 4]; [9]]
The |>, <|, >>, and << operators serve as a way to clarify up F# code. Idiomatic F# uses these operators where appropriate to make code easier to read and more concise. Avoid these operators if adding them would only add clutter or confusion.
Pattern Matching All programs need to sort and sift through data. To do this using functional programming you use pattern matching. Pattern matching is similar to a switch statement from other programming languages, but it is much more powerful. A pattern match is a series of rules that will execute if the pattern matches the input. The pattern match expression then returns the result of the rule that was matched; therefore, all rules in a pattern match must return the same type.
15
O’Reilly Media, Inc. 4/2/2012
To preform pattern matching, you use the match and with keywords with a series of pattern rules, each followed by an arrow ->. The following snippet shows using pattern matching against the expression isOdd x to mimic the behavior of an if expression. The first rule matches the true value, and if that rule matches it will print "x is odd" to the console.
> // Simple pattern matching let isOdd x = (x % 2 = 1) let ibeNumber descr x = match is d x with Od | true -> printfn "x is odd" | false -> printfn "x is even";; val isOdd : int -> bool val describeNumber : int -> unit > describeNumber 4;; x is even val it : unit = ()
The simplest sort of pattern matching is against constant values. Example 3-5 constructs a truth table for the Boolean function And by matching both values of a tuple simultaneously.
Example 3-5. Constructing a truth table using pattern matching > // Truth table for AND via pattern matching let testAnd x y = match x, y with | true, true -> true | true, false -> false | false, true -> false | false, false -> false;; val testAnd : bool -> bool -> bool > testAnd true true;; val it : bool = true
Note that type inference works on pattern matches. In Example 3-5, because the first rule matches x with the Boolean value true and y with another Boolean value, both x and y are inferred to be Boolean values
The underscore, _, is a wild card that matches anything. So you can simplify the previous example by using a wild card to capture any input but true, true:
let testAnd x y = match x, y with | true, true -> true | _, _ -> false
Pattern-matching rules are checked in the order they are declared. So if you had wild card matches first, subsequent rules will never be checked. (Fortunately the F# compiler issues a warning in this case.)
16

O’Reilly Media, Inc. 4/2/2012
Match Failure You might have been wondering, what would happen if we left out one of the possible truth table matches in the original version of testAnd? For example:
let testAnd x y = match x, y with | true, true -> true | true, false -> false // | false, true -> false - Oops! false, true case omitted! | false, false -> false
If no match is found during a pattern matching, an exception of type Microsoft.FSharp.Core.MatchFailureException is raised. You can avoid this by making sure that all possible cases are covered. Fortunately, the F# compiler will issue a warning when it can determine that pattern match rules are incomplete.
> // Incomplete pattern matching. OOPS! Not every letter matched. let letterIndex l = match l with | 'a' -> 1 | 'b' -> 2;; match l with ----------^ stdin(48,11): warning FS0025: Incomplete pattern matches on this expression. For example, the value '' '' may indicate a case not covered by the pattern(s). val letterIndex : char -> int > letterIndex 'k';; Microsoft.FSharp.Core.MatchFailureException: The match cases were incomplete at FSI_0040.letterIndex(Char l) at <StartupCode$FSI_0041>.$FSI_0041.main@() stopped due to error
Named Patterns So far we have just matched constant values, but you can also use named patterns to actually extract data and bind it to a new value. Consider the following example. It matches against a specific string, but for anything else it captures a new value, x.
> // Named patterns let greet name = match name with | "Robert" -> printfn "Hello, Bob" | "William" -> printfn "Hello, Bill" | x -> printfn "Hello, %s" x;; val greet : string -> unit > greet "Earl";; Hello, Earl val it : unit = ()
17

O’Reilly Media, Inc. 4/2/2012
The last match rule doesn’t match a constant value; instead, it binds the value being matched to a new value you can then use in the match rule’s body. Value captures, like wild cards, match anything, so make sure to put more specific rules first.
Matching Literals Naming patterns is great, but this also prevents you from using an existing value as part of a pattern match. In the previous example, hardcoding the names as part of the pattern match will make the code more difficult to maintain and potentially lead to bugs.
If you want to match against a well-known value, but don’t want to copy and paste the literal value into every match rule, you could make the mistake of using a named pattern. This, however, does not work as you intend and just shadows the existing value.
In the following example the first pattern-match rule doesn’t compare the value name against the value bill, rather it just introduces a new value named bill. This is why the second pattern-match rule yields a warning, because the previous rule already catches all pattern-match input.
> // ERROR: Unintentional value captures let bill = "Bill Gates" let greet name = match name with | bill -> "Hello Bill!" | x -> sprintf "Hello, %s" x;; | x -> sprintf "Hello, %s" x;; ------^^ stdin(56,7): warning FS0026: This rule will never be matched. val bill : string = "Bill Gates" val greet : string -> string
In order to match against an existing value, you must add the [<Literal>] attribute. Any literal value (a constant) marked with this attribute and beginning with a capital can be used inside of a pattern match.
Attributes are a way to annotate .NET code with metadata. For more information about attributes and .NET metadata refer to Chapter 12, .NET Reflection.
> // Define a literal value [<Literal>] let Bill = "Bill Gates";; val Bill : string = "Bill Gates" > // Match against literal values let greet name = match name with | Bill -> "Hello Bill!" | x -> sprintf "Hello, %s" x;; val greet : string -> string
18
O’Reilly Media, Inc. 4/2/2012
> greet "Bill G.";; val it : string = "Hello, Bill G." > greet "Bill Gates";; val it : string = "Hello Bill!"
Only integers, characters, Booleans, strings, and floating-point numbers can be marked as literals. If you want to match against more complex types like a dictionary or map, you must use a when guard.
when Guards While pattern matching is a powerful concept, sometimes you need custom logic to determine whether a rule should match. This is what when guards are for. If a pattern is matched, the optional when guard will execute and the rule will fire if and only if the when expression evaluates to true.
The following example implements a simple game where you guess a random number. when guards are used to check if the guess is higher, lower, or equal to the secret number.
> // High / Low game open System let highLowGame () = let rng = new Random() let secretNumber = rng.Next() % 100 let rec highLowGameStep () = printfn "Guess the secret number:" let guessStr = Console.ReadLine() let guess = Int32.Parse(guessStr) match guess with | _ when guess > secretNumber -> printfn "The secret number is lower." highLowGameStep() | _ when guess = secretNumber -> printfn "You've guessed correctly!" () | _ when guess < secretNumber -> printfn "The secret number is higher." highLowGameStep() // Begin the game highLowGameStep();; val highLowGame : unit -> unit > highLowGame();; Guess the secret number: 50 The secret number is lower. Guess the secret number: 25
19

O’Reilly Media, Inc. 4/2/2012
The secret number is higher. Guess the secret number: 37 You've guessed correctly! val it : unit = ()
Grouping Patterns As your pattern matches contain more and more rules, you might want to combine patterns together. There are two ways to combine patterns. The first way is to use Or, represented by a vertical pipe |, which combines patterns together so the rule will fire if any of the grouped patterns match. The second way is to use And, represented by an ampersand &, which combines patterns together so that the rule will fire only if all of the grouped patterns match.
let vowelTest c = match c with | 'a' | 'e' | 'i' | 'o' | 'u' -> true | _ -> false let describeNumbers x y = match x, y with | 1, _ | _, 1 -> "One of the numbers is one." | (2, _) & (_, 2) -> "Both of the numbers are two" | _ -> "Other."
The And pattern has little use in normal pattern matching; however, it is invaluable when using active patterns (Chapter 7).
Matching the Structure of Data Pattern matching can also match against the structure of data.
Tuples
You have already seen how to match against tuples. If the tuple’s elements are separated by commas in the pattern match, each element will be matched individually. However, if a tuple input is used in a named pattern, the bound value will have a tuple type.
In the following example, the first rule binds value tuple which captures both values x and y. Other rules match against tuple elements individually.
let testXor x y = match x, y with | tuple when fst tuple <> snd tuple -> true | true, true -> false | false, false -> false
20
O’Reilly Media, Inc. 4/2/2012
Lists
Example 3-6 demonstrates how you can pattern match against the structure of lists. The function listLength matches against lists of fixed size, otherwise it recursively calls itself with the tail of the list.
Example 3-6. Determining the length of a list let rec listLength l = match l with | [] -> 0 | [_] -> 1 | [_; _] -> 2 | [_; _; _] -> 3 | hd :: tail -> 1 + listLength tail
The first four pattern-match rules match against lists of specific lengths, using wild cards to indicate that list elements are not important. The last line of the pattern match however uses the cons operator :: to match the first element of the list, hd, and the rest of the list, tail. tail could be any list, from an empty list [] on up to a list with a million elements. (However, because of the first four rules in the pattern match, we can infer that tail is at least three elements long.)
Options
Pattern matching also provides a more functional way to use option types:
let describeOption o = ma with tch o | Some(4 ) -> "The answer was 42, but what was the question?" 2 | Some(x) -> sprintf "The answer was %d" x | None -> "No answer found."
Outside of Match Expressions Pattern matching is an extremely powerful concept, but its secret is that it doesn’t have to be used exclusively in a “match with” expression. Pattern matching occurs throughout the F# language.
let bindings
let bindings are actually pattern-match rules. So if you write: let x = f() ...
You can think of it as if you had written: match f() with | x -> ...
This is how we use let bindings to extract values from tuples.
// This... let x, y = (100, 200) // ... is the same as this... match (100, 200) with | x, y -> ...
21
O’Reilly Media, Inc. 4/2/2012
This is why F# suspiciously accepts the code: let 1 = 2
Try it in an FSI window, and see what happens.
Function parameters
Parameters to functions are pattern matches in disguise too! // Given a tuple of option eir sum values, return thlet addOptionValues = fun (Some(x), Some(y)) -> x + y
Wild card patterns
Imagine you wanted to write a function but didn’t care about one of the parameters, or perhaps want to ignore values from a tuple. In that case, you could use a wild card pattern.
> List.iter (fun _ -> printfn "Step...") [1 .. 3];; Step... Step... Step... val it : unit = () > let _, second, _ = (1, 2, 3);; val second : int = 2
Alternate Lambda Syntax The final use for pattern matching is simplified lambda syntax. In writing F# code you will find that it’s common to pass the parameter directly into a pattern-match expression, such as:
let rec listLength theList = match theList with | [] -> 0 | [_] -> 1 | [_; _] -> 2 | [_; _; _] -> 3 | hd :: tail -> 1 + listLength tail
A simplier way to write this is to use the function keyword, which acts much like the fun keyword for creating lambdas, except that function lambdas only accept one parameter that must be placed within a pattern match. The following example rewrites the listLength function using the function keyword:
> // The 'function' keyword let istLength = rec funL function | [] -> 0 | [_] -> 1 | [_; _] -> 2 | [_; _; _] -> 3 | hd :: tail -> 1 + funListLength tail;; val funListLength : 'a list -> int
22

O’Reilly Media, Inc. 4/2/2012
> funListLength [1 .. 5];; val it : int = 5
Discriminated Unions A foundational type in functional programming is the discriminated union, which is a type that can only be one of a set of possible values. Each possible value of a discriminated union is referred to as a union case. With the invariant that discriminated unions can only be one of a set of values, the compiler can do additional checks to make sure your code is correct. In particular, the F# compiler ensures that pattern matches cover all discriminated union cases.
You’ve already been taking advantage of discriminated union types. The option type is a discriminated union with two union cases: Some('a) and None.
To define a discriminated union use the type keyword, followed by the type’s name, and then each union case separated by a pipe |. In a standard deck of cards, a card’s suit can be represented with the following discriminated union:
> // im Discr inated union for a card's suit type uit = S | eart H | Diamond | Spade | Club;; type Suit = | Heart | Diamond | Spade | Club > let suits = [ Heart; Diamond; Spade; Club ];; val suits : Suit list = [Heart; Diamond; Spade; Club]
You can also optionally associate data with each union case. To continue the playing card example, each card can be associated with a suit, and value cards with an integer and suit pair. (The int * Suit syntax may look familiar—it is the type signature of a tuple.)
// Discriminated union for playing cards type PlayingCard = | Ace of Suit | King of Suit | Queen of Suit | Jack of Suit | ValueCard of int * Suit // Use a list comprehension to generate a deck of cards. let deckOfCards = [ for suit in [ Spade; Club; Heart; Diamond ] do yield Ace(suit)
23

O’Reilly Media, Inc. 4/2/2012
yield King(suit) yield Queen(suit) yield Jack(suit) for value in 2 .. 10 do yield ValueCard(value, suit) ]
It is also possible to declare discriminated unions on the same line, with the first pipe | optional.
type Number = Odd | Even
Discriminated unions can also be recursive. If you need to define a set of mutually recursive discriminated unions, just like functions, they need to be linked together with the and keyword.
The following defines a simple format for describing a programming language. // Program statements type Statement = | Print of string | Sequence of Statement * Statement | IfStmt of Expression * Statement * Statement // Program expressions and Expression = | Integer of int | LessThan of Expression * Expression | GreaterThan of Expression * Expression (* if (3 > 1) print "3 is greater than 1" else print "3 is not" print "greater than 1" *) let program = IfStmt( GreaterThan( Integer(3), Integer(1)), Print("3 is greater than 1"), Sequence( Print("3 is not"), Print("greater than 1") ) )
Using Discriminated Unions for Tree Structures Discriminated unions are ideal for representing tree-like data structures, like in the previous code snippet.
Example 3-7 defines a binary tree and a function for traversing it in only 11 lines of code.
Example 3-7. Binary tree using discriminated unions type BinaryTree =
24

O’Reilly Media, Inc. 4/2/2012
| Node of int * BinaryTree * BinaryTree | Empty let rec printInOrder tree = match tree with | Node (data, left, right) -> printInOrder left printfn "Node %d" data printInOrder right | Empty -> () (* 2 / \ 1 4 / \ 3 5 *) let binTree = Node(2, Node(1, Empty, Empty), Node(4, Node(3, Empty, Empty), Node(5, Empty, Empty) ) )
When evaluated within an FSI session, the previous example prints the following: > printInOrder binTree;; Node 1 Node 2 Node 3 Node 4 Node 5 val it : unit = ()
Pattern Matching You can pattern match against discriminated unions by using just the case labels as patterns. If the union label has data associated with it then you can match its value against a constant, a wild card, or capture the value just like a normal pattern match.
The following example demonstrates the power of pattern matching and discriminated unions by describing two “hole cards” in a game of poker.
// Describe a pair of cards in a game of poker let describeHoleCards cards = match cards with | [] | [_] -> failwith "Too few cards." | cards when List.length cards > 2 -> failwith "Too many cards." | [ Ace(_); Ace(_) ] -> "Pocket Rockets" | [ King(_); King(_) ] -> "Cowboys"
25

O’Reilly Media, Inc. 4/2/2012
| [ ValueCard(2, _); ValueCard(2, _)] -> "Ducks" | [ Queen(_); Queen(_) ] | [ Jack(_); Jack(_) ] -> "Pair of face cards" | [ ValueCard(x, _); ValueCard(y, _) ] when x = y -> "A Pair" | [ first; second ] -> sprintf "Two cards: %A and %A" first second
You can also have recursive discriminated unions in pattern matches. Notice in the following example the third rule uses a nested pattern to match only Manager values that have exactly two Worker employees.
type Employee = | Manager of string * Employee list | Worker of string let rec printOrganization worker = match worker with | Worker(name) -> printfn "Employee %s" name // Manager with a worker list with one element | Manager(managerName, [ Worker(employeeName) ] ) -> printfn "Manager %s with Worker %s" managerName employeeName // Manager with a worker list of two elements | Manager(managerName, [ Worker(employee1); Worker(employee2) ] ) -> printfn "Manager %s with two workers %s and %s" managerName employee1 employee2 // Manager with a list ers of work | Manager(managerName, workers) -> printfn "Manager %s with workers..." managerName workers |> List.iter printOrganization
The previous example would result in the following FSI session: > let company = Manager("Tom", [ Worker("Pam"); Worker("Stuart") ] );; val company : Employee = Manager ("Tom",[Worker "Pam"; Worker "Stuart"]) > printOrganization company;; Manager Tom with two workers Pam and Stuart val it : unit = ()
Because the compiler knows every possible data tag associated with a discriminated union at compile time, any incomplete pattern match will issue a warning. For example, if the Ace union case were left out of the pattern match, then F# compiler would know.
> // OOPS! Forgot about the Ace union case... let getCardValue card = match card with | King(_) | Queen(_) | Jack(_) -> 10
26

O’Reilly Media, Inc. 4/2/2012
| ValueCard(x, _) -> x;; match card with ----------^^^^ stdin(53,11): warning FS0025: Incomplete pattern matches on this expression. For example, the value 'Ace (_)' may indicate a case not covered by the pattern(s). val getCardValue : PlayingCard -> int
Be careful when using a wild card to match against a discriminated union. If the union is ever extended later you will get a warning for each instance where the pattern match is not exhaustive. However, no warning will be issued if you use a wild card because it will consume all additional cases. Being warned where your code could cause a match failure at runtime goes a long way toward preventing defects.
Methods and Properties You can add more power to discriminated unions by adding methods and properties. In the following snippet, a property Value is added so given any PlayingCard object you can get its value. (For more information on adding methods and properties, refer to Chapter 5.)
type PlayingCard = | Ace of Suit | King of Suit | Queen of Suit | Jack of Suit | ValueCard of int * Suit member this.Value = match this with | Ace(_) -> 11 | King(_) | Queen (_)| Jack(_) -> 10 | ValueCard(x, _) when x <= 10 && x >= 2 -> x | ValueCard(_) -> failwith "Card has an invalid value!" let highCard = Ace(Spade) let highCardValue = highCard.Value
Records Discriminated unions are great for defining a hierarchy of data, but when trying to get values out of a discriminated union they have the same problem as tuples. Namely, that there is no meaning associated with each value—rather, data is lumped together in some fixed ordering. For example, consider a single-case discriminated union for describing a person. Are its two string fields referring to the first and then last name, or the last and then first name?
type Person = | Person of string * string * int
27
O’Reilly Media, Inc. 4/2/2012
let steve = Person("Steve", "Holt", 17) let gob = Person("Bluth", "George Oscar", 36)
When you want to group your data into a structured format without needing hefty syntax, you can use F# record types. Records give you a way to organize values into a type, as well as name those values through fields.
To define a record, you simply define a series of name/type pairs enclosed in curly braces. To create an instance of a record, simply provide a value for each record field and type inference will figure out the rest. See Example 3-8.
Example 3-8. Constructing and using records > // Define a record type type PersonRec = { First : string; Last : string; Age : int};; type PersonRec = {First: string; Last: string; Age: int;} > // Construct a record let steve = { First = "Steve"; Last = "Holt"; Age = 17 };; val steve : PersonRec = {First = "Steve"; Last = "Holt"; Age = 17;} > // Use '.field' to access record fields printfn "%s is %d years old" steve.First steve.Age;; Steve is 17 years old val it : unit = ()
To the seasoned .NET developer, it may look like records are just a simplified version of standard .NET classes. You can easily create properties and methods in F#, so why use a record? Records offer several distinct advantages over traditional object-oriented data structures.
• Type inference can infer a record’s type. No need for superfluous type annotations.
• Record fields are immutable by default, whereas class types offer no safety guarantee.
• Records cannot be subclassed, giving a future guarantee of safety. • Records can be used as part of standard pattern matching; classes
cannot without resorting to active patterns or when guards.
• Records (and discriminated unions) get structural comparison and equality semantics for free. Equality and comparison in .NET will be covered in Chapter 6.
Cloning Records Records can easily be cloned using the with keyword.
28
O’Reilly Media, Inc. 4/2/2012
type Car = { Make : string Model : string Year : int } let thisYear's = ury Sedan"; Year = 2012 } { Make = "FSharp"; Model = "Luxlet nextYear's = { thisYear's with Year = 2013 }
This is equivalent to writing: let nextYear's = { Make = thisYear's.Make Model = thisYear's.Model Year = 2013 }
Pattern Matching You can pattern match on records, providing value capture and literal matching. Note that not every record field needs to be a part of the pattern match. In the following example, a list of Car is filtered to just those where the Model field is equal to "Coup". Fields Make and Year are not considered.
let allCoups = allNewCars |> List.filter (function | { Model = "Coup" } -> true | _ -> false)
Type Inference One distinct advantage of records is how they work with F#’s type inference system. Whereas .NET class types must be annotated in order to be used, record types can be inferred by the fields you access.
In Example 3-9, no type annotation is provided for values pt1 and pt2. Because fields X and Y were accessed and the compiler knows of a record type with an X and Y field, the type of pt1 and pt2 was inferred to be of type Point.
Example 3-9. Type inference for records > type Point = { X : float; Y : float };; type Point = {X: float; Y: float;} > // Distance between two points. (No type annotations required!) let distance pt1 pt2 = let square x = x * x sqrt <| square (pt1.X - pt2.X) + square (pt1.Y - pt2.Y);; val distance : Point -> Point -> float
29
O’Reilly Media, Inc. 4/2/2012
> distance {X = 0.0; Y = 0.0} {X = 10.0; Y = 10.0};; val it : float = 14.14213562
When using two records that have identical field names, the type inference system will either issue an error or infer types that were different than what you intended. To combat this you can either provide type annotations or fully qualify the record fields.
type Point = { X: float; Y: float;} type Vector3 = { X : float; Y : float; Z : float } // Provide a type annotation to not infer pt1 and pt2 to be Vector3 // (since Vector3 was defined last with fields X and Y) let distance (pt1 : Point) (pt2 : Point) = let square x = x * x sqrt <| square (pt1.X - pt2.X) + square (pt1.Y - pt2.Y) // Disambiguate a Point from the Vector type by // fully qualifying record fields. let origin = { Point.X = 0.0; Point.Y = 0.0 }
This provides all the necessary information for the type inference system to figure out what you mean.
Methods and Properties Just like discriminated unions, you can add methods and properties to records as well.
> // Add a property to a record type Vector = type Vector = ; Z : float } { X : float; Y : float member this.Length = sqrt <| this.X ** 2.0 + this.Y ** 2.0 + this.Z ** 2.0;; type Vector = {X: float; Y: float; Z: float;} with member Length : float end > let v = { X = 10.0; Y = 20.0; Z = 30.0 };; val v : Vector = {X = 10.0; Y = 20.0; Z = 30.0;} > v.Length;; val it : float = 37.41657387
Lazy Evaluation The code we have written so far has been evaluated eagerly, meaning as soon as we sent it to FSI it was executed. The same is true if you compiled and ran your F# program. However, there are situations when you only want to evaluate code on demand, for
30
O’Reilly Media, Inc. 4/2/2012
example you want to perform computationally expensive operations only if necessary. This is known as lazy evaluation.
Using lazy evaluation can lead to a dramatic reduction in memory footprint because you are only creating values in memory as you need them.
F# supports lazy evaluation in two ways—through the Lazy type and sequences (the seq<'a> type.)
Lazy Types A Lazy type is a thunk or placeholder for some computation. Once created, you can pass around the lazy value as if it has been evaluated. But it will only be evaluated once, and only when forced.
Example 3-10 creates two values, x and y, both of which have the side effect of printing to the console. Because they are initialized lazily, they are not evaluated when declared. Only when the value of y is desired is y’s evaluation forced, which in turn forces the evaluation of x.
To construct a lazy value, you can use the lazy keyword or Lazy<_>.Create.
Example 3-10. Using lazy evaluation > // Def es ine two lazy valulet x = Lazy<int>.Create(fun () -> printfn "Evaluating x..."; 10) let y = lazy (printfn "Evaluating y..."; x.Value + x.Value);; val x : System.Lazy<int> = Value is not created. val y : Lazy<int> = Value is not created. > // Directly requesting y's value will force its evaluation y.Value;; Evaluating y... Evaluating x... val it : int = 20 > // Accessing y's value again will use a cached value (no side effects) y.Value;; val it : int = 20
Sequences The most common use of lazy evaluation is through the sequence or seq type in F#, which represents an ordered sequence of items, much like a List. The following snippet defines a sequence of five elements and iterates through them using the Seq.iter function. (Just like the List module, there are a whole slew of available functions to operate on sequences.)
> let seqOfNumbers = seq { 1 .. 5 };; val seqOfNumbers : seq<int> > seqOfNumbers |> Seq.iter (printfn "%d");; 1
31

O’Reilly Media, Inc. 4/2/2012
2 3 4 5 val it : unit = ()
seq is just an alias for the .NET interface System.Collections.Generic.IEnumerable<'a>
So why have two types when you can just use a list? The answer has to do with the impact that the seq<_> and list types have on memory.
The contents of lists are stored entirely in memory, while sequence elements are generated dynamically in a so-called “pull” fashion. You can define an infinite sequence quite easily, but an infinite list would run out of memory. Also, with lists you must know the value of each element ahead of time whereas sequence elements may take program events into account.
Example 3-11 defines a sequence of all positive 32-bit integers represented as strings. It then tries to create an equivalent list, but fails due to memory.
Example 3-11. A sequence of all integers > // Sequence of all positive integers let allPositiveIntsSeq = seq { for i in 1 .. System.Int32.MaxValue do yield i };; val allPositivesIntsSeq : seq<int> > allPositiveIntsSeq;; val it : seq<int> = seq [1; 2; 3; 4; ...] > // List of all positive integers - ERROR: Can't fit in memory! let allPositiveIntsList = [ for i in 1 .. System.Int32.MaxValue -> i ];; System.OutOfMemoryException: Exception of type 'System.OutOfMemoryException' was thrown.
Sequence Expressions We can use the same list comprehension syntax to define sequences (technically referred to as sequence expressions). You begin a sequence by writing seq followed by curly braces:
> let alphabet = seq { for c in 'A' .. 'Z' -> c };; val alphabet : seq<char> > Seq.take 4 alphabet;; val it : seq<char> = seq ['A'; 'B'; 'C'; 'D']
Sequences are evaluated lazily, so every time an element is yielded, the code executing inside the sequence is still running. Let’s try the previous example again, but this time adding a side effect every time an element is returned. Instead of returning a letter of the alphabet, it will print that letter to the console as well.
> // Sequence with a side effect let noisyAlphabet = seq {
32

O’Reilly Media, Inc. 4/2/2012
for c in 'A' .. 'Z' do printfn "Yielding %c..." c yield c };; val noisyAlphabet : seq<char> > let fifthLetter = Seq.nth 4 noisyAlphabet;; Yielding A... Yielding B... Yielding C... Yielding D... Yielding E... val fifthLetter : char = 'E'
An interesting aspect of sequence expressions is that they can be recursive. By using the yield! (pronounced yield bang) keyword you can return a subsequence, the result of which is merged into the main sequence in order.
Example 3-12 shows how to leverage yield! within a sequence expression. The function allFilesUnder returns a seq<string>, which recursively gets all files under a given folder. Directory.GetFiles returns an array of strings containing all the files in the basePath folder. Because array is compatible with seq, the yield! returns all of those files.
Example 3-12. Sequence for listing all files under a folder open System.IO let rec allFilesUnder basePath = seq { ld all files in the base folder // Yie yield! Directory.GetFiles(basePath) // Yield all files in its sub folders for in Directory.GetDirectories(basePath) do subdir yield! allFilesUnder subdir }
Seq Module Functions The Seq module contains many helpful functions for using sequence types.
Seq.take
Returns the first n items from a sequence: > // Sequence of random numbers open System let randomSequence = seq { let rng = new Random() while true do yield rng.Next() };; val randomSequence : seq<int>
33

O’Reilly Media, Inc. 4/2/2012
> randomSequence |> Seq.take 3;; val it : seq<int> = seq [2101281294; 1297716638; 1114462900]
Seq.unfold
Seq.unfold generates a sequence using the provided function. It has type ('a -> ('b * 'a) option) -> 'a -> seq<'b>.
The supplied function takes an input value, and its result is an option type with a tuple of the next value in the sequence combined with the input to the next iteration of Seq.unfold. The function returns None to indicate the end of the sequence. Example 3-13 generates all Fibonacci numbers under 100. (The nth Fibonacci number is the sum of the two previous items in the sequence; or 1, 1, 2, 3, 5, 8, and so on.) The example also uses the Seq.toList function, which converts a sequence to a list.
Example 3-13. Using Seq.unfold > // Generate the next element of the Fibonacci sequence given the previous // two elements. To be used with Seq.unfold. let nextFibUnder100 (a, b) = if a + b > 100 then None else let nextValue = a + b Some(nextValue, (nextValue, a));; val nextFibUnder100 : int * int -> (int * (int * int)) option > let fibsUnder100 = Seq.unfold nextFibUnder100 (0, 1);; val fibsUnder100 : seq<int> > Seq.toList fibsUnder100;; val it : int list = [1; 1; 2; 3; 5; 8; 13; 21; 34; 55; 89]
Other useful Seq module functions can be found in Table 3-1.
Table 3-1. Common Seq module functions
Function and Type Description
Seq.length seq<'a> -> int
Returns the length of the sequence.
Seq.exists ('a -> bool) -> seq<'a> -> bool
Returns whether or not an element in the sequence satisfies the search function.
Seq.tryFind ('a -> bool) -> seq<'a> -> 'a option
Returns Some(x) for the first element x in which the given function returns true. Otherwise returns None.
Seq.filter ('a -> bool) -> seq<'a> -> seq<'a>
Filters out all sequence elements for which the provided function does not
34

O’Reilly Media, Inc. 4/2/2012
35
Function and Type Description evaluate to true.
Seq.concat (seq< #seq<'a> > -> seq<'a>
Flattens a series of sequences so that all of their elements are returned in a single seq.
Aggregate Operators The Seq module also contains the same aggregate operators available in the List module.
Seq.iter
Iterates through each item in the sequence: > // Print odd numbers under 10 let oddsUnderN n = seq { for i in 1 .. 2 .. n -> i } Seq.iter (printfn "%d") (oddsUnderN 10);; 1 3 5 7 9 val oddsUnderN : int -> seq<int>
Seq.map
Produces a new sequence by mapping a function onto an existing sequence. The map operation is not performed however until the values are requested from the output sequence. The mapping is done only on demand.
> // Sequence of words (Arrays are compatible with sequences) let words = "The quick brown fox jumped over the lazy dog".Split( [| ' ' |]);; val words : string [] = [|"The"; "quick"; "brown"; "fox"; "jumped"; "over"; "the"; "lazy"; "dog"|] > // Map to string, length tuples stringswords |> Seq.map (fun word -> word, word.Length);; val it : seq<string * int> = seq [("The", 3); ("quick", 5); ("brown", 5); ("fox", 3); ...]
Seq.fold
Reduces the sequence to a single value. Because there is only one way to iterate through sequences there is no equivalent to List.foldBack.
> Seq.fold (+) 0 <| seq { 1 .. 100 };; val it : int = 5050
Queries Sequences combined with the pipe-forward operator provide all the power you need for transforming data, and will make up the backbone of your F# applications. However
O’Reilly Media, Inc. 4/2/2012
there are times when querying sequences of data can become cumbersome, even in terse F# code.
Consider the following snippet, which shows a pipeline over a sequence of customers: // Return the zip codes of all known customers in a given state. let customerZipCodesByState stateName = allCustomers |> Seq.filter (fun customer -> customer.State = stateName) |> Seq.map (fun customer -> customer.ZipCode) |> Seq.distinct
The previous example is declarative and functional, as well as shows off the expressiveness of sequences when used with pipelines. But compare it to the following:
let customerZipCodesByState2 stateName = query { for customer in allCustomers do where (customer.State = stateName) select customer.ZipCode distinct }
While the first version is slightly shorter, the second is undeniably clearer. The reason is that rather than using generic data transformation operators like Seq.filter and Seq.map, the second example used a (potentially) more familiar SQL-like syntax.
The second example is using a feature of the F# language called query expressions.
Querying data is a common part of any program; be it gathering specific nodes from an XML document, gathering results from a SQL database, or even something as simple as filtering a sequence of customers.
F# query expressions provide a way to describe the nature of a “query” in a declarative manner, rather than relying on the step-by-step details of a sequence pipeline. Doing so not only can make code cleaner, this abstraction also enables new capabilities such as automatically converting program code into a SQL query. (Opposed to querying all data rows from the database and then sorting through it on the client.)
The scope of F# query expressions and its underlying technologies could easily fit within another book, so for now we will just focus on queries over in-memory sequences. Later, in chapter 15, Type Providers, we will look at feeding more sophisticated data sources into F#’s query expression machinery.
Advanced readers will notice that F#’s query expressions are just wrappers on top of the .NET IQueryable<T> interface. The same thing that powers C# and VB.NET’s LINQ feature. As such, the same powers and limitations apply.
For a more in-depth look at the implementation details of query expressions refer to chapter 13.
Query Expressions Query expressions can be thought of as syntactic sugar on top of sequence expressions. In exchange for slightly less expressiveness they offer more power. In general, you should
36
O’Reilly Media, Inc. 4/2/2012
prefer query expressions over sequence expressions if you are returning raw data. (And don’t need to rely on map operations to transform the data source.)
To create a query expression, use the same format as a sequence expression except use query instead of seq. Within the body of a query expression new operators are available to you, such as where, join, groupJoin, and so on.
> open System.Diagnostics let ProcCount = active query { for activeProc in Process.GetProcesses() do count } let memoryHog = query { for activeProcess in Process.GetProcesses() do sortByDescending activeProcess.WorkingSet64 head };; val activeProcCount : int = 66 val memoryHog : System.Diagnostics.Process = System.Diagnostics.Process (devenv) > printfn "'%s' has a working set of:\n%d bytes" memoryHog.MainWindowTitle memoryHog.WorkingSet64;; 'QueryExpressions.fsx - Microsoft Visual Studio' has a working set of: 254578688 bytes val it : unit = ()
Query Operators The types of operators allowed inside of query expressions are quite similar to the existing methods we have already seen in the Seq module. For example, ending a query expression with count will return the number of selected items, similar to the Seq.length method.
Selection operators
Selection from a query expression is different than element selection in a sequence expression though. You don’t control each individual item returned (like you did with the yield keyword). Instead, query expressions can only have one return point, and the type of the query result depends on the operator used.
The most common is simply select which is an analog to Seq.map, returning each element of the query except those filtered, skipped, and otherwise ignored.
> // Returns all processes displaying a UI. let windowedProcesses = query { for activeProcess in Process.GetProcesses() do where (activeProcess.MainWindowHandle <> nativeint 0) select activeProcess }
37

O’Reilly Media, Inc. 4/2/2012
let printProcessList procSeq = Seq.iter (printfn "%A") procSeq;; val windowedProcesses : seq<Process> val printProcessList : seq<'a> -> unit > printProcessList windowedProcesses;; System.Diagnostics.Process (chrome) System.Diagnostics.Process (devenv) System.Diagnostics.Process (explorer) System.Diagnostics.Process (WINWORD) System.Diagnostics.Process (notepad) val it : unit = ()
But many times you don’t want a sequence of values, but rather you just want to know something about that sequence of values. Fortunately, the result of a query expression can be specialized.
The contains operator allows you to check if the resulting query contains at least one element satisfying a predicate. (Like Seq.exists.)
> let isChromeRunning = query { es do for windowedProc in windowedProcess select windowedProc.ProcessName contains "chrome" };; val isChromeRunning : bool = true
The count operator returns the number of items returned. (Like Seq.length.)
> let numOfServiceProcesses = query { for activeProcess in Process.GetProcesses() do MainWindowHandle = nativeint 0) where (activeProcess. select activeProcess count };; val numOfServiceProcesses : int = 59
The distinct operator dedupes returned elements based on their hash code. (Like Seq.distinct.)
> // Using the distinct operator let oneHundredNumbersUnderFifty = let rng = new System.Random() seq { for i = 1 to 100 do yield rng.Next() % 50 } let distinctNumbers = query { for randomNumber in oneHundredNumbersUnderFifty do select randomNumber distinct };; val oneHundredNumbersUnderFifty : seq<int> val distinctNumbers : seq<int>
38

O’Reilly Media, Inc. 4/2/2012
> oneHundredNumbersUnderFifty;; val it : seq<int> = seq [36; 7; 25; 9; ...] > printfn "%d distinct numbers found." <| Seq.length distinctNumbers;; 43 distinct numbers found. val it : unit = ()
Beyond contains, count, and distinct there are other selection operations you can use in place of select. Consider the following example which selects a value based on the maxBy operator, which returns the highest value given a selection projection.
> // The number of threads used by the process with the most threads. let highestThreadCount = query { for proc in Process.GetProcesses() do maxBy proc.Threads.Count };; val highestThreadCount : int = 134
Table 3-2 lists shows common selection operators.
Table 3-2. Common selection operators over a Seq<’a>.
Operator Result Type Description head 'a Returns the first element. last 'a Returns the last element. exactlyOne 'a Returns the first element. If the resulting
elements are zero or more than one, an exception is thrown.
exists bool Returns whether or not an element exists in the queried elements which satisfy a predicate.
find 'a Returns the first queried element that satisfies a predicate. If no element is found, an exception is thrown.
all bool Returns whether or not all queried elements satisfy a predicate.
Sorting operators
Sorting is a common operation and can be part of the query expression by using the sortBy and sortByDescending operators. In fact, you can further refine the sort order by using the thenBy and thenByDescending operators.
In the example, notice the let binding introduces a new value. Introducing local values can be a useful for identifying custom sorting criteria.
// Active processes sorted by whether or not they have a UI, then by name. let sortedProcs = query { for proc in Process.GetProcesses() do let isWindowed = proc.MainWindowHandle <> nativeint 0 sortBy isWindowed
39

O’Reilly Media, Inc. 4/2/2012
40
thenBy proc.ProcessName select proc }
There are many more query operators not mentioned here – groupJoin, leftOuterJoin, takeWhile, and thenByNullableDescending – to name a few. See the MSDN documentation online for a complete set.
You now know the main aspects for writing functional code. Though it is perfectly OK if the advantages of function composition and lazy evaluation aren’t immediately obvious. The majority of the examples in this book are written in the functional style and over time you will begin to see how to formulate solutions in the functional style.
Finishing this chapter was your first step into exploring a new world. Welcome.

O’Reilly Media, Inc. 4/2/2012
4 Imperative Programming
Until now most programs we have written has been pure, meaning that they never changed state. Whenever a function does something other than just return a value, it is known as a side effect. While pure functions have some interesting features like composability, the fact of the matter is that programs aren’t interesting unless they do something: save data to disk, print values to the screen, issue network traffic, and so on. These side effects are where things actually get done.
This chapter will cover how to change program state and alter control flow, which is known as imperative programming. This style of programming is considered to be more error prone than functional programming because it opens up the opportunity for getting things wrong. The more detailed the instructions given to the computer to branch, or write certain values into memory, the more likely the programmer will make a mistake. When you programmed in the functional style, all of your data was immutable, so you couldn’t assign a wrong value by accident. However, if used judiciously, imperative programming can be a great boon for F# development.
Some potential benefits for imperative programming are:
• Improved performance • Ease of maintenance through code clarity • Interoperability with existing code
Imperative programming is a style in which the program performs tasks by altering data in memory. This typically leads to patterns where programs are written as a series of statements or commands. Example 4-1 shows a hypothetical program for using a killer robot to take over the Earth. The functions don’t return values, but do impact some part of the system, such as updating an internal data structure.
Example 4-1. Taking over the Earth with imperative programming let robot = new GiantKillerRobot() robot.Initialize() robot.EyeLaserIntensity <- Intensity.Kill
1

O’Reilly Media, Inc. 4/2/2012
robot.Target <- [| Animals; Humans; Superheroes |] // Sequence for taking over the Earth let earth = Planets.Earth while robot.Active && earth.ContainsLife do if robot.CurrentTarget.IsAlive then robot.FireEyeLaserAt(robot.CurrentTarget) else robot.AquireNextTarget()
While the code snippet makes taking over the Earth look fairly easy, you don’t see all the hard work going on behind the scenes. The Initialize function may require powering up a nuclear reactor; and if Initialize is called twice in a row, the reactor might explode. If Initialize were written in a purely function style, its output would only depend on the function’s input. Instead, what happens during the function call to Initialize depends on the current state of memory.
While this chapter won’t teach you how to program planet-conquering robots, it will detail how to write F# programs that can change the environment they run in. You will learn how to declare variables, whose values you can change during the course of your program. You’ll learn how to use mutable collection types, which offer an easier to use alternative to F#’s list type. Finally, you will learn about control flow and exceptions, allowing you to alter the order in which code executes
Understanding Memory in .NET Before you can start making changes to memory, you first need to understand how memory works in .NET. Values in .NET applications are stored in one of two locations: on the stack or in the heap. (Experienced programmers may already be familiar with these concepts.) The stack is a fixed amount of memory for each process where local variables are stored. Local variables are temporary values used only for the duration of the function, like a loop counter. The stack is relatively limited in space, while the heap (also called RAM) may contain several gigabytes of data. .NET uses both the stack and the heap to take advantage of the cheap memory allocations on the stack when possible, and store data on the heap when more memory is required.
The area in memory where a value is stored affects how you can use it.
Value Types Versus Reference Types Values stored on the stack are known as value types, and values stored on the heap are known as reference types.
Values types have a fixed size of bytes on the stack. int and float are both examples of value types, because their size is constant. Reference types on the other hand only store a pointer on the stack, which is the address of some blob of memory on the heap. So while the pointer has a fixed size – typically four or eight bytes – the blob of memory it points to can be much, much larger. list and string are both examples of reference types.
This is visualized in Figure 4-1. The integer 5 exists on the stack, and has no counterpart on the heap. A string, however, exists on the stack as a memory address, pointing to some sequence of characters on the heap.
2
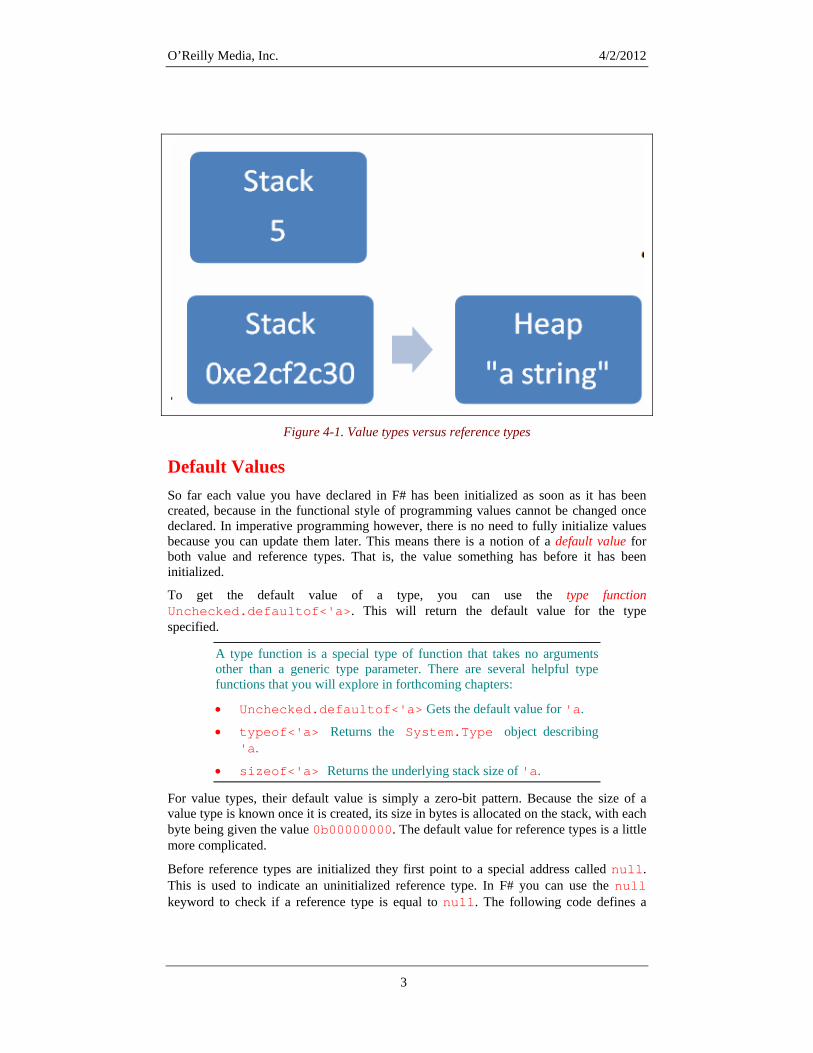
O’Reilly Media, Inc. 4/2/2012
Figure 4-1. Value types versus reference types
Default Values So far each value you have declared in F# has been initialized as soon as it has been created, because in the functional style of programming values cannot be changed once declared. In imperative programming however, there is no need to fully initialize values because you can update them later. This means there is a notion of a default value for both value and reference types. That is, the value something has before it has been initialized.
To get the default value of a type, you can use the type function Unchecked.defaultof<'a>. This will return the default value for the type specified.
A type function is a special type of function that takes no arguments other than a generic type parameter. There are several helpful type functions that you will explore in forthcoming chapters:
• Unchecked.defaultof<'a> Gets the default value for 'a.
• typeof<'a> Returns the System.Type object describing 'a.
• sizeof<'a> Returns the underlying stack size of 'a.
For value types, their default value is simply a zero-bit pattern. Because the size of a value type is known once it is created, its size in bytes is allocated on the stack, with each byte being given the value 0b00000000. The default value for reference types is a little more complicated.
Before reference types are initialized they first point to a special address called null. This is used to indicate an uninitialized reference type. In F# you can use the null keyword to check if a reference type is equal to null. The following code defines a
3

O’Reilly Media, Inc. 4/2/2012
function to check if its input is null or not, and then calls it with an initialized and an uninitialized string value.
> let isNull = function null -> true | _ -> false;; val isNull : obj -> bool > isNull "a string";; val it : bool = false > isNull (null : string);; val it : bool = true
However, reference types defined in F# do not have null as a proper value, meaning that they cannot be assigned to be null.
> type Thing = Plant | Animal | Mineral;; type Thing = | Plant | Animal | Mineral > // ERROR: Thing cannot be null let testThing thing = match thing with | Plant -> "Plant" | Animal -> "Animal" | -> "Mineral" Mineral | null -> "(null)";; | null -> "(null)";; ------^^^^^ stdin(9,7): error FS0043: The type 'Thing' does not have 'null' as a proper value.
This seems like a strange restriction, but it eliminates the need for excessive null checking. (If you call a method on an uninitialized reference type, your program will throw a NullReferenceException, so defensively checking all function parameters for null in other .NET languages is typical.) If you do need to represent an uninitialized state in F#, consider using the Option type instead of a reference type with value null, where the value None represents an uninitialized state and Some('a) represents an initialized state.
You can attribute some F# types to accept null as a proper value to ease interoperation with other .NET languages, see Appendix B, F# Interop for more information.
Also, that chapter covers the System.Nullable<T> type, which is used in other .NET languages as a primitive form of F#’s option type.
Reference Type Aliasing It is possible that two reference types point to the same memory address on the heap. This is known as aliasing. When this happens, modifying one value will silently modify the
4

O’Reilly Media, Inc. 4/2/2012
other because they both point to the same memory address. This situation can lead to bugs if you aren’t careful.
Example 4-2 creates one instance of an array (covered shortly), but has two values that point to the same instance. Modifying value x also modifies y and vice-a-versa.
Example 4-2. Aliasing reference types > // Value x points to an array, while y points // to the same memory address that x does let x = [| 0 |] let y = x;; val x : int [] = [|0|] val y : int [] = [|0|] > // If you modify the value of x... x.[0] <- 3;; val it : unit = () > // ... x will change... x;; val it : int [] = [|3|] > // ... but so will y... y;; val it : int [] = [|3|]
Changing Values Now that you understand the basics of where and how data is stored in .NET, you can look at how to change that data. Mutable variables are those that you can change, and can be declared using the mutable keyword. To change the contents of a mutable value, use the left arrow operator <-.
> let mutable message = "World";; val mutable message : string = "World" > printfn "Hello, %s" message;; Hello, World val it : unit = () > message <- "Universe";; val it : unit = () > printfn "Hello, %s" message;; Hello, Universe val it : unit = ()
There are several limitations on mutable values, all stemming from security-related CLR restrictions. This prevents you from writing some code using mutable values. Example 4-3 tries to define an inner-function incrementX, which captures a mutable value x in its closure (meaning it can access x, even though it wasn’t passed in as a parameter). This leads to an error from the F# compiler, because mutable values can only be used in the same function they are defined in.
Example 4-3. Errors using mutable values in closures > // ERROR: Cannot use mutable values except in the function they are defined
5

O’Reilly Media, Inc. 4/2/2012
let invalidUseOfMutable() = let mutable x = 0 let incrementX() = x <- x + 1 incrementX() x;; let incrementX() = x <- x + 1 -----------------------^^^^^^^^^^^ stdin(16,24): error FS0407: The mutable variable 'x' is used in an invalid way. Mutable variables may not be captured by closures. Consider eliminating this use of mutation or using a heap-allocated mutable reference cell via 'ref' and '!'.
The full list of restrictions related to mutable values are as follows:
• Mutable values cannot be returned from functions (a copy is made instead) • Mutable values cannot be captured in inner-functions (closures)
If you ever run into one of these issues, the simple work around is to store the mutable data on the heap using a ref cell.
Reference Cells The ref type, sometimes referred to as a ref cell, allows you to store mutable data on the heap, enabling you to bypass limitations with mutable values that are stored on the stack. To retrieve the value of a ref cell use the ! symbolic operator and to set the value use the := operator.
ref is not only the name of a type, but also the name of a function that produces ref values, which has the signature:
val ref: 'a -> 'a ref
The ref function takes a value and returns a copy of it wrapped in a ref cell. Example 4-4 shows passing a list of planets to the ref function and then later altering the contents of the returned ref cell.
Example 4-4. Using ref cells to mutate data let planets = ref [ "Mercury"; "Venus"; "Earth"; "Mars"; "Jupiter"; "Saturn"; "Uranus"; "Neptune"; "Pluto" ] // Oops! Sorry Pluto... // Filter all planets not equal to "Pluto" // Get the value of the planets ref cell using (!), // then assign the new value using (:=) planets := !planets |> List.filter (fun p -> p <> "Pluto")
6

O’Reilly Media, Inc. 4/2/2012
C# programmers should take care when using ref types and Boolean values. !x is simply the value of x, not the Boolean not function applied to x.
> let x = ref true;; val x : bool ref > !x;; val it : bool = true
The F# library has two functions decr and incr to simplify incrementing and decrementing int ref types.
> let x = ref 0;; val x : int ref = {contents = 0;} > incr x;; val it : unit = () > x;; val it : int ref = {contents = 1;} > decr x;; val it : unit = () > x;; val it : int ref = {contents = 0;}
Mutable Records Mutability can be applied to more than just single values; record fields can be marked as mutable as well. This allows you to use records with the imperative style. To make a record field mutable simply prefix the field name with the mutable keyword.
The following example creates a record with a mutable field Miles, which can be modified as if it were a mutable variable. Now you can update record fields without being forcing to clone the entire record.
> // Mutable record types open System type MutableCar = { Make : string; Model : string; mutable Miles : int } let driveForASeason car = let rng = new Random() car.Miles <- car.Miles + rng.Next() % 10000;; type MutableCar = {Make: string; Model: string; mutable Miles: int;} val driveForASeason : MutableCar -> unit > // Mutate record fields let kitt = { Make = "Pontiac"; Model = "Trans Am"; Miles = 0 }
7

O’Reilly Media, Inc. 4/2/2012
driveForASeason kitt driveForASeason kitt driveForASeason kitt driveForASeason kitt;; val kitt : MutableCar = {Make = "Pontiac"; Model = "Trans Am"; Miles = 4660;}
As Uncle Ben once said, “With great power comes great responsibility.” And the ability to mutate values is no different. Fortunately, in F# it is difficult to get into too much trouble with incorrect mutations because of the type systems ability to enforce correctness.
Units of Measure There are several universal truths in this world: the acceleration of gravity is 9.8 meters per second squared, water will boil at over 100 degrees Celsius (at one atmosphere of pressure), and any programmer, no matter how talented or careful, will have bugs related to units of measure.
If you are ever writing code that deals with real world units, you will invariably get it wrong. For example, you might pass in seconds when the function takes minutes, or mistake acceleration for velocity. The result of these sorts of bugs in software has ranged from minor annoyances to loss of life.
The problem is that if you represent a value with just a floating-point number, you have no additional information about what that number means. If I give you a float with value 9.8, you have no idea if it is in miles, meters per second, hours, or even megabytes.
A powerful language feature for combating these dimensional analysis issues is units of measure. Units of measure allow you to pass along unit information with a floating-point value – float, float32, decimal – or signed integer types in order to prevent an entire class of software defects. Consider Example 7-1, which describes a temperature. Notice how the parameter temp is encoded to only take fahrenheit values. We will cover exactly what float<_> means later in this section.
Example 4-5. Converting Fahrenheit to Celsius with units of measure [<Measure>] type fahrenheit let printTemperature (temp : float<fahrenheit>) = if temp < 32.0<_> then printfn Freezing!" "Below elif temp < 65.0<_> then printfn "Cold" elif temp < 75.0<_> then printfn "Just right!" elif temp < 100.0<_> then printfn "Hot!" else printfn "Scorching!"
8

O’Reilly Media, Inc. 4/2/2012
Because the function only accepts fahrenheit values, it will fail to work with any floating-point values encoded with a different unit of measure. Calling the function with an invalid unit of measure will result in a compile-time error (and prevent potentially disastrous results at runtime).
> let seattle = 59.0<fahrenheit>;; val seattle : float<fahrenheit> = 59.0 > printTemperature seattle;; Cold val it : unit = () > // ERROR: Different units [<Measure>] type celsius let cambridge = 18.0<celsius>;; [<Measure>] type celsius val cambridge : float<celsius> = 18.0 > printTemperature cambridge;; printTemperature cambridge;; -----------------^^^^^^^^^ stdin(18,18): error FS0001: Type mismatch. Expecting a float<fahrenheit> but given a float<celsius>. The unit of measure 'fahrenheit' does not match the unit of measure 'celsius'
Units of measure also can be compounded by multiplication or division. So if you divide a meter unit of measure by another such as second, the result will be encoded as float<meter/second>.
> // Define a measure for meters [<Measure>] type m;; [<Measure>] type m > // Multiplication, goes to meters squared 1.0<m> * 1.0<m>;; val it : float<m ^ 2> = 1.0 > // Division, drops unit entirely 1.0<m> / 1.0<m>;; val it : float = 1.0 > // Repeated division, results in 1 / meters 1.0<m> / 1.0<m> / 1.0<m>;; val it : float</m> = 1.0
9

O’Reilly Media, Inc. 4/2/2012
Defining Units of Measure To define a unit of measure, simply add the [<Measure>] attribute on top of a type declaration. A unit of measure type can only contain static methods and properties, and typically they are defined as opaque types, meaning they have no methods or properties at all. Unit of measure types can also be abbreviated to be relative to other units of measure. In Example 7-2 a new unit of measure, s, for seconds, is defined as well as a relative unit of measure Hz, for hertz, which stands for cycles per second. Because the units are relative to one another, two values with the same semantic meaning are considered equal.
Example 4-6. Defining new units of measure > // Define seconds and hertz [<Measure>] type s [<Measure>] type Hz = s ^ -1;; [<Measure>] type s [<Measure>] type Hz =/s > // If Hz was not convertible to s, this // would result in a compile error. 3.0<s ^ -1> = 3.0<Hz>;; val it : bool = true
Sometimes it can be quite useful to add functions for conversions between units of measures to the measure type itself. The following snippet defines units of measure for Fahrenheit and Celsius like before, except with the addition of static methods to do conversion between the two. Note the use of the and keyword to so that the type far knows about type cel as part of its declaration.
> // Adding methods to units of measure [<Measure>] type far = static member ConvertToCel(x : float<far>) = (5.0<cel> / 9.0<far>) * (x - 32.0<far>) and [<Measure>] cel = static member ConvertToFar(x : float<cel>) = (9.0<far> / 5.0<cel> * x) + 32.0<far>;; [<Measure>] type far = class static member ConvertToCel : x:float<far> -> float<cel> end [<Measure>] and cel = class static member ConvertToFar : x:float<cel> -> float<far> end
10

O’Reilly Media, Inc. 4/2/2012
> far.ConvertToCel(100.0<far>);; val it : float<cel> = 37.77777778
While defining units of measure is an easy task, all of the common elements of the international system of units have been defined in the F# library. They are separated into two namespaces in case you wish to refer to units by their abbreviated form or by name.
// UnitSymbols contains the abbreviated versions of SI units. open Microsoft.FSharp.Data.UnitSystems.SI.UnitSymbols // In candela, the SI unit of luminous intensity. let flaslightIntensity = 80.0<cd> // The UnitNames contains the full-names of SI units. open Microsoft.FSharp.Data.UnitSystems.SI.UnitNames // This might be worth a few dollars, euros, yen, etc. let world'sLargestGoldNugget = 280.0<kilogram>
Converting Between Units of Measure Not every function takes a measured value as a parameter. To convert between a measured parameter and the base type simply pass the value to the appropriate conversion function. Example 7-3 shows how to drop units of measure when calling the sin and cos trigonometric functions, because they do not accept values marked with a unit of measure.
Example 4-7. Converting units of measure > // Radians [<Measure>] type rads;; [<Measure>] type rads > let halfPI = System.Math.PI * 0.5<rads>;; val halfPI : float<rads> > // ERROR: Pass a float<_> to a function accepting a float sin halfPI;; sin halfPI;; ----^^^^^^^ stdin(7,5): error FS0001: The type 'float<rads>' does not match type 'float'. > // the units from value halfPi, to convert float<_> to float Drop sin (float halfPI);; val it : float = 1.0
Generic Units of Measure Relying on custom conversion can be a pain, especially if you want to create a generic function. Fortunately, you can allow the F# type system to infer a unit of measure type. If
11

O’Reilly Media, Inc. 4/2/2012
you leave the unit of measure type off and use float<_> instead, the F# type inference system will define the value as having a generic unit of measure.
> let squareMeter (x : float<m>) = x * x;; val squareMeter : float<m> -> float<m ^ 2> > let genericSquare (x : float<_>) = x * x;; val genericSquare : float<'u> -> float<'u ^ 2> > genericSquare 1.0<m/s>;; val it : float<m ^ 2/s ^ 2> = 1.0 > genericSquare 9.0;; val it : float = 81.0
If you want to create a type that is generic with regard to a unit of measure, add the [<Measure>] attribute to a generic type parameter. That generic type parameter will allow you to refer to the unit of measure, but it cannot be anything else. In fact, the compiled form of the type will not expose the generic type parameter at all.
Example 7-4 shows defining a point type that preserves a unit of measure.
Example 4-8. Creating a type which is generic with respect to a unit of measure // Represents a point respecting the unit of measure type Point< [<Measure>] 'u >(x : float<'u>, y : float<'u>) = member this.X = x member this.Y = y member this.UnitlessX = float x member this.UnitlessY = float y member this.Length = let sqr x = x * x sqrt <| sqr this.X + sqr this.Y override this.ToString() = sprintf "{%f, %f}" this.UnitlessX this.UnitlessY
When executed in an FSI session, Example 7-4 looks like the following. Notice how the unit of measure is persisted through the Length property – taking the square root of the sum of two squares.
> let p = new Point<m>(10.0<m>, 10.0<m>);; val p : Point<m> > p.Length;; val it : float<m> = 14.14213562
Units of measure are a feature specific to the F# language and not to the Common Language Runtime. As a result, custom types you create in F# will not have their units of measure types exposed across assembly
12

O’Reilly Media, Inc. 4/2/2012
boundaries. So types that are float<'a> will only be exported as float when referenced from C#.
Units of measure are not only suited for “real world” values. They can also be helpful when dealing with abstract units as well, such as clicks, pixels, game-tiles, and so on.
Arrays Until now, when you’ve needed to join multiple pieces of data together, you’ve used lists. Lists are extremely efficient at adding and removing elements from the beginning of a list, but they aren’t ideal for every situation. For example, random access of list elements is very slow. In addition, if you needed to change the last element of a list, you would need to clone the entire list. (The performance characteristics of lists will be covered more in-depth in Chapter 7.)
When you know ahead of time how many items you will need in your collection and would like to be able to update any given item, arrays are the ideal type to use.
Arrays in .NET are a contiguous block of memory containing zero or more elements, each of which can be modified individually. (This is unlike lists, which are immutable.)
Arrays can be constructed using array comprehensions, which are identical to list comprehensions (discussed in Chapter 2), or manually via a list of values separated by semicolons and enclosed between [| |].
> // Using the array comprehension syntax let perfectSquares = [| for i in 1 .. 7 -> i * i |];; val perfectSquares : int [] = [|1; 4; 9; 16; 25; 36; 49|] > // Manually declared let perfectSquares2 = [| 1; 4; 9; 16; 25; 36; 49; 64; 81 |];; val perfectSquares2 : int []
Indexing an Array To retrieve an element from the array you can use an indexer, .[], which is a zero-based index into the array.
> // Indexing an array printfn "The first three perfect squares are %d, %d, and %d" perfectSquares.[0] perfectSquares.[1] perfectSquares.[2];; The first three perfect squares are 1, 4, and 9 val it : unit = ()
Example 4-5 uses array indexers to change individual characters of a character array to implement a primitive form of encryption known as ROT13. ROT13 works by simply taking each letter and rotating it 13 places forward in the alphabet. The example achieves this by converting each letter to an integer, adding 13, and then converting it back to a character.
13

O’Reilly Media, Inc. 4/2/2012
Example 4-9. ROT13 encryption in F# open System // Encrypt a letter using ROT13 let rot13Encrypt (letter : char) = // Move the letter forward 13 places in the alphabet (looping around) // Otherwise ignore. if Char.IsLetter(letter) then let newLetter = (int letter) |> (fun letterIdx -> letterIdx - (int 'A')) |> (fun letterIdx -> (letterIdx + 13) % 26) |> (fun letterIdx -> letterIdx + (int 'A')) |> char newLetter else letter // Loop through each array element, encrypting each letter let encryptText (text : char[]) = for idx = 0 to text.Length - 1 do let letter = text.[idx] text.[idx] <- rot13Encrypt letter let text = Array.ofSeq "THE QUICK BROWN FOX JUMPED OVER THE LAZY DOG" printfn "Origional = %s" <| new String(text) encryptText(text) printfn "Encrypted = %s" <| new String(text) // A unique trait of ROT13 is that to decrypt, simply encrypt again encryptText(text) printfn "Decrypted = %s" <| new String(text)
The output of our simple program is: Origional = THE QUICK FOX JUMPED OVER THE LAZY DOG Encrypted = GUR DHVPX SBK WHZCRQ BIRE GUR YNML QBT Decrypted = THE QUICK FOX JUMPED OVER THE LAZY DOG
Unlike C# and VB.NET, indexers in F# require using the dot notation. You can think of an indexer then as just another method or property. // Incorrect x[0] // Correct x.[0]
Attempting to access an element in the array with an index either less than zero or greater than or equal to the number of elements in the array will raise an IndexOutOfRangeException exception. (Exceptions will be covered later in this chapter.) Fortunately, arrays have a Length property, which will return the number of items in the array. Because array indexes are zero-based, you need to subtract one from Length to get the index of the last element in the array.
14

O’Reilly Media, Inc. 4/2/2012
> let alphabet = [| 'a' .. 'z' |];; val alphabet : char [] > // First letter alphabet.[0];; val it : char = 'a' > // Last leter alphabet.[alphabet.Length - 1];; val it : char = 'z' > // Some non-existant letter alphabet.[10000];; System.IndexOutOfRangeException: Index was outside the bounds of the array. at <StartupCode$FSI_0012>.$FSI_0012._main() stopped due to error
Array Slices When you’re analyzing data stored in arrays, it is sometimes convenient to just work with a subset of the data. In F# there is a special syntax for taking a slice of an array, where you specify optional lower and upper bounds for the subset of data. The syntax for taking a slice is:
array.[lowerBound..upperBound]
If no lower bound is specified, 0 is used. If no upper bound is specified then the length of the array - 1 is used. If neither a lower nor upper bound is specified, by using *, then the entire array is copied.
Example 4-6 shows the various ways for taking a slice of an array, but we will break it down line by line shortly.
Example 4-10. Using array slices open System let daysOfWeek = Enum.GetNames( typeof<DayOfWeek> ) // Standard slice, elements 2 through 4 arraydaysOfWeek.[2..4] // Just specify lower bound, elements 4 to the end daysOfWeek.[4..] // Just spe an upper bound, elements 0 to 2 cify daysOfWeek.[..2] // Specify no bounds, get all elements (copies the array) daysOfWeek.[*]
The first way we sliced an array was specifying both an upper and lower bound, this returned all array elements within that range.
> // Standa ay slice, elements 2 through 4 rd arrdaysOfWeek.[2..4];; val it : string [] = [|"Tuesday"; "Wednesday"; "Thursday"|]
15

O’Reilly Media, Inc. 4/2/2012
Next we specified just a lower or just an upper bound. This returns each element from the lower bound to the end of the array, or from the beginning of the array to the upper bound.
> // Just s y lower bound, elements 4 to the end pecifdaysOfWeek.[4..];; val it : string [] = [|"Thursday"; "Friday"; "Saturday"|] > // Just s y an upper bound, elements 0 to 2 pecifdaysOfWeek.[..2];; val it : string [] = [|"Sunday"; "Monday"; "Tuesday"|]
And finally we just copied the entire array using an *. Note that for every slice operation a new array is returned, so there will never be problems with aliasing.
> // Specify no bounds, get all elements (copies the array) daysOfWeek.[*];;
Creating Arrays Array comprehensions and manually specifying each element aren’t the only ways to construct arrays, you can also use the Array.init function; Array.init takes a function used to generate each array element based on its index. To create an uninitialized array, use the Array.zeroCreate function. With that function, each element is initialized to its default value – zero or null.
Example 4-7 shows how to use Array.init and Array.zeroCreate to construct arrays.
Example 4-11. Initializing arrays using Array.init > // Initialize an array of sin-wave elements let divisions = 4.0 let twoPi = 2.0 * Math.PI;; val divisions : float = 4.0 val twoPi : float = 6.283185307 > Array.init (int divisions) (fun i -> float i * twoPi / divisions);; val it : float [] = [|0.0; 1.570796327; 3.141592654; 4.71238898|] > // Construct empty arrays let emptyIntArray : int [] = Array.zeroCreate 3 let emptyStringArray : string [] = Array.zeroCreate 3;; val emptyIntArray : int [] = [|0; 0; 0|] val emptyStringArray : string [] = [|null; null; null|]
The CLR limits arrays to take up no more than 2GB of memory, even on 64-bit machines. If you need to allocate an array to store a massive amount of data then use a custom data structure instead.
Pattern Matching Pattern matching against arrays is just as easy as using lists. And just like pattern matching against lists, when matching against arrays you can capture element values as
16
O’Reilly Media, Inc. 4/2/2012
well as match against the structure of the array. Example 4-8 shows matching an array value against null or an array with 0, 1, or 2 elements.
Example 4-12. Pattern matching against arrays > // Describe an array let describeArray arr = match arr with | null -> "The array is null" | [| |] -> "The array is empty" | [| x |] -> sprintf "The array has one element, %A" x | [| x; y |] -> sprintf "The array has two elements, %A and %A" x y | a -> sprintf "The array had %d elements, %A" a.Length a;; val describeArray : 'a [] -> string > describeArray [| 1 .. 4 |];; val it : string = "The array had 4 elements, [|1; 2; 3; 4|]" > describeArray [| ("tuple", 1, 2, 3) |];; val it : string = "The array has one element, ("tuple", 1, 2, 3)"
Array Equality Arrays in F# are compared using structural equality. Two arrays are considered equal if they have the same rank, length, and elements. (Rank is the dimensionality of the array, something we will cover in the next section.)
> [| 1 .. 5 |] = [| 1; 2; 3; 4; 5 |];; val it : bool = true > [| 1 .. 3 |] = [| | ];;val it : bool = false
This is different from the behavior of equality on arrays in C#. In F# the = operator contains special logic for comparing arrays so the default referential equality is not used. For more information on object equality in .NET please refer to Chapter 5.
Array Module Functions Just like the List and Seq modules, there is an Array module containing methods like Array.iter, Array.map, and Array.fold. Among these methods in the Array module are a pair used for creating new arrays, detailed in Table 4-1.
Table 4-1. Array construction methods
Function Description Array.init int -> (int -> 'a) -> 'a[]
Creates a new array with the given number of elements, each element is initialized by the result of the provided function.
Array.zeroCreate int -> 'a[]
Creates an array with the given length where each entry is the type’s default value.
17

O’Reilly Media, Inc. 4/2/2012
partition
Array.partition divides the given array into two new arrays. The first array contains only elements where the provided function returns true, the second array contains elements where the provided function returns false.
> // Simple Boolean function let isGreaterThanTen x = (x > 10);; val isGreaterThanTen : int -> bool > // Partitioning arrays [| 5; 5; 6; 20; 1; 3; 7; 11 |] |> Array.partition isGreaterThanTen;; val it : int [] * int [] = ([|20; 11|], [|5; 5; 6; 1; 3; 7|])
tryFind and tryFindIndex
Array.tryFind returns Some of the first element for which the given function returns true. Otherwise, it returns None. Array.tryFindIndex works just like Array.tryFind, except rather than returning the element it returns its index in the array.
> // Simple Boolean function let rec isPowerOfTwo x = if x = 2 then true elif x % 2 = 1 (* is odd *) then false else isPowerOfTwo (x / 2);; val isPowerOfTwo : int -> bool > [| 1; 7 4; 32 |] ; 13; 6|> Array.tryFind isPow ;; erOfTwoval it : int option = Some 64 > [| 1; 7; 13; 64; 32 |] |> Array.tryFindIndex isPowerOfTwo;; val it : int option = Some 3
Array.tryFind and Array.tryFindIndex illustrate why the Option type is so powerful. In C#, functions similar to tryFindIndex will return -1 to indicate failure (as opposed to None). However, if trying to implement tryFind, -1 could both indicate a failure to find an array element or finding an element with value -1.
Aggregate Operators
The Array module also contains the aggregate operators of the List module. Namely: fold, foldBack, map, and iter. In addition, there are also index-aware versions of these methods. Example 4-9 demonstrates the iteri function, which behaves just like iter except that in addition to the array element the element’s index is provided as well.
Example 4-13. Using the iteri array aggregate function > let vowels = [| 'a'; 'e'; 'i'; 'o'; 'u' |];;
18

O’Reilly Media, Inc. 4/2/2012
val vowels : char [] = [|'a'; 'e'; 'i'; 'o'; 'u'|] > Array.iteri (fun idx chr -> printfn "vowel.[%d] = %c" idx chr) vowels vowel.[0] = a vowel.[1] = e vowel.[2] = i vowel.[3] = o vowel.[4] = u val it : unit = ()
Multidimensional Arrays Arrays are helpful for storing data in a linear fashion, but what if you need to represent data as a two, three, or higher-dimensional grid? You can create multidimensional arrays, which enable you to treat data as a block indexed by several values.
Multidimensional arrays come in two flavors: rectangular and jagged, the difference is illustrated in Figure 4-2. Rectangular arrays are in a solid block while jagged arrays are essentially arrays of arrays.
Figure 4-2. Jagged and rectangular arrays
Which type of multidimensional array to use depends on the situation. Using jagged arrays allows you to save memory if each row doesn’t need to be the same length, however rectangular arrays are more efficient for random access because the elements are stored in a contiguous block of memory. (And therefore can benefit from your processor’s cache.)
Rectangular arrays
Rectangular arrays are rectangular blocks of n by m elements in memory. Rectangular arrays are indicated by rectangular brackets with a comma separating them for each new dimension. Also, just like single-dimensional arrays, there are the Array2D and Array3D modules for creating and initializing rectangular arrays.
19

O’Reilly Media, Inc. 4/2/2012
> // Creating a 3x3 array let identityMatrix : float[,] = Array2D.zeroCreate 3 3 identityMatrix.[0,0] <- 1.0 identityMatrix.[1,1] <- 1.0 identityMatrix.[2,2] <- 1.0;; val identityMatrix : float [,] = [[1.0; 0.0; 0.0] [0.0; 1.0; 0.0] [0.0; 0.0; 1.0]]
2D rectangular arrays can also take slices, using the same syntax but providing a slice for each dimension.
> // All rows for columns with index 1 through 2 identityMatrix.[*, 1..2];; val it : float [,] = [[0.0; 0.0] [1.0; 0.0] [0.0; 1.0]]
Jagged arrays
Jagged arrays are simply single-dimensional arrays of single-dimensional arrays. Each row in the main array is a different array, each needing to be initialized separately.
> // Create a jagged array let jaggedArray : int[][] = Array.zeroCreate 3 jaggedArray.[0] <- Array.init 1 (fun x -> x) jaggedArray.[1] <- Array.init 2 (fun x -> x) jaggedArray.[2] <- Array.init 3 (fun x -> x);; val jaggedArray : int [] [] = [|[|0|]; [|0; 1|]; [|0; 1; 2|]|]
Mutable Collection Types Often you will need to store data, but you won’t know how many items you will have ahead of time. For example, you might be loading records from a database. If you used an array, you run the risk of allocating too many elements and wasting memory, or even worse, not enough and crashing instead.
Mutable collection types allow you to dynamically add and remove elements over time. While mutable collection types can be problematic when doing parallel and asynchronous programming, they are very simple to work with.
List<'T> The List type in the System.Collections.Generic namespace – not to be confused with the F# list type – is a wrapper on top of an array that allows you to dynamically adjust the size of the array when adding and removing elements. Because List is built on top of standard arrays, retrieving and adding values is typically very fast. But once the internal array is filled up a new, larger one, will need to be created and the List ’s contents copied over.
20

O’Reilly Media, Inc. 4/2/2012
Example 4-10 shows basic usage of a List. Again, we’re denying poor Pluto the title of planet.
Example 4-14. Using the List type > // Create a List<_> of planets open System.Collections.Generic let planets = new List<string>();; val planets : Collections.Generic.List<string> > // Ad dividual planets d inplanets.Add("Mercury") planets.Add("Venus") planets.Add("Earth") planets.Add rs");; ("Ma> planets.Count;; val it : int = 4 > // Add a collection of values at once planets.AddRange( [| "Jupiter"; "Saturn"; "Uranus"; "Neptune"; "Pluto" |] );; val it : unit = () > planets.Count;; val it : int = 9 > // Sorry bro planets.Remove("Pluto");; val it : true bool => planets.Count;; val it : int = 8
Table 4-2 shows common methods on the List type.
Table 4-2. Methods and properties on the List<’T> type
Function and type Description Add: 'a -> unit
Adds an element to the end of the list.
Clear: unit -> unit
Removes all elements from the list.
Contains: 'a -> bool
Returns whether or not the item can be found in the list.
Count: int
Property for the number of items in the list.
IndexOf: 'a -> int
Returns a zero-based index of the given item in the list. If it is not present, returns -1.
Insert: int * 'a -> unit
Inserts the given item at the specified index into the list.
Remove: 'a -> bool
Removes the given item if present from the list.
RemoveAt: int -> unit
Removes the item at the specified index.
21

O’Reilly Media, Inc. 4/2/2012
Dictionary<'K,'V> The Dictionary type in the System.Collections.Generic namespace contains key-value pairs. Typically you would use a dictionary when you want to store data and require a friendly way to look it up, rather than an index, such as using a name to look up someone’s phone number.
Example 4-11 shows using a dictionary to map element symbols to a custom Atom type. Note the use of F#’s units of measure feature to encode an atom’s weight in atomic mass units.
Example 4-15. Using a dictionary // Atomic Mass Units [<Measure>] type amu type Atom = { Name : string; Weight : float<amu> } open System.Collections.Generic let periodicTable = new Dictionary<string, Atom>() periodicTable.Add( "H", { Name = "Hydrogen"; Weight = 1.0079<amu> }) periodicTable.Add("He", { Name = "Helium"; Weight = 4.0026<amu> }) periodicTable.Add("Li", { Name = "Lithium"; Weight = 6.9410<amu> }) periodicTable.Add("Be", { Name = "Beryllium"; Weight = 9.0122<amu> }) periodicTable.Add( "B", { Name = "Boron "; Weight = 10.811<amu> }) // ... // Lookup an element let printElement name = if periodicTable.ContainsKey ame) then (n let atom = periodicTable.[name] printfn "Atom with symbol with '%s' has weight %A." atom.Name atom.Weight else printfn "Error. No atom with name '%s' found." name // Alternate syntax to get a value. Return a tuple of 'success * result' let printElement2 name = let (found, atom) = periodicTable.TryGetValue(name) if found then printfn "Atom with symbol with '%s' has weight %A." atom.Name atom.Weight else printfn "Error. No atom with name '%s' found." Name
Table 4-3 shows common methods on the Dictionary<'k,'v> type.
Table 4-3. Methods and properties on the Dictionary<’k,’v> type
Function and Type Description Add: Adds a new key-value pair to the
22

O’Reilly Media, Inc. 4/2/2012
23
Function and Type Description 'k * 'v -> unit dictionary. Clear: unit -> unit
Removes all items from the dictionary.
ContainsKey: 'k -> bool
Checks if the given key is present in the dictionary.
ContainsValue: 'v -> bool
Checks if the given value is present in the dictionary.
Count: int
Returns the number of items in the dictionary.
Remove: 'k -> unit
Removes a key-value pair from the dictionary with then given key.
HashSet<'T> A HashSet, also defined in the System.Collections.Generic namespace, is an efficient collection for storing an unordered set of items. Let’s say you were writing an application to crawl web pages. You would need to keep track of which pages you have visited before so you didn’t get stuck in an infinite loop, however, if you stored the page URLs you have already visited in a List, it would be very slow to loop through each element to check if a page had already been visited. A HashSet stores a collection of unique values based on their hash code, so checking if an element exists in the set can be done rather quickly.
Hash codes will be better explained in the next chapter, for now you can just think of them as a way to uniquely identify an object. They are the reason why looking up elements in a HashSet or Dictionary is fast.
Example 4-12 shows using a HashSet to check if a movie has won the Oscar for Best Picture.
Example 4-16. Using the HashSet type open System.Collections.Generic let bestPicture = new HashSet<string>() bestPicture.Add("The Artist") bestPicture.Add("The King's Speech") bestPicture.Add("The Hurt Locker") bestPicture.Add("Slumdog Milionaire") bestPicture.Add("No Country for Old Men") bestPicture.Add("The Departed") // ... // st picture Check if it was a beif bestPicture.Contains("Manos: The Hands of Fate") then printfn "Sweet..." // ...
Table 4-4 shows common methods on the HashSet<'T> type.
Table 4-4. Methods and properties on the HashSet<'T> type

O’Reilly Media, Inc. 4/2/2012
Function and Type Description Add: 'a -> unit
Adds a new item to the HashSet.
Clear: unit -> unit
Removes all items from the HashSet.
Count: int
Returns the number of items in the HashSet.
IntersectWith: seq<'a> -> unit
Modifies the HashSet to contain only elements that are also contained in the given sequence.
IsSubsetOf: seq<'a > -> bool
Returns whether the HashSet is a subset of the sequence; that is, every element in the HashSet is found in the sequence.
IsSupersetOf: seq<'a > -> bool
Returns whether the HashSet is a superset of the sequence; that is, every element in the sequence is contained in the HashSet.
Remove: 'a -> unit
Removes the given item from the HashSet.
UnionWith: seq<'a> -> unit
Modifies the HashSet to contain at least every element in the given sequence.
Looping Constructs F# has the traditional sorts of looping constructs seen in imperative languages. These allow you to repeat the same function or piece of code a set number of times or until a condition is met.
While Loops while expressions loop until a Boolean predicate evaluates to false. (For this reason while loops cannot be used in a purely functional style, otherwise the loop would never terminate because you could never update the predicate.)
Note that the while loop predicate must evaluate to bool and the body of the loop must evaluate to unit. The following code shows how to use a while loop to count up from zero.
> // While loop let m i utable = 0 while i < 5 do i <- i + 1 printfn "i = %d" i;; i = 1 i = 2 i = 3 i = 4
24

O’Reilly Media, Inc. 4/2/2012
i = 5 val mutable i : int = 5
The predicate for the while loop is checked before the loop starts, so if the initial value of the predicate is false the loop will never execute.
For Loops When you need to iterate a fixed number of times, you can use a for expression, of which there are two flavors in F#: simple and enumerable.
Simple for loops
Simple for loops introduce a new integer value and count up to a fixed value. The loop won’t iterate if the counter is greater than the maximum value.
> / o oo/ F r l p for i = 1 to 5 do printfn "%d" i;; 1 2 3 4 5 val it : unit = ()
To count down, use the downto keyword. The loop won’t iterate if the counter is less than the minimum value.
> // Counting down for i = 5 downto 1 do printfn "%d" i;; 5 4 3 2 1 val it : unit = ()
Numerical for loops are only supported with integers as the counter, so if you need to loop more than System.Int32.MaxValue times, you will need to use enumerable for loops.
Enumerable for loop
The more common type of for loop is one that iterates through a sequence of values. Enumerable for loops work with any seq type, such as array or list. The following example loops over a list literal:
> / nu op/ E merable lo for i in [1 .. 5] do printfn "%d" i;; 1 2 3 4 5
25
O’Reilly Media, Inc. 4/2/2012
val it : unit = ()
What makes enumerable for loops more powerful than a foreach loop in C# is that enumerable for loops can take advantage of pattern matching. The element that follows the for keyword is actually a pattern-match rule, so if it is a new identifier like i, it simply captures the pattern-match value. But more complex pattern-match rules can be used instead.
In Example 4-13 a discriminated union is introduced with two union cases, Cat and Dog. The for loop iterates through a list but only executes when the element in the list is an instance of the Dog union case.
Example 4-17. For loops with pattern matching > // Pet type type Pet = | Cat of string * int // Name, Lives | Dog of string // Name ;; type Pet = | Cat of string * int | Dog of string > let famousPets = [ Dog("Lassie"); Cat("Felix", 9); Dog("Rin Tin Tin") ];; val famousPets : Pet list = [Dog "Lassie"; Cat ("Felix",9); Dog "Rin Tin Tin"] > // Print famous dogs. (Prints warning due to incomplete match.) for Dog(name) in famousPets do printfn "%s was a famous dog." name;; Lassie was a famous dog. Rin Tin Tin was a famous dog. val it : unit = ()
There are no break or continue keywords in F#. If you want to exit prematurely in the middle of a for loop, you will need to create a mutable value and convert the for loop to a while loop.
Exceptions Every programmer knows things don’t always happen as planned. I’ve been careful in examples so far to avoid showing you code where things fail. But dealing with the unexpected is a crucial aspect of any program, and fortunately the .NET platform supports a powerful mechanism for handling the unexpected.
An exception is a failure in a .NET program that causes an abnormal branch in control flow. If an exception occurs, the function immediately exits, as well as its calling function, and its calling function, and so on until the exception is caught by an exception handler. If the exception is never caught then the program terminates.
The simplest way to report an error in an F# program is to use the failwith function. This function takes a string as a parameter, and when called, throws an instance of System.Exception. An alternate version exists called failwithf that takes a format string similar to printf and sprintf.
26

O’Reilly Media, Inc. 4/2/2012
> // Using failwithf let divide x y = if y = 0 then failwithf "Cannot divide %d by zero!" x x / y;; val divide : int -> int -> int > divide 10 0;; System.Exception: Cannot divide 10 by zero! at FSI_0003.divide(Int32 x, Int32 y) at <StartupCode$FSI_0004>.$FSI_0004._main() stopped due to error
In the previous example FSI indicated an exception was thrown, displaying the two most important properties on an exception type: the exception message and stack trace. Each exception has a Message property, which is a programmer-friendly description of the problem. The Stacktrace property is a string printout of all the functions waiting on a return value before the exception occurred, and is invaluable for tracking down the origin of an exception. Because the stack unwinds immediately after an exception is thrown, the exception could be caught far away from the where the exception originated.
While a descriptive message helps programmers debug the exception, it is a best practice in .NET to use a specific exception type, because using typed exceptions makes it far easier to catch and deal with any problems appropriately. To throw a more specific type of exception, you use the raise function. This takes a custom exception type (any type derived from System.Exception) and throws the exception just like failwith.
> // Raising a DivideByZeroException let divide2 x y = if y = 0 then raise <| new System.DivideByZeroException() x / y;; val divide2 : int -> int -> int > divide2 10 0;; System.DivideByZeroException: Attempted to divide by zero. at FSI_0005.divide2(Int32 x, Int32 y) at <StartupCode$FSI_0007>.$FSI_0007._main() stopped due to error
It is tempting to throw exceptions liberally when your program reaches an unexpected situation; however, throwing exceptions incurs a significant performance hit. Whenever possible, situations that would throw an exception should be obviated.
Handling Exceptions To handle an exception you catch it using a try-catch expression. Any exceptions raised while executing code within a try-catch expression will be handled by a with block, which is a pattern match against the exception type.
Because the exception handler to execute is determined by pattern matching, you can combine exception handlers for multiple types using Or. Similarly, you can use a wild card to catch any exception. If an exception is thrown within a try-catch expression
27
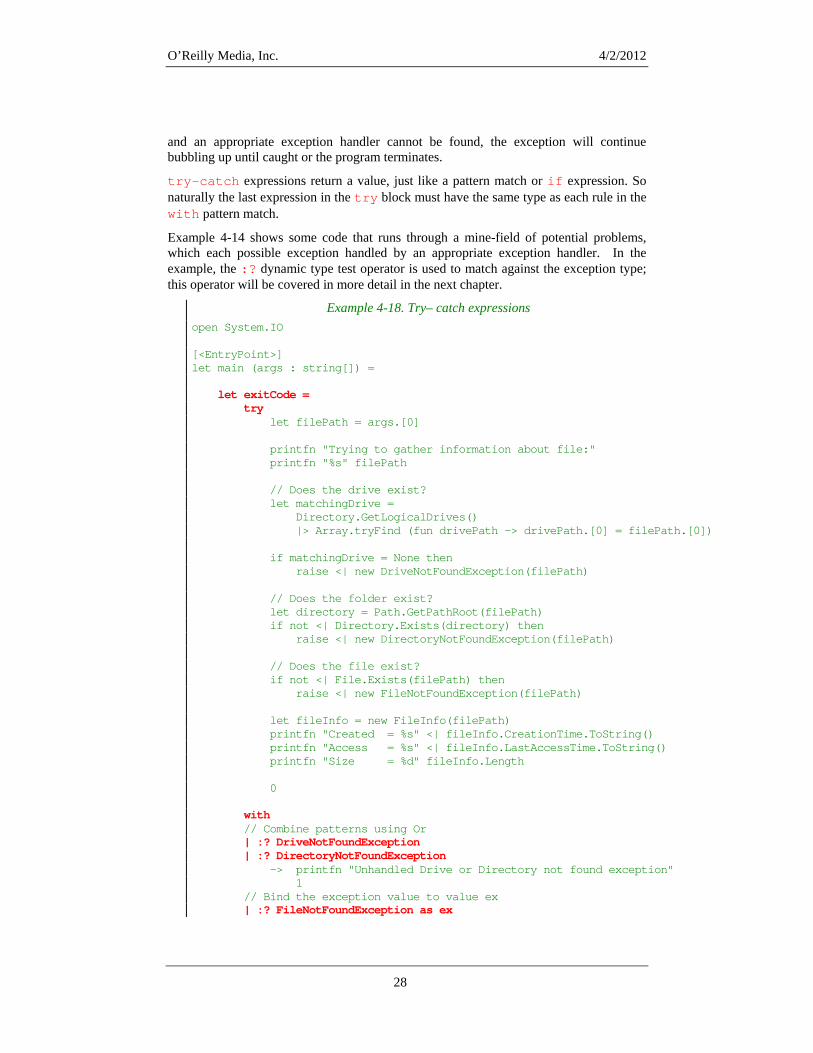
O’Reilly Media, Inc. 4/2/2012
and an appropriate exception handler cannot be found, the exception will continue bubbling up until caught or the program terminates.
try-catch expressions return a value, just like a pattern match or if expression. So naturally the last expression in the try block must have the same type as each rule in the with pattern match.
Example 4-14 shows some code that runs through a mine-field of potential problems, which each possible exception handled by an appropriate exception handler. In the example, the :? dynamic type test operator is used to match against the exception type; this operator will be covered in more detail in the next chapter.
Example 4-18. Try– catch expressions open System.IO [<EntryPoint>] let main (args : string[]) = let exitCode = try let filePath = args.[0] printfn "Trying to gather information about file:" printfn "%s" filePath // Does the drive exist? let matchingDrive = Directory.GetLogicalDrives() |> Array.tryFind (fun drivePath -> drivePath.[0] = filePath.[0]) if matchingDrive = None then raise <| new DriveNotFoundException(filePath) // Does the folder exist? let directory = Path.GetPathRoot(filePath) if not <| Directory.Exists(directory) then raise <| new DirectoryNotFoundException(filePath) // Does the file exist? if not <| File.Exists(filePath) then raise <| new FileNotFoundException(filePath) let fileInfo = new FileInfo(filePath) printfn "Created = %s" <| fileInfo.CreationTime.ToString() printfn "Access = %s" <| fileInfo.LastAccessTime.ToString() printfn "Size = %d" fileInfo.Length 0 with // Combine patterns using Or | :? DriveNotFoundException | :? DirectoryNotFoundException -> printfn "Unhandled Drive or Directory not found exception" 1 // Bind the exception value to value ex | :? FileNotFoundException as ex
28

O’Reilly Media, Inc. 4/2/2012
-> printfn "Unhandled FileNotFoundException: %s" ex.Message 3 | :? IOException as ex -> printfn "Unhandled IOException: %s" ex.Message 4 // Use a wild card match (ex will be of type System.Exception) | _ as ex -> printfn "Unhandled Exception: %s" ex.Message 5 // Return the exit code printfn "Exiting with code %d" exitCode exitCode
Because not catching an exception might prevent unmanaged resources from being freed, such as closing file handles or flushing buffers, there is a second way to catch process exceptions: try-finally expressions. In a try-finally expression, the code in the finally block is executed whether or not an exception is thrown, giving you an opportunity to do required cleanup work.
Example 4-15 demonstrates a try-finally expression in action.
Example 4-19. Try–finally expressions > // Try-finally expressions let tryFinallyTest() = try printfn "Before exception..." failwith "ERROR!" tfn "After exception raised..." prin finally printfn "Finally block executing..." let test() = try tryFinallyTest() with | ex -> printfn "Exception caught with message: %s" ex.Message;; val tryFinallyTest : unit -> unit val test : unit -> unit > test();; Before exception... Finally block executing... Exception caught with message: ERROR! val it : unit = ()
Unlike C#, Java, and other languages there is no try-catch-finally expression. If you need to clean up any resources within an exception handler, you must do it for each exception handler or simply after the try-catch block.
29

O’Reilly Media, Inc. 4/2/2012
Reraising Exceptions Sometimes, despite your best efforts to take corrective action for raised exceptions, you just can’t fix the problem. In those situations you can reraise the exception, which will allow the original exception to continue bubbling up from within an exception handler.
Example 4-16 demonstrates reraising an exception by using the reraise function.
Example 4-20. Reraise exceptions // Retry a function throwing an exception N times before failing. let tryWithBackoff f times = let mutable attempt = 1 let mutable success = false while not success do try f() success <- true with ex -> attempt <- attempt + 1 if attempt >= times then reraise()
Defining Exceptions The reason for throwing specialized exceptions is for consumers of your code to only catch the exceptions they know how to handle. Other exceptions will then continue to bubble up until an appropriate exception handler is found.
You can define your own custom exceptions by creating types that inherit from System.Exception, which you will see in Chapter 5. However, in F# there is an easier way to define exceptions using a lightweight exception syntax. Declaring exceptions in this way allows you to define them with the same syntax as discriminated unions.
Example 4-17 shows creating several new exception types, some of which are associated with data. The advantage of these lightweight exceptions is that when they are caught they are easier to extract the relevant data from because you can use the same syntax for pattern matching against discriminated unions. Also, there is no need for a dynamic type test operator :?, which we saw in previous examples.
Example 4-21. Lightweight F# exception syntax open System open System.Collections.Generic exception NoMagicWand exception NoFullMoon of int * int exception BadMojo of string let castHex (ingredients : HashSet<string>) = try let currentWand = Environment.MagicWand if currentWand = null then
30
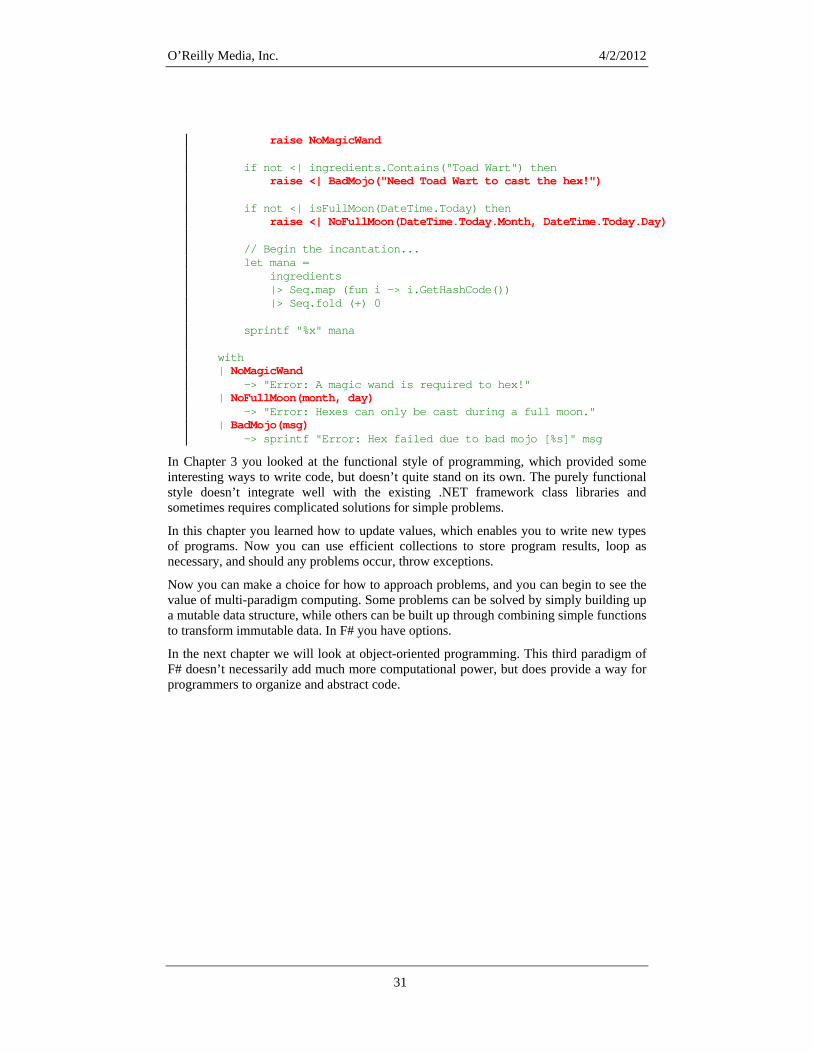
O’Reilly Media, Inc. 4/2/2012
31
raise NoMagicWand if not <| ingredients.Contains("Toad Wart") then raise <| BadMojo("Need Toad Wart to cast the hex!") if not <| isFullMoon(DateTime.Today) then raise <| NoFullMoon(DateTime.Today.Month, DateTime.Today.Day) // Begin the incantation... let mana = ingredients |> Seq.map (fun i -> i.GetHashCode()) |> Seq.fold (+) 0 sprintf "%x" mana with | NoMagicWand and is required to hex!" -> "Error: A magic w | NoFullMoon(month, day) -> "Error: Hexes can only be cast during a full moon." | BadMojo(msg) -> sprintf "Error: Hex failed due to bad mojo [%s]" msg
In Chapter 3 you looked at the functional style of programming, which provided some interesting ways to write code, but doesn’t quite stand on its own. The purely functional style doesn’t integrate well with the existing .NET framework class libraries and sometimes requires complicated solutions for simple problems.
In this chapter you learned how to update values, which enables you to write new types of programs. Now you can use efficient collections to store program results, loop as necessary, and should any problems occur, throw exceptions.
Now you can make a choice for how to approach problems, and you can begin to see the value of multi-paradigm computing. Some problems can be solved by simply building up a mutable data structure, while others can be built up through combining simple functions to transform immutable data. In F# you have options.
In the next chapter we will look at object-oriented programming. This third paradigm of F# doesn’t necessarily add much more computational power, but does provide a way for programmers to organize and abstract code.

O’Reilly Media, Inc. 4/2/2012
5 Object-Oriented Programming
In this chapter we will cover the most widely used programming paradigm today: object-oriented programming. Mastering object-oriented programming is crucial for taking advantage of the existing frameworks and libraries available on .NET, as well as writing F# code that can be integrated into those libraries.
Object-oriented programing is a way of thinking about programming in terms of “objects” and their interactions. For example, in this chapter we will cover the differences between methods and properties, which have subtle ways for communicating the nature of your object and its responsibilities. We will also cover static methods and fields, which communicate how to access an object. And finally method overloading and overriding, for customizing the actual implementation of the object.
When taken all at once, these object-oriented approaches seem much more complicated than F#’s simple function values. However, the benefit is the subtle indication of usage. Given an object and its public-facing methods and properties you can get a feel for how to use it. Whereas with a collection of loose functions there is no rhyme or reason for how they work together to achieve a common goal.
Programming with Objects Software systems are the some of the most complex things created by man. Consider your typical .NET program: thousands if not millions of lines of source code, transformed into some intermediate language by compilers, then compiled again to machine code via a JITer, which then executes on a processor. Knowing the details about how each step works is just too much to handle.
Rather than sweating all the details of a program, object-oriented programming enables you to organize batches of code into conceptual objects, and manipulating those. By modeling the world in terms of abstract objects, you can simplify the complexities of the underlying code.
For example, imagine you have a web log file. You can write several functions to parse and analyze the data. But conceptually it is a log file, which has properties such as file
1
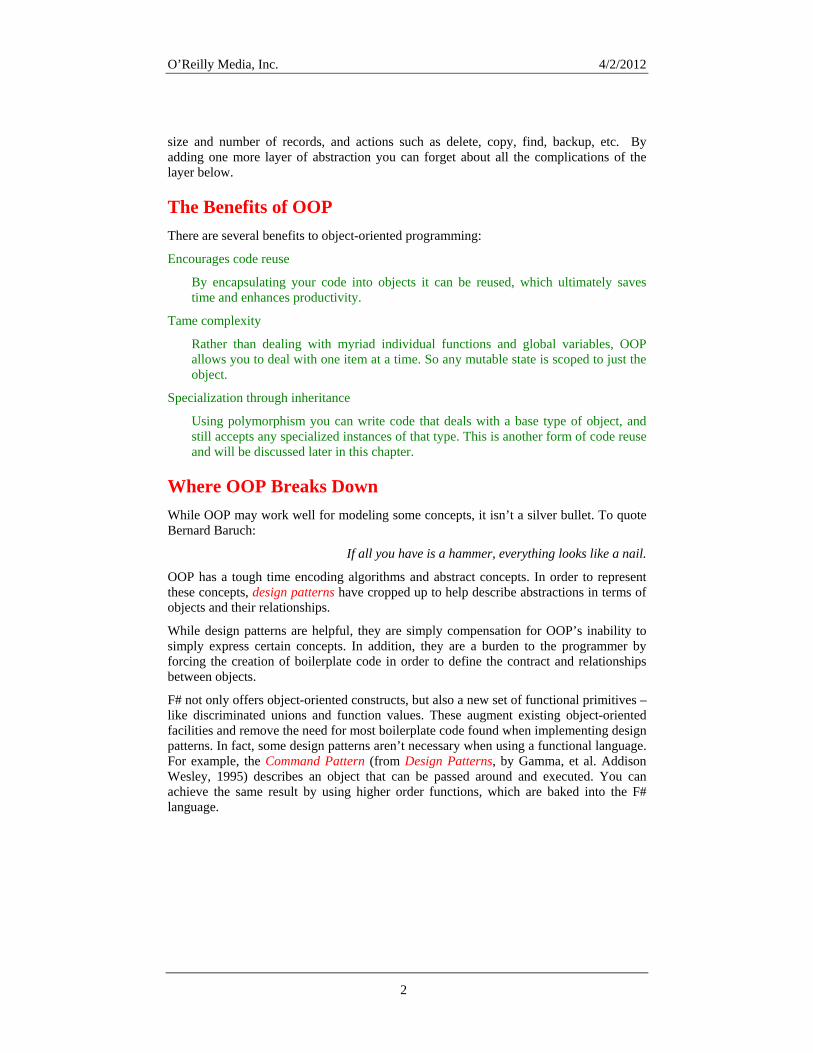
O’Reilly Media, Inc. 4/2/2012
size and number of records, and actions such as delete, copy, find, backup, etc. By adding one more layer of abstraction you can forget about all the complications of the layer below.
The Benefits of OOP There are several benefits to object-oriented programming:
Encourages code reuse
By encapsulating your code into objects it can be reused, which ultimately saves time and enhances productivity.
Tame complexity
Rather than dealing with myriad individual functions and global variables, OOP allows you to deal with one item at a time. So any mutable state is scoped to just the object.
Specialization through inheritance
Using polymorphism you can write code that deals with a base type of object, and still accepts any specialized instances of that type. This is another form of code reuse and will be discussed later in this chapter.
Where OOP Breaks Down While OOP may work well for modeling some concepts, it isn’t a silver bullet. To quote Bernard Baruch:
If all you have is a hammer, everything looks like a nail.
OOP has a tough time encoding algorithms and abstract concepts. In order to represent these concepts, design patterns have cropped up to help describe abstractions in terms of objects and their relationships.
While design patterns are helpful, they are simply compensation for OOP’s inability to simply express certain concepts. In addition, they are a burden to the programmer by forcing the creation of boilerplate code in order to define the contract and relationships between objects.
F# not only offers object-oriented constructs, but also a new set of functional primitives – like discriminated unions and function values. These augment existing object-oriented facilities and remove the need for most boilerplate code found when implementing design patterns. In fact, some design patterns aren’t necessary when using a functional language. For example, the Command Pattern (from Design Patterns, by Gamma, et al. Addison Wesley, 1995) describes an object that can be passed around and executed. You can achieve the same result by using higher order functions, which are baked into the F# language.
2

O’Reilly Media, Inc. 4/2/2012
Understanding System.Object .NET offers a rich type system that can check the identity of objects and guarantee type safety at runtime. By keeping track of the type of an object, the .NET runtime can ensure that square pegs aren’t put into round holes.
To achieve this notion of object identity, everything from integers to strings to discriminated unions are instances of System.Object (abbreviated in F# by obj). An instance of System.Object isn’t useful on its own, because it doesn’t have any customizations. However, it is important to know the methods available on System.Object because they are available on every object you encounter in .NET.
Common Methods Each instance of System.Object comes with several methods that can be overridden, or customized. For custom F# types (discriminated unions and records) some of these methods are overridden by the F# compiler automatically.
ToString
ToString produces a human readable string representation of the object. In F# this is the value the printf format specifier %A or %O displays to the console. No formal guidelines exist for what this should return, though the result from ToString should be adequate to differentiate the object from others, as well as an aid in debugging. The default value is the full name of the class itself.
The following example defines a type PunctionMark and provides an implementation of its ToString method. Without overriding ToString, the default message would look something like FSI_0002+PunctuationMark.
> // Overriding ToString type PunctuationMark = | Period | Comma | QuestionMark | ExclamationPoint override this.ToString() = match this with | Period -> "Period (.)" | Comma -> "Comma (,)" | QuestionMark -> "QuestionMark (?)" | ExclamationPoint -> "ExclamationPoint (!)";; type PunctuationMark = | Period | Comma | QuestionMark | ExclamationPoint with override ToString : unit -> string end > let x = Comma;; val x : PunctuationMark = Comma
3

O’Reilly Media, Inc. 4/2/2012
> x.ToString();; val it : string = "Comma (,)"
GetHashCode
GetHashCode returns a hash value for the object. Overriding this function is crucial for the type to be used in collections such as Dictionary, HashSet, and Set. A hash code is a pseudo-unique identifier that describes a particular instance of the type. This makes it much more efficient to compare if two objects are identical.
> "alpha".GetHashCode();; val it : int = -1898387216 > "bravo".GetHashCode();; val it : int = 1946920786 > "bravo".GetHashCode();; val it : int = 1946920786
The default implementation is good enough for most applications, but if you ever override Equals then you should override GetHashCode.
When overriding GetHashCode you must ensure the following invariants in order for the type to work correctly in collections. Otherwise, the type will behave incorrectly when used with data structures which require a hash code. (Like Dictionary<K, V>.)
• If two objects are equal, then their hash code must be identical. The converse is not true; two different objects may have the same hash code. However, you should take care to avoid these hash collisions whenever possible.
• An object’s hash code must remain consistent if no changes have been made to the object. If its internal state has been changed, then the hash code may change accordingly.
Equals
The equals function compares if two objects are equal. Equality in .NET is a complex topic; see the section on Object Equality later in this chapter.
> "alpha".Equals(4);; val it : bool = false > "alpha".Equals("alpha");; val it : bool = true
If you override Equals, you must also override GetHashCode because if two objects are considered equal, then their hash codes must also match.
GetType
Finally, the GetType method returns an instance of System.Type, which is the type of the actual object. This is important for understanding what something is at runtime, and you will see much more of this when we cover reflection in Chapter 12.
> let stringType = "A String".GetType();;
4
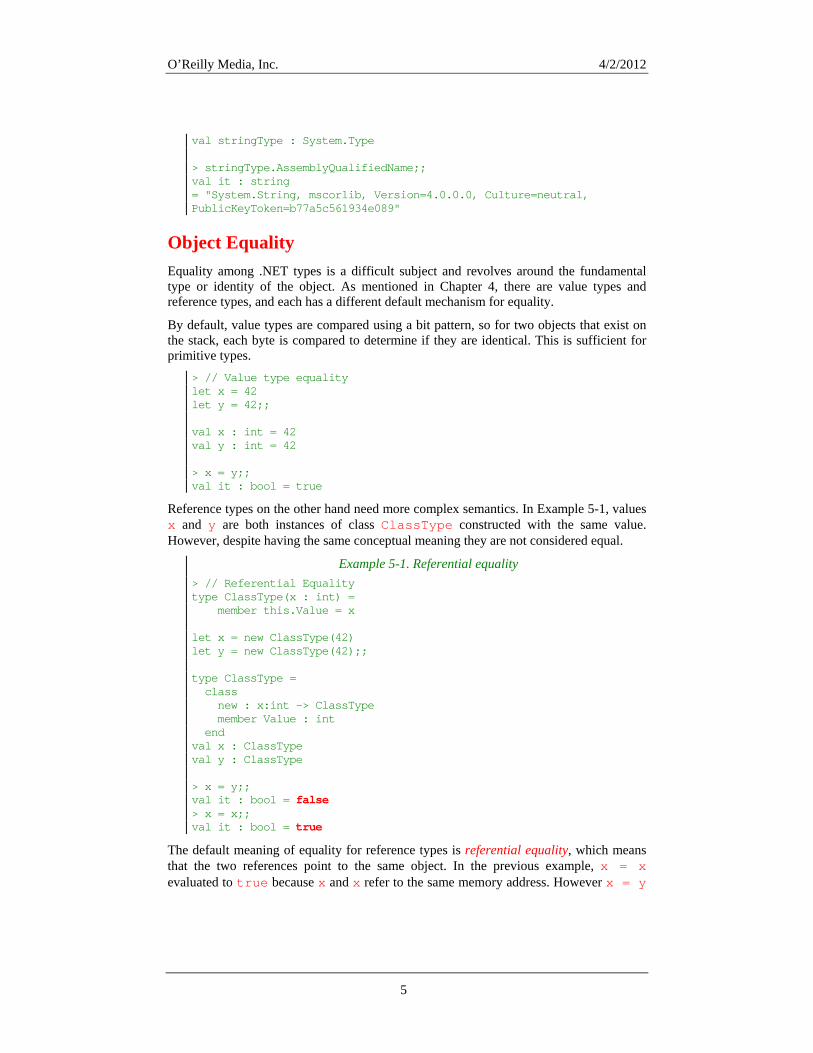
O’Reilly Media, Inc. 4/2/2012
val stringType : System.Type > stringType.AssemblyQualifiedName;; val it : string = "System.String, mscorlib, Version=4.0.0.0, Culture=neutral, PublicKeyToken=b77a5c561934e089"
Object Equality Equality among .NET types is a difficult subject and revolves around the fundamental type or identity of the object. As mentioned in Chapter 4, there are value types and reference types, and each has a different default mechanism for equality.
By default, value types are compared using a bit pattern, so for two objects that exist on the stack, each byte is compared to determine if they are identical. This is sufficient for primitive types.
> // Value type equality let x = 42 let y = 42;; val x : int = 42 val y : int = 42 > x = y;; val it : bool = true
Reference types on the other hand need more complex semantics. In Example 5-1, values x and y are both instances of class ClassType constructed with the same value. However, despite having the same conceptual meaning they are not considered equal.
Example 5-1. Referential equality > // Referential Equality type ClassType(x : int) = member this.Value = x let x = new ClassType(42) let y = new ClassType(42);; type ClassType = class new : x:int -> ClassType member Value : int end val x : ClassType val y : ClassType > x = y;; val it : bool = false > x = x;; val it : bool = true
The default meaning of equality for reference types is referential equality, which means that the two references point to the same object. In the previous example, x = x evaluated to true because x and x refer to the same memory address. However x = y
5
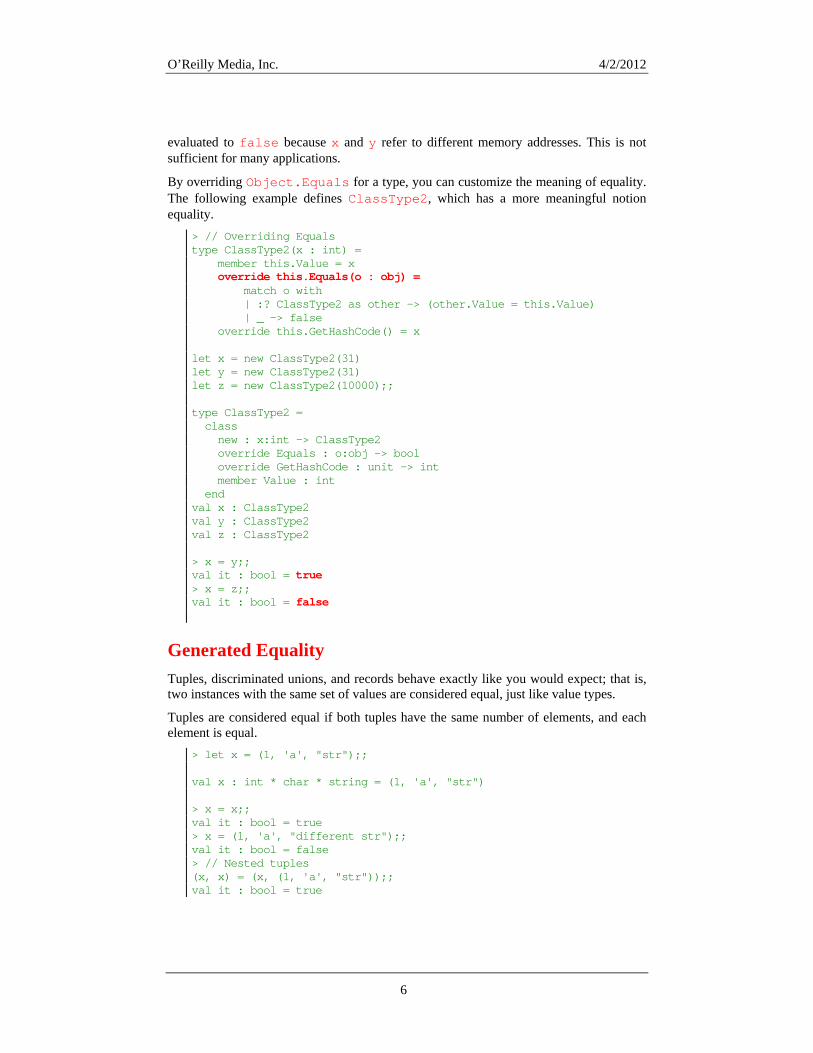
O’Reilly Media, Inc. 4/2/2012
evaluated to false because x and y refer to different memory addresses. This is not sufficient for many applications.
By overriding Object.Equals for a type, you can customize the meaning of equality. The following example defines ClassType2, which has a more meaningful notion equality.
> // Overriding Equals type ClassType2(x : int) = member this.Value = x override this.Equals(o : obj) = match o with | :? ClassType2 as other -> (other.Value = this.Value) | _ -> false override this.GetHashCode() = x let x = new ClassType2(31) let y = new ClassType2(31) let z = new ClassType2(10000);; type ClassType2 = class new : x:int -> ClassType2 override Equals : o:obj -> bool override GetHashCode : unit -> int member Value : int end val x : ClassType2 val y : ClassType2 val z : ClassType2 > x = y;; val it : bool = true > x = z;; val it : bool = false
Generated Equality Tuples, discriminated unions, and records behave exactly like you would expect; that is, two instances with the same set of values are considered equal, just like value types.
Tuples are considered equal if both tuples have the same number of elements, and each element is equal.
> let x = (1, 'a', "str");; val x : int * char * string = (1, 'a', "str") > x = x;; val it : bool = true > x = (1, 'a', "different str");; val it : bool = false > // Nested tuples (x, x) = (x, (1, 'a', "str"));; val it : bool = true
6

O’Reilly Media, Inc. 4/2/2012
Records are considered equal if all of their fields have the same value. > // Record equality type RecType = { Field1 : string; Field2 : float } let x = { Field1 = "abc"; Field2 = 3.5 } let y = { Field1 = "abc"; Field2 = 3.5 } let z = { Field1 = "XXX"; Field2 = 0.0 };; type RecType = {Field1: string; Field2: float;} val x : RecType = {Field1 = "abc"; Field2 = 3.5;} val y : RecType = {Field1 = "abc"; Field2 = 3.5;} val z : RecType = {Field1 = "XXX"; Field2 = 0.0;} > x = y;; val it : bool = true > x = z;;val it : bool = false
Discriminated unions are considered equal if both values are of the same data tag, and the tuples of data associated with the tags are equal.
> // Discriminated Union Equality type DUType = | A of int * char | B let x = A(1, 'k') let y = A(1, 'k') let z = B;; type DUType = | A of int * char | B val x : DUType = A (1,'k') val y : DUType = A (1,'k') val z : DUType = B > x = y;; val it : bool = true > x = z;; val it : bool = false
In reality tuples, discriminated unions, and records are all reference types. So by default they should use reference equality, meaning that all the comparisons in the previous examples would evaluate to false. The reason this works is because the F# compiler overrides Equals and GetHashCode for you. (Providing what is known as structural equality semantics.)
You can change the default behavior of generated equality should the need arise, either by overriding Equals and GetHashCode yourself, or by adding the ReferenceEquality attribute.
Example 5-2 shows creating a discriminated union types which uses referential equality.
7
O’Reilly Media, Inc. 4/2/2012
Example 5-2. Customizing generated equality > // Referential Equality on Functional Types [<ReferenceEquality>] type RefDUType = | A of int * char | B;; type RefDUType = | A of int * char | B > // Declare two conceputally equal values let x = A(4, 'A') let y = A(4, 'A');; val x : RefDUType = A (4,'A') val y : RefDUType = A (4,'A') > x = y;; val it : bool = false > x = x;; val it : bool = true
Understanding Classes With knowledge of what a basic obj can do, let’s look at how we can create class types of our own. Classes on the simplest level are functions glued to data. Data associated with a class are known as fields. Functions associated with a class are known as properties or members. (Properties are simply parameter-less methods.)
We covered data and functions before, but how they relate to object oriented programming is that fields may be classes themselves. In other words, a class type may be composed of other classes. Also, a class can inherit the functionality of others.
Consider the web log file example again. The web log class has a field which is a file handle. You can interact with the web log file to write new data, and the web log file then delegates that to its file handle. Thereby simplifying the interface to just “log data” rather than dealing with file offsets and data-encoding issues.
I’ll cover each aspect of fields, methods, properties, and abstractions all in due time. But creating a new class isn’t going to be useful unless you can initialize it with some initial state. Classes have special methods called constructors, whose job is to initialize the class’s fields.
A class’s constructor is called when it is created by a call to new, and may not be invoked again once the class has been instantiated.
F# features two separate syntaxes for defining class constructors – explicit constructors and implicit constructors. One is in line with F#’s simple yet terse syntax, while the other allows for more explicit control over how the class is generated.
8

O’Reilly Media, Inc. 4/2/2012
Explicit Construction The explicit class construction syntax is the least pleasant way to construct a class, but provides the greatest degree of control. When you define a class using this syntax you must explicitly name each class field and initialize each field it with a constructor.
Class fields are prefixed with the val keyword and are accessed by using the self identifier, discussed later. Example 5-3 defines a new class called Point which has two fields, m_x and m_y. The class has two constructors, one which takes two parameters and another which takes none.
Example 5-3. Explicit class construction syntax type Point = val m_x : float val m_y : float eters // Constructor 1 – Takes two param new (x, y) = { m_x = x; m_y = y } // Constructor 2 – Takes no parameters new () = { m_x = 0.0; m_y = 0.0 } member this.Length = let sqr x = x * x sqrt <| sqr this.m_x + sqr this.m_y let p1 = new Point(1.0, 1.0) let p2 = new Point()
In C# a default constructor is provided if you don’t define any custom constructors. This is not the case in F#. In F# you can define a class without a constructor, but then there would be no way to instantiate that class!
You can have arbitrary code execute before or after the class’s fields are initialized to perform a limited set of setup actions. To perform an action before the class’s fields are set, simply write code after the equals sign; to perform actions after the fields are initialized use the then keyword followed by an expression, which must evaluate to unit.
Example 5-4 adds an explicit constructor to our Point type that takes a string, called text, as a parameter. Then, several new values are introduced as the string is parsed. Next, the class’s fields m_x and m_y are initialized. Finally, after the fields are initialized, a message is printed to the console.
Example 5-4. Arbitrary execution before explicit constructor open System type Point2 = val m_x : float val m_y : float // Parse a string, e.g. "1.0, 2.0" new (text : string) as this =
9

O’Reilly Media, Inc. 4/2/2012
// Do any required pre processing if text = null then raise <| new ArgumentException("text") let parts = text.Split([| ',' |]) let (successX, x) = Double.TryParse(parts.[0]) let (successY, y) = Double.TryParse(parts.[1]) if not successX || not successY then raise <| new ArgumentException("text") // Initialize class fields = x; m_y = y } { m_x then // Do any post processing printfn "Initialized to [%f, %f]" this.m_x this.m_y
Implicit Class Construction While explicit class construction follows typical object-oriented programming styles, it seems rather unnatural in functional programming. Implicit class construction is a simpler way to define classes and fits more naturally with the F# language.
With an implicit constructor there are no explicit fields (val-bindings); instead, you can use let-bindings inside of the type’s definition. When the class is compiled, the let-bindings will be compiled as class fields or simply optimized away. So although the implicit class construction syntax doesn’t allow you to explicitly specify class fields, it does clean up the code for creating classes.
To create a type with an implicit constructor, simply add parentheses and arguments after the type name. The arguments will serve as parameters to the type’s primary constructor. Any let-bindings or do-bindings in the body of the class will execute during its construction. Additional constructors defined must end up calling the primary constructor, to ensure all let-bindings are initialized.
Example 5-5 shows creating a class using the implicit class construction syntax. The example performs the same task of parsing a 2D point from a string, except it adds an additional constructor that takes two floating-point values. This will serve as the class’s primary constructor.
Example 5-5. Implicit class construction type Point3(x : float, y : float) = let length = let sqr x = x * x sqrt <| sqr x + sqr y do printfn "Initialized to [%f, %f]" x y member this.X = x member this.Y = y member this.Length = length // Define custom constructors, these must
10

O’Reilly Media, Inc. 4/2/2012
// call the 'main' constructor new() = new Point3(0.0, 0.0) // Define a second constructor. new(text : string) = if text = null then raise <| new ArgumentException("text") let parts = text.Split([| ',' |]) let (successX, x) = Double.TryParse(parts.[0]) let (successY, y) = Double.TryParse(parts.[1]) if not successX || not successY then raise <| new ArgumentException("text") ary constructor // Calls the prim new Point3(x, y)
The primary constructor’s parameters, as well as any let-bindings, are accessible anywhere within the class and do not need to be prefixed with the self identifier. In the previous example the values x and y – parameters of the primary constructor – were available as well as the length value defined in a let-binding.
Having two syntaxes for creating classes seems redundant. The preferred way to create classes is to use the implicit class construction format, and only rely on the explicit class construction syntax when you need to have explicit control over the class’s fields.
Generic Classes In Chapter 2 we covered generic functions, or functions that accepted input of any type. This concept also extends to classes, enabling you to define a type that can be a collection of other types. For example, the F# list and seq types are generic, because you can have lists and sequences of any type; such as a list of strings or a seq of floats.
To add a generic type parameter to a class, use angle brackets after the class name. From then on, refer to the type parameter name if you need to refer to the generic type. For example:
type GenericClass<'a, 'b>() = ...
Just like in generic functions, generic type parameters are prefixed with an apostrophe '. It is the convention in F# to name generic type parameters 'a, 'b, 'c, and so on.
Example 5-6 defines a generic class Arrayify whose primary constructor takes a generic parameter, x, and contains properties that return arrays filled with x of various sizes.
Example 5-6. Defining generic classes > // Define a generic class type Arrayify<'a>(x : 'a) = member this.EmptyArray : 'a[] = [| |] member this.ArraySize1 : 'a[] = [| x |] member this.ArraySize2 : 'a[] = [| x; x |] member this.ArraySize3 : 'a[] = [| x; x; x |];; type Arrayify<'a> =
11
O’Reilly Media, Inc. 4/2/2012
class new : x:'a -> Arrayify<'a> member ArraySize1 : 'a [] member ArraySize2 : 'a [] member ArraySize3 : 'a [] member EmptyArray : 'a [] end > let arrayifyTuple = new Arrayify<int * int>( (10, 27) );; val arrayifyTuple : Arrayify<int * int> > arrayfiyTuple.ArraySize3;; val it : (int * int) [] = [|(10, 27); (10, 27); (10, 27)|]
It is worth noting that the generic type may be omitted by using a wild card <_>and having the parameter’s type be inferred by the F# compiler. In the following snippet, based on the value of x passed to Arrayify’s constructor, the generic type parameter is inferred to be of type string.
> let inferred = new Arrayify<_>( "a string" );; val inferred : Arrayify<string>
Records and discriminated unions can be declared generic as well. The following snippet defines a generic discriminate union type:
> // Generic discriminated union type GenDU<'a> = | Tag1 of 'a | Tag2 of string * 'a list;; type GenDU<'a> = | Tag1 of 'a | Tag2 of string * 'a list > Tag2("Primary Colors", [ 'R'; 'G'; 'B' ]);; val it : GenDU<char> = Tag2 ("Primary Colors",['R'; 'G'; 'B'])
The following snippet defines a generic record type: > type GenRec<'a, 'b> = { Field1 : 'a; Field2 : 'b };; type GenRec<'a,'b> = {Field1: 'a; Field2: 'b;} > let x = { Field1 = "Blue"; Field2 = 'C' };; val x : GenRec<string,char> = {Field1 = "Blue"; Field2 = 'C';}
The Self Identifier In the previous examples, you may have noticed a curious ‘this’ before each method name. In the examples, this was the name of the self identifier, which allows you to
12

O’Reilly Media, Inc. 4/2/2012
refer to the instance of the class inside of any of its methods. It doesn’t have to be called this; in fact it could be called any valid identifier.
Example 5-7 shows defining a class with oddly named self identifiers. Note that the identifier used to name the self identifier is only scoped to the method or property.
Example 5-7. Naming the this-pointer open System type Circle = val m_radius : float new(r) m_radius } = { = r member foo.Radius = foo.m_ra dius member bar.Area = Math.PI * bar.Radius * bar.Radius
Obviously, the name of the self identifier should be consistent for every member of a class.
The examples in this book typically name it this, to closer match the C# equivalent. Though in idiomatic F# code you’ll rarely need to refer to the self identifier, so it is common to give it a short name such as x, or even __. (_ is not a valid self identifier name.)
Methods and Properties Classes are given meaning by their methods and properties. Methods are actions – verbs – that describe what the type can do or have done to it. Properties, on the other hand are attributes – adjectives – that help describe the type.
Properties The best way to describe properties is to identify the problems that they solve.
How should a type expose its data? In order to interact with a type it might seem useful to expose its internal fields so that clients can manipulate them. However, this anti-pattern can lead to some bad situations:
// Class for controlling all global proton streams. type StreamManager() = // Public field exposing rather delicate data... public let streams = new List<Stream>() // Verifies that the streams aren't crossed. What would happen if // they do happen to get in a bad state? From Dr. Spengler: // // "Try to imagine all life as you know it stopping instantaneiously // and every molecule in your body exploding at the speed of light." member this.CheckStreamsAren'tCrossed() = ...
Don’t worry if you missed the movie reference in snippet above, but the moral of the story is that – in addition to not crossing the streams – you should avoid exposing data directly to clients. The solution is to create accessor methods in front of fields.
13

O’Reilly Media, Inc. 4/2/2012
The following snippet wraps an internal field of type Widget by a getter and setter accessor method.
type FancyMachine() = let mutable m_widget = Widget.FromSerialNumber("tuacm-2004") member this.GetWidget() = m_widget member this.SetWidget(newWidget) = // Clone newWidget so that it may change after this call to // SetWidget without modifying m_widget. m_widget <- newWidget.Clone()
While the getters and setters make sure the type can be used correctly, the approach makes code a little more cumbersome to read.
In short, properties are simply syntactic sugar on top of accessor methods, and come in three different flavors: read-only, write-only, and read-write. A property getter is defined with the get keyword and returns the property value while a property setter, defined with the set keyword, updates the property value.
The syntax for defining a read-only property is simply a method with no arguments. For more explicit control you can provide with get and with set methods.
Example 5-8 shows creating a simple read-only property as well as a more complex property with both a getter and a setter. To invoke the setter use the left arrow operator, <-, as if setting a mutable value.
Example 5-8. Defining class properties > // Define a WaterBottle type with two properties [<Measure>] type ml type WaterBottle() = let mutable m_amount = 0.0<ml> erty // Read-only prop member this.Empty = (m_amount = 0.0<ml>) // Read-write property member this.Amount with get () = m_amount and set newAmt = m_amount <- newAmt;; [<Measure>] type ml type WaterBottle = class new : unit -> WaterBottle member Amount : float<ml> member Empty : bool member Amount : float<ml> with set end > let bottle = new WaterBottle();; val bottle : WaterBottle
14
O’Reilly Media, Inc. 4/2/2012
> bottle.Empty;; val it : bool = true > bottle.Amount <- 1000.0<ml>;; val it : unit = () > bottle.Empty;; val it : bool = false
Auto-Properties
Creating a mutable class field, and exposing it through a property is a common practice and semi-tedious. To simplify this pattern, F# supports automatically implemented properties, which adds even more syntactic sugar to accessor methods by hiding the backing field.
The previous WaterBottle example could be rewritten as the following:
type WaterBottle() = member this.Empty = (this.Amount = 0.0<ml>) // Auto-property, initialized to 0.0<ml> member this.Amount = 0.0<ml> with get, set
The with get, set means that both a getter and setter should get automatically generated, as well as a private, backing field initialized to 0.0<ml>.
Auto-properties should be used whenever you don’t need any custom logic in the property getter or setter. This approach might seem unnecessary compared to just exposing the field itself, but by requiring clients to access data through a property you can later add custom logic in front of the data access without requiring a breaking change. (In effect replacing the auto property with a regular one with custom logic.)
Setting Properties in the Constructor Properties simply provide an easy way to access data for a type, but it is worth noting that you can set properties as additional arguments to a class’s constructor. This simplifies the code required to construct an object and set it up the way you want.
Example 5-9 shows two identical ways for constructing a new Form object, in the System.Windows.Forms namespace. The first way constructs the object and sets properties individually. The second sets the properties as part of the class’s constructor. This is just syntactic sugar for setting the properties individually after the constructor has executed.
Example 5-9. Setting properties after the class’s constructor open System.Windows.Forms // Attempt one – The hard way let f1 = new Form() f1.Text <- "Window Title" f1.TopMost <- true f1.Width <- 640 f1.Height <- 480 f1.ShowDialog() // Attempt two – The easy way let f2 = new Form(Text = "Window Title",
15

O’Reilly Media, Inc. 4/2/2012
TopMost = true, Width = 640, Height = 480) f2.ShowDialog()
Methods To add methods to a class, specify a self identifier followed by the function name. Just like function values, any pattern rules after the function’s name are its parameters. And, just like functions, to define a method that takes no parameters simply have it taking unit as a parameter.
type Television = val mutable m_channel : int val mutable m_turnedOn : bool new() = { m_channel = 3; m_turnedOn = true } member this.TurnOn() = printfn "Turning on..." this.m_turnedOn <- true member this.TurnOff() = printfn "Turning off..." this.m_turnedOn <- false member this.ChangeChannel(newChannel : int) = if this.m_turnedOn = false then failwith "Cannot change channel, the TV is not on." printfn "Changing channel to %d..." newChannel this.m_channel <- newChannel member this.CurrentChannel = this.m_channel
Class methods can partially applied just like function values. However, this is not recommended, because other .NET languages do not support this. The best practice is to have all parameters wrapped in a single tuple. When referenced from other languages, your F# code won’t look like it takes a single parameter of type Tuple, but rather a parameter for each element of the tuple, like you would expect.
> // Curryable class methods type Adder() = // Curried method arguments member this.AddTwoParams x y = x + y // Normal arguments member this.AddTwoTupledParams(x, y) = x + y;; type Adder = class new : unit -> Adder member AddTwoParams : x:int -> y:int -> int member AddTwoTupledParams : x:int * y:int -> int end
16

O’Reilly Media, Inc. 4/2/2012
> let adder = new Adder();; val adder : Adder > let add10 = adder.AddTwoParams 10;; val add10 : (int -> int) > adder.AddTwoTupledParams(1, 2);; val it : int = 3
A notable difference between class methods and function values is that class methods can be recursive without needing to use the rec keyword.
.NET design guidelines state that methods and properties should be named in Pascal Case, meaning every word is capitalized including the first word. DoStuff is a recommending naming instead of doStuff or do_stuff.
For more information on .NET conventions, see Framework Design Guidelines by Abrams and Cwalina, Addison-Wesley 2008.
Static Methods, Properties, and Fields We’ve now see methods and properties, which are functions associated with a particular instance of a type. But what if you want a method that is associated with the type itself and not a particular instance? For example, the Environment class in the System namespace has properties to describe the current computer, like the machine name. The current machine name isn’t conceptually associated with a particular instance of System.Environment so it seems strange to require an instance of the type in order to access the MachineName property. (Which should already exist in memory, and not require allocating a new object.)
To declare a method or property that can be accessed without an instance of the type you need to mark it as static. This means that the method or property cannot access anything referenced from the self identifier, such as class fields, but can be called without having an instance of the type.
To define a static method, simply use the static keyword before a method declaration without declaring a self identifier. Example 5-10 shows creating a static method for class SomeClass. To call a static method you must fully qualify the type and the method name, otherwise it will lead to a compiler error.
Example 5-10. Static methods > // Declaring a static method type SomeClass() = static member StaticMember() = 5;; type SomeClass = class new : unit -> SomeClass static member StaticMember : unit -> int end > SomeClass.StaticMember();;
17
O’Reilly Media, Inc. 4/2/2012
val it : int = 5 > let x = new SomeClass();; val x : SomeClass > x.StaticMember();; x.StaticMember();; ^^^^^^^^^^^^^^^^ stdin(39,1): error FS0809: StaticMember is not an instance method
Static methods are usually associated with utility classes and are not typical in F# code. When you find the need to write many static methods relating to a type, consider organizing methods into an F# module.
Static fields
Class fields can also be marked as static, meaning there is a piece of data associated with a type that is accessible through any instance. (Rather than having a custom copy of the value for each instance of the class.)
Static fields typically serve as global constants. However, mutable static fields can be useful as well. Example 5-11 defines a class RareType which whenever its primary constructor executes, the static field is decremented by one. Once the static field m_numLeft is zero an exception is raised preventing the class from being instantiated again. Without one shared value between each instance of RareType this wouldn’t be possible.
Example 5-11. Creating and using static fields // Static fields type RareType() = e instance of m_numLeft for all instances of RareType // There is only on static let mutable m_numLeft = 2 do if m_numLeft <= 0 then failwith "No more left!" m_numLeft <- m_numLeft - 1 printfn "Initialized a rare type, only %d left!" m_numLeft static member NumLeft = m_numLeft
The following FSI session shows the type winding down. > let a = new RareType();; val a : RareType Initialized a rare type, only 1 left! > let b = new RareType();; val b : RareType Initialized a rare type, only 0 left! > let c = new RareType();;
18

O’Reilly Media, Inc. 4/2/2012
val c : RareType System.Exception: No more left! at FSI_0012.RareType..ctor() in C:\Users\chrsmith\Desktop\Ch05.fsx:line 18 at <StartupCode$FSI_0015>.$FSI_0015._main() stopped due to error > RareType.NumLeft;; val it : int = 0
Method Overloading Often you’ll create a very useful method that you want to customize with different sets of parameters. This saves you the hassle of needing to convert your data into the exact types the method needs. Creating a method with the same name but which accepts a different number or different types of arguments is known as method overloading.
For example, the System.Console.Writeline method has 19 different overloads! This might seem like a lot, but if you want to print an integer you can use the overload that takes an int.
System.Console.WriteLine(42)
Otherwise, you would need to convert the int parameter to a string first, which would quickly become annoying.
System.Console.WriteLine((42).ToString())
Example 5-12 the method CountBits is overridden to accept arguments of any primitive integer types.
Example 5-12. Method overloading in F# type BitCounter = static member CountBits (x : int16) = let mutable x' = x let mutable numBits = 0 for i = 0 to 15 do numBits <- numBits + int (x' &&& 1s) x' <- x' >>> 1 numBits static member CountBits (x : int) = let mutable x' = x let mutable numBits = 0 for i = 0 to 31 do numBits <- numBits + int (x' &&& 1) x' <- x' >>> 1 numBits static member CountBits (x : int64) = let mutable x' = x let mutable numBits = 0 for i = 0 to 63 do numBits <- numBits + int (x' &&& 1L) x' <- x' >>> 1 numBits
19
O’Reilly Media, Inc. 4/2/2012
Accessibility Modifiers You can now create classes to encapsulate the complex inner workings of your abstractions. However, if consumers of your classes can access every method, property, or field, they could inadvertently modify some internal state and introduce bugs.
Limiting member visibility is important so that when you share your type across assembly boundaries consumers can only use the methods and properties you specify.
In F# you can control the visibility of a type or method by providing an accessibility modifier. In example 5-13 the type Ruby is marked internal, and its primary constructor is private, while its other constructors are all public. Attempting to call or access a private value, method, property, or constructor will lead to a compiler error.
Example 5-13. Accessibility modifiers type internal Ruby private(shininess, carats) = let mutable m_size = carats let mutable m_shininess = shininess // Polishing increases shiness but decreases size member this.Polish() = this.Size <- this.Size - 0.1 m_shininess <- m_shininess + 0.1 // Publ r, private setter ic gette member public this.Size with get () = m_size member private this.Size with set newSize = m_size <- newSize member this.Shininess = m_shininess public new() = let rng = new Random() let s = float (rng.Next() % 100) * 0.01 let c = float (rng.Next() % 16) + 0.1 new Ruby(s, c) public new(carats) = let rng = new Random() let s = float (rng.Next() % 100) * 0.01 new Ruby(s, carats)
The specific for all three types of accessibility modifiers in F# are described in Table 5-1. The default accessibility for types, values, and functions in F# is public. The default accessibility for class fields (val and let bindings) is private.
Table 5-1. Accessibility modifiers
Accessibility Modifier Visibility public public visibility means that the method or property is
visible from anywhere. This is the default for all types, values, and functions in F#.
private private visibility limits the value to only be available in
20

O’Reilly Media, Inc. 4/2/2012
21
Accessibility Modifier Visibility that class. Outside callers cannot access the value, nor can derived classes. This is the default for class fields.
internal internal visibility is the same as public, however this only extends to the current assembly. internal types will not be accessible from another assembly – as if they had originally been declared private.
Unlike C#, there is no protected visibility. However, F# will honor protected visibility on types inherited from languages that support protected inheritance.
Accessibility modifiers on module values
Accessibility modifiers can be applied to more than just classes; they work on values defined in modules as well.
Example 5-14 defines a Logger module, which has a private mutable value m_filesToWriteTo. This value is only visible from within the module, so it can safely expose methods AddLogFile and LogMessage without needing to check that m_filesToWriteTo is null. (Since if m_filesToWriteTo were public, a caller could accidently replace its value.)
Example 5-14. Accessibility modifiers in modules open System.IO open System.Collections.Generic module Logger = let mutable private m_filesToWriteTo = new List<string>() let AddLogFile(filePath) = m_filesToWriteTo.Add(filePath) let LogMessage(message : string) = for logFile in m_filesToWriteTo do use file = new StreamWriter(logFile, true) file.WriteLine(message) file.Close()
F# signature files
Accessibility modifiers are key to limiting scope and encapsulation, but providing the correct accessibility modifiers to every type method and value adds a lot of clutter to your code. The cleanest way to control accessibility across an entire file is to use an F# signature file. A signature file, suffixed with the .fsi extension, allows you to specify a signature for an entire code file. Anything in the code file but not in the signature is assumed to have private accessibility. This provides a simple way to bulk annotate your code.
Example 5-15 shows a code file and the corresponding signature file. The signature file defines a class with a constructor and two methods. In the corresponding implementation file there are additional methods and properties, and even though those methods and properties aren’t explicitly marked private they will be compiled as such. Also,

O’Reilly Media, Inc. 4/2/2012
because the signature file specifies the type is internal it will be compiled with that accessibility. If no accessibility is specified in the .fsi file, the member will have public accessibility.
An error will be raised if the implementation file has a lower visibility than the signature file.
.fsi signature files are best used for F# modules intended to be referenced by other projects and form a primitive kind of documentation.
Example 5-15. Example .fsi and .fs files // File.fsi namespace MyProject.Utilities type internal MyClass = new : unit -> MyClass member public Property1 : int member private Method1 : int * int -> int // File.fs namespace MyProject.Utilities type internal MyClass() = member this.Property1 = 10 member this.Property2 with set (x : int) = () member this.Method1 (x, y) = x + y member this.Method2 () = true
Inheritance So far I have covered classes, but not polymorphism, which is the magic that makes object-oriented programming so powerful. Consider the following two classes: a delicious BLTSandwich and the standard TurkeyAndSwissSandwich.
type BLTSandwich() = member this.Ingredients = ["Bacon"; "Lettuce"; "Tomato"] member this.Calories = 450 override this.ToString() = "BLT" type TurkeySwissSandwich() = member this.Ingredients = ["Turkey"; "Swiss"] member this.Calories = 330 override this.ToString() = "Turkey and Swiss"
Even though both classes are nearly identical, they are different entities. So in order to write a function that accepts both an instance of BLTSandwich and an instance of TurkeySwissSandwich you will need to resort to method overloading. Also, we would have to add a new overload method whenever we added a new sandwich type.
member this.EatLunch(sandwich : BLTSandwich) = (*...*) member this.EatLunch(sandwich : TurkeySwissSandwich) = (*...*) // This will need to be added later...
22

O’Reilly Media, Inc. 4/2/2012
member this.EatLunch(sandwich : ClubSandwich) = (*...*)
The right way to think about this is that both of these tasty snacks are specializations of the same base type: Sandwich; and can customize the general properties and methods of a Sandwich. Each specialization of Sandwich will have a different calorie count and list of ingredients.
Moreover, you can continue to create a class hierarchy to specialize even further: Perhaps create a BLTWithPickelsSandwich type. This is exactly how inheritance and polymorphism works.
Inheritance is the ability to create a new class that inherits the methods and properties of a base class, as well as the ability to add new methods and properties and/or customize existing ones. So in this example, BLTSandwich is a specialization, or derived class, of Sandwich, with its own custom implementations of the Calories and Ingredients properties.
Polymorphism is the ability to treat any derived class like an instance of its base class. (Since you know that the derived class has all of the same methods and properties of its base.)
The syntax for inheriting from a class is to add the line inherit type under the type declaration. The syntax is slightly different between explicit and implicit class construction syntax.
When using the implicit class construction syntax, simply add the base class constructor you want to call immediately after the inherit declaration in the primary constructor. Be sure to provide any applicable parameters to the base class’s constructor.
// Base class type BaseClass = val m_field1 : int new(x) = { m_field1 = x } member this.Field1 = this.m_field1 // Derived class using implicit class construction type ImplicitDerived(field1, field2) = inherit BaseClass(field1) let m_field2 : int = field2 member this.Field2 = m_field2
When using explicit class construction, you call the desired base class constructor by putting inherit type in the field initialization of the class.
// Derived class using explicit class construction type ExplicitDerived = inherit BaseClass val m_field2 : int new(field1, field2) = { inherit BaseClass(field1) m_field2 = field2
23
O’Reilly Media, Inc. 4/2/2012
} member this.Field2 = this.m_field2
Method Overriding The key to customization in derived classes is a technique called method overriding, which allows you to redefine what a method does.
To communicate that a method or property can be overridden in F#, mark it as abstract. In example 5-16 type Sandwich has two abstract properties Ingredients and Calories. To provide a default implementation for these methods, you use the default keyword before the member declaration.
To override or customize the implementation of a base class’s method in a derived class, use the override keyword before the member declaration. (Just like you have seen for overriding System.Object’s ToString method.) From then on, when that method is called, the derived class’s version will be used instead of the base class’s.
Example 5-16. Method overriding in F# type Sandwich() = abstract Ingredients : string list default this.Ingredients = [] abstract Calories : int default this.Calories = 0 type BLTSandwich() = inherit Sandwich() override this.Ingredients = [" con"; "Lettuce"; "Tomato"] Ba override this.Calories = 330 type TurkeySwissSandwich() = inherit Sandwich() override this.Ingredients = ["Turkey"; "Swiss"] override this.Calories = 330
To access the base class explicitly, you use the base keyword. Example 5-17 defines a new class BLTWithPickleSandwich, which accesses its base class to print its new ingredients and increase its calories.
Example 5-17. Accessing the base class > // BLT with pickles type BLTWithPickleSandwich() = inherit BLTSandwich() override this.Ingredients = "Pic :: base.Ingredients kles" override this.Calories = 50 + base.Calories;; type BLTWithPickleSandwich = class inherit BLTSandwich new : unit -> BLTWithPickleSandwich override Calories : int
24

O’Reilly Media, Inc. 4/2/2012
override Ingredients : string list end > let lunch = new BLTWithPickleSandwich();; val lunch : BLTWithPickleSandwich > lunch.Ingredients;; val it : string list = ["Pickles"; "Bacon"; "Lettuce"; "Tomato"]
Categories of Classes With the ability to create a class hierarchy, you have the choice of what to do with the classes higher in the tree and the ones at the very bottom.
Nodes at the top may represent abstract classes, which are so general that they might not actually exist. In a previous example we defined a Sandwich class, for which we provided a default implementation for its abstract members. But not every abstract member has a meaningful default implementation.
To continue with our sandwich example, type Sandwich might inherit from Food, which inherits from System.Object. Class Food cannot provide any meaningful defaults for its methods, and thus would need to be declared abstract.
At the bottom of the class hierarchy are things so specific that they cannot further be specialized. While BLTNoPicklesLightMayo could be the foundation for BLTNoPicklesLightMayoOrganicLettuce, there isn’t a need to customize the behavior of System.String.
In .NET you can annotate these topmost and bottommost classes a special way to help define how your classes get used.
Abstract classes
Abstract classes are typically the root objects in hierarchies and are not whole on their own. In fact, you cannot instantiate a class marked as abstract or otherwise you could potentially call a method that hasn’t been defined.
To create an abstract class simply apply the [<AbstractClass>] attribute to the class declaration. Otherwise you will get an error for not providing a default implementation for abstract remembers.
> // ERROR: Define a class without providing an implementation to its members type Foo() = member this.Alpha() = true abstract member Bravo : unit -> bool;; type Foo() = -----^^^ stdin(2,6): error FS0365: No implementation was given for 'abstract member Foo.Bravo : unit -> bool' > // Properly define an abstract class [<AbstractClass>] type Bar() = member this.Alpha() = true abstract member Bravo : unit -> bool;;
25

O’Reilly Media, Inc. 4/2/2012
type Bar = class new : unit -> Bar abstract member Bravo : unit -> bool member Alpha : unit -> bool end
Sealed classes
If abstract classes are those that you must inherit from, sealed classes are those that you cannot inherit from. To seal a class, simply add the [<Sealed>] attribute.
> // Define a sealed class [<Sealed>] type Foo() = member this.Alpha() = true;; type Foo = class new : unit -> Foo member Alpha : unit -> bool end > // ERROR: Inherit from a sealed class type Bar() = inherit Foo() member this.Barvo() = false;; inherit Foo() ----^^^^^^^^^^^^^ stdin(19,5): error FS0191: Cannot inherit a sealed type
Sealing a class enables certain compiler optimizations, because the compiler knows that virtual methods cannot be overridden. It also prevents a certain kind of security bug where a malicious user creates a derived class for an object used for authentication and can spoof credentials.
Casting A key advantage of polymorphism is that you can take an instance of a derived class and treat it like its base class. So in our previous examples, every class in the Sandwich hierarchy had a Calories property and an Ingredients property. To take an instance of a type and convert it to another type in the class hierarchy, you can use a cast operator.
Casting is a way to convert types between one another. There are two types of casts – static and dynamic – which are based on the direction you cast, up or down, an inheritance chain.
Static upcast
A static upcast is where an instance of a derived class is cast as one of its base classes, or cast to something higher up the inheritance tree. It is done using the static cast operator :>. The result is an instance of the targeted class.
26
O’Reilly Media, Inc. 4/2/2012
Example 5-18 creates a class hierarchy where Pomeranian is a type of Dog, which is a type of Animal. By using a static upcast we can convert an instance of Pomeraninan into an instance of Dog or Animal. Anything can be upcast to obj.
Example 5-18. Static upcasts > // Define a class hierarchy [<AbstractClass>] type Animal() = abstract member Legs : int [<AbstractClass>] type Dog() = inherit Animal() abstract member Description : string override this.Legs = 4 type Pomeranian() = inherit Dog() override this.Description = "Furry";; ... snip ... > let steve = new Pomeranian() val steve : Pomeranian > // Casting Steve as various types let steveAsDog = steve :> Dog let steveAsAnimal = steve :> Animal let steveAsObject = steve :> obj;; val steveAsDog : Dog val steveAsAnimal : Animal val steveAsObject : obj
Dynamic cast
A dynamic cast is when you cast a base type as a derived type, or cast something down the inheritance tree. (Therefore, this type of cast cannot be checked statically by the compiler.) This allows you to cast any peg – circular or not – into a round hole, which could lead to failures at runtime.
The most common use of a dynamic cast is when you have an instance of System.Object and you know that it is actually something else. To perform a dynamic cast, use the dynamic cast operator :?>. Building off of our previous example, we can cast our steveAsObj value, which is of type obj to a Dog by employing a dynamic cast.
> let steveAsObj = steve :> obj;; val steveAsObj : obj > let steveAsDog = steveAsObj :?> Dog;; val steveAsDog : Dog
27

O’Reilly Media, Inc. 4/2/2012
28
> steveAsDog.Description;; val it : string = "Furry"
If a type is converted to something it is not, the error will be caught at runtime and result in a System.InvalidCastException exception.
> let _ = steveAsObj :?> string;; System.InvalidCastException: Unable to cast object of type 'Pomeranian' to type 'System.String'. at <StartupCode$FSI_0022>.$FSI_0022._main() stopped due to error
Pattern matching against types
When you use dynamic casts, if the cast fails, an exception is raised, so you cannot test the type of an object without the unnecessary overhead of exception handling. Fortunately, you can use a dynamic type test as part of a pattern match to simplify type checking using the :? operator.
Example 5-19 shows a function whatIs which takes an object and matches it against several known types. If the type is not known, it calls the GetType method, from System.Object, and prints the name to the console.
It is worth noting that the as ident trailing the dynamic type test in the pattern match binds a new value with type equal to the type tested. So in the example, value s has type string and not obj.
Example 5-19. Type tests in a pattern match > // Pattern matching against types let whatIs (x : obj) = ma x with tch | :? string as s -> printfn "x is a string \"%s\"" s | :? int as i -> printfn "x is an int %d" i | :? list<int> as l -> printfn "x is an int list '%A'" l | _ -> printfn "x is a '%s'" <| x.GetType().Name;; val whatIs : obj -> unit > whatIs [1 .. 5];; x is an int list '[1; 2; 3; 4; 5]' val it : unit = () > whatIs "Rosebud";; x is a string "Rosebud" val it : unit = () > whatIs (new System.IO.FileInfo(@"C:\config.sys"));; x is a 'FileInfo' val it : unit = ()
While there is plenty more to learn about OOP, and especially object-oriented design, you now can create classes and use inheritance to organize and reuse your code. This enables you to write code in F# to utilize its strengths – data exploration, quantitative computing, and so on – and package the code up to integrate with object-oriented languages like C#.

O’Reilly Media, Inc. 4/2/2012
6 .NET Programming
The .NET platform is a general-purpose programming platform that can do more than just object-oriented or functional programming. This chapter will cover some additional concepts available when using .NET that will offer advantages when you put them to use in your F# code.
In this chapter you will learn how to use interfaces to build better abstractions, enums and structs which can help performance, and how to use F#’s object expressions for boosting programmer productivity.
The .NET Platform Let’s begin our look at .NET-specific concepts by examining the runtime on which .NET applications execute. This will help you understand how to take full advantage of the platform by seeing the features F# gets for free.
The CLI The foundation of the .NET platform is the CLI, or Common Language Infrastructure. This is a specification for a runtime system that actually runs your F# code. The F# compiler produces a binary file called an assembly, which is composed of a high-level assembly language called MSIL or Microsoft Intermediate Language.
An implementation of the CLI compiles this MSIL to machine code at runtime to execute the code faster than if it were just interpreted. The compilation happens “just-in-time” as the code is needed, or JIT.
Code which is compiled to MSIL and executed through the JITter is referred to as managed code, opposed to unmanaged code which is simply raw machine code. (Typically from programs written in C or C++.)
There are several benefits of running through the CLI / managed code and not compiling your F# directly down to the machine level.
1

O’Reilly Media, Inc. 4/2/2012
• Interoperability between languages. It would be much more difficult to share code between C#, VB.NET, and F# projects if it weren’t for a common language (MSIL).
• Ability to work cross-platform. Since the CLI specification can be implemented anywhere, it is possible to run .NET code on other platforms: such as on the Web with Microsoft Silverlight, on the X-Box with the XNA and the .NET Compact Framework, or even on Linux through the Mono project.
• Machine independence. The JIT layer takes care of compiling down to machine code, so you don’t have to worry about compiling your source code to target a specific architecture like x86 or ARM.
In addition, the .NET runtime offers garbage collection. This frees the programmer from the error-prone process of tracking the allocation and freeing of memory, and (mostly) eliminates an entire class of bugs.
Most of the benefits you don’t even need to think about, as things “just work.” But the one aspect of .NET programming you should be cognizant about is how the garbage collector works.
Garbage Collection The garbage collector is an aspect of the .NET runtime that will automatically free any memory that is no longer referenced. As soon as a value is no longer accessible, typically because the execution has left the function scope, the memory the object occupied is marked for deletion and will be freed later by the garbage collector. For example, if a function declares a value named x, as soon as that function exits there is no longer a way to refer to x and therefore its memory can be safely reclaimed.
As the programmer, you usually don’t need to worry about whether or not a section of memory should be freed or not; the garbage collector will take care of that for you.
However, it is still possible to have a memory leak in managed code. If you unintentionally keep a reference to something that you don’t need, then the garbage collector won’t free it because you could potentially access that memory later.
Having the garbage collector to manage all memory works fine for managed resources, which are the ones created and referenced by the CLI. But things get more complicated when you’re dealing with unmanaged resources, which includes pretty much anything existing outside of the CLI environment, such as file handles, operating system handles, shared memory, etc. Those resources must be explicitly managed and freed by the developer.
If for whatever reason you need to manually deal with allocating and freeing resources, the recommended pattern to use is the IDisposable interface. (Interfaces will be covered later in this chapter.) The IDisposable interface just contains one method, Dispose, which does the freeing of resources. You customize the implementation of Dispose to take care of any cleanup you need, such as closing a file.
type IDisposable = interface abstract member Dispose : unit -> unit end
2

O’Reilly Media, Inc. 4/2/2012
But remembering to call Dispose is problematic, in fact it is just as error prone as manually managing memory in the first place. Fortunately, F# has some syntactic sugar to help you.
If you use the use keyword, the F# code will dispose of the item as soon as it is done being used; that is as it leaves scope. Syntactically, the use keyword behaves exactly like the let keyword.
The following example defines a new class called MultiFileLogger that implements IDisposable and prints some text to the console window when Dispose is called. Because the value logger is bound with use, as soon as the value leaves scope – such as when the function exits – Dispose will automatically be called.
> // Implementing IDisposable open System open System.IO open System.Collections.Generic type MultiFileLogger() = do printfn "Constructing..." let m_logs = new List<StreamWriter>() member this.AttachLogFile file = let newLogFile = new StreamWriter(file, true) m_logs.Add(newLogFile) member this.LogMessage (msg : string) = m_logs |> Seq.iter (fun writer -> writer.WriteLine(msg)) interface IDisposable with member this.Dispose() = printfn "Cleaning up..." m_logs |> Seq.iter (fun writer -> writer.Close()) m_logs.Clear();; type MultiFileLogger = class interface IDisposable new : unit -> MultiFileLogger member AttachLogFile : file:string -> unit member LogMessage : msg:string -> unit end > // Write some code using a MultiFileLogger let task1() = use logger = new MultiFileLogger() // ... printfn "Exiting the function task1.." ();; val task1 : unit -> unit > task1();; Constructing... Exiting the function task1.. Cleaning up... val it : unit = ()
3
O’Reilly Media, Inc. 4/2/2012
Interfaces So far in object-oriented programming we have modeled a couple of different relationships. Is a relationships can be modeled through inheritance, and has a relationships are modeled through aggregation (fields and properties). For example, a BMW is a car (inherits from type Car) and has a motor (contains a field named m_motor of type Engine).
There is however a third type of relationship, the can do relationship, which means that type X can do the operations described by type Y. For example: people, cars, and wine all age. While there may be no clear relationship between people, cars, or wine they are all capable of aging.
In .NET programming, the can do relationship is modeled via an interface, which is a contract that a type can implement to establish that it can perform a certain set of actions.
An interface is just a collection of methods and properties. A type can declare that it implements the interface if it provides an implementation for each method or property. Once this contract has been implemented, then the type can do whatever the interface describes.
In Example 6-1 several types implement the IConsumable interface. To implement an interface use the interface keyword followed by the implementation of each interface method or property to fulfill the contract. If a class implements the IConsumable interface it means that the class has a Tastiness property and an Eat method.
Example 6-1. Interfaces in F# type Tastiness = | Delicious | SoSo | TrySomethingElse type IConsumable = abstract Eat : unit -> unit abstract Tastiness : Tastiness // Protip: Eat one of these a day type Apple() = interface IConsumable with member this.Eat() = printfn "Tastey!" member this.Tastiness = Delicious // Not that tastey, but if you are really hungry will do a bind. type CardboardBox() = interface IConsumable with member this.Eat() = printfn "Yuck!" member this.Tastiness = TrySomethingElse
In C# it is possible to partially implement an interface, and allow derived classes to provide the rest of the contract. This is not possible in F#. If a type is declared to implement an interface, it must implement each method and property explicitly.
4

O’Reilly Media, Inc. 4/2/2012
Using Interfaces Unlike other .NET languages, in F#, the methods and properties of implemented interfaces are not in scope by default, so in order to call interface methods you must cast the type to the corresponding interface. Once you have an instance of the interface, that object can do exactly what the interface specifies.
Needing to cast F# objects to interfaces before calling interface members is a common source of confusion when interoperating with existing .NET code. This requirement however makes it clear whether you are relying on the interface’s functionality or the type’s.
> let apple = new Apple();; val apple : Apple > apple.Tastiness;; apple.Tastiness;; ------^^^^^^^^^ stdin(81,7): error FS0039: The field, constructor or member 'Tastiness' is not defined. > let iconsumable = apple :> IConsumable;; val iconsumable : IConsumable > iconsumable.Tastiness;; val it : Tastiness = Delicious
Defining Interfaces To create an interface, you simply define a new class type with only abstract methods. The type inference system will infer the type to be an interface. Alternatively, you can use the interface keyword, followed by abstract members and properties, followed by the end keyword.
In .NET code it is a convention to prefix interfaces with the letter I. This is a relic of Hungarian notation, which was a programming convention to prefix variables with the type of data something contained or the purpose of that value. For example, an integer that contained a column index would be named colX or nX, rather than the ambiguous x.
Because .NET code relies less on tracking machine-level primitives and more about abstractions, the .NET style guidelines dictate that you should not use it; with interface definitions being an exception.
> // Define a type inferred to be an interface type IDoStuff = abstract DoThings : unit -> unit;; // Define an interface explicitly type IDoStuffToo =
5

O’Reilly Media, Inc. 4/2/2012
interface abstract member DoThings : unit -> unit end;; type IDoStuff = interface abstract member DoThings : unit -> unit end type IDoStuffToo = interface abstract member DoThings : unit -> unit end
Interfaces can inherit from one another; with the derived interface extending the contract of the first. However, consumers must implement the entire inheritance chain, implementing each interface fully.
This is another departure from the way C# handles interfaces. It may seem strange to explicitly implement the base interface if you implement the derived interface, but this provides an extra degree of explicitness in the F# language. The less the compiler does behind the scenes for you, the fewer surprises you will find in your programs.
Example 6-2 defines two interfaces IDoStuff and IDoMoreStuff, which inherits from IDoStuff. When creating a class that implements the derived interface but not its base, an error is raised.
Example 6-2. Implementing a derived interface > // Inherited interfaces type IDoStuff = abstract DoStuff : unit -> unit type IDoMoreStuff = inherit IDoStuff abstract DoMoreStuff : unit -> unit;; ... snip ... > // ERROR: Doesn't implement full interface inheritance heirarchy type Foo() = interface IDoMoreStuff with override this.DoMoreStuff() = printfn "Stuff getting done...";; interface IDoMoreStuff with ----^
error FS0191: No implementation was given for 'abstract member stdin(116,5): IDoStuff.DoStuff : unit -> unit'. Note that all interface members must be implemented and listed under an appropriate 'interface' declaration, e.g. 'interface ... with member ...' > // Works type Bar() = interface IDoStuff with override this.DoStuff() = printfn "Stuff getting done..."
6
O’Reilly Media, Inc. 4/2/2012
interface IDoMoreStuff with override this.DoMoreStuff() = printfn "More stuff getting done...";; type Bar = class interface IDoMoreStuff interface IDoStuff new : unit -> Bar end
Object Expressions Interfaces are useful in .NET, but sometimes you just want an implementation of an interface, but without going through the hassle of defining a custom type. For example, in order to sort the elements in a List<_>, you must provide a type that implements the IComparer<'a> interface. As you require more ways to sort that List<_>, you will quickly find your code littered with types that serve no purpose than to house the single method that defines how to compare two objects.
In F# you can use an object expression, which will create an anonymous class and return an instance of it for you. (The term “anonymous class” just means the compiler will generate the class for you and that you have no way to know its name.) This simplifies the process of creating one-time-use types, much in the same way using a lambda expression simplifies creating one-time-use functions.
The syntax for creating object expressions is a pair of curly braces { } beginning with the new keyword followed by the name of an interface, declared like you would normally use them. The result of an object expression is an instance of the anonymous class.
Object Expressions for Interfaces Example 6-3 shows both using an object expression and an implementation of the IComparer<'a> interface, which is used to sort items in a collection. Each object expression defines a different way to sort a list of names. Without the use of object expressions this would take two separate type definitions, each implementing IComparer<'a>. Instead, from the use of object expressions, no new explicit types were required.
Example 6-3. Sorting a list using IComparer<’a> open System.Collections.Generic type Person = { First : string; Last : string } override this.ToString() = sprintf "%s, %s" this.Last this.First let people = new List<_>( [| { First = "Jomo"; Last = "Fisher" } { First = "Brian"; Last = "McNamara" } { First = "Joe"; Last = "Pamer" } |] )
7

O’Reilly Media, Inc. 4/2/2012
let printPeople () = Seq.iter (fun person -> printfn "\t %s" (person.ToString())) people // Now sort by last name printfn "Initial ordering:" printPeople() // Sort people by first name people.Sort( {
new IComparer<Person> with member this.Compare(l, r) = if l.First > r.First then 1 elif l.First = r.First then 0 else -1 } ) printfn "After sorting by first name:" printPeople() // Sort people by last name peop Sort( le. { new IComparer<Person> with member this.Compare(l, r) = if l.Last > r.Last then 1 elif l.Last = r.Last then 0 else -1 } ) printfn "After sorting by last name:" printPeople()
The output in FSI is as follows: Initial ordering: Fisher, Jomo McNamara, Brian Pamer, Joe After sorting by first name: McNamara, Brian Pamer, Joe Fisher, Jomo After sorting by last name: Fisher, Jomo McNamara, rian B Pamer, Joe
Object Expressions for Derived Classes In addition to implementing interfaces, you can also use object expressions to create derived classes. However, types declared in object expressions cannot add any new methods or properties. They can only override abstract members of the base type.
8
O’Reilly Media, Inc. 4/2/2012
Example 6-4 uses an object expression to create a new instance of the abstract class Sandwich, without explicitly declaring a type.
Example 6-4. Object expressions for creating derived classes > // Abstract class [<AbstractClass>] type Sandwich() = abstract Ingredients : string list abstract Calories : int // Object expression for a derived class let lunch = { new Sandwich() with member this.Ingredients = ["Peanutbutter"; "Jelly"] member this.Calories = 400 };; type Sandwich = class abstract member Calories : int abstract member Ingredients : string list new : unit -> Sandwich end val lunch : Sandwich > lunch.Ingredients;; val it : string list = ["Peanutbutter"; "Jelly"]
A situation where object expressions are especially useful is when writing unit tests. In unit tests you typically want to create a stub object, or a class that simulates behavior that is otherwise slow or complicated to isolate, such as stubbing out the database connection so your tests don’t hit a real database. Using object expressions you can easily create anonymous types that can serve as placeholders without the need for defining a plethora of custom types.
Extension Methods There are times when you are working with a type and may not be able to make changes, either because you don’t have the source code or because you are programming against an older version. This poses a problem when you want to extend that type in some way.
Extension methods provide a simple extension mechanism without needing to modify a type hierarchy or modify existing types. Extension methods are special types of methods you can use to augment existing types and use as if they were originally members of the type. This prevents you from having to rebuild base libraries or resort to using inheritance in order to add a few methods. Once extension methods have been added, you can use types as if they had the additional methods and properties, even if they weren’t originally written for the type.
To declare an extension method, write type ident with followed by the extension methods, where ident is the fully-qualified class name.
9

O’Reilly Media, Inc. 4/2/2012
Note that because extension methods are not actually part of the class, they cannot access private or internal data. They are simply methods that can be called as if they were members of a class.
In Example 6-5 System.Int32 is extended to provide the ToHexString method.
Example 6-5. Using an extension method > (1094).ToHexString();; (1094).ToHexString();; -------^^^^^^^^^^^ stdin(131,8): error FS0039: The field, constructor or member 'ToHexString' is not defined. > // Extend the System.Int32 AKA int type type System.Int32 with member this.ToHexString() = sprintf "0x%x" this;; type Int32 with member ToHexString : unit -> string > (1094).ToHexString();; val it : string = "0x446"
Type extensions must be defined within modules, and are only available once the given module has been opened. In other words, people need to opt-in to using extension methods by opening the defining module.
Extension methods created in F# are not proper extension methods, in that they cannot be consumed from C# and VB.NET as extension methods. Rather, extension methods defined in F# code only extend types in other F# assemblies.
Extending Modules Modules in F# can be extended by simply creating a new module with the same name. As long as the new module’s namespace is opened, all new module functions, types, and values will be accessible.
The following snippet creates a new namespace called FSCollectionExtensions. Once this namespace is opened, its two modules will be available, adding new functions to the List and Seq modules.
namespace FSCollectionExtensions open System.Collections.Generic module List = /// Skips the first n elements of the list let rec skip n list = match n, list with | _, [] -> [] | 0, list -> list
10

O’Reilly Media, Inc. 4/2/2012
| n, hd :: tl -> skip (n - 1) tl module Seq = /// Reverse the elements in the sequence let rec rev (s : seq<'a>) = let stack = new Stack<'a>() s |> Seq.iter stack.Push seq { while stack.Count > 0 do yield stack.Pop() }
Enumerations We have covered discriminated unions, which are helpful for defining types of things within a set. However, each discriminated union case is a distinctly different class and is too heavyweight of a construct in some situations. Many times you simply want to define a group of related constant integral values, and in those situations you can use enumerations.
An enumeration is a primitive integral type, such as int or sbyte, which also contains a series of named constant values. An enumeration is just a wrapper over that integral type however, so an instance of an enumerated type can have a value not defined within that enumeration.
Creating Enumerations To create an enumeration, you use the same syntax for creating discriminated unions, but each data tag must be given a constant value of the same type. Example 6-6 shows creating an enumeration type for chess pieces. Each enumeration field value must be unique. In the example, the field values correspond to the chess piece’s material value.
Example 6-6. Declaring an enumeration type ChessPiece = | Empty = 0 | Pawn = 1 | Knight = 3 | Bishop = 4 | Rook = 5 | Queen = 8 | King = 1000000
To use an enumeration value, simply use the fully qualified field name. Example 6-7 initializes an eight-by-eight array to represent locations on a chessboard.
With our ChessPiece enum as-is, it would be impossible to differentiate between a black piece and a white piece. However, because each ChessPiece value is simply an integer, we can get sneaky and treat black pieces as their ChessPiece values, and white pieces as the negative. So -1 * ChessPiece.Bishop would represent a white bishop. The mechanics of converting enumeration values between their underlying primitives will be covered in the next section.
Example 6-7. Initializing a chessboard enum array
11

O’Reilly Media, Inc. 4/2/2012
/// Create a 2D array of the ChessPiece enumeration let createChessBoard() = let board = Array2D.init 8 8 (fun _ _ -> ChessPiece.Empty) // Place pawns for i = 0 to 7 do board.[1,i] <- ChessPiece.Pawn board.[6,i] <- enum<ChessPiece> (-1 * int ChessPiece.Pawn) // Place black pieces in order [| ChessPiece.Rook; ChessPiece.Knight; ChessPiece.Bishop; ChessPiece.Queen; ChessPiece.King; ChessPiece.Bishop; ChessPiece.Knight; ChessPiece.Rook |] |> Array.iteri(fun idx piece -> board.[0,idx] <- piece) // Place white pieces in order [| ChessPiece.Rook; ChessPiece.Knight; ChessPiece.Bishop; ChessPiece.King; ChessPiece.Queen; ChessPiece.Bishop; ChessPiece.Knight; ChessPiece.Rook |] |> Array.iteri(fun idx piece -> board.[7,idx] <- enum<ChessPiece> (-1 * int piece)) // Return the board Board
Enumerations can be used in pattern matching, but unlike discriminated unions, each enumeration field again must be fully qualified through their type name.
let isPawn piece = match piece with | ChessPiece.Pawn -> true | _ -> false
Conversion To construct an enumeration value, simply use the enum<_> function. The function converts its argument to the enum type of its generic type parameter.
The following snippet converts the value 42 to an instance of ChessPiece. let invalidPiece = enum<ChessPiece>(42)
To get values from an enumeration, simply use the typical primitive value conversion functions, such as int.
let materialValueOfQueen = int ChessPiece.Queen
When to Use an Enum Versus a Discriminated Union Enumerations and discriminated unions have two significant differences. First, enumerations don’t offer a safety guarantee. Whereas a discriminated union can only be one of a known set of possible values, an enumeration is syntactic sugar over a primitive type. So if you are given an enumeration value, there is no implicit guarantee that the value is something meaningful.
For example, if the value -711 were converted to a ChessPiece enum, it would make no sense and likely introduce bugs when encountered. When you have obtained an enum value from an external source, be sure to check it with the Enum.IsDefined method.
12
O’Reilly Media, Inc. 4/2/2012
> System.Enum.IsDefined(typeof<ChessPiece>, int ChessPiece.Bishop);; val it : bool = true > System.Enum.IsDefined(typeof<ChessPiece>, -711);; val it : bool = false
Second, enumerations only hold one piece of data – their value. Discriminated union data tags can each hold a unique tuple of data.
However, enumerations represent a common .NET idiom and offer significant performance benefits over discriminated unions. Whereas enums are simply a few bytes on the stack, discriminated unions are reference types and require separate memory allocations. So populating an array with a large number of enums will be much faster than populating that array with discriminated unions.
A useful benefit to enums is bit flags, shown in Example 6-8. By giving the enum fields powers of two as values, each bit of an underlying enum is treated as a Boolean flag. This way flags can be combined using bitwise OR (|||) and tested using bitwise AND (&&&). Using this technique, you can store up to 32 flags within an int based enum, or up to 64 flags in an int64 based enum.
Example 6-8. Combining enumeration values for flags open System // Enumeration of flag values type FlagsEnum = | OptionA = 0b0001 | OptionB = 0b0010 | OptionC = 0b0100 | OptionD = 0b1000 let isFlagSet (enum : FlagsEnum) (flag : FlagsEnum) = let flagName = Enum.GetName(typeof<FlagsEnum>, flag) if enum &&& flag = flag then printfn "Flag [%s] is set." flagName else printfn "Flag [%s] is not set." flagName
The following FSI session is from Example 6-8. > // Check if given flags are set let customFlags = FlagsEnum.OptionA ||| FlagsEnum.OptionC isFlagSet customFlags FlagsEnum.OptionA isFlagSet customFlags FlagsEnum.OptionB isFlagSet customFlags FlagsEnum.OptionC isFlagSet customFlags FlagsEnum.OptionD ;; Flag [OptionA] is set. Flag [OptionB] is not set. Flag [OptionC] is set. Flag [OptionD] is not set. val customFlags : FlagsEnum = 5
13
O’Reilly Media, Inc. 4/2/2012
Structs We have covered classes before and gone through the complexities of overriding Equals to create equality semantics that make sense. However, for simple types there is a better way. Rather than trying to simulate value type semantics through overriding Equals, why not just create a new value type? Structs are similar to classes, the main difference being that they are a value type, and therefore may be put on the stack. Struct instances take up much less memory than that of a class and, if stack allocated, will not need to be garbage collected.
Creating Structs To create a struct, define a type like you normally would, but add the [<Struct>] attribute. Alternately, you could use the struct and end keywords before and after the struct’s body.
[<Struct>] type StructPoint(x : int, y : int) = member this.X = x member this.Y = y type Rect(top : int, bottom : int, left : int, right : int) = Struct struct member this.Top = top member this.Bottom = bottom member this.Left = left member this.Right = right override this.ToString() = sprintf "[%d, %d, %d, %d]" top bottom left right end
Structs have many of the features of classes but may be stored on the stack rather than the heap. Therefore, equality (by default) is determined by simply comparing the values on the stack rather than references
> // Define two different struct values let x = new StructPoint(6, 20) let y = new StructPoint(6, 20);; val x : StructPoint = FSI_0011+StructPoint val y : StructPoint = FSI_0011+StructPoint > x = y;; val it : bool = true
One difference between structs and classes however is how they are constructed. Whereas classes only have the constructors you provide, structs automatically get a default constructor, which assigns the default value to each struct field. (Which you might recall is zero for value types and null for reference types.)
> // Struct for describing a book [<Struct>] type BookStruct(title : string, pages : int) = member this.Title = title member this.Pages = pages
14
O’Reilly Media, Inc. 4/2/2012
override this.ToString() = sprintf "Title: %A, Pages: %d" this.Title this.Pages;; type BookStruct = struct new : title:string * pages:int -> BookStruct override ToString : unit -> string member Pages : int member Title : string end > // Create uctor an instance of the struct using the constrlet book1 = new BookStruct("Philosopher's Stone", 309);; val book1 : BookStruct = Title: "Philosopher's Stone", Pages: 309 > // Create an inst efault constructor ance using the dlet namelessBook = new BookStruct();; val namelessBook : BookStruct = Title: <null>, Pages: 0
To create a struct in which you can modify its fields you must explicitly declare each mutable field in a val binding and add the [<DefaultValue>] attribute. In addition, in order to mutate a struct’s fields the instance of that struct must be declared mutable.
The following snippet defines a struct MPoint with two mutable fields. It then creates a mutable instance of that struct, pt, and updates the struct’s fields.
> // Define a struct with mutable fields [<Struct>] type MPoint = val mutable X : int val mutable Y : int override this.ToString() = sprintf "{%d, %d}" this.X this.Y;; type MPoint = struct val mutable X: int val mutable Y: int override ToString : unit -> string end > let mutable pt = new MPoint();; val mutable pt : MPoint = {0, 0} > // Update the fields pt.X <- 10 pt.Y <- 7;; > pt;; val it : MPoint = {10, 7} > let nonMutableStruct = new MPoint();; val nonMutableStruct : MPoint = {0, 0}
15

O’Reilly Media, Inc. 4/2/2012
16
> // ERROR: Update a non-mutable struct's field nonMutableStruct.X <- 10;; nonMutableStruct.X <- 10;; ^^^^^^^^^^^^^^^^ stdin(54,1): error FS0256: A value must be mutable in order to mutate the contents of a value type, e.g. 'let mutable x = ...'
Restrictions Structs have several restrictions in place in order to enforce their characteristics.
• Structs cannot be inherited; they are implicitly marked with [<Sealed>].
• Structs cannot override the default constructor. (Because the default constructor always exists and zeros out all memory.)
• Structs cannot use let bindings as with the implicit constructor syntax from class types.
When to Use a Struct Versus a Record Because F# offers both structs and records as lightweight containers for data, it can be confusing to know when to use which.
The main benefit of using structs over records is the same benefit of using structs over classes, namely that they offer different performance characteristics. When you’re dealing with a large number of small objects, allocating the space on the stack to create new structs is much faster than allocating many small objects on the heap. Similarly, with structs there is no additional garbage collection step, because the stack is cleared as soon as the function exits.
For the most part however, the performance gain for struct allocation is negligible. In fact, if used thoughtlessly, structs can have a detrimental impact on performance due to excessive copying when passing structs as parameters. Also, the .NET garbage collector and memory manager are designed for high-performance applications. When you think you have a performance problem, use the Visual Studio code profiler to identify what the bottleneck is first before prematurely converting all of your classes and records to structs.
O’Reilly Media, Inc. 4/2/2012
Part II Programming F#
1

O’Reilly Media, Inc. 4/2/2012
7 Applied Functional Programming
Most of the programming you have done so far has been in the functional style. While this has enabled you to write succinct, powerful programs you never quite used the functional style to its full potential. Functional programming means more than just treating functions as values. Embracing the functional programming paradigm and having it help shape your thought process will enable you to write programs that would otherwise be prohibitively difficult in an imperative style.
In this chapter we will build on what you learned about functional programming back in Chapter 3, and introduce new language features that will help you be more productive in the functional style. For example, using active patterns will allow you to increase the power of your pattern matching and eliminate the need for when guards, and by creating auto-opened modules you can extend common F# modules.
In addition, we will look at some of the more mind-bending aspects of functional programming. You will learn how to use advanced forms of recursion to avoid stack overflows in your code and write more efficient programs using lists. And we will take a look at some common design patterns and data structures for functional code.
If parts of this chapter don’t immediately seem intuitive, don’t worry. In F# you can write code in a more comfortable style such as imperative or object-oriented while familiarizing yourself with functional programming. But the heart of F# is in functional programming, so understanding and mastering the techniques in this chapter is crucial towards becoming an expert in F#.
To begin, let’s look at how to take pattern matching from “switch statements on steroids” to an entirely new level.
Active Patterns Pattern matching adds power to your programming by giving you a way to be much more expressive in code branching than using if expressions alone. It allows you to match against constants, capture values, and match against the structure of data. However, pattern matching has a significant limitation. Namely, it only has the ability to match
1

O’Reilly Media, Inc. 4/2/2012
against literal values such as string, or a limited range of class types like arrays and lists.
Ideally, pattern matching could be used to match against higher-level concepts such as elements in a seq<_>. The following is an example of what you would like to write, however, it fails to compile:
// Does not compile let containsVowel (word : string) = let letters = word.Chars match letters with | ContainsAny [ 'a'; 'e'; 'i'; 'o'; 'u' ] -> true | SometimesContains [ 'y' ] -> true | _ -> false
To check if elements exist in a seq<_> you need to resort to using when guards, which are ugly at best. The following snippet creates a Set type filled with the letters of a string, and then searches for specific letters in a pattern match rule’s when guard.
let containsVowel (word : string) = let letters = word |> Set.of_seq match letters with | _ when letters.Contains('a') || letters.Contains('e') || letters.Contains('i') || letters.Contains('o') || letters.Contains('u') || letters.Contains('y') -> true | _ -> false
Fortunately, in F# there is a feature that captures all the succinct expressiveness you want with the elegance of pattern matching called active patterns.
Active patterns are just special functions that can be used inside of pattern-match rules. Using them eliminates the need for when guards as well as adds clarity to the pattern match, which you can use to make the code look as if it maps more to the problem you are solving.
Active patterns take on several forms, each takes an input and converts it into one or more new values.
• Single-case active patterns convert the input into a new value. • Partial-case active patterns carve out an incomplete piece of the input space. Such as
only matching against strings which contain the letter ‘e’. • Multi-case active patterns partition the input space into one of several values. Such
as partitioning all possible integers into odds, evens, or zero.
Single-case Active Patterns The simplest type of active pattern is the single-case active pattern, which converts data from one type to another. This enables you to use the existing pattern match syntax on classes and values that couldn’t otherwise be expressed in a pattern match rule. We will see an example of this shortly.
To define an active pattern, define the function enclosed with banana clips or (| |).
2

O’Reilly Media, Inc. 4/2/2012
Example 7-5 defines an active pattern for converting a file path into its extension. This allows you to pattern match against the file extension, without your needing to resort to using a when guard.
To use the FileExtension active pattern, simply use it in place of a pattern match rule. The result of the active pattern will come immediately after the active patterns name, and will behave just like any other pattern match rule. So in the example, the constant value ".jpg" is matched against the result of the active pattern. In another pattern match rule, a new value ext is bound to the result of the active pattern.
Example 7-1. Single-case active pattern open System.IO // Convert a file path into its extension let (|FileExtension|) filePath = Path.GetExtension(filePath) let determineFileType (filePath : string) = match filePath with // Without active patterns | filePath when Path.GetExtension(filePath) = ".txt" -> printfn "It is a text file." sing an active pattern // Converting the data u | FileExtension ".jpg" | FileExtension ".png" | FileExtension ".gif" -> printfn "It is an image file." e // Binding a new valu | FileExtension ext -> printfn "Unknown file extension [%s]" ext
Partial Active Patterns Using single case active patterns are helpful for cleaning up pattern matches, however there are many situations where there isn’t a 1:1 correspondance between input and output. For example, what happens when you write an active pattern for converting strings to integers? Not every string can be converted to an intenger.
> // Active pattern for converting strings to ints open System let (|ToInt|) x = Int32.Parse(x);; val ( |ToInt| ) : string -> int > // Check if the input string parses as the number 4 let isFour str = match str with | ToInt 4 -> true | _ -> false;; val isFour : string -> bool > isFour " 4 ";; val it : bool = true
3

O’Reilly Media, Inc. 4/2/2012
> isFour "Not a valid Integer";; System.FormatException: Input string was not in a correct format. at System.Number.StringToNumber(String str, NumberStyles options, NumberBuffer& number, NumberFormatInfo info, Boolean parseDecimal) at System.Number.ParseInt32(String s, NumberStyles style, NumberFormatInfo info) at FSI_0007.IsFour(String str) at <StartupCode$FSI_0009>.$FSI_0009._main() stopped due to error
Partial active patterns allow you to define active patterns that don’t always convert the input data. To do this, a partial active pattern returns an option type. (Which if you recall has only two values, Some('a) and None.) If the match succeeds, it returns Some; otherwise, it returns None. The option type is removed as part of the pattern match when the result is bound.
Example 7-6 shows how to define a partial active pattern that doesn’t throw an exception for malformed input. To define a partial active pattern, simply enclose your active pattern with (|ident|_|) instead of the usual (|ident|). When used in the pattern match, the rule will only match if the partial active pattern returns Some.
Another way to think about partial active patterns is that they are optional single-case active patterns.
Example 7-2. Partial active patterns in action open System let (|ToBool|_|) x = let success, result = Boolean.TryParse(x) if success then Some(result) else None let (|ToInt|_|) x = let success, result = Int32.TryParse(x) if success then Some(result) else None let (|ToFloat|_|) x = let success, result = Double.TryParse(x) if success then Some(result) else None let describeString str = match str with | ToBool b -> printfn "%s is a bool with value %b" str b | ToInt i -> printfn "%s is an integer with value %d" str i | ToFloat f -> printfn "%s is a float with value %f" str f | _ -> printfn "%s is not a bool, int, or float" str
An example of describeString is as follows:
> describeString " 3.141 ";; 3.141 is a float with value 3.141000 val it : unit = () > describeString "Not a valid integer";; Not a valid integer is not a bool, int, or float val it : unit = ()
4

O’Reilly Media, Inc. 4/2/2012
Parameterized Active Patterns Active patterns can take parameters too. Parameters for an active pattern are provided immediately after the active pattern name, but before the result of the active pattern.
Example 7-7 shows creating parameterized active patterns to check if the given string matches a regular expression. Rather than needing to keep track of the regular expression match and teasing out the individual groups, using active patterns you can check if the regular expression matches, as well as bind values to each group from within a pattern match rule.
Example 7-3. Parameterized active patterns for regular expression matching open System open System.Text.RegularExpressions // Use a regular expression to capture three groups let (|RegexMatch3|_|) (pattern : string) (input : string) = let result = Regex.Match(input, pattern) if result.Success then match (List.tail [ for g in result.Groups -> g.Value ]) with | fst :: snd :: trd :: [] -> Some (fst, snd, trd) | [] -> failwith <| "Match succeeded, but no groups found.\n" + "Use '(.*)' to capture groups" | _ -> failwith "Match succeeded, but did not find exactly three groups." else None let parseTime input = match input with // Match input of the form "6/20/2008" | RegexMatch3 "(\d+)/(\d+)/(\d\d\d\d)" (month, day, year) // Match input of the form "2004-12-8" | RegexMatch3 "(\d\d\d\d)-(\d+)-(\d+)" (year, month, day) -> Some( new DateTime(int year, int month, int day) ) | _ -> None
The result of this active pattern can be seen in the following FSI session: > parseTime "1996-3-15";; val it : DateTime option = Some 3/15/1996 12:00:00 AM {Date = ...; Day = 15; DayOfWeek = Friday; DayOfYear = 75; Hour = 0; Kind = Unspecified; Millisecond = 0; Minute = 0; Month = 3; Second = 0; Ticks = 629624448000000000L; TimeOfDay = 00:00:00; Year = 1996;} > parseTime "invalid";; val it : DateTime option = None
5

O’Reilly Media, Inc. 4/2/2012
Active patterns can clean up match statements, but should be treated like .NET properties. They should not be computationally expensive to execute nor cause side effects. Otherwise it can be difficult to isolate performance problems or anticipate where exceptions could be thrown.
Multi-case Active Patterns While single-case and partial active patterns are helpful for converting data, they have the drawback that they can only covert the input data into one other format. But sometimes you want to transform that data into multiple types, typically when you want to partition the input space into multiple categories.
Using a multi-case active pattern you can partition the input space into a known set of possible values. To define a multi-case active pattern, simply use the banana clips again but you may include multiple identifiers to identify the categories of output.
For example, consider doing a pattern match against a row in your Customers table in a database. You could write multiple partial active patterns to divide the customer into power user, non-user, valued customer, etc. Rather than defining a group of partial active patterns to determine which category the input falls into, a multi-case active pattern partitions the input space into exactly one of a group of possible results.
Another way to think about multi-case active patterns is that they simply act as a way of converting the input data into a discriminated union type.
Example 7-8 takes a string and breaks it into a Paragraph, Sentence, Word, or Whitespace categories. These categories, and associated data, can then be used as part of a pattern match.
Example 7-4. Multi-case active patterns open System // This active pattern divides all strings into their various meanings. let (|Paragraph|Sentence|Word|WhiteSpace|) (input : string) = let input = input.Trim() if i hen nput = "" t WhiteSpace elif input.IndexOf(".") <> -1 then // Paragraph contains a tuple of sentence counts and sentences. ingSplitOptions.None) let sentences = input.Split([|"."|], Str Paragraph (sentences.Length, sentences) elif input.IndexOf(" ") <> -1 then // Sentence contains an array of string words Sentence (input.Split([|" "|], StringSplitOptions.None)) else ins a string // Word conta Word (input) // Count the number of letters of a string by breaking it down let rec countLetters str = ma th tch str wi | WhiteSpace -> 0
6

O’Reilly Media, Inc. 4/2/2012
| Word x -> x.Length | Sentence words -> words |> Array.map countLetters |> Array.sum | Paragraph (_, sentences) -> sentences |> Array.map countLetters |> Array.sum
Using Active Patterns Active patterns can do more than just spice up the standard sort of pattern matches we have seen so far. You can combine, nest, and use active patterns outside of match expressions just like pattern-match rules.
Active patterns can be used in place of any pattern-matching element, which if you recall means that they can be used as part of let bindings or as parameters in lambda expressions too.
The following code snippet applies the active pattern ToUpper to the first parameter of function f.
> let (|ToUpper|) (input : string) = input.ToUpper();; val ( |ToUpper| ) : string -> string > let f ( ToUpper x ) = printfn "x = %s" x;; val f : string -> unit > f "this is lower case";; x = THIS IS LOWER CASE val it : unit = ()
Combining active patterns
Active patterns can also be combined much like regular pattern match rules using Or and And s. Example 7-9 shows how to combine multiple active patterns into the same pattern match rule using Or |.
Example 7-5. Combining active patterns with Or // Classify movies by genre. let (|Action|Drama|Comedy|Documentary|Horror|Romance|) movie = // ... // Checks if a movie won a specific award. let (|WonAward|_|) awardTitle movie = // ... // Determine if the film would make a good date movie. let goodDateMovie movie = match movie with // Matching cases of the multi-case active pattern | Romance | Comedy
7

O’Reilly Media, Inc. 4/2/2012
// Using the parameterized active pattern | WonAward "Best Picture" | WonAward "Best Adaptation" -> true | _ -> false
And & allows you to test against multiple active patterns simultaneously. Example 7-10 combines active patterns to determine if an image file is too large to send in an email. The example combines a multi-case active pattern that converts a file path into one of several size active pattern tags and a second, partial active pattern that will determine if a file path is an image file.
Example 7-6. Combining active patterns with And open System.IO let (|KBInSize|MBInSize|GBInSize|) filePath = let file = File.Open(filePath, FileMode.Open) if file.Length < 1024L * 1024L then KBInSize elif file.Length < 1024L * 1024L * 1024L then MBInSize else GBInSize let (|IsImageFile|_|) filePath = match filePath with | EndsWithExtension ".jpg" | EndsWithExtension ".bmp" | EndsWithExtension ".gif" -> Some() | _ -> None let ImageTooBigForEmail filePath = match filePath with | IsImageFile & (MBInSize | GBInSize) -> true | _ -> false
Nesting active patterns
With all the power that active patterns have for converting data within pattern matching, a problem you quickly run into is transforming data multiple times. However, binding the result of an active pattern and immediate pattern matching against the value leads to tedious and error-prone code.
Fortunately, just like pattern matching, you can nest active patterns. You can also use an active pattern in place of the result of an active pattern, which will then apply the result of the first active pattern to the second.
Example 7-11 defines a few simple active patterns for parsing XML elements. One is for converting an XML node into its child elements, another is for converting the value of an XML element’s attributes, and so on. By nesting active patterns within a single match statement, you can match against the full structure of an XML document within a single rule of a pattern match. This shows the full extent to which active patterns add power to pattern matching.
8

O’Reilly Media, Inc. 4/2/2012
Example 7-7. Nesting active patterns within a match expression // This example requires a reference to System.Xml.dll #r "System.Xml.dll" open System.Xml // Match an XML element let (|Elem|_|) name (inp : XmlNode) = if inp.Name = name then Some(inp) else None // Get the attributes of an element let (|Attributes|) (inp : XmlNode) = inp.Attributes // Match a specific attribute let (|Attr|) attrName (inp : XmlAttributeCollection) = match inp.GetNamedItem(attrName) with | null -> failwithf "Attribute %s not found" attrName | attr -> attr.Value // What we are actually parsing type Part = | Widget of float | Sprocket of string * int let ParseXmlNode element = match element with // Parse a Widget without nesting active patterns | Elem "Widget" xmlElement -> match xmlElement with | Attributes xmlElementsAttributes -> match xmlElementsAttributes with | Attr "Diameter" diameter -> Widget(float diameter) // Parse a Sprocket using nested active patterns | Elem "Sprocket" (Attributes (Attr "Model" model & Attr "SerialNumber" sn)) -> Sprocket(model, int sn) |_ -> failwith "Unknown element"
When executed through FSI, the previous Example 7-11 has the following output: > // Load the XML Document let xmlDoc = let doc = new System.Xml.XmlDocument() let xmlText = "<?xml version=\"1.0\" encoding=\"utf-8\"?> <Parts> <Widget Diameter='5.0' /> <Sprocket Model='A' SerialNumber='147' /> <Sprocket Model='B' SerialNumber='302' /> </Parts> " doc.LoadXml(xmlText) doc;; val xmlDoc : XmlDocument
9

O’Reilly Media, Inc. 4/2/2012
> // Parse each document node xmlDoc.DocumentElement.ChildNodes |> Seq.cast<XmlElement> |> Seq.map ParseXmlNode;; val it : seq<Part> = seq [Widget 5.0; Sprocket ("A",1024); Sprocket ("B",306)]
Using active patterns you can easily add a great deal of flexibility to your pattern matching. The best time to use an active pattern is whenever you find yourself writing a lot of similar when guards or when you would like to be more expressive in pattern matches. For instance, XML doesn’t lend itself naturally to pattern matching but with a few simple active patterns you can then use it as part of any pattern match.
Using Modules If you recall from Chapter 2, namespaces are a way to organize types. Modules behave much like namespaces, except that instead of only being able to contain types, modules can contain values as well.
While modules’ ability to contain values makes it easy to write simple applications, they are not well suited for being shared with other programmers and .NET languages. A well-designed class can stand on its own, and is simple and intuitive to use because all of its complex inner workings are hidden. With a module, you are given a loose collection of values, functions, and types, and it can be unclear how they all relate.
Identifying when and how to convert a module into a namespace and class is important for mastering functional programming in F#.
Converting Modules to Classes Simply put, code defined in modules doesn’t scale as well as typical object-oriented hierarchies. Ten modules with dozens of values and types is manageable, but hundreds of modules with thousands of values and types is not. Eliminating the loose values and just relying on classes is one way to help combat complexity.
The code in Example 7-12 creates a simple screen scraper, or a program that downloads the images at a particular URL. You can see how code like this can easily grow out of a long FSI session: typing some code in the FSI window until it works and then copying it to the code editor later. While the code works in the context of a single code file and an FSI session, it cannot easily be integrated into an existing project.
Example 7-8. Web scraper in a module open System.IO open System.Net open System.Text.RegularExpressions let url = @"http://oreilly.com/" // Download the webpage let req = WebRequest.Create(url) let resp = req.GetResponse() let stream = resp.GetResponseStream() let reader = new StreamReader(stream) let html = reader.ReadToEnd()
10

O’Reilly Media, Inc. 4/2/2012
// Extract all images let results = Regex.Matches(html, "<img src=\"([^\"]*)\"") let allMatches = [ for r in results do for grpIdx = 1 to r.Groups.Count - 1 do yield r.Groups.[grpIdx].Value ] let fullyQualified = allMatches |> List.filter (fun url -> url.StartsWith("http://")) // Download the images let downloadToDisk (url : string) (filePath : string) = use client = new System.Net.WebClient() client.DownloadFile (url, filePath) fullyQualified |> List.map(fun url -> let parts = url.Split( [| '/' |] ) url, parts.[parts.Length - 1]) |> List.iter(fun (url, filename) -> downloadToDisk url (@"D:\Images\" + filename))
The problem with example 7-12 is that it is an unorganized series of values. While the code makes perfect sense when executing a series of steps from top to bottom, the next programmer just sees module properties like results and allMatches, which are meaningless out of context.
The first step to convert this code is to abstract elements into a series of functions, removing the need for any purely local values. By indenting everything four spaces and adding a function declaration up top, the module’s contents could be placed inside of a function. Doing this allows us to break up the code into several pieces:
let downloadWebpage (url : string) = let req = WebRequest.Create(url) let resp = req.GetResponse() let stream = resp.GetResponseStream() let reader = new StreamReader(stream) reader.ReadToEnd() let extractImageLinks html = let results = Regex.Matches(html, "<img src=\"([^\"]*)\"") [ for r in results do for grpIdx = 1 to r.Groups.Count - 1 do yield r.Groups.[grpIdx].Value ] |> List.filter (fun url -> url.StartsWith("http://")) let downloadToDisk (url : string) (filePath : string) = use client = new System.Net.WebClient() client.DownloadFile (url, filePath) let scrapeWebsite destPath (imageUrls : string list) = imageUrls |> List.map(fun url -> let parts = url.Split( [| '/' |] ) url, parts.[parts.Length - 1])
11
O’Reilly Media, Inc. 4/2/2012
|> List.iter(fun (url, filename) -> downloadToDisk url (Path.Combine(destPath, filename)))
This refactoring would enable you to use the web scrapper in the following fashion: downloadWebpage "http://oreilly.com/" |> extractImageLinks |> scrapeWebsite @"C:\Images\"
But loose functions aren’t that useful for the same reasons as loose values aren’t useful. Namely, they don’t abstract or simplify anything. You still need to figure out how to get the functions to work together. So the next step would be to create classes that could then be used by other programmers. All you need to do then is replace the function value with a type declaration, and its parameters are simply parameters to the constructor.
In Example 7-13 all the loose functions are brought into the class, so that they are encapsulated. This leaves only a class with a constructor and a member SaveImagesToDisk.
Example 7-9. Web scraper converted to a class type WebScraper(url) = let downloadWebpage (url : string) = let req = WebRequest.Create(url) let resp = req.GetResponse() let stream = resp.GetResponseStream() let reader = new StreamReader(stream) reader.ReadToEnd() let extractImageLinks html = let results = Regex.Matches(html, "<img src=\"([^\"]*)\"") [ for r in results do for grpIdx = 1 to r.Groups.Count - 1 do yield r.Groups.[grpIdx].Value ] |> List.filter (fun url -> url.StartsWith("http://")) let downloadToDisk (url : string) (filePath : string) = use client = new System.Net.WebClient() client.DownloadFile (url, filePath) let scrapeWebsite destPath (imageUrls : string list) = imageUrls |> List.map(fun url -> let parts = url.Split( [| '/' |] ) url, parts.[parts.Length - 1]) |> List.iter(fun (url, filename) -> downloadToDisk url (Path.Combine(destPath, filename))) // Add class fields let m_html = downloadWebpage url let m_images = extractImageLinks m_html // Add class members member this.SaveImagesToDisk(destPath) = scrapeWebsite destPath m_images
12

O’Reilly Media, Inc. 4/2/2012
Modules serve a valuable purpose in F# code, especially in the development of simple programs. However mastering the conversion of modules to classes is important for sharing and reusing your F# code with other .NET languages.
Intentional Shadowing In F# the notion of a value is simply a name bound to some data. By declaring a new value with the same name you can shadow the previous value with that name.
let test() = let x = 'a' let x = "a string" let x = 3 // The function returns 3 x
In the same vein, opening a module dumps a series of new name/value pairs into the current environment, potentially shadowing existing identifiers. So if you have a value in scope named x, and you open a module that also contains a value named x, after the module is opened, x will refer to the module’s value. This will silently shadow the previous value x, leaving no way to access it.
While this has the potential for introducing subtle bugs, using modules to intentionally shadow values can be beneficial too. This is exactly the approach F# uses for checking for arithmetic overflow.
Consider the case of checked arithmetic, that is, arithmetic that throws an exception if there is an overflow. By default, F#’s mathematical operators do not support this, so when you overflow the bounds of an integer value, it just wraps around.
> let maxInt = System.Int32.MaxValue;; val maxInt : int > maxInt;; val it : int = 2147483647 > maxInt + 1;; val it : int = -2147483648
The Microsoft.FSharp.Core.Operators.Checked module defines common arithmetic operators such as +, -, and so on, that check for overflow conditions and throw the OverflowException. By opening the Checked module, you shadow all of the existing arithmetic functions and essentially replace them with new ones. Opening that module effectively redefines all those operators for you.
> let maxInt = System.Int32.MaxValue;; val maxInt : int > open Checked;; > maxInt + 1;; System.OverflowException: Arithmetic operation resulted in an overflow. at <StartupCode$FSI_0009>.$FSI_0009._main() stopped due to error
13
O’Reilly Media, Inc. 4/2/2012
The reason you only need to write open Checked instead of open Microsoft.FSharp.Core.Operators.Checked is because F# automatically opens the Microsoft.FSharp.Core.Operators namespace for you.
This ability to intentionally shadow values can be handy for customizing the behavior of code in a file, but you should be careful about making sure you have the right usage semantics for the modules you write.
Controlling Module Usage What if a library writer wants to ensure that people are only accessing module values through the module’s name? For example, opening the List module would bring a lot of simple functions like map and length into scope, but would be easy to confuse those functions with other common functions like Seq.map or Array.length.
open List open Seq // Confusion: Is this List.length or Seq.length? length [1 .. 10];;
To prevent a module from being opened in this way, you can simply add the [<RequireQualifiedAccess>] to the module, which bars them from being imported.
[<RequireQualifiedAccess>] module Foo let Value1 = 1 [<RequireQualifiedAccess>] module Bar = let Value2 = 2
When you try to open a module with the [<RequireQualifiedAccess>] attribute you will get an error. For example, in the F# library the List module requires qualified access.
> open List;; open List;; ^^^^^^^^^ stdin(10,1): error FS0191: This declaration opens the module 'Microsoft.FSharp.Collections.List', which is marked as 'RequireQualifiedAccess'. Adjust your code to use qualified references to the elements of the module instead, e.g. 'List.map' instead of 'map'. This will ensure that your code is robust as new constructs are added to libraries
However, some modules are especially useful and always having their values and types in scope would be good. In Chapter 6 you learned about extension methods, which allowed you to augment the members of a class. If you define a set of extension methods that are especially useful when used with a given namespace, you can mark the module to be
14
O’Reilly Media, Inc. 4/2/2012
automatically opened as soon as the parent namespace is opened with the [<AutoOpen>] attribute.
A good example of this in the F# libraries is the Linq.NullableOperators module. As soon as the Microsoft.FSharp.Linq namespace is opened, the NullableOperators module is automatically opened, importing custom operators like (?+) and (?>=?).
Example 7-14 defines a namespace that contains an auto-opened module. After opening the parent namespace with open Alpha.Bravo, you can access any values in the module Charlie without needing to fully qualify them, because module Charlie was opened implicitly.
Example 7-10. The AutoOpen attribute namespace Alpha.Bravo [<AutoOpen>] module Charlie = let X = 1
The first half of this chapter showed you how to take advantage of language elements in F# and syntax to enable you to write code in the functional style. The rest of the chapter will focus not on syntax, but theory. Specifically, how to take full advantage of the unique characteristics of functional programming.
Mastering Lists Whereas arrays and the List<_> type make up the backbone data structure for imperative programming, lists are the cornerstone of functional programming. Lists offer a guarantee of immutability, which helps support function composition and recursion, as well as freeing you from needing to allocate all the memory up front. (Such as fixed size array.)
Although lists are pervasive when programming in the functional style, I have not yet covered how to use them efficiently. Lists in F# have unique performance characteristics that you should be aware of or else you run the risk of unexpectedly poor performance.
F# lists are represented as a linked list, visualized in Figure 7-1. Every element of the list has a value as well as a reference to the next element in the list. (Except of course the last element of the list.)
Figure 7-1. Structure of an FSharpList type
15
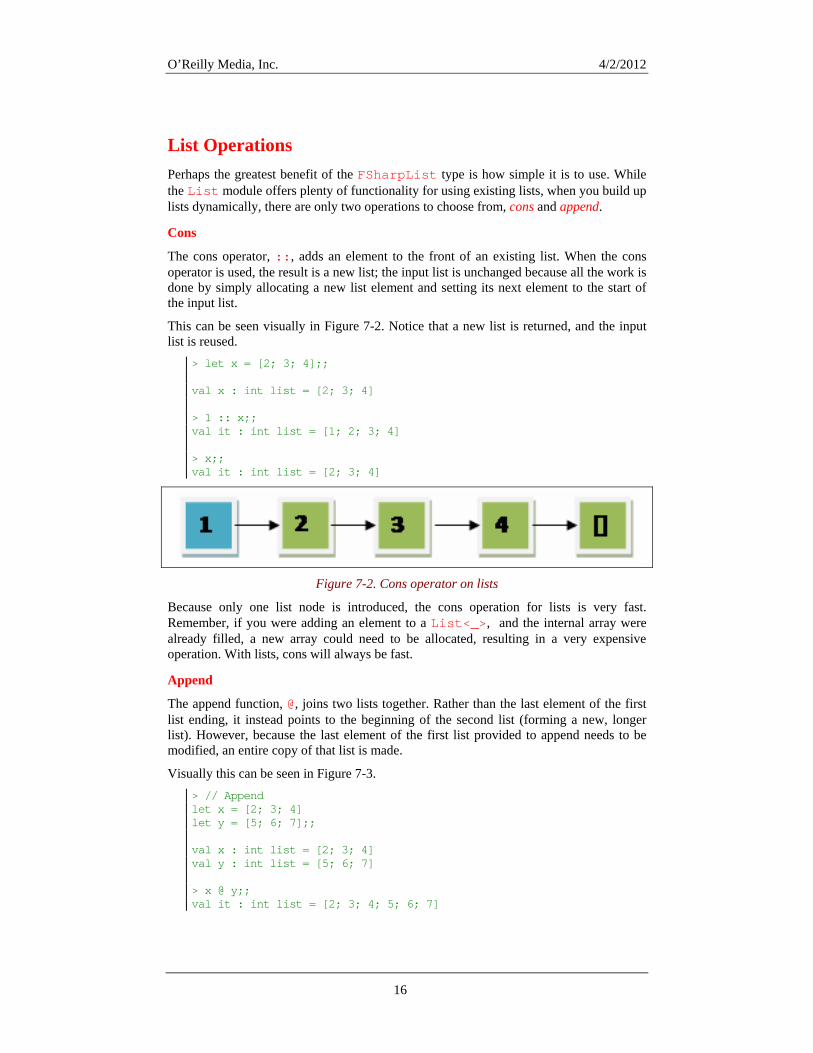
O’Reilly Media, Inc. 4/2/2012
List Operations Perhaps the greatest benefit of the FSharpList type is how simple it is to use. While the List module offers plenty of functionality for using existing lists, when you build up lists dynamically, there are only two operations to choose from, cons and append.
Cons
The cons operator, ::, adds an element to the front of an existing list. When the cons operator is used, the result is a new list; the input list is unchanged because all the work is done by simply allocating a new list element and setting its next element to the start of the input list.
This can be seen visually in Figure 7-2. Notice that a new list is returned, and the input list is reused.
> let x = [2; 3; 4];; val x : int list = [2; 3; 4] > 1 :: x;; val it : int list = [1; 2; 3; 4] > x;; val it : int list = [2; 3; 4]
Figure 7-2. Cons operator on lists
Because only one list node is introduced, the cons operation for lists is very fast. Remember, if you were adding an element to a List<_>, and the internal array were already filled, a new array could need to be allocated, resulting in a very expensive operation. With lists, cons will always be fast.
Append
The append function, @, joins two lists together. Rather than the last element of the first list ending, it instead points to the beginning of the second list (forming a new, longer list). However, because the last element of the first list provided to append needs to be modified, an entire copy of that list is made.
Visually this can be seen in Figure 7-3. > // Append let x = [2; 3; 4] let y = [5; 6; 7];; val x : int list = [2; 3; 4] val y : int list = [5; 6; 7] > x @ y;; val it : int list = [2; 3; 4; 5; 6; 7]
16

O’Reilly Media, Inc. 4/2/2012
Figure 7-3. Append operator on lists
Looking at Figures 7-2 and 7-3 it is easy to see that cons is a very fast operation because all you do is create a new element and you are done. Append on the other hand is potentially more expensive because you need to clone the first list, meaning that for very long lists, append takes a proportionally long time. (Copying the list not only takes twice as much time but also twice as much memory!)
Using Lists Once you know the performance characteristics of lists, you can then use them effectively. Cons should almost always be preferred over append, except in special circumstances.
Consider Example 7-15. Both functions defined remove consecutive duplicate elements in a list. The first implementation uses a fold, going from left to right. This makes producing the list costly, because append must be used in each iteration of the fold. (For those familiar with asymptotic time complexity, this is an O(n^2) operation.) Notice that the accumulator for fold is a tuple of the last letter and the new list with duplicate items removed.
The second implementation uses foldBack, which means this implementation can build up the list in order by using cons. This is precisely the reason for having two separate fold operations. For this particular problem, foldBack enables the use of cons, which is much more efficient than fold, which requires the use of append.
Example 7-11. Effective list manipulation (* Removes consecutive duplicate letters. e.g., [1; 1; 2; 2; 3; 4] => [1; 2; 3; 4] *) // Slow implementation... let removeConsecutiveDupes1 lst = let foldFunc acc item = let lastLetter, dupesRemoved = acc match lastLetter with | Some(c) when c = item -> Some(c), dupesRemoved | Some(c) -> Some(item), dupesRemoved @ [item] | None -> Some(item), [item]
17

O’Reilly Media, Inc. 4/2/2012
let (_, dupesRemoved) = List.fold foldFunc (None, []) lst dupesRemoved // Fast implementation... let removeConsecutiveDupes2 lst = let f item acc = match acc with | [] -> [item] | hd :: tl when hd <> item -> item :: acc | _ -> acc List.foldBack f lst []
When using lists, think of append as a “code smell” — it is usually indicative of a suboptimal solution.
Tail Recursion You can now use lists to process large amounts of data efficiently, but there is trouble looming. Because lists are immutable, the primary way they are built is with recursion. Consider the following two ways to construct two lists of integers.
> // Creating a List<_> of 100,000 integers open System.Collections.Generic let createMutableList() = let l = new List<int>() for i = 0 to 100000 do l.Add(i) l;; val createMutableList : unit -> List<int> > // Creating a list of 100,000 integers let createImmutableList() = let rec createList i max = if i = max then [] else i :: createList (i + 1) max createList 0 100000;; val createImmutableList : unit -> int list
Both solutions look identical, but the createImmutableList function won’t work. (In fact, it will crash.) I’ll explain the reason why the function is flawed as well as how to fix it by introducing tail recursion.
You may have heard of tail recursion before; in fact, you may have even written tail recursive functions before without even knowing it. Tail recursion is a special form of recursion, where the compiler can optimize the recursive call to not consume any additional stack space. When a function makes a recursive call, the rest of the calling
18
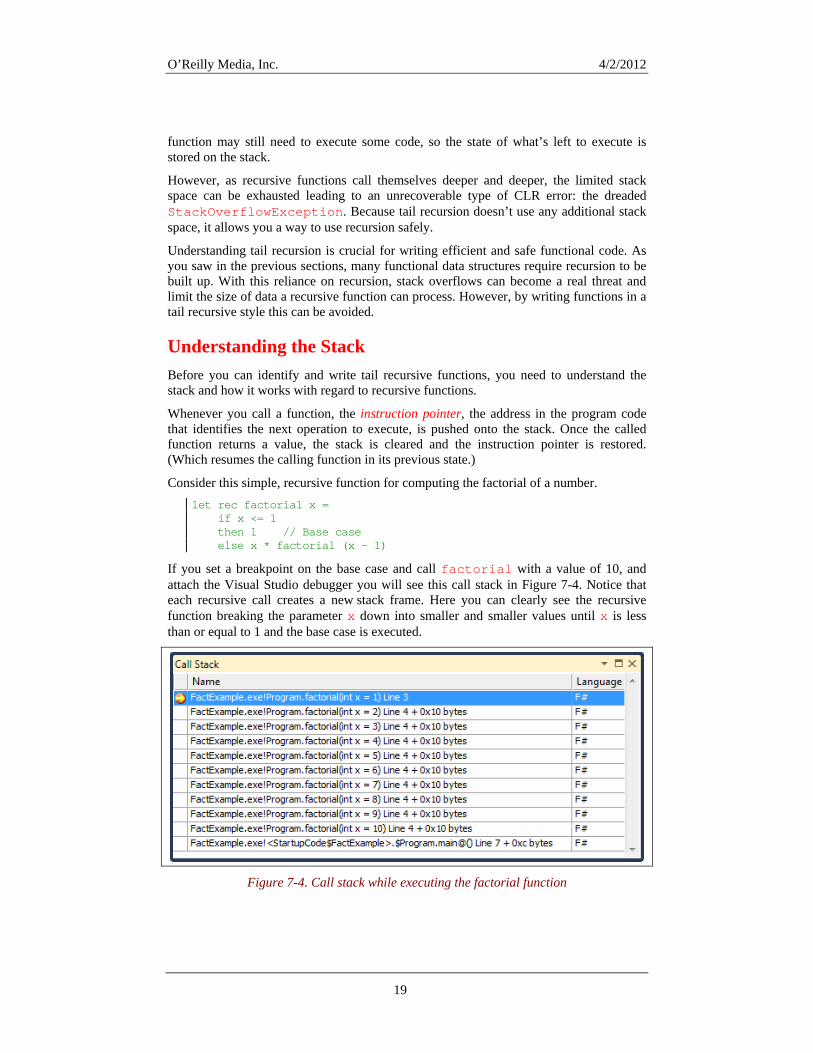
O’Reilly Media, Inc. 4/2/2012
function may still need to execute some code, so the state of what’s left to execute is stored on the stack.
However, as recursive functions call themselves deeper and deeper, the limited stack space can be exhausted leading to an unrecoverable type of CLR error: the dreaded StackOverflowException. Because tail recursion doesn’t use any additional stack space, it allows you a way to use recursion safely.
Understanding tail recursion is crucial for writing efficient and safe functional code. As you saw in the previous sections, many functional data structures require recursion to be built up. With this reliance on recursion, stack overflows can become a real threat and limit the size of data a recursive function can process. However, by writing functions in a tail recursive style this can be avoided.
Understanding the Stack Before you can identify and write tail recursive functions, you need to understand the stack and how it works with regard to recursive functions.
Whenever you call a function, the instruction pointer, the address in the program code that identifies the next operation to execute, is pushed onto the stack. Once the called function returns a value, the stack is cleared and the instruction pointer is restored. (Which resumes the calling function in its previous state.)
Consider this simple, recursive function for computing the factorial of a number. let rec factorial x = if x <= 1 then 1 // Base case else x * factorial (x - 1)
If you set a breakpoint on the base case and call factorial with a value of 10, and attach the Visual Studio debugger you will see this call stack in Figure 7-4. Notice that each recursive call creates a new stack frame. Here you can clearly see the recursive function breaking the parameter x down into smaller and smaller values until x is less than or equal to 1 and the base case is executed.
Figure 7-4. Call stack while executing the factorial function
19

O’Reilly Media, Inc. 4/2/2012
Once the base case executes, it will return the value 1. The stack will be restored to when factorial was called with 2 as its parameter, which will return 2 * 1. Then the stack will be restored to when factorial was called with 3 as its parameter, returning 3 * 2, and so on.
But remember that the stack is in a fixed block of memory, and generally limited to 1MB. So the factorial function will exhaust the stack for sufficiently large values. An easier demonstration of this is in the infLoop function in example 7-16. Notice how fsi.exe is launched from the command line and when the StackOverflow exception is thrown, the process terminates. That is because you cannot catch the StackOverflowException.
Example 7-12. Overflowing the stack with recursion C:\Program Files\Microsoft F#\v4.0>Fsi.exe Microsoft F# Interactive, (c) Microsoft Corporation, All Rights Reserved F# Version 1.9.7.2, compiling for .NET Framework Version v4.0.20620 Please send bug reports to [email protected] For help type #help;; > let rec infLoop() = 1 + infLoop();; val infLoop : unit -> int > // Go hunting for a StackOverflowException try printfn "%d" <| infLoop() with | _ -> printfn "Exception caught";; Process is terminated due to StackOverflowException. C:\Program Files\Microsoft F#\v4.0>
Figure 7-5 shows the same infLoop program but from within the Visual Studio debugger.
20

O’Reilly Media, Inc. 4/2/2012
Figure 7-5. The dreaded StackOverflow exception
Introducing Tail Recursion So how can you solve this problem of recursive calls consuming too much stack space? Tail recursion.
If there are no additional instructions to execute, then there is no need to store the instruction pointer on the stack, because the only thing left to do once the recursive call exits is restore the stack to the previous function. So rather than needlessly modifying the stack, tail calls (or recursive calls from a tail recursive function) drop the current stack frame before making the recursive call. And once the recursion eventually succeeds, the function will return to the original instruction pointer location.
The previous implementation of factorial was not tail recursive because after the recursive call to factorial (x-1) completed, the function needed to multiply that result by x, the original parameter. This is made clearer if you rewrite the function as follows:
let rec factorial x = if x <= 1 then 1
21

O’Reilly Media, Inc. 4/2/2012
else // Recurse let resultOfRecusion = factorial (x - 1) // Instruction Pointer needed to be stored // so that this instance of the function // can be resumed at a later time. let result = x * resultOfRecusion result
Example 7-17 is the tail-recursive version of factorial. By passing the data around as an extra parameter, you remove the need to execute code after the recursive function call, so no additional stack space is required. Instead, the result is built up to be returned in the base case rather than being unwound from all the recursive calls.
Example 7-13. Tail recursive version of factorial let factorial x = tor value (acc) // Keep track of both x and an accumula let rec tailRecursiveFactorial x acc = if x <= 1 then acc else tailRecursiveFactorial (x - 1) (acc * x) tailRecursiveFactorial x 1
When the F# compiler identifies a function as tail recursive, it generates the code differently. For example, the tailRecursiveFactorial function would be generated as the following C# code. Notice how the recursion is simply replaced with a while loop.
// tailRecursiveFactorial function as it would get compiled in C#. public static int tailRecursiveFactorial (int x, int acc) { while (true) { if (x <= 1) { return acc; } acc *= x; x--; } }
If you fire up the Visual Studio debugger and set a breakpoint on the base case of the tailRecursiveFactorial function, you see that only one stack frame has been used, as shown in Figure 7-6.
22

O’Reilly Media, Inc. 4/2/2012
Figure 7-6. The call stack when the function is tail recursive
To review the benefits of using tail recursion:
• The function executes slightly faster, because fewer stack pushes and pops are required.
• The function can recurse indefinitely.
• No StackOverflowException is thrown.
And to review, a function is considered tail recursive if and only if there is no work to be performed after a recursive call is executed. We will see more examples of this in the next section.
There is no indication from Visual Studio if a function will be compiled as tail recursive. When you write recursive functions in the functional style be careful to write them as tail recursive.
Tail-Recursive Patterns There are two main ways to ensure that a recursive function is tail recursive. The simplest applies to when you are whittling down the input while at the same time building up the answer. The second, and much more mind-bending approach, is used when you need to have two recursive calls and branch code flow.
Accumulator pattern
The simplest way to master tail recursion is to have your code follow certain patterns of usage. The easiest thing to do is to add additional parameters, just like in the previous example of tailRecursiveFactorial. This is known as the accumulator pattern. Rather than waiting for a recursive call to return, instead you pass an accumulator parameter to the recursive call so that the base case will return the final state of the accumulator. (The location of the stack pointer can be forgotten because no execution is left after the recursive call.)
23
O’Reilly Media, Inc. 4/2/2012
To illustrate the point, let’s write a naïve implementation of List.map, which transforms a list based on a provided function.
let rec map f list = match list with | [] -> [] | hd :: tl -> (f hd) :: (map f tl)
However, that code is not tail recursive because on the fourth line, the recursive call to map completes and then the cons operation completes. To combat this, you can use the accumulator pattern to simply store the completed result. In Example 7-18 a nested recursive function is defined that takes the mapped list as a parameter and returns it in the base case..
Example 7-14. The accumulator pattern let map f list = let rec mapTR f list acc = match list with | [] -> acc | hd :: tl -> mapTR f tl (f hd :: acc) mapTR f (List.rev list) []
For simple recursive functions the accumulator pattern is all you need. But what if there is some sort of branching? A function where in order for the function to return, you need to make two recursive calls? (So called binary recursion.) One recursive call at the very least won’t be in tail position. Consider Example 7-19, which is an implementation of a binary tree and an iter operation that applies a function to each node in the tree.
Example 7-15. Non tail recursive iter implementation type BinTree<'a> = | Node of 'a * BinTree<'a> * BinTree<'a> | Empty let rec iter f binTree = match binTree with | Empty -> () | Node(x, l, r) -> f x iter f l // NOT in tail position iter f r // In tail position
Because there are two recursive calls to make, there simply is no way to use the accumulator pattern. Is all hope lost? Is the dream of entirely tail-recursive code a myth? Fortunately no. But it will take some functional programming magic to achieve.
Continuations
Imagine rather than passing the current state of the accumulator so far as a parameter to the next function call, you instead passed a function value representing the rest of the code to execute. That is, rather than storing “what’s left” on the stack, you store it in a function. This is known as the continuation passing style or simply using a continuation.
Continuations are when you return a function value that represents the rest of the code to execute when the current recursive call completes. This allows you to write tail-recursive functions even though there is more work to be done. Conceptually, you are trading stack space (the recursive calls) with heap space (the function values).
24

O’Reilly Media, Inc. 4/2/2012
Consider Example 7-20, which prints a list of integers in reverse. The printing is done as part of the continuation, which grows larger with each recursive call. In the base case, the continuation is called. The function printListRevTR as well as the built continuation are both tail recursive, so no matter how much input was processed or how large the resulting continuation becomes, it will not overflow the stack.
Example 7-16. Building up a function value > // Print a list in revere using a continuation let printListRev list = let rec printListRevTR list cont = match list with // For an empy list, execute the continuation | [] -> cont() // For other lists, add printing the current // node as part of the continuation. | hd :: tl -> printListRevTR tl (fun () -> printf "%d " hd cont() ) printListRevTR list (fun () -> printfn "Done!");; val printListRev : int list -> unit > printListRev [1 .. 10];; 10 9 8 7 6 5 4 3 2 1 Done! val it : unit = ()
Admittedly the act of building up a function value is a little mind-bending. But this technique allows you to write functions that otherwise would be impossible to implement in a tail-recursive fashion.
Let’s revisit the binary tree iter operation. This operation needed to perform two recursive calls, and therefore the function cannot be tail recursive using the accumulator pattern. However, in order to write code that can perform operations on large trees, you need to convert the function to be tail recursive.
There are several ways to do this using continuations, but the simplest to understand is to use a custom iterator type. This is a pattern where rather than building up a single continuation to perform all the computation you need in tail recursive fashion, you linearrize what needs to happen through a custom data type.
Example 7-21 defines a custom iterator type ContinuationStep, which has two data tags Finished and Step, which is a tuple of a value and a function to produce the next ContinuationStep.
The function linearize uses a continuation to convert the binary tree into a ContinuationStep object. Each node is converted into a Step union tag in addition to breaking the recursive calls to the left and right sub-trees in lambdas. Finally, the processSteps function breaks apart the ContinuationStep object to actually perform the iter operation on the binary tree.
Example 7-17. Building a custom interator type ContinuationStep<'a> = | Finished | Step of 'a * (unit -> ContinuationStep<'a>)
25

O’Reilly Media, Inc. 4/2/2012
let iter f binTree = let rec linearize binTree cont = match binTree with | Empty -> cont() | Node(x, l, r) -> Step(x, (fun () -> linearize l (fun() -> linearize r cont))) let steps = linearize binTree (fun () -> Finished) let rec processSteps step = match step with | Finished -> () | Step(x, getNext) -> f x processSteps (getNext()) processSteps steps
While this example will take some time staring at to make sense, it is one way to break apart recursive functions and write tail recursive code.
Admittedly, such a complicated solution is likely not the best one. Perhaps using a mutable data structure to store nodes to visit, in the order to visit them, would make more sense. (For example, keeping a mutable Stack<_> of nodes.) But when programming in F# you have options to find the solution that works best for you.
Programming with Functions Although tail recursion and modules allow you to get more out of the functional style of programming, there is still more you can learn about functions as values. Next we will look at function currying and closures. While they may not be the most important aspect of functional programming, having a good understanding of their capabilities will make it easier for you to write code in the purely functional style.
Partial Function Application Recall that partial function application is the ability to specify a subset of a function’s parameters and return new functions taking fewer parameters. On the surface this seems like a strange feature to add. What does only providing a subset of a function’s parameters actually buy you? The most visible benefit of partial function application is the pipe forward operator, which makes data transformation much more elegant.
getCustomers() |> List.filter (fun cust -> datesEqual cust.Birthday DateTime.Today) |> List.map (fun cust -> cust.EmailAddress) |> List.filter Option.isSome |> sendSpam "Happy Birthday... Now buy our product!"
Each line of the previous expression is a curried function whose last parameter is provided by the previous line of code. Writing code in this style enables you to write code exactly the way you conceptualize it in your head. But partial function application has another way of cleaning up your code as well.
26

O’Reilly Media, Inc. 4/2/2012
Passing functions as parameters
Using function currying can potentially eliminate the need for many lambda expressions. Consider the following code, which maps the function f to all the elements of a list.
List.map (fun x -> f x) lst
Note that the lambda’s parameter x is passed as the last parameter to the function f. Whenever you see code like this, you can remove the lambda altogether, because f can be passed as a parameter to the function List.map. (Which is the way you see most functions passed to List.map.)
List.map f lst
In much the same vein you can simplify functions even if they accept more than one parameter. In the following example, g takes four parameters a, b, c, and x. However, because the lambda only takes one parameter, x, you can just pass the partially applied function value as a parameter.
List.map (fun x -> g a b c x) lst
Again, the code can be simplified again by just currying the function. List.map (g a b c) lst
Although passing functions as parameters can be elegant, it can also obfuscate code. Remember that one day someone else will be debugging your programs so always take care to ensure that they are readable.
Eliminating Redundant Code A common need in refactoring is to eliminate redundancy through reuse, typically through inheritance in object-oriented code. However, you can also eliminate redundant code in the functional style using higher-order functions.
Consider these two functions to aid you in picking what to get for dinner. pickCheapest returns the cheapest entrée from the list, while pickHealthiest returns the item with the fewest calories. Remember that reduce behaves just like fold except that the initial value of the accumulator is the first element of the list.
[<Measure>] type usd type Entree = { Name : string; Price : float<usd>; Calories : int } // Picks the cheapest item on the menu let pickCheapest menuItems = List.reduce (fun acc item -> if item.Price < acc.Price then item else acc) menuItems let pickHealthiest menuItems = List.reduce (fun acc item -> if item.Calories < acc.Calories
27

O’Reilly Media, Inc. 4/2/2012
then item else acc) menuItems
Both of these functions are nearly identical and just differ in how they compare the given element. Why not factor that out? If you define the compare function as a parameter, you can swap out implementations much more easily and potentially result in more readable code. Note that the functions pickCheapest2 and pickHealthiest2 rely on their partially applied call to pickItem.
let private pickItem cmp menuItems = let reduceFunc acc item = match cmp acc item with | true -> acc | false -> item List.reduce reduceFunc menuItems let pickCheapest2 = pickItem (fun acc item -> item.Price < acc.Price) let pickHealthiest2 = pickItem (fun acc item -> item.Calories < acc.Calories)
Closures Closures is the term used to describe an inner or nested function being able to access values not explicitly passed in as parameters to that function. Like currying, this too may seem like some strange concept that isn’t particularly applicable, but you have actually been using closures constantly throughout the book without even knowing it.
A simple example of a closure would be the following function mult, which multiplies every element in a list by a given number. Notice that i is a parameter to the first function, but not a parameter to the lambda expression. So you might be wondering, how can i be used inside that lambda if it isn’t explicitly passed in as a parameter? That’s the beauty of closures. Because value i is in scope, it is captured by the closure of the lambda, and therefore accessible. Behind the scenes the compiler actually links the value i to the lambda so that at runtime the value is accessible, but this is all done for you.
> let mult i lst = List.map (fun x -> x * i) lst;; val mult : int -> int list -> int list > mult 10 [1; 3; 5; 7];; val it : int list = [10; 30; 50; 70]
In essence, with closures a function may capture some additional data with it, which enables the function to know about values in the scope where the function was declared. With this we can achieve some interesting results.
Imagine creating an abstract data type, like a class, without any explicit fields to store the type’s state. It doesn’t sound like it is possible – because in order for the type to have some meaning, it must store its internal data somewhere. But with closures that isn’t the case.
Consider Example 7-22, which defines a record type Set where its two fields are functions, one to add items to the Set, and another to check if an item exists in the set. To create an instance of Set, simply access the static property Empty. Once you have an instance of Set, adding and removing items works entirely by capturing the data in
28

O’Reilly Media, Inc. 4/2/2012
closures. The function makeSet is passed in a list – which are the items contained in the set. When new items are added to the list, a recursive call to makeSet is returned, capturing the original set’s item list and the new item to be added in the closure of the updated Add function.
Example 7-18. Data encapsulation via closures // Data type for a set. Notice the implementation is // stored in record fields... type Set = { // Add an item to the set Add : int -> Set // Checks if an element exists in the set Exists : int -> bool } // Returns an empty set static member Empty = let rec makeSet lst = { Add = (fun item -> makeSet (item :: lst)) Exists = (fun item -> List.exists ((=) item) lst) } makeSet []
You can see the Set type in action in the following FSI session:
> // Set in action let s = Set.Empty let s' = s.Add(1) let s'' = s'.Add(2) let s''' = s''.Add(3);; val s : Set val s' : Set val s'' : Set val s''' : Set > s.Exists 2;; val it : bool = false > s'''.Exists 2;; val it : bool = true
Just like writing super-complicated continuations, there are likely better ways to write types than by storing internal data entirely in closures. However, understanding that functions can contain more than just their parameters opens up new possibilities.
Functional Patterns Now that we have covered some advanced concepts in the functional style of programming, let’s examine some common design patterns they enable. Describing solutions to problems in terms of design patterns makes it easier to explain and reuse such solutions.
29
O’Reilly Media, Inc. 4/2/2012
Memoization When you write in the functional style, most of the functions you write will be pure, meaning that for the same input they will always produce the same output. However, if you call the same pure function many times, it can be a waste of resources to recompute known values. Instead, it would be more efficient to store those values in a Dictionary<_,_> type that maps input values to function results.
The process of storing known input/result pairs of a function is known as memoization, and can be done automatically by taking advantage of higher-order functions and closures in F#.
Example 7-23 defines a memoize function, which takes a function as a parameter and returns a memoized version of that function as its result. The memoized version stores a dictionary of previous results in its closure, and only calls the provided function when necessary.
Example 7-19. Memoizing pure functions open System.Collections.Generic let memoize (f : 'a -> 'b) = let dict = new Dictionary<'a, 'b>() let memoizedFunc (input : 'a) = match dict.TryGetValue(input) with | true, x -> x | false, _ -> // Evaluate and add to lookup table let answer = f input dict.Add(input, answer) answer // Return our memoized version of f dict is captured in the closure memoizedFunc
The following FSI session shows the memoize function in action. The function f simply waits a given number of seconds, and calling the function twice with the same input will cause it to wait twice. Calling the memoized version will simply look up the cached value the second time, so the function doesn’t need to actually be evaluated.
> // Some long running function... let f x = // Sleep for x seconds System.Threading.Thread.Sleep(x * 1000) // Return x x;; val f : int -> int > // Benchmark #time;; --> Timing now on > f 10;; Real: 00:00:10.007, CPU: 00:00:00.000, GC gen0: 0, gen1: 0, gen2: 0
30

O’Reilly Media, Inc. 4/2/2012
val it : int = 10 > f 10;; Real: 00:00:10.008, CPU: 00:00:00.000, GC gen0: 0, gen1: 0, gen2: 0 val it : int = 10 > let memoizedF = memoize f;; Real: 00:00:00.004, CPU: 00:00:00.000, GC gen0: 0, gen1: 0, gen2: 0 val memoizedF : (int -> int) > memoizedF 10;; Real: 00:00:10.009, CPU: 00:00:00.000, GC gen0: 0, gen1: 0, gen2: 0 val it : int = 10 > memoizedF 10;; Real: 00:00:00.000, CPU: 00:00:00.000, GC gen0: 0, gen1: 0, gen2: 0 val it : int = 10
Memoizing recursive functions
Memoizing recursive functions can be a bit more tricky. In Example 7-23, the function memoize took a function f and returned a new function that checked if the value of f has already been computed for a given input. However, what if in its evaluation f calls itself? Unfortunately, it will call the non-memoized version – which eliminates any benefits of memoization. Memoization will only occur for the first input value to the function, it will not check for memoized values for any recursive calls.
The correct thing to do is have any recursive calls to the function be through the memoized version. If you think about it, this shouldn’t work, because the memoized function needs to be called before the memoized function is even finish being defined! Fortunately, the F# compiler does the extra work to make it happen, albeit with a warning.
Example 7-24 shows an FSI session illustrating both the correct and incorrect way of memoizing the fib function. Notice how the function fib in the definition of memFib2 calls memFib2 (the memoized function) instead of recursively calling itself.
Example 7-20. Memoization of recursive functions > // WRONG way to memoize the function - fib doesn't call the // memoized version recursively. let wrongMemFib = let rec fib x = match x with | 0 | 1 -> 1 | 2 -> 2 | n -> fib (n - 1) + fib (n - 2) memoize fib;; val wrongMemFib : (int -> int) > // CORRECT way to memoize the function - fib does call // the memoized version recursively. let rec rightMemFib = let fib x = match x with | 0 | 1 -> 1 | 2 -> 2 | n -> rightMemFib (n - 1) + rightMemFib (n - 2)
31

O’Reilly Media, Inc. 4/2/2012
memoize fib;; val rightMemFib : (int -> int) > #time;; --> Timing now on > wrongMemFib 45;; Real: 00:00:21.553, CPU: 00:00:21.528, GC gen0: 0, gen1: 0, gen2: 0 val it : int = 1836311903 > righ tMemFib 45;;Real: 00:00:00.001, CPU: 00:00:00.000, GC gen0: 0, gen1: 0, gen2: 0 val it : int = 1836311903
Mutable Function Values Function values provide a simple way to pass around the implementation of a function. However, a function value can also be mutable, allowing you to easily swap out the implementation of a function. Much in the same way a mutable integer allows you to update its value, a mutable function can be updated as well.
Example 7-25 shows how you can change out the implementation of the generateWidget function on the fly. This allows customization of implementation without resorting to heavyweight solutions like polymorphism and inheritance.
In the example, the generateWidget function is initialized to generate Sprockets. However, once the generateWidget function is updated, subsequent calls will generate Cogs.
Example 7-21. Using mutable function values > // Code to produce Widgets, the backbone of all .NET applications type Widget = | Sprocket of string * int | Cog of string * float let mutable generateWidget = let count = ref 0 (fun () -> incr count Sprocket("Model A1", !count));; type Widget = | Sprocket of string * int | Cog of string * float val mutable generateWidget : (unit -> Widget) > // Produce a Widget generateWidget();; val it : Widget = Sprocket ("Model A1",1) > // ... and another generateWidget();; val it : Widget = Sprocket ("Model A1",2) > // Now update the function... generateWidget <- let count = ref 0
32
O’Reilly Media, Inc. 4/2/2012
(fun () -> incr count Cog( (sprintf "Version 0x%x" !count), 0.0));; val it : unit = () > // Produce another Widget - with the updated function generateWidget();; val it : Widget = Cog ("Version 0x1",0.0) > generateWidget();; val it : Widget = Cog ("Version 0x2",0.0)
To be clear, calling a function when you aren’t 100% sure what it does can lead to heinous bugs. But being able to change the implementation of a function can be very helpful in certain situations.
Lazy Programming Lazy programming was brought up briefly in Chapter 3, but it is a style in and of itself. In short, lazy programming means only computing values when needed – as opposed to eagerly, which is as soon as they are declared.
Lazy programming can have a few distinct advantages if used correctly.
Reducing memory usage
Earlier we looked at continuations as a way of making operations on a binary tree tail recursive. But even if you didn’t need to worry about overflowing the stack, for very large trees, those operations can take a long time to compute. What if you wanted to map a function to every node in a tree with a million elements? Moreover, what if you only needed to access a small subset of the resulting nodes? If you lazily evaluated the map operation, you only compute the values you need.
Example 7-26 defines a binary tree where the nodes are evaluated lazily. So in the implementation of map, the function f is only applied to the child nodes once their evaluation has been forced. (By accessing the Value property
Defining the map operation in this way, the input tree isn’t duplicated. Instead, new nodes are only created as they are accessed. So for very large trees that are minimally inspected, using lazy programming can lead to a dramatic savings in memory usage.
Example 7-22. Lazy type type LazyBinTree<'a> = | Node of 'a * LazyBinTree<'a> Lazy * LazyBinTree<'a> Lazy | Empty let rec map f tree = match tree with | Empty -> Empty | Node(x, l, r) -> Node( f x, lazy( let lfNode = l.Value map f lfNode ), lazy( let rtNode = r.Value map f rtNode
33

O’Reilly Media, Inc. 4/2/2012
) )
Abstracting data access
Another example of lazy programming is abstracting data access. Example 7-27 loads an entire directory full of comma separated value (CSV) files and returns the data as a single sequence of string arrays. However the files aren’t actually opened and accessed until necessary, so while on the surface the result of processFile looks to be a constant sequence of data, it is in fact opening and closing separate files behind the scenes. With Seq.map and Seq.concat the file provided to processFile isn’t opened until the actual sequence elements are required. Or put another way, the sequences are produced lazily.
Example 7-23. Lazy programming for processing CSV files open System open System.IO let processFile (filePath : string) = seq { use fileReader = new StreamReader(filePath) // Skip header row fileReader.ReadLine() |> ignore while not fileReader.EndOfStream do let line = fileReader.ReadLine() yield line.Split( [| ',' |] ) } let rootPath = @"D:\DataFiles\" let csvFiles = Directory.GetFiles(rootPath, "*.csv") let allCsvData = csvFiles |> Seq.map processFile |> Seq.concat
Functional Data Structures In chapter 4 we looked at a few data structures that had efficient access for data such as the HashSet<T> and Dictionary<K,V> types. However, those types don’t lend themselves well to functional programming.
For example, consider passing a dictionary as a parameter to a function. If that function modifies that dictionary in any way, then the calling function’s expectations of that dictionary might have been violated.
This leads to the question, are there data structures designed specifically functional use? As it turns out, yes.
34

O’Reilly Media, Inc. 4/2/2012
Functional Set In the F# libraries are the Set<_> and Map<_,_> types which behave much like the HashSet<_> and Dictionary<_,_>, except that they are immutable. So when you add a new element to the collection by using the Add method, rather than returning unit, and updating the internal data structure, a new instance of the Set<_> or Map<_,_> is returned instead.
Example 7–24 uses the Set<_> type to get the list of unique words from a given web page, which in the example is the text of the book Frankenstein by Mary Shelley.
Notice how the Set<_> type is built up using the Array.fold method. In order to fill a functional collection type you must use some form of recursion. Also, just like how the List and Seq modules provide a series of functions for working with types of the same name, there is a Set module containing methods like Set.add and Set.count.
Example 7–24. Using the Set type > // The functional Set type open System open System.IO open System.Net let getHtml (url : string) = let req = WebRequest.Create(url) let rsp = req.GetResponse() use stream = rsp.GetResponseStream() use reader = new StreamReader(stream) reader.ReadToEnd() let uniqueWords (text : string) = let words = text.Split([| ' ' |], StringSplitOptions.RemoveEmptyEntries) let uniqueWords = Array.fold : Set<string>) (word : string) -> Set.add word acc) (fun (acc Set.empty words uniqueWords;; val getHtml : string -> string val uniqueWords : string -> Set<string> > let urlToShelley'sFrankenstein = "http://www.gutenberg.org/files/84/84.txt";; val urlToShelley'sFrankenstein : string = "http://www.gutenberg.org/files/84/84.txt" > // Produce the Set of unique words let wordsInBook = urlToShelley'sFrankenstein |> getHtml |> uniqueWords;; val wordsInBook : Set<string> = ...
35

O’Reilly Media, Inc. 4/2/2012
> Set.count wordsInBook;; val it : int = 16406
Functional Map Example 7–25 uses the Map<_,_> type to associate each word with the number of times it is used in the book. Then, the Map<_,_> is converted to a sequence of key-value tuples, sorted, and the top 20 most frequently occurring words are printed to the screen.
Just like how the Set<_> was built up in the previous example, the Map<_,_> is also produced during a fold operation.
Example 7–25. Using the Map type > // The functional Map type let wordUsage (text : string) = let words = text.Split([| ' ' |], StringSplitOptions.RemoveEmptyEntries) let wordFrequency = Array.fold (fun (a Map<string, int>) (word : string) -> cc : if Map.containsKey word acc then let timesUsed = acc.[word] Map.add word (timesUsed + 1) acc else Map.add word 1 acc) Map.empty words wordFrequency let printMostFrequentWords (wordFrequency : Map<string, int>) = let top20Words = wordFrequency |> Map.toSeq |> Seq.sortBy (fun (word, timesUsed) -> -timesUsed) |> Seq.take 20 printfn "Top Word Usage:" top20Words |> Seq.iteri(fun idx (word, timesUsed) -> printfn "%d\t '%s' was used %d times" idx word timesUsed);; val wordUsage : string -> Map<string,int> val printMostFrequentWords : Map<string,int> -> unit > // Print the most frequent words urlToShelley'sFrankenstein |> getHtml |> wordUsage |> printMostFrequentWords ;; Top Word Usage: 0 'the' was used 3408 times 1 'and' was used 2569 times 2 'of' was used 2405 times 3 'I' was used 2333 times 4 'to' was used 1900 times
36

O’Reilly Media, Inc. 4/2/2012
37
5 'my' was used 1389 times 6 'a' was used 1212 times 7 'in' was used 980 times 8 'that' was used 876 times 9 'was' was used 874 times 10 'with' was used 573 times 11 'had' was used 571 times 12 'but' was used 480 times 13 'me' was used 478 times 14 'which' was used 465 times 15 'as' was used 437 times 16 'not' was used 432 times 17 'his' was used 413 times 18 'by' was used 411 times 19 'you' was used 404 times val it : unit = ()
For more information on functional data structures and how to implement them, see Purely Functional Data Structures by Chris Okasaki (Cambridge University Press).

O’Reilly Media, Inc. 4/2/2012
8 Applied Object-Oriented
Programming
This chapter could also be called “being functional in an object-oriented world.” By now you’ve mastered the F# syntax and style, but there is still plenty to be said about using F# in the object-oriented landscape of the .NET platform.
In this chapter you will learn how to create F# types that integrate better with other object-oriented languages like C# when consumed. For example, with operator overloading you can allow your types to be used with symbolic code. Also, events enable your classes to allow consumers to receive notifications when certain actions occur. This not only enables you to be more expressive in your F# code, but also reduce the friction with non-F# developers when sharing your code.
Operators Using a symbolic notation for manipulating objects can simplify your code by eliminating the need to call methods like Add and Remove, and instead use more intuitive counterparts like + and -. Also, if an object represents a collection of data, being able to index directly into it with the .[ ] or .[expr .. expr] notation can make it much easier to access the data an object holds.
Operator Overloading Operator overloading is a term used for adding new meaning to an existing operator, like + or -. Instead of only working on primitive types, you can overload those operators to accept custom types you create. Operator overloading in F# can be done by simply adding a static method to a type. After that, you can use the operator as if it natively supported the type. The F# compiler will simply translate the code into a call to your static method.
1
O’Reilly Media, Inc. 4/2/2012
Besure to use an operator that makes sense. For example, overloading + for a custom type shouldn’t subtract values or remove items from a collection.
When you overload an operator, the operator’s name must be in parentheses. For example (+) to overload the plus operator. To overload a unary operator, simply prefix the operator with a tilde ~.
Example 8–1 overloads the + and – operators to represent operators on a bottle. Note the ~- operator allows for unary negation.
Example 8–1. Operator overloading [<Measure>] type ml type Bottle(capacity : float<ml>) = new() = new Bottle(0.0<ml>) member this.Volume = capacity static member (+) ((lhs : Bottle), rhs) = new Bottle(lhs.Volume + rhs) static member (-) ((lhs : Bottle), rhs) = new Bottle(lhs.Volume - rhs) static member (~-) (rhs : Bottle) = new Bottle(rhs.Volume * -1.0<1>) override this.ToString() = sprintf "Bottle(%.1fml)" (float capacity)
Once the proper operators have been added, then you can intuitively use the class using the standard symbolic operators you would expect. (Well, a bottle really can’t have a negative volume but you get the idea.)
> let half = new Bottle(500.0<ml>);; val half : Bottle = Bottle(500.0ml) > half + 500.0<ml>;; val it : Bottle = Bottle(1000.0ml) {Volume = 1000.0;} > half - 500.0<ml>;; val it : Bottle = Bottle(0.0ml) {Volume = 0.0;} > -half;; val it : Bottle = Bottle(-500.0ml) {Volume = -500.0;}
You can also add overloaded operators to discriminated unions and record types the same way they are added to class types.
type Person = | Boy of string | Girl of string | Couple of Person * Person static member (+) (lhs, rhs) = match lhs, rhs with
2
O’Reilly Media, Inc. 4/2/2012
| Couple(_), _ | _, Couple(_) -> failwith "Three's a crowd!" | _ -> Couple(lhs, rhs)
Using the + operator we can now take two Person objects and convert them into a Couple union case.
Boy("Dick") + Girl("Jane");; val it : Person = Couple (Boy "Dick",Girl "Jane")
F# allows you to define arbitrary symbolic operators for types; however, only a subset of these can be used natively with C# and VB.NET. Only the following operators are recognized by those languages:
Binary operators: +, -, *, /, %, &, |, <<, >> +=, -=, *=, /=, %=
Unary operators: ~+, ~-, ~!, ~++, ~--
Otherwise the method will be exposed as a friendly name describing the symbols used. For example, overloading operator +-+ will be exposed as a static method named op_PlusMinusPlus.
Note that this list does not contain >, <, =, !=, and so on. To properly define relational and equality operators for your type see the section on Equality later in this chapter.
Indexers For types that are a collection of values, an indexer is a natural way to extend the metaphor by enabling developers to index directly into the object. For example, you can get an arbitrary element of an array by using the .[ ] operator.
In F# you can add an indexer by simply adding a property named Item. This property will be evaluated whenever you call the .[ ] method on the class.
Example 8–2 creates a class Year and adds an indexer to allow you to look up the nth day of the year.
Example 8–2. Adding an indexer to a class open System type Year(year : int) = member this.Item (idx : int) = if idx < 1 || idx > 365 then failwith "Invalid day range" let dateStr = sprintf "1-1-%d" year DateTime.Parse(dateStr).AddDays(float (idx - 1))
3

O’Reilly Media, Inc. 4/2/2012
The following FSI session shows using the indexer for type Year:
> // Using a custom indexer let eightyTwo = new Year 982(1 ) let specialDay = eightyTwo.[171];; val eightyTwo : Year val specialDay : DateTime = 6/20/1982 12:00:00 AM > specialDay.Month, specialDay.Day, specialDay.DayOfWeek;; val it : int * int * DayOfWeek = (6, 20, Sunday)
But what if you want to not only read values from an indexer, but write them back as well? Also, what if you wanted the indexer to accept a non-integer parameter? The F# language can accommodate both of those requests.
Example 8–3 defines an indexer for a type that accepts a non-integer parameter. In a different take on the Year class example, the indexer takes a month and date tuple.
Example 8–3. Non integer indexer type Year2(year : int) = member this.Item (month : string, day : int) = let monthIdx = match month.ToUpper() with | "JANUARY" -> 1 | "FEBRUARY" -> 2 | "MARCH" -> 3 | "APRIL" -> 4 | "MAY" -> 5 | "JUNE" -> 6 | "JULY" -> 7 | "AUGUST" -> 8 | "SEPTEMBER" -> 9 | "OCTOBER" -> 10 | "NOVEMBER" -> 11 | "DECEMBER" -> 12 | _ -> failwithf "Invalid month [%s]" month let dateStr = sprintf "1-1-%d" year DateTime.Parse(dateStr).AddMonths(monthIdx - 1).AddDays(float (day - 1))
Year2 uses a more intuitive indexer that makes the type easier to use.
> // Using a non-integer index let O'seven = new Year2(2007) let randomDay = O'seven.["April", 7];; val O'seven : Year2 val randomDay : DateTime = 4/7/2007 12:00:00 AM > randomDay.Month, randomDay.Day, randomDay.DayOfWeek;; val it : int * int * DayOfWeek = (4, 7, Saturday)
The read-only indexers you’ve seen so far aren’t ideal for every situation. What if you wanted to provide a read/write indexer to not only access elements but to also update their values? To make a read/write indexer, simply add an explicit getter and setter to the Item property.
Example 8–4 defines a type WordBuilder that allows you to access and update letters of a word at a given index.
Example 8–4. Read/write indexer open System.Collections.Generic type WordBuilder(startingLetters : string) =
4

O’Reilly Media, Inc. 4/2/2012
let m_letters = new List<char>(startingLetters) member this.Item with get idx = m_letters.[idx] and set idx c = m_letters.[idx] <- c member this.Word = new string (m_letters.ToArray())
The syntax for writing a new value using the indexer is the same as updating a value in an array.
> let wb = new WordBuilder("Jurassic Park");; val wb : WordBuilder > wb.Word;; val it : string = "Jurassic Park" > wb.[10];; val it : char = 'a' > wb.[10] <- 'o';; val it : unit = () > wb.Word;; val it : string = "Jurassic Pork"
Adding Slices Similar to indexers, slices allow you to index into a type that represents a collection of data. The main difference is that where an indexer returns a single element, a slice produces a new collection of data. Slices work by providing syntax support for providing an optional lower bound and an optional upper bound for an indexer.
To add a one-dimensional slice, add a method named GetSlice that takes two option types as parameters. Example 8–5 defines a slice for a type called TextBlock where the slice returns a range of words in the body of the text.
Example 8–5. Providing a slice to a class type TextBlock(text : string) = let words = text.Split([| ' ' |]) member this.AverageWordLength = words |> Array.map float |> Array.average member this.GetSlice(lowerBound : int option, upperBound : int option) = let words = match lowerBound, upperBound with // Specify both upper and lower bounds | Some(lb), Some(ub) -> words.[lb..ub] // Just one bound specified | Some(lb), None -> words.[lb..] | None, Some(ub) -> words.[..ub] // No lower or upper bounds | None, None -> words.[*] words
Using our TextBlock class we can see:
> // Using a custom slice operator
5

O’Reilly Media, Inc. 4/2/2012
let text = "The quick brown fox jumped over the lazy dog" let tb = new TextBlock(text);; val text : string = "The quick brown fox jumped over the lazy dog" val tb : TextBlock > tb.[..5];; val it : s ing [] = [|"The"; "quick"; "brown"; "fox"; "jumped"; "over"|] tr> tb.[4..7];; val it : string [] = [|"jumped"; "over"; "the"; "lazy"|]
If you need a more refined way to slice your data you can provide a two-dimension slicer. This allows you to specify two ranges of data. To define a two-dimensional slice, simply add a method called GetSlice again, except that the method should now take four option-type parameters. In order, they are: first dimension lower bound, first dimension upper bound, second dimension lower bound, and second dimension upper bound.
Example 8–6 defines a class that encapsulates a sequence of data points. The type provides a 2D slice that returns only those points within the given range.
Example 8–6. Defining a two-dimensional slice open System type DataPoints(points : seq<float * float>) = member this.GetSlice(xlb, xub, ylb, yub) = let getValue optType defaultValue = match optType with | Some(x) -> x | None -> defaultValue let minX = getValue xlb Double.MinValue let maxX = getValue xub Double.MaxValue let minY = getValue ylb Double.MinValue let maxY = getValue yub Double.MaxValue // Return if a given tuple representing a point is within range let inRange (x, y) = (minX < x && x < maxX && minY < y && y < maxY) Seq.filter inRange points
The following FSI session shows the 2D slice in action. The slice allows you to only get data points that fall within a specific range, allowing you to isolate certain sections for further analysis.
> // Define 1,000 random points with value between 0.0 to 1.0 let points = seq { let rng = new Random() for i = 0 to 1000 do let x = rng.NextDouble() let y = rng.NextDouble() yield (x, y) };;
6

O’Reilly Media, Inc. 4/2/2012
val points : seq<float * float> > points;; val it : seq<float * float> = seq [(0.6313018304, 0.8639167859); (0.3367836328, 0.8642307673); (0.7682324386, 0.1454097885); (0.6862907925, 0.8801649925); ...] > let d = new DataPoints(points);; val d : DataPoints > // Get all values where the x and y values are greater than 0.5. d.[0.5.., 0.5..];; val it : seq<float * float> = seq [(0.7774719744, 0.8764193784); (0.927527673, 0.6275711235); (0.5618227448, 0.5956258004); (0.9415076491, 0.8703156262); ...] > // Get all values where the x-value is between 0.90 and 0.99, // with no restriction on the y-value. d.[0.90 .. 0.99, *];; val it : seq<float * float> = seq [(0.9286256581, 0.08974070246); (0.9780231351, 0.5617941956); (0.9649922103, 0.1342076446); (0.9498346559, 0.2927135142); ...]
Slices provide an expressive syntax for extracting data from types. However, you cannot add a slice notation for a type higher than two dimensions.
Generic Type Constraints Adding generic type parameters to a class declaration enables the type to be used in conjunction with any other type. However, what if you want the class to actually do something with that generic type? Not just hold a reference to an instance 'a, but do something meaningful with 'a as well. Because 'a could be anything, you are out of luck.
Fortunately, you can add a generic type constraint, which will enable you to still have the class be generic but put a restriction on the types it accepts. For example, you can force the generic class to only accept types that implement a specific interface. This allows you to restrict which types can be used as generic type parameters so that you can do more with those generic types.
A generic type constraint is simply a form of type annotation. Whenever you would have written a generic type 'a, you can add type constraints using the when keyword.
Example 8–7 defines a generic class GreaterThanList where the type parameter must also implement the IComparable interface. This allows instances of the generic type to be cast to the IComparable interface, and ultimately enables items to be checked if they are greater than the first element in the list.
Example 8–7. Generic type constraints open System
7

O’Reilly Media, Inc. 4/2/2012
open System.Collections.Generic exception NotGreaterThanHead /// Keep a list of items where each item added to it is /// greater than the first element of the list. type GreaterThanList< 'a when 'a :> IComparable<'a> >(minValue : 'a) = let m_head = minValue let m_list = new List<'a>() do m_list.Add(minValue) member this.Add(newItem : 'a) = // Casting to IComparable wouldn't be possible // if 'a weren't constrainted let ic = newItem :> IComparable<'a> if ic.CompareTo(m_head) >= 0 then m_list.Add(newItem) else raise NotGreaterThanHead member this.Items = m_list :> seq<'a>
There are ten ways to constrain types in F# and using multiple type constraints allows you to refine a type parameter. To combine multiple type constraints simply use the and keyword.
/// Given a type x which contains a constructor and implements IFoo, /// returns an instance of that type cast as IFoo. let fooFactory<x : 'a when 'a : (new : unit -> 'a) and 'a :> IFoo>() = // Creating new instance of 'a because the type constraint enforces // there be a valid constructor. let clone = new 'a() // Comparing x with a new instance, because we know 'a implements IFoo let ifoo = x :> IFoo ifoo
The most common type constraints deal with kind of type.
Value type constraint
The struct constraint enforces that the type argument must be a value type. The syntax for the struct constraint is as follows: 'a : struct
Reference type constraint
The reference constraint enforces that the type argument must be a reference type. The syntax for the reference constraint is as follows: 'a : not struct
8

O’Reilly Media, Inc. 4/2/2012
Enumeration constraint
With the enumeration constraint the type argument must be an enumeration type whose underlying type must be of the given base type (such as int). The syntax for the enumeration constraint is as follows: 'a : enum<basetype>
Delegate constraint
The delegate constraint requires that the type argument must be a delegate type, with the given signature and return type. (Delegates will be covered in the next section.) The syntax for defining a delegate constraint is as follows:
Null constraint
The null constraint requires that the type argument be assignable to null. This is true for all objects, except those defined in F# without the [<AllowNullLiteral>] attribute. 'a : null
Unmanaged constraint
The provided type must be an unmanaged. (Either a primitive value type like int or float, or a non-generic struct with only unmanaged types as fields.) 'a : unmanaged
The second set of constraints has to do with what the type is capable of doing. These are the most common types of generic constraints.
Type constraint
The subtype constraint enforces that the generic type parameter must match or be a subtype of a given type. (This also applies to implementing interfaces.) This allows you to cast 'a as a known type. The syntax for a subtype constraint is as follows: 'a :> type
Constructor constraint
The default constructor constraint enforces that the type parameter must have a default (parameter-less) constructor. This allows you to instantiate new instances of the generic type. The syntax for a default constructor constraint is as follows: 'a : (new : unit -> 'a)
Equality constraint
The type must support equality. For nearly all .NET types satisfy thie constraint by the use of the default referential equality. F# types annotated with the [<NoEquality>] attribute do not satisfy this constraint. 'a : equality
Comparison constraint
The type must support comparison by implementing the System.IComparable interface. F# records and discriminated unions support the comparison constraint by default unless annotated with the [<NoComparison>] attribute. 'a : comparison
9
O’Reilly Media, Inc. 4/2/2012
Delegates and Events So far the classes and types we have created have been useful, but they needed to be acted upon in order for something to happen. However, it would be beneficial if types could be proactive instead of reactive. That is, you want types that act upon others, and not the other way around.
Consider Example 8–8, which defines a type CoffeeCup that lets interested parties know when the cup is empty. This is helpful in case you wanted to automatically get a refill and avoid missing out on a tasty cup of joe. This is done by keeping track of a list of functions to call when the cup is eventually empty.
Example 8–8. Creating proactive types open System.Collections.Generic [<Measure>] type ml type CoffeeCup(amount : float<ml>) = let mutable m_amountLeft = amount let mutable m_interestedParties = List<(CoffeeCup -> unit)>() member this.Drink(amount) = printfn "Drinking %.1f..." (float amount) m_amountLeft <- max (m_amountLeft - amount) 0.0<ml> if m_amountLeft <= 0.0<ml> then this.LetPeopleKnowI'mEmpty() member this.Refil(amountAdded) = printfn "Coffee Cup refilled with %.1f" (float amountAdded) m_amountLeft <- m_amountLeft + amountAdded member this.WhenYou'reEmptyCall(func) = m_interestedParties.Add(func) member private this.LetPeopleKnowI'mEmpty() = printfn "Uh ho, I'm empty! Letting people know..." for interestedParty in m_interestedParties do interestedParty(this)
When used in an FSI session, the following transpires after a refreshing cup of coffee has been emptied.
> let cup = new CoffeeCup(100.0<ml>);; val cup : CoffeeCup > // Be notified when the cup is empty cup.WhenYou'reEmptyCall( (fun cup -> printfn "Thanks for letting me know..." cup.Refil(50.0<ml>) ));; val it : unit = () > cup.Drink(75.0<ml>);;
10

O’Reilly Media, Inc. 4/2/2012
Drinking 75.0... val it : unit = () > cup.Drink(75.0<ml>);; Drinking 75.0... Uh ho, I'm empty! Letting people know... Thanks for letting me know... Coffee Cup refilled with 50.0 val it : unit = ()
Abstractly, we can describe the CoffeeCup class as a pattern enabling consumers – people who have an instance of the class – to subscribe to an event – when the cup is empty. This turns out to be very useful, and makes up the foundation of most graphical programming environments. (So-called event-driven programming.) For example, windowing systems allow you to provide functions to be called when a button is clicked or when a check box is toggled. However, our custom implementation of keeping a list of function values is clunky at best.
Fortunately, the .NET framework has rich support for this pattern through the use of delegates and events. A delegate is very similar to F#’s function values. An event is simply the mechanism for calling the functions provided by all interested parties.
When used together, delegates and events form a contract. The first class publishes an event, which enables other classes to subscribe to that event. When the class’ event is fired, the delegates provided by all subscribers are executed.
Delegates can be thought of as an alternate form of function values. They represent a function pointer to a method and can be passed around as parameters or called directly, just like function values. Delegates however offer a couple of advantages over the F# functions you are used to, as we will see shortly.
Defining Delegates To define a delegate, simply use the following syntax. The first type represents the parameters passed to the delegate and the second type is the return type of the delegate when called.
type ident = delegate of type1 -> type2
Example 8–9 shows how to create a simple delegate and how similar it is to a regular function value. Notice how to instantiate a delegate type you use the new keyword and pass the body of the delegate in as a parameter, to execute a delegate you must call its Invoke method.
Example 8–9. Defining and using delegates let functionValue x y = printfn "x = %d, y = %d" x y x + y // Defining a delegate type DelegateType = delegate of int * int -> int // Construct a delegate value let delegateValue1 = new DelegateType( fun x y ->
11

O’Reilly Media, Inc. 4/2/2012
printfn "x = %d, y = %d" x y x + y ) // Calling function values and delegates let functionResult = functionValue 1 2 let delegateResult = delegateValue1.Invoke(1, 2)
F# has a bit of magic that eliminates the need for instantiating some delegate types. If a class member takes a delegate as a parameter, rather than passing an instance of that delegate type, you can pass in a lambda expression, provided it has the same signature as the delegate.
The following code snippet defines a delegate IntDelegate and a class method ApplyDelegate. ApplyDelegate is called twice, the first using an explicit instance of IntDelegate, and again using an implicit instance. The lambda expression provided would create a valid instance of IntDelegate and so the F# compiler creates one behind the scenes.
This dramatically cleans up F# code that interacts with .NET components that expect delegates, such as the Parallel Extensions to the .NET Framework, discussed in Chapter 11.
type IntDelegate = delegate of int -> unit type ListHelper = /// Invokes a delegate for every element of a list static member ApplyDelegate (l : int list, d : IntDelegate) = l |> List.iter (fun x -> d.Invoke(x)) // Explicitly constructing the delegate ListHelper.ApplyDelegate([1 .. 10], new IntDelegate(fun x -> printfn "%d" x)) // Implicitly constructing the delegate ListHelper.ApplyDelegate([1 .. 10], (fun x -> printfn "%d" x))
Combining Delegates While delegates are very similar to function values there are two key differences. First, delegates can be combined. Combining multiple delegates together allows you to execute multiple functions with a single call to Invoke. Delegates are coalesced by calling the Combine and Remove static methods on the System.Delegate type, the base class for all delegates.
Example 8–10 shows combining delegates so that a single call to Invoke will execute multiple delegates at once.
Example 8–10. Combining delegates open System.IO type LogMessage = delegate of string -> unit let printToConsole = LogMessage(fun msg -> printfn "Logging to console: %s..." msg) let appendToLogFile =
12

O’Reilly Media, Inc. 4/2/2012
LogMessage(fun msg -> printfn "Logging to file: %s..." msg use file = new StreamWriter("Log.txt", true) file.WriteLine(msg)) let doBoth = LogMessage.Combine(printToConsole, appendToLogFile) let typedDoBoth = doBoth :?> LogMessage
The following is the output from the FSI session. Invoking the typedDoBoth delegate executes both the printToConsole delegate and the appendToLogFile delegate. F# function values cannot be combined in this way.
> typedDoBoth.Invoke("[some important message]");; Logging to console: [some important message]... Logging to file: [some important message]... val it : unit = ()
The second main difference between delegate types and function values is that you can invoke a delegate asynchronously, so the delegate’s execution will happen on a separate thread and your program will continue as normal. To invoke a delegate asynchronously call the BeginInvoke and EndInvoke methods.
Unfortunately, delegates created in F# do not have the BeginInvoke and EndInvoke methods, so to create delegates that can be invoked asynchronously you must define them in VB.NET or C#. In Chapter 11 we will look at parallel and asynchronously programming in F# and simple ways to work around this.
Events Now that you understand delegates, let’s look at how to take advantage of them to create events. Events are just syntactic sugar for properties on classes that are delegates. So when an event is raised, it is really just invoking the combined delegates associated with the event.
Creating Events Let’s start with a simple example and work backwards from that. Unlike C# or VB.NET there is no event keyword in F#.
Example 8–11 creates a NoisySet type that fires events whenever items are added and removed from the set. Rather than keeping track of event subscribers manually, it uses the Event<'Del, 'Arg> type, which will be discussed shortly.
Example 8–11. Events and the Event<_,_> type type SetAction = Added | Removed type SetOperationEventArgs<'a>(value : 'a, action : SetAction) = inherit System.EventArgs() member this.Action = action member this.Value = value type SetOperationDelegate<'a> = delegate of obj * SetOperationEventArgs<'a> -> unit // Contains a set of items that fires events whenever
13

O’Reilly Media, Inc. 4/2/2012
// items are added. type NoisySet<'a when 'a : comparison>() = let mutable m_set = Set.empty : Set<'a> let m_itemAdded = new Event<SetOperationDelegate<'a>, SetOperationEventArgs<'a>>() let m_itemRemoved = new Event<SetOperationDelegate<'a>, SetOperationEventArgs<'a>>() member this.Add(x) = m_set <- m_set.Add(x) // Fire the 'Add' event m_itemAdded.Trigger(this, new SetOperationEventArgs<_>(x, Added)) member this.Remove(x) = m_set <- m_set.Remove(x) // Fire the 'Remove' event m_itemRemoved.Trigger(this, new SetOperationEventArgs<_>(x, Removed)) // Publish the events so others can subscribe to them member this.ItemAddedEvent = m_itemAdded.Publish member this.ItemRemovedEvent = m_itemRemoved.Publish
Delegates for events
The first thing to point out in the example is the delegate used for the event. In .NET the idiomatic way to declare events is to have the delegate return unit and take two parameters. The first parameter is the source, or object raising the event, the second parameter is the delegate’s arguments passed in an object derived from System.EventArgs.
In the example the SetOperationEventArgs type stores all relevant information for the event, such as the value of the item being added or removed. Many events, however, are raised without needing to send any additional information, in which case the EventArgs class is not inherited from.
Creating and raising the event
Once the delegate has been defined for the event, the next step is to actually create the event. In F# this is done by creating a new instance of the Event<_,_> type.
let m_itemAdded = new Event<SetOperationDelegate<'a>, SetOperationEventArgs<'a>>()
We will cover the Event<_,_> type shortly, but note that whenever you want to raise the event or add subscribers to the event, you must use that type. Raising the event is done by calling the Trigger method, which takes the parameters to the delegates to be called.
// Fire the 'Add' event m_itemAdded.Trigger(this, new SetOperationEventArgs<_>(x, Added))
Subscribing to events
Finally, to subscribe to a class’s events use the AddHandler method on the event property. From then on, whenever the event is raised, the delegate you passed to AddHandler will be called.
14
O’Reilly Media, Inc. 4/2/2012
If you no longer want your event handler to be called, you can call the RemoveHandler method.
Be sure to remove an event handler when an object no longer needs to subscribe to an event. Otherwise, the event raiser will still have a reference to the object and therefore will prevent the subscriber from being garbage collected. This is a very common way to introduce memory leaks in .NET applications.
Example 8–12 shows the NoisySet<_> type in action.
Example 8–12. Adding and removing event handlers > // Using events let s = new NoisySet<int>() let setOperationHandler = new SetOperationDelegate<int>( fun sender args -> printfn "%d was %A" args.Value args.Action ) s.ItemAddedEvent.AddHandler(setOperationHandler) s.ItemRemovedEvent.AddHandler(setOperationHandler);; val s : NoisySet<int> val setOperationHandler : SetOperationDelegate<int> > s.Add(9);; 9 was Added val it : unit = () > s.Remove(9);; 9 was Removed val it : unit = ()
As you can see from example 8-12, all the work of combining delegates and eventually raising the event was handled by the Event<'Del, 'Arg> class. But what is it exactly? And why does it need two generic parameters?
The Event<_,_> Class The Event<'Del, 'Arg> type keeps track of the delegates associated with the event, and makes it easier to fire and publish an event. The type takes two generic parameters. The first is the type of delegate associated with the event, which in the previous example was SetOperationDelegate. The second generic parameter is the type of the delegate’s argument, which was SetOperationEventArgs. (Note that this ignores the delegate’s actual first parameter, the sender object.)
If your events don’t follow this pattern where the first parameter is the sender object, then you should use the DelegateEvent<'del> type instead. It is used the same way, except that its arguments are passed in as an obj array.
Example 8–13 defines a clock type with a single event that gets fired every second, notifying subscribers of the current hour, minute, and second. Note that in order to trigger
15

O’Reilly Media, Inc. 4/2/2012
an event with type DelegateEvent<_> you must pass in an obj array for all of its parameters. As a reminder, the box function converts its parameter to type obj.
Example 8–13. The DelegateEvent type open System type ClockUpdateDelegate = delegate of int * int * int -> unit type Clock() = let m_event = new DelegateEvent<ClockUpdateDelegate>() member this.Start() = printfn "Started..." while true do // Sleep one second... Threading.Thread.Sleep(1000) let hour = DateTime.Now.Hour let minute = DateTime.Now.Minute let second = DateTime.Now.Second m_event.Trigger( [| box hour; box minute; box second |] ) member this.ClockUpdate = m_event.Publish
When finally run, Example 8–13 produces the following output: > // Non-standard event types let c = new Clock();; val c : Clock > // Adding an event handler c.ClockUpdate.AddHandler( new ClockUpdateDelegate( fun h m s -> printfn "[%d:%d:%d]" h m s ) );; val it : unit = () > c.Start();; Started... [14:48:27] [14:48:28] [14:48:29]
The Observable Module Using events as a way to make class types proactive and notify others when particular events occur is helpful. However events in F# don’t have to be associated with a particular class, much like functions in F# don’t have to be members of a particular class either.
The Observable module defines a series of functions for creating instances of the I Observable<_> interface, which allows you to treat events like first-class citizens
16
O’Reilly Media, Inc. 4/2/2012
much like objects and functions. So you can use functional programming techniques like composition and data transformation on events.
Example 8–14 defines a JukeBox type that raises an event whenever a new song is played. (The specifics of the mysterious CLIEvent attribute will be covered later.)
Example 8–14. Compositional events [<Measure>] type minute [<Measure>] type bpm = 1/minute type MusicGenre = Classical | Pop | HipHop | Rock | Latin | Country type Song = { Title : string; Genre : MusicGenre; BPM : int<bpm> } type SongChangeArgs(title : string, genre : MusicGenre, bpm : int<bpm>) = inherit System.EventArgs() member this.Title = title member this.Genre = genre member this.BeatsPerMinute = bpm type SongChangeDelegate = delegate of obj * SongChangeArgs -> unit type JukeBox() = let m_songStartedEvent = new Event<SongChangeDelegate, SongChangeArgs>() member this.PlaySong(song) = m_songStartedEvent.Trigger( this, new SongChangeArgs(song.Title, song.Genre, song.BPM) ) [<CLIEvent>] member this.SongStartedEvent = m_songStartedEvent.Publish
Rather than just adding event handlers directly to the JukeBox type, we can use the Observable module to create new, more specific event handlers. In Example 8–15 the Observable.filter and Observable.partition methods are used to create two new events, slowSongEvent and fastSongEvent, which will be raised whenever the JukeBox plays songs that meet a certain criteria.
The advantage is that you can take an existing event and transform it into new events, which can be passed around as values.
Example 8–15. Using the Event module > // Use the Observable module to only subscribe to specific events let jb = new JukeBox() let fastSongEvent, slowSongEvent = jb.SongStartedEvent // Filter event to just dance music |> Observable.filter(fun songArgs -> match songArgs.Genre with
17

O’Reilly Media, Inc. 4/2/2012
| Pop | HipHop | Latin | Country -> true | _ -> false) ong' // Split the event into 'fast song' and 'slow s |> Observable.partition(fun songChangeArgs -> songChangeArgs.BeatsPerMinute >= 120<bpm>);; val jb : JukeBox val slowSongEvent : IObservable<SongChangeArgs> val fastSongEvent : IObservable<SongChangeArgs> > // Add event handlers to the IObservable event slowSongEvent.Add(fun args -> printfn "You hear '%s' and start to dance slowly..." args.Title) fastSongEvent.Add(fun args -> printfn "You hear '%s' and start to dance fast!" args.Title);; > jb.PlaySong( { Title = "Burnin Love"; Genre = Pop; BPM = 120<bpm> } );; You hear 'Burnin Love' and start to dance fast! val it : unit = ()
However, Observable.filter and Observable.partition are not the only useful methods in the module.
Observable.add
Observable.add simply subscribes to the event. Typically this method is used at the end of a series of forward-pipe operations and is a cleaner way to subscribe to events than calling AddHandler on the event object.
Observable.add has the following signature:
val add : ('a -> unit) -> IObservable<'a> -> unit
Example 8–16 pops up a message box whenever the mouse moves into the bottom half of a form.
Example 8–16. Subscribing to events with Observable.add open System.Windows.Forms let form = new Form(Text="Keep out of the bottom!", TopMost=true) form.MouseMove |> Observable.filter (fun moveArgs -> moveArgs.Y > form.Height / 2) |> Observable.add (fun moveArgs -> MessageBox.Show("Moved into bottom half!") |> ignore) form.ShowDialog()
Observable.merge
Observable.merge takes two input events and produces a single output event, which will be fired whenever either of its input events is raised.
Observable.merge has the following signature:
val merge: IObservable<'a> -> IObservable<'a> -> IObservable<'a>
18
O’Reilly Media, Inc. 4/2/2012
This is useful for when trying to combine and simplify events. For example, in the previous example if a consumer didn’t care about specifically dancing to slow or fast songs, both the song events could be combined into a single justDance event.
> // Combine two song events let justDanceEvent = Observable.merge slowSongEvent fastSongEvent justDanceEvent.Add(fun args -> printfn "You start dancing, regardless of tempo!");; val justDanceEvent : System.IObservable<SongChangeArgs> > // Queue up another song jb.PlaySong( { Title = "Escape (The Pina Colada Song)"; Genre = Pop; BPM = 70<bpm> } );; You hear 'Escape (The Pina Colada Song)' and start to dance slowly... You start dancing, regardless of tempo! val it : unit = ()
Observable.map
Sometimes when working with an event value, you want to transform it into some sort of function that is easier to work with. Observable.map allows you to convert an event with a given argument type into another. It has the following signature:
val map: ('a -> 'b) -> IObservable<'a> -> IObservable<'b>
When using Windows Forms, all mouse click events are given in pixels relative to the top left of the form. So for a given form f the top left corner is at position (0, 0) and the bottom right corner is at position (f.Width, f.Height). Example 8–17 uses Event.map to create a new Click event that remaps the positions to points relative to the center of the form.
Example 8–17. Transforming event arguments with Event.map > // Create the form open System.Windows.Forms let form = new Form(Text="Relative Clicking", TopMost=true) form.MouseClick.AddHandler( new MouseEventHandler( fun sender clickArgs -> printfn "MouseClickEvent @ [%d, %d]" clickArgs.X clickArgs.Y ) );; val form : System.Windows.Forms.Form = System.Windows.Forms.Form, Text: Relative Clicking > // Create a new click event relative to the center of the form let centeredClickEvent = form.MouseClick |> Observable.map (fun clickArgs -> clickArgs.X - (form.Width / 2), clickArgs.Y - (form.Height / 2)) // Subscribe centeredClickEvent |> Observable.add (fun (x, y) -> printfn "CenteredClickEvent @ [%d, %d]" x y);; val centeredClickEvent : System.IObservable<int * int>
19

O’Reilly Media, Inc. 4/2/2012
20
> // The output is from clicking the dialog twice, first in the // top left corner and then in the center. form.ShowDialog();; MouseClickEvent @ [4, 8] CenteredClickEvent @ [-146, -142] MouseClickEvent @ [150, 123] CenteredClickEvent @ [0, -27] val it : DialogResult = Cancel
Using the Observable module enables you to think about events in much the same way as function values. This adds a great deal of expressiveness and enables you to do more with events in F# than you can in other .NET events.
Creating .NET Events There is just one extra step for creating events in F#. To create an event in F# code, you simply need to create a property that returns an instance of the IEvent<_, _> interface. However, to create an event that can be used by other .NET languages, you must also add the [<CLIEvent>] attribute. This is just a hint to the F# compiler specifying how to generate the code for the class. To F# consumers of your code the class will behave identically, however to other .NET languages rather than being a property of type IEvent<_,_> there will be a proper .NET event in its place.
Example 8–18 revisits our coffee cup example, but rather than keeping an explicit list of functions to notify when the coffee cup is empty, a proper .NET event is used instead.
Example 8–18. Creating .NET compatible events open System [<Measure>] type ml type EmptyCoffeeCupDelegate = delegate of obj * EventArgs -> unit type EventfulCoffeeCup(amount : float<ml>) = let mutable m_amountLeft = amount let m_emptyCupEvent = new Event<EmptyCoffeeCupDelegate, EventArgs>() member this.Drink(amount) = printfn "Drinking %.1f..." (float amount) m_amountLeft <- max (m_amountLeft - amount) 0.0<ml> if m_amountLeft <= 0.0<ml> then m_emptyCupEvent.Trigger(this, new EventArgs()) member this.Refil(amountAdded) = printfn "Coffee Cup refilled with %.1f" (float amountAdded) m_amountLeft <- m_amountLeft + amountAdded [<CLIEvent>] member this.EmptyCup = m_emptyCupEvent.Publish

O’Reilly Media, Inc. 4/2/2012
9 Asynchronous and Parallel
Programming
“Parallel programming” frightens many developers as the term has become synonymous with complexity and difficult-to-find bugs. However, with the libraries and language features available to F#, any anxiety over parallel programming is misplaced.
In fact, even if parallel programming were difficult – which I contend it is not – it is still worth studying because without it you simply cannot take advantage of your hardware’s potential.
This chapter will focus on how to speed up computation in F# using asynchronous and parallel programming. By the end of this chapter you will be able to execute code in different contexts (threads), use the F# asynchronous workflows library for mastering asynchronous programming, and also take advantage of the Parallel Extensions to .NET.
Before we begin, let’s define some of the domains related to “parallel programming”:
Asynchronous programming
Asynchronous programming describes programs and operations that once started are executed in the background and terminate at some “later time.” For example, in most email clients, new emails are retrieved asynchronously in the background so the user doesn’t have to force checking for new mail.
Parallel programming
Parallel programming is dividing up work between processing resources in order to speed up execution. For example, converting a song into an MP3 can be parallelized – dividing the song into pieces and converting each segment in parallel.
Reactive programming
Reactive programming is writing applications in such a way that they respond to events as they occur in real time. For example, an application which updates the user interface whenever the backing data store has been updated.
1

O’Reilly Media, Inc. 4/2/2012
While each of these paradigms can add a great deal of complexity to applications, using them provides some clear benefits.
Take advantage of multiple processors and cores
Modern computers come with multiple processors, each equipped with multiple cores. These logical units allow multiple computations to happen at the same time, so rather than executing your program sequentially, you can take advantage of these extra processors and cores by splitting up your programs. For example, a computer with two quad-core processors can execute eight operations at once.
Asynchronous IO
Historically IO operations such as reading and writing to disk have been the bottleneck in high-performance applications. Modern hardware has the ability to do asynchronous IO, which can greatly improve overall performance.
Application responsiveness
Perhaps the most compelling reason to introduce asynchronous programming into your applications is to increase responsiveness. For any long-running computation, if you run it asynchronously then your application is still free to process user input. This enables users to continue working or perhaps even cancel operations in progress. Nobody likes staring at a frozen screen.
Working with Threads Asynchronous and parallel programming is done by using threads, which are different computational units. Once started, the operating system will give each thread on the system a certain amount of time to execute before passing control to another thread.
What separates threads from processes is that processes are kept isolated from each other. Threads belong to the process that spawned them and can access the same memory heap as any other thread spawned by that process, so communication between threads is as simple as writing data to shared memory. Processes, on the other hand, cannot easily access each other’s memory, and so communication is more difficult.
At any given moment, the operating system determines which threads are executing. The ones that aren’t executing are suspended, and simply waiting for their next slice of processor time.
Spawning multiple threads on a single-processor system won’t hurt anything – but the processor can only execute one of those threads at a time, so there will be time lost switching between the different threads. The same program on a multi-processor or multi-core machine on the other hand would be able to execute several threads concurrently, so it will often go much faster.
The drawback with multiple things going on at once is that it can be difficult to keep track of data being read or written. Is the data that thread alpha read out of date because thread beta just updated the value? What if thread alpha needs to access a file that thread beta has locked for writing? When you’re dealing with multiple threads, several classes of synchronization issues can occur, which we will cover later.
2

O’Reilly Media, Inc. 4/2/2012
Spawning Threads To spin up a new thread and have it execute in the background, simply create a new instance of System.Threading.Thread and pass in a ThreadStart delegate to its constructor. Then, call the Thread object’s Start method.
Example 9–1 spawns a couple of threads that each count to five.
Remember that in F# if a function takes a delegate as a parameter, you can pass in a lambda expression or function value and the compiler will treat it as if you had created an instance of the delegate type. So in the example, threadBody is passed into the constructor of Thread and converted into new instance of ThreadStart.
Example 9–1. Creating threads // Creating new threads open System open System.Threading // What will execute on each thread let threadBody() = for i in 1 .. 5 do // Wait 1/10 of a second Thread.Sleep(100) printfn "[Thread %d] %d..." Thread.CurrentThread.ManagedThreadId i let spawnThread() = let thread = new Thread(threadBody) thread.Start() // Spawn a couple of threads at once spawnThread() spawnThread()
When executed, Example 9–1 will output the following. (Or something like it, depending on how the OS schedules the threads and/or assign thread IDs.)
[Thread 5] 1... [Thread 6] 1... [Thread 5] 2... [Thread 6] 2... [Thread 5] 3... [Thread 6] 3... [Thread 5] 4... [Thread 6] 4... [Thread 5] 5... [Thread 6] 5...
Spawning multiple threads that count to five is a good start, but imagine that the threadBody function calculated insurance premiums or did gene sequence alignment. Getting multiple threads executing code concurrently is actually just as simple as spinning up a new thread and calling Start.
3

O’Reilly Media, Inc. 4/2/2012
Other than Start, there are two methods on a Thread object that you should be aware of: Sleep and Abort.
Thread.Sleep
Thread.Sleep is a static method that puts the currently executing thread to sleep for a given number of milliseconds. In Example 9–1 both threads had a 100 millisecond sleep – or 1/10th of a second – in between when they printed to the console.
Typically Thread.Sleep is used to put in a static delay or simply yield execution of the current thread so the OS can devote processor time to a different thread.
Thread.Abort
The Thread.Abort method kills the thread, attempting to stop its execution by raising a ThreadAbortException execution somewhere in the executing thread. (With a few exceptions, wherever the thread’s instruction pointer happens to be at the time the thread is aborted.) With the .NET memory model, the abrupt termination of the thread likely won’t leak any memory, but you should always avoid using Thread.Abort.
Later in this chapter we will look at more advanced libraries built on top of System.Thread to enable friendly notions such as task cancellation to avoid the need for Thread.Abort.
The .NET Thread Pool Spawning new threads can be costly. For example, each thread has its own stack to keep track of its execution that can be several megabytes in size. For short-lived actions, rather than continually allocating memory for new threads, it is recommended that you use the .NET thread pool, which is a collection of threads just waiting around to do your bidding.
You can spawn a task on the .NET thread pool by using the ThreadPool.QueueUserWorkItem function, which takes a delegate of type WaitCallback. The following example does the same printing numbers to the console, except that it doesn’t need to manually allocate and start the threads.
WaitCallback takes a parameter of type obj, because in one overload of the QueueUserWorkItem method you can pass in an obj parameter, which will be passed to the callback. If no parameter is specified when calling QueueUserWorkItem, the callback’s parameter will be null.
open System.Threading ThreadPool.QueueUserWorkItem(fun _ -> for i = 1 to 5 do printfn "%d" i) // Our thread pool task, note that the delegate's // parameter is of type obj let printNumbers (max : obj) = for i = 1 to (max :?> int) do printfn "%d" i ThreadPool.QueueUserWorkItem(new WaitCallback(printNumbers), box 5)
4
O’Reilly Media, Inc. 4/2/2012
Sharing Data With multiple threads executing, you will want to share data between them for coordination and storing intermediate results. This can lead to a couple of problems: race conditions and deadlocks.
Race conditions
A race condition is when you have two threads trying to read or write the same reference at the same time. If two threads are writing a value, the last one wins, and the first write operation is lost forever. Similarly, if one thread reads a value and the other immediately overwrites that value, then the first thread’s data is out of date and potentially invalid.
Example 9–2 simply loops through an array and adds up its elements on two threads. Both threads are constantly updating the total reference cell, which leads to a data race.
Example 9–2. Race conditions open System.Threading let t[]) = sumArray (arr : in let total = ref 0 // Add the first half let thread1Finished = ref false ThreadPool.QueueUserWorkItem( fun _ -> for i = 0 to arr.Length / 2 - 1 do total := arr.[i] + !total thread1Finished := true ) |> ignore // Add the second half let thread2Finished = ref false ThreadPool.QueueUserWorkItem( fun _ -> for .Length - 1 do i = arr.Length / 2 to arr total := arr.[i] + !total thread2Finished := true ) |> ignore // Wait while the two threads finish their work while !thread1Finished = false || !thread2Finished = false do Thread.Sleep(0) !total
The results of the sumArray function in an FSI session are quite troubling. Not only does this function fail to work, it returns a different value each time! An array with an million elements with value one should sum to exactly one million; instead, sumArray is returning about half that.
> // Array of 1,000,000 ones let millionOnes = Array.create 1000000 1;;
5

O’Reilly Media, Inc. 4/2/2012
val millionOnes : int [] = [|1; 1; 1; 1; 1; 1; 1; 1; 1; 1; 1; 1; 1; 1; 1; 1; 1; 1; 1; 1; 1; 1; 1; 1; 1; 1; 1; 1; 1; 1; 1; 1; 1; 1; 1; 1; 1; 1; 1; 1; 1; 1; 1; 1; 1; 1; 1; 1; 1; 1; 1; 1; 1; 1; 1; 1; 1; 1; 1; 1; 1; 1; 1; 1; 1; 1; 1; 1; 1; 1; 1; 1; 1; 1; 1; 1; 1; 1; 1; 1; 1; 1; 1; 1; 1; 1; 1; 1; 1; 1; 1; 1; 1; 1; 1; 1; 1; 1; 1; 1; ...|] > sumArray mill s;; ionOneval it : int = 547392 > sumArray millionOnes;; val it : int = 579574 > sumArray mill s;; ionOneval it : int = 574109 > sumArray mill s;; ionOneval it : int = 573321 > sumArray millionOnes;; val it : int = 550012
The problem arises from the fact that updating total consists three separate operations: reading the value, incrementing it, and then writing it back. Ideally updating total would occur as a single, atomic operation.
A solution for data races is to lock the shared data, that is, to prevent other threads from accessing it while you update its value. For example, there would be no problem with the implementation of sumArray if only one thread could read and update the value of total at a time.
In F#, you can lock a value by using the lock function, which has the following signature. It takes a reference value, which is the value being locked on, and will lock that value until the provided function is finished executing.
val lock : ('a -> (unit -> 'b) -> 'b) when 'a : not struct
Example 9–3 is the same as Example 9–2 except that this time all access to the total value is done inside of lock, meaning that all other threads must wait to access it until the provided predicate has finished executing.
Example 9–3. Array summing using lock let lockedSumArray (arr : int[]) = let total = ref 0 // Add the first half let thread1Finished = ref false ThreadPool.QueueUserWorkItem( fun _ -> for i = 0 to arr.Length / 2 - 1 do lock (total) (fun () -> total := arr.[i] + !total) thread1Finished := true ) |> ignore // Add the second half let thread2Finished = ref false ThreadPool.QueueUserWorkItem( fun _ -> for i = arr.Length / 2 to arr.Length - 1 do lock (total) (fun () -> total := arr.[i] + !total) thread2Finished := true ) |> ignore
6

O’Reilly Media, Inc. 4/2/2012
// Wait while the two threads finish their work while !thread1Finished = false || !thread2Finished = false do Thread.Sleep(0) !total
Now the function works exactly like we want; the sum of an array with a million ones is exactly one million. However with the locking there is no longer any performance gain from summing the array elements in parallel, because the counting is actually done one element at a time as the lock is released and immediately acquired, over and over again.
Later in this chapter you will learn to use concurrent data structures which are built for high performance while still using locking internally to maintain data integrity.
> lockedSumArray millionOnes;; val it : int = 1000000 > lockedSumArray millionOnes;; val it : int = 1000000 > lockedSumArray millionOnes;; val it : int = 1000000 > lockedSumArray millionOnes;; val it : int = 1000000
Deadlocks
Locking solves the data race problem; however, it unfortunately introduces more problems down the road. What if you need to acquire a lock while you are locking something else? This has the potential to lead to a deadlock.
Deadlocks are when you want to access a resource that is locked by another thread, but that other thread won’t let up until you release a resource that you have locked. So both you and the other thread are left waiting for the other to release their lock indefinitely.
Whenever you have a lock on an object, you run the risk of a potential deadlock if another thread needs to access that value.
Example 9–4 shows a simple implementation of a bank account and a function to transfer funds between two bank accounts using locking.
Example 9–4. Deadlocks in F# type BankAccount = { AccountID : int; OwnerName : string; mutable Balance : int } /// Transfer money between bank accounts let transferFunds amount fromAcct toAcct = printfn "Locking %s's account to deposit funds..." toAcct.OwnerName lock fromAcct (fun () -> king %s's account to withdraw funds..." fromAcct.OwnerName printfn "Loc lock toAcct (fun () -> fromAcct.Balance <- fromAcct.Balance - amount toAcct.Balance <- toAcct.Balance + amount ) )
7

O’Reilly Media, Inc. 4/2/2012
The previous code snippet looks simple enough, but if there is ever a fund transfer between the same two accounts at the same time, then the code will deadlock.
In the following example the first call to transferFunds will lock John Smith’s account, while on a separate thread, the second call to transferFunds will lock Jane Doe’s account. Then, when the transferFunds routine goes to lock the other account, both threads will stall indefinitely.
let john = { AccountID = 1; OwnerName = "John Smith"; Balance = 1000 } let jane = { AccountID = 2; OwnerName = "Jane Doe"; Balance = 2000 } ThreadPool.QueueUserWorkItem(fun _ -> transferFunds 100 john jane) ThreadPool.QueueUserWorkItem(fun _ -> transferFunds 100 jane john)
Deadlocking doesn’t mean that sharing data between threads is a no-win situation. You just need to be judicious in your use of locking and be aware of what dependencies threads have. There are many ways to write code with locks that does not lead to deadlocks. For example, in the previous example if the function transferFunds always locked the account with the lower AccountID first, then there would be no deadlock.
Asynchronous Programming Armed with a firm understanding of threads, you can now look at how to begin writing asynchronous programs for .NET.
Asynchronous programming is when you begin an operation on a background thread to execute concurrently, and have it terminate at some later time; either ignoring the new task to complete in the background, or polling it at a later time to check on its return value.
Modern hardware has facilities for parallel reading and writing, so performing asynchronous IO may improve your application’s performance. This is especially true if you are writing data to disk which you will not need later – there is no need to “block” the program, waiting for the operation to complete, when you can begin the write asynchronously and continue execution of your program.
The way asynchronous programs have historically been written on .NET has been using the asynchronous programming model, or APM.
The APM is a pattern for dividing asynchronous operations into two methods called BeginOperation and EndOperation. When BeginOperation is called, the operation will begin asynchronously, and when the operation completes, a provided delegate callback is executed. The code within that callback must call EndOperation, which will retrieve the result of the asynchronous computation. Coordination, such as polling for when the operation has completed, happens through the use of the IAsyncResult interface.
Example 9–5 uses the APM to asynchronously open a file, perform some operation on the file’s data, and then asynchronously write the updated data to disk. Doing this asynchronously effectively queues up all the IO operations so that the disk controller can work as fast as it can. More importantly, the thread isn’t blocked while the operation completes.
8

O’Reilly Media, Inc. 4/2/2012
Don’t worry if all the AsyncCallback delegates and IAsyncResult interfaces seem complicated. The APM truly is a pain to work with, and in the next section you will see a way to avoid using this model explicitly.
Example 9–5. Asynchronous IO using the AMP open System open System.IO let processFileAsync (filePath : string) (processBytes : byte[] -> byte[]) = // This is the callback from when the AsyncWrite completes let asyncWriteCallback = new AsyncCallback(fun (iar : IAsyncResult) -> // Get state from the async result let writeStream = iar.AsyncState :?> FileStream // End the async write operation by calling EndWrite let bytesWritten = writeStream.EndWrite(iar) writeStream.Close() printfn "Finished processing file [%s]" (Path.GetFileName(writeStream.Name)) ) // This is the callback from when the AsyncRead completes let asyncReadCallback = new AsyncCallback(fun (iar : IAsyncResult) -> // Get state from the async result let readStream, data = iar.AsyncState :?> (FileStream * byte[]) // End the async read by calling EndRead let bytesRead = readStream.EndRead(iar) readStream.Close() // Process the result printfn "Processing file [%s], read [%d] bytes" (Path.GetFileName(readStream.Name)) bytesRead let updatedBytes = processBytes data let resultFile = new FileStream(readStream.Name + ".result", FileMode.Create) let _ = resultFile.BeginWrite( updatedBytes, h, 0, updatedBytes.Lengt asyncWriteCallback, resultFile) () ) // Begin the async read, whose callback will begin the async write
9

O’Reilly Media, Inc. 4/2/2012
let fileStream = new FileStream(filePath, FileMode.Open, FileAccess.Read, FileShare.Read, 2048, FileOptions.Asynchronous) let fileLength = int fileStream.Length let buffer = Array.zeroCreate fileLength // State passed into the async read let state = (fileStream, buffer) printfn "Processing file [%s]" (Path.GetFileName(filePath)) let _ = fileStream.BeginRead(buffer, 0, buffer.Length, asyncReadCallback, state) ()
To the mortal programmer, the code in Example 9-5 demonstrates just how painful and error prone the APM is. Several problems with this pattern stand out:
• If several asynchronous computations happen back to back, you can no longer follow the flow of the program as it is spread across multiple callbacks.
• Forgetting to call EndOperation can lead to adverse effects from memory leaks to exceptions to program hangs.
• Casting any state information from the IAsyncResult.AsyncState property can lead to type cast exceptions at runtime.
• Once you start looping with asynchronous calls you encounter a nightmare of spaghetti callbacks.
These aren’t the only pitfalls when using the APM. What if you wanted to do proper exception handling across the series of asynchronous operations? You can’t wrap all of your callbacks inside of a single try-with expression; rather, you need to have an exception handler inside each callback.
The point of introducing the APM wasn’t to scare you away from asynchronous programming, but rather to set the stage for how F# can improve upon this.
Ideally there would be a way to eliminate the need for explicitly dividing up your code into what happens before the asynchronous operation (the code that calls BeginOperation) and what happens after the asynchronous operation (the callback, which calls EndOperation).
It would be useful if you could write your code in a synchronous fashion, and just have some helper library do the “thread hopping” and “chopping up your computation and passing it to a callback” for you. Ideally, you could write:
printfn "Opening file..."let_wait_until_async_is_done data = openFileAsync filePath let result = processFile data filePath printfn "Writing result to disk..." do_wait_until_async_is_done writeFileAsync (filePath + ".result") result printfn "Finished!"
As it turns out, you are in luck! In F# you can do just that.
10
O’Reilly Media, Inc. 4/2/2012
Asynchronous Workflows F# asynchronous workflows allow you to perform asynchronous operations without the need for explicit callbacks. This allows you to write code as if it was using synchronous execution but in actuality the code will execute asynchronously, suspending and resuming the computation as asynchronous operations complete.
F# asynchronous workflows don’t introduce any new primitives to the .NET platform; rather F#’s computation expression syntax makes the existing threading libraries much more palatable.
Example 9–6 repeats the same task of asynchronously reading and writing a file, except rather than using the APM, all of the asynchronous operations are handled by the F# asynchronous workflows library. The result is that the code is dramatically simpler to write and understand.
The magic of how async workflows works will be discussed shortly. But for now, just notice that the code is wrapped up in the async computation expression builder and the asynchronous operations begin with let! and do!. Also, note that the result of the async builder is passed to the mysterious Async.Start method.
Example 9–6. Asynchronous file IO using F# async workflows open System.IO let cessFile (filePath : string) (processBytes : byte[] -> byte[]) = asyncPro async { printfn "Processing file [%s]" (Path.GetFileName(filePath)) use fileStream = new FileStream(filePath, FileMode.Open) let bytesToRead = int fileStream.Length let! data = fileStream.AsyncRead(bytesToRead) printfn "Opened [%s], read [%d] bytes" (Path.GetFileName(filePath)) data.Length let data' = processBytes data ts", FileMode.Create) use resultFile = new FileStream(filePath + ".resul do! resultFile.AsyncWrite(data', 0, data'.Length) printfn "Finished processing file [%s]" <| Path.GetFileName(filePath) } |> Async.Start
The Async Library The secret behind asynchronous workflows is that the code is wrapped in an async block and doesn’t immediately execute. Rather, the computation that the code performs is returned in the form of an Async<'T> object, which you can think of as an asynchronous operation that will eventually return an instance of 'T. Exactly how the 'T
11

O’Reilly Media, Inc. 4/2/2012
will be extracted from the Async<'T> is the business of the Async module and the async computation expression builder.
Whenever a let! or do!, or similar action is performed, the async computation builder will begin the task asynchronously and then execute the rest of the computation once that task completes.
In the previous example, the function AsyncRead returns an Async<byte[]>. So if the code were written:
let data = fileStream.AsyncRead(bytesToRead)
The type of data would be Async<byte[]>.
However, let! (pronounced let-bang) was used instead. This starts the async builder’s machinery to begin the computation asynchronously, and return the result that was a byte array once that operation completes.
let! data : byte[] = fileStream.AsyncRead(bytesToRead)
Please refer to Chapter 13 for more information about how let! and do! translate to function calls on a computation expression builder.
Starting async tasks
There are several methods available to start asynchronous workflows. The simplest of which is the Async.Start method. Async.Start takes an Async<unit> as a parameter, and simply begins executing it asynchronously. If you want the async task to return a value, then you need to wait for operation to complete by calling Async.RunSynchronously.
Example 9–7 defines a function getHtml that takes a URL as a parameter and returns the web page’s content. The function returns an instance of type Async<string>.
Notice that a value is returned from the async workflow by using the return! keyword. return is also a valid way to return a value from an async workflow, and will have the workflow return an Async<'T> instead of a 'T.
Example 9–7. Retrieving values from async workflows open System.IO open System.Net let getHtml (url : string) = async { let req = WebRequest.Create(url) let! rsp = req.AsyncGetResponse() use stream = rsp.GetResponseStream() use reader = new StreamReader(stream) return reader.ReadToEndAsync().Result } let html = ia.org/wiki/F_Sharp_programming_language" getHtml "http://en.wikiped |> Async.RunSynchronously
12

O’Reilly Media, Inc. 4/2/2012
Async.RunSynchronously isn’t especially useful on its own, because it blocks the starting thread waiting for the operation to complete – which is exactly the opposite of asynchronous execution. Usually this method is called immediately after the Async.Parallel method, which takes a seq< Async<'T> >, and starts all of the sequence’s computations in parallel. The results are combined into an instance of Async<'T[]>.
The following code snippet builds off the getHtml method, and retrieves a series of web pages in parallel.
let webPages : string[] = [ "http://www.google.com"; "http://www.bing.com"; "http://www.yahoo.com" ] |> List.map getHtml |> Async.Parallel |> Async.RunSynchronously
In addition to simplifying asynchronous code, using F# asynchronous workflows have the added benefit of making it easier to handle exceptions and support cancellation; something that is prohibitively difficult when using the APM.
Exceptions
Earlier when we were chopping up asynchronous tasks with BeginOperation and EndOperation, what if you wanted to properly handle an exception? Rather than having multiple exception handlers – each within an APM callback – when using asynchronous workflows, you can put the exception handler directly in the async block.
Even if the body of the try has several asynchronous operations (let!s and do!s) inside of it, the exception will be caught exactly the way you expect.
let asncOperation = async { try / ... / with | :? IOException as ioe -> printfn "IOException: %s" ioe.Message | :? ArgumentException as ae -> printfn "ArgumentException: %s" ae.Message }
But what happens if an exception from an async workflow isn’t caught? Does the exception bubble up and eventually bring down the whole process? Unfortunately, yes.
In asynchronous workflows, unhandled exceptions bring down the whole process because by default they are not caught. To catch unhandled exceptions from async workflows, you can use the Async.StartWithContinuations method, discussed later, or use the Async.Catch combinator.
The Async.Catch method takes an async workflow and wraps it into a success or exception result. It has the following signature:
val Catch : Async<'T> -> Async< Choice<'T,exn> >
The Choice type means that its value has one of several values; this is what multi-case active patterns compile to behind the scenes.
13

O’Reilly Media, Inc. 4/2/2012
The following example uses the Async.Catch combinator to enable catching exceptions and then runs the async workflow. If the task completes successfully the result is printed to the screen, otherwise the exception’s message is printed.
asyncTaskX |> Async.Catch |> Async.RunSynchronously |> function | Choice1Of2 result -> printfn "Async operation completed: %A" result | Choice2Of2 (ex : exn) -> printfn "Exception thrown: %s" ex.Message
Cancellation
When you execute code asynchronously, it is important to have a cancellation mechanism just in case the user notices things going awry or gets impatient. Earlier, when we were working with raw threads, the only way to cancel an operation was to literally kill the thread using Thread.Abort, and in doing so introduce numerous problems.
Asynchronous workflows can be cancelled, but unlike Thread.Abort, cancelling an async workflow is simply a request. The task does not immediately terminate, but rather the next time a let!, do!, etc. is executed, the rest of the computation will not be run and a cancellation handler will be executed instead.
The simplest way to hook up cancellation is to use the Async.TryCancelled method. Similar to Async.Catch, it takes an Async<'T> and returns an updated Async<'T> that will call a provided function in the event that the workflow is cancelled.
Example 9–8 defines a simple task that counts to ten and cancels it later. Notice how the cancellation is done by calling the Async.CancelDefaultToken method.
Example 9–8. Cancelling asynchronous operations open System open System.Threading let cancelableTask = async { printfn "Waiting 10 seconds..." for i = 1 to 10 do printfn "%d..." i do! Async.Sleep(1000) printfn "Finished!" } // Callback used when the operation is canceled let cancelHandler (ex : OperationCanceledException) = printfn "The task has been canceled." Async.TryCancelled(cancelableTask, cancelHandler) |> Async.Start // ... Async.CancelDefaultToken()
Cancellation in F# asynchronous workflows is handled using the same mechanism of the Parallel Extensions to .NET, via the CancellationToken type. A
14

O’Reilly Media, Inc. 4/2/2012
CancellationToken keeps track of whether or not the operation has been cancelled. (Or more specifically, had cancellation requested.) So whenever a let! or do! is encountered, the async builder checks the workflow’s CancellationToken to see if the operation should continue or terminate early.
The Async.CancelDefaultToken method cancels the last asynchronous workflow that was started. This is ideal most of the time but can cause issues if your application starts multiple asynchronous workflows.
If you want to be able to cancel an arbitrary asynchronous workflow, then you’ll want to create and keep track of a CancellationTokenSource object. A CancellationTokenSource is what signals the cancellation, which in turn updates all of its associated CancellationTokens.
The following snippet shows how to start an asynchronous workflow whose cancellation is tracked by a CancellationTokenSource object.
open System.Threading let computation = Async.TryCancelled(cancelableTask, cancelHandler) let cancellationSource = new CancellationTokenSource() Async.Start(computation, cancellationSource.Token) // ... cancellationSource.Cancel()
The Async module may seem a bit complicated with so many ways to start and customize async workflow tasks. Most likely you will only use one method for hooking into unhandled exceptions and cancellations, and that is the Async.StartWithContinuations method. Essentially, it is Async.Catch, Async.TryCancelled, and Async.Start all rolled into one. It takes four parameters:
• The async workflow to execute • A function to execute when the operation completes • A function to call in case an exception is thrown • A function to call in case the operation gets cancelled
The following snippet shows the Async.StartWithContinuations method in action:
Async.StartWithContinuations( superAwesomeAsyncTask, (fun result -> printfn "Task completed with result %A" result), (fun exn -> printfn "Task threw an exception with Message: %s" exn.Message), (fun oce -> printfn "Task was cancelled. Message: %s" oce.Message) )
Async Operations F# asynchronous workflows show the ease at which you can write asynchronous code, but how do you get an instance of Async<'T>? You can build your own async objects,
15
O’Reilly Media, Inc. 4/2/2012
as you will see shortly, but most likely you will be using the extension methods defined in the F# library.
The System.IO.Stream type is extended with several methods for reading and writing data synchronously. You’ve already seen examples of AsyncRead and AsyncWrite.
The System.Net.WebRequest class is extended with AsyncGetResponse for retrieving web pages asynchronously.
open System.IO open System.Net open Microsoft.FSharp.Control.WebExtensions let getHtml (url : string) = async { let req = WebRequest.Create(url) let! rsp = req.AsyncGetResponse() use stream = rsp.GetResponseStream() use reader = new StreamReader(stream) return reader.ReadToEnd() }
The Async.Sleep method does a sleep just like Thread.Sleep except that it does not block the async workflow thread. Instead, the thread that begins the sleep will be reused by some other task, and when the sleep completes, another thread will be woken up to finish the execution.
The following code snippet suspends and resumes an async workflow each second to update a progress bar attached to a WinForm.
#r "System.Windows.Forms.dll" #r "System.Drawing.dll" open System.Threading open System.Windows.Forms let form = new Form(TopMost = true) let pb = new ProgressBar(Minimum = 0, Maximum = 15, Dock = DockStyle.Fill) form.Controls.Add(pb) form.Show() async { for i = 0 to 15 do do! Async.Sleep(1000) pb.Value <- i } |> Async.Start
16

O’Reilly Media, Inc. 4/2/2012
Custom Async Primitives You can build your own async workflow primitives by using the Async. FromBeginEnd function. As parameters, it takes the BeginOperation and EndOperation methods from the APM, but wraps them so that they can be used with an async workflow. (The Async.FromBeginEnd function is overloaded to accept various types of APM operations.)
Example 9–9 defines two extension methods for getting the files in a directory and copying a file asynchronously. Both async primitives work by using the Func<_,_> type, which is a way to create function values, except that it works using delegates. Remember that any delegate type defined in C# or VB.NET comes with a BeginInvoke and EndInvoke method that can serve as the basis for the APM.
Once the two new async primitives AsyncGetFiles and AsyncCopy have been created, they are used to copy all the files from one folder to another.
Be careful when creating your own async primitives. Unless there is a specific reason for executing an operation asynchronously, such as an OS hook to improve IO throughput, you won’t see any improvement as the operation will complete synchronously and then switch to a different thread when the async workflow resumes.
Example 9–9. Creating custom async primitives open System open System.IO type System.IO.Directory with /// Retrieve all files under a path asynchronously static member AsyncGetFiles(path : string, searchPattern : string) = let dele = new Func<string * string, string[]>(Directory.GetFiles) Async.FromBeginEnd( (path, searchPattern), dele.BeginInvoke, dele.EndInvoke) type System.IO.File with /// Copy a file asynchronously static member AsyncCopy(source : string, dest : string) = let dele = new Func<string * string, unit>(File.Copy) Async.FromBeginEnd((source, dest), dele.BeginInvoke, dele.EndInvoke) let asyncBackup path searchPattern destPath = async { let! files = Directory.AsyncGetFiles(path, searchPattern) for file in files do let filename = Path.GetFileName(file) do! File.AsyncCopy(file, Path.Combine(destPath, filename)) }
17
O’Reilly Media, Inc. 4/2/2012
Limitations F# asynchronous workflows are great for enabling IO parallelism; however, because the library simply is a lightweight wrapper on top of the thread pool, using it won’t guarantee that you will maximize performance. When executing code in parallel, there are numerous factors to take into account, for example:
• The number of processor cores • Processor cache coherency • The existing CPU workload
While F# asynchronous workflows make it easy to perform multiple computations at once, there is no throttling of executing threads to ensure an optimal usage. For example, if eight threads are vying for CPU-time, but the machine is already under a heavy workload, then a lot of time is wasted context switching between those threads. Ideally, a governor would give some threads more processor time to reduce this context switching.
You should use F# asynchronous workflows for asynchronous programming, but for CPU-level parallelism, consider using the .NET Task Parallel Library.
Parallel Programming Parallel programming is about dividing a computation up into n parts to hopefully obtain an n-times speed up (though in practice this is rarely achievable).
The simplest way to do parallel programming on .NET is through the Task Parallel Library (TPL); which is Microsoft-speak for new primitives to make it easier to write parallel programs. By using the TPL you should have no need to manually control threads or the thread pool.
Parallel.For The first thing you can do to parallelize your applications is to just swap out your for loops with the Parallel.For and Parallel.ForEach methods in the System.Threading namespace. Like their name implies, these functions can replace for loops and execute loop iterations in parallel.
Example 9–10 uses Parallel.For to multiply two matrices. The code to produce each row of the resulting matrix is in the rowTask function, so rows of the resulting matrix will be computed in parallel.
Example 9–10. Using Parallel.For open System open System.Threading.Tasks /// Multiply two matricies using the TPL let matrixMultiply (a : float[,]) (b : float[,]) = let aRow, aCol = Array2D.length1 a, Array2D.length2 a let bRow, bCol = Array2D.length1 b, Array2D.length2 b if aCol <> bRow then failwith "Array dimension mismatch."
18

O’Reilly Media, Inc. 4/2/2012
// Allocate space for the resulting matrix, c let c = Array2D.create aCol bRow 0.0 let cRow, cCol = aCol, bRow // Compute each row of the resulting matrix let rowTask rowIdx = for colIdx = 0 to cCol - 1 do for x = 0 to aRow - 1 do c.[colIdx, rowIdx] <- c.[colIdx, rowIdx] + a.[x, colIdx] * b.[rowIdx, x] () let _ = Parallel.For(0, cRow, new Action<int>(rowTask)) // Return the computed matrix c // Example usage: // let x = array2D [| [| 1.0; 0.0 |]; [| 0.0; 1.0 |] |] // let y = array2D [| [| 1.0; 2.0; |]; [| 7.0; 8.0; |] |] // let result = matrixMultiply y x
Blindly swapping out for loops with Parallel.For will introduce bugs if the code executing inside the for loop depends on the previous iteration. For instance, if you are using a for loop to perform a fold-type operation. In the previous example, the order in which rows were computed didn’t matter, so the code could safely be parallelized.
You can start to see the benefits of containing mutation and not sharing global state. In F#, you have to “‘opt-in” for mutating data, so your code by default is thread safe.
The Array.Parallel Module Built on top of the TPL, for F# developers, is the Array.Parallel module that contains some of the methods found in the Array module, such as map, mapi, and partition. The only difference is that these methods complete the operation in parallel.
Example 9–11 shows using the Array.Parallel module to open and search through files in parallel. Just like using Parallel.For, if the operation on each element of the array is independent, you can safely replace the synchronous operations with the parallel ones.
The code retrieves a list of classified files, decrypts them in parallel, then searches for keywords in parallel, and finally encrypts them again… in parallel.
Example 9–11. Using the Array.Parallel library open System.IO let getSecretData keyword = let secretFiles = Directory.GetFiles(@"D:\TopSecret\", "*.classified") Array.Parallel.iter File.Decrypt secretFiles let secretData = Directory.GetFiles(@"D:\TopSecret\", "*.classified")
19

O’Reilly Media, Inc. 4/2/2012
|> Array.Parallel.map (fun filePath -> File.ReadAllText(filePath)) |> Array.Parallel.choose (fun contents -> if contents.Contains(keyword) then Some(contents) else None) Array.Parallel.iter File.Encrypt secretFiles secretData
Task Parallel Library In the previous section we looked at how to execute operations in arrays and for loops in parallel; however, not every problem can decompose so nicely. Most likely you will see a way to cleanly break-up a problem, but the divisions may not be equal. Or perhaps one part of the problem may need to be subdivided again and again in a “divide and conquer” approach.
Fortunately, the TPL allows you divide your operations however you see fit and the library will take care of scheduling and executing those pieces in parallel.
The core structure of TPL parallelism is the Task object. Similar to the Async<'T> type, a Task represents a body of work to be completed later. To see what the Task object offers, let’s quickly review how to write parallel programs in F#.
Suppose you have two independent, long-running tasks. The naïve implementation simply runs them in serial.
let result1 = longTask1() let result2 = longTask2()
You can improve upon this by using the thread pool as you saw earlier; however, this makes a mess of the code and prevents you from canceling the operation or handling exceptions properly.
let mutable completed = false let mutable result1 = null ThreadPool.QueueUserWorkItem(fun _ -> result1 <- longTask1() completed <- true ) |> ignore let result2 = longTask2() // Wait until task1 complete while not completed do Thread.Sleep(0)
Here is how you can solve this problem using the TPL: open System.Threading.Tasks let taskBody = new Func<string>(longTask1) let task = Task.Factory.StartNew<string>(taskBody) let result2 = longTask2()
20

O’Reilly Media, Inc. 4/2/2012
let result1 = task.Result
Primitives New tasks can be created using one of the overloads of the Task.Factory.StartNew method. Once created, the task will be scheduled to execute in parallel. However, the machinery of the TPL library will determine just how many tasks to spawn at a time, dependent upon factors such as current available CPU resources, number of processors, and so on.
The point is that you don’t need to manage this explicitly; the TPL will do it for you. So whereas spawning numerous operations using F# asynchronous workflows would overwhelm the thread pool and CPU, the TPL properly modulates how many tasks are executing at once to get the best performance possible.
To retrieve a task’s return value, all you need to do is access its Result property.
let x = task.Result
Accessing Result will do one of two things:
• Return the task’s stored result if it the task has already completed. • Block until the task has completed.
You don’t have to track individual tasks either. You can combine multiple tasks with synchronization primitives Task.WaitAll and Task.WaitAny. These functions take an array of tasks and wait until all the tasks have finished or any of the tasks have finished before continuing on.
Example 9–12 shows spawning several tasks to resize images in a directory, and using the WaitAll method to wait for all of the parallel operations to complete.
Example 9–12. Using Task.WaitAll to wait for tasks to complete open System open System.IO open System.Drawing open System.Drawing.Imaging open System.Drawing.Drawing2D open System.Threading.Tasks /// Resize images to a new width, height let resizeImage (newWidth : int, newHeight : int) (filePath : string) = let originalImage = Bitmap.FromFile(filePath) let resizedImage = new Bitmap(newWidth, newHeight) use g = Graphics.FromImage(resizedImage) g.InterpolationMode <- InterpolationMode.HighQualityBicubic g.DrawImage(originalImage, 0, 0, newWidth, newHeight) let fileName = Path.GetFileNameWithoutExtension(filePath) let fileFolder = Path.GetDirectoryName(filePath) resizedImage.Save( Path.Combine(fileFolder, fileName + ".Resized.jpg"), ImageFormat.Jpeg) // Spawns a new TPL task to resize an image
21

O’Reilly Media, Inc. 4/2/2012
let spawnTask filePath = let taskBody = new Action(fun () -> resizeImage (640, 480) filePath) Task.Factory.StartNew(taskBody) let imageFiles = Directory.GetFiles(@"C:\2012-06-20 iPhone\", "*.jpg") // Spawning resize tasks let resizeTasks = imageFiles |> Array.map spawnTask // Wait for them all to complete Task.WaitAll(resizeTasks)
The WaitAny primitive may seem strange – why spawn several tasks and only wait for one to complete? There are two good reasons to use this primitive.
First, if you have a family of algorithms you can use to solve a problem, each with varying degrees of efficiently based on input, then it can make sense to start them all in parallel and just get the first one that completes. (You might want to cancel all the other tasks once you know their results won’t be needed though.)
Second, it can be helpful for creating more responsive applications. For example, if there were a UI attached to Example 9-13, the user might want to see the results of the resized images as they came in – not just after all of the operations have completed.
Cancellation
Another benefit of using the Task class unlike manually controlling threads you spawn is to take advantage of cancellation. Just like F# asynchronous workflows, cancellation is a request and doesn’t immediately terminate the task. So if you want tasks to behave well when cancelled, you must explicitly check for it.
As mentioned earlier, the Parallel Extensions to .NET use the same cancellation mechanism as F# asynchronous workflows. Specifically, each task can be associated with a CancellationToken object that keeps track of its cancellation status. A CancellationToken is produced by a CancellationTokenSource object, which actually signals cancellation.
Example 9–13 shows starting up a task that will execute for 10 seconds, unless it is otherwise cancelled. The task is started with a CancellationToken associated the longTaskCTS CancellationTokenSource. Once signaled to be cancelled, a task must either shutdown as best it can or simply throw an OperationCanceledException.
Example 9–13. Cancelling tasks open System open System.Threading open System.Threading.Tasks let longTaskCTS = new CancellationTokenSource() let longRunningTask() = let mutable i = 1 let mutable loop = true while i <= 10 && loop do printfn "%d..." i
22
O’Reilly Media, Inc. 4/2/2012
i <- i + 1 Thread.Sleep(1000) // Check if the task was cancelled if longTaskCTS.IsCancellationRequested then printfn "Cancelled; stopping early." loop <- false printfn "Complete!" let startLongRunningTask() = Task.Factory.StartNew(longRunningTask, longTaskCTS.Token) let t = startLongRunningTask() // ... longTaskCTS.Cancel()
Exceptions
Handling exceptions in conjunction with the TPL is a bit more involved. If a task throws an exception, it returns an exception of type System.AggregateException. It may seem strange that tasks don’t surface the exception you originally threw, but remember that tasks are executing in an entirely different context from where the exception will be caught. What if the task had spawned child tasks – and they too threw exceptions?
The AggregateException type combines all exceptions originating from the target task, which you can access later via the InnerExceptions collection.
Example 9–14 shows using the TPL for searching through a graph structure, which in the example is a magical cave filled with yeti and treasure. Whenever a fork is encountered, new tasks are spawned to visit the left and right branches.
Example 9–14. Using the TPL to search through a graph open System open System.Threading.Tasks type CaveNode = | ManEatingYeti of string | BottomlessPit | Treasure | DeadEnd | Fork of CaveNode * CaveNode let rec findAllTreasure node = match node with // Finding treasure in magical caves ain't easy... | ManEatingYeti(n) -> failwithf "Eaten by a yeti named %s" n | BottomlessPit -> failwith "Fell into a bottomless pit" // Leaf nodes | DeadEnd -> 0 | Treasure -> 1 // Branches. Send half of your expidition left, the other half goes right...
23

O’Reilly Media, Inc. 4/2/2012
// ... hopefully not to only be eaten by a Yeti | Fork(left, right) -> let goLeft = Task.Factory.StartNew<int>(fun () -> findAllTreasure left) let goRight = Task.Factory.StartNew<int>(fun () -> findAllTreasure right) goLeft.Result + goRight.Result
The following snippet calls the findAllTreasure function and catches the AggregateException. Notice how the decomposeAggregEx function is used to extract all the non-AggregateExceptions.
let colossalCave = Fork( Fork( DeadEnd, Fork(Treasure, BottomlessPit) ), Fork( ManEatingYeti("Umaro"), Fork( ManEatingYeti("Choko"), Treasure ) ) ) try let treasureFindingTask = Task.Factory.StartNew<int>(fun () -> findAllTreasure colossalCave) printfn "Found %d treasure!" treasureFindingTask.Result with | :? AggregateException as ae -> // Get all inner exceptions from the aggregate exception. let rec decomposeAggregEx (ae : AggregateException) = seq { for innerEx in ae.InnerExceptions do match innerEx with | :? AggregateException as ae -> yield! decomposeAggregEx ae | _ -> yield innerEx } printfn "AggregateException:" // Alternately, you can use ae.Flatten() to put all nested // exceptions into a single AggregateException collection. decomposeAggregEx ae |> Seq.iter (fun ex -> printfn "\tMessage: %s" ex.Message)
Concurrent Data Structures Mastering the Task type is crucial for exploiting the TPL and writing parallel programs without a lot of extra fuss. However, the Task.Result property alone is insufficient to store the results for many parallel applications. Ideally, you will have tasks working in concert to fill out a shared data structure.
24
O’Reilly Media, Inc. 4/2/2012
However, sharing data structures between tasks can be problematic due to the data races you saw early in the chapter. You could lock the data type every single time you access the value, but acquiring an exclusive lock is an expensive operation, and can dramatically hamper performance if it is never used. (That is, you acquire a lock during a time nobody else accesses the data.) Also, should you acquire a lock for a read operation?
The TPL introduces several new collection types to solve this problem. The System.Collections.Concurrent namespace contains the standard sort of collection types you would expect, except that they can all be shared freely between threads. Each collection uses locking to ensure data is consistent, but does so in a way to maximize performance. (Or if possible, simply use a lock-free algorithm.)
Concurrent queue
A common pattern in parallel programming is having a list of work to be done and dividing it among various threads. However, there is an inherent contention for the list of things to do. Fortunately, the ConcurrentQueue data type solves this problem.
The type is a first-in, first-out queue that can safely be used across threads. The main methods on the type are TryDequeue and Enqueue. The Try-prefix indicates that the function will return true if the operation completes successfully and false if it doesn’t. (In the context of concurrent data structures this is typically due to a data race.)
Similar to Dictionary.TryGetValue, the result of TryDequeue will be returned as a tuple, with the first element indicating success or failure of the operation.
open System.Collections.Concurrent let cq = new ConcurrentQueue<int>() [1 .. 10] |> List.iter cq.Enqueue let success, firstItem = cq.TryDequeue() if success then printfn "%d was successfully dequeued" firstItem else printfn "Data race, try again later"
Concurrent dictionary
The ConcurrentDictionary type behaves like a normal dictionary. Example 9–15 uses a ConcurrentDictionary to associate words with the number of times they are encountered in a set of files.
In the example, the AddOrUpdate method is used. The ConcurrentDictionary has different methods for adding new items to the dictionary, and AddOrUpdate takes a key, a function to generate a value to add if the key doesn’t exist, and a function to update the value if the key is already present in the dictionary. Using this method makes it easier to insert items into the dictionary rather than checking the result of TryAdd.
Example 9–15. Using the ConcurrentDictionary open System open System.IO open System.Collections.Concurrent // Queue of files to process let filesToProcess =
25
O’Reilly Media, Inc. 4/2/2012
Directory.GetFiles(@"D:\Book\", "*.txt") |> (fun files -> new ConcurrentQueue<_>(files)) // Dictionary to store the occurrences of particular words let wordUsage = new ConcurrentDictionary<string, int>() let processFile filePath = let text = File.ReadAllText(filePath) let words = text.Split([| ' '; '\r'; '\n' |], StringSplitOptions.RemoveEmptyEntries) |> Array.map (fun word -> word.Trim()) // Add the word to our lookup table. Inserts value '1', or if the key // is already present updates it to be 'count + 1'. Array.Parallel.iter(fun word -> wordUsage.AddOrUpdate(word, (fun _ -> 1), (fun _ count -> count + 1)) |> ignore ) words // Begins updating the wordUsage dictionary let fillDictionary() = let mutable continueWorking = true while continueWorking do let dequeueSuccessful, filePath = filesToProcess.TryDequeue() if not dequeueSuccessful then // If the queue is empty, then we are done working if filesToProcess.IsEmpty then continueWorking <- false // ... otherwise, two tasks tried to dequeue // at the same time. Try again. else continueWorking <- true // Process the file processFile filePath // Start three tasks to count word usage fillDictionary() fillDictionary() fillDictionary()
Concurrent bag
The ConcurrentBag class behaves much like the HashSet<_> type we covered in Chapter 4, except that it allows duplicate items to be added. This isn’t a world-shattering loss, because once the bag has been filled you can filter out duplicates on your own.
A ConcurrentBag is ideal for aggregating results found from several tasks you have spawned.
Example 9–16 spawns several tasks to compute a list of prime numbers up to a maximum value in parallel using a ConcurrentBag. If a HashSet<_> type were used instead, some of the values added to the collection would be “dropped,” because of the race
26

O’Reilly Media, Inc. 4/2/2012
conditions when trying to update the HashSet’s internal data structures. (Or even worse, the data itself could get corrupted.)
The function computePrimes returns the ConcurrentBag cast as a seq<int> and then passed to a HashSet<_>. (ConcurrentBag, like most collection types, implements the IEnumerable<_> interface and therefore can be cast as a seq<_>.)
Example 9–16. Using the ConcurrentBag class to store parallel results open System open System.Threading.Tasks open System.Collections.Concurrent open System.Collections.Generic /// Check if a number is prime let isPrime x = let rec primeCheck count = // If the counter has reached x, then we know x is prime if count = x then true // If x is divisible by the counter, we know x isn't prime elif x % count = 0 then false else primeCheck (count + 1) // Special case 1 as prime if x = 1 then true else primeCheck 2 let computePrimes tasksToSpawn maxValue = let range = maxValue / tasksToSpawn let primes = new ConcurrentBag<int>() // Spawn several tasks at once, adding any primes they find // to the ConcurrentBag let tasks = [| for i in 0 .. tasksToSpawn - 1 do yield Task.Factory.StartNew( Action(fun () -> for x = i * range to (i + 1) * range - 1 do if isPrime x then primes.Add(x) ) ) |] Task.WaitAll(tasks) new HashSet<_>(primes :> seq<int>)
Now you can write asynchronous and parallel programs in F# by taking advantage of the great libraries available. You can also see why an emphasis on functional programming is beneficial when doing parallel programming: composing pure, immutable functions makes it easy to decompose tasks to execute independently, without worrying about introducing bugs.
Remember that adding parallelism to an application doesn’t always make it perform better. Whenever doing any architectural changes for performance, be sure to benchmark your application early and often.
27

O’Reilly Media, Inc. 4/2/2012
28

O’Reilly Media, Inc. 4/2/2012
10 Scripting
In previous chapters, you saw how F# can be effective across multiple programming paradigms. But F# is not only well suited for different styles of programming, it can also be effective for writing different types of programs as well. F# is not only useful for client applications, but can also be effective as a scripting language too.
Scripting is general term used to describe programs that don’t have a UI and are focused on solving a particular task. In most scripting languages, the script consists entirely of code – as opposed to an executable program – that is then interpreted by a runtime engine.
Programming in this mode typically sacrifices execution speed for the convenience of being able to easily modify and deploy the program. Rather than creating a complex solution designed to work everywhere, you can simply move a script from machine to machine and modify it as necessary.
While F# may be best suited for client application programming, using it in a scripting context has one major advantage: you already know it. Rather than learning a separate language for your scripts, employing F# for your scripting needs lets you reuse your existing code and knowledge about F# programming. Also, F# code is never interpreted; it is always compiled first. So F# can be comparatively faster than pure scripting languages.
If you have a simple problem and don’t need a complicated interface, consider scripting the solution. In this chapter you will learn about some constructs available to script files as well as see some recipes for creating useful F# scripts that you can put to good use right away.
F# Script Files When F# is installed on a system, it registers .fsx files as F# Script files. These are F# source files specifically designed to be easy to execute. Double clicking on an F# script file will bring up Visual Studio to edit the script. Right clicking on the file in Windows
1

O’Reilly Media, Inc. 4/2/2012
Explorer enables you to execute it directly by selecting the Run with F# Interactive context menu item, seen in Figure 10–1.
Figure 10–1. Windows shell integration for F# script files
Executing an F# script file simply sends the contents of the file to console version of F# Interactive, fsi.exe. (Located in the C:\Program Files (x86)\Microsoft SDKs\F#\3.0\Framework\v4.0 directory.)
F# script files behave just as if you had opened the code file within Visual Studio and sent it all directly to FSI. The code will then be compiled and executed, performing whatever actions are in the script. In F# script files, you have full usage of the F# language and a few additional features to help make writing scripts easier.
Directives The most noticeable difference between normal F# source files and F# Script files is the usage of compiler directives. These are special hints and commands to the F# compiler.
General Directives The following directives are available in any F# source program but are mostly applicable to F# scripts.
2
O’Reilly Media, Inc. 4/2/2012
__SOURCE_DIRECTORY__
The Source Directory directive, available with __SOURCE_DIRECTORY__, returns the current directory of the executing code. This is especially helpful in scripts for determining where the script file is located. Any instance of __SOURCE_DIRECTORY__ will be replaced with a constant string as soon as the file is compiled.
C:\Program Files (x86)\Microsoft F#\v4.0>cd C:\Program Files (x86)\Microsoft SDK s\F#\3.0\Framework\v4.0 C:\Program Files (x86)\Microsoft SDKs\F#\3.0\Framework\v4.0>fsi Microsoft (R) F# 3.0 Interactive build 4.0.30319.16909 Copyright (c) Microsoft Corporation. All Rights Reserved. For help type #help;; > __SOURCE_DIRECTORY__;; val it : string = "C:\Program Files (x86)\Microsoft SDKs\F#\3.0\Framework\v4.0" > #q;;
__SOURCE_FILE__
The __SOURCE_FILE__ directive returns the current filename. When you combine this directive with __SOURCE_DIRECTORY__, you can determine the actual script being executed.
Example 10–1 runs a script that prints the __SOURCE_FILE__ to the console. Like __SOURCE_DIRECTORY__, __SOURCE_FILE__ will be replaced with a string as soon as the file is compiled.
Example 10–1. Using __SOURCE_FILE__ and __SOURCE_DIRECTORY__ C:\Programming FS\Ch10>type AwesomestScriptEver.fsx printfn "__SOURCE_DIRECTORY__ = %s" __SOURCE_DIRECTORY__ printfn "__SOURCE_FILE__ = %s" __SOURCE_FILE__ C:\Programming FS\Ch10>fsi AwesomestScriptEver.fsx __SOURCE_DIRECTORY__ = C:\Programming FS\Ch10 __SOURCE_FILE__ = AwesomestScriptEver.fsx
F# Script-Specific Directives The following directives are not available in regular F# source files. Rather, they are specifically designed to be used in F# script files to provide an experience as if they were single-file projects within Visual Studio. These directives are also available from within an FSI session in Visual Studio.
#r
The #r directive references an assembly. This allows your F# script file to reference types defined in a separate .NET assembly, perhaps written in another language, such as C#. The string passed to the #r directive can be as simple as the assembly’s shortened file name or the full assembly name containing the name, version, culture, and so on.
3

O’Reilly Media, Inc. 4/2/2012
4
Note that the #r directive only works in .fsx files. For regular F# source files (with the .fs extension) use your IDE’s add reference dialog.
Example 10–2 shows how to load the Windows Forms libraries to display a list of files located in the Pictures folder on a data grid.
Example 10–2. Loading assembly references in scripts #r "System.Windows.Forms.dll" #r "System.Drawing.dll" open System open System.IO open System.Collections.Generic open System.Drawing open System.Windows.Forms // val images : seq<string * System.Drawing.Image> let images = let myPictures = Environment.GetFolderPath(Environment.SpecialFolder.MyPictures) Directory.GetFiles(myPictures, "*.JPG") |> Seq.map (fun filePath -> Path.GetFileName(filePath), Bitmap.FromFile(filePath)) // Create the data grid and put on a form let dg = new DataGridView(Dock = DockStyle.Fill) dg.DataSource <- new List<_>(images) let f = new Form() f.Controls.Add(dg) f.ShowDialog()
The order for reference resolution is:
1. The Include Path (discussed next) e script
Cache 2. The same directory as th3. The .NET Global Assembly
#I
The #I directive adds a new directory to the search path for references. If you want to keep your scripts and the assemblies they depend upon in separate folders you can use the #I directive to add a new folder to the search path, so that those assemblies can be found when using #r.
The following example adds several directories to F#’s search path so that when it comes time to actually load a reference with #r, the desired assembly can be found.
// Reference whatever version of "SuperAwesomeLib" is installed... #I @"C:\PW Software\SuperAwesomeLib\1.0.0" #I @"C:\PW Software\SuperAwesomeLib\1.0.1" #I @"C:\PW Software\SuperAwesomeLib\1.1.0" #I @"C:\PW Software\SuperAwesomeLib\1.2.0"

O’Reilly Media, Inc. 4/2/2012
#r "SuperAwesomeLib.dll" #r "SuperAwesomeLib.Client.dll" // ...
#load
The #load directive opens up another F# file with a relative path and executes it. This is for when you want scripts to be broken up across multiple files, or if you want to reuse some existing F# code. Loading a code file will work as if you had opened the file and sent its entire contents directly into the FSI session. Example 10–3 shows loading a code file for displaying charts and plots while the actual script file does the computation.
Example 10–3. Loading a code file into an F# script #load "Plotting.fs" open System let data = seq { let rng = new Random() for i in 1 .. 10000 do yield (rng.NextDouble(), rng.NextDouble()) } // Function plot is defined in 'Plotting.fs' plot "Random plot" data
Use #load sparingly in F# scripts. They make scripts more difficult to maintain and deploy. If your script needs multiple code files to work consider creating an actual project.
F# Script Recipes This section will highlight some simple utilities that can help make your F# scripts more effective – such as taking advantage of console coloring or automating data input to Microsoft Excel.
Colorful Output Scripts don’t primarily invest in a UI, rather they are often designed not to need any user input. However taking advantage of a color console can dramatically improve the readability of your script’s output. Example 10–4 defines a cprintfn function that behaves just like printfn, taking a string filled with format specifiers and additional arguments, except that it also takes a color parameter.
Example 10–4. Producing colorful output /// Colorful printing for helpful diagnostics let cprintfn c fmt = Printf.kprintf (fun s -> let orig = System.Console.ForegroundColor
5
O’Reilly Media, Inc. 4/2/2012
System.Console.ForegroundColor <- c; System.Console.WriteLine(s) System.Console.ForegroundColor <- orig) fmt
The cprintfn function takes advantage of the Printf.kprintf function in the F# library, which does all the conversion of the format string, such as "%d %f %s", and the additional arguments, and calls the provided function once they have been combined into the final result. The cprintfn function then simply updates the console color before doing the actual printing.
The following code prints text to the console in various colors. The last section of the code uses a little functional programming magic to print a string where each letter is in a different color – see if you can figure out how it works. (Hint: a string type can be treated as if it were a seq<char>.)
open System cprintfn ConsoleColor.Blue "Hello, World! in blue!" cprintfn ConsoleColor.Red "... and in red!" cprintfn ConsoleColor.Green "... and in green!" let rotatingColors = let possibleColors = Enum.GetValues(typeof<ConsoleColor>) let getColor idx : ConsoleColor = enum (idx % possibleColors.Length) Seq.initInfinite getColor "Experience the rainbow of possibility!" |> Seq.zip rotatingColors |> Seq.iter (fun (color, letter) -> cprintfn color "%c" letter)
Producing Sound Similar to using the console’s ability to color output as a way of improving your scripts, you can also take advantage of the console’s ability to beep. To have your script make sounds, you can use the System.Console.Beep method, which takes a frequency and duration as parameters. While potentially very annoying, having an audible cue for when a script is complete or when a special event has occurred can be helpful.
The following code defines two functions, victory and defeat, which play sounds to indicate success or failure. victory beeps ascending tones to convey the sheer joy of success, while defeat beeps a series of increasingly depressing low tones.
open System /// Victory! let victory() = for frequency in [100 .. 50 .. 2000] do Console.Beep(frequency, 25) /// Defeat :( let defeat() = for frequency in [2000 .. -50 .. 37] do Console.Beep(frequency, 25)
6

O’Reilly Media, Inc. 4/2/2012
Walking a Directory Structure You’ll often want a script to process all the files under a certain directory. An easy and effective way to process every file is to use the sequence expression defined in Example 10–5. Remember that in a sequence expression, yield! merges a sequence of elements into the master sequence, similar to the Seq.concat function.
Example 10–5. Getting all sub files under a directory open System.IO let rec filesUnder basePath = seq { yield! Directory.GetFiles(basePath) for subDir in Directory.GetDirectories(basePath) do yield! filesUnder subDir }
This following script can be applied to walk a directory tree and identify specific files, which can then be processed by your script. Notice that using the __SOURCE_DIRECTORY__ directive allows you to scan each file under the directory where the script resides. The following code uses the filesUnder function to copy all JPEG files under the script’s directory into a new folder.
open System.IO let rec filesUnder basePath = seq { yield! Directory.GetFiles(basePath) for subDir in Directory.GetDirectories(basePath) do yield! filesUnder subDir } let NewImageFolder = @"D:\NewImagesFolder\" __SOURCE_DIRECTORY__ |> filesUnder |> Seq.filter(fun filePath -> filePath.ToUpper().EndsWith("JPG")) |> Seq.iter(fun filePath -> let fileName = Path.GetFileName(filePath) let destPath = Path.Combine(NewImageFolder, fileName) File.Copy(filePath, destPath))
Starting Processes Easily Another common task for scripts is to launch a separate tool. The functionality for spawning new processes is built into the .NET base class libraries. The simplest way to do this is to use the Process.Start method, and simply wait for it to complete.
open System.Diagnostics Process.Start("notepad.exe", "file.txt").WaitForExit()
For more sophisticated scripts, you will probably need to check the result of the process, either the process exit code or its console output.
Example 10–6 defines a function called shellExecute that launches a program with the given arguments and returns its exit code and output as a tuple.
7

O’Reilly Media, Inc. 4/2/2012
Example 10–6. Launching a new process open System.Text open System.Diagnostics /// Spawns a new process. Returns (exit code, stdout) let shellExecute program arguments = let startInfo = new ProcessStartInfo() startInfo.FileName <- program startInfo.Arguments <- arguments startInfo.UseShellExecute <- false startInfo.RedirectStandardOutput <- true let proc = new Process() proc.EnableRaisingEvents <- true // Add a handler to the 'OutputDataRecieved' event, so we can store // the STDOUT stream of the process. let driverOutput = new StringBuilder() proc.OutputDataReceived.AddHandler( DataReceivedEventHandler( (fun sender args -> driverOutput.AppendLine(args.Data) |> ignore) ) ) proc.StartInfo <- startInfo proc.Start() |> ignore proc.BeginOutputReadLine() proc.WaitForExit() (proc.ExitCode, driverOutput.ToString())
Automating Microsoft Office Yet another possible application for F# scripts is automation, or programmatically performing otherwise mundane tasks. The following script illustrates how to automate simple tasks for Microsoft Office.
Example 10–7 automates Microsoft Word. It prints out all documents in the same folder as the script modifying the print options so that pages are printed with four pages per sheet.
The APIs for manipulating Microsoft Word are fairly straightforward, the only bit of trickiness in Example 10-7 is that the Word COM APIs expect to take byref<obj> objects as parameters, so the comarg function is introduced to convert a value into a mutable obj. (The byref<_> type is discussed in more detail in Appendix C, F# Interop.)
Example 10–7. Printing all documents in a folder #r "stdole.dll" #r "Microsoft.Office.Interop.Word" open Microsoft.Office.Interop.Word
8
O’Reilly Media, Inc. 4/2/2012
let private m_word : ApplicationClass option ref = ref None let openWord() = m_word := Some(new ApplicationClass()) let getWordInstance() = Option.get !m_word let closeWord() = (getWordInstance()).Quit() // COM objects expect byref<obj>, ref cells will be // converted to byref<obj> by the compiler. let comarg x = ref (box x) let openDocument filePath = printfn "Opening %s..." filePath getWordInstance().Documents.Open(comarg filePath) let printDocument (doc : Document) = printfn "Printing %s..." doc.Name doc.PrintOut( Background = comarg true, Range = comarg WdPrintOutRange.wdPrintAllDocument, Copies = comarg 1, PageType = comarg WdPrintOutPages.wdPrintAllPages, PrintToFile = comarg false, Collate = comarg true, ManualDuplexPrint = comarg false, PrintZoomColumn = comarg 2, // Pages 'across' PrintZoomRow = comarg 2) // Pages 'up down' let closeDocument (doc : Document) = printfn "Closing %s..." doc.Name doc.Close(SaveChanges = comarg false) // ------------------------------------------------------------- open System open System.IO try openWord() printfn "Printing all files in [%s]..." __SOURCE_DIRECTORY__ Directory.GetFiles(__SOURCE_DIRECTORY__, "*.docx") |> Array.iter (fun filePath -> let doc = openDocument filePath printDocument doc closeDocument doc) finally closeWord() printfn "Press any key..." Console.ReadKey(true) |> ignore
Example 10–8 creates a new Microsoft Excel workbook and dumps the contents of the Pictures folder to a spreadsheet. You could just as easily store the results of some computations.
9

O’Reilly Media, Inc. 4/2/2012
10
The script starts up by loading up the Excel application, creating a new workbook, and allowing spreadsheet cells to be set using the setCellText function. The script then walks through each file in the My Pictures folder and prints the filename, size, etc.
Example 10–8. Creating Excel worksheets #r "Microsoft.Office.Interop.Excel" open System open System.IO open System.Reflection open Microsoft.Office.Interop.Excel let app = ApplicationClass(Visible = true) let sheet = app.Workbooks .Add() .Worksheets.[1] :?> _Worksheet let setCellText (x : int) (y : int) (text : string) = let range = sprintf "%c%d" (char (x + int 'A')) (y+1) sheet.Range(range).Value(Missing.Value) <- text let printCsvToExcel rowIdx (csvText : string) = csvText.Split([| ',' |]) |> Array.iteri (fun partIdx partText -> setCellText partIdx rowIdx partText) let rec filesUnderFolder basePath = seq { yield! Directory.GetFiles(basePath) for subFolder in Directory.GetDirectories(basePath) do yield! filesUnderFolder subFolder } // Print header printCsvToExcel 0 "Directory, Filename, Size, Creation Time" // Print rows filesUnderFolder (Environment.GetFolderPath(Environment.SpecialFolder.MyPictures)) |> Seq.map (fun filename -> new FileInfo(filename)) |> Seq.map (fun fileInfo -> sprintf "%s, %s, %d, %s" fileInfo.DirectoryName fileInfo.Name fileInfo.Length (fileInfo.CreationTime.ToShortDateString())) |> Seq.iteri (fun idx str -> printCsvToExcel (idx + 1) str)
F# scripts allow you to use F# code outside of the normal “projects and solution” format of Visual Studio. F# scripts enable many new scenarios that would otherwise be prohibitively annoying to automate in a language like C#, or easy in a language like Python but requiring additional software to be installed and configured.
Using F# scripts you can automate tasks such as uploading files to a web server, analyzing and extracting data from log files, and so on. Using F# in a scripting context is just one more way you can apply the language toward helping you be more productive.

O’Reilly Media, Inc. 4/2/2012
11 Data Processing
By now you have been exposed to just about every core feature of the F# programming language and seen how to program in the functional, imperative, and object-oriented styles. But in order to develop a deep understanding of a language you need to actually go out and use it. If you don’t have an F# starter project in mind, well, this chapter should hopefully serve as the next-best thing.
This chapter will focus on the real-world application of the F# programming language. The goal is not only show how F# is used, but why: what traits of the F# language make it advantageous over others.
There isn’t a single, canonical F# application. The language is well suited across multiple domains and industries. Yet in all cases, F# is best suited for the computational core of a program: the numeric heavy lifting and data processing.
With that in mind, we will write a fully functional search engine using F#. This includes the indexing, querying, and serving of documents. Along the way, we will learn about MapReduce-style data processing and using Lex and Yacc for generating parsers. While this F# search engine won’t rival Google any time soon, it will serve as a large-enough code base to practice idiomatic F#.
Of course a detailed look at the source code for a search engine and the technologies powering could easily fill several books. So this chapter will only cover the key concepts. For more detail, see the source code found on GitHub at: https://github.com/aChrisSmith/Programming-FS-Examples
Before we begin, let’s quickly cover the major components of the project. (Which, while each leading down a technically interesting rabbit hole, are not that difficult to grasp.)
Indexing
Indexing is the process of transforming a corpus of data (in our case, the full text of books) and converting it into a more efficient format for retrieval. To perform this we will use MapReduce and cloud computing.
1

O’Reilly Media, Inc. 4/2/2012
Querying
Querying is the intermediate step used to take a human-readable string such as "wherefore art thou Romeo" OR "to be, or not to be" and look for results in our index. We will transform queries using industry-standard Lex and Yacc tools for generating a lexer and parser.
Serving
With the right querying and indexing infrastructure in place, all that is left is a way to provide a front-end for users and serve. For this project we use WCF for sending remote procedure calls to a server.
So with a general notion of what the product looks like, let’s get started!
Indexing The indexing step is a great example of where F# can lead to productivity benefits. We want to construct a reverse index for our corpus, which requires a great deal of computational processing.
The Index Data Structure Each document is assigned a unique document id, tracked by a DocumentID type (a type alias for int). The DocumentID is just a hash code of the original document name. Each document will then be tokenized, or broken into individual words. Each token is mapped to a TokenID, or a hash code of the original lexeme. In both cases the integer ID is used as an optimization to conserve memory.
The tokenizer presented here ignores the punctuation between words. However a more sophisticated tokenizer would treat punctuation, HTML tags, and other non-word entities as special kinds of tokens.
The following shows the tokenization of a poem by the syntax-loving poet e.e. Cummings:
> // Snippet from "dying is fine)but Death" // By e.e. cummings let poem = @" dying is fine)but Death ?o baby i wouldn't like Death if Death were good:for when(instead of stopping to think)you begin to feel of it,dying
2

O’Reilly Media, Inc. 4/2/2012
's miraculous why?be cause dying is ...";; val poem : string = " dying is fine)but Death ?o baby i wouldn't like Death if "+[126 chars] > // Break text into tokens, then tokenize each lexeme. let rawTokens = breakText poem let tokens = tokenizeText rawTokens;; val rawTokens : Indexer.Core.DataTypes.RawToken [] = [|"dying"; "is"; "fine"; "but"; "Death"; "o"; "baby"; "i"; "wouldn't"; "like"; "Death"; "if"; "Death"; "were"; "good:for"; "when"; "instead"; "of"; "stopping"; "to"; "think"; "you"; "begin"; "to"; "feel"; "of"; "it"; "dying"; "'s"; "miraculous"; "why"; "be"; "cause"; "dying"; "is"|] val tokens : Indexer.Core.DataTypes.TokenID [] = [|80806596; -839403577; -1502834418; -1740700924; -2006800497; -842352703; 1879991166; -842352697; -2126694611; -1099549881; -2006800497; -840648761; -2006800497; 109517273; 1246798081; -389758630; 1836624903; -840648767; -1985537974; -840190004; 48366728; 987527096; -1621728523; -840190004; -8273589; -840648767; -839469113; 80806596; -839403655; -544253080; -1693843354; -840583234; 1953640505; 80806596; -839403577|]
With a way to map each document (DocumentID) to an array of tokens (TokenID) we can now create a reverse index data structure, described next.
Token posting lists
A token posting list is the list of all documents in which a token occurs. For example, the token posting list for the word “is” would be rather long. The token posting list for “legolas” – as in Legolas the elf from The Lord of the Rings – would only list a handful of documents.
These token posting lists, once constructed, provide an efficient way to map a search term to the list of documents where it occurs.
3
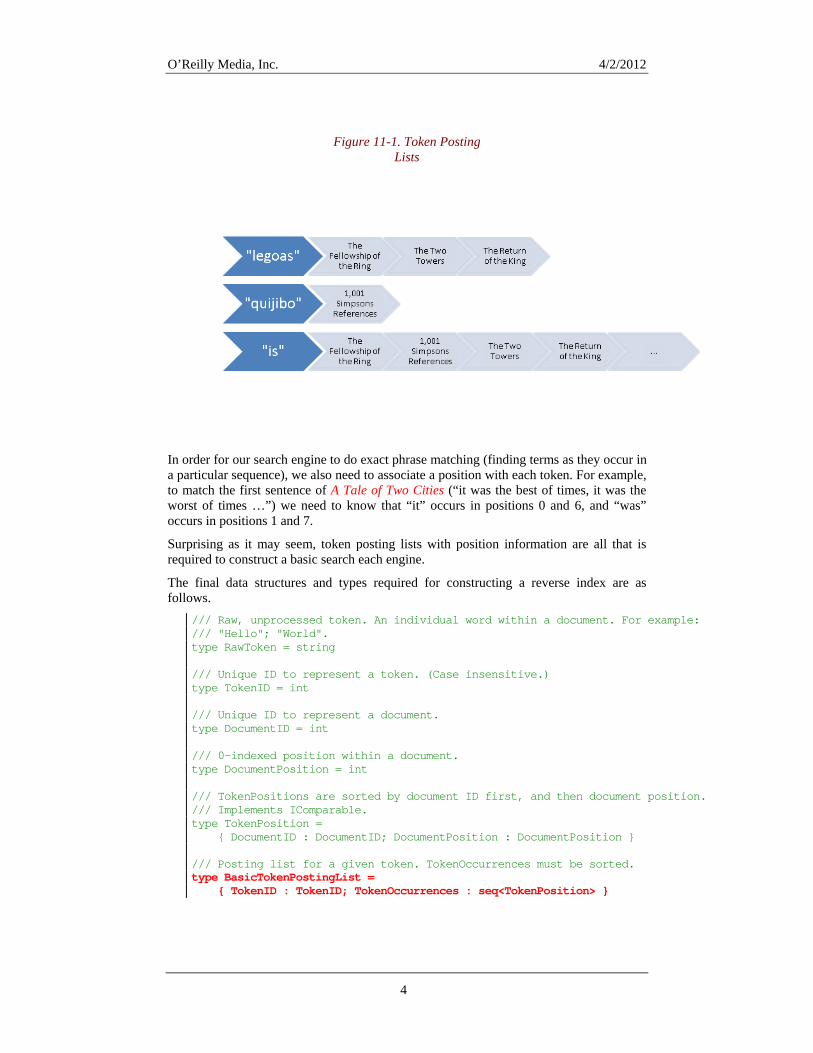
O’Reilly Media, Inc. 4/2/2012
Figure 11-1. Token Posting Lists
In order for our search engine to do exact phrase matching (finding terms as they occur in a particular sequence), we also need to associate a position with each token. For example, to match the first sentence of A Tale of Two Cities (“it was the best of times, it was the worst of times …”) we need to know that “it” occurs in positions 0 and 6, and “was” occurs in positions 1 and 7.
Surprising as it may seem, token posting lists with position information are all that is required to construct a basic search each engine.
The final data structures and types required for constructing a reverse index are as follows.
/// Raw, unprocessed token. An individual word within a document. For example: /// "Hello"; "World". type RawToken = string /// Unique ID to represent a token. (Case insensitive.) type TokenID = int /// Unique ID to represent a document. type DocumentID = int /// 0-indexed position within a document. type DocumentPosition = int /// TokenPositions are sorted by document ID first, and then document position. /// Implements IComparable. type TokenPosition = { DocumentID : DocumentID; DocumentPosition : DocumentPosition } /// Posting list for a given token. TokenOccurrences must be sorted. type BasicTokenPostingList = { TokenID : TokenID; TokenOccurrences : seq<TokenPosition> }
4

O’Reilly Media, Inc. 4/2/2012
Note that F# type aliases are used to make code more declarative. The function converting a raw token into a token ID could have signature string -> int, but the signature RawToken -> TokenID is much more useful.
All we need to create a basic search engine is a BasicTokenPostingList for each token in the search corpus. But how can we go about doing that?
The naive solution would:
• Tokenize each document to build a list of all unique tokens. • For each unique token, check each document for its occurrences.
Tens of thousands of tokens spread across tens of thousands of documents isn’t going to scale well when using a single machine, even using the asynchronous and parallel programming concepts covered in Chapter 9.
To construct our index then we will need to distribute the computation from just one machine to dozens, if not hundreds more. Fortunately there is an technique for distributed computing which allows us to do just that and is ideally suited for the task at hand.
MapReduce Processing The terms “map” and “reduce” should be familiar to you, as you have seen then in the forms of List.map, Seq.reduce, and so on. However, the combined term “MapReduce” wasn’t associated with large-scale distributed computation until 2004, when Google published a paper titled MapReduce: Simplified Data Processing on Large Clusters.
The paper goes on to describe how simple map and reduce functions much like the F# functions we have seen before can be combined to dramatically simplify large-scale computing problems.
In a MapReduce, the map operation takes an input data source and produces a list of key/value pairs. The reduce operation takes the key and list of values to produce a terminal list of values.
Consider the following example map and reduce functions for counting the number of occurrences of each word in a collection of documents.
The map operation takes its input document and emits tuples of the form (word, 1). So if the word "palabra" occurred twice, the output stream of the map operation would contain ("palabra", 1); ("palabra", 1) along with all the other words.
The reduce operation will receive its input key and a list of values. In this case, the input key will be each word, such as "palabra" or "super-excited". The list of values will be all map operation output tuples that had that word as the key. (Recall that the value for the map operation’s output tuples was always 1.) For the reduce operation to generate the word count then, all it needs to do is count the total number of elements in the list of values passed to the reducer.
The word count map reduce can be implemented using the following pseudo-code: map(string inputKey, string inputValue):
5
O’Reilly Media, Inc. 4/2/2012
// inputKey: document name // inputValue: document contents for each word w in inputValue: EmitOutput(w, "1"); reduce(String outputKey, Enumerator intermediateValues): // outputKey: a word // outputValues: a total count int result = 0; for each (word, value) in intermediateValues: result += ParseInt(value); EmitOutput(result);
There are also two parts of a MapReduce that happen behind the scenes. First, there is a “shuffler” which groups the map output by key so that it can be passed to a reducer. (For example, combining all (word, 1) tuples by word. Second, after the reduce phase, there is another process that aggregates the output results, and saves it off to disk.
The Figure 11-2 illustrates the flow of data during a MapReduce.
TBD
Figure 11-2. The flow of data in a MapReduce
Benefits
So what does constraining our computations into separate map and reduce operations buy us? In a word: scale.
Notice that both the map and reduce operations can each be performed in parallel. However, the reducers cannot be started before all mappers are complete since the shufflers need all mapper output tuples to pass as inputs to the reducers.
Notice that the mappers and reducers can be idempotent. If any of the physical machines dies, crashes, or otherwise goes caput, then the work can be restarted without corrupting the entire MapReduce job. (When performing computations across thousands of machines, hardware failures aren’t a question of if, rather is a question of when.)
There are many other more subtle benefits to using MapReduce, for example it makes file sharding very easy. Sharding is the process of breaking a large file or dataset into multiple pieces for redundancy and/or ease of use.
Once you have mastered the MapReduce concept, you will probably want to use it for all of your large-scale data processing needs. But how do you actual start a MapReduce job? It is unlikely that you have a large-scale data center at your disposal. Fortunately for both you and I, we live in the future and can send our jobs to the cloud.
Cloud Hosts
There are several companies offering cloud computing for general computational tasks such as Google’s App Engine, Amazon’s Web Services, and Microsoft’s Windows Azure. Each of these generic computing platforms can host software to host your map reduce job.
The original MapReduce framework that Google wrote about it in their paper is proprietary. However, there are several open source libraries for performing MapReduce
6

O’Reilly Media, Inc. 4/2/2012
operations with the most popular being the open-source Hadoop framework (http://hadoop.apache.org/).
To construct the reverse index for our search engine we will be using Hadoop on Windows Azure. For more information on the boilerplate code to hook up F# projects to Windows Azure, see the source code for this project on GitHub.
Search Index Mapper The mapper for our indexing MapReduce job will take an input document and emit a TokenID * TokenPosition tuple. Note that the DocumentID for every TokenPosition will be the same.
Example 11-1 shows the mapper code we will use, stripped of any Hadoop-specific code.
Example 11-1. The search index mapper.
type DocumentHitListMapper() = inherit Mapper<TokenID, TokenPosition>() default this.Map(fileName) = let docID = fileName.GetHashCode() tokenizeFile fileName |> Seq.mapi(fun i token -> token, { DocumentID = docID; DocumentPosition = i }) |> Seq.iter(fun (token, tokenPos) -> this.Output(token, tokenPos))
Once all the mappers have completed, the shuffler will group all TokenID * TokenPosition tuples by the leading TokenID. In other words, it will identify all positions where a single token occurs across all documents in our corpus.
Search Index Reducer Merging these long lists of TokenPositions is done in the reducer step.
Given a token and all of its occurrences in the corpus, we just need to sort those occurrences in a standard ordering. (DocumentID low to high, then DocumentPosition low to high.) We will see why this sorting is required when we look at how to query documents.
Once complete, the reducer emits a BasicTokenPostingList, and our reverse index is ready for searching!
Example 11-2 shows the reducer code to use, again, stripped of any Hadoop-specific code.
Example 11-2. The search index reducer. type TokenPostingListReducer() = inherit Reducer<TokenID, TokenPosition, BasicTokenPostingList>() default this.Reduce(key, values) = // Sort the values by the document ID and then by position.
7

O’Reilly Media, Inc. 4/2/2012
let sortedTokenOccurrences = new List<TokenPosition>() sortedTokenOccurrences.AddRange(values) sortedTokenOccurrences.Sort() this.Output({ TokenID = key; TokenOccurrences = sortedTokenOccurrences })
That’s it. That is all the code we need to do to construct our search engine’s index; and by using MapReduce, we can leverage a single machine or 10,000.
Document Retrieval With token posting lists we will be able to quickly determine which documents a given term occurs. However, knowing the document isn’t enough, we will also want to actually retrieve its contents. To do that, we will simply query them from a SQL database.
MapReduce is a super-handy tool to have in your belt for future projects, but it’s far more likely that you will want to use F# and SQL right now. So the decision to use document retrieval in SQL is purely pedagogical. (In fact, with the right configuration you can get SQL Server to construct the reverse index for you too.)
The code for performing document retrieval is very straight forward using query expressions and F#’s SqlDataConnection type provider. (Type providers will be covered in more detail in Chapter 15.) Example 11-3 shows how to retrieve documents by ID.
Example 11-3. Document retrieval type documentDB = SqlDataConnection<"Data Source=SearchCorpus\INSTANCE;\ Initial Catalog=Documents"> let db = documentDB.GetDataContext() let loadDocument id = query { for document in db.Documents do where document.ID = id select document.Contents head }
Querying With an efficient lookup mechanism for our search engine, we want to enable actual querying. There are three features to support:
Basic keyword query such as "eggs" or "ham"
A basic keyword query retrieves all documents that contain the given keyword. This just requires returning all documents from the appropriate token posting list.
Exact phrase queries such as "green eggs and ham"
An exact phrase query searches for several keywords at the same time and in a specific sequence. This requires searching through multiple token hit lists at the same time and ensuring the document positions are in order.
Logical operators such as "(planes OR trains) AND automobiles"
8
O’Reilly Media, Inc. 4/2/2012
Logical operators group queries together and require that the document satisfy some combination.
But before we can implement returning queries, we first need to define how users will actually submit queries to the system. That is, how we convert input queries like "where's waldo" into a more useful data structure.
We could use regular expressions, however they are unable to deal with complex queries such as "((a OR b) AND (c OR d)) OR "e f g"". Instead, we will create a proper lexer and parser for queries, which we will use to convert the raw text into a format more suitable for wiring into our system.
Lex and Yacc To complete this task we will use FSLex.exe and FSYacc.exe, two F# implementations of classic tools for generating parsers. The tools do not ship with Visual Studio and are instead a part of the F# PowerPack, which is a library of tools and utilities for F#. It is available at: http://fsharppowerpack.codeplex.com/.
Converting a string query into a custom data type is done through a two-step process known as lexing and parsing. Lexing converts input text into lexical tokens. (Similar to the way we tokenized documents during our indexing step.)
Consider the F# code: let x = 1 * f()
After lexing by the F# compiler, the text would be converted into a token sequence. This step makes it much easier to describe acceptable inputs to parse, and free us from needing to deal with string-representations of the raw query.
LET; VAR("x"); EQUAL; Number(1); ASTERISK; VAR("f"); LPARAN; RPAREN
Parsing converts lexed token streams into higher-level concepts, forming a parse tree. For example, the previous example would be parsed into something resembling:
Assignment("x", Multiplication( Number(1), FunctionCall("f", ArgumentList([])) ) )
For more information on lex and yacc – including how they are implemented – see the “Dragon Book”: Compilers: Principles, Techniques, and Tools 2nd Edition by Lam, Sethi, and Ullman (Prentice Hall).
The FSlex.exe and FSyacc.exe tools generate F# source code for lexers and parsers. The programmer provides the set of regular expressions to identify each token, and FSlex.exe emits the source code for the lexer. The programmer provides a set of grammar productions (i.e. the “structure” of the language) and FSyacc.exe emits the source code for the parser. By combining the two, you have the ability to convert raw text into a parsed-representation.
9

O’Reilly Media, Inc. 4/2/2012
While there is no direct Visual Studio support for FSlex and FSyacc, you can use custom MSBuild targets so that you can regenerate your lex and yacc code output as part of your project’s build.
Example 11-4 shows how useful F# discriminated unions can be for defining tree-like data structures, and the final query data type used by our search engine.
Example 11-4. The Query type type Query = | Term of string | Phrase of string list | And of Query * Query | Or of Query * Query | SubQuery of Query | NoOpQuery
Parsing
Parsing is defined by a grammar file, or a set of productions corresponding to specific token sequences. Note that the grammar production may contain both tokens and other grammar productions.
The following is the yacc parser definition for a simple four-function calculator. A Factor can be produced by either a Float or Int32 token. A Factor can be substituted for a Term, and a Term followed by a SLASH token and another Term matches division. (The reason for the hierarchy of Expr, Term, and Factor is to encode the order of operations.)
Equation: | Expr EOF { $1 } Expr: | Expr PLUS Term { Plus($1, $3) } | Expr MINUS Term { Minus($1, $3) } | Term { Term($1) } Term: | Term ASTER Factor { Times($1, $3) } | Term SLASH Factor { Divide($1, $3) } | Factor { Factor($1) } Factor: | FLOAT { Float($1) } | INT32 { Integer($1) } | LPAREN Expr RPAREN { ParenEx($2) }
On the right, the parentheses correspond to what F# code will be emitted when the parser encounters tokens in that order. $1, $2, and so on refer to any data associated with the tokens on the left. The FLOAT token is associated float value, which is passed to the Float discriminated union data tag when parsed.
Taking a step back to the search engine, we can see how we can encode our search features into a parser grammer in Example 11-5.
Example 11-5. Search engine query parser. UserQuery:
10
O’Reilly Media, Inc. 4/2/2012
| UserQuery EOF { $1 } | SingleQuery { [ $1 ] } | UserQuery SingleQuery { $2 :: $1 } SingleQuery: | TERM { Term($1) } | QUOTATION_MARK Phrase QUOTATION_MARK { Phrase($2) } | SingleQuery AND SingleQuery { And($1, $3) } | SingleQuery OR SingleQuery { Or($1, $3) } | LEFT_PAREN SingleQuery RIGHT_PAREN { SubQuery($2) } Phrase: | TERM { [$1] } | Phrase TERM { $2 :: $1 }
Lexing
With the parser in place, we just need to define what regular expressions which will be used to identify individual tokens.
To go back to the simple four-function calculator example, consider the following lexer file. Note that strings like "+" and "(" get mapped to static tokens, while more complex strings such as "9999" will get parsed and associated with a token as its value.
let digit = ['0'-'9'] let whitespace = [' ' '\t' ] let newline = ('\n' | '\r' '\n') rule tokenize = parse // Eat whitespace | whitespace { tokenize lexbuf } | newline { tokenize lexbuf } // Operators | "+" { PLUS } | "-" { MINUS } | "*" { ASTER } | "/" { SLASH } // Misc | "(" { LPAREN } | ")" { RPAREN } // Numberic constants | ['-']?digit+ { INT32 (Int32.Parse(lexeme lexbuf)) } | ['-']?digit+('.'digit+)? { FLOAT (Double.Parse(lexeme lexbuf)) } // EOF | eof { EOF }
Example 11-6 shows the lex file used for the query parser in its entirety.
Example 11-6. The lex file. // These are some regular expression definitions let digit = ['0'-'9'] let whitespace = [' ' '\t' ] let newline = ('\n' | '\r' '\n') // Just grab a sequence of characters to form a token. We will turn that into // a 'document token' later.
11

O’Reilly Media, Inc. 4/2/2012
let wordcharacter = ['a'-'z''A'-'Z''\''] let softcharacter = ['.' ',' '!' '?'] let term = (wordcharacter | softcharacter)+ rule tokenize = parse // Eat whitespace | whitespace { tokenize lexbuf } | newline { tokenize lexbuf } // Symbols | "\"" { QUOTATION_MARK } | "(" { LEFT_PAREN } | ")" { RIGHT_PAREN } // Keywords | "AND" | "and" { AND } | "OR" | "or" { OR } // Any other string is considered a term in a search query. | term { TERM(LexBuffer<_>.LexemeString(lexbuf)) } // EOF | eof { EOF }
Once the parser and lexer source files have been built by FSLex.exe and FSYacc.exe, they can be used together to work and parse user queries. Example 11-7 shows using the supporting code found in the F# PowerPack for parsing queries.
Example 11-7. Using the parser and lexer. > // Load the F# PowerPack. #r "FSharp.PowerPack.dll" // Contains the definition of the final data type: // type Query = // | Term of string // | Phrase of string list // | And of Query * Query // | Or of Query * Query // | SubQuery of Query // | NoOpQuery #load "QueryTypes.fs" // Parser generated from fsyacc #load "QueryParser.fs" // Lexer generated from fslex #load "QueryLexer.fs";; --> Referenced 'C:\Program Files (x86)\FSharpPowerPack-2.0.0.0\bin\FSharp.PowerPack.dll' [Loading QueryTypes.fs] namespace FSI_0002.Query.Core type Query = | Term of string | Phrase of string list | And of Query * Query | Or of Query * Query
12
O’Reilly Media, Inc. 4/2/2012
| SubQuery of Query | NoOpQuery [Loading QueryParser.fs] ... snip ... [Loading QueryLexer.fs] ... snip ... > // Code against the generated lexer/parser. open System open Microsoft.FSharp.Text.Lexing // Parse a query. let parseQuery rawQuery = printfn "Lexing [%s]" rawQuery let lexbuff = LexBuffer<char>.FromString(rawQuery) while not lexbuff.IsPastEndOfStream do let token = Query.Core.Lexer.tokenize lexbuff printfn "Token %A" token printfn "Parsing" let lexbuff2 = LexBuffer<char>.FromString(rawQuery) let query = Query.Core.Parser.start Query.Core.Lexer.tokenize lexbuff2 printfn "Query =\n%A" query;; val parseQuery : string -> unit > // Simple two-term query. parseQuery "Hello, World";; Lexing [Hello, World] Token TERM "Hello," Token TERM "World" Token EOF Parsing Query = [Term "World"; Term "Hello,"] val it : unit = () > // Use of phrase and conjunction. parseQuery "\"Super excited\" OR \"mega awesome\"";; Lexing ["Super excited" OR "mega awesome"] Token QUOTATION_MARK Token TERM "Super" Token TERM "excited" Token QUOTATION_MARK Token OR Token QUOTATION_MARK Token TERM "mega" Token TERM "awesome" Token QUOTATION_MARK Token EOF Parsing
13

O’Reilly Media, Inc. 4/2/2012
Query = [Or (Phrase ["excited"; "Super"],Phrase ["awesome"; "mega"])] val it : unit = ()
Query Processing Now that we have actual query objects represented as tree, we need to find a way to process them.
The end result we want to achieve is a sequence of documents matching the input query. However, our index only allows us to iterate by specific terms (tokens) and determine which documents that term appears and where.
To do this we will create a special type of iterator (a form of seq) that allows fast-forwarding through a token posting list. Once we have determined that a term occurs in a document, we can skip through all other occurrences in that same document.
Example 11-8 shows the implementation of the TokenPostingList type, which we will use as our core data structure for iterating through documents.
Example 11-8. The TokenPostingList type. /// Generaliziation of a seq<TokenPosition> with an AdvanceTo method for /// bulk advancing. Note that this only performs a one-through traversal of /// the underlying sequence. type TokenPostingList(basePostingList : seq<TokenPosition>) = let underlyingEnumerator = basePostingList.GetEnumerator() // Move enumerator to initial position and initialize m_atEnd. // ... is how you would initialize a normal enumerator. A seq<_> from the F# // compiler however appears do not support Reset(). // do underlyingEnumerator.Reset() let mutable m_atEnd = not <| underlyingEnumerator.MoveNext() /// If the enumerator as reached its final position. Reset by calling member this.AtEnd = m_atEnd member this.AdvanceTo(tokenPosition) = while (not this.AtEnd) && (this.Current < tokenPosition) do this.MoveNext() member this.Current = if not m_atEnd then underlyingEnumerator.Current else TokenPosition.InvalidTokenPosition member this.MoveNext() = m_atEnd <- not <| underlyingEnumerator.MoveNext() () member this.MoveNextDocument() = let startingDoc = this.Current.DocumentID while not this.AtEnd && this.Current.DocumentID = startingDoc do this.MoveNext()
The intention to have the TokenPostingList type not implement IEnumerable<_> is because F#’s requirement that an object be cast
14

O’Reilly Media, Inc. 4/2/2012
to an interface type before using it. This requires clients two have two instances, one of the IEnumerable<_> and a second of the TokenPostingList to call AdvanceTo.
Keyword queries
Keyword queries we get for free. We simply just return a sequence iterating through our token posting list returning each unique document we reach.
Exact phrase queries
Exact phrases on the other hand require multiple keyword queries at the same time. This is where the AdvanceTo method described earlier on our hit lists comes in handy.
When dealing with an exact query, such as "foo bar baz", we can iterate through keyword hit lists for "foo", "bar", and "baz" separately. For every hit we have with "foo", we advance "bar" to the point that "foo" occurs, and if it is exactly the next token, then advance the "baz" iterator to that point, and so on down the line.
Example 11-9 shows the implementation of handling exact phrase queries…
Example 11-9. Exact phrase queries /// Exact phrase enumerator. Returns all document positions where the given /// tokens occur in a specific order. /// /// This is done by finding all hits of the enumerators where the positions /// differ by one. let createExactPhraseEnumerator(phraseParts : TokenPostingList[]) = new TokenPostingList( seq { if phraseParts.Length > 0 then while not <| phraseParts.[0].AtEnd do let firstTokenPosition = phraseParts.[0].Current // Advance all other enumerators to that point (if possible). for i = 1 to phraseParts.Length - 1 do phraseParts.[i].AdvanceTo(firstTokenPosition) // Check if they all line up. let foldFunc (expectedDocID, expectedPosition, lineUp) (phrasePartEnumerator : TokenPostingList) = let lineUp' = lineUp && (phrasePartEnumerator.Current.DocumentID = expectedDocID) && (phrasePartEnumerator.Current.DocumentPosition = expectedPosition) (expectedDocID, expectedPosition + 1, lineUp') let initialState = (firstTokenPosition.DocumentID, firstTokenPosition.DocumentPosition, true) let allLineUp = phraseParts |> Array.fold foldFunc initialState |> (fun (_, _, lineUp) -> lineUp)
15
O’Reilly Media, Inc. 4/2/2012
if allLineUp then yield firstTokenPosition // Move to the next start of the phrase and continue. phraseParts.[0].MoveNext() })
Logical operators
Local operators are where our search queries become nested. However, since we have used sequences for the other types of queries there is no reason not to further nest them.
For logical operators we can exploit the fact that the hit lists are sorted by document and position in the index. This way for any logical operator we can keep track of two iterators at the same time, advancing the other as necessary.
For OR operators, we simply return the union of all documents returned by both queries. Once a document is found in either query, advance whichever one is lower in the total ordering until it hits the next document.
Example 11-10 shows using OR in queries.
Example 11-10. Using OR in queries. /// Disjunctive enumerator returning documents that are found in either list. let disjunctiveEnumerator (iter1 : TokenPostingList) (iter2 : TokenPostingList) = new TokenPostingList( seq { while (not iter1.AtEnd) || (not iter2.AtEnd) do if iter1.AtEnd then yield iter2.Current iter2.MoveNextDocument() elif iter2.AtEnd then yield iter1.Current iter1.MoveNext() else let i1Current = iter1.Current let i2Current = iter2.Current if i1Current.DocumentID = i2Current.DocumentID then // Take care not to yield the same document more than once. yield i1Current iter1.MoveNextDocument() iter2.MoveNextDocument() elif i1Current < i2Current then yield i1Current iter1.MoveNextDocument() else yield i2Current iter2.MoveNextDocument() })
And works in a similar way, except that it advances whichever one is lower until it gets matches the other. Example 11-11 shows using AND in queries.
Example 11-11. Using AND in queries. /// Combine two enumerators to return only documents found in both enumerators. let conjunctiveEnumerator (iter1 : TokenPostingList) (iter2 : TokenPostingList) = new TokenPostingList(
16

O’Reilly Media, Inc. 4/2/2012
seq { while (not iter1.AtEnd) && (not iter2.AtEnd) do if iter1.AtEnd then yield iter2.Current iter2.MoveNextDocument() elif iter2.AtEnd then yield iter1.Current iter1.MoveNext() else let i1Current = iter1.Current let i2Current = iter2.Current if i1Current.DocumentID = i2Current.DocumentID then // Take care not to yield the same document more than once. yield i1Current iter1.MoveNextDocument() iter2.MoveNextDocument() elif i1Current < i2Current then yield i1Current iter1.MoveNextDocument() else yield i2Current iter2.MoveNextDocument() })
Putting them together
With the basic enumerators in place, we can now compose them to handle arbitrarily complex search queries. For example "(planes OR trains) AND automobiles". The result is a combination of three term enumerators, and both a conjunction and disjunction enumerator.
/// Map a query object into a single document interator. let rec getIterator (index : Index) query = match query with | Term(term) -> let tokenID = getTokenID term let tokenHitList = index.GetPostingList(tokenID).TokenOccurrences printfn "Term with %d hits" <| Seq.length tokenHitList let tpl = new TokenPostingList(tokenHitList) if tpl.AtEnd then failwith "Invalid initial state" tpl | Phrase(phrase) -> let individualTokenIterators = phrase |> List.rev |> List.map getTokenID |> List.map(fun tokenID -> index.GetPostingList(tokenID).TokenOccurrences) |> List.map(fun tokenHits -> new TokenPostingList(tokenHits)) |> List.toArray createExactPhraseEnumerator individualTokenIterators | And(x, y) -> Enumerators.conjunctiveEnumerator (getIterator index x) (getIterator index y) | Or(x, y) -> Enumerators.disjunctiveEnumerator (getIterator index x) (get ) Iterator index y | SubQuery(q) -> getIterator index q | NoOpQuery -> new TokenPostingList([])
17

O’Reilly Media, Inc. 4/2/2012
With that, the bulk of our search engine is complete. The following shows a console grab of the search engine in action.
QueryParserTester Loading index... 29 documents with 60518 tokens in index. :what Lexing [what] Microsoft.FSharp.Text.Lexing.LexBuffer`1[System.Char] Token TERM "what" Token EOF Parsing... Query = [Term "what"] JoinedQuery = Or (NoOpQuery,Term "what") Term with 7801 hits Results = C:\Users\chrsmith\Desktop\MiniCorpus\0ws1910.txt @ 1891 C:\Users\chrsmith\Desktop\MiniCorpus\0ws0910.txt @ 1885 C:\Users\chrsmith\Desktop\MiniCorpus\0ws1810.txt @ 1882 C:\Users\chrsmith\Desktop\MiniCorpus\0ws0310.txt @ 1891 C:\Users\chrsmith\Desktop\MiniCorpus\0ws1210.txt @ 1879 C:\Users\chrsmith\Desktop\MiniCorpus\0ws0210.txt @ 1891 C:\Users\chrsmith\Desktop\MiniCorpus\0ws2210.txt @ 1882 C:\Users\chrsmith\Desktop\MiniCorpus\0ws4210.txt @ 1903 C:\Users\chrsmith\Desktop\MiniCorpus\0ws1110.txt @ 1885 C:\Users\chrsmith\Desktop\MiniCorpus\0ws0110.txt @ 1891 C:\Users\chrsmith\Desktop\MiniCorpus\0ws2110.txt @ 1891 C:\Users\chrsmith\Desktop\MiniCorpus\0ws1010.txt @ 1885 C:\Users\chrsmith\Desktop\MiniCorpus\0ws2010.txt @ 1885 C:\Users\chrsmith\Desktop\MiniCorpus\0ws1710.txt @ 1882 C:\Users\chrsmith\Desktop\MiniCorpus\0ws3710.txt @ 1888 C:\Users\chrsmith\Desktop\MiniCorpus\0ws1610.txt @ 1888 C:\Users\chrsmith\Desktop\MiniCorpus\0ws0610.txt @ 1882 C:\Users\chrsmith\Desktop\MiniCorpus\0ws1510.txt @ 1897 C:\Users\chrsmith\Desktop\MiniCorpus\0ws1410.txt @ 1891 C:\Users\chrsmith\Desktop\MiniCorpus\0ws0410.txt @ 1888 C:\Users\chrsmith\Desktop\MiniCorpus\00ws110.txt @ 1877 C:\Users\chrsmith\Desktop\MiniCorpus\7abam10.txt @ 926 C:\Users\chrsmith\Desktop\MiniCorpus\7abpt10.txt @ 457 C:\Users\chrsmith\Desktop\MiniCorpus\7afas10.txt @ 1243 C:\Users\chrsmith\Desktop\MiniCorpus\7aesp10.txt @ 4055 C:\Users\chrsmith\Desktop\MiniCorpus\7adis10.txt @ 713 C:\Users\chrsmith\Desktop\MiniCorpus\7aca210.txt @ 276 C:\Users\chrsmith\Desktop\MiniCorpus\2sdms10.txt @ 1897 :opened the door Lexing [opened the door] Microsoft.FSharp.Text.Lexing.LexBuffer`1[System.Char] Token TERM "opened" Token TERM "the" Token TERM "door" Token EOF Parsing... Query = [Term "door"; Term "the"; Term "opened"]
18
O’Reilly Media, Inc. 4/2/2012
JoinedQuery = Or (Or (Or (NoOpQuery,Term "door"),Term "the"),Term "open Term with 155 hits Term with 80302 hits Term with 61 hits Results = C:\Users\chrsmith\Desktop\MiniCorpus\0ws1910.txt @ 13 C:\Users\chrsmith\Desktop\MiniCorpus\0ws0910.txt @ 24 C:\Users\chrsmith\Desktop\MiniCorpus\0ws1810.txt @ 23 C:\Users\chrsmith\Desktop\MiniCorpus\0ws0310.txt @ 13 C:\Users\chrsmith\Desktop\MiniCorpus\0ws1210.txt @ 22 C:\Users\chrsmith\Desktop\MiniCorpus\0ws0210.txt @ 13 C:\Users\chrsmith\Desktop\MiniCorpus\0ws2210.txt @ 23 C:\Users\chrsmith\Desktop\MiniCorpus\0ws4210.txt @ 12 C:\Users\chrsmith\Desktop\MiniCorpus\0ws1110.txt @ 24 C:\Users\chrsmith\Desktop\MiniCorpus\0ws0110.txt @ 13 C:\Users\chrsmith\Desktop\MiniCorpus\0ws2110.txt @ 13 C:\Users\chrsmith\Desktop\MiniCorpus\0ws1010.txt @ 11 C:\Users\chrsmith\Desktop\MiniCorpus\0ws2010.txt @ 24 C:\Users\chrsmith\Desktop\MiniCorpus\0ws1710.txt @ 23 C:\Users\chrsmith\Desktop\MiniCorpus\0ws3710.txt @ 25 C:\Users\chrsmith\Desktop\MiniCorpus\0ws1610.txt @ 25 C:\Users\chrsmith\Desktop\MiniCorpus\0ws0610.txt @ 23 C:\Users\chrsmith\Desktop\MiniCorpus\0ws1510.txt @ 15 C:\Users\chrsmith\Desktop\MiniCorpus\0ws1410.txt @ 26 C:\Users\chrsmith\Desktop\MiniCorpus\0ws0410.txt @ 12 C:\Users\chrsmith\Desktop\MiniCorpus\00ws110.txt @ 20 C:\Users\chrsmith\Desktop\MiniCorpus\7abam10.txt @ 15 C:\Users\chrsmith\Desktop\MiniCorpus\7abpt10.txt @ 27087 C:\Users\chrsmith\Desktop\MiniCorpus\7afas10.txt @ 1934 C:\Users\chrsmith\Desktop\MiniCorpus\7aesp10.txt @ 21 C:\Users\chrsmith\Desktop\MiniCorpus\7adis10.txt @ 5698 C:\Users\chrsmith\Desktop\MiniCorpus\7aca210.txt @ 988 C:\Users\chrsmith\Desktop\MiniCorpus\2sdms10.txt @ 12305 :"opened the door" Lexing ["opened the door"] Microsoft.FSharp.Text.Lexing.LexBuffer`1[System.Char] Token QUOTATION_MARK Token TERM "opened" Token TERM "the" Token TERM "door" Token QUOTATION_MARK Token EOF Parsing... Query = [Phrase ["door"; "the"; "opened"]] JoinedQuery = Or (NoOpQuery,Phrase ["door"; "the"; "opened"]) Results = C:\Users\chrsmith\Desktop\MiniCorpus\7afas10.txt @ 94701 C:\Users\chrsmith\Desktop\MiniCorpus\7adis10.txt @ 37096 C:\Users\chrsmith\Desktop\MiniCorpus\7aca210.txt @ 1793
From here there are many more things to do. For example, we could create an ASP.NET MVC website in F# to gather user search queries. And that web site could use a Windows
19

O’Reilly Media, Inc. 4/2/2012
20
Communication Foundation to make RPCs to a dedicated service sitting in front of the index. And, we could also write Windows Services in F# to monitor our website and serving instances to track memory usage and reliability… you get the idea.
So is this all there is to making Google? No. In addition to scaling our corpus up to hundreds of billions of documents, our results do not consider relevance. Users can narrow down their search by adding more terms, but they still come in the order defined by the docId. Sorting the document matches by “what the user wanted to search for in the first place” is what makes Google magical.
O’Reilly Media, Inc. 4/2/2012
Part III Extending the F# Language
1

O’Reilly Media, Inc. 4/2/2012
12 Reflection
We have covered almost all of the raw syntax of F#, and the programming paradigms it enables. In this chapter you won’t learn any new capabilities of the F# language per se; instead you will learn how to harness the .NET Reflection APIs.
Reflection allows you to access the runtime metadata information about executing code. Metadata can be raw type information, such as the methods a class has, or it can come in the form of attributes, which are programmer-supplied code annotations.
The most common usage of .NET reflection is for metaprogramming, which is writing programs that reason about themselves, or modify themselves, such as those that can load plug-ins to add new functionality at runtime. In other words, allowing other developers to extend your application without them needing to have access to the source code.
But before you can do full-on metaprogramming, you must first understand how to annotate code to provide metadata.
Attributes Attributes are a form of metadata you can attach to assemblies, methods, parameters, and so on. These annotations can then be inspected at runtime using reflection, which we will get to later in this chapter. The F# compiler will recognize attributes as well; in fact, you have been using attributes for a while now to provide hints for how to compile your code.
Recall from Chapter 5 that in order to mark a class as abstract, you need to provide the [<Abstract>] attribute to the type declaration. When the F# compiler sees that attribute, it will generate the code differently than if the attribute had not been present. The same is true for [<Struct>], [<ReferenceEquality>], and other attributes.
[<AbstractClass>] type Animal = abstract Speak : unit -> unit abstract NumberOfLegs : int with get
1

O’Reilly Media, Inc. 4/2/2012
In .NET programming there are many common attributes that the F# compiler will recognize as well. For example, the System.ObsoleteAttribute is used to mark deprecated methods and classes. When using code entities marked with [<Obsolete>] the F# compiler will generate an error or warning based on usage.
Example 12–1 shows some F# code that has been refactored since originally written. An [<Obsolete>] attribute has been added to help guide consumers of the class to update their code.
As you have seen earlier, to place an attribute, simply insert the attribute’s name surrounded by [< >] above the class or method you want the attribute to annotate. When applying an attribute, if the attribute’s name is suffixed with Attribute, you can omit the word Attribute. For example, to apply an instance of System.ObsoleteAttribute you just need to write [<Obsolete>] if the System namespace has been opened.
Example 12-1. The Obsolete attribute open System type SafetyLevel = | RecreationalUse | HaveMcCoyOnDuty | SetPhasersToKill type HoloDeck(safetyLevel : SafetyLevel) = let mutable m_safetyLevel = safetyLevel member this.SafetyLevel with get () = m_safetyLevel [<Obsolete("Deprecated. Cannot update protocols once initialized.", true)>] member this.SafetyLevel with set x = m_safetyLevel <- x
Figure 12–1 shows the Visual Studio 2010 editor when trying to call a method or property marked with [<Obsolete>].
Figure 12–1. Warnings and errors in the Visual Studio Editor
2

O’Reilly Media, Inc. 4/2/2012
Applying Attributes Later in this chapter we will look at how to analyze type information to examine any attributes provided. But first, in order to have metadata to analyze, let’s take a deeper look at adding attributes to your code.
Attribute targets
Most of the time putting the attribute directly above the type or method you want to annotate will be sufficient. However, there are times when the attribute’s target can be ambiguous. To have the attribute apply to a specific construct you can use an attribute target, which is a keyword indicating what the attribute applies to.
For example, assembly-level attributes are global, in the sense that they do not belong to a particular class or method, but rather apply to the whole assembly. So an attribute target is required to make clear that the assembly-level attribute doesn’t apply to the next type or value declared.
The most common assembly-level attributes are those for setting the assembly’s version and copyright information. Note in the example that character trigraphs \169 and \174 are used to encode the © and ™ characters, respectively.
open System.Reflection [<assembly:AssemblyDescription("RemoteCombobulator.exe")>] [<assembly:AssemblyCompany("Initech Corporation")>] [<assembly:AssemblyCopyright("\169 Initech Corporation. All rights reserved.")>] [<assembly:AssemblyProduct("Initech \174 RemoteCombobulator")>] do()
Assembly-level attributes must be placed inside of a module on a do binding.
The list of common attribute targets are listed in Table 12–1.
Table 12-1. Attribute targets
Target Name Description
assembly Applies to the assembly.
field Applies to a class field.
param Applies to a parameter of a method.
return Applies to the return value of a method or property.
Applying multiple attributes
When you apply multiple attributes, you have the choice to either place each attribute individually, or group all the attributes together in a semicolon-delimited list.
Example 12–2 shows the same assembly-level attributes from the previous code snippet, but in a slightly cleaned up form.
Example 12-2. Applying multiple attributes
3

O’Reilly Media, Inc. 4/2/2012
open System.Reflection [< assembly:AssemblyDescription("RemoteCombobulator.exe"); assembly:AssemblyCompany("Initech Corporation"); assembly:AssemblyCopyright("\169 Initech Corporation. All rights reserved."); assembly:AssemblyProduct("Initech \174 RemoteCombobulator") >] do()
Defining New Attributes To define new attributes of your own, simply create a class that inherits from System.Attribute. Defining your own custom attributes is instrumental for creating custom type annotations.
Example 12–3 defines a couple of custom attributes for adding descriptions for classes and methods. XML-Doc comments are unavailable at runtime, whereas the custom ClassDescription and MethodDescription attributes are available.
Note that the custom attributes have the optional AttributeUsage attribute applied to them. This attribute for custom attributes determines where the attribute can be applied. (Meta-meta-programming indeed!) In Example 12–3 the AttributeUsage attribute indicates that the MethodDescriptionAttribute can only be applied to methods, otherwise an error will be issued by the F# compiler. Similarly, the ClassDescriptionAttribute can only be applied to classes.
Example 12–3. Defining custom attributes open System /// Provide a description for a given class [<AttributeUsage(AttributeTargets.Class)>] type ClassDescriptionAttribute(desc) = inherit Attribute() member this.Description = desc /// Provide a description for a given method [<AttributeUsage(AttributeTargets.Method)>] type MethodDescriptionAttribute(desc) = inherit Attribute() member this.Description = desc type Widget = | RedWidget | GreenWidget | BlueWidget /// XML Doc comments like this one are great for describing a class, /// but are only available at compile-time. Metadata encoded into /// attributes is available at run-time. [<ClassDescription("Represents a stack of Widgets.")>] type WidgetStack() = let mutable m_widgets : Widget list = [] [<MethodDescription("Pushes a new Widget onto the stack.")>]
4

O’Reilly Media, Inc. 4/2/2012
member this.Push(x) = m_widgets <- x :: m_widgets [<MethodDescription("Access the top of the Widget stack.")>] member this.Peek() = List.head m_widgets [<MethodDescription("Pops the top Widget off the stack.")>] member this.Pop() = let top = List.head m_widgets m_widgets <- List.tail m_widgets top
Type Reflection So you have learned how to attribute code, but what if you want to inspect those attributes? The way you access attributes on code is through type reflection.
Recall that everything in .NET inherits from System.Object, and therefore every value in .NET has a GetType method, which returns an instance of System.Type. The Type class describes everything there is to know about a type – including its attributes.
Accessing Types The following FSI session defines a custom type named Sprocket and then uses two different methods to access its type information. The first method used in the sample is the generic typeof<_> type function, which returns the type of the supplied type parameter. The second method used is to call the GetType method found on an instance of Sprocket, because it inherits from obj.
> // Simple sprocket type type Sprocket() = member this.Gears = 16 member this.SerialNumber = "WJM-0520";; type Sprocket = class new : unit -> Sprocket member Gears : int member SerialNumber : string end > // Get type information via typeof<_> let type1 = typeof<Sprocket>;; val type1 : System.Type = FSI_0002+Sprocket > // Get type information via GetType let aSprocket = new Sprocket() let type2 = aSprocket.GetType();; val aSprocket : Sprocket val type2 : System.Type = FSI_0002+Sprocket > type1 = type2;; val it : bool = true
5

O’Reilly Media, Inc. 4/2/2012
> type1.Name;; val it : string = "Sprocket"
Accessing generic types
While typeof<_> is helpful for getting type information, when used on generic types it must fix any unknown generic type parameter to obj. If you want the returned type to be fully generic, use the typedefof<_> type function.
The following snippet shows getting type information from a sequence. Notice that the returned type information from using typedefof<_> is fully generic, whereas typeof<_> indicates that the sequence is of type obj, which is potentially incorrect.
> let fixedSeq = typeof< seq<float> >;; val fixedSeq : Type = System.Collections.Generic.IEnumerable`1[System.Double] > let genSeq = typeof< seq<'a> >;; val genSeq : Type = System.Collections.Generic.IEnumerable`1[System.Object] > let fullyGenSeq = typedefof< seq<'a> >;; val fullyGenSeq : Type = System.Collections.Generic.IEnumerable`1[T]
Inspecting methods
Once you have an instance of Type, you can inspect the type’s methods and properties by calling GetMethods and GetProperties, and so on.
Example 12–4 defines a function called describeType, which will print all methods, properties, and fields for a type to the console.
The BindingFlags enum is passed in to filter the results. For example, BindingFlags.DeclaredOnly is used so that the call to GetMethods doesn’t return inherited methods, such as GetHashCode and ToString.
Example 12–4. Inspecting and analyzing types open System open System.Reflection /// Prints the methods, properties, and fields of a type to the console let describeType (ty : Type) = let bindingFlags = BindingFlags.Public ||| BindingFlags.NonPublic |||
BindingFlags.Instance ||| BindingFlags.Static ||| BindingFlags.DeclaredOnly let methods = ty.GetMethods(bindingFlags) |> Array.fold (fun desc meth -> desc + sprintf " %s" meth.Name) "" let props = ty.GetProperties(bindingFlags) |> Array.fold (fun desc prop -> desc + sprintf " %s" prop.Name) ""
6

O’Reilly Media, Inc. 4/2/2012
let fields = ty.GetFields(bindingFlags) |> Array.fold (fun desc field -> desc + sprintf " %s" field.Name) "" printfn "Name: %s" ty.Name printfn "Methods: \n\t%s\n" methods printfn "Properties: \n\t%s\n" props printfn "Fields: \n\t%s" fields
The following FSI session shows using describeType on string.
Name: String Methods: Join get_FirstChar Join nativeCompareOrdinal nativeCompareOrdinalEx nativeCompareOrdinalWC SmallCharToUpper EqualsHelper CompareOrdinalHelper Equals Equals Equals Equals Equals op_Equality op_Inequality get_Chars CopyTo ToCharArray ToCharArray IsNullOrEmpty GetHashCode get_Length get_ArrayLength get_Capacity Split Split Split Split Split Split InternalSplitKeepEmptyEntries InternalSplitOmitEmptyEntries MakeSeparatorList MakeSeparatorList Substring Substring InternalSubStringWithChecks InternalSubString Trim TrimStart TrimEnd CreateString ...snip... Properties: FirstChar Chars Length ArrayLength Capacity Fields: m_arrayLength m_stringLength m_firstChar Empty WhitespaceChars TrimHead TrimTail TrimBoth charPtrAlignConst alignConst
Now let’s use describeType on a custom class. First, define a type called Cog. Note the private accessibility modifiers on the class’s field and property.
/// Unit of measure for milliliter [<Measure>] type ml type Cog = val mutable private m_oilLevel : float<ml> new() = { m_oilLevel = 100.0<ml> } member private this.Gears = 16 member this.SerialNumber = "1138-THX" member this.Rotate() = // Rotating loses a bit of oil on each turn... this.m_oilLevel <- this.m_oilLevel - 0.01<ml>
Now in an FSI session, call describeType on the type of Cog. Notice how all type information is printed out, including members marked with the private accessibility modifiers.
7

O’Reilly Media, Inc. 4/2/2012
Code accessibility is a language-level restriction to help programmers; however, declaring something private or internal offers no security at runtime. When using .NET reflection, you can access any fields and members of objects. You should keep this in mind when persisting sensitive information in memory.
> describeType (typeof<Cog>);; Name: Cog Methods: get_Gears get_SerialNumber Rotate Properties: SerialNumber Gears Fields: m_oilLevel val it : unit = ()
Inspecting attributes
Inspecting a type’s attributes is done in much the same way as inspecting its methods and properties. The only difference however, is that attributes can be put in many more places.
Example 12–5 shows inspecting a type for the ClassDescription and MethodDescription attributes from earlier in this chapter. Note how the full list of custom attributes on a type needs to be pared down to just the ClassDescription or MethodDescription attributes.
Example 12–5. Inspecting type attributes open System /// Displays data attributed with the MethodDesc or ClassDesc attributes let printDocumentation(ty : Type) = // Return if an object has a given type let objHasType ty obj = (obj.GetType() = ty) let on = classDescription : string opti ty.GetCustomAttributes(false) |> Seq.tryFind(objHasType typeof<ClassDescriptionAttribute>) |> Option.map(fun attr -> (attr :?> ClassDescriptionAttribute)) |> Option.map(fun cda -> cda.Description) let methodDescriptions : seq<string * string option> = ty.GetMethods() |> Seq.map(fun mi -> mi, mi.GetCustomAttributes(false)) |> Seq.map(fun (methodInfo, methodAttributes) -> let attributeDescription = methodAttributes |> Seq.tryFind(objHasType typeof<MethodDescriptionAttribute>) |> Option.map(fun atr -> (atr :?> MethodDescriptionAttribute)) |> Option.map(fun mda -> mda.Description) methodInfo.Name, attributeDescription) let getDescription = function
8

O’Reilly Media, Inc. 4/2/2012
| Some(desc) -> desc | None -> "(no description provided)" printfn "Info for class: %s" ty.Name printfn "Class Description:\n\t%s" (getDescription classDescription) printfn "Method Descriptions:" methodDescriptions |> Seq.iter(fun (methName, desc) -> printfn "\t%15s - %s" methName (getDescription desc))
When run on the WidgetStack type from Example 12–3, the printDocumentation function has the following output:
> printDocumentation (typeof<WidgetStack>);; Info for class: WidgetStack Class Description: Represents a stack of Widgets. Method Descriptions: Push - Pushes a new Widget onto the stack. Peek - Access the top of the Widget stack. Pop - Pops the top Widget off the stack. ToString - (no description provided) Equals - (no description provided) GetHashCode - (no description provided) GetType - (no description provided) val it : unit = ()
Reflecting on F# Types While the .NET reflection APIs are easy to use, they were written long before F# existed and as such don’t have any concept of special F#-types. As a result, when inspecting things like records or discriminated unions, you might get unexpected results.
Consider the following discriminated union to describe playing cards. Conceptually the PlayingCard type is a very simple data structure.
type Suit = | Club | Diamond | Heart | Spade type PlayingCard = | Ace of Suit | King of Suit | Queen of Suit | Jack of Suit | ValueCard of int * Suit | Joker
However, when analyzed using reflection by our describeType function you can see all the work the F# compiler does behind the scenes to map the discriminated union onto the object-oriented .NET runtime.
> describeType (typeof<PlayingCard>);;
9

O’Reilly Media, Inc. 4/2/2012
Name: PlayingCard Methods: get_Joker get_IsJoker NewValueCard get_IsValueCard NewJack get_IsJack NewQueen get_IsQueen NewKing get_IsKing NewAce get_IsAce get_Tag __DebugDisplay CompareTo CompareTo CompareTo GetHashCode GetHashCode Equals Equals Equals Properties: Tag Joker IsJoker IsValueCard IsJack IsQueen IsKing IsAce Fields: _tag _unique_Joker val it : unit = ()
Fortunately, the F# library contains a few additional APIs for reflecting over functional types in the Microsoft.FSharp.Reflection namespace.
Tuples
The underlying type used for tuples is System.Tuple<_>. To decompose a particular instance of a tuple and get the type of its elements, you can use the FSharpType.GetTupleElements method, which will return the types of the tuple’s elements in order as an array.
> let xenon = ("Xe", 54);; val xenon : string * int = ("Xe", 54) > // Get the tuple's element's types open Microsoft.FSharp.Reflection let tupleElementTypes = FSharpType.GetTupleElements (xenon.GetType());; val tupleElementTypes : Type [] = [|System.String; System.Int32|]
Discrminated unions
You can reflect over discriminated union data tags by using the FSharpType.GetUnionCases method. This will return an array of the UnionCaseInfo type, which will describe each data tag.
The following snippet reflects over the PlayingCard type and prints each data tag name to the console.
> // Reflect the PlayingCard discriminated union type FSharpType.GetUnionCases typeof<PlayingCard> |> Array.iter (fun unionCase -> printfn "%s" unionCase.Name);; Ace King Queen Jack ValueCard Joker val it : unit = ()
Records
You can use the FSharpType.GetRecordFields method to get all of the properties on a record type.
> // Type definitions
10

O’Reilly Media, Inc. 4/2/2012
[<Measure>] type far // Degrees fahrenheit type Outlook = Sunny | Cloudy | Rainy type Weather = { Outlook : Outlook; High : float<far>; Low : float<far> };; ...snip... > // Reflect over the Weather record type FSharpType.GetRecordFields typeof<Weather> |> Array.iter (fun propInfo -> printfn "Name [%s], Type [%s]" propInfo.Name propInfo.PropertyType.Name);; Name [Outlook], Type [Outlook] Name [High], Type [Double] Name [Low], Type [Double] val it : unit = ()
Dynamic Instantiation In the previous section you saw ways to examine types and reflect on their metadata. However, the real power of reflection lies in dynamic instantiation, which is a fancy way to say “creating values at runtime whose type you didn’t know about at compile time.” In other words, given an instance of System.Type, create a new instance of the type it describes.
Instantiating Types Dynamically instantiating types can be done using the Activator class. Example 12–6 defines a type PoliteWriter, and creates a new instance dynamically using Activator.CreateInstance.
The parameters to PoliteWriter’s constructor are passed in as an obj array. The result of CreateInstance is an obj, which will need to be cast as the type you want.
Example 12–6. Dynamic instantiation > // Define a polite text writer open System open System.IO type PoliteWriter(stream : TextWriter) = member this.WriteLine(msg : string) = sprintf "%s... please" msg |> stream.WriteLine;; type PoliteWriter = class new : stream:IO.TextWriter -> PoliteWriter member WriteLine : msg:string -> unit end
11

O’Reilly Media, Inc. 4/2/2012
> // Dynamically create an instance of that class let politeConsole = Activator.CreateInstance(typeof<PoliteWriter>, [| box Console.Out |]);; val politeConsole : obj > (politeConsole :?> PoliteWriter).WriteLine("Hello, World!");; Hello, World!... please val it : unit = ()
Now you have the ability to not only load types, but also create new instances of them at runtime. This opens up powerful new capabilities for F# applications such as loading plug-ins.
Instantiating F# Types Just like the custom F# reflection APIs for doing type inspection of functional code, there are special methods to do dynamic instantiation as well. Table 12–2 shows some common methods in the FSharpValue module for dynamically instantiating functional types like tuples and discriminated unions.
Table 12–2. Common methods in the FSharpValue module
Signature Description MakeTuple: obj[] * Type -> obj
Creates a new tuple value.
MakeRecord: Type * obj[] -> obj
Creates a new record value.
MakeUnion: UnionCaseInfo * obj[] -> obj
Creates a new instance of a discriminated union. You can get an instance of UnionCaseInfo by calling FSharpType.GetUnionCases.
Dynamic Invocation If you can go about dynamically loading and instantiating types, why stop there? In .NET you can do dynamic invocation, which is a fancy term for late binding, which is in turn a fancy way to say “calling methods at runtime which you didn’t know about at compile time.” Using reflection you can get an instance of a method or property and call it.
Example 12–7 defines a class Book and dynamically gets an instance of the type’s CurrentPage property. That property can then be updated dynamically without manipulating an instance of Book directly, but rather calling SetValue on the returned PropertyInfo object.
Example 12–7. Dynamic invocation > // Type for representing a book type Book(title, author) = // Current page, if the book is opened let mutable m_currentPage : int option = None
12
O’Reilly Media, Inc. 4/2/2012
member this.Title = title member this.Author = author member this.CurrentPage with get () = m_currentPage and set x = m_currentPage <- x override this.ToString() = match m_currentPage with | Some(pg) -> sprintf "%s by %s, opened to page %d" title author pg | None -> sprintf "%s by %s, not currently opened" title author;; ...snip... > let afternoonReading = new Book("The Mythical Man Month", "Brooks");; val afternoonReading : Book = The Mythical Man Month by Brooks, not currently opened > let currentPagePropertyInfo = typeof<Book>.GetProperty("CurrentPage");; val currentPagePropertyInfo : PropertyInfo = Microsoft.FSharp.Core.FSharpOption`1[System.Int32] CurrentPage > currentPagePropertyInfo.SetValue(afternoonReading, Some(214), [| |]);; val it : unit = () > afternoonReading.ToString();; val it : string = "The Mythical Man Month by Brooks, opened to page 214"
Using late binding isn’t that common because normally if you are given an obj you know what types to expect, so you can use a dynamic cast (:?>) and then call the expected method. Late binding is typically used in dynamic languages, in which methods and properties can be added to objects at runtime. So you need to look up if the given method or property even exists before calling it!
The Question Mark Operators As you saw in the previous example, dynamically getting a property and calling it can feel clunky in F#. For that reason, the question mark ? and question mark setter ?<- operators were introduced. Functions defined with that name are treated specially by the F# compiler, and make late binding much easier to perform.
If a symbolic operator named ? is defined, then when it is called the first parameter will be the expression on the left hand side and the text on the right hand side will be passed in as a string parameter.
The following example defines a question mark operator that checks if a property exists on a type, printing the result to the screen. When using the . operator to access class members, whether or not the member exists is checked at compile time. With the question mark operator you get the text of the member name and can do the check at runtime.
> // Use the Question Mark operator to check if a type // contains a given property. let (?) (thingey : obj) (propName : string) = let ty = thingey.GetType() match ty.GetProperty(propName) with
13
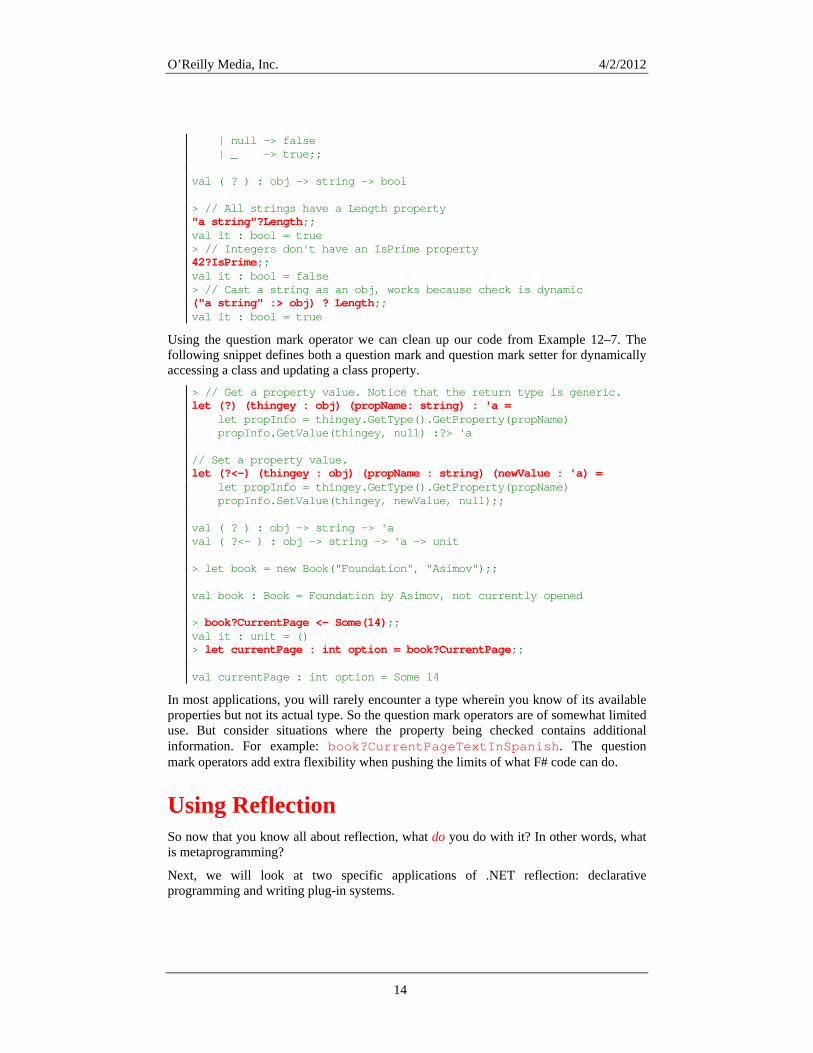
O’Reilly Media, Inc. 4/2/2012
| null -> false | _ -> true;; val ( ? ) : obj -> string -> bool > // All strings have a Length property "a string"?Length;; val it : bool = true > // Integers don't have an IsPrime property 42?IsPrime;; val it : bool = false > // Cast a string as an obj, works because check is dynamic ("a string" :> obj) ? Length;; val it : bool = true
Using the question mark operator we can clean up our code from Example 12–7. The following snippet defines both a question mark and question mark setter for dynamically accessing a class and updating a class property.
> // Get a property value. Notice that the return type is generic. let (?) (thingey : obj) (propName: string) : 'a = let propInfo = thingey.GetType().GetProperty(propName) propInfo.GetValue(thingey, null) :?> 'a // Set a property value. let (?<-) (thingey : obj) (propName : string) (newValue : 'a) = let propInfo = thingey.GetType().GetProperty(propName) propInfo.SetValue(thingey, newValue, null);; val ( ? ) : obj -> string -> 'a val ( ?<- ) : obj -> string -> 'a -> unit > let book = new Book("Foundation", "Asimov");; val book : Book = Foundation by Asimov, not currently opened > book?CurrentPage <- Some(14);; val it : unit = () > let currentPage : int option = book?CurrentPage;; val currentPage : int option = Some 14
In most applications, you will rarely encounter a type wherein you know of its available properties but not its actual type. So the question mark operators are of somewhat limited use. But consider situations where the property being checked contains additional information. For example: book?CurrentPageTextInSpanish. The question mark operators add extra flexibility when pushing the limits of what F# code can do.
Using Reflection So now that you know all about reflection, what do you do with it? In other words, what is metaprogramming?
Next, we will look at two specific applications of .NET reflection: declarative programming and writing plug-in systems.
14

O’Reilly Media, Inc. 4/2/2012
Declarative Programming Perhaps the simplest thing to do when using reflection is to create more declarative code. Rather than hardcoding data into properties and methods, you can encode data by using attributes. This leads to potentially cleaner and more readable code.
Consider Example 12–8, which defines a function determineBoxToUse to calculate the proper container to ship an item in. Each item that can be shipped inherits from the ShippingItem class and overrides the Weight and Dimension properties, which are used to determine the correct box size.
No reflection or declarative programming is used just yet; we’ll see how we can improve upon this code next.
Example 12–8. Simple shipping software /// Pounds [<Measure>] type lb [<Measure>] type inches type Container = | Envelope | Box | Crate type Dimensions = { Length : float<inches>; Width : float<inches>; Height : float<inches> } [<AbstractClass>] type ShippingItem() = abstract Weight : float<lb> abstract Dimension : Dimensions // Piece of paper describing what is in the box type ShippingManifest() = inherit ShippingItem() override this.Weight = 0.01<lb> override this.Dimension = { Length = 11.00<inches> Width = 8.50<inches> Height = 0.01<inches> } // Will it blend? type Blender() = inherit ShippingItem() override this.Weight = 14.00<lb> override this.Dimension = { Length = 6.0<inches>; Width = 5.0<inches>
15

O’Reilly Media, Inc. 4/2/2012
Height = 12.0<inches> } /// Partial active pattern which matches only if the input is /// greater than its parameter. let (|GreaterThan|_|) (param : float<'a>) input = if param > input then Some() else None let determineBoxToUse(item : ShippingItem) = match item.Weight, item.Dimension with // Heavy orders must always go into a crate | GreaterThan 10.0<lb>, _ -> Crate // Large orders must always go into a crate | _, { Length = GreaterThan 24.0<inches>; Width = _; Height = _} | _, { Length = _; Width = GreaterThan 24.0<inches>; Height = _} | _, { Length = _; Width = _; Height = GreaterThan 24.0<inches>} -> Crate // Beefy orders must go into a box | GreaterThan 2.0<lb> _, _ -> Box // Min dimensions for a box | _, { Length = GreaterThan 10.0<inches>; Width = _; Height = _} | _, { Length = _; Width = GreaterThan 10.0<inches>; Height = _} | _, { Length = _; Width = _; Height = GreaterThan 10.0<inches>} -> Box // Looks like an envelope will do | _ -> Envelope
Example 12–8 seems simple enough, but the code doesn’t scale very well. Imagine you need to extend it so that you can add special handling instructions. For example, suppose you need to account for the fact that some shipping items are fragile or flammable.
Using the fully object-oriented approach, you might extend the ShippingItem base class and add new properties.
[<AbstractClass>] type ShippingItem() = abstract Weight : float<lb> abstract Dimension : Dimensions abstract Fragile : bool abstract Flammable : bool
But because you are adding a new property to the base class, you either need to give the Fragile property a default implementation, or you need to provide an implementation for every single class which inherits from ShippingItem. You then suffer this same problem every time you want to extend ShippingItem in some way – edit every single class or provide a default implementation.
Providing a default implementation may seem simple, but remember that it adds complexity to the type. If you are inheriting from ShippingItem and see 15+ abstract
16

O’Reilly Media, Inc. 4/2/2012
methods or properties, it may take some time to determine which ones are important and which ones are not.
For many items it would be far easier to have them declare any special handling needs themselves, rather than adding dozens of “one-off” properties to the ShippingItem base class. You can use attributes to annotate these types with their special needs.
Example 12–9 defines several attributes for annotating types to be shipped, so that later special shipping requirements can be determined. This frees the base type from needing to modify any special flags, and allows new shipping items to be written in a more declarative way. (In fact, the Weight and Dimension properties could also be replaced with attributes.)
Example 12–9. Using attributes for declarative programming open System type FragileAttribute() = inherit System.Attribute() type FlammableAttribute() = inherit System.Attribute() type LiveAnimalAttribute() = inherit System.Attribute() /// A real, live wombat delivered right to your door! [<LiveAnimal>] type Wombat() = inherit ShippingItem() override this.Weight = 60.0<lb> override this.Dimension = { Length = 39.0<inches> Width = 10.0<inches> Height = 13.0<inches> } [<Fragile; Flammable>] type Fireworks() = inherit ShippingItem() override this.Weight = 5.0<lb> override this.Dimension = { Length = 10.0<inches> Width = 8.0<inches> Height = 5.0<inches> }
The following snippet defines a getShippingRequirements function that uses an inner function named containsAttribute to check if a given object is marked with a specific attribute. This is then used to check the items to be shipped and determine additional requirements.
open System.Collections.Generic
17

O’Reilly Media, Inc. 4/2/2012
type ShippingRequirements = | NeedInsurance of ShippingItem | NeedSignature of ShippingItem | NeedBubbleWrap of ShippingItem /// Get any additional requirements for shipping the package let getShippingRequirements (contents : ShippingItem list) = let containsAttribute (targetAttrib : Type) x = x.GetType().GetCustomAttributes(false) |> Array.tryFind(fun attr -> attr.GetType() = targetAttrib) |> Option.isSome let itemsWithAttribute attr = contents |> List.filter (containsAttribute attr) let requirements = new HashSet<ShippingRequirements>() // Include fragile items itemsWithAttribute typeof<FragileAttribute> |> List.iter (fun item -> requirements.Add(NeedBubbleWrap(item)) |> ignore) // Include flammable items itemsWithAttribute typeof<FlammableAttribute> |> List.iter (fun item -> requirements.Add(NeedInsurance(item)) |> ignore) // Include live animals itemsWithAttribute typeof<LiveAnimalAttribute> |> List.iter (fun item -> requirements.Add(NeedSignature(item)) |> ignore) // Return the list of special shipping requirements Seq.toList requirements
Plug-in Architecture Another use of reflection is to allow for a plug-in architecture, where other developers can extend your application by creating new .NET assemblies that conform to a specific contract. You can then use reflection to dynamically load those assemblies and call into the other programmer’s code.
Typically this is done through a two-step process. First, you create an assembly to define the core infrastructure pieces, such as an interface and/or custom attributes to define new plug-ins. Then you have your application search other assemblies for types that look like plug-ins and instantiate them.
The following examples will continue our delivery system implementation by allowing other developers to create new methods for delivering packages.
If your application has more serious requirements around extensibility, consider using the Managed Extensibility Framework. It is a library built into the .NET Framework for writing and consuming plugins like the one described here.
18

O’Reilly Media, Inc. 4/2/2012
Plug-in interfaces
Example 12–10 defines the code for DeliverySystem.Core.dll, which is a library future plug-ins will need to reference. It defines an interface IDeliveryMethod which future plug-ins must implement.
Example 12–10. DeliverySystem.Core.dll // DeliverySystem.Core.dll namespace DeliverySystem.Core /// Represents a package to be delivered type Package = class (* ... *) end /// Package destination type Destination = { Address : string City : string State : string Zip : int Country : string } /// Interface for new delivery systems to be added type IDeliveryMethod = interface abstract MethodName : string abstract DeliverPackage : Package * Destination -> unit end
Next, let’s author a simple plugin. Example 12–11 defines a new assembly, which references DeliverySystem.Core.dll, and implements a new, high-speed delivery system called CarrierPigeon.
Example 12–11. CarrierPigeonPlugin.dll // CarrierPigeonPlugin.dll // References DeliverySystem.Core.dll open DeliverySystem.Core type CarrierPigeon() = interface IDeliveryMethod with member this.MethodName = "Carrier Pigeon" member this.DeliverPackage (pkg, dest) = (* A lot of code using the System.Animals.Pigeon APIs *) ()
19
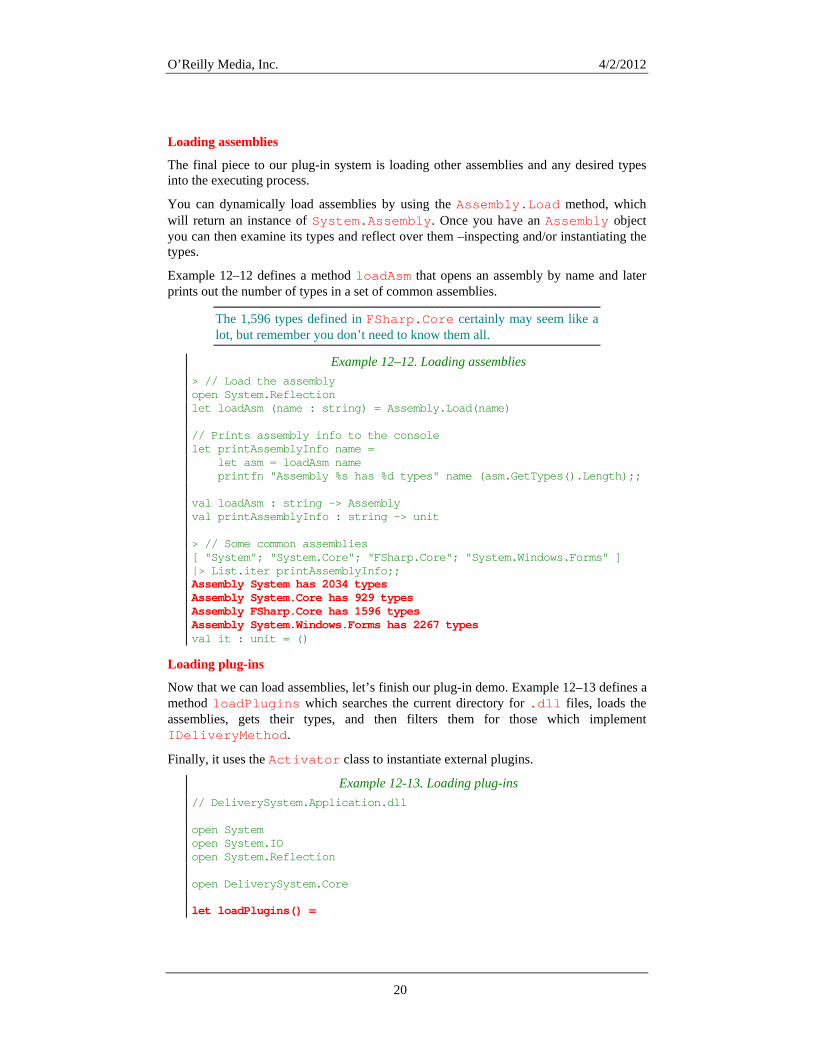
O’Reilly Media, Inc. 4/2/2012
Loading assemblies
The final piece to our plug-in system is loading other assemblies and any desired types into the executing process.
You can dynamically load assemblies by using the Assembly.Load method, which will return an instance of System.Assembly. Once you have an Assembly object you can then examine its types and reflect over them –inspecting and/or instantiating the types.
Example 12–12 defines a method loadAsm that opens an assembly by name and later prints out the number of types in a set of common assemblies.
The 1,596 types defined in FSharp.Core certainly may seem like a lot, but remember you don’t need to know them all.
Example 12–12. Loading assemblies > // Load the assembly open System.Reflection let loadAsm (name : string) = Assembly.Load(name) // Prints assembly info to the console let printAssemblyInfo name = let asm = loadAsm name printfn "Assembly %s has %d types" name (asm.GetTypes().Length);; val loadAsm : string -> Assembly val printAssemblyInfo : string -> unit > // Some common assemblies [ "System"; "System.Core"; "FSharp.Core"; "System.Windows.Forms" ] |> List.iter printAssemblyInfo;; Assembly System has 2034 types Assembly System.Core has 929 types Assembly FSharp.Core has 1596 types Assembly System.Windows.Forms has 2267 types val it : unit = ()
Loading plug-ins
Now that we can load assemblies, let’s finish our plug-in demo. Example 12–13 defines a method loadPlugins which searches the current directory for .dll files, loads the assemblies, gets their types, and then filters them for those which implement IDeliveryMethod.
Finally, it uses the Activator class to instantiate external plugins.
Example 12-13. Loading plug-ins // DeliverySystem.Application.dll open System open System.IO open System.Reflection open DeliverySystem.Core let loadPlugins() =
20

O’Reilly Media, Inc. 4/2/2012
21
// Returns whether or not a type implements the given interface let typeImplementsInterface (interfaceTy : Type) (ty : Type) = printfn "Checking %s" ty.Name match ty.GetInterface(interfaceTy.Name) with | null -> false | _ -> true Directory.GetFiles(Environment.CurrentDirectory, "*.dll") // Load all of the assembly's types |> Array.map (fun file -> Assembly.LoadFile(file)) |> Array.map(fun asm -> asm.GetTypes()) |> Array.concat // Just get types that implement IDeliveryMethod |> Array.filter (typeImplementsInterface typeof<IDeliveryMethod>) // Instantiate each plugin |> Array.map (fun plugin -> Activator.CreateInstance(plugin)) // Cast the obj to IDeliveryMethod |> Array.map (fun plugin -> plugin :?> IDeliveryMethod) [<EntryPoint>] let main(_) = let plugins = loadPlugins() plugins |> Array.iter (fun pi -> printfn "Loaded Plugin - %s" pi.MethodName) (* Ship some packages! *) 0
It may seem like a lot of extra work to go loading external assemblies and instantiating their types, but remember that the final application has no knowledge of the types it will load ahead of type. So using reflection you can extend and modify the behavior of an application without actually modifying its source.

O’Reilly Media, Inc. 4/2/2012
13 Computation Expressions
In Chapters 2, 3, and 4 we covered list, sequence, and array comprehensions, which are ways to write integrated F# code that ultimately produce a collection of ordered elements in list, sequence, or array form. These comprehensions are not just syntactic sugar built into the language, but rather an advanced feature at work called computation expressions. (Less formally referred to as workflows.)
In fact, this same technique that simplifies declaring sequences can also be applied to asynchronous programming or creating domain specific languages.
In short, computation expressions allow you to take F# code and determine how it gets executed. Having the workflow do all the heavy lifting behind the scenes can dramatically reduce redundant code and in some ways extend the F# language itself.
Toward Computation Expressions Let’s review briefly what’s possible with sequence expressions – they allow you to define a sequence by embedding some F# code into a seq computation expression. Example 13–1 shows a sequence expression for generating the days of the year.
Notice that you can write pretty much any F# code inside the seq { } block, and elements are produced from the sequence as items are returned with the yield keyword.
Example 13–1. Sequence expression for enumerating days of the year > // Sequence for producing month, day tuples let TheYear = daysOf seq { let months = [ "Jan"; "Feb"; "Mar"; "Apr"; "May"; "Jun"; "Jul"; "Aug"; "Sep"; "Oct"; "Nov"; "Dec" ] let daysInMonth month = match month with
1

O’Reilly Media, Inc. 4/2/2012
| "Feb" -> 28 | "Apr" | "Jun" | "Sep" | "Nov" -> 30 | _ -> 31 for month in months do for nth month do day = 1 to daysInMo yield (month, day) };; val daysOfTheYear : seq<string * int> > daysOfTheYear;; val it : seq<string * int> = seq [("Jan", 1); ("Jan", 2); ("Jan", 3); ("Jan", 4); ...] > Seq.length daysOfTheYear;; val it : int = 365
It is clear that the code you can put inside of a sequence expression – and by extension any computation expressions – is sufficient for performing powerful computations. In fact the only limitations to the F# code you can put inside of a computation expression are:
• No new types may be declared within a computation expression.
• Mutable values cannot be used inside computation expressions; you must use ref cells instead.
I’ve claimed that computation expressions can dramatically simplify code. To demonstrate this, let me provide a motivating example.
Example 13–2 tries to do some basic math, except rather than leaving division up to chance – and potentially throwing a DivideByZeroException – each division is wrapped into a custom type that will indicate success or failure.
The computation preformed is a simple electrical calculation: the total resistance of three resistors in parallel, which requires four division operations. Because we want to check the result of division against Success or DivByZero, the code ends up looking excessively complex, because after each division we much check if we want to continue the computation or stop with a DivByZero.
Example 13–2. Setting the state for custom workflows type Result = Success of float | DivByZero let divide x y = match y with | 0.0 -> DivByZero | _ -> Success(x / y) // Total resistance of three resistors in parallel is given // by: 1/R_e = 1/R_1 + 1/R_2 + 1/R_3 let totalResistance r1 r2 r3 = let r1Result = divide 1.0 r1 match r1Result with | DivByZero -> DivByZero
2

O’Reilly Media, Inc. 4/2/2012
| Success(x) -> let r2Result = divide 1.0 r2 match r2Result with | DivByZero -> DivByZero | Success(y) -> let r3Result = divide 1.0 r3 match r3Result with | DivByZero -> DivByZero | Success(z) -> let finalResult = divide 1.0 (x + y + z) finalResult
While this code works as expected, it is clear that programming in this style is tedious and error prone. Ideally you could define a new function called let_with_check that did the result checking for you. This function could check the result of a call to divide and if it was Success then the next line of code would execute, otherwise the function would return DivByZero.
let e r1 r2 r3 = totalResistanc let_with_check x = divide 1.0 r1 let_with_check y = divide 1.0 r2 let_with_check z = divide 1.0 r3 return_with_check 1.0 (x + y + z)
However, the special function let_with_check cannot be added to the F# language because it would have to abnormally break control flow. That is, in F# there is no way to exit a function prematurely other than throwing an exception.
If only there was a way to chop this function up into different parts, and have the let_with_check take two parameters, the first being the result of divide, and the second being a function that represents the rest of the computation to be performed. (If you recall, this is known as a continuation, from Chapter 7.)
Example 13–3 defines a function let_with_check that does just that. It takes two parameters, the result of a division operation, and a function representing the rest of the computation. And if the result returned DivByZero, then the rest of the computation is not executed.
Example 133–3. Defining let_with_check let let_with_check result restOfComputation = match result with | DivByZero -> DivByZero | Success(x) -> restOfComputation x let totalResistance r1 r2 r3 = let_with_check 0 r1) (divide 1. (fun x -> let_with_check (divide 1.0 r2) (fun y -> let_with_check 0 r3) (divide 1. (fun z -> divide 1.0 (x + y + z)) )
3

O’Reilly Media, Inc. 4/2/2012
)
With the code indented and the additional lambda expressions, it looks even worse than it did before. However, let’s try to rewrite our totalResistance function once more, but this time putting the lambdas on the same line.
If we write it the following way, the code almost looks like we originally wanted; giving the appearance that the function will abruptly stop as soon as the first DivByZero is encountered.
let totalResistance r1 r2 r3 = let_with_check (divide 1.0 r1) (fun x -> let_with_check (divide 1.0 r2) (fun y -> let_with_check (divide 3) (fun z -> 1.0 r divide 1.0 (x + y + z) ) ) )
Computation Expression Builders Computation expressions in a nutshell are syntactic transforms for F# code, just like let_with_check in the previous example. Let’s look at how you can leverage F#’s support for computation expressions to simplify your code.
Example 13–4 shows how to create a custom workflow. We’ll go over what’s going on behind the scenes in a moment. For now just look at the implementation of the Bind method, the defined { } block, and the use of the let! keyword.
Example 133–4. The success/failure computation expression type Result = Success of float | DivByZero let divide x y = match y with | 0.0 -> DivByZero | _ -> Success(x / y) type DefinedBuilder() = member this.Bind ((x : Result), (rest : float -> Result)) = // If the result is Success(_) then execute the // rest of the function. Otherwise terminate it // prematurely. match x with | Success(x) -> rest x | DivByZero -> DivByZero member this.Return (x : 'a) = x // Create an instance of our computation expression builder let defined = DefinedBuilder() let totalResistance r1 r2 r3 = defined { let! x = divide 1.0 r1 let! y = divide 1.0 r2 let! z = divide 1.0 r3 return divide 1.0 (x + y + z) }
4

O’Reilly Media, Inc. 4/2/2012
You can test this in FSI and verify that the computation expression version gets the same results, and in one-third the lines of code!
> totalResistance 0.01 0.75 0.33;; val it : Result = Success 0.009581881533 > totalResistance 0.00 0.55 0.75;; val it : Result = DivByZero
All computation expressions do is break the expression into multiple function calls to the computation expression builder. In the previous example, it was of type DefinedBuilder. To use the computation expression builder, all you need to do is put an instance of it out in front of two curly braces { } surrounding the code you want to execute. In the previous example, it was an instance of DefinedBuilder via value defined.
Every let! is replaced with a call to the builder’s Bind method, where the evaluation of the right hand side of the equals sign is the first parameter, and the second parameter is the function representing the rest of the computation to be performed. This is how the computation stops after the first DivByZero is reached. In the computation expression builder’s implementation of Bind, the rest of the computation isn’t executed if the result is DivByZero. If the result is Success, then the rest of the computation is performed.
Example 13–5 shows the expansion of this in a desugared form of the defined workflow, which is strikingly similar to the code you saw in Example 13–3.
Example 133–5. Desugared form of a computation expression // De-sugared form let totalResistance r1 r2 r3 = defined.Bind( (divide 1.0 r1), (fun x -> defined.Bind( (divide 1.0 r2), (fun y -> defined.Bind( (divide 1.0 r3), (fun z -> defined.Return( divide 1.0 (x + y + z) ) ) ) ) ) ) )
Inside of a custom workflow builder you can write normal F# code, but in addition you have access to new keywords and abilities such as let!, return, and yield. By using these new primitives in the body of the computation expression, you can extend how F# processes the code. (For example, adding custom semantics for when the yield keyword is encountered.)
By providing a Bind method, you provided a way to determine how let! was computed. Similarly, providing a Return method will enable you to determine how the
5

O’Reilly Media, Inc. 4/2/2012
return keyword works. But a workflow builder can provide more methods to determine how F# code gets executed. A full list is in Table 13–1.
Another way to think about computation expressions is that they enable you to insert code in-between the various steps of the computation; doing any necessary background processing without requiring you to explicitly write the code.
Table 133–1. Computation expression methods
Method Signature Description
member For: seq<'a> * ('a -> Result<unit>) -> Result<unit>
Enables execution of for loops. The parameters are the values which the loop executes on and the body of the for loop.
member Zero: unit -> Result<unit>
Enables execution of unit expressions, such as the result of an if expression without a matching else if the predicate evaluates to false.
member Combine: Result<unit> * Result<'a> -> Result<'a>
Used to link together computation expression parts, for example two for loops in sequence.
member While: (unit -> bool) * Result<unit> -> Result<unit>
Enables execution of while loops. The parameters are the function which determines whether or not the while loop should continue and the body of the loop.
member Return: 'a -> Result<'a>
Enables execution of the return keyword.
member ReturnFrom: 'a -> Result<'a>
Enables execution of the return! keyword.
member Yield: 'a -> Result<'a>
Enables execution of the yield keyword.
member YieldFrom: seq<'a> -> Result<'a>
Enables execution of the yield! keyword.
member Delay: (unit -> Result<'a>) -> Result<'a>
This operation is typically used in conjunction with Combine, to make sure that operations get executed in the correct order (in case they have side effects).
member Run: If provided, the method will be called at the very start of the
6
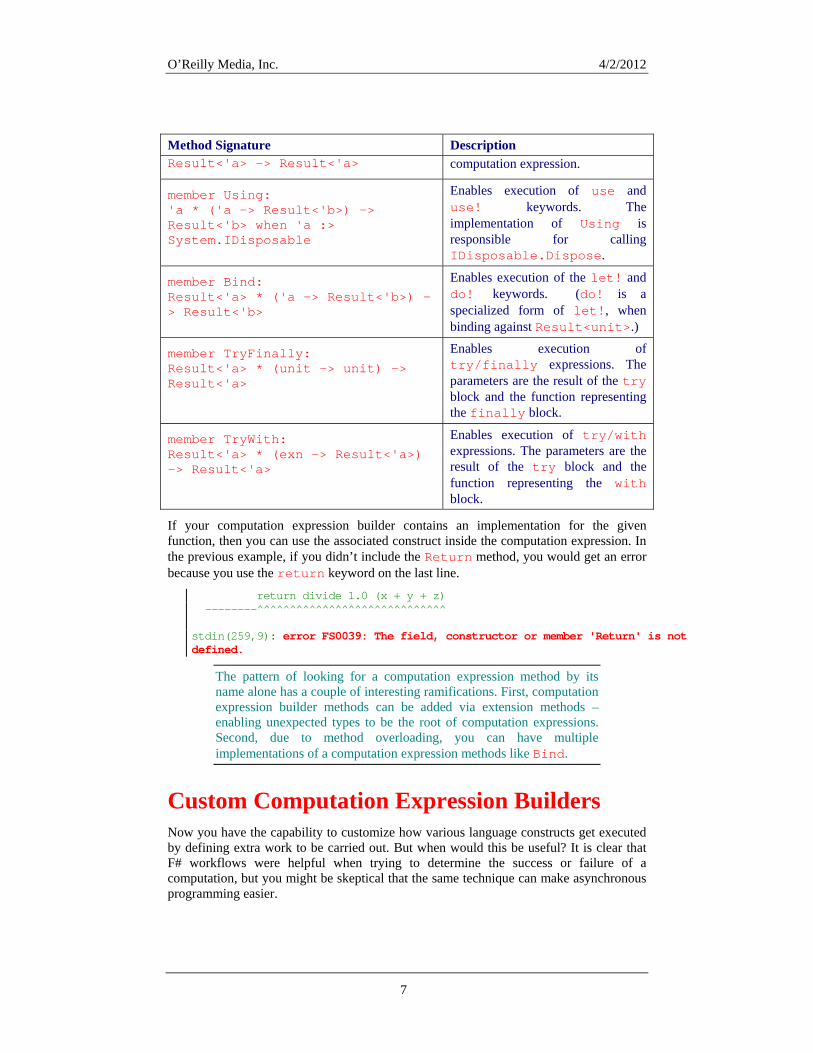
O’Reilly Media, Inc. 4/2/2012
7
Method Signature Description Result<'a> -> Result<'a> computation expression.
member Using: 'a * ('a -> Result<'b>) -> Result<'b> when 'a :> System.IDisposable
Enables execution of use and use! keywords. The implementation of Using is responsible for calling IDisposable.Dispose.
member Bind: Result<'a> * ('a -> Result<'b>) -> Result<'b>
Enables execution of the let! and do! keywords. (do! is a specialized form of let!, when binding against Result<unit>.)
member TryFinally: Result<'a> * (unit -> unit) -> Result<'a>
Enables execution of try/finally expressions. The parameters are the result of the try block and the function representing the finally block.
member TryWith: Result<'a> * (exn -> Result<'a>) -> Result<'a>
Enables execution of try/with expressions. The parameters are the result of the try block and the function representing the with block.
If your computation expression builder contains an implementation for the given function, then you can use the associated construct inside the computation expression. In the previous example, if you didn’t include the Return method, you would get an error because you use the return keyword on the last line.
return divide 1.0 (x + y + z) --------^^^^^^^^^^^^^^^^^^^^^^^^^^^^^ stdin(259,9): error FS0039: The field, constructor or member 'Return' is not defined.
The pattern of looking for a computation expression method by its name alone has a couple of interesting ramifications. First, computation expression builder methods can be added via extension methods – enabling unexpected types to be the root of computation expressions. Second, due to method overloading, you can have multiple implementations of a computation expression methods like Bind.
Custom Computation Expression Builders Now you have the capability to customize how various language constructs get executed by defining extra work to be carried out. But when would this be useful? It is clear that F# workflows were helpful when trying to determine the success or failure of a computation, but you might be skeptical that the same technique can make asynchronous programming easier.

O’Reilly Media, Inc. 4/2/2012
Asynchronous Workflows Think about the most tedious aspects of parallel and asynchronous programming – dealing with threads. If you want your program to have two things going on at once, you need to spawn new threads, give them appropriate work, and then marshal their results back. It is just as painful to exploit IO-level parallelism. The .NET Framework provides asynchronous IO operations via FileStream.BeginRead and FileStream.BeginWrite. However using these constructs requires a messy combination of IAsyncResult interfaces, AsyncCallback delegates, and a lot of tedious code.
Even if you didn’t mind handling all the thread hopping and the managing of incomplete tasks yourself, it is still a pain to deal with exceptions. And, there is no good way to cancel the operation once it starts.
If only there were a way to abstract the code and wire in the thread hopping…. Fortunately, this library does exist and it is built into F#. F# asynchronous workflows is a type of computation expression builder specifically designed for asynchronous tasks.
Example 13–6 shows how to use an asynchronous workflow for reading and writing file data asynchronously. Note the use of let! to perform asynchronous operations; all the thread hopping will be performed in the implementation of the async builder’s Bind method. (If you recall, the details for how the async computation expression builder and how Async.Start work were be covered in Chapter 9.)
Example 133–6. F# asynchronous workflows open System.IO let cessFile (filePath : string) (processBytes : byte[] -> byte[]) = asyncPro async { printfn "Processing file [%s]" (Path.GetFileName(filePath)) let fileStream = new FileStream(filePath, FileMode.Open) let bytesToRead = int fileStream.Length let! data = fileStream.AsyncRead(bytesToRead) printfn "Opened [%s], read [%d] bytes" (Path.GetFileName(filePath)) data.Length let data' = processBytes data let resultFile = new FileStream(filePath + ".results", FileMode.Create) do! resultFile.AsyncWrite(data', 0, data'.Length) shed processing file [%s]" <| Path.GetFileName(filePath) printfn "Fini } |> Async.Start
Computation expressions weren’t added to the F# language with ultra-useful asynchronous workflows in mind, rather they just enable certain patterns of code which have the potential to be quite useful.
8
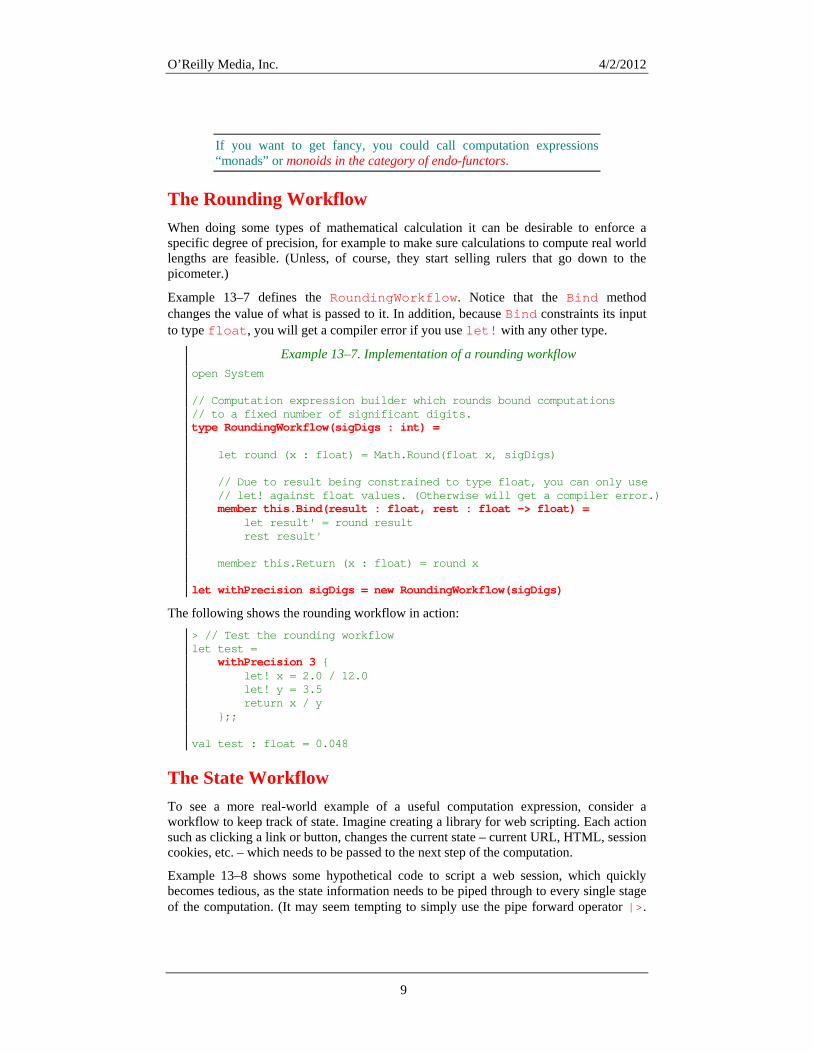
O’Reilly Media, Inc. 4/2/2012
If you want to get fancy, you could call computation expressions “monads” or monoids in the category of endo-functors.
The Rounding Workflow When doing some types of mathematical calculation it can be desirable to enforce a specific degree of precision, for example to make sure calculations to compute real world lengths are feasible. (Unless, of course, they start selling rulers that go down to the picometer.)
Example 13–7 defines the RoundingWorkflow. Notice that the Bind method changes the value of what is passed to it. In addition, because Bind constraints its input to type float, you will get a compiler error if you use let! with any other type.
Example 13–7. Implementation of a rounding workflow open System // Computation expression builder which rounds bound computations // to a fixed number of significant digits. type RoundingWorkflow(sigDigs : int) = let round (x : float) = Math.Round(float x, sigDigs) // Due to result being constrained to type float, you can only use // let! against float values. (Otherwise will get a compiler error.) member this.Bind(result : float, rest : float -> float) = let result' = round result rest result' member this.Return (x : float) = round x let withPrecision sigDigs = new RoundingWorkflow(sigDigs)
The following shows the rounding workflow in action: > // Test the rounding workflow let test = withPrecision 3 { let! x = 2.0 / 12.0 let! y = 3.5 return x / y };; val test : float = 0.048
The State Workflow To see a more real-world example of a useful computation expression, consider a workflow to keep track of state. Imagine creating a library for web scripting. Each action such as clicking a link or button, changes the current state – current URL, HTML, session cookies, etc. – which needs to be passed to the next step of the computation.
Example 13–8 shows some hypothetical code to script a web session, which quickly becomes tedious, as the state information needs to be piped through to every single stage of the computation. (It may seem tempting to simply use the pipe forward operator |>.
9
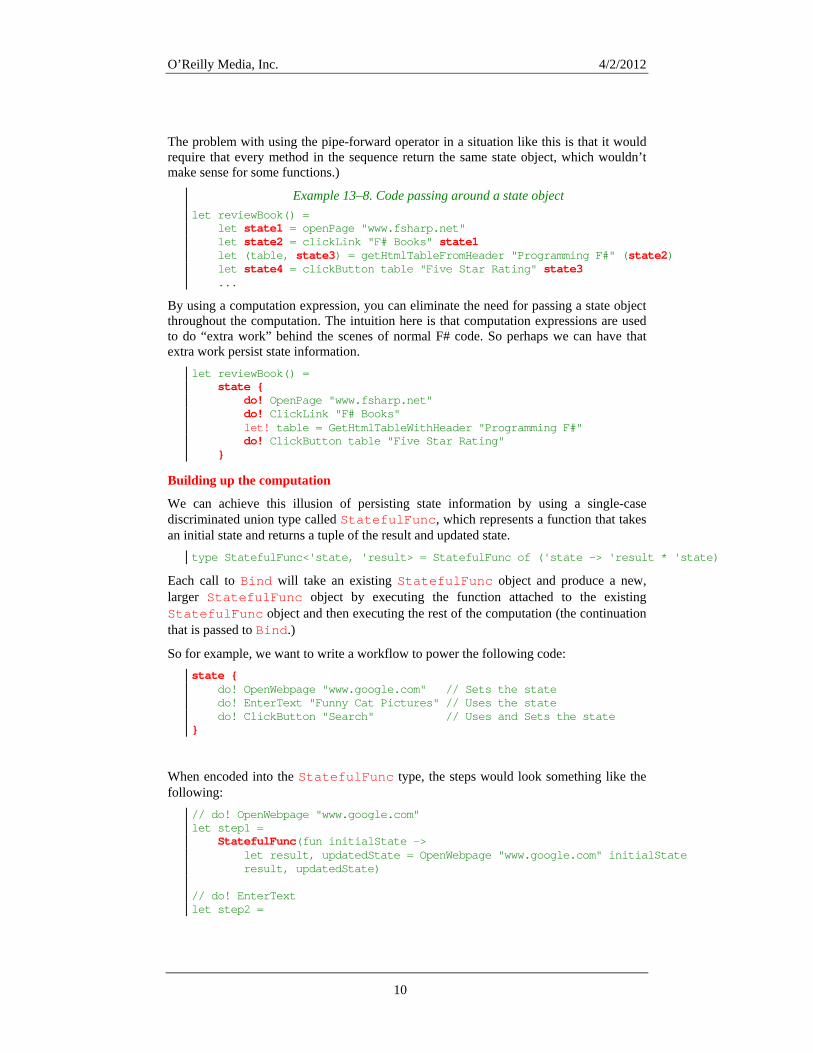
O’Reilly Media, Inc. 4/2/2012
The problem with using the pipe-forward operator in a situation like this is that it would require that every method in the sequence return the same state object, which wouldn’t make sense for some functions.)
Example 13–8. Code passing around a state object let reviewBook() = let state1 = openPage "www.fsharp.net" let state2 = Link "F# Books" state1 click let (table, state3) = getHtmlTableFromHeader "Programming F#" (state2) let state4 = clickButton table "Five Star Rating" state3 ...
By using a computation expression, you can eliminate the need for passing a state object throughout the computation. The intuition here is that computation expressions are used to do “extra work” behind the scenes of normal F# code. So perhaps we can have that extra work persist state information.
let ok() = reviewBo state { do! OpenPage "www.fsharp.net" do! ClickLink "F# Books" let! table = GetHtmlTableWithHeader "Programming F#" do! ClickButton table "Five Star Rating" }
Building up the computation
We can achieve this illusion of persisting state information by using a single-case discriminated union type called StatefulFunc, which represents a function that takes an initial state and returns a tuple of the result and updated state.
type StatefulFunc<'state, 'result> = StatefulFunc of ('state -> 'result * 'state)
Each call to Bind will take an existing StatefulFunc object and produce a new, larger StatefulFunc object by executing the function attached to the existing StatefulFunc object and then executing the rest of the computation (the continuation that is passed to Bind.)
So for example, we want to write a workflow to power the following code: state { do! OpenWebpage "www.google.com" // Sets the state do! EnterText "Funny Cat Pictures" // Uses the state do! ClickButton "Search" // Uses and Sets the state }
When encoded into the StatefulFunc type, the steps would look something like the following:
// do! OpenWebpage "www.google.com" let step1 = StatefulFunc(fun initialState -> let result, updatedState = OpenWebpage "www.google.com" initialState result, updatedState) // do! EnterText let step2 =
10
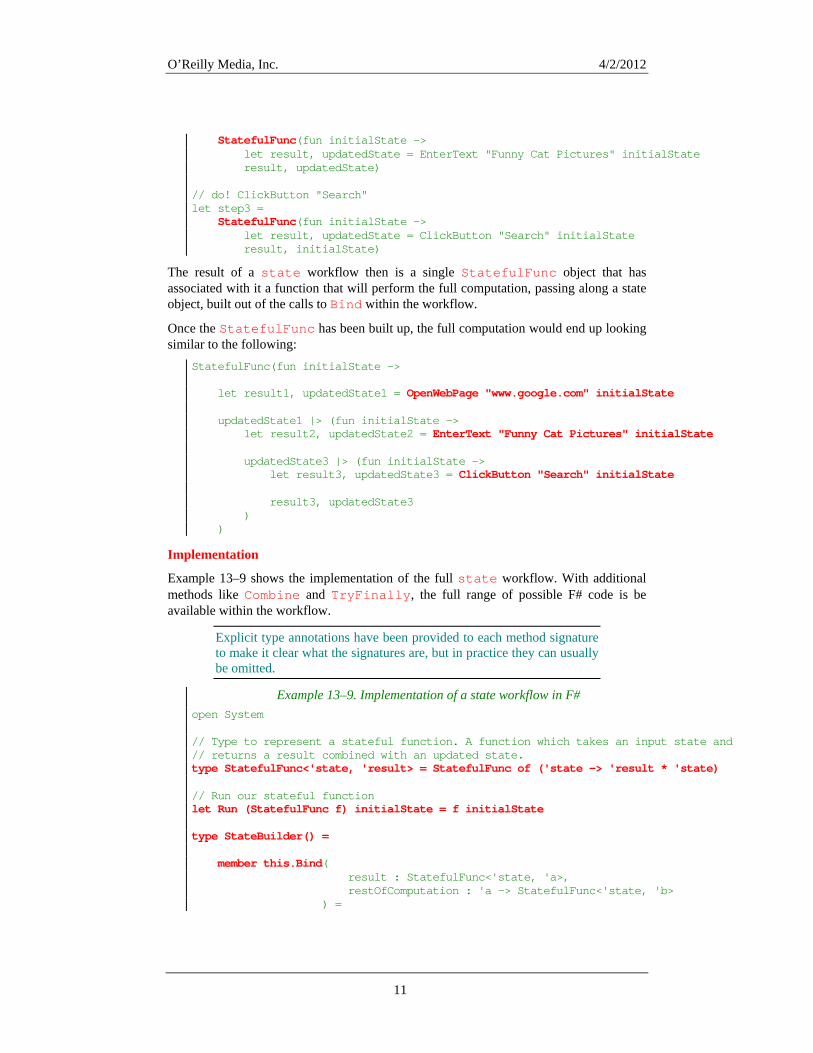
O’Reilly Media, Inc. 4/2/2012
StatefulFunc(fun initialState -> let result, updatedState = EnterText "Funny Cat Pictures" initialState result, updatedState) // do! ClickButton "Search" let step3 = StatefulFunc(fun initialState -> let result, updatedState = ClickButton "Search" initialState result, initialState)
The result of a state workflow then is a single StatefulFunc object that has associated with it a function that will perform the full computation, passing along a state object, built out of the calls to Bind within the workflow.
Once the StatefulFunc has been built up, the full computation would end up looking similar to the following:
StatefulFunc(fun initialState -> let result1, updatedState1 = OpenWebPage "www.google.com" initialState updatedState1 |> (fun initialState -> let result2, updatedState2 = EnterText "Funny Cat Pictures" initialState updatedState3 |> (fun initialState -> let result3, updatedState3 = ClickButton "Search" initialState result3, updatedState3 ) )
Implementation
Example 13–9 shows the implementation of the full state workflow. With additional methods like Combine and TryFinally, the full range of possible F# code is be available within the workflow.
Explicit type annotations have been provided to each method signature to make it clear what the signatures are, but in practice they can usually be omitted.
Example 13–9. Implementation of a state workflow in F# open System // Type to represent a stateful function. A function which takes an input state and // returns a result combined with an updated state. type StatefulFunc<'state, 'result> = StatefulFunc of ('state -> 'result * 'state) // Run our stateful function let Run (StatefulFunc f) initialState = f initialState type StateBuilder() = member this.Bind( result : StatefulFunc<'state, 'a>, restOfComputation : 'a -> StatefulFunc<'state, 'b> ) =
11

O’Reilly Media, Inc. 4/2/2012
StatefulFunc(fun initialState -> let result, updatedState = Run result initialState Run (restOfComputation result) updatedState ) member this.Combine( partOne : StatefulFunc<'state, unit>, partTwo : StatefulFunc<'state, 'a> ) = StatefulFunc(fun initialState -> let (), updatedState = Run partOne initialState Run partTwo updatedState ) member this.Delay( restOfComputation : unit -> StatefulFunc<'state, 'a> ) = StatefulFunc (fun initialState -> Run ( restOfComputation() ) initialState ) member this.For( elements : seq<'a>, forBody : ('a -> StatefulFunc<'state, unit>) ) = StatefulFunc(fun initialState -> let state = ref initialState for e in elements do let (), updatedState = Run (forBody e) (!state) state := updatedState // Return unit * finalState (), !state ) member this.Return(x : 'a) = StatefulFunc(fun initialState -> x, initialState) member this.Using<'a, 'state, 'b when 'a :> IDisposable> ( x : 'a, restOfComputation : 'a -> StatefulFunc<'state, 'b> ) = StatefulFunc(fun initialState -> try Run (restOfComputation x) initialState finally x.Dispose() )
12

O’Reilly Media, Inc. 4/2/2012
member this.TryFinally( tryBlock : StatefulFunc<'state, 'a>, finallyBlock : unit -> unit ) = StatefulFunc(fun initialState -> try Run tryBlock initialState finally finallyBlock() ) member this.TryWith( tryBlock : StatefulFunc<'state, 'a>, exnHandler : exn -> StatefulFunc<'state, 'a> ) = StatefulFunc(fun initialState -> try Run tryBlock initialState with | e -> Run (exnHandler e) initialState ) member this.While( predicate : unit -> bool, body : StatefulFunc<'state, unit> ) = StatefulFunc(fun initialState -> let state = ref initialState while predicate() = true do let (), updatedState = Run body (!state) state := updatedState // Return unit * finalState (), !state ) member this.Zero() = StatefulFunc(fun initialState -> (), initialState) // Declare the state workflow builder let state = StateBuilder() // Primitive functions for getting and setting state let GetState = StatefulFunc (fun state -> state, state) let SetState newState = StatefulFunc (fun prevState -> (), newState)
With the full workflow defined, Example 13–10 uses the state workflow to script a four-function calculator. (You can use the same state workflow for creating a web crawler, but the code to do that properly would easily dwarf the text in this chapter.)
13

O’Reilly Media, Inc. 4/2/2012
The state is represented by the current total and the calculator’s operational history. The functions Add, Subtract, Multiply, and Divide will take an input state, modify it, and return a new StatefulFunc object.
Example 133–10. Using the state workflow to create a calculator let Add x = state { let! currentTotal, history = GetState do! SetState (currentTotal + x, (sprintf "Added %d" x) :: history) } let Subtract x = state { let! currentTotal, history = GetState do! SetState (currentTotal - x, (sprintf "Subtracted %d" x) :: history) } let Multiply x = stat e { let! currentTotal, history = GetState do! SetState (currentTotal * x, (sprintf "Multiplied by %d" x) :: history) } let Divide x = state { let! currentTotal, history = GetState do! SetState (currentTotal / x, (sprintf "Divided by %d" x) :: history) }
Using functions like Add and Subtract within the state workflow will give the illusion that you are not passing the state around while in actuality a large StatefulFunc object is built up, which can be executed by passing it to the Run function.
> // Define the StatefulFunc we will use, no need to thread // the state parameter through each function. let calculatorActions = state { do! Add 2 do! Multiply 10 do! Divide 5 do! Subtract 8 return "Finished" } // Now run our StatefulFunc passing in an intial state let sfResult, finalState = Run calculatorActions (0, []);; val calculatorActions : StatefulFunc<(int * string list),string> = StatefulFunc <fun:Delay@324> val sfResult : string = "Finished" val finalState : int * string list = (-4, ["Subtracted 8"; "Divided by 5"; "Multiplied by 10"; "Added 2"])
F# workflows are a very advanced concept that can be difficult to grasp even by expert developers. But they can be used to simplify code by giving you execute in between computation steps. If you find yourself writing a lot of redundant, boilerplate code,
14

O’Reilly Media, Inc. 4/2/2012
15
consider looking into whether or not you can wrap that functionality inside of a computation expression.

O’Reilly Media, Inc. 4/2/2012
14 Quotations
In the previous chapter we looked at .NET reflection as a way to do metaprogramming; analyzing static type information to reason about program code. While metaprogramming using reflection can do things like load program plug-ins, if you want to reason about how that code operates, you are out of luck. The .NET reflection APIs allow you to get at the raw MSIL op codes, but you have to reverse engineer what that code does – a daunting task at best.
However, there are many applications where knowing not only the structure of program code but also how it operates can be beneficial. For example, taking a function written in F# and converting it into a form that can execute on a graphics card’s GPU. (Presumably to be executed much, much faster.)
F# provides a mechanism called quotation expressions by which you can access not only the static type information for a block of code, but also see how the code is structured – that is the F# compiler’s internal representation. (Sometimes referred to as an abstract syntax tree, or AST.)
Using F# quotations you can:
• Perform code analysis and inspection • Deferring computation to other platforms (SQL, GPU, and so on) • Generate new code
We will look at these capabilities shortly, but first let’s look at how we can get started with this language feature. Be warned though, quotations are deep wizardry, and not for the faint of heart. This chapter only provides a crash course on the subject. To truly master quotations, refer to online resources at the F# developer center at http://fsharp.net.
1

O’Reilly Media, Inc. 4/2/2012
Quotation Basics Simply put, a quotation is an object representing the structure of some F# code. You can get a hold of a quotation by placing quotation markers <@ @> or <@@ @@> around an expression.
> // Simple addition <@ 1 + 1 @>;; val it : Quotations.FSharpExpr<int> = Call (None, Int32 op_Addition[Int32,Int32,Int32](Int32, Int32), [Value (1), Value (1)]) {CustomAttributes = [NewTuple (Value ("DebugRange"), NewTuple (Value ("stdin"), Value (7), Value (3), Value (7), Value (8)))]; Raw = ...; Type = System.Int32;} > // Lambda expression <@@ fun x -> "Hello, " + x @@>;; val it : Quotations.FSharpExpr = Lambda (x, Call (None, System.String op_Addition[String,String,String](System.String, System.String), [Value ("Hello, "), x])) {CustomAttributes = [NewTuple (Value ("DebugRange"), NewTuple (Value ("stdin"), Value (10), Value (4), Value (10), Value (26)))]; Type = Microsoft.FSharp.Core.FSharpFunc`2[System.String,System.String];}
F# exposes quotations using the Expr<_> type defined in the Microsoft.FSharp.Quotations namespace. The generic type parameter of Expr<_> is the result of the expression, for example <@ 1 + 1 @> evaluates to Expr<int> because the expression 1 + 1 evaluates to an integer.
Using <@@ @@> will produce an untyped quotation, of type Expr, which doesn’t contain the expression’s return type. In most situations it won’t matter which way you quote code. Note that an Expr<_> can always be converted into an Expr by accessing its Raw property.
You can quote any arbitrary F# expression with the only restriction being that you cannot quote the use of an object expression. (Which if you recall is how F# introduces anonymous classes.)
Decomposing Quotations Once you have a quotation, deconstructing the AST is done using active patterns defined in the F# library. So while an Expr<_> represents a complicated tree-like data structure, you can use pattern matching to match against what the code represents with the additional benefit of being able to bind new values from the results of the pattern match.
Example 14–1 defines a function describeCode, which takes a quotation expression and prints a description of the code to the console. Notice that the pattern match does not use a dynamic type test to get the type of the expression, but rather is matching against
2
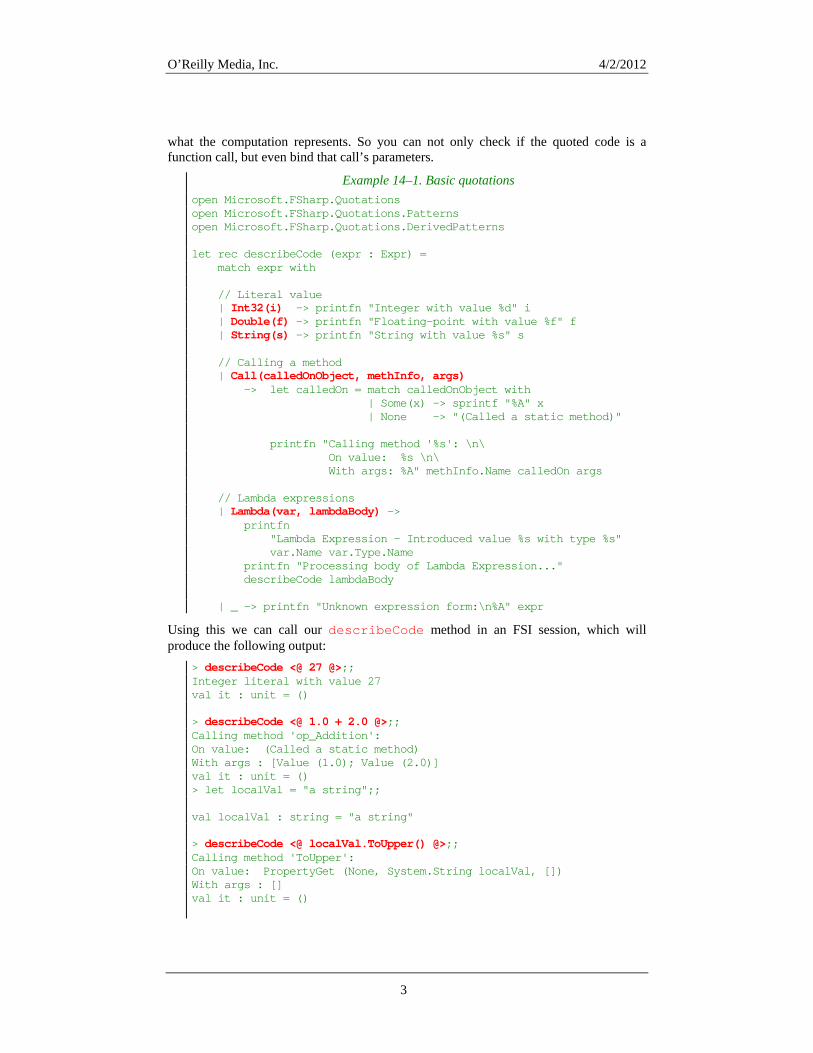
O’Reilly Media, Inc. 4/2/2012
what the computation represents. So you can not only check if the quoted code is a function call, but even bind that call’s parameters.
Example 14–1. Basic quotations open Microsoft.FSharp.Quotations open Microsoft.FSharp.Quotations.Patterns open Microsoft.FSharp.Quotations.DerivedPatterns let rec describeCode (expr : Expr) = match expr with // Literal value | Int32(i) -> printfn "Integer with value %d" i | Double(f) -> printfn "Floating-point with value %f" f | String(s) -> printfn "String with value %s" s // Calling a method | Call(calledOnObject, methInfo, args) -> let calledOn = match calledOnObject with | Some(x) -> sprintf "%A" x | None -> "(Called a static method)" printfn "Calling method '%s': \n\ On value: %s \n\ With args: %A" methInfo.Name calledOn args // Lambda expressions | Lambda(var, lambdaBody) -> printfn "Lambda Expression - Introduced value %s with type %s" var.Name var.Type.Name printfn "Processing body of Lambda Expression..." describeCode lambdaBody | _ -> printfn "Unknown expression form:\n%A" expr
Using this we can call our describeCode method in an FSI session, which will produce the following output:
> describeCode <@ 27 @>;; Integer literal with value 27 val it : unit = () > describeCode <@ 1.0 + 2.0 @>;; Calling method 'op_Addition': On value: (Called a static method) With args : [Value (1.0); Value (2.0)] val it : unit = () > let localVal = "a string";; val localVal : string = "a string" > describeCode <@ localVal.ToUpper() @>;; Calling method 'ToUpper': On value: PropertyGet (None, System.String localVal, []) With args : [] val it : unit = ()
3
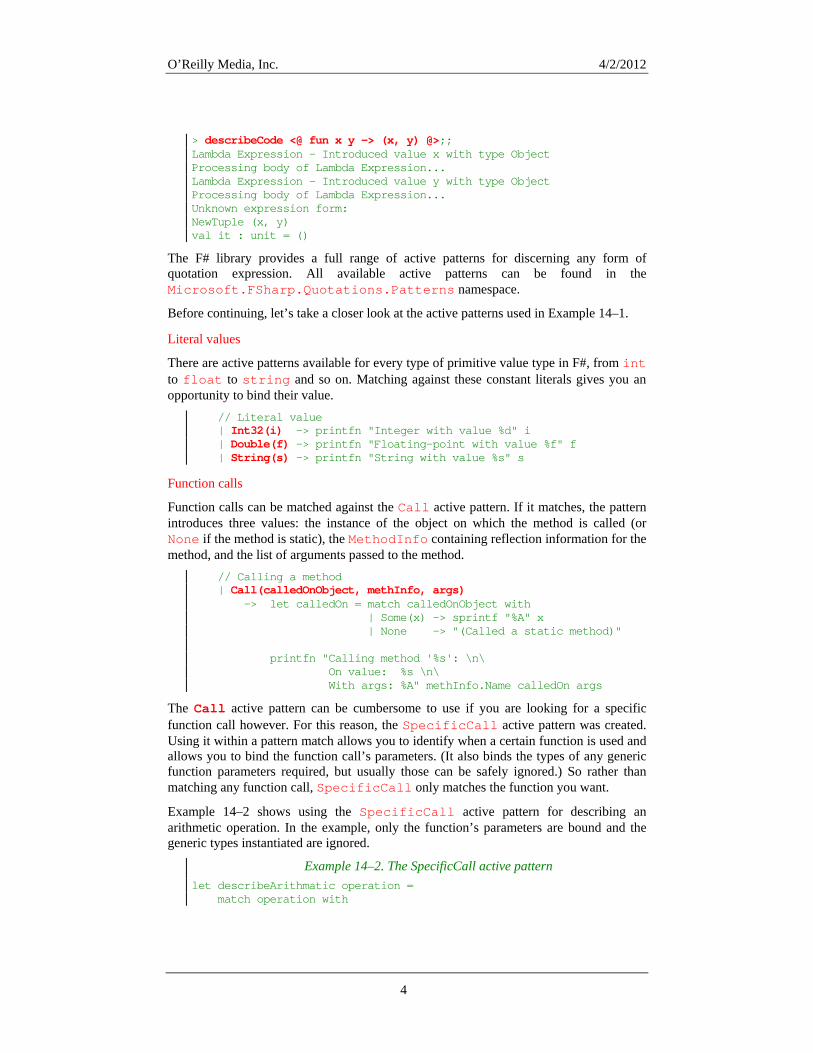
O’Reilly Media, Inc. 4/2/2012
> describeCode <@ fun x y -> (x, y) @>;; Lambda Expression - Introduced value x with type Object Processing body of Lambda Expression... Lambda Expression - Introduced value y with type Object Processing body of Lambda Expression... Unknown expression form: NewTuple (x, y) val it : unit = ()
The F# library provides a full range of active patterns for discerning any form of quotation expression. All available active patterns can be found in the Microsoft.FSharp.Quotations.Patterns namespace.
Before continuing, let’s take a closer look at the active patterns used in Example 14–1.
Literal values
There are active patterns available for every type of primitive value type in F#, from int to float to string and so on. Matching against these constant literals gives you an opportunity to bind their value.
// value Literal | Int32(i) -> printfn "Integer with value %d" i | Double(f) -> printfn "Floating-point with value %f" f | String(s) -> printfn "String with value %s" s
Function calls
Function calls can be matched against the Call active pattern. If it matches, the pattern introduces three values: the instance of the object on which the method is called (or None if the method is static), the MethodInfo containing reflection information for the method, and the list of arguments passed to the method.
// Calling a method | Call(calledOnObject, methInfo, args) -> let calledOn = match calledOnObject with | Some(x) -> sprintf "%A" x | None -> "(Called a static method)" printfn "Calling method '%s': \n\ On value: %s \n\ With args: %A" methInfo.Name calledOn args
The Call active pattern can be cumbersome to use if you are looking for a specific function call however. For this reason, the SpecificCall active pattern was created. Using it within a pattern match allows you to identify when a certain function is used and allows you to bind the function call’s parameters. (It also binds the types of any generic function parameters required, but usually those can be safely ignored.) So rather than matching any function call, SpecificCall only matches the function you want.
Example 14–2 shows using the SpecificCall active pattern for describing an arithmetic operation. In the example, only the function’s parameters are bound and the generic types instantiated are ignored.
Example 14–2. The SpecificCall active pattern let describeArithmatic operation = match operation with
4

O’Reilly Media, Inc. 4/2/2012
| SpecificCall <@ (+) @> (_, _, [lhs; rhs]) -> printfn "Addition." | SpecificCall <@ (-) @> (_, _, [lhs; rhs]) -> printfn "Subtraction." | SpecificCall <@ (*) @> (_, _, [Int32(0); _]) | SpecificCall <@ (*) @> (_, _, [_; Int32(0)]) -> printfn "Multiplication by zero." | SpecificCall <@ (*) @> (_, _, [lhs; rhs]) -> printfn "Multiplcation." | SpecificCall <@ (/) @> (_, _, [lhs; Int32(0)]) -> printfn "Division by zero." | SpecificCall <@ (/) @> (_, _, [lhs; rhs]) -> printfn "Division." | _ -> failwith "Unknown quotation form."
Function values
Function values are matched using the Lambda active pattern. The two values bound in the active pattern are of type Var and Expr.
// Lambda expressions | Lambda(var, lambdaBody) -> printfn "Lambda Expression - Introduced value %s with type %s" var.Name var.Type.Name printfn "Processing body of Lambda Expression..." describeCode lambdaBody
The Expr is simply the body of the lambda expression. The Var represents the new value introduced by the lambda expression (its parameter.)
When quoting code, anytime you decompose an expression that introduces a new value, such as a let binding, the newly introduced value is represented as a Var.
Quoting Method Bodies While enclosing an expression in <@ @> marks returns the F# compiler’s representation of that code, it is usually insufficient because that code calls into functions, which then call into other functions and so on. To get the full abstract syntax tree of the expression, you need to drill into method bodies as well. By default, the F# compiler cannot return the quoted form of functions and class member bodies in a quotation.
To allow function bodies to be included inside of a qutotation you can provide the [<ReflectedDefinition>] attribute. Methods marked with this attribute can be further expanded upon when processing the quotation by using the (|MethodWithReflectedDefinition|_|) active pattern.
Example 14–3 is the same describeCode function with a slight modification to add support for processing methods attributed with the [<ReflectedDefinition>] attribute. The function checks the MethodInfo object returned by the (|Call|_|)
5

O’Reilly Media, Inc. 4/2/2012
active pattern and checks if the body of the method is known. If so, then the body of the method being called is processed as well.
Example 14–3. Using the ReflectedDefinition attribute open Microsoft.FSharp.Quotations open Microsoft.FSharp.Quotations.Patterns open Microsoft.FSharp.Quotations.DerivedPatterns let rec describeCode2 (expr : Expr) = match expr with // Literal value | Int32(i) -> printfn "Integer literal with value %d" i | Double(f) -> printfn "Floating point literal with value %f" f | String(s) -> printfn "String literal with value %s" s // Calling a method | Call(calledOnObject, methInfo, args) -> let calledOn = match calledOnObject with | Some(x) -> sprintf "%A" x | None -> "(static method)" printfn "Calling method '%s': \n\ On intance: %s \n\ With args : %A" methInfo.Name calledOn args match methInfo with | MethodWithReflectedDefinition(methBody) -> printfn "Expanding method body of '%s'..." methInfo.Name describeCode2 methBody | _ -> printfn "Unable to expand body of '%s'. Quotation stops here." methInfo.Name // Lambda expressions | Lambda(var, lambdaBody) -> printfn "Lambda Expression on value '%s' with type '%s'" var.Name var.Type.Name printfn "Processing body of Lambda Expression..." describeCode2 lambdaBody | _ -> printfn "Unknown expression form:\n%A" expr
The following FSI session shows the processing of two quotation expressions. describeCode2 can process the body of the invertNumberReflected function because it has been decorated with the [<ReflectedDefinition>] attribute.
> // Define functions with and without ReflectedDefinition let invertNumber x = -x [<ReflectedDefinition>] let invertNumberReflected x = -1 * x;;
6

O’Reilly Media, Inc. 4/2/2012
val invertNumber : int -> int val invertNumberReflected : int -> int > // Describe code without ReflectedDefinition describeCode2 <@ invertNumber 10 @> ;; Calling method 'invertNumber': On intance: (static method) With args : [Value (10)] Unable to expand body of 'invertNumber'. Quotation stops here. val it : unit = () > // Describe code with ReflectedDefinition describeCode2 <@ invertNumberReflected 10 @> ;; Calling method 'invertNumberReflected': On intance: (static method) With args : [Value (10)] Expanding method body of 'invertNumberReflected'... Lambda Expression on value 'x' with type 'Int32' Processing body of Lambda Expression... Calling method 'op_Multiply': On intance: (static method) With args : [Value (-1); x] Unable to expand body of 'op_Multiply'. Quotation stops here. val it : unit = ()
Decomposing Arbitrary Code Armed with just a few active patterns we were able to decompose many code types in the describeCode method. However whenever code wasn’t matched it fell through the pattern match and threw an exception.
Most applications of active patterns decompose an arbitrary AST intercepting only the nodes that the code cares about and ignoring the rest. However, it is important to traverse the entire AST. Abruptly stopping the traversal at a given node isn’t a valid option, because it ignores a large amount of the tree and potentially some code constructs you cared about.
However, it also doesn’t make sense to match against every possible active pattern available, from ForIntegerRangeLoop (for loops) to IfThenElse (if expressions) to LetRecursive (recursive let bindings) and so on.
Fortunately there is a “catchall” active pattern that matches the most general forms of F# expressions. The catchall active pattern is in the ExprShape module and converts any F# quotation expression into a ShapeVar, ShapeLambda, or ShapeCombination. Example 14–4 introduces a new function, generalizedDescribeCode for decomposing any quotation. The quotation matches against a ShapeVar if the expression is looking up a value and ShapeLambda is matched whenever a new function value is introduced. The majority of F# quotations fall into the third active pattern case, ShapeCombination. ShapeCombination is intentionally non-descript, only giving you an opaque handle to what was used to generate it and the subexpressions from the code construct. (Meaning
7
O’Reilly Media, Inc. 4/2/2012
that you cannot determine what the code represents – you are just given a list of its sub expressions.)
Example 14–4. Generalized quotation traversal open Microsoft.FSharp.Quotations open Microsoft.FSharp.Quotations.ExprShape let rec generalizedDescribeCode indentation expr = let indentedMore = indentation + " " match expr with // eing used A variable b | ShapeVar(var) -> printfn "%s Looking up value '%s'" indentation var.Name // A new lambda expression | ShapeLambda(var, lambdaBody) -> printfn "%s Lambda expression, introducing var '%s'" indentation var.Name generalizedDecribeCode indentedMore lambdaBody // Other | ShapeCombination(_, exprs) -> printfn "%s ShapeCombination:" indentation exprs |> List.iter (generalizedDecribeCode indentedMore)
The following FSI session shows the generalizedDescribeCode method in action.
> generalizedDescribeCode "" <@ (fun x y z -> x + y + z) @>;; Lambda expression, introducing var 'x' Lambda expression, introducing var 'y' Lambda expression, introducing var 'z' ShapeCombination: ShapeCombination: Looking up value 'x' Looking up value 'y' Looking up value 'z' val it : unit = () >
You are then free to add new pattern match rules earlier in the match expression to “intercept” the things you care about, like in earlier versions of the describeCode method.
Application: Deferring Computation to Other Platforms You have seen ways to decompose F# quotation expressions to analyze the compiler-generated form of the code, but what do you do with it? Perhaps the best usage of F# quotations is deferring computation to other platforms. By processing the F# quotation expressions you can take F# code and transport it to another platform, such as a GPU or on a SQL database. By walking the AST, you can transform the F# code into a format that is amenable to another computing environment. This technique allows you to avoid the use of a second language, and use the existing F# toolset (IntelliSense, type checking, and so on).
8

O’Reilly Media, Inc. 4/2/2012
For example, rather than writing assembly code for your graphics card encoded as a string, you can write F# code, and then convert that quotation of that code to the appropriate assembly language.
To provide a simple example of this, let’s use quotations to convert F# mathematical expressions into reverse polish notation, or RPN.
RPN is a form of expressing mathematical equations without the need for parentheses. It works by using a hypothetical stack of numbers, where algebraic functions such as addition, pop the top two items from the stack and push the result back on.
For example, the expression 2 * 3 + 4 would be represented by the operations listed in Table 14–1.
Table 14–1. Evaluation of 1*2 + 3 in RPN
Operation Stack Push 2 2 Push 3 3, 2 Call (*) 6 Push 4 4, 6 Call (+) 10
Encoding functions in RPN can be difficult and error-prone. Instead, you can use quotations to write F# code – letting compiler build up the expression tree preserving the order of operations – and then transform the quotation of that code into RPN.
Example 14–5 defines a function called fsharpToRpn, which takes a quotation expression and decomposes the expression building up a list of operations to express the equation in RPN.
The example works by intercepting arithmetic operations and recursively generating the list of RPN operations to compute the left and right hand sides of the operator. Then, it simply adds those operators to the list of RPN operations in the correct order.
Example 14–5. Converting F# code to RPN open Microsoft.FSharp.Quotations open Microsoft.FSharp.Quotations.Patterns open Microsoft.FSharp.Quotations.DerivedPatterns let rec fsharpToRpn code stackOperations = match code with | Int32(n) -> (sprintf "Push %d" n) :: stackOperations | Double(f) -> (sprintf "Push %f" f) :: stackOperations | SpecificCall <@ (+) @> (_, _, [lhs; rhs]) -> let lhs = fsharpToRpn lhs stackOperations let rhs = fsharpToRpn rhs stackOperations lhs @ rhs @ ["Call (+)"] | SpecificCall <@ (-) @> (_, _, [lhs; rhs]) -> let lhs = fsharpToRpn lhs stackOperations let rhs = fsharpToRpn rhs stackOperations
9
O’Reilly Media, Inc. 4/2/2012
lhs @ rhs @ ["Call (-)"] | SpecificCall <@ (*) @> (_, _, [lhs; rhs]) -> let lhs = fsharpToRpn lhs stackOperations let rhs = fsharpToRpn rhs stackOperations lhs @ rhs @ ["Call (*)"] | SpecificCall <@ (/) @> (_, _, [lhs; rhs]) -> let lhs = fsharpToRpn lhs stackOperations let rhs = fsharpToRpn rhs stackOperations lhs @ rhs @ ["Call (/)"] | expr -> failwithf "Unknown Expr:\n%A" expr
The following snippet shows the fsharpToRPN function in action. > fsharpToRpn <@ 1 + 2 @> [];; va ; "Push 2"; "Call (+)"] l it : string list = ["Push 1"> fsharpToRpn <@ 2 * 3 + 4 @> [];; val it : string list = ["Push 2"; "Push 3"; "Call (*)"; "Push 4"; "Call (+)"] > // A little more complex fsharpToRpn <@ (2 + 10) / (3 * (2 - 6 / 7 - 2)) @> [] |> List.iter (printfn "%s");; Push 2 Push 10 Call (+) Push 3 Push 2 Push 6 Push 7 Call (/) Call (-) Push 2 Call (-) Call (*) Call (/)
Generating Quotation Expressions Decomposing quotation expressions gives you a way to inspect and transform ASTs, but you can build up quotation expressions dynamically at runtime as well.
Generating quotation expressions is especially useful when creating mini programming languages. Rather than writing F# code and processing the AST, you can parse another, perhaps simpler, language to generate the expression tree and then process that.
Any active pattern you see for decomposing quotation expressions has a complementary static method on the Expr class for producing an equivalent Expr<_> value.
The following snippet shows taking the quotation of a simple expression and the equivalent way to build up that same expression value.
let organicQuotation = <@ let x = (1, 2, 3) (x, x) @>
10

O’Reilly Media, Inc. 4/2/2012
let cQuotation = syntheti Expr.Let( new Var("x", typeof<int * int * int>), Expr.NewTuple( [ Expr.Value(1); Expr.Value(2); Expr.Value(3) ] ), Expr.NewTuple( [ Expr.GlobalVar("x").Raw; Expr.GlobalVar("x").Raw ] ) )
Expression Holes Using methods on the Expr type isn’t the only way to generate quotation expressions. Quotations may contain expression holes, which are locations for new instances of Expr<_> to be placed, allowing you to build up expression trees by simply patching holes in an existing expression.
To declare an expression hole, simply use a percent sign % in front of any expression within the quotation, and the result of that expression will be bound to the generated quotation expression tree. (Similar to <@@ @@>, using %% will leave a hole for an Expr type instead of Expr<_>.)
Example 14–6 defines a function called addTwoQuotations that takes two quoted values and builds a new expression, adding the two Expr<_>s together. So calling addTwoQuotations with the quoted form of two integer literals <@ 1 @> and <@ 2 @> is the same as quoting <@ 1 + 2 @>. Moreover, the generated quotation is identical to the static version of the quotation.
Example 14–6. Quotation holes > let addTwoQuotations x y = <@ %x + %y @>;; val addTwoQuotations : Expr<int> -> Expr<int> -> Expr<int> > // Generate the quotation and describe it addTwoQuotations <@ 1 @> <@ 2 @> |> describeCode;; Calling method 'op_Addition': On value: (Called a static method) With args: [Value (1); Value (2)] val it : unit = () > // Generate and describe a more complex quotation addTwoQuotations <@ "a string".Length @> <@ (2 * 2) @> |> describeCode;; Calling method 'op_Addition': On value: (Called a static method) With args: [PropGet (Some (Value ("a string")), Int32 Length, []); Call (None, Int32 op_Multiply[Int32,Int32,Int32](Int32, Int32), [Value (2), Value (2)])] val it : unit = ()
Evaluating Quotations You can not only analyze quotations – but execute them too. The F# PowerPack contains an experimental library for converting F# quotation expressions to LINQ expression trees. LINQ expression trees are a very similar feature to F# quotation expressions, both
11

O’Reilly Media, Inc. 4/2/2012
are ways to represent compiler ASTs. While F# quotation expressions can express more forms of code than expression trees alone, the main advantage is that expression trees can be compiled and executed.
The F# PowerPack does not come with Visual Studio 2010 and is a separate download from the F# PowerPack’s homepage on CodePlex, www.codeplex.com. For more information on the F# PowerPack please refer to Appendix A.
To evaluate or compile F# quotations you will need to download and add a reference to FSharp.PowerPack.dll and FSharp.PowerPack.Linq.dll and open up the Microsoft.FSharp.Linq.QuoationEvaluation namespace. That will add extension methods to Expr and Expr<_> allowing you to evaluate and compile quotations via the Eval and Compile methods.
The following example shows simple evaluation and compilation of F# quotation expressions:
> // Reference required libraries #r "System.Core.dll" #r "FSharp.PowerPack.dll" #r "FSharp.PowerPack.Linq.dll" // Adds extension methods to Expr<_> open Microsoft.FSharp.Linq.QuotationEvaluation;; --> Referenced 'C:\Program Files\Reference Assemblies\Microsoft\Framework\v3.5\System.Core.dll' --> Referenced 'C:\Program Files\Microsoft F#\PowerPack\FSharp.PowerPack.dll' --> Referenced 'C:\Program Files\Microsoft F#\PowerPack\FSharp.PowerPack.Linq.dll' > // Evaluate a simple expression let x = <@ 1 + 2 * 3 @> val x : Expr<int> = Call (None, Int32 op_Addition[Int32,Int32,Int32](Int32, Int32), [Value (1), Call (None, Int32 op_Multiply[Int32,Int32,Int32](Int32, Int32), [Value (2), Value (3)])]) > x.Eval();; val it : int = 7 > // Compile a function value expression let toUpperQuotati x.ToUpper()) @> on = <@ (fun (x : string) -> let toUpperFunc = toUpperQuotation.Compile() ();; val toUpperQuotation : Expr<(string -> string)> = Lambda (x, Call (Some (x), System.String ToUpper(), [])) val toUpperFunc : (string -> string) > toUpperFunc "don't panic";; val it : string = "DON'T PANIC"
12

O’Reilly Media, Inc. 4/2/2012
Application: Generating Derivatives The ability to evaluate or compile F# quotation expressions adds a bold new capability to your F# applications – namely the ability to generate new code. Example 13–7 analyzes the raw quotation and then generates a new Expr<_> representing the function’s derivative.
The derivative of a function f(x) is the rate at which function f changes at point x. If f is increasing in value from f(x) to f(x+0.0001) then the derivative will be positive. Likewise, if f(x) is decreasing at point x, the derivative will be negative. Derivatives may seem like complicated business, but computing them is simple with a few easy rules.
Example 14–7 defines a function generateDerivative, which just like previous examples, matches basic arithmetic functions. When each arithmetic operation is encountered, the corresponding derivative rule is applied so that the resulting Expr represents the derivative of the operation. From there you can use the F# PowerPack to compile and execute the generated function.
Example 14–7. Using quotations to create a derivative #r "FSharp.PowerPack.dll" #r "FSharp.PowerPack.Linq.dll" // Adds extension methods to Expr<_> open Microsoft.FSharp.Linq.QuotationEvaluation open Microsoft.FSharp.Quotations open Microsoft.FSharp.Quotations.Patterns open Microsoft.FSharp.Quotations.DerivedPatterns // Get the 'MethodInfo' object corresponding to basic arithmetic functions. // These will be used to generate new Expr<_>. type Operations = static member Add (x, y) : float = x + y static member Sub (x, y) : float = x - y static member Mul (x, y) : float = x * y static member Div (x, y) : float = x / y let addMi = (typeof<Operations>).GetMethod("Add") let subMi = (typeof<Operations>).GetMethod("Sub") let mulMi = (typeof<Operations>).GetMethod("Mul") let divMi = (typeof<Operations>).GetMethod("Div") let rec generateDerivative (equation : Expr) = match equation with // Lamda - Begining of a function | Lambda(arg, body) -> Expr.Lambda(arg, generateDerivative body) // Method Call - Begining of a function | Call(None, MethodWithReflectedDefinition(methBody), [ arg ]) -> generateDerivative methBody // Property Getter - For module-bound properties
13

O’Reilly Media, Inc. 4/2/2012
| PropertyGet(None, PropertyGetterWithReflectedDefinition(body), []) -> generateDerivative body // Addition // [d/dx] f(x) + g(x) = f'(x) + g'(x) | SpecificCall <@ (+) @> (_, _, [f; g]) -> let f' = generateDerivative f let g' = generateDerivative g Expr.Call(addMi, [f'; g']) // Subtraction // [d/dx] f(x) - g(x) = f'(x) - g'(x) | SpecificCall <@ (-) @> (_, _, [f; g]) -> let f' = generateDerivative f let g' = generateDerivative g Expr.Call(subMi, [f'; g']) // Product Rule // [d/dx] f(x) * g(x) = (f'(x) * g(x)) + (f(x) * g'(x)) | SpecificCall <@ ( * ) @> (_, _, [f; g]) -> let f' = generateDerivative f let g' = generateDerivative g Expr.Call(addMi, [ Expr.Call(mulMi, [f'; g]); Expr.Call(mulMi, [f; g']) ] ) // Quotient Rule // [d/dx] f(x) / g(x) = ((f '(x) * g(x)) - (f(x) * g'(x))) / (g^2(x)) | SpecificCall <@ ( / ) @> (_, _, [f; g]) -> let f' = generateDerivative f let g' = generateDerivative g let numerator = Expr.Call(subMi, [ Expr.Call(mulMi, [f'; g]) Expr.Call(mulMi, [f; g'])] ) let denominator = Expr.Call(mulMi, [g; g]) Expr.Call(divMi, [numerator; denominator]) // Value // = 1 [d/dx] x | Var(x) -> Expr.Value(1.0, typeof<double>) // Constant // .0 [d/dx] C = 0 | Double(_) -> Expr.Value(0.0, typeof<double>) | _ -> failwithf "Unrecognized Expr form: %A" equation let f = (fun x -> 1.5*x*x*x + 3.0*x*x + -80.0*x + 5.0) let f' =
14
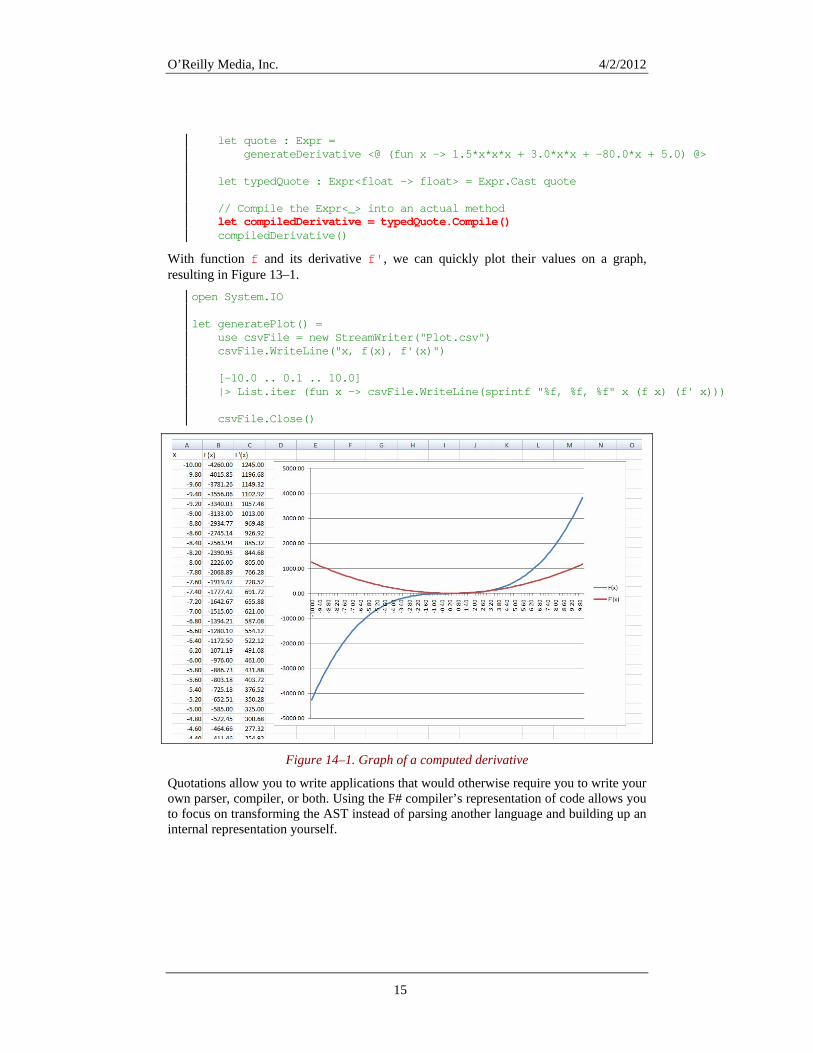
O’Reilly Media, Inc. 4/2/2012
let quote : Expr = generateDerivative <@ (fun x -> 1.5*x*x*x + 3.0*x*x + -80.0*x + 5.0) @> let typedQuote : Expr<float -> float> = Expr.Cast quote // Compile the Expr<_> into an actual method let compiledDerivative = typedQuote.Compile() compiledDerivative()
With function f and its derivative f', we can quickly plot their values on a graph, resulting in Figure 13–1.
open System.IO let generatePlot() = use csvFile = new StreamWriter("Plot.csv") csvFile.WriteLine("x, f(x), f'(x)") [-10.0 .. 0.1 .. 10.0] |> List.iter (fun x -> csvFile.WriteLine(sprintf "%f, %f, %f" x (f x) (f' x))) csvFile.Close()
Figure 14–1. Graph of a computed derivative
Quotations allow you to write applications that would otherwise require you to write your own parser, compiler, or both. Using the F# compiler’s representation of code allows you to focus on transforming the AST instead of parsing another language and building up an internal representation yourself.
15

O’Reilly Media, Inc. 4/2/2012
15 Type Providers
In chapter 11 we saw how to create database connections and access web services. In this chapter we will take a look at the technology which powers these features, called “type providers”.
Connecting to a SQL database might seem like a mundane thing to do in a programming language, but the mechanism F# uses for connecting to typed data sets it apart from other languages and can be extended in surprising ways. But before we can look at the power and flexibility F# type providers bring to the language, let’s look at why they are needed.
Typed Data versus Typed Languages F# is a statically typed programming language; and goes well out of its way to encourage F# programmers to embrace types. For example, not many other languages have features like:
• Type abbreviations such as type NodeList = List<Node> allowing you to create ad hoc types.
• Units of measure such as 32.0f<Fahrenheit> which allow you to further specialize primitive data types.
But F#’s type system has a crucial limitation. (Actually, this is true for most any programming language.) Types only describe the shape of data within programs. The outside world – and the data it contains – is also typed, but in a way that is completely divorced from the program code.
The API for opening XML documents just returns a generic XElement back, even if the underlying document contains data with a well-known structure or schema.
The API for reading a web requests’ response just returns a byte buffer; which could represent JSON, an XML SOAP message, or a custom binary format such as a Protocol Buffer.
1

O’Reilly Media, Inc. 4/2/2012
If protobufs and JSON aren’t familiar to you, then you should immediately see the problem: “typed” data from the outside world doesn’t fit well into programming languages. Extra work must be done in order to correctly unify data from the outside and the type system of a programming language.
Wrapper Assemblies The traditional solution has been to use a custom tool to generate wrapper libraries that act as a shim on top of the data source. The output of such a tool is either a separate .NET assembly or source code to be compiled in with you programs.
The custom tool knows how to read type information from the data source, and generates custom code to replicate the data source’s types in the programming language.
To go back to our XML example, there is an old tool to generate wrappers on top of XML documents called xsd.exe. xsd.exe will inspect an XML file (or schema) and generates source code for a typed object model. This way you can write code as if the XML document and its types were written in .NET.
The following XML document was retrieved from the National Oceanic and Atmospheric Administration’s National Digital Forecast Database web service. (Details about the NOAA NDFD are available at http://graphical.weather.gov/xml/. Also, the unfortunate realities of living in the Pacific Northwest has been highlighted in the forecast below.)
<?xml version="1.0"?> <dwml version="1.0" xmlns:xsd="http://www.w3.org/2001/XMLSchema" xmlns:xsi="http://ww <head> <product srsName="WGS 1984" concise-name="dwmlByDay" ... <title>NOAA's Weather Service Forecast by 24 Hour Period</title> <field>meteorological</field> <category>forecast</category> <creation-date refresh-frequency="PT1H">2012-06-20T01:49:48Z</creation-date> </product>
2

O’Reilly Media, Inc. 4/2/2012
<source> <more-information>http://graphical.weather.gov/xml/</more-information> <credit>http://www.weather.gov/</credit> </source> </head> <data> <location> <location-key>point1</location-key> <point latitude="47.45" longitude="-122.30"/> </location> <time-layout time-coordinate="local" summarization="12hourly"> <layout-key>k-p12h-n2-1</layout-key> <start-valid-time>2012-02-17T18:00:00-08:00</start-valid-time> <end-valid-time>2012-02-18T06:00:00-08:00</end-valid-time> <start-valid-time>2012-02-18T06:00:00-08:00</start-valid-time> <end-valid-time>2012-02-18T18:00:00-08:00</end-valid-time> </time-layout> <parameters applicable-location="point1"> <probability-of-precipitation type="12 hour" units="percent"> <name>12 Hourly Probability of Precipitation</name> <value>95</value> </probability-of-precipitation> </parameters> </data> </dwml>
Example 15-1 shows how to generate C# source code to wrap the types exposed from the previous XML document using xsd.exe. (Unfortunately xsd.exe cannot emit F# code.)
Example 15-1. Using xsd.exe C:\TypeProviders>xsd.exe SampleXmlDoc.xml Microsoft (R) Xml Schemas/DataTypes support utility [Microsoft (R) .NET Framework, Version 4.0.30319.17020] Copyright (C) Microsoft Corporation. All rights reserved. Writing file 'C:\TypeProviders\SampleXmlDoc.xsd'. C:\TypeProviders>xsd.exe SampleXmlDoc.xsd /language:CS /classes Microsoft (R) Xml Schemas/DataTypes support utility [Microsoft (R) .NET Framework, Version 4.0.30319.17020] Copyright (C) Microsoft Corporation. All rights reserved. Writing file 'C:\TypeProviders\SampleXmlDoc.cs'.
After compiling the emitted C# source code into a separate assembly, we can finally write F# code that interacts with the data and get all the safety guarantees of the type system to a certain extent. The generated library treats all XML attributes and element bodies as string. However, the structure and relationship between the elements and attributes is maintained.
> #r @"C:\TypeProviders\SampleXmlDocWrapperLibrary.dll" open System.Xml.Serialization open System.IO // 'dwml' is a type from the generated wrapper library. let deserializer = new XmlSerializer(typeof<dwml>)
3

O’Reilly Media, Inc. 4/2/2012
// Pass the raw XML file to the XML deserializer. let filePath = @"C:\TypeProviders\SampleXmlDoc.xml" let fileStream = new FileStream(filePath, FileMode.Open) let parsedXmlDoc = deserializer.Deserialize(fileStream) :?> dwml;; --> Referenced 'C:\TypeProviders\SampleXmlDocWrapperLibrary.dll' val deserializer : System.Xml.Serialization.XmlSerializer val filePath : string = "C:\TypeProviders\SampleXmlDoc.xml" val fileStream : System.IO.FileStream val parsedXmlDoc : dwml > let probabilityOfPercipitation = parsedXmlDoc.data.[0].parameters.[0].probabilityofprecipitation.[0].value.[0].Value;; val probabilityOfPercipitation : string = "95"
It works! Using a custom tool we can integrate external, typed data sources into our programs. So life is good, right?
Well, think for a moment about what a pain this is. As soon as you want to bring in any data source you need to: exit your code editor, break into a command line, generate source code, compile it into a separate assembly, reference it, and then finally get back to programming. Also, what if when you finish you realize that you referenced the wrong dataset and need to start the process all over again?
Wouldn’t it be better if you didn’t need to deal with the wrapper assembly at all? Ideally you could just write code that used the data source without needing to futz with external tools.
The desire to remove this speed bump when dealing with typed data is the motivation behind F#’s type providers. And with them you can just focus on code, leaving all the type-wrapper-conversion-generation “stuff” to the F# compiler.
F# Type Providers Example 15-2 shows an F# interactive session loading the same XML file, but this time going through an XML type provider. Notice that no reference to a separate assembly is required, yet the XML types are still available to program against. (And provide IntelliSense in the Visual Studio editor!)
Example 15-2. Using an XML type provider // The StructuredXml type provider is defined in the FSharpx library's // FSharpx.TypeProviders.dll open FSharpx type NOAANDFDFile = StructuredXml< FileName="C:\weather.xml"> let reasonI'llStayInside : string = query { let document = NOAANDFDFile().Root for data in document.GetDatas() do
4
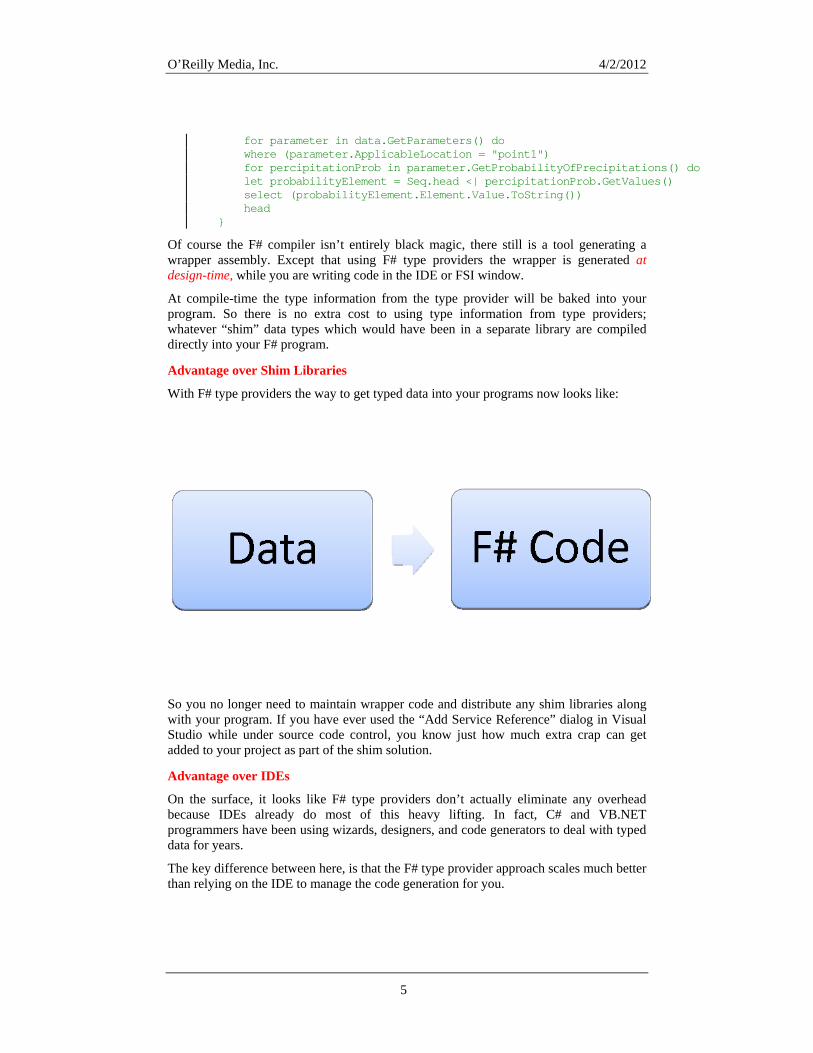
O’Reilly Media, Inc. 4/2/2012
for parameter in data.GetParameters() do where (parameter.ApplicableLocation = "point1") for percipitationProb in parameter.GetProbabilityOfPrecipitations() do let probabilityElement = Seq.head <| percipitationProb.GetValues() select (probabilityElement.Element.Value.ToString()) head }
Of course the F# compiler isn’t entirely black magic, there still is a tool generating a wrapper assembly. Except that using F# type providers the wrapper is generated at design-time, while you are writing code in the IDE or FSI window.
At compile-time the type information from the type provider will be baked into your program. So there is no extra cost to using type information from type providers; whatever “shim” data types which would have been in a separate library are compiled directly into your F# program.
Advantage over Shim Libraries
With F# type providers the way to get typed data into your programs now looks like:
So you no longer need to maintain wrapper code and distribute any shim libraries along with your program. If you have ever used the “Add Service Reference” dialog in Visual Studio while under source code control, you know just how much extra crap can get added to your project as part of the shim solution.
Advantage over IDEs
On the surface, it looks like F# type providers don’t actually eliminate any overhead because IDEs already do most of this heavy lifting. In fact, C# and VB.NET programmers have been using wizards, designers, and code generators to deal with typed data for years.
The key difference between here, is that the F# type provider approach scales much better than relying on the IDE to manage the code generation for you.
5

O’Reilly Media, Inc. 4/2/2012
IDEs like Visual Studio, while as powerful as they might seem, only provide support along a specific path. As soon as you want to write code to interact with data sources outside of that path – for example, web services returning protocol buffers or working with OData – it is highly unlikely that your IDE will “just work”. You will instead need to resort to the speed bump of going to the command line and working with custom tools directly.
F# type providers on the other hand provide a seamless way to bring typed data into your programs without relying on IDE support. All you need to do is fire up your favorite code editor and write F# source code. The F# compiler and type provider assembly –not an IDE – will take care of all the work of type generation for you.
Also, and perhaps more importantly, if there isn’t a type provider for your needs, the F# type provider system is easily extensible. It is much easier to write an F# type provider for a new data source than create a new add-in to your favorite IDE.
Type Providers To create an instance of the type provider, construct the type provider by passing a string literal to the type provider type. Once created, you can use IntelliSense to navigate any exposed types freely. At no point in time do you need to leave the comfort of your editor.
[<Literal>] let ConnectionString = "Data Source=MYSERVER\INSTANCE;\ Initial Catalog=MyDatabase;\ Integrated Security=SSPI;" // Use the SqlDataConnection type provider. type dbSchema = SqlDataConnection<ConnectionString>
There are several type providers that ship with F# in the FSharp.Data.TypeProviders.dll assembly. However, you can download more type providers for different data types from the internet.
Be careful when using 3rd party type providers. F# type providers execute while you type, so only use type providers from sources you trust.
SQL Data Type Providers The most common use-case for type providers is to read and write data from a SQL database. Databases store their contents in a very specific format. Type providers allow these typed data sources to be integrated directly into F# and act as the object-relational mapping, or ORM, without the need for additional tools and libraries.
However, SQL is a very broad technology and has many manifestations. F# provides four (!) different type providers to connect to SQL data, each offering differing tradeoffs. However, all of them can be used in the same way and work well with F#’s query expressions.
The following examples use the prototypical Northwind database, an example database for Microsoft Access and SQL Server. For
6

O’Reilly Media, Inc. 4/2/2012
information on setting up and configuring the Northwind database, see this chapter’s source code on GitHub at:
https://github.com/aChrisSmith/Programming-FS-Examples
LINQ to SQL
The SqlDataConnection type provider uses a technology called LINQ to SQL and is the simplest of all the SQL-related type providers.
Example 15-3 shows using the SqlDataConnection type provider to lookup a customer by their ID in the database.
Example 15-3. Using the SqlDataConnection type provider. type dbSchema = SqlDataConnection<"Data Source=MYSERVER\INSTANCE;\ Initial Catalog=MyDatabase;\ Integrated Security=SSPI;"> let db = dbSchema.GetDataContext() // Enable the logging of database activity to the console. db.DataContext.Log <- System.Console.Out let getCustomerByID id = query { for customer in db.Customers do where customer.CustomerID = id select c head }
The type alias dbSchema contains all of information about the data housed within the database specified by the connection string. Its GetDataContext method is used to construct the value db, which can be used to references to the live database tables.
The SqlDataConnection type provider also has parameters to customize how it generates types. For example, the Timeout parameter can be used to to adjust the timeout, in milliseconds, to use when connecting to the database.
Note that the connection string passed to the type provider – including any applicable passwords – is visible within your program’s binary.
For accessing sensitive data, make sure to retrieve the database password from the user at runtime. There is an overload of the type provider’s GetContext method to provide a connection string at runtime to do this.
DbmlFile
One drawback of the SqlDataConnection provider is that it requires a live connection to the database during development, so that the type provider can generate type information from the database’s tables. Although a connection to the database is only created at runtime when the data is actually queried, this can cause friction in your development environment.
The DbmlFile provider allows you to generate the same type information as the SqlDataConnection type provider, except that it operates on a schema file
7

O’Reilly Media, Inc. 4/2/2012
describing the database’s structure. (A .dbml file can be created by the Visual Studio Object Relational Designer from a data source.)
Example 15-4 shows using the DbmlFile provider to provide the same getCustomerByID function of the previous example.
Example 15-4. Using the DbmlFile type provider open Microsoft.FSharp.TypeProviders [<Generate>] type dbml = DbmlFile<"DataBaseSchema.dbml", ContextTypeName = "DataContext"> // This connection string can be specified at run time. let connectionString = "Data Source=MYSERVER\INSTANCE;Initial Catalog=MyDatabase;Integrated Security=SSPI;" let db = new dbml.DataContext(connectionString) let getCustomerByID id = query { for customer in db.Customers do where customer.CustomerID = id select c head }
Entity Framework The SqlDataConnection and DbmlFile type providers enable an elegant way to bring SQL data into your F# programs. However, for some users, the types generated are too primitive. The Microsoft Entity Framework is designed to address all the (supposed) limitations of LINQ to SQL. In Microsoft’s on words:
“The ADO.NET Entity Framework supports data-centric applications and services, and provides a platform for programming against data that raises the level of abstraction from the logical relational level to the conceptual level. By enabling developers to work with data at a greater level of abstraction, the Entity Framework supports code that is independent of any particular data storage engine or relational schema.” (http://msdn.microsoft.com/en-us/library/bb386876.aspx, retrieved March, 2012.)
For programmers looking to work with data at a “greater level of abstraction” and “independent of any particular data storage engine or relational schema” the SqlEntityConnection and EdmxFile type providers are available.
Web Service Type Providers Another major area where typed data can come from is the internet. There are two built-in type providers for accessing data from web sources.
The WsdlService Provider
The classic notion of a web service is described using the web service description language, or WSDL. WSDL is a an XML-based format for describing the interchange of information over a network.
8

O’Reilly Media, Inc. 4/2/2012
The following is an example WSDL service definition for retrieving stock quotes from the W3C. (The W3C is the standards body which has codified the WSDL specification back in 2001.)
<?xml version="1.0"?> <definitions name="StockQuote" targetNamespace="http://example.com/stockquote.wsdl" xmlns:tns="http://example.com/stockquote.wsdl" xmlns:xsd1="http://example.com/stockquote.xsd" xmlns:soap="http://schemas.xmlsoap.org/wsdl/soap/" xmlns="http://schemas.xmlsoap.org/wsdl/"> <types> <schema targetNamespace="http://example.com/stockquote.xsd" xmlns="http://www.w3.org/2000/10/XMLSchema"> <element name="TradePriceRequest"> <complexType> <all> <element name="tickerSymbol" type="string"/> </all> </complexType> </element> <element name="TradePrice"> <complexType> <all> <element name="price" type="float"/> </all> </complexType> </element> </schema> </types> <message name="GetLastTradePriceInput"> <part name="body" element="xsd1:TradePriceRequest"/> </message> <message name="GetLastTradePriceOutput"> <part name="body" element="xsd1:TradePrice"/> </message> <portType name="StockQuotePortType"> <operation name="GetLastTradePrice"> <input message="tns:GetLastTradePriceInput"/> <output message="tns:GetLastTradePriceOutput"/> </operation> </portType> <binding name="StockQuoteSoapBinding" type="tns:StockQuotePortType"> <soap:binding style="document" transport="http://schemas.xmlsoap.org/soap/http"/> <operation name="GetLastTradePrice"> <soap:operation soapAction="http://example.com/GetLastTradePrice"/> <input> <soap:body use="literal"/> </input> <output>
9

O’Reilly Media, Inc. 4/2/2012
<soap:body use="literal"/> </output> </operation> </binding> <service name="StockQuoteService"> <documentation>My first service</documentation> <port name="StockQuotePort" binding="tns:StockQuoteBinding"> <soap:address location="http://example.com/stockquote"/> </port> </service> </definitions>
Although the specification is uncomfortably verbose, it contains all the necessary information for describing what methods the service exposes (via the <service> element) and the type of data messages passed across the network (via the <types> element).
The WsdlService type provider understands how to convert the WSDL description of a service into types and methods for use in your programs.
Example 15-7 shows using the WsdlService type provider to connect to w3school.com’s temperature conversion service. Notice how the web service client is obtained by calling the GetTempConvertSoap method on the type provider’s provided type.
Example 15-5. Using the WsdlService type provider. > // FSI session using the WsdlService type provider. #r "FSharp.Data.TypeProviders.dll" #r "System.ServiceModel.dll" open Microsoft.FSharp.Data.TypeProviders [<Literal>] let WsdlAddress = "http://www.w3schools.com/webservices/tempconvert.asmx?WSDL" type TemperatureConversionService = WsdlService<WsdlAddress> let serviceClient = TemperatureConversionService.GetTempConvertSoap();; --> Referenced 'C:\Program Files (x86)\Reference Assemblies\Microsoft\FSharp\3.0\Runtime\v4.0\Type Providers\FSharp.Data.TypeProviders.dll' --> Referenced 'C:\Windows\Microsoft.NET\Framework\v4.0.30319\System.ServiceModel.dll' val WsdlAddress : string = "http://www.w3schools.com/webservices/tempconvert.asmx?WSDL" type TemperatureConversionService = class static member GetTempConvertSoap : unit -> TemperatureConversionService.ServiceTypes.SimpleDataContextTypes.TempConvertSoapClient + 1 overload
10
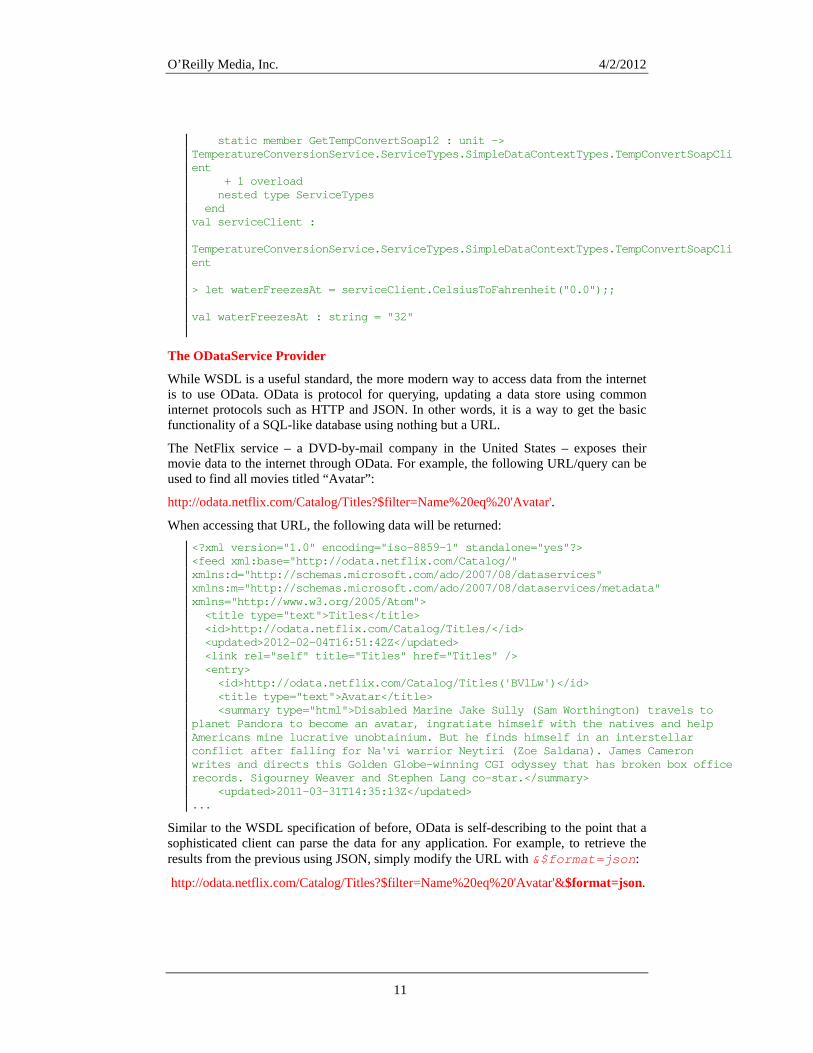
O’Reilly Media, Inc. 4/2/2012
static member GetTempConvertSoap12 : unit -> TemperatureConversionService.ServiceTypes.SimpleDataContextTypes.TempConvertSoapClient + 1 overload nested type ServiceTypes end val serviceClient : TemperatureConversionService.ServiceTypes.SimpleDataContextTypes.TempConvertSoapClient > let waterFreezesAt = serviceClient.CelsiusToFahrenheit("0.0");; val waterFreezesAt : string = "32"
The ODataService Provider
While WSDL is a useful standard, the more modern way to access data from the internet is to use OData. OData is protocol for querying, updating a data store using common internet protocols such as HTTP and JSON. In other words, it is a way to get the basic functionality of a SQL-like database using nothing but a URL.
The NetFlix service – a DVD-by-mail company in the United States – exposes their movie data to the internet through OData. For example, the following URL/query can be used to find all movies titled “Avatar”:
http://odata.netflix.com/Catalog/Titles?$filter=Name%20eq%20'Avatar'.
When accessing that URL, the following data will be returned: <?xml version="1.0" encoding="iso-8859-1" standalone="yes"?> <feed xml:base="http://odata.netflix.com/Catalog/" xmlns:d="http://schemas.microsoft.com/ado/2007/08/dataservices" xmlns:m="http://schemas.microsoft.com/ado/2007/08/dataservices/metadata" xmlns="http://www.w3.org/2005/Atom"> <title type="text">Titles</title> <id>http://odata.netflix.com/Catalog/Titles/</id> <updated>2012-02-04T16:51:42Z</updated> <link rel="self" title="Titles" href="Titles" /> <entry> <id>http://odata.netflix.com/Catalog/Titles('BVlLw')</id> <title type="text">Avatar</title> <summary type="html">Disabled Marine Jake Sully (Sam Worthington) travels to planet Pandora to become an avatar, ingratiate himself with the natives and help Americans mine lucrative unobtainium. But he finds himself in an interstellar conflict after falling for Na'vi warrior Neytiri (Zoe Saldana). James Cameron writes and directs this Golden Globe-winning CGI odyssey that has broken box office records. Sigourney Weaver and Stephen Lang co-star.</summary> <updated>2011-03-31T14:35:13Z</updated> ...
Similar to the WSDL specification of before, OData is self-describing to the point that a sophisticated client can parse the data for any application. For example, to retrieve the results from the previous using JSON, simply modify the URL with &$format=json:
http://odata.netflix.com/Catalog/Titles?$filter=Name%20eq%20'Avatar'&$format=json.
11
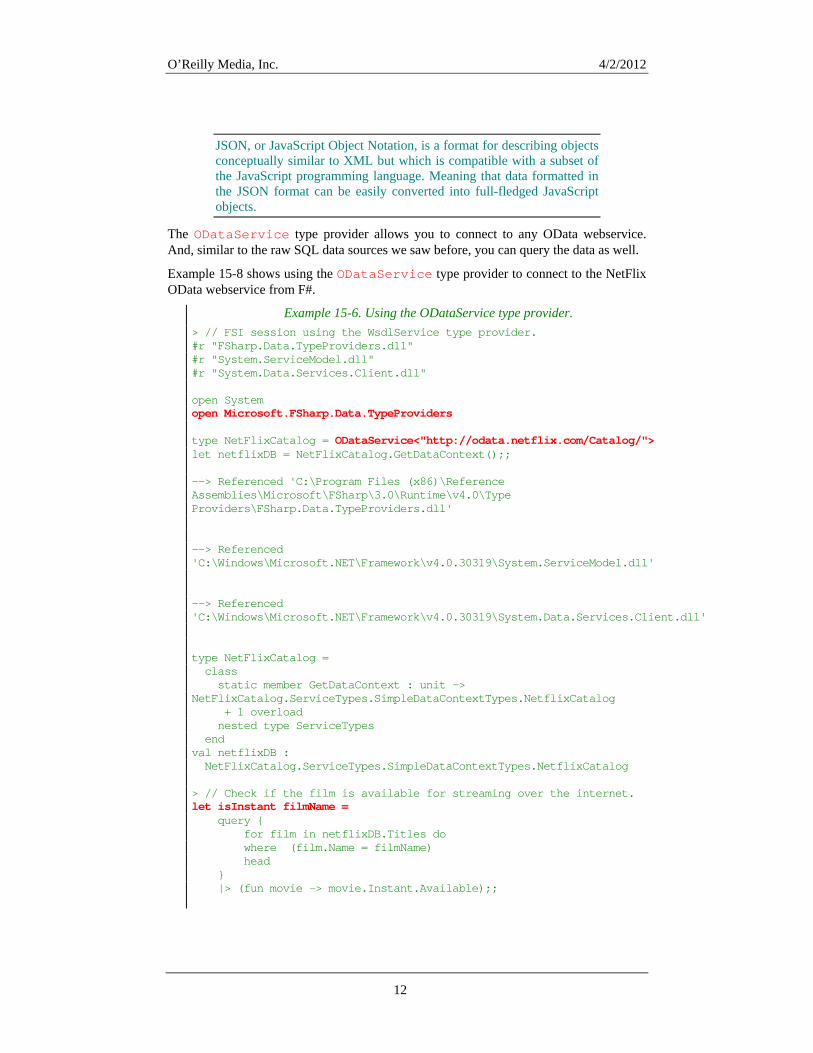
O’Reilly Media, Inc. 4/2/2012
JSON, or JavaScript Object Notation, is a format for describing objects conceptually similar to XML but which is compatible with a subset of the JavaScript programming language. Meaning that data formatted in the JSON format can be easily converted into full-fledged JavaScript objects.
The ODataService type provider allows you to connect to any OData webservice. And, similar to the raw SQL data sources we saw before, you can query the data as well.
Example 15-8 shows using the ODataService type provider to connect to the NetFlix OData webservice from F#.
Example 15-6. Using the ODataService type provider. > // FSI session using the WsdlSer ce type provider. vi#r "FSharp.Data.TypeProviders.dll" #r "System.ServiceModel.dll" #r "System.Data.Services.Client.dll" open System open Microsoft.FSharp.Data.TypeProviders type NetFlixCatalog = ODataService<"http://odata.netflix.com/Catalog/"> let netflixDB = NetFlixCatalog.GetDataContext();; --> Referenced 'C:\Program Files (x86)\Reference Assemblies\Microsoft\FSharp\3.0\Runtime\v4.0\Type Providers\FSharp.Data.TypeProviders.dll' --> Referenced 'C:\Windows\Microsoft.NET\Framework\v4.0.30319\System.ServiceModel.dll' --> Referenced 'C:\Windows\Microsoft.NET\Framework\v4.0.30319\System.Data.Services.Client.dll' type NetFlixCatalog = class static member GetDataContext : unit -> NetFlixCatalog.ServiceTypes.SimpleDataContextTypes.NetflixCatalog + 1 overload nested type ServiceTypes end val netflixDB : NetFlixCatalog.ServiceTypes.SimpleDataContextTypes.NetflixCatalog > // Check if the film is available for streaming over the internet. let isInstant filmName = query { for film in netflixDB.Titles do where (film.Name = filmName) head } |> (fun movie -> movie.Instant.Available);;
12
O’Reilly Media, Inc. 4/2/2012
13
val isInstant : string -> bool > isInstant "Iron Man";; val it : bool = false > isInstant "The Terminator";; val it : bool = true
While OData services allow you to query data on the internet, it comes with rather strict limitations on the nature of the queries possible. For example, you cannot perform joins against two tables.
FSharpx Type Providers A big advantage to F#’s type provider system is that it is extensible, allowing you to author new type providers. While the API for creating new type providers won’t be covered in this book, the source code for many excellent type providers is available on GitHub in the FSharpx project. Available at: https://github.com/fsharp/fsharpx.
FSharpx is an open-source library built on top of Microsoft’s FSharp.Core.dll in order to extend core F# capabilities. For example, the library contains extensions to asynchronous workflows, new computation expression builders, and other functionality. Of note, are its type providers for common data sources like Microsoft Excel workbooks and XML files.
F# type providers represent a new way of writing software, and can dramatically reduce the friction for exploratory development. (Using type providers and testing algorithms against live data sources in an FSI window, opposed to build-compile-and-test development.)

O’Reilly Media, Inc. 4/2/2012
Part IV Appendices
1

O’Reilly Media, Inc. 4/2/2012
A Overview of .NET Libraries
The .NET ecosystem has incredible breadth – by enabling you to run .NET code on various platforms, like on your phone, the X-Box gaming system, or even on the internet via Silverlight. It also has incredible depth – by having a wealth of powerful libraries from visualization, to communications, to databases, and so on.
This appendix will provide a quick overview of some existing .NET libraries so you can transition from the sample applications in this book to real-world problem solving. The APIs covered will be divided into three main areas: visualization, data processing, and storing data.
Visualization F# is a great tool for processing raw data, but visualizing that data doesn’t need to be constrained to just the command line.
There are two main visualization APIs available for .NET: Windows Forms (WinForms) and Windows Presentation Foundation (WPF). WinForms is the older of the two and is an object-oriented wrapper on top of core Windows APIs. With WinForms it is easy to create a functional UI with buttons and common controls, but it can be difficult to create a rich and dynamic interface. WPF on the other hand is a much more design-centric library that allows for sophisticated interfaces at the cost of added complexity and a steeper learning curve.
F# doesn’t support code generation, so you cannot use the WYSIWYG editors of Visual Studio. The examples you see in this chapter will build UIs programmatically; however, it is recommend you write your presentation layer code in C# or VB.NET to take advantage of the rich tool support available.
1

O’Reilly Media, Inc. 4/2/2012
Windows Forms WinForms is conceptually very simple. Each window on the screen is an instance of a Form, which contains a collection of UI elements of type Control. As users interact with the Form’s controls, they will raise events, which the programmer can listen to. For example, a Button control has a Click event, which will be fired whenever the button is clicked.
#r "System.Drawing.dll" #r "System.Windows.Forms.dll" open System.Windows.Forms // Create a form let form = new Form() // Create a button let btn = new Button(Text = "Click Me") btn.Click.AddHandler(fun _ _ -> MessageBox.Show("Hello, World") |> ignore) // Add the button to the form form.Controls.Add(btn) // Display the form form.ShowDialog()
Example A–1 creates a form that displays a progress bar while counting the number of words in the complete works of Shakespeare. The form contains two controls, a ProgressBar and a Label (a control that displays text). As files are processed asynchronously, the two form controls will be updated to indicate progress.
Note the assembly references to System.Windows.Forms.dll and System.Drawing.dll, these are required for WinForms development.
Example A–1. Using Windows Forms #r "System.Drawing.dll" #r "System.Windows.Forms.dll" open System.IO open System.Windows.Forms // Count the number of words in a given text file. let countWords filePath = System.Threading.Thread.Sleep(2000) let lines = File.ReadAllText(filePath) let words = lines.Split([| ' ' |]) words.Length // The complete works of Shakespeare let filesToProcess = Directory.GetFiles(@"D:\CompleteWorksOfShakespeare\") // Setup the WinForm let form = new Form(Text = "The Words of Shakespeare", TopMost=true, Height=130)
2

O’Reilly Media, Inc. 4/2/2012
3
let wordCountText = new Label(Dock = DockStyle.Bottom) let progress = new ProgressBar(Minimum = 0, Maximum = filesToProcess.Length - 1, Dock = DockStyle.Fill) form.Controls.Add(progress) form.Controls.Add(wordCountText) form.Show() // Begin processing files asynchronously. Once each file has been // processed the status of the progress bar and label will be updated. async { let totalWords = ref 0 for i in 0 .. filesToProcess.Length - 1 do totalWords := !totalWords + (countWords filesToProcess.[i]) ress bar value and text // Update prog progress.Value <- i wordCountText.Text <- sprintf "%d words counted so far..." (!totalWords) } |> Async.Start
When the code from Example A–1 is executed, a form similar to Figure A–1 will be displayed.
Figure A-1. Windows forms
Windows Presentation Foundation WinForms provides a simple API for putting together a functional user interface, but to build more advanced UIs with “sizzle” you will need to take a different approach. Windows Presentation Foundation (WPF) was added as part of .NET 3.0 with the aim of changing how people write and develop user interfaces.
WPF was designed around a couple of key tenets:
Enable rich media
Make it easy to embed rich media like video and animation into application. Whereas WinForms applications typically rely on bland operating system controls, the hallmarks of a WPF application are smooth corners, translucency, and clear text. In addition, WPF applications will benefit from hardware acceleration where possible.

O’Reilly Media, Inc. 4/2/2012
4
Dec
roblem with WinForms applications is that the design of the UI and the tricably linked. It is nearly impossible to change the
GettExa does the prototypical “Hello, World” style application using WPF.
larative programming model
Another pcode that powers it are inexinterface of a WinForms application without needing to rewrite most of the program code. In WPF the UI layout is separate from the code, and therefore much easier to refactor.
ing a simple WPF app up and running doesn’t take much more work than WinForms. mple A–2
Example A–2. Hello, World in WPF #r "PresentationCore.dll" #r "PresentationFramework.dll" #r "WindowsBase.dll" open System open System.Windows open System.Windows.Controls let win = new Window(Height = 128.0, Width = 360.0) let label = new Label() label.FontSize <- 62.0 label.Content <- "Hello, World" win.Content <- label let app = new Application() app.Run(win)
Figu application in action. Notice how smooth the text look ased, meaning that displays created with WPF can
re A–2 shows our “Hello, World” e WPF is vector-bs. This is becaus
be zoomed without pixelation, making the overall experience much cleaner and more visually appealing.
Figure A–2. Hello, World in WPF
XAML, the eXtensible Application Markup Language
While you can create WPF user interfaces en ponent of WPF tensible Application Markup
tirely in code, a key comdevelopment is XAML (pronounced “zam-el”) or the eXLanguage. XAML is an XML-dialect that enables you to express application UI elements declaratively. This enables black-turtleneck-wearing designers to create application interfaces without impacting the coding done by caffeine-guzzling programmers. In

O’Reilly Media, Inc. 4/2/2012
5
addition to enabling designers to add “sizzle” to applications, XAML solves the problems we experienced with WinForms programming where the code and UI were too tightly coupled.
Example A–3 defines a simple WPF application that accepts user input, and when a button is pressed, displays "Hello, Name". The application interface is described in XAML, which is then parsed at runtime using the XamlReader class. (The specifics of the XAML itself won’t be covered here.)
Example A–3. Hello, World in WPF #r "PresentationCore.dll" #r "PresentationFramework.dll" #r "WindowsBase.dll" open System open System.Windows open System.Windows.Controls open System.Windows.Markup /// Declare the UI in XAML let windowXaml = " <Window xmlns='http://schemas.microsoft.com/winfx/2006/xaml/presentation' xmlns:sys='clr-namespace:System;assembly=mscorlib' xmlns:x='http://schemas.microsoft.com/winfx2006/xaml' > <StackPanel> <TextBlock>Who do you want to say hello to?</TextBlock> <TextBox Name='NameTextBox'> [name goes here] </TextBox> <Button Name='SayHelloButton'>Say Hello!</Button> </StackPanel> </Window> " // End string-based XAML // Load our XAML markup let getWindow() = let xamlObj = XamlReader.Parse(windowXaml) xamlObj :?> Window let win = getWindow() // Get instance of the XAML-based UI controls, and wire up event handlers let textBox = win.FindName("NameTextBox") :?> TextBox let button = win.FindName("SayHelloButton") :?> Button button.Click.AddHandler(fun _ _ -> let msg = sprintf "Hello, %s" textBox.Text MessageBox.Show(msg) |> ignore) let app = new Application() app.Run(win)
The UI layout in XAML, but the program code and inte tightly coupled. Because the program code gets a reference to the
example enablerface are still too
d us to express the
TextBox and Button controls by their Name property, the layout has to have a button and text box with specific names or else the application will stop working. Ideally, there

O’Reilly Media, Inc. 4/2/2012
6
would be a way to write code so that it didn’t depend on the specific type of interface elements.
Binding
The desigand the c
ners of WPF wanted to make progress and enable a true separation of the UI ode powering it. To achieve this, XAML supports binding, or linking live
of it later.
o greet the user. Example A–4 defines
program objects with UI elements.
Let’s rewrite our “Say Hello” application by first focusing on what we want the code to model, and grafting an interface on top
To power our “Say Hello” application we want a class that has an introductory message, a Name property the user can set, and a command tthis simple Greeter class as well as a GreetUserCommand, which displays a message box. This is all the code required to power our WPF application. Note the lack of any reference to UI elements.
Example A–4. Greeter for the SayHello application // Greeter.fs namespace GreetersNamespace open System open System.Windows open System.Windows.Input /// Greet command - when executed displays a message box type GreetUserCommand() = let m_canExecuteChangedEvent = new Event<System.EventHandler, EventArgs>() interface ICommand with member this.CanExecute(param : obj) = true member this.Execute(param : obj) = MessageBox.Show(sprintf "Hello, %s" (string param)) |> ignore [<CLIEvent>] member this.CanExecuteChanged with get() = m_canExecuteChangedEvent.Publish /// Greeter class - Used to model greeting an end user type Greeter() = let m_greetCommand = new GreetUserCommand() let mutable m_name = " [name goes here] " /// Introductory text member this.Introduction = "Hello, what is your name?" member this.Name with get () = m_name and set x = m_name <- x member this.GreetCommand = m_greetCommand

O’Reilly Media, Inc. 4/2/2012
7
Now te, we want to define some
AML know about the namespace where our code lives. The
that we have a model for how the code should execuXAML to use that model.
First, we need to let our Xfollowing snippet defines a new XML namespace, g, to be the GreetersNamespace in the current assembly (named WPFinFSharp).
<Window xmlns='http: crosoft.com/winfx/2006/xaml/presentation' //schemas.mi xmlns:x='http://schemas.microsoft.com/winfx/2006/xaml' xmlns:g='clr-namespace:GreetersNamespace;assembly=WPFinFSharp' Title='Greeter' Height='220' Width='450'>
The eGreeter. With
<!-- Add an instance of 'Greeter' to the Window's resources -->
n, we add a resource to the window of type Greeter called Ththis resource in the XAML code, an instance of Greeter will be created behind the scenes and stored in a resource dictionary. This will enable future UI elements to bind to it.
<Window.Resources> <g:Greeter x:Key='TheGreeter' /> </Window.Resources>
Now, we g WPF binding. The following XAML
esource TheGreeter}}'>
can refer to that live object usinassociates the live Greeter object with the StackPanel. It then adds a TextBlock which will display the Introduction property of resource TheGreeter.
<StackPanel DataContext='{Binding Source={StaticR <TextBlock Margin='7.5' FontSize='36.0' Text='{Binding Introduction}' />
Like ame property. So wise we can bind the TextBox’s value to TheGreeter’s Nwhenever the textbox is updated, the Name property is updated accordingly.
<TextBox Margin='7.5' FontSize='36.0' Text='{Binding Name}' />
Fina and y, which is an lly, we bind clicking the button to our GreetComm propertinstance of GreetUserCommand. When activated, this will carry out greeting the user by calling the Execute method of the command.
<Button Margin='7.5' FontSize='36.0' Content='Say Hello' Command='{Binding GreetCommand}' CommandParameter='{Binding Name}' />
This
of
e
introduction of another abstraction layer – the window resource – seems like additional complexity, but the code is no longer explicitly tied to the layout of the UI.
Example A–5 shows the updated XAML, which uses proper WPF binding, and the restthe refactored “Say Hello” application. The XAML also adds a LinearGradientBrush element to add a vibrant splash of color to the UI.
Note that the code references the Greeters namespace from thcurrently executing assembly, WPFinFSharp. You’ll need to update
O’Reilly Media, Inc. 4/2/2012
8
that with the name of the application you build, which may be different, for example Application1.
Example A–5. XAML for the SayHello application // Program.fs open System open System.Windows open System.Windows.Input open System.Windows.Markup module XamlCode = let xamlUI = " <Window xmlns='http://schemas.microsoft.com/winfx/2006/xaml/presentation' xmlns:x='http://schemas.microsoft.com/winfx/2006/xaml' xmlns:g='clr-namespace:GreetersNamespace;assembly= ' WPFinFSharp Title='Greeter' Height='240' Width='450'> <!-- Add an instance of 'Greeter' to the Window's resources --> <Window.Resources> <g:Greeter x:Key='TheGreeter' /> </Window.Resources> <StackPanel DataContext='{Binding Source={StaticResource TheGreeter}}'> <!-- Add a gratutious use of gradient brushes --> <StackPanel.Background> <LinearGradientBrush> <GradientStop Color='Red' Offset='0.00' /> <GradientStop Color='Orange' Offset='0.16' /> <GradientStop Color='Yellow' Offset='0.33' /> <GradientStop Color='Green' Offset='0.50' /> <GradientStop Color='Blue' Offset='0.66' /> <GradientStop Color='Indigo' Offset='0.83' /> <GradientStop Color='Violet' Offset='1.00' /> </LinearGradientBrush> </StackPanel.Background> <!-- Set the TextBlock's Text property equal to the Greeter's Introduction property --> <TextBlock Margin='7.5' FontSize='36.0' Text='{Binding Introduction}' /> <!-- Bind e Greetethe TextBox's data to th r's Name property --> <TextBox Margin='7.5' FontSize='36.0' Text='{Binding Name}' /> <!-- When you click the button, execute the Greeter's GreetCommand, passing in the Name property as its parameter --> <Button Margin='7.5' FontSize='36.0' Content='Say Hello' Command='{Binding GreetCommand}' CommandParameter='{Binding Name}' /> </StackPanel> </Window> "
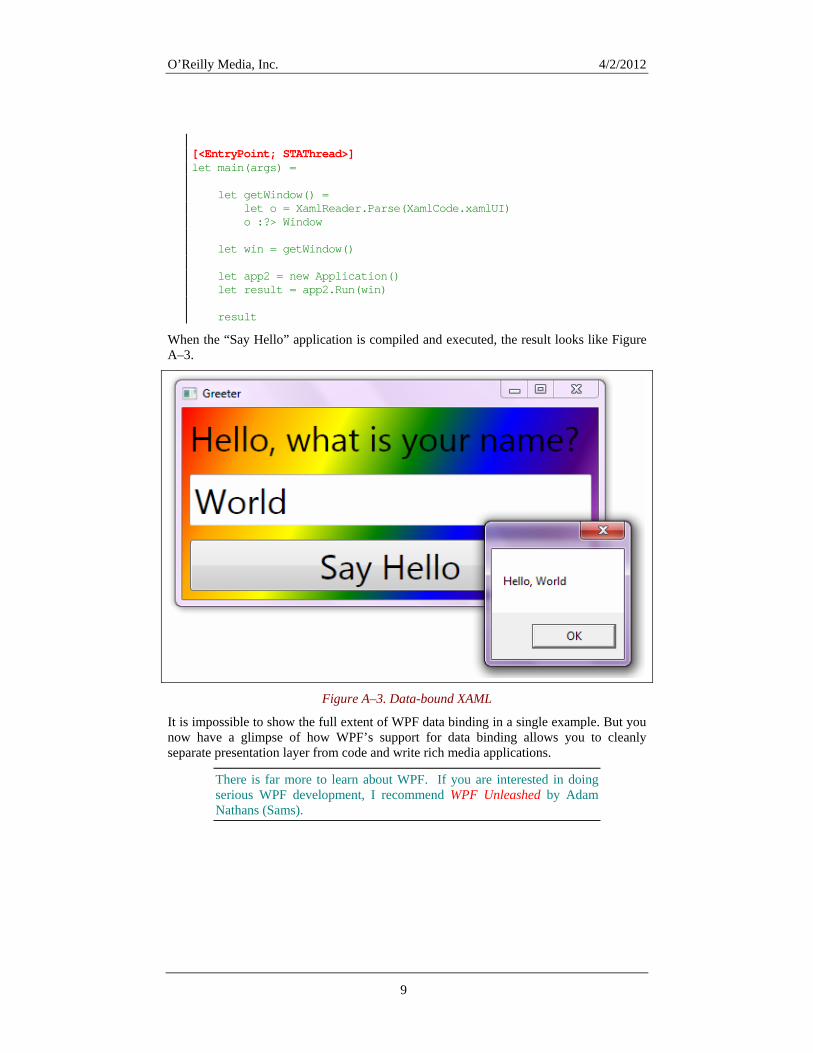
O’Reilly Media, Inc. 4/2/2012
9
[<EntryPoint; STAThread>] let main(args) = let getWindow() = let o = XamlReader.Parse(XamlCode.xamlUI) o :?> Window let win = getWindow() let app2 = new Application() let result = app2.Run(win) result
Whe iled and executed, the result looks like Figure A–3
n the “Say Hello” application is comp.
Figure A–3. Data-bound XAML
It is impossible to show the full extent of WPF data binding in a single example. But younow have a glimpse of ho ing allows you to cleanly
w WPF’s support for data bind
separate presentation layer from code and write rich media applications.
There is far more to learn about WPF. If you are interested in doing serious WPF development, I recommend WPF Unleashed by Adam Nathans (Sams).

O’Reilly Media, Inc. 4/2/2012
Data Processing Once you have a fancy user interface set up for your application, the next step is doing something. There are plenty of great data-processing libraries in .NET for whatever your application needs. (Also, see chapter 11 for in-depth examples of data processing in F#.)
Regular Expressions Manipulating text is one of the most common tasks you will encounter, and fortunately .NET has the full support for regular expressions to aid you.
Regular expressions are a formal language for searching text for particular words or sequences of characters. You can use regular expressions in .NET to simplify processing textual data to do things like:
• Validate input against a particular format • Identify substrings that match a particular structure • Create new strings that are modified versions of the input
To start with, consider the following code snippet. It defines a symbolic function =~= that takes a string and a regular expression – the format for which we will cover shortly – and returns if the string matches the given regular expression. The regular expression provided, "\d+", checks if the string contains a number.
> // Simple regular expressions open System.Text.RegularExpressions let (=~=) str regex = Regex.IsMatch(str, regex);; val ( =~= ) : string -> string -> bool > "Does this contain a number?" =~= "\d+";; val it : bool = false > "Does this (42) contain a number?" =~= "\d+";; val it : bool = true
Metacharacters
Regular expressions are built on their own language of metacharacters. The metacharacters and syntax for .NET regular expressions are defined in Table A–1.
Table A–1. Regular expression metacharacters
Character Description Most characters Characters other than . $ { [ ( | )
] } * + ? are matched verbatim. . Matches any character except for \n. [aeiou0-9] Matches any of a series of characters,
including those in a range. [^aeiou0-9] Matches any character except those
specified.
10
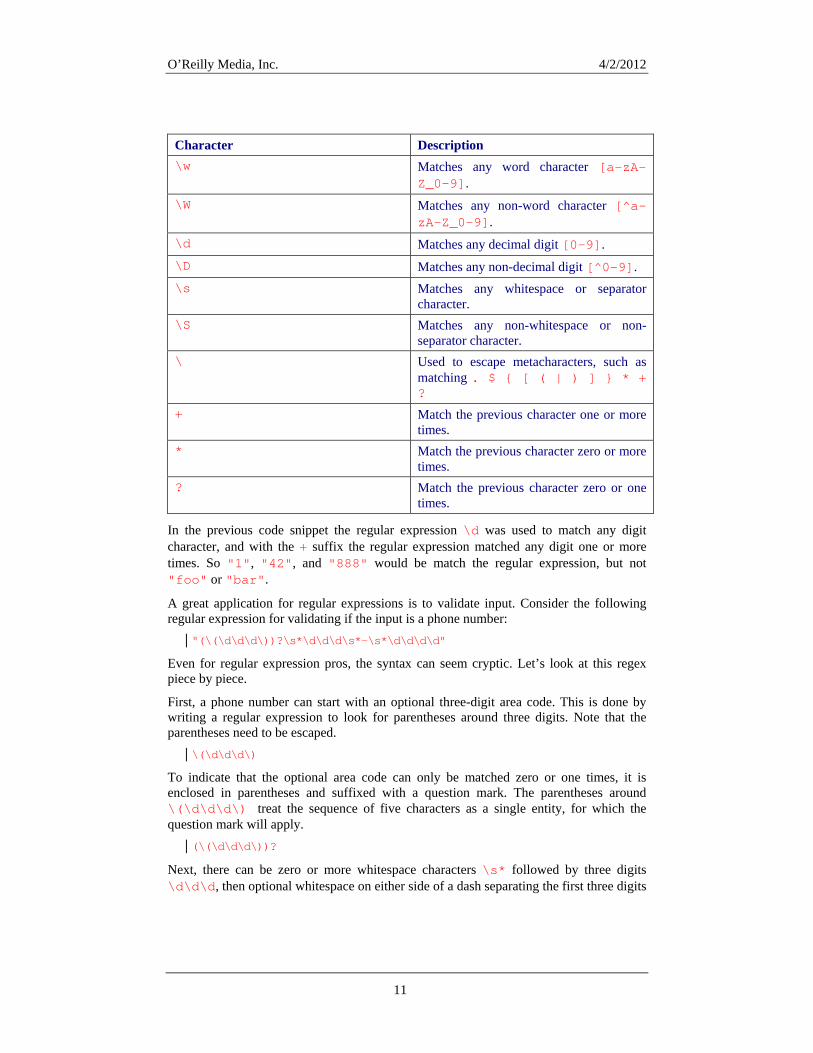
O’Reilly Media, Inc. 4/2/2012
11
Character Description \w Matches any word character [a-zA-
Z_0-9]. \W Matches any non-word character [^a-
zA-Z_0-9]. \d Matches any decimal digit [0-9]. \D Matches any non-decimal digit [^0-9]. \s Matches any whitespace or separator
character. \S Matches any non-whitespace or non-
separator character. \ Used to escape metacharacters, such as
matching . $ { [ ( | ) ] } * + ?
+ Match the previous character one or more times.
* Match the previous character zero or more times.
? Match the previous character zero or one times.
In the previous code snippet the regular expression \d was used to match any digit character, and with the + suffix the regular expression matched any digit one or more times. So "1", "42", and "888" would be match the regular expression, but not "foo" or "bar".
A great application for regular expressions is to validate input. Consider the following regular expression for validating if the input is a phone number:
"(\(\d\d\d\))?\s*\d\d\d\s*-\s*\d\d\d\d"
Even for regular expression pros, the syntax can seem cryptic. Let’s look at this regex piece by piece.
First, a phone number can start with an optional three-digit area code. This is done by writing a regular expression to look for parentheses around three digits. Note that the parentheses need to be escaped.
\(\d\d\d\)
To indicate that the optional area code can only be matched zero or one times, it is enclosed in parentheses and suffixed with a question mark. The parentheses around \(\d\d\d\) treat the sequence of five characters as a single entity, for which the question mark will apply.
(\(\d\d\d\))?
Next, there can be zero or more whitespace characters \s* followed by three digits \d\d\d, then optional whitespace on either side of a dash separating the first three digits

O’Reilly Media, Inc. 4/2/2012
of a phone number from the rest \s*-\s*, and finally four sequential digits \d\d\d\d.
Example A–6 defines a function isValidPhoneNumber for validating input. The regular expression itself is processed using the static Regex.IsMatch method.
Example A–6. Validating input with regular expressions > // Matching a phone number open System.Text.RegularExpressions let phoneNumberRegEx = "(\(\d\d\d\))?\s*\d\d\d\s*-\s*\d\d\d\d" let isValidPhoneNumber text = Regex.IsMatch(text, phoneNumberRegEx);; val phoneNumberRegEx : string = "(\(\d\d\d\))?\s*\d\d\d\s*-\s*\d\d\d\d" val isValidPhoneNumber : string -> bool > isValidPhoneNumber "(707) 827-7000";; val it : bool = true > isValidPhoneNumber "123-4567";; val it : bool = true > isValidPhoneNumber "123 - 4567";; val it : bool = true > isValidPhoneNumber "(this is not a phone number)";; val it : bool = false > isValidPhoneNumber "(123) 456-????";; val it : bool = false
String manipulation
The Regex class offers methods to help build new strings based on existing ones. Split can be used to break a string into parts separated by a regex, Replace replaces all instances of a regex with a static string.
Using these two methods we can go a long way toward parsing semi-structured textual data.
The most widely used file-format for storing Chess games is in Portable Game Notation, or PGN. The format starts with data/value pairs enclosed in brackets, can have comments enclosed in curly braces, and each move is prefixed with a number and one or three dots.
The following snippet shows an example PGN file describing a match between Bobby Fischer and Boris Spassky.
[Event "F/S Return Match"] [Site "Belgrade, Serbia Yugoslavia|JUG"] [Date "1992.11.04"] [Round "29"] [White "Fischer, Robert J."] [Black "Spassky, Boris V."] [Result "1/2-1/2"] 1. e4 e5 2. Nf3 Nc6 3. Bb5 {This opening is called the Ruy Lopez.} 3... a6 4. Ba4 Nf6 5. O-O Be7 6. Re1 b5 7. Bb3 d6 8. c3 O-O 9. h3 Nb8 10. d4 Nbd7 11. c4 c6 12. cxb5 axb5 13. Nc3 Bb7 14. Bg5 b4 15. Nb1 h6 16. Bh4 c5 17. dxe5 Nxe4 18. Bxe7 Qxe7 19. exd6 Qf6 20. Nbd2 Nxd6 21. Nc4 Nxc4 22. Bxc4 Nb6 23. Ne5 Rae8 24. Bxf7+ Rxf7 25. Nxf7 Rxe1+ 26. Qxe1 Kxf7 27. Qe3 Qg5 28. Qxg5 hxg5 29. b3 Ke6 30. a3 Kd6 31. axb4 cxb4 32. Ra5 Nd5 33. f3 Bc8 34. Kf2 Bf5 35. Ra7 g6 36. Ra6+ Kc5 37. Ke1 Nf4 38. g3 Nxh3 39. Kd2 Kb5 40. Rd6 Kc5 41. Ra6
12

O’Reilly Media, Inc. 4/2/2012
Nf2 42. g4 Bd3 43. Re6 1/2-1/2
In order to access the game move data, first all comments and meta-data must first be removed. Using Regex.Replace this task is very straightforward. In the game format all comments and metadata are enclosed between [ ] or { }. So with two regular expressions, any text that matches any sequence of characters between [ ] or { } can be replaced with the empty string, effectively stripping out all comments and metadata.
// Remove comments and markup from the PGN file let removeMarkup text = let tagPairs = new Regex(@"\[[^\]]+\]") let noTagPairs = tagPairs.Replace(text, "") let comments = new Regex(@"\{[^\}]+\}") let noComments = comments.Replace(noTagPairs, "") // Trim any leading whitespace and convert to a single-line noComments.Trim().Replace("\r", "").Replace("\n", " ")
Within the raw move-data blob, the next step is to separate the list of chess moves from the move markers. This can be done using Regex.Split on any sequences of digits followed by periods.
// Get the list of moves, each prefixed with a number and one or three dots let getMoves text = let movePrefix = new Regex(@"\d+\.+") movePrefix.Split(text)
Using the removeMarkup and getMoves methods in conjunction will get you access to the meat of the PGN file. While there certainly is need for more format-specific code to be written, Example A–7 shows how using regular expressions can quickly transform a chunk of textual data into a form that can be more easily processed.
Example A–7. PGN file parser > // Starting to parse a PGN file open System.Text.RegularExpressions let pgnGameText = " [Event \"F/S Return Match\"] [Site \"Belgrade, Serbia Yugoslavia|JUG\"] [Date \"1992.11.04\"] [Round \"29\"] [White \"Fischer, Robert J.\"] [Black \"Spassky, Boris V.\"] [Result \"1/2-1/2\"] 1. e4 e5 2. Nf3 Nc6 3. Bb5 {This opening is called the Ruy Lopez.} 3... a6 4. Ba4 Nf6 5. O-O Be7 6. Re1 b5 7. Bb3 d6 8. c3 O-O 9. h3 Nb8 10. d4 Nbd7 11. c4 c6 12. cxb5 axb5 13. Nc3 Bb7 14. Bg5 b4 15. Nb1 h6 16. Bh4 c5 17. dxe5 Nxe4 18. Bxe7 Qxe7 19. exd6 Qf6 20. Nbd2 Nxd6 21. Nc4 Nxc4 22. Bxc4 Nb6 23. Ne5 Rae8 24. Bxf7+ Rxf7 25. Nxf7 Rxe1+ 26. Qxe1 Kxf7 27. Qe3 Qg5 28. Qxg5 hxg5 29. b3 Ke6 30. a3 Kd6 31. axb4 cxb4 32. Ra5 Nd5 33. f3 Bc8 34. Kf2 Bf5 35. Ra7 g6 36. Ra6+ Kc5 37. Ke1 Nf4 38. g3 Nxh3 39. Kd2 Kb5 40. Rd6 Kc5 41. Ra6 Nf2 42. g4 Bd3 43. Re6 1/2-1/2 " // Remove comments and markup from the PGN file
13

O’Reilly Media, Inc. 4/2/2012
let removeMarkup text = let tagPairs = new Regex(@"\[.*\]") let noTagPairs = tagPairs.Replace(text, "") let comments = new Regex(@"\{.*\}") let noComments = comments.Replace(noTagPairs, "") // Trim any leading whitespace and convert to a single-line noComments.Trim().Replace("\r", "").Replace("\n", " ") // Get the list of moves, each prefixed with a number and one or three dots let getMoves text = let factRegex = new Regex(@"\d+\.+", RegexOptions.Multiline) factRegex.Split(text) let normalizedText = removeMarkup pgnGameText let listMoves() = getMoves normalizedText |> Array.map (fun move -> move.Trim()) |> Array.iter (printfn "%s");; val pgnGameText : string = " [Event "F/S Return Match"] [Site "Belgrade, Serbia Yugoslavi"+[684 chars] val removeMarkup : string -> string val getMoves : string -> string [] val normalizedText : string = "1. e4 e5 2. Nf3 Nc6 3. Bb5 3... a6 4. Ba4 Nf6 5. O-O Be7 6. "+[464 chars] val listMoves : unit -> unit > listMoves();; e4 e5 Nf3 Nc6 Bb5 a6 Ba4 Nf6 O-O Be7 Re1 b5 Bb3 d6 c3 O-O h3 Nb8 d4 Nbd7 c4 c6 ...
Capture groups
Regular expressions can be used for more than just validating input and manipulating text. You can also use regular expressions to extract textual data that matches a given format.
If you want to use a metacharacter like ?, +, or * to apply to a sequence of characters you can group them in parentheses. For example, "(foo)+" matches the phrase "foo"
14

O’Reilly Media, Inc. 4/2/2012
one or more times. Without the parentheses, "foo+" the regular expression would match the letters f, o, and then another o one or more times.
Grouping can be more useful than adding expressiveness to regular expression syntax, if you use the Regex.Match method a Match object will be returned that you can use to refer back to the string captured in each captured group.
Example A–8 defines a regular expression to parse out word analogies found on standardized tests. Each part of the regular expression associated with a word is enclosed in parentheses, and therefore its own group.
The example takes the returned Match object and prints each captured group to the console. Notice that the full regular expression is considered the “first” group, which in the example is the full word analogy.
Example A–8. Capturing regular expression groups > // Capturing regex groups open System open System.Text.RegularExpressions let analogyRegex = "(\w+):(\w+)::(\w+):(\w+)" let m = Regex.Match("dog:bark::cat:meow", analogyRegex);; val analogyRegex : string = "(\w+):(\w+)::(\w+):(\w+)" val m : Match = dog:bark::cat:meow > // Print captures printfn "Group captures..." for i = 0 to m.Groups.Count - 1 do printfn "[%d] %s" i (m.Groups.[i].Value);; Group captures... [0] dog:bark::cat:meow [1] dog [2] bark [3] cat [4] meow
We’ve already seen a great example of when to use regular expression group captures, and that is in conjunction with active patterns.
Example A–9 is from Chapter 7, Applied Functional Programming. Notice how the partial active pattern returns a tuple of three strings, which are the result of three captures in the given regular expression. List.tail is used to skip the first group’s value – the fully matched string – and instead returns each individual group capture.
The example uses the (|RegexMatch3|_|) partial active pattern to match different ways to specify a date, binding the year, month, and day to values in the pattern match rule.
Example A–9. Regular expression captures via active patterns let (|RegexMatch3|_|) (pattern : string) (input : string) = let result = Regex.Match(input, pattern) if result.Success then match (List.tail [ for g in result.Groups -> g.Value ]) with | fst :: snd :: trd :: [] -> Some (fst, snd, trd)
15

O’Reilly Media, Inc. 4/2/2012
| [] -> failwith "Match succeeded, but no groups found.\n \ Use '(.*)' to capture groups" | _ -> failwith "Match succeeded, but did not find exactly three groups." else None let parseTime input = match input with // Match input of the form "6/20/2008" | RegexMatch3 "(\d+)/(\d+)/(\d+)" (month, day, year) // Match input of the form "2000-3-6" | RegexMatch3 "(\d+)-(\d+)-(\d+)" (year, month, day) -> Some( new DateTime(int year, int month, int day) ) | _ -> None
If you are interested in learning more about regular expressions, consider reading Mastering Regular Expressions by Jeffrey E. F. Friedl (O’Reilly).
Working with XML Working with XML allows you to easily create and store structured data without the fuss of writing your own parser. It means that you can leverage .NET APIs for manipulating XML documents as well.
There are two separate XML libraries for .NET, an early version in the System.Xml.dll assembly, which is somewhat painful to use, and a newer, friendlier library in System.Xml.Linq.dll which will be covered here.
Writing XML
Writing XML documents is as simple as constructing a hierarchy of XElement objects. Example A–10 defines a Book type that knows how to convert itself into an XML document, via the ToXml method.
Example A–10. Writing XML documents #r "System.Xml.dll" #r "System.Xml.Linq.dll" open System.Xml.Linq // Convert a strin XName object g into anlet xname thing = XName.Get(thing.ToString()) type Book = | ComicBook of string * int | Novel of string * string | TechBook of string * string member this.ToXml() = match this with | ComicBook(series, issue) -> new XElement(xname "ComicBook", new XElement(xname "Series", series), new XElement(xname "Issue", issue)) | Novel(author, title) ->
16

O’Reilly Media, Inc. 4/2/2012
new XElement(xname "Novel", new XElement(xname "Author", author), new XElement(xname "Title", title)) | TechBook(author, title) -> new XElement(xname "TechBook", new XElement(xname "Author", author), new XElement(xname "Title", title)) /// Generates an XML document from a list of books let bookshelfToXml (bookshelf : Book list) = let books = bookshelf |> List.map (fun book -> book.ToXml()) |> Array.ofList new XElement(xname "Bookshelf", books)
When used in an FSI session you can see how easily it is to construct XML documents. Saving XML documents is as simple as calling the Save method on an XElement object.
> // Convert a list of Book union cases to an XML document [ ComicBook("IronMan", 1) ComicBook("IronMan", 2) TechBook("Machine Learning", "Mitchell") TechBook("Effective C++", "Meyers") Novel("World War Z", "Max Brooks") ComicBook("IronMan", 3) ] |> bookshelfToXml |> (printfn "%A");; <Bookshelf> <ComicBook> <Series>IronMan</Series> <Issue>1</Issue> </ComicBook> <ComicBook> <Series>IronMan</Series> <Issue>2</Issue> </ComicBook> <TechBook> <Author>Machine Learning</Author> <Title>Mitchell</Title> </TechBook> <TechBook> <Author>Effective C++</Author> <Title>Meyers</Title> </TechBook> <Novel> <Author>World War Z</Author> <Title>Max Brooks</Title> </Novel> <ComicBook> <Series>IronMan</Series> <Issue>3</Issue> </ComicBook> </Bookshelf>
17

O’Reilly Media, Inc. 4/2/2012
val it : unit = ()
Reading XML
To open XML documents use the static methods XElement.Parse and XElement.Load. Parse takes a string containing structured XML data and return an instance of XElement, Load will take a file path to a valid XML file.
> // Load an existing XML document from disk let shelf = XElement.Load("LordOfTheRings.xml") printfn "Loaded Document:\n%A" shelf;; Loaded Document: <Bookshelf> <Novel> <Author>The Two Towers</Author> <Title>Tolkien</Title> </Novel> <Novel> <Author>Fellowship of the Ring</Author> <Title>Tolkien</Title> </Novel> <Novel> <Author>The Return of the King</Author> <Title>Tolkien</Title> </Novel> </Bookshelf> val it : unit = () > // Parse an XML document from a string do let shelf = XElement.Parse("<Bookshelf> <TechBook> <Author>Steve McConnell</Author> <Title>CodeComplete</Title> </TechBook><TechBook> <Author>Charles Petzold</Author> <Title>Code</Title> </TechBook> </Bookshelf>") printfn "Parsed Document:\n%A" shelf;; Parsed Document: <Bookshelf> <TechBook> <Author>Steve McConnell</Author> <Title>CodeComplete</Title> </TechBook> <TechBook> <Author>Charles Petzold</Author> <Title>Code</Title> </TechBook> </Bookshelf> val it : unit = ()
18

O’Reilly Media, Inc. 4/2/2012
Storing Data Once you’ve computed the values you need, you will probably want to save that data to disk or in a database. There are numerous ways of storing data in .NET, each with varying degrees of performance and ease of use.
File IO Most .NET IO facilities are based around the abstract System.IO.Stream class, which defines a primitive interface between the stream and the backing store. (Backing store is just a fancy term for “where the data comes from.”) Classes inherit from Stream and add specialized ways to read or write from a particular backing store. For example, MemoryStream is used to read or write data from memory, NetworkStream is used to read or write data from a network connection, and FileStream is used to read or write data from a file, and so on.
The simplest way to read or write data from disk is to use the File.ReadAllLines and File.WriteAllLines methods. WriteAllLines takes a file path and a string array of textual data to be written to the file, while ReadAllLines takes a file path and returns the string array of the file’s lines.
> // Solving the fizz buzz problem open System.IO let computeFileContents() = [| 1 .. 100 |] |> Array.map(function | x when x % 3 = 0 && x % 5 = 0 -> "FizzBuzz" | x when x % 3 = 0 -> "Fizz" | x when x % 5 = 0 -> "Buzz" | _ -> ".");; val computeFileContents : unit -> string [] > File.WriteAllLines("FizzBuzzSln.txt", computeFileContents());; val it : unit = () > let fileContents = File.ReadAllLines("FizzBuzzSln.txt");; val fileContents : string [] = [|"."; "."; "Fizz"; "."; "Buzz"; "Fizz"; "."; "."; "Fizz"; "Buzz"; "."; "Fizz"; "."; "."; "FizzBuzz"; "."; "."; "Fizz"; "."; "Buzz"; "Fizz"; "."; "."; "Fizz"; "Buzz"; "."; "Fizz"; "."; "."; "FizzBuzz"; "."; "."; "Fizz"; "."; "Buzz"; "Fizz"; "."; "."; "Fizz"; "Buzz"; "."; "Fizz"; "."; "."; "FizzBuzz"; "."; "."; "Fizz"; "."; "Buzz"; "Fizz"; "."; "."; "Fizz"; "Buzz"; "."; "Fizz"; "."; "."; "FizzBuzz"; "."; "."; "Fizz"; "."; "Buzz"; "Fizz"; "."; "."; "Fizz"; "Buzz"; "."; "Fizz"; "."; "."; "FizzBuzz"; "."; "."; "Fizz"; "."; "Buzz"; "Fizz"; "."; "."; "Fizz"; "Buzz"; "."; "Fizz"; "."; "."; "FizzBuzz"; "."; "."; "Fizz"; "."; "Buzz"; "Fizz"; "."; "."; "Fizz"; "Buzz"|]
19
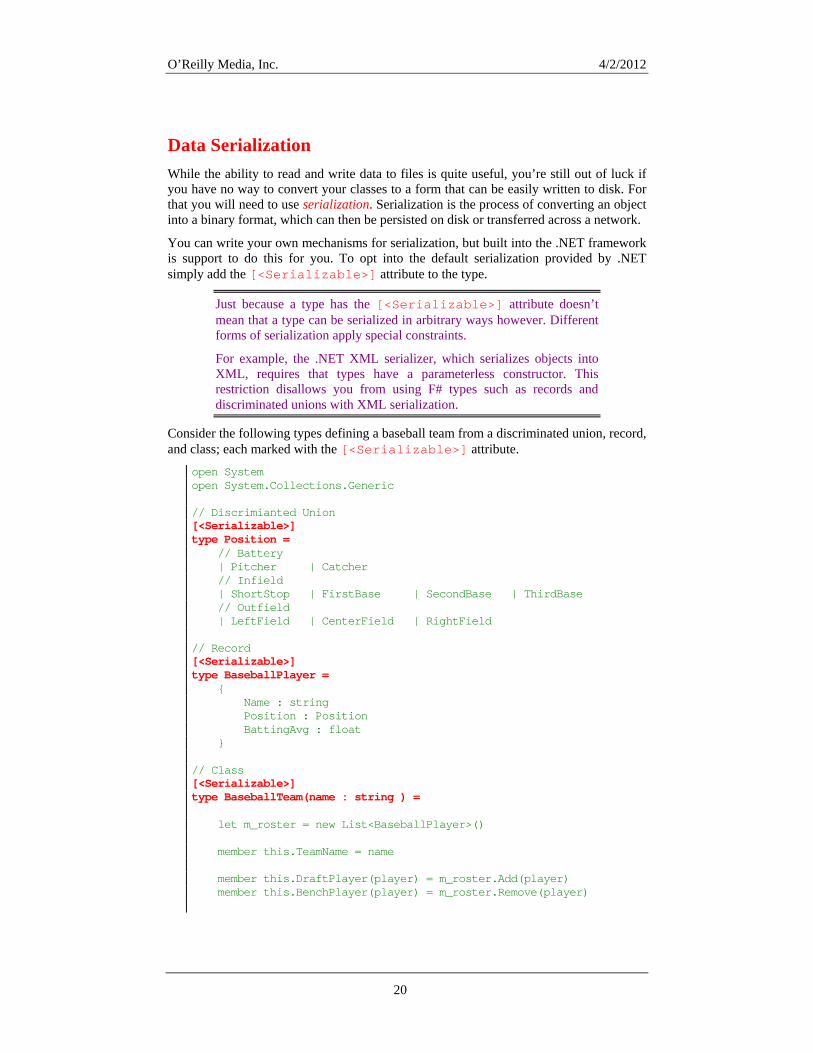
O’Reilly Media, Inc. 4/2/2012
Data Serialization While the ability to read and write data to files is quite useful, you’re still out of luck if you have no way to convert your classes to a form that can be easily written to disk. For that you will need to use serialization. Serialization is the process of converting an object into a binary format, which can then be persisted on disk or transferred across a network.
You can write your own mechanisms for serialization, but built into the .NET framework is support to do this for you. To opt into the default serialization provided by .NET simply add the [<Serializable>] attribute to the type.
Just because a type has the [<Serializable>] attribute doesn’t mean that a type can be serialized in arbitrary ways however. Different forms of serialization apply special constraints.
For example, the .NET XML serializer, which serializes objects into XML, requires that types have a parameterless constructor. This restriction disallows you from using F# types such as records and discriminated unions with XML serialization.
Consider the following types defining a baseball team from a discriminated union, record, and class; each marked with the [<Serializable>] attribute.
open System open System.Collections.Generic // Discrimianted Union [<Serializable>] type Position = // Battery | Pitcher | Catcher // Infield | ShortStop | FirstBase | SecondBase | ThirdBase // Outfield | LeftField | CenterField | RightField // Record [<Serializable>] type BaseballPlayer = { Name : string Position : Position BattingAvg : float } // Class [<Serializable>] type BaseballTeam(name : string ) = let m_roster = new List<BaseballPlayer>() member this.TeamName = name member this.DraftPlayer(player) = m_roster.Add(player) member this.BenchPlayer(player) = m_roster.Remove(player)
20

O’Reilly Media, Inc. 4/2/2012
member this.Roster = m_roster |> Seq.to_array
Serializing an object to a byte[] is as simple as passing a stream to an instance of BinaryFormatter. Example A–11 shows an FSI session where the method serializeThing serializes an arbitrary obj into a byte[] and a method saveTeam which saves a BaseballTeam object to disk.
The serializeThing method works by creating a MemoryStream, which allows the binary BinaryFormatter to write the serialized version of the obj into memory. Then, the function returns the MemoryStream’s data in the form of a byte[].
Example A–11. Serialization > // Serializing an object open System.IO open System.Runtime.Serialization.Formatters.Binary /// Serialize an object let serializeThing(thing) = let bf = new BinaryFormatter() use mstream = new MemoryStream() bf.Serialize(mstream, thing) mstream.ToArray() /// Saves a baseball team to disk let saveTeam(team : BaseballTeam, filePath : string) = let byteArr = serializeThing team use fileStream = new FileStream(filePath, FileMode.CreateNew) fileStream.Write(byteArr, 0, byteArr.Length) fileStream.Close() () ;; val serializeThing : 'a -> byte [] val saveTeam : BaseballTeam * string -> unit > // Creating a baseball team let M's = new BaseballTeam("Mariners") let ichiro = { Name = "Ichiro Suzuki" Position = RightField BattingAvg = 0.330 } let griffeyJr = { Name = "Ken Griffey, Jr."; Position = LeftField; BattingAvg = 0.287 } M's.DraftPlayer(ichiro) M's.DraftPlayer(griffeyJr);; val M's : BaseballTeam val ichiro : BaseballPlayer = {Name = "Ichiro Suzuki"; Position = RightField; BattingAvg = 0.33;} val griffeyJr : BaseballPlayer = {Name = "Ken Griffey, Jr.";
21

O’Reilly Media, Inc. 4/2/2012
22
Position = LeftField; BattingAvg = 0.287;} > // Serialize poor Ichiro into a byte[] serializeThing ichiro;; val it : byte [] = [|0uy; 1uy; 0uy; 0uy; 0uy; 255uy; 255uy; 255uy; 255uy; 1uy; 0uy; 0uy; 0uy; 0uy; 0uy; 0uy; 0uy; 12uy; 2uy; 0uy; 0uy; 0uy; 67uy; 70uy; 83uy; 73uy; 45uy; 65uy; 83uy; 83uy; 69uy; 77uy; 66uy; 76uy; 89uy; 44uy; 32uy; 86uy; 101uy; 114uy; 115uy; 105uy; 111uy; 110uy; 61uy; 48uy; 46uy; 48uy; 46uy; 48uy; 46uy; 48uy; 44uy; 32uy; 67uy; 117uy; 108uy; 116uy; 117uy; 114uy; 101uy; 61uy; 110uy; 101uy; 117uy; 116uy; 114uy; 97uy; 108uy; 44uy; 32uy; 80uy; 117uy; 98uy; 108uy; 105uy; 99uy; 75uy; 101uy; 121uy; 84uy; 111uy; 107uy; 101uy; 110uy; 61uy; 110uy; 117uy; 108uy; 108uy; 5uy; 1uy; 0uy; 0uy; 0uy; 23uy; 70uy; 83uy; 73uy; 95uy; ...|] > saveTeam(M's, @"D:\MarinersTeam.bbt");; val it : unit = ()
Deserialization Deserializing data is done in much the same way it is serialized, except the Deserialize method is called on the BinaryFormatter. Deserialize returns an obj, which will need to be cast as another type.
Example A–12 provides the complement of saveTeam called loadTeam. The method opens up a FileStream object, which the BinaryFormatter will read from and deserialize a BaseballTeam type.
Example A–12. Deserialization > // Deserialization let loadTeam(filePath) = use fileStream = new FileStream(filePath, FileMode.Open) let bf = new BinaryFormatter() let result = bf.Deserialize(fileStream) (result :?> BaseballTeam);; val loadTeam : string -> BaseballTeam > let loadedM's = loadTeam @"D:\MarinersTeam.bbt";; val loadedM's : BaseballTeam > // Print the loaded data loadedM's.Roster |> Array.iter (fun player -> printfn "%s - Batting %.3f" player.Name player.BattingAvg);; Ichiro Suzuki - Batting 0.330 Ken Griffey, Jr. - Batting 0.287 val it : unit = ()
O’Reilly Media, Inc. 4/2/2012
B F# Interop
This book presents F# as a great language for helping you to be more productive and which can also seamlessly integrate with the existing .NET stack. While it is true that F# is a great language, the word seamlessly may need to be qualified.
The dominant languages used in .NET today are C# and Visual Basic .NET, and while in F# you can write and call into object-oriented assemblies to interact with C# and VB.NET code, some concepts may get lost in translation.
This appendix is focused on how to ease interop with F#. By the end of this appendix you’ll be able to identify problem areas when doing multi-language programming. In addition, you’ll be able to have your F# interoperate with unmanaged (native) code as well by using Platform Invoke and COM.
Although F# allows you to work with both C# and Visual Basic .NET, in this appendix, I’m just going to refer to C# for convenience. Whenever you see the term C#, you can replace it with the phrase C# or Visual Basic .NET depending on your preference.
.NET Interop The key to interoperation between .NET languages is to make sure that the types and methods in the public surface area of a class library are available to all languages consuming the code. Intuitively, if a library exposes constructs that are not native to the consuming language, things can look a little strange. Or, even worse, the library exposes different idioms for the concepts in both languages.
Nullable Types Nullable types are for unfortunate C# and VB.NET programmers who don’t have pattern matching, discriminated unions, and the ability to use option types. In order for them to express that an object may or may not have a value, they must use the System.Nullable<T> type.
1

O’Reilly Media, Inc. 4/2/2012
For example, the following expresses a nullable integer type, which has value zero, one, or null.
> // Nullable types open System let x = new Nullable<int>(1) let y = new Nullable<int>();; val x : Nullable<int> = 1 val y : Nullable<int> = null > printfn "HasValue: x = %b, y = %b" x.HasValue y.HasValue;; HasValue: x = true, y = false val it : unit = () > x.Value;; val it : int = 1 > y.Value;; System.InvalidOperationException: Nullable object must have a value. at System.ThrowHelper.ThrowInvalidOperationException(ExceptionResource resource) at <StartupCode$FSI_0057>.$FSI_0057.main@() Stopped due to error
In pure F#-code, stick to using option types wherever possible. If inter-operating with other .NET code however, or reading from a SQL database, using nullable types might be unavoidable.
Linq.NullableOperators
Once you have a nullable value, you cannot use the standard set of operators on it. (Since (+) doesn’t default to having semantics for adding two null values.) Fortunately there is a plethora of operators for using nullable types.
As soon as you open the Microsoft.FSharp.Linq namespace, the NullableOperators module will auto-open and add a slew of custom operators.
The semantics for operating on nullable types is as follows: if both operands have a value, then the result is as you would normally expect. However, if either or both of the values is null, then the result will be null.
The general pattern is to add a question mark ? for each operand which is nullable. For example, use (?+) to add two values if the left side is nullable, (+?) if the right side is nullable, and (?+?) if both operands are nullable.
> // Nullable operators open Microsoft.FSharp.Linq (?+);; val it : (Nullable<int> -> int -> Nullable<int>) = <fun:it@46-2> > (+?);; val it : (int -> Nullable<int> -> Nullable<int>) = <fun:it@47-3> > (?+?);; val it : (Nullable<int> -> Nullable<int> -> Nullable<int>) = <fun:it@48-4> > let x = new Nullable<int>(12);; val x : Nullable<int> = 12 > // ERROR: (+) doesn't work on nullable types.
2
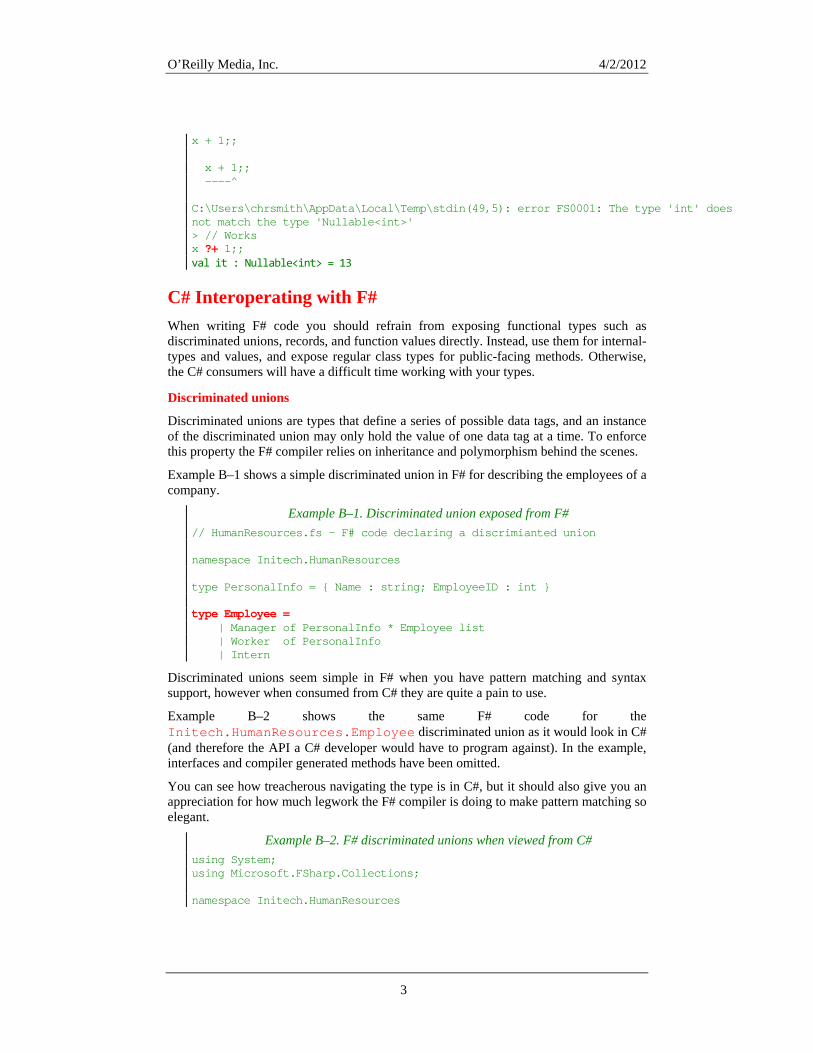
O’Reilly Media, Inc. 4/2/2012
x + 1;; x + 1;; ----^ C:\Users\chrsmith\AppData\Local\Temp\stdin(49,5): error FS0001: The type 'int' does not match the type 'Nullable<int>' > Works //x ?+ 1;; val it : Nullable<int> = 13
C# Interoperating with F# When writing F# code you should refrain from exposing functional types such as discriminated unions, records, and function values directly. Instead, use them for internal-types and values, and expose regular class types for public-facing methods. Otherwise, the C# consumers will have a difficult time working with your types.
Discriminated unions
Discriminated unions are types that define a series of possible data tags, and an instance of the discriminated union may only hold the value of one data tag at a time. To enforce this property the F# compiler relies on inheritance and polymorphism behind the scenes.
Example B–1 shows a simple discriminated union in F# for describing the employees of a company.
Example B–1. Discriminated union exposed from F# // HumanResources.fs - F# code declaring a discrimianted union namespace Initech.HumanResources type PersonalInfo = { Name : string; EmployeeID : int } type Employee = | Manager of PersonalInfo * Employee list | Worker of PersonalInfo | Intern
Discriminated unions seem simple in F# when you have pattern matching and syntax support, however when consumed from C# they are quite a pain to use.
Example B–2 shows the same F# code for the Initech.HumanResources.Employee discriminated union as it would look in C# (and therefore the API a C# developer would have to program against). In the example, interfaces and compiler generated methods have been omitted.
You can see how treacherous navigating the type is in C#, but it should also give you an appreciation for how much legwork the F# compiler is doing to make pattern matching so elegant.
Example B–2. F# discriminated unions when viewed from C# using System; using Microsoft.FSharp.Collections; namespace Initech.HumanResources
3

O’Reilly Media, Inc. 4/2/2012
{ [Serializable, CompilationMapping(SourceConstructFlags.SumType)] public abstract class Employee { // Fields internal static readonly Employee _unique_Intern = new _Intern(); // Methods internal Employee() { } [CompilationMapping(SourceConstructFlags.UnionCase, 0)] public static Employee NewManager(PersonalInfo item1, FSharpList<Employee> item2) { return new Manager(item1, item2); } [CompilationMapping(SourceConstructFlags.UnionCase, 1)] public static Employee NewWorker(PersonalInfo item) { return new Worker(item); } // Properties public static Employee Intern { [CompilationMapping(SourceConstructFlags.UnionCase, 2)] get { return _unique_Intern; } } public bool IsIntern { [CompilerGenerated, DebuggerNonUserCode] get { return (this is _Intern); } } public bool IsManager { [CompilerGenerated, DebuggerNonUserCode] get { return (this is Manager); } } public bool IsWorker { [CompilerGenerated, DebuggerNonUserCode] get
4

O’Reilly Media, Inc. 4/2/2012
{ return (this is Worker); } } public int Tag { get { Employee employee = this; return (!(employee is _Intern) ? (!(employee is Worker) ? 0 : 1) : 2); } } // Nested Types [Serializable] internal class _Intern : Employee { // Methods internal _Intern() { } } [Serializable] public class Manager : Employee { // Fields internal readonly PersonalInfo item1; internal readonly FSharpList<Employee> item2; // Methods internal Manager(PersonalInfo item1, FSharpList<Employee> item2) { this.item1 = item1; this.item2 = item2; } // Properties [CompilationMapping(SourceConstructFlags.Field, 0, 0)] public PersonalInfo Item1 { get { return this.item1; } } [CompilationMapping(SourceConstructFlags.Field, 0, 1)] public FSharpList<Employee> Item2 { get { return this.item2; } }
5

O’Reilly Media, Inc. 4/2/2012
} public static class Tags { // Fields public const int Intern = 2; public const int Manager = 0; public const int Worker = 1; } [Serializable] public class Worker : Employee { // Fields internal readonly PersonalInfo item; // Methods internal Worker(PersonalInfo item) { this.item = item; } // Properties [CompilationMapping(SourceConstructFlags.Field, 1, 0)] public PersonalInfo Item { get { return this.item; } } } } }
Function values
Function values represent a similar problem when consuming F# code from C#. While C# supports lambda expressions just like F#, the way the C# compiler handles them is much different.
In C# the method for representing function values is to use delegates, and in C# 3.0 two generic delegate types were introduced to help aid C# developers when doing functional programming: System.Action<_> and System.Func<_,_>.
The Action<_> type represents a function that does not return a value. The Func<_,_> type on the other hand does return a value. In both cases, the generic type parameters are the types of the function’s parameters.
The following snippet shows F# code for creating Action<_> and Func<_,_> function values.
> // Using the System.Action type #r "System.Core.dll" open System let fsAction = new Action<string>(fun arg -> printfn "Hello, %s" arg);;
6

O’Reilly Media, Inc. 4/2/2012
--> Referenced 'C:\Windows\Microsoft.NET\Framework\v4.0.20620\System.Core.dll' val fsAction : Action<string> > fsAction.Invoke("World");; Hello, World val it : unit = () > // Using the System.Func type let fsFunc = new Func<string, int>(fun s -> Int32.Parse(s) * Int32.Parse(s));; val fsFunc : Func<string,int> > fsFunc.Invoke("4");; val it : int = 16
Function values created in F# are not of type Action<_> or Func<_,_>, but instead of type FSharpFunc<_,_>. In F#, function values may be partially applied, so passing in the first parameter of a function returns a new function with one fewer parameter.
Example B–3 shows the type MathUtilities, which has a method named GetAdder that returns an F# function value taking three string parameters.
Example B–3. Function values in F# namespace Initech.Math open System type MathUtilities = static member GetAdder() = (fun x y z -> Int32.Parse(x) + Int32.Parse(y) + Int32.Parse(z))
The type returned by GetAdder is an FSharpFunc<_,_> object, which in F# can be expressed by:
string -> string -> string -> int
However, to declare that same function type in C# you must write:
FSharpFunc <string, FSharpFunc <string, FSharpFunc <string, int>>>
Just imagine what the function signature would look like if it took more parameters! Curried function values are an elegant way to simplify code in functional languages, but be wary of exposing them to languages that don’t support currying natively.
F# Interoperating with C# Consuming C# code from F# is typically no problem because F# contains most all of the language features found in C# and VB.NET. However, there are a few things you can do in C# that you cannot do easily in F#; so if you have control over the C# libraries you will consume from F#, keep the following points in mind.
7
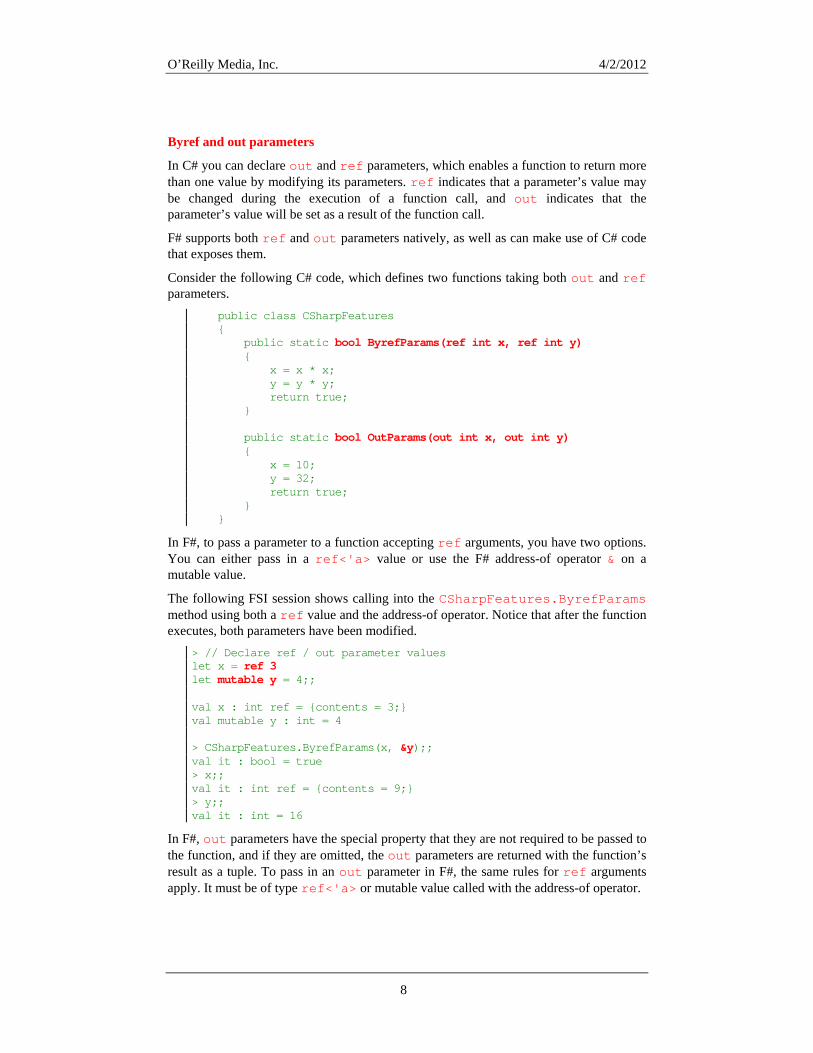
O’Reilly Media, Inc. 4/2/2012
Byref and out parameters
In C# you can declare out and ref parameters, which enables a function to return more than one value by modifying its parameters. ref indicates that a parameter’s value may be changed during the execution of a function call, and out indicates that the parameter’s value will be set as a result of the function call.
F# supports both ref and out parameters natively, as well as can make use of C# code that exposes them.
Consider the following C# code, which defines two functions taking both out and ref parameters.
public class CSharpFeatures { public static bool ByrefParams(ref int x, ref int y) { x = x * x; y = y * y; return true; } public static bool OutParams(out int x, out int y) { x = 10; y = 32; return true; } }
In F#, to pass a parameter to a function accepting ref arguments, you have two options. You can either pass in a ref<'a> value or use the F# address-of operator & on a mutable value.
The following FSI session shows calling into the CSharpFeatures.ByrefParams method using both a ref value and the address-of operator. Notice that after the function executes, both parameters have been modified.
> // Dec ref / out parameter values lare let ref 3 x = let mutable y = 4;; val x : int ref = {contents = 3;} val mutable y : int = 4 > CSharpFeatures.ByrefParams(x, &y);; val it : bool = true > x;; val it : int ref = {contents = 9;} > y;; val it : int = 16
In F#, out parameters have the special property that they are not required to be passed to the function, and if they are omitted, the out parameters are returned with the function’s result as a tuple. To pass in an out parameter in F#, the same rules for ref arguments apply. It must be of type ref<'a> or mutable value called with the address-of operator.
8

O’Reilly Media, Inc. 4/2/2012
The following FSI session shows calling into the CSharpFeatures.OutParams method three times. Notice how the return type of the function changes based on whether or not the out parameters were passed in.
> // Declare ref / out parameter values let x = ref 0 let mutable y = 0;; val x : int ref = {contents = 0;} val mutable y : int = 0 > // Pass in both out pa s, return value is bool rameterCSharpFeatures.OutParams(x, &y);; val it : bool = true > // Pass in just one ou arameter, return value is bool * int t pCSharpFea (x)tures.OutParams ;; val it : bool * int = (true, 32) > // Pass in no out parameters, return value is bool * int * int CSharpFeatures.OutParams();; val it : bool * int * int = (true, 10, 32)
To expose a method parameter from F# as a ref parameter, simply give the parameter type byref<'a>. You can then treat that parameter as a local, mutable variable. To expose an out parameter, give the parameter type byref<'a> as well but also attribute it with System.Runtime.InteropServices.OutAttribute. The following snippet defines an F# function that takes a ref and an out parameter respectively.
open System.Runtime.InteropServices let fsharpFunc (x : byref<int>, [<Out>] y : byref<int>) = x <- x + 1 y <- y + 1
Dealing with null
Another F#-C# interop area is dealing with null. Types created in F# cannot be null, but any reference type in C# can have null as a proper value. This can lead to sticky situations when round-tripping types defined in F# through C# libraries. (Because the C# library could return null when the F# library doesn’t expect it.)
To enable types defined in an F# assembly to permit null as a possible value, you can add the AllowNullLiteral attribute. This attribute is only available on class and interface types; so records, structs, and discriminated unions still may not be null.
The following FSI session shows the AllowNullLiteral attribute in action. Notice that when trying to create an instance of Widget with a value of null, a compiler error is given. However, you can have a value of type Sprocket equal to null because it was decorated with the AllowNullLiteral attribute.
> // Define two classes, one with [<AllowNullLiteral>] and one without type Widget() = override this.ToString() = "A Widget" [<AllowNullLiteral>] type Sprocket() = override this.ToString() = "A Sprocket";;
9
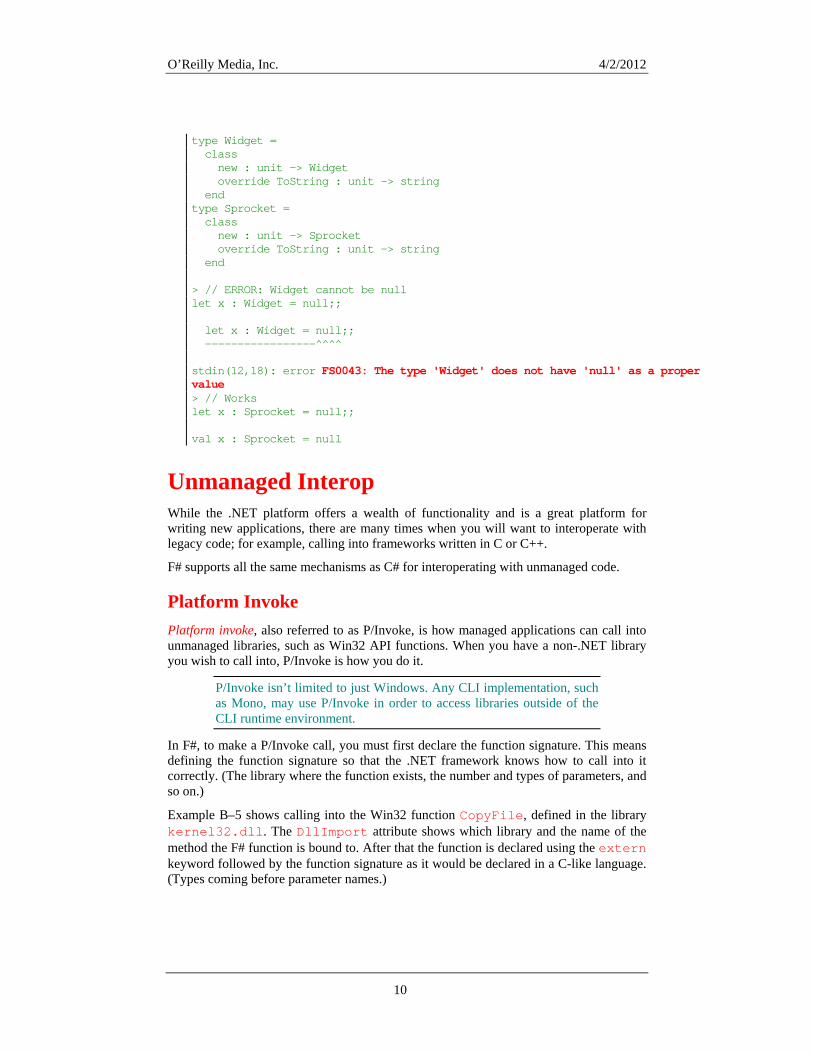
O’Reilly Media, Inc. 4/2/2012
type Widget = class new : unit -> Widget override ToString : unit -> string end type Sprocket = class new : unit -> Sprocket override ToString : unit -> string end > // ERROR: Widget cannot be null let x : Widget = null;; let x : Widget = null;; -----------------^^^^ stdin(12,18): error FS0043: The type 'Widget' does not have 'null' as a proper value > // Works let x : Sprocket = null;; val x : Sprocket = null
Unmanaged Interop While the .NET platform offers a wealth of functionality and is a great platform for writing new applications, there are many times when you will want to interoperate with legacy code; for example, calling into frameworks written in C or C++.
F# supports all the same mechanisms as C# for interoperating with unmanaged code.
Platform Invoke Platform invoke, also referred to as P/Invoke, is how managed applications can call into unmanaged libraries, such as Win32 API functions. When you have a non-.NET library you wish to call into, P/Invoke is how you do it.
P/Invoke isn’t limited to just Windows. Any CLI implementation, such as Mono, may use P/Invoke in order to access libraries outside of the CLI runtime environment.
In F#, to make a P/Invoke call, you must first declare the function signature. This means defining the function signature so that the .NET framework knows how to call into it correctly. (The library where the function exists, the number and types of parameters, and so on.)
Example B–5 shows calling into the Win32 function CopyFile, defined in the library kernel32.dll. The DllImport attribute shows which library and the name of the method the F# function is bound to. After that the function is declared using the extern keyword followed by the function signature as it would be declared in a C-like language. (Types coming before parameter names.)
10

O’Reilly Media, Inc. 4/2/2012
Once the P/Invoke signature is declared, the actual function can be called like any normal F# function value. The F# compiler will take care of passing data to the unmanaged library. The process of transferring data between managed and unmanaged code is known as marshalling.
Example B–4. Using platform invoke in F# open System.Runtime.InteropServices /// PInvoke signature for CopyFile [<DllImport("kernel32.dll", EntryPoint="CopyFile")>] extern bool copyfile(char[] lpExistingFile, char[] lpNewFile, bool bFailIfExists); let file1 = @"D:\File.dat" let file2 = @"D:\Backups\File.dat" // Calls the CopyFile method defined in kernel32.dll copyfile(file1.ToCharArray(), file2.ToCharArray(), false)
For more advanced interop scenarios, you can customize how data gets marshalled by providing hints to the F# compiler.
Example B–6 declares two structs, SequentialPoint and ExplicitRect, for use with the Win32 API function PtInRect. The function PtInRect returns whether or not a given point exists inside of a rectangle. However, because the Win32 function has no knowledge of the .NET type system, it simply expects structs with a specific layout to be passed on the stack.
The StructLayout attribute determines how the struct’s data gets laid out in memory, to ensure that it lines up with the way data is expected to be received on the unmanaged half of the P/Invoke call.
For example, the PtInRect function expects the rectangle to be made up of four, four-byte integers in left, top, right, bottom order. In the example, the ExplicitRect doesn’t declare its fields in that order. Instead, it uses the FieldOffset attributes so that when the F# compiler generates code for the ExplicitRect type, its fields are laid out in the expected order.
Example B–5. Customizing marshalling open System.Runtime.InteropServices /// Define a Point using the sequential layout [<Struct; StructLayout(LayoutKind.Sequential)>] type SequentialPoint = new (x, y) = { X = x; Y = y } val X : int val Y : int /// Define a rectangle struct explicitly [<Struct; StructLayout(LayoutKind.Explicit)>] type ExplicitRect = new (l, r, t, b) = { left = l; top = t; right = r; bottom = b } [<FieldOffset(12)>]
11
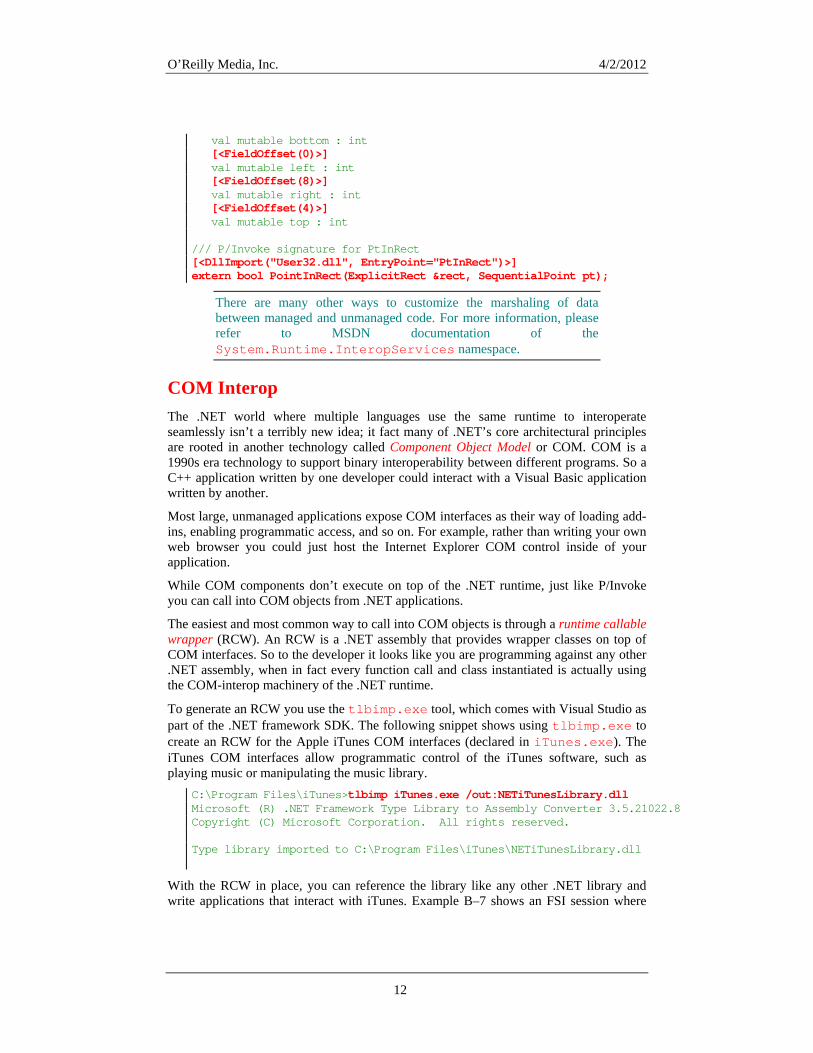
O’Reilly Media, Inc. 4/2/2012
val mutable bottom : int [<FieldOffset(0)>] val mutable left : int [<FieldOffset(8)>] val mutable right : int [<FieldOffset(4)>] val mutable top : int /// P/Invoke signature for PtInRect [<DllImport("User32.dll", EntryPoint="PtInRect")>] extern bool PointInRect(ExplicitRect &rect, SequentialPoint pt);
There are many other ways to customize the marshaling of data between managed and unmanaged code. For more information, please refer to MSDN documentation of the System.Runtime.InteropServices namespace.
COM Interop The .NET world where multiple languages use the same runtime to interoperate seamlessly isn’t a terribly new idea; it fact many of .NET’s core architectural principles are rooted in another technology called Component Object Model or COM. COM is a 1990s era technology to support binary interoperability between different programs. So a C++ application written by one developer could interact with a Visual Basic application written by another.
Most large, unmanaged applications expose COM interfaces as their way of loading add-ins, enabling programmatic access, and so on. For example, rather than writing your own web browser you could just host the Internet Explorer COM control inside of your application.
While COM components don’t execute on top of the .NET runtime, just like P/Invoke you can call into COM objects from .NET applications.
The easiest and most common way to call into COM objects is through a runtime callable wrapper (RCW). An RCW is a .NET assembly that provides wrapper classes on top of COM interfaces. So to the developer it looks like you are programming against any other .NET assembly, when in fact every function call and class instantiated is actually using the COM-interop machinery of the .NET runtime.
To generate an RCW you use the tlbimp.exe tool, which comes with Visual Studio as part of the .NET framework SDK. The following snippet shows using tlbimp.exe to create an RCW for the Apple iTunes COM interfaces (declared in iTunes.exe). The iTunes COM interfaces allow programmatic control of the iTunes software, such as playing music or manipulating the music library.
C:\Program Files\iTunes>tlbimp iTunes.exe /out:NETiTunesLibrary.dll Microsoft (R) .NET Framework Type Library to Assembly Converter 3.5.21022.8 Copyright (C) Microsoft Corporation. All rights reserved. Type library imported to C:\Program Files\iTunes\NETiTunesLibrary.dll
With the RCW in place, you can reference the library like any other .NET library and write applications that interact with iTunes. Example B–7 shows an FSI session where
12

O’Reilly Media, Inc. 4/2/2012
the RCW for calling into the iTunes APIs is used to print out a list of top-rated albums for the current music library.
This is done by creating an instance of the iTunesAppClass, and accessing the LibrarySource property. These all correspond to COM interfaces defined in the iTunes API, but with the generated RCW it looks just like any other .NET assembly. Moreover, if you add a reference to an RCW within Visual Studio you will get full IntelliSense support.
Example B–6. COM interop > // Reference required libraries #r "System.Core.dll" #r @"C:\Program Files\iTunes\NETiTunesLibrary.dll";; --> Referenced 'C:\Program Files\Reference Assemblies\Microsoft\Framework\v3.5\System.Core.dll' --> Referenced 'C:\Program Files\iTunes\NETiTunesLibrary.dll' > // Bind to the iTunes app open System.Linq open NetiTunesLibrary // Load up the main iTunes library let iTunes = new iTunesAppClass() let iTunesLibrary = iTunes.LibrarySource.Playlists.[1];; Binding session to 'C:\Program Files\iTunes\NetiTunesLibrary.dll'... val iTunes : NetiTunesLibrary.iTunesAppClass val iTunesLibrary : NetiTunesLibrary.IITPlaylist > // Search my iTunes music library to sort albums by average song rating // Return type is seq< albumName * avgRating * tracksInAlbum> let albumsByAverageRating : seq<string * float * seq<IITTrack>> = iTunesLibrary.Tracks.OfType<IITTrack>() |> Seq.groupBy(fun track -> track.Album) |> Seq.map(fun (albumName, tracks) -> // Get average track rating let trackRatings = tracks |> Seq.map (fun track -> float track.Rating) albumName, (Seq.average trackRatings), tracks);; val albumsByAverageRating : seq<string * float * seq<IITTrack>> > // Return whether or not the majority of tracks in the album have been rated let mostTracksRated tracks = let rated, notRated = Seq.fold (fun (rated, notRated) (track : IITTrack) -> if track.Rating <> 0 then (rated + 1, notRated) else (rated, notRated + 1)) (0, 0) tracks if rated > notRated then true
13

O’Reilly Media, Inc. 4/2/2012
14
else false // Print top albums, filtering out those with few ratings let printTopAlbums() = albumsByAverageRating |> Seq.filter(fun (_,_,tracks) -> mostTracksRated tracks) |> Seq.sortBy(fun (_, avgRating, _) -> -avgRating) |> Seq.iter(fun (albumName, avgRating, _) -> printfn "Album [%-18s] given an average rating of %.2f" albumName avgRating);; val mostTracksRated : seq<IITTrack> -> bool val printTopAlbums : unit -> unit > printTopAlbums();; Album [Aloha From Hawaii ] given an average rating of 100.00 Album [Sample This - EP ] given an average rating of 95.00 Album [Dark Passion Play ] given an average rating of 83.08 Album [When I Pretend to Fall] given an average rating of 80.00 Album [Weezer (Red Album)] given an average rating of 78.30 Album [The Best Of The Alan Parsons Project] given an average rating of 76.36 Album [Karmacode ] given an average rating of 64.00 val it : unit = ()
The subject of .NET and COM interop is a very complex subject where attention must be paid to details like security models, threading, and garbage collection. Fortunately, F# doesn’t have any special requirements over C# when it comes to COM interop.
If you are interested in learning more about COM interop, I recommend .NET and COM: The Complete Interoperability Guide by Adam Nathan (Sams).


