Janome - AOTM Project - October 2020 1 Accessory of the Month October 2020 PROJECT Machine Mat with Pocket Border Guide Foot WHAT YOU WILL NEED Janome Sewing Machine (we used the CM7P) Border Guide Foot FB San Stch Foot F AcuFeed Foot AD (dual feed ſt) or Even Feed Foot Janome Blue Tip Needle Janome Plasc Bobbin Quilng Pins / Quilt clips Quilng Safety Pins Erasable Markers Chalk & Felt Tip Marker for plasc Scissors or Thread Snips Cung Mat / Rotary Cuer / Quilt ruler Ironing Board & Iron FABRIC & NOTIONS Quilt Fabric (2.5m) if you use for binding as well Clear Vinyl Plasc for pocket (75cm x 15cm) Fusible Fleece 1m Fusible Tear-away Stabilizer (1m x 55cm wide) Bias Binding 25mm (4 metres) only required if you are not cung your own from the Quilt fabric 1 x Reel of Sewing Thread (match fabric, we used rasant) 1 x Reel Decorave Thread (WonderFil variegated) CUTTING INSTRUCTIONS Quilt Fabric Cut 2: 29½” x 20½” (75cm x 52cm) Clear Vinyl Plasc Cut 1: 29½” x 6” (75cm x 15cm) Fusible Fleece Cut 1: 29½” x 20½” (75cm x 52cm) Fusible Tear-away Stabilizer Cut 1: 29½” x 20½” (75cm x 52cm) Bias Binding 25mm x 4m How to measure your machine to create a Mat. Measure the base of your sewing machine. Add an extra 2 inches to the leſt and right sides. Add an extra 8 inches to the front to create the pockets. Machine Footprint Add 2” or 5cm Add 2” or 5cm Add 8” or 20cm
Transcript
Janome - AOTM Project - October 2020 1
Accessory of the Month October 2020
PROJECT
Machine Mat with Pocket Border Guide Foot
WHAT YOU WILL NEED
Janome Sewing Machine (we used the CM7P)
Border Guide Foot FB
Satin Stitch Foot F
AcuFeed Foot AD (dual feed ft) or Even Feed Foot
Janome Blue Tip Needle
Janome Plastic Bobbin
Quilting Pins / Quilt clips
Quilting Safety Pins
Erasable Markers Chalk & Felt Tip Marker for plastic
Scissors or Thread Snips
Cutting Mat / Rotary Cutter / Quilt ruler
Ironing Board & Iron
FABRIC & NOTIONS
Quilt Fabric (2.5m) if you use for binding as well
Clear Vinyl Plastic for pocket (75cm x 15cm)
Fusible Fleece 1m
Fusible Tear-away Stabilizer (1m x 55cm wide)
Bias Binding 25mm (4 metres) only required if you are
not cutting your own from the Quilt fabric
1 x Reel of Sewing Thread (match fabric, we used rasant)
1 x Reel Decorative Thread (WonderFil variegated)
CUTTING INSTRUCTIONS
Quilt Fabric
Cut 2: 29½” x 20½” (75cm x 52cm)
Clear Vinyl Plastic
Cut 1: 29½” x 6” (75cm x 15cm)
Fusible Fleece
Cut 1: 29½” x 20½” (75cm x 52cm)
Fusible Tear-away Stabilizer
Cut 1: 29½” x 20½” (75cm x 52cm)
Bias Binding
25mm x 4m
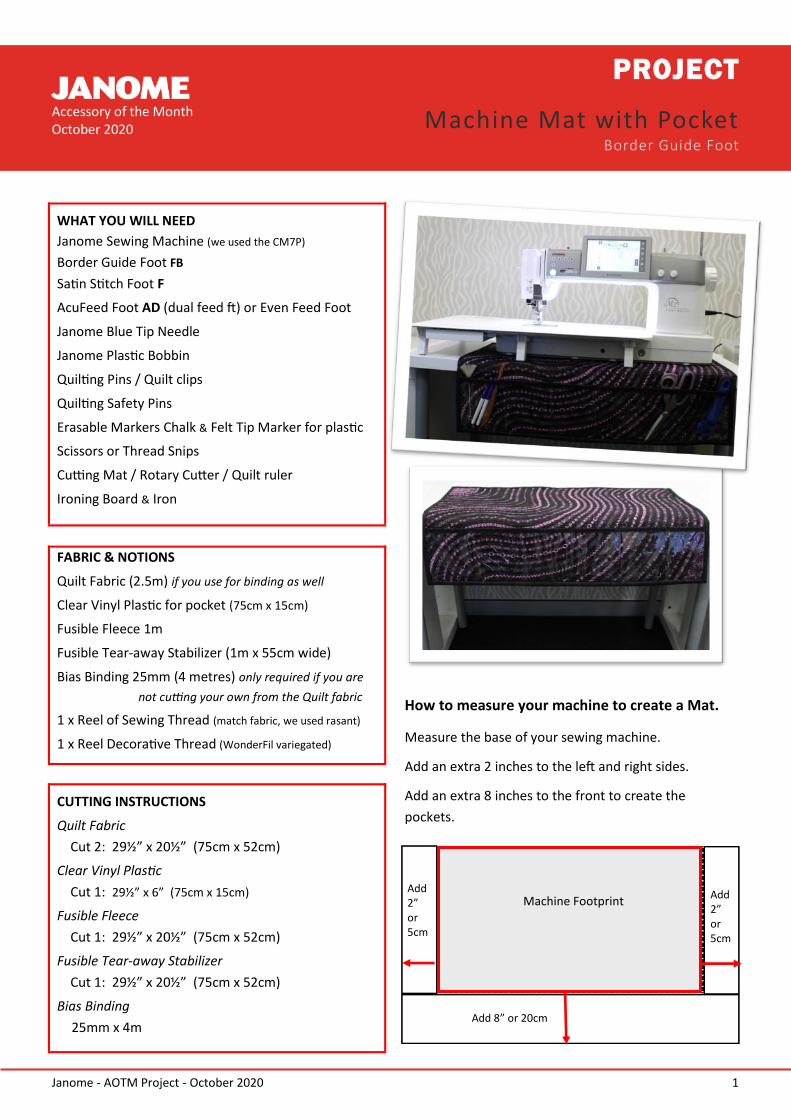
How to measure your machine to create a Mat.
Measure the base of your sewing machine.
Add an extra 2 inches to the left and right sides.
Add an extra 8 inches to the front to create the
pockets.
Machine Footprint Add2” or 5cm
Add2” or 5cm
Add 8” or 20cm
Janome - AOTM Project - October 2020 2
Accessory of the Month August 2019
INSTRUCTIONS
Step 1
Wind bobbin with sewing thread.
Thread the machine with the decorative thread.
Attach the Satin Stitch Foot F
Select Decorative Stitch #44
Step 2
Take one of the main fabric pieces and the fusible
tear-away stabilizer; using the iron, press the
stabilizer onto the wrong side of the fabric.
Step 3
On the right side of the fabric, use the erasable
chalk marker and draw a curvy reference line.
This is the reference line for your first row, of your
decorative stitching.
Step 4
Place on the drawn line, the
red arrow located on the
front of the Satin Stitch Foot,
then stitch following the
drawn line with the red
arrow on the foot, to create
the first stitched line.
Step 5
Change the foot to the Border Guide Foot.
Align, the first row of the pattern between the left
guidelines and stitch out the second line of decorative
stitching. We used Decorative Stitch #72.
Tip: When stitching decorative stitches, sew slower to
achieve the best stitch result. Stitching at speed may cause
stitching issues. See page 4 for images of stitches used.
Step 6
Continue working through the same process until you
have covered the surface of the fabric, using the
previous stitch as the guide. See above image.
Tip: As you stitch, keep your eyes on the previously sewn
stitch which is lined up with the border guide foot markings.
If your eyes follow the needle, your stitching can easily move
out of alignment.
If you find that you need to turn the fabric and move in
the opposite direction, align the previous row of the
stitching between the right guideline, then stitch out
the next line of decorative stitching.
See below image.
Janome - AOTM Project - October 2020 3
Accessory of the Month August 2019
Step 7
Remove the stabilizer from the back of the fabric.
Iron the fusible fleece to the wrong side of the
decorative stitched fabric, then place on the wrong
side of your second main fabric piece.
Now, pin together using the quilting safety pins.
The red circles below, show where we pinned.
Step 8
Change top thread to the sewing thread.
Attach the AcuFeed Flex Foot.
Engage the AcuFeed System.
Select stitch—Utility #3
Adjust stitch length to 4.0mm
Baste the layers together,
by stitching around the outer edge.
Step 9
Using the same stitch, change the length to 3.0mm
Quilt down between the decorative stitched rows.
When finished, trim all sides to be straight, removing
any access fabric.
Now, set aside.
Step 10
Take the piece of clear vinyl plastic and attach the bias
binding to one long side of the plastic using the quilting
clips.
Tip: If pin the binding onto the plastic, make sure you pin
through the binding and plastic section; you do not want to
see pin holes in the plastic, once you finish.
Step 11
Divide the vinyl into 5 sections and mark.
This will create the pockets.
Clear Vinyl Plastic
Bias binding clipped to plastic
Janome - AOTM Project - October 2020 4
Accessory of the Month August 2019
Step 12
Using Quilt clips attach the clear vinyl plastic to the
bottom of the quilted fabric. See below image.
Use same stitch - Utility stitch #3, length 3.0mm
Stitch around the 3 outer edges to attach the clear
vinyl pocket.
Stitch down, the marked sections to create the
5 pockets.
Step 13
Next, attach the bias binding around the outer edge
to completed the project.
Tip: You may like to use Janome’s Taping Guide Foot to
attach the bias binding.
9mm models
Part Number: 202310008
7mm models
Part Number: 202311009
FINISH.
Decorative Stitches used in our project using the
Continental Memory 7 Professional
Long (L) Stitches
Decorative (D) Stitches
Heirloom (H) Stitches
Satin (S) Stitches
Quilt (Q) Stitches
Pictograph (P) Stitches
NOTE: Purple Stitches can be tapered.
Shaded grey stitches - can flip horizonal & vertical