134
v12 Project Management Tools

v12Project Management
Tools

Welcome to ComputerEase v12This manual is designed to walk you through basic functions
by ComputerEase Software, Inc.
This manual will be a useful tool as you exploreComputerEase.
If you have upgraded from a previous version of the software,please be sure to reference our "What's New in v12" Manual.

The text of this publication, or any part thereof, may not be reproduced or transmitted in any form or by any means,electronic or mechanical, including photocopying, recording, storage in an information retrieval system, orotherwise, without the prior written permission of ComputerEase Software, Inc.
Willful violation of this Copyright law of the United States can result in civil damages up to $50,000 (US) perinfringement (17 USC 506; reasonable attorney fees may be awarded (17 USC 505); and copyright infringementscan be a criminal offense. (17 USC506).
All names, products and services mentioned are the trademarks or registered trademarks of the respective vendorsor organizations.
ComputerEase v12
Copyright 2017ComputerEase Software, Inc.All rights reserved.4/4/2017
Publisher
ComputerEase Software
ComputerEase Software, Inc.7601 Cheviot RdCincinnati, OH 45247

Project Management Tools4
ComputerEase Software, Inc.
Table of Contents
Part I Document Control 1
................................................................................................................................... 21 Contacts
.......................................................................................................................................................... 2Creating and Editing Contacts
.......................................................................................................................................................... 4Creating Contact Types
.......................................................................................................................................................... 4Creating Contact Titles
................................................................................................................................... 52 Working on Documents
.......................................................................................................................................................... 5Submittal Log
......................................................................................................................................................... 6Adding Items
......................................................................................................................................................... 8Creating Submittal Data Requests
......................................................................................................................................................... 10Receving Submittal Data
......................................................................................................................................................... 10Creating Submittals
......................................................................................................................................................... 12Tracking Submittal Return Status
......................................................................................................................................................... 13Working With Submittal Notices
......................................................................................................................................................... 15Working w ith Purchase Orders
......................................................................................................................................................... 15Printing Submittal Reports
.......................................................................................................................................................... 16Correspondence Log
......................................................................................................................................................... 16Creating Transmittals
......................................................................................................................................................... 18Creating Requests for Information
......................................................................................................................................................... 20Tracking Incoming Requests for Information
......................................................................................................................................................... 21Tracking Replies
......................................................................................................................................................... 22Filtering & Grouping Messages
......................................................................................................................................................... 22Printing the Correspondence Log
.......................................................................................................................................................... 23Drawing Log
......................................................................................................................................................... 23Adding New Draw ings/Revisions
......................................................................................................................................................... 24Sending Messages About Draw ings
.......................................................................................................................................................... 27Requests for Change Log
.......................................................................................................................................................... 29Undoing, Reprinting and Editing Messages
................................................................................................................................... 293 Viewing Documents
................................................................................................................................... 294 Reports in Document Control
................................................................................................................................... 295 Punch Lists
.......................................................................................................................................................... 30Creating a Punch List
.......................................................................................................................................................... 31Punch List Management Center
................................................................................................................................... 326 Field Log Entry
.......................................................................................................................................................... 32Weather Code Maintenance
.......................................................................................................................................................... 33Field Log Maintenance
.......................................................................................................................................................... 38Field Log Management Center
.......................................................................................................................................................... 39Field Log Type Maintenance
................................................................................................................................... 397 Meeting Minutes
.......................................................................................................................................................... 40Item Groups
.......................................................................................................................................................... 40Entering Meeting Minutes
.......................................................................................................................................................... 47Print Meeting Minutes
.......................................................................................................................................................... 47Meeting History Report
Part II Scheduling 49

5Contents
5
................................................................................................................................... 501 Editing the Schedule
.......................................................................................................................................................... 51Schedule & Column Settings
.......................................................................................................................................................... 56Comparison of the Three Schedule Views
.......................................................................................................................................................... 58Overview of Job Settings
.......................................................................................................................................................... 60Overview of Activity Details
.......................................................................................................................................................... 63How do I Read the Bar Chart?
.......................................................................................................................................................... 66Navigating the Bar Chart Display
.......................................................................................................................................................... 67Parent Activities & Child Activities
.......................................................................................................................................................... 67Adding Jobs
.......................................................................................................................................................... 69Working With the Activity List
.......................................................................................................................................................... 71Manipulating the Schedule
.......................................................................................................................................................... 72More Schedule Options
.......................................................................................................................................................... 75Filtering Activities
.......................................................................................................................................................... 75Using Links
.......................................................................................................................................................... 78Working With Resources
.......................................................................................................................................................... 81CrewBuilder
.......................................................................................................................................................... 84Building Your Crew
.......................................................................................................................................................... 88Resource Assignments
.......................................................................................................................................................... 91Scheduling Reports
................................................................................................................................... 922 Daily Schedule Board
.......................................................................................................................................................... 94Working With Resources
.......................................................................................................................................................... 97Scheduling Resources
.......................................................................................................................................................... 99Working With Multiple Schedules
.......................................................................................................................................................... 99Changing the Display Preferences
.......................................................................................................................................................... 100Setting & Changing the Date
.......................................................................................................................................................... 101Schedule Board Reports
................................................................................................................................... 1013 View Docket
Part III SubContract 103
................................................................................................................................... 1041 The Benefits of the Subcontract Module
................................................................................................................................... 1042 Enter a New Subcontract
................................................................................................................................... 1103 Enter a New Change Order
................................................................................................................................... 1114 Edit a Subcontract or Change Order
................................................................................................................................... 1115 Print Subcontract
................................................................................................................................... 1126 Print Subcontractor Change Order
................................................................................................................................... 1127 Subcontract Type Maintenance
................................................................................................................................... 1138 Lien Waiver Tracking
................................................................................................................................... 1149 Subcontract Reports
.......................................................................................................................................................... 114Subcontract Summary
.......................................................................................................................................................... 115Subcontract Detail
.......................................................................................................................................................... 116Subcontract Center
.......................................................................................................................................................... 117Lien Tracking Report
Part IV Bid Day 118
................................................................................................................................... 1191 What is Bid Day?
................................................................................................................................... 1192 Features In Bid Day
................................................................................................................................... 1203 Enter a Bid
................................................................................................................................... 1254 Edit a Bid

Project Management Tools6
ComputerEase Software, Inc.
................................................................................................................................... 1255 Viewing the Bid Schedule
................................................................................................................................... 1276 Bid Reports

Part
I
Document Control

Project Management Tools2
ComputerEase Software, Inc.
1 Document Control
The Document Control module allows you to track your submittals throughout the approval process. Your job teamsimply prepares the document, transmits the submittal and marks the progress of each document on the trackingboard. Since the tracking board is part of your ComputerEase Software, everyone on your job team will know thestatus of each item and can help with future follow-up. ComputerEase Document Control ensures that documentsare tracked to completion.
1.1 Contacts
Your contact list is an independent database of the individuals with whom you correspond when working on aproject. Because there might be multiple individuals at one business with whom you correspond, the contactdatabase is not directly linked to either your customer database or your vendor database. However, you have theoption when creating a new contact of copying information about that contact from an entry in either your vendor orcustomer database.
1.1.1 Creating and Editing Contacts
Select Document Control / Edit Contacts.
To create a new contact, leave the Display Name field empty and click OK. To edit an existing contact, select orchoose the display name of the contact you want to edit and click OK.
Tip: To import contacts from a file, click on File, then Import Contacts in the upper left corner.
Main Tab
Document Control 3
v12 User Manual
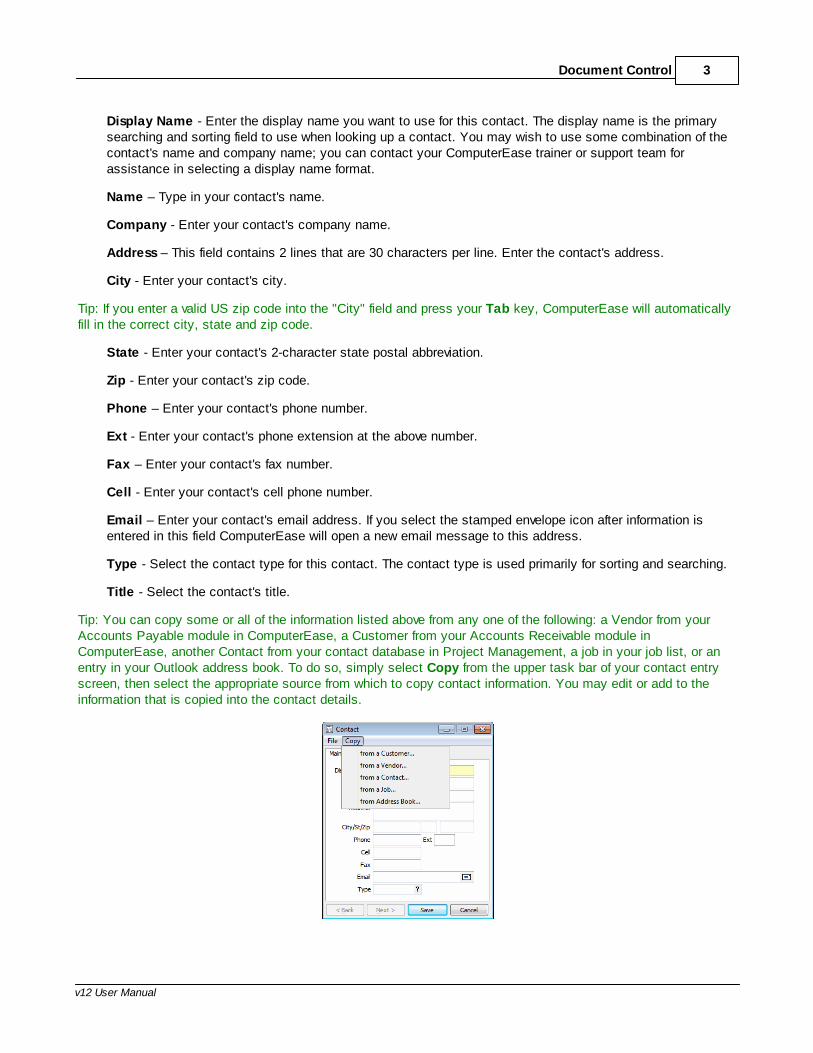
Display Name - Enter the display name you want to use for this contact. The display name is the primarysearching and sorting field to use when looking up a contact. You may wish to use some combination of thecontact's name and company name; you can contact your ComputerEase trainer or support team forassistance in selecting a display name format.
Name – Type in your contact's name.
Company - Enter your contact's company name.
Address – This field contains 2 lines that are 30 characters per line. Enter the contact's address.
City - Enter your contact's city.
Tip: If you enter a valid US zip code into the "City" field and press your Tab key, ComputerEase will automaticallyfill in the correct city, state and zip code.
State - Enter your contact's 2-character state postal abbreviation.
Zip - Enter your contact's zip code.
Phone – Enter your contact's phone number.
Ext - Enter your contact's phone extension at the above number.
Fax – Enter your contact's fax number.
Cell - Enter your contact's cell phone number.
Email – Enter your contact's email address. If you select the stamped envelope icon after information isentered in this field ComputerEase will open a new email message to this address.
Type - Select the contact type for this contact. The contact type is used primarily for sorting and searching.
Title - Select the contact's title.
Tip: You can copy some or all of the information listed above from any one of the following: a Vendor from yourAccounts Payable module in ComputerEase, a Customer from your Accounts Receivable module inComputerEase, another Contact from your contact database in Project Management, a job in your job list, or anentry in your Outlook address book. To do so, simply select Copy from the upper task bar of your contact entryscreen, then select the appropriate source from which to copy contact information. You may edit or add to theinformation that is copied into the contact details.

Project Management Tools4
ComputerEase Software, Inc.
User Fields Tab
The user fields tab allows you to enter information into the user defined fields for contacts that were setup in theParameters for Document Control. This tab only appears if you have created at least one user field for contactsunder Configure/System Parameters/Document Control Parameters.
1.1.2 Creating Contact Types
You have the option of creating and using contact types to categorize your list of contacts. The contact types areused primarily for searching at this time.
Select Document Control / Edit Contact Types.
Code - Enter the alphanumeric code (up to ten alphanumeric characters) you want to assign to the newcontact type and click on OK.
Description - Enter a brief description of the contact type and click OK to save.
You can create a new contact type at any time. Once you have created your contact types, you can assign eachcontact to a type. See Creating and Editing Contacts for more information.
1.1.3 Creating Contact Titles
Contact titles are used to give more information about your contacts on your Job Contact List.Select Document Control / Edit Contact Titles.
Title - Enter the alphanumeric code (up to ten alphanumeric characters) you want to assign to the newcontact title and click on OK.
Description - Enter a brief description of the contact title and click OK to save.
You can create a new contact title at any time. Once you have created your contact titles, you can assign a titleto existing contacts. See Creating and Editing Contacts for more information.
2
2

Document Control 5
v12 User Manual
1.2 Working on Documents
The document control program has 4 separate views; each one tracks different information. The Submittal ItemView tracks submittal items along with messages for approval and information. The Correspondence Log Viewtracks all messages sent and received regarding submittal items, but also tracks requests for information andtransmittals. The Drawing Log provides you with the ability to track drawings and revisions to make sure everyoneis working from the same set of drawings and no one is left out of the loop on any revisions. Finally, the Requestsfor Change View allows you to track and enter all change order requests.
To work on documents, select Document Control / Work on Documents.
Job Number - Enter or choose the job for which you want to work on documentation.
Help
The document control board has a Help "Wizard" that allows quick access to help on using its features. To turn onthe wizard, click on the Help icon on your toolbar - .
The Help Wizard will appear along the right side of your document control window. To get help with any action,click on the appropriate link. The action will be performed for you or a window with additional help will appear. Foractions that will be performed for you, the toolbar shortcut for that action is displayed next to the action in the Helpwindow to help familiarize you with the shortcuts.
1.2.1 Submittal Log
Once a job is selected, you will see the Submittal Items View (shown below). From this view, you can enter andtrack submittal items for the job and track submittal documents associated with each item.
Project Management Tools6
ComputerEase Software, Inc.
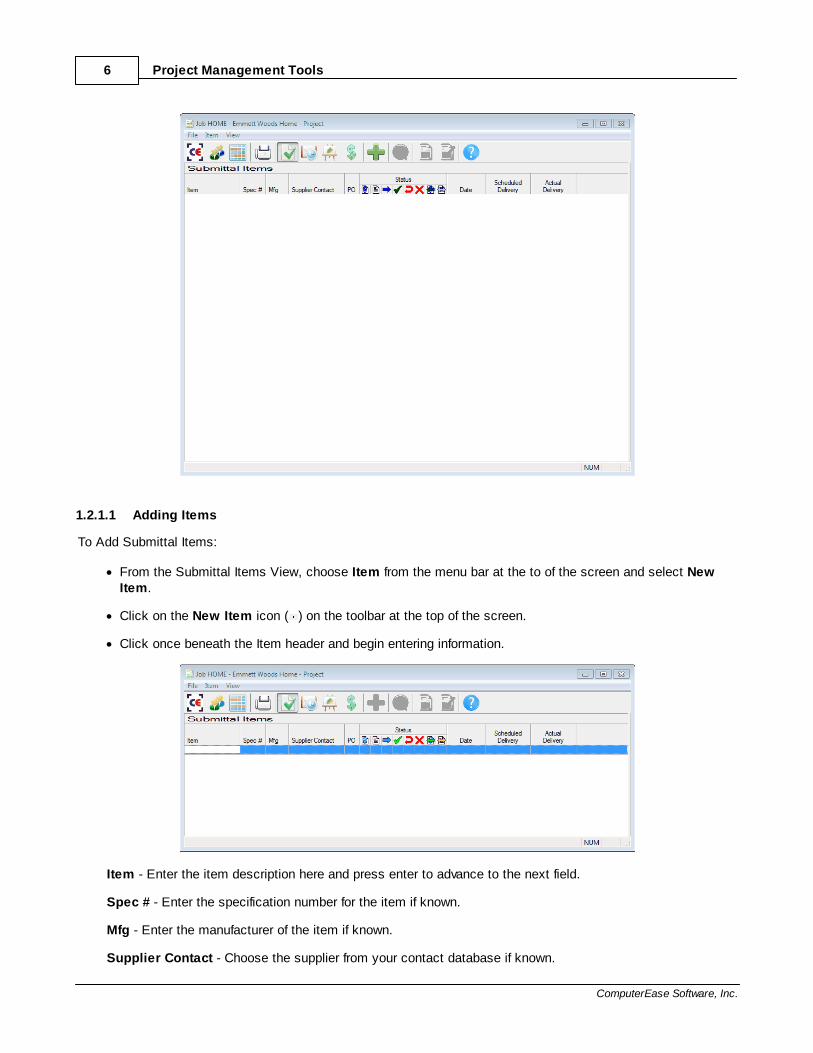
1.2.1.1 Adding Items
To Add Submittal Items:
· From the Submittal Items View, choose Item from the menu bar at the to of the screen and select NewItem.
· Click on the New Item icon ( ) on the toolbar at the top of the screen.
· Click once beneath the Item header and begin entering information.
Item - Enter the item description here and press enter to advance to the next field.
Spec # - Enter the specification number for the item if known.
Mfg - Enter the manufacturer of the item if known.
Supplier Contact - Choose the supplier from your contact database if known.

Document Control 7
v12 User Manual
PO - Choose the PO number associated with this item, if applicable.
Status - The status of any and all documents associated with the item will be listed here.
Date - The last activity date for item documentation will be listed here.
Scheduled Delivery - Enter or choose the scheduled delivery date if known.
Actual Delivery - Enter or choose the actual delivery date once the item is received.
With the next line on the view highlighted, enter the description for the item and press Enter to advance to the nextcolumn. Continue to fill in the appropriate information for each column that applies to this item (Specificationnumber, Manufacturer, Supplier, Purchase Order number and Scheduled Delivery) pressing Enter to advance toeach field. You cant use the F2 lookup feature for Specification number, Manufacturer, Supplier and ScheduledDelivery.
Once you have entered the information, you may edit the information at any time by choosing Item from the menubar at the top of the screen and selecting the field you wish to edit, right-clicking on the item and choosing theappropriate action or simply by clicking once on the field you wish to edit. You can delete an item by choosing Item from the menu bar at the top of the screen and selecting Delete.
Importing Items
For faster entry of items into Document Control, you may import items from another job.
From the Submittal Items View, choose File from the menu bar at the top of the screen and select Import Items,then From another Job. Choose the job from which you want to copy your items.
Grouping Items
For easy organization of Submittal Items, you can group your items together.
· Click on Item in the menu bar at the top of the screen and select Group Items.
· Right-click on one or more of the items you want to group and select Group Items.
Once you have created your group, you can add items to it by dragging and dropping them under the group title.

Project Management Tools8
ComputerEase Software, Inc.
1.2.1.2 Creating Submittal Data Requests
To Create a Request for Submittal Item Data:
· Highlight the line item or line items for which you want to request submittal data and click on Item in themenu bar at the top of the screen and select Enter Submittal Request.
· Highlight the line item or line items for which you want to request submittal data and click on that line inthe Requested Submittal Data ( ) field.
General Tab
Request # – This field allows you to create a numbering scheme for your submittal requests. Enter the alpha-numeric code you wish to use for this request.
Request From - Enter the contact from whom you are requesting this data (the contact who will receive thisrequest). This field is automatically filled in with the supplier listed for this item, if applicable, but can bechanged to anyone in your contact database.
Regarding – Enter a brief description of your submittal data request.
Date Requested - Enter the date on which you are requesting this information. This field is automaticallyfilled in with the current system date.
Sent Via - Choose the method that will be used to send this request to the contact. Your choices are definedunder your Document Control Parameters.
Return By - Enter the date by which you want to receive a response to this request.
Send Copy To - Enter or choose any contacts to whom you are copying this message.

Document Control 9
v12 User Manual
Notes Tab
The notes tab allows you to enter notes concerning this submittal data request. These notes will optionally print onyour form.
Items Tab
Here you can add a PO number for your submittal request (if not previously entered), change the item quantity andenter any optional item-specific notes.
User Fields Tab
The user fields tab allows you to enter information into the user defined fields for messages that were setup in theParameters for Document Control. This tab only appears if you have created at least one user field under Configure/System Parameters/Document Control Parameters.
Attachments Tab
The Attachments tab gives you the option to add files, scan documents, and drag existing saved documentationinto the message file. This tab only appears if you have created at least one messages attachment folder under Configure/System Parameters/Document Control Parameters.
For instructions on adding attachments, refer to "How Do I Work With Attachments" in the "System Setup"chapter of your manual.

Project Management Tools10
ComputerEase Software, Inc.
Click on Save to save your submittal data request or Cancel to exit the screen without saving your changes. Ifyou save the request, you will have the option of printing a form to send to your supplier.
1.2.1.3 Receving Submittal Data
To change a submittal item’s status to indicate that submittal data has been received:
· Select the line item you wish to mark as received and click on that line in the Received Submittal Data (
)field.
· Click on Item in the menu bar at the top of the screen and select Have Submittal Data.
Date Received - Enter the date you received this Submittal Data. This field is automatically filled in with thecurrent system date but may be changed if necessary.
Supplier - Enter or choose the supplier for this Submittal Item. This field is automatically filled in with thesupplier listed for this item if applicable, but may be changed if necessary.
Manufacturer - Enter or choose the manufacturer for this Submittal Item. This field is automatically filled inwith the manufacturer listed for this item if applicable, but may be changed if necessary.
When you are finished, click Save. The icon will now appear in the Received Submittal Data field and thedocument’s current status will display on the bottom of the screen when this line is highlighted.
1.2.1.4 Creating Submittals
To submit item data for approval:
· Select the line item you wish to mark as received and click on that line in the Submitted ( )field.
· Click on Item in the menu bar at the top of the screen and select Enter Submittal.
Submittal Info Tab

Document Control 11
v12 User Manual
Submittal # – Enter the number you want to use for this submittal. If you selected that option when settingup this job, your submittals will automatically number.
Submit To - Enter the contact to whom you are submitting this data (the contact who will receive thisrequest). This field is automatically filled in with the submit to contact listed for this item in the job master, ifapplicable, but can be changed to anyone in your contact database.
Regarding – Enter a brief description of your submittal data message.
Date Submitted - Enter the date on which you are submitting this information. This field is automaticallyfilled in with the current system date.
Sent Via - Choose the method that will be used to send this request to the contact. Your choices are definedunder your Document Control Parameters.
Return By - Enter the date by which you want to receive a response to this message.
Notes Tab
The notes tab allows you to enter notes concerning this submittal. These notes will optionally print on your form.
Items Tab
Here you can change the item quantity and enter any optional item-specific notes.
Project Management Tools12
ComputerEase Software, Inc.
User Fields Tab
The user fields tab allows you to enter information into the user defined fields for messages that were setup in theParameters for Document Control. This tab only appears if you have created at least one user field under Configure/System Parameters/Document Control Parameters.
Attachments Tab
The Attachments tab gives you the option to add files, scan documents, and drag existing saved documentationinto the message file. This tab only appears if you have created at least one messages attachment folder under Configure/System Parameters/Document Control Parameters.
For instructions on adding attachments, refer to "How Do I Work With Attachments" in the "System Setup"chapter of your manual.
Click on Save to save your message or Cancel to exit the screen without saving your changes. If you save therequest, you will have the option of printing a form to send to your contact.
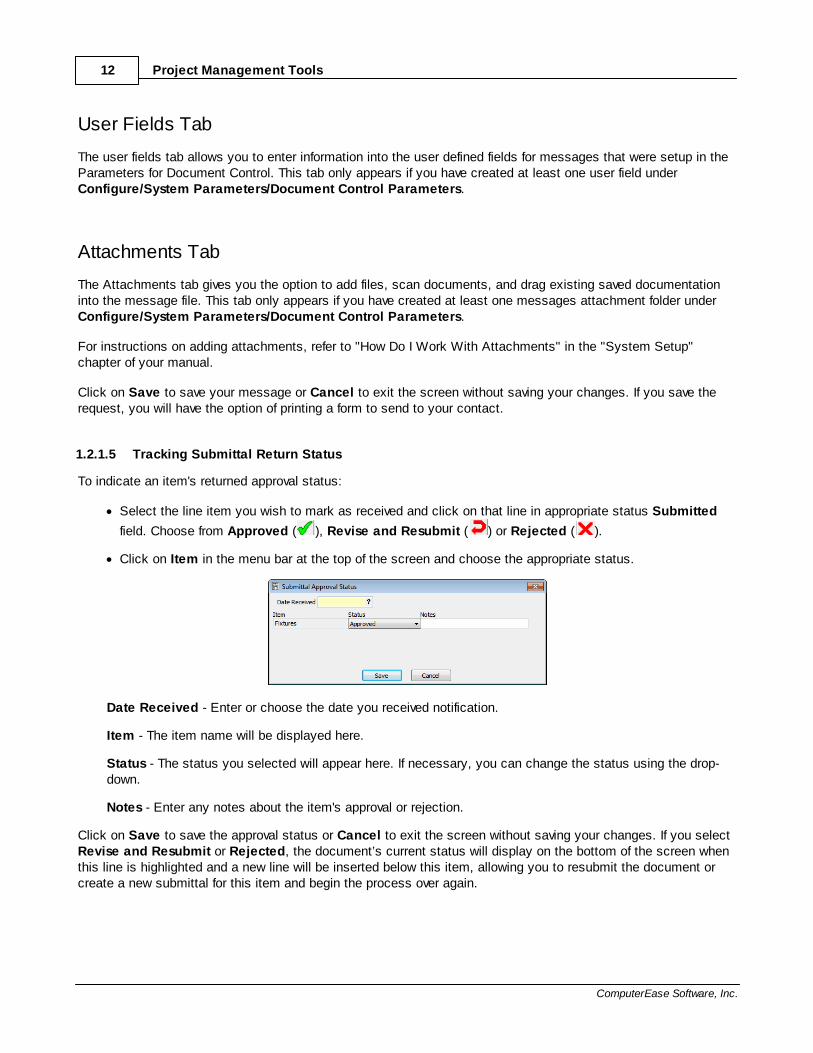
1.2.1.5 Tracking Submittal Return Status
To indicate an item's returned approval status:
· Select the line item you wish to mark as received and click on that line in appropriate status Submitted
field. Choose from Approved ( ), Revise and Resubmit ( ) or Rejected ( ).
· Click on Item in the menu bar at the top of the screen and choose the appropriate status.
Date Received - Enter or choose the date you received notification.
Item - The item name will be displayed here.
Status - The status you selected will appear here. If necessary, you can change the status using the drop-down.
Notes - Enter any notes about the item's approval or rejection.
Click on Save to save the approval status or Cancel to exit the screen without saving your changes. If you selectRevise and Resubmit or Rejected, the document’s current status will display on the bottom of the screen whenthis line is highlighted and a new line will be inserted below this item, allowing you to resubmit the document orcreate a new submittal for this item and begin the process over again.

Document Control 13
v12 User Manual
1.2.1.6 Working With Submittal Notices
Once you receive notification of an item's approval or rejection, you may want to notify subcontractors, suppliers orothers of its status.
To create a Submittal Notice:
· Select the line item you wish to mark as received and click on that line in the Submittal Notice ( )field.
· Click on Item in the menu bar at the top of the screen and select Enter Submittal Notice.
General Tab
Number – Enter the alpha-numeric code you want to use for this notice.
Send To - Enter the contact to whom you are sending this notice (the contact who will receive this notice).This field is automatically filled in with the submit to contact listed for this item, if applicable, but can bechanged to anyone in your contact database.
Regarding – Enter a brief description of your notification.
Date Sent - Enter the date on which you are sending this notice. This field is automatically filled in with thecurrent system date.
Sent Via - Choose the method that will be used to send this notice to the contact. Your choices are definedunder your Document Control Parameters.
Send Copy To - Enter or choose any contacts to whom you are copying this message.
Project Management Tools14
ComputerEase Software, Inc.
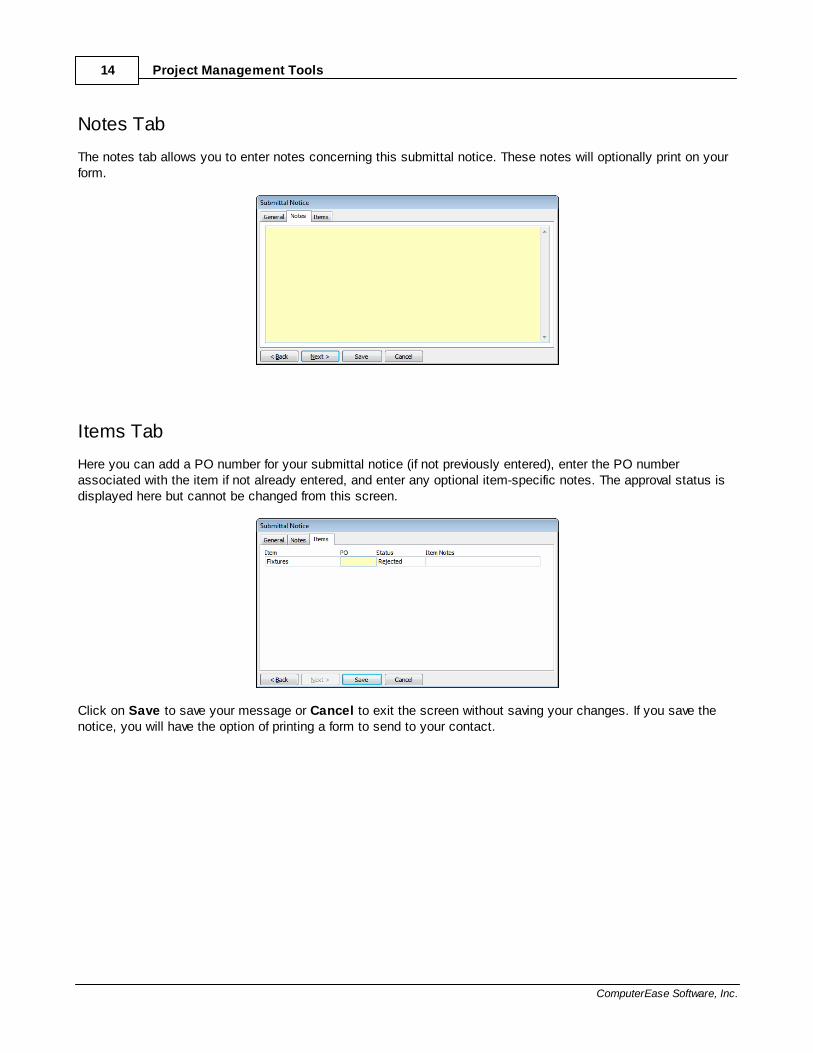
Notes Tab
The notes tab allows you to enter notes concerning this submittal notice. These notes will optionally print on yourform.
Items Tab
Here you can add a PO number for your submittal notice (if not previously entered), enter the PO numberassociated with the item if not already entered, and enter any optional item-specific notes. The approval status isdisplayed here but cannot be changed from this screen.
Click on Save to save your message or Cancel to exit the screen without saving your changes. If you save thenotice, you will have the option of printing a form to send to your contact.

Document Control 15
v12 User Manual
1.2.1.7 Working with Purchase Orders
From the Submittal Items View, you can edit your associated purchase orders and print and view the PurchaseOrder Status Report. Refer to the Inventory Control section of the ComputerEase User Manual for more informationon Purchase Orders.
To work on Purchase Orders you must highlight an item for which the PO has been identified. Then:
· Select the line item for which you want to edit the Purchase Order and click on the Edit PO ( ) icon inthe toolbar at the top of the screen.
· Click on File in the menu bar at the top of the screen and select Edit PO.
If this Purchase Order has already been created in Inventory Control, the Purchase Order Entry screen willdisplay, allowing you to edit the information. If this Purchase Order has not yet been created, you will receive amessage stating this Purchase Order does not exist and asking if you would like to create it. Select Yes and thePurchase Order Entry screen will display, allowing you to enter the information for this new Purchase Order.Refer to the Inventory Control Chapter of this manual for information on creating and editing purchase orders.
To view the Purchase Order Status Report:
· Select the line item for which you want to edit the Purchase Order and click on the PO Status Report ( )icon in the toolbar at the top of the screen.
· Click on View in the menu bar at the top of the screen and select P.O. Status Report.
The Purchase Order Status Report will display for the selected Purchase Order. You may print this report byclicking the print icon on the icon toolbar at the top of the report.
1.2.1.8 Printing Submittal Reports
Printing Reports
There are several reports available from the Submittal Items screen. Click on the printer icon and choose to printeither the Item List, Item Status Report or Open RFIs Report.

Project Management Tools16
ComputerEase Software, Inc.
1.2.2 Correspondence Log
The Correspondence Log allows you to view and track all Data Requests and Submittals that are entered andmaintained in the Submittal Items View. In addition, from this view you may enter and track Requests forInformation (RFIs) and Transmittals. To select the correspondence log view, choose View, then Correspondence
Log from the menu bar at the top of the screen or click on the View Correspondence Log icon ( ) on thetoolbar at the top of the screen.
1.2.2.1 Creating Transmittals
To Create a Transmittal:
· Click Message in the menu bar at the top of the screen and select New Transmittal.
· Click the New Transmittal icon ( ) on the toolbar at the top of the screen.
General Tab
Transmittal # – Enter the number you want to use for this transmittal. If you selected that option whensetting up this job, your transmittals will automatically number.
Send To - Enter the contact to whom you are sending this transmittal. This field is automatically filled in withthe submit to contact listed for this item in the job master, if applicable, but can be changed to anyone inyour contact database.

Document Control 17
v12 User Manual
Regarding – Enter a brief description of your transmittal message.
Date Submitted - Enter the date on which you are sending this transmittal. This field is automatically filled inwith the current system date.
Sent Via - Choose the method that will be used to send this transmittal to the contact. Your choices aredefined under your Document Control Parameters.
Response Required - Check this box if you require a response to this message.
Respond By - Enter the date by which you want to receive a response to this message.
Send Copy To - Enter or choose any contacts to whom you are copying this message.
Notes Tab
The notes tab allows you to enter notes concerning this transmittal. These notes will optionally print on your form.
Items Tab
Here you can add an item to the transmittal, along with a quantity and any item-specific notes.

Project Management Tools18
ComputerEase Software, Inc.
User Fields Tab
The user fields tab allows you to enter information into the user defined fields for messages that were setup in theParameters for Document Control. This tab only appears if you have created at least one user field under Configure/System Parameters/Document Control Parameters.
Attachments Tab
The Attachments tab gives you the option to add files, scan documents, and drag existing saved documentationinto the message file. This tab only appears if you have created at least one messages attachment folder under Configure/System Parameters/Document Control Parameters.
For instructions on adding attachments, refer to "How Do I Work With Attachments" in the "System Setup"chapter of your manual.
Click on Save to save your transmittal or Cancel to exit the screen without saving your changes. If you save themessage, you will have the option of printing a form to send to your contact.
1.2.2.2 Creating Requests for Information
To create an outgoing RFI:
· Click Message in the menu bar at the top of the screen and select New Outgoing RFI.
· Click the New Outgoing RFI icon ( ) on the toolbar at the top of the screen.
General Tab
RFI Number – Enter the number you want to use for this RFI. If you selected that option when setting up thisjob, your RFIs will automatically number.
Send To - Enter the contact from whom you are requesting information.
Regarding – Enter a brief description of your request.

Document Control 19
v12 User Manual
Attach to Item – This feature allows you to link your RFI to a specific Submittal Item. If you want to attach anItem to this RFI, enter or choose the item from the list by clicking on F2 or ?.
Cost Impact – Check this box to indicate that this RFI could impact your cost.
Schedule Impact – Check this box to indicate that this RFI could impact your schedule.
Date Sent - Enter the date on which you are sending this request. This field is automatically filled in with thecurrent system date.
Sent Via - Choose the method that will be used to send this information request to the contact. Your choicesare defined under your Document Control Parameters.
Respond By - Enter the date by which you want to receive a response to this RFI.
Send Copy To - Enter or choose any contacts to whom you are copying this message.
Notes Tab
The notes tab allows you to enter notes concerning this RFI. These notes will optionally print on your form.
User Fields Tab
The user fields tab allows you to enter information into the user defined fields for messages that were setup in theParameters for Document Control. This tab only appears if you have created at least one user field under Configure/System Parameters/Document Control Parameters.
Attachments Tab
The Attachments tab gives you the option to add files, scan documents, and drag existing saved documentationinto the message file. This tab only appears if you have created at least one messages attachment folder under Configure/System Parameters/Document Control Parameters.
For instructions on adding attachments, refer to "How Do I Work With Attachments" in the "System Setup"chapter of your manual.

Project Management Tools20
ComputerEase Software, Inc.
Click on Save to save your RFI or Cancel to exit the screen without saving your changes. If you save themessage, you will have the option of printing a form to send to your contact.
1.2.2.3 Tracking Incoming Requests for Information
To track an Incoming RFI:
· Click Message in the menu bar at the top of the screen and select New Incoming RFI.
· Click the New Incoming RFI icon ( ) on the toolbar at the top of the screen.
General Tab
RFI Number – Enter the number you want to use for this RFI. If you selected that option when setting up thisjob, your RFIs will automatically number.
Sent From - Enter the contact from whom you received this request.
Date Received - Enter the date on which you received this request. This field is automatically filled in withthe current system date.
Received Via - Choose the method that was used to send this information request. Your choices are definedunder your Document Control Parameters.
Respond By - Enter the date by which your contact wants to receive a response to this RFI.
Attach to Item – This feature allows you to link your RFI to a specific Submittal Item. If you want to attach anItem to this RFI, enter or choose the item from the list by clicking on F2 or ?.
Cost Impact – Check this box to indicate that this RFI could impact your cost.
Schedule Impact – Check this box to indicate that this RFI could impact your schedule.
Notes Tab
The notes tab allows you to enter notes concerning this incoming RFI. These notes will optionally print on yourform.

Document Control 21
v12 User Manual
User Fields Tab
The user fields tab allows you to enter information into the user defined fields for messages that were setup in theParameters for Document Control. This tab only appears if you have created at least one user field under Configure/System Parameters/Document Control Parameters.
Attachments Tab
The Attachments tab gives you the option to add files, scan documents, and drag existing saved documentationinto the message file. This tab only appears if you have created at least one messages attachment folder under Configure/System Parameters/Document Control Parameters.
For instructions on adding attachments, refer to "How Do I Work With Attachments" in the "System Setup"chapter of your manual.
Click on Save to save your RFI or Cancel to exit the screen without saving your changes. If you save themessage, you will have the option of printing a form to send to your contact.
1.2.2.4 Tracking Replies
You having the option of entering and tracking replies to any and all messages.
To enter a reply sent:
· Highlight the message for which you are sending a reply and click Message in the menu bar at the top ofthe screen and select New Message Sent.
· Click the New Reply Sent icon ( ) on the toolbar at the top of the screen.
To enter a reply received:
· Highlight the message for which you are sending a reply and click Message in the menu bar at the top ofthe screen and select New Message Received.
· Click the New Reply Received icon ( ) on the toolbar at the top of the screen.

Project Management Tools22
ComputerEase Software, Inc.
1.2.2.5 Filtering & Grouping Messages
You can control how and which messages are displayed in your correspondence log using the shortcuts on yourtoolbar or by making the appropriate selections under View on the menu bar at the top of the screen.
To filter the view by message type, you can choose to display All Messages, only Submittal Requests, onlySubmittals, only Transmittals or only RFIs by choosing the appropriate selection on the View menu. Thecorresponding shortcuts on the toolbar are in order, from left to right:
To filter the view by message status, you can choose to display Completed Items and/or Uncompleted Items,Items Due within 7 Days, or Late Items by choosing the appropriate selection on the View menu. Thecorresponding shortcuts on the toolbar are in order, from left to right:
You also have the option to group related items by selecting that option from the View menu or choosing the
appropriate shortcut ( ).
1.2.2.6 Printing the Correspondence Log
To print the Correspondence Log:
· Choose File in the menu bar at the top of the screen and select Print List.
· Click the Printer icon on the toolbar at the top of the screen.

Document Control 23
v12 User Manual
1.2.3 Drawing Log
The Drawing Log allows you to view and track all drawings and revisions, as well as whether you have sentnotifications of revisions. To select the drawing log view, choose View, then Drawing Log from the menu bar at
the top of the screen or click on the View Drawing Log icon ( ) on the toolbar at the top of the screen.
1.2.3.1 Adding New Drawings/Revisions
Adding New Drawings
To add a new drawing to the log:
· Select Drawing from the menu bar at the top of the Drawing Log screen and click Add New Drawing.
· Click once below the Sheet # field.
Your cursor will now be in the first field on the log.
Sheet # – Enter the sheet number for the drawing you are adding to the log.
Revision – This field automatically populates, indicating which draft of the selected drawing this is. For yourfirst entry, this will be the Initial drawing.
Description – Enter a brief description of the drawing.
Date – This field is automatically filled in with the current system date but can be changed if necessary.

Project Management Tools24
ComputerEase Software, Inc.
Attachments - Click in the column with the paper clip next to any drawing to attach a file to that drawing. Apaper clip symbol will appear next to any drawing with attachments. You can double-click on the symbol toaccess the attachments.
Adding New Revisions
To add a new revision to an existing drawing:
· Highlight the drawing for which you are entering a revisions and select Drawing from the menu bar at thetop of the Drawing Log screen and click Add New Revision.
· Right-click on the drawing for which you are entering a revisions and select Add New Revision from thelist.
Enter the Description and date of the revision. If you have previously sent a notification about a drawing or priorrevision, you will see a red X appear in the Revision Sent column under Status. This is to remind you to send anotification about the revision. Once you send a message about the revision, the red X will be replaced with agreen check mark.
Grouping Drawings
For easy organization of drawings, you can group your drawings together.
· Click on Group in the menu bar at the top of the screen and select Group Drawings.
· Right-click on one or more of the drawings you want to group and select Group Drawings.
Once you have created your group, you can add drawings to it by dragging and dropping them under the grouptitle.
1.2.3.2 Sending Messages About Drawings
To send a transmittal message about a drawing:
· Select Drawing from the menu bar at the top of the Drawing Log screen and click Send Drawings To.
· Click once beneath the status field on the line with the drawing.

Document Control 25
v12 User Manual
General Tab
Transmittal # – Enter the number you want to use for this transmittal. If you selected that option whensetting up this job, your transmittals will automatically number.
Send To - Enter the contact to whom you are sending this transmittal. This field is automatically filled in withthe submit to contact listed for this item in the job master, if applicable, but can be changed to anyone inyour contact database.
Regarding – Enter a brief description of your transmittal message.
Date Submitted - Enter the date on which you are sending this transmittal. This field is automatically filled inwith the current system date.
Sent Via - Choose the method that will be used to send this transmittal to the contact. Your choices aredefined under your Document Control Parameters.
Response Required - Check this box if you require a response to this message.
Respond By - Enter the date by which you want to receive a response to this message.
Send Copy To - Enter or choose any contacts to whom you are copying this message.
Notes Tab
The notes tab allows you to enter notes concerning this transmittal. These notes will optionally print on your form.

Project Management Tools26
ComputerEase Software, Inc.
Items Tab
Here you can add an item to the transmittal in addition to the drawing(s) already listed, along with a quantity andany item-specific notes.
User Fields Tab
The user fields tab allows you to enter information into the user defined fields for messages that were setup in theParameters for Document Control. This tab only appears if you have created at least one user field under Configure/System Parameters/Document Control Parameters.
Attachments Tab
The Attachments tab gives you the option to add files, scan documents, and drag existing saved documentationinto the message file. This tab only appears if you have created at least one messages attachment folder under Configure/System Parameters/Document Control Parameters.
For instructions on adding attachments, refer to "How Do I Work With Attachments" in the "System Setup"chapter of your manual.
Click on Save to save your transmittal or Cancel to exit the screen without saving your changes. If you save themessage, you will have the option of printing a form to send to your contact.
Any transmittals sent from the transmittal log will appear in the Correspondence Log.

Document Control 27
v12 User Manual
1.2.4 Requests for Change Log
The Requests for Change Log allows you to view and track all change order requests. To select the change orderlog view, choose View, then RFC Log from the menu bar at the top of the screen or click on the View RFC Log
icon ( ) on the toolbar at the top of the screen.
Project Management Tools28
ComputerEase Software, Inc.
Entering Requests for Change
To enter a request for change:
· Select File from the menu bar at the top of the RFC Log screen and click Enter/Edit a RFC.
· Click on the Enter/Edit a RFC icon ( ) on the toolbar at the top of the screen.
Refer to the Job Costing section in your ComputerEase User Manual for more information on entering Requests forChange.
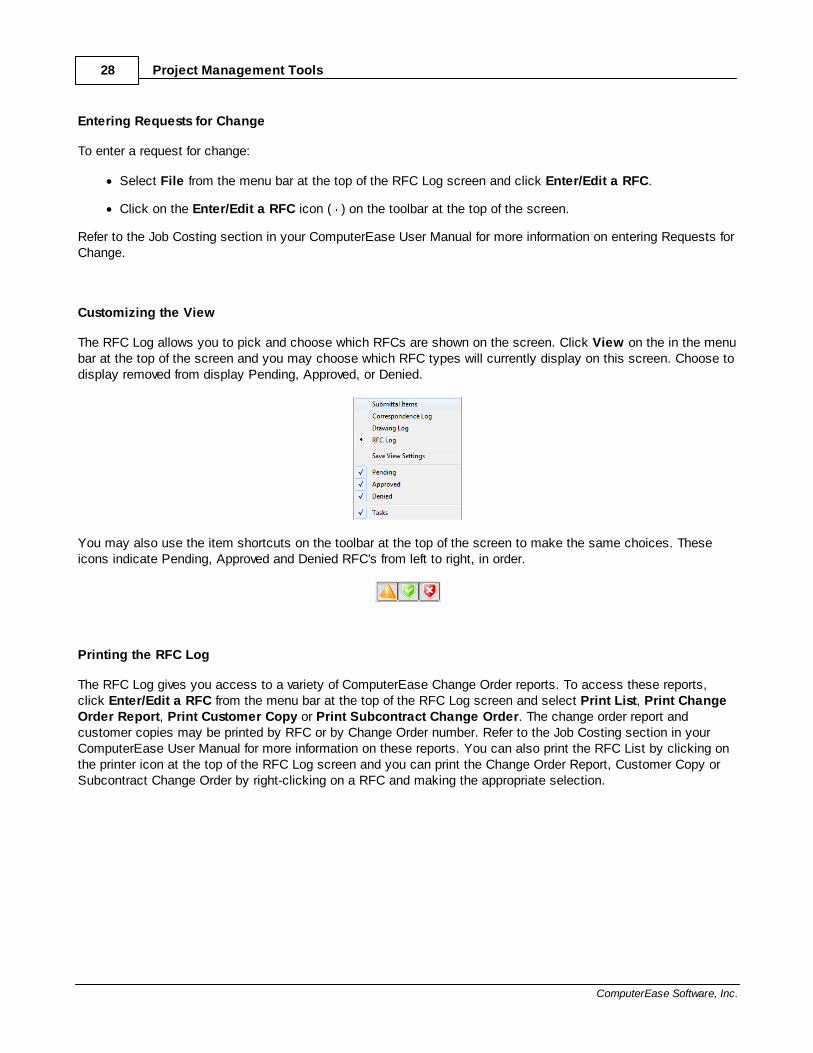
Customizing the View
The RFC Log allows you to pick and choose which RFCs are shown on the screen. Click View on the in the menubar at the top of the screen and you may choose which RFC types will currently display on this screen. Choose todisplay removed from display Pending, Approved, or Denied.
You may also use the item shortcuts on the toolbar at the top of the screen to make the same choices. Theseicons indicate Pending, Approved and Denied RFC's from left to right, in order.
Printing the RFC Log
The RFC Log gives you access to a variety of ComputerEase Change Order reports. To access these reports,click Enter/Edit a RFC from the menu bar at the top of the RFC Log screen and select Print List, Print ChangeOrder Report, Print Customer Copy or Print Subcontract Change Order. The change order report andcustomer copies may be printed by RFC or by Change Order number. Refer to the Job Costing section in yourComputerEase User Manual for more information on these reports. You can also print the RFC List by clicking onthe printer icon at the top of the RFC Log screen and you can print the Change Order Report, Customer Copy orSubcontract Change Order by right-clicking on a RFC and making the appropriate selection.

Document Control 29
v12 User Manual
1.2.5 Undoing, Reprinting and Editing Messages
Data Requests, data receipts, submittals, approvals, submittal notices, transmittals, RFIs and message repliesmay be reprinted (where applicable), "undone" or edited at any time. To perform any of these actions, right-click onthe item you wish to reprint, undo or edit and select the appropriate option. Or, you can highlight the item andchoose Item or Message from the menu bar and then choose the appropriate action.
Actions must be undone in sequence. That is, before you can undo a submittal, you would have to undo yoursubmittal notice and submittal status.
1.3 Viewing Documents
This menu option is offered to allow users to view information contained in document control but not change it. Ifyou have any users who need access to the information but who should not enter it, you can give them access to View Documents. Everything that can be seen in Work on Documents is visible here but no entry ormodification can take place.
1.4 Reports in Document Control
In addition to the reports accessible from each of the document control screens, ComputerEase offers severalreports from the main Project Management menu.
· Submittal Item List · Submittal Item Status
· Submittal Item History · Open RFIs Report by Job
· Open RFIs Report by Contact · Job Contact List
· Drawing List · Punch List
These reports are provided to allow you to manage your messages and documentation quickly and easily.
1.5 Punch Lists
ComputerEase allows you to enter and save your "Punch Lists" to help you organize tasks to be completed on ajob. Documenting punch lists in ComputerEase allows you to keep all relevant documentation in one place, whereit can be easily accessed.

Project Management Tools30
ComputerEase Software, Inc.
1.5.1 Creating a Punch List
Select Document Control / Work on Punch Lists.
Job - Enter or choose the job for which you want to create a punch list.
List - Enter a name or ID number for the list you want to create. You can have multiple punch lists for eachjob. Different departments might each have their own list.
Items Tab
Description - Enter a description of your task list.
Date Created - Enter or choose the date the list was created.
Item - Enter the first task to be completed.
Cost Code - Choose the cost code, if applicable, to which this item applies. This is strictly informational andwill not affect your job cost reports.
Notes - Click here to enter any notes for this item. Enter any notes for the current item in the new window.
Document Control 31
v12 User Manual
Completed/by - Check this box once the item is completed. A date field will become available next to it;enter the date the task was completed and the initials or name of the person who completed the task.
Approved/by - Check this box once the item is approved. A date field will become available next to it; enterthe date the task was approved and the initials or name of the person who approved the task's completion.
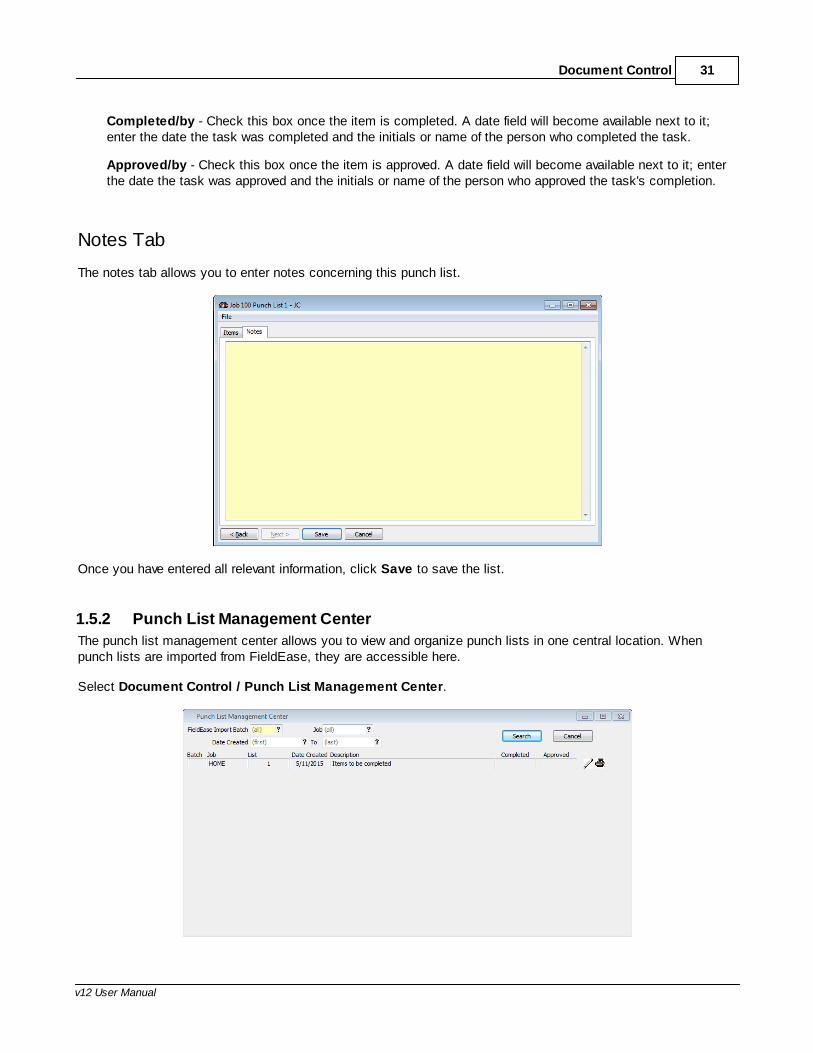
Notes Tab
The notes tab allows you to enter notes concerning this punch list.
Once you have entered all relevant information, click Save to save the list.
1.5.2 Punch List Management Center
The punch list management center allows you to view and organize punch lists in one central location. Whenpunch lists are imported from FieldEase, they are accessible here.
Select Document Control / Punch List Management Center.

Project Management Tools32
ComputerEase Software, Inc.
The fields at the top are used to select which punch lists are available in the center. Use any or all to find specificpunch lists for specific days.
FieldEase Import Batch -If you imported your punch lists from FieldEase, you can select a batch here. Onlypunch lists imported with that batch will be displayed below.
Job - Enter or choose a job to view punch lists for that specific job.
Date Created... To - Enter or choose a date range for which the punch lists were created.
Once you have made your selections, click on Search. Basic information is displayed to help you identify eachpunch list.
Batch - The FieldEase batch number that this punch lists was imported as a part of.
Job - The job number for the punch lists.
List - The punch list number.
Date Created - The date the punch list was created.
Description - The general description on the punch list.
Completed - The date the punch list was completed, if all items were completed on the same date.
Approved - The date the punch list was approved, if all items were approved on the same date.
Next to each list are two buttons. These buttons perform the following actions:
- Select to edit the punch list.
- Select to print the punch list report.
1.6 Field Log Entry
The Field Log program allows you to record the activity on a job site on any given day. For each day, you canrecord what the weather was like, which employees, subcontractors and visitors were present at a job site, whatequipment and material was used, as well as any general notes for the day. This daily record-keeping is importantfor planning, scheduling, and tracking the progress of the job.
It is important to know that the field log is independent of the accounting portion of ComputerEase. Althoughemployees, subcontractors, material and equipment are added to a field log from existing databases, entries herewill not affect your accounting modules and only the name or description of your employees, subcontractors,material and equipment will be viewed in the field log.
1.6.1 Weather Code Maintenance
You have the ability to create your own weather codes. The weather codes are used to record weather conditionsat the job site. You can have as many weather codes as you want; from just a few to describe general conditions(rain, snow, heat, wind) or a more descriptive list with even more codes (rain delay 1 hr, rain delay 2 hr, etc).
Select Document Control / Weather Code Maintenance.

Document Control 33
v12 User Manual
Weather Code - Enter a code to describe the weather condition you want to create. Click OK to create yourcode.
Description - Enter a description of your weather code. This gives you the opportunity to describe theweather conditions more fully.
1.6.2 Field Log Maintenance
Each day, you will need to enter your field log.
Select Document Control / Field Log Maintenance.
Job - Enter or choose the job for which you want to record the day's activities.
Date - Enter or choose the date for which you want to record the job's daily activities.
Type - Enter or choose the field log type to which this field log will be assigned. Use of field log types isoptional, but is necessary if you want to record more than one field log per job per day.
Select OK to create the log for the selected job and date.

Project Management Tools34
ComputerEase Software, Inc.
Main Tab
Temperature - Enter the temperature at the job site for the day. Typically this would be the high, low oraverage temperature.
Weather 1/2/3 - Enter or choose up to 3 weather codes to describe weather conditions at the job site.Because weather conditions can change during the course of the day, you can select anywhere from one tothree.
Employees Tab
Employee - Enter or choose any employee present on the job site. If the employee is not an employee fromyour payroll database, skip this field.
Name - The description of the employee chosen will display here for reference only. If you did not choose anemployee, enter the name of the employee who worked on the job.
Hours - Enter the number of hours the employee was on the job site.
Comments - Enter any comments associated with the employee's work.
Time In/Time Out - Enter the time the employee began and ended work; this is for your records only.

Document Control 35
v12 User Manual
Subcontractors Tab
Vendor - Enter or choose any subcontractor present on the job site. If the subcontractor is not asubcontractor from your vendor database, skip this field.
Name - The description of the subcontractor chosen will display here for reference only. If you did not choosea subcontractor, enter the name of the subcontractor here.
Men - Enter the number of men from the subcontractor's business who were present on the job site.
Hours - Enter the number of hours the subcontractor's men were present on the job site.
Comments - Enter any comments associated with the subcontractor chosen.
Time In/Time Out - Enter the time the subcontractor began and ended work; this is for your records only.
Material Tab
Item Number - Enter or choose any inventory material item used on the job site. If the item is not materialfrom your inventory database, skip this field.
Project Management Tools36
ComputerEase Software, Inc.
Description - The description of the material item chosen will display here for reference only. If you did notchoose an item, enter the description of the item used here.
Qty - Enter the quantity used of the item selected.
Comments - Enter any comments associated with the material use.
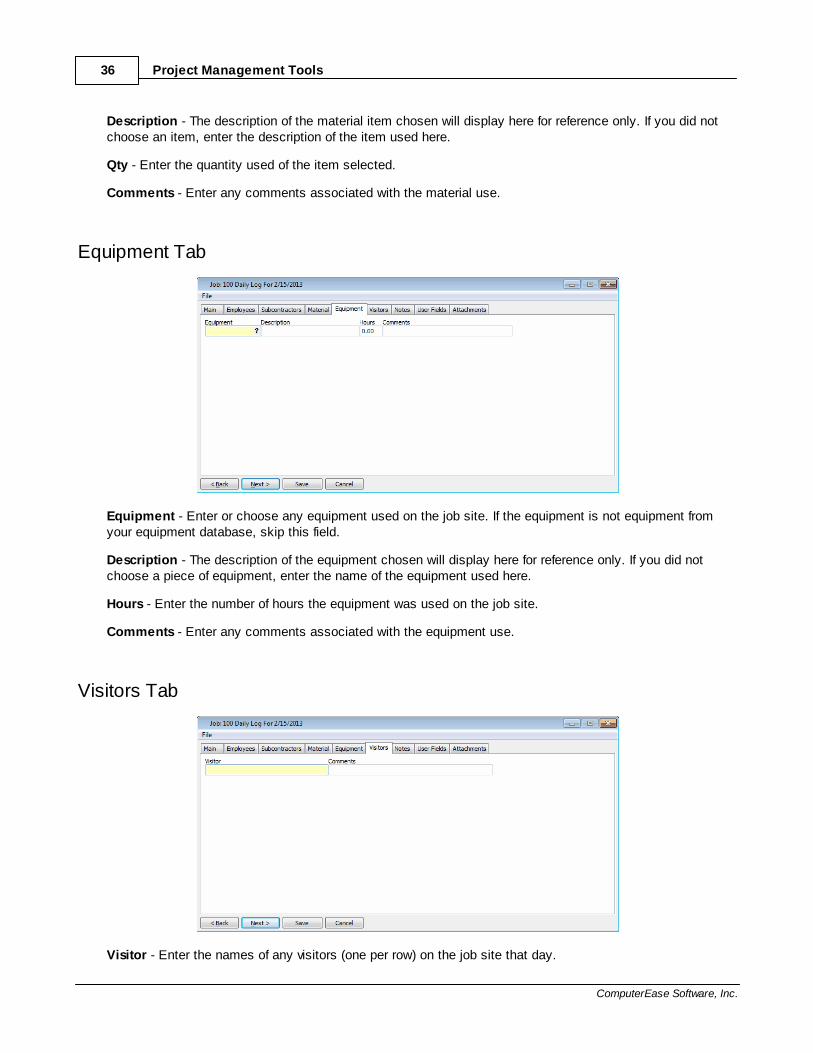
Equipment Tab
Equipment - Enter or choose any equipment used on the job site. If the equipment is not equipment fromyour equipment database, skip this field.
Description - The description of the equipment chosen will display here for reference only. If you did notchoose a piece of equipment, enter the name of the equipment used here.
Hours - Enter the number of hours the equipment was used on the job site.
Comments - Enter any comments associated with the equipment use.
Visitors Tab
Visitor - Enter the names of any visitors (one per row) on the job site that day.

Document Control 37
v12 User Manual
Comments - Enter any comments associated with the person's visit.
Notes Tab
The notes tab allows you to enter notes concerning this field log.
User Fields Tab
The user fields tab allows you to enter information into the user defined fields for field logs that were setup in theParameters for Document Control. This tab only appears if you have created at least one user field under Configure/System Parameters/Document Control Parameters.
Attachments Tab
The Attachments tab gives you the option to add files, scan documents, and drag existing saved documentationinto the field log file. This tab only appears if you have created at least one field log attachment folder under Configure/System Parameters/Document Control Parameters.
For instructions on adding attachments, refer to "How Do I Work With Attachments" in the "System Setup"chapter of your manual.
Click on Save to save your entry or Cancel to exit the screen without saving your changes.

Project Management Tools38
ComputerEase Software, Inc.
1.6.3 Field Log Management Center
The field log management center allows you to view and organize field logs in one central location. When field logsare imported from FieldEase, they are accessible here.
Select Document Control / Field Log Management Center.
The fields at the top are used to select which field logs are available in the center. Use any or all to find specificlogs for specific days.
FieldEase Import Batch -If you imported your logs from FieldEase, you can select a batch here. Only logsimported with that batch will be displayed below.
Job - Enter or choose a job to view logs for that specific job.
Type - Enter or choose a log type to view logs for that specific type.
Log Date... To - Enter or choose a date range for which the logs were entered.
Comment Contains - Enter a text string to search for logs where the comments contain that text.
Sort - Choose how you would like your logs to be sorted; they can be sorted by job, date and/or type and canbe sorted by all three (in a set order).
Once you have made your selections, click on Search. Basic information is displayed to help you identify eachlog.
Batch - The FieldEase batch number that this log was imported as a part of.
Job - The job number for the log.
Log Date - The date for the log.
Comments - Any general comments entered onto the Notes tab of the log.
Weather - Any weather codes entered for the log.
Temp - The temperature recorded for the log.

Document Control 39
v12 User Manual
Next to each log are several buttons. These buttons perform the following actions:
- Select to view handwritten notes from FieldEase.
- Select to view the signature captured from FieldEase.
- Select to edit the field log.
- Select to print the field log report.
1.6.4 Field Log Type Maintenance
You have the option of creating field log types, which allow you to create multiple field logs per day.Select Document Control / Edit Field Log Types.
Log Type - Enter a code for your log type, up to eight alphanumeric characters. Choose Edit to create thetype.
Description - Enter a description of your field log type.
Enable Tabs - Check the box next to each tab you want to enable for this log type: Employees,Subcontractors, Material, Equipment, Visitors. Any tabs not selected will not be active for this log type.
Enable User Fields - If you have created any user fields for field logs, check the box next to each user fieldyou want to enable for this log type. Any user fields not selected will not be active for this log type.
Select OK to save the type.
1.7 Meeting Minutes
Meeting minutes are used to record items discussed during job site meetings. However, meeting minutes can alsobe use to record items discussed in office meetings regarding projects as well as punch list items remaining at theclose of a project. Option item groups allow you to categorize or group your items together for convenience.

Project Management Tools40
ComputerEase Software, Inc.
1.7.1 Item Groups
Item groups can be created to allow you to categorize your meeting topics. Item groups are optional but if used,allow you to group and sort your items on printed meeting reports, allowing readers to easily find topics of concern.
To create item groups, select Meeting Minutes / Edit Meeting Item Groups from the Project Managementsection of the Main Menu.
Add - Click here to add a new item grouping.
Code - Enter a code abbreviation for your item grouping.
Description - Enter a name or title for your item grouping that is more descriptive.
Edit - Highlight an item grouping you want to edit and click here to make changes to it.
Move Up - Highlight an item grouping you want to move higher in your listing and click here to move it higheron your list. The order here determines the order in which groups of items will print on your meeting minutesreport.
Move Down - Highlight an item grouping you want to move lower in your listing and click here to move itlower on your list.
Remove - Highlight an item grouping you want to remove and click here to remove it from your list.
OK - Click here to save your changes and exit the screen.
Cancel - Click here to close the screen without saving changes.
1.7.2 Entering Meeting Minutes
Select Meeting Minutes / Enter Meeting Minutes from the Project Management section of the Main Menu.
Job Number - Enter or choose the job for which you want to enter meeting minutes. Click OK to create themeeting.

Document Control 41
v12 User Manual
Sequence - Enter the type of job meeting or sequence of job meeting for which you want to enter meetingminutes. If you will only have one type of meeting for this job, you can just use the job number.
Main Tab
Project Management Tools42
ComputerEase Software, Inc.
Description - Enter a description of the meeting.
Meeting Number - The field for the meeting number will automatically fill for the first meeting.
Prepared By - Enter the name of the person who prepared the meeting minutes.
Meeting Date - Enter the date on which the meeting was held.
Time - Enter the start and ending times of the meeting.
Location - Enter the location of the meeting.
Next Meeting Date - If a subsequent meeting is scheduled, enter in the date and times of the next meeting.
Next Location - Enter the location of the next meeting.
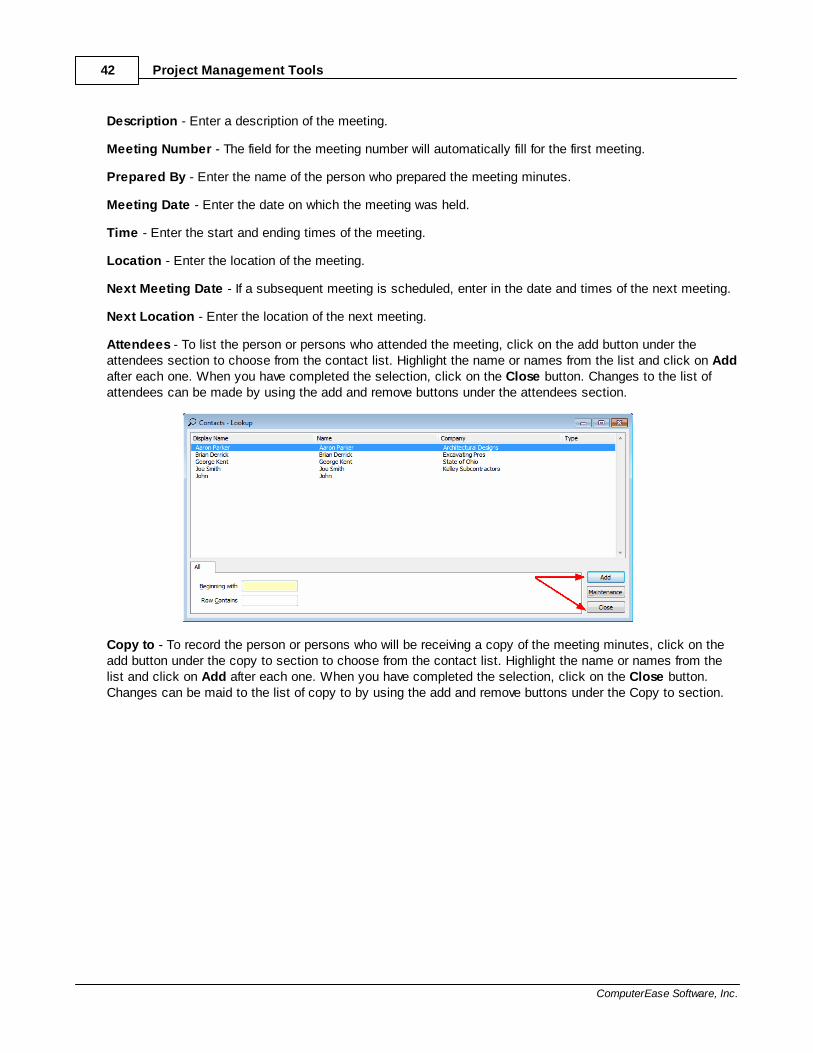
Attendees - To list the person or persons who attended the meeting, click on the add button under theattendees section to choose from the contact list. Highlight the name or names from the list and click on Addafter each one. When you have completed the selection, click on the Close button. Changes to the list ofattendees can be made by using the add and remove buttons under the attendees section.
Copy to - To record the person or persons who will be receiving a copy of the meeting minutes, click on theadd button under the copy to section to choose from the contact list. Highlight the name or names from thelist and click on Add after each one. When you have completed the selection, click on the Close button.Changes can be maid to the list of copy to by using the add and remove buttons under the Copy to section.

Document Control 43
v12 User Manual
Old Business Tab
If this is your first meeting, you will skip this tab. If it is not your first meeting, you will see items begun in previousmeetings listed here. To add notes to any item, highlight it and click on Edit Item. To add an item to your oldbusiness, click on Add Item.
New Business Tab

Project Management Tools44
ComputerEase Software, Inc.
Add Item - Click here to enter a new item discussed.
Item - Enter a brief description of the topic discussed.
Group - Choose the group or category to which the item belongs. This is optional and may be left empty ifyou do not use item groups.
Notes - Enter detailed notes of the discussion.
Responsible Party - Choose the meeting contact responsible for following up on the item, if applicable.
Date Due - Enter the due date of the item if applicable.
Closed - If the item was resolved in this meeting, check this box to complete the item. If the item isunresolved, leave empty and this item will appear in the next meeting under the old business section.
Date Completed - If the item is closed and/or completed, enter in the date of completion. Click OK tosave this item.
Continue adding items as needed. When finished, click Cancel in the item box to close the section on items.
Edit Item - Highlight an item and click here to make changes to the item.
Remove Item - Highlight an item and click here to remove an item.

Document Control 45
v12 User Manual
Notes Tab
The notes tab allows you to enter notes concerning this meeting.
User Fields Tab
The user fields tab allows you to enter information into the user defined fields for meetings that were setup in theParameters for Document Control. This tab only appears if you have created at least one user field under Configure/System Parameters/Document Control Parameters.
Click Save to save this meeting.
When you are ready to record minutes for subsequent meetings, click on File in the upper-left corner and chooseStart next meeting. The meeting number will advance and you will begin the entry process.

Project Management Tools46
ComputerEase Software, Inc.
In subsequent meetings, it may become necessary to reopen old items that had previously been marked closed.To do so, click on File in the upper-left corner and choose Reopen Old Item. Items will be organized in tabs bythe meeting in which they were introduced.
Select the item you want to reopen and click OK to reopen the item and enter notes for the current meeting.

Document Control 47
v12 User Manual
1.7.3 Print Meeting Minutes
The meeting minutes report is a distribution-style report. It is meant to be distributed to all meeting attendees andanyone who was unable to attend the report to keep them informed on critical items. A separate report will print foreach meeting selected.
Select Meeting Minutes / Print Meeting Minutes from the Project Management section of the Main Menu.
Job - Enter or choose a job for which to print the report.
Sequence - Enter or choose the job meeting sequence for which to print the report.
Meeting...To - Enter a meeting or range of meetings to report.
Show prior item notes - Choose Yes to include notes from prior meetings or No to only include the relevantnotes from the current meeting for each item.
Send To - Select Display, Printer, Email or Clipboard depending on what you would like to do with thisreport. If you are printing the report, select the appropriate printer in the next field. Click OK and the report willprint, display, create a PDF file on the clipboard or generate an email depending on your choice in this field.
Format - Choose the format to use for printing the report. The meeting minutes report can be printed using aWord template if desired.
1.7.4 Meeting History Report
The meeting items history report is designed to track the progress of items or topics that were discussed acrossseveral meetings.
Select Meeting Minutes / Meeting Items History Report from the Project Management section of the MainMenu.
Job - Enter or choose a job for which to print the report.
Sequence - Enter or choose the job meeting sequence for which to print the report.

Project Management Tools48
ComputerEase Software, Inc.
Meeting...To - Enter a meeting or range of meetings to report.
Items - Select All, Open, or Closed Items to choose which items will print on your report.
Send Report To - Select Display, Printer, Email or Clipboard depending on what you would like to do withthis report. If you are printing the report, select the appropriate printer in the next field. Click OK and thereport will print, display, create a PDF file on the clipboard or generate an email depending on your choice inthis field.

Part
II
Scheduling

Project Management Tools50
ComputerEase Software, Inc.
2 Scheduling
2.1 Editing the Schedule
ComputerEase scheduling is a Gantt chart style scheduling program. It allows you to manage your project andtask schedule, and even track which employees, subcontractors, equipment and or crews are scheduled to workon a project on any given day.
Select Scheduling / Schedule Maintenance.
Help
The schedule has a Help "Wizard" that allows quick access to help on using its features. To turn on the wizard,click on the Help icon on your toolbar - .
Scheduling 51
v12 User Manual
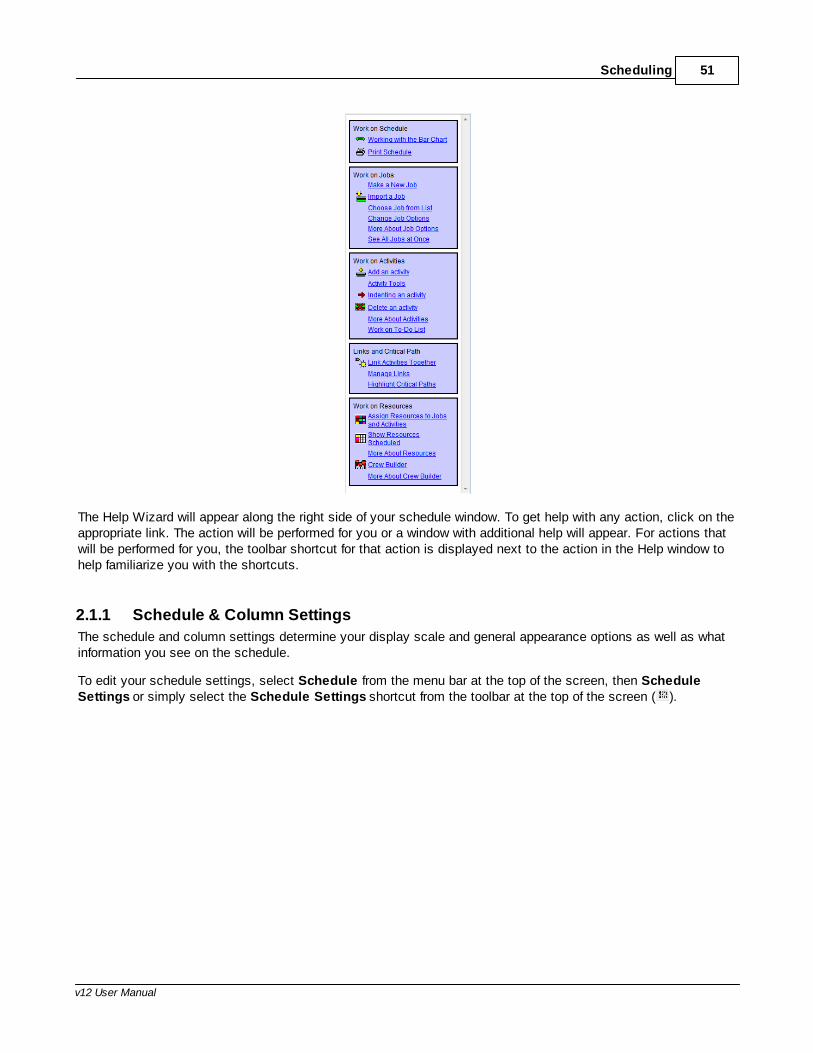
The Help Wizard will appear along the right side of your schedule window. To get help with any action, click on theappropriate link. The action will be performed for you or a window with additional help will appear. For actions thatwill be performed for you, the toolbar shortcut for that action is displayed next to the action in the Help window tohelp familiarize you with the shortcuts.
2.1.1 Schedule & Column Settings
The schedule and column settings determine your display scale and general appearance options as well as whatinformation you see on the schedule.
To edit your schedule settings, select Schedule from the menu bar at the top of the screen, then ScheduleSettings or simply select the Schedule Settings shortcut from the toolbar at the top of the screen ( ).
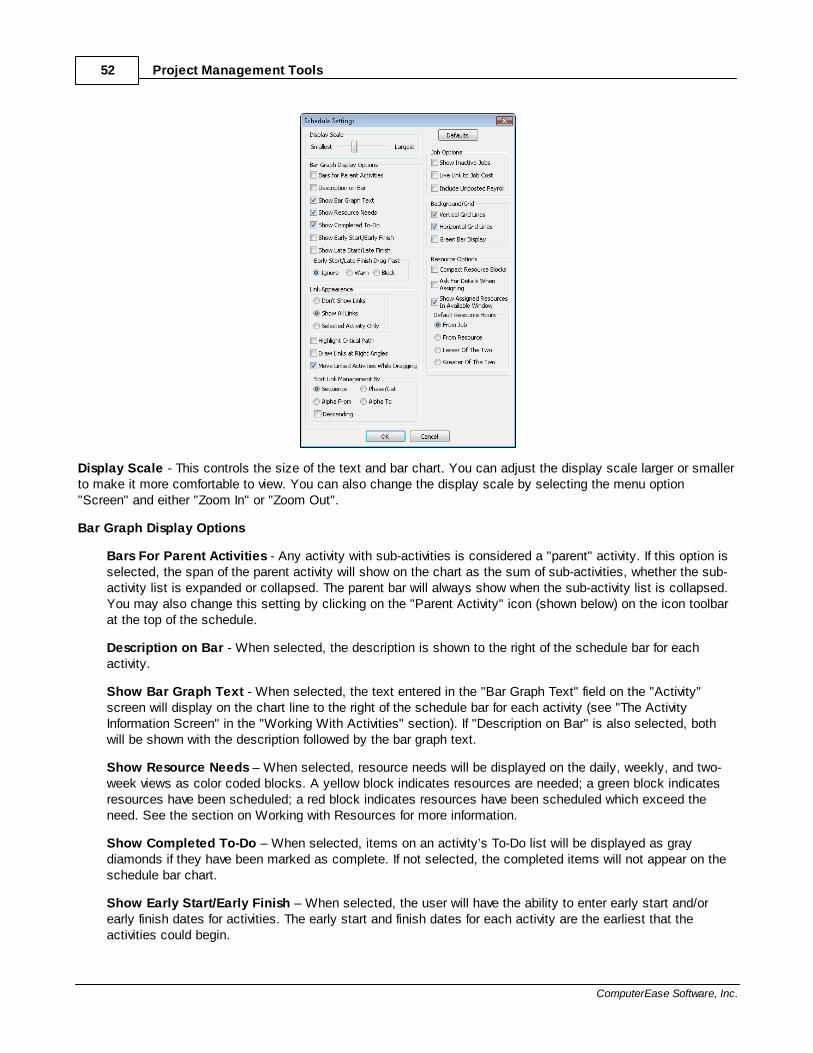
Project Management Tools52
ComputerEase Software, Inc.
Display Scale - This controls the size of the text and bar chart. You can adjust the display scale larger or smallerto make it more comfortable to view. You can also change the display scale by selecting the menu option"Screen" and either "Zoom In" or "Zoom Out".
Bar Graph Display Options
Bars For Parent Activities - Any activity with sub-activities is considered a "parent" activity. If this option isselected, the span of the parent activity will show on the chart as the sum of sub-activities, whether the sub-activity list is expanded or collapsed. The parent bar will always show when the sub-activity list is collapsed.You may also change this setting by clicking on the "Parent Activity" icon (shown below) on the icon toolbarat the top of the schedule.
Description on Bar - When selected, the description is shown to the right of the schedule bar for eachactivity.
Show Bar Graph Text - When selected, the text entered in the "Bar Graph Text" field on the "Activity"screen will display on the chart line to the right of the schedule bar for each activity (see "The ActivityInformation Screen" in the "Working With Activities" section). If "Description on Bar" is also selected, bothwill be shown with the description followed by the bar graph text.
Show Resource Needs – When selected, resource needs will be displayed on the daily, weekly, and two-week views as color coded blocks. A yellow block indicates resources are needed; a green block indicatesresources have been scheduled; a red block indicates resources have been scheduled which exceed theneed. See the section on Working with Resources for more information.
Show Completed To-Do – When selected, items on an activity’s To-Do list will be displayed as graydiamonds if they have been marked as complete. If not selected, the completed items will not appear on theschedule bar chart.
Show Early Start/Early Finish – When selected, the user will have the ability to enter early start and/orearly finish dates for activities. The early start and finish dates for each activity are the earliest that theactivities could begin.

Scheduling 53
v12 User Manual
Show Late Start/Late Finish – When selected, the user will have the ability to enter late start and/or latefinish dates for activities. The late start and finish dates for each activity are the latest that the activities couldbegin without impacting other activities and/or the job schedule as a whole.
Early Start/Late Finish Drag-Past – If using early and/or late finish dates, you can choose how schedulechanges will be affected by violations of the early start or late finish constraints. You can Ignore all violations,allowing you to change the schedule regardless of whether any scheduling violations will occur, have thesystem Warn you when your schedule change will cause a violation, or Block any schedule changes thatwill cause a violation.
Link Appearances
Don’t Show Links – Links between activities are not shown.
Show All Links – All links between activities are shown.
Selected Activity Only – Links are shown only for the currently selected activity, if any.
Highlight Critical Path – If selected, activities which are part of a critical path will be highlighted withdiagonal gold bars in the bar chart. A critical path is the longest route through any group of linked activities.
Draw Links at Right Angles – If selected, link lines are drawn only with horizontal and vertical lines.Otherwise the link lines will be drawn using the shortest distance. Depending on the number of links and thecomplexity of the bar chart, either option may produce a better appearance.
Move Linked Activities While Dragging - When moving a schedule bar or endpoint, activities that are hard-linked to the moving schedule bar or endpoint will automatically move along with it. When this option isselected, you will see the linked activities move as you move a bar on the schedule. If this option isunselected, you will see only the bar you are moving and linked activities will move into place only after youhave finished moving the bar. You may also change this setting by clicking on the "Move Linked Activities"icon (shown below) on the icon toolbar at the top of the schedule or by selecting Link on the top left-handcorner of the schedule screen and choosing Show Links When Dragging.
Sort Link Management By
Sequence – When selected the links in the Link Management window will be sorted by sequence number (inthe order in which they were created).
Phase/Cat – When selected the links in the Link Management window will be sorted by phase, then categorynumber of the activity from which the link is originated.
Alpha From – When selected the links in the Link Management window will be sorted by the activity namefrom which the link is originated.
Alpha To – When selected the links in the Link Management window will be sorted by the activity name towhich the link is generated.
Descending - If selected, links will be sorted in descending order, according to the method selected above.
Job Options
Show Inactive Jobs - If checked, all jobs in the schedule will be shown in the job list dialog. Otherwise, jobsflagged as inactive will not be shown.

Project Management Tools54
ComputerEase Software, Inc.
Live Link to Job Cost - If checked, each time the schedule is launched or a new job is selected, the currentjob cost information is loaded from ComputerEase. Otherwise, the job cost information is loaded at importtime only, or when specifically requested. Check this option if you want to have up to the minute job costfigures each time you look at a job on the schedule. Do not check this option if you want to make manualchanges to any of the job cost figures in the schedule itself.
Background/Grid
Vertical Grid Lines - Vertical separators are drawn between columns.
Horizontal Grid Lines - Horizontal separators are drawn between activities.
Green Bar Display - Alternating green/white background on horizontal lines. The vertical and horizontal gridlines used together give a "spreadsheet" appearance to the bar chart. Without the lines the display is moreopen. The green bar gives the appearance of a report printed on green bar computer paper.
Resource Options
Compact Resource Blocks - When this box is selected the resource blocks will appear smaller in size. Thisworks well when working with a large volume of resources.
Ask For Details When Assigning - When this box is selected, each time a new resource is assigned to anactivity, a dialog box will appear allowing you to specify hours and an optional description.
Show Assigned Resources in Available Window - When this field is checked, resources that havealready been assigned will still appear in the resource available window with an X. If not checked, resourcesthat have been fully assigned will disappear from the available resource box.
Default Resource Hours
From Job - When assigning resources, if this option is selected, the number of hours for which the resourcewill be assigned will default from the "Regular Work Day Hours" in the job settings, even if the resource'sdefault hours per day differs.
From Resource - When assigning resources, if this option is selected, the number of hours for which theresource will be assigned will default from the resource's "Hours Daily", even if the job's default hours per daydiffers.
Lesser Of The Two - When assigning resources, if this option is selected, the number of hours for which theresource will be assigned be the lesser of the job's "Regular Work Day Hours" in the job settings or theresource's "Daily Hours" when the two differ.
Greater Of The Two - When assigning resources, if this option is selected, the number of hours for whichthe resource will be assigned be the greater of the job's "Regular Work Day Hours" in the job settings or theresource's "Daily Hours" when the two differ.
You can press Defaults at any time to restore system default schedule settings.
To edit your column settings and change how much information appears on the schedule, select Schedule thenColumn Settings, or right-click on any line in the schedule and select Column Settings.

Scheduling 55
v12 User Manual
Available Columns - All columns that are available for display in the schedule are listed here. To select a columnand add it to your view, select it and either double-click on it or press the right-arrow button to move it to theColumns area. Choosing the right-pointing double arrow button will move all fields to the Columns area.
Columns - All columns that you have selected for display are listed here. To remove a column from your view,select it and either double-click on it or press the left-arrow button to move it to the Available Columns area.Choosing the left-pointing double arrow button will move all fields to the Available Columns area.
Date Format - Choose how you want dates to be formatted from the drop-down.
You can press Defaults at any time to restore system default schedule settings.
There are several other settings that affect the appearance of your schedule. Choose Schedule from the menu barat the top of the screen. Then select from the options listed below.
Show Expanded Parent Bars - Select this option to show a bar on a parent activity that spans the duration of allof its child activities. For example, if an activity has two child activities, one from 1/5 to 1/20 and the other from1/17 to 2/1, selecting this option would cause a bar to appear on the parent activity from 1/5 to 2/1.
Show Resources Needs - Select this option to indicate on the schedule display whether resource needs havebeen fully scheduled, over-scheduled or still need to be scheduled. A red color around an activity's schedule barindicates over-scheduling, green indicates an item is fully scheduled and yellow indicates inadequate scheduling.
Go to Beginning of Schedule - Select this option to be taken to the first day of the schedule.
Go to End of Schedule - Select this option to be taken to the last day of the schedule.
Go to Today's Date - Select this option to today's date on the schedule. You can also press the shortcut on the
toolbar to take you to today's date ( ).
Holidays/Off Days - Select this option to add holidays and off days to your schedule.

Project Management Tools56
ComputerEase Software, Inc.
Add - Press here to add a holiday or other day off to the schedule. You will be prompted for a date anddescription of the day.
Edit - Press here to change a selected day listed.
Delete - Press here to remove a day off.
UnDelete - In the same session, you can undo any deletion you just made.
2.1.2 Comparison of the Three Schedule Views
You schedule can be viewed in one of three formats. You can change the view with the click of a mouse,depending on your needs. To select any of these view, select Screen from the menu bar at the top of the window,then choose the appropriate view.

Scheduling 57
v12 User Manual
Daily Calendar View - The daily calendar view shows each day of the schedule in a separate column. Thenumber of days available for view without using your scroll bar depend on your display scale. You can also select
this view by pressing the shortcut on the toolbar at the top of the screen ( ).
Weekly Calendar View - The weekly calendar view shows each week of the schedule in a separate column. Thenumber of weeks available for view without using your scroll bar depend on your display scale. This view is morecompact and allows you to get a general view of the schedule over a larger span of time. You can also select this
view by pressing the shortcut on the toolbar at the top of the screen ( ).

Project Management Tools58
ComputerEase Software, Inc.
Two-Week Detail View – The two-week detail calendar view shows each day of the schedule in a separatecolumn, but over a two-week span (the number of days that display is also dependent on how many optionalschedule columns you have displayed). You can also select this view by pressing the shortcut on the toolbar at
the top of the screen ( ).
2.1.3 Overview of Job Settings
The job settings are the primary settings for the job as a whole. You can access the job settings by selecting Jobs, then Job Settings. You will also have the opportunity to enter the job settings when creating a new job.
Job Number – The job's number; this must be unique.
Description – The description or name of the job.

Scheduling 59
v12 User Manual
Job Group – The job group is used for filtering purposes when viewing or scheduling groups of jobs. This can bethe name or initials of the project manager or some other classification that makes sense.
Live Link to Job Cost - If checked, each time the schedule is launched for this job, the current job costinformation is loaded from ComputerEase. Otherwise, the job cost information is loaded at import time only, orwhen specifically requested. Check this option if you want to have up to the minute job cost figures each time youlook at a job on the schedule. Do not check this option if you want to make manual changes to any of the job costfigures in the schedule itself.
Include Document Manager Events – Check this option to display items in Document Control that have not yetbeen received. These show as diamond icons in the first line of the job/activity display. As documents that are dueare completed, they will disappear from the schedule.
Adjust To-Do Events to Schedule Changes – If this option is selected, the To-Do items for each activity will bemoved with any changes made in the scheduled begin/end date. For example, if the schedule bar is moved ahead5 working days, then each item on the To-Do list will be moved ahead 5 working days.
Important: this applies only when the schedule bar is moved from the middle and the duration is not changed. If thestart or end points are moved, changing the duration, the To-Do Event dates will not be changed.
Adjust Resources to Schedule Changes – If this option is selected, any resources assigned to an activity willbe moved with any changes made in the scheduled begin/end date. The same restriction on changing durationapplies as with the above option.
Note: Moving resource assignments to a different date may cause a conflict in which the same resource isassigned to more than one task on the same day.
Lock All Activities – When checked, movement of activity schedule bars is prevented. The end-points of lockedbars appear as red diamonds, instead of green.
Work All Saturdays – When checked, all Saturdays are considered work days when projecting the job schedule.Or you may select Choose to set only specific Saturdays as work days.
Warning: Changing this setting will cause the schedule to be adjusted accordingly.
Work All Sundays – When checked, all Sundays are considered work days when projecting the job schedule. Oryou may select Choose to set only specific Sundays as work days.
Warning: Changing this setting will cause the schedule to be adjusted accordingly.
Regular Work Day Hours – The number of hours normally worked per day. This value is used to determine thenumber of man-days needed when assigning resources in man-day mode. It does not affect the schedule startand end dates.
Highlight Columns - Choose Target to place a green vertical bar through the target start date and a red verticalbar through the target finish date on the schedule; choose Earliest/Latest to place a green vertical bar through theearliest start date and a red vertical bar through the latest finish date on the schedule; or choose None if you donot want to highlight either set of start and finish dates on the schedule.
Early/Late Dates - Choose Automatic to have the early and late dates for each activity automatically calculatebased on the job's early start and late finish dates; choose Explicit by Activity to manually enter the early andlate dates for each activity if the float for each activity is not constant; or choose Auto w/Explicit Override tohave each activity's early and late dates automatically calculate based on the job's early start and late finish datesbut allow the user to manually change these dates for any activity or all activities individually.
Schedule Summary Section

Project Management Tools60
ComputerEase Software, Inc.
Make Current Schedule The Original – The original schedule dates are saved for each activity. Any time achange is made to the current schedule start and/or finish dates, the original dates do not change. Any activitywhose schedule dates differ from the original will be drawn as red bars rather than green. When this box ischecked, all of the activities on the job will have their original dates reset to the current scheduled dates.
Target Start and Target Finish Dates – These dates are for information purposes only; they do not affect theschedule. The Target Start Date is highlighted in green on the schedule bar graph. The Target Finish Date ishighlighted on the schedule bar graph as a red line. Use these dates as a comparison point with the originalschedule dates and current schedule dates.
Current Schedule Start and Finish Dates – These dates are derived from the schedule of all activities, with thestart being the earliest current activity start date and the finish being the latest current activity finish date.
Original Start and Finish Dates – These dates are derived from the schedule of all activities, with the start beingthe earliest scheduled activity start date and the finish being the latest scheduled activity finish date.
Earliest/Latest Dates - These dates are the earliest and latest the job can begin.
Duration Days – For each of the four columns, Target, Current, Original and Earliest/Latest, the duration iscalculated in both working days and calendar days, as well as the number of days remaining from the current(system) date. The Current and Original finish dates are also shown in days over or under the original target dateselected.
2.1.4 Overview of Activity Details
The activity details dialog box displays the settings for each activity on the job. You can access it by double-clicking on an activity or by selecting Activities, then Edit Activity Detail.
Phase – The phase, if any, or phase imported from ComputerEase.
Category – The category, if any, or category imported from ComputerEase.
Title – Description of the activity to appear on the schedule.
Bar Graph Text – Enter up to 60 characters of text which will optionally appear to the right of the bar graph line.
Notes - Enter any notes about this activity.

Scheduling 61
v12 User Manual
Omit From Hours/Cost Refresh - Check here to omit an activity from refreshing current hours/cost that is in JobCost if using a live link to Job Cost.
Estimated Hours/Cost – The total estimated hours and cost for this activity. This can be manually entered orimported from Job Costing. It does not affect the schedule or resource scheduling, it is only provided forcomparison.
Actual Hours/Cost – The total actual hours and cost to date for this activity. It does not affect the schedule orresource scheduling, it is only provided for comparison with the scheduled hours and assigned hours values. Thisis only updated if using a live link to Job Cost or it may be manually entered here.
To-Do List
You can create a list of specific events or to-do items attached to each activity. A To-Do event will appear as a reddiamond on the bar graph. When an event is marked complete, it will disappear from the schedule unless theoption to show completed to-do items is selected in the Schedule Settings.
Add – Click to add a new To-Do item.
Done - Check this box when the to-do item is completed.
Date - Enter the date of the event.
Description - Enter a description of the event.
Resources - If this event is to be assigned to a resource or resources, make that selection here.
Details/Notes - Enter any detailed notes or instructions.
Recurring - Click to add a recurring item.

Project Management Tools62
ComputerEase Software, Inc.
Frequency - Choose how often this event will take place.
How Many - Choose the number of events to create, one per day/week/month.
Starting Date - Enter the first date the even should take place.
Description - Enter a description of the event.
Resources - If this event is to be assigned to a resource or resources, make that selection here.
Details/Notes - Enter any detailed notes or instructions.
Edit – Select a To-Do item from the list and click Edit, or double-click the item to change it.
Delete – Select a To-Do item from the list and click Delete to remove it.
Projected Resource Needs
This section allows you to optionally enter resource needs for the activity. Resource needs differ from resourceassignments in that they project a number of hours or men needed; assignments dedicate a particular resource ona particular day and are applied against the resource needs.
On Resource Schedule – Checked by default; uncheck this box to remove this activity from the resourceschedule screen.
Need Sub – Check this box if the activity requires a subcontractor assignment. his will appear with thenotation “Sub” on the resource schedule until at least one subcontractor is assigned.
Schedule Hours-Enter the number of Schedule hours to complete the activity.
Man Days – If in man-day mode, this is the nearest number of whole man-days needed, based on the totalhours needed divided by the job’s work day hours. his value is computed, and cannot be changed directly.
Distribute Evenly Over Schedule – Resource needs are projected evenly over the total number of days inthe schedule, unless Manual /Detail by Day is selected. For example, if an activity is scheduled for 80 manhours, over 5 working days, it will show a need of 16 hours per day. If the number of days is increased to 6,the hours will be spread out 14, 14, 13, 13, 13, 13 over the 6 days.
Manual/Detail By Day-Choosing detail allows you to fine-tune the resource requirements on a daily basis.For each day, you can choose the exact number of hours needed.
Add – Add a new detail day.
Date - Enter the date the resource will be needed.
Day Number - This is the day of work on the schedule; automatically calculated.
Hours/Men - Depending on whether you selected to schedule by Hours or Man Days in your SchedulingParameters, you will enter the appropriate number of hours or men required on this day.
Description - Enter an optional description or instructions.
Scheduling 63
v12 User Manual
Reload - Select Reload if there has been a change in the Hours/Men needed to complete activity. This willallow the detail to rebuild the list needed activity based on changes made.
Edit – Select and edit, or double click an existing detail item from the list to change it.
Delete – Select and delete to remove a detail item from the list.
Start – For the current schedule and original this is the start date. You can only manually change the current startdate here. If you have selected the option to manually enter early/late dates, you can also manually change theearly and/or late start date. The early/late start dates are the earliest and latest this activity can begin without theproject's schedule being affected.
Days – For both the current schedule and original this is duration or number of days between start and finish. Youcan only manually change the current duration here. If you have selected the option to manually enter early/latedates, you can also manually change the number of days between the early/late start date and early/late finishdate. The early/late finish dates are calculated using the early/late start date and corresponding duration.
Finish – For both the current schedule and original this is the finish date. You can only manually change thecurrent finish date here. If you have selected the option to manually enter early/late dates, you can also manuallychange the early and/or late finish date. The early/late finish dates are the earliest and latest this activity can finishwithout the project's schedule being affected.
Locked – Check to lock the current schedule dates of this activity, preventing the start/finish date and durationfrom being changed.
Completed – Check to mark this activity as completed. Completed activities will be displayed with a black bar,rather than green or red.
Pct Complete – Enter a percentage complete from 0 to 100. This is optional, and will cause the bar graph todisplay the appropriate percentage in black and the remaining portion in green or red.
Revised – If the current schedule start/finish/duration differs from the original, this is checked automatically.
Make Current Schedule The Original – Check this box to change the original schedule dates and make themmatch the current, if different. Normally the schedule bar graph will be red to show that the activity’s dates havebeen changed from the original. Checking this box will reset the original dates causing the bar to display in greenonce again.
Manual Entry of Early/Late Dates - If you have selected the option for this job to manually enter early/late startand finish dates for activities, check this box to allow you to enter early and/or late start and finish dates for thisactivity.
Always Critical Path - Check this box if activity needs to be flagged as always part of the critical path.
2.1.5 How do I Read the Bar Chart?
The structure of the schedule is a Gantt-style format. Activities are listed down the left side, and dates are listed incolumns across the top. The schedule is represented by horizontal bars showing the date and duration of eachactivity. The three schedule views (Daily View, Weekly View, and Two Week View) all report the same informationin slightly different formats but share the same basic characteristics. You can review these by viewing the legendby selecting Screen, then Legend from the menu.

Project Management Tools64
ComputerEase Software, Inc.
· A darker blue bar indicates an activity’s original schedule.
· A red bar indicates that the activity’s current schedule differs from the original.
· A black bar indicates the activity is marked as complete.
· A partial black bar indicates a percentage of completion.
· A lighter blue bar indicates a parent bar, which spans the length of the activities that are indented below it.
· Solid black lines between activities indicate lockstep links. When a lockstep link is present, if any of theactivities within the linked group is moved (dates or duration changed), the corresponding linked activities willalso be moved.
· Dotted black lines between activities indicate floating links. A floating link shows a relationship (precedence)between two activities, but moving one does not force the others to move along with it.
· The horizontal and vertical grid lines are optional. They may be turned off or on in the Schedule Settings.
· The left side of the bar chart view contains all of the optional columns and the hierarchy of activities and sub-activities.
· The individual columns on the left side of the bar chart are selected in the Column Settings.
· The gray divider between the left-side columns and the bar chart on the right can be dragged in either direction topresent the optimum view. The left and right sides have independent horizontal scrolling.

Scheduling 65
v12 User Manual
· Each individual column on the left side may have its width adjusted.
· Child activities are shown indented below the parent activity unless you select the flat view (selected bychoosing Activities, then Flat View). A parent activity will have a yellow diamond next to it to indicate childactivities are present. A + inside the yellow diamond means that the child activity list is collapsed; click the + toexpand the list. A – inside the yellow diamond means that the child activity list is expanded; click the – to
collapse the list. You can also expand or collapse all child activities using the shortcuts on the toolbar ( ).
· Memo activities are shown below the owner activity. The owner activity will have a blue diamond icon next to it toindicate memos are present. A + inside the blue diamond means that the memo list is collapsed; click the + toexpand the list. A - inside the blue diamond means that the memo list is expanded; click the - to collapse the
list. You can also expand or collapse all memo activities using the shortcuts on the toolbar ( ).
· The columns that show hours and dollars will show the detail for each activity. For parent activities, it will showdetail for that parent activity only (if any) when the parent is expanded. If the parent is collapsed, it will show thetotal for that parent and all sub-activities. When collapsed these numbers appear in blue.
· The totals for the entire job appear in blue in the column heading area.
· To-Do events appear as a red diamond on the bar chart wherever a to-do event is scheduled. These may appearoutside of the bar graph for that activity. Hover the mouse on the diamond to view the details of the event. Seethe section on Activity Details for more information on creating the To-Do list. Multiple events scheduled on thesame day will appear as a single diamond, but hovering will show all of the event details. Events marked as“Done” will not show, or will appear as a gray diamond if the option to show completed events is selected.
· Resource needs can be indicated on the bar chart views if the Show Resource Needs option is selected in theSchedule Settings dialog. These appear as color-coded backgrounds for a particular activity and date. Theresource needs are defined in the Activity Details dialog. Resources are applied to these needs on a man-hour,or man-day basis depending on the choice in Schedule Settings.
· Yellow indicates that the current activity is under-scheduled.
· Green indicates that the current activity is fully scheduled.
· Red indicates that the current activity is over-scheduled.
· Hovering the mouse cursor on a yellow, green, or red block will show resource needs and any resourcescurrently assigned to the activity and date.

Project Management Tools66
ComputerEase Software, Inc.
2.1.6 Navigating the Bar Chart Display
Your schedule is easy to navigate using your mouse to take advantage of the display tools.
· Use the left and right arrows to select the previous or next job.
· Click the Change button, or double click the job description in the yellow area to change the Job Settings.
· Click the New button to create a new job.
· Click the List button to bring up a list of jobs you can select from.
· Click the Filter button to filter the activities displayed.
· Scroll the right side date display forward or back using the horizontal scroll bar.
· Scroll the left side columns forward or back using the horizontal scroll bar.
· Scroll the activity list up or down using the vertical scroll bar.
· Click the yellow diamonds to expand or collapse parent activities.
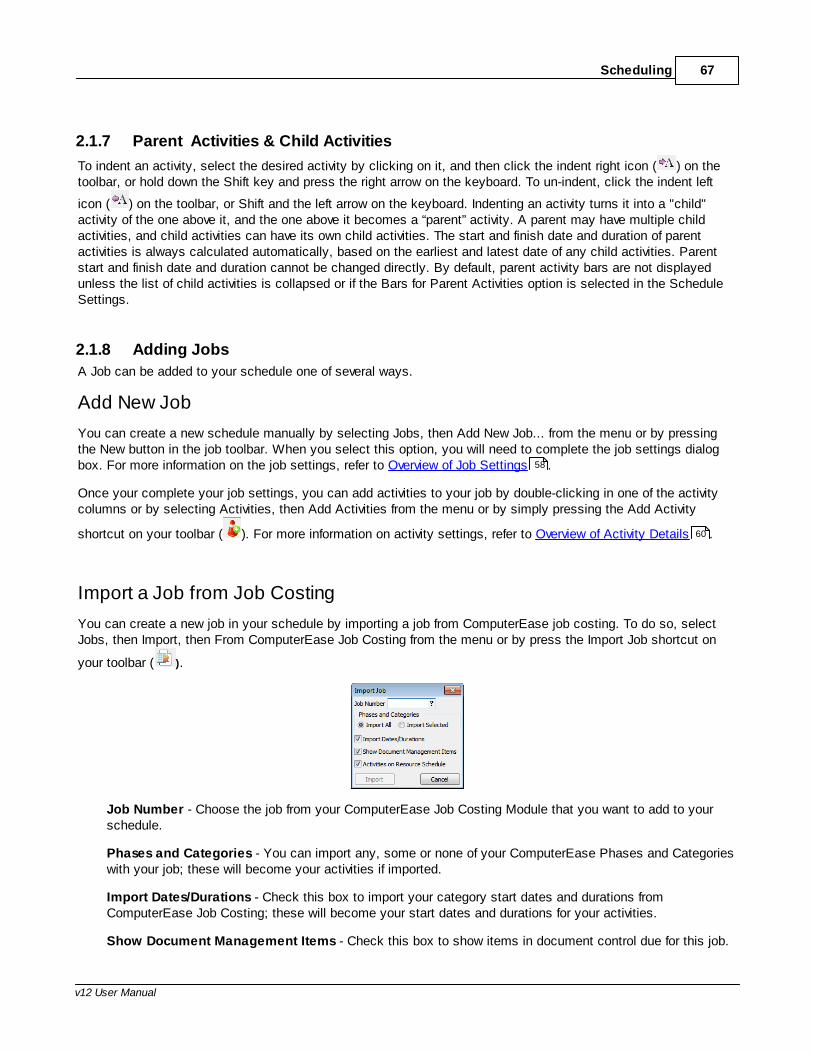
Scheduling 67
v12 User Manual
2.1.7 Parent Activities & Child Activities
To indent an activity, select the desired activity by clicking on it, and then click the indent right icon ( ) on thetoolbar, or hold down the Shift key and press the right arrow on the keyboard. To un-indent, click the indent left
icon ( ) on the toolbar, or Shift and the left arrow on the keyboard. Indenting an activity turns it into a "child"activity of the one above it, and the one above it becomes a “parent” activity. A parent may have multiple childactivities, and child activities can have its own child activities. The start and finish date and duration of parentactivities is always calculated automatically, based on the earliest and latest date of any child activities. Parentstart and finish date and duration cannot be changed directly. By default, parent activity bars are not displayedunless the list of child activities is collapsed or if the Bars for Parent Activities option is selected in the ScheduleSettings.
2.1.8 Adding Jobs
A Job can be added to your schedule one of several ways.
Add New Job
You can create a new schedule manually by selecting Jobs, then Add New Job... from the menu or by pressingthe New button in the job toolbar. When you select this option, you will need to complete the job settings dialogbox. For more information on the job settings, refer to Overview of Job Settings .
Once your complete your job settings, you can add activities to your job by double-clicking in one of the activitycolumns or by selecting Activities, then Add Activities from the menu or by simply pressing the Add Activity
shortcut on your toolbar ( ). For more information on activity settings, refer to Overview of Activity Details .
Import a Job from Job Costing
You can create a new job in your schedule by importing a job from ComputerEase job costing. To do so, selectJobs, then Import, then From ComputerEase Job Costing from the menu or by press the Import Job shortcut on
your toolbar ( ).
Job Number - Choose the job from your ComputerEase Job Costing Module that you want to add to yourschedule.
Phases and Categories - You can import any, some or none of your ComputerEase Phases and Categorieswith your job; these will become your activities if imported.
Import Dates/Durations - Check this box to import your category start dates and durations fromComputerEase Job Costing; these will become your start dates and durations for your activities.
Show Document Management Items - Check this box to show items in document control due for this job.
58
60

Project Management Tools68
ComputerEase Software, Inc.
Activities on Resource Schedule - Check this box to make imported activities available for resourcescheduling.
Import a Job from a File
You can import a job schedule from an external file. You can import an MPX file, Microsoft Project XML file or textfile (saved as a CES file type). Typically a text file would be a file exported from one ComputerEase schedule forimport into another.
Importing a Job from an MPX File - SureTrak or Microsoft Project MPX
1. Save the file in MPX format from SureTrak or MS Project.
2. In the ComputerEase schedule, select Jobs, then Import, then From MPX from the menu.
3. Browse to the file you want to import.
4. Enter a new job number (must be unique within the schedule).
5. Select optimization for SureTrak or Microsoft Project. This impacts the way duration hours are imported.
6. Select Import Predecessor Links to derive links from the MPX predecessor values. If unchecked, no linkswill be imported.
Importing a Job from Microsoft Project XML
1. Save the file in XML format from MS Project.
2. In the ComputerEase schedule, select Jobs, then Import, then From Microsoft Project XML from themenu.
3. Browse to the file you want to import.
4. Enter a new job number (must be unique within the schedule).
5. Select Import Predecessor Links to derive links from the MS Project predecessor values. If unchecked, nolinks will be imported.
Importing a Job from a Text file
1. Save the Schedule in Text File format using Jobs, then Export, then Text File from the menu.
2. Name and save your file to a location you choose using Windows Explorer.
3. In the ComputerEase schedule, select Jobs, then Import, then From Text File from the menu.
4. Browse to the file you want to import.
5. Enter a new job number (must be unique within the schedule).
6. Check Import Predecessor Links to derive links from the MS Project predecessor values. If unchecked, nolinks will be imported.

Scheduling 69
v12 User Manual
2.1.9 Working With the Activity List
There are several ways that your activity list can be manipulated in the schedule.
Adding An Activity
Select the place in the schedule where you would like to add an activity and choose Activities, then Add Activity
on the menu. You can also choose the Add Activity shortcut on the toolbar ( ).
Refer to Overview of Activity Details for more information on completing the new activity detail.
Adding a Memo Activity
Memo activities are a way to add items to the schedule that do not impact other activities, resources, or theschedule as a whole. They differ from “To-Do” items in that they have both a start and end date, and appear as aseparate line on the schedule bar chart.
· A memo activity is owned by a regular activity
· Memo activities may be added to any parent or child activity
· A memo activity may have any date range assigned
· The parent activity’s date range is not affected by the memo activity
· The memo activity’s date range is not affected by the parent activity
· Memo activities do not have hours or resource needs
· Memo activities are indicated by a blue diamond
· May be expanded or collapsed individually or all
· Memo activities do not change when the parent activity changes
· Memo activities are not part of the critical path
· You cannot link to a memo activity
· You cannot assign resources to a memo activity
· Memo activities cannot have To-Do items
· Memo activities cannot have sub-activities
Choose the activity you want to add a memo to and choose Activities, then Add Memo Activity on the menu. You
can also choose the Add Memo Activity shortcut on the toolbar ( ).
60

Project Management Tools70
ComputerEase Software, Inc.
Description - Enter a description of the memo item.
Start Date - Enter the start date for the memo activity.
Finish Date - Enter the end date for the memo activity
Day - The duration from start to finish.
Working with Popup Notes
Popup notes are a way to add notes to the schedule that appear as a popup item.
· A popup note is owned by a regular activity
· Popup notes may be added to any parent or child activity
· A popup note can be color-coded for easier identification and classification
Choose the activity you want to add a popup note to and choose Screen, then Create Popup Note on the menu.
You can also choose the Create Popup Note shortcut on the toolbar ( ).
Enter the text for the popup note in the text field. You can also choose a color for the note box, click Edit on anynote to edit it, Delete any note, or Hide any note. Any activity with a hidden popup note will have a small triangle inthe upper left corner of the activity text field:
You can show all hidden popup notes by choosing Screen, then Show All Popup Notes; hide all popup notes bychoosing Screen, then Hide All Popup Notes; or Manage popup notes in the Manage Popup Notes Window bychoosing Screen, then Manage Popup Notes.
Click on any popup note to manage it and then Edit, Show, Hide, Delete or UnDelete.
Splitting an Activity
Select the Activity that you want to split into one or more child activities and choose Activities, then Split Activity
on the menu. You can also choose the Split Activity shortcut on the toolbar ( ).
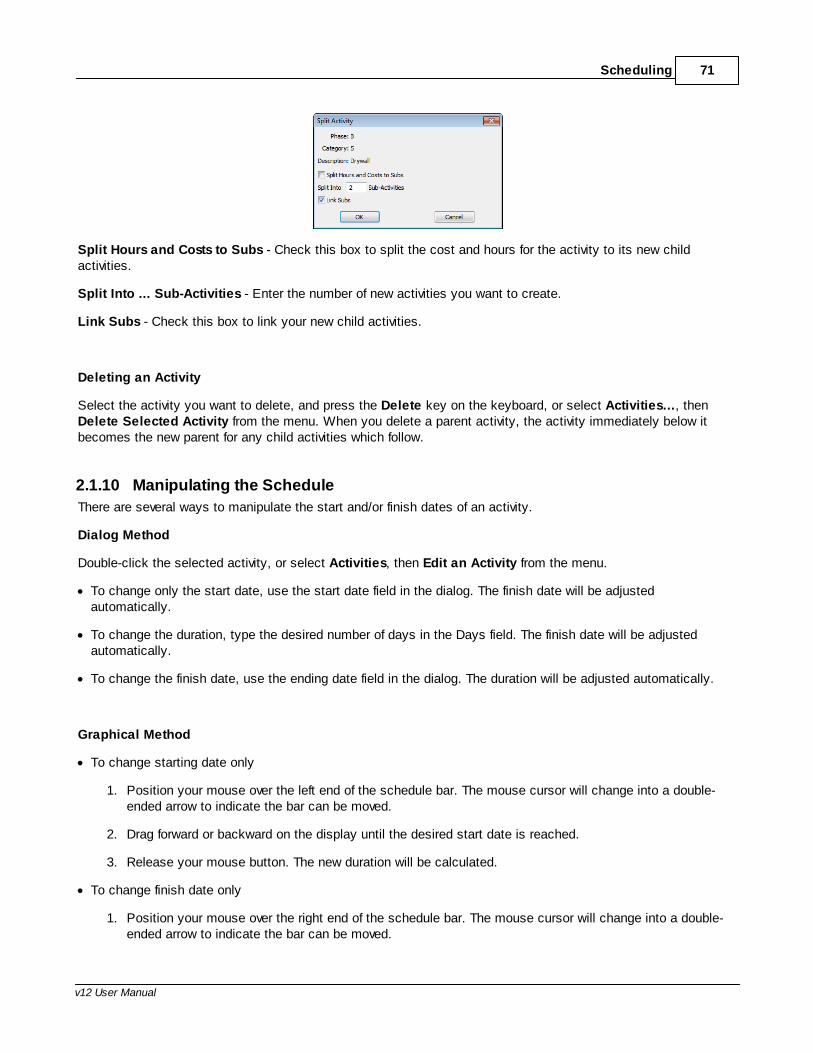
Scheduling 71
v12 User Manual
Split Hours and Costs to Subs - Check this box to split the cost and hours for the activity to its new childactivities.
Split Into ... Sub-Activities - Enter the number of new activities you want to create.
Link Subs - Check this box to link your new child activities.
Deleting an Activity
Select the activity you want to delete, and press the Delete key on the keyboard, or select Activities…, thenDelete Selected Activity from the menu. When you delete a parent activity, the activity immediately below itbecomes the new parent for any child activities which follow.
2.1.10 Manipulating the Schedule
There are several ways to manipulate the start and/or finish dates of an activity.
Dialog Method
Double-click the selected activity, or select Activities, then Edit an Activity from the menu.
· To change only the start date, use the start date field in the dialog. The finish date will be adjustedautomatically.
· To change the duration, type the desired number of days in the Days field. The finish date will be adjustedautomatically.
· To change the finish date, use the ending date field in the dialog. The duration will be adjusted automatically.
Graphical Method
· To change starting date only
1. Position your mouse over the left end of the schedule bar. The mouse cursor will change into a double-ended arrow to indicate the bar can be moved.
2. Drag forward or backward on the display until the desired start date is reached.
3. Release your mouse button. The new duration will be calculated.
· To change finish date only
1. Position your mouse over the right end of the schedule bar. The mouse cursor will change into a double-ended arrow to indicate the bar can be moved.

Project Management Tools72
ComputerEase Software, Inc.
2. Drag forward or backward on the display until the desired finish date is reached.
3. Release your mouse button. The new duration will be calculated.
· To change both start and finish, without changing duration
1. Click anywhere in the middle of the bar graph and hold. The mouse cursor will change into a hand toindicate the bar can be moved.
2. Drag the bar forward or backward on the display until the left end diamond is under the desired start date.
3. Release the button.
There are some things to keep in mind when making changes to the schedule.
The screen will auto-scroll left or right when you drag beyond the edge of the display.
Duration always is in working days. Non-working days (weekends, holidays, etc) are shown as gray on thedisplay. The apparent length of the bar may change if you drag it over a weekend, or away from a weekend, but thetotal number of working days will be computed correctly. For example, if an activity is scheduled for Mondaythrough Friday, and it is dragged (by the middle) to the right so that the start date is now Wednesday, the barwhen re-drawn will now span 7 days – from Wednesday to the following Tuesday, but still only 5 working days.Saturdays and Sundays can be optionally designated as working days, either all or some, within the Job Settings.
Activities which are Lockstep Linked to the activity being moved will also be moved. Activities linked with a floatinglink will not be moved. A move of one activity in a “chain” of linked activities will move the entire chain. The linkedactivities are subject to the same conditions detailed above with regard to working and non-working days.
Parent activities cannot be moved directly. The bar graph of a parent activity is always the span of all of its childactivities.
Activities which are locked cannot be moved. Locking prevents an activity from being dragged on the screen, andalso prevents it from being moved as part of a linked chain. Individual activities may be locked in place in the Activity Details dialog, or an entire job’s activities may be locked in the Job Settings.
When dragging an item that is part of a lockstep linked chain, you can optionally show all of the activities movingalong with it if you click the Move Links When Dragging icon on the tool bar, or in the Schedule Settings.
The schedule bars may be moved in the daily, weekly, and 2-week views. However, making precise moves in theweekly view is difficult because each column represents a whole week. It is recommended that you use the dailyor 2-week view to drag the bars, or if in weekly view, to use the Activity Details dialog to change the dates orduration.
When you move a schedule bar, it will turn red instead of green to show that it deviates from the original schedule.When you initially create the schedule, this will cause most or all of the bars to be red. Once the original scheduleis in place, you can go to the Job Settings dialog, check Make Current Schedule the Original and click OK.This resets the original schedule dates, and all of the bars will revert to green. Subsequent changes after this willcause the affected bars to turn red. The individual activities can be reset in the Activity Details.
2.1.11 More Schedule Options
Adjusting the Entire Job Schedule
To move the entire schedule forward or backward, adjusting all activities by the same number of days.

Scheduling 73
v12 User Manual
· Select Jobs then Adjust Entire Job Schedule from the menu.
· Change the start date or finish date. As you change one, the other will change automatically. You can changethe start or end date and the schedule will be adjusted to follow, but you cannot change the duration of theschedule because the duration is calculated from all of the activities.
· Check Make New Schedule the Original if you want to reset the original schedule dates along with this move.
· Click OK to complete the move.
Multi-Job View
You may view more than one job by selecting Jobs… then Show All Jobs from the menu.
Choose either Show All Jobs or By Job Group. If you want to view jobs for one or more job groups, choose thatgroup or those groups from the list.
Most editing functions can be performed while in multi-job mode, including resource assignment. You cannot linkacross jobs, but you may still create a link while in multi-job mode but it must be to another activity on the samejob.
Setting Schedule Hours
You can set the number of resource hours needed for an activity several ways. Note that this does not assignresources to the activity, but defines the hours that are needed so that resources can be assigned accordingly.
· Total hours, distributed evenly over the work days scheduled for the activity
1. Go into the Activity dialog by double-clicking the activity on the bar chart, or select the activity andActivities... Edit Activity Details from the menu.
2. Choose Distribute Evenly Over Schedule
3. Enter the total number of hours
· Manual detail by day, each day can have the hours specified individually
1. Go into the Activity details dialog by double-clicking the activity on the bar chart, or select the activityand Activities... then Edit Activity Details from the menu.

Project Management Tools74
ComputerEase Software, Inc.
2. Choose Manual/Detail By Day. If there was a previous value in total hours, it will distribute evenly by date.
3. Use the Add, Edit, and Delete buttons within the Projected Resource Needs section to fine tune the hoursand optionally add descriptions.
· Set hours over a block of days using the clock tool
1. Click on the clock toolbar icon ( ), or select Activities... then Set Schedule Hours from the menu.
2. Click on the activity line beneath the first date for which you want to set hours.
3. Click on the same activity line beneath the last date for which you want to set hours.
4. Enter either hours or man days, the corresponding value will be calculated based on the default work dayhours for the job.
5. Enter a description if desired.
Alternate Schedule Views
Select Activities… then Flat View from the menu to change the schedule display to flat view mode. In this mode,activities can be viewed in different ways independent of the indentation and sub-activity structure. Flat view can beused in single or multi-job display mode.
The following sorts are available in Flat View:
· Default – The same order as indented view, without the indenting structure.
· By Phase – Sort by phase.
· By Category – Sort by category. These are useful for viewing similar activities together, from multiple jobs orwithin different parts of the same job.
· By Start Date – Sort all activities chronologically by start date.
· By Finish Date – Sort all activities chronologically by finish date.
· By Duration – Sort all activities by duration, shortest to longest.

Scheduling 75
v12 User Manual
2.1.12 Filtering Activities
Activities can be filtered by phase and/or category or by date range. Select Activities, then Filter Phase/Category from the menu.
Filter Activity Display - You must check this box to apply a filter.
Phase From...To/Category...To - Choose the Phases and/or Categories you want to include.
Omit Completed Activities - Check this box to remove activities marked completed from the view.
Display Only Activities Scheduled Within the Date Range - Check this box and enter a date range to onlyview those activities scheduled for activity within a specified date range.
Display Only Critical Path Activities - Check this box to only view those activities that are part of the criticalpath.
2.1.13 Using Links
Links allow you to connect multiple activities within the schedule.
There are three types of links, floating, lockstep and range.
· A floating link is a passive link, and is indicated only by a dotted line connecting the activities. Moving oneactivity in a floating link chain does not move the linked activities. This is merely used to indicate apredecessor/successor relationship in a passive way.
· A lockstep link causes any activities linked to be automatically adjusted in their start and finish dates toreflect any changes to other activities in the chain. A lockstep link allows for the entry of either AllowedDays Before or Allowed Days After the first activity's start or end point that the second activity must beginor end.
· A range link causes any activities linked to be automatically adjusted in their start and finish dates toreflect any changes to other activities in the chain ONLY up until its early or late start or finish constraintwill be violated. Once the linked activity's constraints will be violated, the "float" range (the number of daysallowed between the linked points in the two activities) will extend until it reaches the maximum number ofdays allowed in the range.
There are three types of link points:
· End to Start – Second activity must start relative to the finish date of the first.
· Start to Start – Second activity must start relative to the start date of the first.
· End to End – Second activity must finish relative to the finish date of the first.

Project Management Tools76
ComputerEase Software, Inc.
There are two ways to create a link.
Drag method
· Point the cursor at beginning or the end point of the activity you want to link from.
· Click and hold the right mouse button. The mouse cursor will change to a crosshairs.
· Move the mouse to the beginning or end point of the activity you want to link to.
· Release the mouse button to bring up the link dialog.
· Choose the link type: Floating, Lockstep or Range.
· Choose the link points: End to Start, Start to Start, or End to End.
· For Lockstep links, optionally enter the number of days allowed before or after the first activity's start or endpoint that the second activity must begin or end. For Range links, optionally enter the maximum number ofdays from the first activity or to the latter activity that will be allowed as "float" between the two activities.
· Click OK.
· The link will appear and adjust the linked activity to the correct number of allowed before or after days, aswell as adjusting any other activities which may be already linked to the target.
Menu Method
· Select the activity from which you want to link.
· Select Links… then New Link From Selection from the menu or right-click on the selection and chooseMake New Link From Here or choose the Create New Link From Current Selection shortcut on the
toolbar ( ). The mouse cursor will change to a crosshairs. OR, right click on the selection and chooseMake New Link From Here.
· Click anywhere on the activity line you wish to link to. The link dialog will appear.
· Choose the link type: Lockstep or Floating.
· Choose the link points: End to Start, Start to Start, or End to End.
· Enter the number of Allowed Days Before or After the first activity's start or end point that the secondactivity must begin or end. These entries are only used by the schedule for lockstep links.
· Click OK.
· The link will appear and adjust the linked activity to the correct number of allowed before or after days, aswell as adjusting any other activities which may be already linked to the target.

Scheduling 77
v12 User Manual
Note: You can create the link by selecting the target first. Select the target of the link, and then choose Links… then New Link To Selection from the menu or right-click on the selection and choose Make New
Link To Here or choose the Create New Link To Current Selection shortcut on the toolbar ( ).
Changing or Removing Links
· Select Links then Manage Links from the menu or right-click anywhere on the schedule grid and selectManage Links to bring up a list of all links in the schedule.
· Select the link from the list and click Edit to make changes to the link.
· Select the link from the list and click Delete to remove the link.
Rules for Links
· Links cannot be circular, i.e. a link can not go forward to a point earlier on the link chain.
· When you move any activity in a lockstep link chain, everything in that chain moves with it.
· Parent activities cannot be linked. If an activity with links becomes a parent (when activities are indentedbelow it), any links are removed.
· Links must be within the same job.
Critical Path
A critical path is the longest route through any group of linked activities. Select Links… then Show Critical Pathto highlight the critical path with gold diagonal lines.

Project Management Tools78
ComputerEase Software, Inc.
2.1.14 Working With Resources
To go to the resource assignment screen, select Screen then Resource Scheduling from the menu, or click theSchedule Resources by Activity shortcut ( ) in the tool bar.
There are four types of resources: Employees, Equipment, Subcontractors, and Crews.
Employees, Equipment, and Subcontractors can be imported from ComputerEase. To quickly import each or all ofthese, select Resourceshen Import All from the menu. Check or uncheck to select which resources you want toimport, and click OK.
Active employees, classes and departments will be imported from the payroll master.
Equipment will be imported from the equipment master.
Vendors flagged as subcontractors will be imported from the vendor master.
You may import these resources, create your own list, or import the resources and add to them or modify them asneeded. When you import the resources, they remain part of the schedule so you do not need to import again,unless there are new resources added to ComputerEase.
You can optionally import any of these resource classes individually.
Employees
To create, view or modify the list of employees you are working with in the schedule, select Resources and thenEmployees Resources from the menu bar.
To import employees from ComputerEase Payroll, click on the Import button. This will import all Active employeesfrom your ComputerEase Payroll module. It is important to know that any changes made here will not affect youremployees in ComputerEase Payroll.

Scheduling 79
v12 User Manual
· To change an employee’s name, class or department, double-click the employee in the list or click once toselect and then click the Edit button.
· To delete an employee, click once to select it and then click the Delete button.
· If you delete an employee by mistake, in the same session you can select it and click the UnDeletebutton.
· Click the Add button to add a new employee manually; enter the employee number, name, class,department and/or hours per day. You can also select the option to not assign hours on the resourceschedule for an employee if you do not want his or her hours to affect resource needs.
Employees are sorted by their ComputerEase employee number initially when imported. However, they may alsobe sorted by first name, last name, class, or department by clicking on the heading area within the Employee Listdialog. The order you choose will affect the list dialog, and the order in which employees appear in the availableresource dialog.
Equipment
To create, view or modify the list of equipment you are working with in the schedule, select Resources and thenEquipment Resources from the menu bar.
To import equipment from ComputerEase Equipment Costing, click on the Import button. This will import all activeequipment from your ComputerEase Equipment Costing module. It is important to know that any changes madehere will not affect your equipment in ComputerEase Equipment Costing.

Project Management Tools80
ComputerEase Software, Inc.
· To change any equipment's number, description or department, double-click the equipment in the list orclick once to select and then click the Edit button.
· To delete a piece of equipment, click once to select it and then click the Delete button
· If you delete a piece of equipment by mistake, in the same session you can select it and click the UnDelete button.
· Click the Add button to add a new piece of equipment manually; enter the equipment number, description,optional department and hours per day.
Equipment is are sorted by ComputerEase equipment number initially when imported. However, equipment mayalso be sorted by description by clicking on the heading area within the Equipment List dialog. The order youchose will affect the list dialog, and the order in which equipment appears in the available resource dialog.
Subcontractors
To create, view or modify the list of subcontractors you are working with in the schedule, select Resources andthen Subcontractor Resources from the menu bar.
To import subcontractors from ComputerEase Accounts Payable, click on the Import button. This will import allactive subcontractor-type vendors from your ComputerEase Accounts Payable module. It is important to know thatany changes made here will not affect your job in ComputerEase Accounts Payable.
· To change a subcontractor's number, description or department, double-click the subcontractor in the list orclick once to select and then click the Edit button.
· To delete a subcontractor, click once to select it and then click the Delete button

Scheduling 81
v12 User Manual
· If you delete a subcontractor by mistake, in the same session you can select it and click the UnDeletebutton.
· Click the Add button to add a new subcontractor manually; enter the subcontractor number, descriptionand optional department.
Subcontractors are sorted by ComputerEase vendor number initially when imported. However, they may also besorted by name by clicking on the heading area within the Subcontractor List dialog. The order you chose willaffect the list dialog, and the order in which subcontractors appear in the available resource dialog.
2.1.15 CrewBuilder
The Crew Builder screen allows you to create crews and assign resources to crews for ease of scheduling. Thecrew can be created from the Crew Builder window or from within the Resource Assignments window.
To create, view or modify the list of work crews you are working with in the schedule, select Resources and thenCrew Resources from the menu bar. Crews are optional and can be used to pair other resources together for easeof scheduling.
To create a new crew, click on the Add button and enter the Crew Name and Start and End dates (if it is not aperpetual crew) that the resources in the crew will be paired together. You can optionally add the number of menrequired and define classes required to fulfill the crew.
· To change a crew's name, start and/or end dates, number of men or hours per day, double-click the crew inthe list or click once to select and then click the Edit button.

Project Management Tools82
ComputerEase Software, Inc.
· To delete a crew, click once to select it and then click the Delete button.
· If you delete a crew by mistake, in the same session you can select it and click the UnDelete button.
Assigning Resources to your crew must be done from within the Crew Builder.
· Select Screen then Crew Builder from the main menu or the Crew Builder shortcut ( ) on the toolbar.
· Select or scroll until the date range visible is the range you want to assign for or click the T toolbar icon togo to today’s date. The list of available resources for that day will be listed in the Available Resourceswindow for that day.
· A list of crews active on that date is displayed down the left column.
· Drag the resource blocks from the resource window to the cell in the selected date column for the crew.The number of men assigned to that crew/day will display in the cell.
Display Options
· Show Crews Out Of Range – This option will list all crews in the left hand column even if they are not active
for the date range displayed on the screen. You can also toggle the shortcut on your toolbar ( ).

Scheduling 83
v12 User Manual
· Show Inactive Crews – This option will list all crews whether marked Inactive or not. You can also toggle
the shortcut on your toolbar ( ).
· Highlights - If you have specified number of men for the crew you can use your CrewBuilder highlights toindicate if your crew is understaffed, over staffed or fully staffed for that day. You can also toggle the
highlights shortcuts on your toolbar ( )
· Yellow indicates crew is understaffed for that day.
· Green indicates crew is fully staffed for that day.
· Red indicates crew is over staffed for that day.
· Expand All Crews – Expands crews which have detail complement specified. You can also toggle the
shortcut on your toolbar ( ).
· Collapse All Crews – Collapses crews which have detail complement specified. You can also toggle the
shortcut on your toolbar ( ).
The Crew Builder screen has configurable columns on the left side similar to the bar graph schedule. Right-click onthe column area to chose which columns to display, or drag the individual column divider lines to size thecolumns. You may also drag the thick bar between the left side columns and the Crew Builder chart to the left orright.
Detail Class Requirements
When creating a crew you have the option of defining the class requirements of the crew. This does not actuallyassign personnel, but simply defines the regular requirements. For instance, a crew may be designated as beingmade up of a supervisor, two skilled workers, and two helpers. These are based on the classes as defined orimported to the schedule. The class detail structure does not force the crew to conform, but merely uses thepredefined list to indicate if the crew has been correctly assigned via the red/yellow/green blocks.
To define detail classes:
· Select Resources then Crew Resources from the main menu, select the desired crew from the list andclick Edit or double-click the crew name in the left hand column of the CrewBuilder screen.
· Check the Define Classes box.
· Click Add.
· Enter the class code, or select from the drop-down box of available classes.
· Enter the number of employees needed from that class.
· Click OK.
· Repeat as needed.
To remove a class:

Project Management Tools84
ComputerEase Software, Inc.
· From the crew edit box, select the class you want to delete.
· Click Delete.
To change the quantity of a class:
· From the crew edit box, select the class you want to change
· Click Edit.
· Enter the number of employees needed of that class.
· Click OK.
2.1.16 Building Your Crew
The resource assignment process is the same whether a crew has detail class requirements or not. You stillassign the resources by selecting a date and dragging the resource to the desired column. The difference is that ifthe detail list is expanded, CrewBuilder will automatically put the new resource in the correct class, and indicatehow many have been assigned and highlight red, green, or yellow if those options are enabled.
Assignments of resources are to the crew, not to the crew+class, so you may still build a crew of any size andcomplement. CrewBuilder will simply indicate to what degree it matches the pre-defined class component. If youadd employees to the crew that do not match any of the pre-defined classes, they will show on the total line for thecrew but not in the class breakdown.
Hovering the mouse over any cell on the CrewBuilder screen will cause a list of all resources assigned to appear.
Assigning Resources to a Crew Permanently
You may assign any resource to a crew on a permanent basis; that is until the end date of the crew. If the crewdoes not have an end date, then the assignment is considered perpetual.
There are two ways to assign to a crew permanently.
First Method:
· Select the starting date by clicking on the date column on the CrewBuilder screen, holding the left buttondown.
· While holding down the left mouse button, click the right mouse button. This will highlight that day andbeyond.
· Drag resources to the desired crew anywhere within the selected area.
Second method:
· Double-click the crew/date cell you want to start with. The crew work window will be displayed next to theavailable resource window.

Scheduling 85
v12 User Manual
· Drag resources from the available window to the work window.
Assign Resources to a Crew for a Date Range
You may assign resources for a range of dates without having to assign each date one at a time.
There are two ways to assign to a crew by date range.
First Method:
· Select the starting date by clicking on the date column on the CrewBuilder screen, Find the ending datecolumn, use the horizontal scroll bars, if necessary.
· Hold down the shift key and click on the ending date column. This will highlight the days in between,inclusive.
· Drag resources to the desired crew anywhere within the selected area.
Second method:
· Double-click the crew/date cell you want to start with. The crew work window will be displayed next to theavailable resource window.
· Drag resources from the available window to the work window.
· For each resource you drag over, you will be prompted if the assignment is to be for a date range, orpermanent.
· Select date range.
· Select the ending date.
· Click OK.
Removing Resources from a Crew

Project Management Tools86
ComputerEase Software, Inc.
· Double click the crew/date cell you want to start with. The crew work window will be displayed next to theavailable resource window.
· Drag the resource from the crew work window to the available window.
· For each resource you drag over, you will be prompted if the removal is to be for a date range or permanent.
· Select permanent to remove the resource from the crew from that day forward.
· Select date range, and an ending date, to remove the resource for a date range.
· Click OK.
If you remove a crew resource for a date range, the resource will be removed only for that range and will be back onthe crew after that date (if it is within the crew’s pre-defined date range).
Example of Substitution:
You have a crew called the Framing Crew. It starts on 7/1, and is perpetual. As of 7/1, you have assigned John,George, Bill, Dan, and Paul as permanent crew members. Dan is going on vacation the week of August 7-11th.You want to replace him on the crew for that week only – his replacement is Jim.
· Double-click the cell on 8/7 for Framing Crew.
· Crew work window will display showing all 5 crew members.
· Drag Dan from the work window to the available window.
· Box will ask for range or permanent, select Date Range.
· Select 8/11 as the ending date.
· Click OK.
· Find the replacement Jim in the Available Resource window.
· Drag Jim to the work window.
· Box will ask for range or permanent, select Date Range.
· Select 8/11 as the ending date.
· Click OK.
There is nothing else to do. As of 8/12, the crew will return to its original lineup.
Resources other than employees may be assigned to a crew using the same method as employees. You mayassign subcontractors or equipment. The only difference is that subcontractors and equipment do not count towardthe men component of the crew, whether by class or not.
Removing a Crew
You can delete a crew completely, however this is not recommended if you have already scheduled the crew onpast dates. Removing the crew will remove the record of the past assignments. If a crew is going to be disbanded,or for any reason you no longer will be using a certain named crew, it is recommended that you give it an endingdate corresponding to the last assignment. This will prevent the unused crew from appearing on future CrewBuilderdisplays, but will retain all of the historical information.

Scheduling 87
v12 User Manual
You may also mark a crew as inactive to remove it from the CrewBuilder display. You can do this by double-clicking the crew name and checking the Inactive box, or right clicking the crew name on the display and selectingthe popup option to inactive.
How to read the CrewBuilder Display
· Crews are listed down the left hand side. Normally only crews that are active within the indicated daterange are listed, unless the options are enabled to show inactive crews or crews outside the date range.
· Crews which have detail classes specified will have a green diamond next to the crew name. This diamondis an expand/collapse toggle and works the same as the activity and memo expand and collapse on themain schedule board. When collapsed only the crew total line is shown. Once again, the detail classesare only a suggested crew component that you define, so that the CrewBuilder can indicate a match ormismatch. You may still structure the crew any way you like day by day.
Note: It may be possible for a crew to have both a yellow square and a red square in the detail, and a green squarein total. If a crew is detailed to be (1) SUPER, (2) JRNY, and (2) HLPR and you have assigned (1) SUPER, (3)JRNY and (1) HLPR, the total square will be green (because a total of 5 men are assigned overall), the SUPERsquare will be green, the JRNY square will be red (over), and the HLPR square will be yellow (short).
Crews which do not have a number of men or class detail specified will not show color squares, however they willshow the number of employees assigned if any.
Solid gray cells on the display indicate area outside the crew’s date range.
Vertical gray cells on the display indicate normal weekends and specified holidays. They are just marked forclarity, you may still assign resources on these days normally.
You may adjust the width of the crew description area in the left column by clicking and dragging the black verticalline separating the description from the date grid.
Only one user may be modifying crews at the same time in the CrewBuilder. Additional users may view theCrewBuilder screen but may not make changes until the first user has left CrewBuilder.

Project Management Tools88
ComputerEase Software, Inc.
Date range locking works the same as it does for the regular resource assignment screen. You can lock all datesby selecting Resources… Lock Resource Schedule or clicking the Lock All Dates button on the toolbar.
2.1.17 Resource Assignments
Assigning Resources on the Schedule
To assign a resource to an activity
· Click on the column under the date you want to schedule.
· The Resources Available window will appear, showing all resources available for that date.
· Click and drag the resource to the desired activity within the selected date column.
Alternate Assignment Method
· Double-click the cell corresponding to the date and activity you wish to assign resources to.
· The Resources Available window will appear, showing all resources available for that date. Also, aresources assigned window will appear showing the resources (if any) already assigned.
· Click and drag the resources from the Resources Available window to the assignment window.
Multiple Resource Assignment
· Click on the column under the date you wish to schedule.
· The Resources Available window will appear, showing all resources available for that date.
· Hold down the CTRL key and click each of the resources you want to assign
· While still holding CTRL, click and hold any one of the resources you have selected and drag it to thedesired activity within the selected date column.
Assigning the Same Resource(s) to Multiple Dates
· Click on the first date column you want to schedule.
· Hold down the shift key and click on the last date column you want to schedule (use the scroll bar ifneeded). All of the selected columns will be highlighted in blue. The Resources Available window willappear showing only those resources available for all of the days selected.
· Select and drag single or multiple resources to the desired activity, anywhere within the selected area. Theresources will be assigned to all of the days selected.
· This may be repeated for additional activities and resources within the selected range.
· Click any date column to cancel the multi-column selection.
Freeing Resources
Releasing a resource individually:
· Double click the cell corresponding to the activity and date you wish to release. The Resources Availablewindow will appear, as well as a window showing all of the resources assigned.
Scheduling 89
v12 User Manual
· Drag the resources from the Assignment window back to the Resources Available window.
To free all resources on an activity:
· Right click on cell corresponding to the activity and date.
· Select Free all Resources.
To free all resources on a given date:
· Right-click on the column corresponding to the date.
· Select Free All Resources on This Date.
To free all resources on an activity on a given date:
· Right-click on the column corresponding to the activity and date.
· Select Free All Resources on This Activity.
Assigning Resources by the Hour
You may assign resources in hours or fractional hours. The available hours remaining for each resource will showin the resource available dialog. If you have chosen to display assigned resources in the Schedule Settings,depleted resources will show in gray and you can continue to assign them for more than their available hours. Thesplit method from earlier versions is no longer used.
Reading the Resource Screen
The resource assignment screen displays the activities down the left side, and dates across the top. The scrollingand display features correspond to the bar graph views for the most part.

Project Management Tools90
ComputerEase Software, Inc.
Resource needs as defined in the Activity Details will appear as yellow cells on the display. The cell will showeither the number of men needed (in man-day mode) or hours, if in hourly mode. A yellow cell indicates that thereare resources needed but not assigned. If a subcontractor is needed, it will also contain the word Sub.
There are icons for employees (the man), equipment (the truck), subcontractors (the house), and crews (multiplemen). These appear in each activity/date cell on the resource assignment screen to show that resources of thattype have been assigned. Hovering the mouse cursor on these icons will produce a pop-up list of the individualresources assigned.
When the correct number of hours or men have been assigned, the background color of the cell will change fromyellow to green. If the number of hours or men needed is exceeded, the cell will change to red.
The Resources Available window will show only those resources which are free for assignment on the selecteddate, or date range. If this window does not show a resource that you are expecting to see, one of the followingconditions may be in effect:
The resource is already assigned to an activity on the selected date.
The resource has not been imported.
The resource is part of a crew on the selected date.
If multiple date columns are selected, the resource may be already assigned to at least one activity within thatdate range.
Subcontractors are always available. Assigning them to multiple activities or crews within a given date ispermissible.

Scheduling 91
v12 User Manual
2.1.18 Scheduling Reports
There are several reports available from the daily schedule board. They include:
· Individual Employee Work Schedule
· Individual Equipment Work Schedule
· Individual Subcontractor Work Schedule
· Individual Crew Work Schedule
· Job Work Schedule
· Weekly Resource Schedule
· Resources Needed Report
· Job Comparison Report
To print a report, select Reports from the menu bar and choose the desired report. Most reports can be printed bydate range for selected or all resources of that type. The weekly resource schedule prints the schedule forselected resource types for the week following the date selected. The Resources Needed report prints resourceneeds for a date or date range. The job comparison report allows you to print a report comparing the schedule forany two jobs.

Project Management Tools92
ComputerEase Software, Inc.
2.2 Daily Schedule Board
The daily schedule board is a simplified method of assigning resources to tasks, designed to resemble a “whiteboard” or “magnet board” that is typically used for scheduling. Select Scheduling / Daily Schedule Board.
Jobs or tasks appear across the top of the screen, from left to right. Resources assigned to that job appear in thecolumn below that specific job. The screen displays a single day at one time. Jobs may be created independentlywithin the daily schedule board, or imported from ComputerEase Job Costing.
Resources appear in a separate window below. Resources may be employees, equipment, subcontractors, orcrews. Employees may be imported from ComputerEase Payroll; Equipment from ComputerEase EquipmentManager; Subcontractors from the ComputerEase vendor file; or they may all be created independently within thedaily schedule board.

Scheduling 93
v12 User Manual
A crew is a combination of resources that may including multiple employees, equipment and subcontractors.
The toolbar is used to control the display, choose the date and perform various other tasks.
Help
The daily schedule board has a Help "Wizard" that allows quick access to help on using its features. To turn onthe wizard, click on the Help icon on your toolbar - .

Project Management Tools94
ComputerEase Software, Inc.
The Help Wizard will appear along the right side of your schedule window. To get help with any action, click on theappropriate link. The action will be performed for you or a window with additional help will appear. For actions thatwill be performed for you, the toolbar shortcut for that action is displayed next to the action in the Help window tohelp familiarize you with the shortcuts.
2.2.1 Working With Resources
Jobs
To create, view or modify the list of jobs you are working with in the daily schedule board, select Jobs and thenJob List from the menu bar.
· To import jobs from ComputerEase Job Costing, click on the Import button. This will import all Active jobsfrom your ComputerEase Job Costing module. The start and finish dates associated here with each job willdetermine whether or not that job will be visible on the schedule board for a given day. It is important toknow that any changes made here will not affect your job in ComputerEase Job Costing.
· To change a job’s description or the dates for which it will be visible on the board, double-click the job in thelist or click once to select and then click the Edit button.
· To delete a job, click once to select it and then click the Delete button.
· If you delete a job by mistake, in the same session you can select it and click the UnDelete button.
· Click the Add button to add a new job manually; enter the job number, description and start and finishdates.
Employees
To create, view or modify the list of employees you are working with in the daily schedule board, select Resourcesand then Employees from the menu bar.
· To import employees from ComputerEase Payroll, click on the Import button. This will import all Activeemployees from your ComputerEase Payroll module. It is important to know that any changes made herewill not affect your employees in ComputerEase Payroll.

Scheduling 95
v12 User Manual
· To change an employee’s name, class or department, double-click the employee in the list or click once toselect and then click the Edit button.
· To delete an employee, click once to select it and then click the Delete button.
· If you delete an employee by mistake, in the same session you can select it and click the UnDeletebutton.
· Click the Add button to add a new employee manually; enter the employee number, name, class and/ordepartment.
· The employee icon on the toolbar toggles the employee display in the resources on and off.
Equipment
To create, view or modify the list of equipment you are working with in the daily schedule board, select Resourcesand then Equipment from the menu bar.
· To import equipment from ComputerEase Equipment Costing, click on the Import button. This will importall active equipment from your ComputerEase Equipment Costing module. It is important to know that anychanges made here will not affect your equipment in ComputerEase Equipment Costing.
· To change any equipment's number, description or department, double-click the equipment in the list orclick once to select and then click the Edit button.
· To delete a piece of equipment, click once to select it and then click the Delete button
· If you delete a piece of equipment by mistake, in the same session you can select it and click the UnDelete button.
· Click the Add button to add a new piece of equipment manually; enter the equipment number, descriptionand optional department.
· The equipment icon on the toolbar toggles the employee display in the resources on and off.
Subcontractors
To create, view or modify the list of subcontractors you are working with in the daily schedule board, select Resources and then Subcontractors from the menu bar.

Project Management Tools96
ComputerEase Software, Inc.
· To import subcontractors from ComputerEase Accounts Payable, click on the Import button. This willimport all active subcontractor-type vendors from your ComputerEase Accounts Payable module. It isimportant to know that any changes made here will not affect your job in ComputerEase Accounts Payable.
· To change a subcontractor's number, description or department, double-click the subcontractor in the list orclick once to select and then click the Edit button.
· To delete a subcontractor, click once to select it and then click the Delete button
· If you delete a subcontractor by mistake, in the same session you can select it and click the UnDeletebutton.
· Click the Add button to add a new subcontractor manually; enter the subcontractor number, descriptionand optional department.
· The subcontractor icon on the toolbar toggles the subcontractor display in the resources on and off.
Classes
To create, view or modify the list of worker classes you are working with in the daily schedule board, select Resources and then Classes from the menu bar. Classes are not resources that can be scheduled but instead areoptional and can be used to control the coloring of the employee magnets in your schedule board.
· To import worker classes from ComputerEase Payroll, click on the Import button. This will import allworker classes from your ComputerEase Payroll module. It is important to know that any changes madehere will not affect your classes in ComputerEase Payroll.
· To change a class number, description or how it affects the employee display, double-click the class in thelist or click once to select and then click the Edit button.
· To delete a class, click once to select it and then click the Delete button.
· If you delete a class by mistake, in the same session you can select it and click the UnDelete button.
· Click the Add button to add a new class manually; enter the class number, description and select theappropriate display settings.

Scheduling 97
v12 User Manual
Crews
To create, view or modify the list of work crews you are working with in the daily schedule board, select Resources and then Crews from the menu bar. Crews are optional and can be used to pair other resourcestogether for ease of scheduling.
· To create a new crew, click on the Add button and enter the Crew Name and Start and End dates that theresources in the crew will be paired together.
· To change a crew's name, start and/or end dates, double-click the crew in the list or click once to selectand then click the Edit button.
· To add resources to a crew, click once on the crew in the list to select it and then click on Resources.This will open a window for the work crew to which you can drag and drop resources from your availableresources window. Once a resource is added to a crew, they will be removed from the available resourceswindow for all dates for which the crew is active. In order to be added to a crew, resources must beavailable and unassigned for all dates for which the crew is active.
· To remove resources from a crew, click once on the crew in the list to select it and then click on Resources. This will open a window for the work crew from which you can drag and drop resources back toyour available resources window.
· To delete a crew, click once to select it and then click the Delete button.
· If you delete a crew by mistake, in the same session you can select it and click the UnDelete button.
· The crew icon on the toolbar toggles the crew display in the resources on and off.
2.2.2 Scheduling Resources
Select the date for which you want to work on the schedule or the first date in a range you want to schedule.
Drag the resources from the available resource window to the column under the job to which you want to assigneach resource.
Use Ctrl key on your keyboard and the left mouse button to select multiple resources from the available resourcewindow and schedule all at once by holding down the CTRL key and dragging them to the desired job column.
If you need to schedule a resource for more than one job/task that day, click on your resource in the availableresources window and, holding down the left mouse button, press the right mouse button once for each "copy" ofthat resource you will need. For example, if you want to split an employee between three jobs for one day, selectthat employee and, while holding the left mouse button down, press the right mouse button twice. That employeeshould now be listed three times in your available resources window. If you need to delete an extra copy of aresource that you created just double-click on it and click the Delete button.

Project Management Tools98
ComputerEase Software, Inc.
You may drag a resource from one job column to another.
You may drag a resource from a job column back to the available resource window.
You may drag a resource to the “off” column. This allows you to make a resource unavailable while not assigning itto a job.
The Daily Schedule Board uses "perpetual" scheduling. When you assign a resource on a specific date, theresource will remain assigned to that job from that day forward, until you do one of the following on a future date:
· Assign the resource to a different job.
· Move the resource back to the available box.
· Move the resource to the off column.
· Select the Reset Resources option for a future date.
For example, if you assign “John” to job 100 on January 1, he will show as being assigned to job 100 on January 2,3, 4 and so on, until his status is assigned differently on a future date. If you wanted to assign John to job 100 forthe entire month, and then make him available in the following month, you would assign him to job 100 on January1, then go to February 1, and move him back to the available resources window, to the off column, or to anotherjob. Thus, there is no need to assign him explicitly for every single day as long as his assignment is in effect.
The Reset Resources option is used to cancel all previous resource assignments from a specific day forward. Toreset your resources, choose the date as of which you want to free up your resources, click on Dates on yourmenu bar and choose Reset Resources. This prevents resources from being assigned forever, and also makes aconvenient way to end the assignment for multiple resources. For example, you may want to reset at thebeginning of a week or of a month, to prevent prior assignments from carrying over.
An asterisk (*) appears in the lower right corner of an assigned resource to indicate that the assignment is carriedover from a prior date. If you move an assigned resource with an asterisk to another job, it will change theassignment from that day forward only, leaving assignments from previous days intact.
When you assign a resource, you can enter an option task or work description. Once your resource is scheduled,double-click on your resource in the job column and enter your description.

Scheduling 99
v12 User Manual
2.2.3 Working With Multiple Schedules
The daily schedule board is saved by default in a file called default.ceb. You may create additional schedules andsave them under different file names.
To Create a New Schedule
Select File then New from the menu bar, or click the New icon in the toolbar - . You will be prompted to savethe current file if necessary. In the new schedule dialog for each job and resource type you may elect to keepthem from the current schedule, import them from ComputerEase, or leave them empty and build new tables.Choose the beginning date for the new schedule and click OK to create once you have made your selections.
When you exit you will be prompted to name and save the file or you can select Save or Save As to save the fileimmediately. You can make a copy of any schedule by opening it and choosing to Save As and giving it a newname.
Separate schedule files are completely independent from each other. Changes made to one schedule file will notappear on another. Schedule files may also be emailed or copied normally from one user to another.
2.2.4 Changing the Display Preferences
The display preferences determine what the format of your magnets, which represent your jobs and resources.
Select Preferences... from the menu bar, or click on the Preferences toolbar button - .

Project Management Tools100
ComputerEase Software, Inc.
· Choose the desired magnet color of each resource type by clicking on the Magnet Color button next tothat resource type and selecting the color you want to use. You can select from pre-defined colors orcreate a custom color. Please contact your ComputerEase Support contact for help creating customcolors.
· Choose the desired text color of each resource type by clicking on the Text Color button next to thatresource type and selecting the color you want to use. You can select from pre-defined colors or create acustom color. Please contact your ComputerEase Support contact for help creating custom colors.
· Click the button next to the magnet style for each resource type that contains the information you want tosee. For example, your job magnets might contain the job number, the job name or both the job numberand job name.
· Change the magnet size by clicking on the button next to the size you prefer.
· Change the text size by clicking on the button next to the size you prefer; you can also check the Boldbox to display all text in bold font.
2.2.5 Setting & Changing the Date
There are several ways to select the date you want to work with in the daily schedule board:
· Use the arrows on the toolbar next to the date to move forward or backward one day at a time.
· Choose the day of the current week to be displayed by clicking the button corresponding to that weekdayon the tool bar.
· Select the date window and enter the date manually.
· Click on the green T toolbar icon to go to today’s date.
· Click on the ? next to the date and select the date from the calendar.
· Select Dates from the menu bar at the top of the daily schedule board and make the appropriate selection.

Scheduling 101
v12 User Manual
2.2.6 Schedule Board Reports
There are several reports available from the daily schedule board. They include:
· Employee Work Schedule
· Equipment Work Schedule
· Subcontractor Work Schedule
· Crew Work Schedule
· Job Work Schedule
· Weekly Resource Schedule
To print a report, select Reports from the menu bar and choose the desired report. Each report with the exceptionof the Weekly Resource Schedule can be printed by date range for selected or all resources of that type. Theweekly resource schedule prints the schedule for selected resource types for the week following the date selected.
2.3 View Docket
The Docket is a report that is generated by the data from the schedule, with additional optional information fromDocument Control. This report shows you on a daily basis, what jobs, activities, to-do events, resources anddocuments are scheduled to take place for that day.
Select Scheduling / Daily Schedule Board.
Setting the Date
There are several ways to select the date you want to work with in the docket:
· Use the arrows on the toolbar next to the date to move forward or backward one day at a time.
· Select the date window and enter the date manually.
· Click on the green T toolbar icon to go to today’s date.
· Click on the ? next to the date and select the date from the calendar.
· Select View from the menu bar at the top of the docket and make the appropriate selection.
You can display the docket for four different time frames:
· One day only; to view one day at a time, click on the green Day button on the toolbar or select View fromthe menu bar and choose One Day.
· One week; to view one week at a time, click on the green Week button on the toolbar or select View fromthe menu bar and choose One Week.
· Two week; to view two weeks at a time, click on the green 2 Week button on the toolbar or select Viewfrom the menu bar and choose Two Weeks.
· Four week; to view four weeks at a time, click on the green 4 Week button on the toolbar or select Viewfrom the menu bar and choose Four Weeks.
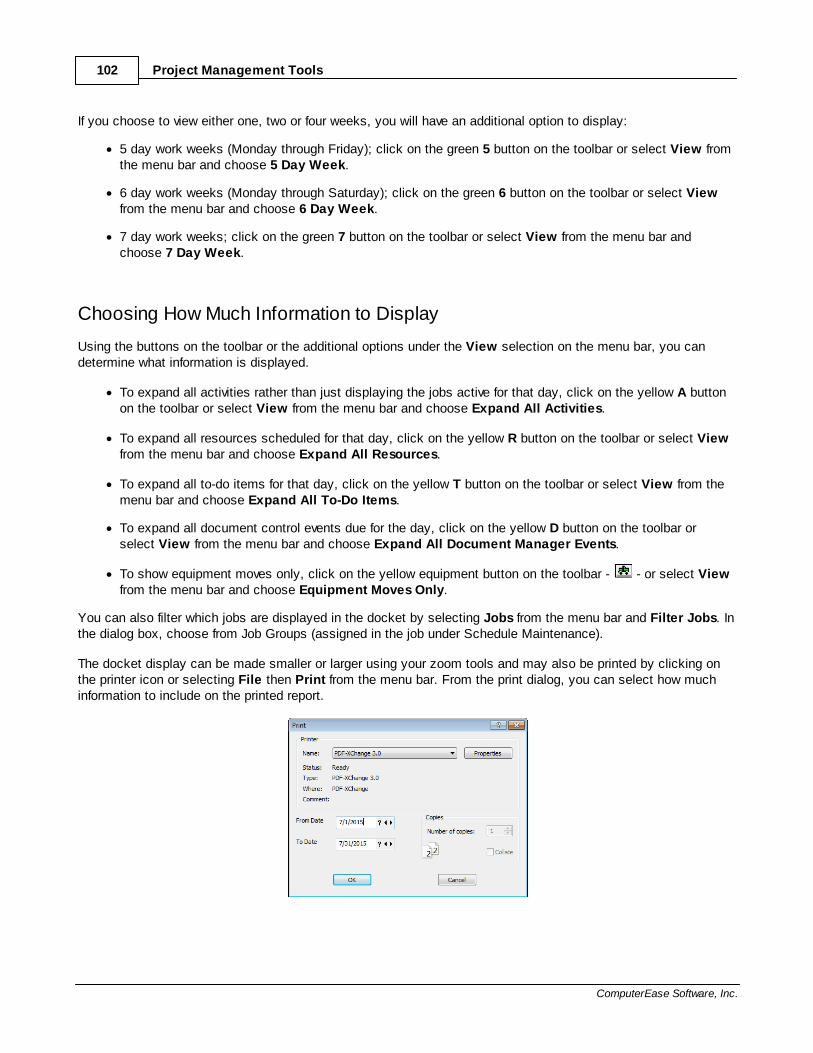
Project Management Tools102
ComputerEase Software, Inc.
If you choose to view either one, two or four weeks, you will have an additional option to display:
· 5 day work weeks (Monday through Friday); click on the green 5 button on the toolbar or select View fromthe menu bar and choose 5 Day Week.
· 6 day work weeks (Monday through Saturday); click on the green 6 button on the toolbar or select Viewfrom the menu bar and choose 6 Day Week.
· 7 day work weeks; click on the green 7 button on the toolbar or select View from the menu bar andchoose 7 Day Week.
Choosing How Much Information to Display
Using the buttons on the toolbar or the additional options under the View selection on the menu bar, you candetermine what information is displayed.
· To expand all activities rather than just displaying the jobs active for that day, click on the yellow A buttonon the toolbar or select View from the menu bar and choose Expand All Activities.
· To expand all resources scheduled for that day, click on the yellow R button on the toolbar or select Viewfrom the menu bar and choose Expand All Resources.
· To expand all to-do items for that day, click on the yellow T button on the toolbar or select View from themenu bar and choose Expand All To-Do Items.
· To expand all document control events due for the day, click on the yellow D button on the toolbar orselect View from the menu bar and choose Expand All Document Manager Events.
· To show equipment moves only, click on the yellow equipment button on the toolbar - - or select Viewfrom the menu bar and choose Equipment Moves Only.
You can also filter which jobs are displayed in the docket by selecting Jobs from the menu bar and Filter Jobs. Inthe dialog box, choose from Job Groups (assigned in the job under Schedule Maintenance).
The docket display can be made smaller or larger using your zoom tools and may also be printed by clicking onthe printer icon or selecting File then Print from the menu bar. From the print dialog, you can select how muchinformation to include on the printed report.

Part
III
SubContract
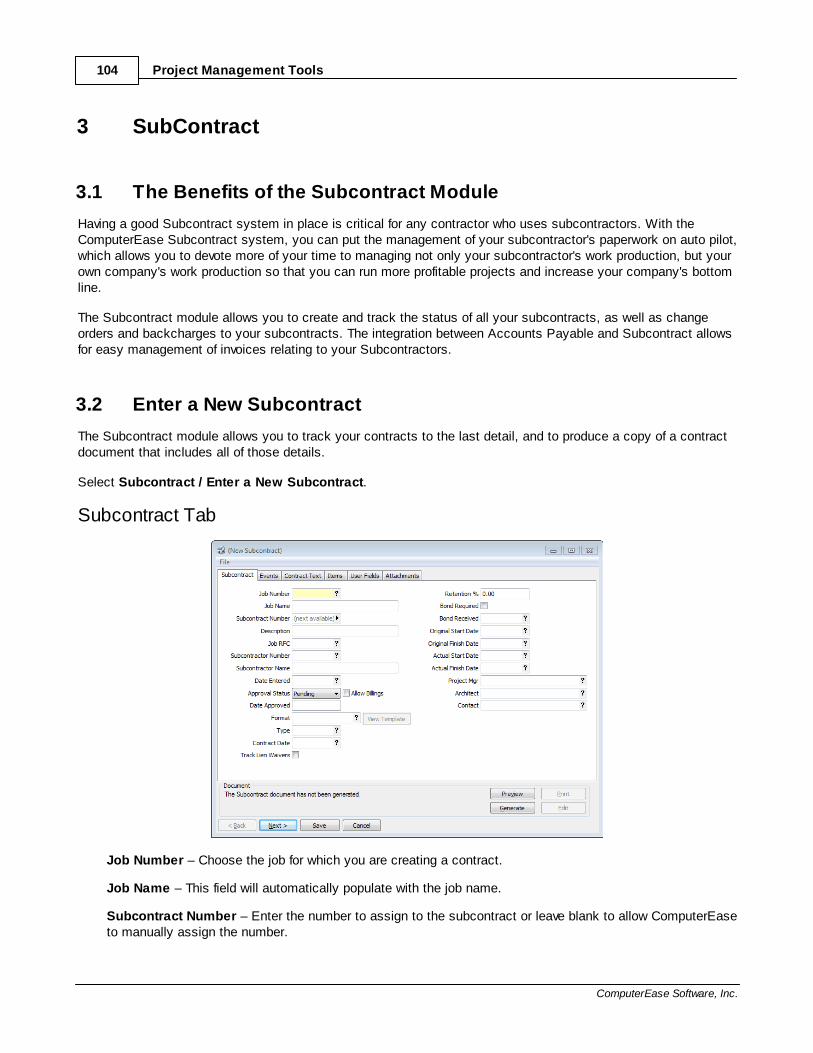
Project Management Tools104
ComputerEase Software, Inc.
3 SubContract
3.1 The Benefits of the Subcontract Module
Having a good Subcontract system in place is critical for any contractor who uses subcontractors. With theComputerEase Subcontract system, you can put the management of your subcontractor's paperwork on auto pilot,which allows you to devote more of your time to managing not only your subcontractor's work production, but yourown company's work production so that you can run more profitable projects and increase your company's bottomline.
The Subcontract module allows you to create and track the status of all your subcontracts, as well as changeorders and backcharges to your subcontracts. The integration between Accounts Payable and Subcontract allowsfor easy management of invoices relating to your Subcontractors.
3.2 Enter a New Subcontract
The Subcontract module allows you to track your contracts to the last detail, and to produce a copy of a contractdocument that includes all of those details.
Select Subcontract / Enter a New Subcontract.
Subcontract Tab
Job Number – Choose the job for which you are creating a contract.
Job Name – This field will automatically populate with the job name.
Subcontract Number – Enter the number to assign to the subcontract or leave blank to allow ComputerEaseto manually assign the number.

SubContract 105
v12 User Manual
Description - Enter a description of the subcontract.
Job RFC – If this subcontract is the result of an owner contract change order, select the RFC with which thiscontract is associated.
Subcontractor Number – Choose the vendor with whom you are making the contract.
Subcontract Name – This field will automatically populate with the vendor/subcontractor name.
Date Entered – Enter the date that all parties have entered into this contract.
Approved Status – Choose the status of the subcontract: Approved, Pending or Denied. If the contract isPending, you have the option to Allow Billings by checking the box to the right.
Date Approved – If the subcontract is approved, enter the date it was approved.
Format – Choose the format to use when printing the contract.
View Template – Once you have selected a format, you can click here to view the template associated withthat format.
Type – Select the type of subcontract. For information on subcontract types, see Subcontract TypeMaintenance .
Contract Date – Enter the date listed on the contract.
Track Lien Waivers - Check this box to track lien waivers for this contract.
Retention % - If you want to hold a set percentage of all subcontractor billings on this contract as retention,enter that percentage here. You have the option when entering an invoice to change or override thispercentage.
Bond Required – Check this box if a bond is required.
Bond Received – When the bond is received, enter the date it was received here.
Original Start – Enter your estimated start date.
Original Finish – Enter your estimated finish date.
Actual Start – Enter the actual start date.
Actual Finish – Enter the actual finish date.
Project Manager – Enter the project manager's name or choose from your list of contacts. If you haveselected a contact in the Manager field on the Document Control tab of this job's maintenance screen, thatname will automatically populate here.
Architect – Enter the architect's name or choose from your list of contacts. If you have selected a contact inthe Architect field on the Document Control tab of this job's maintenance screen, that name willautomatically populate here.
Contact – Enter the job contact's name or choose from your list of contacts. If you have selected a contact inthe Contact field on the Document Control tab of this job's maintenance screen, that name willautomatically populate here.
112

Project Management Tools106
ComputerEase Software, Inc.
Events Tab
The Events tab is where you optionally track events that affect your subcontract.
New Event - Click here to choose the status of the Subcontract. The list of statuses is below.
Change - Highlight an existing event and click here to change that event.
Delete - Highlight an existing event and click here to remove that event.
Contract Text Tab
Enter any contract text for this subcontract. Information entered here is available to print on the contract; this caninclude scope of work or any other instructions or notes for this contract.

SubContract 107
v12 User Manual
Items Tab
This is where the individual work details and charges for this subcontract are entered.
Add Item - Click here to add a new line item to your subcontract.
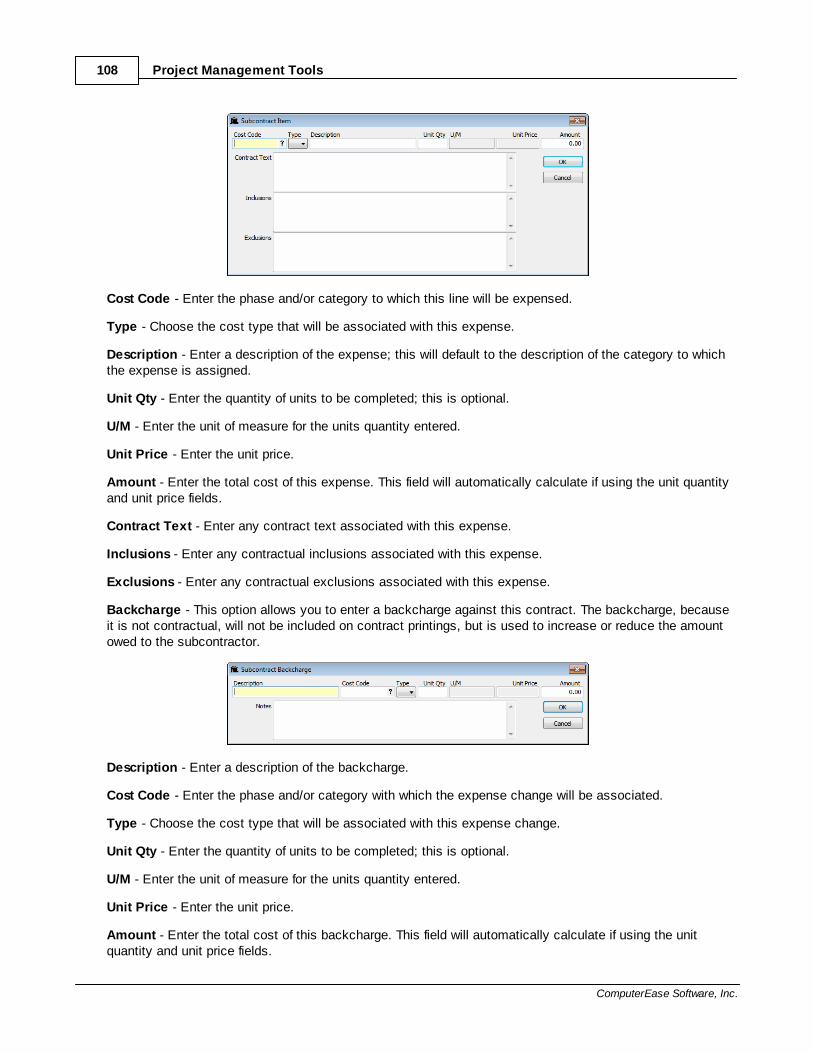
Project Management Tools108
ComputerEase Software, Inc.
Cost Code - Enter the phase and/or category to which this line will be expensed.
Type - Choose the cost type that will be associated with this expense.
Description - Enter a description of the expense; this will default to the description of the category to whichthe expense is assigned.
Unit Qty - Enter the quantity of units to be completed; this is optional.
U/M - Enter the unit of measure for the units quantity entered.
Unit Price - Enter the unit price.
Amount - Enter the total cost of this expense. This field will automatically calculate if using the unit quantityand unit price fields.
Contract Text - Enter any contract text associated with this expense.
Inclusions - Enter any contractual inclusions associated with this expense.
Exclusions - Enter any contractual exclusions associated with this expense.
Backcharge - This option allows you to enter a backcharge against this contract. The backcharge, becauseit is not contractual, will not be included on contract printings, but is used to increase or reduce the amountowed to the subcontractor.
Description - Enter a description of the backcharge.
Cost Code - Enter the phase and/or category with which the expense change will be associated.
Type - Choose the cost type that will be associated with this expense change.
Unit Qty - Enter the quantity of units to be completed; this is optional.
U/M - Enter the unit of measure for the units quantity entered.
Unit Price - Enter the unit price.
Amount - Enter the total cost of this backcharge. This field will automatically calculate if using the unitquantity and unit price fields.
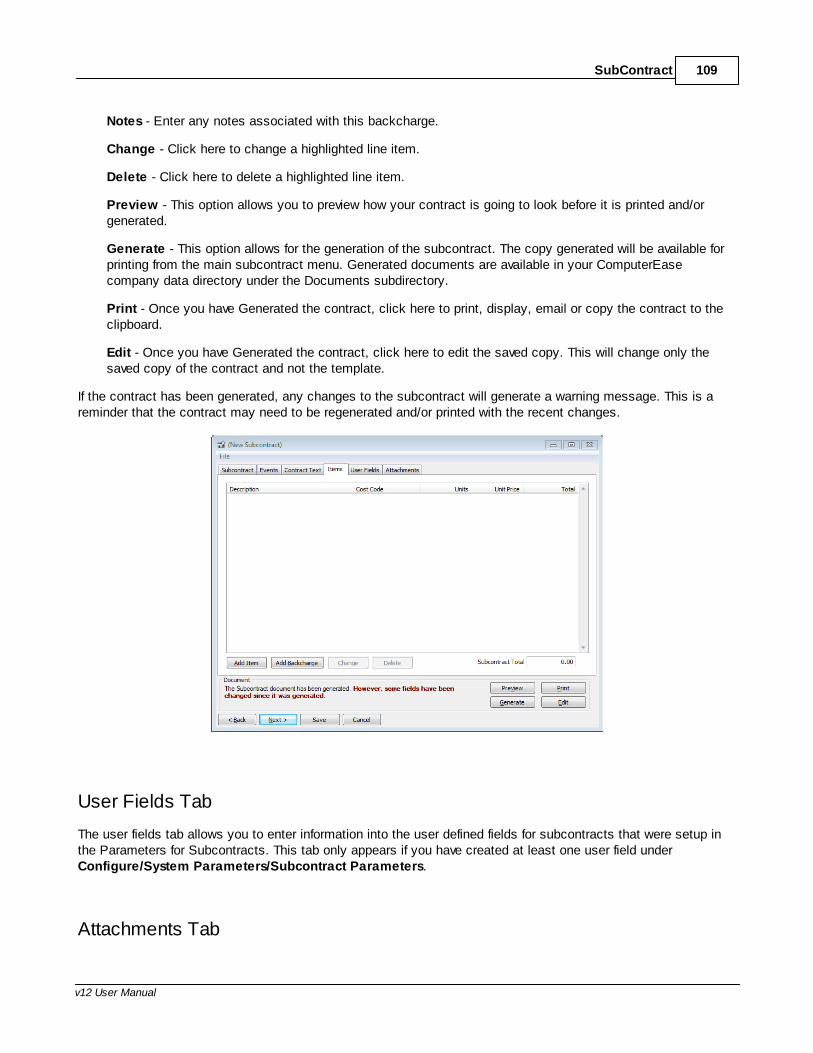
SubContract 109
v12 User Manual
Notes - Enter any notes associated with this backcharge.
Change - Click here to change a highlighted line item.
Delete - Click here to delete a highlighted line item.
Preview - This option allows you to preview how your contract is going to look before it is printed and/orgenerated.
Generate - This option allows for the generation of the subcontract. The copy generated will be available forprinting from the main subcontract menu. Generated documents are available in your ComputerEasecompany data directory under the Documents subdirectory.
Print - Once you have Generated the contract, click here to print, display, email or copy the contract to theclipboard.
Edit - Once you have Generated the contract, click here to edit the saved copy. This will change only thesaved copy of the contract and not the template.
If the contract has been generated, any changes to the subcontract will generate a warning message. This is areminder that the contract may need to be regenerated and/or printed with the recent changes.
User Fields Tab
The user fields tab allows you to enter information into the user defined fields for subcontracts that were setup inthe Parameters for Subcontracts. This tab only appears if you have created at least one user field under Configure/System Parameters/Subcontract Parameters.
Attachments Tab
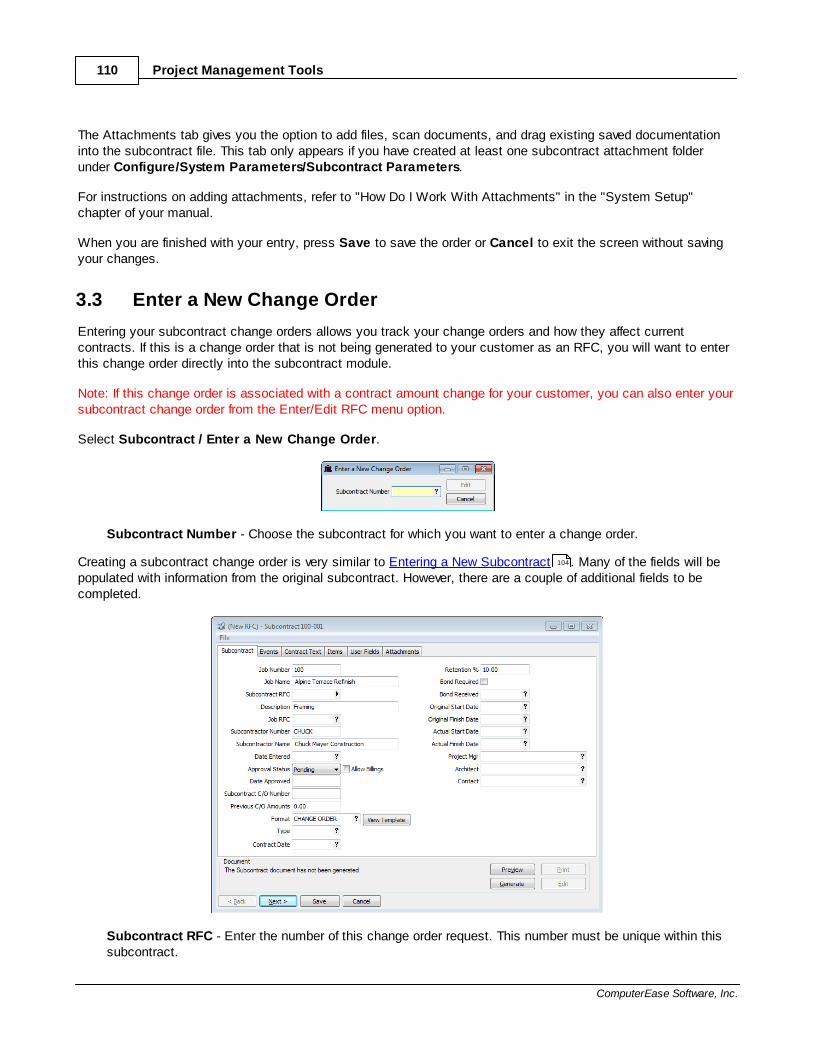
Project Management Tools110
ComputerEase Software, Inc.
The Attachments tab gives you the option to add files, scan documents, and drag existing saved documentationinto the subcontract file. This tab only appears if you have created at least one subcontract attachment folderunder Configure/System Parameters/Subcontract Parameters.
For instructions on adding attachments, refer to "How Do I Work With Attachments" in the "System Setup"chapter of your manual.
When you are finished with your entry, press Save to save the order or Cancel to exit the screen without savingyour changes.
3.3 Enter a New Change Order
Entering your subcontract change orders allows you track your change orders and how they affect currentcontracts. If this is a change order that is not being generated to your customer as an RFC, you will want to enterthis change order directly into the subcontract module.
Note: If this change order is associated with a contract amount change for your customer, you can also enter yoursubcontract change order from the Enter/Edit RFC menu option.
Select Subcontract / Enter a New Change Order.
Subcontract Number - Choose the subcontract for which you want to enter a change order.
Creating a subcontract change order is very similar to Entering a New Subcontract . Many of the fields will bepopulated with information from the original subcontract. However, there are a couple of additional fields to becompleted.
Subcontract RFC - Enter the number of this change order request. This number must be unique within thissubcontract.
104

SubContract 111
v12 User Manual
Subcontract C/O Number - Enter the change order number assigned to this change order once it isapproved.
Previous C/O Amounts - This should automatically populate with the total of all previous change orders forthis subcontract. It can be modified if necessary.
3.4 Edit a Subcontract or Change Order
You may need to edit your subcontracts and/or change orders as the job progresses. Here you have the option toedit the individual subcontract or edit a specific change order associated with the subcontract.
Select Subcontract / Edit a Subcontract or Change Order.
Subcontract Number - Choose the subcontract that must be modified.
RFC Number - If it is a change order that must be modified, choose or enter the RFC number here. If it is theoriginal subcontract that must be modified, leave this field empty.
To make changes, follow the procedures as outlined in section Enter a New Subcontract or Enter a NewChange Order in this section.
Note: If the subcontract or change order is associated with an itemized owner change order, you must edit thesubcontract change order from the owner RFC. See the Job Costing section of the manual for more information.
3.5 Print Subcontract
Once a subcontract or change order has been generated, you can use this option to print or reprint a copy.
Select Subcontract / Print Subcontract.
Subcontract Number - Choose the subcontract number for the contract you want to print.
RFC Number - If it is a change order that you want to print, choose or enter the RFC number here. If it is theoriginal subcontract that you want to print, leave this field empty.
Send To - Select Printer, Display, Email or Clipboard depending on what you would like to do with thisreport. If you are printing the report, select the appropriate printer in the next field. Click OK and the report willprint, display or generate an email or a pdf on the clipboard depending on your choice in this field.
104
110

Project Management Tools112
ComputerEase Software, Inc.
3.6 Print Subcontractor Change Order
The subcontract change order form allows you to print a form detailing your subcontract change order withoutincluding all of the contract verbiage. This format is a different format than the subcontract change order formatsthat can be generated and printed from within the entry screen.
Select Subcontract / Print Subcontract Change Order.
Subcontract Number - Choose the subcontract number for the change order report you want to print.
CO # - Choose the change order number for which you want to print a change order form.
Send Report To - Select Printer, Display, Email or Clipboard depending on what you would like to do withthis report. If you are printing the report, select the appropriate printer in the next field. Click OK and thereport will print, display or generate an email or a pdf on the clipboard depending on your choice in this field.
Format - Choose the format to use when printing the report.
3.7 Subcontract Type Maintenance
The subcontract type option allows you to categorize your subcontractors and subcontracts. The subcontract typecan make assigning vendors to a bid in the Bid Day module quick and easy.
Select Subcontract / Subcontract Type Maintenance.
Type – Enter a code for this type, up to 10 alphanumeric characters.
Description – Enter a description of your subcontract type.
Now you can assign types to your vendors, your subcontracts and you can use this type to make inviting a groupof subcontractors to bid on projects just a click away.

SubContract 113
v12 User Manual
3.8 Lien Waiver Tracking
Lien Waiver Tracking allows you to track lien waivers sent and received; using the lien waiver tracking allows youto stay on top of all required releases as your job progresses.
To track lien releases for a subcontract or PO, check the Track Lien Waivers box in the appropriate entryscreen.
When invoices are received against those contracts, you will be able to track when a waiver is received and if it isa progress waiver or final waiver. Additionally, you will be able to track lien waivers received from suppliers.
Select Subcontract / Lien Waiver Tracking.
Job Number - Enter the job number for which you want to view the status of lien waivers.
You will see any purchase orders (designated with a "PO" before the number under Contract) and subcontracts forwhich you selected the option to track lien waivers. Next to each purchase order or subcontract, you will see acount of suppliers for which lien waivers are being entered/tracked, a count for Notices of Furnishings received, anda count of open waivers followed by a count of invoices for that item.
Lien waivers can be marked received either when the invoice is entered or from this entry screen, by double-clicking on the appropriate contract.

Project Management Tools114
ComputerEase Software, Inc.
When a waiver or Notice of Furnishings is received, check the appropriate box; you will be prompted for a date ofreceipt.
3.9 Subcontract Reports
The subcontract module has several reports available to help you track your subcontracts. These reports can all beviewed directly from the Accounts Payable module as well as from the Subcontract module.
3.9.1 Subcontract Summary
Select Subcontract / Reports / Subcontract Summary.
Then select by Vendor to view the report sorted and subtotaled by vendor or by Job to view the report sorted andsubtotaled by job.
Subcontract Number - Choose the subcontract or range of subcontracts you want to report.
Vendor - Choose the vendor or range of vendors you want to report.
Job - Choose the vendor or range of jobs you want to report.
Active or Inactive Jobs - Select All, Active, or Inactive jobs.

SubContract 115
v12 User Manual
Active or Inactive Vendors - Select Active, Inactive or All vendors.
Print Pending Contracts and Change Orders - Choose Yes to include contracts that are pending in yourreport or No to only include approved contracts and change orders.
Send Report To - Select Printer, Display, Email or Clipboard depending on what you would like to do withthis report. If you are printing the report, select the appropriate printer in the next field. Click OK and thereport will print, display or generate an email or a pdf on the clipboard depending on your choice in this field.
The Subcontract Summary report includes the total amount of the contract, with total amount invoiced to date andtotal amount paid to date.
3.9.2 Subcontract Detail
Select Subcontract / Reports / Subcontract Detail.
Then select by Vendor to view the report sorted and subtotaled by vendor or by Job to view the report sorted andsubtotaled by job.
Subcontract Number - Choose the subcontract or range of subcontracts you want to report.
Vendor - Choose the vendor or range of vendors you want to report.
Job - Choose the vendor or range of jobs you want to report.
Active or Inactive Jobs - Select All, Active, or Inactive jobs.
Active or Inactive Vendors - Select Active, Inactive or All vendors.
Print Pending Contracts and Change Orders - Choose Yes to include contracts that are pending in yourreport or No to only include approved contracts and change orders.
Send Report To - Select Printer, Display, Email or Clipboard depending on what you would like to do withthis report. If you are printing the report, select the appropriate printer in the next field. Click OK and thereport will print, display or generate an email or a pdf on the clipboard depending on your choice in this field.
The Subcontract Detail report includes the total amount of the contract, with details by line item including eachinvoice received and each payment made on the contract.
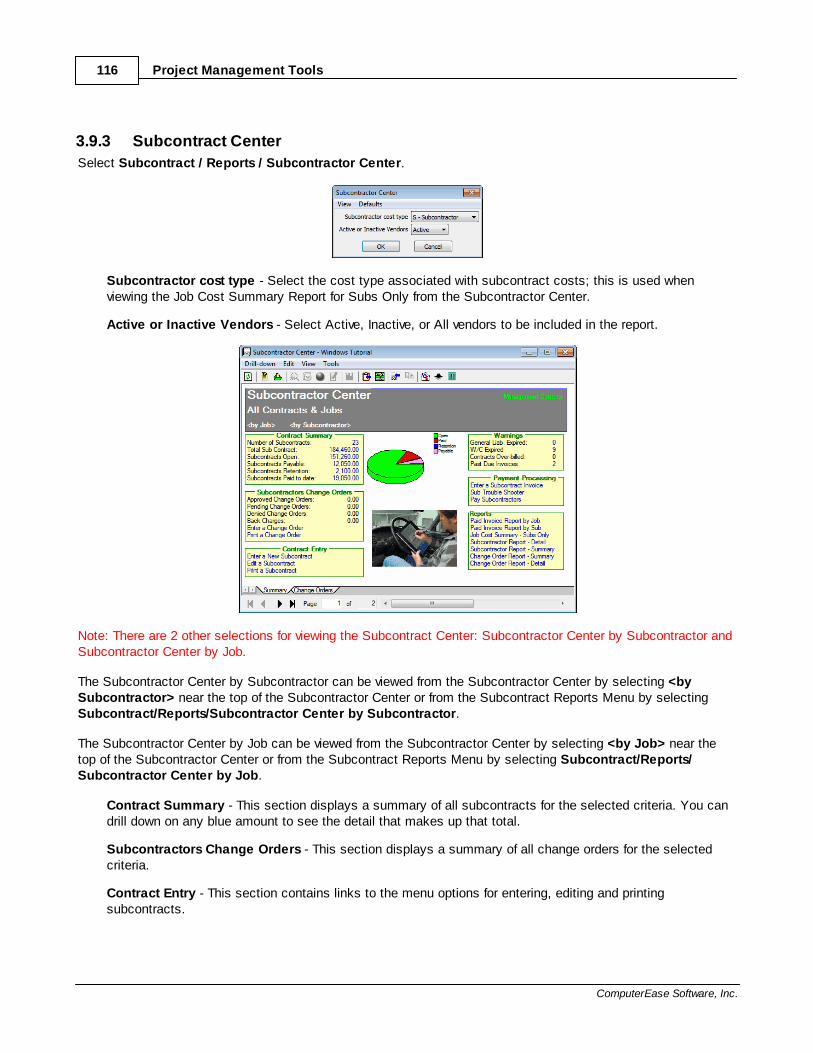
Project Management Tools116
ComputerEase Software, Inc.
3.9.3 Subcontract Center
Select Subcontract / Reports / Subcontractor Center.
Subcontractor cost type - Select the cost type associated with subcontract costs; this is used whenviewing the Job Cost Summary Report for Subs Only from the Subcontractor Center.
Active or Inactive Vendors - Select Active, Inactive, or All vendors to be included in the report.
Note: There are 2 other selections for viewing the Subcontract Center: Subcontractor Center by Subcontractor andSubcontractor Center by Job.
The Subcontractor Center by Subcontractor can be viewed from the Subcontractor Center by selecting <bySubcontractor> near the top of the Subcontractor Center or from the Subcontract Reports Menu by selectingSubcontract/Reports/Subcontractor Center by Subcontractor.
The Subcontractor Center by Job can be viewed from the Subcontractor Center by selecting <by Job> near thetop of the Subcontractor Center or from the Subcontract Reports Menu by selecting Subcontract/Reports/Subcontractor Center by Job.
Contract Summary - This section displays a summary of all subcontracts for the selected criteria. You candrill down on any blue amount to see the detail that makes up that total.
Subcontractors Change Orders - This section displays a summary of all change orders for the selectedcriteria.
Contract Entry - This section contains links to the menu options for entering, editing and printingsubcontracts.

SubContract 117
v12 User Manual
Warnings - This section contains notification of expired insurance policies as well as overbilled contracts andpast due invoices. You can drill down on the expired insurance numbers to print a notification to send to anysubcontractors whose insurance is expired or drill down on either of the other warnings to see the detailassociated with that warning.
Payment Processing - This section contains links to menu options for entering invoices, making paymentsor to review the troubleshooter for subcontracts.
Reports - This section lists a number of reports for this job that may be easily accessed simply by double-clicking on the report name.
The Change Orders tab contains a detailed change order report for your subcontracts.
3.9.4 Lien Tracking Report
Select Subcontract / Reports / Lien Waiver Tracking Report.
Job - Choose the vendor or range of jobs you want to report.
Vendor - Choose the vendor or range of vendors you want to report.
Waiver Status - Select Open, Closed or All.
PO's, Subcontracts or All - Choose whether you want to view waivers for PO's only, subcontracts only or forboth.
Sort by - Select Contract Number or Vendor Number to sort waivers by subcontract number or by vendornumber.
Send Report To - Select Printer, Display, Email or Clipboard depending on what you would like to do withthis report. If you are printing the report, select the appropriate printer in the next field. Click OK and thereport will print, display or generate an email or a pdf on the clipboard depending on your choice in this field.
The Lien Waiver Tracking Report details the status of all lien waivers being tracked for each job.

Part
IV
Bid Day
Bid Day 119
v12 User Manual
4 Bid Day
4.1 What is Bid Day?
Bid Day is a complementary feature to the Subcontract module that includes all the features you need to completethe bidding process for a Subcontractor and begin the Subcontract agreement. This feature interfaces directly tothe Subcontract module, giving you the flexibility and accuracy to complete your bid information with ease.
4.2 Features In Bid Day
· Ability to setup jobs you are bidding on as well as to invite and track bids you are receiving from yourSubcontractors.
· Ability to breakdown bids by item.
· Freeform text fields for description of work to be performed.
· If you have set up Subcontractor types for you vendors, ComputerEase will automatically pull those thatmatch your bid type when you select a vendor lookup.
· ComputerEase will print a Bid Invitation for all vendors you select and track when this letter was sent. Theinvitations MUST either be printed or emailed for the Sent field to fill in automatically.
· Generate request for bid documents with MS Word template.
· Ability to, at a glance, track how many invites have been sent, how many bids have been received, the lowestbid received and the amount actually awarded.
· Easily compare bids from different vendors.
· Ability to award a bid and change the amount of the contract.
· Ability to generate the contract from an awarded bid and will automatically bring over the pertinent informationfrom the bid to the Subcontractor’s contract.
· Track solicitations, bids, and awards by date.

Project Management Tools120
ComputerEase Software, Inc.
4.3 Enter a Bid
Select Bid Day / Enter a New Bid.
Bid Number - Enter a number for this bid, or leave empty to allow ComputerEase to assign a bid number foryou.
Date Entered - Enter the date the bid is created.
Bid Due Date – Enter the date by which all bids will be due.
Description – Enter a brief description of the job.
Invitation Text – Use this box to enter any necessary general invitation information. This is where you canenter the details of the work to be done for the invitation.
Job Number – If this bid is for an already active job, enter the job number. If a job has not yet been created,you can leave this field empty.
Click Next to enter information into any User fields (if applicable), or click on Save to save the general bidinformation.
After you have entered and saved your general bid information, you have the ability to add line items to your bid.These line items would allow you to designate specific tasks or types of work, for example. If once the bid isawarded, it is turned into a subcontract, these line items will become the subcontract line items.

Bid Day 121
v12 User Manual
Add Bid Item - This option creates the detail of the bid.
Description - Enter a description of this line item of your bid.
Type - Choose the subcontract type associated with this line item; this is optional.
Cost Code - If this bid is for an active job, choose the cost code to which this line item will be expensedwhen it becomes a subcontract.
Qty - Enter the number of units to complete as part of this item; this is optional.
U/M - Enter the unit of measure for the units entered.
Unit Price - Enter the unit price for this item.
Budget - Enter the total budget for this item.
Contract Text - Enter the contractual text associated with this line item.
Inclusions - Enter any contractual inclusions for this item.
Exclusions - Enter any contractual exclusions for this item.
Edit Item - Click here to edit any highlighted item.
Delete Item - Click here to delete any highlighted item.
Setup - This option takes you back to the Bid Setup screen.
Close - This option exits the Bid.

Project Management Tools122
ComputerEase Software, Inc.
After you have completed a bid item, it will display on the main bid screen. From this point you will be able toselect Invitations & Bids to send out bid requests.
Vendor - Choose a vendor to invite to bid. When you select vendors, if you have setup your vendor types, youwill be able to see only the vendors that apply in the vendor lookup. Note that you can click on the "AllVendors" tab to see all vendors.
Tip: You can add multiple vendors at once using the Add Group button. If you choose more than one group(separated by commas), then only vendors belonging to every group listed will be added.
Tip: If you are accepting bids from subcontractors with whom you have not worked before, you can set up a vendorwith a status of "Inactive" and add that vendor to your bid. If you accept their bid and award them the contract, youwill need to change their status to "Active" in order to process invoices from them.
Continue adding vendors to invite. After you have selected all the vendors you wish to include in your bid request,select each line’s Invite checkbox (or click on Invite All to invite all at once). Then select Print (or Export tocreate a file listing of all vendors invited). Enter the date the invitation was sent for each of the vendors.
Once you begin receiving bids from your subcontractors, you will be able to enter the date received into theReceived field as well as the amount of the bid into the Amount field. If the bid is rejected, you can simply checkthe box indicating so.

Bid Day 123
v12 User Manual
Once you have saved this information you will able to see all of the necessary information to award this bid on themain bid screen.
The lowest bid available is listed under the Low Bid column. If the lowest bid is over the original budget amount, thebid amount will show in red.
When you are ready to award a bid, click the Award Item button on the bid screen.
Choose which subcontractor you will award with the subcontract. You also have the ability to change the amountof the bid. If you have been able to bring the contract amount even further down in price, you will be able to changethe amount automatically listed at the bottom.

Project Management Tools124
ComputerEase Software, Inc.
When you return to the main bid screen, you will be able to see the awarded amount of the bid. If it is lower thanthe original bid amount, it will be displayed in green; if it is higher than the original bid, it will display in red.
Once you have awarded the bid, you may wish to create a contract by selecting Create Contract.
Cost Code - At this point, if you had not previously charged this bid to a job, you will be required do so inorder to continue.
Once you click on OK, you will automatically be brought into the Subcontract module with all the pertinentinformation from your bid already filled in. See Enter a New Subcontract for further information on creatingsubcontracts.
104

Bid Day 125
v12 User Manual
4.4 Edit a Bid
Select Bid Day / Edit a Bid.
Bid Number - Enter the number of the Bid you would like to make changes to.
To make changes to the Bid, please follow the procedures outlined in Enter a Bid .
4.5 Viewing the Bid Schedule
The Bid Schedule allows you to review all activities for a bid in a Gantt chart-like format.
Select Bid Day / Bid Schedule.
The columns in view can be configured by clicking on Screen, then Column Settings...
120

Project Management Tools126
ComputerEase Software, Inc.
You can add a column to the view by selecting it under Available Columns and either double-clicking on it orclicking on the > button. Similarly, a column can be removed from view by selecting it under Columns and eitherdouble-clicking on it or clicking on the < button. You can also change the date format for date columns here. Clickon Defaults to return to the default column view.
The icons along the top of the chart represent shortcuts.
- Click here to print the schedule.
- Click here to view a print preview of the schedule.
- Click here to email the schedule.
- Change the date range viewable in the schedule by entering a new date, choosing a newdate using the ? or by changing the date using the arrows.
- Click here to move to today's date.
- Click here to expand all bid items.
- Click here to collapse all bid items.
- Click here to expand all bid vendors.
- Click here to collapse all bid vendors.
- Click here to zoom out (items will decrease in size).
- Click here to zoom in (items will increase in size, but fewer rows and columns will fit on the page).
- Click here to create a pop-up note.
- Click here to show hidden lines. A line may be hidden by right-clicking on it and selecting Hide Line.

Bid Day 127
v12 User Manual
4.6 Bid Reports
The Bid Status and Bid History reports allow you to easily review the status and history of any and all bids enteredinto the system.
Select Bid Day / Reports / Bid Status.
Bid Number - Choose the bid or range of bids you want to review.
Send Report To - Select Printer, Display, Email or Clipboard depending on what you would like to do withthis report. If you are printing the report, select the appropriate printer in the next field. Click OK and thereport will print, display or generate an email or a pdf on the clipboard depending on your choice in this field.
The bid status report will show you the details of the bid, as well as whether it has been awarded and thesubcontract number of the resulting subcontract.
Select Bid Day / Reports / Bid History.
Vendor - Choose the vendor or range of vendors for whom you want to review bids.
Active or Inactive Vendors - Choose to view Active, Inactive or All vendors in the vendor range.
Date - Enter the date or date range for the bids you want to review.
Send Report To - Select Printer, Display, Email or Clipboard depending on what you would like to do withthis report. If you are printing the report, select the appropriate printer in the next field. Click OK and thereport will print, display or generate an email or a pdf on the clipboard depending on your choice in this field.
The bid history report will show you the history of bids for a vendor, including whether they were the low bidder andwhether they were awarded the contract.


![Scrap Creations [Catálogo EK Tools] Tools.pdf · tgols succ- j dece succ— tools tools tools . tools tools tools tokls tgols tools . Cutter bee 60; too 15 tools](https://static.documents.pub/doc/80x56/5b09bbc97f8b9abe5d8d1d96/scrap-creations-catlogo-ek-tools-toolspdftgols-succ-j-dece-succ-tools-tools.jpg)


