Page 1
B-30/M&S/2011-2013
STEGANOGRAPHY
PROJECT REPORT
SUBMITTED IN PARTIAL FULFILLMENT OF THE REQUIREMENT FOR THE AWARD OF THE DEGREE OF
MBA
(MARKETING & SALES)
AMITY BUSINESS SCHOOL, NOIDA
SUBMITTED TO: - SUBMITTED BY:-GAURAV CHANDIOK ABHINAV CHUGH
ABS B-30 MBA-M&S
ABS, ITFM/MAJOR PROJECT 1
Page 2
B-30/M&S/2011-2013
TITLE:-
STEGANOGRAPHY
MAJOR PROJECT
ABS, ITFM/MAJOR PROJECT 2
SUBMITTED TO:-Mr. GAURAV CANDIOK
SUBMITTED BY:-ABHINAV CHUGH
(B-30 M&S)
Page 3
B-30/M&S/2011-2013
ACKNOWLEDGEMENT
I would like to take this opportunity to express my sincere gratitude towards my institution and
my worthy and respectable teachers
I gratefully acknowledge the cooperation given by the faculty and the staff of LOVELY
INSTITUTE OF TECHNOLOGY specially Er. JANPREET sir for his help during the progress
of the project. I would like to thank him because without his help this project would not have
been a success.
I acknowledge with pleasure, the love, encouragement and moral support given to me by my
parents from time to time.
ABS, ITFM/MAJOR PROJECT 3
Page 4
B-30/M&S/2011-2013
CERTIFICATE
This is to certify that the project report containing the java project of STEGANOGRAPHY
submitted to AMITY BUSINESS SCHOOL during the 1st semester has been carried out under my
guidance and supervision.
The assistance and help received during the project has been fully acknowledged.
Mr. Gaurav Chandiok
Professor
Deptt. Of I.T.
AMITY BUSINESS SCHOOL
ABS, ITFM/MAJOR PROJECT 4
Page 5
B-30/M&S/2011-2013
CONTENTS INDEX:-
S.NO. TOPICS PAGE
NO.
1. FRONT PAGE 01
2. TITLE PAGE 02
3. ACKNOWLEDGEMENT 03
4. CERTIFICATE 04
5. CONTEXT INDEX 05-06
6. SUMMARY 07
7.TERMS OF REFERENCES
08
8. METHODOLOGY AND PRCEDURES
8.1) INRODUCTION TO STEGANOGRAPHY
I.) HISTORY
II.) STEGANOGRAPHIC TECHNIQUES
III.)APPLICATIONS
09-11
12-13
14
14-17
17-18
ABS, ITFM/MAJOR PROJECT 5
Page 6
B-30/M&S/2011-2013
9.INTRODUCTION TO JAVA AND OOPS
19-71
10. WORKING OF PROJECT(SNAP SHOTS OF VARIOUS FRAMES) AND HOW TO RUN
THE PROJECT
72-78
11. RECOMMENDATIONS
I.)PROBLEM STATEMENT
II.)WHY PARTICULAR TYPE IS CHOOSEN
79
79
79
12. BIBLIOGRAPHY 80
ABS, ITFM/MAJOR PROJECT 6
Page 7
B-30/M&S/2011-2013
SUMMARY:-
The proposed software is an attempt to make a simple Steganography program(Encoding and
decoding wav file) using crypt algorithm to overcome the problems faced by the old techniques
and to hide the encryption and decryption of wav files and hide the users also. The advantage of
steganography, over cryptography alone, is that messages do not attract attention to themselves.
Plainly visible encrypted messages—no matter how unbreakable—will arouse suspicion, and may
in themselves be incriminating in countries where encryption is illegal. Therefore, whereas
cryptography protects the contents of a message, steganography can be said to protect both
messages and communicating parties.
Steganography includes the concealment of information within computer files. In digital
steganography, electronic communications may include steganographic coding inside of a
transport layer, such as a document file, image file, program or protocol. Media files are ideal for
steganographic transmission because of their large size.
As a simple example, a sender might start with an innocuous image file and adjust the color of
every 100th pixel to correspond to a letter in the alphabet, a change so subtle that someone not
specifically looking for it is unlikely to notice it.
ABS, ITFM/MAJOR PROJECT 7
Page 8
B-30/M&S/2011-2013
TERMS OF REFERENCES:-
OBJECTIVE AND SCOPE OF PROJECT:-
OBJECTIVES:-
Create graphic user interface so that user easily use the program.
To make a simple Steganography program(Encoding and decoding wav file)
using crypt algorithm.
To overcome the problems faced by the old techniques and to hide the
encryption and decryption of wav files and hide the users also.
Cryptography protects the contents of a message, Steganography can be said
to protect both messages and communicating parties.
To provide a user friendly environment.
SCOPE:-
As we already know the picture steganography is being widely and extensively used and given a
paramount importance in today’s technology freak world and there has been an enormous rise in
the demand for steganography for wav and other sound format files. So we are trying to make a
ABS, ITFM/MAJOR PROJECT 8
Page 9
B-30/M&S/2011-2013
project on encryption and decryption of wav files and hiding details of commuting parties also
which can used by normal users on internet to maintain their privacy over net.
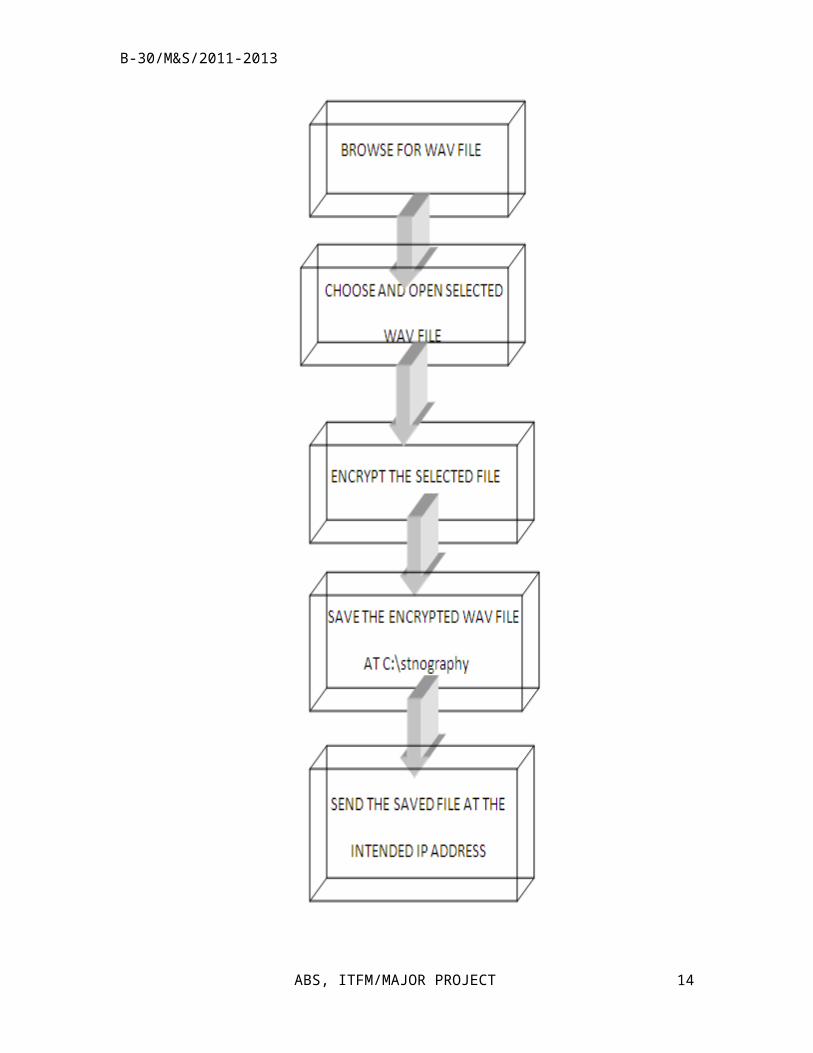
METHODOLOGY
In this we are using crypt algorithm and trim algorithm. The software trims and encodes the no of
bytes of any given wave file as entered by the user under the encryption key entry and stores the
given file in the dedicated and designated folder in c:\ drive
ABS, ITFM/MAJOR PROJECT 9
Page 10
B-30/M&S/2011-2013
ABS, ITFM/MAJOR PROJECT 10
Page 11
B-30/M&S/2011-2013
ABS, ITFM/MAJOR PROJECT 11
Page 12
B-30/M&S/2011-2013
ABS, ITFM/MAJOR PROJECT 12
Page 13
B-30/M&S/2011-2013
INTRODUCTION TO STEGANOGRAPHY
Steganography is the art and science of writing hidden messages in
such a way that no one, apart from the sender and intended
recipient, suspects the existence of the message, a form of security
through obscurity. The word steganography is of Greek origin and
means "concealed writing".The first recorded use of the term was in
1499 by Johannes Trithemius in his Steganographia, a treatise on
cryptography and steganography disguised as a book on magic.
Steganography includes the concealment of information within
computer files. In digital steganography, electronic communications
may include steganographic coding inside of a transport layer, such
as a document file, image file, program or protocol. Media files are
ideal for steganographic transmission because of their large size.It
is generally of three types
PHYSICAL STEGANOGRAPHY
DIGITAL STEGANOGRAPHY
PRINTED STEGANOGRAPHY
ABS, ITFM/MAJOR PROJECT 13
Page 14
B-30/M&S/2011-2013
ABS, ITFM/MAJOR PROJECT 14
Page 15
B-30/M&S/2011-2013
Ancient Steganography
The first recorded uses of steganography can be traced back to 440 BC whenHerodotus mentions
two examples of steganography in The Histories of Herodotus.Demaratus sent a warning about a
forthcoming attack to Greece by writing itdirectly on the wooden backing of a wax tablet before
applying its beeswax surface.Wax tablets were in common use then as reusable writing surfaces,
sometimes usedfor shorthand. Another ancient example is that of Histiaeus, who shaved the head
ofhis most trusted slave and tattooed a message on it. After his hair had grown themessage was
hidden. The purpose was to instigate a revolt against the Persians.
Steganographic Techniques
Physical Steganography
Steganography has been widely used including recent historical times and the present day.
Possible permutations are endless and known examples include:
ABS, ITFM/MAJOR PROJECT 15
Page 16
B-30/M&S/2011-2013
Steganart example. Within this picture, the letters position of a hidden message are represented
by increasing numbers (1 to 20), and a letter value is given by its intersection position in the grid.
For instance, the first letter of the hidden message is at the intersection of 1 and 4. So, after a few
tries, the first letter of the message seems to be the 14th letter of the alphabet; the last one
(number 20) is the 5th letter of the alphabet.
Hidden messages within wax tablets: in ancient Greece, people wrote messages on the
wood, then covered it with wax upon which an innocent covering message was written.
Hidden messages on messenger's body: also in ancient Greece. Herodotus tells the story
of a message tattooed on a slave's shaved head, hidden by the growth of his hair, and
exposed by shaving his head again. The message allegedly carried a warning to Greece
about Persian invasion plans. This method has obvious drawbacks such as delayed
transmission while waiting for the slave's hair to grow, and its one-off use since
additional messages requires additional slaves. In WWII, the French Resistance sent
some messages written on the backs of couriers using invisible ink.
Hidden messages on paper written in secret inks, under other messages or on the blank
parts of other messages.
Messages written in morse code on knitting yarn and then knitted into a piece of clothing
worn by a courier.
Messages written on the back of postage stamps.
During and after World War II, espionage agents used photographically produced
microdots to send information back and forth. Microdots were typically minute, about or
less than the size of the period produced by a typewriter. WWII microdots needed to be
embedded in the paper and covered with an adhesive (such as collodion). This was
reflective and thus detectable by viewing against glancing light. Alternative techniques
included inserting microdots into slits cut into the edge of post cards.
During World War II, a spy for the Japanese in New York City, Velvalee Dickinson, sent
information to accommodation addresses in neutral South America. She was a dealer in
dolls, and her letters discussed how many of this or that doll to ship. The stegotext was
the doll orders, the concealed 'plaintext' was itself encoded and gave information about
ship movements, etc. Her case became somewhat famous and she became known as the
Doll Woman.
ABS, ITFM/MAJOR PROJECT 16
Page 17
B-30/M&S/2011-2013
Cold War counter-propaganda. During 1968, crew members of the USS Pueblo (AGER-
2) intelligence ship held as prisoners by North Korea, communicated in sign language
during staged photo opportunities, informing the United States they were not defectors
but rather were being held captured by the North Koreans. In other photos presented to
the US, crew members gave "the finger" to the unsuspecting North Koreans, in an
attempt to discredit photos that showed them smiling and comfortable.
Digital Steganography
Modern steganography entered the world in 1985 with the advent of the personal computer
applied to classical steganography problems. Development following that was slow, but has since
taken off, going by the number of 'stego' programs available: Over 725 digital steganography
applications have been identified by the Steganography Analysis and Research Center. Digital
steganography techniques include:
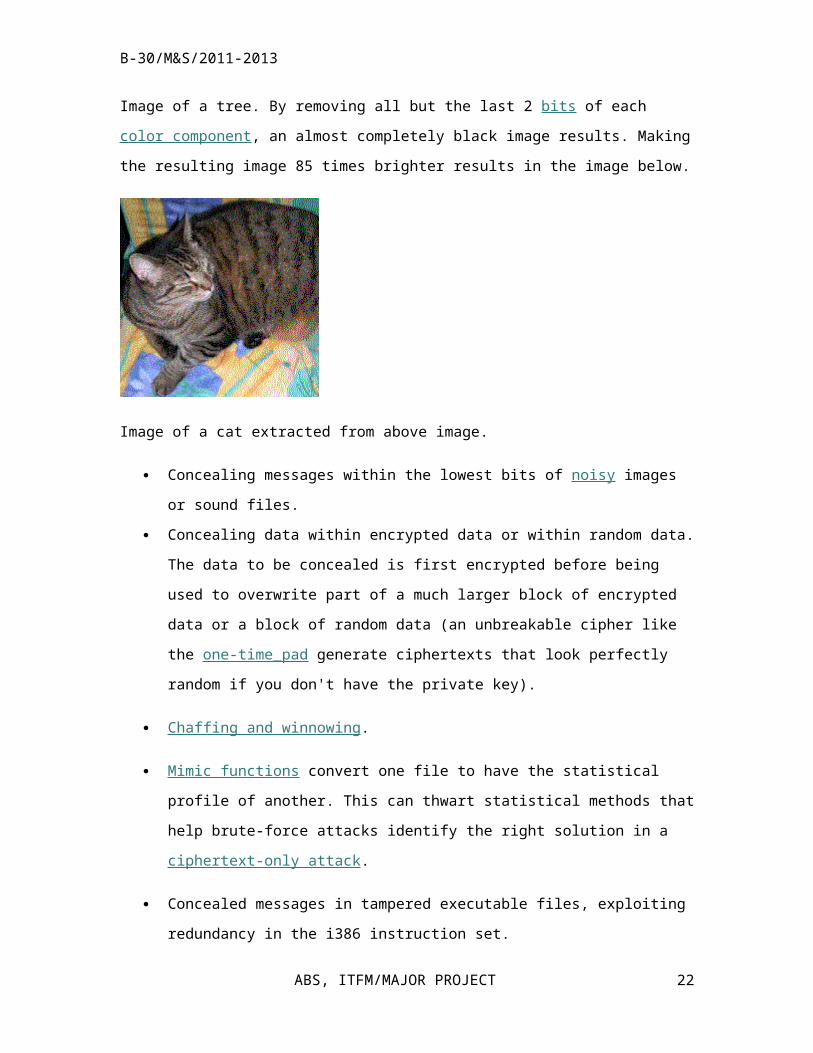
Image of a tree. By removing all but the last 2 bits of each color component, an almost
completely black image results. Making the resulting image 85 times brighter results in the image
below.
ABS, ITFM/MAJOR PROJECT 17
Page 18
B-30/M&S/2011-2013
Image of a cat extracted from above image.
Concealing messages within the lowest bits of noisy images or sound files.
Concealing data within encrypted data or within random data. The data to be concealed is
first encrypted before being used to overwrite part of a much larger block of encrypted
data or a block of random data (an unbreakable cipher like the one-time_pad generate
ciphertexts that look perfectly random if you don't have the private key).
Chaffing and winnowing .
Mimic functions convert one file to have the statistical profile of another. This can thwart
statistical methods that help brute-force attacks identify the right solution in a ciphertext-
only attack.
Concealed messages in tampered executable files, exploiting redundancy in the i386
instruction set.
Pictures embedded in video material (optionally played at slower or faster speed).
Injecting imperceptible delays to packets sent over the network from the keyboard.
Delays in keypresses in some applications (telnet or remote desktop software) can mean a
delay in packets, and the delays in the packets can be used to encode data.
Content-Aware Steganography hides information in the semantics a human user assigns
to a datagram. These systems offer security against a non-human adversary/warden.
Blog -Steganography. Messages are fractionalized and the (encrypted) pieces are added as
comments of orphaned web-logs (or pin boards on social network platforms). In this case
ABS, ITFM/MAJOR PROJECT 18
Page 19
B-30/M&S/2011-2013
the selection of blogs is the symmetric key that sender and recipient are using; the carrier
of the hidden message is the whole blogosphere
Applications
Usage in modern printers
Main article: Printer steganography
Steganography is used by some modern printers, including HP and Xerox brand color laser
printers. Tiny yellow dots are added to each page. The dots are barely visible and contain encoded
printer serial numbers, as well as date and time stamps.
Example from modern practice
The larger the cover message is (in data content terms—number of bits) relative to the hidden
message, the easier it is to hide the latter. For this reason, digital pictures (which contain large
amounts of data) are used to hide messages on the Internet and on other communication media. It
is not clear how commonly this is actually done. For example: a 24-bit bitmap will have 8 bits
representing each of the three color values (red, green, and blue) at each pixel. If we consider just
the blue there will be 28 different values of blue. The difference between 11111111 and 11111110
in the value for blue intensity is likely to be undetectable by the human eye. Therefore, the least
significant bit can be used (more or less undetectably) for something else other than color
information. If we do it with the green and the red as well we can get one letter of ASCII text for
every three pixels.
Stated somewhat more formally, the objective for making steganographic encoding difficult to
detect is to ensure that the changes to the carrier (the original signal) due to the injection of the
payload (the signal to covertly embed) are visually (and ideally, statistically) negligible; that is to
say, the changes are indistinguishable from the noise floor of the carrier.
From an information theoretical point of view, this means that the channel must have more
capacity than the 'surface' signal requires, that is, there must be redundancy. For a digital image,
this may be noise from the imaging element; for digital audio, it may be noise from recording
ABS, ITFM/MAJOR PROJECT 19
Page 20
B-30/M&S/2011-2013
techniques or amplification equipment. In general, electronics that digitize an analog signal suffer
from several noise sources such as thermal noise, flicker noise, and shot noise. This noise
provides enough variation in the captured digital information that it can be exploited as a noise
cover for hidden data. In addition, lossy compression schemes (such as JPEG) always introduce
some error into the decompressed data; it is possible to exploit this for steganographic use as
well.
Steganography can be used for digital watermarking, where a message (being simply an
identifier) is hidden in an image so that its source can be tracked or verified.
In fact, not only picture files can host hidden information, but other file formats can also hide data
such as audio files, text files, web pages and many other file formats
Introduction to Java and Object Oriented Programming
What is Java ?
JAVA was conceived by JAMES GOSLING,PATRICK NAUGHTON,CHRIS
WARTH,ED FRANK, and MIKE SHERIDAN at SUN MICROSYSTEMS,INC in 1991.
this language was initially called “OAK”, but was renamed “JAVA” in 1995.
Put simply Java is just another object-oriented programming language, not unlike C++. But Java
is much more than this, the real power of Java lies in the fact that Java source code does not
compile to machine code, like C++. Instead of a Java program being a series of instructions for a
specific processor Java programs compile to a series of byte codes which are run by the Java
virtual machine.
The last sentence of the previous paragraph probably doesn't make a lot of sense if you don't
understand the terms byte code and virtual machine. Bytes codes are simply the compiled version
of a Java program which are interpreted by the Java virtual machine, basically any computer
running a Java interpreter. It is the Java virtual machine which then converts the byte code
ABS, ITFM/MAJOR PROJECT 20
Page 21
B-30/M&S/2011-2013
instructions into form which can be understood by the computer running the Java program, i.e.
machine code.
All this means that Java programs are machine independent, in other words any Java program
will run on any Java virtual machine regardless of what kind of computer or operating system the
virtual machine is running on. For example, a program written and compiled (to byte code) on a
Windows 95 PC will run on an Apple Mac running a Java interpreter (in theory at least).
What is so good about a program being machine independent ?
The answer to this question, in its simplest form, is just three letters: WWW.
Anyone who as looked at the World Wide Web lately can not have failed to notice the abundance
of pages which now have scrolling text, animated graphics and other fancy widgets. For the most
part this is Java. Anyone who has seen these pages has been, possibly unwittingly, running Java
programs on a Java virtual machine, composed of their computer and their Java compatible Web
browser. Small programs, called applets, can be embedded into HTML pages and run when a
Java compatible browser accesses them.
The advantage of this is that the Java applets actually run on the same machine as the browser,
and not on the server. This means that the server is not overcome by having to run a program for
several different clients, the Java byte codes are simply transmitted to the client and their machine
takes over all the hard work.
Isn't allowing someone elses' program to run on my machine dangerous ?
The short answer is yes, but it shouldn't be. Java has a number of safeguards built into it to ensure
that an applet can not do any harm to the client machine it is running on. For example, a Java
applet can not access files on the client nor can an applet access arbitrary memory locations.
There is a big argument currently raging, amongst Java programmers, about whether the
limitations placed on applets make the language better or worse. Some argue that the limitations
are needed for security while others say that the restrictions are too great and remove much of the
power of the language.
ABS, ITFM/MAJOR PROJECT 21
Page 22
B-30/M&S/2011-2013
Is WWW the only thing Java is useful for ?
It's critics would say yes, but those who have used the language and realised its potential would
say not. Java is a fully fledged object-oriented programming language, the restrictions which
apply to Java applets running in WWW pages don't apply to proper Java programs. Java has
learned from many other language, notably C++, and removed things which were not useful or
over complicated. The result, many argue, is a much better language, a sort of C++--++.
Object-Oriented Programming
What is Object-Oriented Programming ?
Object Oriented programming (OOP) is at the core of java. Object oriented programming
organizes a program around its data (that is objects) and a set of well defined interfaces to that
data. An object oriented program can be characterized as data controlling access to code.
The three OOP principles:
Encapsulation
Encapsulation is an important part of OO programming, but it's not difficult. In Java
Encapsulation is implemented by a class, all a class is the generic form of an object. methods and
instance variables can be accessed from any class. Encapsulation is the mechanism that binds
together code and the data it manipulates and keep both safe from the outside interference and
misuse.
Inheritance
Inheritance is the process by which one object acquires theproperties of another object. This is
important because it supports the concept of hierarchical classification.
Polymorphism
Polymorphism is the ability of objects to react differently when presented with different
information, known as parameters. In a functional programming language the only way to
complete two different tasks is to have two functions with different names. Object-oriented
ABS, ITFM/MAJOR PROJECT 22
Page 23
B-30/M&S/2011-2013
languages, which include Java, allow different methods to be run depending on what type of
parameters are specified.
A First Java Program
Here is a simple Java program which displays the obligatory "hello world" on the screen":
// Start of the Java Program
class HelloWorld
{
public static void main (String args[])
{
System.out.println ("Hello World");
}
}
// End of the Java program
Compiling and Running the Program
There are three steps to getting this program up and working:
ABS, ITFM/MAJOR PROJECT 23
Page 24
B-30/M&S/2011-2013
Copy the code and paste it into a text document, then save the document with the
filename "HelloWorld.java". All Java programs must be saved into a file with the same
name as the class it contains, with the .java extension.
Go to a Command/Shell Tool, or Dos Prompt and type "javac HelloWorld.java", note
that this is case sensitive so where you see a capital type a capital.
After the program has compiled type "java HelloWorld" (note no extension) to run the
program, if everything goes OK you should see "Hello World" displayed just after the
"java HelloWorld" command.
Data Types and Variables
In Java variables are declared with the following syntax:
data_type variable_name;
The data_type can be from the simple types or from user defined types (which will be covered in
later tutorials).
The simple types are:
byte, short, int and long. All these types hold integer numbers of varying minimum and
maximum sizes.
float and double which hold floating point numbers, again with different minimum and
maximum values.
char is used to hold the value of characters.
boolean variables are either true or false
ABS, ITFM/MAJOR PROJECT 24
Page 25
B-30/M&S/2011-2013
Assigning values to variables
Once a variable has been declared then assigning a value to it takes the following syntax
variable_name = value;
A shortcut, declare and assign at the same time
Often you will want to declare a variable and assign a value to it at the same time, you can do this
as follows:
//declare and assign at the same time
int counter = 0; //declare counter and set to 0 on one line
boolean flag = false; //declare flag and set to false;
Arrays
An array is a table of variables of the same type which are accessed by the array name and an
index number. They are declared as follows:
data_type array_name[]
Once an array has been declared you can specify the number of elements within it, this is done as
follows:
array_name[] = new data_type [number_of_element]
Or both declaration and initialisation of elements can be combined together as follows:
data_type array_name[] = new data_type[number_of_elements]
ABS, ITFM/MAJOR PROJECT 25
Page 26
B-30/M&S/2011-2013
Multi-dimensional Arrays
Having an array with just one index is useful but there is no reason why an array can't be multi-
dimensional. For example if you wanted to declare and array which showed which player number
had which card in a traditional pack of playing cards you could defined a 2-dimensional array for
the pack.
int pack [][] = new int[4][13] //Defines a 2-d array, one index for suit and one for value
If you the wanted to assign a particular card to a player you would just access the card using the
two indexes, for example:
pack[0][0] = 1; //Assigns the first card in the first suit to player 1
You can specify as many indexes as you like. But, be careful with large multi-dimensional arrays
because often it is easier to specify them as several smaller array, the array names are easier to
remember than the index numbers.
Casting variables to a different type
There will be occasions when you will have a variable which you wish to store in a variable of
another type.
Automatic Casting
When the Java compiler knows that the new data type has enough room to store the new value the
casting is automatic and there is no need to specify it explicitly. For example, if you had a value
stored in a byte typed variables and wanted to store it in a integer typed variable the compiler will
let you because a byte value will always fit in an integer
int a; // declare an int variable called a
byte b=10; // declare a byte variable called b and assign it the value 10
a = b; // legal because a byte will always fit into a int
ABS, ITFM/MAJOR PROJECT 26
Page 27
B-30/M&S/2011-2013
This kind of casting is commonly known as widening since the value has been made wider
because it is now stored in a type which is larger than it actually needs, it is useful to view the
widened value as padded by zeros.
Explicit Casting
When an int value is to be stored in a byte it is possible that the byte will not be able to hold the
full value. In this case as explicit casting must be made, the syntax for this is as follows:
variable_of_smaller_type = (smaller_type) value_of larger_type;
At first this appears complicated but it isn't really, what the code is really saying is that the
variable on the left is made equal to the smaller_type version of the value on the right. For the
example above, this is:
class CastTest
{
public static void main (String args[])
{
byte a; // declare a variable a of type byte
int b=10000; // declare a variable b of type int and assign the value 10000
a = (byte) b; // store in a with explicit casting
System.out.println (a); // print the value in a to screen
}
}
// End of the program
ABS, ITFM/MAJOR PROJECT 27
Page 28
B-30/M&S/2011-2013
In other words the variable a is assigned the byte value of the int variable b. When the full value
will not fit in the new type, as in this example, then the value is reduced modulo the byte's range.
In the above example the result stored in a is 16, that is 10000 % 128 = 16. Where 128 is the
range of a byte (0 to 127). If you want to try this for yourself, the just copy and paste it, save as
CastTest.java and compile with the javac command and run with java - as you did for the first
program in the last lesson
Logic and Branching
Note that logic and branching instructions in Java are very, very similar to those in C++ and C.
The only real difference is the use of Java's boolean type. Because Java has a boolean type all
comparative and logical operations equate to either true or false. In Java there is no relation
between 0 and false, or between any other number and true, as there is in C/C++.
Logic
We have already seen that variables can be changed and updated but we have done nothing to
inspect the values they hold. Java has two sets of operators which allow the programmer to
compare variables with numbers, numbers with variables etc. These are the comparative operators
and the boolean operators.
Comparative Operators
These are:
< Less than
> Greater then
<= Less than or equal to
>= Greater than or equal to
== Equal to
!= Not equal to
These operators compare two numbers or variables and equate to either true or false depending on
the numbers/variables and the operator used. For example:
ABS, ITFM/MAJOR PROJECT 28
Page 29
B-30/M&S/2011-2013
int a = 3;
int b = 2;
int c = 2;
boolean d;
d = a < b; // c = false, a is NOT less than b
d = a > b; // c = true, a is greater than b
d = a >= b; // c = true, a is greater than or equal to b
d = b <= c; // c = true, a is less than or equal to c
d = a == b; // c = false, a is NOT equal to b
d = b != c; // c = false, b and c are NOT not equal (i.e. they are equal)
Boolean Logical Operators
Simple boolean operators
Firstly there are four simple boolean operators:
& logical AND && short circuit logical AND | logical OR || short circuit logical OR ^ logical
XOR These operators compare two boolean values and equate to another boolean value. The
values they equate to are simple, for an OR to equate to true one of the values must be true, the
other does not matter. For an AND to equate to true both values must be false. Any other
combination produces false. See the results below. The XOR operator is exactly the same as the
OR except that if both values are true false is returned, it is easy to remember the XOR operator
because both values must be different for the result to be true.
ABS, ITFM/MAJOR PROJECT 29
Page 30
B-30/M&S/2011-2013
Boolean Truth Table
TRUE & TRUE = TRUE TRUE | TRUE = TRUE TRUE ^ TRUE = FALSE
TRUE & FALSE = FALSE TRUE | FALSE = TRUE TRUE ^ FALSE = TRUE
FALSE & TRUE = FALSE FALSE | TRUE = TRUE FALSE ^ TRUE = TRUE
FALSE & FALSE = FALSE FALSE | FALSE = FALSE FALSE ^ FALSE = FALSE
Advanced Boolean Operators
The first four of these are the boolean assignment operators, which work in the same way as the
mathematical assignment operators in the last lesson. They are:
&= AND assignment |= OR assignment ^= XOR assignment The boolean assignments take the
first value as being the current value of the variable and the second is specified, the result of the
boolean operation is then left in the variable. The example below explains:
boolean a = true;
boolean b = false;
a &= true; // a remains true because true & true = true
b |= a; // b becomes true because false | true = true
a ^= b; // a becomes false because true ^ true = false
There are two other boolean operators, == and !=. These are exactly the same as there conditional
counterparts except that they compare two boolean values. For example:
ABS, ITFM/MAJOR PROJECT 30
Page 31
B-30/M&S/2011-2013
boolean a = true;
boolean b = false;
boolean c;
c = a == b; // c becomes false because the two are different
c = a != b // c becomes true because the two are the same
You might have noticed that for boolean values != and ^ are exactly the same.
The last boolean operator is probably the most powerful, ! (NOT) allows the booleans to be
reversed.
boolean a = true;
boolean b;
b = a; // b becomes true
b = !a; // b becomes false, i.e. the opposite of a
b = !b; // b becomes false
Branching
The conditional and logical operators in this lessons are all very well but so far we have seen no
use for them. This is where branching comes in, this allows different sets of statements to run
ABS, ITFM/MAJOR PROJECT 31
Page 32
B-30/M&S/2011-2013
depending on a boolean value. This value can obviously be calculated from variables using the
conditional and boolean operators.
if - else statement
The first, and most widely used of these branching statements is the if-else statement. This allows
a statement or set of statements to run if a value is true.
The statement or statements after the if statement will only run if the boolean expression, in
brackets, immediately after the if is true. If you want to run a block of statements rather than just
one then all you need to do is put curly brackets around the block. If you want to see the output of
this code fragment cut and paste it into a text editor, save as iftest.java and compile and run as
usual.
Shorcut if-else operator
In programming it is very usual to test an expression then execute one statement if the result is
true and another if it is false. This can be done with an if-else statement although Java includes a
ternary conditional operator (straight from C/C++) which sometimes allows the code to be a little
more readable. The syntax for this is as follows:
expression ? statement1 : statement2;
If the expression is true then the first statement is executed else the second is run.
The Switch Statement
Sometimes a value is tested and different statements are executed depending on the value, this
can be done with a long series of if-else statements, however, Java borrows the switch statement
from C/C++ to allow this to be more easily implemented. The syntax is:
switch (expression)
{
case value1:{statements1}; break;
ABS, ITFM/MAJOR PROJECT 32
Page 33
B-30/M&S/2011-2013
case value2: {statements2}; break;
case valueN: {statementsN}; break;
default: {statements;}
}
The expression specified after the switch statement should be any variable of an ordinal type
(byte, int, short). The value after each case statement should be any legal value for the expression.
If the value after the case statement matched the value of the expression then the set of statements
for that case are executed. The break statement simply ensures that there is no 'fallthrough',
although this is sometimes useful. If non of the cases match then the statements associated with
the default are run.
Looping
Often in programming a number of statements need to be run multiple times, this is where loops
come in. A looping structure is basically a structure which allows a set of statements to be run
either for a fixed number of times or until some condition is met. Java has three such looping
structures, borrowed from C, the for loop, the while loop and the do-while loop.
For loop
The for loop is the simplest kind of loop in Java, it allows a statement or group of statements to
be repeated a number of times. The number of times the loop runs is determined by the index
variables which is altered each time the loop is iterated. The syntax of the for loop is fairly
simple:
for (set_index_variable, loop_condition, iteration_alteration_to_index)
ABS, ITFM/MAJOR PROJECT 33
Page 34
B-30/M&S/2011-2013
{
statements
}
While loop
The while loop is a little more flexible than the for, instead of just iterating a fixed number of
times the while loop executes indefinitely while a certain condition holds. This makes it useful, as
we will see later, for waiting for input from the keyboard etc. The syntax for a while loop is:
while (loop_condition)
{
statements
}
do-while Loop
The problem with the while loop is that if the loop_condition is false the loop will not execute
even once, the do-while loop solves this problem. A do-while loop will always execute its
statements once because the check of the loop condition is done at the bottom of the loop rather
than at the top. The syntax is simple:<BR
do
{
statements
}
while (loop_condition);
ABS, ITFM/MAJOR PROJECT 34
Page 35
B-30/M&S/2011-2013
Classes, Methods, Inheritance, Packages and Interfaces
Classes and Methods
The instance variables are the variables which are created every time an instance of the class (an
object) is created. The methods are simply functions which are carried out on an object (unless
the class is static) and normally alter the instance variables.
Creating an Object
As we saw in there are several simple types in Java. However, whenever you create and object
this also has a type, the complicated type of an object is the same as its class. So an object
myBicycle, created from the class bicycle is of type bicycle. Java uses object references, which
are of the same type as the class of the object they reference, to keep track of its objects. You can
use these references rather like a normal variable except that you use a complicated rather than a
simple type. For example, you can declare a reference of a certain type the same as you would a
variable:
complicated_type reference;
If you wanted to create a reference (called mybike) to an object of type bicycle (from) you would
use the following code fragment:
bicycle mybike;
The new Operator
In order to actual create an object the new operator is used, the syntax is as follows:
complicated_type reference = new complicated_type();
}
ABS, ITFM/MAJOR PROJECT 35
Page 36
B-30/M&S/2011-2013
Using an Object
The dot operator
The code above is all very well but it is not very useful, we can create an object but we can not do
anything with it. This is where the dot operator comes in. This operator allows us to alter the
instance variables of an object (depending on the access protection) and more importantly to run
methods on the objects.
Method Parameters
Methods can also receive parameters when they are called, the parameter block of a method is
found in brackets after the method name, each parameter has a specified type and a name for use
in the method, multiple parameters are separated by commas
Constructors
If you specify a method with the same name as the class this is known as a constructor.
Constructors are run automatically when an object is created. They are useful for setting instance
variables to starting values or for printing on the screen when an object has been created, useful
for debugging.
The this Operator
Often in a method you will need to refer to the object which the method was called on, the current
object. The this keyword can be used anywhere an object reference can be used in a reference and
refers to the current object. See the example below (olTest) for how this is useful.
Method Overloading
Overloading allows Java, and other languages like C++, to implement the polymorphic element
of object-oriented programming. Method overloading, in Java, simply allows two or more
methods of the same class to have the same name so long as they have different parameter list.
This means that, for example, a method called init could be called with no parameters in which
case the default values would be set up, or one or more values could be given, in which case
different versions of the method would be run depending on which set of parameters was given.
At this point it is possible to see why when an object is created there is a set of brackets after the
classname, since this is also the constructor name they are simply there to contain any parameters
to be passed to the
ABS, ITFM/MAJOR PROJECT 36
Page 37
B-30/M&S/2011-2013
Finalize
Just as constructors are methods run when an object is created a method called finalize is run
when an object is destroyed. There is only ever one finalize method for each class. In Java the
finalize method is not used very often, in other languages such as C++, method which run when
objects are destroyed are usually used to reclaim memory a object was using. In Java, however,
all resources used by objects which are no longer in existence (actually objects which no longer
have a reference to them) are reclaimed automatically by the garbage collector which runs
periodically. Actually the finalize method will only be run when the garbage collection takes
place.
Static
So far we've only see the keyword static in definition of the main method in various example, an
explanation of what it mean and does has been avoided. Now the rest of the basic class/method
syntax has been covered static can be considered. Basically static methods are those which do
require an instance of an object to be run. When we have created a main method for the classes so
far it has always been independent of any object, i.e. it is run all the time regardless of whether
there is an object or not. Methods which are static are accessed using the classname rather than a
reference before the dot and the method name after it.
Inheritance
extends
Inheritance is the way Object-Oriented languages build on object templates, classes, to form other
in templates. In Java classes can be extended to include all of the instance variables and methods
of the extended class as well as some new ones. The syntax for a class is actually slightly more
complicated than that given in the last lesson, the original class line can optionally have the word
extends and another class name after it.
ABS, ITFM/MAJOR PROJECT 37
Page 38
B-30/M&S/2011-2013
super
The keyword super is used within methods (usually constructors) of a derived class to refer to the
constructor of the class from which the new class was derived. This may sound a bit complicated
so an example should help clarify this lesson so far. The code below is for a class which handles
2d points and has been extended to handle 3d points. The constructor is used to set up the values
from the two parameters given to it, what the constructor to the derived class does is set the new
instance variable z to 0 and then call the constructor of the original class (using super) to set x and
y.
Obviously the code above doesn't form a full program, it will compile but if you try and run it the
compiler will complain that there is no main method. If you wanted to create a runnable program
from this code you would need to either add another class with a main method, or add a main
method to one of the two classes already in the code.
There are several possibilities with the super keyword and calling constructors giving them
parameters but it is left to you to experiment with these.
Dynamic Method Calling
We have already seen that classes form complicated types in Java, when a class is extended then
the new type is compatible with the old. But Java will always know which object a method has
been called on. The following example shows that even though references may have been
declared to point to an object of a base class they may also be used to point to objects of the
derived classes.
final
We have already seen that methods and instance variables can be overridden when a class is
extended. However, often it is undesirable to have this happen. The final keyword allows
methods and instance variables to be marked as 'unoverridable', thus any attempt to override them
will result in a compiler error. For example if you had worked out a set of variables which you
did not want to be overridden they would be specified as follows:
final int Do_Not_Change = 3;
final int Do_Not_Alter = 4;
ABS, ITFM/MAJOR PROJECT 38
Page 39
B-30/M&S/2011-2013
abstract
Sometimes the full definition of a method can not be given when a class is created, in these
circumstances the class relies on the fact that the method will be overridden later. These methods
are known as abstract methods and should be prefixed by the words abstract. Any class which
contains an abstract method should also we prefixed by the word abstract. Abstract classes can
not be used with the new operator to create an object
Interface
Interfaces add another dimension to classes, rather than simply having classes which are derived
from other classes, Java allows classes to implement interfaces. An interface is simply a
specification of methods that any class implementing it should include. There are special benefits
to having classes which implement interfaces (as we will see later) interfaces allow many of the
characteristics of multiple inheritance, from other languages like C++.
The Syntax of Interfaces
interface
Interfaces are defined simply with the keyword interface followed by a list of method name and
parameter (variables can also be included). The syntax is:
interface name
{
return_type method_name (parameters);
type variable_name = value;
}
Note that the body of the method is not described, just its name, return type and parameters.
Variables must be assigned a value, and are always final (whether this is stated or not).
ABS, ITFM/MAJOR PROJECT 39
Page 40
B-30/M&S/2011-2013
Uses of Interfaces
The big advantage of interfaces is that they become one of Java's complicated type, so an object
can be created with their type. These variables can then be used to store references to any object
which implements the interface, but can only be used to access the methods (and variables) in the
interface. This allows for a limited kind of multiple inheritance since a class can only be derived
from one other but can implement unlimited interfaces.
Exception Handling
An exception is an "exceptional event"; an event which is not normally expected to occur in the
normal operation of a program. There is a slight difference between an exception and an error,
basically an exception can be handled whilst an error can not (this will be dealt with in greater
detail in the next lesson). Handling an exception basically means dealing with it so that the
program can continue as if nothing had happened. Exceptions can occur for many reasons, the
typically cited example is attempting to divide a number by zero. But there are many others, such
as trying to access an array element which doesn't exist.
Exceptions in Java
What happens when an exception occurs in Java ?
If an exception occurs in a Java program and is left unhandled the program will stop executing
and the user will see a runtime error. The following code generates such a runtime error by
attempting to access an array element which doesn't exist.
class genExc
{
public static void main (String args[])
{
int array [] = new int[9];
int index = 10;
ABS, ITFM/MAJOR PROJECT 40
Page 41
B-30/M&S/2011-2013
array [index] = 3; // illegal, array only has 10 elements
// do NOT forget start numbering at 0
}
}
Handling the Exception
Java has a mechanism for handling exceptions so that the program can continue to run as if
nothing had happened. This mechanism is based around two statements: try and catch.
try and catch
This statement is placed before a block of code which the programmer suspects might generate an
exception. The catch statement comes straight after the try block and specifies what type of
exception is being caught, a block of instructions after the catch statement are executed if the
exception generated matches the one in the catch. There can be multiple catch statements after a
try block all with the different exceptions.
More complicated exception handling?
Exceptions
When an exception occurs in Java an Object is created which is of the Exception type, this is then
thrown until it is caught. In the simple example in the previous lesson the exception was dealt
with straight away, but there is no need to do this.
The call-stack
It is possible to allow an exception to move backwards through the call-stack until a catch clause
is found which is the the same type as the exception. Imagine the situation where the main
method calls another method (called, for example, print) and print in turn calls another called
display. If an exception occurs in display then a check will be made to see if there is a catch for
the exception, if not then the next method in the call-stack (print) will be made, then the next
(main), if the exception is not handled by the last method on the call-stack then a runtime error
occurs and the program stops running.
ABS, ITFM/MAJOR PROJECT 41
Page 42
B-30/M&S/2011-2013
throws
Before you can allow an exception to check the next method in the call-stack you must first state
that the current method generates an exception that it does not handle itself, this is achieved by
adding the word throws, after the method parameter list, and a comma separated list of
exceptions. This tells the compiler that these exceptions can be generated by the method but are
dealt with elsewhere. In the following example the method cause does not deal with the exception
it generates (divide by 0), it tells the compiler that it can not (with throws) and the error is caught
by the catch statement in main, which follows the try block in which the call to the cause method
is found.
throw
It is possible to actually throw an exception from within the program code, using the keyword
throw. This is useful if an exception is caught in method and the calling method also needs to be
informed of the exception.
Programmer-Defined Exceptions
It is possible to create your own exceptions simply by creating a sub-class of the Exception class.
This allows custom exceptions to be generated (using throw) and caught in the same way as
normal exceptions. The following example creates an exception (illegalValue), this is tested for in
the method print, if one of the values is found to be illegal the exception is thrown, it is caught by
the main method
finally
Usually when an exception is thrown the code immediatelly stops executing and goes looking for
a catch block to match the exception, see example above. However, this is not always desirable, it
is sometimes useful to have a piece of code which runs no matter what exceptions have been
generated and handled. This is known as the finally block
Introduction to Threads
What is a Thread ?
A thread is a real thing with a beginning, a sequence of operations that it will execute and an end.
So far all the programs we have looked at have just had a single thread, the beginning was the
ABS, ITFM/MAJOR PROJECT 42
Page 43
B-30/M&S/2011-2013
start of the program, the sequence the whole program and the end when the program terminated.
Threads in Java are also known as lightweight processes and execution contexts. They are similar
to processes in the UNIX operating system (which are known as heavyweight processes) except
that threads run within the address space of the program to which they belong.
How are Threads controlled ?
The control of threads in Java is achieved by the Thread class. It is important not to confuse the
objects which are of type Thread with the actual thread itself. The thread is the so called
lightweight process with a beginning, sequence and an end. The Thread object, on the other hand,
is simply the mechanism by which the thread is controlled, rather like a control panel.
Some of the methods which control threads are called on instances of the Thread object, others
are static and are called on the classname (Thread). Typically the static methods refer to the
current thread while those called on an object obviously refer to the thread connected with that
object. The following section looks at a few of the simple operations which can be carried out on
thread, others (including thread creation) which are more complicated and refer to thread
interaction and communication are left to the remaining two lessons in this tutorial.
currentThread
currentThread is a static method which returns a Thread object referring to the currently running
thread. This is very useful to allow us to get a 'control panel' for the current thread, like so:
Thread cur = Thread.currentThread();
cur would now be an object of type Thread referring to the current thread and thus allow us to
manipulate it.
setName
Threads have a name associated with them to help debugging, this can be set with the setName
method which is called on the Thread object referring to the thread you wish to rename. The only
parameter passed to it is a string (either a String object, or a speech mark enclosed piece of text).
For example,
cur.setName ("Current Thread");
ABS, ITFM/MAJOR PROJECT 43
Page 44
B-30/M&S/2011-2013
getName
This method is the partner of setName, again it is called on the Thread object. getName takes no
parameters but returns a String object, which can be printed or assigned to a String reference,
containing the thread name. For example,
system.out.println (cur.getName); // will print the threads name
sleep
This is a very useful static method which simply sends the current thread to sleep for a length of
time which is specified as an input parameter, in milliseconds. This is useful for pauses in
execution or, as we will see in later lessons, to allow other threads to take control for a period of
time. The only slight complication with sleep is that it can cause an exception if it is interrupted.
At this stage we do not need to worry about why it might be interrupted, all we need to know is
that any program with sleep will not compile if the exception is not caught. sleep can be used as
follows:
try
{
Thread.sleep(1000); // sleep for 1 second
}
catch
{
System.out.println ("Thread interrupted");
}
Thread.sleep(1000); // sleep for 1 second
}
}
ABS, ITFM/MAJOR PROJECT 44
Page 45
B-30/M&S/2011-2013
Using Multiple Threads
Creating a new thread
To create a new thread all that needs to be done is to create a new instance of the Thread class
using the new operator. There are several versions of the constructor for this class, the simplest
takes no parameters. For example :
Thread newOne = new Thread ();
Controlling Threads
The whole concept of controlling multiple threads can appear complicated at first. Java expects
the control of threads to appear in the form of the following methods: run, start, stop, suspend and
resume. Briefly the run method should contain the sequence part of the thread (i.e. what it is to
do), the other methods are called on the Thread object in order to affect the running of the thread,
for example start starts the execution of the thread (i.e. begins executing statements in run).
The following section, looking at the methods which control threads, may not make sense
immediately but should do after you have examined the examples which follows them.
run
run is the key to any thread, it is here that the sequence of the thread is described. There are two
ways that run can be implemented in Java. Firstly the Thread class can be extended and the run
method overridden in the new class. A rather more elegant way of achieving, effectively, the
same result is to have your class implement the Runnable interface.
start
This method is called on a Thread object and simply starts the thread running.
stop
This method is called on a Thread object and halts a thread.
ABS, ITFM/MAJOR PROJECT 45
Page 46
B-30/M&S/2011-2013
suspend and resume
This method is identical to the stop method except that a thread stopped with suspend can be
restarted, at the point it was stopped with the resume method..
Thread Priorities
It is sometimes useful to have threads which take precedence over each other, these threads are
said to have a higher priority. The priority of a thread is an integer between 1 and 10, the higher
the number the higher the priority. If, for example, two threads were started at the same time the
thread with the higher priority would execute first. Similarly if a thread were running and another,
with a higher priority, woke up the thread with the higher priority would immediately take over
and start executing.
Changing Thread Priorities
When a thread is created it is automatically given a priority of 5. This can later be increased or
decreased using the method setPriority. There is also a partner method called getPriority which
allows the priority of a thread to be returned as an int.
In addition to priorities being referred to as numbers the Thread class also provides static final
variables (effectively constants). These are as follows:
MIN_PRIORITY = 1
NORM_PRIORITY = 5
MAX_PRIORITY = 10
The setPriority method
This method is called on a Thread object with an int between 1 and 10 as the only input
parameter. This parameter can be one of the three static final variables defined in the Thread
class.
ABS, ITFM/MAJOR PROJECT 46
Page 47
B-30/M&S/2011-2013
The getPriority method
This method is also called on a Thread object but takes no input parameters and returns the
priority of the thread, referenced by the Thread object, as an int.
Applets, Graphics and Internet interaction
What is an Applet ?
An applet is a small program which is embedded in a HTML document. When you view the
document, with a Java compatible Web browser, the applet runs. If you see scrolling text,
animation or anything else which doesn't look like HTML on a Web page it is probably Java.
Applets are the reason Java has received so much hype, despite the fact that it is actually a very
good, fully functional object - oriented programming language. Some people criticise applets
because there are some quite serious security limitations placed on them, for obvious reasons,
however, we haven't covered anything in these tutorials which is restricted.
A First Applet
The code below is probably the simplest possible applet that actually does anything. And if
you've completed the other tutorials you should just about be able to work out what it does and
how.
import java.applet.*;
import java.awt.*;
public class helloApplet extends Applet
{
public void paint (Graphics g_obj)
{
g_obj.drawString ("Hello World", 10, 10);
}
ABS, ITFM/MAJOR PROJECT 47
Page 48
B-30/M&S/2011-2013
}
Including the Applet in a HTML page
You may be thinking hang on a minute how does the applet get embedded into the HTML page?
Well is you really wanted the answer you might already have selected the view source option in
your browser when you looked at the running applet. If you did you will have a seen the line:
<APPLET CODE="helloApplet.class" WIDTH = 200 HEIGHT = 40></APPLET>
.
Lots of Methods to Overload
The short example we've just looked at contained the paint method. Actually this method already
exists in the class Applet, but it doesn't do anything, so we were overloading it. There are a
number of methods like this in the Applet class, they all run at different time for example when
an applet first runs, when it is covered, when the browser leaves the page with the applet on it etc.
Understanding when to use which method is the key to good applet design, the following list and
descriptions should provide you with everything you need to know.
paint
This one we've already looked, paint, it is run whenever an applet is damaged or the repaint
method is called. Damages means that the applet has been covered or partially covered by another
window, for example if you move the file manager window over the browser with the applet in it
the paint method will be called. This method usually contains the main graphical part of any
applet.
init
This method is called only once as soon as the applet starts. It is an ideal place to do any
initialisation, hence its name.
ABS, ITFM/MAJOR PROJECT 48
Page 49
B-30/M&S/2011-2013
update
This is one of the few methods that actually does anything if you don't override it. The default
version fills the applet with the default background colour and then calls paint. If you want your
applet to be a different colour you can override this method but don't forget to call paint !
stop
This is called when the browser leaves the page containing the applet. The text book use for stop
is to suspend all running threads.
start
This method is called after init when an applet is first started and each time an applet is displayed.
So if an applet is stopped after the page is left when the browser comes back the start method will
be run. This is the place to resume any threads which were suspended by stop.
repaint
repaint is the most complicated of the methods because it is overridden to take a differing number
of parameters. If no parameters are given it just called the update method which then calls paint.
There are another three versions which allow a time and specific co-ordinates to be given. For
example:
repaint (1000); // repaint in 1000 milliseconds
repaint (10, 20, 30, 40); // repaint the area: x = 10, y = 20, width = 30, height = 40
repaint (1000, 10, 20, 30, 40); // a combination of the two above
Running a Java Applet outside of a Browser
When you are developing an applet it is often useful to be able to run an applet without having to
start a browser. The Java Development Kit includes the appletviewer, all you need to do is type
its name and the name of the HTML file containing the embedded applet. For example:
ABS, ITFM/MAJOR PROJECT 49
Page 50
B-30/M&S/2011-2013
appletviewer helloWorld.html
would run the helloWorld applet if it was in the path from which you typed appletviewer.
More Advanced Applet Features
Drawing Graphics Primitives in Java Applets
The Graphics object which is passed to the paint method by the browser, or applet viewer, has a
number of simple methods which allow simple graphics primitives to be drawn in the applet.
These include rectangles and arcs and can be filled or unfilled. There is also a rather important
method for determining the size of an applet, important because an applet in browser can be
resized by altering the width and height parameters of the HTML tag parameters while the applet
viewer can simply be resized with the mouse.
Determining the Size of an Applet
It is relatively easy to determine the size of an applet. A call to a static method (in the Applet
class) returns a variable of type Dimension. This is a simple type which contains two instance
variables called height and width. The following code fragments demonstrates this.
Dimension dim;
public void paint (Graphics g_obj)
{
dim = size (); // get the size of the current applet
System.out.println ("width is " + dim.width);
System.out.println ("height is " + dim.height);
Changing the Current Colour
All of the methods, in this lesson, which draw into applets do so using the current colour. The
default colour is black but there a number of ways to change this. The method setColor, called on
ABS, ITFM/MAJOR PROJECT 50
Page 51
B-30/M&S/2011-2013
the Graphics object, allows the colour to be altered. The input to this method is a Object of type
Color. A number of these exist a final static variables (constants) which can be accessed like so:
Color.Black If you can't find a colour you want in this way you can simply create a new Color
object.
Creating a new Color Object
Creating a Color object is exactly the same as creating any other object in Java. There are two
main constructors: the first accepts three ints, in the range 0 to 255, and the second three floats, in
the range 0.0 to 1.0. These three values represent the amount of Red, Green and Blue in the
colour. The following code fragment would create a colour called BrightRed which contains no
colour except red.
Color BrightRed = new Color (255,0,0);
or
Color BrightRed = new Color (1.0, 0.0, 0.0);
The best way to find the colour you want is to experiment. (There are other ways to set the
colour, for example using the HSB colour model, but the two mentioned are adequate for most
purposes.) You should also remember that any applet you write might be run on a number of
different machines with different colour capabilities so any colour you produce on one machine
will only be an approximation of what it will look like on another.
The example given below use the int method of creating colours but they do not assign a
reference to the created colour. Because the colour is used only once it is created inside the
setColor's parameter list. (See the examples if you are not quite sure what this means.) If you
were to create a lot of colours in an applet and switch between them frequently it may be an idea
to assign references, perhaps creating the colours in the init method.
Drawing Shapes
There are several methods, called on the Graphic object, which allow shapes to be drawn in an
applet.. Each type of shape has two versions, one for hollow shapes (starting with draw) and one
for filled shapes (starting with fill). The outline of the hollow shapes and the whole of the filled
ones is are drawn in the current color. The parameters passed vary from shape to shape. One thing
ABS, ITFM/MAJOR PROJECT 51
Page 52
B-30/M&S/2011-2013
to remember is that the co-ordinate system, like most in computer graphics, has the origin (0,0) at
the top left of the applet. The first number in the co-ordinate pair is the x axis (across the screen)
and the second is the y axis (up and down). If you specify a shape which will extend beyond the
boundaries of the applet it will be clipped and only the section inside the applet will be seen.
Rectangles
The two methods for drawing rectangles are drawRect and fillRect. Both methods take four ints
as input parameters. These are:
Parameter 1: The x position of the top left corner of the rectangle.
Parameter 2: The y position of the top left corner of the rectangle.
Parameter 3: The x position of the bottom right corner of the rectangle.
Parameter 4: The y position of the bottom right corner of the rectangle.
Ovals
Ovals can include circles or any elliptical shape which is a complete oval (i.e. not an arc). The
two methods for drawing ovals are drawOval and fillOval. They both accept four ints as input
parameters, which are:
Parameter 1: The x position of the top left of the oval.
Parameter 2: The y position of the top right of the oval.
Parameter 3: The width of the oval.
Parameter 4: The height of the oval.
It is odd to thing of an oval as having a top left but if you think of a rectangle bounding the oval
you won't go far wrong. It is the separate parameters for width and height which allow oval to be
drawn rather than just circles (as is often the case), but if both values are the same the oval will,
in fact, be a circle.
ABS, ITFM/MAJOR PROJECT 52
Page 53
B-30/M&S/2011-2013
Arcs
An arc is basically a partial oval, when they are filled they resemble piecharts. Because arcs are
slightly more complicated than rectangles and ovals they need an additional two parameters to
specify the start angle and the travel angle. The six parameters are:
Parameter 1: The x position of the top left of the arc.
Parameter 2: The y position of the top right of the arc.
Parameter 3: The width of the arc.
Parameter 4: The height of the arc.
Parameter 5: The start angle.
Parameter 6: The travel angle.
The first four parameters work in the same way as they do for an oval but the last two need a bit
of explanation. If, for a moment we ignore the fact that arcs can be parts of an oval rather than
just parts of a circle, we can imagine a circle. The start angle is a point on the outside of this
circle, with 0 degrees being at 3 O'clock, 90 degrees at 12 O'clock, 180 at 9 O'clock and 270 at 6
O'clock. The travel angle is the distance around the circle that the arc covers, anti-clockwise if the
angle is positive and clockwise if the travel angle is negative. So an filled arc with a start angle of
90 and a travel angle of -90 will be the top right quarter of a circle (or oval).
Polygons
A polygon is a multi-sided shape. The two methods for drawing polygons are drawPoly and
fillPoly, both of which take three parameters:
Parameter 1: An array of ints containing the x values of each point
Parameter 2: An array of ints containing the y values of each point.
Parameter 3: The number of points in the shape.
The polygon methods simply join up the points in the order they appear in the arrays, you don't
have to worry about making the last point the same as the first because this is handled for you,
ABS, ITFM/MAJOR PROJECT 53
Page 54
B-30/M&S/2011-2013
although there is no harm doing it. So if you want to draw a triangle (0,0), (0,10), (10,0) the first
parameter will be an array containing the numbers {0,0,10}, the second array will contain
{0,10,0} whilst the third parameter will be 3 because a triangle has three points..
Customising Text Output
We have already seen the drawString method which allows text to be outputted into an applet.
The size and style of the text can be customised by a number of methods.
Fonts
A font is the style in which text is outputted, when we used the drawString method in our first
applet we used the default font. The font which drawString uses is the one currently associated
with the graphics objects that drawString was called on. Since a font is an object we can create
new fonts or get a handle on the current one. Before we can create a font we need to understand a
little about it so lets start by getting a reference to the font which is currently being used, this is
done by the getFont method.
The getFont method is called on a graphics object and returns an object, of type Font, which is
the font currently being used. For example:
Font current = g_obj.getFont();
Now we know how to get a reference to a font we can look at the various bits which go to make
up a font. Each font has a name, like Times or Helvetica, although the ones available on your
system will vary. A font also has style, this can be bold, italic both bold and italic or plain. And
finally a font also has a size, usually ranging between 8 and 24. There are a number of methods
which allow us to find out the name, style and size of a font. All of these are called on the font
although their return type does vary. The following list shows these methods along with their
return types.
getFamily, returns a String containing the family to which the font belongs
getName, returns a String containing the name of the font
getSize, returns an int containing the size of the font
isBold, returns a boolean which is true if the font is bold
ABS, ITFM/MAJOR PROJECT 54
Page 55
B-30/M&S/2011-2013
isItalic, returns a boolean which is true if the font is italic
is Plain, returns a boolean which is true if the font is plain
Note that isPlain can actually be worked out, if isBold and isItlaic are both false isPlain will be
true.
Creating a new font
Now that you know the components of a font creating a new one is relatively straightforward as
soon as you know the order in the constructor these components are expected. They are: name,
style then size. The style component is slightly complicated in that the constructor expects a
constant (either Font.BOLD or Font.ITALIC) or the two or(ed) together, if the style is omitted
from the line then the font is assumed to be plain. So the following are all legitimate fonts:
Font custom = new Font ("Times", Font.BOLD, 24);
Font custom2 = new Font ("Times, Font.BOLD|Font.ITALIC, 12);
Font custom3 = new Font ("Helvetica, 18);
Using a new font
The method setFont, called on a Graphics object, sets the current font to the one given as an input
parameter. This parameter can be either a the name of a font that has already been created or
simply what would normally appear on the right-hand side of the equals sign in a font definition.
So these two ways of changing the current font are both valid.
Font custom = new Font ("Times", Font.BOLD, 24);
g_obj.setFont (custom);
and
g_obj.setFont (new Font ("Times", Font.Italic, 14);
Passing Parameters to Applets
When an applet is called from a HTML document it is possible to give it a number of parameters,
similar to how method receive parameters. The only difference is that these parameters are
ABS, ITFM/MAJOR PROJECT 55
Page 56
B-30/M&S/2011-2013
always treated as strings by the applet so if you want to use them as numbers etc you have to
convert them (using the parseInt method, called on a String returning an int). There are two
halves to this problem, first specifying parameters in the HTML tag and second interpreting them
in the applet code.
Parameters in HTML Documents
In the HTML code the parameters is surrounded by PARAM tags (within the APPLET tags),
which contains two pieces of information, the name of the parameter (how it will be referred to in
the applet code) and the actual value. So to pass two simple parameters the HTML tag would
look like this.
<APPLET CODE="ParamTest.class" WIDTH=200 HEIGHT=200>
<PARAM NAME=first VALUE="hello">
<PARAM NAME=second VALUE="16">
</APPLET>
Using the Parameters in the Applet Code
In order to use the parameters in the applet the method getParameter is called with the name of
the parameter (String) as an input and the value is returned. So for the HTML tag above the
following code fragment will get the values.
String greeting;
int number;
one = getParameter ("first");
number = parseInt(getParameter("second"));
ABS, ITFM/MAJOR PROJECT 56
Page 57
B-30/M&S/2011-2013
An Introduction to the Abstract Windows Toolkit
What is the Abstract Windows Toolkit ?
As we have already seen Java applets can be run on any computer which has a Java virtual
machine. What the AWT does is allow basic graphic user interface (GUI) components to be used
in applets with a reasonable degree of certainty that what appears on one computer will be
comparable to what appears on another. On a Solaris based machine, such as those in the
University of Bradford's Department of Computing, the GUI components are implemented using
the motif toolkit. This basically means that when an applet needs to display a button it makes the
appropriate call to the motif toolkit. On a Windows 95 based machine the GUI components come
from Windows while on a Apple Macintosh the components come from the GUI system on this
machine.
Because Java applets must run on all Java virtual machines the GUI components which can be
implemented by the AWT are limited to those which can be found in the graphics toolkits of all
computer which support Java. This means that the components which can be found in the AWT
are the very simple ones, for example buttons, lists and labels, since they are the lowest common
denominator of the components found in the toolkits on the computers which support Java.
This is all very well in theory but in practise things are not quite so straightforward. The AWT
was designed to work with the motif toolkit (and the X11 server) and so most of the bugs have
been removed from the implementation of the Java virtual machine on computers which support
motif. The Windows 95 version, however, is a separate toolkit which has had less testing and so
some bugs do still exist, for example the first Java Development Kit (JDK 1.0) was unable to read
full-stops when they were entered in text fields. The news for Macintosh users is even worse
since the AWT is implemented in theory but many bugs exist. It is also likely that the AWT may
be completely rewritten on for all toolkits and that the conventions, classes and methods which
currently exist in the latest version (JDK 1.0.2) will no longer be supported, although this seems
unlikely because of the volume of Java applets which already exist.
Object Hierarchy and the AWT
Before the AWT can be examined it is first very useful to look at the way the object hierarchy is
built up. You will remember from the previous tutorials that super-classes can be extended and
ABS, ITFM/MAJOR PROJECT 57
Page 58
B-30/M&S/2011-2013
their properties inherited. You should also remember that classes can be abstract, meaning that
they are simply templates which are sub-classed to provide concrete implementations of a class.
Having said all this we can now begin to look at the object hierarchy used in the AWT. Although
this is quite fundamental to how the AWT works you don't need to understand every bit of it to be
able to use the AWT effectively.
Component
Component is an abstract class at the top of the AWT hierarchy. Every GUI component that
appears on the screen in a Java applet is a sub-class of Component, this means that every graphics
objects shares a number of methods and instance variables which allow, for example, the
currently used colour to be stored and altered.
Container
Container is an abstract sub-class of Component which allows other Components to be nested
inside it. These Components can also be Containers so the structure is hierarchical. Containers are
useful for arranging GUI components on the screen.
Panel
Panel is the simplest concrete sub-class of Container. Graphics objects which are drawn into an
applet are drawn onto the surface of a Panel. We have already seen a sub-class of Panel, although
we didn't identify it as such. Applet is a sub-class of Panel.
So far we have only looked at the container classes rather than the actual components which go in
these containers. Before we go into these components, buttons labels etc, we need to look at how
the components are positioned on screen and how we can interrogate the components.
Positioning GUI Components
There are two ways of positioning components, the first is a method called reshape which allows
each component to be placed by hand the second is using the LayoutManager which is part of the
Component class, and allows a degree of automation. However, before a component can be
placed on the screen it must first be added to the Panel (or Panel sub-class), this is done using the
static add method.
ABS, ITFM/MAJOR PROJECT 58
Page 59
B-30/M&S/2011-2013
The add method
add is a static method which takes the component to be added as its only parameter. In the
example which we will see the components are added to the class in which they are defined. This
class will be a sub-class of Applet which is in turn a sub-class of Panel. If you aren't quite sure
what this means don't worry because you will soon pick it up after looking at the example of
concrete components.
The reshape method
The reshape method is called on the component to be placed on the screen taking four integers are
input parameters. The first two are the x,y co-ordinate of the top left corner of the component
while the second pair is the size of the component. Again this will become clearer when some
actual examples are looked at.
Using the LayoutManager
You will see, in the later examples, that even if the LayoutManager isn't used and all components
are placed by hand there is still a call to the static method LayoutManager giving the parameter
null. This basically says that we don't want to use any automated layout. However, when you are
using more than a couple of components it is useful to be able to lay them automatically. There
are a number of layout styles which can be used, the most useful are: FlowLayout, BorderLayout
and GridLayout.
FlowLayout
FlowLayout places components similarly to how a word processor justifies text, either right, left
or centred. To set a layout in this style you must create a new layout which the setLayout method
takes as its input parameter. The constructor for FlowLayout takes three components, the first is a
final static (constant) value from the FlowLayout class: RIGHT, LEFT or CENTRE this
determines how the components will appear. The second and third parameters are integers
representing gap, in pixels, between a components and the one to its left and to the one above,
respectively. So for example:
set Layout (new FlowLayout.LEFT, 20, 10);
ABS, ITFM/MAJOR PROJECT 59
Page 60
B-30/M&S/2011-2013
This creates a layout which will be left justified with a 20 pixel gap between the components
horizontally and a 10 pixel gap vertically.
BorderLayout
This layout style is based around having one large component in the centre and four narrow, fixed
width, components around. This layout style uses the add method in a slightly different way,
asking for an additional parameter which is a String stating that the component is "North",
"South", "East" or "West" depending on where you wish to place it in relation to the centre
component. The centre component is identified by "Center". Note that the constructor for
BorderLayout has no input parameters. For Example:
setLayout (new BorderLayout());
add ("Center", new Button ("Middle");
add ("North", new Button ("Top");
add ("South", new Button ("Bottom");
add ("East", new Button ("Left");
add ("West", new Button ("Right");
Don't worry too much about how the Button bit works, we'll look at this later, but what this code
fragment does is put four small buttons around the edge of a much larger one.
GridLayout
This is probably the most useful of the layout styles. The constructor takes two integers as inputs
the first the number of columns to divide the Panel (or Panel sub-class, e.g. Applet) into and the
second is the number of rows. The components are then places in the grid created, starting at the
top left, running down the columns and finishing at the bottom right. The following code
fragment divides the Panel into a 6 by 8 grid.
setLayout (new GridLayout(6, 8));
ABS, ITFM/MAJOR PROJECT 60
Page 61
B-30/M&S/2011-2013
Event Handling
Although GUI components can look very impressive in an applet they aren't actually of any use if
you can't interrogate them. For example a button is no good if you can't tell whether it has been
pressed. Java deals with this problem by implementing a number of methods which are called
when certain events happen. Actually what happens is that when an event occurs a call is made to
the handleEvent method which determines what kind of event it was and calls an appropriate
method. The methods which are called can be overridden so the Java program knows what has
happened. Since this is only an introduction to the AWT we will only be looking at the action
method, this method is called (by handle Event) whenever an action takes place. All usable
components we are going to look at have actions, for example pressing a button is an action.
Basically an action is using the component, so changing the contents of a text field is an action as
is altering the selected item in a list or choice. (Don't worry about the names of components they
will be introduced shortly).
The action method has two input parameters, the first is an Event and the second an Object (and
returns a boolean). While the precise reason for these two parameters is beyond the scope of this
introductory lesson one important point is that it is possible to work out which Component caused
the event by checking the instance variable target of the Event. So to test whether the action had
been caused by a Component called wasItMe the action method looks like this:
public boolean action (Event e, Object o)
{
if (e.target == isItMe)
System.out.println ("It was ME");
return true;
}
It is also possible to override the handleEvent method, although not recommended. By doing this
you can act on any event, however, because you have overridden the default handle event the
action method (and others) will not be called.
Event types
ABS, ITFM/MAJOR PROJECT 61
Page 62
B-30/M&S/2011-2013
The Event class is a model of a user interface event. Events naturally fall into categories based on
the type of the event (the event type is indicated by the id data member). Table lists all of the
events defined by the AWT, sorted by category.
Window events
Window events are generated in response to changes in the state of a window, frame, or dialog.
Event
WINDOW_DESTROY
WINDOW_EXPOSE
WINDOW_ICONIFY
WINDOW_DEICONIFY
WINDOW_MOVED
Keyboard events
Keyboard events are generated in response to keys pressed and released while a component has
input focus.
Event
KEY_PRESS
KEY_RELEASE
KEY_ACTION
KEY_ACTION_RELEASE
ABS, ITFM/MAJOR PROJECT 62
Page 63
B-30/M&S/2011-2013
Mouse events
Mouse events are generated in response to mouse actions occurring within the boundary of a
component.
Event
MOUSE_DOWN
MOUSE_UP
MOUSE_MOVE
MOUSE_ENTER
MOUSE_EXIT
MOUSE_DRAG
Scroll events
Scroll events are generated in response to manipulation of scrollbars.
Event
SCROLL_LINE_UP
SCROLL_LINE_DOWN
SCROLL_PAGE_UP
SCROLL_PAGE_DOWN
SCROLL_ABSOLUTE
List events
ABS, ITFM/MAJOR PROJECT 63
Page 64
B-30/M&S/2011-2013
List events are generated in response to selections made to a list.
Event
LIST_SELECT
LIST_DESELECT
Miscellaneous events
Miscellaneous events are generated in response to a variety of actions.
Event
ACTION_EVENT
LOAD_FILE
SAVE_FILE
GOT_FOCUS
LOST_FOCUS
Events defined by the AWT, sorted by category
Event helper methods
The handleEvent() method is one place a programmer can put application code for handling
events. Occasionally, however, a component will only be interested in events of a certain type
(for example, mouse events). In these cases, the programmer can place the code in a helper
method, rather than placing it in the handleEvent() method.
Here is a list of the helper methods available to programmers. There are no helper methods for
certain types of events.
ABS, ITFM/MAJOR PROJECT 64
Page 65
B-30/M&S/2011-2013
action(Event evt, Object what)
gotFocus(Event evt, Object what)
lostFocus(Event evt, Object what)
mouseEnter(Event evt, int x, int y)
mouseExit(Event evt, int x, int y)
mouseMove(Event evt, int x, int y)
mouseUp(Event evt, int x, int y)
mouseDown(Event evt, int x, int y)
mouseDrag(Event evt, int x, int y)
keyDown(Event evt, int key)
keyUp(Event evt, int key)
false to indicate that the helper method did not handle the event.
The implementation of the handleEvent() method provided by class Component invokes each
helper method. For this reason, it is important that the redefined implementations of the
handleEvent() method in derived classes always end with the statement
return super.handleEvent(e);
Using GUI Components in the AWT
Using GUI Components - Labels
What is a Label ?
A Label is basically a piece of text which is displayed in a Panel (or Panel sub-class) which is
usually used to label other components.
Label Constructor
The Label constructor takes two parameters. The first is a String which forms the text to be
displayed as the Label. The second is a final static (constant) from the Label class which
determines the printing location of the Label, LEFT, RIGHT or CENTER.
ABS, ITFM/MAJOR PROJECT 65
Page 66
B-30/M&S/2011-2013
Using GUI Components - Buttons
What is a Button ?
A Button is a component which appears as a raised piece of applet containing a string of text.
Buttons are pressed by clicking on them with the left mouse button, this causes an action event.
Button Constructors
There are two main constructors for Buttons, the first has no parameters while the second takes a
String which becomes the text on the Button.
Button Methods
There are two pairs of methods that are very useful.
getLabel and setLabel
getLabel is called on the Button object and returns a String which is the current text displayed on
the button. setLabel is also called on the Button object and takes a String as a parameter, this
String then becomes the text displayed on the button. setLabel is useful to assign a Button a label
if it was created with no parameters constructor and has no label set or to change the current
label. The label on a Button (the text displayed on the actual Button) should not be confused with
the Label component.
enable and disable
These two methods are called on a Button object. disable "greys out" a Button and stops it being
selected. enable reverses this allowing a Button to become usable again.
ABS, ITFM/MAJOR PROJECT 66
Page 67
B-30/M&S/2011-2013
Using GUI Components - Checkboxes
What is a Checkbox ?
A Checkbox is item (usually in a list of other Checkboxes) which has a mark alongside it which
indicates either on or off.
What is a CheckboxGroup ?
A CheckboxGroup allows many Checkboxes to be grouped together. Only one Checkbox, in a
particular CheckboxGroup, may be "on" at any one time. Selecting another Checkbox will
deselect the currently selected one in the CheckboxGroup.
CheckboxGroups are created as objects of type CheckboxGroup. Checkboxes are made to belong
to CheckboxGroups either by a parameter in their constructor or by a method called
setCheckBoxGroup - see below
Checkbox Constructors
There are three useful forms of constructor for Checkboxes. The first has no parameters, the label
of the Checkbox can be given later with the setLabel method, as it can for Buttons. The second
simply takes a String, which will become the label of the Checkbox. The final form takes three
input parameters. The first is a String which will become the boxes label. The second is the
CheckboxGroup to which the box is to belong (null if none). And the third is the initial state of
the Checkbox, true or false.
CheckBox Methods
There are two pairs of methods that are very useful.
getState and setState
getState is called on a Checkbox object and returns a boolean indicating the current setting of the
box. setState is also called on a Checkbox object and accepts a single boolean parameter which it
sets the box to.
ABS, ITFM/MAJOR PROJECT 67
Page 68
B-30/M&S/2011-2013
getCheckboxGroup and setCheckboxGroup
getCheckboxGroup allows the group to which a Checkbox belongs to be determined. The get
method is called on a Checkbox object and returns an object of type CheckboxGroup, null is
returned if the box belongs to no group.
setCheckboxGroup allows a group to be assigned to a box, or the current one changed. The set
method is called on the Checkbox object and takes an object of CheckboxGroup type as the single
input parameter.
Using GUI Components - Text Fields and Text Areas
What are Text Fields and Text Areas?
The two text components allow text to be entered into an applet. They share a number of methods
in common, since they are both derived from the text component. The main difference between
the two is the individual methods which they have, in general the TextField is more suitable for
getting a single word of text, like a password whilst the TextArea is used for longer text.
TextField and TextArea Constructors
TextField has four forms of its constructor. The first takes no parameters. The second accepts a
single int which is the number of columns (i.e. characters) the field is to have. The third takes a
String which it uses as the initial value of the field. The final constructor combines the second
and third accepting a String and an int.
TextArea has four forms of its constructor. The first takes no parameters. The second takes two
ints which are the number of rows and columns (in that order) which the field is to have. The
third version takes a single String which is used as the initial value of the TextArea. The final
constructor combines the second and third accepting a String and two ints (in that order).
ABS, ITFM/MAJOR PROJECT 68
Page 69
B-30/M&S/2011-2013
Methods Common to both TextFields and TextAreas
The setText Method
The setText method is called on the text object (either of type TextField or TextArea) and takes a
String as a single input parameter. This String then becomes the text in the text object, this means
that the current value can be changed or a value.
The select and selectAll Methods
These two methods are called on a text object and allow part or all of the text in the object to be
highlighted. select accepts two integers representing the start position (an ordinal number in terms
of the characters in the object) and a end point, the text between the two points is then
highlighted. selectAll simply highlights all text in the object.
The getText and getSelectedText Methods
Both of these methods are called on a text object and return a String. The getText methods returns
the entire text content of the text object while getSelectedText just returns the text which is
highlighted.
The getColumns Method
This method is called on a TextField object an returns a int containing the number of columns
(i.e. character positions) in the TextField.
TextField Methods
The setEchoCharacter and getEchoChar Methods
When a TextField is used the characters typed into it are echoed in the TextField so the user can
see what they are typing. Sometimes this is not desirable, for example when a password is being
inputted. The setEchoCharacter method is called on a TextField with a char as its only input, this
character then becomes the one echoed. The getEchoChar method is also called on a TextField
and returns a char indicating the currently echoed character.
ABS, ITFM/MAJOR PROJECT 69
Page 70
B-30/M&S/2011-2013
TextArea Methods
The getRows Method
This method is identical to the getColumns method except that the int returns the number of rows
in the TextArea.
appendText Method
The appendText method is called on a TextArea object taking a single String as a parameter, this
String is then appended to the end of the text in the TextArea.
The insertText Method
This method works in the same way as the appendText method except that it takes another
parameter. This additional parameter is an int indicating the number of characters into the
TextArea to insert the text.
The replaceText Method
This method is called on a TextArea with three input parameters. The first is a String which will
replace the text in the positions indicated by the two ints which are the second and third
parameters. The first int is the position where the replaced text begins and the second is where it
will end. If the gap between the positions is greater than the number of characters in the String
then all of the excess characters are deleted from the TextArea. This means that replaced text will
always start at the first int specified and always end at the second.
ABS, ITFM/MAJOR PROJECT 70
Page 71
B-30/M&S/2011-2013
Using GUI Components - Images
What is an Image ?
An image is computer stored picture, Java can display pictures in GIF and JPEG (JPG) formats.
This lesson will just teach you how to display the images in an applet but there is much more you
can do with images in Java.
Image Constructor
The constructor for an image object takes two parameters, is a URL to the document base and the
second is a String containing the file name (with path). For now the first parameter can be
ignored, URLs are covered in the next lesson, it is unlikely that you will want to load images
from a different machine anyway so stick with the getDocumentBase method which is in the
example below. The second parameter is simple enough, but you must remember to specify the
path, Java will assume the file is in the same directory as the Java dot class file is you don't tell it
any different.
The drawImage Method
The drawImage method is used to display an Image object in the window. Rather than being
called on a Image object drawImage is a static method in the Applet class which takes 4
parameters. The first is the Image object while the next two are ints specifying the x and y co-
ordinates where the image is to be displayed. The final parameter is the applet into which the
image is to be drawn, normally you can specify the applet as this because you will want to draw
the image into the current applet.
Internet Interaction
Because Java is a language invented after the internet became a household name it includes a
package containing a number of classes and methods specifically designed for interaction with
the internet. The package, java.net.* should be imported at the top of any code which implements
material covered in this lesson. In this lesson we are going to concentrate on just one part of the
internet, the World Wide Web, after all this is where most Java applets will end up. Java also has
ABS, ITFM/MAJOR PROJECT 71
Page 72
B-30/M&S/2011-2013
classes to deal with opening sockets, sending datagram packets and identifying the host machine
in a variety of ways. There is, however, one rather large problem with the Java networking
functions which was intended to be a security feature. A Java applet can NOT open a socket to
any machine other than the one from which the applet was loaded. Basically this means that the
majority of the java.net classes and methods are useless. They can still be used in applications but
it is a real shame that applets are rendered almost powerless in terms of network functions. But all
is not lost, Java does include two classes (URL and URLConnection) which allow for interaction
with the WWW.
Universal Resource Locators (URLs)
What is a URL ?
A URL is like an address, in terms of the World Wide Web it allows any page to be uniquely
identified. The URLs are the thing which are found at the top of web browsers, usually beginning
with http://, for example:
http://www.brad.ac.uk/~mdwilks/homepage.html
How does Java use URLs ?
As you would expect Java implements URLs as objects, actually there are two types. The first
class URL deals with the details of the URL without actually opening a connection to it, this is
left to URLConnection.
The URL class and its Methods
The constructor for the URL class simply takes a string containing the URL address (in the form
that you normally see in a web browser. There are a number of methods which can then be called
on this new object which give various pieces of information about the URL object, they are:
getProtocol, this will normally be http
getHost, returns the host, i.e. the machine domain (e.g. www.brad.ac.uk)
getPort, returns the port specified in the URL, or -1 if not specified
getFile, returns the file, e.g. index.html
ABS, ITFM/MAJOR PROJECT 72
Page 73
B-30/M&S/2011-2013
toExternalForm, returns the full version of the URL, e.g. http://www/brad.ac.uk/index.html
Working:-
We have managed to create a very good user-friendly graphical interface using some forms. We
have created these forms using swings with the help of two packages java.awt and javax.swings.
Further, we extended the main class from JFrame class to make a basic frame which includes
various fiels like
1. labels from JLabel class
2. radio buttons from JRadioButton class
ABS, ITFM/MAJOR PROJECT 73
Page 74
B-30/M&S/2011-2013
3. buttons from JButton class
4. image icons from Icon class
5. text fields from JTextField class
We have also set the font, back ground and foreground color using following methods:-
1. setFont()
2. setForeground()
3. setBackground()
HOW TO RUN THE SOFTWARE
ABS, ITFM/MAJOR PROJECT 74
Page 75
B-30/M&S/2011-2013
FRAME-MAIN
ABS, ITFM/MAJOR PROJECT 75
Page 76
B-30/M&S/2011-2013
ABS, ITFM/MAJOR PROJECT 76
Page 77
B-30/M&S/2011-2013
HOW TO BROWSE AND OPEN A WAV FILE
HOW TO ENCRPYT THE SELECTED FILE
ABS, ITFM/MAJOR PROJECT 77
Page 78
B-30/M&S/2011-2013
ABS, ITFM/MAJOR PROJECT 78
Page 79
B-30/M&S/2011-2013
HOW TO SAVE THE ENCRYPTED FILE
ABS, ITFM/MAJOR PROJECT 79
Page 80
B-30/M&S/2011-2013
HOW TO SEND THE ENCRYPTED FILE
ABS, ITFM/MAJOR PROJECT 80
Page 81
B-30/M&S/2011-2013
RECOMMENDATIONS:-
STATEMENT OF PROBLEM:-
The proposed software is an attempt to make a simple Steganography program(Encoding and
decoding wav file) using crypt algorithm to overcome the problems faced by the old techniques
and to hide the encryption and decryption of wav files and hide the users also. The advantage of
steganography, over cryptography alone, is that messages do not attract attention to themselves.
Plainly visible encrypted messages—no matter how unbreakable—will arouse suspicion, and may
in themselves be incriminating in countries where encryption is illegal. Therefore, whereas
cryptography protects the contents of a message, steganography can be said to protect both
messages and communicating parties.
In ancient times, the process of cryptography that to manually had few drawbacks:-
1) The process was really insecure.
2) It was less efficient.
3) Sending of information was very risky and presence of sender and receiver was always
shown which defeated the purpose of hiding information.
WHY THE PARTICULAR TYPE IS CHOOSEN? :-
TO REMOVE THE SHORT COMMINGS OF CRYPTOGRAPHY AND MAKE THE
NETWORK COMMUNICATION MORE SECURE AND USER FRIENDLY
ABS, ITFM/MAJOR PROJECT 81
Page 82
B-30/M&S/2011-2013
BIBLIOGRAPHY:-
Professionals Referred:-
1. Er. Janpreet(L.I.T.)
2. Er. Kewal Krishan(L.I.T.)
3. Er. Nagpal(LPU)
Books Referred:-
1. Complete Reference in Java
2. Learn To Program in Java—John Smiley
3. Programming with Java---E.Balagurusamy
4. Basic Fundamentals of Java---Cay.S.Hortsmann
Internet Sites Referred:-
1. http://java.sun.com/docs/books/tutorial/uiswing
2. http://www.decoz.com/Calculations.htm
ABS, ITFM/MAJOR PROJECT 82
Page 83
B-30/M&S/2011-2013
3. http://www.sourcecodeworld.com/tutorials
ABS, ITFM/MAJOR PROJECT 83