23
ProMAX Platform Portable Quick Start Guide Version 5.0

ProMAX Platform Portable Quick Start Guide
Version 5.0

ProMAX Platform Portable Quick Start Guide
© 2016 ProMAX Systems | All Rights Reserved Page 2 of 23
Table of Contents
Contents About this guide ............................................................................................................................................ 3
Getting Started .............................................................................................................................................. 4
Before You Begin ....................................................................................................................................... 4
Space and Cooling Requirements ............................................................................................................. 4
Network Settings and Connecting Computers to Your Platform Server................................................... 5
Connecting Drives ..................................................................................................................................... 6
Starting the System for the First Time ...................................................................................................... 7
Client Setup ................................................................................................................................................... 8
Connection Problems ................................................................................................................................ 9
Install Platform Client Software for Mac .................................................................................................. 9
Accessing the Platform on a Mac ............................................................................................................ 10
Install Platform Client Software for Windows ........................................................................................ 11
Accessing the Platform from Windows ................................................................................................... 12
Server Configuration ................................................................................................................................... 13
Step1 – Connect Storage Devices ........................................................................................................... 13
Step2 – Log into the Platform ................................................................................................................. 13
Step 3 - Configure Platform Spaces (Volume Shares) ............................................................................. 16
Step 4 - Create New Users ...................................................................................................................... 18
Step 5 – Assign User Permissions to Platform ........................................................................................ 18
Step 6 – Start Sharing .............................................................................................................................. 19
Connection Problems .................................................................................................................................. 21
Troubleshooting Connection Problems .................................................................................................. 21
Mac Connection Troubleshooting .......................................................................................................... 21
Windows Connection Troubleshooting .................................................................................................. 21
Reset Connections .................................................................................................................................. 22
ProMAX Platform Portable Quick Start Guide
© 2016 ProMAX Systems | All Rights Reserved Page 3 of 23
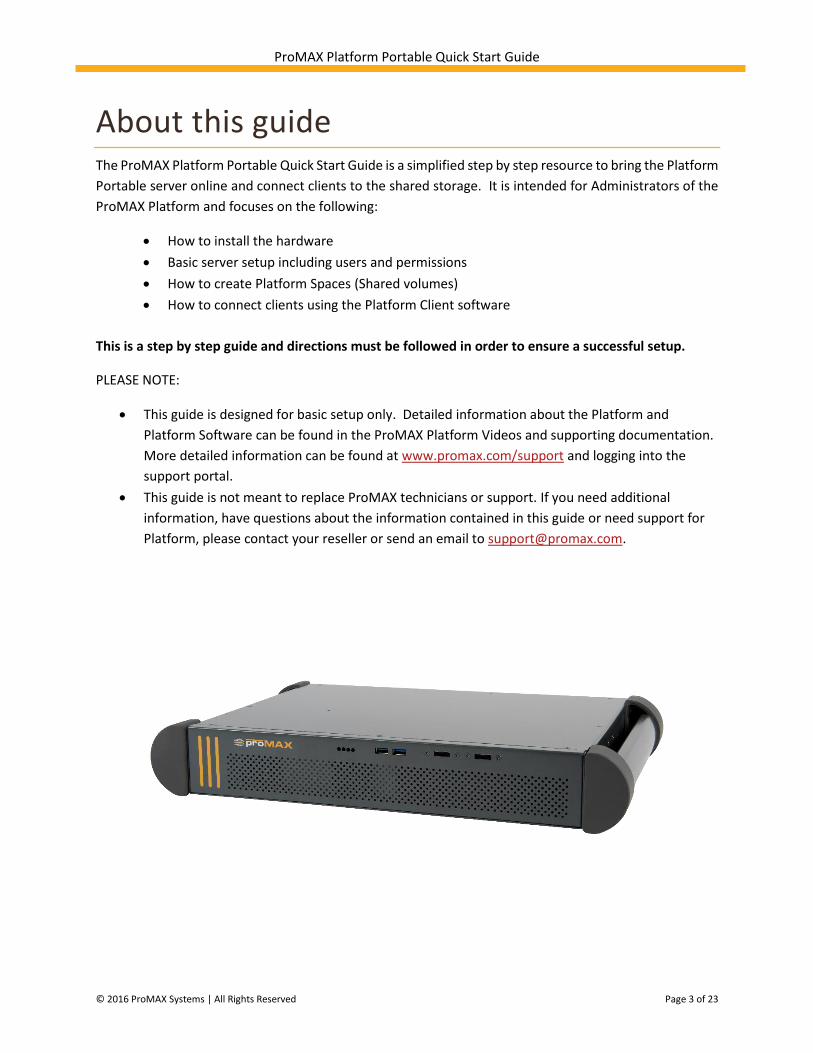
About this guide The ProMAX Platform Portable Quick Start Guide is a simplified step by step resource to bring the Platform
Portable server online and connect clients to the shared storage. It is intended for Administrators of the
ProMAX Platform and focuses on the following:
How to install the hardware
Basic server setup including users and permissions
How to create Platform Spaces (Shared volumes)
How to connect clients using the Platform Client software
This is a step by step guide and directions must be followed in order to ensure a successful setup.
PLEASE NOTE:
This guide is designed for basic setup only. Detailed information about the Platform and
Platform Software can be found in the ProMAX Platform Videos and supporting documentation.
More detailed information can be found at www.promax.com/support and logging into the
support portal.
This guide is not meant to replace ProMAX technicians or support. If you need additional
information, have questions about the information contained in this guide or need support for
Platform, please contact your reseller or send an email to [email protected].

ProMAX Platform Portable Quick Start Guide
© 2016 ProMAX Systems | All Rights Reserved Page 4 of 23
Getting Started
Before You Begin
Check the contents of your package. You should have received the following standard components:
1 x Platform Portable Carrying Case
1 x ProMAX Platform Portable Chassis
1 x Power cables
1 x HDMI to DVI Conversion Adapter
1 x ProMAX Platform Recovery USB Drive
1x Platform Portable Quick Start Guide (This manual)
If you are missing any of these components please contact your reseller or ProMAX support at
Space and Cooling Requirements
The ProMAX Platform Portable is designed to operate in a safe environment inside or outside of the office.
Make sure that the area you place it is clean, cool and vibration free. Make sure nothing blocks any of the
openings in the front and back panels and case of the Platform as air needs to flow freely through these
areas. Platform Portable must be kept cool and dry in an operating environment of between 5C/41F –
22C/80F.

ProMAX Platform Portable Quick Start Guide
© 2016 ProMAX Systems | All Rights Reserved Page 5 of 23
Network Settings and Connecting Computers to Your Platform Server
The Platform Portable has 2 onboard NIC (Network Interface Connection) ports. The Left port (labeled
#1) can be used for connection to your internal network or internet and will show up in the system as
the ‘internet’ connection.
The Right port (labeled #2) can be used to connect to a workstation. This will show up in your system as
Onboard NIC 2.
Other client computers connect directly to network adapter cards installed in the slot of the chassis.
The number of ports available will depend on the exact model of Platform Portable you purchased.
These can be 1GbE or 10GbE
Copper NICs or 10GbE Fiber NICs.
All of the NIC ports (other than
the internet connection
discussed above) come pre-
configured and optimized for
video streaming. Do not change
any of the NIC port settings
unless advised by a ProMAX
Technical Support Representative.
#1 #2

ProMAX Platform Portable Quick Start Guide
© 2016 ProMAX Systems | All Rights Reserved Page 6 of 23
PLEASE NOTE: All client workstations must be physically connected to the Platform Server either
directly or via a qualified switch before proceeding to Server Setup.
Connecting Drives
Before you can begin sharing your information to the client computers, you will need to connect your
storage to the Platform. This can be done thru various types of connections on the Platform Unit. The
Portable supports the following types of connections:
1) USB 2.0 (Back)
2) USB 3.0 (Front and Back)
3) Firewire 400 (Back)
4) Firewire 800 (Back)
5) Thunderbolt (Back)
6) eSata (Front)
7) USB 3.0 (Front)
You can also connect a drive to the Platform any time after the system is up and running.
Back of Unit Firewire 800
USB 3.0
USB 2.0
Thunderbolt
Back of Unit
eSata
FW 400

ProMAX Platform Portable Quick Start Guide
© 2016 ProMAX Systems | All Rights Reserved Page 7 of 23
Starting the System for the First Time
Before powering on the system please check that the following items are in place:
Connect all client workstations to the network cards in the back of the server using either Cat6
or Multimode Fiber. (Note that the first NICs (Network Interface Card) discussed above is
reserved the internet connection)
Connect the power cable to the power supply in the back of the server
PLEASE NOTE: You must first unplug any USB storage devices such as flash drives and external hard
drives as the system may attempt to boot from them.
You can now depress power button on the back of the unit. The power button is located on the back of
the unit, right side, just above the power supply. The power switch is a “rocker” type switch so you can
simply toggle it over to the “1” position for a second, and then let it go and the system will power up.
PLEASE NOTE: All client workstations must be physically connected to the Platform Server either
directly or via a qualified switch before proceeding to Server Setup.
Wait at least 3 full minutes before proceeding to the next step. The Platform Portable server must fully
start up before you can login from your workstation.

ProMAX Platform Portable Quick Start Guide
© 2016 ProMAX Systems | All Rights Reserved Page 8 of 23
Client Setup PLEASE NOTE:
- Client workstations must be physically connected to the Platform (either direct or thru an
approved switch) before installing the Platform Client Software.
- Client workstation NICs must be set to “DHCP”. If you are unsure how to set your network
connection for DHCP please contact your system administrator.
Access to the Platform occurs through a browser interface. The Platform supports both Google Chrome
and Apple Safari browsers. Once logged into the server, the browser allows for easy mounting and
dismounting of Platform Spaces which are used as Project locations. To begin using the Platform, follow
the steps below for both PC and Mac users.
The Platform requires a ‘Listener’ program to be installed on the workstation.
To start, bring up a Google Chrome or Safari browser and type in http://platform1.local (substitute
platform1.local with the name of your server if it is different).
Note: On certain computers, Apple Bonjour can have a conflict and using http://platform1.local will not work. In this
case you will need to type the IP address of the Platform server. Check the IP address of the connection on your
computer. It will show up as 10.10.3.100 (for example). In this case type 10.10.3.1 in the browser
You will see the following message appear in the browser:

ProMAX Platform Portable Quick Start Guide
© 2016 ProMAX Systems | All Rights Reserved Page 9 of 23
Click on the Listener download link appropriate and the browser will download the Platform
Listener program to the download folder on your computer.
Connection Problems
When you start the browser and type in http://platform1.local, if you do not see the screen above and
instead the browser does an internet search on that keyword or you are having general connectivity
problems, see the Troubleshooting Connection Problems section of this document.
If you are going to connect to the Platform from the Mac, see the section directly below, Install Platform
Client Software for Mac. If you are going to connect to the Platform from a Windows workstation, see
the section called Install Platform Client Software for Windows.
Install Platform Client Software for Mac
On the browser, click in the downloads section of the browser and Double click the ProMAX
Platform Client Monitor package to begin (PromaxClientMonitor.pkg)
1) Click Continue at the Introduction step
2) Read the Software License. Click
Continue at the Software License step.
3) If you agree to the license, click the
‘Agree’ button
4) Click Continue when selecting the
destination of the installation
5) Click Install and type in an administrator
password to being the installation. Note, you will get
the following warning message. If you do not wish to
reboot your mac at this time, you will need to stop the
installation now.

ProMAX Platform Portable Quick Start Guide
© 2016 ProMAX Systems | All Rights Reserved Page 10 of 23
After the installation is complete, you will receive the following
message. Click on ‘Restart’ to restart your Mac.
Accessing the Platform on a Mac
In the system doc (top right hand corner of the screen), you will see the Platform Logo.
. Shown here
outlined in red , this logo indicates that the Platform Listener service is running but the session is not
connected. If this logo is not visible, you will need to start the listener. Go to Spotlight search and type
in Platform. The listener will appear in the list of results and you can start it.
To login to the Platform, bring up a Google Chrome or Safari browser and type in http://platform1.local
(substitute platform1.local with the name of your server if it is different).
Note: On certain computers, Apple Bonjour can have a conflict and using http://platform1.local will not work. In this
case you will need to type the IP address of the Platform server. Check the IP address of the connection on your
computer. It will show up as 10.10.3.100 (for example). In this case type 10.10.3.1 in the browser
You will see the following message appear in the browser:
After the browser has connected, you will get a login screen.
ProMAX Platform Portable Quick Start Guide
© 2016 ProMAX Systems | All Rights Reserved Page 11 of 23
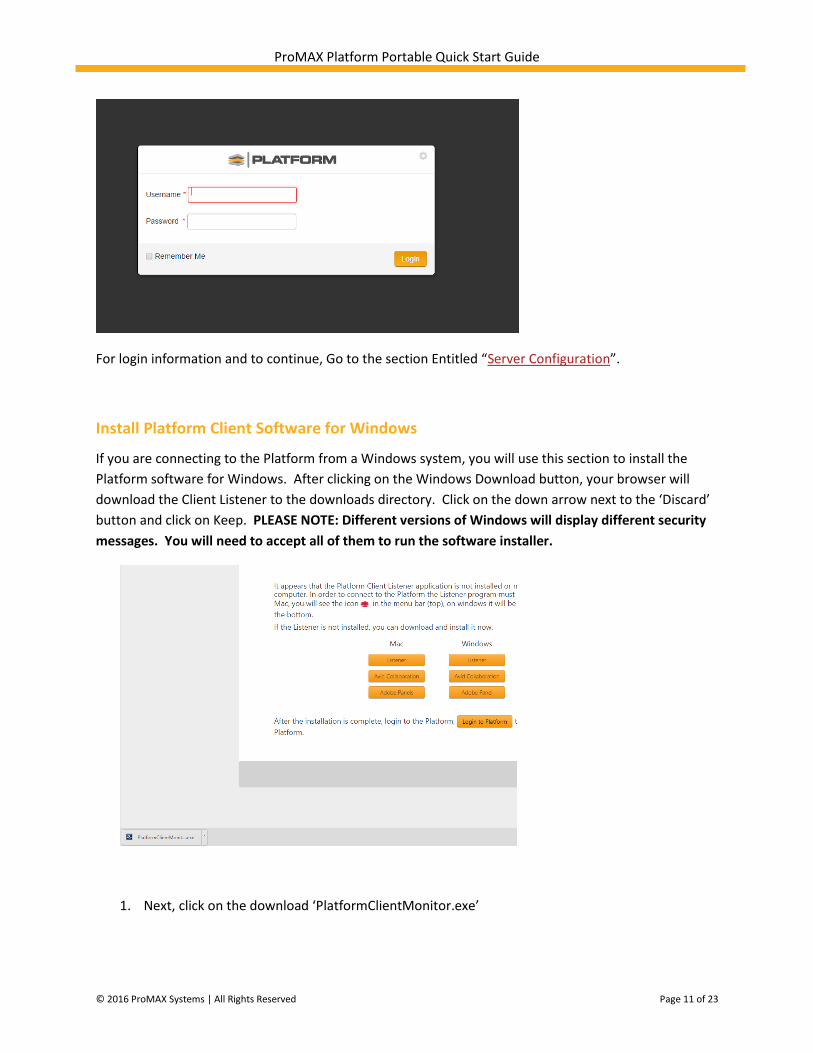
For login information and to continue, Go to the section Entitled “Server Configuration”.
Install Platform Client Software for Windows
If you are connecting to the Platform from a Windows system, you will use this section to install the
Platform software for Windows. After clicking on the Windows Download button, your browser will
download the Client Listener to the downloads directory. Click on the down arrow next to the ‘Discard’
button and click on Keep. PLEASE NOTE: Different versions of Windows will display different security
messages. You will need to accept all of them to run the software installer.
1. Next, click on the download ‘PlatformClientMonitor.exe’

ProMAX Platform Portable Quick Start Guide
© 2016 ProMAX Systems | All Rights Reserved Page 12 of 23
1. You will receive a security warning. Click on Run.
2. If this is not the first time you have installed the
Platform Client Listener, you will get a message
asking if you want to upgrade. Click on Yes.
3. Click Next
4. Click Finish
Accessing the Platform from Windows
In the system tray (bottom right hand corner of the screen), you will see the Platform Logo.
. Shown here outlined in Red , this logo indicates that
the Platform Listener service is running but the session is not connected. To login to the Platform, bring
up a Google Chrome browser and type in http://platform1.local (substitute platform1.local with the
name of your platform portable server if it is different).
You will see the following message appear in the browser as the login screen is loading:
Please note that it may take 1-2mins to contact Platform the first time you connect.
For login information and to continue, Go to the next section Entitled “Server Configuration”.
ProMAX Platform Portable Quick Start Guide
© 2016 ProMAX Systems | All Rights Reserved Page 13 of 23
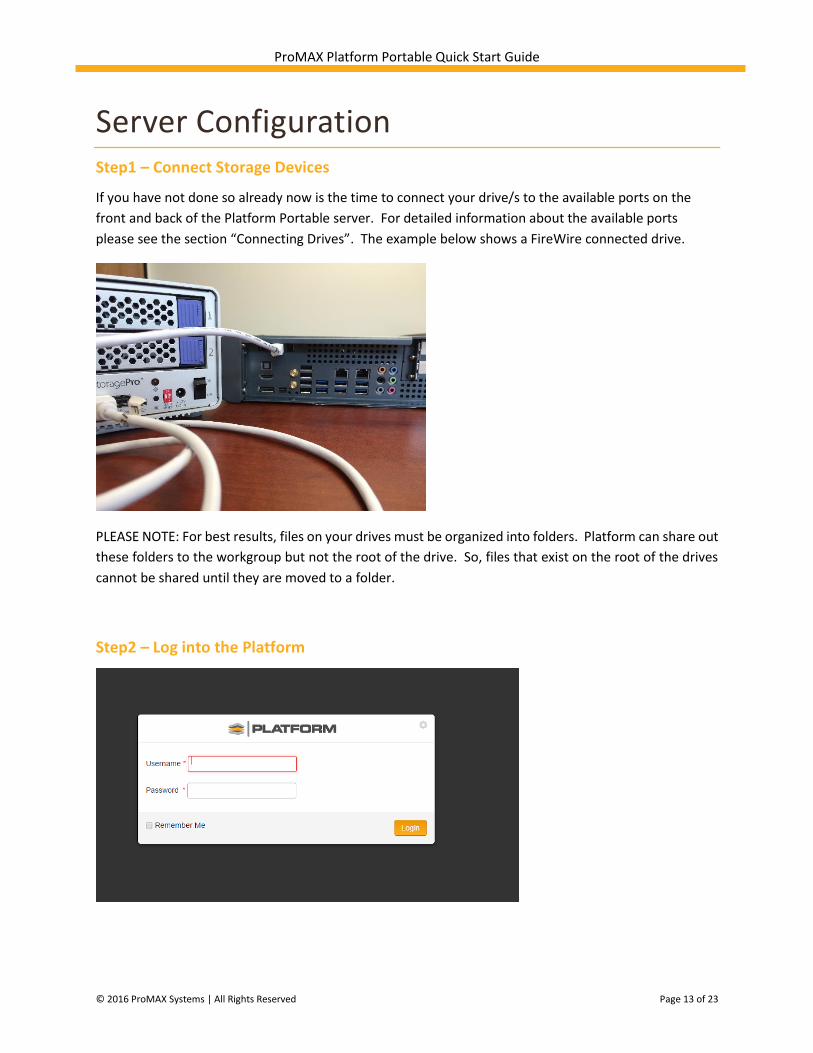
Server Configuration Step1 – Connect Storage Devices
If you have not done so already now is the time to connect your drive/s to the available ports on the
front and back of the Platform Portable server. For detailed information about the available ports
please see the section “Connecting Drives”. The example below shows a FireWire connected drive.
PLEASE NOTE: For best results, files on your drives must be organized into folders. Platform can share out
these folders to the workgroup but not the root of the drive. So, files that exist on the root of the drives
cannot be shared until they are moved to a folder.
Step2 – Log into the Platform

ProMAX Platform Portable Quick Start Guide
© 2016 ProMAX Systems | All Rights Reserved Page 14 of 23
Use the following to Login to the Platform on the server:
Username: Admin
Password: Promax123 (password is case sensitive)
The first time you connect to the Platform on Windows you will be prompted to optimize your network
connections for streaming. Mac systems are automatically optimized for streaming during the installation
process.
Click yes to optimize your connection for Platform Streaming.
When finished, the system will show this message.
If you answer no, the software will still allow you to login, however, your connection is will not be
optimized until you restart your system.
Upon first login to the Platform you will be positioned on the Platform Spaces screen under the first
Storage Group as see below. Storage Groups are another name for the attached storage devices you
connect to your system. Although the name in the example below is “StorageGroup01”, the name of your
drive will likely be different.
PLEASE NOTE: If you purchased a Platform Portable [Y] Server or Platform Portable 100 Server, the
onboard SSD RAID storage will show up as “StorageGroup01”

ProMAX Platform Portable Quick Start Guide
© 2016 ProMAX Systems | All Rights Reserved Page 15 of 23
If you do not see a Storage group listed, go back to the server and make sure you have a drive physically
connected to the server.
If drives are physically connected and powered on but you still do not see a Storage group listed please
follow these steps:
1. Click on the “Storage Groups” button from the main menu on the left hand side.
2. On the Storage Group page click the button “Scan for Hard Drives”. Platform will scan the
system and attempt to add any drives that are not already displayed.

ProMAX Platform Portable Quick Start Guide
© 2016 ProMAX Systems | All Rights Reserved Page 16 of 23
Step 3 - Configure Platform Spaces (Volume Shares)
Platform Spaces are the shared volumes that will be presented to users for them to access files on the
server. Platform Spaces can be organized anyway you like however when organized by project they allow
the greatest flexibility for users of the Platform. You can choose to create new spaces on your drives
“Create New Platform Space” and then add content to them, or take existing folders with content
already in them and convert them to Platform Spaces “Add Existing Platform Space”. Both methods are
described in the sections below.
Create New Platform Spaces
Click on the Platform Spaces button listed on the menu. When creating a new Platform Space, please first
select the Storage Group tab at the top of the screen you want to create your Platform Space under. In a
new Platform Server, you may only have one Storage Group.
In this example, we are positioned on StorageGroup01 and the Platform space we create will be under
StorageGroup-1.
Next, click on the ‘Create New Platform Space’ button.
Type in the name of your Platform Space. Next, select the
maximum size you want to allow for this Platform Space.
You can enter a number and selecting the increment
(Megabytes, Gigabytes, and Terabytes) or you can check
the box ‘No Size Cap’ which will not assigned a max size.
When you click on “Create” your new Platform Space will
appear in the list. PLEASE NOTE: Max size cannot be set
on spaces that are created on HFS+ formatted drives.
ProMAX Platform Portable Quick Start Guide
© 2016 ProMAX Systems | All Rights Reserved Page 17 of 23
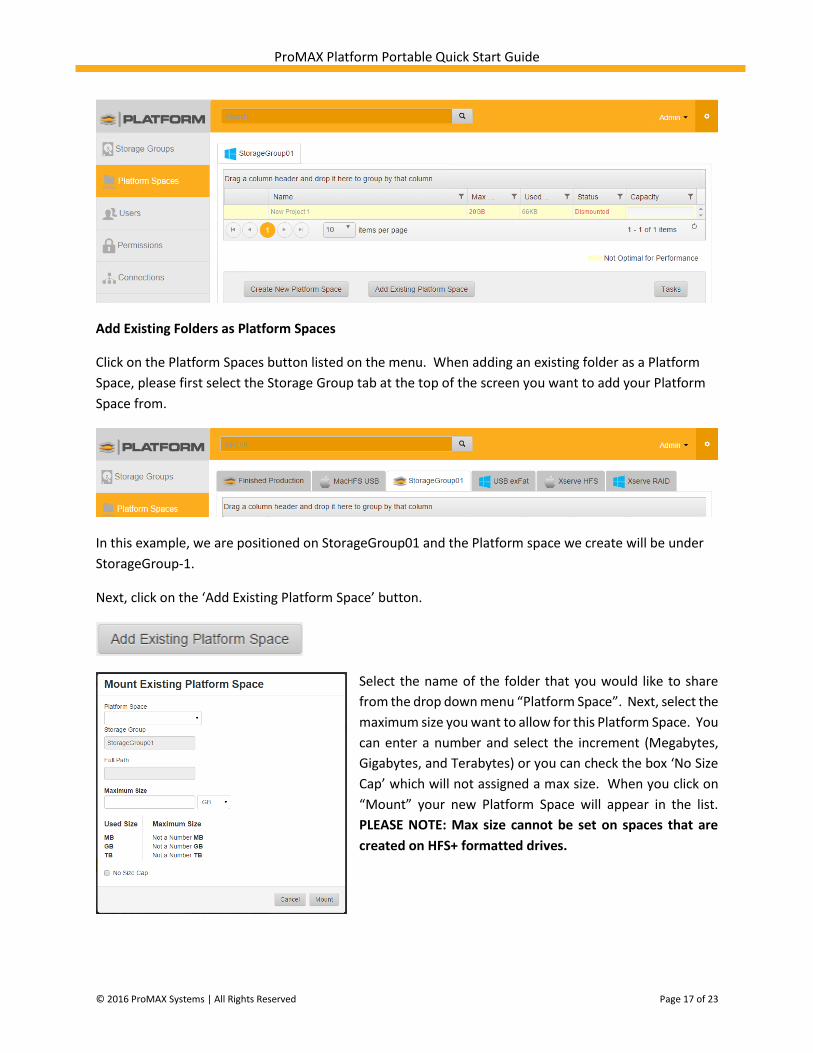
Add Existing Folders as Platform Spaces
Click on the Platform Spaces button listed on the menu. When adding an existing folder as a Platform
Space, please first select the Storage Group tab at the top of the screen you want to add your Platform
Space from.
In this example, we are positioned on StorageGroup01 and the Platform space we create will be under
StorageGroup-1.
Next, click on the ‘Add Existing Platform Space’ button.
Select the name of the folder that you would like to share
from the drop down menu “Platform Space”. Next, select the
maximum size you want to allow for this Platform Space. You
can enter a number and select the increment (Megabytes,
Gigabytes, and Terabytes) or you can check the box ‘No Size
Cap’ which will not assigned a max size. When you click on
“Mount” your new Platform Space will appear in the list.
PLEASE NOTE: Max size cannot be set on spaces that are
created on HFS+ formatted drives.

ProMAX Platform Portable Quick Start Guide
© 2016 ProMAX Systems | All Rights Reserved Page 18 of 23
Step 4 - Create New Users
Click on the “Users” button on the left hand menu.
Click the “Add New User” button and a pop up window will appear:
Complete the form fields and click “Create” to add the new user. Please note that only the Username and
Password fields are required to create the user.
Step 5 – Assign User Permissions to Platform
By default a new user will have Read and Modify access to all Platform Spaces. It’s important to remember
to set specific permissions for each user that is added to the system.
User access and permissions are managed per Platform Space. To set permissions click on the
“Permissions” button on the left hand side of the Platform Manager. Now select the new user you just
created.
The grid on the left side of the window shows all the active users in the Platform. The right side shows a
list of Platform Spaces and permission rights.

ProMAX Platform Portable Quick Start Guide
© 2016 ProMAX Systems | All Rights Reserved Page 19 of 23
For each Platform Space listed, assign either the Read or Modify permission by clicking inside the box to
check it. To ensure that the user has no access to a Platform space, make sure both permissions options
are unchecked.
Adding Feature Permissions allows you to determine what capabilities the user has to the Platform. Click
on the ‘Feature Permissions’ tab at the top of the screen.
In this view, you select what features the user has access to when they login. This will dynamically change
the menu of the platform interface. You will choose between Admin, User and No access for each feature.
New users automatically have ‘user’ access to Platform Spaces, File Locking and the Search function.
Step 6 – Start Sharing
To mount Platform Spaces and start sharing content you will need to login to Platform from one of the
connected workstations with a user account that has access to one or more of the Platform Spaces. (NOTE:
You may already be logged in if you are using the same workstation that configured the server.)
1. Open a Safari or Chrome browser window from a workstation with the Platform Listener
installed. Please refer to previous sections for how to install the Listener.
2. Browse to http://platform1.local
3. Login with your username and password (created in step 4 of this section)
4. Click on the “Platform Spaces” tab on the main menu
5. Mount the Platform Spaces that you need to access content from by either clicking the status
link “Dismounted” or by right clicking on the space and selecting “Mount”

ProMAX Platform Portable Quick Start Guide
© 2016 ProMAX Systems | All Rights Reserved Page 20 of 23
6. If you are on a windows workstation then mounted platform spaces will show up in windows
explorer as mapped network drives. If you are on a Mac workstation mounted platform spaces
show up as mounted volumes on the desktop. You can now use these spaces to start adding and
sharing content.
Additional Features and Options:
This guide was designed for basic setup only. For Detailed information about the Platform and
Platform Software including how to configure Indexing and Proxy Generation please refer to the
ProMAX Platform Videos and supporting documentation. More detailed information can be
found at www.promax.com/support and logging into the support portal.
Archiving with Platform Portable
If you have purchased the option to use the LTO Backup and Archival features on your Platform
Portable, please see the supplemental Quick Start Guide for Archiving with Platform which provides
detailed step by step instructions.

ProMAX Platform Portable Quick Start Guide
© 2016 ProMAX Systems | All Rights Reserved Page 21 of 23
Connection Problems Troubleshooting Connection Problems
If you are having problems getting connect to the Platform, try to follow these simple steps:
Mac Connection Troubleshooting
1) Make sure your computer’s network port is connected and communicating with the Platform.
Under preferences, open up the Network
screen. For the network port connected to the
Platform, make sure it shows a green icon and
‘Connected’. Most of the time, the setting
should be set to ‘Using DHCP’.
2) If you have an amber color and the IP address
shows 169.254.X.X this indicates that your
computer is not pulling an IP address from the
server. In this case, you can unplug your
network connection, wait 60 seconds, and plug
it back in again. Or follow the procedure listed
below to Reset Connections.
Windows Connection Troubleshooting
1) Make sure your computer’s network port is connected and communicating with the Platform.
First, click or type the start button, and type in ‘Network’
.
2) Then click on Network and Sharing Center.
3) On the left hand menu, click on ‘Change adapter Settings’.
ProMAX Platform Portable Quick Start Guide
© 2016 ProMAX Systems | All Rights Reserved Page 22 of 23
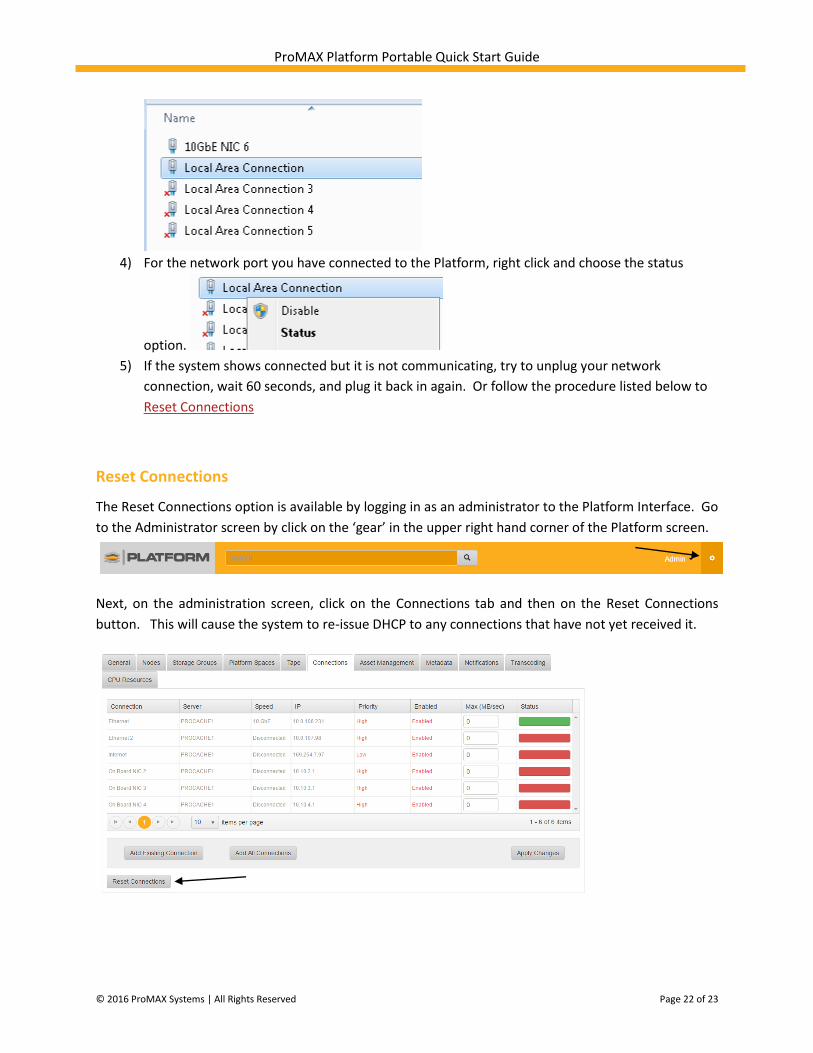
4) For the network port you have connected to the Platform, right click and choose the status
option.
5) If the system shows connected but it is not communicating, try to unplug your network
connection, wait 60 seconds, and plug it back in again. Or follow the procedure listed below to
Reset Connections
Reset Connections
The Reset Connections option is available by logging in as an administrator to the Platform Interface. Go
to the Administrator screen by click on the ‘gear’ in the upper right hand corner of the Platform screen.
Next, on the administration screen, click on the Connections tab and then on the Reset Connections
button. This will cause the system to re-issue DHCP to any connections that have not yet received it.

ProMAX Platform Portable Quick Start Guide
© 2016 ProMAX Systems | All Rights Reserved Page 23 of 23
Contact Support For more information about ProMAX Platform and Platform Manager Software please refer to the visit
our website at www.promax.com Technical support requests and parts replacement in the US and North
America are handled directly by ProMAX, and in all other markets are handled by the local reseller. Please
see below for complete contact information:
USA & North America Please contact your reseller or: ProMAX Systems 2850 S. Fairview Street Santa Ana, CA 92704 Sales (949) 861-2700, Option 1 [email protected] Technical Support (949) 861-2700, Option 2 [email protected]
International (Asia/Pacific, Europe, South America) For all international sales and support inquiries please contact your local reseller.


