29
PROVIDER SETA PORTAL PROVIDER SETA PORTAL PROVIDER SETA PORTAL PROVIDER SETA PORTAL USER MANUAL REMOTENET PTY (LTD) 2016©
PROVIDER SETA PORTALPROVIDER SETA PORTALPROVIDER SETA PORTALPROVIDER SETA PORTAL
USER MANUAL
REMOTENET PTY (LTD) 2016©

1 | P a g e
The PROVIDER SETA PORTAL (PSP) is an online designed to directly update information into the
SETA MIS.
The User is to use the following link to register: https://banksetamis.org.za/
The above link will open up the following page:
NEW REGISTRATION:
The User should proceed by clicking on: PROCEED TO PSP (PROVIDER SETA PORTAL). This will take
the User to the page below:
Proceed by clicking on My Account and then New Registration.
2 | P a g e
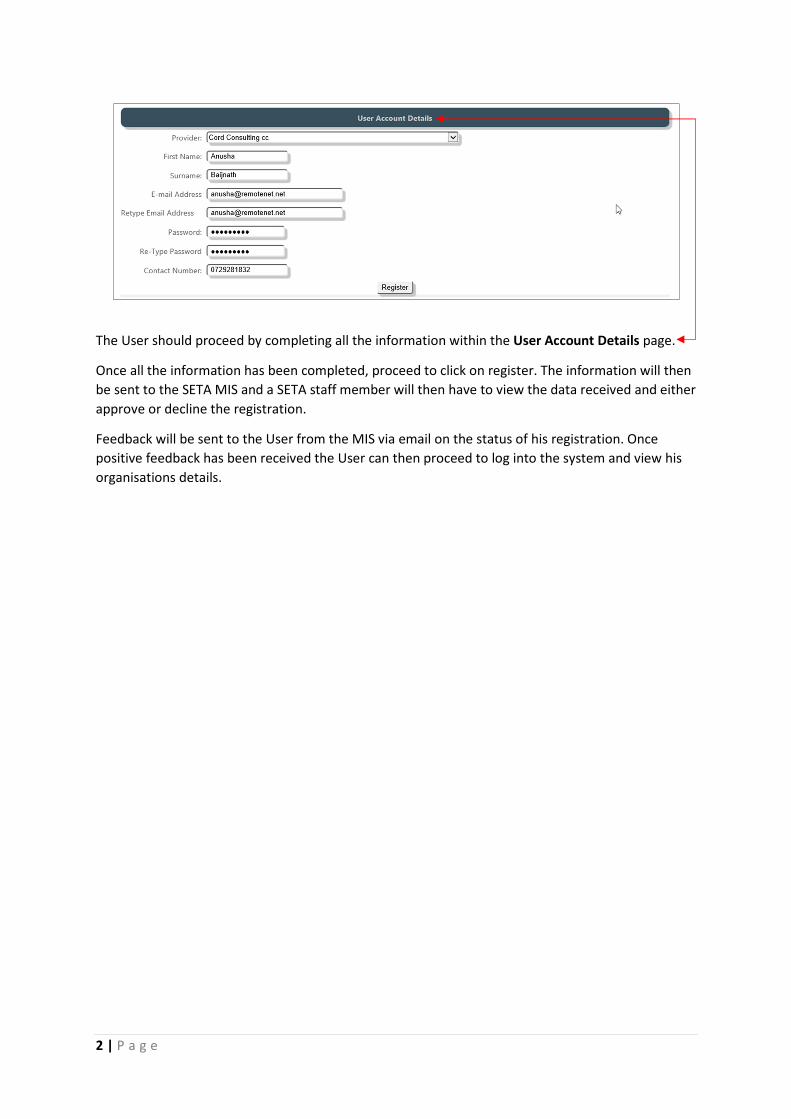
The User should proceed by completing all the information within the User Account Details page.
Once all the information has been completed, proceed to click on register. The information will then
be sent to the SETA MIS and a SETA staff member will then have to view the data received and either
approve or decline the registration.
Feedback will be sent to the User from the MIS via email on the status of his registration. Once
positive feedback has been received the User can then proceed to log into the system and view his
organisations details.
3 | P a g e
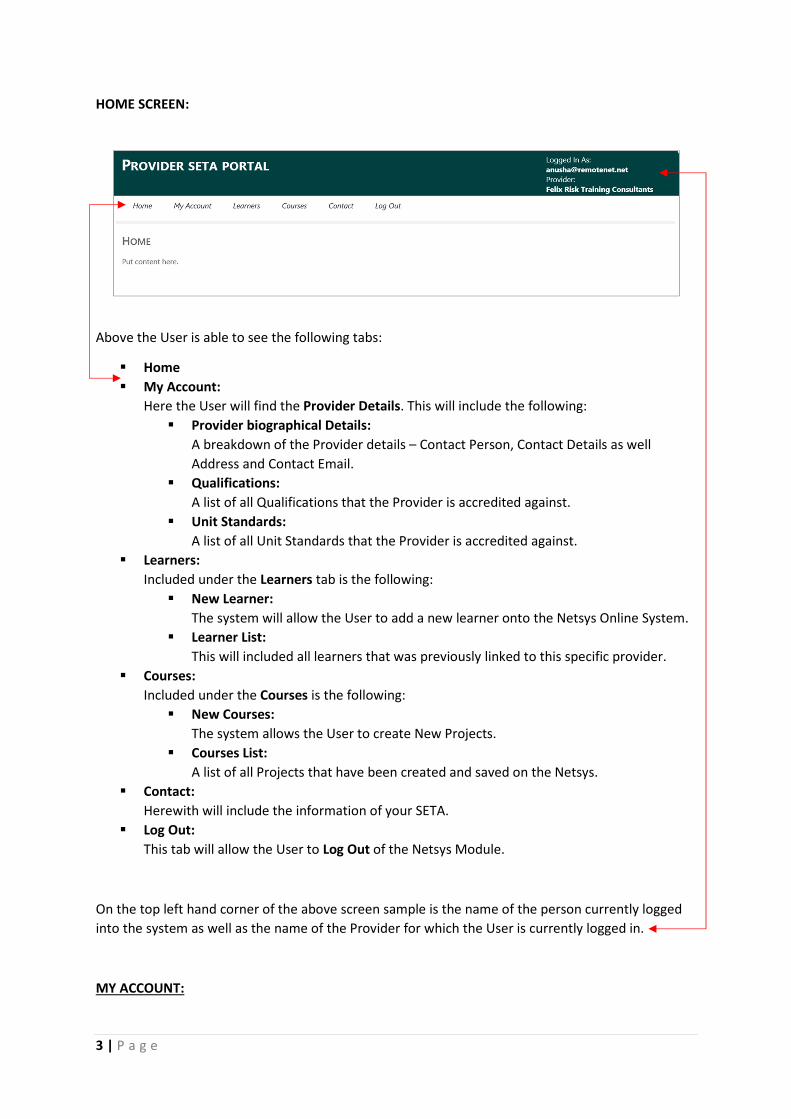
HOME SCREEN:
Above the User is able to see the following tabs:
� Home
� My Account:
Here the User will find the Provider Details. This will include the following:
� Provider biographical Details:
A breakdown of the Provider details – Contact Person, Contact Details as well
Address and Contact Email.
� Qualifications:
A list of all Qualifications that the Provider is accredited against.
� Unit Standards:
A list of all Unit Standards that the Provider is accredited against.
� Learners:
Included under the Learners tab is the following:
� New Learner:
The system will allow the User to add a new learner onto the Netsys Online System.
� Learner List:
This will included all learners that was previously linked to this specific provider.
� Courses:
Included under the Courses is the following:
� New Courses:
The system allows the User to create New Projects.
� Courses List:
A list of all Projects that have been created and saved on the Netsys.
� Contact:
Herewith will include the information of your SETA.
� Log Out:
This tab will allow the User to Log Out of the Netsys Module.
On the top left hand corner of the above screen sample is the name of the person currently logged
into the system as well as the name of the Provider for which the User is currently logged in.
MY ACCOUNT:
4 | P a g e
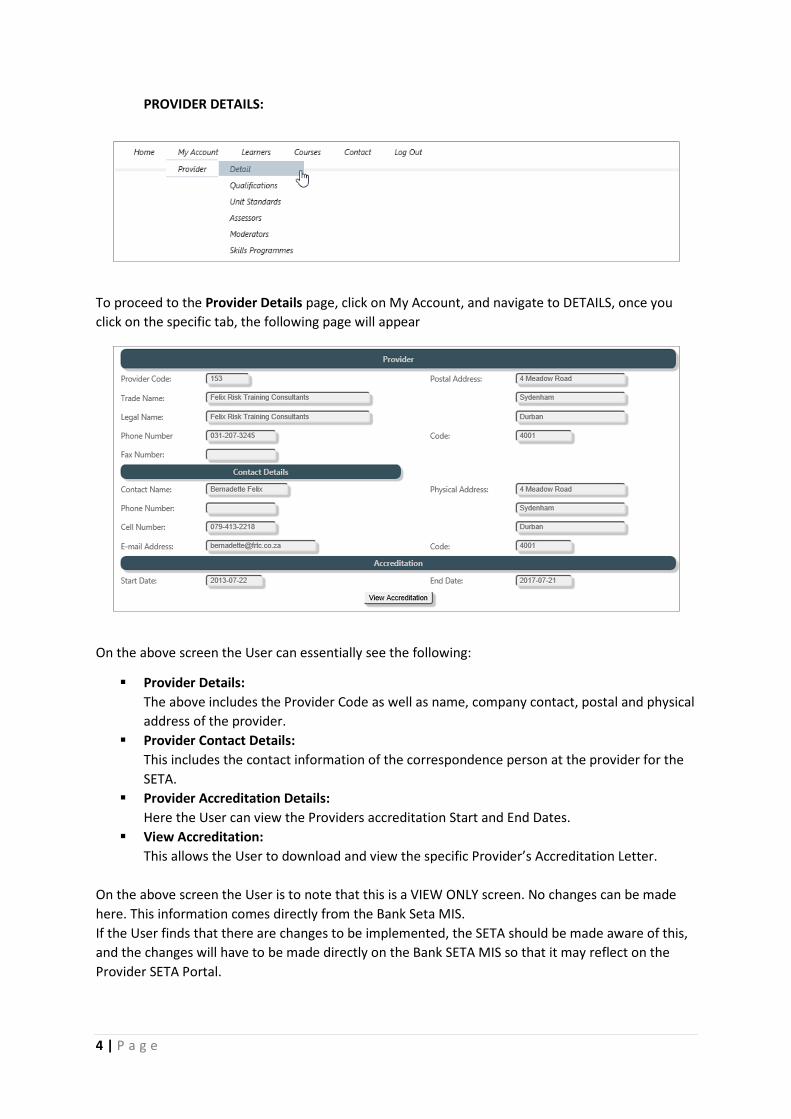
PROVIDER DETAILS:
To proceed to the Provider Details page, click on My Account, and navigate to DETAILS, once you
click on the specific tab, the following page will appear
On the above screen the User can essentially see the following:
� Provider Details:
The above includes the Provider Code as well as name, company contact, postal and physical
address of the provider.
� Provider Contact Details:
This includes the contact information of the correspondence person at the provider for the
SETA.
� Provider Accreditation Details:
Here the User can view the Providers accreditation Start and End Dates.
� View Accreditation:
This allows the User to download and view the specific Provider’s Accreditation Letter.
On the above screen the User is to note that this is a VIEW ONLY screen. No changes can be made
here. This information comes directly from the Bank Seta MIS.
If the User finds that there are changes to be implemented, the SETA should be made aware of this,
and the changes will have to be made directly on the Bank SETA MIS so that it may reflect on the
Provider SETA Portal.
5 | P a g e
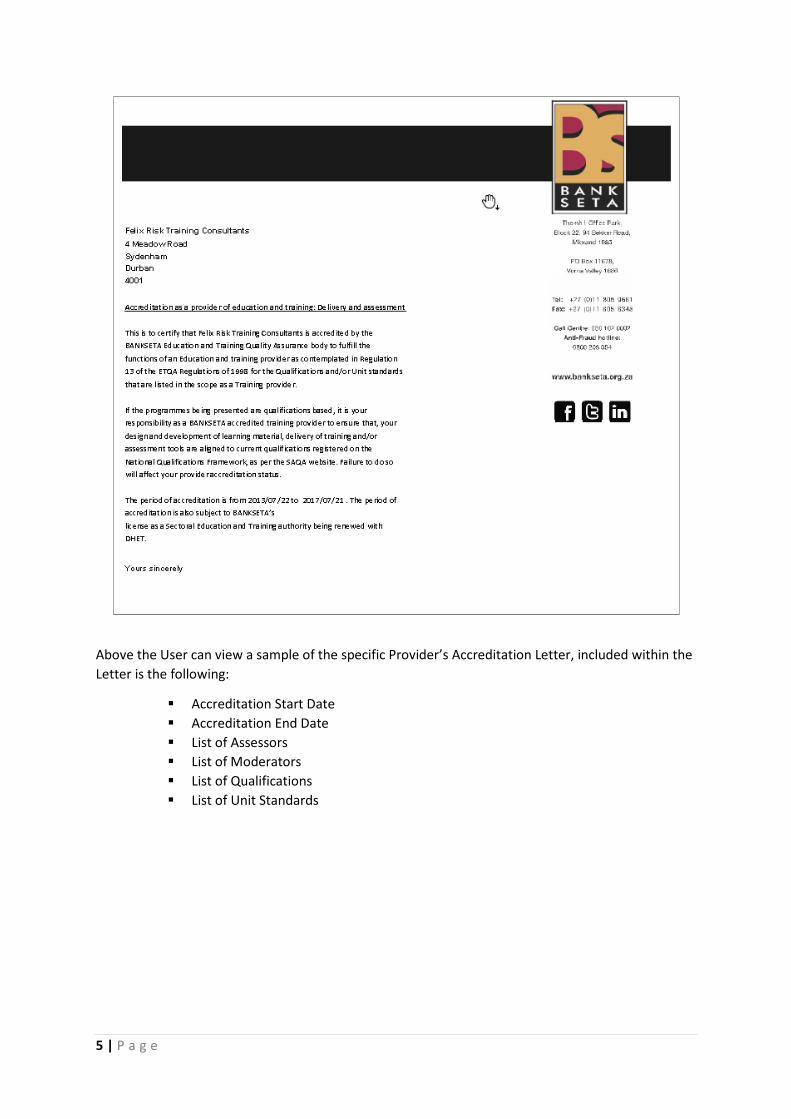
Above the User can view a sample of the specific Provider’s Accreditation Letter, included within the
Letter is the following:
� Accreditation Start Date
� Accreditation End Date
� List of Assessors
� List of Moderators
� List of Qualifications
� List of Unit Standards
6 | P a g e
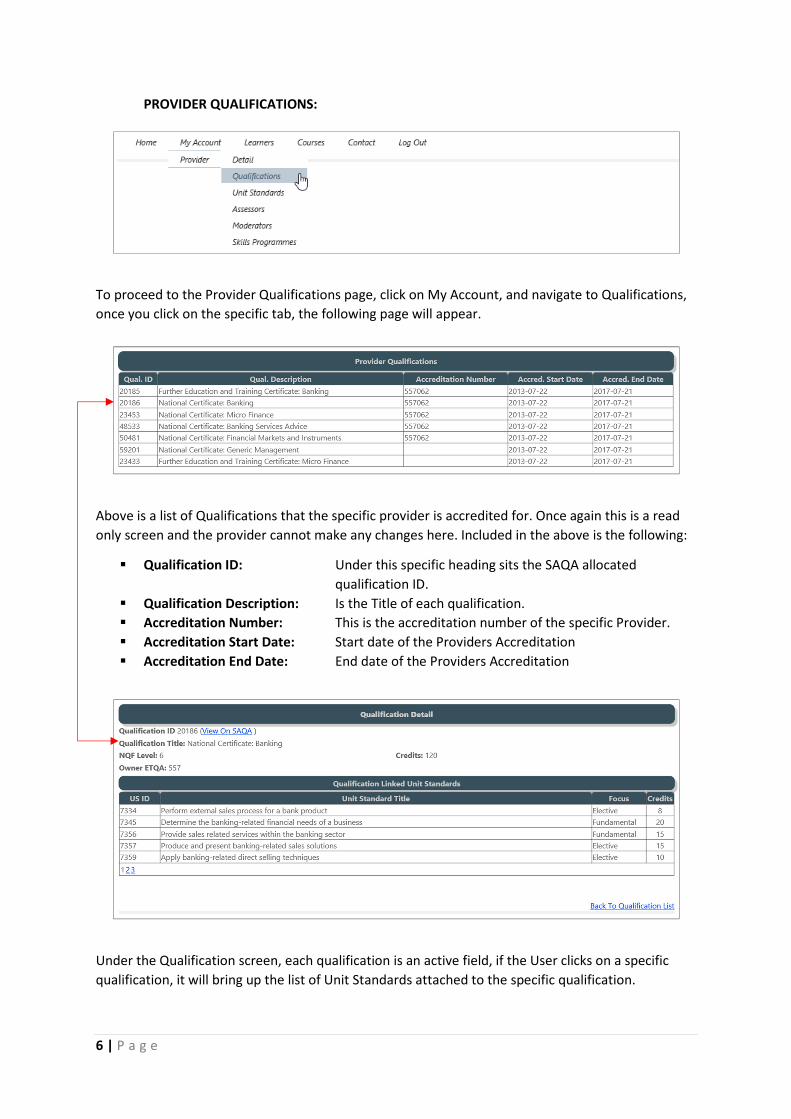
PROVIDER QUALIFICATIONS:
To proceed to the Provider Qualifications page, click on My Account, and navigate to Qualifications,
once you click on the specific tab, the following page will appear.
Above is a list of Qualifications that the specific provider is accredited for. Once again this is a read
only screen and the provider cannot make any changes here. Included in the above is the following:
� Qualification ID: Under this specific heading sits the SAQA allocated
qualification ID.
� Qualification Description: Is the Title of each qualification.
� Accreditation Number: This is the accreditation number of the specific Provider.
� Accreditation Start Date: Start date of the Providers Accreditation
� Accreditation End Date: End date of the Providers Accreditation
Under the Qualification screen, each qualification is an active field, if the User clicks on a specific
qualification, it will bring up the list of Unit Standards attached to the specific qualification.

7 | P a g e
From the above screen the User can view the specific qualification on the SAQA website.
On the above the screen, on the top, the User can view the details of the qualification, and at the
bottom the User can view all the Unit Standards linked to the specific qualification.
Under Qualification Linked Unit Standards, the User can view the following:
� Unit Standard ID: SAQA allocated unit standard ID.
� Unit Standard Title: Description or title of each unit standard.
� Focus: Shows if the unit standard is an Elective, Core or Fundamental.
� Credits: This is the credit allocation for each Unit Standard.
To return to the list of Qualifications, proceed by clicking on Back To Qualification List.
8 | P a g e
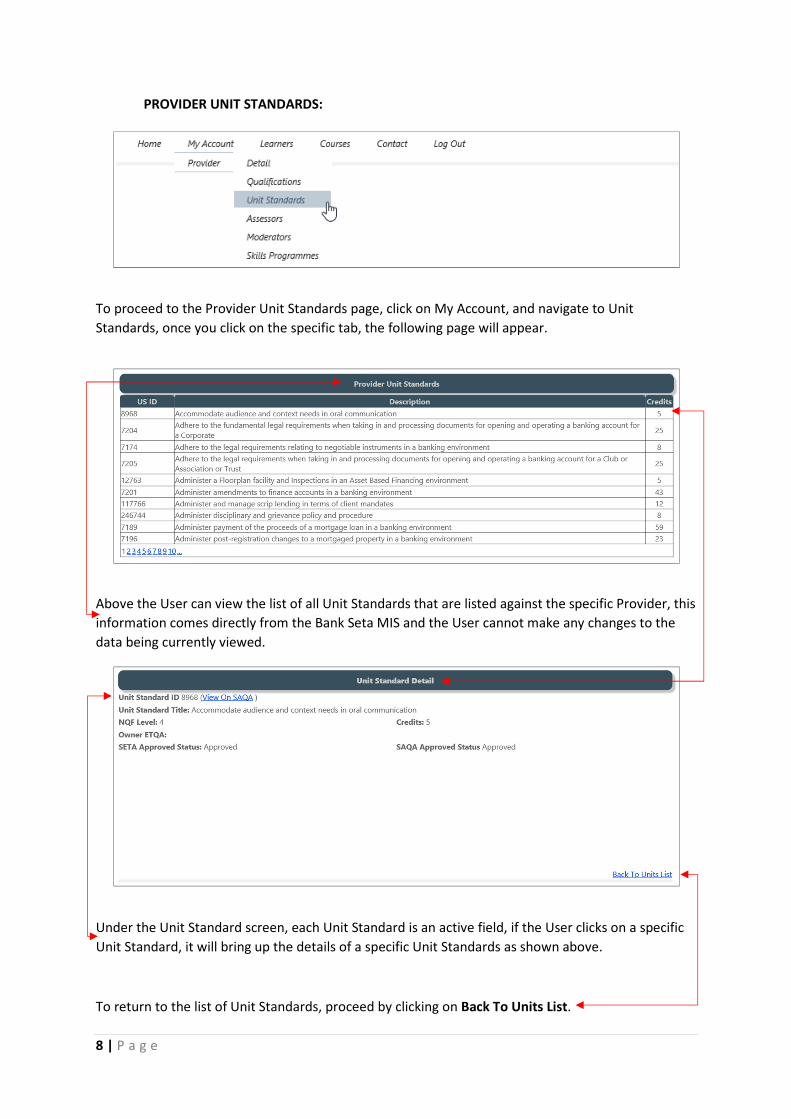
PROVIDER UNIT STANDARDS:
To proceed to the Provider Unit Standards page, click on My Account, and navigate to Unit
Standards, once you click on the specific tab, the following page will appear.
Above the User can view the list of all Unit Standards that are listed against the specific Provider, this
information comes directly from the Bank Seta MIS and the User cannot make any changes to the
data being currently viewed.
Under the Unit Standard screen, each Unit Standard is an active field, if the User clicks on a specific
Unit Standard, it will bring up the details of a specific Unit Standards as shown above.
To return to the list of Unit Standards, proceed by clicking on Back To Units List.
9 | P a g e
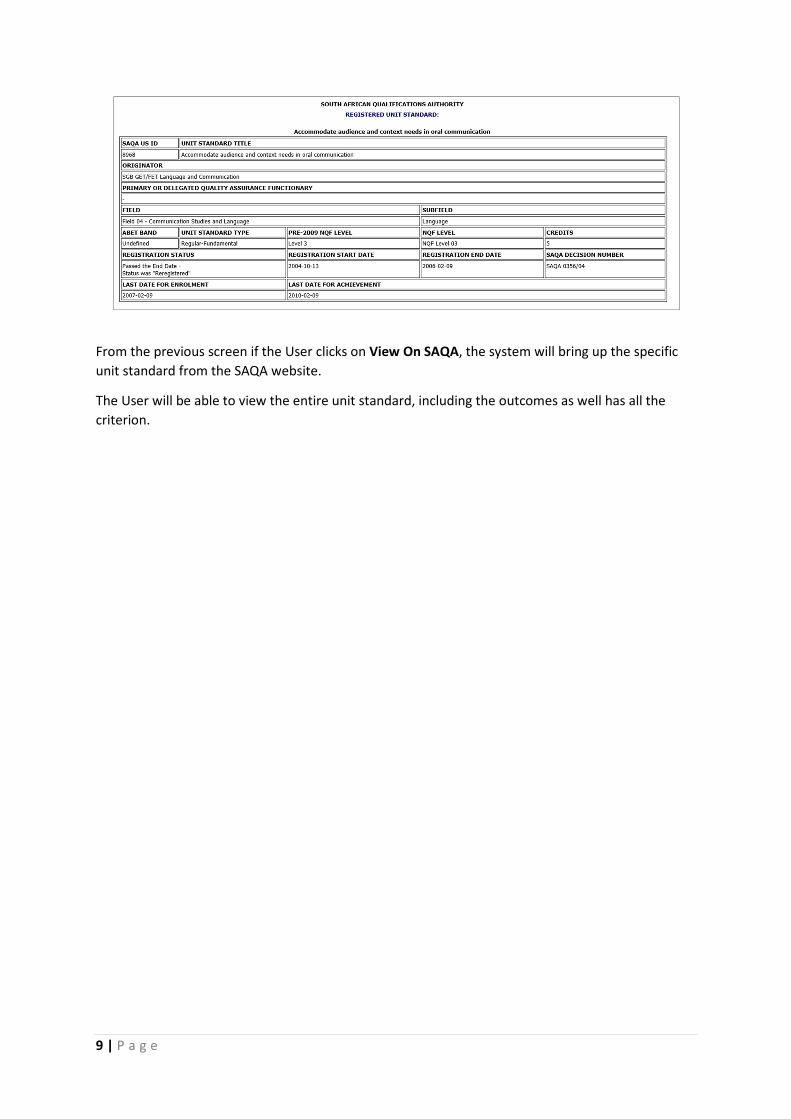
From the previous screen if the User clicks on View On SAQA, the system will bring up the specific
unit standard from the SAQA website.
The User will be able to view the entire unit standard, including the outcomes as well has all the
criterion.
10 | P a g e
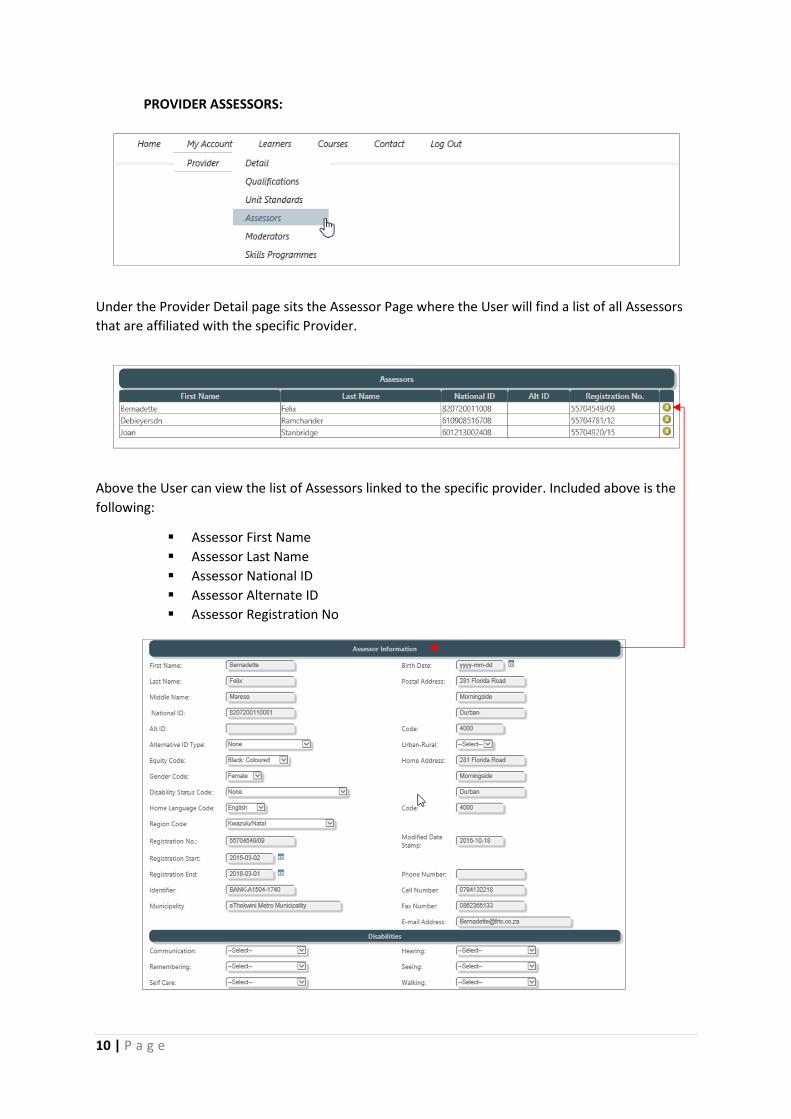
PROVIDER ASSESSORS:
Under the Provider Detail page sits the Assessor Page where the User will find a list of all Assessors
that are affiliated with the specific Provider.
Above the User can view the list of Assessors linked to the specific provider. Included above is the
following:
� Assessor First Name
� Assessor Last Name
� Assessor National ID
� Assessor Alternate ID
� Assessor Registration No
11 | P a g e
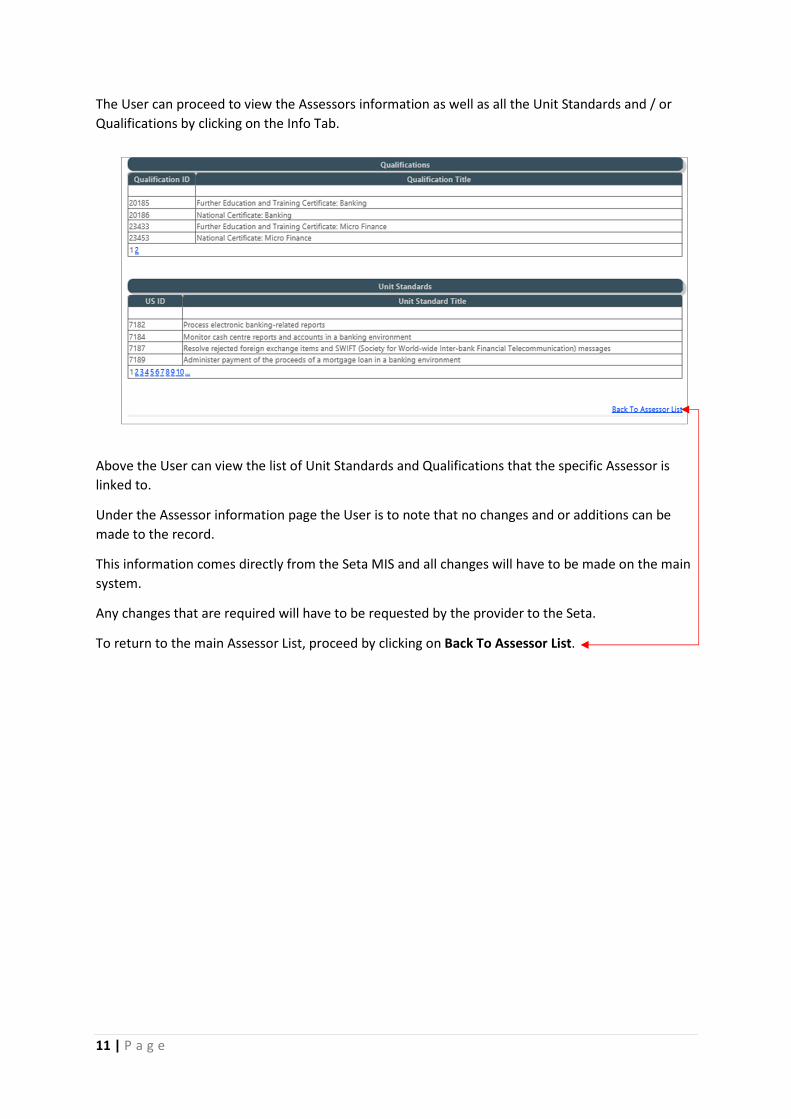
The User can proceed to view the Assessors information as well as all the Unit Standards and / or
Qualifications by clicking on the Info Tab.
Above the User can view the list of Unit Standards and Qualifications that the specific Assessor is
linked to.
Under the Assessor information page the User is to note that no changes and or additions can be
made to the record.
This information comes directly from the Seta MIS and all changes will have to be made on the main
system.
Any changes that are required will have to be requested by the provider to the Seta.
To return to the main Assessor List, proceed by clicking on Back To Assessor List.
12 | P a g e
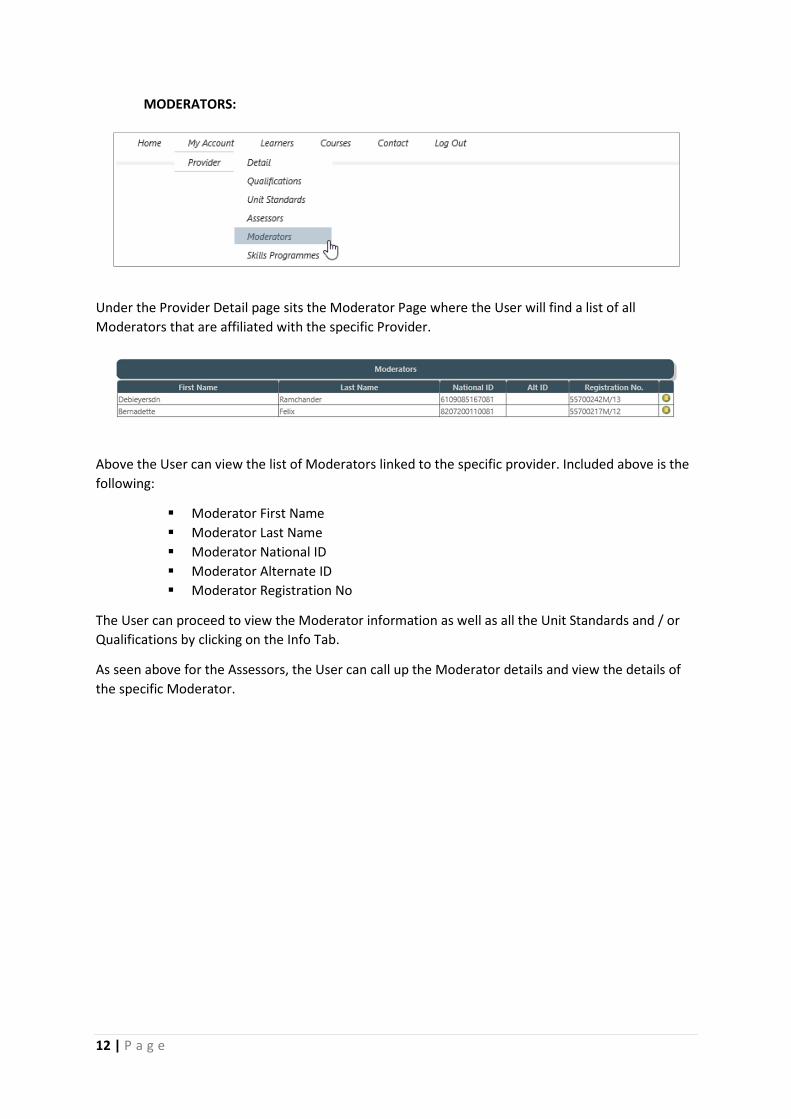
MODERATORS:
Under the Provider Detail page sits the Moderator Page where the User will find a list of all
Moderators that are affiliated with the specific Provider.
Above the User can view the list of Moderators linked to the specific provider. Included above is the
following:
� Moderator First Name
� Moderator Last Name
� Moderator National ID
� Moderator Alternate ID
� Moderator Registration No
The User can proceed to view the Moderator information as well as all the Unit Standards and / or
Qualifications by clicking on the Info Tab.
As seen above for the Assessors, the User can call up the Moderator details and view the details of
the specific Moderator.
13 | P a g e
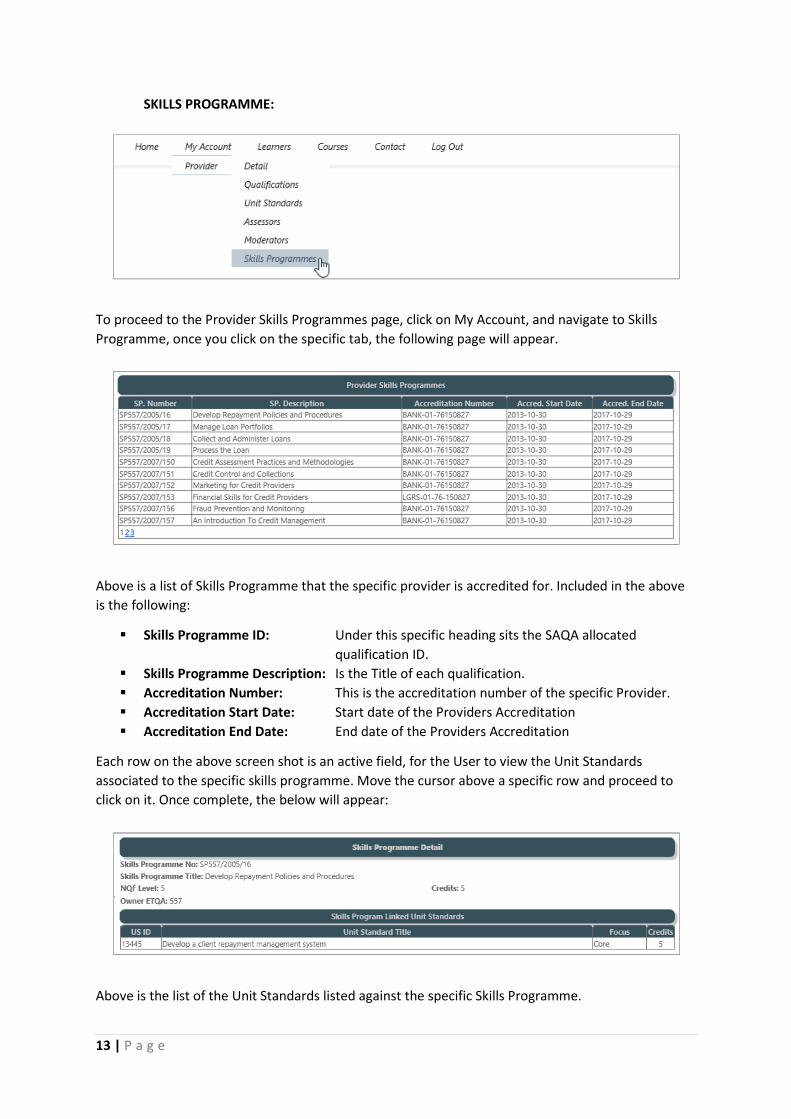
SKILLS PROGRAMME:
To proceed to the Provider Skills Programmes page, click on My Account, and navigate to Skills
Programme, once you click on the specific tab, the following page will appear.
Above is a list of Skills Programme that the specific provider is accredited for. Included in the above
is the following:
� Skills Programme ID: Under this specific heading sits the SAQA allocated
qualification ID.
� Skills Programme Description: Is the Title of each qualification.
� Accreditation Number: This is the accreditation number of the specific Provider.
� Accreditation Start Date: Start date of the Providers Accreditation
� Accreditation End Date: End date of the Providers Accreditation
Each row on the above screen shot is an active field, for the User to view the Unit Standards
associated to the specific skills programme. Move the cursor above a specific row and proceed to
click on it. Once complete, the below will appear:
Above is the list of the Unit Standards listed against the specific Skills Programme.
14 | P a g e
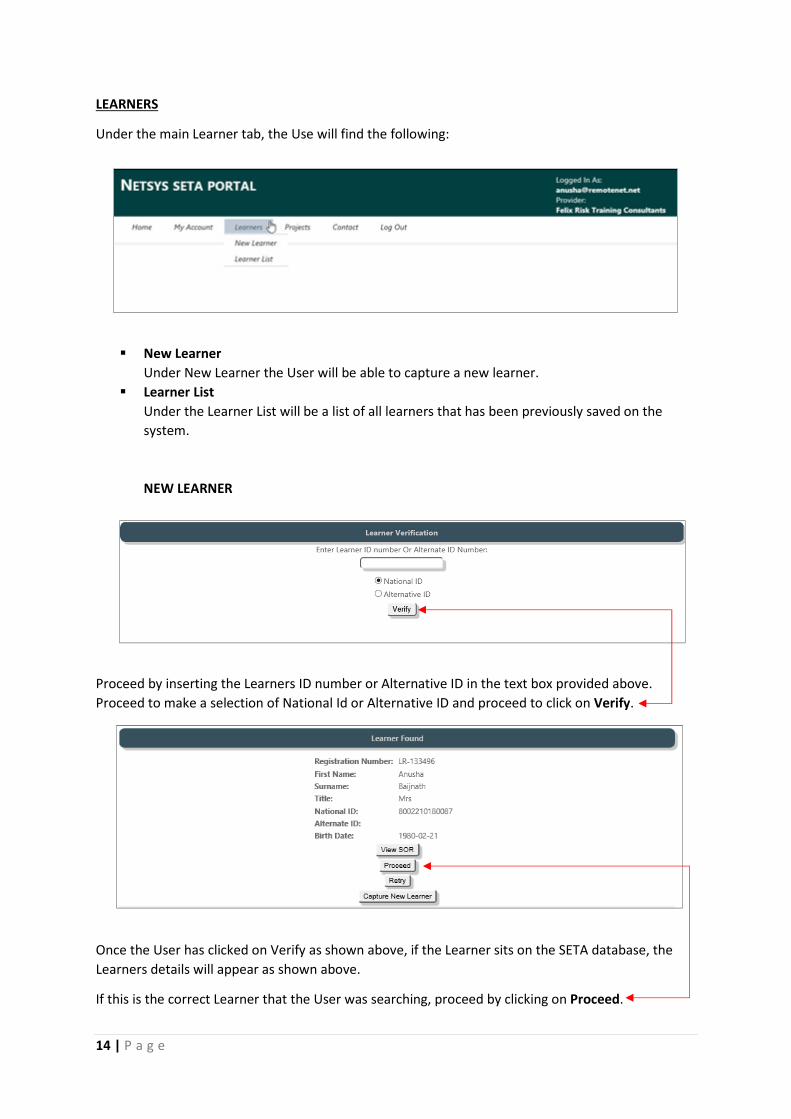
LEARNERS
Under the main Learner tab, the Use will find the following:
� New Learner
Under New Learner the User will be able to capture a new learner.
� Learner List
Under the Learner List will be a list of all learners that has been previously saved on the
system.
NEW LEARNER
Proceed by inserting the Learners ID number or Alternative ID in the text box provided above.
Proceed to make a selection of National Id or Alternative ID and proceed to click on Verify.
Once the User has clicked on Verify as shown above, if the Learner sits on the SETA database, the
Learners details will appear as shown above.
If this is the correct Learner that the User was searching, proceed by clicking on Proceed.
15 | P a g e
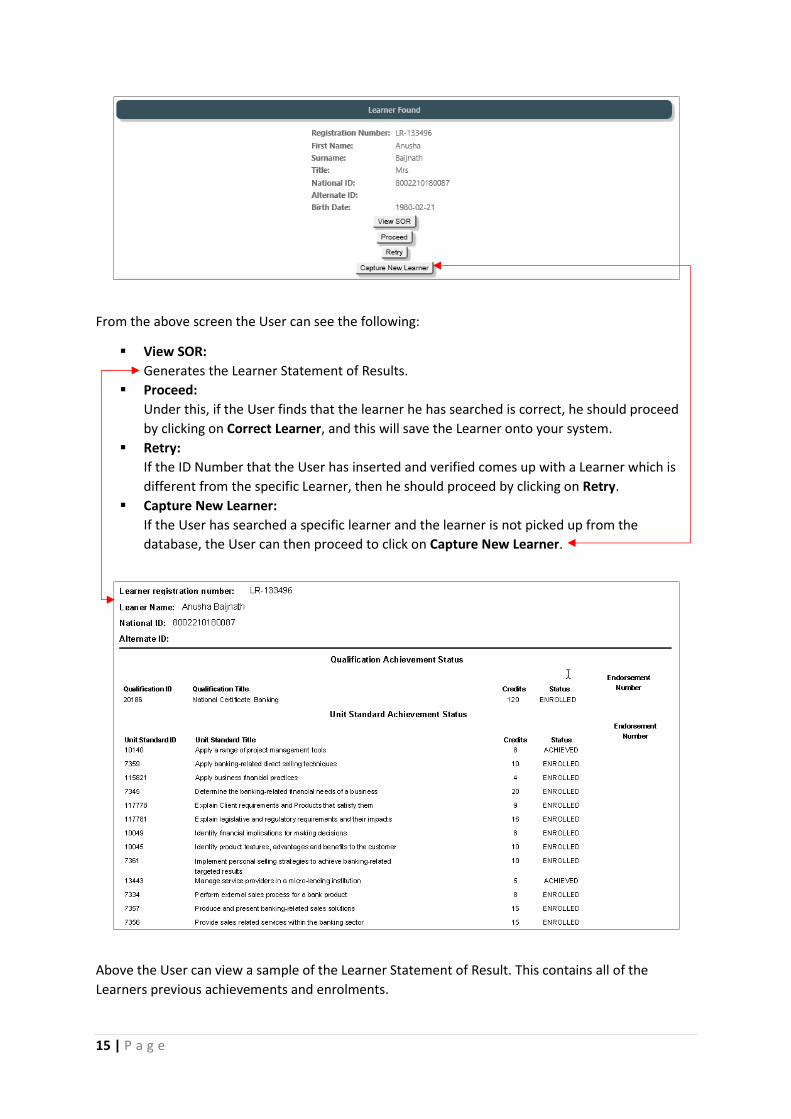
From the above screen the User can see the following:
� View SOR:
Generates the Learner Statement of Results.
� Proceed:
Under this, if the User finds that the learner he has searched is correct, he should proceed
by clicking on Correct Learner, and this will save the Learner onto your system.
� Retry:
If the ID Number that the User has inserted and verified comes up with a Learner which is
different from the specific Learner, then he should proceed by clicking on Retry.
� Capture New Learner:
If the User has searched a specific learner and the learner is not picked up from the
database, the User can then proceed to click on Capture New Learner.
Above the User can view a sample of the Learner Statement of Result. This contains all of the
Learners previous achievements and enrolments.
16 | P a g e
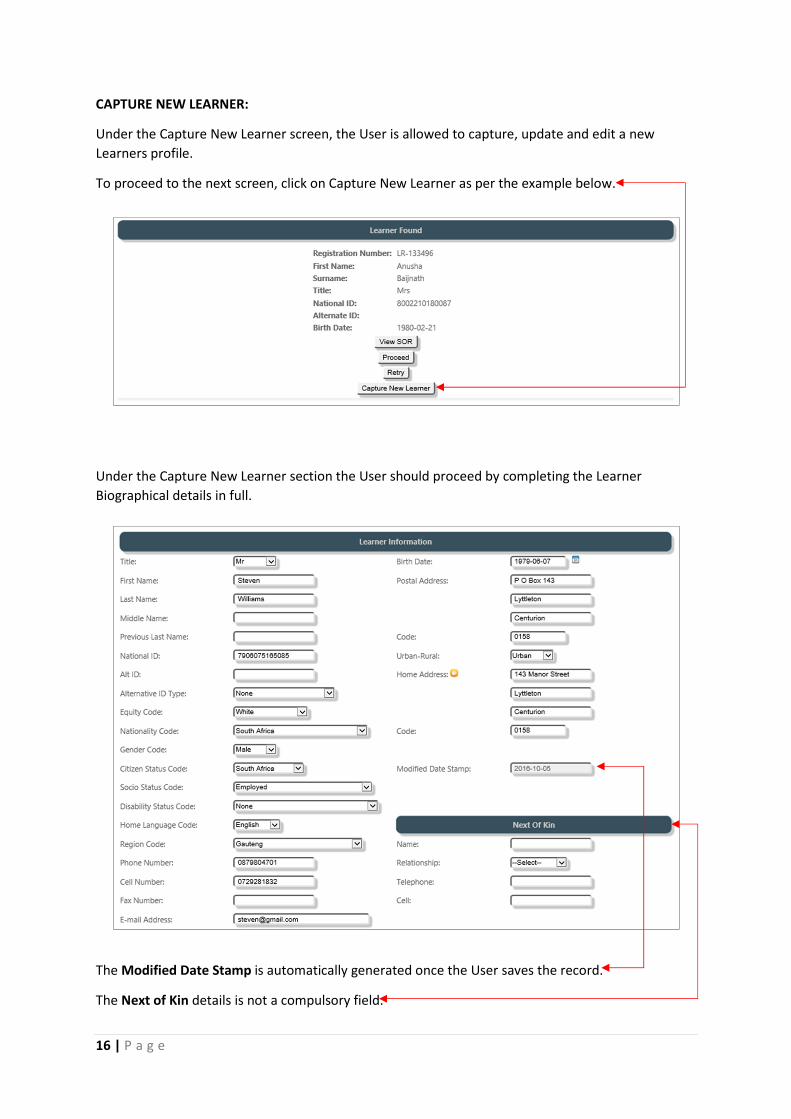
CAPTURE NEW LEARNER:
Under the Capture New Learner screen, the User is allowed to capture, update and edit a new
Learners profile.
To proceed to the next screen, click on Capture New Learner as per the example below.
Under the Capture New Learner section the User should proceed by completing the Learner
Biographical details in full.
The Modified Date Stamp is automatically generated once the User saves the record.
The Next of Kin details is not a compulsory field.
17 | P a g e
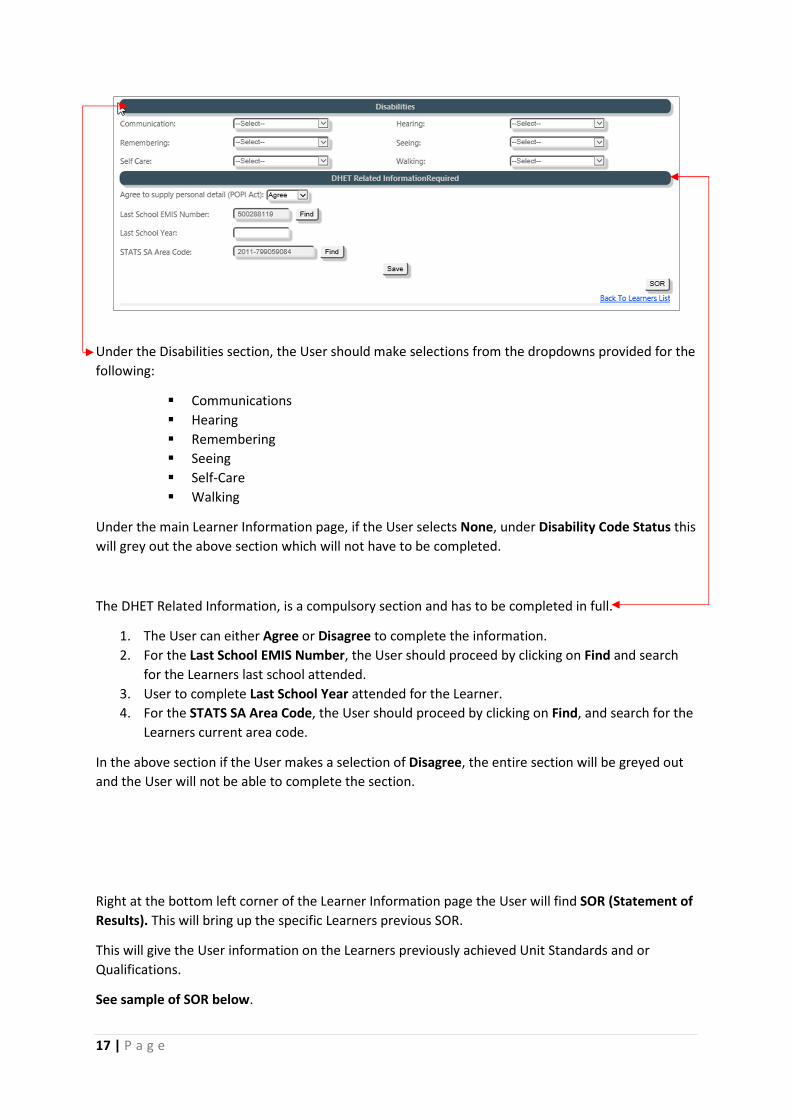
Under the Disabilities section, the User should make selections from the dropdowns provided for the
following:
� Communications
� Hearing
� Remembering
� Seeing
� Self-Care
� Walking
Under the main Learner Information page, if the User selects None, under Disability Code Status this
will grey out the above section which will not have to be completed.
The DHET Related Information, is a compulsory section and has to be completed in full.
1. The User can either Agree or Disagree to complete the information.
2. For the Last School EMIS Number, the User should proceed by clicking on Find and search
for the Learners last school attended.
3. User to complete Last School Year attended for the Learner.
4. For the STATS SA Area Code, the User should proceed by clicking on Find, and search for the
Learners current area code.
In the above section if the User makes a selection of Disagree, the entire section will be greyed out
and the User will not be able to complete the section.
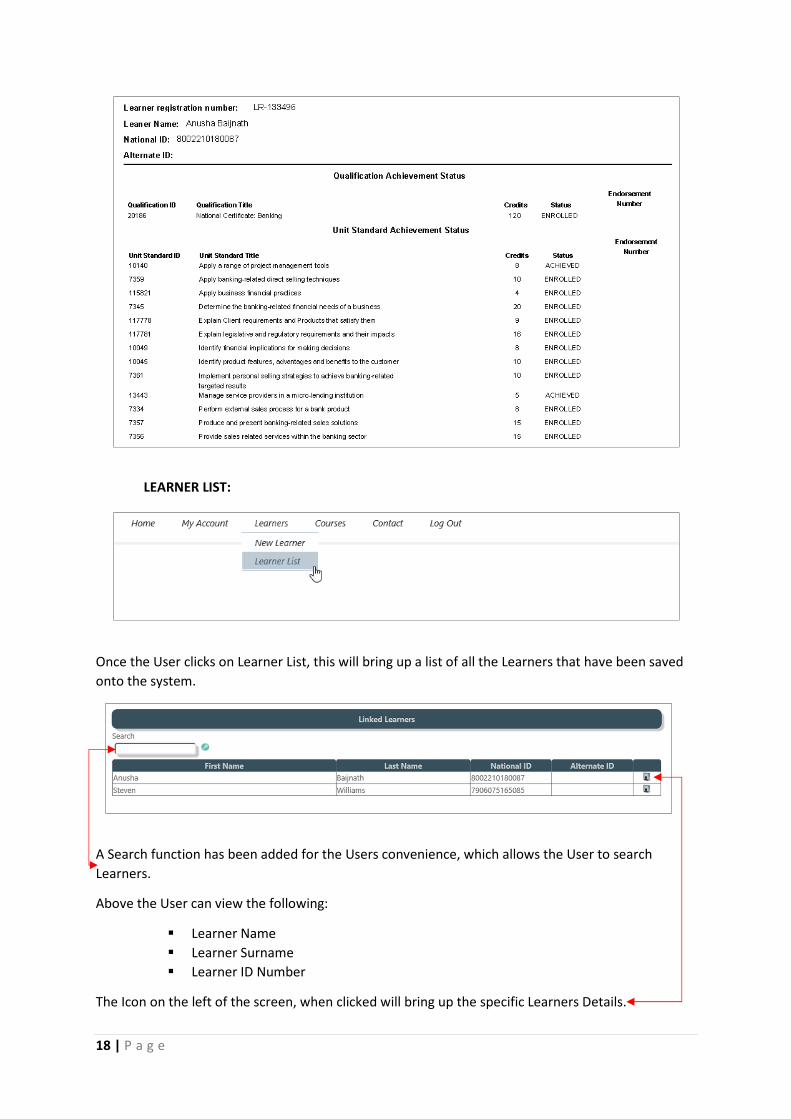
Right at the bottom left corner of the Learner Information page the User will find SOR (Statement of
Results). This will bring up the specific Learners previous SOR.
This will give the User information on the Learners previously achieved Unit Standards and or
Qualifications.
See sample of SOR below.
18 | P a g e
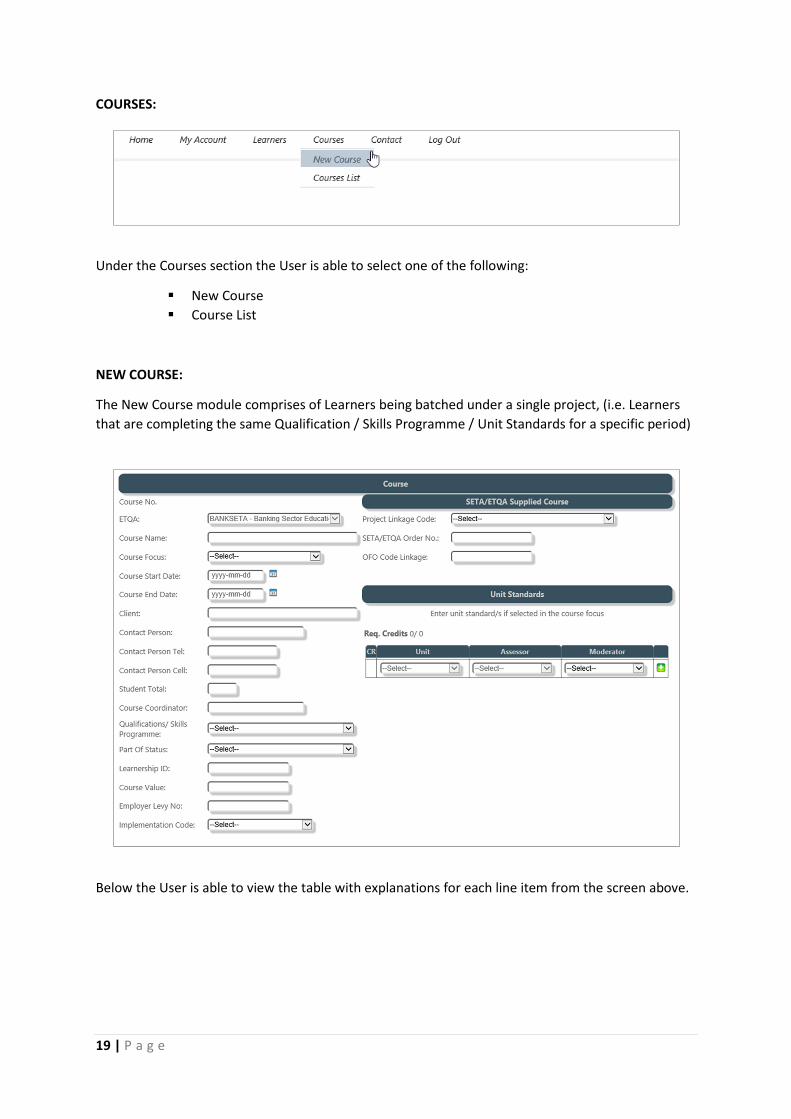
LEARNER LIST:
Once the User clicks on Learner List, this will bring up a list of all the Learners that have been saved
onto the system.
A Search function has been added for the Users convenience, which allows the User to search
Learners.
Above the User can view the following:
� Learner Name
� Learner Surname
� Learner ID Number
The Icon on the left of the screen, when clicked will bring up the specific Learners Details.
19 | P a g e
COURSES:
Under the Courses section the User is able to select one of the following:
� New Course
� Course List
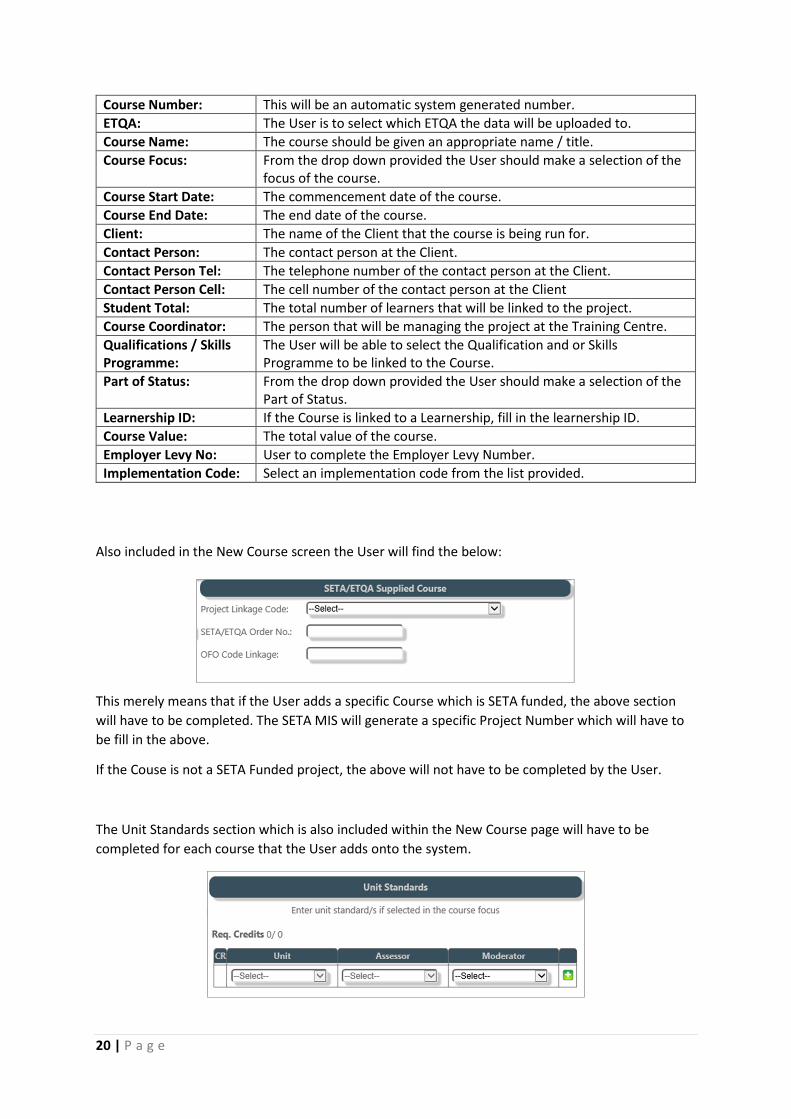
NEW COURSE:
The New Course module comprises of Learners being batched under a single project, (i.e. Learners
that are completing the same Qualification / Skills Programme / Unit Standards for a specific period)
Below the User is able to view the table with explanations for each line item from the screen above.
20 | P a g e
Course Number: This will be an automatic system generated number.
ETQA: The User is to select which ETQA the data will be uploaded to.
Course Name: The course should be given an appropriate name / title.
Course Focus: From the drop down provided the User should make a selection of the
focus of the course.
Course Start Date: The commencement date of the course.
Course End Date: The end date of the course.
Client: The name of the Client that the course is being run for.
Contact Person: The contact person at the Client.
Contact Person Tel: The telephone number of the contact person at the Client.
Contact Person Cell: The cell number of the contact person at the Client
Student Total: The total number of learners that will be linked to the project.
Course Coordinator: The person that will be managing the project at the Training Centre.
Qualifications / Skills
Programme:
The User will be able to select the Qualification and or Skills
Programme to be linked to the Course.
Part of Status: From the drop down provided the User should make a selection of the
Part of Status.
Learnership ID: If the Course is linked to a Learnership, fill in the learnership ID.
Course Value: The total value of the course.
Employer Levy No: User to complete the Employer Levy Number.
Implementation Code: Select an implementation code from the list provided.
Also included in the New Course screen the User will find the below:
This merely means that if the User adds a specific Course which is SETA funded, the above section
will have to be completed. The SETA MIS will generate a specific Project Number which will have to
be fill in the above.
If the Couse is not a SETA Funded project, the above will not have to be completed by the User.
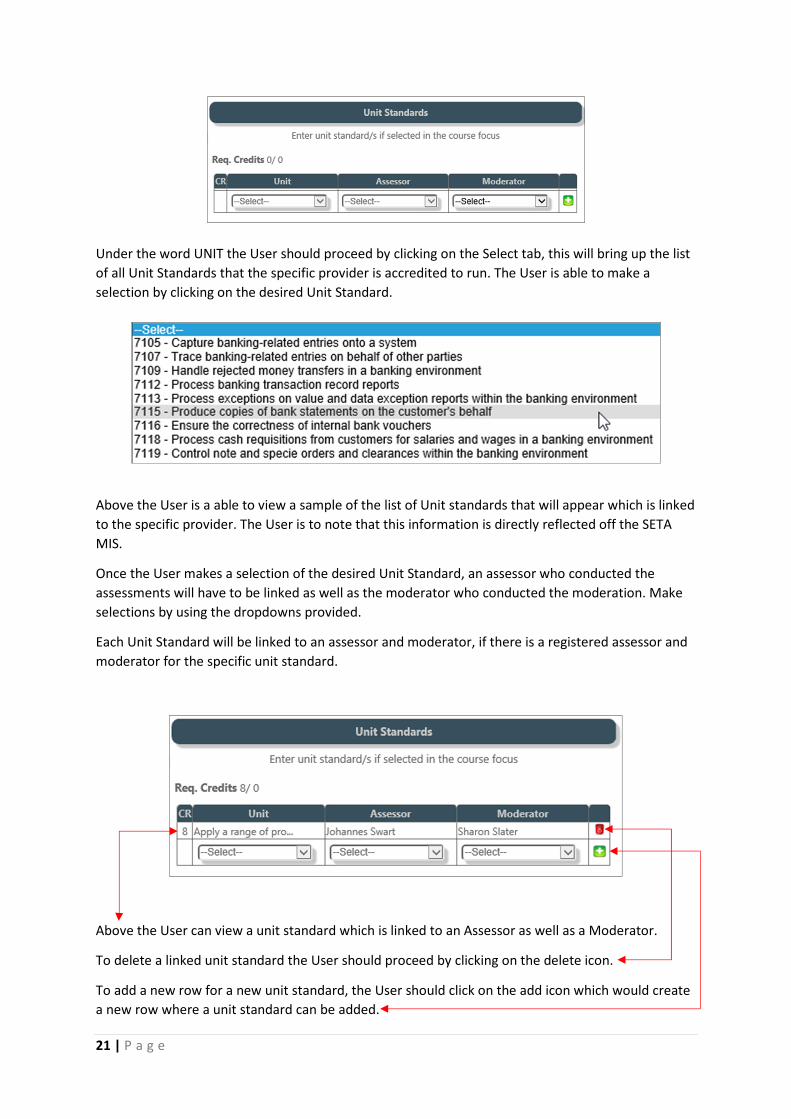
The Unit Standards section which is also included within the New Course page will have to be
completed for each course that the User adds onto the system.
21 | P a g e
Under the word UNIT the User should proceed by clicking on the Select tab, this will bring up the list
of all Unit Standards that the specific provider is accredited to run. The User is able to make a
selection by clicking on the desired Unit Standard.
Above the User is a able to view a sample of the list of Unit standards that will appear which is linked
to the specific provider. The User is to note that this information is directly reflected off the SETA
MIS.
Once the User makes a selection of the desired Unit Standard, an assessor who conducted the
assessments will have to be linked as well as the moderator who conducted the moderation. Make
selections by using the dropdowns provided.
Each Unit Standard will be linked to an assessor and moderator, if there is a registered assessor and
moderator for the specific unit standard.
Above the User can view a unit standard which is linked to an Assessor as well as a Moderator.
To delete a linked unit standard the User should proceed by clicking on the delete icon.
To add a new row for a new unit standard, the User should click on the add icon which would create
a new row where a unit standard can be added.
22 | P a g e
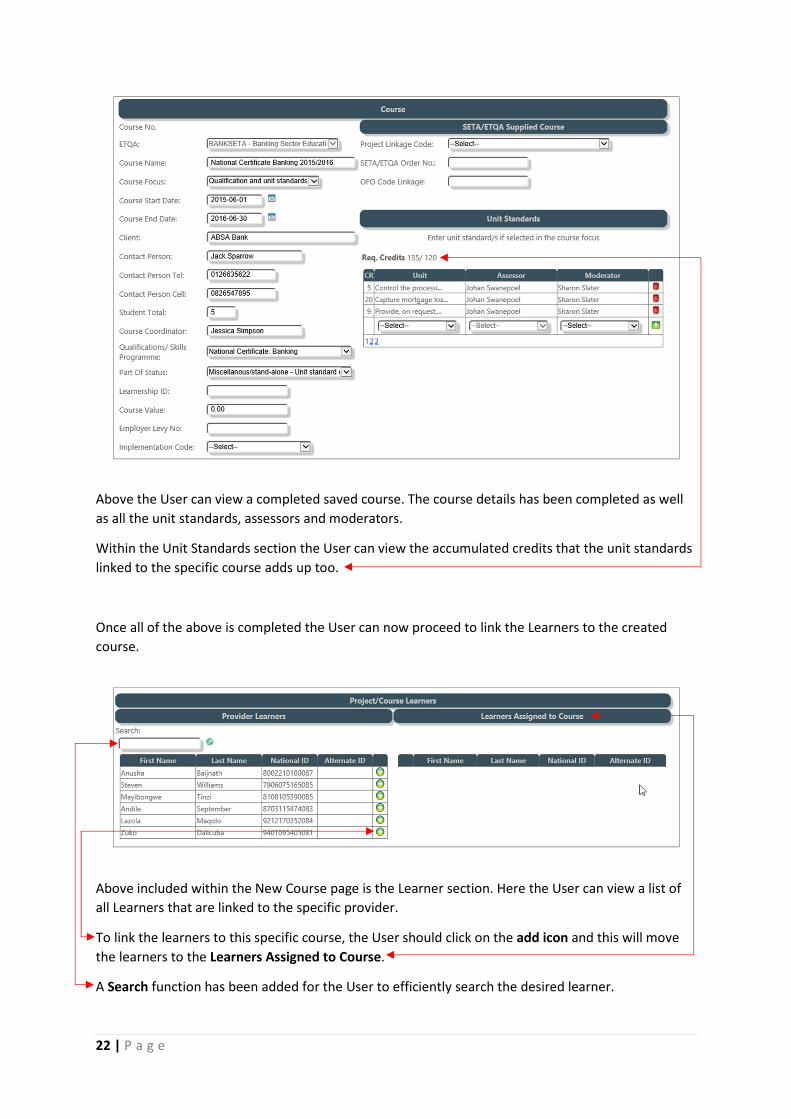
Above the User can view a completed saved course. The course details has been completed as well
as all the unit standards, assessors and moderators.
Within the Unit Standards section the User can view the accumulated credits that the unit standards
linked to the specific course adds up too.
Once all of the above is completed the User can now proceed to link the Learners to the created
course.
Above included within the New Course page is the Learner section. Here the User can view a list of
all Learners that are linked to the specific provider.
To link the learners to this specific course, the User should click on the add icon and this will move
the learners to the Learners Assigned to Course.
A Search function has been added for the User to efficiently search the desired learner.

23 | P a g e
Above the User can view the learners who are now linked to the specific course.
If the User finds that he has linked an incorrect learner he should click on the add icon which will
return the Learner to the Learner List, and remove the Learner from the project.
Once all of the above is complete the User can proceed by clicking on Save Project and this will save
your information and move the project / course onto the Course List.
To return to the Course List page the User can proceed by clicking on Back to Projects.
24 | P a g e
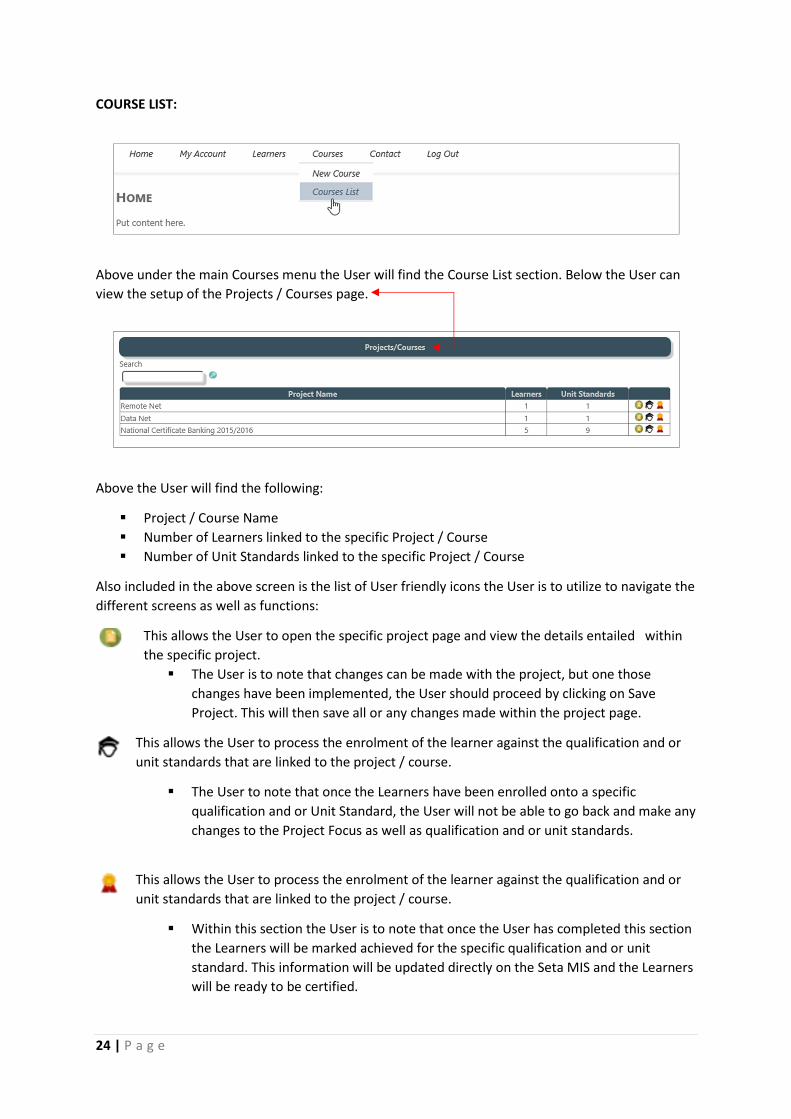
COURSE LIST:
Above under the main Courses menu the User will find the Course List section. Below the User can
view the setup of the Projects / Courses page.
Above the User will find the following:
� Project / Course Name
� Number of Learners linked to the specific Project / Course
� Number of Unit Standards linked to the specific Project / Course
Also included in the above screen is the list of User friendly icons the User is to utilize to navigate the
different screens as well as functions:
This allows the User to open the specific project page and view the details entailed within
the specific project.
� The User is to note that changes can be made with the project, but one those
changes have been implemented, the User should proceed by clicking on Save
Project. This will then save all or any changes made within the project page.
This allows the User to process the enrolment of the learner against the qualification and or
unit standards that are linked to the project / course.
� The User to note that once the Learners have been enrolled onto a specific
qualification and or Unit Standard, the User will not be able to go back and make any
changes to the Project Focus as well as qualification and or unit standards.
This allows the User to process the enrolment of the learner against the qualification and or
unit standards that are linked to the project / course.
� Within this section the User is to note that once the User has completed this section
the Learners will be marked achieved for the specific qualification and or unit
standard. This information will be updated directly on the Seta MIS and the Learners
will be ready to be certified.
25 | P a g e
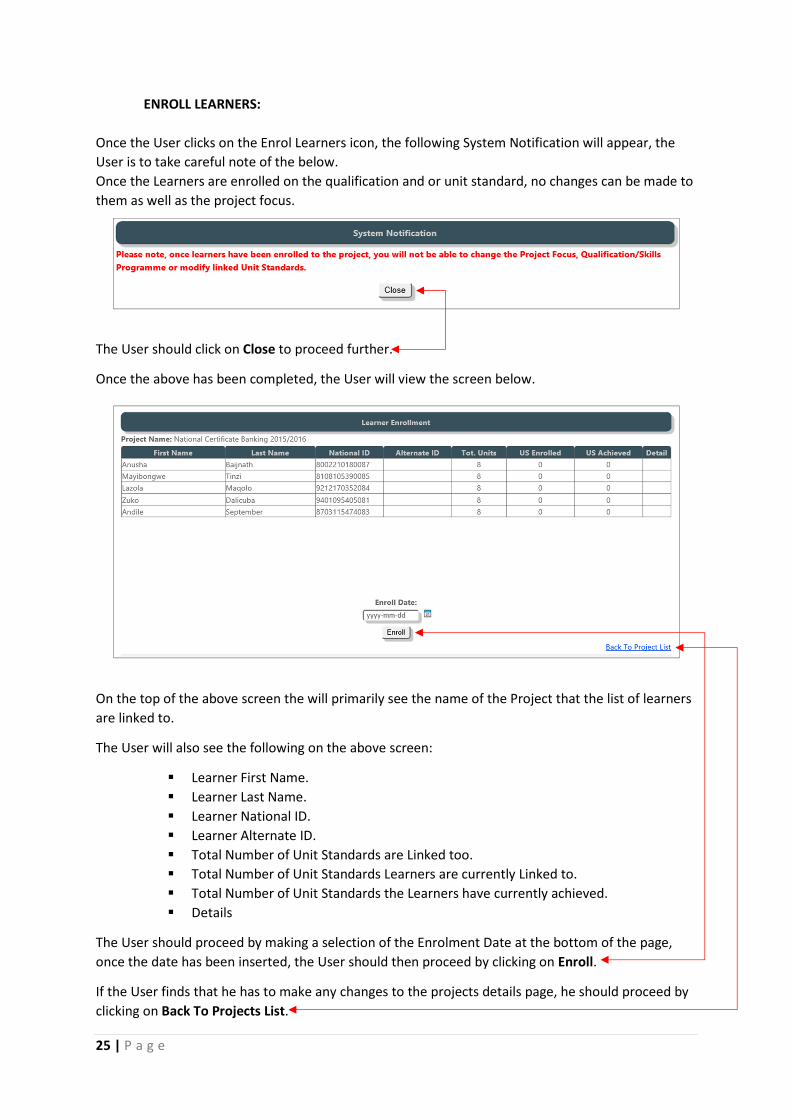
ENROLL LEARNERS:
Once the User clicks on the Enrol Learners icon, the following System Notification will appear, the
User is to take careful note of the below.
Once the Learners are enrolled on the qualification and or unit standard, no changes can be made to
them as well as the project focus.
The User should click on Close to proceed further.
Once the above has been completed, the User will view the screen below.
On the top of the above screen the will primarily see the name of the Project that the list of learners
are linked to.
The User will also see the following on the above screen:
� Learner First Name.
� Learner Last Name.
� Learner National ID.
� Learner Alternate ID.
� Total Number of Unit Standards are Linked too.
� Total Number of Unit Standards Learners are currently Linked to.
� Total Number of Unit Standards the Learners have currently achieved.
� Details
The User should proceed by making a selection of the Enrolment Date at the bottom of the page,
once the date has been inserted, the User should then proceed by clicking on Enroll.
If the User finds that he has to make any changes to the projects details page, he should proceed by
clicking on Back To Projects List.
26 | P a g e
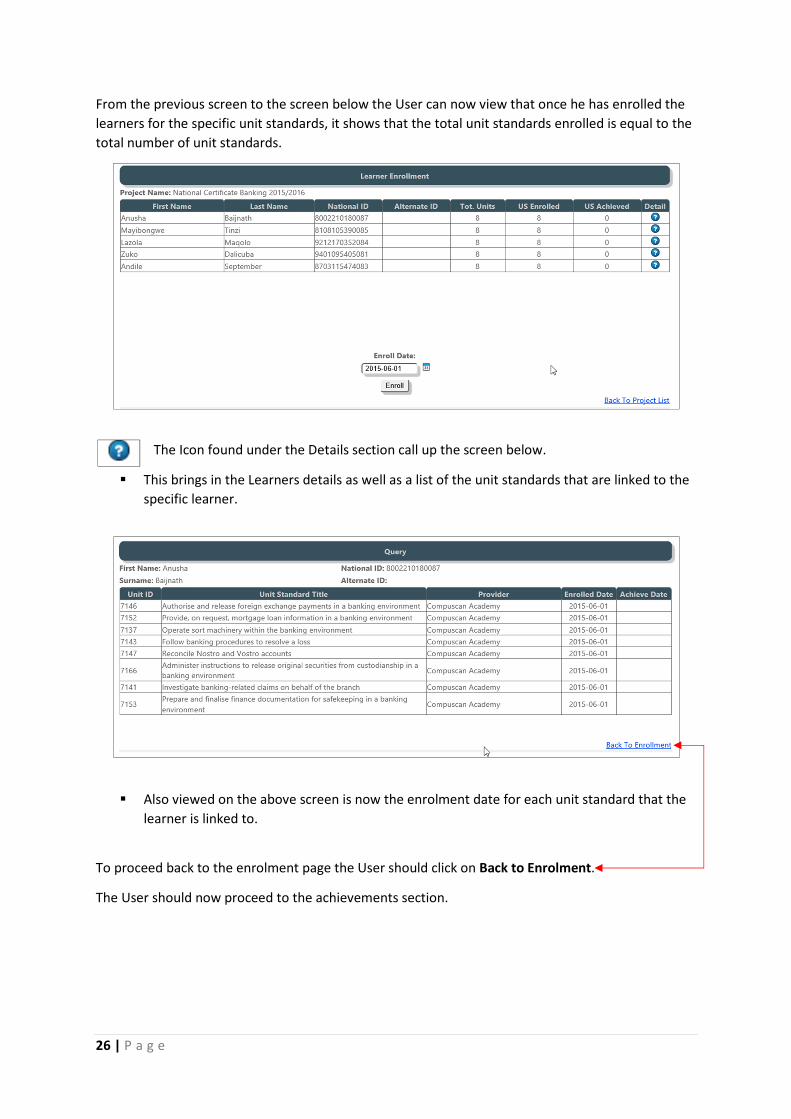
From the previous screen to the screen below the User can now view that once he has enrolled the
learners for the specific unit standards, it shows that the total unit standards enrolled is equal to the
total number of unit standards.
The Icon found under the Details section call up the screen below.
� This brings in the Learners details as well as a list of the unit standards that are linked to the
specific learner.
� Also viewed on the above screen is now the enrolment date for each unit standard that the
learner is linked to.
To proceed back to the enrolment page the User should click on Back to Enrolment.
The User should now proceed to the achievements section.
27 | P a g e
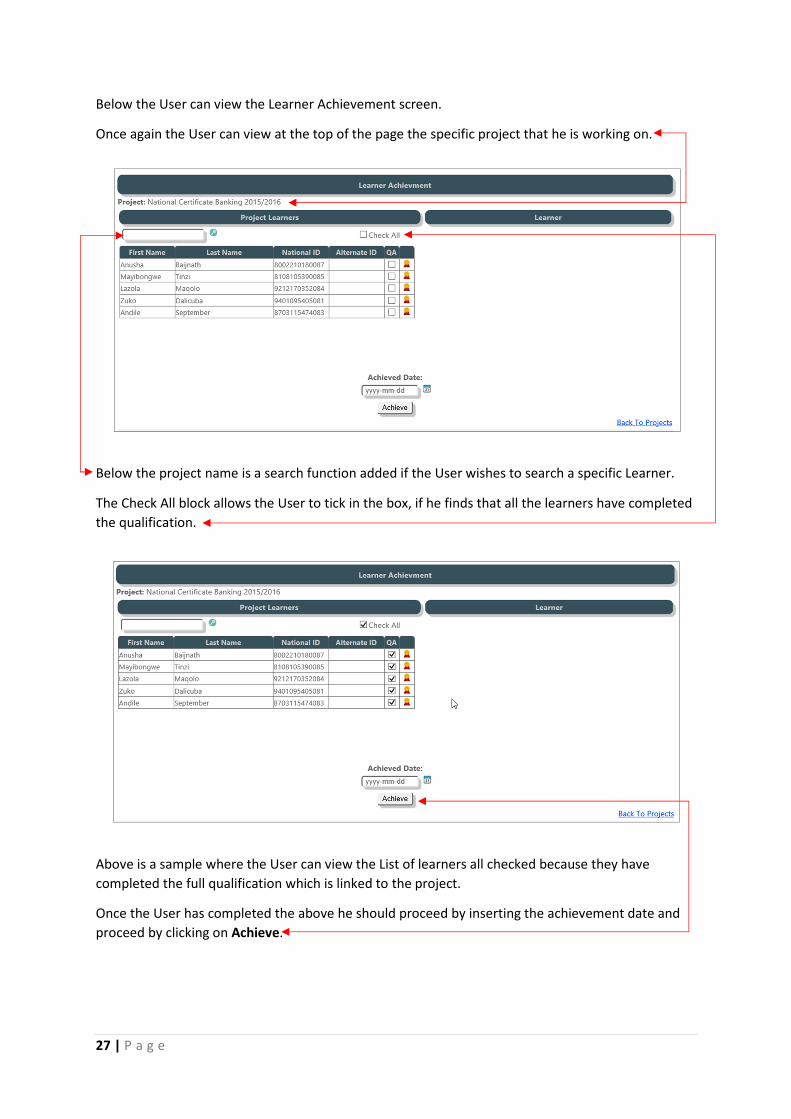
Below the User can view the Learner Achievement screen.
Once again the User can view at the top of the page the specific project that he is working on.
Below the project name is a search function added if the User wishes to search a specific Learner.
The Check All block allows the User to tick in the box, if he finds that all the learners have completed
the qualification.
Above is a sample where the User can view the List of learners all checked because they have
completed the full qualification which is linked to the project.
Once the User has completed the above he should proceed by inserting the achievement date and
proceed by clicking on Achieve.
28 | P a g e
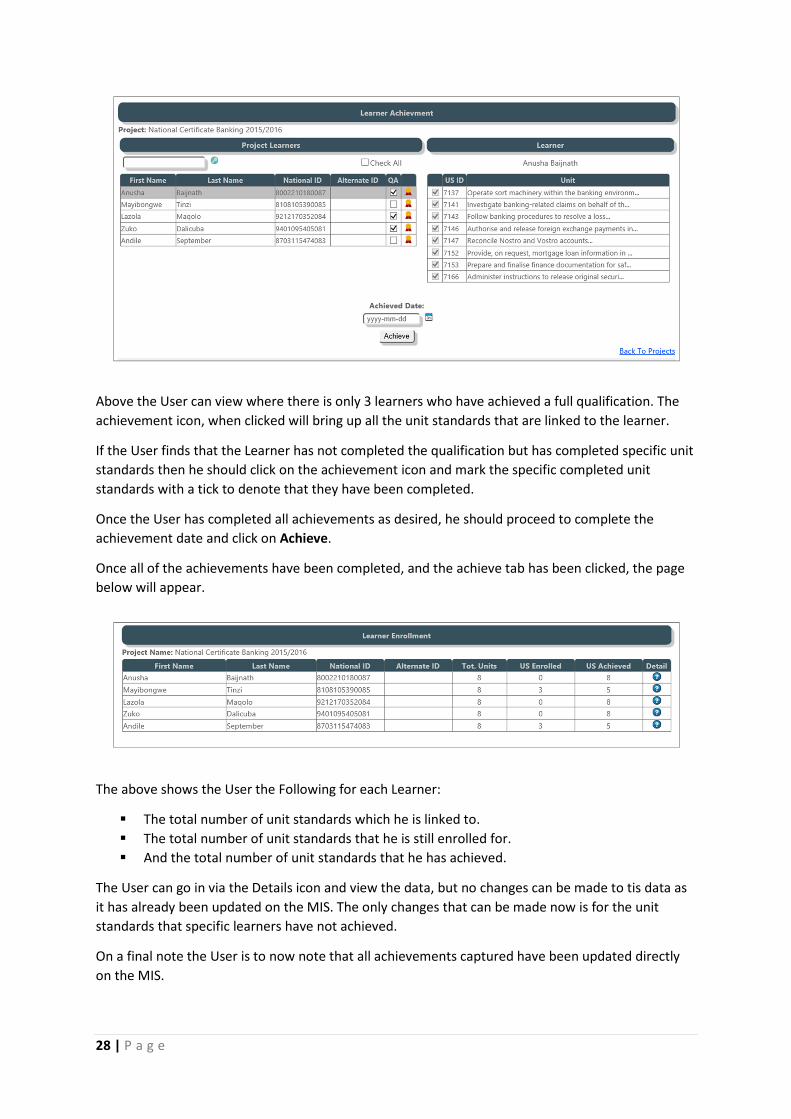
Above the User can view where there is only 3 learners who have achieved a full qualification. The
achievement icon, when clicked will bring up all the unit standards that are linked to the learner.
If the User finds that the Learner has not completed the qualification but has completed specific unit
standards then he should click on the achievement icon and mark the specific completed unit
standards with a tick to denote that they have been completed.
Once the User has completed all achievements as desired, he should proceed to complete the
achievement date and click on Achieve.
Once all of the achievements have been completed, and the achieve tab has been clicked, the page
below will appear.
The above shows the User the Following for each Learner:
� The total number of unit standards which he is linked to.
� The total number of unit standards that he is still enrolled for.
� And the total number of unit standards that he has achieved.
The User can go in via the Details icon and view the data, but no changes can be made to tis data as
it has already been updated on the MIS. The only changes that can be made now is for the unit
standards that specific learners have not achieved.
On a final note the User is to now note that all achievements captured have been updated directly
on the MIS.


