49
PROVIDER PROVIDER WEBINARS WEBINARS June 2011
PROVIDER PROVIDER WEBINARSWEBINARS
June 2011
22
AGENDA
What’s New
What’s Changing
What’s NOT Changing
Administrative Reminders
Web Portal Registration and User Set–Up Process
Web Portal Overview
Questions and Answers
3
WhatWhat’’s New s New ……
44
New Web Portal FeaturesUpload attachments and x-rays free of charge
Ability to communicate via secure messaging
Ability to obtain status of claims and authorizations much quicker
Ability to enter broken/missed appointment information via the web
Claims ProcessingState-of-the-art claims processing system
Claims decisions made nearly instantaneously so claims and authorizations can be viewed much quicker on the portal -usually within 24 hours
New and Improved Automated Phone SystemAbility to verify benefits and eligibility and obtain a procedure history
Ability to have information faxed back to you
Once member information (such as membership number or date of birth) is entered, you will be able to jump between menus without re-entering that information.
What’s New
55
Electronic EOBs
EOBs will be posted to the web portal for easy access and viewing.
Electronic Notifications
Notices will be posted to the web portal for immediate distribution including regulatory updates, newsletters, meeting notices and contractual changes.
What’s New
66
WhatWhat’’s Changing s Changing ……
77
When we migrate to the new system, current provider user id and password will no longer be valid.
Providers must register on the new web portal.
Providers may pre-register the week of June 27 – July 3, 2011 and the week of July 4 – 11, 2011.
Improved security features that allow tiered access and increased provider control.
NPI numbers will be used on all correspondence. Provider ID numbers will no longer be used.
Provider Remittance Advice will have a different look.
Examples of Changes
88
The Early and Periodic Screening Diagnosis and Treatment (EPSDT) program is a comprehensive and preventive child health program for individuals under the age of 21.
EPSDT requires that any medically necessary health care services be provided when the service is needed to correct or ameliorate a dental condition.
Coverage is available under EPSDT for services even if the service is not available under the Smiles For Children to the rest of the Smiles For Children population.
Cases for EPSDT Review
99
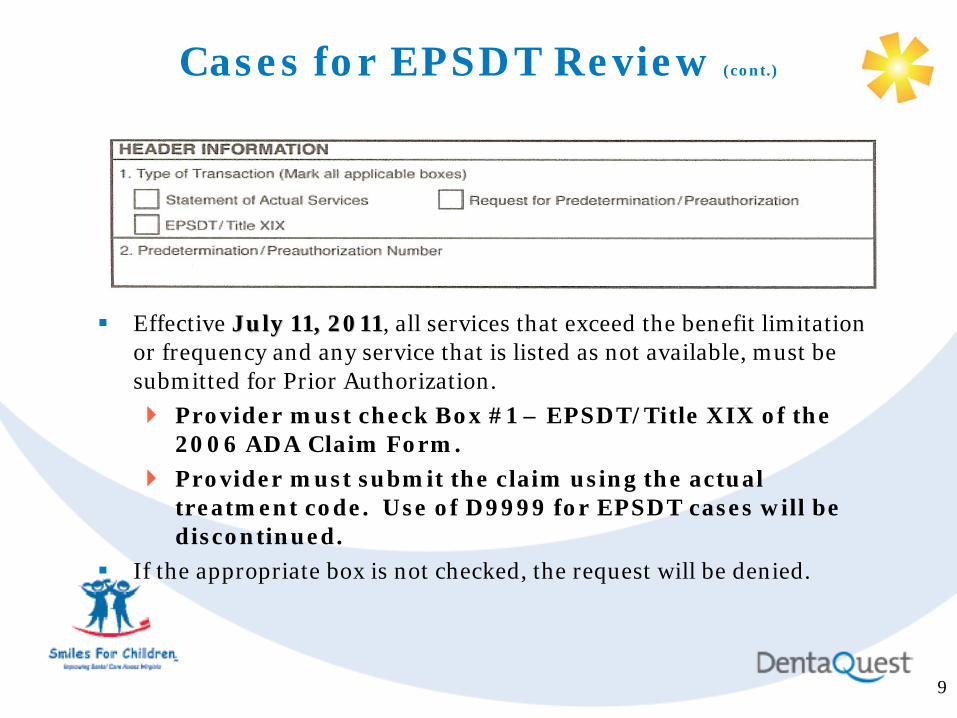
Effective July 11, 2011July 11, 2011, all services that exceed the benefit limitation or frequency and any service that is listed as not available, must be submitted for Prior Authorization.
Provider must check Box #1 – EPSDT/Title XIX of the 2006 ADA Claim Form.
Provider must submit the claim using the actual treatment code. Use of D9999 for EPSDT cases will be discontinued.
If the appropriate box is not checked, the request will be denied.
Cases for EPSDT Review (cont.)
10
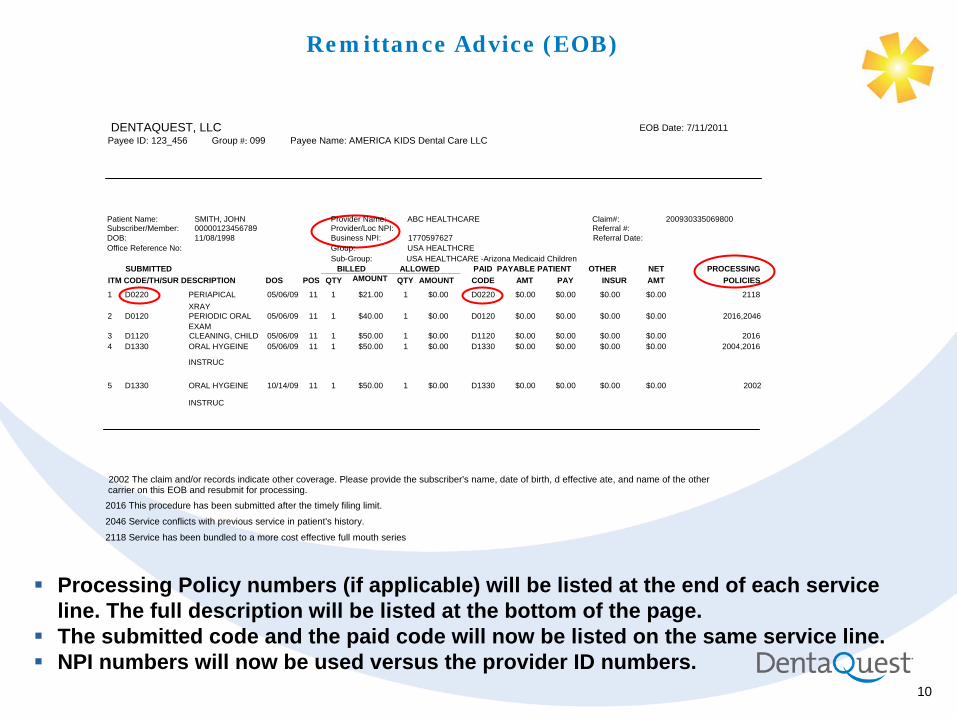
Processing Policy numbers (if applicable) will be listed at the end of each service line. The full description will be listed at the bottom of the page. The submitted code and the paid code will now be listed on the same service line. NPI numbers will now be used versus the provider ID numbers.
Remittance Advice (EOB)
DENTAQUEST, LLC EOB Date: 7/11/2011Payee ID: 123_456 Group #: 099 Payee Name: AMERICA KIDS Dental Care LLC
Patient Name: SMITH, JOHN Provider Name: ABC HEALTHCARE Claim#: 200930335069800 Subscriber/Member: 00000123456789 Provider/Loc NPI: Referral #: DOB: 11/08/1998 Business NPI: 1770597627 Referral Date: Office Reference No: Group: USA HEALTHCRE
Sub-Group: USA HEALTHCARE -Arizona Medicaid Children SUBMITTED BILLED ALLOWED PAID PAYABLE PATIENT OTHER NET PROCESSING
ITM CODE/TH/SUR DESCRIPTION DOS POS QTY AMOUNT QTY AMOUNT CODE AMT PAY INSUR AMT POLICIES
1 D0220 PERIAPICAL 05/06/09 11 1 $21.00 1 $0.00 D0220 $0.00 $0.00 $0.00 $0.00 2118 XRAY
2 D0120 PERIODIC ORAL 05/06/09 11 1 $40.00 1 $0.00 D0120 $0.00 $0.00 $0.00 $0.00 2016,2046 EXAM
3 D1120 CLEANING, CHILD 05/06/09 11 1 $50.00 1 $0.00 D1120 $0.00 $0.00 $0.00 $0.00 2016 4 D1330 ORAL HYGEINE 05/06/09 11 1 $50.00 1 $0.00 D1330 $0.00 $0.00 $0.00 $0.00 2004,2016
INSTRUC
5 D1330 ORAL HYGEINE 10/14/09 11 1 $50.00 1 $0.00 D1330 $0.00 $0.00 $0.00 $0.00 2002
INSTRUC
2002 The claim and/or records indicate other coverage. Please provide the subscriber's name, date of birth, d effective ate, and name of the other carrier on this EOB and resubmit for processing.
2016 This procedure has been submitted after the timely filing limit.
2046 Service conflicts with previous service in patient's history.
2118 Service has been bundled to a more cost effective full mouth series
11
WhatWhat’’s NOT Changing s NOT Changing ……
1212
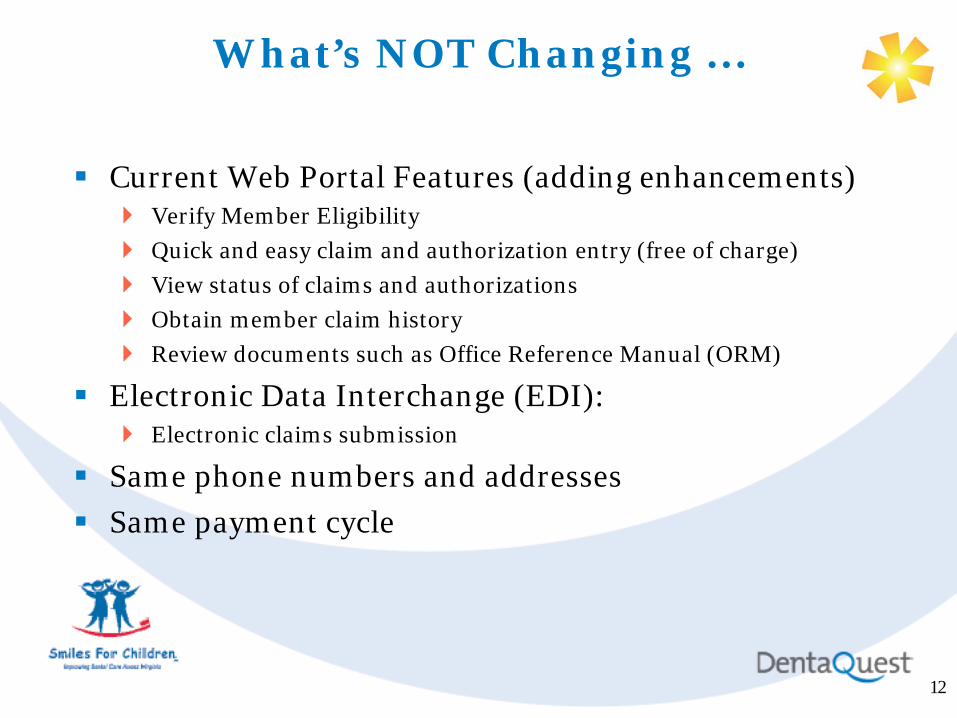
Current Web Portal Features (adding enhancements)Verify Member Eligibility
Quick and easy claim and authorization entry (free of charge)
View status of claims and authorizations
Obtain member claim history
Review documents such as Office Reference Manual (ORM)
Electronic Data Interchange (EDI):Electronic claims submission
Same phone numbers and addresses
Same payment cycle
What’s NOT Changing …
1313
Submission of electronic claims is highly recommended via our web portal or through a clearing house.
If submitting paper claims, they must be submitted on a 2006 or newer ADA claim form, which can be found at www.ada.org.
To ensure your claims are not returned to you, be sure to:Enter the appropriate NPI numbers in box #49 and #54. Include the treating dentist signature in box #53. Acceptable signatures include: “Signature on file”, electronic name and typed names.Indicate in box #4 if the member has other insurance. Check the appropriate Place of Treatment in box #38.If you are submitting an adjustment, void or resubmission of a claim, enter “adjustment”, “void” or “resubmission” in the remark field box #35.
Do not send in marked up pre-authorization determination letters when submitting the services for payment. The services must be submitted on an appropriate ADA claim form.
When submitting claims/authorizations via regular mail, do not also submit the request electronically. Sending both creates duplicate requests.
Administrative Reminders
1414
Methods of submitting claims and authorization (refer to your ORM for further details)
Electronic via DentaQuest’s web portalElectronic via Clearinghouse HIPPA compliant 837D FilePaper Claims
If you are interested in using NEA (National Electronic Attachments) for attachments, we have secured a special deal for you:
By mentioning promotion code DQSTSZ when registering (www.nea-fast.com) NEA will waive the $200 registration fee if you sign up by July 31, 2011sign up by July 31, 2011.
Direct DepositAs a benefit to participating Providers, DentaQuest offers Direct Deposit for claims payments. This process improves payment turnaround times as funds are directly deposited into your banking account. Please refer to your Office Reference Manual (ORM) for detailed instructions.
Administrative Reminders

1515
X-ray Policy
We require that x-rays be mounted.
Claims received with more than 4 un-mounted x-rays will be returned for mounting.
X-rays must be of diagnostic quality, properly mounted, dated and identified with the member's name.
Below are the options in which you can submit x-rays to us. These are (in order of preference):
Electronically using NEA (National Electronic Attachment)
Mail duplicate x-rays with your ADA form
Send original x-rays, your ADA form, and a self addressed stamped envelope (SASE) so that we may return the x-rays to you.
We are unable to return x-rays received without a SASE. X-rays without a SASE will be scanned and recycled.
Refer to your Office Reference Manual to determine if the submission of x-rays is required.
Administrative Reminders
1616
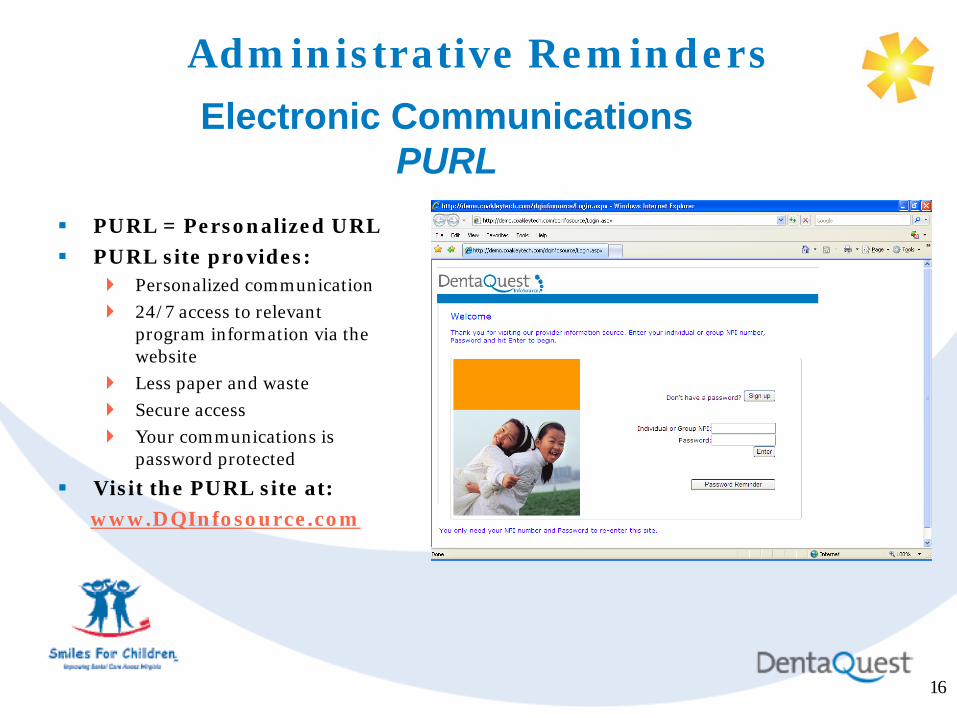
PURL = Personalized URL
PURL site provides:Personalized communication
24/7 access to relevant program information via the website
Less paper and waste
Secure access
Your communications is password protected
Visit the PURL site at:
www.DQInfosource.com
Electronic Communications PURL
Administrative Reminders
1717
Registration Process Registration Process OverviewOverview
1818
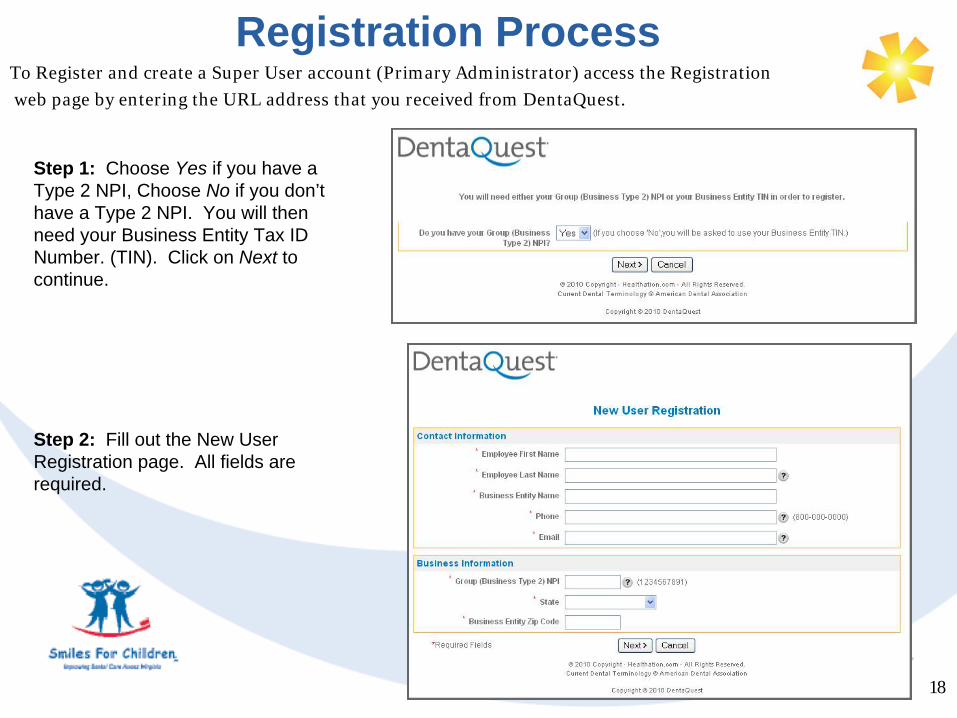
To Register and create a Super User account (Primary Administrator) access the Registration
web page by entering the URL address that you received from DentaQuest.
Registration Process
Step 1: Choose Yes if you have a Type 2 NPI, Choose No if you don’t have a Type 2 NPI. You will then need your Business Entity Tax ID Number. (TIN). Click on Next to continue.
Step 2: Fill out the New User Registration page. All fields are required.
1919
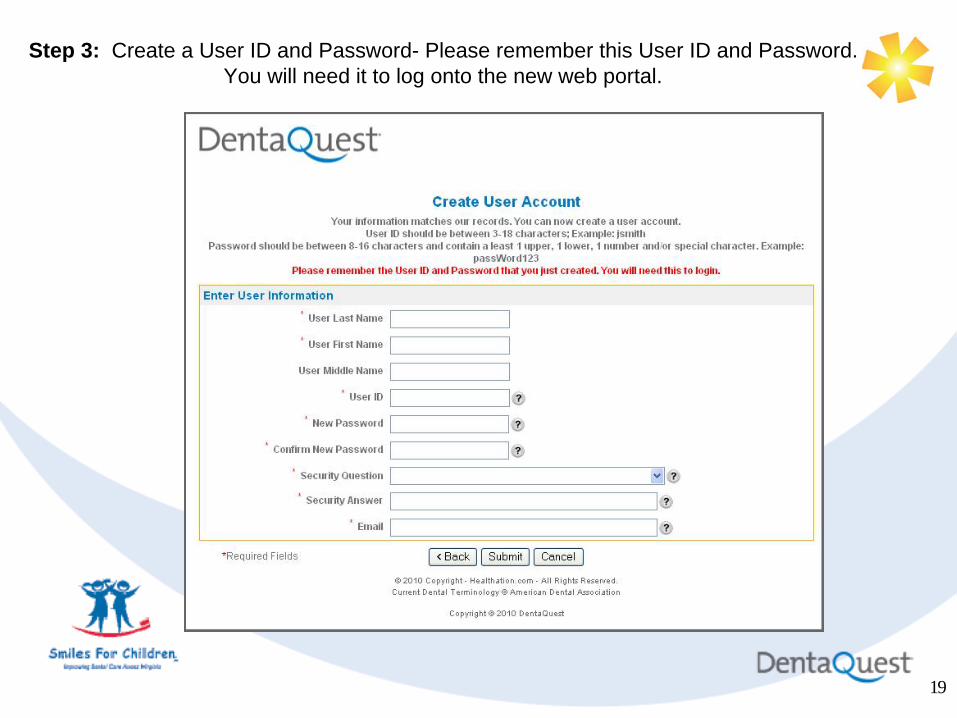
Step 3: Create a User ID and Password- Please remember this User ID and Password. You will need it to log onto the new web portal.
2020
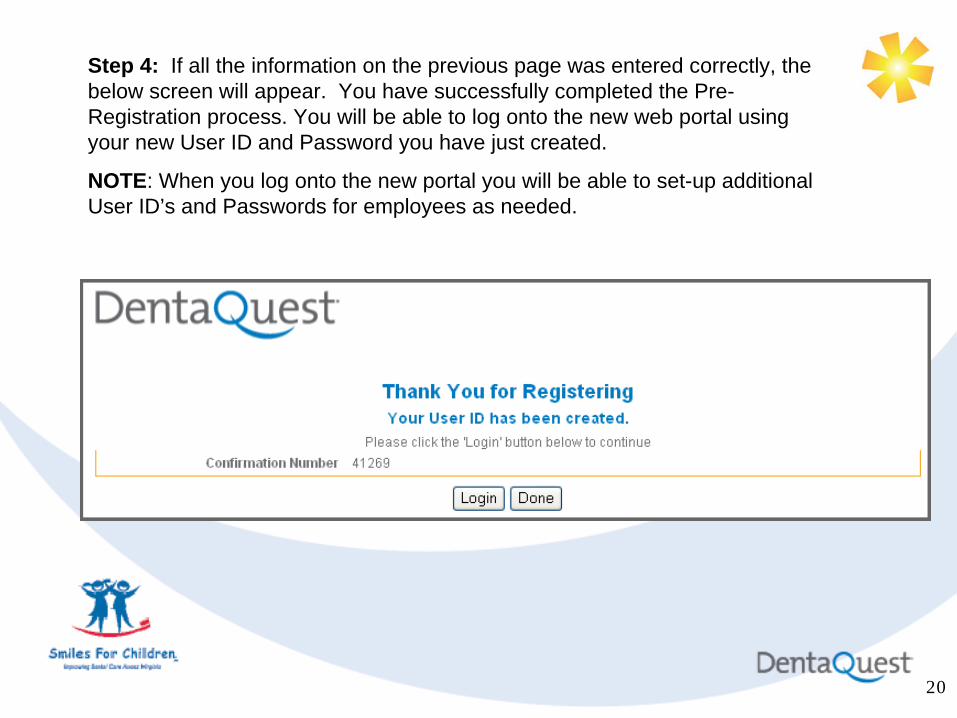
Step 4: If all the information on the previous page was entered correctly, the below screen will appear. You have successfully completed the Pre- Registration process. You will be able to log onto the new web portal using your new User ID and Password you have just created.
NOTE: When you log onto the new portal you will be able to set-up additional User ID’s and Passwords for employees as needed.
2121
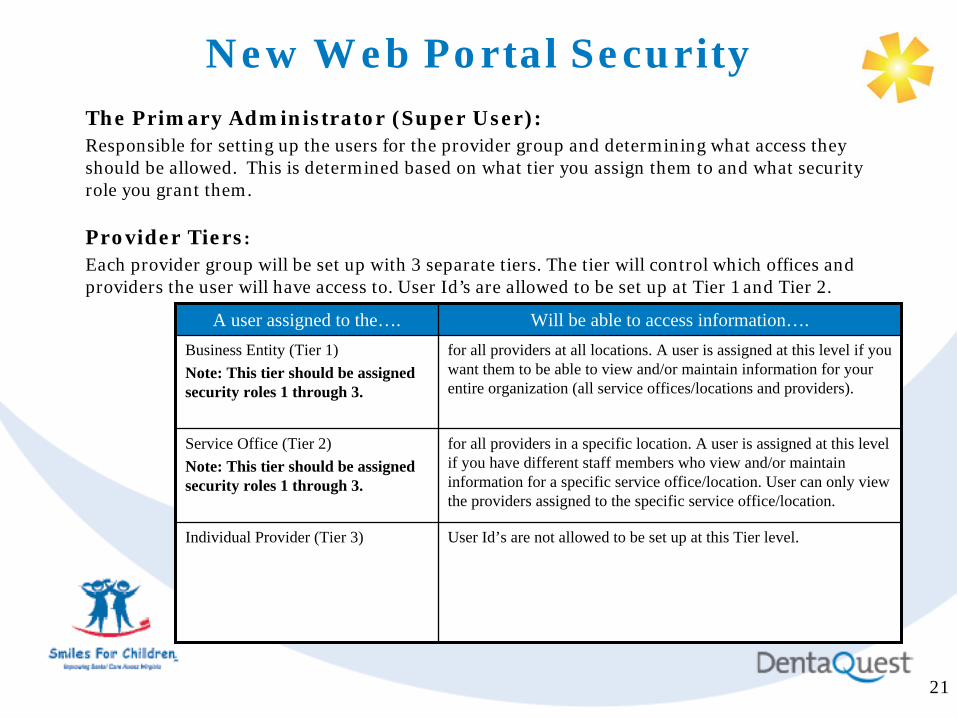
The Primary Administrator (Super User):Responsible for setting up the users for the provider group and determining what access they should be allowed. This is determined based on what tier you assign them to and what security role you grant them.
Provider Tiers:
Each provider group will be set up with 3 separate tiers. The tier will control which offices and providers the user will have access to. User Id’s are allowed to be set up at Tier 1 and Tier 2.
A user assigned to the…. Will be able to access information….Business Entity (Tier 1)Note: This tier should be assigned security roles 1 through 3.
for all providers at all locations. A user is assigned at this level if you want them to be able to view and/or maintain information for your entire organization (all service offices/locations and providers).
Service Office (Tier 2)Note: This tier should be assigned security roles 1 through 3.
for all providers in a specific location. A user is assigned at this level if you have different staff members who view and/or maintain information for a specific service office/location. User can only view the providers assigned to the specific service office/location.
Individual Provider (Tier 3) User Id’s are not allowed to be set up at this Tier level.
New Web Portal Security
2222
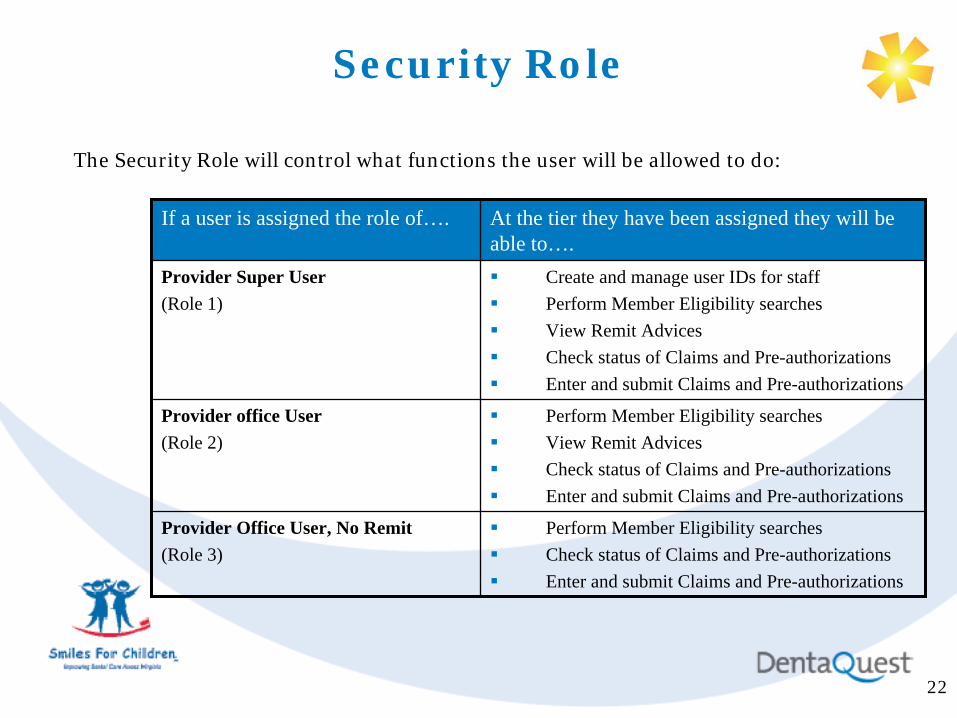
Security Role
The Security Role will control what functions the user will be allowed to do:
If a user is assigned the role of…. At the tier they have been assigned they will be able to….
Provider Super User(Role 1)
Create and manage user IDs for staffPerform Member Eligibility searchesView Remit AdvicesCheck status of Claims and Pre-authorizationsEnter and submit Claims and Pre-authorizations
Provider office User(Role 2)
Perform Member Eligibility searchesView Remit AdvicesCheck status of Claims and Pre-authorizationsEnter and submit Claims and Pre-authorizations
Provider Office User, No Remit(Role 3)
Perform Member Eligibility searchesCheck status of Claims and Pre-authorizationsEnter and submit Claims and Pre-authorizations
2323
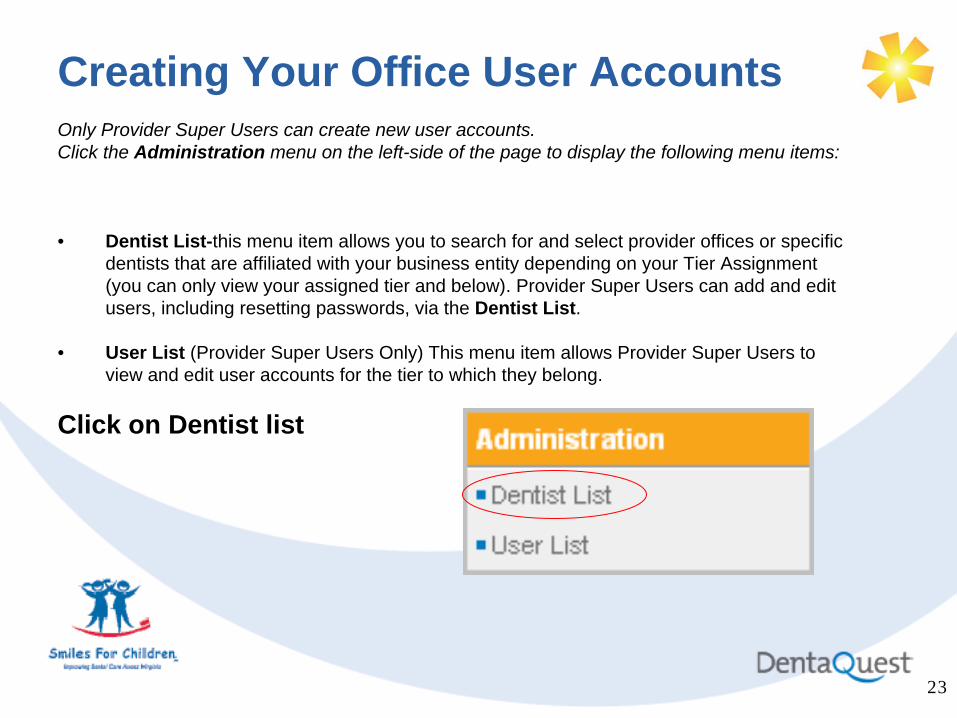
Creating Your Office User AccountsOnly Provider Super Users can create new user accounts. Click the Administration menu on the left-side of the page to display the following menu items:
• Dentist List-this menu item allows you to search for and select provider offices or specific dentists that are affiliated with your business entity depending on your Tier Assignment (you can only view your assigned tier and below). Provider Super Users can add and edit users, including resetting passwords, via the Dentist List.
• User List (Provider Super Users Only) This menu item allows Provider Super Users to view and edit user accounts for the tier to which they belong.
Click on Dentist list
2424
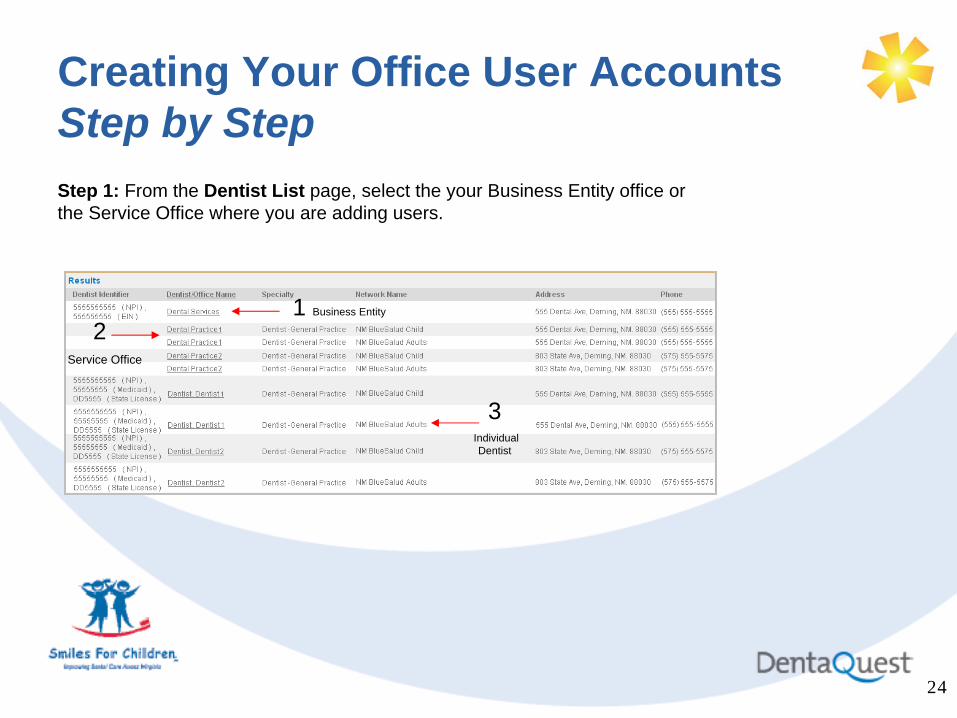
Creating Your Office User AccountsStep by StepStep 1: From the Dentist List page, select the your Business Entity office or the Service Office where you are adding users.
1 Business Entity
2Service Office
3Individual Dentist
2525
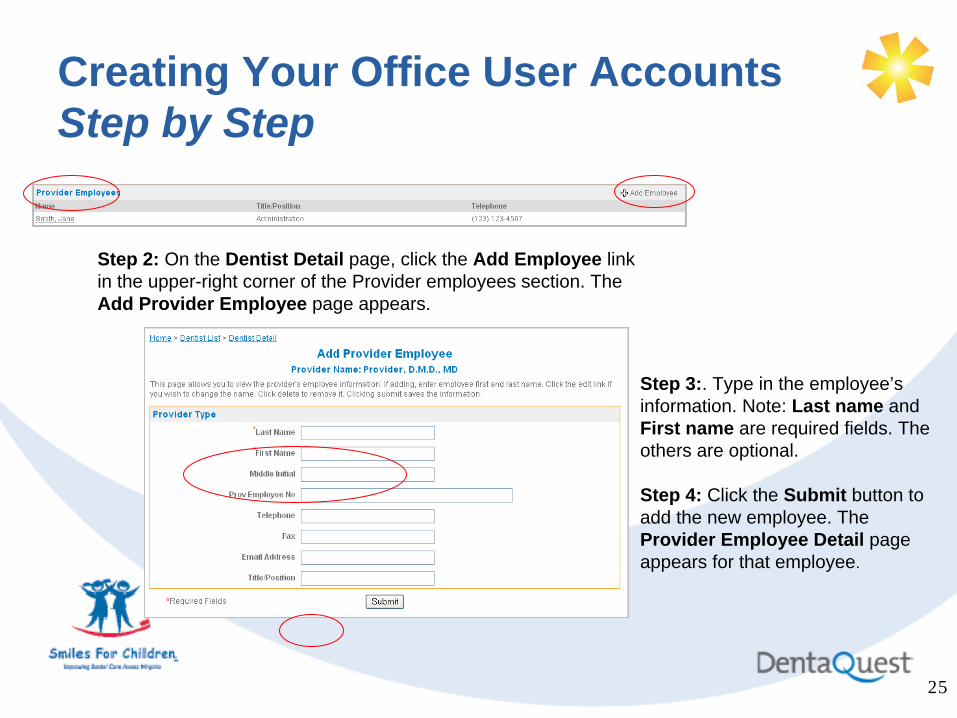
Step 2: On the Dentist Detail page, click the Add Employee link in the upper-right corner of the Provider employees section. The Add Provider Employee page appears.
Step 3:. Type in the employee’s information. Note: Last name and First name are required fields. The others are optional.
Step 4: Click the Submit button to add the new employee. The Provider Employee Detail page appears for that employee.
Creating Your Office User AccountsStep by Step
2626
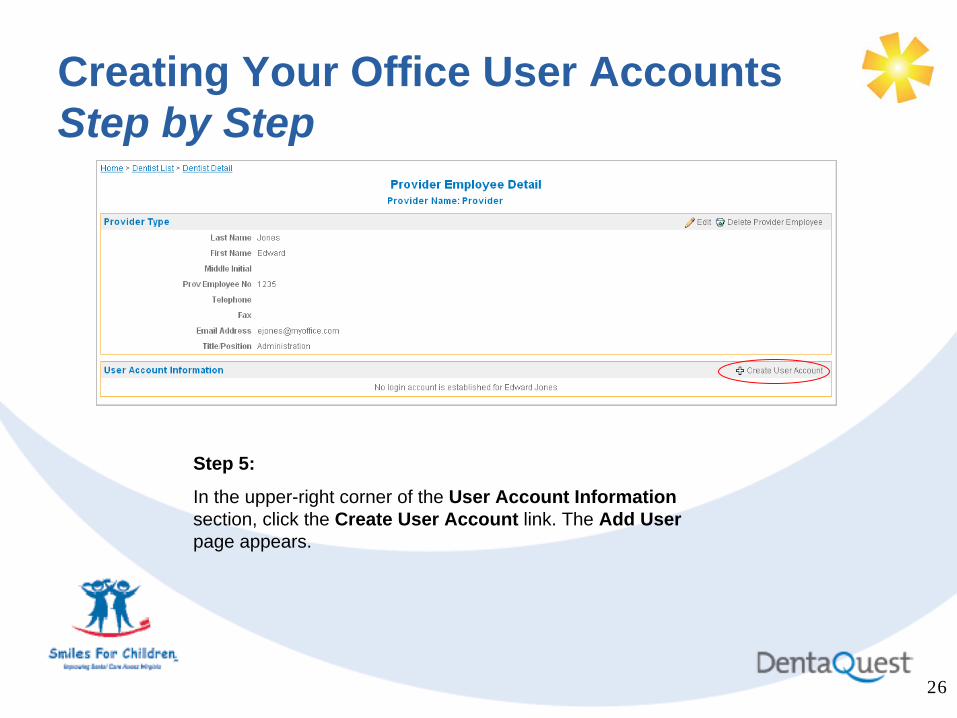
Step 5:
In the upper-right corner of the User Account Information section, click the Create User Account link. The Add User page appears.
Creating Your Office User AccountsStep by Step

2727
Creating Your Office User AccountsStep by Step
Step 6: Select a user role for this employee’s account from the User Role drop-down list.
2828
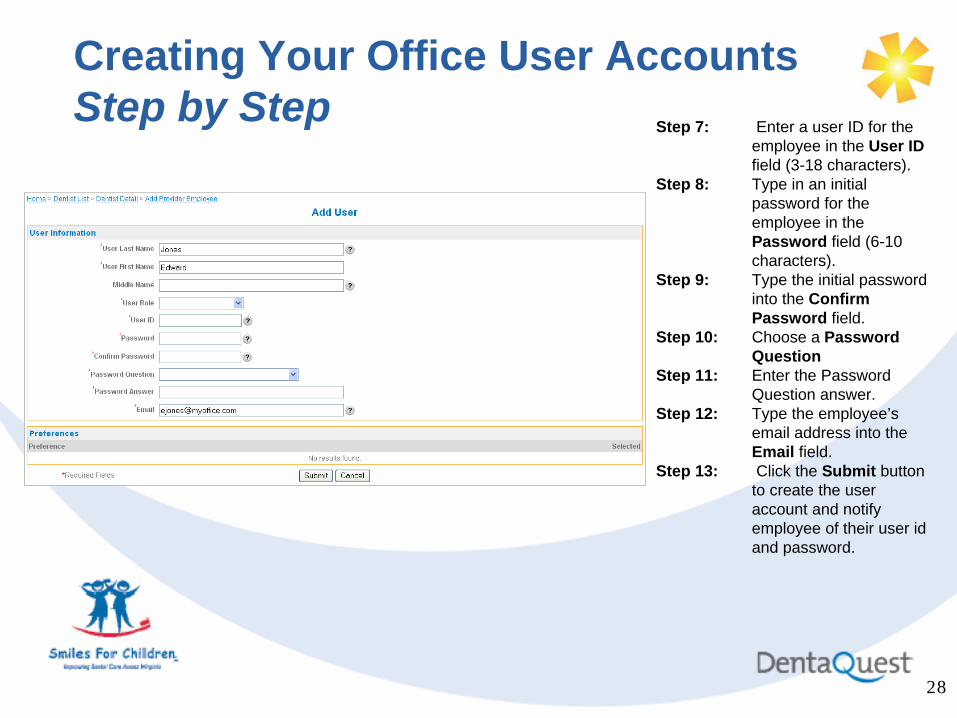
Step 7: Enter a user ID for the employee in the User ID field (3-18 characters).
Step 8: Type in an initial password for the employee in the Password field (6-10 characters).
Step 9: Type the initial password into the Confirm Password field.
Step 10: Choose a Password Question
Step 11: Enter the Password Question answer.
Step 12: Type the employee’s email address into the Email field.
Step 13: Click the Submit button to create the user account and notify employee of their user id and password.
Creating Your Office User AccountsStep by Step
2929
Web Portal OverviewWeb Portal Overview
3030
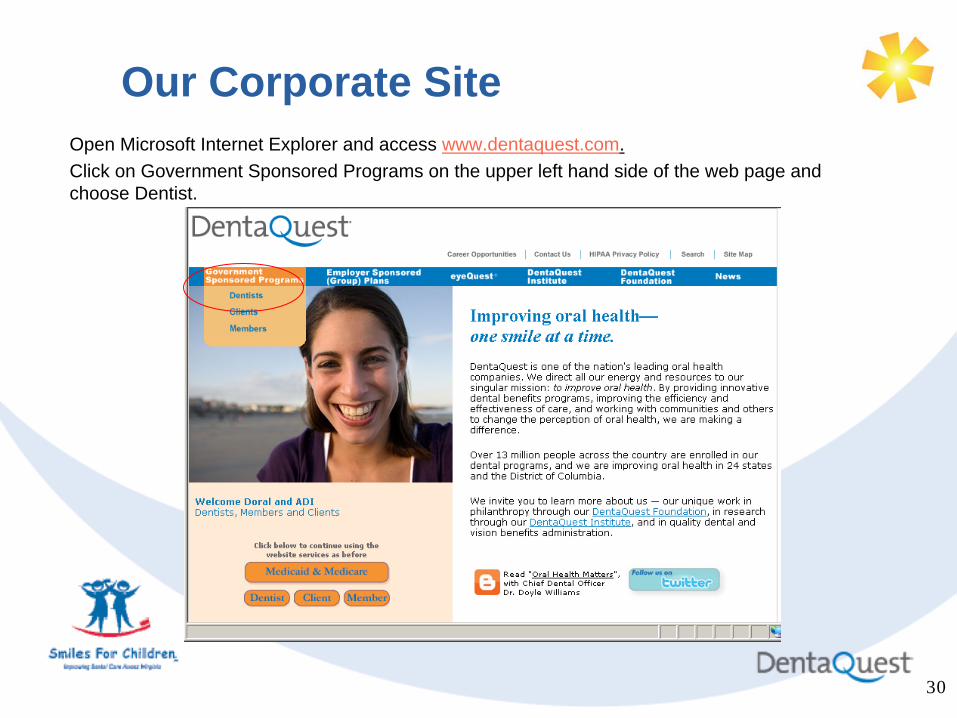
Open Microsoft Internet Explorer and access www.dentaquest.com.Click on Government Sponsored Programs on the upper left hand side of the web page and choose Dentist.
Our Corporate Site
3131
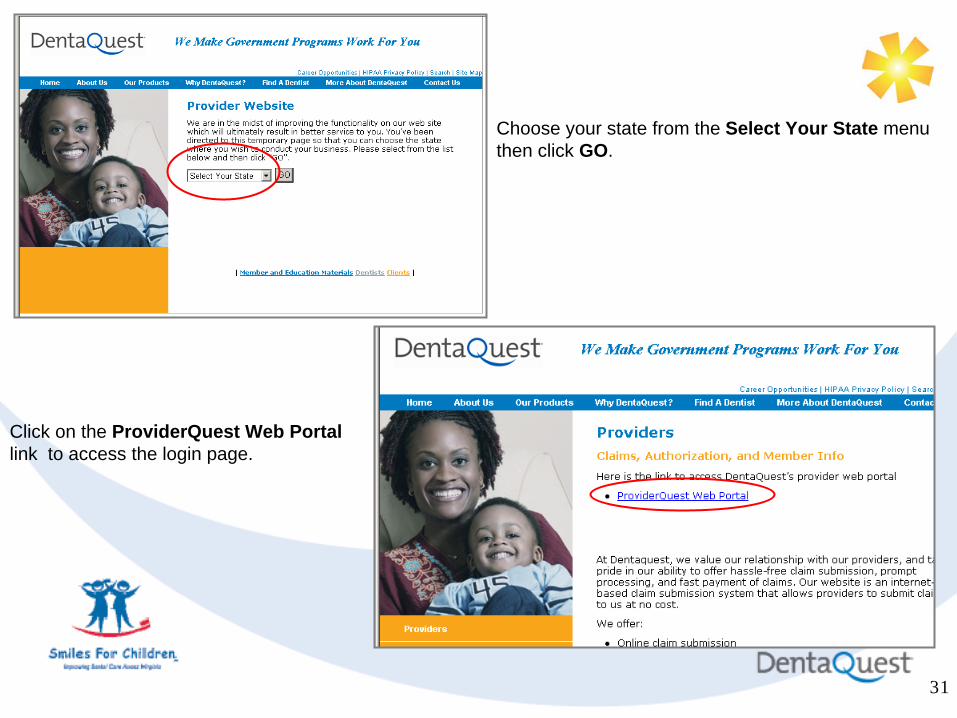
Choose your state from the Select Your State menu then click GO.
Click on the ProviderQuest Web Portal link to access the login page.
3232
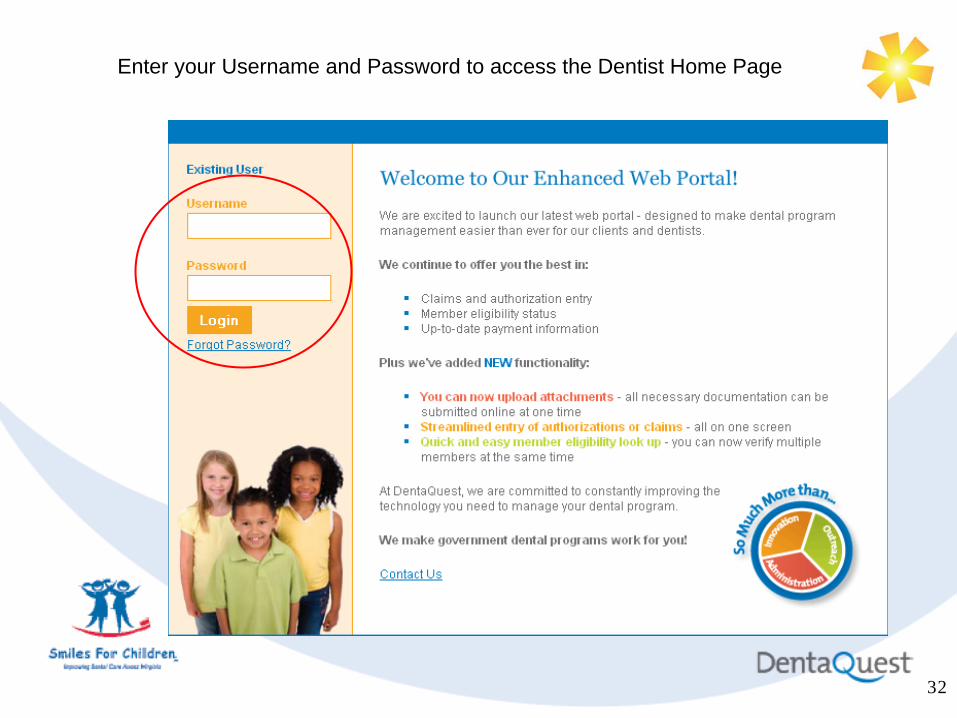
Enter your Username and Password to access the Dentist Home Page
3333
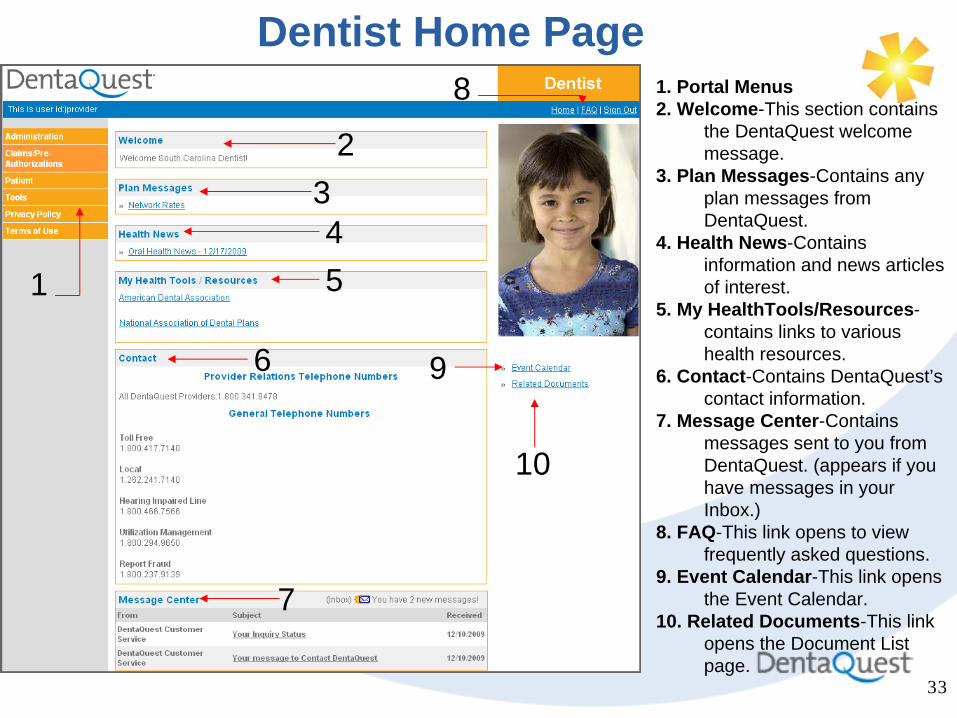
1. Portal Menus2. Welcome-This section contains
the DentaQuest welcome message.
3. Plan Messages-Contains any plan messages from DentaQuest.
4. Health News-Contains information and news articles of interest.
5. My HealthTools/Resources- contains links to various health resources.
6. Contact-Contains DentaQuest’s contact information.
7. Message Center-Contains messages sent to you from DentaQuest. (appears if you have messages in your Inbox.)
8. FAQ-This link opens to view frequently asked questions.
9. Event Calendar-This link opens the Event Calendar.
10. Related Documents-This link opens the Document List page.
Dentist Home Page
1
2345
6
7
8
9
10
3434
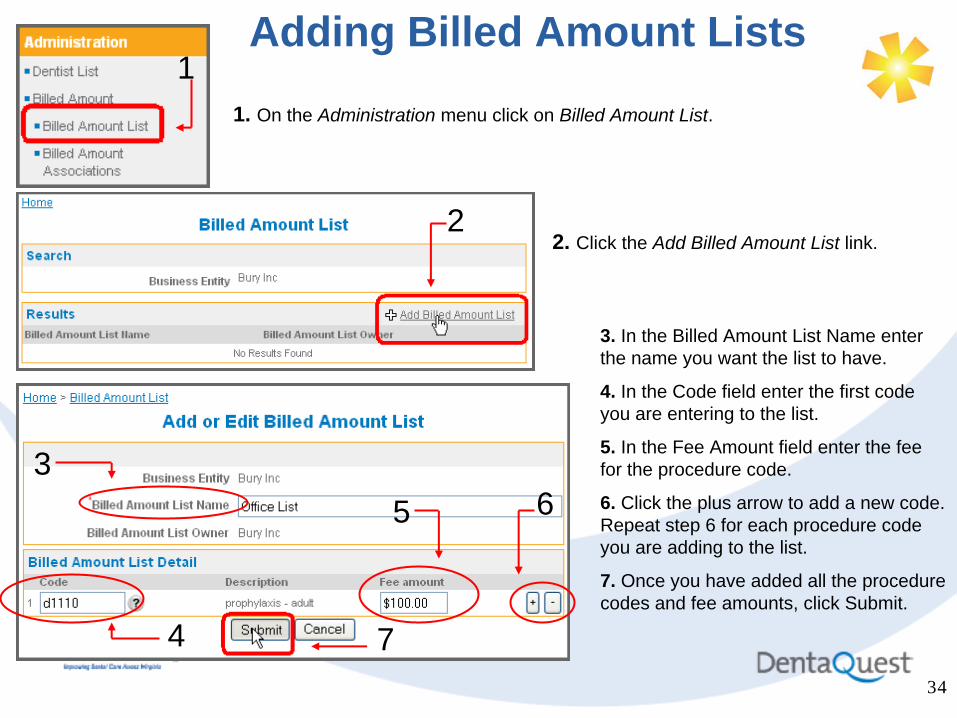
Adding Billed Amount Lists
1. On the Administration menu click on Billed Amount List.
2. Click the Add Billed Amount List link.
3. In the Billed Amount List Name enter the name you want the list to have.
4. In the Code field enter the first code you are entering to the list.
5. In the Fee Amount field enter the fee for the procedure code.
6. Click the plus arrow to add a new code. Repeat step 6 for each procedure code you are adding to the list.
7. Once you have added all the procedure codes and fee amounts, click Submit.
1
2
3
4
5 6
7
3535
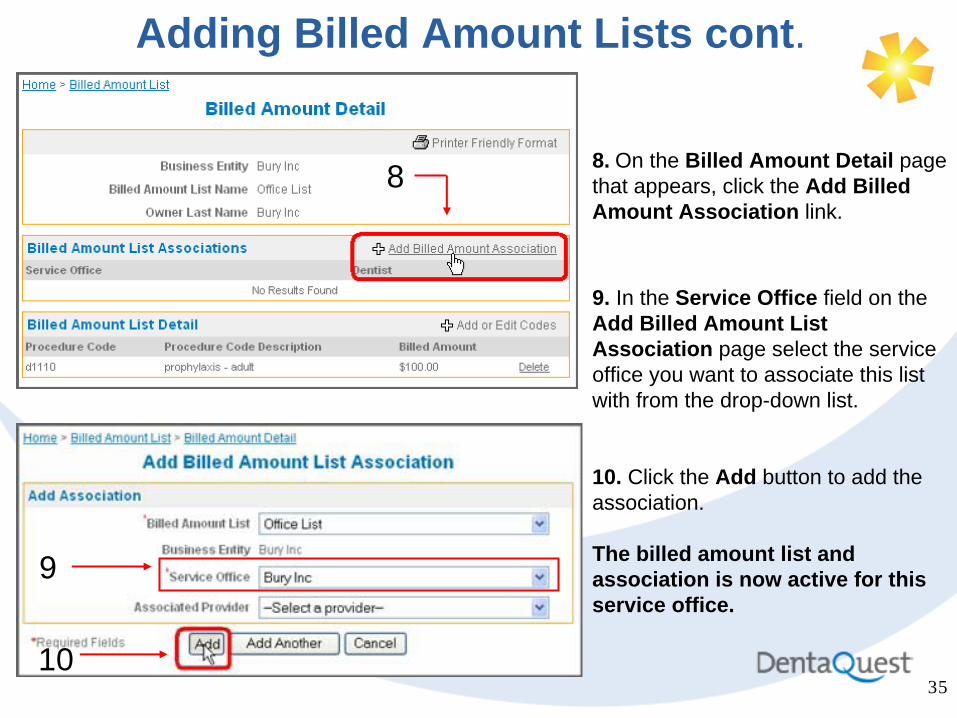
Adding Billed Amount Lists cont.
8. On the Billed Amount Detail page that appears, click the Add Billed Amount Association link.
9. In the Service Office field on the Add Billed Amount List Association page select the service office you want to associate this list with from the drop-down list.
10. Click the Add button to add the association.
The billed amount list and association is now active for this service office.
8
9
10
3636
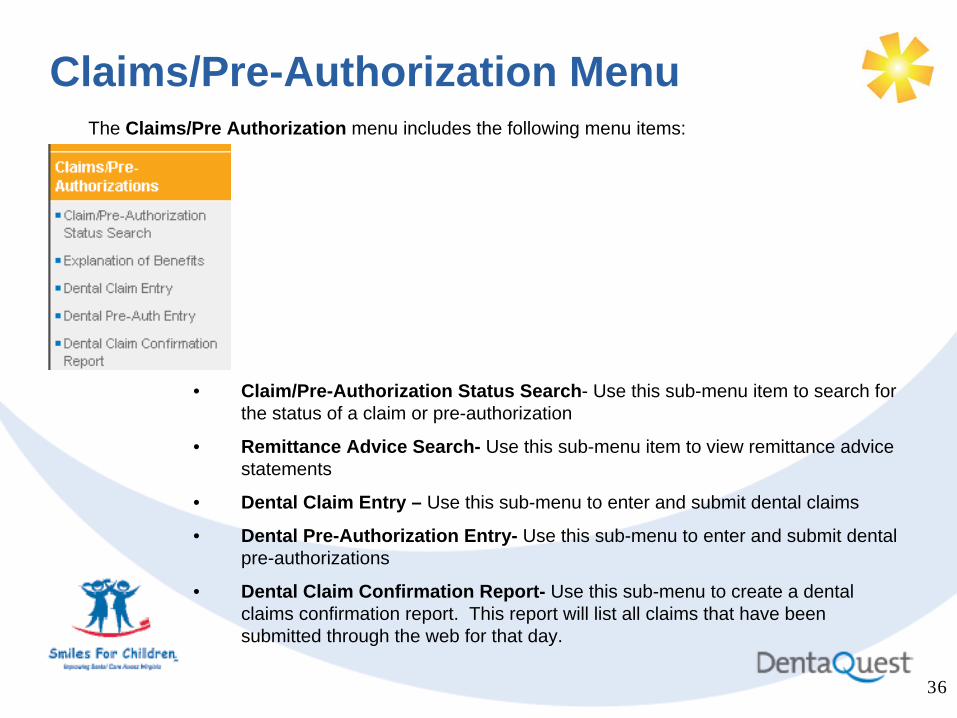
Claims/Pre-Authorization Menu
• Claim/Pre-Authorization Status Search- Use this sub-menu item to search for the status of a claim or pre-authorization
• Remittance Advice Search- Use this sub-menu item to view remittance advice statements
• Dental Claim Entry – Use this sub-menu to enter and submit dental claims
• Dental Pre-Authorization Entry- Use this sub-menu to enter and submit dental pre-authorizations
• Dental Claim Confirmation Report- Use this sub-menu to create a dental claims confirmation report. This report will list all claims that have been submitted through the web for that day.
The Claims/Pre Authorization menu includes the following menu items:

3737
Claim/Pre-Authorization Status Search
Search Criteria Key:
1. Member Last Name
2. Member First Name
3. Member Number
4. Member DOB
5. Servicing Dentist
6.Claim/Pre-authorization Number
7. Type: Dental Claim or Pre- Authorization
8. Status Category: Successfully Entered, Accepted, In Process, Adjudicated, Finalized
9. Date From/To: Enter the Date of Service
10. Claim Received Date From/To: Enter the Claim or Pre-auth Received Date.
This page allows you to conduct a claim or pre-authorization search. **At least one search criteria must be entered to perform a search**
3838
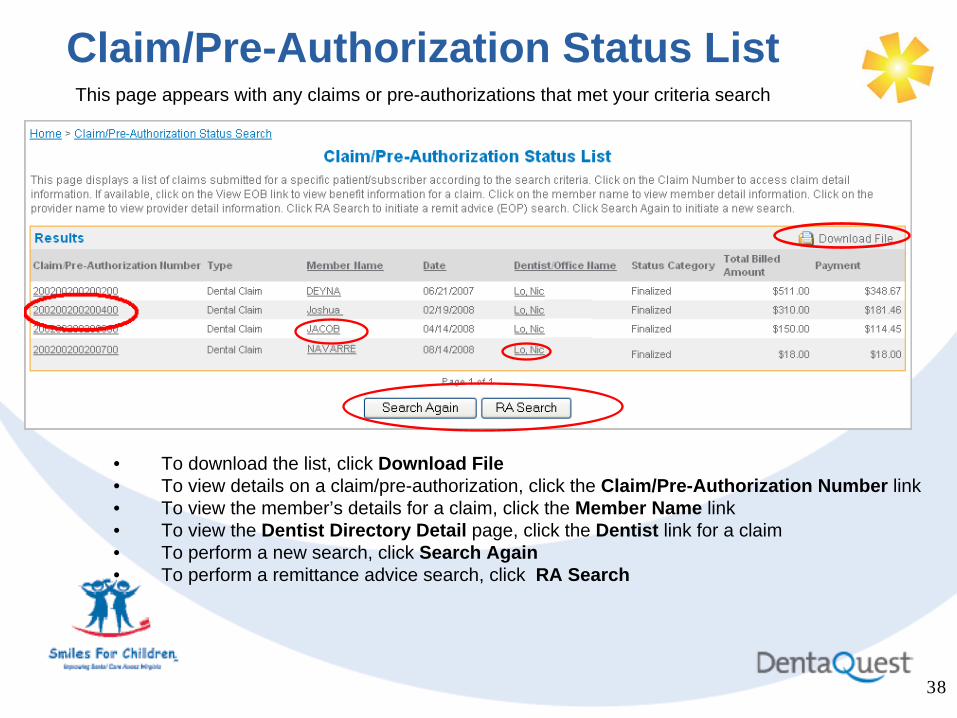
Claim/Pre-Authorization Status ListThis page appears with any claims or pre-authorizations that met your criteria search
• To download the list, click Download File• To view details on a claim/pre-authorization, click the Claim/Pre-Authorization Number link• To view the member’s details for a claim, click the Member Name link• To view the Dentist Directory Detail page, click the Dentist link for a claim• To perform a new search, click Search Again• To perform a remittance advice search, click RA Search
3939
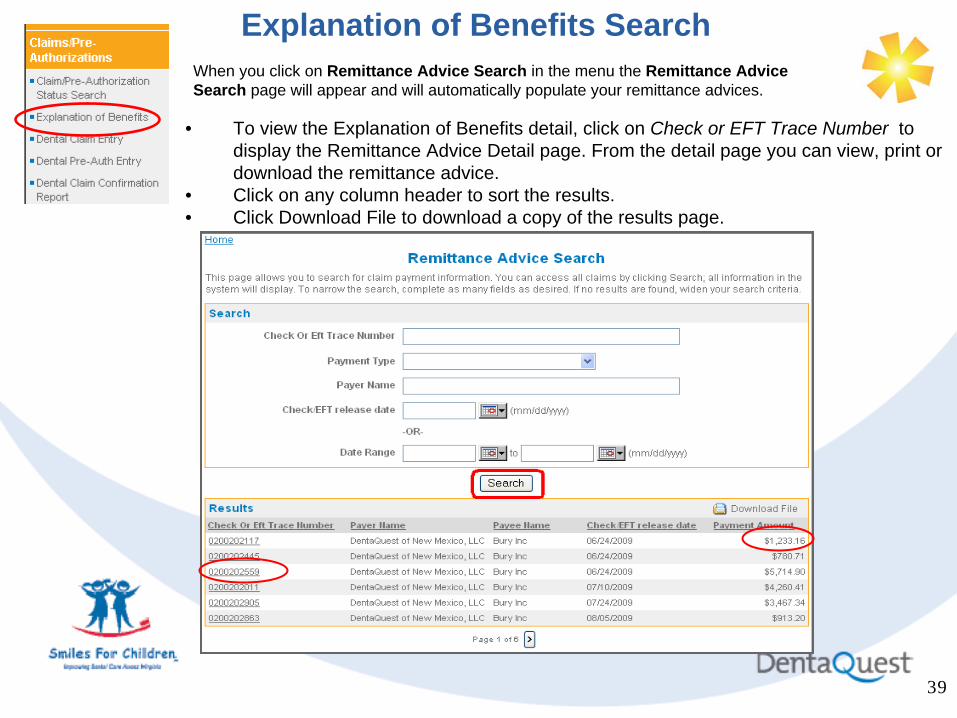
Explanation of Benefits Search
• To view the Explanation of Benefits detail, click on Check or EFT Trace Number to display the Remittance Advice Detail page. From the detail page you can view, print or download the remittance advice.
• Click on any column header to sort the results.• Click Download File to download a copy of the results page.
When you click on Remittance Advice Search in the menu the Remittance Advice Search page will appear and will automatically populate your remittance advices.
4040
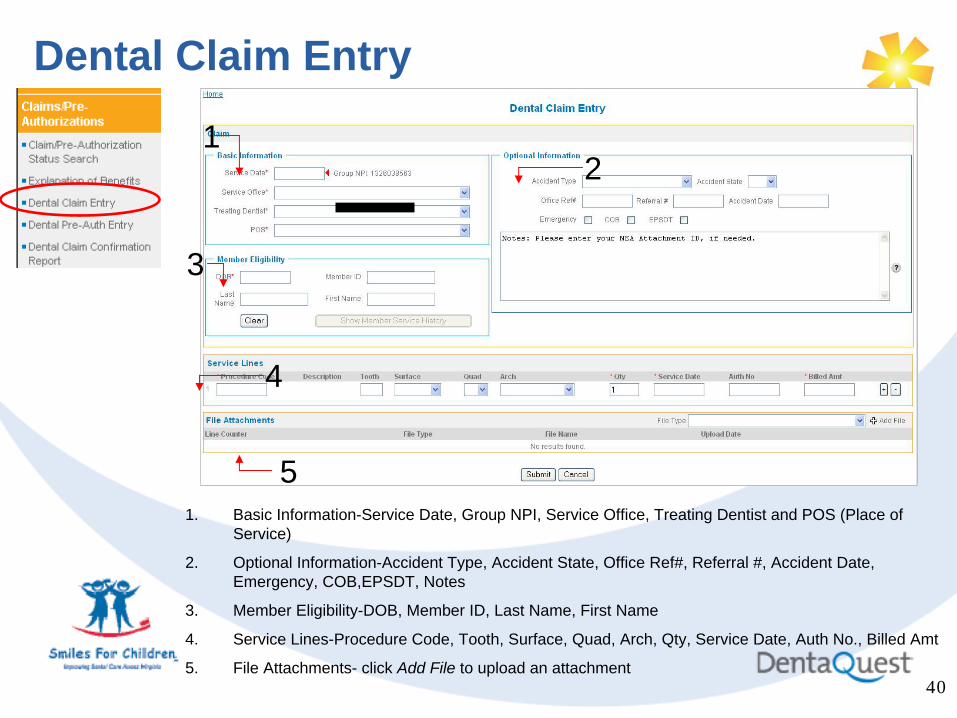
Dental Claim Entry
1. Basic Information-Service Date, Group NPI, Service Office, Treating Dentist and POS (Place of Service)
2. Optional Information-Accident Type, Accident State, Office Ref#, Referral #, Accident Date, Emergency, COB,EPSDT, Notes
3. Member Eligibility-DOB, Member ID, Last Name, First Name
4. Service Lines-Procedure Code, Tooth, Surface, Quad, Arch, Qty, Service Date, Auth No., Billed Amt
5. File Attachments- click Add File to upload an attachment
12
3
4
5
4141
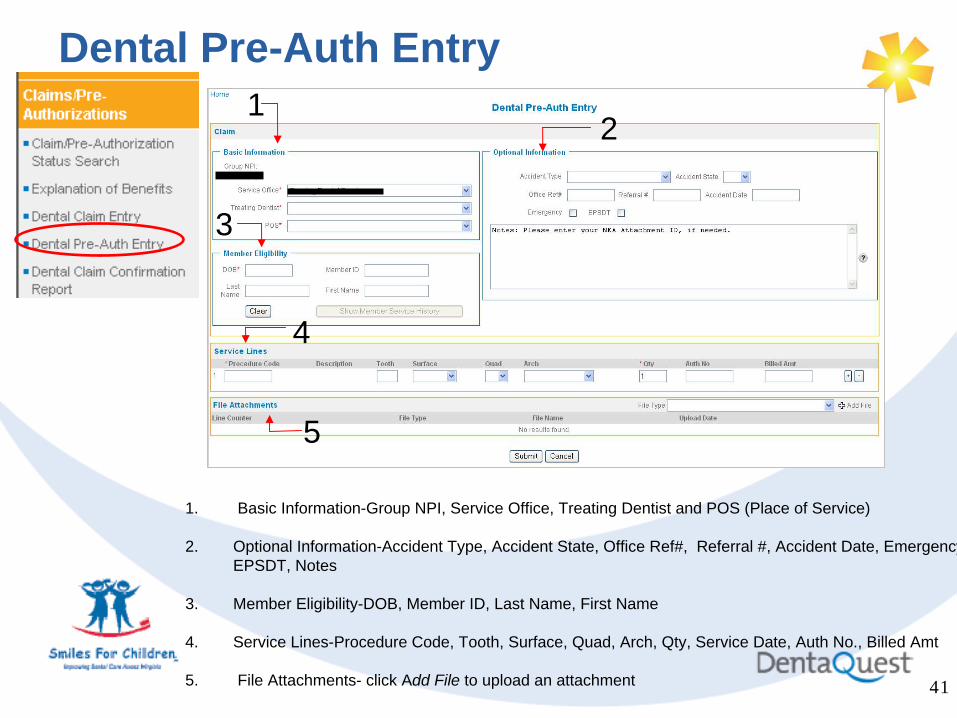
Dental Pre-Auth Entry
1. Basic Information-Group NPI, Service Office, Treating Dentist and POS (Place of Service)
2. Optional Information-Accident Type, Accident State, Office Ref#, Referral #, Accident Date, Emergency EPSDT, Notes
3. Member Eligibility-DOB, Member ID, Last Name, First Name
4. Service Lines-Procedure Code, Tooth, Surface, Quad, Arch, Qty, Service Date, Auth No., Billed Amt
5. File Attachments- click Add File to upload an attachment
12
3
4
5
4242
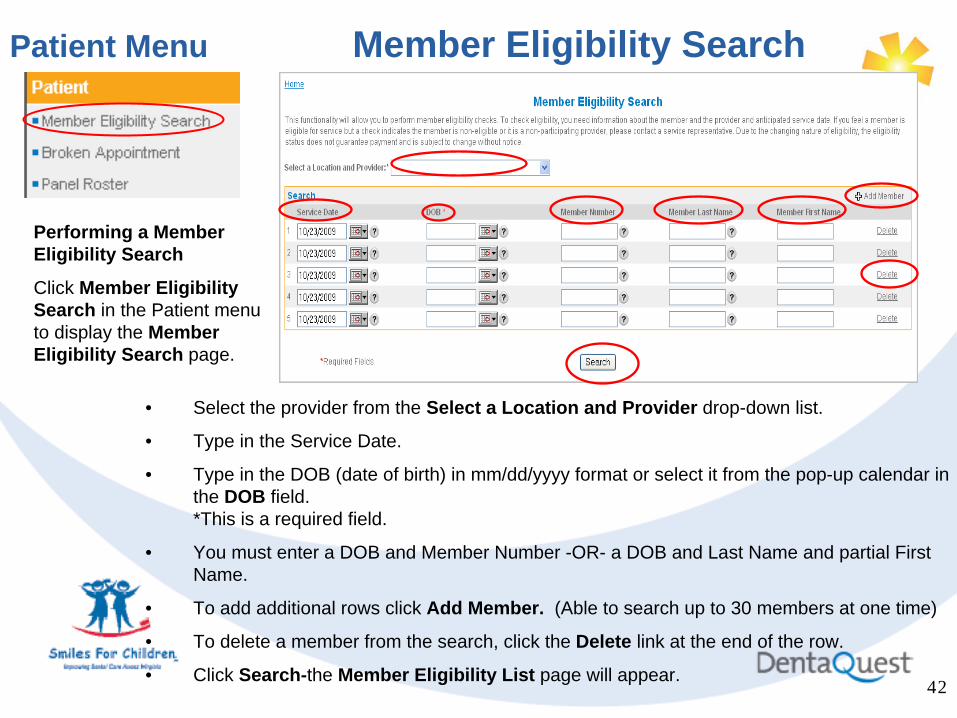
Patient Menu Member Eligibility Search
Performing a Member Eligibility Search
Click Member Eligibility Search in the Patient menu to display the Member Eligibility Search page.
• Select the provider from the Select a Location and Provider drop-down list.
• Type in the Service Date.
• Type in the DOB (date of birth) in mm/dd/yyyy format or select it from the pop-up calendar in the DOB field. *This is a required field.
• You must enter a DOB and Member Number -OR- a DOB and Last Name and partial First Name.
• To add additional rows click Add Member. (Able to search up to 30 members at one time)
• To delete a member from the search, click the Delete link at the end of the row.
• Click Search-the Member Eligibility List page will appear.
4343
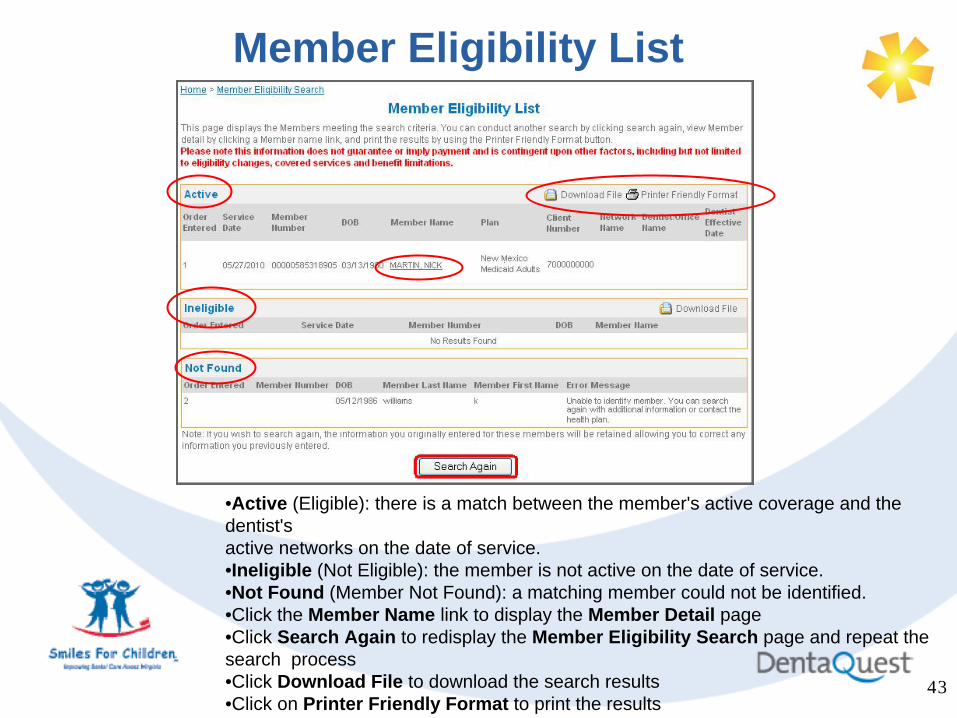
Member Eligibility List
•Active (Eligible): there is a match between the member's active coverage and the dentist's active networks on the date of service.•Ineligible (Not Eligible): the member is not active on the date of service.•Not Found (Member Not Found): a matching member could not be identified.•Click the Member Name link to display the Member Detail page•Click Search Again to redisplay the Member Eligibility Search page and repeat the search process•Click Download File to download the search results•Click on Printer Friendly Format to print the results

4444
Member Detail Page
• To view a list summary of claims for the specific member, click View Claims; the Claim Status List page appears.
• To view the member’s service history (available if they are eligible), click View Service History; the Member Service History page appears.
• To search for a dentist, click View Provider Directory; the Find a Dentist page appears pre-populated with information for the dentist you selected in the eligibility check.
• The Eligibility Information section lists the current Plan name.• The Other Coverage section lists cross-coverage information (COB) for the member.
4545
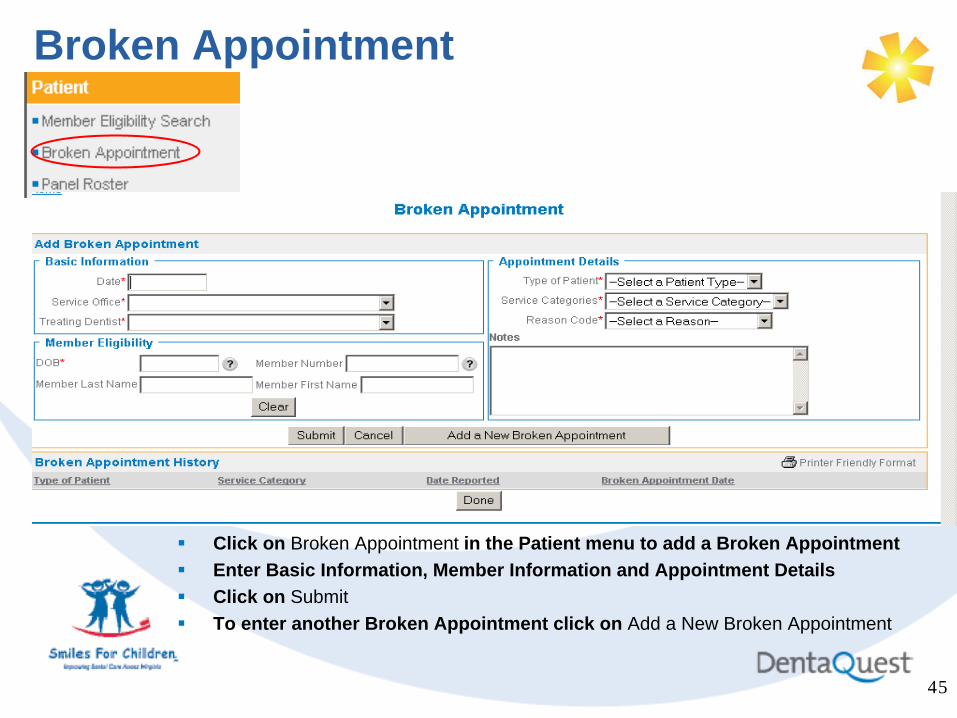
Broken Appointment
Click on Broken Appointment in the Patient menu to add a Broken AppointmentEnter Basic Information, Member Information and Appointment DetailsClick on SubmitTo enter another Broken Appointment click on Add a New Broken Appointment

4646
Tools Menu
Click the Tools menu to display the sub-menu items:
• User Profile- Use this sub-menu to view your user information and change your name, password, and email address.
• Inbox- use this sub-menu to view and manage any messages sent to you
• Contact DentaQuest- use this sub-menu to send secure messages
• Find a Dentist - Use this menu item to search for a specific type of dentist, view detailed provider information, and get directions to a dentist’s office.

4747
Send Secure Messages1. Message Type-select from the
drop-down list: Location Information Change, Provider NPI Info, Provider Authorization, Provider Claims, Remittance Documents
2. Attachment- To add an attachment click on Upload. You can have only one attachment per message
3. Claim/Pre-Authorization Number -Click on Search to search for a claim or pre- authorization
4. Dentist Name- Click on Search to search for a Dentist Name
5. Description-Type your question, comment or suggestion in the text box.
12
3
4
5
4848
In the weeks leading up to the migration, providers may receive larger than normal checks.
As a result of the July 11, 2011 migration, providers will not receive a reimbursement check during the week of July 25, 2011.
Providers may continue to submit claims through the current web portal through July 10, 2011.
Providers should plan accordingly and prepare for this delay in claims payment. DMAS and DentaQuest will not issue advance pays associated with this delay.
Change in Claims Adjudication Schedule

4949
A copy of this presentation can be found on the home page of the current Provider Web Portal
(PWP).
QUESTIONS AND ANSWERS


