Help from your Division/College’s Computer ConsultantSome divisions and colleges have computer consultants assigned to them. You can contact these consultants when you need
help. To determine if you have a consultant assigned to your division or college, look to: http://rohan.sdsu.edu/~facstaff
Help from the BATS Web Page
BATS (Baseline Access, Training and Support) is a California State University initiative to provide all students, faculty, and
staff with "baseline" access to information resources via networks, training in the uses of baseline hardware and software
systems, and ongoing professional and technical support for utilization of computer resources at San Diego State University.
You can access the BATS Web Page by pointing your browser to: http://rohan.sdsu.edu/~bats/
Help in the San Diego State University, Faculty RoomThe Faculty Room is staffed Monday through Friday with computing consultants who will try to answer your questions.
Improving Image Quality........................................................................................................................................................... 1 Steps to Making Improvements ................................................................................................................................1 Adjust Contrast and Brightness.................................................................................................................................1
Auto levels.............................................................................................................................................................1
The Marquee Tool........................................................................................................................................................................ 6 Selecting a rectangular region...................................................................................................................................6 Selecting a circular region.........................................................................................................................................6 Selecting a single row or column.............................................................................................................................. 7 Selecting free-form areas .......................................................................................................................................... 7 Selecting contiguous areas of color...........................................................................................................................7 Selecting non-contiguous areas of color ...................................................................................................................7 Adjusting selections ..................................................................................................................................................7 Moving selections .....................................................................................................................................................7 Inverting Selections...................................................................................................................................................8
Painting Tools...............................................................................................................................................................................8 Paintbrush and Pencil................................................................................................................................................8 Shape Menu...............................................................................................................................................................8 Paint bucket...............................................................................................................................................................8 Eraser ........................................................................................................................................................................8 Color Tools ............................................................................................................................................................... 8
Picking a different color ........................................................................................................................................ 8 Fill and Stroke...........................................................................................................................................................9
Adding Text to an Image ............................................................................................................................................................. 9 Typing Text...............................................................................................................................................................9 Type Tools ................................................................................................................................................................9
Working with Layers ................................................................................................................................................................. 10 Layers Palette..........................................................................................................................................................10
Showing and hiding layers ..................................................................................................................................10 Choosing a layer ..................................................................................................................................................10 Linking layers......................................................................................................................................................10 Creating a new layer............................................................................................................................................10 Naming a layer ....................................................................................................................................................10 Deleting a layer....................................................................................................................................................10 Duplicating a layer .............................................................................................................................................. 10 Moving layer contents ......................................................................................................................................... 10 Rearranging layers...............................................................................................................................................10 Converting the Background to a layer.................................................................................................................10
Aligning layers ....................................................................................................................................................11 Merging layers.....................................................................................................................................................11 Changing layer opacity........................................................................................................................................11 Flattening layers ..................................................................................................................................................11 Copying a layer between documents...................................................................................................................11 Preserving Transparency .....................................................................................................................................11
Saving a Layered Image..........................................................................................................................................11 Exporting a Layered Image.....................................................................................................................................11 Using Layer Styles ..................................................................................................................................................11
Adding a Drop Shadow .......................................................................................................................................11 Applying Bevel and Emboss ...............................................................................................................................11
Applying other Layer Styles ...................................................................................................................................11 Adjustment Layers ..................................................................................................................................................11
Creating Images for the Web .................................................................................................................................................... 13 GIF vs. JPEG...........................................................................................................................................................13
Rule of thumb......................................................................................................................................................13 Exceptions to the rule .......................................................................................................................................... 13
Saving as JPEG ....................................................................................................................................................... 13 Saving as GIF..........................................................................................................................................................13
Making Mistakes and More Photoshop Wisdom .................................................................................................................... 14 Oops, I goofed.........................................................................................................................................................14
Undo ....................................................................................................................................................................14 Revert ..................................................................................................................................................................14 History Palette .....................................................................................................................................................14
Common Mistakes, Problems, and Remedies.........................................................................................................14 I can’t save it as a JPEG, TIFF, etc. ....................................................................................................................14 It won’t let me paint ............................................................................................................................................ 14 It won’t let me edit .............................................................................................................................................. 14 My selection won’t feather..................................................................................................................................14 I can’t paint in color ............................................................................................................................................ 14
A Word about Modes..............................................................................................................................................14
One of the most common tasks in Photoshop includes
improving the quality of images. Most improvementscan be made with just a few commands that are outlined
below.
Steps to Making ImprovementsThe basic steps towards better image quality (ACTORS):
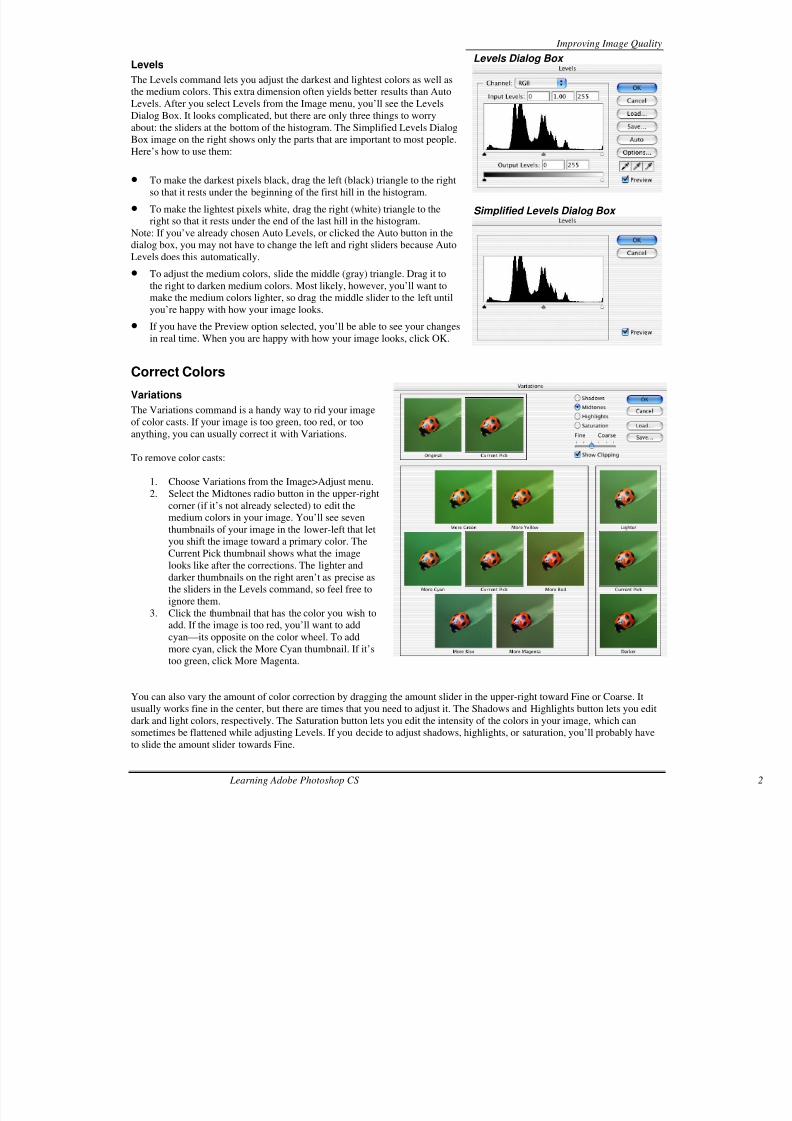
1. Adjust contrast and brightness by adjusting Levels.
2. Correct color with the Variations command.
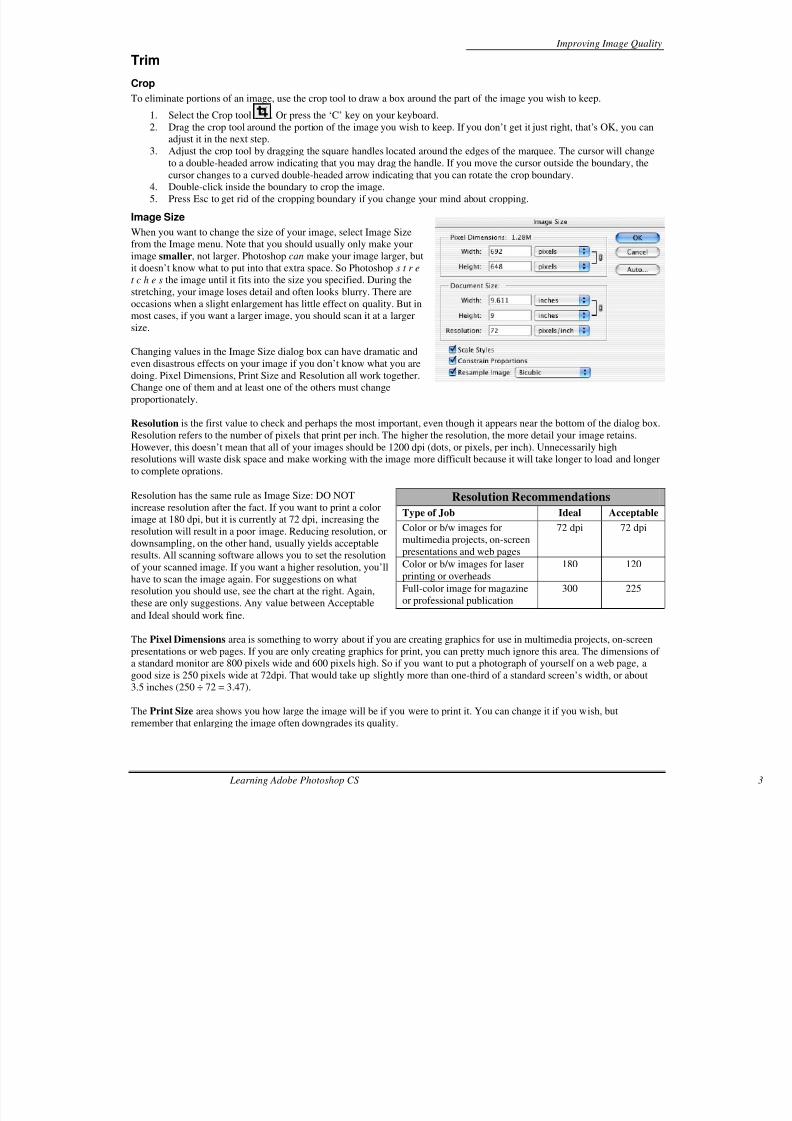
3. Trim the image using Crop, Image Size and Canvas Size.
4. Orient using Rotate.
5. Repair the image using painting tools and Clone Stamp.
6. Sharpen the image with Unsharp Mask.
Improving images is definitely more art than science. The steps above will help you get the most out of your images, but they
aren’t always applied in that order and some steps are sometimes skipped entirely. There is only one absolute rule: Garbage In,
Garbage Out . Photoshop can sometimes work miracles, but if you start with a very poor image, you’ll have a hard time making
something good come of it. If you don’t see any significant improvement after step 2, you are probably starting with an
extremely poor image. Scan it again, or find a better one.
Adjust Contrast and BrightnessYou would think that the Brightness and Contrast command under the Image>Adjust menu would be the best choice for this
job, but in reality, the Brightness and Contrast command is just plain terrible. To get better results, use the Levels command.
Auto levels
No matter what type of image you have, choose Auto Levels from the Image>Adjust menu to automatically correct the contrastof an image. Auto Levels makes the lightest colors lighter and the darkest colors darker. Sometimes this is all you need. But if
The Constrain Proportions check box near the bottom will keep everything in proportion if it is checked. So as you change
the width, the height will change proportionately, and vice versa. If you want to make your photos look squished or stretched,
uncheck the box and you can change each dimension independently.
The Resample Image check box should usually remain checked and set to Bicubic. If you are working with print images,
deselecting it can sometimes have better results when resizing the image proportionately. Experiment.
Canvas Size
Unlike the Image Size command, which stretches or shrinks an image, the Canvas Size command changes the size of the page
— or canvas — on which the image sits. If you increase the size of the canvas, the new area will be filled with the background
color. If you make the canvas smaller, your image will be cropped. You can enter a new width or height for your canvas and
indicate where you’d like the image to sit inside the new canvas by adjusting the Anchor point. Often you’ll increase the
canvas size if you want to create a collage of many images in one file, or if you want to add text adjacent to the image.
OrientIf you haven’t gotten your image straight using the crop tool, you can orient your image by using the Rotate Canvas command
under the Image menu. You can rotate the image 180 degrees, 90 degrees clockwise or counter-clockwise, or choose Arbitrary
to insert any number you wish. One word of caution: when you rotate the image, the canvas will adjust itself to be rectangular
again. New areas of the canvas will be filled by the background color and often you’ll need to be cropped with the crop tool, or
select the image with the a marquee tool and choose Crop under the Image menu.
Advanced users with multiple layers in an image can use the Free Transform and Transform tools under the Edit menu to
resize, reshape, and reorient images on different layers. They take time to get used to, but they’re time savers once mastered.
RepairMany times after you’ve scanned an image, you’ll see that it looks like it’s been dropped behind the refrigerator. Dust, hair,
specks, stains, and fingerprints abound. You can get rid of many of them by wiping the photo with a lint-free cloth or cleaning
the scanner bed before scanning, but they are often part of the photograph and not even the cleaning lady, can get them out.
If you have areas of a single color that have blemishes, use the eyedropper to select the color next to the blemish and use the
painting tools to cover it up. You can also experiment with the Dust and Scratches filter under the Filter>Noise menu at a low
radius and threshold, but results are variable. The most useful tool to eliminate these problems is the Clone Stamp.
Clone Stamp
The Clone Stamp tool allows you to clone portions of your image to cover up blemishes and other problem areas that you
would like removed. For example, you can use the Clone Stamp to remove scratches from a face by cloning skin or a telephonepole and wires by cloning the sky to cover them up. It takes practice, but it gives great results. To use the Clone Stamp:
1. Click once on the Clone Stamp tool in the toolbox.
2. Hold down the Option {Alt} key and click an area that looks similar to the area around the blemish. You must tell
Photoshop which portion of the image you want to clone before you can clone it. If you don’t hold down the Option
{Alt} key, you’ll get an error message telling you so. You want to click on an area that looks similar to the area that
contains the blemish because you want it to blend in with the surrounding area.
3. Release the Option {Alt} key and click or drag on top of the blemish. You’ll see a cross cursor with the Clone Stamp
that shows the area you are cloning from. When you move the stamp, the cross also moves giving you the current
reference point. Undo and the History palette are very helpful when using the Clone Stamp because it takes time to get
it right.
To change the size or shape of the area being cloned, change brushes in the Brushes palette (Window>Show Brushes). The
Clone Stamp Options palette lets you change the opacity of the brush, which often helps the cloned portion to blend in. Youcan also clone between images if you have them both open by option-clicking in one and dragging the stamp in the other.
Images often look a little blurry or fuzzy after scanning or resizing. To correct this,
you can sharpen the image using the Unsharp Mask command under the
Filter>Sharpen menu. That’s right, Unsharp Mask. Even though it sounds like the
opposite of what you want to do, it’s the one you want to use. The others don’t
work nearly as well. Almost all images can be improved using the Unsharp Mask
command. Results are subjective, but the ranges below usually work well and thevalues in the dialog box to the right yields good results.
1. Set the Amount to somewhere between 40-90% by sliding the slider or
typing in the numbers. The higher the amount, the more sharpening
occurs.
2. Set the Radius to between 1 and 2. This specifies the width of the edge you
want to sharpen.
3. Set the Threshold to between 0-4. This determines how different
neighboring pixels must be to be considered an edge.
4. Uncheck the Preview button to see the difference Unsharp Mask makes.
You can usually see dramatic results around eyes and leaves. Unsharp Mask is one
of those features where you won’t notice the improvement in your image until youcompare it to the original. Another quick way to preview is to click and hold the
mouse button down inside the image preview thumbnail inside the Unsharp Mask
dialog box to see the before results, and release the mouse to see the after results.
Selecting a single row or columnThe single row or single column marquees let you define the border as a 1-pixel-wide row or column.
Selecting free-form areas
• Use the lasso tool to trace around the portion of the image you wish to select. It’s easy, but sometimes difficult to be exact.
• Use the polygon lasso lets to create a selection with straight sides.
1. Click to set the starting point of the selection.
2. Move the cursor to the point where you want the first segment to end.3. Keep clicking around the image to create new segments.
4. When you circle back to the first point, you’ll see a little circle next to the cursor. Click to close the selection.
5. If you want to draw a curved line among your straight segments, hold down the Option {Alt} key.
• The magnetic lasso lets you easily select an image that is a different color than the background. It works best with high-
contrast images.
1. Click on the edge of the portion you wish to select.
2. Move the cursor around the edge. The magnetic lasso automatically creates an outline with square anchor points.
3. If the line is off, back up the mouse and try again.
4. If you need to delete an anchor point, press the delete key. To create an anchor point, click the mouse.
Selecting contiguous areas of color
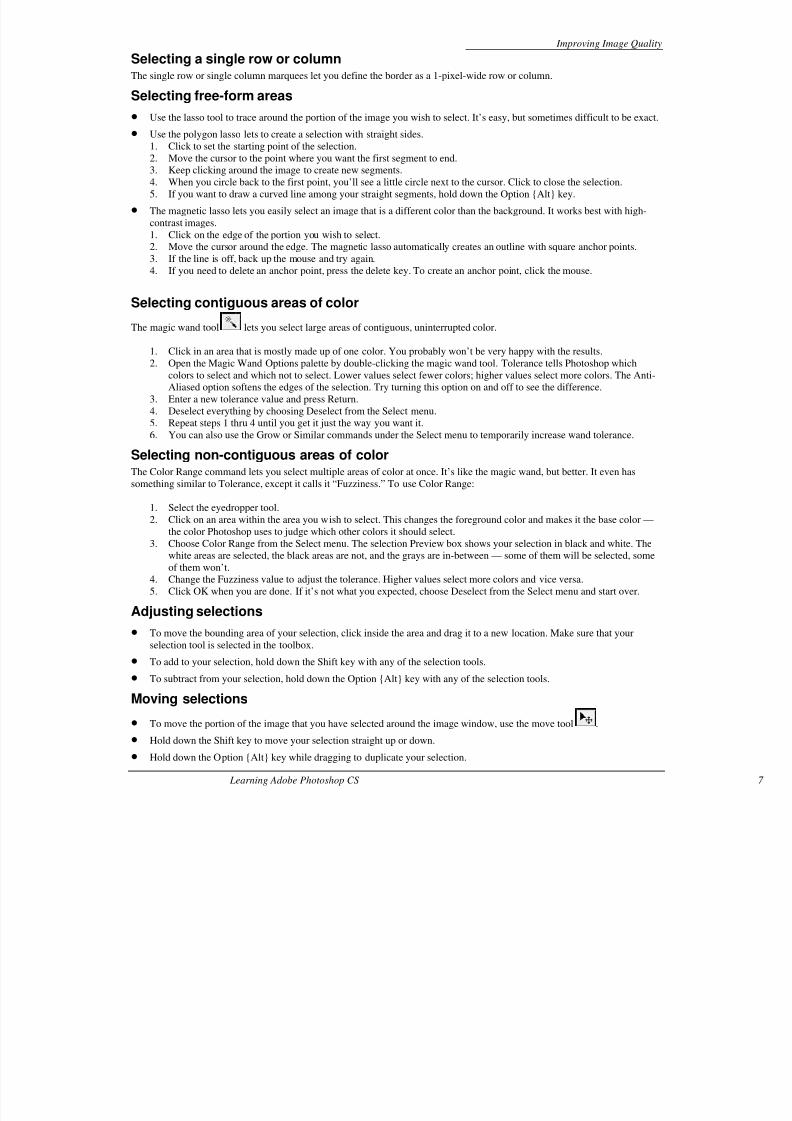
The magic wand tool lets you select large areas of contiguous, uninterrupted color.
1. Click in an area that is mostly made up of one color. You probably won’t be very happy with the results.
2. Open the Magic Wand Options palette by double-clicking the magic wand tool. Tolerance tells Photoshop which
colors to select and which not to select. Lower values select fewer colors; higher values select more colors. The Anti-
Aliased option softens the edges of the selection. Try turning this option on and off to see the difference.
3. Enter a new tolerance value and press Return.
4. Deselect everything by choosing Deselect from the Select menu.
5. Repeat steps 1 thru 4 until you get it just the way you want it.
6. You can also use the Grow or Similar commands under the Select menu to temporarily increase wand tolerance.
Selecting non-contiguous areas of color
The Color Range command lets you select multiple areas of color at once. It’s like the magic wand, but better. It even hassomething similar to Tolerance, except it calls it “Fuzziness.” To use Color Range:
1. Select the eyedropper tool.
2. Click on an area within the area you wish to select. This changes the foreground color and makes it the base color —
the color Photoshop uses to judge which other colors it should select.
3. Choose Color Range from the Select menu. The selection Preview box shows your selection in black and white. The
white areas are selected, the black areas are not, and the grays are in-between — some of them will be selected, some
of them won’t.
4. Change the Fuzziness value to adjust the tolerance. Higher values select more colors and vice versa.
5. Click OK when you are done. If it’s not what you expected, choose Deselect from the Select menu and start over.
Adjusting selections
• To move the bounding area of your selection, click inside the area and drag it to a new location. Make sure that yourselection tool is selected in the toolbox.
• To add to your selection, hold down the Shift key with any of the selection tools.
• To subtract from your selection, hold down the Option {Alt} key with any of the selection tools.
Moving selections
• To move the portion of the image that you have selected around the image window, use the move tool .
• Hold down the Shift key to move your selection straight up or down.
• Hold down the Option {Alt} key while dragging to duplicate your selection.
Inverting SelectionsSometimes it’s easier to select what you don’t want. For example, if your object is on a white background, try the following:
• Use the Magic Wand to select the white part that surrounds the object.
• Choose Inverse from the Select menu.
Painting Tools
The painting tools in Photoshop allow you to paint colors on your image. Double-click each tool to openthe Option palettes where you can change brush modes and opacity settings. You can use the selection
tools to select area to be painted. This will prevent you from going outside the lines.
Paintbrush and Pencil1. The paintbrush paints soft lines like the airbrush. The only difference between the two is that the airbrush paints color
continuously even when you hold it in place—as long as the mouse button is down. The paintbrush paints only as you
drag the mouse.
2. You can select the size and type of brush you wish to use from the Brush menu on the Info Pallet
3. The Pencil tool works much like the paintbrush tool except that it draws hard-edged lines of any thickness. You can
adjust the opacity in the options palette. You can choose the size of the pencil and type of brush from Brush menu on
the Info Pallet
Shape Menu
1. The shape menu lets you select and draw geometric shapes
2. The Line tool lets you draw straight lines between two points. Click on the image to set the beginning point, then drag
the mouse to the location of the end point and release the mouse. The Info palette allows you to set the line thickness.
Paint bucketThe paint bucket tool fills a continuous area of color with a different color. The paint bucket tool has an opacity option like the
other painting tools as well as tolerance and anti-aliased options that are described under the magic wand tool.
Eraser
The eraser tool will erase the parts of the image that you drag it over, but it will paint in the background color, which istypically white. Hence it’s not very useful when you can use the paintbrush to do the same thing. The eraser is much more
useful when working with an image that has multiple layers. The areas you erase on one layer will reveal areas of the
underlying layers.
Color ToolsThe foreground color is applied by the painting tools. The background color is applied by the eraser tool and it is the color of
the empty portion of the canvas when increasing Canvas Size. Click the Default Colors icon to restore the foreground color to
black and the background color to white. Click the Switch Colors icon to swap the foreground and background colors.
Picking a different color
There are several ways to define the foreground and background colors.
1. Click the foreground or background color icons and select a color from the Color Picker.2. Open the Color palette (Window>Show Color) and slide the RGB sliders until you get the color you want.
3. Open the Swatches palette (Window>Show Swatches) and click on the color you would like to use. Advanced users
can load more swatches (including web-safe colors) from Photoshop’s Goodies: Color Palettes folder by clicking the
palette menu (the right triangle next to the tabs) in the Swatches palette.
4. Use the eyedropper tool to “lift” colors from other parts of the image. Just click on the color you want to use.
To align layers, link them and select Align Linked from the Layer menu.
Merging layers
There are two ways to merge or combine layers:
• Link them and select Merge Linked from the palette menu or Layer menu.
• Hide all the layers except the ones you want to merge and select Merge Visible from the palette menu or Layer menu.
Changing layer opacityPhotoshop allows you to make layers translucent by entering an opacity value in the Opacity option box or by dragging its
attached Opacity slider.
Flattening layers
To flatten the image and merge all visible layers, select Flatten Image from the palette menu or Layer menu.
Copying a layer between documents
Open the source and destination document, select the move tool and drag the layer from the source to the destination. If you
hold down the Shift key while dragging the layer will be positioned in the center of the destination image (if the pixel
dimensions are different) or in the same position it occupied in the source image (if the pixel dimensions are the same).
Preserving Transparency
To paint only inside the image on a layer and keep the transparent areas transparent, check the Preserve Transparency box near
the top of the Layers palette.
Saving a Layered ImageThe Photoshop format is the only format that preserves layers. Preserve the layered file for easy editing later.
Exporting a Layered ImageIf you want to use your image in a different program, most other programs, do not support layers, so you’ll have to flatten your
image. Choose the Save a Copy option from the Save menu, select the format you wish to use (TIFF, JPEG, etc) and Photoshop
will automatically flatten the layers for you and not overwrite the original (layered) file.
Using Layer StylesPhotoshop CS has made it very easy to add drop shadows, glows and bevels to elements of you image. Layer styles can be
applied to regular layers and text layers, but not to Backgrounds.
Adding a Drop Shadow
To apply a soft shadow behind an element:
1. Select a layer.
2. Choose Drop Shadow from the Layer>Layer Styles menu.
3. Adjust the settings in the dialog box as needed.
4. Make sure the Apply box is selected and click OK.
Applying Bevel and Emboss
Bevel and Emboss effects add shadows and highlights to make elements look three-dimensional.
• Applying Bevel and Emboss is just like Applying a Drop Shadow except that you select Bevel and Emboss from the Layer
Styles menu.
• You can pretty much leave Highlight and Shadow alone and focus on the bottom of the dialog box.
• Choose a style, Angle, Depth and Blur and watch the results to your image.
Applying other Layer Styles
• To apply Inner Shadow, Our Glow or Inner Glow, follow the same steps as Applying a Drop Shadow, but choose the
effect you want from the Layer>Layer Styles menu.
Adjustment LayersAdjustment layers let you experiment with color and tonal adjustments to an image without permanently modifying it. The
color and tonal changes act as a veil through which the underlying layers appear. For more, see Photoshop’s online help.
GIF vs. JPEGGIF and JPEG are still the most popular formats to use for images on the Web. But how do you know which one to use?
Rule of thumb
• Use GIF for images that use a lot of flat colors. This includes line drawings, clip art, and most images that are notphotographs. GIF stands for Graphics Interchange Format, which is a big hint — the G stands for graphics.
• Use JPEG for photographs. JPEG stands for Joint Photographic Experts Group. The P in JPEG stands for photograph.
Exceptions to the rule
• Graphics that have a lot of shading, texture, or drop shadows often are better saved as JPEGs.
• Photographs that you want to make partially transparent must be saved as GIFs.
• Graphical animations made from photographs must be saved as Animated GIFs. (Photoshop won’t create Animated GIFs)
Saving as JPEGTo save images in JPEG format, select Save a Copy under the File menu. For more, see File Formats in this handout.
Saving as GIF
Compuserve GIF
You can use the Save As command to save RGB, indexed-color, grayscale, or Bitmap-mode images directly in GIF format..
1. Save the artwork, and choose CompuServe GIF from the Format menu..
2. For RGB images, the Indexed Color dialog box appears. Specify conversion options and click OK.
3. Select a row order for the GIF file, and click OK:
4. Normal displays the image in a browser only when download is complete.
5. Interlaced displays low-resolution versions of the image in a browser as the file downloads. Interlacing makes
download time seem shorter, but it also increases file size.
Web-Safe colorsAn advanced option for GIFs is to use web-safe colors. Web-safe (or browser-safe) colors won’t dither on screen and they are
guaranteed to look consistent across browsers and platforms. When adding text or painting lines or colors, it’s best to use web-safe colors. Advanced users can load web color swatches from Photoshop’s Goodies: Color Palettes folder by clicking the
palette menu in the Swatches palette. You can also select the Web palette from the Indexed Color command under
Image>Mode to make a graphic web-safe. For more information, see http://www.adobe.com/newsfeatures/palette/ .
Oops, I goofedPhotoshop is an experimentation program. You try something and if you don’t like it, you go back and try something else. And
no matter how hard you try, you’re bound to make mistakes. Photoshop has several ways to turn the digital clock.
Undo
The Undo command will reverse the effect of the last operation you performed. You can select Undo from the Edit menu, or
press -Z (Control-Z on Windows). After you’ve selected Undo, the command changes to Redo. You can flip back and forth
between the current and previous states of the image to decide which you like better.
Revert
The Revert command under the File menu reloads the last saved version of your file. So if you’ve made many changes to your
image and you hate them all, choose Revert to start over entirely.
History Palette
The History Palette (Window>Show History) records all of the operations you have performed on an image and keeps a
running list. As you perform each operation, Photoshop gives a name to the current state of the image and displays a small icon
that corresponds to the last tool used. To return to a previous state, click on it in the History Palette.
Common Mistakes, Problems, and RemediesI can’t save it as a JPEG, TIFF, etc.
If you have at least one layer in your document, you won’t be able to save your image in any format other than Photoshop
format. To save it in another format and merge the layers, select Save a Copy from the File menu.
It won’t let me paint
Three common problems/remedies:
• You have another portion selected. Photoshop only edits the portion that is selected. Choose Select>Deselect.
• You’re on the wrong layer. Open the Layers Palette (Window>Show Layers) and click on the layer you want to edit.
• You have enabled Preserve Transparency and you can’t fill in the transparent area. Uncheck it in the Layers Palette.
It won’t let me edit
See “It won’t let me paint” above.
My selection won’t feather
The Feather command doesn’t do anything until you copy and paste the selected portion. After using the feather command,
copy your selection and paste it into a new document or layer. You can also Select>Inverse and Edit>Fill to color the image
while leaving your feathered selection.
I can’t paint in color
The image might be in bitmap or grayscale mode. Choose RGB Color from the Image>Mode menu. If it is in Bitmap format,
select grayscale first, then RGB.
A Word about ModesIf you’ve ever looked under the Image>Mode menu, you’ve noticed the different color modes that images can have. Most of
the time, you’ll want your images to be in RGB mode. The exceptions are:• You want a black and white image with no grays and harsh edges. Choose Bitmap. You may have to choose Grayscale
first, then Bitmap.
• You want a detailed black and white image with a lot of grays. Grayscale gives you the most detail, but again, RGB works
fine most of the time.
• You need hundreds of copies of a color image and you want to do traditional offset printing. Use the CMYK format and
create color separations. CMYK is another science altogether. For more information, see Photoshop’s online help.
• You need to save space, save images in a certain color palette, or save GIF images for the web. Select Indexed color and
choose your palette to reduce the number of colors to 256 or fewer. For more information about the GIF format, see the