171
pServer Guide for Microsoft Windows Server 2003 For BladeFrame ® EX and BladeFrame ® ES Document Number 432-B00051 August 2008 WIN2003_PM5.2_BF

pServer Guide for Microsoft Windows Server 2003
For BladeFrame® EX and BladeFrame® ES
Document Number 432-B00051
August 2008
WIN2003_PM5.2_BF


CopyrightCopyright © 2008 Egenera, Inc. All rights reserved.
This document, and the product described in it, is furnished under license and may only be used in accordance with the terms of such license. The content of this document is furnished for information purposes only and is subject to change without notice.
Egenera, Egenera stylized logos, BladeFrame, BladeLatch, BladeMate, BladePlane, cBlade, Control Blade, PAN Manager, pBlade, Processing Blade, sBlade, and Switch Blade are either registered trademarks or trademarks of Egenera, Inc. in the United States and/or other countries.
PRIMERGY is a registered trademark of Fujitsu Siemens Computers.
AMD, AMD Opteron, and AMD Athlon are trademarks of Advanced Micro Devices, Inc..
EMC, CLARiiON, and Symmetrix are registered trademarks of EMC Corporation.
The IBM Developer Kit for Linux, Java 2 Technology Edition contains software which is copyright IBM Corporation, Sun Microsystems Inc., Hewlett-Packard Co., and X Consortium.
Intel and Itanium are registered trademarks and Xeon is a trademark of the Intel Corporation in the United States and other countries.
Sun, Sun Microsystems, the Sun Logo, Solaris, and the Java logo are trademarks or registered trademarks of Sun Microsystems, Inc. in the United States and other countries.
Linux is a registered trademark of Linus Torvalds.
Microsoft and Windows are either registered trademarks or trademarks of Microsoft Corporation in the United States and/or other countries. The virtual VGA console uses Microsoft Terminal Services Advanced Client (TSAC), which is a copyright of Microsoft Corporation.
MindTerm is copyright AppGate AB.
Nero is a trademark of Nero AG.
NetApp is a registered trademark and Network Appliance is a trademark of Network Appliance, Inc.
Oracle9i is a trademark of Oracle Corporation.
Red Hat is a registered trademark of Red Hat, Inc. in the United States and other countries.
SUSE is a registered trademark of SUSE LINUX Products GmbH, a Novell business.
VMware, Virtual SMP, and VMotion are registered trademarks or trademarks of VMware, Inc.
Xen, XenSource, XenServer, and XenEnterprise are either registered trademarks or trademarks of Citrix Systems, Inc. in the United States and/or other countries.
All other company and product names are trademarks or registered trademarks of their respective holders.
Printed in the United States of America.
Egenera, Inc., 165 Forest Street, Marlboro, Massachusetts 01752.

Contents
Preface
Customer Support ....................................................................................................... x
Chapter 1: Preparing to Install a WIN2003 pServer
About pServers ........................................................................................................ 1-2
Minimum Requirements for a WIN2003 pServer ................................................... 1-3Supported Architectures ................................................................................... 1-3Getting Assistance ............................................................................................ 1-5Upgrade Paths .................................................................................................. 1-5Deployment Options......................................................................................... 1-5
Guidelines for a WIN2003 pServer Installation ...................................................... 1-6
Getting Ready for the pServer Install ...................................................................... 1-9
About WIN2003 pServer Software ....................................................................... 1-10
Downloading WIN2003 pServer Software ........................................................... 1-11
Chapter 2: Installing a WIN2003 pServer
Selecting a pServer Installation Method ................................................................. 2-2
Set up a Network Installation Area (Optional) ........................................................ 2-4
Set up for VCD Installations (Optional) .................................................................. 2-6
iii

pServer Guide for Microsoft Windows Server 2003
Creating an ISO Image ..................................................................................... 2-7Using ISO Images at Install Time .................................................................... 2-7
Configuring a WIN2003 pServer ............................................................................ 2-9
Install the WinPE Installation Media on the Control Blades ............................... 2-10
Configure the LPAN ............................................................................................. 2-15
Create the pServer ................................................................................................. 2-16
Install the WIN2003 Operating System on a pServer ........................................... 2-18Performing the Installation ............................................................................. 2-18
Next Steps .............................................................................................................. 2-24
Chapter 3: Creating WIN2003 pServers from Sysprep
Reviewing Sysprep Requirements and Tasks ......................................................... 3-2General Sysprep Requirements ........................................................................ 3-2Windows Sysprep Requirements...................................................................... 3-3
Deploying Windows Server 2003 with Sysprep ..................................................... 3-3Preparing the Source pServer ........................................................................... 3-4Preparing the Worker pServer .......................................................................... 3-5Creating the Sysprep Image.............................................................................. 3-5Cloning the Sysprep Image .............................................................................. 3-7Booting the Destination pServers ..................................................................... 3-8
Keeping Egenera Drivers Updated ........................................................................ 3-10
Chapter 4: Upgrading a WIN2003 pServer
Preparing for a pServer Upgrade ............................................................................. 4-2Upgrade Requirements ..................................................................................... 4-2Upgrade Methods ............................................................................................. 4-2Upgrade Steps................................................................................................... 4-3
iv
Contents
Disabling Automatic Reboots........................................................................... 4-3Upgrading vVGA Drivers ................................................................................ 4-3Checking the PAN Manager Release ............................................................... 4-3
Upgrading Egenera Drivers on Windows pServers ................................................ 4-4Setting Up and Installing the Upgrade ............................................................. 4-4Installing the vVGA Drivers (2003.0.2.12 and 2003.0.3.x only) ..................... 4-7Rebooting the pServer ...................................................................................... 4-8Installing the PAN Agent (Optional)................................................................ 4-8
Deploying Upgrade MSIs With Group Policy ........................................................ 4-9Deployment Requirements ............................................................................... 4-9Uninstalling the MSI ...................................................................................... 4-10Upgrading an MSI .......................................................................................... 4-10
Using the Installer Command-line Options ........................................................... 4-11Upgrade MSI Options..................................................................................... 4-11PAN Agent MSI Options................................................................................ 4-12
Rolling Back to an Earlier Release ........................................................................ 4-13
Chapter 5: Troubleshooting Problems
Recovering a Failed pServer ................................................................................... 5-2
Correcting Installation Problems ............................................................................. 5-4Product Keys .................................................................................................... 5-4Incompatible cBlade Release ........................................................................... 5-4Incorrect Settings for Custom CD-ROM Image (WinPE 1.x Only)
.................................................................................................................. 5-4Windows Setup Logs........................................................................................ 5-4Troubleshooting WinPE Installation Problems (WinPE 1.x Only)
.................................................................................................................. 5-5
Resolving Upgrade and Rollback Failures ............................................................. 5-6Repairing Upgrades .......................................................................................... 5-6Handling Upgrade Failures............................................................................... 5-6Handling Driver Installation Failures ............................................................... 5-7Handling Virtual VGA Desktop Failures ......................................................... 5-8
v
pServer Guide for Microsoft Windows Server 2003
Handling Rollback Failures Caused by Incorrect Driver Versions .................. 5-8Handling Rollback Failures When MPIO Is Disabled ..................................... 5-9Interpreting Upgrade Error Messages ............................................................ 5-10
Examining Windows Event Log Messages ........................................................... 5-12Displaying the Windows Event Log............................................................... 5-12Controlling the Verbosity of Events............................................................... 5-13Common Recovery Procedures for Storage Path Failures ............................. 5-15Event Description Format............................................................................... 5-16EVENT 2 ........................................................................................................ 5-19EVENT 3 ........................................................................................................ 5-20EVENT 4 ........................................................................................................ 5-21EVENT 5 ........................................................................................................ 5-22EVENTS 6, 8, 9.............................................................................................. 5-23EVENTS 7, 10................................................................................................ 5-25EVENT 11 ...................................................................................................... 5-26EVENTS 14, 15, 16, 17.................................................................................. 5-27EVENT 34 ...................................................................................................... 5-28EVENT 37 ...................................................................................................... 5-29EVENT 48 ...................................................................................................... 5-30EVENTS 49, 50.............................................................................................. 5-31EVENT 51 ...................................................................................................... 5-32EVENT 52 ...................................................................................................... 5-33EVENTS 64, 66.............................................................................................. 5-34EVENT 67 ...................................................................................................... 5-35EVENT 80 ...................................................................................................... 5-36EVENT 96 ...................................................................................................... 5-37EVENT 112 .................................................................................................... 5-38EVENT 176 .................................................................................................... 5-39EVENT 186 .................................................................................................... 5-41EVENT 187 .................................................................................................... 5-42EVENTS 1004, 1005...................................................................................... 5-43EVENT 1006 .................................................................................................. 5-44EVENT 1007 .................................................................................................. 5-45EVENTS 1008, 1009...................................................................................... 5-46EVENT 1104 .................................................................................................. 5-47EVENT 1105 .................................................................................................. 5-48EVENT 1106 .................................................................................................. 5-49EVENT 1107 .................................................................................................. 5-50EVENT 1108 .................................................................................................. 5-51
vi

Contents
EVENT 1109 .................................................................................................. 5-52EVENT 1110 .................................................................................................. 5-53EVENTS 2032, 2033, 2035, 2036.................................................................. 5-54EVENT 2128 .................................................................................................. 5-55EVENT 2129 .................................................................................................. 5-56EVENT 2130 .................................................................................................. 5-57EVENTS 2131, 2132...................................................................................... 5-59EVENT 2133 .................................................................................................. 5-61EVENT 2145 .................................................................................................. 5-62EVENT 2146 .................................................................................................. 5-63
Appendix A: Installing a WIN2003 pServer Using WinPE1.0 and Custom CDs
Preparing to Install a WIN2003 pServer from Physical Media (CD or DVD) ...... A-2Installing WIN2003 pServer WinPE Procedure.............................................. A-2Custom CD-ROM Requirements .................................................................... A-6
Installing the Windows Boot Image on the cBlades .............................................. A-6Customizing the Installation............................................................................ A-6
Installing WIN2003 pServer from a Custom CD-ROM ........................................ A-8Optional Tasks................................................................................................. A-9Creating a Custom Installation CD-ROM Image ............................................ A-9CD Burner Settings........................................................................................ A-12Installing WIN2003 pServer Custom CD-ROM Procedure.......................... A-15
Installing WIN2003 pServer from a Network Using a Custom WinPE Disk Image ...A-21Optional Tasks............................................................................................... A-21WinPE Requirements (for Network Installations) ........................................ A-21Creating a Custom WinPE Image.................................................................. A-22Customizing the Installation.......................................................................... A-23Creating a Bootable WinPE Disk .................................................................. A-26Installing WIN2003 pServer WinPE Procedure............................................ A-27
vii

pServer Guide for Microsoft Windows Server 2003
viii

Preface
Welcome to PAN Manager PM5.2_BF pServer Guide for Microsoft Windows Server 2003. This guide is part of the PAN Manager documentation set. Its purpose is to describe how to install, configure, and use Microsoft Windows Server 2003 (WIN2003) for pServers. You can use this document to install WIN2003 as the operating system (OS) for a pServer on a pBlade in Egenera PAN Manager.
Audience — pServer Guide for Microsoft Windows Server 2003 is for PAN Administrators and LPAN Administrators.
Topics — Read this book to learn about the following:
• Preparing to Install a WIN2003 pServer
• Installing a WIN2003 pServer
• Creating WIN2003 pServers from Sysprep
• Upgrading a WIN2003 pServer
• Troubleshooting Problems
Release Notes — Release notes are available to you by accessing the following documents from http://www.egenera.com/support-services-overview.htm.
• PAN Manager Release Notes: Release PM5.2_BF
ix
pServer Guide for Microsoft Windows Server 2003
PAN Manager Documentation Set — To learn about the other documents available in the PAN Manager documentation set, see the PAN Manager Feature Summary.
PAN Manager Features — To learn about the PAN Manager features available in the current release, see the PAN Manager Feature Summary.
Customer Support
If you require customer support regarding this product, use the following contact information.
Egenera Enterprise Services
Internet http://www.egenera.com/support-services-over-view.htm
Telephone 1-866-301-3117
x WIN2003_PM5.2_BF

Preface
Document Conventions
Convention Description
> Directory-level delimiter used to navigate the left pane of the PAN Manager GUI.
Example: Resources > Ethernet Connections
Sans serif italics Variable text, such as a path, a filename, or an LPAN name.
Example: lpan -c lpanname
Sans serif Text that must be typed as shown.
Example: Type root at the login prompt.
Bold The name of a field or window element appearing in a GUI. It also highlights default values in PAN Manager man pages.
Example: In the Users page...
Italics Text that is emphasized.
Example: Do not connect the power.
[text] Text that is optional to a command.
{text} A set of choices, one of which is required.
| Separation of mutually exclusive choices in syntax lines.
Example: lpan [-aD | -rD]{switch | SCSI_ID} lpanname
Note Information of importance or that may not fit in main text.
Caution Failure to heed a caution could result in loss of data.
Warning — Failure to heed a warning could result in physical harm to the user or the hardware.
!
WIN2003_PM5.2_BF xi

pServer Guide for Microsoft Windows Server 2003
xii WIN2003_PM5.2_BF

Chapter 1Preparing to Install a
WIN2003 pServer
This pServer guide describes how to install and configure Microsoft® Windows® Server 2003 (WIN2003) on one or more pServers in PAN Manager. In this chapter, you’ll learn how to prepare for your WIN2003 installation and configuration work. Topics include:
• About pServers
• Minimum Requirements for a WIN2003 pServer
• Guidelines for a WIN2003 pServer Installation
• Getting Ready for the pServer Install
• About WIN2003 pServer Software
• Downloading WIN2003 pServer Software
1-1
pServer Guide for Microsoft Windows Server 2003
About pServers
A pServer is a logical server that you define in PAN Manager and associate with the resources you want it to use. These resources include a processing blade (in this case, a pBlade), networked disk storage, and virtual network connections.
Once you create a pServer, you need to install the operating system to run on it. This includes the usual software distribution from the OS vendor (in this case, Microsoft) as well as virtualization extension software from Egenera that has been customized for this OS.
The pServer Virtualization Extensions for WIN2003 enable the Microsoft Windows Server 2003 OS to function within your PAN and enable you to administer the pServer from PAN Manager. These extensions consist of modules and device drivers designed for ease of maintenance — they are layered on top of the OS, without any modifications to the kernel, so you can use standard distributions from Microsoft for your OS install and updates.
You can run pServers in 32-bit or 64-bit mode on various pBlade types, depending on the pBlade chipset architecture. The installation files you need are in the /egenera directory.
To learn more about pServers and how to administer them, see the PAN Manager documentation.
1-2 WIN2003_PM5.2_BF

Preparing to Install a WIN2003 pServer
Minimum Requirements for a WIN2003 pServer
Your platform must meet the following hardware and software requirements to install and run Windows Server 2003 (WIN2003) on a pServer.
Supported Architectures
Release 2003.x of the Egenera pServer software supports running Windows Server 2003 on multiple pBlade architectures. Specifically, this release supports the following Standard and Enterprise Editions of Windows Server 2003:
• Windows Server 2003 SP2 (32-bit)
• Windows Server 2003 R2 (32-bit)
• Windows Server 2003 x64 (64-bit)
• Windows Server 2003 R2 x64 (64-bit)
Table 1.1 Minimum Requirements
Component Requirements
cBlade hardware The following cBlades are supported: EP, EX, and ES.
cBlade software PAN Manager PM5.2_BF or higher.
Default Boot Image EVBS (Egenera Virtualized Boot Services) EVBS1.0_BF_1 or higher, installed on the cBlades for use with pServers in the PAN.
EVBS is a flexible pre-boot environment that lets you boot a pServer directly from a media drive, a SAN disk, or the network (using PXE). EVBS also lets you use custom boot arguments to control the boot device selection.
For the details on EVBS and how to use it, see the document Using Egenera Virtualized Boot Services (available from http://www.egenera.com/support-services-overview.htm).
WIN2003_PM5.2_BF 1-3

pServer Guide for Microsoft Windows Server 2003
Caution: If you have not installed PM5.2_BF (or higher) on the cBlade, attempting to install or upgrade to Release 2003.x results in a Windows blue screen error, also known as a bug check error. For more information, see PAN Manager Version Check in your PAN Manager documentation.
OS Installation Media WinPE 2.1 (Microsoft Windows Preinstallation Environment) or higher
A one-time boot feature used to override the EVBS default boot image, which allows you to boot a temporary WIN2003 installation environment to install and configure the operating system for the pServer.
Note: Make sure you adhere to the following requirements when working with boot images:
32 bit versus 64 bit - You can only deploy a boot image for 32 bit pServers created on a 32 bit pServer using a tftp boot image. You cannot create 64 bit pServers using a tftp boot image created on a 32 bit pServer.
PAN Manager patch requirement
See pServer Release Notes for Microsoft Windows Server 2003 for the latest information about patch requirements.
Switch blade hardware No restrictions.
pBlade firmware
MasterBlaster 42.2 or higher (required by EVBS).
Note: In general, you should keep pBlades at the latest available firmware levels.
pBlade hardware Follow the OS vendor’s recommended memory requirements when you are choosing a pBlade for your pServer.
pServer type pBlade pServer — The software and procedures described in this document apply to WIN2003 pServers on pBlades. These pServers do not use the vBlades feature of PAN Manager in any way, even when running the Xen kernel to support guests.
To learn about WIN2003 guests on vBlade pServers, see the vBlades documentation.
Component Requirements
1-4 WIN2003_PM5.2_BF

Preparing to Install a WIN2003 pServer
Getting Assistance
If you need assistance meeting any of these requirements, contact Egenera Enterprise Services or your authorized support vendor.
Upgrade Paths If your server is running WIN2003, the recommended upgrade path is to first upgrade to the Release 2003.1.1.0 drivers, and then apply the Windows Server 2003 SPx or Rx upgrade (if applicable). For upgrade information, see pServer Release Notes for Microsoft Windows Server 2003 and Chapter 4, “Upgrading a WIN2003 pServer”
Deployment Options
If you are installing WIN2003 on more than one pServer, you can use either the media- or network-based procedure to perform the initial installation. However, to quickly replicate the install process, use Microsoft System Preparation (Sysprep). For more detail, see Chapter 3, “Creating WIN2003 pServers from Sysprep”
WIN2003_PM5.2_BF 1-5

pServer Guide for Microsoft Windows Server 2003
Guidelines for a WIN2003 pServer Installation
Before you install Windows Server 2003 on a pServer, review the following guidelines.
Table 1.2 Reviewing pServer Specifications and Guidelines
Features Guidelines
PAN Agent When you install the Windows Server 2003 pServer, PAN Agent is installed by default. PAN Agent provides support for health monitors and graceful shutdown of the pServer from PAN Manager. Review your enterprise security policy to make sure it is compatible with using PAN Agent. If you need to disable the installation of PAN Agent or uninstall PAN Agent, contact Egenera Enterprise Services.
pServer Console Window
If you are installing from the GUI, a pServer console window is not required although it can be helpful to monitor the progress of the installation.
You connect to PAN Manager using Telnet or SSH, and open the command-line interface (CLI) to display the pServer console.
Note: If your version of Windows Server 2003 uses a multibyte character set (for support of East Asian languages), you need a terminal emulator that supports VT-UTF8 to connect with PAN Manager and display the console. (The HyperTerm that ships with Windows Server 2003 supports VT-UTF8 terminal emulation.)
Virtual VGA (vVGA) Desktop
Because vVGA uses Microsoft ActiveX controls, you must access PAN Manager using Microsoft Internet Explorer, version 5.5 or higher. Depending on your Internet Explorer security settings, you may see a security warning message asking whether you want to install and run the Remote Desktop ActiveX Control the first time that you access the vVGA desktop. Click Yes to accept the installation.
For more detailed information about vVGA, see the PAN Manager Administrator’s Guide.
pServer Disks If you are installing Windows Server 2003 on a pServer with multiple disks configured, only the first disk is available for installation.
1-6 WIN2003_PM5.2_BF
Preparing to Install a WIN2003 pServer
TCP Window Size
The installation script and upgrade MSI set the default TCP Window size to 256KB, which is adequate for modern applications.
For complete information about choosing values for the TCP Window size, see the following Microsoft articles:
• http://support.microsoft.com/kb/224829/
• http://technet2.microsoft.com/WindowsServer/en/library/823ca085-8b46-4870-a83e-8032637a87c81033.mspx?mfr=true
Unsupported PAN Manager Features
This section describes some functional differences between Windows pServers and pServers running other operating systems. Windows Server 2003 does not support the following PAN Manager features at this time:
• Rate limiting
• Multicast flow control
• Application control
• Application failover
• Load balancing
• Root images
• Disk partitioning
Load Balancing Application High Availability (HA) and load-balancing clusters are not supported, but you can use Microsoft Cluster Server (MSCS). For more information on using MSCS, see PAN Manager Administrator’s Guide.
Root Images If applicable, the PAN Administrator at your site can use the PAN Manager software to manage root disk images that are available for Linux pServers to use. These root disk images reside on the cBlades. By contrast, because you install Windows Server 2003 directly on a pServer disk, and not on the cBlades, you do not need to manage root disk images as you do for Linux pServers.
Disk Partitioning You can use the standard Windows disk management interface to create or modify disk partitions during and after installing Windows Server 2003. After installation, you can use PAN Manager to view Windows partitions, but not to create or modify them.
Features Guidelines
WIN2003_PM5.2_BF 1-7

pServer Guide for Microsoft Windows Server 2003
VCD Reporting Your Windows pServer will report two VCD devices. Both cBlades (A and B) will recognize the VCD device and both cBlades will acknowledge it. Since the cBlades are actually reporting the same device, you can use either of the VCD devices that appear; both VCD devices will display an ISO that has been inserted.
Features Guidelines
1-8 WIN2003_PM5.2_BF

Preparing to Install a WIN2003 pServer
Getting Ready for the pServer Install
To prepare for the WIN2003 operating system installation on a pServer, you need to:
1. Meet the requirements listed in “Minimum Requirements for a WIN2003 pServer” on page 1-3.
2. Obtain the following software in your appropriate format:
3. :
4. To install immediately, proceed to Chapter 2, “Installing a WIN2003 pServer”.
Software You Need Where to Get It
Microsoft Windows Server 2003 Enterprise Edition DVD Release 2003.x. See “Supported Architectures” on page 1-3 for the editions supported.
There are specific WinPE Requirements for Network Installations. Please refer to “WinPE Requirements (for Network Installations)” on page A-21 of Appendix A, “Installing a WIN2003 pServer Using WinPE1.0 and Custom CDs” for more information.
Microsoft
pServer Virtualization Extensions for Windows Server 2003, WIN2003.x
Egenera
WIN2003_PM5.2_BF 1-9

pServer Guide for Microsoft Windows Server 2003
About WIN2003 pServer Software
This section takes a closer look your choices when selecting a distribution of the pServer Virtualization Extensions for Windows Server 2003, WIN2003.x.
You can run pServers in 32-bit or 64-bit mode on various pBlade types, depending on the pBlade chipset architecture. Use the following information to determine the appropriate WIN2003 distribution (WINPE image) for your needs according to your pBlade hardware and mode requirements.
The WINPE image contains the appropriate installation files for each supported architecture. They have been factory-installed and pre-registered in your PAN.
• WINPE_X86 — Contains files for installing the 32-bit version of Windows Server 2003 on any [company name of HW vendor] pBlade that supports Windows. Use this image when installing Windows Server 2003 on pBlades running in 32-bit mode.
• WINPE_X64 — Contains files for installing the 64-bit version of Windows Server 2003 on AMD-64 or IA-32E pBlades. In keeping with Microsoft conventions, the folder name does not imply restriction to AMD CPUs. Use this image when installing Windows Server 2003 on pBlades running in 64-bit mode.
Note: ISO images of the pServer Virtualization Extension software are also available, if necessary. These files may be useful if you need to update or customize your installation at some point. You can obtain these files either by navigating to the cBlade/Win2003 directory on your cBlade and unzip the egen_win_ext.zip file,or by contacting your vendor. To download the files from Egenera, see “Downloading WIN2003 pServer Software” on page 1-11.
1-10 WIN2003_PM5.2_BF

Preparing to Install a WIN2003 pServer
Downloading WIN2003 pServer Software
To obtain the Egenera pServer software by downloading it from the Egenera web site, do the following:
1. Go to http://www.egenera.com/support-services-overview.htm, then log in using your customer username and password.
If you need assistance logging in, contact Egenera Enterprise Services.
2. Navigate the Web site to find the pServer Releases page for the Windows Server 2003 pServer software.
3. Follow the download instructions to save the appropriate distribution (ISO image) to your local system.
You can run pServers in 32-bit or 64-bit mode on various pBlade types, depending on the pBlade chipset architecture. To determine which distribution you need, see “About WIN2003 pServer Software” on page 1-10.
4. (Optional) When the download is finished, you can verify its success by doing the following:
a. Use the Linux md5sum command to calculate the checksum for the downloaded file:
md5sum filename
b. Compare that result to the checksum value provided on the download page.
If the values are identical, go on to Step 5 (if not, contact Egenera Enterprise Services).
WIN2003_PM5.2_BF 1-11

pServer Guide for Microsoft Windows Server 2003
5. Use the downloaded ISO file in one of these ways:
You can run pServers in 32-bit or 64-bit mode on various pBlade types, depending on the pBlade chipset architecture. The installation files you need are in the /egenera directory.
If You Plan to Install from Do This
Physical media (CD) Use a CD burn utility to create a CD that contains the contents of the ISO file.
Control Blade (VCD) Make the ISO file accessible in PAN Manager as described in “If you are installing the WinPE installation media from the Control Blade (VCD):” on page 2-11.
Local network Mount the ISO file:mount -o loop filename.iso /mnt_pnt
Then copy the contents to a network area as described in “If you are installing the WinPE Installation Media from the Network:” on page 2-13
1-12 WIN2003_PM5.2_BF

Chapter 2Installing a WIN2003
pServer
This chapter describes how to install Microsoft Windows Server 2003 as the operating system for a pServer on a pBlade.
Installation Roadmap
The following sections guide you through the process of installing a WIN2003 pServer by using either media or the network. The tasks include:
• Selecting a pServer Installation Method (Media or Network)
• Set up a Network Installation Area (Optional)
• Set up for VCD Installations (Optional)
• Configuring a WIN2003 pServer
• Install the WinPE Installation Media on the Control Blades
• Install the WIN2003 Operating System on a pServer
For information on how to create multiple pServers using deployment methods, see Chapter 3, “Creating WIN2003 pServers from Sysprep”.
2-1
pServer Guide for Microsoft Windows Server 2003
Selecting a pServer Installation Method
Before Installing the pServer software, you must decide which type of pServer installation you want to perform.
Method When to Use It
From Physical Media Use this method to install the pServer software directly from the installation media provided by Egenera and Microsoft. This method is only practical when the person installing the pServer has physical access to the platform’s Control Blades.
If you are using an earlier version of WinPE (WinPE 1.x) and you must perform custom CD-ROM installations, see Appendix A, “Installing a WIN2003 pServer Using WinPE1.0 and Custom CDs”for help.
Installing from the Control Blade (VCD)
Use this method to install the pServer Virtualization Extension media images from Egenera and the Windows Server 2003 OS software from Microsoft (in ISO format) that you have copied to a temporary location (such as the /crash_dumps directory) on one of your cBlades.
For this installation method, you use the pServer’s Virtual CD-ROM (VCD) drive. See “Set up for VCD Installations (Optional)” on page 2-6 for more information.
2-2 WIN2003_PM5.2_BF

Installing a WIN2003 pServer
The steps for installing the software (from media or from the network) vary slightly, and are noted throughout this section.
Note that all PAN Manager commands described here have an equivalent PAN Manager GUI procedure. See the PAN Manager GUI Guide for more information.
Enabling Enabling Media Drives for CD/DVD-based Installs
Before you can install to a pServer from physical media (a CD or DVD), you must use PAN Manager to enable that pServer’s access to a media drive. For example, you can use the following command to enable a specified media drive for every pServer in a particular LPAN:
# lpan -e "(0.0.0.0)"@myplatform/c1 mylpan
From the Network Use this method to copy the contents of the pServer Virtualization Extension media images provided by Egenera and Windows Server 2003 OS software from Microsoft (in ISO format) to a server in your network that is network accessible from the pServer you are installing.
This method is best when the person installing the pServer software does not have physical access to the platform, or if multiple installations will be performed.
If you perform a network installation, the pServer must be connected to a vSwitch that has an uplink to the external network. See “Set up a Network Installation Area (Optional)” on page 2-4 for details.
There are specific WinPE Requirements for Network Installations. Please refer to “Installing a WIN2003 pServer Using WinPE1.0 and Custom CDs” on page A-1 of Appendix A, “Installing a WIN2003 pServer Using WinPE1.0 and Custom CDs”for more information.
Method When to Use It
WIN2003_PM5.2_BF 2-3

pServer Guide for Microsoft Windows Server 2003
Set up a Network Installation Area (Optional)
1. Set up your Network Share area according to your Microsoft Windows documentation.
If you plan to install both the 32-bit and 64-bit distributions of Microsoft Windows Server 2003, you must set up separate Network Share distribution folders. For example:• //server/share_name/mnt_point/
WIN2003.x_PM5.2_BF_32_0
• //server/share_name/mnt_point/WIN2003.x_PM5.2_BF_64_0
2. Be sure that the Network Share is network-accessible to the pServer on which you will install the OS:
• If the Network Share is a pServer that resides in the same PAN as your target pServer, and the pServers are connected to non-uplinked vSwitches, use PAN Manager to configure both pServers to connect to the same vSwitch.
• If the Network Share server resides outside of the PAN, you must connect your target pServer to a vSwitch that is uplinked to the external network.
3. Obtain the media to use, as described in “Getting Ready for the pServer Install” on page 1-9.
This includes each Microsoft and Egenera CD/DVD (or corresponding ISO image) for WIN2003.
• Copy the contents of the Microsoft Windows Server 2003 Windows distribution. If the OS distribution consists of a single DVD, copy its entire contents to a directory (nfspath/dirname) on your Network Share server.
If your Windows distribution consists of multiple CDs, copy the contents of each CD to the same directory (nfspath/dirname) on your Network Share server.
2-4 WIN2003_PM5.2_BF

Installing a WIN2003 pServer
• Copy the contents of the Virtualization Extensions for Microsoft Windows Server 2003 (WIN2003.x) media to the directory nfspath/dirname on your Network Share server
Make sure that you copy all of the files and maintain the directory structure as it is presented in the image.
WIN2003_PM5.2_BF 2-5

pServer Guide for Microsoft Windows Server 2003
Set up for VCD Installations (Optional)
A virtual CD-ROM drive (VCD) is automatically attached to each pServer at the time the pServer is created. The VCD enables the pServer to access an ISO image that resides on the cBlades as if it were an image on a physical CD-ROM.
There are a few tasks you need to perform to prepare for a VCD installation. Note that the WinPE Installation image, which contains the pServer Virtualization Extensions, has been factory-installed and is already registered on your cBlade.
You will need to:
1. Obtain the Windows Server 2003 OS software from Microsoft in the form of an ISO image. You can do that in one of these ways:
• Download the ISO image from the Microsoft (MSDN) Web site.
• Create the ISO image yourself from the install CD or DVD provided by Microsoft. For details, see “Creating an ISO Image” on page 2-7.
2. Add that Windows Server 2003 OS ISO image to your PAN. For example, in the Egenera PAN Manager CLI:
a. Copy the ISO image to a temporary location (such as the /crash_dumps directory) on one of your cBlades.
b. Register the ISO image in your PAN as a media image with the OS type Windows:
– On the PAN>PANname page, scroll to the Media Images area and click Import.
– In the Create Media Image dialog, fill in the following fields for the image you wish to register as a virtual CD-ROM:
– Name: a display name
2-6 WIN2003_PM5.2_BF
Installing a WIN2003 pServer
– Source: the full pathname of the image where it currently resides
– Click Submit.
c. Delete your temporary copy of the ISO image (from the /crash_dumps directory or wherever you put it).
Creating an ISO Image
This section describes how you can create an ISO image of your Windows install CD or DVD.:
Using ISO Images at Install Time
When you’re ready to install WIN2003 software on a pServer, use the following PAN Manager commands to operate registered ISO images and the VCD drive:
To Create an ISO image via: Do This:
a Windows system Use a CD/DVD burning tool that provides this capability.
a Linux system 1. Insert the CD/DVD into your media drive.
2. Make sure the CD/DVD is not mounted.
3. Enter the following command (as root):# dd if=/dev/cdrom of=/path/cdimg_filename.iso
This creates the ISO image. Note that it takes several minutes to complete.
To Do This Type
Insert an ISO image into the VCD drive
1. On the pServer>pServerName page in the Media Drives area, click Load/Eject.
2. In the Load/Eject Media in Virtual CD-ROM dialog, pull down the Loaded Media menu.
3. Select the desired image.
4. Click Submit.
WIN2003_PM5.2_BF 2-7

pServer Guide for Microsoft Windows Server 2003
Eject an ISO image from the VCD drive
1. On the pServer>pServerName page in the Media Drives area, click Load/Eject.
2. In the Load/Eject Media in Virtual CD-ROM dialog, pull down the Loaded Media menu.
3. On the Loaded Media menu, select [EMPTY].
4. If the pServer still has the image mounted, check the Force Media Ejection box.
5. Click Submit.
To Do This Type
2-8 WIN2003_PM5.2_BF

Installing a WIN2003 pServer
Configuring a WIN2003 pServer
Configuring a pServer that runs the Microsoft Windows Server 2003 software requires you to perform two sets of tasks:
1. Obtain pServer resources from the LPAN, then create and boot the pServer.
2. Install the Microsoft Windows Server 2003 OS software, install the Virtualization Extensions software via WinPE.
Both task sets combined take roughly 1 hour to complete, and are described in detail in the following sections:
On the Control Blade:
• Install the WinPE Installation Media on the Control Blades
• Configure the LPAN
• Create the pServer
On the pBlade:
• Install the WIN2003 Operating System on a pServer
WIN2003_PM5.2_BF 2-9

pServer Guide for Microsoft Windows Server 2003
Install the WinPE Installation Media on the Control Blades
The WinPE Installation media is factory-installed in your PAN. However, this install information is provided in case you ever need to re-install any of the installation media in your PAN.
Before installing Microsoft Windows Server 2003 on a pServer, you must install the installation media (also known as WinPE 2.1) on the cBlades. You only need to install the media on one cBlade; PAN Manager automatically copies it to the other cBlade as well.
This installation media, which is supplied by Egenera, allows you to boot a temporary Windows installation environment to install and configure the operating system for the pServer. You boot this image using the one-time boot feature of PAN Manager. Once the WIN2003 operating system is installed and configured, the pServer thereafter boots from EVBS, which you configure to be the default boot image for your pServer.
To perform this procedure:
• You must have access to a media drive:
• If you are installing the WIN2003 installation media from physical installation media -- you must have physical access to the platform.
• If you are installing the installation media from the Control Blade (VCD) -- you will use the pServer’s virtual CD-ROM (VCD) device.
• If you are installing the installation media from the Network -- You must have access to the network directory on the client computer that contains your Egenera distribution
• You must have root privileges on the platform.
• PAN Manager must be running.
2-10 WIN2003_PM5.2_BF

Installing a WIN2003 pServer
Installing the WinPE Media Image
This section describes how to install and register the installation WinPE media image on the Control Blades. Depending on how you are installing the Microsoft Windows Server 2003 software, do one of the following to install and register the WinPE media image in PAN Manager.
If you are installing the WinPE installation media from physical media:
a. Insert the PAN Manager CD into the media drive of one of the cBlades.
b. Log on as root to the cBlade in which the Virtualization Extensions CD is inserted.
c. Mount the installation drive:# mount /mnt/cdrom
d. Run the install.sh installation script.# /mnt/cdrom/egenera/install.sh
e. When the shell prompt reappears, eject the Virtualization Extensions CD from the cBlade.# eject cdrom
Because you have installed the Windows installation media on both cBlades, the PAN Manager GUI provides the pServer Boot Image for Windows as an option when you configure a pServer.
Go on to “Configure the LPAN” on page 2-15.
If you are installing the WinPE installation media from the Control Blade (VCD):
a. Be sure that the pServer's Virtual CD-ROM drive is empty.
b. Enter the following command (as root):# dd if=/dev/cdrom of=/path/cdimg_filename.iso
This creates the ISO image. Note that it takes several minutes to complete.
WIN2003_PM5.2_BF 2-11

pServer Guide for Microsoft Windows Server 2003
c. Copy each ISO image to a temporary location (such as the /crash_dumps directory) on one of your cBlades.
d. Create a mount point on the cBlade.# mkdir /mnt/WIN2003_EGEN
e. Mount the Virtualization Extensions media image.# mount -o loop /crash_dumps/WIN2003.x_PM5.2_BF_32_x.iso /mnt/WIN2003_EGEN
where x is the software’s build number. (Specify the image’s file name by using a specific build number here.)
f. Run the install.sh installation script.# /mnt/WIN2003_EGEN/egenera/install.sh
g. Unmount the media image.# unmount /mnt/WIN2003_EGEN
h. Register the Microsoft Windows Server 2003 media image in PAN Manager.# pan -a -I -C /crash_dumps/W2K3.XXX.x.iso -P -T WINPE image_name
where image_name is the name of your choosing for the Microsoft Windows 2003 Server image that will appear in PAN Manager; for example: Microsoft_W2K3_32_build
i. Register the Virtualization Extensions media image in PAN Manager.# pan -a -J -C /crash_dumps/WIN2003.x_PM5.2_BF_32_x.iso image_name
where
x is the software’s build number. (Specify the image’s file name by using a specific build number here.)
image_name is the name of your choosing for the Virtualization Extensions media image that will appear in PAN Manager; for example: WIN2003_32_Install.
j. Eject the image from the VCD.
Go on to “Configure the LPAN” on page 2-15.
2-12 WIN2003_PM5.2_BF

Installing a WIN2003 pServer
If you are installing the WinPE Installation Media from the Network:
In the following procedure, you can choose to install the boot image from the network using either of the following methods:
• Server Message Block (SMB) to mount a Windows folder
• Network File System (NFS) to mount a Linux directory.
In the procedure, $NFSPATH represents the full pathname of the network directory on the client computer that contains your Egenera distribution. For example, $NFSPATH could be the /home/releases/windows2003.x.x directory. Substitute the actual path when entering these commands, or define a $NFSPATH shell variable specifying that path.
To install the WinPE installation media using SMB:
1. Log on as root on one of the cBlades.
2. Mount the path from your client computer.
To mount a Windows folder with SMB, use the following command:mount -t smbfs -o 'username=domain_name\user_name' //smb_server/share_name /mnt_point
where domain_name is the Windows domain, user_name is the Windows user, smb_server is the Windows server, share_name is the Windows shared folder, and mnt_point is the complete path to the unzipped Egenera software distribution that resides on your local network.
To mount a Linux directory with NFS, use the following command:# mount nfs_server:/$NFSPATH /mnt_point
where mnt_point is the complete path to the unzipped Egenera software distribution that resides on your local network.
3. Run the install.sh script:# /mnt_point/egenera/install.sh
WIN2003_PM5.2_BF 2-13

pServer Guide for Microsoft Windows Server 2003
PAN Manager automatically copies the installation media to the other cBlade.
Because you have installed the boot image on both cBlades, the PAN Manager GUI provides pServer Boot Image for Windows as an option when you configure a pServer.
• Proceed to “Configure the LPAN” on page 2-15.
To install the WinPE installation media using NFS:
1. Insert the pServer Virtualization Extensions for use with Microsoft® Windows® Server 2003 media in the media drive of the cBlade:
2. Log on as root on one of the cBlades.
3. Mount the media drive:# mount /mnt/vcd
4. Run the install.sh script by specifying the full pathname:# /mnt/vcd/egenera/install.shInstalling image(s) in /tftpbootCreating links in /tftpboot directoryCreating version fileRegistering image(s)Boot image Windows added successfully.
PAN Manager automatically copies the boot image to the other cBlade.
5. When this installation is complete, eject the Egenera media.
Because you have installed the boot image on both cBlades, the PAN Manager GUI provides the pServer Boot Image for Windows as an option when you configure a pServer.
6. Proceed to “Configure the LPAN” on page 2-15.
2-14 WIN2003_PM5.2_BF

Installing a WIN2003 pServer
Configure the LPAN
Before you create a WIN2003 pServer, be sure the LPAN in which you are creating the pServer contains the following resources:
• A Virtual Switch (vSwitch) that is uplinked to a physical switch in the external network:
• A media drive:
• If you are installing the pServer software from physical installation media -- you must enable at least one of the CD-ROM drives for use in the LPAN in which the WIN2003 pServer is to reside.
• If you are installing the pServer software from the Control Blade -- you will use the pServer’s virtual CD-ROM (VCD) device to access the pServer installation software.
• If you are installing from the network -- no action is required.
• At least one Processing Blade (pBlade) for each pServer on which you are installing the WIN2003 pServer software
• At least one disk for each pServer on which you are installing the WIN2003 software.
See the PAN Manager Administrator’s Guide for complete instructions for configuring an LPAN.
When you have prepared the LPAN, you can now create a pServer on which to install the WIN2003 software.
WIN2003_PM5.2_BF 2-15

pServer Guide for Microsoft Windows Server 2003
Create the pServer
A PAN Administrator must create an LPAN and allocate resources to it before creating and configuring pServers. For details about creating LPANs and pServers, see PAN Manager Administrator’s Guide or the PAN Manager GUI Guide.
Before you can install Windows Server 2003 on a pServer, you must create the pServer and configure it with the following:
1. A primary pBlade that supports the Windows operating system architecture that you are installing.
2. One or more SCSI disks.
You install Windows Server 2003 on disk 0.0 of the pServer. When adding a disk to be used as the boot disk for a new pServer, you should first clear any existing partitions from it.
3. One uplinked vEth (Virtual Ethernet interface).
This is required for network installations.
4. At least one media drive enabled.
This is required for physical media. If you plan to use the Virtual CD (VCD) feature, you don’t need to enable the physical media drives.
5. Default boot image set to EVBS.
To set the default boot image to EVBS, go to PANname > pServer Boot Images > Default and select EVBS as the default boot image.
See “Minimum Requirements for a WIN2003 pServer” on page 1-3 for more information about the required version of EVBS (Egenera Virtualized Boot Services).
6. .(Optional) A failover pBlade that is appropriate for the operating system architecture. A pServer running 64-bit Windows requires a failover pBlade with 64-bit architecture:
2-16 WIN2003_PM5.2_BF

Installing a WIN2003 pServer
either Intel IA-32E or AMD-64 Opteron. A pServer running 32-bit Windows can fail over to any pBlade capable of supporting Windows.
Note: As you select primary and failover pBlades for your pServer, keep in mind the following. By default, Hyperthreading is on for Windows pServers running on Intel pBlades. To disable Hyperthreading, see the PAN Manager Administrator’s Guide.
WIN2003_PM5.2_BF 2-17

pServer Guide for Microsoft Windows Server 2003
Install the WIN2003 Operating System on a pServer
This section describes how to install Windows Server 2003 on a pServer, using WinPE 2.1. Tasks include:
• Performing the Installation
• Next Steps
• Optional Tasks:
• Troubleshooting Problems
Be sure that the WIN2003 WinPE 2.1 image is already installed on the cBlades.
Performing the Installation
Whether you are installing the software from media (in a physical or VCD drive) or from the network, follow the procedure that is appropriate for your site:
To install the WIN2003 pServer software:
1. Log on to either cBlade.
If installing from the network or from the control blade (VCD): Insert the WinPE installation media into the pServer’s VCD drive. (Refer to “Using ISO Images at Install Time” on page 2-7 for instructions.)
If installing from physical media: Insert the Virtualization Extensions for Microsoft Windows Server 2003 (WIN2003.x) media into an enabled media drive on a cBlade.
2. Go to the PAN>PANname screen to list the available boot images.
3. Select the WinPE image that you placed in the VCD drive.
2-18 WIN2003_PM5.2_BF

Installing a WIN2003 pServer
4. Follow these steps to override the pServer’s boot parameters. This loads the Microsoft installation program.
a. In the left pane, select LPANs > LPANname > pServerName.
b. In the right pane, on the bottom border of the pServer > pServerName page, in the Controls area, click .
Table 2.1 WinPE Installer Media Display Names
c. In the Boot pServer dialog box, keep the default setting “Boot with configured boot image”.
d. In the User Defined Boot Arguments field, change the boot arguments to: boot-order=cd;disk.
e. Click Submit.
f. In the top border of the pServer > pServerName page, the Boot Status indicates that the pServer is Booting. The word Booted is displayed when the boot is complete. This can take several minutes.
g. In the Boot pServer dialog box, click OK.
5. Once the pServer has booted, refresh the GUI and open the vVGA desktop. The Windows pServer Installation Wizard displays on the vVGA desktop.
6. After the Windows pServer Installation Wizard displays, go back to the pServerName GUI screen and eject the WinPE2.x image from the vcd.
Display Name Description
WINPE_X64 Installation and recovery ramdisk image for installing WIN2003 pServers, to run in 64-bit mode on Intel or AMD pBlades.
WINPE_X86 Installation and recovery ramdisk image for installing WIN2003 pServers, to run in 32-bit mode on Intel or AMD pBlades.
WIN2003_PM5.2_BF 2-19

pServer Guide for Microsoft Windows Server 2003
7. If installing from the control blade (VCD): At the pServerName GUI screen, insert the Windows Server 2003 OS Disk 1 image that you placed in the PAN.
If installing from the network: Skip to the next step.
8. Return to the Windows pServer Installation Wizard on the vVGA desktop
Follow the screen prompts to specify details of the WIN2003 install.
As you proceed through the WinPE install screens, note that some screens require specific responses to support your WIN2003 pServer. Table 2.2 lists those screens and what you need to specify.
Note: You may be prompted to enable or install ActiveX if you do not already have it. Go ahead and install the ActiveX, it is required for this installation.
2-20 WIN2003_PM5.2_BF
Installing a WIN2003 pServer
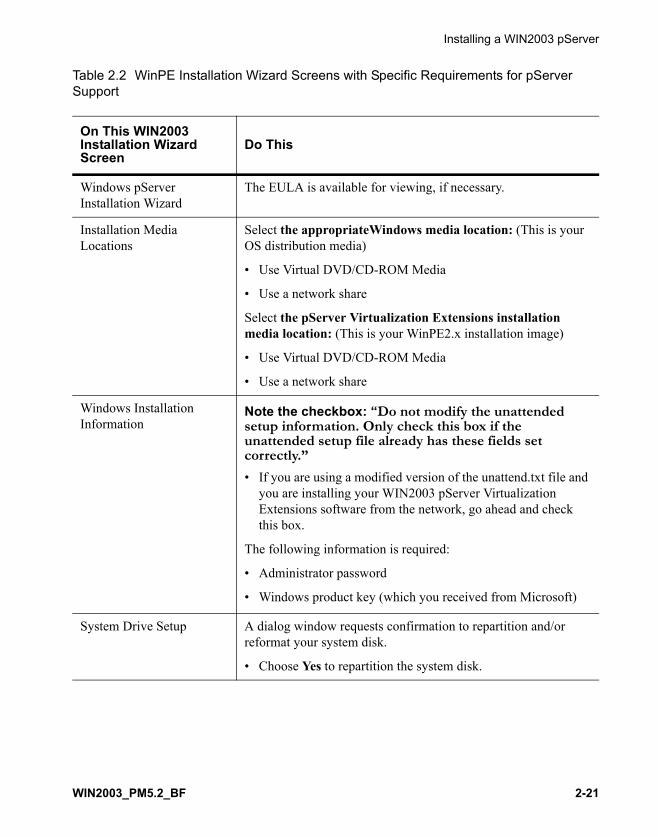
Table 2.2 WinPE Installation Wizard Screens with Specific Requirements for pServer Support
On This WIN2003 Installation Wizard Screen
Do This
Windows pServer Installation Wizard
The EULA is available for viewing, if necessary.
Installation Media Locations
Select the appropriateWindows media location: (This is your OS distribution media)
• Use Virtual DVD/CD-ROM Media
• Use a network share
Select the pServer Virtualization Extensions installation media location: (This is your WinPE2.x installation image)
• Use Virtual DVD/CD-ROM Media
• Use a network share
Windows Installation Information
Note the checkbox: “Do not modify the unattended setup information. Only check this box if the unattended setup file already has these fields set correctly.”
• If you are using a modified version of the unattend.txt file and you are installing your WIN2003 pServer Virtualization Extensions software from the network, go ahead and check this box.
The following information is required:
• Administrator password
• Windows product key (which you received from Microsoft)
System Drive Setup A dialog window requests confirmation to repartition and/or reformat your system disk.
• Choose Yes to repartition the system disk.
WIN2003_PM5.2_BF 2-21

pServer Guide for Microsoft Windows Server 2003
9. When the final reboot has completed, the Windows Server 2003 portion of the installation is complete the vVGA icon displays. Click to open the vVGA console.
10. In the vVGA console, the Windows Server 2003 Login Screen.When prompted press Ctrl-Alt-End (instead of Ctrl-Alt-Delete). Log on using the assigned Administrator username and password (use the same password that you provided earlier in the Windows Installation Wizard).
11. The Windows Operating System R2 Setup window may request Disk 2 (depending on which Microsoft distribution you purchased). If no further disks are requested, go to Step 12. If you are requested to insert another disk, do this:
If installing from physical media:
a. Eject the current disk from the media drive.
b. From the vVGA desktop, locate the Microsoft Windows Server 2003 media or image file.
c. Insert the media or image.
If installing from the network:
a. Locate the file in the Network Share you set up earlier
b. Select the file and press OK.
Windows Setup Screen • (Optional) Enter your Product Registration Key or CD Key (which you received from Microsoft).
Windows Operating System Installation
The Windows Operating System Installation begins. During the installation, the pServer will reboot three times. This may take several minutes to complete.
On This WIN2003 Installation Wizard Screen
Do This
2-22 WIN2003_PM5.2_BF
Installing a WIN2003 pServer
If installing from the control blade (VCD):
a. Eject the current disk from the VCD drive. (Refer to “Using ISO Images at Install Time” on page 2-7 for instructions.)
b. From the vVGA desktop, locate the Microsoft Windows Server 2003 media or image file.
c. Insert the image.
12. The Windows Operating System R2 Setup Wizard is displayed.
Continue through next few screens to complete the Windows Server 2003 installation. When the installation script finishes, it is not necessary to reboot.
13. The network installation is complete.
WIN2003_PM5.2_BF 2-23
pServer Guide for Microsoft Windows Server 2003
Next Steps
After the installation completes, you can perform these optional steps:
• Complete the Windows Hardware Management setup for the Microsoft operating system.
After the default installation, you will receive instruction to insert a second CD into the media drive. This is the point where the Windows Hardware Management component is installed and configured. This component is necessary for Windows crash dumps to work. You can find the installation instructions at http://www.microsoft.com/technet/scriptcenter/preview/wsm/enable.mspx.
• Complete the Post-Setup Security Updates for the Microsoft Operating system. See your Microsoft documentation for more information.
Note: Each time you boot this pServer, keep in mind the following:
• After a pServer boots, there is a slight delay before it is fully functional.
• The PAN Manager reports the boot status as Booted before all of the drivers are loaded. There is a short delay before all pServer services are available. This is standard Microsoft Windows behavior.
2-24 WIN2003_PM5.2_BF
Chapter 3Creating WIN2003
pServers from Sysprep
If you have multiple pServers to install, use Microsoft Sysprep to replicate the process to deploy multiple servers. Once you set up Sysprep, Sysprep assures consistent and quicker builds, however, you need the hardware and software outlined in “General Sysprep Requirements” on page 3-2.
This chapter outlines the requirements and tasks for Sysprep deployment of Windows Server 2003. It also explains how to use Microsoft Sysprep with third-party deployment packages for installation and deployment of multiple WIN2003 pServers.
Topics include:
• Reviewing Sysprep Requirements and Tasks
• Deploying Windows Server 2003 with Sysprep
• Keeping Egenera Drivers Updated
3-1

pServer Guide for Microsoft Windows Server 2003
Reviewing Sysprep Requirements and Tasks
Sysprep is a Microsoft utility that transforms an installed Windows system so it can be copied. The copy can then be used as a system disk for another pServer. This method saves time when installing Windows Server 2003 on multiple pServers. You perform an initial pServer installation using either a custom CD or WinPE, and then use Sysprep to deploy the installation to multiple pServers.
Note: Sysprep allows you to deploy scratch installations; you cannot use Sysprep to deploy or perform upgrades.
For additional information about the Sysprep utility, see the documentation in \Support\Tools\Deploy.cab on the Microsoft Windows Server 2003 CD-ROM, or search for “Automating and Customizing Installations” on the Microsoft web site.
General Sysprep Requirements
To perform a Sysprep deployment, you must have the software outlined in “About WIN2003 pServer Software” on page 1-10, and the following items:
• A set of pServers running on nearly identical pBlade hardware
The pBlades should have the same chip set, but can have different CPU speeds and different configuration details, such as virtual Ethernet interfaces (vEths) or disks.
• Access to a licensed third-party replication utility
You can use your SAN snapshot feature (see your SAN documentation for details), or a replication product such as Ghost or DriveImage Professional.
3-2 WIN2003_PM5.2_BF

Creating WIN2003 pServers from Sysprep
Windows Sysprep Requirements
If you are experienced using Sysprep, deploying Windows Server 2003 on pServers in a PAN requires several changes from a typical Sysprep deployment. These changes have been incorporated into the deployment instructions.
Deploying Windows Server 2003 with Sysprep
The following table outlines the tasks that are required to deploy Windows Server 2003 to multiple pServers using Sysprep. Allow at least 3 hours for the deployment.
The procedures for each task use the following terminology:
• Source pServer — The pServer that you are using as a model for installations on additional pServers. This is the pServer on which you create the Sysprep image.
• Sysprep image — The installation image you are creating for deployment on one or more pServers. This image contains the operating system, software applications, and configuration settings of the source pServer.
• Master disk — The disk on which you create the Sysprep image.
Task Time Estimate
1. Preparing the Source pServer 60 minutes
2. Preparing the Worker pServer 60 minutes
3. Creating the Sysprep Image 30 minutes
4. Cloning the Sysprep Image 30 minutes
5. Booting the Destination pServers 10 minutes
WIN2003_PM5.2_BF 3-3

pServer Guide for Microsoft Windows Server 2003
• Worker pServer — A pServer on which you replicate Sysprep images for future deployment on destination pServers.
• Destination disk — A disk onto which you copy a Sysprep image.
• Destination pServer — A pServer on which you deploy the Sysprep image.
You configure a master disk on the source pServer, and then use Sysprep to strip out the unique system characteristics from Windows and create a Sysprep image.
You disconnect the master disk from the source pServer and connect it to the worker pServer. You then use a third-party utility on the worker pServer to replicate the Sysprep image onto other destination disks, which are then assigned to destination pServers and re-integrated with the unique characteristics that were stripped out by Sysprep.
The PAN architecture and PAN Manager software make it easy to replicate disk images because you can reconfigure disks by reassigning them from one pServer to another. Using PAN Manager to reconfigure disks on a pServer requires no hardware reconfiguration.
Preparing the Source pServer
To prepare the source pServer for creation of the Sysprep image:
1. Install Windows Server 2003, see “Install the WIN2003 Operating System on a pServer” on page 2-18.
2. Install the software applications you plan to use on the pServer, and establish the configuration settings as you want them to appear on multiple computers. These applications and configuration settings become part of the Sysprep image and are automatically installed on the destination pServers.
3-4 WIN2003_PM5.2_BF

Creating WIN2003 pServers from Sysprep
Note: If the source pServer is configured with a static IP address, any Sysprep image created on the source pServer inherits the static IP address. This requires you to reset the IP address of each destination pServer on which you deploy the Sysprep image (see Step 5 on page 3-10).
Preparing the Worker pServer
To prepare the worker pServer for replication of the Sysprep image:
1. Install Windows Server 2003, see “Install the WIN2003 Operating System on a pServer” on page 2-18.
2. Configure the worker pServer with the following:
• A disk for its current operating system installation
• One disk for each destination pServer you want to configure
Creating the Sysprep Image
To create a Sysprep installation image:
1. On the source pServer, create a sysprep directory at the root of the system disk.
2. Insert the Microsoft Windows Server 2003 CD-ROM into a media drive that is accessible from the source pServer.
3. Copy Sysprep.exe, Setupcl.exe, and Setupmgr.exe from the \Support\Tools\Deploy.cab file on the Microsoft Windows Server 2003 CD-ROM to the sysprep directory on the source pServer.
4. Run the Setupmgr.exe utility to create the Sysprep.inf file, which sets the environmental characteristics of the Sysprep image. Use the following table as a guide to answering the dialog boxes:
Dialog Box Step(s)
Type of Setup Select Sysprep setup, and then click Next.
Product Select Windows Server 2003, Enterprise Edition, and then click Next.
WIN2003_PM5.2_BF 3-5

pServer Guide for Microsoft Windows Server 2003
5. Open the Sysprep.inf file in a text editor. In the [Unattended] section, add the following lines:LegacyNic=1
6. If you want to set the administrator password in the Sysprep.inf file, reset the administrator password on the source pServer.
7. Confirm the following settings appear in the Sysprep.inf file:
a. In the [GuiRunOnce] section, you should see the following command:shutdown /r/f/t 30
b. In the [GuiUnattended] section, you should see the following commands:AutoLogon=YesAutoLogonCount=1
If these commands do not appear, go ahead and modify the file to include them.
License Agreement Select Yes, fully automate the installation, and then click Next.
Name and Organization
Select a name other than Administrator or Guest in the Name field, enter any information about your organization (optional), and then click Next.
Computer Name Select Automatically generate computer name or Use the following computer name. The Use the following computer name option establishes a static name for the source pServer. Because any destination pServer on which the Sysprep image is deployed inherits this static name, you have to rename each destination pServer.
Identification string Click Finish.
Setup Manager Place the Sysprep.inf file in the \sysprep directory that you created in Step 1.
When the Setup Manager dialog box displays the message “You have successfully completed Setup Manager,” click Cancel to clear the dialog box.
Dialog Box Step(s)
3-6 WIN2003_PM5.2_BF

Creating WIN2003 pServers from Sysprep
8. Save your changes to the Sysprep.inf file.
9. Run the Sysprep utility.
Running Sysprep transforms the source pServer installation (that is, the master disk) into a disk image that can be cloned to other computers. Do one of the following:
• In command-line mode, type the following:sysprep –pnp –reseal
• In graphical mode, select the Detect non-plug and play hardware check box, and then click Reseal.
• If you are presented with a screen prompting you to regenerate security IDs (SIDs), answer Yes.
When the Sysprep utility has finished running, the Sysprep image is complete, and the source pServer shuts down.
Cloning the Sysprep Image
To clone the Sysprep image to a set of destination disks:
1. Shut down the worker pServer.
2. Using PAN Manager, remove the master disk, which contains the Sysprep image, from the source pServer, and add the disk to the worker pServer (Figure 3.1).
Figure 3.1 Configuring the Master Disk on the pServer
3. Boot the worker pServer.
SourcepServer
System Disk
WorkerpServer
Master Disk
Master Disk
DestinationpServer
DestinationpServer
DestinationpServer
Destination DiskDestination
DiskDestination
Disk
WIN2003_PM5.2_BF 3-7

pServer Guide for Microsoft Windows Server 2003
4. Use a third-party utility of your choice (for example, Ghost or DriveImage Professional) to clone the Sysprep disk image to each destination disk that you are deploying (Figure 3.2).
Figure 3.2 Replicating the Sysprep Image
When the copy operation is complete, the destination disk contains a bootable installation image.
Booting the Destination pServers
To deploy the Sysprep image on a destination pServer:
1. If you have not already done so, use PAN Manager to create a destination pServer for the new installation.
2. Shut down the worker pServer.
System Disk
WorkerpServer
Master Disk
DestinationpServer
DestinationpServer
DestinationpServer
Destination DiskDestination
DiskDestination
Disk
SourcepServer
3-8 WIN2003_PM5.2_BF
Creating WIN2003 pServers from Sysprep
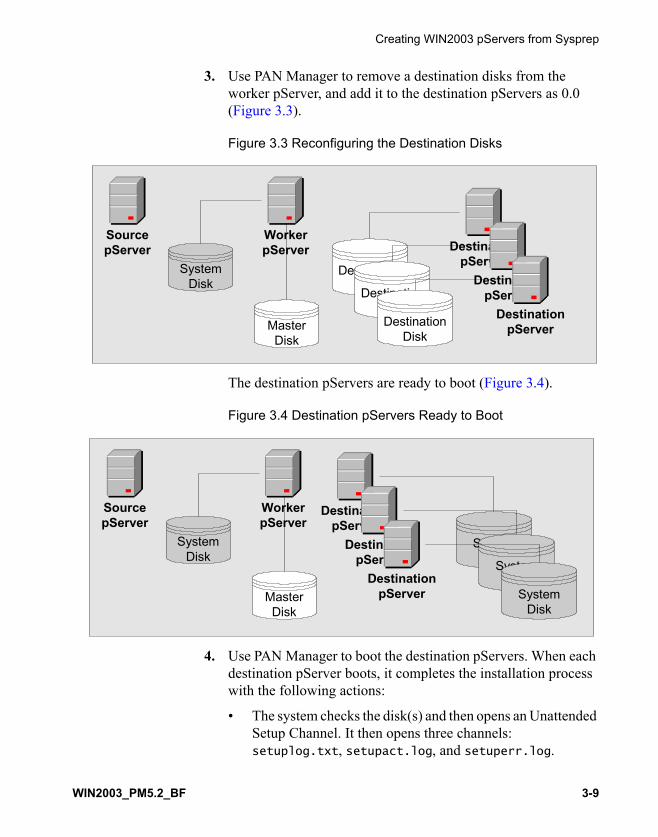
3. Use PAN Manager to remove a destination disks from the worker pServer, and add it to the destination pServers as 0.0 (Figure 3.3).
Figure 3.3 Reconfiguring the Destination Disks
The destination pServers are ready to boot (Figure 3.4).
Figure 3.4 Destination pServers Ready to Boot
4. Use PAN Manager to boot the destination pServers. When each destination pServer boots, it completes the installation process with the following actions:
• The system checks the disk(s) and then opens an Unattended Setup Channel. It then opens three channels: setuplog.txt, setupact.log, and setuperr.log.
System Disk
WorkerpServer
Master Disk
Destination DiskDestination
DiskDestination
Disk
SourcepServer Destination
pServerDestination
pServerDestination
pServer
System Disk
WorkerpServer
Master Disk
DestinationpServer
DestinationpServer
DestinationpServer
System DiskSystem
DiskSystem
Disk
SourcepServer
WIN2003_PM5.2_BF 3-9

pServer Guide for Microsoft Windows Server 2003
• The pServer goes through the mini-setup, which runs for about 5 minutes. When the mini-setup finishes, it closes all channels and reboots.
You can monitor the progress of the installation by opening a console to the destination pServer, which displays the SAC.
5. If you did not use Dynamic Host Configure Protocol (DHCP), you need to set the pServer IP address now. For more information, see the PAN Manager Administrator’s Guide.
The pServer is ready for use.
Note: Each time you boot the pServer keep in mind the following. After a pServer boots there is a slight delay before it is fully functional. The PAN Manager reports the boot status as Booted before all of the drivers have been loaded so there is a delay of a minute or two before all pServer services are available, which is standard Microsoft Windows behavior.
Keeping Egenera Drivers Updated
After you create your Egenera software distribution directories, you should keep them up to date with the latest patches. Please contact Egenera Enterprise Services for information about the latest patch releases.
3-10 WIN2003_PM5.2_BF

Chapter 4Upgrading a WIN2003
pServer
After you’ve installed a WIN2003 pServer (according to the instructions earlier in this document), you can apply updates from the operating system vendor to the OS and kernel when needed.
This chapter explains how to upgrade from an existing Windows pServer release, and provides the following information:
• Preparing for a pServer Upgrade
• Upgrading Egenera Drivers on Windows pServers
• Deploying Upgrade MSIs With Group Policy
• Using the Installer Command-line Options
• Rolling Back to an Earlier Release
4-1

pServer Guide for Microsoft Windows Server 2003
Preparing for a pServer Upgrade
This section describes the requirements, options, and steps for upgrading a Windows pServer to a current release.
Upgrade Requirements
The upgrade process supports 32-bit and 64-bit upgrades. You cannot upgrade a 32-bit installation to 64-bit, or a 64-bit installation to 32-bit. See pServer Release Notes for Microsoft Windows Server 2003 for supported upgrade paths.
You must have administrator rights to install, repair, and remove upgrades, and the upgrade is installed per machine for all users.
If you have MPIO disabled because you are using a third-party multipath solution, the upgrade may not be able to automatically roll back to the prior release in case of an upgrade failure. For more information, see the PAN Manager Administrator’s Guide.
If you make SAN zoning changes while the upgrade is running and fails, refer to “Rolling Back to an Earlier Release” on page 4-13, and be sure to note the Caution information as well.
Upgrade Methods
This chapter describes two upgrade methods:
• Running the upgrade manually, as described in “Upgrading Egenera Drivers on Windows pServers” on page 4-4.
• Deploying the upgrade with Microsoft Group Policy, as described in “Upgrading an MSI” on page 4-10. This method can save time if you have many pServers to upgrade.
4-2 WIN2003_PM5.2_BF

Upgrading a WIN2003 pServer
Upgrade Steps If your pServer is running Windows Server 2003, the recommended upgrade steps are as follows:
1. Upgrade to the Egenera Release 2003.1.1.0 drivers, as described in either “Upgrading Egenera Drivers on Windows pServers” on page 4-4 or “Upgrading an MSI” on page 4-10.
2. Depending on your upgrade path, you apply the Windows upgrade if applicable. If you are upgrading from 2003.0.2.12, 2003.0.3.x, or 2003.0.4.x, apply the Windows Server 2003 SP1 or R2 upgrade. Release 2003.1.1.0 has been qualified with Windows Server 2003 SP1 and R2.
Disabling Automatic Reboots
During the upgrade, you can expect the following reboots to occur:
• If you upgrade from 2003.0.4.x or 2003.1.0.x, your system automatically reboots once.
• If you upgrade from 2003.0.2.12 or 2003.0.3.x, your system automatically reboots twice: while installing the vVGA drivers, and at the end of the upgrade to load the new drivers.
You can disable the automatic rebooting with Microsoft Installer (MSI) command-line options, as described in “Using the Installer Command-line Options” on page 4-11.
Upgrading vVGA Drivers
If you upgrade from 2003.0.2.12 or 2003.0.3.x to 2003.1.1.x, the Found New Hardware Wizard appears because the vVGA drivers need to be installed. If you upgrade from 2003.0.4.x or 2003.1.0.x to 2003.1.1.x, the upgrade MSI upgrades the vVGA drivers without the Found New Hardware Wizard.
Checking the PAN Manager Release
The upgrade MSI verifies whether the PAN Manager release is compatible with Release 2003.1.1.0:
• If you are upgrading from 2003.1.0.x, PAN Manager must be Release 5.2 or higher or the upgrade MSI exits.
WIN2003_PM5.2_BF
pServer Guide for Microsoft Windows Server 2003
• If you are upgrading from 2003.0.2.12, 2003.0.3.x, or 2003.0.4.x, the upgrade MSI cannot verify the PAN Manager release. You need to manually verify that PAN Manager Release 5.2 or higher is running. The upgrade MSI displays an error, which is shown because it cannot verify the PAN Manager release. You can ignore the warning and continue with the upgrade if you are certain that Release 5.2 is running.
Upgrading Egenera Drivers on Windows pServers
To upgrade a Windows pServer to Release 2003.1.1.0, you upgrade the Egenera drivers, as described in this section. Afterward, you apply the Microsoft Windows Server 2003 SP1 or R2 upgrade to the operating system (if applicable).
The upgrade process consists of the following tasks:
• Setting Up and Installing the Upgrade — Step 1 through Step 10.
• Installing the vVGA Drivers (2003.0.2.12 and 2003.0.3.x only) — Step 13 through Step 15.
• Rebooting the pServer — Step 16.
• Installing the PAN Agent (Optional) — Step 17 through Step 24.
Setting Up and Installing the Upgrade
To upgrade the Egenera device drivers on a Windows pServer:
1. Insert the pServer Virtualization Extensions for use with Microsoft Windows Server 2003 CD-ROM in a media drive that is accessible from the pServer.
4-4 WIN2003_PM5.2_BF

Upgrading a WIN2003 pServer
2. Start a pServer console using one of the following methods:
• If you are upgrading from 2003.0.4.x or 2003.1.0.x, use the vVGA console. In PAN Manager, display the pServer dashboard, and click the rectangular vVGA Console icon for the pServer.
The vVGA desktop appears.
• If you are upgrading from 2003.0.2.12 or 2003.0.3.x, use the Remote Desktop Protocol (RDP) console. For further instructions, see the PAN Manager Administrator’s Guide for instructions on opening an RDP connection.
3. Log on to the Windows desktop with your administrator username and password.
4. Using Windows Explorer, change directory to the \EgenWindows directory of the Egenera software distribution.
5. If you want, copy the EgeneraSystem2003-1-x-x_x86.msi or EgeneraSystem2003-1-x-x_amd64.msi update tool to your C: drive, instead of executing it from the media drive or across the network.
Note: The Microsoft Installer (MSI) supports a variety of command-line options for tailoring the upgrade to suit your needs. For more information, see “Using the Installer Command-line Options” on page 4-11.
6. Double-click the EgeneraSystem2003-1-x-x_x86.msi or EgeneraSystem2003-1-x-x_amd64.msi tool, or execute it from a command window with specific options.
Caution: Because there is a problem with dynamic boot disks running MPIO version 1.0.6, the upgrade tool verifies the current MPIO level when it runs MSI. If you see the following warning, contact Egenera Enterprise Services for help in working around the issue. Do not continue with Step 7 until you resolve the issue.
The installer detected that the boot partition is configured as a 'Dynamic Disk'. The installation will be aborted, because MPIO may not be upgraded safely.
WIN2003_PM5.2_BF

pServer Guide for Microsoft Windows Server 2003
MPIO Version: 1.0.6.0
Upgrades from Release 2003.0.4.0: If you remove a 4.0 MSI (that is, EgeneraSystem2003-0-4-0.msi) before running 4.1 or higher, an error message appears informing you that you have inconsistent drivers. You can correct this by running the 4.0 MSI again to repair the installation.
7. In the Setup Wizard, click Next.
8. If you are upgrading from Release 2003.1.0.x, go to Step 10.
9. If you are upgrading from Release 2003.0.2.12, Release 2003.0.3.x, or 2003.0.4.x, the upgrade MSI cannot verify whether PAN Manager Release 5.2 or higher is running and displays a warning message:
• If you have manually verified that PAN Manager Release 5.2 or higher is running, click Yes.
• If you are not running PAN Manager Release 5.2 or higher, click No. You cannot perform the upgrade until you have upgraded PAN Manager.
10. In the Confirm Installation dialog box, click Next.
An installation window with a progress bar appears.
11. Minimize the installation windows so you can see any dialog boxes that appear. The installation can take a few minutes.
The initial phase of the upgrade copies all driver files and utilities to the %ProgramFiles%\Egenera,Inc\Egenera System 2003.1.x.x folder. All base drivers, including the MPIO drivers, are upgraded, and the vVGA drivers are preinstalled.
Note:
• During an upgrade operation, if you see the following error message, always click Yes:The target file exists and is newer than the source. Overwrite the newer file?
4-6 WIN2003_PM5.2_BF

Upgrading a WIN2003 pServer
• If MPIO support for the Egenera Multipath Devices is disabled, the upgrade does not re-enable MPIO support, even though the MPIO drivers are upgraded. See the PAN Manager Administrator’s Guide for more information about configuring Multipath support.
• If the installation does not complete successfully. See the PAN Manager Administrator’s Guide for more detail about repairing upgrades and handling upgrade failures.
12. If you are upgrading from Release 2003.0.4.x or later, go to Step 16.
Installing the vVGA Drivers (2003.0.2.12 and 2003.0.3.x only)
To reboot, connect to the pServer, and install the vVGA drivers:
13. If you are upgrading from Release 2003.0.2.12 or 2003.0.3.x, the pServer reboots for the first time. After the pServer finishes rebooting, open a Remote Desktop Protocol (RDP) connection to the pServer using the console connection syntax. For instructions on connecting to a pServer using the RDP, see the PAN Manager Administrator’s Guide.
The Found New Hardware Wizard appears for both the Egenera KVM and XPT drivers, which provide the vVGA console. The second phase of the upgrade installs the vVGA console.
Caution: You must use the console connection to complete the installation. If you connect directly using the Windows RDP client, you may not see the Found New Hardware Wizard, and the vVGA installation fails.
14. Click Finish to close the Found New Hardware Wizard for BladeFrame KVM.
15. Click Finish to close the Found New Hardware Wizard for BladeFrame KVM Transport.
WIN2003_PM5.2_BF

pServer Guide for Microsoft Windows Server 2003
Rebooting the pServer
To continue the installation and reboot the pServer:
16. Click Close in the Installation Complete dialog box.
The pServer reboots. When the reboot is completed, the Egenera drivers are loaded, and the vVGA driver is installed.
Note: If you disabled automatic rebooting with MSI command-line options in Step 6 on page 4-5 and the pServer did not reboot, you must force a reboot to complete the upgrade.
If you do not want to install the PAN Agent, the upgrade is complete except for the Windows Server 2003 SP1 or R2 upgrade (if applicable). If you are upgrading from 2003.0.2.12, 2003.0.3.x, or 2003.0.4.x, you must apply the Windows Server 2003 SP1 or R2 upgrade from the Microsoft media or web site, or the pServer won’t operate properly.
Installing the PAN Agent (Optional)
To install the PAN Agent:
17. Click the vVGA Console icon and log back on to Windows.
18. Using Windows Explorer, change directory to the \EgenWindows directory of the Egenera software distribution.
19. If you want, copy the EgenAgent.msi file to your C: drive, instead of executing it from the media drive or across the network.
Note: The MSI supports a variety of command-line options for tailoring the upgrade to suit your needs. For more information, see “Using the Installer Command-line Options” on page 4-11.
20. Double-click the EgenAgent.msi tool, or execute it from a command window with specific options.
21. In the PAN Agent Setup Wizard dialog box, click Next.
22. In the Confirm Installation dialog box, click Next.
An installation window with a progress bar appears
23. Click Close in the Installation Complete dialog box.
4-8 WIN2003_PM5.2_BF

Upgrading a WIN2003 pServer
24. Click Yes in the dialog box to reboot the pServer and complete the upgrade.
The upgrade is complete except for the Windows Server 2003 SP1 or R2 upgrade (if applicable). If you are upgrading from 2003.0.2.12, 2003.0.3.x, or 2003.0.4.x, you must apply the Windows Server 2003 SP1 or R2 upgrade from the Microsoft media or web site, or the pServer won’t operate properly.
Deploying Upgrade MSIs With Group Policy
If you want, you can upgrade pServers to Release 2003.1.1.0 by deploying the upgrade MSI with group policy. This section outlines the requirements and supported features for deploying upgrade MSIs.
Deployment Requirements
To deploy an Egenera upgrade MSI using group policy, you must meet the following requirements:
• You assign the MSI to a computer so that the deployment process actually installs the MSI and performs the driver upgrades the next time that the computer is rebooted.
• The MSI file exists within a network share.
• All users have read permissions for that network share.
• You clear the Make this 32-bit X86 application available to Win64 computers check box under Advanced Deployment options when you deploy the 32-bit MSI.
• You leave the Upgrade options blank.
WIN2003_PM5.2_BF

pServer Guide for Microsoft Windows Server 2003
The MSI initiates one or two reboots, depending on the version of the installed pServer:
• Upgrades from version 2003.0.2.12 and 2003.0.3.x — The MSI initiates two reboots. The computer may not perform the final reboot until a user logs on with the Remote Desktop Protocol (RDP) and acknowledges the Found New Hardware Wizard for the Egenera KVM and XPT drivers.
• Upgrades from version 2003.0.4.x and higher — The MSI initiates one reboot at the end of the installation process. The computer might not perform the final reboot if a user logs onto the pServer while the upgrade is still running. Check the event log to see that the MSI has successfully completed the upgrade.
Uninstalling the MSI
Uninstalling the MSI using group policy is not supported. The MSI can be uninstalled locally by a user with administrator rights for the computer. To uninstall the MSI locally, the computer must be removed from the software deployment group first. Select the Allow users to continue to use the software, but prevent new installations option.
Upgrading an MSI
An MSI that was deployed using group policy can only be upgraded using group policy. You remove the old MSI from the deployment group and assign the new MSI to the deployment group. When you remove the old MSI, you need to do the following:
• Select the Allow users to continue to use the software, but prevent new installations option.
• Leave the Upgrade options blank.
You can deploy the new MSI to computers with or without the old MSI installed. The MSI upgrades the computer to the latest set of drivers.
4-10 WIN2003_PM5.2_BF

Upgrading a WIN2003 pServer
Using the Installer Command-line Options
You can run the installer from the command line on the pServer using the following syntax:
msiexec [options] msifile [options]
where msifile is the name of the MSI, such as EgeneraSystem2003-1-1-0_x86.msi.
For a complete list of MSI command-line options, see the following Microsoft web site: http://msdn.microsoft.com/library/default.asp?url=/library/en-us/msi/setup/command_line_options.asp
Upgrade MSI Options
The following table outlines some useful command-line options for the upgrade MSI.
Task Examples
Disable automatic rebooting (REBOOTPROMPT=””) for the following installation operations: install (/i), remove (/x), and repair (/f).
msiexec /i EgeneraSystem2003-1-1-0_x86.msi
REBOOTPROMPT=""
msiexec /x EgeneraSystem2003-1-1-0_amd64.msi
REBOOTPROMPT=""
msiexec /f EgeneraSystem2003-1-1-0_x86.msi
REBOOTPROMPT=""
Disable interactive mode (/qb!) for the install operation (/i).
msiexec /qb! /i EgeneraSystem2003-1-1-0_x86.msi
Update installations (/i) in silent mode (/qn).a
msiexec /i EgeneraSystem2003-1-1-0_x86.msi /qn
Enable verbose Windows Installer logging (/L*v) to the %temp%\EgenMSI.log file for the install operation.b
msiexec /i /L*v %temp%EgenMsi.log
EgeneraSystem2003-1-1-0_amd64.msi
WIN2003_PM5.2_BF

pServer Guide for Microsoft Windows Server 2003
PAN Agent MSI Options
If desired, you can use the NEEDSREBOOT property to disable automatic reboots by the PAN Agent MSI. To prevent the PAN Agent MSI from querying or forcing a reboot, use the following command:
msiexec /i EgenAgent.msi NEEDSREBOOT=”0”
Roll back (/x) to the previous release without displaying a warning dialog.
msiexec /x EgeneraSystem2003-1-1-0_x86.msi
Update installations (/i) and change the TCP Window size (TCPWINDOWSIZE=”numbytes”).c
msiexec /i EgeneraSystem2003-1-1-0_x86.msi
TCPWINDOWSIZE=”65536”
a. The MSI does not display a graphical user interface (GUI) in silent mode, so you can only perform the install operation in silent mode. The repair and remove operations are not supported; you can only perform repair and remove in GUI mode.
b. For more information about logging, see the PAN Manager Administrator’s Guide.
c. To use the Windows default value, set TCPWINDOWSIZE=””.
Task Examples
4-12 WIN2003_PM5.2_BF

Upgrading a WIN2003 pServer
Rolling Back to an Earlier Release
If the upgrade fails for any reason, the installer automatically rolls back to an earlier release. If the upgrade succeeds but you want to roll back to an earlier release, or the rollback fails and you need to resume it, you can manually roll back. Before you roll back, review the following requirements:
• You must have MPIO enabled. Otherwise, the driver remove operation fails. For instructions on enabling MPIO, see the PAN Manager Administrator’s Guide for more information about configuring Multipath storage support.
• The rollback does not remove the Egenera vVGA drivers. Do not manually delete the vVGA driver files.
• The rollback requires that patches remain in place. Do not remove any previously installed patches.
Note: Running an MSI from an earlier release is not a supported way to roll back or downgrade a pServer. Egenera requires that you use the Control Panel applet Add/Remove Programs to roll back a pServer.
To roll back to the previously installed Windows pServer release:
1. Select Settings > Control Panel > Add or Remove Programs. The control panel applet appears.
2. Click the Change button in the Egenera System 2003.1.x.x program entry.
A Setup Wizard appears that displays the Repair and Remove options.
3. Click Remove and then Finish.
A warning dialog appears that states you are about to remove Release 2003.1.1.0, and the pServer will reboot.
WIN2003_PM5.2_BF

pServer Guide for Microsoft Windows Server 2003
The installer removes the program entry, rolls back the drivers, and automatically reboots the system.
Caution: If the boot partition is a dynamic disk and if the MPIO version of the drivers stored in the rollback folder is 1.0.6.0, the MSI displays the following warning. Do not complete the rollback. Call Egenera Enterprise Services.
The installer detected that the boot partition is configured as a 'Dynamic Disk'. The installation will be aborted, because MPIO may not be upgraded safely. MPIO Version: 1.0.6.0
After a rollback, you can encounter stale or inconsistent upgrade and driver names. If you encounter either of the following situations, you can ignore the incorrect names:
• After a rollback, the System Properties page may still list the previously-installed upgrade, even though the rollback was successful.
• If you upgrade a 2003.0.3.x pServer to 2003.0.4.x or later, and then roll back to 2003.0.3.x, some driver names may not be rolled back correctly, even though the versions are correct and drivers function properly. For example, after such a rollback, if you open Computer Management, go to Device Manager, and look under Network Adapters, you will see two adapters: one external, and one internal. The external adapter rolled back to Platform Network #2, and the internal adapter still says Platform Network vEth1. You can ignore this stale name; the driver functions normally. For example, pinging from another pServer on the same platform works correctly.
If desired, you can remove the upgrade MSI without displaying the warning dialog by using one of the following commands:
msiexec -x EgeneraSystem2003-1-1-0_x86.msimsiexec -x EgeneraSystem2003-1-1-0_amd64.msi
4-14 WIN2003_PM5.2_BF

Chapter 5Troubleshooting
Problems
This chapter describes methods for gathering the required information to adequately diagnose, examine Windows event log messages, troubleshoot, and resolve problems with a pServer. This chapter covers the following topics:
• Recovering a Failed pServer
• Correcting Installation Problems
• Resolving Upgrade and Rollback Failures
• Examining Windows Event Log Messages
5-1

pServer Guide for Microsoft Windows Server 2003
Recovering a Failed pServer
If you encounter a problem with a Windows pServer, such as a crash or unresponsiveness, you can recover the pServer by using an alternate Windows pServer to access its disk to troubleshoot or to retrieve crash logs.
This section explains how to access the failed pServer’s disk from an alternate Windows pServer.
1. From the PAN Manager GUI:
a. Select a separate Windows pServer (with a different boot disk than the failed pServer).
b. Go to LPANs > LPANname and make sure the disk from the failed pServer is allocated to the LPAN.
c. Go to LPANs > LPANname > pServerName and add the disk from the failed pServer to the alternate Windows pServer.
– If you are adding a disk to a running pServer, you will receive a warning. Press Continue.
– If your alternate pServer is shut down, boot it now.
2. From the Windows Desktop of the alternate pServer:
a. Right click on My Computer, select Manage, select Disk Management, then right click on the added disk to assign a drive letter to it.
b. Once the disk from the failed pServer has a drive letter, explore and troubleshoot it from the alternate pServer.
3. When you’re finished troubleshooting, detach the disk and reassign it if you wish.
a. From the Windows Desktop of the alternate pServer, go to Disk Management to cleanly unmap the drive letter of the disk from the failed pServer.
5-2 WIN2003_PM5.2_BF

Troubleshooting Problems
b. From PAN Manager, remove the disk from the alternate pServer.
For more information about troubleshooting Windows pServers, see the PAN Manager Administrator’s Guide.
WIN2003_PM5.2_BF 5-3
pServer Guide for Microsoft Windows Server 2003
Correcting Installation Problems
This section provides suggestions for problems that can occur when you install Microsoft Windows Server 2003 on a pServer. To review and analyze Windows events to help troubleshoot, see “Examining Windows Event Log Messages” on page 5-12.
Product Keys Incorrect product keys are a common source of installation problems. Use the correct Microsoft product key for your CD-ROM, and make sure that the key contains no typographical errors.
Incompatible cBlade Release
If the installation software detects a cBlade release lower than PM5.2_BF during the boot sequence, the boot fails and generates events in PAN Manager. The event log shows an IPMI_SEL_PANIC event and five non-sensor events. For information about Version Checking, see the PAN Manager Administrator’s Guide.
Incorrect Settings for Custom CD-ROM Image (WinPE 1.x Only)
Incorrect settings in the Winnt.sif file can cause installation problems. If necessary, create a new custom CD-ROM image by making only the changes to the Winnt.sif file that are described in “Installing WIN2003 pServer from a Custom CD-ROM” on page A-8. Then burn the new image onto a CD-ROM. When you run the installation, monitor the setup logs for any failures, as described in the following section Windows Setup Logs.
Windows Setup Logs
The Windows setup logs provide detailed information on the steps taken during the installation and any errors that occurred. There are three setup log files:
%SystemRoot%\setuplog.txt%SystemRoot%\setupact.log%SystemRoot%\setuperr.log
5-4 WIN2003_PM5.2_BF

Troubleshooting Problems
To examine these logs, use the SAC console on the pServer. If you cannot boot the pServer or use the SAC console, you can use PAN Manager to reconfigure the pServer. If you have another Windows pServer that is functioning properly, remove the installation disk from this pServer and then add it to the configuration of the healthy pServer. You can log into the healthy pServer and examine the setup logs on this installation disk.
Troubleshooting WinPE Installation Problems (WinPE 1.x Only)
Incorrect settings in the unattend.txt file can cause installation problems. If necessary, modify the unattend.txt file as appropriate, and then rerun network_install.bat, as described in “Installing WIN2003 pServer from a Network Using a Custom WinPE Disk Image” on page A-21. When you run the installation, monitor the setup logs for any failures.
WIN2003_PM5.2_BF 5-5
pServer Guide for Microsoft Windows Server 2003
Resolving Upgrade and Rollback Failures
This section outlines techniques for troubleshooting and correcting upgrade and rollback failures. This section covers the following topics:
• Repairing Upgrades
• Handling Upgrade Failures
• Handling Driver Installation Failures
• Handling Virtual VGA Desktop Failures
• Handling Rollback Failures Caused by Incorrect Driver Versions
• Handling Rollback Failures When MPIO Is Disabled
• Interpreting Upgrade Error Messages
Repairing Upgrades
If you click the Cancel button during the upgrade, or you restart the upgrade because it does not complete the second phase, the wizard provides you with a choice of repairing or removing the previous upgrade. You can also use the repair option to reinstall drivers or files that were manually deleted or corrupted. To manually access the repair option:
1. Navigate to Settings > Control Panel > Add or Remove Programs.
2. Click the Change button in the Egenera System 2003.1.x.x program entry.
A dialog is displayed that displays the Repair and Remove options.
Handling Upgrade Failures
If the upgrade fails for any reason, the installer attempts to roll back changes, including driver upgrades that were made during the failed installation.
5-6 WIN2003_PM5.2_BF

Troubleshooting Problems
Caution: During the driver rollback, Windows may display a dialog box asking you to confirm the replacement of a newer file with an older file. You must click Yes to confirm the replacement, or the rollback fails. The dialog box may be hidden behind the status screen’s progress bar. If this happens, select and move the rollback progress bar to access the confirmation box.
Caution: A driver rollback failure can leave incompatible drivers on the system and prevent the system from booting properly. The installer displays an error dialog box listing the drivers that are incompatible. Do not reboot if the rollback fails.
Handling Driver Installation Failures
If the installer fails to complete the driver installation and rolls back your version, do the following:
• Check the %windir%\setupapi.log for Egenera driver error entries.
If desired, you can control verbose logging of driver updates with the LogLevel registry value in HKEY_LOCAL_MACHINE\SOFTWARE\Microsoft\Windows\
CurrentVersion\Setup. For more information, see the following MSFT document:
http://www.microsoft.com/whdc/driver/install/setupapilog.mspx
• Enable MSI logging to increase the verbosity of the setupapi.log file.To enable logging, set the /L MSI command-line option. You can also enable logging in the Windows registry to create log files automatically every time the MSI is executed. To do so, insert the following keys in the registry:
[HKEY_LOCAL_MACHINE\SOFTWARE\Policies\Microsoft\windows\Installer]"Logging"="voicewarmupx"[HKEY_LOCAL_MACHINE\SOFTWARE\Microsoft\Windows\CurrentVersion\Setup]"LogLevel"=dword:8000ffff
For a description of the logging options, refer to the following MSI document:
http://msdn.microsoft.com/library/default.asp?url=/library/
WIN2003_PM5.2_BF 5-7

pServer Guide for Microsoft Windows Server 2003
en-us/msi/setup/command_line_options.asp
For information on enabling MSI logging globally or when using Group Policy, see the following document:
http://support.microsoft.com/kb/223300/
Handling Virtual VGA Desktop Failures
If Virtual VGA (vVGA) does not start from the PAN Manager icon on the pServer, do the following:
1. If you are upgrading from Release 2003.0.3.x, open a Remote Desktop Console Connection to the pServer to see if the vVGA portion of the installation completed. If the Found New Hardware Wizards appear, confirm and close the wizards to complete the installation. Skip the rest of this procedure.
2. If you are upgrading from Release 2003.0.4.x or higher, open the Device Manager from the system control panel, and select View > Show hidden devices.
3. Expand the Egenera Virtual VGA item, and view the properties of BladeFrame KVM and BladeFrame KVM Transport devices to verify that the correct drivers are installed.
4. If the correct drivers are installed, reboot. The vVGA service should work after rebooting. Skip the rest of this procedure.
5. If the correct drivers are not installed, click the Update Driver button to manually update the drivers. The drivers are located in the following folders:%Program Files%\Egenera, Inc\Egenera System 2003.1.x\EgenKVM%Program Files%\Egenera, Inc\Egenera System 2003.1.x\EgenXpt
6. Reboot the pServer after you update the drivers.
Handling Rollback Failures Caused by Incorrect Driver Versions
If the driver version check fails, the rollback fails and displays the error.
To recover from this error:
1. Click OK to close the error, but do not reboot.
5-8 WIN2003_PM5.2_BF

Troubleshooting Problems
2. Settings > Control Panel > Add or Remove Programs.
3. Click the Change button in the Egenera System 2003.1.x.x program entry.
A Setup Wizard is displayed that displays the Repair and Remove options.
4. Click Repair and then Finish.
5. When the Overwrite Newer System Files dialog box is displayed, click Yes to confirm.
6. Click the Change button in the Egenera System 2003.1.x.x program entry.
A Setup Wizard is displayed that displays the Repair and Remove options.
7. Click Remove and then Finish.
A warning dialog is displayed that states you are about to remove Release 2003.1.1.0, and the pServer will reboot.
The installer removes the program entry, rolls back the drivers, and automatically reboots the system.
Handling Rollback Failures When MPIO Is Disabled
If you have MPIO disabled, the rollback fails.
To roll back when MPIO is disabled:
1. If you have a third-party multipath solution installed, you might need to uninstall it.
2. Enable MPIO before you resume the rollback. See more information about configuring multipath storage support in the PAN Manager Administrator’s Guide.
3. Reboot the pServer to apply the new MPIO state.
4. Resume the rollback, as described in “Rolling Back to an Earlier Release” on page 4-13.
WIN2003_PM5.2_BF 5-9
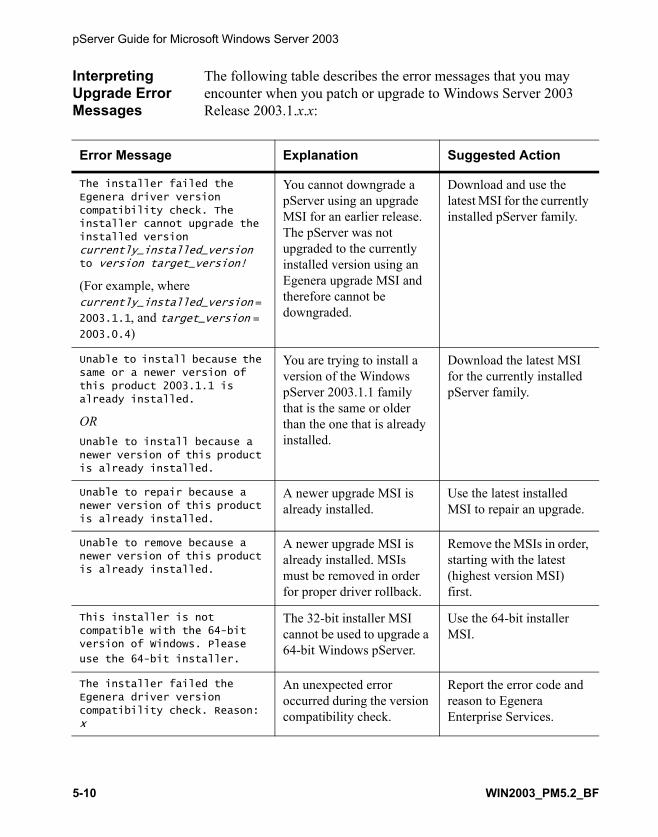
pServer Guide for Microsoft Windows Server 2003
Interpreting Upgrade Error Messages
The following table describes the error messages that you may encounter when you patch or upgrade to Windows Server 2003 Release 2003.1.x.x:
Error Message Explanation Suggested Action
The installer failed the
Egenera driver version
compatibility check. The installer cannot upgrade the
installed version
currently_installed_version to version target_version!
(For example, where currently_installed_version = 2003.1.1, and target_version = 2003.0.4)
You cannot downgrade a pServer using an upgrade MSI for an earlier release. The pServer was not upgraded to the currently installed version using an Egenera upgrade MSI and therefore cannot be downgraded.
Download and use the latest MSI for the currently installed pServer family.
Unable to install because the same or a newer version of
this product 2003.1.1 is
already installed.
OR Unable to install because a
newer version of this product is already installed.
You are trying to install a version of the Windows pServer 2003.1.1 family that is the same or older than the one that is already installed.
Download the latest MSI for the currently installed pServer family.
Unable to repair because a
newer version of this product
is already installed.
A newer upgrade MSI is already installed.
Use the latest installed MSI to repair an upgrade.
Unable to remove because a newer version of this product
is already installed.
A newer upgrade MSI is already installed. MSIs must be removed in order for proper driver rollback.
Remove the MSIs in order, starting with the latest (highest version MSI) first.
This installer is not
compatible with the 64-bit version of Windows. Please
use the 64-bit installer.
The 32-bit installer MSI cannot be used to upgrade a 64-bit Windows pServer.
Use the 64-bit installer MSI.
The installer failed the
Egenera driver version
compatibility check. Reason: x
An unexpected error occurred during the version compatibility check.
Report the error code and reason to Egenera Enterprise Services.
5-10 WIN2003_PM5.2_BF

Troubleshooting Problems
Unable to install because the installer found inconsistent
driver registry entries.
The installer found inconsistent or incorrect registry entries.
Report the error code and reason to Egenera Enterprise Services.
Unable to install because the
installer failed to write to
the registry.
The installer could not write required registry entries.
Ensure that the installer is executed with administrator rights.
Error: Setup had problems
registering the following OLE
control DLL: C:\WINDOWS\system32\
dynamic_link_library_file.dll
Contact your system administrator, who may
provide assistance in
diagnosing this problem.
The upgrade failed because changes were made to the SAN zoning while the upgrade was running.
Once the changes to SAN zoning are complete, retry the upgrade.
The installer is unable to
read the cBlade version.
Click “Yes” if the installed cBlade version is higher than
the minimum supported version
5.0.0.0. Click “No” to abort the installer.
!!! WARNING !!! Continuing
the pServer upgrade with an unsupported cBlade version
WILL result in an unbootable
pServer!
You are upgrading from 2003.0.2.12, 2003.0.3.x, or 2003.0.4.x to Release 2003.1.1.0. The upgrade MSI cannot verify whether PAN Manager PM5.2_BF or higher is running.
If you have manually verified that PAN Manager PM5.2_BF or higher is running, click Yes.
If you are not running PAN Manager PM5.2_BF or higher, click No. You cannot perform the upgrade until you have upgraded PAN Manager.
Error Message Explanation Suggested Action
WIN2003_PM5.2_BF 5-11

pServer Guide for Microsoft Windows Server 2003
Examining Windows Event Log Messages
The section describes each event that the EgenBus, EgenDsm, EgenKVM, EgenNet, and EgenScsi drivers write to the Windows System Event Log. This section also describes each event that the Management vEth and EgenTsrv (the vVGA console) services write to the Windows Application Event Log. The following sections include:
• Displaying the Windows Event Log
• Controlling the Verbosity of Events
• Common Recovery Procedures for Storage Path Failures
• Event Description Format
• Listing Each Numbered Event from EVENT 2 through EVENT 2146
For additional information about drivers, see the PAN Manager Administrator’s Guide for more information about managing Egenera device drivers.
Displaying the Windows Event Log
This section explains how to use the Windows Event Viewer to display events in the Windows Event Log. The services log events to the Application Log, and the drivers log events to the System Log.
To display the Windows Event Log:
1. Start the vVGA console for the pServer. Detailed information about accessing the vVGA desktop is provided in the PAN Manager Administrator’s Guide.
2. Select Start > Control Panel > Administrative Tools > Event Viewer.
3. Click System to display the events recorded by drivers, or click Application to display the events recorded by the Management vEth and EgenTsrv services.
5-12 WIN2003_PM5.2_BF

Troubleshooting Problems
4. Double-click on an event to display the detail.
The Data field contains dump data, which can be used by Egenera Enterprise Services when diagnosing problems. If the Windows Event Log is exported, both the events and the dump data are saved.
Note: When viewing events in the Windows Application Event Log (as opposed to the Windows System Event Log), all events have Event ID 0. Scroll to the bottom of the Description field to see the message, and ignore the text indicating that the event is empty.
5. Look up the Event ID in this chapter, and follow the recovery instructions.
Controlling the Verbosity of Events
The Egenera drivers log events in normal mode (default) or in verbose mode, which provides additional events for specific diagnostic tasks. In the EgenDsm and EgenNet drivers, these additional events have event IDs of 2000 and above, such as 2032 and 2128. Table 5.1 lists the additional events that appear in verbose mode for each driver and their typical use:
Table 5.1 Events That Appear in Verbose Mode
Driver Verbose Events Purpose
EgenBus EVENT 4, EVENT 5 Locate pServer errors involving remote pServers that communicate with the local pServer.
Locate switch and fabric errors involving the sBlades.
EgenDsm EVENTS 2032, 2033, 2035, 2036
Determine that EgenDsm started up, verified paths, added each path, and added each failover group successfully.
EgenKVM None None
WIN2003_PM5.2_BF 5-13

pServer Guide for Microsoft Windows Server 2003
To turn on verbose events:
1. Select Start > Control Panel > Egenera Server Configuration.
2. Click the Log Configuration tab.
3. Select the check boxes to turn on verbose events.
4. Click Close.
5. Reboot the pServer.
When you are finished using verbose events to investigate an issue:
1. Click the Log Configuration tab in the control panel.
2. Clear the check boxes.
3. Click Close.
4. Reboot the pServer.
EgenNet EVENT 2128, EVENT 2129, EVENT 2130, EVENTS 2131, 2132, EVENT 2133,EVENT 2145, EVENT 2146
Locate network configuration errors of Windows pServer, such as incorrect MAC addresses, incorrect IP addresses, and misuse of private management network.
EgenScsi None None
Driver Verbose Events Purpose
5-14 WIN2003_PM5.2_BF

Troubleshooting Problems
Common Recovery Procedures for Storage Path Failures
This section describes common recovery procedures for storage path failures to Logical Unit Numbers (LUNs) or through cBlades. These common procedures are referenced by specific EgenDsm event descriptions in this chapter:
Checking the LUN Configuration
To recover from a storage path failure to a LUN:
1. Verify that the LUN has not been removed from the pServer configuration:
a. In PAN Manager, navigate to the pServer page and select the disk that is configured for the pServer.
b. Verify that the Universally Unique Identifier (UUID) for the disk matches the UUID displayed with the event in the Windows Event Viewer. Typically, the UUID is the World Wide Name (WWN) of the LUN.
2. Verify that the LUN is still defined in the storage subsystem and presented to both cBlades. For procedures see the documentation for your storage system.
Checking cBlade Connectivity
Some storage path failures involve all paths through a specific cBlade. In this case, the EgenDsm driver sees the cBlade failure as a series of LUN failures.
To recover from a storage path failure through a cBlade:
1. Verify that the cBlade has not been rebooted, crashed, or removed.
2. Verify that the cBlade has physical connectivity to the SAN. For procedures, see PAN Manager SAN Integration Guide.
WIN2003_PM5.2_BF 5-15

pServer Guide for Microsoft Windows Server 2003
Event Description Format
Event descriptions are organized by the numerical Event ID, and include the message, driver name, event type, failure type, possible causes, and recommended actions. For descriptions of the drivers, refer to the PAN Manager Administrator’s Guide for more information about Egenera device drivers.
Event ID
The Windows pServer drivers and services use the specific ranges of Event IDs shown in Table 5.2:
Table 5.2 Use of Event IDs
For more information about verbose events, see “Controlling the Verbosity of Events” on page 5-13.
Event ID Range Component(s) Log
1-999 EgenBus, EgenDsm, EgenKVM, EgenNet, and EgenScsi drivers
System Event Log
1000-1099 EgenTsrv service Application Event Log
1100-1199 Management vEth service Application Event Log
2000-2200 Verbose events for EgenBus, EgenDsm, EgenKVM, EgenNet, and EgenScsi drivers
System Event Log
5-16 WIN2003_PM5.2_BF

Troubleshooting Problems
Event Type
The Windows pServer drivers classify events according to the standard types outlined in Table 5.3:
Table 5.3 Event Types
Some event types indicate that the driver logs the event only in verbose mode. For more information, see “Controlling the Verbosity of Events” on page 5-13.
Failure
Each event description indicates whether there is a failure that is visible from the pServer or cBlade, such as degradation of pServer I/O.
Recovery - Causes and Actions
Each event description provides a table that lists one or more possible causes of the event. For each cause, the table outlines the actions you can take to correct the problem. If necessary, refer to PAN Manager Administrator’s Guide for instructions on examining
Type Description
Error A component failure occurred, such as a blade going down unexpectedly, or a software error occurred, such as a communication error between blades. Investigate the event immediately, and follow the recommended actions.
Warning A software error or component failure occurred. Investigate the event, and follow the recommended actions.
Information An event of interest occurred, such as a blade finishing a reboot. You do not need to investigate the event, and usually no action is required.
WIN2003_PM5.2_BF 5-17

pServer Guide for Microsoft Windows Server 2003
the cBlade message logs and for instructions on rebooting and replacing blades. For specific information regarding PED messages refer to PAN Manager PED Message Reference.
5-18 WIN2003_PM5.2_BF

Troubleshooting Problems
EVENT 2
Message The driver has detected that communication with cBlade n is down.
where:
n — 1 or 2
Driver EgenBus
Type Warning
Failure The cBlade is down.
Recovery
Possible Cause Recommended Action
The cBlade started to reboot. Look for an EVENT 3 message in the Windows Event Log. If an EVENT 3 message is present, no action is necessary because the cBlade rebooted successfully.
A cBlade failure occurred. Examine the cBlade message and event logs for cBlade errors/warnings and perform the recommended actions, as described in PAN Manager Administrator’s Guide.
WIN2003_PM5.2_BF 5-19

pServer Guide for Microsoft Windows Server 2003
EVENT 3
Message The driver has detected that communication with cBlade n has been restored.
where:
n — 1 or 2
Driver EgenBus
Type Information
Recovery
Possible Cause Recommended Action
The cBlade finished rebooting.
None. This event is preceded by an EVENT 2 message.
5-20 WIN2003_PM5.2_BF
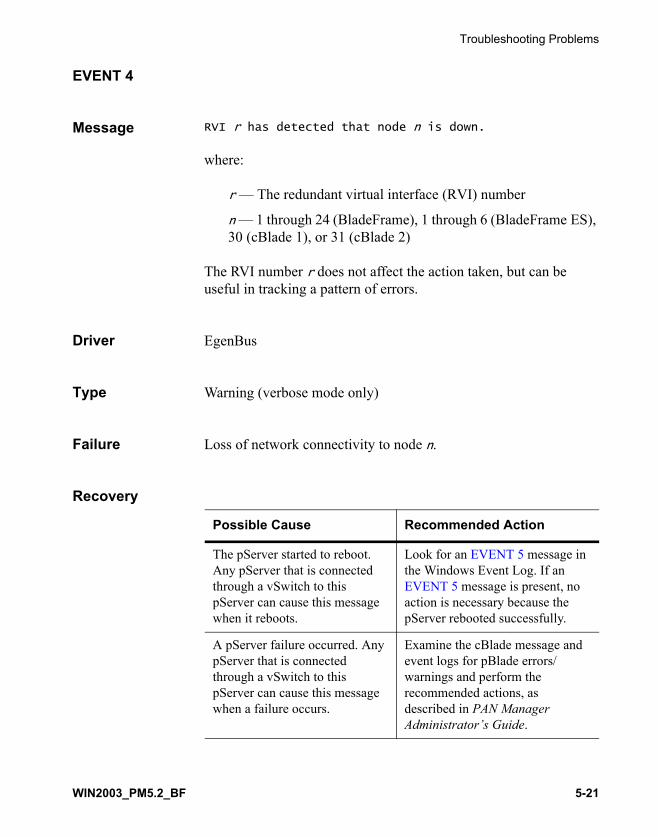
Troubleshooting Problems
EVENT 4
Message RVI r has detected that node n is down.
where:
r — The redundant virtual interface (RVI) number
n — 1 through 24 (BladeFrame), 1 through 6 (BladeFrame ES), 30 (cBlade 1), or 31 (cBlade 2)
The RVI number r does not affect the action taken, but can be useful in tracking a pattern of errors.
Driver EgenBus
Type Warning (verbose mode only)
Failure Loss of network connectivity to node n.
Recovery
Possible Cause Recommended Action
The pServer started to reboot. Any pServer that is connected through a vSwitch to this pServer can cause this message when it reboots.
Look for an EVENT 5 message in the Windows Event Log. If an EVENT 5 message is present, no action is necessary because the pServer rebooted successfully.
A pServer failure occurred. Any pServer that is connected through a vSwitch to this pServer can cause this message when a failure occurs.
Examine the cBlade message and event logs for pBlade errors/warnings and perform the recommended actions, as described in PAN Manager Administrator’s Guide.
WIN2003_PM5.2_BF 5-21

pServer Guide for Microsoft Windows Server 2003
EVENT 5
Message RVI r detects that node n is up.
where:
r — The redundant virtual interface (RVI) number
n — 1 through 24 (BladeFrame), 1 through 6 (BladeFrame ES), 30 (cBlade 1), or 31 (cBlade 2)
The RVI number r does not affect the action taken, but can be useful in tracking a pattern of errors.
Driver EgenBus
Type Information (verbose mode only)
Recovery
Possible Cause Recommended Action
The pServer finished rebooting.
None. This event is preceded by an EVENT 4 message.
5-22 WIN2003_PM5.2_BF

Troubleshooting Problems
EVENTS 6, 8, 9
Messages 6 — RVI r has detected a fabric error on path p of 2 to node n.
8 — RVI r has detected intermittent fabric errors on path p of 2 to node n.
9 — RVI r has detected send/receive fabric errors on path p of 2 to node n.
where:
r — The redundant virtual interface (RVI) number
p — The path number (1 or 2)
n — 1 through 24 (BladeFrame), 1 through 6 (BladeFrame ES), 30 (cBlade 1), or 31 (cBlade 2)
The path number p can indicate the source of the error. The RVI number r does not affect the action taken, but can be useful in tracking a pattern of errors.
Driver EgenBus
Type Warning
Failure Degradation of pServer I/O.
WIN2003_PM5.2_BF 5-23

pServer Guide for Microsoft Windows Server 2003
Recovery
Possible Cause Recommended Action
The sBlade started to reboot. If you see a single instance of this error, no action is required.
If you see multiple instances of this error, examine the cBlade message and event logs for sBlade errors/warnings and perform the recommended actions, as described in PAN Manager Administrator’s Guide.
An sBlade failure occurred.
A pBlade failure occurred because the pBlade needs to be upgraded with the latest network components.
Contact Egenera Enterprise Services about obtaining ECO A1405 for the pBlade.
A pBlade failure occurred. Examine the cBlade message and event logs for pBlade errors/warnings and perform the recommended actions, as described in PAN Manager Administrator’s Guide.
5-24 WIN2003_PM5.2_BF

Troubleshooting Problems
EVENTS 7, 10
Messages 7 — RVI r has detected that path p of 2 to node n has recovered.
10 — RVI r detects send/receive fabric errors on path p of 2 to node n have recovered.
where:
r — The redundant virtual interface (RVI) number
p — The path number (1 or 2)
n — 1 through 24 (BladeFrame), 1 through 6 (BladeFrame ES), 30 (cBlade 1), or 31 (cBlade 2)
The path number p can indicate the source of the error. The RVI number r does not affect the action taken, but can be useful in tracking a pattern of errors.
Driver EgenBus
Type Information
Recovery
Possible Cause Recommended Action
The fabric recovered from an error and is operating normally again.
None. An Event 7 message is preceded by Event 6 message, and Event 10 message is preceded by Event 9 message.
WIN2003_PM5.2_BF 5-25

pServer Guide for Microsoft Windows Server 2003
EVENT 11
Message RVI r (remote node n) had an undefined line event (event) occur.
where:
r — The redundant virtual interface (RVI) number
n — 1 through 24 (BladeFrame), 1 through 6 (BladeFrame ES), 30 (cBlade 1), or 31 (cBlade 2)
event — The name of the line event
The RVI number r does not affect the action taken, but can be useful in tracking a pattern of errors.
Driver EgenBus
Type Warning
Recovery
Possible Cause Recommended Action
An internal error occurred in the EgenBus driver.
Contact Egenera Enterprise Services.
5-26 WIN2003_PM5.2_BF

Troubleshooting Problems
EVENTS 14, 15, 16, 17
Messages 14 — The driver could not connect to the TCP stack.
15 — The driver could not create a socket.
16 — The driver could not bind to a socket.
17 — The driver could not listen to a socket.
Driver EgenKVM
Type Error
Failure Failure of the virtual VGA desktop.
Recovery
Possible Cause Recommended Action
The Windows pServer software was not installed correctly, so the EgenXpt driver is not present. The EgenKVM driver cannot connect to the network without the EgenXpt driver.
Contact Egenera Enterprise Services.
WIN2003_PM5.2_BF 5-27

pServer Guide for Microsoft Windows Server 2003
EVENT 34
Message The driver has created a new multipath group representing LUN UUID u.
where:
u — the UUID number
Driver EgenDsm
Type Information
Recovery
Possible Cause Recommended Action
Each time the driver creates a multipath group, it records this event.
None.
5-28 WIN2003_PM5.2_BF

Troubleshooting Problems
EVENT 37
Message The driver has detected that LUN UUID u is in the redundant access state.
where:
u — the UUID number
Driver EgenDsm
Type Information
Recovery
Possible Cause Recommended Action
The specified LUN can be accessed from both cBlades.
None.
WIN2003_PM5.2_BF 5-29

pServer Guide for Microsoft Windows Server 2003
EVENT 48
Message The driver has not added a path into a multipath group representing LUN UUID u because the maximum supported paths has been exceeded.
where:
u — the UUID number
Driver EgenDsm
Type Warning
Recovery
Possible Cause Recommended Action
The multipath group for the specified LUN already has a maximum number of paths, so another path cannot be added.
Verify that the Map All Subpaths option has not been selected for this pServer:
1. Start the PAN Manager GUI.
2. Navigate to the pServer page.
3. Click the Advanced Configuration button.
4. Click Disk subpaths.
Make sure Map All Subpaths is not checked, and click Submit.
5-30 WIN2003_PM5.2_BF
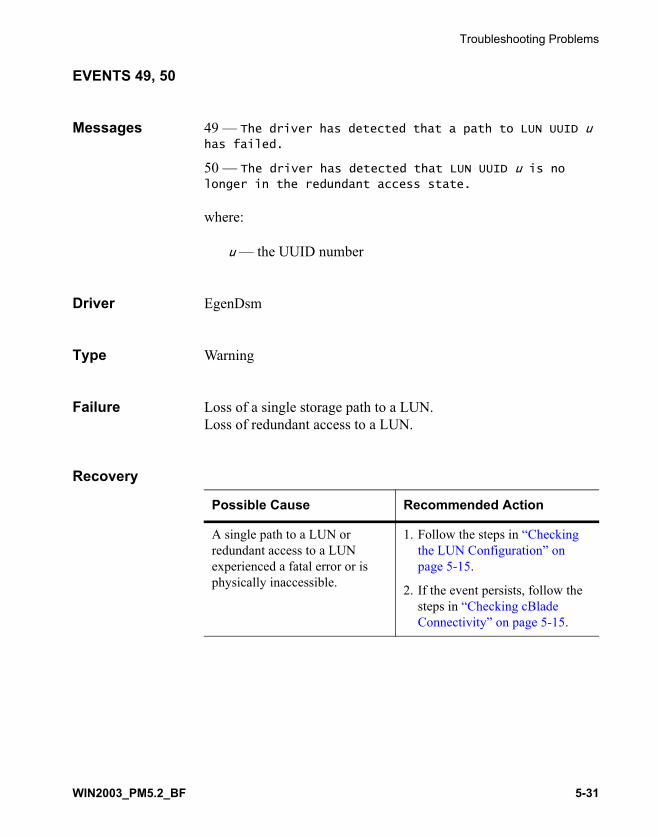
Troubleshooting Problems
EVENTS 49, 50
Messages 49 — The driver has detected that a path to LUN UUID u has failed.
50 — The driver has detected that LUN UUID u is no longer in the redundant access state.
where:
u — the UUID number
Driver EgenDsm
Type Warning
Failure Loss of a single storage path to a LUN.Loss of redundant access to a LUN.
Recovery
Possible Cause Recommended Action
A single path to a LUN or redundant access to a LUN experienced a fatal error or is physically inaccessible.
1. Follow the steps in “Checking the LUN Configuration” on page 5-15.
2. If the event persists, follow the steps in “Checking cBlade Connectivity” on page 5-15.
WIN2003_PM5.2_BF 5-31

pServer Guide for Microsoft Windows Server 2003
EVENT 51
Message The driver has deleted the multipath group associated with LUN UUID u because it no longer contains any component physical devices.
where:
u — the UUID number
Driver EgenDsm
Type Warning
Failure Application failures (depending on the data contained by the LUN).Loss of all storage paths to a LUN.
Recovery
Possible Cause Recommended Action
There are no physical paths remaining to the LUN. This event is usually followed by an EVENT 67.
Follow the steps in “Checking the LUN Configuration” on page 5-15.
5-32 WIN2003_PM5.2_BF

Troubleshooting Problems
EVENT 52
Message The driver has deleted the failover group associated with cBlade n.
where:
n — 1 or 2
Driver EgenDsm
Type Warning
Failure Loss of all storage paths through the specified cBlade.
Recovery
Possible Cause Recommended Action
There are no physical paths to any LUNs through the specified cBlade.
This event is usually preceded by a series of Event 49 messages. (See EVENTS 49, 50.)
Follow the steps in “Checking cBlade Connectivity” on page 5-15.
WIN2003_PM5.2_BF 5-33

pServer Guide for Microsoft Windows Server 2003
EVENTS 64, 66
Messages 64 — The driver (Version n) has failed to properly initialize.
66 — The driver was unable to configure a path for multipath control.
where:
n — the version number of the EgenDsm driver
Driver EgenDsm
Type Error
Failure Loss of a storage path.
Recovery
Possible Cause Recommended Action
The EgenDsm driver failed one or more of its initialization functions.
1. Reboot the pServer immediately.
2. Contact Egenera Enterprise Services.
The attached storage device failed or did not contain the necessary UUID type for multipath support.
5-34 WIN2003_PM5.2_BF

Troubleshooting Problems
EVENT 67
Message The driver has detected that the multipath group associated with LUN UUID u has no accessible paths.
where:
u — the UUID number
Driver EgenDsm
Type Error
Failure Application failures (depending on the date contained by the LUN).
Recovery
Possible Cause Recommended Action
There are no functional physical paths to the specified LUN. Typically, an EVENT 51 message follows this event.
Follow the steps in “Checking the LUN Configuration” on page 5-15.
WIN2003_PM5.2_BF 5-35

pServer Guide for Microsoft Windows Server 2003
EVENT 80
Message The driver has detected a command timeout on cBlade n.
where:
n — cBlade 1 or cBlade 2
Driver EgenScsi
Type Information
Recovery
Possible Cause Recommended Action
A SCSI request did not complete within the allocated time. This can indicate momentary delays in the SAN or the storage subsystem.
None.
This message is related to EVENT 96 and EVENT 112.
5-36 WIN2003_PM5.2_BF
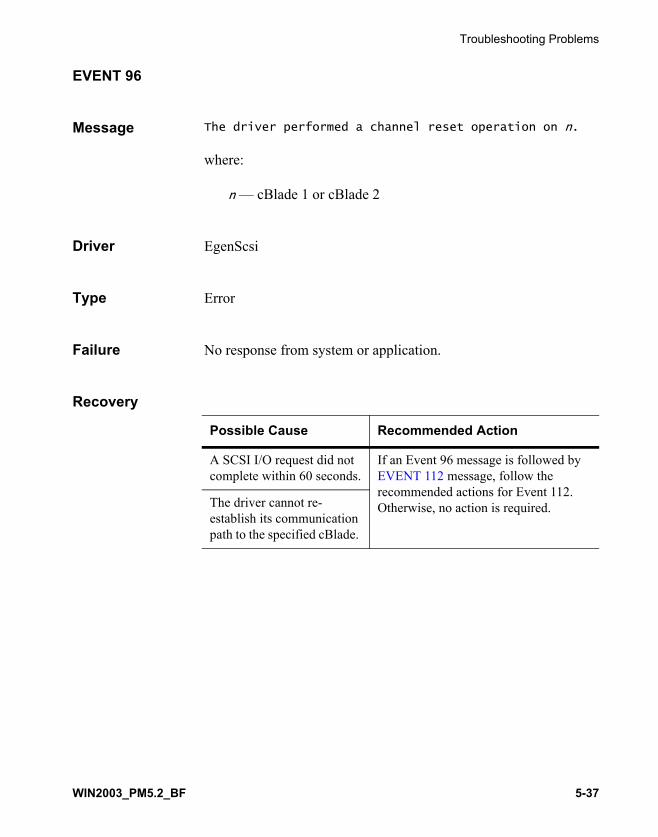
Troubleshooting Problems
EVENT 96
Message The driver performed a channel reset operation on n.
where:
n — cBlade 1 or cBlade 2
Driver EgenScsi
Type Error
Failure No response from system or application.
Recovery
Possible Cause Recommended Action
A SCSI I/O request did not complete within 60 seconds.
If an Event 96 message is followed by EVENT 112 message, follow the recommended actions for Event 112. Otherwise, no action is required.The driver cannot re-
establish its communication path to the specified cBlade.
WIN2003_PM5.2_BF 5-37

pServer Guide for Microsoft Windows Server 2003
EVENT 112
Message The driver was unable to restore channel communications to n.
where:
n — cBlade 1 or cBlade 2
Driver EgenScsi
Type Error
Failure No response from system or application.
Recovery
Possible Cause Recommended Action
A SCSI I/O request did not complete within 60 seconds.
1. Reboot the pServer.
2. If this event occurs on multiple pServers through a common cBlade on the same platform, reboot the cBlade.
3. If the event persists, contact Egenera Enterprise Services.
The driver cannot re-establish its communication path to the specified cBlade.
5-38 WIN2003_PM5.2_BF

Troubleshooting Problems
EVENT 176
Message RVI r to remote node n has not responded. The driver has stopped sending packets on this RVI.
where:
r — The redundant virtual interface (RVI) number
n — 1 through 24 (BladeFrame), 1 through 6 (BladeFrame ES), 30 (cBlade 1), or 31 (cBlade 2)
The RVI number r does not affect the action taken, but can be useful in tracking a pattern of errors.
Driver EgenNet
Type Error
Failure Loss of network connectivity to the pServer running on the pBlade specified by node n in the message.
Recovery
Possible Cause Recommended Action
The remote pServer shut down or is not responding.
Look for an EVENT 2146 message after this Event 176 message in the Windows Event Log. If an Event 2146 message is present, no action is necessary because the pServer recovered.
If an Event 2146 message is not present, examine the Windows Event Log for the remote pServer, and perform the recommended actions.
The remote pServer is experiencing a high volume of I/O.
WIN2003_PM5.2_BF 5-39

pServer Guide for Microsoft Windows Server 2003
An sBlade failure occurred. Look for an EVENT 2146 message after this Event 176 message in the Windows Event Log. If an Event 2146 message is present, no action is necessary because the sBlade recovered.
If an Event 2146 message is not present, examine the cBlade message and event logs for switch and fabric errors/warnings and perform the recommended actions, as described in PAN Manager PED Message Reference.
A pBlade failure occurred because the pBlade needs to be upgraded with the latest network components.
Contact Egenera Enterprise Services about obtaining ECO A1405 for the pBlade.
Possible Cause Recommended Action
5-40 WIN2003_PM5.2_BF

Troubleshooting Problems
EVENT 186
Message The driver has detected that cBlade n is now the uplink for vEth v.
where:
n — 1 or 2
v — The virtual Ethernet (vEth) interface number (1 through 30)
Driver EgenNet
Type Warning
Recovery
Possible Cause Recommended Action
The cBlade rebooted, and the network uplink changed for the specified vEth.
None.
WIN2003_PM5.2_BF 5-41

pServer Guide for Microsoft Windows Server 2003
EVENT 187
Message The driver has detected that cBlade n is down.
where:
n — 1 or 2
Driver EgenNet
Type Warning
Failure The cBlade is down.
Recovery
Possible Cause Recommended Action
The cBlade shut down. Look for an EVENT 2 message and an EVENT 3 message in the Windows Event Log. If an Event 3 message is present, no action is necessary because the cBlade rebooted successfully.
A cBlade failure occurred. Examine the cBlade message and event logs for cBlade errors/warnings and perform the recommended actions, as described in PAN Manager Administrator’s Guide.
5-42 WIN2003_PM5.2_BF

Troubleshooting Problems
EVENTS 1004, 1005
Messages 1004 — Service registration failure.1005 — Startup failure - Service failed to create exit event.1005 — Startup failure - Service failed to create run thread.
Service EgenTsrv
Type Error
Failure The vVGA console does not run.
RecoveryPossible Cause Recommended Action
A problem occurred accessing the EgenKVM driver. The EgenTsrv service (the vVGA console) does not run at all.
1. Restart the EgenTsrv service.
2. If the problem persists, reboot the pServer.
3. If the problem persists, contact Egenera Enterprise Services.
WIN2003_PM5.2_BF 5-43

pServer Guide for Microsoft Windows Server 2003
EVENT 1006
Messages Failed to open console window station named nFailed to switch to console window station named nFailed to open console desktopFailed to switch to console desktopFailed to restore console desktopFailed to restore console window stationFailed to close console desktopFailed to close console window stationFailed to restore console desktopFailed to restore console window stationFailed to close console desktopFailed to close console window station
Service EgenTsrv
Type Error
Failure The vVGA console operates incorrectly.
RecoveryPossible Cause Recommended Action
A system problem occurred, such as a lack of resources. The EgenTsrv service (the vVGA console) does not run correctly.
1. Restart the EgenTsrv service.
2. If the problem persists, reboot the pServer.
3. If the problem persists, contact Egenera Enterprise Services.
5-44 WIN2003_PM5.2_BF

Troubleshooting Problems
EVENT 1007
Messages Service failed to send get connect request to driver.Service overlapped request failed to driver.Service failed with bad wait state return.Service failed to send disconnect event to driver.Service failed to connect to driver.Service failed to create disconnect wait event.Service failed to create connect wait event.
Service EgenTsrv
Type Error
Failure The vVGA console does not run.
RecoveryPossible Cause Recommended Action
A problem occurred accessing the EgenKVM driver. The EgenTsrv service (the vVGA console) does not run at all.
1. Restart the EgenTsrv service.
2. If the problem persists, reboot the pServer.
3. If the problem persists, contact Egenera Enterprise Services.
WIN2003_PM5.2_BF 5-45

pServer Guide for Microsoft Windows Server 2003
EVENTS 1008, 1009
Message 1008 — Bad service request.1009 — Service failed to exit thread at shutdown.
Service EgenTsrv
Type Warning
Failure The vVGA console does not run.
RecoveryPossible Cause Recommended Action
A system problem occurred, such as a lack of resources. The EgenTsrv service (the vVGA console) does not run correctly or does not run at all.
1. Restart the EgenTsrv service.
2. If the problem persists, reboot the pServer.
3. If the problem persists, contact Egenera Enterprise Services.
5-46 WIN2003_PM5.2_BF

Troubleshooting Problems
EVENT 1104
Message Failed to register service - message.
where message is a Windows32 system message.
Service Management vEth
Type Error
Failure The management vEth service is not running, and therefore, the PAN Agent is not running. The following functions are not available to the pServer: graceful startup, graceful shutdown, and health monitors.
RecoveryPossible Cause Recommended Action
A system problem, such as a lack of resources, prevented the management vEth service from registering.
1. Open the Services applet to see if the management vEth service is present.
2. Register the management vETH service with the following command on the pServer:egenmgmtveth /service
3. If the problem persists, contact Egenera Enterprise Services.
WIN2003_PM5.2_BF 5-47

pServer Guide for Microsoft Windows Server 2003
EVENT 1105
Message Startup failure - message.
where message is a Windows32 system message.
Service Management vEth
Type Error
Failure The management vEth service is not running, and therefore, the PAN Agent is not running. The following functions are not available to the pServer: graceful startup, graceful shutdown, and health monitors.
RecoveryPossible Cause Recommended Action
The system does not have enough resources for the management vEth service to run.
1. Open the Services applet to see if the management vEth service is present and stopped.
2. Depending on the content of the Windows32 portion of the message, stop another application or service on the pServer to free up resources.
3. Open the Services applet and start the management vEth service.
5-48 WIN2003_PM5.2_BF

Troubleshooting Problems
EVENT 1106
Message Shutdown failure - Timeout waiting for worker thread to terminate.Shutdown failure - Timeout waiting for thread termination event.
Service Management vEth
Type Warning
RecoveryPossible Cause Recommended Action
A system error has delayed the shutdown of the management vEth service during a pServer shutdown. The management vEth service eventually stops, and the pServer shuts down.
No action required.
WIN2003_PM5.2_BF 5-49

pServer Guide for Microsoft Windows Server 2003
EVENT 1107
Message Failed to open pushed config fileMissing configuration information in pushed config file
Service Management vEth
Type Error
Failure The management vEth service is not running, and therefore, the PAN Agent is not running. The following functions are not available to the pServer: graceful startup, graceful shutdown, and health monitors.
RecoveryPossible Cause Recommended Action
The management vEth service cannot read its configuration file from the cBlade.
Contact Egenera Enterprise Services.
5-50 WIN2003_PM5.2_BF

Troubleshooting Problems
EVENT 1108
Message Could not connect to WMI via COMFailed to retrieve management veth info via WMIFailed to get Management Veth adapter objectFailed to retrieve Management Veth adapter propertiesManagement veth not foundFailed to get Management Veth adapter configFailed to enable static TCP/IP addressing for Management VethFailed to create static parameters for Management VethFailed to get route table info via WMIFailed to create new route table entryFailed to delete route table entry
Service Management vEth
Type Error
Failure The management vEth service is not running, and therefore, the PAN Agent is not running. The following functions are not available to the pServer: graceful startup, graceful shutdown, and health monitors.
RecoveryPossible Cause Recommended Action
The management vEth service could not be configured because it was disabled, removed, or changed. (You should not change the management vEth.)
Open the Device Manager to examine the management vEth device.
• If the management vEth service is present but not enabled, enable it.
• If the management vEth is present but the driver is missing, update or install the driver.
• If the management vEth is not present at all, contact Egenera Enterprise Services.
WIN2003_PM5.2_BF 5-51

pServer Guide for Microsoft Windows Server 2003
EVENT 1109
Message WMI error - Failed to create WMI locator object.WMI error - Failed to connect to WMI server.WMI error - Failed to set authentication info for WMI connection.
Service Management vEth
Type Warning
RecoveryPossible Cause Recommended Action
The application program interface (API) for the Windows Management Instrumentation (WMI) returned some errors during the configuration of the management vEth.
No action required. There is a delay in starting the management vEth service and PAN Agent.
5-52 WIN2003_PM5.2_BF

Troubleshooting Problems
EVENT 1110
Message WMI alert - Timeout waiting for WMI results.
Service Management vEth
Type Informational
RecoveryPossible Cause Recommended Action
The application program interface (API) for the Windows Management Instrumentation (WMI) returned some timeout errors during the configuration of the management vEth.
No action required. There is a delay in starting the management vEth service and PAN Agent.
WIN2003_PM5.2_BF 5-53

pServer Guide for Microsoft Windows Server 2003
EVENTS 2032, 2033, 2035, 2036
Messages 2032 — The driver (Version x) has successfully started.
2033 — The driver has added a new path to the multipath group representing LUN UUID u.
2035 — The driver has created a new failover group associated with cBlade n.
2036 — The driver Path Verify Passed.
where:
x — 2003.1.1.0 (Build number) (Built for cpu_arch)
where cpu_arch is either x86 for 32-bit or x64 for 64-bit
u — The UUID number
n — 1 or 2
Driver EgenDsm
Type Information (verbose mode only)
Recovery
Possible Cause Recommended Action
The EgenDsm driver passed through the important steps in its initialization.
None.
5-54 WIN2003_PM5.2_BF

Troubleshooting Problems
EVENT 2128
Message The driver has detected that vEth v has been removed from the pServer.
where:
v — The vEth interface number (1 through 30)
Driver EgenNet
Type Warning (verbose mode only)
Failure Loss of network connectivity for the pServer.
Recovery
Possible Cause Recommended Action
The LPAN Administrator removed the specified vEth from the pServer.
To restore network connectivity, use PAN Manager to add the vEth to the pServer.
WIN2003_PM5.2_BF 5-55

pServer Guide for Microsoft Windows Server 2003
EVENT 2129
Message The driver has limited the rate of transmitted packets on vEth v.
where:
v — The vEth interface number for the internal management vEth (normally 31)
Driver EgenNet
Type Warning (verbose mode only)
Failure A Windows application is trying to communicate through the internal management vEth.
Recovery
Possible Cause Recommended Action
The networking configuration for the Windows application is incorrect. The application is attempting to use the internal management vEth instead of a vEth that is configured to access the premises network. The internal management vEth blocks all traffic except traffic from the PAN Agent.
Check the networking configuration for the Windows applications that are running on the pServer. To determine which application is configured incorrectly, check the Windows Event Log for application errors.
5-56 WIN2003_PM5.2_BF

Troubleshooting Problems
EVENT 2130
Message The driver has blocked transmitted packets on vEth v. Reason: reason.
where:
v — The vEth interface number for the internal management vEth (normally 31)
reason — the specific reason the packets were blocked, such as packet size or network protocol restrictions
Driver EgenNet
Type Warning (verbose mode only)
Failure A Windows application is trying to communicate through the internal management vEth.
Recovery
Possible Cause Recommended Action
The networking configuration for the Windows application is incorrect. The application is attempting to use the internal management vEth instead of a vEth that is configured to access the premises network. The internal management vEth blocks all traffic except traffic from the PAN Agent.
Check the networking configuration for the Windows applications that are running on the pServer. To determine which application is configured incorrectly, check the Windows Event Log for application errors.
WIN2003_PM5.2_BF 5-57

pServer Guide for Microsoft Windows Server 2003
Windows NETBIOS is attempting to send packets through the internal management vEth. The internal management vEth blocks all traffic except traffic from the PAN Agent.
Disable Windows NETBIOS if it is not required.
Possible Cause Recommended Action
5-58 WIN2003_PM5.2_BF

Troubleshooting Problems
EVENTS 2131, 2132
Messages 2131 — vEth v is dropping received packets due to MAC address conflict. Reason: The adapter’s MAC address has been overwritten by the registry.
2132 — vEth v is dropping sent packets due to MAC address conflict. Reason: The adapter’s MAC address has been overwritten by the registry.
where:
v — The vEth interface number (1 through 30)
Driver EgenNet
Type Warning (verbose mode only)
Failure Loss of network connectivity for the pServer.
WIN2003_PM5.2_BF 5-59

pServer Guide for Microsoft Windows Server 2003
Recovery
Possible Cause Recommended Action
There is a Media Access Control (MAC) address conflict. An application such as VMware or Microsoft Virtual Server overwrote the MAC address for the vEth.
1. Change the configuration for the NIC for vEth v so that the MAC address is valid.
2. Start RegEdit and change the incorrect MAC address that is stored in the registry. The address in the registry should match the valid address in the NIC configuration. The registry key location is as follows:
HKEY_LOCAL_MACHINE\SYSTEM\CurrentControlSet\Control\Class
\{4D36E972-E325-11CE-BFC1-08002bE10318}\000x
One of the subkeys (0000 to 000n) is the key for the vEth that reported the error. The subkey has a string value entry named NetworkAddress.
5-60 WIN2003_PM5.2_BF
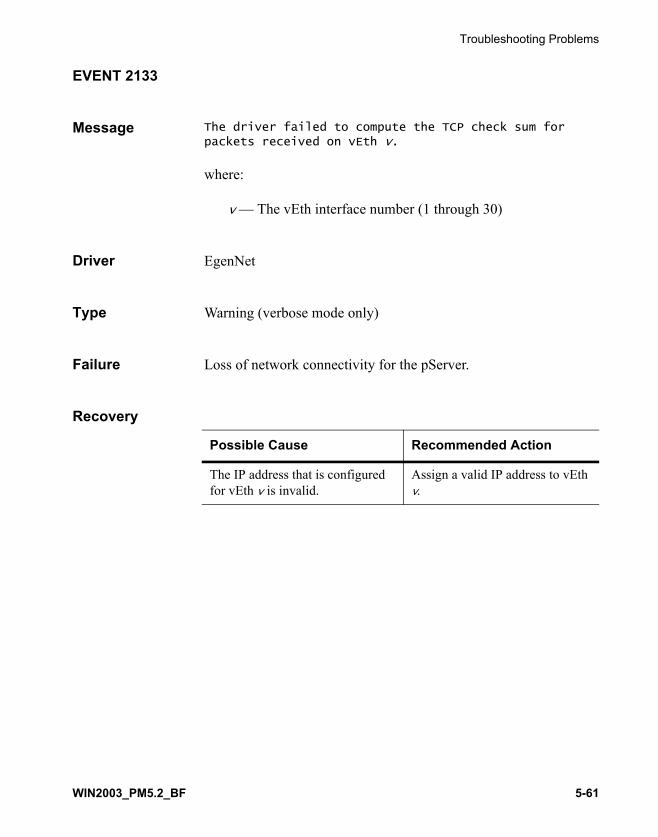
Troubleshooting Problems
EVENT 2133
Message The driver failed to compute the TCP check sum for packets received on vEth v.
where:
v — The vEth interface number (1 through 30)
Driver EgenNet
Type Warning (verbose mode only)
Failure Loss of network connectivity for the pServer.
Recovery
Possible Cause Recommended Action
The IP address that is configured for vEth v is invalid.
Assign a valid IP address to vEth v.
WIN2003_PM5.2_BF 5-61

pServer Guide for Microsoft Windows Server 2003
EVENT 2145
Message The driver has detected that vEth v has been added to the pServer.
where:
v — The vEth interface number (1 through 30)
Driver EgenNet (verbose mode only)
Type Information
Recovery
Possible Cause Recommended Action
The LPAN Administrator added the specified vEth to the pServer configuration.
None.
5-62 WIN2003_PM5.2_BF

Troubleshooting Problems
EVENT 2146
Message RVI r to remote node n has recovered. The driver has resumed sending packs on this RVI.
r — The redundant virtual interface (RVI) number
n — 1 through 24 (BladeFrame), 1 through 6 (BladeFrame ES), 30 (cBlade 1), or 31 (cBlade 2)
The RVI number r does not affect the action taken, but can be useful in tracking a pattern of errors.
Driver EgenNet (verbose mode only)
Type Information
Recovery
Possible Cause Recommended Action
The pServer, sBlade, or pBlade recovered from a previous error.
None. This event is preceded by an EVENT 176 message.
WIN2003_PM5.2_BF 5-63

pServer Guide for Microsoft Windows Server 2003
5-64 WIN2003_PM5.2_BF

Appendix AInstalling a WIN2003 pServerUsing WinPE1.0 and Custom
CDs
If you prefer to use the older version of WinPE (WinPE 1.x) to install your WIN2003 pServer, you can do so. This appendix is intended to guide you through the process of installing a WIN2003 pServer using a custom CD installation using WinPE 1.x. The following tasks include:
• Preparing to Install a WIN2003 pServer from Physical Media (CD or DVD)
• Installing the Windows Boot Image on the cBlades
• Installing WIN2003 pServer from a Custom CD-ROM
• Installing WIN2003 pServer from a Network Using a Custom WinPE Disk Image
WIN2003.2_PM5.2_BF A-1

pServer Guide for Microsoft Windows Server 2003
Preparing to Install a WIN2003 pServer from Physical Media (CD or DVD)
If you want to perform a custom CD-ROM installation using WinPE 1.0, you create a custom installation CD-ROM image, and install Windows Server 2003 interactively on one pServer at a time. Allow approximately 2 hours for the first pServer installation, and approximately 80 minutes for each additional installation. For requirements and procedures for custom CD-ROM installations, see “Installing WIN2003 pServer from a Custom CD-ROM” on page A-8.
If you have a large number of pServers to install, custom CD-ROM installations can be labor-intensive, because each installation is performed interactively. If you choose to perform your initial pServer installation from custom CD-ROM, use Microsoft Sysprep to replicate the installation on multiple pServers. See
Installing WIN2003 pServer WinPE Procedure
To install Windows Server 2003.1 from the network to the pServer:
1. On the pServer page of the PAN Manager GUI, click the Console control button.
2. In the Console window, enter the following SAC command to open a command prompt session:SAC> cmd
3. Enter the following SAC command to enter the command shell:SAC> ch -si 1
4. Mount the client computer’s EgenWinPE\x86\NetworkInstall or EgenWinPE\amd64\NetworkInstall directory as drive z:X:\i386\system32> net use z: \\computer\network_install_share_name
where:
A-2 WIN2003.2_PM5.2_BF

• computer is either a hostname or an IP address of the client computer.
• network_install_share_name is the network share name of the EgenWinPE\arch\NetworkInstall folder, which you specified in Step 2.
Note: If you cannot mount the directory as drive z:, use an appropriate drive letter when editing the OemFilesPath in the NetworkInstall\unattend.txt file (see “Customizing the Installation”) and issuing the commands in this procedure.
5. If the net use command prompts you, type the client computer username (in the format domain\username) and the password.
6. Mount the directory or drive that contains the Microsoft Windows Server 2003 CD-ROM or image. The following example uses network drive w:X:\i386\system32> net use w: \\computer\win_cd_share_name
where:
• computer is either a hostname or an IP address of the client computer.
• win_cd_share_name is the network share name of the client computer’s media drive, which you specified in Step 1 on page A-23.
7. If the net use command prompts you, enter a username and password.
8. Run the network_install.bat script, which uses up to three arguments:
• The pathname of the Microsoft Windows Server 2003 CD-ROM.
• The pathname of the unattend.txt file.
• (optional) The size of the install partition (in MB), or all to use the entire disk. Keep in mind the following:
WIN2003.2_PM5.2_BF A-3

pServer Guide for Microsoft Windows Server 2003
– If you specify this argument, the installation script creates a new partition that overwrites the original WinPE partition.
– If you do not specify this argument, the installation script retains the original WinPE partition (which is the same behavior as in 2003.1.0.0 and earlier releases).
Note: Consult the latest Microsoft documentation for Windows Server 2003 to calculate the size of the install partition.
If you used drives z: and w: in the net use commands in Step 4 and Step 6, and want to use the entire disk as the install partition (that is, all) invoke the script with the following command:network_install.bat w: z:\unattend.txt all
If you want to use 4000 MB of the disk as the install partition, invoke the script with the following command:network_install.bat w: z:\unattend.txt 4000
The network_install.bat script does the following:
• Runs winnt32.exe on the Microsoft Windows Server 2003 CD-ROM to install Windows Server 2003.
• Creates a log file in C:\winnt32.log that you can display in a command shell to show the progress of the installation. To open a channel to the log file and display its contents:
– Open another cmd channel in the SAC, and navigate to the C drive:SAC> cmdSAC> ch -si 1X:\i386\system32> C:
– View the winnt32.log file:more < winnt32.log
• After approximately 8 minutes, boots the pServer to continue the second phase of the installation. If the first phase of the installation fails, the script prompts you to check the log file and correct the error.
A-4 WIN2003.2_PM5.2_BF

• Shows the progress of the second phase of installation with the Setup screen.
• Formats the partition, copies the installation files to disk, configures the pServer, and reboots the pServer two more times during the second phase of the installation. When the “The CMD command is now available” message appears for the final time, the pServer has finished rebooting.
The next step depends on how you configured security updates:
• If you did not preconfigure security updates in the winnt.sif file (see Step 4 on page A-24), continue with Step 9.
• If you did preconfigure security updates, Windows Update runs and installation is complete. Go to “Next Steps” on page A-31.
9. In PAN Manager, display the pServer dashboard, and click the rectangular vVGA Console icon for the pServer.
The vVGA desktop appears.
10. Log on to the Windows desktop with your administrator username and password.
The Windows Server Post-Setup Security Updates window appears.
11. Update the server, and then configure automatic updates as appropriate for your site. This phase of the installation takes approximately 30 minutes if you perform Microsoft Update.
12. Click Finish when your updates are complete.
13. Click Yes when prompted to enable inbound connections to the pServer.
If you look at the top of the console window or in the PAN Manager browser window, the PAN Agent icon is highlighted to show that graceful shutdowns and health monitors are now enabled for the pServer. It can take a few minutes for the PAN Agent icon to appear.
WIN2003.2_PM5.2_BF A-5

pServer Guide for Microsoft Windows Server 2003
Custom CD-ROM Requirements
In addition to the software outlined in “Getting Ready for the pServer Install” on page 1-9, you need the following items to create and install from a custom CD-ROM:
• Each pServer install is interactively done one at a time
• CD-ROM authoring software (such as Nero) capable of creating a bootable CD-ROM
• A media drive capable of burning CD-ROMs
• Up to 600 MB of free disk space
• Physical access to the media drive on the cBlade
Installing the Windows Boot Image on the cBlades
Before you install Windows Server 2003 on the pServers, you must install the Egenera Windows boot image (also known as EVBS) on both cBlades. See “Install the WinPE Installation Media on the Control Blades” on page 2-10 for detailed instructions.
Customizing the Installation
To customize the installation parameters and set up the network shares:
1. On the client computer, create a network share of the Microsoft Windows Server 2003 CD-ROM; for example:C:\Distfiles\EgenWinPE> net share win_cd_share_name=E:\
where win_cd_share_name is the share name and E:\ is the drive letter of the client computer media drive.
2. On the client computer, create a network share of the folder that contains the Egenera installation files; for example:C:\Distfiles\EgenWinPE> net share network_install_share_name=%cd%
A-6 WIN2003.2_PM5.2_BF

where network_install_share_name is the share name and %cd% specifies the client computer’s media drive.
3. In the distribution directory, edit the unattend.txt file. The pathname for the unattend.txt file varies with the version of the operating system:
• 32-bit: C:\Distfiles\EgenWinPE\x86\NetworkInstall\
unattend.txt
• 64-bit: C:\Distfiles\EgenWinPE\amd64\
NetworkInstall\unattend.txt
4. Change the items shown in italics according to the guidelines listed in the following table.[Unattended] OemFilesPath=directory[GuiUnattended] AdminPassword="password"[UserData] ProductKey=key FullName=user_name OrgName=company_name ComputerName=pserver_name
Field Value
OemFilesPath Specify the folder in network_install_share_name on the client computer as it should appear on the installation pServer, such as z:\$OEM$. If necessary, replace this default value with a pathname applicable to your site.
ExtendOemPartition
If you want to extend the size of the installation pServer’s disk partition (minimum of 2500 MB required), refer to your Microsoft documentation for information about adding the ExtendOemPartition parameter to the [Unattended] section of the unattend.txt file.
AdminPassword Supply the correct password for the Administrator account. Double quotation marks are required.
WIN2003.2_PM5.2_BF A-7

pServer Guide for Microsoft Windows Server 2003
In addition to the fields shown in the table, you can configure other fields. For example, you can do the following:
• Change any fields that are applicable to your local area, such as time zones.
• Preconfigure security settings so that Windows Update automatically runs at the conclusion of the installation.
For additional information about setting fields in the unattend.sif file, see your Microsoft Windows Server 2003 documentation, which is located in \support\tools\deploy.cab\ref.chm.
5. Save your changes to the unattend.txt file Installation
Installing WIN2003 pServer from a Custom CD-ROM
You create a custom installation CD-ROM image to install the WN2003 pServer operating system. You create a build directory, and use it to create a custom CD-ROM. In the process, you copy
ProductKey Obtain the product key from the Microsoft Windows Server 2003 CD-ROM, and use dashes between number segments. Do not use quotation marks.
Note: Incorrect product keys are often a source of installation issues. Use the correct product key for your CD-ROM, and make sure the key contains no typographical errors.
FullName Supply the name of the person to whom the Microsoft product is registered. Do not use Administrator or Guest.
OrgName Supply the name of the organization to whom the Microsoft product is registered.
ComputerName Use an asterisk (ComputerName=*), which allows the installation software to generate a unique name for the pServer.
Field Value
A-8 WIN2003.2_PM5.2_BF

files, configure the operating system, run an update program, enable incoming connections, and reboot several times to complete the installation.
Installation Roadmap
The following sections guide you through the process of installing a WIN2003 pServer, and the tasks include:
• Creating a Custom Installation CD-ROM Image
• Installing WIN2003 pServer Custom CD-ROM Procedure
• Next Steps
Optional Tasks The following tasks are optional, depending on your requirements:
• “Correcting Installation Problems” on page 5-4
Creating a Custom Installation CD-ROM Image
This section describes how to create the custom installation CD-ROM image that you use to install the operating system on a pServer. You create a build directory and use it to create a custom CD-ROM. If you want, you can modify this build directory to create different custom CD-ROMs for different configurations.
To create a custom installation CD-ROM image:
1. Create a distribution folder on your client computer. For example, on a Windows computer, this directory might be C:\Distfiles.
2. Copy the EgenWindows directory from the Egenera software distribution to the distribution directory on your client computer (C:\Distfiles).
Note: Copy the entire distribution, including both x86 and amd64 folders, even if you only need one. The files do not take up much disk space, and the Egenera scripts automatically use the correct folder.
WIN2003.2_PM5.2_BF A-9
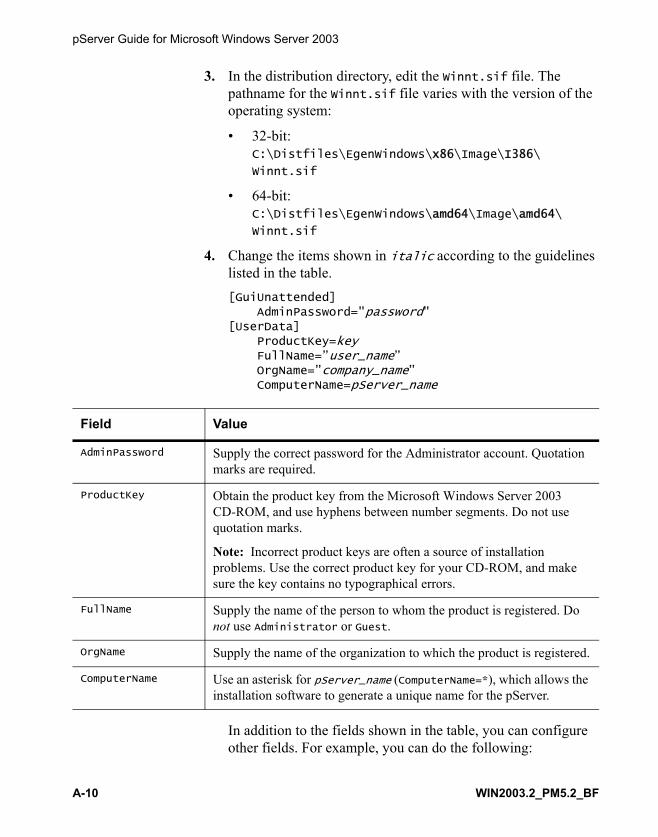
pServer Guide for Microsoft Windows Server 2003
3. In the distribution directory, edit the Winnt.sif file. The pathname for the Winnt.sif file varies with the version of the operating system:
• 32-bit: C:\Distfiles\EgenWindows\x86\Image\I386\
Winnt.sif
• 64-bit: C:\Distfiles\EgenWindows\amd64\Image\amd64\
Winnt.sif
4. Change the items shown in italic according to the guidelines listed in the table.[GuiUnattended] AdminPassword="password"[UserData] ProductKey=key FullName=”user_name” OrgName=”company_name” ComputerName=pServer_name
In addition to the fields shown in the table, you can configure other fields. For example, you can do the following:
Field Value
AdminPassword Supply the correct password for the Administrator account. Quotation marks are required.
ProductKey Obtain the product key from the Microsoft Windows Server 2003 CD-ROM, and use hyphens between number segments. Do not use quotation marks.
Note: Incorrect product keys are often a source of installation problems. Use the correct product key for your CD-ROM, and make sure the key contains no typographical errors.
FullName Supply the name of the person to whom the product is registered. Do not use Administrator or Guest.
OrgName Supply the name of the organization to which the product is registered.
ComputerName Use an asterisk for pServer_name (ComputerName=*), which allows the installation software to generate a unique name for the pServer.
A-10 WIN2003.2_PM5.2_BF

• Change any fields that are applicable to your local area, such as time zones.
• Preconfigure security settings so that Windows Update automatically runs at the conclusion of the installation.
For additional information about setting fields in the Winnt.sif file, see your Microsoft Windows Server 2003 documentation, which is located in \support\tools\deploy.cab\ref.chm.
5. Save your changes to the Winnt.sif file.
6. Insert the Windows Server 2003 CD-ROM in your client computer’s media drive. Close the Welcome screen if it appears.
7. Open a command window by selecting Start > Run. In the Run dialog box, enter cmd, and then select OK.
8. In the command window, change directories to the EgenWindows subdirectory of the distribution directory:C:\> cd distfiles\egenwindows
9. Execute the BuildEgenImage command:C:\Distfiles\EgenWindows> BuildEgenImage.bat pathname target
where:
• pathname is the full pathname, on the media drive, of the Microsoft Windows Server 2003 software, such as E:\.
• target is a directory in which you create the image for the custom installation, such as C:\CustomCDarea. If the target directory does not exist, the BuildEgenImage.bat command creates it. (You need 600 MB of free space on the drive that contains the target directory.)
For example:C:\Distfiles\EgenWindows> BuildEgenImage.bat E:\ C:\CustomCDarea
If you are installing the English language version of the operating system software from a Microsoft System Developer Network (MSDN) CD-ROM, specify BuildEgenImage.bat E:\ENGLISH\WIN2003\ENT C:\CustomCDArea.
WIN2003.2_PM5.2_BF A-11

pServer Guide for Microsoft Windows Server 2003
The BuildEgenImage command takes approximately 10 minutes to run.
10. When the command prompt returns, insert a blank writable CD-ROM into the writable drive.
11. Open the application of your choice for creating the CD-ROM. Make sure the application is capable of creating bootable CD-ROMs.
12. Use the guidelines listed in the next section “CD Burner Settings” for configurung the characteristics of the new CD-ROM. Include all files from the target area.
13. Execute the appropriate command to write the data to the CD-ROM. Depending on the system performance of the client computer, and the CD-ROM application you use, this step can take approximately 20 minutes.
The custom installation CD-ROM is now complete, and ready to use to install Windows Server 2003 on one or more Egenera pServers. To create custom installation CD-ROMs for additional pServers, retain the contents of the image directory (such as C:\Distfiles), and then modify the Winnt.sif file as appropriate for each pServer.
14. Proceed to “Installing WIN2003 pServer Custom CD-ROM Procedure”.
CD Burner Settings
This section describes recommended settings when creating a custom CD-ROM, as previously described in “Installing WIN2003 pServer from a Custom CD-ROM” on page A-8. Although the examples show the commonly used Nero Burning ROM 6 utility, you can use whatever utility you choose. Users of other CD-ROM burning utilities should adapt these recommendations to their software.
The following settings are known to produce valid, bootable CD-ROMs when created with the Nero 6 utility. Adapt these settings for other versions or other packages.
• Boot Settings
A-12 WIN2003.2_PM5.2_BF

• ISO Settings
• Burn Settings
Boot Settings
Set the items on the Boot tab to the following values:
1. Image file: boot.bin
2. Kind of emulation: No Emulation
3. Boot message (or “publisher”): Microsoft Corporation
4. Load segment of sectors (hex): 07c0
5. Number of loaded sectors: 4
ISO Settings
Set the items on the ISO tab to the following values:
1. Data mode: Mode 1
2. File system: ISO 9600 + Joliet
3. File name length (ISO): Max. of 31 chars (Level 2)
4. Character set: (ISO): DOS
5. Relax Restrictions:
• Allow path depth of more than 8 directories
• Allow more than 255 characters in path
• Do not add the ";1" ISO file version extension
• Allow more than 64 characters for Joliet names
Note: The character set must be DOS, not ISO9660, to prevent the change of directory name from “$OEM$” to “_OEM_” (“$” is not supported in the ISO9660 specification.)
WIN2003.2_PM5.2_BF A-13

pServer Guide for Microsoft Windows Server 2003
Burn Settings
Set the items on the Burn tab to the following values:
1. Action: Write
2. Action: Finalize CD
3. Write method: Track-at-once
A-14 WIN2003.2_PM5.2_BF

Installing WIN2003 pServer Custom CD-ROM Procedure
Use the following procedure to install the operating system software on a pServer from a custom CD-ROM. An installation takes approximately 45 minutes to complete, and includes several separate reboots. The installation consists of the following tasks:
• Setting Up for Installation and Reboot — Step 1 through Step 12
• Copying Files, Configuring the OS, and Rebooting Twice — Step 13 through Step 15
• Running Microsoft Update and Enabling Incoming Connections — Step 16 through Step 21
• Next Steps
Setting Up for Installation and Reboot
To install Windows Server 2003 on a pServer:
1. Insert your custom CD-ROM into the enabled media drive:
• On a BladeFrame: Drive A is on the bottom cBlade, cBlade A; Drive B is on the top cBlade, cBlade B.
• On a BladeFrame ES: Drive A is on the left cBlade, cBlade A; Drive B is on the right cBlade, cBlade B.
2. Open a web browser, and enter a URL that contains the PAN Manager IP address.
3. Log on to PAN Manager.
PAN Manager displays the pServer dashboard page, which shows the status of all pServers in the PAN.
4. In the pServer dashboard, click the rectangular Console icon for your pServer.
5. At the top of the console window, click the Boot or Reboot icon, depending on which is displayed due to the state of the pServer.
6. Click Submit to boot with the default boot image.
WIN2003.2_PM5.2_BF A-15

pServer Guide for Microsoft Windows Server 2003
7. Click Dismiss after each message.
The pServer takes approximately one minute to boot. When the pServer has finished booting, the boot drive menu appears.
Note: Only drives with a bootable CD-ROM appear. If you do not see an expected drive, either the drive is not enabled, or it is not populated with a valid, bootable CD-ROM.
8. Quickly enter the drive letter of the CD-ROM drive (D or E) where you inserted the custom installation CD-ROM in Step 1 on page A-15.
Caution: In the boot drive menu, you have only 15 seconds to enter the drive letter of the CD-ROM drive.
The pServer boots from the custom installation CD-ROM. After approximately eight minutes, the Windows Server 2003 Setup menu appears in the console window; the drive letters and partitions shown may vary with your specific installation.
9. In the Windows Server 2003 Setup menu, you decide where to place the Windows boot partition. You can choose unpartitioned space, an existing partition, or a new partition, depending on your circumstances:
• To use unpartitioned space, select Unpartitioned space, and then press Enter. Go to Step 11.
• To use an existing partition, select the partition, and then press Enter. Go to Step 13.
• To create a new disk partition, continue with Step 10.
10. To create the new partition using the next Setup screen, specify a partition size, and then press Enter.
To calculate a partition size, you need to take into account several factors specific to your installation, such as operating system size, pagefile size, log file folders, and so on. See the Microsoft documentation and support web site for more information. Also, Egenera Enterprise Services can provide you with a Knowledge Base article and spreadsheet to help you with this calculation.
A-16 WIN2003.2_PM5.2_BF

Note: If the Create partition of size field is not editable,right-click in the Console window, and navigate to the Settings > Terminal Misc. menu. Make sure that the Backspace sends Delete and Delete sends Backspace check boxes are either both checked or both unchecked.
11. To format the new partition with the next Setup screen, select the partition, and then press Enter.
12. Select a file system type for the partition, and then press Enter.
The following actions occur:
• The final Setup screen shows the progress of the partitioning. Windows formats the partition, copies the installation files to disk, and then configures and reboots the pServer (reboot number 1). This takes approximately two minutes.
• The boot drive menu appears next.
Caution: Do not make any selections on this screen; accept the default setting to boot from the hard drive.
• After approximately two minutes, the SAC prompt appears in the console window. Wait for the “A new channel has been created” message to appear before moving on to the next step.
Copying Files, Configuring the OS, and Rebooting Twice
To continue the installation of Windows Server 2003 on a pServer:
13. If you already entered your product key in the Winnt.sif file (see Step 3), you can skip this step and proceed to Step 14. Otherwise, do the following to enter your product key:
a. Enter the following SAC command to switch to the unattended setup channel:SAC> ch -si 1
b. Press Enter again to display the Product Key prompt.
c. Enter the Product Key, including the dashes:
WIN2003.2_PM5.2_BF A-17
pServer Guide for Microsoft Windows Server 2003
Product Key: xxxxx-xxxxx-xxxxx-xxxxx-xxxxx
The message “Setup will now proceed in an automated fashion” appears.
14. To continue the installation, press Enter.
The SAC displays channel information about the three setup logs.
15. To monitor the progress of the installation, press Esc-Tab and then Enter to toggle between the following four SAC channels:
• The setuplog.txt file, which records all files installed
• The setupact.log file, which records actions taken by the installation
• The setuperr.log file, which records errors (if any) that occur during the installation
• The SAC command prompt
This phase of the installation takes approximately 20 minutes. At the end of this phase, the following actions occur:
• The console displays a message that the pServer is shutting down.
• After approximately three minutes, the pServer reboots (reboot number 2), and the SAC prompt reappears in the console window.
• Approximately three minutes after the SAC prompt appears, the system performs its final reboot (reboot number 3), which takes approximately two minutes.
• When the “The CMD command is now available” message appears, the pServer has finished rebooting.
The next step depends on how you configured security updates:
• If you did not preconfigure security updates in the winnt.sif file (see Step 4), continue with Step 16.
• If you did preconfigure security updates, Windows Update runs and installation is complete. Go to “Next Steps”.
A-18 WIN2003.2_PM5.2_BF

Running Microsoft Update and Enabling Incoming Connections
To complete the installation of Windows Server 2003 on a pServer:
16. In PAN Manager, display the pServer dashboard, and click on the rectangular vVGA Console icon for the pServer.
The vVGA desktop appears.
17. When prompted to press Ctrl-Alt-Delete, press Ctrl-Alt-End instead.
The remote desktop ActiveX control substitutes Ctrl-Alt-End for the Ctrl-Alt-Delete combination used in the normal logon process.
18. Log in to the Windows desktop with your administrator username and password.
The Windows Server Post-Setup Security Updates window appears.
19. Update the server, and then configure automatic updates as appropriate for your site. This phase of the installation takes approximately 30 minutes if you perform Microsoft Update.
20. Click Finish when your updates are complete.
21. Click Yes when prompted to enable inbound connections to the pServer.
If you look at the top of the console window or in the PAN Manager browser window, notice that the PAN Agent icon is highlighted to show that graceful shutdowns and health monitors are now enabled for the pServer.
Next Steps The installation is complete. You can continue with the following tasks if you want:
• You can use the SAC console to log on to the pServer or (optionally) reconfigure the pServer IP address.
WIN2003.2_PM5.2_BF A-19

pServer Guide for Microsoft Windows Server 2003
• For information on options for installing more pServers, see Chapter 3, “Creating WIN2003 pServers from Sysprep”.
Note: Each time you boot this pServer, keep in mind the following. After a pServer boots there is a slight delay before it is fully functional. The PAN Manager reports the boot status as Booted before all of the drivers have been loaded so there is a delay of a minute or two before all pServer services are available, which is standard Microsoft Windows behavior.
A-20 WIN2003.2_PM5.2_BF
Installing WIN2003 pServer from a Network Using a Custom WinPE Disk Image
You use WinPE 1.x to create a custom WinPE disk image, and copy it to the cBlades. Then you use the WinPE image to create a bootable WinPE disk for the new pServer, which can run a network installation of the Windows Server 2003. This section describes how to install Windows Server 2003 using WinPE 1.x and the network.
Installation Roadmap
The following sections guide you through the process of installing a WIN2003 pServer, and the tasks include:
• Creating a Custom WinPE Image
• Customizing the Installation
• Creating a Bootable WinPE Disk
• Installing WIN2003 pServer WinPE Procedure
• Next Steps
Optional Tasks The following tasks are optional, depending on your requirements:
• Chapter 5, “Troubleshooting Problems”
WinPE Requirements (for Network Installations)
To prepare for the WIN2003 operating system installation on a pServer, you need to obtain the software in your appropriate format as described in “Getting Ready for the pServer Install” on page 1-9. In addition to OS installation requirements, WinPE requires the following:
• The OEM Preinstallation Kit (OPK) software (Version 1.2 or higher) from Microsoft. See http://www.microsoft.com/oem for details.
WIN2003.2_PM5.2_BF A-21

pServer Guide for Microsoft Windows Server 2003
After you have installed the OPK software, make note of its pathname (C:\OPKTools\Lang\ENG\winpe). You’ll need this information when you create a custom WinPE disk image.
• If you don’t have access to WinPE with the Microsoft OPK, you can’t perform network installations. Most sites do not have access to the OPK. The WinPE that comes with Microsoft Select and MSDN is not based on the OPK and won’t work.
• A client computer to serve as a build computer for the WinPE image with at least 300MB free space on one of its drives. This client computer must be network-accessible from the pServer on which you are installing Windows Server 2003.
Creating a Custom WinPE Image
To put the pServer software distribution on the client computer, and create a custom WinPE image:
1. Create a distribution directory on the client computer, such as C:\Distfiles.
2. Insert the Egenera Virtualization Extensions for use with Microsoft Windows Server 2003 CD-ROM in the client computer’s media drive.
3. Copy the EgenWinPE directory from the pServer software distribution to the distribution directory on the client computer (C:\Distfiles).
4. Eject the Egenera CD-ROM.
5. Insert the Microsoft Windows Server 2003 CD-ROM in the client computer media drive.
6. If the Welcome screen appears, close it.
7. Select Start > Run to open a command window.
8. In the Run dialog box, enter cmd, and select OK.
9. In the command window, change directories to the EgenWinPE subdirectory of the distribution folder:C:\> cd Distfiles\EgenWinPE
10. Execute the BuildEgenWinpe command:BuildEgenWinpe.bat winpe_path pathname target
A-22 WIN2003.2_PM5.2_BF

where:
• winpe_path is the location of the winpe directory in the OPK software distribution, such as C:\OPKTools\Lang\ENG\winpe.
• pathname is the full pathname on the media drive of the Microsoft Windows Server 2003 software, such as E:\.
• target is a directory in which you create the WinPE image, such as C:\WinPEarea. If the target directory does not exist, the BuildEgenWinpe.bat command creates it.
If you are installing from the Microsoft Windows Server 2003 CD-ROM, you specify the following:C:\Distfiles\EgenWinPE> BuildEgenWinpe.bat C:\OPKTools\Lang\ENG\winpe E:\ C:\WinPEarea
If you are installing the English language version of the operating system from an Microsoft Developer Network (MSDN) CD-ROM, you specify the following:C:\Distfiles\EgenWinPE> BuildEgenWinpe.bat C:\OPKTools\Lang\ENG\winpe E:\ENGLISH\WIN2003\ENT C:\WinPEarea
The BuildEgenWinpe command takes approximately 5 minutes to run. When the command prompt returns, the WinPE image (winpe.iso) is complete.
11. Copy the winpe.iso image file to the /images directory on each cBlade. If necessary, use the scp (secure copy) utility. (To obtain scp for Windows, download PuTTY from http://www.chiark.greenend.org.uk/~sgtatham/putty/.)
The WinPE image is now ready to use to install Windows Server 2003 on one or more pServers.
Customizing the Installation
To customize the installation parameters and set up the network shares:
1. On the client computer, create a network share of the Microsoft Windows Server 2003 CD-ROM; for example:C:\Distfiles\EgenWinPE> net share win_cd_share_name=E:\
WIN2003.2_PM5.2_BF A-23

pServer Guide for Microsoft Windows Server 2003
where win_cd_share_name is the share name and E:\ is the drive letter of the client computer media drive.
2. On the client computer, create a network share of the folder that contains the Egenera installation files; for example:C:\Distfiles\EgenWinPE> net share network_install_share_name=%cd%
where network_install_share_name is the share name and %cd% specifies the client computer’s media drive.
3. In the distribution directory, edit the unattend.txt file. The pathname for the unattend.txt file varies with the version of the operating system:
• 32-bit: C:\Distfiles\EgenWinPE\x86\NetworkInstall\
unattend.txt
• 64-bit: C:\Distfiles\EgenWinPE\amd64\
NetworkInstall\unattend.txt
4. Change the items shown in italics according to the guidelines listed in the following table.[Unattended] OemFilesPath=directory[GuiUnattended] AdminPassword="password"[UserData] ProductKey=key FullName=user_name OrgName=company_name ComputerName=pserver_name
Field Value
OemFilesPath Specify the folder in network_install_share_name on the client computer as it should appear on the installation pServer, such as z:\$OEM$. If necessary, replace this default value with a pathname applicable to your site.
A-24 WIN2003.2_PM5.2_BF
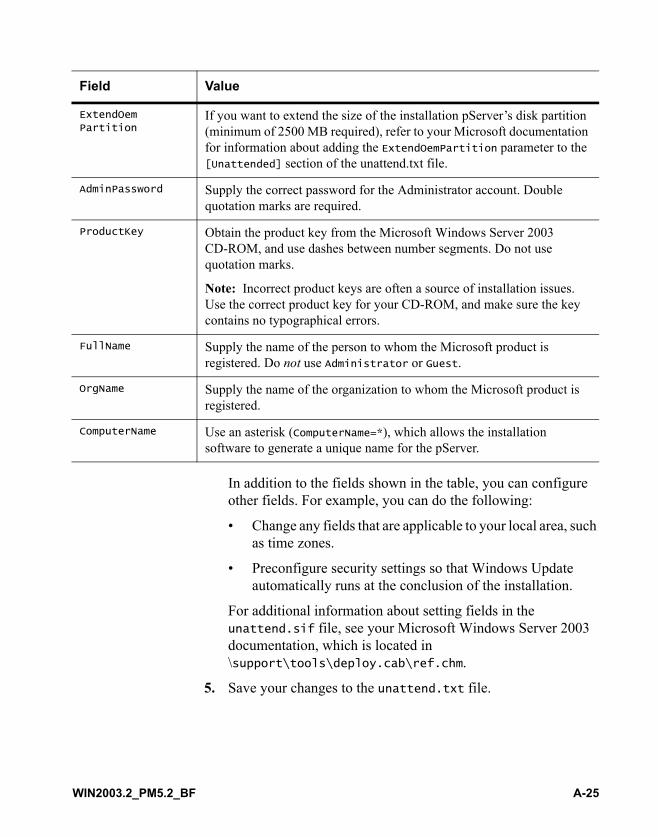
In addition to the fields shown in the table, you can configure other fields. For example, you can do the following:
• Change any fields that are applicable to your local area, such as time zones.
• Preconfigure security settings so that Windows Update automatically runs at the conclusion of the installation.
For additional information about setting fields in the unattend.sif file, see your Microsoft Windows Server 2003 documentation, which is located in \support\tools\deploy.cab\ref.chm.
5. Save your changes to the unattend.txt file.
ExtendOemPartition
If you want to extend the size of the installation pServer’s disk partition (minimum of 2500 MB required), refer to your Microsoft documentation for information about adding the ExtendOemPartition parameter to the [Unattended] section of the unattend.txt file.
AdminPassword Supply the correct password for the Administrator account. Double quotation marks are required.
ProductKey Obtain the product key from the Microsoft Windows Server 2003 CD-ROM, and use dashes between number segments. Do not use quotation marks.
Note: Incorrect product keys are often a source of installation issues. Use the correct product key for your CD-ROM, and make sure the key contains no typographical errors.
FullName Supply the name of the person to whom the Microsoft product is registered. Do not use Administrator or Guest.
OrgName Supply the name of the organization to whom the Microsoft product is registered.
ComputerName Use an asterisk (ComputerName=*), which allows the installation software to generate a unique name for the pServer.
Field Value
WIN2003.2_PM5.2_BF A-25

pServer Guide for Microsoft Windows Server 2003
Creating a Bootable WinPE Disk
In this section, you use the WinPE image to create a bootable WinPE disk for the new pServer, which can run network installations of Windows Server 2003. This section assumes the following:
• You have already created the pServer and are ready to configure it for booting WinPE.
• You have already installed the Windows boot image on both cBlades.
To create a bootable WinPE disk on the pServer:
1. Log on to the PAN Manager GUI.
The pServer Dashboard appears.
2. Click the pServer name.
The pServer page appears.
3. In the SCSI Disks area, select the SCSI ID of the 0.0 disk.
The Disk page for the 0.0 disk appears.
4. Click the Create WinPE Disk button.
Caution: Creating a WinPE disk causes any existing data on the disk to be lost.
The Create WinPE Disk dialog box appears.
5. In the Create WinPE Disk dialog box, do the following:
a. Set the disk’s Partition Size to a value between 2500 MB and 4095 MB.
Note: WinPE uses a RAM disk instead of an install partition, so the WinPE partition size is not important. As an option, once the boot disk is loaded into RAM, the disk can be reformatted with NTFS, which optimizes the NTFS cluster size. When you install Windows Server 2003 in Step 8, you optionally specify an install partition to be reformatted with NTFS and replace this WinPE partition.
A-26 WIN2003.2_PM5.2_BF

b. Configure an IP address for the pServer. To do this, do one of the following:
– Click DHCP to allow DHCP to assign an IP address to the pServer
– Click Static and supply an address, gateway, and network mask.
c. Click Submit.
Creating the WinPE disk may take several minutes.
6. When the WinPE disk creation is complete, click the PAN Manager Back button to return to the pServer page.
Booting the pServer
1. To boot the pServer, click the Boot control button, and then click Submit.
2. When the pServer finishes booting, the pServer is now running the WinPE operating system. When Windows Server 2003 is installed on this disk (see next section), it overwrites WinPE.
Installing WIN2003 pServer WinPE Procedure
To install Windows Server 2003 from the network to the pServer:
1. On the pServer page of the PAN Manager GUI, click the Console control button.
2. In the Console window, enter the following SAC command to open a command prompt session:SAC> cmd
3. Enter the following SAC command to enter the command shell:SAC> ch -si 1
4. Mount the client computer’s EgenWinPE\x86\NetworkInstall or EgenWinPE\amd64\NetworkInstall directory as drive z:X:\i386\system32> net use z: \\computer\network_install_share_name
where:
WIN2003.2_PM5.2_BF A-27

pServer Guide for Microsoft Windows Server 2003
• computer is either a hostname or an IP address of the client computer.
• network_install_share_name is the network share name of the EgenWinPE\arch\NetworkInstall folder, which you specified in Step 2.
Note: If you cannot mount the directory as drive z:, use an appropriate drive letter when editing the OemFilesPath in the NetworkInstall\unattend.txt file (see “Customizing the Installation”) and issuing the commands in this procedure.
5. If the net use command prompts you, type the client computer username (in the format domain\username) and the password.
6. Mount the directory or drive that contains the Microsoft Windows Server 2003 CD-ROM or image. The following example uses network drive w:X:\i386\system32> net use w: \\computer\win_cd_share_name
where:
• computer is either a hostname or an IP address of the client computer.
• win_cd_share_name is the network share name of the client computer’s media drive, which you specified in Step 1 on page A-23.
7. If the net use command prompts you, enter a username and password.
8. Run the network_install.bat script, which uses up to three arguments:
• The pathname of the Microsoft Windows Server 2003 CD-ROM.
• The pathname of the unattend.txt file.
• (optional) The size of the install partition (in MB), or all to use the entire disk. Keep in mind the following:
A-28 WIN2003.2_PM5.2_BF
– If you specify this argument, the installation script creates a new partition that overwrites the original WinPE partition.
– If you do not specify this argument, the installation script retains the original WinPE partition (which is the same behavior as in 2003.1.0.0 and earlier releases).
Note: Consult the latest Microsoft documentation for Windows Server 2003 to calculate the size of the install partition.
If you used drives z: and w: in the net use commands in Step 4 and Step 6, and want to use the entire disk as the install partition (that is, all) invoke the script with the following command:network_install.bat w: z:\unattend.txt all
If you want to use 4000 MB of the disk as the install partition, invoke the script with the following command:network_install.bat w: z:\unattend.txt 4000
The network_install.bat script does the following:
• Runs winnt32.exe on the Microsoft Windows Server 2003 CD-ROM to install Windows Server 2003.
• Creates a log file in C:\winnt32.log that you can display in a command shell to show the progress of the installation. To open a channel to the log file and display its contents:
– Open another cmd channel in the SAC, and navigate to the C drive:SAC> cmdSAC> ch -si 1X:\i386\system32> C:
– View the winnt32.log file:more < winnt32.log
• After approximately 8 minutes, boots the pServer to continue the second phase of the installation. If the first phase of the installation fails, the script prompts you to check the log file and correct the error.
WIN2003.2_PM5.2_BF A-29

pServer Guide for Microsoft Windows Server 2003
• Shows the progress of the second phase of installation with the Setup screen.
• Formats the partition, copies the installation files to disk, configures the pServer, and reboots the pServer two more times during the second phase of the installation. When the “The CMD command is now available” message appears for the final time, the pServer has finished rebooting.
The next step depends on how you configured security updates:
• If you did not preconfigure security updates in the winnt.sif file (see Step 4 on page A-24), continue with Step 9.
• If you did preconfigure security updates, Windows Update runs and installation is complete. Go to “Next Steps” on page A-31.
9. In PAN Manager, display the pServer dashboard, and click the rectangular vVGA Console icon for the pServer.
The vVGA desktop appears.
10. Log on to the Windows desktop with your administrator username and password.
The Windows Server Post-Setup Security Updates window appears.
11. Update the server, and then configure automatic updates as appropriate for your site. This phase of the installation takes approximately 30 minutes if you perform Microsoft Update.
12. Click Finish when your updates are complete.
13. Click Yes when prompted to enable inbound connections to the pServer.
If you look at the top of the console window or in the PAN Manager browser window, the PAN Agent icon is highlighted to show that graceful shutdowns and health monitors are now enabled for the pServer. It can take a few minutes for the PAN Agent icon to appear.
A-30 WIN2003.2_PM5.2_BF

Next Steps The network installation is complete. If you want, you can perform the following optional steps:
• To create additional custom installations for pServers, keep the contents of the distribution directory (such as C:\Distfiles) and modify the parameters in the unattend.txt file, as appropriate, for each pServer. Refer to Chapter 3, “Creating WIN2003 pServers from Sysprep”.
Note: Each time you boot this pServer, keep in mind the following:
• After a pServer boots, there is a slight delay before it is fully functional.
• The PAN Manager reports the boot status as Booted before all the drivers are loaded. There is a delay of about a minute before all pServer services are available, as this is standard Microsoft Windows behavior.
WIN2003.2_PM5.2_BF A-31

pServer Guide for Microsoft Windows Server 2003
A-32 WIN2003.2_PM5.2_BF

Information on this document On April 1, 2009, Fujitsu became the sole owner of Fujitsu Siemens Compu-ters. This new subsidiary of Fujitsu has been renamed Fujitsu Technology So-lutions.
This document from the document archive refers to a product version which was released a considerable time ago or which is no longer marketed.
Please note that all company references and copyrights in this document have been legally transferred to Fujitsu Technology Solutions.
Contact and support addresses will now be offered by Fujitsu Technology So-lutions and have the format …@ts.fujitsu.com.
The Internet pages of Fujitsu Technology Solutions are available at http://ts.fujitsu.com/... and the user documentation at http://manuals.ts.fujitsu.com.
Copyright Fujitsu Technology Solutions, 2009
Hinweise zum vorliegenden Dokument Zum 1. April 2009 ist Fujitsu Siemens Computers in den alleinigen Besitz von Fujitsu übergegangen. Diese neue Tochtergesellschaft von Fujitsu trägt seit-dem den Namen Fujitsu Technology Solutions.
Das vorliegende Dokument aus dem Dokumentenarchiv bezieht sich auf eine bereits vor längerer Zeit freigegebene oder nicht mehr im Vertrieb befindliche Produktversion.
Bitte beachten Sie, dass alle Firmenbezüge und Copyrights im vorliegenden Dokument rechtlich auf Fujitsu Technology Solutions übergegangen sind.
Kontakt- und Supportadressen werden nun von Fujitsu Technology Solutions angeboten und haben die Form …@ts.fujitsu.com.
Die Internetseiten von Fujitsu Technology Solutions finden Sie unter http://de.ts.fujitsu.com/..., und unter http://manuals.ts.fujitsu.com finden Sie die Benutzerdokumentation.
Copyright Fujitsu Technology Solutions, 2009


