37
PSP Module Guide April 2014 Department of Water Resources Project Services Office
PSP Module Guide
April 2014 Department of Water Resources
Project Services Office

Page intentionally left blank.

Contents
I. PSP Module Overview ........................................................................................................................... 1
II. Creating a PSP ....................................................................................................................................... 3
A. Sections ........................................................................................................................................... 17
B. Questions ........................................................................................................................................ 19
III. Releasing a PSP to the Public .............................................................................................................. 26
IV. Monitoring Progress of Proposals ...................................................................................................... 31
V. Reporting On Proposals ...................................................................................................................... 33

Page intentionally left blank.
PSP Module Guide
Project Services Office Page 1
I. PSP Module Overview The Proposal Solicitation Package (PSP) Module in GRANTS allows you to create a customized on-line proposal solicitation package to gather information that your program requires to evaluate grant applications. After awarding the proposals, much of the information provided by the applicant will be used to create the contracts and projects in GRANTS. This prevents DWR staff from having to enter data manually; better ensuring accuracy and consistency. Once a PSP has been created, the form is saved in the system and can be updated and used for later solicitations.
DWR staff will generally act as the point of contact for a program during the solicitation and will be responsible for answering program-related questions. The GRANTS Admin team will answer all technical questions related to GRANTS and refer any program-related questions to the Program Manager or their designated staff.
Before creating a PSP, be sure to contact the GRANTS Admin Team to find out about planned software releases, temporary system outages, recommended questions to include in your PSP, common pitfalls, and what information can be provided to your program using the Ad Hoc Reporting tools.
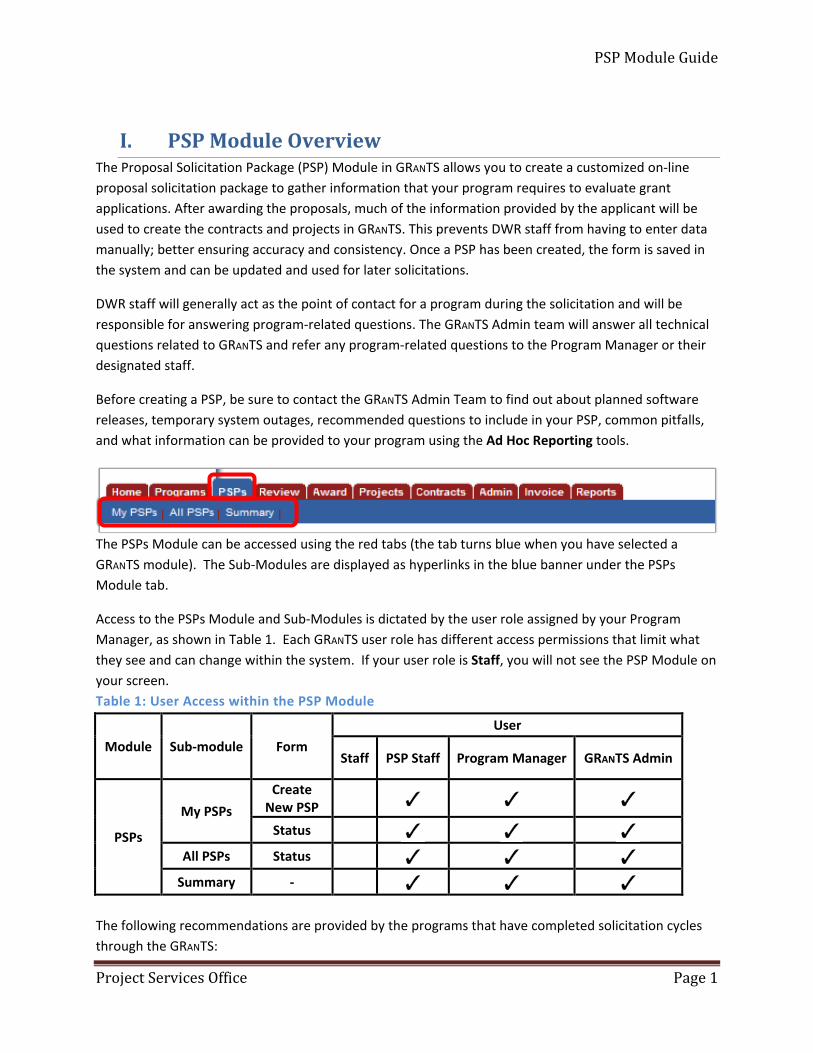
The PSPs Module can be accessed using the red tabs (the tab turns blue when you have selected a GRANTS module). The Sub-Modules are displayed as hyperlinks in the blue banner under the PSPs Module tab.
Access to the PSPs Module and Sub-Modules is dictated by the user role assigned by your Program Manager, as shown in Table 1. Each GRANTS user role has different access permissions that limit what they see and can change within the system. If your user role is Staff, you will not see the PSP Module on your screen. Table 1: User Access within the PSP Module
Module Sub-module Form User
Staff PSP Staff Program Manager GRANTS Admin
PSPs
My PSPs Create
New PSP
Status
All PSPs Status
Summary -
The following recommendations are provided by the programs that have completed solicitation cycles through the GRANTS:
PSP Module Guide
Project Services Office Page 2
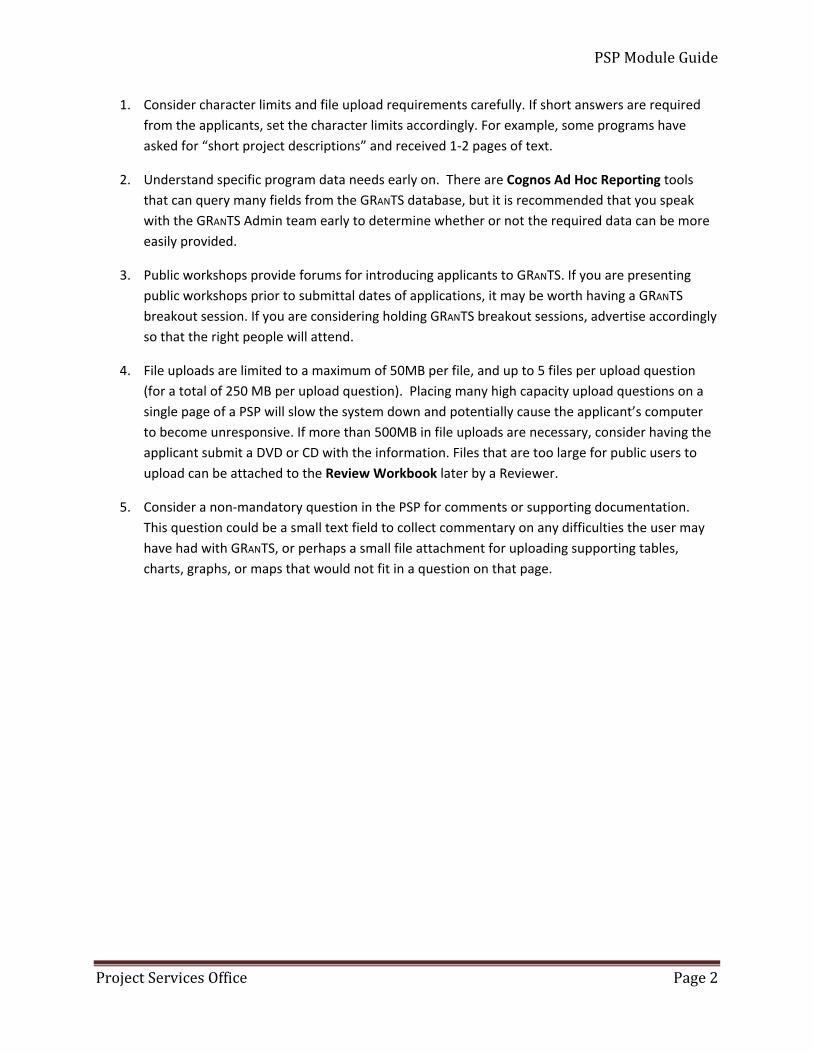
1. Consider character limits and file upload requirements carefully. If short answers are required from the applicants, set the character limits accordingly. For example, some programs have asked for “short project descriptions” and received 1-2 pages of text.
2. Understand specific program data needs early on. There are Cognos Ad Hoc Reporting tools that can query many fields from the GRANTS database, but it is recommended that you speak with the GRANTS Admin team early to determine whether or not the required data can be more easily provided.
3. Public workshops provide forums for introducing applicants to GRANTS. If you are presenting public workshops prior to submittal dates of applications, it may be worth having a GRANTS breakout session. If you are considering holding GRANTS breakout sessions, advertise accordingly so that the right people will attend.
4. File uploads are limited to a maximum of 50MB per file, and up to 5 files per upload question (for a total of 250 MB per upload question). Placing many high capacity upload questions on a single page of a PSP will slow the system down and potentially cause the applicant’s computer to become unresponsive. If more than 500MB in file uploads are necessary, consider having the applicant submit a DVD or CD with the information. Files that are too large for public users to upload can be attached to the Review Workbook later by a Reviewer.
5. Consider a non-mandatory question in the PSP for comments or supporting documentation. This question could be a small text field to collect commentary on any difficulties the user may have had with GRANTS, or perhaps a small file attachment for uploading supporting tables, charts, graphs, or maps that would not fit in a question on that page.

PSP Module Guide
Project Services Office Page 3
II. Creating a PSP
1. Login to GRANTS at https://grants.water.ca.gov/grants/Login/.
2. The My Work page is your Home page that lists all your reviews, projects, contracts, and invoices assigned to you. Select the PSPs Module tab.
3. In the My PSPs page select the Create New PSP hyperlink to create a new PSP, or select an
existing PSP from the list displayed.
PSP Module Guide
Project Services Office Page 4
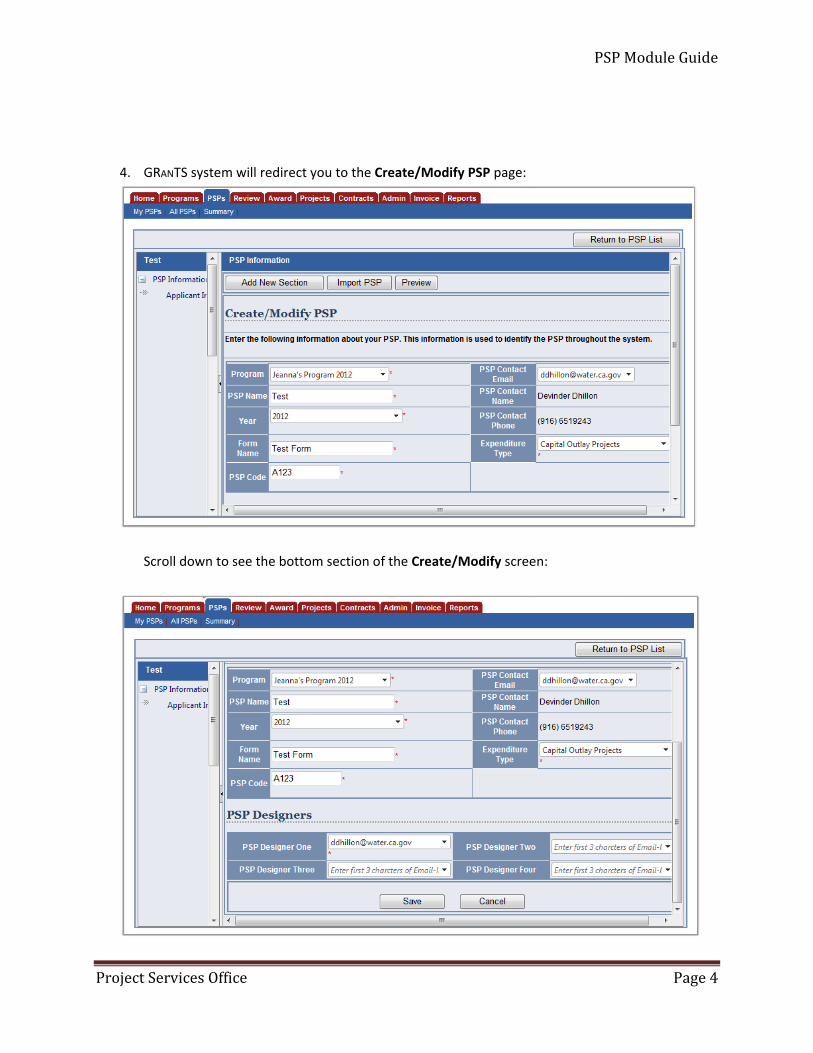
4. GRANTS system will redirect you to the Create/Modify PSP page:
Scroll down to see the bottom section of the Create/Modify screen:
PSP Module Guide
Project Services Office Page 5
Complete all fields on this page:
Program Use the dropdown list to enter the program associated with the selected PSP. If the Program is not in the list, it will need to be added. Refer to the Program Module Guide posted on the Project Services Office (PSO) website at https://pso.water.ca.gov/web/guest/grants-review-and-tracking-system for more information.
PSP Name Enter the official name of the PSP. This is the PSP name the public will see in the list of available PSPs. PSP name is limited to 40 alpha numeric characters.
PSP Contact Email Enter the email address of the primary DWR employee who is creating the PSP. This email identifies the contact person and is specific to that PSP. The PSP contact email will not be seen by the public.
Expenditure Type
Select the expenditure type from the dropdown list. Valid expenditure types are Competitive Grant, Direct Expenditures Internal, Direct Expenditures External, Capital Outlay Projects, Delta Levee Special Projects, Delta Levee Subventions, or Flood Control Subventions.
PSP Code The entry in this field is an arbitrary value determined by program staff and is used as a portion of the serial number assigned to submitted applications. The code has to be a minimum of four alpha numeric characters.
Year Enter the calendar year in which the PSP will be released to the public.
Form Name The entry in this field can be the same as the PSP name, or may be any other name that your program may use. The form name is limited to 2,000 alpha numeric characters. The entry in this field will not be seen by applicants. PSP Designers Add the email of at least one other person to have design access to the PSP. The people you list here are in a sense, backup designers to the creator. The PSP can have up to four additional PSP Designers (1 required and 3 optional).
PSP Module Guide
Project Services Office Page 6
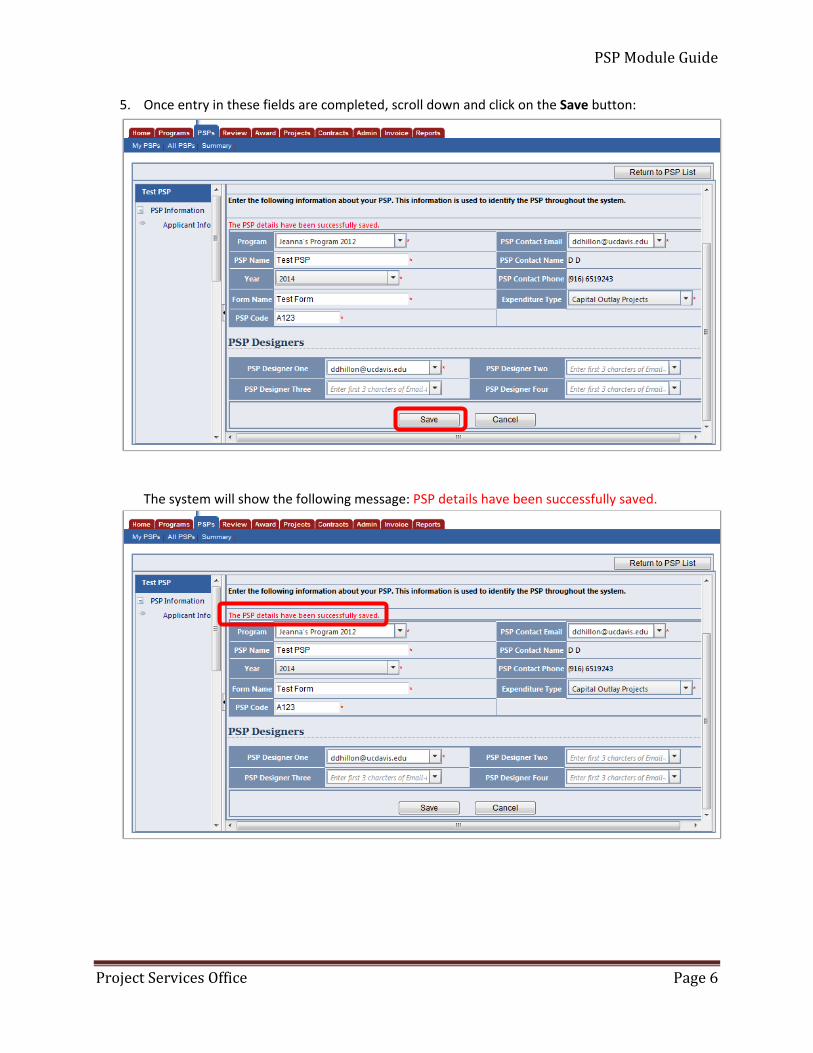
5. Once entry in these fields are completed, scroll down and click on the Save button:
The system will show the following message: PSP details have been successfully saved.

PSP Module Guide
Project Services Office Page 7
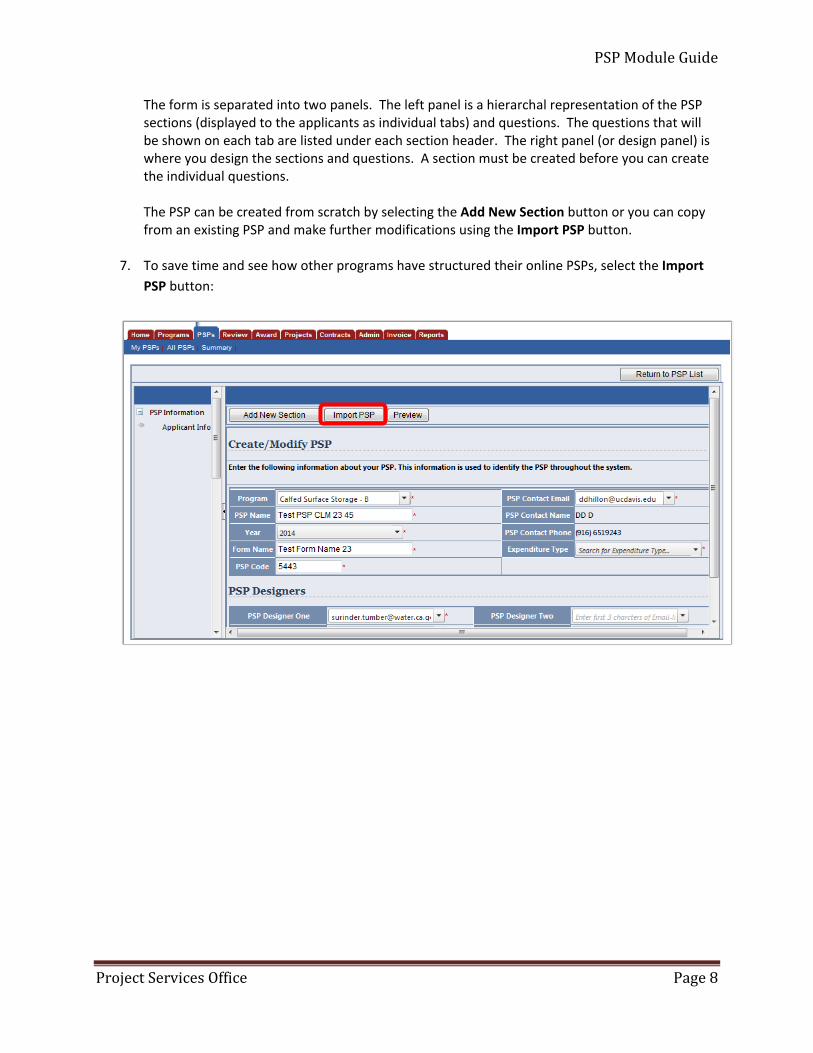
6. Scroll back up to the top of the page to see the buttons for Add New Section, Import PSP, and Preview:
PSP Module Guide
Project Services Office Page 8
The form is separated into two panels. The left panel is a hierarchal representation of the PSP sections (displayed to the applicants as individual tabs) and questions. The questions that will be shown on each tab are listed under each section header. The right panel (or design panel) is where you design the sections and questions. A section must be created before you can create the individual questions. The PSP can be created from scratch by selecting the Add New Section button or you can copy from an existing PSP and make further modifications using the Import PSP button.
7. To save time and see how other programs have structured their online PSPs, select the Import PSP button:

PSP Module Guide
Project Services Office Page 9
A list of PSPs will be displayed. Select a PSP to import by clicking the Select field to the far right of the proposal you wish to import. Then click on the Import button. Once you select Import it will automatically import the PSP for you. Clicking the Import button multiple times will import the PSP multiple times.
Note: The Flood Corridor Program 2010-2011 PSP is a recommended import due to its complexity and use of formatting. This will give you an idea of what can be done with an application form in GRANTS. The entire PSP format (sections and questions) will import to your PSP after the Application Information section. After importing this form, you can delete sections or questions that you do not wish to keep and add your own sections and questions. You can also modify any of the design attributes (section name, section header, question name, question type, display formatting etc.) of the sections and questions.

PSP Module Guide
Project Services Office Page 10
8. All of the details from the PSP have been imported into your PSP. Preview the entire PSP in a pop-up window by clicking the Preview button:
PSP Module Guide
Project Services Office Page 11
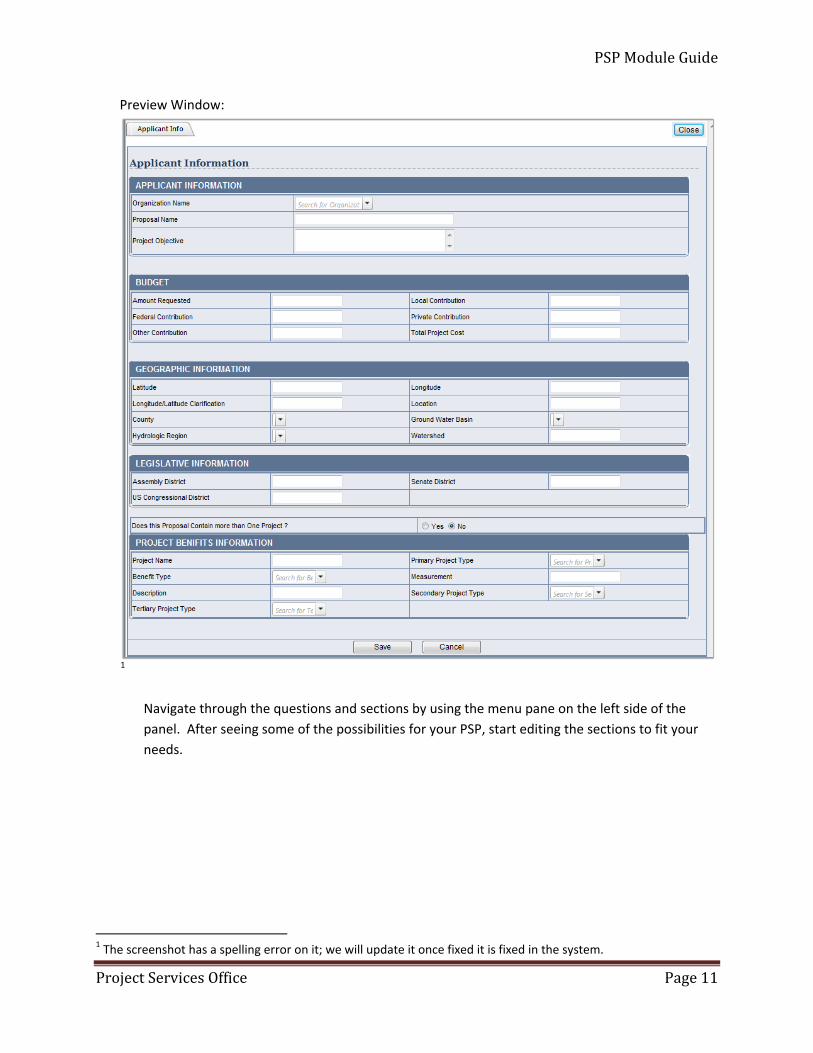
Preview Window:
1 Navigate through the questions and sections by using the menu pane on the left side of the panel. After seeing some of the possibilities for your PSP, start editing the sections to fit your needs.
1 The screenshot has a spelling error on it; we will update it once fixed it is fixed in the system.
PSP Module Guide
Project Services Office Page 12
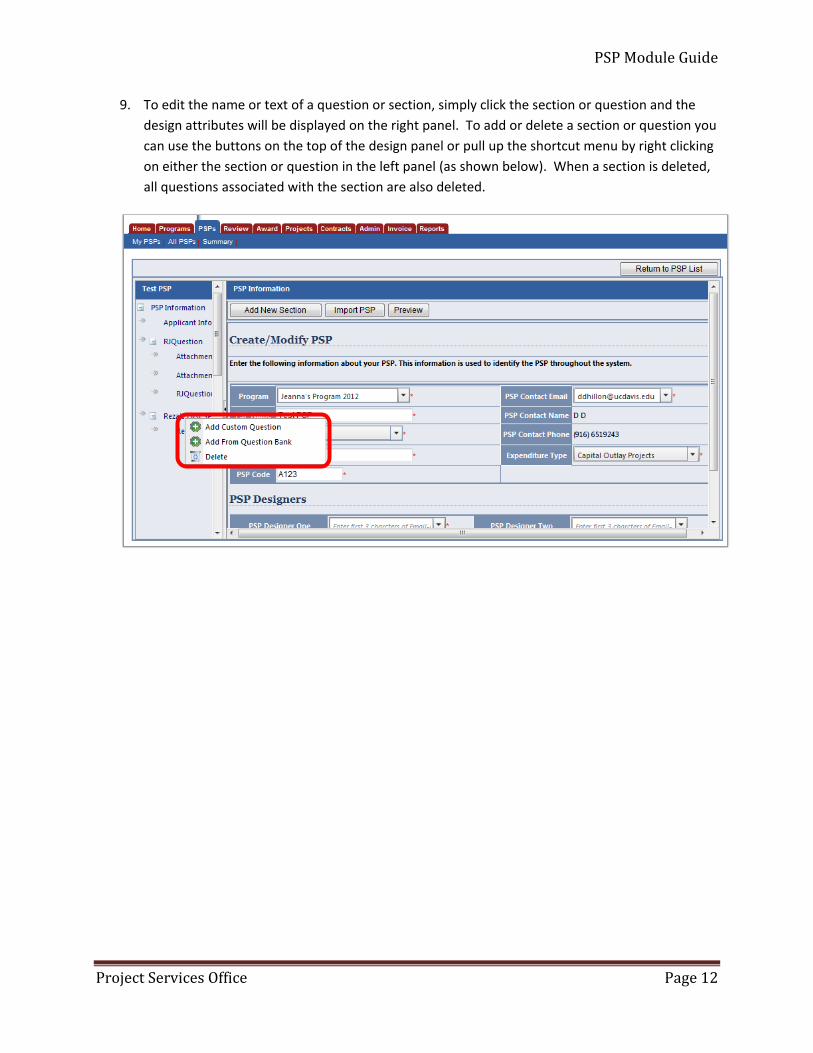
9. To edit the name or text of a question or section, simply click the section or question and the design attributes will be displayed on the right panel. To add or delete a section or question you can use the buttons on the top of the design panel or pull up the shortcut menu by right clicking on either the section or question in the left panel (as shown below). When a section is deleted, all questions associated with the section are also deleted.
PSP Module Guide
Project Services Office Page 13
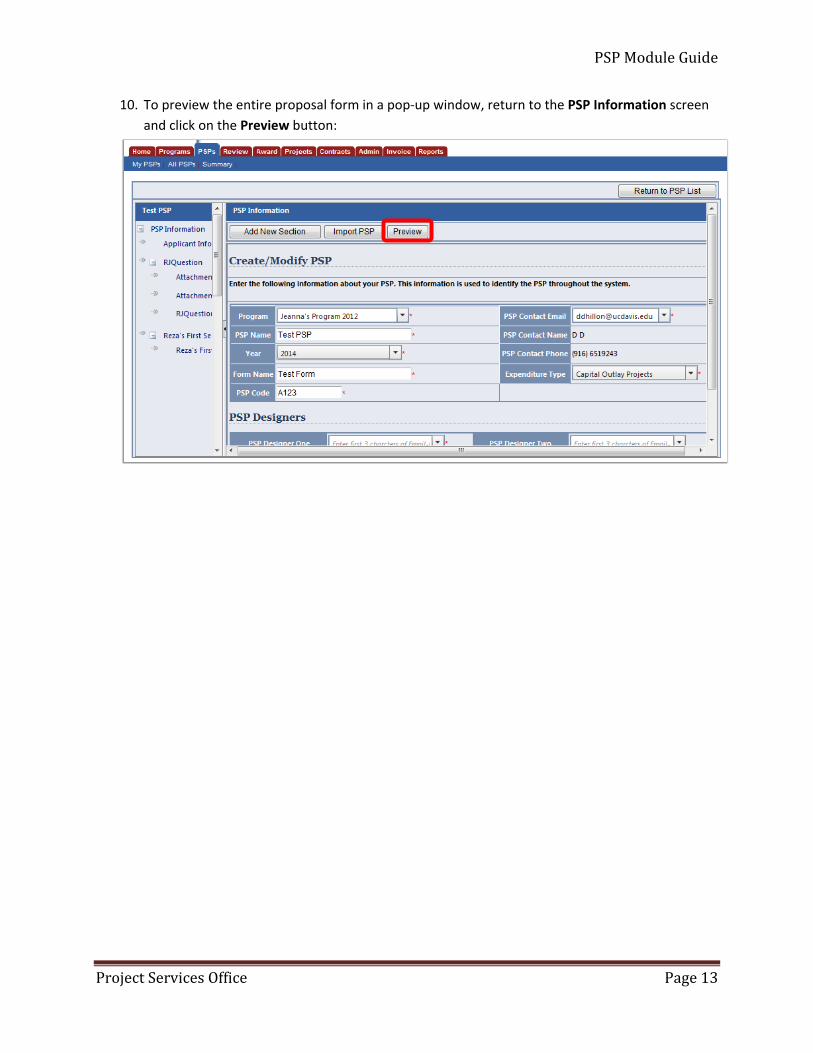
10. To preview the entire proposal form in a pop-up window, return to the PSP Information screen and click on the Preview button:

PSP Module Guide
Project Services Office Page 14
Preview Window:
2
2 The screenshot has a spelling error on it; we will update it once fixed it is fixed in the system.
PSP Module Guide
Project Services Office Page 15
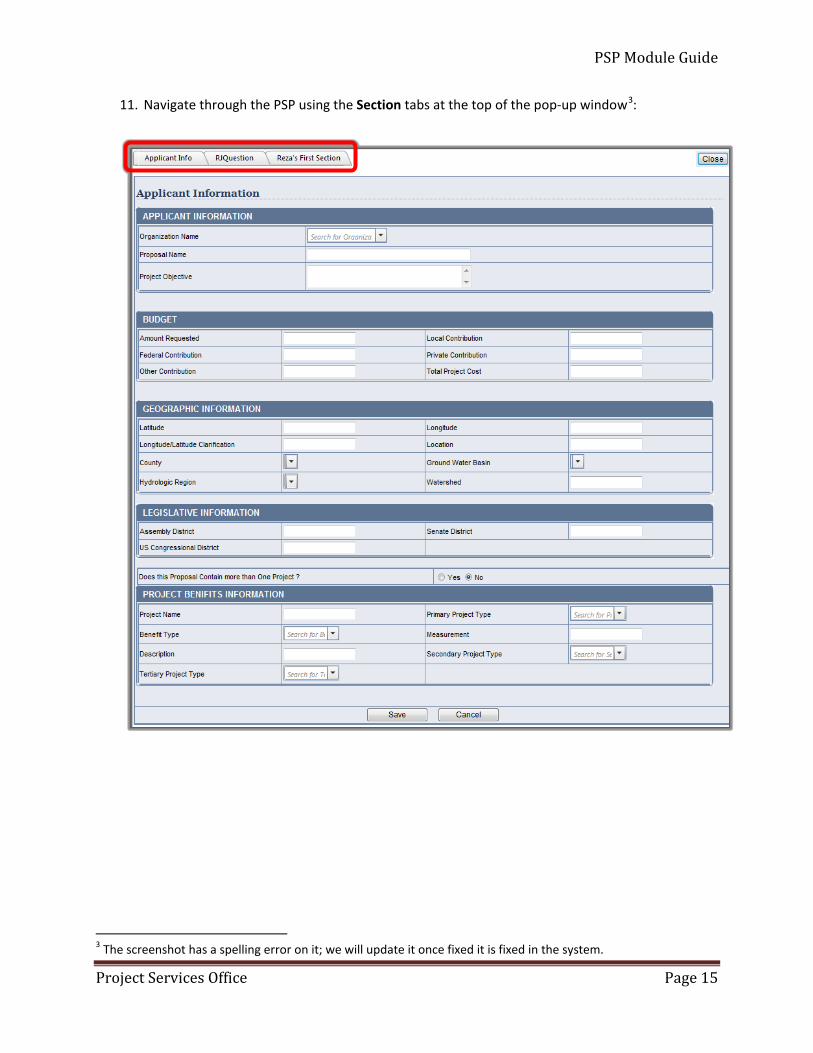
11. Navigate through the PSP using the Section tabs at the top of the pop-up window3:
3 The screenshot has a spelling error on it; we will update it once fixed it is fixed in the system.
PSP Module Guide
Project Services Office Page 16
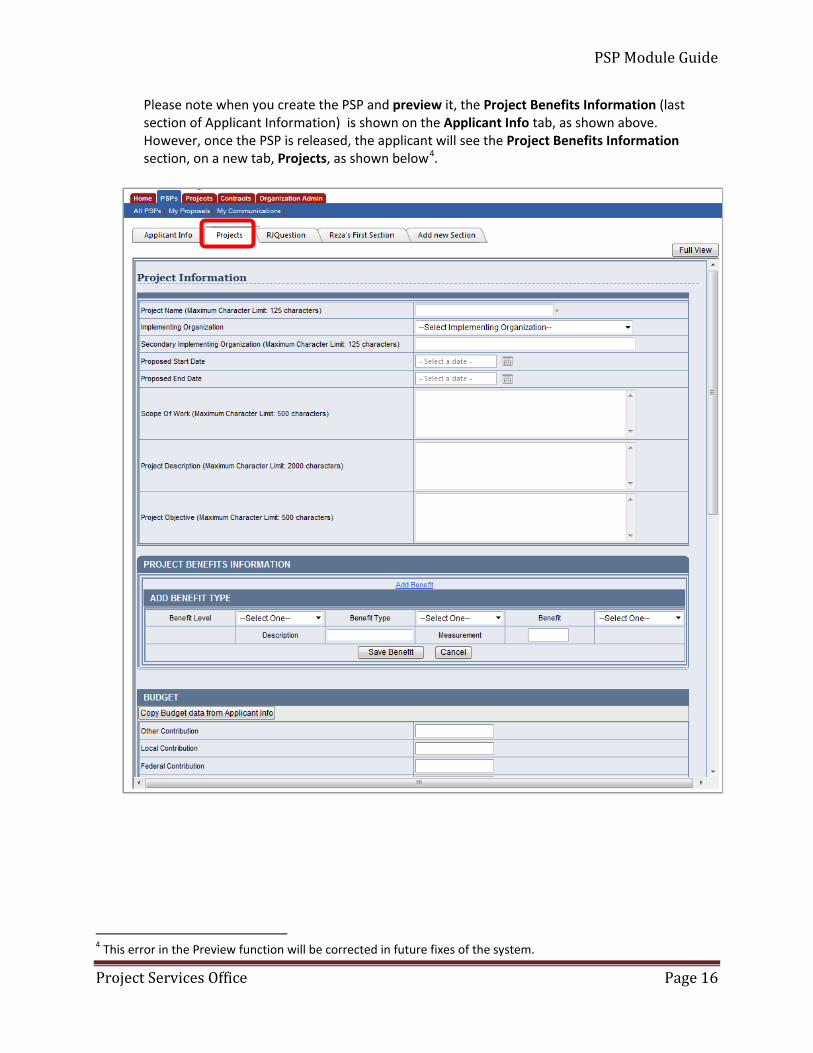
Please note when you create the PSP and preview it, the Project Benefits Information (last section of Applicant Information) is shown on the Applicant Info tab, as shown above. However, once the PSP is released, the applicant will see the Project Benefits Information section, on a new tab, Projects, as shown below4.
4 This error in the Preview function will be corrected in future fixes of the system.
PSP Module Guide
Project Services Office Page 17
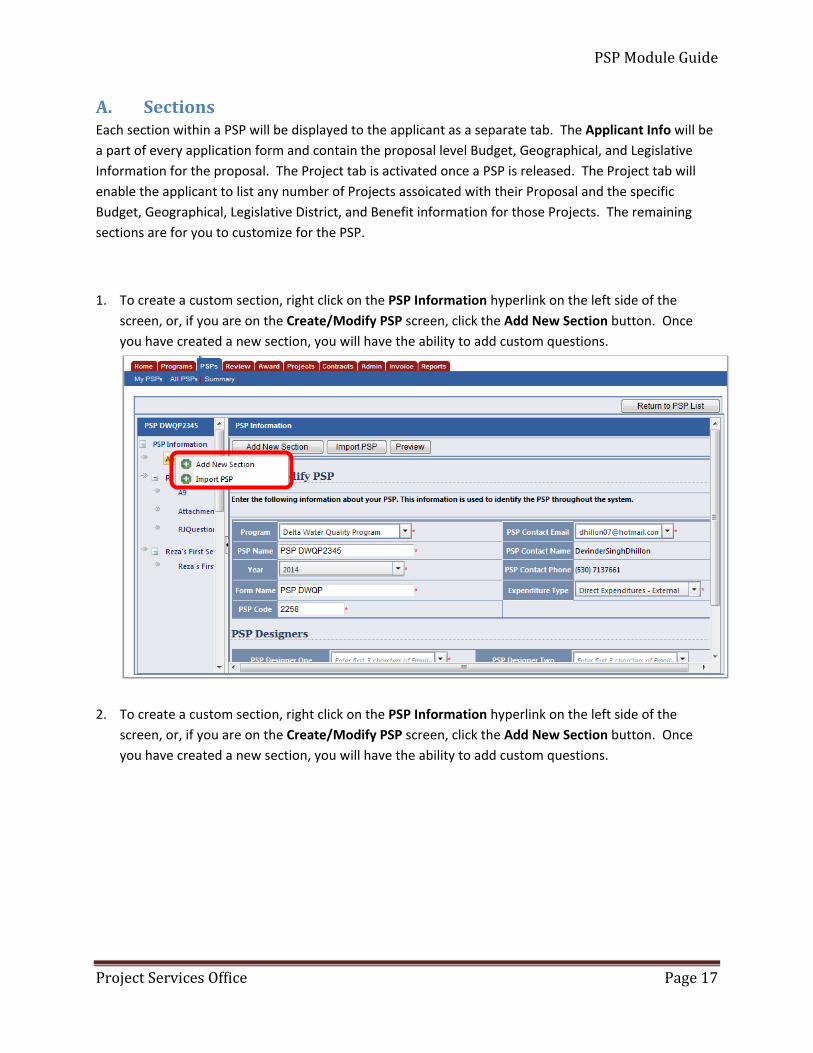
A. Sections Each section within a PSP will be displayed to the applicant as a separate tab. The Applicant Info will be a part of every application form and contain the proposal level Budget, Geographical, and Legislative Information for the proposal. The Project tab is activated once a PSP is released. The Project tab will enable the applicant to list any number of Projects assoicated with their Proposal and the specific Budget, Geographical, Legislative District, and Benefit information for those Projects. The remaining sections are for you to customize for the PSP.
1. To create a custom section, right click on the PSP Information hyperlink on the left side of the screen, or, if you are on the Create/Modify PSP screen, click the Add New Section button. Once you have created a new section, you will have the ability to add custom questions.
2. To create a custom section, right click on the PSP Information hyperlink on the left side of the screen, or, if you are on the Create/Modify PSP screen, click the Add New Section button. Once you have created a new section, you will have the ability to add custom questions.

PSP Module Guide
Project Services Office Page 18
Each section must have a Section Name. As indicated, this is the tab name that the applicant will see. The next design feature is the Section Header. The section header will appear in the dark blue banner below the tabs. You can customize the message shown to the applicant including the formatting of the text.
The section header appears on the top of the application form for the section. This is what the applicant will see:
The sequence of the sections can be altered by clicking on the section (in the left panel) and dragging it above or below another section.
This is my section 1 header.
PSP Module Guide
Project Services Office Page 19
B. Questions Within each section, you can include either required or optional questions for the PSP. Each question requires you to specify the Question Title, Question Type, Character Limit, Optional, Question Header, Question, Helpful Hints, Center, and Question Bank, which are discussed below.
Question Title This is the title of the question which is displayed in the design panel and only viewable by the PSP creator. Question Type This is a drop-down menu with eight different question types (list provided below). Character Limit This is the number of characters available to the applicant to answer each question. Optional Check this box if the question is optional. If you do not check the box, the applicant must answer it before the application can be submitted. Question Header This is question header or title that the applicant will see for each question. Question This is the text of the question itself. Question Helpful Hints These are hints or additional information you can provide to help clarify a question. The hints appear in a text box when the applicants put their cursor over the question mark icon in the PSP. Center This is an aesthetic feature and controls if the question shown to the applicant is centered in their display or not. Question Bank The Question Bank consists of questions that are frequently used for PSP’s or questions that have been saved to the Question Bank for future PSP use.
The question order can be rearranged by clicking on the question and dragging it above or below another question in the same section in the left panel. A question cannot be move to another section.
PSP Module Guide
Project Services Office Page 20
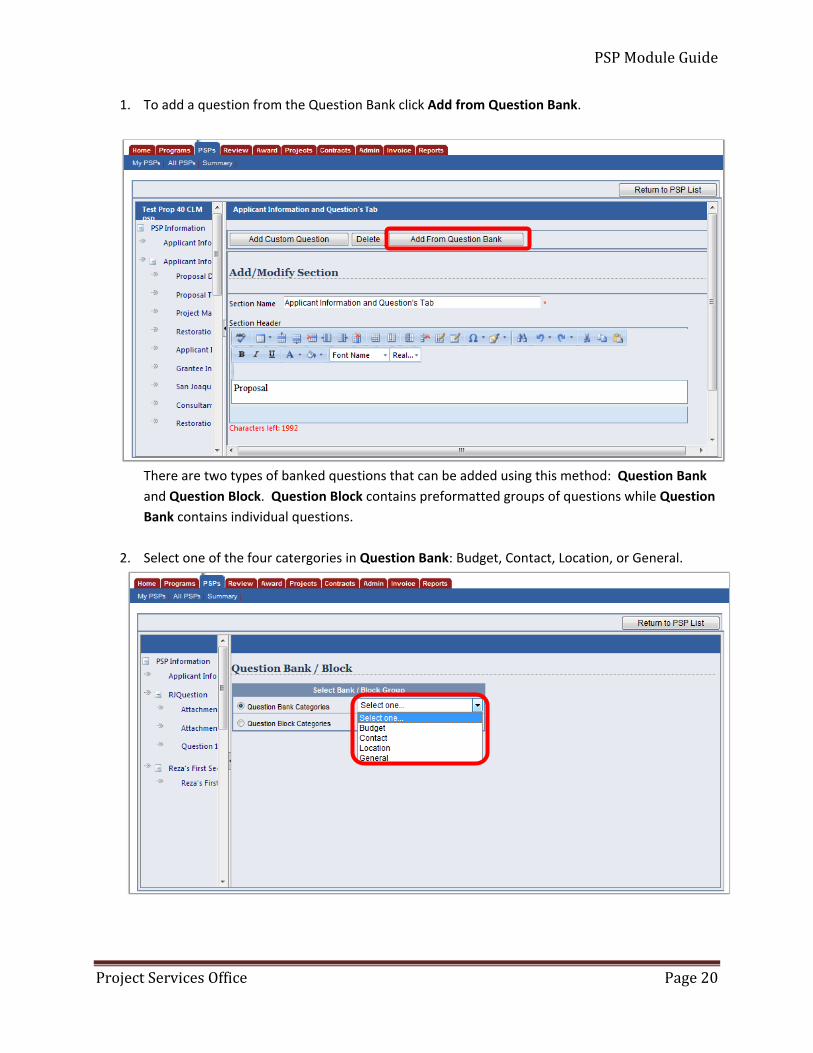
1. To add a question from the Question Bank click Add from Question Bank.
There are two types of banked questions that can be added using this method: Question Bank and Question Block. Question Block contains preformatted groups of questions while Question Bank contains individual questions.
2. Select one of the four catergories in Question Bank: Budget, Contact, Location, or General.
PSP Module Guide
Project Services Office Page 21
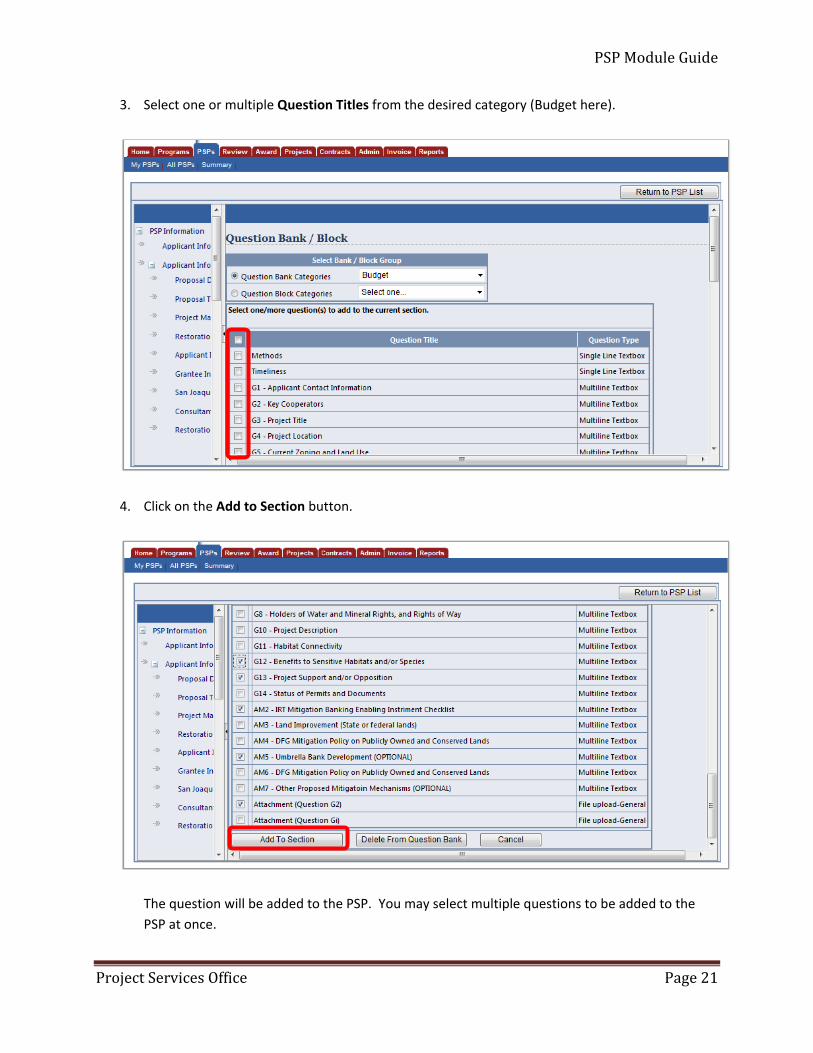
3. Select one or multiple Question Titles from the desired category (Budget here).
4. Click on the Add to Section button.
The question will be added to the PSP. You may select multiple questions to be added to the PSP at once.

PSP Module Guide
Project Services Office Page 22
5. To add a question to the Question Bank, click the drop the down menu in Select Question Bank on the bottom of the question’s page.
6. Select the category you want to save the question to in the Question Bank.
PSP Module Guide
Project Services Office Page 23
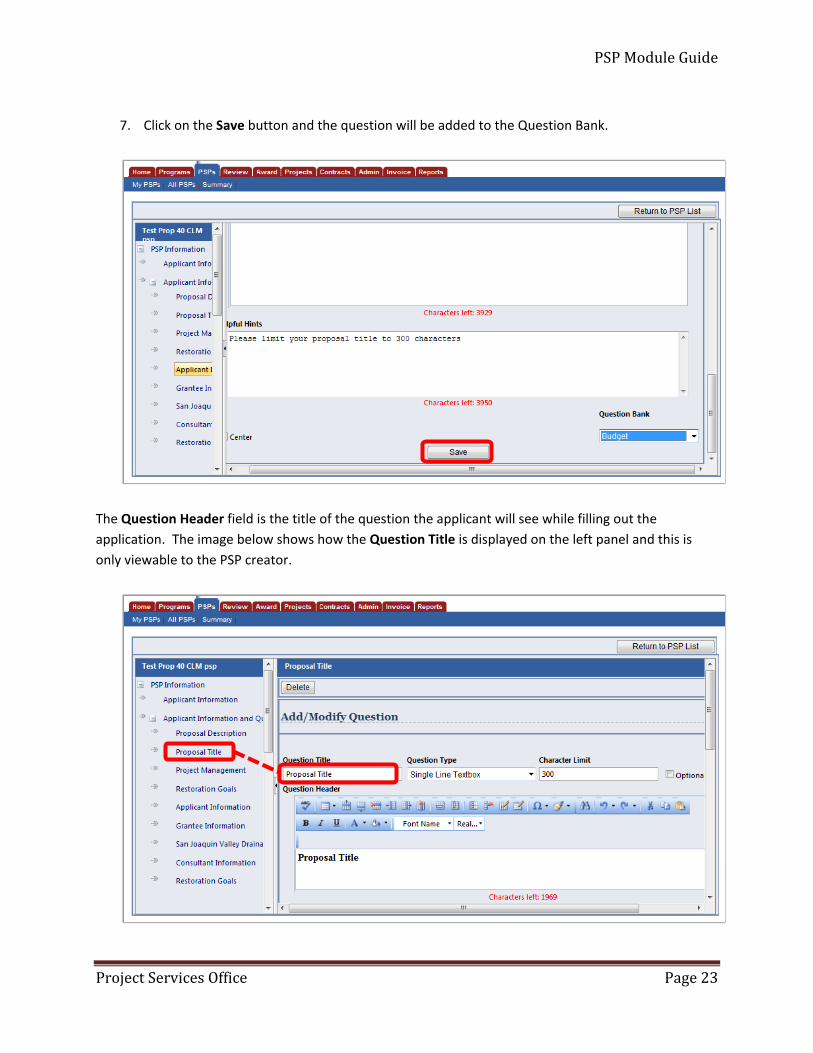
7. Click on the Save button and the question will be added to the Question Bank.
The Question Header field is the title of the question the applicant will see while filling out the application. The image below shows how the Question Title is displayed on the left panel and this is only viewable to the PSP creator.
PSP Module Guide
Project Services Office Page 24
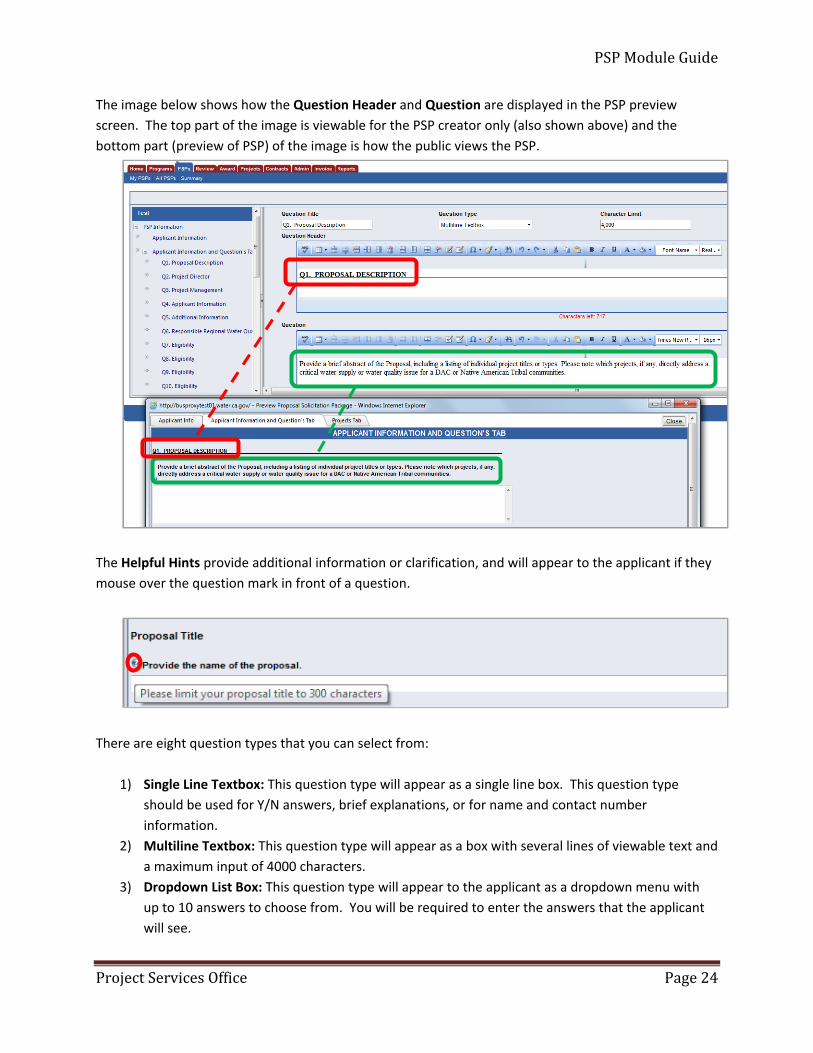
The image below shows how the Question Header and Question are displayed in the PSP preview screen. The top part of the image is viewable for the PSP creator only (also shown above) and the bottom part (preview of PSP) of the image is how the public views the PSP.
The Helpful Hints provide additional information or clarification, and will appear to the applicant if they mouse over the question mark in front of a question.
There are eight question types that you can select from:
1) Single Line Textbox: This question type will appear as a single line box. This question type should be used for Y/N answers, brief explanations, or for name and contact number information.
2) Multiline Textbox: This question type will appear as a box with several lines of viewable text and a maximum input of 4000 characters.
3) Dropdown List Box: This question type will appear to the applicant as a dropdown menu with up to 10 answers to choose from. You will be required to enter the answers that the applicant will see.
PSP Module Guide
Project Services Office Page 25
4) Checkboxes: This question type will appear to the applicant as a list of up to 10 choices with checkboxes adjacent to each answer choice. The applicant can choose all, many or one of the checkboxes. You will be required to enter the answers that the applicant will see.
5) Radio Options: This question type will appear to the applicant as a list of up to 10 answers, but only one selection can be made. You will be required to enter the answers that the applicant will see.
6) Date: This question type will appear to the applicant as a single line of text with a calendar button adjacent to the text box. This question restricts the applicant’s input to a single date.
7) File Upload (General): This question type allows applicants to upload any file type. Use this question type to gather Schedules, Work Plans, Budgets, Authorizations, or any other documentation required for your program. Each file upload question allows the applicant to upload up to 5 files (from 1 to 50MB each) per upload question. You will need to specify the file size limit (1, 5, 10, 20, or 50 MB).
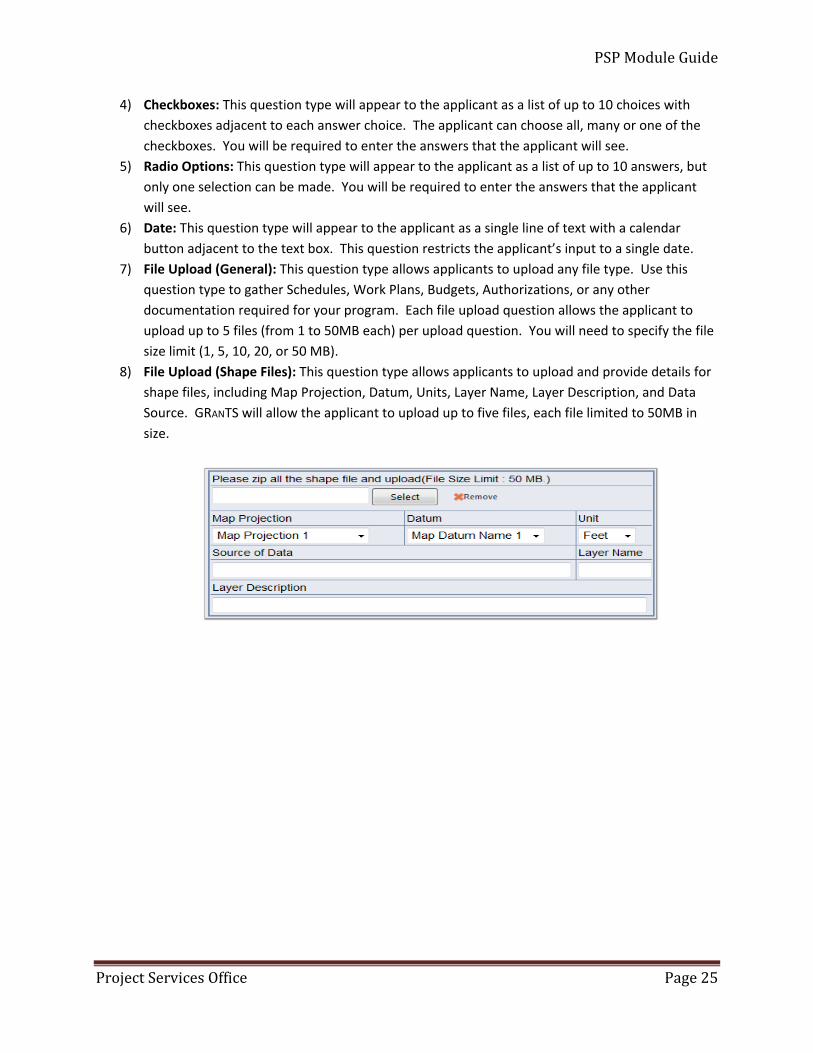
8) File Upload (Shape Files): This question type allows applicants to upload and provide details for shape files, including Map Projection, Datum, Units, Layer Name, Layer Description, and Data Source. GRANTS will allow the applicant to upload up to five files, each file limited to 50MB in size.
PSP Module Guide
Project Services Office Page 26
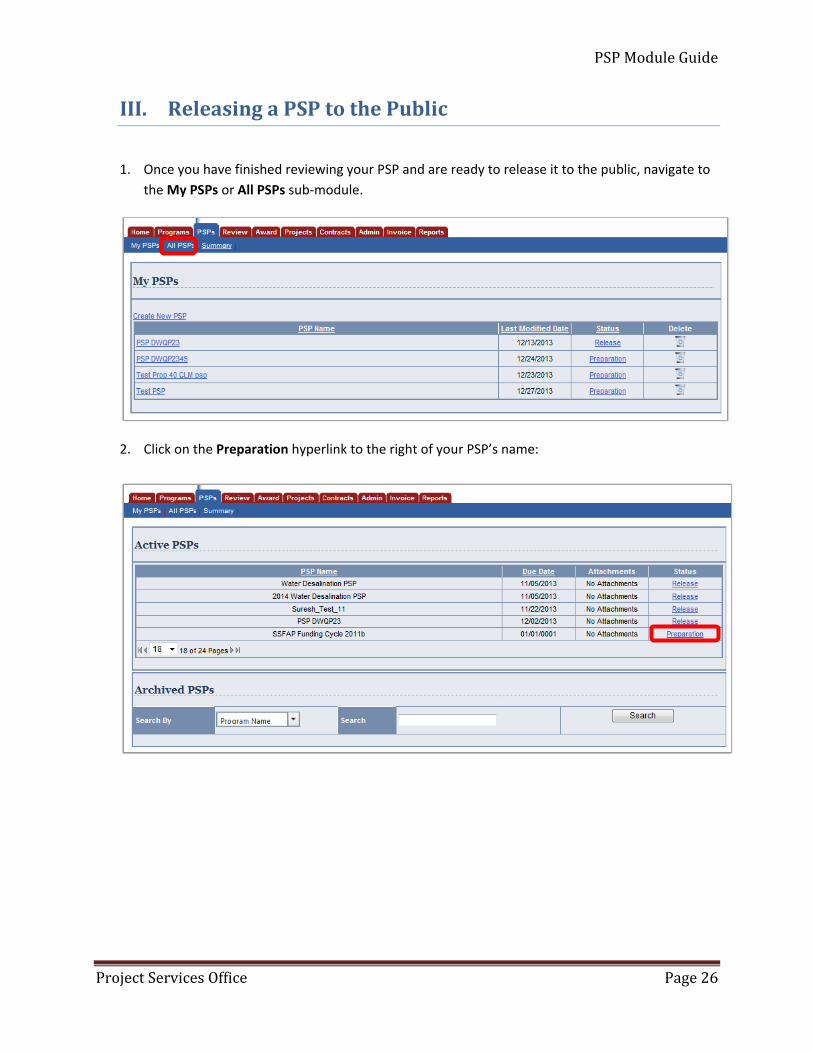
III. Releasing a PSP to the Public
1. Once you have finished reviewing your PSP and are ready to release it to the public, navigate to the My PSPs or All PSPs sub-module.
2. Click on the Preparation hyperlink to the right of your PSP’s name:
PSP Module Guide
Project Services Office Page 27
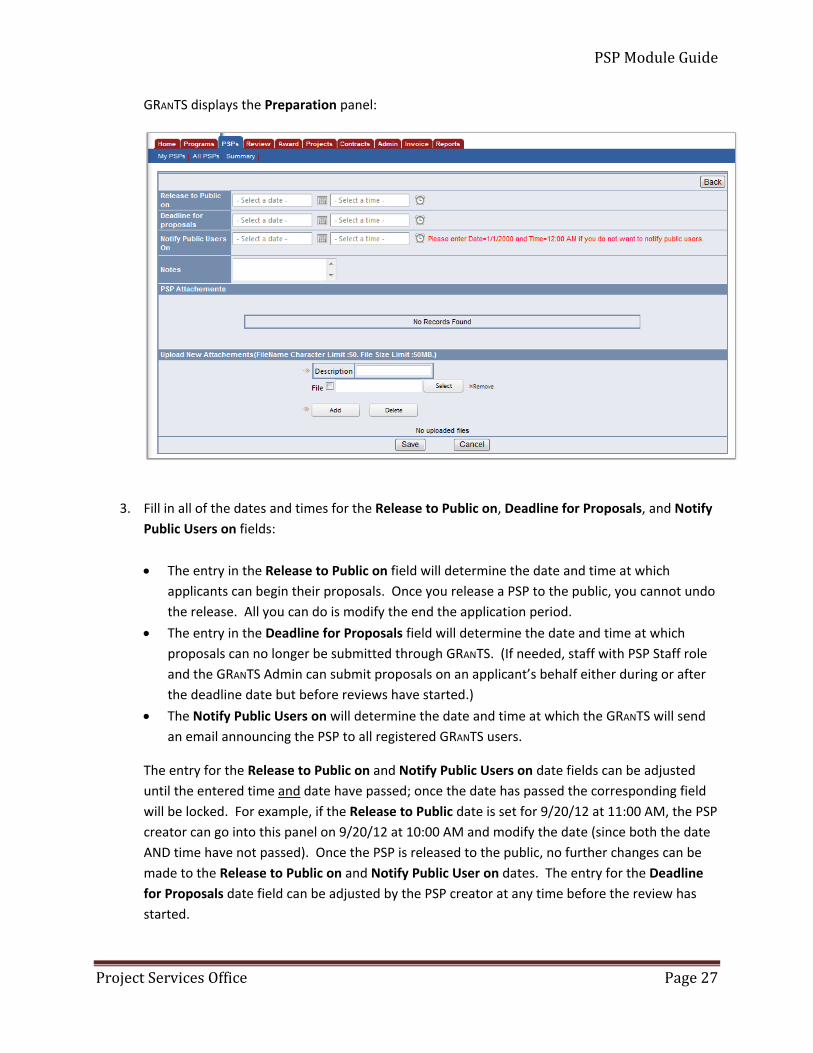
GRANTS displays the Preparation panel:
3. Fill in all of the dates and times for the Release to Public on, Deadline for Proposals, and Notify
Public Users on fields: • The entry in the Release to Public on field will determine the date and time at which
applicants can begin their proposals. Once you release a PSP to the public, you cannot undo the release. All you can do is modify the end the application period.
• The entry in the Deadline for Proposals field will determine the date and time at which proposals can no longer be submitted through GRANTS. (If needed, staff with PSP Staff role and the GRANTS Admin can submit proposals on an applicant’s behalf either during or after the deadline date but before reviews have started.)
• The Notify Public Users on will determine the date and time at which the GRANTS will send an email announcing the PSP to all registered GRANTS users.
The entry for the Release to Public on and Notify Public Users on date fields can be adjusted until the entered time and date have passed; once the date has passed the corresponding field will be locked. For example, if the Release to Public date is set for 9/20/12 at 11:00 AM, the PSP creator can go into this panel on 9/20/12 at 10:00 AM and modify the date (since both the date AND time have not passed). Once the PSP is released to the public, no further changes can be made to the Release to Public on and Notify Public User on dates. The entry for the Deadline for Proposals date field can be adjusted by the PSP creator at any time before the review has started.
PSP Module Guide
Project Services Office Page 28
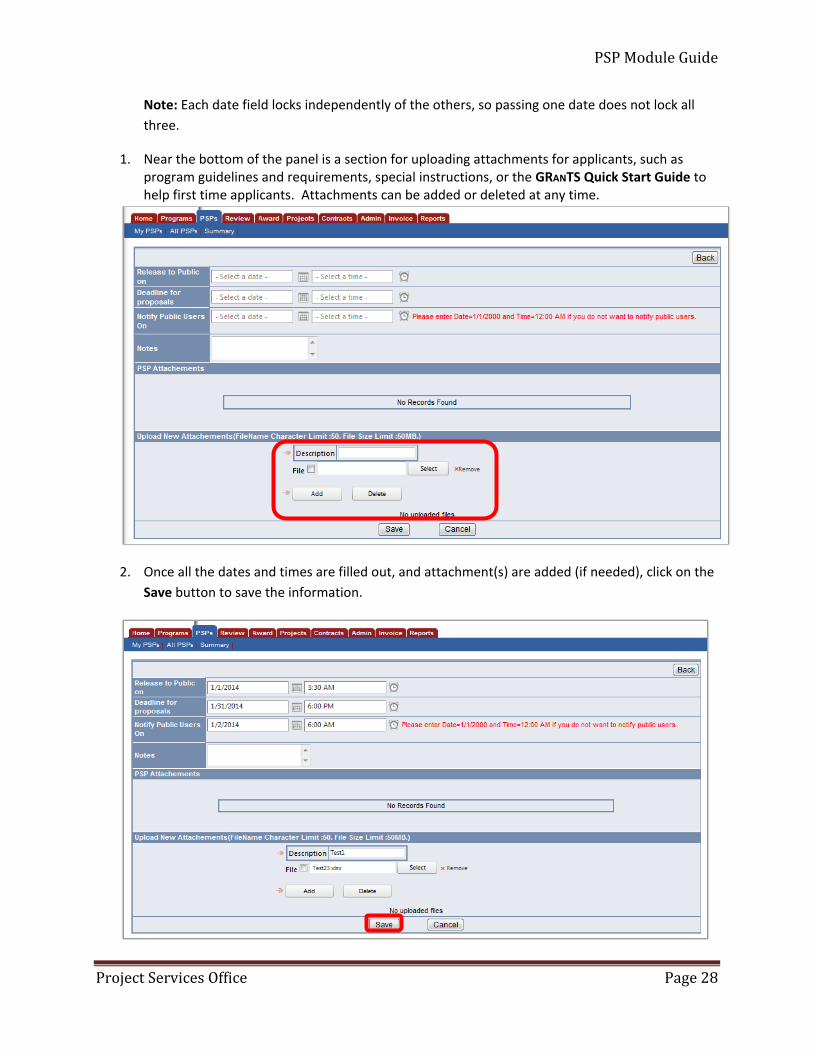
Note: Each date field locks independently of the others, so passing one date does not lock all three.
1. Near the bottom of the panel is a section for uploading attachments for applicants, such as program guidelines and requirements, special instructions, or the GRANTS Quick Start Guide to help first time applicants. Attachments can be added or deleted at any time.
2. Once all the dates and times are filled out, and attachment(s) are added (if needed), click on the Save button to save the information.
PSP Module Guide
Project Services Office Page 29
PSP Module Guide
Project Services Office Page 30
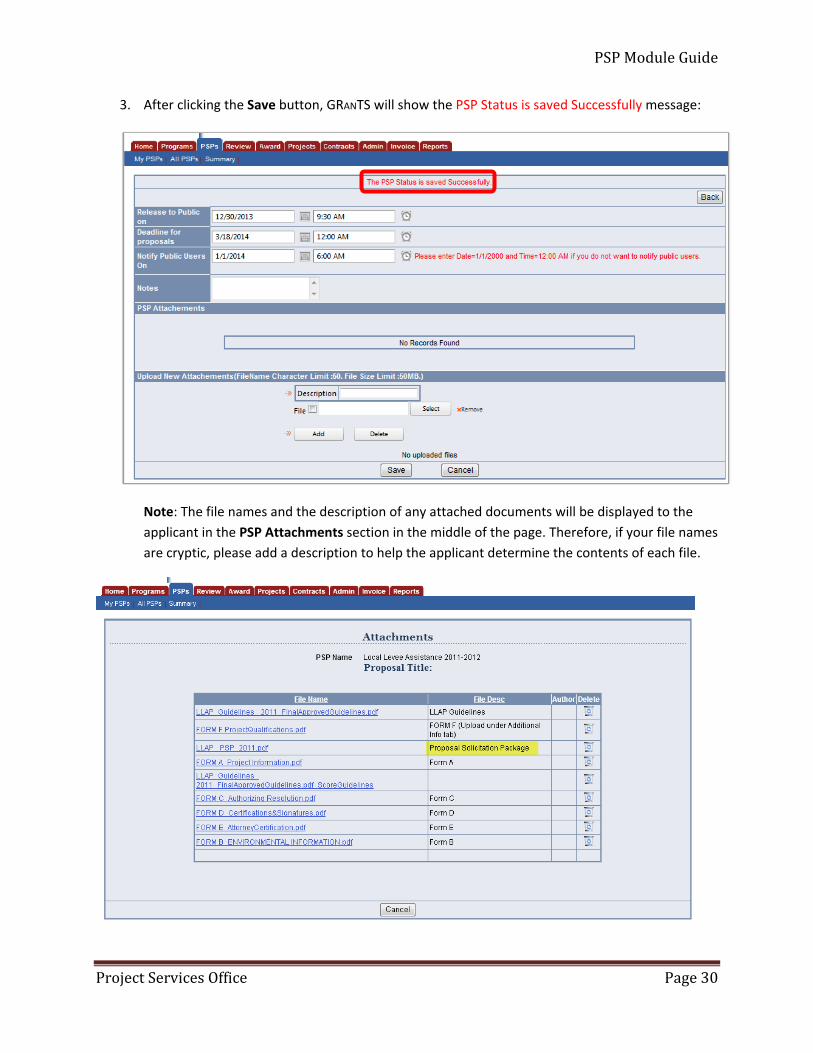
3. After clicking the Save button, GRANTS will show the PSP Status is saved Successfully message:
Note: The file names and the description of any attached documents will be displayed to the applicant in the PSP Attachments section in the middle of the page. Therefore, if your file names are cryptic, please add a description to help the applicant determine the contents of each file.

PSP Module Guide
Project Services Office Page 31
IV. Monitoring Progress of Proposals
1. By navigating to the PSP Summary sub-module, you can access all of the proposals that have been created and/or submitted. Use the dropdown fields to choose the Year and the PSP:
2. GRANTS lists all of the proposals matching the entered search criteria in the PSP Summary page.
Submitted proposals will be assigned a system generated Label that is comprised of the PSP fiscal year, PSP code, and a four digit number (based on the order/sequence when the application is submitted). To view the entire list in Excel, click on the Export to Excel button.
PSP Module Guide
Project Services Office Page 32
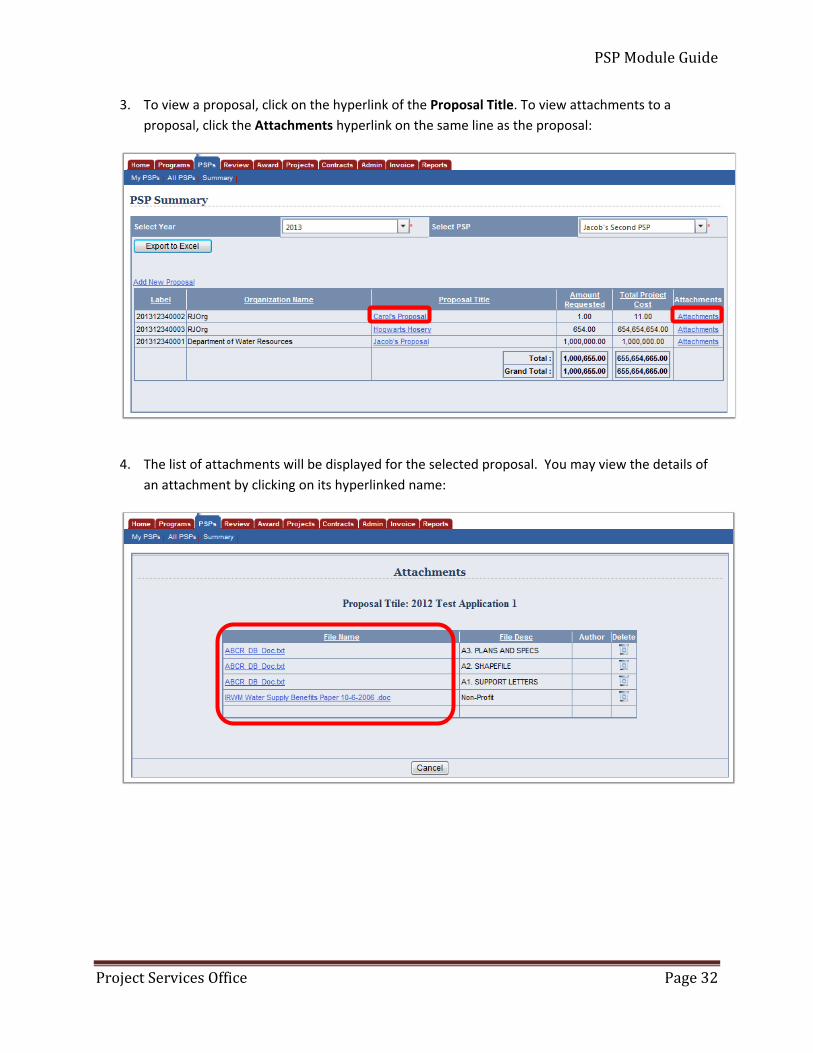
3. To view a proposal, click on the hyperlink of the Proposal Title. To view attachments to a proposal, click the Attachments hyperlink on the same line as the proposal:
4. The list of attachments will be displayed for the selected proposal. You may view the details of
an attachment by clicking on its hyperlinked name:
PSP Module Guide
Project Services Office Page 33
V. Reporting On Proposals
The Ad Hoc Reporting Tool in GRANTS enables users to create custom reports that extract information submitted by applicants from the system. This tool is both powerful and complex requiring familiarity with the GRANTS database. Examples of information that can be provided using Ad Hoc Reporting include:
• Summary of all proposed projects, benefits, and locations for all proposals. • List of Contacts for all proposal creators. • Summary of all answers to questions on the proposal for all proposals.
Contact GRanTS Administrator at [email protected] to learn how to use Ad Hoc Reporting.


