PURCHASING SECTION 13450 – 104 Avenue, Surrey, B.C. V3T 1V8 Tel: 604-590-7274 E-mail: [email protected]ADDENDUM No. 2 REQUEST FOR QUOTATIONS (RFQ) NO.: 1220-040-2016-026 TITLE: GUILDFORD RECREATION CENTRE WASHROOMS & CHANGEROOMS RENOVATION ADDENDUM ISSUE DATE: SEPTEMBER 8, 2016 REVISED CLOSING DATE: PREFER TO RECEIVE QUOTATIONS ON OR BEFORE SEPTEMBER 14, 2016. INFORMATION FOR CONTRACTORS Contractors are advised that Addendum No. 2 to the above referenced Request for Quotations is hereby issued by the City. This addendum shall form part of the Contract Documents and is to be read, interpreted and coordinated with all other parts. The following information is provided to answer questions raised by a Contractor for the above named project, to the extent referenced and shall become a part thereof. No consideration will be allowed for extras due to the Contractor or any sub-contractor not being familiar with this addendum. This Addendum No. 2 contains five (5) pages plus attachments for a total of eighteen (18) pages. QUESTIONS AND ANSWERS: Q1. The tile specification is vague about which tiles are used in which area. The drawings do not seem to indicate a product key. The specifications have tiles circled but do not indicate clearly which rooms they are being used in and to which extent. Where is the mosaic tile intended to be installed? Where does the accent colour tile go? Is the concrete tile the field tile throughout? Is the white tile to be the wall tile or only base? Please advise. A1. 2”x2” mosaic tile: floors in Shower 101B and Shower 102B. 2”x2” mosaic tile (including trims: CB, CBI, CBO in 2”x2”): wall base in Female Change Room 101, Washroom 101A, Shower 101B, Male Washroom 102, Washroom 102A, and Shower 102B. For further clarification refer to numbers and letters in attached plans and specs. Q2. Are there any alternatives allowed to the toilet partitions; Hadrian, Bobrick, etc. as long as they are phenolic? A2. Phenolic Hadrian, Bobrick, ASI Global are approved as equal.
REQUEST FOR QUOTATIONS (RFQ) NO.: 1220-040-2016-026
TITLE: GUILDFORD RECREATION CENTRE WASHROOMS & CHANGEROOMS RENOVATION
ADDENDUM ISSUE DATE: SEPTEMBER 8, 2016
REVISED CLOSING DATE: PREFER TO RECEIVE QUOTATIONS ON OR BEFORE SEPTEMBER 14, 2016.
INFORMATION FOR CONTRACTORS Contractors are advised that Addendum No. 2 to the above referenced Request for Quotations is hereby issued by the City. This addendum shall form part of the Contract Documents and is to be read, interpreted and coordinated with all other parts. The following information is provided to answer questions raised by a Contractor for the above named project, to the extent referenced and shall become a part thereof. No consideration will be allowed for extras due to the Contractor or any sub-contractor not being familiar with this addendum. This Addendum No. 2 contains five (5) pages plus attachments for a total of eighteen (18) pages. QUESTIONS AND ANSWERS:
Q1. The tile specification is vague about which tiles are used in which area. The drawings do not seem to indicate a product key. The specifications have tiles circled but do not indicate clearly which rooms they are being used in and to which extent. Where is the mosaic tile intended to be installed? Where does the accent colour tile go? Is the concrete tile the field tile throughout? Is the white tile to be the wall tile or only base? Please advise.
A1. 2”x2” mosaic tile: floors in Shower 101B and Shower 102B. 2”x2” mosaic tile (including trims: CB, CBI, CBO in 2”x2”): wall base in Female Change Room 101, Washroom 101A, Shower 101B, Male Washroom 102, Washroom 102A, and Shower 102B.
For further clarification refer to numbers and letters in attached plans and specs.
Q2. Are there any alternatives allowed to the toilet partitions; Hadrian, Bobrick, etc. as long as they are phenolic?
A2. Phenolic Hadrian, Bobrick, ASI Global are approved as equal.
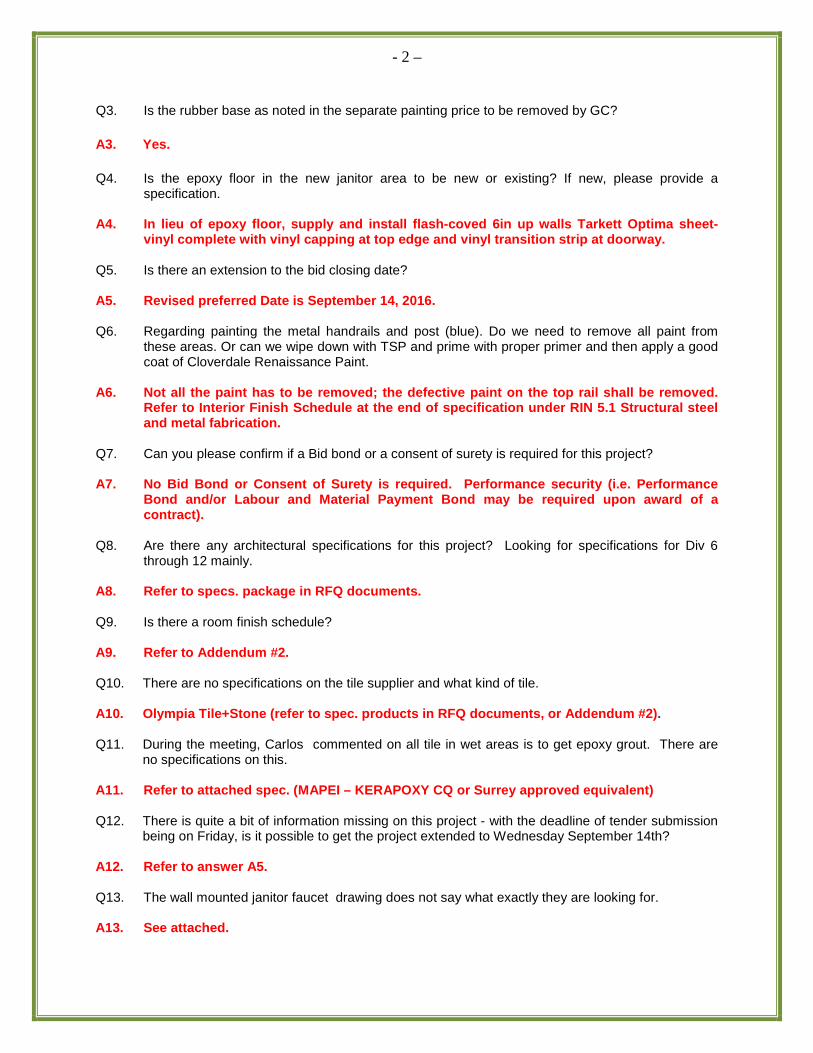
Q3. Is the rubber base as noted in the separate painting price to be removed by GC?
A3. Yes.
Q4. Is the epoxy floor in the new janitor area to be new or existing? If new, please provide a specification.
A4. In lieu of epoxy floor, supply and install flash-coved 6in up walls Tarkett Optima sheet-
vinyl complete with vinyl capping at top edge and vinyl transition strip at doorway. Q5. Is there an extension to the bid closing date? A5. Revised preferred Date is September 14, 2016. Q6. Regarding painting the metal handrails and post (blue). Do we need to remove all paint from
these areas. Or can we wipe down with TSP and prime with proper primer and then apply a good coat of Cloverdale Renaissance Paint.
A6. Not all the paint has to be removed; the defective paint on the top rail shall be removed.
Refer to Interior Finish Schedule at the end of specification under RIN 5.1 Structural steel and metal fabrication.
Q7. Can you please confirm if a Bid bond or a consent of surety is required for this project? A7. No Bid Bond or Consent of Surety is required. Performance security (i.e. Performance
Bond and/or Labour and Material Payment Bond may be required upon award of a contract).
Q8. Are there any architectural specifications for this project? Looking for specifications for Div 6
through 12 mainly. A8. Refer to specs. package in RFQ documents. Q9. Is there a room finish schedule? A9. Refer to Addendum #2. Q10. There are no specifications on the tile supplier and what kind of tile. A10. Olympia Tile+Stone (refer to spec. products in RFQ documents, or Addendum #2). Q11. During the meeting, Carlos commented on all tile in wet areas is to get epoxy grout. There are
no specifications on this.
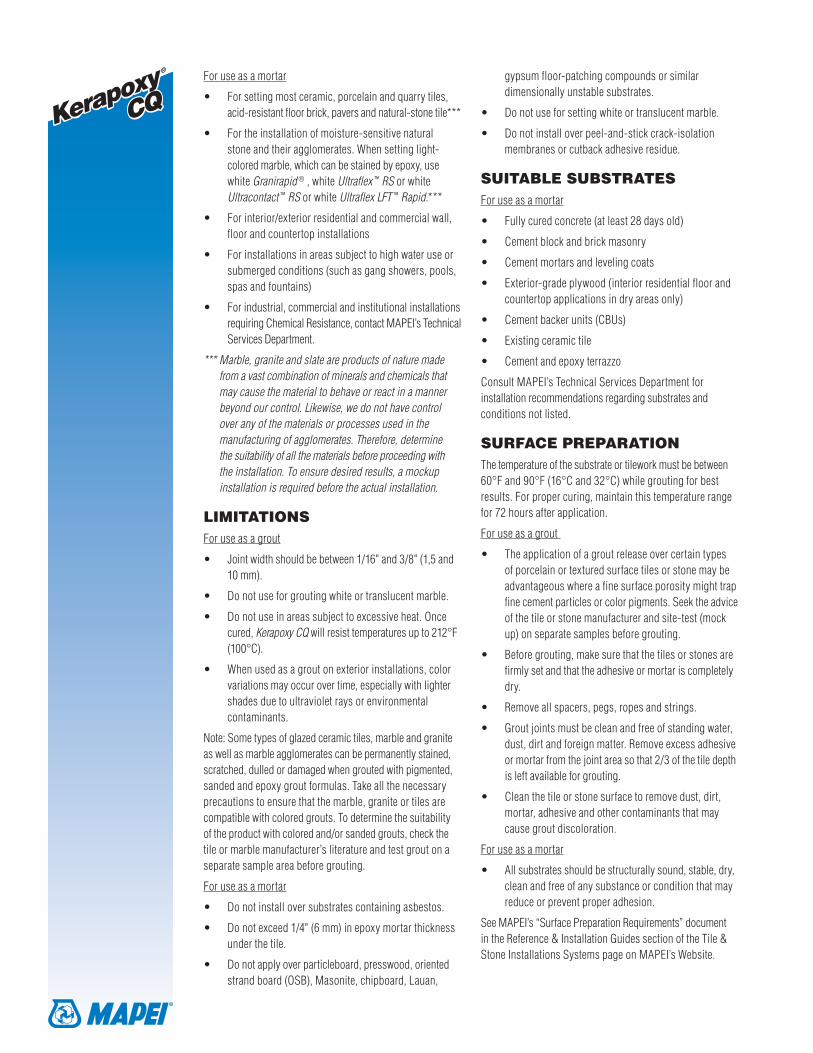
A11. Refer to attached spec. (MAPEI – KERAPOXY CQ or Surrey approved equivalent) Q12. There is quite a bit of information missing on this project - with the deadline of tender submission
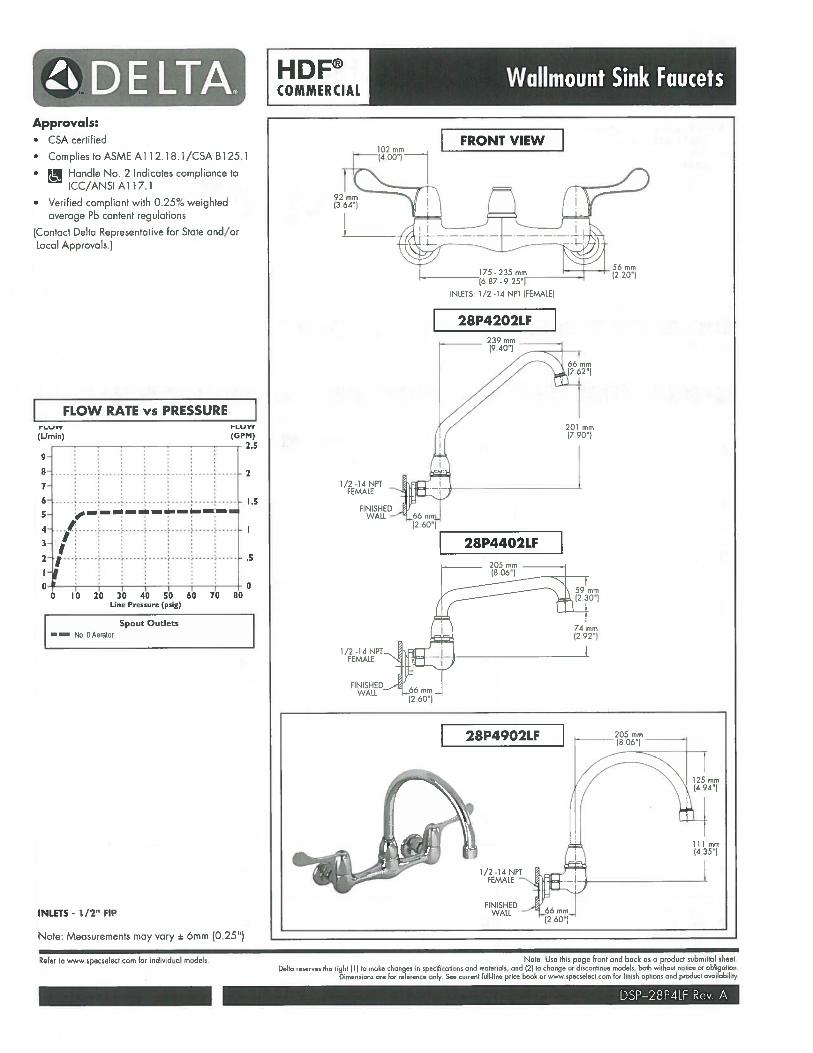
being on Friday, is it possible to get the project extended to Wednesday September 14th? A12. Refer to answer A5. Q13. The wall mounted janitor faucet drawing does not say what exactly they are looking for. A13. See attached.
- 3 –
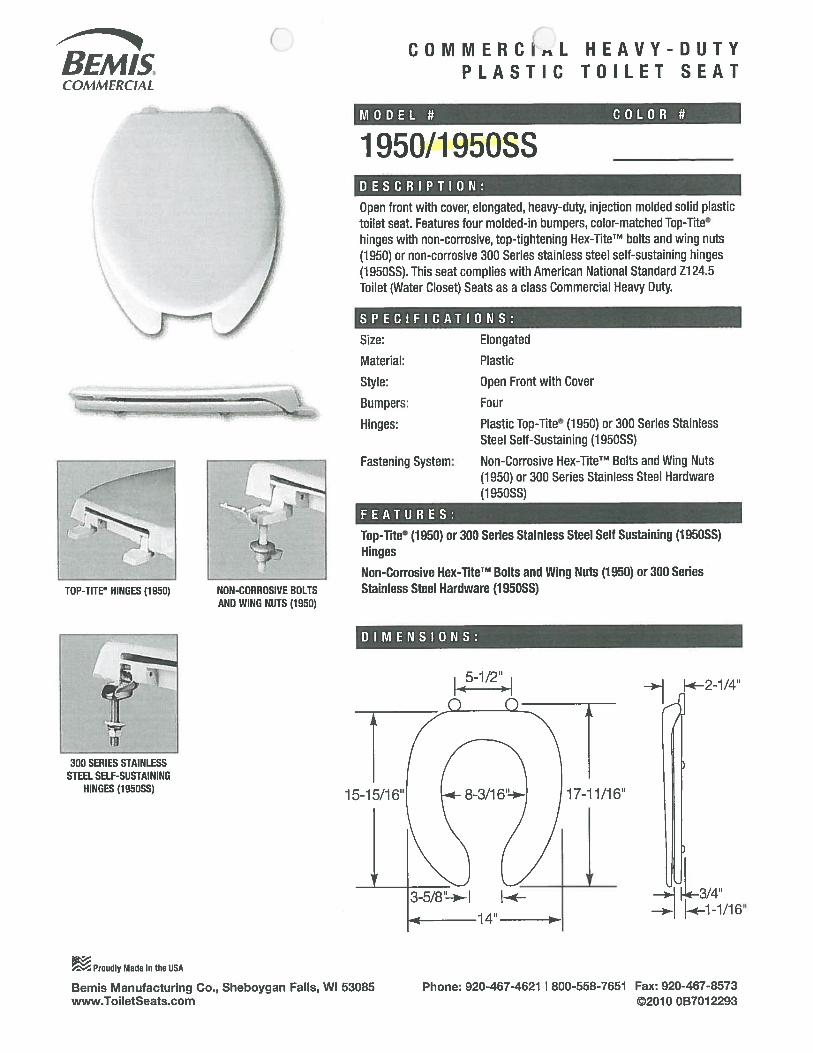
Q14. The Madera toilet is not specified other than being right height , none of the options are checked. A14. See attached. Q15. Also there is no flush valve specified for this toilet. A15. Same flush valve as the wall hung toilets in the lower floor washrooms. Base Contract Work: Q16. Please confirm the name of the verification company of the fire alarm system – this is required for
re and re of the strobe lights. A16. Edwards. Yes. Q17. Please confirm if the existing auto openers can be re-used? A17. Yes. Q18. Please confirm hoarding and protection requirements? Do we require hard hoarding with man
doors, or will white poly be sufficient? A18. Poly is sufficient. Painting Scope: Q19. Are the stringers to be painted in common areas and stairs? A19. Yes. Q20. Under the stairs in the common areas three is a metal wire mesh – does this get painted. A20. Yes. Q21. Does only the handrail need to be stripped? Or does all the metal require to be stripped? A21. No, stripping involves scraping and rubbing with scotch bright pads or other abrasives
along with a building cleaner or TSP. The top rail requires most of the prep. All other areas require a light sanding before painting.
Q22. Please note that most products for stripping paint has a strong odor to it, and this may not be
suitable work for night time, is it fair to say this work should take place after hours when the facilities are closed? If so, please confirm the hours of operation.
A22. As discussed on-site, no chemical stripping should be required. Only hand scrubbing and
sanding of the top rails. Specification indicated levels of surface preparation. Q23. Painting scope only shows walls to be painted in the stairs – do the hand rails, metal stringers,
and screen require painting as well? A23. Yes. All surfaces for painting are indicated in the spec. Q24. During the tender meeting, the MPI Inspector noted that PSF window frames do not get painted –
can we confirm if this is correct?
- 4 –
A24. No, as indicated in the spec. all steel window frames and door frames are to be painted. Q25. What is the load capacity of the 2nd floor slab? A25. This information is not available. Q26. Is all the work related to the black tbar deleted as per addendum #1? A26. Yes. Demolition of millwork on the painting scope – this is the millwork unit next to the registration desk on the North end of the building. Q27. Who removes the TV millwork unit which is to be disabled? A27. CoS will remove the TVs before the demo work. Q28. Drawings calls for this area to be patched after removal of the millwork unit, however there is no
drywall, and a lot of loose wire and services behind the millwork – much of the work related is unknown. This is not a patch job, this will require drywall, taping and finishing.
A28. CoS will take care of the loose wiring. Contractor should demo millwork (incl. security
grille and associated hardware), frame (if required), install new drywall, tape, mud, sand, and finish wall.
Q29. Can we get clarification on the hoarding requirements – is white poly sufficient, or do we require
hard hoarding? A29. Poly is sufficient. Q30. Please note the floor behind this millwork is also unfinished. It is bare concrete. A30. New finish on the concrete floor is not part of the scope of work. Q31. There is a water fountain with tile all 3 sides. Removing 2 sides may damage the back side of it.
What is the intention with the tile around the back of the water fountain? It may be best to remove the water fountain, remove the tiles, and reinstall after finished? Please provide direction.
A31. Remove the water fountain, remove the tiles, and reinstall after finished. Q32. Once millwork is removed there won't be any panels on the new wall, please confirm this is the
intention? A32. The existing wall protection panels should be relocated on the new wall (add new to
complete the length if required). Q33. What to do about the security grille when millwork is removed. It will be visible and people and
children can play with it. This may be a hazard. A33. Removal of the security grille and associated hardware should be included into the scope
of work.
- 5 –
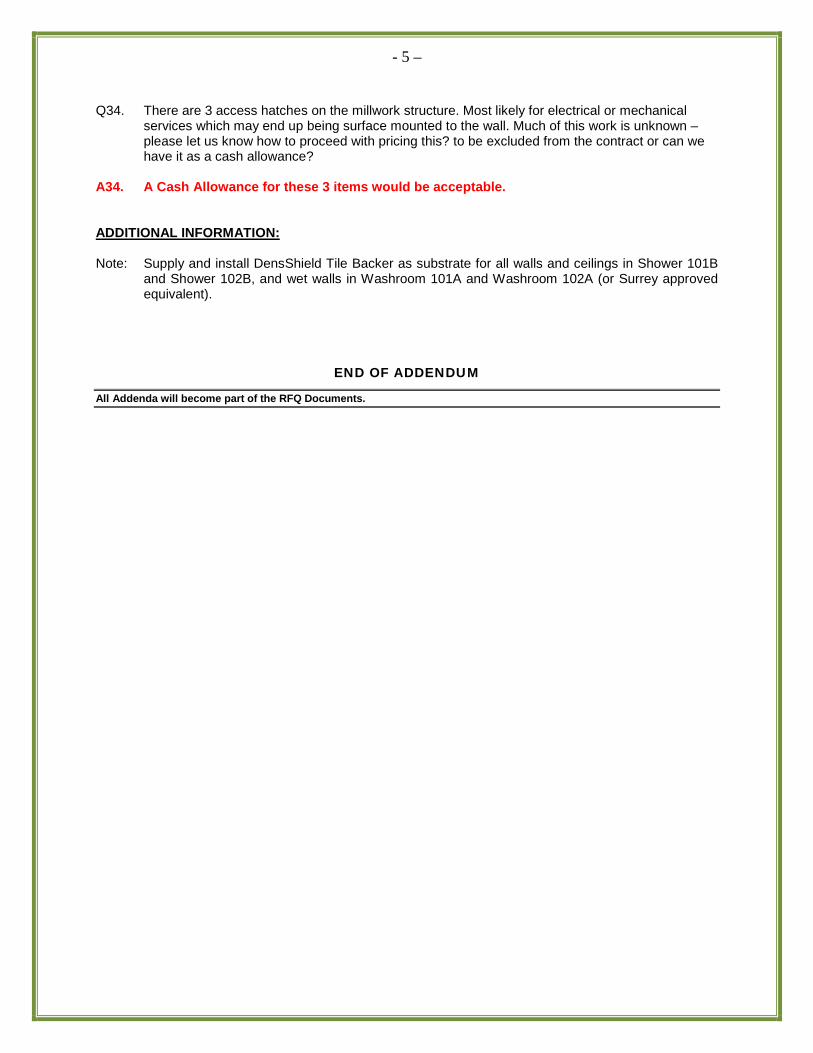
Q34. There are 3 access hatches on the millwork structure. Most likely for electrical or mechanical services which may end up being surface mounted to the wall. Much of this work is unknown – please let us know how to proceed with pricing this? to be excluded from the contract or can we have it as a cash allowance?
A34. A Cash Allowance for these 3 items would be acceptable. ADDITIONAL INFORMATION: Note: Supply and install DensShield Tile Backer as substrate for all walls and ceilings in Shower 101B
and Shower 102B, and wet walls in Washroom 101A and Washroom 102A (or Surrey approved equivalent).
END OF ADDENDUM
All Addenda will become part of the RFQ Documents.
DESCRIPTIONKerapoxy CQ is an improved, two-component, 100%-solids epoxy grout and mortar that is nonsagging/nonslumping in joints up to 3/8" (10 mm) in width, water-cleanable and easy to apply. Kerapoxy CQ uses a proprietary aggregate to achieve its durable color, making it excellent for countertops, high-traffic areas, and areas needing stain and chemical resistance. Easy to maintain, Kerapoxy CQ will clean to the original color and contains BioBlock® technology to help protect against mold and mildew.
FEATURES AND BENEFITS• Superior workability and water cleanability for ease of application
• Nonsagging and nonslumping in joints, for use in both floor and wall applications
• Color consistency and durability
• For grout joints from 1/16" to 3/8" (1,5 to 10 mm)
• No sealer required
• High stain resistance*
* With immediate cleaning and proper maintenance, Kerapoxy CQ grout is highly resistant to staining when exposed to most common household goods and cleaning agents. Long-term exposure to any material can increase the potential for staining grout.
INDUSTRY STANDARDS AND APPROVALS • ANSI: Meets A118.3 requirements
• ISO 13007: Classification R2/RG
LEED v3 Points Contribution LEED Points
MR Credit 5, Regional Materials** .....................................Up to 2 points
IEQ Credit 4.3, Low-Emitting Materials – Flooring Systems .............1 point
** Using this product may help contribute to LEED certification of projects in the categories shown above. Points are awarded based on contributions of all project materials.
WHERE TO USEFor use as a grout
• For grouting most ceramic, porcelain and quarry tiles; acid-resistant floorbrick; pavers; and natural-stone tile***
• For grouting interior residential and commercial floor/wall applications
• For grouting exterior residential and commercial floor applications (contact MAPEI’s Technical Services Department)
• For industrial, commercial and institutional installations with high-strength, chemical-resistant and nonsagging grout requirements, see “Chemical Resistance” chart in this document. For extreme industrial or commercial applications such as dairies, breweries and high-volumefood kitchens, Kerapoxy IEG CQ is recommended.
• For heavy traffic areas such as subway stations, shopping malls and airport terminal buildings
• For areas requiring stain-resistant grout such as countertops and vanities
Premium Epoxy Grout and Mortar with Color-Coated Quartz
Kerapoxy®
CQKerapoxy®
CQ
Version: July 5, 2016
For use as a mortar
• For setting most ceramic, porcelain and quarry tiles, acid-resistant floor brick, pavers and natural-stone tile***
• For the installation of moisture-sensitive natural stone and their agglomerates. When setting light-colored marble, which can be stained by epoxy, use white Granirapid ® , white Ultraflex ™ RS or white Ultracontact ™ RS or white Ultraflex LFT ™ Rapid.***
• For interior/exterior residential and commercial wall, floor and countertop installations
• For installations in areas subject to high water use or submerged conditions (such as gang showers, pools, spas and fountains)
• For industrial, commercial and institutional installations requiring Chemical Resistance, contact MAPEI’s Technical Services Department.
*** Marble, granite and slate are products of nature made from a vast combination of minerals and chemicals that may cause the material to behave or react in a manner beyond our control. Likewise, we do not have control over any of the materials or processes used in the manufacturing of agglomerates. Therefore, determine the suitability of all the materials before proceeding with the installation. To ensure desired results, a mockup installation is required before the actual installation.
LIMITATIONSFor use as a grout
• Joint width should be between 1/16" and 3/8" (1,5 and 10 mm).
• Do not use for grouting white or translucent marble.
• Do not use in areas subject to excessive heat. Once cured, Kerapoxy CQ will resist temperatures up to 212°F (100°C).
• When used as a grout on exterior installations, color variations may occur over time, especially with lighter shades due to ultraviolet rays or environmental contaminants.
Note: Some types of glazed ceramic tiles, marble and granite as well as marble agglomerates can be permanently stained, scratched, dulled or damaged when grouted with pigmented, sanded and epoxy grout formulas. Take all the necessary precautions to ensure that the marble, granite or tiles are compatible with colored grouts. To determine the suitability of the product with colored and/or sanded grouts, check the tile or marble manufacturer’s literature and test grout on a separate sample area before grouting.
For use as a mortar
• Do not install over substrates containing asbestos.
• Do not exceed 1/4" (6 mm) in epoxy mortar thickness under the tile.
• Do not apply over particleboard, presswood, oriented strand board (OSB), Masonite, chipboard, Lauan,
gypsum floor-patching compounds or similar dimensionally unstable substrates.
• Do not use for setting white or translucent marble.
• Do not install over peel-and-stick crack-isolation membranes or cutback adhesive residue.
SUITABLE SUBSTRATESFor use as a mortar
• Fully cured concrete (at least 28 days old)
• Cement block and brick masonry
• Cement mortars and leveling coats
• Exterior-grade plywood (interior residential floor and countertop applications in dry areas only)
• Cement backer units (CBUs)
• Existing ceramic tile
• Cement and epoxy terrazzo
Consult MAPEI’s Technical Services Department for installation recommendations regarding substrates and conditions not listed.
SURFACE PREPARATION The temperature of the substrate or tilework must be between 60°F and 90°F (16°C and 32°C) while grouting for best results. For proper curing, maintain this temperature range for 72 hours after application.
For use as a grout
• The application of a grout release over certain types of porcelain or textured surface tiles or stone may be advantageous where a fine surface porosity might trap fine cement particles or color pigments. Seek the advice of the tile or stone manufacturer and site-test (mock up) on separate samples before grouting.
• Before grouting, make sure that the tiles or stones are firmly set and that the adhesive or mortar is completely dry.
• Remove all spacers, pegs, ropes and strings.
• Grout joints must be clean and free of standing water, dust, dirt and foreign matter. Remove excess adhesive or mortar from the joint area so that 2/3 of the tile depth is left available for grouting.
• Clean the tile or stone surface to remove dust, dirt, mortar, adhesive and other contaminants that may cause grout discoloration.
For use as a mortar
• All substrates should be structurally sound, stable, dry, clean and free of any substance or condition that may reduce or prevent proper adhesion.
See MAPEI’s “Surface Preparation Requirements” document in the Reference & Installation Guides section of the Tile & Stone Installations Systems page on MAPEI’s Website.
Kerapoxy®
C
QKerapoxy®
C
Q
MIXINGChoose all appropriate safety equipment before use. Refer to the Safety Data Sheet for details.
1. Parts A and B are packaged to exact quantity ratios for proper curing.
2. Pour out all material from the Part B container into Part A. To improve flowability, use a margin trowel to thoroughly scrape all material from the Part B container. Always mix complete units. Do not add other materials to this mixture.
3. Use a slow-speed mixer (at about 300 rpm), or manually mix smaller kits with a margin trowel.
4. Avoid prolonged mixing, which will trap air and shorten the pot life.
5. Mix thoroughly until a homogenous, consistent color is obtained. Scrape the edges of the mixing container at least once during mixing.
6. Wash tools immediately with water before the epoxy hardens. Kerapoxy CQ is extremely difficult to remove once cured.
7. Do not place the lid on the container after the material has been mixed.
PRODUCT APPLICATIONRead all installation instructions thoroughly before installation.
For use as a grout
1. Remove mixed product from the container and place it in small piles. (If grouting a wall, place the product on kraft paper laid on the floor.) Kerapoxy CQ is a thermosetting product, so that it sets up faster in a container or in a large mass.
2. Use a hard-rubber float with a sharp edge to force the grout into the joints in a continuous manner, leaving it flush with the tile edge.
3. Be certain that all joints are well-compacted and free of voids/gaps. Fill the joints with the maximum amount of grout possible.
4. Thoroughly remove excess Kerapoxy CQ from the face of the tile before it loses its plasticity or begins to set. This is most easily accomplished by holding the rubber float at a 90-degree angle to the tile surface and dragging the float across the tile surface diagonally to the grout lines, leaving as little epoxy grout on the tile surface as possible.
5. Clean tiles immediately after applying each unit of Kerapoxy CQ. Grout and clean in small areas. Do not attempt to use more than one Kerapoxy CQ unit before cleaning tiles. Do not allow Kerapoxy CQ to harden on the tile surface. On large projects, working in teams of 2 to 3 people will simplify the installation.
6a. For horizontal surfaces: • Apply a liberal amount of cold water to the freshly
grouted area. Scrub the tile surface diagonally
to the joint line using a nonwoven, nylon, white scouring pad (use a more aggressive pad if the tile has an abrasive surface). Apply enough pressure on the pad to loosen any film without removing grout from the joints. Rinse pads frequently while cleaning. Be careful not to get any water in the ungrouted joints.
• To remove the loosened epoxy residue and water, drag a clean sponge diagonally across the tile surface. Use one side of the sponge for each pass over the tile, rinsing the sponge following the second pass and regularly changing water in the buckets to avoid residue buildup.
• Do not allow excess water to remain on the tile surface, which would allow a film to form on the surface that would be difficult to remove once hardened.
• In certain applications, a short-nap terry-cloth towel may be substituted for the sponge, which may work more effectively for removing the loosened epoxy residue and water. Using the “towel drag” method, hold the towel by two corners and drag it diagonally across the grout joints. Rinse the towel often and keep changing water in the buckets to avoid residue buildup.
• Do not step on freshly cleaned tiles, as this could permanently damage the grout.
6b. For vertical surfaces: • Mist the surface using a spray bottle in small
workable areas. Use a non-abrasive nylon scrubpad and apply enough pressure on the pad to loosen any film without removing grout from the joints. Rinse pads frequently while cleaning. Be careful not to get any water into the ungrouted joints.
• To touch up grout joint imperfections during initial rinsing, the grout joint can be smoothed with a sharp-edged cellulosic sponge.
7. Perform a final wash within 15 to 20 minutes for best results. To aid in the cleaning process, 1 U.S. oz. (29,6 mL) of a clear dishwashing soap may be added (if needed) to a 3-gallon (11,4-L) pail of clean water. Use a clean, white scrubpad to loosen any remaining residue left on the tile from the first wash. Then follow the same cleaning process as referenced in the section above.
8. Check the installation the following day to make sure it is completely clean. If a tacky residue is found within 24 hours of installation, follow the above instructions for the cleaning removal process.
9. Use only fresh material to fill any voids discovered while cleaning.
10. Check the installation the same day before leaving the jobsite to make sure it is completely clean. If the tile surface has any shiny or tacky residue, remove it with the solution of liquid detergent and water mentioned in
Kerapoxy®
C
QKerapoxy®
C
Q
Step 7. For more severe cases of epoxy grout haze, use MAPEI’s UltraCare ™ Epoxy Grout Haze Remover.
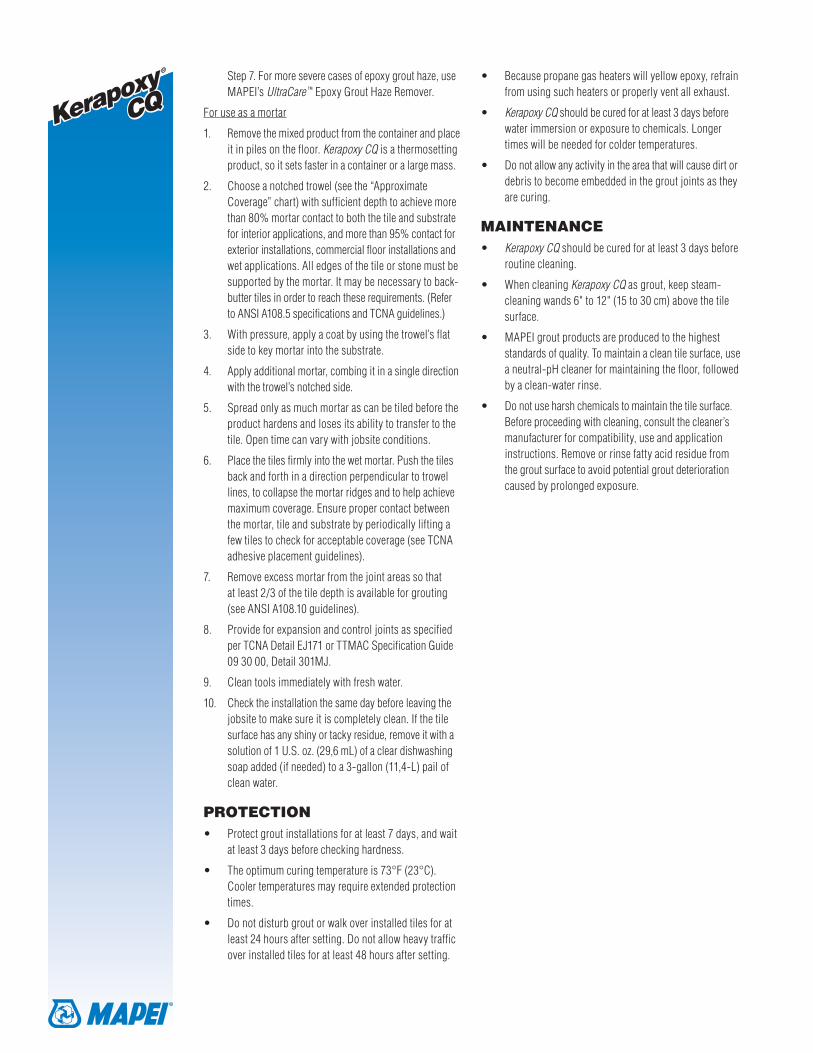
For use as a mortar
1. Remove the mixed product from the container and place it in piles on the floor. Kerapoxy CQ is a thermosetting product, so it sets faster in a container or a large mass.
2. Choose a notched trowel (see the “Approximate Coverage” chart) with sufficient depth to achieve more than 80% mortar contact to both the tile and substrate for interior applications, and more than 95% contact for exterior installations, commercial floor installations and wet applications. All edges of the tile or stone must be supported by the mortar. It may be necessary to back-butter tiles in order to reach these requirements. (Refer to ANSI A108.5 specifications and TCNA guidelines.)
3. With pressure, apply a coat by using the trowel’s flat side to key mortar into the substrate.
4. Apply additional mortar, combing it in a single direction with the trowel’s notched side.
5. Spread only as much mortar as can be tiled before the product hardens and loses its ability to transfer to the tile. Open time can vary with jobsite conditions.
6. Place the tiles firmly into the wet mortar. Push the tiles back and forth in a direction perpendicular to trowel lines, to collapse the mortar ridges and to help achieve maximum coverage. Ensure proper contact between the mortar, tile and substrate by periodically lifting a few tiles to check for acceptable coverage (see TCNA adhesive placement guidelines).
7. Remove excess mortar from the joint areas so that at least 2/3 of the tile depth is available for grouting (see ANSI A108.10 guidelines).
8. Provide for expansion and control joints as specified per TCNA Detail EJ171 or TTMAC Specification Guide 09 30 00, Detail 301MJ.
9. Clean tools immediately with fresh water.
10. Check the installation the same day before leaving the jobsite to make sure it is completely clean. If the tile surface has any shiny or tacky residue, remove it with a solution of 1 U.S. oz. (29,6 mL) of a clear dishwashing soap added (if needed) to a 3-gallon (11,4-L) pail of clean water.
PROTECTION • Protect grout installations for at least 7 days, and wait
at least 3 days before checking hardness.
• The optimum curing temperature is 73°F (23°C). Cooler temperatures may require extended protection times.
• Do not disturb grout or walk over installed tiles for at least 24 hours after setting. Do not allow heavy traffic over installed tiles for at least 48 hours after setting.
• Because propane gas heaters will yellow epoxy, refrain from using such heaters or properly vent all exhaust.
• Kerapoxy CQ should be cured for at least 3 days before water immersion or exposure to chemicals. Longer times will be needed for colder temperatures.
• Do not allow any activity in the area that will cause dirt or debris to become embedded in the grout joints as they are curing.
MAINTENANCE• Kerapoxy CQ should be cured for at least 3 days before
routine cleaning.
• When cleaning Kerapoxy CQ as grout, keep steam-cleaning wands 6" to 12" (15 to 30 cm) above the tile surface.
• MAPEI grout products are produced to the highest standards of quality. To maintain a clean tile surface, use a neutral-pH cleaner for maintaining the floor, followed by a clean-water rinse.
• Do not use harsh chemicals to maintain the tile surface. Before proceeding with cleaning, consult the cleaner’s manufacturer for compatibility, use and application instructions. Remove or rinse fatty acid residue from the grout surface to avoid potential grout deterioration caused by prolonged exposure.
Kerapoxy®
C
QKerapoxy®
C
Q
Resistance to chemicals depends on the concentration, temperature and duration of exposure. For long-term durability and improved grout appearance, clean up spills immediately after they occur.
Laboratory tests reveal variable resistance to certain chemicals. The following table may be considered as a general guide for Kerapoxy CQ applications at 73°F (23°C).
For recommendations regarding chemicals not listed or concentrations exceeding the levels stated, contact MAPEI’s Technical Services Department.
Legend++ Excellent resistance
+ Good resistance; long exposure could cause some deterioration; clean surface rapidly with water
- Poor or no resistance
CHEMICAL RESISTANCE (tested according to ISO 13007)
Product Types Concentration Laboratory Long Time Short Time
Shelf Life and Product Characteristics (before mixing)
Shelf life 2 years when stored in original, unopened packaging at 73°F (23°C)
Physical state Resin (Part A) and hardener (Part B)
ColorsAvailable in MAPEI’s palette of 40 colors, organized into 5 color collections. Refer to MAPEI's grout/caulk color chart. Sample color chips are available upon request.
VOCs (Rule #1168 of California’s SCAQMD) 8 g per L
Protect containers from freezing in transit and storage. Provide for heated storage on site and deliver all materials at least 24 hours before work begins.
Application Properties at 73°F (23°C) and 50% relative humidity
Pot life† 45 to 60 minutes
Full cure† 14 days
Application temperature range 60°F to 90°F (16°C to 32°C)† Pot life and curing time will vary depending on ambient temperature, substrate temperature and humidity.
1" x 1" x 1/4" (25 x 25 x 6 mm) 56 sq. ft. (5,20 m2) 31 sq. ft. (2,88 m2) 18 sq. ft. (1,67 m2) 14 sq. ft. (1,30 m2)
2" x 2" x 1/4" (50 x 50 x 6 mm) 108 sq. ft. (10,0 m2) 56 sq. ft. (5,20 m2) 31 sq. ft. (2,88 m2) 22 sq. ft. (2,04 m2)
3" x 3" x 1/4" (75 x 75 x 6 mm) 159 sq. ft. (14,8 m2) 82 sq. ft. (7,62 m2) 43 sq. ft. (3,99 m2) 31 sq. ft. (2,88 m2)
4" x 4" x 3/8" (100 x 100 x 10 mm) 140 sq. ft. (13,0 m2) 72 sq. ft. (6,69 m2) 37 sq. ft. (3,44 m2) 26 sq. ft. (2,42 m2)
4" x 8" x 1/2" (100 x 200 x 12 mm) 139 sq. ft. (12,9 m2) 71 sq. ft. (6,60 m2) 37 sq. ft. (3,44 m2) 25 sq. ft. (2,32 m2)
4" x 8" x 3/4" (100 x 200 x 19 mm) 93 sq. ft. (8,64 m2) 47 sq. ft. (4,37 m2) 24 sq. ft. (2,23 m2) 17 sq. ft. (1,58 m2)
4" x 8" x 1-1/8" (100 x 200 x 29 mm) 62 sq. ft. (5,76 m2) 32 sq. ft. (2,97 m2) 16 sq. ft. (1,49 m2) 11 sq. ft. (1,02 m2)
4" x 8" x 1-3/8" (100 x 200 x 35 mm) 51 sq. ft. (4,74 m2) 26 sq. ft. (2,42 m2) 13 sq. ft. (1,21 m2) 9 sq. ft. (0,84 m2)
4-1/4" x 4-1/4" x 1/4" (108 x 108 x 6 mm) 223 sq. ft. (20,7 m2) 114 sq. ft. (10,6 m2) 59 sq. ft. (5,48 m2) 41 sq. ft. (3,81 m2)
6" x 6" x 1/4" (150 x 150 x 6 mm) 313 sq. ft. (29,1 m2) 159 sq. ft. (14,8 m2) 82 sq. ft. (7,62 m2) 56 sq. ft. (5,20 m2)
6" x 6" x 1/2" (150 x 150 x 12 mm) 156 sq. ft. (14,5 m2) 79 sq. ft. (7,34 m2) 41 sq. ft. (3,81 m2) 28 sq. ft. (2,60 m2)
8" x 8" x 3/8" (200 x 200 x 10 mm) 277 sq. ft. (25,7 m2) 140 sq. ft. (13,0 m2) 72 sq. ft. (6,69 m2) 49 sq. ft. (4,55 m2)
10" x 10" x 3/8" (250 x 250 x 10 mm) 345 sq. ft. (32,1 m2) 174 sq. ft. (16,2 m2) 89 sq. ft. (8,27 m2) 60 sq. ft. (5,57 m2)
12" x 12" x 1/2" (300 x 300 x 12 mm) 310 sq. ft. (28,8 m2) 156 sq. ft. (14,5 m2) 79 sq. ft. (7,34 m2) 54 sq. ft. (5,02 m2)
16" x 16" x 3/8" (406 x 406 x 10 mm) 551 sq. ft. (51,2 m2) 277 sq. ft. (25,7 m2) 140 sq. ft. (13,0 m2) 94 sq. ft. (8,73 m2)
• For use as a mortar
Trowel SizeCoverage per
1 U.S. qt. (946 mL)Coverage per
1 U.S. gal. (3,79 L) Coverage per
2 U.S. gals. (7,57 L)1/4" x 1/4" x 1/4" (6 x 6 x 6 mm), square-notch 4.5 sq. ft. (0,42 m2) 18 sq. ft. (1,67 m2) 36 sq. ft. (3,34 m2)
5/32" x 5/32" (4 x 4 mm), V-notch 10 sq. ft. (0,93 m2) 40 sq. ft. (3,72 m2) 80 sq. ft. (7,43 m2)
* Trowel dimensions are width/depth/space. Coverage shown is for estimating purposes only. Actual jobsite coverage may vary according to actual tile size and thickness, exact joint width, job conditions and grouting methods.
** When grouting abrasive or slip-resistant floor tiles, anticipated coverage can be dramatically decreased. Alternatives to the traditional grouting technique, such as a grout bag or commercial sealant gun, may be of assistance. Consult MAPEI’s Technical Services Department for approximate coverage not shown in the above table or use the grout calculator at www.mapei.com.
Kerapoxy®
C
QKerapoxy®
C
Q
We proudly support the following industry organizations:
MAPEI Headquarters of the Americas1144 East Newport Center Drive Deerfield Beach, Florida 33442 1-888-US-MAPEI (1-888-876-2734) / (954) 246-8888
Technical Services1-800-992-6273 (U.S. and Puerto Rico) 1-800-361-9309 (Canada)
Customer Service1-800-42-MAPEI (1-800-426-2734)
Services in Mexico0-1-800-MX-MAPEI (0-1-800-696-2734)
Reference Guide: Surface Preparation Requirements for tile and stone installation systems
RGT0309*
Installation Guide for Kerapoxy CQ IGT0111*
Grout Troubleshooting Guide*
* At www.mapei.com
Refer to the SDS for specific data related to health and safety as well as product handling.
STATEMENT OF RESPONSIBILITYBefore using, user shall determine the suitability of the product for its intended use and user alone assumes all risks and liability whatsoever in connection therewith. ANY CLAIM SHALL BE DEEMED WAIVED UNLESS MADE IN WRITING TO US WITHIN FIFTEEN (15) DAYS FROM DATE IT WAS, OR REASONABLY SHOULD HAVE BEEN, DISCOVERED.
Kerapoxy®
C
QKerapoxy®
C
Q
This is for your handy reference. Colours and styles shown here are meant only to give you a preliminary indication pending thedevelopment of sampling, which will be rushed to you as soon as possible.
Trims: RE, REX, CB, CBI,CBO in 2” x 2”. Pool Nosing 2” x 1” (some colours only). All trims will bestocked by end June 2009
Usage: This Series excels in terms of durability and wear resistance and is rated for highcommercial traffic.Dot-mounted, through-body porcelain in speckled and uni-colours.
This is for your handy reference. Colours and styles shown here are meant only to give you a preliminary indication pending the development of sampling, whichwill be rushed to you as soon as possible.
Generic Type:Size(s):
Comments:
GLAZED WALL TILE
BRIGHT & MATTE: 4 1/4 x 4 1/4, 3 x 6, 6 x 6, 4 1/4 x 8 1/2, 4 x 16, 8 x 20
Trims: RE, REX, Cove Base, Cove Base Outer & Inner in various sizes and colours.
An extensive range of co-ordinated bright and matte glazed basic designer colours in six sizes, and aselection of bright glazed Accent colours. Tile sizes 4 1/4 x 4 1/4, 3 x 6, 6 x 6 and 4 1/4 x 8 1/2 have Spacers. Afull range of trim pieces is stocked in all six sizes for the main colours, and standard trim pieces are stockedin all other basic colours. RE trims are stocked in Accent colours
Usage: Residential and commercial wall applications.
FEBRUARY / 2011
For Internal Use Only.
/
ARCTIC WHITE Bright Group 1
4 1/4 x 4 1/4 (CODE # QT.CD.ARW.0404.BR)3 x 6 (CODE # QT.CD.ARW.0306.BR)6 x 6 (CODE # QT.CD.ARW.0606.BR)
4 1/4 x 8 1/2 (CODE # QT.CD.ARW.0408.BR)4 x 16 (CODE # QT.CD.ARW.0416.BR)8 x 20 (CODE # QT.CD.ARW.0820.BR)
ARCTIC WHITE Matte Group 1
4 1/4 x 4 1/4 (CODE # QT.CD.ARW.0404.MT)3 x 6 (CODE # QT.CD.ARW.0306.MT)6 x 6 (CODE # QT.CD.ARW.0606.MT)
4 1/4 x 8 1/2 (CODE # QT.CD.ARW.0408.MT)4 x 16 (CODE # QT.CD.ARW.0416.MT)8 x 20 (CODE # QT.CD.ARW.0820.MT)
WARM WHITE Bright Group 1
4 1/4 x 4 1/4 (CODE # QT.CD.WWT.0404.BR)3 x 6 (CODE # QT.CD.WWT.0306.BR)6 x 6 (CODE # QT.CD.WWT.0606.BR)
4 1/4 x 8 1/2 (CODE # QT.CD.WWT.0408.BR)4 x 16 (CODE # QT.CD.WWT.0416.BR)8 x 20 (CODE # QT.CD.WWT.0820.BR)
WARM WHITE Matte Group 1
4 1/4 x 4 1/4 (CODE # QT.CD.WWT.0404.MT)3 x 6 (CODE # QT.CD.WWT.0306.MT)6 x 6 (CODE # QT.CD.WWT.0606.MT)
4 1/4 x 8 1/2 (CODE # QT.CD.WWT.0408.MT)4 x 16 (CODE # QT.CD.WWT.0416.MT)8 x 20 (CODE # QT.CD.WWT.0820.MT)
BISCUIT Bright Group 1
4 1/4 x 4 1/4 (CODE # QT.CD.BIS.0404.BR)3 x 6 (CODE # QT.CD.BIS.0306.BR)6 x 6 (CODE # QT.CD.BIS.0606.BR)
4 1/4 x 8 1/2 (CODE # QT.CD.BIS.0408.BR)4 x 16 (CODE # QT.CD.BIS.0416.BR)8 x 20 (CODE # QT.CD.BIS.0820.BR)
BISCUIT Matte Group 1
4 1/4 x 4 1/4 (CODE # QT.CD.BIS.0404.MT)3 x 6 (CODE # QT.CD.BIS.0306.MT)6 x 6 (CODE # QT.CD.BIS.0606.MT)
4 1/4 x 8 1/2 (CODE # QT.CD.BIS.0408.MT)4 x 16 (CODE # QT.CD.BIS.0416.MT)8 x 20 (CODE # QT.CD.BIS.0820.MT)
BONE Bright Group 1
4 1/4 x 4 1/4 (CODE # QT.CD.BON.0404.BR)3 x 6 (CODE # QT.CD.BON.0306.BR)6 x 6 (CODE # QT.CD.BON.0606.BR)
4 1/4 x 8 1/2 (CODE # QT.CD.BON.0408.BR)4 x 16 (CODE # QT.CD.BON.0416.BR)8 x 20 (CODE # QT.CD.BON.0820.BR)
BONE Matte Group 1
4 1/4 x 4 1/4 (CODE # QT.CD.BON.0404.MT)3 x 6 (CODE # QT.CD.BON.0306.MT)6 x 6 (CODE # QT.CD.BON.0606.MT)
4 1/4 x 8 1/2 (CODE # QT.CD.BON.0408.MT)4 x 16 (CODE # QT.CD.BON.0416.MT)8 x 20 (CODE # QT.CD.BON.0820.MT)
SAND BEIGE Bright Group 1
4 1/4 x 4 1/4 (CODE # QT.CD.SDB.0404.BR)3 x 6 (CODE # QT.CD.SDB.0306.BR)6 x 6 (CODE # QT.CD.SDB.0606.BR)
SAND BEIGE Matte Group 1
4 1/4 x 4 1/4 (CODE # QT.CD.SDB.0404.MT)3 x 6 (CODE # QT.CD.SDB.0306.MT)6 x 6 (CODE # QT.CD.SDB.0606.MT)
4 x 16 (CODE # QT.CD.SDB.0416.MT)
GREY Bright Group 1
4 1/4 x 4 1/4 (CODE # QT.CD.GRY.0404.BR)3 x 6 (CODE # QT.CD.GRY.0306.BR)6 x 6 (CODE # QT.CD.GRY.0606.BR)
GREY Matte Group 1
4 1/4 x 4 1/4 (CODE # QT.CD.GRY.0404.MT)3 x 6 (CODE # QT.CD.GRY.0306.MT)6 x 6 (CODE # QT.CD.GRY.0606.MT)4 x 16 (CODE # QT.CD.GRY.0416.MT)
TENDER GREY Bright Group 1
4 1/4 x 4 1/4 (CODE # QT.CD.TGR.0404.BR)3 x 6 (CODE # QT.CD.TGR.0306.BR)6 x 6 (CODE # QT.CD.TGR.0606.BR)
TENDER GREY Matte Group 1
4 1/4 x 4 1/4 (CODE # QT.CD.TGR.0404.MT)3 x 6 (CODE # QT.CD.TGR.0306.MT)6 x 6 (CODE # QT.CD.TGR.0606.MT)
SILVER GREY Bright Group 1
4 1/4 x 4 1/4 (CODE # QT.CD.SGR.0404.BR)3 x 6 (CODE # QT.CD.SGR.0306.BR)6 x 6 (CODE # QT.CD.SGR.0606.BR)
SILVER GREY Matte Group 1
4 1/4 x 4 1/4 (CODE # QT.CD.SGR.0404.MT)3 x 6 (CODE # QT.CD.SGR.0306.MT)6 x 6 (CODE # QT.CD.SGR.0606.MT)
4 1/4 x 8 1/2 (CODE # QT.CD.SGR.0408.MT)4 x 16 (CODE # QT.CD.SGR.0416.MT)8 x 20 (CODE # QT.CD.SGR.0820.MT)
STERLING GREY Bright Group 2
4 1/4 x 4 1/4 (CODE # QT.CD.STG.0404.BR)3 x 6 (CODE # QT.CD.STG.0306.BR)6 x 6 (CODE # QT.CD.STG.0606.BR)4 x 16 (CODE # QT.CD.STG.0416.BR)
STERLING GREY Matte Group 2
4 1/4 x 4 1/4 (CODE # QT.CD.STG.0404.MT)3 x 6 (CODE # QT.CD.STG.0306.MT)6 x 6 (CODE # QT.CD.STG.0606.MT)4 x 16 (CODE # QT.CD.STG.0416.MT)
Usage: Board W-03 & Folder FL-521 (Special Architectural Folder being prepared for printing)
P205797
Rectangle
P205797
Rectangle
P205797
Highlight
P205797
Highlight
P205797
Text Box
FIELD COLOUR
P205797
Text Box
ACCENT COLOUR
P205797
Highlight
P205797
Highlight
P205797
Highlight
P205797
Text Box
3A
P205797
Text Box
3B
This is for your handy reference. Colours and styles shown here are meant only to give you a preliminary indication pending thedevelopment of sampling, which will be rushed to you as soon as possible.
Visual Advice: ARGILE SERIES (PA# P14 - 088)Generic Type:
Size(s):
Comments:
COLOURED-BASE PORCELAIN
22.5 x 90 cm (9 x 36) RECTIFIED45 x 90 cm (18 x 36) RECTIFIED30 x 60 cm (12 x 24) Non-rectified
Cement look in earth tone colours.Colours LAND and CONCRETE contain21% pre-consumer recycled material.Colour Variation Rated V-3.
Usage: Rated for residential walls & floors;commercial walls & high traffic floors.
Sampling: Board F-125Folder FL-713
Nov / 2014
For Internal Use Only.
CANVAS (Beige)9” x 36” CODE # GQ.AR.CVS.093612” x 24” CODE # GQ.AR.CVS.122418” x 36” CODE # GQ.AR.CVS.1836
BRICK (Cotto)9” x 36” CODE # GQ.AR.BRK.093612” x 24” CODE # GQ.AR.BRK.122418” x 36” CODE # GQ.AR.BRK.1836
CONCRETE (Dk.Grey)9” x 36” CODE # GQ.AR.CON.093612” x 24” CODE # GQ.AR.CON.122418” x 36” CODE # GQ.AR.CON.1836
LAND (Taupe)9” x 36” CODE # GQ.AR.LND.093612” x 24” CODE # GQ.AR.LND.122418” x 36” CODE # GQ.AR.LND.1836