187
PV-S460 PV-S660 E User’s Guide

PV-S460PV-S660
E
User’s Guide
GUIDELINES LAID DOWN BY FCC RULES FOR USE OF THIS UNIT IN THEU.S.A. (not applicable to other areas).
NOTICEThis equipment has been tested and found to comply with the limits for a Class B digitaldevice, pursuant to Part 15 of the FCC Rules. These limits are designed to provide reasonableprotection against harmful interference in a residential installation. This equipment gener-ates, uses and can radiate radio frequency energy and, if not installed and used in accordancewith the instructions, may cause harmful interference to radio communications. However,there is no guarantee that interference will not occur in a particular installation. If thisequipment does cause harmful interference to radio or television reception, which can bedetermined by turning the equipment off and on, the user is encouraged to try to correct theinterference by one or more of the following measures:
• Reorient or relocate the receiving antenna.• Increase the separation between the equipment and receiver.• Connect the equipment into an outlet on a circuit different from that to which the receiver
is connected.• Consult the dealer or an experienced radio/TV technician for help.
FCC WARNINGChanges or modifications not expressly approved by the party responsible for compliancecould void the user's authority to operate the equipment.Proper connectors must be used for connection to host computer and/or peripherals in orderto meet FCC emission limits.
Cable or cradle (OA-300PV) ..... PV-S460/PV-S660 to Windows PC or SB-90
Declaration of ConformityModel Number: PV-S460/PV-S660Trade Name: CASIO COMPUTER CO., LTD.Responsible party: CASIO, INC.Address: 570 MT. PLEASANT AVENUE, DOVER, NEW JERSEY 07801Telephone number: 973-361-5400
This device complies with Part 15 of the FCC Rules. Operation is subject to the followingtwo conditions: (1) This device may not cause harmful interference, and (2) this device mustaccept any interference received, including interference that may cause undesired operation.
• CASIO COMPUTER CO., LTD. assumes no responsibility for any damage or lossresulting from the use of this manual.
• CASIO COMPUTER CO., LTD. assumes no responsibility for any loss or claims by thirdparties which may arise through the use of the PV Unit.
• CASIO COMPUTER CO., LTD. assumes no responsibility for any damage or loss causedby deletion of data as a result of malfunction, repairs, or battery replacement. Be sure toback up all important data on other media to protect against its loss.
• No part of this manual may be reproduced in any form without the express written consentof the manufacturer.
Microsoft and Windows are registered trademarks of Microsoft Corporation in the UnitedStates and/or other countries.
1
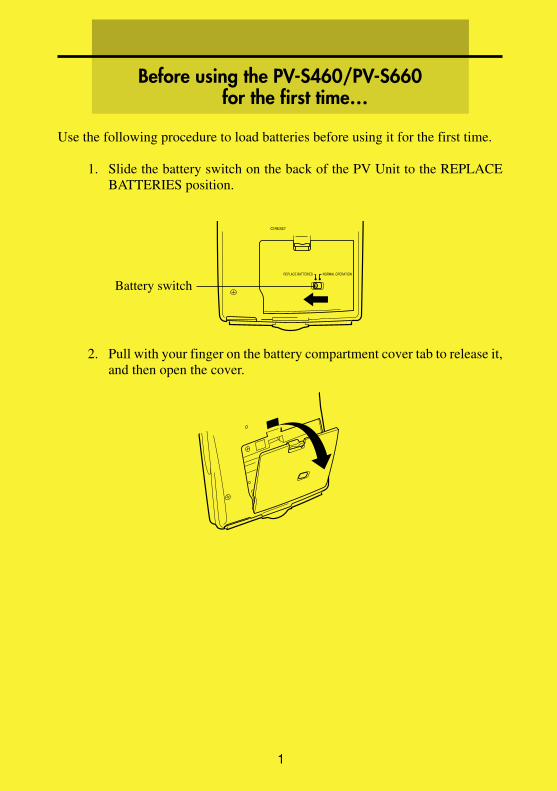
Use the following procedure to load batteries before using it for the first time.
1. Slide the battery switch on the back of the PV Unit to the REPLACEBATTERIES position.
REPLACE BATTERIES NORMAL OPERATION
RESET
2. Pull with your finger on the battery compartment cover tab to release it,and then open the cover.
Before using the PV-S460/PV-S660for the first time…
Battery switch

2
3. Load two new batteries, making sure that their positive (+) and negative(–) ends are facing in the proper directions.
P
RESET
4. Taking care not to damage its tabs, replace the battery compartmentcover back onto the PV Unit.
5. Slide the battery switch back to the NORMAL OPERATION position.
Important!• Always make sure the battery switch is in the NORMAL OPERATION
position at all times, except when loading batteries.
6. Remove the stylus from the PV Unit.• Pull the stylus straight out in the direction indicated by the arrow.

3
7. Pressing down lightly on the center of the cover with your middle threefingers, pull upwards on the bottom of the cover with your thumb, andthen lift up to remove it.
• If the above does not appear on the display, remove the batteries andthen reload them into the PV Unit, making sure you follow properprocedures. If this does not solve the problem, refer to “Troubleshooting”on page 179.
8. Tap the center of each of the four cross marks as they appear on thescreen.
• The contrast adjustment screen appears next.
9. Tap H or J to adjust the contrast of the display, and then tap OK.• This causes the system language selection screen to appear.
10. Tap the button next to the language you want to select as the systemlanguage, and then tap Set.
11. In response to the message that appears (Check your home time settingand correct it if necessary!), tap OK to change to the pop up tool screen.
12. Check the time setting and correct it if necessary (page 157).13. Tap the Menu icon to display the on-screen icon menu (page 26).
Pull here.
4
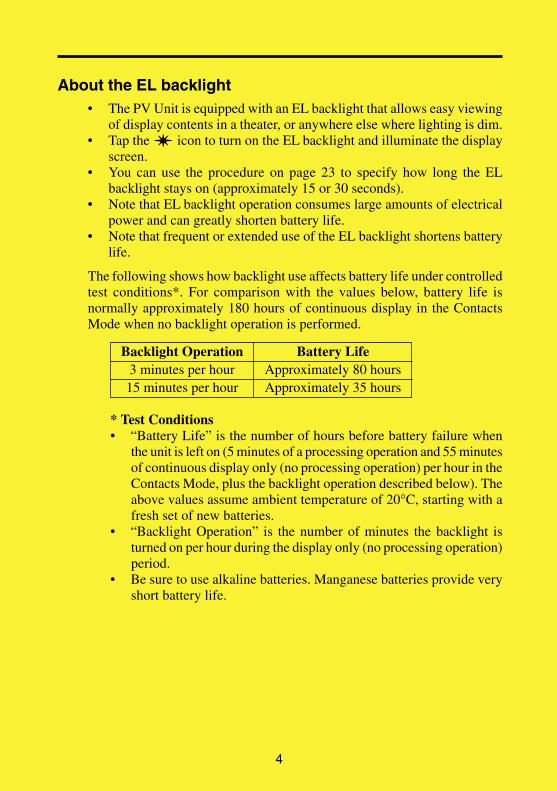
About the EL backlight• The PV Unit is equipped with an EL backlight that allows easy viewing
of display contents in a theater, or anywhere else where lighting is dim.• Tap the icon to turn on the EL backlight and illuminate the display
screen.• You can use the procedure on page 23 to specify how long the EL
backlight stays on (approximately 15 or 30 seconds).• Note that EL backlight operation consumes large amounts of electrical
power and can greatly shorten battery life.• Note that frequent or extended use of the EL backlight shortens battery
life.
The following shows how backlight use affects battery life under controlledtest conditions*. For comparison with the values below, battery life isnormally approximately 180 hours of continuous display in the ContactsMode when no backlight operation is performed.
* Test Conditions• “Battery Life” is the number of hours before battery failure when
the unit is left on (5 minutes of a processing operation and 55 minutesof continuous display only (no processing operation) per hour in theContacts Mode, plus the backlight operation described below). Theabove values assume ambient temperature of 20°C, starting with afresh set of new batteries.
• “Backlight Operation” is the number of minutes the backlight isturned on per hour during the display only (no processing operation)period.
• Be sure to use alkaline batteries. Manganese batteries provide veryshort battery life.
Backlight Operation Battery Life3 minutes per hour Approximately 80 hours15 minutes per hour Approximately 35 hours
5
Turning On the PV UnitYou can turn on the PV Unit by clicking the Action control. You can also set upthe PV Unit so it turns on when you tap its screen with the stylus (screen tappower on).
Note• Use the procedure under “To turn the screen tap power on feature on and off”
on page 21 to control the screen tap power on setting.• The screen tap power on feature is turned on when you use the PV Unit for
the first time after purchasing it.

6
Chapter 1
Before using the PV-S460/PV-S660 for the first time… ........... 1
Getting Acquainted ............................................. 14
Read this first! ................................................................................................... 14Make backup copies of important data! ............................................................. 14Important Precautions ....................................................................................... 15Data Errors ........................................................................................................ 16
To reset after viewing data ............................................................................................... 16General Guide ................................................................................................... 17Using the Cover ................................................................................................. 18
To remove the cover ......................................................................................................... 18To replace the cover ......................................................................................................... 18
Power Supply .................................................................................................... 19Low Battery Warning ....................................................................................................... 19Battery Precautions .......................................................................................................... 19To replace the batteries ..................................................................................................... 21To turn power on and off .................................................................................................. 21To turn the screen tap power on feature on and off .......................................................... 21Auto Power Off ................................................................................................................ 22
Configuring the Start-up Screen ........................................................................ 22To select a start-up screen ................................................................................................ 22To enable and disable start-up screen operation .............................................................. 22
Using the Backlight ............................................................................................ 23To specify the backlight duration ..................................................................................... 23About the EL backlight .................................................................................................... 23
Action Control and Stylus .................................................................................. 24Stylus ................................................................................................................................ 24Action Control .................................................................................................................. 24
Using the Icon Menu ......................................................................................... 25Modes ................................................................................................................ 26
To enter a mode using the icon menu ............................................................................... 26To enter a mode using the on-screen icon menu .............................................................. 27To enter a mode using the Action Menu .......................................................................... 27
Customizing the Appearance of the Mode Menu .............................................. 28Swapping Two Icons ........................................................................................................ 28Moving an Icon to a Specific Location ............................................................................ 28
Contents
7
Scheduler ............................................................ 29
Entering the Scheduler Mode ............................................................................ 29Inputting New Scheduler Data ........................................................................... 29
To input a single-date Schedule item ............................................................................... 30To input a multiple-date Schedule item with the New button .......................................... 30To input a To Do item....................................................................................................... 31To input a Reminder item ................................................................................................. 32
Reminder Types and Settings ........................................................................... 33Importing Contacts Data Into a Schedule Item .................................................. 34
To import Contacts data into a Schedule item ................................................................. 35Viewing Scheduler Data .................................................................................... 37
Screen Organization ......................................................................................................... 37Calendar Screens .............................................................................................................. 38Periodic Schedule Screens ............................................................................................... 41Schedule Data Screen ....................................................................................................... 44Reminder Screens ............................................................................................................ 45To Do Screens .................................................................................................................. 46
Date Highlighting ............................................................................................... 48To highlight dates ............................................................................................................. 48To unhighlight dates ......................................................................................................... 48
Jumping to a Specific Date ................................................................................ 49Renaming To Do Categories ............................................................................. 49
Contacts .............................................................. 50
Entering the Contacts Mode .............................................................................. 50To enter the Contacts Mode from the icon menu ............................................................. 50To enter the Contacts Mode from the Action Menu ......................................................... 50To enter the Contacts Mode from the Mode Menu using the stylus ................................ 50
Changing the Display Category ......................................................................... 51Latest Calls List ................................................................................................. 52Resizing Contacts List Screen Columns ........................................................... 52Inputting New Contacts Data ............................................................................. 53Viewing Contacts Data ...................................................................................... 54
To view Business data ...................................................................................................... 54To view other data ............................................................................................................ 55
Changing Contacts List Screen Contents ......................................................... 56To change the contents of a category’s list ....................................................................... 56
Changing Contacts Input Screen Contents ....................................................... 57To change the contents of a category’s input screen ........................................................ 57
Managing Untitled Categories and Free Entries ............................................... 58Contacts Categories .......................................................................................................... 58To edit Contacts Untitled category and Free entry names ............................................... 59
Copying Data Items Between the Personal and Business Categories .............. 60Exporting Contacts Data Into a Schedule Item ................................................. 60
Chapter 3
Chapter 2
8
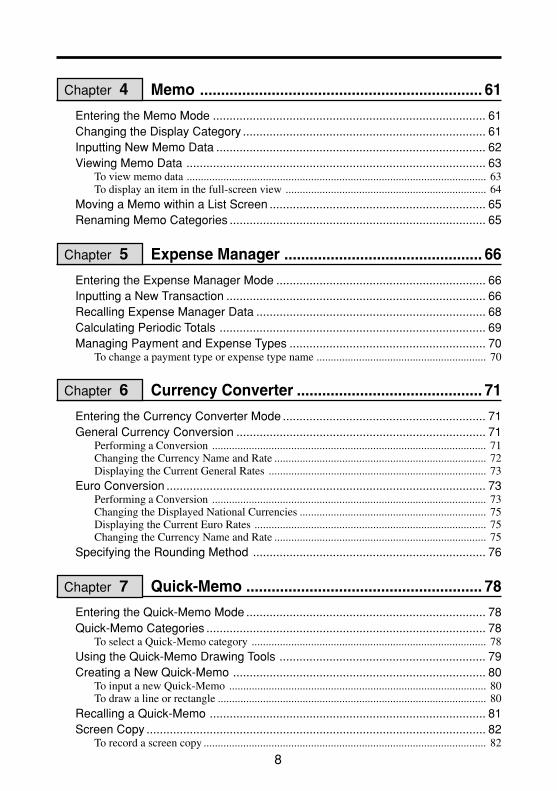
Memo ................................................................... 61
Entering the Memo Mode .................................................................................. 61Changing the Display Category ......................................................................... 61Inputting New Memo Data ................................................................................. 62Viewing Memo Data .......................................................................................... 63
To view memo data .......................................................................................................... 63To display an item in the full-screen view ....................................................................... 64
Moving a Memo within a List Screen ................................................................. 65Renaming Memo Categories ............................................................................. 65
Expense Manager ............................................... 66
Entering the Expense Manager Mode ............................................................... 66Inputting a New Transaction .............................................................................. 66Recalling Expense Manager Data ..................................................................... 68Calculating Periodic Totals ................................................................................ 69Managing Payment and Expense Types ........................................................... 70
To change a payment type or expense type name ............................................................ 70
Currency Converter ............................................ 71
Entering the Currency Converter Mode ............................................................. 71General Currency Conversion ........................................................................... 71
Performing a Conversion ................................................................................................. 71Changing the Currency Name and Rate ........................................................................... 72Displaying the Current General Rates ............................................................................. 73
Euro Conversion ................................................................................................ 73Performing a Conversion ................................................................................................. 73Changing the Displayed National Currencies .................................................................. 75Displaying the Current Euro Rates .................................................................................. 75Changing the Currency Name and Rate ........................................................................... 75
Specifying the Rounding Method ...................................................................... 76
Quick-Memo ........................................................ 78
Entering the Quick-Memo Mode ........................................................................ 78Quick-Memo Categories .................................................................................... 78
To select a Quick-Memo category ................................................................................... 78Using the Quick-Memo Drawing Tools .............................................................. 79Creating a New Quick-Memo ............................................................................ 80
To input a new Quick-Memo ........................................................................................... 80To draw a line or rectangle ............................................................................................... 80
Recalling a Quick-Memo ................................................................................... 81Screen Copy ...................................................................................................... 82
To record a screen copy .................................................................................................... 82
Chapter 6
Chapter 5
Chapter 4
Chapter 7
9
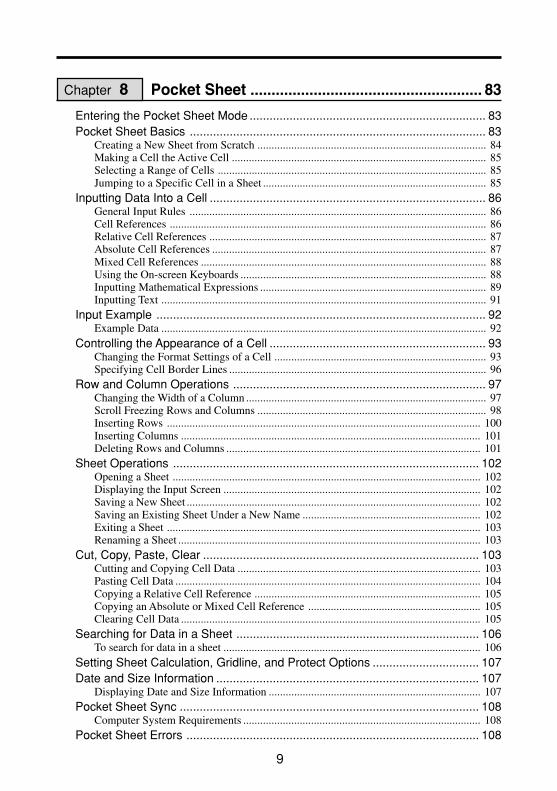
Pocket Sheet ....................................................... 83
Entering the Pocket Sheet Mode ....................................................................... 83Pocket Sheet Basics ......................................................................................... 83
Creating a New Sheet from Scratch ................................................................................. 84Making a Cell the Active Cell .......................................................................................... 85Selecting a Range of Cells ............................................................................................... 85Jumping to a Specific Cell in a Sheet ............................................................................... 85
Inputting Data Into a Cell ................................................................................... 86General Input Rules ......................................................................................................... 86Cell References ................................................................................................................ 86Relative Cell References .................................................................................................. 87Absolute Cell References ................................................................................................. 87Mixed Cell References ..................................................................................................... 88Using the On-screen Keyboards ....................................................................................... 88Inputting Mathematical Expressions ................................................................................ 89Inputting Text ................................................................................................................... 91
Input Example ................................................................................................... 92Example Data ................................................................................................................... 92
Controlling the Appearance of a Cell ................................................................. 93Changing the Format Settings of a Cell ........................................................................... 93Specifying Cell Border Lines ........................................................................................... 96
Row and Column Operations ............................................................................ 97Changing the Width of a Column ..................................................................................... 97Scroll Freezing Rows and Columns ................................................................................. 98Inserting Rows ............................................................................................................... 100Inserting Columns .......................................................................................................... 101Deleting Rows and Columns .......................................................................................... 101
Sheet Operations ............................................................................................ 102Opening a Sheet ............................................................................................................. 102Displaying the Input Screen ........................................................................................... 102Saving a New Sheet ........................................................................................................ 102Saving an Existing Sheet Under a New Name ............................................................... 102Exiting a Sheet ............................................................................................................... 103Renaming a Sheet ........................................................................................................... 103
Cut, Copy, Paste, Clear ................................................................................... 103Cutting and Copying Cell Data ...................................................................................... 103Pasting Cell Data ............................................................................................................ 104Copying a Relative Cell Reference ................................................................................ 105Copying an Absolute or Mixed Cell Reference ............................................................. 105Clearing Cell Data .......................................................................................................... 105
Searching for Data in a Sheet ......................................................................... 106To search for data in a sheet ........................................................................................... 106
Setting Sheet Calculation, Gridline, and Protect Options ................................ 107Date and Size Information ............................................................................... 107
Displaying Date and Size Information ........................................................................... 107Pocket Sheet Sync .......................................................................................... 108
Computer System Requirements .................................................................................... 108Pocket Sheet Errors ........................................................................................ 108
Chapter 8

10
Secret Function................................................. 109
Creating a New Secret Memory Area .............................................................. 109Using the Secret Memory Area ....................................................................... 110
To enter an existing secret memory area ........................................................................ 110To exit the secret memory area ...................................................................................... 110To change your password ............................................................................................... 110To transfer data from the open memory area to the secret memory area ....................... 111To transfer data from the secret memory area to the open memory area ....................... 111
Pop Up Tools ..................................................... 112
Displaying the Pop Up Tool Screen ................................................................. 112Using the Clock Screen ................................................................................... 112
To display the clock screen ............................................................................................ 113To make one of the clocks the main clock ..................................................................... 113To select a time zone city ............................................................................................... 114To switch between standard time and daylight saving time (DST) ................................ 114
Using the Calculator Screen ............................................................................ 114To display the calculator ................................................................................................ 114Calculator Keys .............................................................................................................. 115To perform calculations .................................................................................................. 116To perform constant calculations ................................................................................... 117To correct entries during calculations ............................................................................ 117About calculation errors ................................................................................................. 117To clear an error ............................................................................................................. 118
Next Appointment Screen ................................................................................ 118To display the next appointment screen ......................................................................... 118
Chapter 10
Chapter 9
11
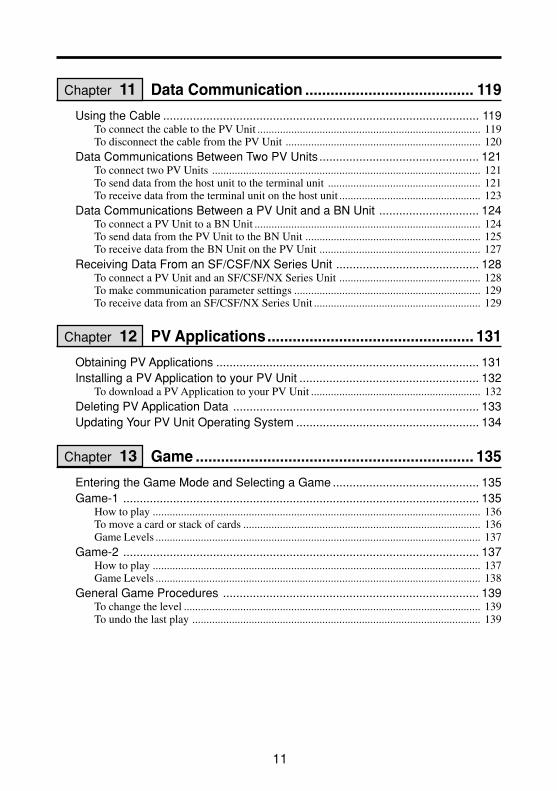
Data Communication ........................................ 119
Using the Cable ............................................................................................... 119To connect the cable to the PV Unit ............................................................................... 119To disconnect the cable from the PV Unit ..................................................................... 120
Data Communications Between Two PV Units ................................................ 121To connect two PV Units ............................................................................................... 121To send data from the host unit to the terminal unit ...................................................... 121To receive data from the terminal unit on the host unit .................................................. 123
Data Communications Between a PV Unit and a BN Unit .............................. 124To connect a PV Unit to a BN Unit ................................................................................ 124To send data from the PV Unit to the BN Unit .............................................................. 125To receive data from the BN Unit on the PV Unit ......................................................... 127
Receiving Data From an SF/CSF/NX Series Unit ........................................... 128To connect a PV Unit and an SF/CSF/NX Series Unit .................................................. 128To make communication parameter settings .................................................................. 129To receive data from an SF/CSF/NX Series Unit ........................................................... 129
PV Applications................................................. 131
Obtaining PV Applications ............................................................................... 131Installing a PV Application to your PV Unit ...................................................... 132
To download a PV Application to your PV Unit ............................................................ 132Deleting PV Application Data .......................................................................... 133Updating Your PV Unit Operating System ....................................................... 134
Game .................................................................. 135
Entering the Game Mode and Selecting a Game ............................................ 135Game-1 ........................................................................................................... 135
How to play .................................................................................................................... 136To move a card or stack of cards .................................................................................... 136Game Levels ................................................................................................................... 137
Game-2 ........................................................................................................... 137How to play .................................................................................................................... 137Game Levels ................................................................................................................... 138
General Game Procedures ............................................................................. 139To change the level ......................................................................................................... 139To undo the last play ...................................................................................................... 139
Chapter 11
Chapter 12
Chapter 13

12
General Reference ............................................ 140
Scroll Bars ....................................................................................................... 140Action Control Scrolling ................................................................................... 141Menu Bar ......................................................................................................... 141
To execute a menu bar command ................................................................................... 141Data Input and Editing ..................................................................................... 141
Moving Between Entries (Fields) .................................................................................. 142On-screen Keyboards ..................................................................................................... 142Time Setting Screens ...................................................................................................... 144Selecting a Range of Text by Dragging ......................................................................... 146Cut, Copy, Paste ............................................................................................................. 147
Initial Default Dates for new items ................................................................... 148Scheduler ........................................................................................................................ 148Expense Manager ........................................................................................................... 148
Closing a Screen ............................................................................................. 148Using the Quick Find Feature .......................................................................... 149
To input a word with the Quick Find feature ................................................................. 149Editing Data Items ........................................................................................... 150Creating a Copy of a Data Item ....................................................................... 150Deleting Data ................................................................................................... 151Searching for Data .......................................................................................... 153
To perform a search ........................................................................................................ 153Search Results ................................................................................................................ 154
Changing the Display Font .............................................................................. 155Program Version Information ........................................................................... 155
To display version information ...................................................................................... 156
Configuring the Unit ......................................... 157
Setting the Date, Time, and Auto Power Off Interval ....................................... 157Turning Sound On and Off .............................................................................. 158Setting a Daily Alarm Time .............................................................................. 158Setting the Date, Time, Calendar, and Keyboard Formats .............................. 159Setting the System Language ......................................................................... 160Adjusting Display Contrast .............................................................................. 160Calibrating the Touch Screen .......................................................................... 161Checking Memory Capacity ............................................................................ 161Memory Management ..................................................................................... 162
To perform memory management .................................................................................. 162
Chapter 14
Chapter 15

13
Technical Reference ......................................... 163
Date Formats ................................................................................................... 163Time Formats .................................................................................................. 163Tool Bars ......................................................................................................... 164Keyboard Formats ........................................................................................... 166Scheduler Mode Alarms .................................................................................. 166Input Limits ...................................................................................................... 167Resetting the PV Unit ...................................................................................... 167Euro Conversion Rate Presets ........................................................................ 169Storage Capacity ............................................................................................. 170Auto Sort Sequence ........................................................................................ 171City Name List ................................................................................................. 172Message Table ................................................................................................ 174Troubleshooting ............................................................................................... 179
Power Supply ................................................................................................................. 179Display Contrast ............................................................................................................. 180Key Tone ........................................................................................................................ 180Operation ........................................................................................................................ 181Data Communication ..................................................................................................... 182
Specifications .................................................................................................. 183
Chapter 16

14
Chapter
1 Getting Acquainted
Read this first!• Be sure to read this part of the User’s Guide before doing anything else! It
includes important information that you need to know in order to use thePV-S460/PV-S660 (hereinafter referred to as the “PV Unit”) correctly.
• You can find more detailed information about other PV Unit operations in“Chapter 14 – General Reference” on page 140 and “Chapter 16 – TechnicalReference” on page 163.
Important!Please keep this User’s Guide and all information handy for future reference.
NoteThe screen shots shown in this User’s Guide may differ slightly from the displaysactually produced by your PV Unit.
Make backup copies of important data!Your PV Unit employs flash memory, which makes it possible to store largevolumes of data and to recall data quickly and easily. Data is retained when poweris turned off and even when batteries go dead, but it can be corrupted or lostentirely due to operational mistakes or malfunction. Data contents can also becorrupted or lost due to strong electrostatic charge, strong impact, or extremes intemperature and humidity. All of this means that you should always keep back-upcopies of important data by transferring it to a personal computer or by writing itdown somewhere.
15
Chapter 1 Getting Acquainted
Important PrecautionsNote the following important precautions whenever using your PV Unit.
• Never expose the PV Unit to fire.• Avoid temperature extremes. Do not locate the PV Unit in direct sunlight,
near a window, near a heater, etc.• In very low temperatures display response may slow down or fail entirely.
This condition is temporary and operation should resume under normaltemperatures.
• Avoid areas subject to excessive moisture, dirt, and dust.• Avoid dropping the PV Unit and otherwise subjecting it to strong impact.• Never bend or twist the PV Unit.• Never try to take the PV Unit apart.• Make sure nothing gets between the hard cover and the touch screen.
Besides creating the risk of scratching the touch screen, an object cominginto contact with the screen can cause power to turn on and run downthe batteries.
• Do not use a pen, pencil, or other sharp object to touch or press thedisplay.
• To clean the exterior of the PV Unit, wipe it with a soft cloth dampenedin a weak solution of a mild neutral detergent and water. Be sure towring out any excess moisture from the cloth before wiping off the PVUnit. Never use benzene, thinner, or any other volatile agent to cleanthe unit. Doing so can remove the figures printed on the case or otherwisedamage the case finish.
• The contents of this manual are subject to change without notice.• CASIO COMPUTER CO., LTD. assumes no responsibility for any loss
or claims by third parties that may arise from the use of this product.
16
Chapter 1 Getting Acquainted
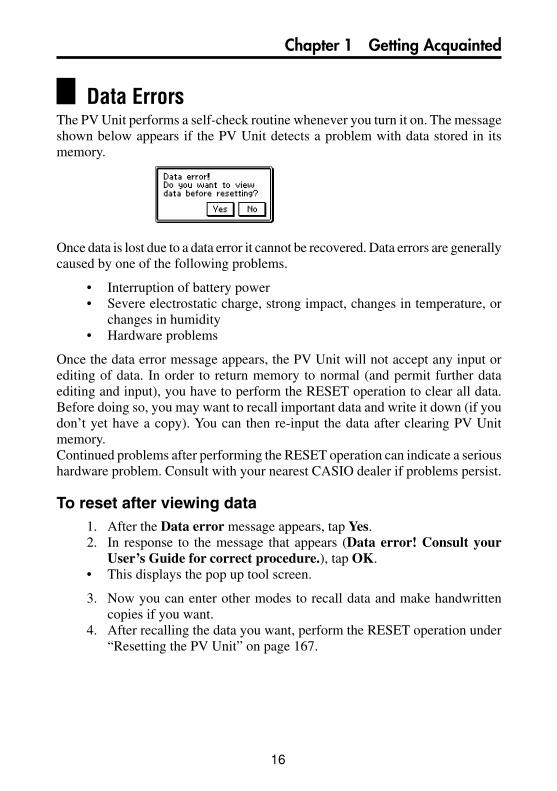
Data ErrorsThe PV Unit performs a self-check routine whenever you turn it on. The messageshown below appears if the PV Unit detects a problem with data stored in itsmemory.
Once data is lost due to a data error it cannot be recovered. Data errors are generallycaused by one of the following problems.
• Interruption of battery power• Severe electrostatic charge, strong impact, changes in temperature, or
changes in humidity• Hardware problems
Once the data error message appears, the PV Unit will not accept any input orediting of data. In order to return memory to normal (and permit further dataediting and input), you have to perform the RESET operation to clear all data.Before doing so, you may want to recall important data and write it down (if youdon’t yet have a copy). You can then re-input the data after clearing PV Unitmemory.Continued problems after performing the RESET operation can indicate a serioushardware problem. Consult with your nearest CASIO dealer if problems persist.
To reset after viewing data1. After the Data error message appears, tap Yes.2. In response to the message that appears (Data error! Consult your
User’s Guide for correct procedure.), tap OK.• This displays the pop up tool screen.
3. Now you can enter other modes to recall data and make handwrittencopies if you want.
4. After recalling the data you want, perform the RESET operation under“Resetting the PV Unit” on page 167.
17
Chapter 1 Getting Acquainted
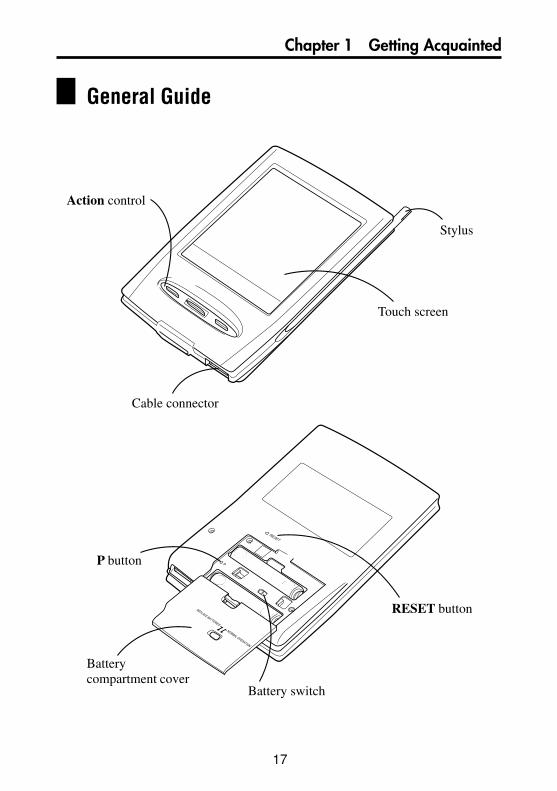
General Guide
Batterycompartment cover
Stylus
Touch screen
Action control
Cable connector
P
RESET
REPLACE BATTERIES
NORMAL OPERATION
RESET button
Battery switch
P button

18
Chapter 1 Getting Acquainted
Using the Cover
To remove the coverPressing down lightly on the center of the cover with your middle threefingers, pull upwards on the bottom of the cover with your thumb, and thenlift up to remove it.
To replace the cover1. Hook the tab on the top of the cover into the groove in the PV Unit.
2. Swing the cover down and press the bottom against the PV Unit until itsnaps securely into place.
Pull here.
Groove
Cover hook
19
Chapter 1 Getting Acquainted
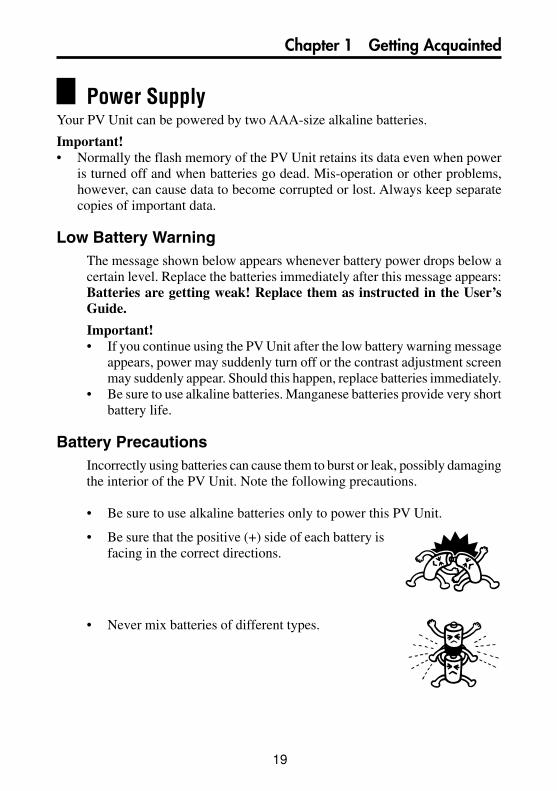
Power SupplyYour PV Unit can be powered by two AAA-size alkaline batteries.
Important!• Normally the flash memory of the PV Unit retains its data even when power
is turned off and when batteries go dead. Mis-operation or other problems,however, can cause data to become corrupted or lost. Always keep separatecopies of important data.
Low Battery WarningThe message shown below appears whenever battery power drops below acertain level. Replace the batteries immediately after this message appears:Batteries are getting weak! Replace them as instructed in the User’sGuide.
Important!• If you continue using the PV Unit after the low battery warning message
appears, power may suddenly turn off or the contrast adjustment screenmay suddenly appear. Should this happen, replace batteries immediately.
• Be sure to use alkaline batteries. Manganese batteries provide very shortbattery life.
Battery PrecautionsIncorrectly using batteries can cause them to burst or leak, possibly damagingthe interior of the PV Unit. Note the following precautions.
• Be sure to use alkaline batteries only to power this PV Unit.
• Be sure that the positive (+) side of each battery isfacing in the correct directions.
• Never mix batteries of different types.

20
Chapter 1 Getting Acquainted
• Never mix old batteries and new ones.
• Do not expose batteries to direct heat, let them become shorted, or try totake them apart.
• Never leave dead batteries in the batterycompartment.
• Remove the batteries if you do not plan to use the PV Unit for a longtime.
• Replace batteries at least once every year, no matter how much you usethe PV Unit during that period.
• About once a month, turn on the PV Unit and check its battery level. Ifthe low battery warning appears or if nothing at all appears on the display,replace batteries as soon as possible.
• Never try to recharge the batteries that come withthe PV Unit.
• Should a battery leak, clean out the battery compartment of the PV Unitimmediately, taking care to avoid letting battery fluid come into directcontact with your skin.
Keep batteries out of the reach of small children. If swallowed, consultwith a physician immediately.
• Frequent data synchronization using the PC sync for Windowsapplication that comes with the PV Unit shortens battery life.
• The batteries that come with this unit discharge slightly duringshipment and storage. Because of this, they may require replacementsooner than the normal expected battery life.
21
Chapter 1 Getting Acquainted
To replace the batteries
Important!• Always make sure the battery switch is in the NORMAL OPERATION
position at all times, except when replacing batteries.
1. Turn off PV Unit power.2. Remove both of the old batteries and replace them with new ones,
referring to the procedure on pages 1 through 3.
To turn power on and off1. Touch anywhere on the PV Unit screen or click the Action control to
turn on power.2. To turn power off, tap Off with the stylus.• You can disable screen tap power on (so power can be turned on only by
clicking the Action control) using the procedure below.
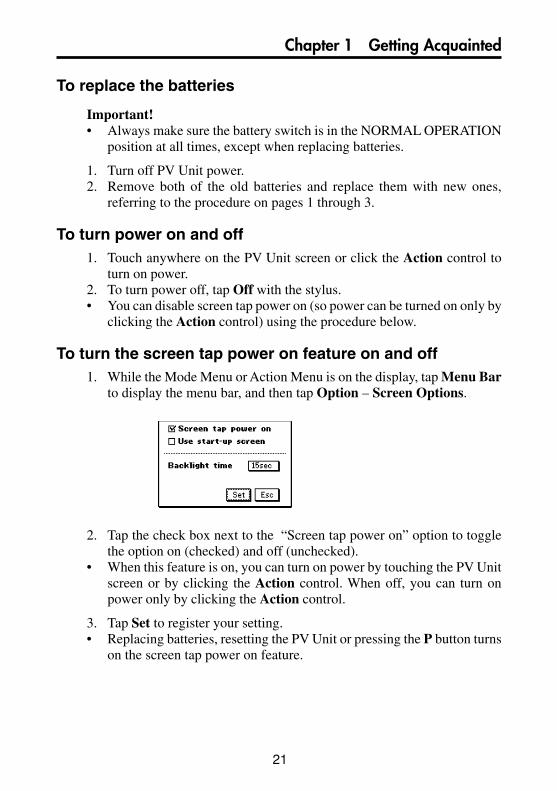
To turn the screen tap power on feature on and off1. While the Mode Menu or Action Menu is on the display, tap Menu Bar
to display the menu bar, and then tap Option – Screen Options.
2. Tap the check box next to the “Screen tap power on” option to togglethe option on (checked) and off (unchecked).
• When this feature is on, you can turn on power by touching the PV Unitscreen or by clicking the Action control. When off, you can turn onpower only by clicking the Action control.
3. Tap Set to register your setting.• Replacing batteries, resetting the PV Unit or pressing the P button turns
on the screen tap power on feature.

22
Chapter 1 Getting Acquainted
Auto Power OffThe Auto Power Off function automatically turns off power wheneveryou do not perform any operation for a specified period. You can specify1 minute, 3 minutes, or 6 minutes before Auto Power Off is triggered(page 157).Use the procedure described under “To turn power on and off” above toturn power back on.
Configuring the Start-up ScreenYou can select a Quick-Memo (page 78) and use its contents as a start-up screenimage. You can even use images from a personal computer, which you transfer toQuick-Memo using PC sync for Windows.
To select a start-up screen1. Enter the Quick-Memo Mode.2. Select the Quick-Memo whose data you want to use as the start-up screen.• You can select a Quick-Memo by displaying its data screen.
3. Tap Menu Bar to display the menu bar, and then tap Option – Start-Up Screen.
• This specifies the data of the Quick-Memo you selected as the start-upscreen, and enables start-up screen operation.
To enable and disable start-up screen operation1. While the Mode Menu or Action Menu is on the display, tap Menu Bar
to display the menu bar, and then tap Option – Screen Options.2. On the configuration screen that appears, tap the check box next to the
“Use start-up screen” option to toggle it on (checked) and off(unchecked).
3. Tap Set to register your setting.
23
Chapter 1 Getting Acquainted
Using the BacklightTapping the icon beneath the PV Unit screen illuminates the display screenfor easy viewing in the dark. You can specify a duration of 15 seconds or 30seconds for the backlight.
To specify the backlight duration1. While the Mode Menu or Action Menu is on the display, tap Menu Bar
to display the menu bar, and then tap Option – Screen Options.2. On the configuration screen that appears, tap the box next to “Backlight
time” to toggle it between 15sec (15 seconds) and 30sec (30 seconds).3. Tap Set to register your setting.
About the EL backlight• Tapping the icon while the backlight is on turns it off.• The backlight may fail to turn on when battery power is low and during
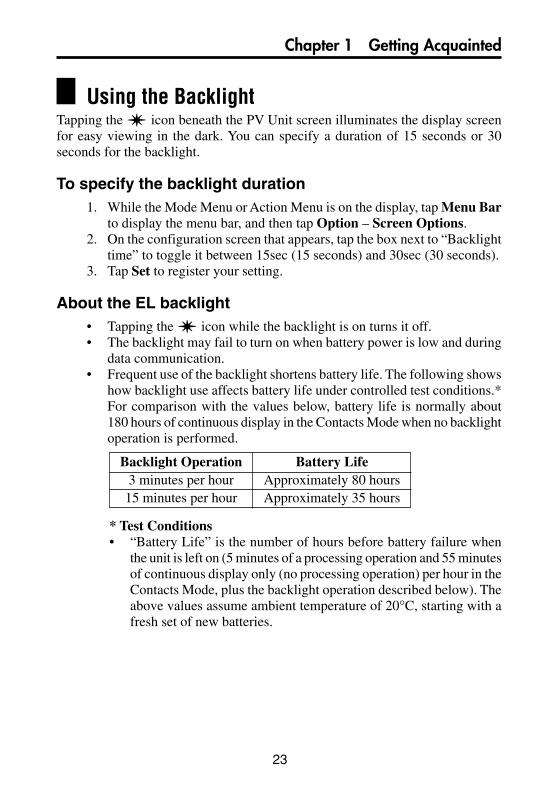
data communication.• Frequent use of the backlight shortens battery life. The following shows
how backlight use affects battery life under controlled test conditions.*For comparison with the values below, battery life is normally about180 hours of continuous display in the Contacts Mode when no backlightoperation is performed.
* Test Conditions• “Battery Life” is the number of hours before battery failure when
the unit is left on (5 minutes of a processing operation and 55 minutesof continuous display only (no processing operation) per hour in theContacts Mode, plus the backlight operation described below). Theabove values assume ambient temperature of 20°C, starting with afresh set of new batteries.
Backlight Operation Battery Life3 minutes per hour Approximately 80 hours
15 minutes per hour Approximately 35 hours
24
Chapter 1 Getting Acquainted
• “Backlight Operation” is the number of minutes the backlight isturned on per hour during the display only (no processing operation)period.
• Be sure to use alkaline batteries. Manganese batteries provide veryshort battery life.
Action Control and StylusMany of the PV Unit’s operations can be performed using either a stylus or theAction control. The following describes the general operations that can beperformed with each.
StylusThe stylus takes the place of a computer mouse. You can perform all PVUnit operations with the stylus. In this manual, all data input operations aredescribed using stylus operations.
You can perform the following basic operations with the stylus.
• TapTap the tip of the stylus on the display to press a button, select an item,select a data input field, etc.
• Double-tapTap the display twice in relatively quick succession.
• DragTouch the tip of the stylus to the screen, and drag it across the screen toselect a range of text, draw a line, etc.
Action ControlThe Action control makes it possible to perform certain PV Unit operationswith one hand. In this manual, many data recall operations are describedusing Action control operations.
You can perform the following basic operations with the Action control.

25
Chapter 1 Getting Acquainted
• ClickPressing the center of the Action control is like a “click” on a computermouse. Clicking the Action control executes the command that is highlightedon the display, executes the function assigned to the button whose name isenclosed by a dotted line (such as ), switching between a list and adata screen, etc.
• Left/Right ScrollPressing the left or right end of the Action control causes movement in thecorresponding direction. You can use left/right scroll to move the cursor,select a cell, etc.
• Up/Down ScrollRocking the center of the Action control upwards or downwards causesmovement in the corresponding direction. You can use up/down scroll tomove the cursor between lines, select a cell, display previous or next items,etc.
Using the Icon MenuThe PV Unit has an icon menu beneath its display screen. You can tap these iconsto perform various functions no matter what mode you are using.
26
Chapter 1 Getting Acquainted
ModesWith most PV Unit operations, you must first enter a mode before you can inputor view data. You can use any of the following methods to enter a mode.
• Tap an icon in the icon menu beneath the display screen• Tap an on-screen icon in the Mode Menu• Select a mode on the Action Menu with the stylus or Action control
Note• All the procedures in this User’s Guide are performed using the icon menu
whenever possible.
To enter a mode using the icon menuUse the stylus to tap on the icon for the mode you want to enter.
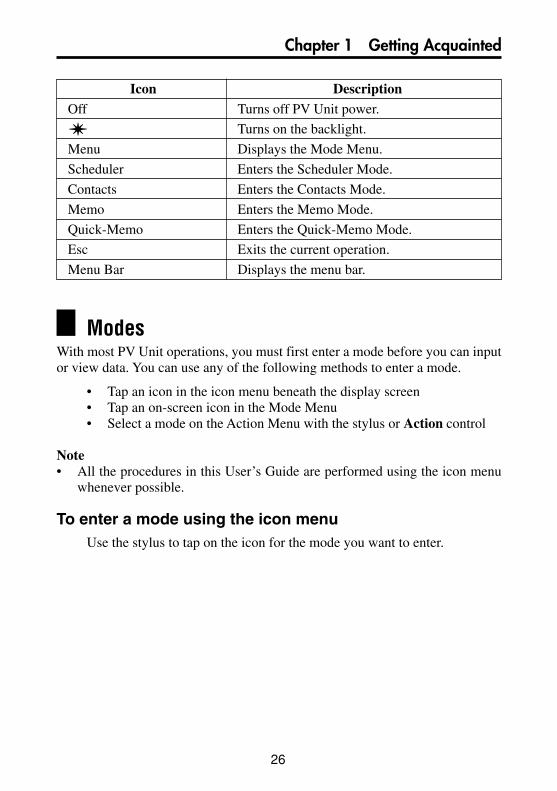
Icon DescriptionOff Turns off PV Unit power.
Turns on the backlight.
Menu Displays the Mode Menu.
Scheduler Enters the Scheduler Mode.
Contacts Enters the Contacts Mode.
Memo Enters the Memo Mode.
Quick-Memo Enters the Quick-Memo Mode.
Esc Exits the current operation.
Menu Bar Displays the menu bar.
27
Chapter 1 Getting Acquainted
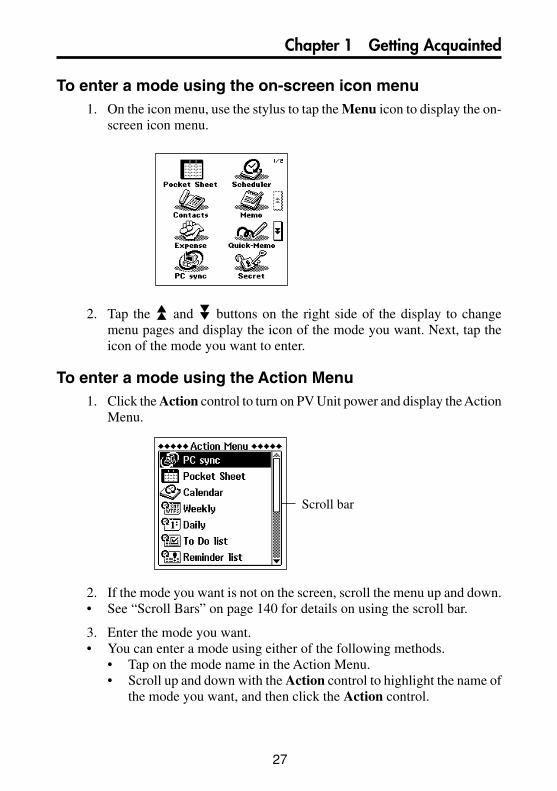
To enter a mode using the on-screen icon menu1. On the icon menu, use the stylus to tap the Menu icon to display the on-
screen icon menu.
2. Tap the “ and ‘ buttons on the right side of the display to changemenu pages and display the icon of the mode you want. Next, tap theicon of the mode you want to enter.
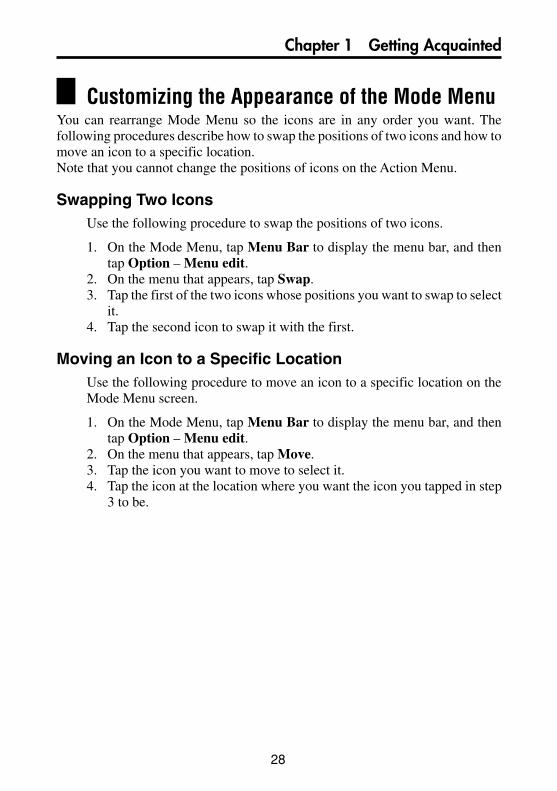
To enter a mode using the Action Menu1. Click the Action control to turn on PV Unit power and display the Action
Menu.
2. If the mode you want is not on the screen, scroll the menu up and down.• See “Scroll Bars” on page 140 for details on using the scroll bar.
3. Enter the mode you want.• You can enter a mode using either of the following methods.
• Tap on the mode name in the Action Menu.• Scroll up and down with the Action control to highlight the name of
the mode you want, and then click the Action control.
Scroll bar
28
Chapter 1 Getting Acquainted
Customizing the Appearance of the Mode MenuYou can rearrange Mode Menu so the icons are in any order you want. Thefollowing procedures describe how to swap the positions of two icons and how tomove an icon to a specific location.Note that you cannot change the positions of icons on the Action Menu.
Swapping Two IconsUse the following procedure to swap the positions of two icons.
1. On the Mode Menu, tap Menu Bar to display the menu bar, and thentap Option – Menu edit.
2. On the menu that appears, tap Swap.3. Tap the first of the two icons whose positions you want to swap to select
it.4. Tap the second icon to swap it with the first.
Moving an Icon to a Specific LocationUse the following procedure to move an icon to a specific location on theMode Menu screen.
1. On the Mode Menu, tap Menu Bar to display the menu bar, and thentap Option – Menu edit.
2. On the menu that appears, tap Move.3. Tap the icon you want to move to select it.4. Tap the icon at the location where you want the icon you tapped in step
3 to be.
29
Chapter
2 Scheduler
The Scheduler Mode provides you with a selection of powerful schedulemanagement tools that help to keep you on time all the time. In addition toSchedule, Reminder, and To Do tools, you can select from among a variety ofdifferent screens to view your appointments on a monthly, weekly, or daily basis.You can even set alarms to help make sure you never miss an importantappointment or event.
Entering the Scheduler ModeOn the icon menu beneath the display screen, tap the Scheduler icon. This entersthe Scheduler Mode and displays the 1-month Calendar screen.
Now you can maneuver around the Scheduler Mode to input and recall data.
Inputting New Scheduler DataThis section describes how to input Schedule, To Do, and Reminder data. Notethat a Schedule item can be input as a “single-date” item (an appointment thatstarts and ends on the same day) or a “multiple-date” item (an appointment thatspans more than one day). You can input a new multiple-date item with the Newbutton or with the calendar screen.

30
Chapter 2 Scheduler
To input a single-date Schedule item1. While any Scheduler Mode data screen is on the display, tap New.2. On the menu that appears, tap Schedule.
2
1
3
3. If you want to change the date of the appointment, tap the displayeddate and then use the date keyboard that appears to make the changesyou want. Tap NEXT to advance to the appointment time.
4. Use the time keyboard that appears to input the start time and end timeif you want, and then tap NEXT to advance to the alarm time.
5. Use the time keyboard to input the Schedule alarm time if you want, andthen tap NEXT to advance to description text input.
6. Use the text keyboard to type text that describes the item.7. After the item is the way you want, tap Save to store it.• In addition to a date, you must input description text or a start time. The
PV Unit will refuse to store the item if it does not contain a date plusdescription text or a start time.
To input a multiple-date Schedule item with the Newbutton
1. While any Scheduler Mode data screen is on the display, tap New.2. On the menu that appears, tap Multi-date item.• If you drag the stylus across a range of dates on the 1-Month Calendar
screen (page 38), a multiple-date item is created with the correspondingrange of dates.
1 Data input tool bar2 Date3 Time bar
31
Chapter 2 Scheduler
3. Tap the date you want to change and then input the year, month, andday.
4. Tap NEXT to advance to the description text input screen.5. Input text that describes the item.6. After the item is the way you want it, tap Save to store it.• Note that you must input a start date, end date, and description text. The
PV Unit will refuse to store the item if it does not contain a start date,end date, and description text.
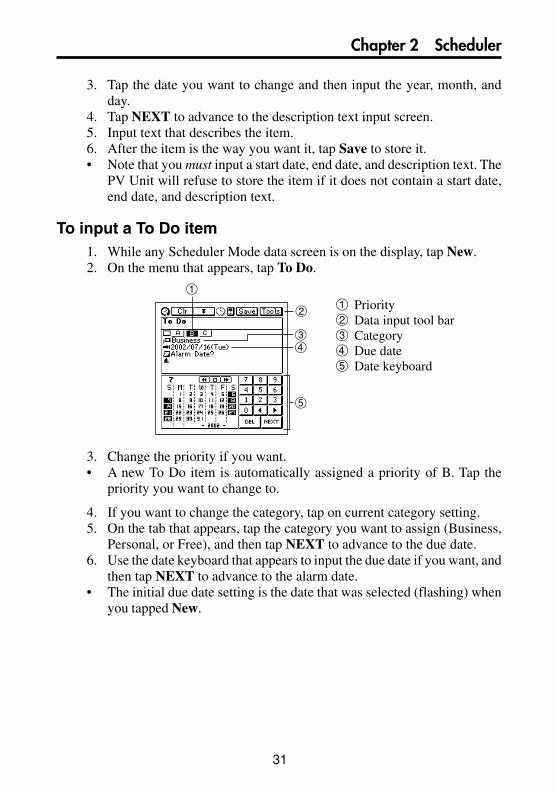
To input a To Do item1. While any Scheduler Mode data screen is on the display, tap New.2. On the menu that appears, tap To Do.
1
2
34
5
3. Change the priority if you want.• A new To Do item is automatically assigned a priority of B. Tap the
priority you want to change to.
4. If you want to change the category, tap on current category setting.5. On the tab that appears, tap the category you want to assign (Business,
Personal, or Free), and then tap NEXT to advance to the due date.6. Use the date keyboard that appears to input the due date if you want, and
then tap NEXT to advance to the alarm date.• The initial due date setting is the date that was selected (flashing) when
you tapped New.
1 Priority2 Data input tool bar3 Category4 Due date5 Date keyboard

32
Chapter 2 Scheduler
7. Use the date keyboard that appears to input an alarm date if you want,and then tap NEXT to advance to the alarm time.
8. Use the time keyboard that appears to input an alarm time if you want.• If you input an alarm time, be sure to also input an alarm date. You will
not be able to store the data item if you input an alarm time without analarm date.
9. Tap NEXT to advance to description text input.10. Use the text keyboard to type text that describes the item.11. After the item is the way you want it, tap Save to store it.• In addition to a due date, you must input description text. The PV Unit
will refuse to store the item if it does not contain a due date and descriptiontext.
To input a Reminder item1. While any Scheduler Mode data screen is on the display, tap New.2. On the menu that appears, tap Reminder.
1
23
4
5
3. If you want to change the start and/or end date of the reminder, tap thedisplayed date and then use the date keyboard that appears to make thechanges you want. Tap NEXT to advance to the reminder time.
4. Use the time keyboard that appears to input the start time and end timeif you want, and then tap NEXT to advance to the alarm time.
1 Data input tool bar2 Start date3 End date4 Reminder type5 Date keyboard

33
Chapter 2 Scheduler
Buttons Selected day of the week
Reminder type
5. Use the time keyboard to input the Reminder alarm time if you want,and then tap NEXT to advance to the Reminder type screen.
6. Input the required data for the Reminder type you select, and then tapNEXT to advance to description text input.
• If you input data incorrectly (with a Reminder date that does not fallbetween the start date and end date, for example), the PV Unit will refuseto store the data item when you tap Save below.
7. Use the text keyboard to type text that describes the item.8. After the item is the way you want it, tap Save to store it.• In addition to a start date and end date, you must input description text
or a start time. The PV Unit will refuse to store the item if it does notcontain a start date and end date plus description text or a start time.
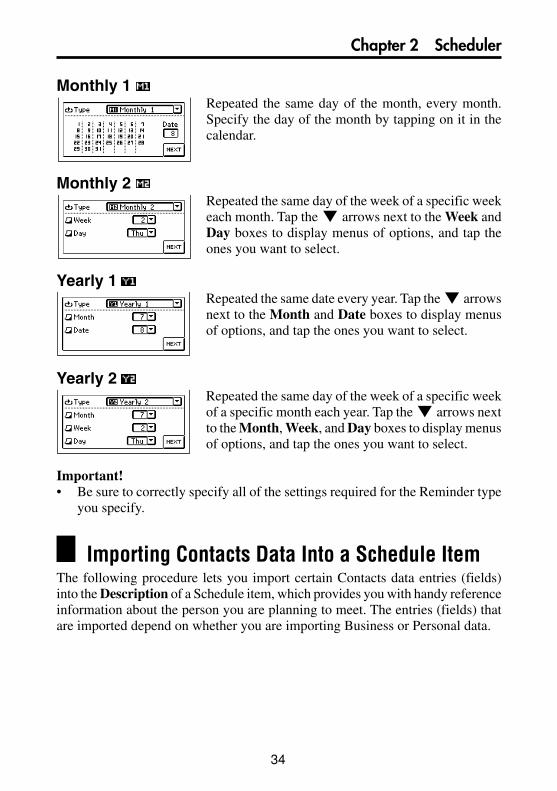
Reminder Types and SettingsThe following describes each of the Reminder types available and provides detailsabout the settings required by each.
Daily Repeated every day. No additional settings arerequired.
Weekly Repeated the same day of the week, each week. Specifythe day of the week by tapping its button.
34
Chapter 2 Scheduler
Monthly 1 Repeated the same day of the month, every month.Specify the day of the month by tapping on it in thecalendar.
Monthly 2 Repeated the same day of the week of a specific weekeach month. Tap the L arrows next to the Week andDay boxes to display menus of options, and tap theones you want to select.
Yearly 1 Repeated the same date every year. Tap the L arrowsnext to the Month and Date boxes to display menusof options, and tap the ones you want to select.
Yearly 2 Repeated the same day of the week of a specific weekof a specific month each year. Tap the L arrows nextto the Month, Week, and Day boxes to display menusof options, and tap the ones you want to select.
Important!• Be sure to correctly specify all of the settings required for the Reminder type
you specify.
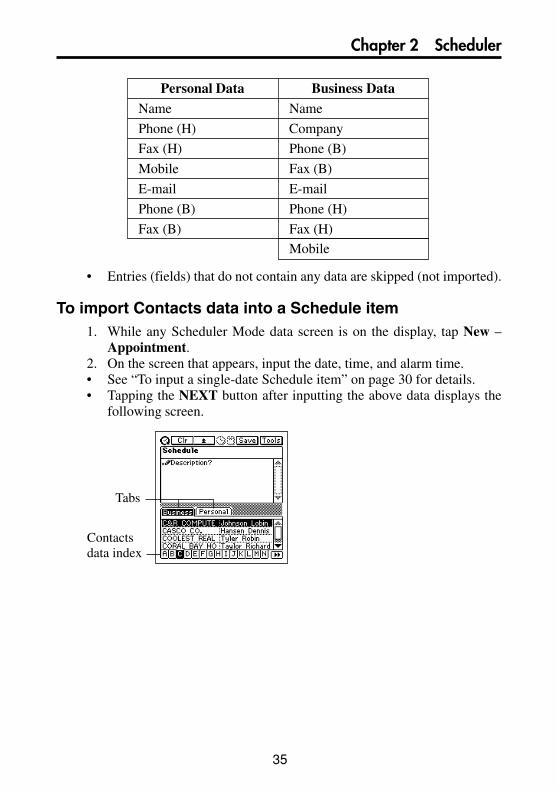
Importing Contacts Data Into a Schedule ItemThe following procedure lets you import certain Contacts data entries (fields)into the Description of a Schedule item, which provides you with handy referenceinformation about the person you are planning to meet. The entries (fields) thatare imported depend on whether you are importing Business or Personal data.
35
Chapter 2 Scheduler
• Entries (fields) that do not contain any data are skipped (not imported).
To import Contacts data into a Schedule item1. While any Scheduler Mode data screen is on the display, tap New –
Appointment.2. On the screen that appears, input the date, time, and alarm time.• See “To input a single-date Schedule item” on page 30 for details.• Tapping the NEXT button after inputting the above data displays the
following screen.
Personal Data Business DataName Name
Phone (H) Company
Fax (H) Phone (B)
Mobile Fax (B)
E-mail E-mail
Phone (B) Phone (H)
Fax (B) Fax (H)
Mobile
Tabs
Contactsdata index
36
Chapter 2 Scheduler
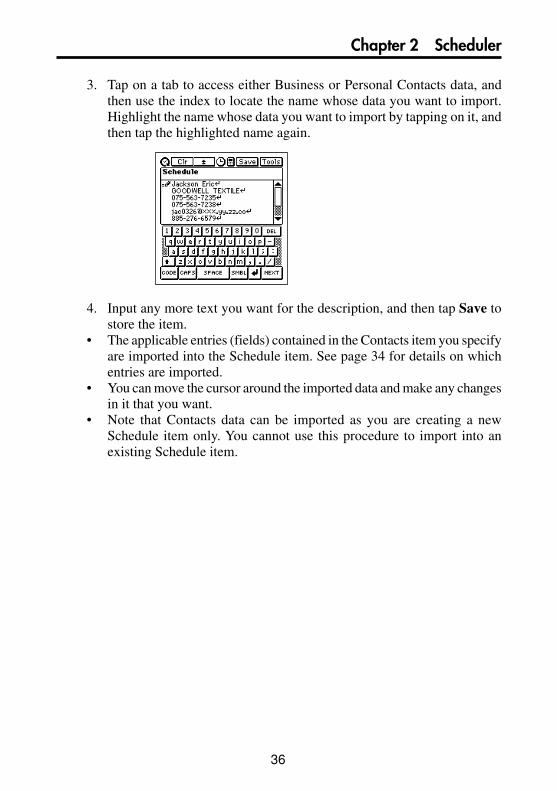
3. Tap on a tab to access either Business or Personal Contacts data, andthen use the index to locate the name whose data you want to import.Highlight the name whose data you want to import by tapping on it, andthen tap the highlighted name again.
4. Input any more text you want for the description, and then tap Save tostore the item.
• The applicable entries (fields) contained in the Contacts item you specifyare imported into the Schedule item. See page 34 for details on whichentries are imported.
• You can move the cursor around the imported data and make any changesin it that you want.
• Note that Contacts data can be imported as you are creating a newSchedule item only. You cannot use this procedure to import into anexisting Schedule item.
37
Chapter 2 Scheduler
Viewing Scheduler DataThe Scheduler Mode provides a variety of screens that you can use to viewSchedule, To Do, and Reminder data. This section describes the various datarecall screens available in the Scheduler Mode, and provides information abouthow to navigate between them.
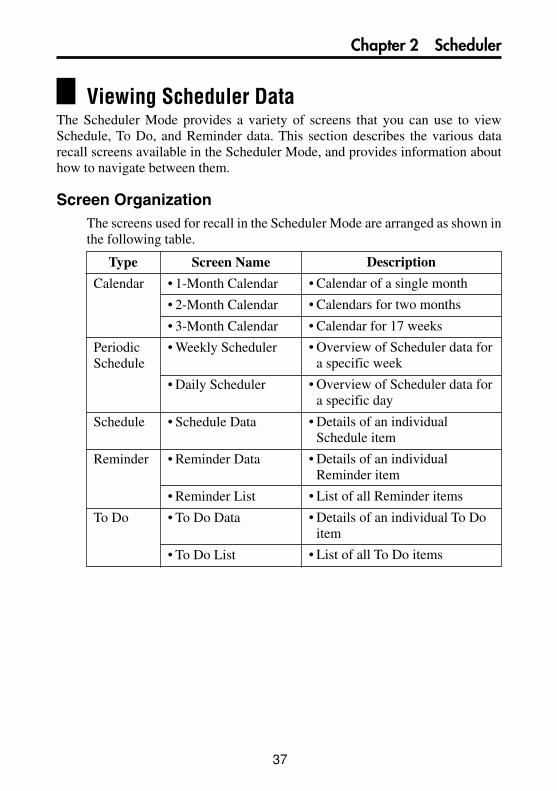
Screen OrganizationThe screens used for recall in the Scheduler Mode are arranged as shown inthe following table.
Type
Calendar
PeriodicSchedule
Schedule
Reminder
To Do
Screen Name
• 1-Month Calendar
• 2-Month Calendar
• 3-Month Calendar
• Weekly Scheduler
• Daily Scheduler
• Schedule Data
• Reminder Data
• Reminder List
• To Do Data
• To Do List
Description
• Calendar of a single month
• Calendars for two months
• Calendar for 17 weeks
• Overview of Scheduler data fora specific week
• Overview of Scheduler data fora specific day
• Details of an individualSchedule item
• Details of an individualReminder item
• List of all Reminder items
• Details of an individual To Doitem
• List of all To Do items
38
Chapter 2 Scheduler
To select a Scheduler Mode screen1. In the Scheduler Mode, tap the View button to display a list of available
screen types.• The View list provides the following screen options: 1-Month Calendar,
2-Month Calendar, 3-Month Calendar, Weekly Scheduler, DailyScheduler, To Do List, and Reminder List.
2. Tap the screen type you want.
Calendar ScreensUse the calendar screens to quickly locate a specific date and view itsScheduler data.
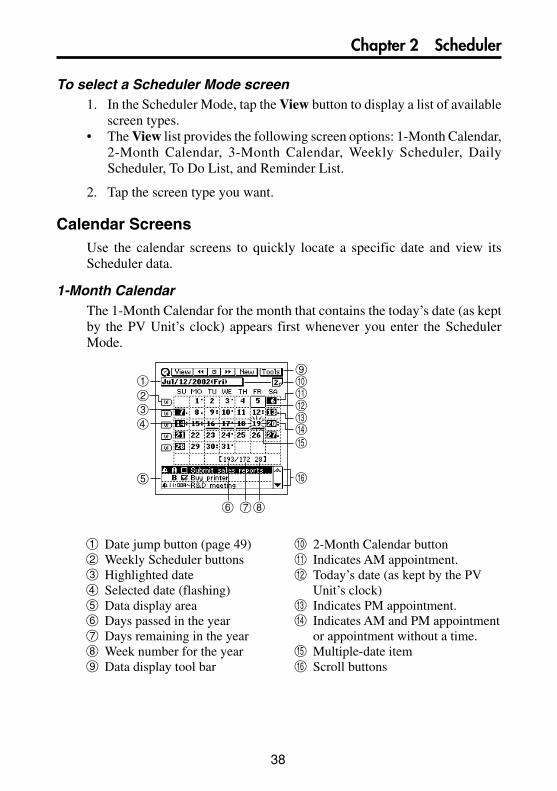
1-Month CalendarThe 1-Month Calendar for the month that contains the today’s date (as keptby the PV Unit’s clock) appears first whenever you enter the SchedulerMode.
1
2
3
4
5
6 78
9
y
0qwert
1 Date jump button (page 49)2 Weekly Scheduler buttons3 Highlighted date4 Selected date (flashing)5 Data display area6 Days passed in the year7 Days remaining in the year8 Week number for the year9 Data display tool bar
0 2-Month Calendar buttonq Indicates AM appointment.w Today’s date (as kept by the PV
Unit’s clock)e Indicates PM appointment.r Indicates AM and PM appointment
or appointment without a time.t Multiple-date itemy Scroll buttons
39
Chapter 2 Scheduler
To view a date’s Daily Scheduler screen1. Tap a date to select it. The selected date flashes in the calendar.2. Tap the flashing date to change to its Daily Scheduler screen.3. In the Daily Scheduler screen, tap Esc to return to the 1-Month Calendar
screen.
To view the 2-Month Calendar screen1. Tap the 2-Month Calendar button to switch to the 2-Month Calendar
screen.2. In the 2-Month Calendar screen, tap Esc to return to the 1-Month
Calendar screen.
To view a Weekly Scheduler screen1. Tap the button to the left of the week whose Weekly Scheduler screen
you want to view.2. In the Weekly Scheduler screen, tap Esc to return to the 1-Month Calendar
screen.
Using the data display area• This area shows an outline of data input for up to three Scheduler items
for the currently selected (flashing) date. It shows Schedule, To Do andReminder data.
• Use the scroll buttons to scroll the data up and down.• Tapping the highlighted item displays its data screen.

40
Chapter 2 Scheduler
2-Month Calendar
87
54
6
9
1
2
3
To view a date’s Daily Scheduler screen1. Tap a date to select it. The selected date flashes in the calendar.2. Tap the flashing date to change to its Daily Scheduler screen.
To view the 1-Month Calendar screenTap the 1-Month Calendar button to switch to the 1-Month Calendar screen.
To view a Weekly Scheduler screenTap the button to the left of the week whose Weekly Scheduler screenyou want to view.
1 Date jump button (page 49)2 Highlighted date3 Weekly Scheduler buttons4 Data display tool bar5 1-Month Calendar button6 Indicates AM appointment.
7 Indicates PM appointment.8 Indicates AM and PM
appointment, appointment withouta time or multiple-date item.
9 Selected date (flashing)
41
Chapter 2 Scheduler
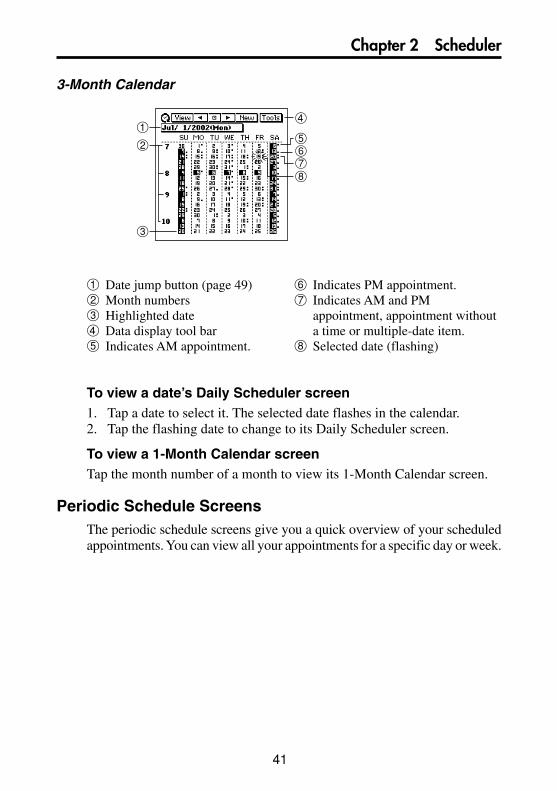
3-Month Calendar
78
6
4
52
1
3
To view a date’s Daily Scheduler screen1. Tap a date to select it. The selected date flashes in the calendar.2. Tap the flashing date to change to its Daily Scheduler screen.
To view a 1-Month Calendar screenTap the month number of a month to view its 1-Month Calendar screen.
Periodic Schedule ScreensThe periodic schedule screens give you a quick overview of your scheduledappointments. You can view all your appointments for a specific day or week.
1 Date jump button (page 49)2 Month numbers3 Highlighted date4 Data display tool bar5 Indicates AM appointment.
6 Indicates PM appointment.7 Indicates AM and PM
appointment, appointment withouta time or multiple-date item.
8 Selected date (flashing)

42
Chapter 2 Scheduler
Weekly Scheduler ScreenThe Weekly Scheduler screen shows your schedule for an entire week,including Schedule, To Do, and Reminder items.
2
1
3
4 5
6
To view a date’s Daily Scheduler screen1. Tap a date in the date column to select (highlight) it.2. Tap the selected date to display its Daily Scheduler screen.
To view an item’s data screen1. Tap an item to select (highlight) it.2. Tap the selected item to display its data screen.
Daily Scheduler ScreenThe Daily Scheduler screen gives you an overview of Scheduler (Schedule,Reminder, To Do) items for a particular date, along with a list of all currentlyunchecked To Do items.
2
1
3
4
5
6 1 Date jump button2 Time bar3 Scheduler area4 To Do area5 Description text6 Data display tool bar
1 Date jump button (page 49)2 Highlighted date3 Multiple-date item4 Date column5 Description text6 Data display tool bar
43
Chapter 2 Scheduler
To shift the time barTap the H and J scroll buttons to shift the time bar left and right.The shaded portion in the time bar indicates a period during which anappointment is scheduled. Overlapping time bars (schedules) are black.
Scheduler Area• This area shows the current date’s six Scheduler (Schedule, Reminder,
To Do) items.• Changing to a different date causes the data in the Scheduler area to be
replaced with the Scheduler data of the new date.• You cannot check or change the priority of a To Do data item in the
Scheduler area.
To Do Area• This area shows the four unchecked To Do items.• You cannot use this screen to change the checked/unchecked status.• The data in this area remains the same, even if you change to a different
date.• You can check a To Do data item in the To Do area by tapping its check
box. As soon as you do, the data item disappears from the To Do area(though it remains stored in the To Do Mode).
• You can change the priority of a To Do data item in the To Do area bytaping on its current priority setting to cycle it in the following sequence:A → B → C → A, etc.
To view an item’s data screen1. Tap an item to select (highlight) it.2. Tap the selected item to display its data screen.

44
Chapter 2 Scheduler
1 Start time (and end time)2 Data display tool bar3 Date4 Alarm time5 Description
Schedule Data ScreenThe Schedule data screen shows the details of a selected Schedule item.
Schedule Data Screen (Single-Date)
4
5
3
2
1
• Tapping Esc goes to the Daily Scheduler screen.
Schedule Data Screen (Multiple-Date)
3
4
2
1
• Tapping Esc goes to the Daily Scheduler screen.
1 Data display tool bar2 Start date3 End date4 Description
45
Chapter 2 Scheduler
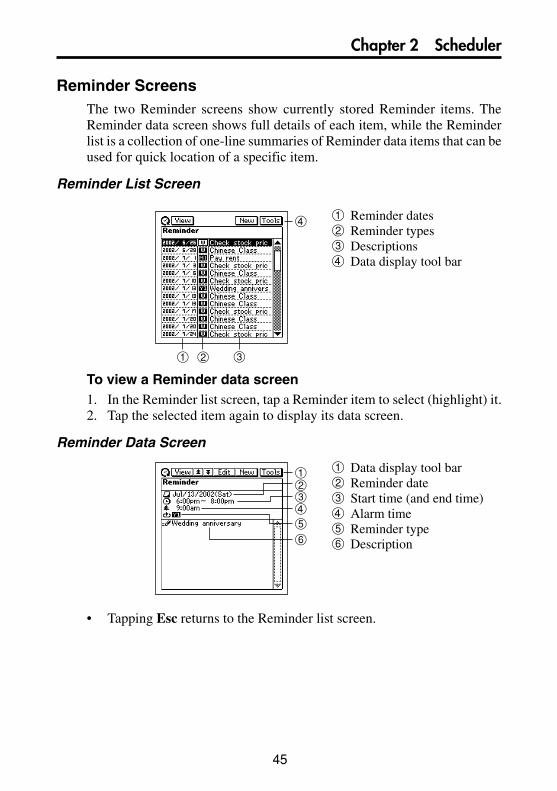
Reminder ScreensThe two Reminder screens show currently stored Reminder items. TheReminder data screen shows full details of each item, while the Reminderlist is a collection of one-line summaries of Reminder data items that can beused for quick location of a specific item.
Reminder List Screen
31 2
4
To view a Reminder data screen1. In the Reminder list screen, tap a Reminder item to select (highlight) it.2. Tap the selected item again to display its data screen.
Reminder Data Screen
34
5
6
21
• Tapping Esc returns to the Reminder list screen.
1 Reminder dates2 Reminder types3 Descriptions4 Data display tool bar
1 Data display tool bar2 Reminder date3 Start time (and end time)4 Alarm time5 Reminder type6 Description

46
Chapter 2 Scheduler
To Do ScreensThe two To Do screens show currently stored To Do items. The To Do datascreen shows full details of each item, while the To Do list is a collection ofone-line summaries of To Do items that can be used for quick location of aspecific item.
To Do List Screen
3
5
2
1
6
7
4
To specify the display category1. Tap the display category box to open a menu of categories.2. Tap the category whose data you want to display.
To specify the display item typeTap the display item button that corresponds to the type of items you wantto display.
Unchecked items onlyChecked items onlyPriority A items onlyPriority B items onlyPriority C items onlyAll items
1 Display category2 Check boxes3 Priorities4 Alarm indicator5 Display item buttons6 Data display tool bar7 Descriptions
47
Chapter 2 Scheduler
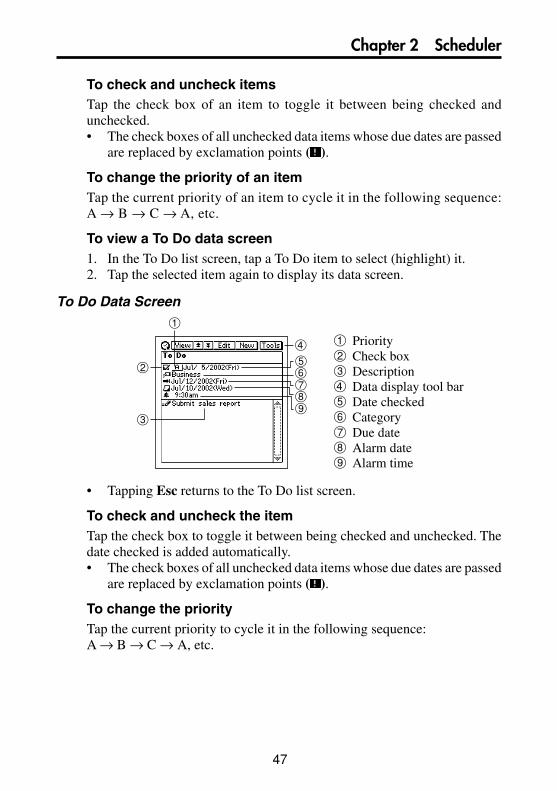
To check and uncheck itemsTap the check box of an item to toggle it between being checked andunchecked.• The check boxes of all unchecked data items whose due dates are passed
are replaced by exclamation points ( ).
To change the priority of an itemTap the current priority of an item to cycle it in the following sequence:A → B → C → A, etc.
To view a To Do data screen1. In the To Do list screen, tap a To Do item to select (highlight) it.2. Tap the selected item again to display its data screen.
To Do Data Screen
3
4
1
256789
• Tapping Esc returns to the To Do list screen.
To check and uncheck the itemTap the check box to toggle it between being checked and unchecked. Thedate checked is added automatically.• The check boxes of all unchecked data items whose due dates are passed
are replaced by exclamation points ( ).
To change the priorityTap the current priority to cycle it in the following sequence:A → B → C → A, etc.
1 Priority2 Check box3 Description4 Data display tool bar5 Date checked6 Category7 Due date8 Alarm date9 Alarm time

48
Chapter 2 Scheduler
Date HighlightingYou can highlight dates on the 1-Month or 2-Month Calendar screen to specifythem as holidays or other special events.
To highlight dates1. While the 1-Month Calendar or 2-Month Calendar is on the display, tap
Menu Bar to display the menu bar, and then tap Option – Highlight.• You can switch between the 1-Month Calendar and 2-Month Calendar
at any time during the following steps.
2. Tap the individual dates you want to highlight, or drag the stylus acrossthe range of dates you want to highlight.
• If you make a mistake and highlight the wrong date, simply tap or dragacross it to unhighlight.
3. If you want to highlight dates in other months, tap the tool bar’s (HHHHH) and (JJJJJ) buttons to change months, and repeat step 2.
• You can highlight dates only within the year that contains the monthwhere the date cursor was located when you started this procedure.
4. After all date highlighting is the way you want it, tap Save to store it.
To unhighlight dates1. While the 1-Month Calendar or 2-Month Calendar is on the display, tap
Menu Bar to display the menu bar, and then tap Option – Unhighlight.2. Specify the start month and end month of the period whose dates you
want to unhighlight.• Note that you can unhighlight dates for a range of months only. You
cannot unhighlight individual dates.
3. After the dates are the way you want them, tap Exe.4. In response to the message that appears, tap Yes to unhighlight all dates
in the range you specified.
49
Chapter 2 Scheduler
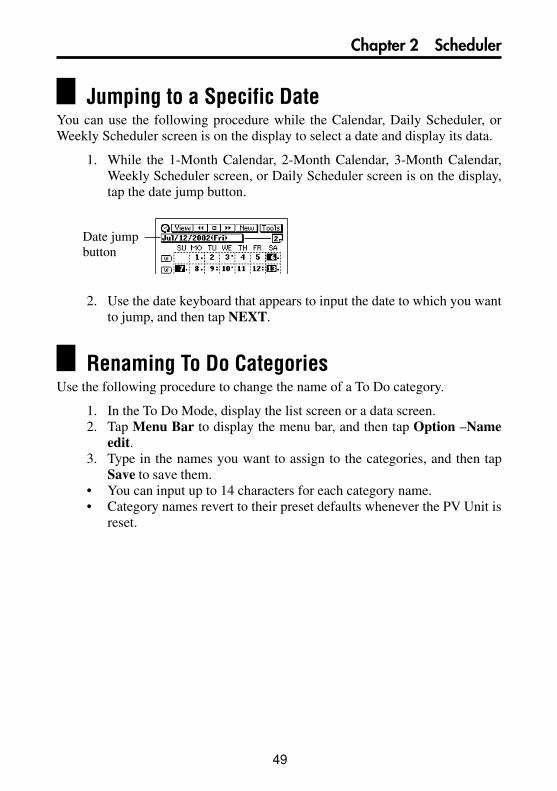
Jumping to a Specific DateYou can use the following procedure while the Calendar, Daily Scheduler, orWeekly Scheduler screen is on the display to select a date and display its data.
1. While the 1-Month Calendar, 2-Month Calendar, 3-Month Calendar,Weekly Scheduler screen, or Daily Scheduler screen is on the display,tap the date jump button.
2. Use the date keyboard that appears to input the date to which you wantto jump, and then tap NEXT.
Renaming To Do CategoriesUse the following procedure to change the name of a To Do category.
1. In the To Do Mode, display the list screen or a data screen.2. Tap Menu Bar to display the menu bar, and then tap Option –Name
edit.3. Type in the names you want to assign to the categories, and then tap
Save to save them.• You can input up to 14 characters for each category name.• Category names revert to their preset defaults whenever the PV Unit is
reset.
Date jumpbutton

50
Chapter
3 Contacts
The Contacts Mode is the easy way to organize, store, and manage all your businessand personal contact data. Fields are provided for name, address, phone number,fax number, e-mail address, and more. Business data is grouped under companyname, so you have instant at-a-glance access to information on everyone whoworks for the same company.
Entering the Contacts ModeYou can use any one of the three following methods to enter the Contacts Mode.The method you use determines what appears on the screen first.
To enter the Contacts Mode from the icon menuTap the Contacts icon below the PV Unit screen to enter the Contacts Mode.This displays the list screen of the data items contained in the category thatwas on the display when you last exited the Contacts Mode.
To enter the Contacts Mode from the Action Menu1. Click the Action control to turn on PV Unit power.2. Scroll up and down with the Action control to highlight the name of the
Contacts Mode list you want.• You can select Latest calls, Business, or Personal.
3. Click the Action control.
To enter the Contacts Mode from the Mode Menu using thestylus
1. On the icon menu beneath the PV Unit display screen, tap Menu todisplay the on-screen icon menu.
2. Tap Contacts.• This displays the list screen of the data items contained in the category
that was on the display when you last exited the Contacts Mode.

51
Chapter 3 Contacts
Changing the Display Category1. Display a Contacts list screen.
• Note that you can change the display category only from a Contacts listscreen.
2. Tap the L arrow to the right of the category name box to open a list ofcategories, and tap the one you want to select.
• The above describes the default list screen contents. You can change thecontents of the Personal and Untitled category lists, and of the employeelist that appears when you select a company name from the Businesscategory list. See “Changing Contacts List Screen Contents” on page 56for details.
Categoryname box
Category Name
Latest calls
All
Business
Personal
Untitled 1 - 5
List Contents
Last 16 Contacts data items whose datascreens you opened. See “Latest Calls List”below for details.
All Contacts data, regardless of category
Company names of Contacts data stored underthe Business category. Selecting a companyname displays a list of employees and theirbusiness phone numbers.
Personal names and home phone numbers ofContacts data stored under the Personalcategory
Free 1 and Free 2 fields of Contacts data storedunder the applicable Untitled category
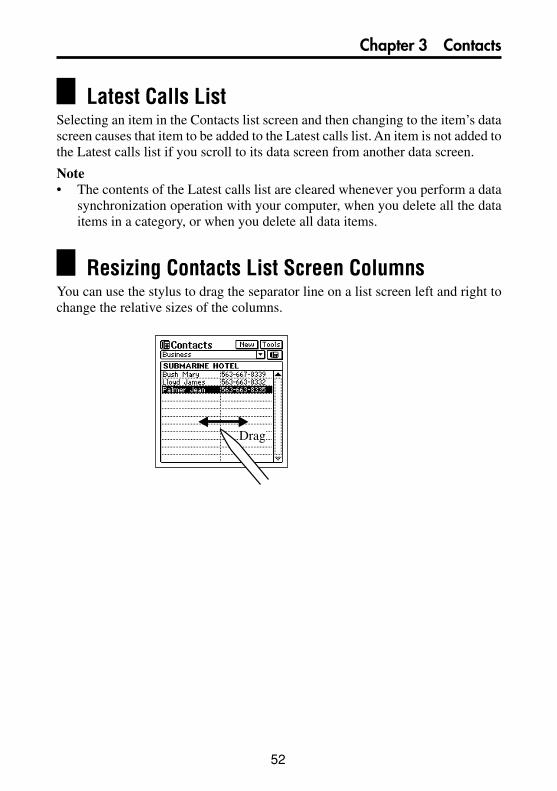
52
Chapter 3 Contacts
Latest Calls ListSelecting an item in the Contacts list screen and then changing to the item’s datascreen causes that item to be added to the Latest calls list. An item is not added tothe Latest calls list if you scroll to its data screen from another data screen.
Note• The contents of the Latest calls list are cleared whenever you perform a data
synchronization operation with your computer, when you delete all the dataitems in a category, or when you delete all data items.
Resizing Contacts List Screen ColumnsYou can use the stylus to drag the separator line on a list screen left and right tochange the relative sizes of the columns.
Drag

53
Chapter 3 Contacts
Inputting New Contacts DataThe following procedure shows how to input new Business category data. Datainput procedures for Personal and Untitled category data are identical.
1. While a Contacts Mode list or data screen is on the display, tap the Newbutton.
2. On the menu that appears, tap the category where you want to input thedata.
• In this example, tap Business.
1
2
3
4
5
3. Input the name of the person. Business and Personal data is sortedautomatically by name, so it is a good idea to input the last name first.
• Note that you must input Name data for a Personal item, Name andCompany data for a Business item, and data for the first entry (field) ofan Untitled item. The PV Unit will refuse to store the item when you tapSave below if it does not contain the minimum required data.
4. Tap the other fields on the screen and input the data you want.5. After you finish inputting all the data that you want, tap Save to store it.
1 Prompt2 Text keyboard3 Data input toolbar4 Scroll bar5 Category name
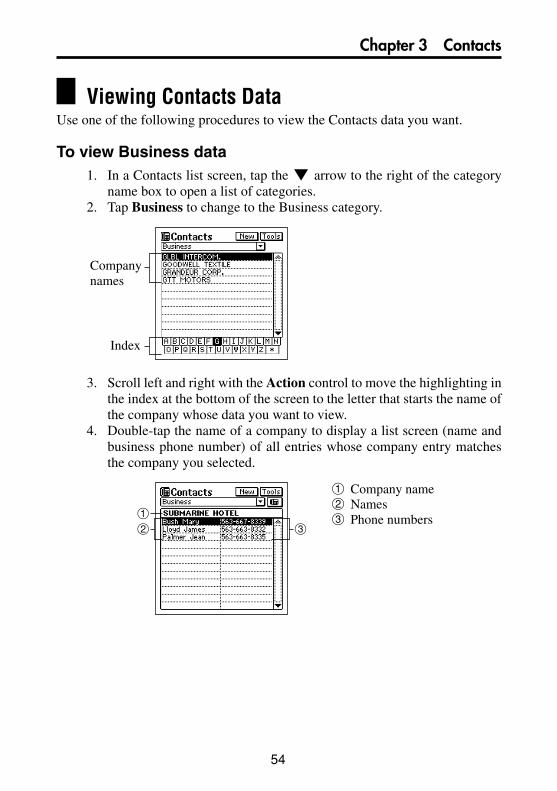
54
Chapter 3 Contacts
Viewing Contacts DataUse one of the following procedures to view the Contacts data you want.
To view Business data1. In a Contacts list screen, tap the L arrow to the right of the category
name box to open a list of categories.2. Tap Business to change to the Business category.
3. Scroll left and right with the Action control to move the highlighting inthe index at the bottom of the screen to the letter that starts the name ofthe company whose data you want to view.
4. Double-tap the name of a company to display a list screen (name andbusiness phone number) of all entries whose company entry matchesthe company you selected.
1
2 3
Companynames
Index
1 Company name2 Names3 Phone numbers

55
Chapter 3 Contacts
5. Scroll up and down with the Action control to move the highlighting tothe name of the person whose data you want to view, and then click theAction control to display the data screen for that person.
To view other data1. In a Contacts list screen, tap the L arrow to the right of the category
name box to open a list of categories.2. Tap the name of the category (besides Business) whose data you want
to view.3. Scroll left and right with the Action control to move the highlighting in
the index at the bottom of the screen to the letter that starts the data thatappears in the left column of the list screen.
• The data that appears in the left column depends on the category youselected.
4. Double-tap the data item in the list to display its data screen.

56
Chapter 3 Contacts
Changing Contacts List Screen ContentsYou can specify one of the entries (fields) that appears in the list screens of thePersonal category and the five Untitled categories, and of the employee list screenthat appears when you select a company name from the Business category list.The following table shows the entries (fields) in each list screen that are fixed.All others are selectable.
• You can make separate settings for each of the five Untitled categories.
To change the contents of a category’s list1. Display the Contacts list of the category whose contents you want to
change.2. Tap the button under the Tools button to display a list of entries (fields)
that can be displayed in the list.3. Tap the entry name that you want to display in the list together with the
fixed entry.• You can specify only one field per list.• Tapping an entry name closes the list entry selection screen and displays
the list with the entry you selected.
Category
Business(Employee List)
Personal
Untitled 1-5
Latest calls
All
Business(Company List)
Fixed Entries (Fields)
Name
Name
Free 1
All entries are fixed.
All entries are fixed.
All entries are fixed.

57
Chapter 3 Contacts
Category
Business
Personal
Untitled 1-5
Fixed Entries (Fields)
Name
Company
Name
Phone (H)
Free 1
Free 2
Check boxes
Changing Contacts Input Screen ContentsUse the procedure described here to change the contents of the Contacts Modedata input screen for each category. The following table shows the entries (fields)in each input screen that are fixed. All others are selectable.
• You can make separate settings for each of the five Untitled categories.
To change the contents of a category’s input screen1. Display the Contacts list of the category whose input screen’s contents
you want to change.2. Tap Menu Bar to display the menu bar, and then tap Option – Prompt
edit to display a list of entries (fields) that can be displayed in category’sinput screen.
• The above is the entry selection screen for the Business category.

58
Chapter 3 Contacts
3. Tap the check box next to an entry to toggle it between checked (displayentry) and unchecked (do not display entry).
• You can check or uncheck any of the displayed entries shown on thescreen.
4. After making the settings you want, tap Yes to save them and close theentry selection screen.
Managing Untitled Categories and Free EntriesYou can use the procedures described here to change the names of each of thefive Untitled categories, and the names of the 13 entries (fields) under each of theUntitled categories.
Contacts CategoriesThere are seven categories in the Contacts Mode: the two preset categoriesnamed Business and Personal, and five undefined categories named Untitled1 through Untitled 5.The Business and Personal categories contain identical entries (fields). Thedifference between them is the sequence the fields appear on the display,and how data is sorted.The Untitled categories contain entries that can be configured by you.
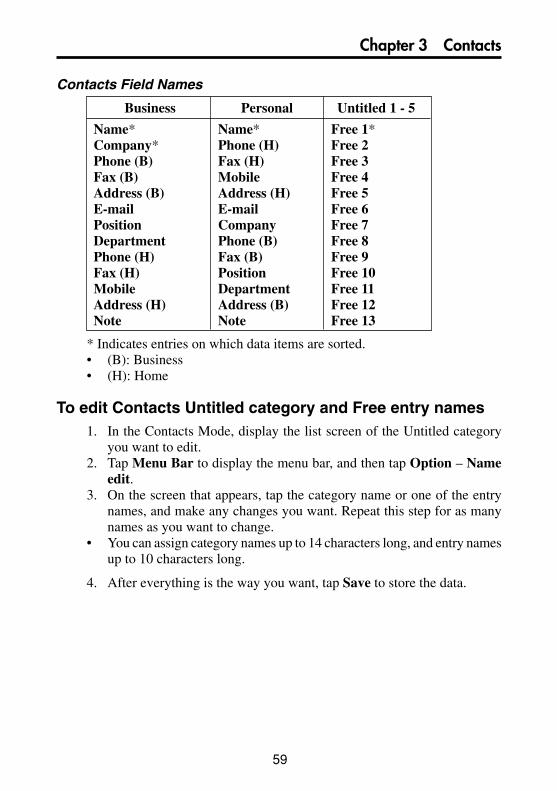
59
Chapter 3 Contacts
Business Personal Untitled 1 - 5
Name* Name* Free 1*Company* Phone (H) Free 2Phone (B) Fax (H) Free 3Fax (B) Mobile Free 4Address (B) Address (H) Free 5E-mail E-mail Free 6Position Company Free 7Department Phone (B) Free 8Phone (H) Fax (B) Free 9Fax (H) Position Free 10Mobile Department Free 11Address (H) Address (B) Free 12Note Note Free 13
Contacts Field Names
* Indicates entries on which data items are sorted.• (B): Business• (H): Home
To edit Contacts Untitled category and Free entry names1. In the Contacts Mode, display the list screen of the Untitled category
you want to edit.2. Tap Menu Bar to display the menu bar, and then tap Option – Name
edit.3. On the screen that appears, tap the category name or one of the entry
names, and make any changes you want. Repeat this step for as manynames as you want to change.
• You can assign category names up to 14 characters long, and entry namesup to 10 characters long.
4. After everything is the way you want, tap Save to store the data.
60
Chapter 3 Contacts
Copying Data Items Between the Personal andBusiness Categories
You can select a Personal data item and copy it to create a Business data item, andvice versa. You can then make any changes you want in the copy.
1. In the Business or Personal category, select the data item you want tocopy.
• You can select an item by displaying its data screen or by tapping theitem on a list screen.
2. Tap Menu Bar to display the menu bar, and then tap Option – Business Personal.
• This creates a copy of the data item you selected in step 1.
3. On the screen that appears, make any changes in the data you want.4. After you are finished, tap Save to save the copied data as a new data
item.
Exporting Contacts Data Into a Schedule ItemThe following procedure lets you export Contacts data into the description text ofa Schedule item, which provides you with handy reference information about theperson you are planning to meet.
1. Display the data item (record) you want to export.2. Tap New – Appointment.3. On the screen that appears, input the date, time, alarm time, and any
additional description text you want.4. Tap Save to store the item.• The applicable entries (fields) of the Contacts item are exported into the
Schedule item. See “Importing Contacts Data Into a Schedule Item” onpage 34 for details on which entries are exported.
• Note that Contacts data can be exported to create a new Schedule itemonly. You cannot use this procedure to export into an existing Scheduleitem.
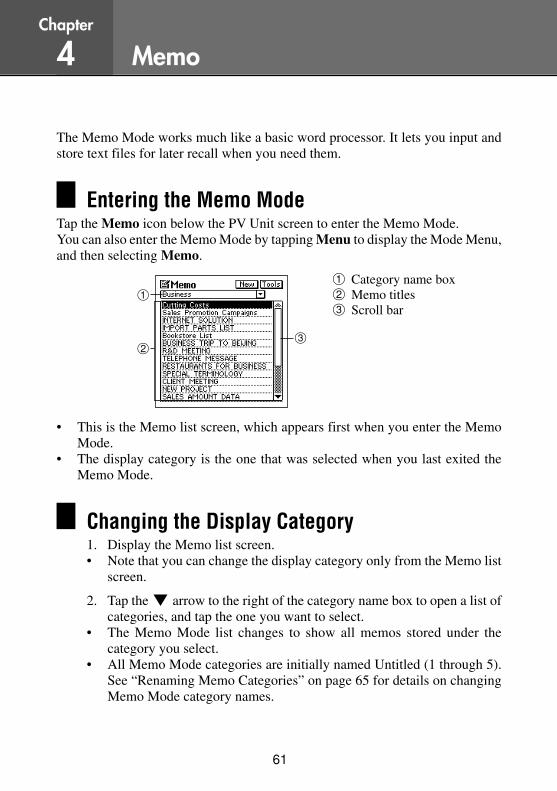
61
Chapter
4 Memo
The Memo Mode works much like a basic word processor. It lets you input andstore text files for later recall when you need them.
Entering the Memo ModeTap the Memo icon below the PV Unit screen to enter the Memo Mode.You can also enter the Memo Mode by tapping Menu to display the Mode Menu,and then selecting Memo.
1
23
• This is the Memo list screen, which appears first when you enter the MemoMode.
• The display category is the one that was selected when you last exited theMemo Mode.
Changing the Display Category1. Display the Memo list screen.• Note that you can change the display category only from the Memo list
screen.
2. Tap the L arrow to the right of the category name box to open a list ofcategories, and tap the one you want to select.
• The Memo Mode list changes to show all memos stored under thecategory you select.
• All Memo Mode categories are initially named Untitled (1 through 5).See “Renaming Memo Categories” on page 65 for details on changingMemo Mode category names.
1 Category name box2 Memo titles3 Scroll bar
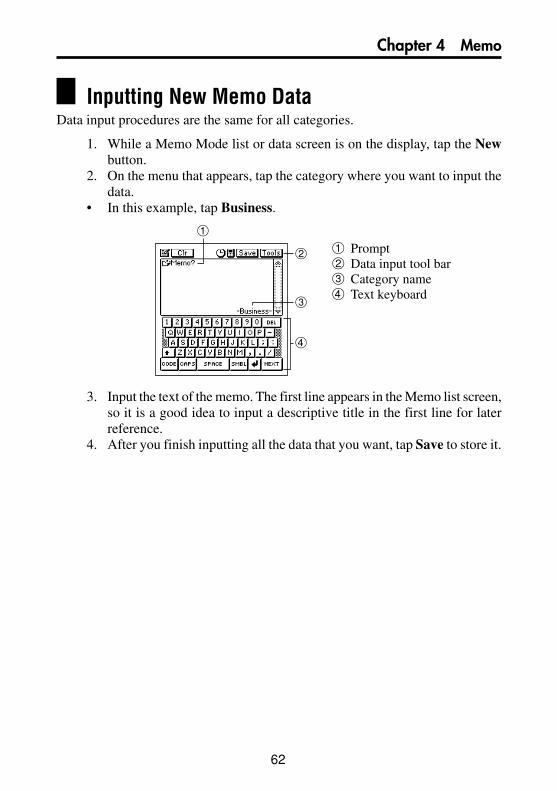
62
Chapter 4 Memo
Inputting New Memo DataData input procedures are the same for all categories.
1. While a Memo Mode list or data screen is on the display, tap the Newbutton.
2. On the menu that appears, tap the category where you want to input thedata.
• In this example, tap Business.
1
2
3
4
3. Input the text of the memo. The first line appears in the Memo list screen,so it is a good idea to input a descriptive title in the first line for laterreference.
4. After you finish inputting all the data that you want, tap Save to store it.
1 Prompt2 Data input tool bar3 Category name4 Text keyboard
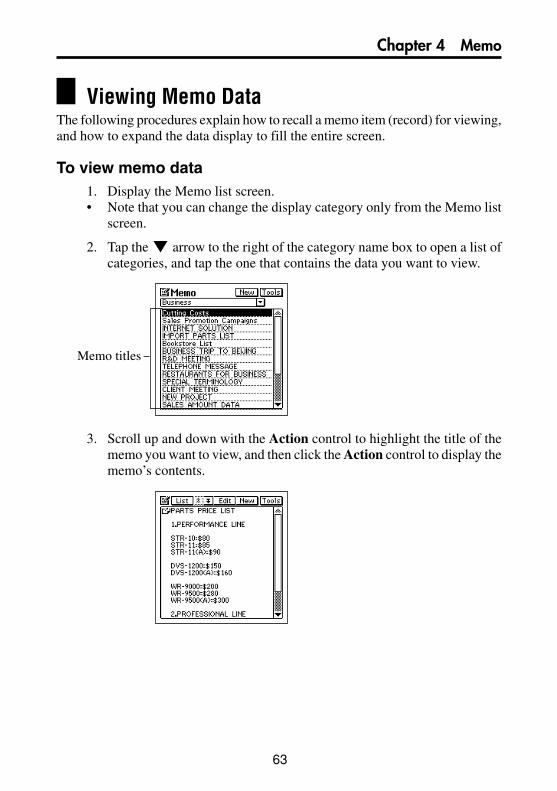
63
Chapter 4 Memo
Viewing Memo DataThe following procedures explain how to recall a memo item (record) for viewing,and how to expand the data display to fill the entire screen.
To view memo data1. Display the Memo list screen.• Note that you can change the display category only from the Memo list
screen.
2. Tap the L arrow to the right of the category name box to open a list ofcategories, and tap the one that contains the data you want to view.
3. Scroll up and down with the Action control to highlight the title of thememo you want to view, and then click the Action control to display thememo’s contents.
Memo titles
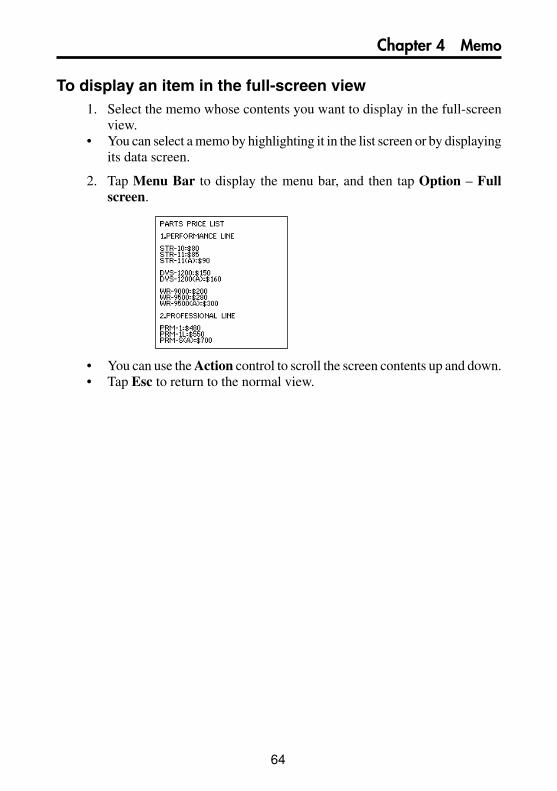
64
Chapter 4 Memo
To display an item in the full-screen view1. Select the memo whose contents you want to display in the full-screen
view.• You can select a memo by highlighting it in the list screen or by displaying
its data screen.
2. Tap Menu Bar to display the menu bar, and then tap Option – Fullscreen.
• You can use the Action control to scroll the screen contents up and down.• Tap Esc to return to the normal view.

65
Chapter 4 Memo
Moving a Memo within a List ScreenUse the following procedure when you want to move a memo to different locationwithin the list screen of the same category.
• You can’t move a memo from one category to another.
1. Display the list screen that contains the memo you want to move, andtap the memo title to highlight it.
2. Tap Menu Bar to display the menu bar, and then tap Option – Move.
3. Tap the memo above which you want to move the memo you selected instep 1.
4. Tap Exe to move the memo.
Renaming Memo CategoriesUse the following procedure to change the name of a Memo category.
1. In the Memo Mode, display the list screen for the category whose nameyou want to change.
2. Tap Menu Bar to display the menu bar, and then tap Option – Nameedit.
3. On the screen that appears, type in the name you want to assign to thecategory, and then tap Save to save it.
• You can use up to 14 characters for a category name.• Category names revert to their preset defaults whenever the PV Unit is
reset.

66
The Expense Manager is like having your own personal bookkeeper along withyou wherever you go. You input transaction data as it occurs, and later you cancalculate periodic totals. It’s the easy way to keep track of your finances day byday.
Entering the Expense Manager ModeEnter the Expense Manager Mode by tapping Menu to display the Mode Menuscreen, and then selecting Expense. This displays a transaction list for today’sdate, as kept by the PV Unit’s clock.
12
4
3
Inputting a New Transaction1. In any Expense Manager Mode list screen or data screen, tap New to
display a new transaction input screen.
12345
6
Chapter
5 Expense Manager
1 Date jump button2 Data display toolbar3 Periodic total button4 Date total
1 Data input tool bar2 Transaction date3 Transaction amount4 Payment type5 Expense type6 Date keyboard

67
Chapter 5 Expense Manager
2. If you want to change the date of the transaction, tap the displayed dateand then use the date keyboard that appears to make the changes youwant. Tap NEXT to advance to the amount.
3. Input the amount of the transaction, and then tap NEXT.• An Expense Manager item must have date and amount data. Otherwise,
the PV Unit will refuse to store the data when you tap Save below.
4. Tap the L arrow to the left of the payment type to open a list of availablepayment types, and select the one you want to assign to the transaction.
• You could also use the text keyboard to input a payment type or to changethe payment types inside the list. Payment types can be up to 14 characterslong.
5. Tap NEXT.6. Tap the L arrow to the left of the expense type to open a list of available
expense types, and select the one you want to assign to the transaction.• You could also use the text keyboard to input a expense type or to change
the expense types inside the list. Expense types can be up to 14 characterslong.
7. After everything on the screen is the way you want, tap to advance tothe description input screen.
8. After inputting the description, tap Save to save it.• If you want to save the transaction without inputting a description, tap
Save to save it without inputting description text.

68
Chapter 5 Expense Manager
Recalling Expense Manager Data1. In the Expense Manager Mode list screen, tap the date jump button.
2. Use the date keyboard that appears to input the date to which you wantto jump, and then tap NEXT.
• You can also scroll forward and back through the dates by tapping and in the data display toolbar.
• Scroll left and right with the Action control to display dates in sequence.
3. To select the contents of the list screen, tap the View button in the datadisplay toolbar to open a menu of data types.
4. On the menu that appears, tap the type of data you want to display in thelist.
5. To display the data screen of a transaction, tap the transaction to highlightit and then tap it again.
Data jumpbutton
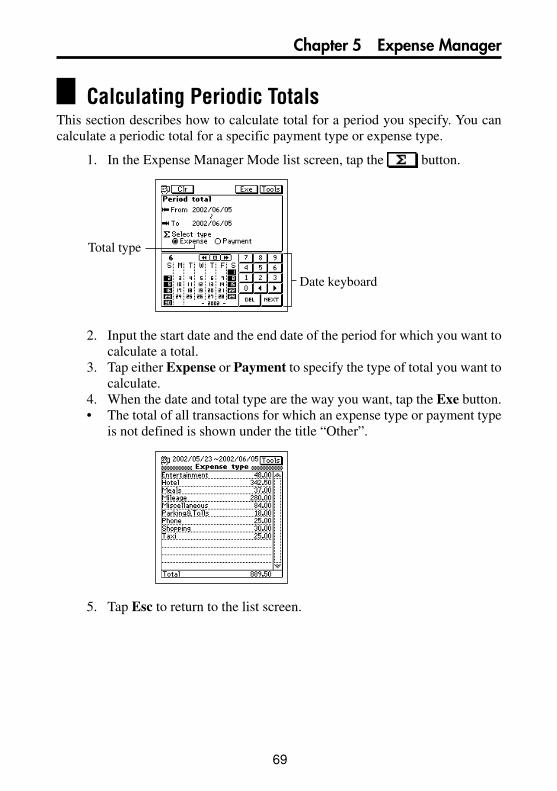
69
Chapter 5 Expense Manager
Calculating Periodic TotalsThis section describes how to calculate total for a period you specify. You cancalculate a periodic total for a specific payment type or expense type.
1. In the Expense Manager Mode list screen, tap the button.
2. Input the start date and the end date of the period for which you want tocalculate a total.
3. Tap either Expense or Payment to specify the type of total you want tocalculate.
4. When the date and total type are the way you want, tap the Exe button.• The total of all transactions for which an expense type or payment type
is not defined is shown under the title “Other”.
5. Tap Esc to return to the list screen.
Date keyboard
Total type
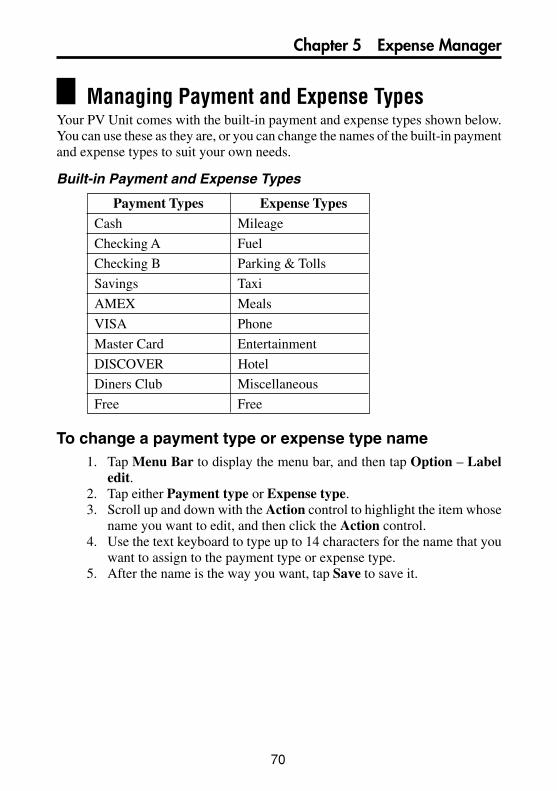
70
Chapter 5 Expense Manager
Managing Payment and Expense TypesYour PV Unit comes with the built-in payment and expense types shown below.You can use these as they are, or you can change the names of the built-in paymentand expense types to suit your own needs.
Built-in Payment and Expense Types
To change a payment type or expense type name1. Tap Menu Bar to display the menu bar, and then tap Option – Label
edit.2. Tap either Payment type or Expense type.3. Scroll up and down with the Action control to highlight the item whose
name you want to edit, and then click the Action control.4. Use the text keyboard to type up to 14 characters for the name that you
want to assign to the payment type or expense type.5. After the name is the way you want, tap Save to save it.
Payment Types Expense TypesCash Mileage
Checking A Fuel
Checking B Parking & Tolls
Savings Taxi
AMEX Meals
VISA Phone
Master Card Entertainment
DISCOVER Hotel
Diners Club Miscellaneous
Free Free

71
The Currency Converter lets you instantly convert from one currency to two othercurrencies. You can even convert between euros and national currencies.
Entering the Currency Converter ModeTap the Menu icon to display the Mode Menu, and then tap Conversion.
1
2
3
4
• Use the General tab for general currency conversion and the Euro tabfor euro currency conversion.
General Currency ConversionYou can perform general currency conversion calculations using the General tabof the Currency Converter.
Performing a ConversionBefore actually performing a conversion, you must first set the exchangerate for each of the currencies and change the currency names, if you want.See “Changing the Currency Name and Rate” on page 72 for details.
Chapter
6 Currency Converter
1 Tabs2 Currency names3 Calculator keyboard4 Rate Table button

72
Chapter 6 Currency Converter
Example: To find out the dollar and yen equivalents of 2 pounds.
1. In the Currency Converter, tap the General tab.
2. Tap the name of the currency from which you want to convert. In thisexample you would tap £.
3. Use the calculator keyboard to input an amount into for the selectedcurrency and then tap = (or NEXT). In this example you would tap 2 =.
4. Tap Exe to perform the conversion.
Changing the Currency Name and RateUse the following procedures to change the currency names that appear onthe General tab, and the rates used for performing currency conversioncalculations. Note that you must constantly update conversion rates to keepthem current.
To set a conversion rate1. While the General tab is displayed on the Currency Converter screen,
tap Menu Bar to display the menu bar, and then tap Option – Rateedit.
2. On the screen that appears, tap the exchange rate value you want tochange.
3. Use the calculator keyboard to input the rate and then tap = (or NEXT).4. Now you can tap Set to apply the rate and close the editing screen or
you can tap Name edit and display the name editing tab.
Currencynames
Chapter 6 Currency Converter
73
To change a currency name1. While the General tab is displayed on the Currency Converter screen,
tap Menu Bar to display the menu bar, and then tap Option – Nameedit.
2. On the screen that appears, tap the currency name you want to change.3. Use the text keyboard to input a name up to four characters long.4. Now you can tap Set to apply the name and close the editing screen, or
you can tap Rate edit and display the rate editing tab.
Displaying the Current General RatesWhile the General tab is displayed on the Currency Converter screen, tapthe Rate button.To close the rate table, tap anywhere on the screen outside of the rate table.
Euro ConversionThe Euro tab lets you convert between euros and any three of the 12 nationalcurrencies of countries where the euro is used.
Performing a ConversionThe 12 national currencies are preset with the exchange rates and decimalplace specifications shown the “Euro Conversion Rate Presets” table onpage 169. If necessary, you can change exchange rates for each of thecurrencies and change the currency names. See “Changing the CurrencyName and Rate” on page 75 for details.
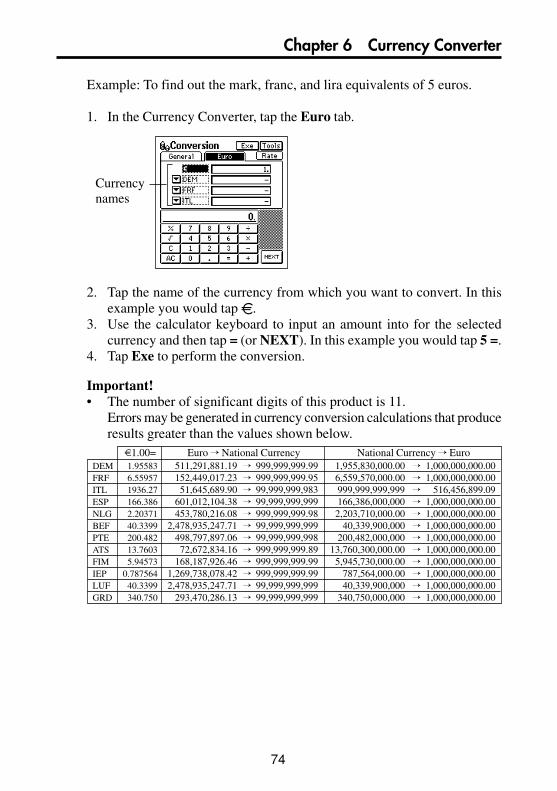
74
Chapter 6 Currency Converter
Example: To find out the mark, franc, and lira equivalents of 5 euros.
1. In the Currency Converter, tap the Euro tab.
2. Tap the name of the currency from which you want to convert. In thisexample you would tap .
3. Use the calculator keyboard to input an amount into for the selectedcurrency and then tap = (or NEXT). In this example you would tap 5 =.
4. Tap Exe to perform the conversion.
Important!• The number of significant digits of this product is 11.
Errors may be generated in currency conversion calculations that produceresults greater than the values shown below.
Currencynames
DEMFRFITLESPNLGBEFPTEATSFIMIEPLUFGRD
1.955836.559571936.27166.3862.2037140.3399200.48213.76035.94573
0.78756440.3399340.750
511,291,881.19 999,999,999.99152,449,017.23 999,999,999.9551,645,689.90 99,999,999,983
601,012,104.38 99,999,999,999453,780,216.08 999,999,999.98
2,478,935,247.71 99,999,999,999498,797,897.06 99,999,999,99872,672,834.16 999,999,999.89
168,187,926.46 999,999,999.991,269,738,078.42 999,999,999.992,478,935,247.71 99,999,999,999
293,470,286.13 99,999,999,999
1,955,830,000.00 1,000,000,000.006,559,570,000.00 1,000,000,000.00999,999,999,999 516,456,899.09166,386,000,000 1,000,000,000.002,203,710,000.00 1,000,000,000.00
40,339,900,000 1,000,000,000.00200,482,000,000 1,000,000,000.00
13,760,300,000.00 1,000,000,000.005,945,730,000.00 1,000,000,000.00
787,564,000.00 1,000,000,000.0040,339,900,000 1,000,000,000.00
340,750,000,000 1,000,000,000.00
1.00= Euro National Currency National Currency Euro

Chapter 6 Currency Converter
75
Changing the Displayed National CurrenciesUse the following procedure to select from among the 12 national currenciesand display the ones you want on the Euro tab.
1. On the Currency Converter Euro tab, tap the L button next to thecurrency you want to change.
2. On the list that appears, tap the currency you want to use.
Displaying the Current Euro RatesWhile the Euro tab is displayed on the Currency Converter screen, tap theRate button.To close the rate table, tap anywhere on the screen outside of the rate table.
Changing the Currency Name and RateYou can use the following procedures to change the names and rates of thenational currencies. Note that you cannot change the euro symbol or exchangerate.
To set a conversion rate1. While the Euro tab is displayed on the Currency Converter screen, tap
Menu Bar to display the menu bar, and then tap Option – Rate edit.2. On the screen that appears, tap the exchange rate value you want to
change.3. Use the calculator keyboard to input the rate and then tap = (or NEXT).4. Now you can tap Set to apply the rate and close the editing screen or
you can tap Name edit and display the name editing tab.
To change a currency name1. While the Euro tab is displayed on the Currency Converter screen, tap
Menu Bar to display the menu bar, and then tap Option – Name edit.2. On the screen that appears, tap the currency name you want to change.

76
Chapter 6 Currency Converter
3. Use the text keyboard to input a name up to four characters long.• Tapping the Initial button displays a list of initial default currency names
and rates. Tapping on a currency in this list returns its name and exchangerate to the settings shown on the list.
4. Now you can tap Set to apply the name and close the editing screen oryou can tap Rate edit and display the rate editing tab.
Specifying the Rounding MethodNormally, you can leave the preset rounding settings the way they are for eachcurrency. When necessary, however, you can use the following procedure to changethem.
1. Tap the General or Euro tab.2. Tap Menu Bar to display the menu bar, and then tap Option – Rounding.
3. Specify the number of decimal places for each currency.• 0 and 2 specify the number of decimal places for the Cut, 5/4, and Up
rounding methods.• Free specifies a floating decimal point, which displays the value without
rounding.
Chapter 6 Currency Converter
77
4. Tap a button at the bottom of the screen to specify the rounding method.• The rounding method you select is applied for all currency conversion
calculations involving a currency for which you specified 0 or 2 decimalplaces in step 3, above.
Cut: Cuts off the decimal part to the specified number of places.5/4: Rounds off the decimal part to the specified number of places.Up: Rounds up the decimal part to the specified number of places.
5. After everything is the way you want, tap Set.
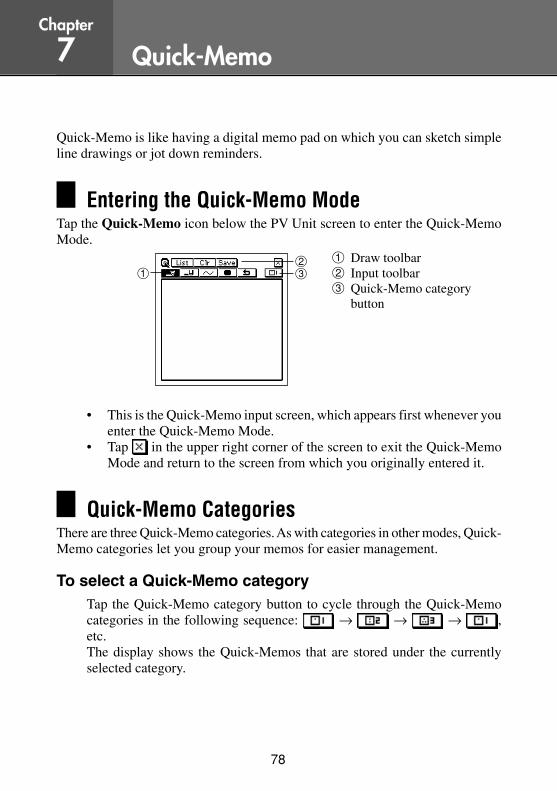
78
Chapter
7 Quick-Memo
1 Draw toolbar2 Input toolbar3 Quick-Memo category
button
Quick-Memo is like having a digital memo pad on which you can sketch simpleline drawings or jot down reminders.
Entering the Quick-Memo ModeTap the Quick-Memo icon below the PV Unit screen to enter the Quick-MemoMode.
123
• This is the Quick-Memo input screen, which appears first whenever youenter the Quick-Memo Mode.
• Tap in the upper right corner of the screen to exit the Quick-MemoMode and return to the screen from which you originally entered it.
Quick-Memo CategoriesThere are three Quick-Memo categories. As with categories in other modes, Quick-Memo categories let you group your memos for easier management.
To select a Quick-Memo categoryTap the Quick-Memo category button to cycle through the Quick-Memocategories in the following sequence: → → → ,etc.The display shows the Quick-Memos that are stored under the currentlyselected category.
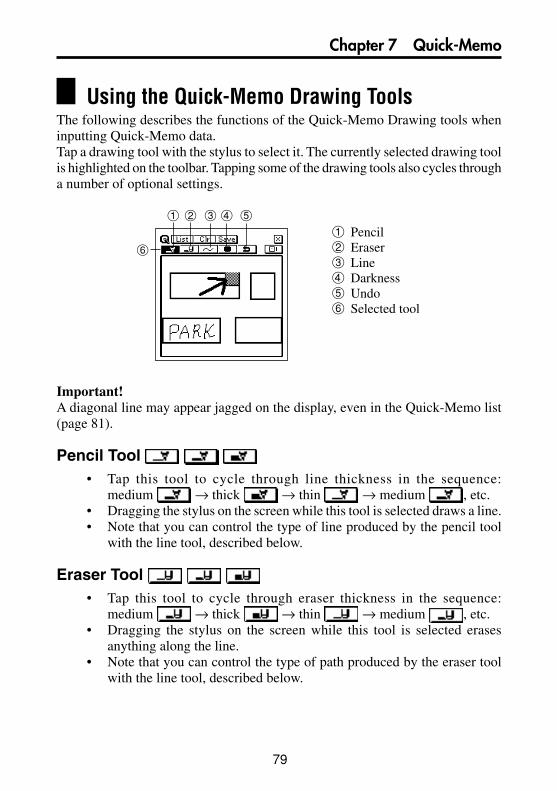
79
Chapter 7 Quick-Memo
Using the Quick-Memo Drawing ToolsThe following describes the functions of the Quick-Memo Drawing tools wheninputting Quick-Memo data.Tap a drawing tool with the stylus to select it. The currently selected drawing toolis highlighted on the toolbar. Tapping some of the drawing tools also cycles througha number of optional settings.
1 2 3 4 5
6
Important!A diagonal line may appear jagged on the display, even in the Quick-Memo list(page 81).
Pencil Tool • Tap this tool to cycle through line thickness in the sequence:
medium → thick → thin → medium , etc.• Dragging the stylus on the screen while this tool is selected draws a line.• Note that you can control the type of line produced by the pencil tool
with the line tool, described below.
Eraser Tool • Tap this tool to cycle through eraser thickness in the sequence:
medium → thick → thin → medium , etc.• Dragging the stylus on the screen while this tool is selected erases
anything along the line.• Note that you can control the type of path produced by the eraser tool
with the line tool, described below.
1 Pencil2 Eraser3 Line4 Darkness5 Undo6 Selected tool
80
Chapter 7 Quick-Memo
Line Tool • Tap this tool to cycle through the type of line or eraser path produced
when dragging the stylus on the display while the line tool or eraser toolis selected. Each tap of this tool cycles through the line type in thesequence: freehand → straight → vertical/horizontal
→ rectangle → freehand , etc.
Darkness Tool • Tap this tool to toggle the darkness of the line between the following
settings: black ↔ gray .
Undo Tool • Tap this tool to undo the last draw operation you just performed.
Creating a New Quick-MemoUse the procedures in this section to draw the figures you want in a Quick-Memo.
To input a new Quick-Memo1. Enter the Quick-Memo Mode.2. Tap the (category) button to select the category where you want to
save the Quick-Memo.3. Use the drawing tools to draw the figure you want.• To clear all Quick-Memo screen contents, tap Clr.
4. After you are finished, tap Save to save the Quick-Memo.• If you want to input another Quick-Memo, tap New.
To draw a line or rectangle1. Select the line tool for the type of figure (freehand, straight line, vertical/
horizontal line, rectangle) you want to draw.2. Drag the stylus on the display to draw the figure.

81
Chapter 7 Quick-Memo
Recalling a Quick-MemoUse the following procedure to scroll through a list of Quick-Memos and find theone you want. Then you can select a Quick-Memo in the list to view it.
1. While the Quick-Memo input screen is on the display, tap List.
1
3
4
2
• This is the Quick-Memo list screen.
2. Tap the category button to specify the category whose Quick-Memosyou want to view. Selecting displays the Quick-Memos in allcategories.
3. Use the scroll buttons to scroll through the Quick-Memos in the currentlyselected category.
4. When the Quick-Memo you want to recall is on the screen, tap it withthe stylus to select it.
5. Tap the selected Quick-Memo to change to its data display.
1
2 3
1 Category button2 Scroll buttons3 Selected Quick-Memo4 Creation date
1 Scroll buttons2 Category of displayed
Quick-Memo3 Creation date

82
Chapter 7 Quick-Memo
6. In the Quick-Memo data display, you can use the scroll buttons to scrollback and forward to the data display of other memos.
7. After viewing the Quick-Memo, tap List to return to the list screen.
Screen CopyThe screen copy feature lets you copy an image of certain screens and store it asa Quick-Memo screen. The following is a list of screens that you can copy withthe screen copy feature.
To record a screen copy1. Display the data for which you want to record a screen copy.2. Tap Menu Bar to display the menu bar, and then tap Option – Screen
copy.• The PV Unit switches to the Quick-Memo Mode, with the new screen
copy on the display. Make any additions or changes if you want, andthen store the image by tapping Save.
Data that can be screen copied
All list and data screens
All calendar screens (1, 2, 3-month)Weekly SchedulerDaily SchedulerTo Do ListReminder ListAll data screens
Screens listing periodic totals by expensetypes or payment types (page 69)All list and data screens
All list and data screens
Conversion calculation screens
List screen and sheet screen (without on-screen keyboard displayed)
Mode
Contacts
Scheduler
Expense Manager
Memo
Currency Converter
Pocket Sheet
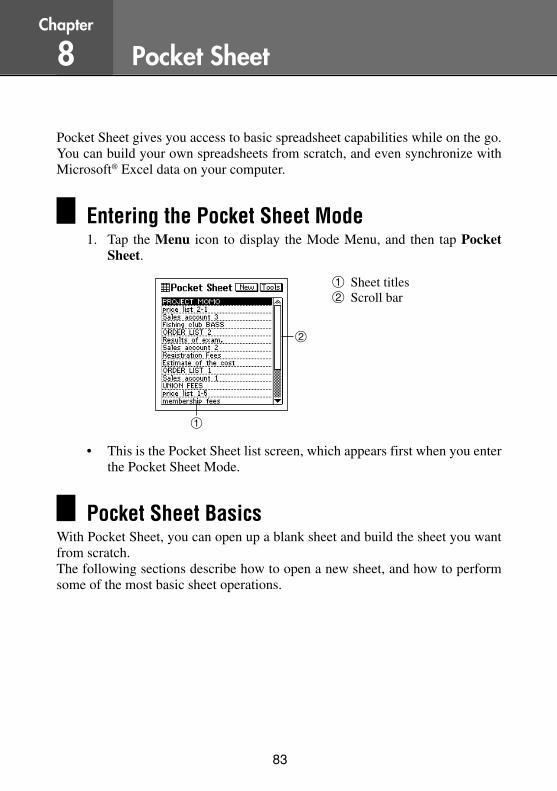
83
Pocket Sheet gives you access to basic spreadsheet capabilities while on the go.You can build your own spreadsheets from scratch, and even synchronize withMicrosoft® Excel data on your computer.
Entering the Pocket Sheet Mode1. Tap the Menu icon to display the Mode Menu, and then tap Pocket
Sheet.
2
1
• This is the Pocket Sheet list screen, which appears first when you enterthe Pocket Sheet Mode.
Pocket Sheet BasicsWith Pocket Sheet, you can open up a blank sheet and build the sheet you wantfrom scratch.The following sections describe how to open a new sheet, and how to performsome of the most basic sheet operations.
Chapter
8 Pocket Sheet
1 Sheet titles2 Scroll bar
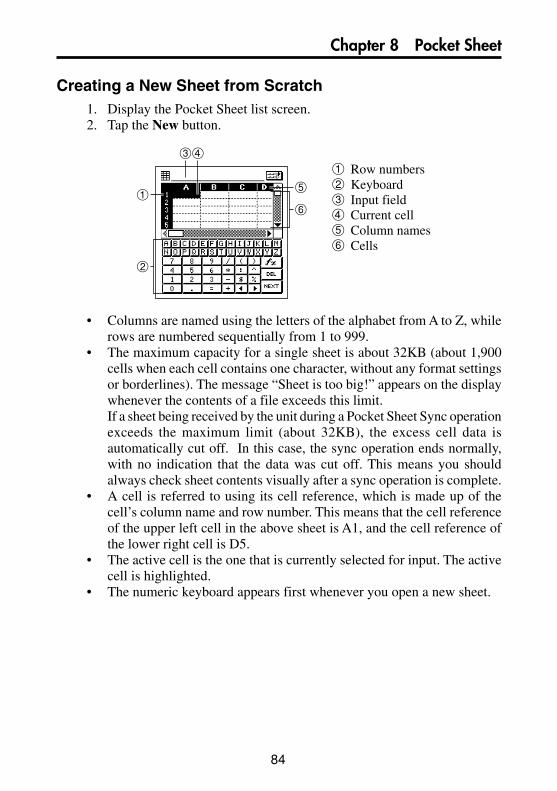
84
Chapter 8 Pocket Sheet
Creating a New Sheet from Scratch1. Display the Pocket Sheet list screen.2. Tap the New button.
1
2
6
5
34
• Columns are named using the letters of the alphabet from A to Z, whilerows are numbered sequentially from 1 to 999.
• The maximum capacity for a single sheet is about 32KB (about 1,900cells when each cell contains one character, without any format settingsor borderlines). The message “Sheet is too big!” appears on the displaywhenever the contents of a file exceeds this limit.If a sheet being received by the unit during a Pocket Sheet Sync operationexceeds the maximum limit (about 32KB), the excess cell data isautomatically cut off. In this case, the sync operation ends normally,with no indication that the data was cut off. This means you shouldalways check sheet contents visually after a sync operation is complete.
• A cell is referred to using its cell reference, which is made up of thecell’s column name and row number. This means that the cell referenceof the upper left cell in the above sheet is A1, and the cell reference ofthe lower right cell is D5.
• The active cell is the one that is currently selected for input. The activecell is highlighted.
• The numeric keyboard appears first whenever you open a new sheet.
1 Row numbers2 Keyboard3 Input field4 Current cell5 Column names6 Cells

85
Chapter 8 Pocket Sheet
Making a Cell the Active CellYou can make a cell active by tapping it with the stylus so it becomeshighlighted. You can also move the highlighting around the display usingthe scroll bar.• Tapping the gray areas of the scroll bar scrolls the entire screen with the
highlighted active cursor in the same relative position in the newlydisplayed screen.
Selecting a Range of CellsWhile a sheet is open on the display, drag the stylus across the range of cellsyou want to select. The cells become highlighted as you drag across them.
Jumping to a Specific Cell in a Sheet
Important!• You cannot jump to a cell located inside a row or column that is frozen. To
jump to such a cell, you must unfreeze the row or column first (page 98).
1. While a sheet is on the display, tap Menu Bar to display the menu bar,and then tap Edit – Go To to display the Go To screen.
2. On the screen that appears, use the on-screen keyboard to type in thecell reference (column and row) of the cell to which you want to jump.
• To jump to cell Z999, for example, type “Z999”.
3. Tap Exe to jump to the cell you specified.
86
Chapter 8 Pocket Sheet
Inputting Data Into a CellThis section explains the rules and procedures for inputting text, values, andmathematical expressions into sheet cells. It also contains detailed informationon the various cell functions that are available.
General Input RulesThe following are the general rules that you should observe wheneverinputting data.
• Anything you enter on the keyboard is input into the sheet’s active cell.• You can input up to 256 characters into each cell.• Mixing text and numbers inside the same cell causes everything in the
cell to be treated as text.• Do not manually input commas as separators inside values. Doing so
interferes with correct display of calculation results. Use the procedureunder “Changing the Format Settings of a Cell” on page 93 to turn onautomatic comma separators.
Cell ReferencesThe term cell reference means calling the contents of one cell into anothercell. Pocket Sheet supports three types of cell references: relative, absolute,and mixed. Whether a cell references is relative, absolute, or mixed does notmake affect the results it normally produces. The cell reference type mattersonly when the contents of the cell are copied and then pasted into anotherlocation. See “Copying a Relative Cell Reference” on page 105 and “Copyingan Absolute or Mixed Cell Reference” on page 105 for full informationabout how cell references are affected by cut, copy, and paste operations.
87
Chapter 8 Pocket Sheet
Relative Cell ReferencesAs its name suggests, a relative cell reference is one that references a cell inrelation to the cell where the reference is made. Note the following examples.
Absolute Cell ReferencesAn absolute cell reference is one that references a specific cell, no matterwhere it is located in relation to the cell where the reference is made. Areference is made absolute by inserting a dollar sign in front of its columnname and row number. Note the following examples.
Meaning
Contents of cell A1Contents of the column of cells from A1through A10Contents of the row of cells from A1 to E1
Relative CellReference
A1A1:A10
A1:E1
Meaning
Contents of cell A1. Both the column ($A) androw ($1) references are absolute.Contents of the column of cells from A1through A10. All the column and rowreferences are absolute.Contents of the row of cells from A1 to E1. Allthe column and row references are absolute.
Absolute CellReference
$A$1
$A$1:$A$10
$A$1:$E$1

88
Chapter 8 Pocket Sheet
Mixed Cell ReferencesA mixed cell reference is one in which one component (column name orrow number) is relative, and the other component is absolute. Note thefollowing examples.
Using the On-screen KeyboardsOpening a new sheet that does not contain any data or tapping the highlightedcell within a sheet causes an on-screen keyboard to appear.
• Tapping the button above the text keyboard changes to the numerickeyboard.
• Tapping the button above the numeric keyboard changes to thetext keyboard.
• Tapping displays a menu of built-in functions.
Meaning
Contents of cell A1. The column reference ($A)is absolute, and the row reference (1) isrelative.Contents of cell A1. The column reference (A)is relative, and the row reference ($1) isabsolute.
Mixed CellReference
$A1
A$1
89
Chapter 8 Pocket Sheet
Inputting Mathematical ExpressionsYou can set up a cell to perform arithmetic operations (addition, subtraction,multiplication, division), and other useful functions like SUM (sum of aseries of values), MIN (extracts the lowest value), and COUNT (counts thenumber of values). You can also use parentheses to ensure that operationsare performed in the sequence you want.
• Inputting a mathematical expression causes its result to be displayed inthe cell. The mathematical expression itself appears in the input fieldonly.
• The results of mathematical operations are normally displayed flush rightin the cell.
• If the result of a mathematical expression is longer than the cell thatcontains it, the contents of the cell are replaced by a string of # marks.This is to let you know that the cell contains a value, but the value cannotbe displayed. If this happens, try making the cell wider (page 97).
To input a mathematical expression1. Make the cell where you want to input the expression the active cell.2. On the on-screen keyboard, tap =.• Inputting = as the first character tells the PV Unit that what follows is a
mathematical expression.
3. Use the on-screen keyboard to input the mathematical expression youwant.
• Tapping the buttons above the keyboard inputs the correspondingfunction. See “Examples” below for details.
4. After the content of the cell is the way you want, tap NEXT to store it.

90
Chapter 8 Pocket Sheet
ExamplesThe following are some examples of mathematical expressions you can inputinto sheet cells.
Cell Contents=1+2-3=(1+2)*(3+4)=(A1+B5)*2
=$A$1+B2=2^3
=ABS(A1)=AVERAGE(A1:D5)=COUNT(A1:D5)=COUNTA(A1:A7)
=EVEN(3)=INT(8.9)=MAX(A1:D5)=MIN(A1:D5)=MOD(3,2)
=ODD(2)=ROUND(2.15,1)
=SQRT(A1*5)=SUM(A1:D5)
Displayed Result021Result of expression using contents of cells A1and B5Contents of cell A1 + Contents of cell B28 (Raises left value to power specified by rightvalue.)Absolute value of value in A1Average of values in cells A1 through D5Number of values in cells A1 through D5Number of non blank cells in cells A1 throughA74 (Rounds up to the nearest even number.)8 (Rounds down to the nearest integer.)Greatest value of those in cells A1 through D5Least value of those in cells A1 through D51 (Integer result when left value is divided byright value.)3 (Rounds up to the nearest odd number.)2.2 (Rounds left value to decimal placesspecified by right value.)Square root of value in cell A1 multiplied by 5Sum of contents of cells A1 through D5
91
Chapter 8 Pocket Sheet
Inputting TextText (letters and numbers) can be input into the active cell using the on-screen text input keyboard.
• Input make up entirely of numbers (including decimal point) is treatedas a numeric value. Inclusion of even a single non-numeric character(alpha-character or symbol) causes the input to be treated as text.
• Text is normally aligned in the cell flush left, while numbers are alignedflush right.
• If a text string is longer than the cell, the extra text is allowed to extendinto the next cell to the right in the sheet display, as long as theneighboring cell does not contain any data. If it does, the extra charactersare cut off in the sheet display.
• If an input value is longer than the cell that contains it, the contents ofthe cell are replaced by a string of # marks. This is to let you know thatthe cell contains a value, but the value cannot be displayed. If thishappens, try making the cell wider (page 97).
• If the first character in a cell is an equals sign (=), the text is consideredto be part of a mathematical expression.
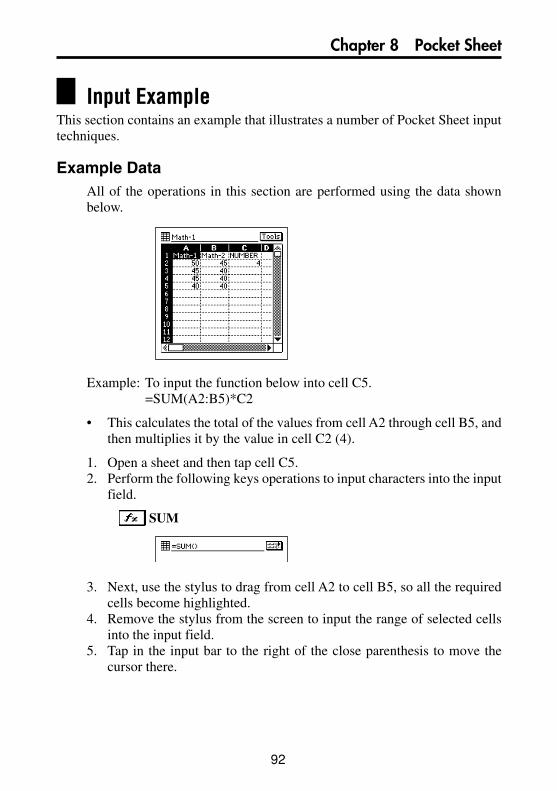
92
Chapter 8 Pocket Sheet
Input ExampleThis section contains an example that illustrates a number of Pocket Sheet inputtechniques.
Example DataAll of the operations in this section are performed using the data shownbelow.
Example: To input the function below into cell C5.=SUM(A2:B5)*C2
• This calculates the total of the values from cell A2 through cell B5, andthen multiplies it by the value in cell C2 (4).
1. Open a sheet and then tap cell C5.2. Perform the following keys operations to input characters into the input
field.
SUM
3. Next, use the stylus to drag from cell A2 to cell B5, so all the requiredcells become highlighted.
4. Remove the stylus from the screen to input the range of selected cellsinto the input field.
5. Tap in the input bar to the right of the close parenthesis to move thecursor there.

93
Chapter 8 Pocket Sheet
6. Type * into the input field.7. Tap cell C2.8. Tap any cell or the NEXT button to display the calculation result.• The value in cell C5 shows the result of the function.
Controlling the Appearance of a CellThis section explains how to make cell format settings that control the format ofdata inside individual cells or a range of cells. The format settings are: numericvalue category (monetary unit, percent), number of decimal places, alignment,text style (bold or normal), comma separators for values, and cell lock.
Changing the Format Settings of a Cell1. Make the cell whose format you want to change the active cell (page
85).• You can select a single cell or a range of cells.
2. Tap Menu Bar to display the menu bar, and then tap Option – Formatsto display the Formats tab.

94
Chapter 8 Pocket Sheet
3. Make the format settings you want.• See the following sections for information about the settings you can
make on the Formats tab.
4. After making the settings you want, tap Set to apply them.• Tapping Esc exits the Formats tab without applying any changes you
have made in the settings.
Category• Tap the L arrow next to Category box to display a list of numeric
value categories. The following shows the available settings and theirmeanings.
• For the monetary units and percent, the applicable symbol is appendedautomatically to the value in the cell.
• When percent is selected as the category setting, a value of 0.1 becomes10%, 1 becomes 100%, 10 becomes 1000%, etc.
Category SettingNone
%$£¥
Description• Numeric value (no setting)• Percent• Dollar value• British pound value• Japanese yen value• Euro value
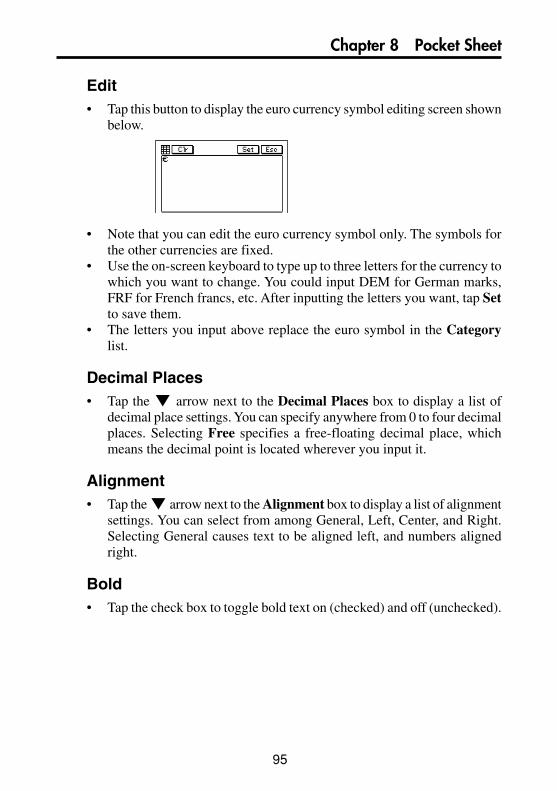
95
Chapter 8 Pocket Sheet
Edit• Tap this button to display the euro currency symbol editing screen shown
below.
• Note that you can edit the euro currency symbol only. The symbols forthe other currencies are fixed.
• Use the on-screen keyboard to type up to three letters for the currency towhich you want to change. You could input DEM for German marks,FRF for French francs, etc. After inputting the letters you want, tap Setto save them.
• The letters you input above replace the euro symbol in the Categorylist.
Decimal Places• Tap the L arrow next to the Decimal Places box to display a list of
decimal place settings. You can specify anywhere from 0 to four decimalplaces. Selecting Free specifies a free-floating decimal place, whichmeans the decimal point is located wherever you input it.
Alignment• Tap the L arrow next to the Alignment box to display a list of alignment
settings. You can select from among General, Left, Center, and Right.Selecting General causes text to be aligned left, and numbers alignedright.
Bold• Tap the check box to toggle bold text on (checked) and off (unchecked).

96
Chapter 8 Pocket Sheet
Comma• Tap the check box to toggle comma separators every three digits on
(checked) and off (unchecked).
Lock• Tap the check box to toggle cell lock on (checked) and off (unchecked).• Note that the sheet where the locked cell is located must be a protected
sheet (page 107) for the cell’s locked status to be enforced. The contentof a cell can always be edited whenever the sheet where it is located isunprotected, even if the cell is locked. The following shows therelationship between the cell lock and sheet protection.
Specifying Cell Border Lines1. Select the range of cells whose borderlines you want to change.• See “Making a Cell the Active Cell” on page 85.
2. Tap Menu Bar to display the menu bar, and then tap Option – Border.3. On the screen that appears, tap the borderline option you want to select.
4. When the borderlines are the way you want, tap Exe to apply them andto close the Border screen.
Cell StatusLockedLocked
UnlockedUnlocked
Sheet StatusProtected
UnprotectedProtected
Unprotected
Cell Content EditingNot allowed
AllowedAllowedAllowed
To select this type of border line:Bold outer lines onlyNormal outer lines onlyNormal outer lines and inner linesBorderlines off
Tap this button:

97
Chapter 8 Pocket Sheet
Row and Column OperationsThis section contains such information as how to change the width of a column,how to insert rows and columns, and how to delete rows and columns.
Changing the Width of a ColumnYou can change the width of a column of cells either by dragging theboundary to the width you want, or by specifying width value that representsa number of display dots.
To change the width of a column by dragging its boundary• In the black bar that shows the column names (A, B, C) at the top of a
sheet, drag either of the white boundary markers of the cell left or rightto change its width.
• You can drag a column boundary marker as far as the edge of the displayscreen.
Drag here
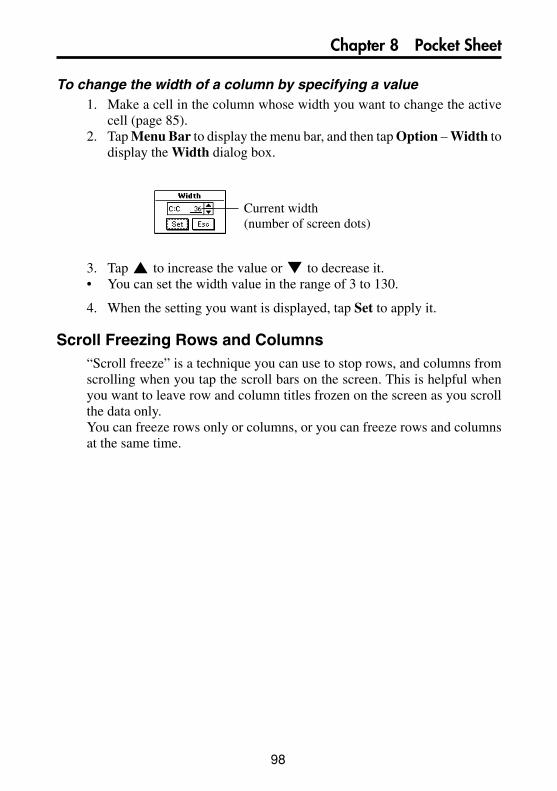
98
Chapter 8 Pocket Sheet
To change the width of a column by specifying a value1. Make a cell in the column whose width you want to change the active
cell (page 85).2. Tap Menu Bar to display the menu bar, and then tap Option – Width to
display the Width dialog box.
3. Tap K to increase the value or L to decrease it.• You can set the width value in the range of 3 to 130.
4. When the setting you want is displayed, tap Set to apply it.
Scroll Freezing Rows and Columns“Scroll freeze” is a technique you can use to stop rows, and columns fromscrolling when you tap the scroll bars on the screen. This is helpful whenyou want to leave row and column titles frozen on the screen as you scrollthe data only.You can freeze rows only or columns, or you can freeze rows and columnsat the same time.
Current width(number of screen dots)
99
Chapter 8 Pocket Sheet
To freeze columns onlyExample: The following procedure describes how to freeze column A.
1. In the top row of the displayed sheet, tap cell in the column to the rightof the column you want to freeze.
• To freeze column A, for example, you would tap cell B in the top row.To freeze both column A and column B, tap cell C.
2. Tap Menu Bar to display the menu bar, and then tap Option – Freeze.
To freeze a row only1. In the far left column of the displayed sheet, tap the cell in the row
below the row you want to freeze.• To freeze row 1, for example, you would tap cell 2 in the far left column.
To freeze both rows 1 and 2, tap cell 3.
2. Tap Menu Bar to display the menu bar, and then tap Option – Freeze.
Solid line indicates columnto the left is frozen.
Solid line indicates rowabove is frozen.

100
Chapter 8 Pocket Sheet
To freeze a row and column at the same time1. Tap the cell below the row and to the right of the column you want to
freeze.• To freeze column A and row 1, for example, you would tap cell B2.
2. Tap Menu Bar to display the menu bar, and then tap Option – Freeze.
To unfreeze rows and columnsIf a row and/or column is frozen on the current sheet, tap Menu Bar todisplay the menu bar, and then tap Option – Freeze to unfreeze them.
Inserting Rows1. Select the location in the sheet where you want to input the rows.• The number of cells you select determines the number of rows that are
inserted. Selecting C1 inserts a single row at row 1. Selecting C1 andC2 inserts two rows at rows 1 and 2.
• Existing rows will be shifted downwards to make room for the newlyinserted rows.
2. Tap Menu Bar to display the menu bar, and then tap Option – Insert.3. On the dialog box that appears, tap Rows to perform the row insert
operation in accordance with the cells you selected in step 1.

101
Chapter 8 Pocket Sheet
Inserting Columns1. Select the location in the sheet where you want to input the columns.• The number of cells you select determines the number of columns that
are inserted. Selecting C1 inserts a single column at column C. SelectingC1 and D1 inserts two columns at columns C and D.
• Existing columns will be shifted right to make room for the newly insertedcolumns.
2. Tap Menu Bar to display the menu bar, and then tap Option – Insert.3. On the dialog box that appears, tap Columns to perform the column
insert operation in accordance with the cells you selected in step 1.
Deleting Rows and Columns1. Select the location in the sheet where you want to delete rows or columns.• The number of cells you select determines the number of rows or columns
that are deleted.• Selecting C1 deletes row 1 or column C.• Selecting C1 and D1 deletes columns C and D.• Selecting C1 and C2 deletes rows 1 and 2.• Remaining columns will be shifted to fill the room created by the deleted
rows or columns.
2. Tap Menu Bar to display the menu bar, and then tap Option – Delete.3. On the dialog box that appears, tap Rows or Columns to perform the
delete operation in accordance with the cells you selected in step 1.

102
Chapter 8 Pocket Sheet
Sheet OperationsThis section contains information about the procedures you need to perform whenworking with sheets.
Opening a Sheet1. Display the Pocket Sheet list screen.2. Double-tap the title of a sheet to open it.
Displaying the Input ScreenYou can use any one of the following two operations to change from a sheetscreen to the input screen.
• Tap the input field.• Tap the currently selected (highlighted) cell.
To change back to the sheet screen from the input screen, tap Esc.
Saving a New Sheet1. After inputting data into a sheet, tap Menu Bar to display the menu bar,
and then tap Edit – Save.2. Use the text keyboard to type in up to 32 characters for the name you
want to assign to the sheet.3. Tap Save to save the sheet.
Saving an Existing Sheet Under a New Name1. Tap Menu Bar to display the menu bar, and then tap Edit – Save As.2. Use the text keyboard to type in up to 32 characters for the name you
want to assign to the sheet.3. Tap Save to save the sheet.

103
Chapter 8 Pocket Sheet
Exiting a SheetWhile a sheet is on the display, tap Esc to exit.
• Instead of tapping Esc, you could tap Menu Bar to display the menubar, and then tap Edit – Close.
• If there are unsaved edits in the sheet, tapping Esc displays a screen forsaving the sheet. Type in a name and then tap Save to save the sheet.
• If you want to quit without saving the sheet, tap Esc.
Renaming a Sheet1. Display the Pocket Sheet list screen.2. Tap the sheet you want to rename so it is highlighted.3. Tap Menu Bar to display the menu bar, and then tap Edit – Rename
item.4. Use the text keyboard to type up to 32 characters for the new name you
want to assign to the sheet.5. Tap Save to save the sheet under its new name.
Cut, Copy, Paste, ClearThe cut, copy, and paste operations in the Pocket Sheet Mode are somewhatdifferent from those in other modes.
Cutting and Copying Cell Data1. Select the cell or range of cells that contains the data you want to cut or
copy.• See “Making a Cell the Active Cell” on page 85.
104
Chapter 8 Pocket Sheet
2. Tap Menu Bar to display the menu bar, and then tap Edit – Cut or Edit– Copy.
• With Cut, the original data is deleted from the cell and placed onto theclipboard.
• With Copy, a copy of the data is placed onto the clipboard withoutchanging the original data.
• The data includes format settings (page 93) as well as any text, numbers,and mathematical expressions. The border specification, however, is notincluded.
• You can use the Paste command to paste the contents of the clipboardinto another cell or range of cells.
Pasting Cell Data
Important!• Pasting data into a cell or range of cells that already contains data causes the
current data to be replaced with the pasted data.
1. Select the cell or range of cells to which you want to paste the datacurrently on the clipboard.
• See “Making a Cell the Active Cell” on page 85.• Data can be placed onto the clipboard using the cut or copy (page 103)
operation.
2. Tap Menu Bar to display the menu bar, and then tap Edit – Paste.• The data is pasted from the clipboard into the currently active cells.• The pasted data includes format settings (page 93) as well as any text,
numbers, and mathematical expressions. No border specification isincluded.
Note• Up to 256 characters can be pasted when pasting data from another application.• The clipboard has a capacity of approximately 2KB.
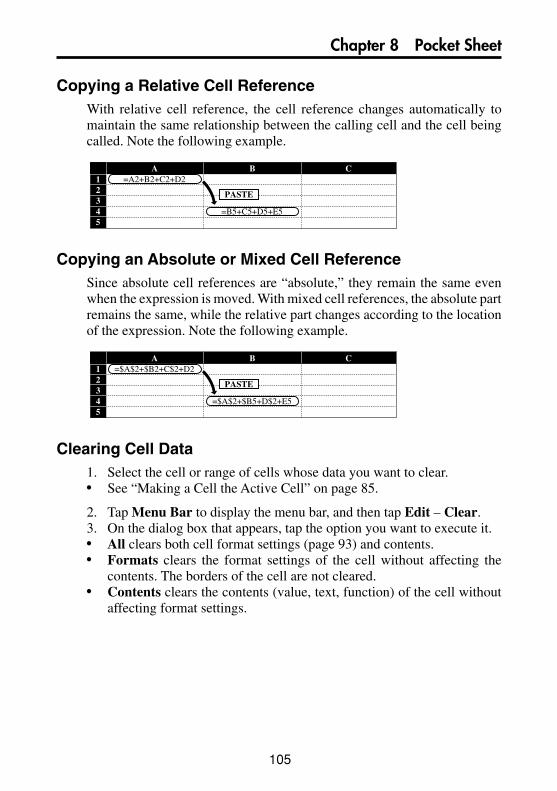
105
Chapter 8 Pocket Sheet
Copying a Relative Cell ReferenceWith relative cell reference, the cell reference changes automatically tomaintain the same relationship between the calling cell and the cell beingcalled. Note the following example.
=A2+B2+C2+D2
=B5+C5+D5+E5
A B C12345
PASTE
Copying an Absolute or Mixed Cell ReferenceSince absolute cell references are “absolute,” they remain the same evenwhen the expression is moved. With mixed cell references, the absolute partremains the same, while the relative part changes according to the locationof the expression. Note the following example.
=$A$2+$B2+C$2+D2
=$A$2+$B5+D$2+E5
A B C12345
PASTE
Clearing Cell Data1. Select the cell or range of cells whose data you want to clear.• See “Making a Cell the Active Cell” on page 85.
2. Tap Menu Bar to display the menu bar, and then tap Edit – Clear.3. On the dialog box that appears, tap the option you want to execute it.• All clears both cell format settings (page 93) and contents.• Formats clears the format settings of the cell without affecting the
contents. The borders of the cell are not cleared.• Contents clears the contents (value, text, function) of the cell without
affecting format settings.
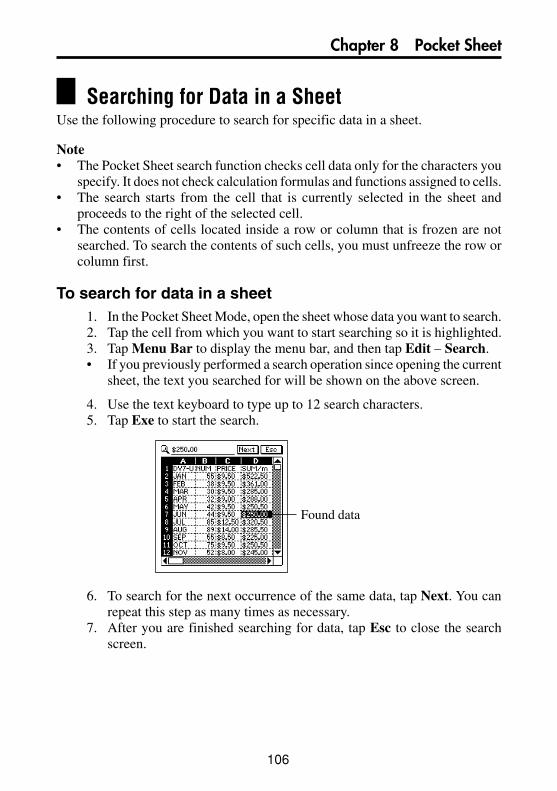
106
Chapter 8 Pocket Sheet
Searching for Data in a SheetUse the following procedure to search for specific data in a sheet.
Note• The Pocket Sheet search function checks cell data only for the characters you
specify. It does not check calculation formulas and functions assigned to cells.• The search starts from the cell that is currently selected in the sheet and
proceeds to the right of the selected cell.• The contents of cells located inside a row or column that is frozen are not
searched. To search the contents of such cells, you must unfreeze the row orcolumn first.
To search for data in a sheet1. In the Pocket Sheet Mode, open the sheet whose data you want to search.2. Tap the cell from which you want to start searching so it is highlighted.3. Tap Menu Bar to display the menu bar, and then tap Edit – Search.• If you previously performed a search operation since opening the current
sheet, the text you searched for will be shown on the above screen.
4. Use the text keyboard to type up to 12 search characters.5. Tap Exe to start the search.
6. To search for the next occurrence of the same data, tap Next. You canrepeat this step as many times as necessary.
7. After you are finished searching for data, tap Esc to close the searchscreen.
Found data

107
Chapter 8 Pocket Sheet
Setting Sheet Calculation, Gridline, and ProtectOptions1. Display the sheet whose options you want to set.2. Tap Menu Bar to display the menu bar, and then tap Option – Sheet to
display the option setting dialog box.3. On the screen that appears, tap the check boxes to turn the options you
want on (checked) and off (unchecked).• Check Auto Calculation when you want the calculations in the sheet
performed automatically whenever a value is changed. When AutoCalculation is turned off, you can perform calculations manually byexecuting Menu Bar – Option – Calc Now.
• Check Gridlines to display the sheets gridlines.• Check Protect Sheet when you want to protect the contents of the sheet
from being changed. Note that sheet protection is related to cell lockingdescribed under “Lock” on page 96.
4. After the settings are the way you want, tap Set to apply them.
Date and Size InformationYou can use the following procedure to display a dialog box that shows the datethe sheet was created or modified, and the size of the sheet in bytes.
Displaying Date and Size Information1. Display the Pocket Sheet list screen.2. Select the name of the sheet whose date and size information you want
to view.3. Tap Menu Bar to display the menu bar, and then tap Option – Date/
Size.• The date format (M/D/Y, D/M/Y, Y/M/D) is in accordance with the
system settings you make under “Setting the Date, Time, Calendar, andKeyboard Formats” on page 159.
4. After you are finished viewing the information, tap OK to close thedialog box.

108
Chapter 8 Pocket Sheet
Pocket Sheet SyncPocket Sheet Sync for Microsoft® Excel 95/97/2000 synchronizes Pocket Sheet datastored in your PV Unit with data in files created using Microsoft Excel (95, 97,2000). For details on using Pocket Sheet Sync, see the documentation containedon the CD-ROM that comes with your PV Unit.
Computer System RequirementsThe following are the minimum computer system requirements for runningPocket Sheet Sync.
• Windows 95/98/2000/Me/NT (English, Spanish, German, French, orItalian)
• Excel 95/97/2000
Pocket Sheet ErrorsThe message #ERR appears inside of a cell any time one of the followingoperations is attempted with the cell.
• Division by zero• Any mathematical operation that produces a value that exceeds the
calculation limit• Any mathematical operation in which a cell references itself• Deletion of a row or column that contains a cell referenced by the cell• A copy operation that causes the referenced cell to be outside the sheet• Any copy operation, or row or column insert operation that causes the
length of a function to exceed 256 characters• Mathematical error• Adding a large number of mathematical expressions to a sheet for which
Auto Calculation is turned off can cause the #ERR message to appear.• Parentheses can be nested up to 10 times inside a single calculation.• Referencing of other cells within the same sheet is limited to 256 levels
per calculation.
Important!• Referencing a cell that contains a calculation that has not yet been performed
may cause the referencing calculation to take a long time.
109
Chapter
9 Secret Function
Your PV Unit lets you set up a secret memory area that keeps your data safe andsecure under a password you specify. After you enter the secret memory area,you can use the Scheduler, Contacts, Memo, and Expense Manager modes tostore data.
Important!• You can have only one secret memory area at any one time.• All secret data for all modes is stored in the same secret memory area,
regardless of what mode you were in when you created the secret memoryarea.
• Make sure you do not forget your password! There is no way to look up apassword if you forget it. You will have to reset the PV Unit and clear all itsmemory contents in order to clear a forgotten password and create a newsecret memory area.
Creating a New Secret Memory AreaUse the following procedure to create a new secret memory area. Note that thisoperation can be performed only if there is no secret memory area already inmemory.
1. Tap the Menu icon to display the Mode Menu, and then tap Secret.2. Use the text keyboard to type up to 12 characters for the password you
want to use.3. Tap Set to register your password and create a secret memory area.4. In response to the confirmation message that appears, tap Yes.• Registering a password creates and immediately enters the secret memory
area, which is indicated by the icon.

110
Chapter 9 Secret Function
Using the Secret Memory AreaThe following describes the operations you can perform after you create a secretmemory area.
To enter an existing secret memory area1. Tap the Menu icon to display the Mode Menu, and then tap Secret.2. Use the text keyboard to type the correct password, and then tap Set.• If the password is correct, the PV Unit enters the secret memory area.• Once you enter the secret memory area, you can move between it and
the open (non-secret) memory area without having to input the passwordagain until you turn power off and then back on again.
To exit the secret memory area1. While in the secret memory area, tap the Menu icon to display the Mode
Menu.2. Tap Secret to exit the secret memory area and return to the open memory
area.
To change your password1. While in the secret memory area, tap the Menu icon to display the Mode
Menu.2. Tap Menu Bar to display the menu bar, and then tap Edit – Password
edit.3. Use the text keyboard to type up to 12 characters for the new password
you want to use.4. Tap Set to register the new password.5. In response to the confirmation message that appears, tap Yes.
111
Chapter 9 Secret Function
To transfer data from the open memory area to the secretmemory area
1. Enter the mode that contains the data you want to transfer to the secretmemory area.
2. Select the data item you want to transfer.• You can select a data item (record) by highlighting it on a list screen,
1-Month Calendar screen, etc. or by displaying the data item’s datascreen.
3. Tap Menu Bar to display the menu bar, and then tap Edit – To secretarea.
4. Use the text keyboard to type the correct password and then tap Set.• You do not need to input the password if you have entered the secret
memory area since you last turned on power.
5. In response to the message that appears, tap Yes to transfer the data.
To transfer data from the secret memory area to the openmemory area
1. Enter the secret memory area.2. Enter the mode that contains the data you want to transfer to the open
memory area.3. Select the data item you want to transfer.• You can select a data item (record) by highlighting it on a list screen,
1-Month Calendar screen, etc. or by displaying the data item’s datascreen.
4. Tap Menu Bar to display the menu bar, and then tap Edit – To openarea.
5. In response to the message that appears, tap Yes to transfer the data.

112
Chapter
10 Pop Up Tools
The pop up tools of the PV Unit provide you with instant access to a calculator, acalendar, and a clock whenever you need them.
Displaying the Pop Up Tool ScreenWhile a screen that has a Tools button in its upper right-hand corner is on thedisplay, tap Tools to display the pop up tool screen.
2
1
3 4 5
6
7
8
Important!• You can use only one pop up tool at a time. This means the calculator screen
will not appear while the clock screen is on the display, etc.
Using the Clock ScreenThe clock screen shows two clocks and the cities whose times are displayed onthe clocks. It also shows whether daylight saving time (summer time) is set foreither clock, and the date in the city of the main (currently selected) clock.
1 Clock(Tap to display date/timesetting screen on page 157.)
2 Home city3 Clock icon4 Calendar icon5 Calculator icon6 Alarm indicator
(Tap to display alarmsetting screen on page 158.)
7 Current date8 Current time
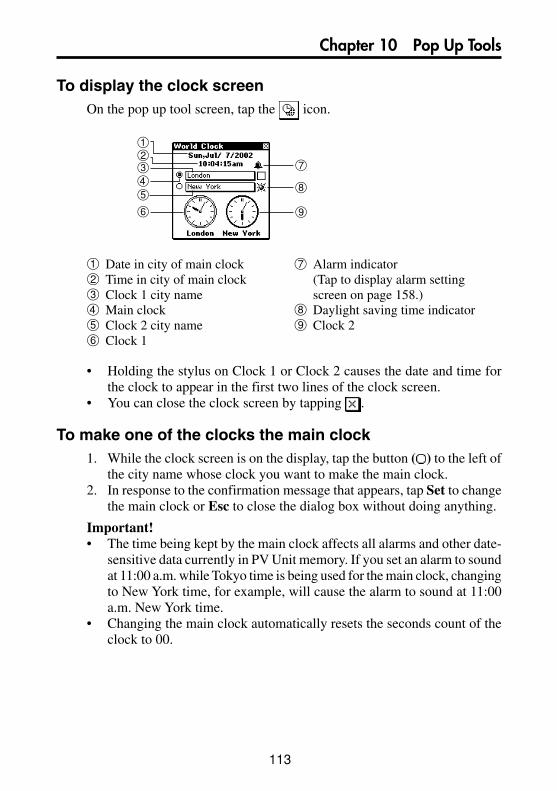
113
Chapter 10 Pop Up Tools
To display the clock screenOn the pop up tool screen, tap the icon.
1
32
45
6
7
8
9
• Holding the stylus on Clock 1 or Clock 2 causes the date and time forthe clock to appear in the first two lines of the clock screen.
• You can close the clock screen by tapping .
To make one of the clocks the main clock1. While the clock screen is on the display, tap the button ( ) to the left of
the city name whose clock you want to make the main clock.2. In response to the confirmation message that appears, tap Set to change
the main clock or Esc to close the dialog box without doing anything.
Important!• The time being kept by the main clock affects all alarms and other date-
sensitive data currently in PV Unit memory. If you set an alarm to soundat 11:00 a.m. while Tokyo time is being used for the main clock, changingto New York time, for example, will cause the alarm to sound at 11:00a.m. New York time.
• Changing the main clock automatically resets the seconds count of theclock to 00.
1 Date in city of main clock2 Time in city of main clock3 Clock 1 city name4 Main clock5 Clock 2 city name6 Clock 1
7 Alarm indicator(Tap to display alarm settingscreen on page 158.)
8 Daylight saving time indicator9 Clock 2

114
Chapter 10 Pop Up Tools
To select a time zone city1. On the clock screen, tap the city name you want to change.2. Highlight the name of the city you want to select by tapping it or by
using Action control.3. Tap Set to register the selected city.
To switch between standard time and daylight saving time(DST)
On the clock screen, tap on the DST (summer time) setting of one of theclocks to toggle it between DST on ( ) and DST off (no indicator).
Using the Calculator ScreenThis screen provides you with a 12-digit calculator that can perform a variety ofcalculations.
To display the calculatorOn the pop up tool screen, tap the icon.
• You can also display the calculator in certain modes by tapping the button in the data input tool bar.
• You can close the calculator screen from the display by tapping .
DST (summer time) setting

115
Chapter 10 Pop Up Tools
Calculator KeysThe following describes the functions of the calculator screen keys.
• Use the number keys to input values.• MC clears calculator memory.• MR recalls calculator memory contents.• M– subtracts the currently displayed value from memory contents.
Tapping M– in place of = at the end of a calculation subtracts its resultsfrom memory contents.
• M+ adds the currently displayed value to memory contents. TappingM+ in place of = at the end of a calculation adds its results to memorycontents.
• Tap +, –, #, and $ to input the corresponding arithmetic operation.• = executes the calculation and displays its results.• AC clears the calculator (except the calculator memory).• C clears the display without clearing calculator memory.• Use q for square root calculations.• Use % for percent calculations.• Tapping shifts the displayed value to the right, cutting off the rightmost
digit.• If you displayed the calculator by tapping the button in a data input
tool bar, tapping copies the calculation result. Edit – Paste pastesthe copied result at the current cursor location.

116
Chapter 10 Pop Up Tools
a 0.
53 + 123 – 63 = 53q123w63u 113.
963 × (23 – 56) = 23w56e963u – 31’779.
(56 × 3 – 89) ÷ 5.2 + 63 = 56e3w89r5.2
q63u 78.1923076923
1234567890 × 741852 = 1234567890e741852u E 915.866658332
C 915.866658332
a 0.
3 × 5 = 3ye5u 8.6602540378
12 + 23 = 23qq12u K + 35.
45 + 23 = 45u K + 68.
7 – 5.6 = 5.6ww7u K – 1.4
2 – 5.6 = 2u K – – 3.6
2.3 × 12 = 12ee2.3u K × 27.6
4.5 × 12 = 4.5u K × 54.
45 ÷ 9.6 = 9.6rr45u K ÷ 4.6875
78 ÷ 9.6 = 78u K ÷ 8.125
12% of 1500 1500e12t 180.
Percentage of 660 against 880 660r880t 75.
15% add-on of 2500 2500e15tq 2’875.
25% discount of 3500 3500e25tw 2’625.
480q25t 640.
w 160.
100w80t 25.
80 × 9 = 720 80e9| M 720.
–) 50 × 6 = 300 50e6 M 300.
20 × 3 = 60 20e3| M 60.
480 \ M 480.
What will the selling price and profitbe when the purchasing price of anitem is $480 and the profitrate to the selling price is 25%?
If you made $80 last week and $100this week, what is the percentincrease?
To perform calculations

117
Chapter 10 Pop Up Tools
To perform constant calculations1. On the calculator screen, input the first value of the operation, tap an
arithmetic operator key twice, and then input the second value of theoperation.
• You can perform a constant calculation using +, –, #, or $.• The first value you input (the one to the left of the arithmetic operator)
is the one that will be used as the constant.• Tapping an arithmetic operator key twice causes the indicator K to appear
on the display to indicate that a constant calculation is being performed.
2. Tap = to display the result of the operation.• Inputting 4 # # 2 = would produce a result of 8.
3. Tap = again to multiply the result by the constant.• Tapping = again with the example shown under step 2 would produce a
result of 32 (8 × 4).• Each subsequent tap of = multiplies the last result obtained by the
constant. Continuing with the above example, tapping = would producethe following results: = 128 (32 × 4), = 512 (128 × 4), = 2048 (512 × 4),and so on.
To correct entries during calculations• If you enter a wrong value, tap C to clear the value and then input the
correct one.• If you tap the wrong arithmetic key (+, –, #, $), simply tap the correct
arithmetic key before inputting anything else.
About calculation errorsAn error indicator appears on the display and further calculation becomesimpossible whenever an error occurs.
Error indicator
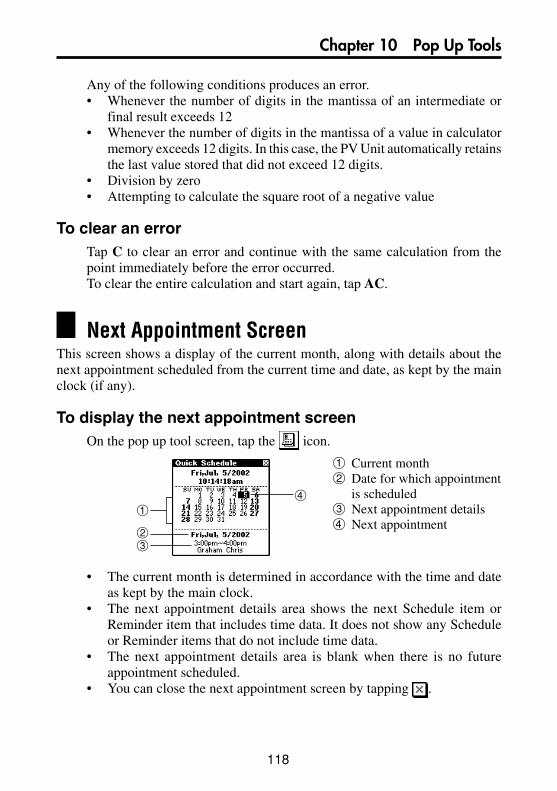
118
Chapter 10 Pop Up Tools
1 Current month2 Date for which appointment
is scheduled3 Next appointment details4 Next appointment
Any of the following conditions produces an error.• Whenever the number of digits in the mantissa of an intermediate or
final result exceeds 12• Whenever the number of digits in the mantissa of a value in calculator
memory exceeds 12 digits. In this case, the PV Unit automatically retainsthe last value stored that did not exceed 12 digits.
• Division by zero• Attempting to calculate the square root of a negative value
To clear an errorTap C to clear an error and continue with the same calculation from thepoint immediately before the error occurred.To clear the entire calculation and start again, tap AC.
Next Appointment ScreenThis screen shows a display of the current month, along with details about thenext appointment scheduled from the current time and date, as kept by the mainclock (if any).
To display the next appointment screenOn the pop up tool screen, tap the icon.
1
23
4
• The current month is determined in accordance with the time and dateas kept by the main clock.
• The next appointment details area shows the next Schedule item orReminder item that includes time data. It does not show any Scheduleor Reminder items that do not include time data.
• The next appointment details area is blank when there is no futureappointment scheduled.
• You can close the next appointment screen by tapping .
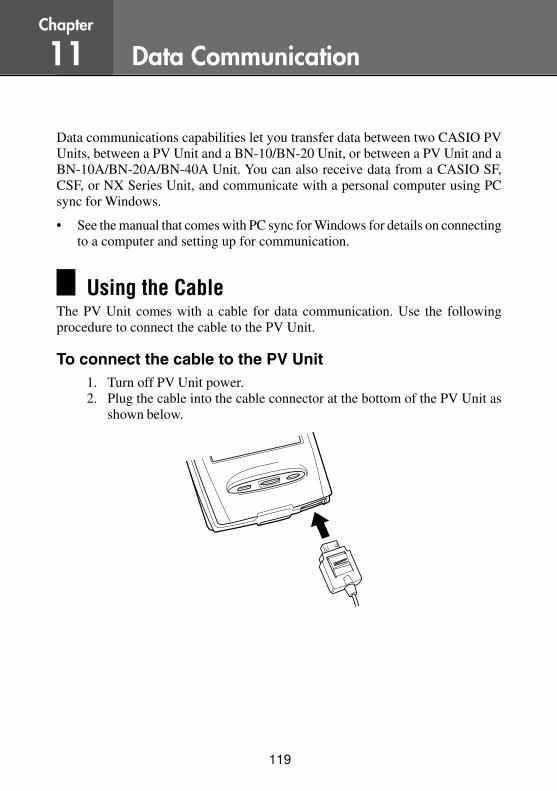
119
Chapter
11 Data Communication
Data communications capabilities let you transfer data between two CASIO PVUnits, between a PV Unit and a BN-10/BN-20 Unit, or between a PV Unit and aBN-10A/BN-20A/BN-40A Unit. You can also receive data from a CASIO SF,CSF, or NX Series Unit, and communicate with a personal computer using PCsync for Windows.
• See the manual that comes with PC sync for Windows for details on connectingto a computer and setting up for communication.
Using the CableThe PV Unit comes with a cable for data communication. Use the followingprocedure to connect the cable to the PV Unit.
To connect the cable to the PV Unit1. Turn off PV Unit power.2. Plug the cable into the cable connector at the bottom of the PV Unit as
shown below.
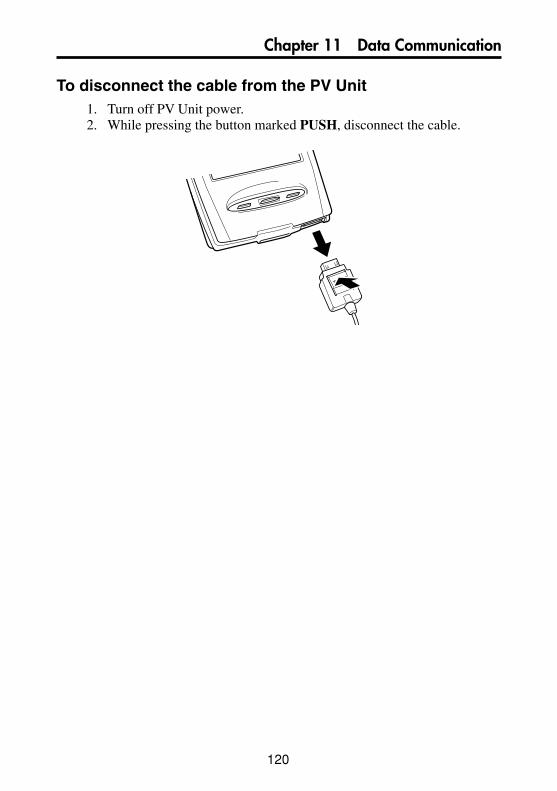
120
Chapter 11 Data Communication
To disconnect the cable from the PV Unit1. Turn off PV Unit power.2. While pressing the button marked PUSH, disconnect the cable.

121
Chapter 11 Data Communication
Data Communications Between Two PV UnitsThis section describes how to set up and communicate between two PV Units.
• You must purchase a separately available SB-90 in order to connect two PVUnits.
To connect two PV Units1. Make sure that the power of both units is turned off.2. Plug the cables that come with each PV Unit into their cable connectors.3. Use an optional SB-90 9-9 pin connector to connect the two cables to
each other.
• All data communication settings must be made on one of the PV Unitsonly. This unit is called the host unit, while the other unit is called theterminal unit.
To send data from the host unit to the terminal unit1. After connecting the two PV Units, turn on the host unit.• Terminal unit power should still be off at this time.
2. Display the list view in a mode whose data can be sent with this setup.• This configuration supports transfer of Contacts (Business, Personal,
Untitled 1-5), Memo (Untitled 1-5), Schedule, To Do, Reminder, ExpenseManager, and Quick-Memo data.
SB-90 9-9 pin connector
Host unit Terminal unit
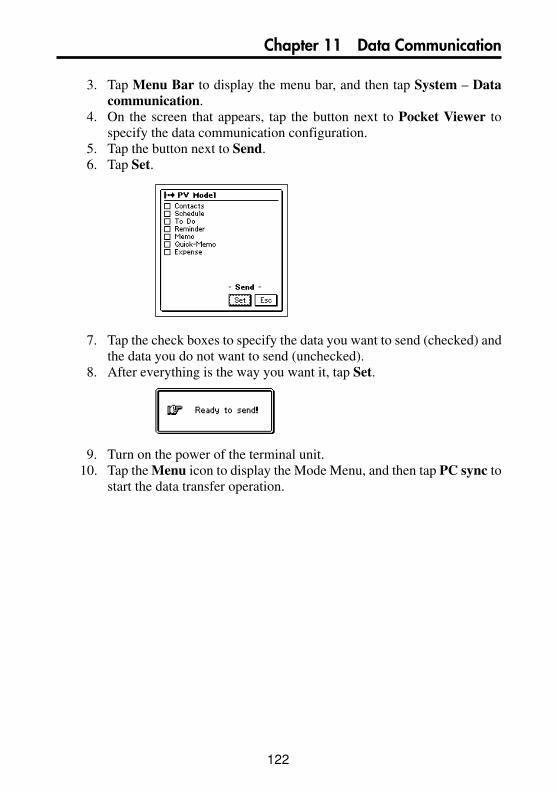
122
Chapter 11 Data Communication
3. Tap Menu Bar to display the menu bar, and then tap System – Datacommunication.
4. On the screen that appears, tap the button next to Pocket Viewer tospecify the data communication configuration.
5. Tap the button next to Send.6. Tap Set.
7. Tap the check boxes to specify the data you want to send (checked) andthe data you do not want to send (unchecked).
8. After everything is the way you want it, tap Set.
9. Turn on the power of the terminal unit.10. Tap the Menu icon to display the Mode Menu, and then tap PC sync to
start the data transfer operation.
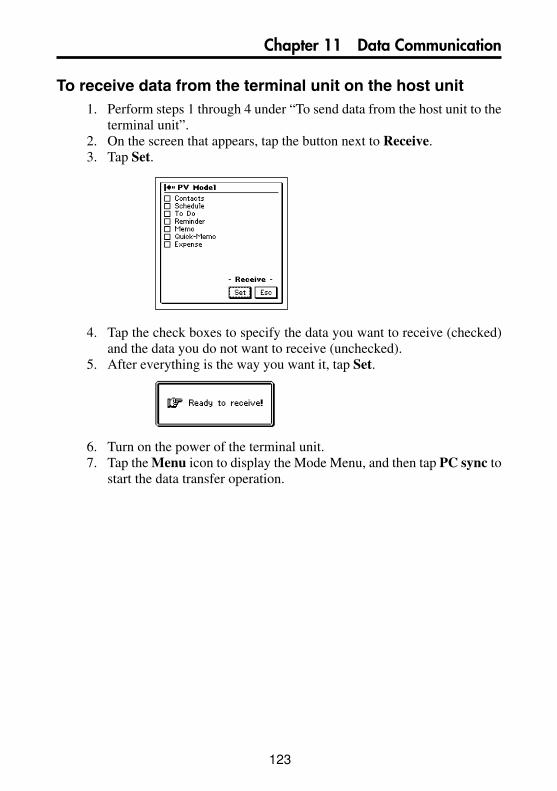
123
Chapter 11 Data Communication
To receive data from the terminal unit on the host unit1. Perform steps 1 through 4 under “To send data from the host unit to the
terminal unit”.2. On the screen that appears, tap the button next to Receive.3. Tap Set.
4. Tap the check boxes to specify the data you want to receive (checked)and the data you do not want to receive (unchecked).
5. After everything is the way you want it, tap Set.
6. Turn on the power of the terminal unit.7. Tap the Menu icon to display the Mode Menu, and then tap PC sync to
start the data transfer operation.

124
Chapter 11 Data Communication
Notes• The above procedures can be used to send or receive all data in specific
modes only. You cannot send or receive individual data items.• Data communication can be interrupted at any time by pressing Esc.• If the secret memory area is accessed on a unit receiving data, the received
data is stored in the secret memory area, regardless of the memory areathe data is in on the sending unit.
• Transferring data from the PV-S460/PV-S660 to a PV-100 or PV-200causes all euro symbols to be replaced by spaces.
• The size of the PV-S460/PV-S660 screen is 160 × 160 dots. TransferringPV-S460/PV-S660 Quick-Memo data to a PV-100 or PV-200, whichboth have 98(V) × 124(H)-dot screens, causes the right side and bottompart of the Quick-Memo image to be cut off in order to fit the PV-100/PV-200 screen.
Data Communications Between a PV Unit anda BN Unit
This section describes how to set up and communicate between a PV Unit and aBN Unit (BN-10/BN-20 or BN-10A/BN-20A/BN-40A).
• You must purchase a separately available SB-90 in order to connect a PVUnit to a BN Unit.
To connect a PV Unit to a BN Unit1. Make sure that the power of both units is turned off.2. Open the cover of the Mini Cradle port of the BN Unit, and connect its
Mini Cradle to the port.3. Plug the cable that comes with the PV Unit into its cable connector.

125
Chapter 11 Data Communication
4. Use an optional SB-90 9-9 pin connector to connect the PV Unit cableto the BN Unit Mini Cradle.
• All data communication settings must be made on the PV Unit, which isthe host unit. The BN Unit is the terminal unit.
To send data from the PV Unit to the BN Unit1. After connecting the two units, turn on the PV Unit.• BN Unit power should still be off at this time.
2. Display the list view in a mode whose data can be sent with this setup.• This configuration supports transfer of Contacts (Business, Personal),
Memo, Schedule, To Do, and Reminder data.• Calendar and Expense Manager data cannot be transferred.• Contacts Untitled 1-5 data is transferred as Personal data.• Memo Untitled 1-5 data is transferred as Memo data (no category).
3. Tap Menu Bar to display the menu bar, and then tap System – Datacommunication.
Host unit (PV Unit) Terminal unit (BN Unit)
Mini Cradle
START button
SB-90 9-9 pin connector
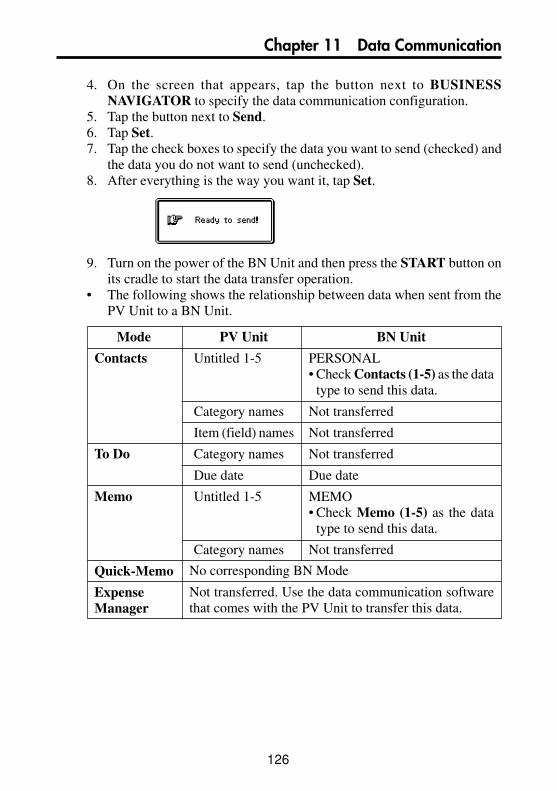
126
Chapter 11 Data Communication
4. On the screen that appears, tap the button next to BUSINESSNAVIGATOR to specify the data communication configuration.
5. Tap the button next to Send.6. Tap Set.7. Tap the check boxes to specify the data you want to send (checked) and
the data you do not want to send (unchecked).8. After everything is the way you want it, tap Set.
9. Turn on the power of the BN Unit and then press the START button onits cradle to start the data transfer operation.
• The following shows the relationship between data when sent from thePV Unit to a BN Unit.
Mode
Contacts
To Do
Memo
Quick-Memo
ExpenseManager
PV Unit
Untitled 1-5
Category names
Item (field) names
Category names
Due date
Untitled 1-5
Category names
BN Unit
PERSONAL• Check Contacts (1-5) as the data
type to send this data.
Not transferred
Not transferred
Not transferred
Due date
MEMO• Check Memo (1-5) as the data
type to send this data.
Not transferred
No corresponding BN Mode
Not transferred. Use the data communication softwarethat comes with the PV Unit to transfer this data.
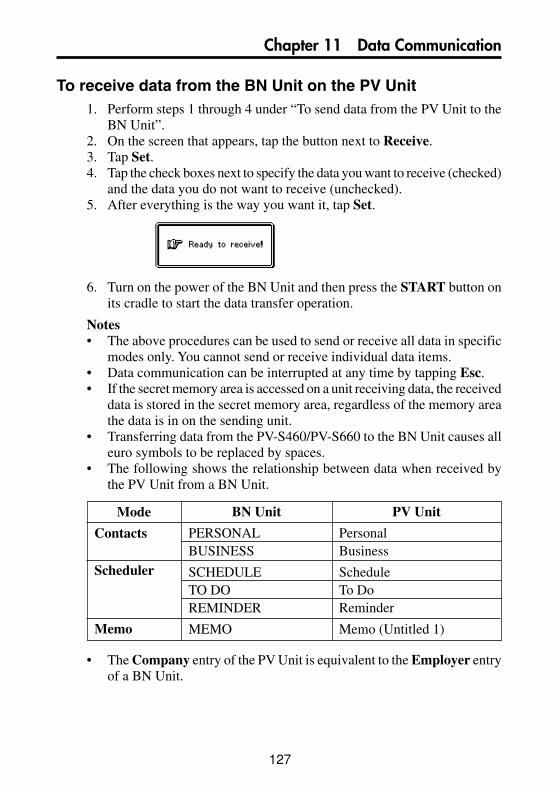
127
Chapter 11 Data Communication
To receive data from the BN Unit on the PV Unit1. Perform steps 1 through 4 under “To send data from the PV Unit to the
BN Unit”.2. On the screen that appears, tap the button next to Receive.3. Tap Set.4. Tap the check boxes next to specify the data you want to receive (checked)
and the data you do not want to receive (unchecked).5. After everything is the way you want it, tap Set.
6. Turn on the power of the BN Unit and then press the START button onits cradle to start the data transfer operation.
Notes• The above procedures can be used to send or receive all data in specific
modes only. You cannot send or receive individual data items.• Data communication can be interrupted at any time by tapping Esc.• If the secret memory area is accessed on a unit receiving data, the received
data is stored in the secret memory area, regardless of the memory areathe data is in on the sending unit.
• Transferring data from the PV-S460/PV-S660 to the BN Unit causes alleuro symbols to be replaced by spaces.
• The following shows the relationship between data when received bythe PV Unit from a BN Unit.
• The Company entry of the PV Unit is equivalent to the Employer entryof a BN Unit.
Mode
Contacts
Scheduler
Memo
PV Unit
PersonalBusiness
ScheduleTo DoReminder
Memo (Untitled 1)
BN Unit
PERSONALBUSINESS
SCHEDULETO DOREMINDER
MEMO
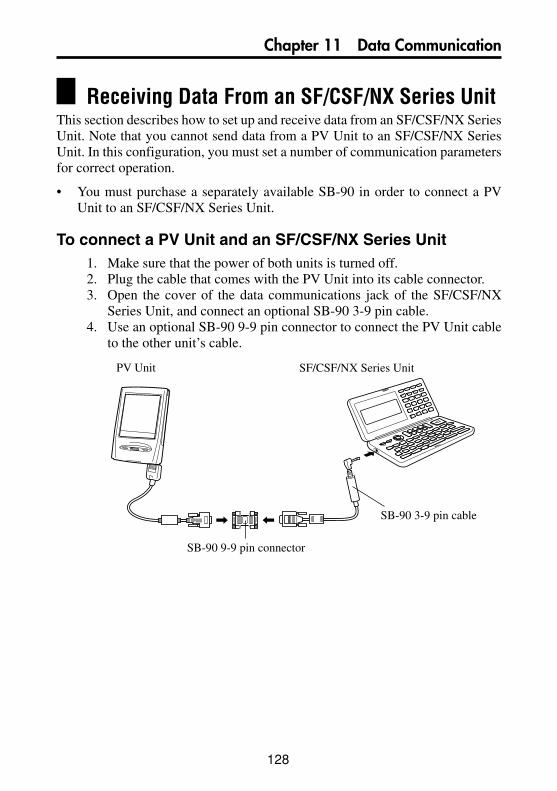
128
Chapter 11 Data Communication
Receiving Data From an SF/CSF/NX Series UnitThis section describes how to set up and receive data from an SF/CSF/NX SeriesUnit. Note that you cannot send data from a PV Unit to an SF/CSF/NX SeriesUnit. In this configuration, you must set a number of communication parametersfor correct operation.
• You must purchase a separately available SB-90 in order to connect a PVUnit to an SF/CSF/NX Series Unit.
To connect a PV Unit and an SF/CSF/NX Series Unit1. Make sure that the power of both units is turned off.2. Plug the cable that comes with the PV Unit into its cable connector.3. Open the cover of the data communications jack of the SF/CSF/NX
Series Unit, and connect an optional SB-90 3-9 pin cable.4. Use an optional SB-90 9-9 pin connector to connect the PV Unit cable
to the other unit’s cable.
SB-90 3-9 pin cable
SB-90 9-9 pin connector
PV Unit SF/CSF/NX Series Unit

129
Chapter 11 Data Communication
To make communication parameter settings1. After connecting the two units, turn on the PV Unit.2. Display the list view in a mode whose data can be received with this
setup.• This configuration supports receipt of Contacts, Memo, Schedule and
To Do data.• REMINDER 1, REMINDER 2, EXPENSE, CALENDAR, SKETCH,
and FREE FILE data cannot be received.
3. On the screen that appears, tap Menu Bar to display the menu bar, andthen tap System – Data communication.
4. Tap the button next to SF/CSF/NX.5. Press the button next to Set up parameters and then tap Set.6. On the screen that appears, tap the buttons under Parity, Bit length, and
BPS to make the settings you want.• Note that the settings you make here must match those of the connected
SF/CSF/NX Series Unit. Otherwise, proper data communication will beimpossible.
7. After making all the settings you want, press Set to register them, andreturn to the screen in step 4, above.
• Now you can continue with the following data receive procedure.
To receive data from an SF/CSF/NX Series Unit1. After connecting the two units, turn on the PV Unit.2. Display the list view in a mode whose data can be received with this
setup.• This configuration supports receipt of Contacts, Memo, Schedule and
To Do data.• REMINDER 1, REMINDER 2, EXPENSE, CALENDAR, SKETCH,
and FREE FILE data cannot be received.
3. Tap Menu Bar to display the menu bar, and then tap System – Datacommunication.

130
Chapter 11 Data Communication
4. On the screen that appears, tap the button next to SF/CSF/NX.• At this time you could perform steps 5 through 7 under “To make
communication parameter settings” above to make communication setup parameter settings if you want.
5. Tap Set.
6. Perform the required operations on the SF/CSF/NX Series Unit to senddata. See the manual that comes with the unit you are using for details.
Notes• Data communication can be interrupted at any time by tapping Esc.• If the secret memory area of the PV Unit is accessed when you receive
data, the data is stored in the secret memory area, regardless of thememory area where it was stored in the sending unit.
• Data cannot be received from the following CASIO units: SF-A Series,SF-5580, 5780, 5980, 5580E, 5780E, 5980E, 5590SY, 5790SY, 5990SY,5590SYE, 5790SYE, 5990SYE, 6500SY, 6700SY, 6900SY, 7100SY,7200SY.
• REMINDER1, REMINDER2, EXPENSE, CALENDAR, andSPREADSHEET data cannot be received from an SF, CSF, or NX Unit.
• NX Unit PERSONAL, FAMILY, TIMETABLE, and GOLF mode datacannot be received.
• Data from SKETCH, FREE FILE, and other SF, CSF, and NX Unitmodes for which there is no equivalent PV modes cannot be received.
• Data from ILLUSTRATION, P.O. BOX, TELEX NUMBER, and otherSF, CSF, and NX Unit entries for which there is no equivalent PV entriescannot be received.
• All data is received in monotone, without any color attributes.• In the case of SF Unit data that is mark protected against deletion, the
mark protection is ignored when received by the PV Unit.
131
Chapter
12 PV Applications
A “PV Application” is a program you can download from the CASIO Website(http://world.casio.com/download/pv/) or from other Websites to your computer,and then install on your PV Unit. You can have up to 14 PV Applications installedon your PV Unit at one time. You can delete PV Applications when you no longerneed them.
• The CD-ROM that comes bundled with your PV Unit contains the PVApplications listed below. You can install these PV Applications as requiredby you.• Travel Phrase Guide• Bonus Add-in Software for PV
• Depending on the size of each application, you may not be able to install 14applications.
• You can delete a PV Application from your PV Unit without deleting its data.Though the PV Unit allows you to have only 14 PV Applications installed atthe same time, you can keep data files for up to 15 different PV Applicationsin memory.
• For information on how to use a particular PV Application, see the manualthat comes with it.
Obtaining PV ApplicationsPV Applications can be downloaded from the CASIO Website (http://world.casio.com/download/pv/) or from other Websites on the Internet.

132
Chapter 12 PV Applications
Installing a PV Application to your PV UnitYou install a PV Application on your PV Unit by downloading it from yourcomputer. Use the following procedure to download a PV Application from yourcomputer to your PV Unit.
Important!• You must have PV Applications Manager installed on your computer in order
to download a PV Application from your computer to your PV Unit.
To download a PV Application to your PV Unit1. Use the cable to connect the PV Unit to your computer.• See the manual that comes with PC sync for Windows for details on
connecting to a computer and setting up for communication.
2. On the PV Unit, display the Mode Menu or the Action Menu.3. Tap Menu Bar to display the menu bar, and then tap Option.
4. Tap Download to put the PV Unit into receive standby.5. On your computer, run the PV Applications Manager software, and
download the PV Application from your computer to your PV Unit.

133
Chapter 12 PV Applications
6. The Mode Menu or the Action Menu screen reappears after download iscomplete.
• The icon of the PV Application you downloaded is shown in the ModeMenu.
• You can interrupt the download at any time by tapping Esc on the PVUnit.
• To start up the newly downloaded PV Application, tap its icon on theMode Menu.
• To delete a PV Application from your PV Unit, perform the same PVUnit steps of the above procedure. See the PV Applications ManagerUser’s Guide for information about the operations you need to performon your computer.
Deleting PV Application DataUse the following procedure to delete all data associated with a particular PVApplication. Note that all of the data for the selected PV Application is deleted,regardless of whether the data is in the select memory area or the open memoryarea.
Important!• This procedure deletes data associated with a PV Application. It does not
delete the PV Application itself.• Either of the following can happen with a PV Application when there are files
for 15 other PV Applications already in memory.• Some PV Applications display an error message when you try to
perform a data save operation.• Some PV Applications that automatically create files when they are
launched may refuse to start up.When either of the above happens, delete data you no longer need to makeroom for the data of the PV Application you are trying to use. See thedocumentation for the PV Application you are using for full details.
134
Chapter 12 PV Applications
1. On the Mode Menu, tap Menu Bar to display the menu bar, and thentap Option – Delete.
2. On the screen that appears, check the boxes next to the PV Applicationswhose data you want to delete.
• The displayed data names are not necessarily identical to their PVApplications. See the documentation of each PV Application forinformation about the names of its data files.
• Each tap of a check box toggles it between being checked (delete data)and unchecked (do not delete data).
• PV Applications that do not have any data do not appear in the list.
3. Tap Set.4. In response to the confirmation message that appears, tap Yes to delete
the data associated with the PV Applications you checked.
Updating Your PV Unit Operating SystemInstalling certain PV Applications may require you to update your PV Unitoperating system at some time in the future. See the user documentation thatcomes with PV Applications Manager for details about performing the OS updateoperation.
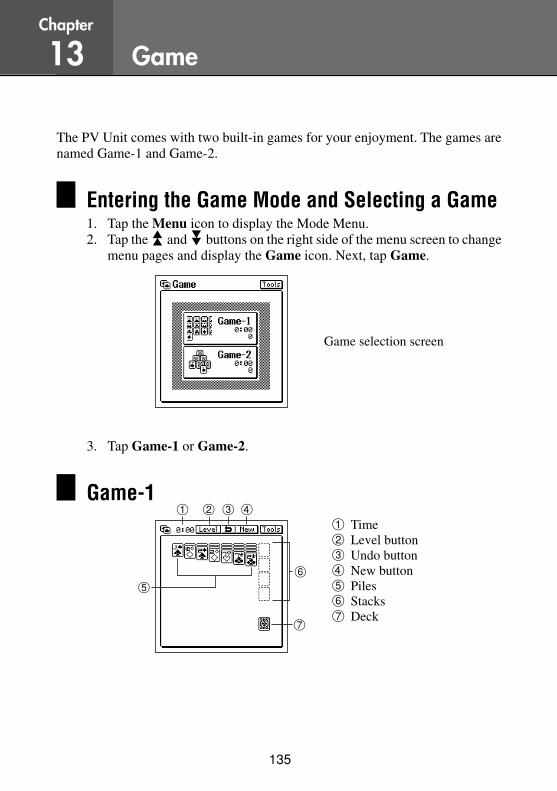
135
Chapter
13 Game
The PV Unit comes with two built-in games for your enjoyment. The games arenamed Game-1 and Game-2.
Entering the Game Mode and Selecting a Game1. Tap the Menu icon to display the Mode Menu.2. Tap the “ and ‘ buttons on the right side of the menu screen to change
menu pages and display the Game icon. Next, tap Game.
3. Tap Game-1 or Game-2.
Game-1
6
7
1 2 3
5
4
1 Time2 Level button3 Undo button4 New button5 Piles6 Stacks7 Deck
Game selection screen
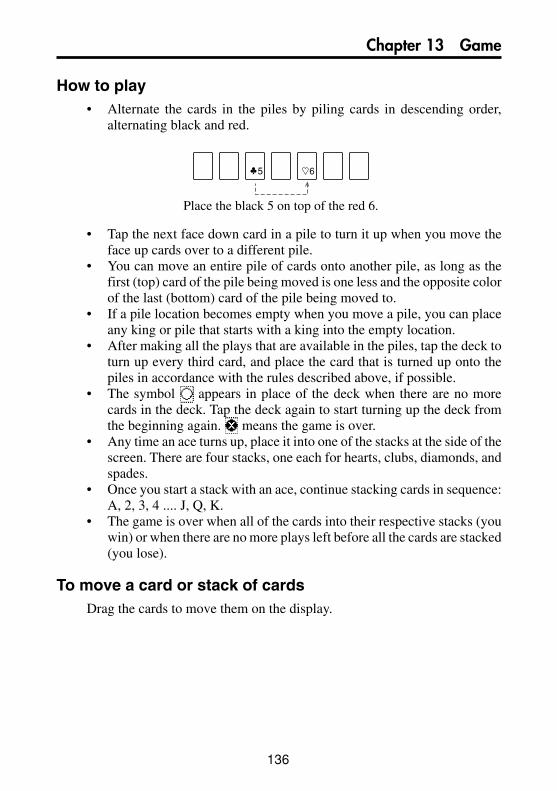
136
Chapter 13 Game
How to play• Alternate the cards in the piles by piling cards in descending order,
alternating black and red.
Place the black 5 on top of the red 6.
5 6
• Tap the next face down card in a pile to turn it up when you move theface up cards over to a different pile.
• You can move an entire pile of cards onto another pile, as long as thefirst (top) card of the pile being moved is one less and the opposite colorof the last (bottom) card of the pile being moved to.
• If a pile location becomes empty when you move a pile, you can placeany king or pile that starts with a king into the empty location.
• After making all the plays that are available in the piles, tap the deck toturn up every third card, and place the card that is turned up onto thepiles in accordance with the rules described above, if possible.
• The symbol appears in place of the deck when there are no morecards in the deck. Tap the deck again to start turning up the deck fromthe beginning again. means the game is over.
• Any time an ace turns up, place it into one of the stacks at the side of thescreen. There are four stacks, one each for hearts, clubs, diamonds, andspades.
• Once you start a stack with an ace, continue stacking cards in sequence:A, 2, 3, 4 .... J, Q, K.
• The game is over when all of the cards into their respective stacks (youwin) or when there are no more plays left before all the cards are stacked(you lose).
To move a card or stack of cardsDrag the cards to move them on the display.
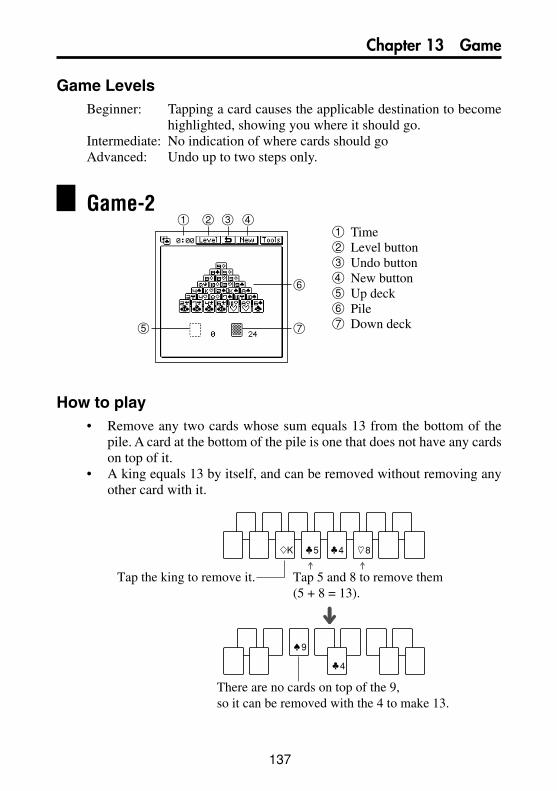
137
Chapter 13 Game
1 Time2 Level button3 Undo button4 New button5 Up deck6 Pile7 Down deck
Game LevelsBeginner: Tapping a card causes the applicable destination to become
highlighted, showing you where it should go.Intermediate: No indication of where cards should goAdvanced: Undo up to two steps only.
Game-2
6
75
1 2 3 4
How to play• Remove any two cards whose sum equals 13 from the bottom of the
pile. A card at the bottom of the pile is one that does not have any cardson top of it.
• A king equals 13 by itself, and can be removed without removing anyother card with it.
K 85 4
Tap the king to remove it. Tap 5 and 8 to remove them(5 + 8 = 13).
4
9
There are no cards on top of the 9,so it can be removed with the 4 to make 13.

138
Chapter 13 Game
• After making all the plays that are available at the bottom of the pile, tapthe down deck to turn up the next card on top of the down deck. Thecard that is turned up can be tapped in combination with a card at thebottom of the pile to equal 13.
• After making all the plays that are available at the bottom of the pile andwith the upturned card on the down deck, tap the upturned card and thentap on the up deck area to move the upturned card there. Next, tap thedown deck to turn up the next card. Now you have three places withcards you can combine to total 13: the bottom of the pile, the upturnedcard on top of the down deck, and the card on the up deck.
• Repeat the above steps until you move the last card from the down deckto the up deck. When you do, there will be either a or in place ofthe down deck. means you can continue playing, so tap the tomove the cards from the up deck back to the down deck. means thegame is over.
• The game is over when all of the cards are gone (you win) or when thereare no more plays left before all the cards are gone (you lose).
Game LevelsBeginner: Tapping a card causes the another card that equals 13 in
combination with the card you tap to become highlighted. Thislevel also lets you turn the up deck over three times (so it becomesa new down deck ) after you run out of cards in the down deck.
Advanced: No indication of which cards equal 13. At this level, get onlyone pass through the deck. You cannot turn the up deck over.
139
Chapter 13 Game
General Game ProceduresThe following procedures can be used for either Game-1 or Game-2.
To change the levelTap Level to open a menu of levels, and tap the one you want.
To undo the last playTapping undoes the last play. You can undo only the latest play youmade.
140
Chapter
14 General Reference
This section describes general operations and procedures.
Scroll Bars1
2
3
4
2
Item
,
,
Scroll bar
Description
• Tap to scroll up and down, a page at a time. (Tapping thesebuttons while the Weekly Scheduler screen is on the display,for example, scrolls a week at a time.)
• These buttons are dimmed if there is no page of data to scrollto.
• Tap to scroll up and down, a line at a time.• These buttons are dimmed if there is no line of data to scroll
to.
• Drag up and down to scroll the screen.• The size of the scroll button changes in accordance with the
amount of data above and below the current screen. If thereis no data above or below, the scroll buttons are dimmed.
• Tap the gray area to jump to the next page above or belowthe current page.
1 Page scroll buttons2 Line scroll buttons3 Scroll bar4 Scroll handle

141
Chapter 14 General Reference
• The PV Unit scroll bars operate similarly to the scroll bars of manypopular personal computer applications.
• The scroll handle location indicates approximately how much data isabove and below the data on the screen. If the scroll handle is located inthe middle of the scroll bar, for example, it means that there is about thesame amount of data above and below.
Action Control ScrollingWhen you are using the Action control to recall items on a list screen, the screenscrolls automatically after you move the highlighting to the top or bottom of thedisplay. In the case of the data screen, an Action control up or down scroll operationscrolls between data items.
Menu BarThe PV Unit’s menu bar gives you access to a number of useful commands fordata editing and other operations.
To execute a menu bar command1. Tap Menu Bar at the beneath of the PV Unit screen to display the menu
bar.2. Tap the name of the menu that contains the command you want to execute.3. Tap the command you want to execute, or use Action control up/down
scrolling to move the highlighting to the command you want, and thenclick the Action control to execute the command.
Data Input and EditingUse the procedures in this section to input and edit data. These procedures applyfor all input and editing screens.
142
Chapter 14 General Reference
Moving Between Entries (Fields)When inputting and editing data, you can move between entries (fields)either by tapping on the entry you want with the stylus, or by tapping theon-screen NEXT button to advance to the next sequential entry. Note thatthe NEXT button may not appear on some input or editing screen.
On-screen KeyboardsThis section describes the keyboards that appear when data input is required.
Note• To close a keyboard screen without registering the data you input with
it, tap Esc.
Text Keyboard
Key Description
Deletes the character at the current cursor location.
Shifts letter keys between upper-case and lower-case for theinput of one character only.
Shifts to the Code Keyboard.
Shift-locks letter keys between upper-case and lower-case.
Shifts to the Symbol Keyboard.
Inputs a carriage return (newline) operation.
Advances to the next entry (field).

143
Chapter 14 General Reference
Key
Symbol Keyboard
Code Keyboard
Date Keyboard
• Specify a date by tapping it in the calendar, or by tapping the numberkeys.
Key
Description
Displays other symbols.
Returns to the Text Keyboard.
Description
Scrolls the month shown on the input screen.
Jumps to the month that contains today’s date as kept by themain clock.
Moves the input point between the month, day, and year.
Deletes the character at the current cursor location.
Advances to the next field.

144
Chapter 14 General Reference
1 Hour input dial2 Time bar screen button3 Keypad
1 Minute input dial2 Time bar screen button3 Keypad
Calculator Keyboard
• See “Using the Calculator Screen” on page 114 for details onmathematical operations.
Time Setting ScreensThere are two basic time setting screens that you can switch between whileinputting time data: a dial type screen and a time bar type screen.The dial type screen is best for setting a single time, while the bar typescreen lets you specify a time period (start time and end time) quickly andeasily.
Dial Type Time Setting Screens
31
2
31
2
• The hour input dial appears when the cursor is located within hour digits,while the minute input dial appears when the cursor is within minutesdigits.
• Specify a time by tapping the hour or minutes in the input dial. You canalso input individual digits on the keypad.

145
Chapter 14 General Reference
1 Scroll buttons2 Selected time period3 Dial type screen button4 Number buttons
Description
Tap on a button to specify the hour or minutes.
Changes to the time bar type time setting screen.
Tap to specify “am” or “pm” for a 12-hour format time.
Deletes the character at the current cursor location.
Advances to the next field.
• The time format you should use for input should match the format of thesystem setting you selected under “Setting the Date, Time, Calendar,and Keyboard Formats” on page 159.
• If you are using the 12-hour time format, be sure to tap the am or pmbutton to specify “am” or “pm”.
Bar Type Time Setting Screen
1 1
42
3
• Specify a time period by dragging the stylus across the time period youwant. You can change the time period in 30-minute units using thismethod.
• Tapping the time bar inputs corresponding time at the current cursorposition (either in the start time or end time area).
• Tap the scroll buttons to scroll the available hours left and right.• The time format you should use for input should match the format of the
system setting you selected under “Setting the Date, Time, Calendar,and Keyboard Formats” on page 159.
Key
Dial
146
Chapter 14 General Reference
• Use the number buttons to input individual digits.• If you are using the 12-hour time format, be sure to tap the am or pm
button to specify “am” or “pm”.
Selecting a Range of Text by DraggingYou can select a range of text on the screen with a technique called dragging.
1. Display the range of text you want to select.2. Press the stylus against the screen at the beginning of the range of text
you want to select.3. Keeping the stylus against the screen, drag it to the end of the range you
want to select.• If the end of the text is not on the screen, drag down to the bottom of the
display and the screen will start to scroll.• If you make a mistake and drag too far, keep the stylus on the screen as
you move back. This will reduce the size of the selected range of text.
4. Remove the stylus from the screen.• The selected text is highlighted on the screen.• To deselect (unhighlight) text, tap anywhere outside of the highlighted
area.
Key
Description
Changes to the dial type time setting screen.
Tap to specify “am” or “pm” for a 12-hour format time.
Deletes the character at the current cursor location.
Advances to the next field.
147
Chapter 14 General Reference
Cut, Copy, PasteThe cut, copy, and paste functions of the PV Unit operate just as they do ona personal computer.
To cut or copy data1. Drag the stylus across characters on the display that you want to cut or
copy.• The text you drag across will become highlighted on the display.
2. Tap Menu Bar to display the menu bar, and then tap Edit – Cut or Edit– Copy.
• Edit – Cut deletes the selected text and places it onto a clipboard.• Edit – Copy puts a copy of the text onto the clipboard, while leaving
the original where it is.
To paste data at a location1. After cutting or copying data, tap the location on an input or editing
screen where you want to paste the data.2. Tap Menu Bar to display the menu bar, and then tap Edit – Paste.• The data on the clipboard is inserted at the current input position on the
screen.
To paste data and replace existing data1. After cutting or copying data, select the text that you want to replace
with the data on the clipboard by dragging the stylus across it.2. Tap Menu Bar to display the menu bar, and then tap Edit – Paste.• The data on the clipboard replaces the selected data on the screen.

148
Chapter 14 General Reference
Initial Default Dates for new itemsWhen you create a new Scheduler or Expense Manager item, the PV Unitautomatically assigns dates to the required date fields in accordance with therules described below. You can leave an initial default date as it is or change it toanother date, if you want.
Scheduler• Whenever you create a new Schedule item or To Do item, the date that
was selected (flashing) on the screen when you tapped the New buttonis automatically input as the item date.
• In the case of a multiple-date Schedule item, or a Reminder item, thedate that was selected (flashing) on the screen when you tapped theNew button is automatically input as both the start date and end date.
Expense Manager• Whenever you create a new Expense Manager transaction, the date that
was displayed in the date jump button when you tapped the New buttonis automatically input as the item date.
Closing a ScreenYou can always close a screen by tapping the Esc button.In addition, some screens have a close button ( ). To close such a screen,simply tap the close button with the stylus.
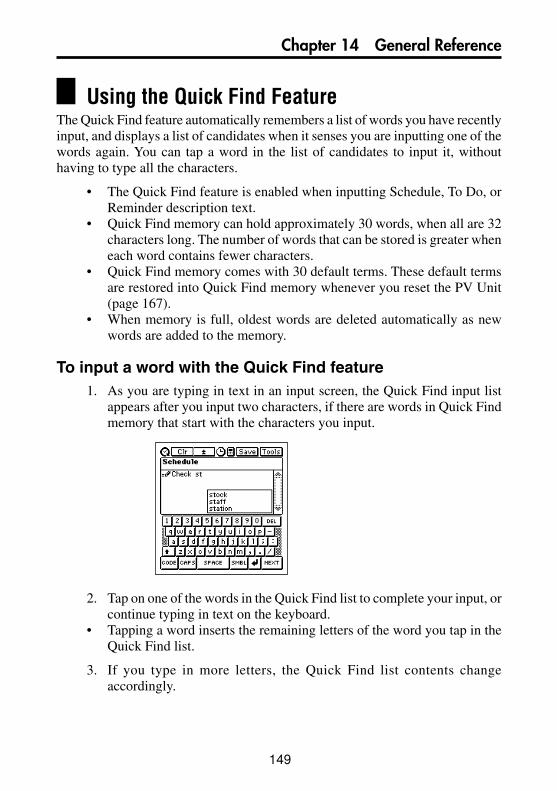
149
Chapter 14 General Reference
Using the Quick Find FeatureThe Quick Find feature automatically remembers a list of words you have recentlyinput, and displays a list of candidates when it senses you are inputting one of thewords again. You can tap a word in the list of candidates to input it, withouthaving to type all the characters.
• The Quick Find feature is enabled when inputting Schedule, To Do, orReminder description text.
• Quick Find memory can hold approximately 30 words, when all are 32characters long. The number of words that can be stored is greater wheneach word contains fewer characters.
• Quick Find memory comes with 30 default terms. These default termsare restored into Quick Find memory whenever you reset the PV Unit(page 167).
• When memory is full, oldest words are deleted automatically as newwords are added to the memory.
To input a word with the Quick Find feature1. As you are typing in text in an input screen, the Quick Find input list
appears after you input two characters, if there are words in Quick Findmemory that start with the characters you input.
2. Tap on one of the words in the Quick Find list to complete your input, orcontinue typing in text on the keyboard.
• Tapping a word inserts the remaining letters of the word you tap in theQuick Find list.
3. If you type in more letters, the Quick Find list contents changeaccordingly.
150
Chapter 14 General Reference
Editing Data ItemsUse the following procedure to edit data items. This general procedure applies inall modes.
1. Select the data item you want to edit.• You can select an item by displaying its data screen, or by tapping the
item on a list screen, calendar, etc.
2. Tap Menu Bar to display the menu bar, and then tap Edit – Item edit todisplay the data editing screen.
3. Make any changes in the data you want.4. After you are finished, tap the Save button to save the new data.
Creating a Copy of a Data ItemYou can use the following procedure to create a copy of a data item in all modes.
1. Select the data item you want to copy.• You can select an item by displaying its data screen, or by tapping the
item on a list screen, calendar, etc.
2. Tap Menu Bar to display the menu bar, and then tap Edit – Item copyto display a new data input screen that contains the data of the item youselected in step 1.
3. Make any changes in the data you want.4. After you are finished, tap the Save button to save the copied data as a
new data item.

151
Chapter 14 General Reference
Deleting DataThe following describes the general procedure for deleting data.
1. Enter the mode that contains the data you want to delete.2. If you want to delete a particular data item, select the item.3. Tap Menu Bar to display the menu bar, and then tap Edit – Delete to
display the data delete screen.• Note that the contents of the data delete screen differ from mode to mode.
4. On the data delete screen, tap the delete operation you want to perform.• See the “Delete Operations Table” below for details on available delete
operations in each mode.• Some modes allow delete operation that delete data within a range of
dates. Selecting such an option displays a screen for input of a start dateand end date. Specify the dates you want and then tap the Exe buttonbefore advancing to the next step.
5. On the confirmation message that appears, tap Yes to perform the deleteoperation you selected or No to close the dialog box without doinganything.

152
Chapter 14 General Reference
Delete Operations Table
Delete Operation
Single data item
Schedule data items
Done data items
To Do data items
Reminder data items
Specified data items
All Scheduler data items
All data items
Category data items
Deletes
Data item that is selected when Edit – Delete istapped
All Schedule data
All done To Do data items
All To Do data
All Reminder data
All Scheduler Mode data up to a specific date.Tapping this option displays a screen that youmust use to specify the date up to which youwant to delete Scheduler Mode data.
All Scheduler data
All data items in the mode you are in when youtap Edit – Delete
All data items in the selected category whenEdit – Delete is tapped
153
Chapter 14 General Reference
Searching for DataYou can use either initial character search or all search to look for specific data inthe Scheduler (Schedule, To Do, Reminder), Contacts, and Memo Modes. Notethat both search operations check the data only in specific entries (fields) of eachdata item.The following table shows which entries (fields) are checked in each mode foreach type of search.
Initial Character SearchThis search method checks the initial characters of a specific field in eachmode to see if any items match characters you specify.
All SearchWith all search, the PV Unit looks for any occurrences of the text you specify,regardless of its location in the searched field.
To perform a search1. Enter the mode whose data you want to search.2. If the mode you are in uses categories, select the category whose data
you want to search.• Note that a search checks the data only in the category you are in.
All Search
Description
Description
Description
All
All
All
All
Memo contents
Initial Character Search
Description
Description
Description
Name
Company
Free 1
Name (Free 1)
Memo contents
Fields CheckedMode
Schedule
To Do
Reminder
Contacts - Personal
Contacts - Business
Contacts - Untitled
Contacts - All
Memo

154
Chapter 14 General Reference
3. Tap Menu Bar to display the menu bar, and then tap Edit – Search.4. On the screen that appears, tap Initial to specify initial character search
or All to specify all search.5. Input up to 12 search characters.6. Tap Exe to start the search.• Searches are not case-sensitive. This means that upper-case and lower-
case letters are not taken into consideration.
Search ResultsA search operation produces a list screen of all items that match the searchcharacters you specify.
• To view the data screen of an item, tap the item to highlight it and thentap it again.
• When you are through using the data screen, tap Esc to close it.

155
Chapter 14 General Reference
Changing the Display FontYou can select one of two different display fonts for list and data screens in theScheduler, Contacts, Memo, and Expense Manager Modes.
1. Display the list screen or data screen in the mode whose display fontyou want to change.
• The font you select is applied in the current mode only. You can makeseparate settings for each mode.
2. Tap Menu Bar to display the menu bar, and then tap Option – Font.3. On the screen that appears, tap the button next to the font you want to
select.4. Tap Yes.
Program Version InformationUse the following procedure to display version information when you need it.The following is a list of the items for which version information is available.
• Built-in application version• Messages, fonts, graphic data• PV Applications• Libraries linked to built-in applications and PV Applications• Operating system• System library

156
Chapter 14 General Reference
To display version information1. On the Mode Menu, tap Menu Bar to display the menu bar, and then
tap Option.2. On the screen that appears, tap Version to display the version list screen.
3. Tap an item in the list to display its full data.4. Tap OK to return to the Mode Menu screen.
Applications
Operating System
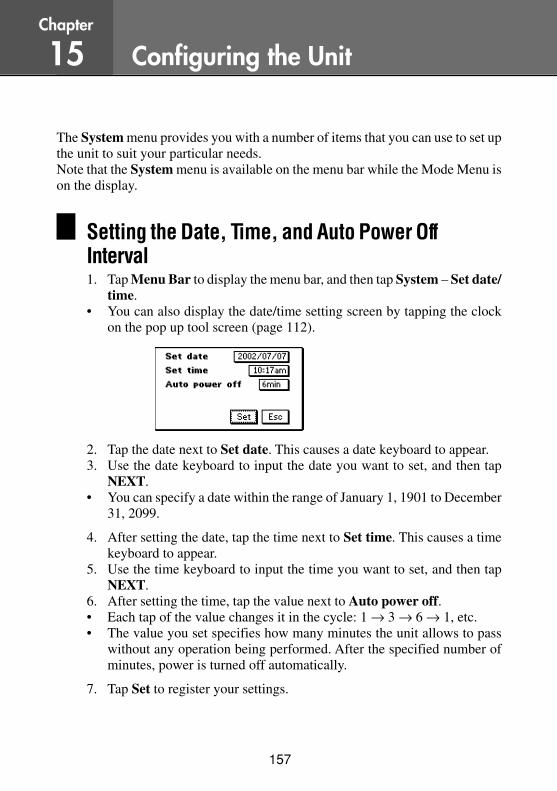
157
Chapter
15 Configuring the Unit
The System menu provides you with a number of items that you can use to set upthe unit to suit your particular needs.Note that the System menu is available on the menu bar while the Mode Menu ison the display.
Setting the Date, Time, and Auto Power OffInterval1. Tap Menu Bar to display the menu bar, and then tap System – Set date/
time.• You can also display the date/time setting screen by tapping the clock
on the pop up tool screen (page 112).
2. Tap the date next to Set date. This causes a date keyboard to appear.3. Use the date keyboard to input the date you want to set, and then tap
NEXT.• You can specify a date within the range of January 1, 1901 to December
31, 2099.
4. After setting the date, tap the time next to Set time. This causes a timekeyboard to appear.
5. Use the time keyboard to input the time you want to set, and then tapNEXT.
6. After setting the time, tap the value next to Auto power off.• Each tap of the value changes it in the cycle: 1 → 3 → 6 → 1, etc.• The value you set specifies how many minutes the unit allows to pass
without any operation being performed. After the specified number ofminutes, power is turned off automatically.
7. Tap Set to register your settings.
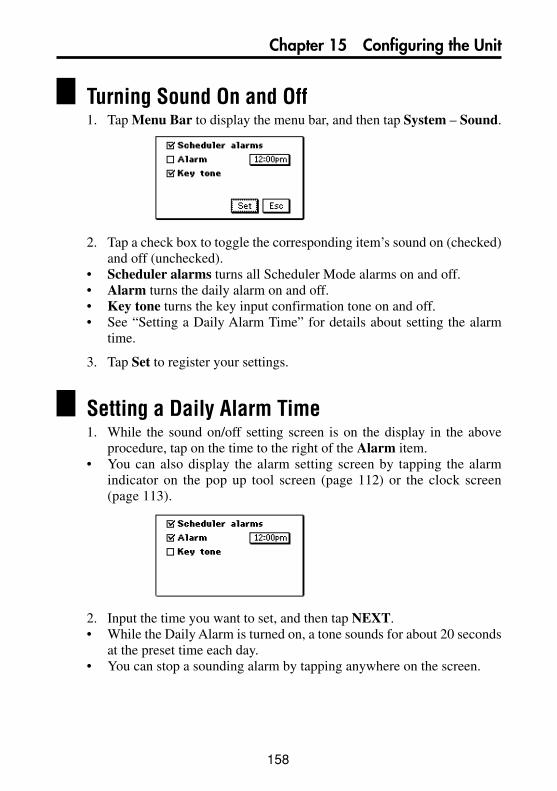
158
Chapter 15 Configuring the Unit
Turning Sound On and Off1. Tap Menu Bar to display the menu bar, and then tap System – Sound.
2. Tap a check box to toggle the corresponding item’s sound on (checked)and off (unchecked).
• Scheduler alarms turns all Scheduler Mode alarms on and off.• Alarm turns the daily alarm on and off.• Key tone turns the key input confirmation tone on and off.• See “Setting a Daily Alarm Time” for details about setting the alarm
time.
3. Tap Set to register your settings.
Setting a Daily Alarm Time1. While the sound on/off setting screen is on the display in the above
procedure, tap on the time to the right of the Alarm item.• You can also display the alarm setting screen by tapping the alarm
indicator on the pop up tool screen (page 112) or the clock screen(page 113).
2. Input the time you want to set, and then tap NEXT.• While the Daily Alarm is turned on, a tone sounds for about 20 seconds
at the preset time each day.• You can stop a sounding alarm by tapping anywhere on the screen.

159
Chapter 15 Configuring the Unit
Setting the Date, Time, Calendar, and KeyboardFormats1. Tap Menu Bar to display the menu bar, and then tap System – Format.
2. Tap the date format next to Date.• Each tap of the date format changes it in the cycle:
M/D/Y → D/M/Y → Y/M/D → M/D/Y, etc.
3. After setting the date format, tap the time format next to Time.• Each tap of the time format toggles it between 12 and 24.
4. After setting the time format, tap the day of the week next to Weekformat.
• Each tap of the day of the week toggles it between Sun and Mon.
5. After setting the calendar format, tap the keyboard format next toKeyboard.
• Each tap of the keyboard format changes it in the cycle:QWERTY → AZERTY → QWERTZ → QWERTY, etc.
6. Tap Set to register your settings.

160
Chapter 15 Configuring the Unit
Setting the System Language1. Tap Menu Bar to display the menu bar, and then tap System – Language.2. On the screen that appears, tap the button next to the language you want
to select as the system language.3. Tap Set to register your setting.• All on-screen text messages appear in the language you set as the system
language.
Note• The system language you set also affects the keyboard format (page 166)
and the code keyboard contents (page 143).
Adjusting Display Contrast1. Tap Menu Bar to display the menu bar, and then tap System – Contrast.2. On the screen that appears, tap H to make the figures on the screen
lighter, or J to make them darker.3. To return to the initial default contrast setting, tap Initial.4. After the setting is the way you want it, tap OK.
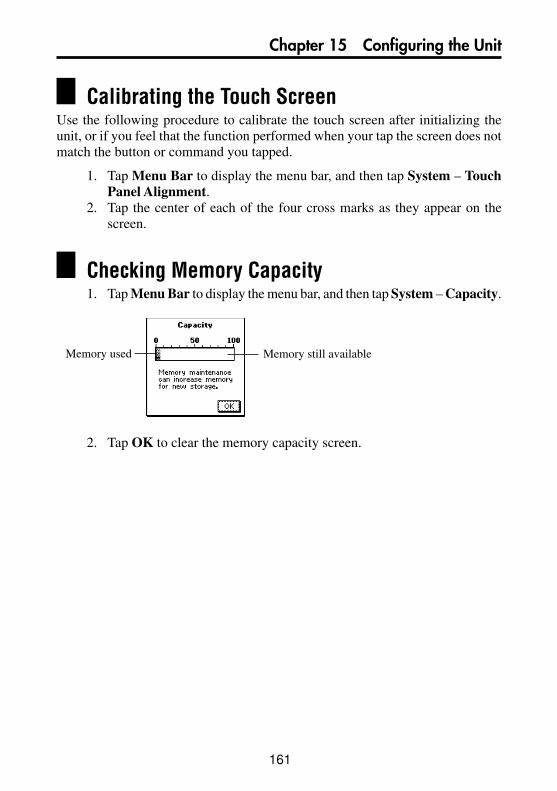
161
Chapter 15 Configuring the Unit
Calibrating the Touch ScreenUse the following procedure to calibrate the touch screen after initializing theunit, or if you feel that the function performed when your tap the screen does notmatch the button or command you tapped.
1. Tap Menu Bar to display the menu bar, and then tap System – TouchPanel Alignment.
2. Tap the center of each of the four cross marks as they appear on thescreen.
Checking Memory Capacity1. Tap Menu Bar to display the menu bar, and then tap System – Capacity.
2. Tap OK to clear the memory capacity screen.
Memory used Memory still available

162
Chapter 15 Configuring the Unit
Memory ManagementThe memory of your PV Unit is designed to make your normal data input andrecall operations as quick and efficient as possible. After repeated storage anddeletion of data, however, you may find that you are unable to store new data,even after you have deleted some data from memory. When this happens, youneed to perform the following “memory management” procedure, which cleansup and rearranges unused memory to make it available for storage of more data.
Note• When you need to perform memory management depends entirely on how
often you delete data from memory and store new data. The more you deleteand store, the sooner you will need to perform the memory managementprocedure.
To perform memory management1. Tap Menu Bar to display the menu bar, and then tap System – Memory
management.2. In response to the message that appears, tap Yes to start memory
management or No to close the dialog box without doing anything.• The message shown below appears after you tap Yes to start memory
management.
• You can tap Esc at any time to interrupt the memory managementprocedure.

163
Chapter
16 Technical Reference
This section contains technical information about the PV Unit.
Date FormatsThe following describes the date formats that can be set for the system (page 159).
Time FormatsThe following describes the time formats that can be set for the system (page 159).
Format
M/D/Y
D/M/Y
Y/M/D
Description
Month/Day/Year. Example: Jan/31/2002
Day/Month/Year. Example: 31/Jan/2002
Year/Month/Day. Example: 2002/1/31
Format
12-hour
24-hour
Description
Represents time in two blocks, from midnight to 11:59am,and from noon to 11:59pm.
Represents time as a single block, from 0:00 to 23:59. Thisformat is often referred to as “military time.”

164
Chapter 16 Technical Reference
Tool BarsThe PV Unit uses standard tool bars for data input and display. The followingshows typical examples of these toolbars, and describes the items that can appearin each.
Data Input Tool Bar
• The above table shows all the buttons that can possibly appear in a datainput tool bar. Depending on mode and other factors, some of the toolsshown above may not be included in a data input tool bar.
Mode icon
Button
Mode icon
Description
Indicates the mode you are currently in.
Clears all characters in the entry (field) where the cursoris located. In the Contacts Mode, pressing this button clearsthe data from all the input fields for the data item (record)you are inputting.
Pastes the current date and time as being kept by the mainclock at the current cursor location.
Displays a calculator.
Advances to the next screen.
Returns to the previous screen.
Saves input data and closes the input screen.
In the Quick-Memo Mode, tapping this button changes tothe list view.
Displays the pop up tool screen.
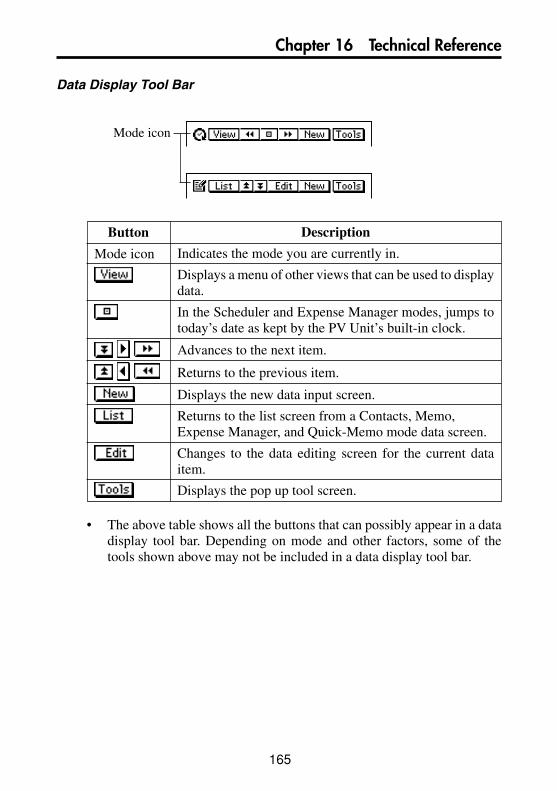
165
Chapter 16 Technical Reference
Data Display Tool Bar
• The above table shows all the buttons that can possibly appear in a datadisplay tool bar. Depending on mode and other factors, some of thetools shown above may not be included in a data display tool bar.
Mode icon
Description
Indicates the mode you are currently in.
Displays a menu of other views that can be used to displaydata.
In the Scheduler and Expense Manager modes, jumps totoday’s date as kept by the PV Unit’s built-in clock.
Advances to the next item.
Returns to the previous item.
Displays the new data input screen.
Returns to the list screen from a Contacts, Memo,Expense Manager, and Quick-Memo mode data screen.
Changes to the data editing screen for the current dataitem.
Displays the pop up tool screen.
Button
Mode icon
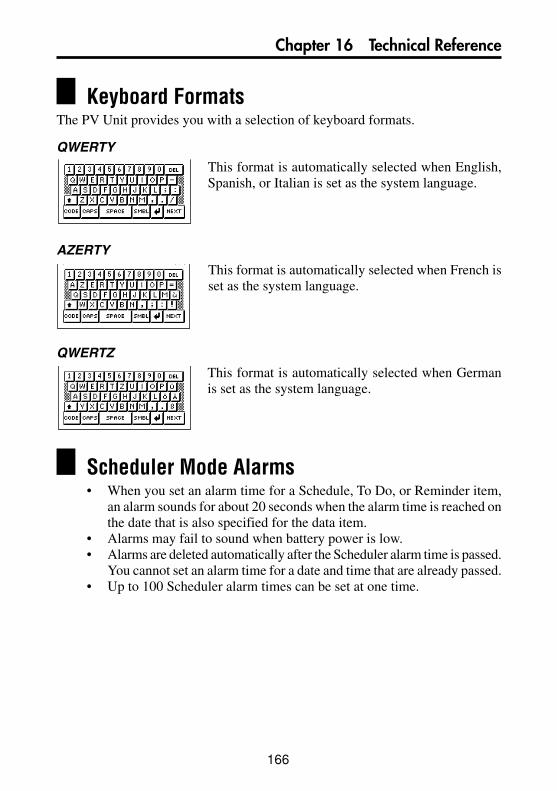
166
Chapter 16 Technical Reference
Keyboard FormatsThe PV Unit provides you with a selection of keyboard formats.
QWERTYThis format is automatically selected when English,Spanish, or Italian is set as the system language.
AZERTYThis format is automatically selected when French isset as the system language.
QWERTZThis format is automatically selected when Germanis set as the system language.
Scheduler Mode Alarms• When you set an alarm time for a Schedule, To Do, or Reminder item,
an alarm sounds for about 20 seconds when the alarm time is reached onthe date that is also specified for the data item.
• Alarms may fail to sound when battery power is low.• Alarms are deleted automatically after the Scheduler alarm time is passed.
You cannot set an alarm time for a date and time that are already passed.• Up to 100 Scheduler alarm times can be set at one time.

167
Chapter 16 Technical Reference
Input LimitsThe following table shows the maximum number of characters that can be inputinto various fields.
Resetting the PV UnitWarning!The following procedure erases all data stored in the memory of the PV Unit.Perform this operation only when you want to delete all data and initialize thesettings of the PV Unit.Remember - you should always keep copies of important data by writing it down,or by transferring it to a personal computer.
Mode
ScheduleTo Do
ReminderContacts
MemoExpenseManager
SearchPasswordClipboard
Maximum Number of Characters
2,046
2,046
14
2,046
2,036
14
12
2,048
8
14
14
2,008
12
12
2,048
Entry (Field)
Description
Description
Category
Description
–
Category
Item
Description
Amount
Payment Type
Expense Type
Description
–
–
–
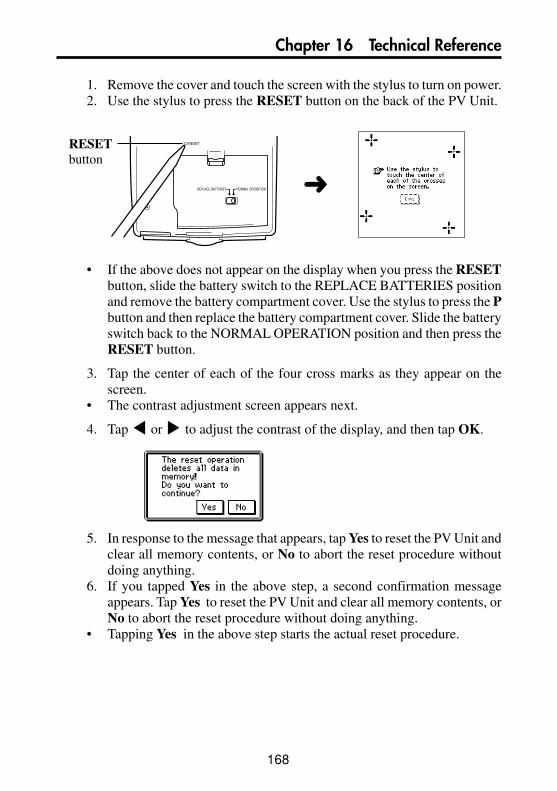
168
Chapter 16 Technical Reference
1. Remove the cover and touch the screen with the stylus to turn on power.2. Use the stylus to press the RESET button on the back of the PV Unit.
REPLACE BATTERIES NORMAL OPERATION
RESET
• If the above does not appear on the display when you press the RESETbutton, slide the battery switch to the REPLACE BATTERIES positionand remove the battery compartment cover. Use the stylus to press the Pbutton and then replace the battery compartment cover. Slide the batteryswitch back to the NORMAL OPERATION position and then press theRESET button.
3. Tap the center of each of the four cross marks as they appear on thescreen.
• The contrast adjustment screen appears next.
4. Tap H or J to adjust the contrast of the display, and then tap OK.
5. In response to the message that appears, tap Yes to reset the PV Unit andclear all memory contents, or No to abort the reset procedure withoutdoing anything.
6. If you tapped Yes in the above step, a second confirmation messageappears. Tap Yes to reset the PV Unit and clear all memory contents, orNo to abort the reset procedure without doing anything.
• Tapping Yes in the above step starts the actual reset procedure.
RESETbutton
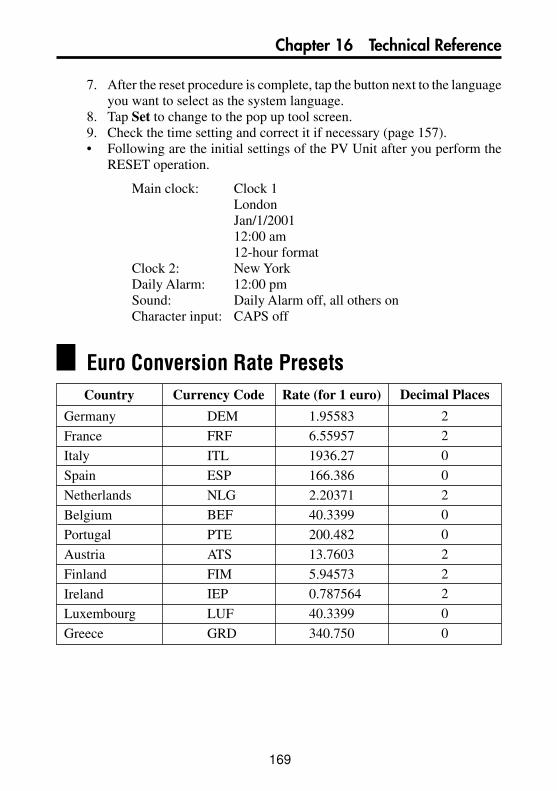
169
Chapter 16 Technical Reference
7. After the reset procedure is complete, tap the button next to the languageyou want to select as the system language.
8. Tap Set to change to the pop up tool screen.9. Check the time setting and correct it if necessary (page 157).• Following are the initial settings of the PV Unit after you perform the
RESET operation.
Main clock: Clock 1LondonJan/1/200112:00 am12-hour format
Clock 2: New YorkDaily Alarm: 12:00 pmSound: Daily Alarm off, all others onCharacter input: CAPS off
Euro Conversion Rate PresetsCountry
Germany
France
Italy
Spain
Netherlands
Belgium
Portugal
Austria
Finland
Ireland
Luxembourg
Greece
Rate (for 1 euro)
1.95583
6.55957
1936.27
166.386
2.20371
40.3399
200.482
13.7603
5.94573
0.787564
40.3399
340.750
Currency Code
DEM
FRF
ITL
ESP
NLG
BEF
PTE
ATS
FIM
IEP
LUF
GRD
Decimal Places
2
2
0
0
2
0
0
2
2
2
0
0
170
Chapter 16 Technical Reference
Storage CapacityMemory capacity is 6 Mbytes for the PV-S660 (4MB User Area, 1MB Add-in Area,1MB OS Area) and 4 Mbytes for the PV-S460 (2MB User Area, 1MB Add-in Area,1MB OS Area). The following shows the number of items that can be stored.
SchedulerApproximately 32,000 items (24,400 for the PV-S460) with 20-characterdescription.
Approximately 27,320 items (12,200 for the PV-S460) with 60-characterdescription.
ContactsApproximately 32,000 items (24,400 for the PV-S460), under the followingconditions.
8-character name10-character home phone number10-character home fax number20-character home address
Approximately 18,210 items (8,130 for the PV-S460), under the followingconditions.
8-character name10-character business phone number10-character business fax number40-character business address20-character company name20-character department20-character position
MemoApproximately 3,210 items (1,430 for the PV-S460), 1,024-character memos.
Expense ManagerApproximately 27,320 items (12,200 for the PV-S460), under the followingconditions.
10-character descriptionExpense type and payment type set
Quick-MemoApproximately 1,300 items (580 for the PV-S460).

171
Chapter 16 Technical Reference
(space)!”#$%&’()*+,–./0123456789:;<=>?@
ABCDEFGHIJKLMNOPQRSTUVWXYZ[\]
ˆ—
`a
ÚÀÈÌÒÙÂÊÎÔÛ¡áéíóúàèìòùâêîôû¿ÄËÏÖÜ
123456789
101112131415161718192021222324252627282930313233
343536373839404142434445464748495051525354555657585960616263646566
676869707172737475767778798081828384858687888990919293949596979899
100101102103104105106107108109110111112113114115116117118119120121122123124125126127128129130131132
133134135136137138139140141142143144145146147148149150151152153154155156157158159160161162163164165
166167168169170171172173174175176177178179180181182183184185186187188189190191192193194195196197198
ÃÕÑIJÆÇÅΦ߶¢äëïöüãõñijæçåφ£¥Ωªº#
$
±°
bcdefghijkl
mnopqrstuvwxyz1
~ÁÉÍÓ
121434
↔
2
3
µ
ƒ|
Fr←→`
§↑
↓-ÿ®
©¤∂DıP
p
y
Y
•1
Auto Sort SequenceThe following table shows the sequence used for alphabetical data sorts.
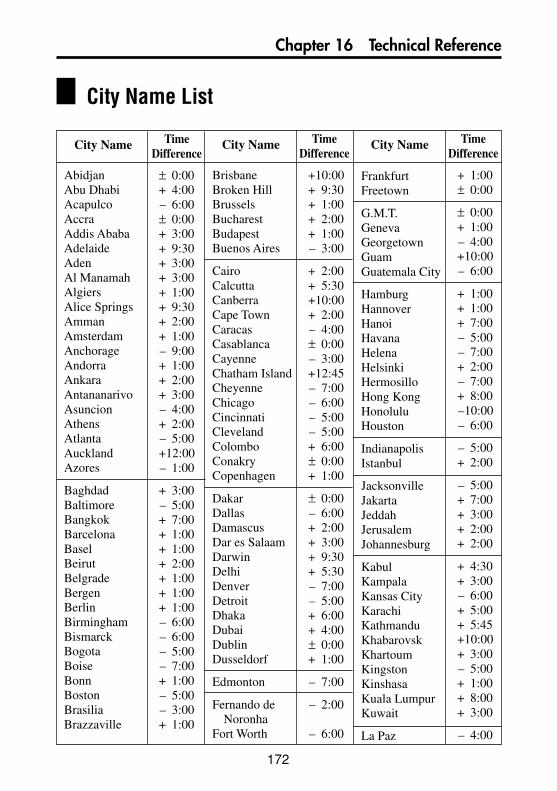
172
Chapter 16 Technical Reference
AbidjanAbu DhabiAcapulcoAccraAddis AbabaAdelaideAdenAl ManamahAlgiersAlice SpringsAmmanAmsterdamAnchorageAndorraAnkaraAntananarivoAsuncionAthensAtlantaAucklandAzores
BaghdadBaltimoreBangkokBarcelonaBaselBeirutBelgradeBergenBerlinBirminghamBismarckBogotaBoiseBonnBostonBrasiliaBrazzaville
BrisbaneBroken HillBrusselsBucharestBudapestBuenos Aires
CairoCalcuttaCanberraCape TownCaracasCasablancaCayenneChatham IslandCheyenneChicagoCincinnatiClevelandColomboConakryCopenhagen
DakarDallasDamascusDar es SalaamDarwinDelhiDenverDetroitDhakaDubaiDublinDusseldorf
Edmonton
Fernando deNoronha
Fort Worth
± 0:00+ 4:00– 6:00± 0:00+ 3:00+ 9:30+ 3:00+ 3:00+ 1:00+ 9:30+ 2:00+ 1:00– 9:00+ 1:00+ 2:00+ 3:00– 4:00+ 2:00– 5:00+12:00– 1:00
+ 3:00– 5:00+ 7:00+ 1:00+ 1:00+ 2:00+ 1:00+ 1:00+ 1:00– 6:00– 6:00– 5:00– 7:00+ 1:00– 5:00– 3:00+ 1:00
+10:00+ 9:30+ 1:00+ 2:00+ 1:00– 3:00
+ 2:00+ 5:30+10:00+ 2:00– 4:00± 0:00– 3:00+12:45– 7:00– 6:00– 5:00– 5:00+ 6:00± 0:00+ 1:00
± 0:00– 6:00+ 2:00+ 3:00+ 9:30+ 5:30– 7:00– 5:00+ 6:00+ 4:00± 0:00+ 1:00
– 7:00
– 2:00
– 6:00
FrankfurtFreetown
G.M.T.GenevaGeorgetownGuamGuatemala City
HamburgHannoverHanoiHavanaHelenaHelsinkiHermosilloHong KongHonoluluHouston
IndianapolisIstanbul
JacksonvilleJakartaJeddahJerusalemJohannesburg
KabulKampalaKansas CityKarachiKathmanduKhabarovskKhartoumKingstonKinshasaKuala LumpurKuwait
La Paz
+ 1:00± 0:00
± 0:00+ 1:00– 4:00+10:00– 6:00
+ 1:00+ 1:00+ 7:00– 5:00– 7:00+ 2:00– 7:00+ 8:00–10:00– 6:00
– 5:00+ 2:00
– 5:00+ 7:00+ 3:00+ 2:00+ 2:00
+ 4:30+ 3:00– 6:00+ 5:00+ 5:45+10:00+ 3:00– 5:00+ 1:00+ 8:00+ 3:00
– 4:00
City Name TimeDifference
City Name TimeDifference
City Name TimeDifference
City Name List

173
Chapter 16 Technical Reference
City Name TimeDifference
City Name TimeDifference
City Name TimeDifference
LagosLas PalmasLilongweLimaLisbonLomeLondonLos AngelesLuandaLusakaLuxembourg
MadridManaguaManausManilaMaputoMarseilleMelbourneMemphisMexico CityMiamiMidway Is.MilanMilwaukeeMinneapolisMogadishuMonroviaMontevideoMontrealMoscowMumbaiMunichMuscat
NadiNairobiNashvilleNassauNew Orleans
New YorkNiameyNorfolkNorfolk IslandNoumea
Oklahoma CityOmahaOsloOttawa
Panama CityPapeeteParamariboParisPeking (Beijing)PerthPhiladelphiaPhnom PenhPhoenixPittsburghPort LouisPort MoresbyPort au PrincePort of SpainPortlandPrague
Quito
ReykjavikRio de JaneiroRiyadhRome
Saint LouisSalt Lake CitySalzburgSan AntonioSan DiegoSan Francisco
San JoseSan JuanSan SalvadorSanaaSanta FeSantiagoSanto DomingoSao PauloSeattleSeoulShanghaiSingaporeSofiaSt PetersburgStockholmSydney
TaipeiTampaTegucigalpaTehranTijuanaTokyoTorontoTripoliTunis
VancouverViennaVientiane
WarsawWashington,D.C.WellingtonWinnipeg
YangonYaounde
Zurich
+ 1:00± 0:00+ 2:00– 5:00± 0:00± 0:00± 0:00– 8:00+ 1:00+ 2:00+ 1:00
+ 1:00– 6:00– 4:00+ 8:00+ 2:00+ 1:00+10:00– 6:00– 6:00– 5:00–11:00+ 1:00– 6:00– 6:00+ 3:00± 0:00– 3:00– 5:00+ 3:00+ 5:30+ 1:00+ 4:00
+12:00+ 3:00– 6:00– 5:00– 6:00
– 5:00+ 1:00– 5:00+11:30+11:00
– 6:00– 6:00+ 1:00– 5:00
– 5:00–10:00– 3:00+ 1:00+ 8:00+ 8:00– 5:00+ 7:00– 7:00– 5:00+ 4:00+10:00– 5:00– 4:00– 8:00+ 1:00
– 5:00
± 0:00– 3:00+ 3:00+ 1:00
– 6:00– 7:00+ 1:00– 6:00– 8:00– 8:00
– 6:00– 4:00– 6:00+ 3:00– 7:00– 4:00– 4:00– 3:00– 8:00+ 9:00+ 8:00+ 8:00+ 2:00+ 3:00+ 1:00+10:00
+ 8:00– 5:00– 6:00+ 3:30– 8:00+ 9:00– 5:00+ 2:00+ 1:00
– 8:00+ 1:00+ 7:00
+ 1:00– 5:00+12:00– 6:00
+ 6:30+ 1:00
+ 1:00
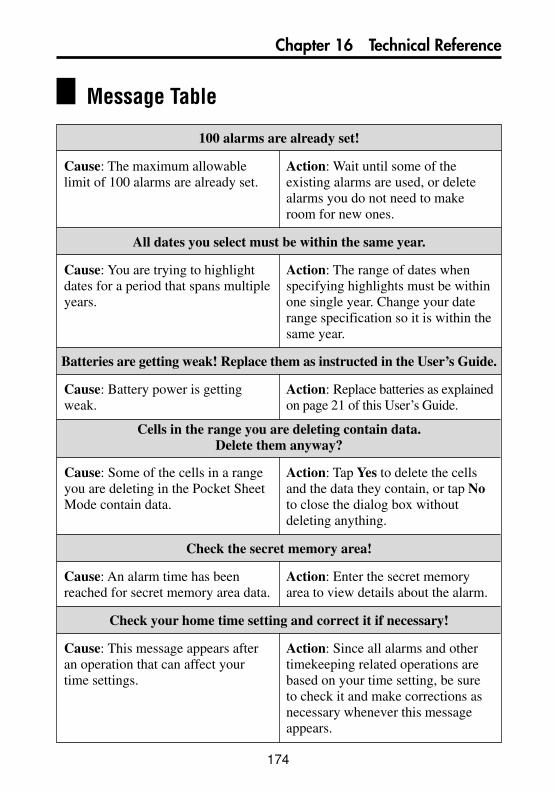
174
Chapter 16 Technical Reference
100 alarms are already set!
Cause: The maximum allowablelimit of 100 alarms are already set.
Action: Wait until some of theexisting alarms are used, or deletealarms you do not need to makeroom for new ones.
Cause: You are trying to highlightdates for a period that spans multipleyears.
Action: The range of dates whenspecifying highlights must be withinone single year. Change your daterange specification so it is within thesame year.
All dates you select must be within the same year.
Cause: Battery power is gettingweak.
Action: Replace batteries as explainedon page 21 of this User’s Guide.
Batteries are getting weak! Replace them as instructed in the User’s Guide.
Cause: An alarm time has beenreached for secret memory area data.
Action: Enter the secret memoryarea to view details about the alarm.
Check the secret memory area!
Cause: This message appears afteran operation that can affect yourtime settings.
Action: Since all alarms and othertimekeeping related operations arebased on your time setting, be sureto check it and make corrections asnecessary whenever this messageappears.
Check your home time setting and correct it if necessary!
Message Table
Cause: Some of the cells in a rangeyou are deleting in the Pocket SheetMode contain data.
Action: Tap Yes to delete the cellsand the data they contain, or tap Noto close the dialog box withoutdeleting anything.
Cells in the range you are deleting contain data.Delete them anyway?
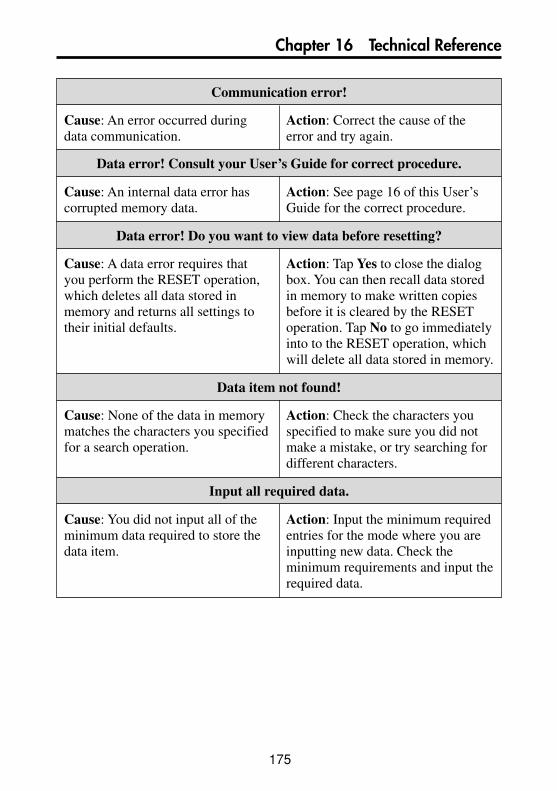
175
Chapter 16 Technical Reference
Data error! Consult your User’s Guide for correct procedure.
Cause: An internal data error hascorrupted memory data.
Action: See page 16 of this User’sGuide for the correct procedure.
Cause: A data error requires thatyou perform the RESET operation,which deletes all data stored inmemory and returns all settings totheir initial defaults.
Action: Tap Yes to close the dialogbox. You can then recall data storedin memory to make written copiesbefore it is cleared by the RESEToperation. Tap No to go immediatelyinto to the RESET operation, whichwill delete all data stored in memory.
Data error! Do you want to view data before resetting?
Cause: None of the data in memorymatches the characters you specifiedfor a search operation.
Action: Check the characters youspecified to make sure you did notmake a mistake, or try searching fordifferent characters.
Data item not found!
Cause: You did not input all of theminimum data required to store thedata item.
Action: Input the minimum requiredentries for the mode where you areinputting new data. Check theminimum requirements and input therequired data.
Input all required data.
Cause: An error occurred duringdata communication.
Action: Correct the cause of theerror and try again.
Communication error!
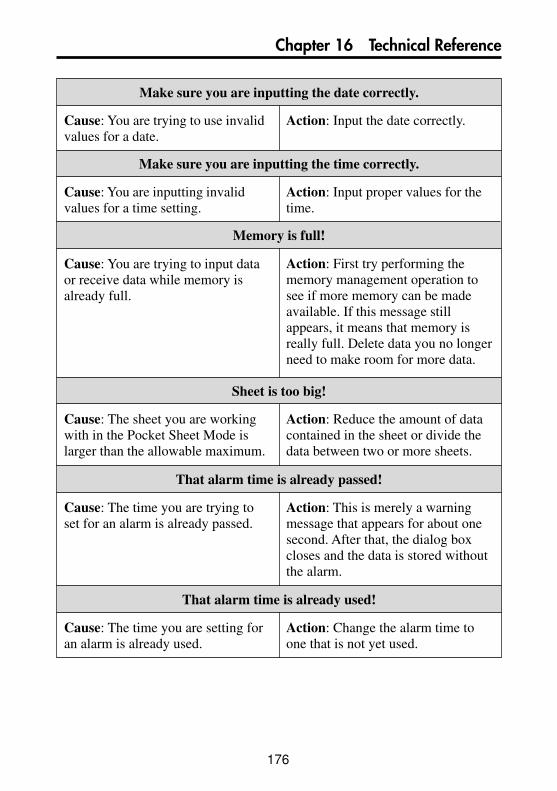
176
Chapter 16 Technical Reference
Memory is full!
Cause: You are trying to input dataor receive data while memory isalready full.
Action: First try performing thememory management operation tosee if more memory can be madeavailable. If this message stillappears, it means that memory isreally full. Delete data you no longerneed to make room for more data.
Cause: The time you are trying toset for an alarm is already passed.
Action: This is merely a warningmessage that appears for about onesecond. After that, the dialog boxcloses and the data is stored withoutthe alarm.
That alarm time is already passed!
Cause: The time you are setting foran alarm is already used.
Action: Change the alarm time toone that is not yet used.
That alarm time is already used!
Cause: You are trying to use invalidvalues for a date.
Action: Input the date correctly.
Make sure you are inputting the date correctly.
Cause: You are inputting invalidvalues for a time setting.
Action: Input proper values for thetime.
Make sure you are inputting the time correctly.
Cause: The sheet you are workingwith in the Pocket Sheet Mode islarger than the allowable maximum.
Action: Reduce the amount of datacontained in the sheet or divide thedata between two or more sheets.
Sheet is too big!

177
Chapter 16 Technical Reference
The reset operation deletes all data in memory!Do you want to continue?
Cause: You are about to perform theRESET operation, which deletes alldata stored in memory and returnsall settings to their initial defaults.
Action: Tap Yes to perform theRESET operation and delete all data,or No to close the dialog boxwithout deleting anything.
Cause: You are specifying aReminder date that is outside theperiod specified by the start date andend date.
Action: Check the specified periodand set the date correctly.
That date is outside of the specified period.
That name is already used!
Cause: You are trying to assign aname that is already used whennaming a payment type or expensetype.
Action: Use a different name.
The next step starts data deletion and unit reset!Do you want to continue?
Cause: This is the final warningbefore execution of the RESEToperation, which deletes all datastored in memory and returns allsettings to their initial defaults.
Action: Tap Yes to execute theRESET operation and delete all data,or No to close the dialog boxwithout deleting anything.
This operation will push some data outside the sheet.Continue?
Cause: The Pocket Sheet Modeoperation you are performing willcause some of the cells of the sheetto be pushed outside the range of thesheet. This causes the data in thecells to be deleted.
Action: Tap Yes to go ahead with theoperation, or No to close the dialogbox without doing anything.

178
Chapter 16 Technical Reference
Cause: You specified more than 60repeats for a Reminder data item.
Action: Shorten the specified periodof the Reminder item to reduce thenumber of repeats.
You cannot specify more than 60 repeats!
Cause: The password you inputwhile trying to enter the secretmemory area does not match thepassword that is registered.
Action: Input the correct password.
Wrong password!
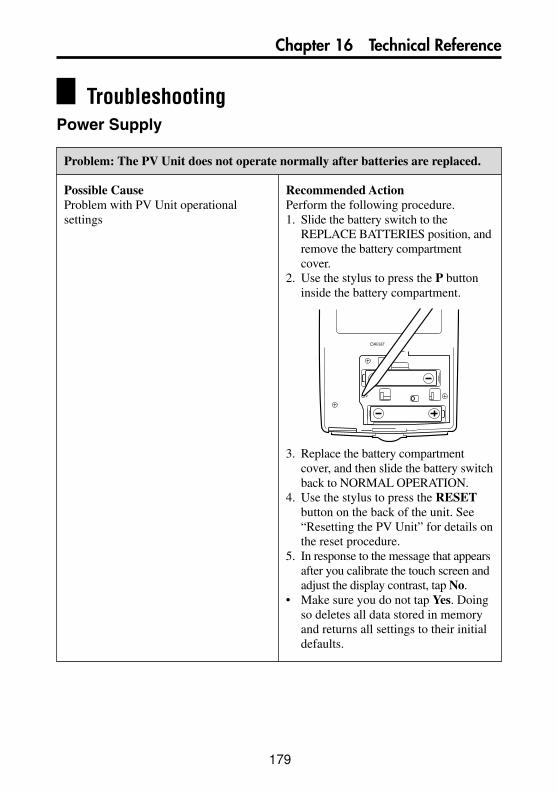
179
Chapter 16 Technical Reference
TroubleshootingPower Supply
Possible CauseProblem with PV Unit operationalsettings
Recommended ActionPerform the following procedure.1. Slide the battery switch to the
REPLACE BATTERIES position, andremove the battery compartmentcover.
2. Use the stylus to press the P buttoninside the battery compartment.
P
RESET
3. Replace the battery compartmentcover, and then slide the battery switchback to NORMAL OPERATION.
4. Use the stylus to press the RESETbutton on the back of the unit. See“Resetting the PV Unit” for details onthe reset procedure.
5. In response to the message that appearsafter you calibrate the touch screen andadjust the display contrast, tap No.
• Make sure you do not tap Yes. Doingso deletes all data stored in memoryand returns all settings to their initialdefaults.
Problem: The PV Unit does not operate normally after batteries are replaced.
180
Chapter 16 Technical Reference
Display Contrast
Key Tone
Possible CauseDisplay contrast is too dark.
Recommended ActionAdjust display contrast (page 160).
Problem: Display is totally black.
Recommended Actions1. Slide the battery switch to NORMAL
OPERATION.2. Replace batteries (page 21).3. Adjust display contrast (page 160).4. Click the Action control to turn on
power or turn on the screen tap poweron feature.
Problem: Nothing appears on the display when power is turned on.
Possible Causes1. The battery switch on the back of the
unit is set to REPLACE BATTERIES.2. Battery power is low.3. Display contrast is too light.4. Screen tap power on feature is turned
off.
Problem: The PV Unit does not beep when you perform an operation.
Possible CauseThe key tone is turned off.
Recommended ActionTurn on the key tone (page 158).
181
Chapter 16 Technical Reference
Operation
Possible Causes1. Battery power is low.2. Exposure of the PV Unit to some
external condition is interfering withproper operation.
3. The touch screen is damaged.
Problem: Nothing happens when you tap the screen.
Recommended Actions1. Replace batteries (page 21).2. Press the P button and then the
RESET button. See procedure above.
3. The touch screen must be replaced.Contact your nearest CASIO dealerto have the touch screen replaced.You will be charged for thisreplacement.
Possible CauseBattery power is low.
Recommended ActionReplace batteries (page 21).
Problem: The functions or cursor movement performed does not match thelocation where you tap on the screen.
Possible CauseThe touch screen needs to be calibrated.
Recommended ActionPerform the procedure under“Calibrating the Touch Screen” on page161.
Problem: Power suddenly turns off or contrast adjustment screen suddenly appears.
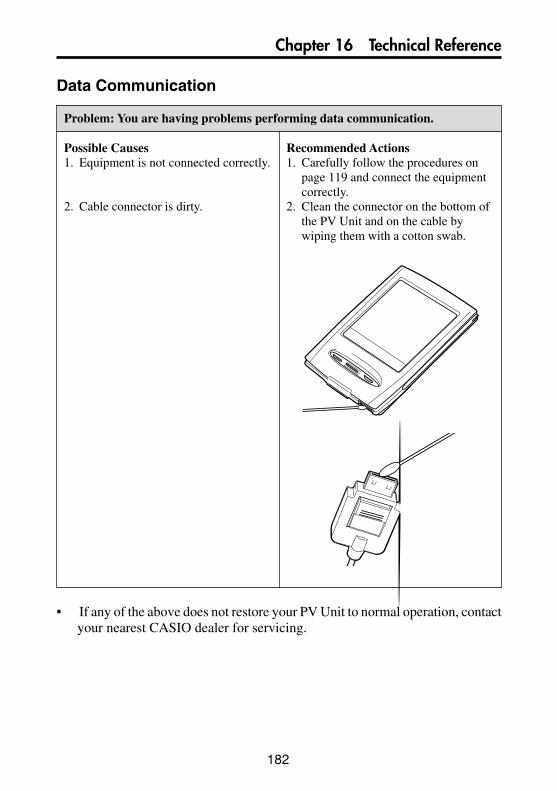
182
Chapter 16 Technical Reference
Data Communication
• If any of the above does not restore your PV Unit to normal operation, contactyour nearest CASIO dealer for servicing.
Problem: You are having problems performing data communication.
Possible Causes1. Equipment is not connected correctly.
2. Cable connector is dirty.
Recommended Actions1. Carefully follow the procedures on
page 119 and connect the equipmentcorrectly.
2. Clean the connector on the bottom ofthe PV Unit and on the cable bywiping them with a cotton swab.

183
Chapter 16 Technical Reference
SpecificationsModel: PV-S460/PV-S660Main Modes:Scheduler (Schedule, To Do, Reminder); Contacts; Memo; Expense Manager;Currency Converter; Quick-Memo; Pocket Sheet; Pop Up Tools (Clock, Calendar,Calculator); Game
Data storage:Storage and recall of Schedule, To Do, Reminder, Contacts, Memo, Expense, Quick-Memo, Pocket Sheet data; calendar display; secret memory area; editing; memorystatus display
Clock:World Time; Schedule alarm; To Do alarm; Reminder alarm; Daily alarm; accuracyunder normal temperatures: ±3 seconds per day
Calculations:12-digit arithmetic calculations; arithmetic constants (+/–/×/÷); independentmemory; percentages; square roots; 24-digit approximations; other mixedcalculations
General:Display: 160 × 160 dotsMemory capacity: 4MB (PV-S460)/6MB (PV-S660)Main component: LSIPower supply: Two AAA-size alkaline batteries (Type: LR03 (AM4))
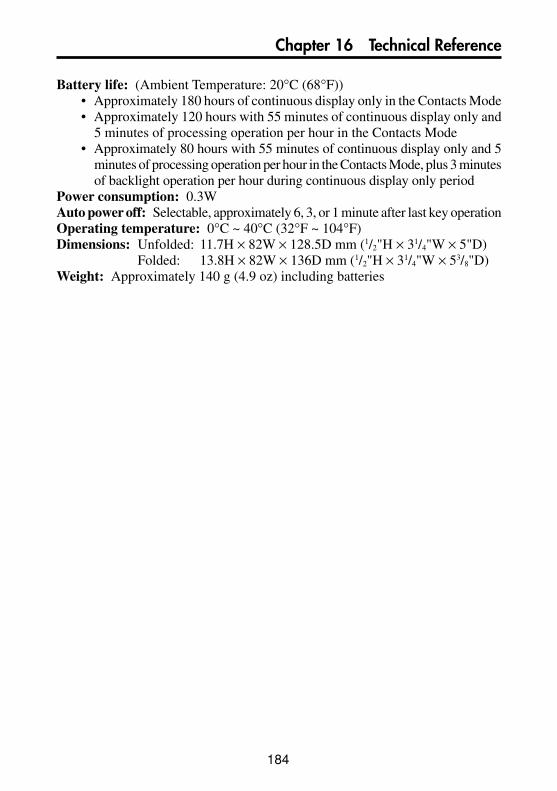
184
Chapter 16 Technical Reference
Battery life: (Ambient Temperature: 20°C (68°F))• Approximately 180 hours of continuous display only in the Contacts Mode• Approximately 120 hours with 55 minutes of continuous display only and
5 minutes of processing operation per hour in the Contacts Mode• Approximately 80 hours with 55 minutes of continuous display only and 5
minutes of processing operation per hour in the Contacts Mode, plus 3 minutesof backlight operation per hour during continuous display only period
Power consumption: 0.3WAuto power off: Selectable, approximately 6, 3, or 1 minute after last key operationOperating temperature: 0°C ~ 40°C (32°F ~ 104°F)Dimensions: Unfolded: 11.7H × 82W × 128.5D mm (1/2"H × 31/4"W × 5"D)
Folded: 13.8H × 82W × 136D mm (1/2"H × 31/4"W × 53/8"D)Weight: Approximately 140 g (4.9 oz) including batteries

CASIO ELECTRONICS CO., LTD.Unit 6, 1000 North Circular RoadLondon NW2 7JD, U.K.


