24
® Quick Start Guide An illustrated guide to setting up your DriveRack ® PX PX
®
®
®
®
®
®
Quick Start GuideAn illustrated guide to setting up your DriveRack® PX
PX
2
GND
SUB OUTPUTS
Manufactured under the following U.S. Patents: 3,789,143; 4,182,993; 6,195,029; 7,203,324.
PXR
UL 60065 IEC 60065120V - 60Hz
RightMain
Pan
Mute
-10
0
+5
+10
-20
-30-
-5
L / R
Mute
L / R
Mute
L / R
Mute
L / R
-5
-4
-3
-2-1 0 +1
+2
+3
+4
+5 Pan-5
-4
-3
-2-1 0 +1
+2
+3
+4
+5 Pan-5
-4
-3
-2-1 0 +1
+2
+3
+4
+5 Pan-5
-4
-3
-2-1 0 +1
+2
+3
+4
+5 Pan-5
-4
-3
-2-1 0 +1
+2
+3
+4
+5 Pan-5
-4
-3
-2-1 0 +1
+2
+3
+4
+5 Pan-5
-4
-3
-2-1 0 +1
+2
+3
+4
+5 Pan-5
-4
-3
-2-1 0 +1
+2
+3
+4
+5
1 2 3 4
-10
0
+5
+10
-20
-30-
-5
-10
0
+5
+10
-20
-30-
-5
-10
0
+5
+10
-20
-30-
-5
Mute
L / R
5
-10
0
+5
+10
-20
-30-
-5
Mute
L / R
6
-10
0
+5
+10
-20
-30-
-5
Mute
L / R
-10
0
+5
+10
-20
-30-
-5
Aux 10
2
4 6
8
10
Aux 20
2
4 6
8
10
Aux 10
2
4 6
8
10
Aux 20
2
4 6
8
10
Aux 10
2
4 6
8
10
Aux 20
2
4 6
8
10
Aux 10
2
4 6
8
10
Aux 20
2
4 6
8
10
Aux 10
2
4 6
8
10
Aux 20
2
4 6
8
10
Aux 10
2
4 6
8
10
Aux 20
2
4 6
8
10
Aux 10
2
4 6
8
10
Aux 20
2
4 6
8
10
Aux 10
2
4 6
8
10
Aux 20
2
4 6
8
10
Mute
L / R
-10
0
+5
+10
-20
-30-
-5
Mixer
JBL PRX515
JBL PRX518
LeftMain
Right Sub
Left/MonoSub
Left/Mono Input
RightInput
JBL PRX515
JBL PRX518
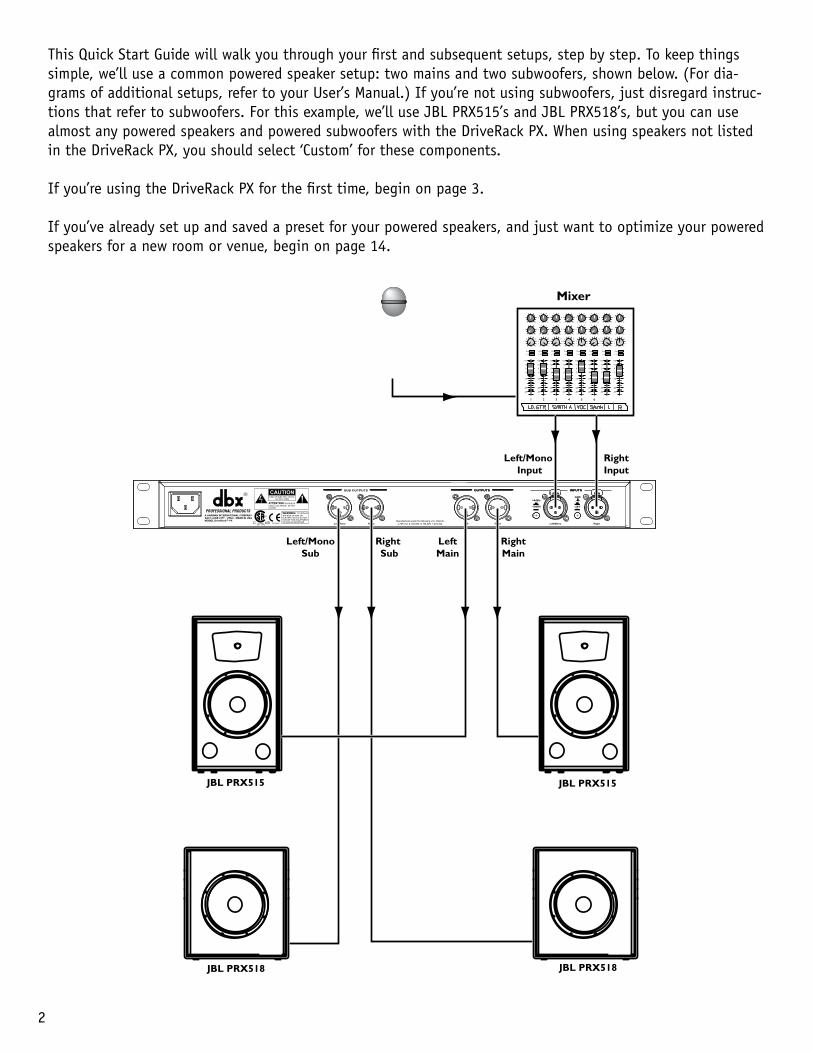
This Quick Start Guide will walk you through your first and subsequent setups, step by step. To keep things simple, we’ll use a common powered speaker setup: two mains and two subwoofers, shown below. (For dia-grams of additional setups, refer to your User’s Manual.) If you’re not using subwoofers, just disregard instruc-tions that refer to subwoofers. For this example, we’ll use JBL PRX515’s and JBL PRX518’s, but you can use almost any powered speakers and powered subwoofers with the DriveRack PX. When using speakers not listed in the DriveRack PX, you should select ‘Custom’ for these components. If you’re using the DriveRack PX for the first time, begin on page 3.
If you’ve already set up and saved a preset for your powered speakers, and just want to optimize your powered speakers for a new room or venue, begin on page 14.

3
First-time Setup - Creating a New Preset
1. Remove the DriveRack PX from its box. Rack mount the DriveRack PX and connnect the power cord.
GND
SUB OUTPUTS
Manufactured under the following U.S. Patents: 3,789,143; 4,182,993; 6,195,029; 7,203,324.
PXR
UL 60065 IEC 60065120V - 60Hz
Attach power cord here.
2. Connect the mixer left and right outputs to the DriveRack PX Left/Mono and Right Inputs.
GND
SUB OUTPUTS
Manufactured under the following U.S. Patents: 3,789,143; 4,182,993; 6,195,029; 7,203,324.
PXR
UL 60065 IEC 60065120V - 60Hz
Pan
Mute
-10
0
+5
+10
-20
-30-
-5
L / R
Mute
L / R
Mute
L / R
Mute
L / R
-5
-4
-3
-2-1 0 +1
+2
+3
+4
+5 Pan-5
-4
-3
-2-1 0 +1
+2
+3
+4
+5 Pan-5
-4
-3
-2-1 0 +1
+2
+3
+4
+5 Pan-5
-4
-3
-2-1 0 +1
+2
+3
+4
+5 Pan-5
-4
-3
-2-1 0 +1
+2
+3
+4
+5 Pan-5
-4
-3
-2-1 0 +1
+2
+3
+4
+5 Pan-5
-4
-3
-2-1 0 +1
+2
+3
+4
+5 Pan-5
-4
-3
-2-1 0 +1
+2
+3
+4
+5
1 2 3 4
-10
0
+5
+10
-20
-30-
-5
-10
0
+5
+10
-20
-30-
-5
-10
0
+5
+10
-20
-30-
-5
Mute
L / R
5
-10
0
+5
+10
-20
-30-
-5
Mute
L / R
6
-10
0
+5
+10
-20
-30-
-5
Mute
L / R
-10
0
+5
+10
-20
-30-
-5
Aux 10
2
4 6
8
10
Aux 20
2
4 6
8
10
Aux 10
2
4 6
8
10
Aux 20
2
4 6
8
10
Aux 10
2
4 6
8
10
Aux 20
2
4 6
8
10
Aux 10
2
4 6
8
10
Aux 20
2
4 6
8
10
Aux 10
2
4 6
8
10
Aux 20
2
4 6
8
10
Aux 10
2
4 6
8
10
Aux 20
2
4 6
8
10
Aux 10
2
4 6
8
10
Aux 20
2
4 6
8
10
Aux 10
2
4 6
8
10
Aux 20
2
4 6
8
10
Mute
L / R
-10
0
+5
+10
-20
-30-
-5
Mixer
Left/Mono Input
RightInput
3. Make sure your powered speakers and subwoofers are turned off. Connect the Left and Right “OUTPUTS” to the left and right main powered speakers. Connect the Left/Mono and Right “SUB OUTPUTS” to the left and right subwoof-ers.
GND
SUB OUTPUTS
Manufactured under the following U.S. Patents: 3,789,143; 4,182,993; 6,195,029; 7,203,324.
PXR
UL 60065 IEC 60065120V - 60Hz
RightMain
JBL PRX515
JBL PRX518
LeftMain
Right Sub
Left/MonoSub
JBL PRX515
JBL PRX518
4
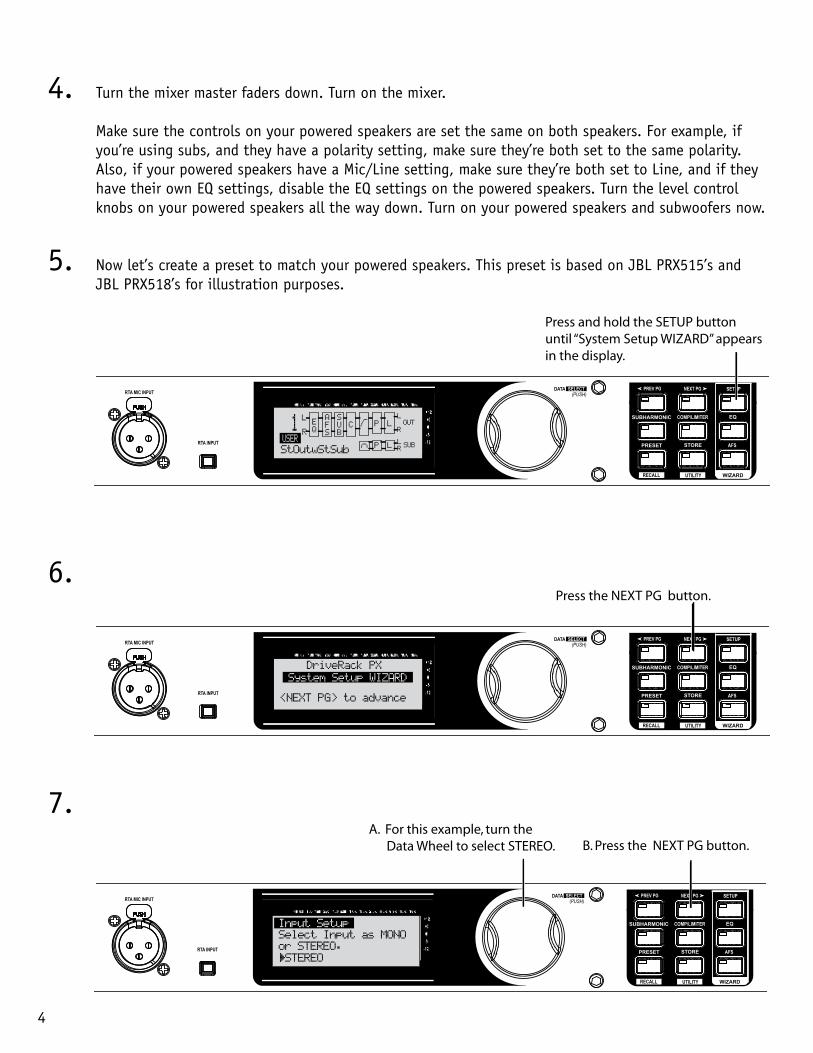
4. Turn the mixer master faders down. Turn on the mixer. Make sure the controls on your powered speakers are set the same on both speakers. For example, if you’re using subs, and they have a polarity setting, make sure they’re both set to the same polarity. Also, if your powered speakers have a Mic/Line setting, make sure they’re both set to Line, and if they have their own EQ settings, disable the EQ settings on the powered speakers. Turn the level control knobs on your powered speakers all the way down. Turn on your powered speakers and subwoofers now.
5. Now let’s create a preset to match your powered speakers. This preset is based on JBL PRX515’s and JBL PRX518’s for illustration purposes.
SETUP
AFS
RECALL
SUBHARMONIC COMP/LIMITER
UTILITY
PRESET
NEXT PG
STORE
EQ
WIZARD
Inputs Sub Outs
UTILITY
PREV PG
WIZARD
0
6
12
24
36
SIG
Headroom dB Headroom dB Headroom dB
Outputs
Limiter
DriveRack PX®
Powered SpeakerOptimizer
0
6
12
24
36
SIG
0
6
12
24
36
SIG
Press and hold the SETUP buttonuntil “System Setup WIZARD” appearsin the display.
EL
PL
ROUT
SUB
L
P L
QRC
AFS
SUB
StOutwStSub
1USER L
R
6.
SETUP
AFS
RECALL
SUBHARMONIC COMP/LIMITER
UTILITY
PRESET
NEXT PG
STORE
EQ
WIZARD
Inputs Sub Outs
UTILITY
PREV PG
WIZARD
0
6
12
24
36
SIG
Headroom dB Headroom dB Headroom dB
Outputs
Limiter
DriveRack PX®
Powered SpeakerOptimizer
0
6
12
24
36
SIG
0
6
12
24
36
SIG
Press the NEXT PG button.
System Setup WIZARD
7.
SETUP
AFS
RECALL
SUBHARMONIC COMP/LIMITER
UTILITY
PRESET
NEXT PG
STORE
EQ
WIZARD
Inputs Sub Outs
UTILITY
PREV PG
WIZARD
0
6
12
24
36
SIG
Headroom dB Headroom dB Headroom dB
Outputs
Limiter
DriveRack PX®
Powered SpeakerOptimizer
0
6
12
24
36
SIG
0
6
12
24
36
SIG
A. For this example, turn the Data Wheel to select STEREO. B. Press the NEXT PG button.

5
8.
SETUP
AFS
RECALL
SUBHARMONIC COMP/LIMITER
UTILITY
PRESET
NEXT PG
STORE
EQ
WIZARD
Inputs Sub Outs
UTILITY
PREV PG
WIZARD
0
6
12
24
36
SIG
Headroom dB Headroom dB Headroom dB
Outputs
Limiter
DriveRack PX®
Powered SpeakerOptimizer
0
6
12
24
36
SIG
0
6
12
24
36
SIG
A. Turn the Data Wheel to select your main speakers (for our example, select PRX515).
B. Press the NEXT PG button.
PRX515JBL PRX500
Main Speakers
9.
SETUP
AFS
RECALL
SUBHARMONIC COMP/LIMITER
UTILITY
PRESET
NEXT PG
STORE
EQ
WIZARD
Inputs Sub Outs
UTILITY
PREV PG
WIZARD
0
6
12
24
36
SIG
Headroom dB Headroom dB Headroom dB
Outputs
Limiter
DriveRack PX®
Powered SpeakerOptimizer
0
6
12
24
36
SIG
0
6
12
24
36
SIG
A. Turn the Data Wheel to select your subwoofer speakers (for our example, select PRX518S STEREO).
B. Press the NEXT PG button.
PRX518S STEREOJBL PRX500
Sub SpeakersSub(s)
10.
SETUP
AFS
RECALL
SUBHARMONIC COMP/LIMITER
UTILITY
PRESET
NEXT PG
STORE
EQ
WIZARD
Inputs Sub Outs
UTILITY
PREV PG
WIZARD
0
6
12
24
36
SIG
Headroom dB Headroom dB Headroom dB
Outputs
Limiter
DriveRack PX®
Powered SpeakerOptimizer
0
6
12
24
36
SIG
0
6
12
24
36
SIG
B. Press the NEXT PG button.A. Set the level knobs on your main speakers to match the position shown on the display.
(Note that you also have the option to turn the Data Wheel to adjust the level shown on the displayto match a preferred setting on your speakers.)
Adjust speakerlevels as shown> 36% Level
Main Speaker Levels
6
11.
SETUP
AFS
RECALL
SUBHARMONIC COMP/LIMITER
UTILITY
PRESET
NEXT PG
STORE
EQ
WIZARD
Inputs Sub Outs
UTILITY
PREV PG
WIZARD
0
6
12
24
36
SIG
Headroom dB Headroom dB Headroom dB
Outputs
Limiter
DriveRack PX®
Powered SpeakerOptimizer
0
6
12
24
36
SIG
0
6
12
24
36
SIG
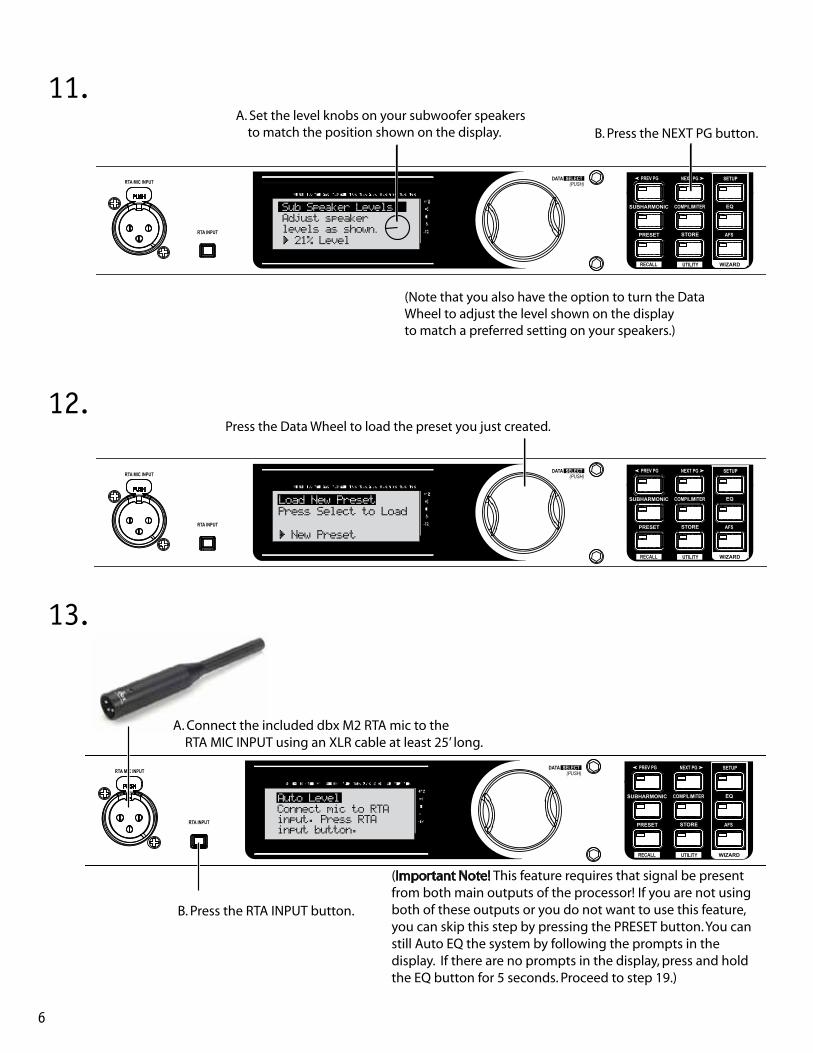
B. Press the NEXT PG button.A. Set the level knobs on your subwoofer speakers to match the position shown on the display.
(Note that you also have the option to turn the Data Wheel to adjust the level shown on the displayto match a preferred setting on your speakers.)
Adjust speakerlevels as shown> 21% Level
Sub Speaker Levels
12.
SETUP
AFS
RECALL
SUBHARMONIC COMP/LIMITER
UTILITY
PRESET
NEXT PG
STORE
EQ
WIZARD
Inputs Sub Outs
UTILITY
PREV PG
WIZARD
0
6
12
24
36
SIG
Headroom dB Headroom dB Headroom dB
Outputs
Limiter
DriveRack PX®
Powered SpeakerOptimizer
0
6
12
24
36
SIG
0
6
12
24
36
SIG
Press the Data Wheel to load the preset you just created.
Press Select to Load
> New Preset
Load New Preset
13.
SETUP
AFS
RECALL
SUBHARMONIC COMP/LIMITER
UTILITY
PRESET
NEXT PG
STORE
EQ
WIZARDUTILITY
PREV PG
WIZARD
A. Connect the included dbx M2 RTA mic to the RTA MIC INPUT using an XLR cable at least 25’ long.
B. Press the RTA INPUT button.
Connect mic to RTAinput. Press RTAinput button.
Auto Level
(Important Note! This feature requires that signal be present from both main outputs of the processor! If you are not using both of these outputs or you do not want to use this feature, you can skip this step by pressing the PRESET button. You can still Auto EQ the system by following the prompts in the display. If there are no prompts in the display, press and hold the EQ button for 5 seconds. Proceed to step 19.)
7
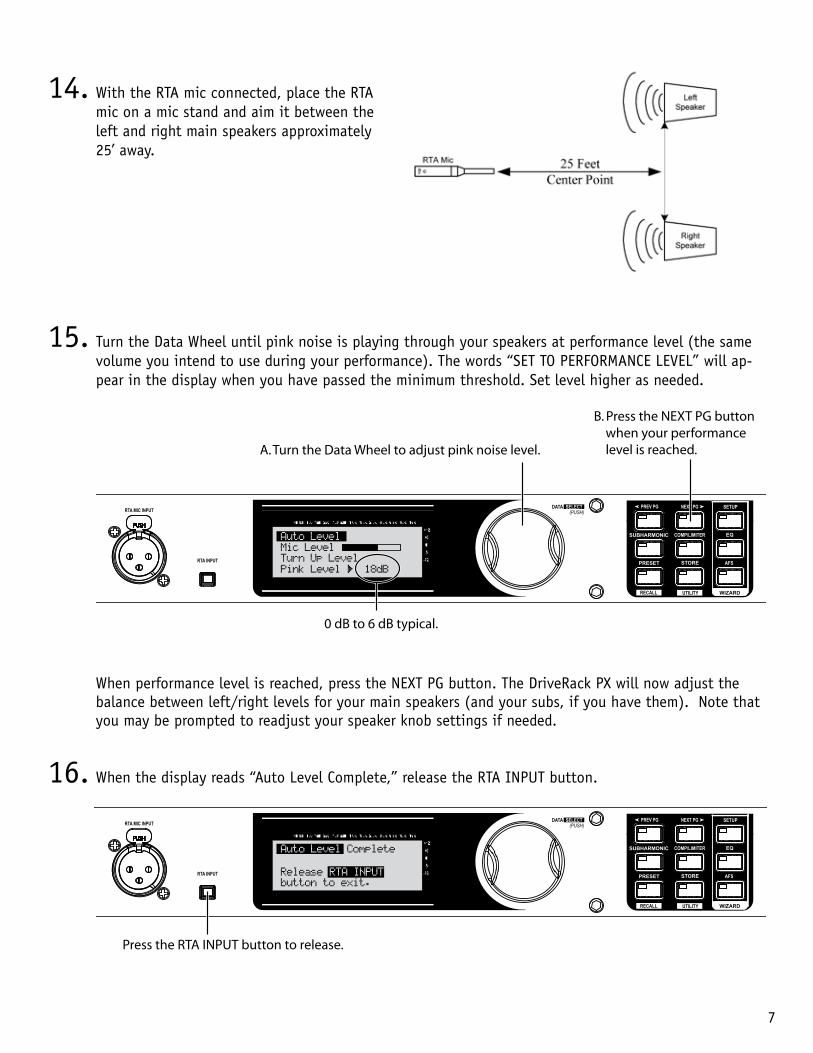
14. With the RTA mic connected, place the RTA mic on a mic stand and aim it between the left and right main speakers approximately 25’ away.
15. Turn the Data Wheel until pink noise is playing through your speakers at performance level (the same volume you intend to use during your performance). The words “SET TO PERFORMANCE LEVEL” will ap-pear in the display when you have passed the minimum threshold. Set level higher as needed.
SETUP
AFS
RECALL
SUBHARMONIC COMP/LIMITER
UTILITY
PRESET
NEXT PG
STORE
EQ
WIZARD
Inputs Sub Outs
UTILITY
PREV PG
WIZARD
0
6
12
24
36
SIG
Headroom dB Headroom dB Headroom dB
Outputs
Limiter
DriveRack PX®
Powered SpeakerOptimizer
0
6
12
24
36
SIG
0
6
12
24
36
SIG
A. Turn the Data Wheel to adjust pink noise level.
B. Press the NEXT PG button when your performance level is reached.
0 dB to 6 dB typical.
Auto Level
When performance level is reached, press the NEXT PG button. The DriveRack PX will now adjust the balance between left/right levels for your main speakers (and your subs, if you have them). Note that you may be prompted to readjust your speaker knob settings if needed.
16. When the display reads “Auto Level Complete,” release the RTA INPUT button.
SETUP
AFS
RECALL
SUBHARMONIC COMP/LIMITER
UTILITY
PRESET
NEXT PG
STORE
EQ
WIZARD
Inputs Sub Outs
UTILITY
PREV PG
WIZARD
0
6
12
24
36
SIG
Headroom dB Headroom dB Headroom dB
Outputs
Limiter
DriveRack PX®
Powered SpeakerOptimizer
0
6
12
24
36
SIG
0
6
12
24
36
SIG
Press the RTA INPUT button to release.
Auto Level Complete
Release RTA INPUT button to exit.
8
17.
SETUP
AFS
RECALL
SUBHARMONIC COMP/LIMITER
UTILITY
PRESET
NEXT PG
STORE
EQ
WIZARD
Inputs Sub Outs
UTILITY
PREV PG
WIZARD
0
6
12
24
36
SIG
Headroom dB Headroom dB Headroom dB
Outputs
Limiter
DriveRack PX®
Powered SpeakerOptimizer
0
6
12
24
36
SIG
0
6
12
24
36
SIG
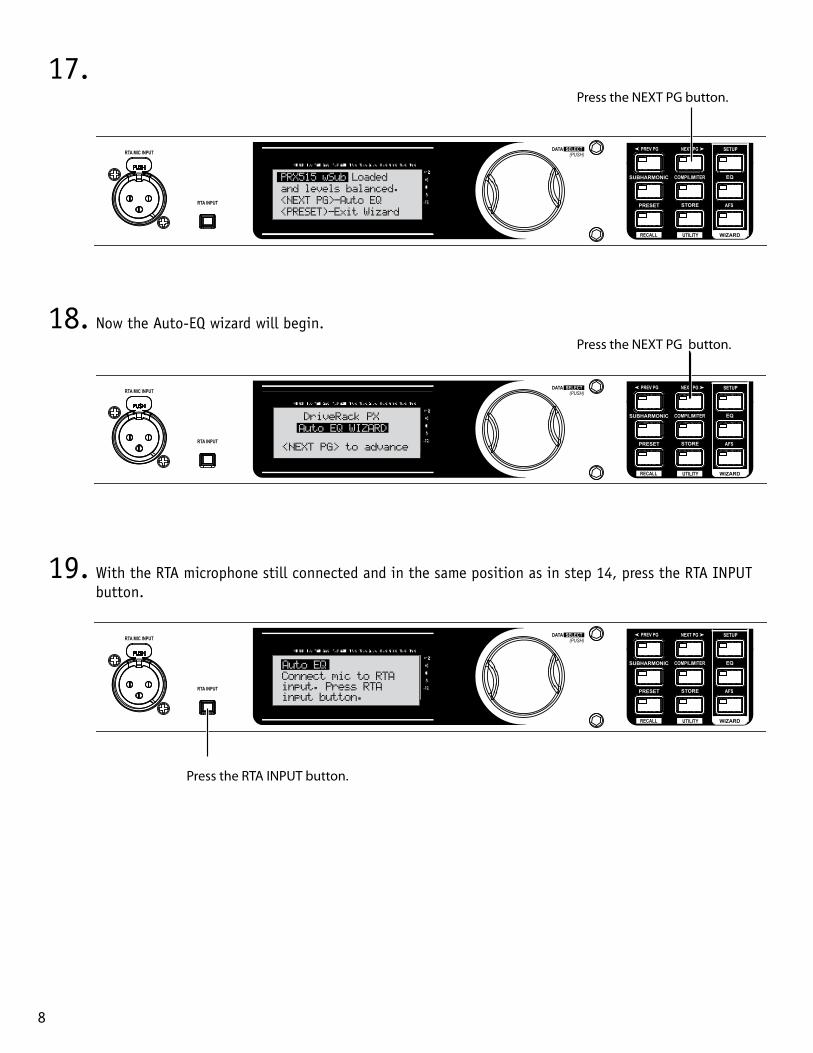
PRX515 wSub Loaded
and levels balanced.
<NEXT PG>-Auto EQ
<PRESET)-Exit Wizard
Press the NEXT PG button.
18. Now the Auto-EQ wizard will begin.
SETUP
AFS
RECALL
SUBHARMONIC COMP/LIMITER
UTILITY
PRESET
NEXT PG
STORE
EQ
WIZARD
Inputs Sub Outs
UTILITY
PREV PG
WIZARD
0
6
12
24
36
SIG
Headroom dB Headroom dB Headroom dB
Outputs
Limiter
DriveRack PX®
Powered SpeakerOptimizer
0
6
12
24
36
SIG
0
6
12
24
36
SIG
Press the NEXT PG button.
DriveRack PX
Auto EQ WIZARD
<NEXT PG> to advance
19. With the RTA microphone still connected and in the same position as in step 14, press the RTA INPUT button.
SETUP
AFS
RECALL
SUBHARMONIC COMP/LIMITER
UTILITY
PRESET
NEXT PG
STORE
EQ
WIZARD
Inputs Sub Outs
UTILITY
PREV PG
WIZARD
0
6
12
24
36
SIG
Headroom dB Headroom dB Headroom dB
Outputs
Limiter
DriveRack PX®
Powered SpeakerOptimizer
0
6
12
24
36
SIG
0
6
12
24
36
SIG
Press the RTA INPUT button.
Connect mic to RTAinput. Press RTAinput button.
Auto EQ
9
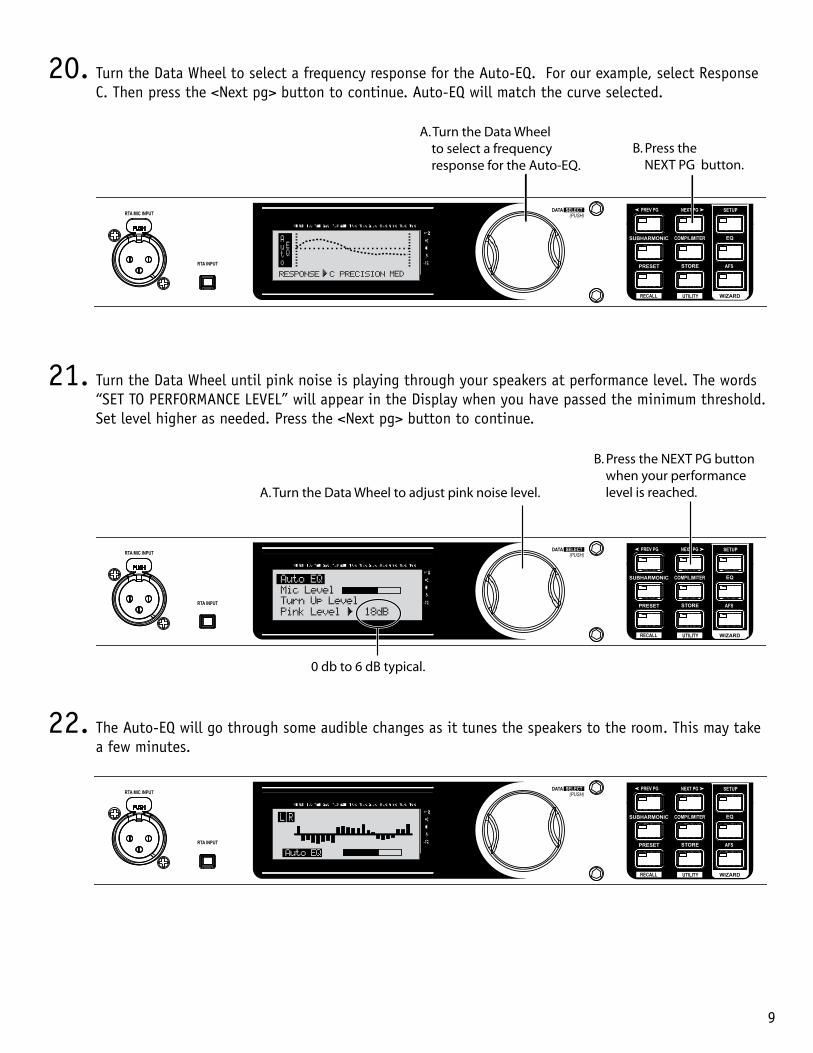
20. Turn the Data Wheel to select a frequency response for the Auto-EQ. For our example, select Response C. Then press the <Next pg> button to continue. Auto-EQ will match the curve selected.
SETUP
AFS
RECALL
SUBHARMONIC COMP/LIMITER
UTILITY
PRESET
NEXT PG
STORE
EQ
WIZARD
Inputs Sub Outs
UTILITY
PREV PG
WIZARD
0
6
12
24
36
SIG
Headroom dB Headroom dB Headroom dB
Outputs
Limiter
DriveRack PX®
Powered SpeakerOptimizer
0
6
12
24
36
SIG
0
6
12
24
36
SIG
MED
B. Press the NEXT PG button.
A. Turn the Data Wheel to select a frequency response for the Auto-EQ.
21. Turn the Data Wheel until pink noise is playing through your speakers at performance level. The words “SET TO PERFORMANCE LEVEL” will appear in the Display when you have passed the minimum threshold. Set level higher as needed. Press the <Next pg> button to continue.
SETUP
AFS
RECALL
SUBHARMONIC COMP/LIMITER
UTILITY
PRESET
NEXT PG
STORE
EQ
WIZARD
Inputs Sub Outs
UTILITY
PREV PG
WIZARD
0
6
12
24
36
SIG
Headroom dB Headroom dB Headroom dB
Outputs
Limiter
DriveRack PX®
Powered SpeakerOptimizer
0
6
12
24
36
SIG
0
6
12
24
36
SIG
A. Turn the Data Wheel to adjust pink noise level.
B. Press the NEXT PG button when your performance level is reached.
0 db to 6 dB typical.
Auto EQ
22. The Auto-EQ will go through some audible changes as it tunes the speakers to the room. This may take a few minutes.
SETUP
AFS
RECALL
SUBHARMONIC COMP/LIMITER
UTILITY
PRESET
NEXT PG
STORE
EQ
WIZARD
Inputs Sub Outs
UTILITY
PREV PG
WIZARD
0
6
12
24
36
SIG
Headroom dB Headroom dB Headroom dB
Outputs
Limiter
DriveRack PX®
Powered SpeakerOptimizer
0
6
12
24
36
SIG
0
6
12
24
36
SIG

10
23. Auto-EQ will complete or finish sending pink noise once it has come as close as possible to matching the Frequency response you selected earlier. Press the RTA INPUT button to release it and continue on to the AFS wizard. NOTE: If the Auto-EQ doesn’t complete after several minutes, you may need to press the RTA INPUT button to release it and continue on the AFS wizard. You can do this during the Auto-EQ process, or when the Auto-EQ wizard prompts you.
SETUP
AFS
RECALL
SUBHARMONIC COMP/LIMITER
UTILITY
PRESET
NEXT PG
STORE
EQ
WIZARD
Inputs Sub Outs
UTILITY
PREV PG
WIZARD
0
6
12
24
36
SIG
Headroom dB Headroom dB Headroom dB
Outputs
Limiter
DriveRack PX®
Powered SpeakerOptimizer
0
6
12
24
36
SIG
0
6
12
24
36
SIG
Press the RTA INPUT button.
Auto EQ Complete
Release RTA INPUT button to exit.
24. Now the AFS wizard will begin.
SETUP
AFS
RECALL
SUBHARMONIC COMP/LIMITER
UTILITY
PRESET
NEXT PG
STORE
EQ
WIZARD
Inputs Sub Outs
UTILITY
PREV PG
WIZARD
0
6
12
24
36
SIG
Headroom dB Headroom dB Headroom dB
Outputs
Limiter
DriveRack PX®
Powered SpeakerOptimizer
0
6
12
24
36
SIG
0
6
12
24
36
SIG
Press the NEXT PG button.
DriveRack PX
AFS WIZARD
<NEXT PG> to advance
25.
SETUP
AFS
RECALL
SUBHARMONIC COMP/LIMITER
UTILITY
PRESET
NEXT PG
STORE
EQ
WIZARD
Inputs Sub Outs
UTILITY
PREV PG
WIZARD
0
6
12
24
36
SIG
Headroom dB Headroom dB Headroom dB
Outputs
Limiter
DriveRack PX®
Powered SpeakerOptimizer
0
6
12
24
36
SIG
0
6
12
24
36
SIG
B. Press the NEXT PG button.A. Turn down the mixer Master or Main level faders on your mixer.
11
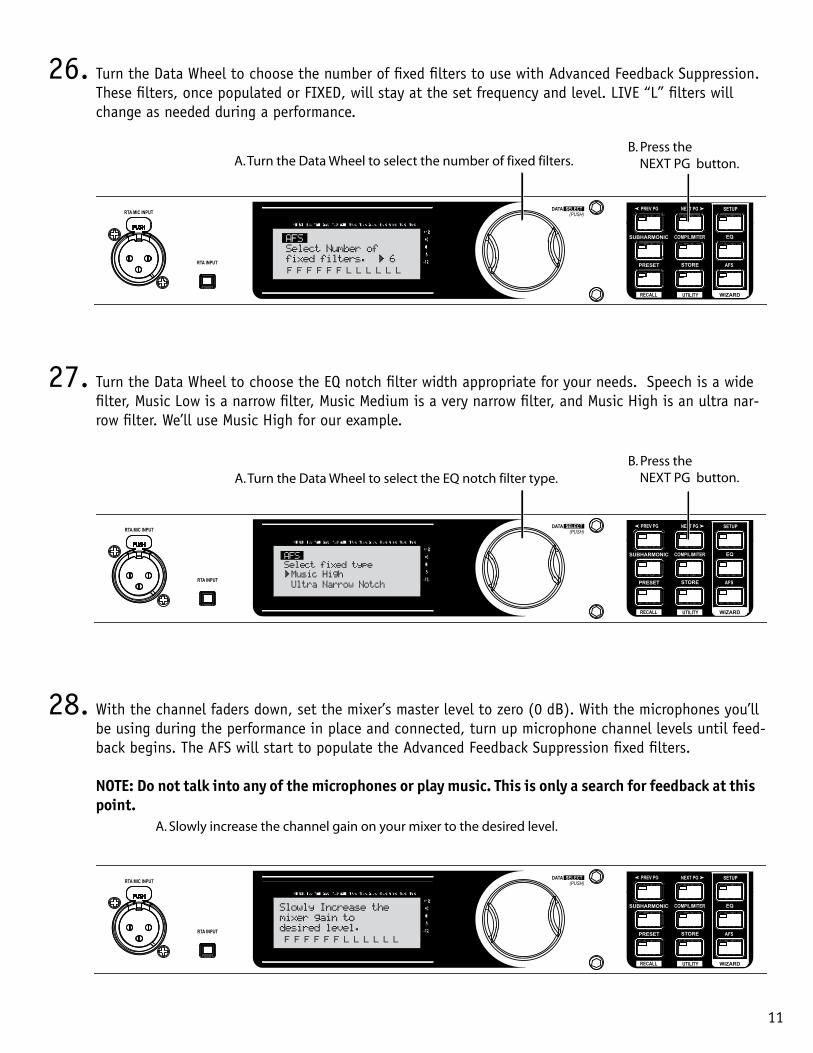
26. Turn the Data Wheel to choose the number of fixed filters to use with Advanced Feedback Suppression. These filters, once populated or FIXED, will stay at the set frequency and level. LIVE “L” filters will change as needed during a performance.
SETUP
AFS
RECALL
SUBHARMONIC COMP/LIMITER
UTILITY
PRESET
NEXT PG
STORE
EQ
WIZARD
Inputs Sub Outs
UTILITY
PREV PG
WIZARD
0
6
12
24
36
SIG
Headroom dB Headroom dB Headroom dB
Outputs
Limiter
DriveRack PX®
Powered SpeakerOptimizer
0
6
12
24
36
SIG
0
6
12
24
36
SIG
A. Turn the Data Wheel to select the number of fixed filters.B. Press the NEXT PG button.
27. Turn the Data Wheel to choose the EQ notch filter width appropriate for your needs. Speech is a wide filter, Music Low is a narrow filter, Music Medium is a very narrow filter, and Music High is an ultra nar-row filter. We’ll use Music High for our example.
SETUP
AFS
RECALL
SUBHARMONIC COMP/LIMITER
UTILITY
PRESET
NEXT PG
STORE
EQ
WIZARD
Inputs Sub Outs
UTILITY
PREV PG
WIZARD
0
6
12
24
36
SIG
Headroom dB Headroom dB Headroom dB
Outputs
Limiter
DriveRack PX®
Powered SpeakerOptimizer
0
6
12
24
36
SIG
0
6
12
24
36
SIG
A. Turn the Data Wheel to select the EQ notch filter type.B. Press the NEXT PG button.
Music High
Ultra Narrow Notch
28. With the channel faders down, set the mixer’s master level to zero (0 dB). With the microphones you’ll be using during the performance in place and connected, turn up microphone channel levels until feed-back begins. The AFS will start to populate the Advanced Feedback Suppression fixed filters. NOTE: Do not talk into any of the microphones or play music. This is only a search for feedback at this point.
SETUP
AFS
RECALL
SUBHARMONIC COMP/LIMITER
UTILITY
PRESET
NEXT PG
STORE
EQ
WIZARD
Inputs Sub Outs
UTILITY
PREV PG
WIZARD
0
6
12
24
36
SIG
Headroom dB Headroom dB Headroom dB
Outputs
Limiter
DriveRack PX®
Powered SpeakerOptimizer
0
6
12
24
36
SIG
0
6
12
24
36
SIG
A. Slowly increase the channel gain on your mixer to the desired level.
12
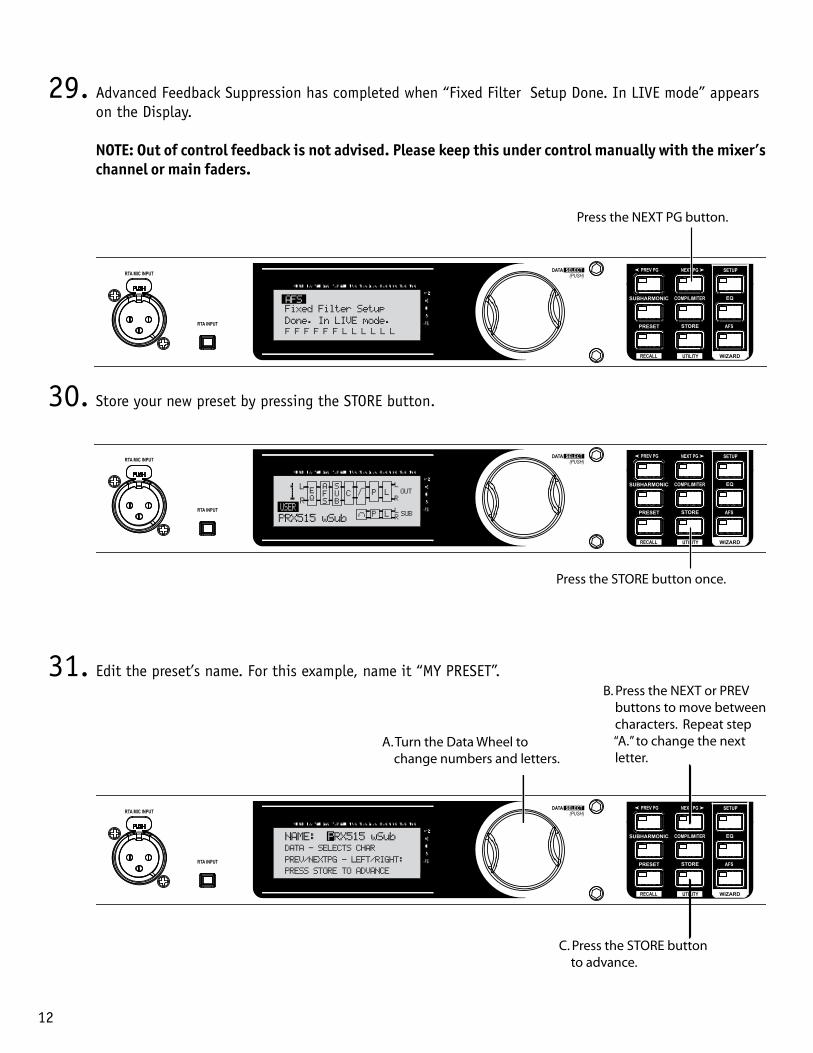
29. Advanced Feedback Suppression has completed when “Fixed Filter Setup Done. In LIVE mode” appears on the Display. NOTE: Out of control feedback is not advised. Please keep this under control manually with the mixer’s channel or main faders.
SETUP
AFS
RECALL
SUBHARMONIC COMP/LIMITER
UTILITY
PRESET
NEXT PG
STORE
EQ
WIZARD
Inputs Sub Outs
UTILITY
PREV PG
WIZARD
0
6
12
24
36
SIG
Headroom dB Headroom dB Headroom dB
Outputs
Limiter
DriveRack PX®
Powered SpeakerOptimizer
0
6
12
24
36
SIG
0
6
12
24
36
SIG
Fixed Filter Setup
Done. In LIVE mode.
Press the NEXT PG button.
30. Store your new preset by pressing the STORE button.
SETUP
AFS
RECALL
SUBHARMONIC COMP/LIMITER
UTILITY
PRESET
NEXT PG
STORE
EQ
WIZARD
Inputs Sub Outs
UTILITY
PREV PG
WIZARD
0
6
12
24
36
SIG
Headroom dB Headroom dB Headroom dB
Outputs
Limiter
DriveRack PX®
Powered SpeakerOptimizer
0
6
12
24
36
SIG
0
6
12
24
36
SIG
EL
PL
ROUT
SUB
L
P L
QRC
AFS
SUB
PRX515 wSub
1USER L
R
Press the STORE button once.
31. Edit the preset’s name. For this example, name it “MY PRESET”.
SETUP
AFS
RECALL
SUBHARMONIC COMP/LIMITER
UTILITY
PRESET
NEXT PG
STORE
EQ
WIZARD
Inputs Sub Outs
UTILITY
PREV PG
WIZARD
0
6
12
24
36
SIG
Headroom dB Headroom dB Headroom dB
Outputs
Limiter
DriveRack PX®
Powered SpeakerOptimizer
0
6
12
24
36
SIG
0
6
12
24
36
SIG
DATA - SELECTS CHAR
PREV/NEXTPG - LEFT/RIGHT:
PRESS STORE TO ADVANCE
NAME: PRX515 wSub
A. Turn the Data Wheel to change numbers and letters.
B. Press the NEXT or PREV buttons to move between characters. Repeat step “A.” to change the next letter.
C. Press the STORE button to advance.
13
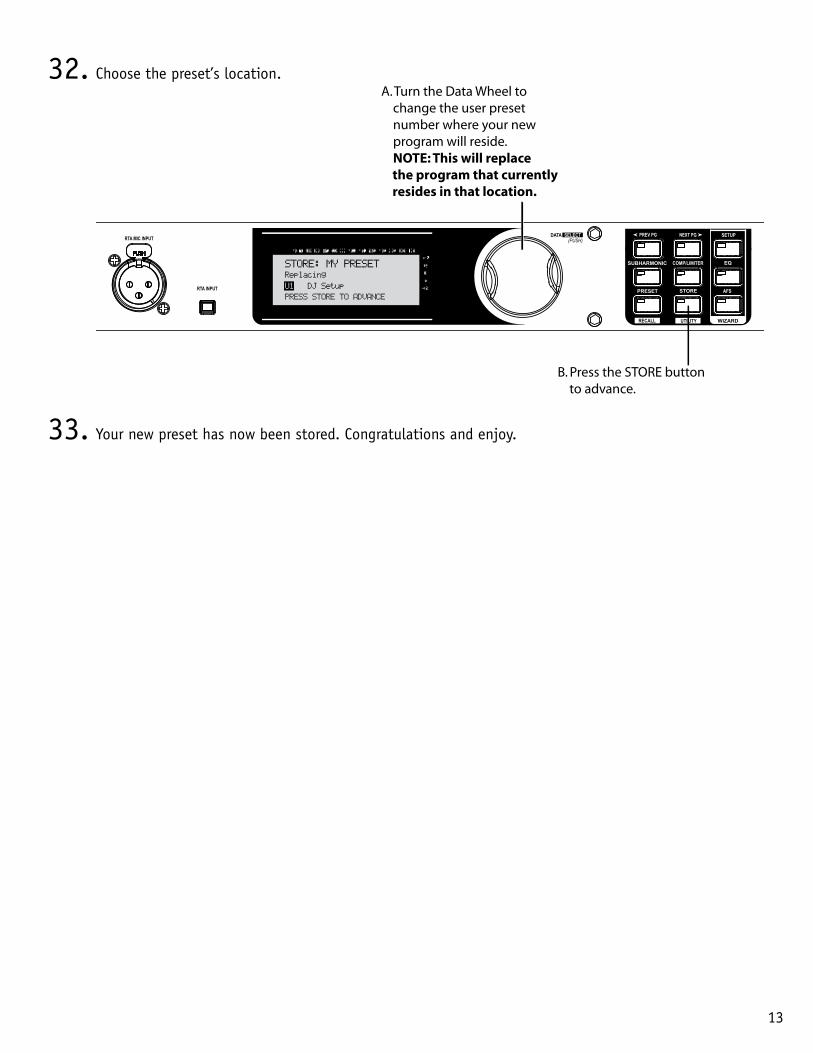
32. Choose the preset’s location.
SETUP
AFS
RECALL
SUBHARMONIC COMP/LIMITER
UTILITY
PRESET
NEXT PG
STORE
EQ
WIZARD
Inputs Sub Outs
UTILITY
PREV PG
WIZARD
0
6
12
24
36
SIG
Headroom dB Headroom dB Headroom dB
Outputs
Limiter
DriveRack PX®
Powered SpeakerOptimizer
0
6
12
24
36
SIG
0
6
12
24
36
SIG
A. Turn the Data Wheel to change the user preset number where your new program will reside. NOTE: This will replace the program that currently resides in that location.
B. Press the STORE button to advance.
Replacing
PRESS STORE TO ADVANCE
STORE: MY PRESET
U1 DJ Setup
33. Your new preset has now been stored. Congratulations and enjoy.
14
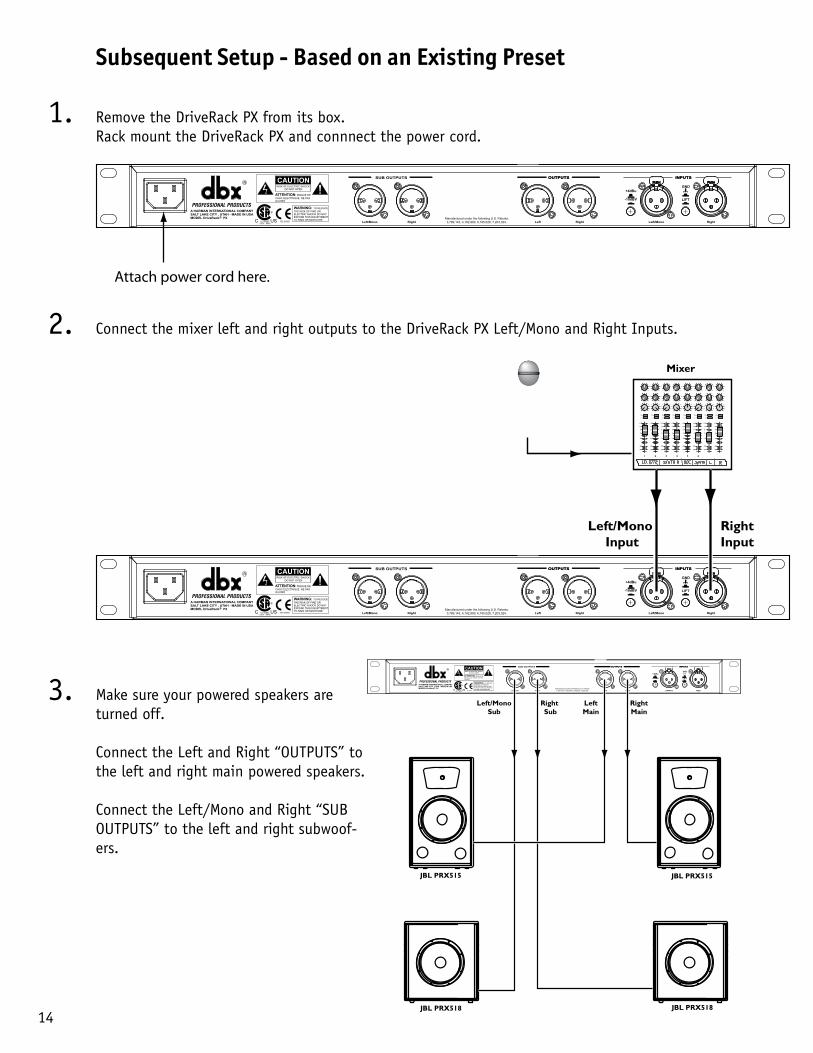
Subsequent Setup - Based on an Existing Preset
1. Remove the DriveRack PX from its box. Rack mount the DriveRack PX and connnect the power cord.
GND
SUB OUTPUTS
Manufactured under the following U.S. Patents: 3,789,143; 4,182,993; 6,195,029; 7,203,324.
PXR
UL 60065 IEC 60065120V - 60Hz
Attach power cord here.
2. Connect the mixer left and right outputs to the DriveRack PX Left/Mono and Right Inputs.
GND
SUB OUTPUTS
Manufactured under the following U.S. Patents: 3,789,143; 4,182,993; 6,195,029; 7,203,324.
PXR
UL 60065 IEC 60065120V - 60Hz
Pan
Mute
-10
0
+5
+10
-20
-30-
-5
L / R
Mute
L / R
Mute
L / R
Mute
L / R
-5
-4
-3
-2-1 0 +1
+2
+3
+4
+5 Pan-5
-4
-3
-2-1 0 +1
+2
+3
+4
+5 Pan-5
-4
-3
-2-1 0 +1
+2
+3
+4
+5 Pan-5
-4
-3
-2-1 0 +1
+2
+3
+4
+5 Pan-5
-4
-3
-2-1 0 +1
+2
+3
+4
+5 Pan-5
-4
-3
-2-1 0 +1
+2
+3
+4
+5 Pan-5
-4
-3
-2-1 0 +1
+2
+3
+4
+5 Pan-5
-4
-3
-2-1 0 +1
+2
+3
+4
+5
1 2 3 4
-10
0
+5
+10
-20
-30-
-5
-10
0
+5
+10
-20
-30-
-5
-10
0
+5
+10
-20
-30-
-5
Mute
L / R
5
-10
0
+5
+10
-20
-30-
-5
Mute
L / R
6
-10
0
+5
+10
-20
-30-
-5
Mute
L / R
-10
0
+5
+10
-20
-30-
-5
Aux 10
2
4 6
8
10
Aux 20
2
4 6
8
10
Aux 10
2
4 6
8
10
Aux 20
2
4 6
8
10
Aux 10
2
4 6
8
10
Aux 20
2
4 6
8
10
Aux 10
2
4 6
8
10
Aux 20
2
4 6
8
10
Aux 10
2
4 6
8
10
Aux 20
2
4 6
8
10
Aux 10
2
4 6
8
10
Aux 20
2
4 6
8
10
Aux 10
2
4 6
8
10
Aux 20
2
4 6
8
10
Aux 10
2
4 6
8
10
Aux 20
2
4 6
8
10
Mute
L / R
-10
0
+5
+10
-20
-30-
-5
Mixer
Left/Mono Input
RightInput
3. Make sure your powered speakers are turned off. Connect the Left and Right “OUTPUTS” to the left and right main powered speakers. Connect the Left/Mono and Right “SUB OUTPUTS” to the left and right subwoof-ers.
GND
SUB OUTPUTS
Manufactured under the following U.S. Patents: 3,789,143; 4,182,993; 6,195,029; 7,203,324.
PXR
UL 60065 IEC 60065120V - 60Hz
RightMain
JBL PRX515
JBL PRX518
LeftMain
Right Sub
Left/MonoSub
JBL PRX515
JBL PRX518
15
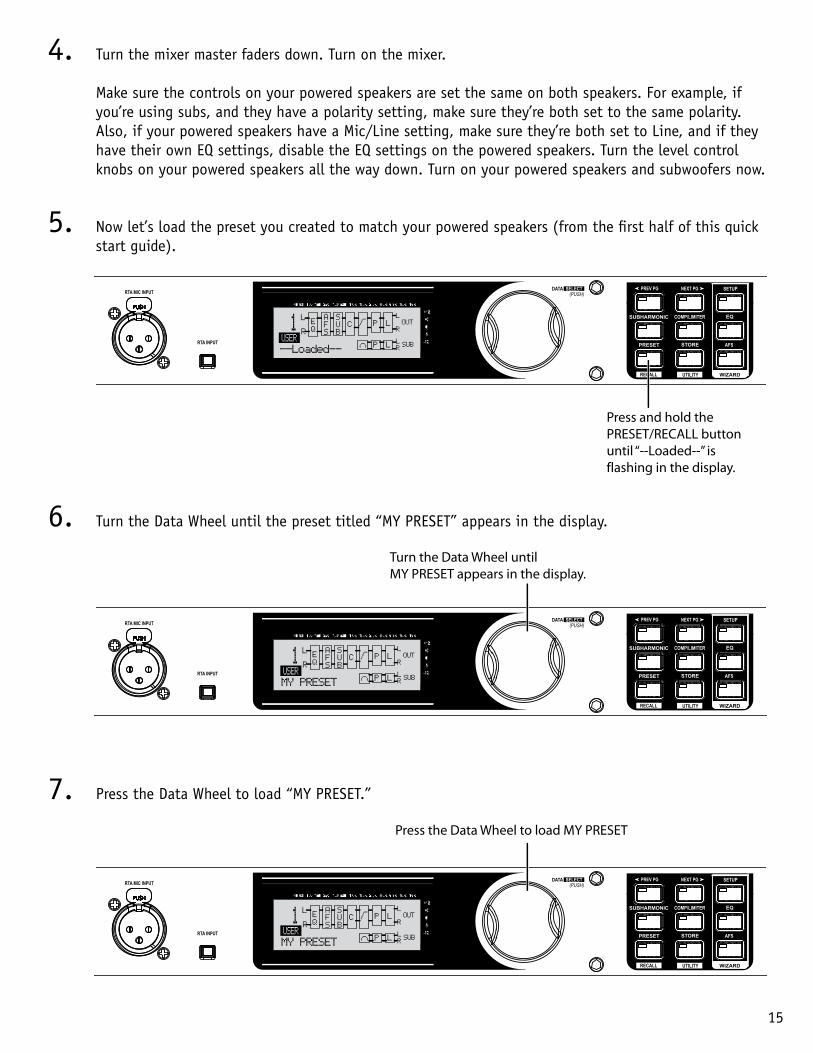
4. Turn the mixer master faders down. Turn on the mixer. Make sure the controls on your powered speakers are set the same on both speakers. For example, if you’re using subs, and they have a polarity setting, make sure they’re both set to the same polarity. Also, if your powered speakers have a Mic/Line setting, make sure they’re both set to Line, and if they have their own EQ settings, disable the EQ settings on the powered speakers. Turn the level control knobs on your powered speakers all the way down. Turn on your powered speakers and subwoofers now.
5. Now let’s load the preset you created to match your powered speakers (from the first half of this quick start guide).
SETUP
AFS
RECALL
SUBHARMONIC COMP/LIMITER
UTILITY
PRESET
NEXT PG
STORE
EQ
WIZARD
Inputs Sub Outs
UTILITY
PREV PG
WIZARD
0
6
12
24
36
SIG
Headroom dB Headroom dB Headroom dB
Outputs
Limiter
DriveRack PX®
Powered SpeakerOptimizer
0
6
12
24
36
SIG
0
6
12
24
36
SIG
Press and hold the PRESET/RECALL buttonuntil “--Loaded--” is flashing in the display.
EL
PL
ROUT
SUB
L
P L
QRC
AFS
SUB
--Loaded--
1USER L
R
6. Turn the Data Wheel until the preset titled “MY PRESET” appears in the display.
SETUP
AFS
RECALL
SUBHARMONIC COMP/LIMITER
UTILITY
PRESET
NEXT PG
STORE
EQ
WIZARD
Inputs Sub Outs
UTILITY
PREV PG
WIZARD
0
6
12
24
36
SIG
Headroom dB Headroom dB Headroom dB
Outputs
Limiter
DriveRack PX®
Powered SpeakerOptimizer
0
6
12
24
36
SIG
0
6
12
24
36
SIG
Turn the Data Wheel untilMY PRESET appears in the display.
EL
PL
ROUT
SUB
L
P L
QRC
AFS
SUB
MY PRESET
1USER L
R
7. Press the Data Wheel to load “MY PRESET.”
SETUP
AFS
RECALL
SUBHARMONIC COMP/LIMITER
UTILITY
PRESET
NEXT PG
STORE
EQ
WIZARD
Inputs Sub Outs
UTILITY
PREV PG
WIZARD
0
6
12
24
36
SIG
Headroom dB Headroom dB Headroom dB
Outputs
Limiter
DriveRack PX®
Powered SpeakerOptimizer
0
6
12
24
36
SIG
0
6
12
24
36
SIG
Press the Data Wheel to load MY PRESET
EL
PL
ROUT
SUB
L
P L
QRC
AFS
SUB
MY PRESET
1USER L
R
16
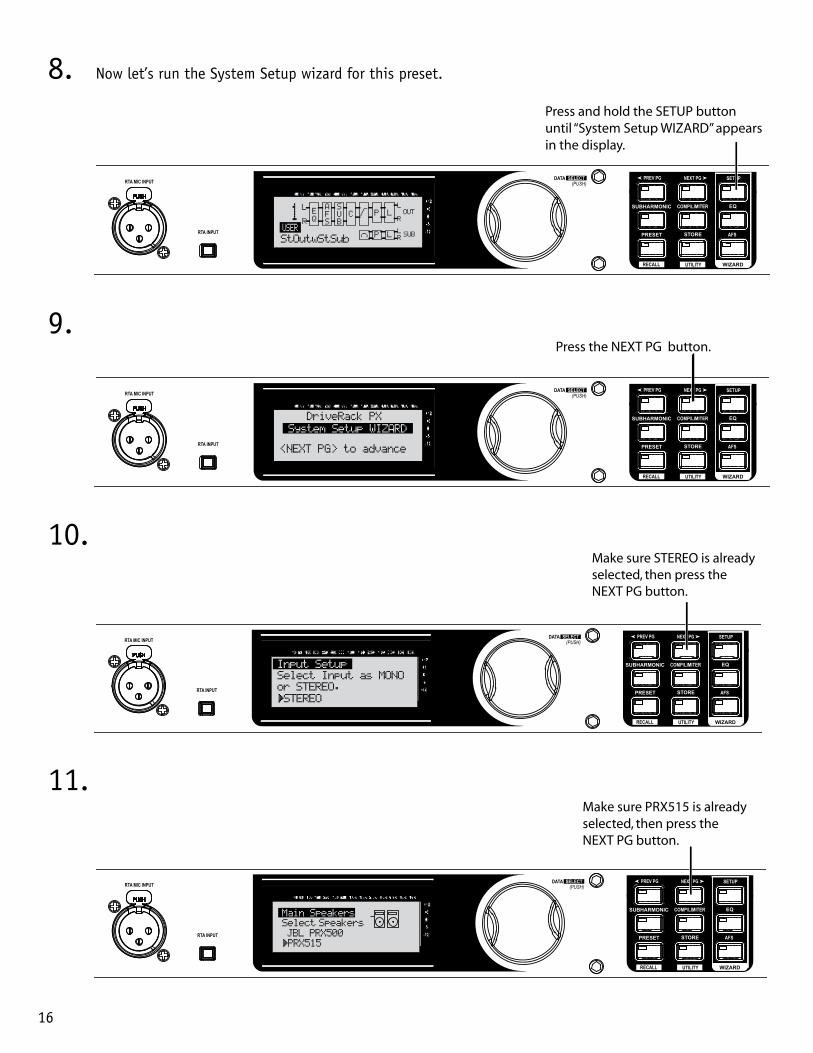
8. Now let’s run the System Setup wizard for this preset.
SETUP
AFS
RECALL
SUBHARMONIC COMP/LIMITER
UTILITY
PRESET
NEXT PG
STORE
EQ
WIZARD
Inputs Sub Outs
UTILITY
PREV PG
WIZARD
0
6
12
24
36
SIG
Headroom dB Headroom dB Headroom dB
Outputs
Limiter
DriveRack PX®
Powered SpeakerOptimizer
0
6
12
24
36
SIG
0
6
12
24
36
SIG
Press and hold the SETUP buttonuntil “System Setup WIZARD” appearsin the display.
EL
PL
ROUT
SUB
L
P L
QRC
AFS
SUB
StOutwStSub
1USER L
R
9.
SETUP
AFS
RECALL
SUBHARMONIC COMP/LIMITER
UTILITY
PRESET
NEXT PG
STORE
EQ
WIZARD
Inputs Sub Outs
UTILITY
PREV PG
WIZARD
0
6
12
24
36
SIG
Headroom dB Headroom dB Headroom dB
Outputs
Limiter
DriveRack PX®
Powered SpeakerOptimizer
0
6
12
24
36
SIG
0
6
12
24
36
SIG
Press the NEXT PG button.
System Setup WIZARD
10.
SETUP
AFS
RECALL
SUBHARMONIC COMP/LIMITER
UTILITY
PRESET
NEXT PG
STORE
EQ
WIZARD
Inputs Sub Outs
UTILITY
PREV PG
WIZARD
0
6
12
24
36
SIG
Headroom dB Headroom dB Headroom dB
Outputs
Limiter
DriveRack PX®
Powered SpeakerOptimizer
0
6
12
24
36
SIG
0
6
12
24
36
SIG
Make sure STEREO is already selected, then press the NEXT PG button.
11.
SETUP
AFS
RECALL
SUBHARMONIC COMP/LIMITER
UTILITY
PRESET
NEXT PG
STORE
EQ
WIZARD
Inputs Sub Outs
UTILITY
PREV PG
WIZARD
0
6
12
24
36
SIG
Headroom dB Headroom dB Headroom dB
Outputs
Limiter
DriveRack PX®
Powered SpeakerOptimizer
0
6
12
24
36
SIG
0
6
12
24
36
SIG
Make sure PRX515 is already selected, then press the NEXT PG button.
PRX515JBL PRX500
Main Speakers
17
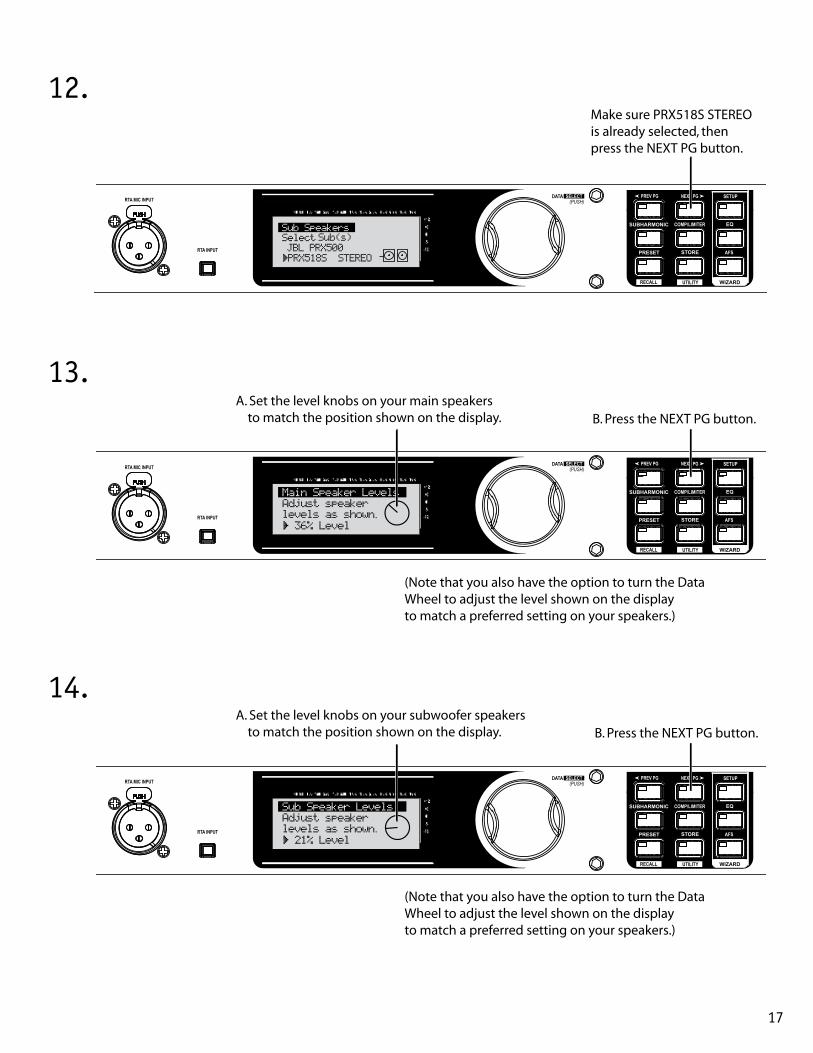
12.
SETUP
AFS
RECALL
SUBHARMONIC COMP/LIMITER
UTILITY
PRESET
NEXT PG
STORE
EQ
WIZARD
Inputs Sub Outs
UTILITY
PREV PG
WIZARD
0
6
12
24
36
SIG
Headroom dB Headroom dB Headroom dB
Outputs
Limiter
DriveRack PX®
Powered SpeakerOptimizer
0
6
12
24
36
SIG
0
6
12
24
36
SIG
Make sure PRX518S STEREOis already selected, then press the NEXT PG button.
PRX518S STEREOJBL PRX500
Sub SpeakersSub(s)
13.
SETUP
AFS
RECALL
SUBHARMONIC COMP/LIMITER
UTILITY
PRESET
NEXT PG
STORE
EQ
WIZARD
Inputs Sub Outs
UTILITY
PREV PG
WIZARD
0
6
12
24
36
SIG
Headroom dB Headroom dB Headroom dB
Outputs
Limiter
DriveRack PX®
Powered SpeakerOptimizer
0
6
12
24
36
SIG
0
6
12
24
36
SIG
B. Press the NEXT PG button.A. Set the level knobs on your main speakers to match the position shown on the display.
(Note that you also have the option to turn the Data Wheel to adjust the level shown on the displayto match a preferred setting on your speakers.)
Adjust speakerlevels as shown> 36% Level
Main Speaker Levels
14.
SETUP
AFS
RECALL
SUBHARMONIC COMP/LIMITER
UTILITY
PRESET
NEXT PG
STORE
EQ
WIZARD
Inputs Sub Outs
UTILITY
PREV PG
WIZARD
0
6
12
24
36
SIG
Headroom dB Headroom dB Headroom dB
Outputs
Limiter
DriveRack PX®
Powered SpeakerOptimizer
0
6
12
24
36
SIG
0
6
12
24
36
SIG
B. Press the NEXT PG button.A. Set the level knobs on your subwoofer speakers to match the position shown on the display.
(Note that you also have the option to turn the Data Wheel to adjust the level shown on the displayto match a preferred setting on your speakers.)
Adjust speakerlevels as shown> 21% Level
Sub Speaker Levels
18
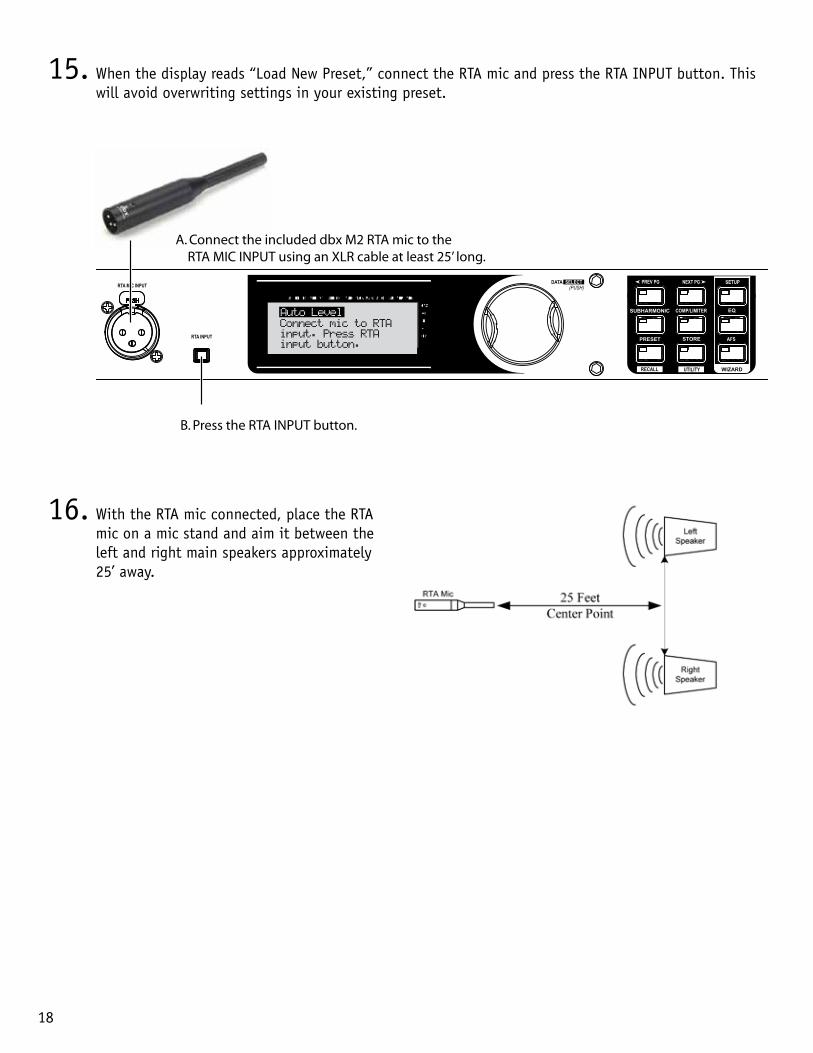
15. When the display reads “Load New Preset,” connect the RTA mic and press the RTA INPUT button. This will avoid overwriting settings in your existing preset.
SETUP
AFS
RECALL
SUBHARMONIC COMP/LIMITER
UTILITY
PRESET
NEXT PG
STORE
EQ
WIZARD
Inputs Sub Outs
UTILITY
PREV PG
WIZARD
0
6
12
24
36
SIG
Headroom dB Headroom dB Headroom dB
Outputs
Limiter
DriveRack PX®
Powered SpeakerOptimizer
0
6
12
24
36
SIG
0
6
12
24
36
SIG
A. Connect the included dbx M2 RTA mic to the RTA MIC INPUT using an XLR cable at least 25’ long.
B. Press the RTA INPUT button.
Connect mic to RTAinput. Press RTAinput button.
Auto Level
16. With the RTA mic connected, place the RTA mic on a mic stand and aim it between the left and right main speakers approximately 25’ away.
19
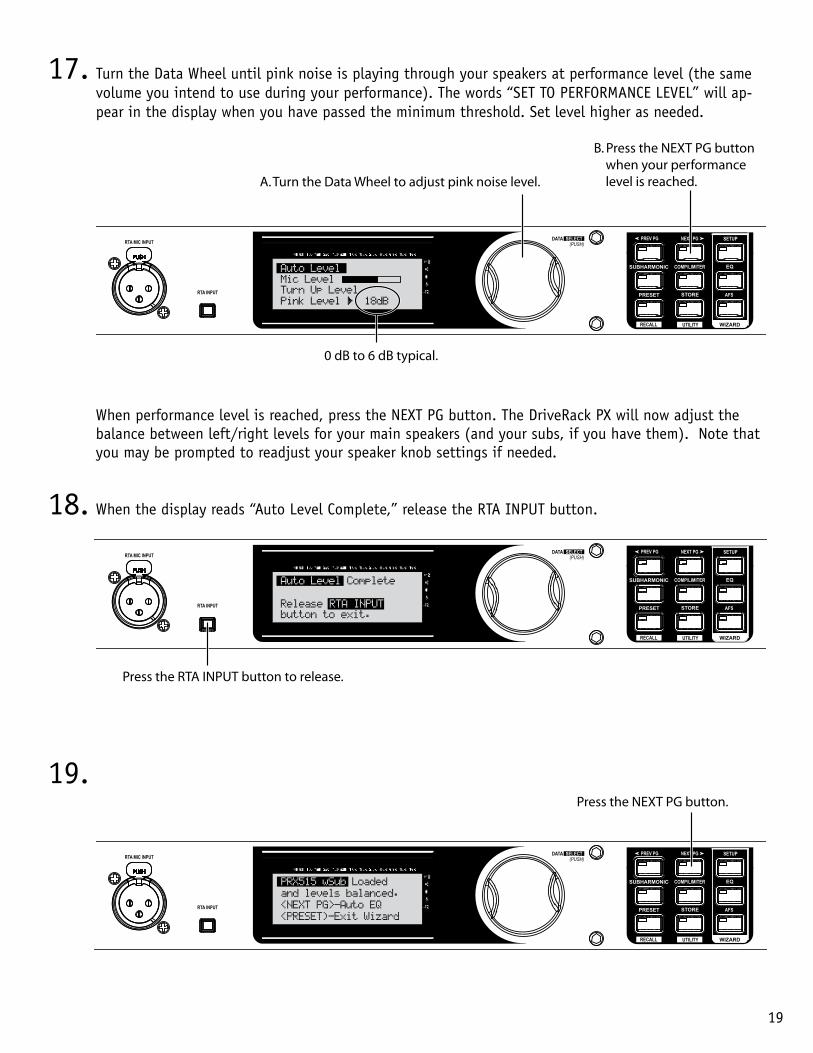
17. Turn the Data Wheel until pink noise is playing through your speakers at performance level (the same volume you intend to use during your performance). The words “SET TO PERFORMANCE LEVEL” will ap-pear in the display when you have passed the minimum threshold. Set level higher as needed.
SETUP
AFS
RECALL
SUBHARMONIC COMP/LIMITER
UTILITY
PRESET
NEXT PG
STORE
EQ
WIZARD
Inputs Sub Outs
UTILITY
PREV PG
WIZARD
0
6
12
24
36
SIG
Headroom dB Headroom dB Headroom dB
Outputs
Limiter
DriveRack PX®
Powered SpeakerOptimizer
0
6
12
24
36
SIG
0
6
12
24
36
SIG
A. Turn the Data Wheel to adjust pink noise level.
B. Press the NEXT PG button when your performance level is reached.
0 dB to 6 dB typical.
Auto Level
When performance level is reached, press the NEXT PG button. The DriveRack PX will now adjust the balance between left/right levels for your main speakers (and your subs, if you have them). Note that you may be prompted to readjust your speaker knob settings if needed.
18. When the display reads “Auto Level Complete,” release the RTA INPUT button.
SETUP
AFS
RECALL
SUBHARMONIC COMP/LIMITER
UTILITY
PRESET
NEXT PG
STORE
EQ
WIZARD
Inputs Sub Outs
UTILITY
PREV PG
WIZARD
0
6
12
24
36
SIG
Headroom dB Headroom dB Headroom dB
Outputs
Limiter
DriveRack PX®
Powered SpeakerOptimizer
0
6
12
24
36
SIG
0
6
12
24
36
SIG
Press the RTA INPUT button to release.
Auto Level Complete
Release RTA INPUT button to exit.
19.
SETUP
AFS
RECALL
SUBHARMONIC COMP/LIMITER
UTILITY
PRESET
NEXT PG
STORE
EQ
WIZARD
Inputs Sub Outs
UTILITY
PREV PG
WIZARD
0
6
12
24
36
SIG
Headroom dB Headroom dB Headroom dB
Outputs
Limiter
DriveRack PX®
Powered SpeakerOptimizer
0
6
12
24
36
SIG
0
6
12
24
36
SIG
PRX515 wSub Loaded
and levels balanced.
<NEXT PG>-Auto EQ
<PRESET)-Exit Wizard
Press the NEXT PG button.
20
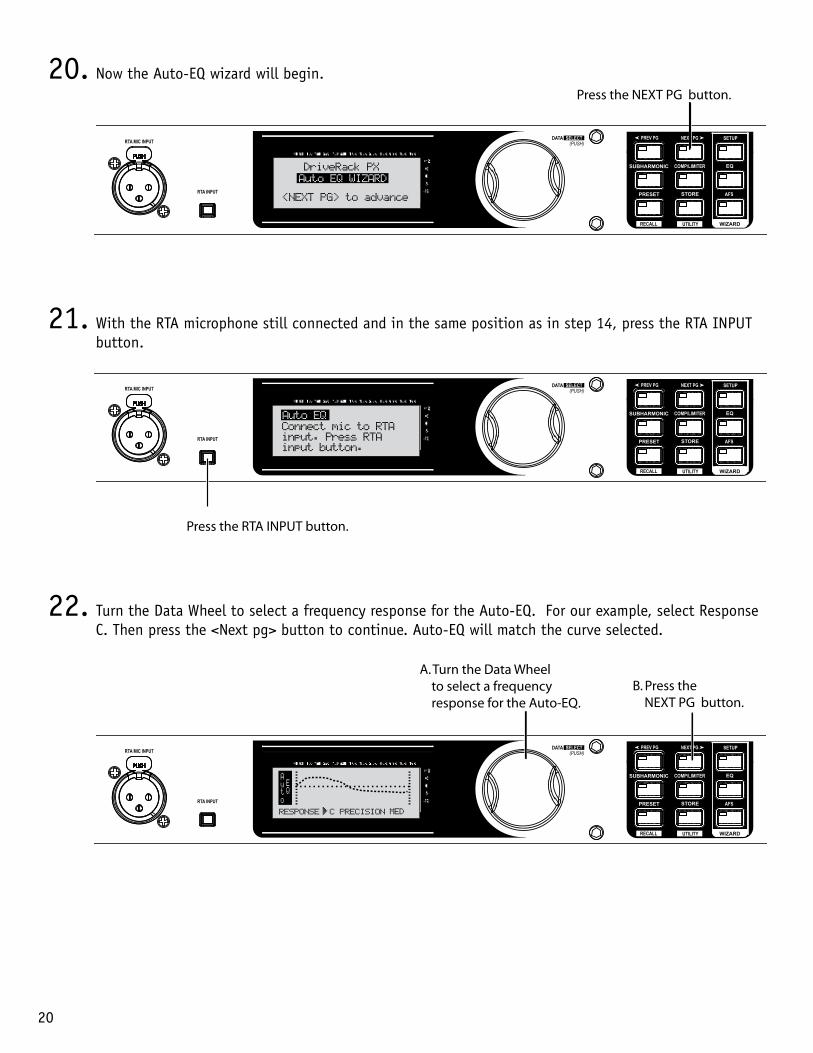
20. Now the Auto-EQ wizard will begin.
SETUP
AFS
RECALL
SUBHARMONIC COMP/LIMITER
UTILITY
PRESET
NEXT PG
STORE
EQ
WIZARD
Inputs Sub Outs
UTILITY
PREV PG
WIZARD
0
6
12
24
36
SIG
Headroom dB Headroom dB Headroom dB
Outputs
Limiter
DriveRack PX®
Powered SpeakerOptimizer
0
6
12
24
36
SIG
0
6
12
24
36
SIG
Press the NEXT PG button.
DriveRack PX
Auto EQ WIZARD
<NEXT PG> to advance
21. With the RTA microphone still connected and in the same position as in step 14, press the RTA INPUT button.
SETUP
AFS
RECALL
SUBHARMONIC COMP/LIMITER
UTILITY
PRESET
NEXT PG
STORE
EQ
WIZARD
Inputs Sub Outs
UTILITY
PREV PG
WIZARD
0
6
12
24
36
SIG
Headroom dB Headroom dB Headroom dB
Outputs
Limiter
DriveRack PX®
Powered SpeakerOptimizer
0
6
12
24
36
SIG
0
6
12
24
36
SIG
Press the RTA INPUT button.
Connect mic to RTAinput. Press RTAinput button.
Auto EQ
22. Turn the Data Wheel to select a frequency response for the Auto-EQ. For our example, select Response C. Then press the <Next pg> button to continue. Auto-EQ will match the curve selected.
SETUP
AFS
RECALL
SUBHARMONIC COMP/LIMITER
UTILITY
PRESET
NEXT PG
STORE
EQ
WIZARD
Inputs Sub Outs
UTILITY
PREV PG
WIZARD
0
6
12
24
36
SIG
Headroom dB Headroom dB Headroom dB
Outputs
Limiter
DriveRack PX®
Powered SpeakerOptimizer
0
6
12
24
36
SIG
0
6
12
24
36
SIG
MED
B. Press the NEXT PG button.
A. Turn the Data Wheel to select a frequency response for the Auto-EQ.
21
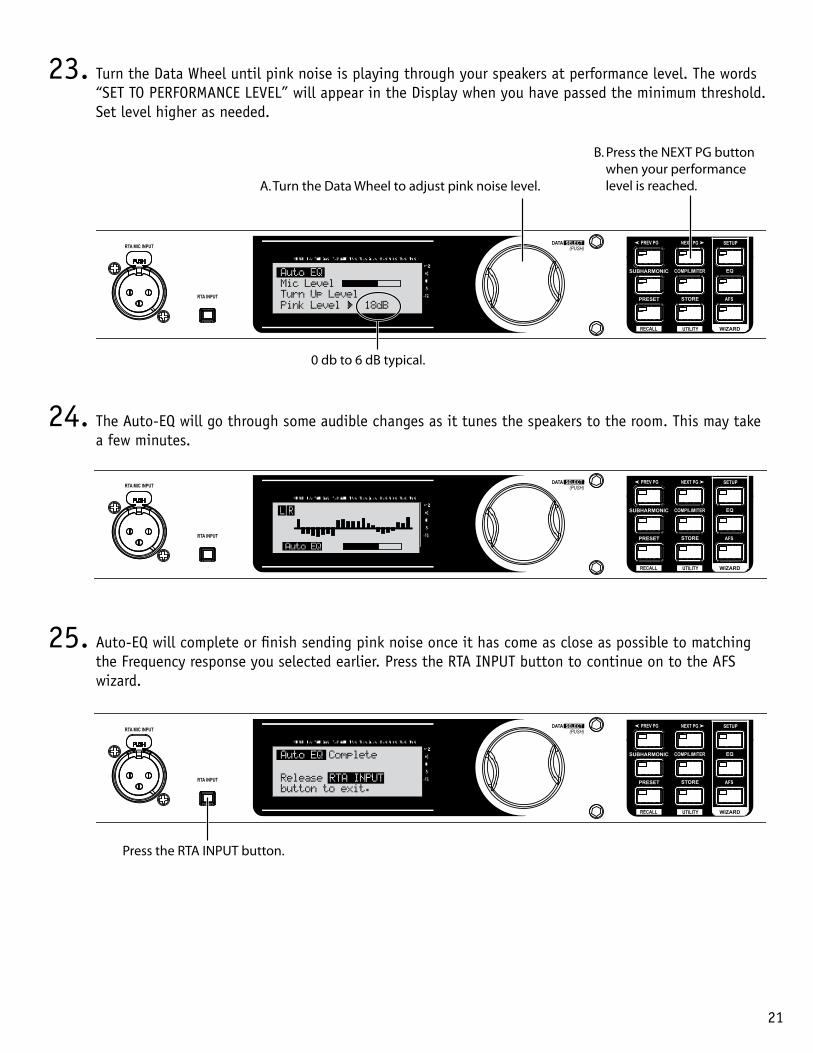
23. Turn the Data Wheel until pink noise is playing through your speakers at performance level. The words “SET TO PERFORMANCE LEVEL” will appear in the Display when you have passed the minimum threshold. Set level higher as needed.
SETUP
AFS
RECALL
SUBHARMONIC COMP/LIMITER
UTILITY
PRESET
NEXT PG
STORE
EQ
WIZARD
Inputs Sub Outs
UTILITY
PREV PG
WIZARD
0
6
12
24
36
SIG
Headroom dB Headroom dB Headroom dB
Outputs
Limiter
DriveRack PX®
Powered SpeakerOptimizer
0
6
12
24
36
SIG
0
6
12
24
36
SIG
A. Turn the Data Wheel to adjust pink noise level.
B. Press the NEXT PG button when your performance level is reached.
0 db to 6 dB typical.
Auto EQ
24. The Auto-EQ will go through some audible changes as it tunes the speakers to the room. This may take a few minutes.
SETUP
AFS
RECALL
SUBHARMONIC COMP/LIMITER
UTILITY
PRESET
NEXT PG
STORE
EQ
WIZARD
Inputs Sub Outs
UTILITY
PREV PG
WIZARD
0
6
12
24
36
SIG
Headroom dB Headroom dB Headroom dB
Outputs
Limiter
DriveRack PX®
Powered SpeakerOptimizer
0
6
12
24
36
SIG
0
6
12
24
36
SIG
25. Auto-EQ will complete or finish sending pink noise once it has come as close as possible to matching the Frequency response you selected earlier. Press the RTA INPUT button to continue on to the AFS wizard.
SETUP
AFS
RECALL
SUBHARMONIC COMP/LIMITER
UTILITY
PRESET
NEXT PG
STORE
EQ
WIZARD
Inputs Sub Outs
UTILITY
PREV PG
WIZARD
0
6
12
24
36
SIG
Headroom dB Headroom dB Headroom dB
Outputs
Limiter
DriveRack PX®
Powered SpeakerOptimizer
0
6
12
24
36
SIG
0
6
12
24
36
SIG
Press the RTA INPUT button.
Auto EQ Complete
Release RTA INPUT button to exit.
22
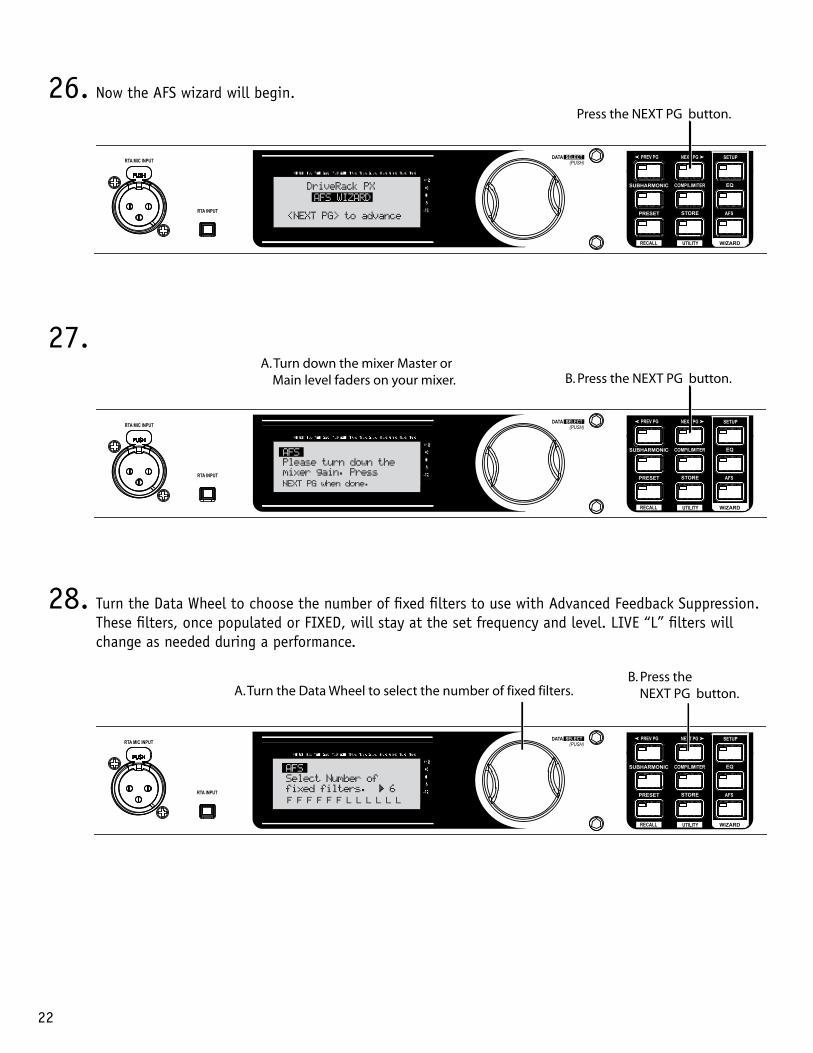
26. Now the AFS wizard will begin.
SETUP
AFS
RECALL
SUBHARMONIC COMP/LIMITER
UTILITY
PRESET
NEXT PG
STORE
EQ
WIZARD
Inputs Sub Outs
UTILITY
PREV PG
WIZARD
0
6
12
24
36
SIG
Headroom dB Headroom dB Headroom dB
Outputs
Limiter
DriveRack PX®
Powered SpeakerOptimizer
0
6
12
24
36
SIG
0
6
12
24
36
SIG
Press the NEXT PG button.
DriveRack PX
AFS WIZARD
<NEXT PG> to advance
27.
SETUP
AFS
RECALL
SUBHARMONIC COMP/LIMITER
UTILITY
PRESET
NEXT PG
STORE
EQ
WIZARD
Inputs Sub Outs
UTILITY
PREV PG
WIZARD
0
6
12
24
36
SIG
Headroom dB Headroom dB Headroom dB
Outputs
Limiter
DriveRack PX®
Powered SpeakerOptimizer
0
6
12
24
36
SIG
0
6
12
24
36
SIG
B. Press the NEXT PG button.A. Turn down the mixer Master or Main level faders on your mixer.
28. Turn the Data Wheel to choose the number of fixed filters to use with Advanced Feedback Suppression. These filters, once populated or FIXED, will stay at the set frequency and level. LIVE “L” filters will change as needed during a performance.
SETUP
AFS
RECALL
SUBHARMONIC COMP/LIMITER
UTILITY
PRESET
NEXT PG
STORE
EQ
WIZARD
Inputs Sub Outs
UTILITY
PREV PG
WIZARD
0
6
12
24
36
SIG
Headroom dB Headroom dB Headroom dB
Outputs
Limiter
DriveRack PX®
Powered SpeakerOptimizer
0
6
12
24
36
SIG
0
6
12
24
36
SIG
A. Turn the Data Wheel to select the number of fixed filters.B. Press the NEXT PG button.

23
29. Turn the Data Wheel to choose the EQ notch filter width appropriate for your needs. Speech is a wide filter, Music Low is a narrow filter, Music Medium is a very narrow filter, and Music High is an ultra nar-row filter. We’ll use Music High for our example.
SETUP
AFS
RECALL
SUBHARMONIC COMP/LIMITER
UTILITY
PRESET
NEXT PG
STORE
EQ
WIZARD
Inputs Sub Outs
UTILITY
PREV PG
WIZARD
0
6
12
24
36
SIG
Headroom dB Headroom dB Headroom dB
Outputs
Limiter
DriveRack PX®
Powered SpeakerOptimizer
0
6
12
24
36
SIG
0
6
12
24
36
SIG
A. Turn the Data Wheel to select the EQ notch filter type.B. Press the NEXT PG button.
Music High
Ultra Narrow Notch
30. With the channel faders down, set the mixer’s master level to zero (0). With the microphones you’ll be using during the performance in place and connected, turn up microphone channel levels until feed-back begins. The AFS will start to populate the Advanced Feedback Suppression fixed filters. NOTE: Do not talk into any of the microphones or play music. This is only a search for feedback at this point.
SETUP
AFS
RECALL
SUBHARMONIC COMP/LIMITER
UTILITY
PRESET
NEXT PG
STORE
EQ
WIZARD
Inputs Sub Outs
UTILITY
PREV PG
WIZARD
0
6
12
24
36
SIG
Headroom dB Headroom dB Headroom dB
Outputs
Limiter
DriveRack PX®
Powered SpeakerOptimizer
0
6
12
24
36
SIG
0
6
12
24
36
SIG
A. Slowly increase the channel gain on your mixer to the desired level.
31. Advanced Feedback Suppression has completed when “Fixed Filter Setup Done. In LIVE mode” appears on the Display. NOTE: Out of control feedback is not advised. Please keep this under control manually with the mixer’s channel or main faders.
SETUP
AFS
RECALL
SUBHARMONIC COMP/LIMITER
UTILITY
PRESET
NEXT PG
STORE
EQ
WIZARD
Inputs Sub Outs
UTILITY
PREV PG
WIZARD
0
6
12
24
36
SIG
Headroom dB Headroom dB Headroom dB
Outputs
Limiter
DriveRack PX®
Powered SpeakerOptimizer
0
6
12
24
36
SIG
0
6
12
24
36
SIG
Fixed Filter Setup
Done. In LIVE mode.
Press the NEXT PG button.

24
32. Store your new preset (with its same name, and in its current location) by pressing the STORE button three times.
SETUP
AFS
RECALL
SUBHARMONIC COMP/LIMITER
UTILITY
PRESET
NEXT PG
STORE
EQ
WIZARD
Inputs Sub Outs
UTILITY
PREV PG
WIZARD
0
6
12
24
36
SIG
Headroom dB Headroom dB Headroom dB
Outputs
Limiter
DriveRack PX®
Powered SpeakerOptimizer
0
6
12
24
36
SIG
0
6
12
24
36
SIG
EL
PL
ROUT
SUB
L
P L
QRC
AFS
SUB
PRX515 wSub
1USER L
R
Press the STORE button once.
33. Your new preset has now been stored. Congratulations and enjoy.
18-0557-BPrinted in the USA


